
Ask AI
— answers from the official manualAnswers from the official manual.
Common questions
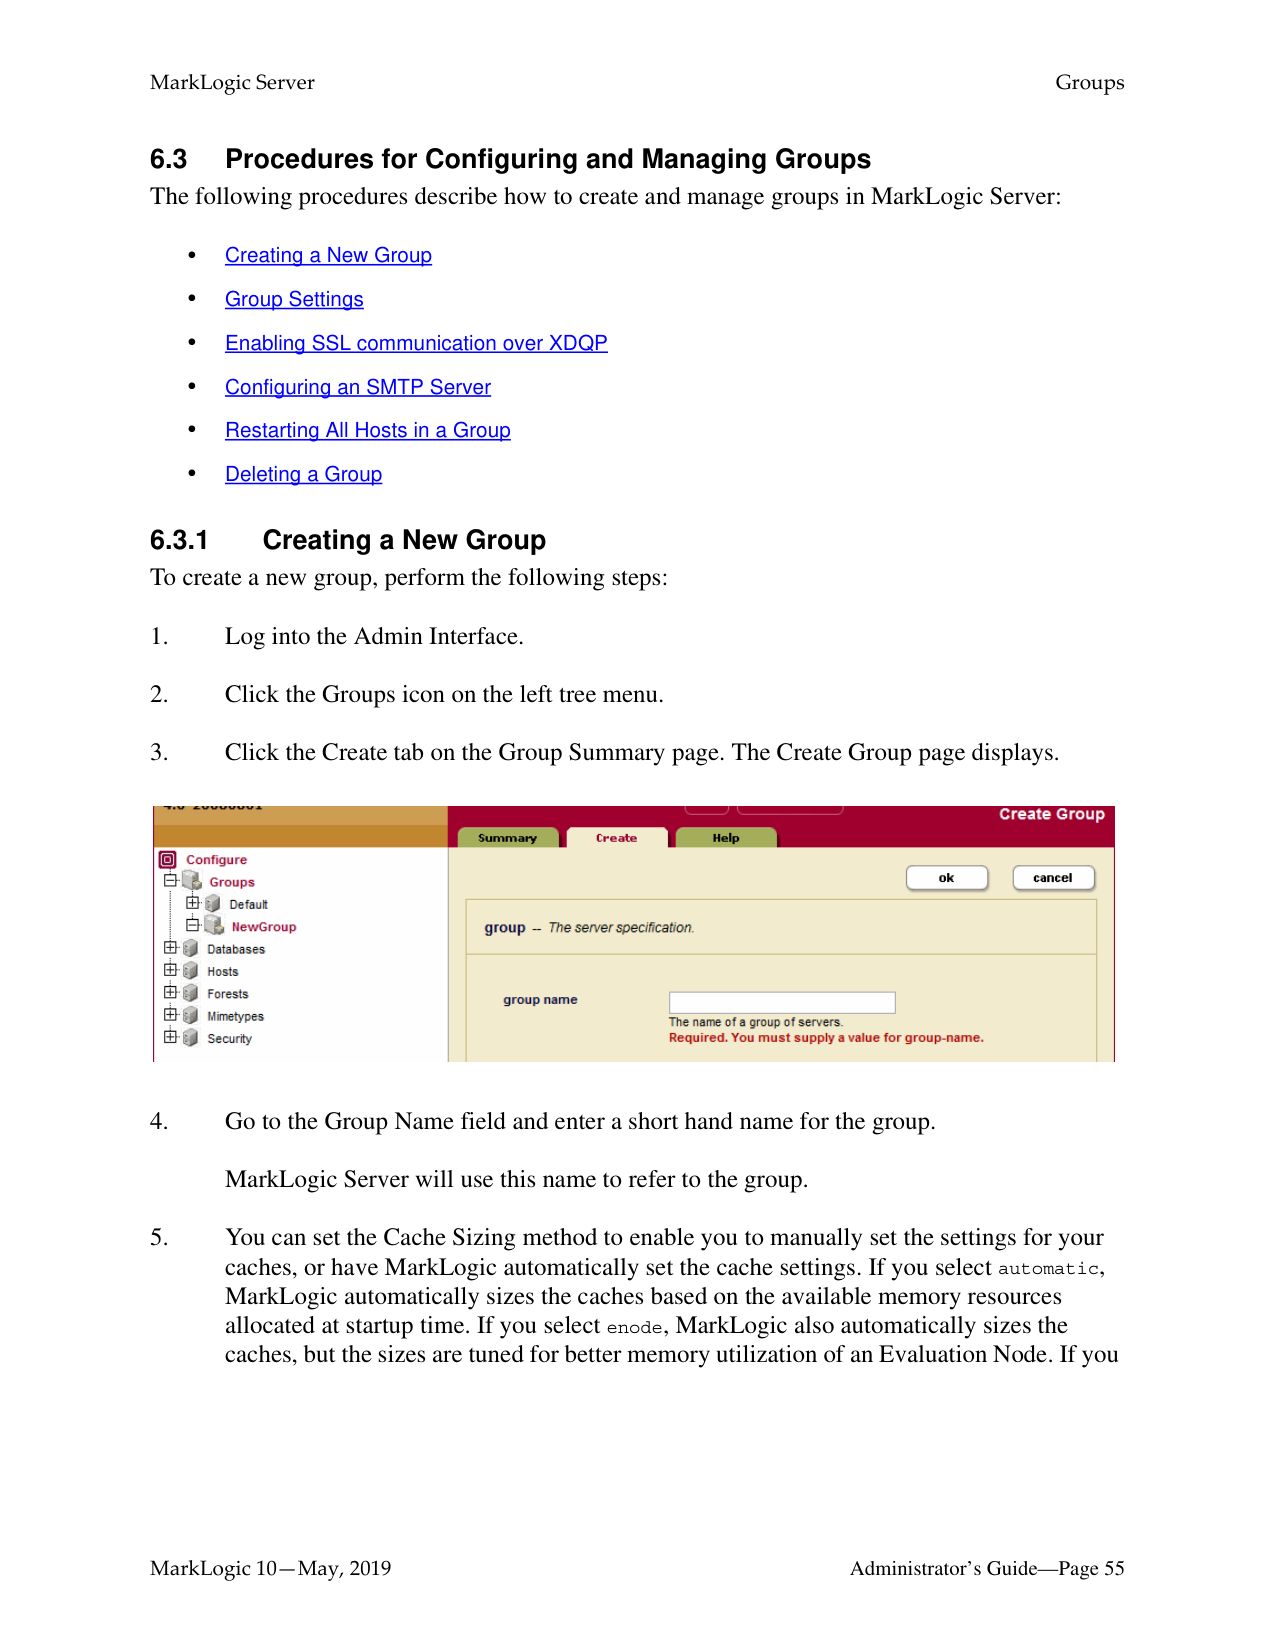
Common Questions
3 totalWhat is the difference between a forest-level backup and a database-level backup?
A database-level backup backs up all forests in the specified directory, creating new data for each initiation. Forest-level backups require separate directories for individual forests and keep incremental backups that only overwrite changed stands.
How do I log into the MarkLogic Administrative Interface (Admin UI)?
Access the Admin Interface by opening http://localhost:8001/ in your browser, enter the admin username and password. If you have already logged on as an admin during this session, a login is not necessary.
How do I restart MarkLogic Server?
To restart the server, follow these steps: Use the System Command to stop the MarkLogic server and then start it again; alternatively, you can use the Admin Interface, which can be accessed by navigating to http://localhost:8001/.
Full Manual
532 pages
MarkLogic Server
Administrator’s Guide
Copyright © 2022 MarkLogic Corporation. All rights reserved.
MarkLogic 10 May, 2019
Last Revised: 10.0-9, February, 2022
################# MarkLogic Server
Table of Contents
Administrator’s Guide


######## 6.0 Groups ..........................................................................................................53
######## 7.0 HTTP Servers ...............................................................................................67
######## 8.0 XDBC Servers ..............................................................................................77
######## 9.0 WebDAV Servers ........................................................................................85
######## 10.0 ODBC Servers ..............................................................................................99
######## 11.0 Auditing Events ..........................................................................................111
######## 12.0 Managing User Requests and Monitoring Login Attempts .......................123
######## 13.0 Databases ...................................................................................................127
######## 14.0 Word Query Database Settings ..................................................................149
######## 15.0 Fields Database Settings ............................................................................159
######## 16.0 Understanding and Controlling Database Merges .....................................181

######## 17.0 Database Rebalancing ................................................................................199
######## 18.0 Tiered Storage ............................................................................................217
######## 19.0 Super Databases and Clusters ....................................................................249

######## 20.0 Backing Up and Restoring a Database .......................................................253

######## 21.0 Rolling Upgrades .......................................................................................293
######## 22.0 Hosts ...........................................................................................................311

######## 23.0 Forests ........................................................................................................321
######## 24.0 Security Administration .............................................................................339
######## 25.0 Text Indexing .............................................................................................369
######## 26.0 Range Indexes and Lexicons ......................................................................389

######## 27.0 Fragments ...................................................................................................411
######## 28.0 Namespaces ................................................................................................419
######## 29.0 Understanding and Defining Schemas .......................................................42529.1 Understanding Schemas ......................................................................................42529.2 Procedures For Defining Schemas ......................................................................426
######## 30.0 Log Files ....................................................................................................433
######## 31.0 Scheduling Tasks .......................................................................................439
######## 32.0 Using the Configuration Manager ..............................................................447
######## 33.0 Appendix A: ‘Hot’ versus ‘Cold’ Admin Tasks ........................................465

##### 1.0 Introduction
MarkLogic Server is a powerful NoSQL database for harnessing your digital content base, complete with Enterprise features demanded by real world, mission-critical applications. MarkLogic enables you to build complex applications that interact with large volumes of content in XML, SGML, HTML, JSON, and other popular content formats. The unique architecture of MarkLogic ensures that your applications are both scalable and high-performance, delivering query results at search-engine speeds while providing transactional integrity over the underlying content repository. MarkLogic can be configured for a distributed environment, enabling you to scale your infrastructure through hardware expansion.
######### 1.1 Objectives
This document describes administrative tasks required to manage the operation of MarkLogic on your system.
######### 1.2 Audience
This document is intended for a technical audience, specifically the system administrator in charge of MarkLogic .
######### 1.3 Scope and Requirements
This guide explains administrative tasks for MarkLogic running on all platforms. For details on the supported platforms, see the Installation Guide and the Release Notes.
This document only explains the administrative tasks for the software. To learn how to get started using the software, or how to install the software, refer to the appropriate documents:
This document assumes that you have successfully completed all the tasks in Getting Started with MarkLogic Server. If not, be sure to complete these basic tasks before doing any administrative work for MarkLogic Server. For a list of features in this release, a list of known incompatibilities with previous releases, and a list of all MarkLogic documentation, see the Release Notes.
######### 1.4 Architecture Overview
Applications in Browser
Cluster
Browser-to-Server
Group 2
Group 1
|MarkLogic App Server
Host 3| |---|
|Host 1 MarkLogic App Server
| |---|
|MarkLogic App Server
Host 2| |---|
intra-cluster XDQP
Legend
Forest
Database
Host
Group
Cluster
App Server
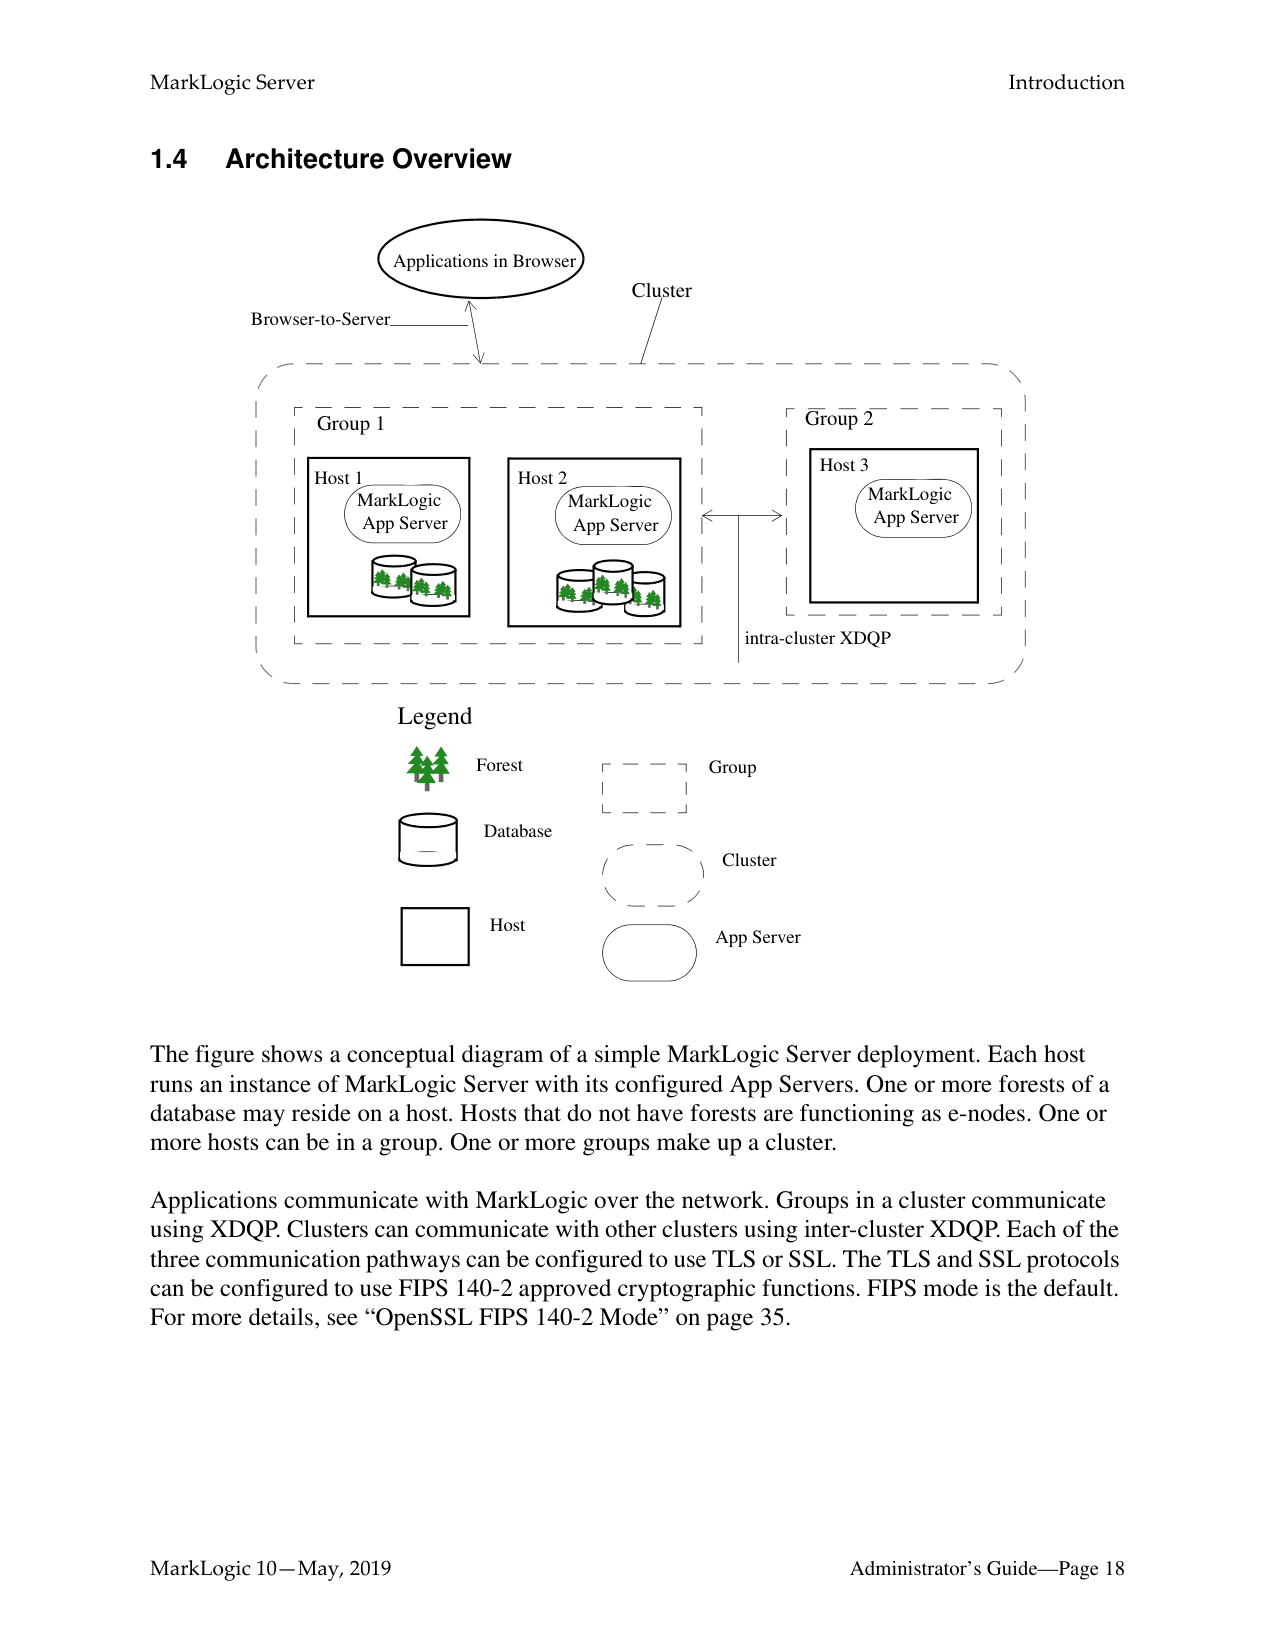
The figure shows a conceptual diagram of a simple MarkLogic Server deployment. Each host runs an instance of MarkLogic Server with its configured App Servers. One or more forests of a database may reside on a host. Hosts that do not have forests are functioning as e-nodes. One or more hosts can be in a group. One or more groups make up a cluster.
Applications communicate with MarkLogic over the network. Groups in a cluster communicate using XDQP. Clusters can communicate with other clusters using inter-cluster XDQP. Each of the three communication pathways can be configured to use TLS or SSL. The TLS and SSL protocols can be configured to use FIPS 140-2 approved cryptographic functions. FIPS mode is the default. For more details, see “OpenSSL FIPS 140-2 Mode” on page 35.
For more information, see the following:
##### 2.0 Administrative Interface
The MarkLogic Server administrative interface (or Admin Interface) is used to configure the MarkLogic Server software on your system. This chapter provides a general overview of the Admin Interface and includes the following sections:
########## 2.1 Overview of the Admin InterfaceWith the Admin Interface, you can complete any of the following tasks:
The Admin Interface is implemented as a MarkLogic Server web application. By default, it runs on port 8001 of your hosts. If you have completed the basic tasks in the Getting Started with
MarkLogic Server manual, then accessing the Admin Interface requires that you enter a username and password. After you have been authenticated, you should not need to re-enter your username and password to complete any of the other tasks outlined in this guide during the current session.
Some configurations changes require the server to restart to reflect the changes. Configuration changes that do not require the server to restart to reflect the changes are defined as “hot”. In a clustered deployment, “cold” tasks will require all of the hosts in the cluster to restart their instance of MarkLogic in order to reflect the changes. In a single-server deployment, “cold” tasks will cause MarkLogic to restart in order to reflect the changes. For a list of which tasks are “hot” and which are “cold,” see “Appendix A: ‘Hot’ versus ‘Cold’ Admin Tasks” on page 465.
Users with the admin-ui-user role may view the Admin UI, but not have access to data or the ability to make administrative changes. For more about the admin-ui-user role, see “The adminui-user role” on page 23.
To access the Admin Interface, complete the following procedure:
http://localhost:8001/
Note: If you are not accessing the Admin Interface from the same system on which MarkLogic Server is running, you will have to use the IP address or domain name of the server instead of localhost.
Note: If you have already logged on as an admin user during this session, you do not
have to log in again.
From the summary screen, you can see and click on many of the items configured in MarkLogic Server. The summary screen displays all of the Databases, App Servers, Groups, Forests, Security objects, and Hosts configured for your system. If you click on any object or category, the Admin Interface takes you to a more detailed page for the object or category.
To log off the Admin Interface, close the browser window used to access the Admin Interface. This action is sufficient to end the current session and force the user to authenticate again starting another session.
MarkLogic Server administrators are managed by defining which user has the admin role. Users with the admin role, known as authorized administrators, are trusted personnel and are assumed to be non-hostile, appropriately trained, and follow proper administrative procedures. For the procedures for creating, managing and removing administrators, see “Security Administration” on page 339.
######### 2.5 The admin-ui-user role
The admin-ui-user role has a set of base privileges that are required in order to use the Admin UI. The role allows the user “read-only” Admin UI usage, but does not give them access to the data, to security configuration, or write access to Server configuration.
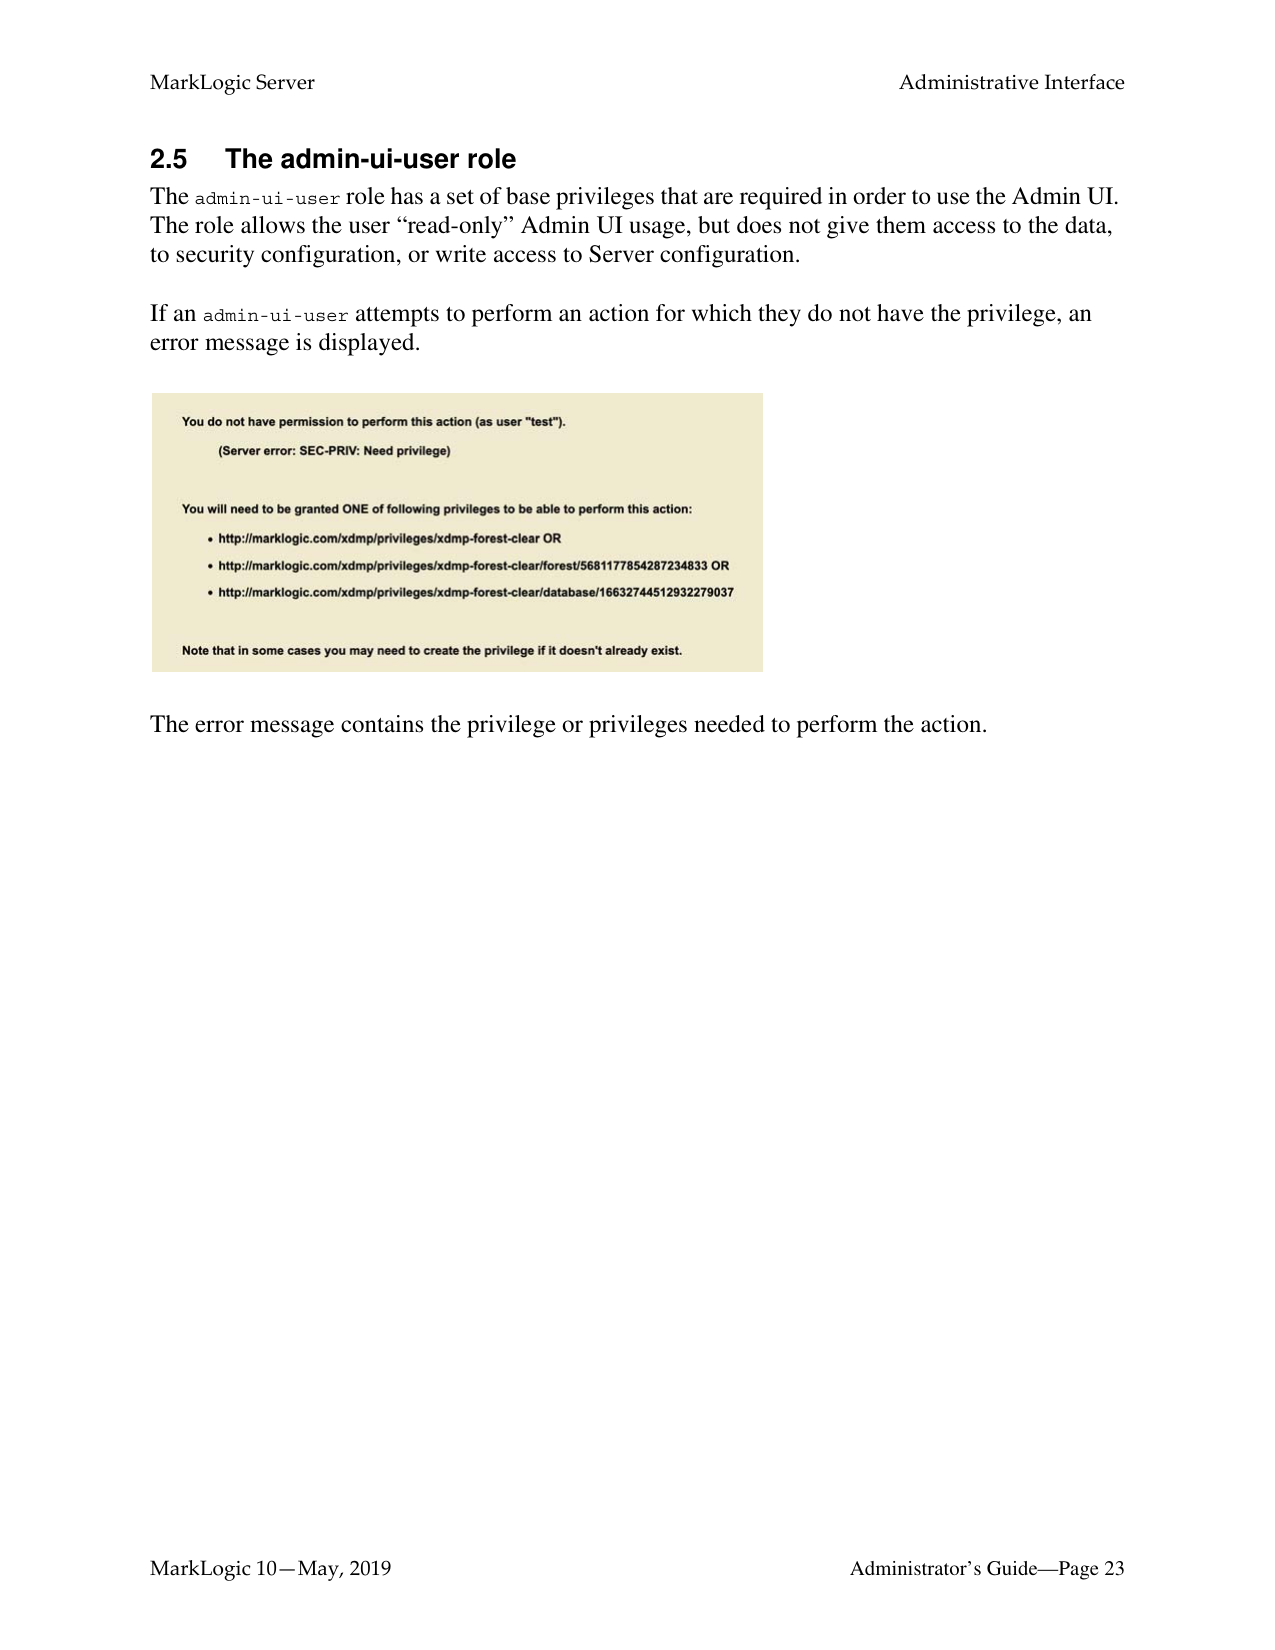
If an admin-ui-user attempts to perform an action for which they do not have the privilege, an error message is displayed.

The error message contains the privilege or privileges needed to perform the action.
##### 3.0 Common Administrative Procedures
This chapter describes some of the common administrative procedures for MarkLogic Server and where you can find more details on each procedure.
The common administrative procedures are:
######### 3.1 Installing and Upgrading MarkLogic Server
MarkLogic Server runs on a variety of platforms. For a list of support platforms and installation procedures, see the Installation Guide
For issues and procedures related to upgrading MarkLogic Server, see:
######### 3.2 Starting and Stopping MarkLogic Server
The start, stop, and restart operations for MarkLogic Server are described in “Starting and Stopping MarkLogic Server” on page 31.
######### 3.3 Creating and Configuring Forests and Databases
MarkLogic Server stores XML, JSON, XQuery, and JavaScript data in forests. App Servers connect to a database that, in turn, accesses one or more forests.
Several types of auxiliary databases are created when you install MarkLogic Server, which are described in “Understanding Databases” on page 127. This section outlines the general procedures for creating a database to store your documents.
To create a database to store your documents, do the following:
An application is executed on an App Server, which is configured with a specific database, port number, and so on. Once you have created a database, you can create an App Server. MarkLogic Server allows you to create three types of App Servers to support different types of applications:
To secure your App Server using SSL, see Enabling SSL communication over XDQP in the Administrator’s Guide.
MarkLogic Server provides a rich set of security objects that enable you to control user access to documents and applications, which are described in the Security Guide and in “Security Administration” on page 339 in this guide.
In addition to the Security pages in the Admin UI, there are also XQuery, JavaScript, and REST functions you can use in scripts to set up and manage security objects.
######### 3.6 Loading Content into a Database
You can load documents into the database using the load document functions, as described in the Loading Content Into MarkLogic Server Guide.
You can also set up a WebDAV server and client, such as Windows Explorer, to load your documents. See Simple Drag-and-Drop Conversion in the Content Processing Framework Guide for information on how to configure a WebDAV server to work with Windows Explorer.
Documents can also be loaded into the database by an XCC application, as described in Using the Sample Applications in the XCC Developer’s Guide.
######### 3.7 Running The XQuery Use Cases and Building Simple Applications
To test your MarkLogic Server configuration, Follow the procedure in Getting Started with MarkLogic Server for Exploring the Use Cases. The procedure uses Query Console to evaluate the W3C XQuery use cases. For procedures on building a simple XQuery application, see Sample XQuery Application that Runs Directly Against an App Server in Getting Started with MarkLogic Server. For more in-depth information, see the Application Developer’s Guide. If you are writing a Java application that communicates with MarkLogic Server through the XCC API, see the XCC Developer’s Guide
######### 3.8 Backing up and Restoring Data
You can make backups of a database, as described in “Backing Up a Database” on page 263, which backs up all of the forests in the database. You can also create backups of individual forests used by a database, as described in “Making Backups of a Forest” on page 330.
There are a number of key differences between database-level and forest-level backups. A database-level backup, by default, backs up all of the forests in the database to the specified directory. Each time a database backup is initiated, a new set of backup data is created in that directory. With a forest-level backup, each forest must be backed up to a separate directory. In addition, each incremental backup of a forest is added onto the previous backup data. A forest backup also has additional logic that checks to see if any of its stands have changed before overwriting the backup of the earlier stand. Only the stands that have changed are overwritten.
Along with full backups, you can use incremental backups and journal archiving to create backups that enable you to recover your database to a specific point in time. For details, see “Backing Up and Restoring a Database” on page 253.
You can restore an entire database from a database backup, as described in “Restoring a Database without Journal Archiving” on page 272. You can restore an individual forest from either a database backup, as described in “Restoring a Database without Journal Archiving” on page 272, or from an individual forest backup, as described in “Restoring a Forest” on page 333.
For details on how to tune your applications for maximum performance, see the Query Performance and Tuning Guide.
MarkLogic Server includes built-in and library modules that enable you to write XQuery, JavaScript, and REST scripts that perform administrative tasks on MarkLogic Server. The functions provided by these modules enable you to script most administrative procedures.
For example, the Admin Library Module (admin.xqy) enables you to write scripts that create or modify databases, forests, App Servers, set up SSL security, and so on. The Security Library Module (security.xqy) provides a set of functions that enable you to create scripts that set up security entities. The xdmp built-in functions enable you to do forest and database backup/restore operations, as well as other database and forest management operations.
For a general overview of scripting administrative tasks, see Scripting Administrative Tasks in MarkLogic Server in the Scripting Administrative Tasks Guide. All of the available administrative functions are described in the XQuery and XSLT Reference Guide and MarkLogic REST API Reference.
You can schedule administrative scripts to be invoked at specific intervals or times, as described in “Scheduling Tasks” on page 439.
######### 3.11 Configuring Clusters, Groups and Failover
A single instance of MarkLogic Server running on a single machine is called a host. You can configure multiple hosts into a cluster, as described in the Scalability, Availability, and Failover Guide. Within a cluster, you can create groups of similarly configured hosts, as described in “Groups” on page 53. Different configurations of grouped hosts are useful when different groups of hosts perform different tasks or have different system capabilities.
Should a host go down, its duties can be resumed by another host in the cluster. MarkLogic provides support for failover, which allows the forest to automatically mount to a different host in the event of a forest’s primary host going offline. For details on configuring forests for failover, see High Availability of Data Nodes With Failover and Configuring Shared-Disk Failover for a Forest in the Scalability, Availability, and Failover Guide.
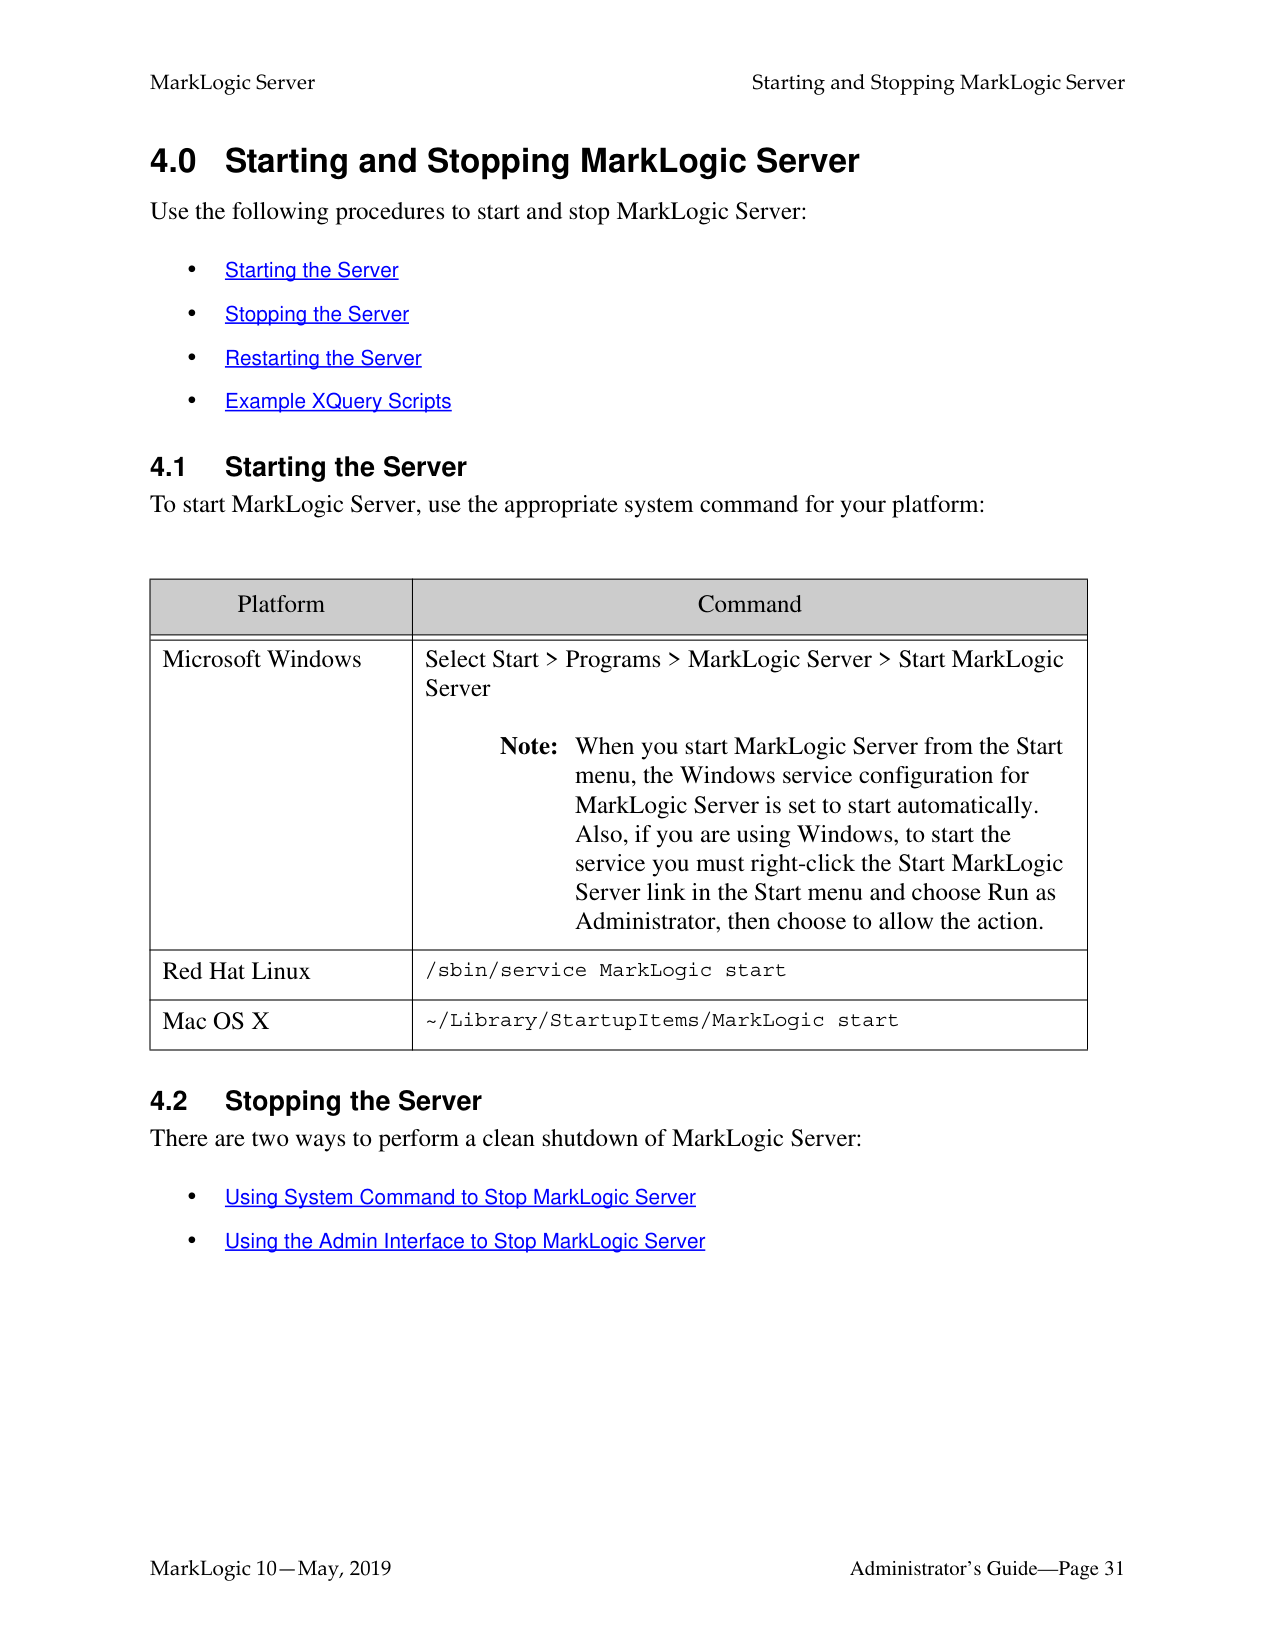
|Platform|Command| |---|---| | | | |Microsoft Windows|Select Start > Programs > MarkLogic Server > Start MarkLogic Server
Note: When you start MarkLogic Server from the Start menu, the Windows service configuration for MarkLogic Server is set to start automatically. Also, if you are using Windows, to start the service you must right-click the Start MarkLogic Server link in the Start menu and choose Run as Administrator, then choose to allow the action.| |Red Hat Linux|/sbin/service MarkLogic start| |Mac OS X|~/Library/StartupItems/MarkLogic start|
Note: MarkLogic Server must be running in order for you to use the Admin Interface. Once you have stopped the server, you will no longer be able to access the Admin Interface until you start MarkLogic Server again; to restart the server, run the system command for your platform as described in “Starting the Server” on page 31.
|Platform|Command| |---|---| | | | |Microsoft Windows|Select Start > Programs > MarkLogic Server > Stop MarkLogic Server
Note: If you are using Windows, to stop the service you must right-click the Stop MarkLogic Server link in the Start menu and choose Run as Administrator, then choose to allow the action.|
|Red Hat Linux|/sbin/service MarkLogic stop| |Mac OS X|~/Library/StartupItems/MarkLogic stop|
Note: The restart operation normally completes within a few seconds. It is possible, however, for it to take longer under some conditions (for example, if the Security database needs to run recovery or if the connectivity between hosts in a cluster is slow). If it takes longer than a few seconds for MarkLogic Server to restart, than the Admin Interface might return a 503: Service Unavailable message. If you encounter this situation, wait several seconds and then reload the Admin Interface.
######### 4.4.1 Script that Restarts MarkLogic ServerThe following script restarts MarkLogic Server:

xquery version "1.0-ml"; xdmp:restart((), "Restarting MarkLogic Server")
######### 4.4.2 Script that Stops MarkLogic ServerThe following script stops MarkLogic Server:
xquery version "1.0-ml"; xdmp:shutdown((), "Shutting Down MarkLogic Server")
##### 5.0 Clusters
This chapter describes cluster configuration using the Admin Interface. A cluster is a set of hosts that work together. This chapter includes the following sections:
######### 5.1 Overview of Cluster Configuration
In MarkLogic clusters, a common configuration is to have one group defined for the evaluator nodes (hosts that service query requests) and another group defined for the data nodes (hosts to which forests are attached).
The Cluster configuration page found in the Admin Interface enables you to configure FIPS 1402 mode for a cluster and to couple local and foreign clusters. For a description of each configuration option, see the help tab of the group configuration page in the Admin Interface. For a discussion of how clustering works in MarkLogic Server, see Clustering in MarkLogic Server in the Scalability, Availability, and Failover Guide.
######### 5.2 OpenSSL FIPS 140-2 Mode
MarkLogic Server uses FIPS-capable OpenSSL to implement the Secure Sockets Layer (SSL v3) and Transport Layer Security (TLS v1) protocols. When you install MarkLogic Server, FIPS mode is enabled by default and SSL RSA keys are generated using secure FIPS 140-2 cryptography. This implementation disallows weak ciphers and uses only FIPS 140-2 approved cryptographic functions. Should your applications experience any difficulty running in SSL FIPSmode, you can disable FIPS-mode using the Admin Interface as described below.
For more information on the OpenSSL FIPS 140-2 cryptographic capabilities, refer to the documentation provided by the OpenSSL Project at: https://www.openssl.org/docs/fips.html
########## 5.3 Procedures for Configuring ClustersThe following procedures describe how to configure clusters in MarkLogic Server:
######### 5.3.1 Configuring OpenSSL FIPS 140-2 Mode
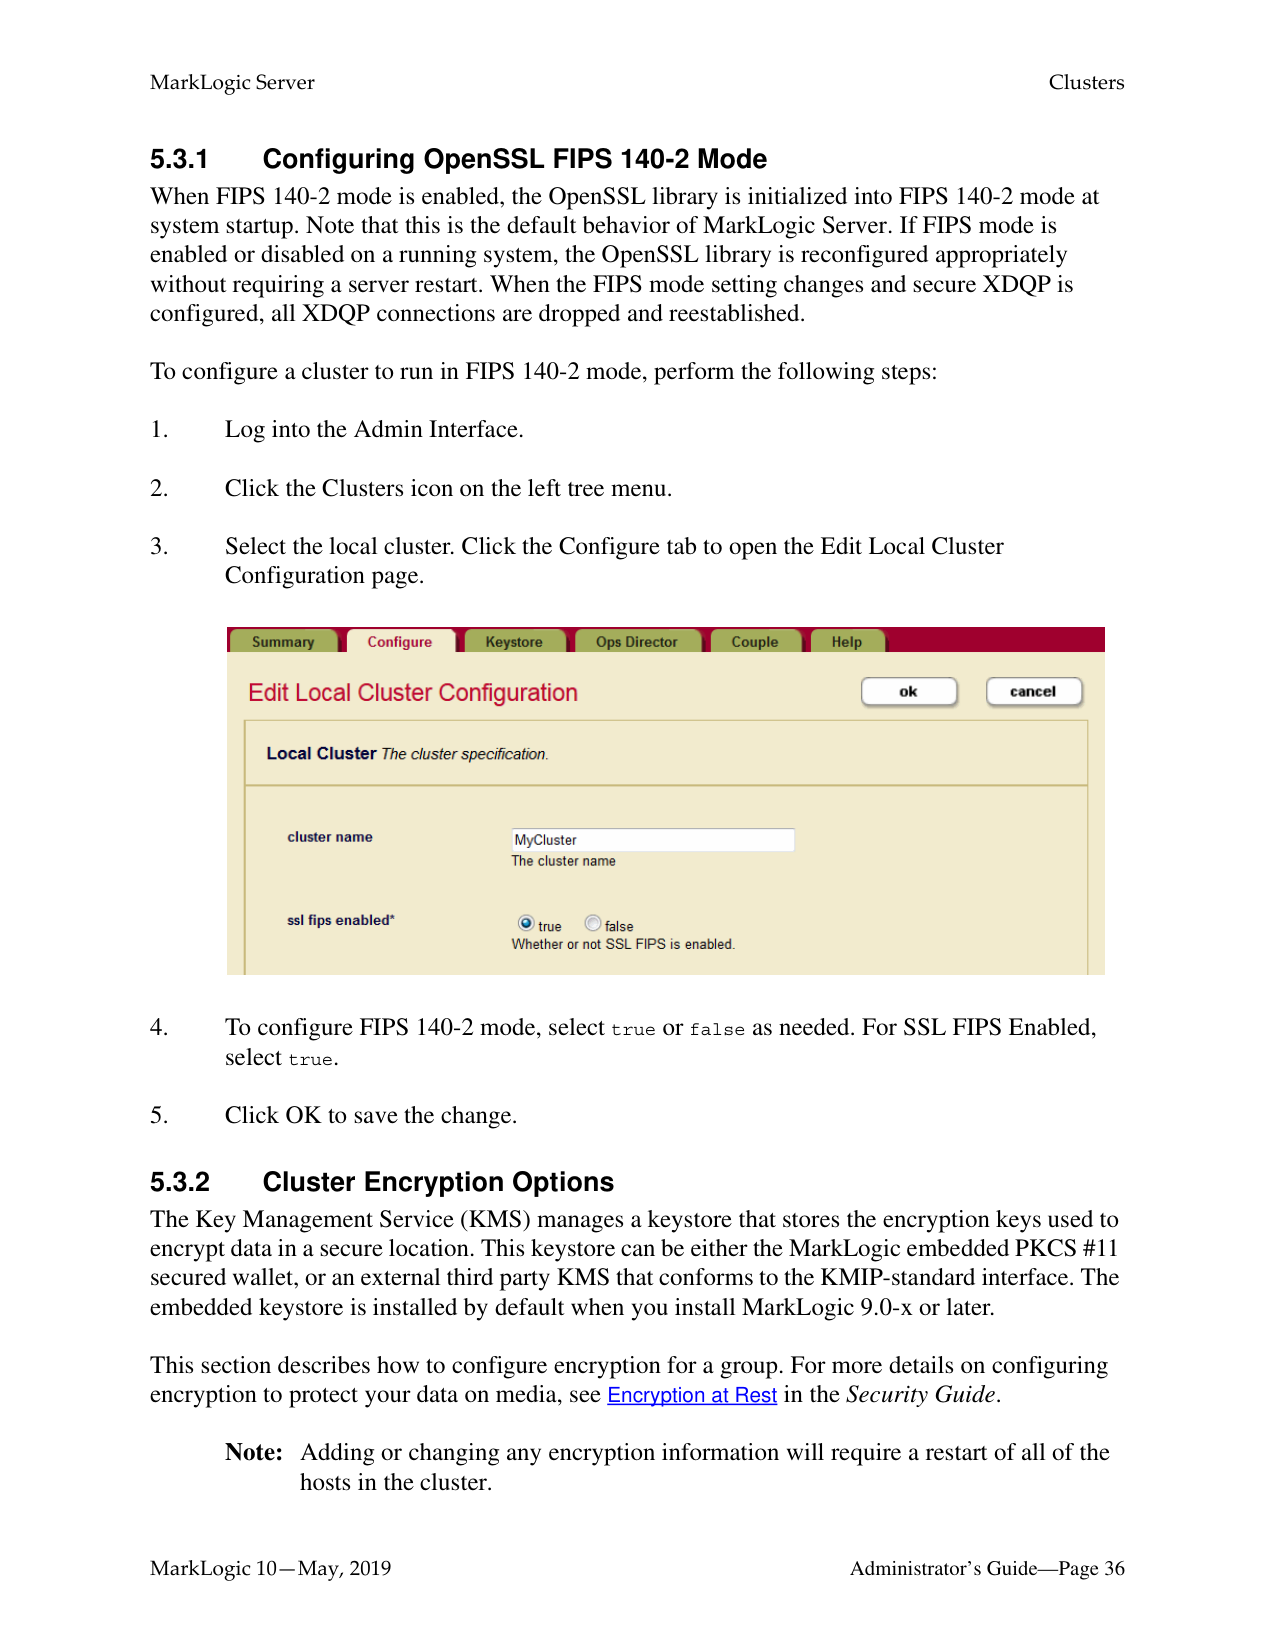
When FIPS 140-2 mode is enabled, the OpenSSL library is initialized into FIPS 140-2 mode at system startup. Note that this is the default behavior of MarkLogic Server. If FIPS mode is enabled or disabled on a running system, the OpenSSL library is reconfigured appropriately without requiring a server restart. When the FIPS mode setting changes and secure XDQP is configured, all XDQP connections are dropped and reestablished.
To configure a cluster to run in FIPS 140-2 mode, perform the following steps:

######### 5.3.2 Cluster Encryption Options
The Key Management Service (KMS) manages a keystore that stores the encryption keys used to encrypt data in a secure location. This keystore can be either the MarkLogic embedded PKCS #11 secured wallet, or an external third party KMS that conforms to the KMIP-standard interface. The embedded keystore is installed by default when you install MarkLogic 9.0-x or later.
This section describes how to configure encryption for a group. For more details on configuring encryption to protect your data on media, see Encryption at Rest in the Security Guide.
Note: Adding or changing any encryption information will require a restart of all of the
hosts in the cluster.
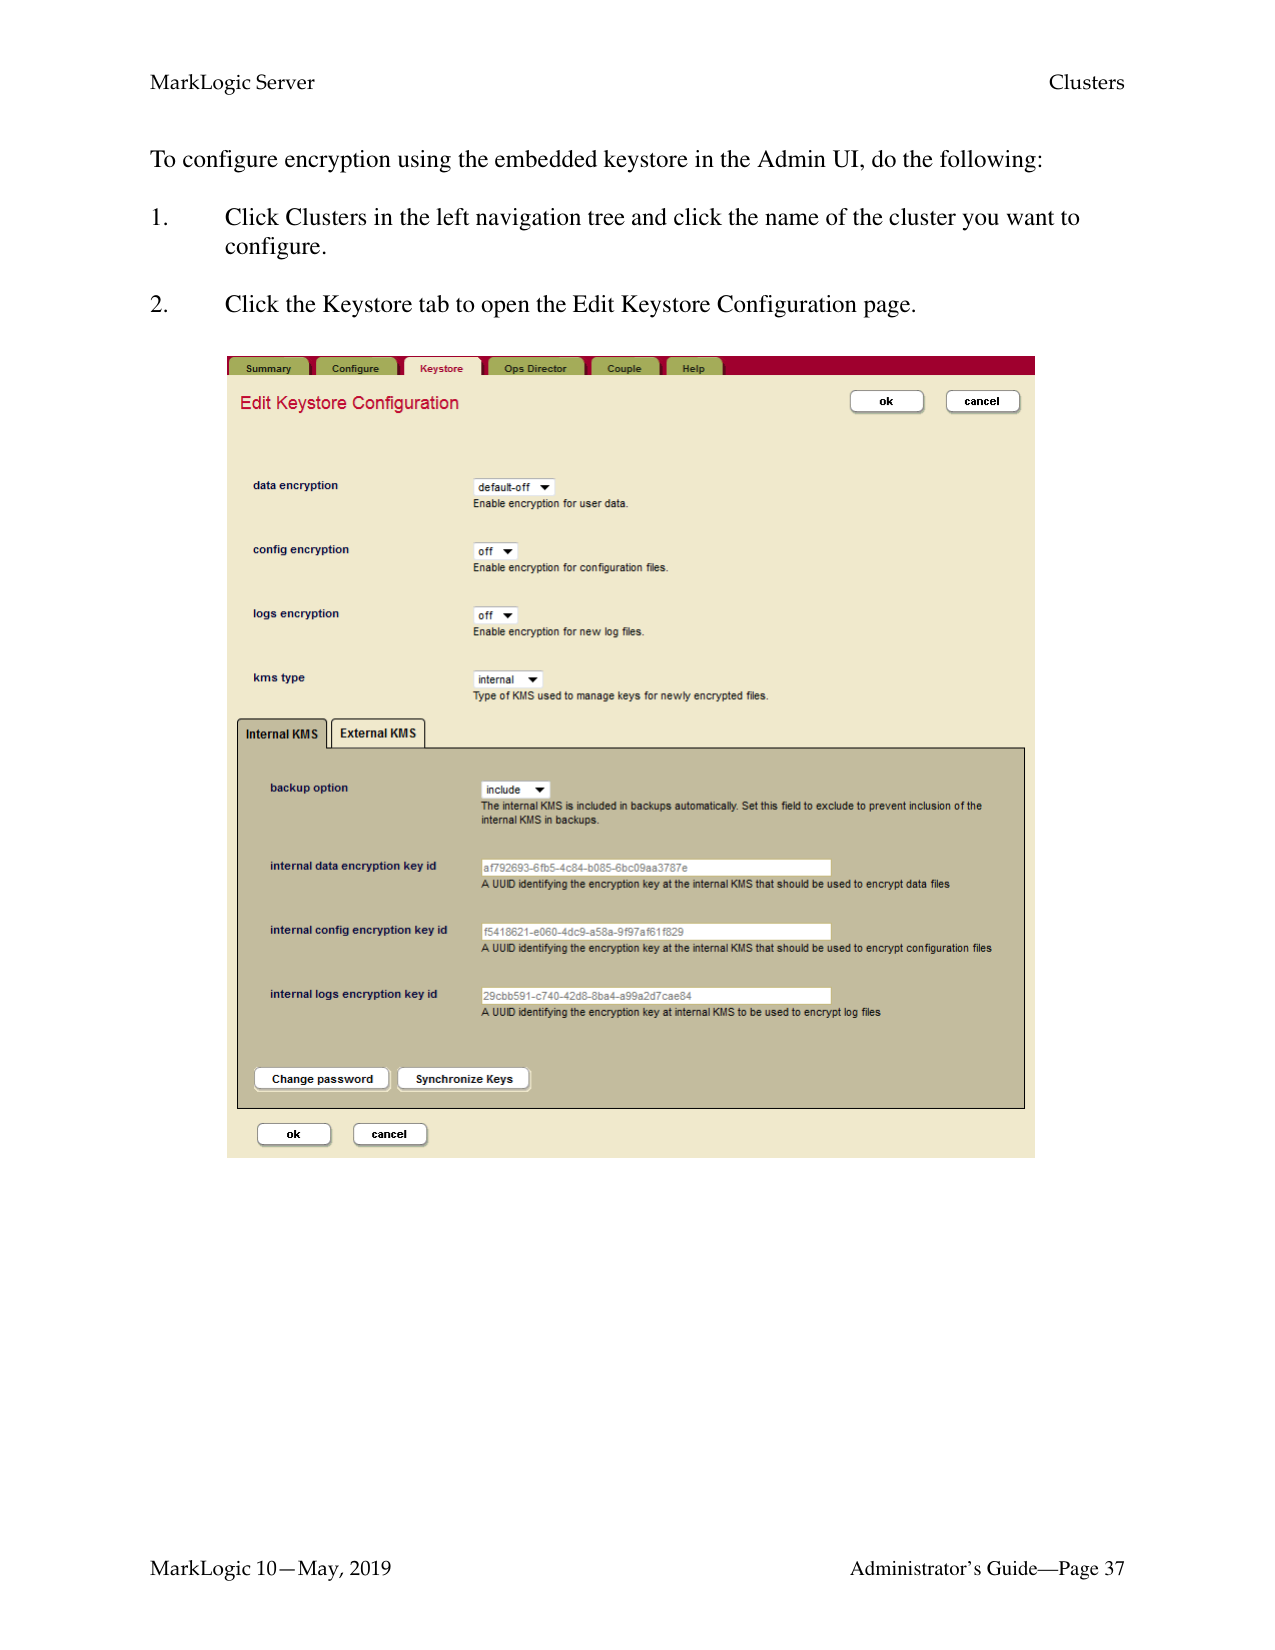
To configure encryption using the embedded keystore in the Admin UI, do the following:

|Setting|Description| |---|---| | | | |data encryption|Specifies whether or not encryption is enabled for user data. The options are:
force — Force encryption for all data in the cluster. The database configuration cannot overwrite this setting.
default-on — By default encryption is on. The database configuration can overwrite this setting.
default-off — By default encryption is off. The database configuration can overwrite this setting.| |config encryption|Specifies whether or not encryption is enabled for configuration files| |logs encryption|Specifies whether or not encryption is enabled for log files.| |kms type|Specifies whether the KMS is internal to MarkLogic or an external KMS A keystore is a secure location where the actual encryption keys used to encrypt data are stored. The keystore for encryption at rest is a key management system (KMS). This keystore can be either the MarkLogic embedded PKCS #11 secured wallet, or an external third party KMS|

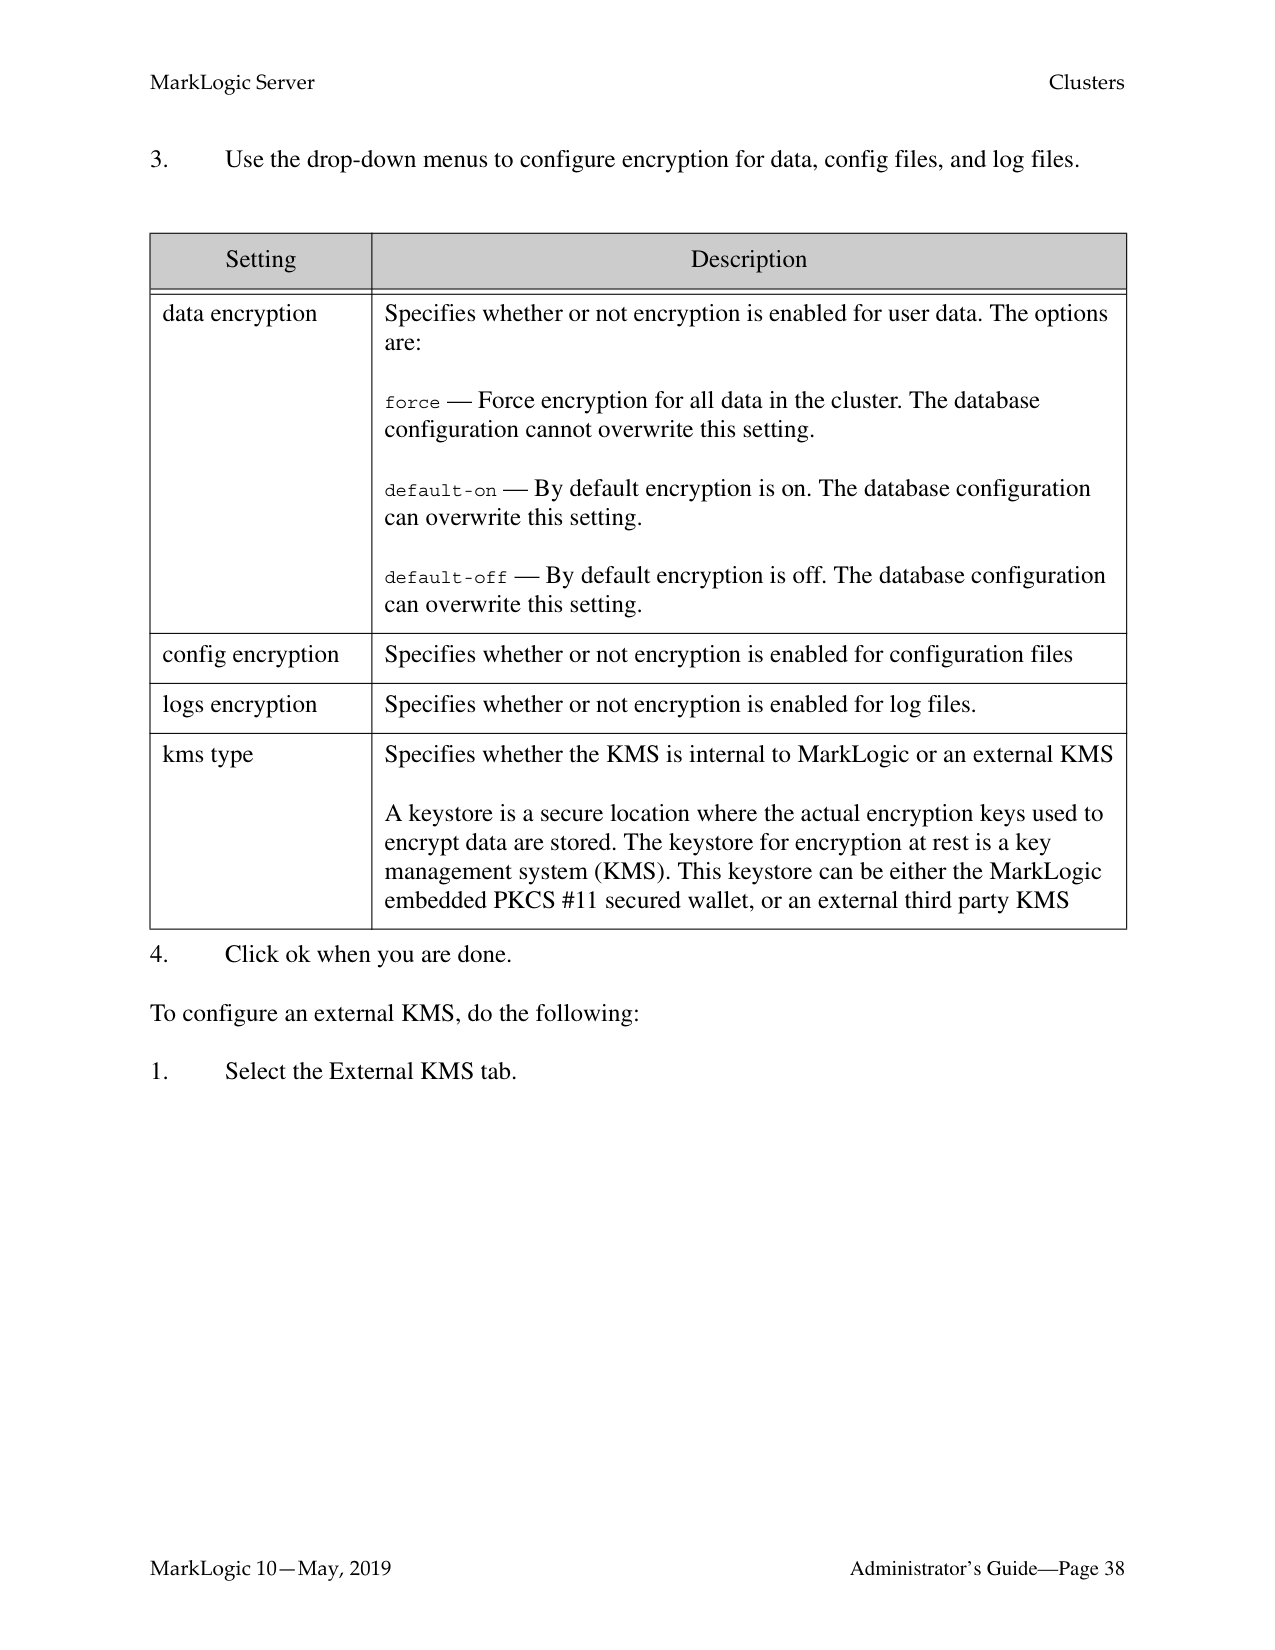
|Setting|Description| |---|---| | | | |host name|The host name of the Key Management Server (KMS).| |port|The KMS client socket port number.| |external data encryption key id|The encryption key at the KMS to encrypt user data.| |external config encryption key id|The encryption key at the KMS to encrypt configuration files.| |external logs encryption key id|The encryption key at the KMS to encrypt log files.|
The encryption keys must be a URN representation of a UUID as defined by Network Working Group Request for Comments: 4122 :
http://www.ietf.org/rfc/rfc4122.txt For example:
################ 06ea22c9-b972-4652-8d0f-9e58c62e0f7f
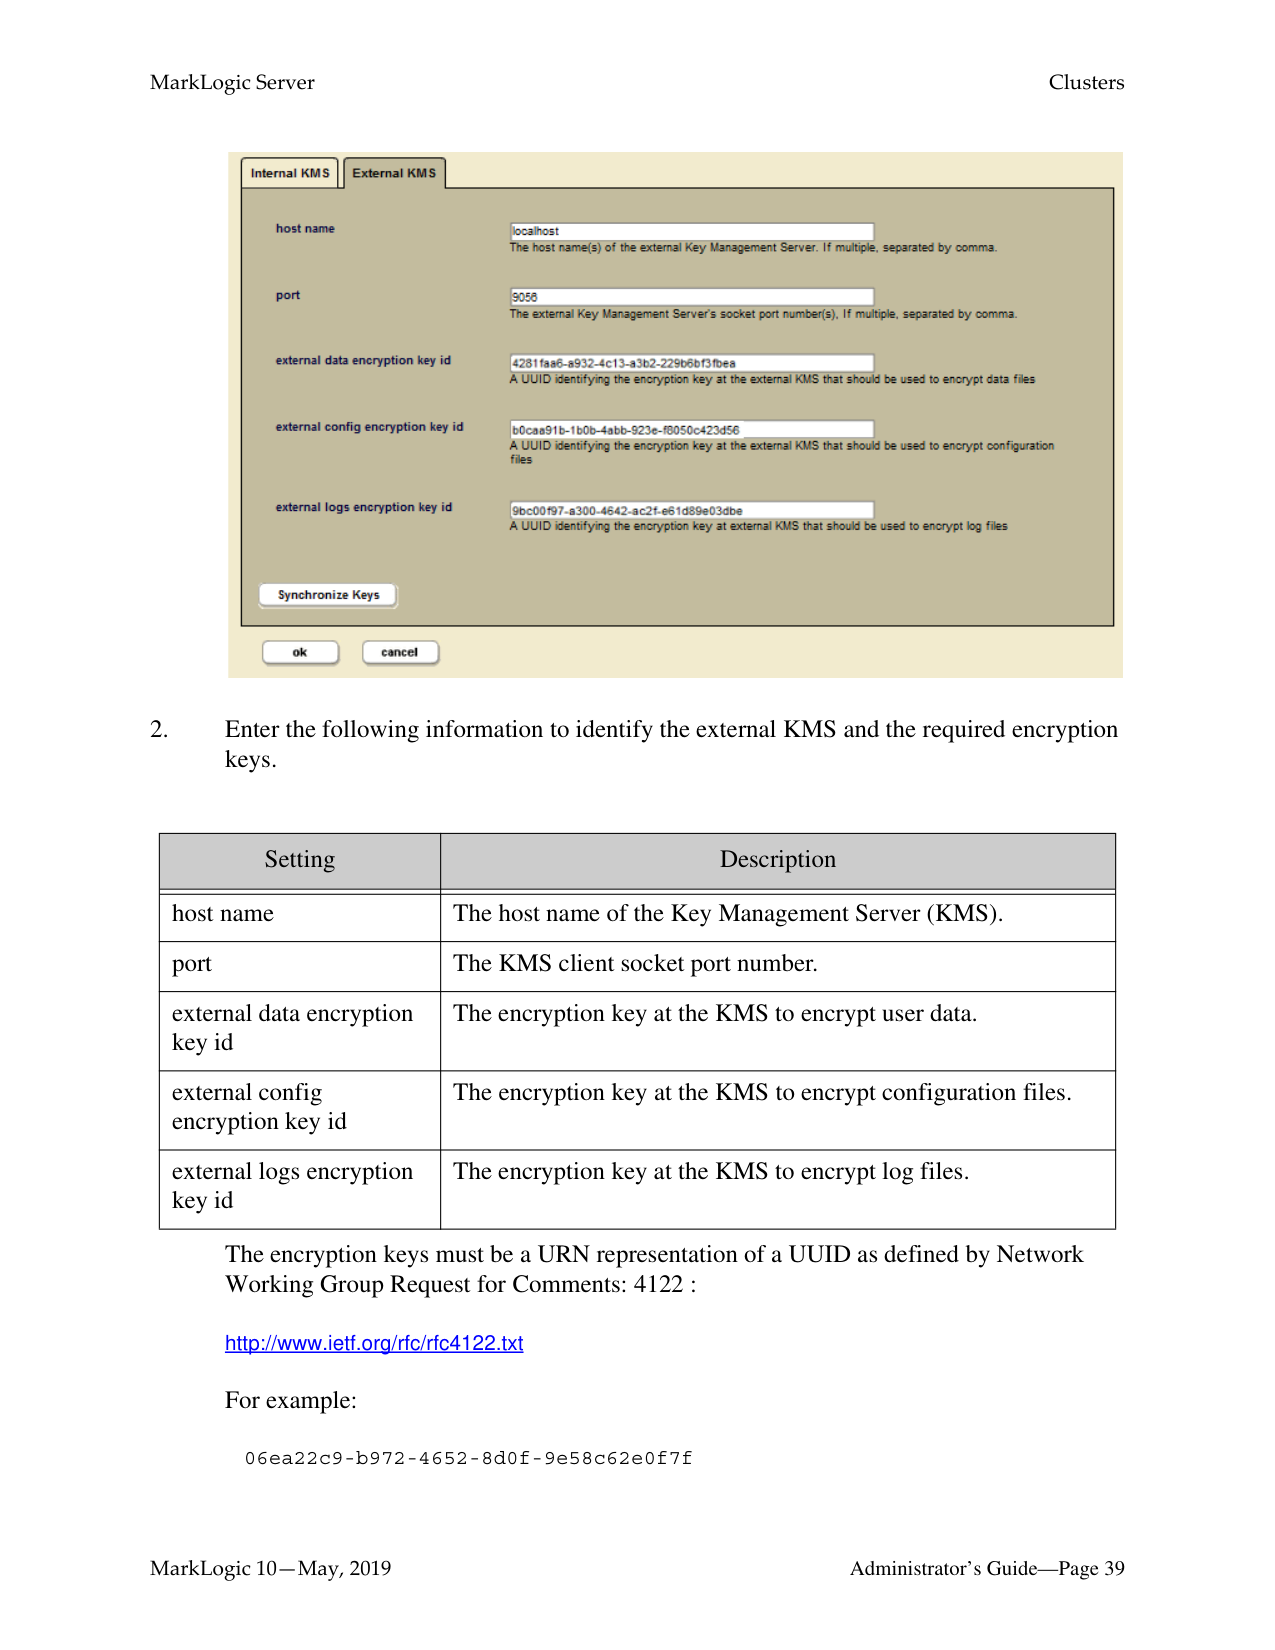
######### 5.3.2.1 Change the Internal KMS Password
The default password value for the internal KMS is the admin user password for that instance. You can change the password for the internal KMS using the Change Internal KMS Password screen. To change the internal KMS password, follow these steps:

For more about MarkLogic encryption at rest and the internal KMS, see Configuring Encryption at Rest in the Encryption chapter of the Security Guide.
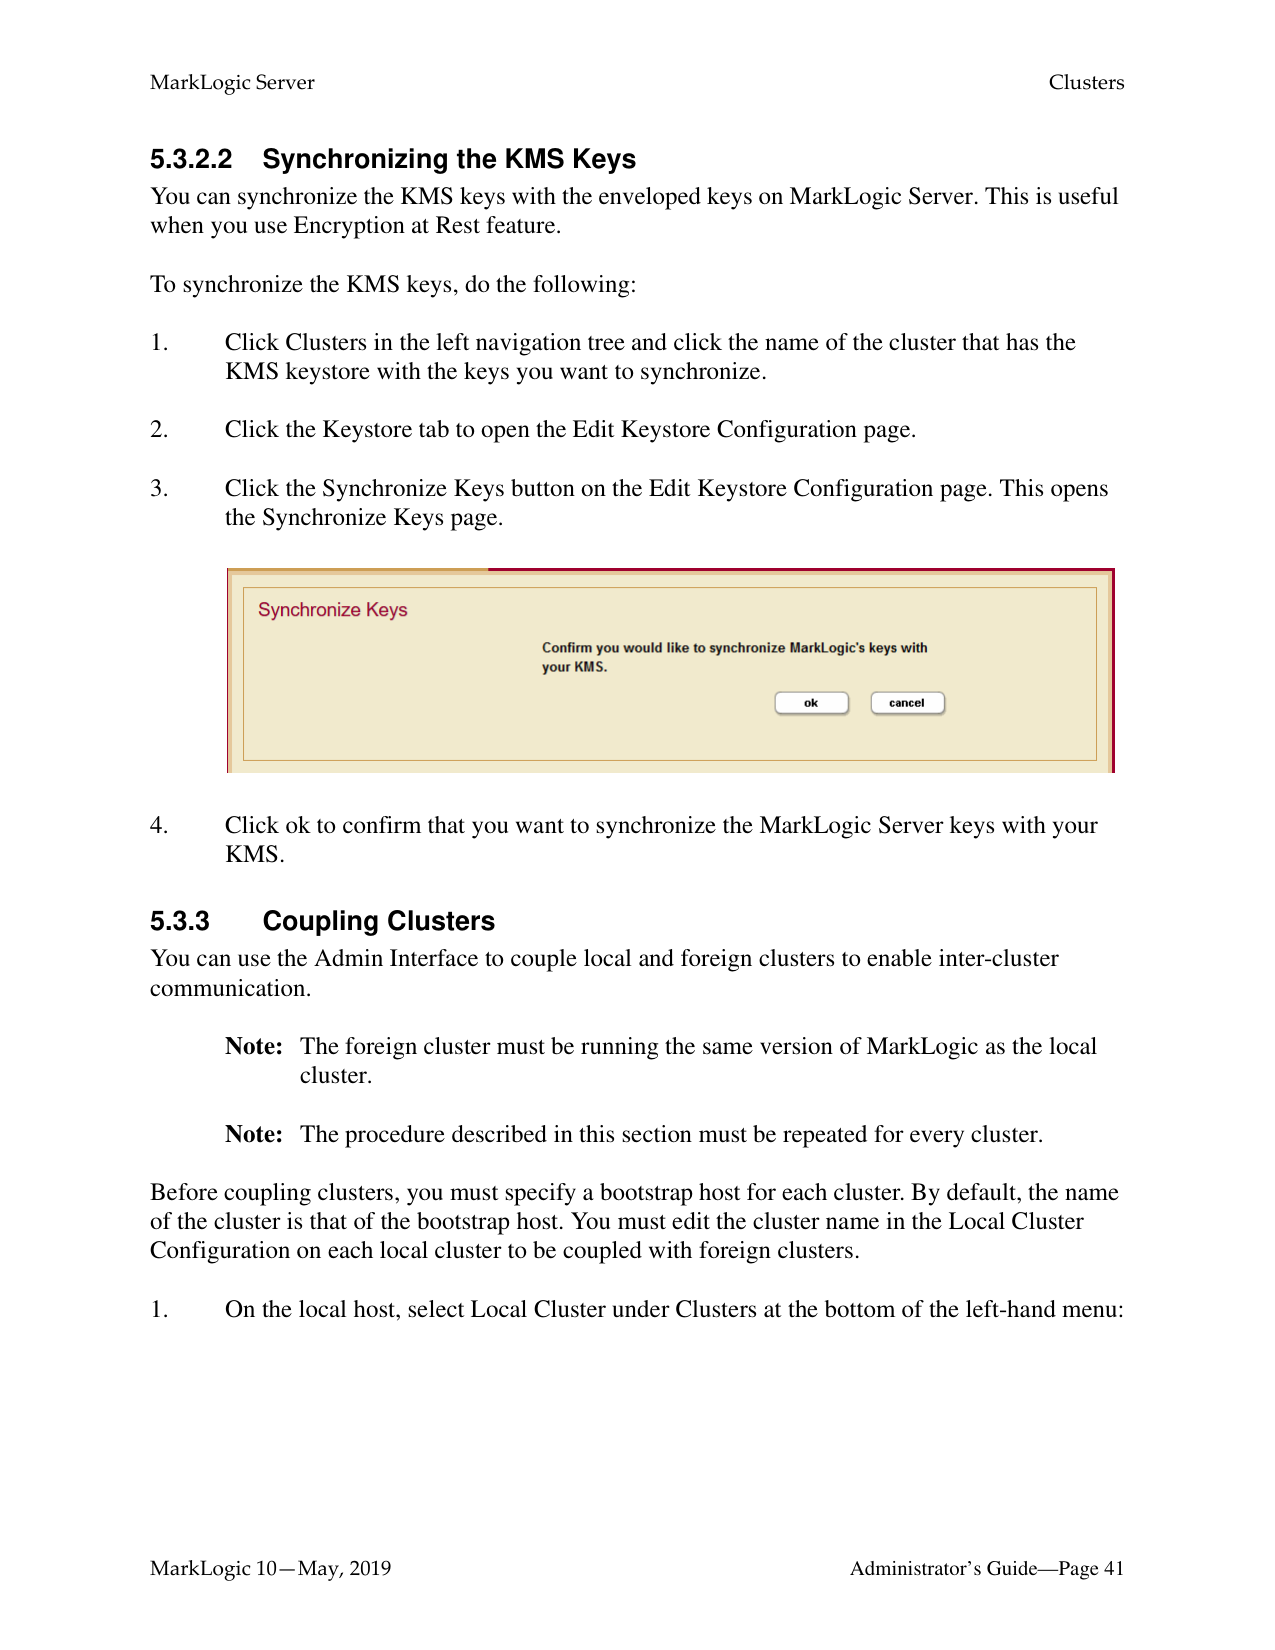
######### 5.3.2.2 Synchronizing the KMS Keys
You can synchronize the KMS keys with the enveloped keys on MarkLogic Server. This is useful when you use Encryption at Rest feature.
To synchronize the KMS keys, do the following:

You can use the Admin Interface to couple local and foreign clusters to enable inter-cluster communication.
Note: The foreign cluster must be running the same version of MarkLogic as the local
cluster.
Note: The procedure described in this section must be repeated for every cluster.
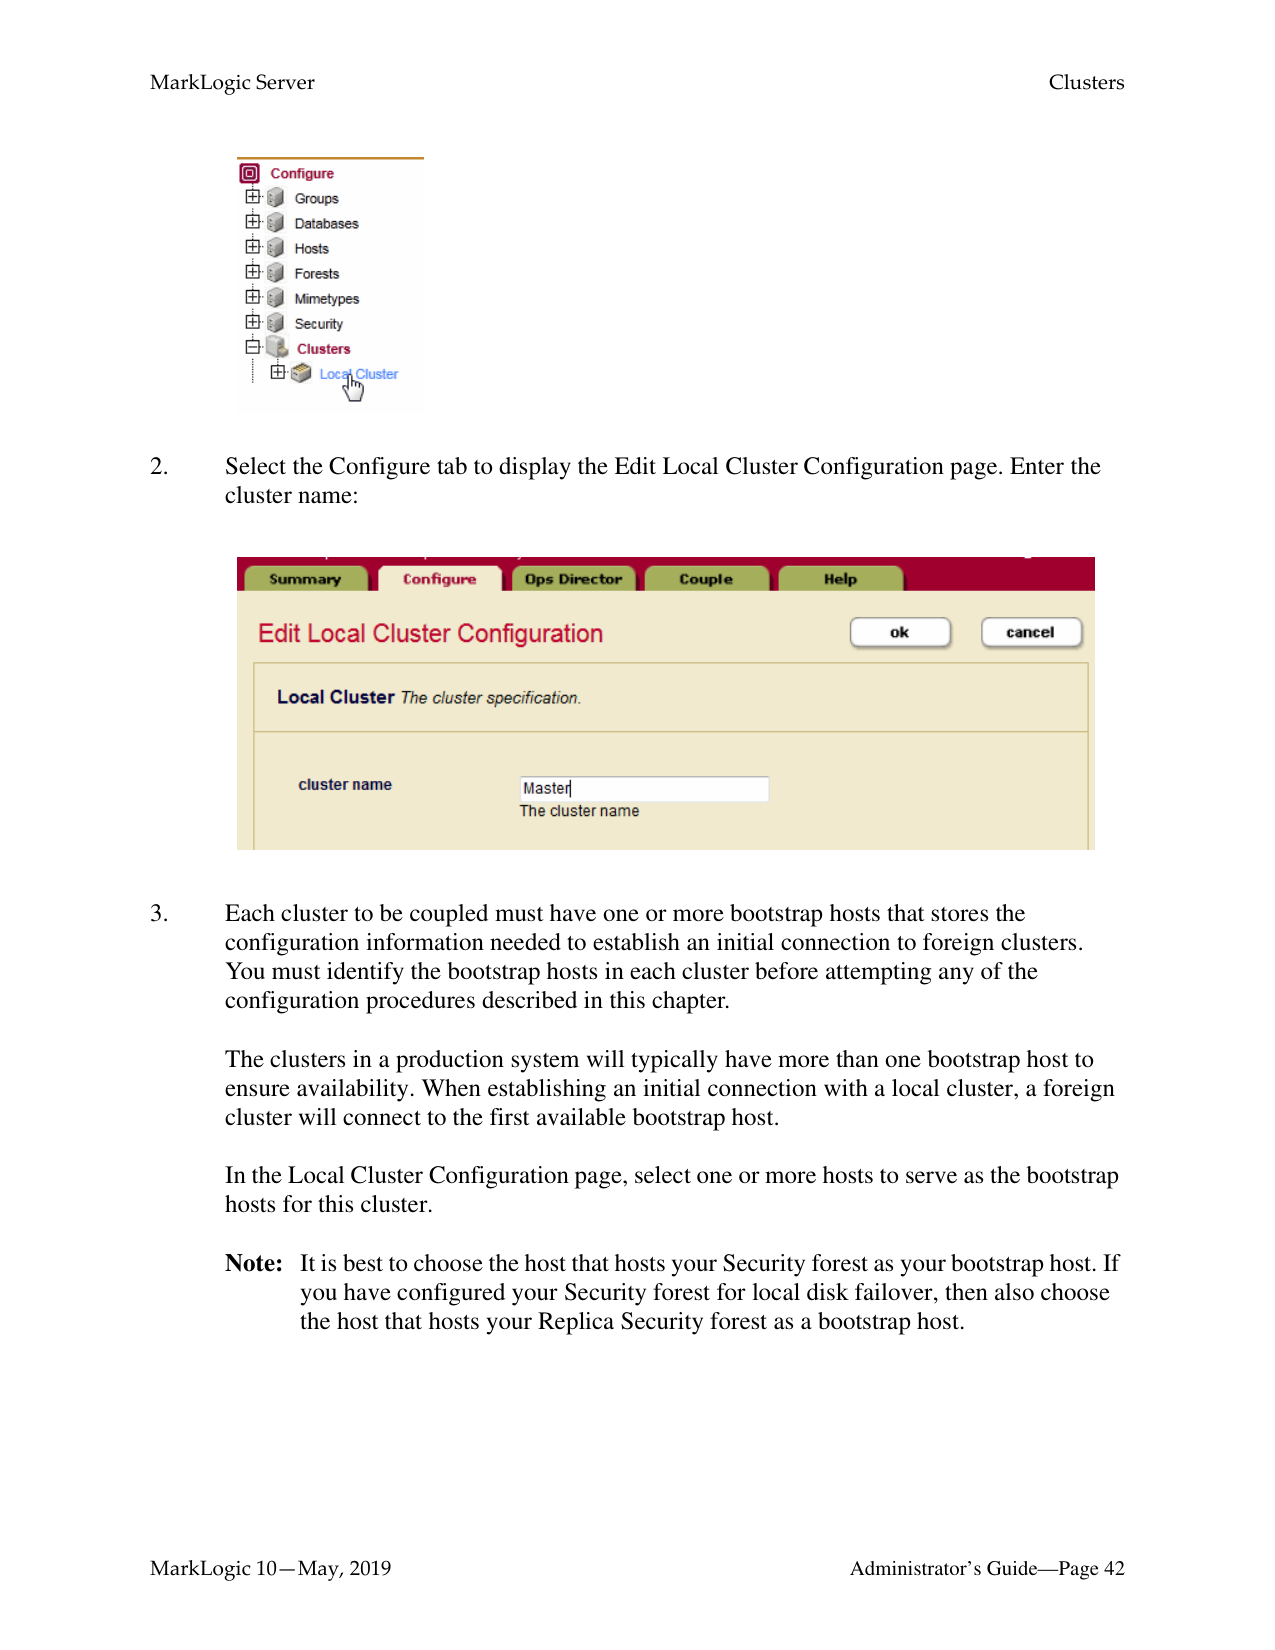
Before coupling clusters, you must specify a bootstrap host for each cluster. By default, the name of the cluster is that of the bootstrap host. You must edit the cluster name in the Local Cluster Configuration on each local cluster to be coupled with foreign clusters.


The clusters in a production system will typically have more than one bootstrap host to ensure availability. When establishing an initial connection with a local cluster, a foreign cluster will connect to the first available bootstrap host.
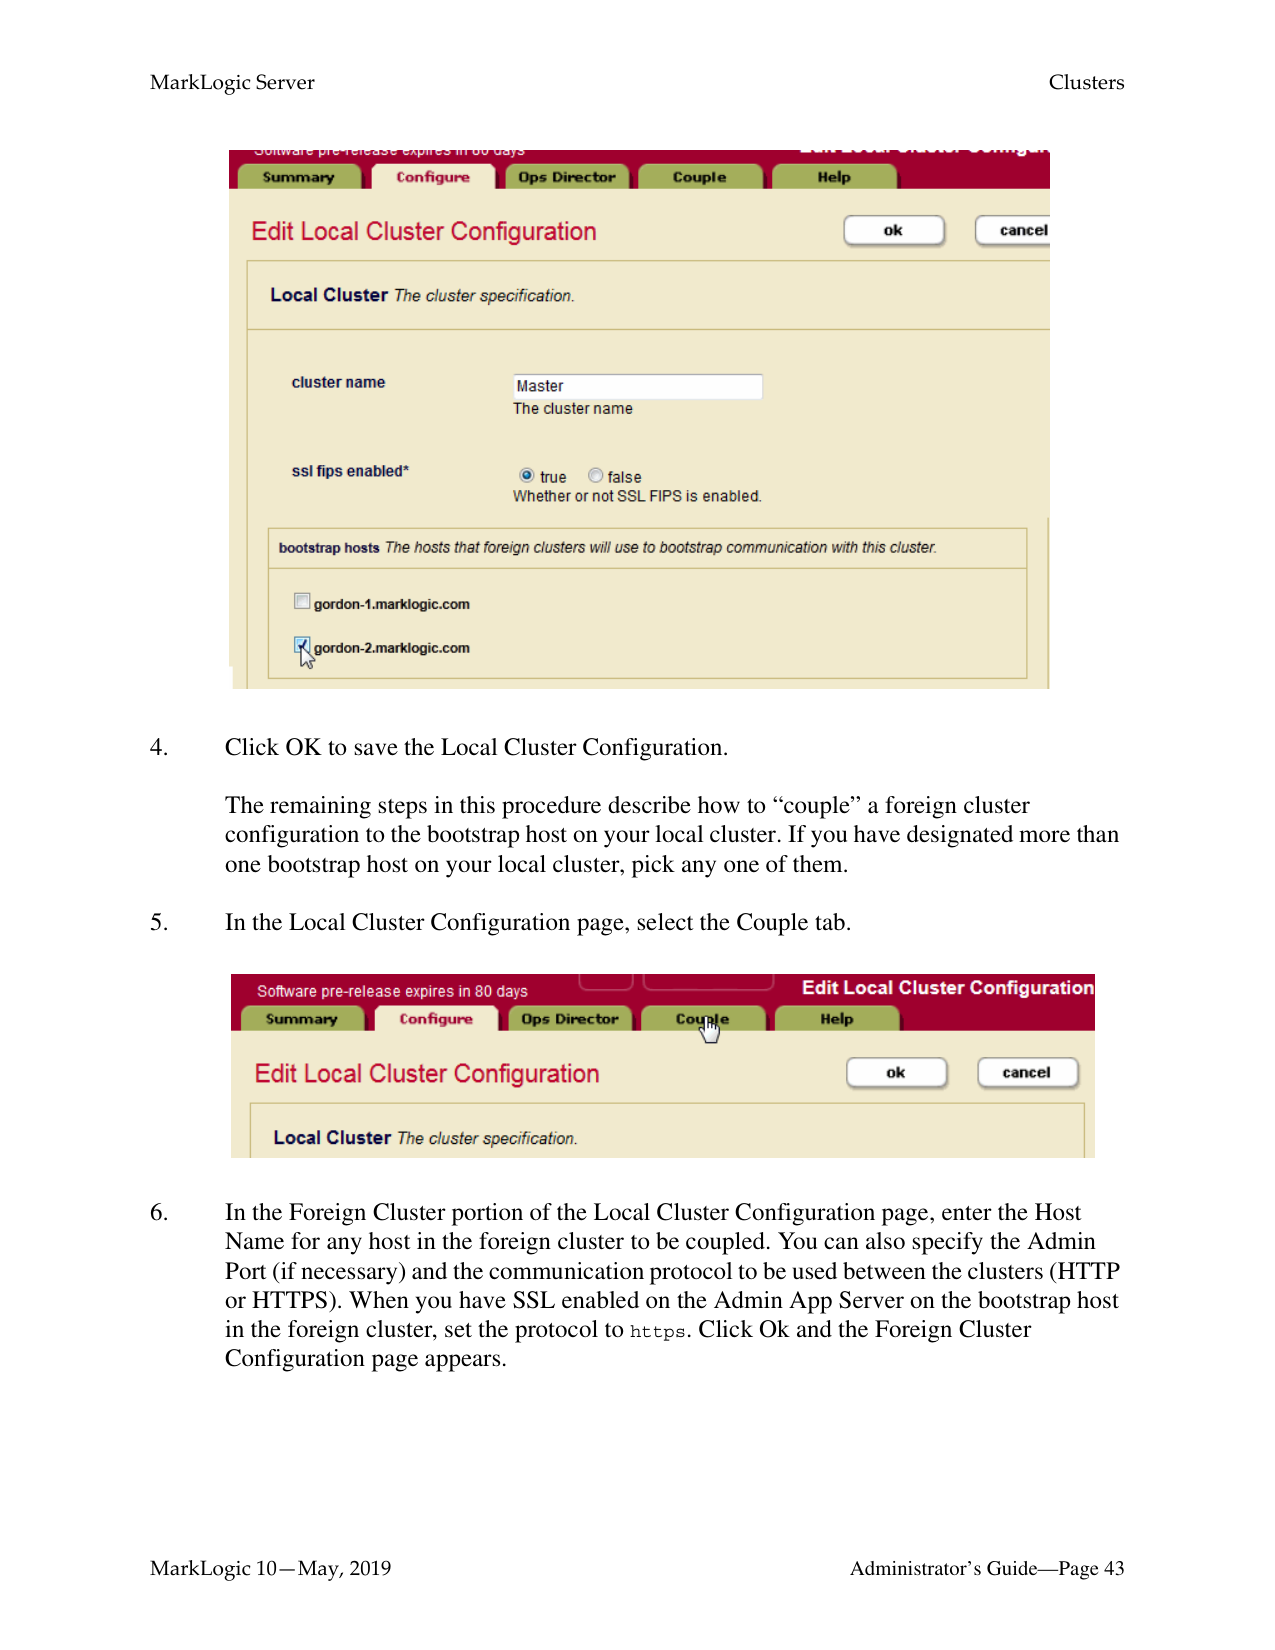
In the Local Cluster Configuration page, select one or more hosts to serve as the bootstrap hosts for this cluster.
Note: It is best to choose the host that hosts your Security forest as your bootstrap host. If you have configured your Security forest for local disk failover, then also choose the host that hosts your Replica Security forest as a bootstrap host.

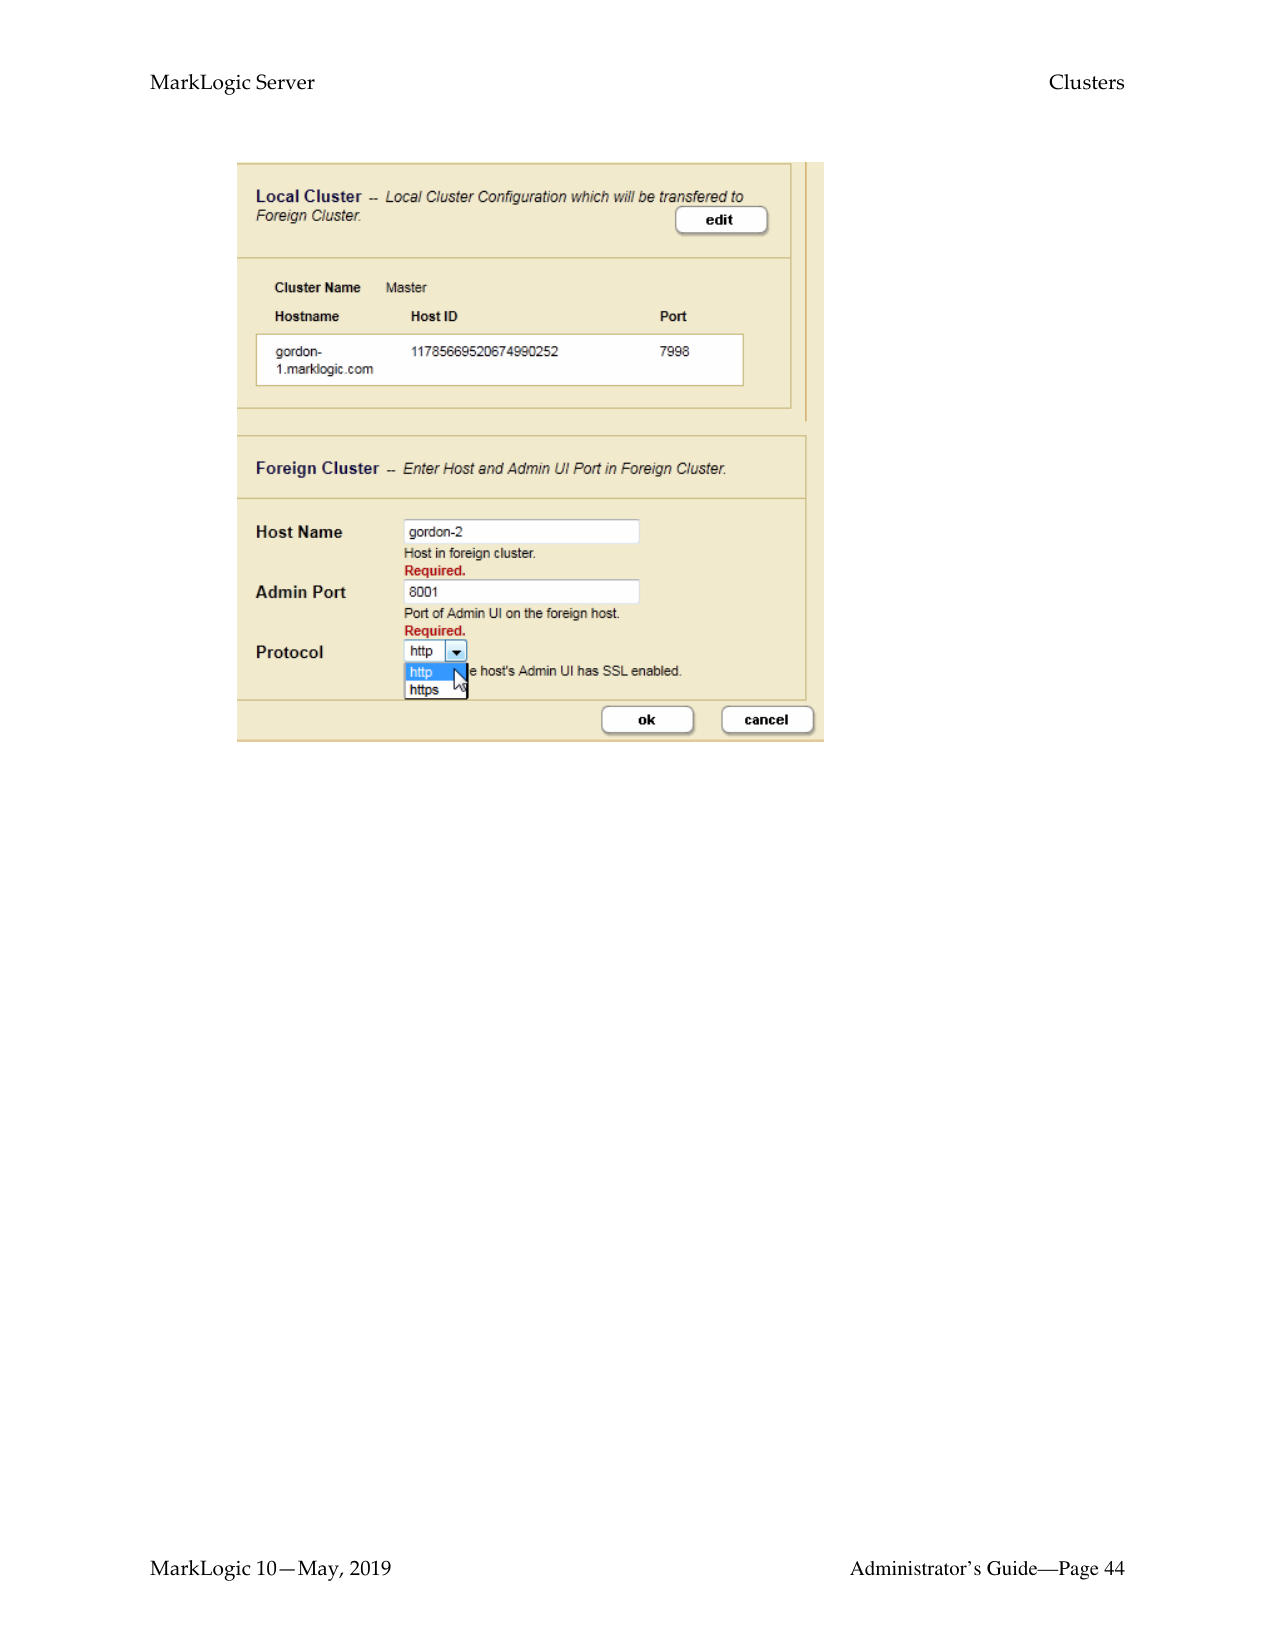
The remaining steps in this procedure describe how to “couple” a foreign cluster configuration to the bootstrap host on your local cluster. If you have designated more than one bootstrap host on your local cluster, pick any one of them.


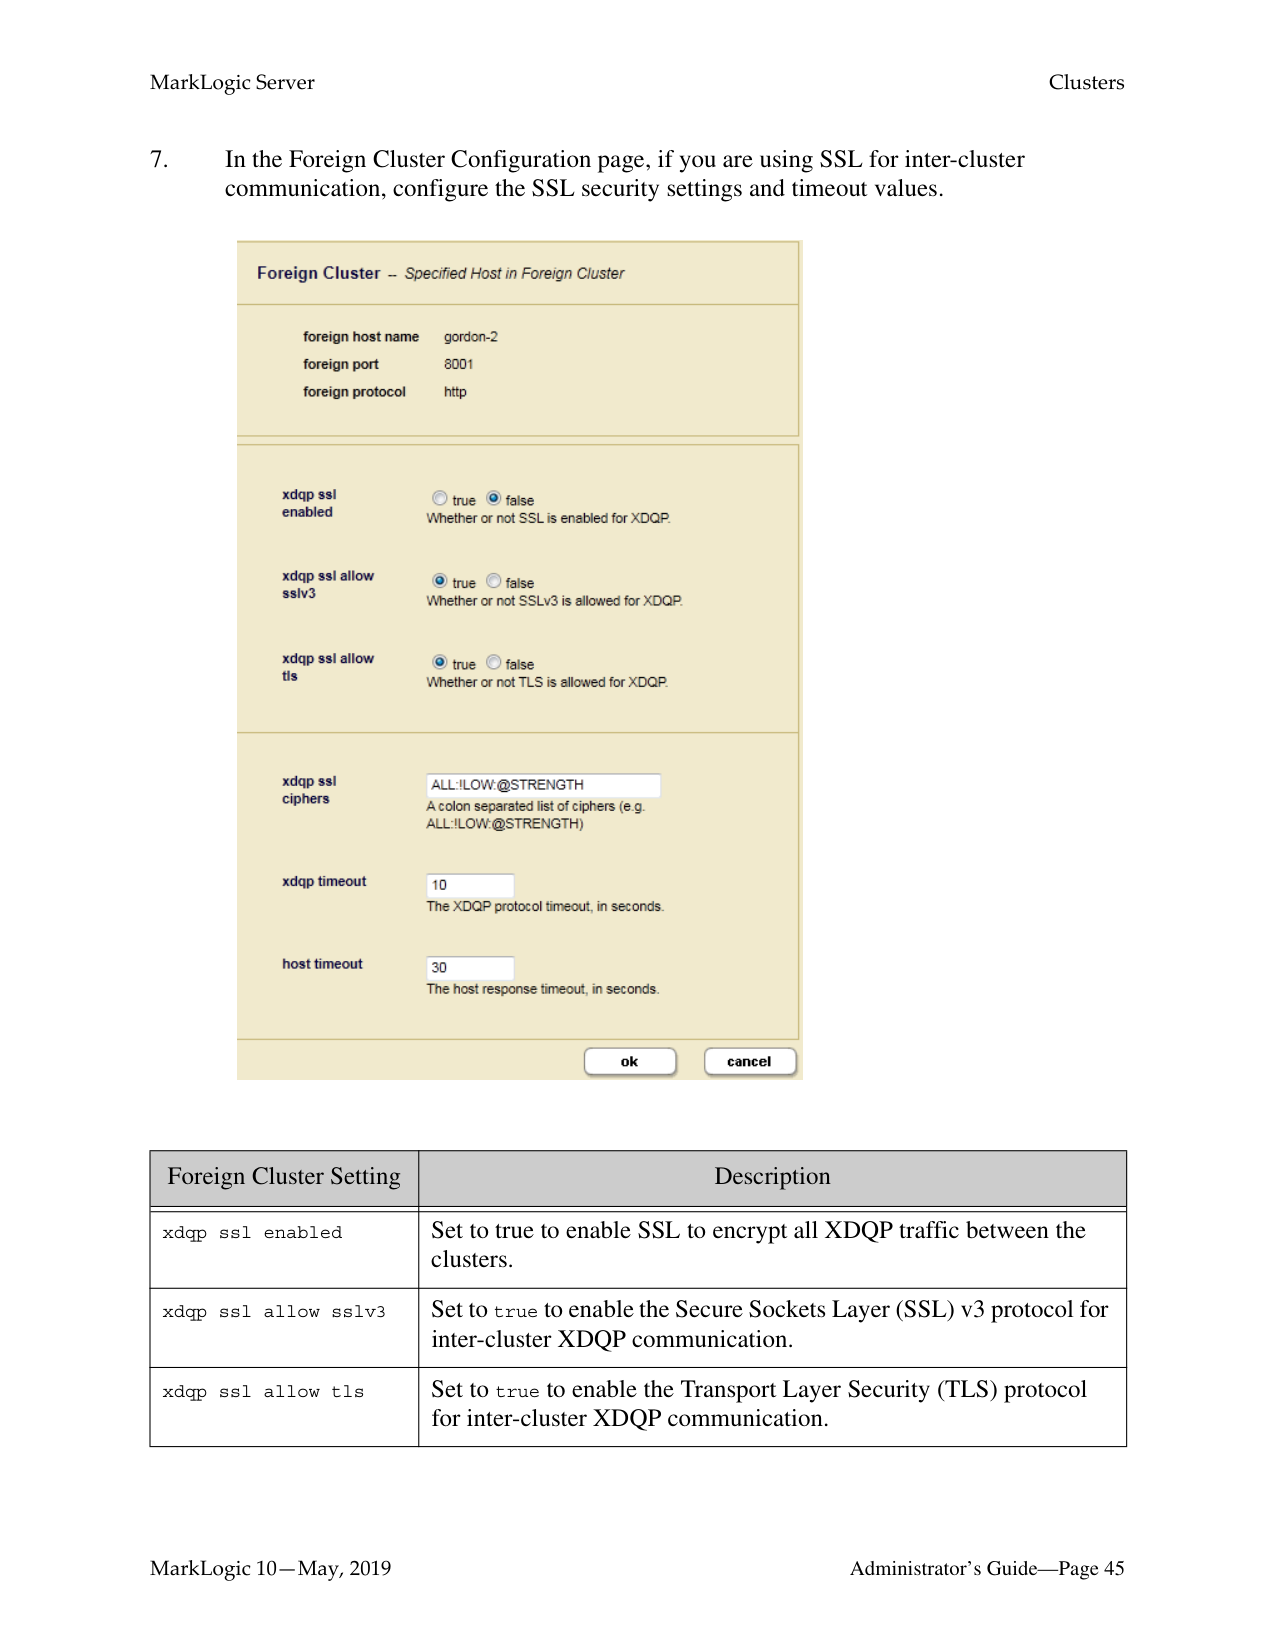
############### 7. In the Foreign Cluster Configuration page, if you are using SSL for inter-clustercommunication, configure the SSL security settings and timeout values.

|Foreign Cluster Setting|Description| |---|---| | | | |xdqp ssl enabled|Set to true to enable SSL to encrypt all XDQP traffic between the clusters.| |xdqp ssl allow sslv3|Set to true to enable the Secure Sockets Layer (SSL) v3 protocol for inter-cluster XDQP communication.| |xdqp ssl allow tls|Set to true to enable the Transport Layer Security (TLS) protocol for inter-cluster XDQP communication.|
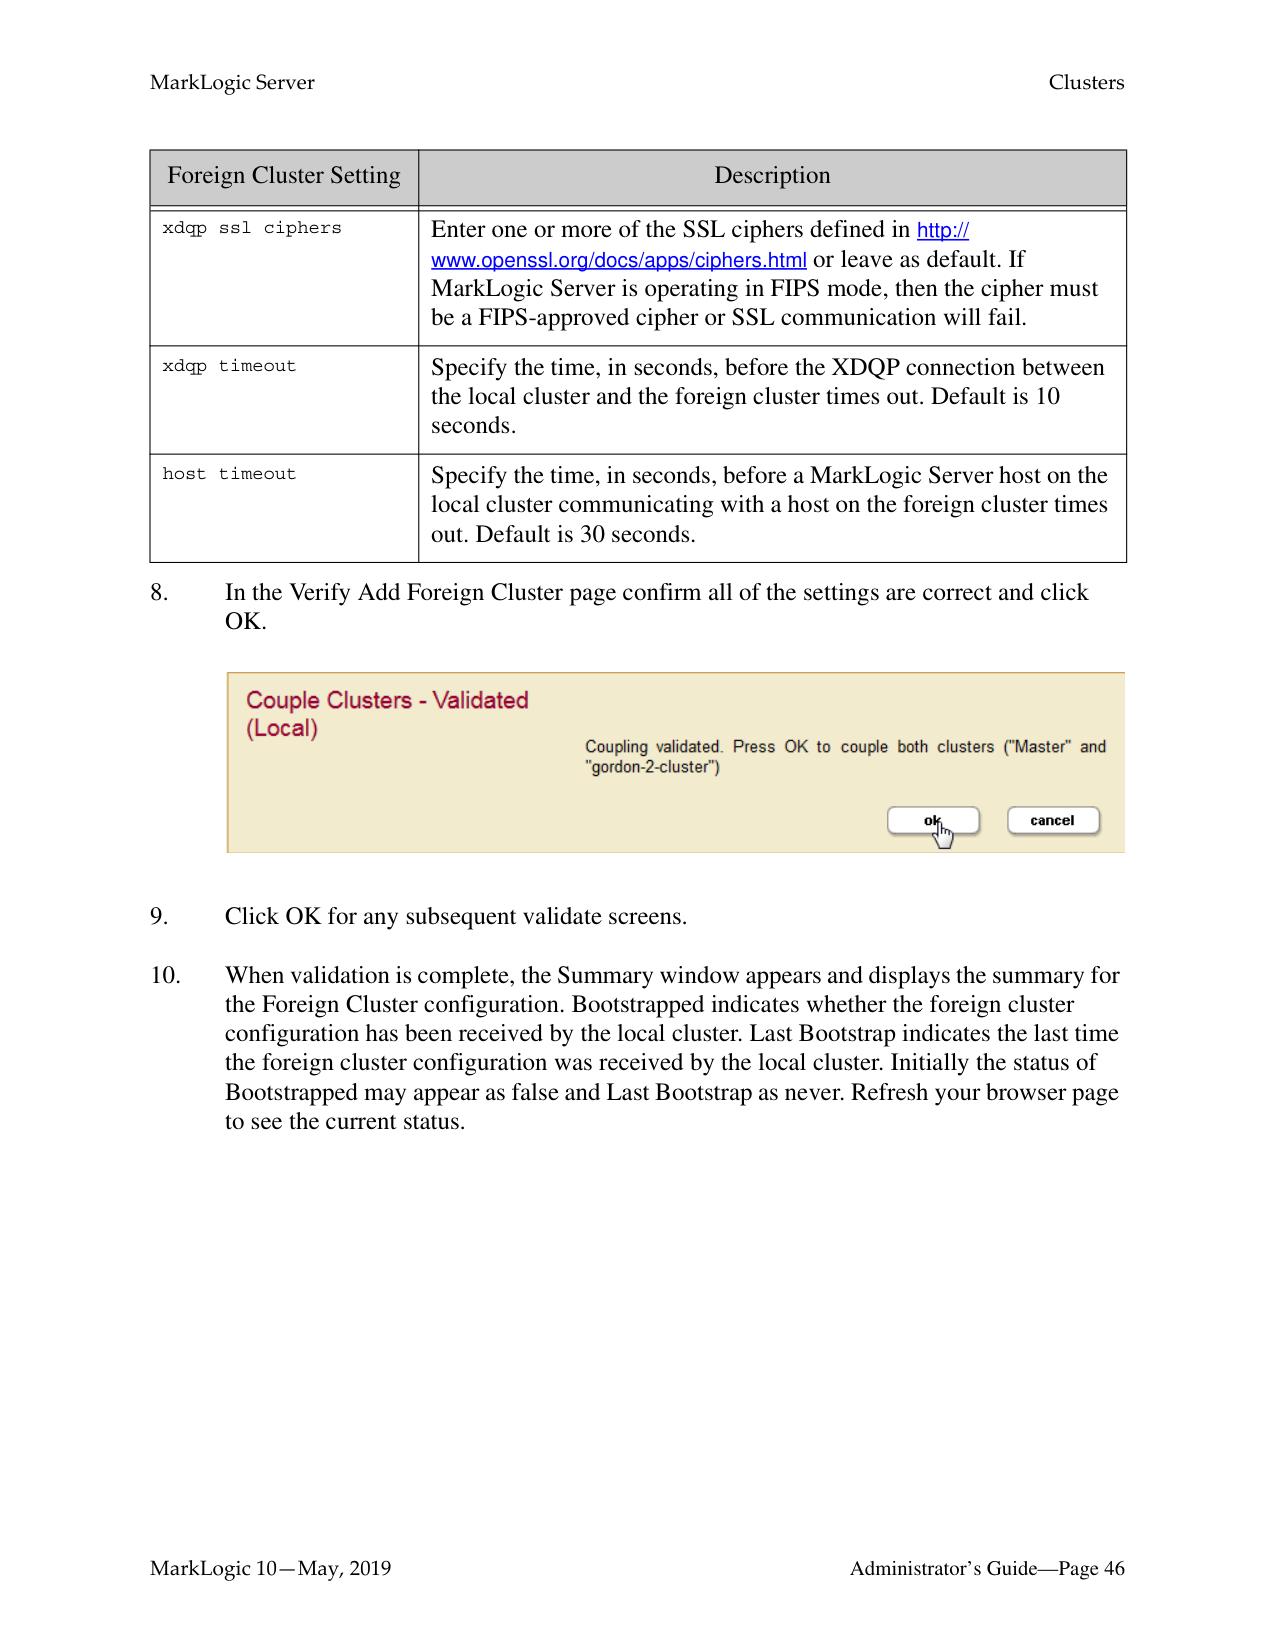
|Foreign Cluster Setting|Description| |---|---| | | | |xdqp ssl ciphers|Enter one or more of the SSL ciphers defined in http:// www.openssl.org/docs/apps/ciphers.html or leave as default. If MarkLogic Server is operating in FIPS mode, then the cipher must be a FIPS-approved cipher or SSL communication will fail.
| |xdqp timeout|Specify the time, in seconds, before the XDQP connection between the local cluster and the foreign cluster times out. Default is 10 seconds.| |host timeout|Specify the time, in seconds, before a MarkLogic Server host on the local cluster communicating with a host on the foreign cluster times out. Default is 30 seconds.|


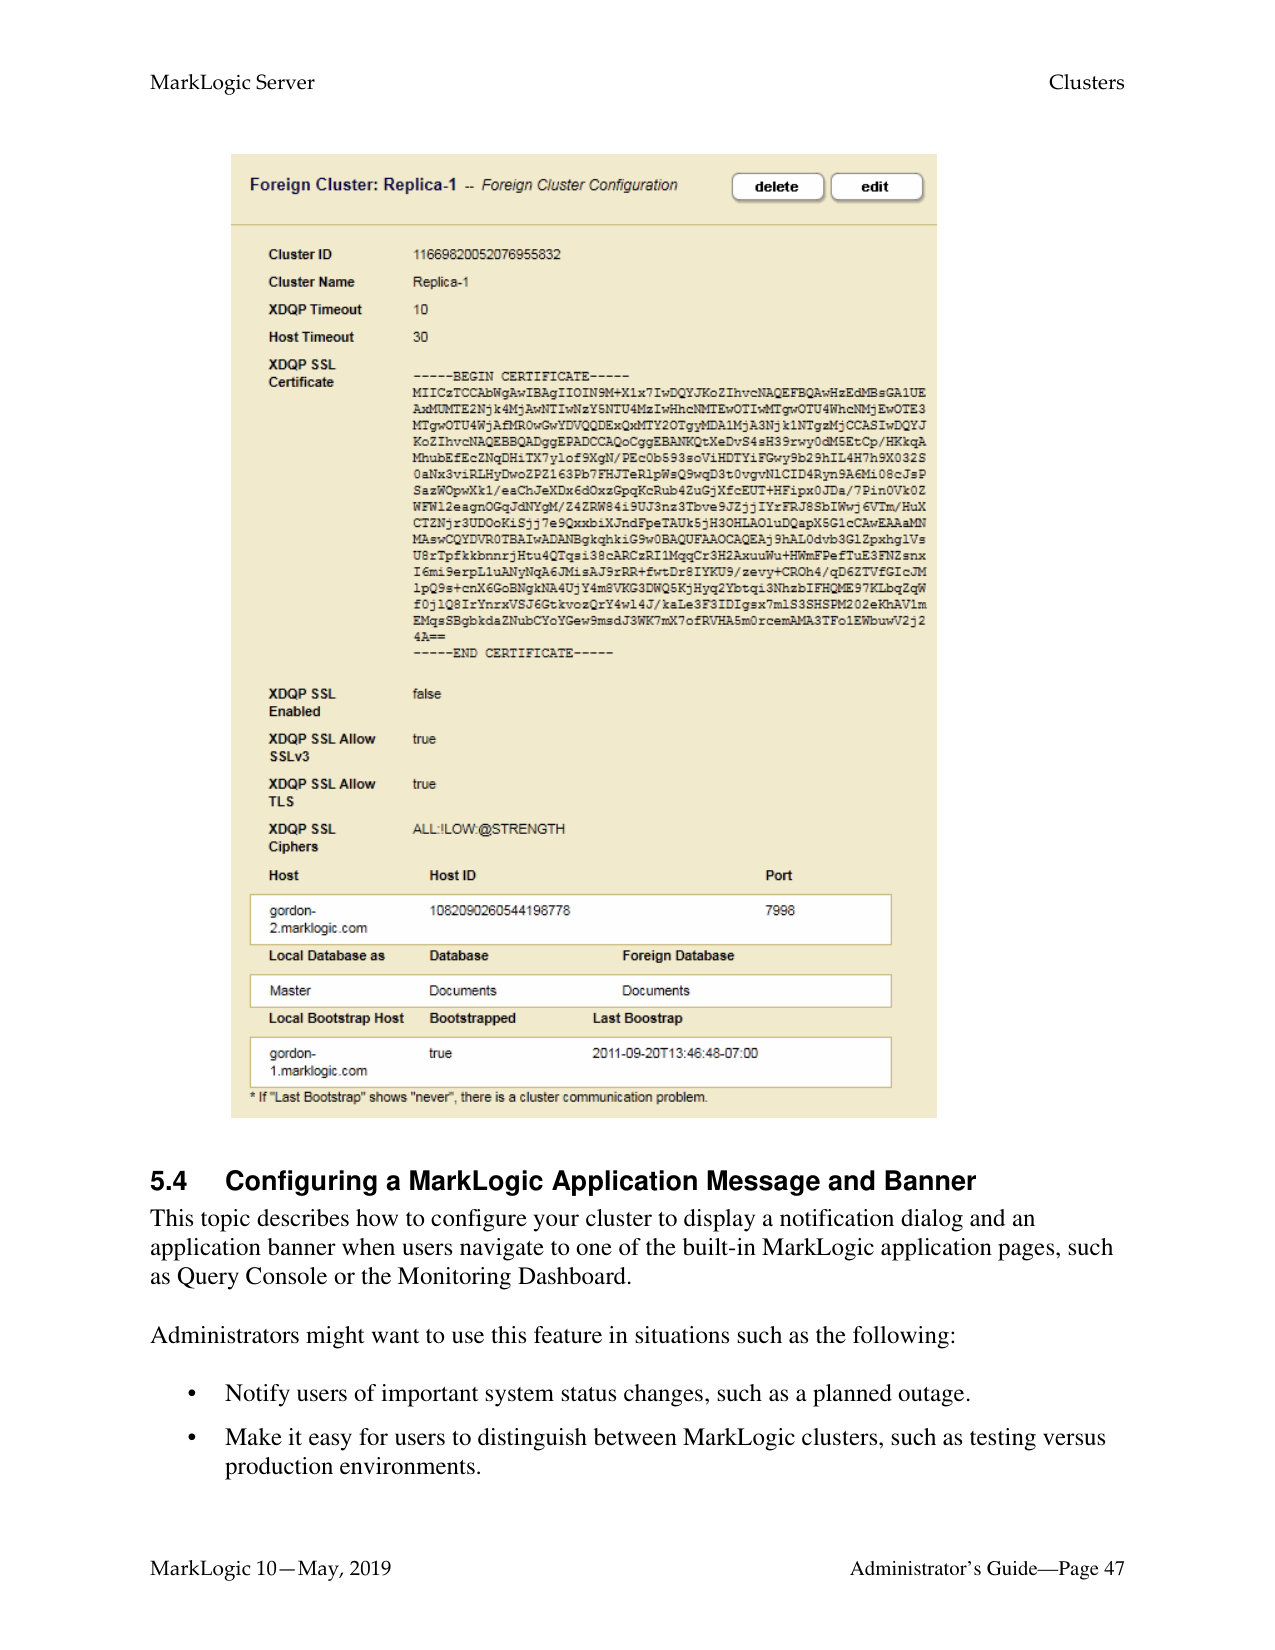
######### 5.4 Configuring a MarkLogic Application Message and Banner
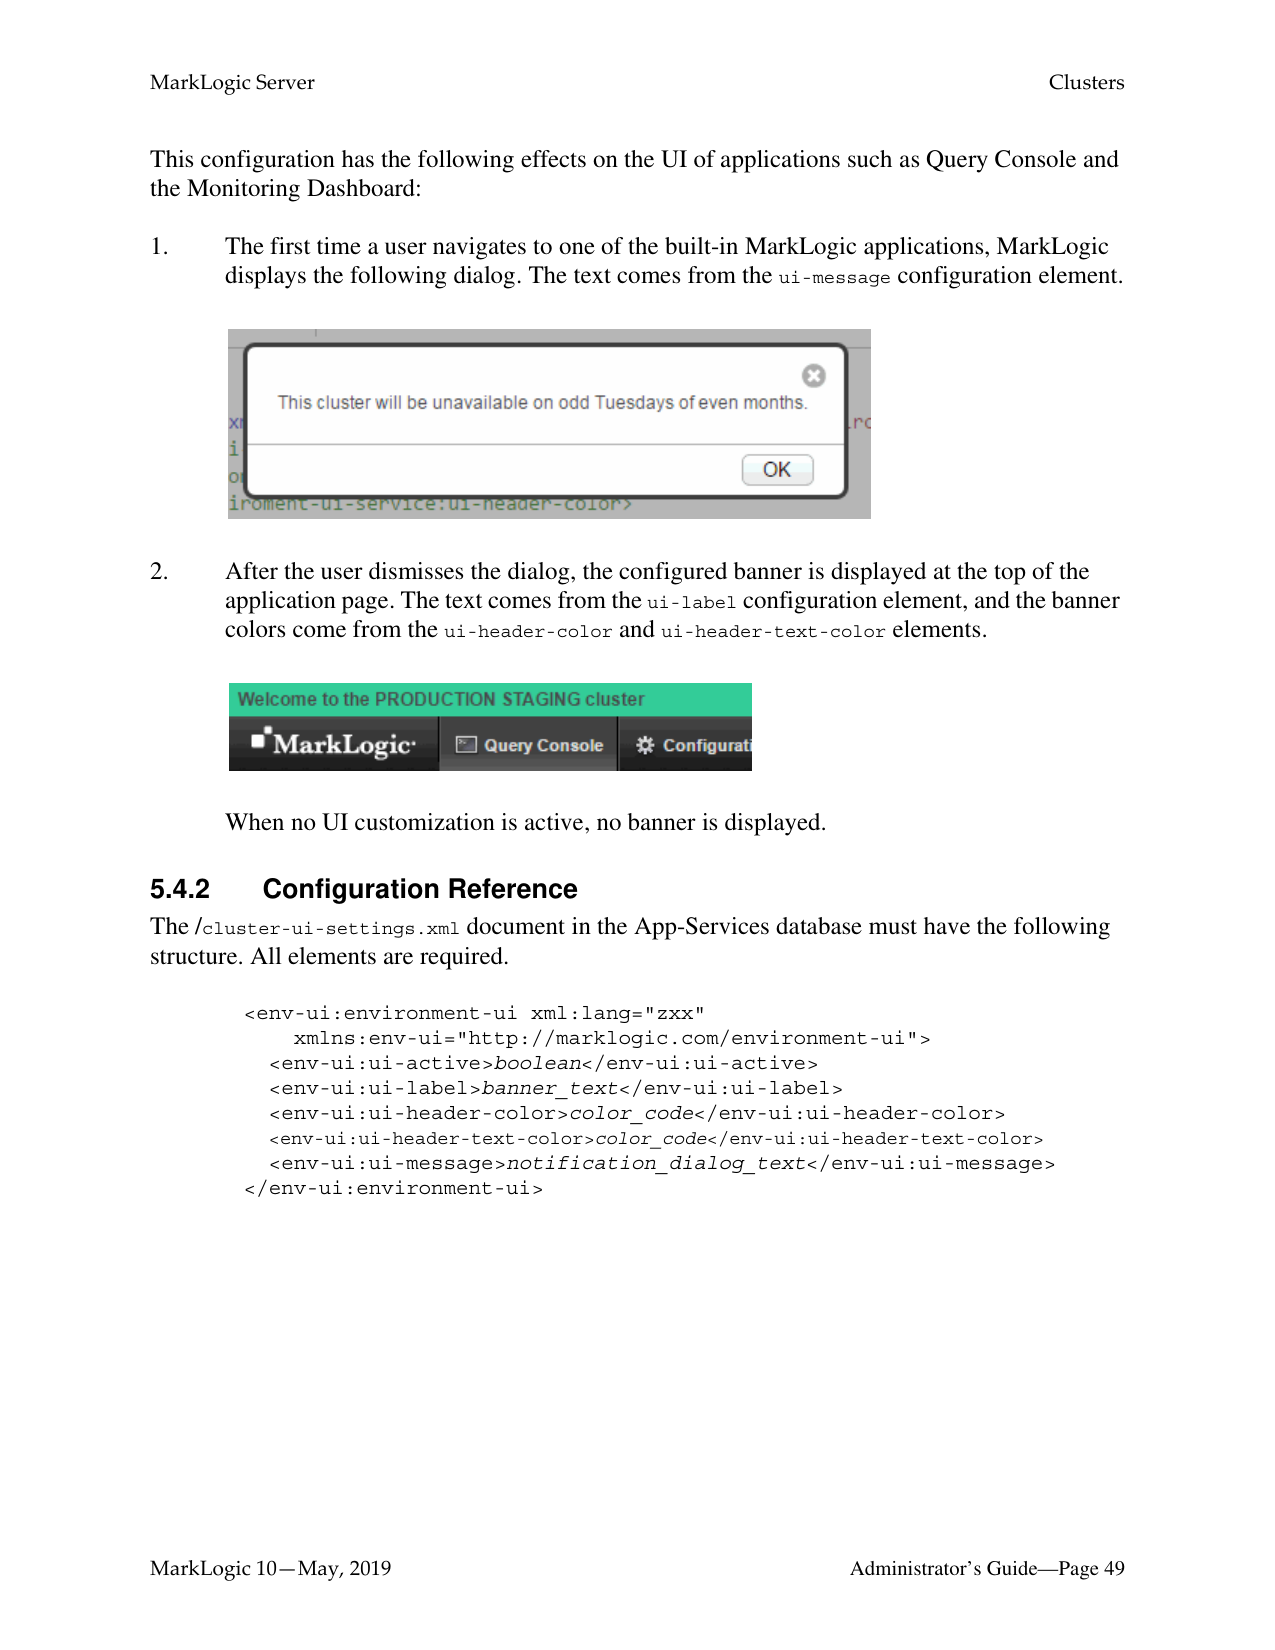
This topic describes how to configure your cluster to display a notification dialog and an application banner when users navigate to one of the built-in MarkLogic application pages, such as Query Console or the Monitoring Dashboard.
Administrators might want to use this feature in situations such as the following:
The notification dialog is only displayed to each user once per host from which he or she connects to a MarkLogic application. If the notification message changes, the dialog will be displayed again, next time the user navigates to one of the affected applications.
Specify the UI configuration in the configuration document in the App-Services database with the URI /cluster-ui-settings.xml. MarkLogic installs a deactivated default configuration that you can use as a baseline for customization.
For more details, see the following topics:
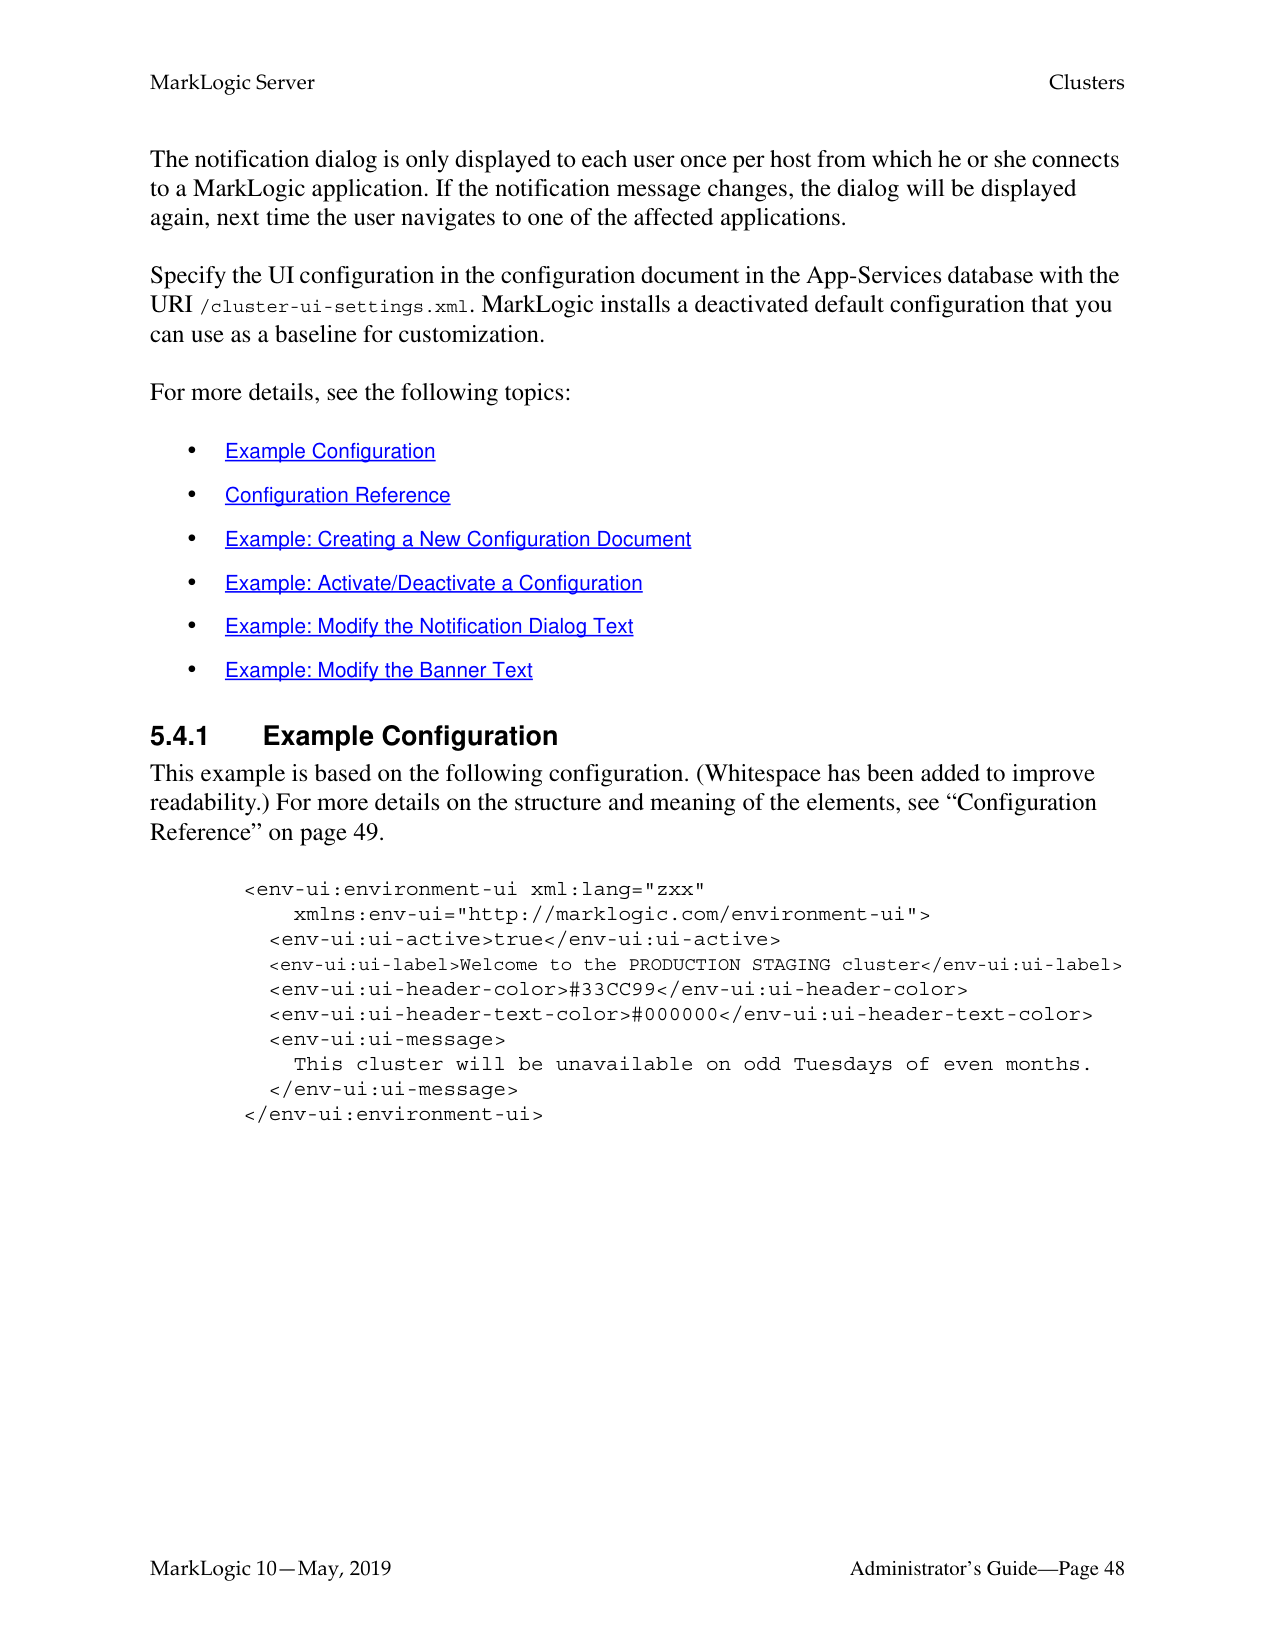
######### 5.4.1 Example Configuration
This example is based on the following configuration. (Whitespace has been added to improve readability.) For more details on the structure and meaning of the elements, see “Configuration Reference” on page 49.
xmlns:env-ui="http://marklogic.com/environment-ui"> This cluster will be unavailable on odd Tuesdays of even months.
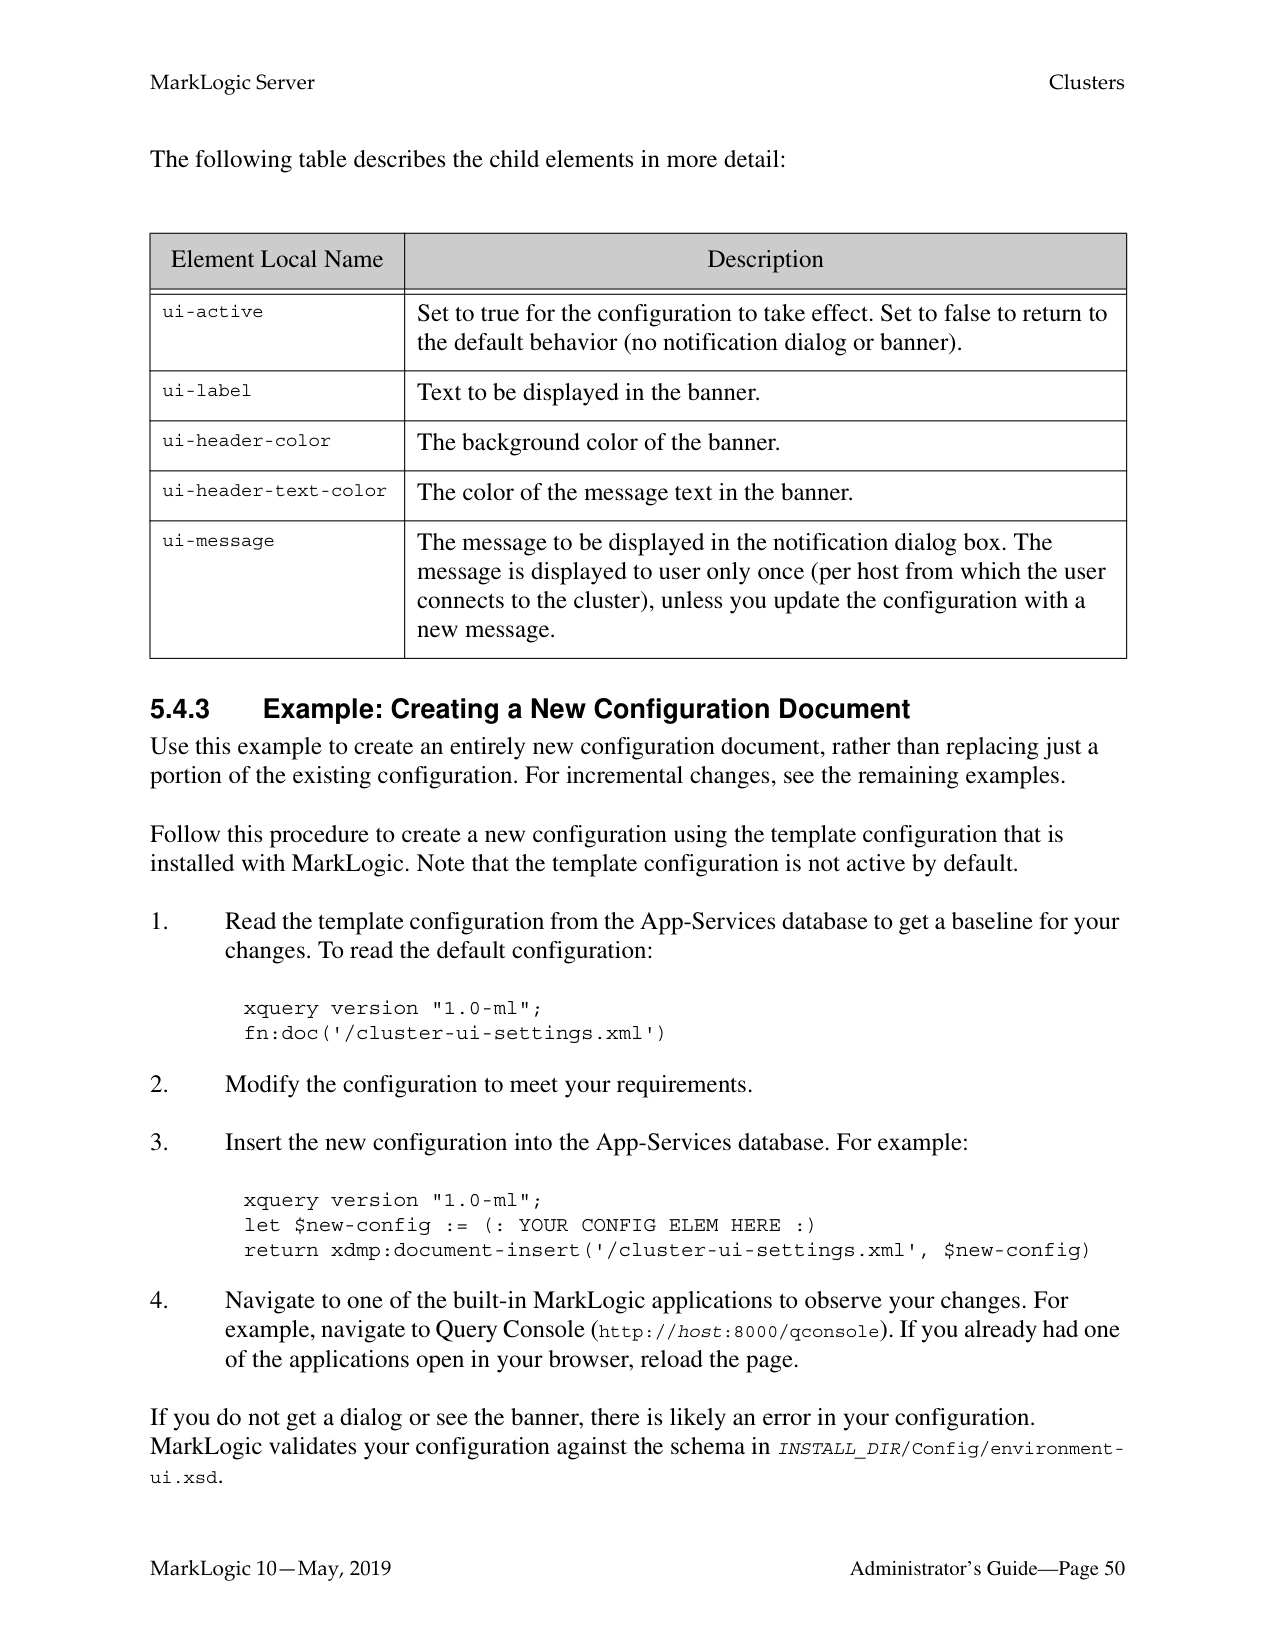
This configuration has the following effects on the UI of applications such as Query Console and the Monitoring Dashboard:


When no UI customization is active, no banner is displayed.
######### 5.4.2 Configuration Reference
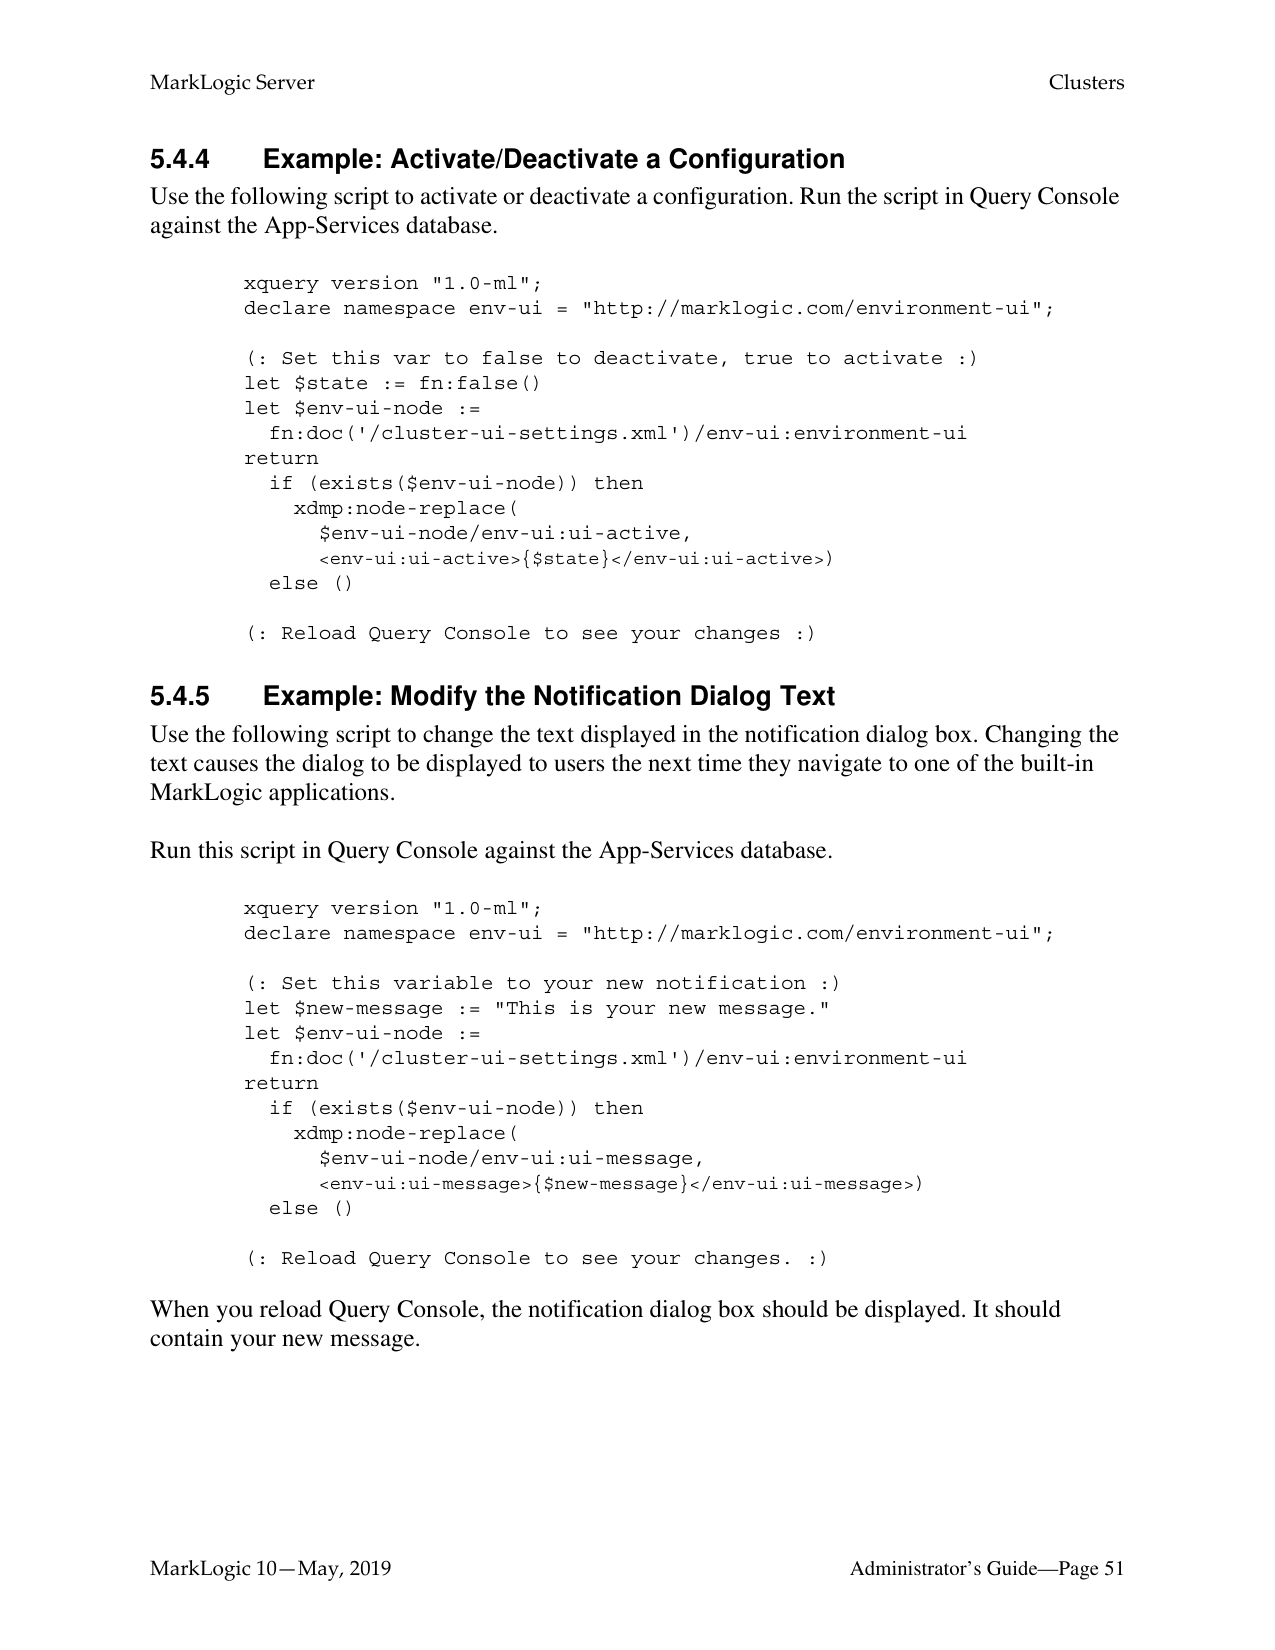
The /cluster-ui-settings.xml document in the App-Services database must have the following structure. All elements are required.
xmlns:env-ui="http://marklogic.com/environment-ui">
The following table describes the child elements in more detail:
|Element Local Name|Description| |---|---| | | | |ui-active|Set to true for the configuration to take effect. Set to false to return to the default behavior (no notification dialog or banner).| |ui-label|Text to be displayed in the banner.| |ui-header-color|The background color of the banner.| |ui-header-text-color|The color of the message text in the banner.| |ui-message|The message to be displayed in the notification dialog box. The message is displayed to user only once (per host from which the user connects to the cluster), unless you update the configuration with a new message.|
######### 5.4.3 Example: Creating a New Configuration Document
Use this example to create an entirely new configuration document, rather than replacing just a portion of the existing configuration. For incremental changes, see the remaining examples. Follow this procedure to create a new configuration using the template configuration that is installed with MarkLogic. Note that the template configuration is not active by default.
xquery version "1.0-ml"; fn:doc('/cluster-ui-settings.xml')
xquery version "1.0-ml"; let $new-config := (: YOUR CONFIG ELEM HERE :) return xdmp:document-insert('/cluster-ui-settings.xml', $new-config)
If you do not get a dialog or see the banner, there is likely an error in your configuration. MarkLogic validates your configuration against the schema in INSTALL_DIR/Config/environmentui.xsd.
######### 5.4.4 Example: Activate/Deactivate a Configuration
Use the following script to activate or deactivate a configuration. Run the script in Query Console against the App-Services database.
xquery version "1.0-ml"; declare namespace env-ui = "http://marklogic.com/environment-ui";
(: Set this var to false to deactivate, true to activate :) let $state := fn:false() let $env-ui-node :=
fn:doc('/cluster-ui-settings.xml')/env-ui:environment-ui return
if (exists($env-ui-node)) then
xdmp:node-replace( $env-ui-node/env-ui:ui-active,
else () (: Reload Query Console to see your changes :)
######### 5.4.5 Example: Modify the Notification Dialog Text
Use the following script to change the text displayed in the notification dialog box. Changing the text causes the dialog to be displayed to users the next time they navigate to one of the built-in MarkLogic applications.
Run this script in Query Console against the App-Services database.
xquery version "1.0-ml"; declare namespace env-ui = "http://marklogic.com/environment-ui";
(: Set this variable to your new notification :) let $new-message := "This is your new message." let $env-ui-node :=
fn:doc('/cluster-ui-settings.xml')/env-ui:environment-ui return
if (exists($env-ui-node)) then
xdmp:node-replace( $env-ui-node/env-ui:ui-message,
else () (: Reload Query Console to see your changes. :)
When you reload Query Console, the notification dialog box should be displayed. It should contain your new message.
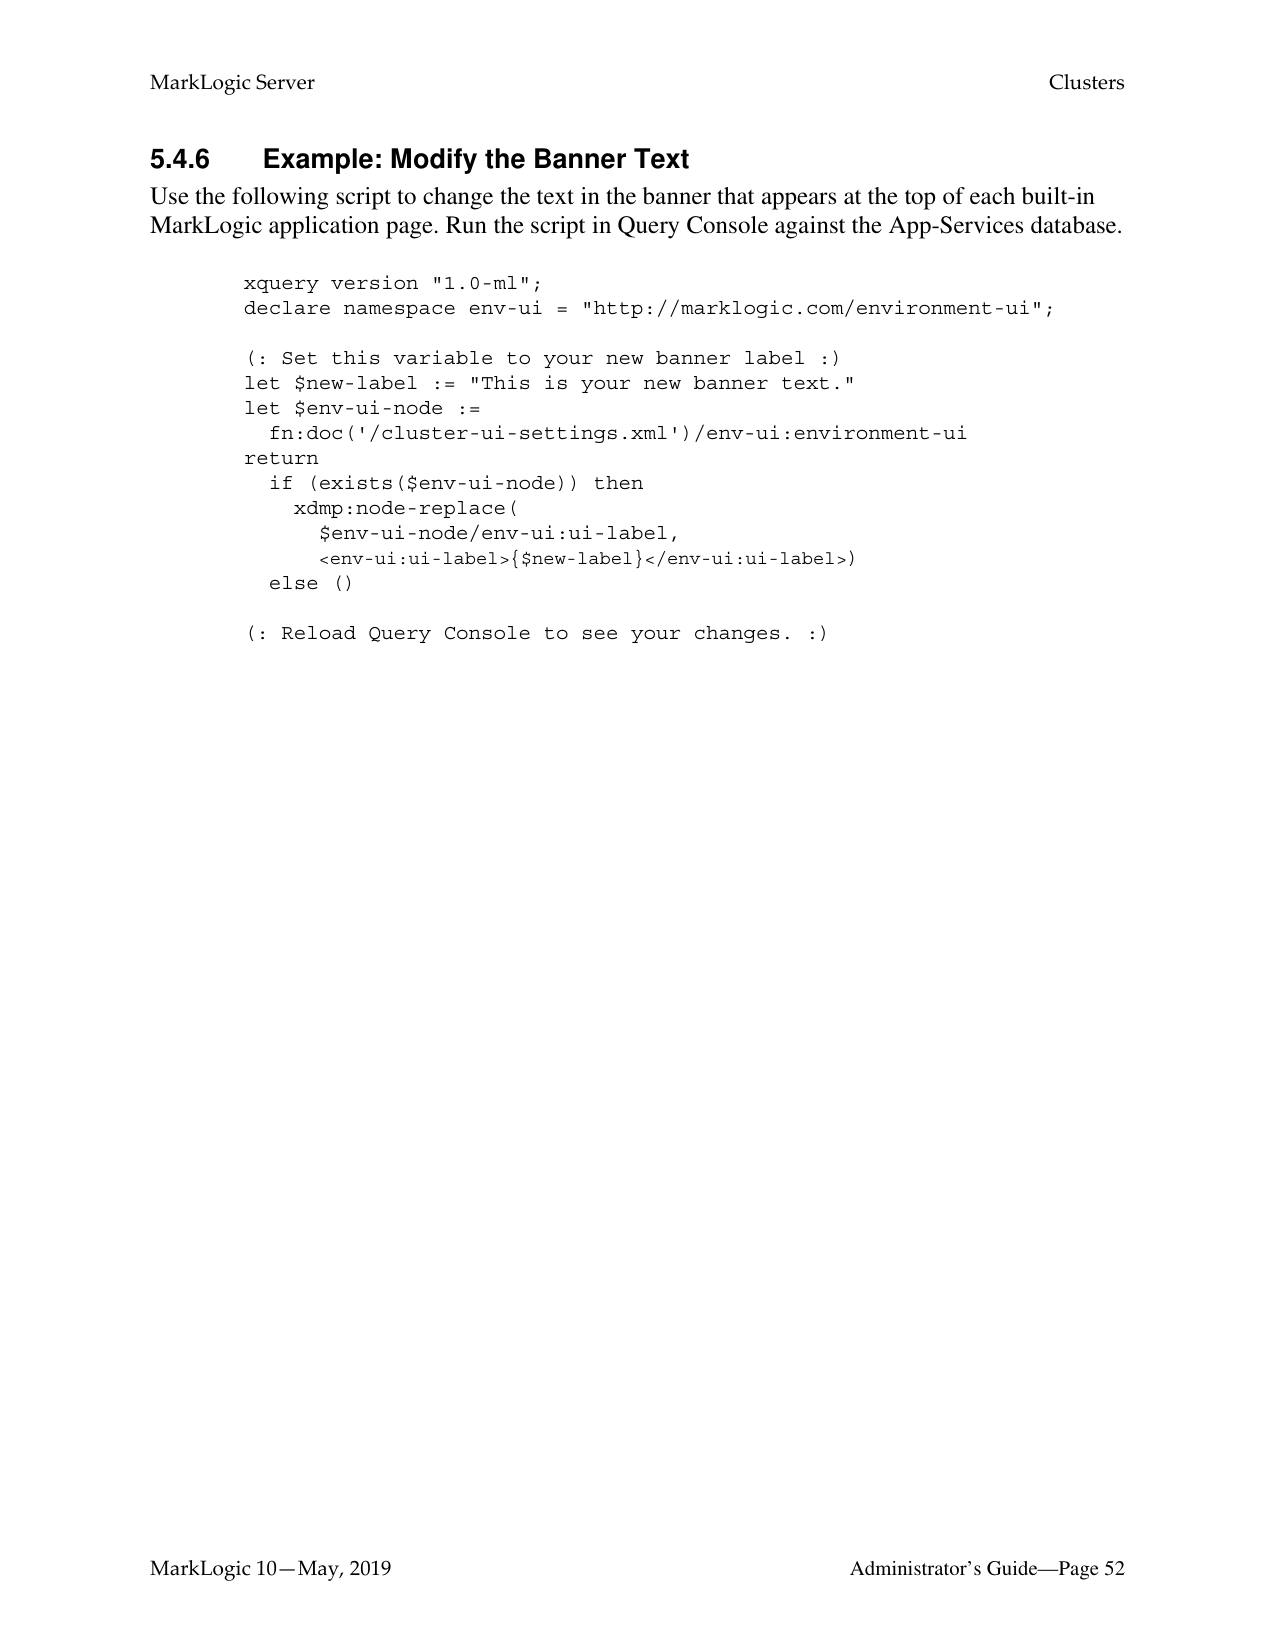
######### 5.4.6 Example: Modify the Banner Text
Use the following script to change the text in the banner that appears at the top of each built-in MarkLogic application page. Run the script in Query Console against the App-Services database.
xquery version "1.0-ml"; declare namespace env-ui = "http://marklogic.com/environment-ui";
(: Set this variable to your new banner label :) let $new-label := "This is your new banner text." let $env-ui-node :=
fn:doc('/cluster-ui-settings.xml')/env-ui:environment-ui return
if (exists($env-ui-node)) then
xdmp:node-replace( $env-ui-node/env-ui:ui-label,
else () (: Reload Query Console to see your changes. :)
This chapter describes how to use the Admin Interface to create and configure groups. For details on how to create and configure groups programmatically, see Creating and Configuring Groups in the Scripting Administrative Tasks Guide.
For single-node configurations, you can only use one group at a time (because there is only one host). For clusters configurations with multiple hosts, you can have as many group configurations as makes sense in your environment.
Groups allow you to have several configurations, each of which applies to a distinct set of hosts. Different configurations are often needed when different hosts perform different tasks, or when the hosts have different system capabilities (disk space, memory, and so on). In cluster configurations, a common configuration is to have one group defined for the evaluator nodes (hosts that service query requests) and another group defined for the data nodes (hosts to which forests are attached).
HTTP, ODBC, XDBC, and WebDAV servers are defined at the group level and apply to all hosts within the group. Schemas and namespaces can also be defined at the group level to apply groupwide.
The Configure tab of the Group Administration section of the Admin Interface enables you to define configuration information for memory settings, SMTP server settings, and other configuration settings. The values for the settings are set at installation time based on your system memory configuration at the time of the installation. For a description of each configuration option, see the Help tab of the Group Administration section of the Admin Interface.
######### 6.2 Example
The relationships between a cluster, a group and a host in MarkLogic Server may be best illustrated with an example.
In this example, each machine is set up as a host within the example cluster. Specifically, hosts E1, E2 and E3 belong to a group called Evaluator-Nodes. They are configured with HTTP servers and XDBC servers to run user applications. All hosts in the Evaluator-Nodes group have the same MarkLogic Server configuration.
Hosts D1, D2 and D3 belong to a group called Data-Nodes. Hosts in the Data-Nodes group are configured with data forests and interact with the nodes in the Evaluator-Nodes group to service data requests. See the sections on databases, forests and hosts for details on configuring data forests.
|Host E1
| | | |---|---| | | | | | |
| | | |---|---| | | | | | |
|Group: Evaluator-Group: Evaluator-Nodes| |---|
Group: Data-Nodes
Example Cluster
Host E2 Host E3
Host D1 Host D2 Host D3| |---|
For more information about clusters, see the Scalability, Availability, and Failover Guide.
Note: If you are administering a single-host MarkLogic environment, the host is automatically added to a Default group during the installation process. You will only have one host in the group and will not be able to add other hosts to the group.


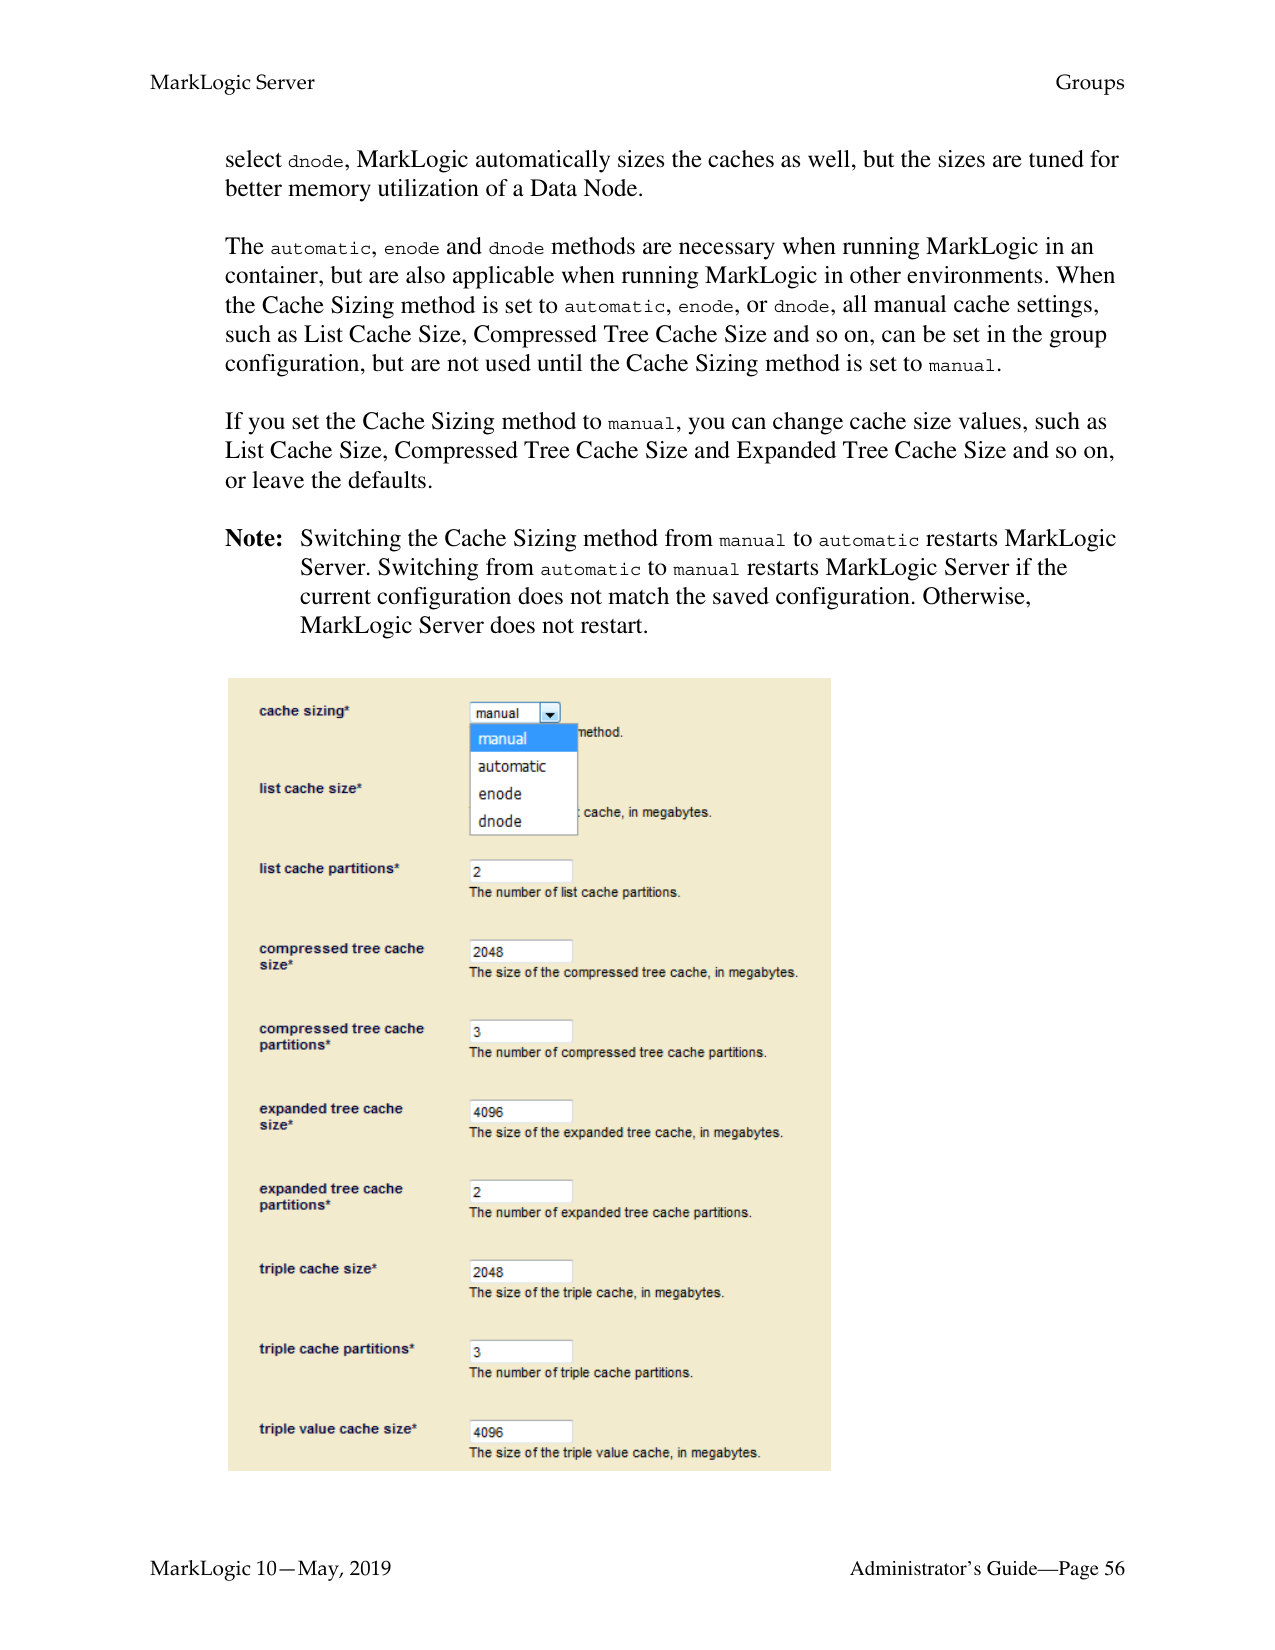
select dnode, MarkLogic automatically sizes the caches as well, but the sizes are tuned for better memory utilization of a Data Node.
The automatic, enode and dnode methods are necessary when running MarkLogic in an container, but are also applicable when running MarkLogic in other environments. When the Cache Sizing method is set to automatic, enode, or dnode, all manual cache settings, such as List Cache Size, Compressed Tree Cache Size and so on, can be set in the group configuration, but are not used until the Cache Sizing method is set to manual.
If you set the Cache Sizing method to manual, you can change cache size values, such as List Cache Size, Compressed Tree Cache Size and Expanded Tree Cache Size and so on, or leave the defaults.
Note: Switching the Cache Sizing method from manual to automatic restarts MarkLogic Server. Switching from automatic to manual restarts MarkLogic Server if the current configuration does not match the saved configuration. Otherwise, MarkLogic Server does not restart.

Note: For information about auditing, including how to configure various audit events,
see “Auditing Events” on page 111.
Adding a group is a “hot” administrative task; the changes are reflected immediately without a restart.
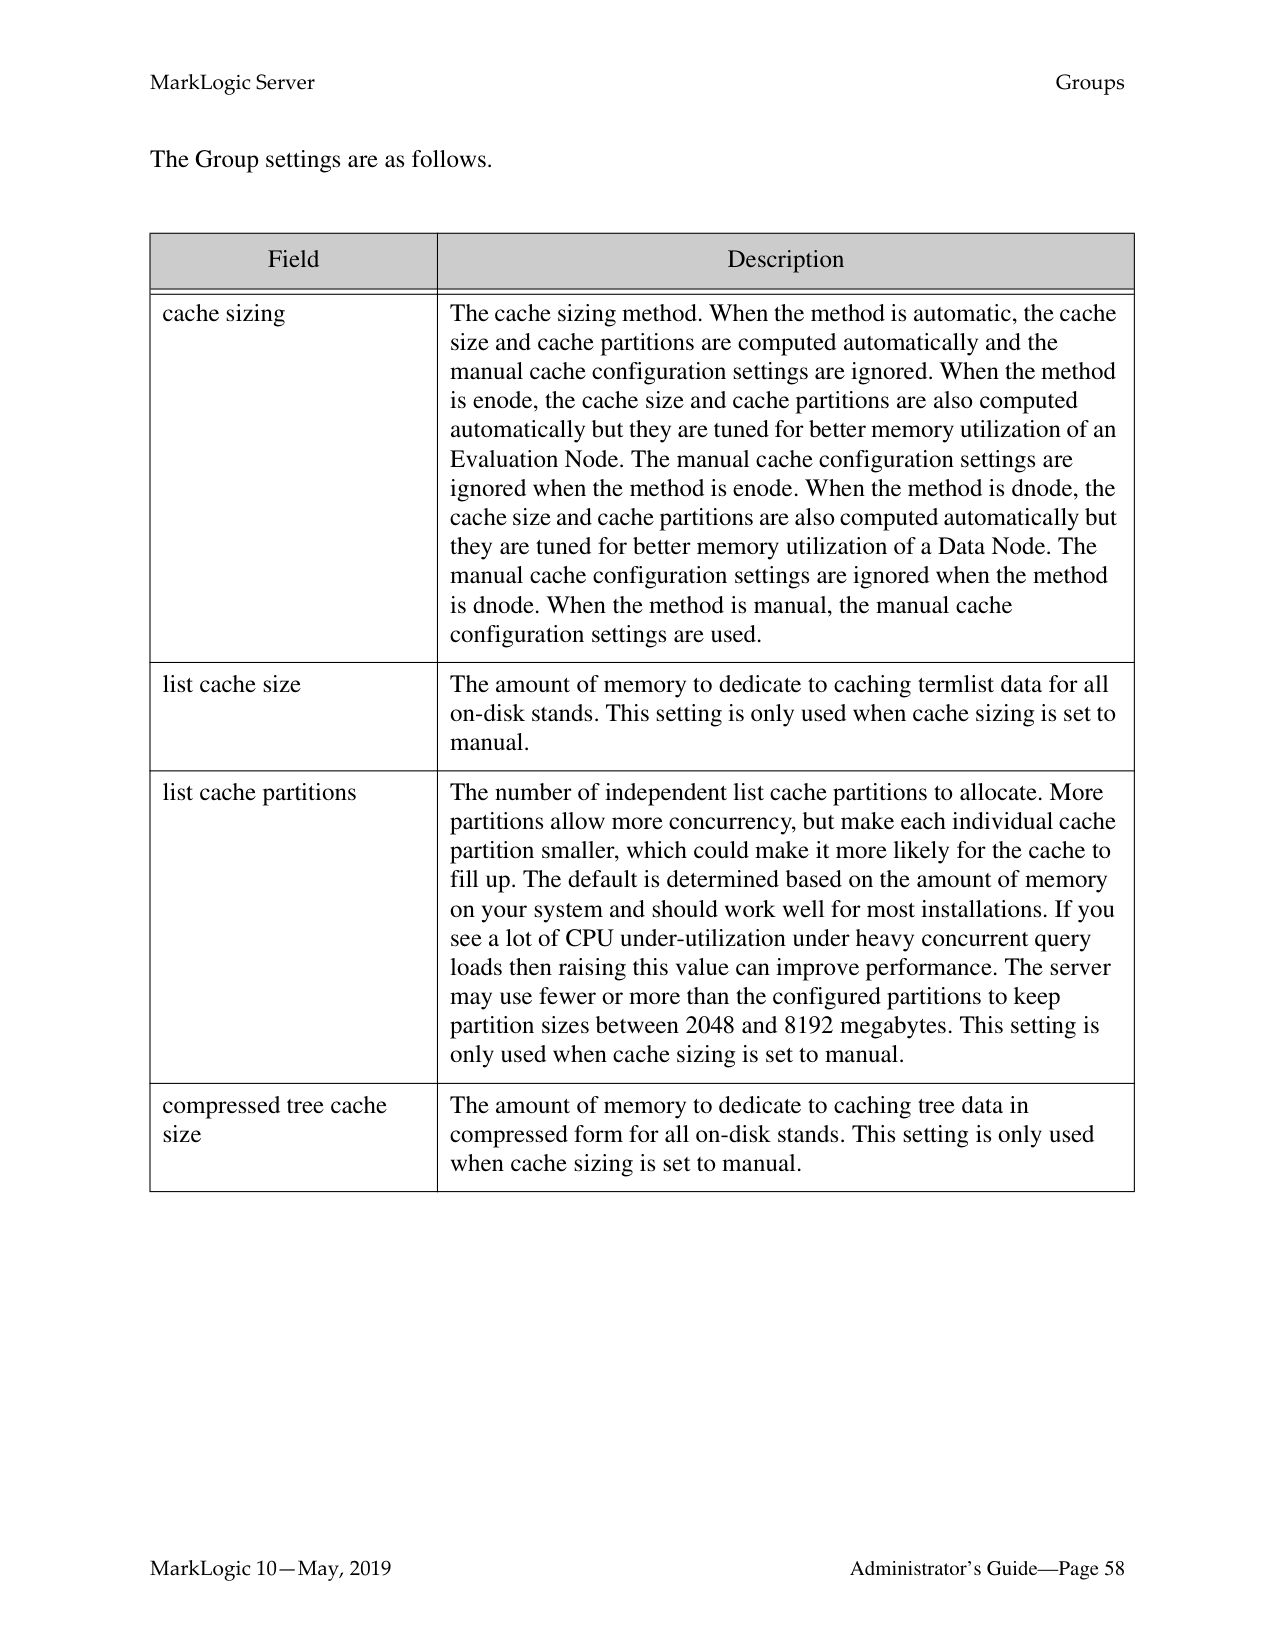
############## The Group settings are as follows.
|Field|Description| |---|---| | | | |cache sizing|The cache sizing method. When the method is automatic, the cache size and cache partitions are computed automatically and the manual cache configuration settings are ignored. When the method is enode, the cache size and cache partitions are also computed automatically but they are tuned for better memory utilization of an Evaluation Node. The manual cache configuration settings are ignored when the method is enode. When the method is dnode, the cache size and cache partitions are also computed automatically but they are tuned for better memory utilization of a Data Node. The manual cache configuration settings are ignored when the method is dnode. When the method is manual, the manual cache configuration settings are used.| |list cache size|The amount of memory to dedicate to caching termlist data for all on-disk stands. This setting is only used when cache sizing is set to manual.| |list cache partitions|The number of independent list cache partitions to allocate. More partitions allow more concurrency, but make each individual cache partition smaller, which could make it more likely for the cache to fill up. The default is determined based on the amount of memory on your system and should work well for most installations. If you see a lot of CPU under-utilization under heavy concurrent query loads then raising this value can improve performance. The server may use fewer or more than the configured partitions to keep partition sizes between 2048 and 8192 megabytes. This setting is only used when cache sizing is set to manual.| |compressed tree cache size|The amount of memory to dedicate to caching tree data in compressed form for all on-disk stands. This setting is only used when cache sizing is set to manual.|
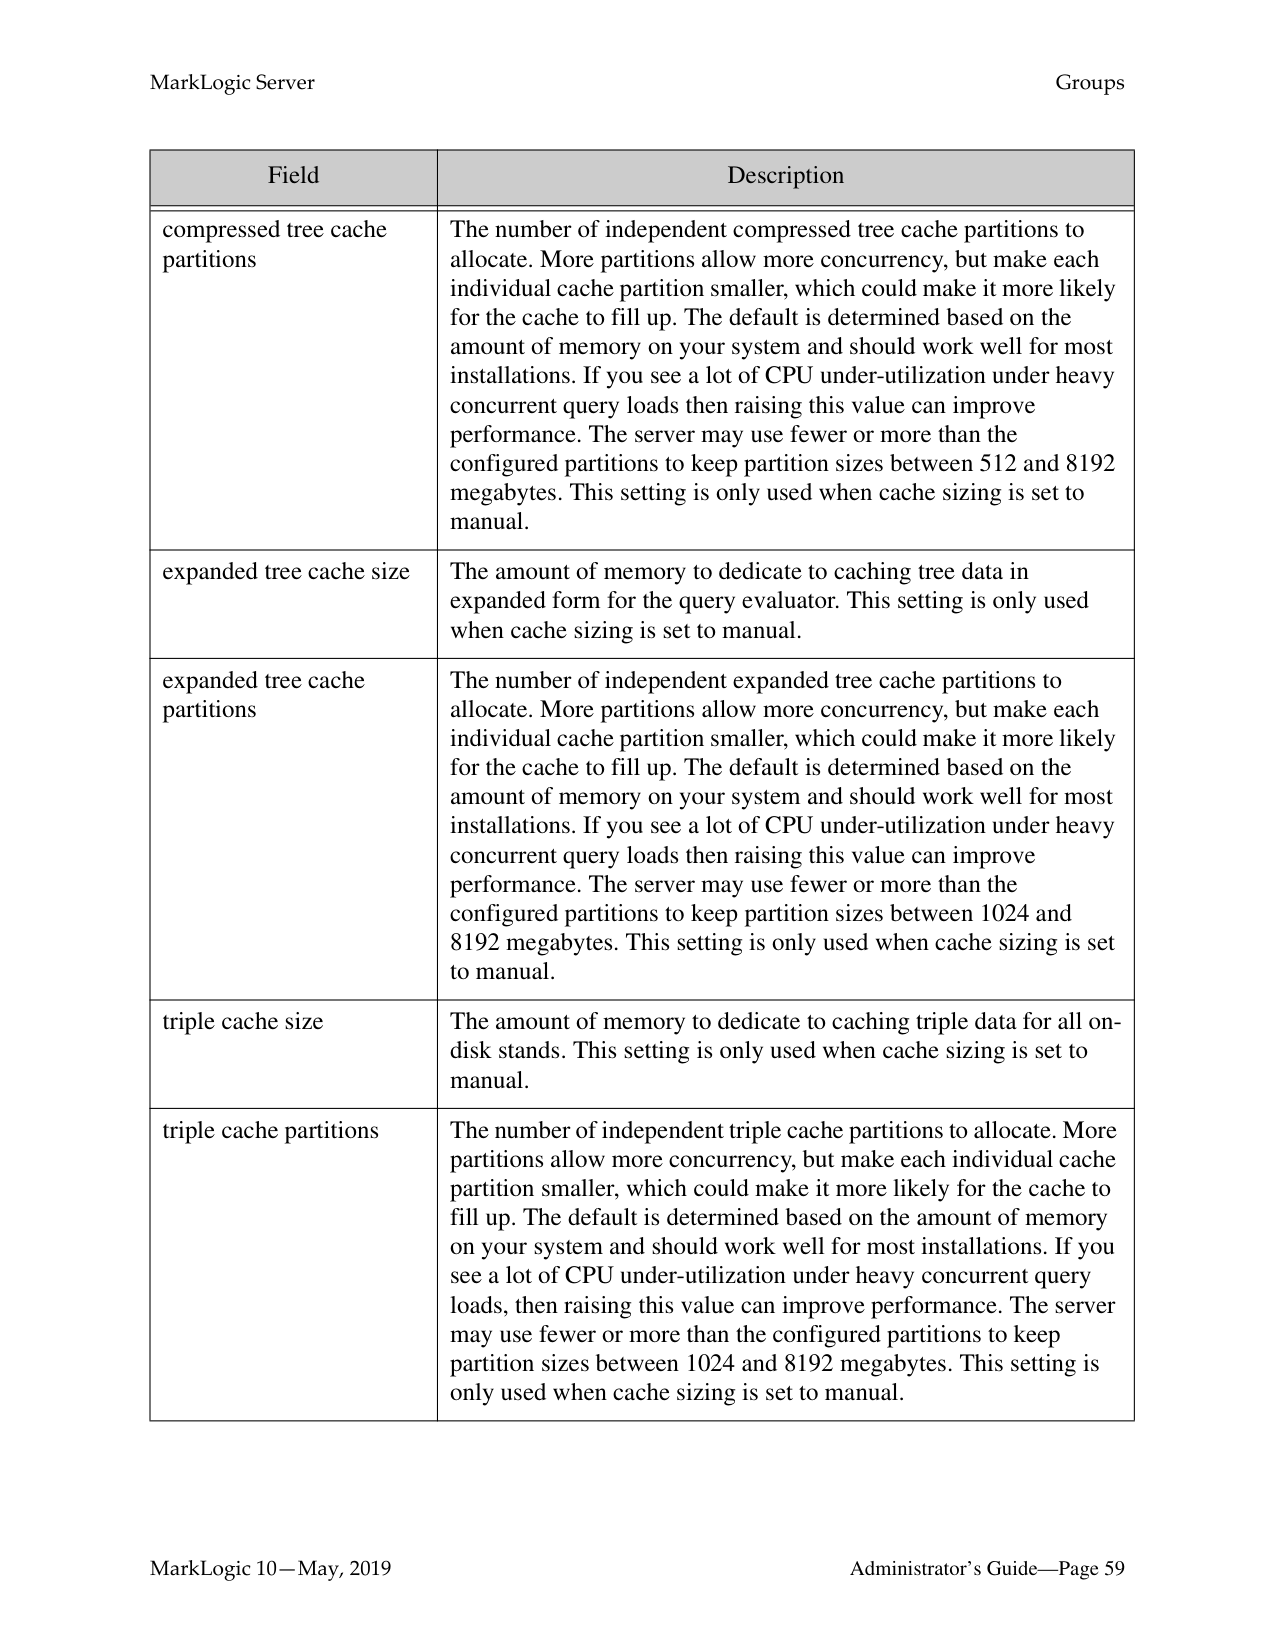
|Field|Description| |---|---| | | | |compressed tree cache partitions|The number of independent compressed tree cache partitions to allocate. More partitions allow more concurrency, but make each individual cache partition smaller, which could make it more likely for the cache to fill up. The default is determined based on the amount of memory on your system and should work well for most installations. If you see a lot of CPU under-utilization under heavy concurrent query loads then raising this value can improve performance. The server may use fewer or more than the configured partitions to keep partition sizes between 512 and 8192 megabytes. This setting is only used when cache sizing is set to manual.| |expanded tree cache size|The amount of memory to dedicate to caching tree data in expanded form for the query evaluator. This setting is only used when cache sizing is set to manual.| |expanded tree cache partitions|The number of independent expanded tree cache partitions to allocate. More partitions allow more concurrency, but make each individual cache partition smaller, which could make it more likely for the cache to fill up. The default is determined based on the amount of memory on your system and should work well for most installations. If you see a lot of CPU under-utilization under heavy concurrent query loads then raising this value can improve performance. The server may use fewer or more than the configured partitions to keep partition sizes between 1024 and 8192 megabytes. This setting is only used when cache sizing is set to manual.| |triple cache size|The amount of memory to dedicate to caching triple data for all ondisk stands. This setting is only used when cache sizing is set to manual.| |triple cache partitions|The number of independent triple cache partitions to allocate. More partitions allow more concurrency, but make each individual cache partition smaller, which could make it more likely for the cache to fill up. The default is determined based on the amount of memory on your system and should work well for most installations. If you see a lot of CPU under-utilization under heavy concurrent query loads, then raising this value can improve performance. The server may use fewer or more than the configured partitions to keep partition sizes between 1024 and 8192 megabytes. This setting is only used when cache sizing is set to manual.|
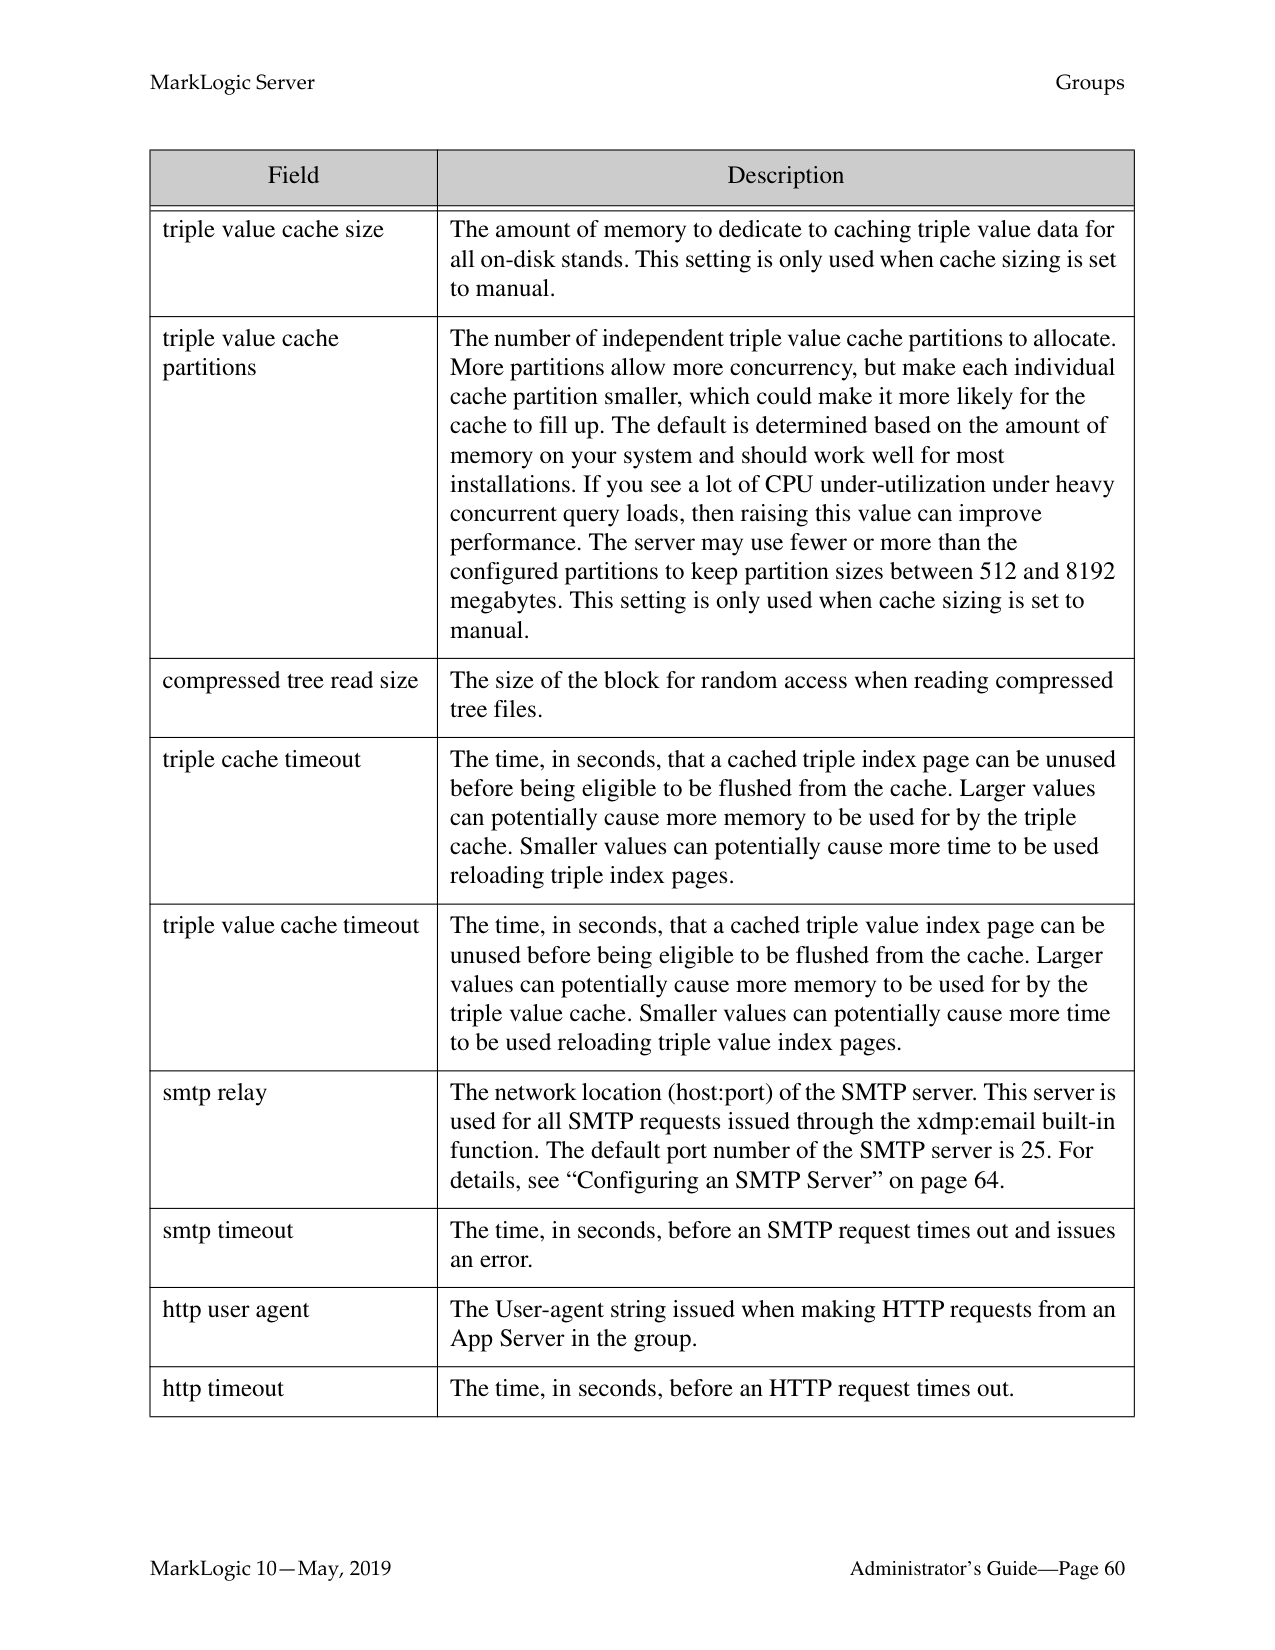
|Field|Description| |---|---| | | | |triple value cache size|The amount of memory to dedicate to caching triple value data for all on-disk stands. This setting is only used when cache sizing is set to manual.| |triple value cache partitions|The number of independent triple value cache partitions to allocate. More partitions allow more concurrency, but make each individual cache partition smaller, which could make it more likely for the cache to fill up. The default is determined based on the amount of memory on your system and should work well for most installations. If you see a lot of CPU under-utilization under heavy concurrent query loads, then raising this value can improve performance. The server may use fewer or more than the configured partitions to keep partition sizes between 512 and 8192 megabytes. This setting is only used when cache sizing is set to manual.| |compressed tree read size|The size of the block for random access when reading compressed tree files.| |triple cache timeout|The time, in seconds, that a cached triple index page can be unused before being eligible to be flushed from the cache. Larger values can potentially cause more memory to be used for by the triple cache. Smaller values can potentially cause more time to be used reloading triple index pages.| |triple value cache timeout|The time, in seconds, that a cached triple value index page can be unused before being eligible to be flushed from the cache. Larger values can potentially cause more memory to be used for by the triple value cache. Smaller values can potentially cause more time to be used reloading triple value index pages.| |smtp relay|The network location (host:port) of the SMTP server. This server is used for all SMTP requests issued through the xdmp:email built-in function. The default port number of the SMTP server is 25. For details, see “Configuring an SMTP Server” on page 64.| |smtp timeout|The time, in seconds, before an SMTP request times out and issues an error.| |http user agent|The User-agent string issued when making HTTP requests from an App Server in the group.| |http timeout|The time, in seconds, before an HTTP request times out.|

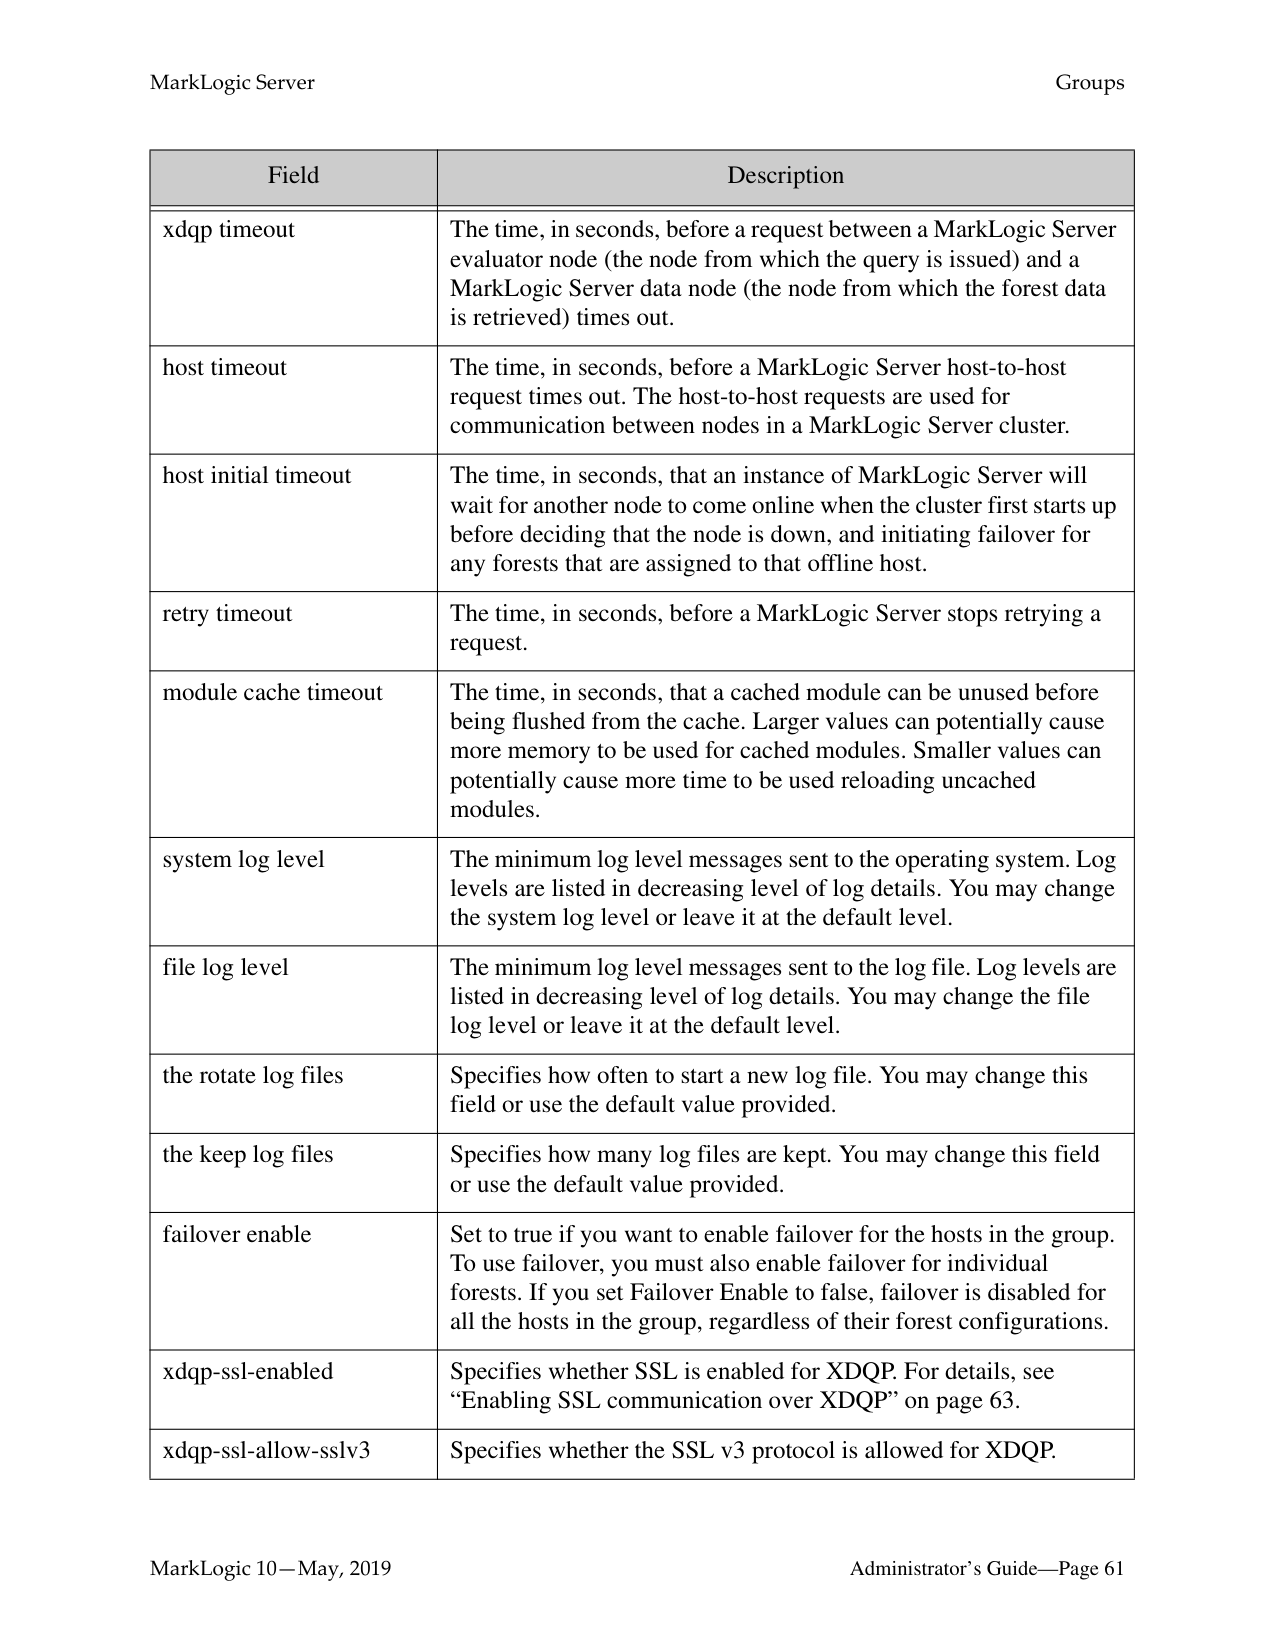
|Field|Description| |---|---| | | | |xdqp timeout|The time, in seconds, before a request between a MarkLogic Server evaluator node (the node from which the query is issued) and a MarkLogic Server data node (the node from which the forest data is retrieved) times out.| |host timeout|The time, in seconds, before a MarkLogic Server host-to-host request times out. The host-to-host requests are used for communication between nodes in a MarkLogic Server cluster.| |host initial timeout|The time, in seconds, that an instance of MarkLogic Server will wait for another node to come online when the cluster first starts up before deciding that the node is down, and initiating failover for any forests that are assigned to that offline host.| |retry timeout|The time, in seconds, before a MarkLogic Server stops retrying a request.| |module cache timeout|The time, in seconds, that a cached module can be unused before being flushed from the cache. Larger values can potentially cause more memory to be used for cached modules. Smaller values can potentially cause more time to be used reloading uncached modules.| |system log level|The minimum log level messages sent to the operating system. Log levels are listed in decreasing level of log details. You may change the system log level or leave it at the default level.| |file log level|The minimum log level messages sent to the log file. Log levels are listed in decreasing level of log details. You may change the file log level or leave it at the default level.| |the rotate log files|Specifies how often to start a new log file. You may change this field or use the default value provided.| |the keep log files|Specifies how many log files are kept. You may change this field or use the default value provided.| |failover enable|Set to true if you want to enable failover for the hosts in the group. To use failover, you must also enable failover for individual forests. If you set Failover Enable to false, failover is disabled for all the hosts in the group, regardless of their forest configurations.| |xdqp-ssl-enabled|Specifies whether SSL is enabled for XDQP. For details, see “Enabling SSL communication over XDQP” on page 63.| |xdqp-ssl-allow-sslv3|Specifies whether the SSL v3 protocol is allowed for XDQP.|
|Field|Description| |---|---| | | | |xdqp-ssl-allow-tls|Specifies whether the Transport Layer Security protocol is allowed for XDQP.|
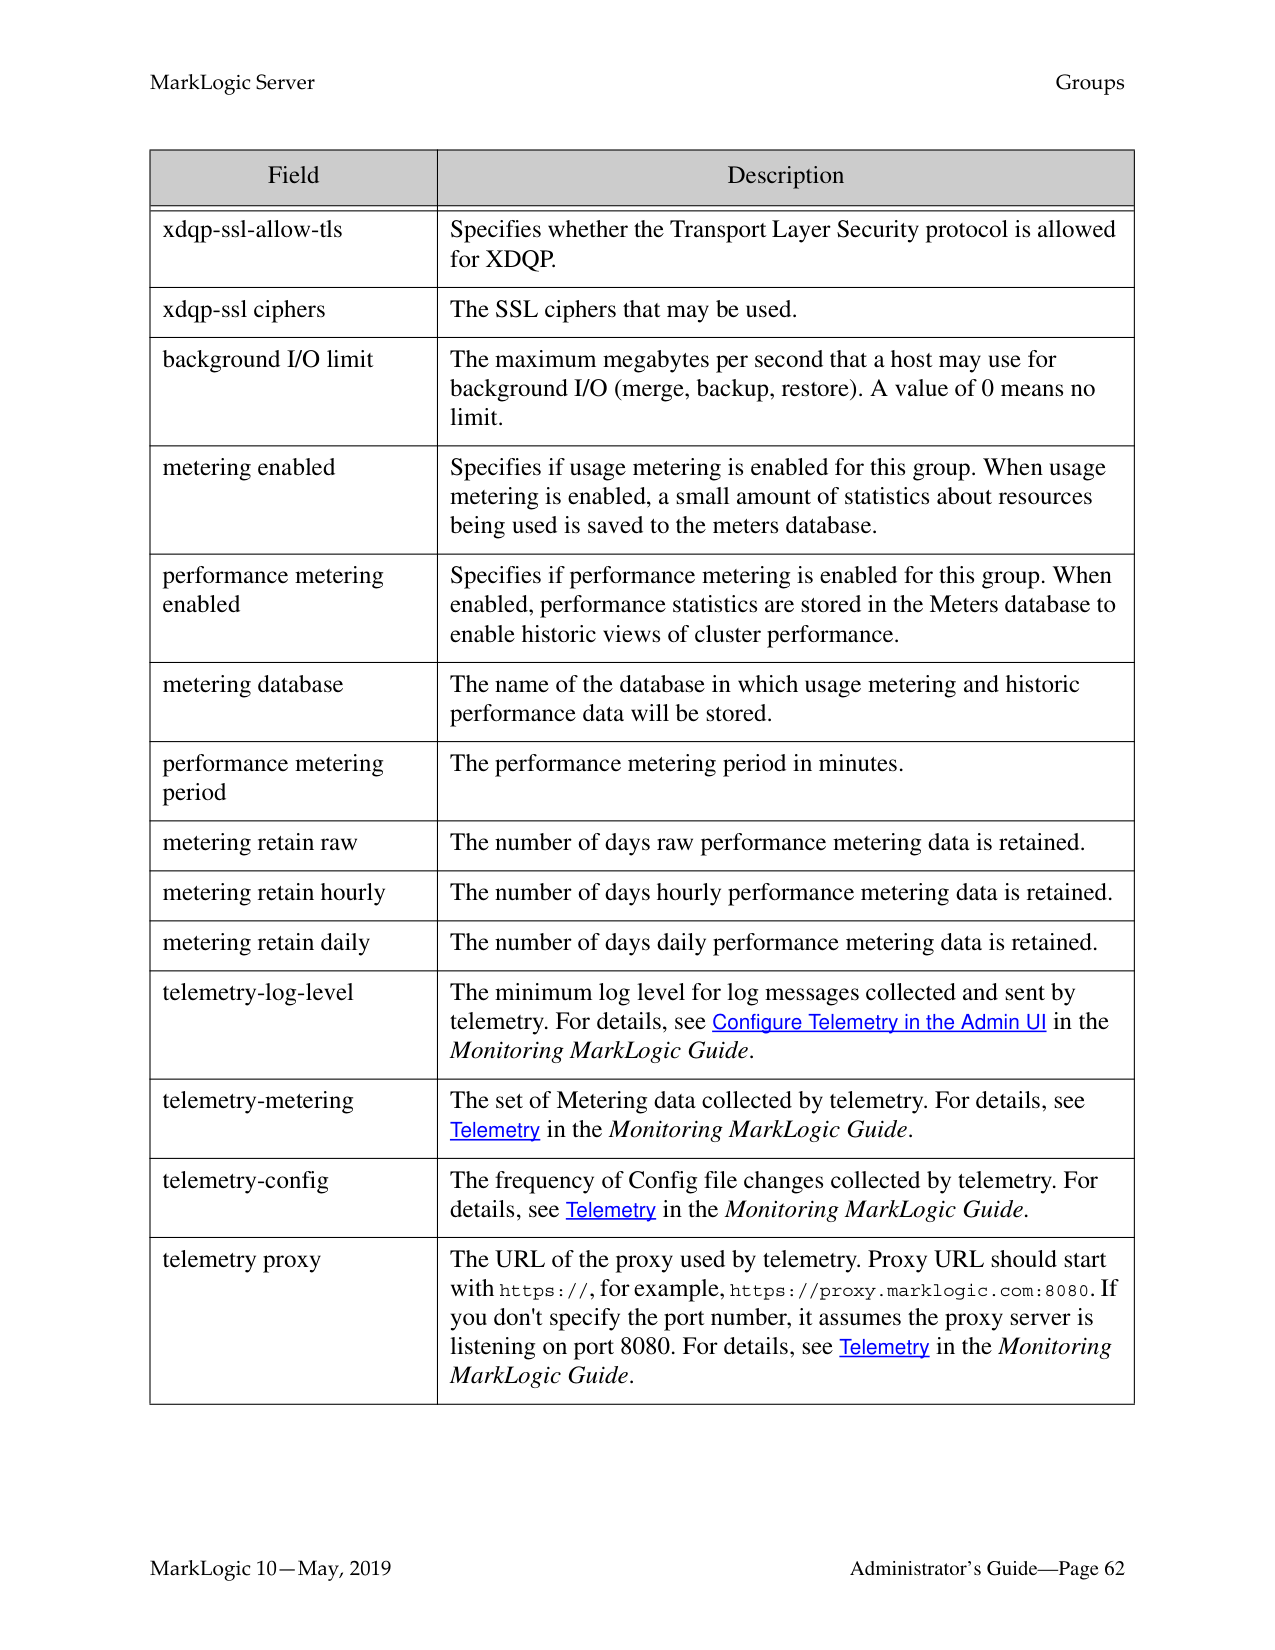
|xdqp-ssl ciphers|The SSL ciphers that may be used.| |background I/O limit|The maximum megabytes per second that a host may use for background I/O (merge, backup, restore). A value of 0 means no limit.| |metering enabled|Specifies if usage metering is enabled for this group. When usage metering is enabled, a small amount of statistics about resources being used is saved to the meters database.| |performance metering enabled|Specifies if performance metering is enabled for this group. When enabled, performance statistics are stored in the Meters database to enable historic views of cluster performance.| |metering database|The name of the database in which usage metering and historic performance data will be stored.| |performance metering period|The performance metering period in minutes.| |metering retain raw|The number of days raw performance metering data is retained.| |metering retain hourly|The number of days hourly performance metering data is retained.| |metering retain daily|The number of days daily performance metering data is retained.| |telemetry-log-level|The minimum log level for log messages collected and sent by telemetry. For details, see Configure Telemetry in the Admin UI in the Monitoring MarkLogic Guide.
| |telemetry-metering|The set of Metering data collected by telemetry. For details, see Telemetry in the Monitoring MarkLogic Guide.
| |telemetry-config|The frequency of Config file changes collected by telemetry. For details, see Telemetry in the Monitoring MarkLogic Guide.
| |telemetry proxy|The URL of the proxy used by telemetry. Proxy URL should start with https://, for example, https://proxy.marklogic.com:8080. If you don't specify the port number, it assumes the proxy server is listening on port 8080. For details, see Telemetry in the Monitoring MarkLogic Guide.
|
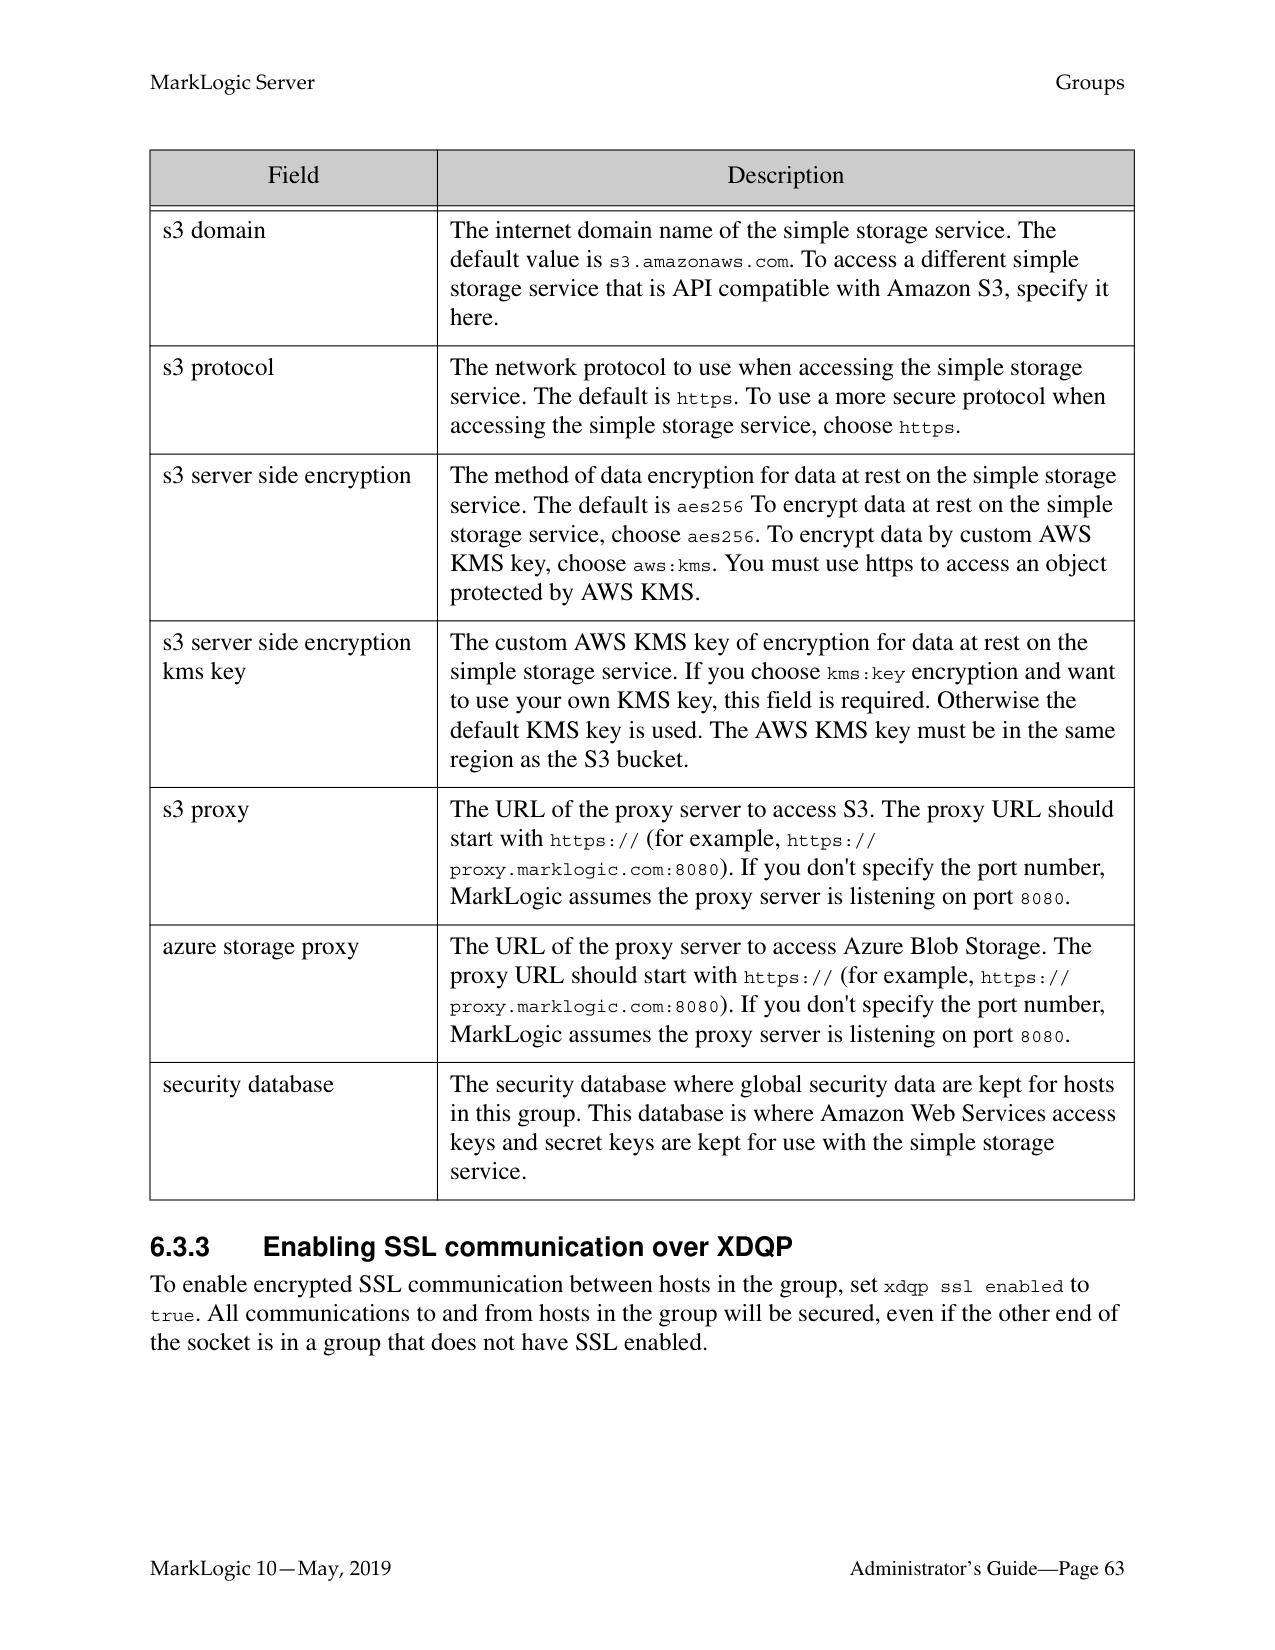
|Field|Description| |---|---| | | | |s3 domain|The internet domain name of the simple storage service. The default value is s3.amazonaws.com. To access a different simple storage service that is API compatible with Amazon S3, specify it here.| |s3 protocol|The network protocol to use when accessing the simple storage service. The default is https. To use a more secure protocol when accessing the simple storage service, choose https.| |s3 server side encryption|The method of data encryption for data at rest on the simple storage service. The default is aes256 To encrypt data at rest on the simple storage service, choose aes256. To encrypt data by custom AWS KMS key, choose aws:kms. You must use https to access an object protected by AWS KMS.| |s3 server side encryption kms key|The custom AWS KMS key of encryption for data at rest on the simple storage service. If you choose kms:key encryption and want to use your own KMS key, this field is required. Otherwise the default KMS key is used. The AWS KMS key must be in the same region as the S3 bucket.| |s3 proxy|The URL of the proxy server to access S3. The proxy URL should start with https:// (for example, https:// proxy.marklogic.com:8080). If you don't specify the port number, MarkLogic assumes the proxy server is listening on port 8080.|
|azure storage proxy|The URL of the proxy server to access Azure Blob Storage. The proxy URL should start with https:// (for example, https:// proxy.marklogic.com:8080). If you don't specify the port number, MarkLogic assumes the proxy server is listening on port 8080.| |security database|The security database where global security data are kept for hosts in this group. This database is where Amazon Web Services access keys and secret keys are kept for use with the simple storage service.|
######### 6.3.3 Enabling SSL communication over XDQP
To enable encrypted SSL communication between hosts in the group, set xdqp ssl enabled to true. All communications to and from hosts in the group will be secured, even if the other end of the socket is in a group that does not have SSL enabled.
The SSL keys and certificates used by the hosts are automatically generated when you install or upgrade MarkLogic Server. No outside authority is used to sign certificates used between servers communicating over the internal XDQP connections in a cluster. Such certificates are self-signed and trusted by each server in the cluster.
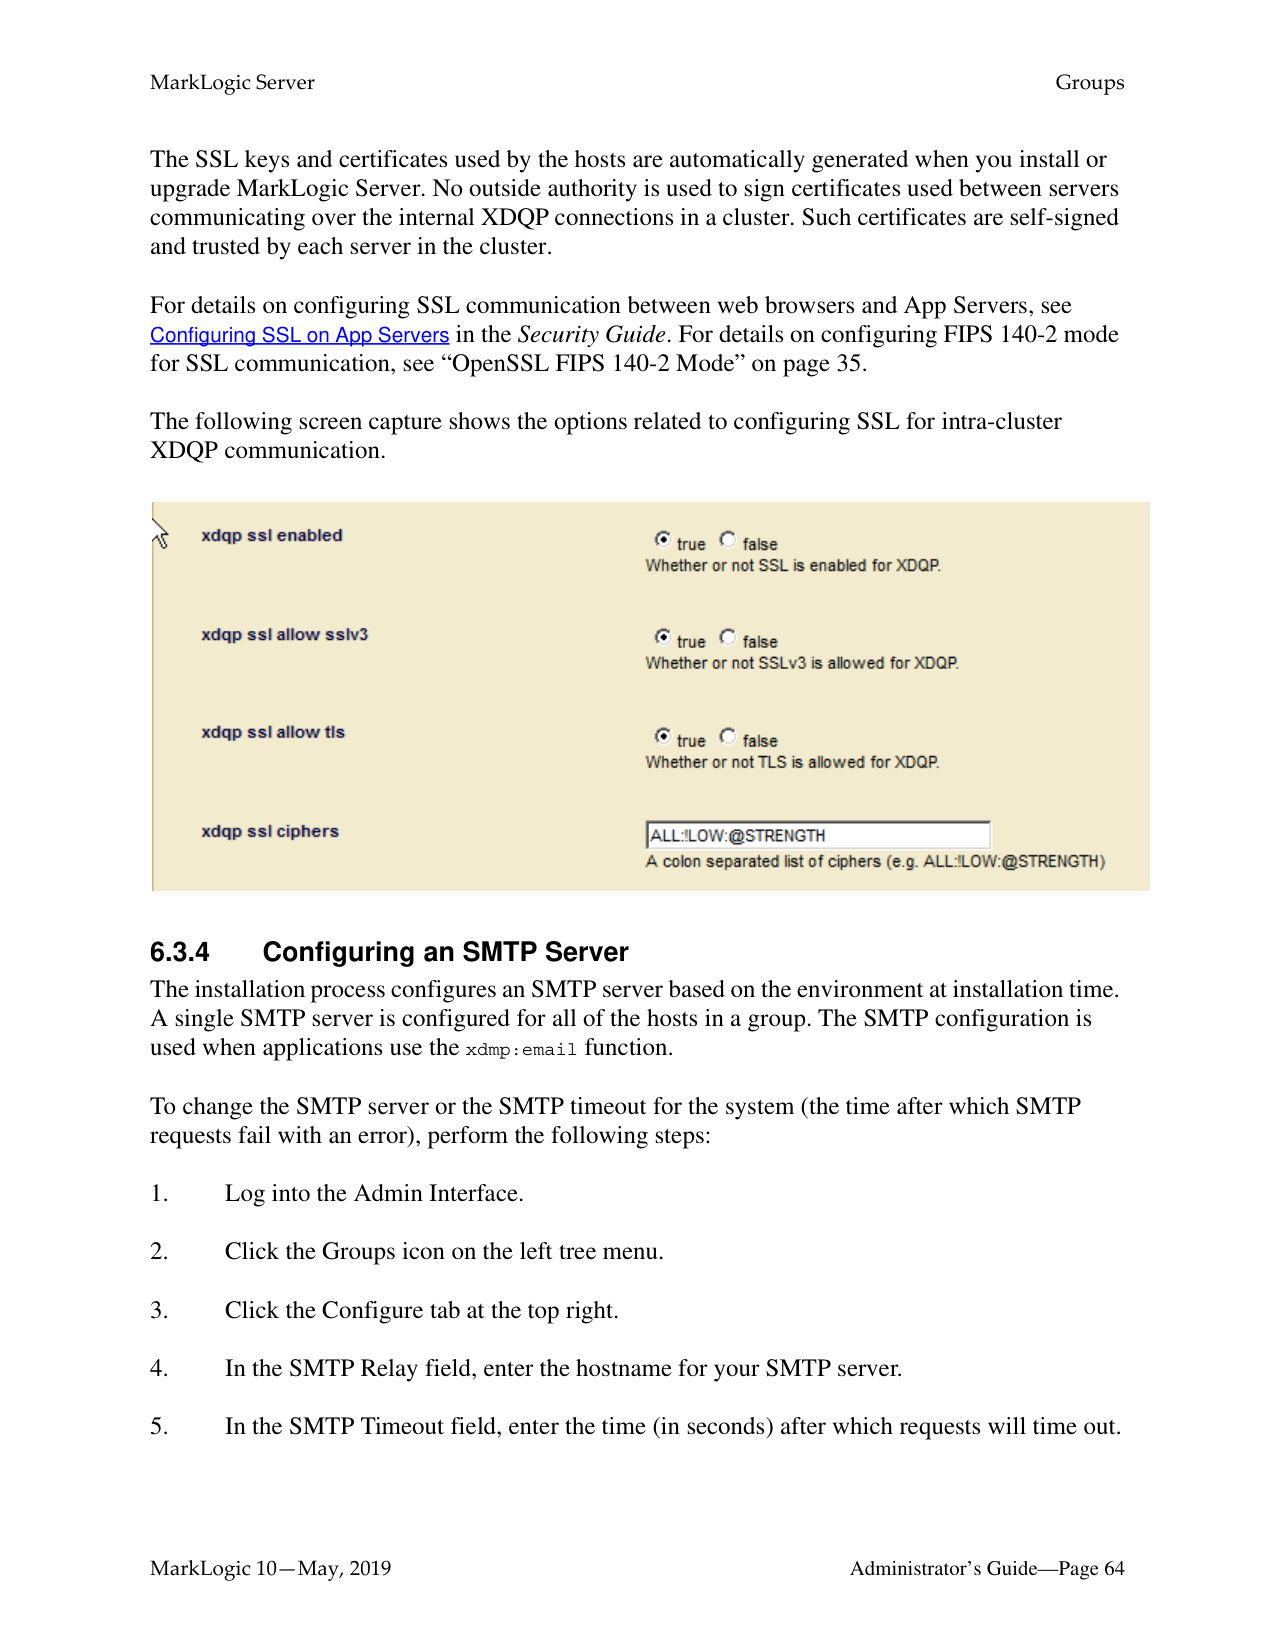
For details on configuring SSL communication between web browsers and App Servers, see Configuring SSL on App Servers in the Security Guide. For details on configuring FIPS 140-2 mode for SSL communication, see “OpenSSL FIPS 140-2 Mode” on page 35. The following screen capture shows the options related to configuring SSL for intra-cluster XDQP communication.

######### 6.3.4 Configuring an SMTP Server
The installation process configures an SMTP server based on the environment at installation time. A single SMTP server is configured for all of the hosts in a group. The SMTP configuration is used when applications use the xdmp:email function.
To change the SMTP server or the SMTP timeout for the system (the time after which SMTP requests fail with an error), perform the following steps:
Changing any SMTP settings is a hot operation; the server does not need to restart to reflect your changes.
Note: The restart operation normally completes within a few seconds. It is possible, however, for it to take longer under some conditions (for example, if the Security database needs to run recovery or if the connectivity between hosts in a cluster is slow). If it takes longer than a few seconds for MarkLogic Server to restart, than the Admin Interface might return a 503: Service Unavailable message. If you encounter this situation, wait several seconds and then reload the Admin Interface.

You must drop all hosts assigned to a group before you can delete a group. To delete a group, perform the following steps:
##### 7.0 HTTP Servers
This chapter describes HTTP servers and provides procedures for configuring them. The following sections are included:
This chapter describes how to use the Admin Interface to create and configure HTTP servers. For details on how to create and configure HTTP servers programmatically, see Creating and Configuring App Servers in the Scripting Administrative Tasks Guide.
######### 7.1 HTTP Server Overview
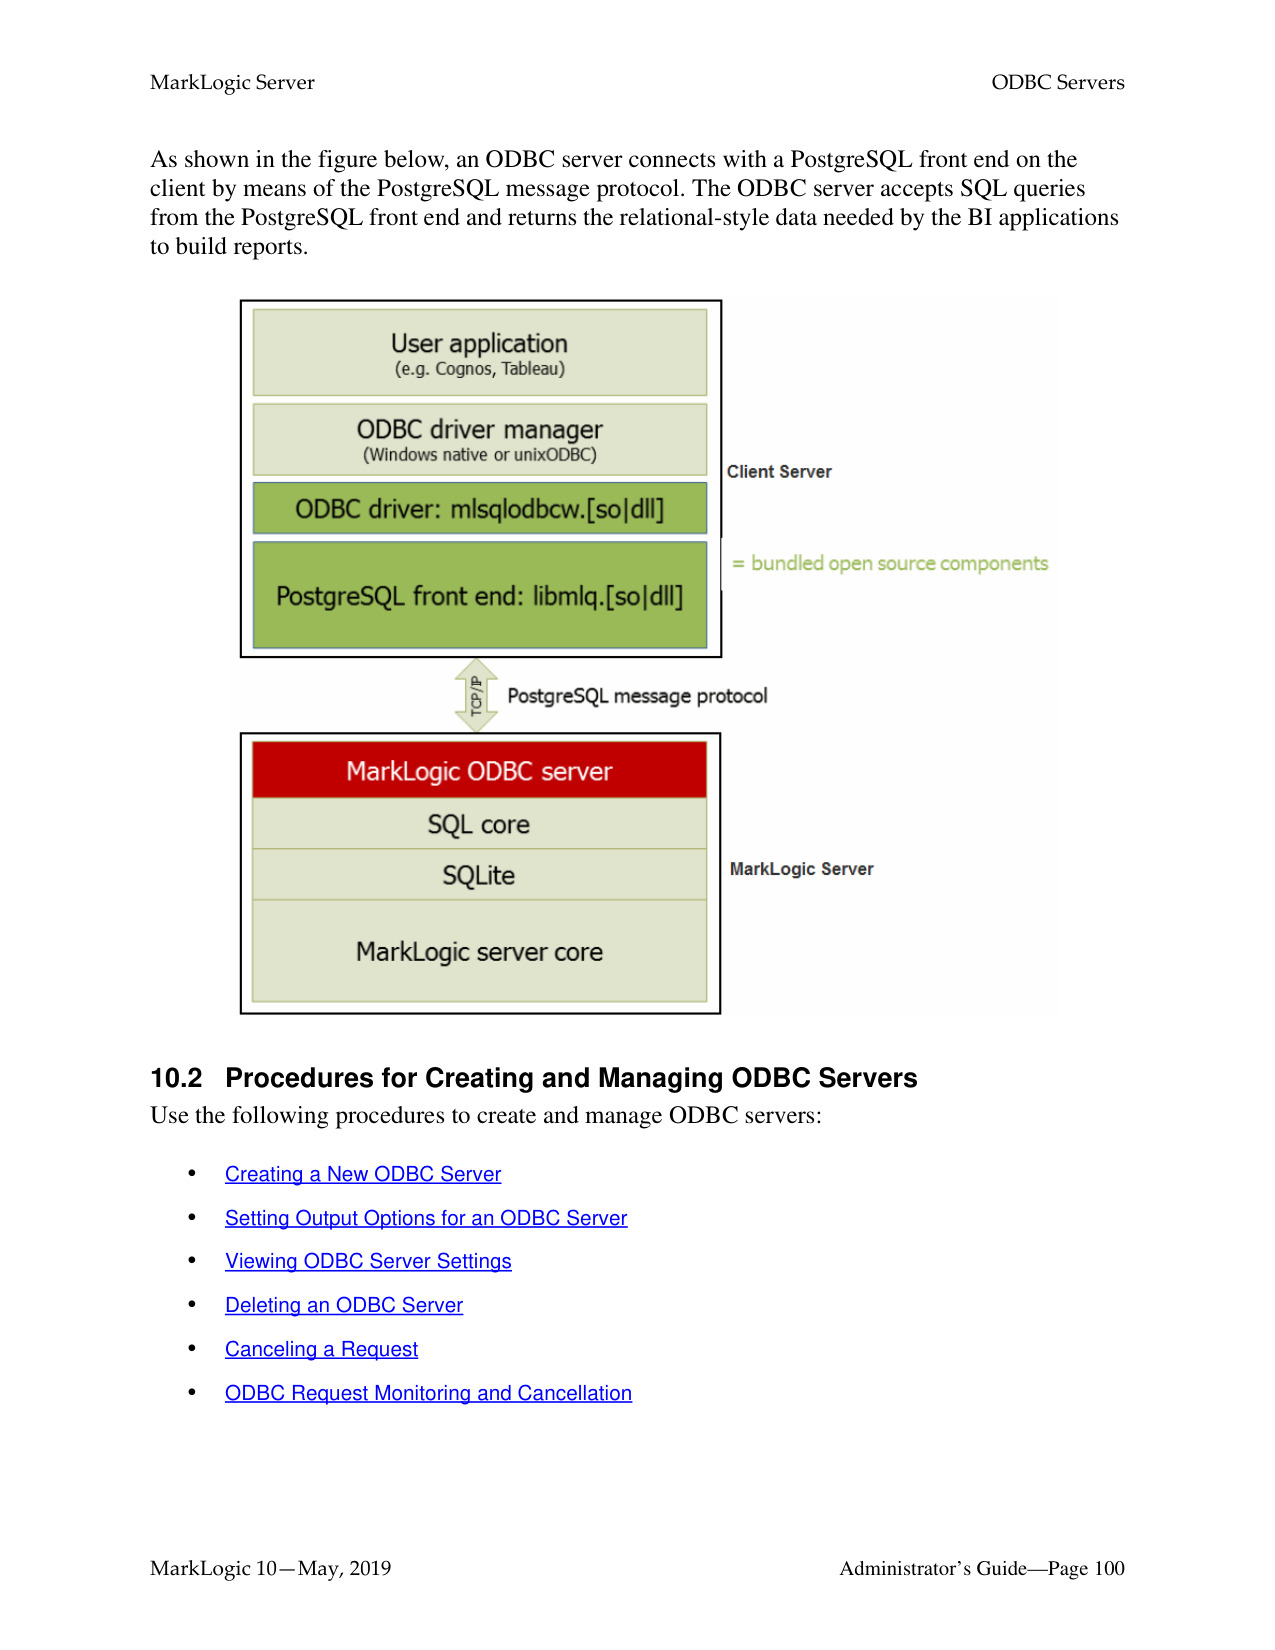
MarkLogic Server enables you to write web applications by connecting sets of XML or JSON content to HTTP servers that can access server-side XQuery, JavaScript, and REST programs. These applications can return XHTML, XML, or JSON content to a browser or other HTTPenabled client application.
HTTP servers are defined at the group level and are accessible by all hosts within the group. Each HTTP server provides access to a set of XQuery programs that reside within a specified directory structure. Each host in the group must have access to the directory structure or mirror the directory structure along with the program files. An HTTP server executes the server-side programs against the database to which it is connected.
HTTP servers follow the MarkLogic Server security model, as do WebDAV, ODBC, and XDBC servers. The server authenticates access to those programs using user IDs and passwords stored in the security database for that HTTP server. (Each HTTP server is connected to a database, and each database is in turn connected to a security database in which security objects such as users are stored.)
HTTP servers execute code, either from a specified location on the file system or from a Modules database.
Granular access control to the system and to the data is achieved through the use of privileges and permissions. For details on configuring security objects in MarkLogic Server, see “Security Administration” on page 339. For conceptual information on the MarkLogic Server security model, see Security Guide.
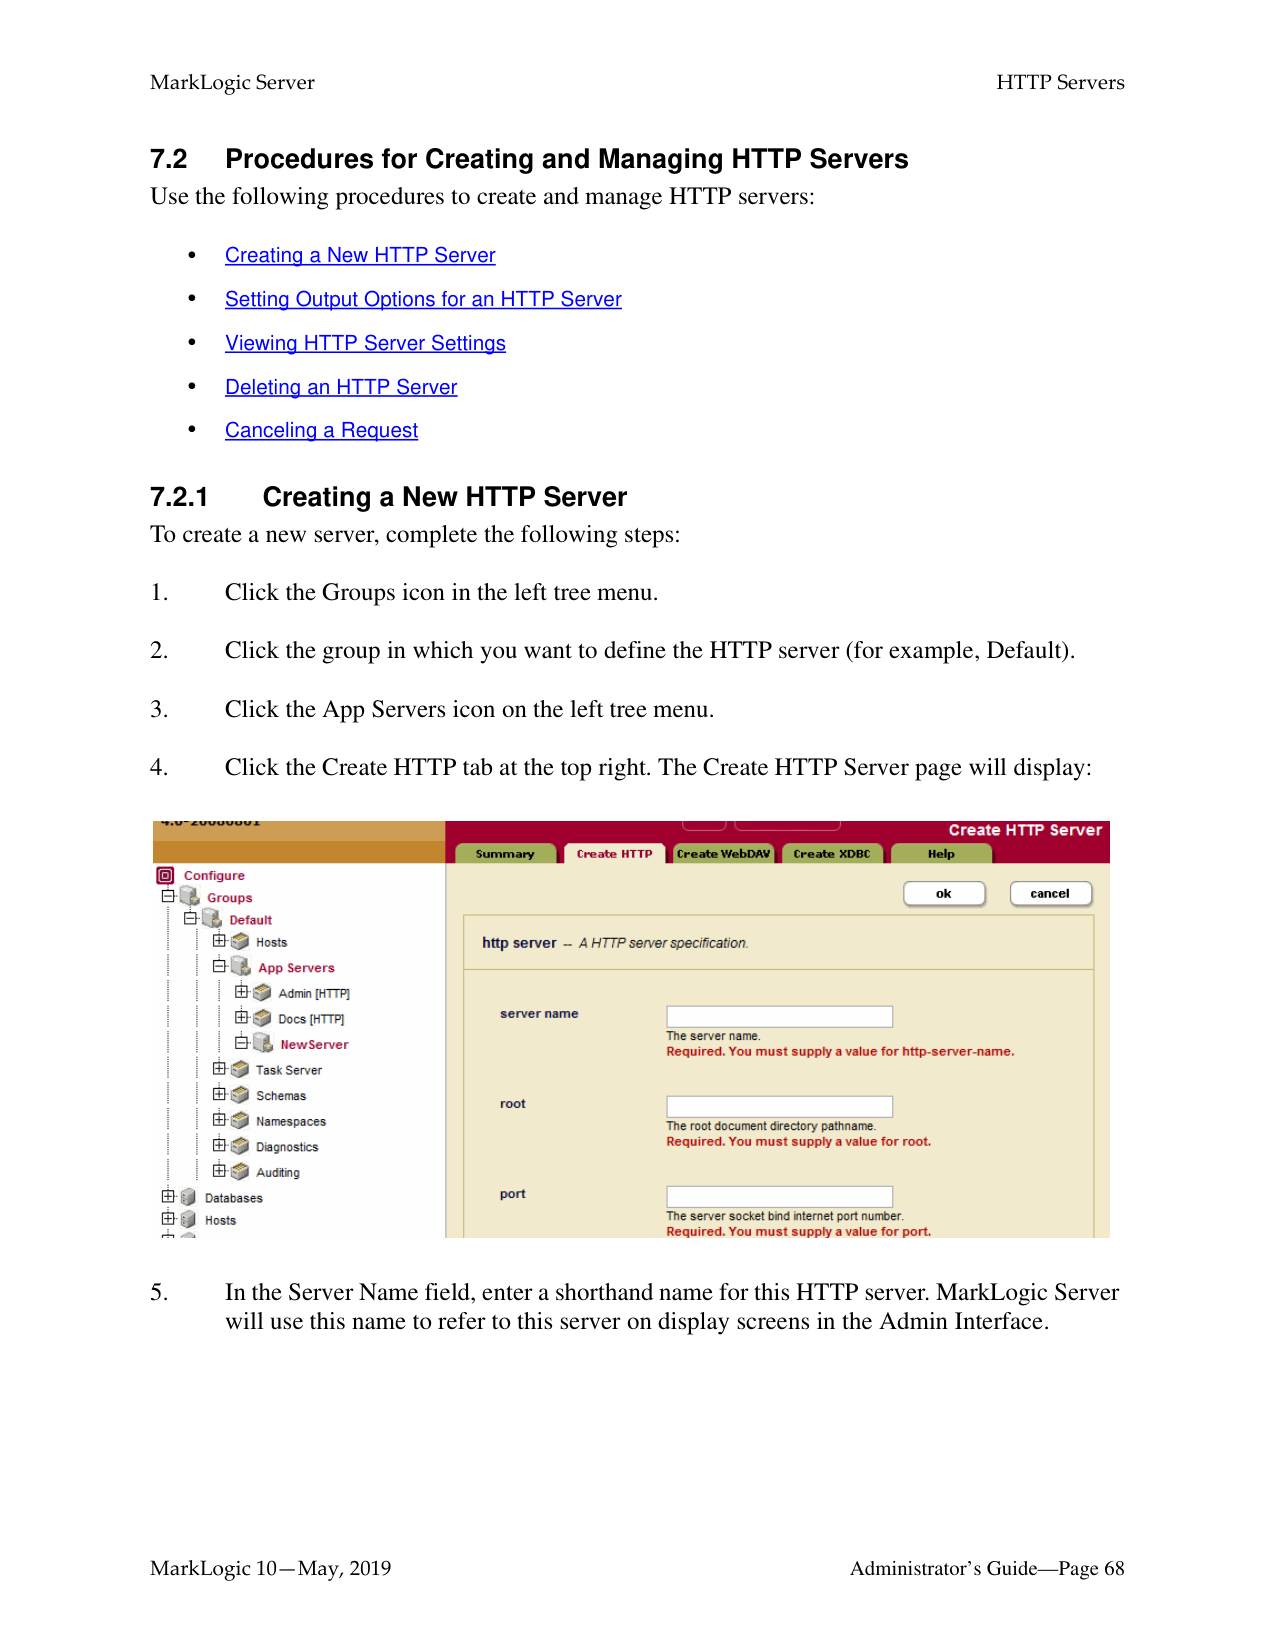
######### 7.2 Procedures for Creating and Managing HTTP ServersUse the following procedures to create and manage HTTP servers:

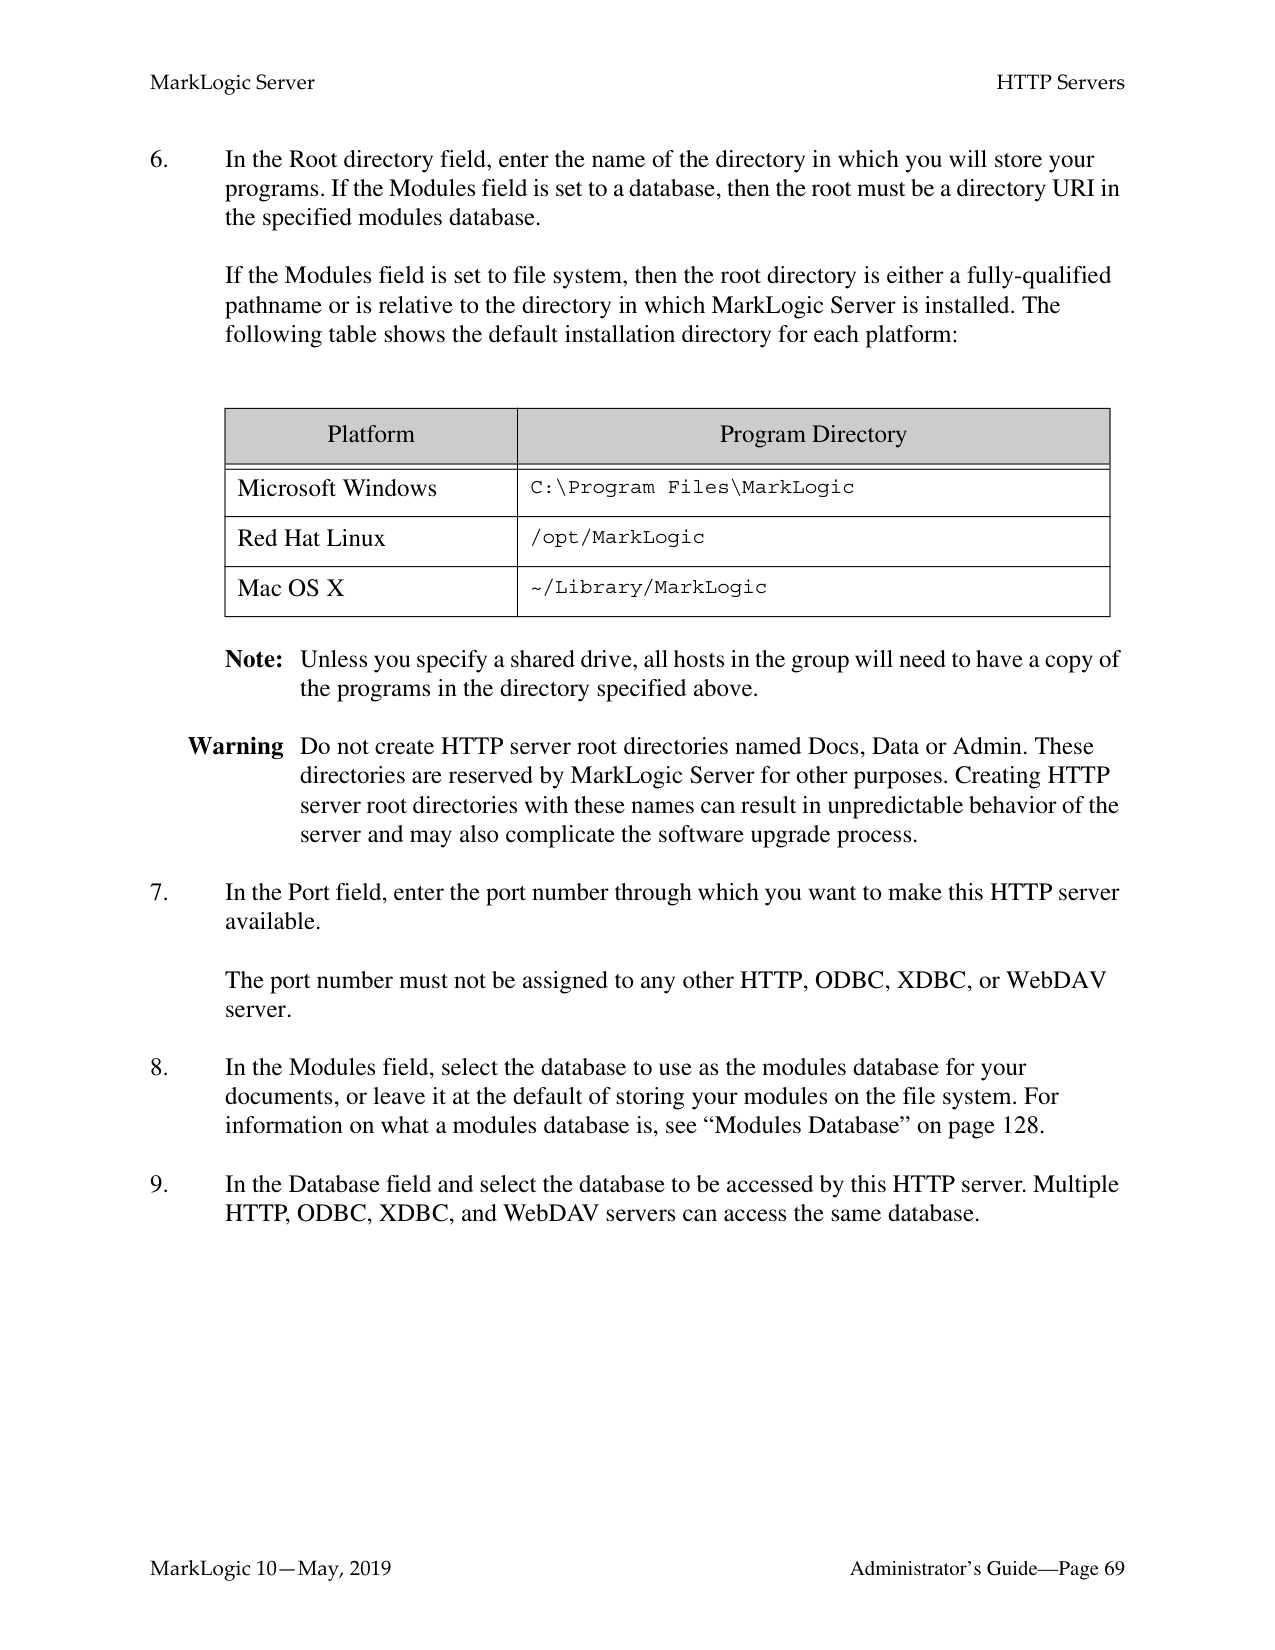
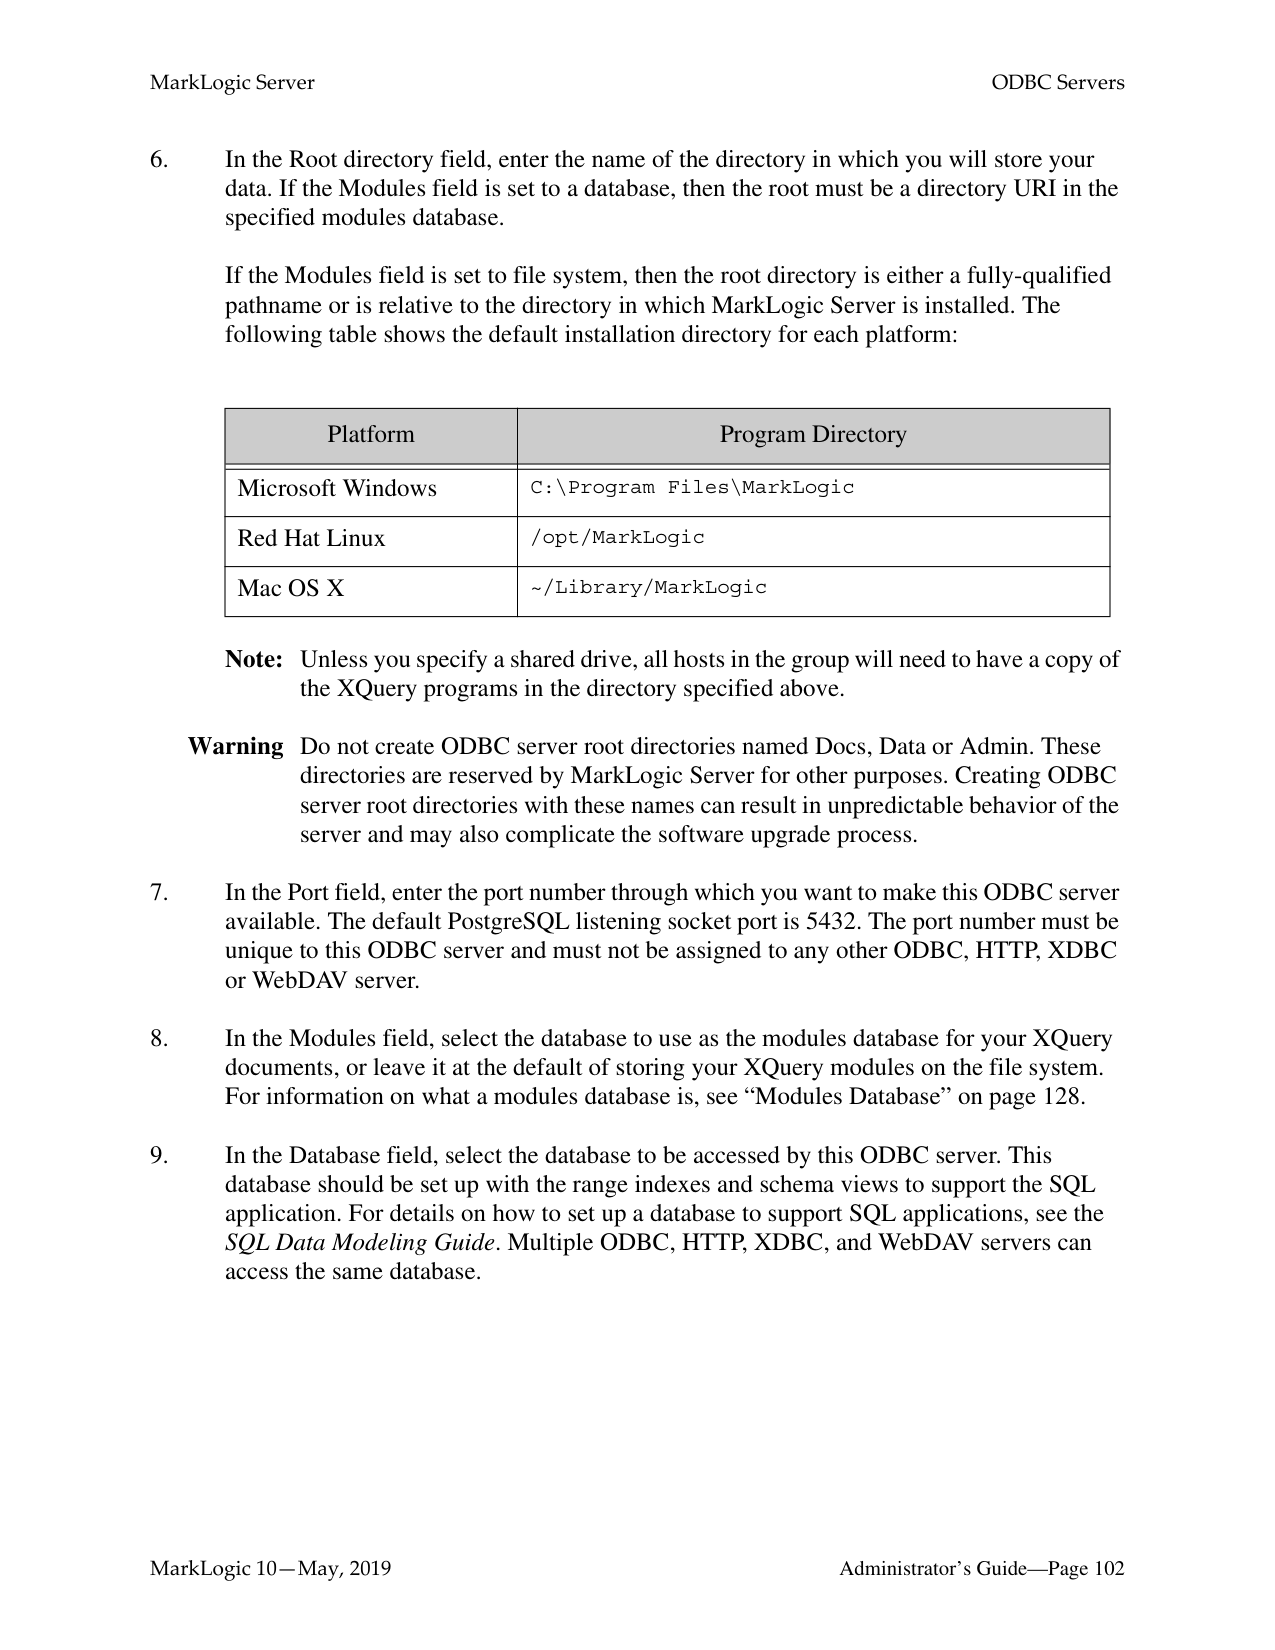
If the Modules field is set to file system, then the root directory is either a fully-qualified pathname or is relative to the directory in which MarkLogic Server is installed. The following table shows the default installation directory for each platform:
Note: Unless you specify a shared drive, all hosts in the group will need to have a copy of
the programs in the directory specified above.
Warning Do not create HTTP server root directories named Docs, Data or Admin. These directories are reserved by MarkLogic Server for other purposes. Creating HTTP server root directories with these names can result in unpredictable behavior of the server and may also complicate the software upgrade process.
The port number must not be assigned to any other HTTP, ODBC, XDBC, or WebDAV server.
|Platform|Program Directory| |---|---| | | | |Microsoft Windows|C:\Program Files\MarkLogic| |Red Hat Linux|/opt/MarkLogic| |Mac OS X|~/Library/MarkLogic|
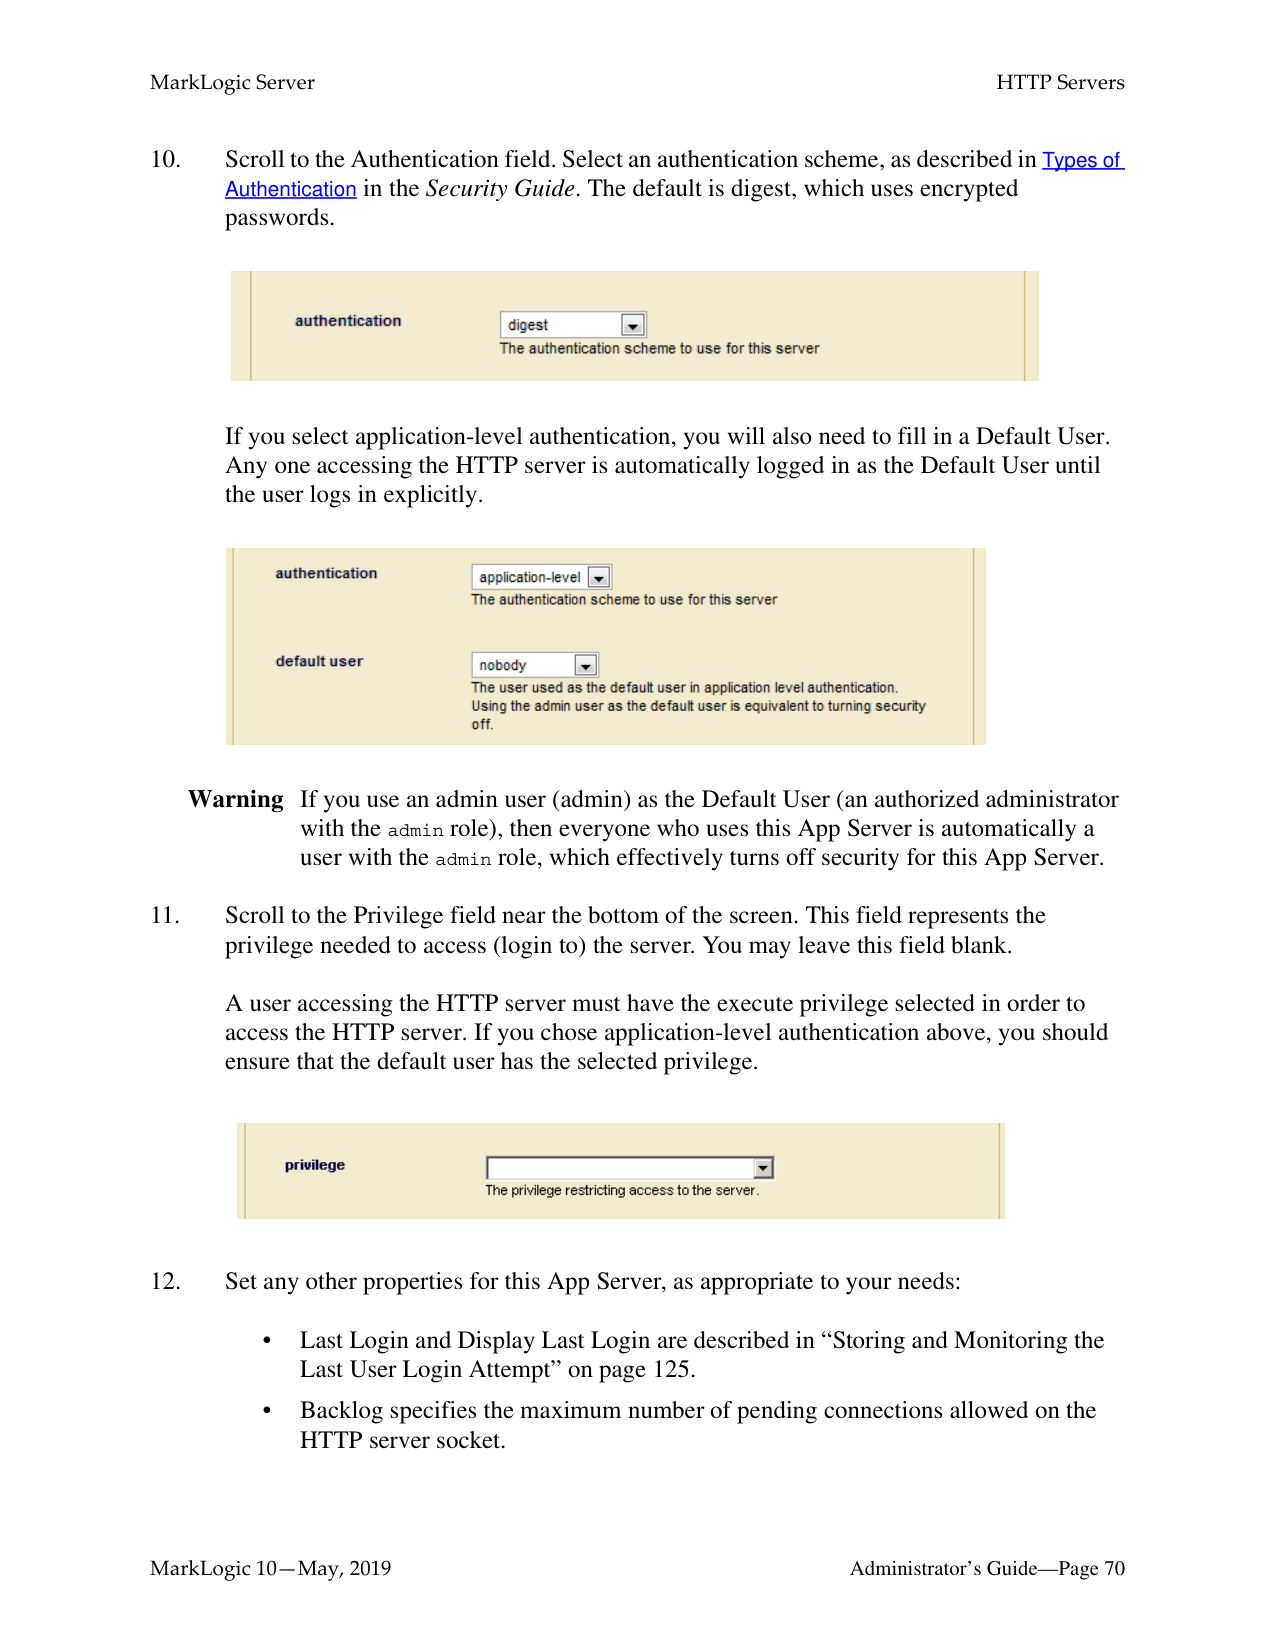
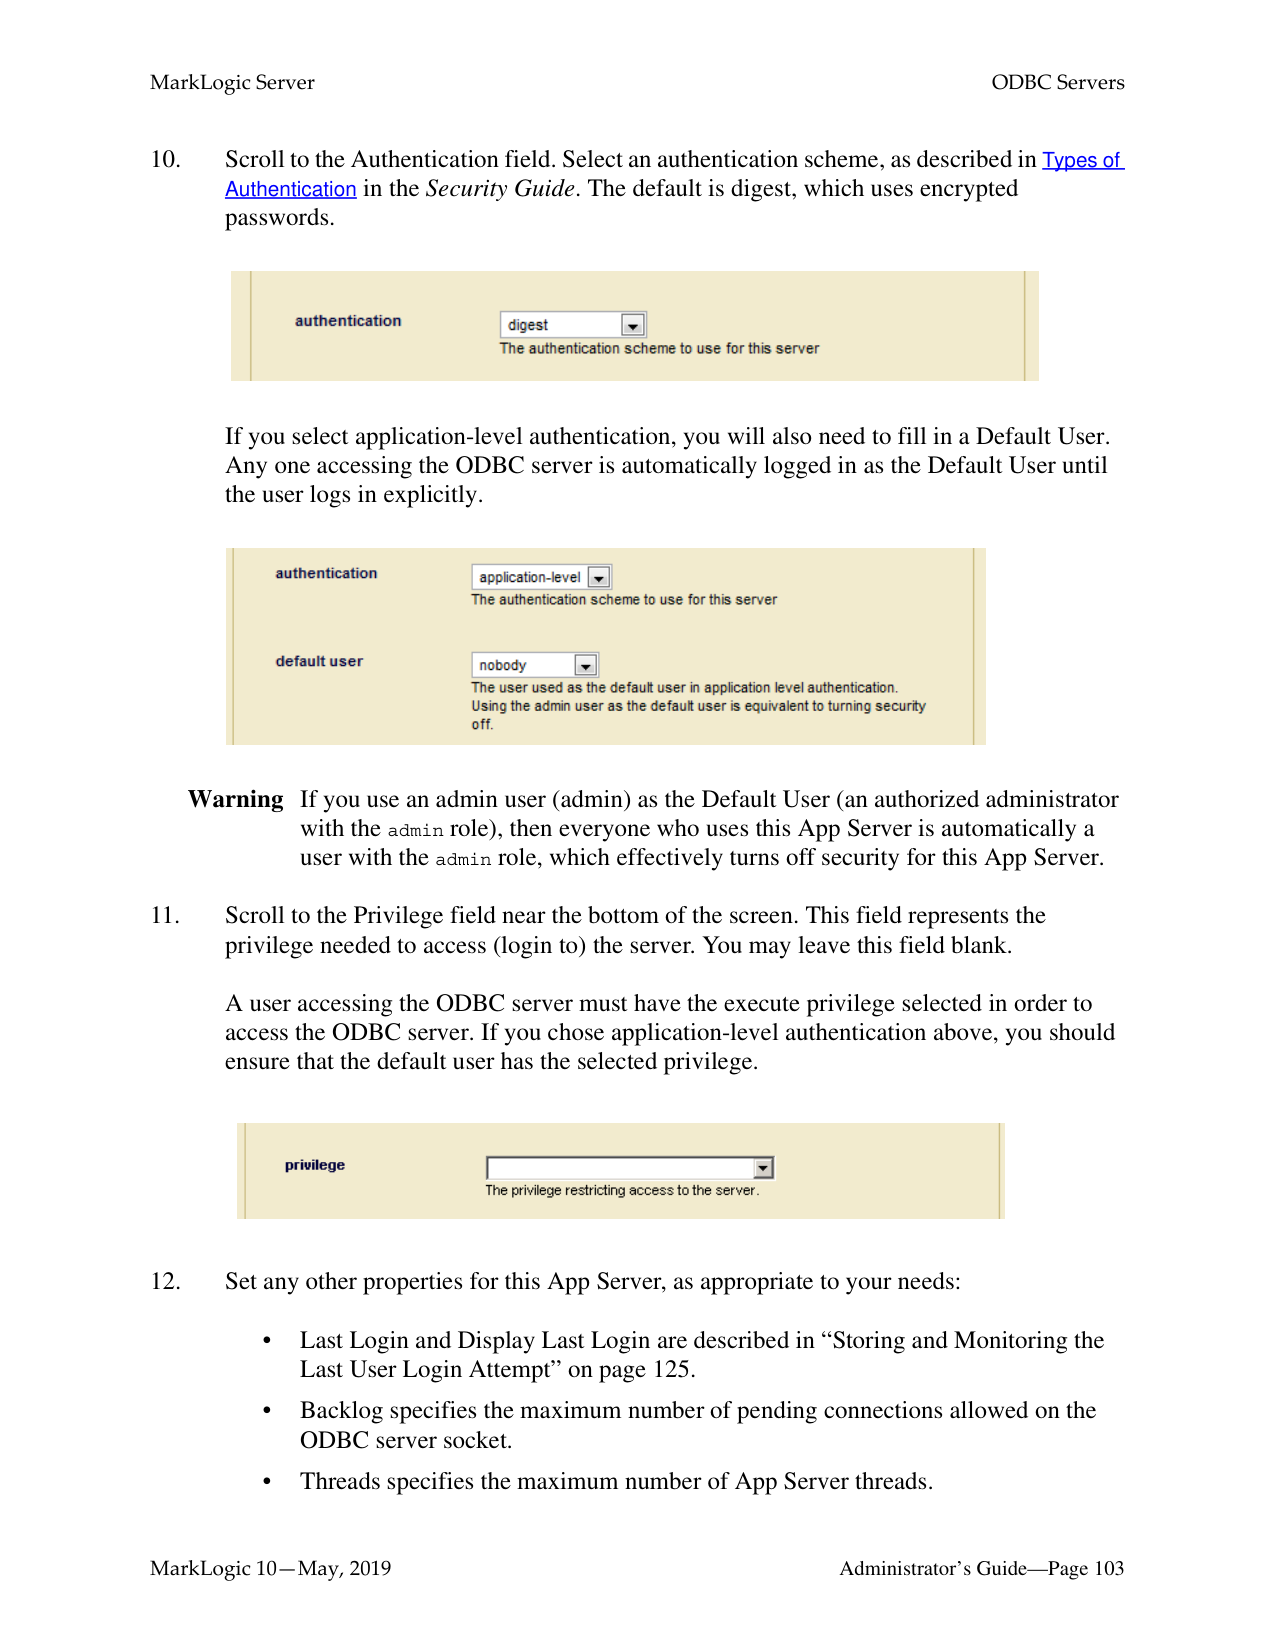
If you select application-level authentication, you will also need to fill in a Default User. Any one accessing the HTTP server is automatically logged in as the Default User until the user logs in explicitly.

Warning If you use an admin user (admin) as the Default User (an authorized administrator with the admin role), then everyone who uses this App Server is automatically a user with the admin role, which effectively turns off security for this App Server.
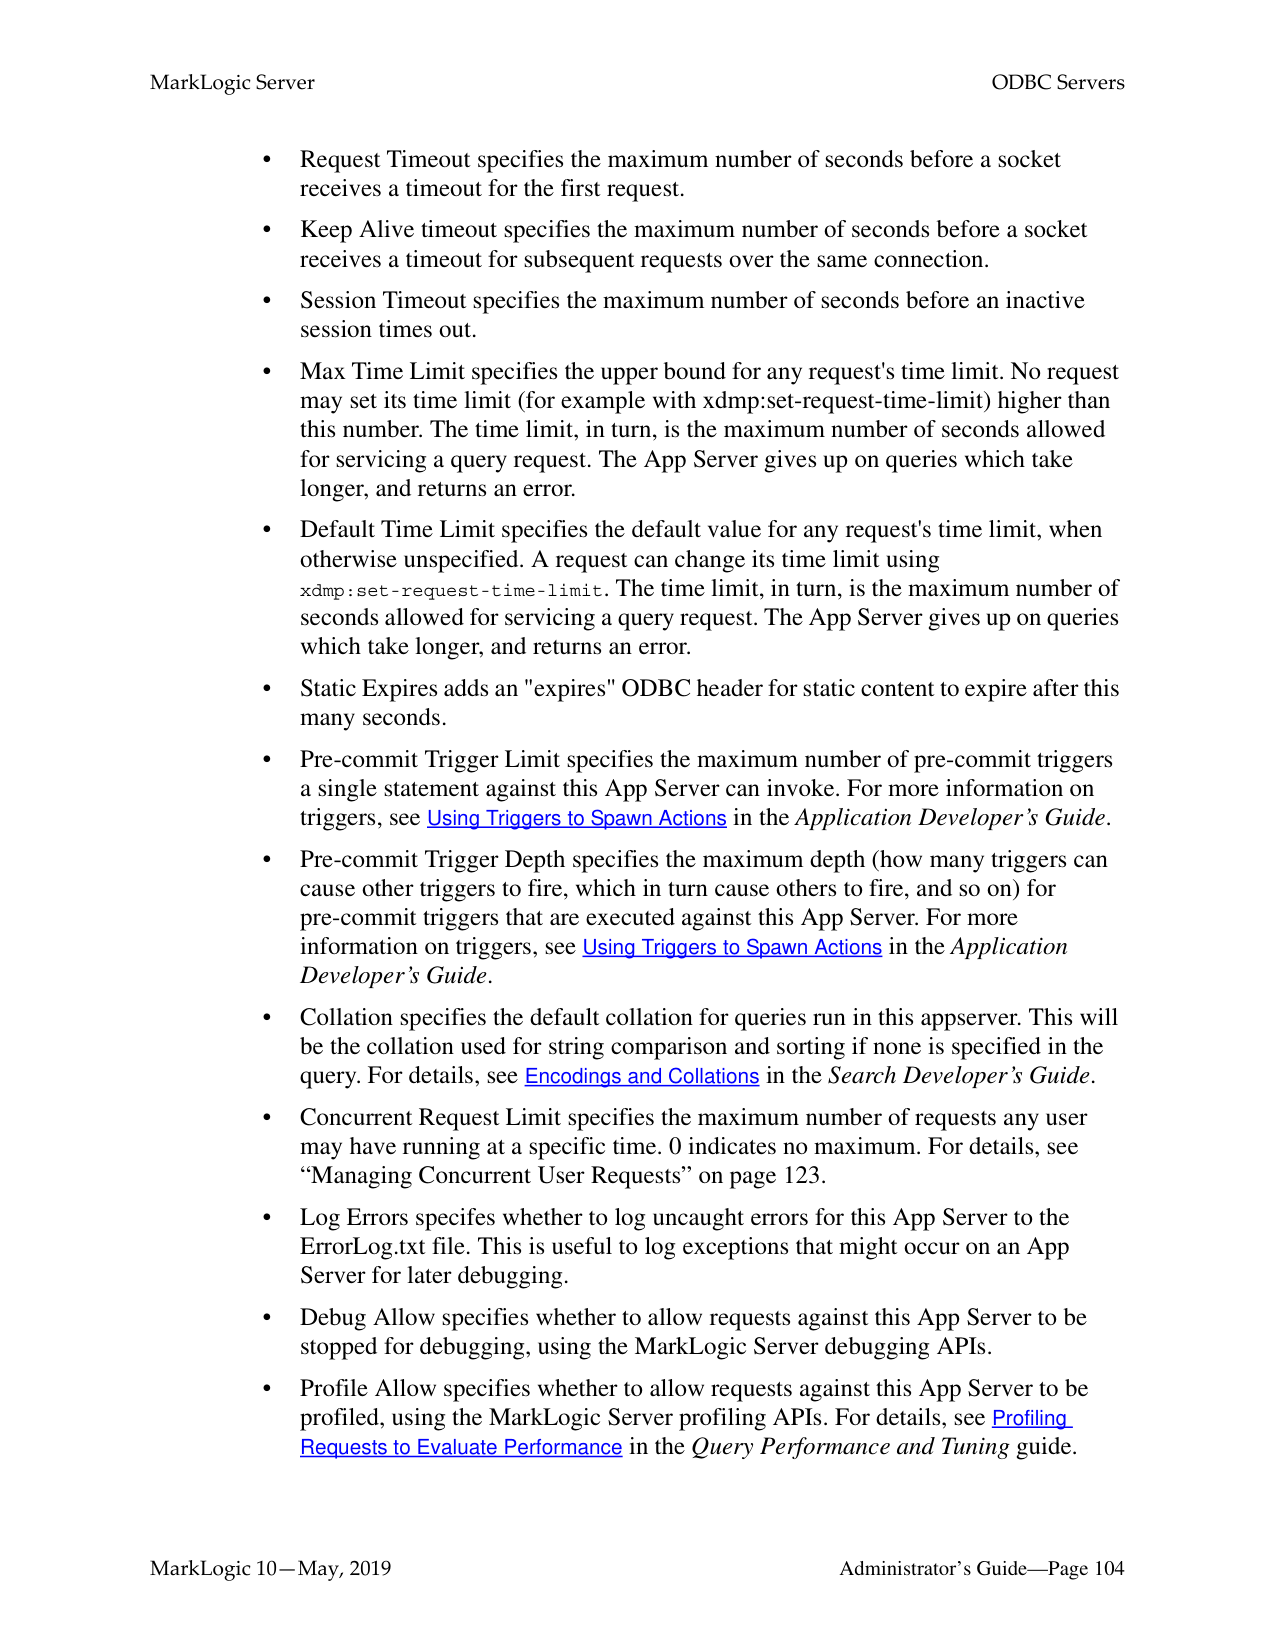
A user accessing the HTTP server must have the execute privilege selected in order to access the HTTP server. If you chose application-level authentication above, you should ensure that the default user has the selected privilege.


The HTTP server is now created. Creating an HTTP server is a “hot” admin task; the changes take effect immediately. For information and setup instructions for managing user sessions and/or keeping track of login attempts, see “Managing User Requests and Monitoring Login Attempts” on page 123.
######### 7.2.2 Setting Output Options for an HTTP Server
For each HTTP Server, you can set various default output options. These output options affect how data returned from the App Server is serialized. You can also set these options at the query level to override any default options. You can set serialization options to override the App Server defaults in XQuery with the declare option XQuery prolog, and in XSLT using the
To specify defaults for the App Server, complete the following steps:
For more details about App Server output, see Controlling App Server Access, Output, and Errors in the Application Developer’s Guide.
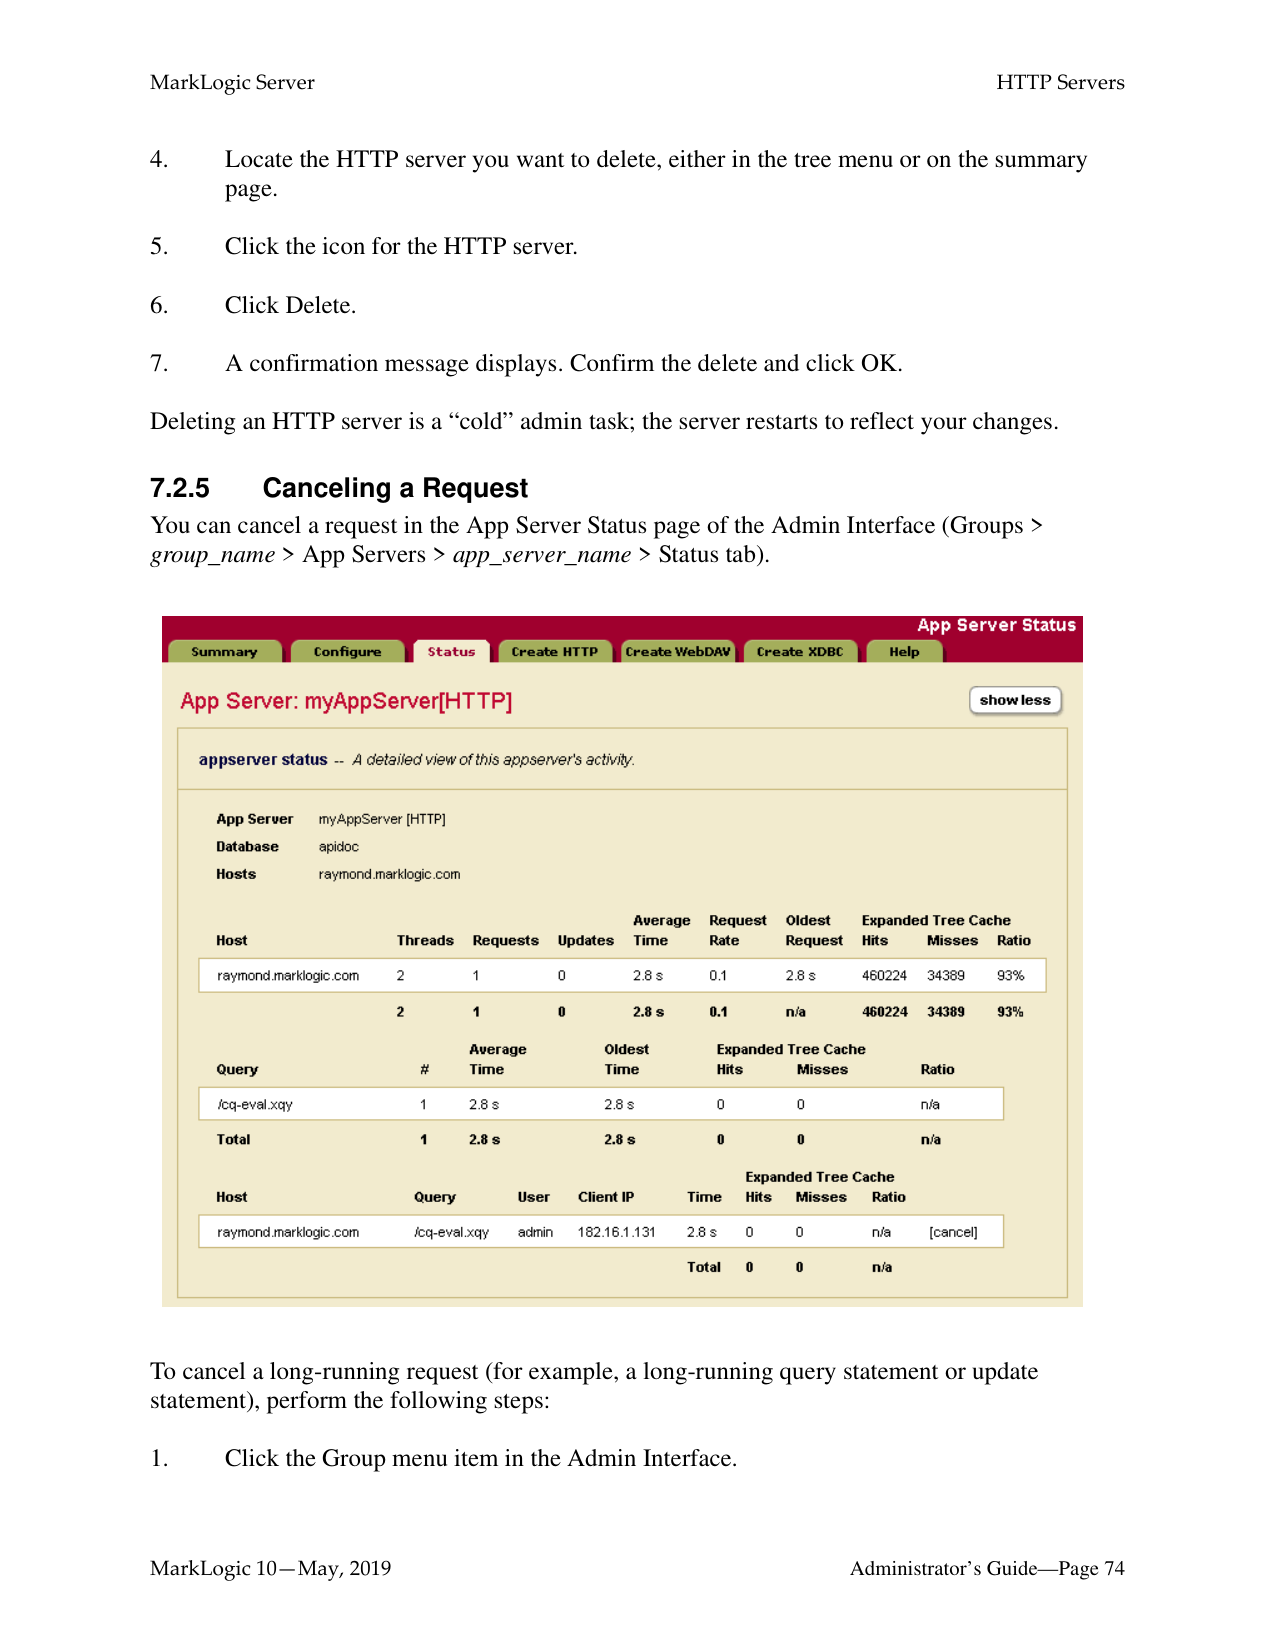
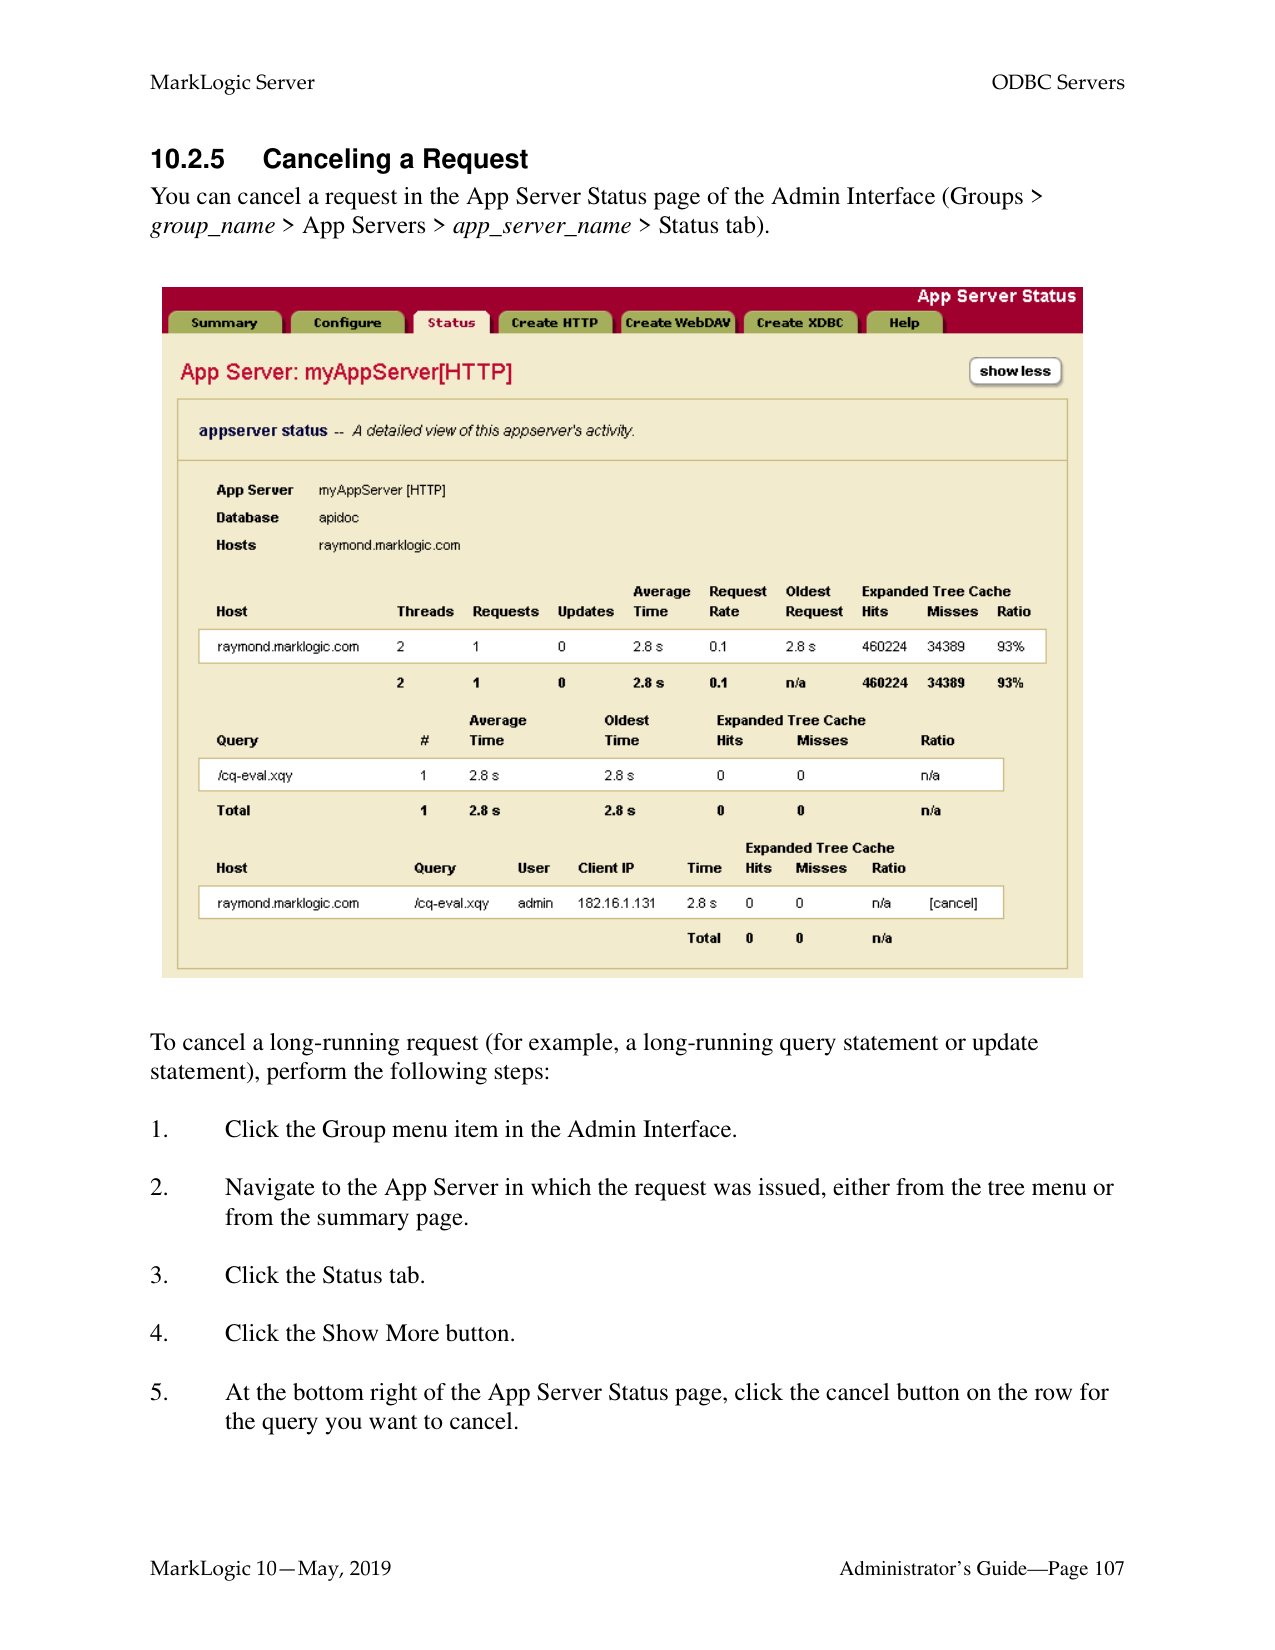
######### 7.2.5 Canceling a Request
You can cancel a request in the App Server Status page of the Admin Interface (Groups > group_name > App Servers > app_server_name > Status tab).

To cancel a long-running request (for example, a long-running query statement or update statement), perform the following steps:
The request is canceled and the App Server Status page appears again.
##### 8.0 XDBC Servers
This chapter describes XDBC servers and provides procedures for configuring them. The following sections are included:
This chapter describes how to use the Admin Interface to create and configure XDBC servers. For details on how to create and configure XDBC servers programmatically, see Creating and Configuring App Servers in the Scripting Administrative Tasks Guide.
######### 8.1 XDBC Server Overview
XDBC (XML Database Connector) servers are defined at the group level and are accessible by all hosts within the group. Each XDBC server provides access to a specific forest, and to a library (root) of XQuery programs that reside within a specified directory structure. Applications execute by default against the database that is connected to the XDBC server.
XDBC Servers allow XML Contentbase Connector (XCC) applications to communicate with MarkLogic Server. XCC is an API used to communicate with MarkLogic Server from Java middleware applications. XDBC servers also allow old-style XDBC applications to communicate with MarkLogic Server, although XDBC applications cannot use certain 3.1 and newer features (such as point-in-time queries). Both XCC and XDBC applications use the same wire protocol.
XQuery requests submitted via XCC return results as specified by the XQuery code. These results can include XML and a variety of other data types. It is the XCC application's responsibility to parse, process and interpret these results in a manner appropriate to the variety of data types available. There are a number of publicly available libraries for assisting with this task, or you may write your own code. In order to accept connections from XCC-enabled applications, MarkLogic Server must be configured with an XDBC Server listening on the designated port. Each XDBC Server connects by default to a specific database within MarkLogic Server, but XCC provides the ability to communicate with any database in the MarkLogic Server cluster to which your application connects (and for which you have the necessary permissions and privileges).
XDBC servers follow the MarkLogic Server security model, as do HTTP and WebDAV servers. The server authenticates access to those programs using user IDs and passwords stored in the security database for that XDBC server. (Each XDBC server is connected to a database, and each database is in turn connected to a security database in which security objects such as users are stored.)
Granular access control to the system and to the data is achieved through the use of privileges and permissions. For details on configuring security objects in MarkLogic Server, see “Security Administration” on page 339. For conceptual information on the MarkLogic Server security model, see Security Guide.
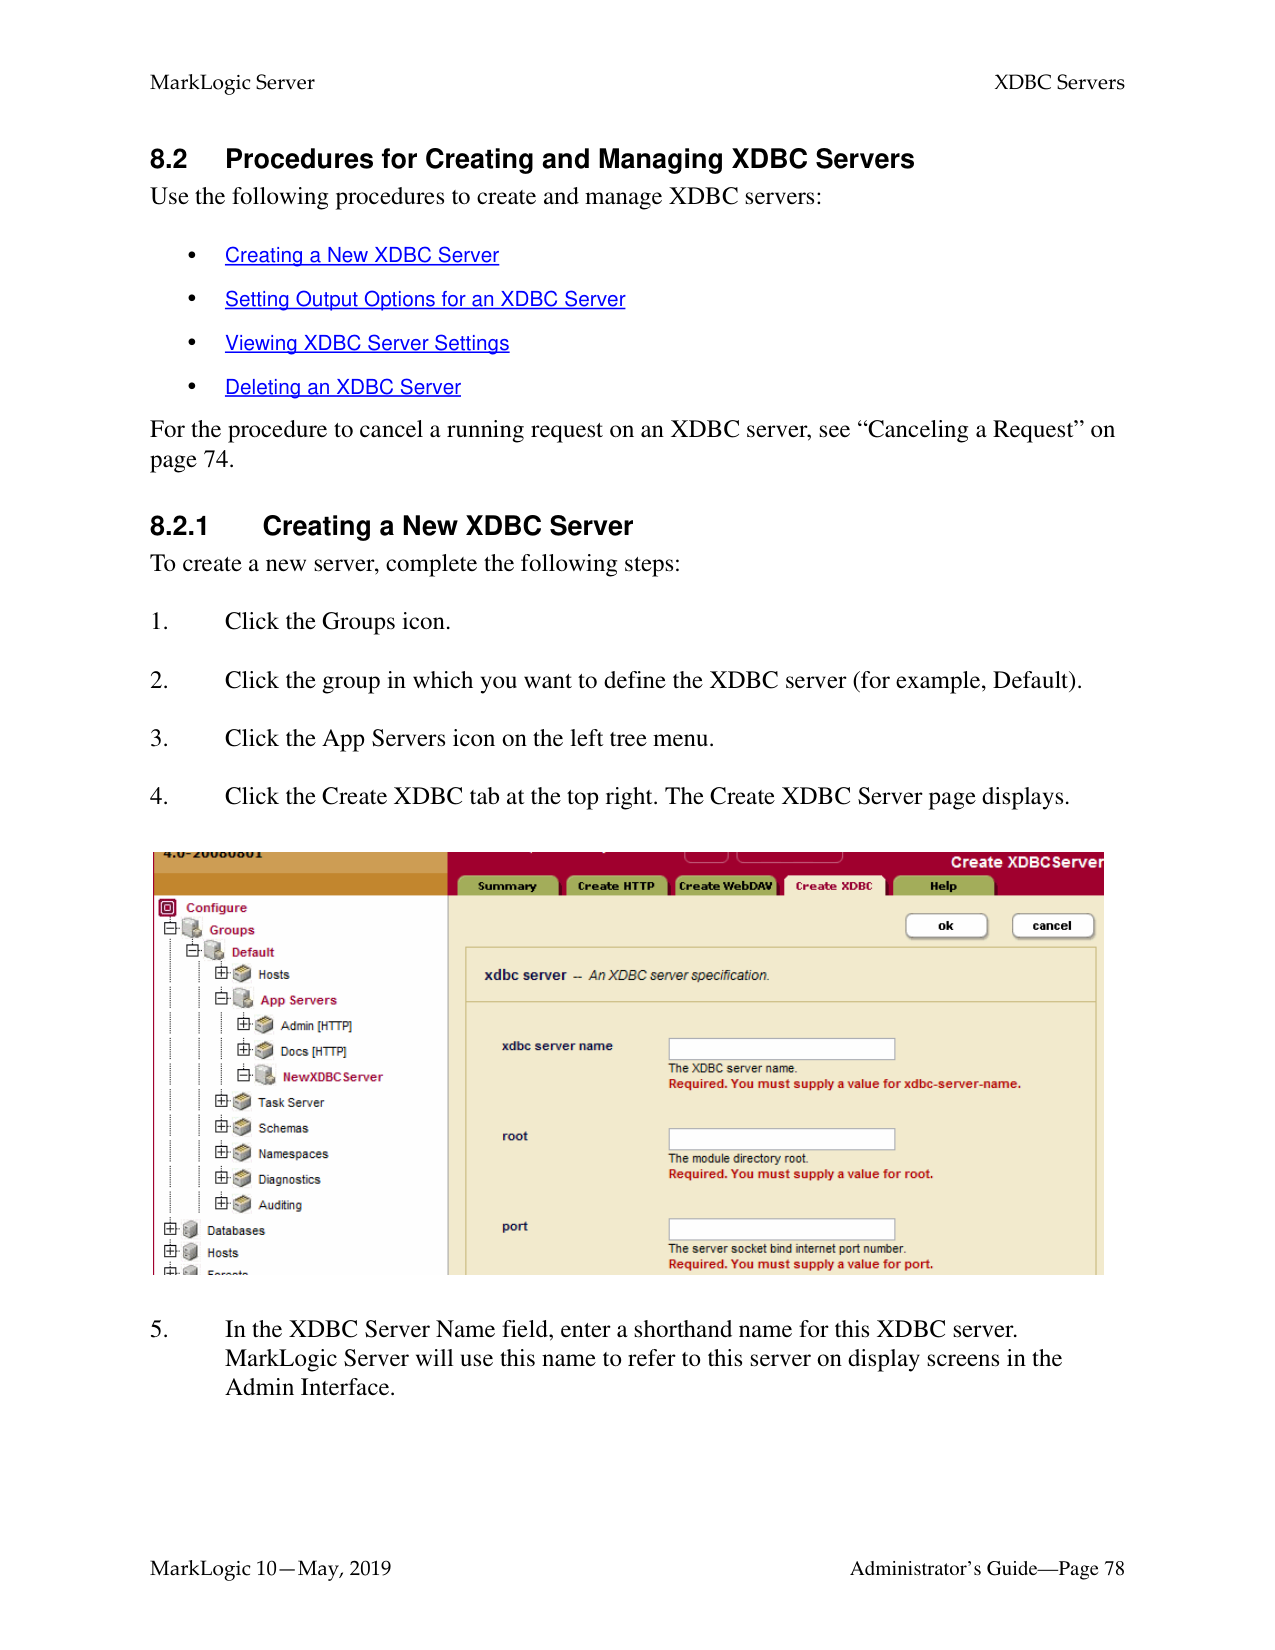
######### 8.2 Procedures for Creating and Managing XDBC ServersUse the following procedures to create and manage XDBC servers:
For the procedure to cancel a running request on an XDBC server, see “Canceling a Request” on page 74.

If the Modules field is set to file system, then the root directory is either a fully-qualified pathname or is relative to the directory in which MarkLogic Server is installed. The following table shows the default installation directory for each platform:
Note: Unless you specify a shared drive, all hosts in the group will need to have a copy of
the XQuery programs in the directory specified above.
Warning Do not create XDBC server root directories named Docs, Data or Admin. These
directories are reserved by MarkLogic Server for other purposes. Creating XDBC server root directories with these names can result in unpredictable behavior of the server and may also complicate the software upgrade process.
|Platform|Program Directory| |---|---| | | | |Microsoft Windows|C:\Program Files\MarkLogic| |Red Hat Linux|/opt/MarkLogic| |Mac OS X|~/Library/MarkLogic|

A user accessing the XDBC server must have the execute privilege selected in order to access the XDBC server (or be a member of the admin role).

The new XDBC server is created. Creating an XDBC server is a “hot” admin task; the changes take effect immediately. For information and setup instructions for managing user sessions and/or keeping track of login attempts, see “Managing User Requests and Monitoring Login Attempts” on page 123.
######### 8.2.2 Setting Output Options for an XDBC Server
For each XDBC Server, you can set various default output options. These output options affect how data returned from the App Server is serialized. You can also set these options at the query level to override any default options. You can set serialization options to override the App Server defaults in XQuery with the declare option XQuery prolog, and in XSLT using the
To specify defaults for the App Server, complete the following steps:

##### 9.0 WebDAV Servers
A WebDAV server in MarkLogic Server is similar to an HTTP server, but has the following important differences:
This chapter describes WebDAV servers in MarkLogic Server and includes the following sections:
This chapter describes how to use the Admin Interface to create and configure WebDAV servers. For details on how to create and configure WebDAV servers programmatically, see Creating and Configuring App Servers in the Scripting Administrative Tasks Guide.
######### 9.1 WebDAV Server Overview
WebDAV (Web-based Distributed Authoring and Versioning) is a protocol that extends the HTTP protocol to provide the ability to write documents through these HTTP extensions. You need a WebDAV client to write documents, but you can still read them through HTTP (through a web browser, for example). For information about WebDAV clients supported in MarkLogic Server, see “WebDAV Clients” on page 94. For general information about WebDAV and the WebDAV protocol, see the following web site:
http://webdav.org
This section provides an overview of WebDAV servers in MarkLogic Server, and includes the following topics:
######### 9.1.1 Accesses a Database for Read and Write, Not XQuery Execution
In MarkLogic Server, WebDAV servers are defined at the group level and apply to all hosts within the group. Each WebDAV server provides access to a single database for reading and writing (dependent on the needed security permissions). When a document is read or written via WebDAV, all of its associated data, such as properties, metadata, collections, and so on are also transferred with the document.
In the Admin Interface, you configure a WebDAV server to access a database. Documents stored in that database are accessible for reading via HTTP. The database is also accessible via WebDAV clients for reading, modifying, deleting, and adding documents. When you add a document via a WebDAV client (by dragging and dropping, for example), you are actually loading a document directly into the database.
When accessing a database via a WebDAV server, you cannot execute XQuery code. Unlike an HTTP server, there is no Modules database for a WebDAV server. You can, however, configure a
######### 9.1.2 WebDAV Server Security
WebDAV servers follow the MarkLogic Server security model, as do HTTP, ODBC, and XDBC servers. The server authenticates users with user IDs and passwords stored in the security database for that WebDAV server, and the server controls access to objects in the database with privileges and roles. (Each WebDAV server is connected to a database, and each database is in turn connected to a security database in which security objects such as users are stored.)
You can configure application-level security if you want everyone who accesses the WebDAV server to effectively log in as the same user with no password. For example, if you want everyone to log in as guest, where guest has both read and write privileges and has a predefined set of default privileges, set the authentication scheme to application-level and set the default user to guest.
Note: Because users who have write permissions to the database on a WebDAV server can load documents into the database via a WebDAV client, be sure to configure appropriate default permissions on those users so that documents they load (for example, by dragging and dropping files into a WebDAV folder) have the needed permissions for other users to read and write, according to your security policy. You can achieve such granular access control to the system and to the data through the use of privileges and permissions. For information on using security features in MarkLogic Server, see “Security Administration” on page 339 and the chapters related to security in the Application Developer’s Guide.
######### 9.1.3 Directories
A WebDAV directory is analogous to a file system directory. A directory must exist in order to view (via a WebDAV client) any documents in that directory (just like in a filesystem, where you must navigate to a directory in order to access any files in that directory). Each document in a directory has a URI that includes the directory URI as a prefix. Also, each directory visible from a WebDAV server must have the WebDAV root as its prefix, and there must exist a directory with the WebDAV root in the database.
For example, if you have a WebDAV root of http://marklogic.com/, then the URI of all documents and all directories must begin with that root in order to be visible from a WebDAV client. Also, the directory with a URI http://marklogic.com/ must exist in the database. Therefore, a document with a URI of http://marklogic.com/file.xml is visible from this WebDAV server, and a directory with a URI of http://marklogic.com/dir/ is also visible. A directory with a URI of /dir/ and a document with a URI of /dir/file.xml is not visible from this server, however, because its URI does not begin with the WebDAV root.
The following sections describe further details about directories:
For more details on directories and properties, see the “Property Documents and Directories” chapter of the Application Developer’s Guide.
######### 9.1.3.1 Automatic Directory Creation in a Database Settings
In the configuration for a database in the Admin Interface, there is a directory creation setting. The directory creation setting specifies whether directories are created automatically when you create a document.
If you are using a WebDAV server to load documents into a database, we recommend you use the Admin Interface to set the directory creation setting for your database to automatic. If you create a WebDAV server that accesses a database with directory creation set to automatic, the root directory (required in order to access the database via a WebDAV client) is automatically created. Automatic directory creation also helps if you are loading documents manually (using the xdmp:document-load function, for example) whose URIs include directory hierarchies that do not exist in the database. Any directory implied by a URI is automatically created with directory creation set to automatic.
You can also manually create and delete directories in XQuery using the xdmp:directory-create and xdmp:directory-delete built-in functions.
For details on all of the directory creation settings, see “Basic Administrative Settings” on page 130.
######### 9.1.3.2 Properties and URIs of Directories
A directory is stored as a properties document in a MarkLogic Server database. Like a document, a directory has a URI, but the URI must end in a forward slash (/). Use the xdmp:document-properties("uri_name") function to retrieve the properties document for a URI, or the xdmp:document-properties() function to retrieve all of the properties documents in the database.
Properties are in the http://marklogic.com/xdmp/property namespace. When you create a directory (either automatically or manually), the system creates a properties document in the database with a child element named directory. For example, if you have a directory in your database with a URI /myCompany/marketing/, the following query return the following results:
xdmp:document-properties("/myServer/Marketing/")
=>
The properties document returned does not contain the URI of the directory, but just an empty element (prop:directory) indicating the existence of a directory.
The xdmp:document-properties() function returns the properties documents for all documents in the database. Whenever there is a directory element in the properties document, there is a directory in the database, and calling the XQuery xdmp:node-uri built-in function on that element returns the URI of the directory. For example, the following query returns the URIs for all of the directories in a database:
declare namespace prop="http://marklogic.com/xdmp/property" for $x in xdmp:document-properties()/prop:properties/prop:directory return
Note: It is possible to create a document with a URI that ends in a forward slash (/). To avoid confusion with directory URIs, the best practice is to avoid creating documents with URIs that end in a forward slash.
######### 9.1.4 Server Root Directory
Each WebDAV server has a concept of a root. The root is the top-level directory accessible from the server; you can access any documents or directories in the database that are children of the root. The root therefore serves as a prefix for all document and directory URIs accessible through the WebDAV server. You enter the WebDAV root in the Admin Interface. The root can be any valid URI. The root should always end with a forward slash (/), and if it does not, the Admin Interface will append one to the string provided.
The root should be a unique string that can serve as the top of a directory structure. It is common practice to use a WebDAV root of the form http://
http://myCompany/marketing/ /myCompany/marketing/
Note: Directories cannot end in two forward slashes (//). Therefore, you cannot create a directory with a URI http://. If you specify a root of http://myCompany for a WebDAV server and directory creation is set to automatic in the database, a directory with the URI http://myCompany/ is automatically created in the database.
Whatever the root, any documents accessible through the WebDAV server must have URIs that begin with the root. Also, any documents created through a WebDAV client (for example, by dragging and dropping into a web folder) will be loaded with URIs beginning with the WebDAV root.
For example, a document with URI /myCompany/marketing/strategy.doc is accessible (given the necessary security permissions) via the WebDAV server with the root /myCompany/marketing/, and you can create that document by dragging a document named strategy.doc into a web folder configured to access the WebDAV server described above.
Note: When a WebDAV client accesses a WebDAV server whose database has directory creation set to automatic, if the WebDAV root directory does not exist in that database, it is automatically created. The directory is created with no permissions, so it will only be readable by users with the admin role. For other users to be able to use the WebDAV server, you should add appropriate read permissions to the directory (with xdmp:document-add-permissions, for example). For details on document and directory permissions, see Security Guide.
######### 9.1.5 Documents in a WebDAV Server
The main purpose of a WebDAV server is to make it easy for people to store, retrieve, and modify documents in a database. The documents can be any type, whether they are text documents such
######### 9.2 Procedures for Creating and Managing WebDAV ServersThis section includes procedures to perform the following actions:
For the procedure to cancel a running request on a WebDAV server, see “Canceling a Request” on page 74.
MarkLogic Server will use this name to refer to this server on display screens and in user interface controls.
If the root directory does not contain a forward slash, the Admin Interface adds one for you.
Multiple HTTP, ODBC, XDBC, and WebDAV servers can be connected to the same database.
Note: If you are using a database with a WebDAV server, the directory creation setting on the database should be set to automatic, which will automatically create the root directory and other directories for any documents added to the database (if the directory does not already exist). For more information on directories, see “Directories” on page 87.
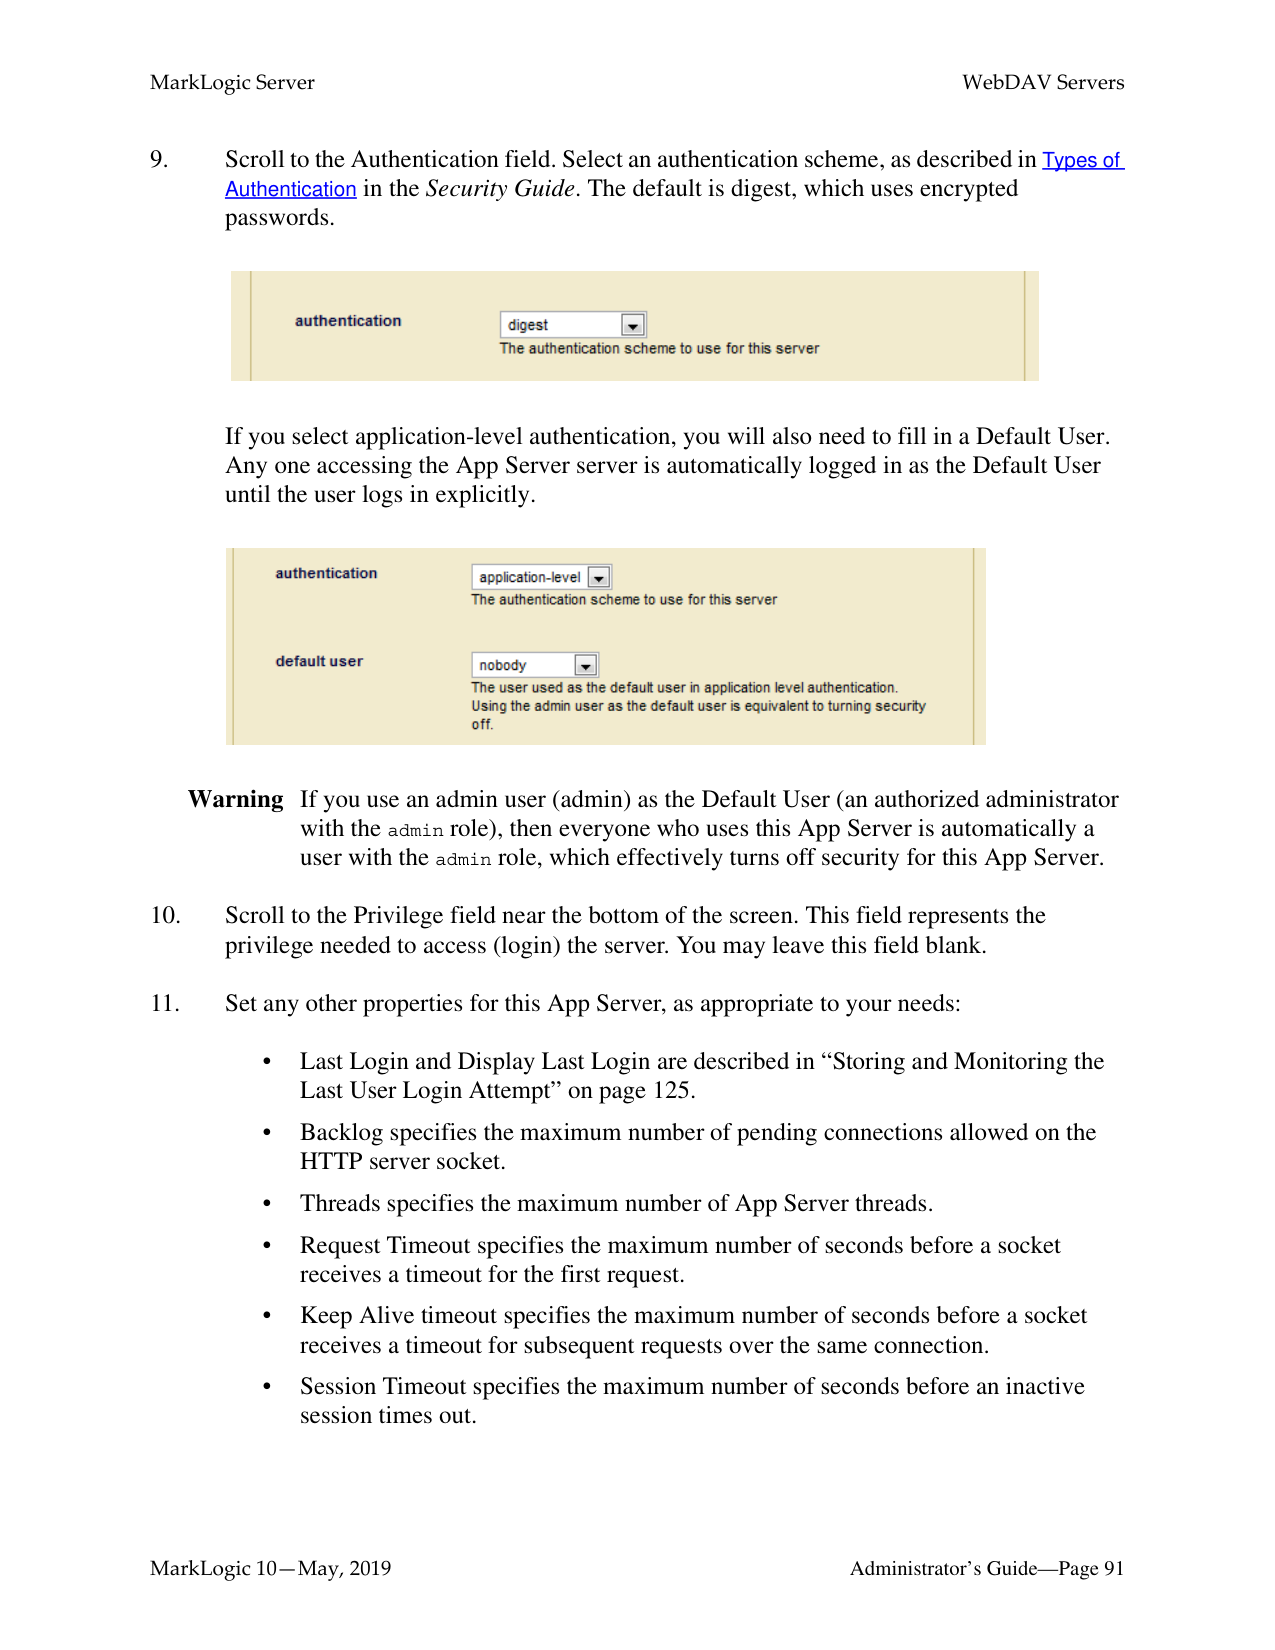
If you select application-level authentication, you will also need to fill in a Default User. Any one accessing the App Server server is automatically logged in as the Default User until the user logs in explicitly.
Warning If you use an admin user (admin) as the Default User (an authorized administrator with the admin role), then everyone who uses this App Server is automatically a user with the admin role, which effectively turns off security for this App Server.


######### 9.2.2 Setting Output Options for a WebDAV Server
For each WebDAV Server, you can set various default output options. These output options affect how data returned from the App Server is serialized. You can also set these options at the query level to override any default options. You can set serialization options to override the App Server defaults in XQuery with the declare option XQuery prolog, and in XSLT using the
To specify defaults for the App Server, complete the following steps:
For more details about App Server output, see Controlling App Server Access, Output, and Errors in the Application Developer’s Guide.
########## 9.2.3 Viewing WebDAV Server SettingsTo view the settings for a WebDAV server, complete the following steps:
A WebDAV client allows you to log into a WebDAV server to read, modify, insert, add, or delete documents. This section lists the supported WebDAV clients for MarkLogic Server and provides some general and specific procedures. The following topics are included:
|WebDAV Client|How to Get It|Notes| |---|---|---| | | | | |Windows Explorer|Part of Windows 10 in many configurations|Allows drag and drop from Windows. For instructions on setting up, see “Steps to Connect to a Web Folder in Windows Explorer” on page 96. Some Windows clients require digest authentication.| |PerlDAV|http://www.webdav.org/perldav/
|A command line, perl-based WebDAV client. Designed to be scriptable and to allow you to send individual WebDAV calls.| |XML Spy|Altova Software (http:// www.altova.com/)
|Allows you to open, edit, and save XML files in XML Spy. Use the File > Open URL menu item in XML Spy.| |jEdit DAV plug-in|Available on developer.marklogic.com
|Allows you to view and edit database documents in jEdit 4.2. This version is available from developer.marklogic.com.
|
For detailed information on these clients, see the documentation accompanying these products.
Note: Directory and document names in WebDAV (and in MarkLogic Server databases) are case-sensitive, but some WebDAV clients (Windows Explorer, for example) are not case-sensitive. While Windows recognizes case, it treats the directory named NewFolder as the same directory as one named newFolder. Therefore, directory or document names that differ only in case might cause confusion when using Windows Explorer or other case-insensitive WebDAV clients. If possible, avoid assigning names to directories or documents that differ only by case (for example, NewFolder vs newFolder).
Note: Windows WebDAV clients will cause two transactions upon initial document creation: the first is a 0-length WebDAV PUT resulting in a new 0-length document, and the second is an update to the 0-length document. If you are using CPF (or other applications that use triggers), this will fire both the create trigger (when the initial 0-length document is created) and the update trigger (when the document is updated with its contents). When using Windows WebDAV clients with CPF applications, make sure that your CPF actions for create and update are designed to work correctly for this behavior. In most cases, having the same action for create and update will be sufficient, but in some cases, you might need to write an action that checks for a 0-length document and does something special with it.
######### 9.3.2 General Steps to Connect to a Server
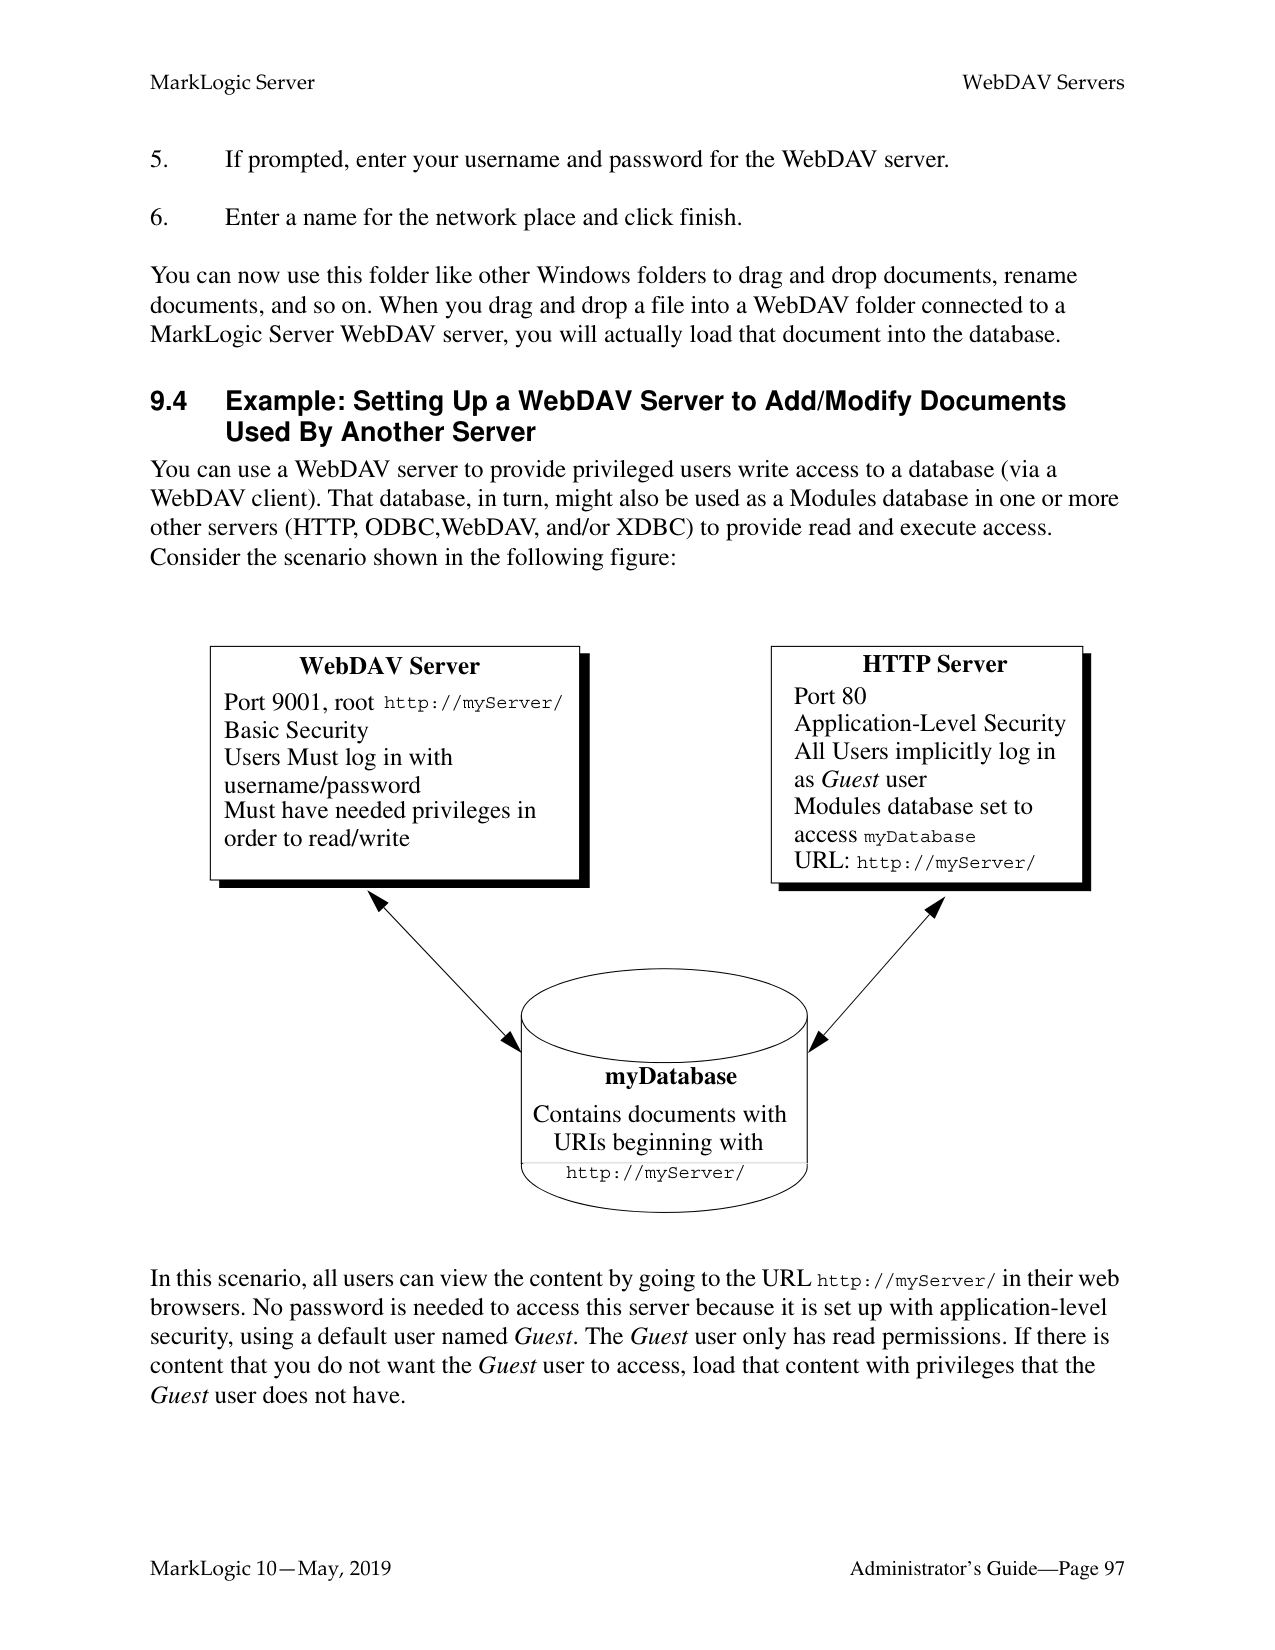
Each WebDAV client has its own way of connecting to a WebDAV server, but the general steps to connect to a WebDAV server are as follows:
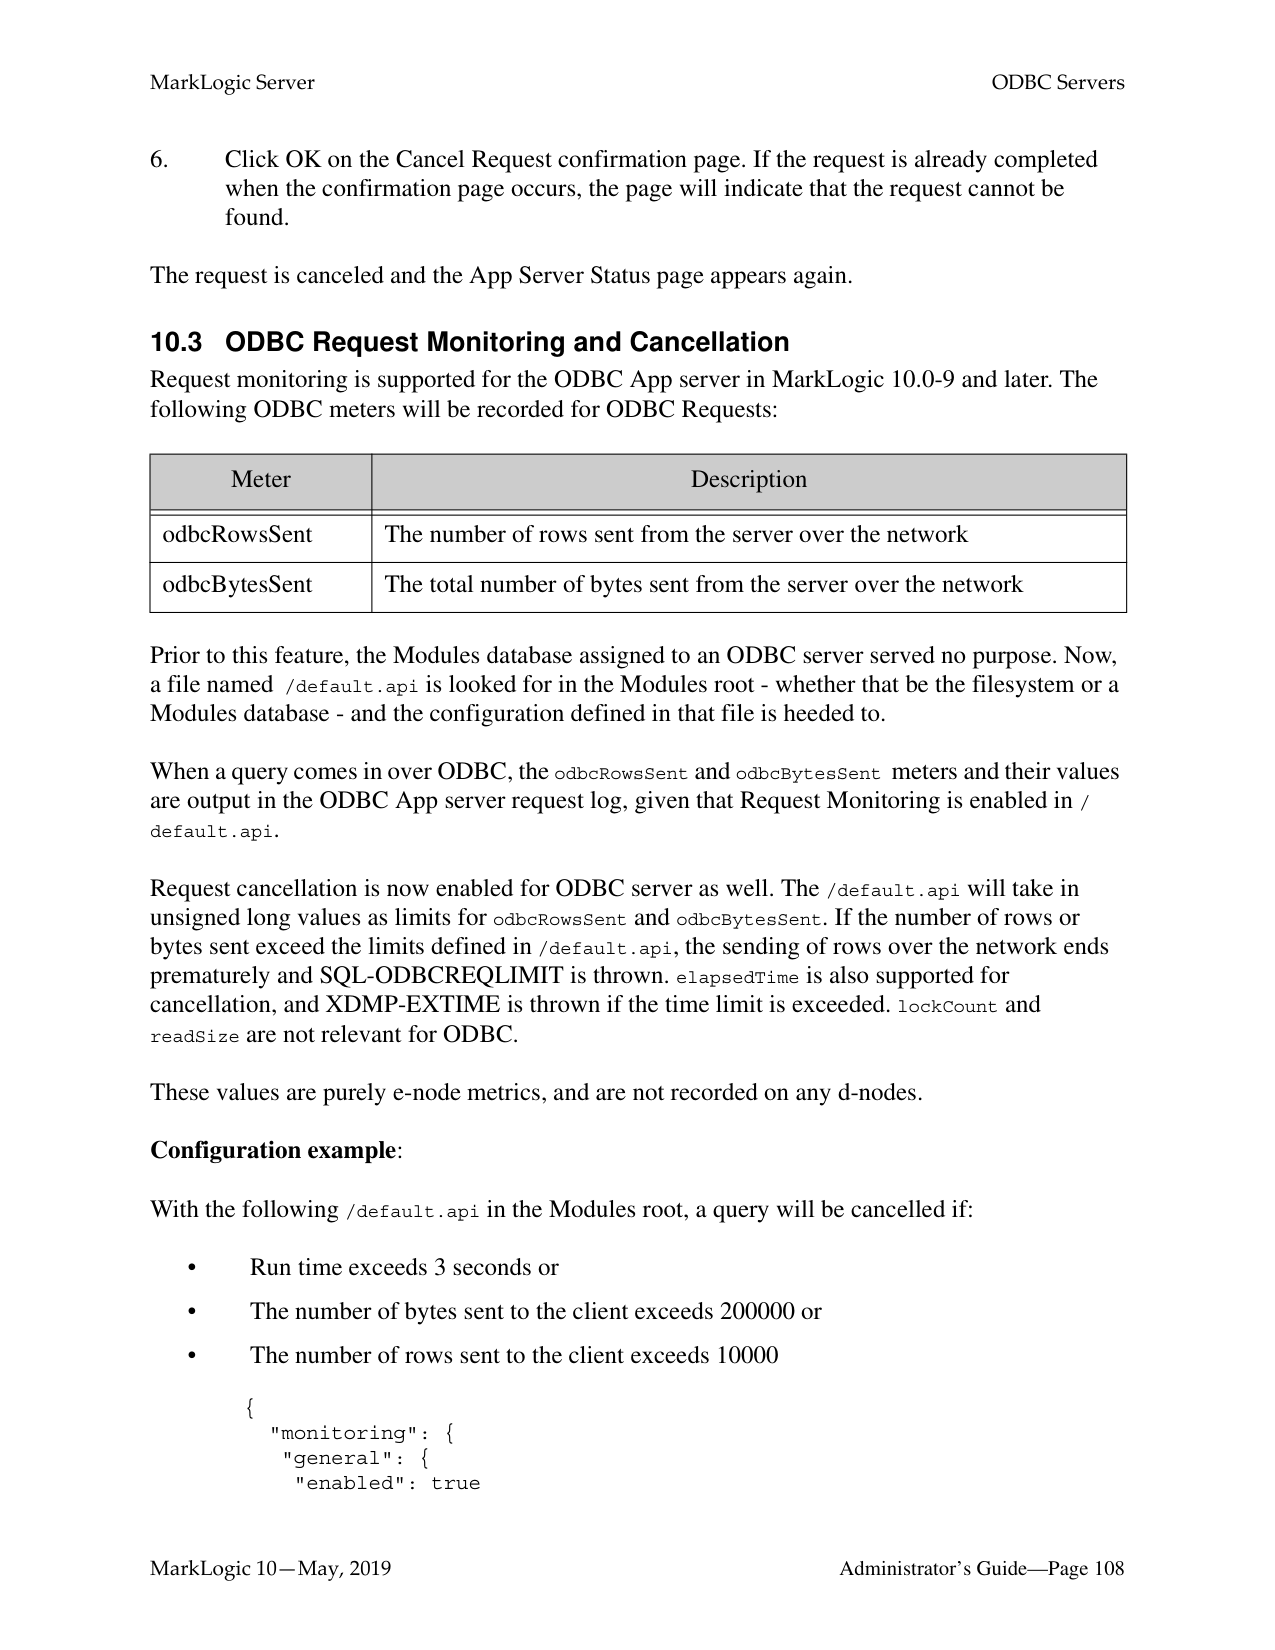
http://marklogic.myCompany.com:9001/
Note: The user who logs into the WebDAV server must have the needed privileges (granted via roles) to access the documents and directories under the WebDAV root directory. Also, if you want the WebDAV user to create documents under the WebDAV root, then that user must have the needed URI privileges (granted via roles) to create documents under the root. The lack of any needed privileges and/or permissions can cause the WebDAV login or other WebDAV activities to fail. For details on URI privileges and document permissions, see Security Guide.
######### 9.3.3 Steps to Connect to a Web Folder in Windows Explorer
If you are running Windows, perform the following steps to use the Windows Explorer WebDAV client:
http://marklogic.myCompany.com:9001/

You can now use this folder like other Windows folders to drag and drop documents, rename documents, and so on. When you drag and drop a file into a WebDAV folder connected to a MarkLogic Server WebDAV server, you will actually load that document into the database.
######### 9.4 Example: Setting Up a WebDAV Server to Add/Modify DocumentsUsed By Another Server
You can use a WebDAV server to provide privileged users write access to a database (via a WebDAV client). That database, in turn, might also be used as a Modules database in one or more other servers (HTTP, ODBC,WebDAV, and/or XDBC) to provide read and execute access. Consider the scenario shown in the following figure:
HTTP Server
WebDAV Server Port 9001, root http://myServer/
Port 80 Application-Level Security All Users implicitly log in as Guest user
Basic Security Users Must log in with
username/password
Modules database set to access myDatabase
Must have needed privileges in order to read/write

URL: http://myServer/
|myDatabase
Contains documents with URIs beginning with| |---|
http://myServer/
In this scenario, all users can view the content by going to the URL http://myServer/ in their web browsers. No password is needed to access this server because it is set up with application-level security, using a default user named Guest. The Guest user only has read permissions. If there is content that you do not want the Guest user to access, load that content with privileges that the Guest user does not have.
Meanwhile, users with the proper privileges can log in through a WebDAV client to access the WebDAV server at port 9001. Because the WebDAV server is configured with basic security, users are prompted for a username and password when they access the server through the WebDAV client (or through a web browser connected to port 9001). From the WebDAV client, they can add documents, edit documents, or read documents according to the database security policy.
For information about a Modules database, see “Modules Database” on page 128.
##### 10.0 ODBC Servers
An ODBC server is one of several components that support SQL queries to MarkLogic Server. This chapter describes ODBC servers and provides procedures for configuring them. The following sections are included:
This chapter describes how to use the Admin Interface to create and configure ODBC servers. For details on how to create and configure ODBC servers programmatically, see Creating and Configuring App Servers in the Scripting Administrative Tasks Guide.
######### 10.1 ODBC Server Overview
The basic purpose of an ODBC server is to return relational-style data resident in MarkLogic Server in response to SQL queries. The ODBC server returns data in tuple form and manages server state to support a subset of SQL and ODBC statements from Business Intelligence (BI) tools.
As shown in the figure below, an ODBC server connects with a PostgreSQL front end on the client by means of the PostgreSQL message protocol. The ODBC server accepts SQL queries from the PostgreSQL front end and returns the relational-style data needed by the BI applications to build reports.

######### 10.2 Procedures for Creating and Managing ODBC ServersUse the following procedures to create and manage ODBC servers:

If the Modules field is set to file system, then the root directory is either a fully-qualified pathname or is relative to the directory in which MarkLogic Server is installed. The following table shows the default installation directory for each platform:
Note: Unless you specify a shared drive, all hosts in the group will need to have a copy of
the XQuery programs in the directory specified above.
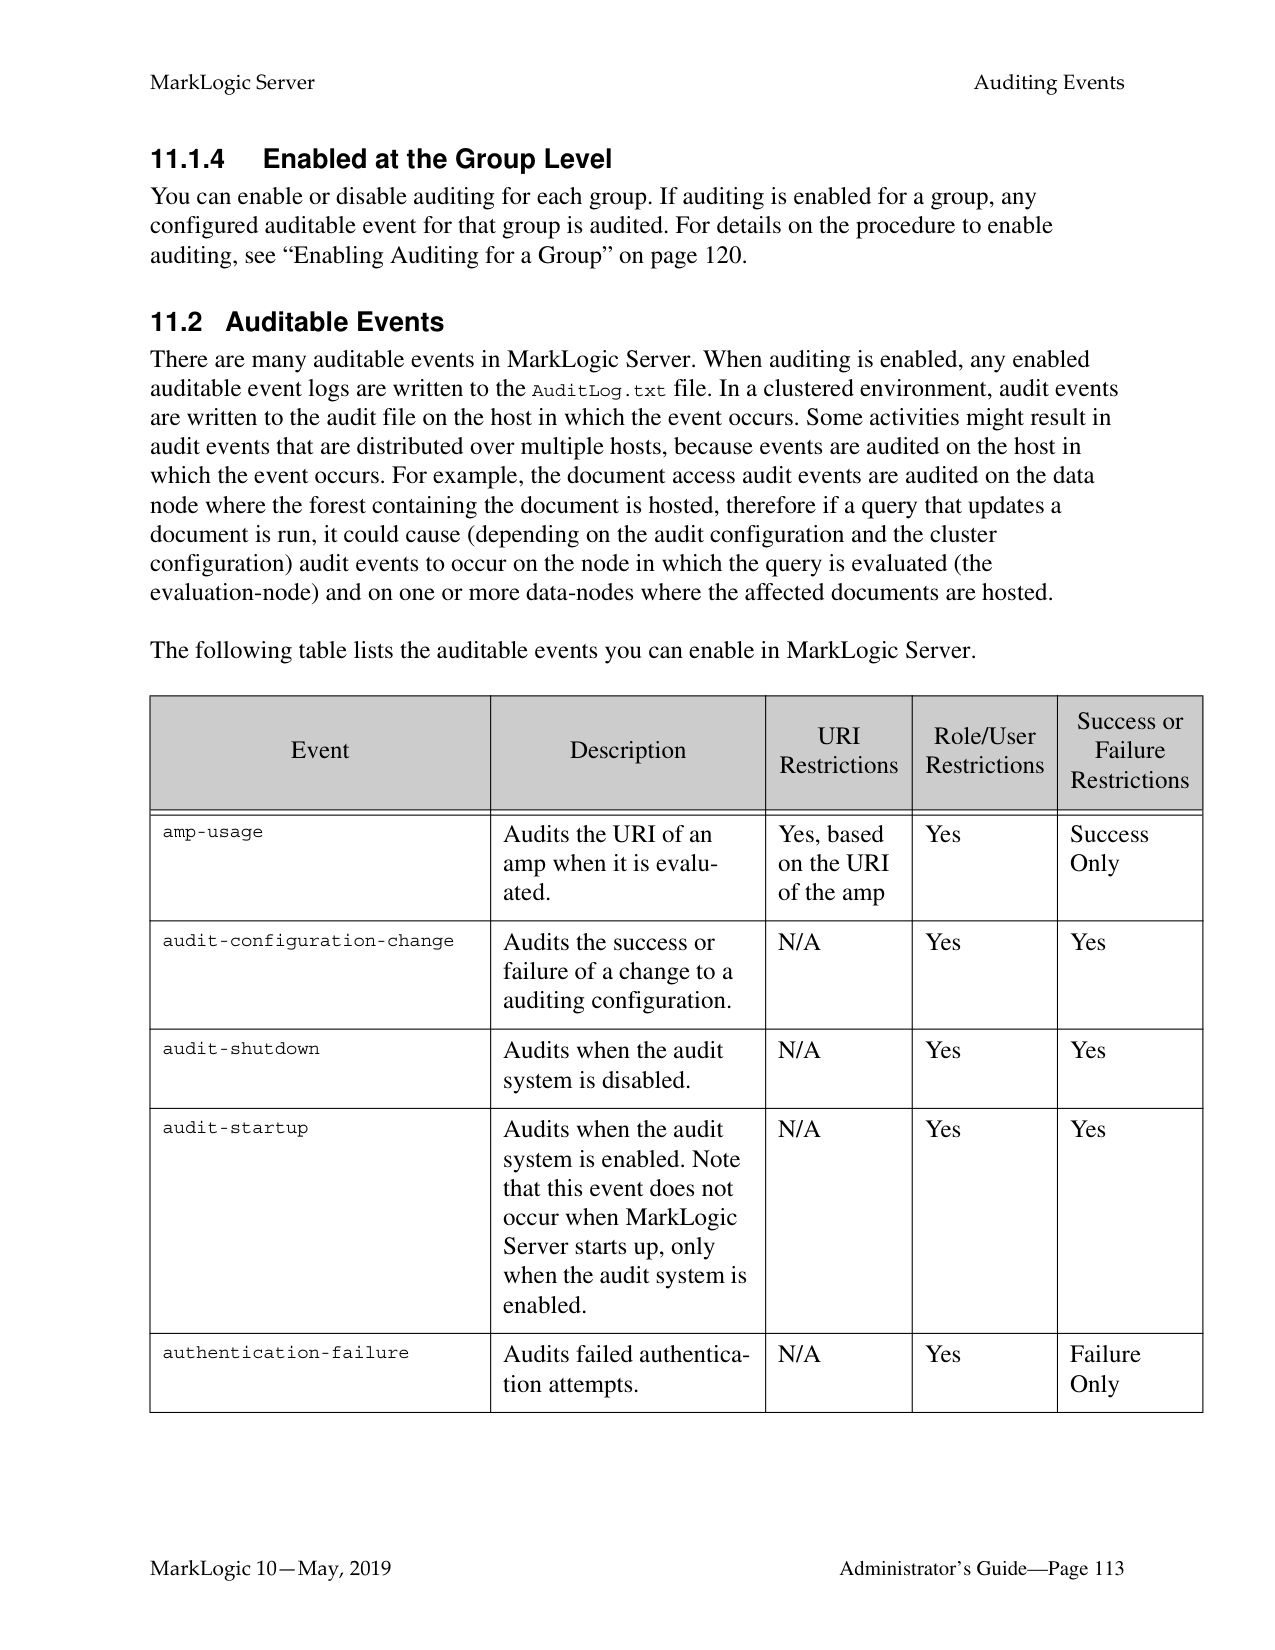
Warning Do not create ODBC server root directories named Docs, Data or Admin. These
directories are reserved by MarkLogic Server for other purposes. Creating ODBC server root directories with these names can result in unpredictable behavior of the server and may also complicate the software upgrade process.
|Platform|Program Directory| |---|---| | | | |Microsoft Windows|C:\Program Files\MarkLogic| |Red Hat Linux|/opt/MarkLogic| |Mac OS X|~/Library/MarkLogic|
If you select application-level authentication, you will also need to fill in a Default User. Any one accessing the ODBC server is automatically logged in as the Default User until the user logs in explicitly.
Warning If you use an admin user (admin) as the Default User (an authorized administrator with the admin role), then everyone who uses this App Server is automatically a user with the admin role, which effectively turns off security for this App Server.
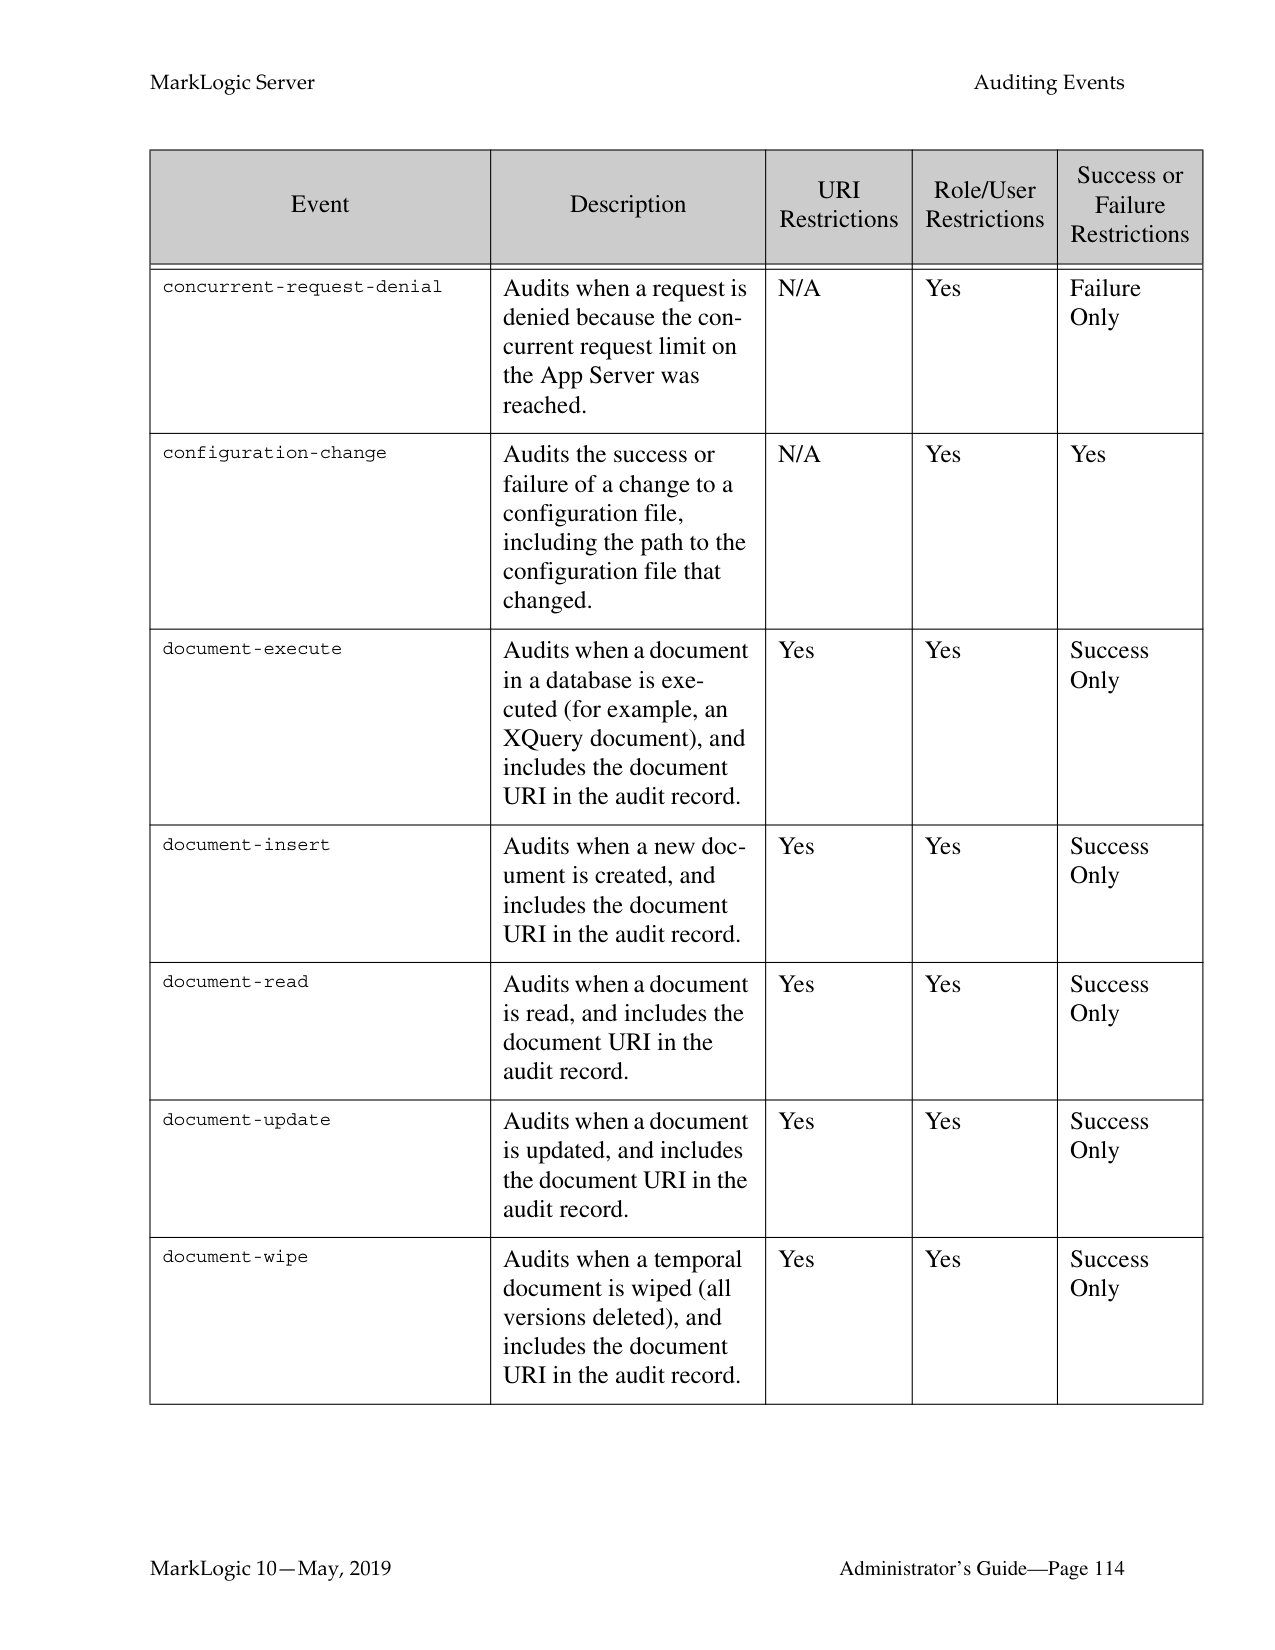
A user accessing the ODBC server must have the execute privilege selected in order to access the ODBC server. If you chose application-level authentication above, you should ensure that the default user has the selected privilege.


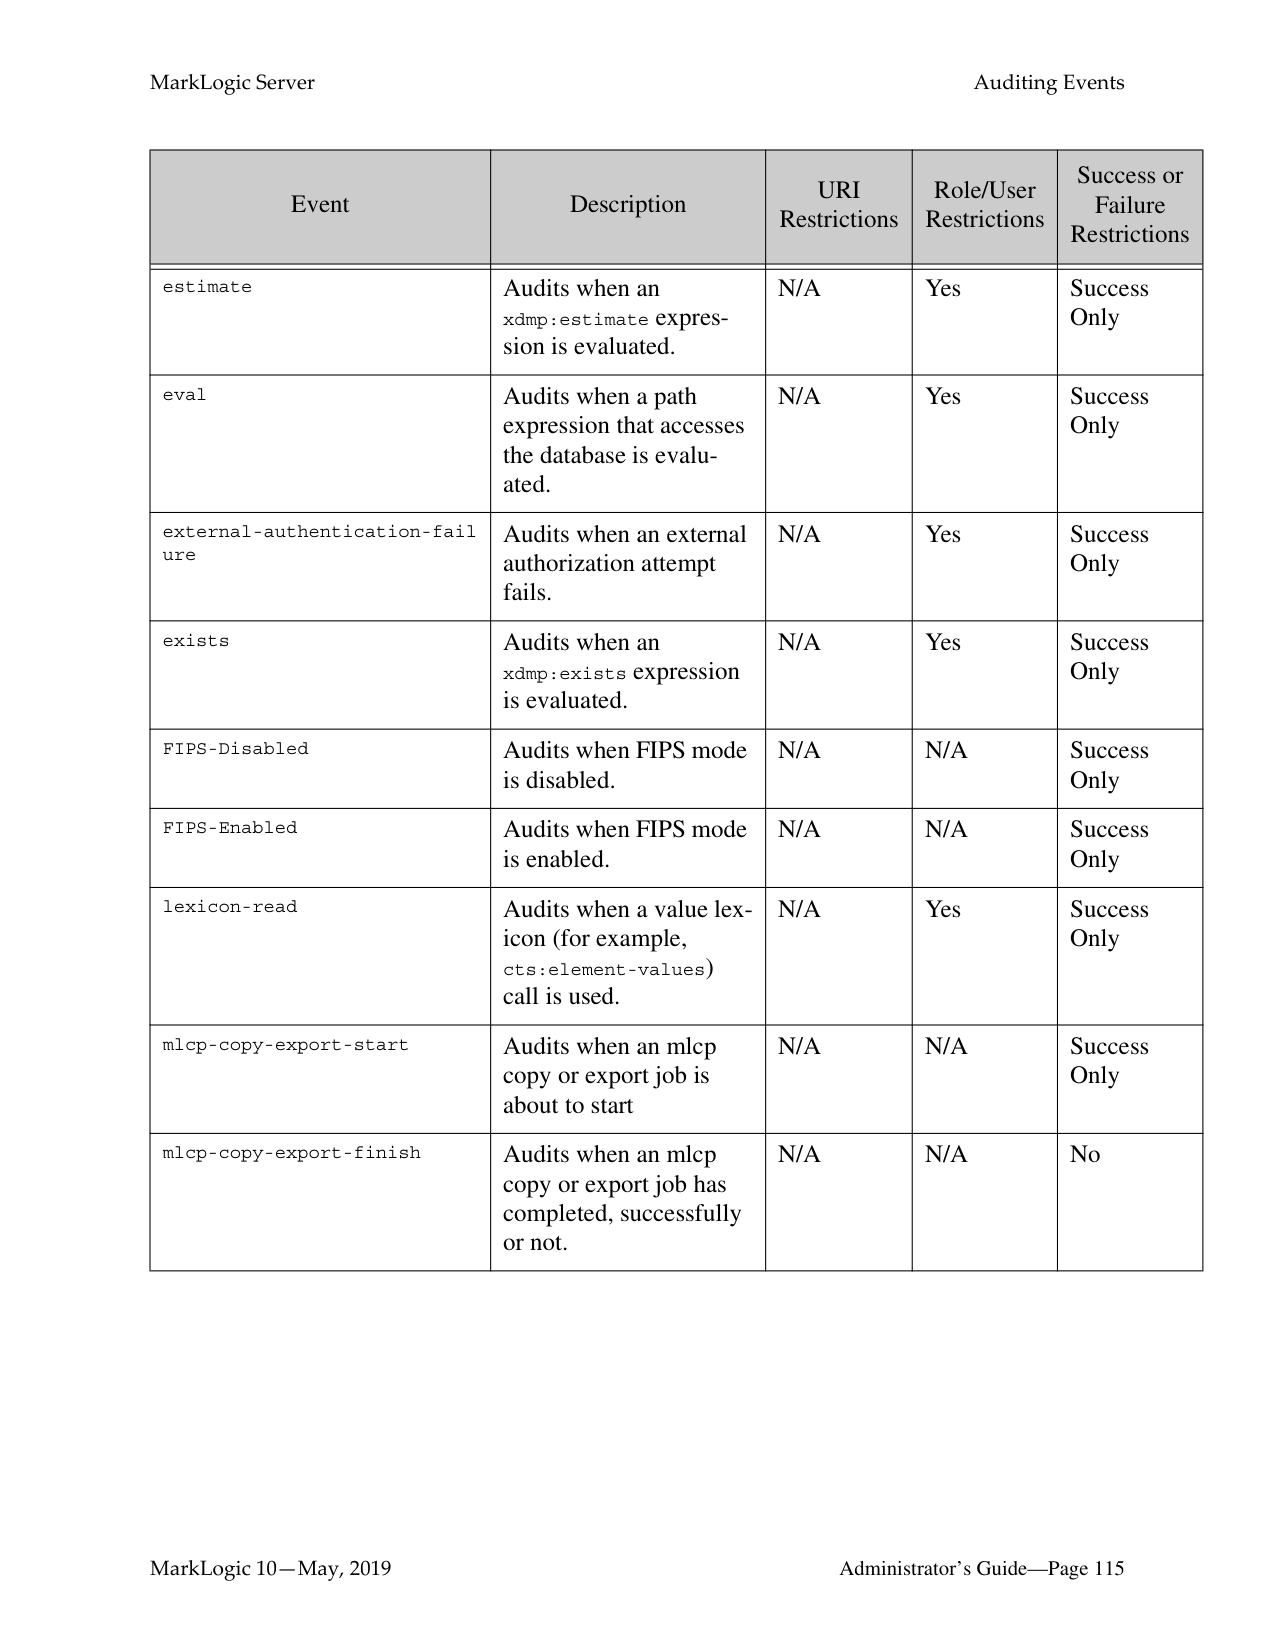
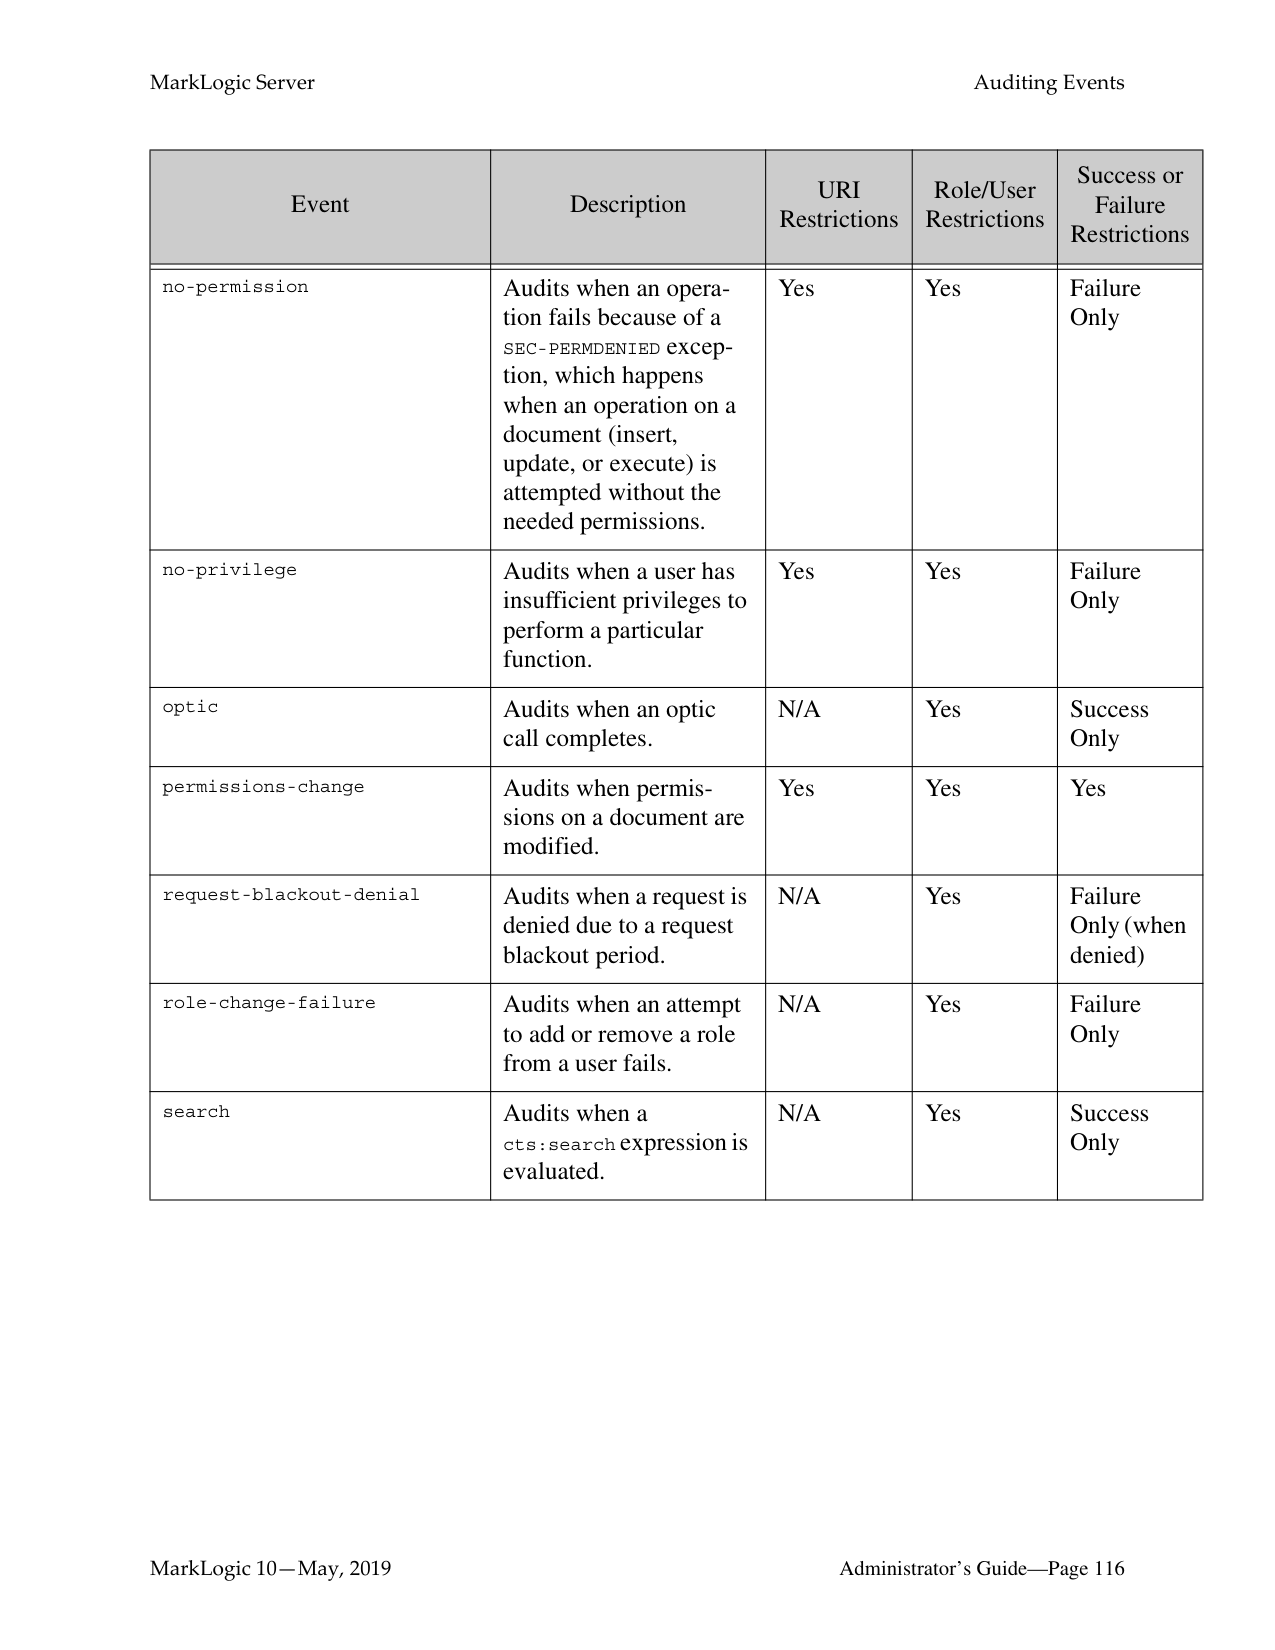
The ODBC server is now created. Creating an ODBC server is a “hot” admin task; the changes take effect immediately. For information and setup instructions for managing user sessions and/or keeping track of login attempts, see “Managing User Requests and Monitoring Login Attempts” on page 123.
######### 10.2.2 Setting Output Options for an ODBC Server
For each ODBC Server, you can set various default output options. These output options affect how data returned from the App Server is serialized. You can also set these options at the query level to override any default options. You can set serialization options to override the App Server defaults in XQuery with the declare option XQuery prolog, and in XSLT using the
To specify defaults for the App Server, complete the following steps:
For more details about App Server output, see Controlling App Server Access, Output, and Errors in the Application Developer’s Guide.
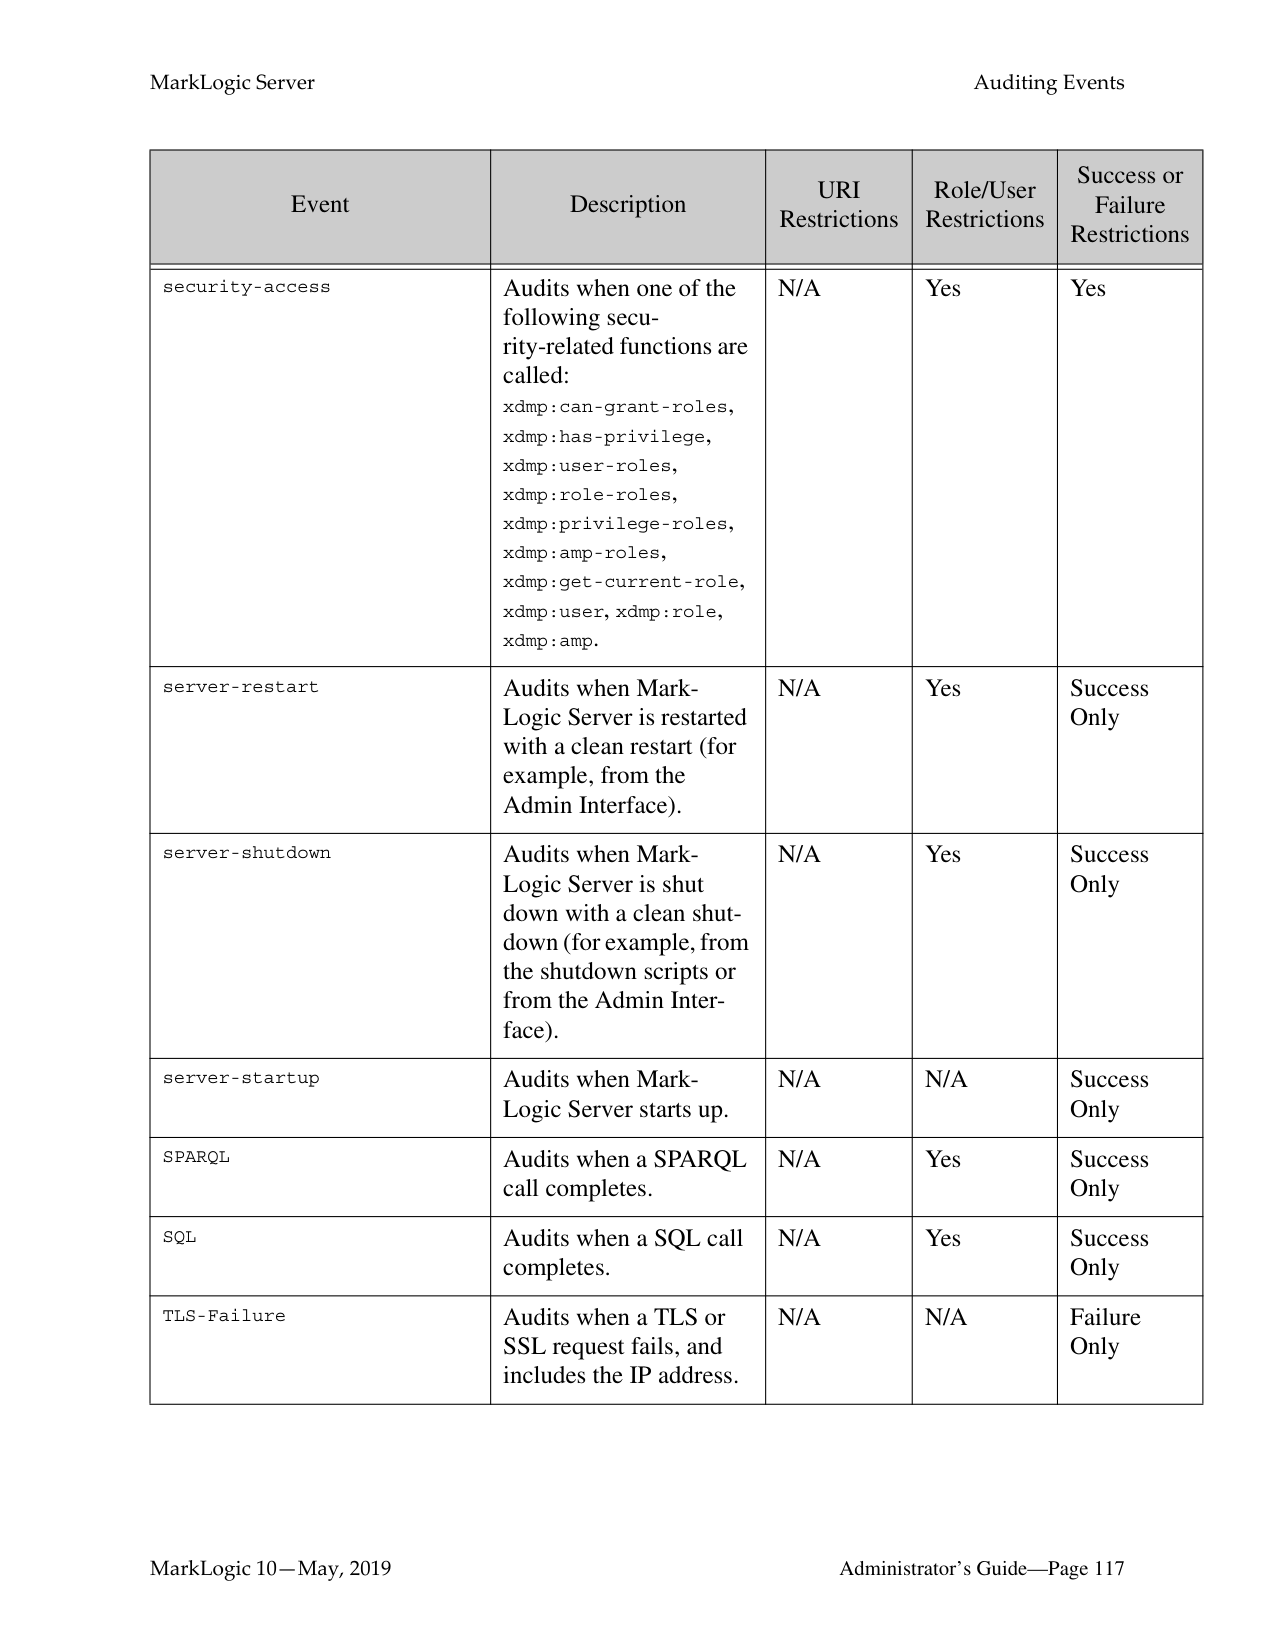
######### 10.2.5 Canceling a Request
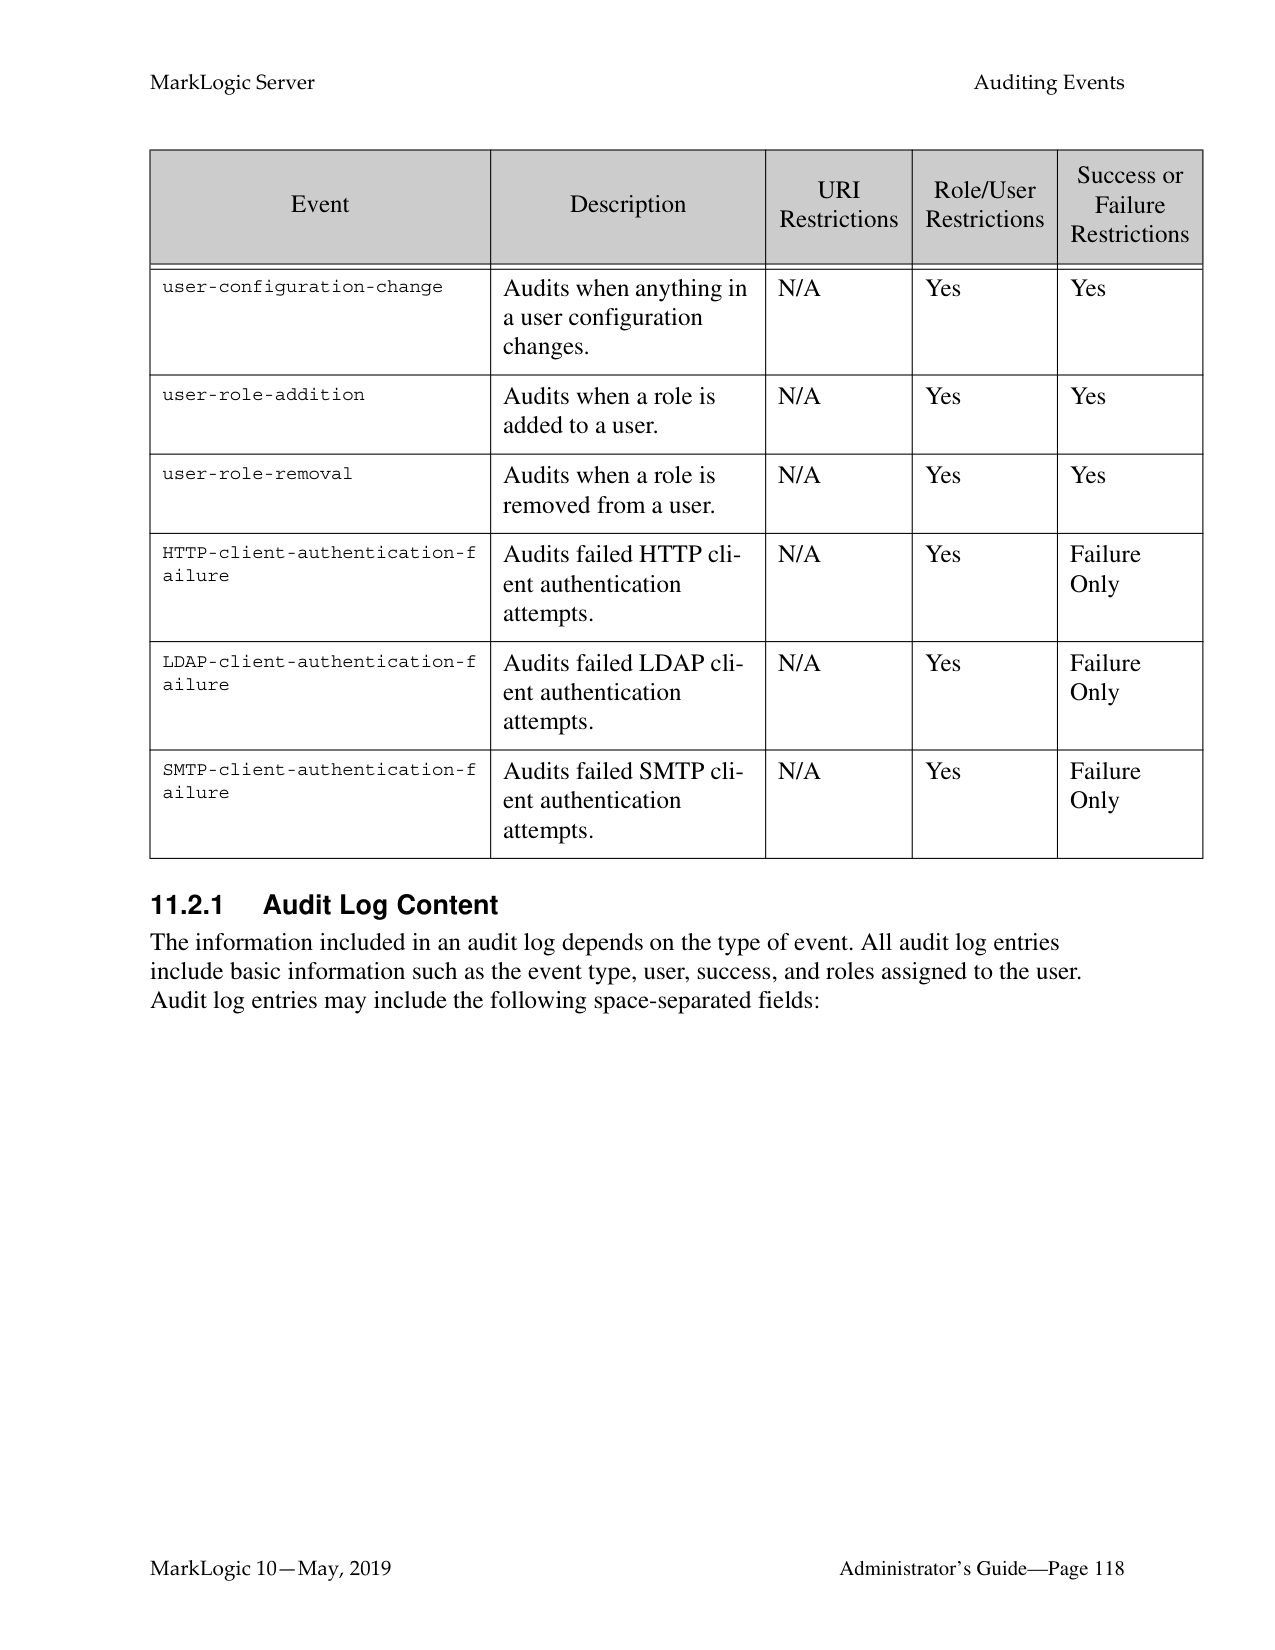
You can cancel a request in the App Server Status page of the Admin Interface (Groups > group_name > App Servers > app_server_name > Status tab).

To cancel a long-running request (for example, a long-running query statement or update statement), perform the following steps:
The request is canceled and the App Server Status page appears again.
######### 10.3 ODBC Request Monitoring and Cancellation
Request monitoring is supported for the ODBC App server in MarkLogic 10.0-9 and later. The following ODBC meters will be recorded for ODBC Requests:
|Meter|Description|
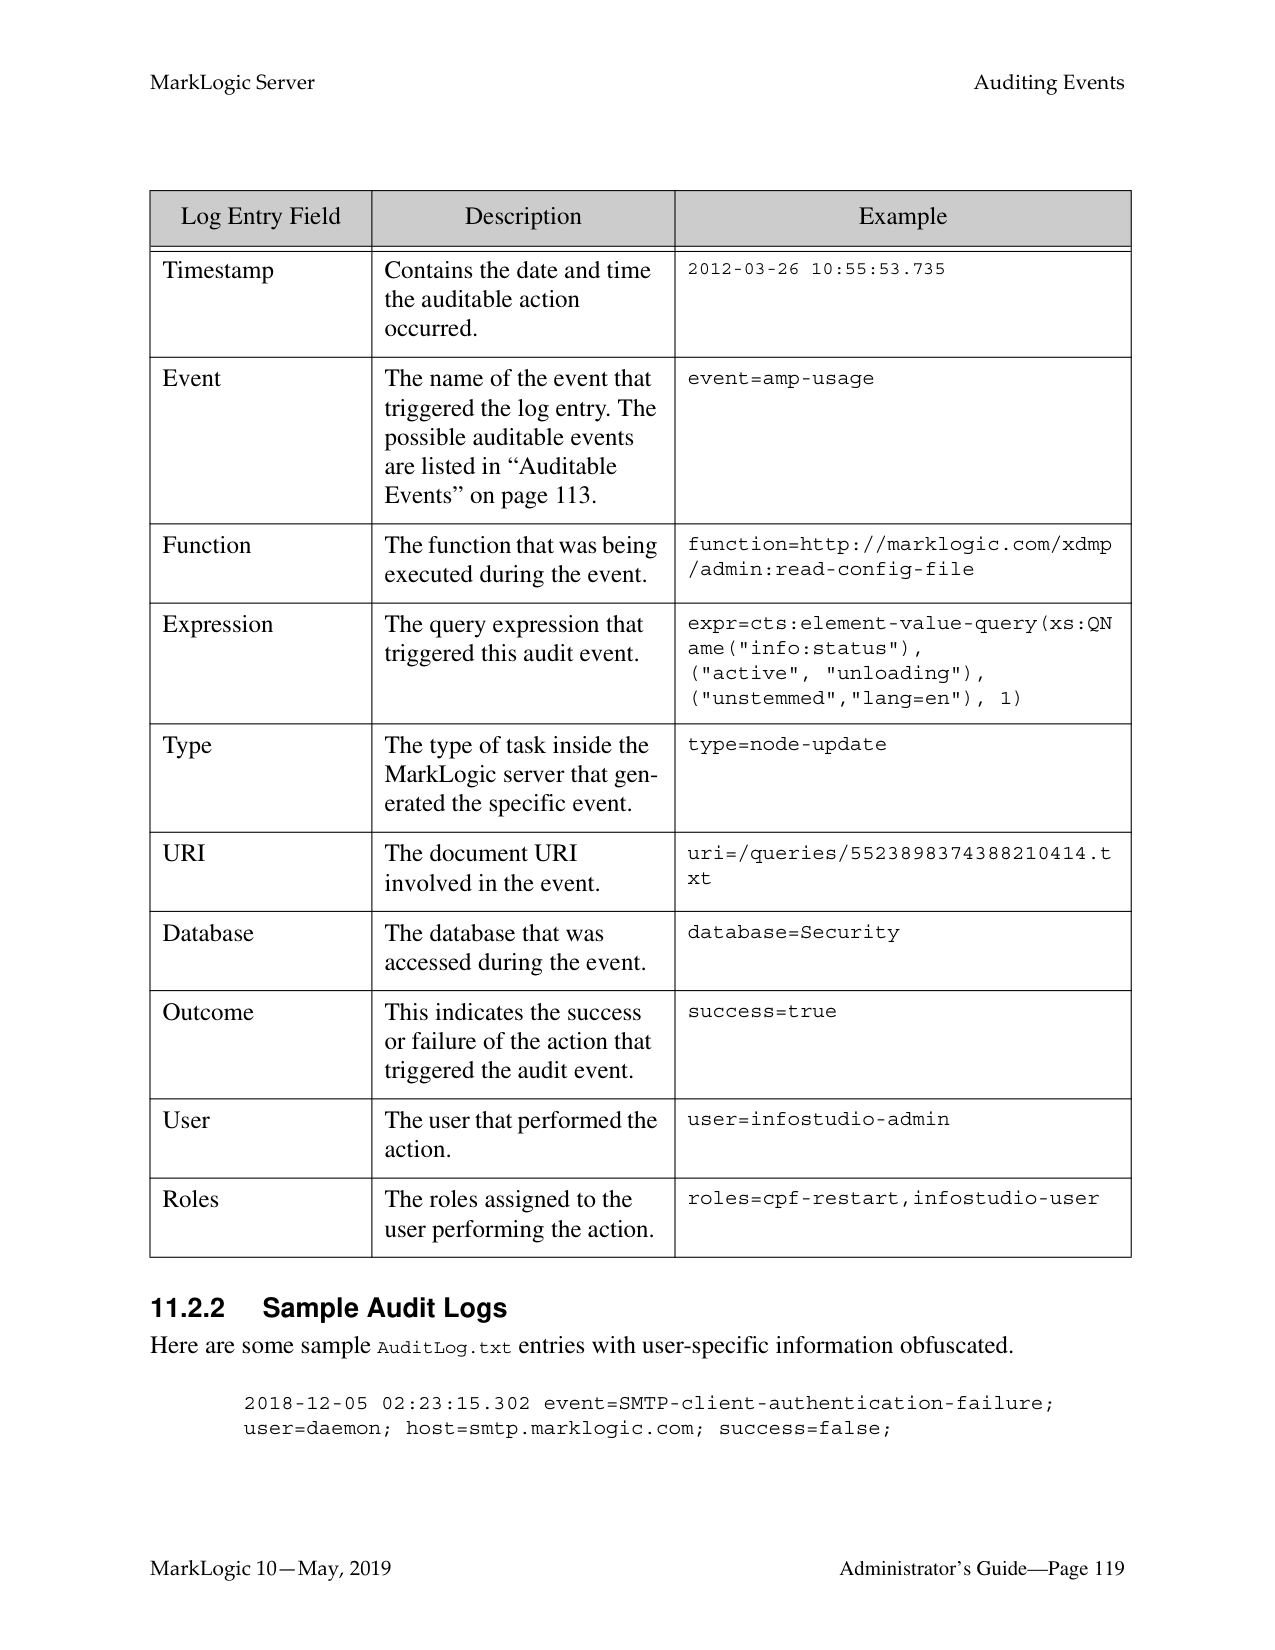
|---|---| | | | |odbcRowsSent|The number of rows sent from the server over the network| |odbcBytesSent|The total number of bytes sent from the server over the network|
Prior to this feature, the Modules database assigned to an ODBC server served no purpose. Now, a file named /default.api is looked for in the Modules root - whether that be the filesystem or a Modules database - and the configuration defined in that file is heeded to.
When a query comes in over ODBC, the odbcRowsSent and odbcBytesSent meters and their values are output in the ODBC App server request log, given that Request Monitoring is enabled in / default.api.
Request cancellation is now enabled for ODBC server as well. The /default.api will take in unsigned long values as limits for odbcRowsSent and odbcBytesSent. If the number of rows or bytes sent exceed the limits defined in /default.api, the sending of rows over the network ends prematurely and SQL-ODBCREQLIMIT is thrown. elapsedTime is also supported for cancellation, and XDMP-EXTIME is thrown if the time limit is exceeded. lockCount and readSize are not relevant for ODBC.
These values are purely e-node metrics, and are not recorded on any d-nodes. Configuration example: With the following /default.api in the Modules root, a query will be cancelled if:
{
"monitoring": { "general": { "enabled": true
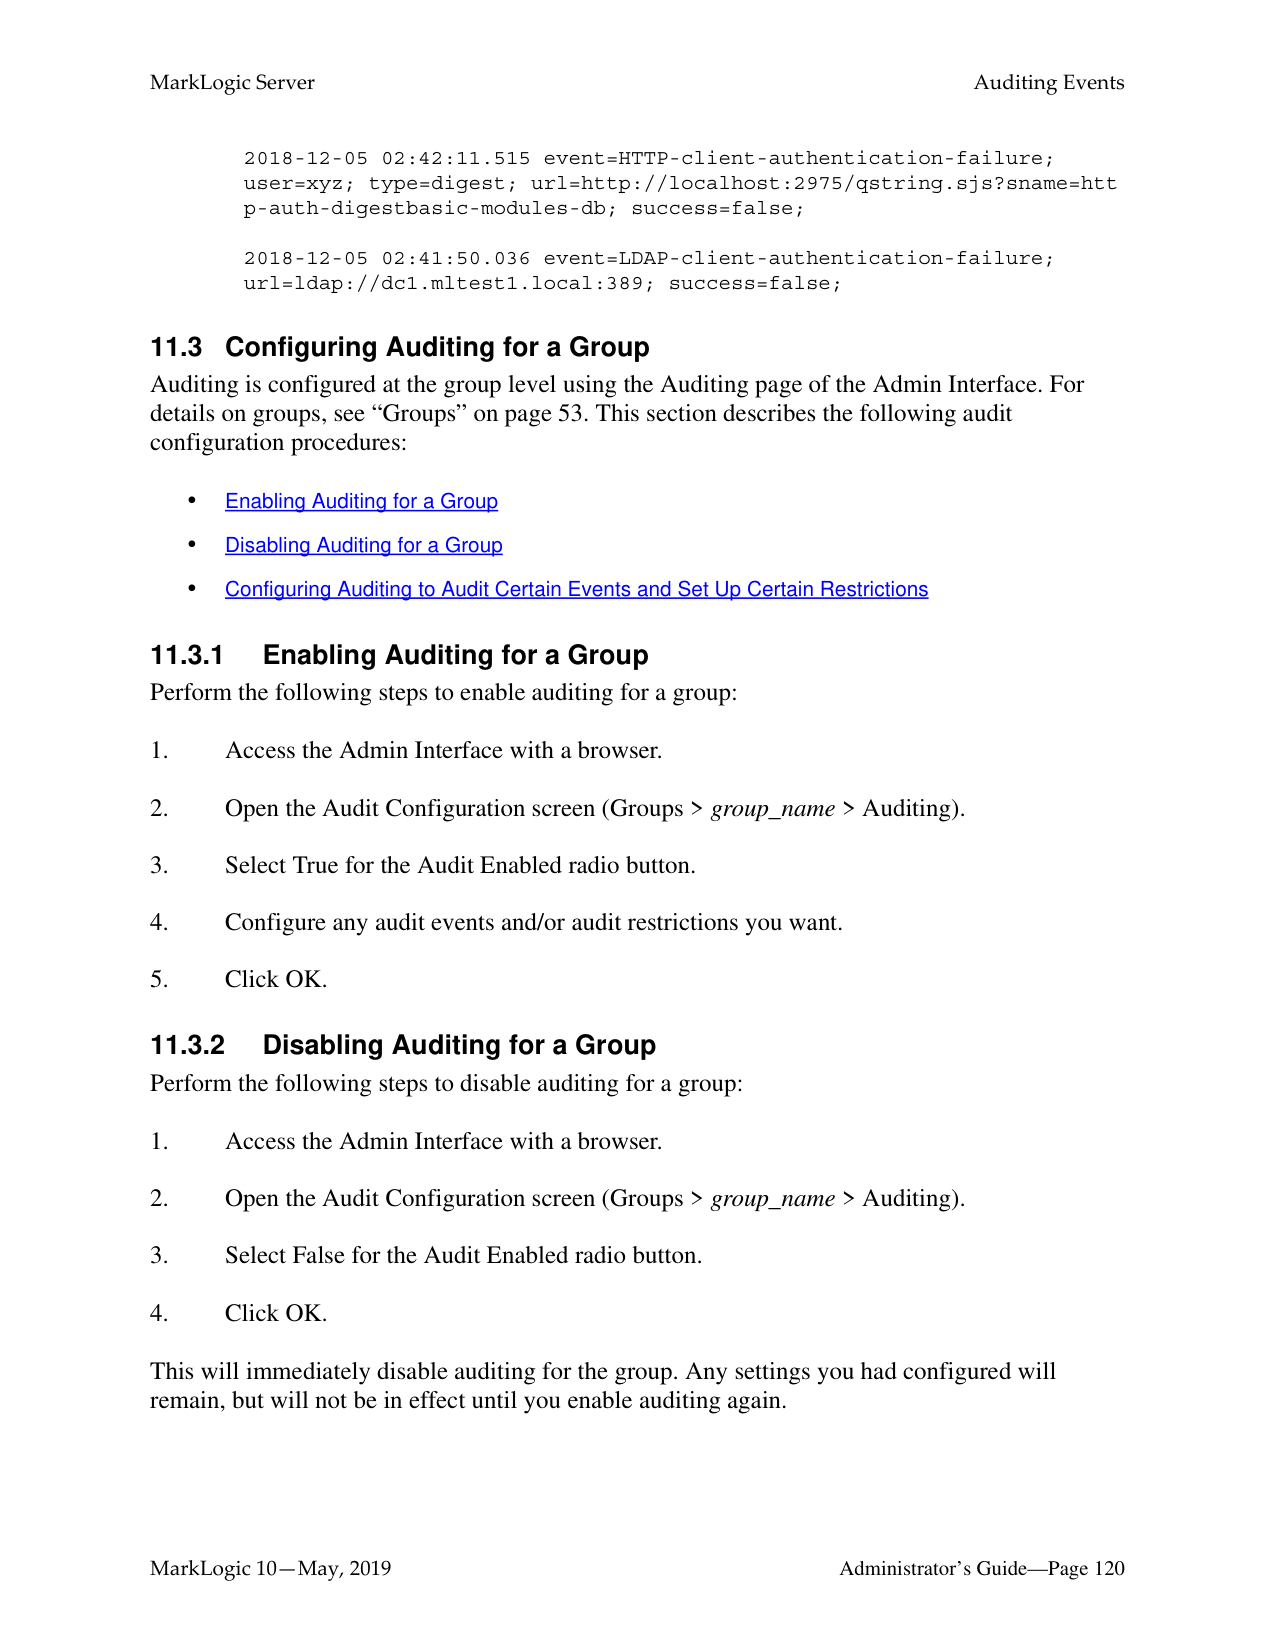
},
}
"limits" : { "elapsedTime" : 3, "odbcBytesSent": 200000, "odbcRowsSent": 10000
} }
##### 11.0 Auditing Events
MarkLogic Server provides an auditing facility to audit various events such as document read access, server startup, server shutdown, document permission changes, and so on. These audit event records are logged to audit files stored under the MarkLogic Server data directory for each instance of MarkLogic Server. This chapter describes the auditing features and includes the following parts:
######### 11.1 Overview of Auditing
Auditing in MarkLogic Server enables you to specify which events should generate an audit event record. You can choose from a large list of events to audit, and can restrict audit events based on various identities (user, role, or document URI). This section describes the logging capabilities of MarkLogic Server and includes the following parts:
######### 11.1.1 Audit Log Files
When auditing is enabled, MarkLogic Server writes audit events to the AuditLog.txt file. Each host in a cluster maintains its own audit log files. Some actions might trigger multiple audit events, and those events might be logged over multiple hosts, as events are audited on the host in which the event occurs. For more information about the audit events, see “Auditable Events” on page 113. Note the following about the audit event log files:
The following table shows the location of the AuditLog.txt files on the various platforms.

|Platform|Audit File| |---|---| | | | |Microsoft Windows|C:\Program Files\MarkLogic\Data\Logs\AuditLog.txt| |Red Hat Linux|/var/opt/MarkLogic/Logs/AuditLog.txt| |Mac OS X|~Library/Application Support/MARKlogic/Data/Logs/AuditLog.txt|
For the procedure to set up auditing, see “Configuring Auditing to Audit Certain Events and Set Up Certain Restrictions” on page 121.
######### 11.1.3 Audit Successful, Unsuccessful, or Both Types of Events
You can choose to audit only unsuccessful, only successful, or both types of events. If you audit many events and/or if you audit both successful and unsuccessful events, then you may end up auditing a lot of events. It is not really a problem to audit many events, but it might make your audit logs get very large very fast. For the procedure to set up auditing, see “Configuring Auditing to Audit Certain Events and Set Up Certain Restrictions” on page 121.
######### 11.1.4 Enabled at the Group Level
You can enable or disable auditing for each group. If auditing is enabled for a group, any configured auditable event for that group is audited. For details on the procedure to enable auditing, see “Enabling Auditing for a Group” on page 120.
######### 11.2 Auditable Events
There are many auditable events in MarkLogic Server. When auditing is enabled, any enabled auditable event logs are written to the AuditLog.txt file. In a clustered environment, audit events are written to the audit file on the host in which the event occurs. Some activities might result in audit events that are distributed over multiple hosts, because events are audited on the host in which the event occurs. For example, the document access audit events are audited on the data node where the forest containing the document is hosted, therefore if a query that updates a document is run, it could cause (depending on the audit configuration and the cluster configuration) audit events to occur on the node in which the query is evaluated (the evaluation-node) and on one or more data-nodes where the affected documents are hosted.
The following table lists the auditable events you can enable in MarkLogic Server.
|Event|Description|URI Restrictions|Role/User Restrictions|Success or Failure Restrictions| |---|---|---|---|---| | | | | | | |amp-usage|Audits the URI of an amp when it is evaluated.|Yes, based on the URI of the amp|Yes|Success Only| |audit-configuration-change|Audits the success or failure of a change to a auditing configuration.|N/A|Yes|Yes| |audit-shutdown|Audits when the audit system is disabled.|N/A|Yes|Yes| |audit-startup|Audits when the audit system is enabled. Note that this event does not occur when MarkLogic Server starts up, only when the audit system is enabled.|N/A|Yes|Yes| |authentication-failure|Audits failed authentication attempts.|N/A|Yes|Failure Only|
|Event|Description|URI Restrictions|Role/User Restrictions|Success or Failure Restrictions|
|---|---|---|---|---| | | | | | | |concurrent-request-denial|Audits when a request is denied because the concurrent request limit on the App Server was reached.|N/A|Yes|Failure Only| |configuration-change|Audits the success or failure of a change to a configuration file, including the path to the configuration file that changed.|N/A|Yes|Yes| |document-execute|Audits when a document in a database is executed (for example, an XQuery document), and includes the document URI in the audit record.|Yes|Yes|Success Only| |document-insert|Audits when a new document is created, and includes the document URI in the audit record.|Yes|Yes|Success Only| |document-read|Audits when a document is read, and includes the document URI in the audit record.|Yes|Yes|Success Only| |document-update|Audits when a document is updated, and includes the document URI in the audit record.|Yes|Yes|Success Only| |document-wipe|Audits when a temporal document is wiped (all versions deleted), and includes the document URI in the audit record.|Yes|Yes|Success Only|
|Event|Description|URI Restrictions|Role/User Restrictions|Success or Failure Restrictions| |---|---|---|---|---| | | | | | | |estimate|Audits when an xdmp:estimate expression is evaluated.|N/A|Yes|Success Only| |eval|Audits when a path expression that accesses the database is evaluated.|N/A|Yes|Success Only| |external-authentication-fail ure|Audits when an external authorization attempt fails.|N/A|Yes|Success Only| |exists|Audits when an xdmp:exists expression is evaluated.|N/A|Yes|Success Only| |FIPS-Disabled|Audits when FIPS mode is disabled.|N/A|N/A|Success Only| |FIPS-Enabled|Audits when FIPS mode is enabled.|N/A|N/A|Success Only| |lexicon-read|Audits when a value lexicon (for example, cts:element-values) call is used.|N/A|Yes|Success Only| |mlcp-copy-export-start|Audits when an mlcp copy or export job is about to start|N/A|N/A|Success Only| |mlcp-copy-export-finish|Audits when an mlcp copy or export job has completed, successfully or not.|N/A|N/A|No|
|Event|Description|URI Restrictions|Role/User Restrictions|Success or Failure Restrictions| |---|---|---|---|---| | | | | | | |no-permission|Audits when an operation fails because of a SEC-PERMDENIED exception, which happens when an operation on a document (insert, update, or execute) is attempted without the needed permissions.|Yes|Yes|Failure Only| |no-privilege|Audits when a user has insufficient privileges to perform a particular function.|Yes|Yes|Failure Only| |optic|Audits when an optic call completes.|N/A|Yes|Success Only| |permissions-change|Audits when permissions on a document are modified.|Yes|Yes|Yes| |request-blackout-denial|Audits when a request is denied due to a request blackout period.|N/A|Yes|Failure Only (when denied)| |role-change-failure|Audits when an attempt to add or remove a role from a user fails.|N/A|Yes|Failure Only| |search|Audits when a cts:search expression is evaluated.|N/A|Yes|Success Only|
|Event|Description|URI Restrictions|Role/User Restrictions|Success or Failure Restrictions| |---|---|---|---|---| | | | | | | |security-access|Audits when one of the following security-related functions are called: xdmp:can-grant-roles, xdmp:has-privilege, xdmp:user-roles, xdmp:role-roles, xdmp:privilege-roles, xdmp:amp-roles, xdmp:get-current-role, xdmp:user, xdmp:role, xdmp:amp.|N/A|Yes|Yes| |server-restart|Audits when MarkLogic Server is restarted with a clean restart (for example, from the Admin Interface).|N/A|Yes|Success Only| |server-shutdown|Audits when MarkLogic Server is shut down with a clean shutdown (for example, from the shutdown scripts or from the Admin Interface).|N/A|Yes|Success Only| |server-startup|Audits when MarkLogic Server starts up.|N/A|N/A|Success Only| |SPARQL|Audits when a SPARQL call completes.|N/A|Yes|Success Only| |SQL|Audits when a SQL call completes.|N/A|Yes|Success Only|
|TLS-Failure|Audits when a TLS or SSL request fails, and includes the IP address.|N/A|N/A|Failure Only|
|Event|Description|URI Restrictions|Role/User Restrictions|Success or Failure Restrictions| |---|---|---|---|---| | | | | | | |user-configuration-change|Audits when anything in a user configuration changes.|N/A|Yes|Yes| |user-role-addition|Audits when a role is added to a user.|N/A|Yes|Yes| |user-role-removal|Audits when a role is removed from a user.|N/A|Yes|Yes| |HTTP-client-authentication-f ailure|Audits failed HTTP client authentication attempts.|N/A|Yes|Failure Only| |LDAP-client-authentication-f ailure|Audits failed LDAP client authentication attempts.|N/A|Yes|Failure Only| |SMTP-client-authentication-f ailure|Audits failed SMTP client authentication attempts.|N/A|Yes|Failure Only|
######### 11.2.1 Audit Log Content
The information included in an audit log depends on the type of event. All audit log entries include basic information such as the event type, user, success, and roles assigned to the user. Audit log entries may include the following space-separated fields:
|Log Entry Field|Description|Example| |---|---|---| | | | | |Timestamp|Contains the date and time the auditable action occurred.|2012-03-26 10:55:53.735| |Event|The name of the event that triggered the log entry. The possible auditable events are listed in “Auditable Events” on page 113.|event=amp-usage|
|Function|The function that was being executed during the event.|function=http://marklogic.com/xdmp /admin:read-config-file| |Expression|The query expression that triggered this audit event.|expr=cts:element-value-query(xs:QN ame("info:status"), ("active", "unloading"), ("unstemmed","lang=en"), 1)| |Type|The type of task inside the MarkLogic server that generated the specific event.|type=node-update| |URI|The document URI involved in the event.|uri=/queries/5523898374388210414.t xt| |Database|The database that was accessed during the event.|database=Security| |Outcome|This indicates the success or failure of the action that triggered the audit event.|success=true| |User|The user that performed the action.|user=infostudio-admin| |Roles|The roles assigned to the user performing the action.|roles=cpf-restart,infostudio-user|
2018-12-05 02:23:15.302 event=SMTP-client-authentication-failure; user=daemon; host=smtp.marklogic.com; success=false;
2018-12-05 02:42:11.515 event=HTTP-client-authentication-failure; user=xyz; type=digest; url=http://localhost:2975/qstring.sjs?sname=htt p-auth-digestbasic-modules-db; success=false;
2018-12-05 02:41:50.036 event=LDAP-client-authentication-failure; url=ldap://dc1.mltest1.local:389; success=false;
######### 11.3 Configuring Auditing for a Group
Auditing is configured at the group level using the Auditing page of the Admin Interface. For details on groups, see “Groups” on page 53. This section describes the following audit configuration procedures:
This will immediately disable auditing for the group. Any settings you had configured will remain, but will not be in effect until you enable auditing again.
######### 11.3.3 Configuring Auditing to Audit Certain Events and Set Up CertainRestrictions
The following is the general procedure for configuring audit events and audit restrictions. Your procedure will vary depending on what events and restrictions you choose to configure.
##### 12.0 Managing User Requests and Monitoring LoginAttempts
MarkLogic Server provides facilities to control and manage user requests and monitoring login attempts. This chapter describes how to use and manage these features and includes the following parts:
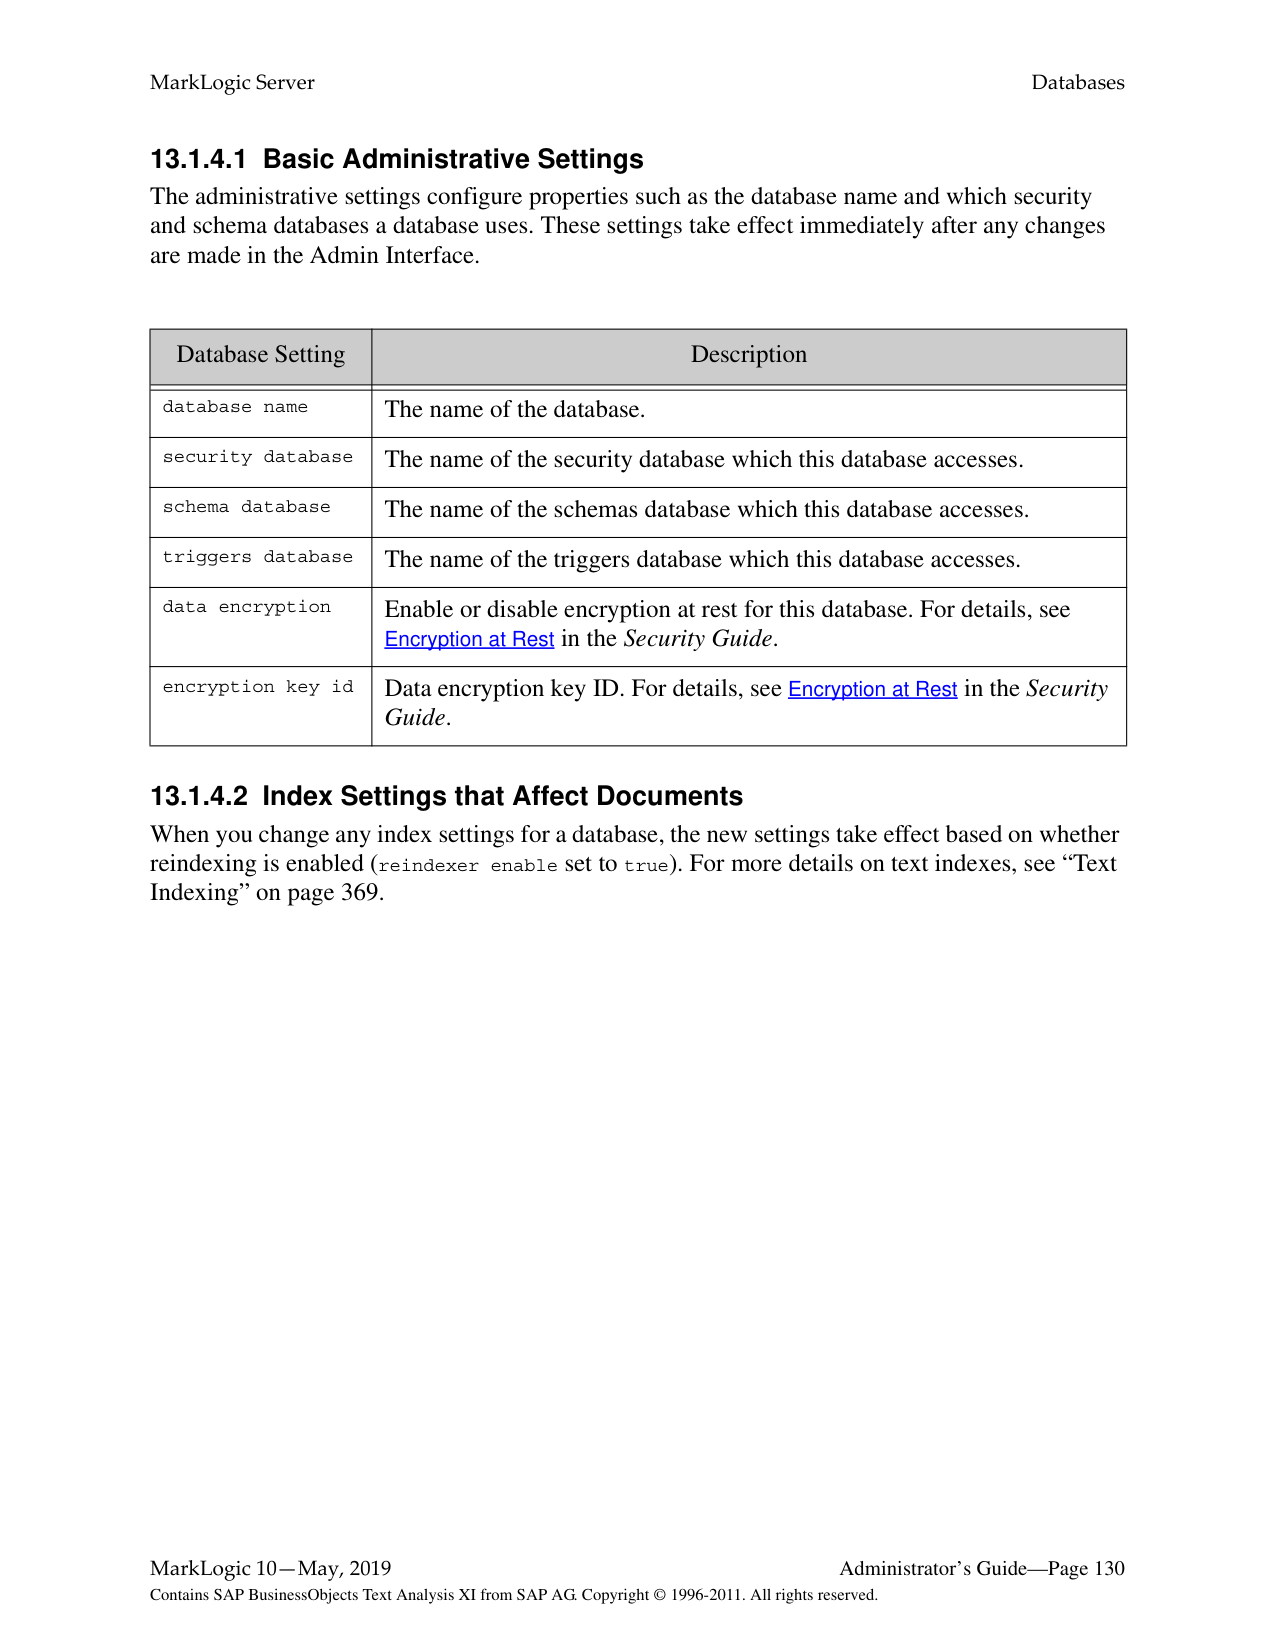
######### 12.1 Managing Concurrent User Requests
MarkLogic Server allows you to limit the maximum number of concurrent user requests against a given App Server. This section describes this feature and provides information on configuring the concurrent request limit, and includes the following parts:
######### 12.1.1 Limiting Concurrent Requests with User Request Limits
There is an option on each App Server (HTTP , ODBC, XDBC, and WebDAV Server) configuration to limit the number of concurrent requests a user can have against that App Server. A concurrent request is defined to be a request against that App Server from the same user while another request from the same user is still active. Each App Server has a concurrent request limit configuration parameter. The default is 0, which means there is no limit to the number of concurrent requests. The value must be an integer greater than or equal to 0. If you set the concurrent request limit configuration parameter to a value other than 0, it limits the number of concurrent requests any user can run against that App Server to the specified number. For example, if you set the number to 3, then any requests made by a user named raymond while 3 requests from raymond are running will fail with an exception. When the limit is reached, the application will throw a 403 (forbidden) error with the XDMP-REQUESTLIMIT exception.
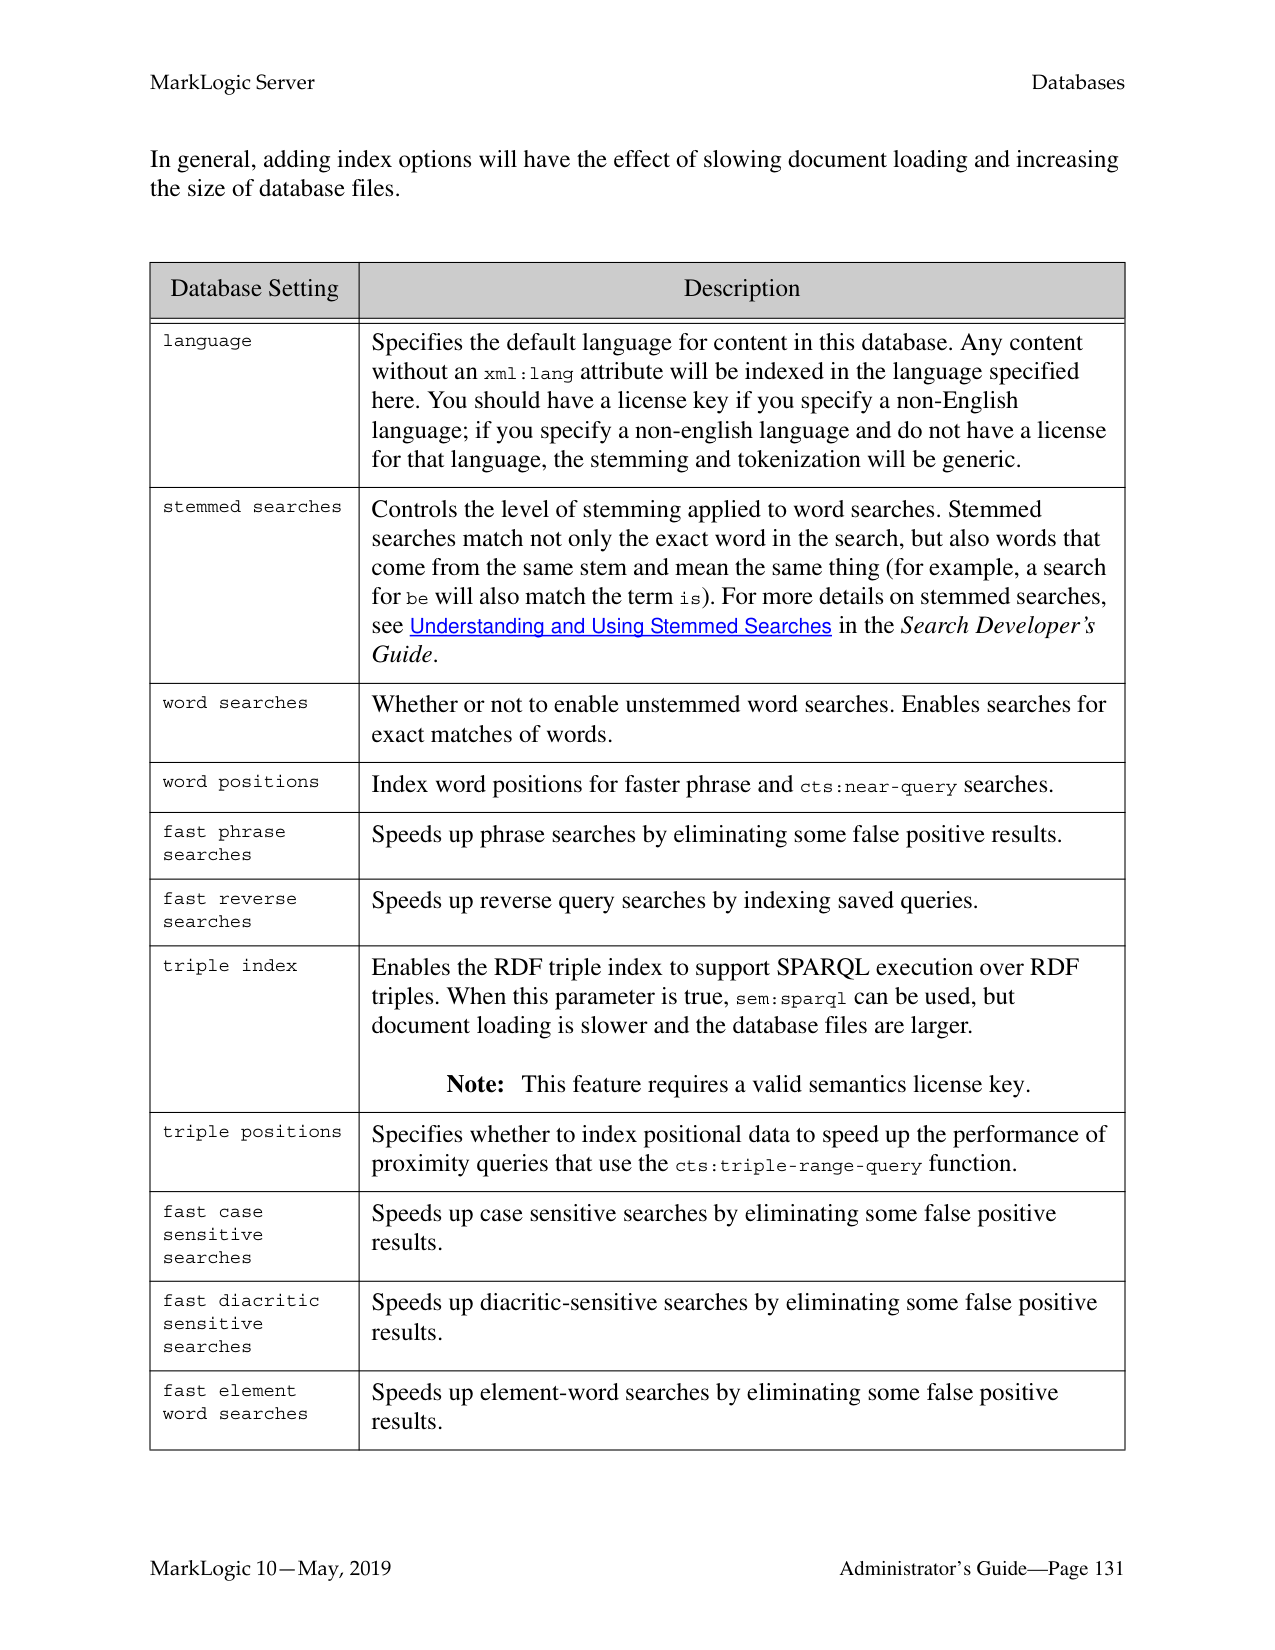
######### 12.2 Setting Request Blackouts on an App Server
MarkLogic Server allows you to manage when a user or group of users cannot run requests against an App Server. You can manage these blackout periods for each App Server by setting up one or more Request Blackouts for an App Server. Request blackouts can specify users, roles, and time periods for the blackouts, as well as specifying if it is a one-time blackout or a recurring blackout.
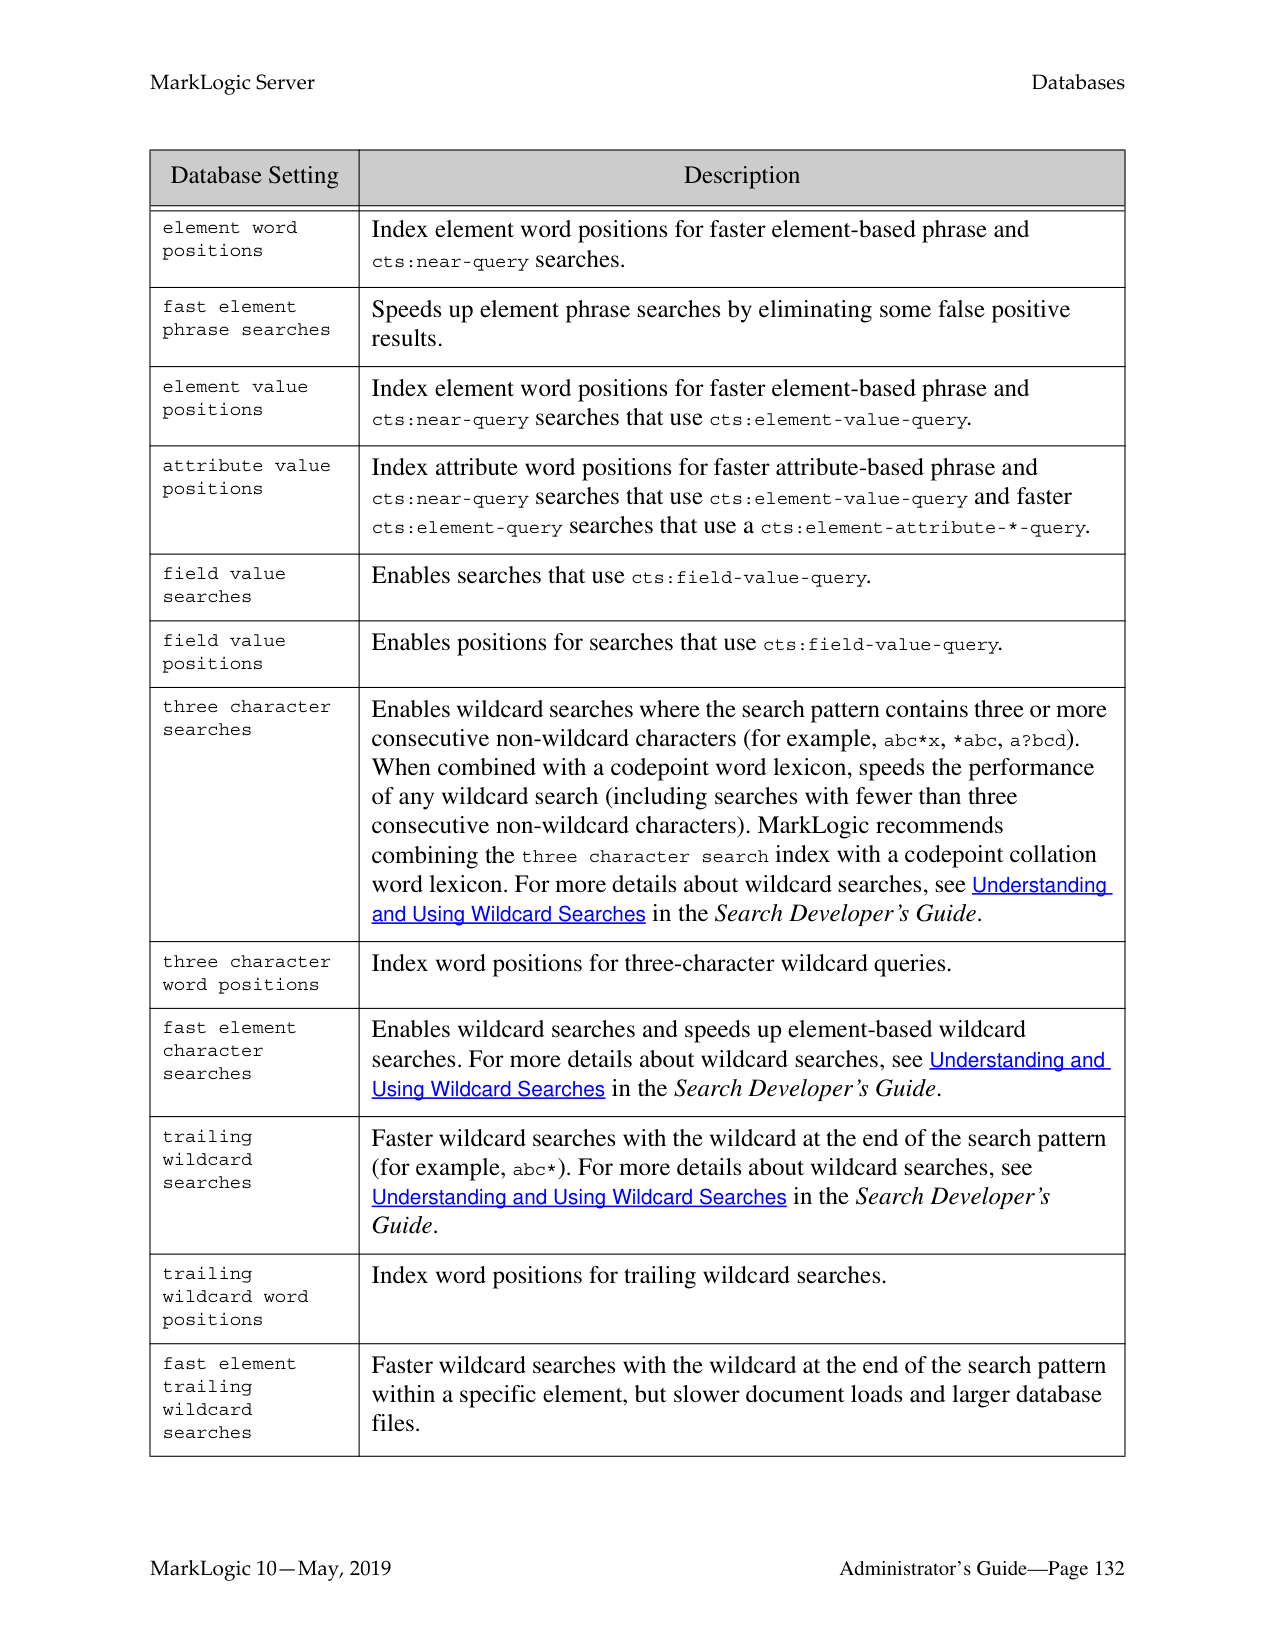
######### 12.3 Storing and Monitoring the Last User Login Attempt
MarkLogic Server provides the ability to store the outcome of the last attempt a user made at logging in. This section describes this feature and how to use it, and contains the following parts:
######### 12.3.1 Storing Last User Login Information in a Last-Login Database
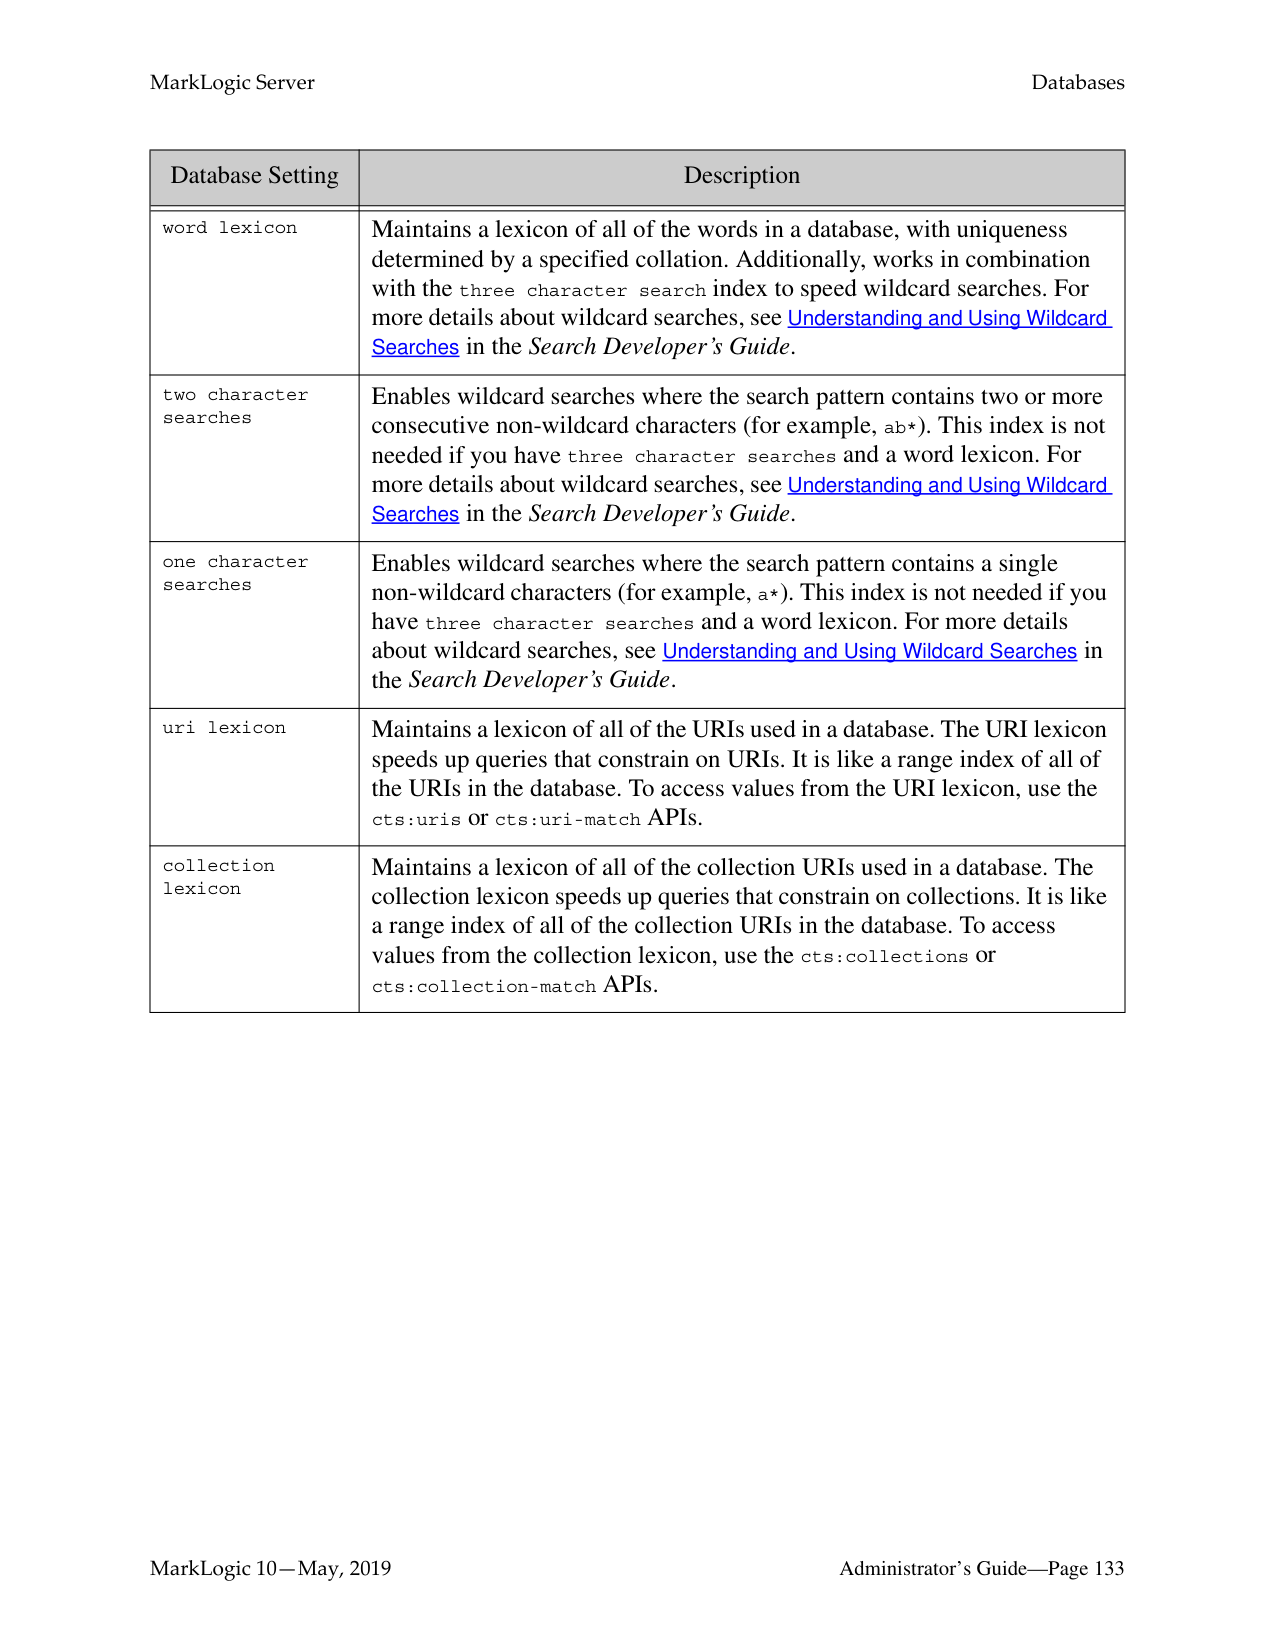
A database named Last-Login is created upon installation of (or upgrade from 3.2 to) MarkLogic Server. You can use this database as the last-login database for one or more App Servers. Each time a successful or unsuccessful login is made via the App Server, the last-login database is updated with that information. Only information for the last login attempt is retained. Because this database is constantly changing with each login attempt (every request is authenticated, so each request updates the last-login database), it is a good idea to use a different database than content database for your last-login database. In general, it is probably OK to keep a single last-login database that is shared by all App Servers who use this functionality, but if you do this, keep in mind that the information will then be shared by all the App Servers; that is, that the last-login time and other statistics will be for all App Servers using the last-login database.
Note: A history of the successful login attempts is not retained; only the time of the last
successful login is stored in the database.
######### 12.3.3 Displaying the Last Login Information for an App Server or for theAdmin Interface
Each App Server configuration page has a display last login setting. The value of this setting is returned as part of the XML output of the xdmp:user-last-login API. You can use this information as logic in your application to determine whether to display some last-login information to the application.
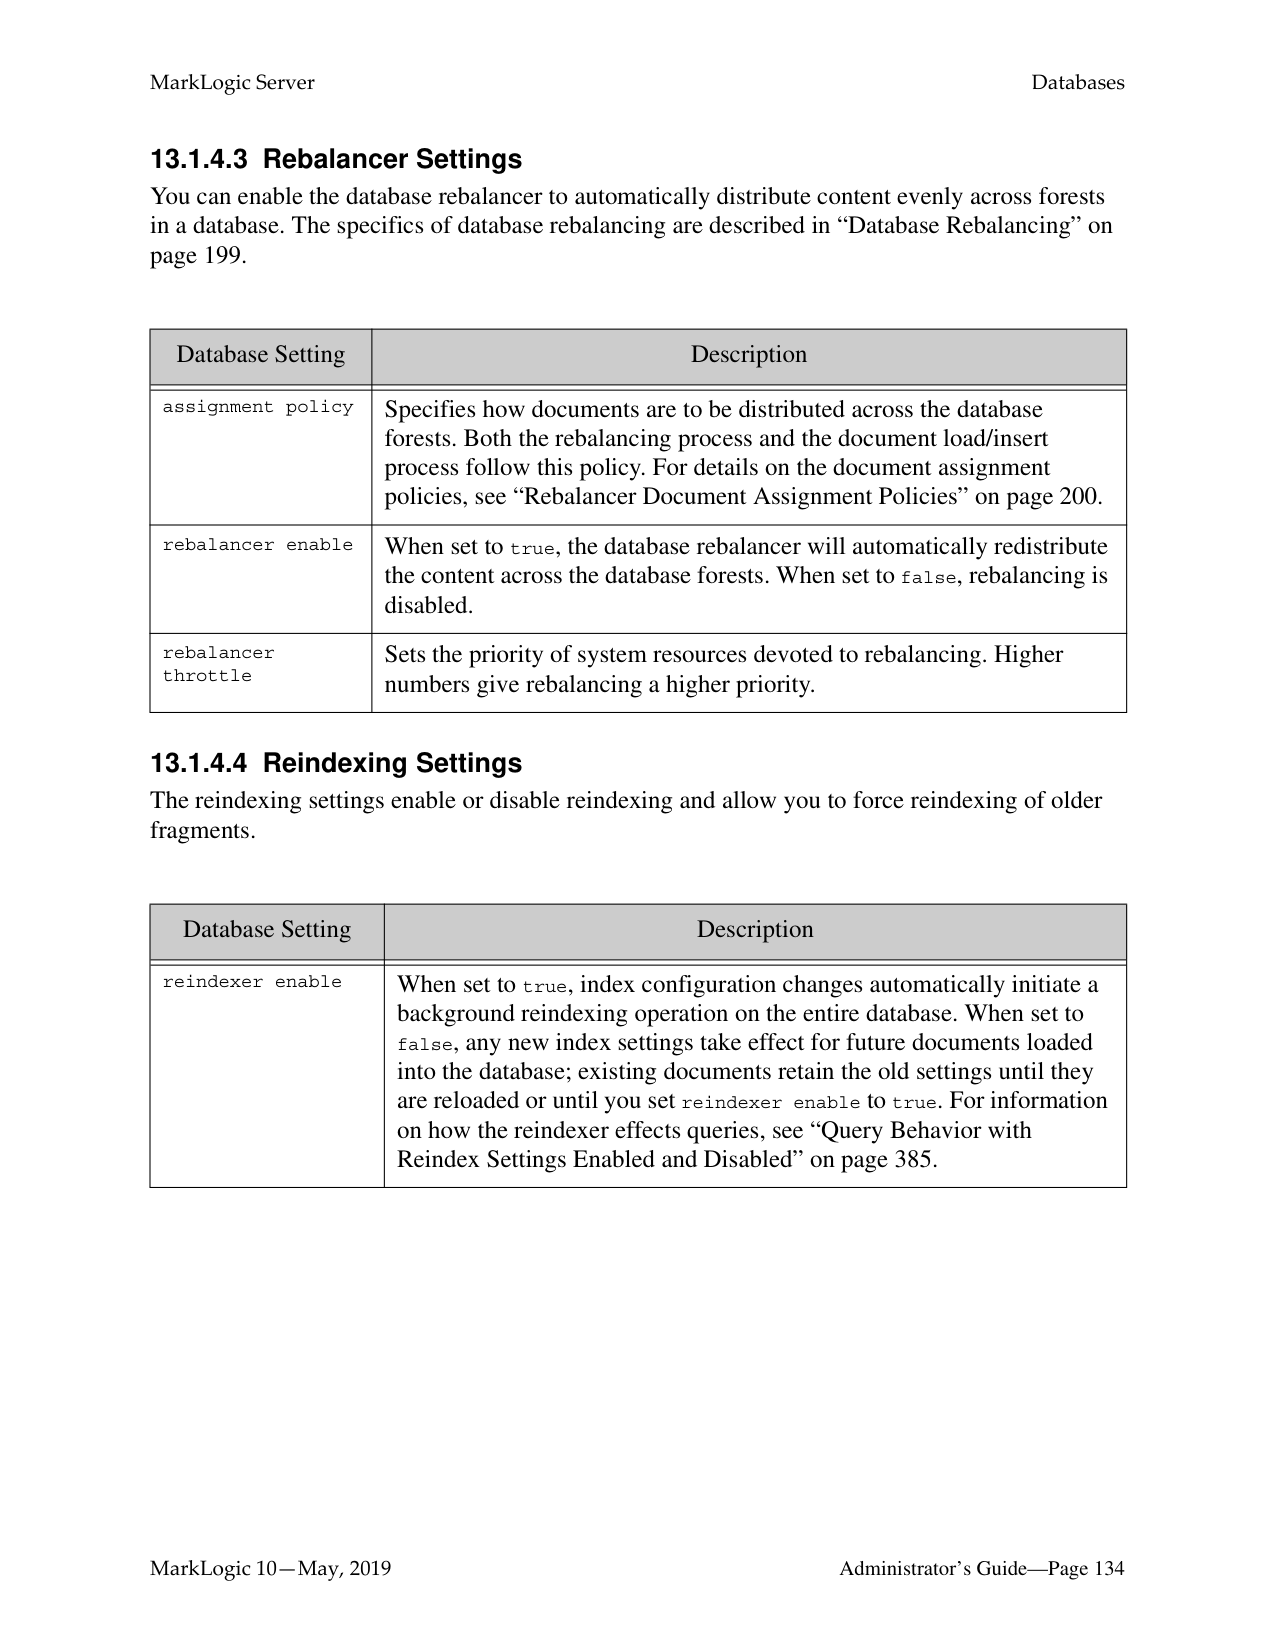
The Admin Interface uses the display last login setting to show information about its last login attempt. When a last-login database is configured and the display last login setting is true, then something similar to the following is displayed at the bottom of each page of the Admin Interface:
last successful login: September 2, 2008 7:54:16 PM
last unsuccessful login: none unsuccessful login attempts since last login: 0
##### 13.0 Databases
This section introduces basic database management procedures. Later sections in this guide introduce some concepts for tuning the performance of your databases. For information on database backup and restore operations, see “Backing Up and Restoring a Database” on page 253. The following topics are included:
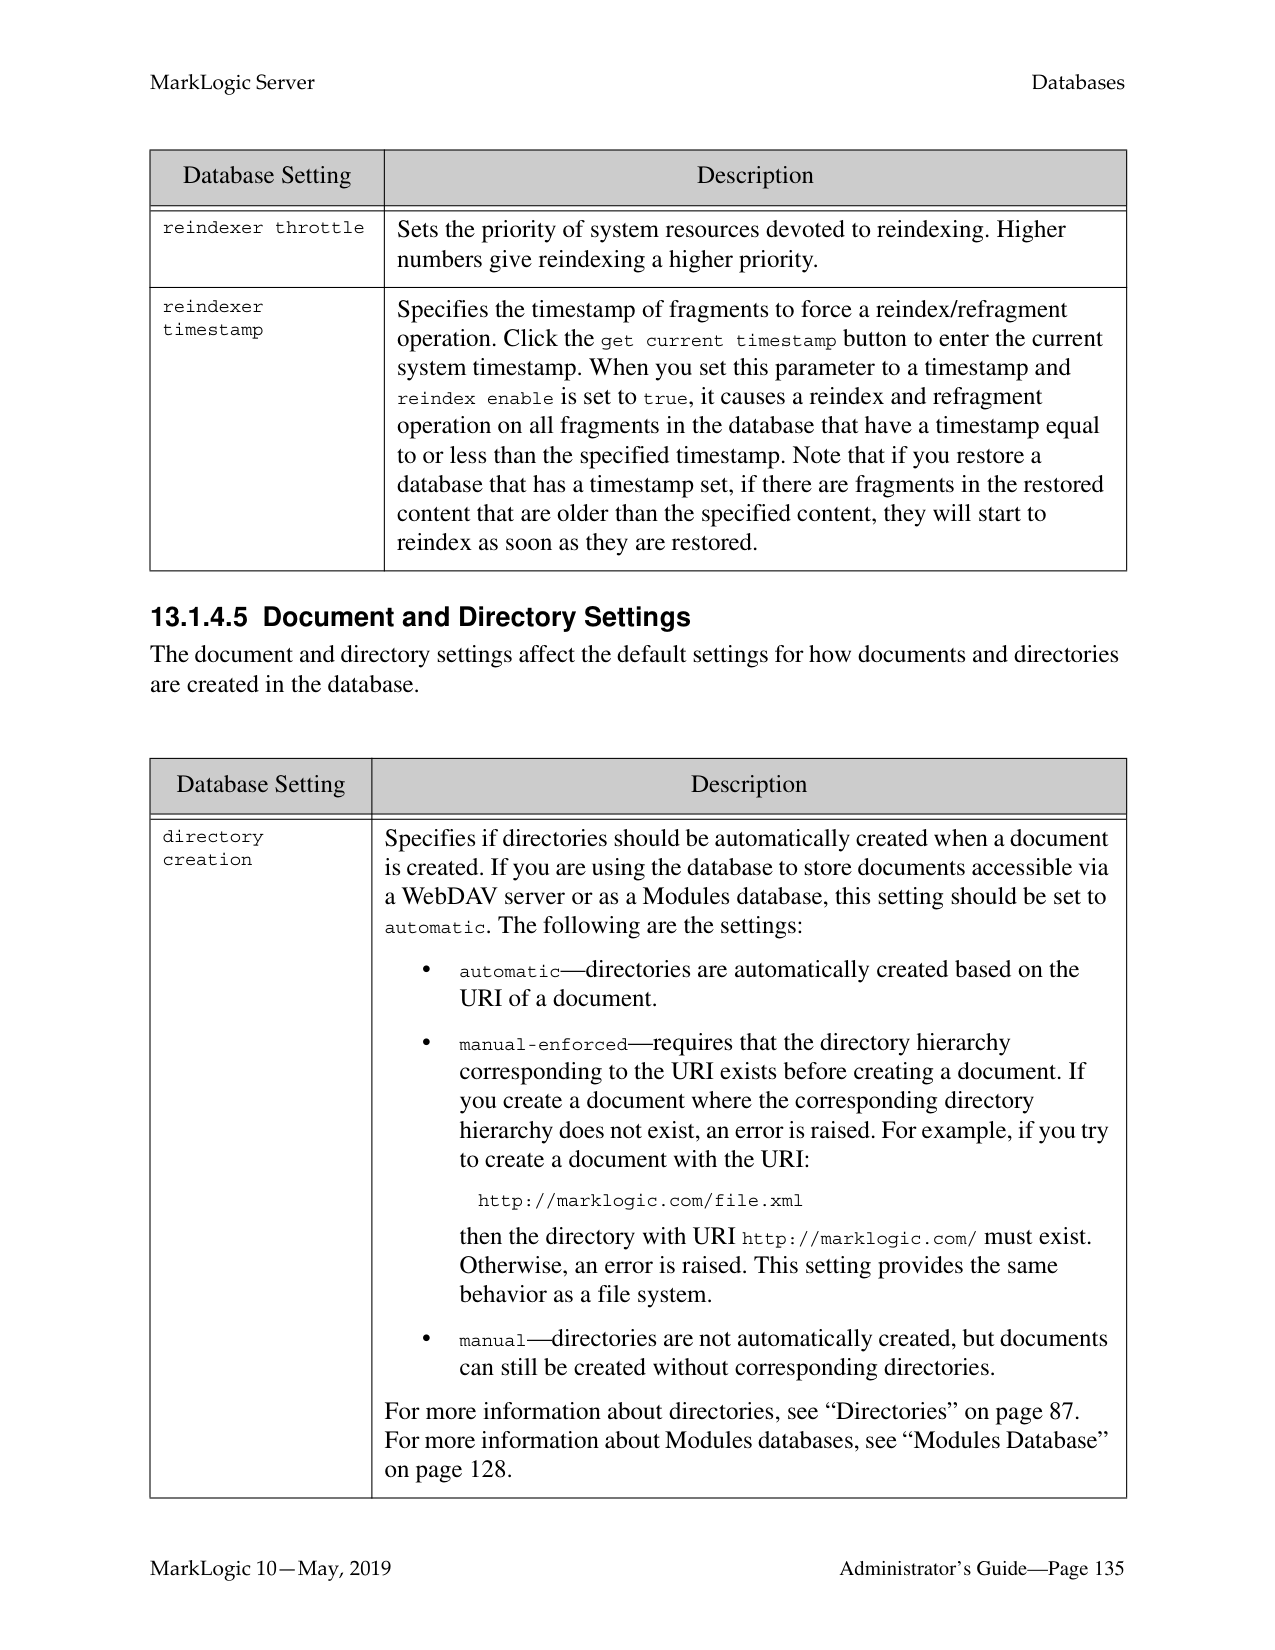
This chapter describes how to use the Admin Interface to create and configure databases. For details on how to create and configure databases programmatically, see Creating and Configuring Forests and Databases in the Scripting Administrative Tasks Guide.
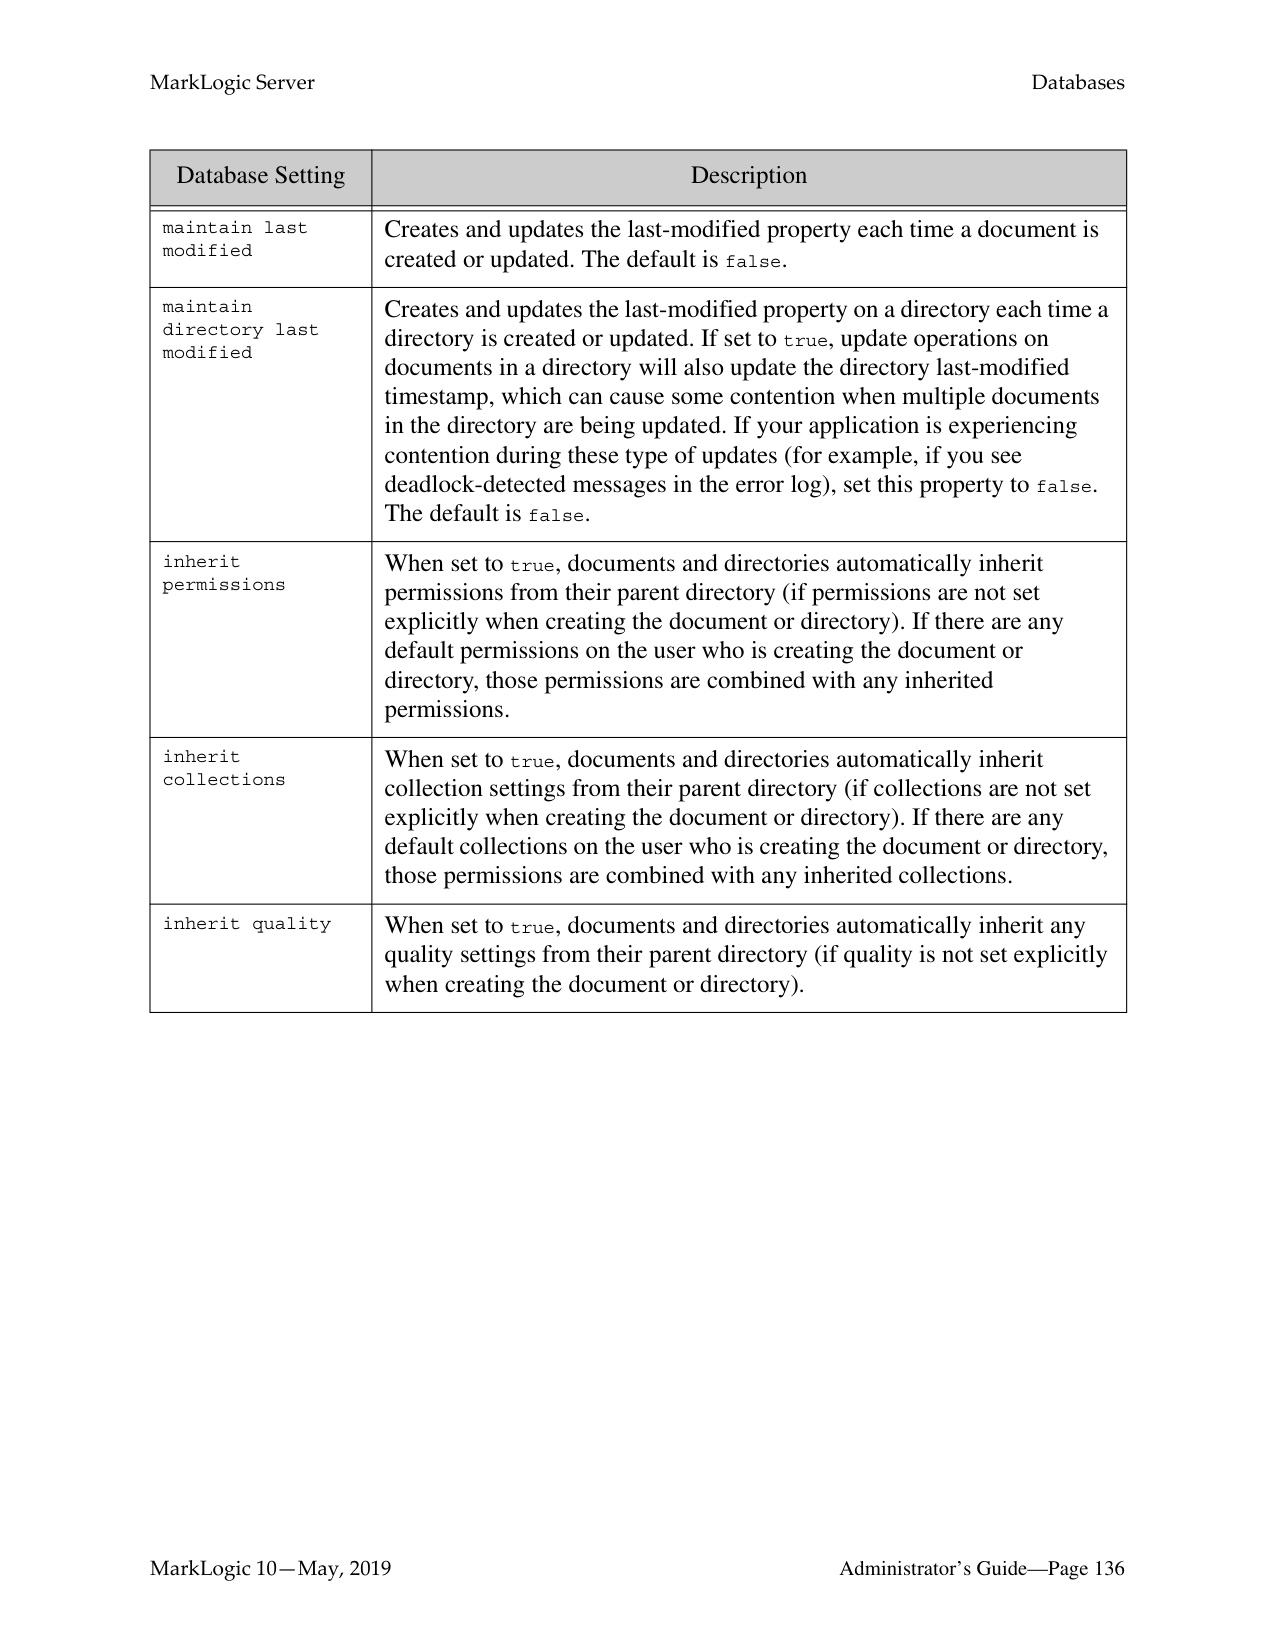
######### 13.1 Understanding Databases
A database in MarkLogic Server serves as a layer of abstraction between forests and HTTP, WebDAV, or XDBC servers. A database is made up of data forests that are configured on hosts within the same cluster but not necessarily in the same group. It enables a set of one or more forests to appear as a single contiguous set of content for query purposes. See “Understanding Forests” on page 321 for more detail on forests.
Multiple HTTP, XDBC, and WebDAV servers can be connected to the same database, allowing different applications to be deployed over a common content base. A database can also span forests that are configured on multiple hosts enabling data scalability through hardware expansion. To ensure database consistency, all forests that are attached to a database must be available in order for the database to be available.
Warning The system databases — Security, Schemas, Triggers, Modules, Extensions, Last-Login and App-Services — should all be single forest databases. For high availability, one or two replica forests can and should be configured. But there is no benefit to having multiple master forests in the database.
######### 13.1.1 Schemas and Security Databases
The installation process creates the following auxiliary databases by default - Documents, Last-Login, Schemas, Security, Modules, and Triggers. Every database points to a security database and a schema database. Security configuration information is stored in the security database and schemas are stored in the schemas database. A database can point back to itself for the security and schemas databases, storing the security information and schemas in the same repository as the documents. However, security objects created through the Admin Interface are stored in the Security database by default. MarkLogic recommends leaving databases connected to Security as their security database.
######### 13.1.2 Modules Database
The modules database is an auxiliary database that is used to store executable XQuery, JavaScript, and REST code. During installation, a database named Modules is created, but any database can be used as a modules database, as long as the HTTP or XDBC server is configured to use it as a modules database. Also, it is possible to use the same database to store executable modules, to store queryable documents, and/or to store triggers.
If you use a modules database, each executable document in the database must have the root (specified in the HTTP or XDBC server) as a prefix to its URI. Also, if you want to access the documents in the database via WebDAV, then it should have automatic directory creation enabled, because automatic directory creation is required for WebDAV. For information about directories and roots, see “Directories” on page 87 and “Server Root Directory” on page 88.
For example, if you are using a modules database and specify a root in an HTTP or XDBC server of http://marklogic.com/, the following documents are executable from that server:
http://marklogic.com/default.xqy http://marklogic.com/myXQueryFiles/search_db.xqy
but the following files are not executable (because they do not have URIs that start with the root):
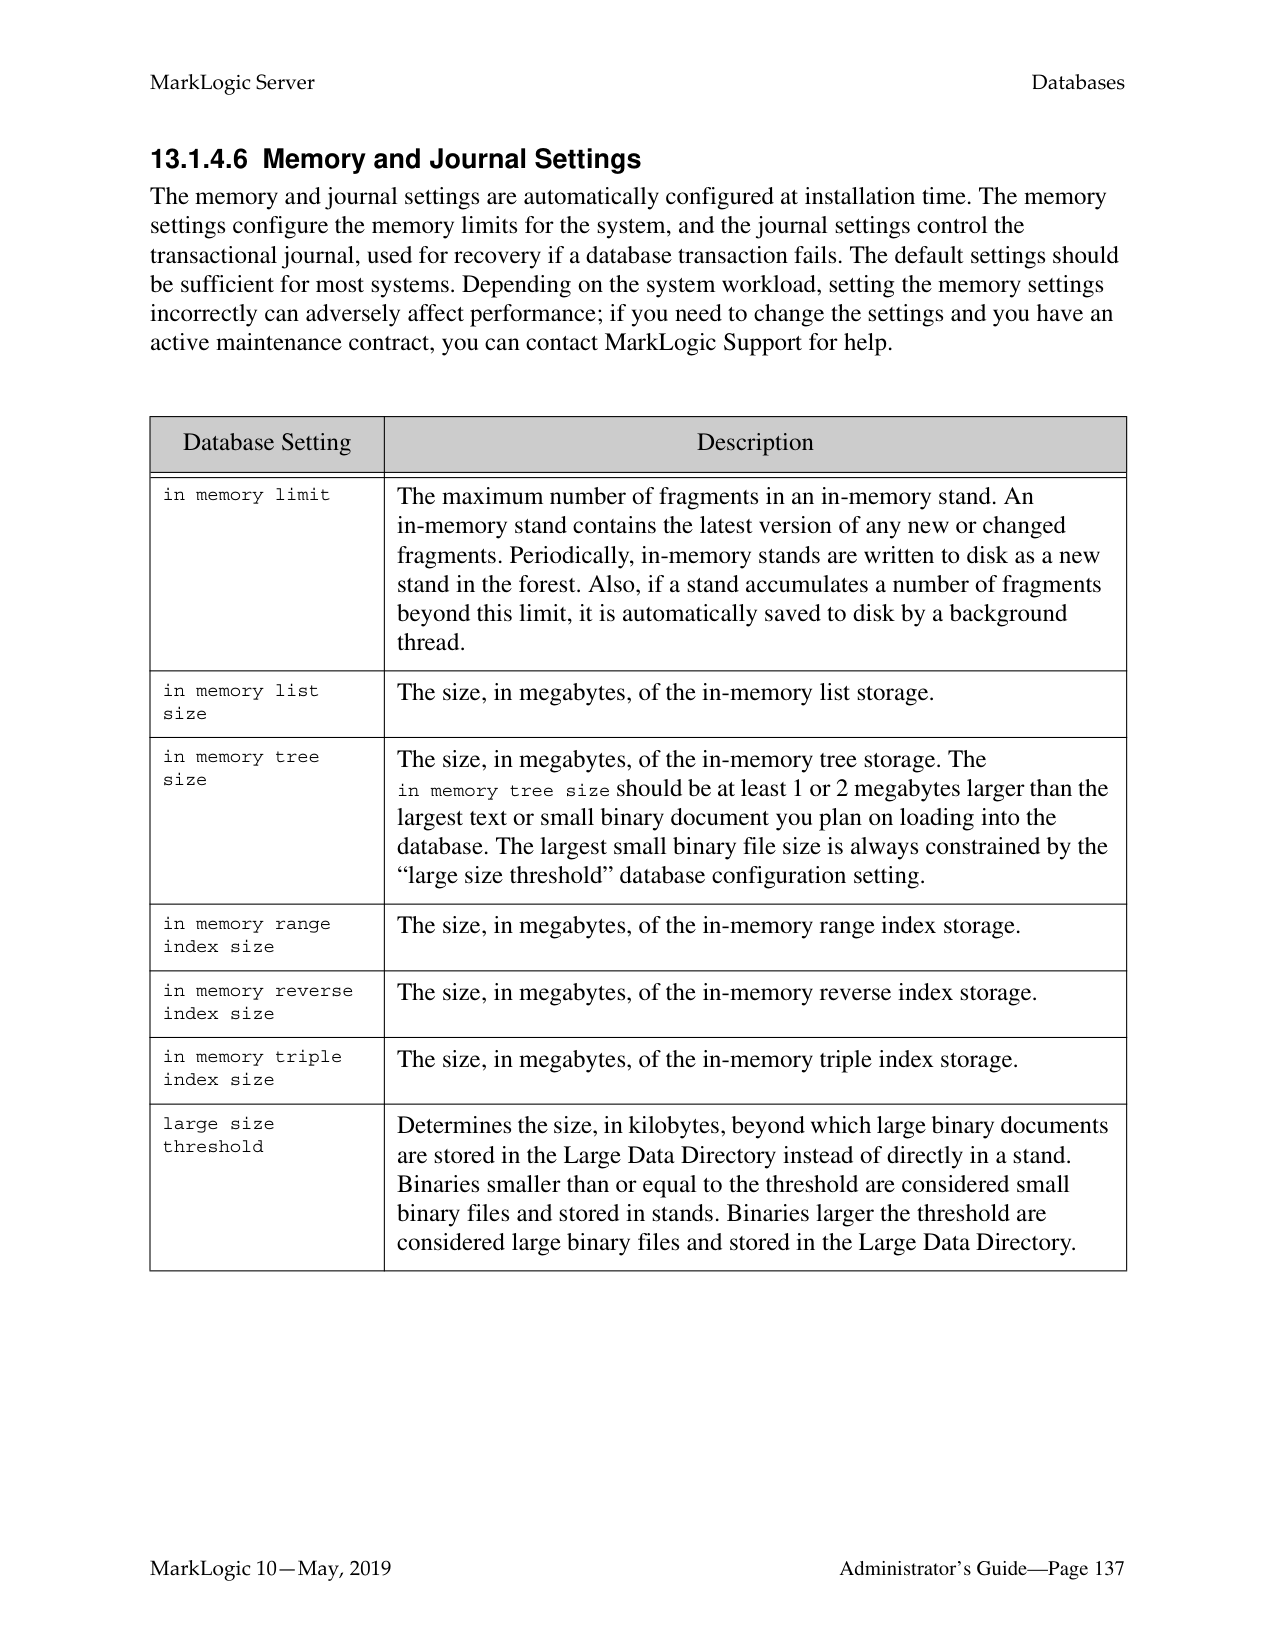
http://mycompany.com/default.xqy /myXQueryFiles/search_db.xqy
In order to execute any documents in a modules database, the documents must be loaded with execute permissions. You can do this either by loading the documents as a user with default privileges that include execute permissions, or by setting those permissions on the document after it loads. For information on using permissions, privileges, and other security features in MarkLogic Server, see “Security Administration” on page 339 and the chapters related to security in the Application Developer’s Guide.
######### 13.1.3 Triggers Database
The triggers database is an auxiliary database that is used to store triggers. During installation, a database named Triggers is created, but any database can be used as a triggers database. Also, it is possible to use the same database to store executable modules, to store queryable documents, and/or to store triggers. A triggers database is required if you are using the Content Processing Framework. For details on the Content Processing Framework, see Content Processing Framework Guide.
Note: To avoid issues with MLCP when triggers are configured, it is recommended that
you do not set a database to be its own Triggers Database.
######### 13.1.4 Database Settings
Each database has settings that control various aspects of a database such as memory allocation, indexing options, and so on. You configure these settings in the Admin Interface. You can configure the following basic types of settings for each database:
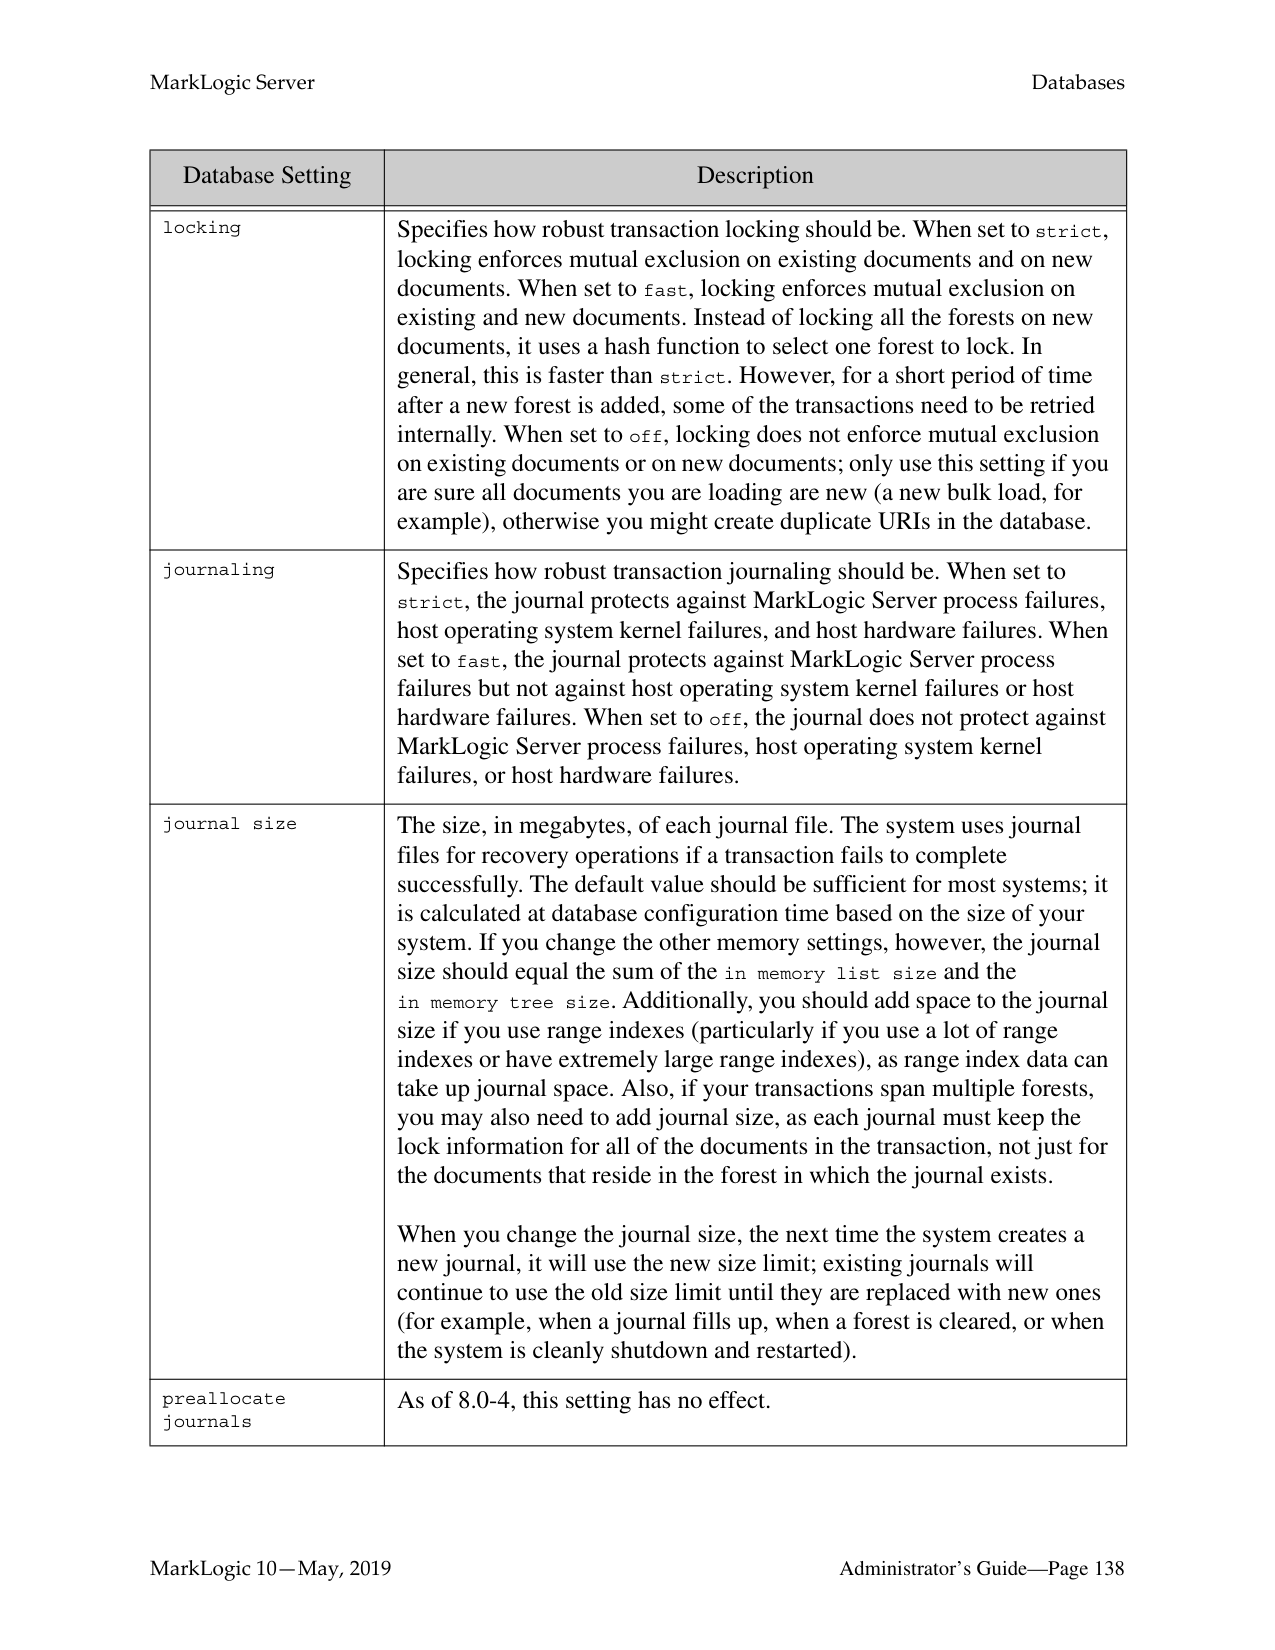
######### 13.1.4.1 Basic Administrative Settings
The administrative settings configure properties such as the database name and which security and schema databases a database uses. These settings take effect immediately after any changes are made in the Admin Interface.
|Database Setting|Description| |---|---| | | | |database name|The name of the database.| |security database|The name of the security database which this database accesses.| |schema database|The name of the schemas database which this database accesses.| |triggers database|The name of the triggers database which this database accesses.| |data encryption|Enable or disable encryption at rest for this database. For details, see Encryption at Rest in the Security Guide.
|
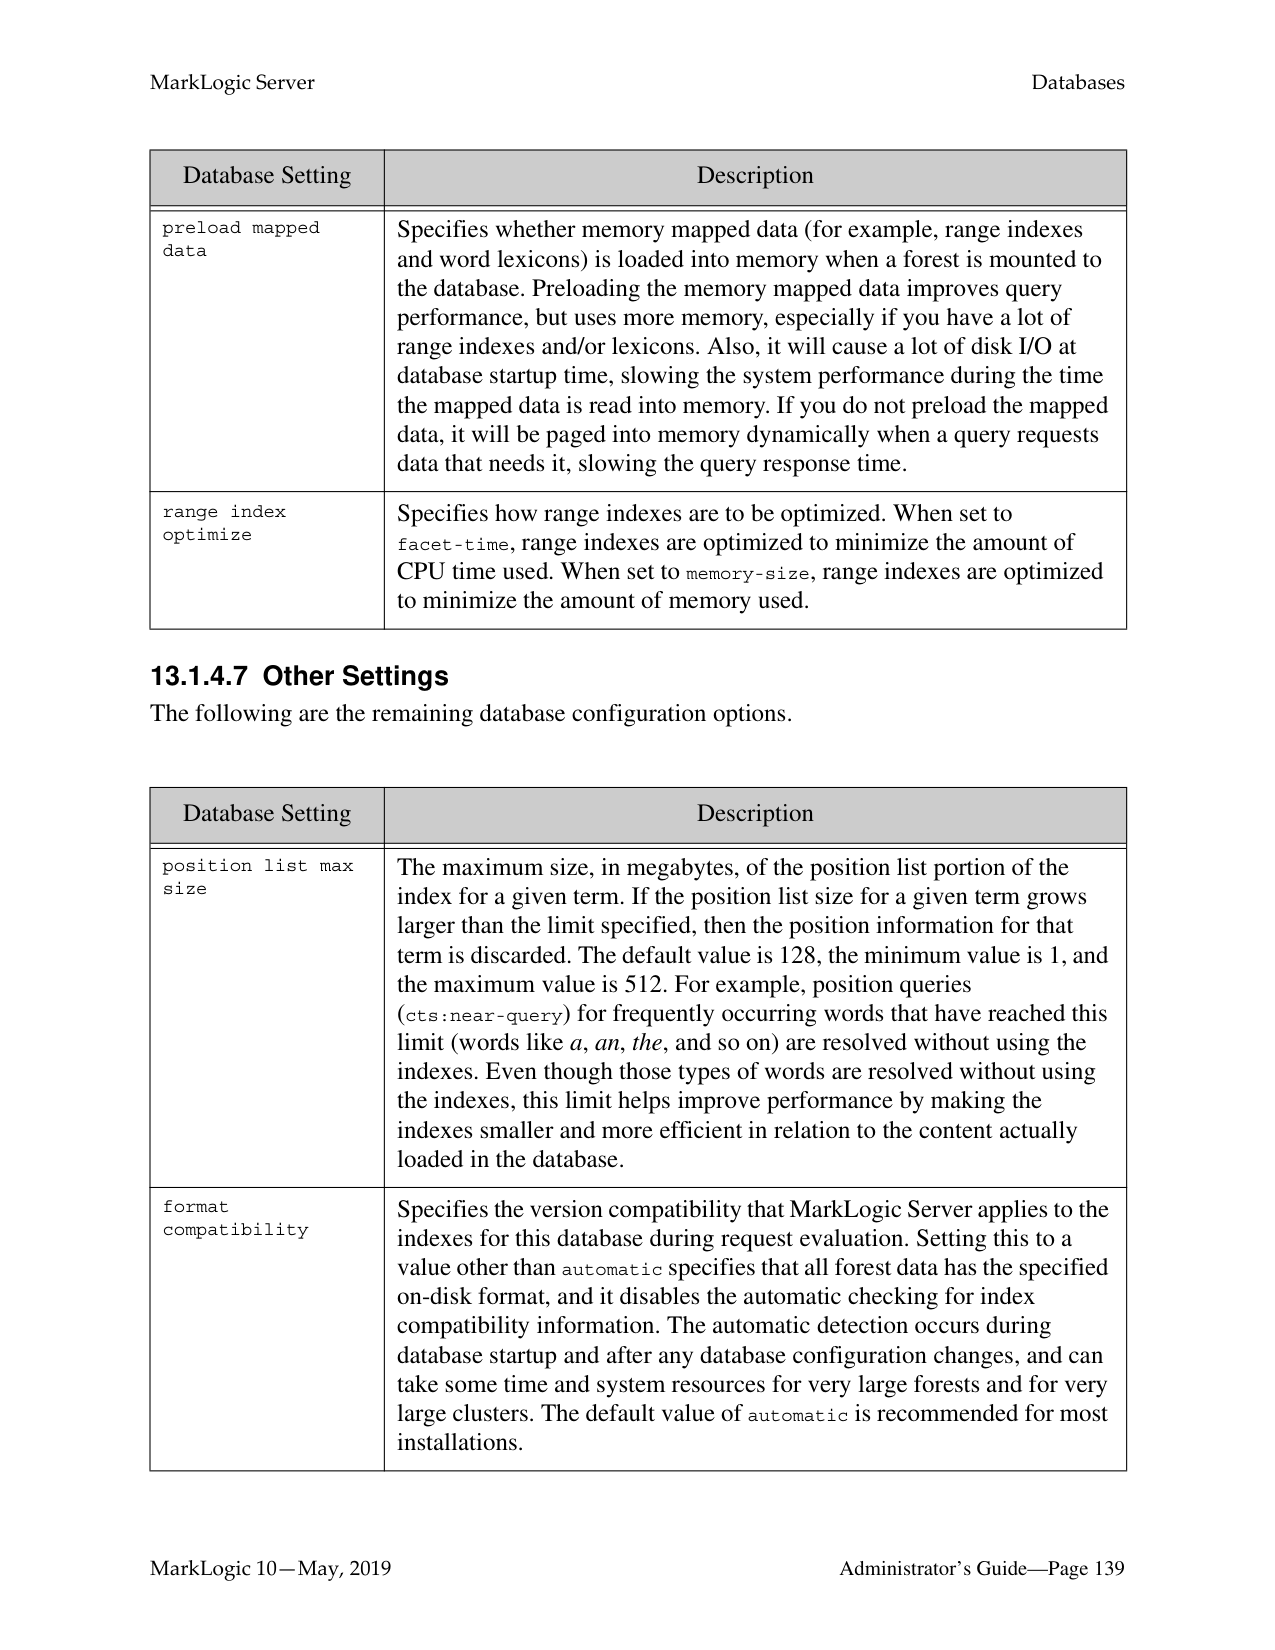
|encryption key id|Data encryption key ID. For details, see Encryption at Rest in the Security Guide.
|
######### 13.1.4.2 Index Settings that Affect Documents
When you change any index settings for a database, the new settings take effect based on whether reindexing is enabled (reindexer enable set to true). For more details on text indexes, see “Text Indexing” on page 369.
MarkLogic 10—May, 2019 Administrator’s Guide—Page 130 Contains SAP BusinessObjects Text Analysis XI from SAP AG. Copyright © 1996-2011. All rights reserved.
############## In general, adding index options will have the effect of slowing document loading and increasing the size of database files.
|Database Setting|Description| |---|---| | | | |language|Specifies the default language for content in this database. Any content without an xml:lang attribute will be indexed in the language specified here. You should have a license key if you specify a non-English language; if you specify a non-english language and do not have a license for that language, the stemming and tokenization will be generic.| |stemmed searches|Controls the level of stemming applied to word searches. Stemmed searches match not only the exact word in the search, but also words that come from the same stem and mean the same thing (for example, a search for be will also match the term is). For more details on stemmed searches, see Understanding and Using Stemmed Searches in the Search Developer’s Guide.
| |word searches|Whether or not to enable unstemmed word searches. Enables searches for exact matches of words.| |word positions|Index word positions for faster phrase and cts:near-query searches.| |fast phrase searches|Speeds up phrase searches by eliminating some false positive results.| |fast reverse searches|Speeds up reverse query searches by indexing saved queries.| |triple index|Enables the RDF triple index to support SPARQL execution over RDF triples. When this parameter is true, sem:sparql can be used, but document loading is slower and the database files are larger.
Note: This feature requires a valid semantics license key.| |triple positions|Specifies whether to index positional data to speed up the performance of proximity queries that use the cts:triple-range-query function.| |fast case sensitive searches|Speeds up case sensitive searches by eliminating some false positive results.|
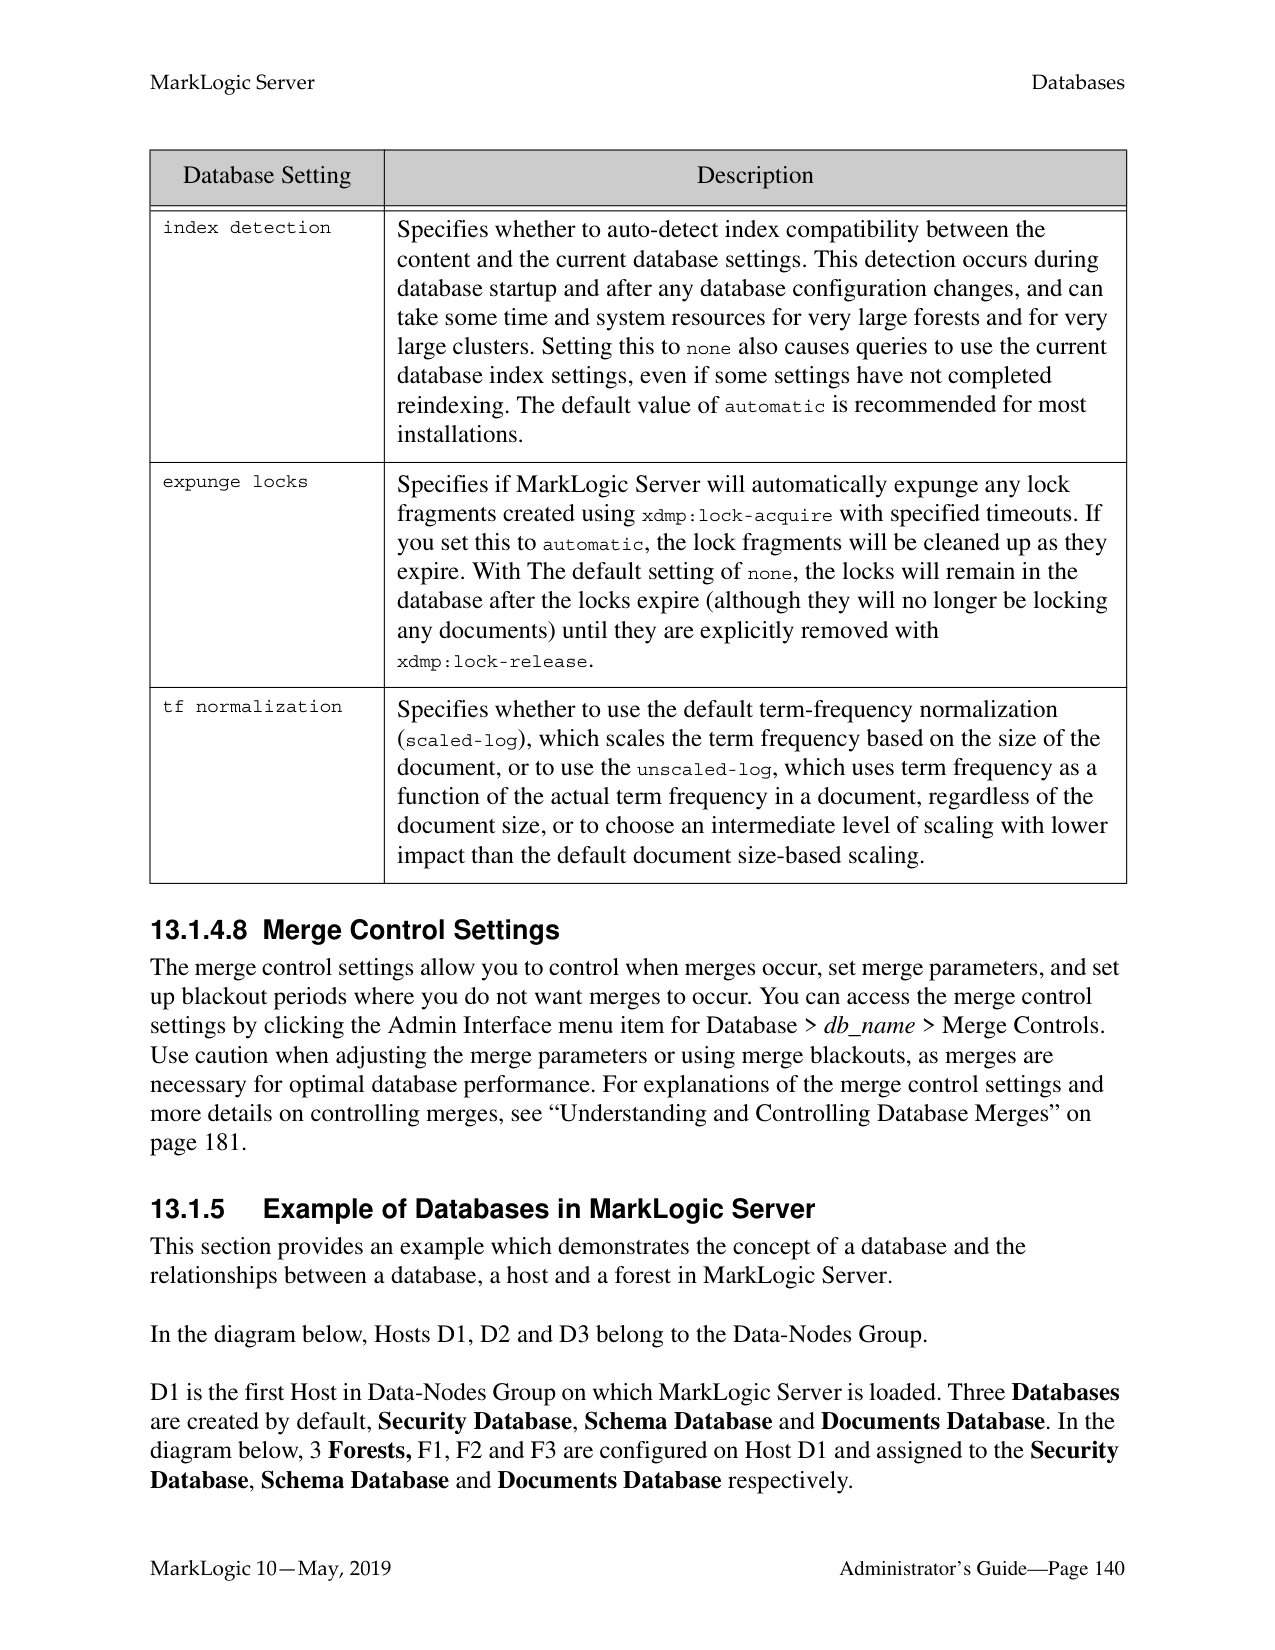
|fast diacritic sensitive searches|Speeds up diacritic-sensitive searches by eliminating some false positive results.| |fast element word searches|Speeds up element-word searches by eliminating some false positive results.|
|Database Setting|Description| |---|---| | | | |element word positions|Index element word positions for faster element-based phrase and cts:near-query searches.| |fast element phrase searches|Speeds up element phrase searches by eliminating some false positive results.| |element value positions|Index element word positions for faster element-based phrase and cts:near-query searches that use cts:element-value-query.| |attribute value positions|Index attribute word positions for faster attribute-based phrase and cts:near-query searches that use cts:element-value-query and faster cts:element-query searches that use a cts:element-attribute-*-query.| |field value searches|Enables searches that use cts:field-value-query.| |field value positions|Enables positions for searches that use cts:field-value-query.| |three character searches|Enables wildcard searches where the search pattern contains three or more consecutive non-wildcard characters (for example, abc*x, *abc, a?bcd). When combined with a codepoint word lexicon, speeds the performance of any wildcard search (including searches with fewer than three consecutive non-wildcard characters). MarkLogic recommends combining the three character search index with a codepoint collation word lexicon. For more details about wildcard searches, see Understanding and Using Wildcard Searches in the Search Developer’s Guide.
| |three character word positions|Index word positions for three-character wildcard queries.| |fast element character searches|Enables wildcard searches and speeds up element-based wildcard searches. For more details about wildcard searches, see Understanding and Using Wildcard Searches in the Search Developer’s Guide.
| |trailing wildcard searches|Faster wildcard searches with the wildcard at the end of the search pattern (for example, abc*). For more details about wildcard searches, see Understanding and Using Wildcard Searches in the Search Developer’s Guide.
| |trailing wildcard word positions|Index word positions for trailing wildcard searches.| |fast element trailing wildcard searches|Faster wildcard searches with the wildcard at the end of the search pattern within a specific element, but slower document loads and larger database files.|
|Database Setting|Description| |---|---|

| | | |word lexicon|Maintains a lexicon of all of the words in a database, with uniqueness determined by a specified collation. Additionally, works in combination with the three character search index to speed wildcard searches. For more details about wildcard searches, see Understanding and Using Wildcard Searches in the Search Developer’s Guide.
| |two character searches|Enables wildcard searches where the search pattern contains two or more consecutive non-wildcard characters (for example, ab*). This index is not needed if you have three character searches and a word lexicon. For more details about wildcard searches, see Understanding and Using Wildcard Searches in the Search Developer’s Guide.
| |one character searches|Enables wildcard searches where the search pattern contains a single non-wildcard characters (for example, a*). This index is not needed if you have three character searches and a word lexicon. For more details about wildcard searches, see Understanding and Using Wildcard Searches in the Search Developer’s Guide.
| |uri lexicon|Maintains a lexicon of all of the URIs used in a database. The URI lexicon speeds up queries that constrain on URIs. It is like a range index of all of the URIs in the database. To access values from the URI lexicon, use the cts:uris or cts:uri-match APIs.| |collection lexicon|Maintains a lexicon of all of the collection URIs used in a database. The collection lexicon speeds up queries that constrain on collections. It is like a range index of all of the collection URIs in the database. To access values from the collection lexicon, use the cts:collections or cts:collection-match APIs.|
######### 13.1.4.3 Rebalancer Settings
You can enable the database rebalancer to automatically distribute content evenly across forests in a database. The specifics of database rebalancing are described in “Database Rebalancing” on page 199.
|Database Setting|Description| |---|---| | | | |assignment policy|Specifies how documents are to be distributed across the database forests. Both the rebalancing process and the document load/insert process follow this policy. For details on the document assignment policies, see “Rebalancer Document Assignment Policies” on page 200.| |rebalancer enable|When set to true, the database rebalancer will automatically redistribute the content across the database forests. When set to false, rebalancing is disabled.| |rebalancer throttle|Sets the priority of system resources devoted to rebalancing. Higher numbers give rebalancing a higher priority.|
######### 13.1.4.4 Reindexing Settings
The reindexing settings enable or disable reindexing and allow you to force reindexing of older fragments.
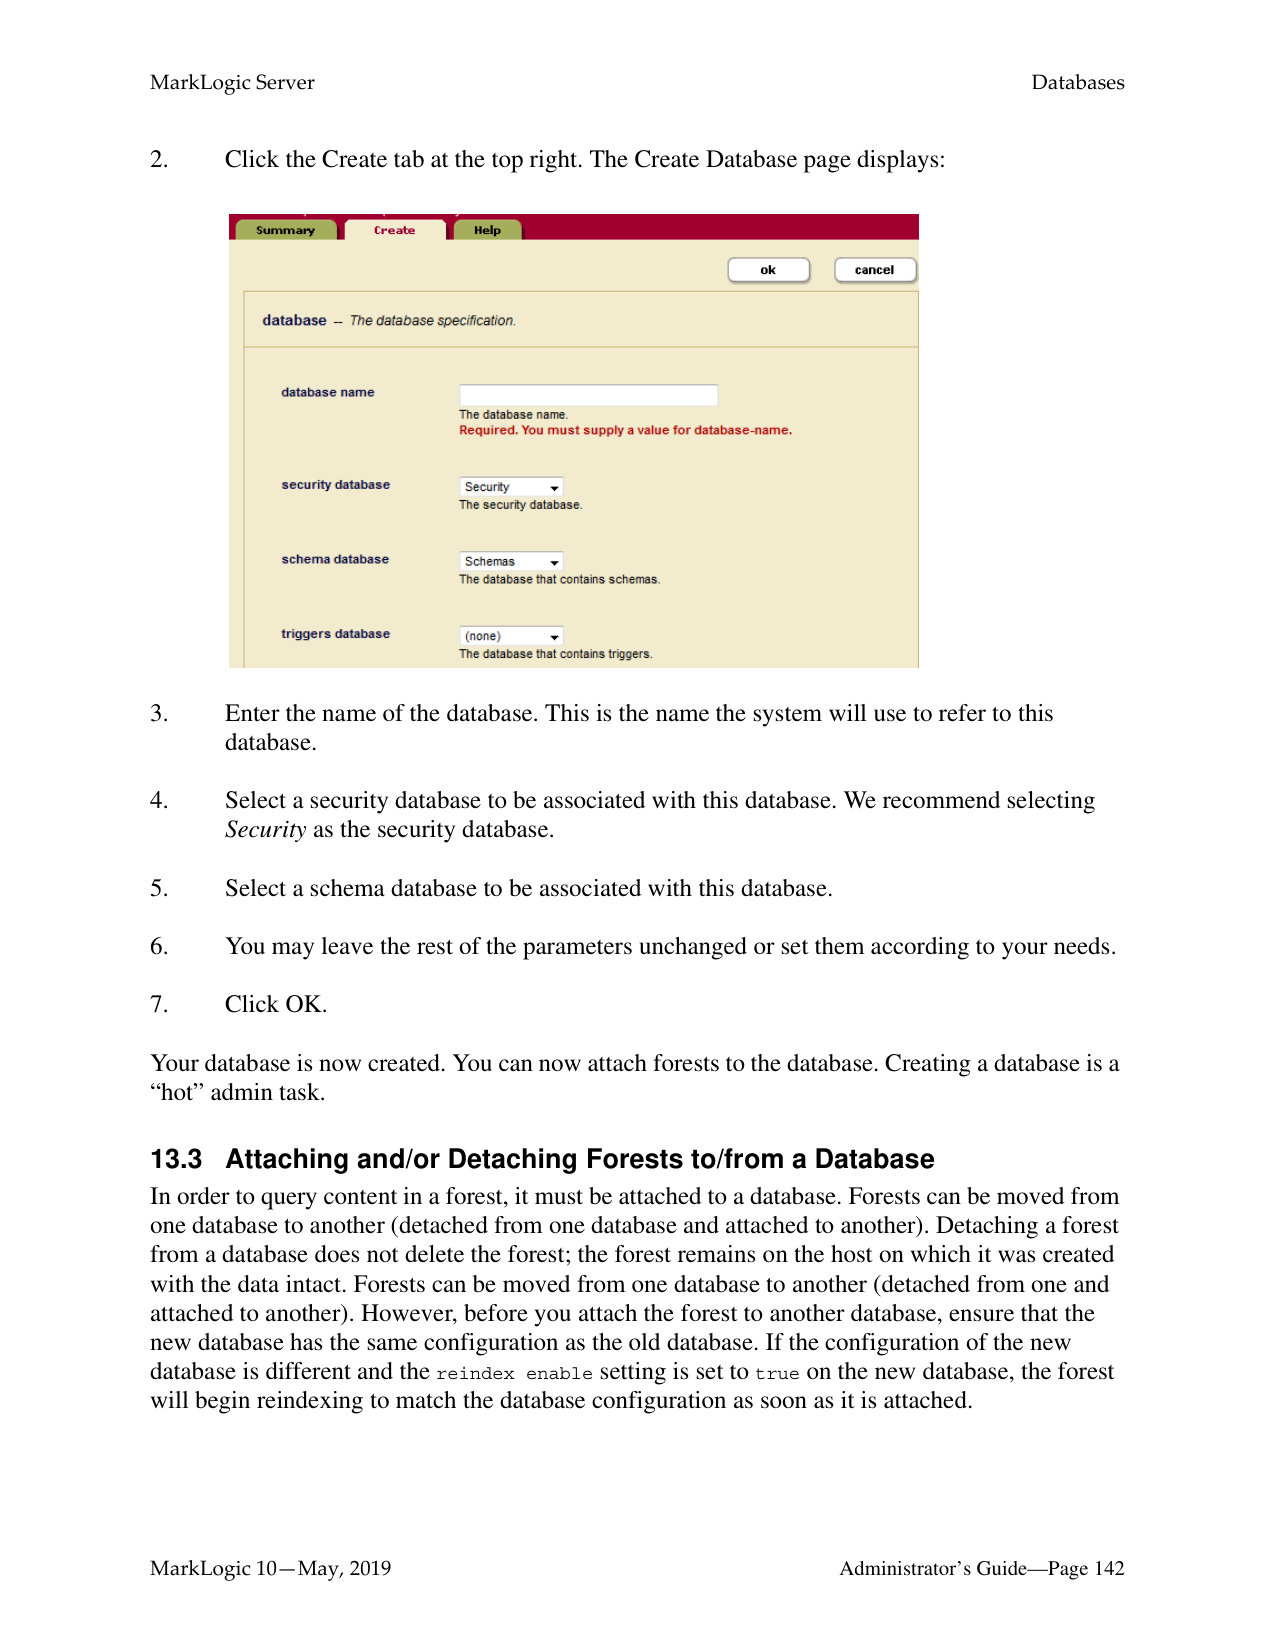
|Database Setting|Description| |---|---| | | | |reindexer enable|When set to true, index configuration changes automatically initiate a background reindexing operation on the entire database. When set to false, any new index settings take effect for future documents loaded into the database; existing documents retain the old settings until they are reloaded or until you set reindexer enable to true. For information on how the reindexer effects queries, see “Query Behavior with Reindex Settings Enabled and Disabled” on page 385.|
|Database Setting|Description| |---|---| | | | |reindexer throttle|Sets the priority of system resources devoted to reindexing. Higher numbers give reindexing a higher priority.| |reindexer timestamp|Specifies the timestamp of fragments to force a reindex/refragment operation. Click the get current timestamp button to enter the current system timestamp. When you set this parameter to a timestamp and reindex enable is set to true, it causes a reindex and refragment operation on all fragments in the database that have a timestamp equal to or less than the specified timestamp. Note that if you restore a database that has a timestamp set, if there are fragments in the restored content that are older than the specified content, they will start to reindex as soon as they are restored.|
######### 13.1.4.5 Document and Directory Settings
The document and directory settings affect the default settings for how documents and directories are created in the database.
|Database Setting|Description| |---|---| | | | |directory creation|Specifies if directories should be automatically created when a document is created. If you are using the database to store documents accessible via a WebDAV server or as a Modules database, this setting should be set to automatic. The following are the settings:
• automatic—directories are automatically created based on the URI of a document.
• manual-enforced—requires that the directory hierarchy corresponding to the URI exists before creating a document. If you create a document where the corresponding directory hierarchy does not exist, an error is raised. For example, if you try to create a document with the URI:
http://marklogic.com/file.xml then the directory with URI http://marklogic.com/ must exist. Otherwise, an error is raised. This setting provides the same behavior as a file system.
• manual—directories are not automatically created, but documents can still be created without corresponding directories.
For more information about directories, see “Directories” on page 87. For more information about Modules databases, see “Modules Database” on page 128.|
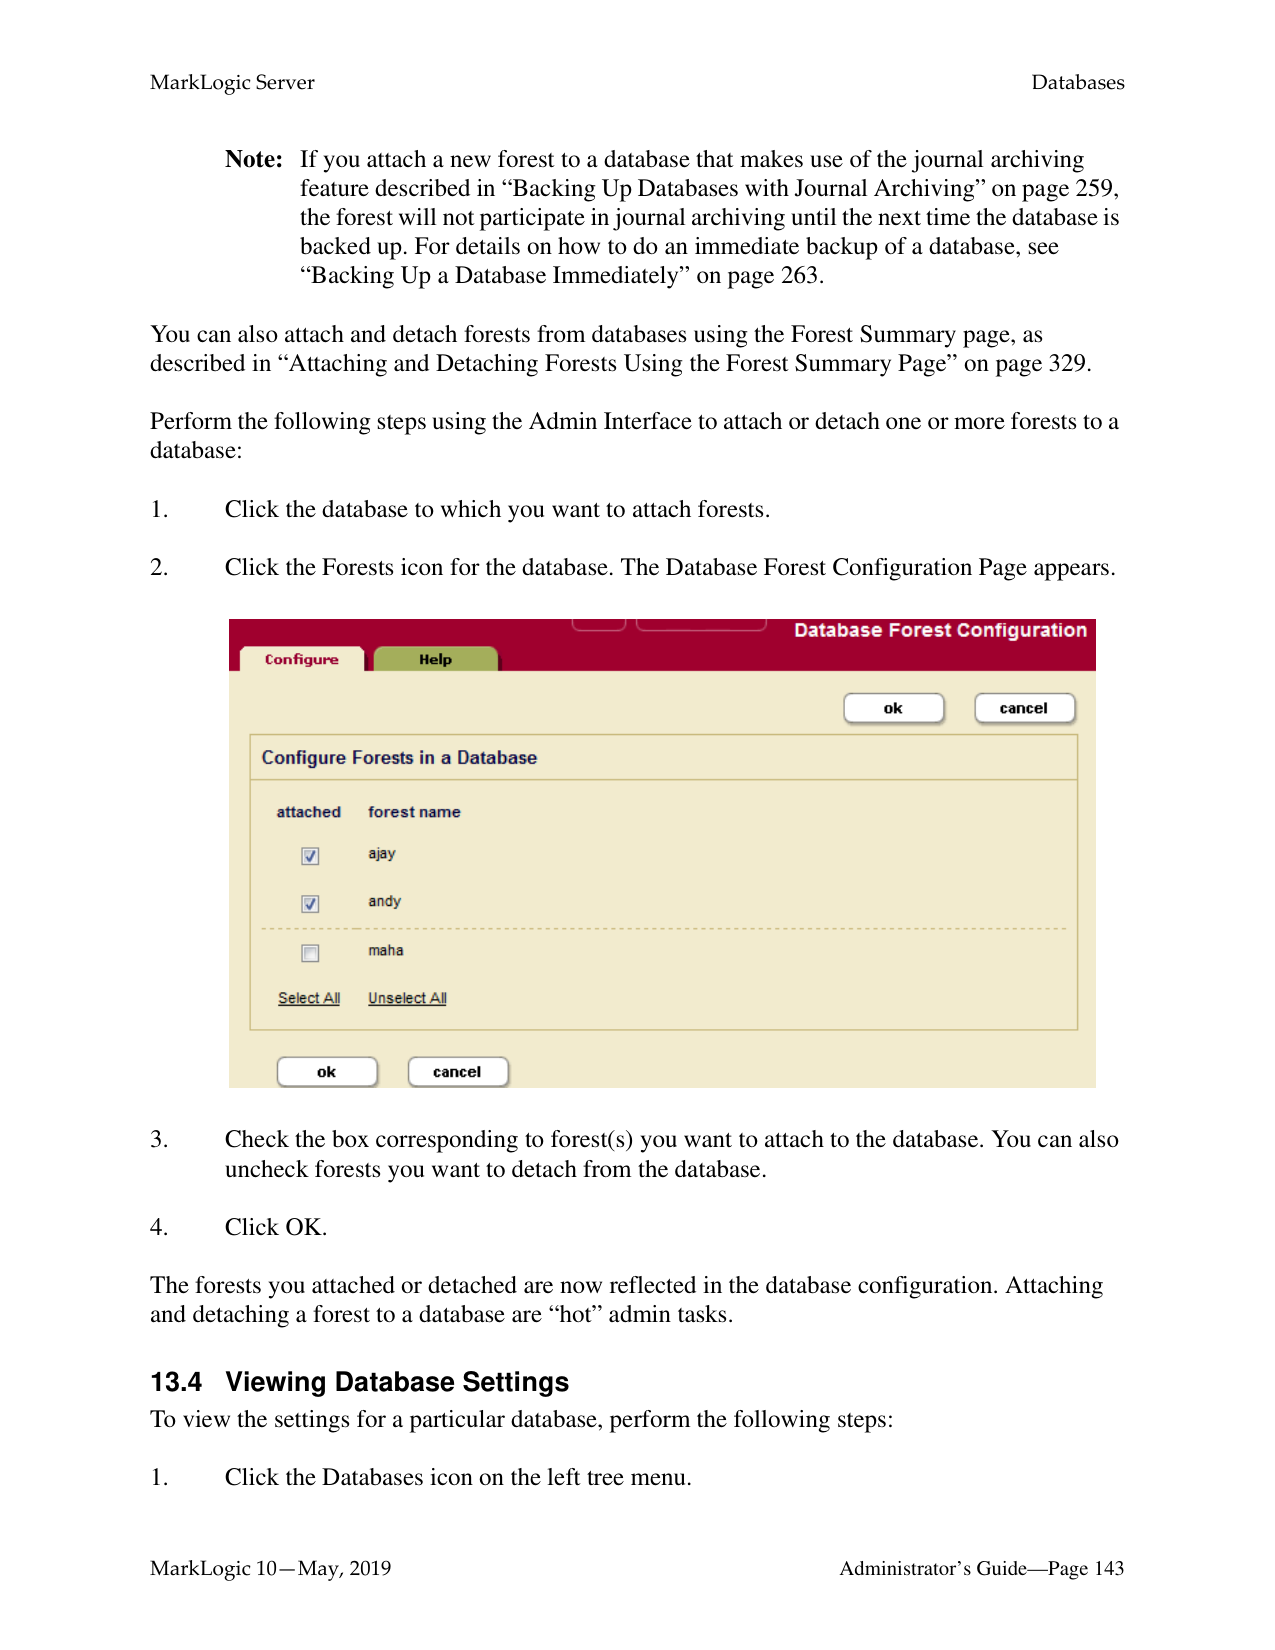
|Database Setting|Description| |---|---| | | | |maintain last modified|Creates and updates the last-modified property each time a document is created or updated. The default is false.| |maintain directory last modified|Creates and updates the last-modified property on a directory each time a directory is created or updated. If set to true, update operations on documents in a directory will also update the directory last-modified timestamp, which can cause some contention when multiple documents in the directory are being updated. If your application is experiencing contention during these type of updates (for example, if you see deadlock-detected messages in the error log), set this property to false. The default is false.| |inherit permissions|When set to true, documents and directories automatically inherit permissions from their parent directory (if permissions are not set explicitly when creating the document or directory). If there are any default permissions on the user who is creating the document or directory, those permissions are combined with any inherited permissions.| |inherit collections|When set to true, documents and directories automatically inherit collection settings from their parent directory (if collections are not set explicitly when creating the document or directory). If there are any default collections on the user who is creating the document or directory, those permissions are combined with any inherited collections.| |inherit quality|When set to true, documents and directories automatically inherit any quality settings from their parent directory (if quality is not set explicitly when creating the document or directory).|
######### 13.1.4.6 Memory and Journal Settings
The memory and journal settings are automatically configured at installation time. The memory settings configure the memory limits for the system, and the journal settings control the transactional journal, used for recovery if a database transaction fails. The default settings should be sufficient for most systems. Depending on the system workload, setting the memory settings incorrectly can adversely affect performance; if you need to change the settings and you have an active maintenance contract, you can contact MarkLogic Support for help.
|Database Setting|Description| |---|---| | | | |in memory limit|The maximum number of fragments in an in-memory stand. An in-memory stand contains the latest version of any new or changed fragments. Periodically, in-memory stands are written to disk as a new stand in the forest. Also, if a stand accumulates a number of fragments beyond this limit, it is automatically saved to disk by a background thread.| |in memory list size|The size, in megabytes, of the in-memory list storage.| |in memory tree size|The size, in megabytes, of the in-memory tree storage. The in memory tree size should be at least 1 or 2 megabytes larger than the largest text or small binary document you plan on loading into the database. The largest small binary file size is always constrained by the “large size threshold” database configuration setting.| |in memory range index size|The size, in megabytes, of the in-memory range index storage.| |in memory reverse index size|The size, in megabytes, of the in-memory reverse index storage.|
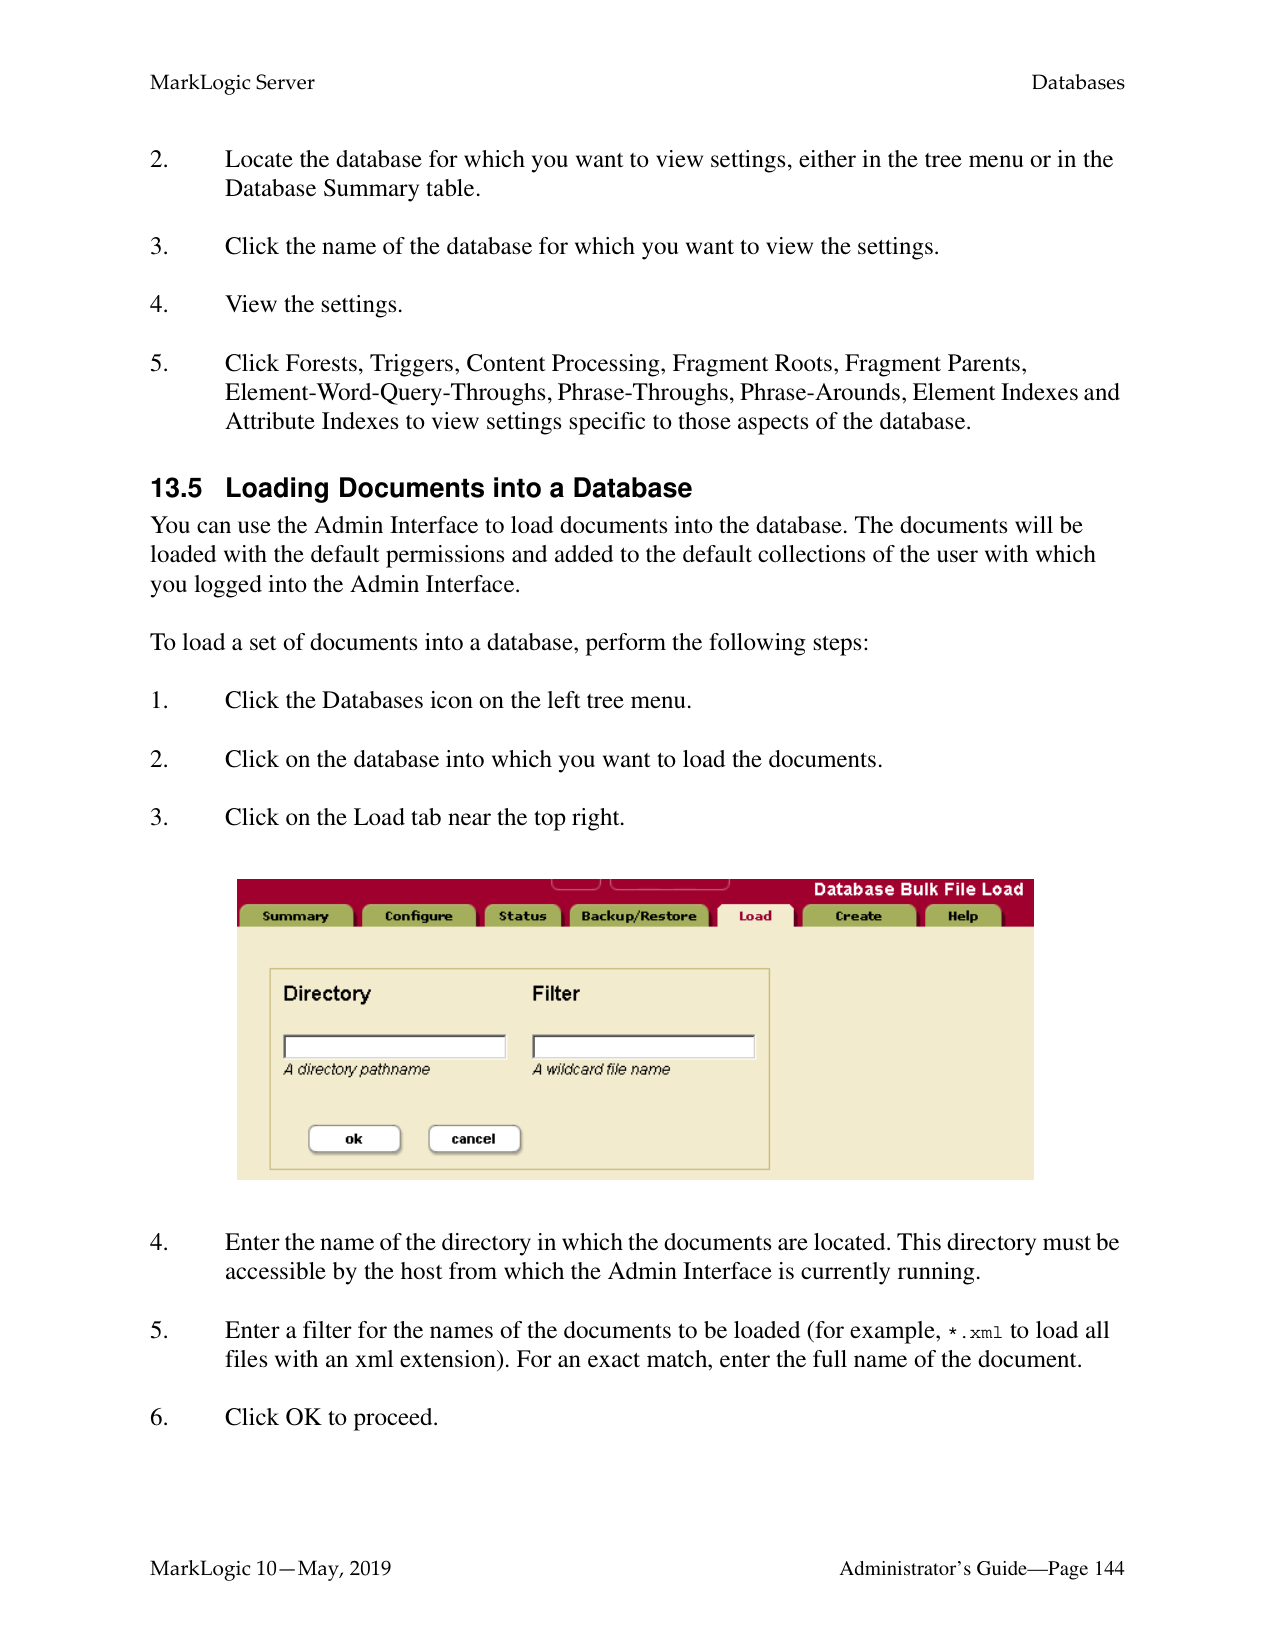
|in memory triple index size|The size, in megabytes, of the in-memory triple index storage.| |large size threshold|Determines the size, in kilobytes, beyond which large binary documents are stored in the Large Data Directory instead of directly in a stand. Binaries smaller than or equal to the threshold are considered small binary files and stored in stands. Binaries larger the threshold are considered large binary files and stored in the Large Data Directory.|
|Database Setting|Description| |---|---| | | | |locking|Specifies how robust transaction locking should be. When set to strict, locking enforces mutual exclusion on existing documents and on new documents. When set to fast, locking enforces mutual exclusion on existing and new documents. Instead of locking all the forests on new documents, it uses a hash function to select one forest to lock. In general, this is faster than strict. However, for a short period of time after a new forest is added, some of the transactions need to be retried internally. When set to off, locking does not enforce mutual exclusion on existing documents or on new documents; only use this setting if you are sure all documents you are loading are new (a new bulk load, for example), otherwise you might create duplicate URIs in the database.| |journaling|Specifies how robust transaction journaling should be. When set to strict, the journal protects against MarkLogic Server process failures, host operating system kernel failures, and host hardware failures. When set to fast, the journal protects against MarkLogic Server process failures but not against host operating system kernel failures or host hardware failures. When set to off, the journal does not protect against MarkLogic Server process failures, host operating system kernel failures, or host hardware failures.| |journal size|The size, in megabytes, of each journal file. The system uses journal files for recovery operations if a transaction fails to complete successfully. The default value should be sufficient for most systems; it is calculated at database configuration time based on the size of your system. If you change the other memory settings, however, the journal size should equal the sum of the in memory list size and the in memory tree size. Additionally, you should add space to the journal size if you use range indexes (particularly if you use a lot of range indexes or have extremely large range indexes), as range index data can take up journal space. Also, if your transactions span multiple forests, you may also need to add journal size, as each journal must keep the lock information for all of the documents in the transaction, not just for the documents that reside in the forest in which the journal exists.
When you change the journal size, the next time the system creates a new journal, it will use the new size limit; existing journals will continue to use the old size limit until they are replaced with new ones (for example, when a journal fills up, when a forest is cleared, or when the system is cleanly shutdown and restarted).| |preallocate journals|As of 8.0-4, this setting has no effect.|
|Database Setting|Description| |---|---| | | | |preload mapped data|Specifies whether memory mapped data (for example, range indexes and word lexicons) is loaded into memory when a forest is mounted to the database. Preloading the memory mapped data improves query performance, but uses more memory, especially if you have a lot of range indexes and/or lexicons. Also, it will cause a lot of disk I/O at database startup time, slowing the system performance during the time the mapped data is read into memory. If you do not preload the mapped data, it will be paged into memory dynamically when a query requests data that needs it, slowing the query response time.| |range index optimize|Specifies how range indexes are to be optimized. When set to facet-time, range indexes are optimized to minimize the amount of CPU time used. When set to memory-size, range indexes are optimized to minimize the amount of memory used.|
########## 13.1.4.7 Other SettingsThe following are the remaining database configuration options.
|Database Setting|Description|

|---|---| | | | |position list max size|The maximum size, in megabytes, of the position list portion of the index for a given term. If the position list size for a given term grows larger than the limit specified, then the position information for that term is discarded. The default value is 128, the minimum value is 1, and the maximum value is 512. For example, position queries (cts:near-query) for frequently occurring words that have reached this limit (words like a, an, the, and so on) are resolved without using the indexes. Even though those types of words are resolved without using the indexes, this limit helps improve performance by making the indexes smaller and more efficient in relation to the content actually loaded in the database.| |format compatibility|Specifies the version compatibility that MarkLogic Server applies to the indexes for this database during request evaluation. Setting this to a value other than automatic specifies that all forest data has the specified on-disk format, and it disables the automatic checking for index compatibility information. The automatic detection occurs during database startup and after any database configuration changes, and can take some time and system resources for very large forests and for very large clusters. The default value of automatic is recommended for most installations.|
|Database Setting|Description| |---|---| | | | |index detection|Specifies whether to auto-detect index compatibility between the content and the current database settings. This detection occurs during database startup and after any database configuration changes, and can take some time and system resources for very large forests and for very large clusters. Setting this to none also causes queries to use the current database index settings, even if some settings have not completed reindexing. The default value of automatic is recommended for most installations.| |expunge locks|Specifies if MarkLogic Server will automatically expunge any lock fragments created using xdmp:lock-acquire with specified timeouts. If you set this to automatic, the lock fragments will be cleaned up as they expire. With The default setting of none, the locks will remain in the database after the locks expire (although they will no longer be locking any documents) until they are explicitly removed with xdmp:lock-release.| |tf normalization|Specifies whether to use the default term-frequency normalization (scaled-log), which scales the term frequency based on the size of the document, or to use the unscaled-log, which uses term frequency as a function of the actual term frequency in a document, regardless of the document size, or to choose an intermediate level of scaling with lower impact than the default document size-based scaling.|
######### 13.1.4.8 Merge Control Settings
The merge control settings allow you to control when merges occur, set merge parameters, and set up blackout periods where you do not want merges to occur. You can access the merge control settings by clicking the Admin Interface menu item for Database > db_name > Merge Controls. Use caution when adjusting the merge parameters or using merge blackouts, as merges are necessary for optimal database performance. For explanations of the merge control settings and more details on controlling merges, see “Understanding and Controlling Database Merges” on page 181.
######### 13.1.5 Example of Databases in MarkLogic Server
This section provides an example which demonstrates the concept of a database and the relationships between a database, a host and a forest in MarkLogic Server.
In the diagram below, Hosts D1, D2 and D3 belong to the Data-Nodes Group.
D1 is the first Host in Data-Nodes Group on which MarkLogic Server is loaded. Three Databases are created by default, Security Database, Schema Database and Documents Database. In the diagram below, 3 Forests, F1, F2 and F3 are configured on Host D1 and assigned to the Security Database, Schema Database and Documents Database respectively.
|
F4 F5F3


F2
Documents Database
Schema Database

F1
Security Database
Group: Data-Nodes

F6
| | | |---|---| |Host D1| | |Host D1| |
| | | |---|---| |Host D2| | |Host D2| |
| | | |---|---| |Host D3| | |Host D3| | | |---|
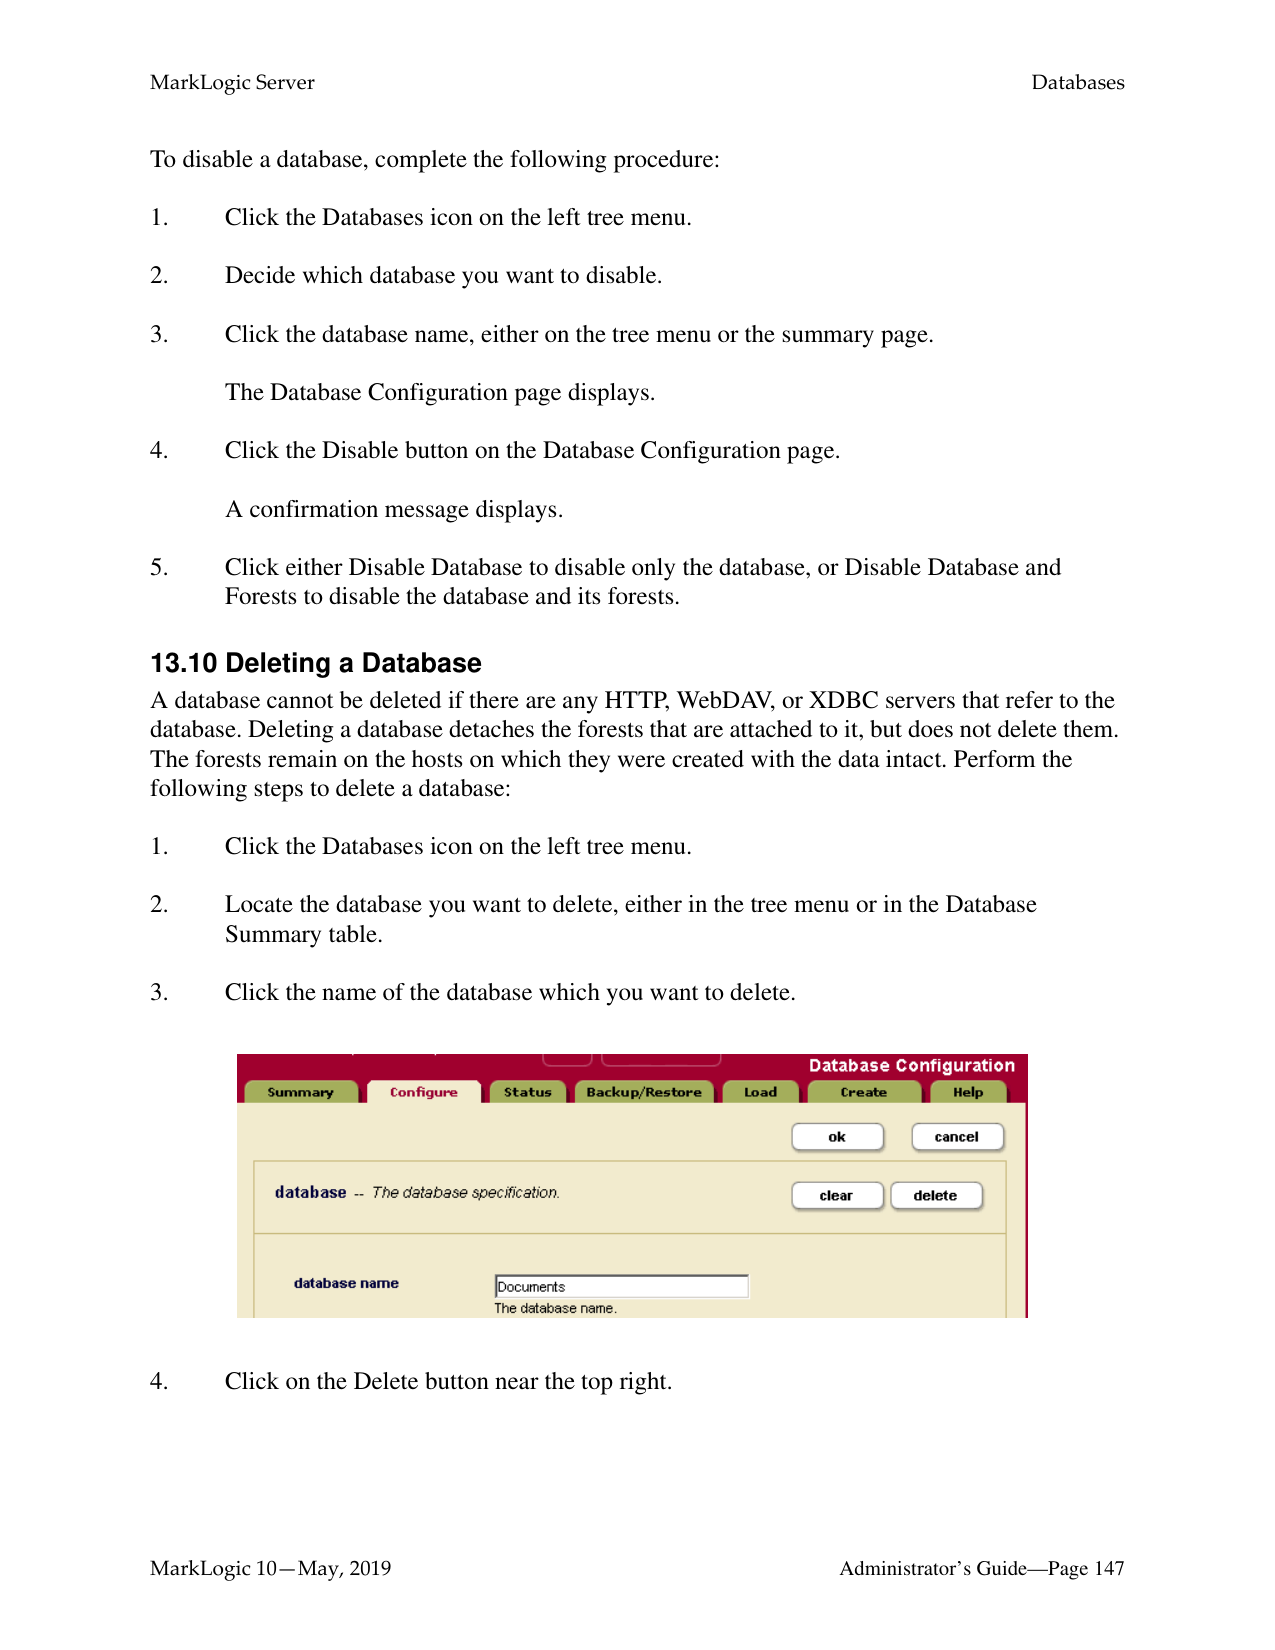

Your database is now created. You can now attach forests to the database. Creating a database is a “hot” admin task.
######### 13.3 Attaching and/or Detaching Forests to/from a Database
In order to query content in a forest, it must be attached to a database. Forests can be moved from one database to another (detached from one database and attached to another). Detaching a forest from a database does not delete the forest; the forest remains on the host on which it was created with the data intact. Forests can be moved from one database to another (detached from one and attached to another). However, before you attach the forest to another database, ensure that the new database has the same configuration as the old database. If the configuration of the new database is different and the reindex enable setting is set to true on the new database, the forest will begin reindexing to match the database configuration as soon as it is attached.
Note: If you attach a new forest to a database that makes use of the journal archiving feature described in “Backing Up Databases with Journal Archiving” on page 259, the forest will not participate in journal archiving until the next time the database is backed up. For details on how to do an immediate backup of a database, see “Backing Up a Database Immediately” on page 263.
You can also attach and detach forests from databases using the Forest Summary page, as described in “Attaching and Detaching Forests Using the Forest Summary Page” on page 329.
Perform the following steps using the Admin Interface to attach or detach one or more forests to a database:

The forests you attached or detached are now reflected in the database configuration. Attaching and detaching a forest to a database are “hot” admin tasks.
######### 13.5 Loading Documents into a Database
You can use the Admin Interface to load documents into the database. The documents will be loaded with the default permissions and added to the default collections of the user with which you logged into the Admin Interface.
To load a set of documents into a database, perform the following steps:

The documents are loaded into the database. The URI path of the documents are the same as your filesystem path.
######### 13.6 Merging a Database
You can merge all of the forest data in the database using the Admin Interface. As described in “Understanding and Controlling Database Merges” on page 181, merging the forests in a database improves performance and is periodically done automatically in the background by MarkLogic Server. The Merge button allows you to explicitly merge the forest data for this database.
To explicitly merge the database, complete the following procedure:
######### 13.7 Reindexing a Database
You can reindex all of the document data in the database using the Admin Interface. As described in “Text Indexing” on page 369, text indexing accelerates the performance of a certain queries and is periodically done automatically in the background by MarkLogic Server. The reindex operation sets the reindexer timestamp to the current system timestamp, which causes a reindex and refragment operation on all fragments in the database that have a timestamp equal to or less than the timestamp (assuming reindexer enable is set to true). The Reindex button forces a complete reindex/refragment operation on the database.
To reindex the database, complete the following procedure:
######### 13.8 Clearing a Database
You can clear all of the forest content from the database using the Admin Interface. Clearing a database deletes all of the content from all of the forests in the database, but leaves the database configuration intact.
To clear all data from a database, complete the following procedure:
######### 13.9 Disabling a Database
You can disable a database using the Admin Interface. You can either disable only the database or the database along with all of its forests. Disabling only the database marks the database as disabled and unmounts all the forests from the database. However, the database forests remain enabled. Disabling the database and its forests marks the database and each forest as disabled, unmounts all the forests from the database, and clears all memory caches for all the forests in the database. The database remains unavailable for any query operations while it is disabled.
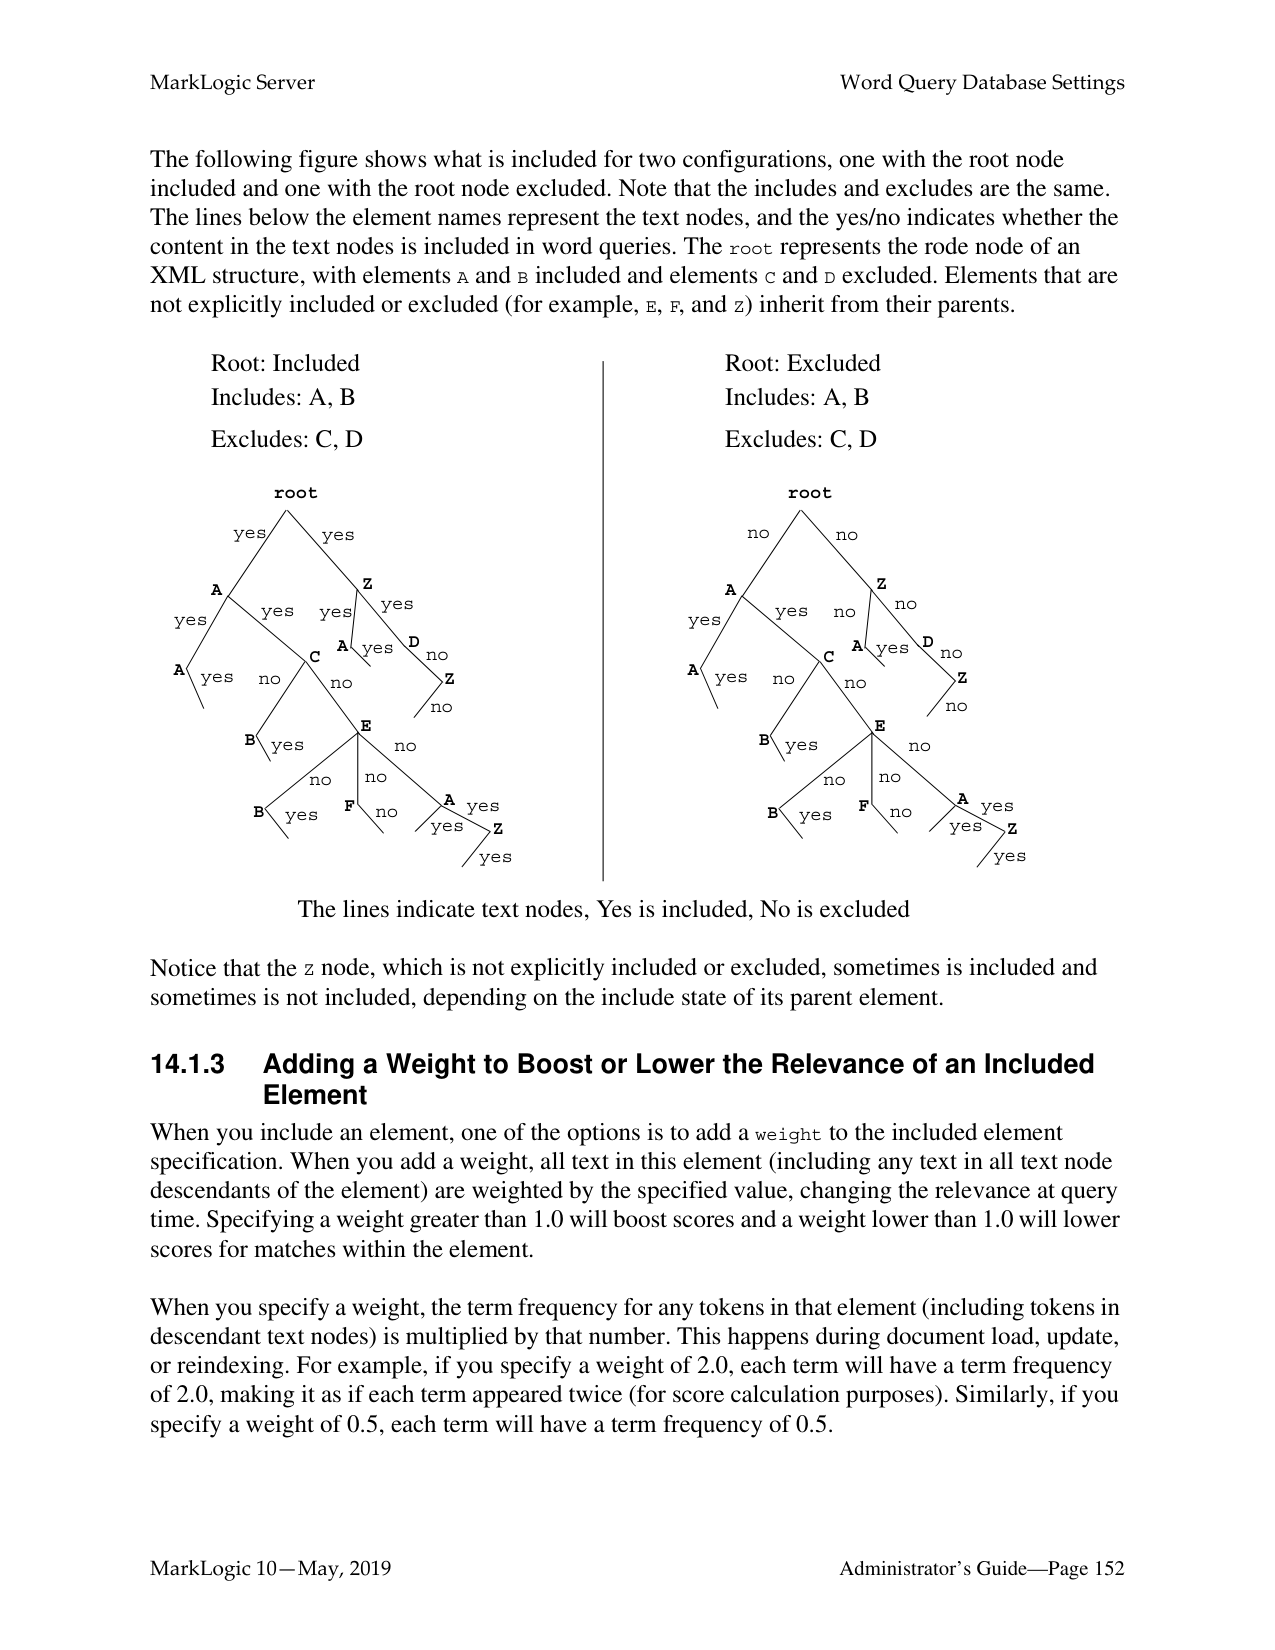
Disabling a database does not delete the configuration or document data. The database and forest can later be re-enabled by clicking Enable.
To disable a database, complete the following procedure:
######### 13.10 Deleting a Database
A database cannot be deleted if there are any HTTP, WebDAV, or XDBC servers that refer to the database. Deleting a database detaches the forests that are attached to it, but does not delete them. The forests remain on the hosts on which they were created with the data intact. Perform the following steps to delete a database:

The database is now permanently deleted. Deleting a database is a “hot” admin task.
######### 13.11 Checking and Setting Permissions for a Document in a Database
You can use the Admin Interface to check the permissions of a document or directory in a database. You can also use the xdmp:document-get-permissions and xdmp:document-set-permissions APIs to get and set permissions. For details on document permissions, see Security Guide. To check and/or set permissions on a document or directory in a database using the Admin Interface, perform the following steps:
##### 14.0 Word Query Database Settings
This chapter describes how to configure a database to include or exclude elements, add index settings, and perform other configuration changes for cts:word-query operations. The following topics are included:
######### 14.1 Understanding the Word Query Configuration
Basic search of words and phrases in MarkLogic Server is based on the query constructor cts:word-query. You can control the behavior of these basic searches by changing the database configuration for word query. You can exclude and/or include elements from word queries, and you can add extra indexing options compared to the options configured in the database configuration. This section describes the options available in the word query configuration and includes the following parts:
######### 14.1.1 Overview of Configuration Options
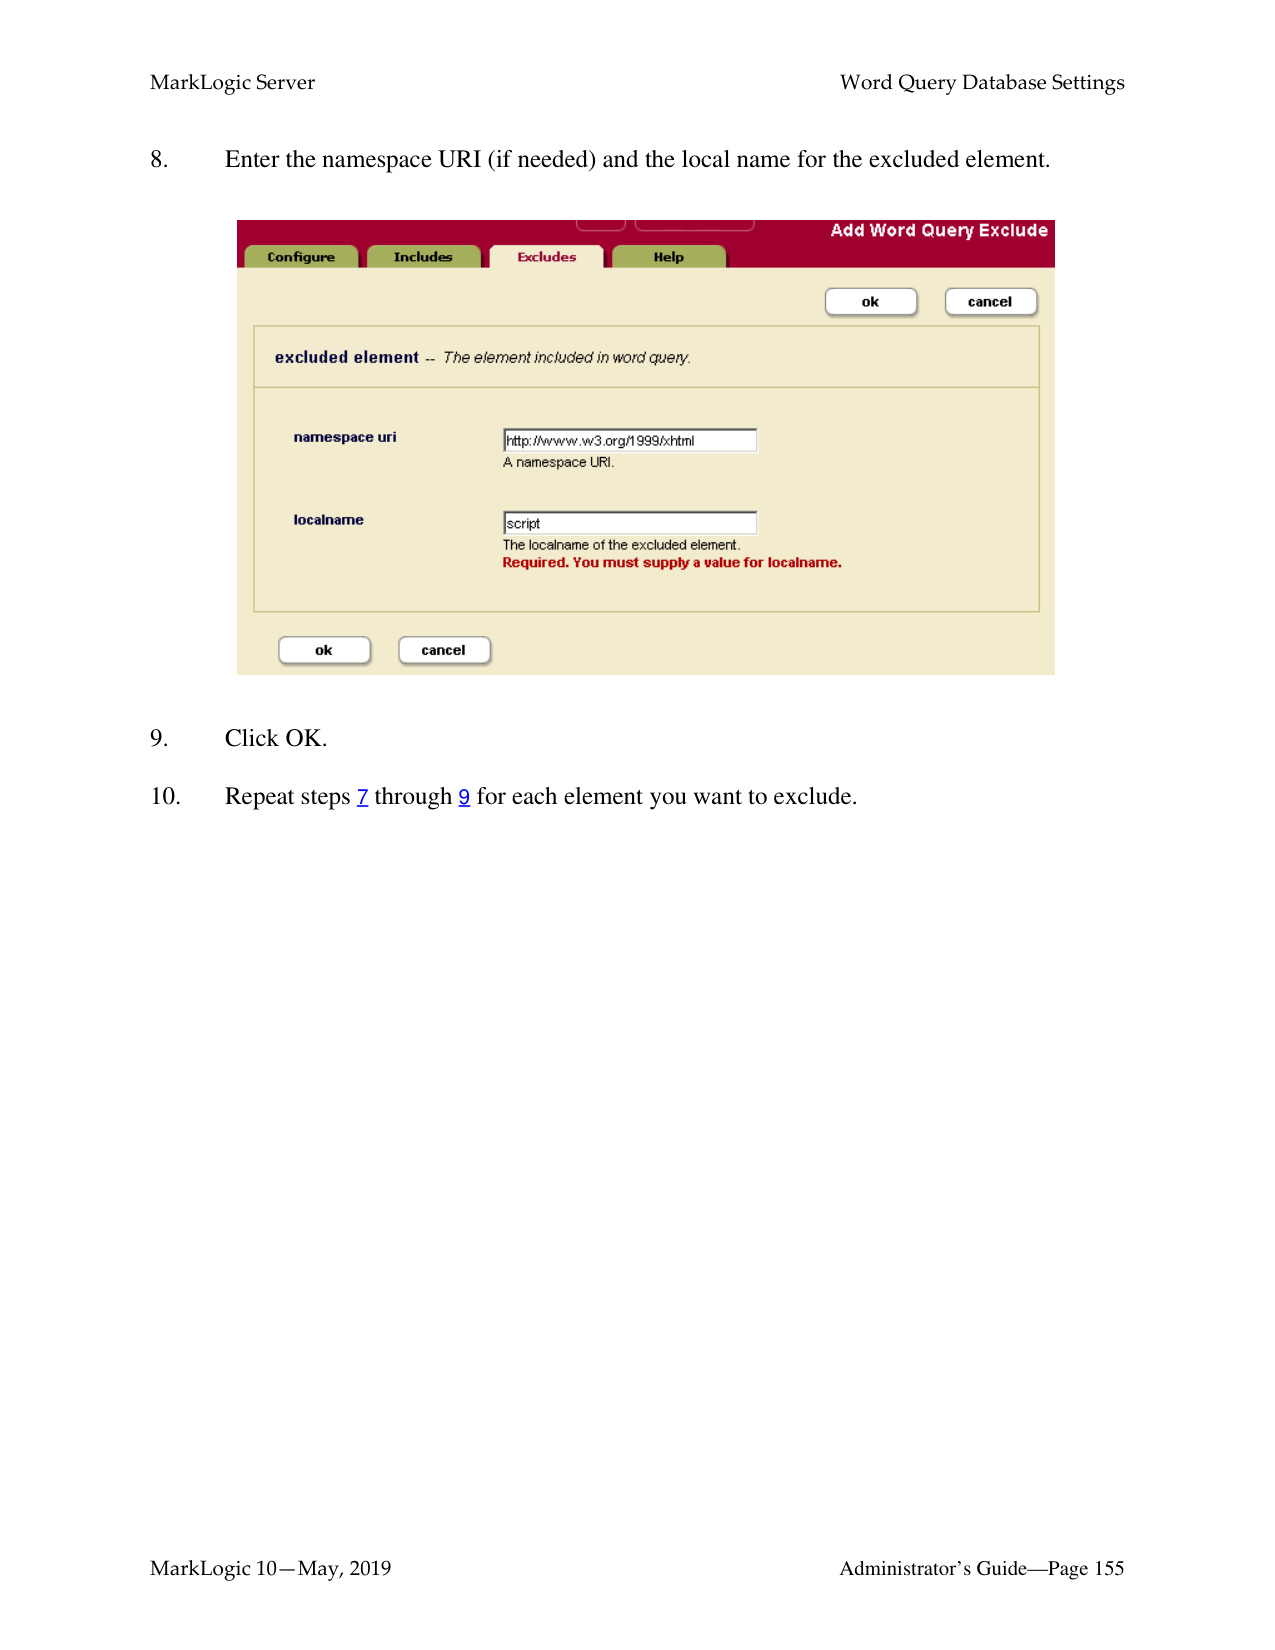
The following lists the main options you can set in the word query configuration to control how word queries are resolved in a database:
######### 14.1.2 Understanding Which Elements are Included and Excluded
You can include and/or exclude elements from word queries. This is useful if you know you will never want to search some element content. This section describes how MarkLogic Server determines what content is included in word queries and what is not when you include and/or exclude elements from the word query configuration.
Note: If you want to be able to search on everything in a word query, but also want a
special view of the content that includes and/or excludes some elements, consider creating a field instead of modifying the word query configuration. For details on fields, see “Fields Database Settings” on page 159.
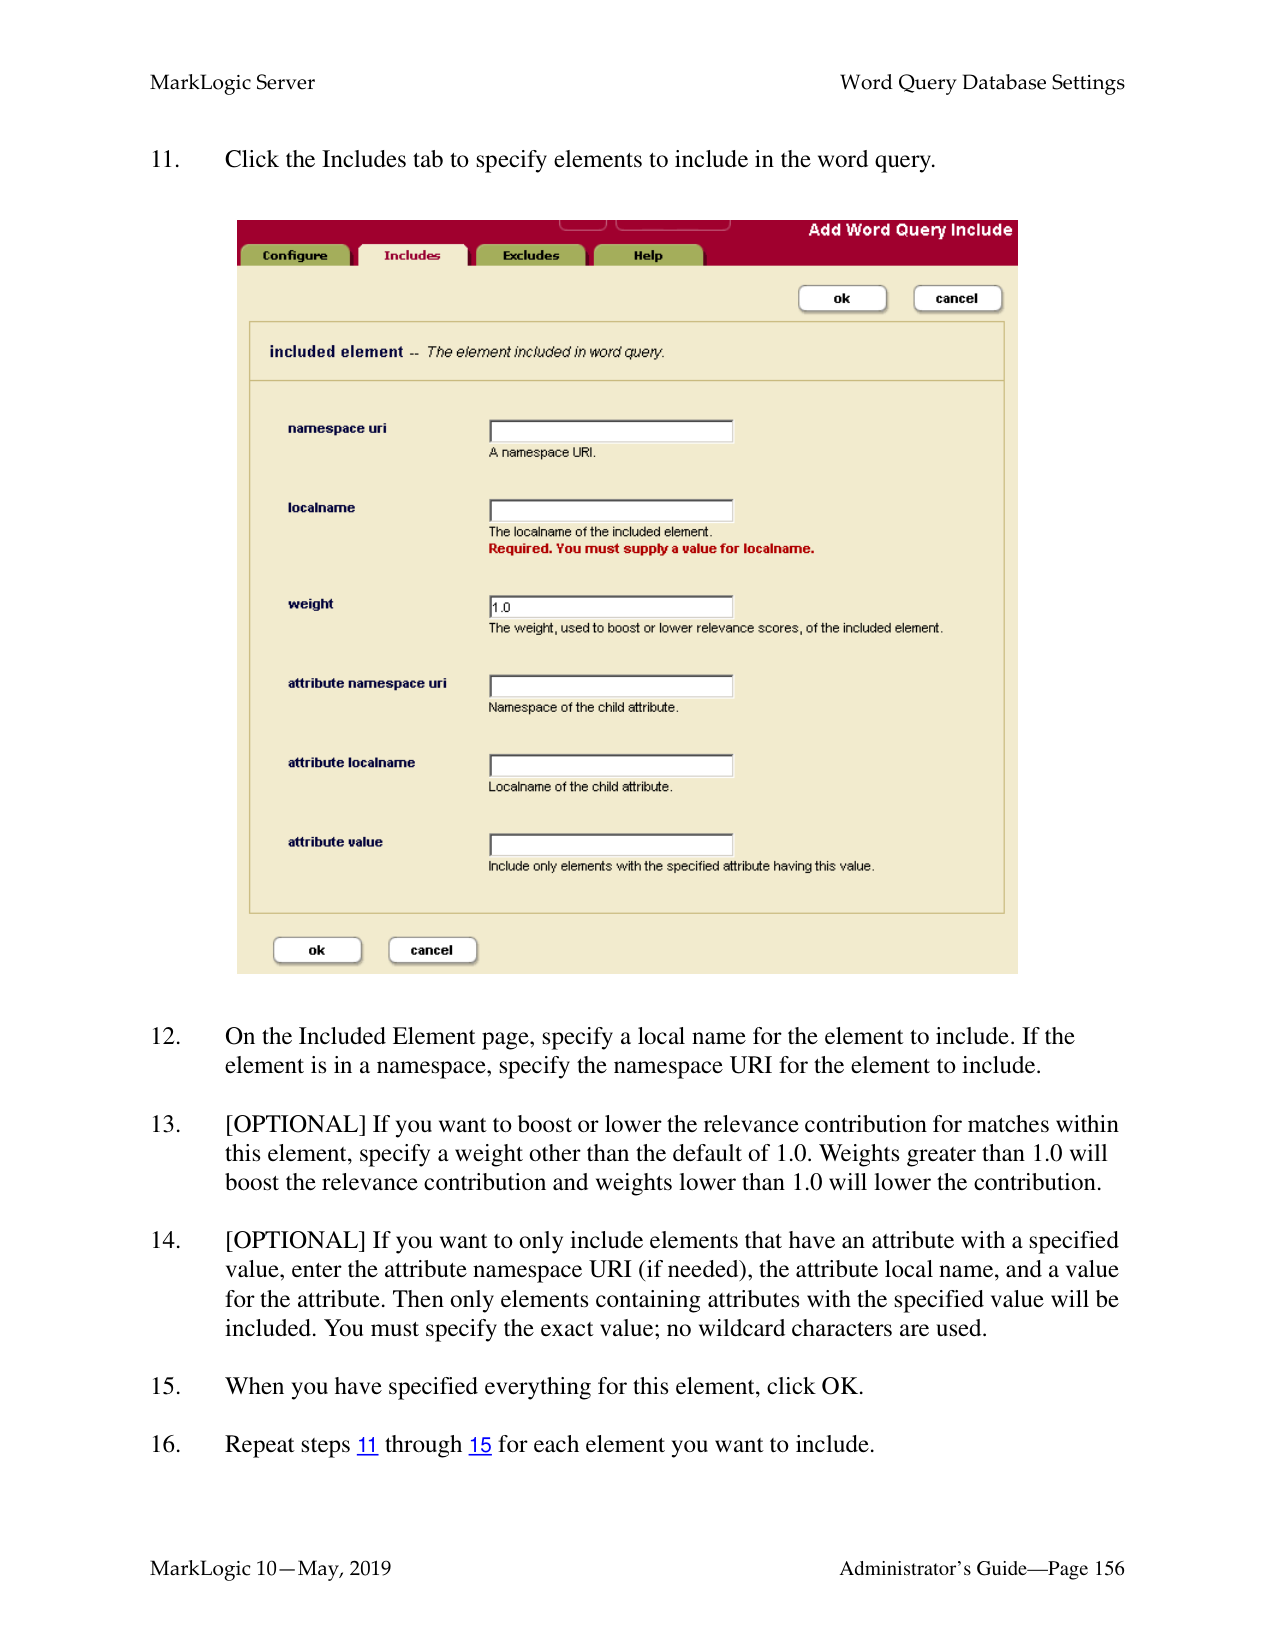
By default, all element content (all text node children of elements) is included in word queries. If you decide to include and/or exclude any elements from word queries, there are rules that govern which non-specified elements are indexed and which are not. The rules are based on inheriting the include state from the parent element. For example, if the parent element is marked as an included element (and is therefore indexed and evaluated for word query), then its children, if they do not appear on the exclude list, are also included.
Note: If you configure word query exclusions then MarkLogic may not use word positions, even if it is enabled. For example, MarkLogic will not use word positions for resolution of queries such as cts:element-word-query or cts.jsonPropertyWordQuery resolution in positional contexts such as a near query. This can lead to false positives. You can use xdmp:plan or cts.plan to determine whether word positions are being used.
When MarkLogic Server determines which elements to include/exclude, it walks the XML tree using the following rules:
The only way to guarantee an element’s text node children will be included (assuming you have any elements included and/or excluded) is to add it to the included list, and the only way to guarantee an element is not included is to add it to the excluded list.
The following figure shows what is included for two configurations, one with the root node included and one with the root node excluded. Note that the includes and excludes are the same. The lines below the element names represent the text nodes, and the yes/no indicates whether the content in the text nodes is included in word queries. The root represents the rode node of an XML structure, with elements A and B included and elements C and D excluded. Elements that are not explicitly included or excluded (for example, E, F, and Z) inherit from their parents.
Root: Included
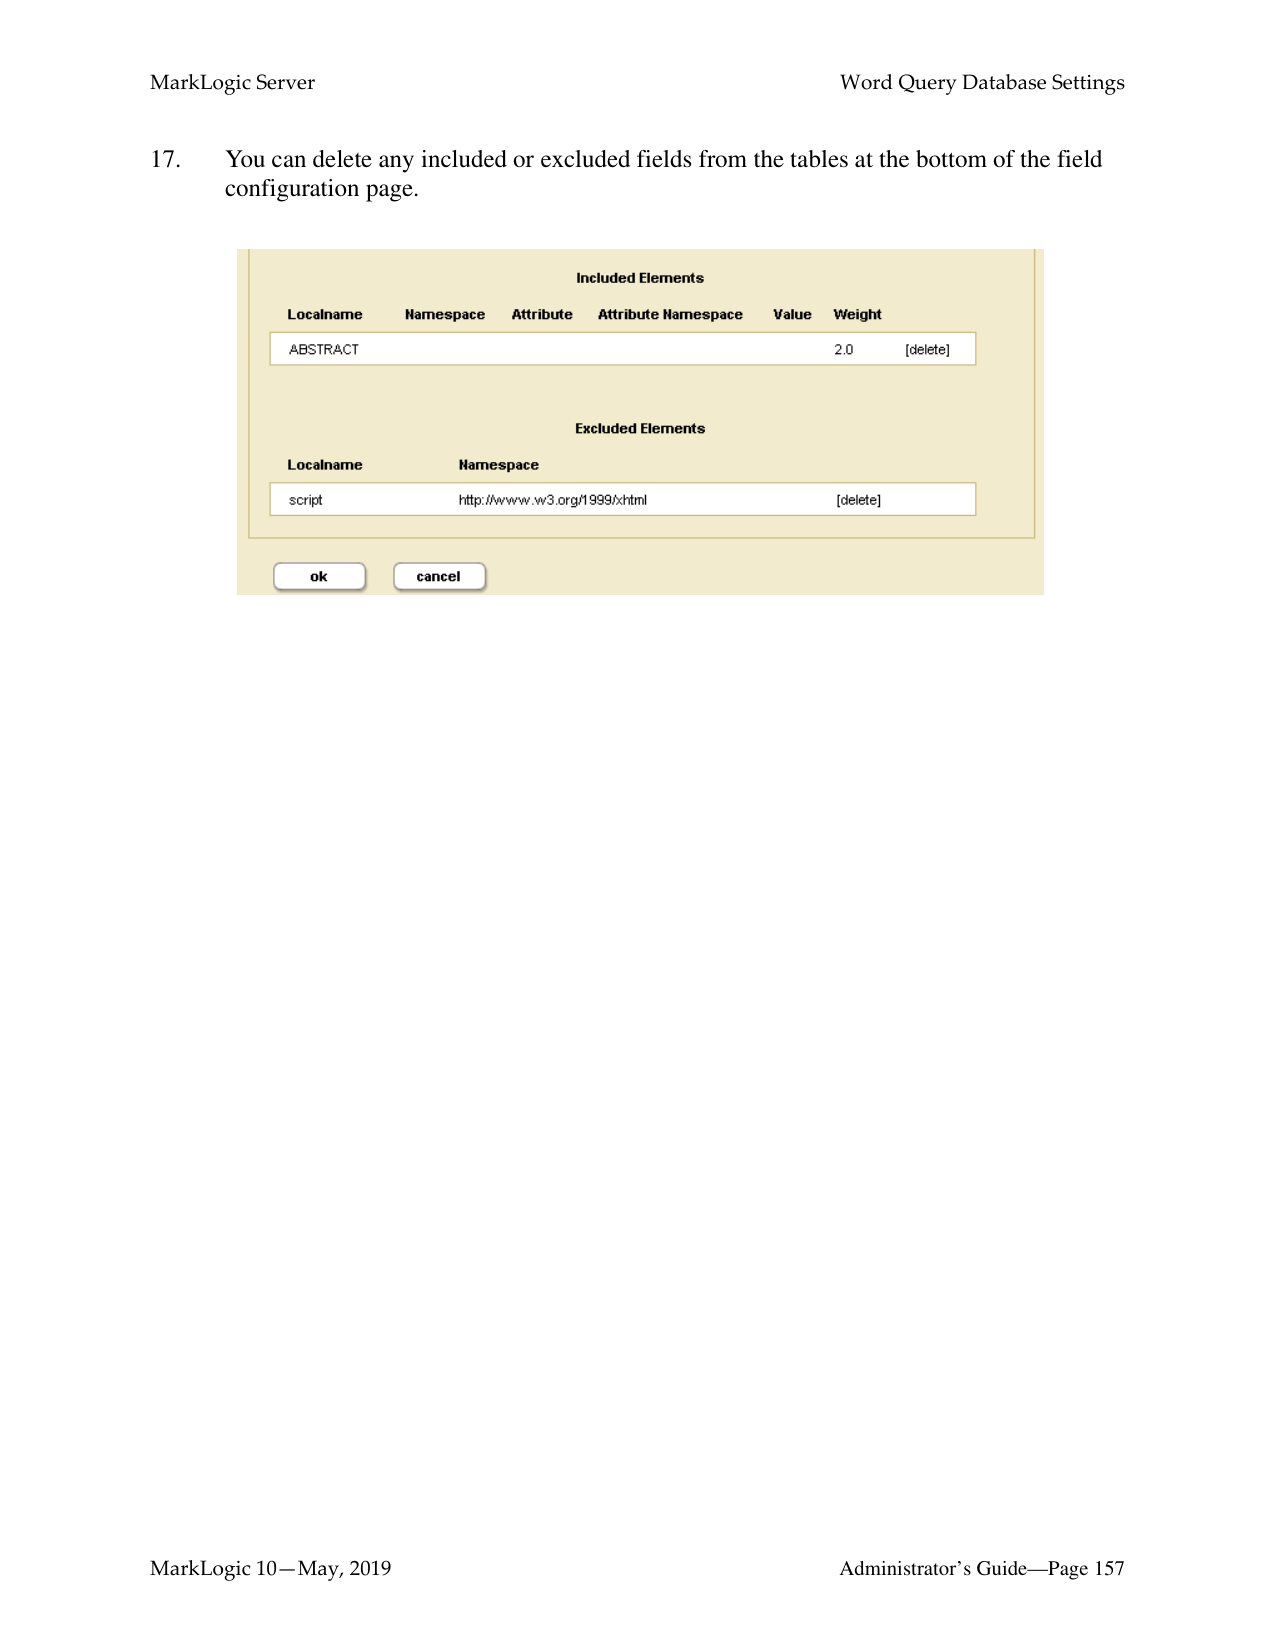
Root: Excluded
Includes: A, B
Includes: A, B
Excludes: C, D
Excludes: C, D
root
root
yes yes
no no
Z
Z

A
A
yes
no
yesyes
yesyes
yes
no
DA
DA
yes
yes
no
no
C
C
A
A
yes no
yes no
Z no
Z no
no
no
E
E
B
B
yes
yes
no
no
no
no
no yes no
no yes no
AF
AF
yes
yes
B
B Z
yes
yes
Z
yes

yes
The lines indicate text nodes, Yes is included, No is excluded
Notice that the Z node, which is not explicitly included or excluded, sometimes is included and sometimes is not included, depending on the include state of its parent element.
######### 14.1.3 Adding a Weight to Boost or Lower the Relevance of an IncludedElement
When you include an element, one of the options is to add a weight to the included element specification. When you add a weight, all text in this element (including any text in all text node descendants of the element) are weighted by the specified value, changing the relevance at query time. Specifying a weight greater than 1.0 will boost scores and a weight lower than 1.0 will lower scores for matches within the element.
When you specify a weight, the term frequency for any tokens in that element (including tokens in descendant text nodes) is multiplied by that number. This happens during document load, update, or reindexing. For example, if you specify a weight of 2.0, each term will have a term frequency of 2.0, making it as if each term appeared twice (for score calculation purposes). Similarly, if you specify a weight of 0.5, each term will have a term frequency of 0.5.
Note: Because the weight boosting affects term frequency, it will only affect relevance orders for scoring algorithms that include term frequency (for example, logtf/idf or logtf); scoring algorithms that do not consider weight will not be affected by these weights (for example, score-simple).
Adding a weight is useful to boost or lower scores on searches where the match occurs in a given element. For example, if you want matches in TITLE elements to contribute more towards the relevancy score than matches in other elements, you can specify a weight of 2.0 for the TITLE element. Conversely, if you want matches in TITLE elements to contribute less to the relevancy score than matches in other elements, you can specify a weight of 0.5 for the TITLE element. For details on how relevance is calculated, see the chapter Composing cts:query Expressions in the Search Developer’s Guide.
######### 14.1.4 Specifying An Attribute Value for an Included Element
When you include an element, one of the options is to specify an attribute value. This option allows you to only include elements with a particular attribute/value pair. The attribute/value pair acts as a predicate on which to constrain the content. For example, consider the following XML snippet:
For the element chapter, if you specify the attribute/value pair of class and history, then only the following elements will be included:
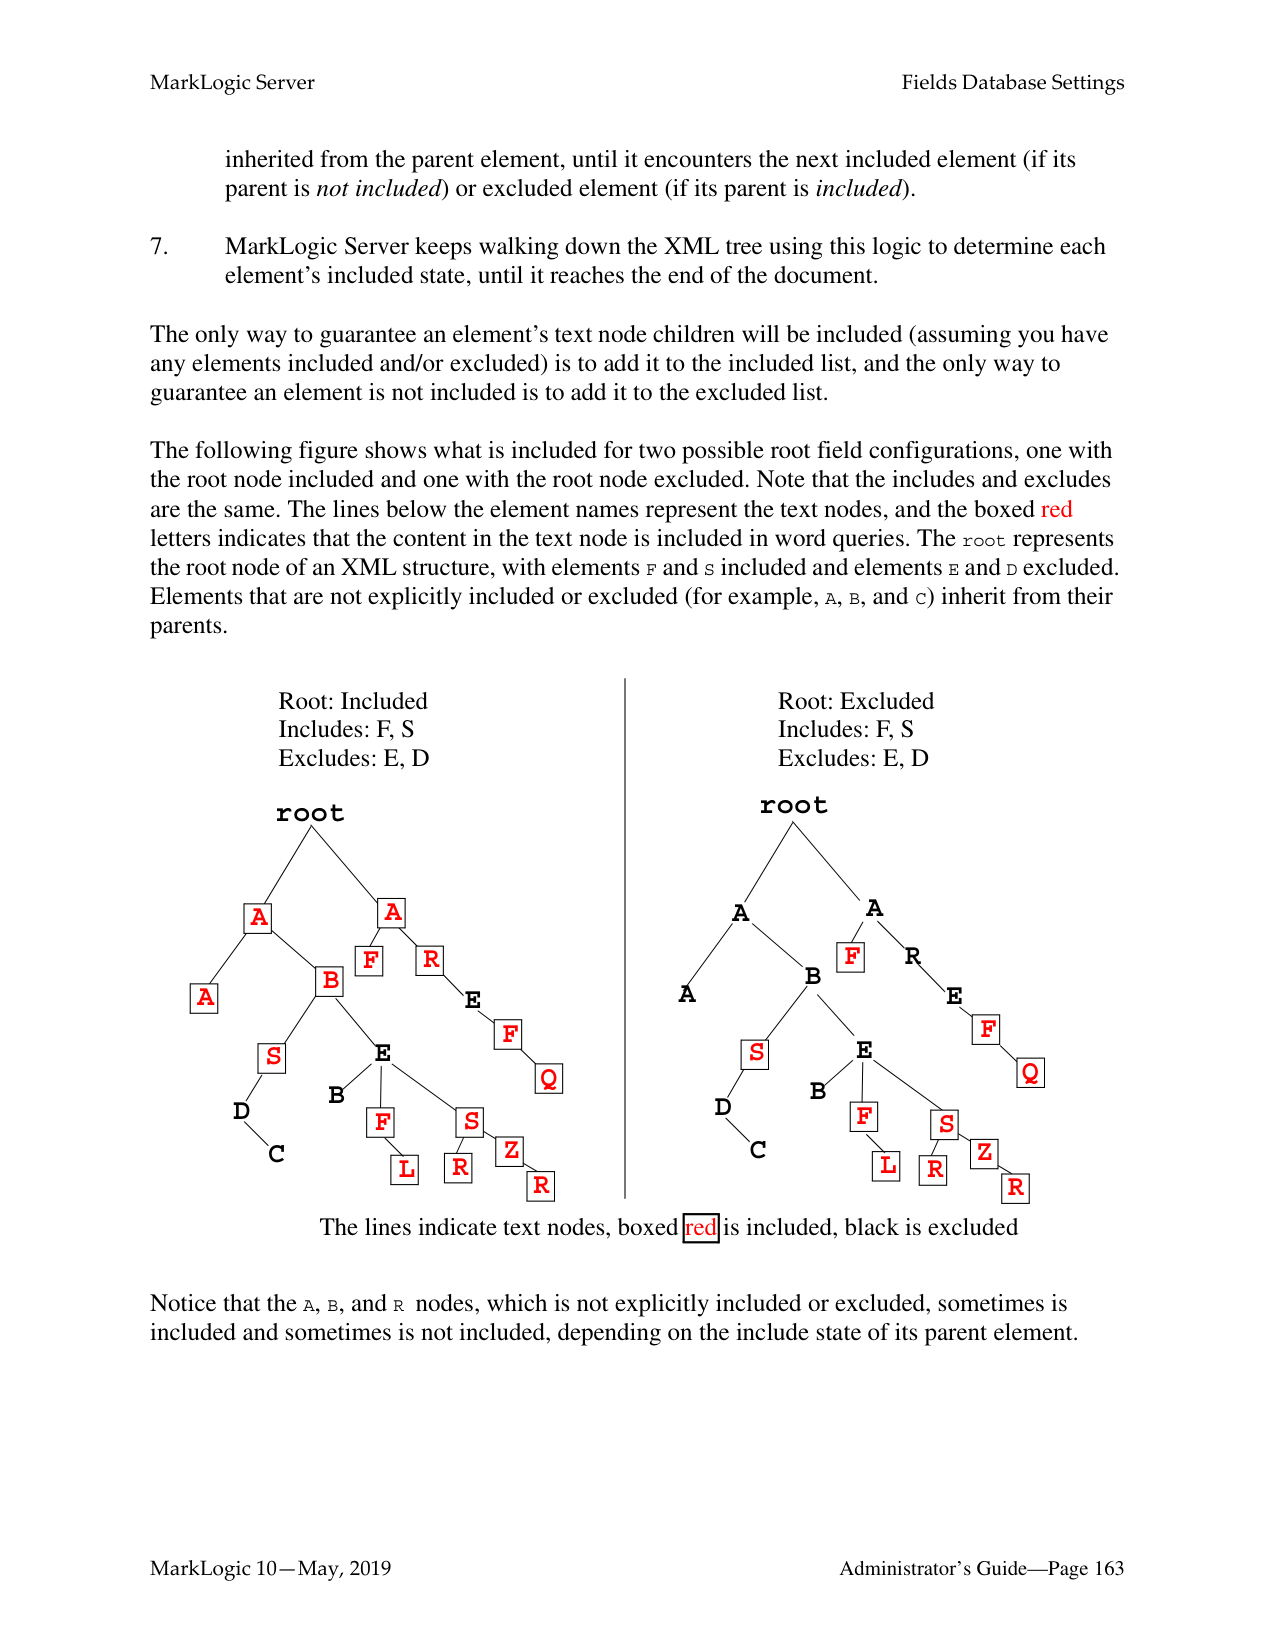
You can only specify an attribute value for an included element; you cannot specify one for an excluded element.
######### 14.1.5 Understanding the Index Option Configuration
The word query configuration allows you to add some extra indexing options from the ones that are currently set in the database configuration. Adding any index options to the word query configuration does not add those options to the element-based index options.
To add a particular index option to word query, you check the box corresponding to the index option. Adding any index options that are not enabled in the database configuration will cause new and updated documents to use the new indexing for word query, and will trigger a reindex operation if reindex enable is set to true in the database configuration.
Options that are enabled in the database configuration appear in bold on the word query configuration. If you check the box next to an option with bold-face type, it does not change your configuration. However, if you subsequently disable that index option in the database configuration, it will remain enabled for word query as long as the box is checked.
######### 14.2 Configuring Customized Word Query Settings
This section provides the procedure for customizing the word query settings. For details on what the meaning of the various configuration options in fields, see “Understanding the Word Query Configuration” on page 149. The following is the procedure for modifying the word query configuration for your database:
Note: When you modify the word query settings, those modifications apply to all queries that use the cts:word-query constructor, which is the default constructor for cts:search. If you want to be able to search on everything in a word query, but also want a special view of the content that includes and/or excludes some elements, consider creating a field instead of modifying the word query configuration. For details on fields, see “Fields Database Settings” on page 159.
Use the Admin Interface to perform the following steps to add a new field configuration to a database.
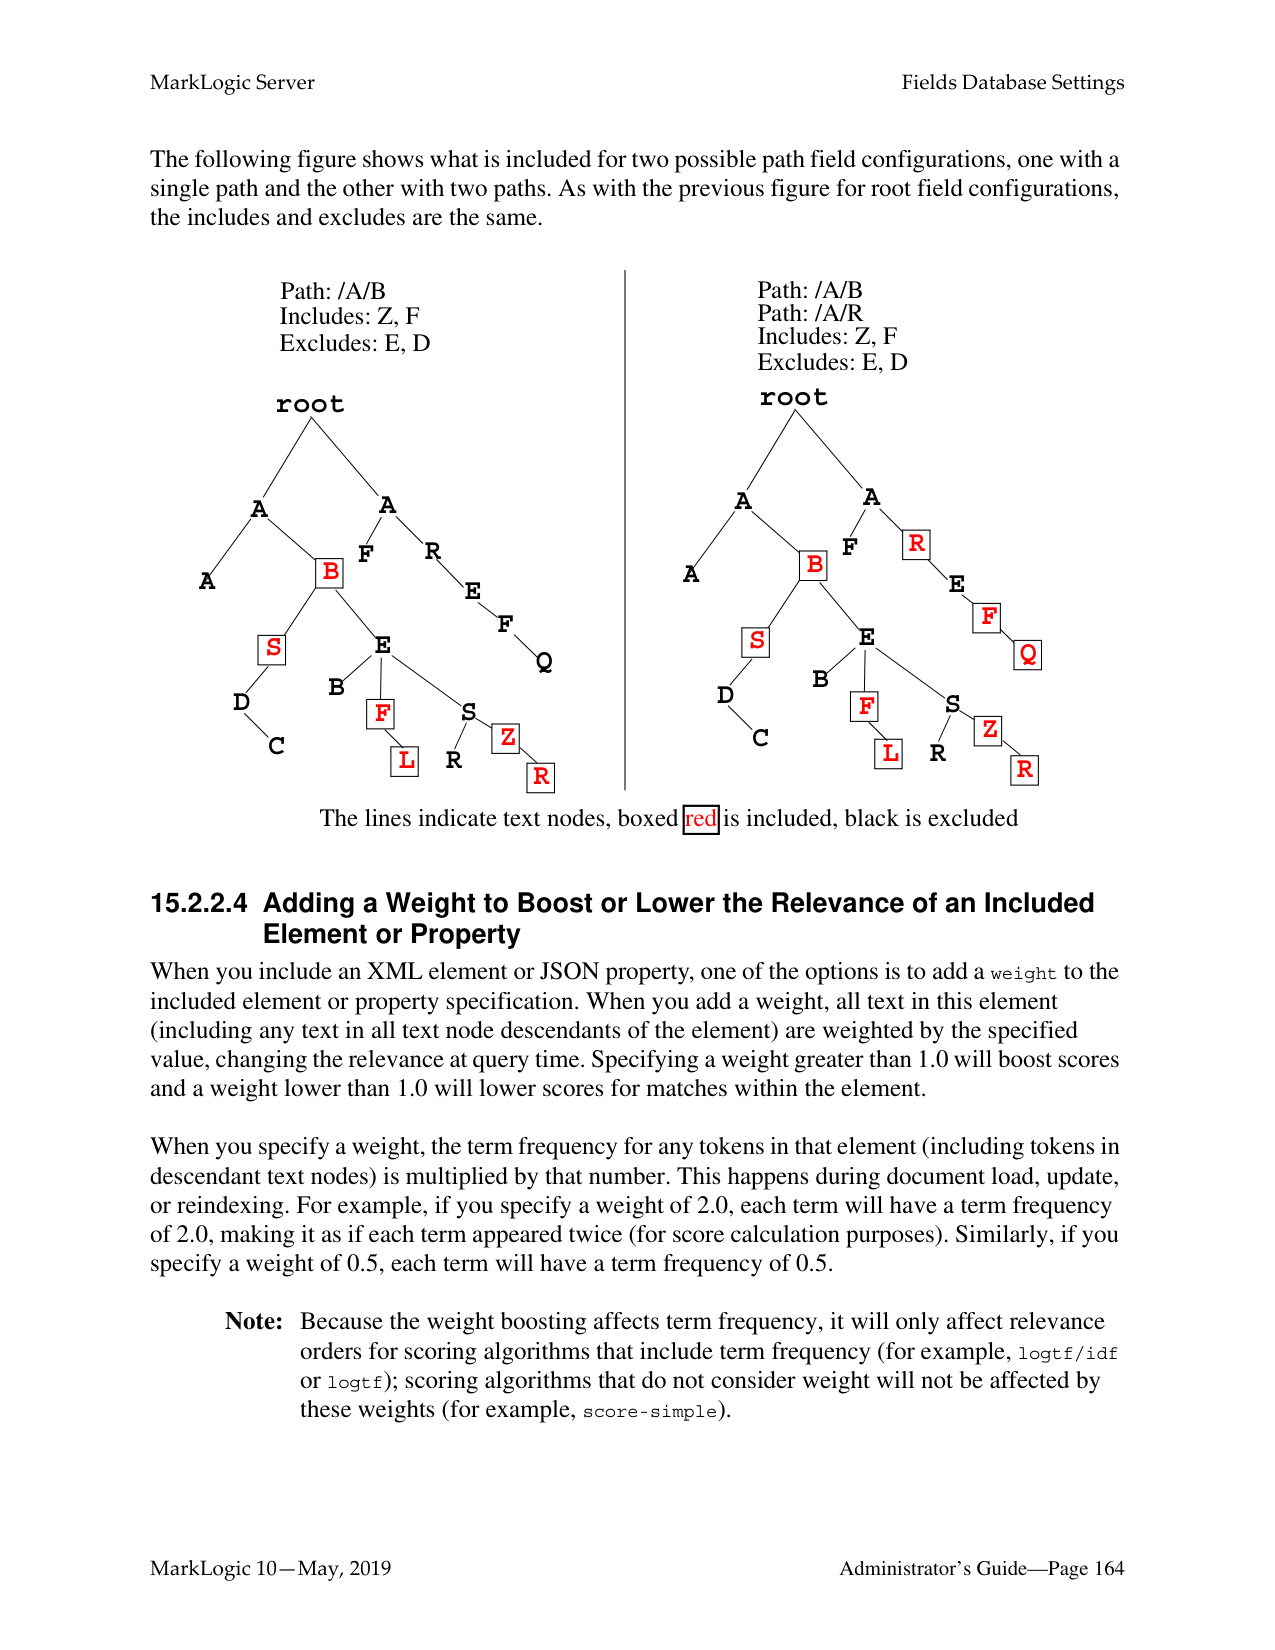


############ 17. You can delete any included or excluded fields from the tables at the bottom of the fieldconfiguration page.

##### 15.0 Fields Database Settings
This chapter describes how to configure fields in the database settings. Fields are used with the cts:field-word-query, cts:field-words, and cts:field-word-match APIs, as well as with the field lexicon APIs, and allow you to define a named field consisting of several elements over which you can search. The following topics are included in this chapter:
This chapter describes how to use the Admin Interface to create and configure fields. For details on how to create and configure fields programmatically, see Adding a Database Field and Included Element in the Scripting Administrative Tasks Guide. For details on lexicons on fields, see Browsing With Lexicons in the Search Developer’s Guide.
######### 15.1 Overview of Fields
Fields provide a convenient mechanism for querying a portion of the database based on XML element QNames or JSON property names. Unlike collections or directories, which enable you to query portions of a database based on document URIs, fields enable you to query portions of a database based on XML element and JSON property names. This offers extra convenience for the application developer, and also offers a performance boost over other methods of querying a portion of the database. Fields are extremely useful when you have content in one or more elements or JSON properties that you want to query simply and efficiently as a single unit.
Field query is similar to word query (in its default configuration, with everything included), but instead of querying everything in the database, fields query only what is configured for the specified field. Fields have their own set of indexes, independent of the database indexes. Because fields have their own indexes, and a field is typically a small subset of the whole database, querying a field is often more efficient than querying those same XML element or JSON properties directly (with cts:word-query, for example).
Also, because fields have their own sets of indexes, relevance for fields is calculated based on the content in the field, not based on all of the content in the database. This provides finer-grain relevance for field searches than for other searches.
You can use fields to create portions of the content that you might want to query as a single unit. Additionally, you can configure a field with indexing options over and above the ones configured in the database. For example, consider a database containing many technical articles, each article containing a brief abstract. You might want to build an application that allows greater capabilities for searching through the abstracts than for searching through the rest of the articles. Assume your
main content does not have wildcard indexes, but you want to be able to search through the abstracts using wildcard searches. You can create a field on the abstract, and then add wildcard indexes to that field. Because the field represents only a relatively small percentage of the content, the relative cost of the extra indexing is small.
Indexing of JSON and XML content differs slightly. This introduces differences in the behavior of field value queries and field range queries over the two types of content. For details, see How Field Queries Differ Between JSON and XML in the Application Developer’s Guide.
######### 15.2 Understanding Field Configurations
Field search of words and phrases in MarkLogic Server is based on the query constructor cts:field-word-query. You can control the behavior of these field searches by changing the database configuration for the field you query. You can exclude and/or include elements from path and root fields, and you can add extra indexing options for some elements. This section describes the options available in the configuration and includes the following parts:
######### 15.2.1 Overview of Field Configuration Options
The following lists the main options you can set in the field query configuration to control how queries against the specified field are resolved:
There are three types of fields:
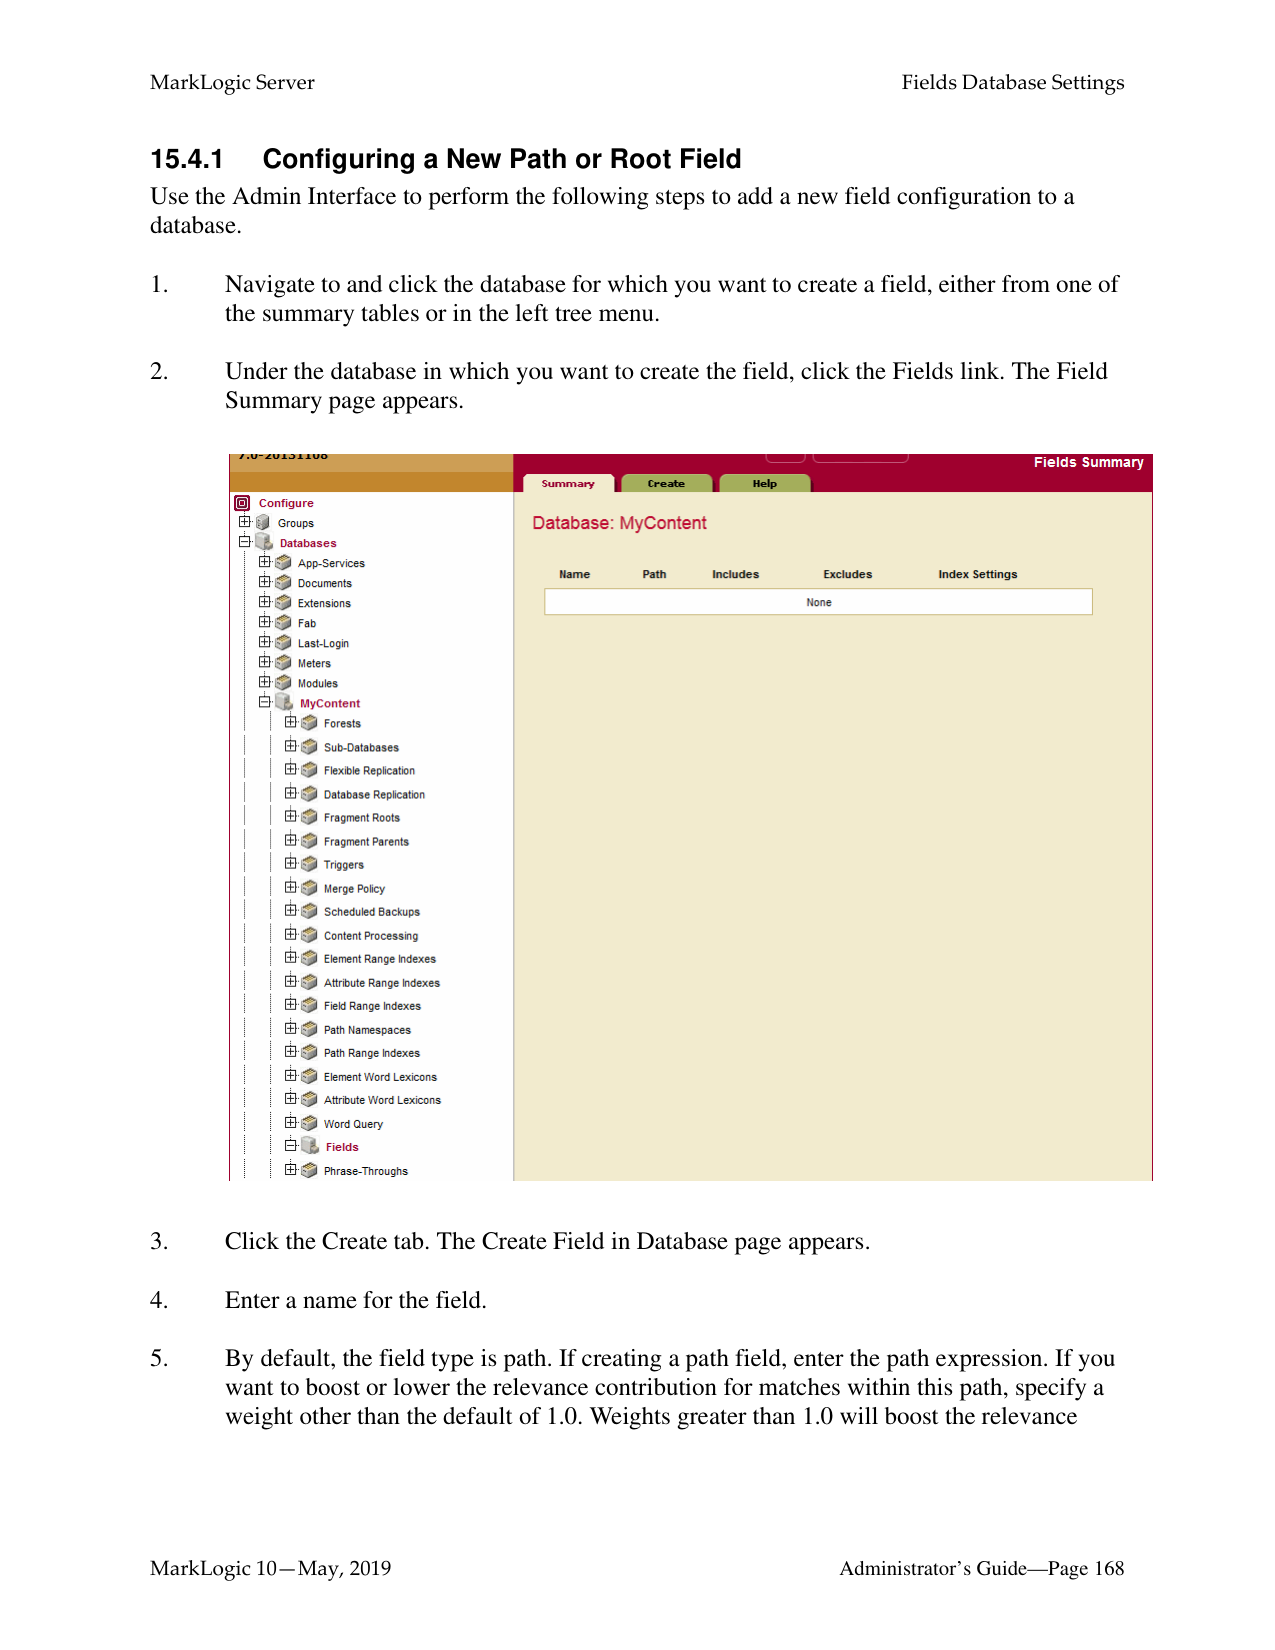
Root and Path fields are described in “Root and Path Fields” on page 161. Metadata fields are described in “Metadata Fields” on page 165.
######### 15.2.2 Root and Path Fields
You can include and/or exclude elements from a root or path field. This is useful if you know you will never want to search some element content. This section describes how MarkLogic Server determines what content is included in the field and what is not when you include and/or exclude elements from the field configuration.
This section describes the options available in the configuration and includes the following parts:
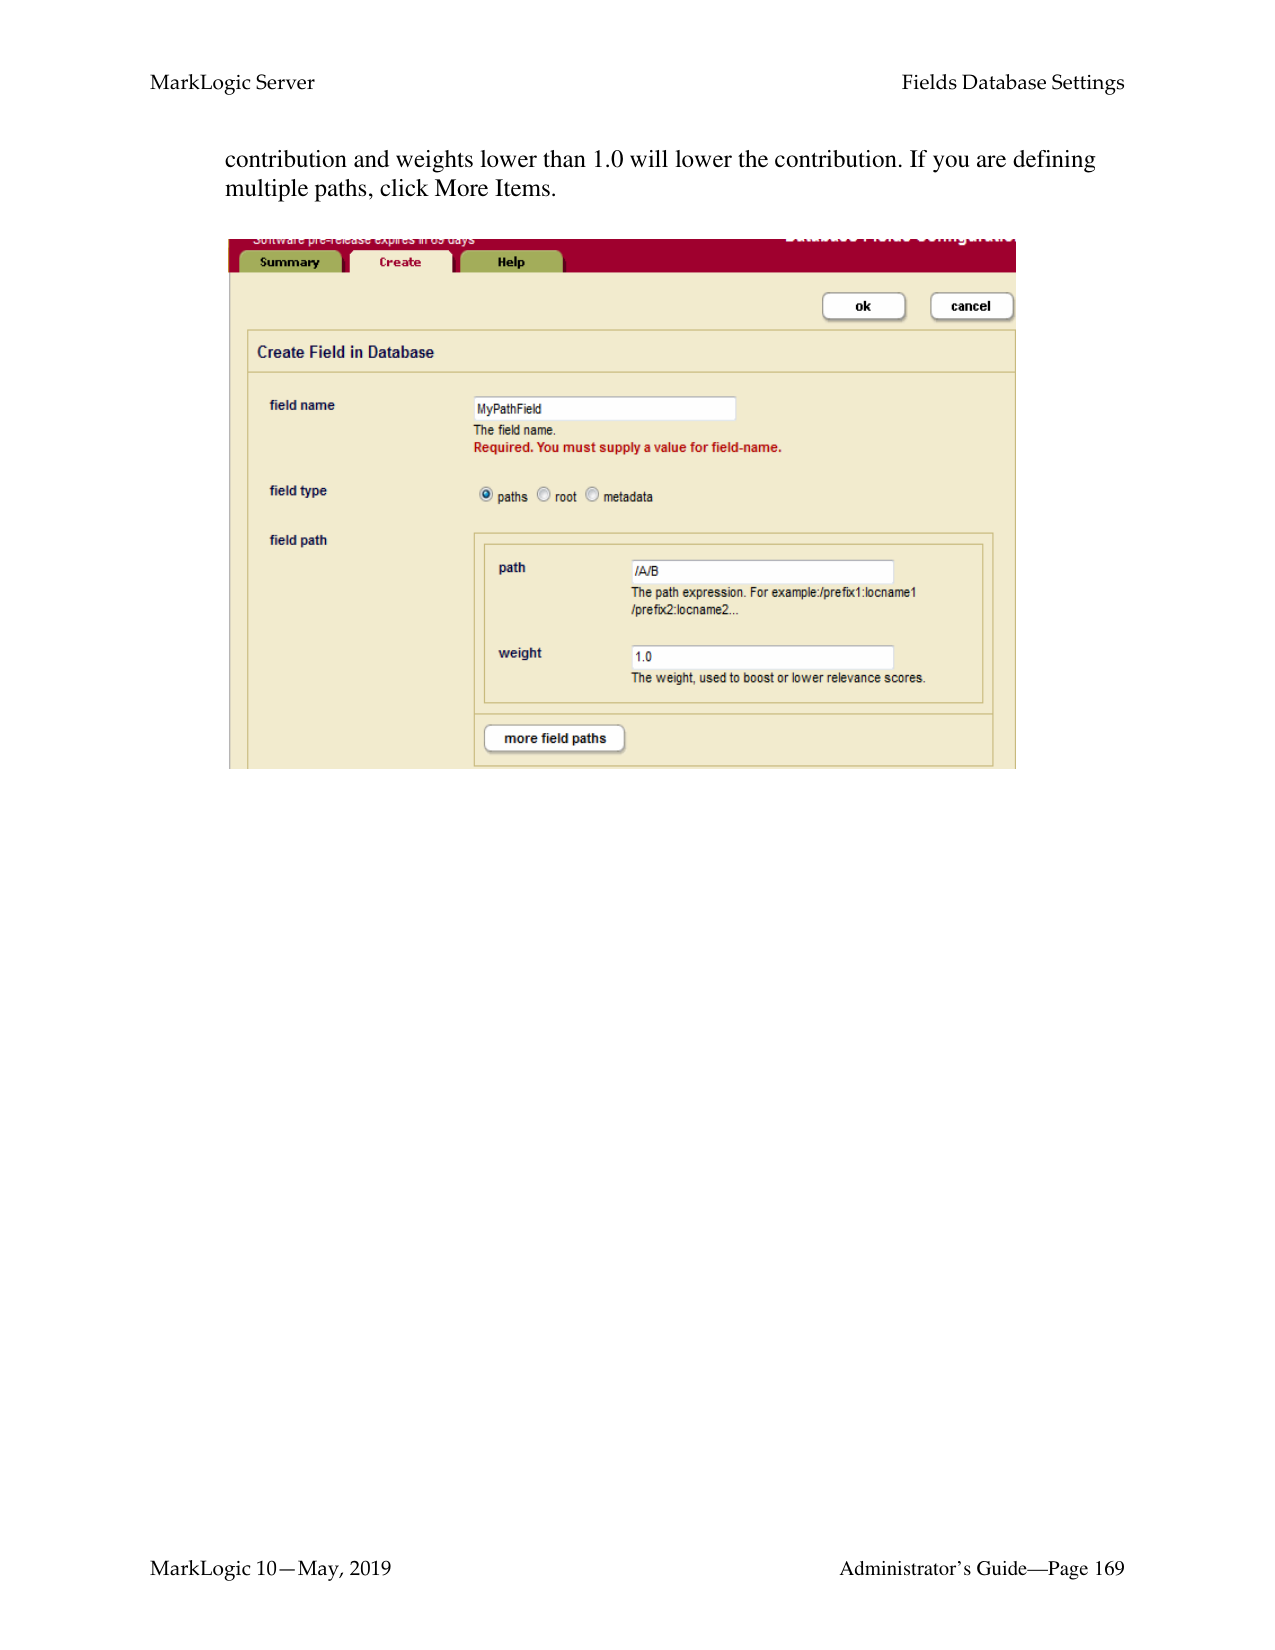
######### 15.2.2.1 Root Fields
Root fields include and/or exclude document elements regardless of their relative positions in the document. In a root field, you can choose whether or not to include and exclude elements starting
######### 15.2.2.2 Path Fields
In a path field, the included and excluded elements are constrained to the sub-tree identified by the path. For example, if the path for the field is /A/B/C, only elements in node C, such as A/B/C/D, A/B/C/D/E and /A/B/C/Z, are included or excluded from the field.
A path field may include one or more paths. Multiple paths are treated as the union of the paths. Consequently, each of them will identify a root of a field-instance in a given document.
If a path includes namespace prefixes on some elements, the namespaces must be defined in the same manner used for path range indexes, as described in “Defining Namespace Prefixes Used in Path Range Indexes and Fields” on page 402.
If a path for a field ends in a single node or an attribute, the include/exclude definitions are meaningless.
Each path is given a weight, which is used to boost or lower the relevance of text that is contributed by the path.
######### 15.2.2.3 How Field Settings Determine What is Included and Excluded
Once you define a path or root field, you can select which document elements are included and excluded. When MarkLogic Server determines which elements to include/exclude, it walks the XML tree using the following rules (note that these are the same rules used for including/ excluding elements in the word query configuration):
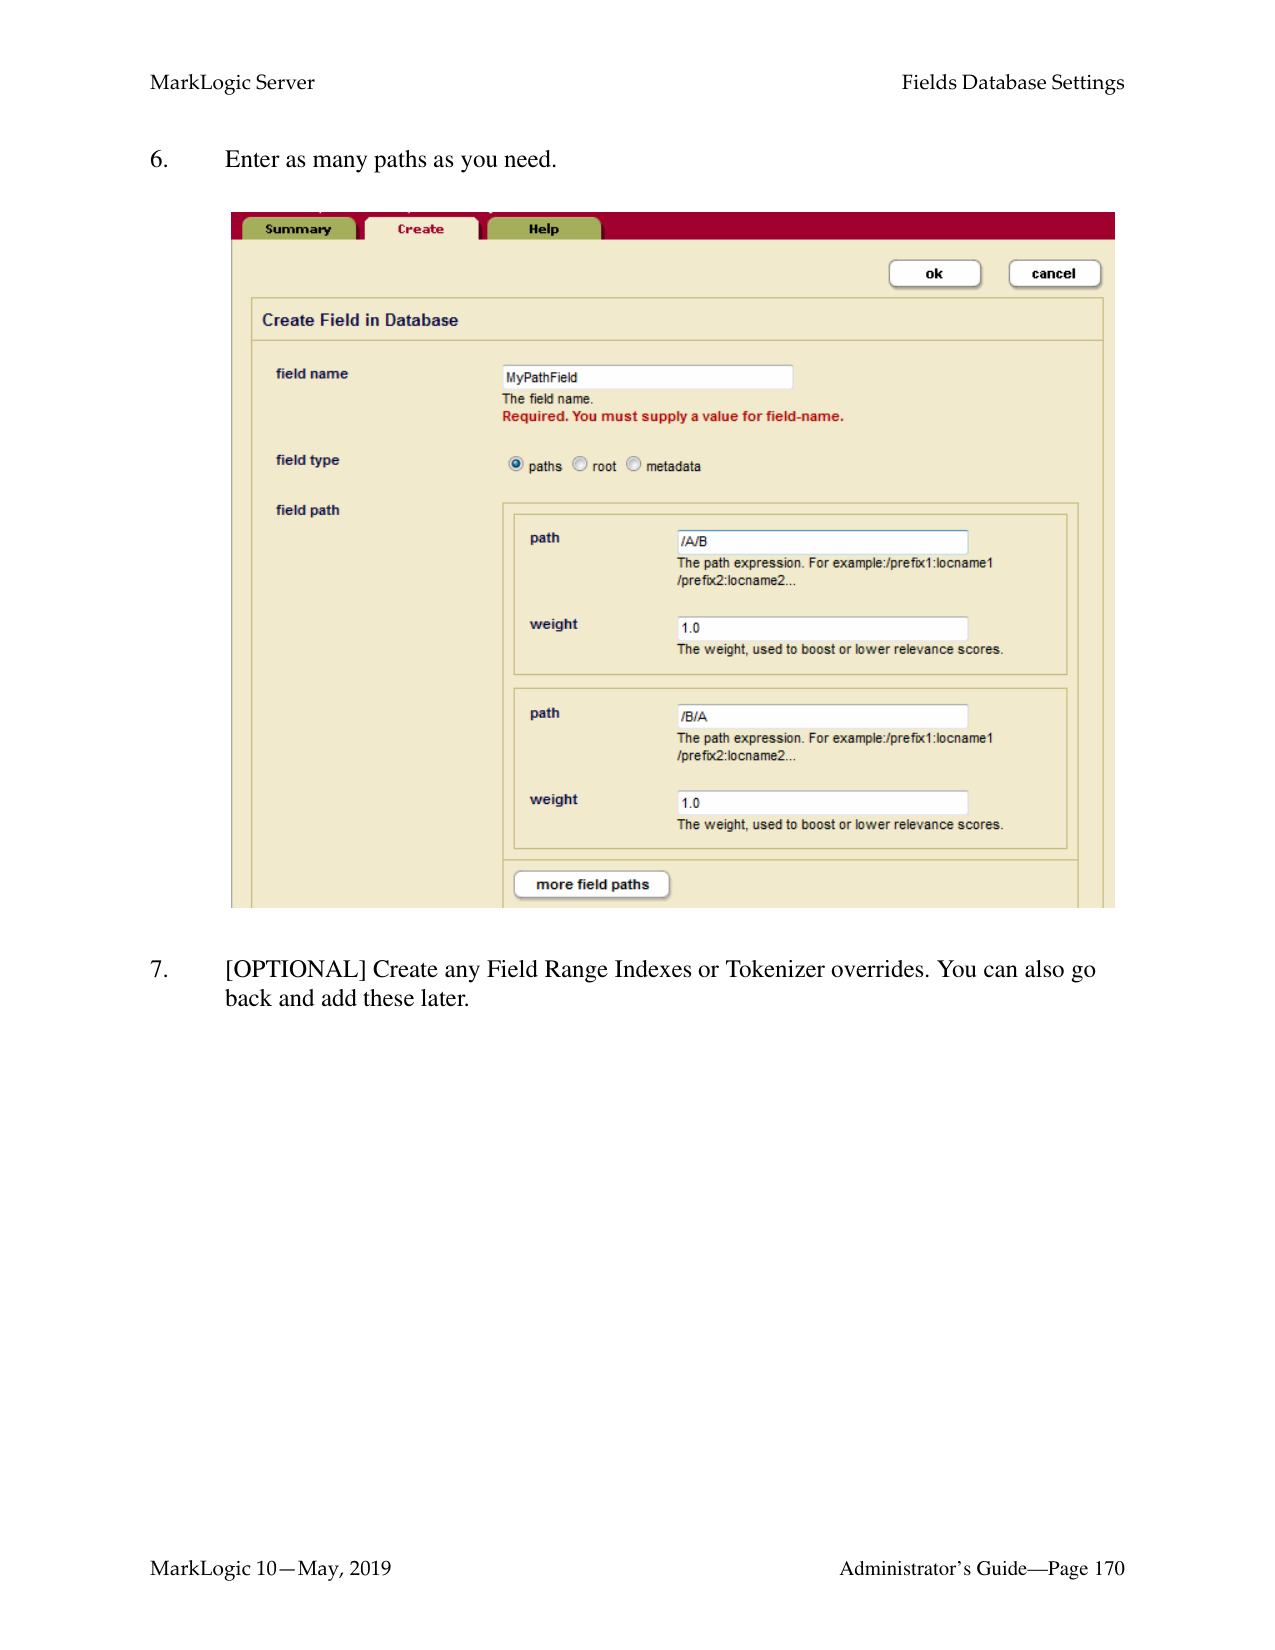
The only way to guarantee an element’s text node children will be included (assuming you have any elements included and/or excluded) is to add it to the included list, and the only way to guarantee an element is not included is to add it to the excluded list.
The following figure shows what is included for two possible root field configurations, one with the root node included and one with the root node excluded. Note that the includes and excludes are the same. The lines below the element names represent the text nodes, and the boxed red letters indicates that the content in the text node is included in word queries. The root represents the root node of an XML structure, with elements F and S included and elements E and D excluded. Elements that are not explicitly included or excluded (for example, A, B, and C) inherit from their parents.
Includes: F, S Root: Included Excludes: E, D
Includes: F, S Root: Excluded Excludes: E, D
####### root
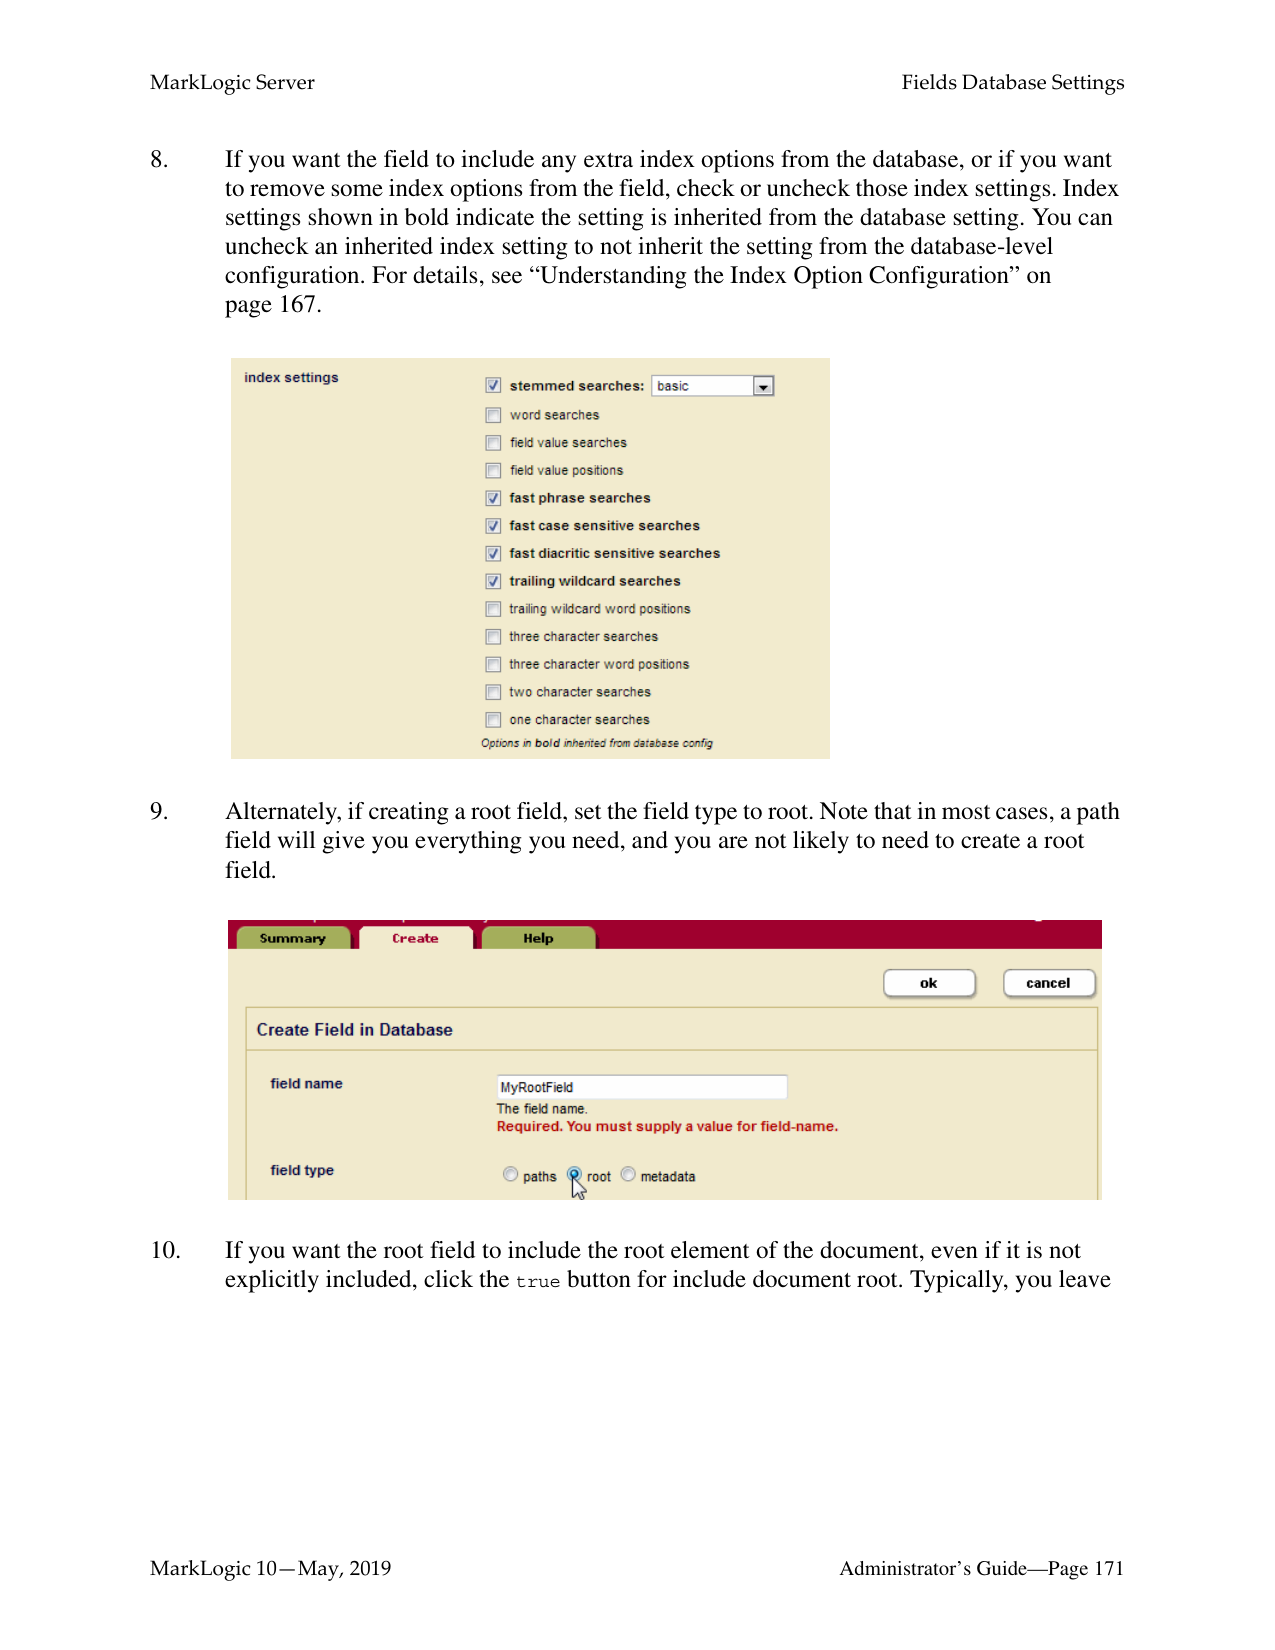
####### root
####### A A
|A| |---|
|A| |---|
####### R A
|F| |---|
|R| |---|
|F|
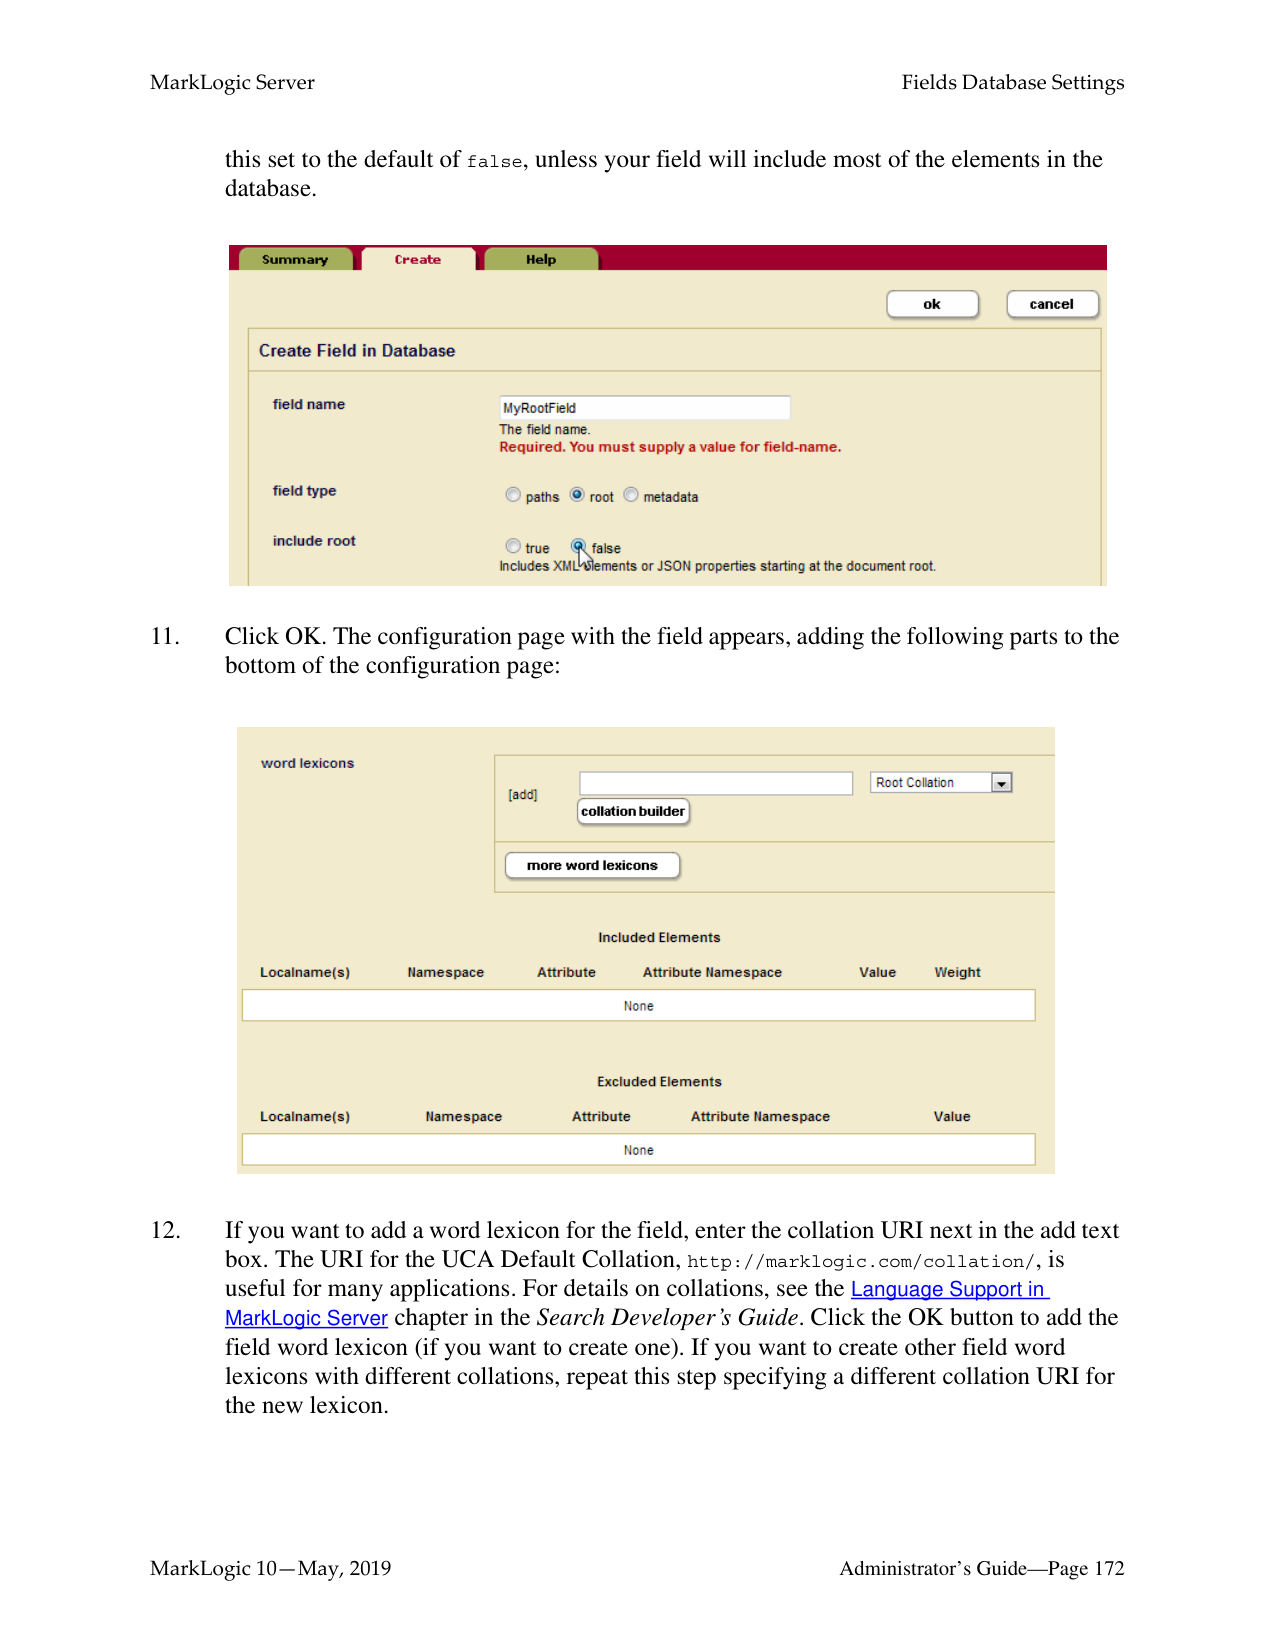
|---|
####### B
|B| |---|
####### E
|A| |---|
####### E
|F| |---|
|F| |---|
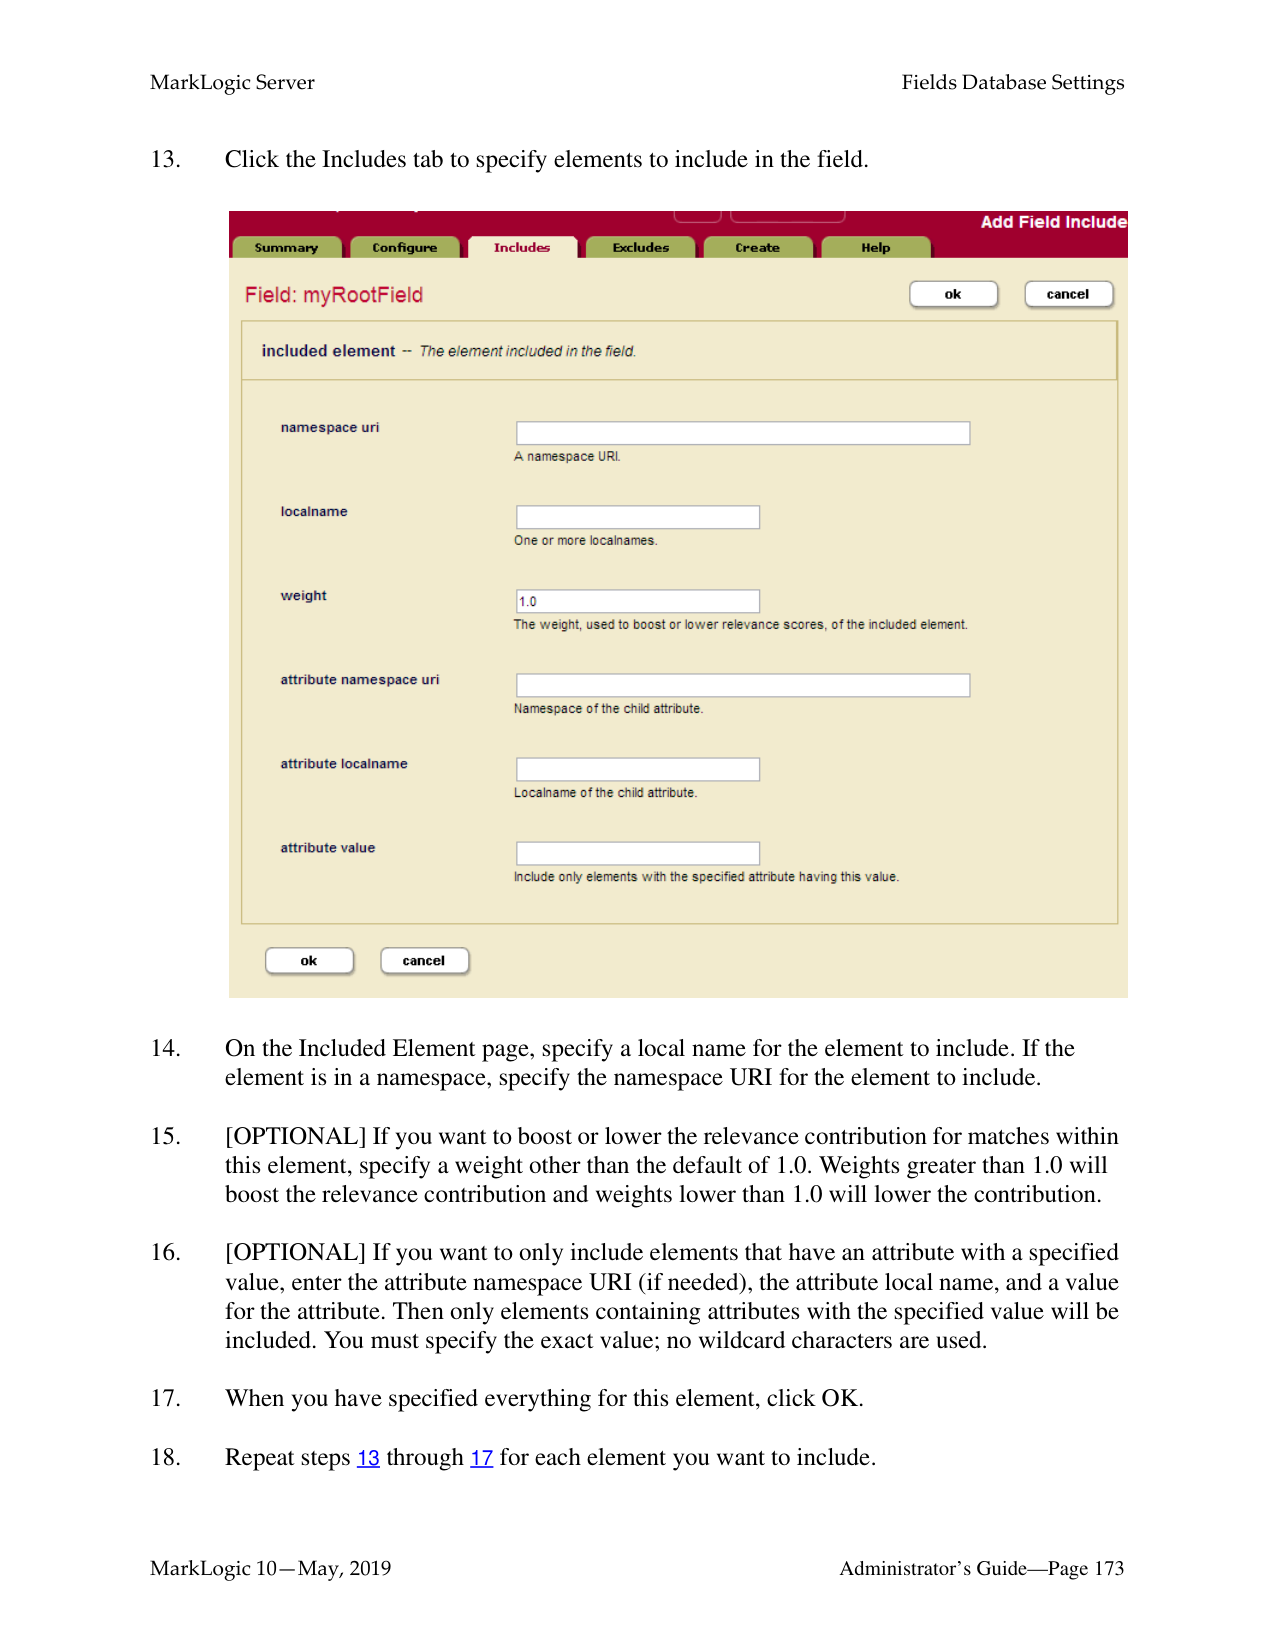
####### E B
####### E B
|S| |---|
|S| |---|
|Q| |---|
|Q| |---|
####### D
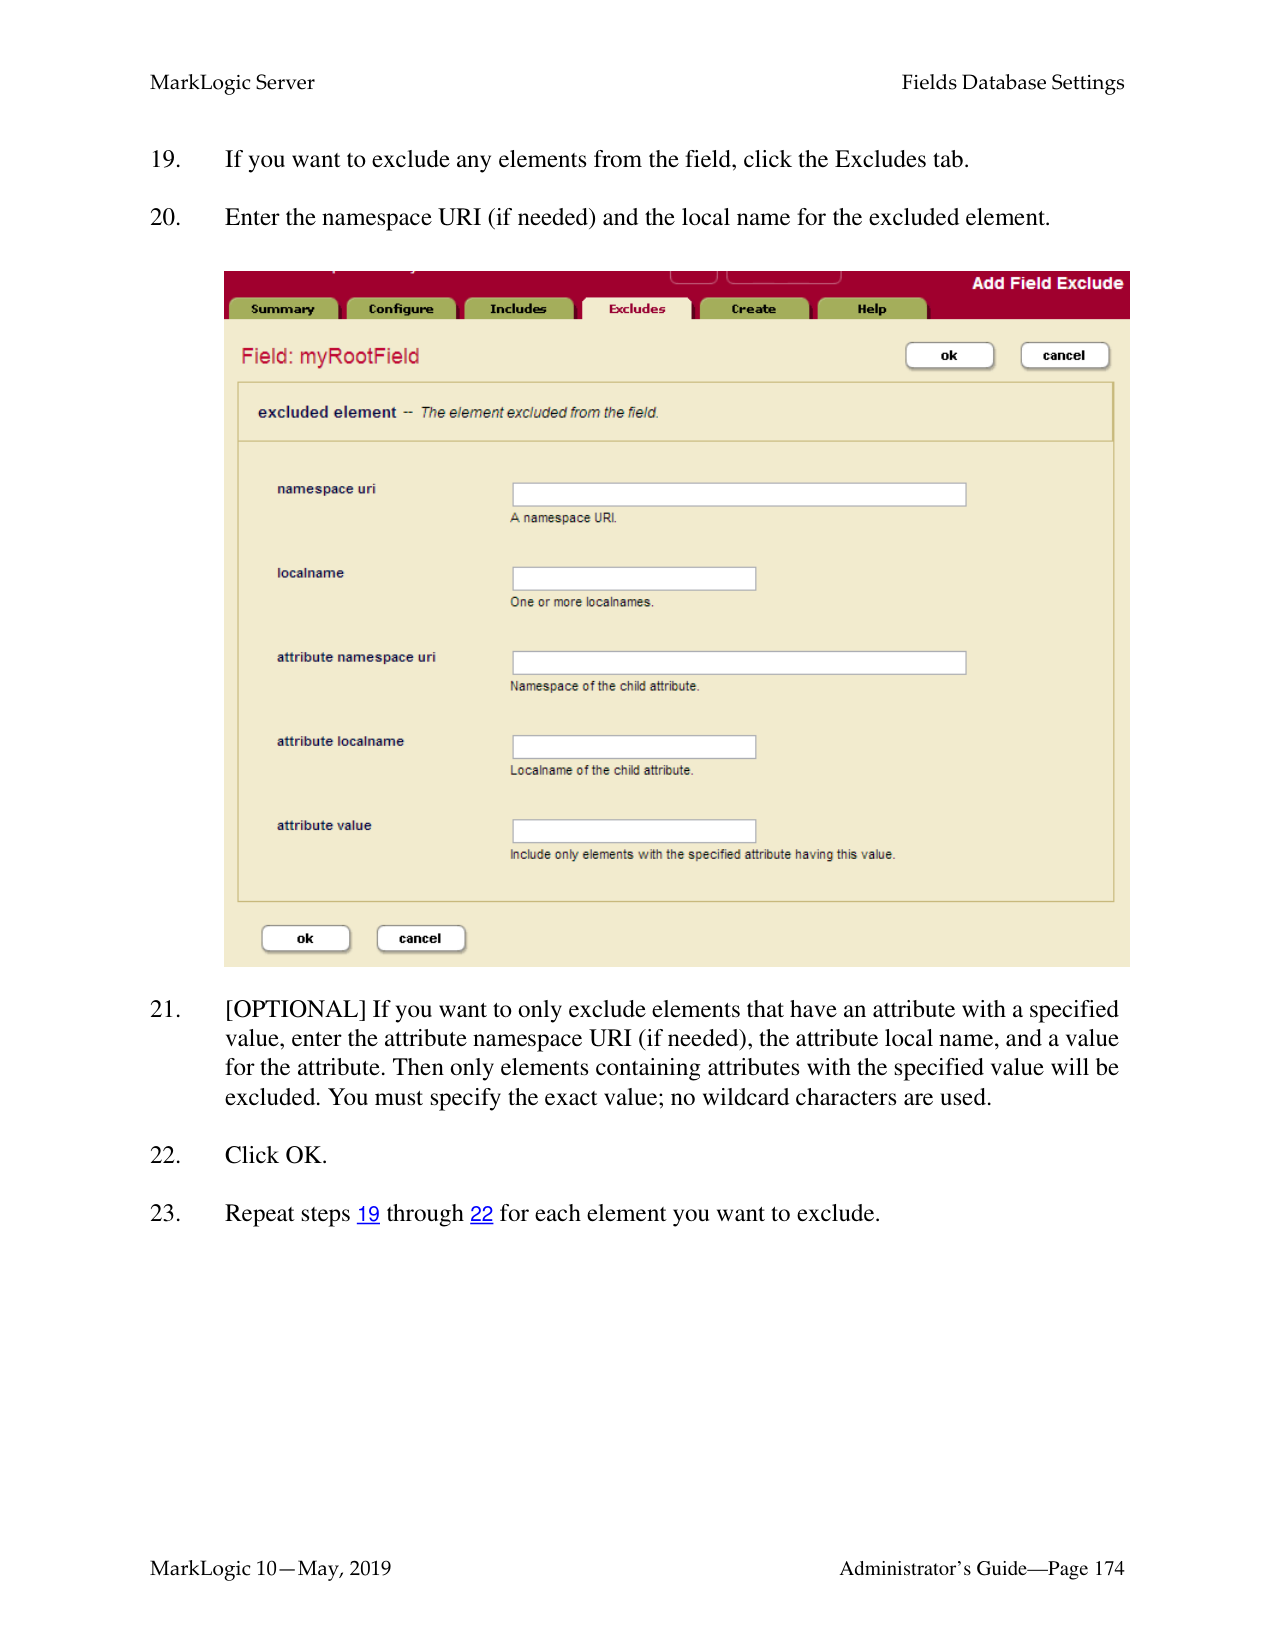
####### D
|F| |---|
|F| |---|
|S| |---|
|S| |---|
####### C
|Z| |---|
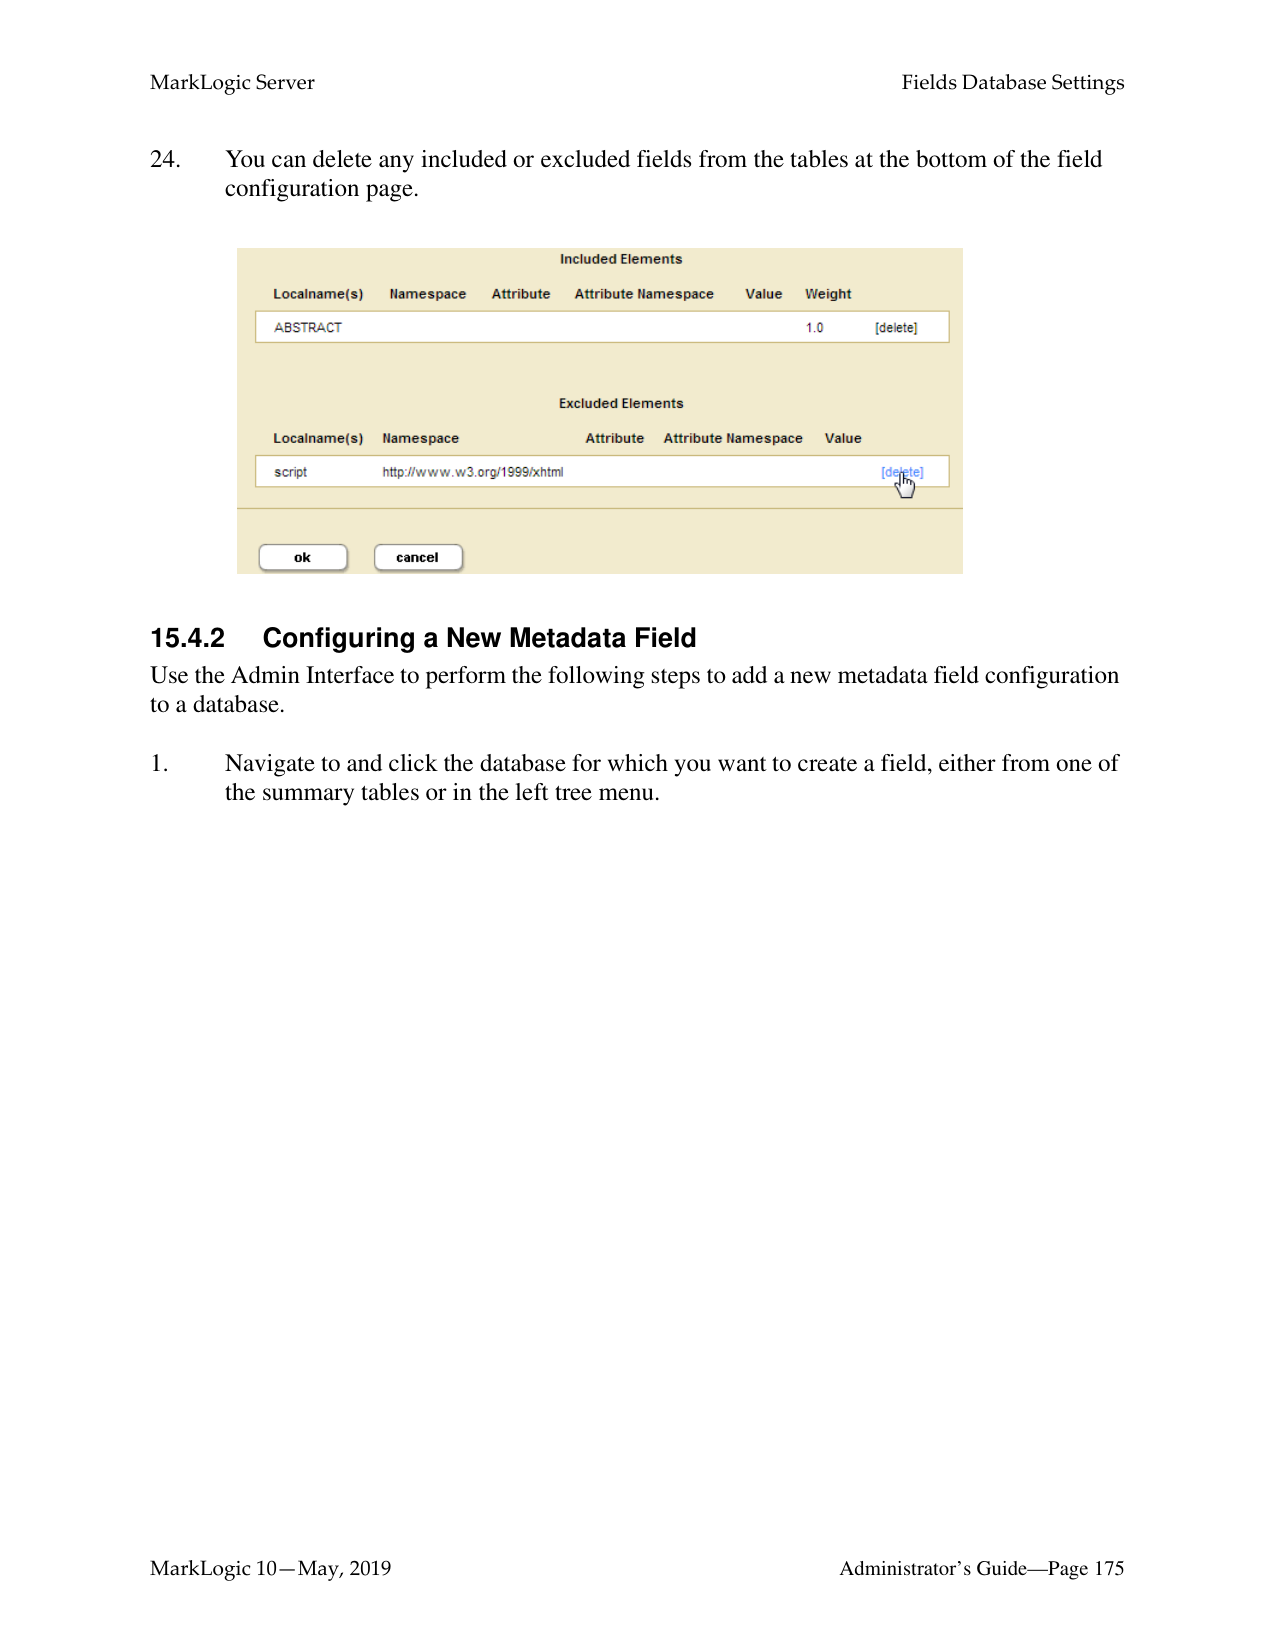
####### C
|Z| |---|
|L| |---|
|R| |---|
|L| |---|
|R| |---|
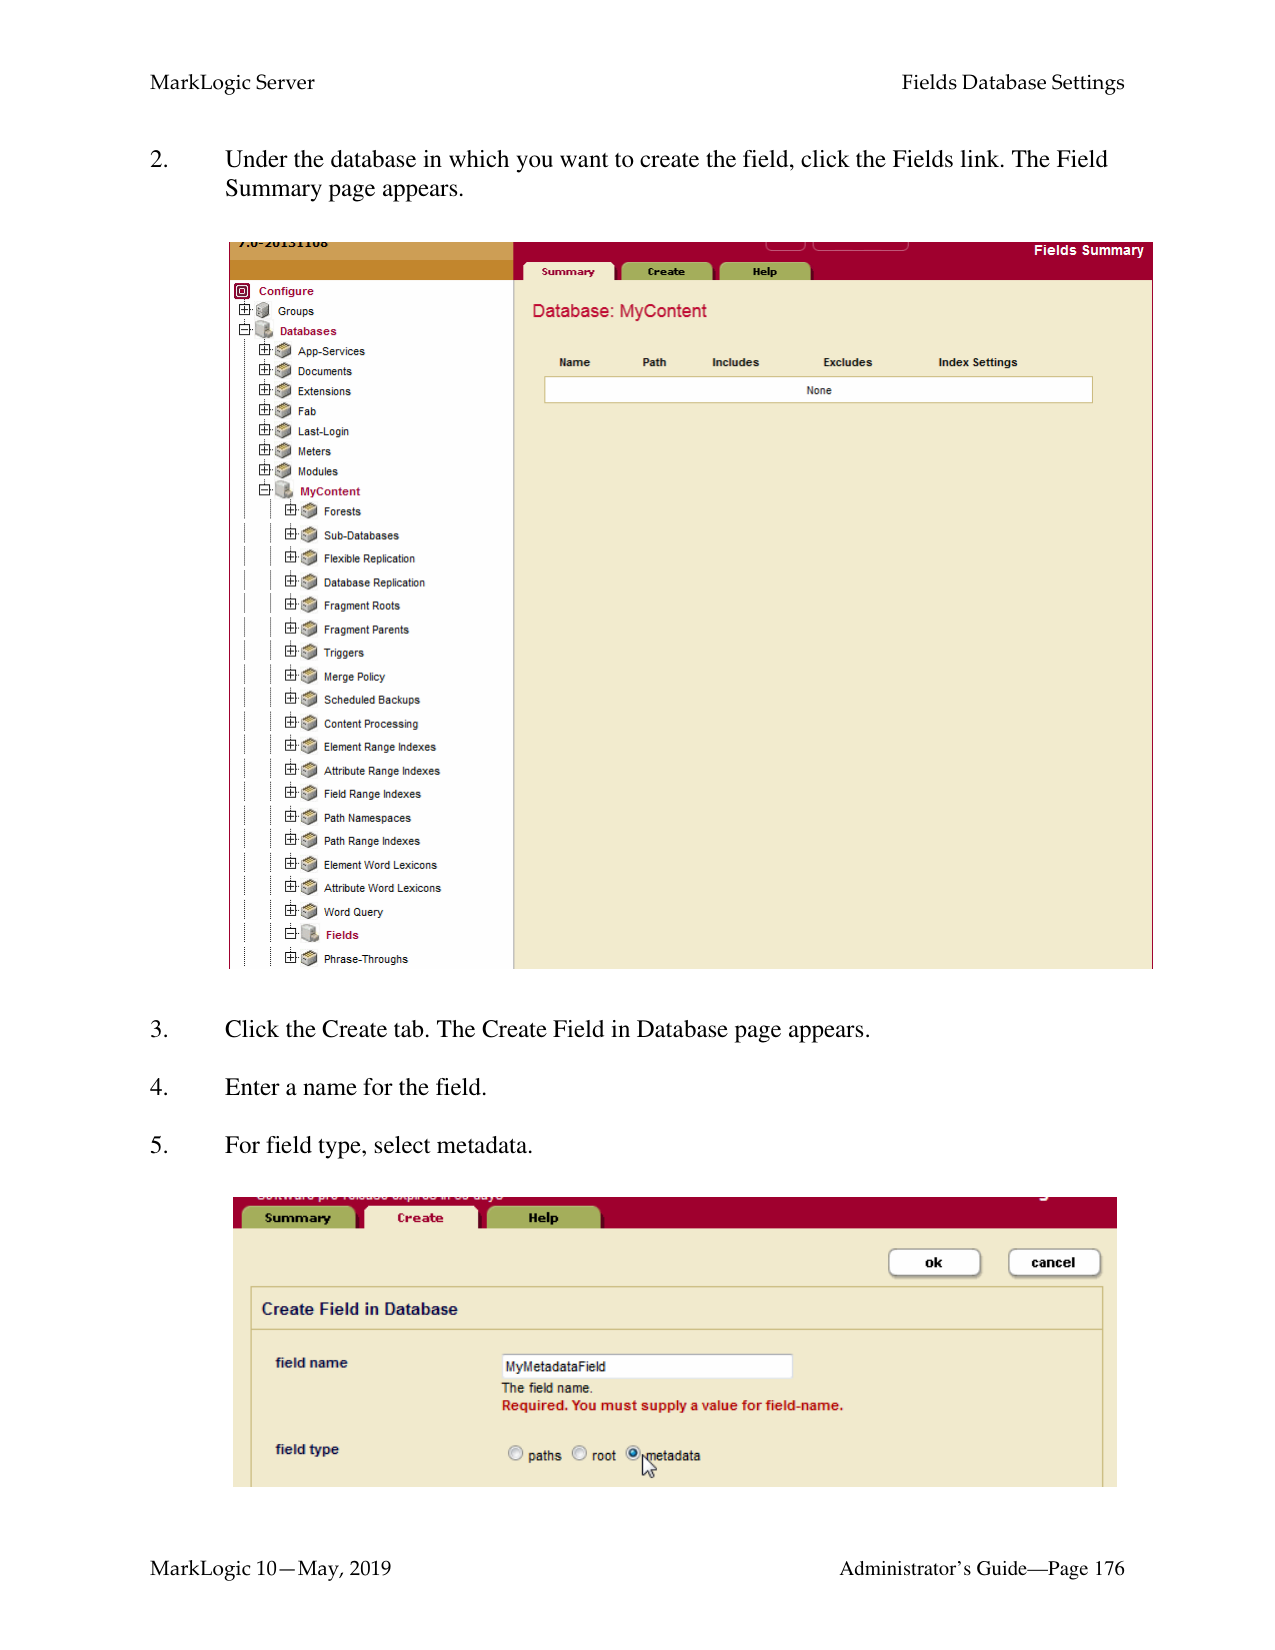
|R| |---|
|R| |---|
The lines indicate text nodes, boxed
is included, black is excluded
|red| |---|
Notice that the A, B, and R nodes, which is not explicitly included or excluded, sometimes is included and sometimes is not included, depending on the include state of its parent element.
The following figure shows what is included for two possible path field configurations, one with a single path and the other with two paths. As with the previous figure for root field configurations, the includes and excludes are the same.
Path: /A/B
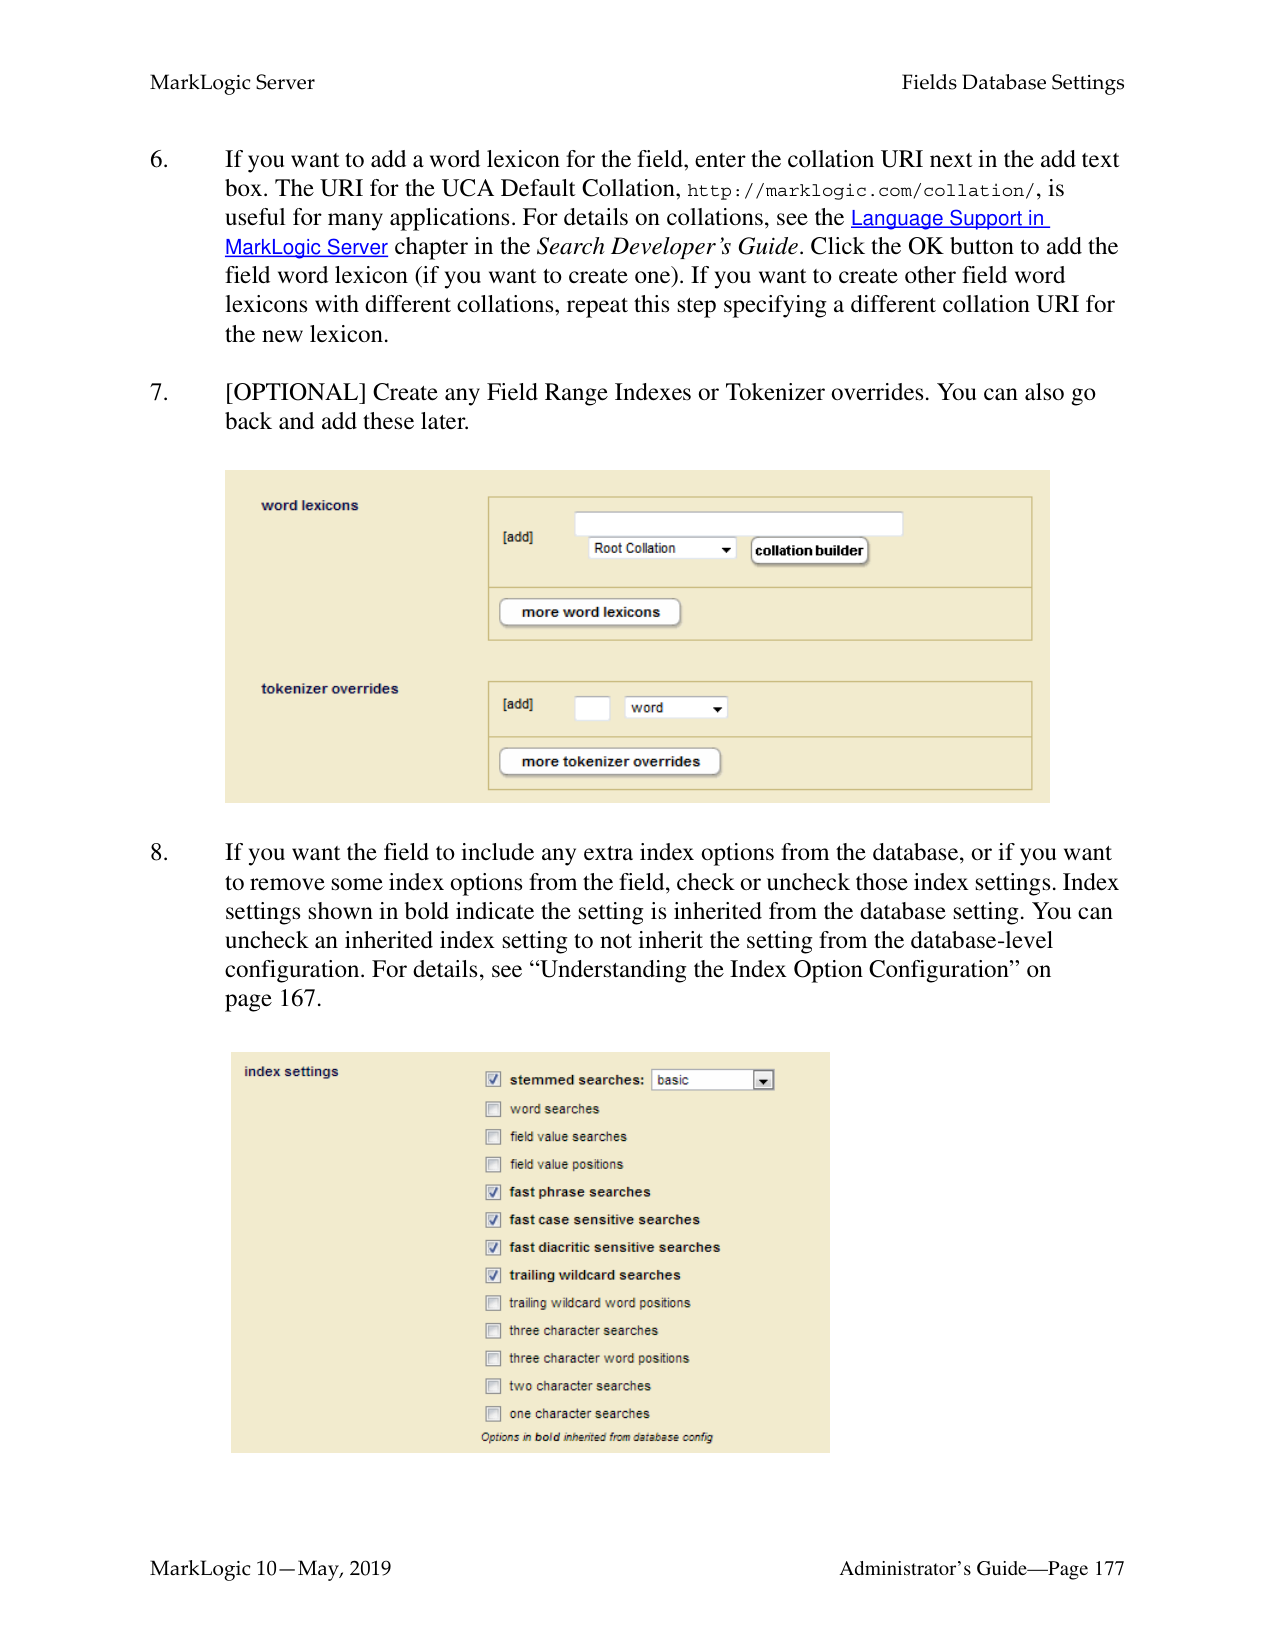
Includes: Z, F Path: /A/B Excludes: E, D root
Path: /A/R
Includes: Z, F
Excludes: E, D
####### root
####### A
####### A
####### A
####### A
|R| |---|
####### F
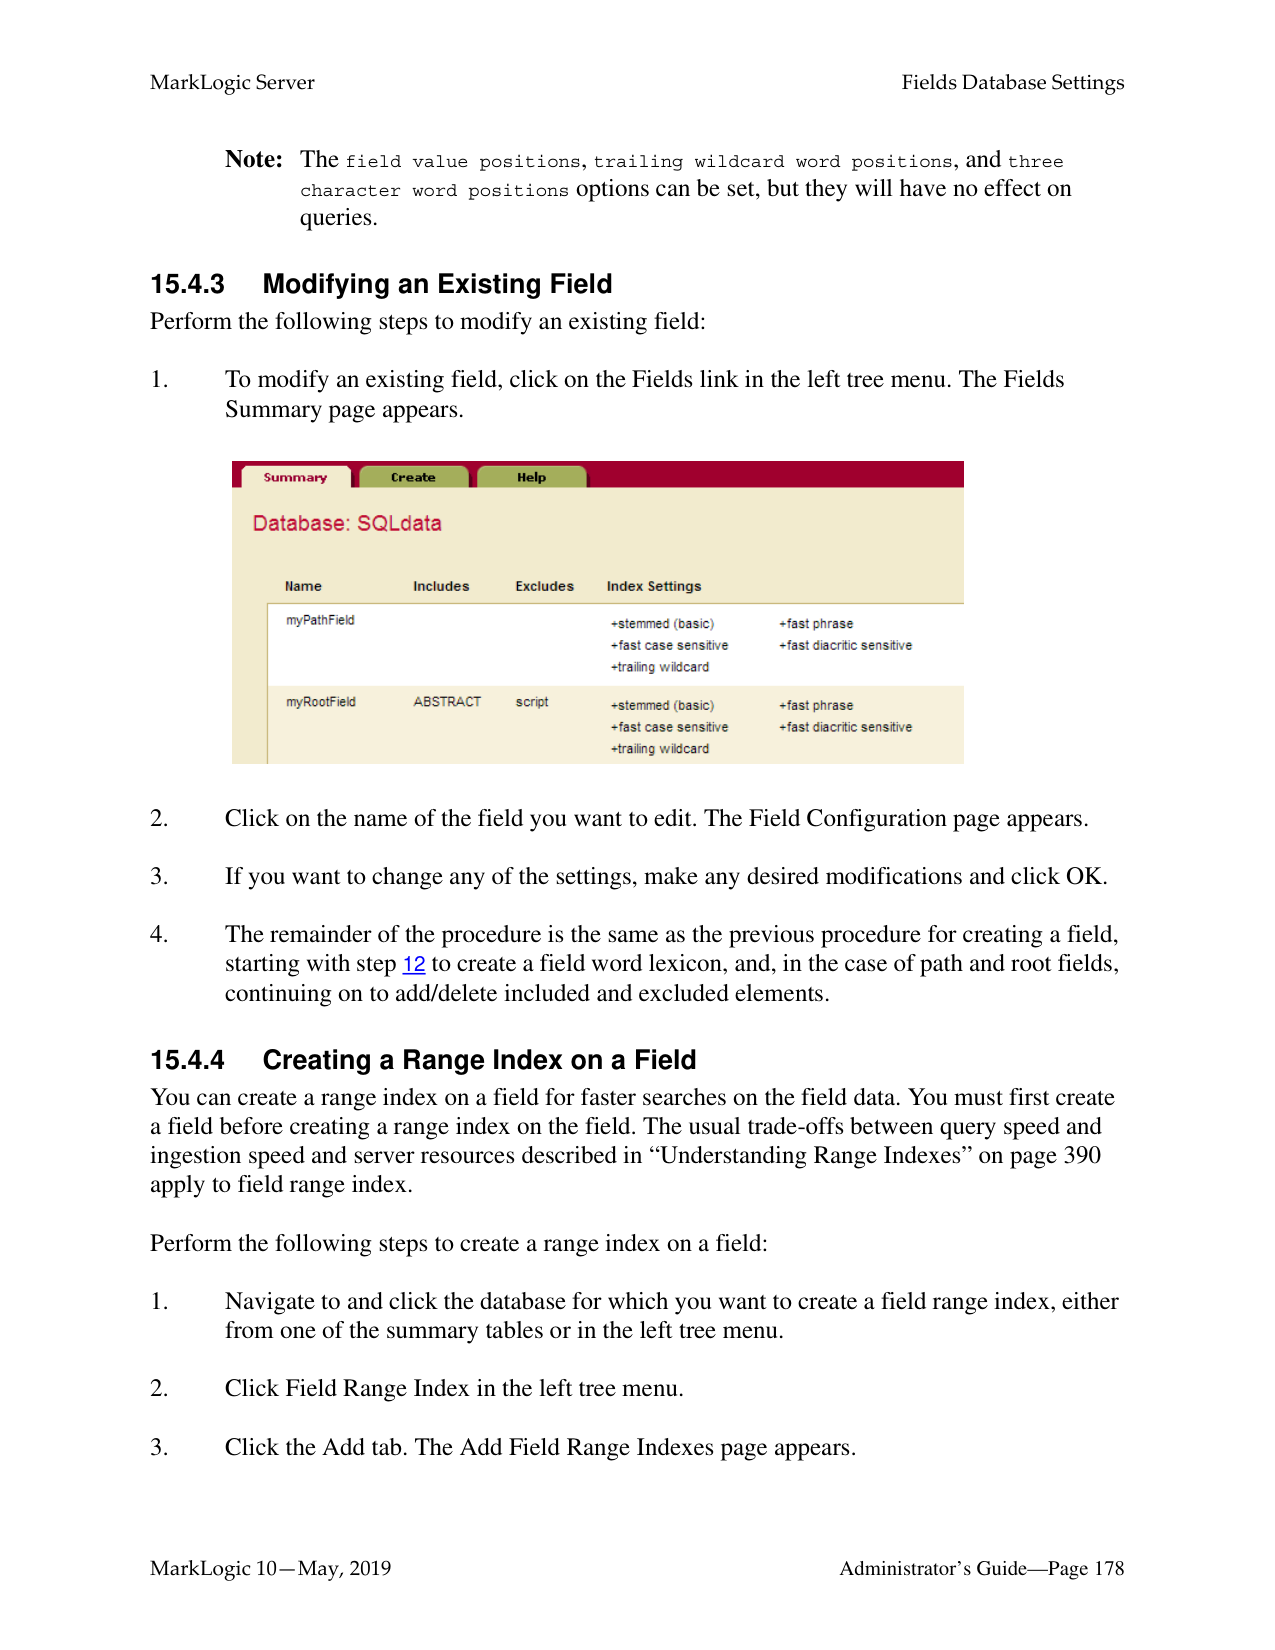
####### R
####### F
|B| |---|
|B| |---|
####### A
####### A
####### E
####### E
|F| |---|
####### F
####### E
|S| |---|
####### E
|S| |---|
|Q| |---|
####### Q
####### B

####### B
####### D
####### D
####### S
|F| |---|
####### S
|F| |---|
|Z| |---|
####### C
|Z| |---|
####### C
####### R
|L| |---|
####### R
|L| |---|
|R| |---|
|R| |---|
The lines indicate text nodes, boxed
is included, black is excluded
|red| |---|
######### 15.2.2.4 Adding a Weight to Boost or Lower the Relevance of an IncludedElement or Property
When you include an XML element or JSON property, one of the options is to add a weight to the included element or property specification. When you add a weight, all text in this element (including any text in all text node descendants of the element) are weighted by the specified value, changing the relevance at query time. Specifying a weight greater than 1.0 will boost scores and a weight lower than 1.0 will lower scores for matches within the element.
When you specify a weight, the term frequency for any tokens in that element (including tokens in descendant text nodes) is multiplied by that number. This happens during document load, update, or reindexing. For example, if you specify a weight of 2.0, each term will have a term frequency of 2.0, making it as if each term appeared twice (for score calculation purposes). Similarly, if you specify a weight of 0.5, each term will have a term frequency of 0.5.
Note: Because the weight boosting affects term frequency, it will only affect relevance orders for scoring algorithms that include term frequency (for example, logtf/idf or logtf); scoring algorithms that do not consider weight will not be affected by these weights (for example, score-simple).
Adding a weight is useful to boost or lower scores on searches where the match occurs in a given element. For example, if you want matches in TITLE elements to contribute more towards the relevancy score than matches in other elements, you can specify a weight of 2.0 for the TITLE element. Conversely, if you want matches in TITLE elements to contribute less to the relevancy score than matches in other elements, you can specify a weight of 0.5 for the TITLE element. For details on how relevance is calculated, see the chapter Composing cts:query Expressions in the Search Developer’s Guide.

If a field has two or more elements with different weights and, if one of those elements is a child of another element, then the weight of the parent element is used and the weight of the child element is ignored. For example, you have a field, named test, that includes elements A and B. A is given a weight of 10 and B is given a weight of 2. The returned results of a search query that includes cts:field-value-query("test",("Foo")), "unfiltered") will be computed based on a weight of 10 for the following document:
Foo
######### 15.2.2.5 Specifying An Attribute Value for an Included or Excluded Element
When you include an element, one of the options is to specify an attribute value. This option allows you to only include or exclude elements with a particular attribute/value pair. The attribute/ value pair acts as a predicate on which to constrain the content. For example, consider the following XML snippet:
For the element chapter, if you specify the attribute/value pair of class and history, then only the following elements will be included:
Similarly, you can specify an attribute value for an excluded element when you configure an excluded element.
######### 15.2.3 Metadata Fields
Metadata fields are used by temporal documents to store valid and system timestamps and archival information, as described in the Temporal Developer’s Guide. You can also use this capability to associate user-defined key-value metadata with non-temporal documents. Metadata fields are sometimes referred to as just “metadata” or as “key-value metadata”.
Metadata fields differ from root and path fields in that they do not define elements to be included or excluded from search. Instead, metadata fields define key/value combinations that are associated with a document, but stored outside of that document.
To search this type of metadata, you must explicitly create a field based on the metadata key you want to be able to search. For details on configuring a metadata field, see “Configuring a New Metadata Field” on page 175.
Metadata fields can be operated on using any API function that takes a field. For example, you can do all of the following operations on a metadata field:
Metadata for temporal documents is managed by the temporal APIs, as described in Managing Temporal Documents in the Temporal Developer’s Guide. For non-temporal documents, metadata can be inserted along with the document by the xdmp.documentInsert or xdmp.documentLoad function. You can add or modify document metadata using the xdmp.documentPutMetadata and xdmp.documentSetMetadata functions. Document metadata can be returned using the xdmp.documentGetMetadata and xdmp.documentGetMetadataValue functions.
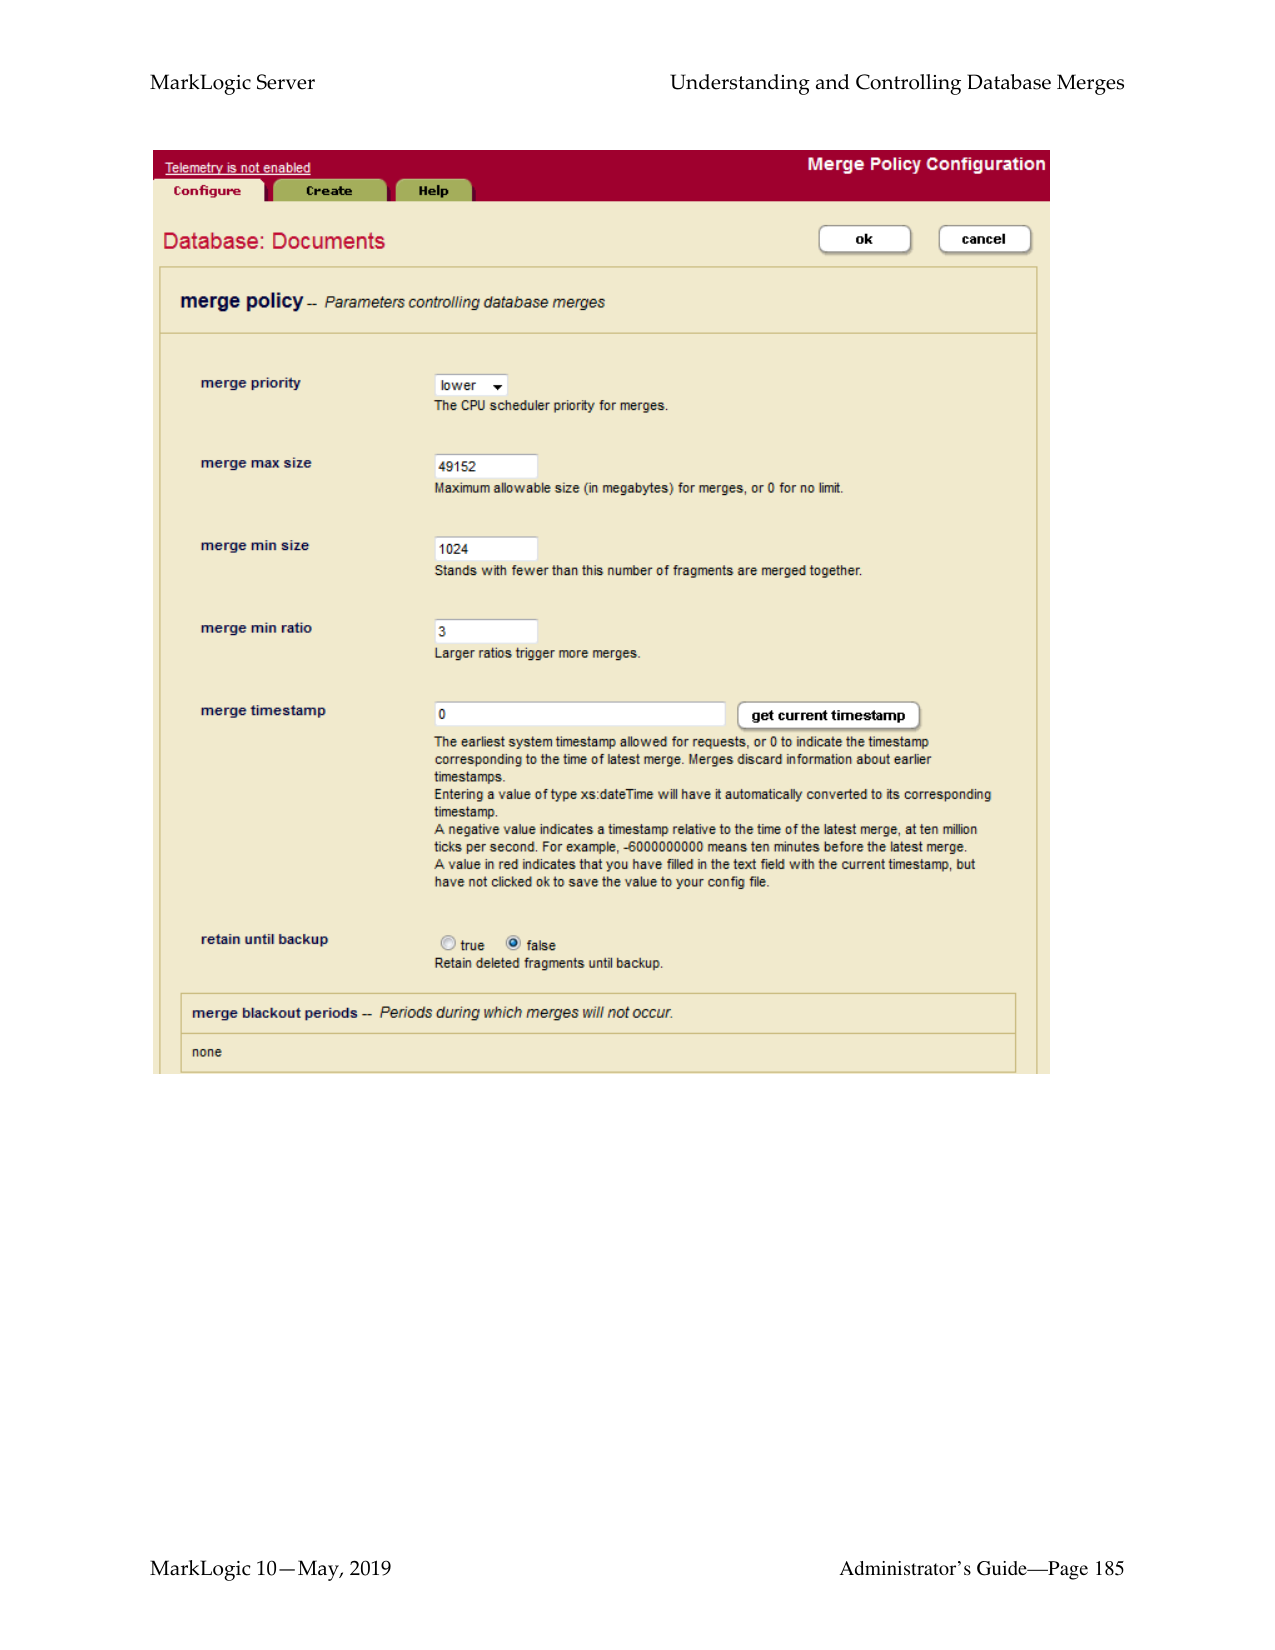
Metadata can also be associated with a document node. Node metadata is managed by means of the xdmp.nodeMetadata and xdmp.nodeMetadataValue functions.
######### 15.2.4 Understanding the Index Option Configuration
The field configuration allows you to add some extra indexing options from the ones that are currently set in the database configuration. Adding any index options to the field configuration does not add those options to the element-based index options at the database level.
To add or remove a particular index option to a field, you check or uncheck the box corresponding to the index option. Adding any index options that are not enabled in the database configuration will cause new and updated documents to use the new indexing for the field, and will trigger a reindex operation if reindex enable is set to true in the database configuration.
Options that are enabled in the database configuration appear in bold in the field configuration. The field settings in the database configuration and the database field configuration are ORed together. For example, if you uncheck the box next to an option with bold-face type in the field configuration, it does not change the equivalent option in the database configuration. To disable a field setting for the database, both the database and field configurations for that option must be consistent.
######### 15.3 Field Word Lexicons and Field Value Lexicons
######### 15.4 Configuring Fields
This section provides procedures to create and modify field configurations in a database. For details on what the meaning of the various configuration options in fields, see “Understanding Field Configurations” on page 160. This section includes the following procedures:
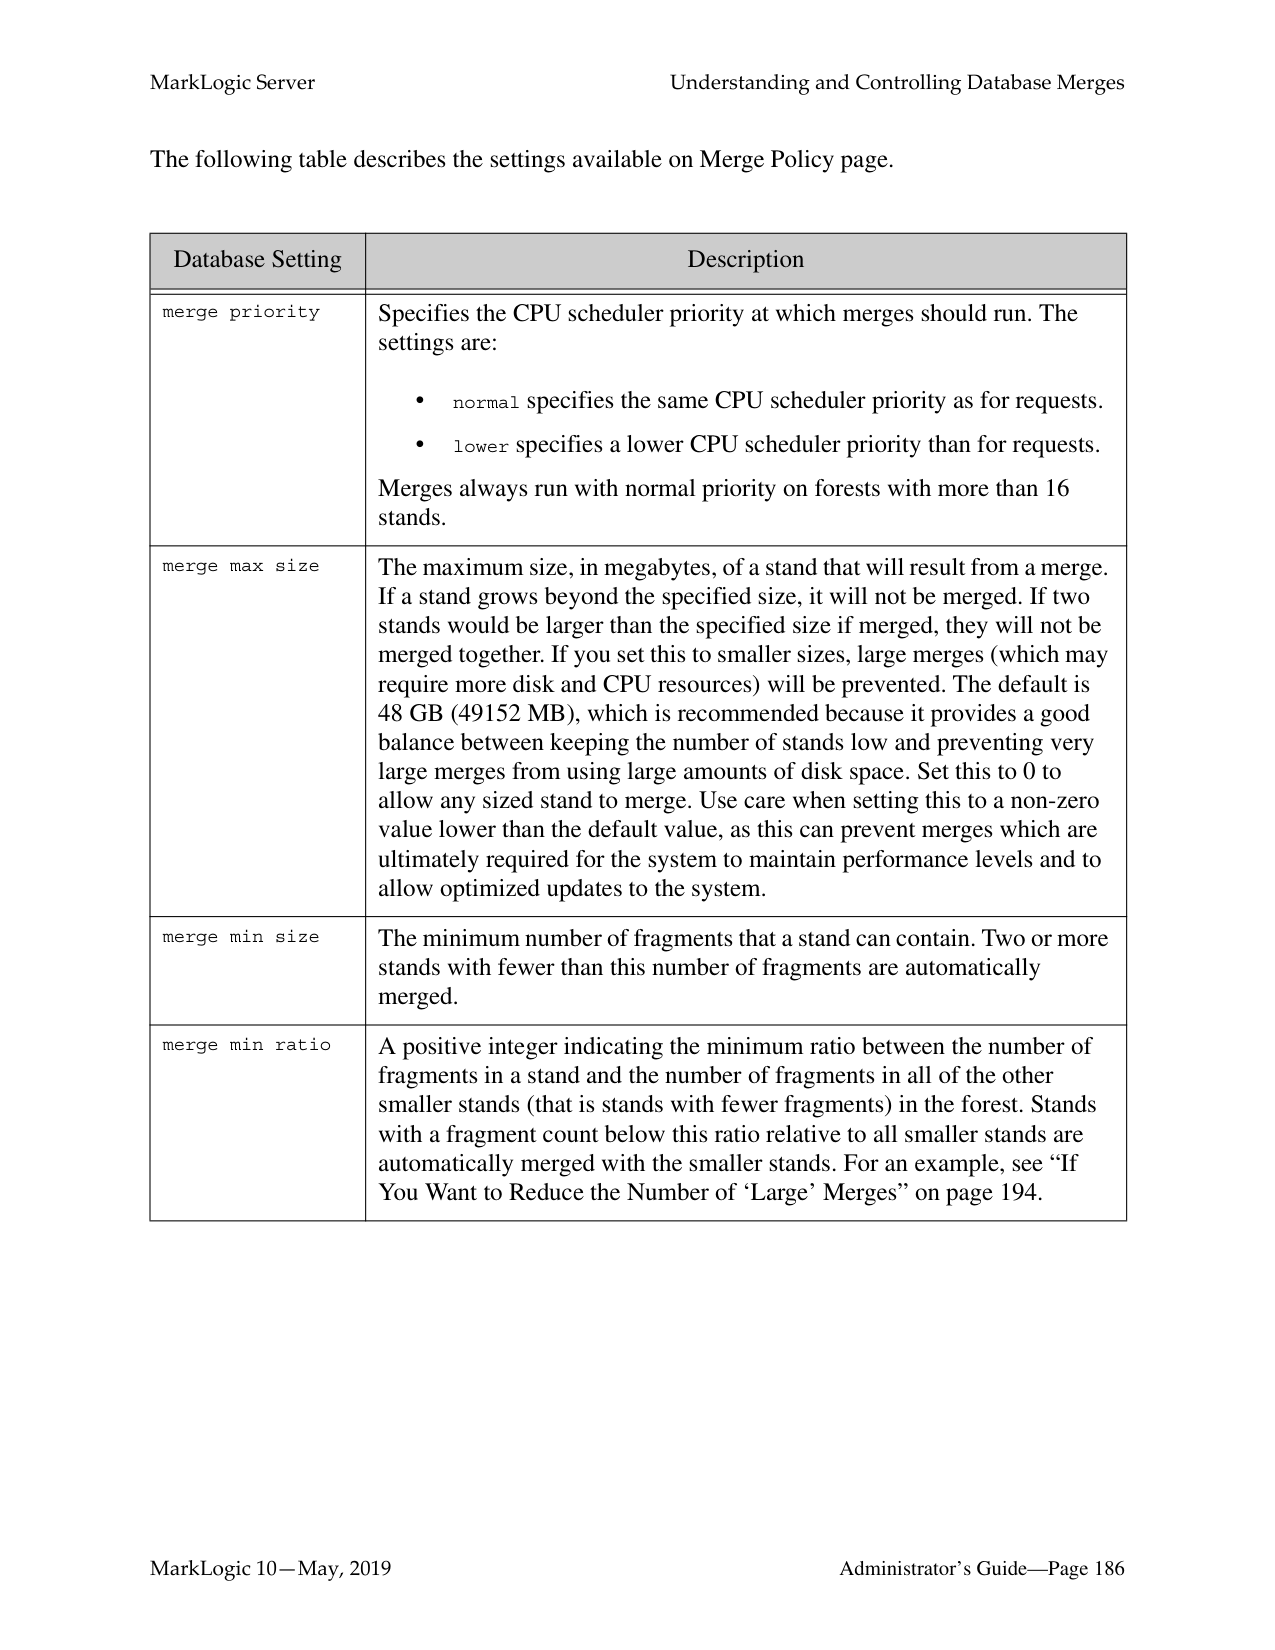
######### 15.4.1 Configuring a New Path or Root Field
Use the Admin Interface to perform the following steps to add a new field configuration to a database.

############ contribution and weights lower than 1.0 will lower the contribution. If you are defining multiple paths, click More Items.
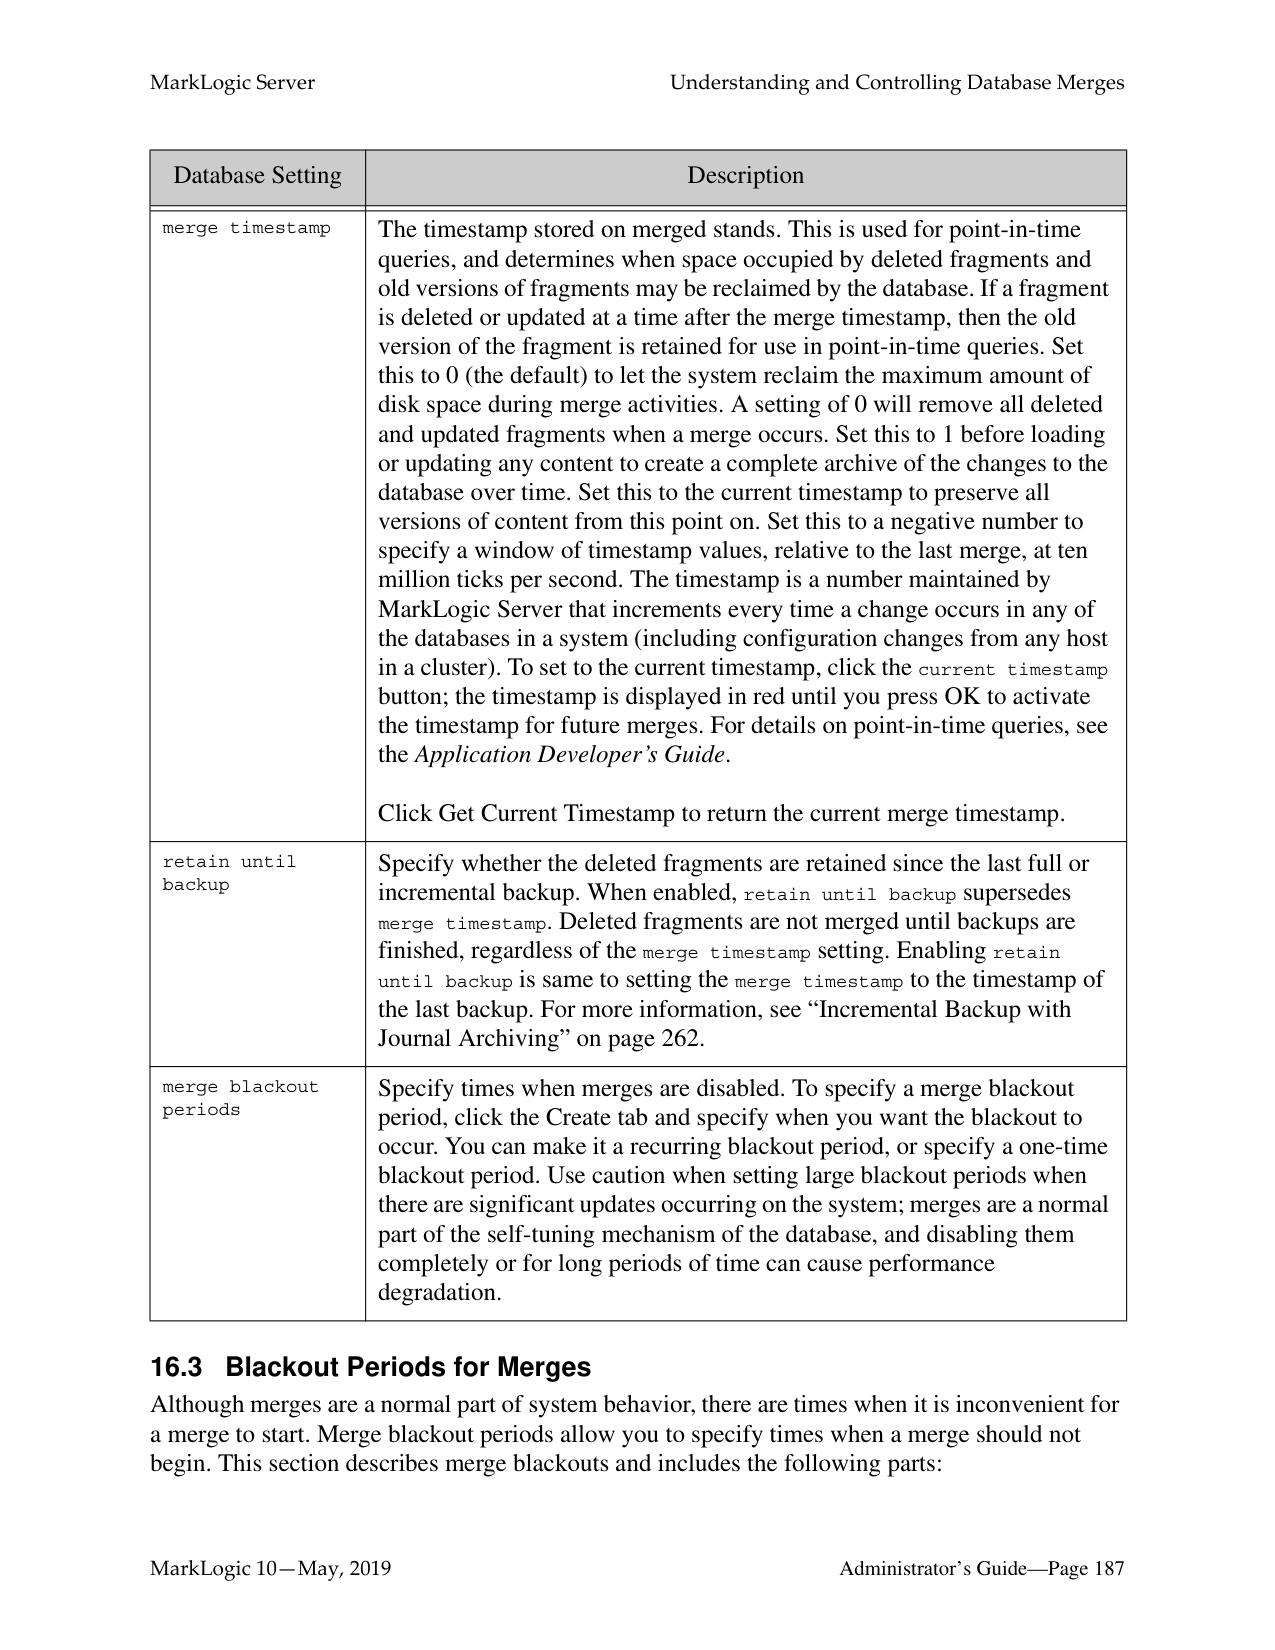


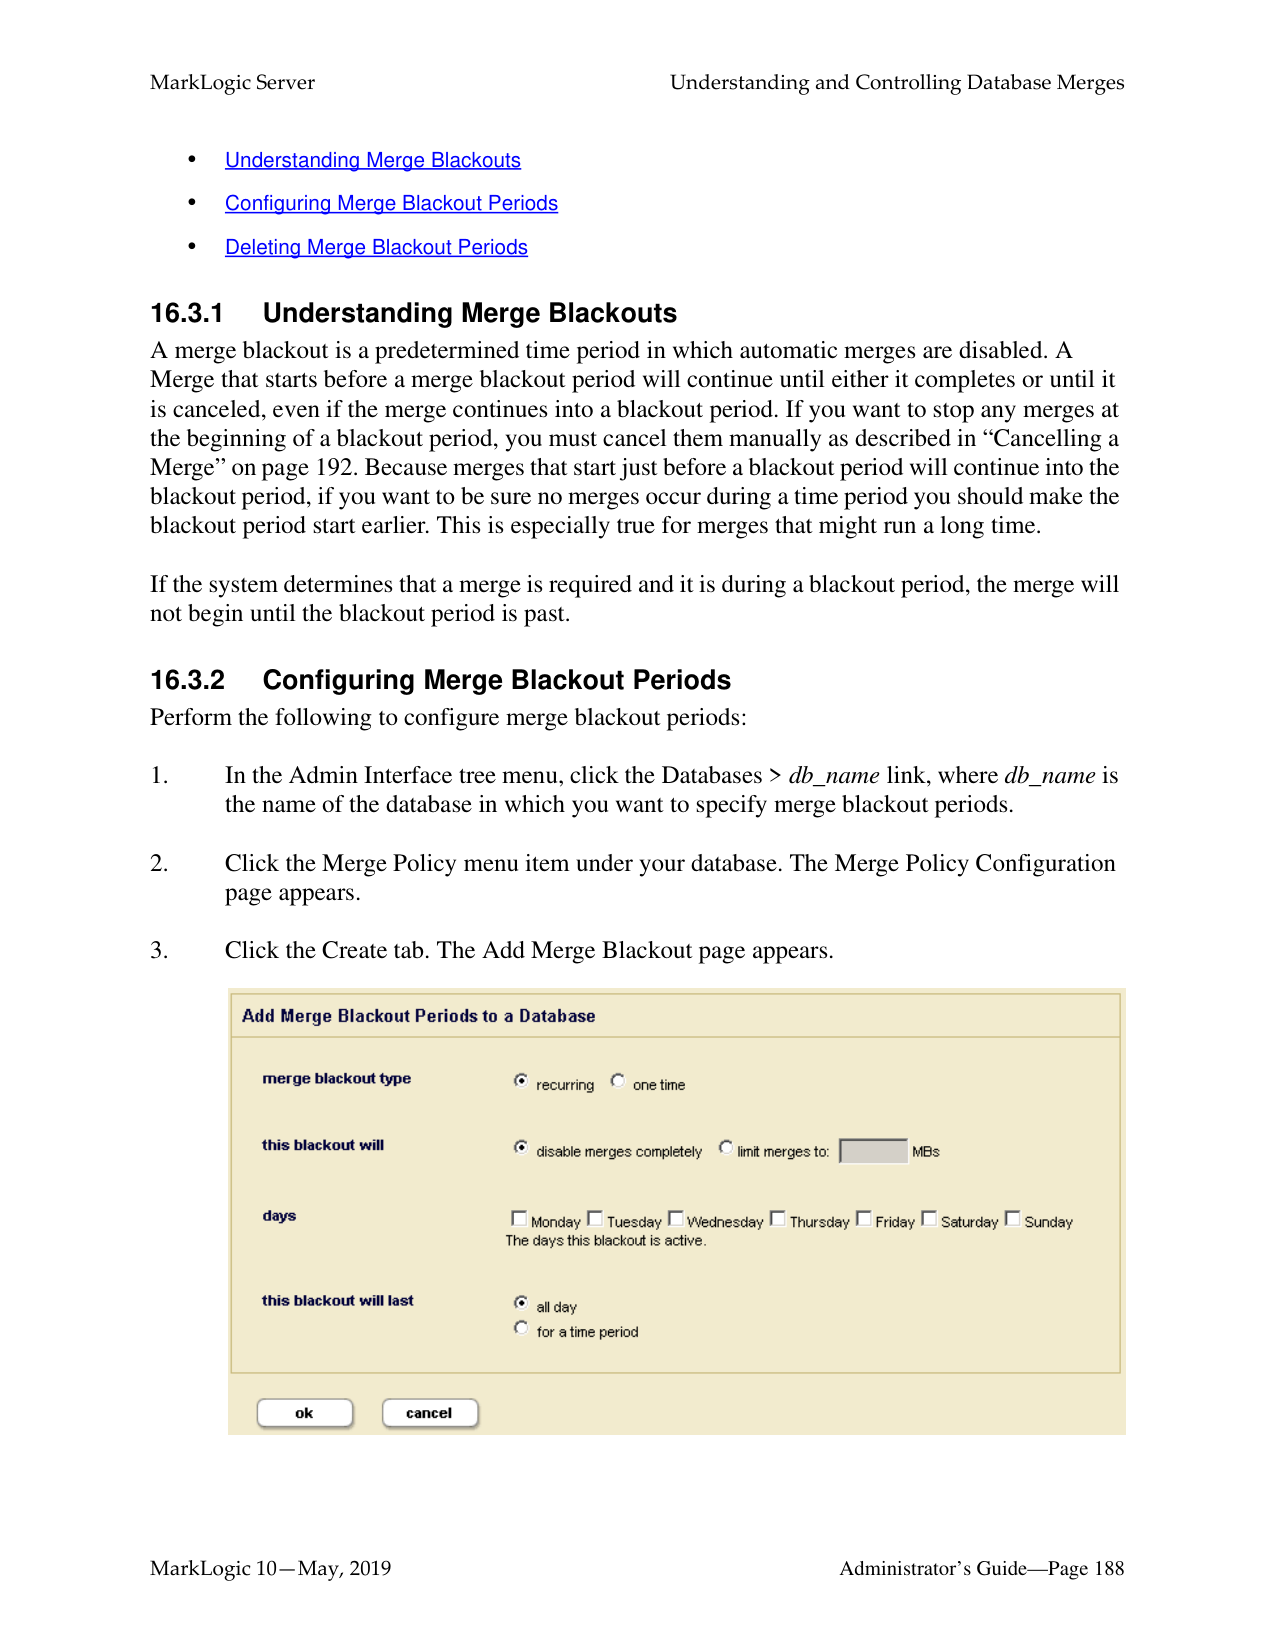


######### 15.4.2 Configuring a New Metadata Field
Use the Admin Interface to perform the following steps to add a new metadata field configuration to a database.


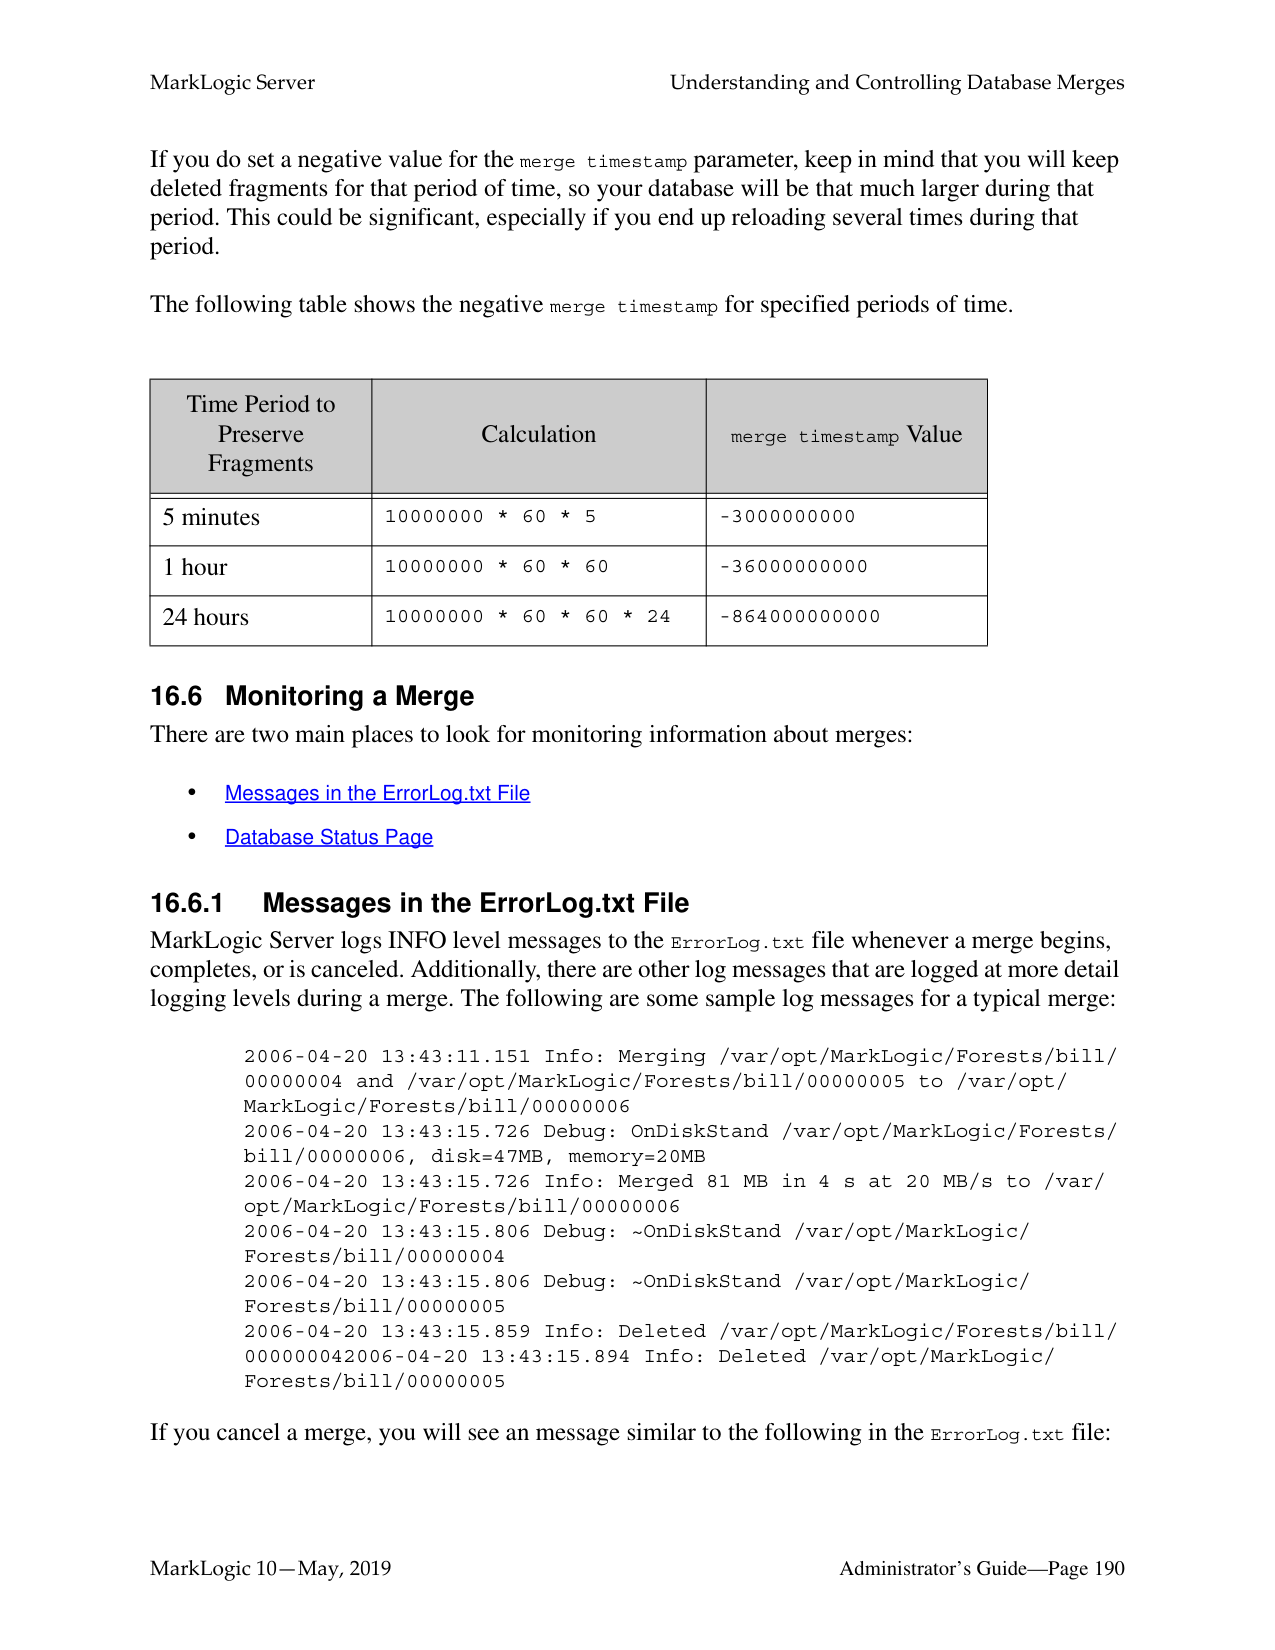


Note: The field value positions, trailing wildcard word positions, and three character word positions options can be set, but they will have no effect on queries.

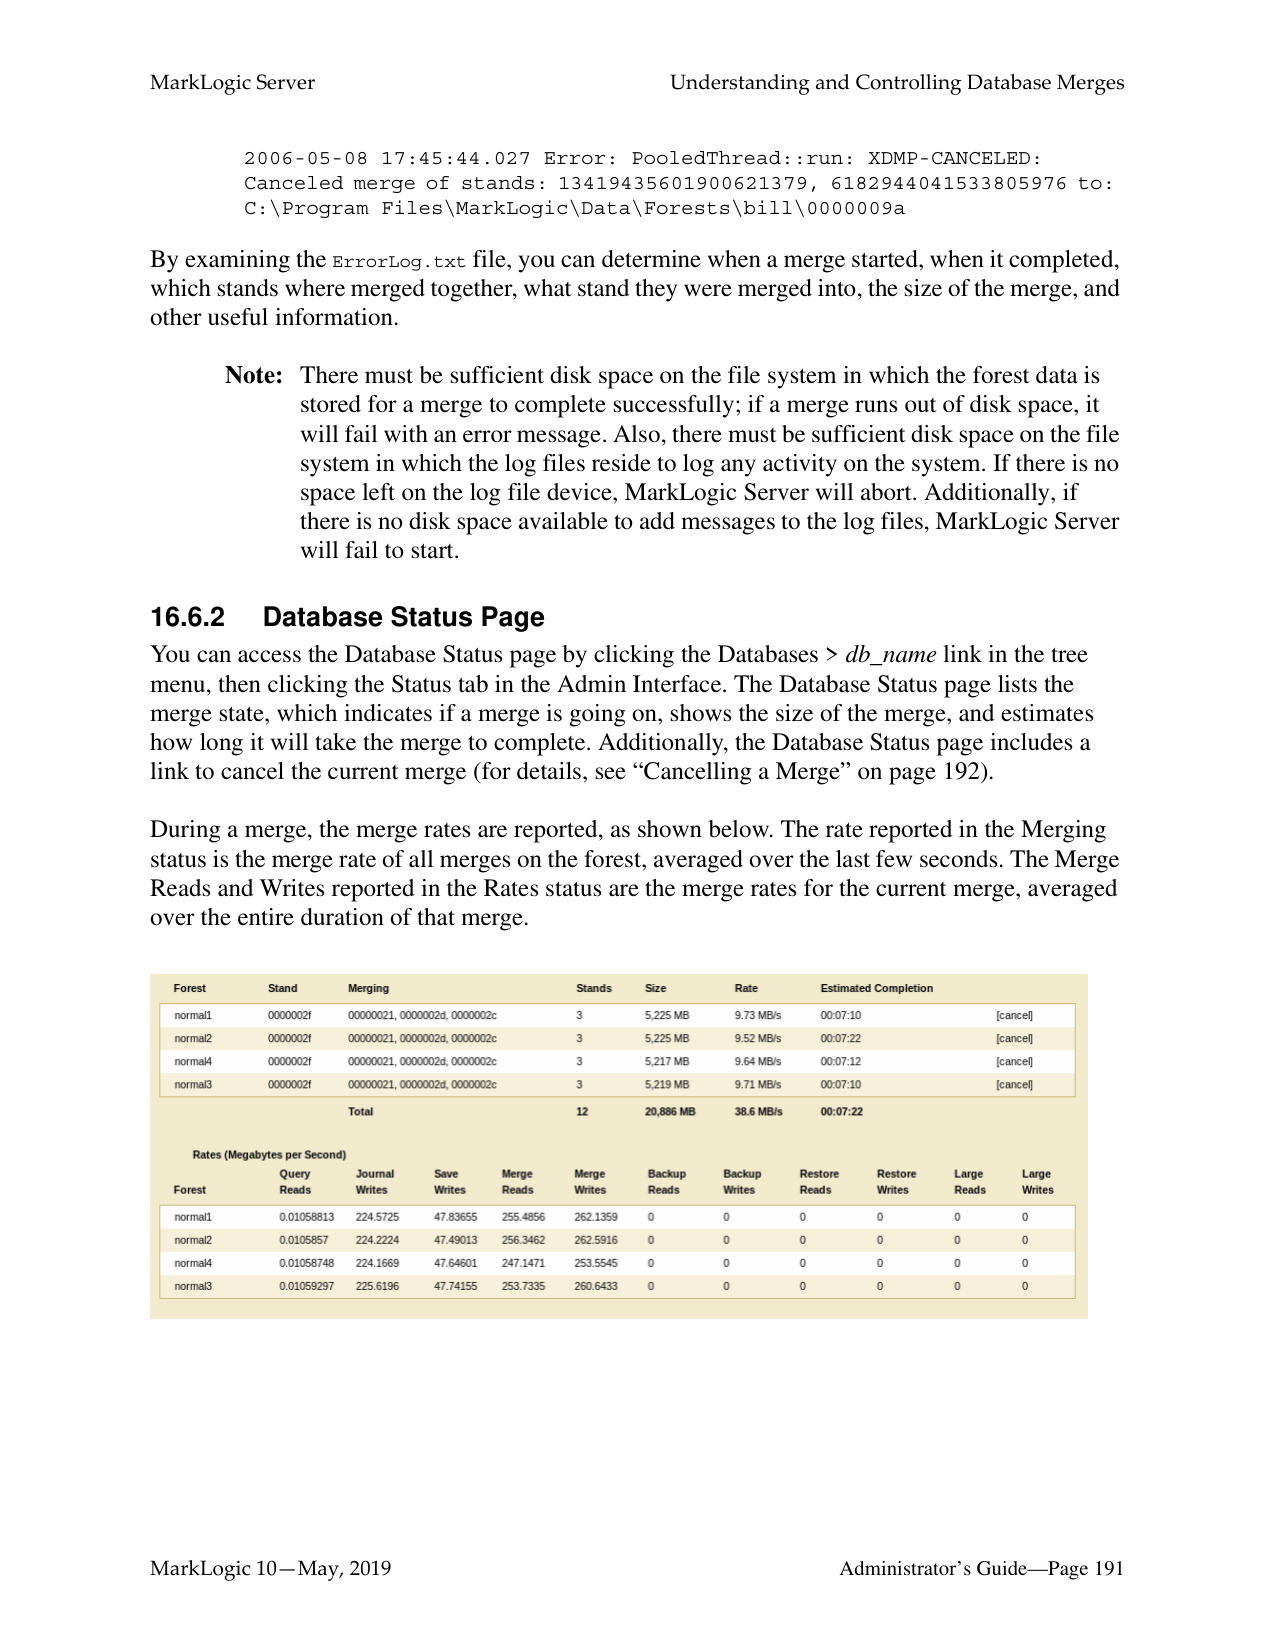
You can create a range index on a field for faster searches on the field data. You must first create a field before creating a range index on the field. The usual trade-offs between query speed and ingestion speed and server resources described in “Understanding Range Indexes” on page 390 apply to field range index.
Perform the following steps to create a range index on a field:
The index is created. If the reindexer enable setting is true for that database, then reindexing will begin immediately. The new index is not available for use in range and lexicon queries until the reindexing operation is complete.
##### 16.0 Understanding and Controlling Database Merges
This chapter describes database merges and how you can control them. It includes the following sections:
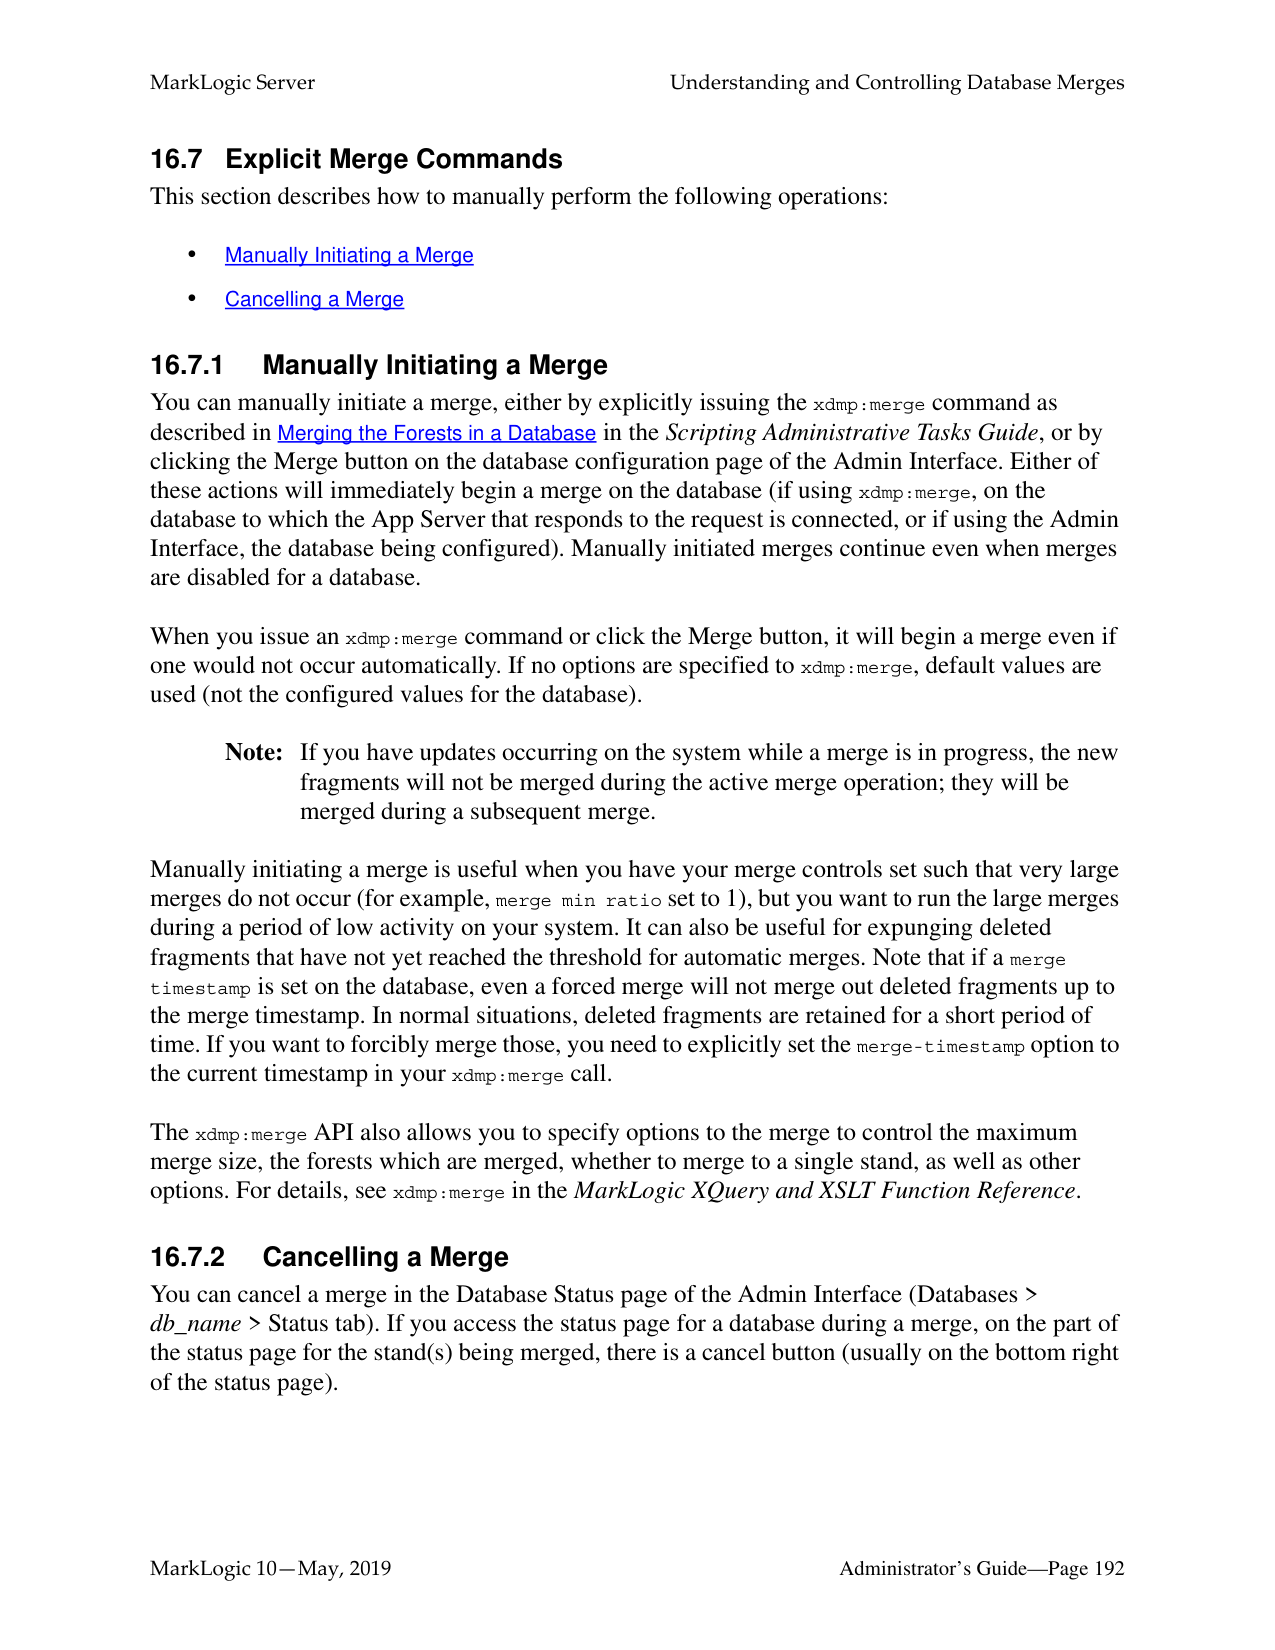
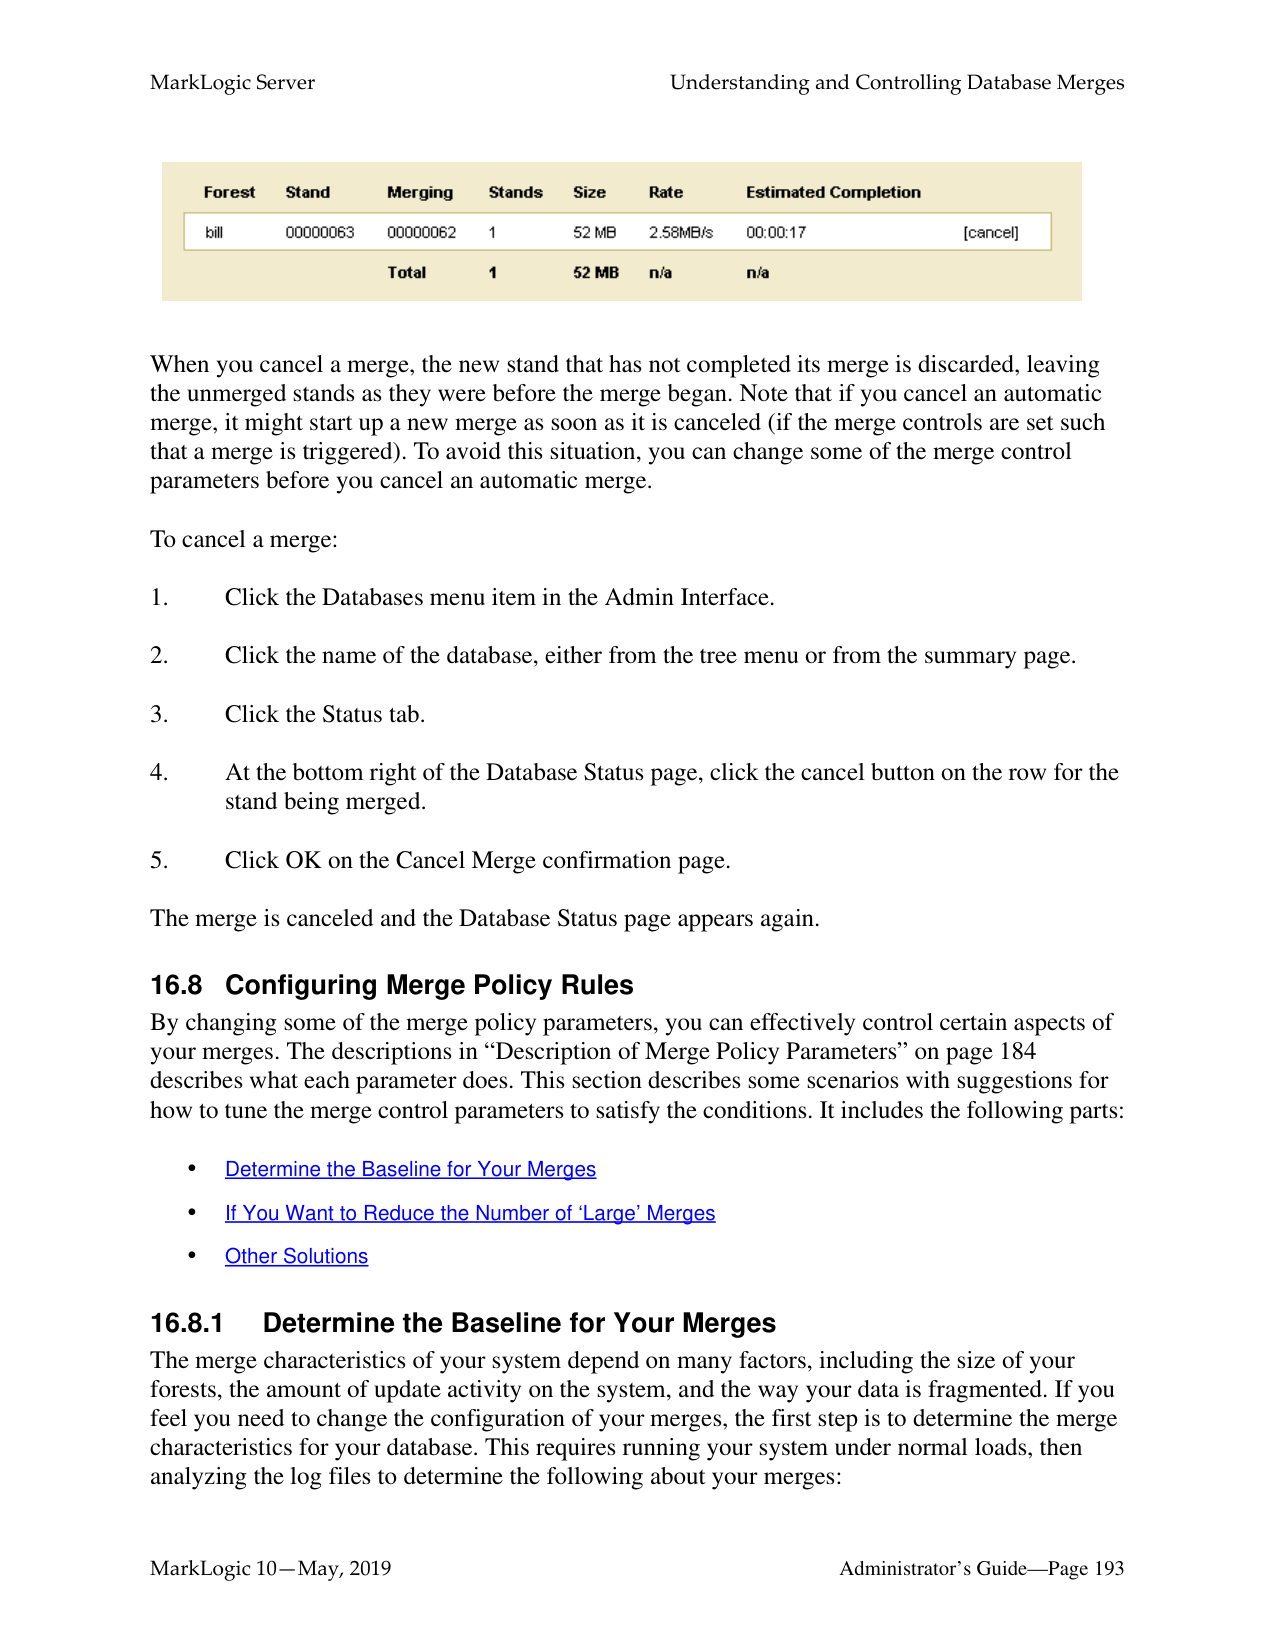
######### 16.1.1 Dynamic and Self-Tuning
Merges are a way of self-tuning the performance of the system, and MarkLogic Server continuously assesses the state of each database to see if it would benefit from self-tuning through a merge. In most cases, the default merge settings and the dynamic nature of merges will keep the database tuned optimally at all times. Because merges can be resource intensive (both disk I/O and CPU), however, some DBAs might need to control when merges occur and/or when they do not occur. You can do that by setting your merge policy as appropriate for your environment, as described in “Setting Merge Policy” on page 183.
Dynamic and self-tuning, merges are a “good thing”; they not only reclaim disk space, but improve the query and search performance of the system. Databases are made up of one or more forests, and forests are made up of one or more stands. The more stands there are in a forest, the more time it takes to resolve a query. Merges reduce the number of stands in each forest in a database, thereby improving the time it takes to resolve queries.
######### 16.1.2 What Happens During a Merge
A database consists of one or more forests, and each forest consists of one or more stands. Each stand consists of one or more fragments. When a document is updated, new versions of all of the fragments associated with the document update are created in a new stand. Any old versions of the fragment remain in the old stand with a system timestamp that lets MarkLogic Server know that they are old versions of the fragments. Similarly, when a document is deleted, its fragments remain in the old stand with a system timestamp that lets MarkLogic Server know that they are old versions of the fragments.
Merges occur to move any unchanged fragments from an old stand into a new stand, deleting any old versions of fragments (including deleted fragments), thereby freeing up disk space and compacting the usable fragments so they are all together on disk. Additionally, merges combine index data for all of the fragments in a stand, thereby optimizing the indexes. Merges are a normal part of database operation, and they ensure that the system continues to perform at its best as updates and deletes occur.
To summarize, as part of merging, the following occurs:

######### 16.1.3 Dangers of Disabling Merges
MarkLogic Server is designed to periodically merge. It is dangerous to leave merges disabled on a database when there are any updates occurring to the system. While disabling merges might eliminate some contention for resources during periods where merges and other requests are simultaneously occurring on the system, the performance of MarkLogic Server will degrade over time if merges are not allowed to proceed when changes (inserts, updates, deletes) are made to the database.
Furthermore, disabling or eliminating merging may eventually lead to a condition in which the server is unable to make changes to the database. For example, when an in-memory stands fills up, it is written to an on-disk stand. MarkLogic Server has a fixed limit for the maximum number of stands (64), and eventually, that limit will occur and you will no longer be able to update your system. Therefore, there is no control available to disable merges. If you feel you need to disable merges and you have an active maintenance contract, you can contact MarkLogic Technical Support for help.
In most cases where merges are causing disruptions to your system, you should be able to adjust the merge policy parameters to settings that will work in your environment. If you feel you need to disable merges and you have an active maintenance contract, you can contact MarkLogic Technical Support for help. Monitor the system and make sure the number of stands per forest does not grow too high. For details on setting merge controls, see “Description of Merge Policy Parameters” on page 184 and “Configuring Merge Policy Rules” on page 193.
In some cases, especially in environments with many forests and constantly changing content across many of the forests, an alternative to disabling merges is to set one or more forests to be delete-only. For details, see “Making a Forest Delete-Only” on page 326.
######### 16.1.4 Merges Will Change Scores
When a database merges, it deletes old fragments that exist in the database, therefore changing (making it smaller) the total number of fragments in the database. Because the number of fragments in the database is used in determining the score for a cts:search operation, merges will have an impact on search scores, which in turn might impact the order of search results (which are ordered by relevance score).
The amount of impact that merges have on scores is dependent on how many old versions of fragments there are waiting to be merged, the content of the old fragments, and the overall size of the database. For large databases with relatively little amount of change, the difference in the scores will be very small. For smaller databases with large amount of change, the differences in scores can be significant before and after a merge completes.
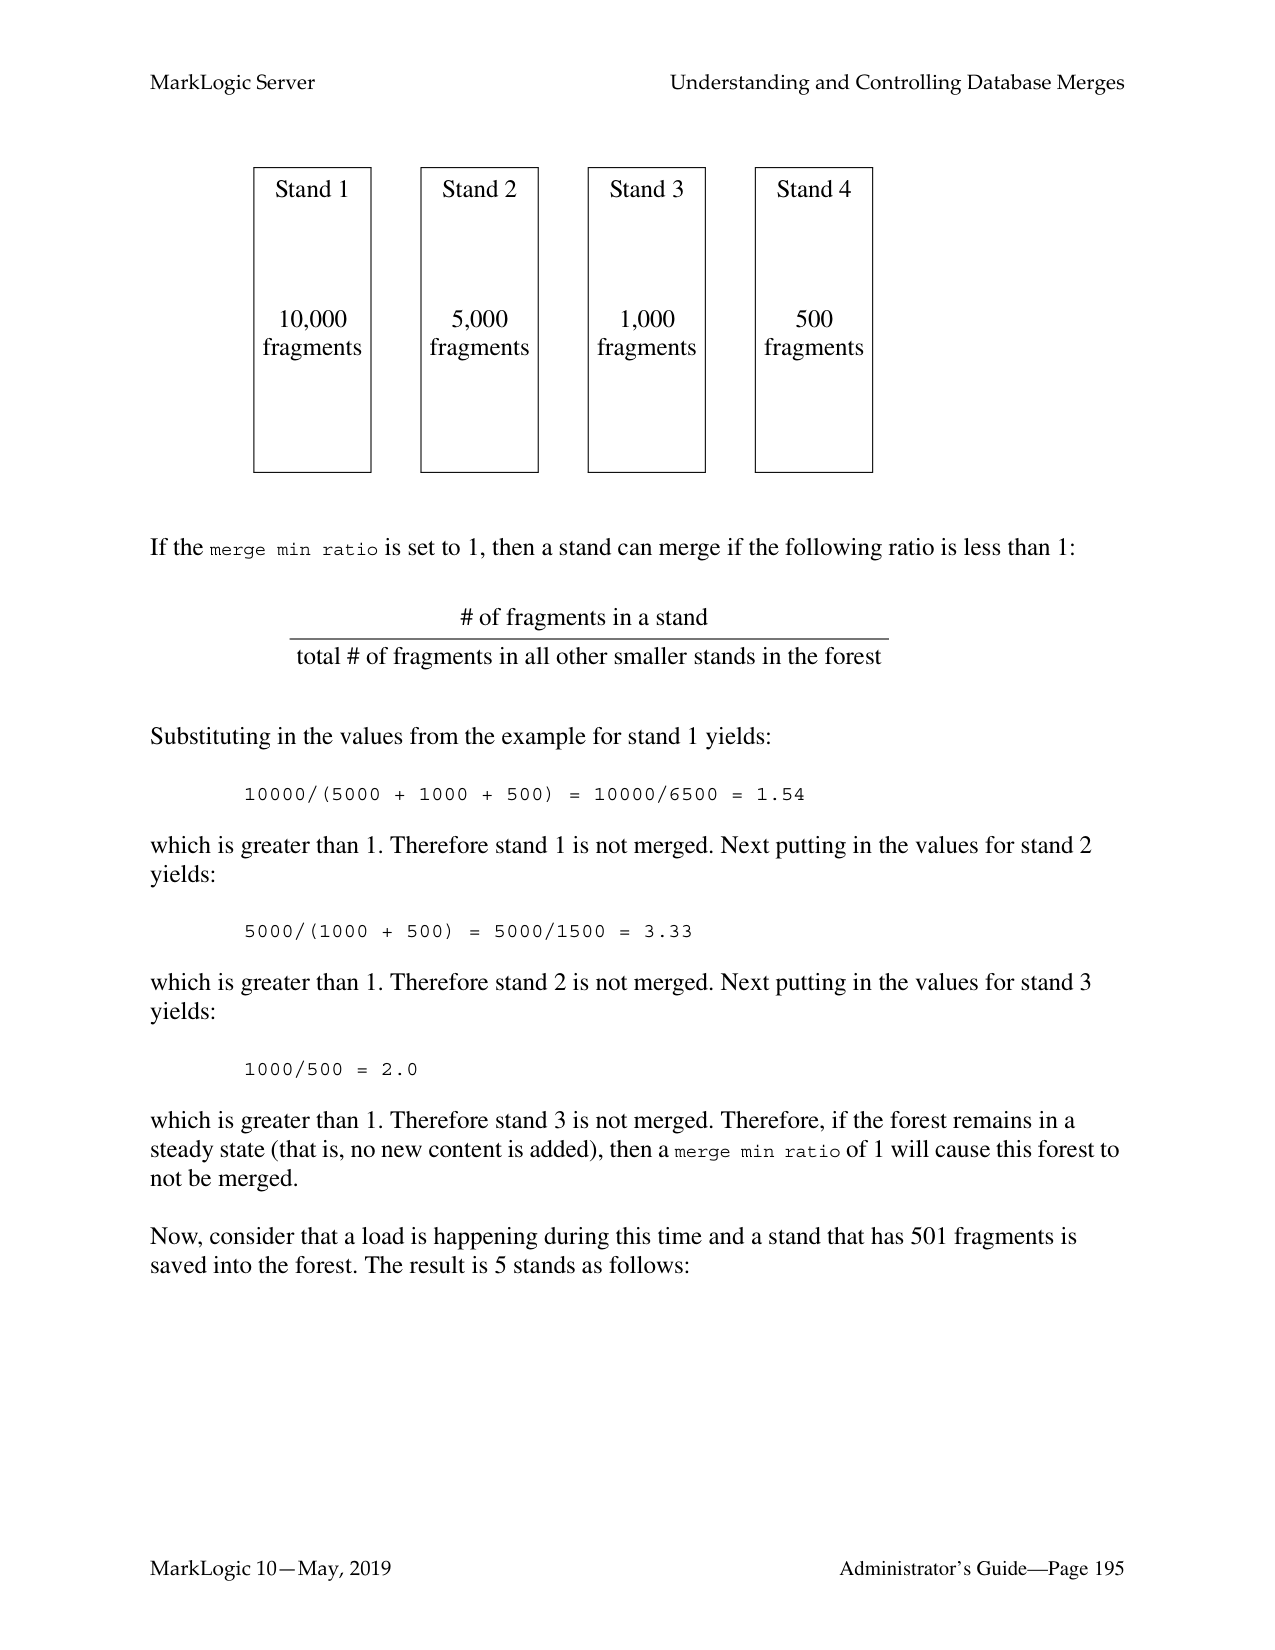
In some cases, especially in environments with many forests and constantly changing content across many of the forests, another tool for setting merge policy is to set one or more forests to be delete-only (updates allowed set to false). For details, see “Making a Forest Delete-Only” on page 326.
######### 16.2.1 Overview of the Merge Policy Controls
If you determine that you need to manage your merges, there are several types of controls to help you manage the conditions in which merges occur:
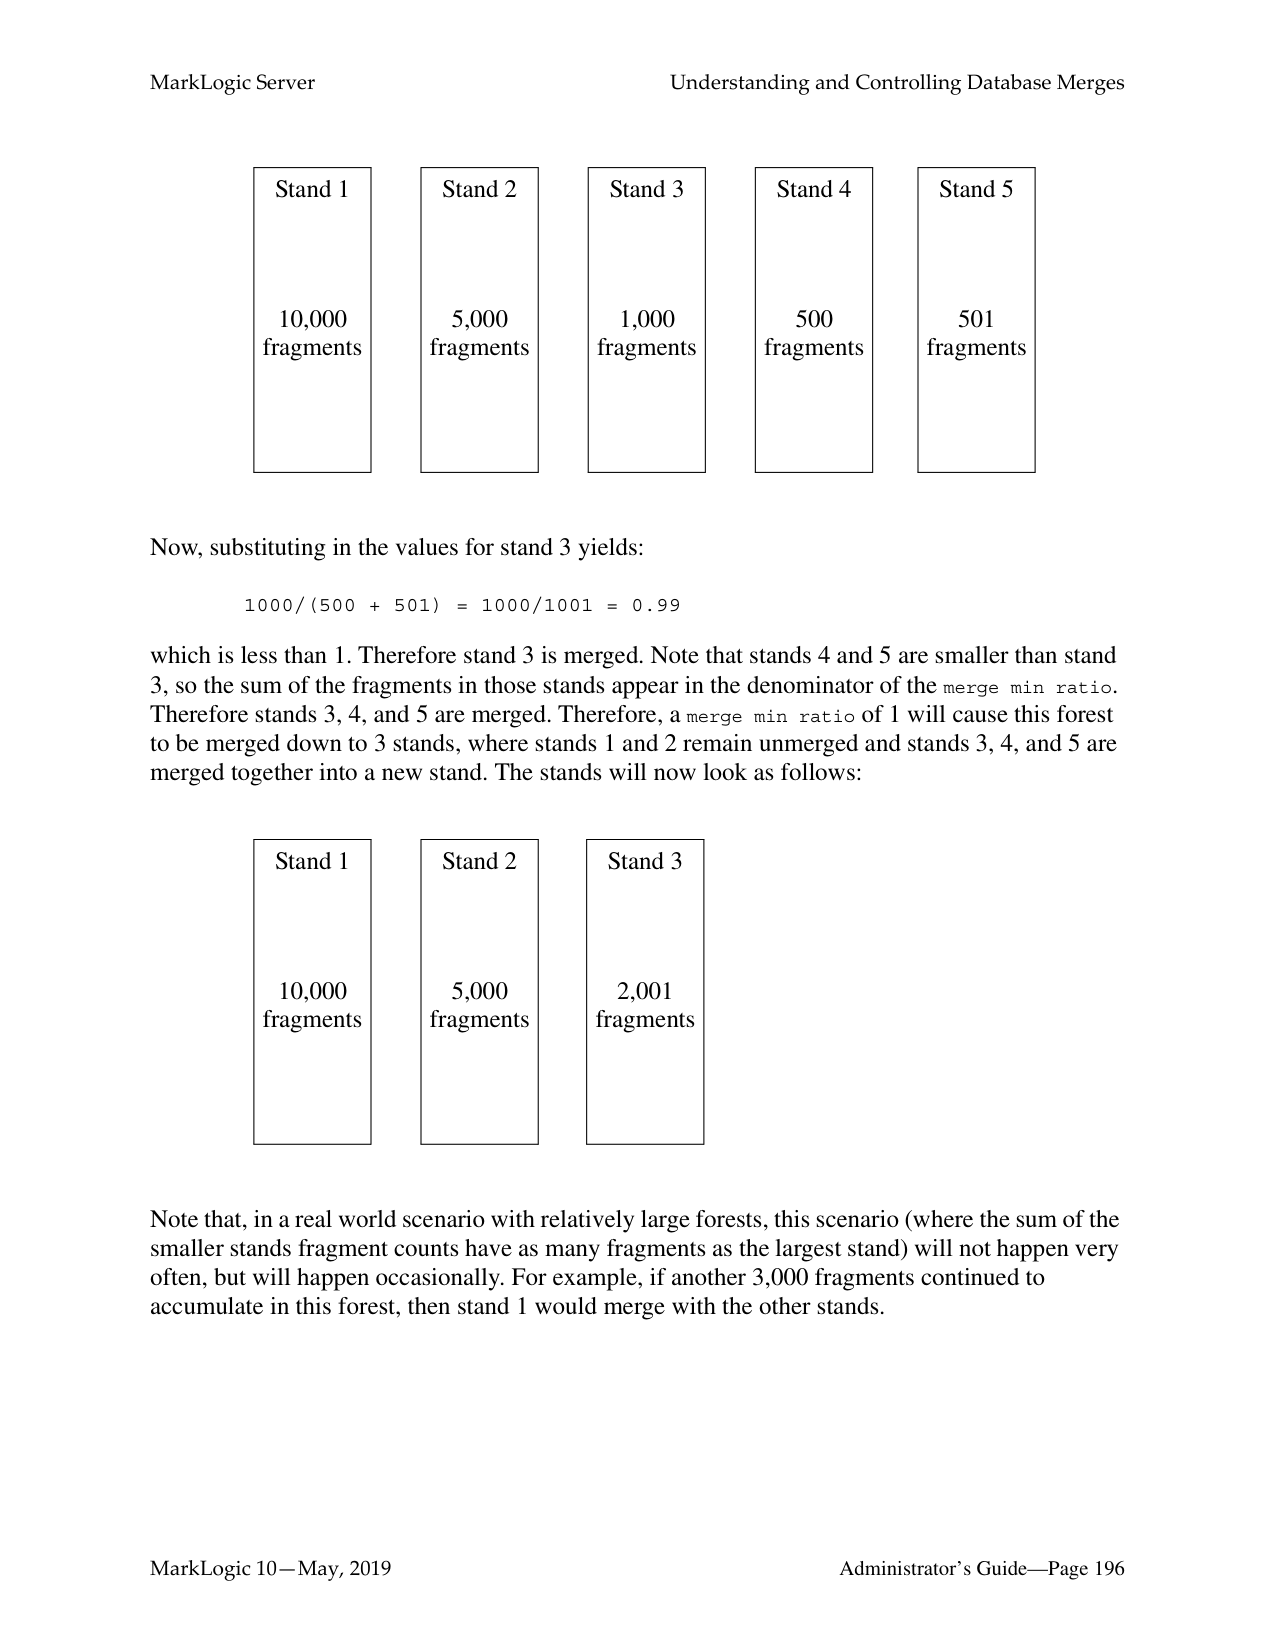
• merge timestamp
For more information on how set up your system to better control merges, see “Configuring Merge Policy Rules” on page 193.
######### 16.2.2 Description of Merge Policy Parameters
The merge policy determines when automatic merges occur on a database, as well as other administrative functions. Perform the following to configure merge policy:

############ The following table describes the settings available on Merge Policy page.
|Database Setting|Description| |---|---| | | | |merge priority|Specifies the CPU scheduler priority at which merges should run. The settings are:
• normal specifies the same CPU scheduler priority as for requests.
• lower specifies a lower CPU scheduler priority than for requests.
Merges always run with normal priority on forests with more than 16 stands.| |merge max size|The maximum size, in megabytes, of a stand that will result from a merge. If a stand grows beyond the specified size, it will not be merged. If two stands would be larger than the specified size if merged, they will not be merged together. If you set this to smaller sizes, large merges (which may require more disk and CPU resources) will be prevented. The default is 48 GB (49152 MB), which is recommended because it provides a good balance between keeping the number of stands low and preventing very large merges from using large amounts of disk space. Set this to 0 to allow any sized stand to merge. Use care when setting this to a non-zero value lower than the default value, as this can prevent merges which are ultimately required for the system to maintain performance levels and to allow optimized updates to the system.| |merge min size|The minimum number of fragments that a stand can contain. Two or more stands with fewer than this number of fragments are automatically merged.| |merge min ratio|A positive integer indicating the minimum ratio between the number of fragments in a stand and the number of fragments in all of the other smaller stands (that is stands with fewer fragments) in the forest. Stands with a fragment count below this ratio relative to all smaller stands are automatically merged with the smaller stands. For an example, see “If You Want to Reduce the Number of ‘Large’ Merges” on page 194.|
|Database Setting|Description| |---|---| | | | |merge timestamp|The timestamp stored on merged stands. This is used for point-in-time queries, and determines when space occupied by deleted fragments and old versions of fragments may be reclaimed by the database. If a fragment is deleted or updated at a time after the merge timestamp, then the old version of the fragment is retained for use in point-in-time queries. Set this to 0 (the default) to let the system reclaim the maximum amount of disk space during merge activities. A setting of 0 will remove all deleted and updated fragments when a merge occurs. Set this to 1 before loading or updating any content to create a complete archive of the changes to the database over time. Set this to the current timestamp to preserve all versions of content from this point on. Set this to a negative number to specify a window of timestamp values, relative to the last merge, at ten million ticks per second. The timestamp is a number maintained by MarkLogic Server that increments every time a change occurs in any of the databases in a system (including configuration changes from any host in a cluster). To set to the current timestamp, click the current timestamp button; the timestamp is displayed in red until you press OK to activate the timestamp for future merges. For details on point-in-time queries, see the Application Developer’s Guide.
Click Get Current Timestamp to return the current merge timestamp.| |retain until backup|Specify whether the deleted fragments are retained since the last full or incremental backup. When enabled, retain until backup supersedes merge timestamp. Deleted fragments are not merged until backups are finished, regardless of the merge timestamp setting. Enabling retain until backup is same to setting the merge timestamp to the timestamp of the last backup. For more information, see “Incremental Backup with Journal Archiving” on page 262.| |merge blackout periods|Specify times when merges are disabled. To specify a merge blackout period, click the Create tab and specify when you want the blackout to occur. You can make it a recurring blackout period, or specify a one-time blackout period. Use caution when setting large blackout periods when there are significant updates occurring on the system; merges are a normal part of the self-tuning mechanism of the database, and disabling them completely or for long periods of time can cause performance degradation.|
######### 16.3 Blackout Periods for Merges
Although merges are a normal part of system behavior, there are times when it is inconvenient for a merge to start. Merge blackout periods allow you to specify times when a merge should not begin. This section describes merge blackouts and includes the following parts:

######### 16.3.1 Understanding Merge Blackouts
A merge blackout is a predetermined time period in which automatic merges are disabled. A Merge that starts before a merge blackout period will continue until either it completes or until it is canceled, even if the merge continues into a blackout period. If you want to stop any merges at the beginning of a blackout period, you must cancel them manually as described in “Cancelling a Merge” on page 192. Because merges that start just before a blackout period will continue into the blackout period, if you want to be sure no merges occur during a time period you should make the blackout period start earlier. This is especially true for merges that might run a long time.
If the system determines that a merge is required and it is during a blackout period, the merge will not begin until the blackout period is past.

When a merge occurs, it deletes all fragments from the stands being merged that have a system timestamp older than the configured merge timestamp (unless the merge timestamp is set to 0, in which case it will delete all fragments older than the current timestamp). This can keep multiple versions of some fragments in the database. You can query the older fragments using point-in-time queries. For details, see the chapter on “Point-In-Time Queries” in the Application Developer’s Guide.
If you are doing update operations and you want the ability to roll back to the point in time when you started, you can set the merge timestamp to a negative number to preserve fragments for the specified number of ticks. The ticks are calculated at 10,000,000 ticks per second.
For example, if you want to preserve deleted fragments for 24 hours (relative to the last merge), then you can set the merge timestamp to -864,000,000,000 (10,000,000 ticks/second times 60 seconds/minute times 60 minutes/hour times 24 hours/day). You can then use xdmp:forest-rollback on all of the forests in the database to roll back up to a day (or whatever time period you have set your negative merge timestamp).
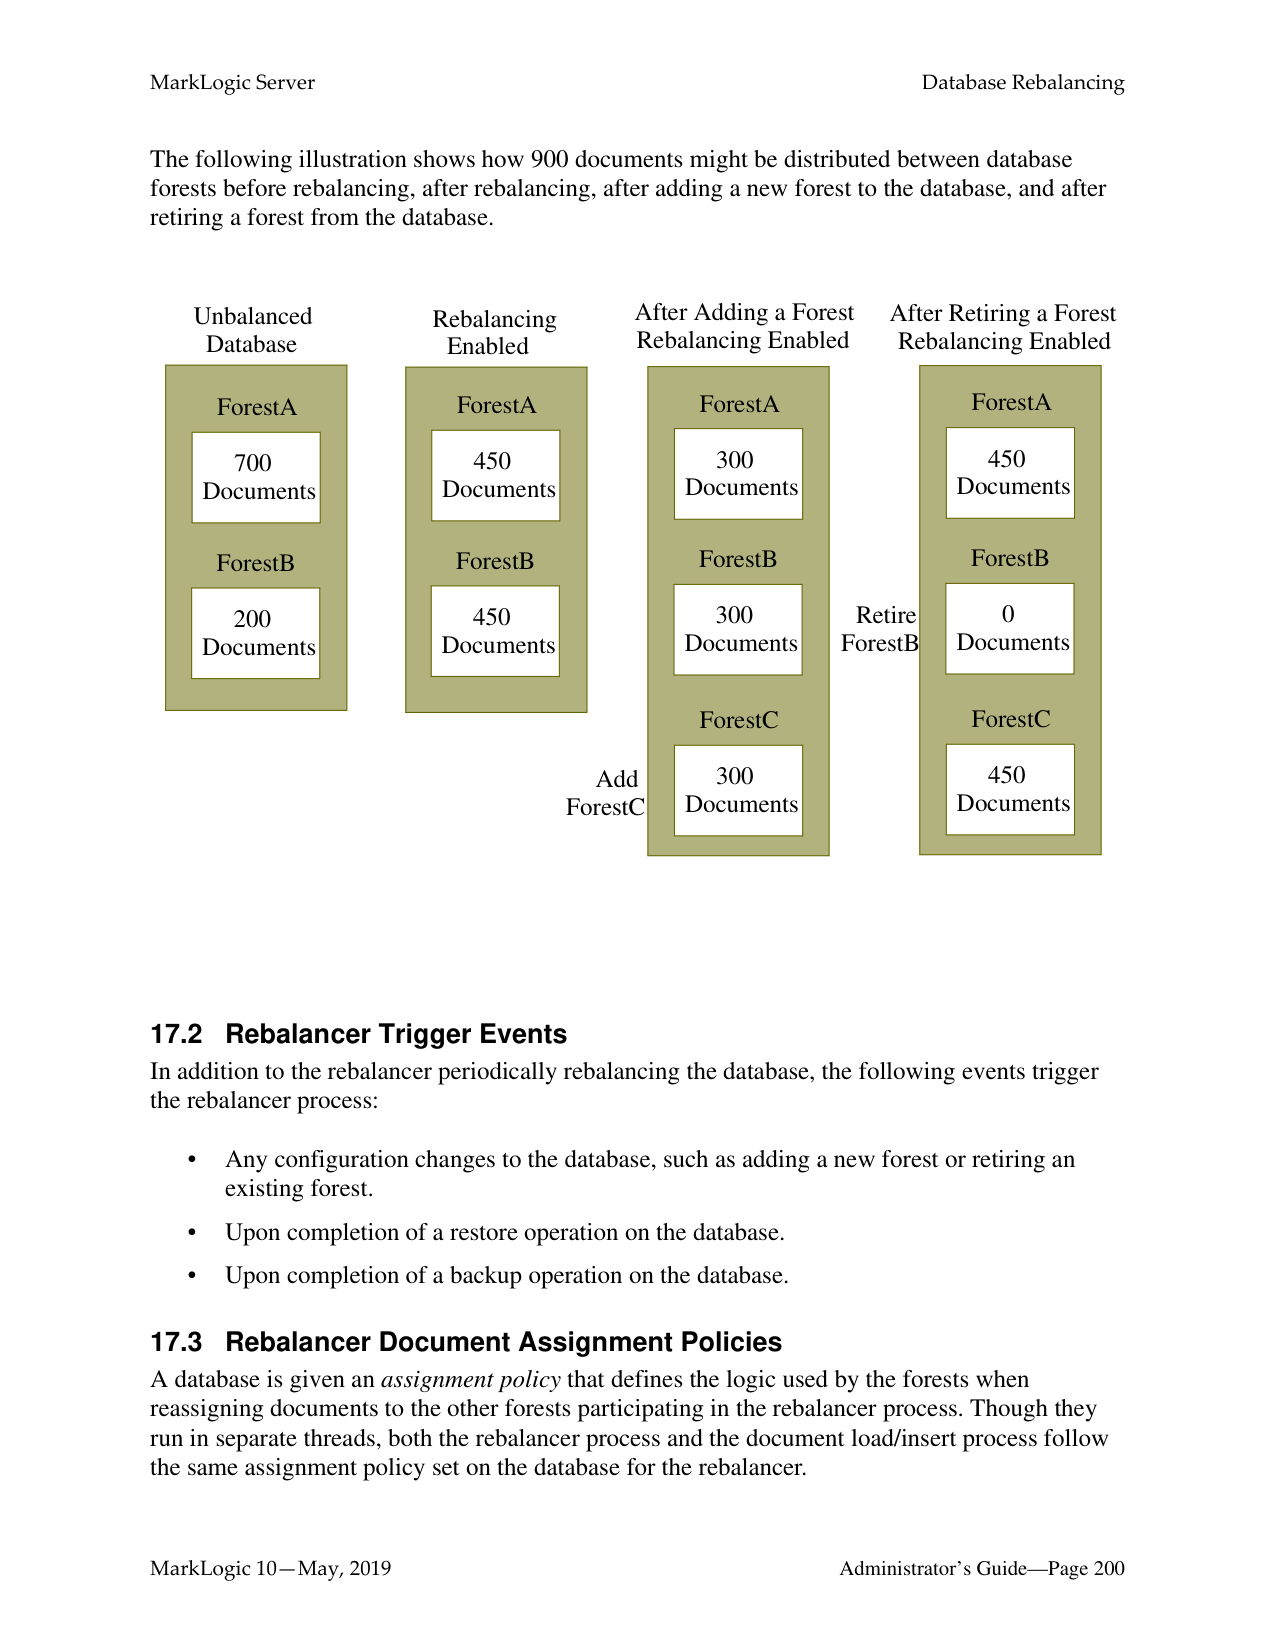
If you do set a negative value for the merge timestamp parameter, keep in mind that you will keep deleted fragments for that period of time, so your database will be that much larger during that period. This could be significant, especially if you end up reloading several times during that period.
The following table shows the negative merge timestamp for specified periods of time.
|Time Period to Preserve Fragments|Calculation|merge timestamp Value| |---|---|---| | | | | |5 minutes|10000000 * 60 * 5|-3000000000| |1 hour|10000000 * 60 * 60|-36000000000| |24 hours|10000000 * 60 * 60 * 24|-864000000000|
16.6.1 Messages in the ErrorLog.txt File MarkLogic Server logs INFO level messages to the ErrorLog.txt file whenever a merge begins, completes, or is canceled. Additionally, there are other log messages that are logged at more detail logging levels during a merge. The following are some sample log messages for a typical merge:
2006-04-20 13:43:11.151 Info: Merging /var/opt/MarkLogic/Forests/bill/ 00000004 and /var/opt/MarkLogic/Forests/bill/00000005 to /var/opt/ MarkLogic/Forests/bill/00000006 2006-04-20 13:43:15.726 Debug: OnDiskStand /var/opt/MarkLogic/Forests/ bill/00000006, disk=47MB, memory=20MB 2006-04-20 13:43:15.726 Info: Merged 81 MB in 4 s at 20 MB/s to /var/ opt/MarkLogic/Forests/bill/00000006 2006-04-20 13:43:15.806 Debug: ~OnDiskStand /var/opt/MarkLogic/
If you cancel a merge, you will see an message similar to the following in the ErrorLog.txt file:
2006-05-08 17:45:44.027 Error: PooledThread::run: XDMP-CANCELED: Canceled merge of stands: 13419435601900621379, 6182944041533805976 to: C:\Program Files\MarkLogic\Data\Forests\bill\0000009a
By examining the ErrorLog.txt file, you can determine when a merge started, when it completed, which stands where merged together, what stand they were merged into, the size of the merge, and other useful information.
Note: There must be sufficient disk space on the file system in which the forest data is stored for a merge to complete successfully; if a merge runs out of disk space, it will fail with an error message. Also, there must be sufficient disk space on the file system in which the log files reside to log any activity on the system. If there is no space left on the log file device, MarkLogic Server will abort. Additionally, if there is no disk space available to add messages to the log files, MarkLogic Server will fail to start.
16.6.2 Database Status Page You can access the Database Status page by clicking the Databases > db_name link in the tree menu, then clicking the Status tab in the Admin Interface. The Database Status page lists the merge state, which indicates if a merge is going on, shows the size of the merge, and estimates how long it will take the merge to complete. Additionally, the Database Status page includes a link to cancel the current merge (for details, see “Cancelling a Merge” on page 192).
During a merge, the merge rates are reported, as shown below. The rate reported in the Merging status is the merge rate of all merges on the forest, averaged over the last few seconds. The Merge Reads and Writes reported in the Rates status are the merge rates for the current merge, averaged over the entire duration of that merge.

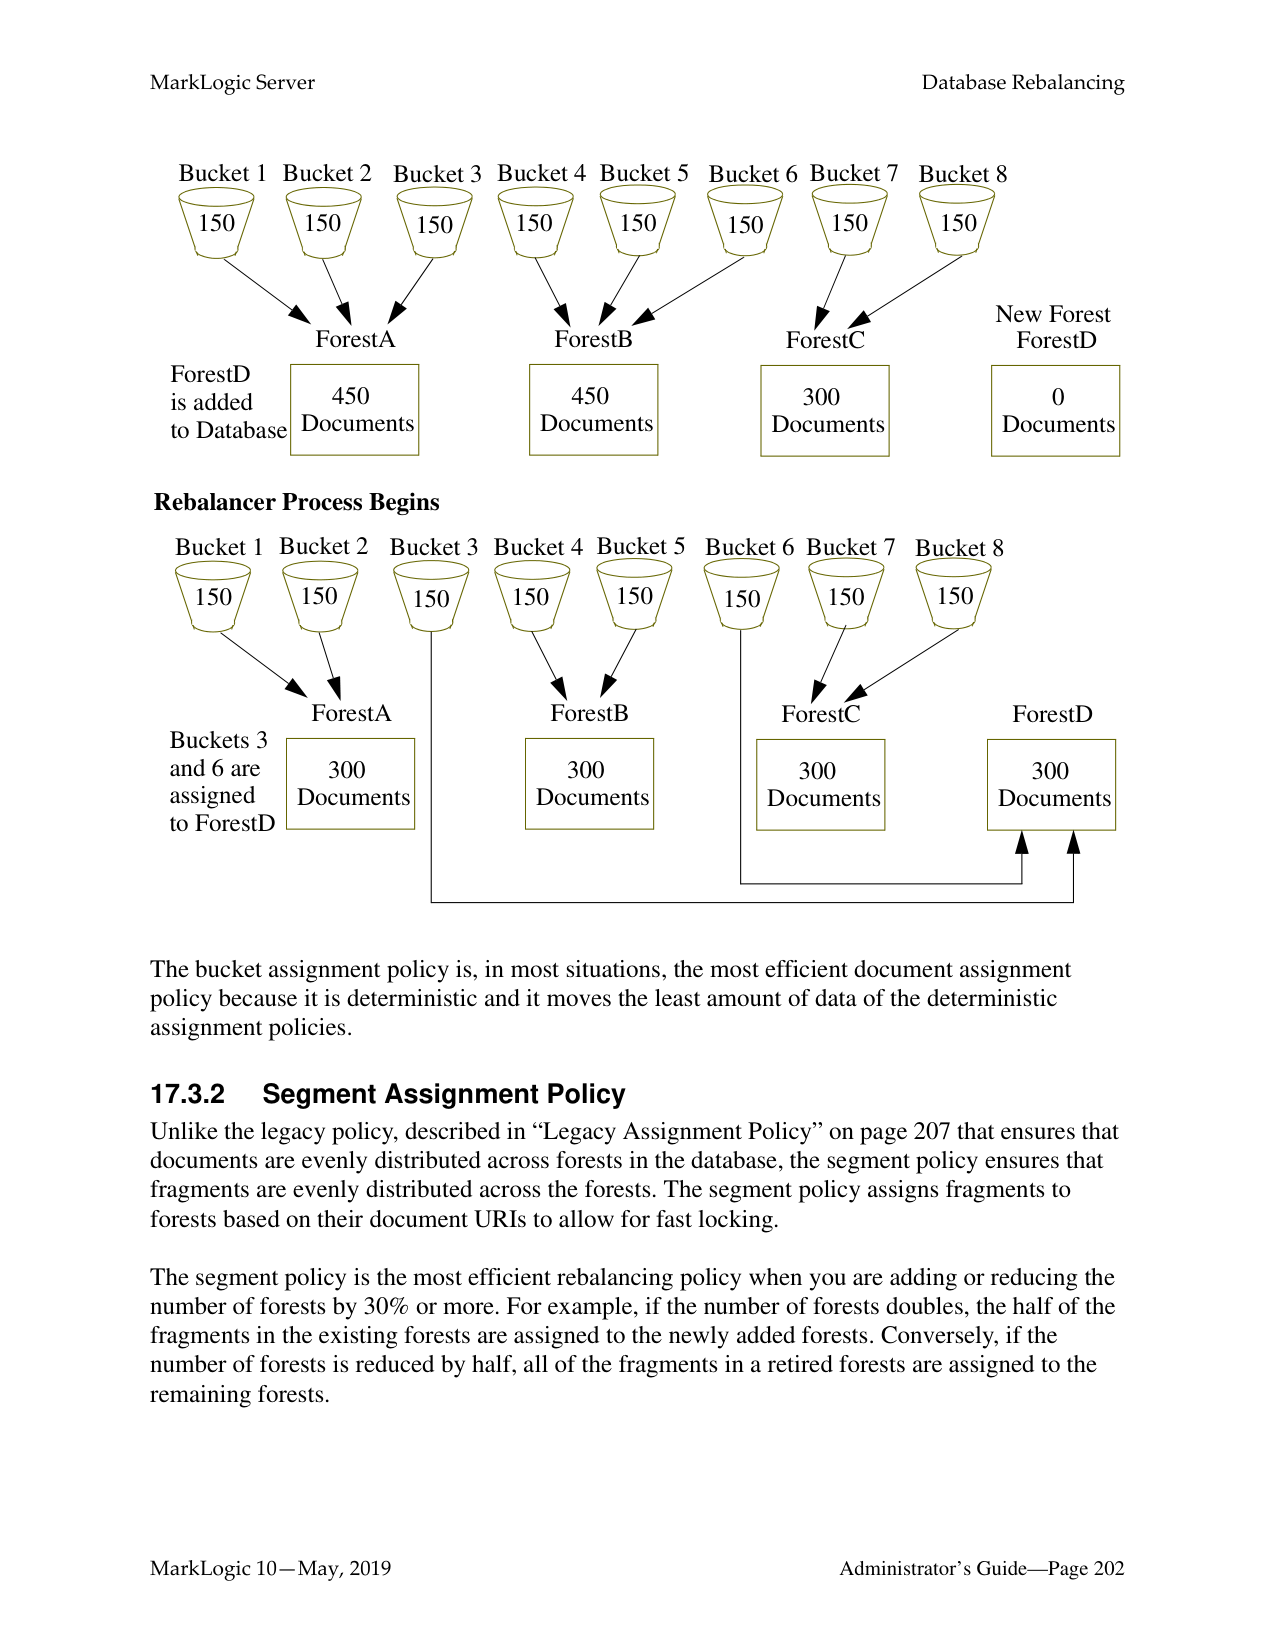
######### 16.7.1 Manually Initiating a Merge
You can manually initiate a merge, either by explicitly issuing the xdmp:merge command as described in Merging the Forests in a Database in the Scripting Administrative Tasks Guide, or by clicking the Merge button on the database configuration page of the Admin Interface. Either of these actions will immediately begin a merge on the database (if using xdmp:merge, on the database to which the App Server that responds to the request is connected, or if using the Admin Interface, the database being configured). Manually initiated merges continue even when merges are disabled for a database.
When you issue an xdmp:merge command or click the Merge button, it will begin a merge even if one would not occur automatically. If no options are specified to xdmp:merge, default values are used (not the configured values for the database).
Note: If you have updates occurring on the system while a merge is in progress, the new fragments will not be merged during the active merge operation; they will be merged during a subsequent merge.
Manually initiating a merge is useful when you have your merge controls set such that very large merges do not occur (for example, merge min ratio set to 1), but you want to run the large merges during a period of low activity on your system. It can also be useful for expunging deleted fragments that have not yet reached the threshold for automatic merges. Note that if a merge timestamp is set on the database, even a forced merge will not merge out deleted fragments up to the merge timestamp. In normal situations, deleted fragments are retained for a short period of time. If you want to forcibly merge those, you need to explicitly set the merge-timestamp option to the current timestamp in your xdmp:merge call.
The xdmp:merge API also allows you to specify options to the merge to control the maximum merge size, the forests which are merged, whether to merge to a single stand, as well as other options. For details, see xdmp:merge in the MarkLogic XQuery and XSLT Function Reference.
######### 16.7.2 Cancelling a Merge
You can cancel a merge in the Database Status page of the Admin Interface (Databases >
db_name > Status tab). If you access the status page for a database during a merge, on the part of the status page for the stand(s) being merged, there is a cancel button (usually on the bottom right of the status page).
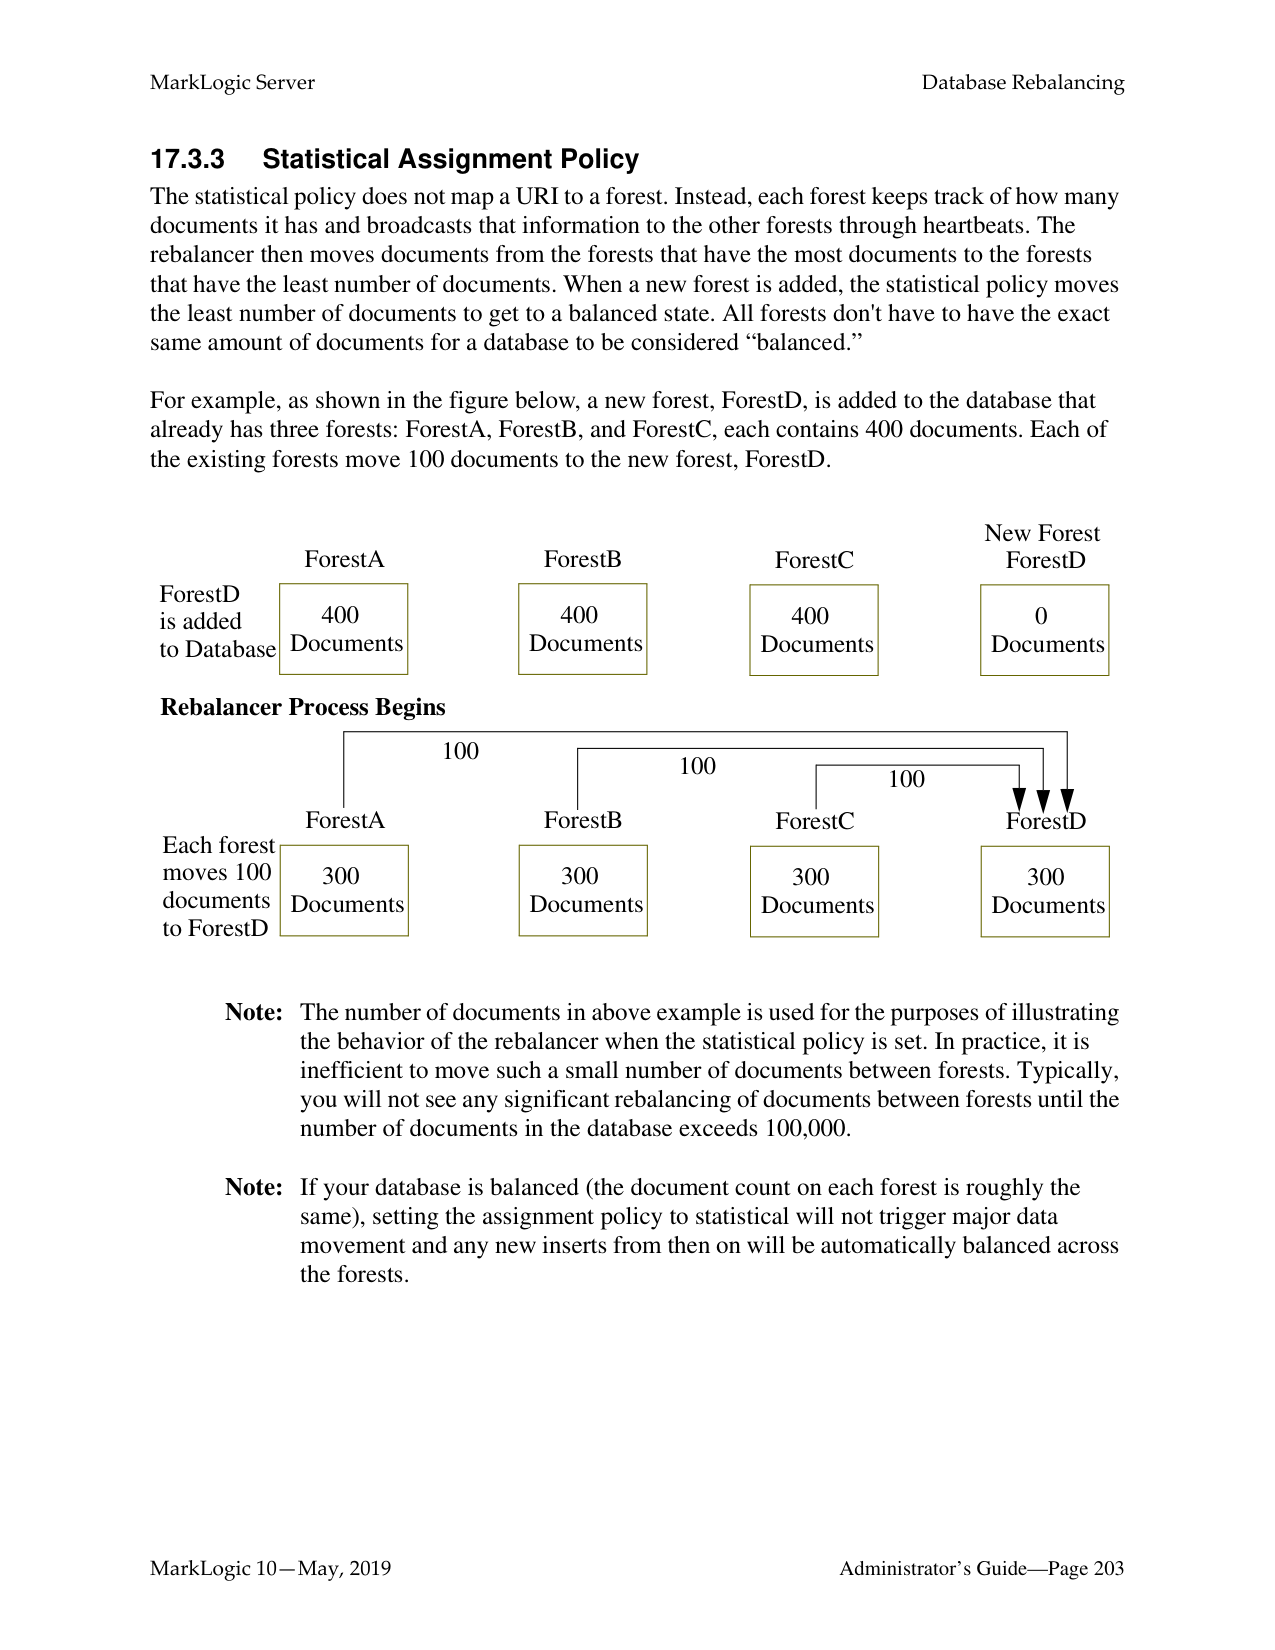

When you cancel a merge, the new stand that has not completed its merge is discarded, leaving the unmerged stands as they were before the merge began. Note that if you cancel an automatic merge, it might start up a new merge as soon as it is canceled (if the merge controls are set such that a merge is triggered). To avoid this situation, you can change some of the merge control parameters before you cancel an automatic merge.
To cancel a merge:
######### 16.8 Configuring Merge Policy Rules
By changing some of the merge policy parameters, you can effectively control certain aspects of your merges. The descriptions in “Description of Merge Policy Parameters” on page 184 describes what each parameter does. This section describes some scenarios with suggestions for how to tune the merge control parameters to satisfy the conditions. It includes the following parts:
######### 16.8.1 Determine the Baseline for Your Merges
The merge characteristics of your system depend on many factors, including the size of your forests, the amount of update activity on the system, and the way your data is fragmented. If you feel you need to change the configuration of your merges, the first step is to determine the merge characteristics for your database. This requires running your system under normal loads, then analyzing the log files to determine the following about your merges:
If it turns out that your merges are never taking more than a few minutes to complete, then there is probably no need to change any of your settings.
######### 16.8.2 If You Want to Reduce the Number of ‘Large’ Merges
In most cases, MarkLogic Server will perform relatively small merges just often enough to keep the system properly optimized. Small merges are generally not very disruptive and reasonably fast. In some cases, however, you might find that your merges are too large and are taking too much time. Exactly how large constitutes a “Large” merge is difficult to measure, but if you determine that your merges are too large, then you might want to try and configure your settings to avoid a really large merge.
One way to avoid large merges is to set the merge max size value. If you do set this value, however, you should only set it to a value as a temporary way to control your maximum merge size, as it can lead to a state where the database really needs to perform a large merge but cannot. Such a situation can lead to a poorly optimized system. One way to think about large merges is to compare them to sleeping for people; a person can go without much sleep for relatively short periods of time (a day or two or maybe even three for some people), but eventually, the person needs sleep or else he begins to function extremely poorly. Similarly, if a database is growing, it will eventually need to perform a large merge. Also, be careful not to set merge max size to such a small value that you end up with a very large number of stands. Always use care when setting the merge max size value, as you might end up with a large number of stands in your database, which can cause it to perform poorly and, when it reaches the maximum number of stands (64), will cause it to go offline.
Another way to accomplish a goal of reducing the number of large merges is to lower the value for merge min ratio to 1. A value of 1 for merge min ratio will not stop large merges from happening, but will make large merges only occur when the number of fragments in your largest stand is equal to the number of fragments in all of the other stands combined. Therefore, the only time merges will be more than 1/2 the size of your forest is when the fragment count of the sum of all but the largest stand is equal to or greater than the fragment count of the largest stand. To illustrate this, consider a forest with the following scenario:
If the merge min ratio is set to 1, then a stand can merge if the following ratio is less than 1:
of fragments in a stand total # of fragments in all other smaller stands in the forest
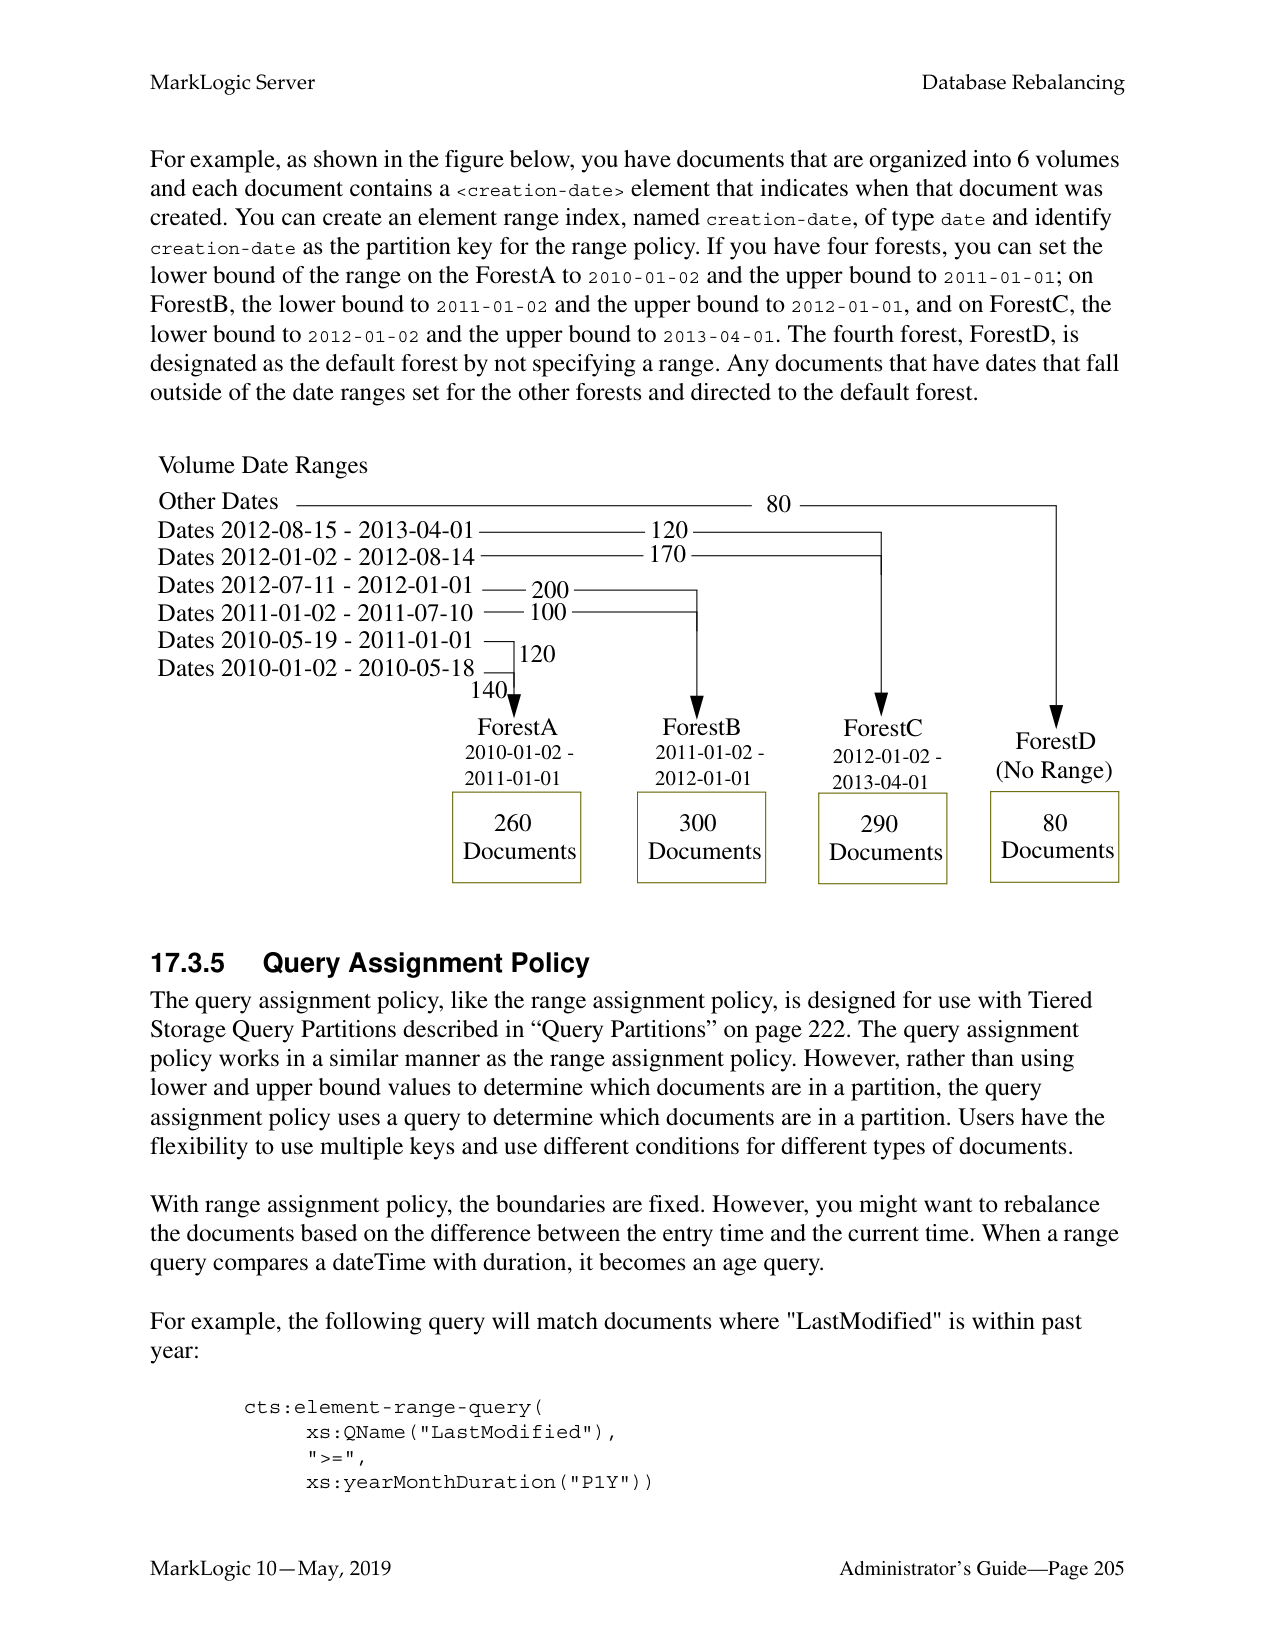
Substituting in the values from the example for stand 1 yields:
10000/(5000 + 1000 + 500) = 10000/6500 = 1.54
5000/(1000 + 500) = 5000/1500 = 3.33
1000/500 = 2.0
Now, consider that a load is happening during this time and a stand that has 501 fragments is saved into the forest. The result is 5 stands as follows:
|Stand 5
501 fragments| |---|
Now, substituting in the values for stand 3 yields:
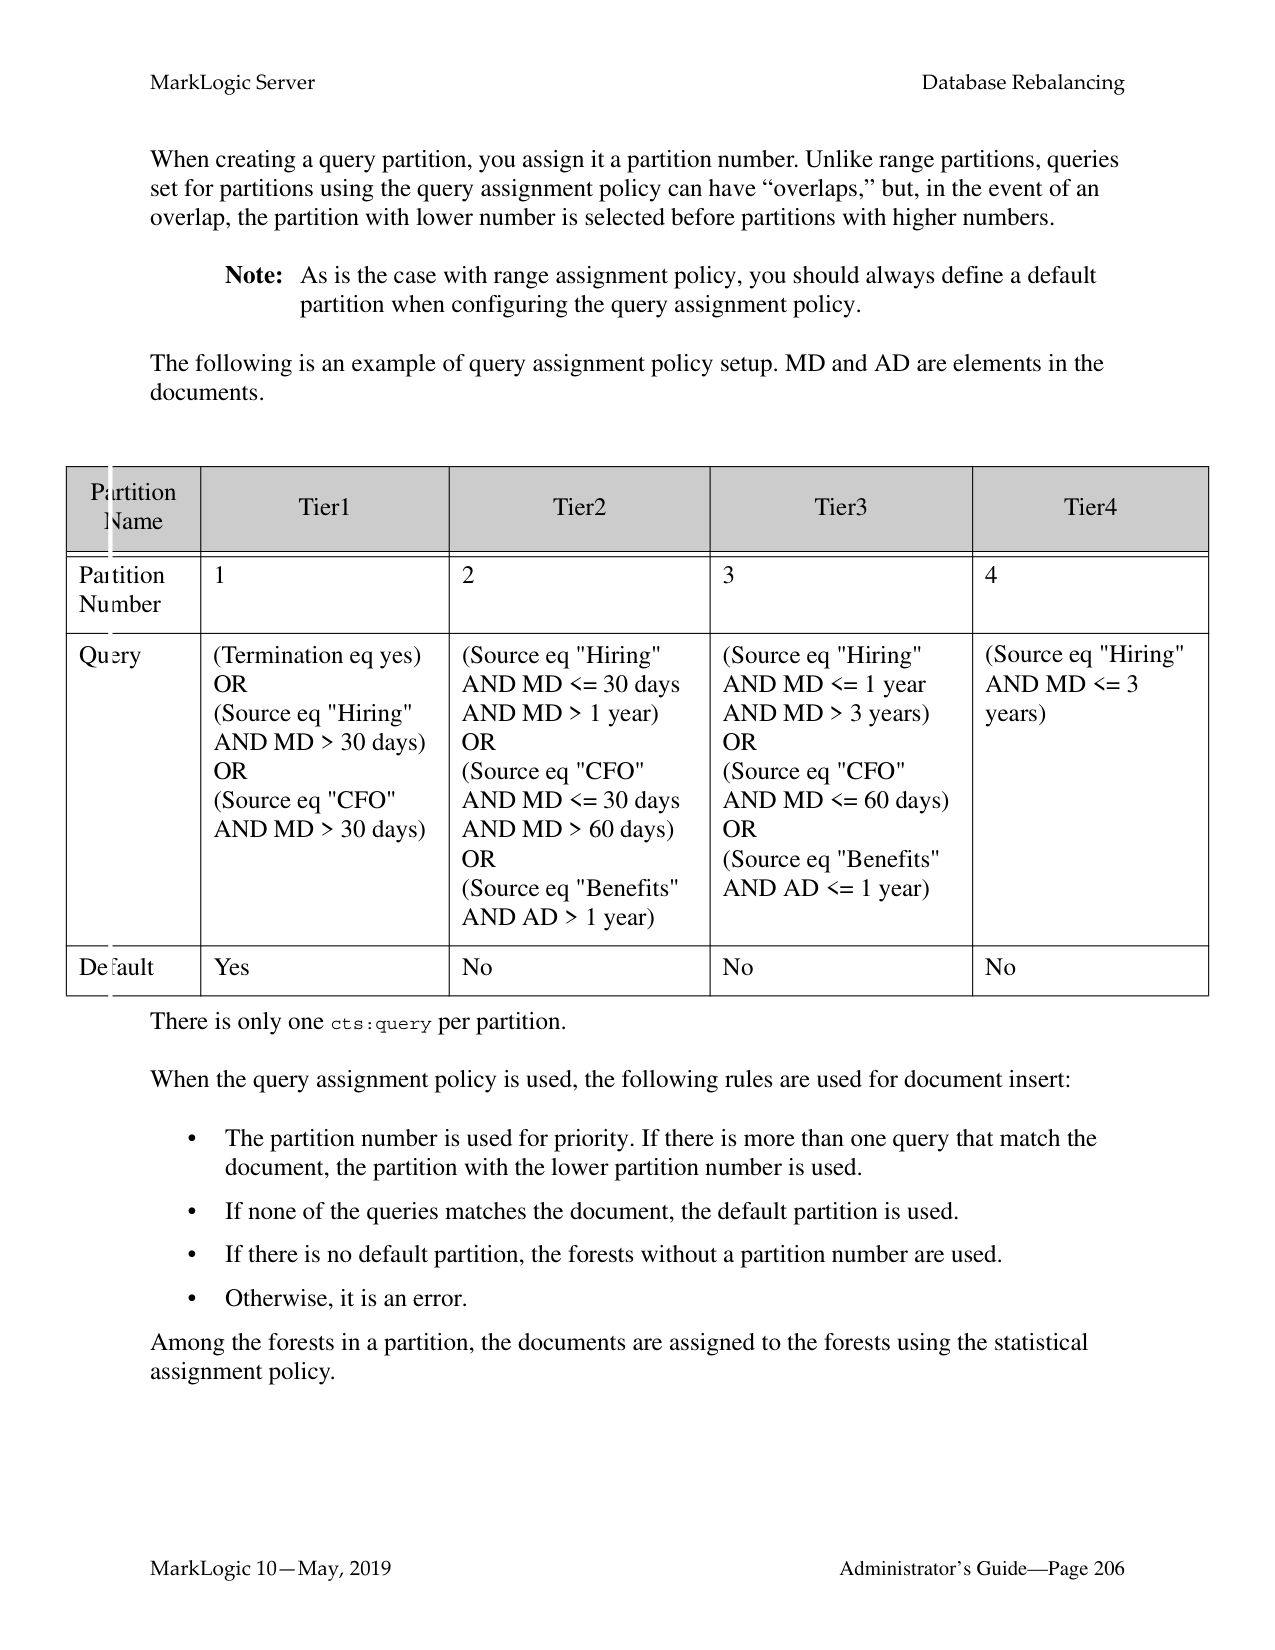
1000/(500 + 501) = 1000/1001 = 0.99
which is less than 1. Therefore stand 3 is merged. Note that stands 4 and 5 are smaller than stand
|Stand 1
10,000 fragments| |---|
|Stand 2
5,000 fragments| |---|
|Stand 3
2,001 fragments| |---|
Note that, in a real world scenario with relatively large forests, this scenario (where the sum of the smaller stands fragment counts have as many fragments as the largest stand) will not happen very often, but will happen occasionally. For example, if another 3,000 fragments continued to accumulate in this forest, then stand 1 would merge with the other stands.
######### 16.8.3 Other Solutions
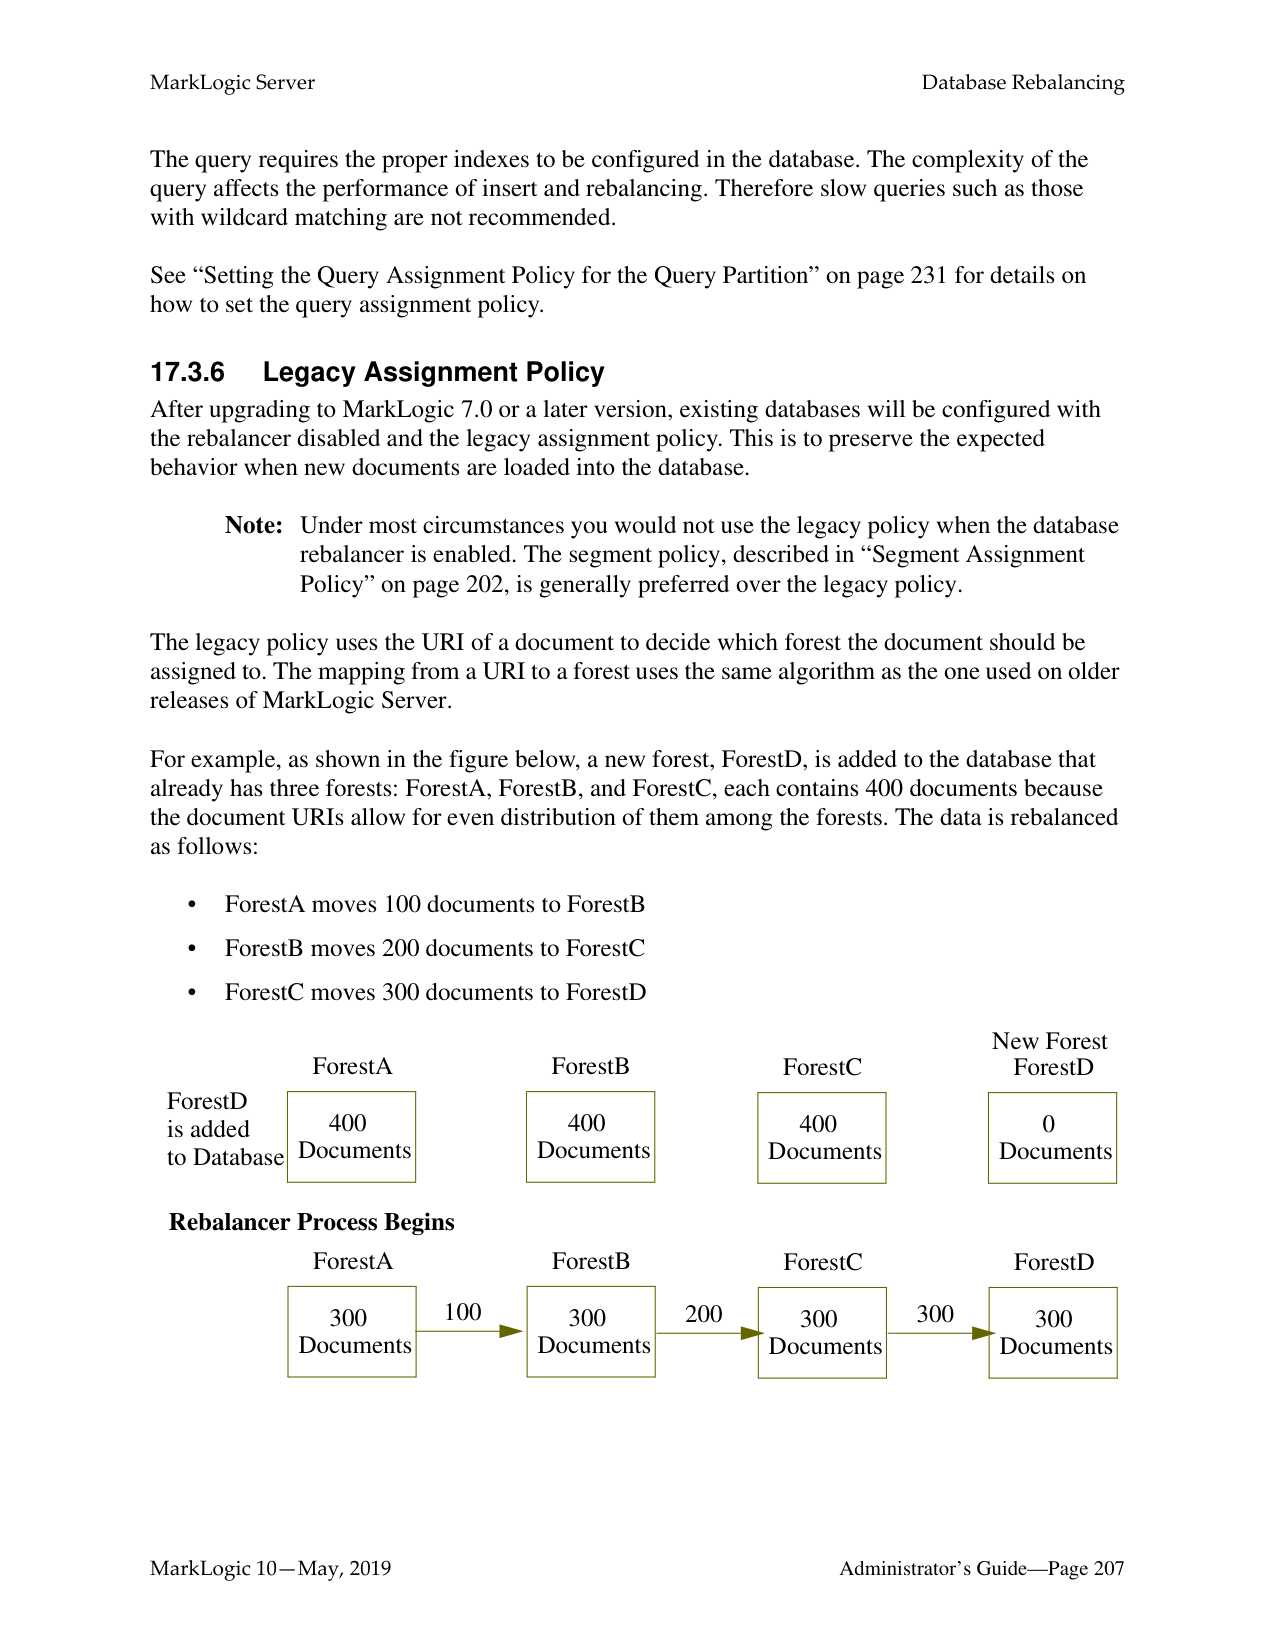
In some cases, changing the merge parameters might not be the best solution for your system. For example, if your merges are taking a very long time due to slow disk drives or other system contention, addressing those issues might do more to help your merge times than any amount of tuning can do. Also, if your merges are extremely large, it could be that the forests are larger than optimal. There is no fixed maximum size for a forest, but experience in the field has shown that when forests grow over 512GB, query performance tends to start to decrease while merge times tend to start to increase. If your forests are larger than 512GB, consider breaking them into multiple forests.
##### 17.0 Database Rebalancing
As your needs for data in a database expand and contract, the more evenly the content is distributed among the database forests, the better its performance and the more efficient its use of storage resources. This chapter describes the database rebalancing mechanism that enables MarkLogic Server to evenly distribute content among the database forests.
This chapter includes the following topics:
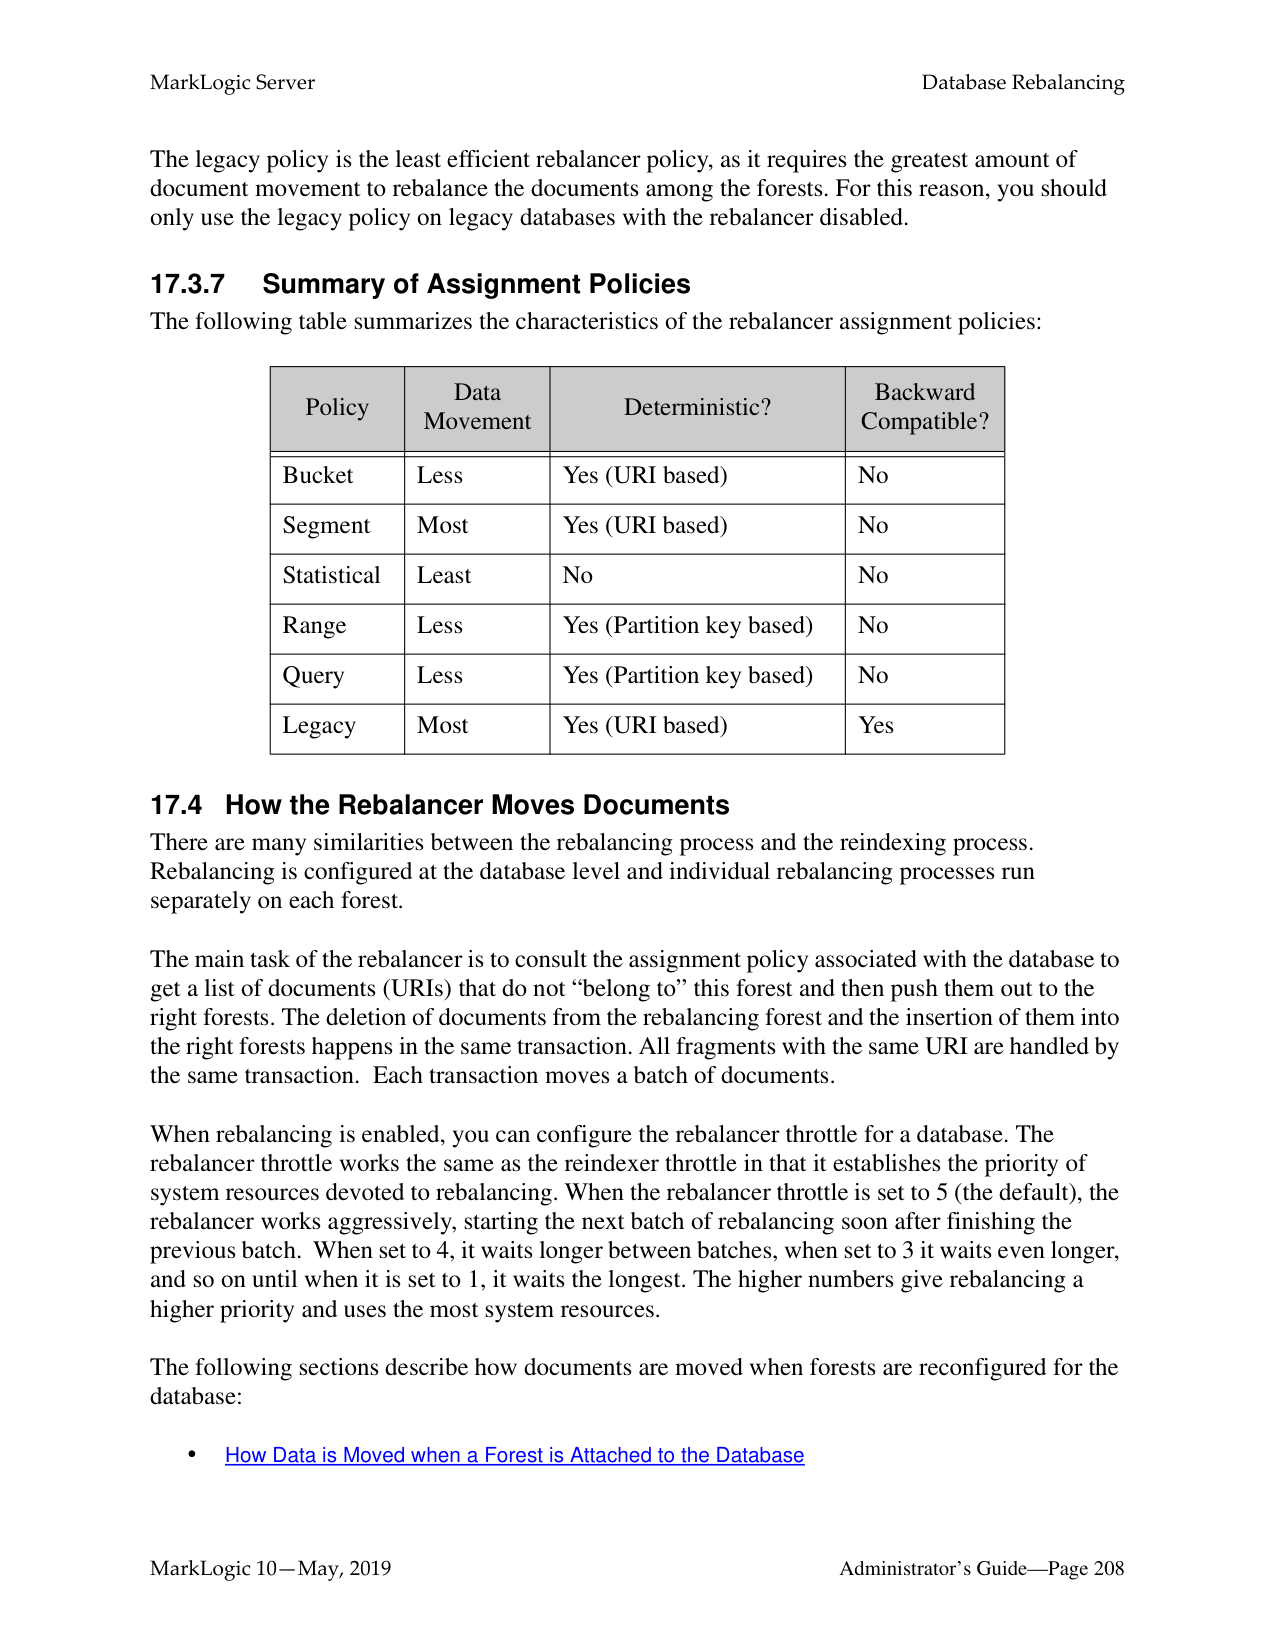
######### 17.1 Overview of the Database Rebalancer
A database rebalancer consists of two parts: an assignment policy for data insert and rebalancing and a rebalancer for data movement. The rebalancer can be configured with one of several assignment policies, which define what is considered “balanced” for a database. You choose the appropriate policy for a database. The rebalancer runs on each forest and consults the database's assignment policy to determine which documents do not “belong to” this forest and then pushes them to the correct forests.
Note: Document loads and inserts into the database follow the same document assignment policy used by the rebalancer, regardless of whether the rebalancer is enabled or disabled.
When you add a new forest to a database configured with a rebalancer, the database will automatically redistribute the documents among the new forest and existing forests. You can also retire a forest in a database to remove all of the documents from that forest and redistribute them among all of the remaining forests in the database.
In addition to enabling and disabling on the database level, the rebalancer can also be enabled or disabled at the forest level. For the rebalancer to run on a forest, it must be enabled on both the database and the forest.
The following illustration shows how 900 documents might be distributed between database forests before rebalancing, after rebalancing, after adding a new forest to the database, and after retiring a forest from the database.
Unbalanced Rebalancing After Adding a Forest Rebalancing Enabled
After Retiring a Forest Rebalancing EnabledDatabaseEnabled
|ForestA
|700 Documents| |---|
|200 Documents| |---|
ForestB
| |---|
||450 Documents| |---|
ForestA
|0 Documents| |---|
ForestB
|450 Documents| |---|
ForestC
| |---|
||300 Documents| |---|
ForestA
|300 Documents| |---|
ForestB
|300 Documents|

|---|
ForestC
| |---|
||450 Documents| |---|
ForestA
|450 Documents| |---|
ForestB
| |---|
Retire ForestB
Add
ForestC
######### 17.2 Rebalancer Trigger Events
In addition to the rebalancer periodically rebalancing the database, the following events trigger the rebalancer process:
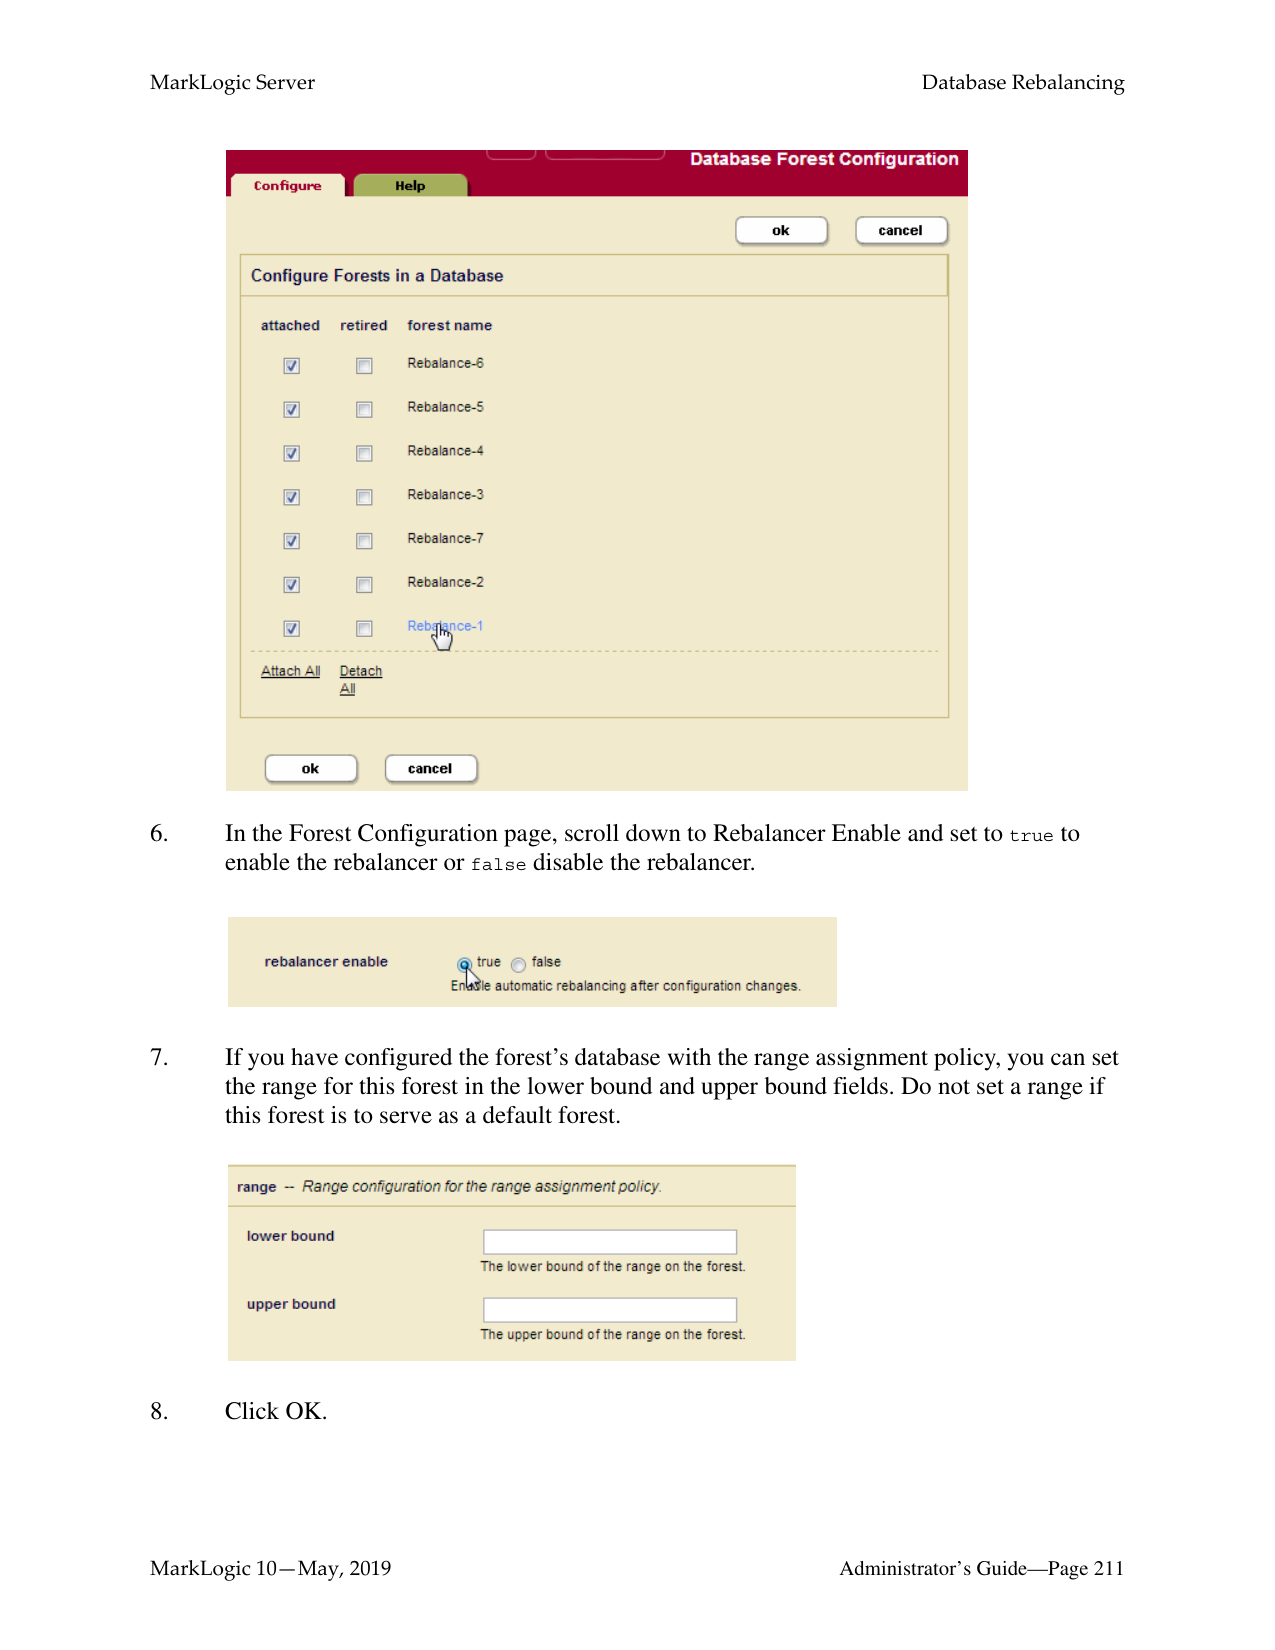
######### 17.3 Rebalancer Document Assignment Policies
A database is given an assignment policy that defines the logic used by the forests when reassigning documents to the other forests participating in the rebalancer process. Though they run in separate threads, both the rebalancer process and the document load/insert process follow the same assignment policy set on the database for the rebalancer.
The five commonly used assignment policies are as follows:
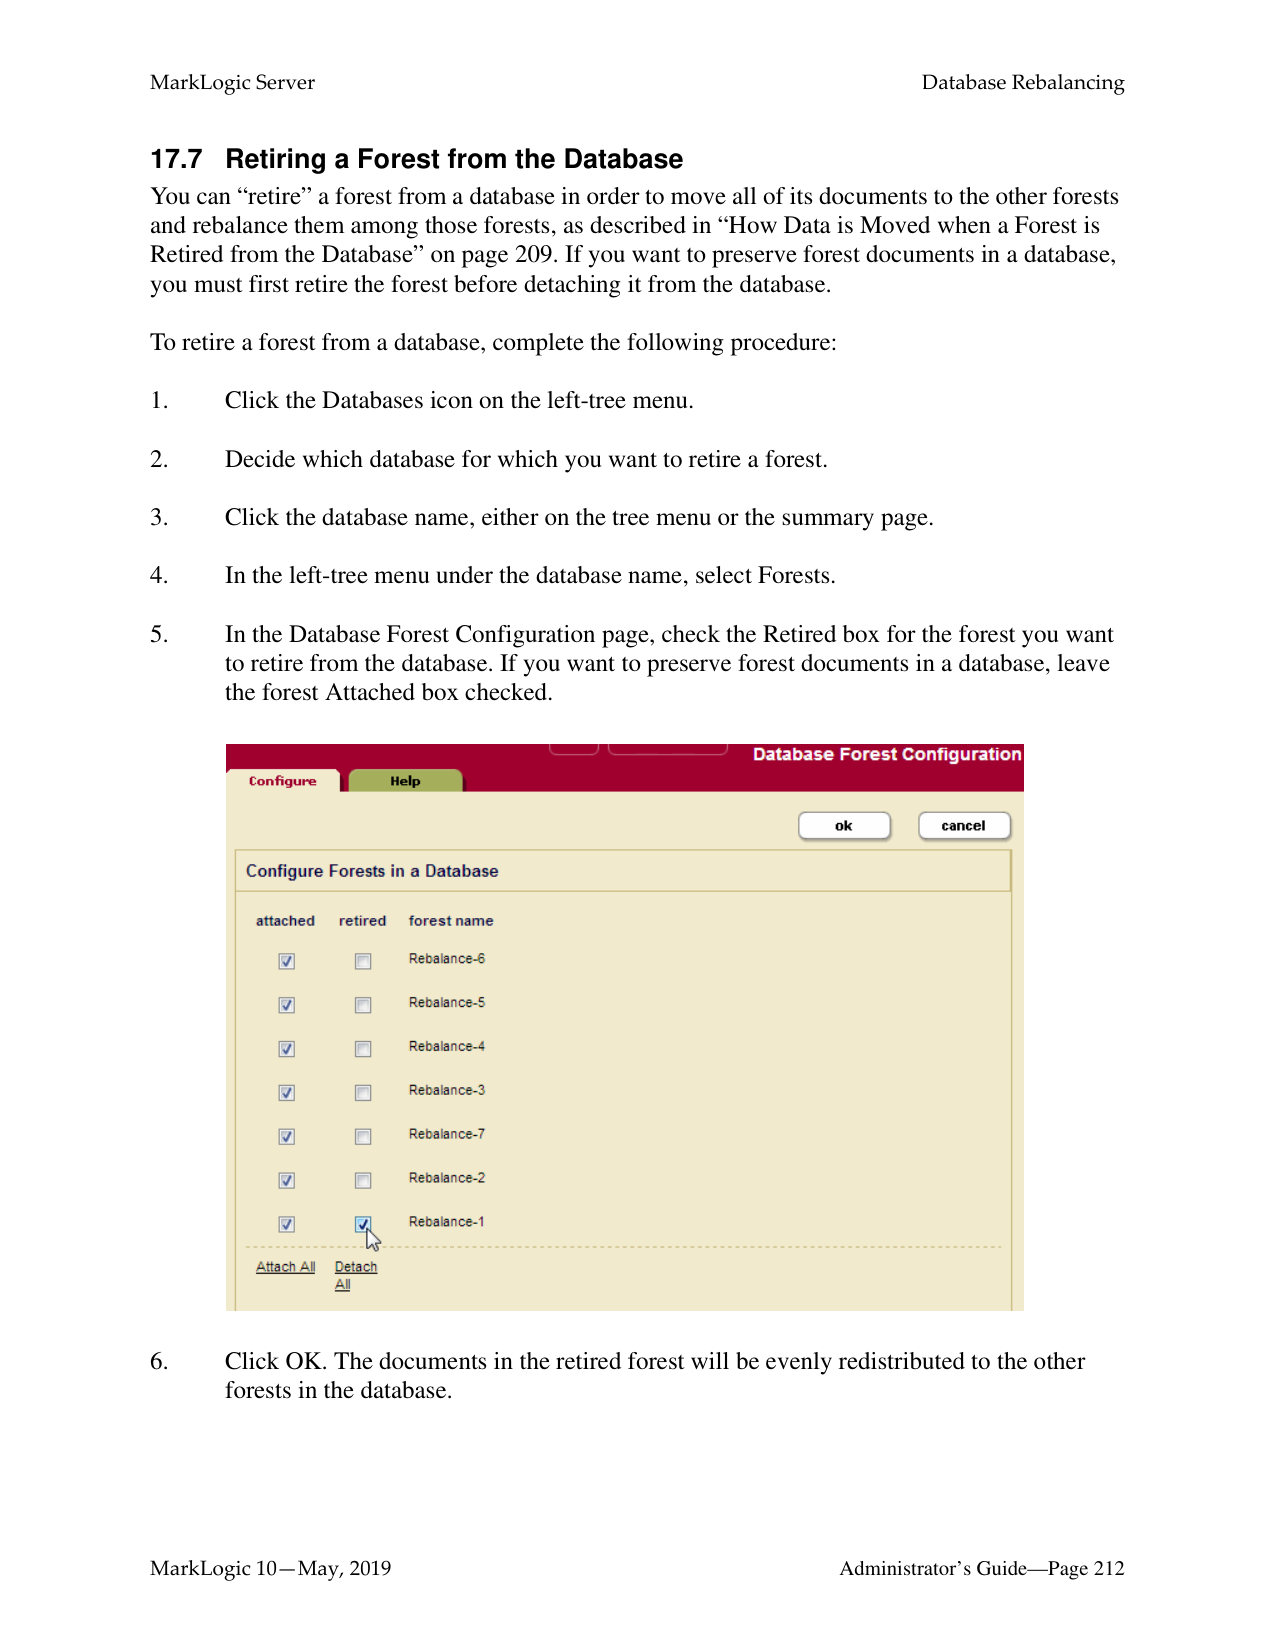
######### 17.3.1 Bucket Assignment Policy
The bucket policy uses the URI of a document to decide which forest the document should be assigned to. The URI is first "mapped" to a bucket then the bucket is "mapped" to a forest. The mapping from a bucket to a forest is kept in memory for fast access. The number of buckets is always 16K, regardless of the number of forests in the database.
Note: How document URIs are mapped to buckets and buckets are mapped to forests are
non-configurable implementation details.
Though there are 16K buckets used by the bucket assignment policy, for the purposes of the example illustrated below, assume there are eight buckets that distribute the 1200 documents across three forests: ForestA, ForestB, and ForestC and that the document URIs allow for even distribution of them among the buckets. ForestD is then added to the database and the rebalancer moves 1/3 of the documents from Forests A and B to ForestD by reassigning Bucket 3 from
Bucket 1 Bucket 2 Bucket 3 Bucket 4 Bucket 5 Bucket 6 Bucket 7 Bucket 8
150 150 150 150 150 150 150 150
ForestA
ForestD is added to Database
|450 Documents|
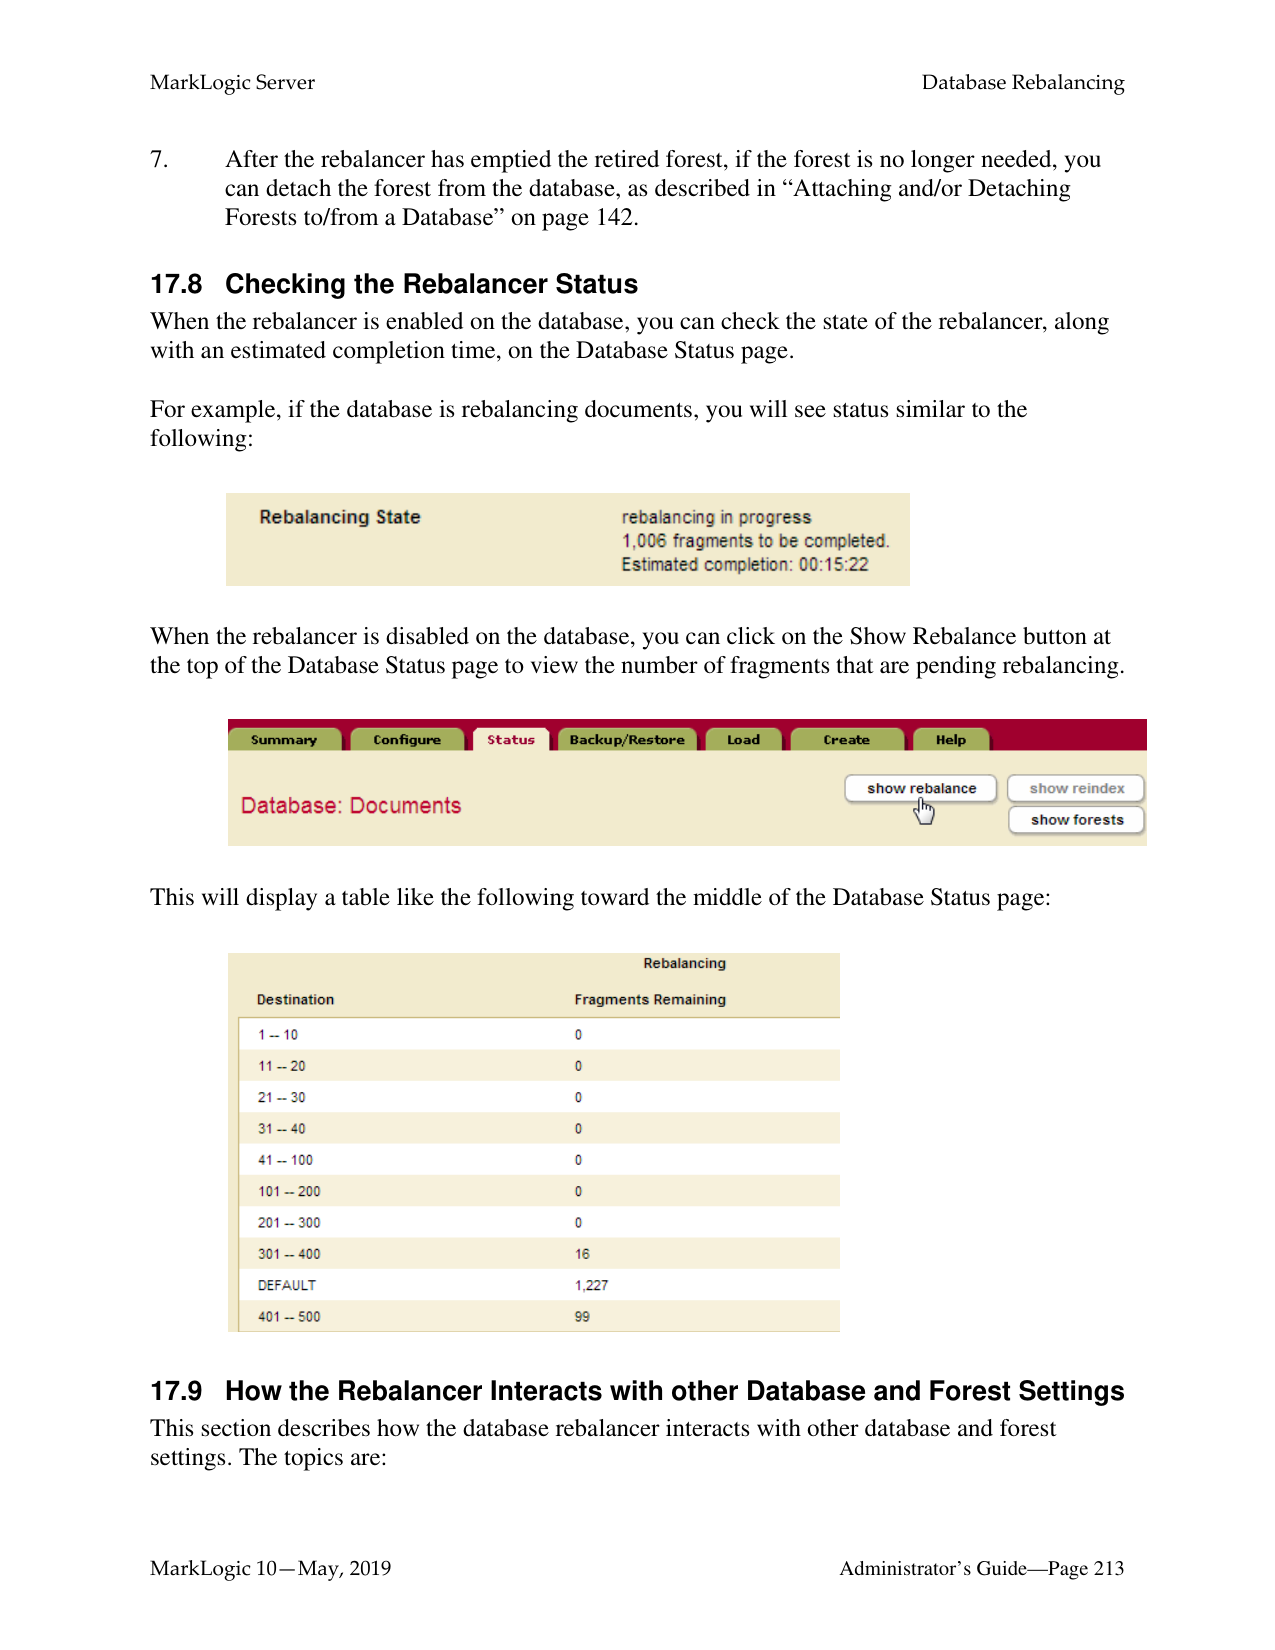
|---|
ForestB
|450 Documents| |---|
ForestC
|300 Documents| |---|
New Forest
ForestD
|0 Documents| |---|
Rebalancer Process Begins
Bucket 1 Bucket 2 Bucket 3 Bucket 4 Bucket 5 Bucket 6 Bucket 7 Bucket 8
150 150 150 150 150 150 150 150
ForestA
ForestB
ForestC
ForestD
Buckets 3 and 6 are assigned to ForestD
|300 Documents| |---|
|300 Documents| |---|
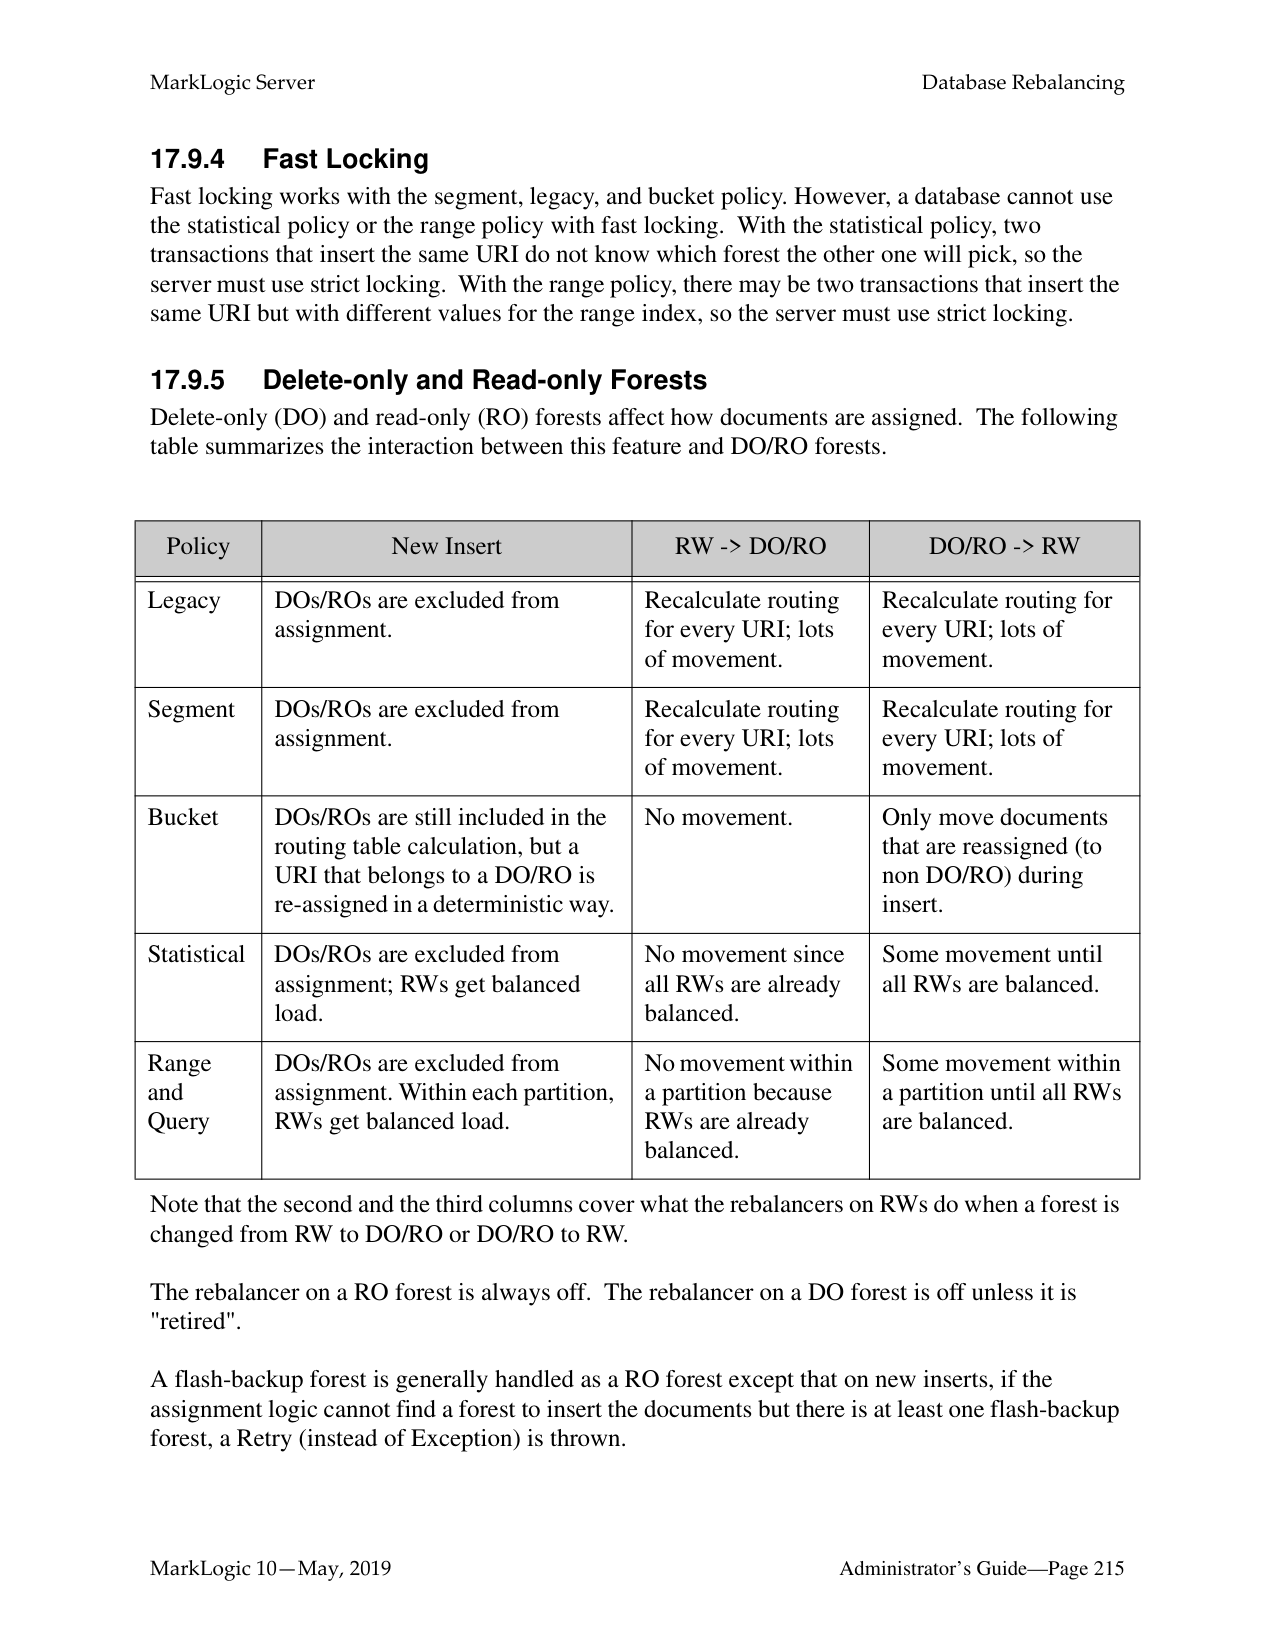
|300 Documents| |---|
|300 Documents| |---|
The bucket assignment policy is, in most situations, the most efficient document assignment policy because it is deterministic and it moves the least amount of data of the deterministic assignment policies.
######### 17.3.2 Segment Assignment Policy
Unlike the legacy policy, described in “Legacy Assignment Policy” on page 207 that ensures that documents are evenly distributed across forests in the database, the segment policy ensures that fragments are evenly distributed across the forests. The segment policy assigns fragments to forests based on their document URIs to allow for fast locking.
The segment policy is the most efficient rebalancing policy when you are adding or reducing the number of forests by 30% or more. For example, if the number of forests doubles, the half of the fragments in the existing forests are assigned to the newly added forests. Conversely, if the number of forests is reduced by half, all of the fragments in a retired forests are assigned to the remaining forests.
######### 17.3.3 Statistical Assignment Policy
The statistical policy does not map a URI to a forest. Instead, each forest keeps track of how many documents it has and broadcasts that information to the other forests through heartbeats. The rebalancer then moves documents from the forests that have the most documents to the forests that have the least number of documents. When a new forest is added, the statistical policy moves the least number of documents to get to a balanced state. All forests don't have to have the exact same amount of documents for a database to be considered “balanced.”
For example, as shown in the figure below, a new forest, ForestD, is added to the database that already has three forests: ForestA, ForestB, and ForestC, each contains 400 documents. Each of the existing forests move 100 documents to the new forest, ForestD.
ForestA
ForestD is added to Database
|400 Documents| |---|
ForestB
|400 Documents| |---|
ForestC
|400 Documents| |---|
New Forest
ForestD

|0 Documents| |---|
########### Rebalancer Process Begins
100
100
100
ForestA
ForestB
ForestC
ForestD
Each forest moves 100 documents to ForestD
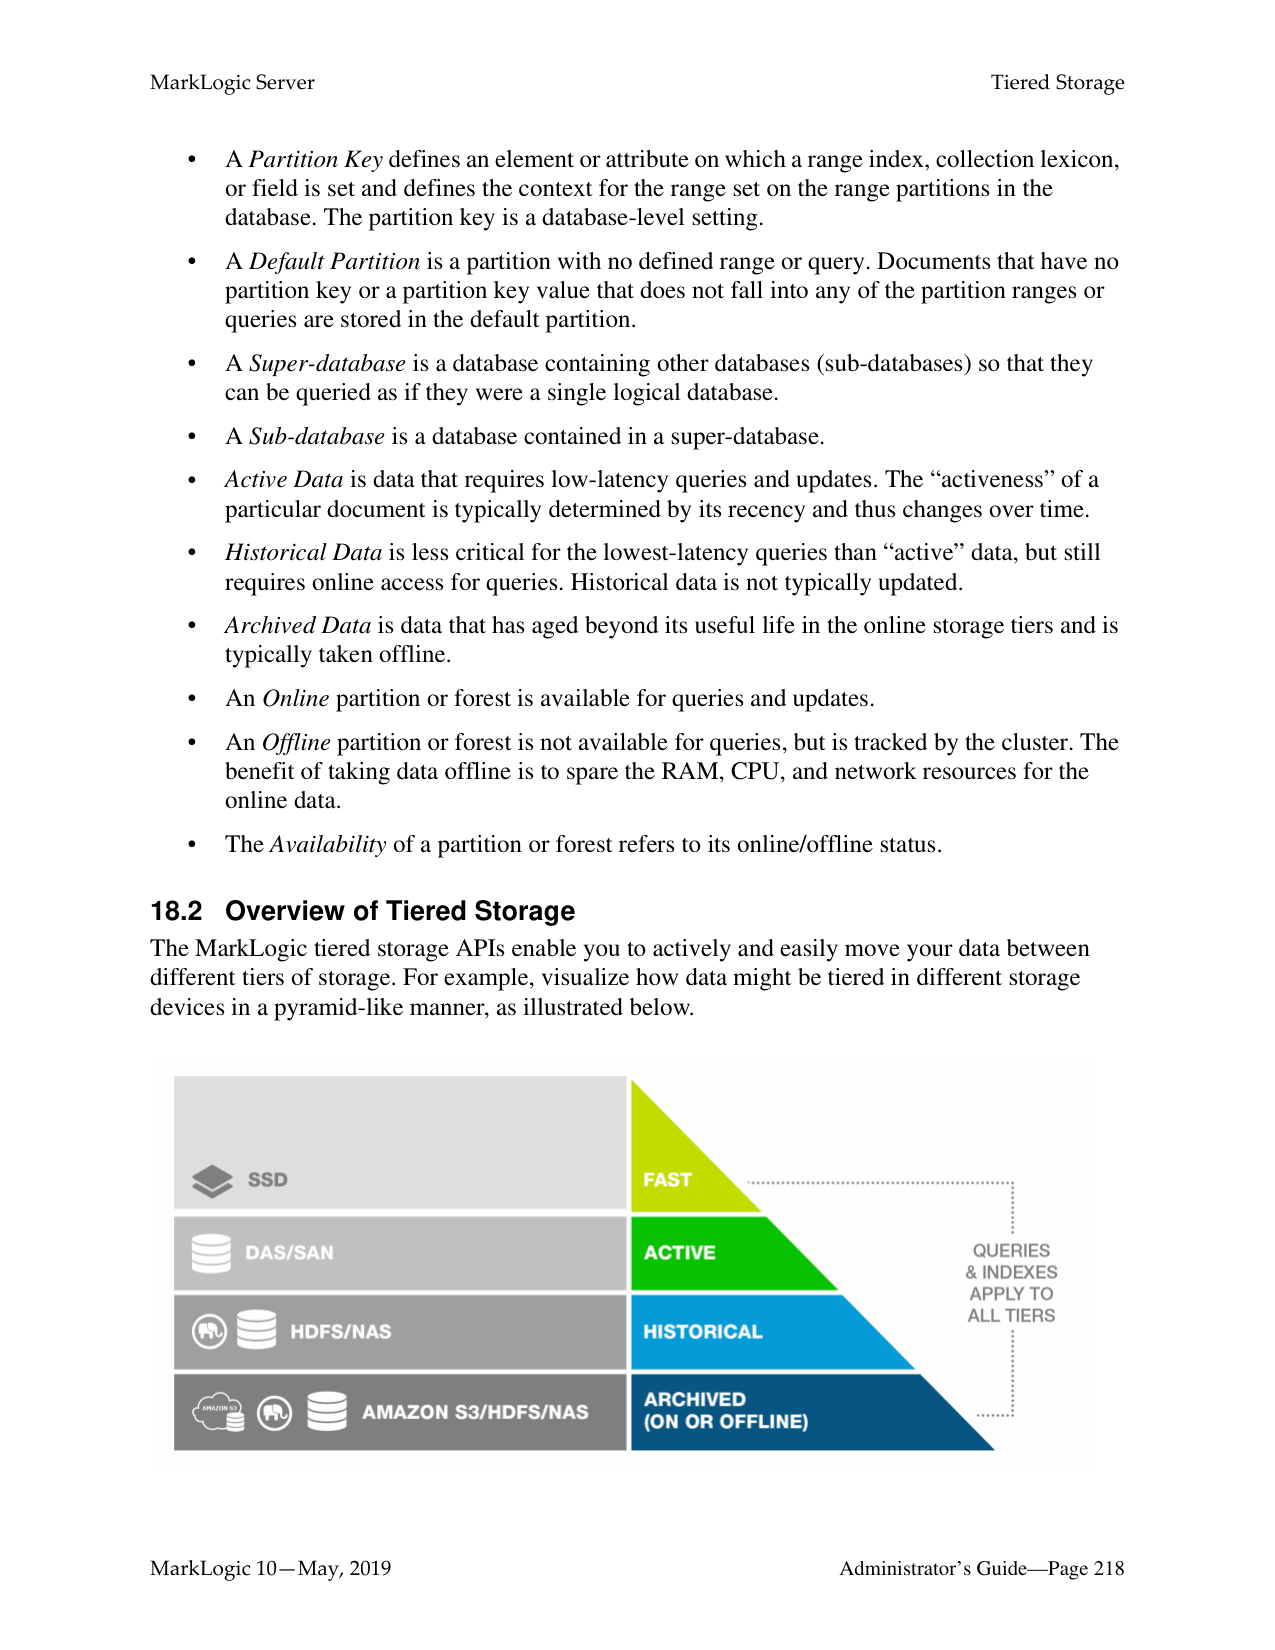
|300 Documents| |---|
|300 Documents| |---|
|300 Documents| |---|
|300 Documents| |---|
Note: The number of documents in above example is used for the purposes of illustrating the behavior of the rebalancer when the statistical policy is set. In practice, it is inefficient to move such a small number of documents between forests. Typically, you will not see any significant rebalancing of documents between forests until the number of documents in the database exceeds 100,000.
Note: If your database is balanced (the document count on each forest is roughly the same), setting the assignment policy to statistical will not trigger major data movement and any new inserts from then on will be automatically balanced across the forests.
######### 17.3.4 Range Assignment Policy
The range policy is designed for use with Tiered Storage Range Partitions described in “Range Partitions” on page 220. It uses a range index value to decide which forest a document should be assigned to. When setting the range policy, you specify a range index for use as the partition key and configure each forest attached to the database with a range that defines a lower and upper end.
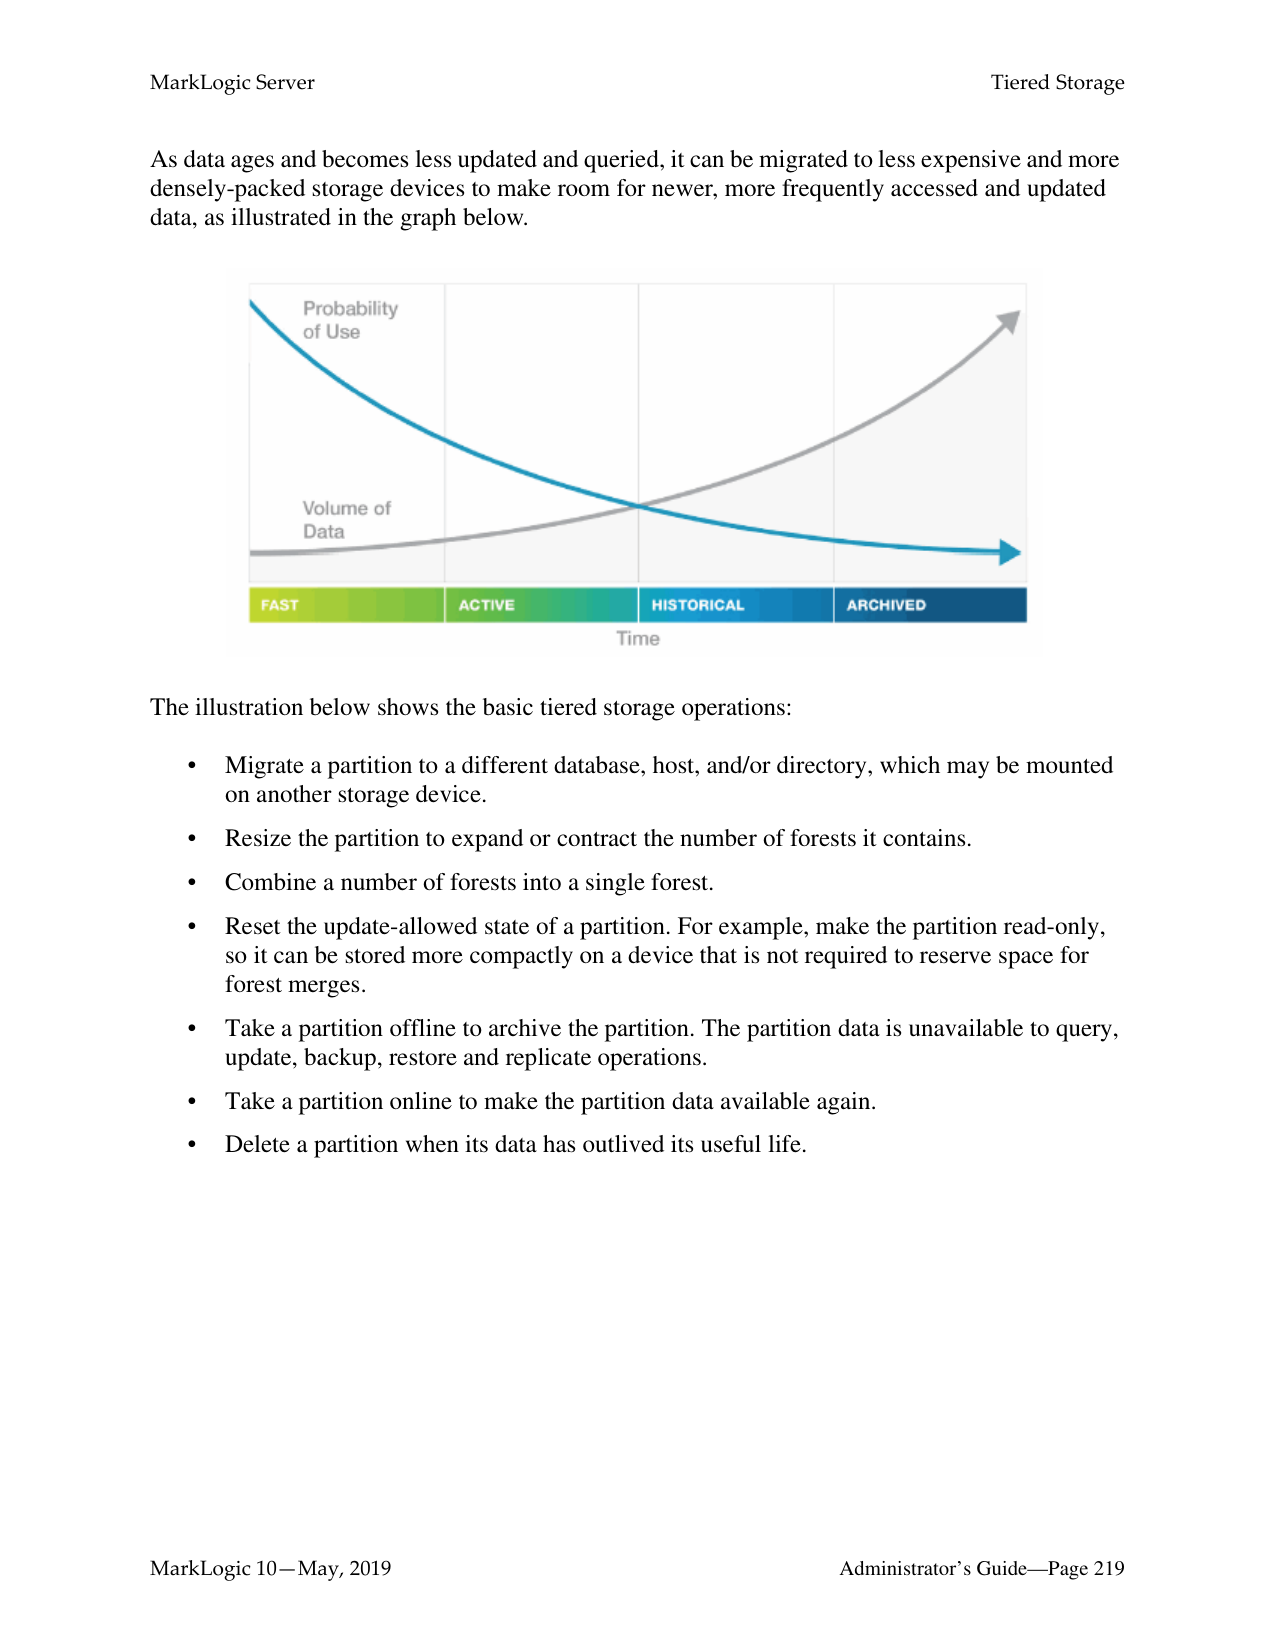
Note: Avoid using the range policy to manage documents that might have more than one
value for a range index, as the behavior in such a circumstance is undefined.
There may be multiple forests that cover the same range, but two forests cannot have partially overlapped ranges. For example, it is valid for both ForestA and ForestB to cover (1 to 10) but not valid for ForestA to cover (1 to 6) while ForestB covers (4 to 10). It is also not valid for ForestA to cover (1 to 10) while ForestB covers (4 to 9). Among those forests that cover the same range, documents are assigned to the forests based on their document count, following a similar mapping process as the statistical policy described in “Statistical Assignment Policy” on page 203.
Note: In order to accommodate range “gaps” and documents that do not contain an element used as the partition key, you should always configure a default forest, as described below.
If a document has been processed by the Content Processing Framework (CPF), the property documents associated with the document may have a partition key value that is different from that in the document. When using the range policy, you may want to use the xdmp:document-add-properties or xdmp:document-set-properties function to put the same partition key value as specified in the document into the property documents to ensure that they are moved to the same forest as the original document. For example, the partition key is creation-date and the example.xml document has a creation-date of 2010-01-02, but its associated property documents contain no creation-date element. You could then use the xdmp:document-add-properties function as follows to add a matching creation-date element to the example.xml property documents.
xdmp:document-add-properties( "example.xml", (
A forest with no range value behaves as the default forest, which means that documents that do not fit into any of the ranges set on the other forests are moved to the default forest. You cannot retire a forest unless there is another forest for the documents to move to, which means that there must either be another forest with the same range as the retired forest or that there is a default forest (no range set) attached to the database. If a database contains no default forest, an attempt to retire a forest containing documents with partition key values that do not match the ranges in the other forests will not be successful.
Note: You should always define a default forest when configuring the range assignment
policy.
For example, as shown in the figure below, you have documents that are organized into 6 volumes and each document contains a
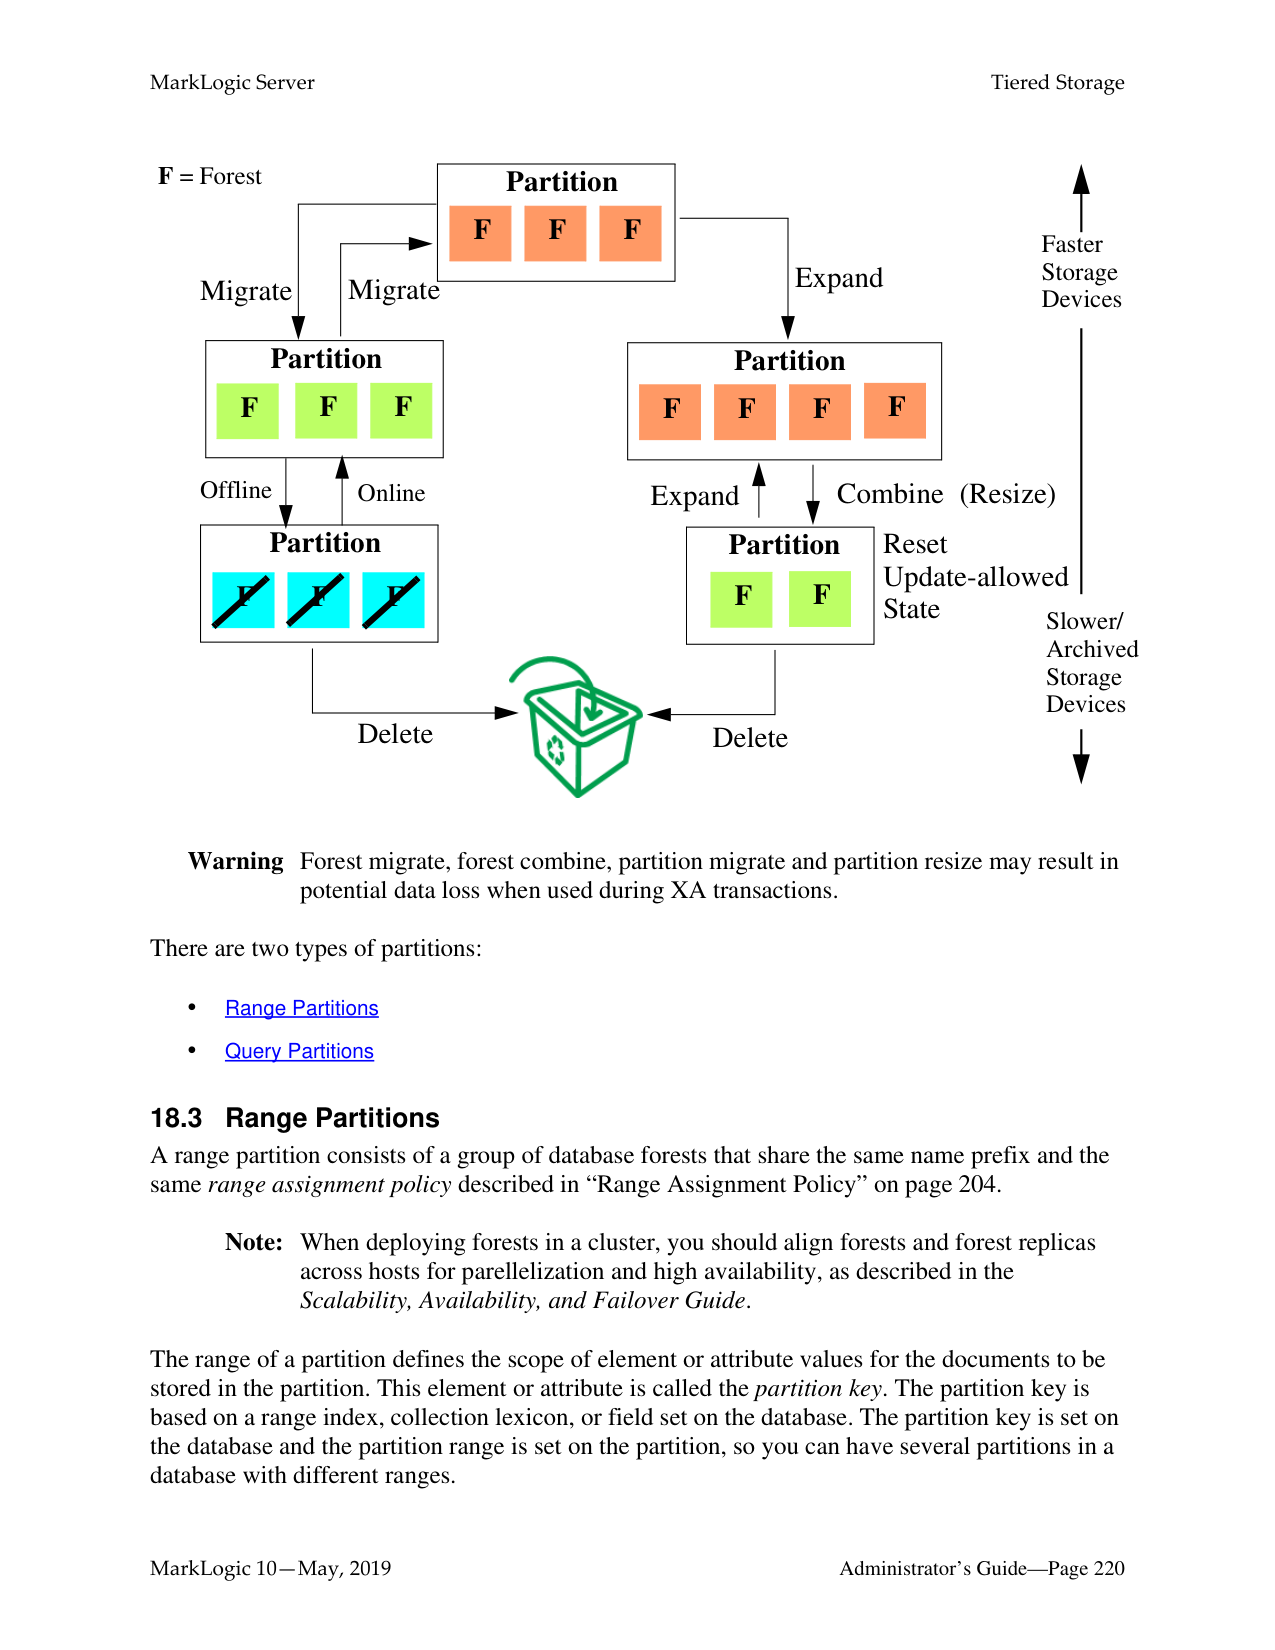
Volume Date Ranges
Other Dates
80
Dates 2012-08-15 - 2013-04-01 Dates 2012-01-02 - 2012-08-14 Dates 2012-07-11 - 2012-01-01 Dates 2011-01-02 - 2011-07-10 Dates 2010-05-19 - 2011-01-01 Dates 2010-01-02 - 2010-05-18
120
170
200
100
120
140
ForestA
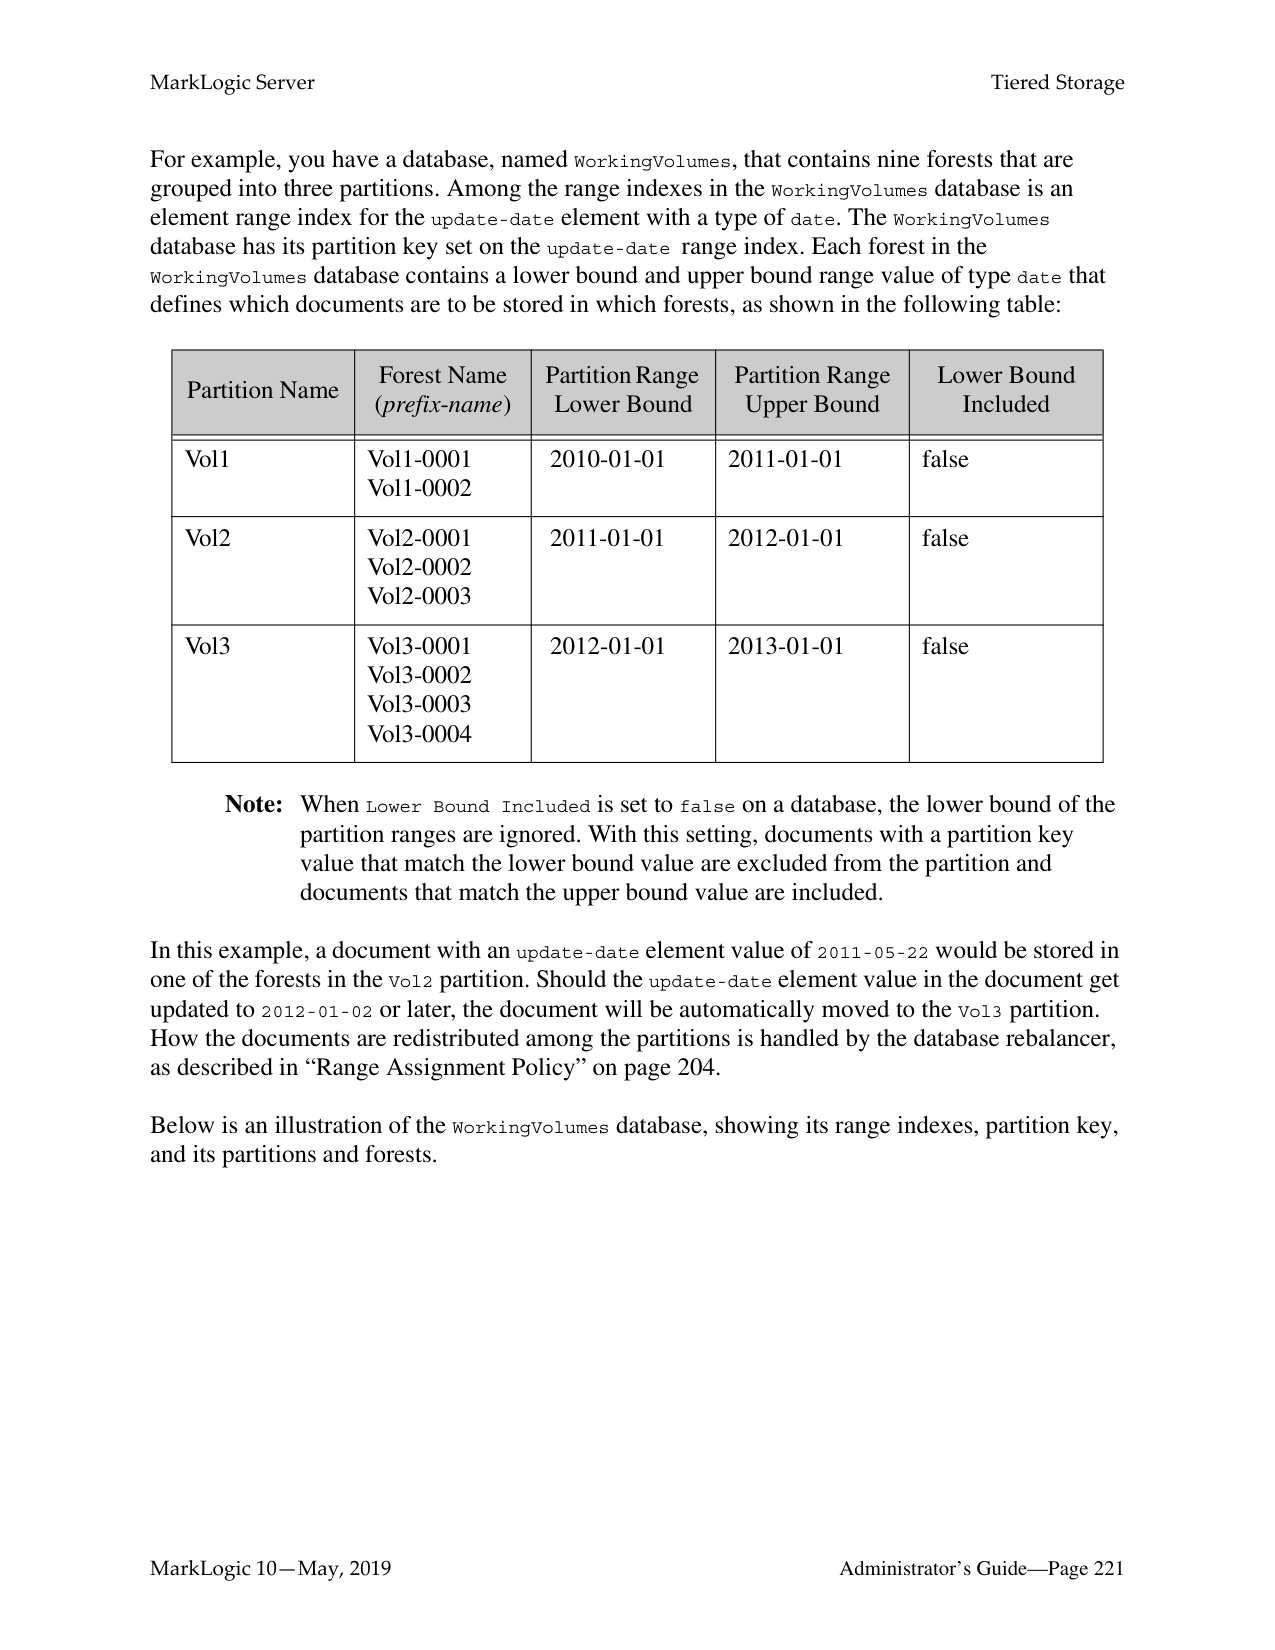
ForestB
|260 Documents| |---|
|300 Documents| |---|
ForestC
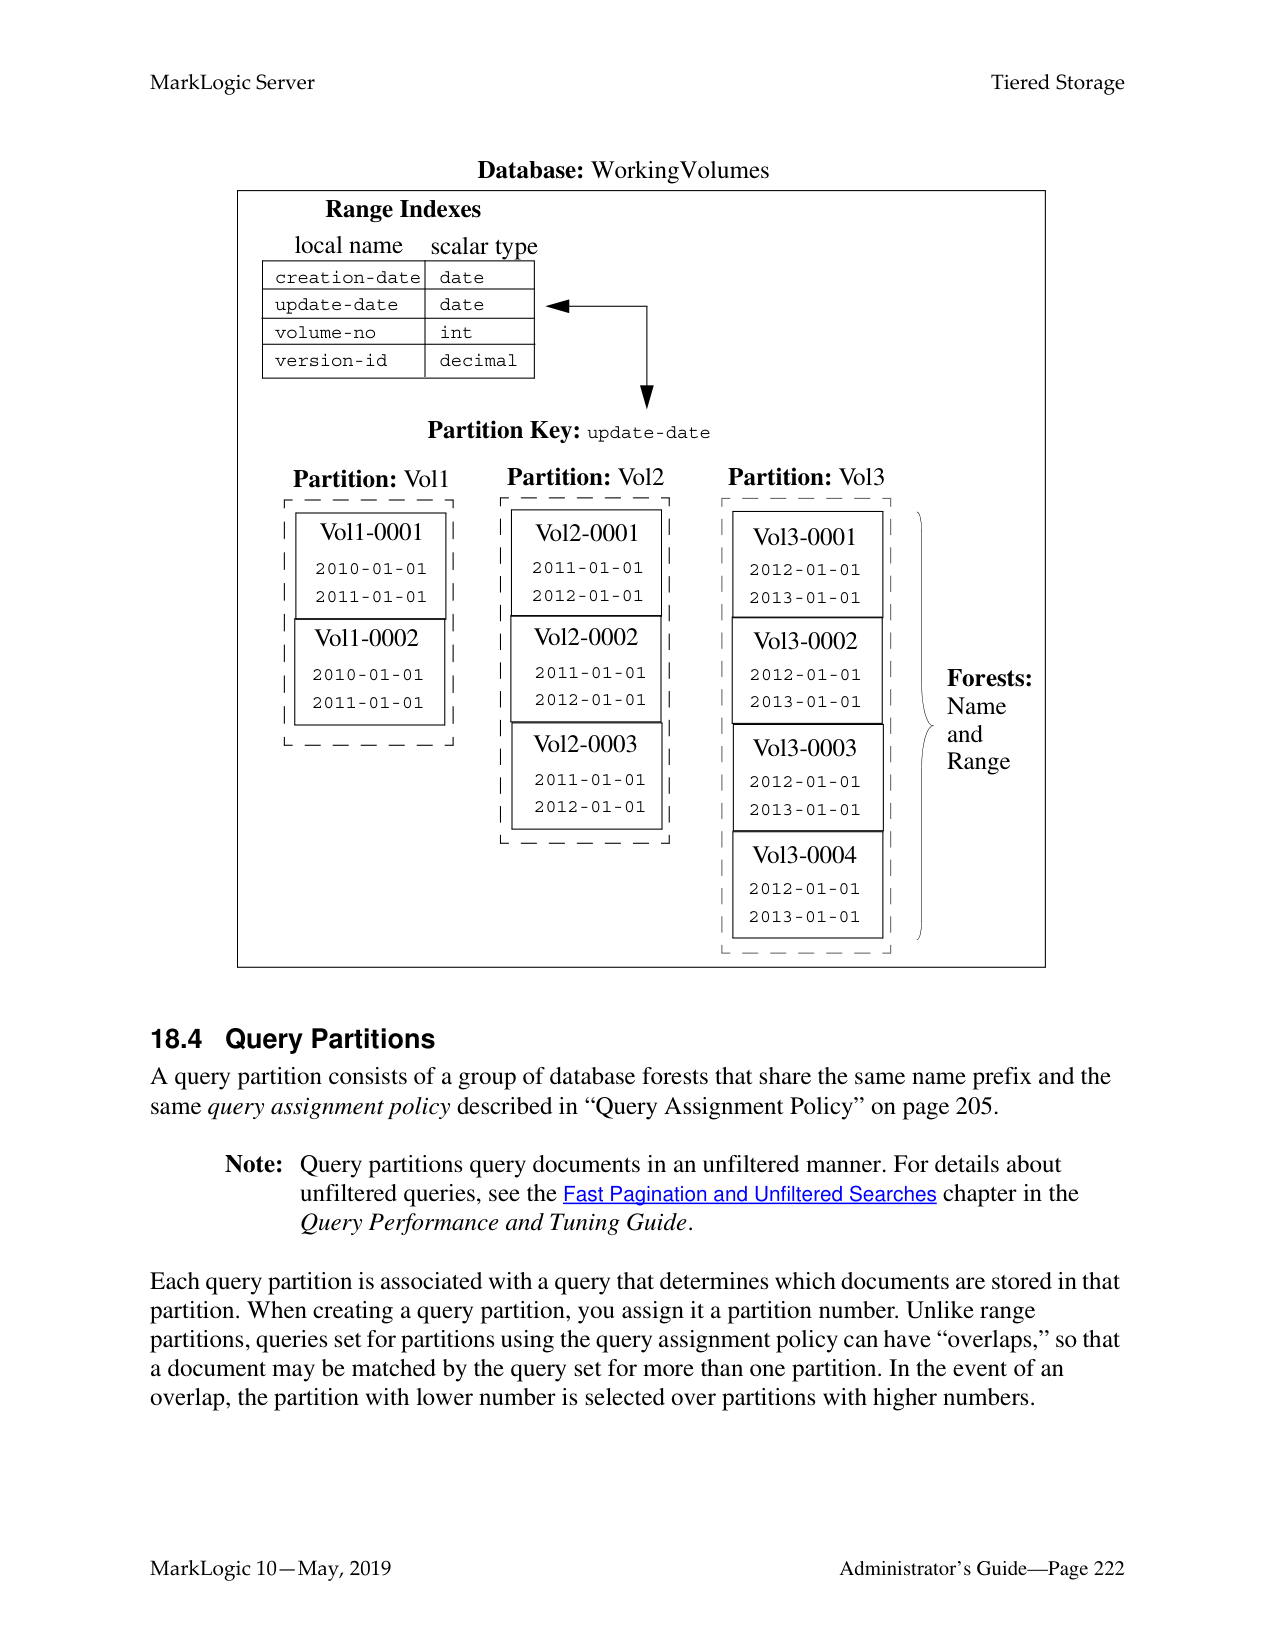
|290 Documents| |---|
ForestD
(No Range)
|80 Documents| |---|
######### 17.3.5 Query Assignment Policy
The query assignment policy, like the range assignment policy, is designed for use with Tiered Storage Query Partitions described in “Query Partitions” on page 222. The query assignment policy works in a similar manner as the range assignment policy. However, rather than using lower and upper bound values to determine which documents are in a partition, the query assignment policy uses a query to determine which documents are in a partition. Users have the flexibility to use multiple keys and use different conditions for different types of documents.
With range assignment policy, the boundaries are fixed. However, you might want to rebalance the documents based on the difference between the entry time and the current time. When a range query compares a dateTime with duration, it becomes an age query.
For example, the following query will match documents where "LastModified" is within past year:
cts:element-range-query( xs:QName("LastModified"), ">=", xs:yearMonthDuration("P1Y"))
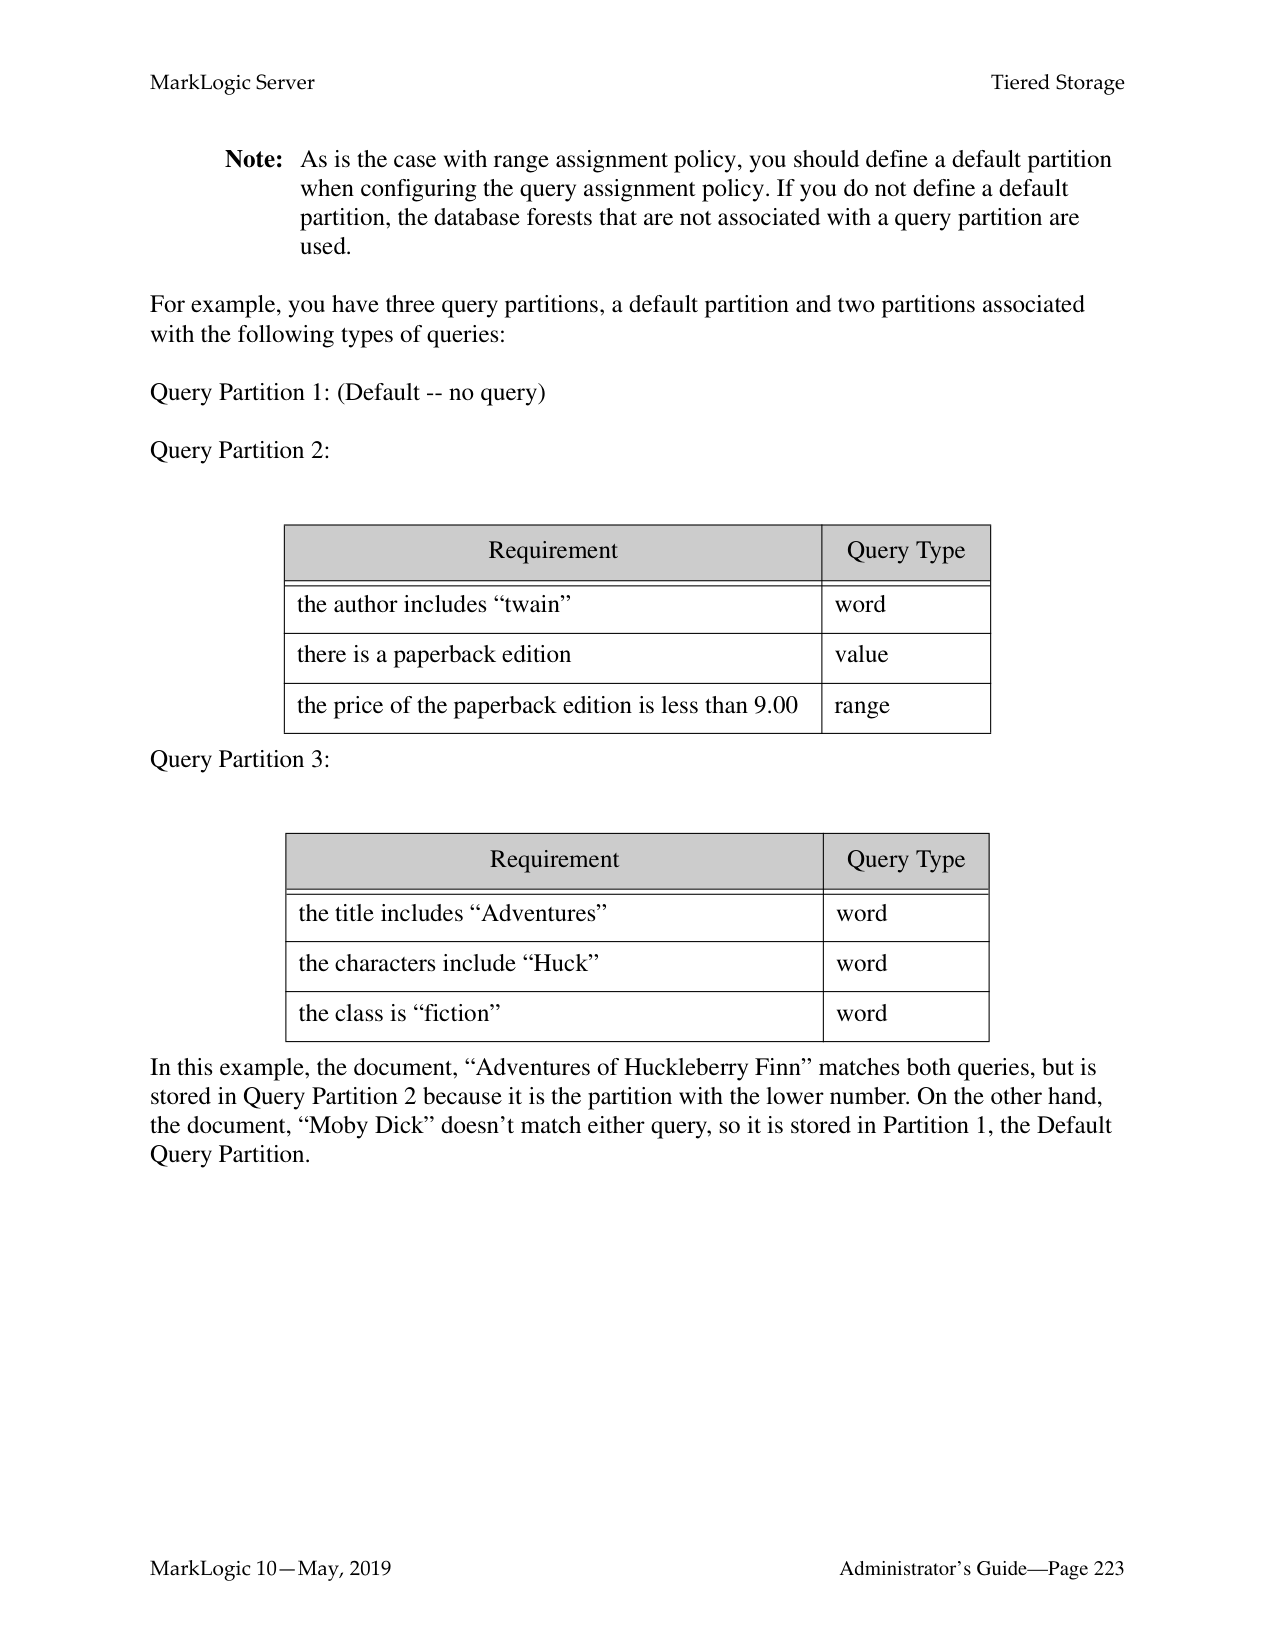
| |When creating a query partition, you assign it a partition number. Unlike range partitions, queries set for partitions using the query assignment policy can have “overlaps,” but, in the event of an overlap, the partition with lower number is selected before partitions with higher numbers.
Note: As is the case with range assignment policy, you should always define a default
partition when configuring the query assignment policy.
The following is an example of query assignment policy setup. MD and AD are elements in the documents.|When creating a query partition, you assign it a partition number. Unlike range partitions, queries set for partitions using the query assignment policy can have “overlaps,” but, in the event of an overlap, the partition with lower number is selected before partitions with higher numbers.
Note: As is the case with range assignment policy, you should always define a default
partition when configuring the query assignment policy.
The following is an example of query assignment policy setup. MD and AD are elements in the documents.| |---|---|---|---|---|---| |P
N|rtition ame|Tier1|Tier2|Tier3|Tier4| |Pa Nu|tition ber|1|2|3|4| |Qu|ry|(Termination eq yes) OR (Source eq "Hiring" AND MD > 30 days) OR (Source eq "CFO" AND MD > 30 days)|(Source eq "Hiring" AND MD <= 30 days AND MD > 1 year) OR (Source eq "CFO" AND MD <= 30 days AND MD > 60 days) OR (Source eq "Benefits" AND AD > 1 year)|(Source eq "Hiring" AND MD <= 1 year AND MD > 3 years) OR (Source eq "CFO" AND MD <= 60 days) OR (Source eq "Benefits" AND AD <= 1 year)|(Source eq "Hiring" AND MD <= 3 years)| |De|ault|Yes|No|No|No| | |There is only one cts:query per partition. When the query assignment policy is used, the following rules are used for document insert:
• The partition number is used for priority. If there is more than one query that match the document, the partition with the lower partition number is used.
• If none of the queries matches the document, the default partition is used.
• If there is no default partition, the forests without a partition number are used.
• Otherwise, it is an error.
Among the forests in a partition, the documents are assigned to the forests using the statistical assignment policy.|There is only one cts:query per partition. When the query assignment policy is used, the following rules are used for document insert:
• The partition number is used for priority. If there is more than one query that match the document, the partition with the lower partition number is used.
• If none of the queries matches the document, the default partition is used.
• If there is no default partition, the forests without a partition number are used.
• Otherwise, it is an error.
Among the forests in a partition, the documents are assigned to the forests using the statistical assignment policy.|
The query requires the proper indexes to be configured in the database. The complexity of the query affects the performance of insert and rebalancing. Therefore slow queries such as those with wildcard matching are not recommended.
See “Setting the Query Assignment Policy for the Query Partition” on page 231 for details on how to set the query assignment policy.
######### 17.3.6 Legacy Assignment Policy
After upgrading to MarkLogic 7.0 or a later version, existing databases will be configured with the rebalancer disabled and the legacy assignment policy. This is to preserve the expected behavior when new documents are loaded into the database.
Note: Under most circumstances you would not use the legacy policy when the database rebalancer is enabled. The segment policy, described in “Segment Assignment Policy” on page 202, is generally preferred over the legacy policy.
The legacy policy uses the URI of a document to decide which forest the document should be assigned to. The mapping from a URI to a forest uses the same algorithm as the one used on older releases of MarkLogic Server.
For example, as shown in the figure below, a new forest, ForestD, is added to the database that already has three forests: ForestA, ForestB, and ForestC, each contains 400 documents because the document URIs allow for even distribution of them among the forests. The data is rebalanced as follows:
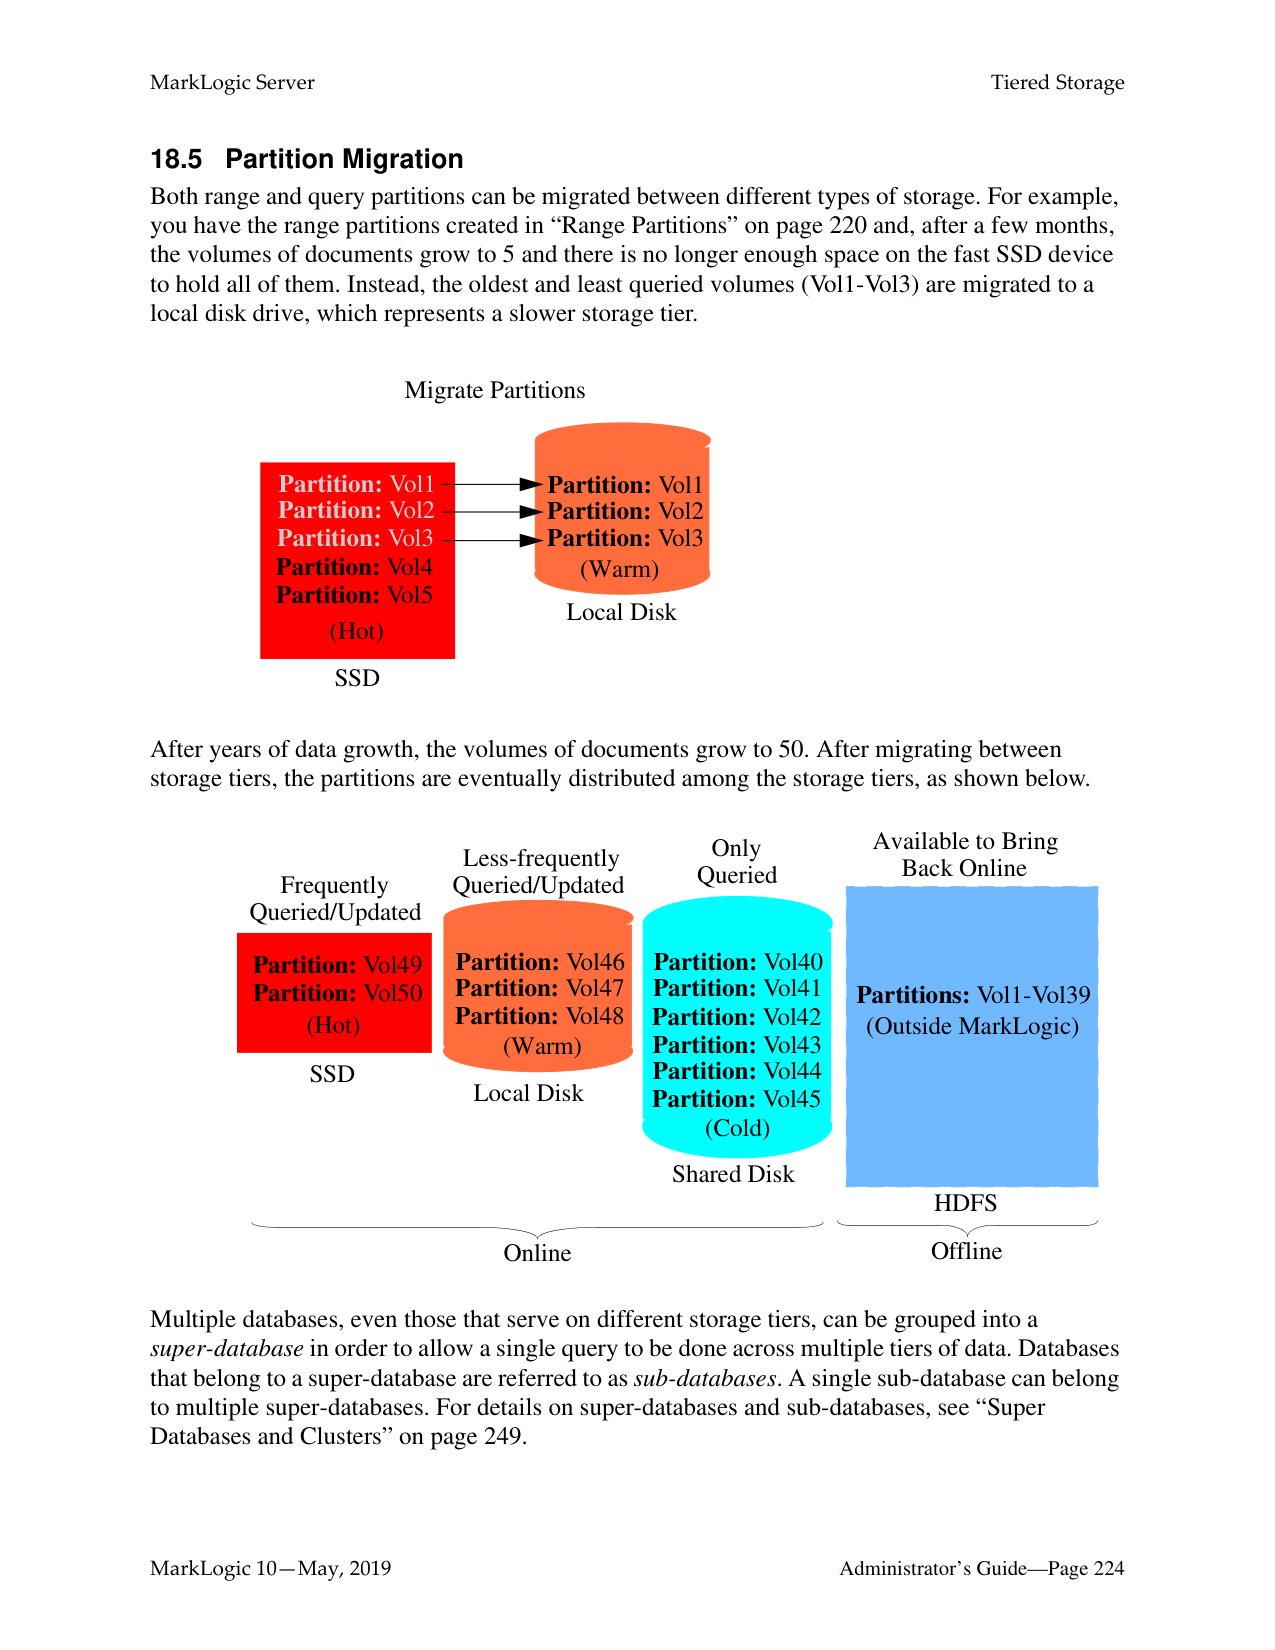
ForestA
ForestD is added to Database
|400 Documents| |---|
ForestB
|400 Documents| |---|
ForestC
|400 Documents| |---|
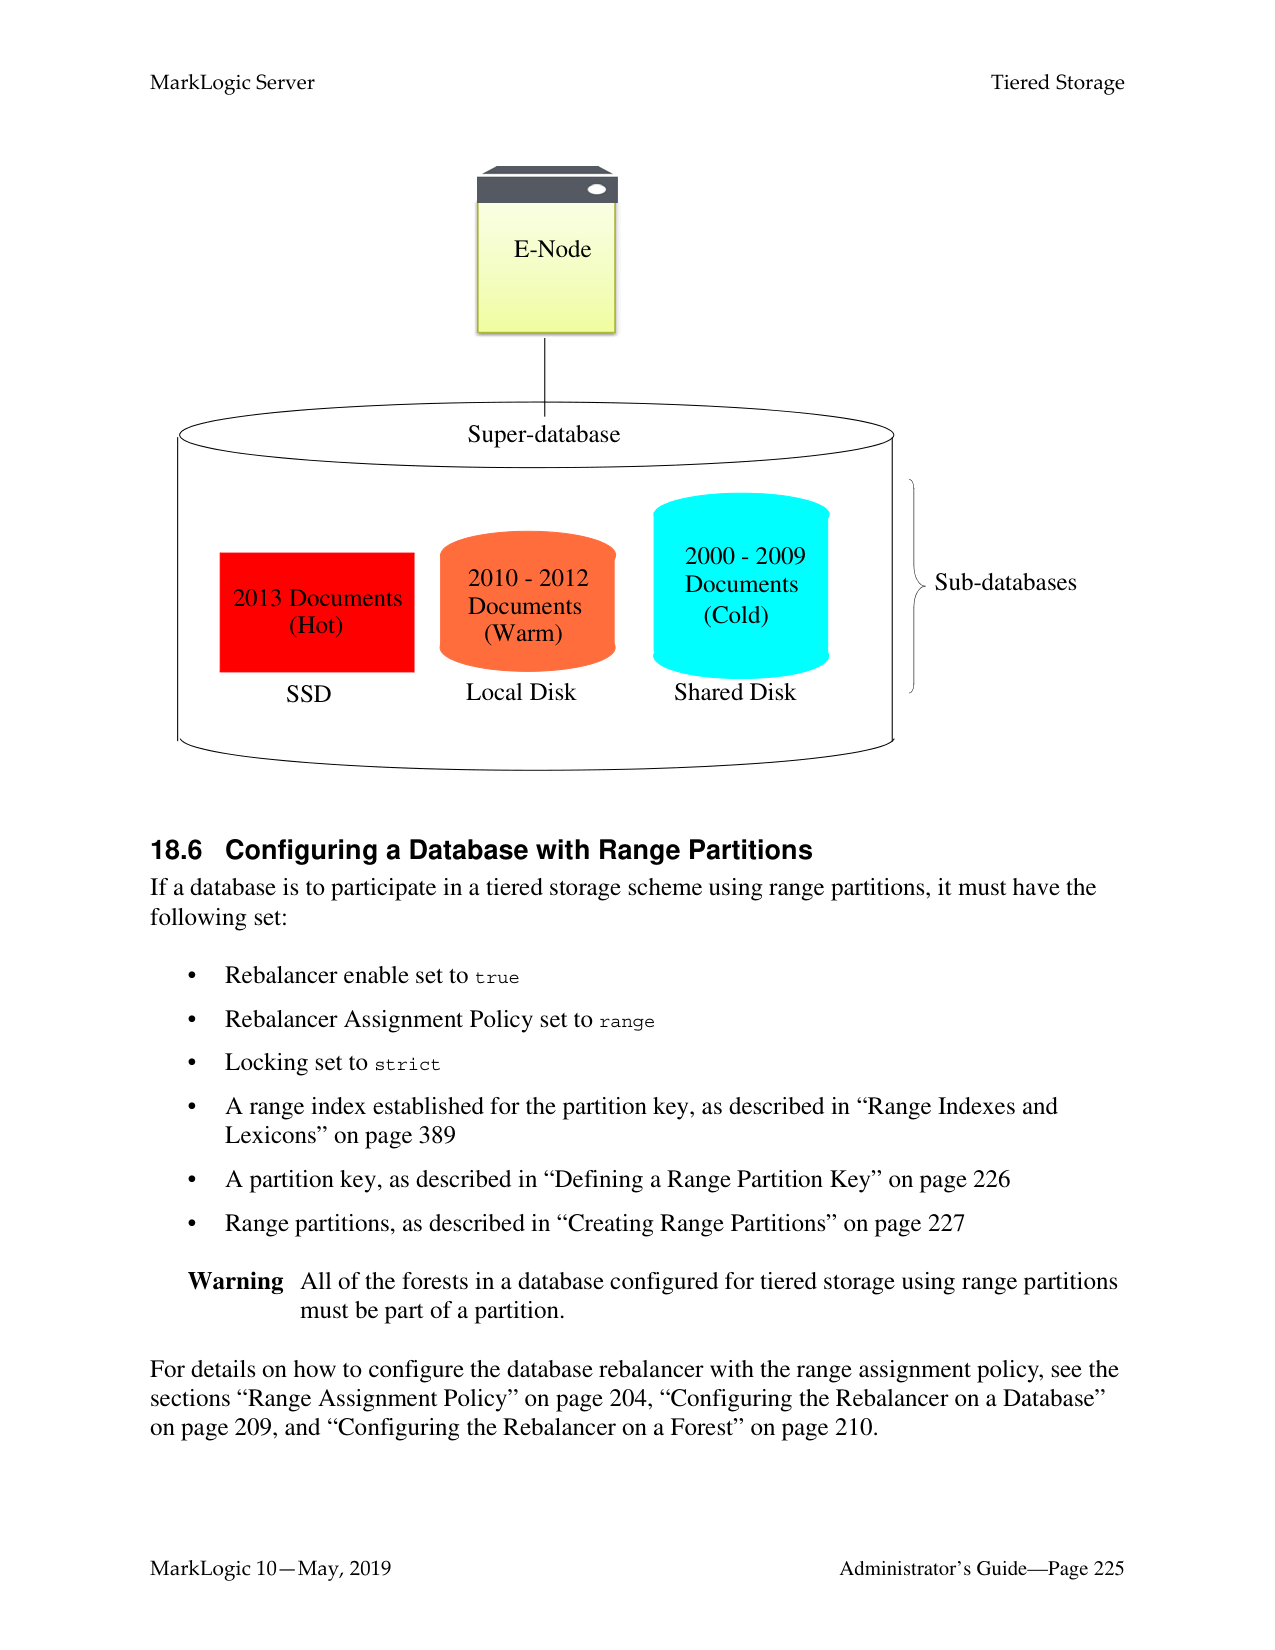
New Forest
ForestD
|0 Documents| |---|
########### Rebalancer Process Begins
ForestA
|300 Documents|100| |---|---| |300 Documents| |
ForestB
ForestD 200 300
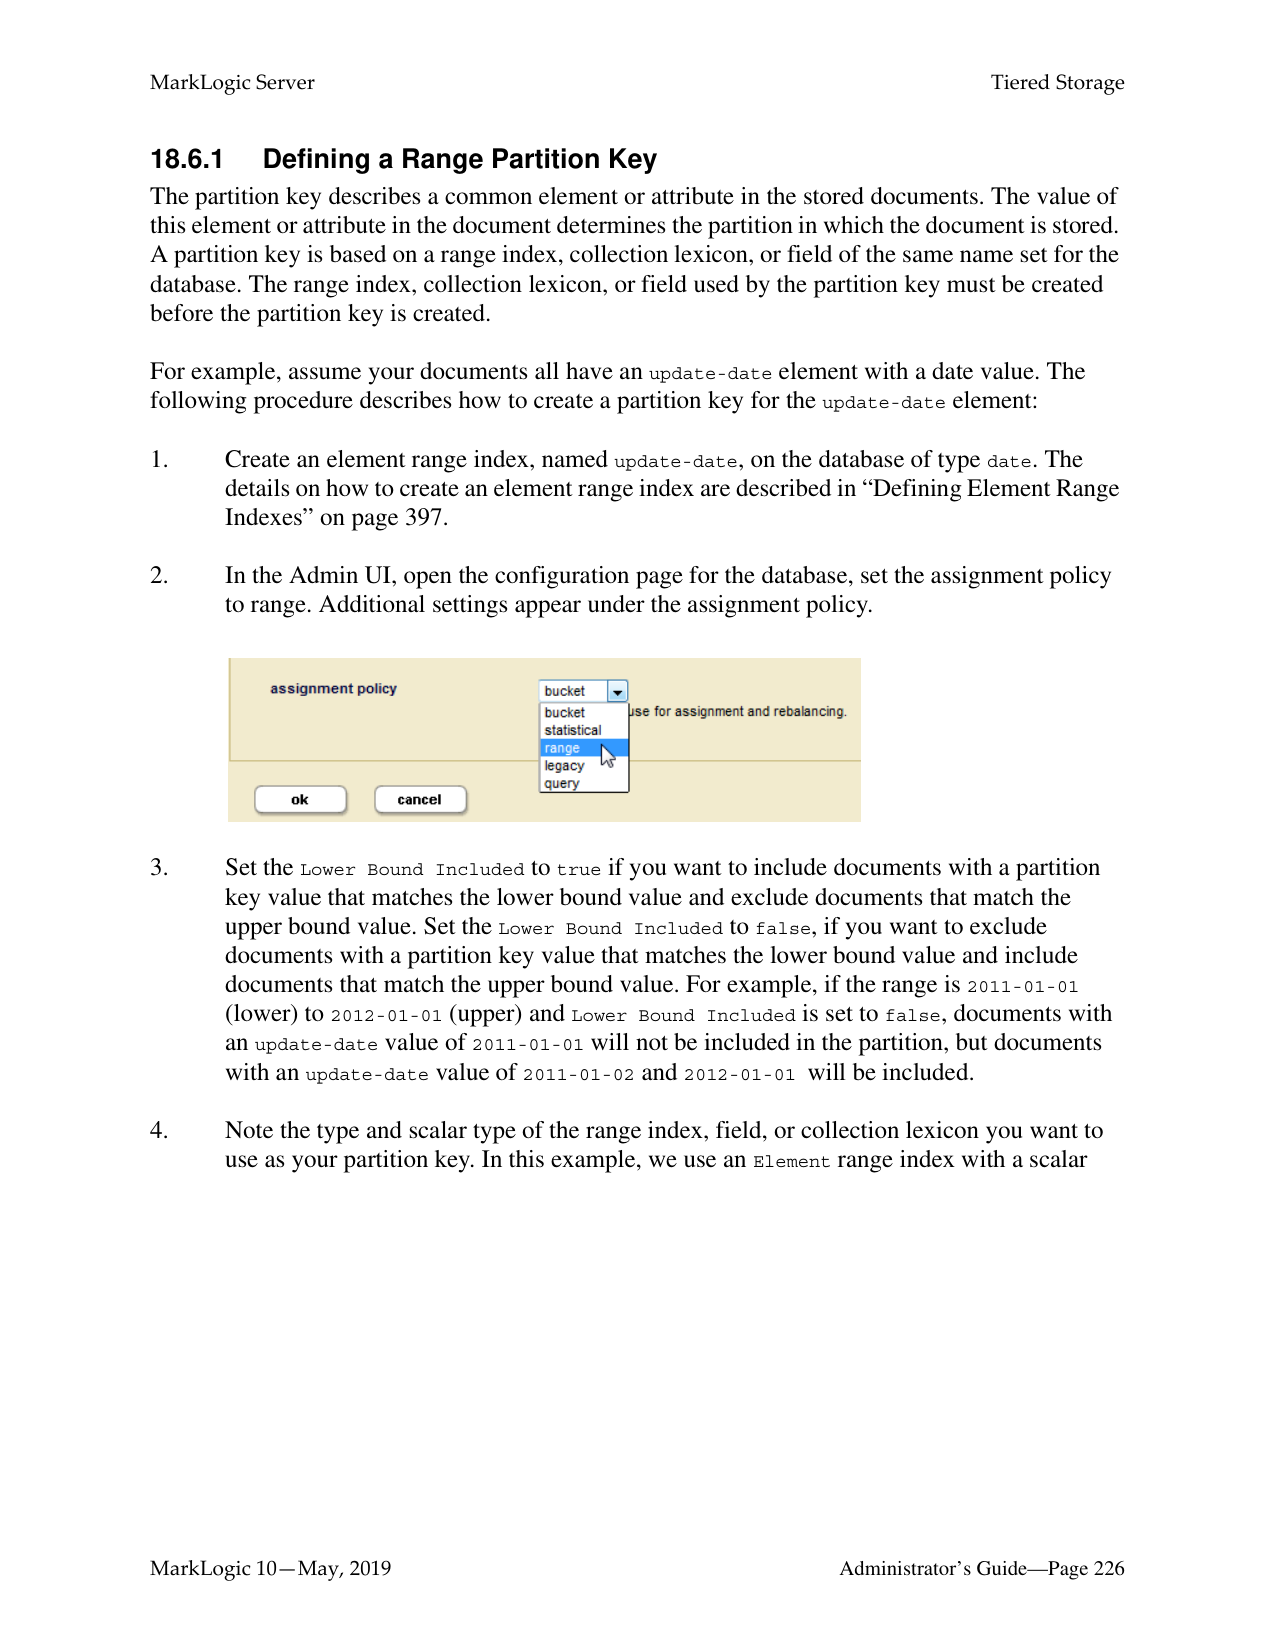
ForestC
|300 Documents| |---|
|300 Documents| |---|
|300 Documents| |---|
The legacy policy is the least efficient rebalancer policy, as it requires the greatest amount of document movement to rebalance the documents among the forests. For this reason, you should only use the legacy policy on legacy databases with the rebalancer disabled.
|Policy|Data Movement|Deterministic?|Backward Compatible?| |---|---|---|---| | | | | | |Bucket|Less|Yes (URI based)|No|
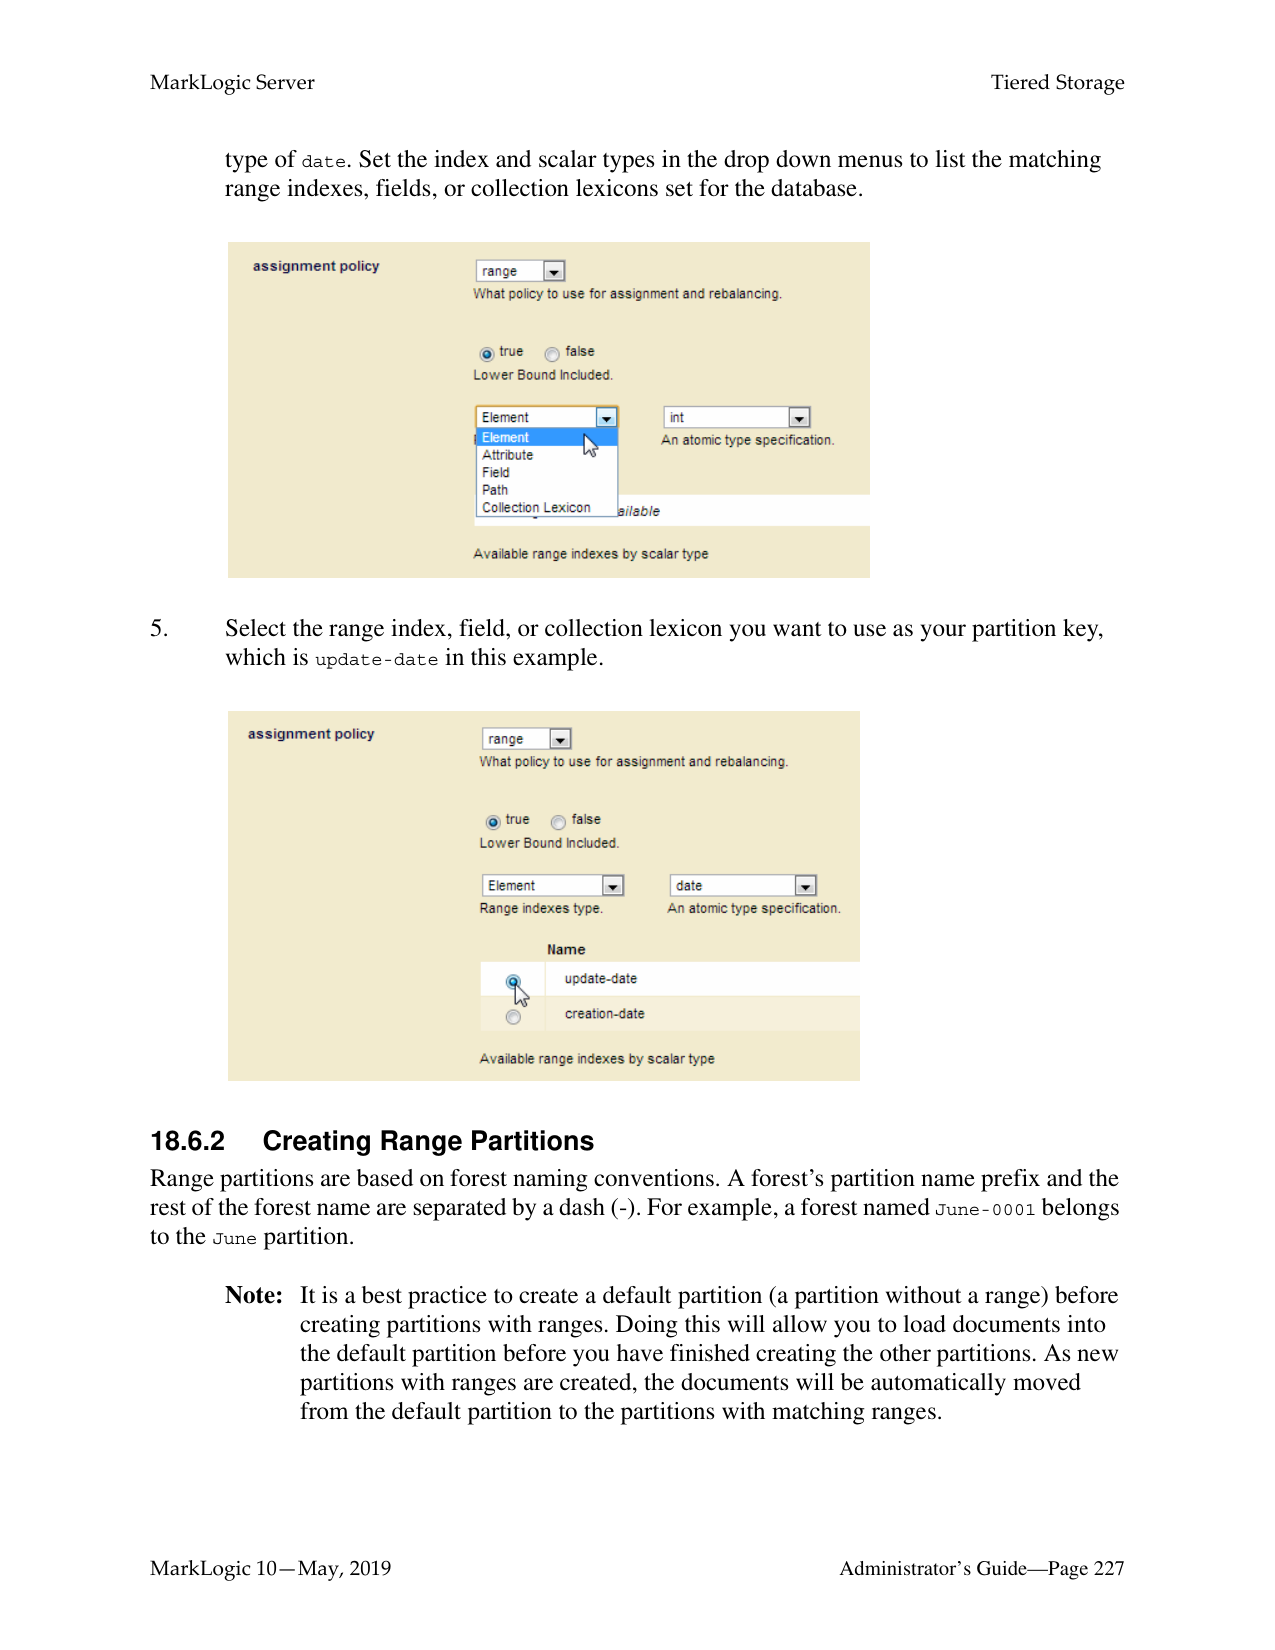
|Segment|Most|Yes (URI based)|No| |Statistical|Least|No|No| |Range|Less|Yes (Partition key based)|No| |Query|Less|Yes (Partition key based)|No| |Legacy|Most|Yes (URI based)|Yes|
######### 17.4 How the Rebalancer Moves Documents
There are many similarities between the rebalancing process and the reindexing process. Rebalancing is configured at the database level and individual rebalancing processes run separately on each forest.
The main task of the rebalancer is to consult the assignment policy associated with the database to get a list of documents (URIs) that do not “belong to” this forest and then push them out to the right forests. The deletion of documents from the rebalancing forest and the insertion of them into the right forests happens in the same transaction. All fragments with the same URI are handled by the same transaction. Each transaction moves a batch of documents.
When rebalancing is enabled, you can configure the rebalancer throttle for a database. The rebalancer throttle works the same as the reindexer throttle in that it establishes the priority of system resources devoted to rebalancing. When the rebalancer throttle is set to 5 (the default), the rebalancer works aggressively, starting the next batch of rebalancing soon after finishing the previous batch. When set to 4, it waits longer between batches, when set to 3 it waits even longer, and so on until when it is set to 1, it waits the longest. The higher numbers give rebalancing a higher priority and uses the most system resources.
The following sections describe how documents are moved when forests are reconfigured for the database:
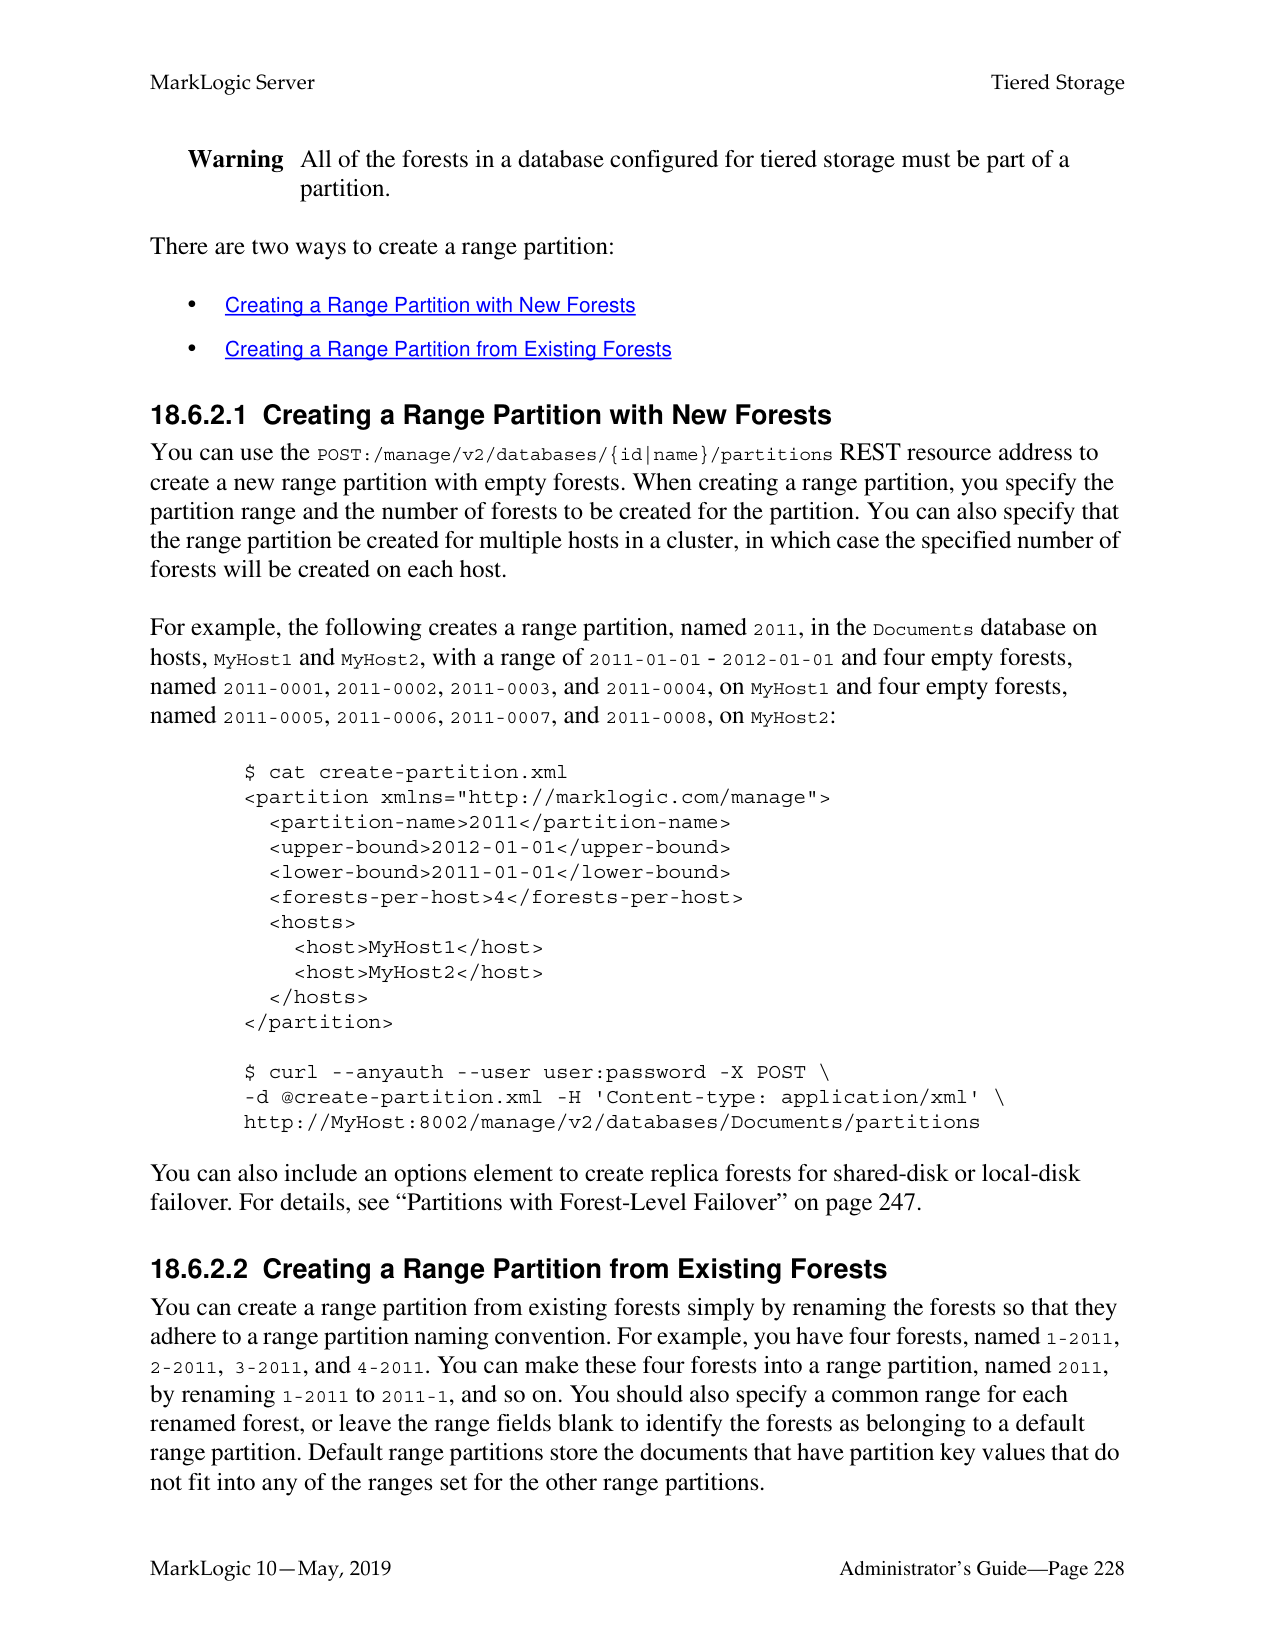
######### 17.4.1 How Data is Moved when a Forest is Attached to the Database
Attaching an empty forest to a database is the same as adding a new forest. If the forest contains existing documents, they will participate in the rebalancing with the documents that are in the other forests that are already attached to the database.
######### 17.4.2 How Data is Moved when a Forest is Retired from the Database
If a rebalancer-enabled forest is retired, the rebalancer empties the forest by “balancing out” all of the documents to the other forests attached to the database. The rebalancers on other forests re-calculate document routing as if the retired forest no longer exists. For new inserts, the retired forest is excluded from consideration by the document assignment policy.
Note: Retire is a separate operation from detach or delete. A read-only forest cannot be retired. To preserve all of the documents in the database, you must first retire a forest to rebalance the documents on the remaining forests in the database before detaching that forest.
######### 17.5 Configuring the Rebalancer on a Database
You can configure and monitor the rebalancing process through the Admin Interface or the Admin APIs.
To configure the rebalancer on a database, complete the following procedure:
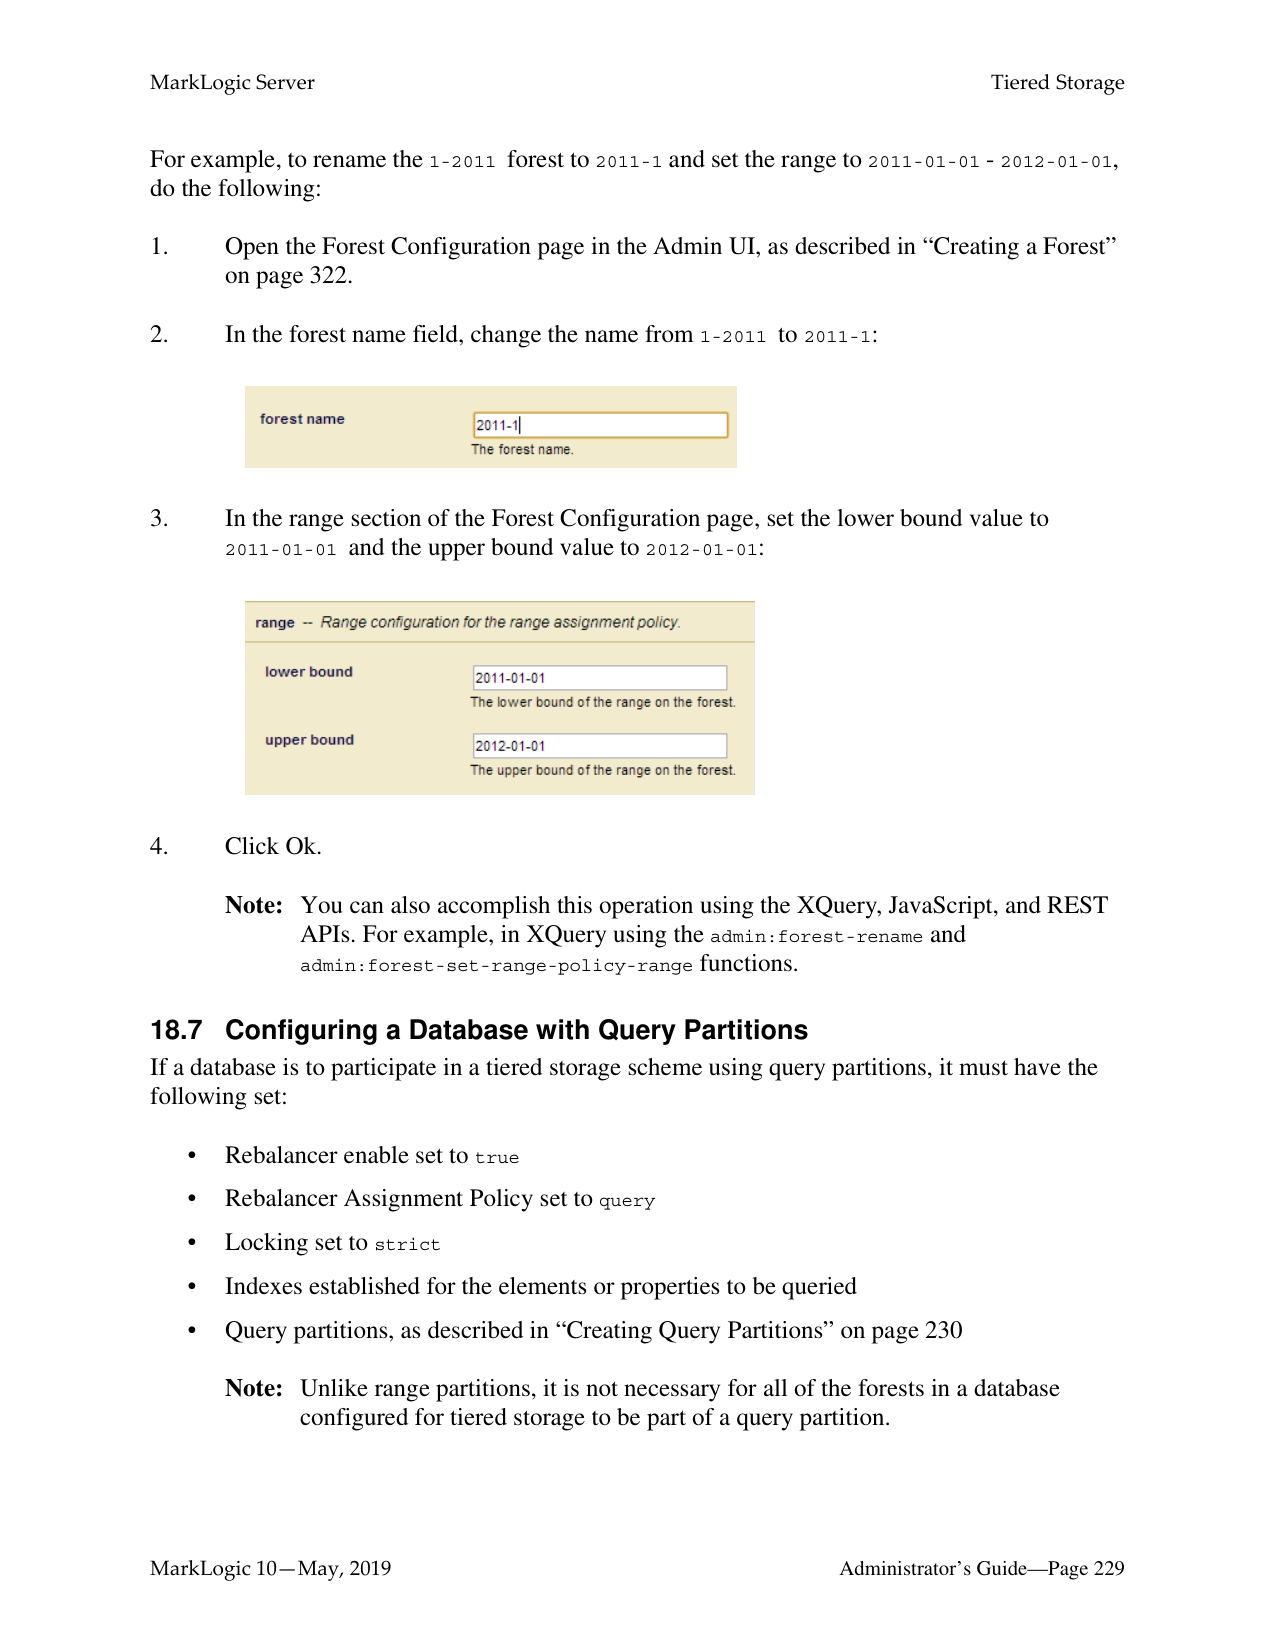

######### 17.6 Configuring the Rebalancer on a Forest
In addition to enabling and disabling on the database level, as described in “Configuring the Rebalancer on a Database” on page 209, the rebalancer can also be enabled or disabled on each individual forest. For the rebalancer to run on a forest, it must be enabled on both the database and the forest.
Note: The rebalancer is enabled on each new forest by default.
To configure the rebalancer on a forest, complete the following procedure:

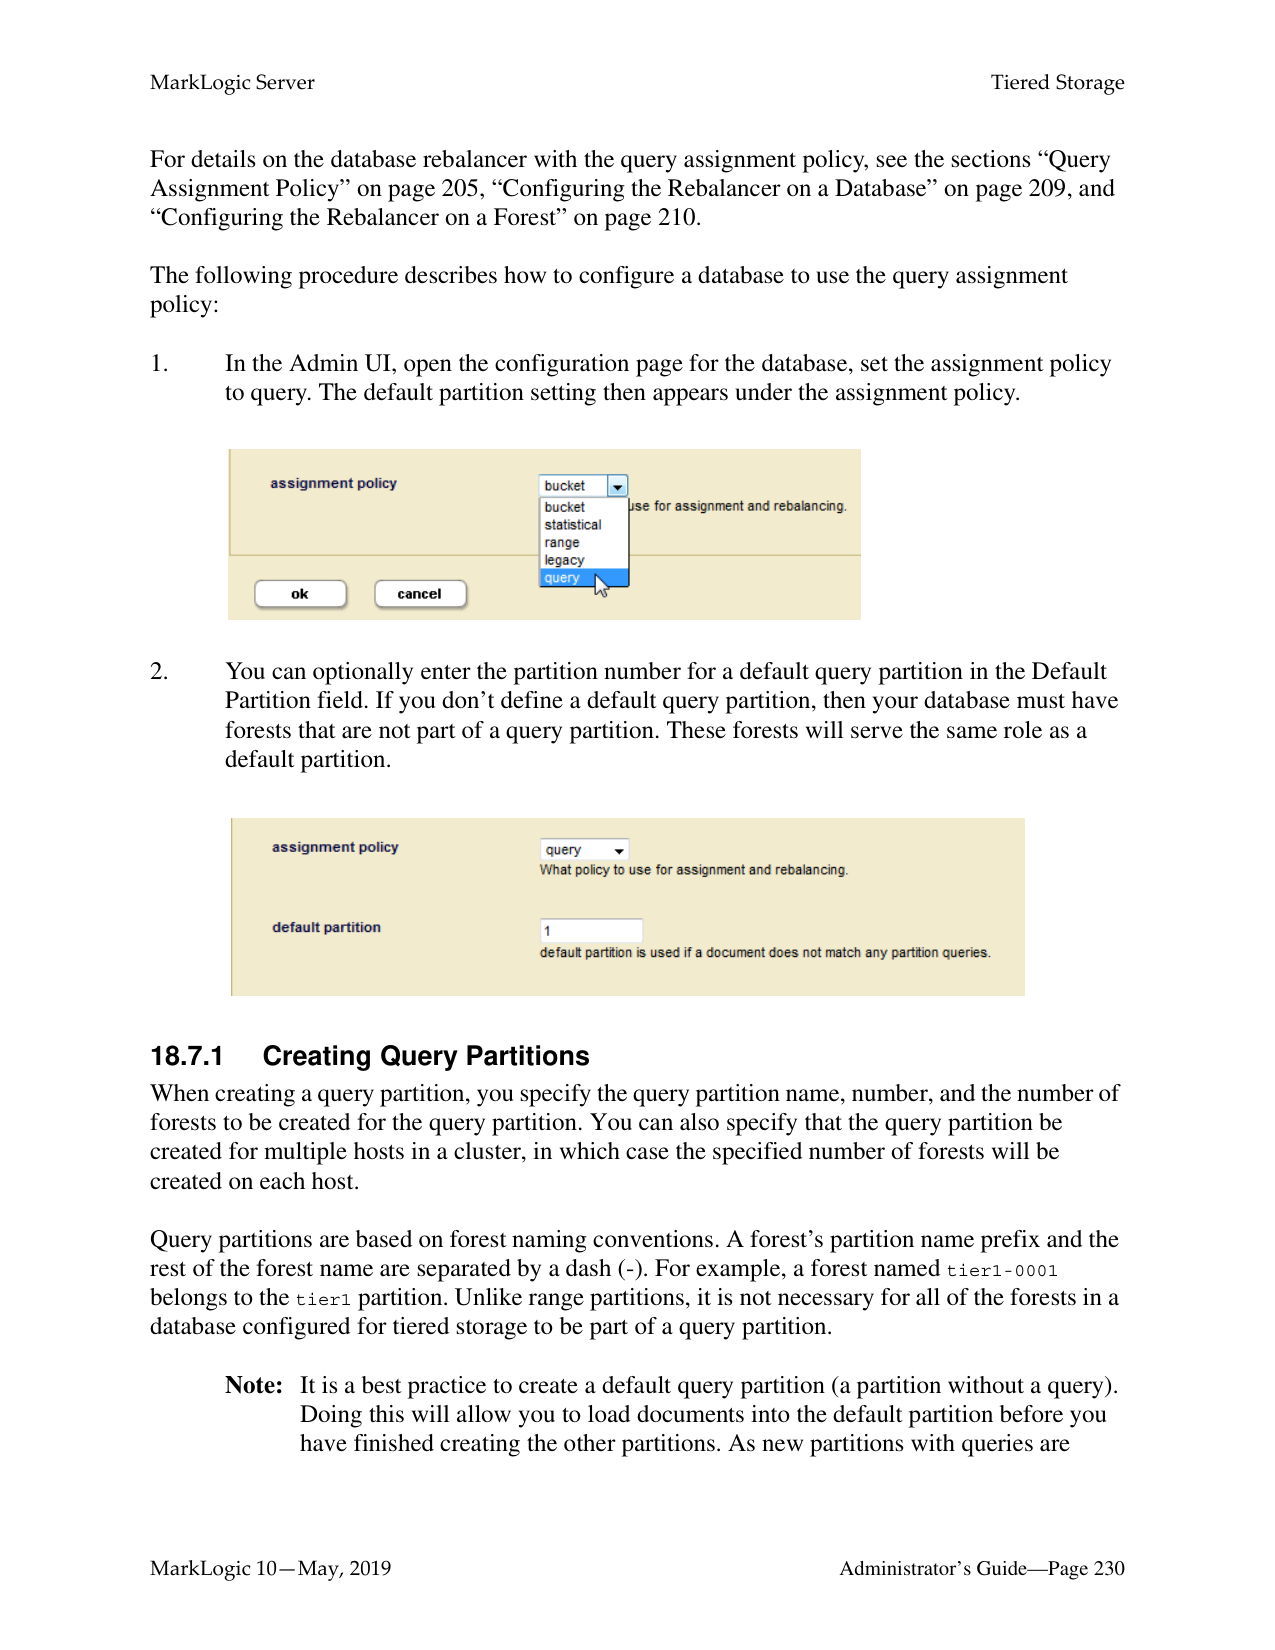


######### 17.7 Retiring a Forest from the Database
You can “retire” a forest from a database in order to move all of its documents to the other forests and rebalance them among those forests, as described in “How Data is Moved when a Forest is Retired from the Database” on page 209. If you want to preserve forest documents in a database, you must first retire the forest before detaching it from the database.
To retire a forest from a database, complete the following procedure:
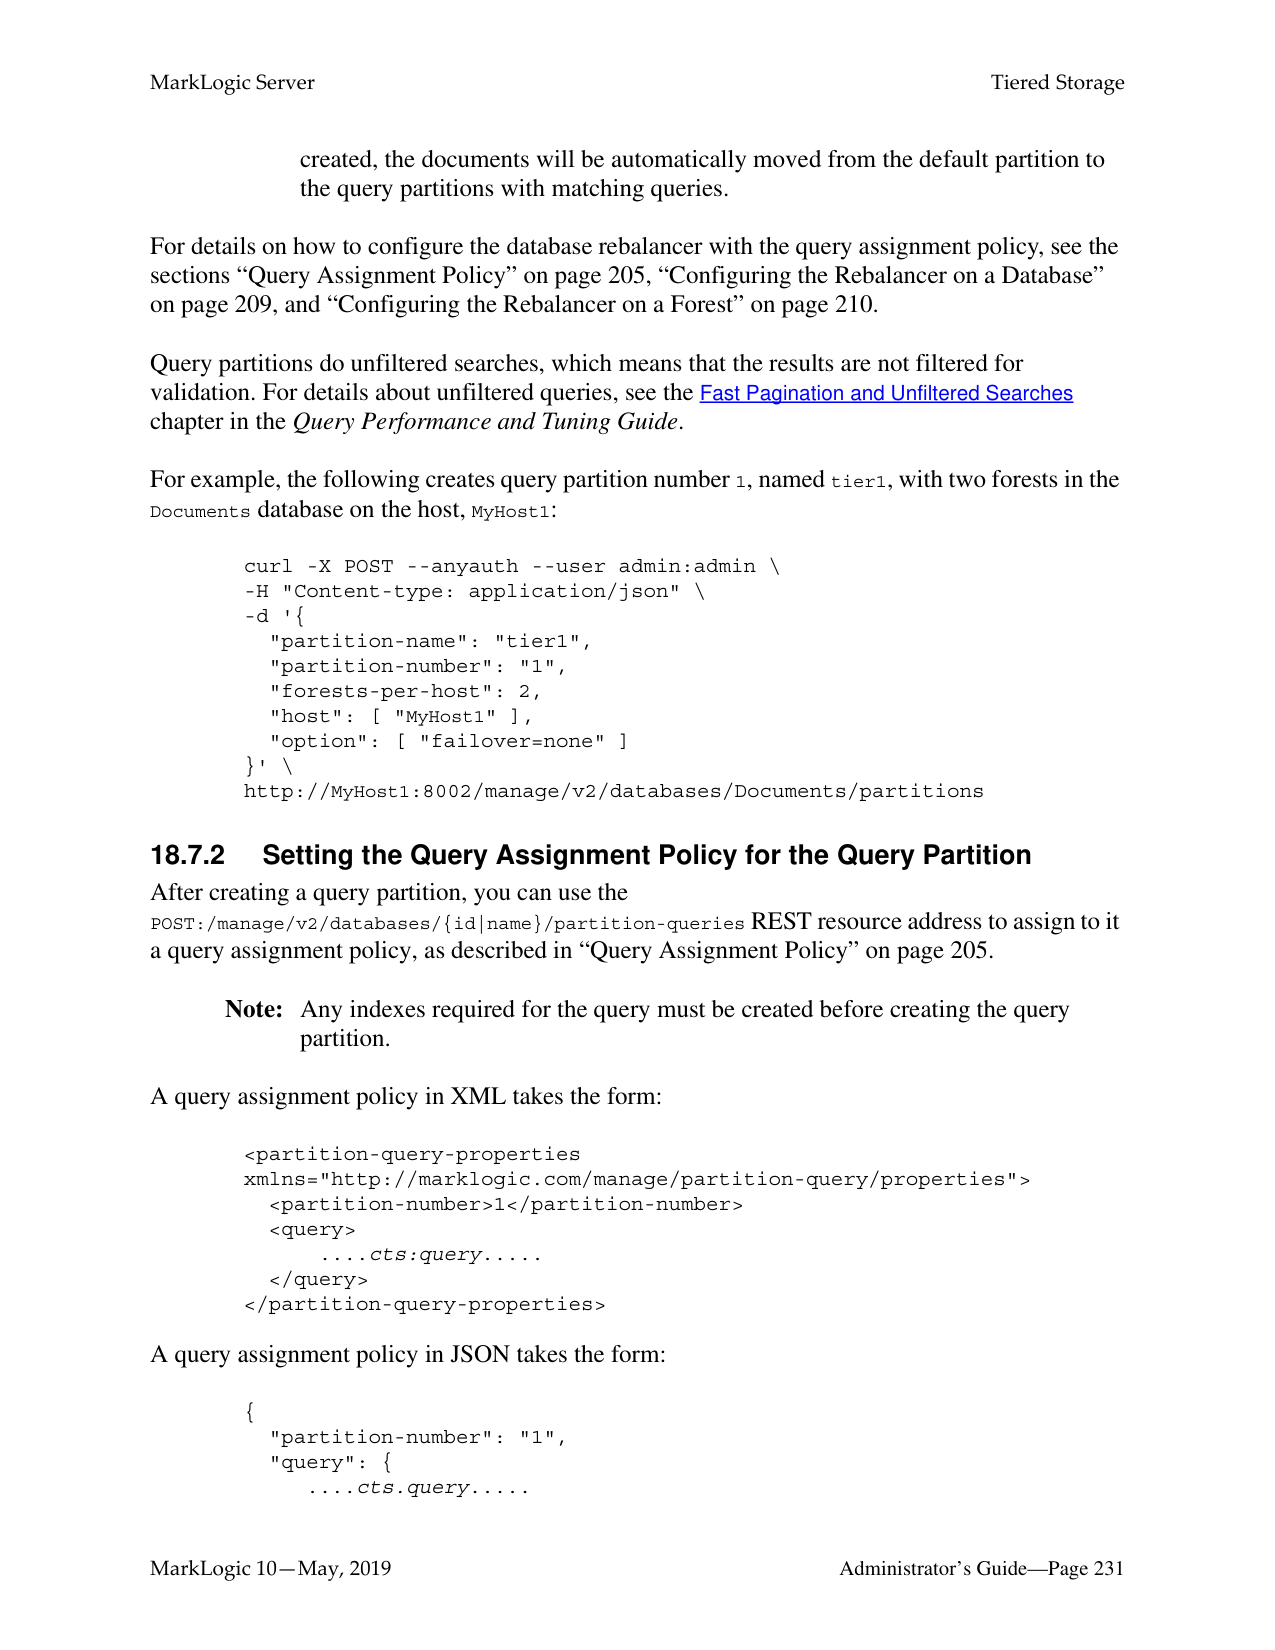

######### 17.8 Checking the Rebalancer Status
When the rebalancer is enabled on the database, you can check the state of the rebalancer, along with an estimated completion time, on the Database Status page.
For example, if the database is rebalancing documents, you will see status similar to the following:

When the rebalancer is disabled on the database, you can click on the Show Rebalance button at the top of the Database Status page to view the number of fragments that are pending rebalancing.

This will display a table like the following toward the middle of the Database Status page:

######### 17.9 How the Rebalancer Interacts with other Database and Forest Settings
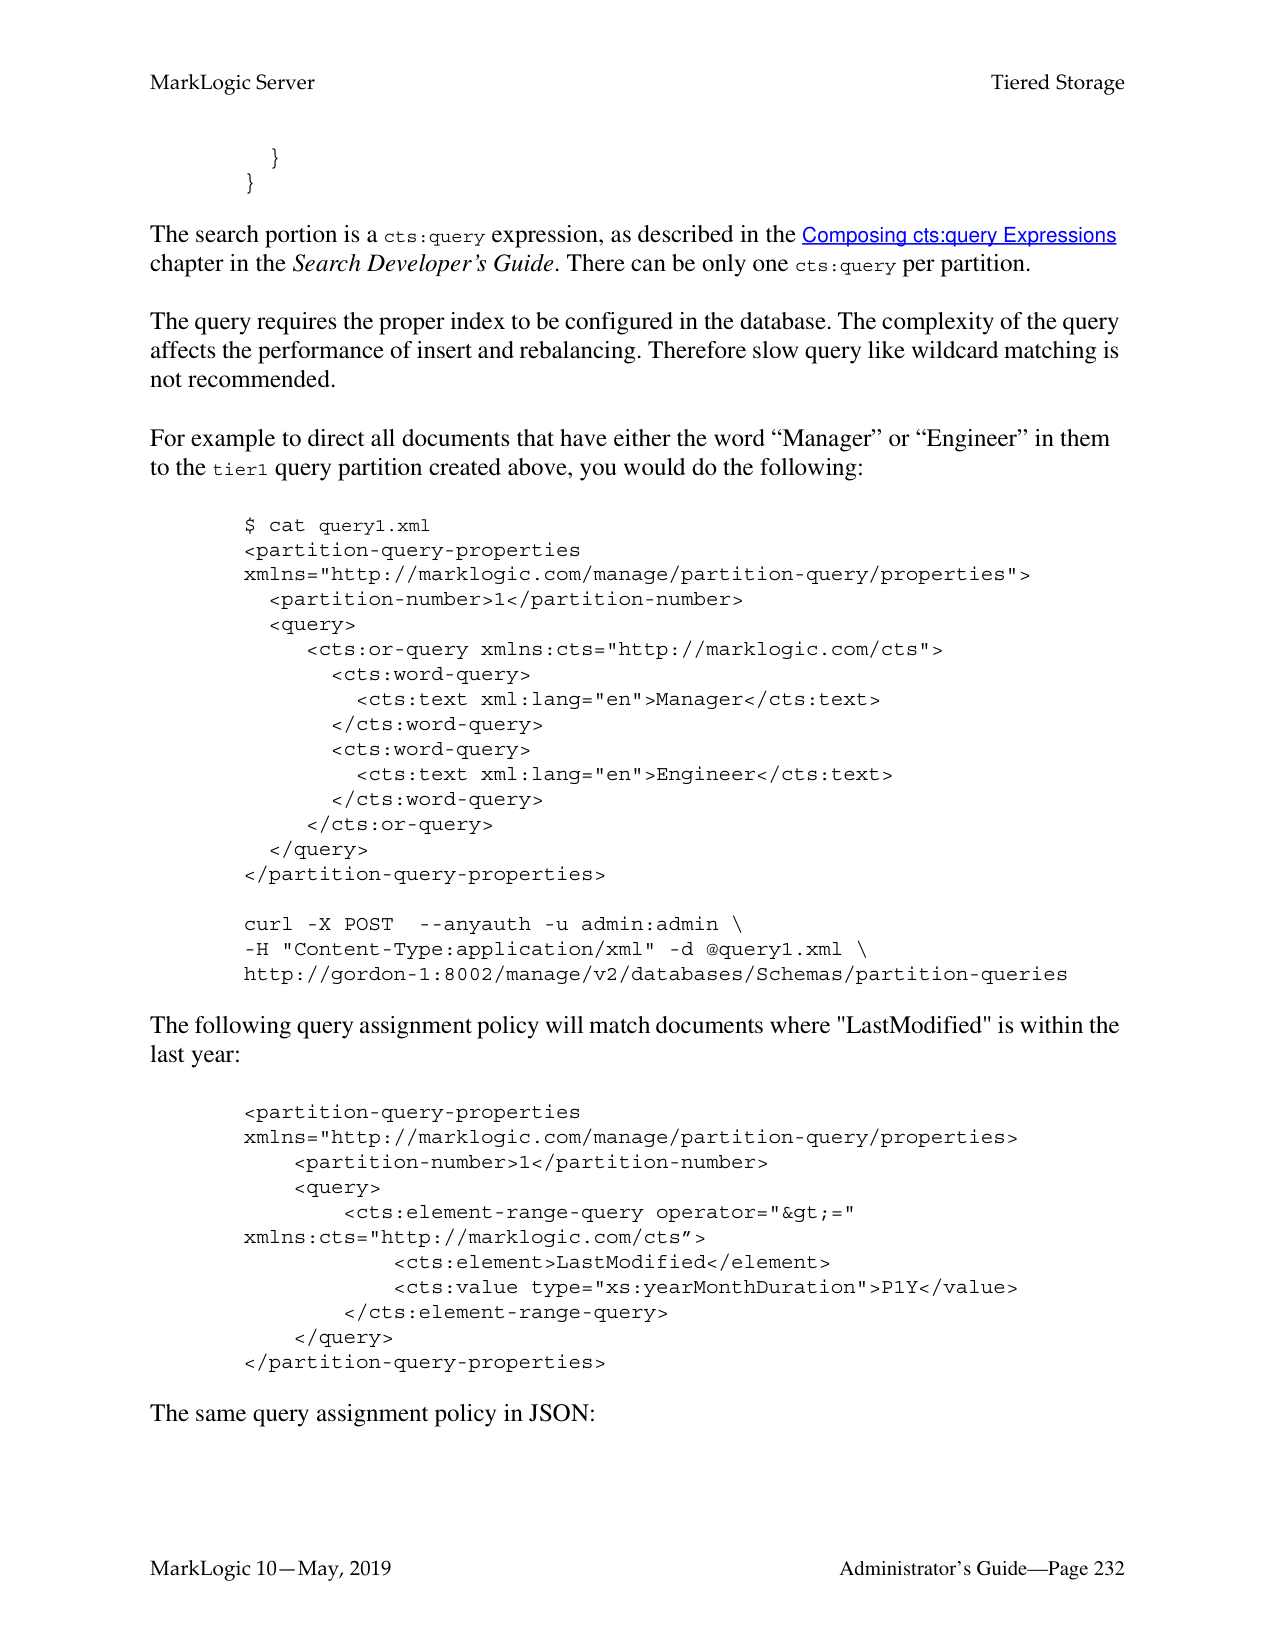
This section describes how the database rebalancer interacts with other database and forest settings. The topics are:
######### 17.9.1 Database Replication
If you have configured a database for database replication and that database is enabled for rebalancing with the segment, legacy or bucket policy, the order of the forests in the database configuration is important, and it should be the same on the master and replica databases. If the order of the master and replica forests is different, you will see a message similar to the following in the log:
Warning: forest order mismatch: local forest XXX is at position A while foreign master forest YYY (cluster=ZZZ) is at position B.
Should you see this error, you can execute the admin:database-reorder-forests function on the replica database to reorder the forests to match the same order as on the master. If you do not reorder the forests so the master and replica match, then rebalancing will occur if replication is deconfigured.
######### 17.9.2 Restoring a Database from a Backup

If you have a database enabled for database rebalancing with the segment, legacy or bucket policy, the order of forests on the database may differ from the order of forests when the database was backed up. You can execute xdmp:database-restore-validate function to return a backup-plan containing a database element that shows the order of the forests when the backup was done. If the order of the forests do not match, then you should execute the admin:database-reorder-forests function to reorder the forests on your database before restoring it from the backup.
Note: When using the segment, legacy or bucket policy, if the order of forests on the
database being restored differs from the order of forests when the database was backed up, the restore operation may trigger major data movement between the forests on the restored database.
######### 17.9.3 Tiered Storage
The range assignment policy described in “Range Assignment Policy” on page 204 is designed to support tiered storage. For details on tiered storage, see “Tiered Storage” on page 217.
######### 17.9.4 Fast Locking
Fast locking works with the segment, legacy, and bucket policy. However, a database cannot use the statistical policy or the range policy with fast locking. With the statistical policy, two transactions that insert the same URI do not know which forest the other one will pick, so the server must use strict locking. With the range policy, there may be two transactions that insert the same URI but with different values for the range index, so the server must use strict locking.
######### 17.9.5 Delete-only and Read-only Forests
Delete-only (DO) and read-only (RO) forests affect how documents are assigned. The following table summarizes the interaction between this feature and DO/RO forests.
|Policy|New Insert|RW -> DO/RO|DO/RO -> RW| |---|---|---|---| | | | | | |Legacy|DOs/ROs are excluded from assignment.|Recalculate routing for every URI; lots of movement.|Recalculate routing for every URI; lots of movement.| |Segment|DOs/ROs are excluded from assignment.|Recalculate routing for every URI; lots of movement.|Recalculate routing for every URI; lots of movement.|
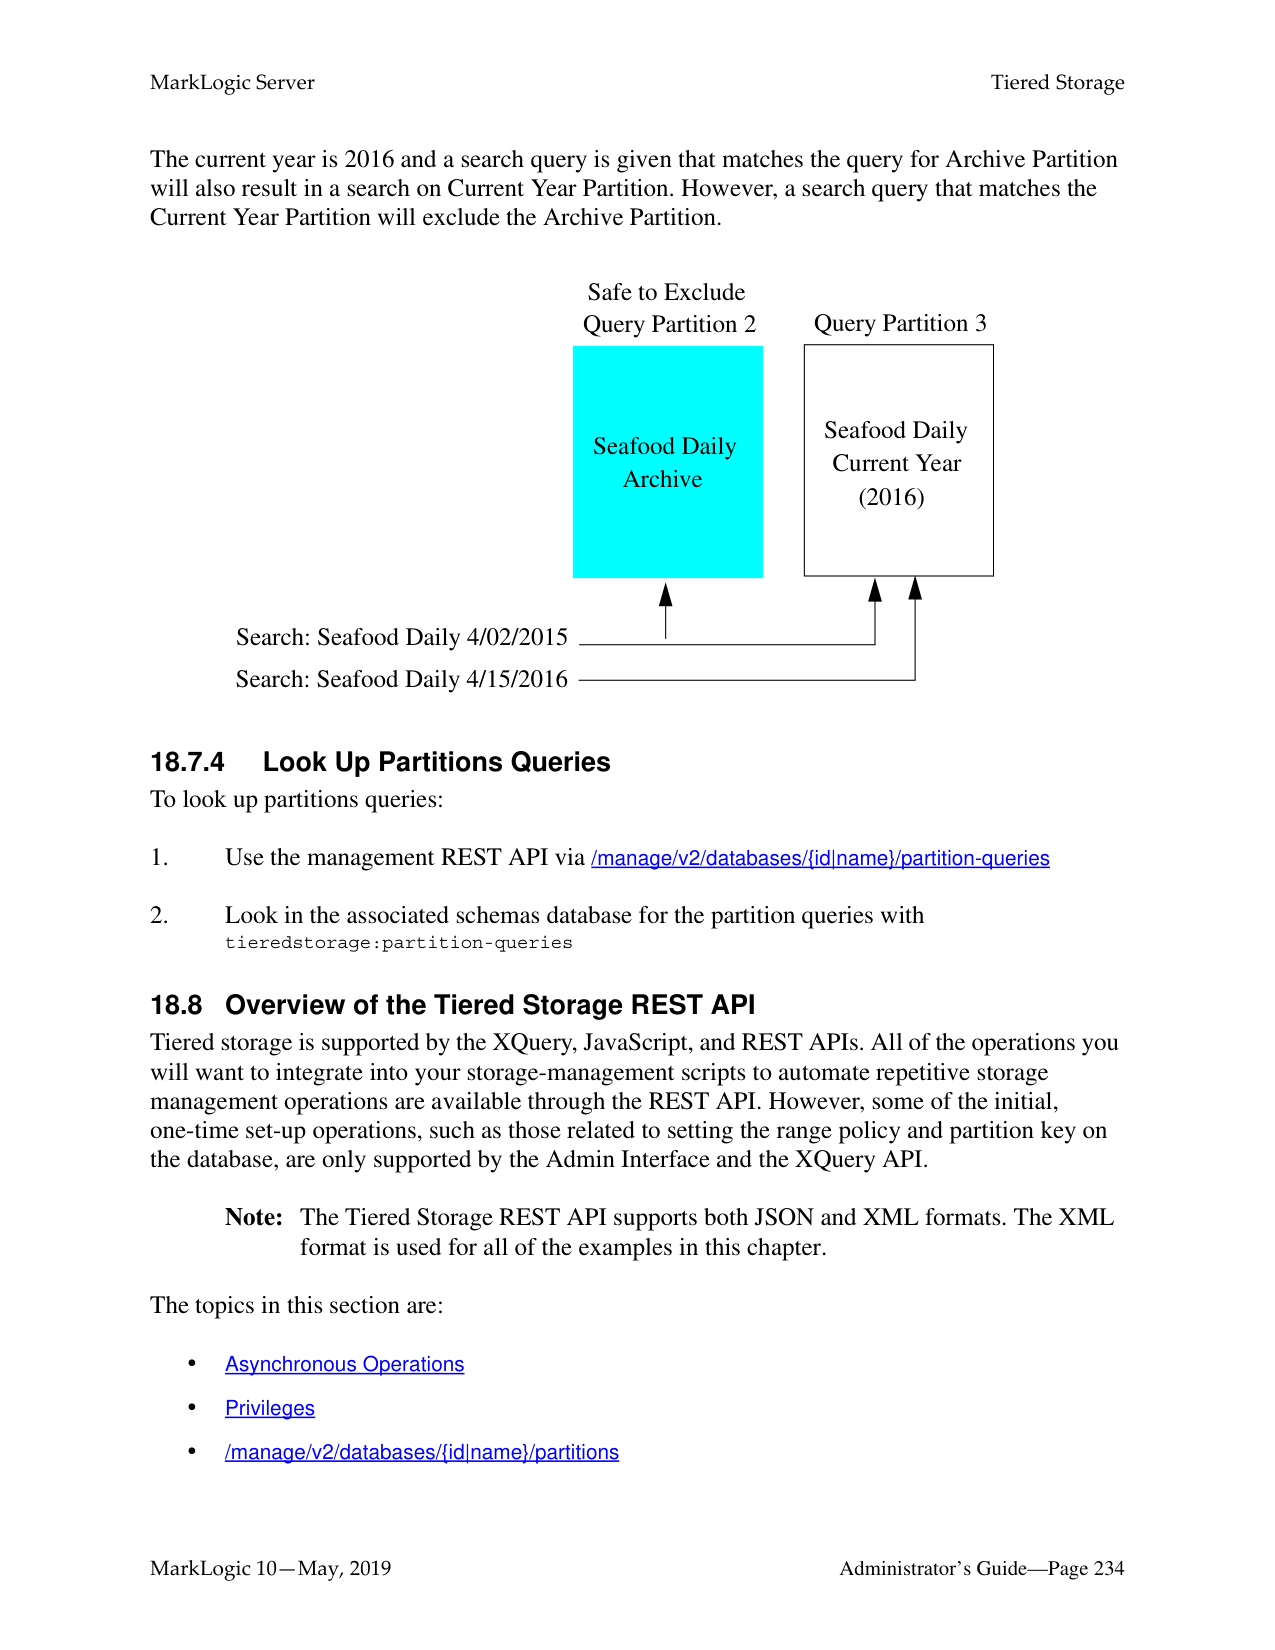
|Bucket|DOs/ROs are still included in the routing table calculation, but a URI that belongs to a DO/RO is re-assigned in a deterministic way.|No movement.|Only move documents that are reassigned (to non DO/RO) during insert.| |Statistical|DOs/ROs are excluded from assignment; RWs get balanced load.|No movement since all RWs are already balanced.|Some movement until all RWs are balanced.| |Range and Query|DOs/ROs are excluded from assignment. Within each partition, RWs get balanced load.|No movement within a partition because RWs are already balanced.|Some movement within a partition until all RWs are balanced.|
Note that the second and the third columns cover what the rebalancers on RWs do when a forest is changed from RW to DO/RO or DO/RO to RW.
The rebalancer on a RO forest is always off. The rebalancer on a DO forest is off unless it is "retired".
A flash-backup forest is generally handled as a RO forest except that on new inserts, if the assignment logic cannot find a forest to insert the documents but there is at least one flash-backup forest, a Retry (instead of Exception) is thrown.
######### 17.10 Rebalancer Settings after Upgrading from an Earlier Release
For a brand new database, the rebalancer is enabled by default and the assignment policy is bucket. The bucket policy moves less data than the legacy policy when adding or deleting a forest and it is still deterministic.
After upgrading from an earlier release of MarkLogic Server, the rebalancer is disabled on existing databases and the policy is set to legacy.
##### 18.0 Tiered Storage
MarkLogic Server allows you to manage your data at different tiers of storage and computation environments, with the top-most tier providing the fastest access to your most critical data and the lowest tier providing the slowest access to your least critical data. Infrastructures, such as Hadoop and public clouds, make it economically feasible to scale storage to accommodate massive amounts of data in the lower tiers. Segregating data among different storage tiers allows you to optimize trade-offs among cost, performance, availability, and flexibility.
Tiered storage is supported by the XQuery, JavaScript, and REST APIs. This chapter describes the tiered storage operations using the REST API, which supports all of the operations you will want to integrate into your storage-management scripts.
Note: To use Tiered Storage, a license that includes Tiered Storage is required. This chapter contains the following topics:
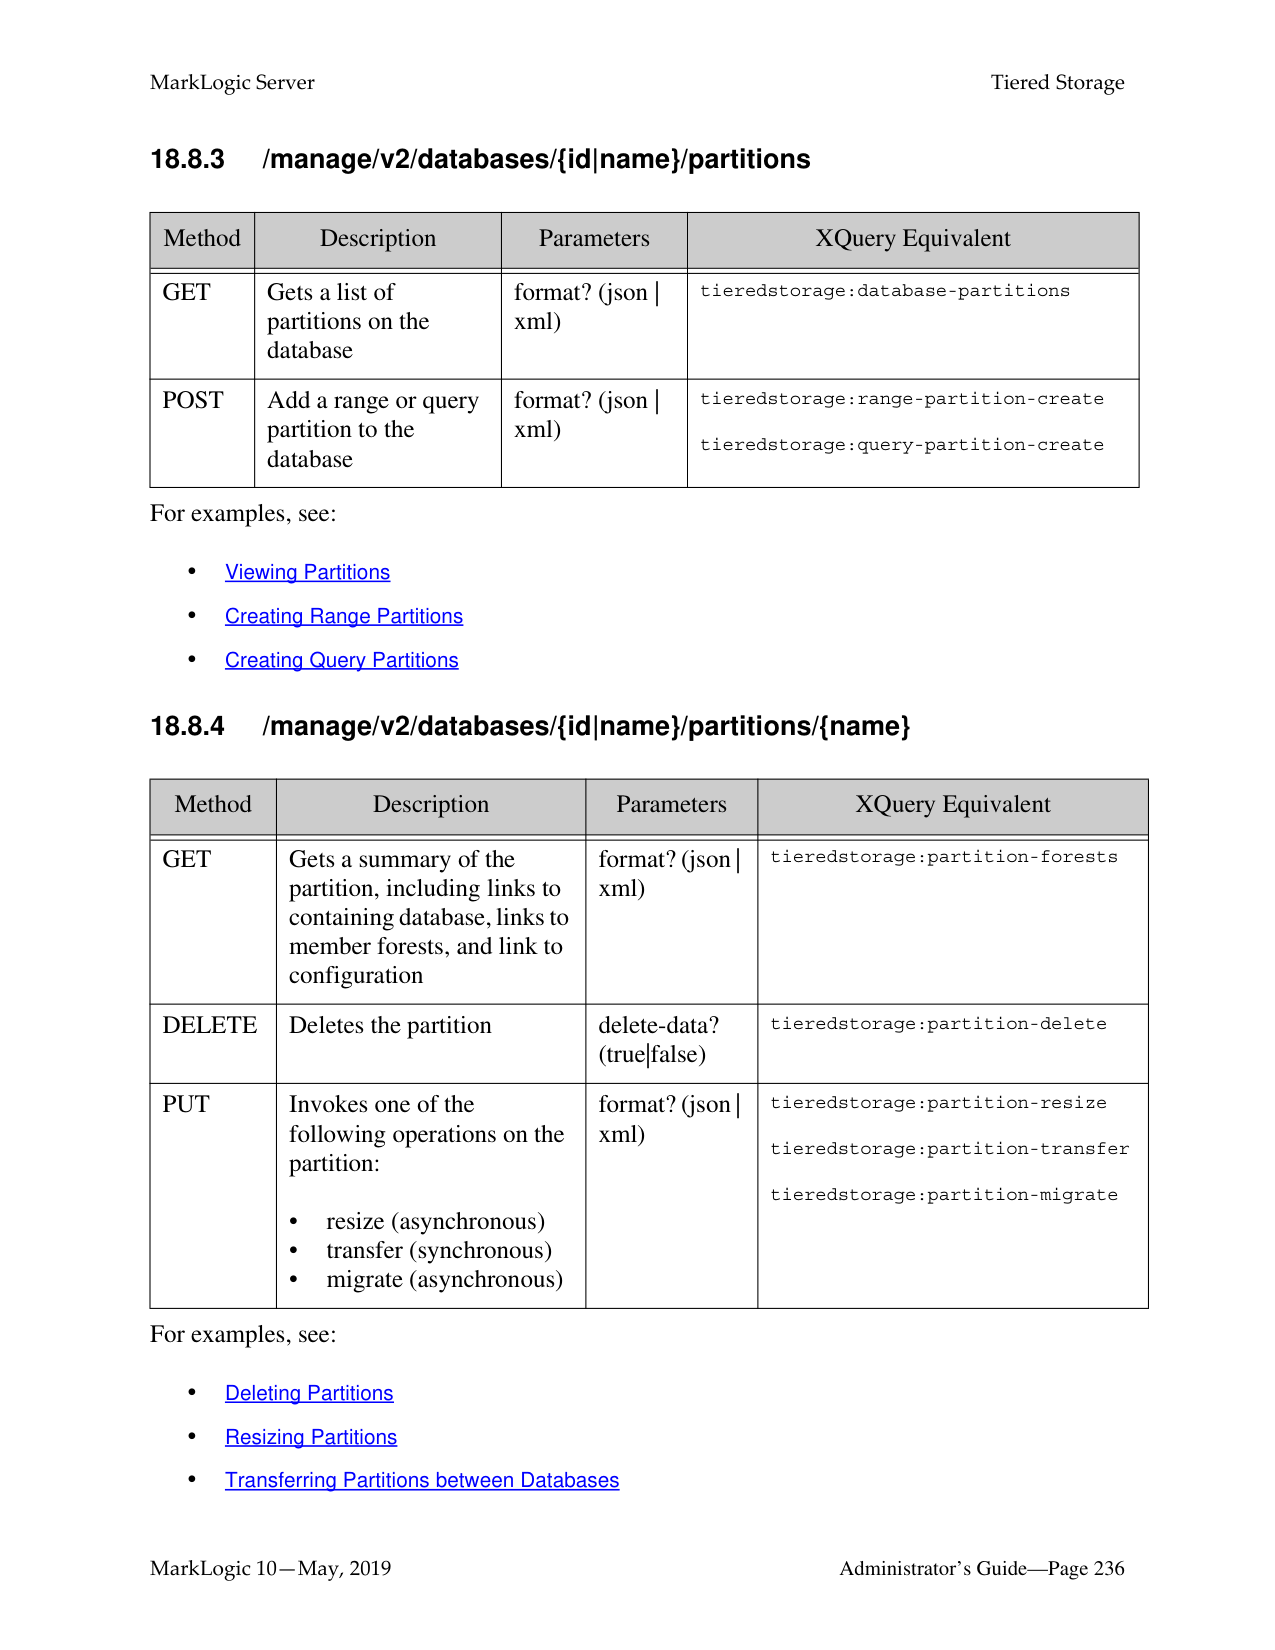
######### 18.1 Terms Used in this Chapter
######### 18.2 Overview of Tiered Storage
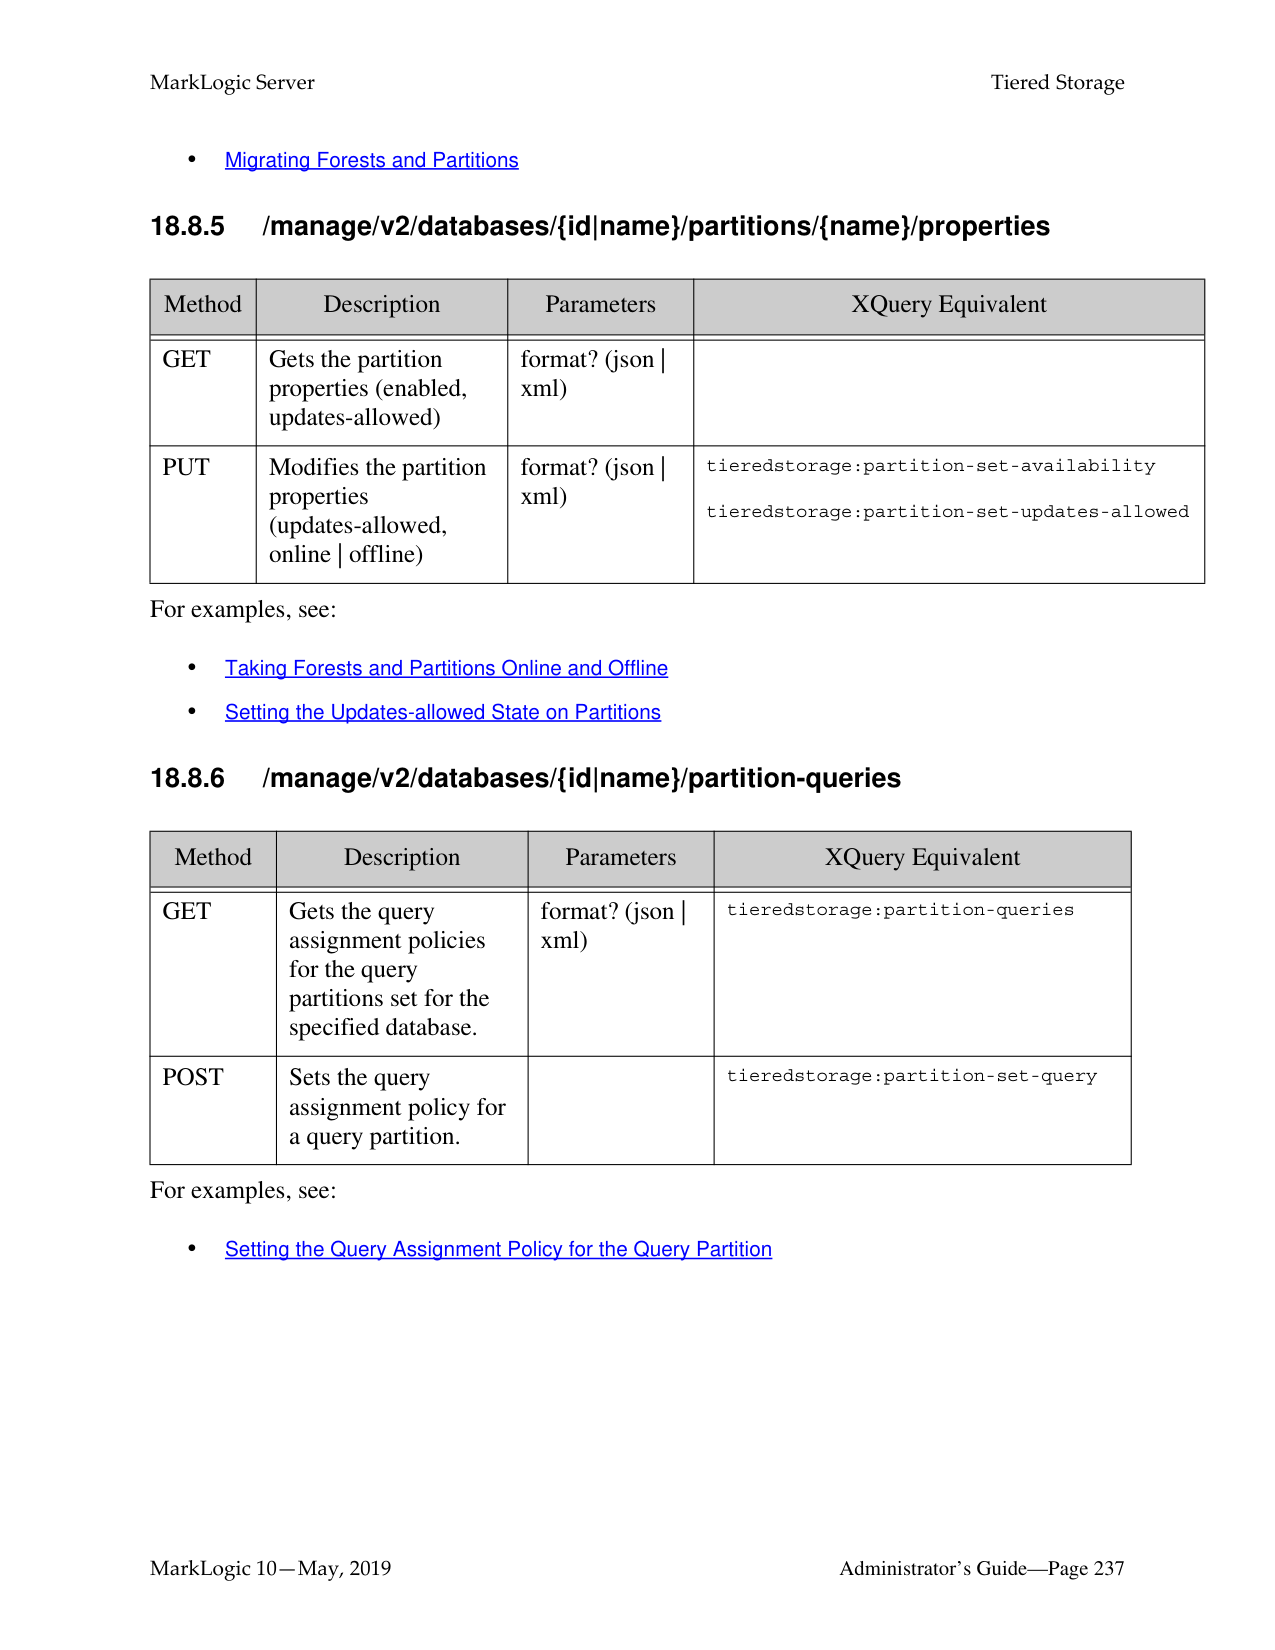
The MarkLogic tiered storage APIs enable you to actively and easily move your data between different tiers of storage. For example, visualize how data might be tiered in different storage devices in a pyramid-like manner, as illustrated below.


The illustration below shows the basic tiered storage operations:
F = Forest
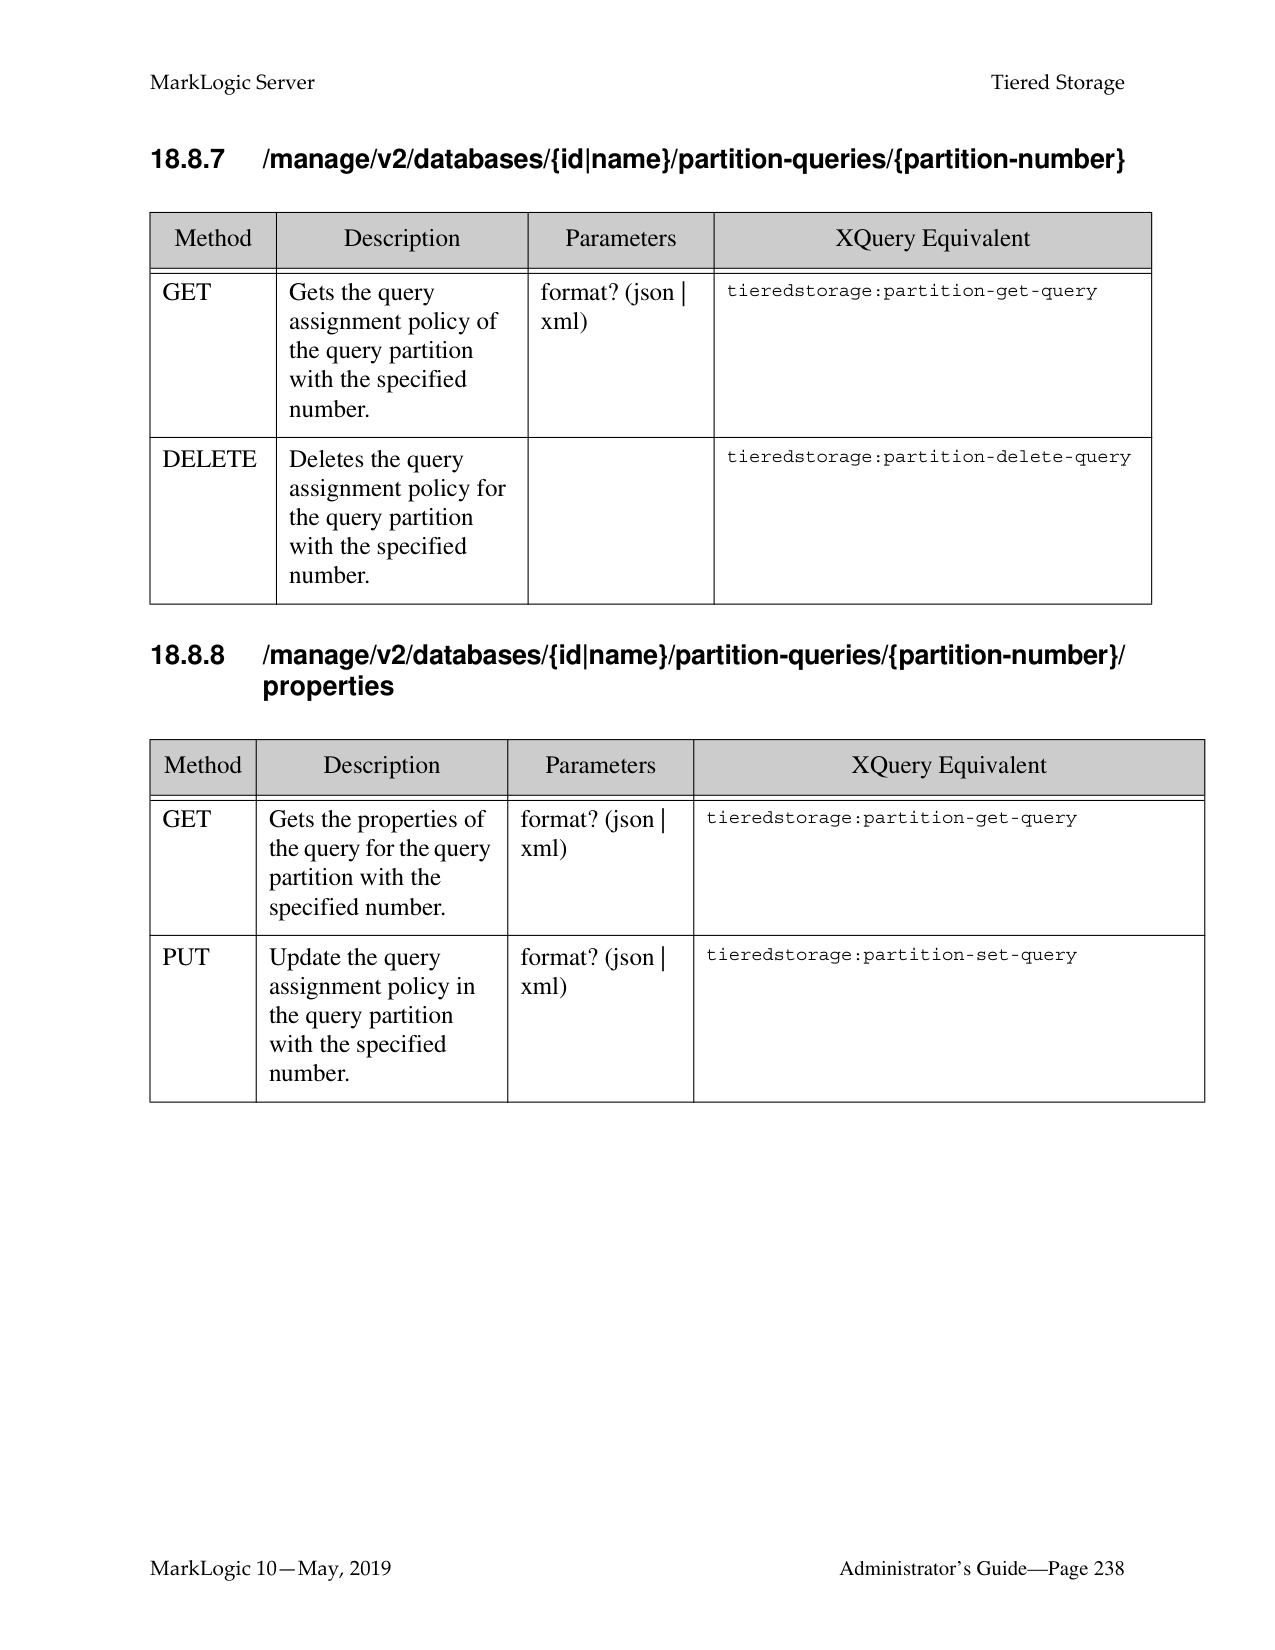
||F| |---|
|F| |---|
|F| |---|
Partition| |---|
Faster Storage Devices
Expand
Migrate
Migrate
||F| |---|
|F| |---|
|F|
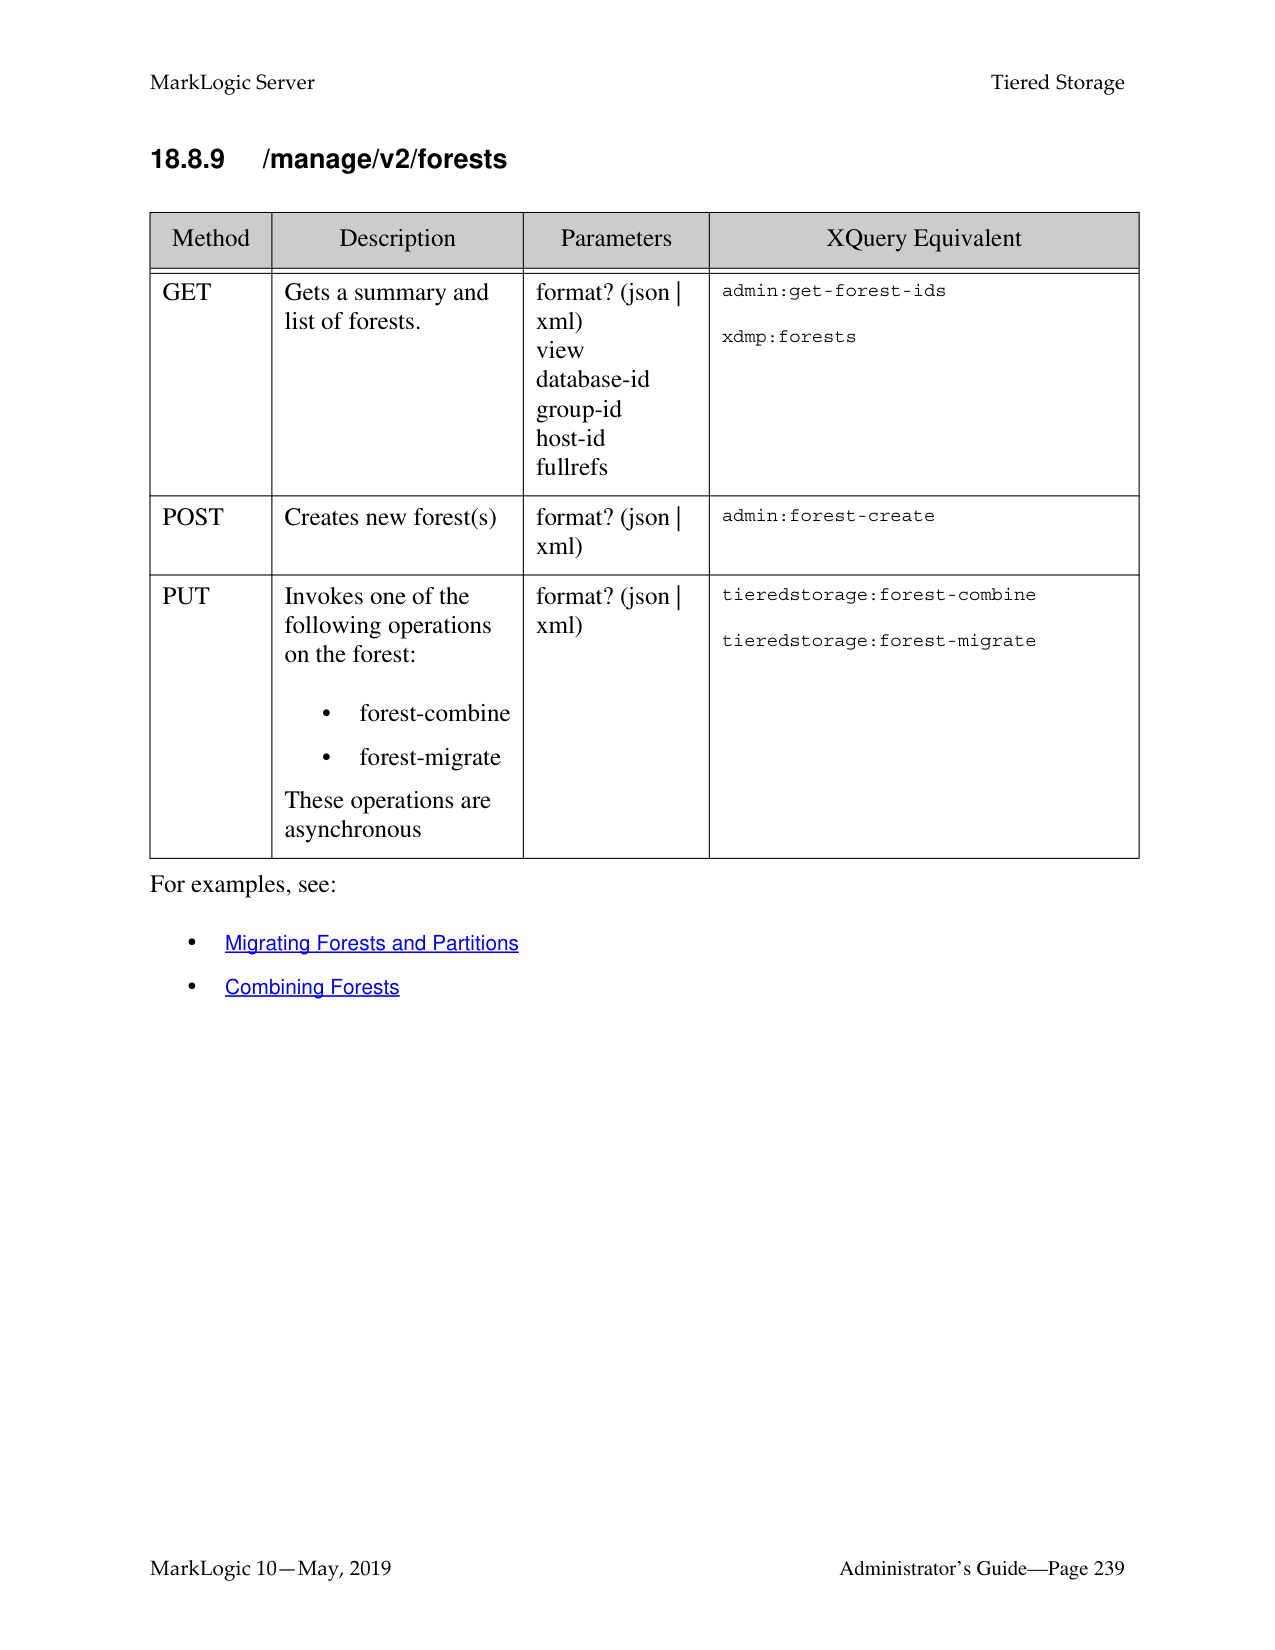
|---|
Partition| |---|
||F| |---|
|F| |---|
|F| |---|
|F| |---|
Partition| |---|
Combine
(Resize)
Expand
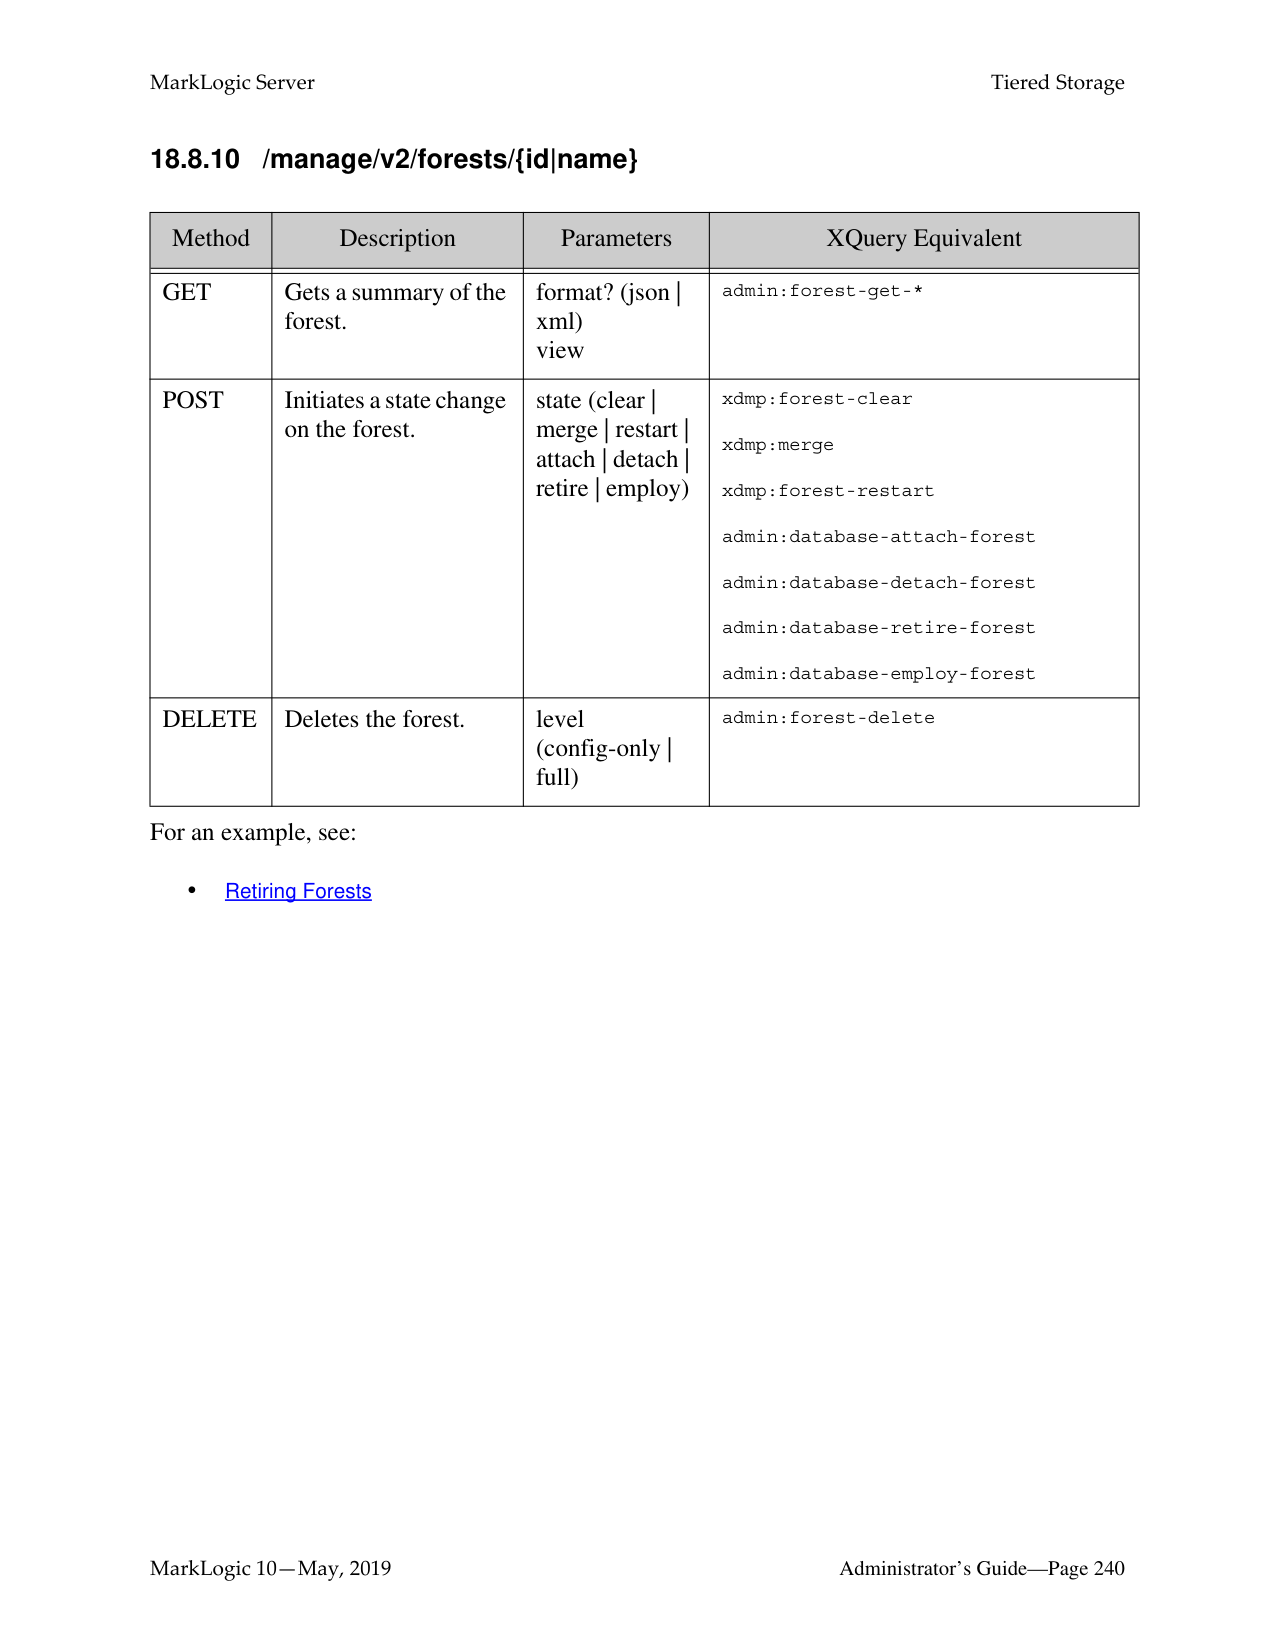
|Offline|Online| |---|---| ||F| |---|
|F| |---|
|F| |---|
Partition
||F| |---|
|F| |---|
|F| |---|
Partition
|
Reset Update-allowed State
||F| |---|
|F| |---|
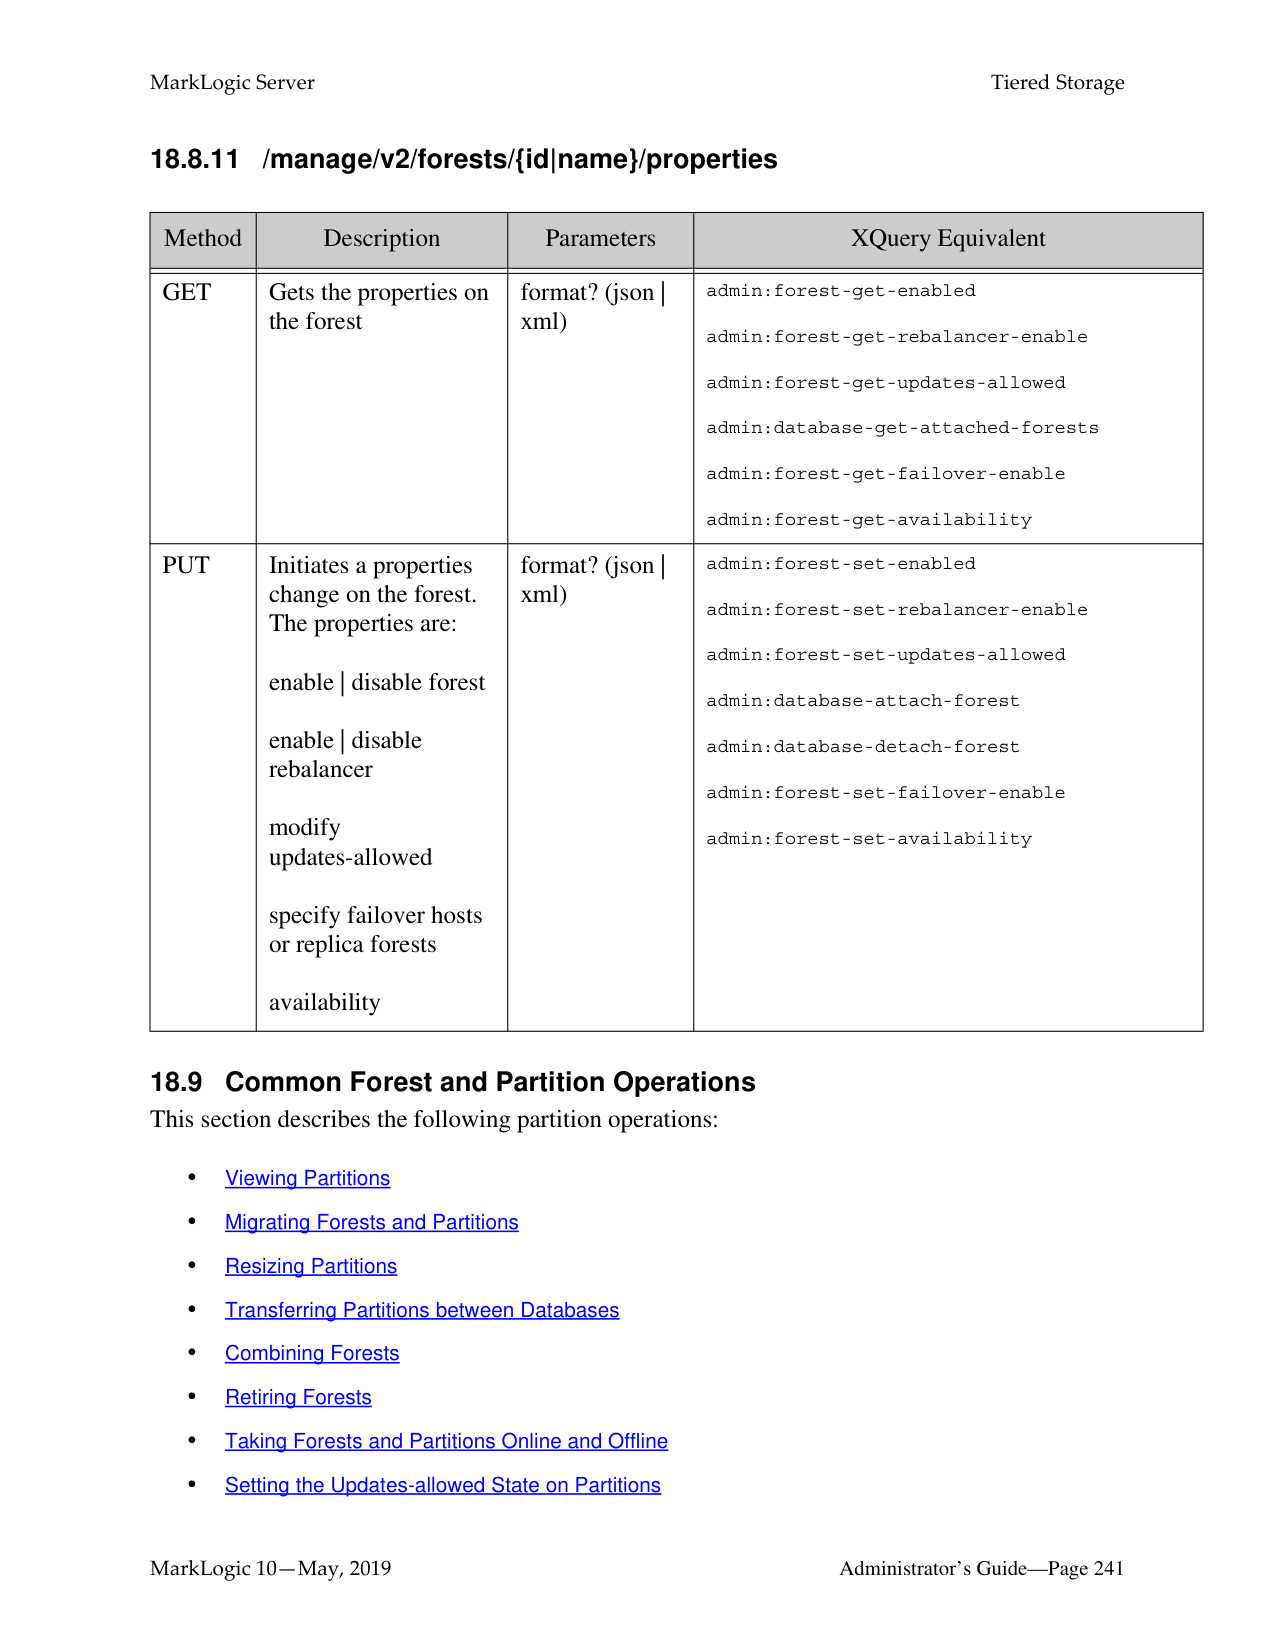
Partition| |---|
Slower/ Archived Storage Devices

DeleteDelete
Warning Forest migrate, forest combine, partition migrate and partition resize may result in
potential data loss when used during XA transactions. There are two types of partitions:
######### 18.3 Range Partitions
A range partition consists of a group of database forests that share the same name prefix and the same range assignment policy described in “Range Assignment Policy” on page 204.
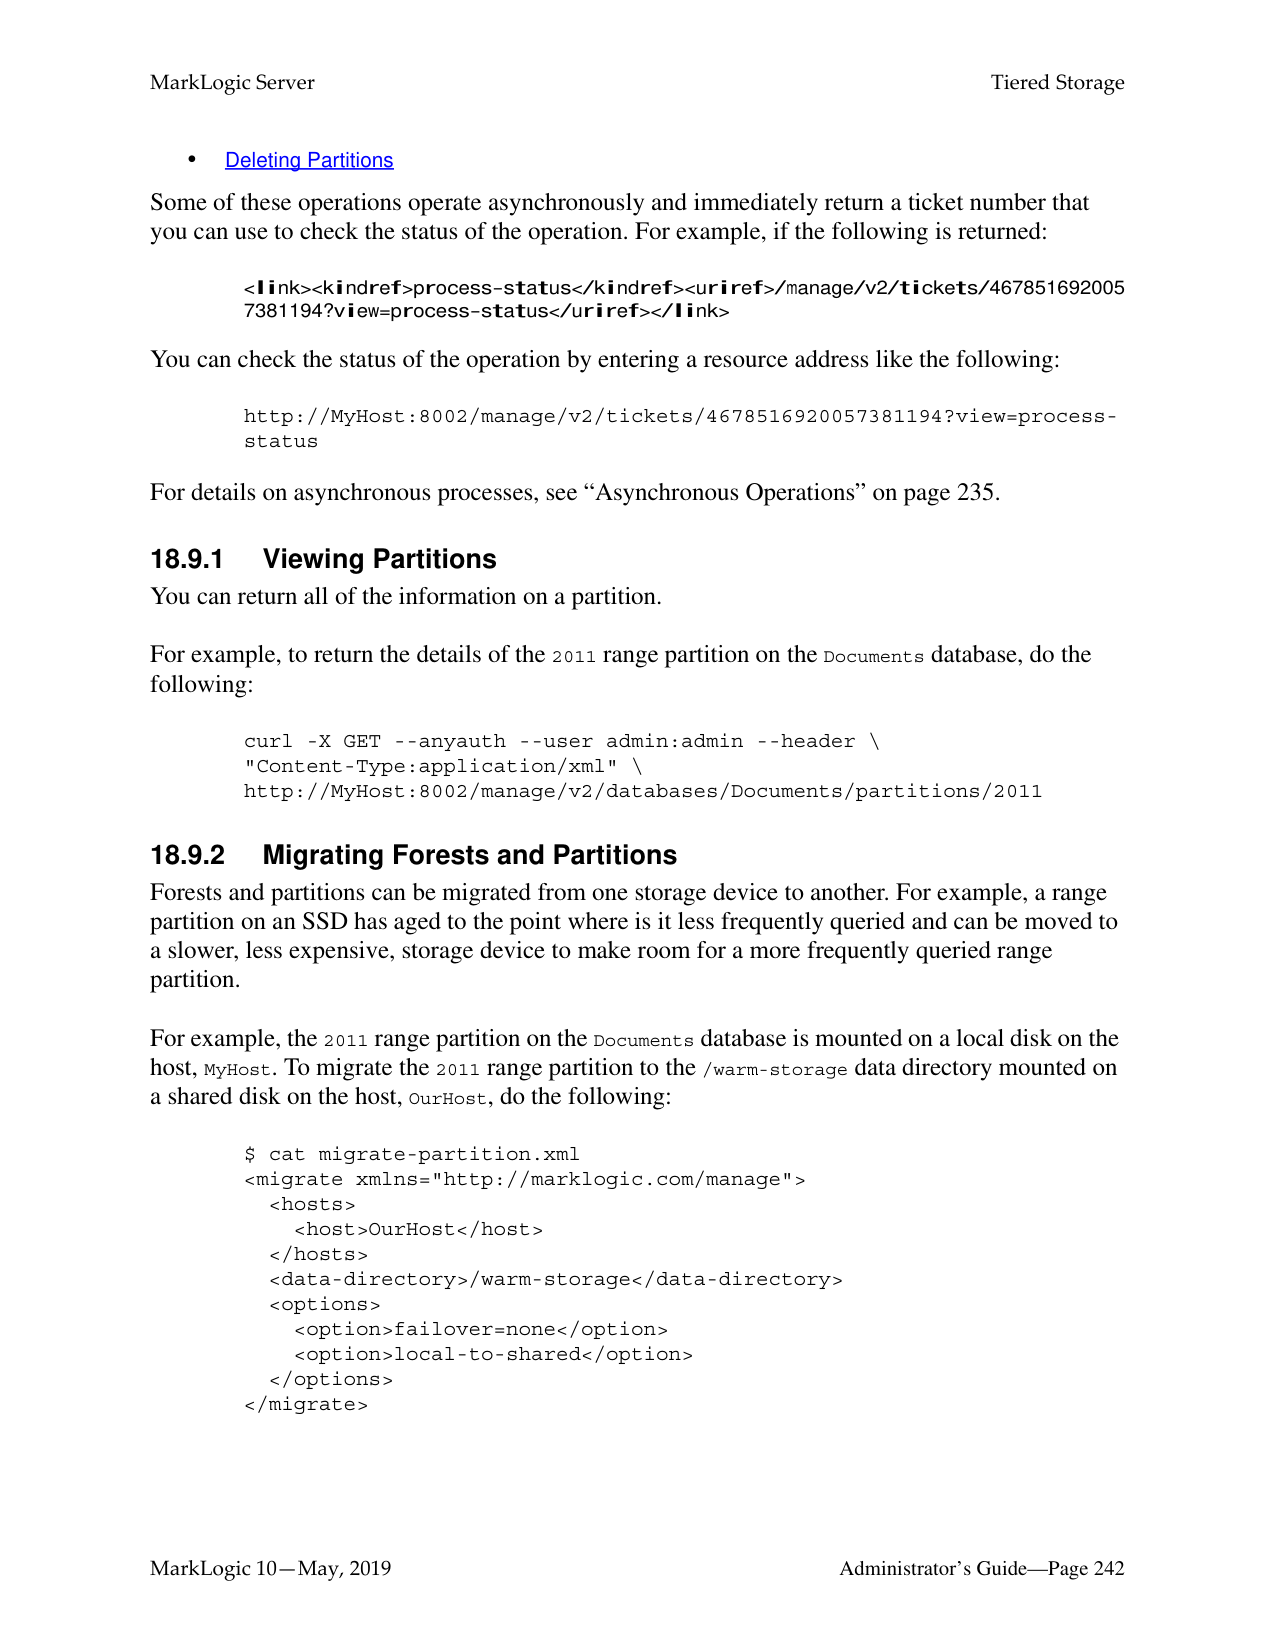
Note: When deploying forests in a cluster, you should align forests and forest replicas across hosts for parellelization and high availability, as described in the Scalability, Availability, and Failover Guide.
The range of a partition defines the scope of element or attribute values for the documents to be stored in the partition. This element or attribute is called the partition key. The partition key is based on a range index, collection lexicon, or field set on the database. The partition key is set on the database and the partition range is set on the partition, so you can have several partitions in a database with different ranges.
For example, you have a database, named WorkingVolumes, that contains nine forests that are grouped into three partitions. Among the range indexes in the WorkingVolumes database is an element range index for the update-date element with a type of date. The WorkingVolumes database has its partition key set on the update-date range index. Each forest in the WorkingVolumes database contains a lower bound and upper bound range value of type date that defines which documents are to be stored in which forests, as shown in the following table:
|Partition Name|Forest Name (prefix-name)|Partition Range Lower Bound|Partition Range Upper Bound|Lower Bound Included| |---|---|---|---|---| | | | | | | |Vol1|Vol1-0001
Vol1-0002
|2010-01-01|2011-01-01|false| |Vol2|Vol2-0001
Vol2-0002
Vol2-0003
|2011-01-01|2012-01-01|false| |Vol3|Vol3-0001
Vol3-0002
Vol3-0003
Vol3-0004
|2012-01-01|2013-01-01|false|
Note: When Lower Bound Included is set to false on a database, the lower bound of the partition ranges are ignored. With this setting, documents with a partition key value that match the lower bound value are excluded from the partition and documents that match the upper bound value are included.
In this example, a document with an update-date element value of 2011-05-22 would be stored in one of the forests in the Vol2 partition. Should the update-date element value in the document get updated to 2012-01-02 or later, the document will be automatically moved to the Vol3 partition. How the documents are redistributed among the partitions is handled by the database rebalancer,
Below is an illustration of the WorkingVolumes database, showing its range indexes, partition key, and its partitions and forests.
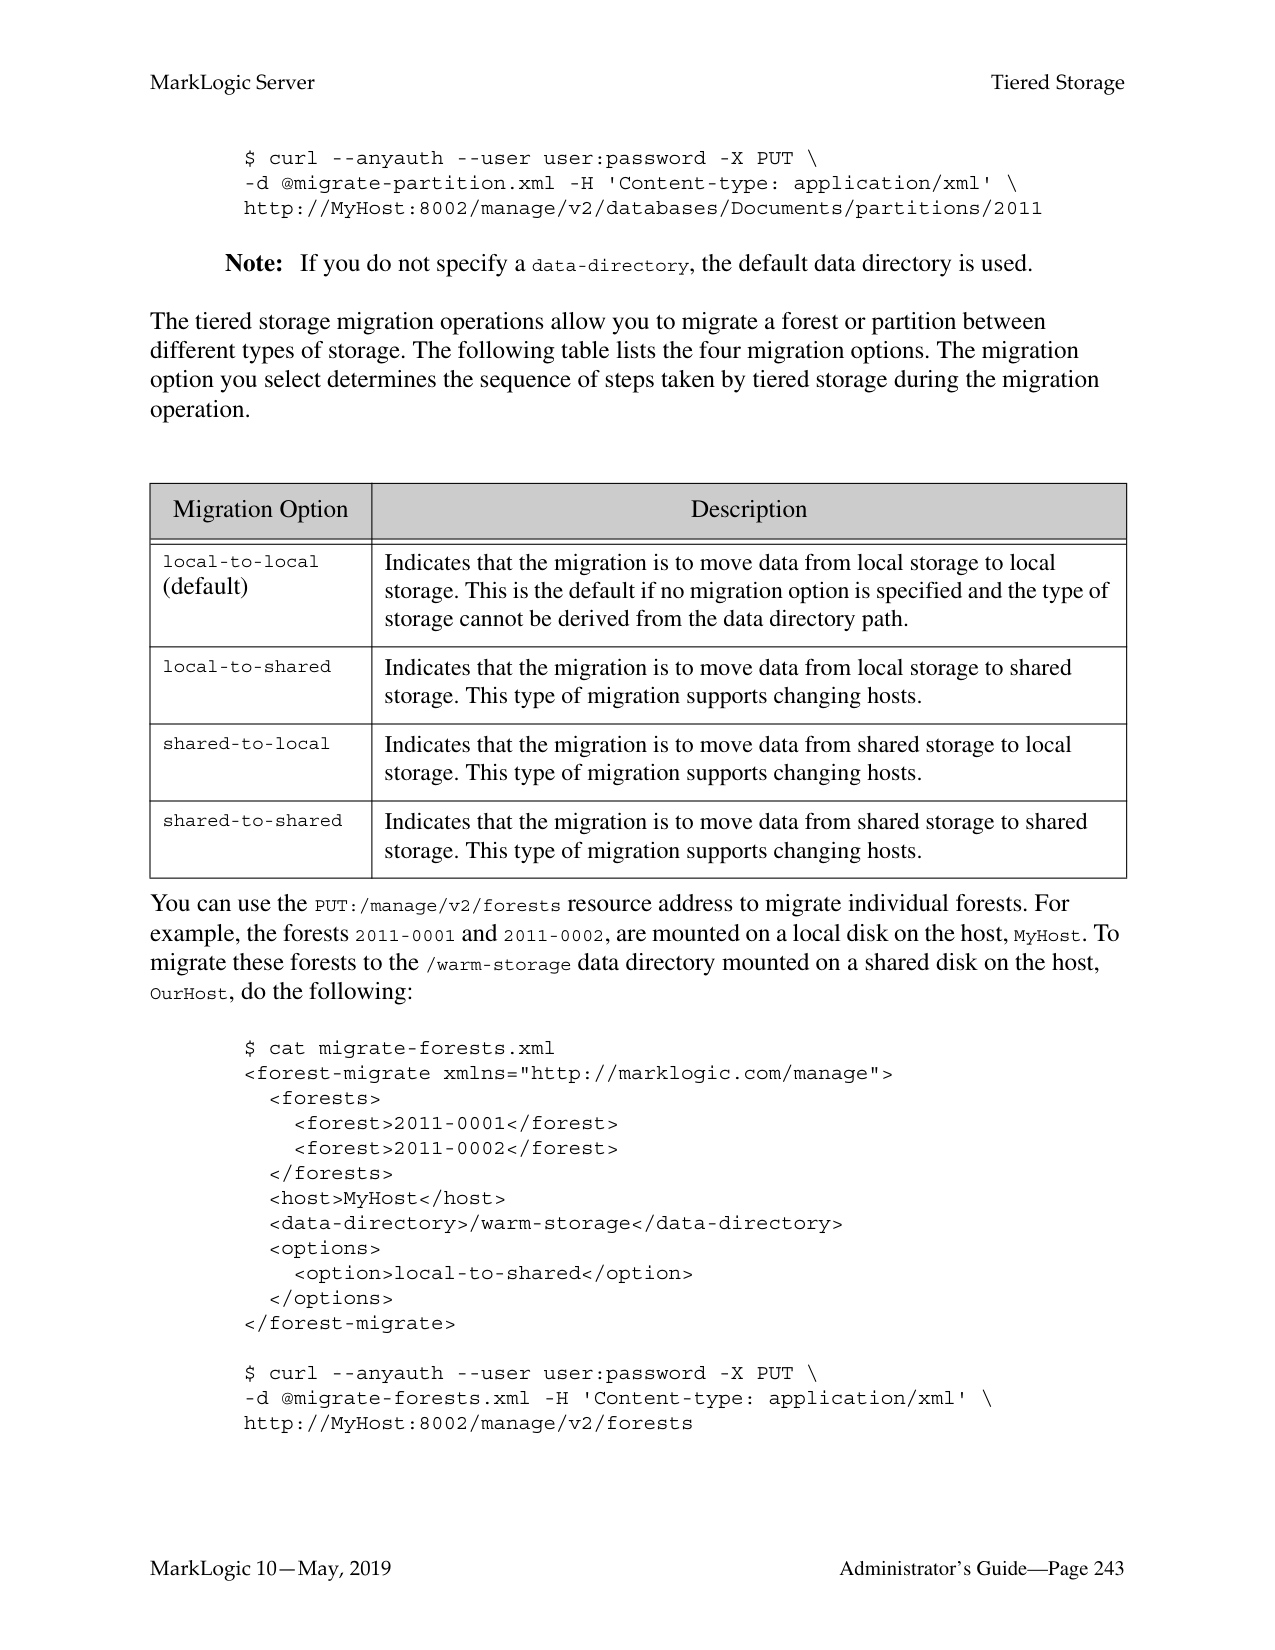
Database: WorkingVolumes
||creation-date|date| |---|---| |update-date|date| |volume-no|int| |version-id|decimal|
local name scalar type
Range Indexes
|2012-01-01
2013-01-01
Vol3-0001| |---| |2012-01-01
2013-01-01
Vol3-0002| |2012-01-01
2013-01-01
Vol3-0003| |2012-01-01
2013-01-01
Vol3-0004|
|2010-01-01
Vol1-0001
2011-01-01
| |---| |2010-01-01
Vol1-0002
2011-01-01
|
|2011-01-01
2012-01-01
Vol2-0001| |---| |2011-01-01
2012-01-01
Vol2-0002| |2011-01-01
2012-01-01
Vol2-0003|
Partition Key: update-date Partition: Vol1 Partition: Vol2 Partition: Vol3
Forests: Name and Range
| |---|
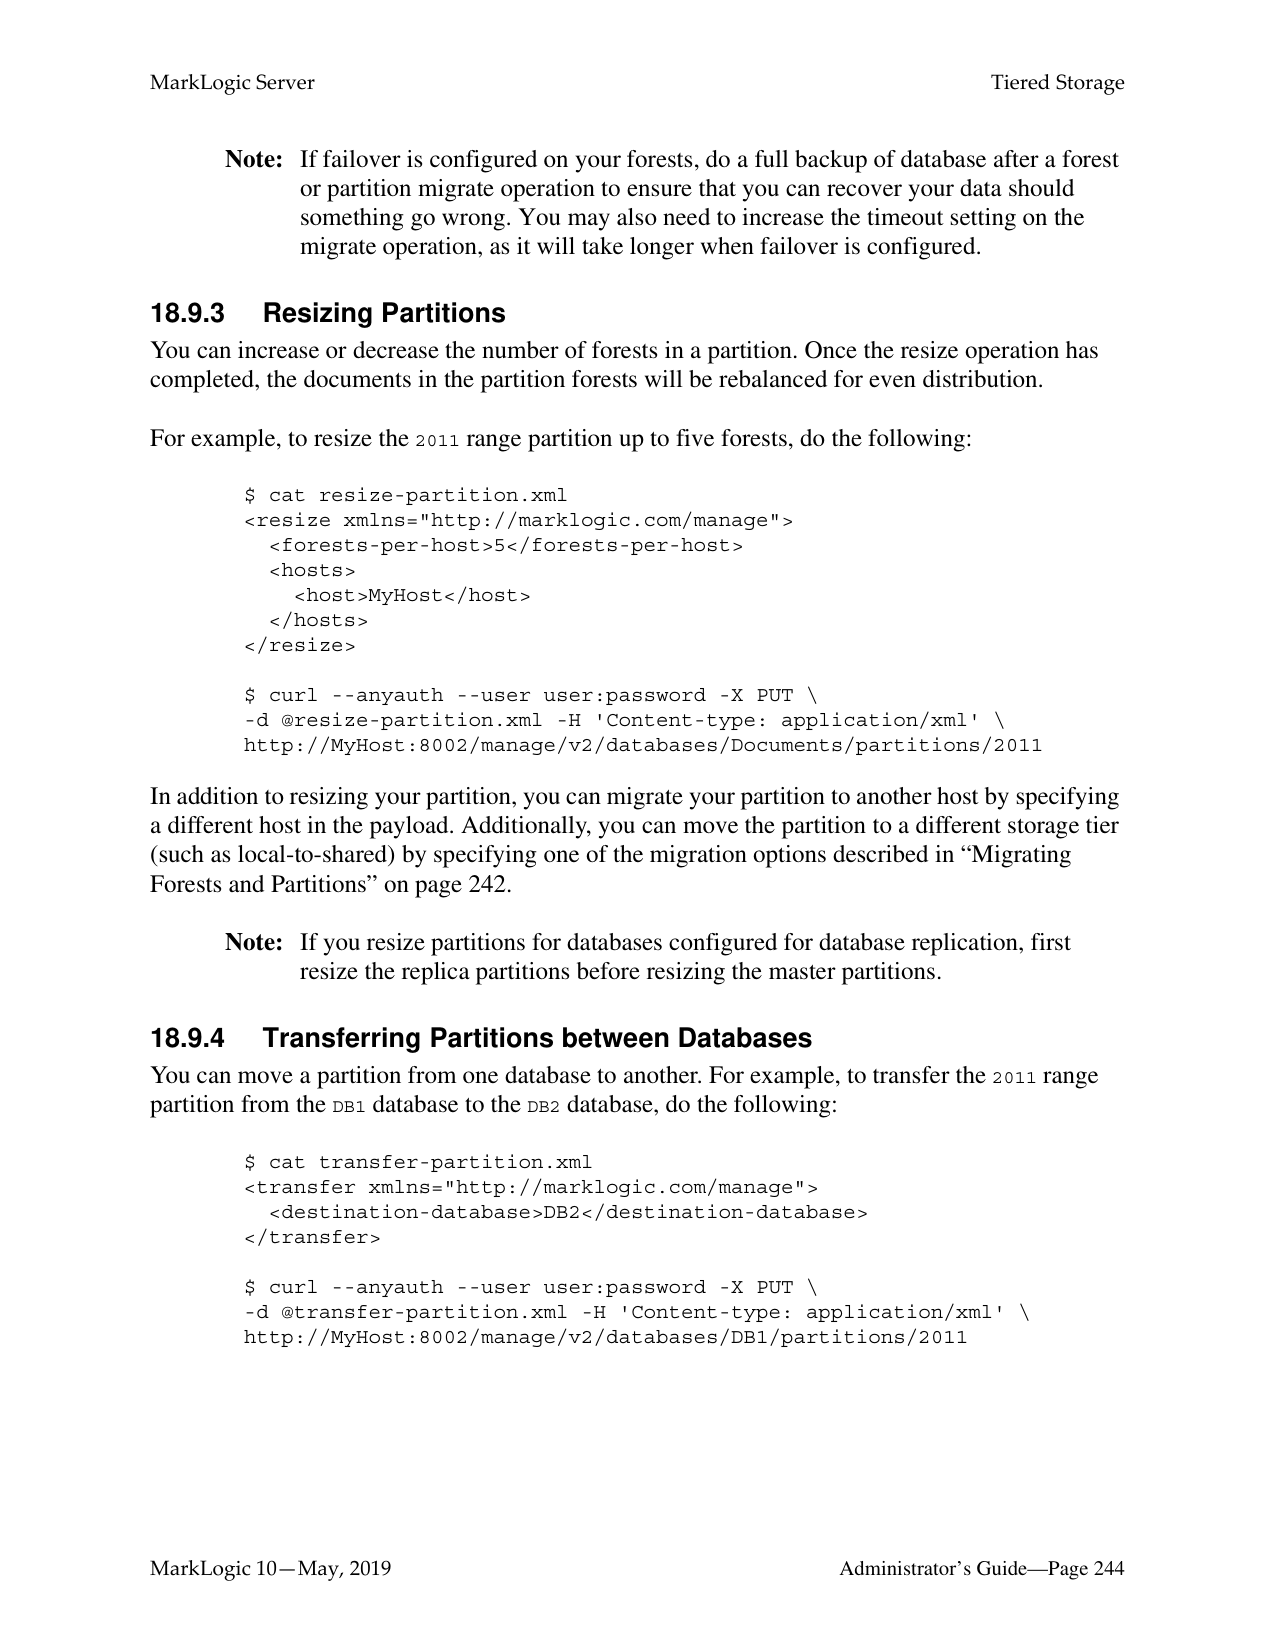
######### 18.4 Query Partitions
A query partition consists of a group of database forests that share the same name prefix and the same query assignment policy described in “Query Assignment Policy” on page 205.
Note: Query partitions query documents in an unfiltered manner. For details about unfiltered queries, see the Fast Pagination and Unfiltered Searches chapter in the Query Performance and Tuning Guide.
Each query partition is associated with a query that determines which documents are stored in that partition. When creating a query partition, you assign it a partition number. Unlike range partitions, queries set for partitions using the query assignment policy can have “overlaps,” so that a document may be matched by the query set for more than one partition. In the event of an overlap, the partition with lower number is selected over partitions with higher numbers.
Note: As is the case with range assignment policy, you should define a default partition when configuring the query assignment policy. If you do not define a default partition, the database forests that are not associated with a query partition are used.
For example, you have three query partitions, a default partition and two partitions associated with the following types of queries:
Query Partition 1: (Default -- no query) Query Partition 2:
|Requirement|Query Type| |---|---| | | | |the author includes “twain”|word| |there is a paperback edition|value| |the price of the paperback edition is less than 9.00|range|
Query Partition 3:

|Requirement|Query Type| |---|---| | | | |the title includes “Adventures”|word| |the characters include “Huck”|word| |the class is “fiction”|word|
In this example, the document, “Adventures of Huckleberry Finn” matches both queries, but is stored in Query Partition 2 because it is the partition with the lower number. On the other hand, the document, “Moby Dick” doesn’t match either query, so it is stored in Partition 1, the Default Query Partition.
######### 18.5 Partition Migration
Both range and query partitions can be migrated between different types of storage. For example, you have the range partitions created in “Range Partitions” on page 220 and, after a few months, the volumes of documents grow to 5 and there is no longer enough space on the fast SSD device to hold all of them. Instead, the oldest and least queried volumes (Vol1-Vol3) are migrated to a local disk drive, which represents a slower storage tier.
Migrate Partitions
Partition: Vol1 Partition: Vol2 Partition: Vol3 Partition: Vol3
Partition: Vol1 Partition: Vol2
Partition: Vol4 Partition: Vol5
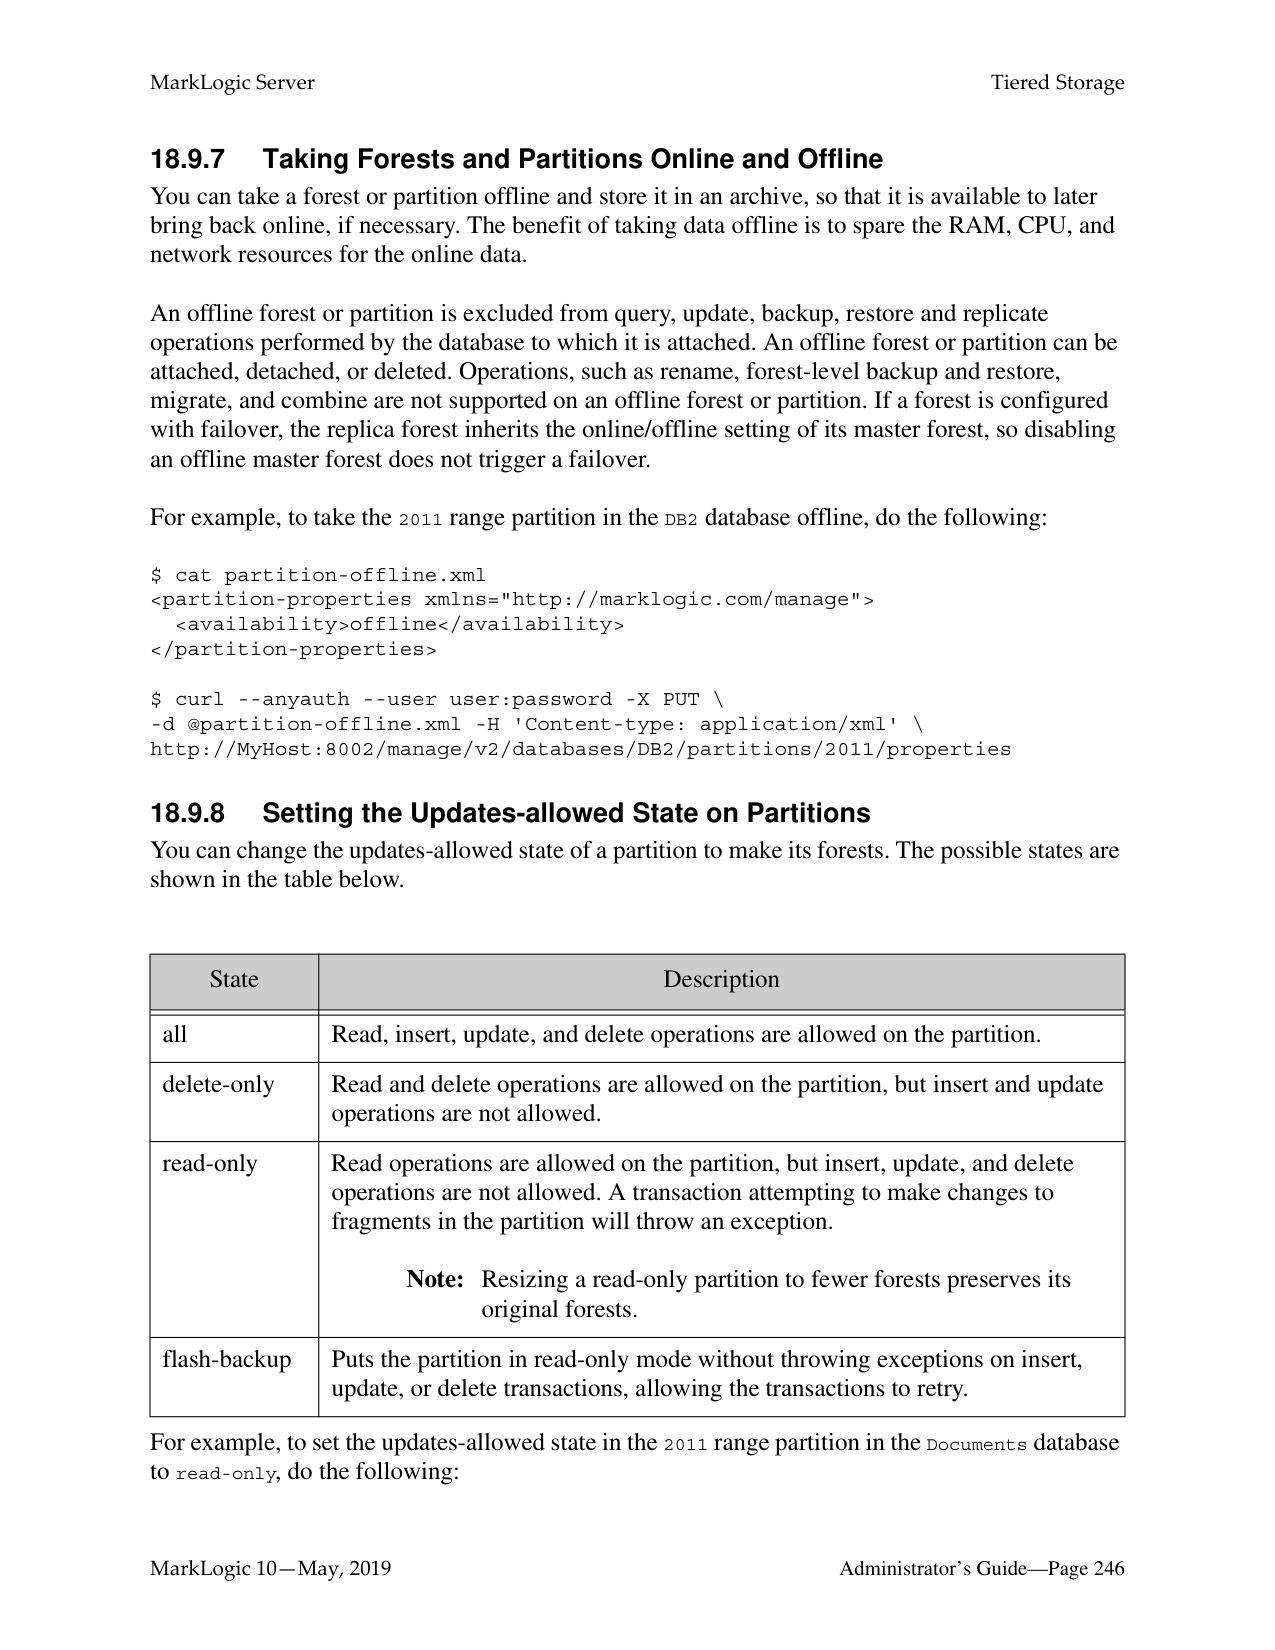
(Warm)
Local Disk
(Hot) SSD
After years of data growth, the volumes of documents grow to 50. After migrating between storage tiers, the partitions are eventually distributed among the storage tiers, as shown below.
Frequently Queried/Updated
|(Hot)
Partition: Vol49 Partition: Vol50| |---|
SSD
Less-frequently Queried/Updated
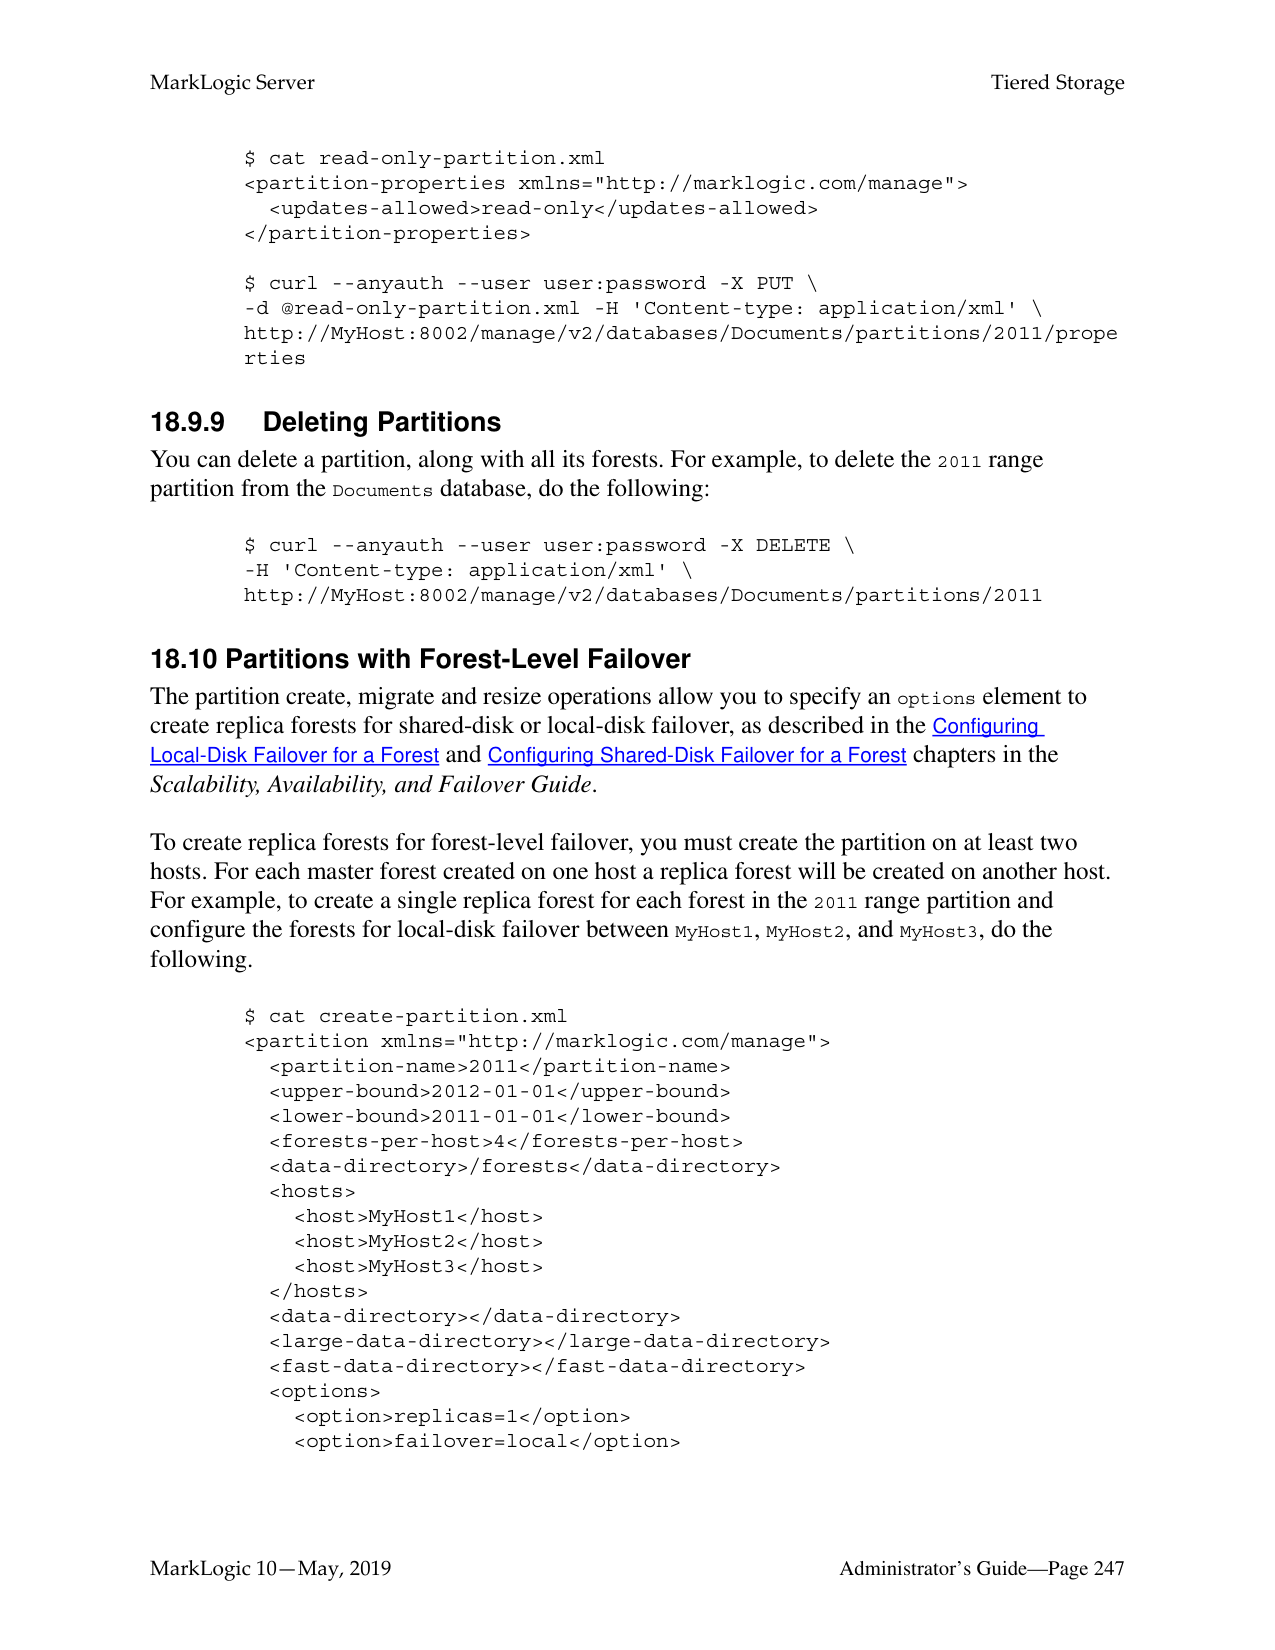
Local Disk
Only Queried
(Cold)
(Outside MarkLogic)
Shared Disk
HDFS
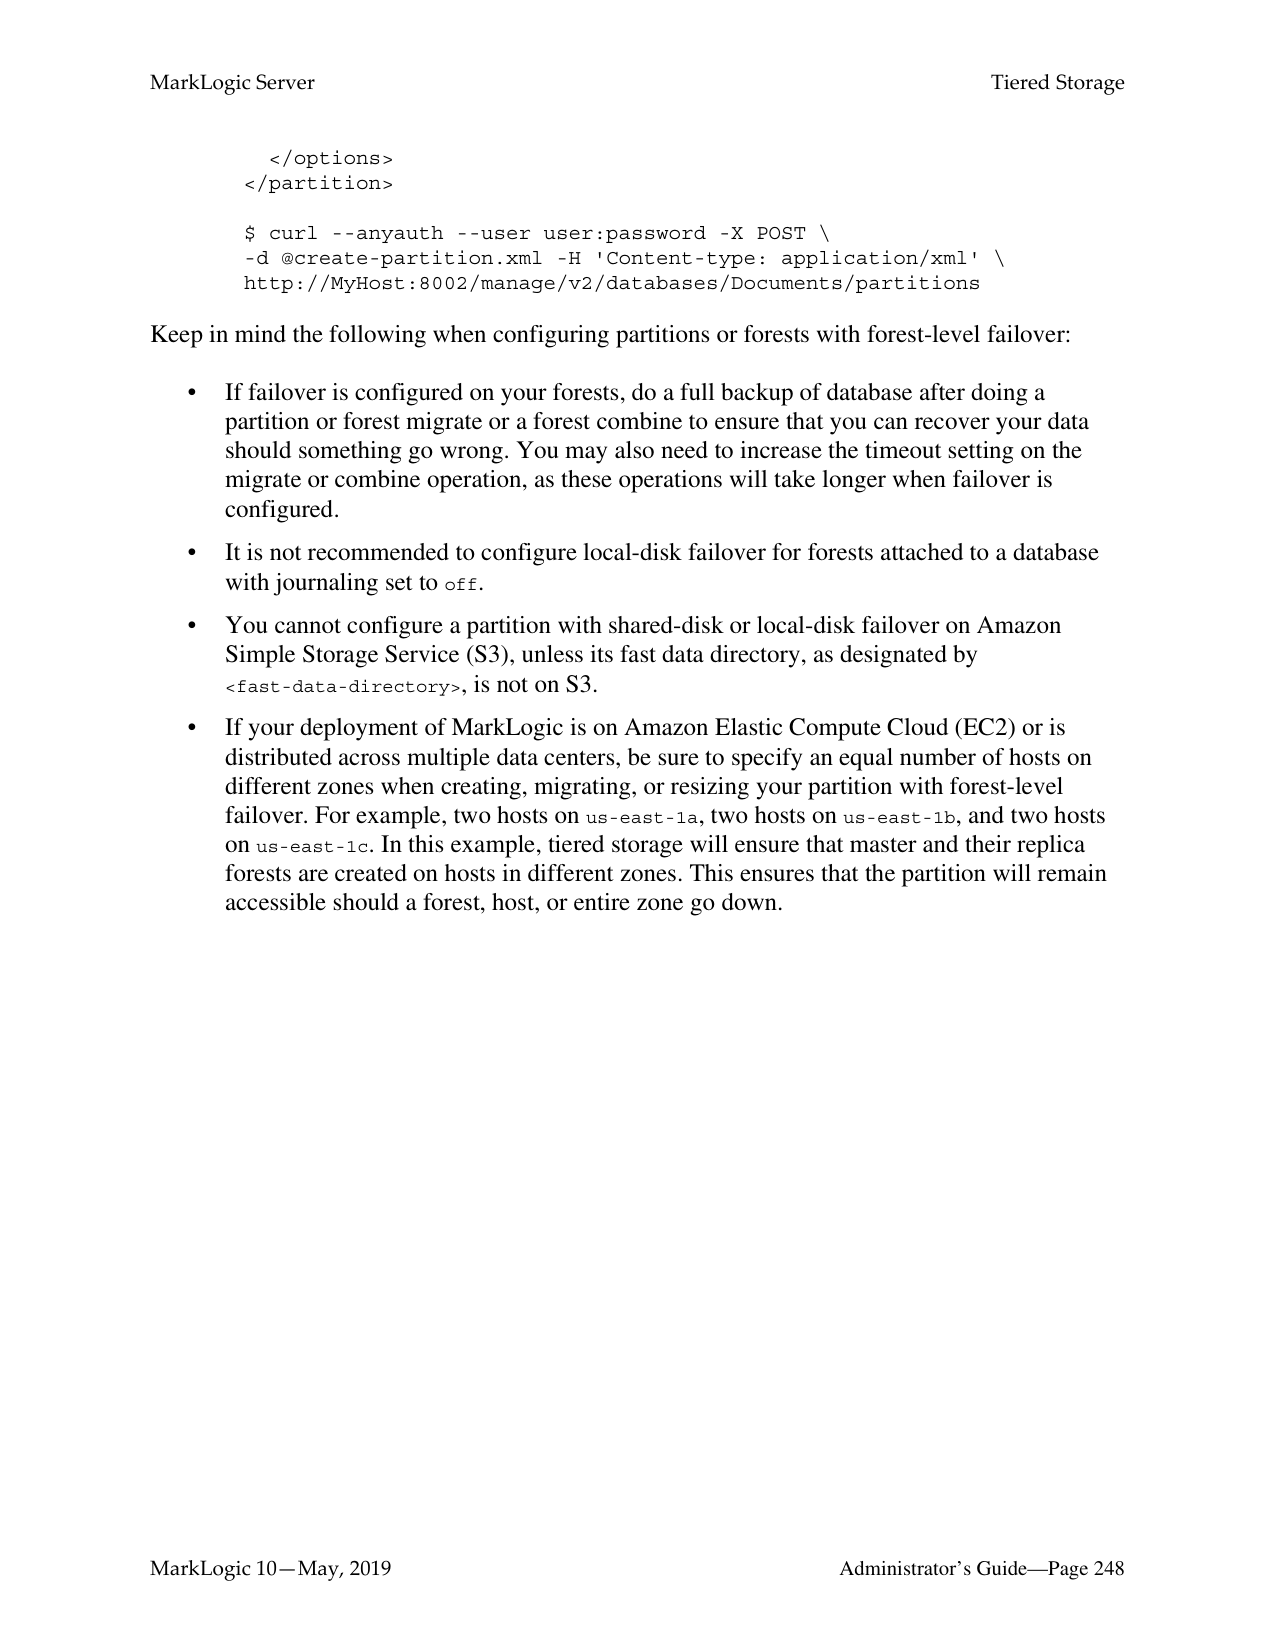
Available to Bring Back Online
Partitions: Vol1-Vol39
Online Offline
Multiple databases, even those that serve on different storage tiers, can be grouped into a super-database in order to allow a single query to be done across multiple tiers of data. Databases that belong to a super-database are referred to as sub-databases. A single sub-database can belong to multiple super-databases. For details on super-databases and sub-databases, see “Super Databases and Clusters” on page 249.


E-Node
Super-database
| ||2013 Documents (Hot)| |---|
(Warm)
2010 - 2012 Documents (Cold)
2000 - 2009 Documents
SSD Local Disk Shared Disk| | |---|---|---| | | | |
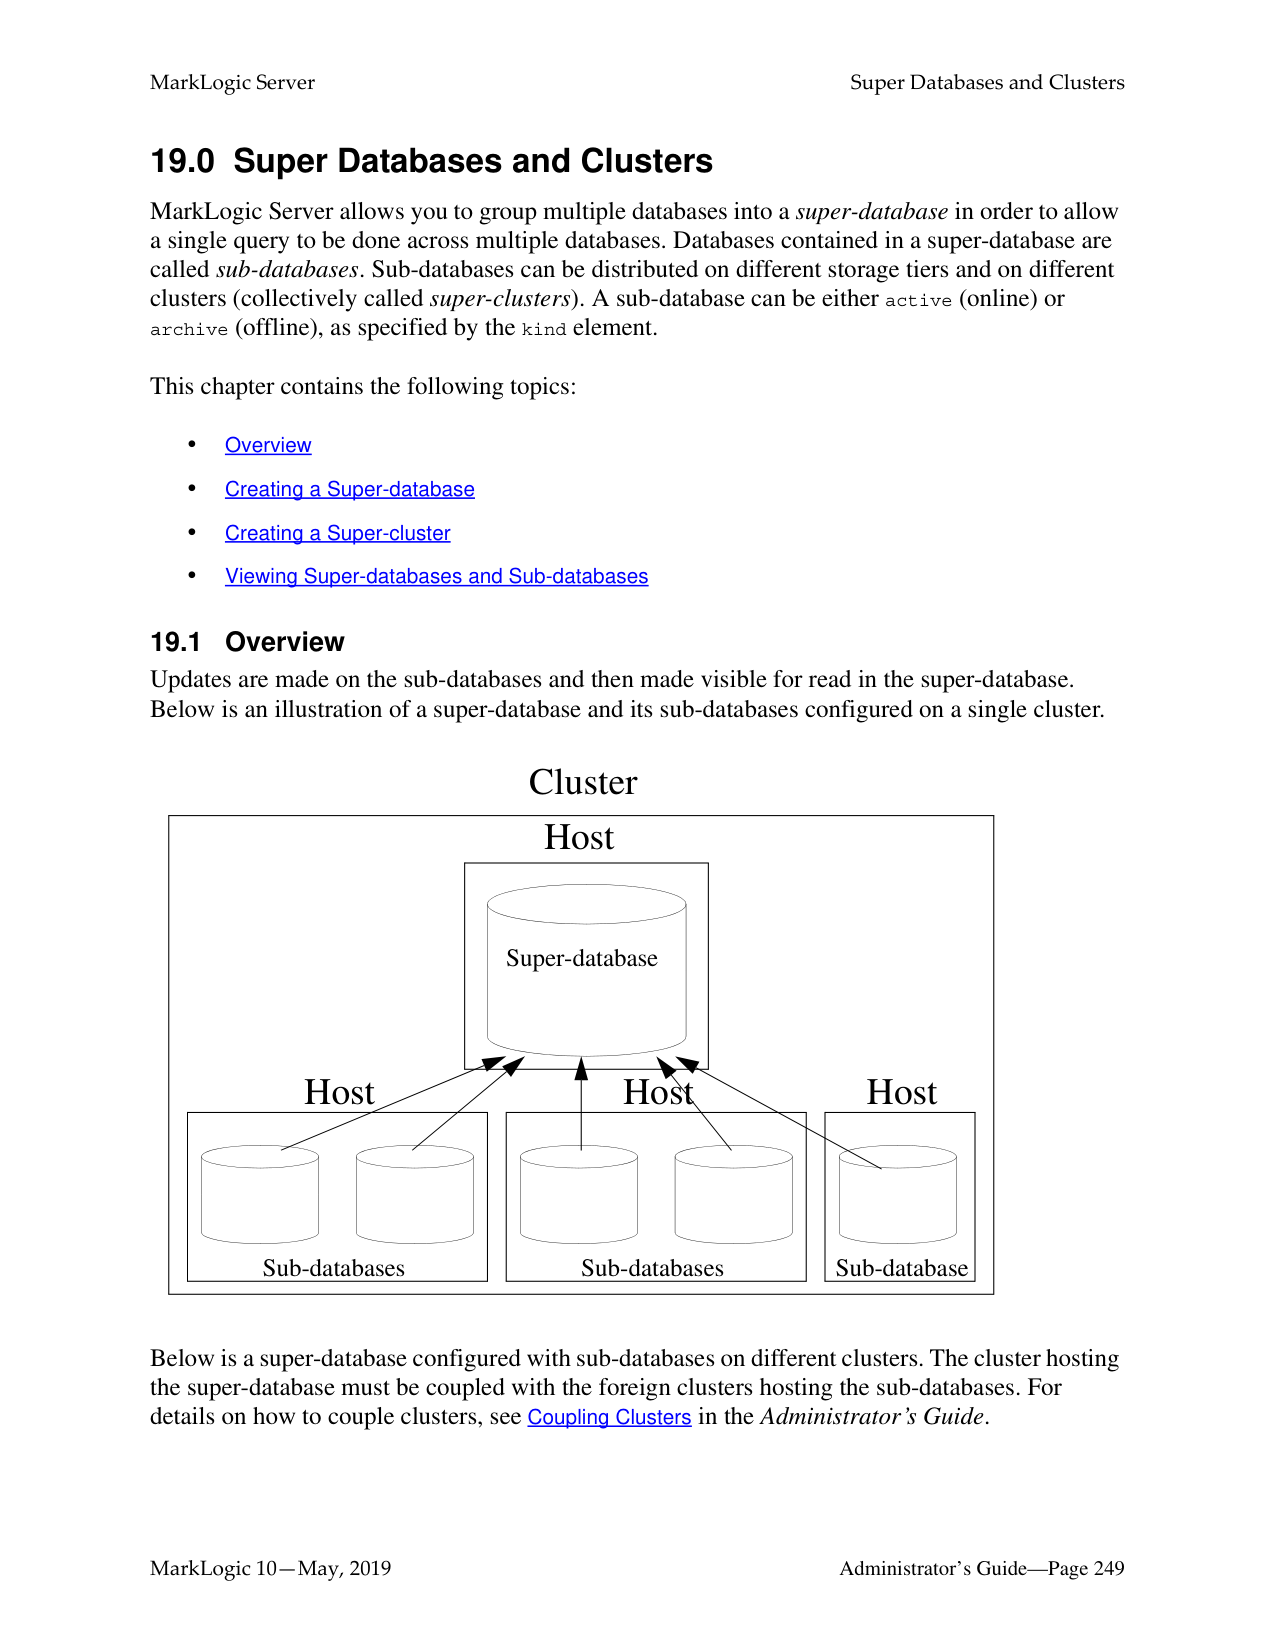
Sub-databases
######### 18.6 Configuring a Database with Range Partitions
If a database is to participate in a tiered storage scheme using range partitions, it must have the following set:
Warning All of the forests in a database configured for tiered storage using range partitions
must be part of a partition.
For details on how to configure the database rebalancer with the range assignment policy, see the sections “Range Assignment Policy” on page 204, “Configuring the Rebalancer on a Database” on page 209, and “Configuring the Rebalancer on a Forest” on page 210.
######### 18.6.1 Defining a Range Partition Key
The partition key describes a common element or attribute in the stored documents. The value of this element or attribute in the document determines the partition in which the document is stored. A partition key is based on a range index, collection lexicon, or field of the same name set for the database. The range index, collection lexicon, or field used by the partition key must be created before the partition key is created.
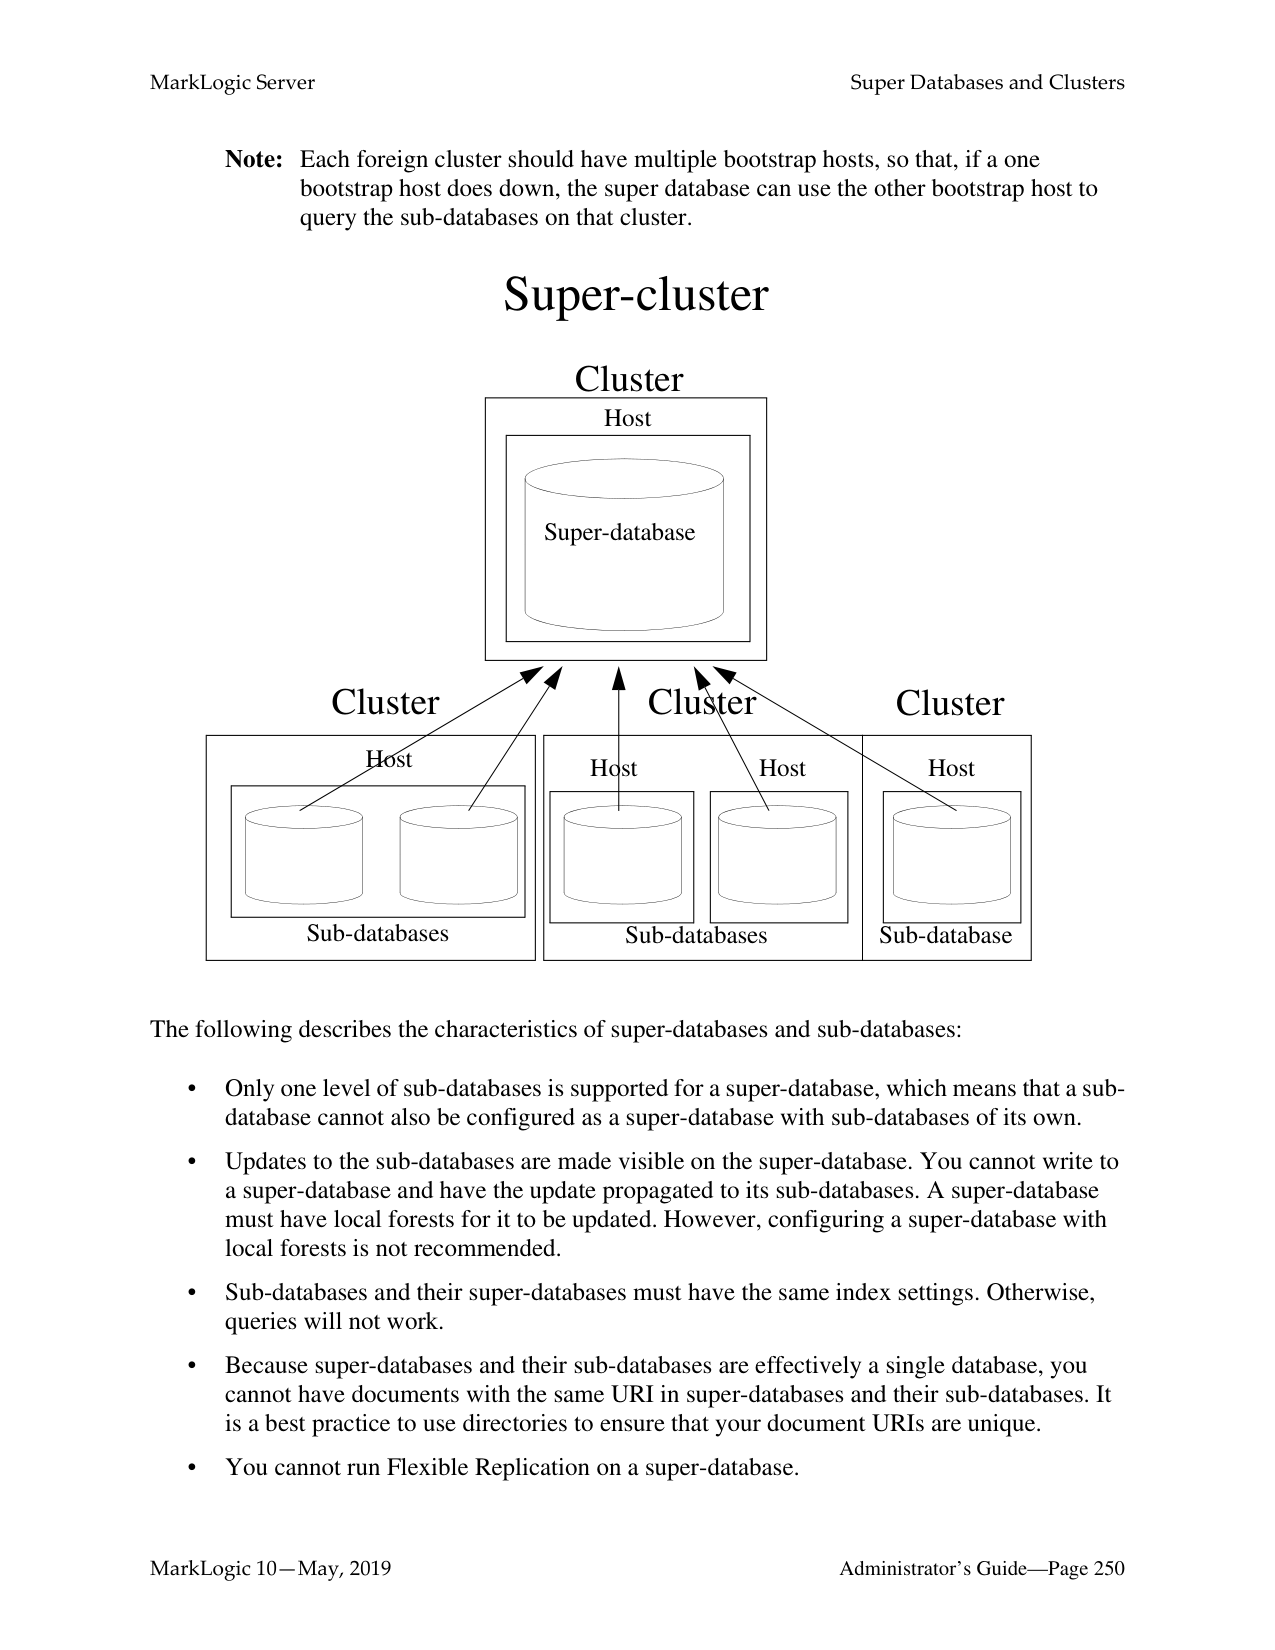
For example, assume your documents all have an update-date element with a date value. The following procedure describes how to create a partition key for the update-date element:


######### 18.6.2 Creating Range Partitions
Range partitions are based on forest naming conventions. A forest’s partition name prefix and the rest of the forest name are separated by a dash (-). For example, a forest named June-0001 belongs to the June partition.
Note: It is a best practice to create a default partition (a partition without a range) before creating partitions with ranges. Doing this will allow you to load documents into the default partition before you have finished creating the other partitions. As new partitions with ranges are created, the documents will be automatically moved from the default partition to the partitions with matching ranges.
Warning All of the forests in a database configured for tiered storage must be part of a
partition. There are two ways to create a range partition:
######### 18.6.2.1 Creating a Range Partition with New Forests
You can use the POST:/manage/v2/databases/{id|name}/partitions REST resource address to create a new range partition with empty forests. When creating a range partition, you specify the partition range and the number of forests to be created for the partition. You can also specify that the range partition be created for multiple hosts in a cluster, in which case the specified number of forests will be created on each host.
For example, the following creates a range partition, named 2011, in the Documents database on hosts, MyHost1 and MyHost2, with a range of 2011-01-01 - 2012-01-01 and four empty forests, named 2011-0001, 2011-0002, 2011-0003, and 2011-0004, on MyHost1 and four empty forests, named 2011-0005, 2011-0006, 2011-0007, and 2011-0008, on MyHost2:
$ cat create-partition.xml
$ curl --anyauth --user user:password -X POST \
-d @create-partition.xml -H 'Content-type: application/xml' \ http://MyHost:8002/manage/v2/databases/Documents/partitions
You can also include an options element to create replica forests for shared-disk or local-disk failover. For details, see “Partitions with Forest-Level Failover” on page 247.
######### 18.6.2.2 Creating a Range Partition from Existing Forests
You can create a range partition from existing forests simply by renaming the forests so that they adhere to a range partition naming convention. For example, you have four forests, named 1-2011,
For example, to rename the 1-2011 forest to 2011-1 and set the range to 2011-01-01 - 2012-01-01, do the following:
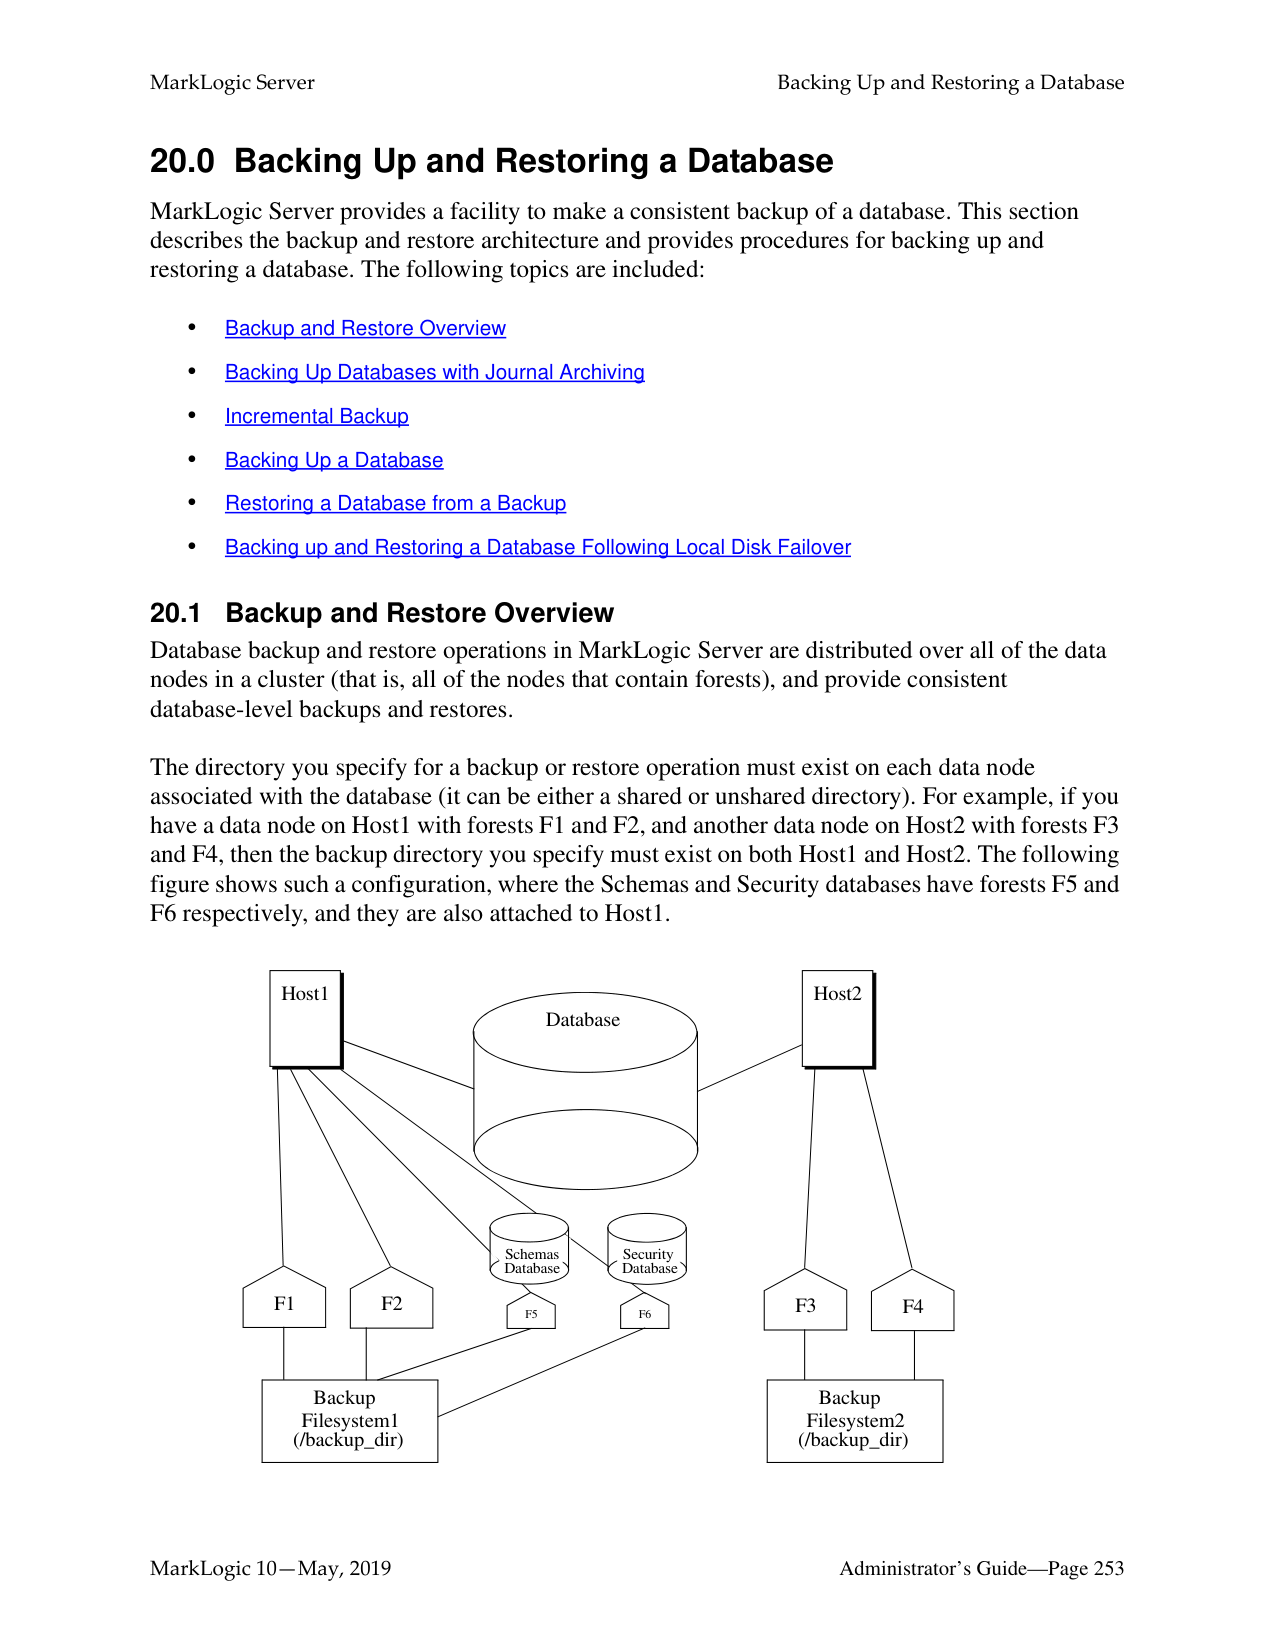


Note: You can also accomplish this operation using the XQuery, JavaScript, and REST APIs. For example, in XQuery using the admin:forest-rename and admin:forest-set-range-policy-range functions.
######### 18.7 Configuring a Database with Query Partitions
If a database is to participate in a tiered storage scheme using query partitions, it must have the following set:
Note: Unlike range partitions, it is not necessary for all of the forests in a database
configured for tiered storage to be part of a query partition.
For details on the database rebalancer with the query assignment policy, see the sections “Query Assignment Policy” on page 205, “Configuring the Rebalancer on a Database” on page 209, and “Configuring the Rebalancer on a Forest” on page 210.
The following procedure describes how to configure a database to use the query assignment policy:


######### 18.7.1 Creating Query Partitions
When creating a query partition, you specify the query partition name, number, and the number of forests to be created for the query partition. You can also specify that the query partition be created for multiple hosts in a cluster, in which case the specified number of forests will be created on each host.
Query partitions are based on forest naming conventions. A forest’s partition name prefix and the rest of the forest name are separated by a dash (-). For example, a forest named tier1-0001 belongs to the tier1 partition. Unlike range partitions, it is not necessary for all of the forests in a database configured for tiered storage to be part of a query partition.
Note: It is a best practice to create a default query partition (a partition without a query). Doing this will allow you to load documents into the default partition before you have finished creating the other partitions. As new partitions with queries are
created, the documents will be automatically moved from the default partition to the query partitions with matching queries.
For details on how to configure the database rebalancer with the query assignment policy, see the sections “Query Assignment Policy” on page 205, “Configuring the Rebalancer on a Database” on page 209, and “Configuring the Rebalancer on a Forest” on page 210.
Query partitions do unfiltered searches, which means that the results are not filtered for validation. For details about unfiltered queries, see the Fast Pagination and Unfiltered Searches chapter in the Query Performance and Tuning Guide.
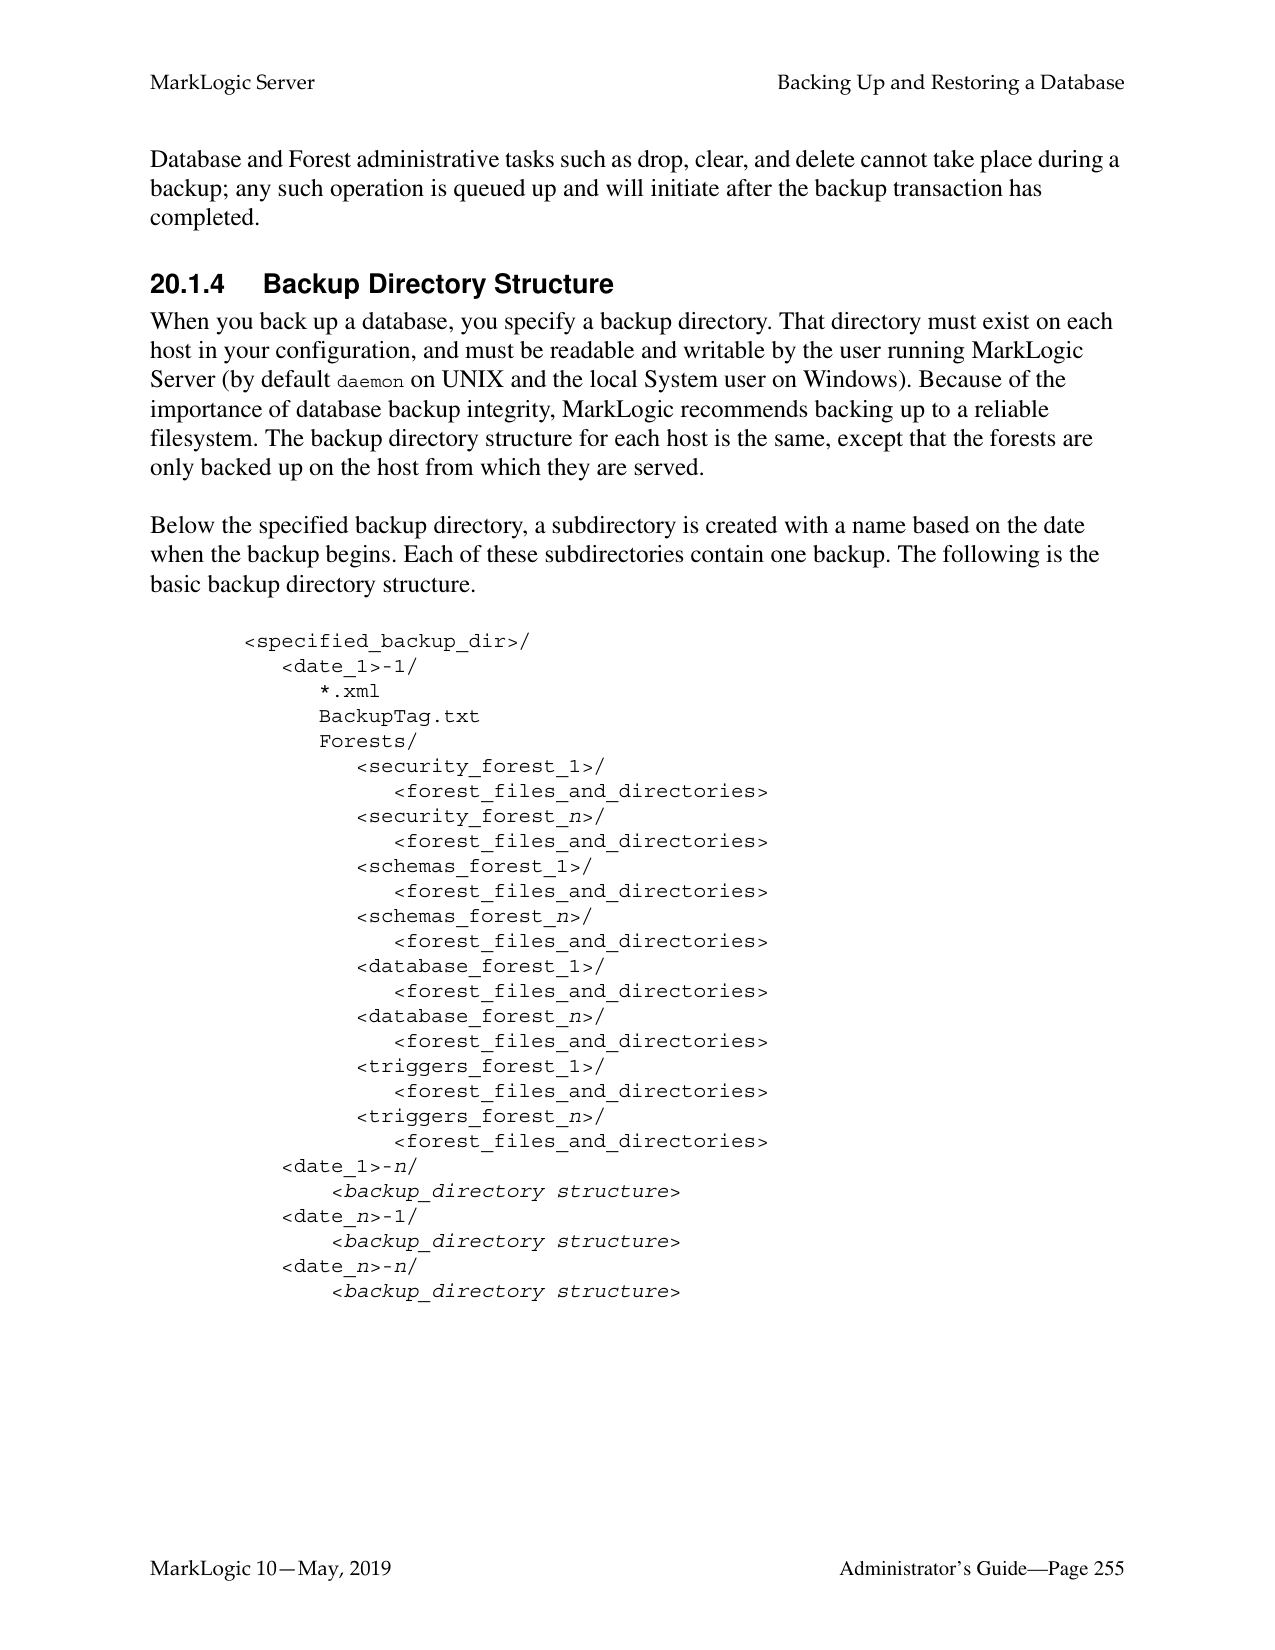
For example, the following creates query partition number 1, named tier1, with two forests in the Documents database on the host, MyHost1:
curl -X POST --anyauth --user admin:admin \
}' \ http://MyHost1:8002/manage/v2/databases/Documents/partitions
######### 18.7.2 Setting the Query Assignment Policy for the Query Partition
After creating a query partition, you can use the POST:/manage/v2/databases/{id|name}/partition-queries REST resource address to assign to it a query assignment policy, as described in “Query Assignment Policy” on page 205.
Note: Any indexes required for the query must be created before creating the query
partition. A query assignment policy in XML takes the form:
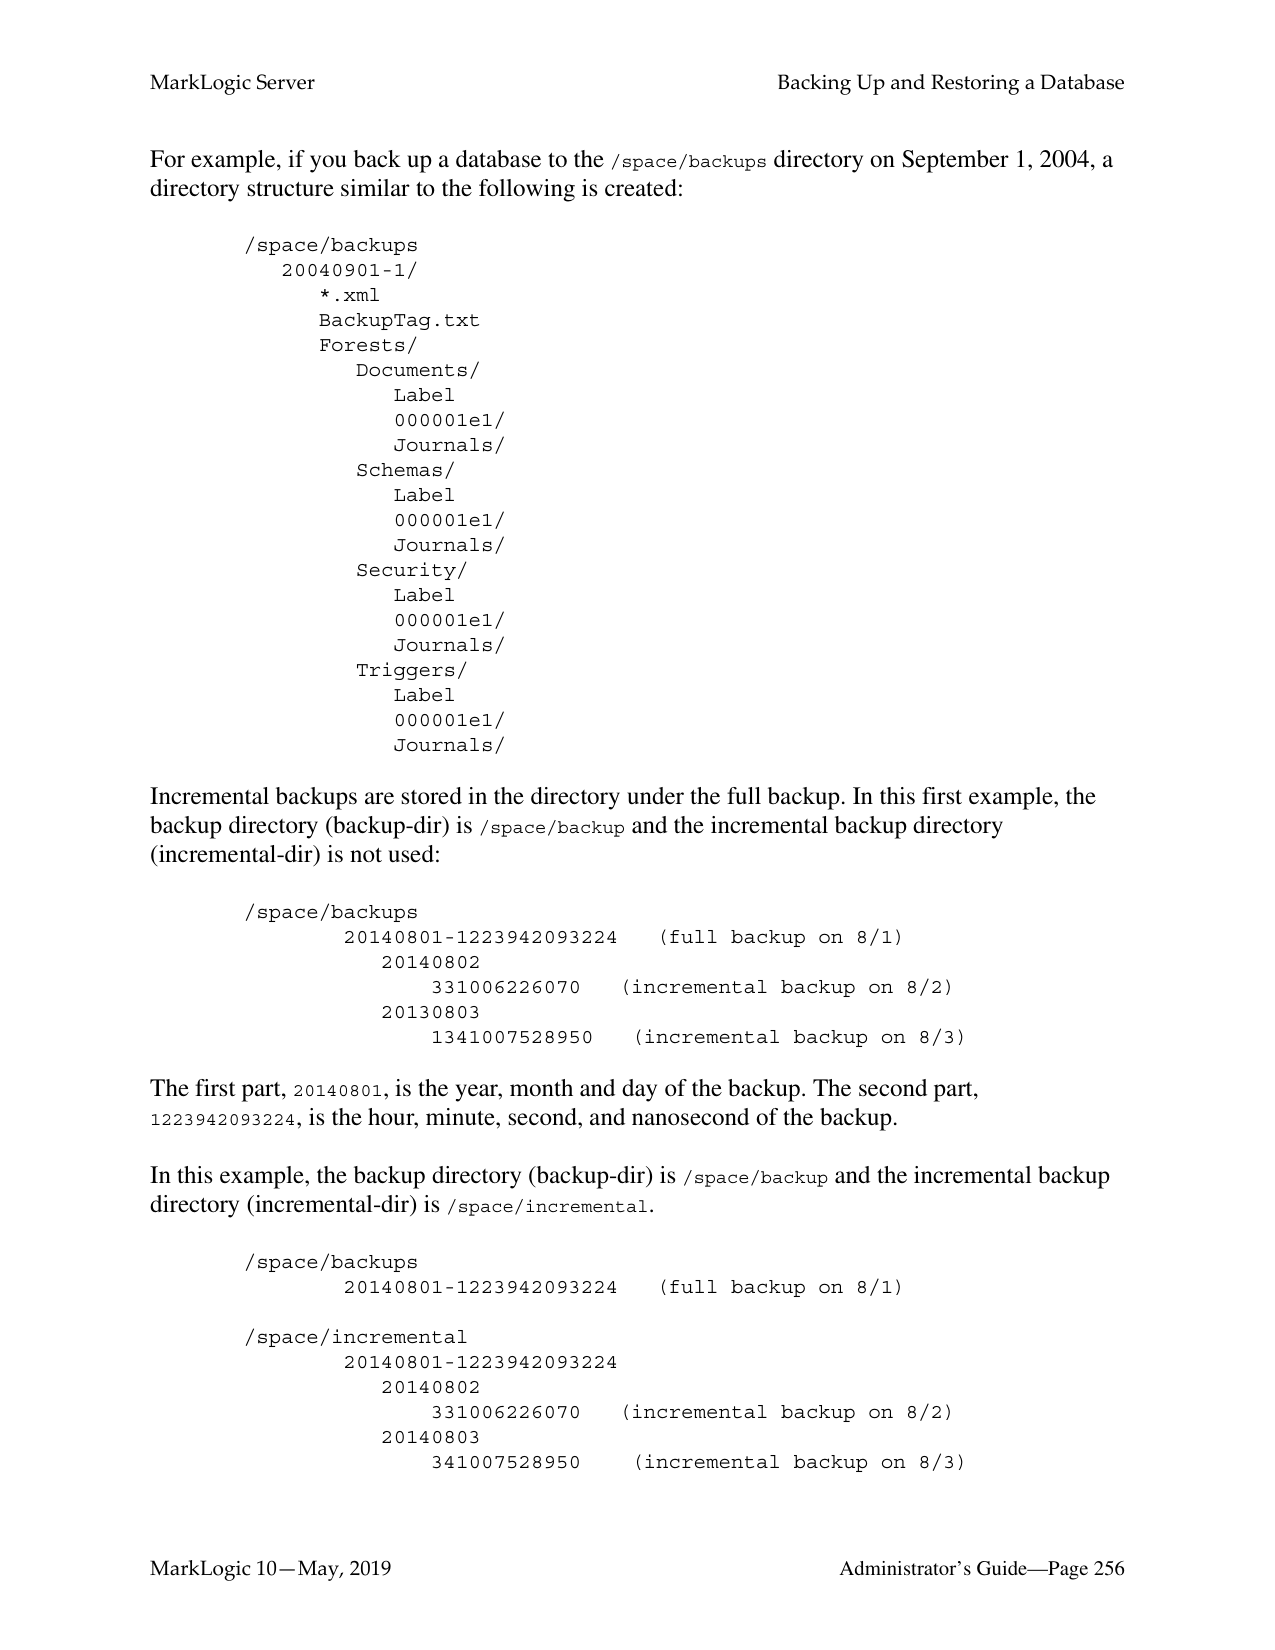
....cts:query.....
A query assignment policy in JSON takes the form:
{
"partition-number": "1", "query": {
....cts.query.....
} }
The search portion is a cts:query expression, as described in the Composing cts:query Expressions chapter in the Search Developer’s Guide. There can be only one cts:query per partition.
The query requires the proper index to be configured in the database. The complexity of the query affects the performance of insert and rebalancing. Therefore slow query like wildcard matching is not recommended.
For example to direct all documents that have either the word “Manager” or “Engineer” in them to the tier1 query partition created above, you would do the following:
$ cat query1.xml
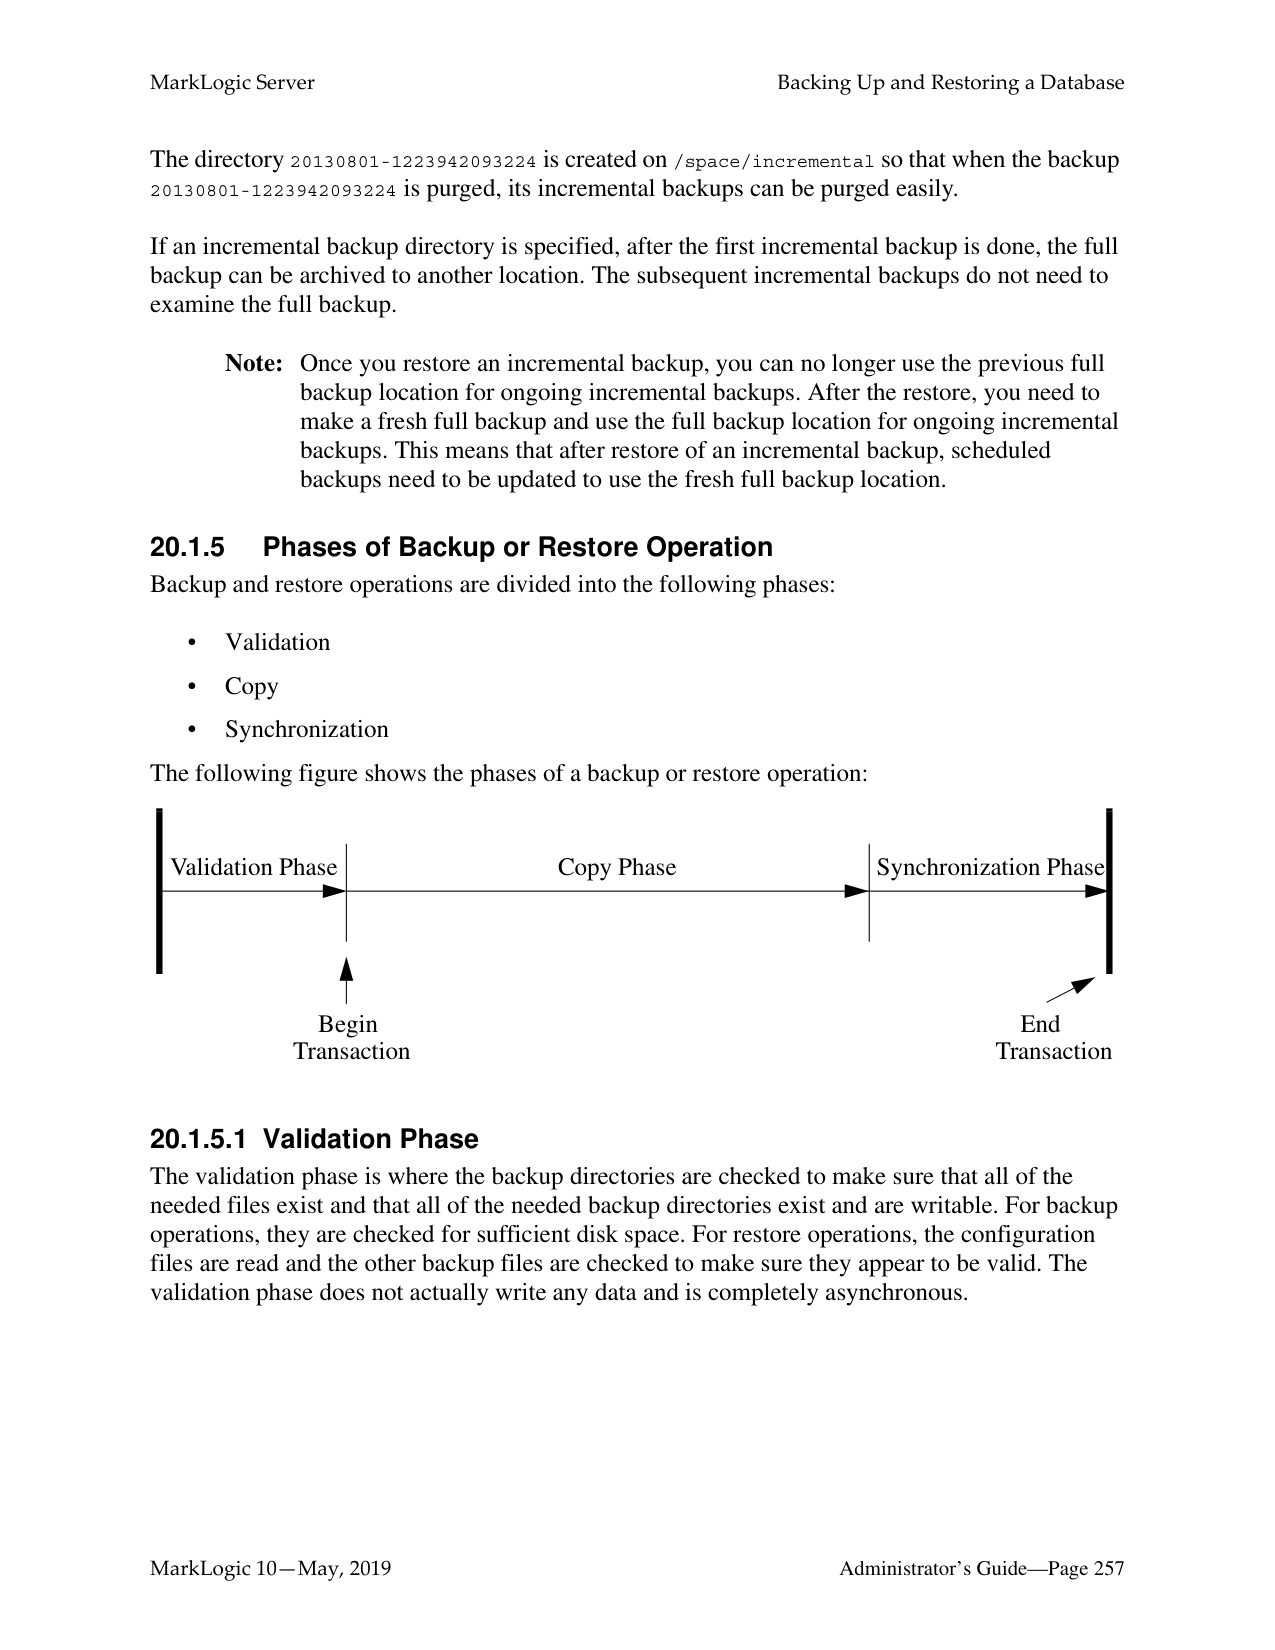
curl -X POST --anyauth -u admin:admin \
-H "Content-Type:application/xml" -d @query1.xml \ http://gordon-1:8002/manage/v2/databases/Schemas/partition-queries
The following query assignment policy will match documents where "LastModified" is within the last year:
xmlns:cts="http://marklogic.com/cts”>
The same query assignment policy in JSON:
{
"partition-number": 1, "query": {
"element-range-query": { "operator": ">=", "element": "LastModified", "value": {
"type": "xs:yearMonthDuration", "val": "P1Y"
} }
}
} For queries against a dateTime index, when $value is an xs:dayTimeDuration or xs:yearMonthDuration, the query is executed as an age query. $value is subtracted from fn:current-dateTime() to create a xs:dateTime used in the query. If there is more than one item in $value, they must all be the same type. For example, given a dateTime index on element startDateTime, queries
cts:element-range-query(xs:QName ("startDateTime"), ">", xs:dayTimeDuration("P1D")) and cts:element-range-query(xs:QName ("startDateTime"), ">", fn:current-dateTime() xs:dayTimeDuration("P1D")) are the same; both match values within the last day.
######### 18.7.3 Isolating a Query Partition
By default, when a search query is given to MarkLogic, all query partitions are searched, regardless of the query assignment policy set on the partition. To avoid this overhead, you can use the tieredstorage:partition-set-exclusion-enabled function to set safe-to-exclude on the query partition so that it will not be searched if the search query does not match the query assignment policy set for that partition.

When documents are distributed in query partitions based on time and date, you may want the option to always search a particular tier (typically the tier holding the most recent documents) because it may be the case that some of the documents in that tier are about to be migrated to a different tier but have not yet been moved. So if a search only matches the query set in a “lower” tier, the non-matching “higher” tier will also be searched to locate the matching documents that have not yet moved to the lower tier.
For example, you have two query partitions that hold the documents, “Seafood Daily,” as shown below. The query assignment policy for each compares the date of the document with the current date and sorts the documents so that one partition contains the issues from the current year and the other archives the issues from previous years. The query partition serving as the archive is set to safe-to-exclude and the query partition containing this year’s issues is not set with this option.
The current year is 2016 and a search query is given that matches the query for Archive Partition will also result in a search on Current Year Partition. However, a search query that matches the Current Year Partition will exclude the Archive Partition.
Safe to Exclude
Query Partition 3
Query Partition 2
|Seafood Daily Current Year
(2016)| |---|
|Seafood Daily Archive| |---|
Search: Seafood Daily 4/02/2015
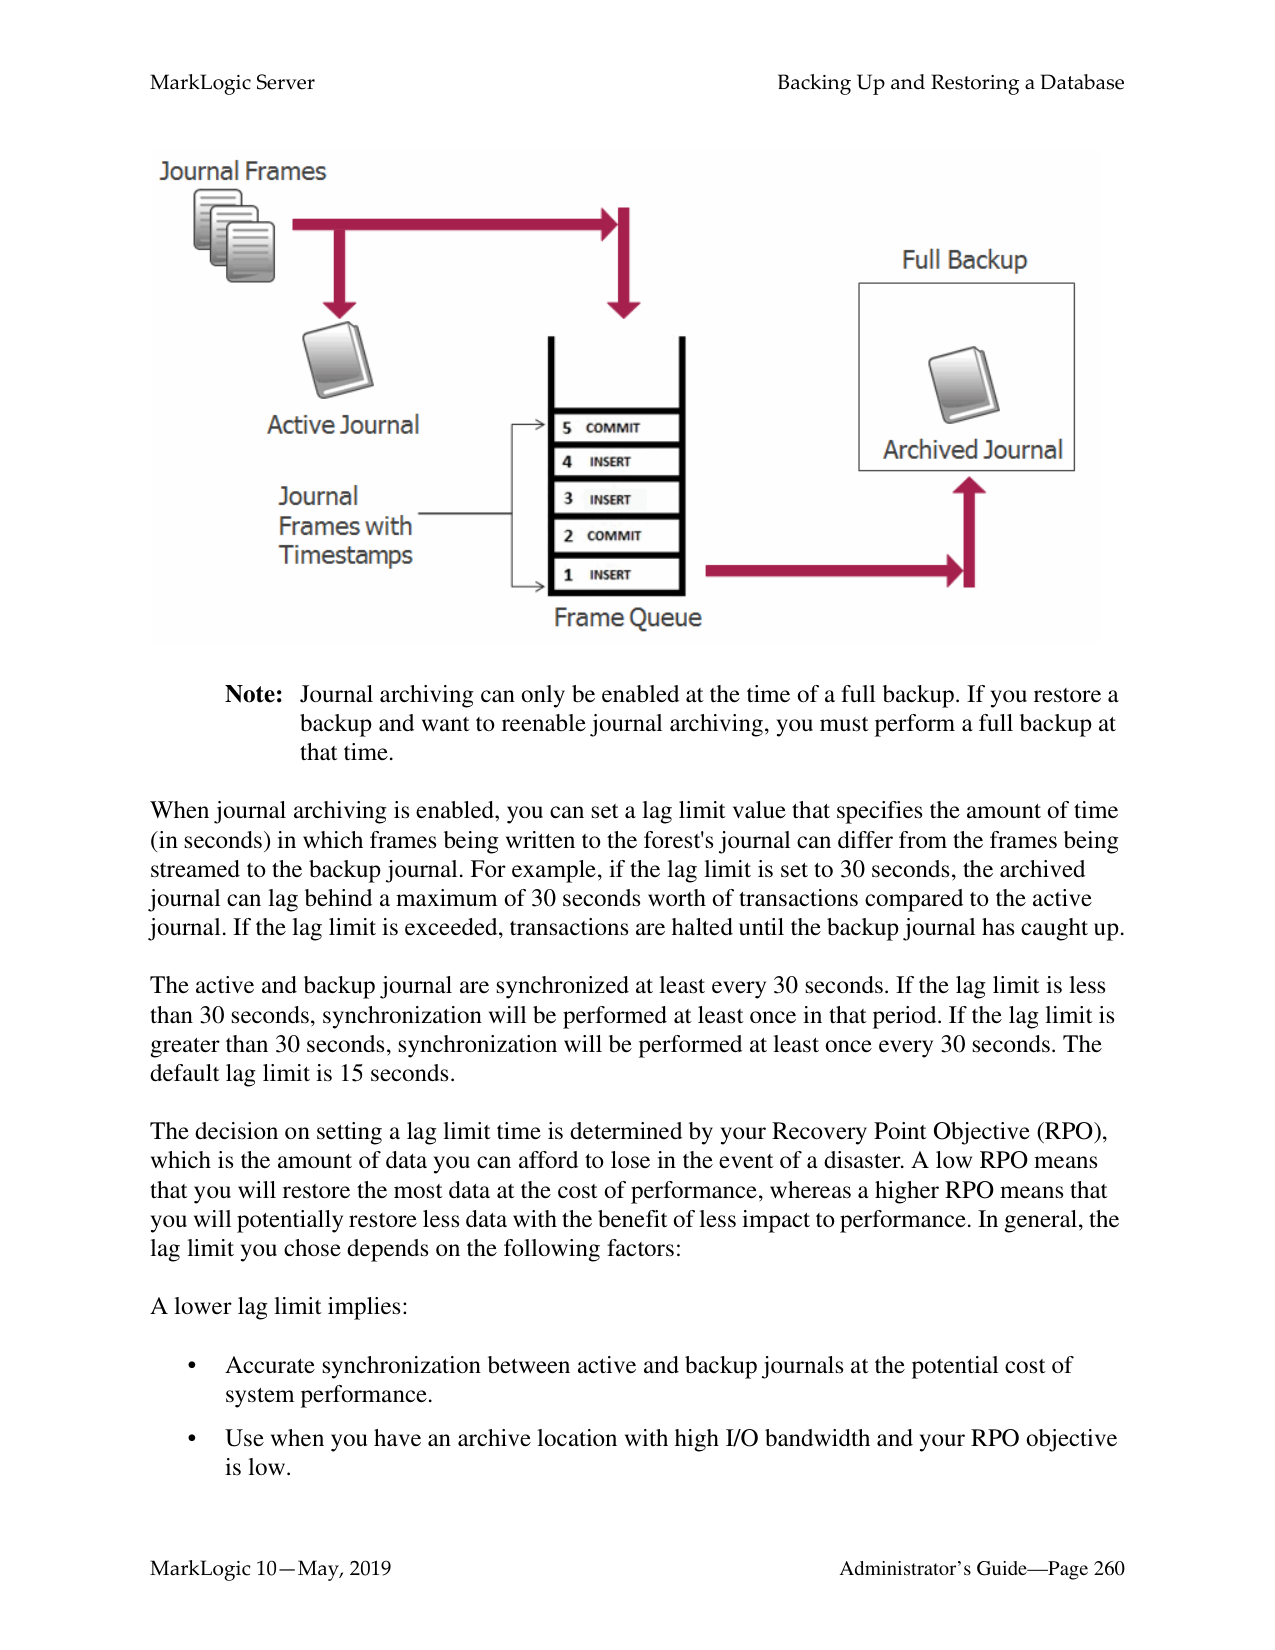
Search: Seafood Daily 4/15/2016
######### 18.7.4 Look Up Partitions QueriesTo look up partitions queries:
tieredstorage:partition-queries
######### 18.8 Overview of the Tiered Storage REST API
Tiered storage is supported by the XQuery, JavaScript, and REST APIs. All of the operations you will want to integrate into your storage-management scripts to automate repetitive storage management operations are available through the REST API. However, some of the initial, one-time set-up operations, such as those related to setting the range policy and partition key on the database, are only supported by the Admin Interface and the XQuery API.
Note: The Tiered Storage REST API supports both JSON and XML formats. The XML
format is used for all of the examples in this chapter. The topics in this section are:
######### 18.8.1 Asynchronous Operations
The partition resize and migrate, as well as the forest migrate and combine operations are processed asynchronously. This is because these operations may move a lot of data and take more time than generally considered reasonable for control to return to your script. Such asynchronous operations are tracked reusing ticket endpoints. This asynchronous process is initiated by GET:/manage/v2/tickets/{tid}?view=process-status, as outlined in the following steps:
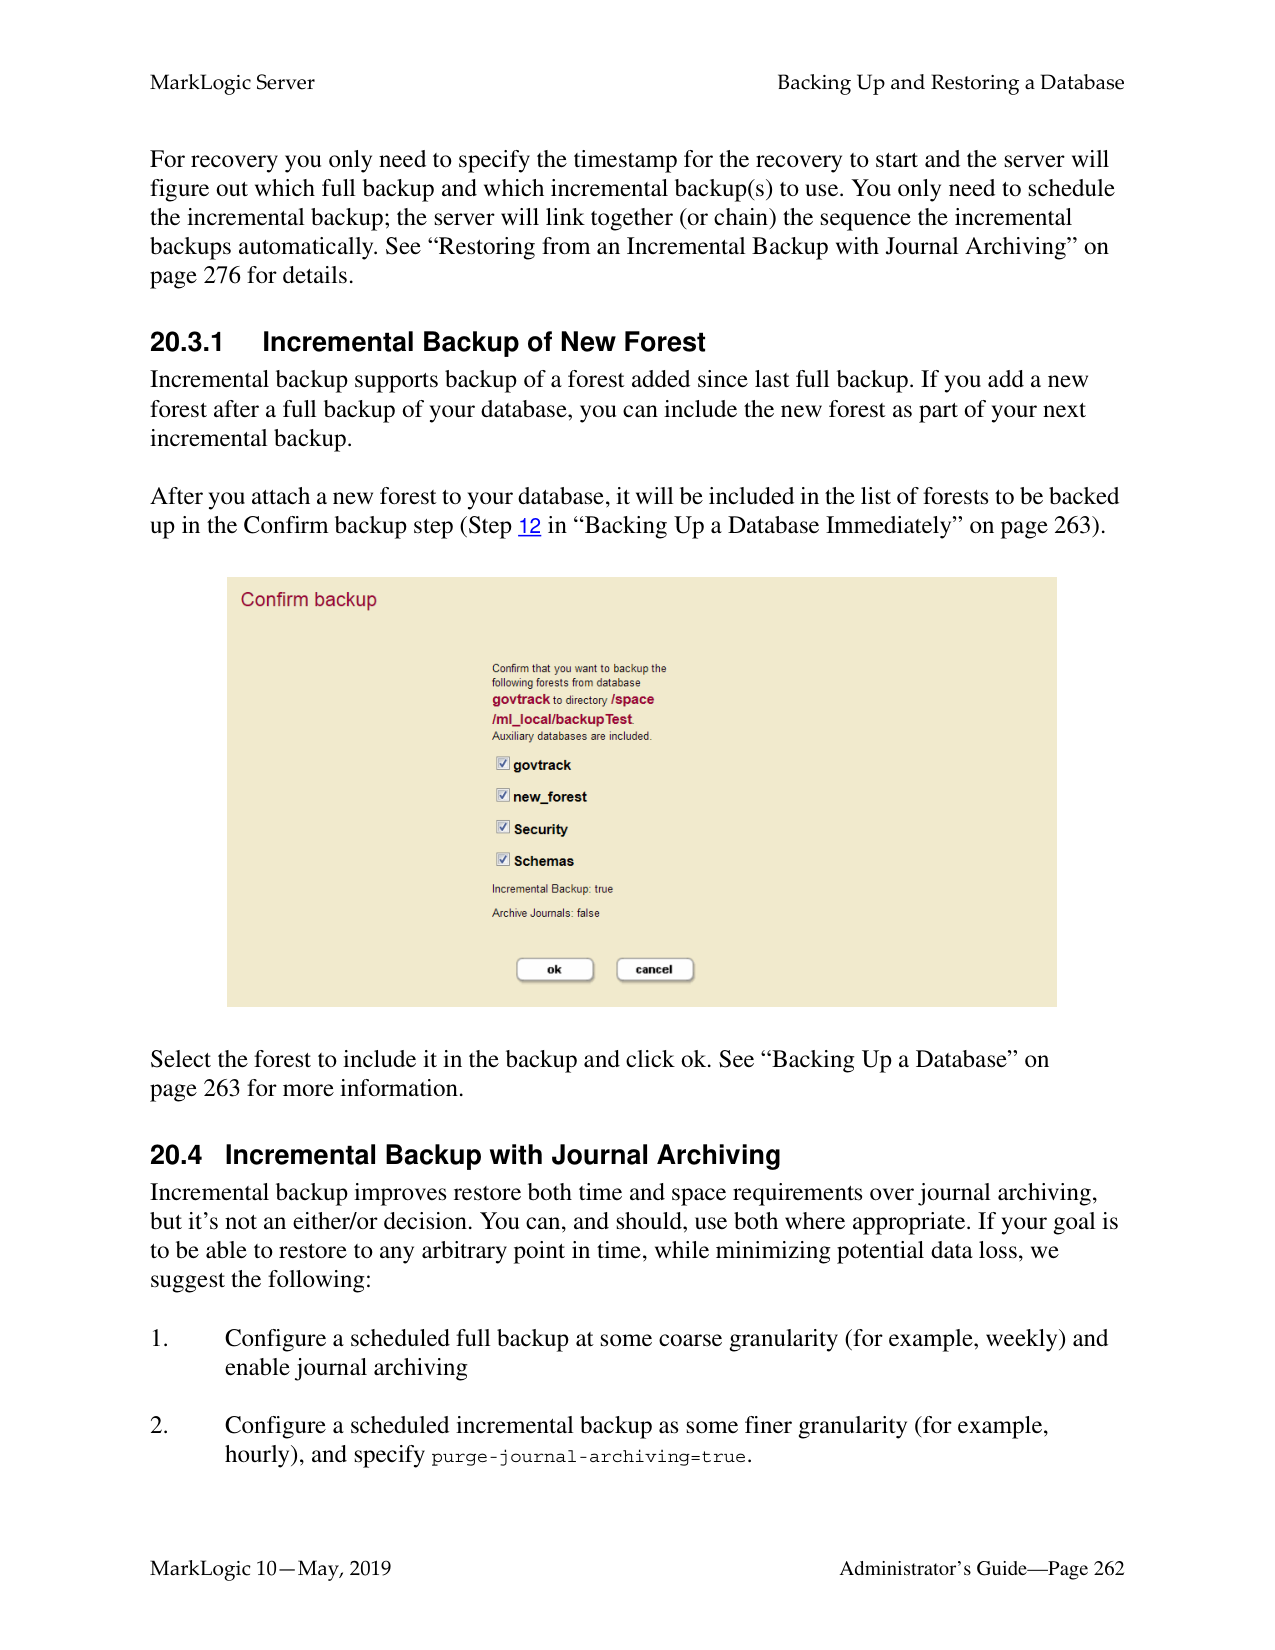
The generated ticket is returned in the form:
/manage/v2/tickets/{id}?view=process-status.
You can view the status of the operation by visiting the URL. For example if the returned ticket is:
/manage/v2/tickets/8681809991198462214?view=process-status
and your host is MyHost, you can view the status of your operation using the following URL:
http://MyHost:8002/manage/v2/tickets/8681809991198462214?view=processstatus
Note: Historical ticket information can always be accessed by viewing the ticket default
view.
########## 18.8.2 PrivilegesThe following privileges are required for the resource addresses described in this section:
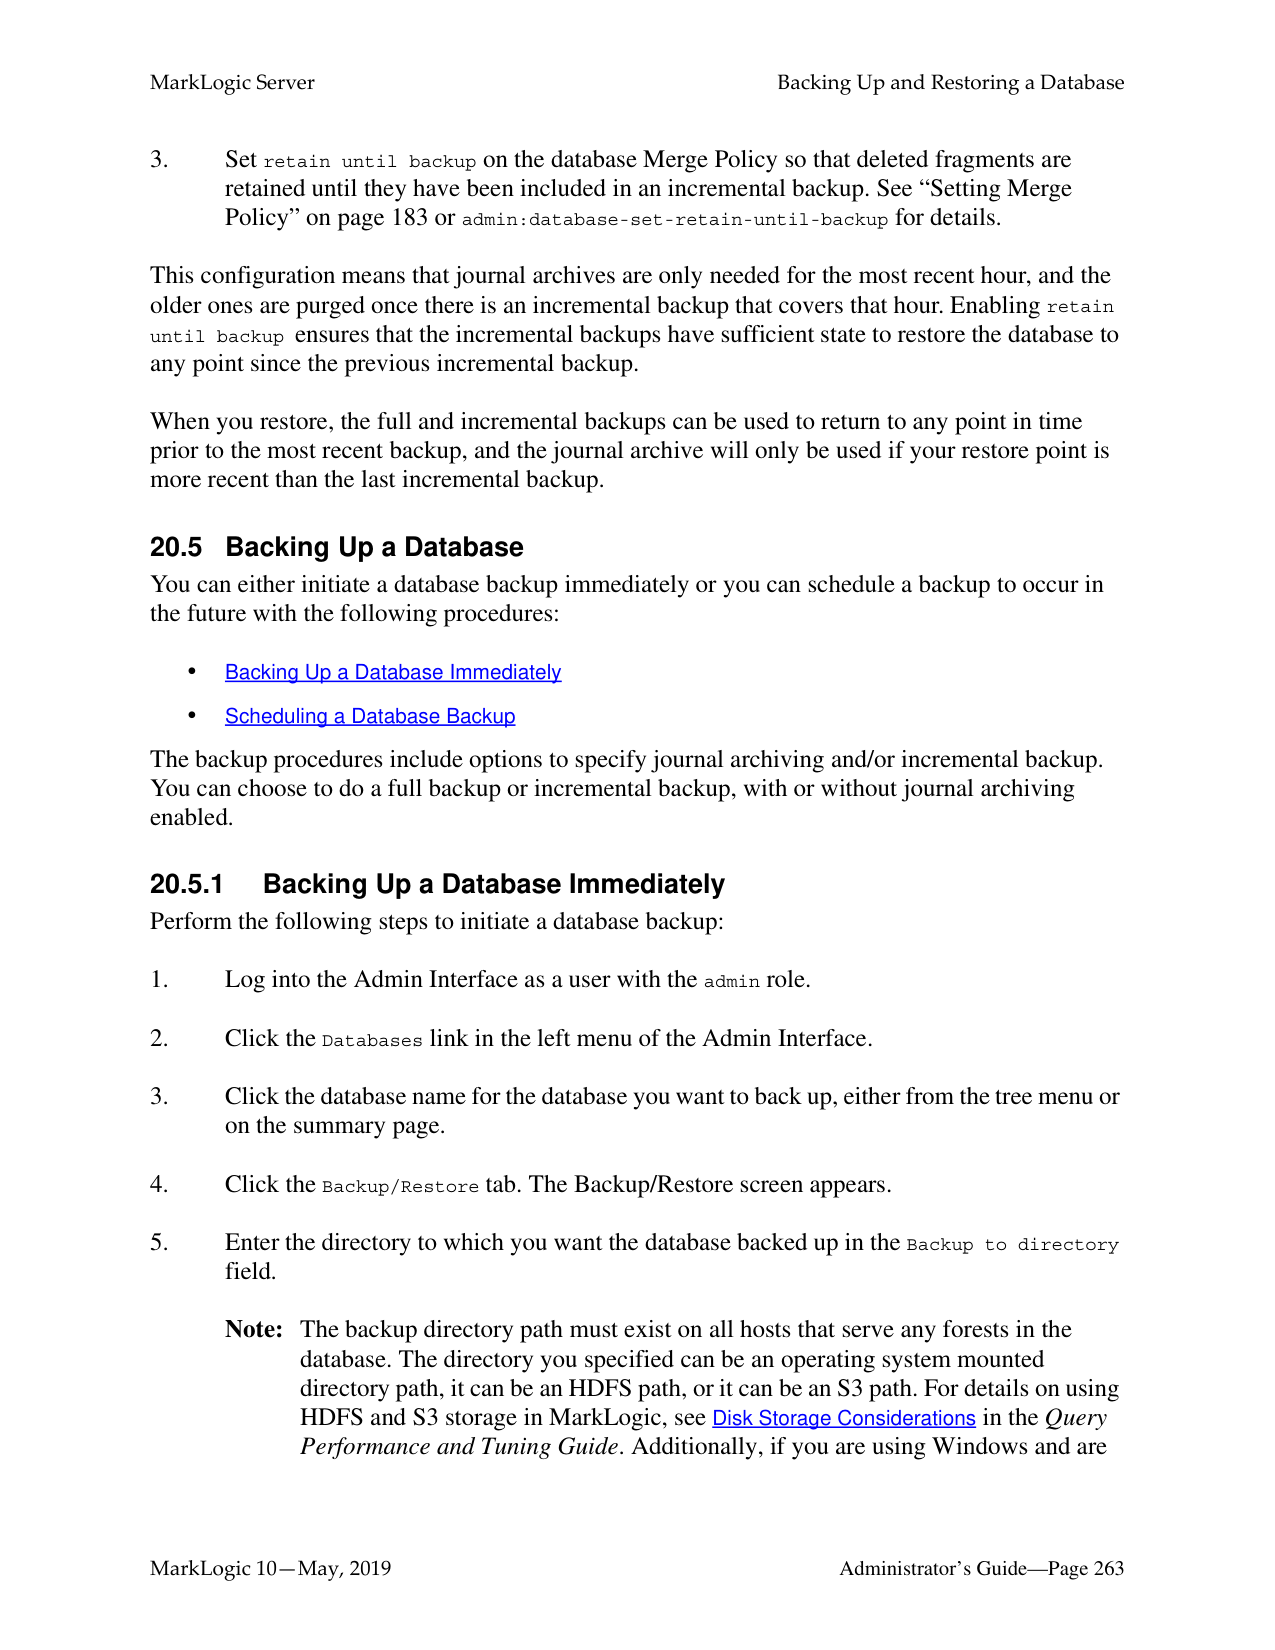
######### 18.8.3 /manage/v2/databases/{id|name}/partitions
|Method|Description|Parameters|XQuery Equivalent| |---|---|---|---| | | | | | |GET|Gets a list of partitions on the database|format? (json | xml)|tieredstorage:database-partitions| |POST|Add a range or query partition to the database|format? (json | xml)|tieredstorage:range-partition-create tieredstorage:query-partition-create|
For examples, see:
######### 18.8.4 /manage/v2/databases/{id|name}/partitions/{name}
|Method|Description|Parameters|XQuery Equivalent| |---|---|---|---| | | | | | |GET|Gets a summary of the partition, including links to containing database, links to member forests, and link to configuration|format? (json | xml)|tieredstorage:partition-forests| |DELETE|Deletes the partition|delete-data? (true|false)|tieredstorage:partition-delete|
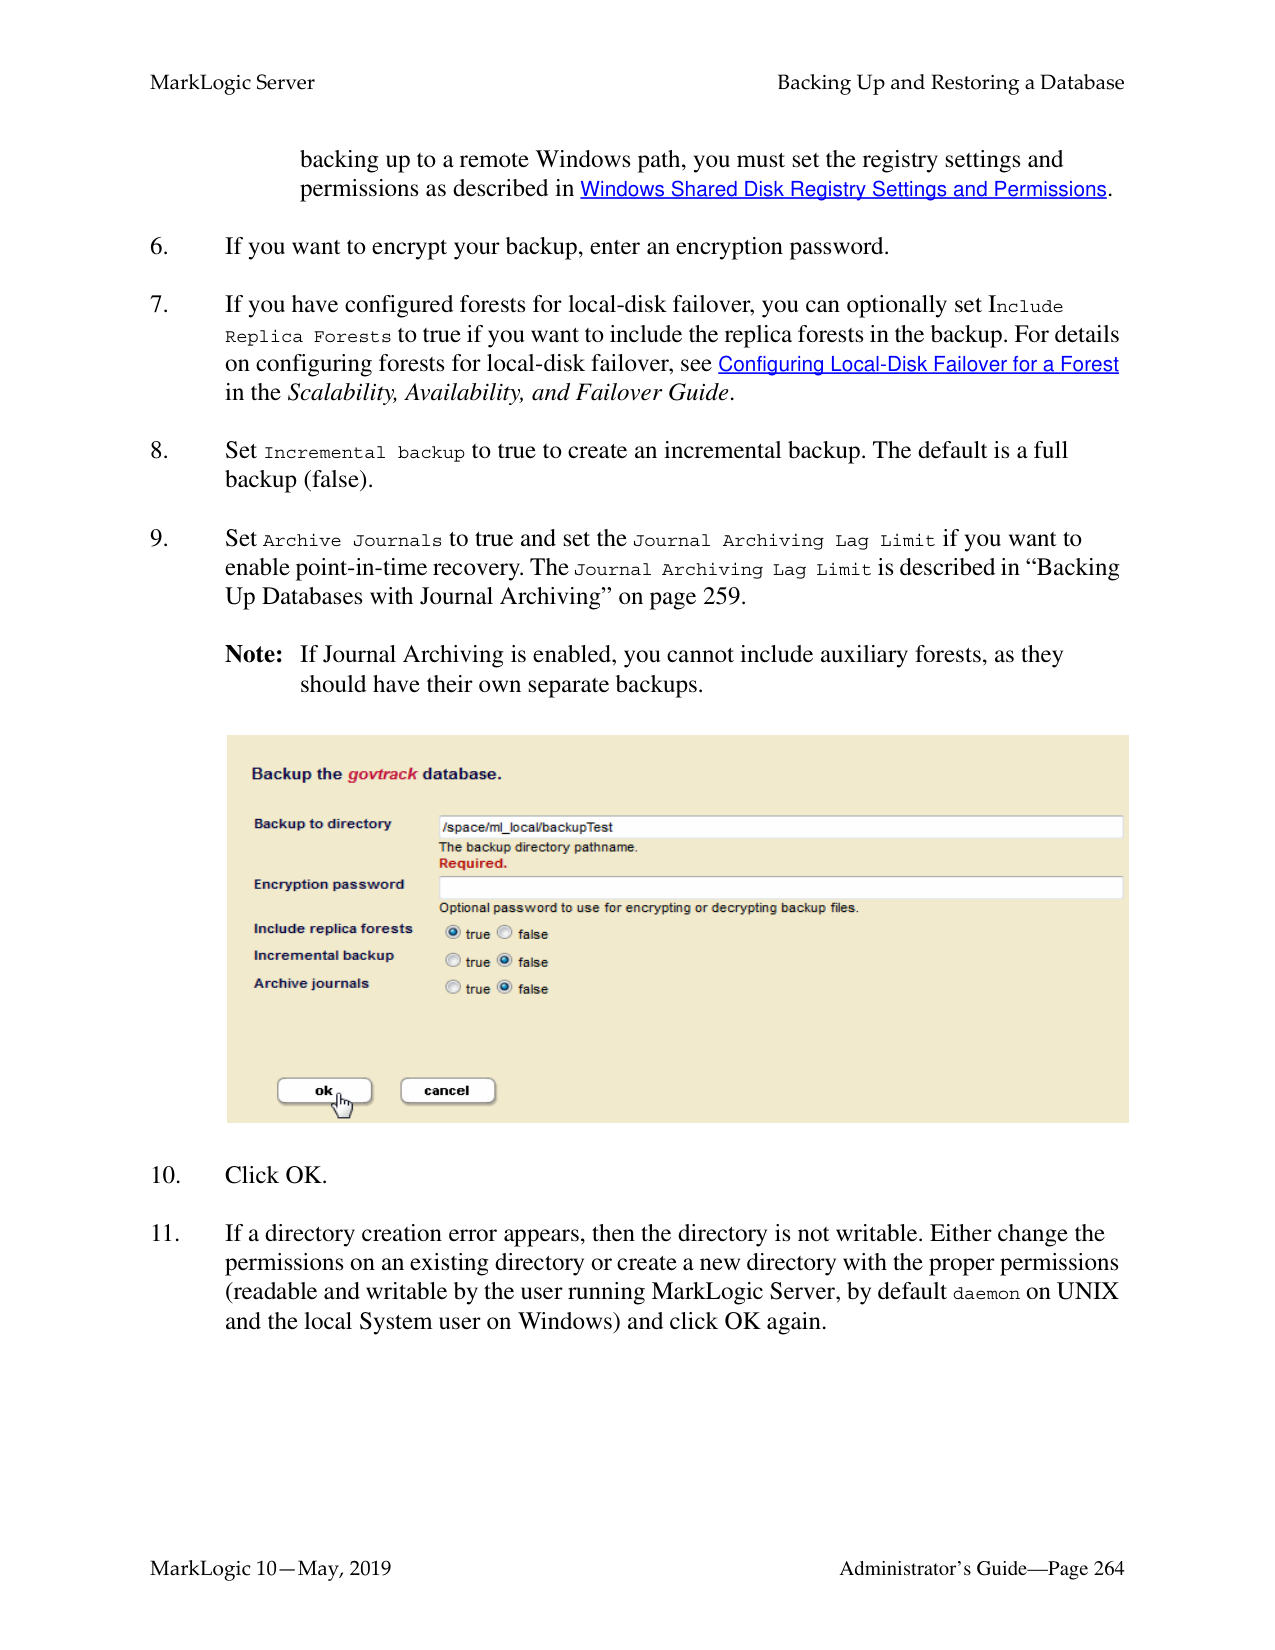
|PUT|Invokes one of the following operations on the partition:
• resize (asynchronous)
• transfer (synchronous)
• migrate (asynchronous)
|format? (json | xml)|tieredstorage:partition-resize tieredstorage:partition-transfer tieredstorage:partition-migrate|
For examples, see:
######### 18.8.5 /manage/v2/databases/{id|name}/partitions/{name}/properties
|Method|Description|Parameters|XQuery Equivalent| |---|---|---|---| | | | | | |GET|Gets the partition properties (enabled, updates-allowed)|format? (json | xml)| | |PUT|Modifies the partition properties (updates-allowed, online | offline)|format? (json | xml)|tieredstorage:partition-set-availability tieredstorage:partition-set-updates-allowed|
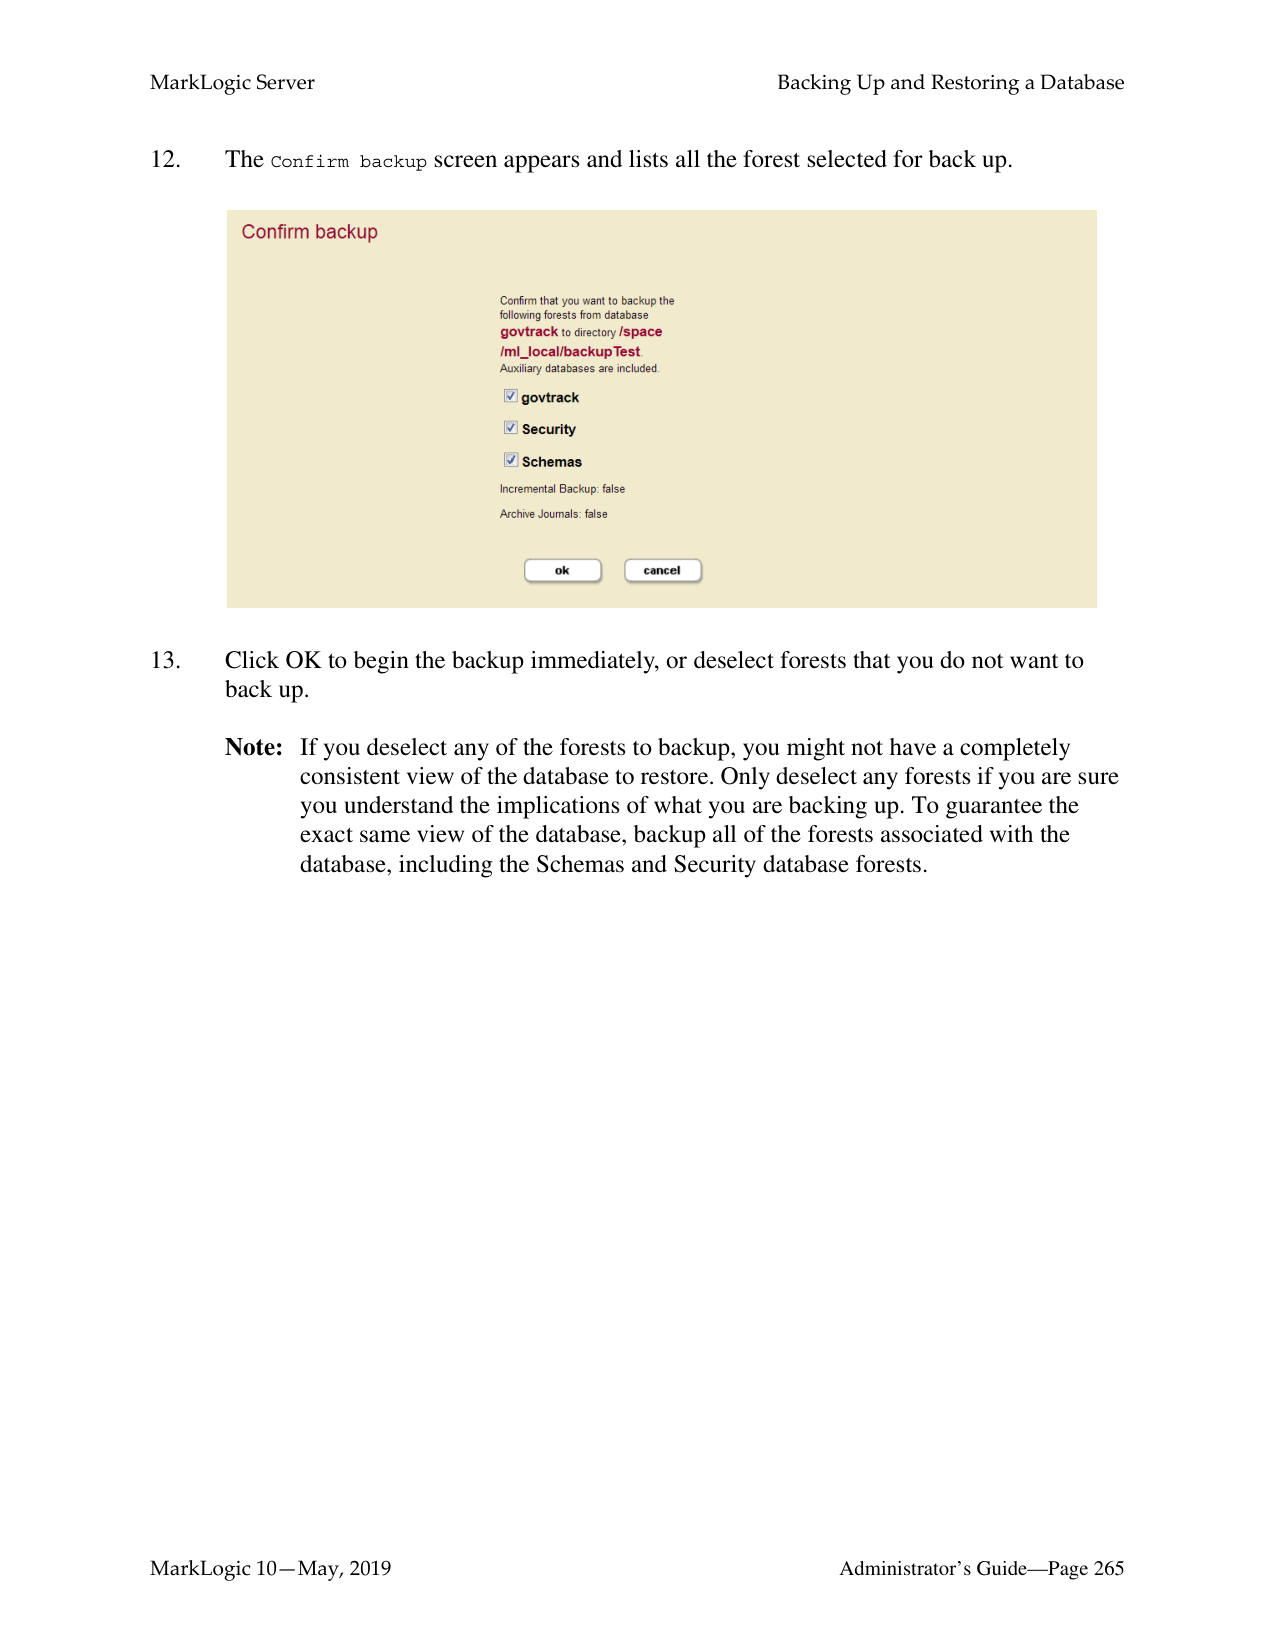
For examples, see:
######### 18.8.6 /manage/v2/databases/{id|name}/partition-queries
|Method|Description|Parameters|XQuery Equivalent| |---|---|---|---| | | | | | |GET|Gets the query assignment policies for the query partitions set for the specified database.|format? (json | xml)|tieredstorage:partition-queries| |POST|Sets the query assignment policy for a query partition.| |tieredstorage:partition-set-query|
For examples, see:
• Setting the Query Assignment Policy for the Query Partition
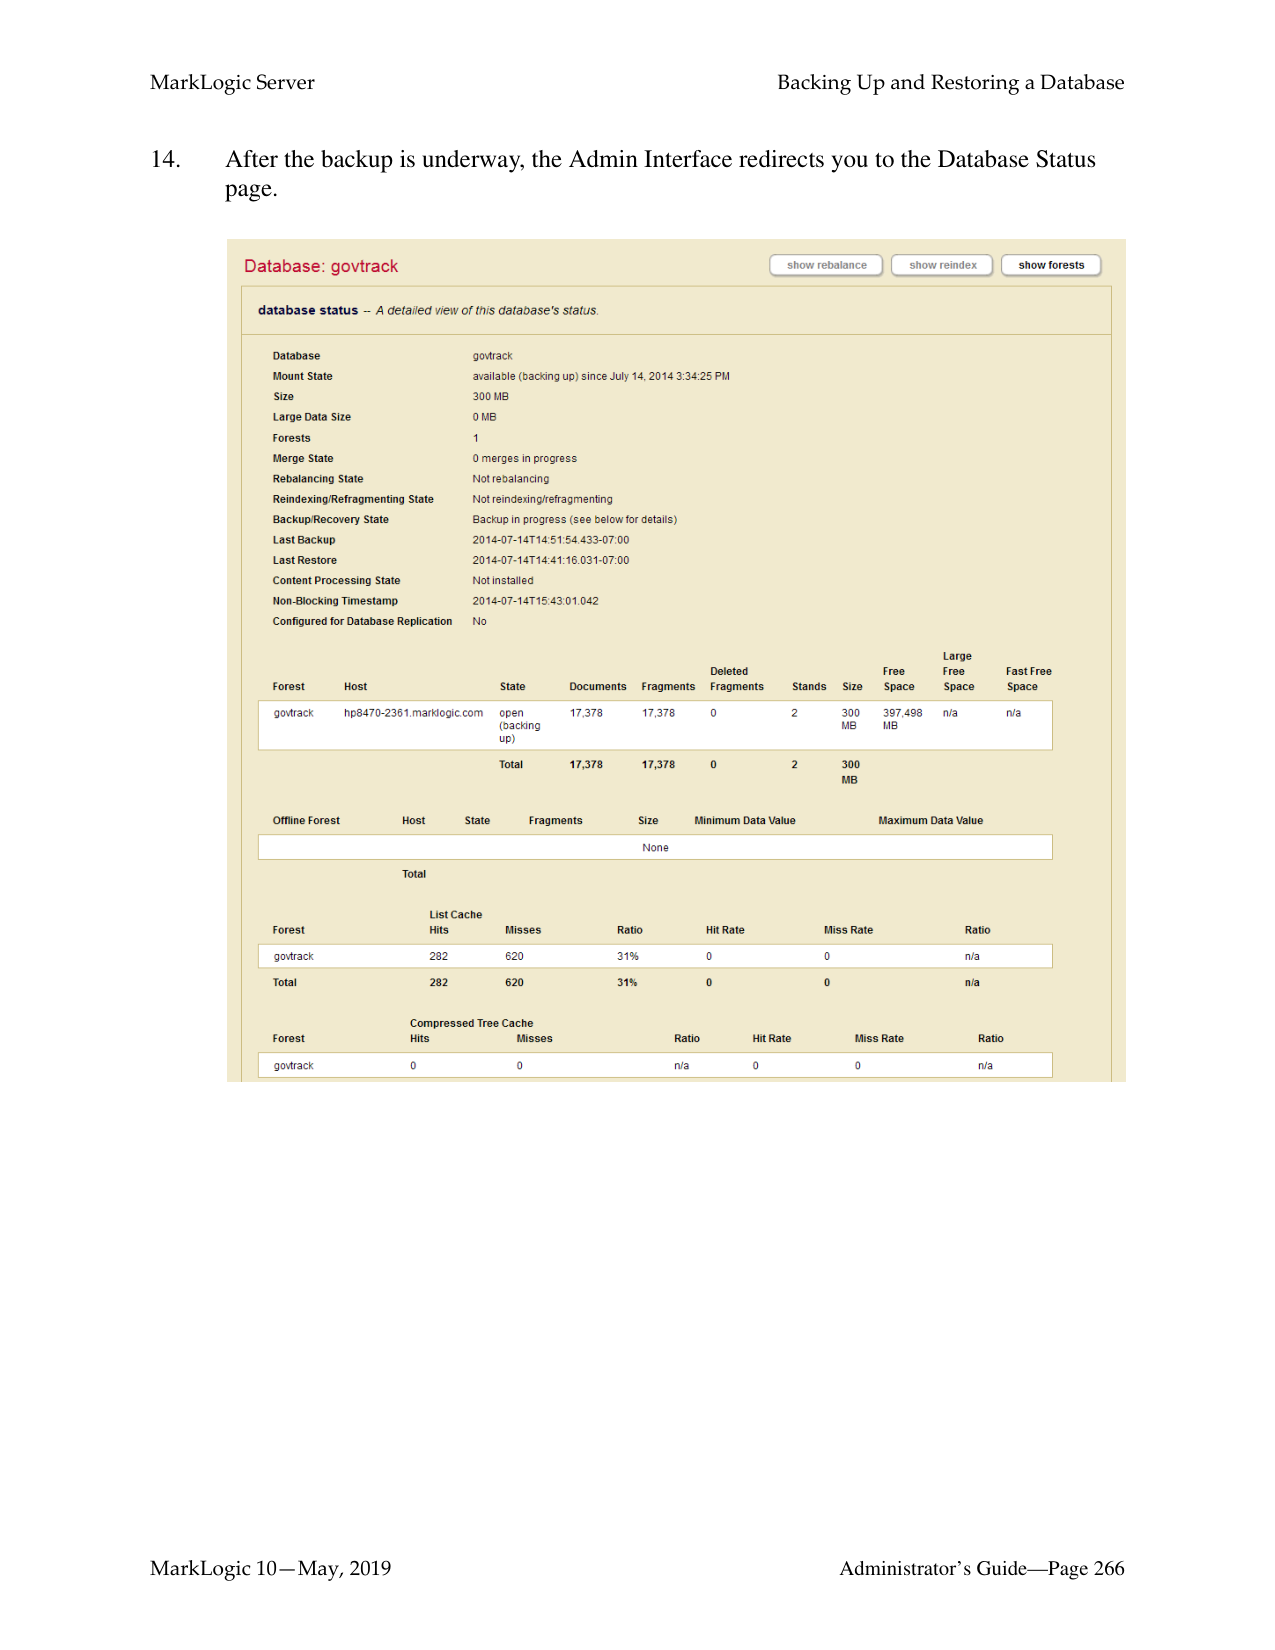
|Method|Description|Parameters|XQuery Equivalent| |---|---|---|---| | | | | | |GET|Gets the query assignment policy of the query partition with the specified number.|format? (json | xml)|tieredstorage:partition-get-query| |DELETE|Deletes the query assignment policy for the query partition with the specified number.| |tieredstorage:partition-delete-query|
|Method|Description|Parameters|XQuery Equivalent| |---|---|---|---| | | | | | |GET|Gets the properties of the query for the query partition with the specified number.|format? (json | xml)|tieredstorage:partition-get-query| |PUT|Update the query assignment policy in the query partition with the specified number.|format? (json | xml)|tieredstorage:partition-set-query|
######### 18.8.9 /manage/v2/forests
|Method|Description|Parameters|XQuery Equivalent| |---|---|---|---| | | | | | |GET|Gets a summary and list of forests.|format? (json | xml) view database-id group-id host-id fullrefs|admin:get-forest-ids xdmp:forests| |POST|Creates new forest(s)|format? (json | xml)|admin:forest-create|
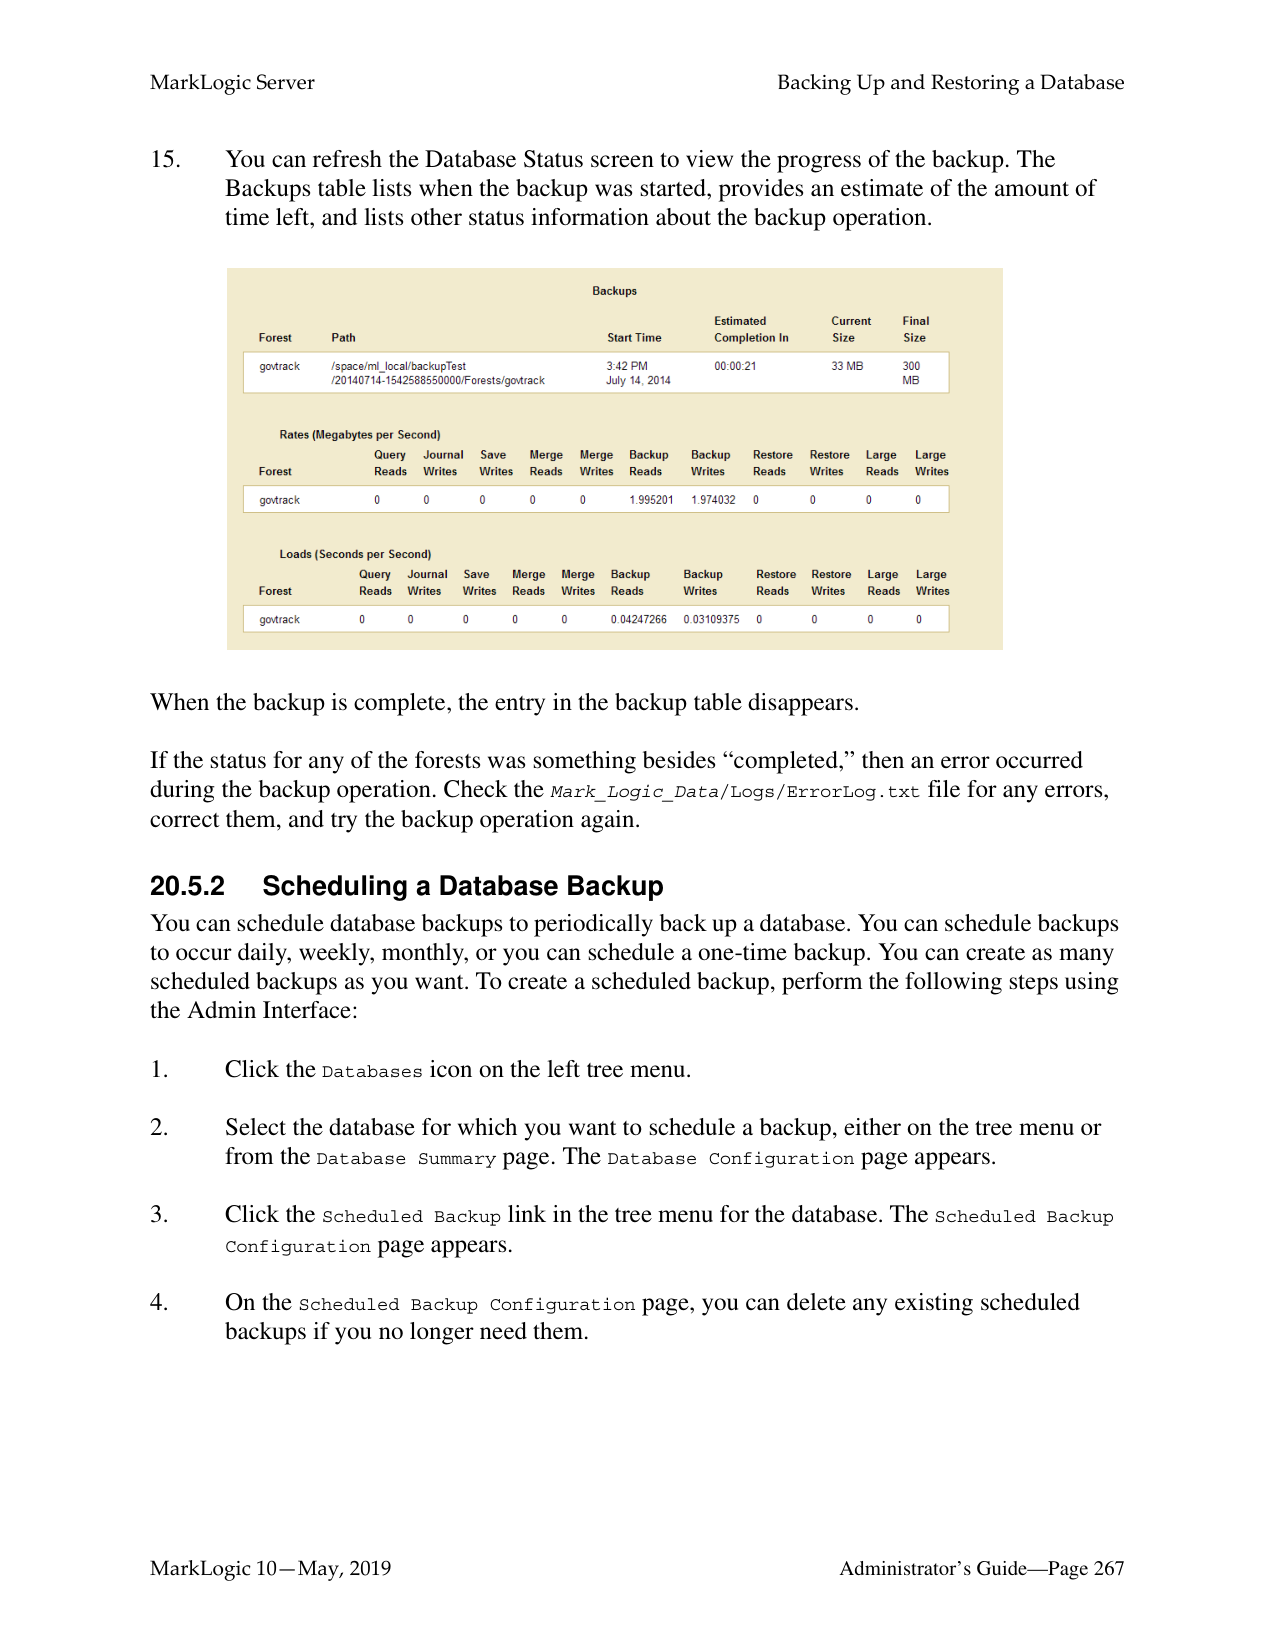
|PUT|Invokes one of the following operations on the forest:
• forest-combine
• forest-migrate
These operations are asynchronous|format? (json | xml)|tieredstorage:forest-combine tieredstorage:forest-migrate|
For examples, see:
######### 18.8.10 /manage/v2/forests/{id|name}
|Method|Description|Parameters|XQuery Equivalent| |---|---|---|---| | | | | | |GET|Gets a summary of the forest.|format? (json | xml) view|admin:forest-get-*| |POST|Initiates a state change on the forest.|state (clear | merge | restart | attach | detach | retire | employ)|xdmp:forest-clear xdmp:merge xdmp:forest-restart admin:database-attach-forest admin:database-detach-forest admin:database-retire-forest admin:database-employ-forest| |DELETE|Deletes the forest.|level (config-only | full)|admin:forest-delete|
For an example, see:
• Retiring Forests
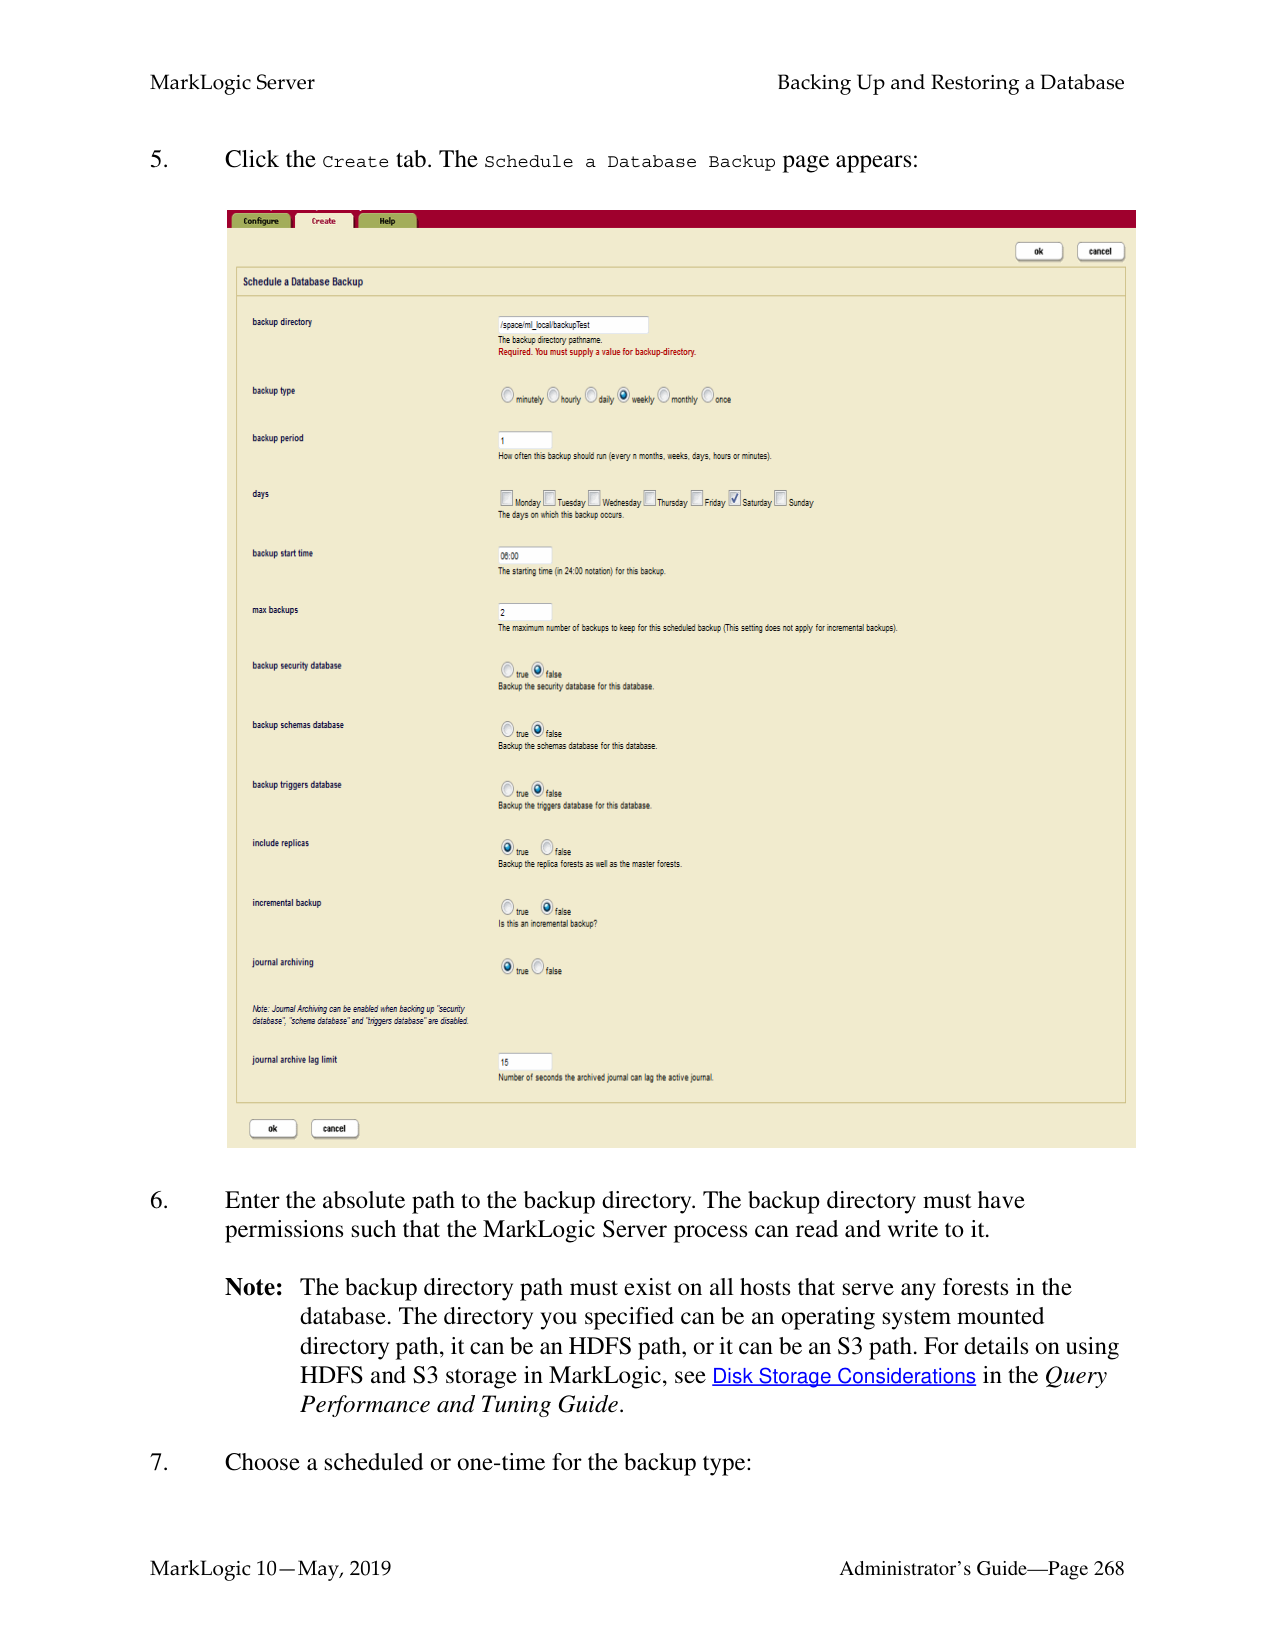
|Method|Description|Parameters|XQuery Equivalent| |---|---|---|---| | | | | | |GET|Gets the properties on the forest|format? (json | xml)|admin:forest-get-enabled admin:forest-get-rebalancer-enable admin:forest-get-updates-allowed admin:database-get-attached-forests admin:forest-get-failover-enable admin:forest-get-availability| |PUT|Initiates a properties change on the forest. The properties are:
enable | disable forest enable | disable rebalancer modify updates-allowed specify failover hosts or replica forests availability|format? (json | xml)|admin:forest-set-enabled admin:forest-set-rebalancer-enable admin:forest-set-updates-allowed admin:database-attach-forest admin:database-detach-forest admin:forest-set-failover-enable admin:forest-set-availability|

Some of these operations operate asynchronously and immediately return a ticket number that you can use to check the status of the operation. For example, if the following is returned:
You can check the status of the operation by entering a resource address like the following:
http://MyHost:8002/manage/v2/tickets/4678516920057381194?view=processstatus
For details on asynchronous processes, see “Asynchronous Operations” on page 235.
For example, to return the details of the 2011 range partition on the Documents database, do the following:
curl -X GET --anyauth --user admin:admin --header \ "Content-Type:application/xml" \ http://MyHost:8002/manage/v2/databases/Documents/partitions/2011
Forests and partitions can be migrated from one storage device to another. For example, a range partition on an SSD has aged to the point where is it less frequently queried and can be moved to a slower, less expensive, storage device to make room for a more frequently queried range partition.
For example, the 2011 range partition on the Documents database is mounted on a local disk on the host, MyHost. To migrate the 2011 range partition to the /warm-storage data directory mounted on a shared disk on the host, OurHost, do the following:
$ cat migrate-partition.xml
$ curl --anyauth --user user:password -X PUT \
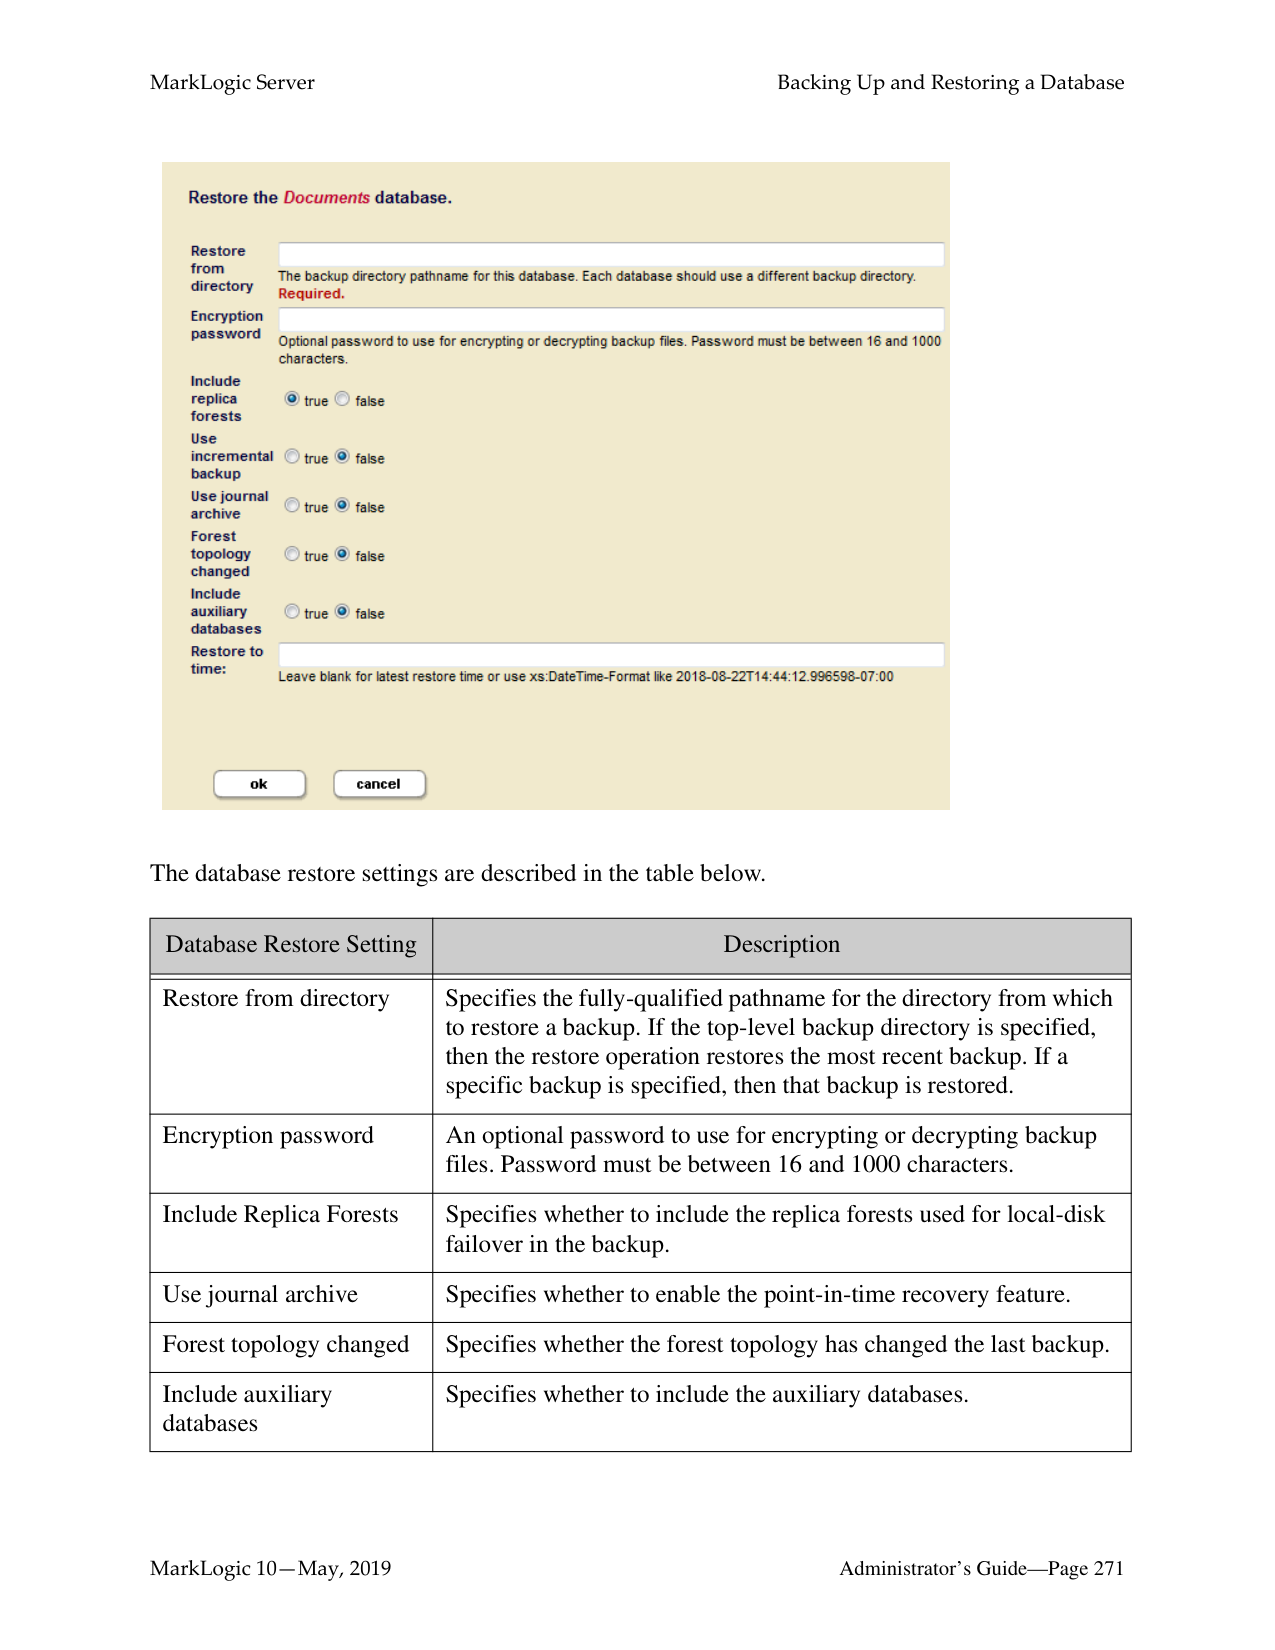
-d @migrate-partition.xml -H 'Content-type: application/xml' \ http://MyHost:8002/manage/v2/databases/Documents/partitions/2011
Note: If you do not specify a data-directory, the default data directory is used.
The tiered storage migration operations allow you to migrate a forest or partition between different types of storage. The following table lists the four migration options. The migration option you select determines the sequence of steps taken by tiered storage during the migration operation.
|Migration Option|Description| |---|---| | | | |local-to-local (default)|Indicates that the migration is to move data from local storage to local storage. This is the default if no migration option is specified and the type of storage cannot be derived from the data directory path.| |local-to-shared|Indicates that the migration is to move data from local storage to shared storage. This type of migration supports changing hosts.| |shared-to-local|Indicates that the migration is to move data from shared storage to local storage. This type of migration supports changing hosts.| |shared-to-shared|Indicates that the migration is to move data from shared storage to shared storage. This type of migration supports changing hosts.|
You can use the PUT:/manage/v2/forests resource address to migrate individual forests. For example, the forests 2011-0001 and 2011-0002, are mounted on a local disk on the host, MyHost. To migrate these forests to the /warm-storage data directory mounted on a shared disk on the host, OurHost, do the following:
$ cat migrate-forests.xml
$ curl --anyauth --user user:password -X PUT \
-d @migrate-forests.xml -H 'Content-type: application/xml' \ http://MyHost:8002/manage/v2/forests
Note: If failover is configured on your forests, do a full backup of database after a forest or partition migrate operation to ensure that you can recover your data should something go wrong. You may also need to increase the timeout setting on the migrate operation, as it will take longer when failover is configured.
######### 18.9.3 Resizing Partitions
You can increase or decrease the number of forests in a partition. Once the resize operation has completed, the documents in the partition forests will be rebalanced for even distribution.
For example, to resize the 2011 range partition up to five forests, do the following:
$ cat resize-partition.xml

$ curl --anyauth --user user:password -X PUT \
-d @resize-partition.xml -H 'Content-type: application/xml' \ http://MyHost:8002/manage/v2/databases/Documents/partitions/2011
In addition to resizing your partition, you can migrate your partition to another host by specifying a different host in the payload. Additionally, you can move the partition to a different storage tier (such as local-to-shared) by specifying one of the migration options described in “Migrating Forests and Partitions” on page 242.
Note: If you resize partitions for databases configured for database replication, first
resize the replica partitions before resizing the master partitions.
######### 18.9.4 Transferring Partitions between Databases
You can move a partition from one database to another. For example, to transfer the 2011 range partition from the DB1 database to the DB2 database, do the following:
$ cat transfer-partition.xml
-d @transfer-partition.xml -H 'Content-type: application/xml' \ http://MyHost:8002/manage/v2/databases/DB1/partitions/2011
######### 18.9.5 Combining Forests
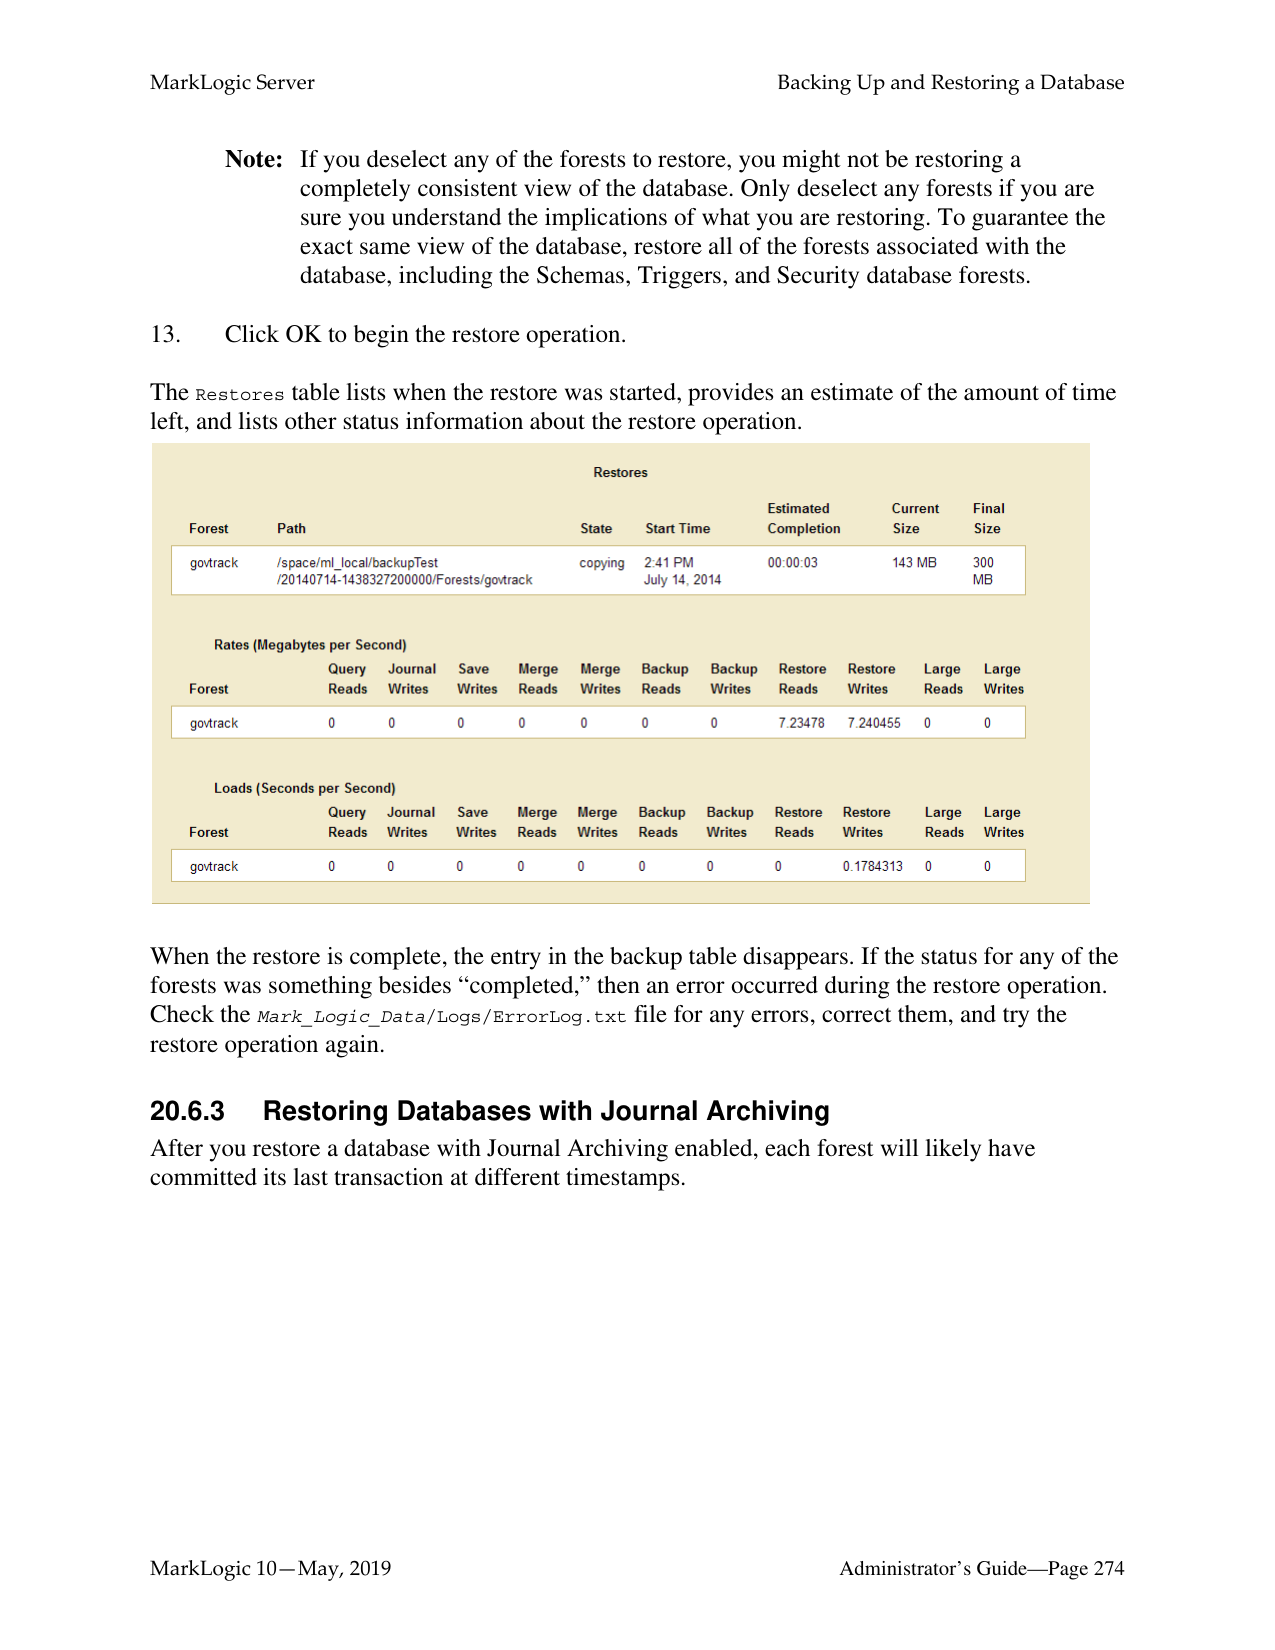
You can use the PUT:/manage/v2/forests resource address to combine multiple forests into a single forest. For example, to combine the forests, 2011-0001 and 2011-0002, into a single forest, named 2011, do the following:
$ cat combine-forests.xml
$ curl --anyauth --user user:password -X PUT \
-d @combine-forests.xml -H 'Content-type: application/xml' \ http://MyHost:8002/manage/v2/forests
You can both combine forests and migrate the combined forest to another host in a single operation by specifying a different host value. You can also move the forests to a different storage tier (such as local-to-shared) by specifying one of the migration options described in “Migrating Forests and Partitions” on page 242.
Note: If you want to combine forests that are attached to databases configured for database replication, first combine the foreign replica forests with the snapshot option before combining the master forests.
Note: If failover is configured on your forests, do a full backup of database after a forest combine operation to ensure that you can recover your data should something go wrong. You may also need to increase the timeout setting on the combine operation, as it will take longer when failover is configured.
######### 18.9.6 Retiring Forests
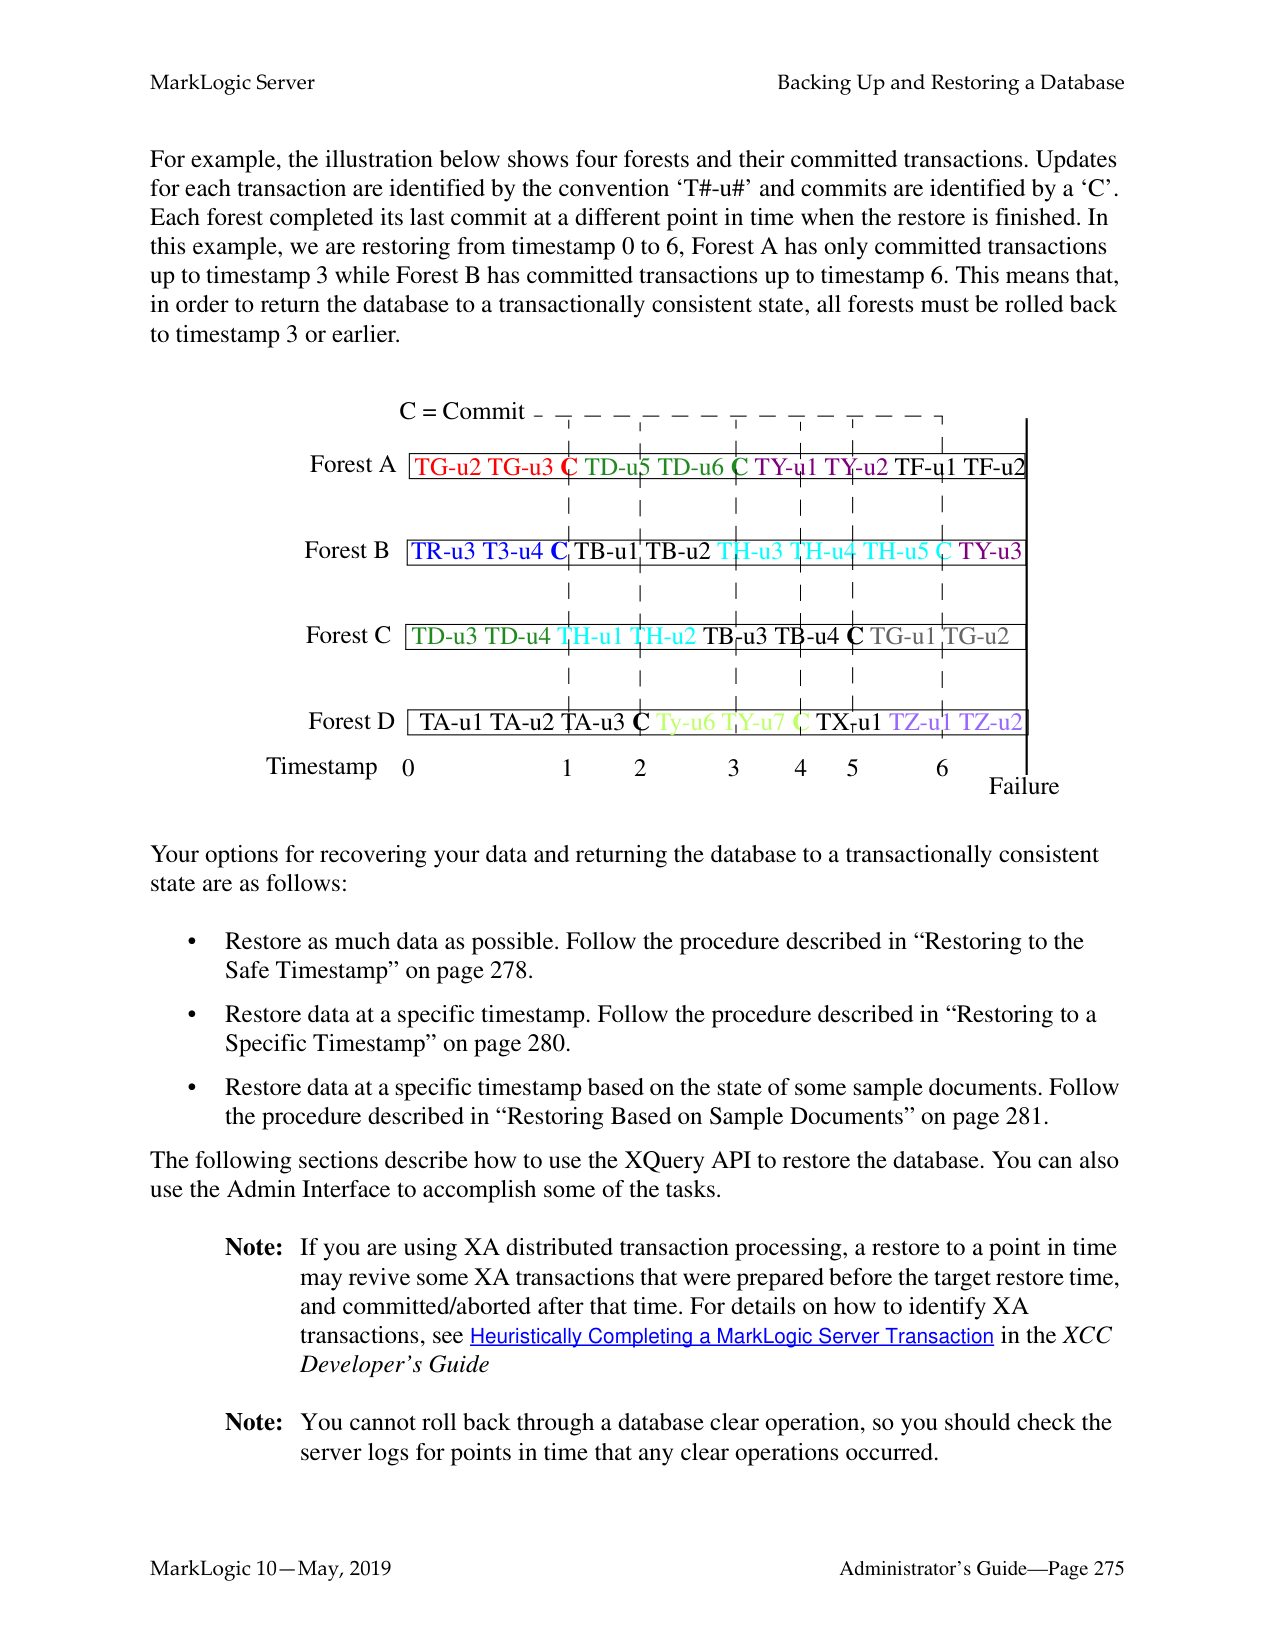
You can “retire” a forest from a database in order to move all of its documents to the other forests and rebalance them among those forests, as described in “How Data is Moved when a Forest is Retired from the Database” on page 209.
For example, to retire the forest, 2011, from the Documents database, do the following:
curl -i -X POST --digest --user user:password -H \ "Content-Type:application/x-www-form-urlencoded" \ --data "state=retire&database=Documents" \ http://MyHost:8002/manage/v2/forests/2011
######### 18.9.7 Taking Forests and Partitions Online and Offline
You can take a forest or partition offline and store it in an archive, so that it is available to later bring back online, if necessary. The benefit of taking data offline is to spare the RAM, CPU, and network resources for the online data.
An offline forest or partition is excluded from query, update, backup, restore and replicate operations performed by the database to which it is attached. An offline forest or partition can be attached, detached, or deleted. Operations, such as rename, forest-level backup and restore, migrate, and combine are not supported on an offline forest or partition. If a forest is configured with failover, the replica forest inherits the online/offline setting of its master forest, so disabling an offline master forest does not trigger a failover.
For example, to take the 2011 range partition in the DB2 database offline, do the following:
$ cat partition-offline.xml
-d @partition-offline.xml -H 'Content-type: application/xml' \ http://MyHost:8002/manage/v2/databases/DB2/partitions/2011/properties
######### 18.9.8 Setting the Updates-allowed State on Partitions
You can change the updates-allowed state of a partition to make its forests. The possible states are shown in the table below.
|State|Description| |---|---| | | | |all|Read, insert, update, and delete operations are allowed on the partition.| |delete-only|Read and delete operations are allowed on the partition, but insert and update operations are not allowed.| |read-only|Read operations are allowed on the partition, but insert, update, and delete operations are not allowed. A transaction attempting to make changes to fragments in the partition will throw an exception.
Note: Resizing a read-only partition to fewer forests preserves its
original forests.| |flash-backup|Puts the partition in read-only mode without throwing exceptions on insert, update, or delete transactions, allowing the transactions to retry.|
For example, to set the updates-allowed state in the 2011 range partition in the Documents database to read-only, do the following:
$ cat read-only-partition.xml
-d @read-only-partition.xml -H 'Content-type: application/xml' \ http://MyHost:8002/manage/v2/databases/Documents/partitions/2011/prope rties
######### 18.9.9 Deleting Partitions
You can delete a partition, along with all its forests. For example, to delete the 2011 range partition from the Documents database, do the following:

$ curl --anyauth --user user:password -X DELETE \
-H 'Content-type: application/xml' \ http://MyHost:8002/manage/v2/databases/Documents/partitions/2011
######### 18.10 Partitions with Forest-Level Failover
The partition create, migrate and resize operations allow you to specify an options element to create replica forests for shared-disk or local-disk failover, as described in the Configuring Local-Disk Failover for a Forest and Configuring Shared-Disk Failover for a Forest chapters in the Scalability, Availability, and Failover Guide.
To create replica forests for forest-level failover, you must create the partition on at least two hosts. For each master forest created on one host a replica forest will be created on another host. For example, to create a single replica forest for each forest in the 2011 range partition and configure the forests for local-disk failover between MyHost1, MyHost2, and MyHost3, do the following.
$ cat create-partition.xml
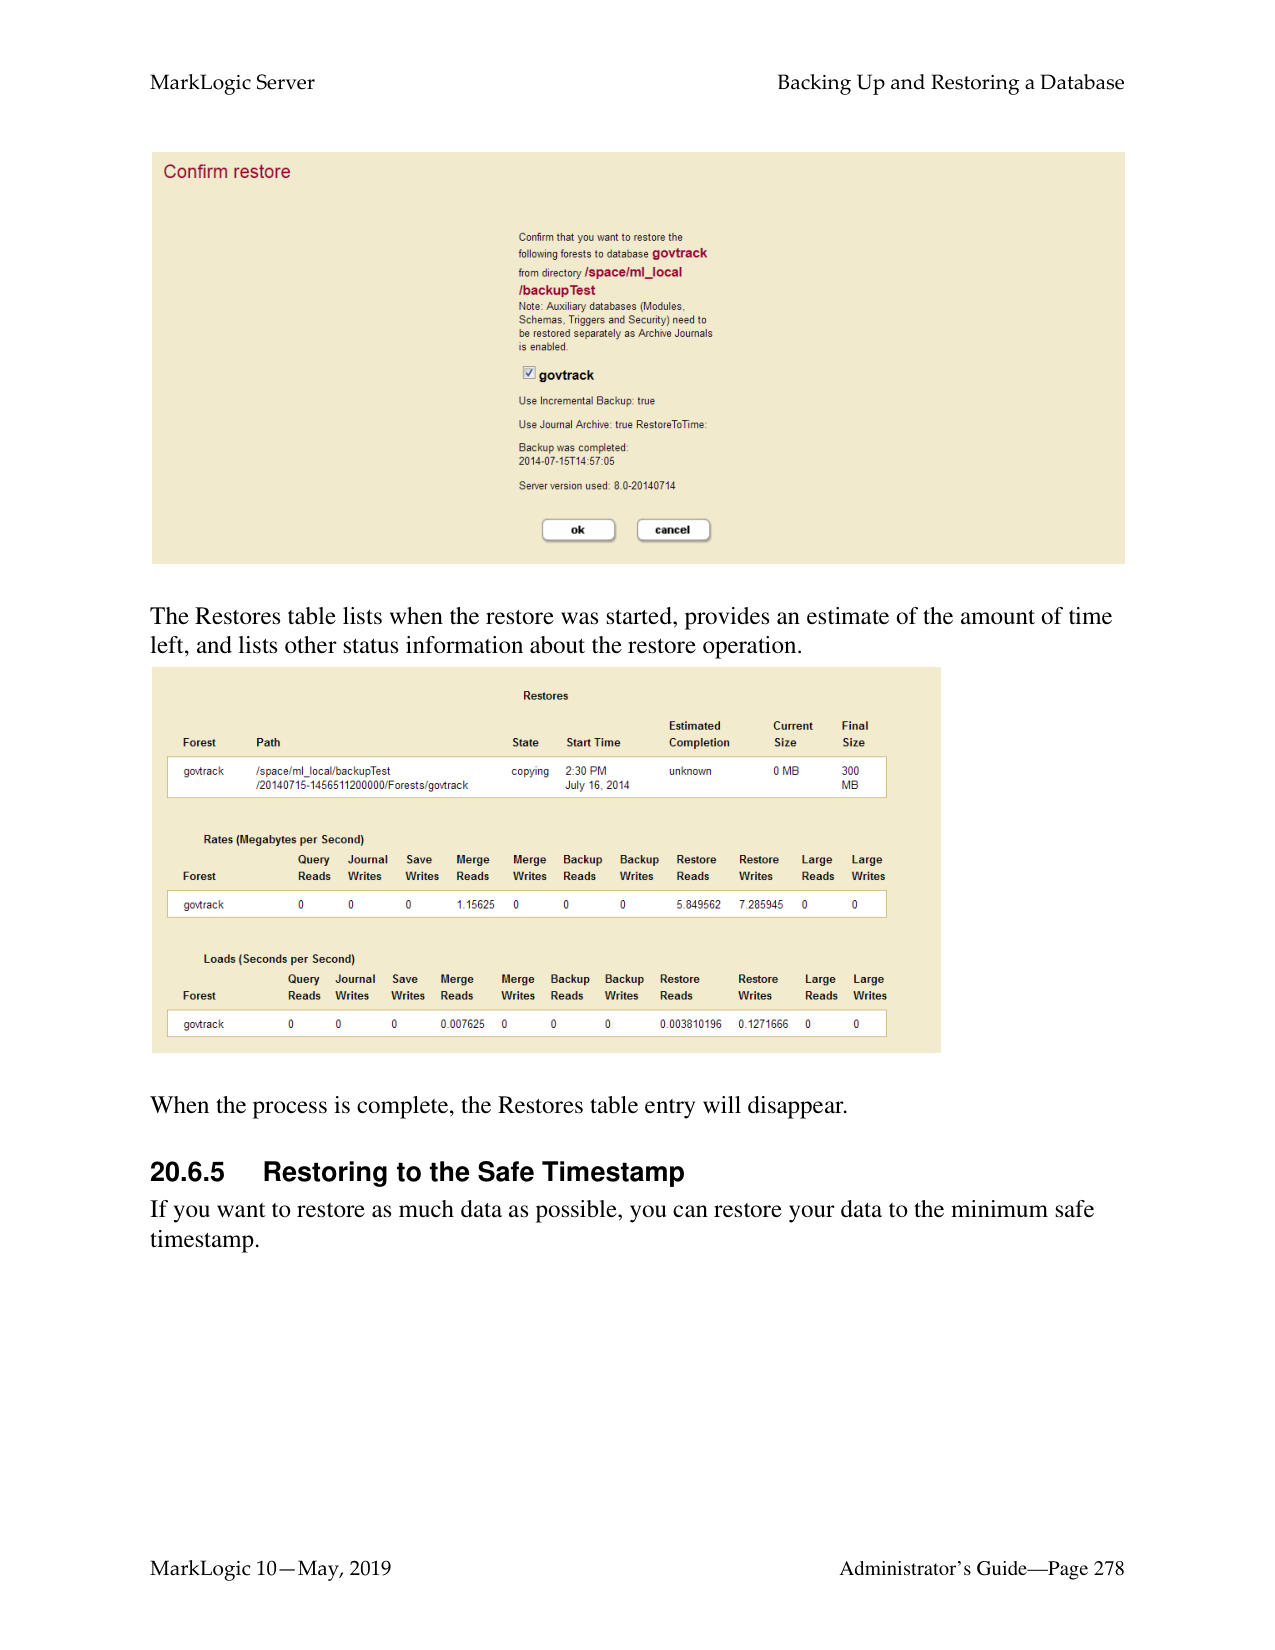
$ curl --anyauth --user user:password -X POST \
-d @create-partition.xml -H 'Content-type: application/xml' \ http://MyHost:8002/manage/v2/databases/Documents/partitions
Keep in mind the following when configuring partitions or forests with forest-level failover:
##### 19.0 Super Databases and Clusters
MarkLogic Server allows you to group multiple databases into a super-database in order to allow a single query to be done across multiple databases. Databases contained in a super-database are called sub-databases. Sub-databases can be distributed on different storage tiers and on different clusters (collectively called super-clusters). A sub-database can be either active (online) or archive (offline), as specified by the kind element.
This chapter contains the following topics:
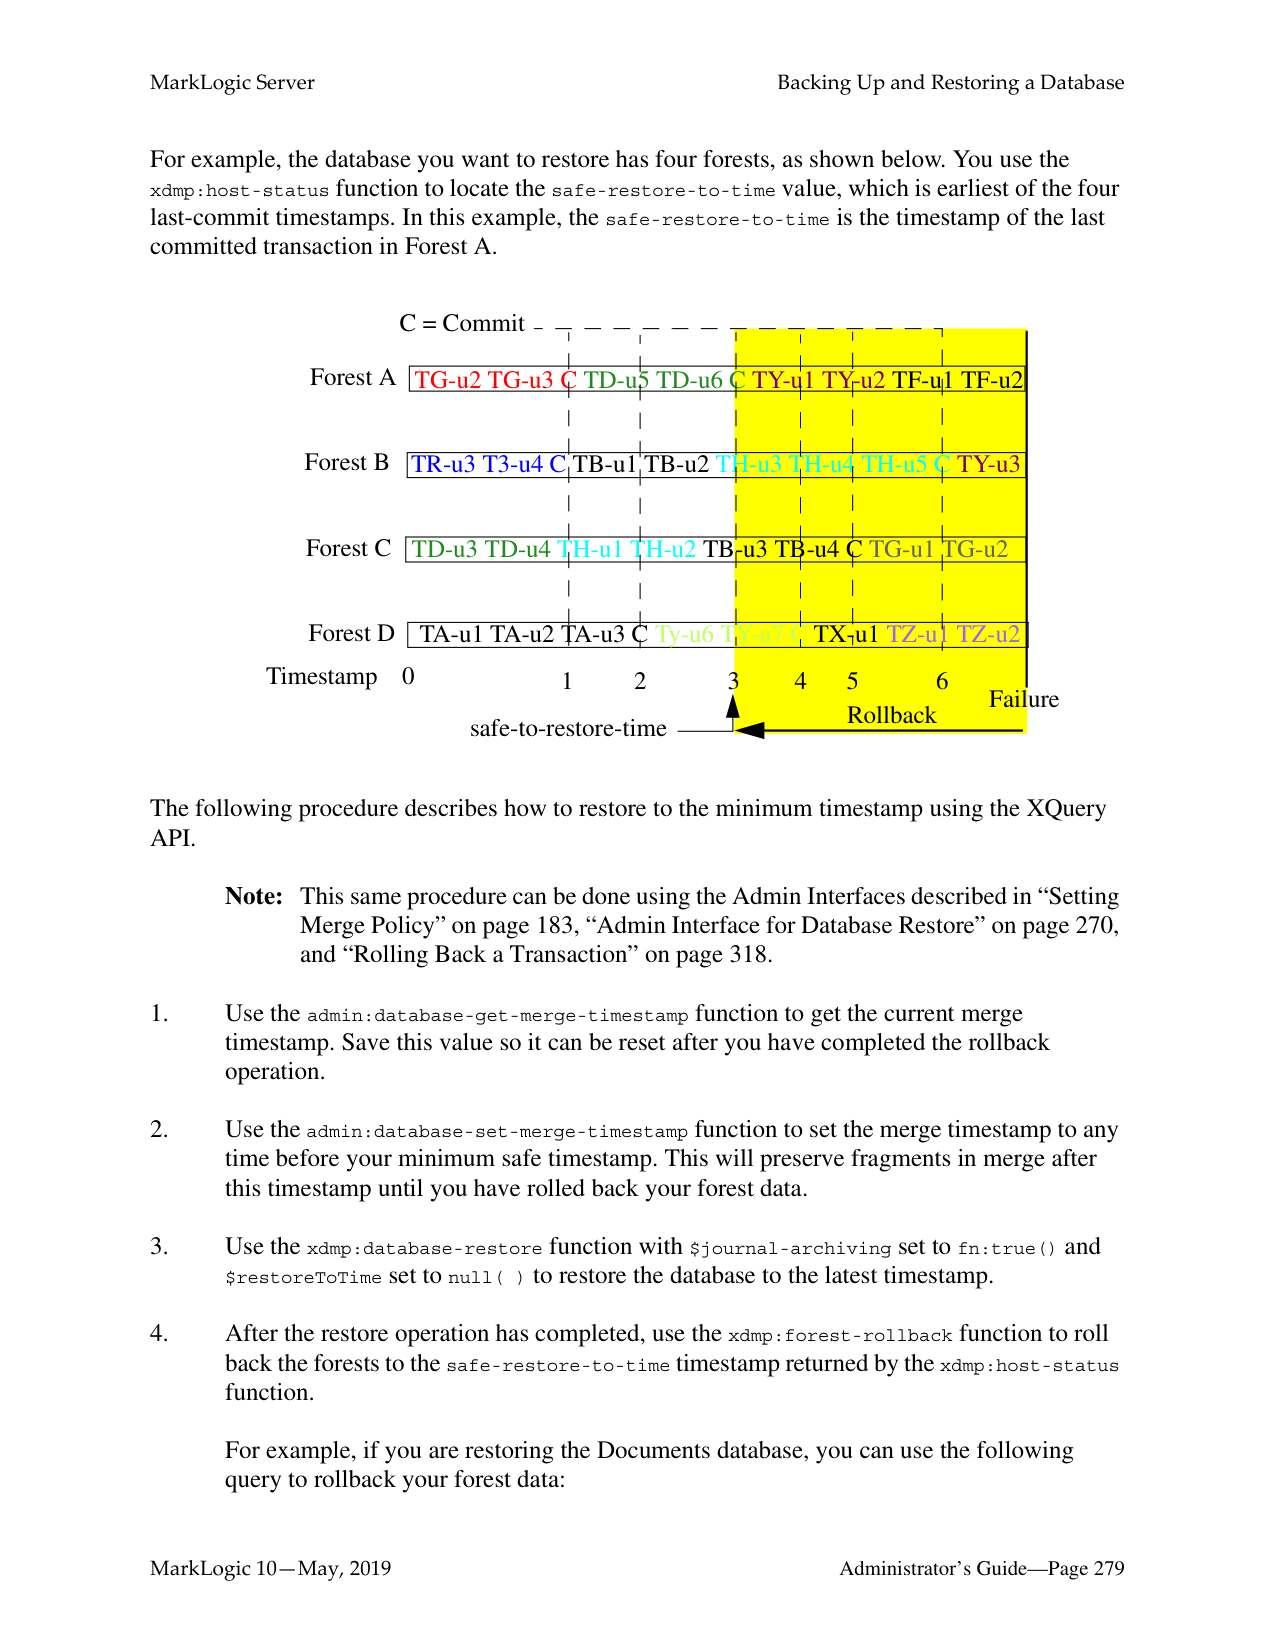
######### 19.1 Overview
Updates are made on the sub-databases and then made visible for read in the super-database. Below is an illustration of a super-database and its sub-databases configured on a single cluster.
#### Cluster
|Host Host Host
| | | | |---|---|---| | |Super-database| |
Sub-databases Sub-databases Sub-database
Host| |---|
Below is a super-database configured with sub-databases on different clusters. The cluster hosting the super-database must be coupled with the foreign clusters hosting the sub-databases. For details on how to couple clusters, see Coupling Clusters in the Administrator’s Guide.
Note: Each foreign cluster should have multiple bootstrap hosts, so that, if a one bootstrap host does down, the super database can use the other bootstrap host to query the sub-databases on that cluster.
Super-cluster
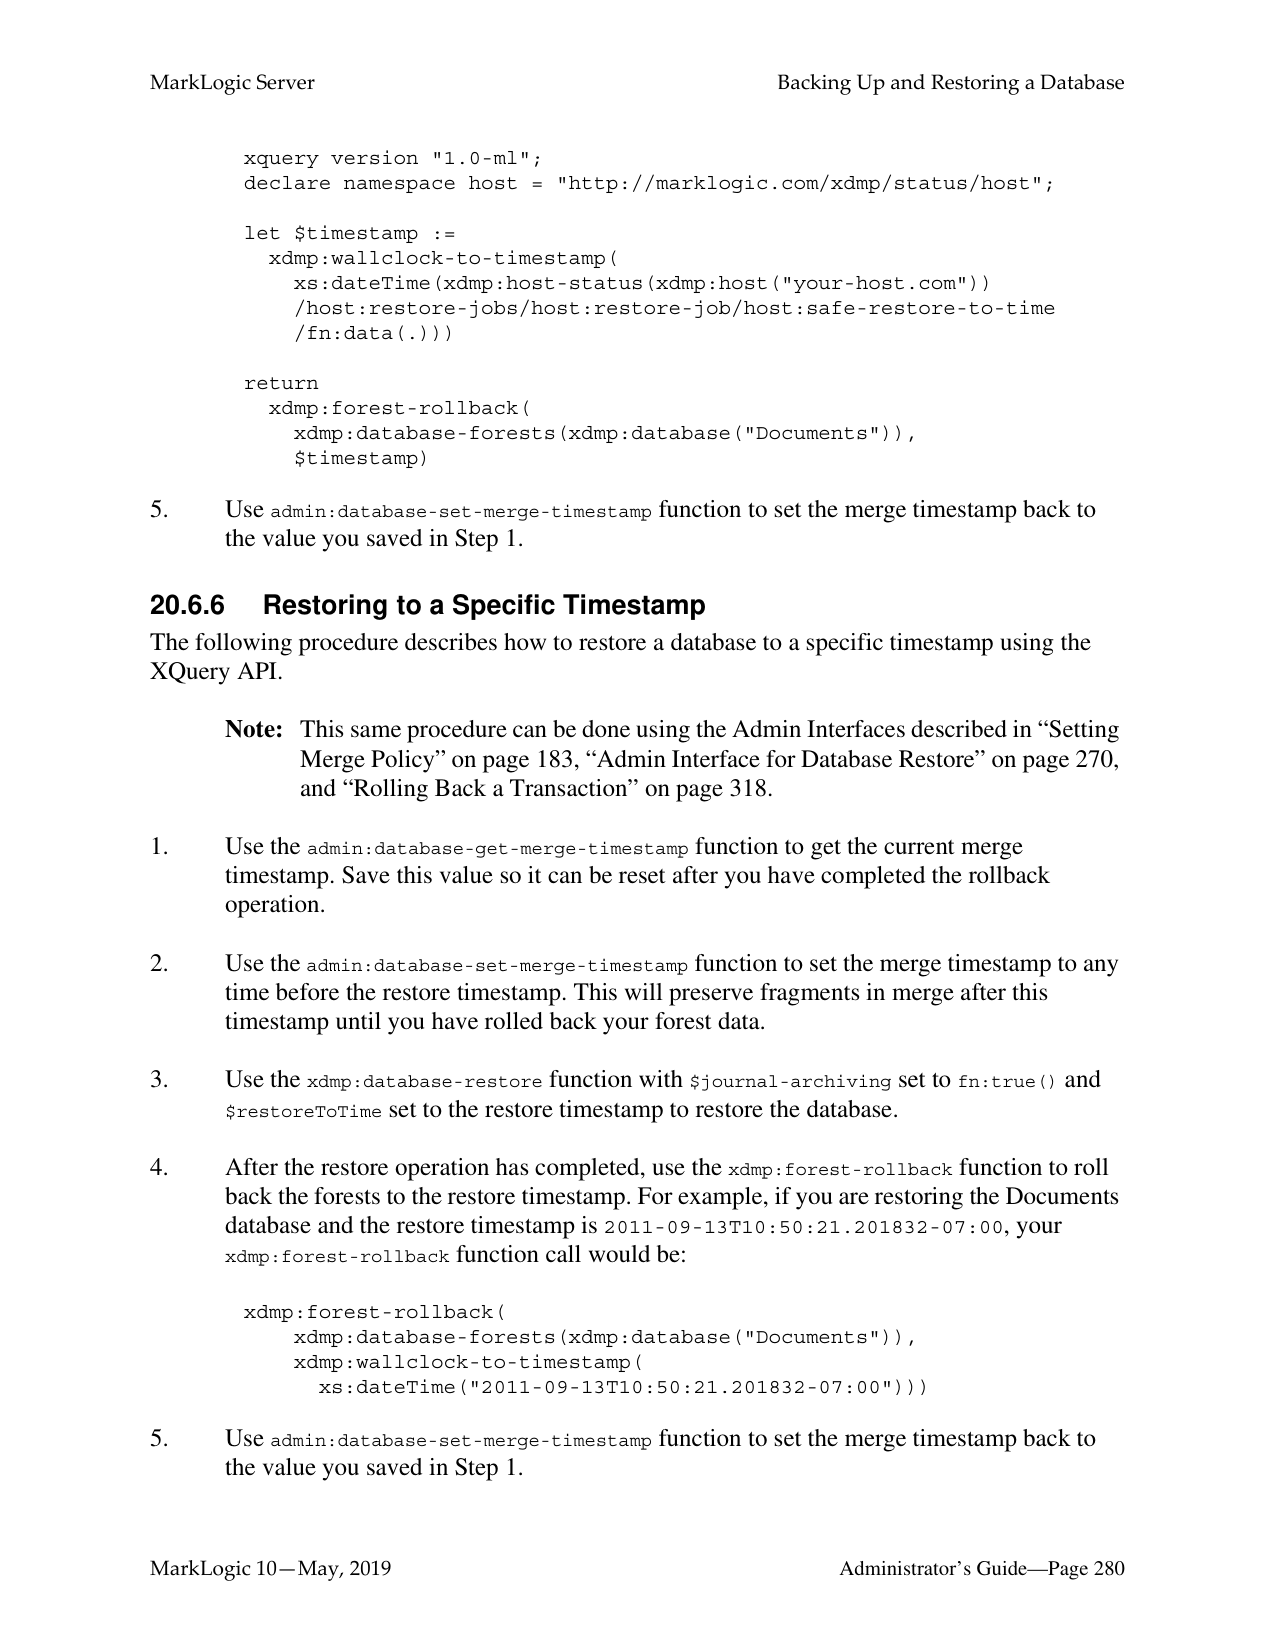
Cluster
||Super-database| |---|
Host| |---|
Cluster Cluster Cluster
|Sub-databases
Host| |---|
Host Host Host
Sub-databases Sub-database
The following describes the characteristics of super-databases and sub-databases:
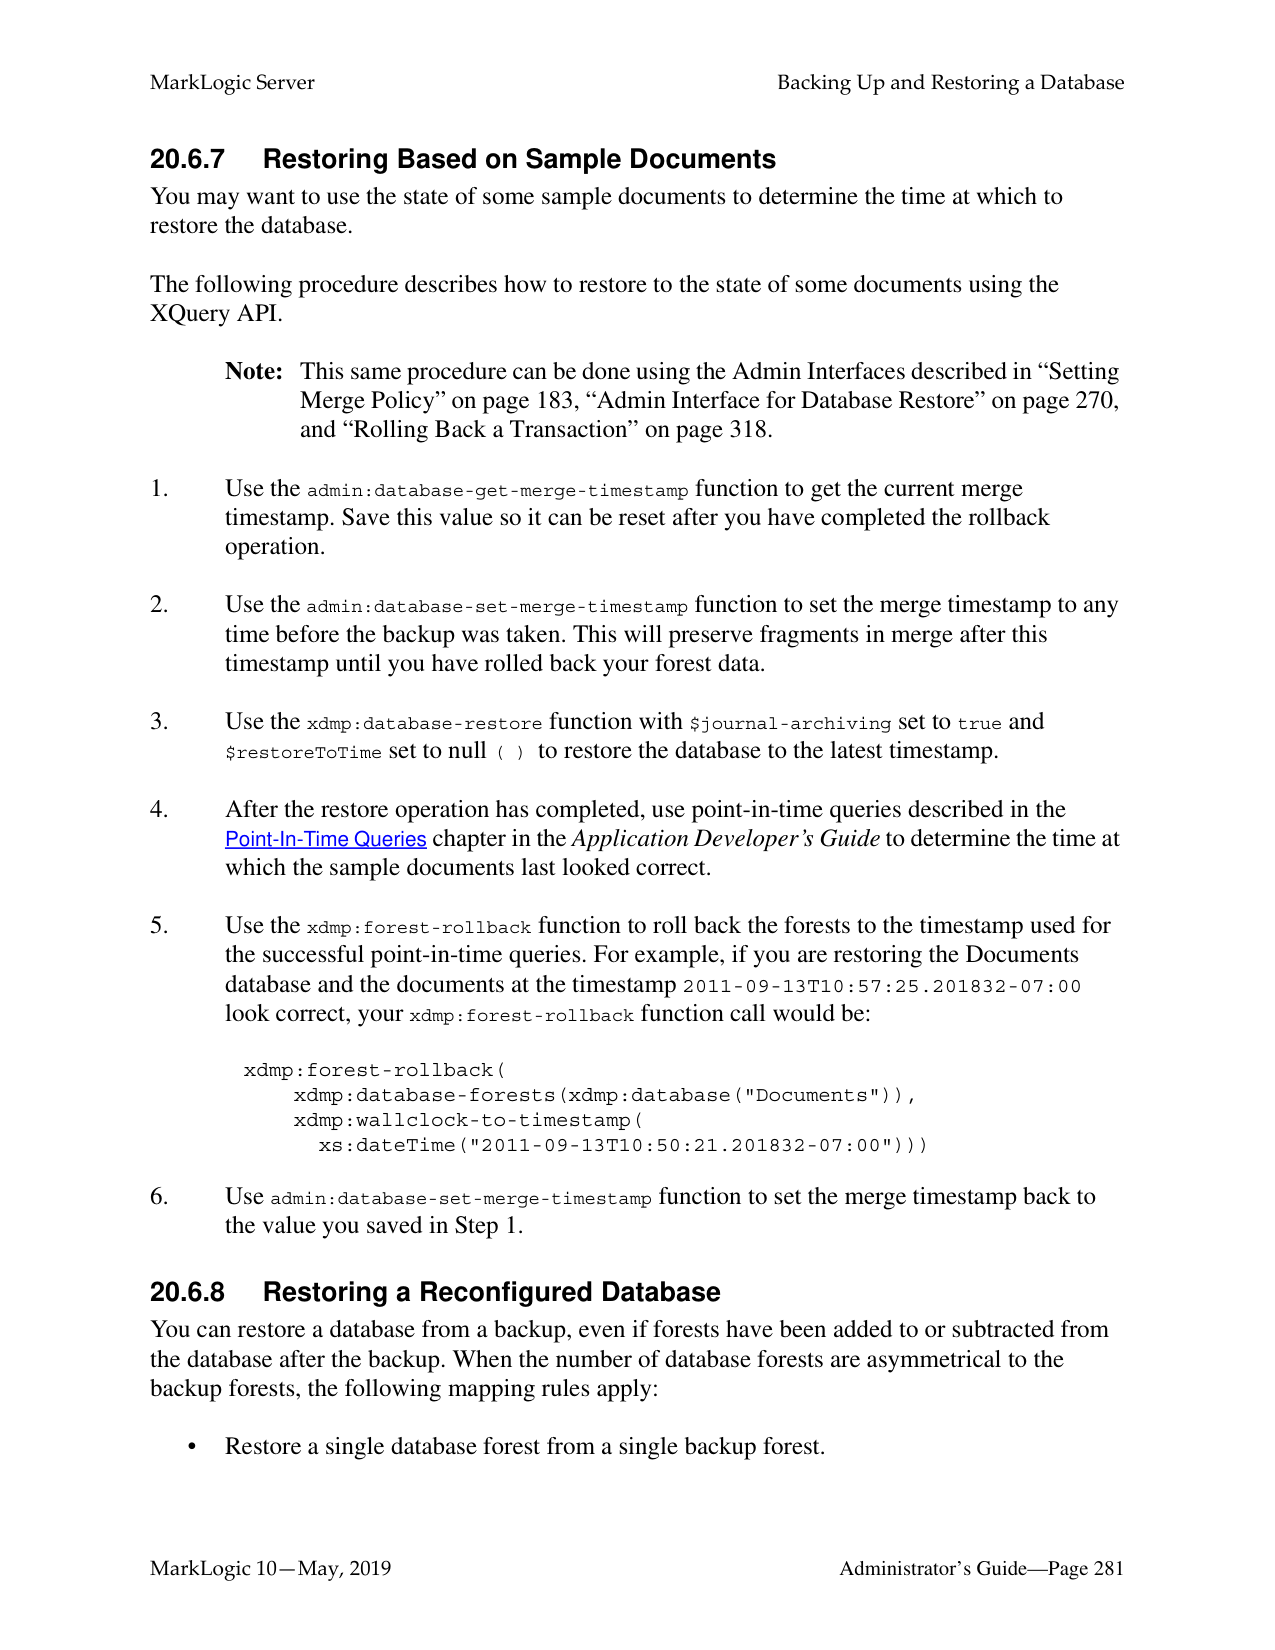
######### 19.2 Creating a Super-database
You can call the POST:/manage/v2/databases resource address to create a super-database. To create a super-database, simply specify which databases are to be its sub-databases.
For example, to define the mySuperDatabase database as a super-database containing the subDB1, subDB2, and subDB3 sub-databases on the same cluster, do the following:
$ curl --anyauth --user user:password -X POST \
######### 19.3 Creating a Super-cluster
Before creating a super-cluster, you must couple the clusters as described in Coupling Clusters in the Administrator’s Guide.
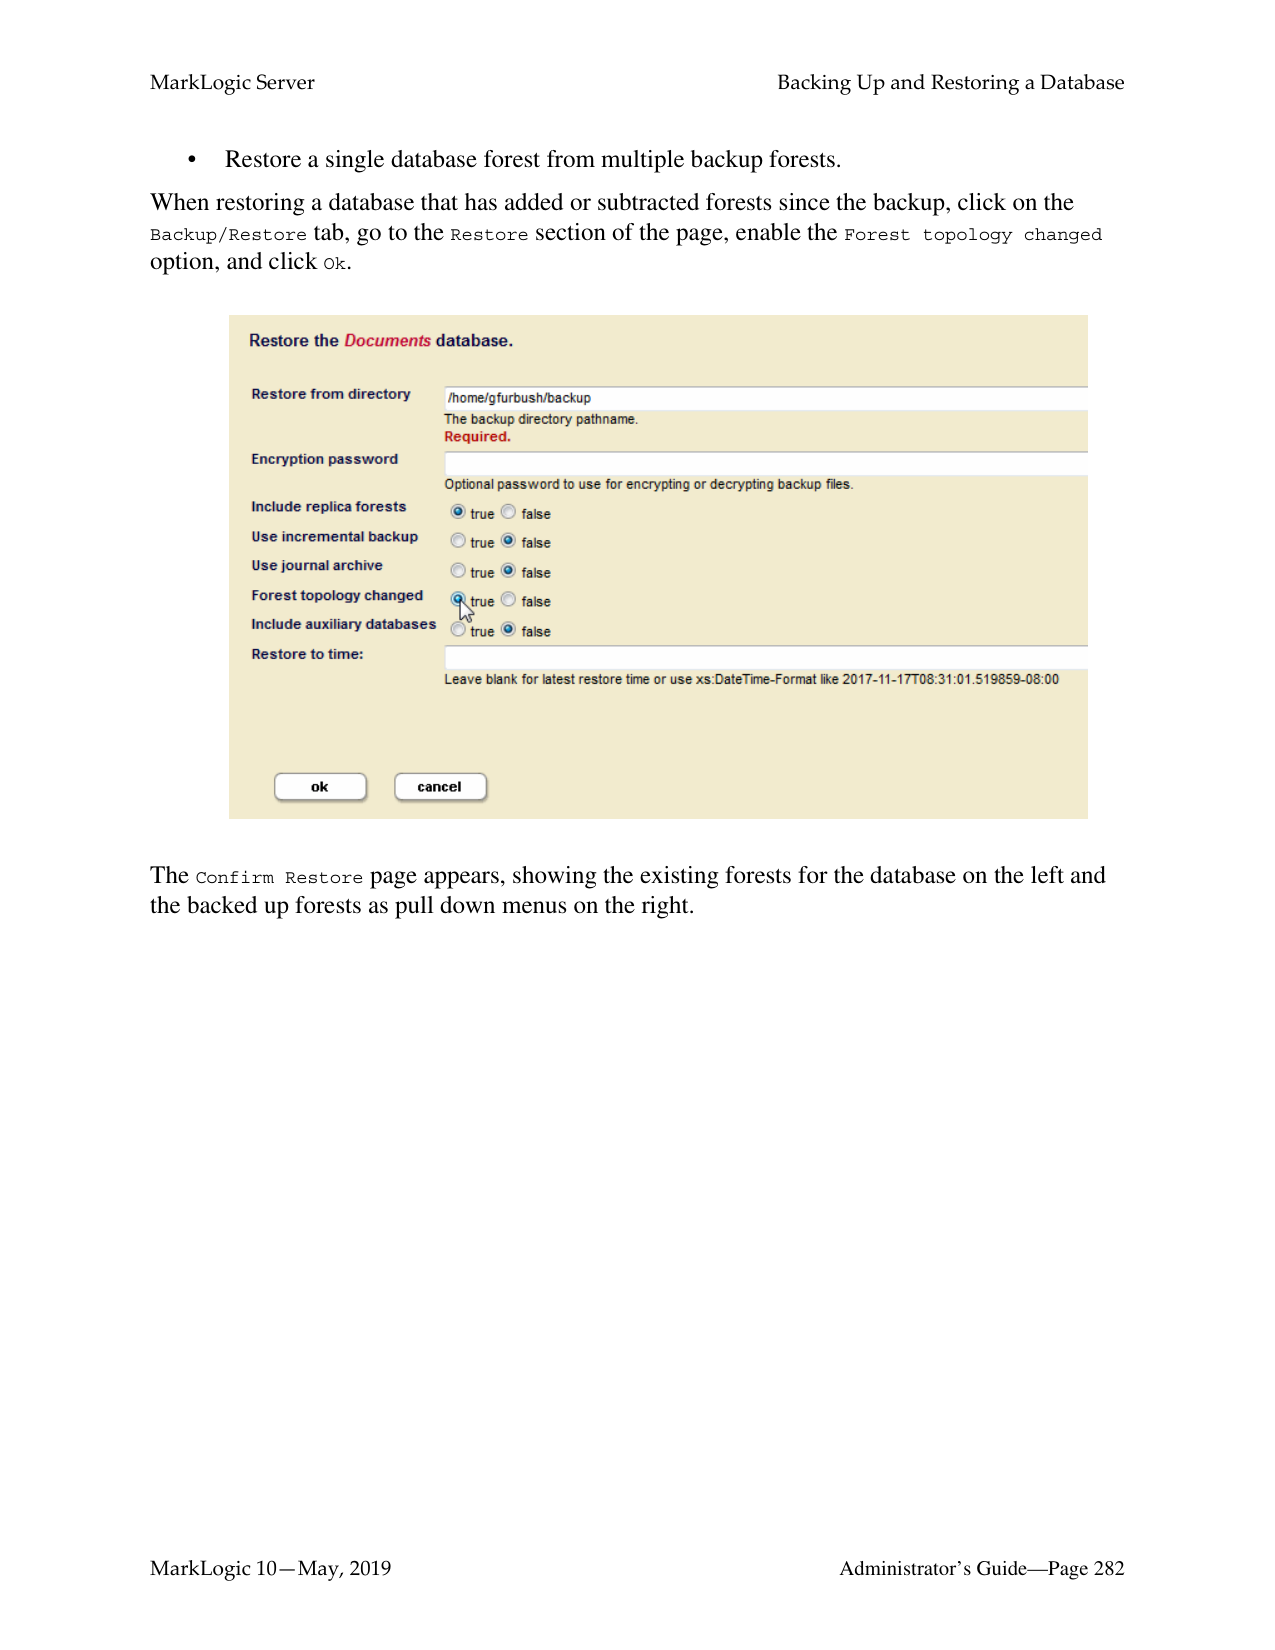
For example, to define the mySuperCluster database as a super-cluster containing the subDB1, subDB2, and subDB3 sub-databases on different clusters, do the following:
$ curl --anyauth --user user:password -X POST \
Note: The maximum capacity for super-clusters is 32 clusters.
######### 19.4 Viewing Super-databases and Sub-databases
You can call the GET:/manage/v2/databases/{id|name}/super-databases resource address to return a list of the super-databases associated with a sub-database. For example, to view the superdatabases of the subdb1 database, do the following:
$ curl --anyauth --user user:password -X GET \
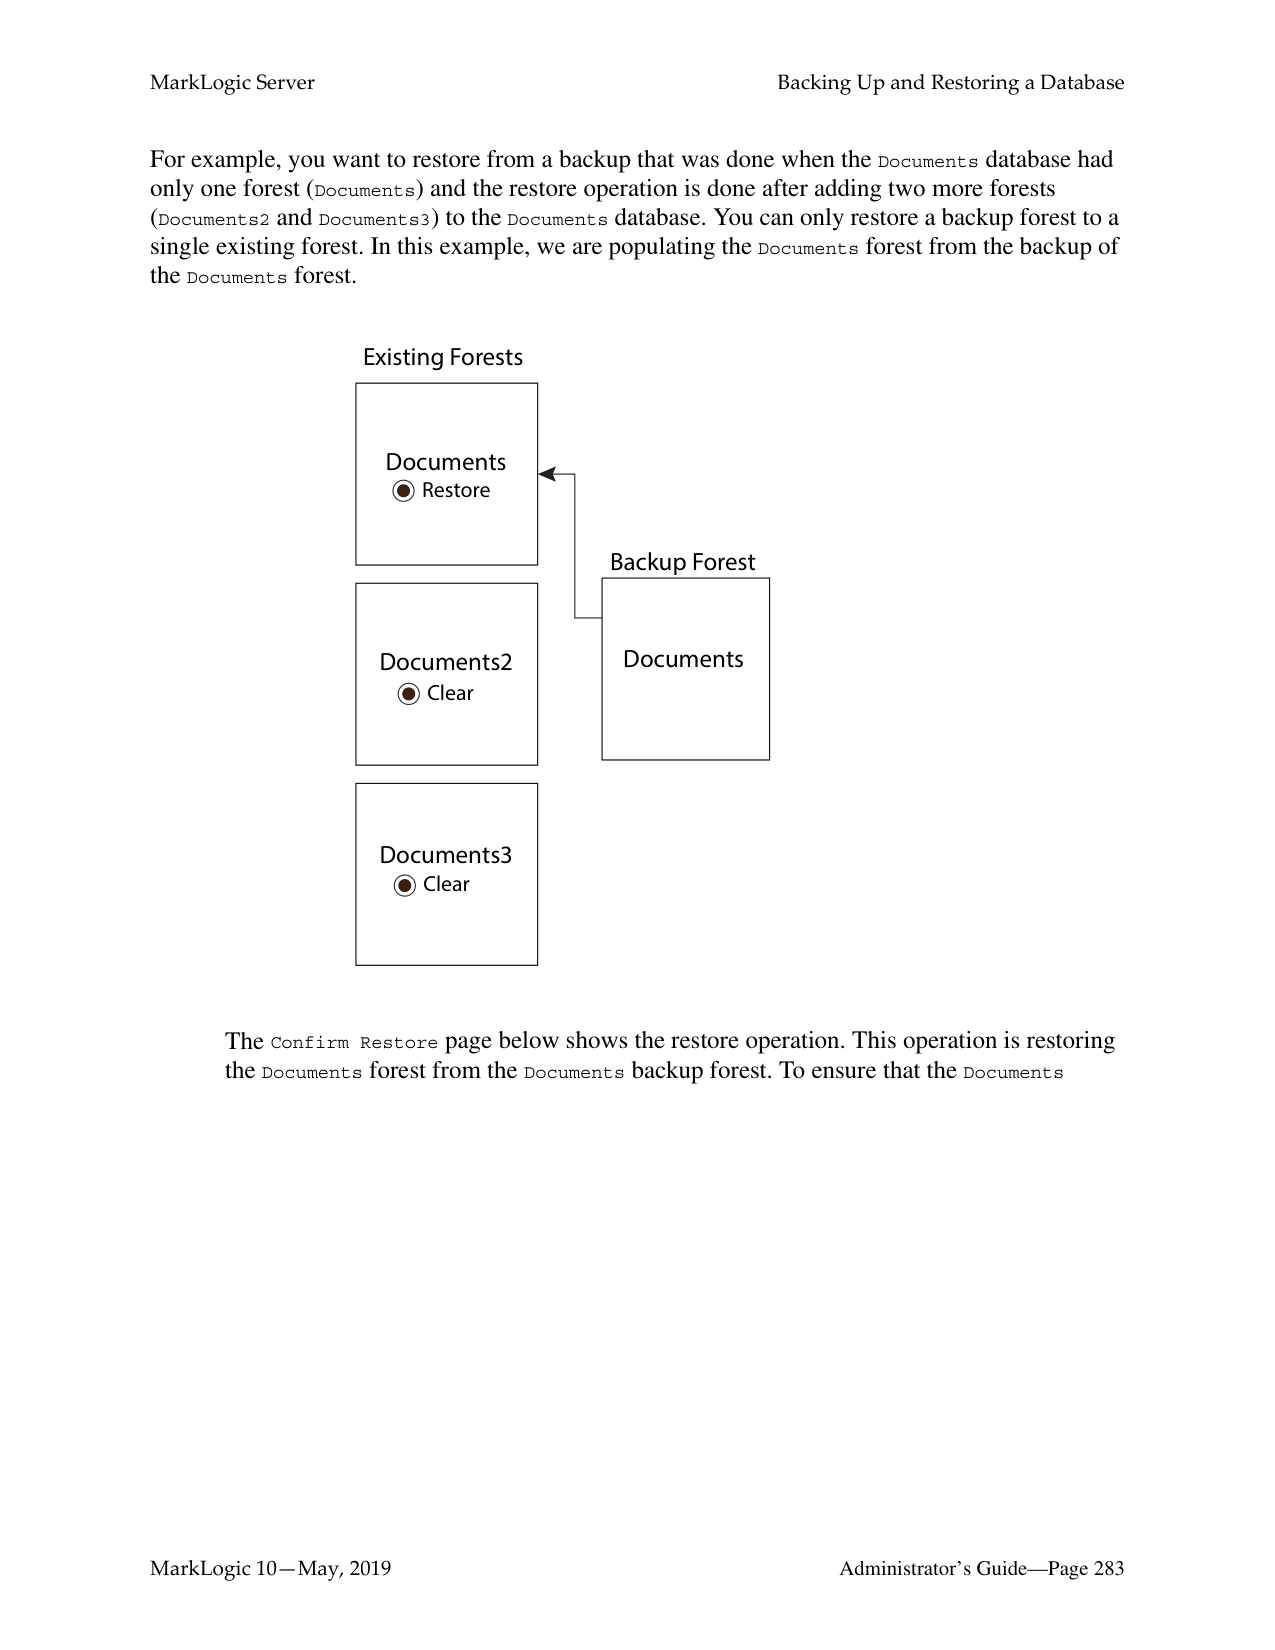
-H 'Content-type: application/xml' \ http://MyHost:8002/manage/v2/databases/subdb1/super-databases
You can call the GET:/manage/v2/databases/{id|name}/sub-databases resource address to return a list of the sub-databases associated with a super-database. For example, to view the subdatabases of the superdb1 database, do the following:
$ curl --anyauth --user user:password -X GET \
-H 'Content-type: application/xml' \ http://MyHost:8002/manage/v2/databases/superdb1/sub-databases
Note: Since updates can happen at both the super-database and the sub-database level, duplicate URIs are more likely in super-databases. Some automatically generated URIs may produce duplicates at the super-database level. This is true not only for automatically-generated URIs for graph documents, but also may be a problem for the bitemporal LSQT documents, and for directory properties fragments created with automatic-directory-creation. Duplicate URIs will generate a DUPURI exception.
##### 20.0 Backing Up and Restoring a Database
MarkLogic Server provides a facility to make a consistent backup of a database. This section describes the backup and restore architecture and provides procedures for backing up and restoring a database. The following topics are included:
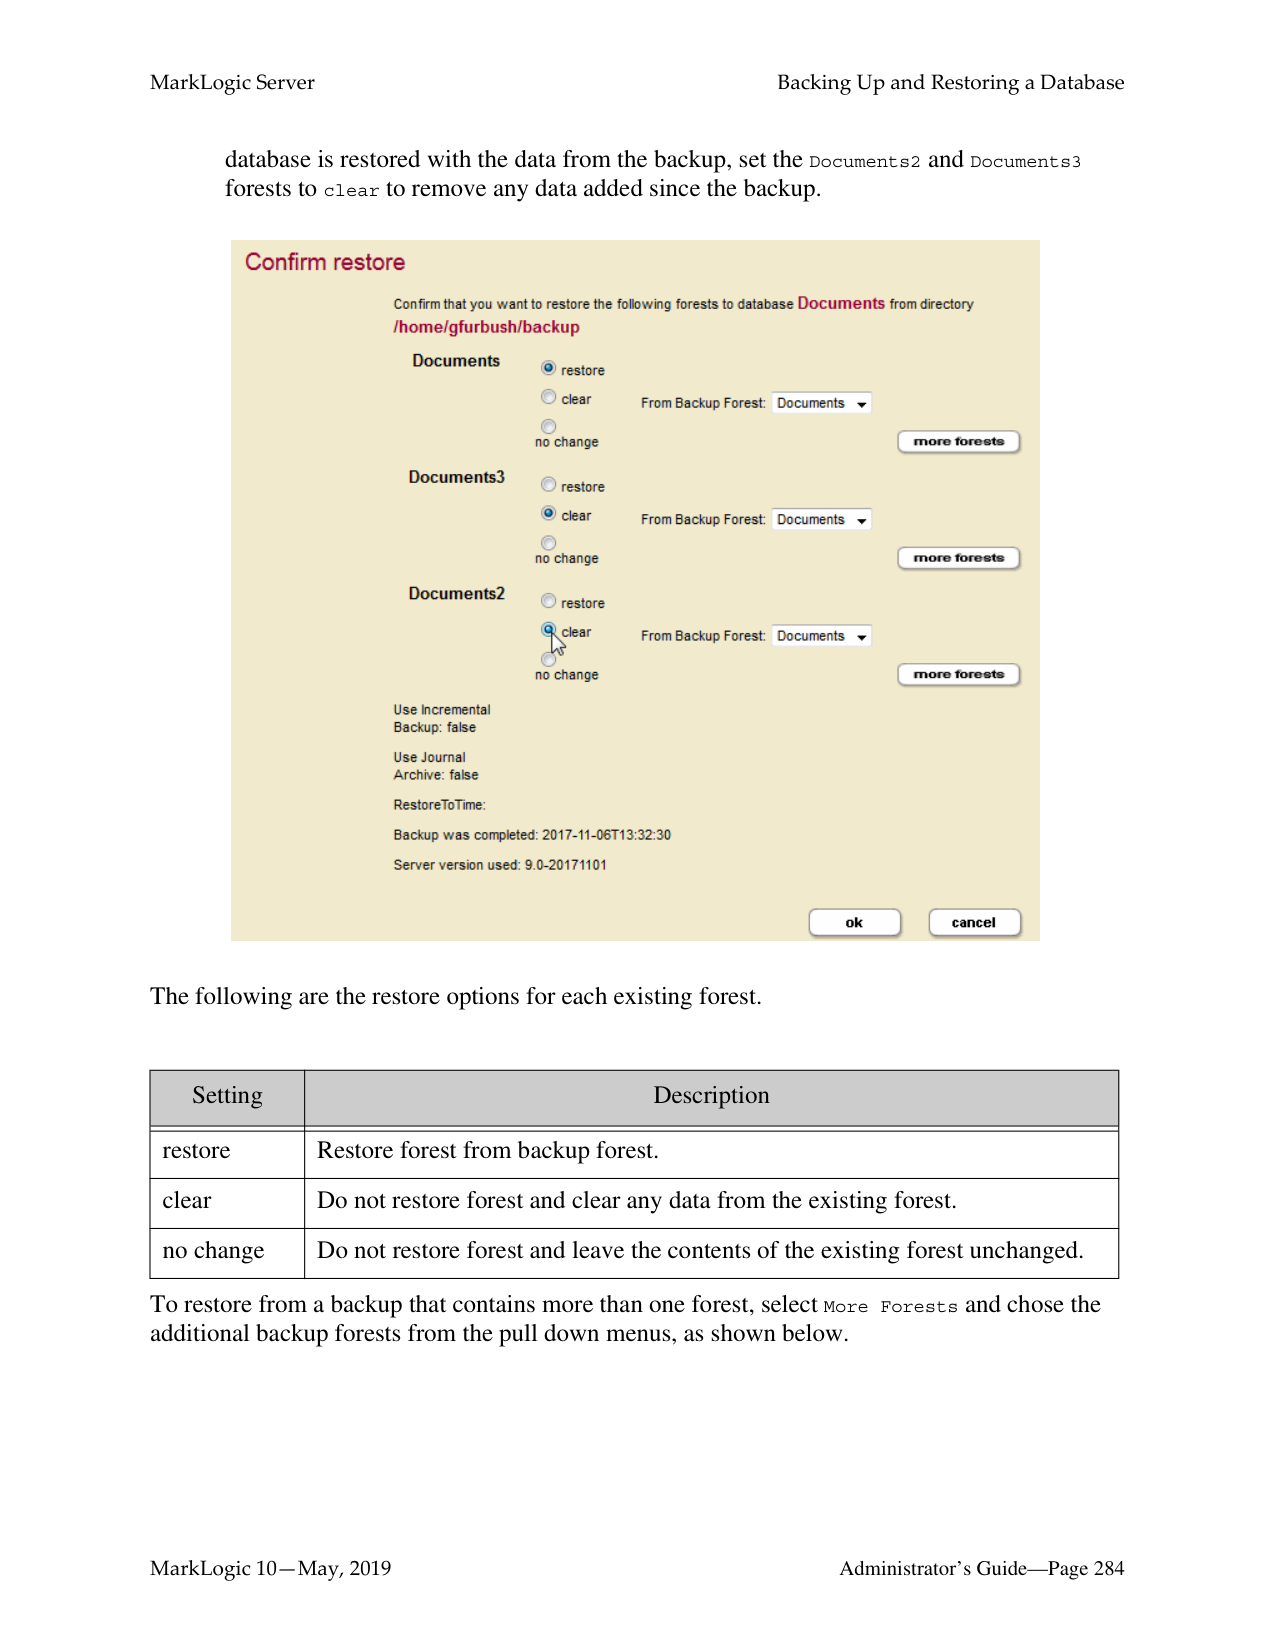
######### 20.1 Backup and Restore Overview
Database backup and restore operations in MarkLogic Server are distributed over all of the data nodes in a cluster (that is, all of the nodes that contain forests), and provide consistent database-level backups and restores.
The directory you specify for a backup or restore operation must exist on each data node associated with the database (it can be either a shared or unshared directory). For example, if you have a data node on Host1 with forests F1 and F2, and another data node on Host2 with forests F3 and F4, then the backup directory you specify must exist on both Host1 and Host2. The following figure shows such a configuration, where the Schemas and Security databases have forests F5 and F6 respectively, and they are also attached to Host1.
|Host1| |---|
|Host2| |---|
Database
|Schemas Database| |---|
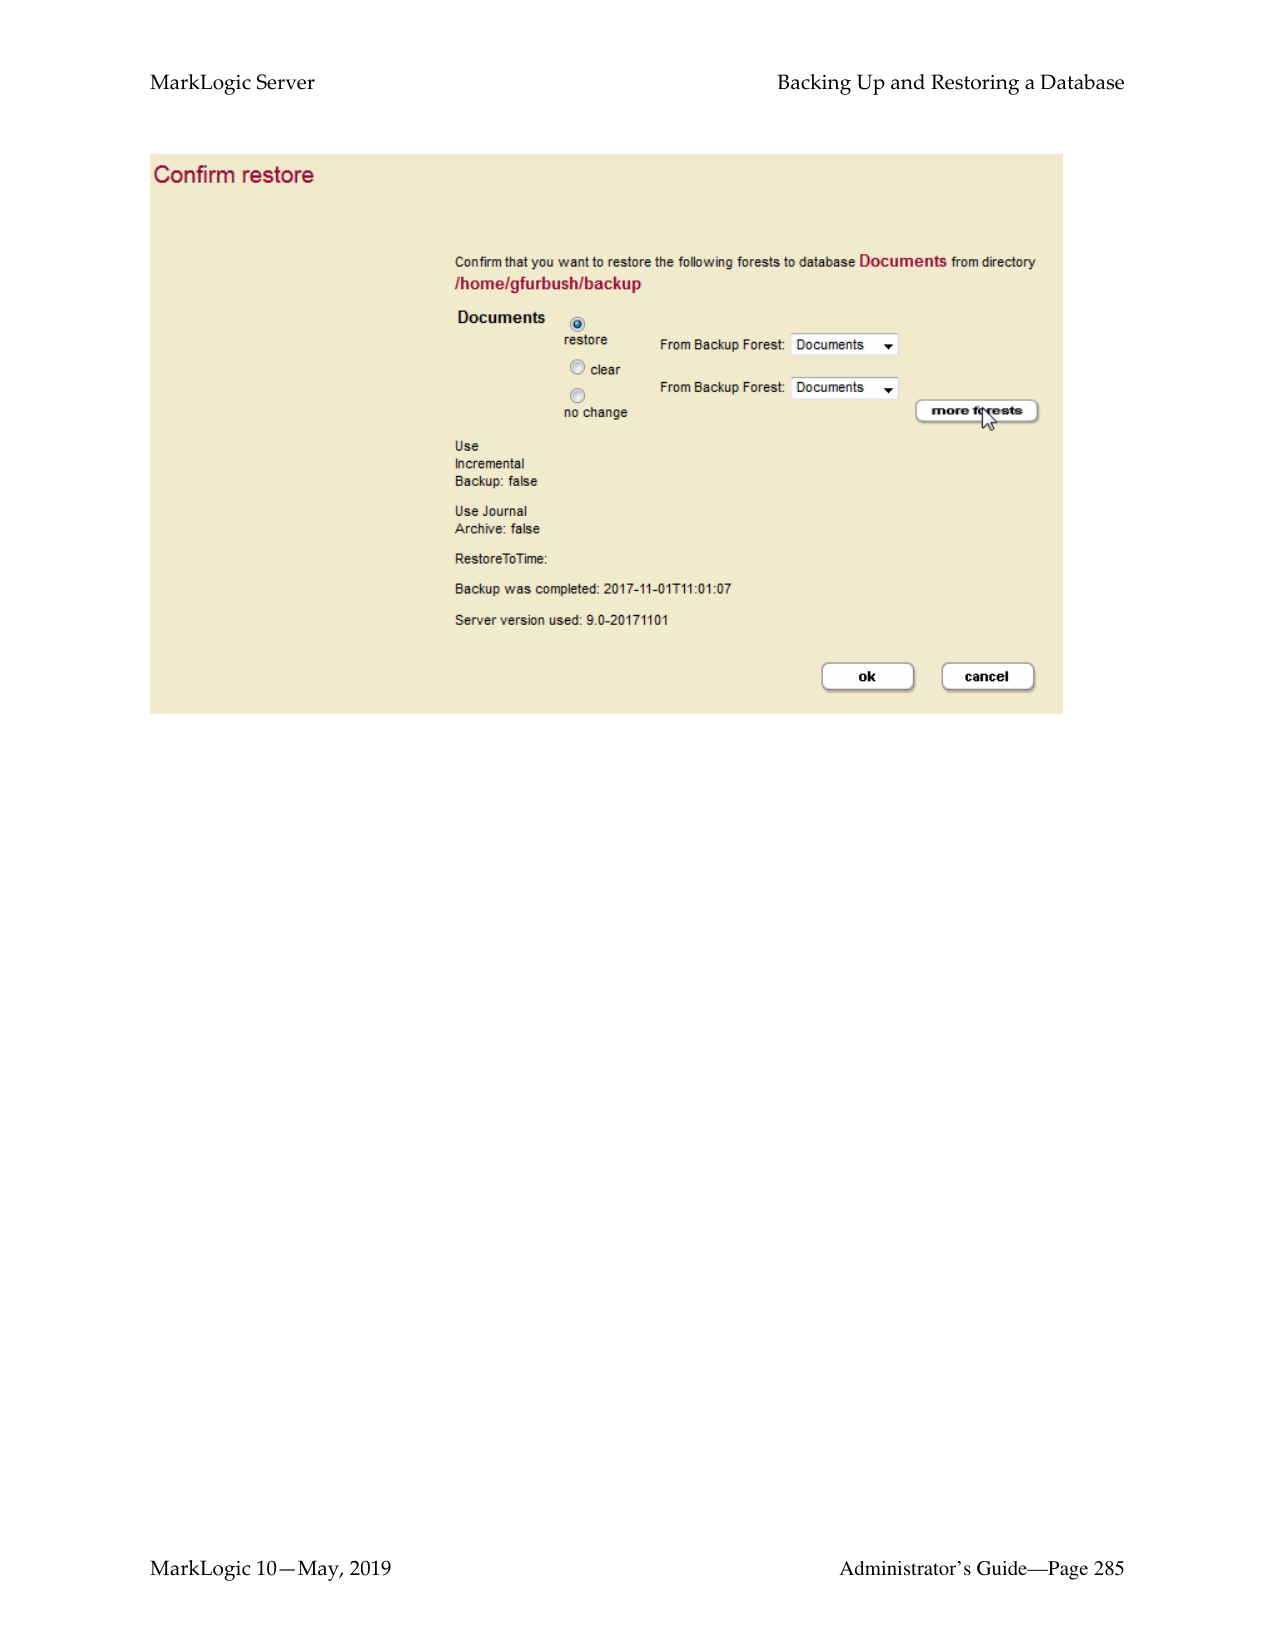
|Security Database| |---|
F1 F2 F3 F4F5F6
Backup
Backup
Filesystem1 (/backup_dir)
Filesystem2 (/backup_dir)
######### 20.1.1 Consistent, Database-Level Backup
By default, when you back up a database you backup everything associated with it, including the following:

If you choose to back up all forests, you will have a backup that you can restore to the exact same state as when the backup begins copying files.
You can also backup any individual forests that you choose, choosing only the ones you need to backup. These forest-level backups are consistent for the data in the forest and any other forests included in the backup, but might not be consistent with changes that occur in other forests not included in the backup.
You can also choose not to backup the Security, Schemas, and Triggers databases. While having backups of these databases that are synchronized with the database backups is important to get the exact same view of the system as when the backup began, you might have separate processes for backing up these databases that can ensure proper consistency. For example, if they do not change frequently, you may only need to back them up when they change.
The database-level backup and restore in MarkLogic Server provides the flexibility for you to decide how much or how little you want to backup or restore. The choices you make depend on the amount of change in your system and your unique backup and restore requirements.
######### 20.1.2 Admin Interface
You use the Admin Interface to initiate backup and restore operations. Use the Backup/Restore tab for each database configured in your system to initiate backup and restore operations. For specific procedures for backup and restore operations, see “Backing Up a Database” on page 263 and “Restoring a Database without Journal Archiving” on page 272.
######### 20.1.3 Backup and Restore Transactions
Backup and restore operations are transactional and therefore guarantee a consistent view of the data. They do not lock the database, however. Therefore, if the data in a database changes after a backup or restore operation begins but before it completes, those changes are not reflected in the backup or restore operation. Similarly, changes to the Security, Triggers, and Schemas databases during a backup or restore operation are allowed, but will not be reflected in the backup or restore.
Database and Forest administrative tasks such as drop, clear, and delete cannot take place during a backup; any such operation is queued up and will initiate after the backup transaction has completed.
######### 20.1.4 Backup Directory Structure
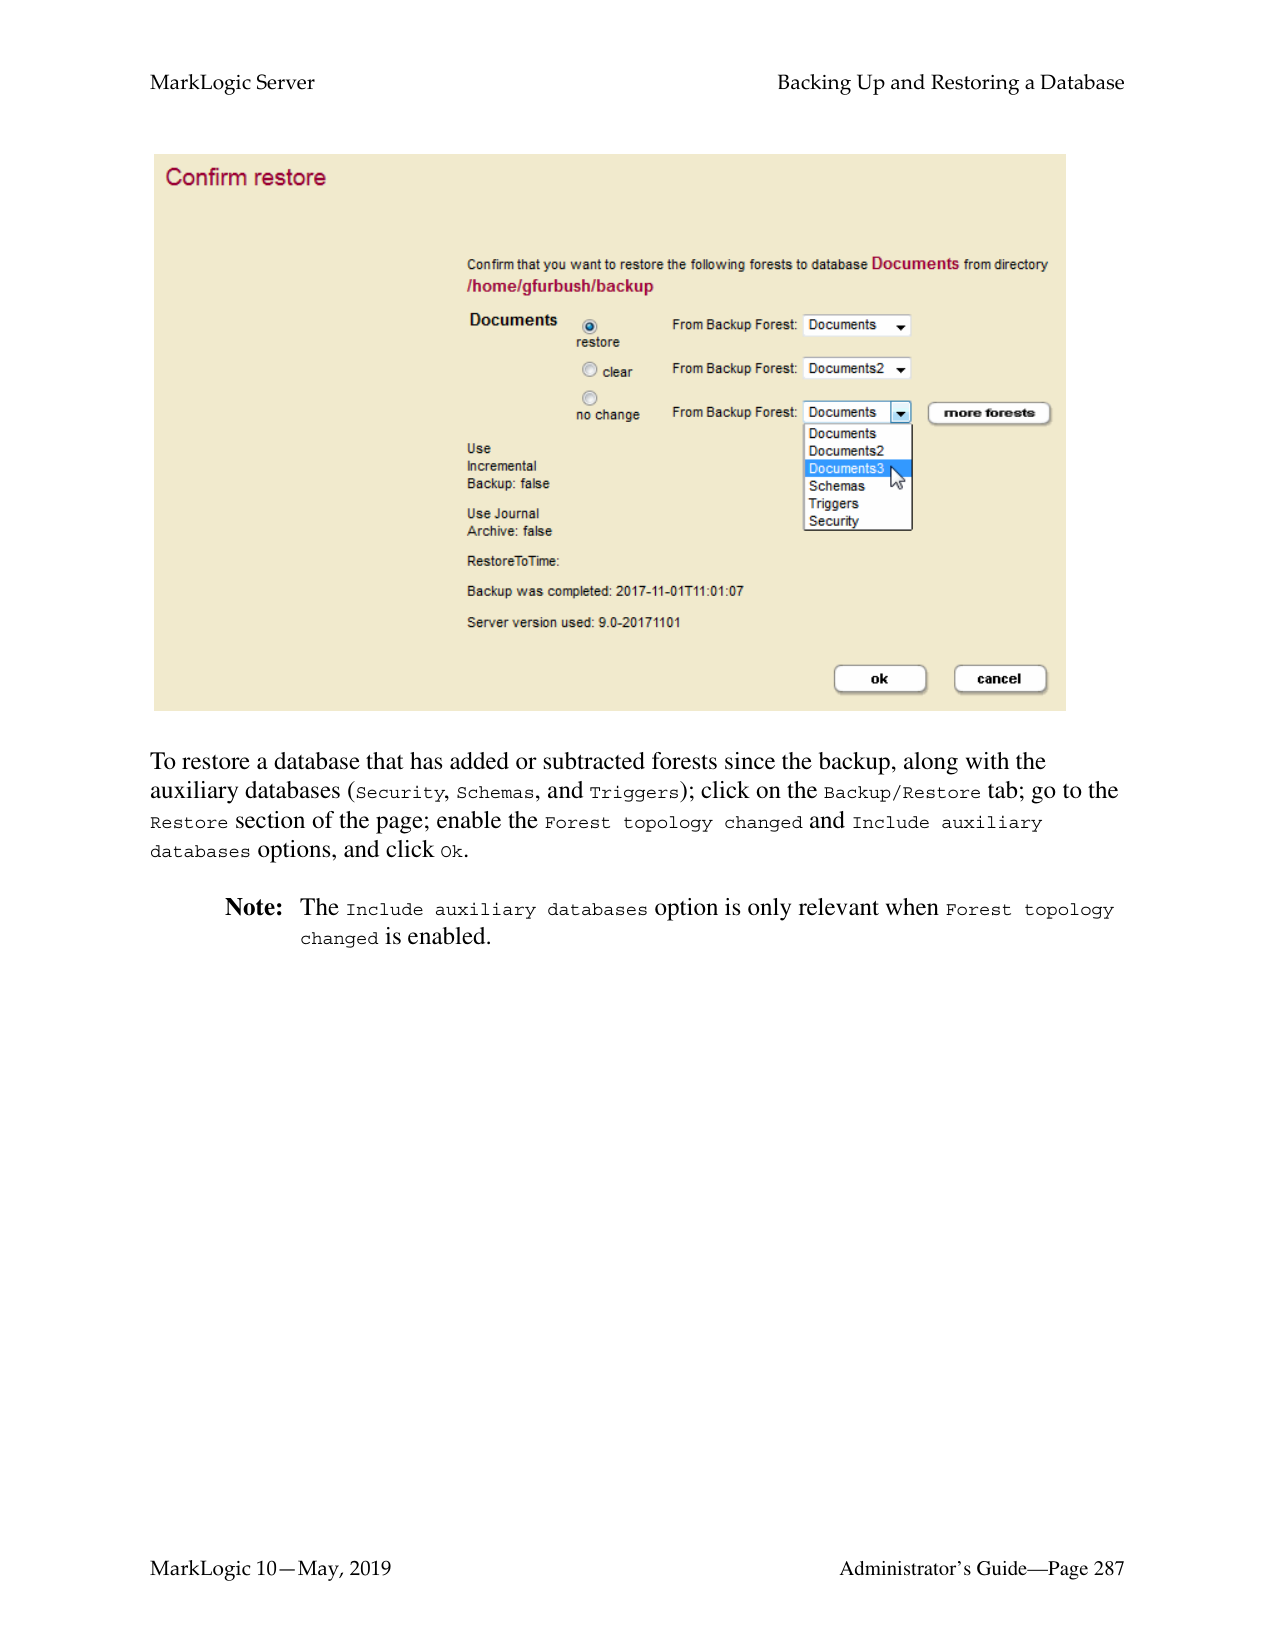
When you back up a database, you specify a backup directory. That directory must exist on each host in your configuration, and must be readable and writable by the user running MarkLogic Server (by default daemon on UNIX and the local System user on Windows). Because of the importance of database backup integrity, MarkLogic recommends backing up to a reliable filesystem. The backup directory structure for each host is the same, except that the forests are only backed up on the host from which they are served.
Below the specified backup directory, a subdirectory is created with a name based on the date when the backup begins. Each of these subdirectories contain one backup. The following is the basic backup directory structure.
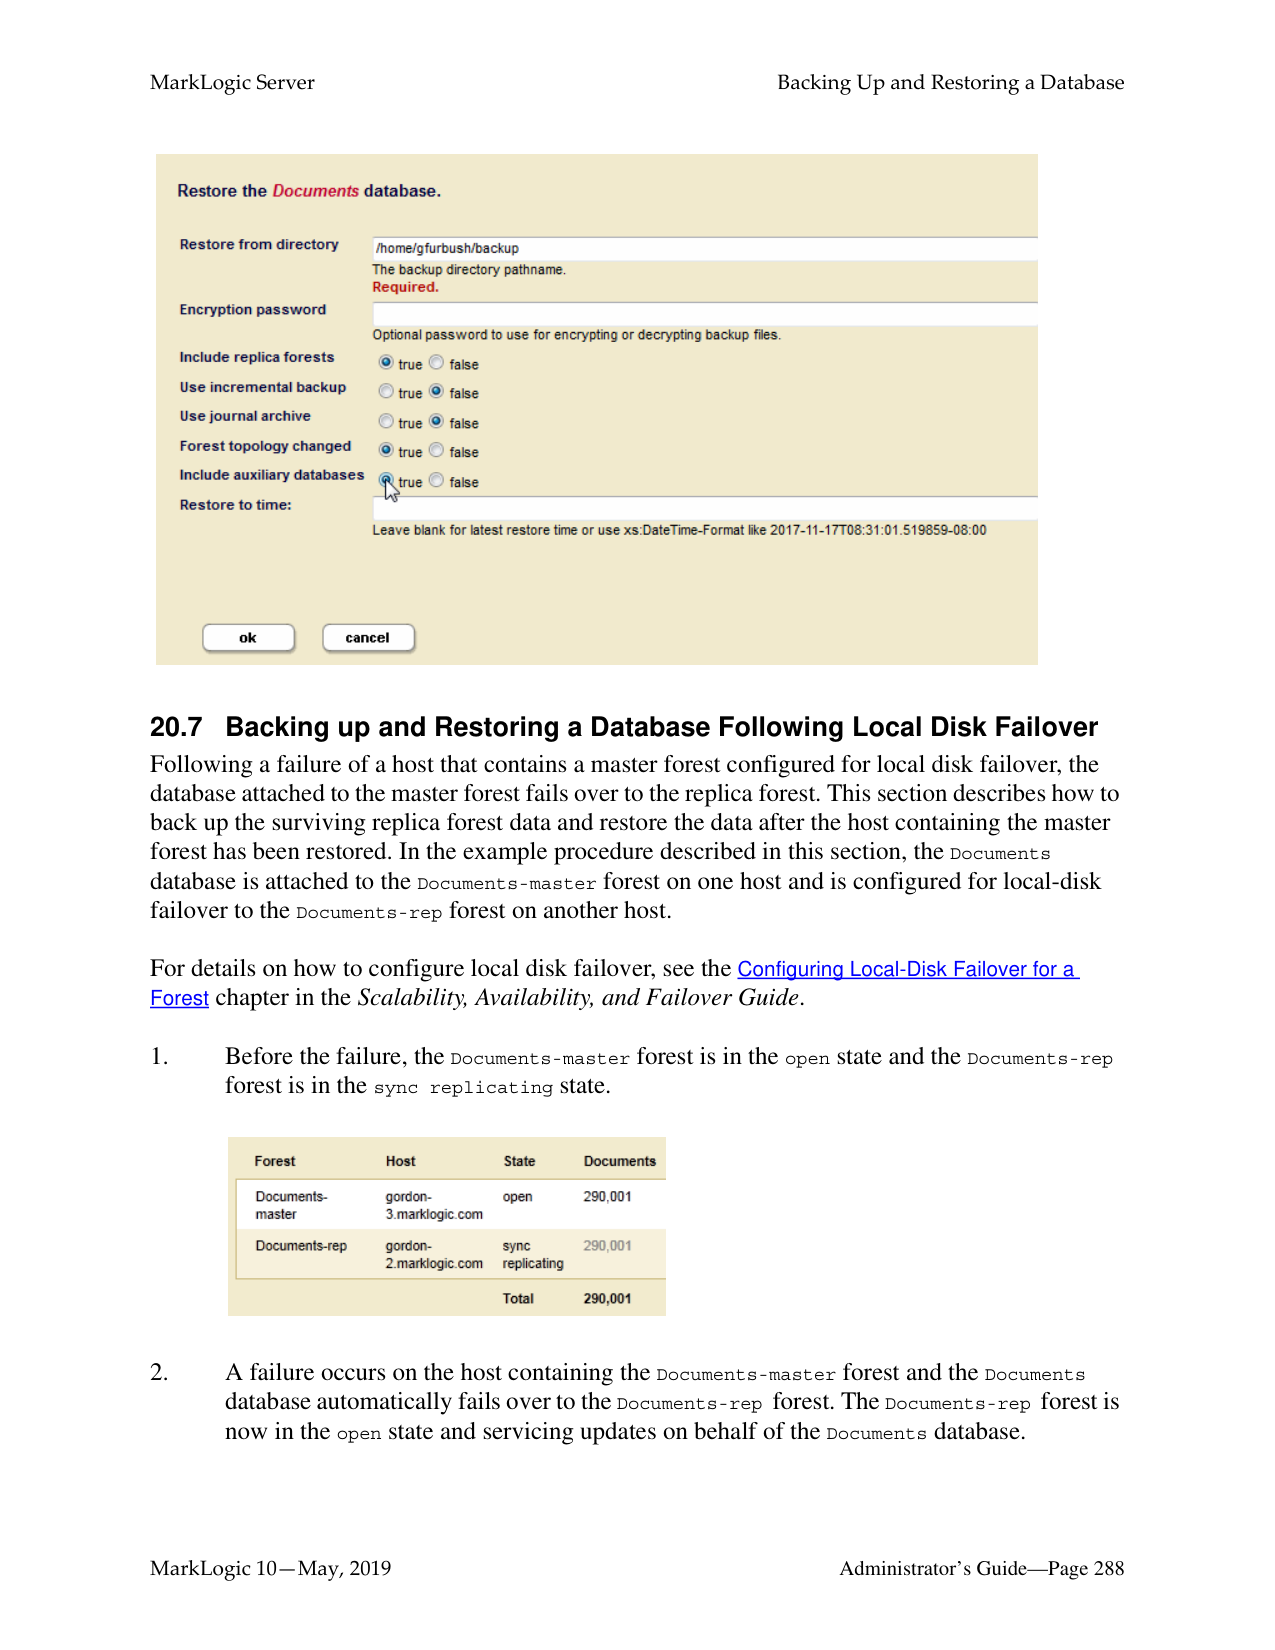
For example, if you back up a database to the /space/backups directory on September 1, 2004, a directory structure similar to the following is created:
/space/backups
20040901-1/ *.xml BackupTag.txt Forests/
Documents/ Label 000001e1/ Journals/
Schemas/ Label 000001e1/ Journals/
Security/ Label 000001e1/ Journals/
Triggers/ Label 000001e1/ Journals/
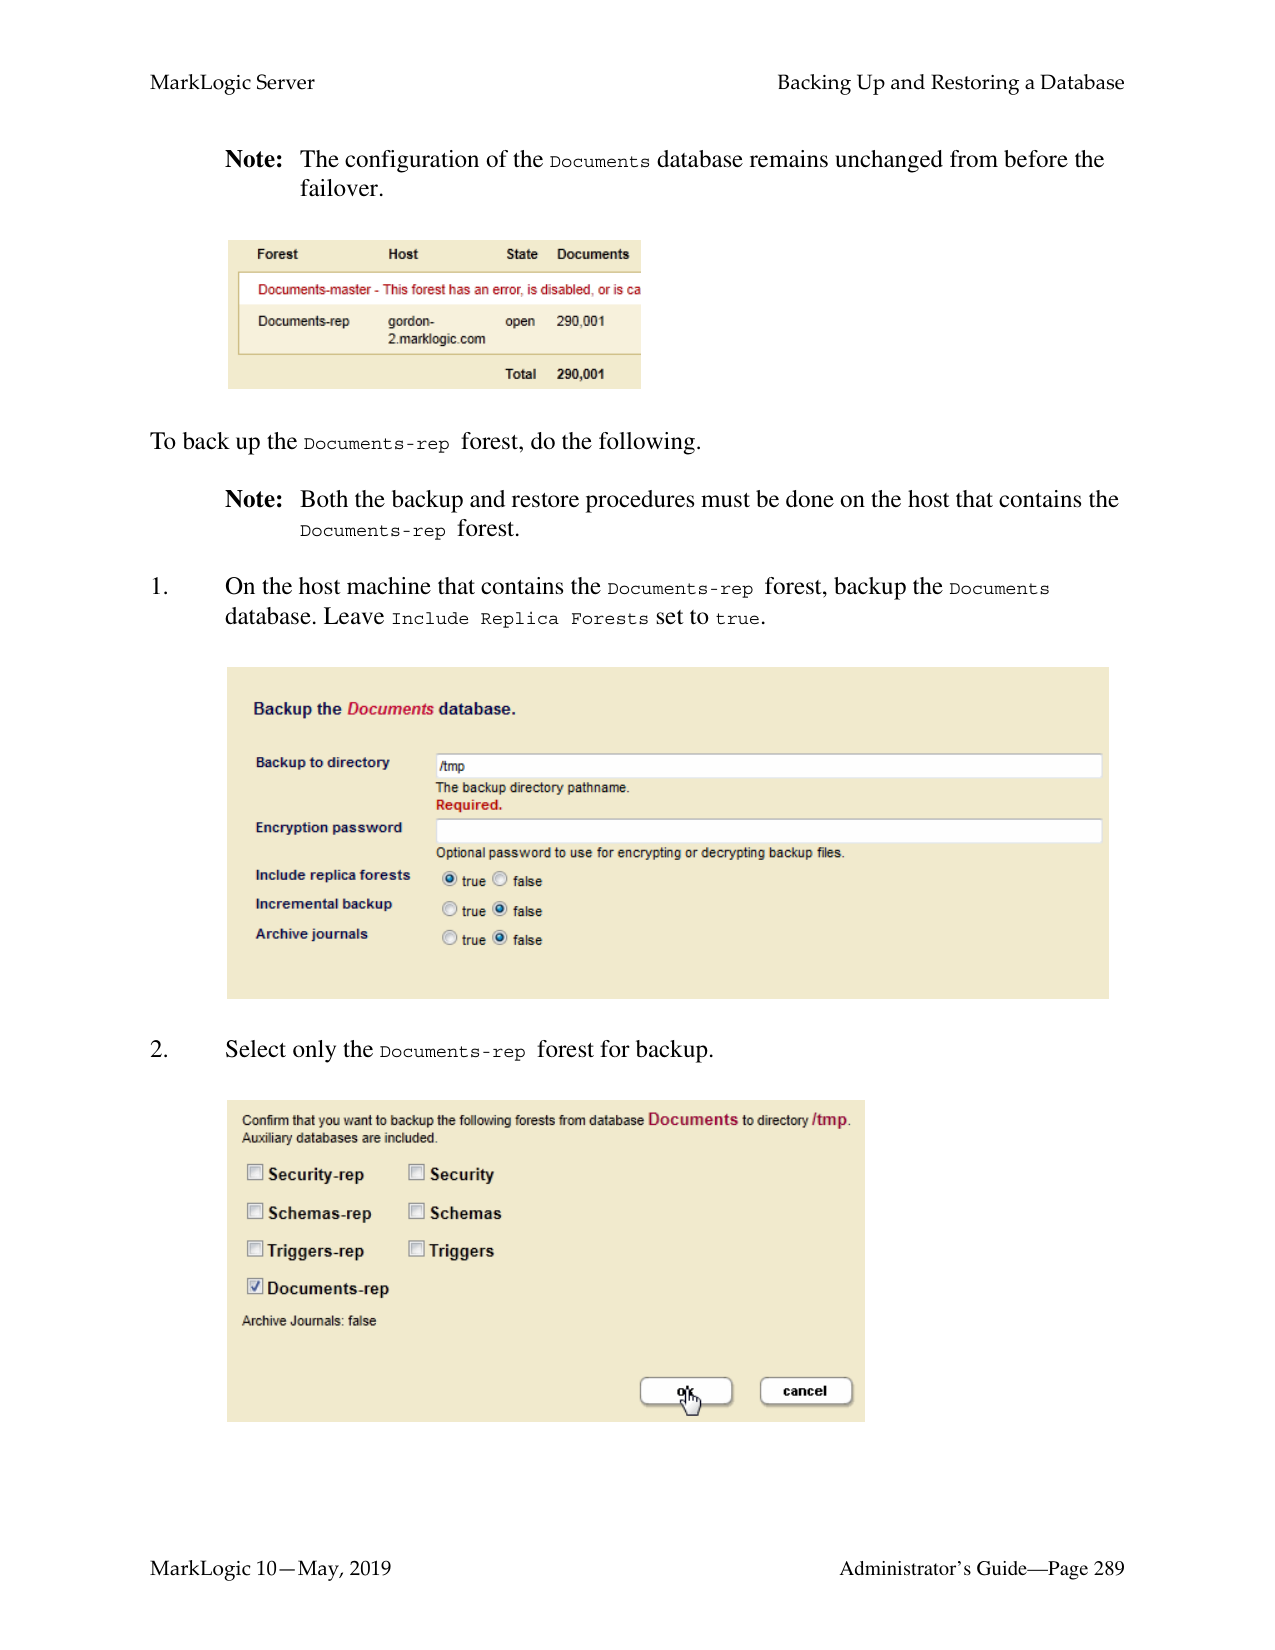
Incremental backups are stored in the directory under the full backup. In this first example, the backup directory (backup-dir) is /space/backup and the incremental backup directory (incremental-dir) is not used:
/space/backups 20140801-1223942093224 (full backup on 8/1) 20140802
331006226070 (incremental backup on 8/2) 20130803
1341007528950 (incremental backup on 8/3)
The first part, 20140801, is the year, month and day of the backup. The second part, 1223942093224, is the hour, minute, second, and nanosecond of the backup.
In this example, the backup directory (backup-dir) is /space/backup and the incremental backup directory (incremental-dir) is /space/incremental.
/space/backups
20140801-1223942093224 (full backup on 8/1) /space/incremental
20140801-1223942093224
The directory 20130801-1223942093224 is created on /space/incremental so that when the backup 20130801-1223942093224 is purged, its incremental backups can be purged easily.
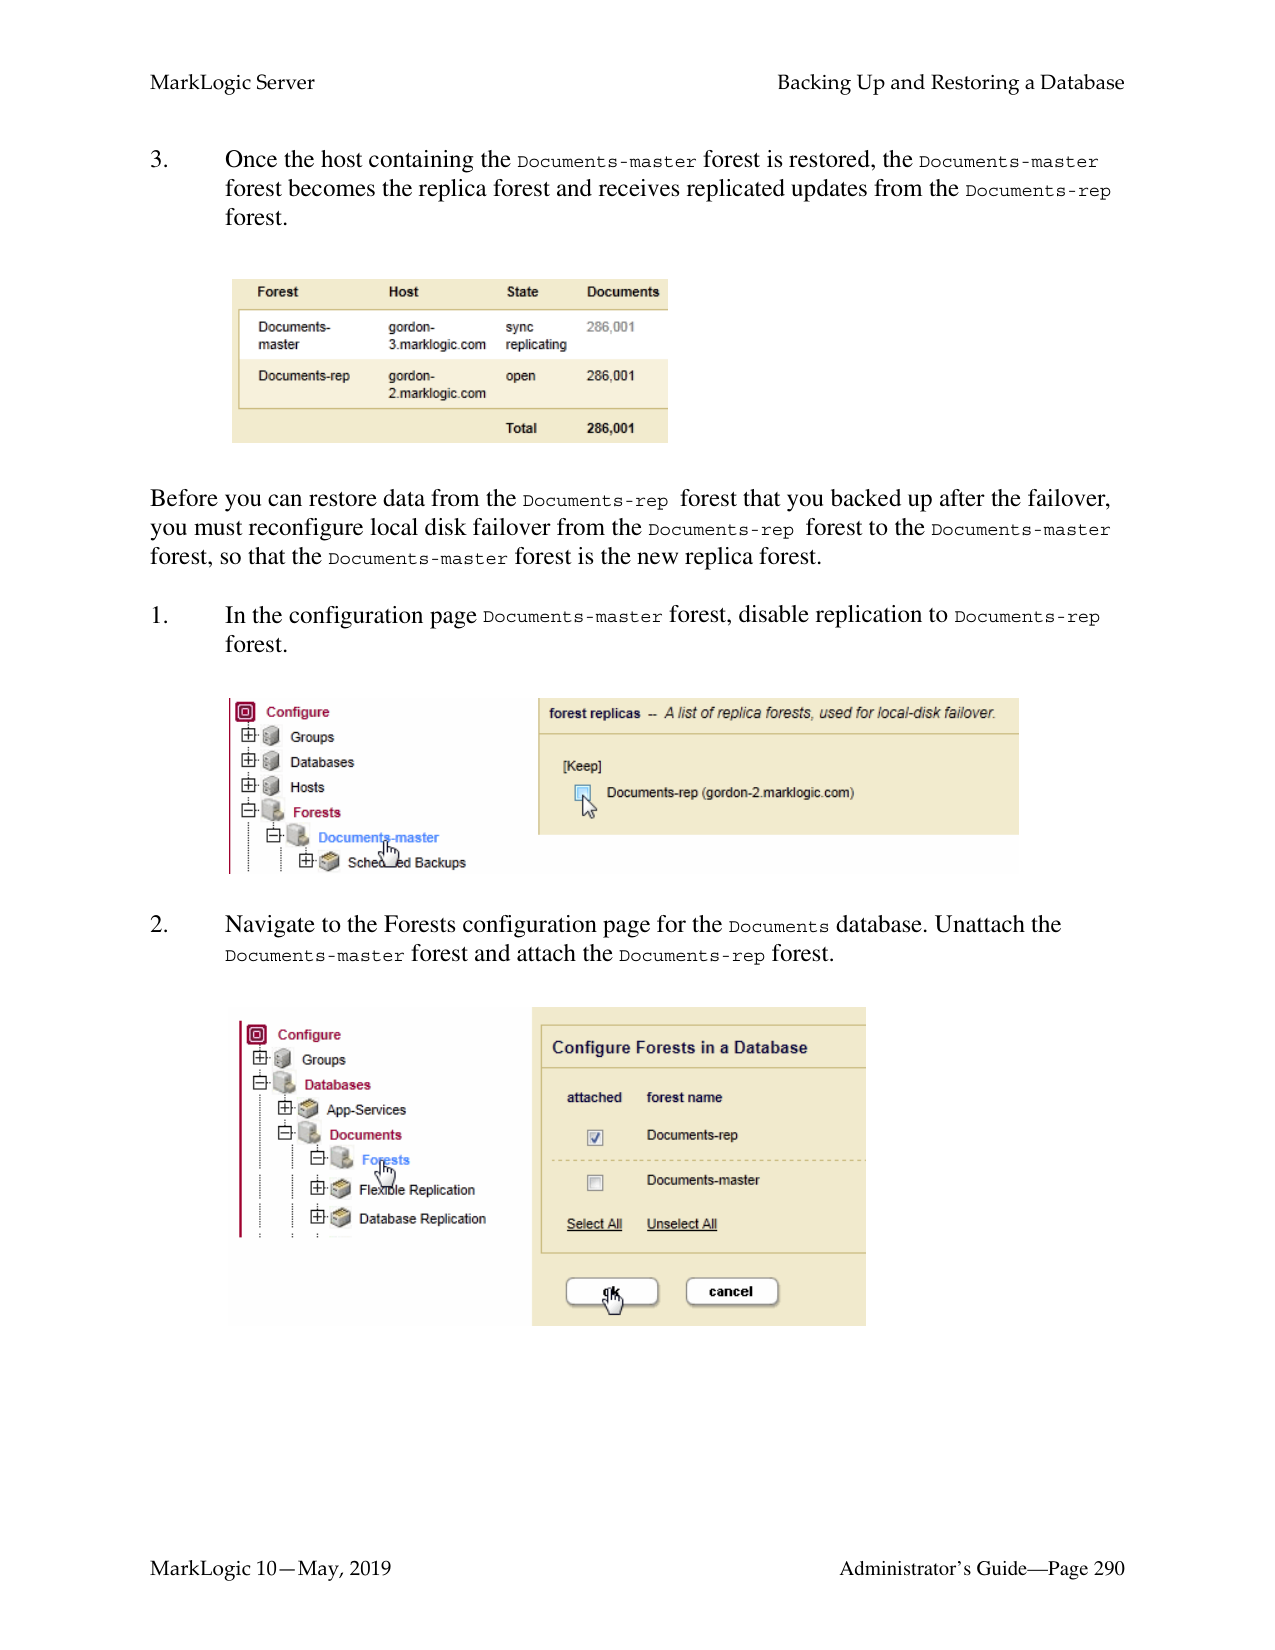
If an incremental backup directory is specified, after the first incremental backup is done, the full backup can be archived to another location. The subsequent incremental backups do not need to examine the full backup.
Note: Once you restore an incremental backup, you can no longer use the previous full backup location for ongoing incremental backups. After the restore, you need to make a fresh full backup and use the full backup location for ongoing incremental backups. This means that after restore of an incremental backup, scheduled backups need to be updated to use the fresh full backup location.
The following figure shows the phases of a backup or restore operation:
Copy PhaseValidation Phase Synchronization Phase
Begin Transaction
End Transaction
######### 20.1.5.1 Validation Phase
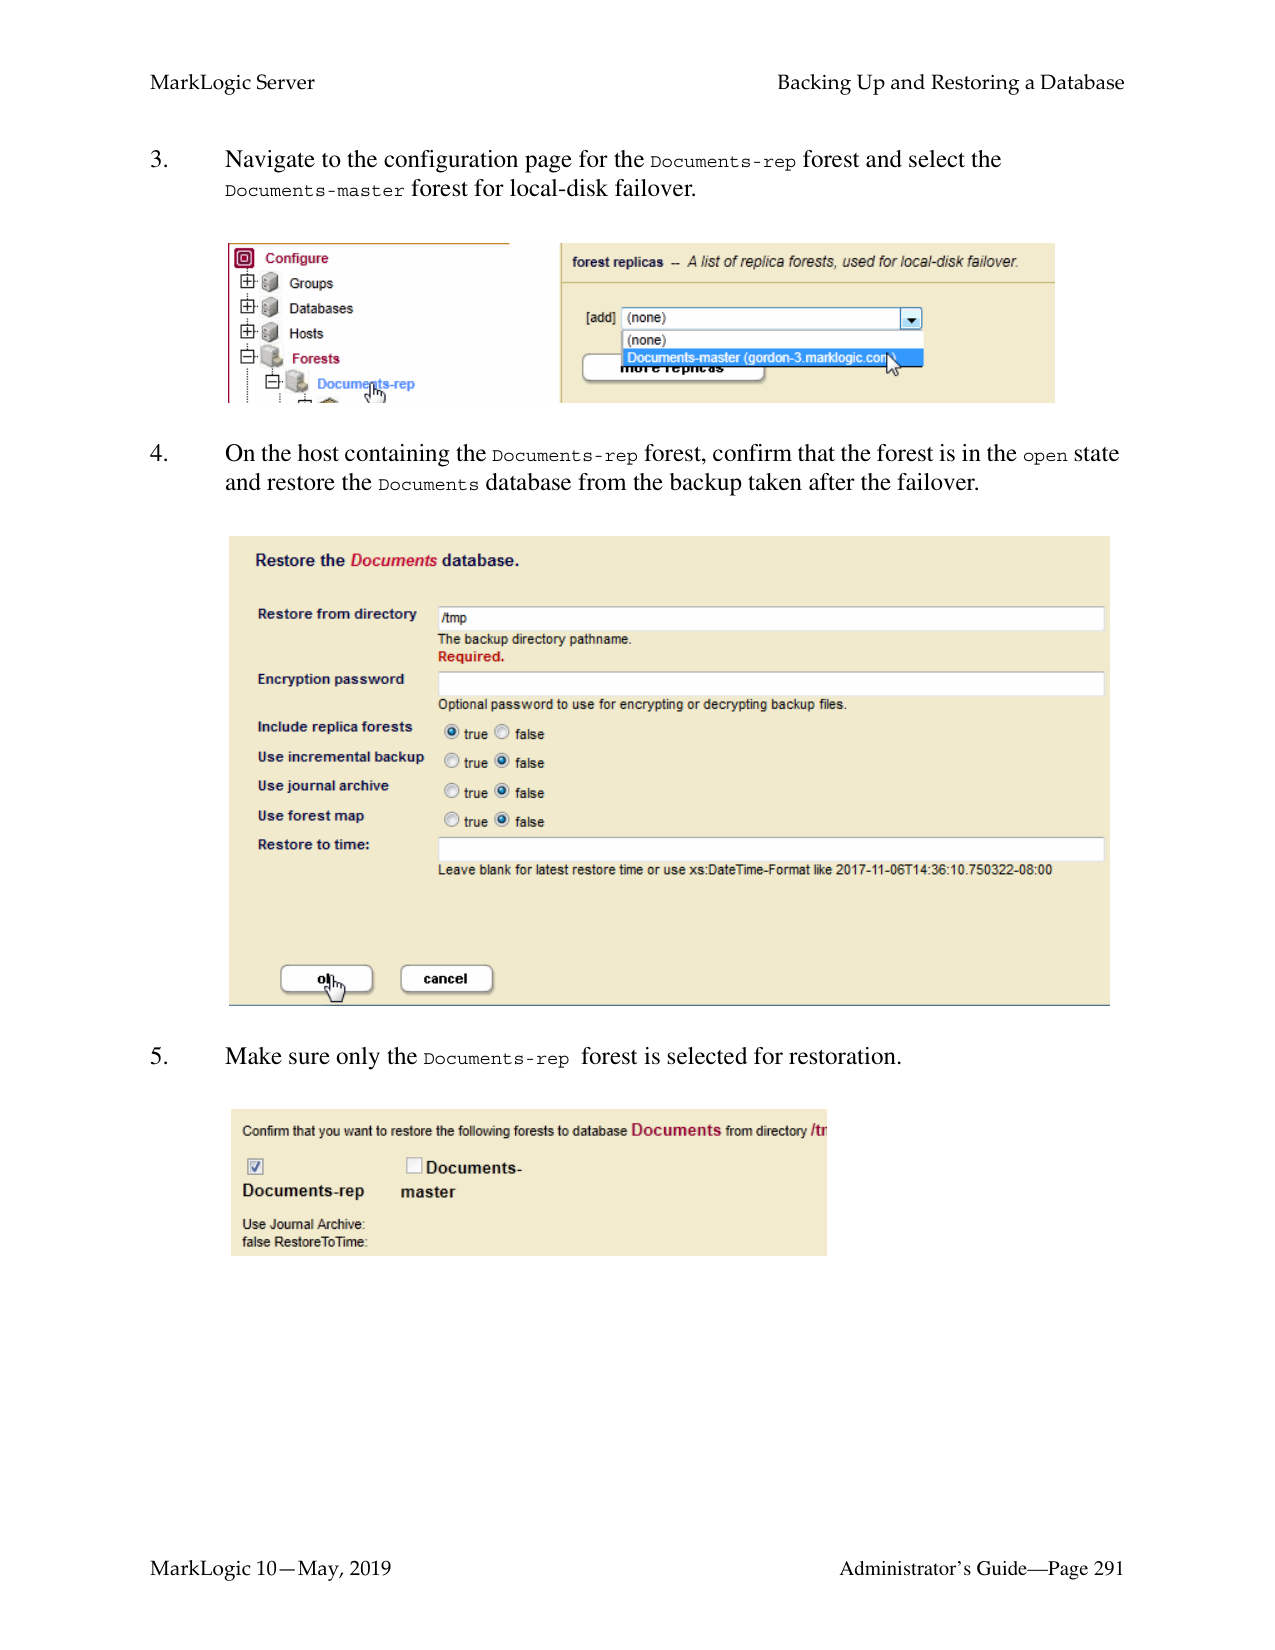
The validation phase is where the backup directories are checked to make sure that all of the needed files exist and that all of the needed backup directories exist and are writable. For backup operations, they are checked for sufficient disk space. For restore operations, the configuration files are read and the other backup files are checked to make sure they appear to be valid. The validation phase does not actually write any data and is completely asynchronous.
######### 20.1.5.2 Copy Phase
The copy phase is where the files are actually copied to or from the backup directory. The configuration files are copied at the beginning of the backup operation, and at this point a timestamp is written to the BackupTag.txt file. The copy phase might take a significant amount of time, depending on the size of the database. The start of the copy phase starts a transaction; if the transaction fails on a restore operation, the database remains unchanged from its original state.
######### 20.1.5.3 Synchronization Phase
During a backup or restore operation, the synchronization phase is where cleanup tasks such as deleting temporary files takes place, leaving the database in a consistent state. During a restore operation, the synchronization phase also takes the old version of the database offline and replaces it with the newly restored version.
Note: Any “cold” administrative tasks (tasks that require a server restart) will cause any backup or restore operations to fail. Do not perform any “cold” administrative tasks during a backup or restore operation. For a list of “hot” and “cold” operations, see “Appendix A: ‘Hot’ versus ‘Cold’ Admin Tasks” on page 465.
######### 20.1.6 Notes about Backup and Restore Operations
This section provides notes and restrictions about backing up and restoring MarkLogic Server databases.
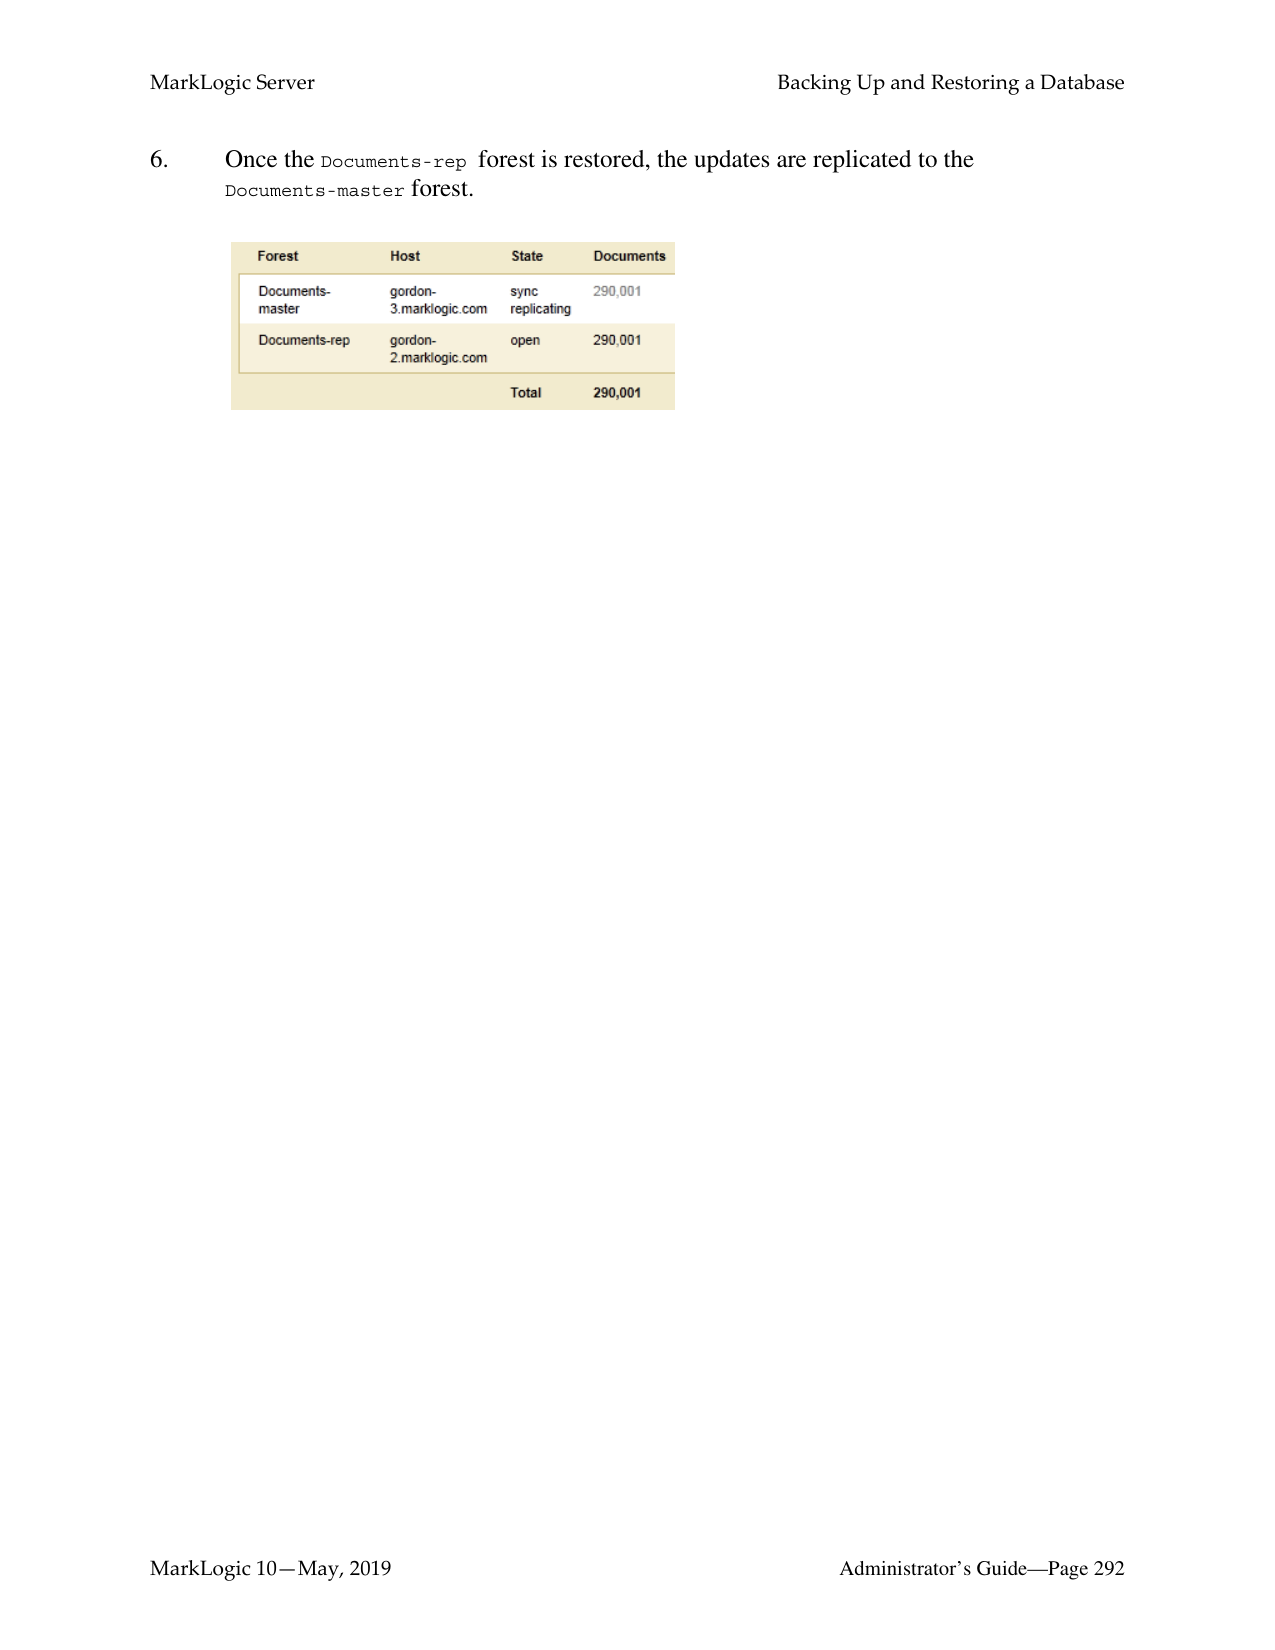
######### 20.2 Backing Up Databases with Journal Archiving
The backup/restore operations with journal archiving enabled provide a point-in-time recovery option that enables you to restore database changes to a specific point in time between full backups with the input of a wall clock time. When journal archiving is enabled, journal frames are written to backup directories by near synchronously streaming frames from the current active journal of each forest.
Note: When you create scheduled backups with journal archiving enabled, and then later delete the backup, it does not stop journal archiving from occuring even though the backups stop happening. The xdmp:stop-journal-archiving function must be to explicitly called to stop journal archiving.
When journal archiving is enabled, you will experience longer restore times and slightly increased system load as a result of the streaming of journal frames.

Note: Journal archiving can only be enabled at the time of a full backup. If you restore a backup and want to reenable journal archiving, you must perform a full backup at that time.
When journal archiving is enabled, you can set a lag limit value that specifies the amount of time (in seconds) in which frames being written to the forest's journal can differ from the frames being streamed to the backup journal. For example, if the lag limit is set to 30 seconds, the archived journal can lag behind a maximum of 30 seconds worth of transactions compared to the active journal. If the lag limit is exceeded, transactions are halted until the backup journal has caught up.
The active and backup journal are synchronized at least every 30 seconds. If the lag limit is less than 30 seconds, synchronization will be performed at least once in that period. If the lag limit is greater than 30 seconds, synchronization will be performed at least once every 30 seconds. The default lag limit is 15 seconds.
The decision on setting a lag limit time is determined by your Recovery Point Objective (RPO), which is the amount of data you can afford to lose in the event of a disaster. A low RPO means that you will restore the most data at the cost of performance, whereas a higher RPO means that you will potentially restore less data with the benefit of less impact to performance. In general, the lag limit you chose depends on the following factors:
A lower lag limit implies:
A higher lag limit implies:
######### 20.3 Incremental Backup
An incremental backup stores only the data that has changed since the previous full or incremental backup. Typically a series of incremental backups are done between full backups. Incremental backups are more compact than archived journals and are faster to restore. It is possible to schedule frequent incremental backups (for example, by ranges of hours) because an incremental backup generally takes less time to complete than a full backup. In normal conditions, it is recommended an incremental backup not be configured for a frequency less than every four hours.
To enable an incremental backup, set Incremental backup to true while initiating or scheduling a backup. See “Backing Up a Database” on page 263 for details. Full and incremental backups need to be scheduled separately. An example configuration might be:
A full backup and a series of incremental backups can allow you to recover from a situation where a database has been lost. Incremental backup can be used with or without journal archiving. If you enable both incremental backup and journal archiving, you can replay the journal starting from the last incremental backup timestamp. See “Backing Up Databases with Journal Archiving” on page 259 for more about journal archiving.
Note: When you restore from an incremental backup, you need to do a full backup before
you can continue with incremental backups. Incremental backup and journal archiving both provide disaster recovery. Incremental backup
Note: If MarkLogic Server cannot memory-map files from the backup in the underlying file system, it cannot create an incremental backup. So MarkLogic incremental backups require that the backup file system support memory-mapping operations (mmap).
For recovery you only need to specify the timestamp for the recovery to start and the server will figure out which full backup and which incremental backup(s) to use. You only need to schedule the incremental backup; the server will link together (or chain) the sequence the incremental backups automatically. See “Restoring from an Incremental Backup with Journal Archiving” on page 276 for details.
######### 20.3.1 Incremental Backup of New Forest
Incremental backup supports backup of a forest added since last full backup. If you add a new forest after a full backup of your database, you can include the new forest as part of your next incremental backup.
After you attach a new forest to your database, it will be included in the list of forests to be backed up in the Confirm backup step (Step 12 in “Backing Up a Database Immediately” on page 263).

Select the forest to include it in the backup and click ok. See “Backing Up a Database” on page 263 for more information.
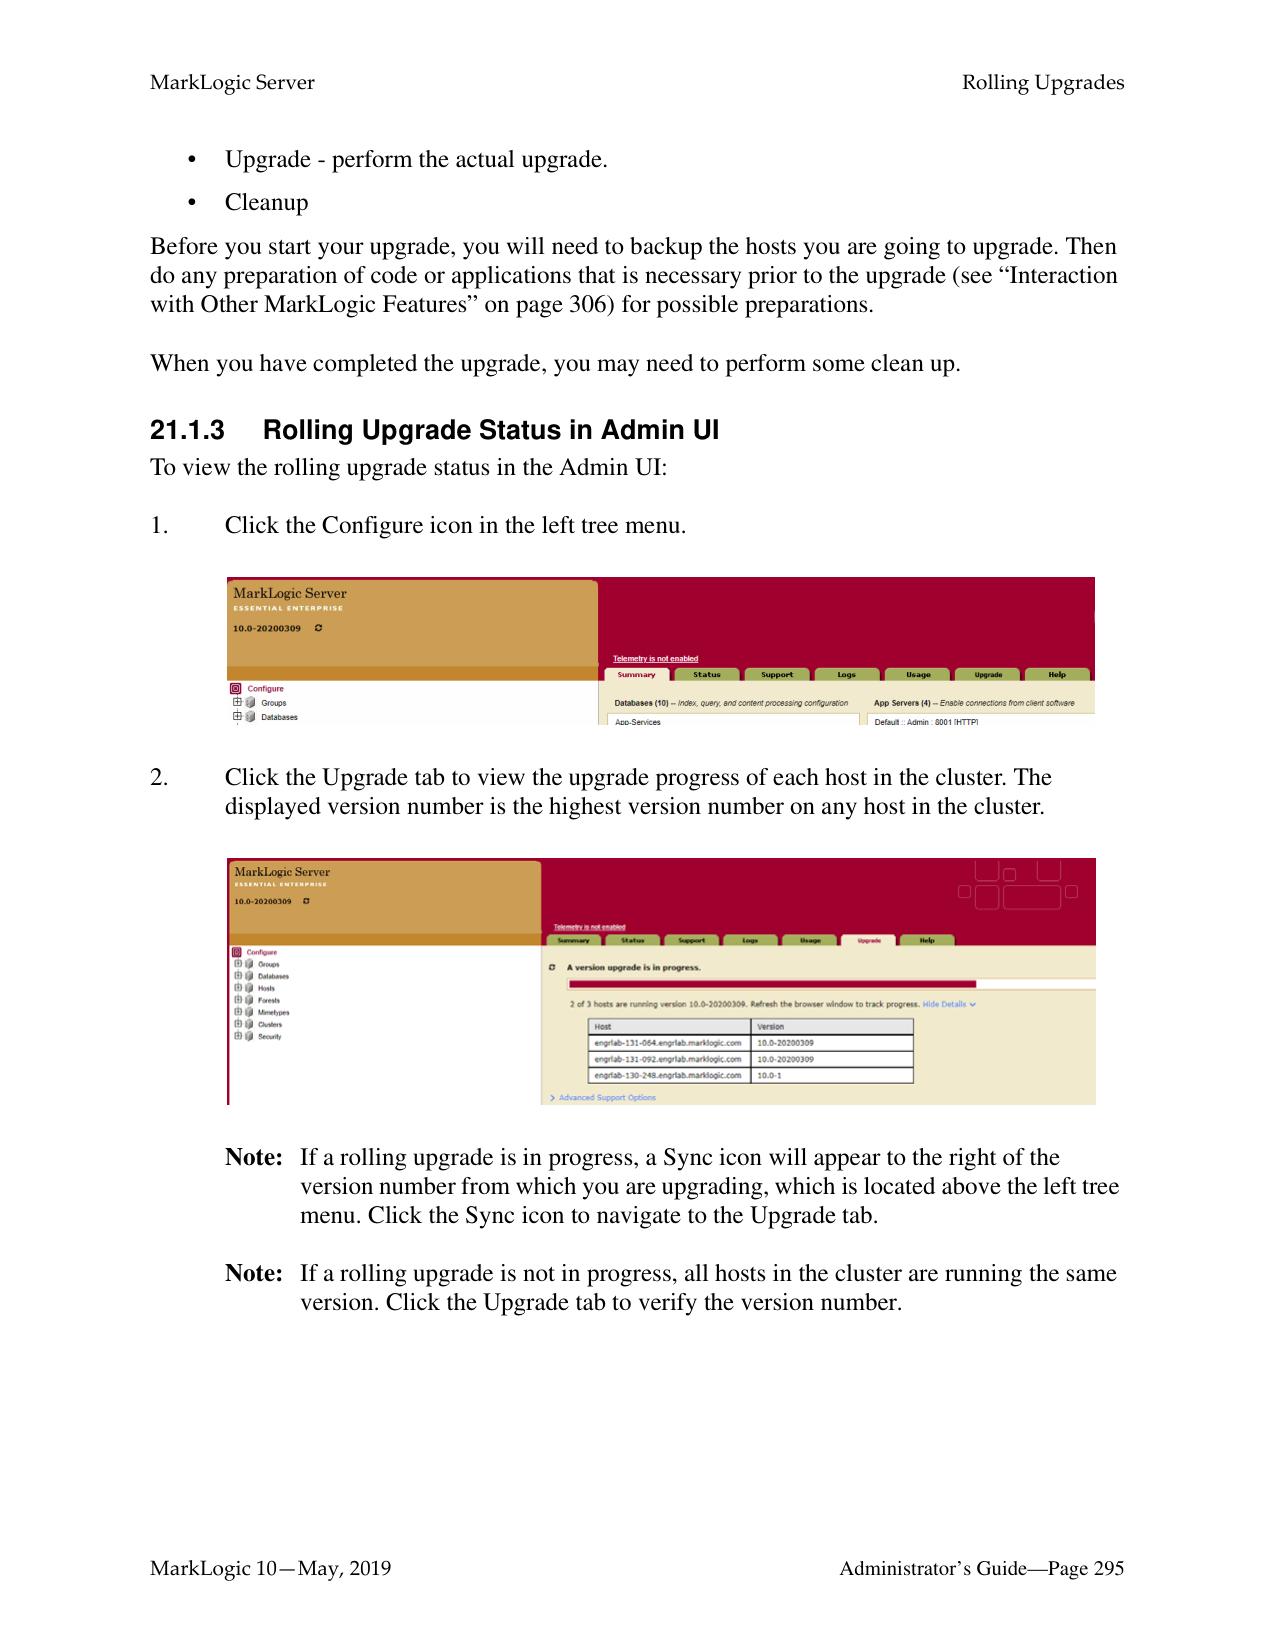
######### 20.4 Incremental Backup with Journal Archiving
Incremental backup improves restore both time and space requirements over journal archiving, but it’s not an either/or decision. You can, and should, use both where appropriate. If your goal is to be able to restore to any arbitrary point in time, while minimizing potential data loss, we suggest the following:
This configuration means that journal archives are only needed for the most recent hour, and the older ones are purged once there is an incremental backup that covers that hour. Enabling retain until backup ensures that the incremental backups have sufficient state to restore the database to
any point since the previous incremental backup. When you restore, the full and incremental backups can be used to return to any point in time prior to the most recent backup, and the journal archive will only be used if your restore point is more recent than the last incremental backup.
######### 20.5 Backing Up a Database
You can either initiate a database backup immediately or you can schedule a backup to occur in the future with the following procedures:
The backup procedures include options to specify journal archiving and/or incremental backup. You can choose to do a full backup or incremental backup, with or without journal archiving enabled.
######### 20.5.1 Backing Up a Database ImmediatelyPerform the following steps to initiate a database backup:
Note: The backup directory path must exist on all hosts that serve any forests in the database. The directory you specified can be an operating system mounted directory path, it can be an HDFS path, or it can be an S3 path. For details on using HDFS and S3 storage in MarkLogic, see Disk Storage Considerations in the Query Performance and Tuning Guide. Additionally, if you are using Windows and are
backing up to a remote Windows path, you must set the registry settings and permissions as described in Windows Shared Disk Registry Settings and Permissions.
Note: If Journal Archiving is enabled, you cannot include auxiliary forests, as they
should have their own separate backups.


Note: If you deselect any of the forests to backup, you might not have a completely consistent view of the database to restore. Only deselect any forests if you are sure you understand the implications of what you are backing up. To guarantee the exact same view of the database, backup all of the forests associated with the database, including the Schemas and Security database forests.
############ 14. After the backup is underway, the Admin Interface redirects you to the Database Statuspage.


When the backup is complete, the entry in the backup table disappears. If the status for any of the forests was something besides “completed,” then an error occurred during the backup operation. Check the Mark_Logic_Data/Logs/ErrorLog.txt file for any errors, correct them, and try the backup operation again.
######### 20.5.2 Scheduling a Database Backup
You can schedule database backups to periodically back up a database. You can schedule backups to occur daily, weekly, monthly, or you can schedule a one-time backup. You can create as many scheduled backups as you want. To create a scheduled backup, perform the following steps using the Admin Interface:
Note: The backup directory path must exist on all hosts that serve any forests in the database. The directory you specified can be an operating system mounted directory path, it can be an HDFS path, or it can be an S3 path. For details on using HDFS and S3 storage in MarkLogic, see Disk Storage Considerations in the Query Performance and Tuning Guide.

Note: If Journal Archiving is enabled, you cannot include auxiliary forests, as they
should have their own separate backups.
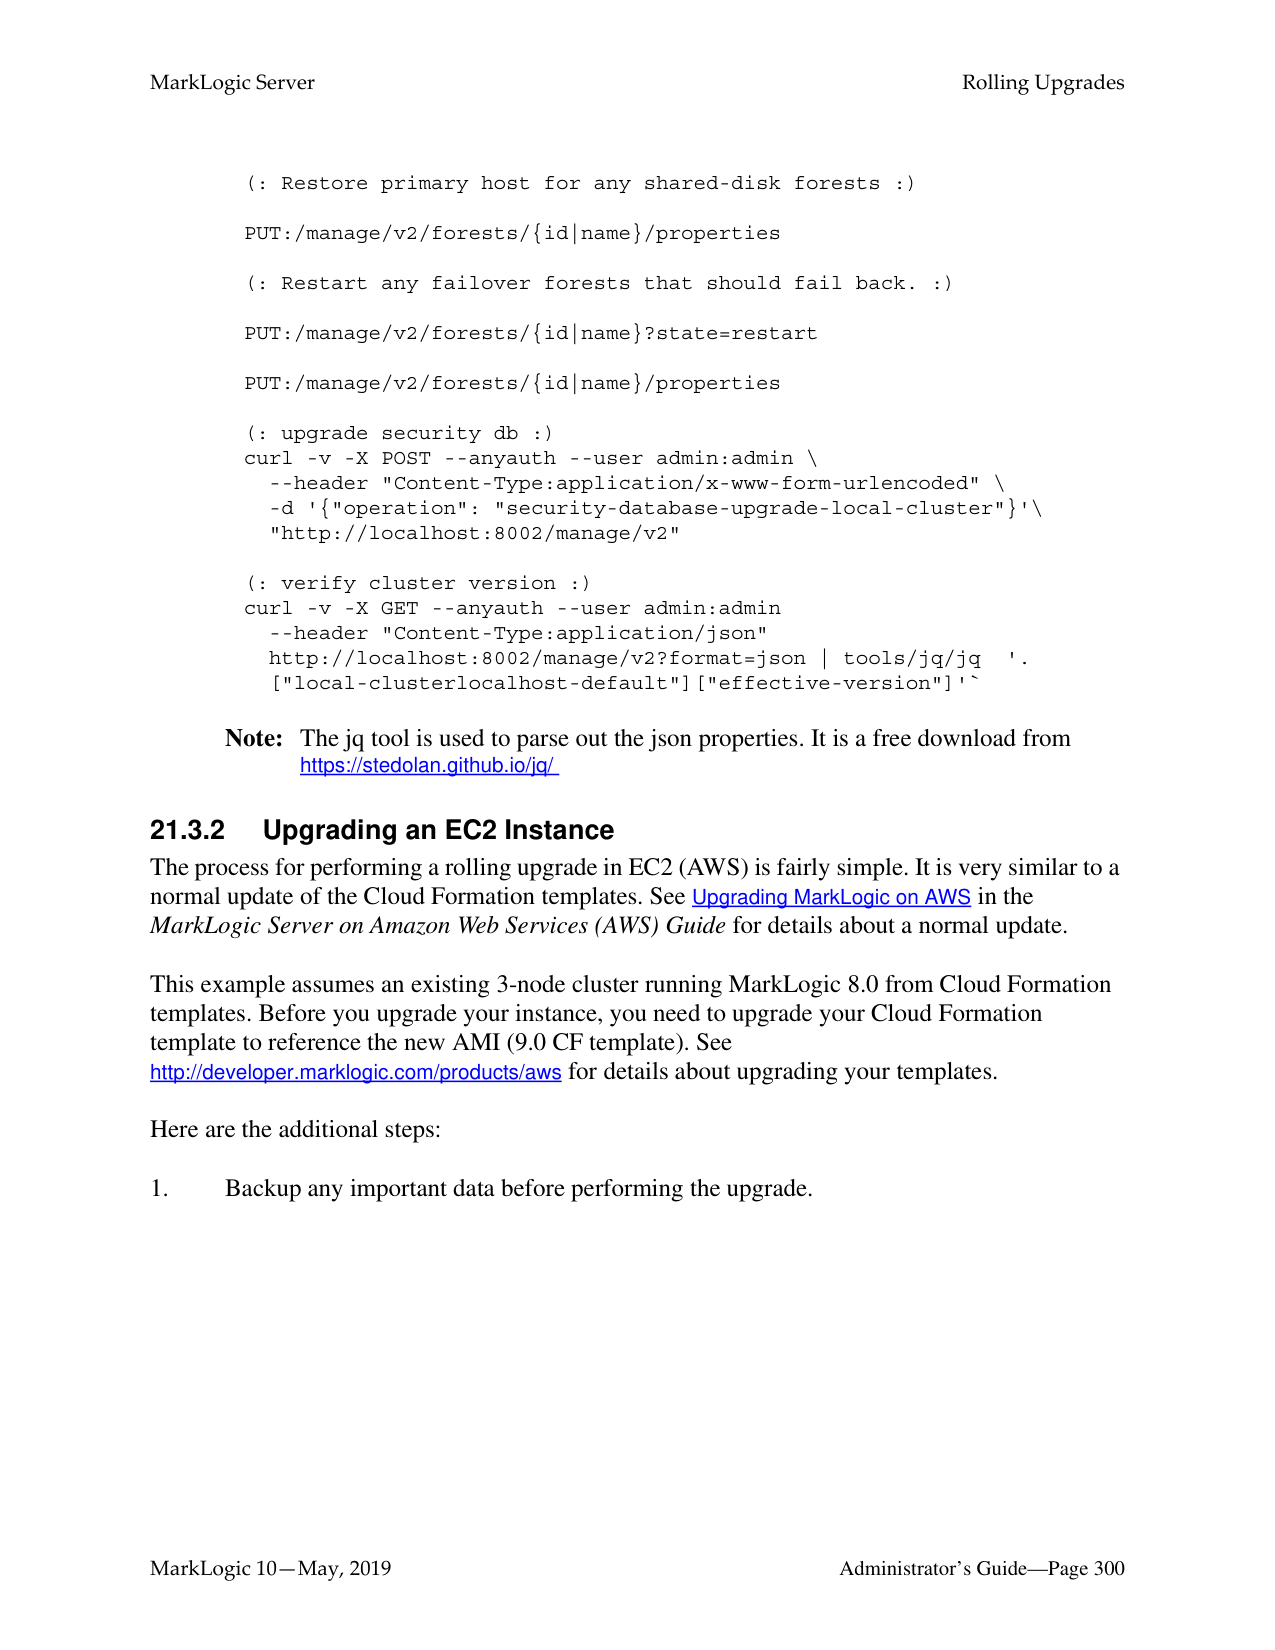
######### 20.6 Restoring a Database from a Backup
There are a number of ways to restore a database from a backup, as described in the following sections.
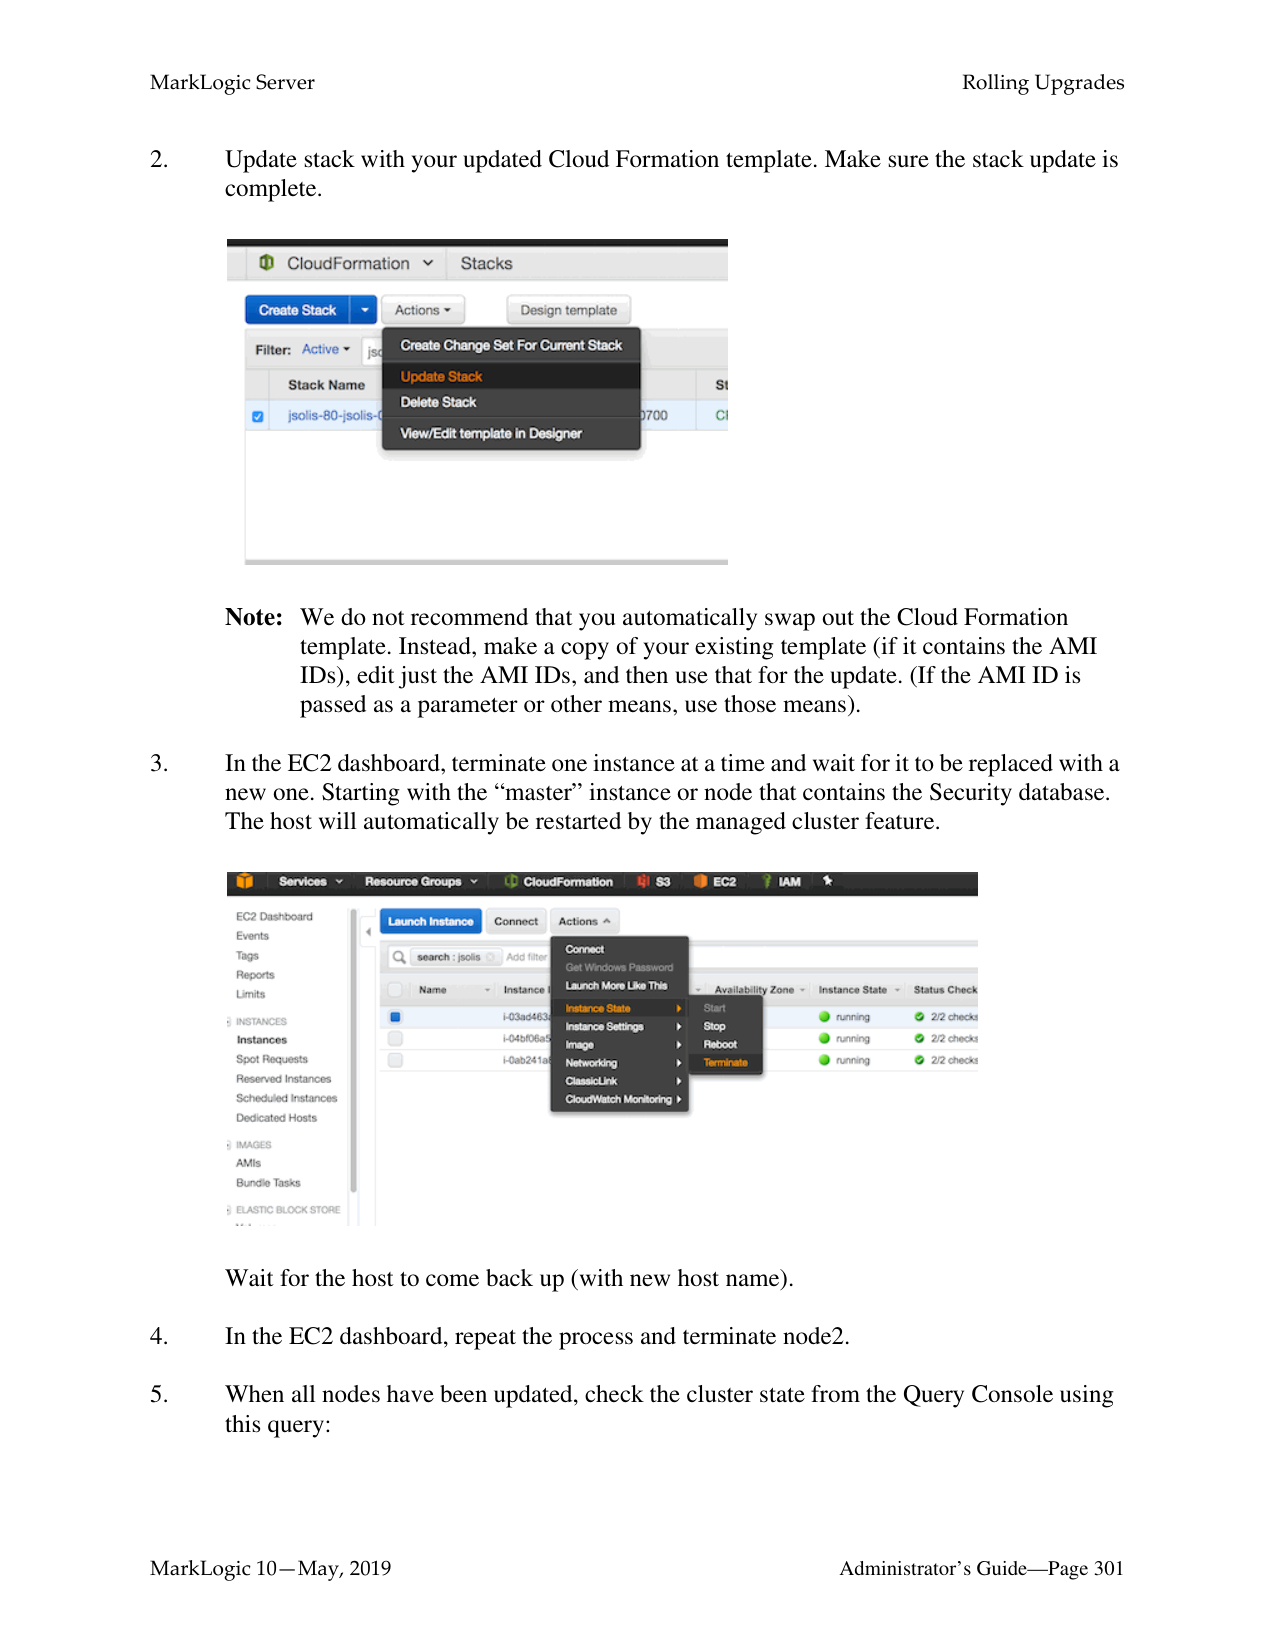
Note: Depending on how the backup was made and what has changed since then, some
restore operations may require a combination of these procedures.
Warning Do not restore the App-Services database from another cluster because this type of backup causes the following error: MANAGE-TIMESTAMPOLD: Config files out of date on host.

############ The database restore settings are described in the table below.
|Database Restore Setting|Description| |---|---| | | |
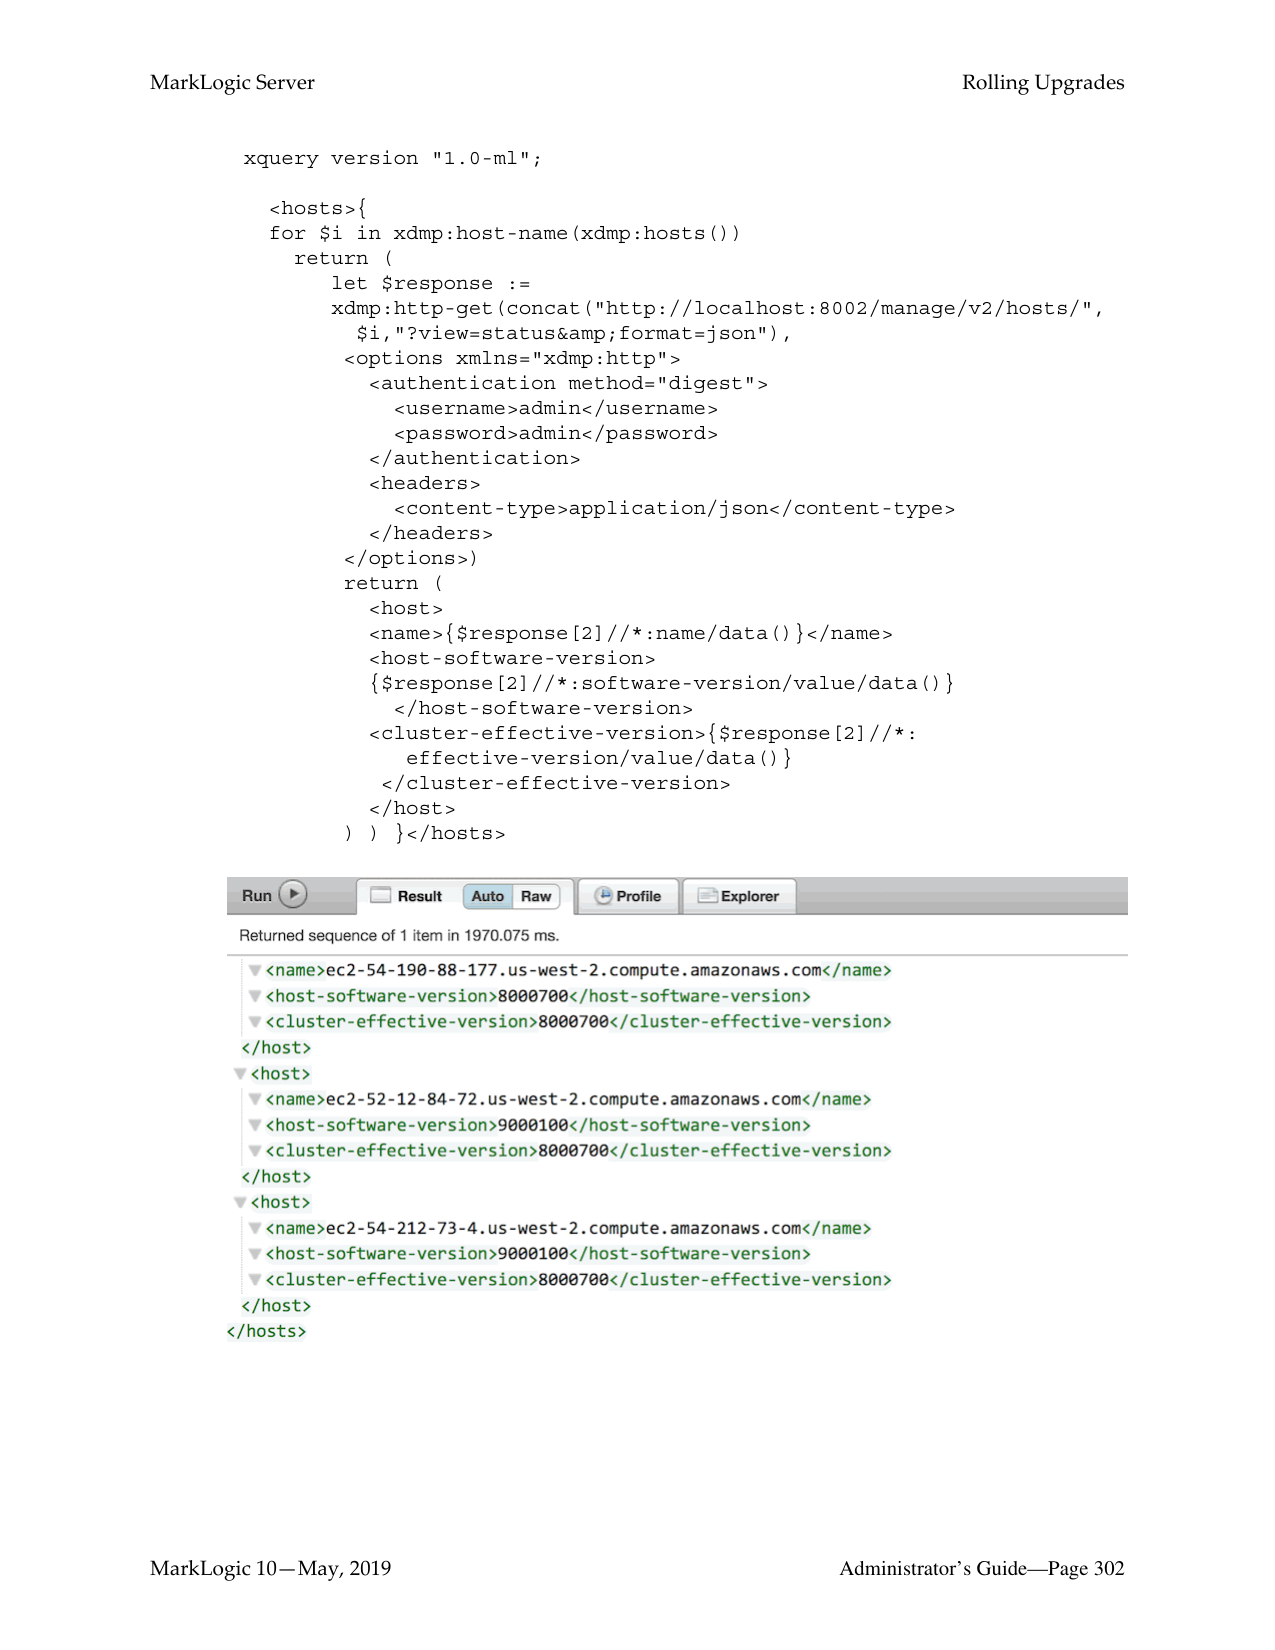
|Restore from directory|Specifies the fully-qualified pathname for the directory from which to restore a backup. If the top-level backup directory is specified, then the restore operation restores the most recent backup. If a specific backup is specified, then that backup is restored.| |Encryption password|An optional password to use for encrypting or decrypting backup files. Password must be between 16 and 1000 characters.| |Include Replica Forests|Specifies whether to include the replica forests used for local-disk failover in the backup.| |Use journal archive|Specifies whether to enable the point-in-time recovery feature.| |Forest topology changed|Specifies whether the forest topology has changed the last backup.| |Include auxiliary databases|Specifies whether to include the auxiliary databases.|
|Database Restore Setting|Description| |---|---| | | | |Restore to time|Specifies the time to which the database is to be restored. Leave blank for latest restore time.|
######### 20.6.2 Restoring a Database without Journal Archiving
This section describes how to restore a database if no journal archiving was enabled for the last backup.
Note: If your last backup enabled Journal Archiving, stop here and follow the procedure
described in “Restoring Databases with Journal Archiving” on page 274. To restore an entire database from a backup, perform the following steps:
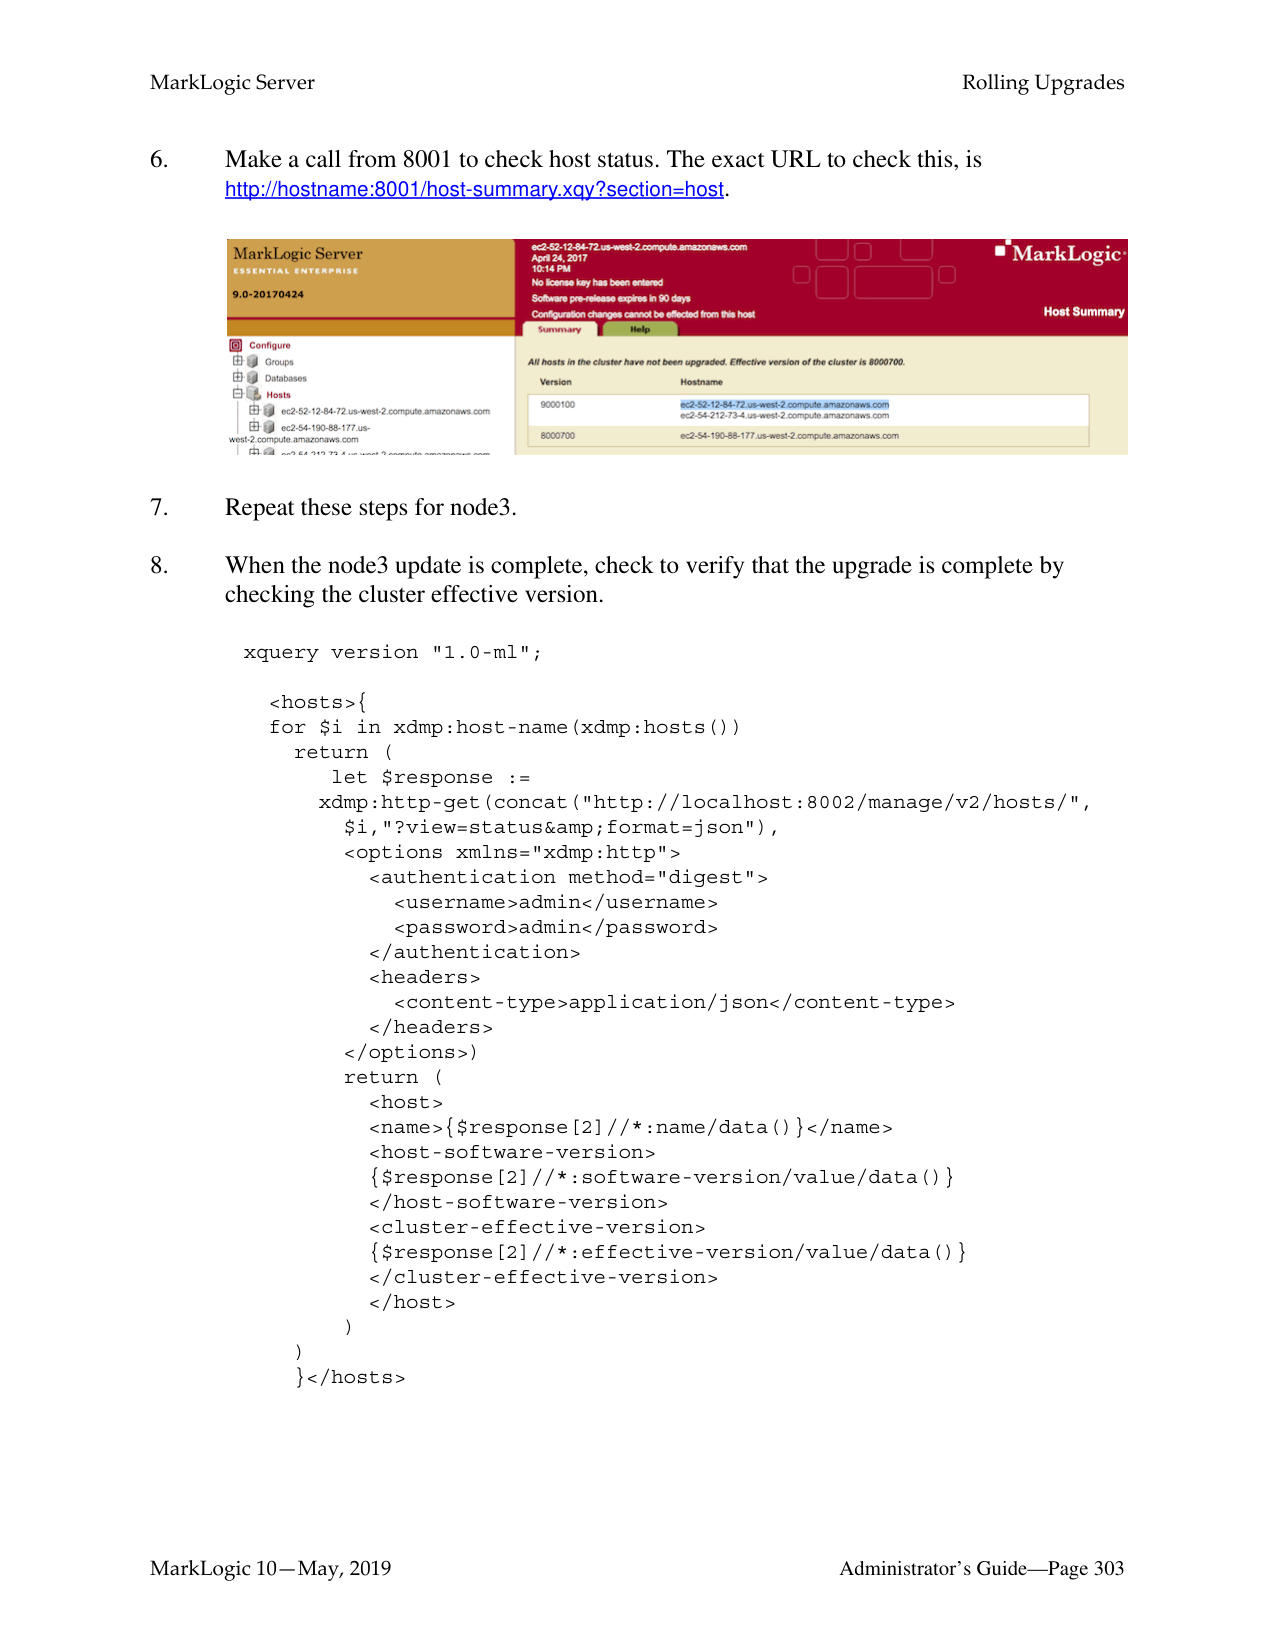
Note: If you enter a directory that contains multiple backups of the same database, the latest one is used. If you want to choose a particular backup to restore, enter the date_stamp subdirectory corresponding to the backup you want to restore. For details of the directory structure, see “Backup Directory Structure” on page 255.
Note: If you restore from an incremental backup, you can’t use the previous full backup location for ongoing incremental backups. You need to make a fresh full backup after the restore and use the full backup location for the ongoing incremental
backups. After doing a restore from an incremental backup, any scheduled backups will need to be updated to use the new full backup location.
The Confirm Restore screen also lists the date the backup was performed and the server version used for the backup you selected.
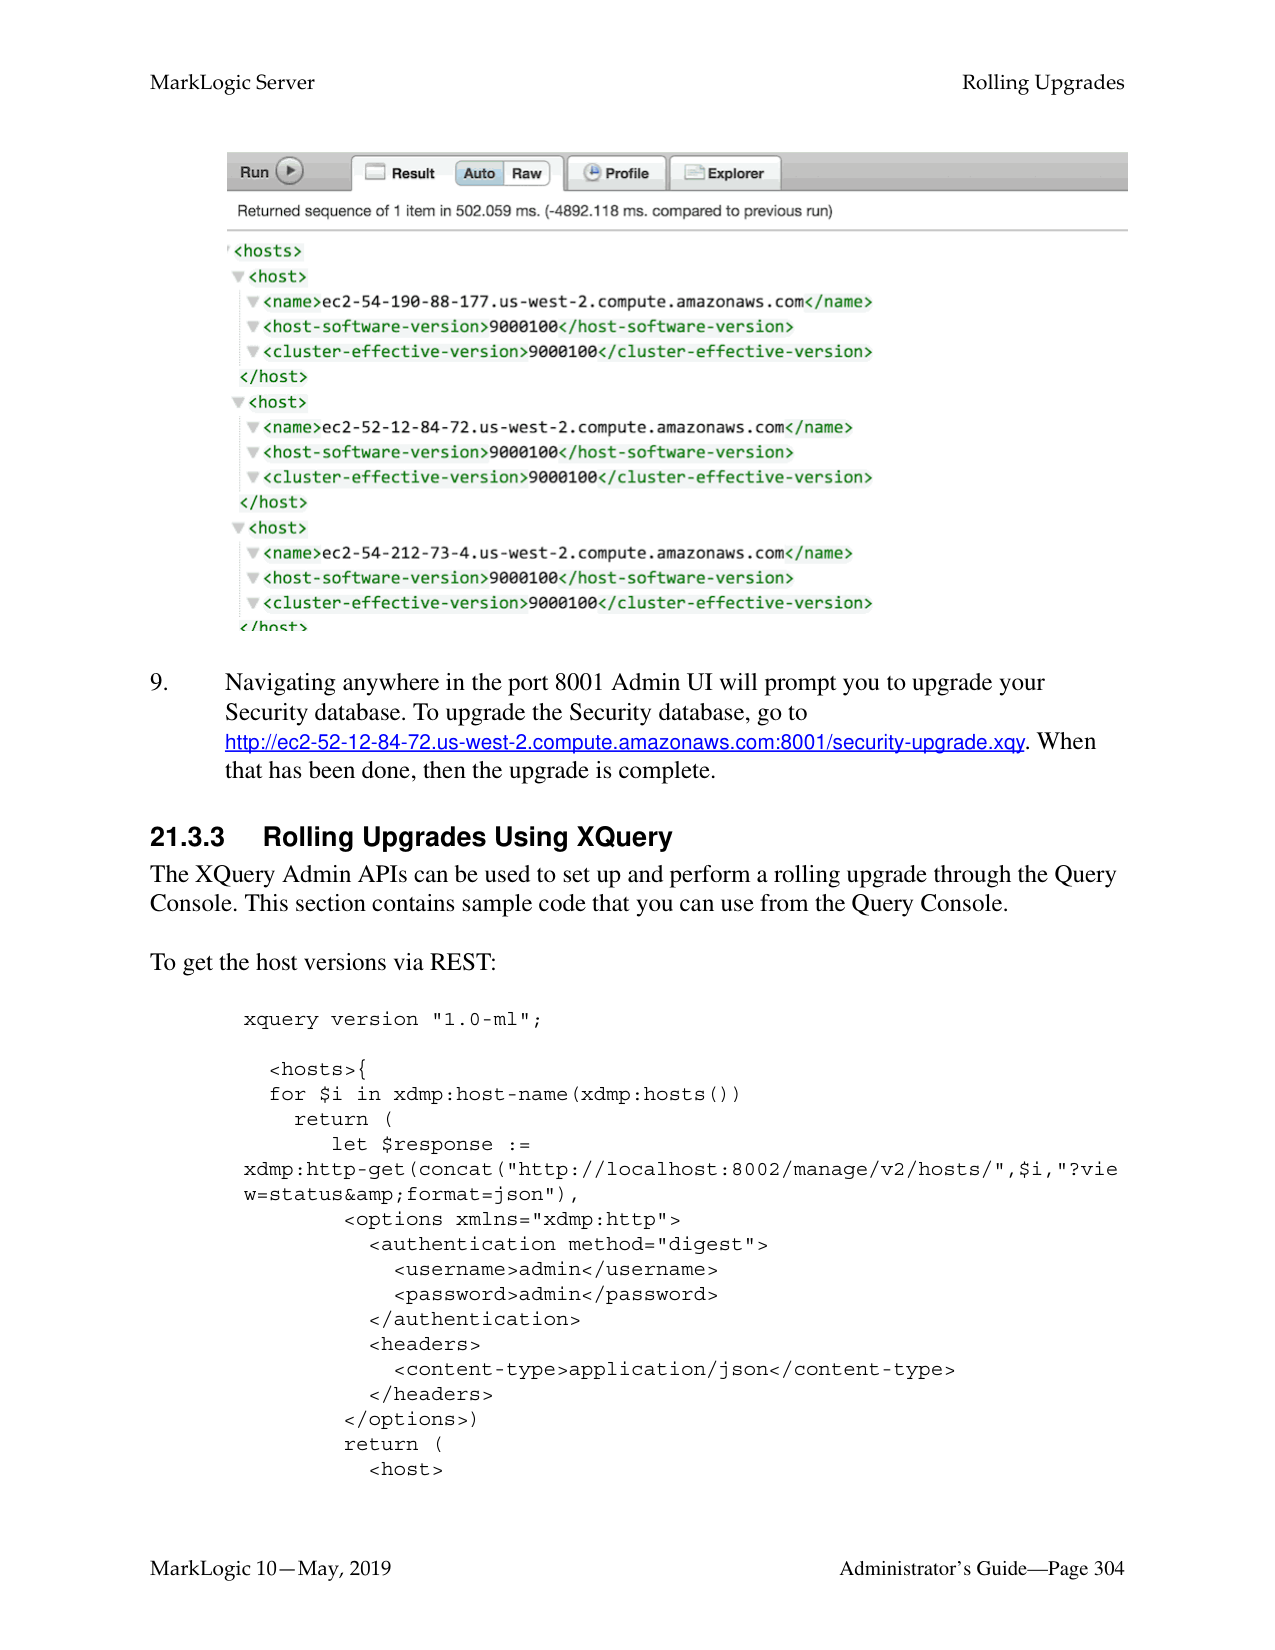


The Restores table lists when the restore was started, provides an estimate of the amount of time left, and lists other status information about the restore operation.

When the restore is complete, the entry in the backup table disappears. If the status for any of the forests was something besides “completed,” then an error occurred during the restore operation. Check the Mark_Logic_Data/Logs/ErrorLog.txt file for any errors, correct them, and try the restore operation again.
######### 20.6.3 Restoring Databases with Journal Archiving
After you restore a database with Journal Archiving enabled, each forest will likely have committed its last transaction at different timestamps.
For example, the illustration below shows four forests and their committed transactions. Updates for each transaction are identified by the convention ‘T#-u#’ and commits are identified by a ‘C’. Each forest completed its last commit at a different point in time when the restore is finished. In this example, we are restoring from timestamp 0 to 6, Forest A has only committed transactions up to timestamp 3 while Forest B has committed transactions up to timestamp 6. This means that, in order to return the database to a transactionally consistent state, all forests must be rolled back to timestamp 3 or earlier.
C = Commit
TG-u2 TG-u3 C TD-u5 TD-u6 C TY-u1 TY-u2 TF-u1 TF-u2Forest A
Forest B
TR-u3 T3-u4 C TB-u1 TB-u2 TH-u3 TH-u4 TH-u5 C TY-u3
Forest C
TD-u3 TD-u4 TH-u1 TH-u2 TB-u3 TB-u4 C TG-u1 TG-u2
Forest D
TA-u1 TA-u2 TA-u3 C TX-u1 TZ-u1 TZ-u2
Timestamp 12 345 60
Failure
Your options for recovering your data and returning the database to a transactionally consistent state are as follows:
The following sections describe how to use the XQuery API to restore the database. You can also use the Admin Interface to accomplish some of the tasks.
Note: If you are using XA distributed transaction processing, a restore to a point in time may revive some XA transactions that were prepared before the target restore time, and committed/aborted after that time. For details on how to identify XA transactions, see Heuristically Completing a MarkLogic Server Transaction in the XCC Developer’s Guide
Note: You cannot roll back through a database clear operation, so you should check the
server logs for points in time that any clear operations occurred.
######### 20.6.4 Restoring from an Incremental Backup with Journal Archiving
To restore from an incremental backup, the server uses the base backup in the backup tag to get a series of incremental backups that lead to the full backup. The restore then starts with a full backup and restores using the incremental backups in reverse order. You need to specify the full backup directory and optionally the incremental backup directory. If no restore timestamp is specified, the server finds the latest backup from which to restore. Once you have completed this process, you can use journal archiving to restore the database to the current time.
If a restore timestamp is specified, the server finds a backup where the restore timestamp is between the minimum query timestamp and the backup timestamp. If no backup meets the requirement and there is a journal archive, the server finds the latest backup with backup timestamp smaller than the restored timestamp. It restores to that backup and then replays the journal to the restored timestamp.
If the journal archive exists, the server will find the backup timestamp of the last incremental backup and replay the journal starting from that timestamp.
Note: Once you restore from an incremental backup, you can no longer use the previous full backup location for ongoing incremental backups. After the restore, you need to make a fresh full backup and use that full backup location for the ongoing incremental backups. This means after the restore from an incremental backup, any scheduled backups will need to be updated to use the new full backup location. Using the old full backup location for incremental backup after a restore will cause an error.
This procedure describes how to restore a database to the current point in time using a full backup, one or more incremental backup, and journal archiving. You need to have a full backup using journal archiving and one or more incremental backups using journal archiving.
Note: For journal archiving, you need either the timestamp for the restore target or the current timestamp. This example uses a blank field (latest restore time/current timestamp) for the restore target.
Note: If you enter a directory that contains multiple backups of the same database, the latest one is used. If you want to choose a particular backup to restore, enter the
date_stamp subdirectory corresponding to the backup you want to restore. For details of the directory structure, see “Backup Directory Structure” on page 255.
Note: For Journal archiving to work, you need a Restore to time, otherwise the restore will proceed with last Incremental backup it finds at the location. Also, the Merge Timestamp should be older than the Restore Time.
When restoring a backup with journal archiving enabled, be sure to change the merge timestamp from 0 to a non-zero value. Using zero for the merge timestamp will result in an error when restoring with journal archiving and restore-to-time set to zero. The merge timestamp must be set to a non-zero value.


The Restores table lists when the restore was started, provides an estimate of the amount of time left, and lists other status information about the restore operation.

When the process is complete, the Restores table entry will disappear.
######### 20.6.5 Restoring to the Safe Timestamp
If you want to restore as much data as possible, you can restore your data to the minimum safe timestamp.
For example, the database you want to restore has four forests, as shown below. You use the xdmp:host-status function to locate the safe-restore-to-time value, which is earliest of the four last-commit timestamps. In this example, the safe-restore-to-time is the timestamp of the last committed transaction in Forest A.
C = Commit
TG-u2 TG-u3 C TD-u5 TD-u6 C TY-u1 TY-u2 TF-u1 TF-u2Forest A
TR-u3 T3-u4 C TB-u1 TB-u2 TY-u3
TD-u3 TD-u4 TH-u1 TH-u2 TB-u3 TB-u4 C TG-u1 TG-u2
TA-u1 TA-u2 TA-u3 C TX-u1 TZ-u1 TZ-u2
Timestamp 12 345 60 safe-to-restore-time
Failure
Rollback
The following procedure describes how to restore to the minimum timestamp using the XQuery API.
Note: This same procedure can be done using the Admin Interfaces described in “Setting Merge Policy” on page 183, “Admin Interface for Database Restore” on page 270, and “Rolling Back a Transaction” on page 318.

For example, if you are restoring the Documents database, you can use the following query to rollback your forest data:
xquery version "1.0-ml"; declare namespace host = "http://marklogic.com/xdmp/status/host";
let $timestamp :=
xdmp:wallclock-to-timestamp( xs:dateTime(xdmp:host-status(xdmp:host("your-host.com")) /host:restore-jobs/host:restore-job/host:safe-restore-to-time /fn:data(.)))
return
xdmp:forest-rollback( xdmp:database-forests(xdmp:database("Documents")), $timestamp)
######### 20.6.6 Restoring to a Specific Timestamp
The following procedure describes how to restore a database to a specific timestamp using the XQuery API.
Note: This same procedure can be done using the Admin Interfaces described in “Setting Merge Policy” on page 183, “Admin Interface for Database Restore” on page 270, and “Rolling Back a Transaction” on page 318.

xdmp:forest-rollback( xdmp:database-forests(xdmp:database("Documents")), xdmp:wallclock-to-timestamp(
xs:dateTime("2011-09-13T10:50:21.201832-07:00")))
######### 20.6.7 Restoring Based on Sample Documents
You may want to use the state of some sample documents to determine the time at which to restore the database.
The following procedure describes how to restore to the state of some documents using the XQuery API.
Note: This same procedure can be done using the Admin Interfaces described in “Setting Merge Policy” on page 183, “Admin Interface for Database Restore” on page 270, and “Rolling Back a Transaction” on page 318.
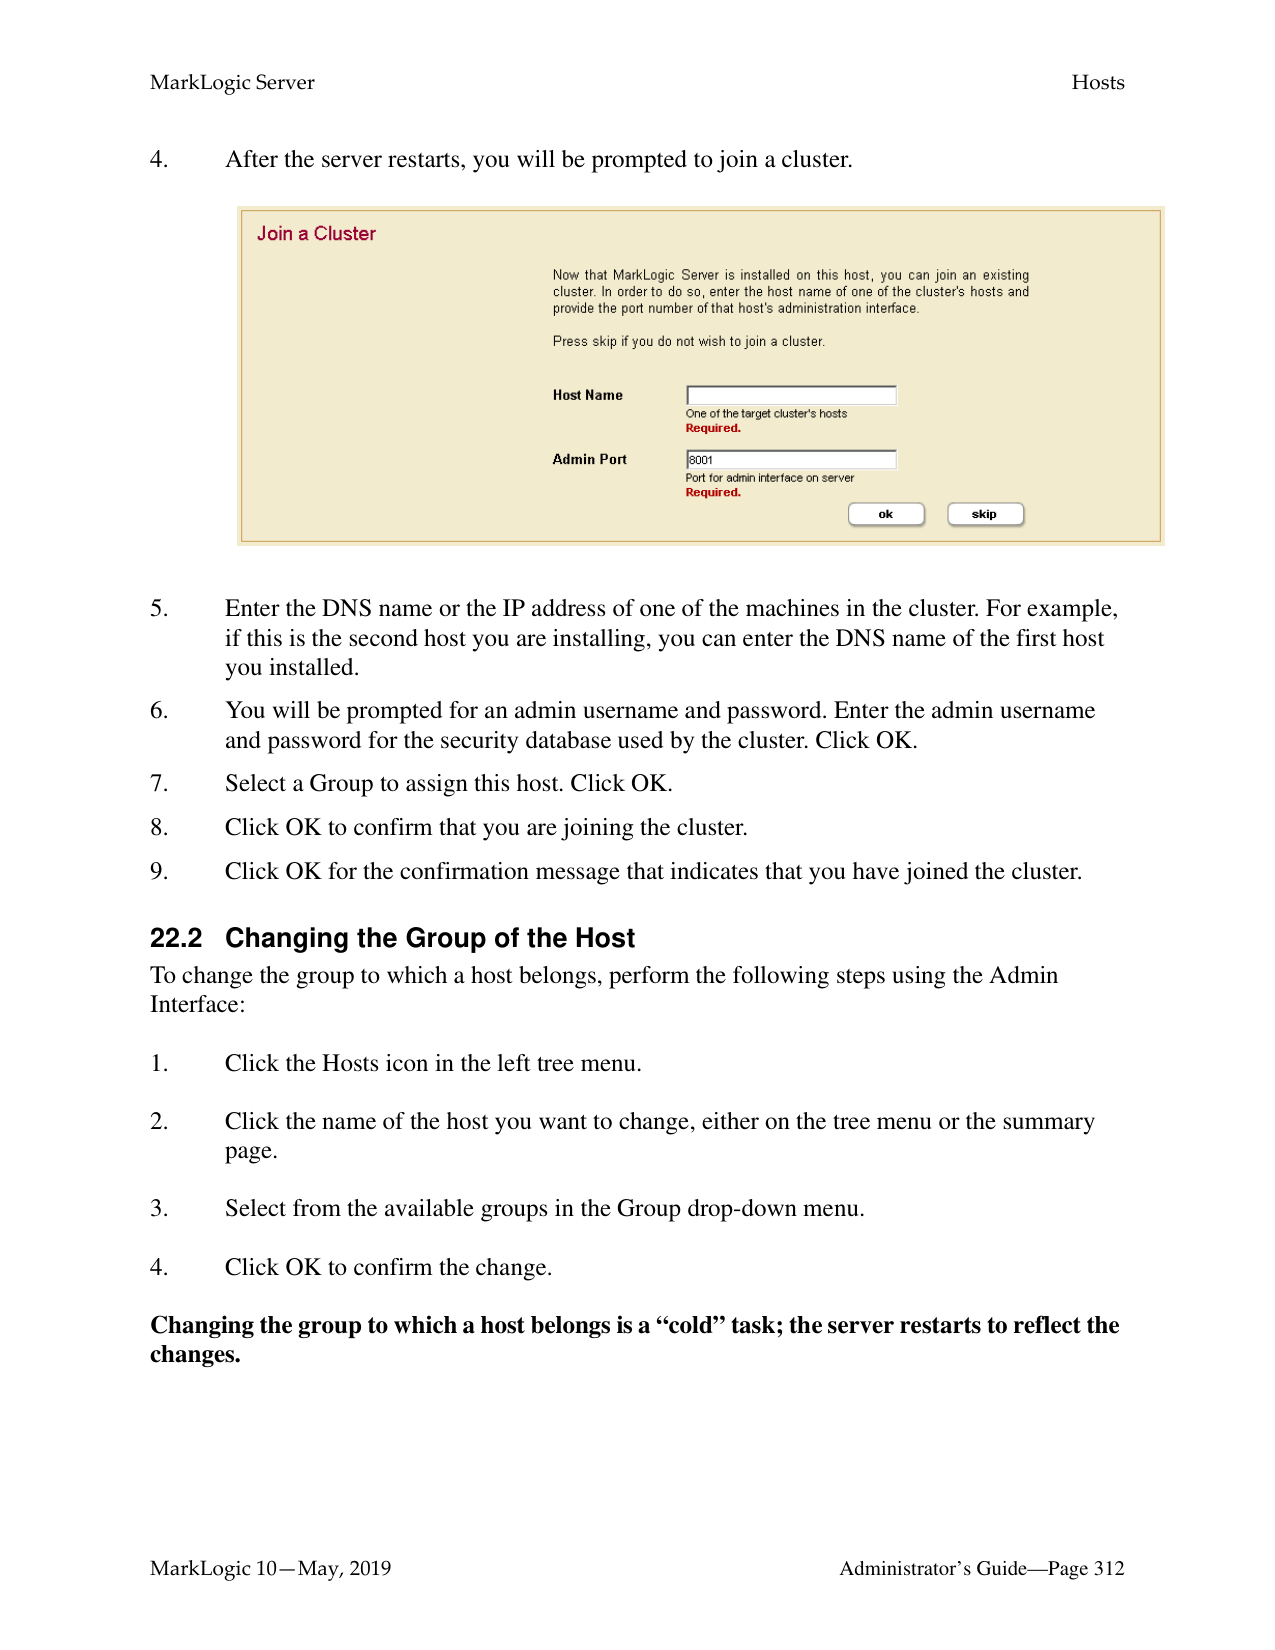
xdmp:forest-rollback( xdmp:database-forests(xdmp:database("Documents")), xdmp:wallclock-to-timestamp(
xs:dateTime("2011-09-13T10:50:21.201832-07:00")))
######### 20.6.8 Restoring a Reconfigured Database
You can restore a database from a backup, even if forests have been added to or subtracted from the database after the backup. When the number of database forests are asymmetrical to the backup forests, the following mapping rules apply:
When restoring a database that has added or subtracted forests since the backup, click on the Backup/Restore tab, go to the Restore section of the page, enable the Forest topology changed option, and click Ok.
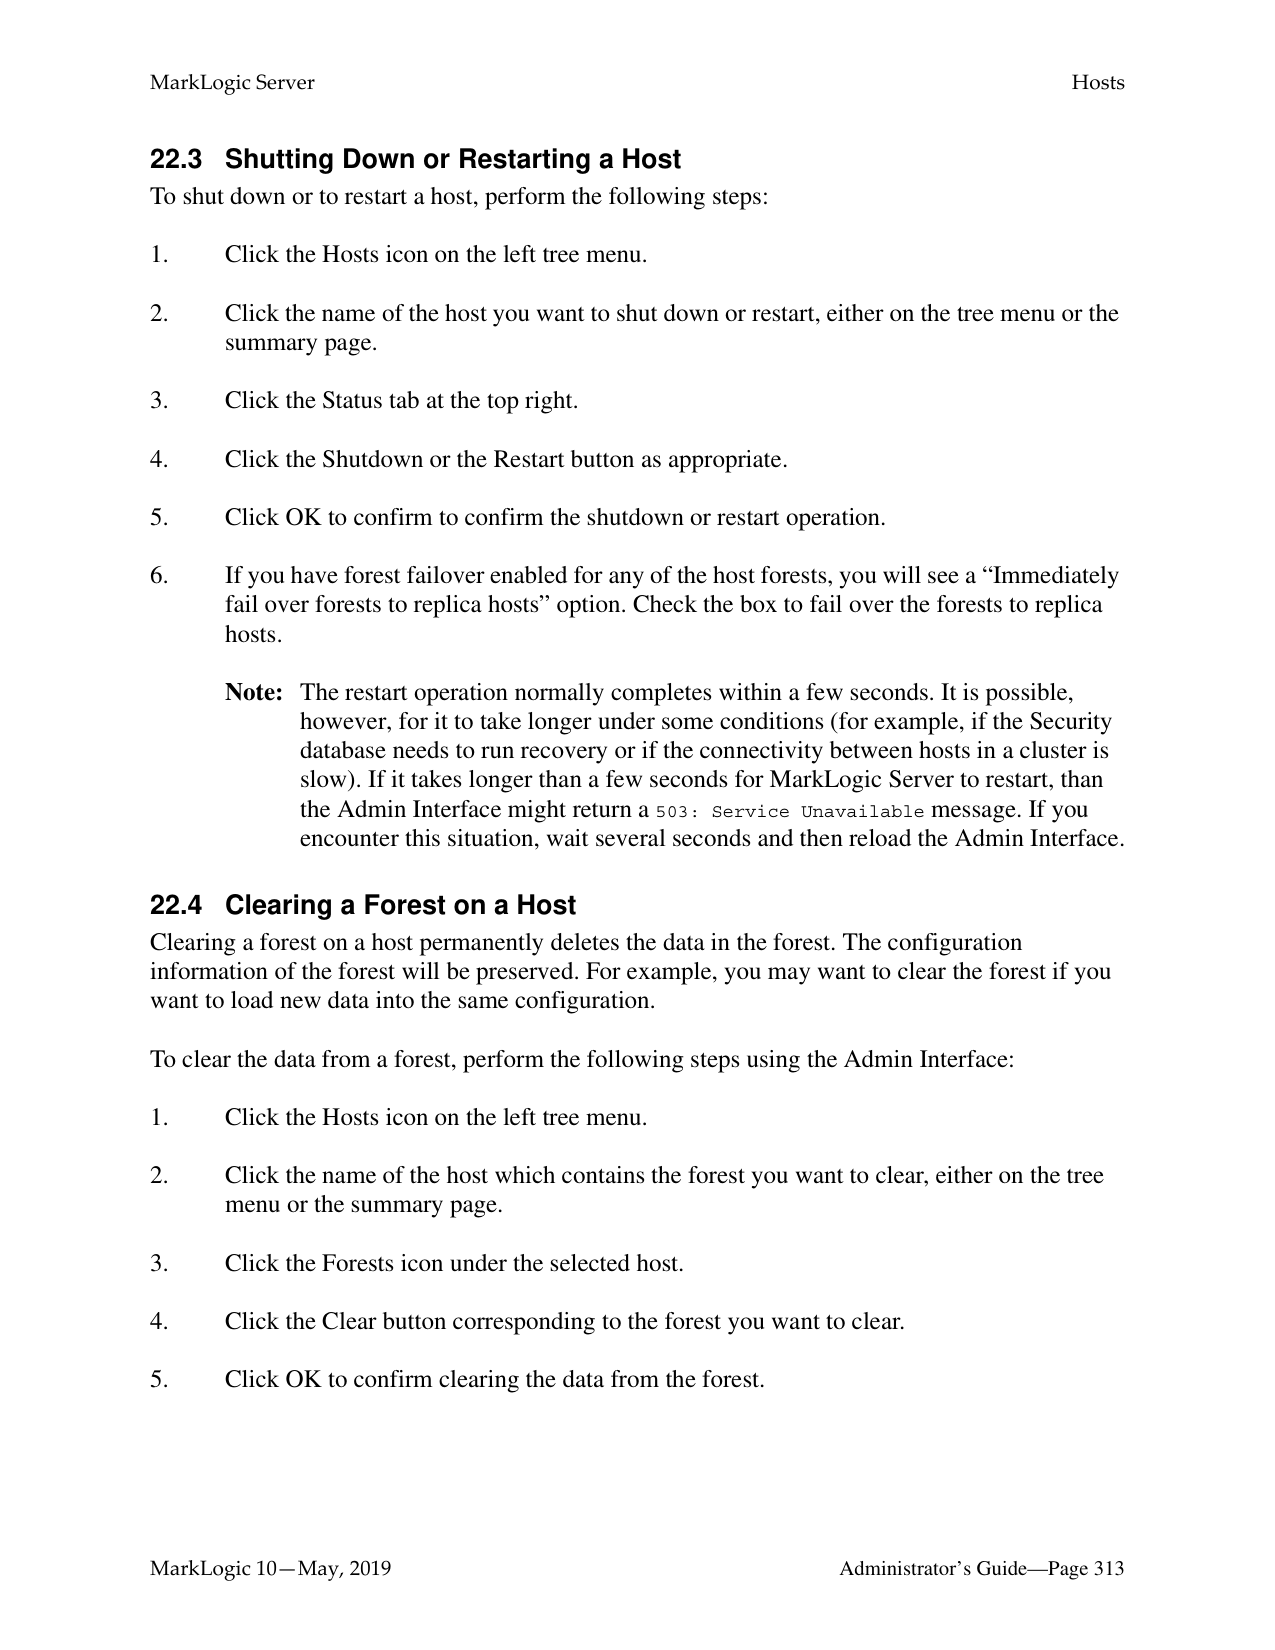

The Confirm Restore page appears, showing the existing forests for the database on the left and the backed up forests as pull down menus on the right.
For example, you want to restore from a backup that was done when the Documents database had only one forest (Documents) and the restore operation is done after adding two more forests (Documents2 and Documents3) to the Documents database. You can only restore a backup forest to a single existing forest. In this example, we are populating the Documents forest from the backup of the Documents forest.
Existing Forests
|Documents
Restore
| |---|
Backup Forest
|Documents2 Clear
| |---|
Documents
|Documents3 Clear
| |---|
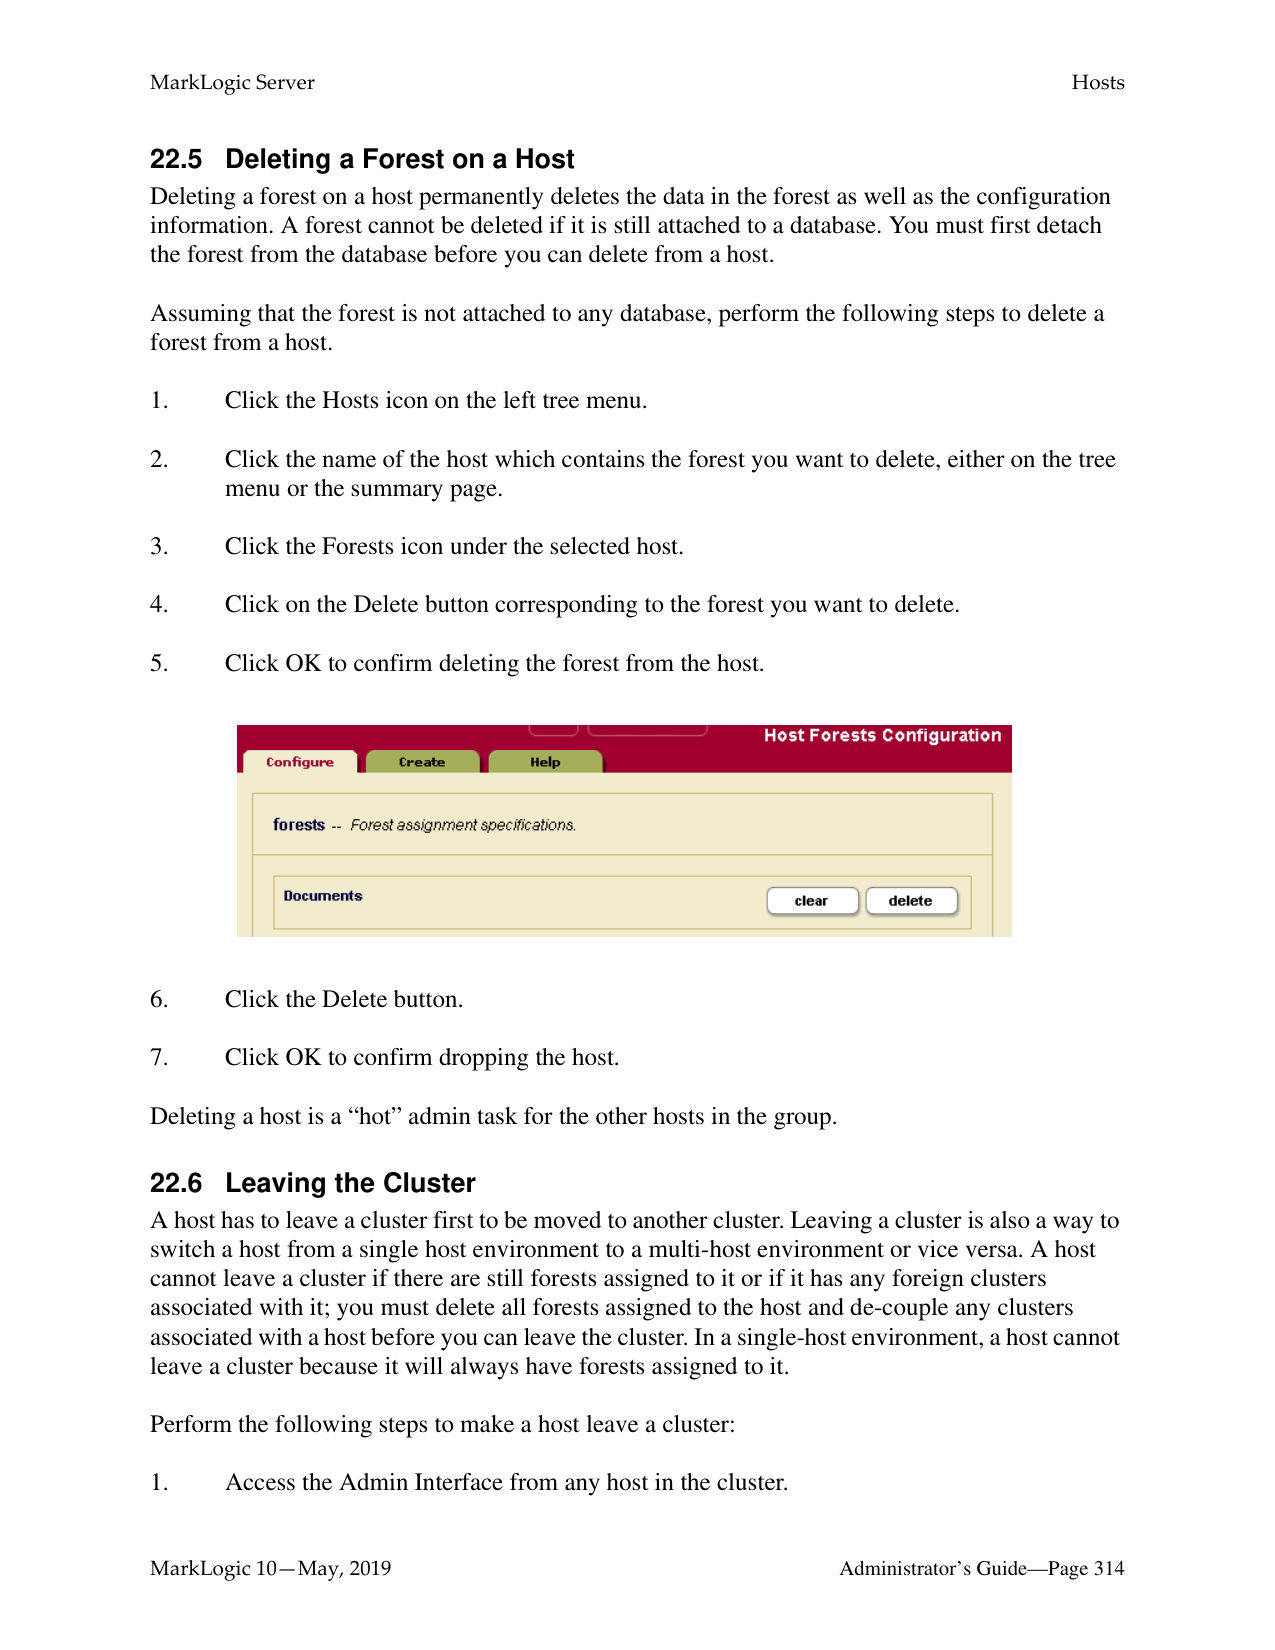
The Confirm Restore page below shows the restore operation. This operation is restoring the Documents forest from the Documents backup forest. To ensure that the Documents
database is restored with the data from the backup, set the Documents2 and Documents3 forests to clear to remove any data added since the backup.

The following are the restore options for each existing forest.
|Setting|Description| |---|---| | | | |restore|Restore forest from backup forest.| |clear|Do not restore forest and clear any data from the existing forest.| |no change|Do not restore forest and leave the contents of the existing forest unchanged.|
To restore from a backup that contains more than one forest, select More Forests and chose the additional backup forests from the pull down menus, as shown below.

For example, you want to restore from a backup that was done when the Documents database had three forests, Documents, Documents2, and Documents3 and the restore operation is done after deleting the Documents2 and Documents3 forests. In this example, we are populating the singular Documents forest from the Documents, Documents2, and Documents3 backup forests.
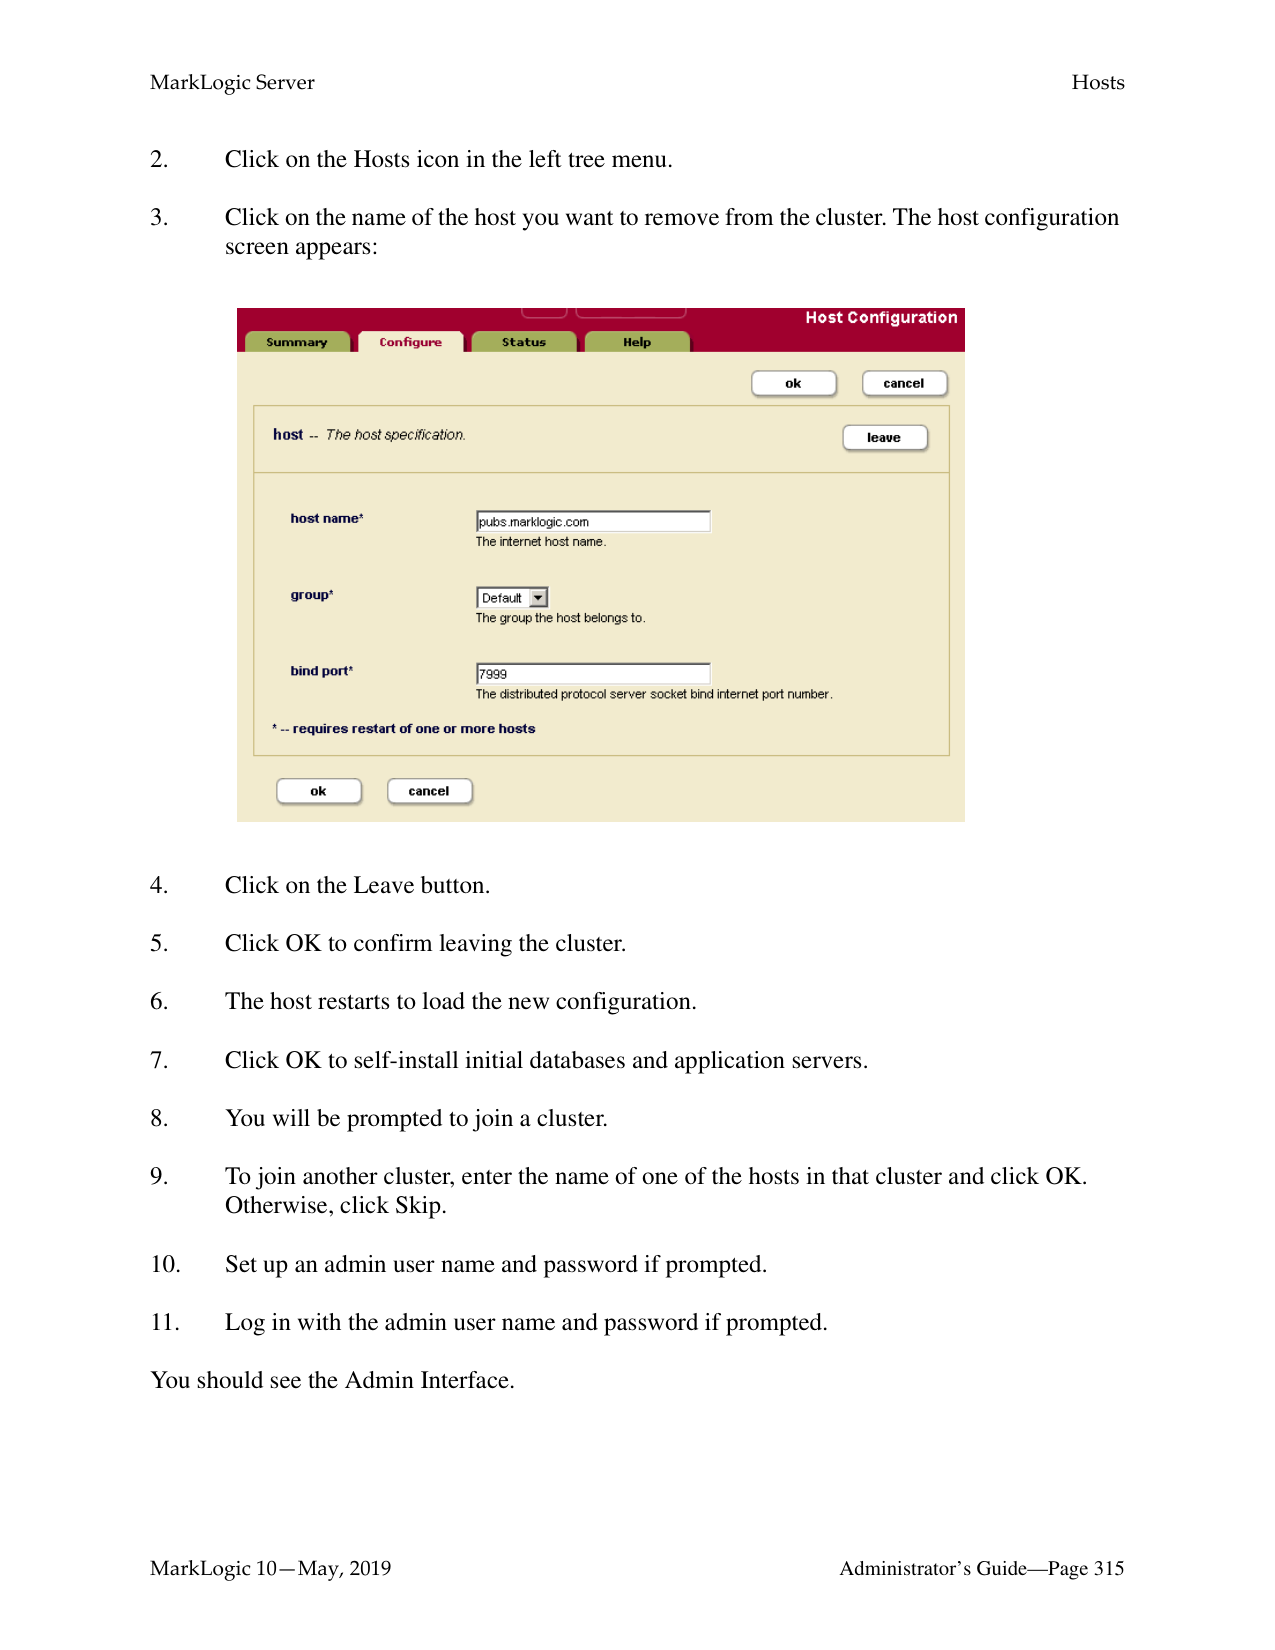
Backup Forests
Documents
Existing Forest
|Documents
Restore
| |---|
| |Documents2| |---|---| | |Documents2|
Documents3
The Confirm Restore page below illustrates the restore operation.

To restore a database that has added or subtracted forests since the backup, along with the auxiliary databases (Security, Schemas, and Triggers); click on the Backup/Restore tab; go to the Restore section of the page; enable the Forest topology changed and Include auxiliary databases options, and click Ok.
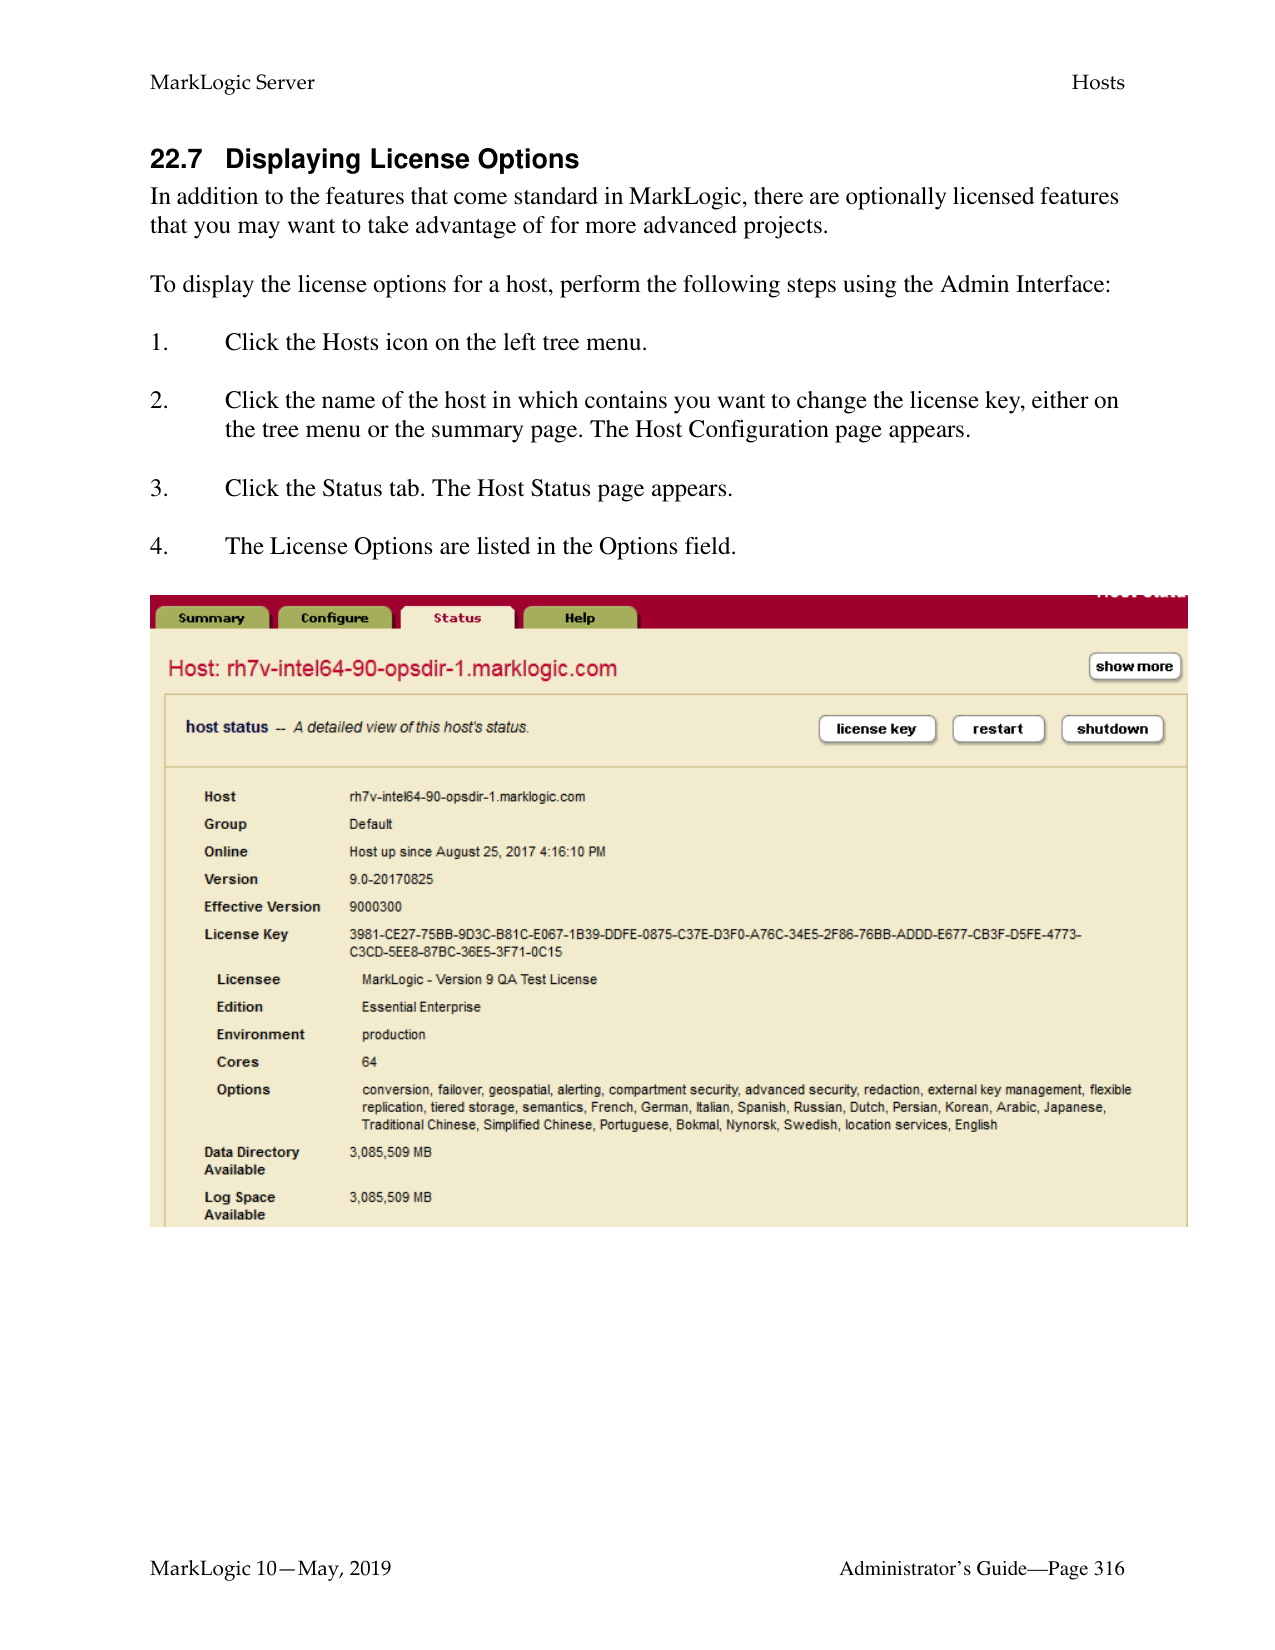
Note: The Include auxiliary databases option is only relevant when Forest topology
changed is enabled.

######### 20.7 Backing up and Restoring a Database Following Local Disk Failover
Following a failure of a host that contains a master forest configured for local disk failover, the database attached to the master forest fails over to the replica forest. This section describes how to back up the surviving replica forest data and restore the data after the host containing the master forest has been restored. In the example procedure described in this section, the Documents database is attached to the Documents-master forest on one host and is configured for local-disk failover to the Documents-rep forest on another host.
For details on how to configure local disk failover, see the Configuring Local-Disk Failover for a Forest chapter in the Scalability, Availability, and Failover Guide.

Note: The configuration of the Documents database remains unchanged from before the
failover.
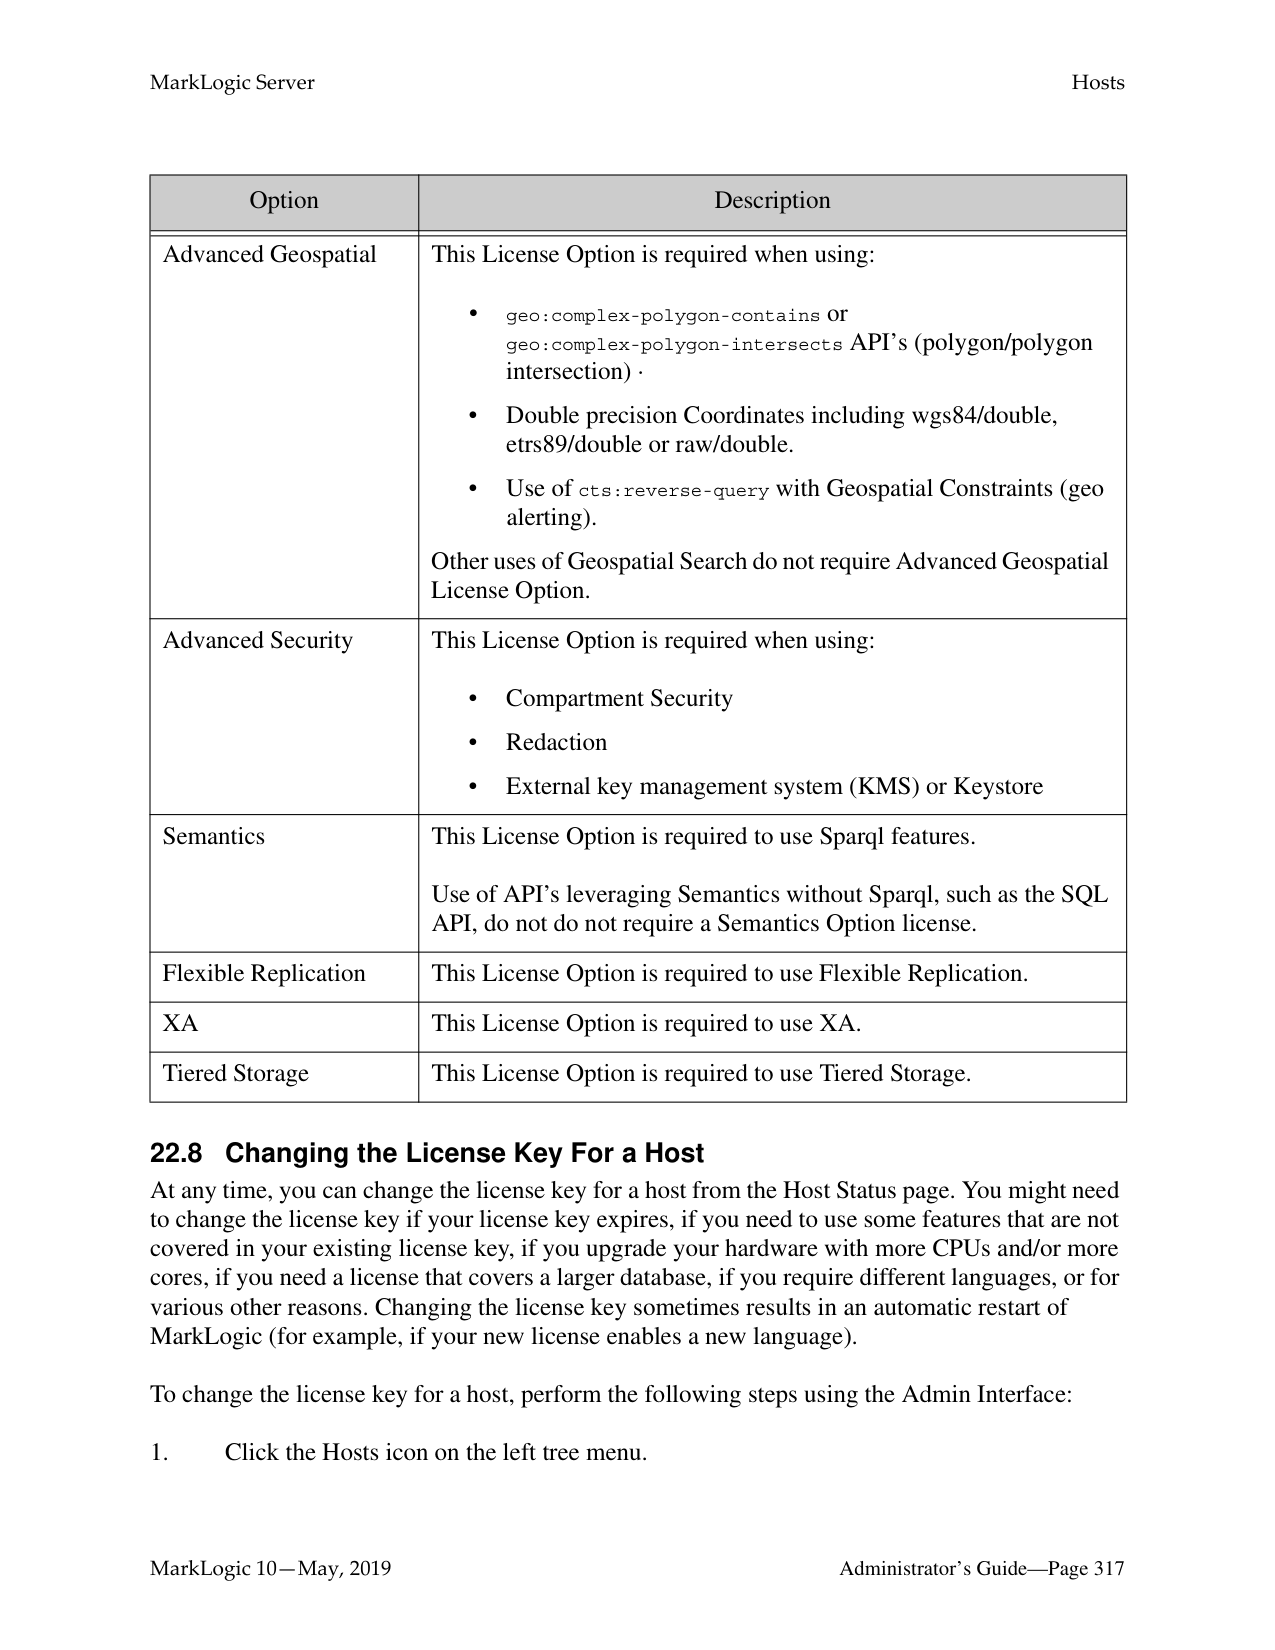

To back up the Documents-rep forest, do the following.
Note: Both the backup and restore procedures must be done on the host that contains the
Documents-rep forest.


Before you can restore data from the Documents-rep forest that you backed up after the failover, you must reconfigure local disk failover from the Documents-rep forest to the Documents-master forest, so that the Documents-master forest is the new replica forest.
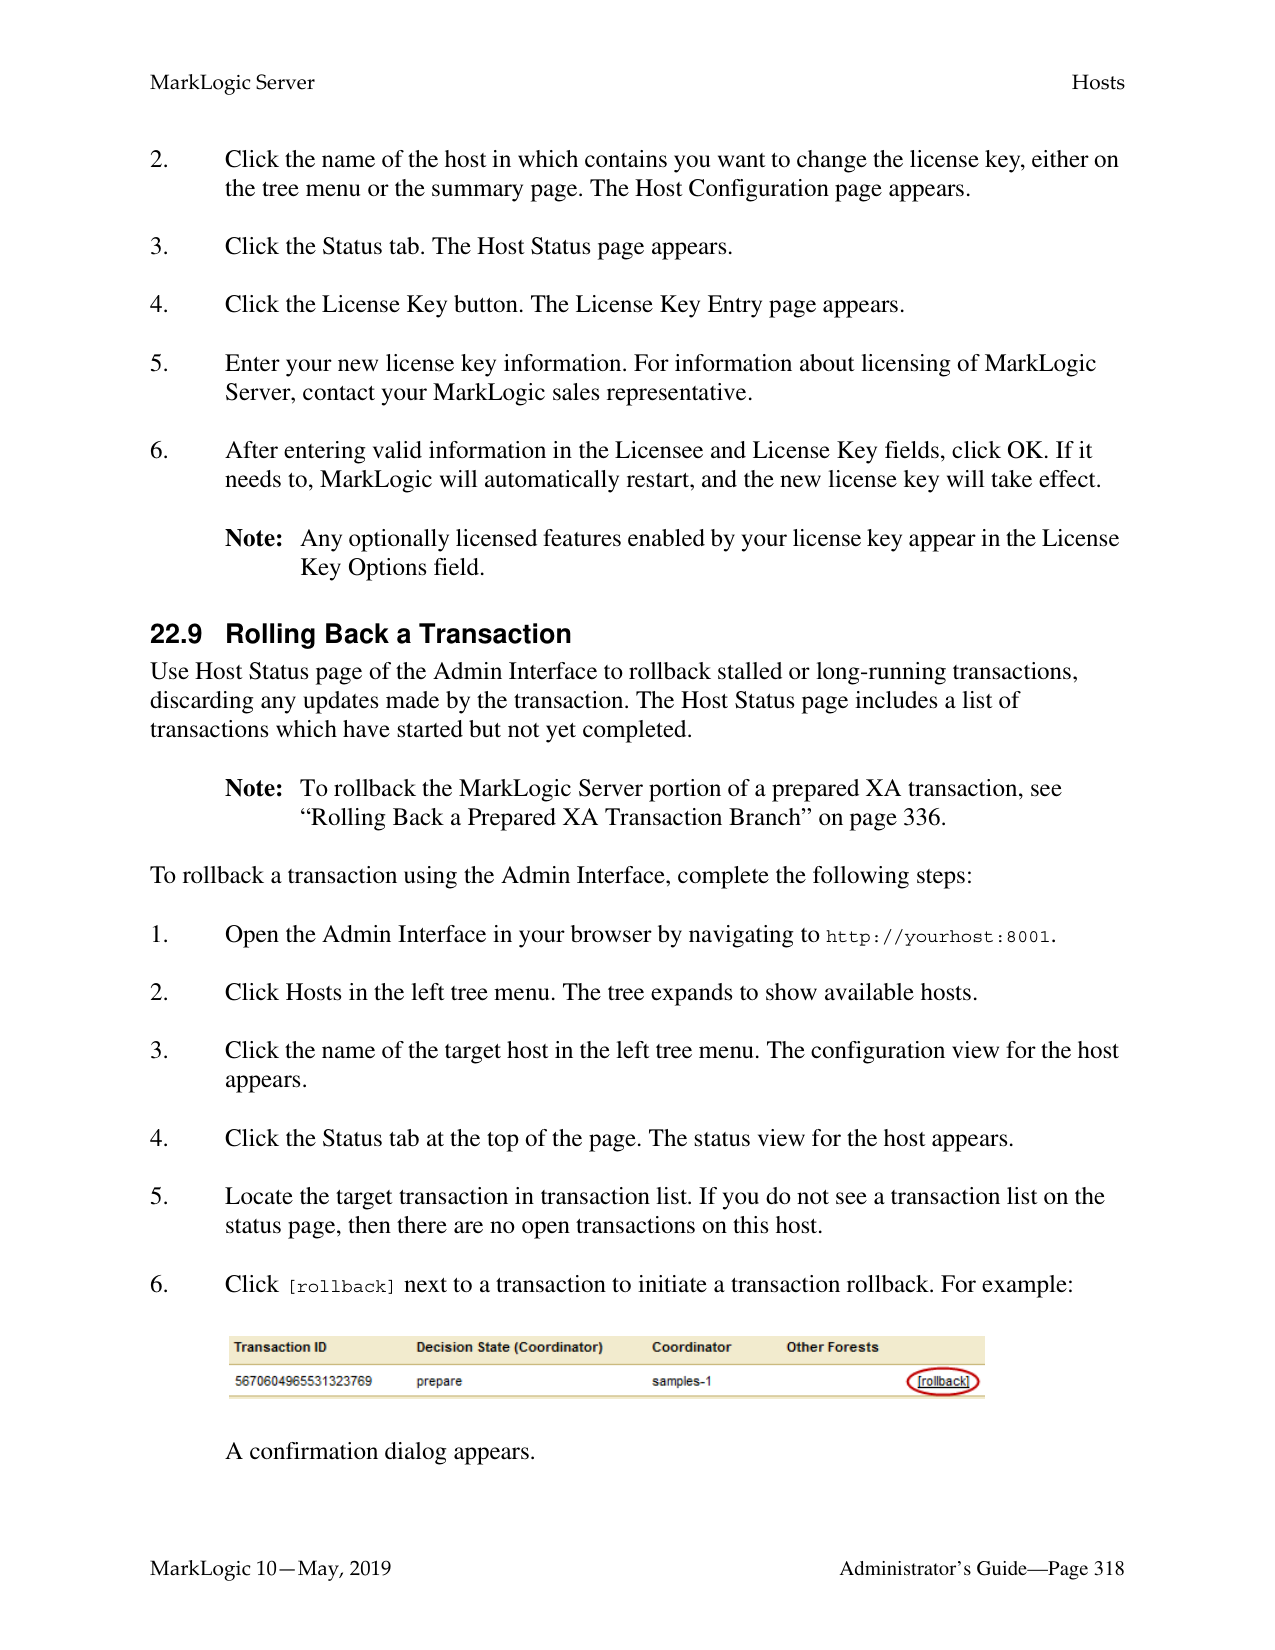


############ 6. Once the Documents-rep forest is restored, the updates are replicated to theDocuments-master forest.

##### 21.0 Rolling Upgrades
Users with highly available clusters under heavy transaction loads may want to upgrade to a newer version of MarkLogic in a seamless manner. A rolling upgrade, where hosts in a cluster are upgraded one by one, is one approach to addressing this need. Rolling upgrades are used to upgrade a large cluster with many hosts to a newer version of MarkLogic Server without incurring any downtime in availability or interruption of transactions. A rolling upgrade may also be used to apply patches to multiple hosts.
The goal in performing a rolling upgrade is to have zero downtime of your server availability or transactional data. This is most useful for large high availability (HA) clusters that have a large number of ongoing transactions. A rolling upgrade can be performed on both a primary cluster and a disaster recovery (DR) cluster.
Your cluster must have MarkLogic 8.0-6 or later installed to perform a rolling upgrade. The rolling upgrade feature works on all supported platforms. Rolling upgrades will only work when upgrading from MarkLogic 8.0-6 or later to MarkLogic 10.0-x or later.
Note: Do not change your application to take advantage of any 10.0-1 features until all the nodes in your cluster have been upgraded to 10.0-1. In addition, you should avoid making any configuration changes to your cluster during a rolling upgrade.
This chapter describes rolling upgrades and includes the following sections:

######### 21.1 Understanding Rolling Upgrades
A rolling upgrade incrementally installs a later version of MarkLogic Server (host by host), rather than having to take down the whole cluster to install the newer version. Performing a rolling upgrade means that your cluster may be in a mixed state (where more than one version of MarkLogic Server is running) for some period of time during the upgrade process. During the process, the features in the newer version of MarkLogic will not be available until the whole
cluster has been committed to the new version. Because of this you may have to change or modify some of your application code prior to starting the rolling upgrade, so that code will work in a mixed environment. For example, JavaScript code may need modification (because of the new version of V8 for server-side JavaScript) before you commit the upgrade.
The security database and the schemas database must be on the same host, and that host should be the first host you upgrade when upgrading a cluster.
Note: In a mixed node cluster, before the upgrade has been committed, the node that has been upgraded to MarkLogic 10.0-1 will be read-only. This is to prevent any configuration changes from the 10.0-1 node. We strongly recommend that you not make any configuration changes until you have finished upgrading the entire cluster.
######### 21.1.1 When Cluster Has Nodes at Different Software Version Levels
The rolling upgrade feature is designed is to enable business continuity while a cluster is being upgraded. The window of time when a cluster has nodes of varying versions should be small. During this time, do not make application code changes and/or configuration changes.
Configuration changes involve the following:
In addition, do not perform any manual merges and disable reindexing while the cluster has nodes that are at different software version levels. Changing error log settings and adding trace events to debug issues should be fine.
######### 21.1.2 Rolling Upgrade Process
You can upgrade your cluster with a minimal amount of transactional downtime (less than 5-10 minutes) without using the rolling upgrade feature. Consider whether the tradeoff in added complexity warrants using rolling upgrades instead of the regular upgrade process. See Upgrading from Previous Releases in the Installation Guide for information about the regular upgrade process.
Here are the steps in the rolling upgrade process:
Before you start your upgrade, you will need to backup the hosts you are going to upgrade. Then do any preparation of code or applications that is necessary prior to the upgrade (see “Interaction with Other MarkLogic Features” on page 306) for possible preparations.
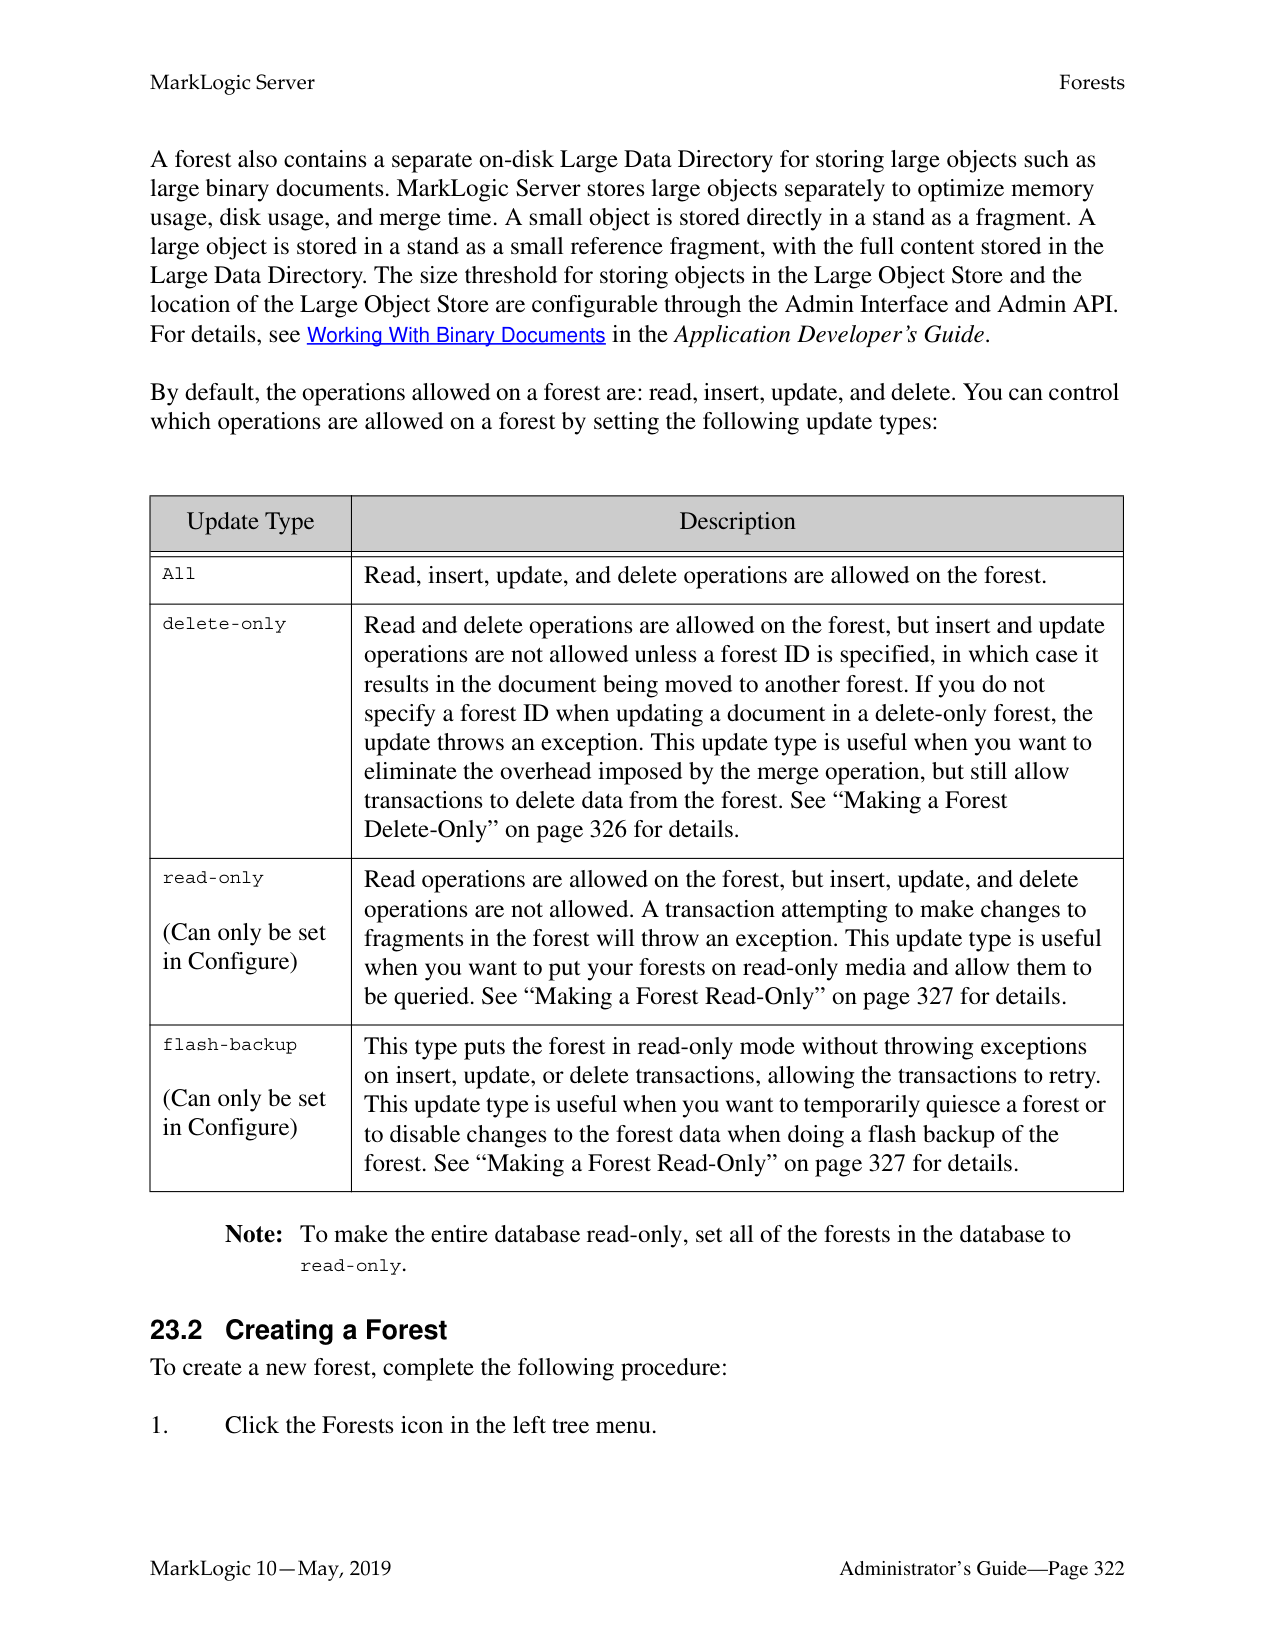
When you have completed the upgrade, you may need to perform some clean up.
######### 21.1.3 Rolling Upgrade Status in Admin UITo view the rolling upgrade status in the Admin UI:


Note: If a rolling upgrade is in progress, a Sync icon will appear to the right of the version number from which you are upgrading, which is located above the left tree menu. Click the Sync icon to navigate to the Upgrade tab.
Note: If a rolling upgrade is not in progress, all hosts in the cluster are running the same
version. Click the Upgrade tab to verify the version number.
######### 21.1.4 Effective version and software version
Until you commit the upgrade, the effective version of the hosts in the cluster is the earlier version, not the newer version (for example 9.0-6, not 10.0-1). The effective version is the version that the cluster as a whole is running. The software version is the version of MarkLogic Server that is installed on each host. You will be prompted to upgrade the Security database when you log into the Admin UI.
Note: After committing a rolling upgrade you can only restore to the later version (for example, 10.0-1), not to the earlier version (for example, 9.0-6). Running your cluster in an uncommitted state is equivalent to running in the previous (earlier) version of MarkLogic. No 10.0-1 features are available until the upgrade has been committed.
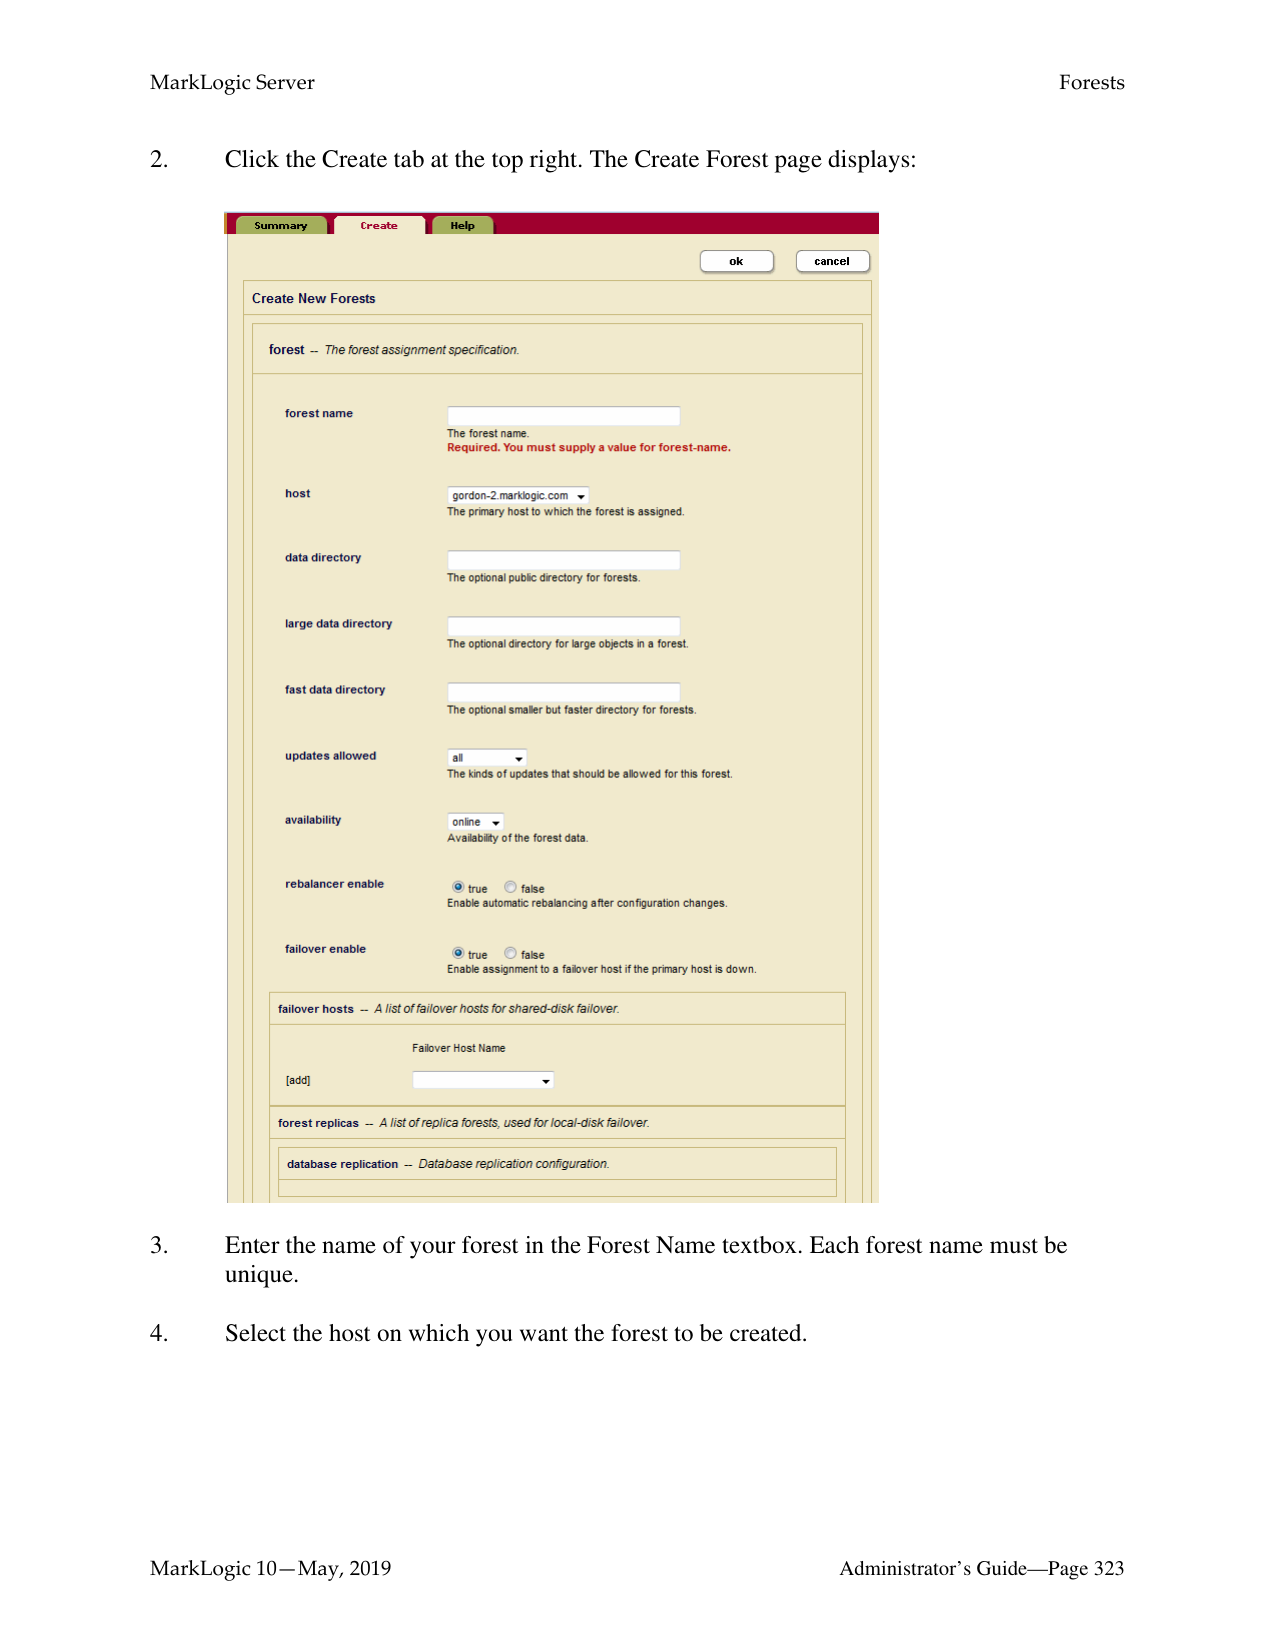
An upgrade of the Security database is required after you have committed the new version of MarkLogic.
######### 21.2 Example—Rolling Upgrade
The following is a simplified step-by-step process for a rolling upgrade, on a small, three host cluster. The general outline is to first backup all of your hosts, make any changes to software applications, then proceed with the rolling upgrade, failing over and upgrading each node. When all nodes in the cluster have been upgraded, verify that you can commit the upgrade and change the cluster effective version to the new version. Finish by doing any cleanup that is necessary.
In addition, prior to starting the upgrade, you may need to modify some of your existing software to run in mixed version cluster. See “Interaction with Other MarkLogic Features” on page 306 for details.
in the Release Notes for more information.
################## curl -X POST --anyauth --user admin:admin -d "state=shutdown&failover=true" "http://node1:8002/manage/v2/hosts/node3"
Note: The failover parameter was added to POST:/manage/v2/hosts/{id|name} in MarkLogic version 9.0-5. The above call will fail in previous versions of MarkLogic.
rpm uninstall MarkLogic-8.0-1.x86_64.rpm
rpm install MarkLogic-10.0-3.x86_64.rpm
sudo /sbin/service MarkLogic start
xquery version "1.0-ml"; import module namespace admin = "http://marklogic.com/xdmp/admin"
at "/MarkLogic/admin.xqy";
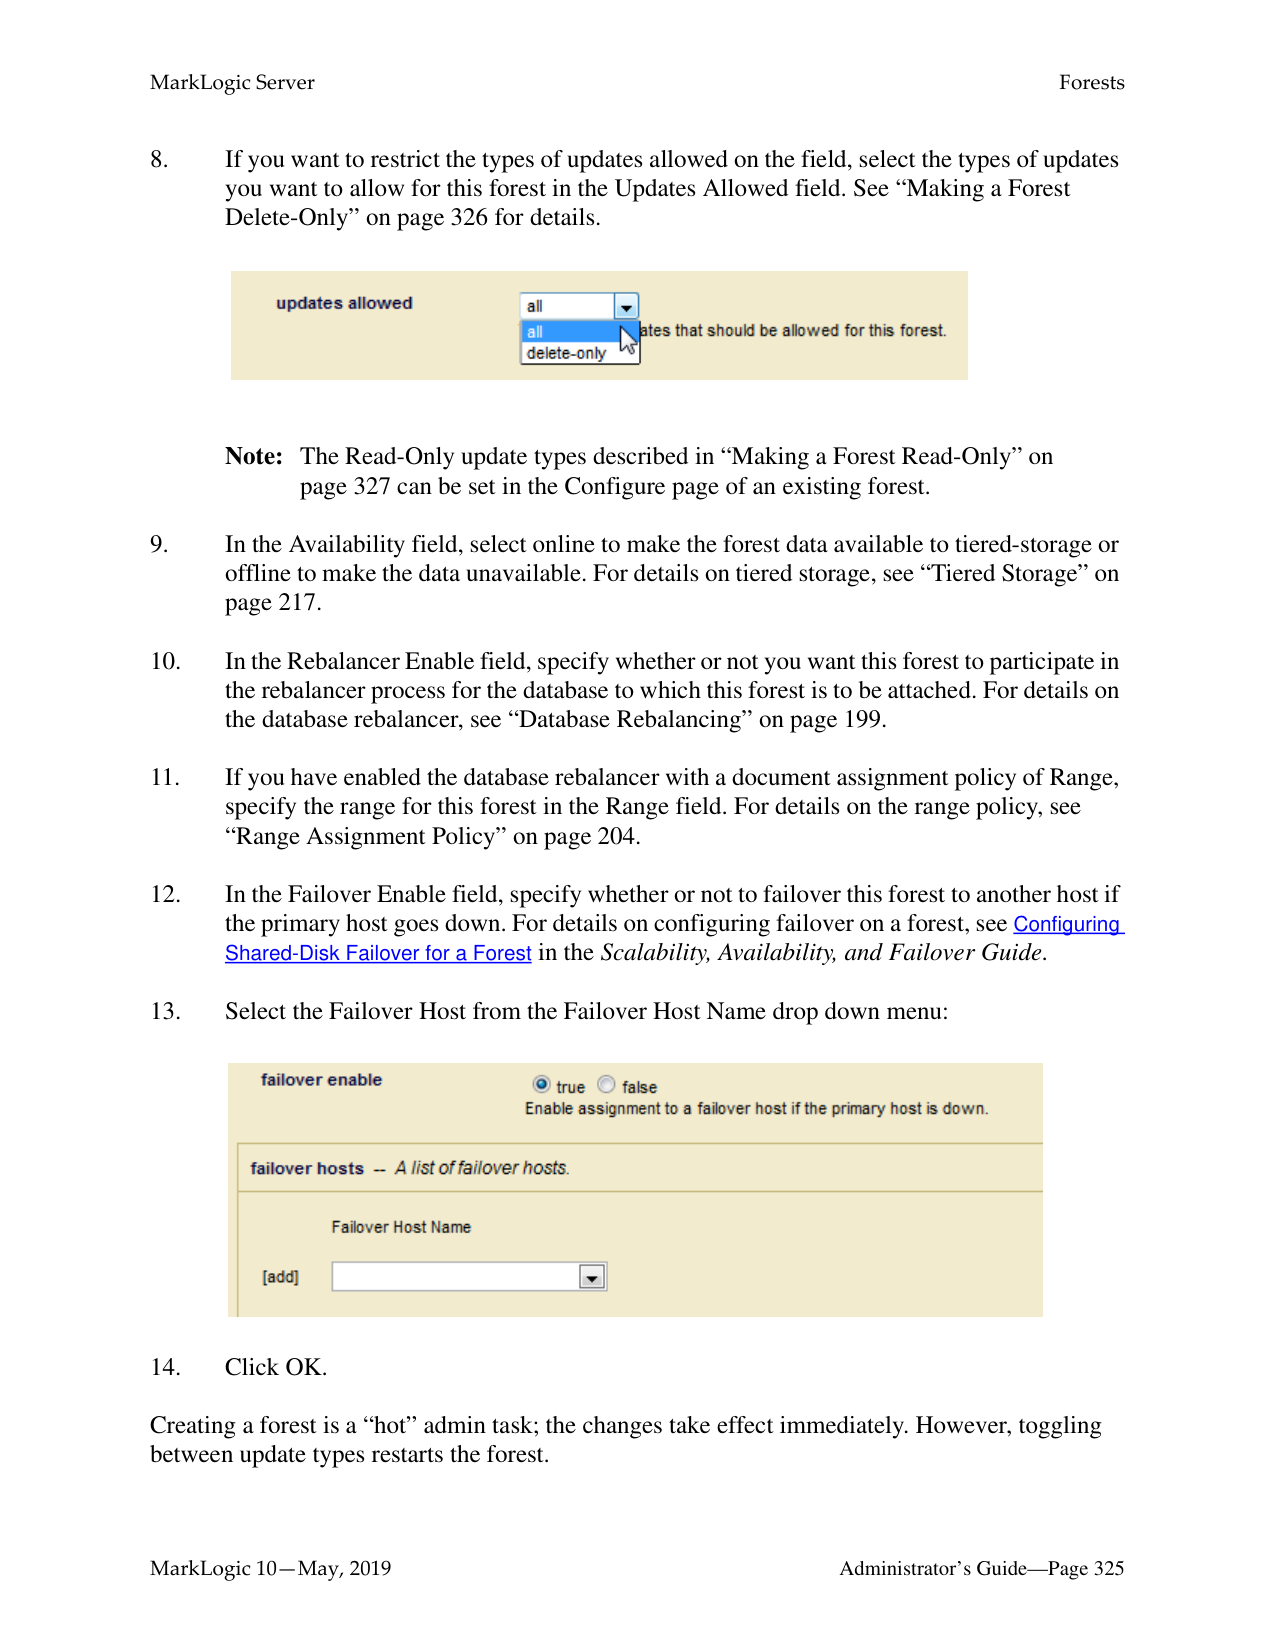
let $config := admin:get-configuration() return
admin:cluster-get-effective-version($config)
=> (: returns the effective software version of this cluster :)
Use this query to check if the cluster is ready to commit the upgrade:
xquery version "1.0-ml"; import module namespace admin = "http://marklogic.com/xdmp/admin"
at "/MarkLogic/admin.xqy"; admin:can-commit-upgrade()
=> (: returns true if the cluster is ready to commit the upgrade :)
The cluster version should be 9000100 or later for the upgrade to commit. Upgrade the Security database on the host cluster. After committing the upgrade, verify the upgrade with this query:
xquery version "1.0-ml"; import module namespace admin = "http://marklogic.com/xdmp/admin"
at "/MarkLogic/admin.xqy";
let $config := admin:get-configuration() return
admin:cluster-get-effective-version($config)
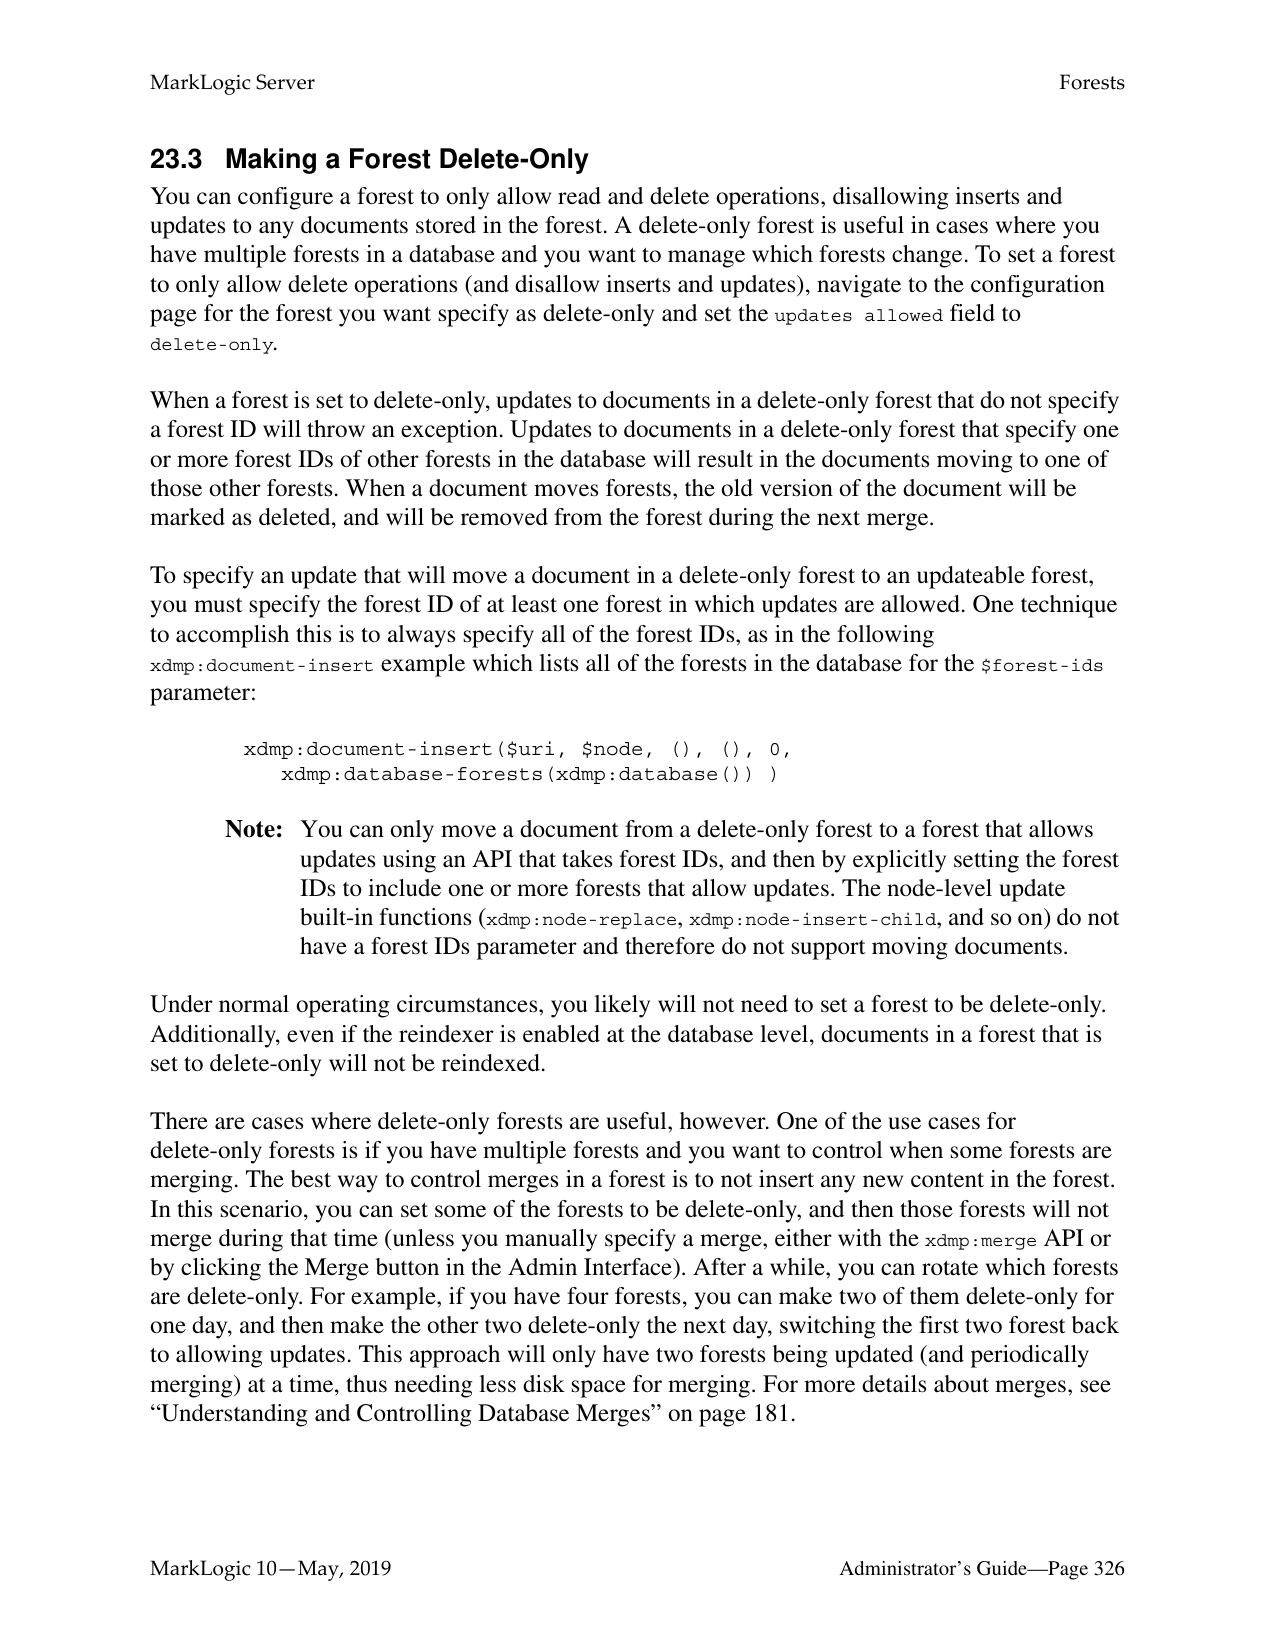
=> (: returns the effective software version of the cluster :)
This step-by-step example for a simple rolling upgrade can also be scripted. For an example model for a script, see “Rolling Upgrades Using REST Management APIs” on page 298.
######### 21.3 Performing Rolling Upgrades
You can perform a rolling upgrade via scripting through the REST Management APIs or by using the XQuery APIs. You can also perform a rolling upgrade on an AWS cluster. This section describes the different options for configuring and performing a rolling upgrade.
######### 21.3.1 Rolling Upgrades Using REST Management APIs
After backing up your hosts and preparing your applications, you can perform a rolling upgrade using the REST Management APIs. The following example assumes a three node cluster with
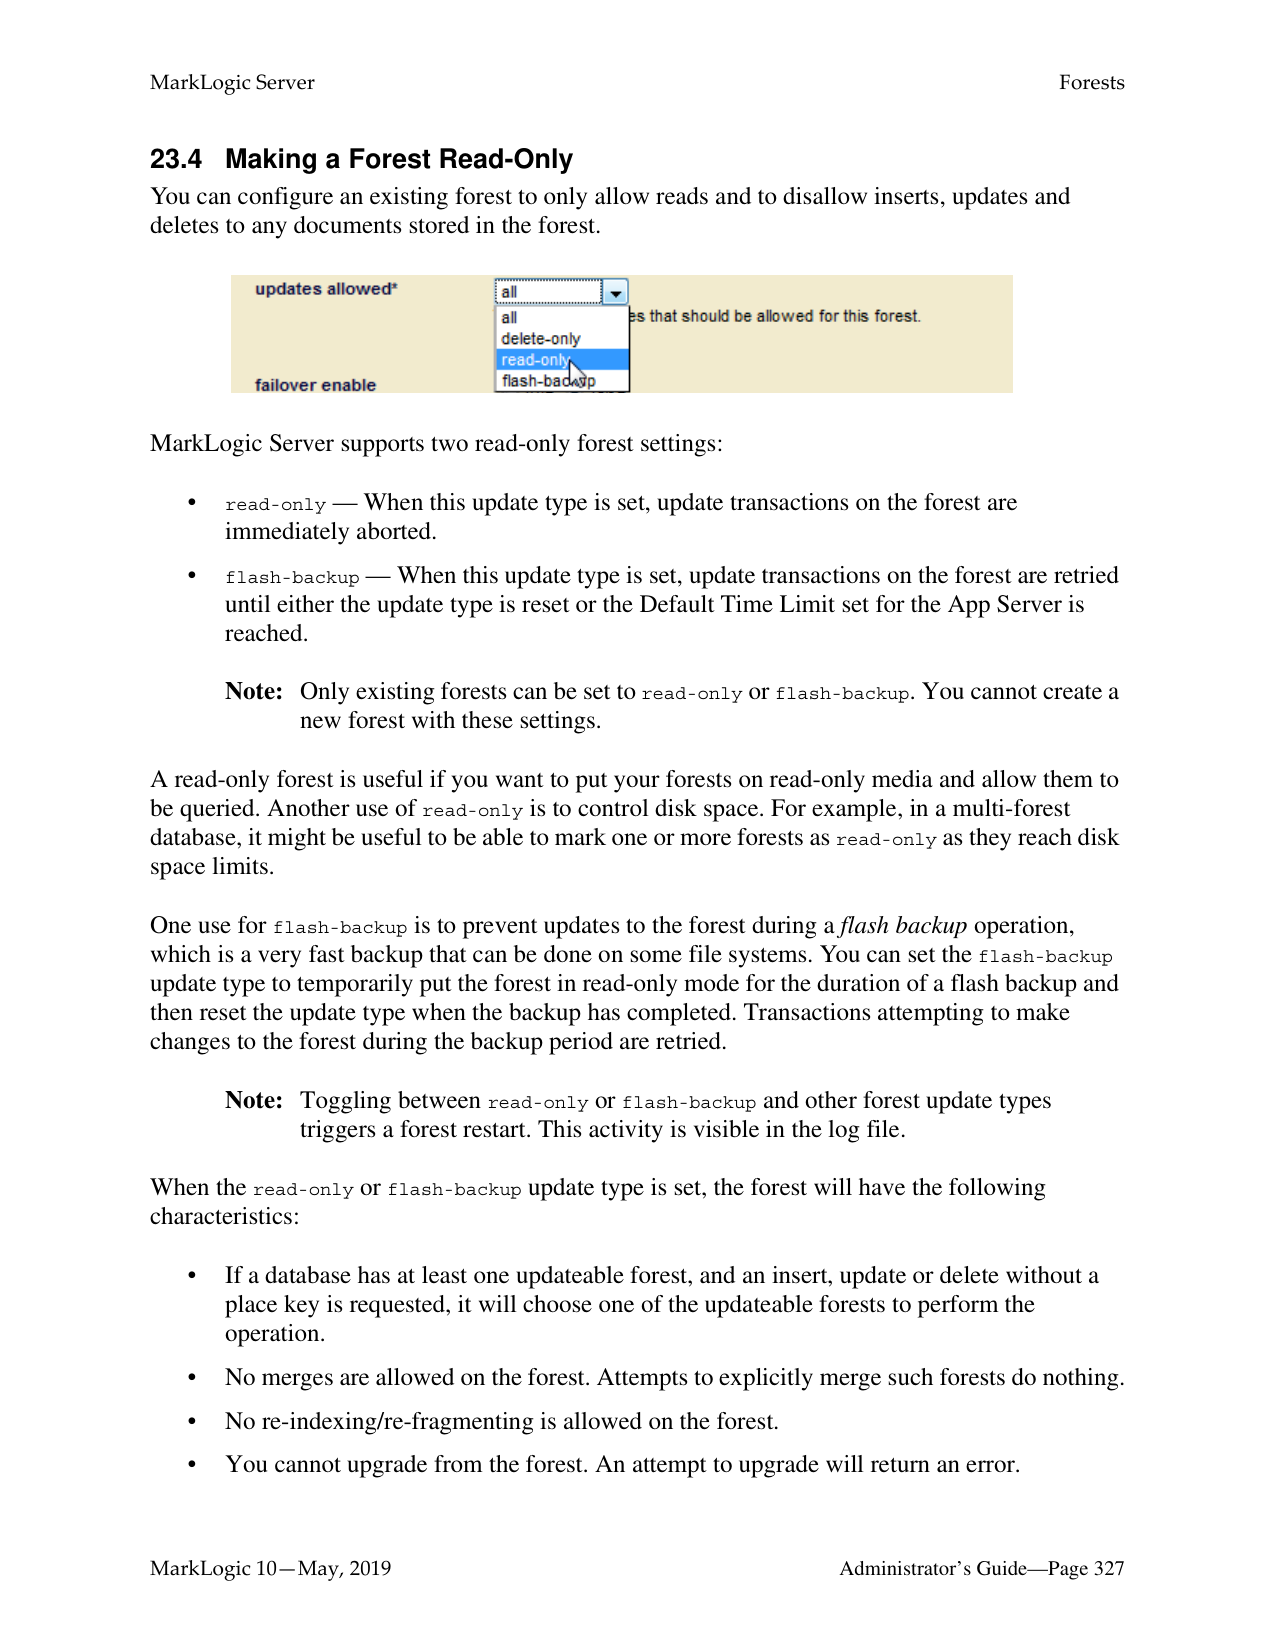
Note: Upgrade your cluster to Red Hat Enterprise Linux 7 (x64) before starting the MarkLogic upgrade. MarkLogic 10 will not work on Red Hat Enterprise Linux 6. See Supported Platforms in the Release Notes for more information.
The following code sample can be used as a model to script an upgrade of a single three-node cluster.
Note: Please note that, when doing a rolling upgrade from 8.0 to 10.0 (with 9.0 being skipped), you must not use the Management REST API at all. You may use the Admin API, but only to read cluster configuration. This does not affect rolling upgrades from 8.0 to 9.0 or upgrades from 9.0 to 10.0.
(: This is an end-to-end scenario to orchestrate a rolling upgrade on a 3-node 9.0 cluster to a 10.0 build. :)
(: Iterate over each host in the cluster :) GET:/manage/v2/hosts (: Remove host from load-balancer rotation if necessary :) PUT:/manage/v2/hosts/{id|name}/properties (: Disable any local-disk forests on the host to force a failover :) PUT:/manage/v2/forests/{id|name}/properties (: Change primary host for any shared-disk forests :) PUT:/manage/v2/forests/{id|name}/properties (: Restart any failover forests that are open on the host :) PUT:/manage/v2/forests/{id|name}?state=restart $ curl --anyauth --user user:password -i -X POST \
-d '{"operation": "restart-local-cluster"}'\ http://localhost:8002/manage/v2
(: Wait for task-server and app servers to become idle :) GET:/manage/v2/servers, GET:/manage/v2/servers/{id|name}?view=status (: Stop the host :) $ curl -v -X POST --anyauth --user admin:admin \
(: Start the host :) $ curl -v -X POST --anyauth --user admin:admin \
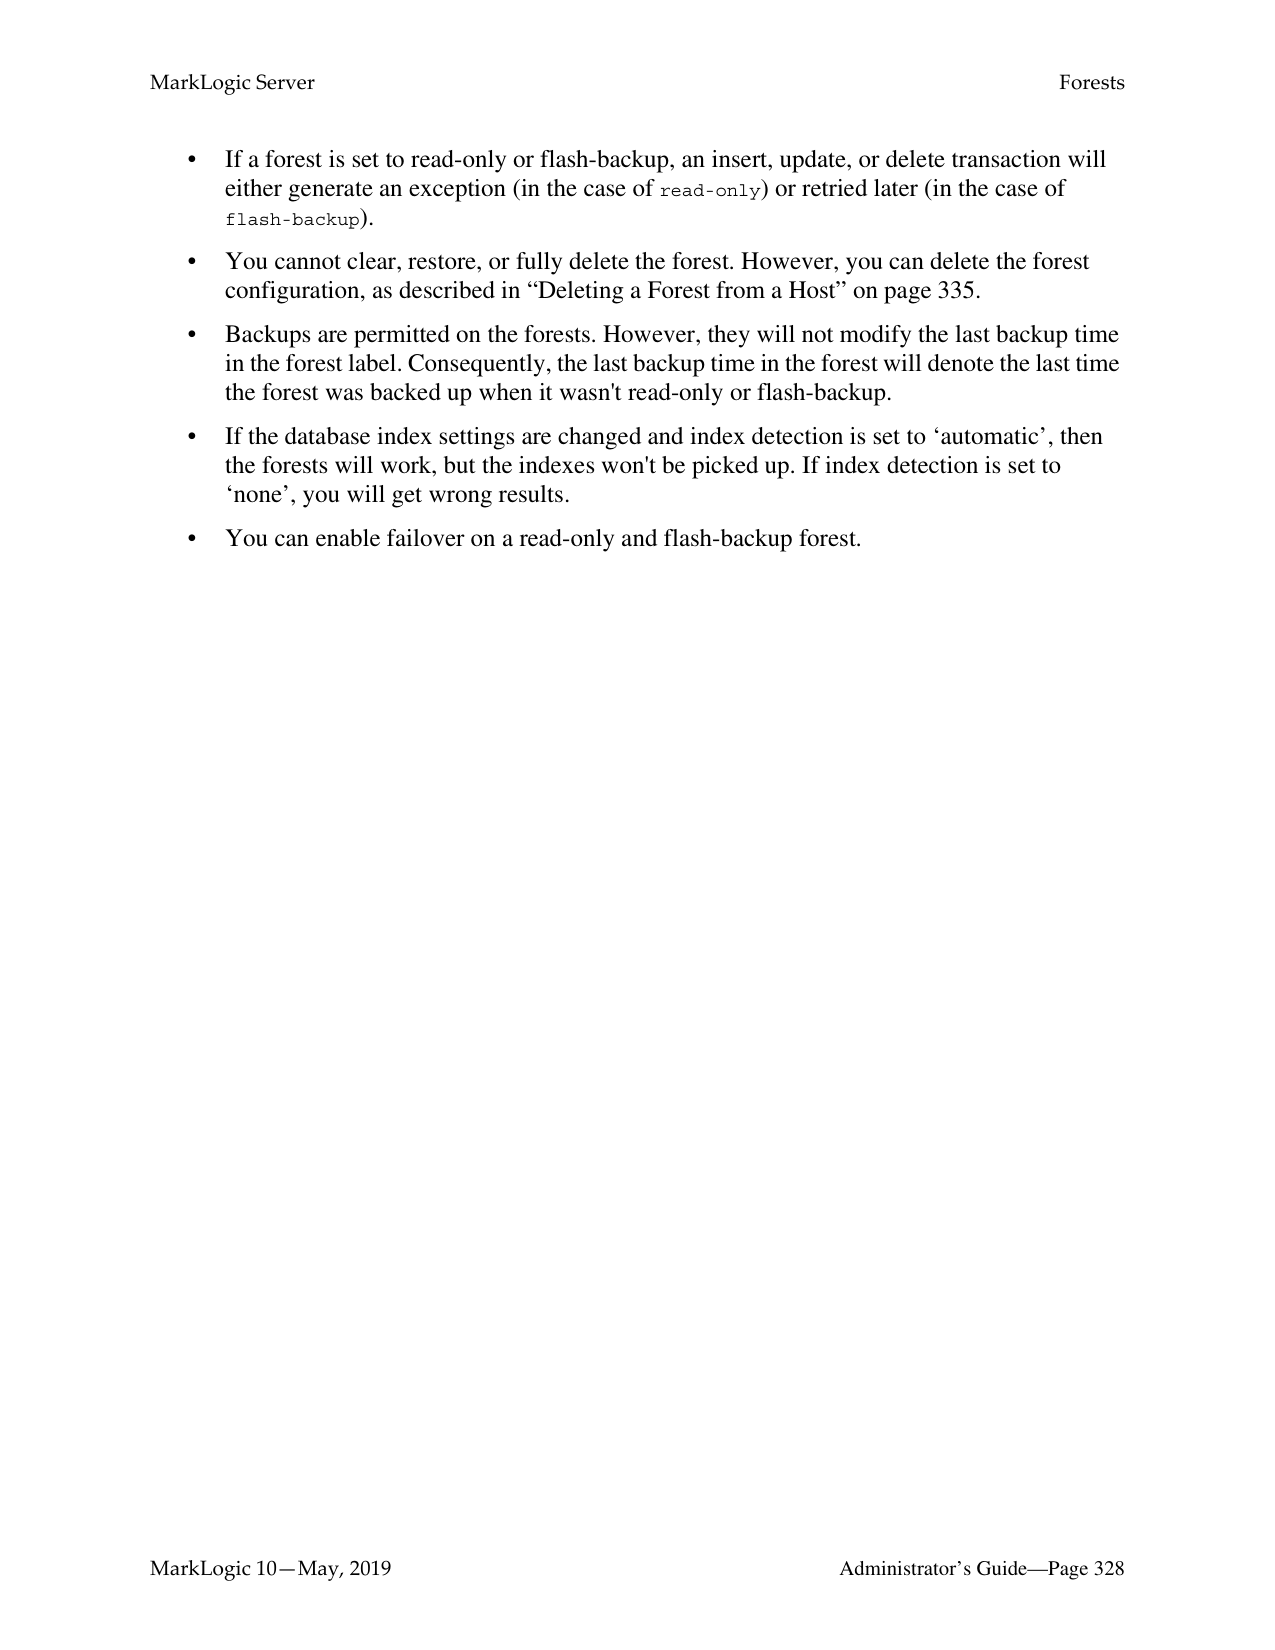
(: Enable any local-disk failover forest on the host :) PUT:/manage/v2/forests/{id|name}/properties
(: Restore primary host for any shared-disk forests :) PUT:/manage/v2/forests/{id|name}/properties (: Restart any failover forests that should fail back. :) PUT:/manage/v2/forests/{id|name}?state=restart PUT:/manage/v2/forests/{id|name}/properties (: upgrade security db :) curl -v -X POST --anyauth --user admin:admin \
--header "Content-Type:application/x-www-form-urlencoded" \
-d '{"operation": "security-database-upgrade-local-cluster"}'\ "http://localhost:8002/manage/v2"
(: verify cluster version :) curl -v -X GET --anyauth --user admin:admin
--header "Content-Type:application/json" http://localhost:8002/manage/v2?format=json | tools/jq/jq '. ["local-clusterlocalhost-default"]["effective-version"]'`
Note: The jq tool is used to parse out the json properties. It is a free download from
https://stedolan.github.io/jq/
######### 21.3.2 Upgrading an EC2 Instance
The process for performing a rolling upgrade in EC2 (AWS) is fairly simple. It is very similar to a normal update of the Cloud Formation templates. See Upgrading MarkLogic on AWS in the MarkLogic Server on Amazon Web Services (AWS) Guide for details about a normal update.
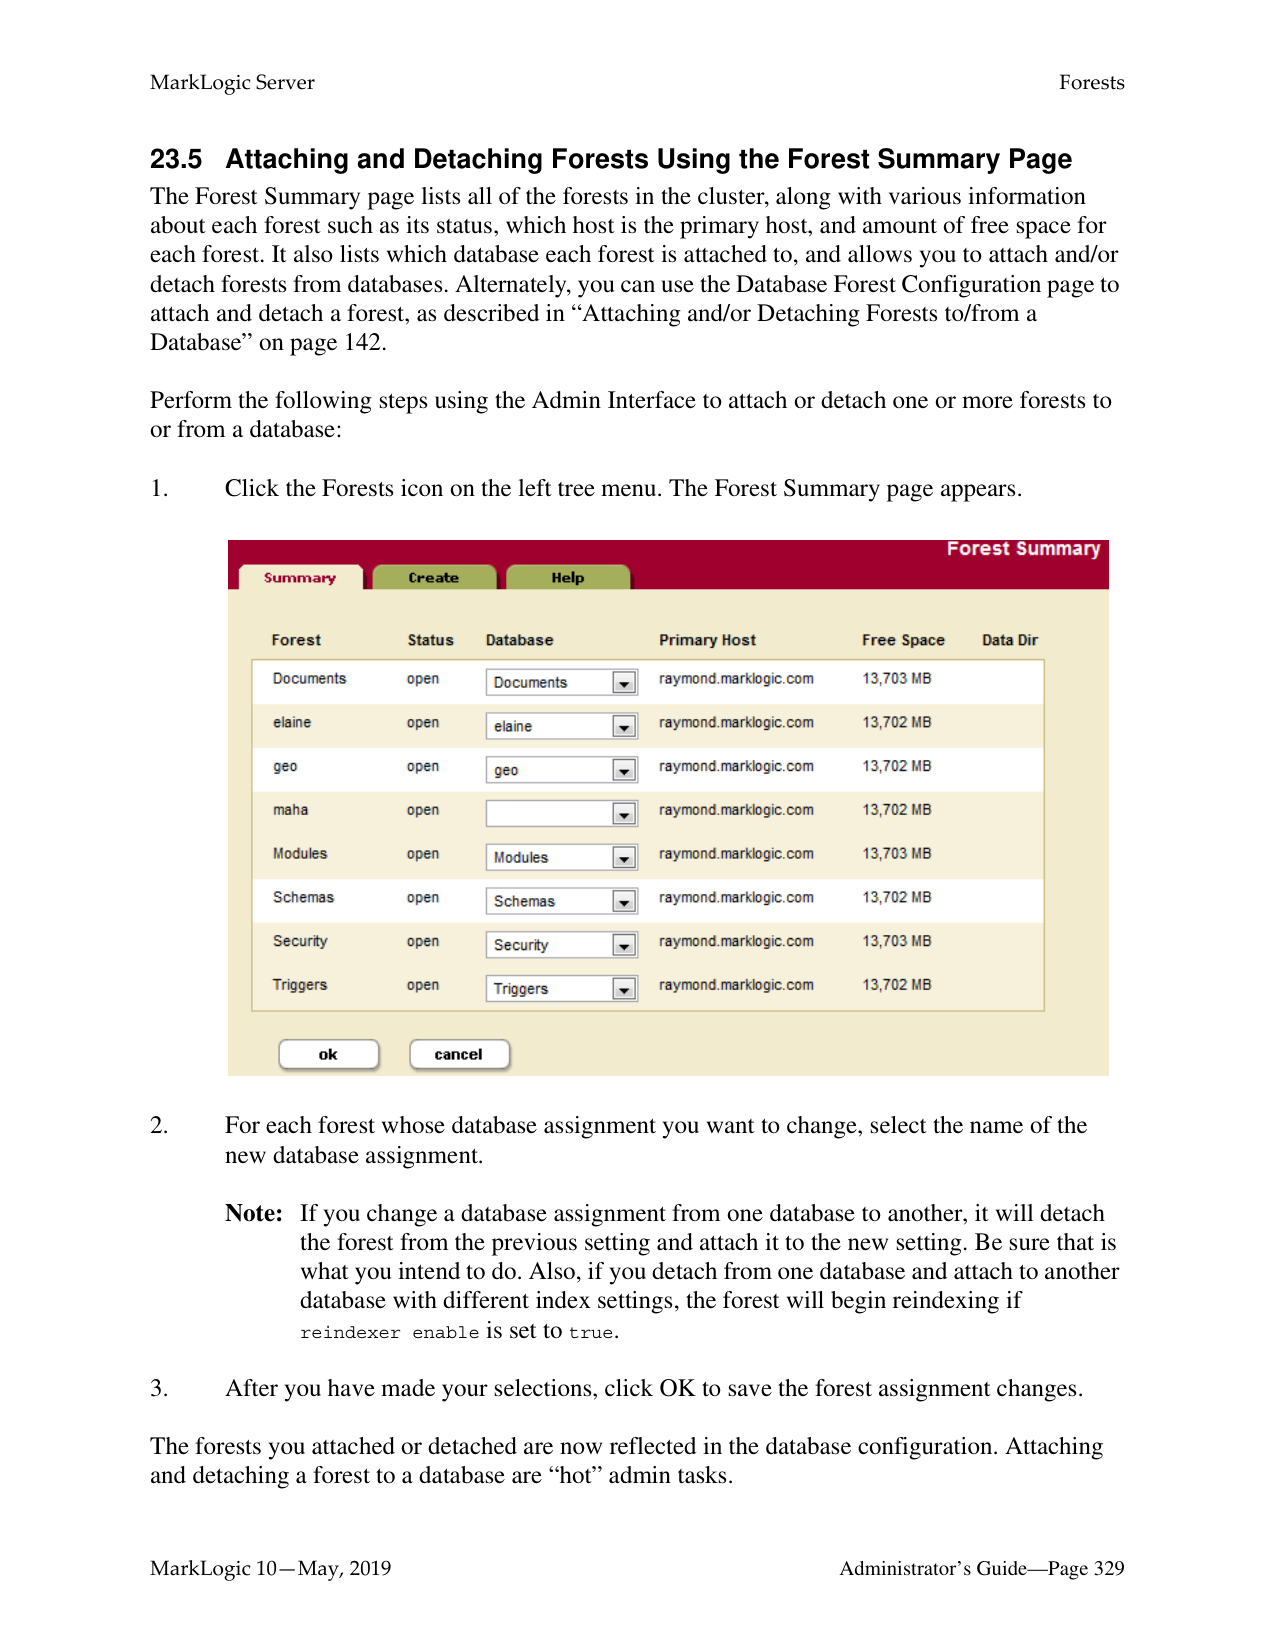
This example assumes an existing 3-node cluster running MarkLogic 8.0 from Cloud Formation templates. Before you upgrade your instance, you need to upgrade your Cloud Formation template to reference the new AMI (9.0 CF template). See http://developer.marklogic.com/products/aws for details about upgrading your templates.
Here are the additional steps:
Note: We do not recommend that you automatically swap out the Cloud Formation template. Instead, make a copy of your existing template (if it contains the AMI IDs), edit just the AMI IDs, and then use that for the update. (If the AMI ID is passed as a parameter or other means, use those means).
Wait for the host to come back up (with new host name).


xquery version "1.0-ml";
return ( let $response := xdmp:http-get(concat("http://localhost:8002/manage/v2/hosts/",
$i,"?view=status&format=json"),
) return (
effective-version/value/data()}
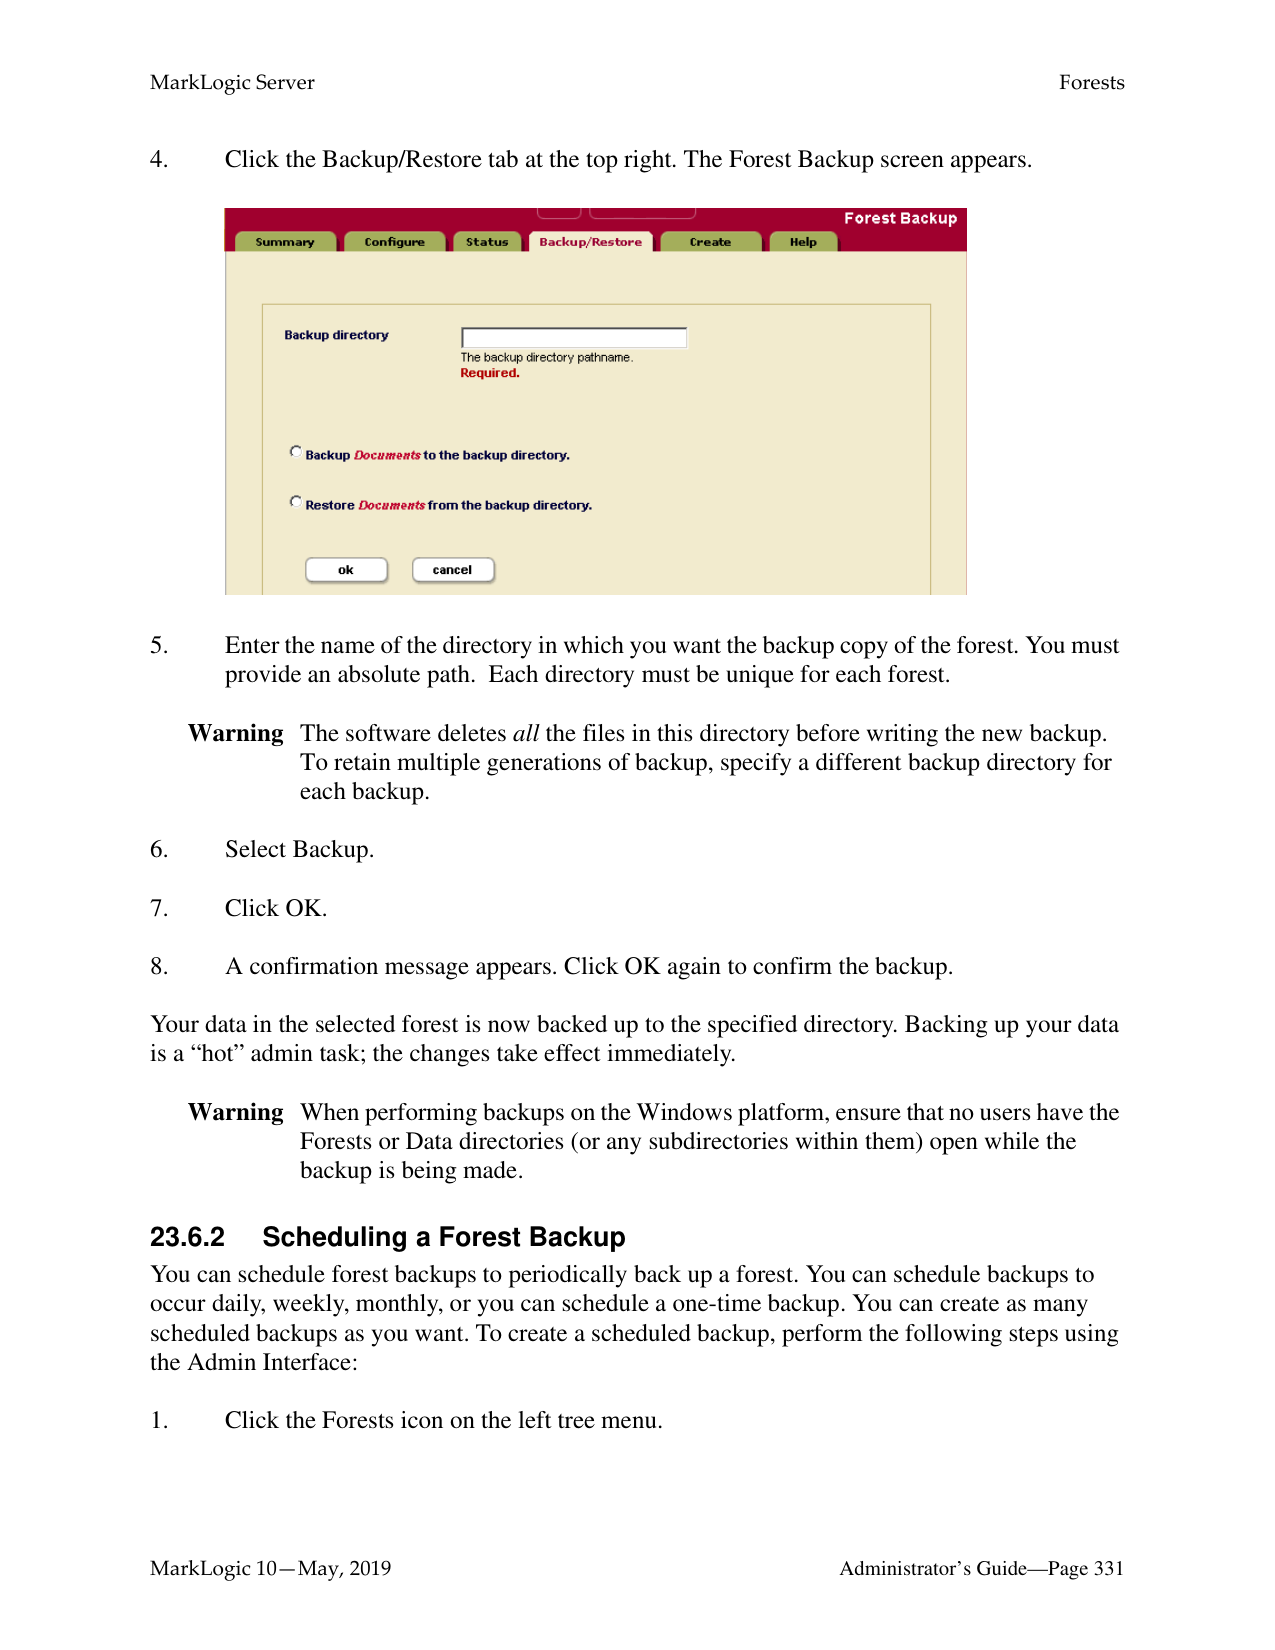
) ) }


xquery version "1.0-ml";
return ( let $response :=
xdmp:http-get(concat("http://localhost:8002/manage/v2/hosts/", $i,"?view=status&format=json"),
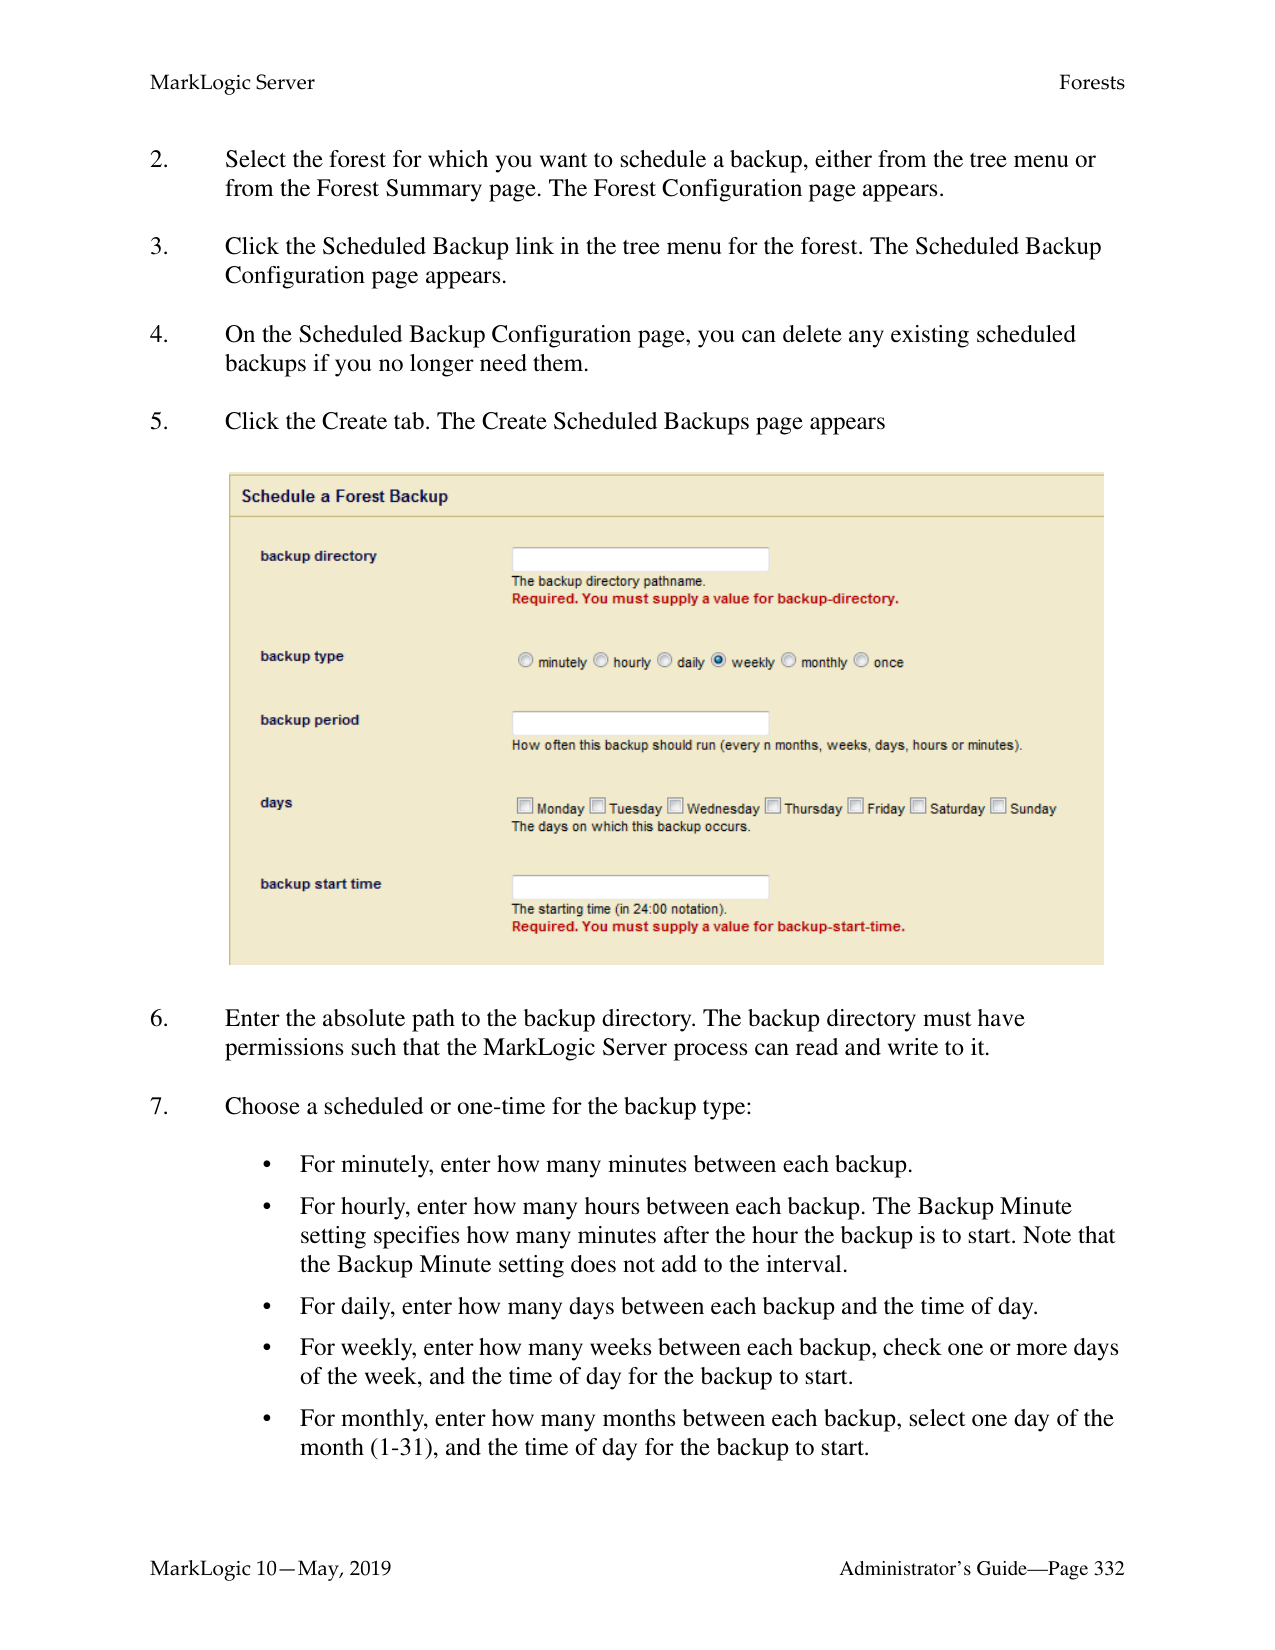
) return (
)
) }

######### 21.3.3 Rolling Upgrades Using XQuery
The XQuery Admin APIs can be used to set up and perform a rolling upgrade through the Query Console. This section contains sample code that you can use from the Query Console.

To get the host versions via REST:
xquery version "1.0-ml";
return (
let $response := xdmp:http-get(concat("http://localhost:8002/manage/v2/hosts/",$i,"?vie w=status&format=json"),
) return (
)
) }
To complete the upgrade, log onto the Admin UI to upgrade the Security database.
Note: Committing the upgrade results in the updated configuration being saved with a re-read delay of 5 seconds to ensure that all online hosts have received the new file before XDQP connections start dropping.
See step #10 in “Upgrading an EC2 Instance” on page 300. If the servers don’t have the correct version, there may be a host that is in maintenance mode. The admin:can-commit-upgrade function will return true if all servers have the correct software version. See “Admin APIs” on page 305 for more about the XQuery Admin APIs available.
######### 21.3.4 Rolling Upgrades on Both Production and DR Clusters
Upgrade the disaster recovery cluster first. It is important to upgrade the disaster recovery cluster first, since the newer version of the software will be able to receive fragments and journal frames encoded on the master cluster.
Once the disaster recovery cluster has been upgraded, then upgrade the production cluster.
######### 21.4 Rolling Back a Partial Upgrade
In the event that you need to roll back an upgrade that has not been completed and committed, you can roll back the partial upgrade by re-installing the previous version of MarkLogic (for example 8.0-6) on the machines that have been upgraded.
########## 21.5 APIs for Rolling UpgradesThese APIs are available for managing rolling upgrades in a MarkLogic cluster.
######### 21.5.2 REST Management APIs
The following REST Management endpoints provide useful information and functionality when performing a Rolling Upgrade operation.
######### 21.6 Interaction with Other MarkLogic Features
For existing features that will work as expected with MarkLogic 9, a rolling upgrade will not have any impact. Some existing features may not work as expected until the rolling upgrade is complete and the cluster has been committed to the newer version.
One possible example of this would be semantic triples, where the triple count may be increased after inserting same data twice in during a rolling upgrade in mixed mode. During a rolling upgrade, the MarkLogic 9 triple index is not able to return triples in the correct order for MarkLogic 8 semantics. A user would need to have multiple triples that are identical, except for the types of the values for this situation to occur.
Features introduced in MarkLogic 9 may or may not work in a mixed cluster (a cluster that has not been completely upgraded to MarkLogic 9, and has an effective version of 8.0-x). The following is a list of features that may need to be monitored while performing rolling upgrade.
######### 21.6.1 SQL
Beginning in MarkLogic 9, an updated version of SQL using the triple index is introduced. The existing version (pre-MarkLogic 9) will continue to work in a mixed cluster, and after the cluster has been upgraded to 9.0-x or 10.0-x. The updated version of SQL will not work in a mixed cluster. You will need to upgrade to the newer version of MarkLogic and commit the upgrade before those features are available.
The earlier version of SQL based on range indexes will work in the mixed cluster (prior to committing the upgrade), and it will also work with MarkLogic 9 and later.
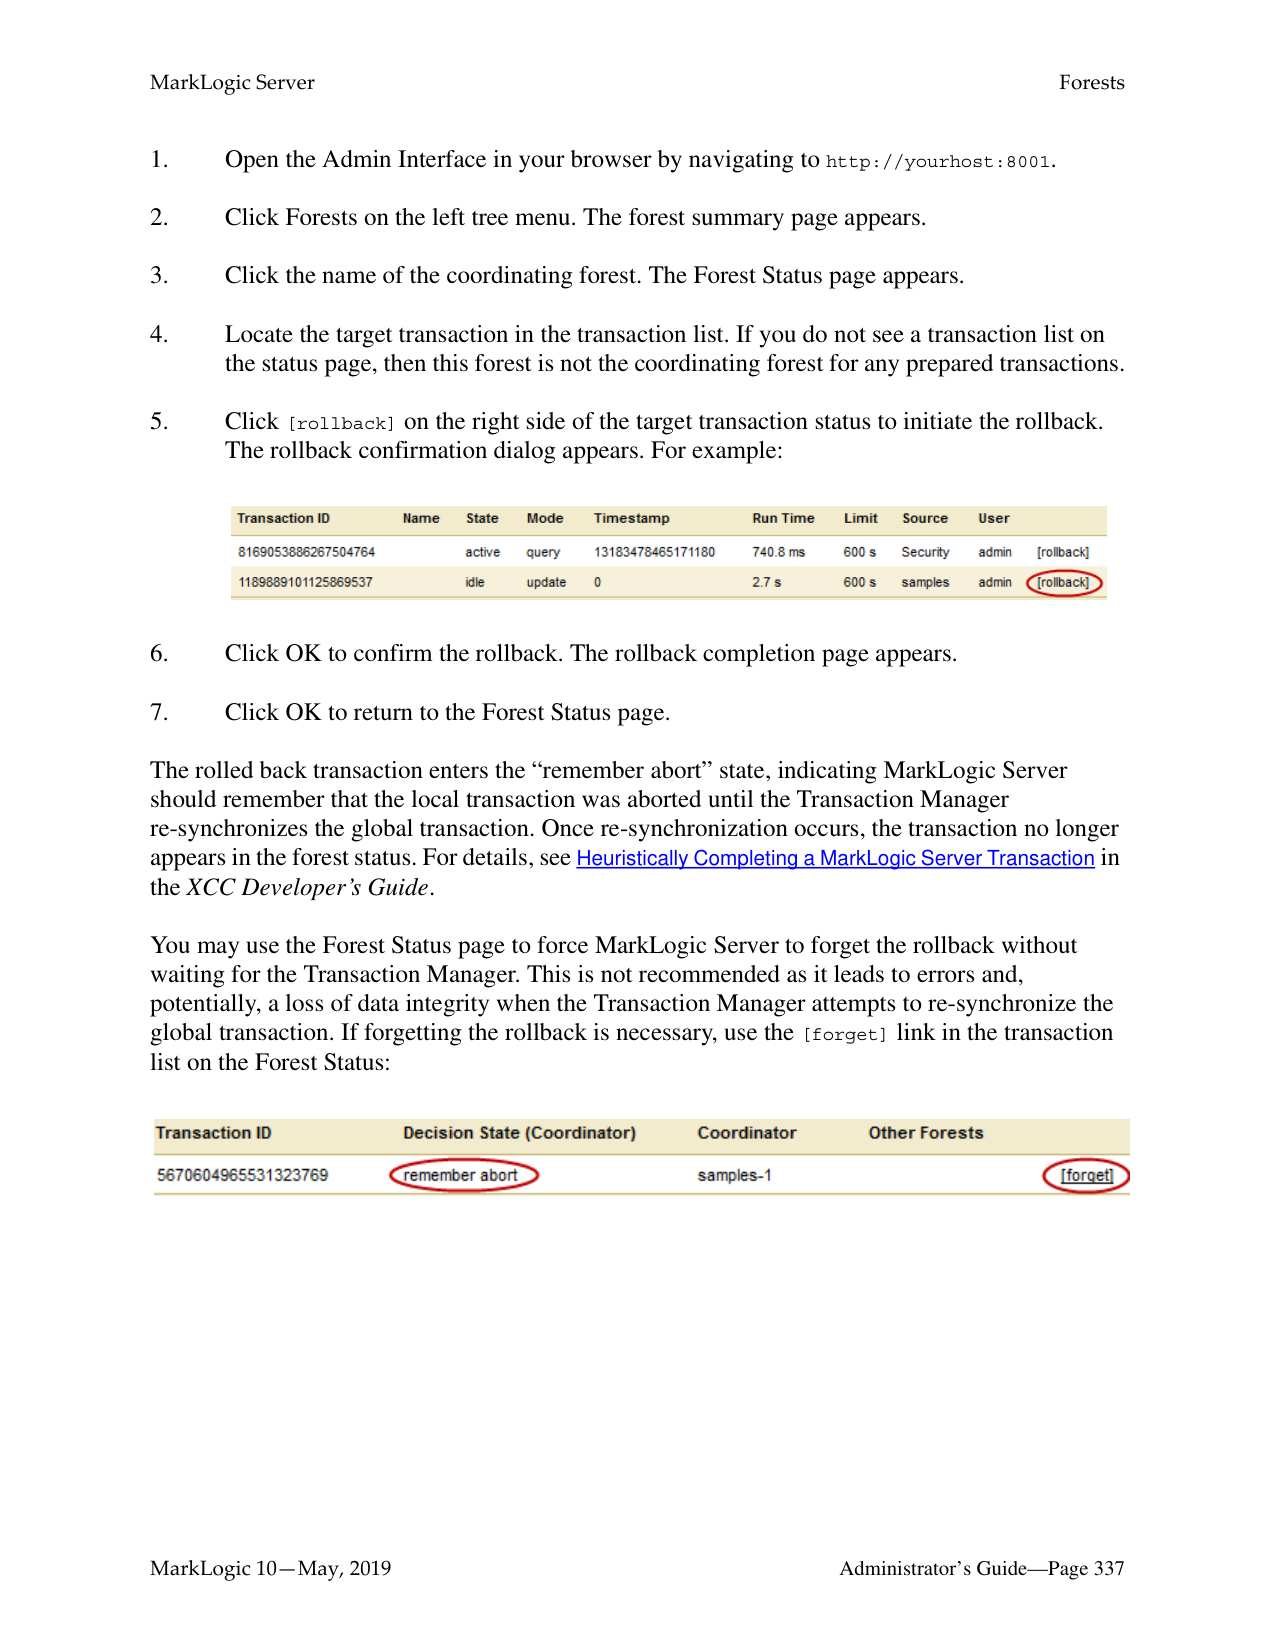
######### 21.6.2 Server-Side JavaScript
In the new version of Server-Side JavaScript, ValueIterator has been replaced by Sequence. The ValueIterator interface used to represent sequences of value in MarkLogic 8 has been replaced by the new Sequence interface. A Sequence is a JavaScript Iterable object. All functions which previously operated on or returned a ValueIterator now use a Sequence instead.
In many cases, this change is transparent to your code. However, code that depends on the following ValueIterator properties and methods must be changed:
To prepare your code for a possible mixed environment, you might use a safe coding pattern similar to this:
var list = xdmp.arrayValues(...); if (list instanceof Sequence) {
... ML9 idiom ... } else {
... ML8 idiom ... }
See Sequence in the JavaScript Reference Guide and Sequence in the MarkLogic Server-Side JavaScript Function Reference for more information.
######### 21.6.3 Java Client API

When upgrading to MarkLogic 9, you can upgrade a Java application from Java Client API 3.x to 4.x before upgrading from MarkLogic 8 to MarkLogic 9. However, you must first upgrade your JRE to version 1.8 or later. The Java Client API version 4.x only supports JRE 1.8 or later.
######### 21.6.4 Custom UDFs
When upgrading from MarkLogic 8, plugins will not work in a mixed cluster because the interface for UDFs has changed. You cannot have the same code compiled against two different sets of definitions from two different releases. You must recompile and redeploy your UDF libraries for MarkLogic 9 and later.
######### 21.6.5 Reverse Queries Involving Circles
In MarkLogic 9, a change was made to store circle radii as kilometers instead of miles. When operating in a mixed cluster consisting of 9.0-1 and 9.0-2 nodes, you may receive unexpected results for reverse queries involving circles. No issues exist when upgrading from MarkLogic 8.0-x.
######### 21.7 Important Points to Note Before Performing Rolling Upgrades
######### 21.8 Other Upgrade Options
There are alternatives to rolling upgrades for applying patches or upgrading your hosts. You can perform an upgrade to hosts in a cluster will very minimal downtime. See Upgrading from Previous Releases in the Installation Guide for more information.
##### 22.0 Hosts
A host is an instance of MarkLogic Server. A host is not configured individually but as a member of a group. A host is added to the Default group if it is not joined to another group during the installation process. For example, in cases where MarkLogic is running in a single host environment, the host is added to the Default group.
Forests are created on hosts and added to a database to interact with HTTP, ODBC, and XDBC Servers running on the same or other hosts.
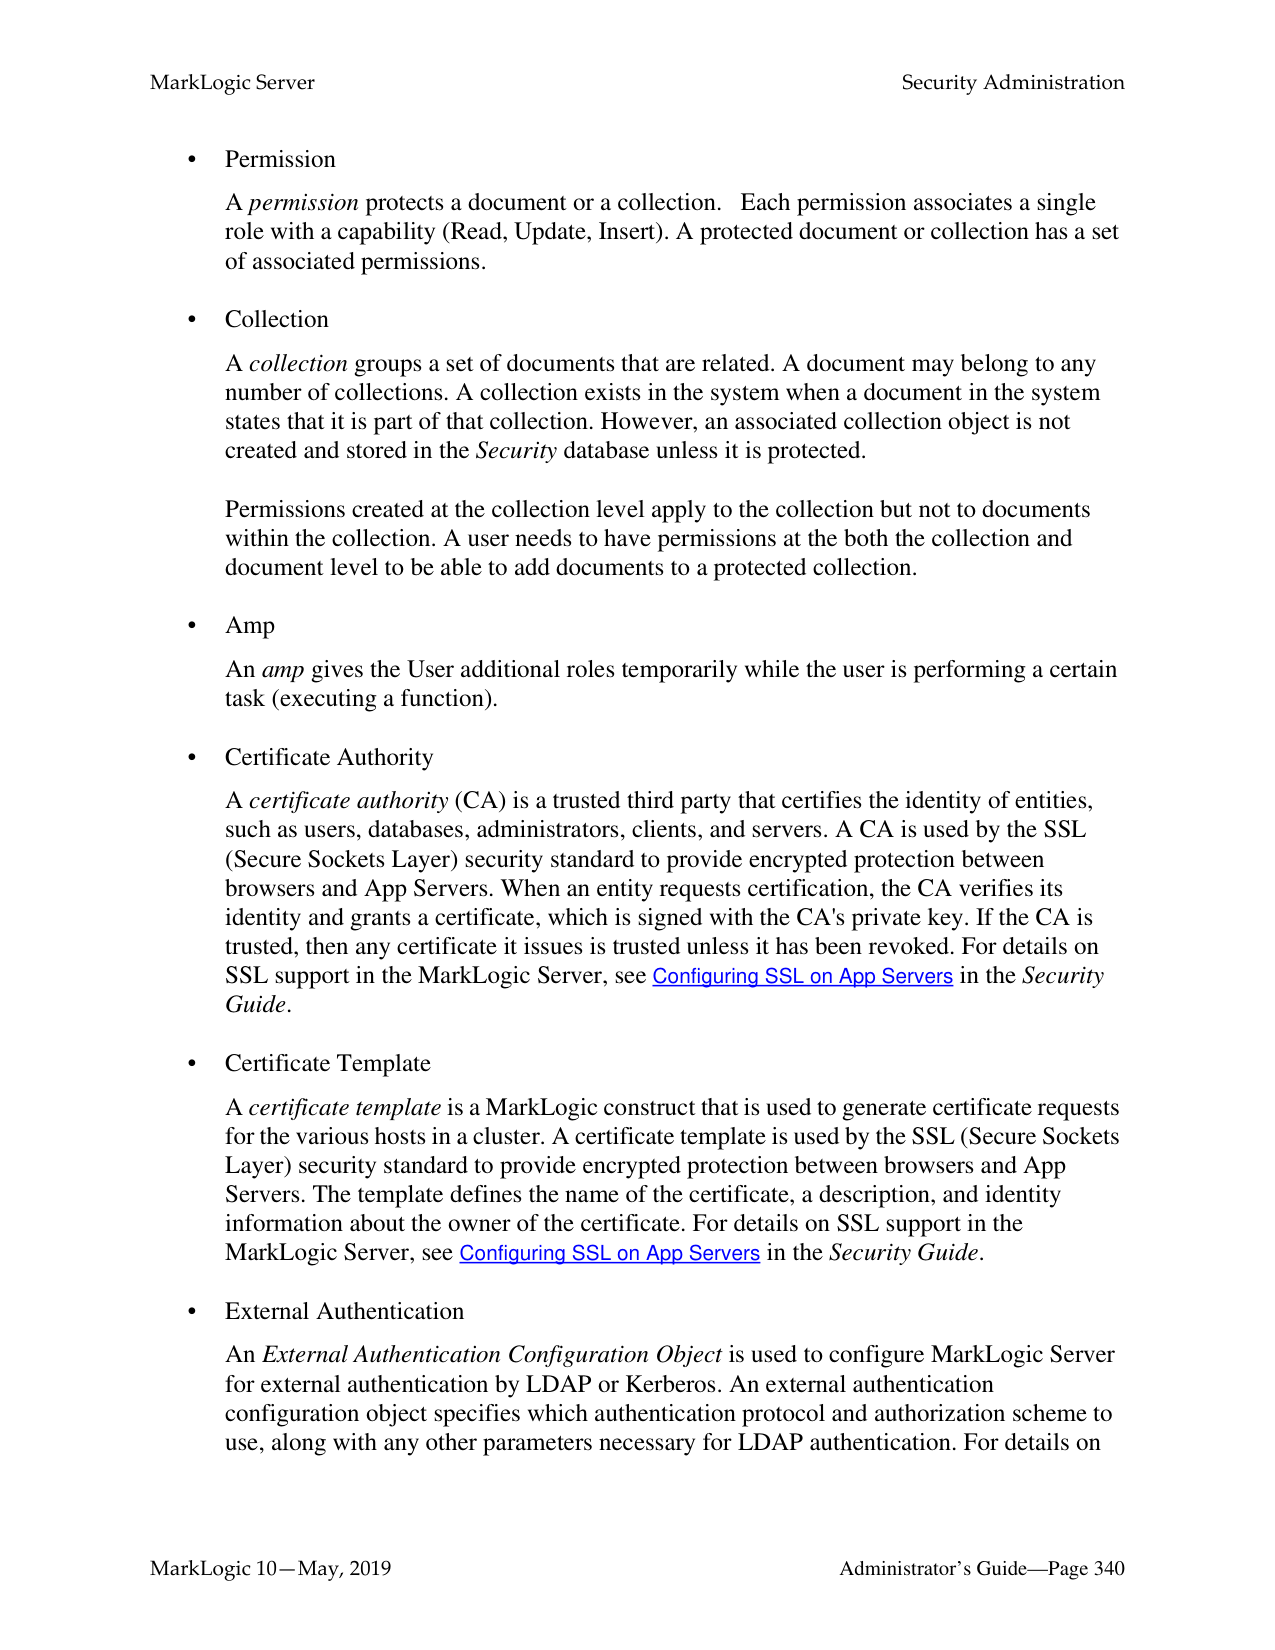
See the chapters “Groups” on page 53 and “Databases” on page 127 for more details on hosts as they relate to groups and databases.
A host is managed from both the Group and Hosts configuration screens. Use the following procedures to administer your hosts
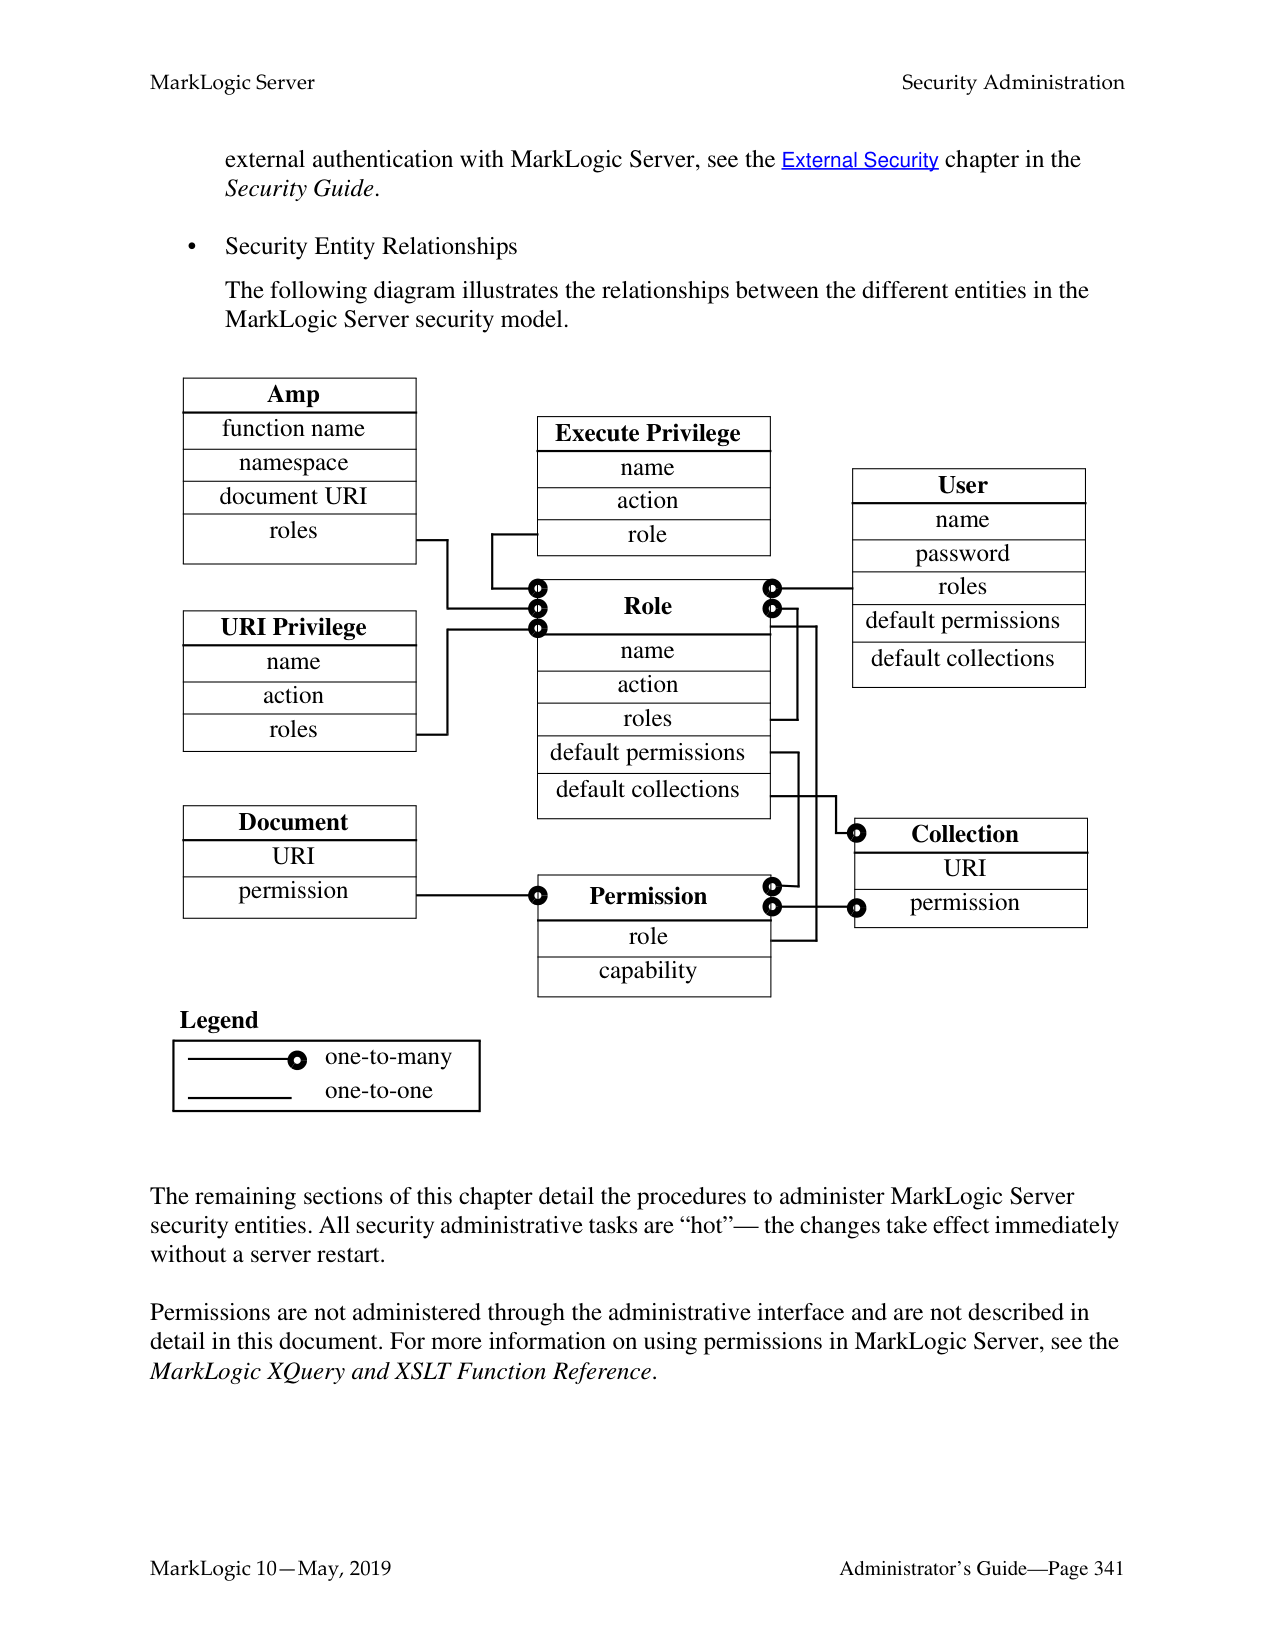
This chapter describes how to use the Admin Interface to manage hosts. For details on how to manage hosts programmatically, see Host Maintenance Operations in the Scripting Administrative Tasks Guide.
######### 22.1 Adding a Host to a Cluster
This only applies for multi-host clusters. For information about installing MarkLogic and a more detailed procedure about joining a cluster, see the Installation Guide.
To add a host to a cluster, perform the following steps using the Admin Interface:

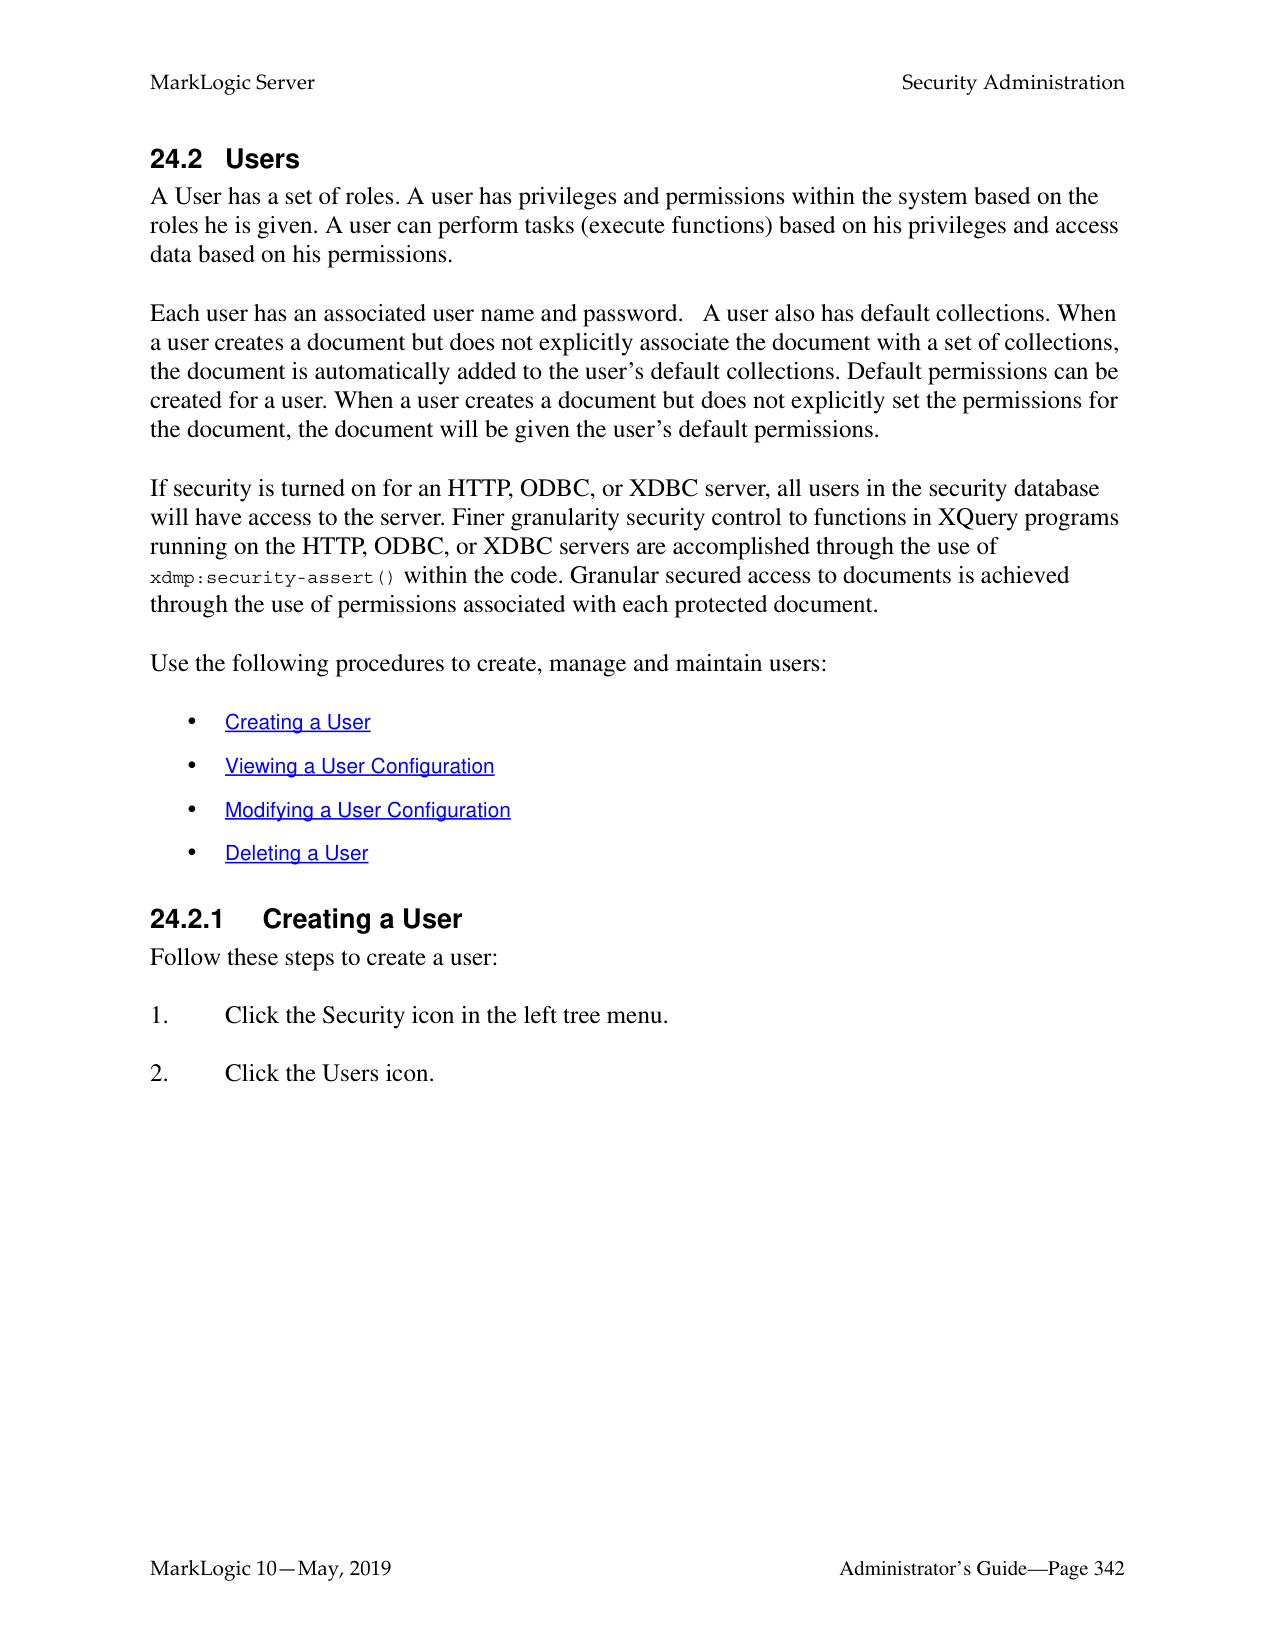
######### 22.2 Changing the Group of the Host
To change the group to which a host belongs, perform the following steps using the Admin Interface:
########### Changing the group to which a host belongs is a “cold” task; the server restarts to reflect the changes.
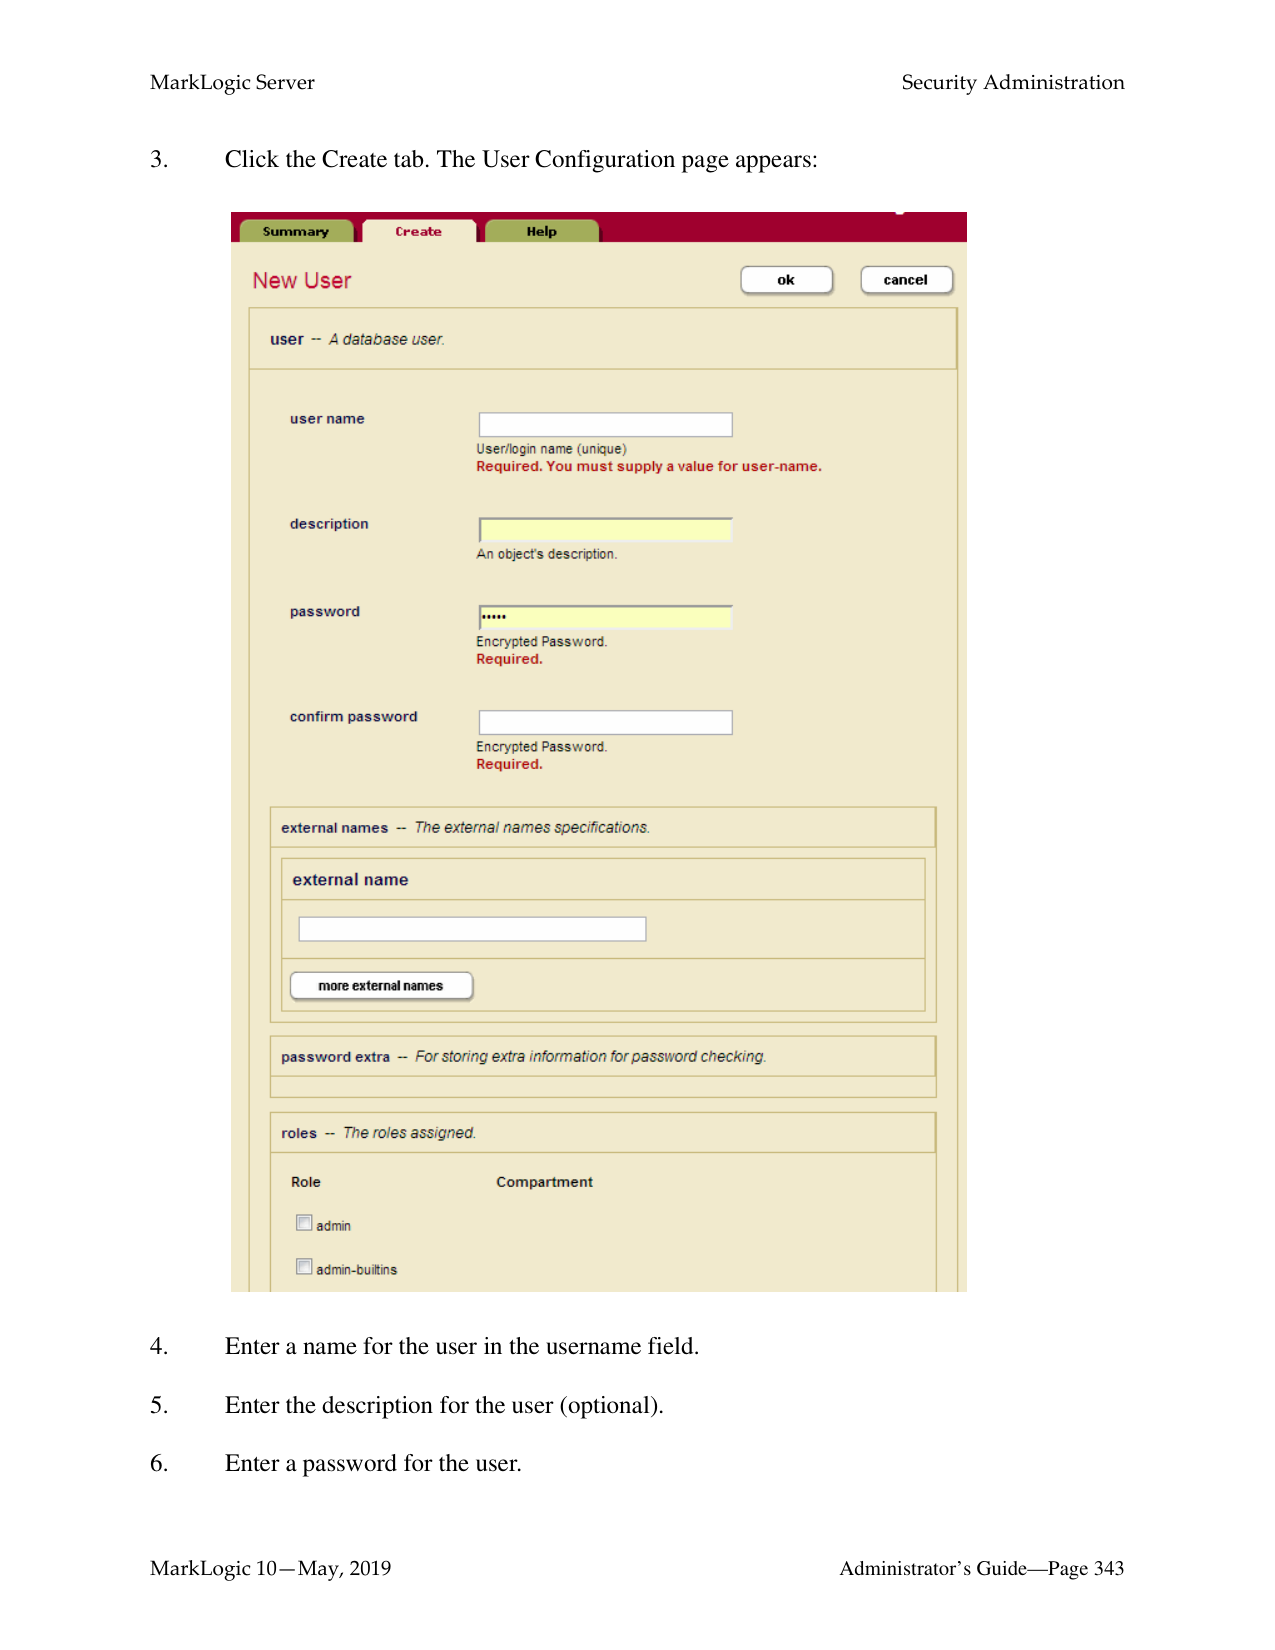
Note: The restart operation normally completes within a few seconds. It is possible, however, for it to take longer under some conditions (for example, if the Security database needs to run recovery or if the connectivity between hosts in a cluster is slow). If it takes longer than a few seconds for MarkLogic Server to restart, than the Admin Interface might return a 503: Service Unavailable message. If you encounter this situation, wait several seconds and then reload the Admin Interface.
######### 22.4 Clearing a Forest on a Host
Clearing a forest on a host permanently deletes the data in the forest. The configuration information of the forest will be preserved. For example, you may want to clear the forest if you want to load new data into the same configuration.
To clear the data from a forest, perform the following steps using the Admin Interface:
######### 22.5 Deleting a Forest on a Host
Deleting a forest on a host permanently deletes the data in the forest as well as the configuration information. A forest cannot be deleted if it is still attached to a database. You must first detach the forest from the database before you can delete from a host.
Assuming that the forest is not attached to any database, perform the following steps to delete a forest from a host.

######### 22.6 Leaving the Cluster
A host has to leave a cluster first to be moved to another cluster. Leaving a cluster is also a way to switch a host from a single host environment to a multi-host environment or vice versa. A host cannot leave a cluster if there are still forests assigned to it or if it has any foreign clusters associated with it; you must delete all forests assigned to the host and de-couple any clusters associated with a host before you can leave the cluster. In a single-host environment, a host cannot leave a cluster because it will always have forests assigned to it.
Perform the following steps to make a host leave a cluster:
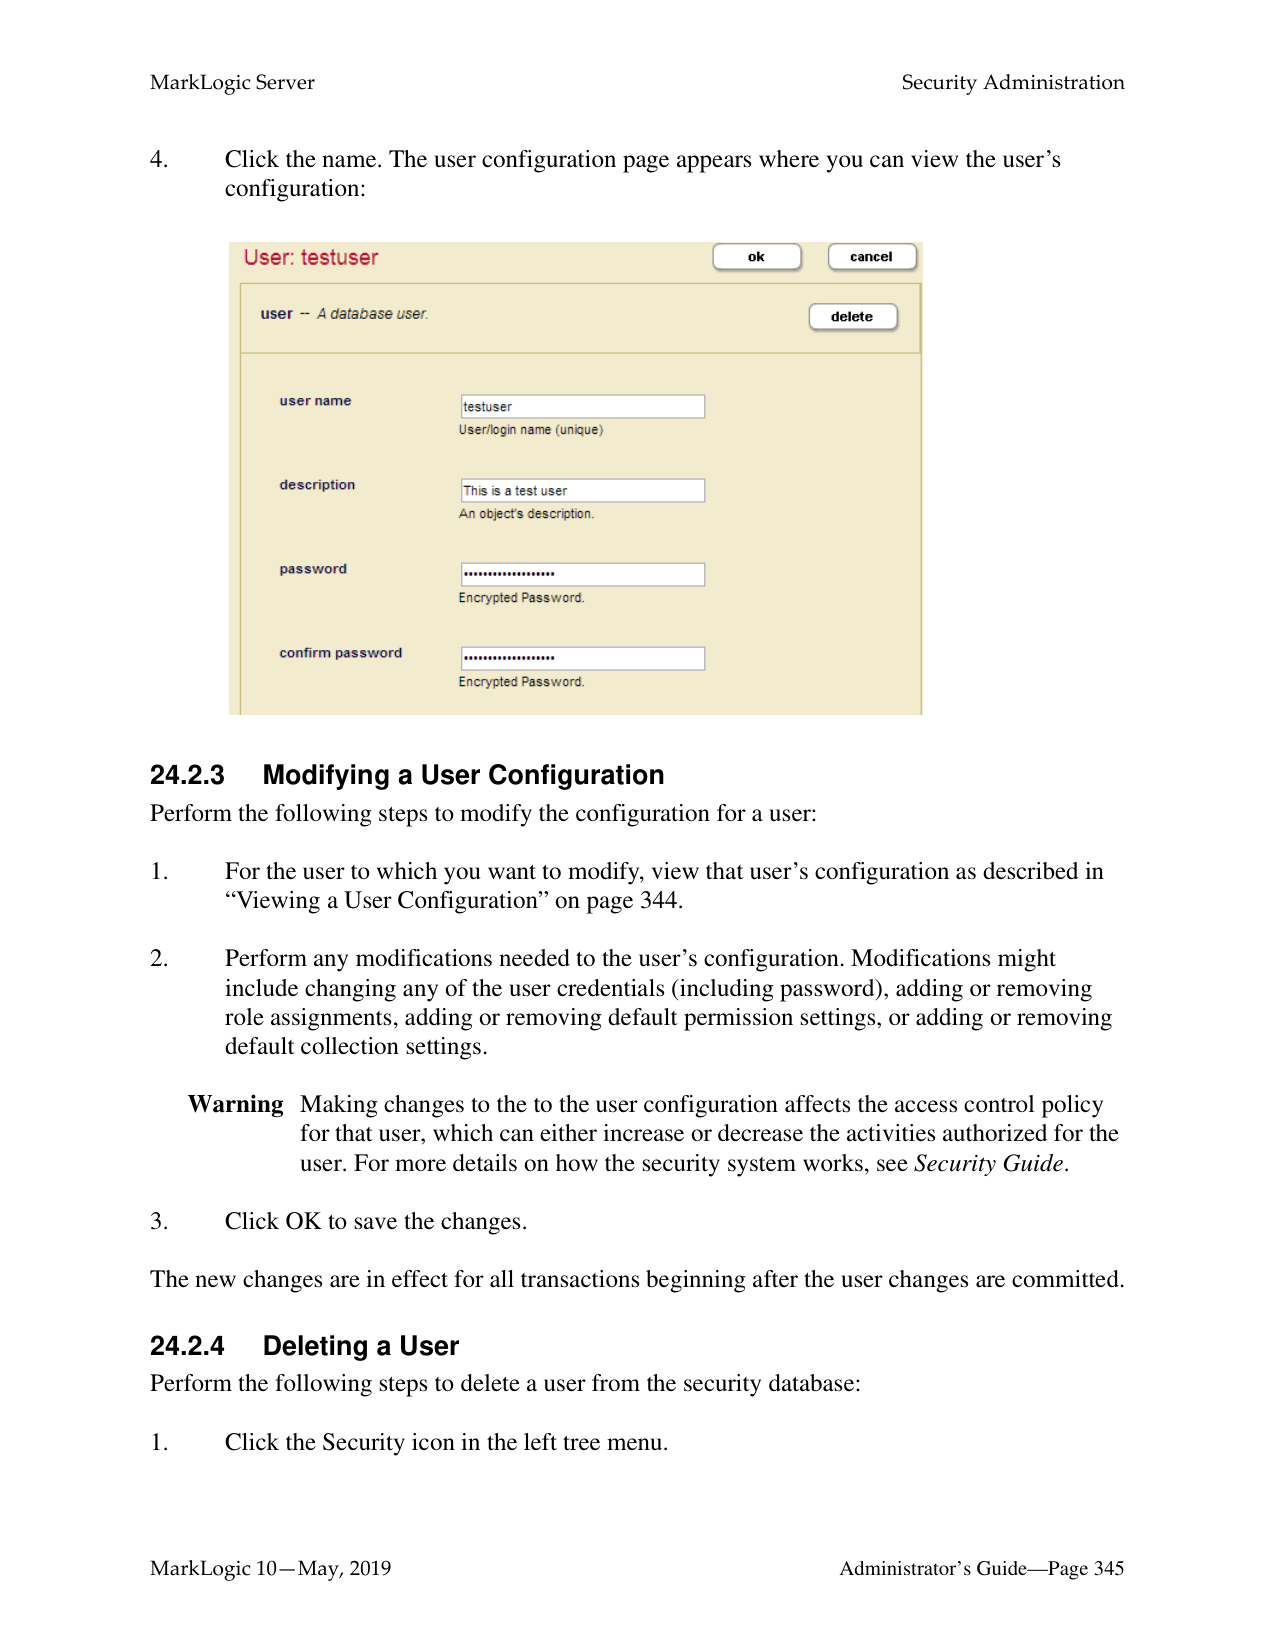

######### 22.7 Displaying License Options
In addition to the features that come standard in MarkLogic, there are optionally licensed features that you may want to take advantage of for more advanced projects.
To display the license options for a host, perform the following steps using the Admin Interface:

|Option|Description| |---|---| | | | |Advanced Geospatial|This License Option is required when using:
• geo:complex-polygon-contains or geo:complex-polygon-intersects API’s (polygon/polygon intersection) ·
• Double precision Coordinates including wgs84/double, etrs89/double or raw/double.
• Use of cts:reverse-query with Geospatial Constraints (geo alerting).
Other uses of Geospatial Search do not require Advanced Geospatial License Option.| |Advanced Security|This License Option is required when using:
• Compartment Security
• Redaction
• External key management system (KMS) or Keystore
| |Semantics|This License Option is required to use Sparql features. Use of API’s leveraging Semantics without Sparql, such as the SQL API, do not do not require a Semantics Option license.| |Flexible Replication|This License Option is required to use Flexible Replication.| |XA|This License Option is required to use XA.| |Tiered Storage|This License Option is required to use Tiered Storage.|
######### 22.8 Changing the License Key For a Host
Note: Any optionally licensed features enabled by your license key appear in the License
Key Options field.
######### 22.9 Rolling Back a Transaction
Use Host Status page of the Admin Interface to rollback stalled or long-running transactions, discarding any updates made by the transaction. The Host Status page includes a list of transactions which have started but not yet completed.
Note: To rollback the MarkLogic Server portion of a prepared XA transaction, see
“Rolling Back a Prepared XA Transaction Branch” on page 336. To rollback a transaction using the Admin Interface, complete the following steps:


A confirmation dialog appears.
There may be a slight delay between when a rollback is initiated and when the transaction terminates. During this period, the transaction still appears on the host status page, with a transaction status of “awaiting rollback”.
This chapter describes how to use the Admin Interface to manage forests. For details on how to manage forests programmatically, see Creating and Configuring Forests and Databases and Database Maintenance Operations in the Scripting Administrative Tasks Guide.
######### 23.1 Understanding Forests
A forest is a collection of XML, JSON, text, or binary documents. Forests are created on hosts and attached to databases to appear as a contiguous set of content for query purposes. A forest can only be attached to one database at a time. You cannot load data into a forest that is not attached to a database.
A forest contains in-memory and on-disk structures called stands. Each stand is composed of XML, JSON, binary, and/or text fragments, plus index information associated with the fragments. When fragmentation rules are in place, XML documents may span multiple stands. MarkLogic Server periodically merges multiple stands into a single stand to optimize performance. See “Understanding and Controlling Database Merges” on page 181 for details on merges.
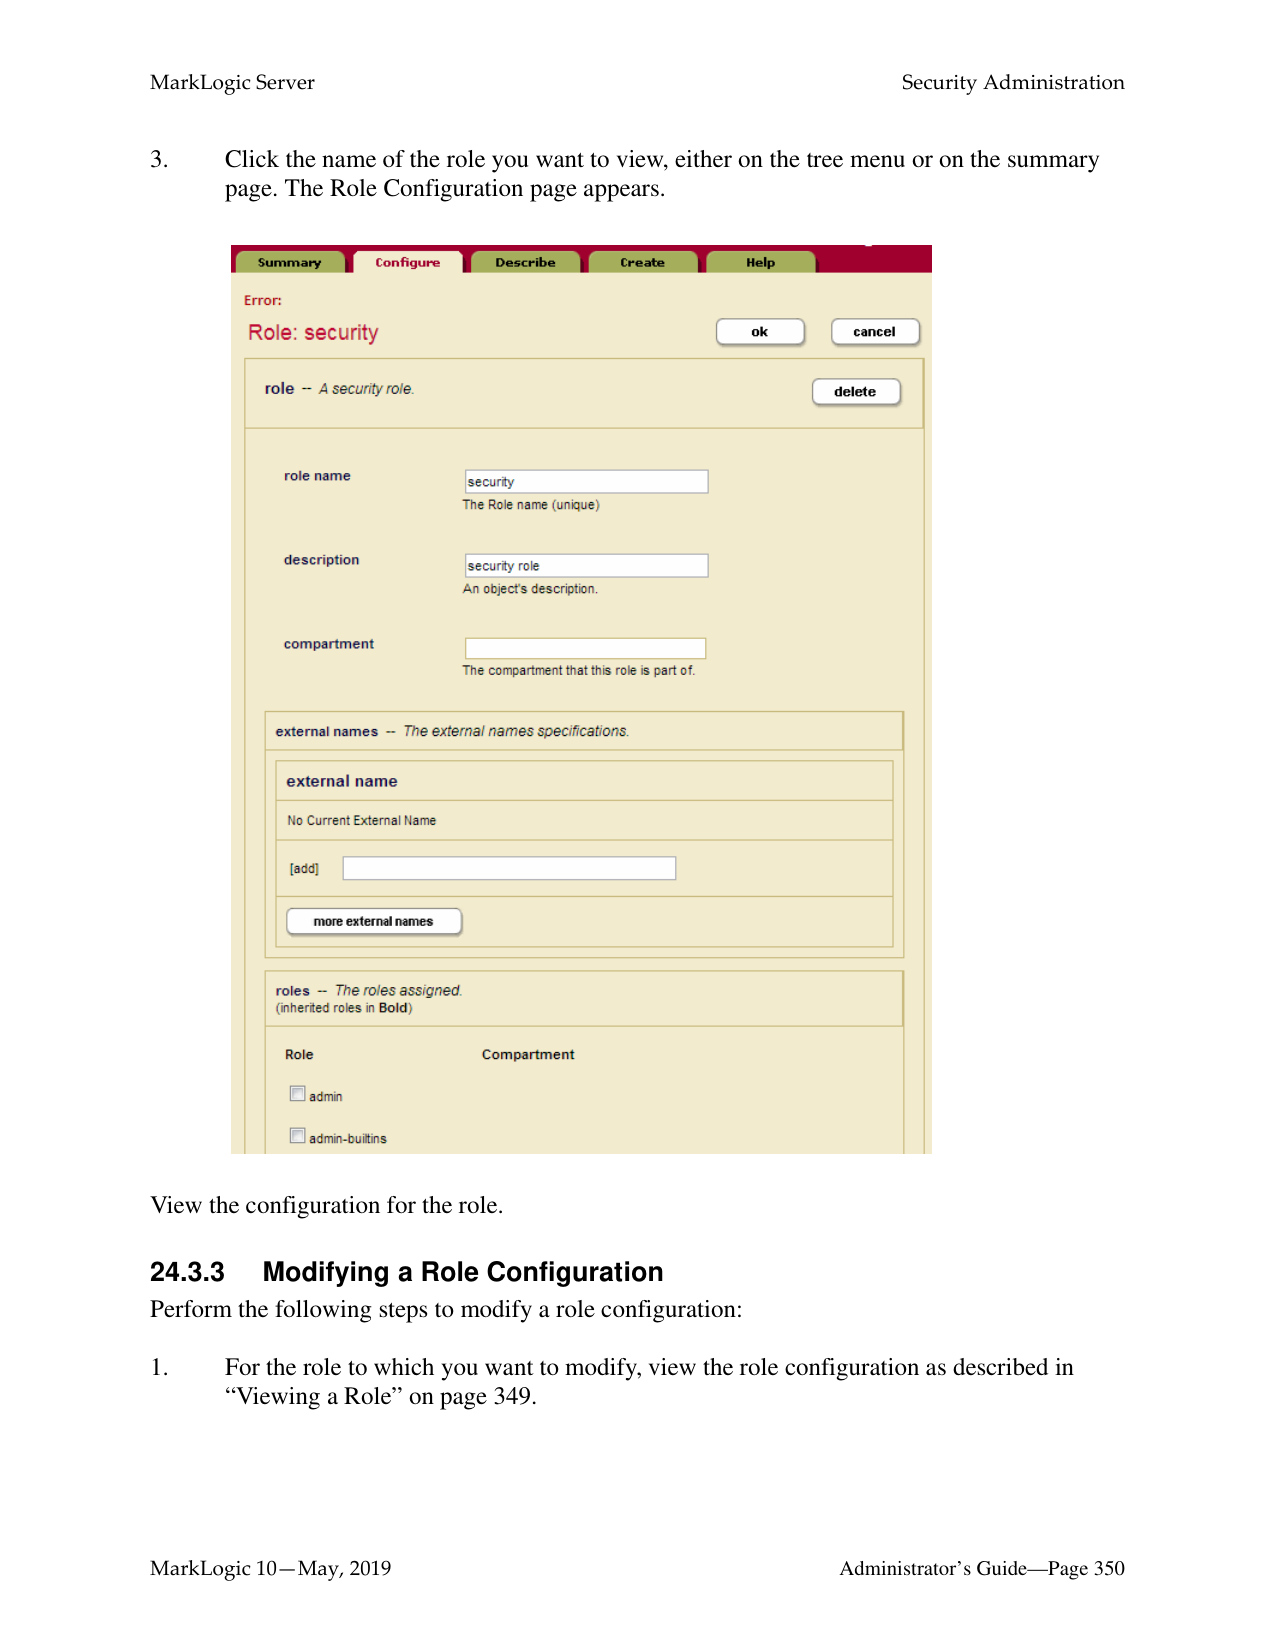
A forest also contains a separate on-disk Large Data Directory for storing large objects such as large binary documents. MarkLogic Server stores large objects separately to optimize memory usage, disk usage, and merge time. A small object is stored directly in a stand as a fragment. A large object is stored in a stand as a small reference fragment, with the full content stored in the Large Data Directory. The size threshold for storing objects in the Large Object Store and the location of the Large Object Store are configurable through the Admin Interface and Admin API. For details, see Working With Binary Documents in the Application Developer’s Guide.
By default, the operations allowed on a forest are: read, insert, update, and delete. You can control which operations are allowed on a forest by setting the following update types:
|Update Type|Description| |---|---| | | | |All|Read, insert, update, and delete operations are allowed on the forest.| |delete-only|Read and delete operations are allowed on the forest, but insert and update operations are not allowed unless a forest ID is specified, in which case it results in the document being moved to another forest. If you do not specify a forest ID when updating a document in a delete-only forest, the update throws an exception. This update type is useful when you want to eliminate the overhead imposed by the merge operation, but still allow transactions to delete data from the forest. See “Making a Forest Delete-Only” on page 326 for details.| |read-only
(Can only be set in Configure)|Read operations are allowed on the forest, but insert, update, and delete operations are not allowed. A transaction attempting to make changes to fragments in the forest will throw an exception. This update type is useful when you want to put your forests on read-only media and allow them to be queried. See “Making a Forest Read-Only” on page 327 for details.| |flash-backup
(Can only be set in Configure)|This type puts the forest in read-only mode without throwing exceptions on insert, update, or delete transactions, allowing the transactions to retry. This update type is useful when you want to temporarily quiesce a forest or to disable changes to the forest data when doing a flash backup of the forest. See “Making a Forest Read-Only” on page 327 for details.|
Note: To make the entire database read-only, set all of the forests in the database to
read-only.

The name of the forest is used by the system as a directory name. Therefore, the forest name must be a legal directory name and cannot contain any of the following 9 characters: \ * ? / : < > | " . Additionally, the name cannot begin or end with a space or a dot (.). MarkLogic recommends that you use an absolute path if you specify a data directory. If you do not specify an absolute path for the data directory, your forest will be created in the default data directory.
The directory you specified can be an operating system mounted directory path, it can be an HDFS path, or it can be an S3 path. For details on using HDFS and S3 storage in MarkLogic, see Disk Storage Considerations in the Query Performance and Tuning Guide.
The Forests directory is either a fully-qualified pathname or is relative to the Forests directory, set at installation time based on the directory in which MarkLogic Server is installed. The following table shows the default location Forest directory for each platform:
|Platform|Program Directory| |---|---|
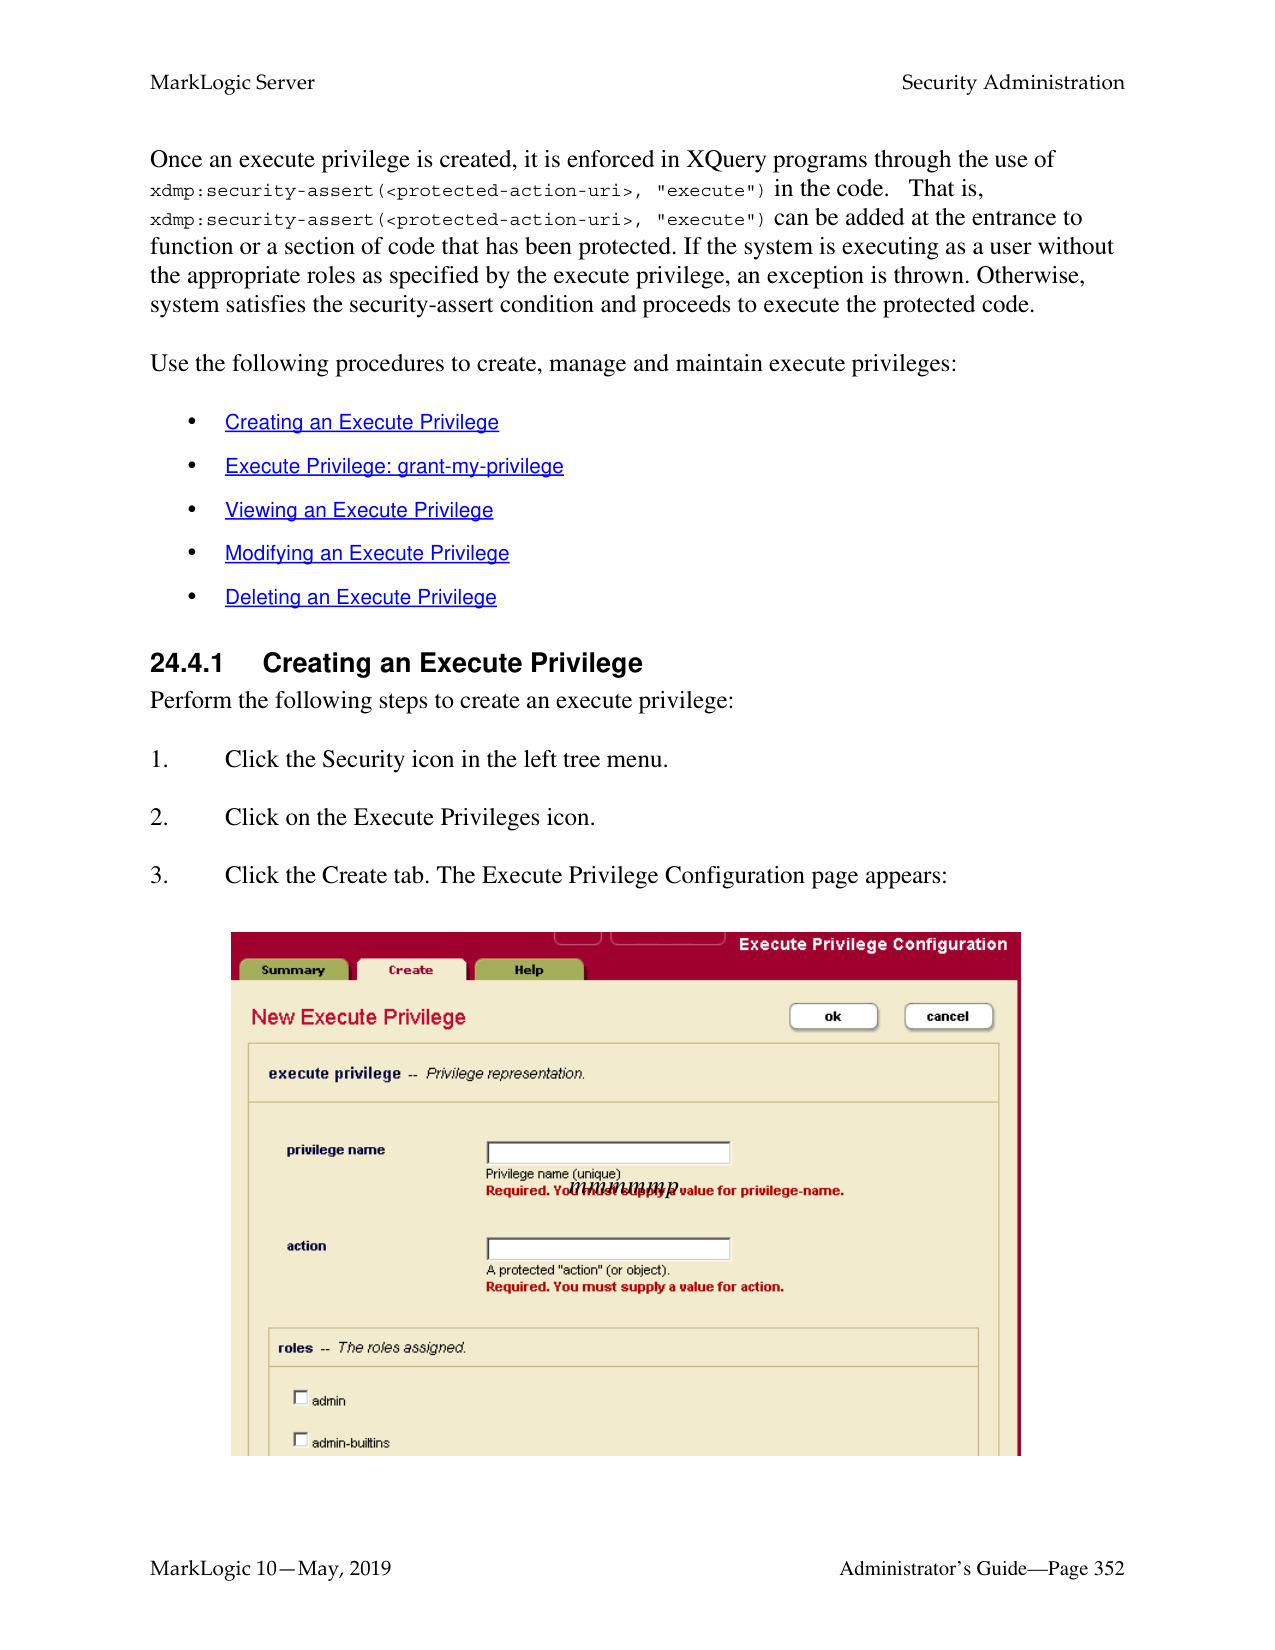
| | | |Microsoft Windows|C:\Program Files\MarkLogic\Data\Forests| |Red Hat Linux|/var/opt/MarkLogic/Forests| |Mac OS X|~/Library/Application\ Support/MarkLogic/Data/Forests or ~/Library/"Application Support"/MarkLogic/Data/Forests or "~/Library/Application Support/MarkLogic/Data/Forests"|
Note: The Read-Only update types described in “Making a Forest Read-Only” on
page 327 can be set in the Configure page of an existing forest.

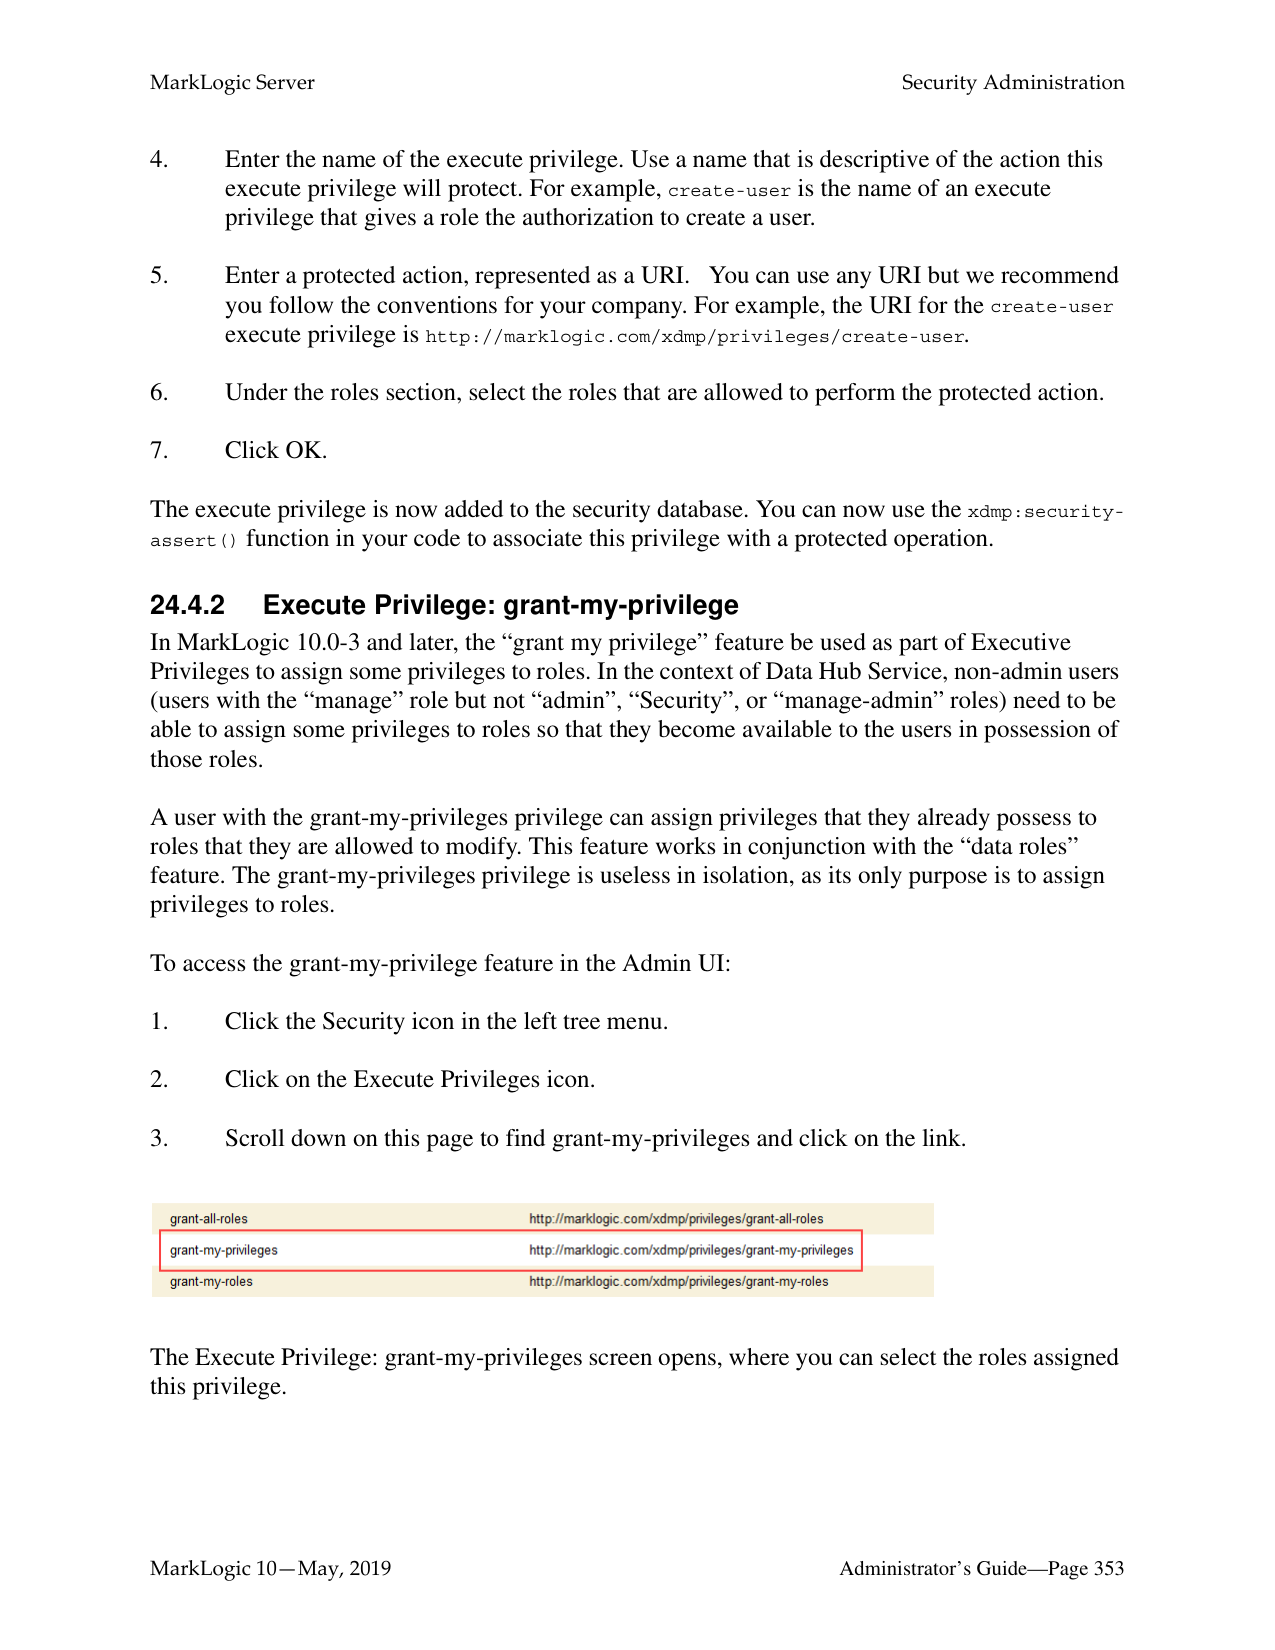

Creating a forest is a “hot” admin task; the changes take effect immediately. However, toggling between update types restarts the forest.
######### 23.3 Making a Forest Delete-Only
You can configure a forest to only allow read and delete operations, disallowing inserts and updates to any documents stored in the forest. A delete-only forest is useful in cases where you have multiple forests in a database and you want to manage which forests change. To set a forest to only allow delete operations (and disallow inserts and updates), navigate to the configuration page for the forest you want specify as delete-only and set the updates allowed field to delete-only.
When a forest is set to delete-only, updates to documents in a delete-only forest that do not specify a forest ID will throw an exception. Updates to documents in a delete-only forest that specify one or more forest IDs of other forests in the database will result in the documents moving to one of those other forests. When a document moves forests, the old version of the document will be marked as deleted, and will be removed from the forest during the next merge.
To specify an update that will move a document in a delete-only forest to an updateable forest, you must specify the forest ID of at least one forest in which updates are allowed. One technique to accomplish this is to always specify all of the forest IDs, as in the following xdmp:document-insert example which lists all of the forests in the database for the $forest-ids parameter:
xdmp:document-insert($uri, $node, (), (), 0, xdmp:database-forests(xdmp:database()) )
Note: You can only move a document from a delete-only forest to a forest that allows updates using an API that takes forest IDs, and then by explicitly setting the forest IDs to include one or more forests that allow updates. The node-level update built-in functions (xdmp:node-replace, xdmp:node-insert-child, and so on) do not have a forest IDs parameter and therefore do not support moving documents.
Under normal operating circumstances, you likely will not need to set a forest to be delete-only. Additionally, even if the reindexer is enabled at the database level, documents in a forest that is set to delete-only will not be reindexed.
There are cases where delete-only forests are useful, however. One of the use cases for delete-only forests is if you have multiple forests and you want to control when some forests are merging. The best way to control merges in a forest is to not insert any new content in the forest. In this scenario, you can set some of the forests to be delete-only, and then those forests will not merge during that time (unless you manually specify a merge, either with the xdmp:merge API or by clicking the Merge button in the Admin Interface). After a while, you can rotate which forests are delete-only. For example, if you have four forests, you can make two of them delete-only for one day, and then make the other two delete-only the next day, switching the first two forest back to allowing updates. This approach will only have two forests being updated (and periodically merging) at a time, thus needing less disk space for merging. For more details about merges, see “Understanding and Controlling Database Merges” on page 181.
######### 23.4 Making a Forest Read-Only
You can configure an existing forest to only allow reads and to disallow inserts, updates and deletes to any documents stored in the forest.
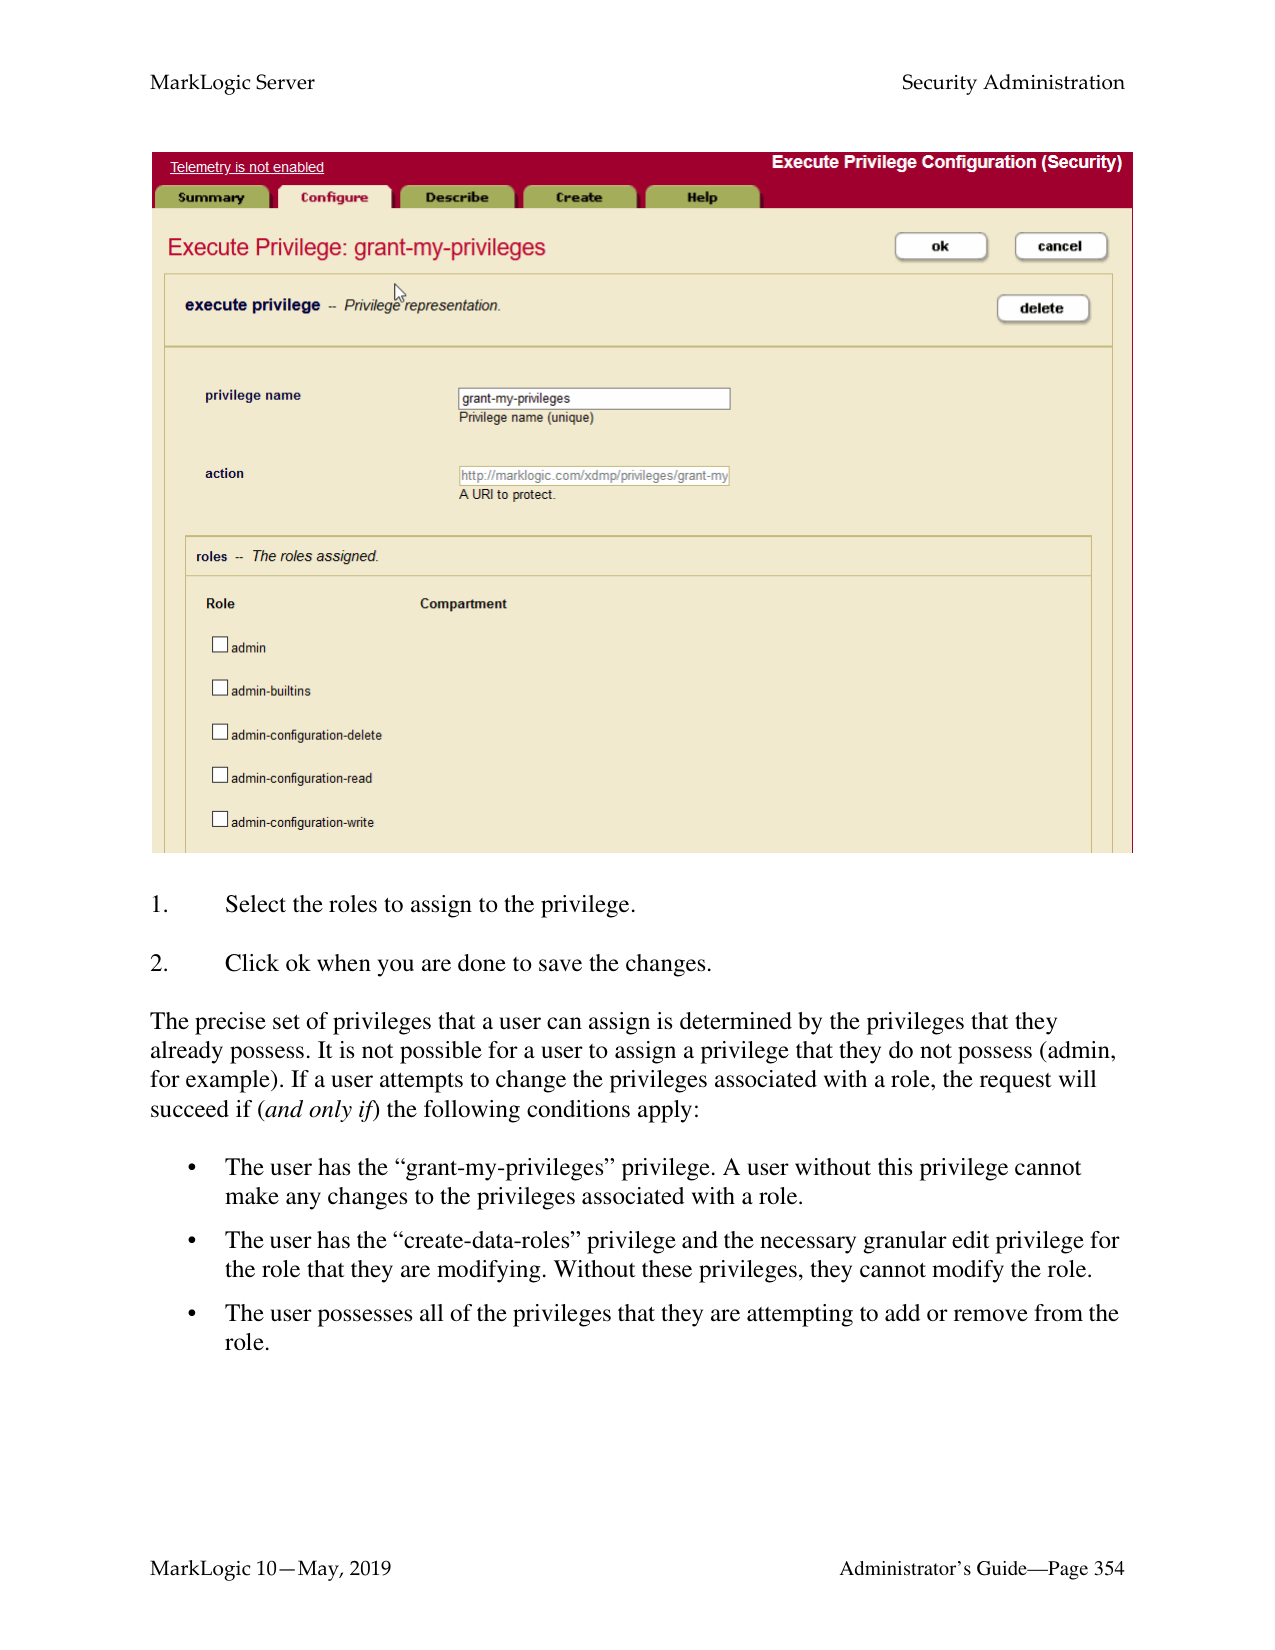

MarkLogic Server supports two read-only forest settings:
Note: Only existing forests can be set to read-only or flash-backup. You cannot create a
new forest with these settings.
A read-only forest is useful if you want to put your forests on read-only media and allow them to be queried. Another use of read-only is to control disk space. For example, in a multi-forest database, it might be useful to be able to mark one or more forests as read-only as they reach disk space limits.
One use for flash-backup is to prevent updates to the forest during a flash backup operation, which is a very fast backup that can be done on some file systems. You can set the flash-backup update type to temporarily put the forest in read-only mode for the duration of a flash backup and then reset the update type when the backup has completed. Transactions attempting to make changes to the forest during the backup period are retried.
Note: Toggling between read-only or flash-backup and other forest update types
triggers a forest restart. This activity is visible in the log file.
When the read-only or flash-backup update type is set, the forest will have the following characteristics:
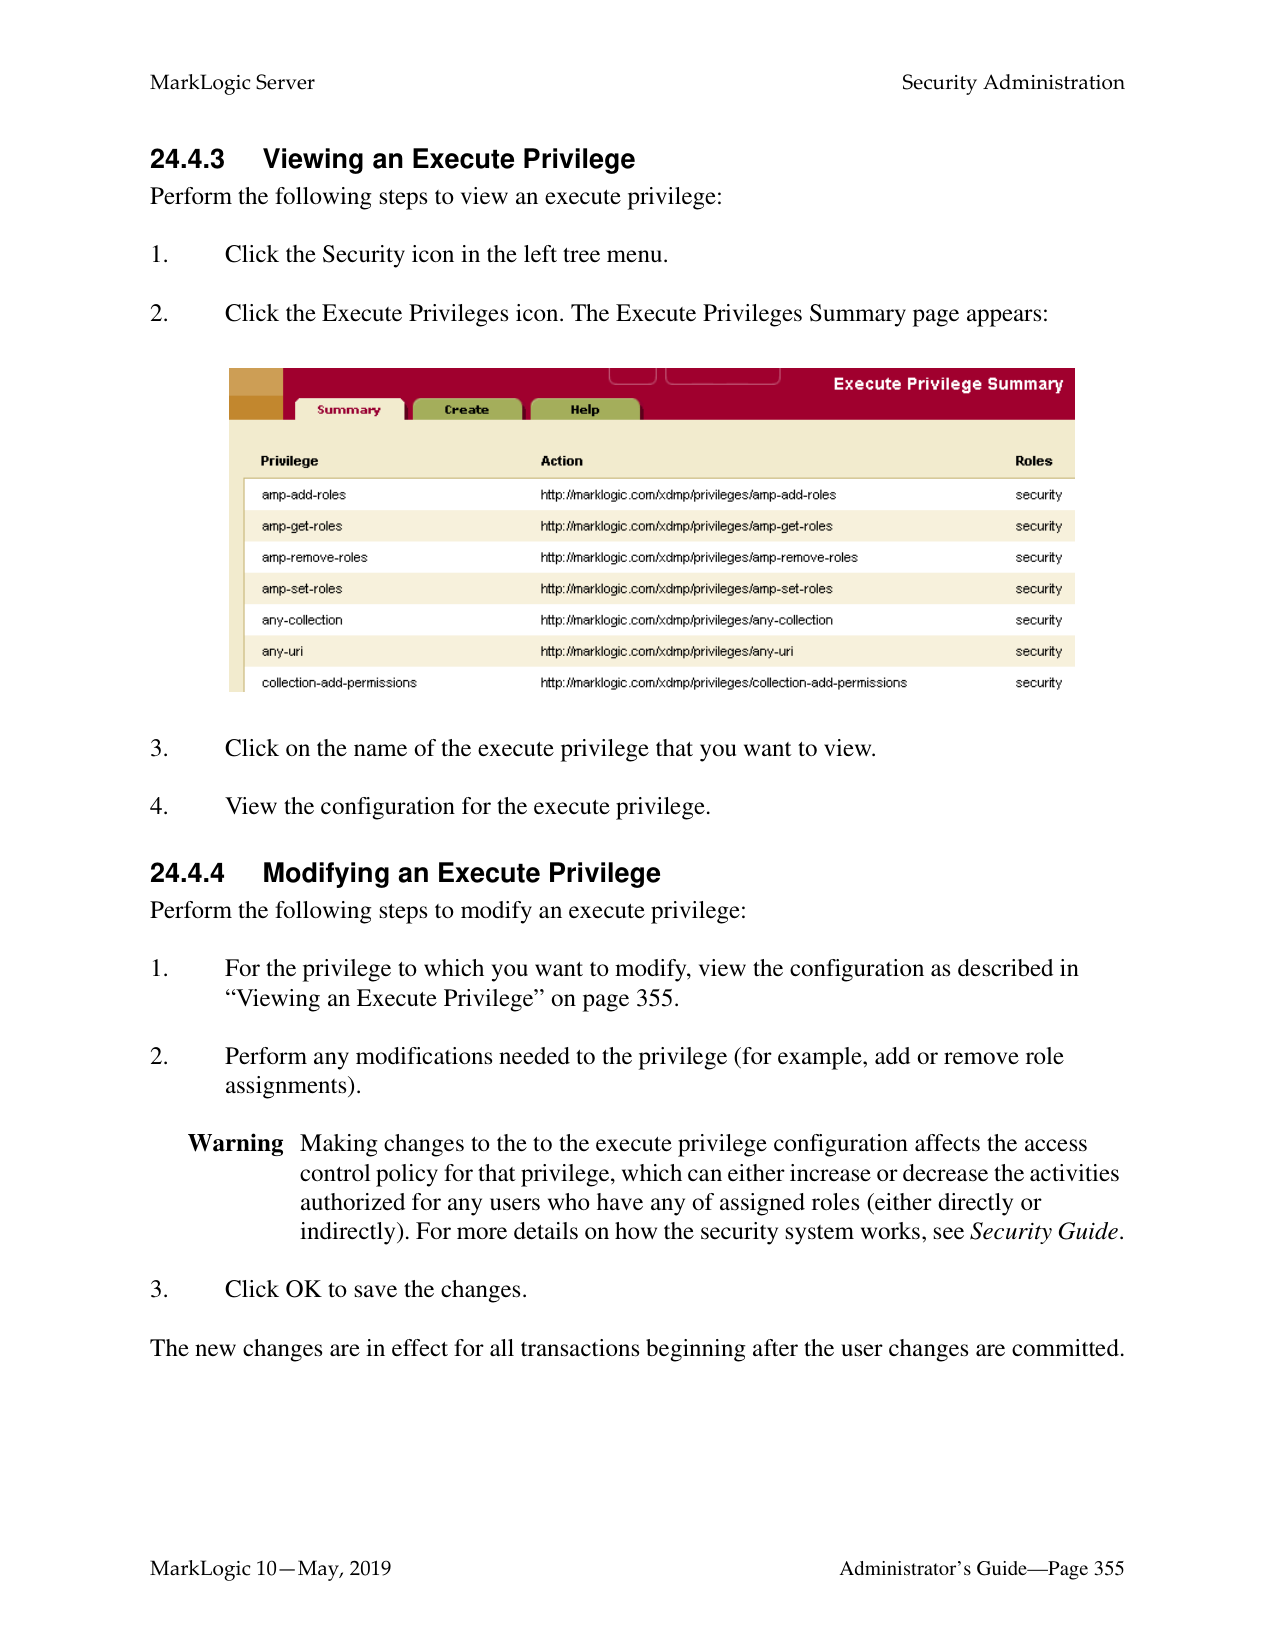
######### 23.5 Attaching and Detaching Forests Using the Forest Summary Page
The Forest Summary page lists all of the forests in the cluster, along with various information about each forest such as its status, which host is the primary host, and amount of free space for each forest. It also lists which database each forest is attached to, and allows you to attach and/or detach forests from databases. Alternately, you can use the Database Forest Configuration page to attach and detach a forest, as described in “Attaching and/or Detaching Forests to/from a Database” on page 142.
Perform the following steps using the Admin Interface to attach or detach one or more forests to or from a database:
Note: If you change a database assignment from one database to another, it will detach
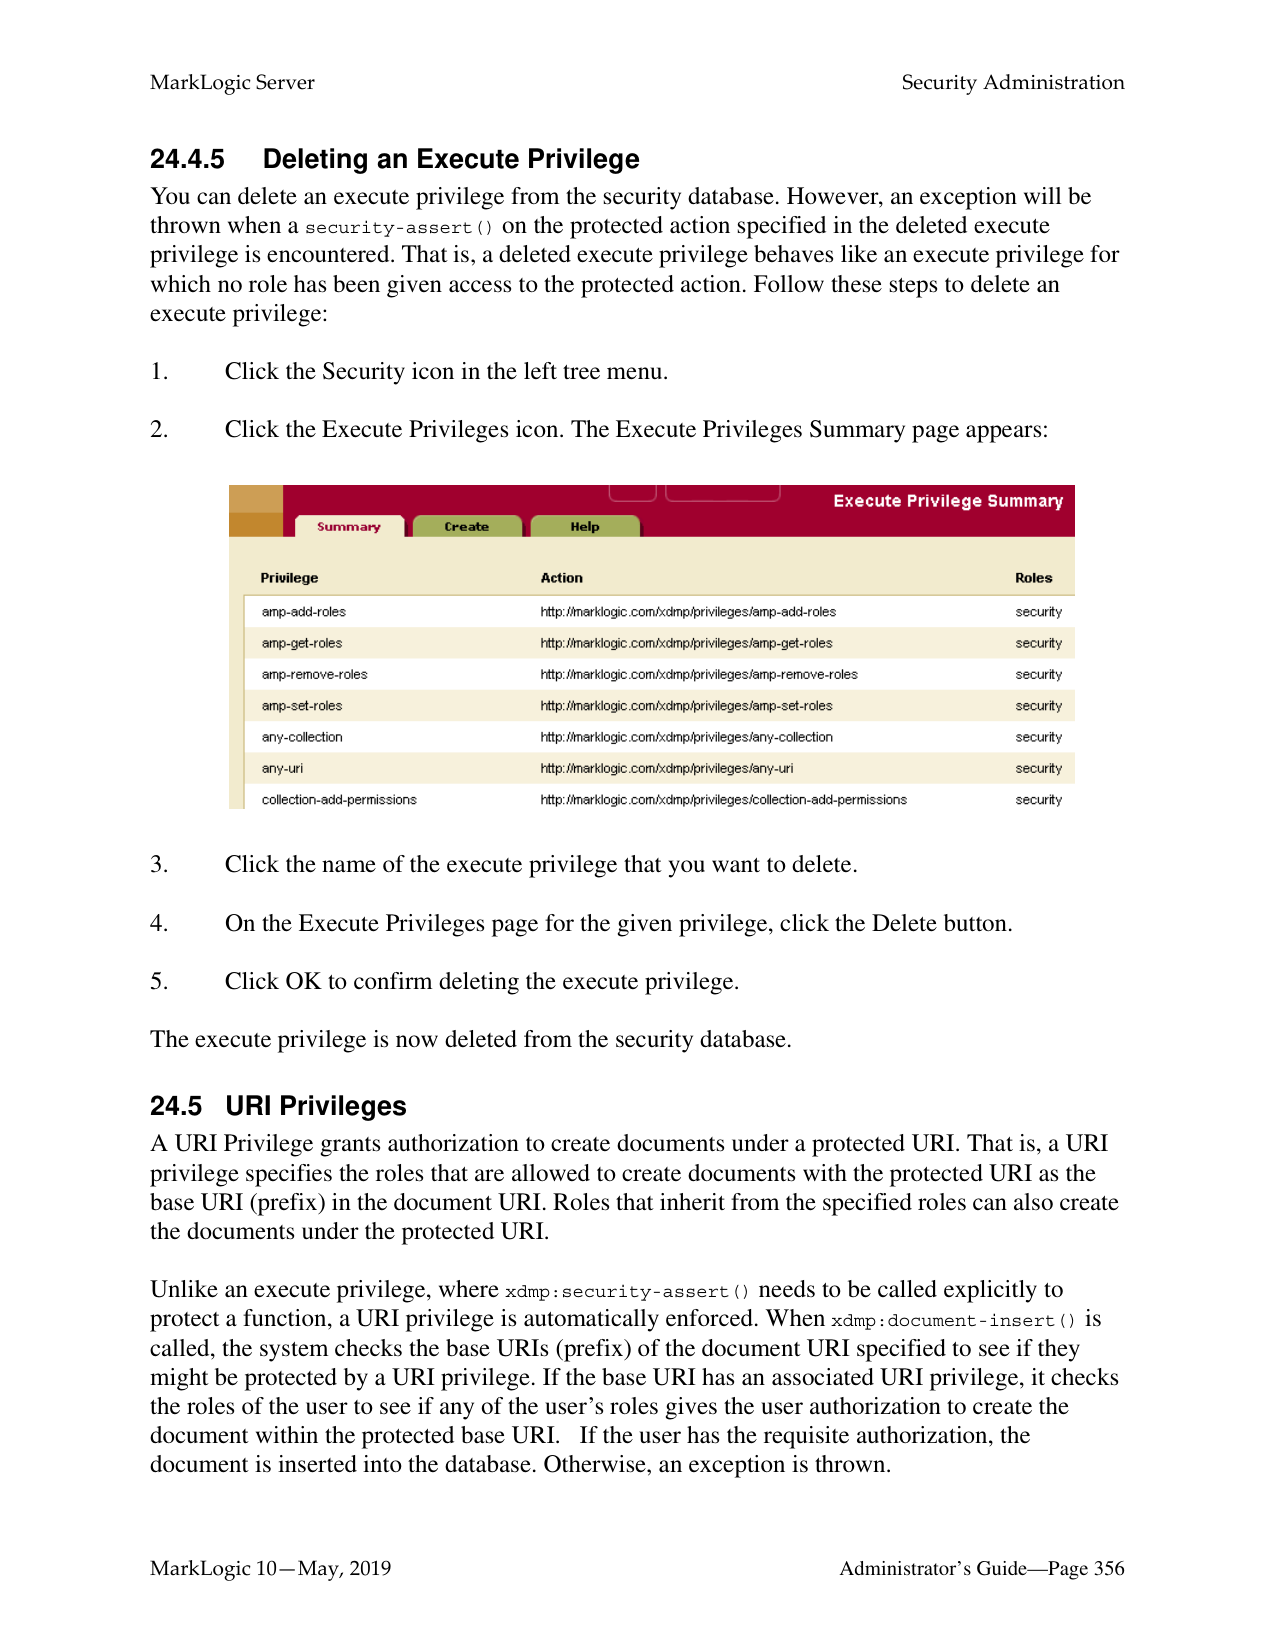
the forest from the previous setting and attach it to the new setting. Be sure that is what you intend to do. Also, if you detach from one database and attach to another database with different index settings, the forest will begin reindexing if
reindexer enable is set to true.

The forests you attached or detached are now reflected in the database configuration. Attaching and detaching a forest to a database are “hot” admin tasks.
######### 23.6 Making Backups of a Forest
MarkLogic Server backs up forest data by transactionally creating an image copy of a specified forest. You can back up data at the granularity of a forest or of a database. Use the Admin Interface to back up a forest.
Forest-level backups only back up the data in a forest, and are not guaranteed to have a consistent database state to restore. The data in the forest is consistent, but other parts of the database (other forests, the schema database, and so on) might be different when you restore the data. For a guaranteed consistent backup, perform a complete database backup For information on backing up a database, see “Backing Up and Restoring a Database” on page 253.
Note: Forest backups do not provide a journal archive feature, as described for database backups in “Backing Up and Restoring a Database” on page 253. However, you can manually invoke the xdmp:start-journal-archiving function during a forest backup to make use of journal archiving with your forest backups.
This section describes the forest backup procedures, and includes the following parts:
Warning The software deletes all the files in this directory before writing the new backup. To retain multiple generations of backup, specify a different backup directory for each backup.

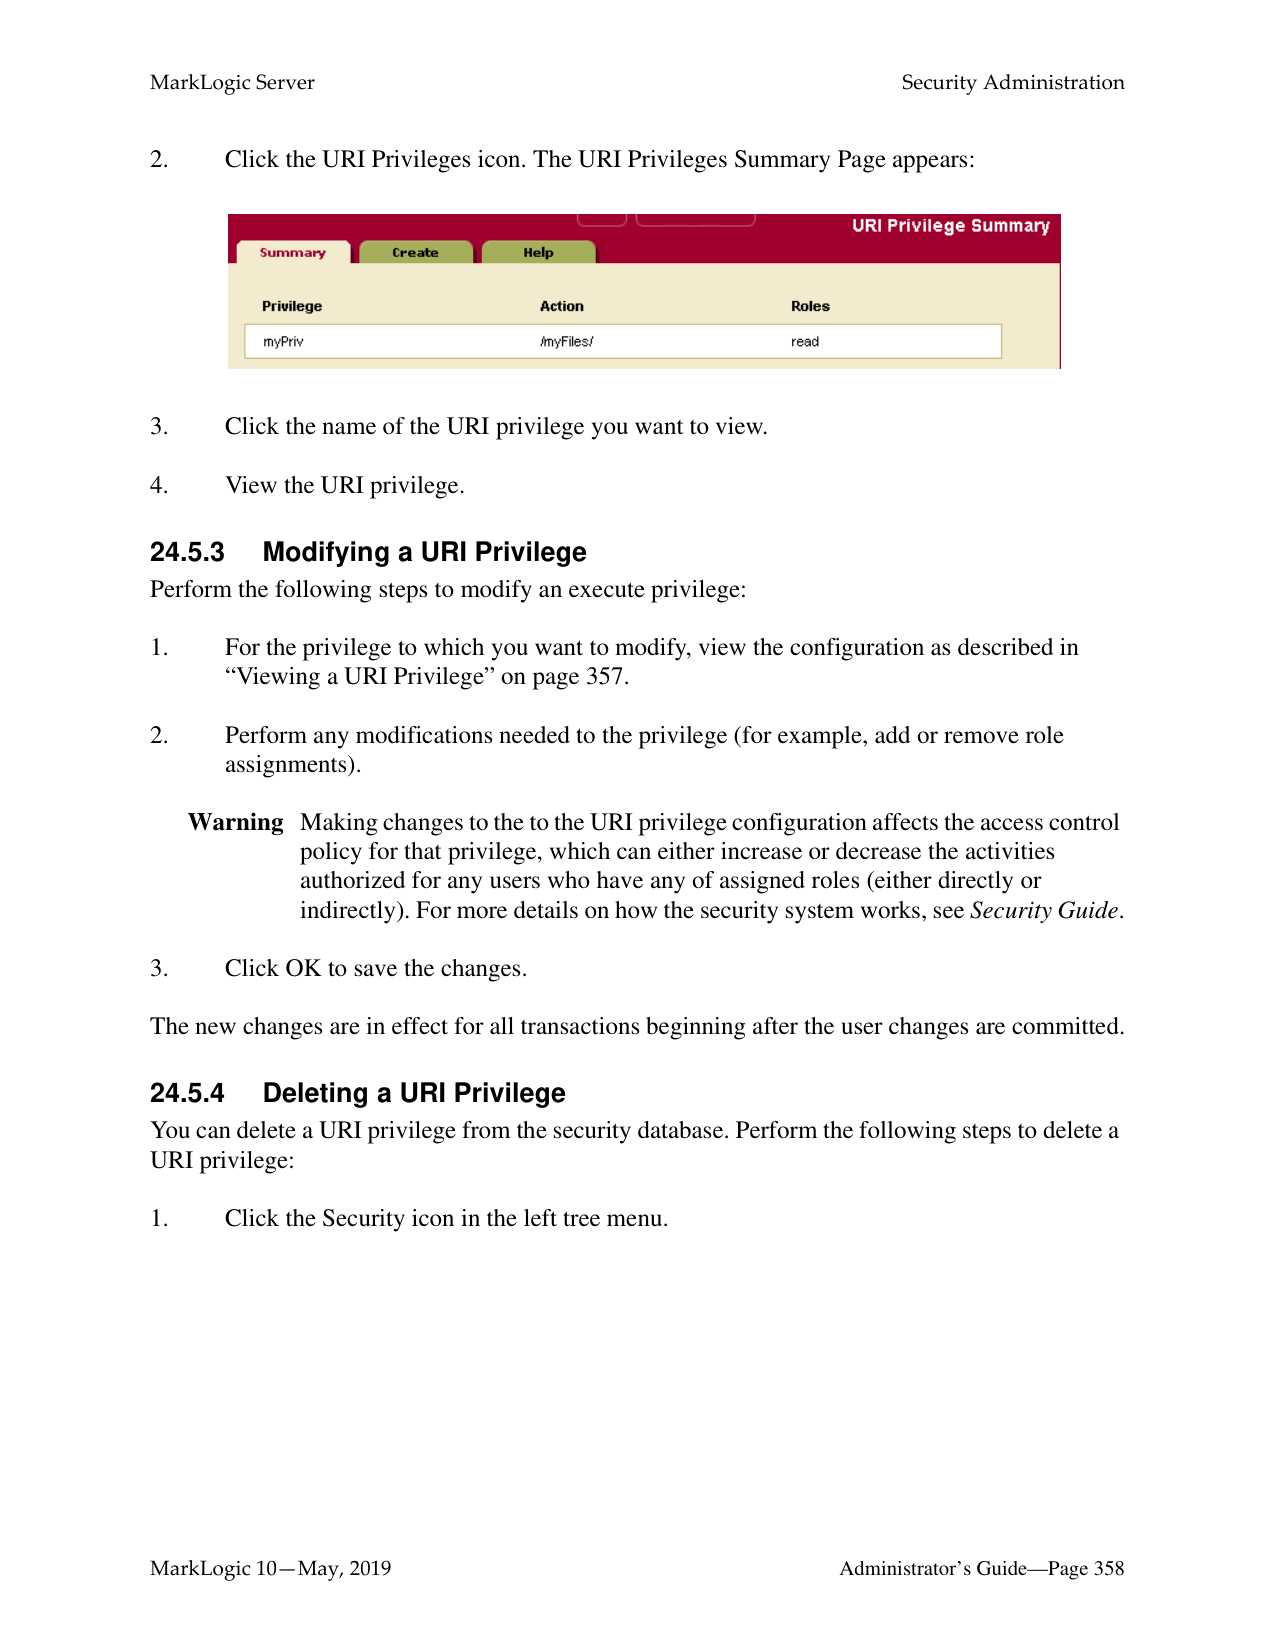
Your data in the selected forest is now backed up to the specified directory. Backing up your data is a “hot” admin task; the changes take effect immediately.
Warning When performing backups on the Windows platform, ensure that no users have the Forests or Data directories (or any subdirectories within them) open while the backup is being made.
######### 23.6.2 Scheduling a Forest Backup
You can schedule forest backups to periodically back up a forest. You can schedule backups to occur daily, weekly, monthly, or you can schedule a one-time backup. You can create as many scheduled backups as you want. To create a scheduled backup, perform the following steps using the Admin Interface:

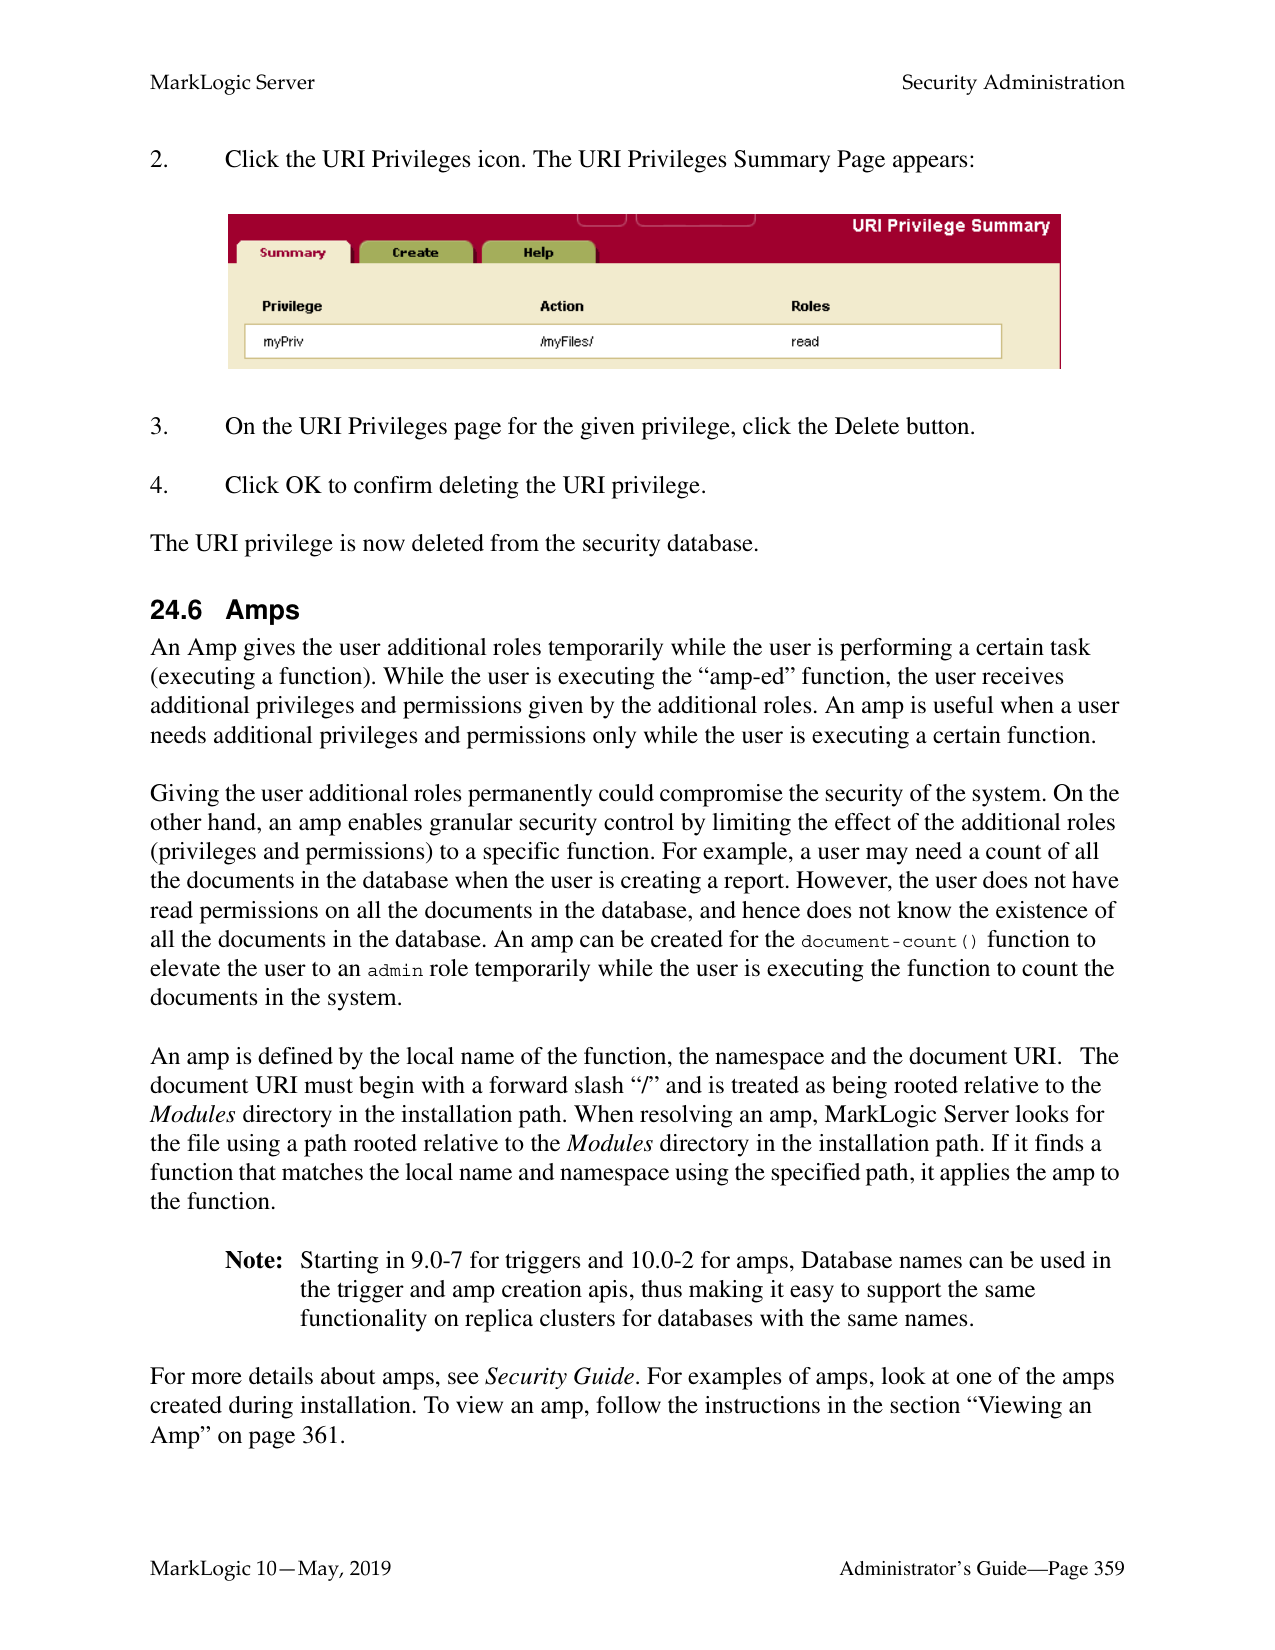
######### 23.7 Restoring a Forest
You can restore a forest from a backup made earlier either using the Admin Interface. Backups are restored at the forest granularity only.
To restore a forest from a backup made previously, complete the following procedure:
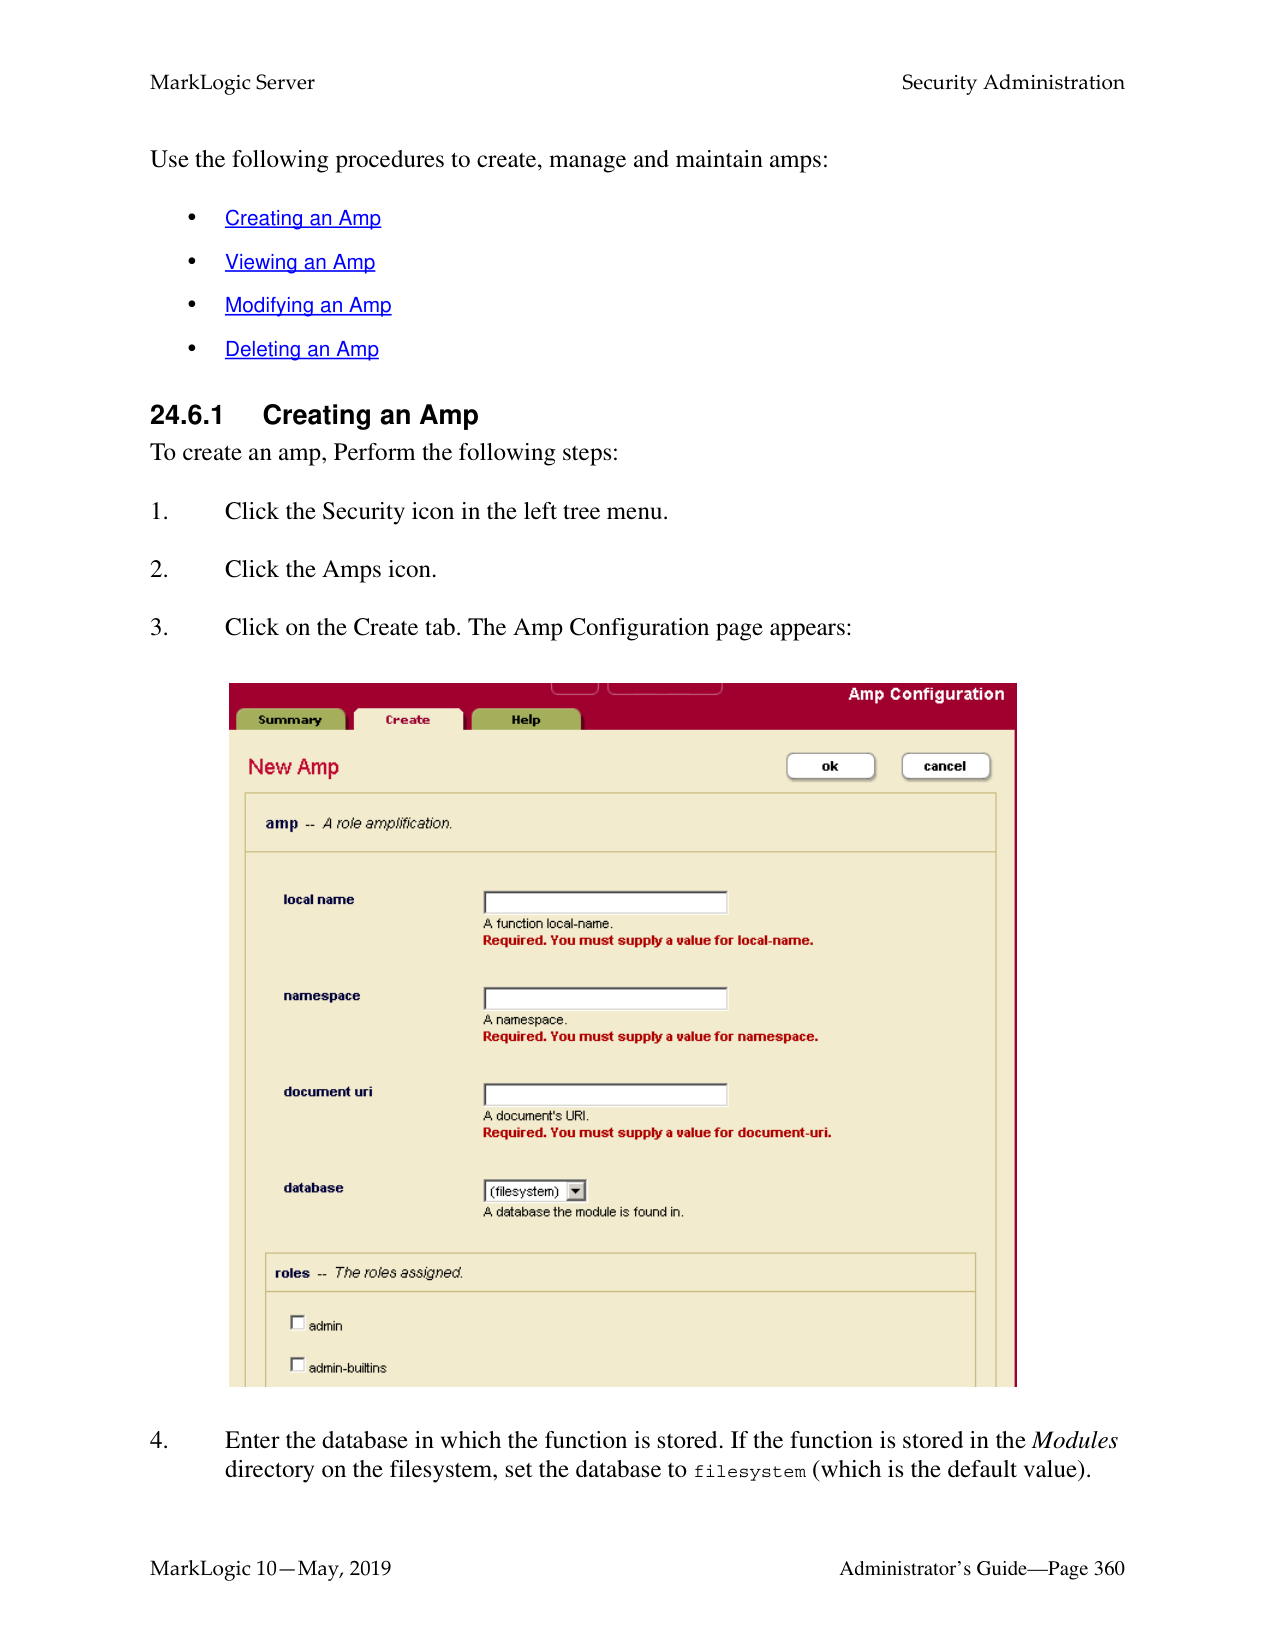
Warning When performing restores on the Windows platform, ensure that no users have the Forests or Data directories (or any subdirectories within them) open while the restore process is executing.
######### 23.8 Rolling Back a Forest to a Point In Time
You can use the xdmp:forest-rollback function to roll the state of one or more forests back to a specified system timestamp. To roll forest(s) back to an earlier timestamp, you must first set the merge timestamp to keep deleted fragments from that specified timestamp. For details on rolling back a forest, including the procedure to perform a rollback, see Rolling Back a Forest to a Particular Timestamp in the Application Developer’s Guide and the xdmp:forest-rollback API documentation in the MarkLogic XQuery and XSLT Function Reference.
######### 23.9 Merging a Forest
You can merge the forest data using the Admin Interface. As described in “Understanding and Controlling Database Merges” on page 181, merging a forest improves performance and is periodically done automatically in the background by MarkLogic Server. The Merge button allows you to explicitly merge the data for this forest.
To explicitly merge the forest, complete the following procedure:
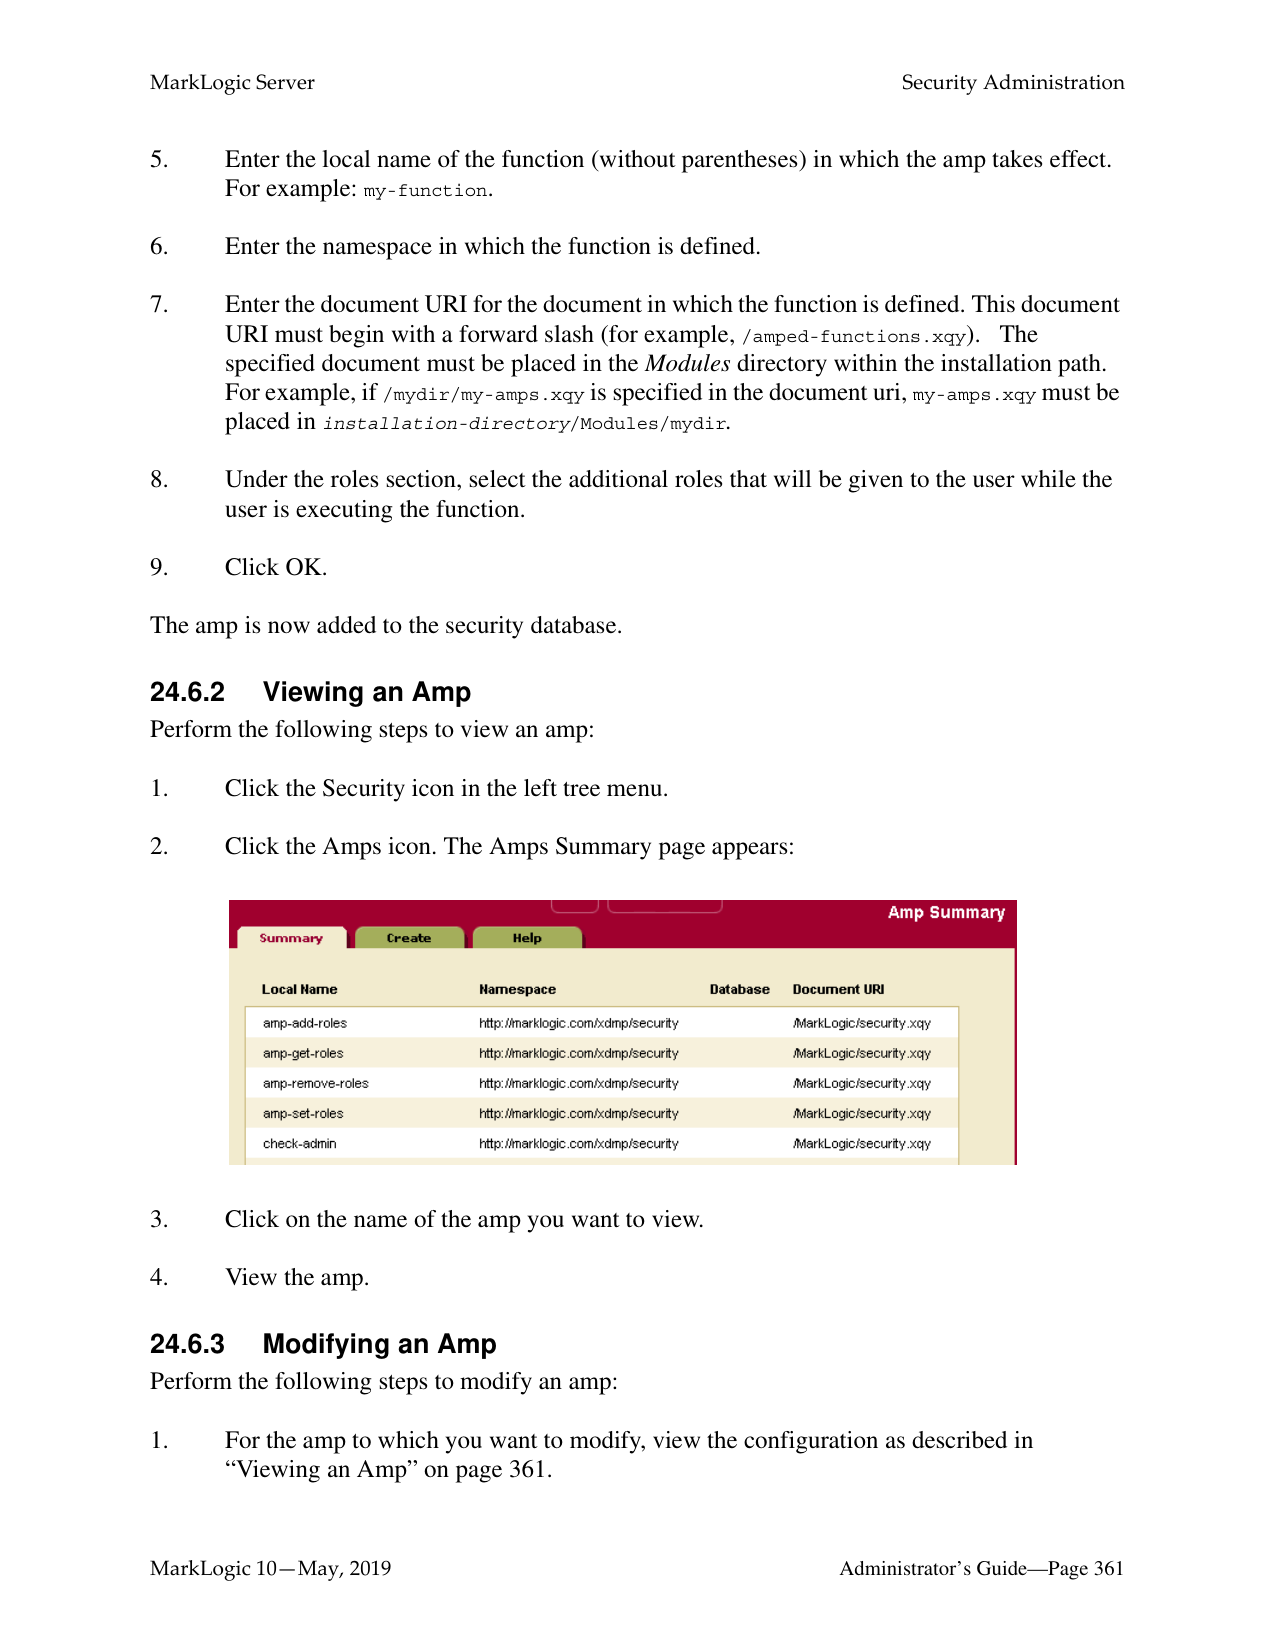
######### 23.10 Clearing a Forest
You can clear the document data from a forest using the Admin Interface. Clearing a forest removes all fragments from the forest, but does not remove its configuration information.
To clear all data from a forest, complete the following procedure:
######### 23.11 Disabling a Forest
You can disable a forest using the Admin Interface. Disabling a forest unmounts the forest from the database and clears all memory caches for all the forests in the database. The database remains unavailable for any query operations while any of its forests are disabled.
Disabling a forest does not delete the configuration or document data. The forest can later be re-enabled by clicking Enable.
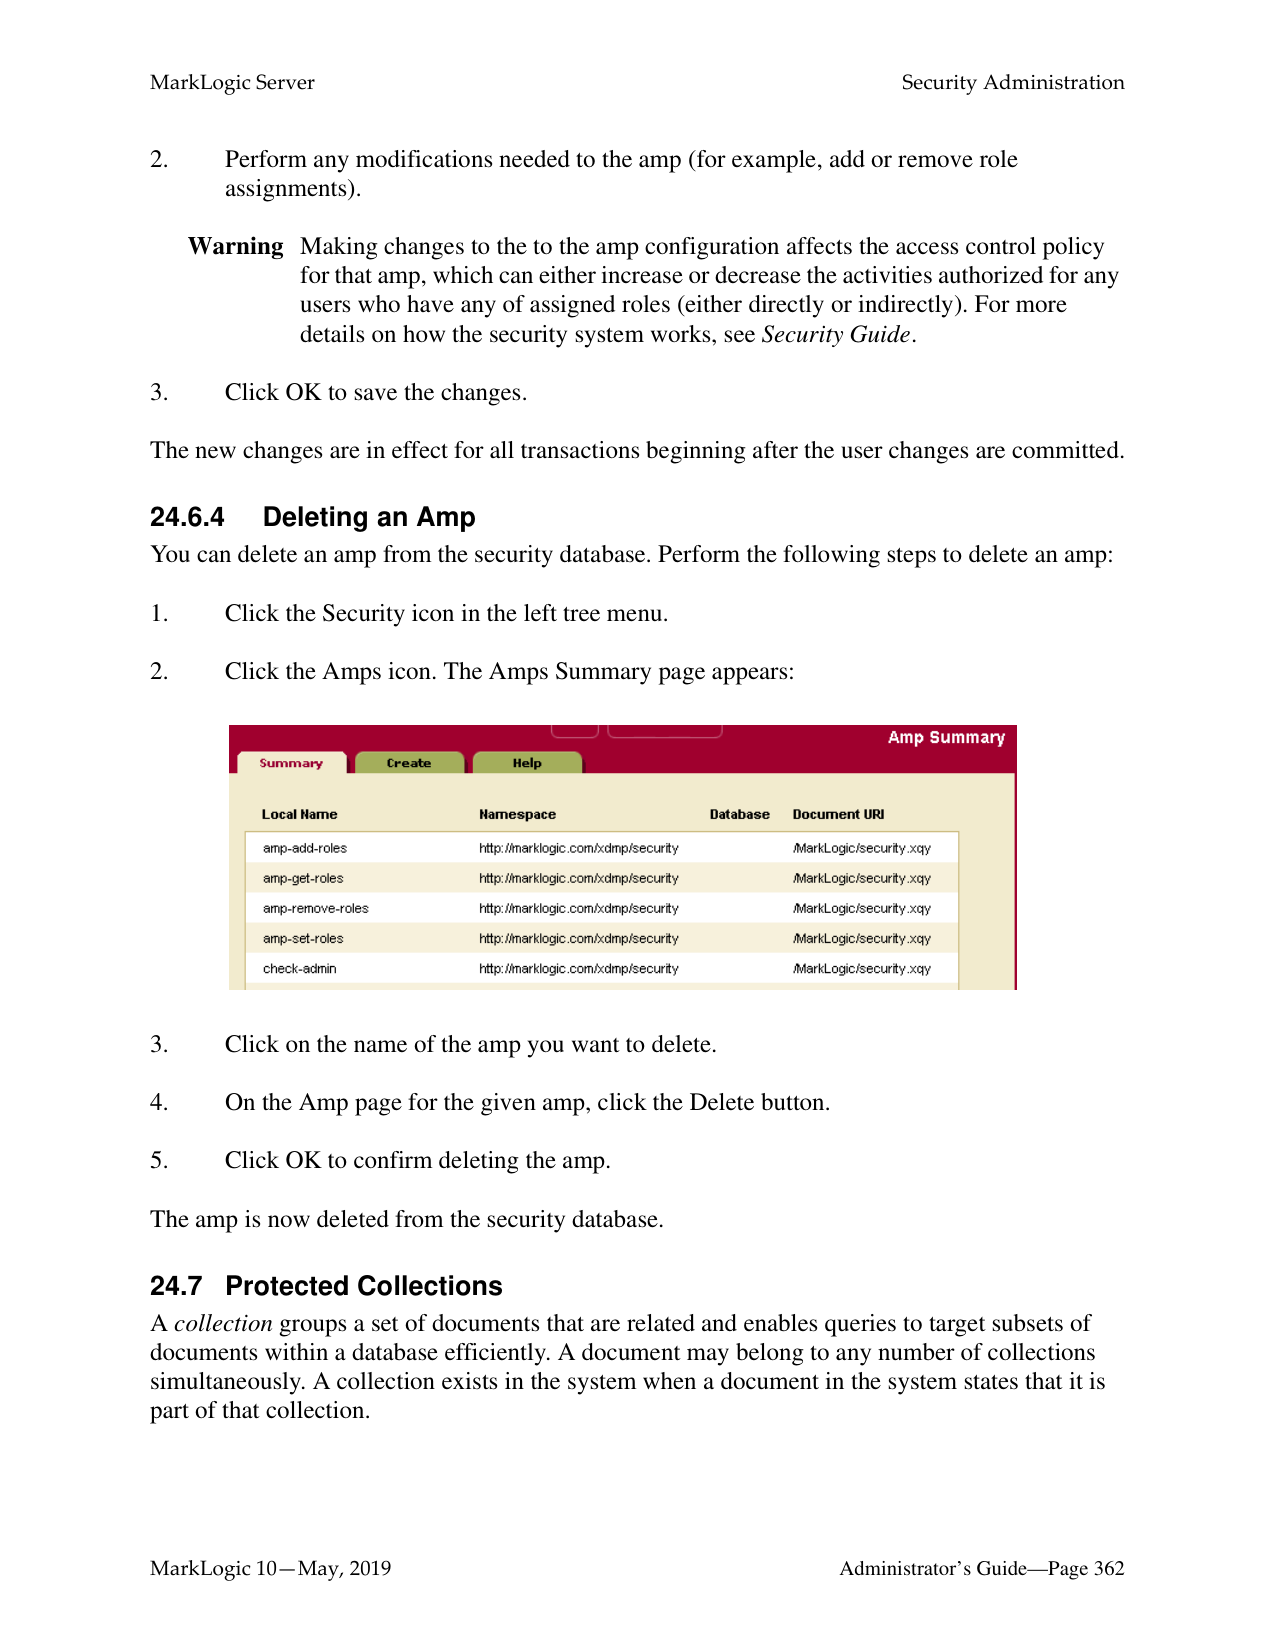
To disable a forest, complete the following procedure:
########## 23.12 Deleting a Forest from a HostYou can use the Admin Interface to delete a forest. There are two levels of forest deletion:
Note: The forest cannot be deleted if it is still attached to a database. Also, you can delete the configuration information on a Read-Only or Flash-Backup forest, but you cannot do a Full Delete on such forests.
To delete a forest, complete the following procedure:
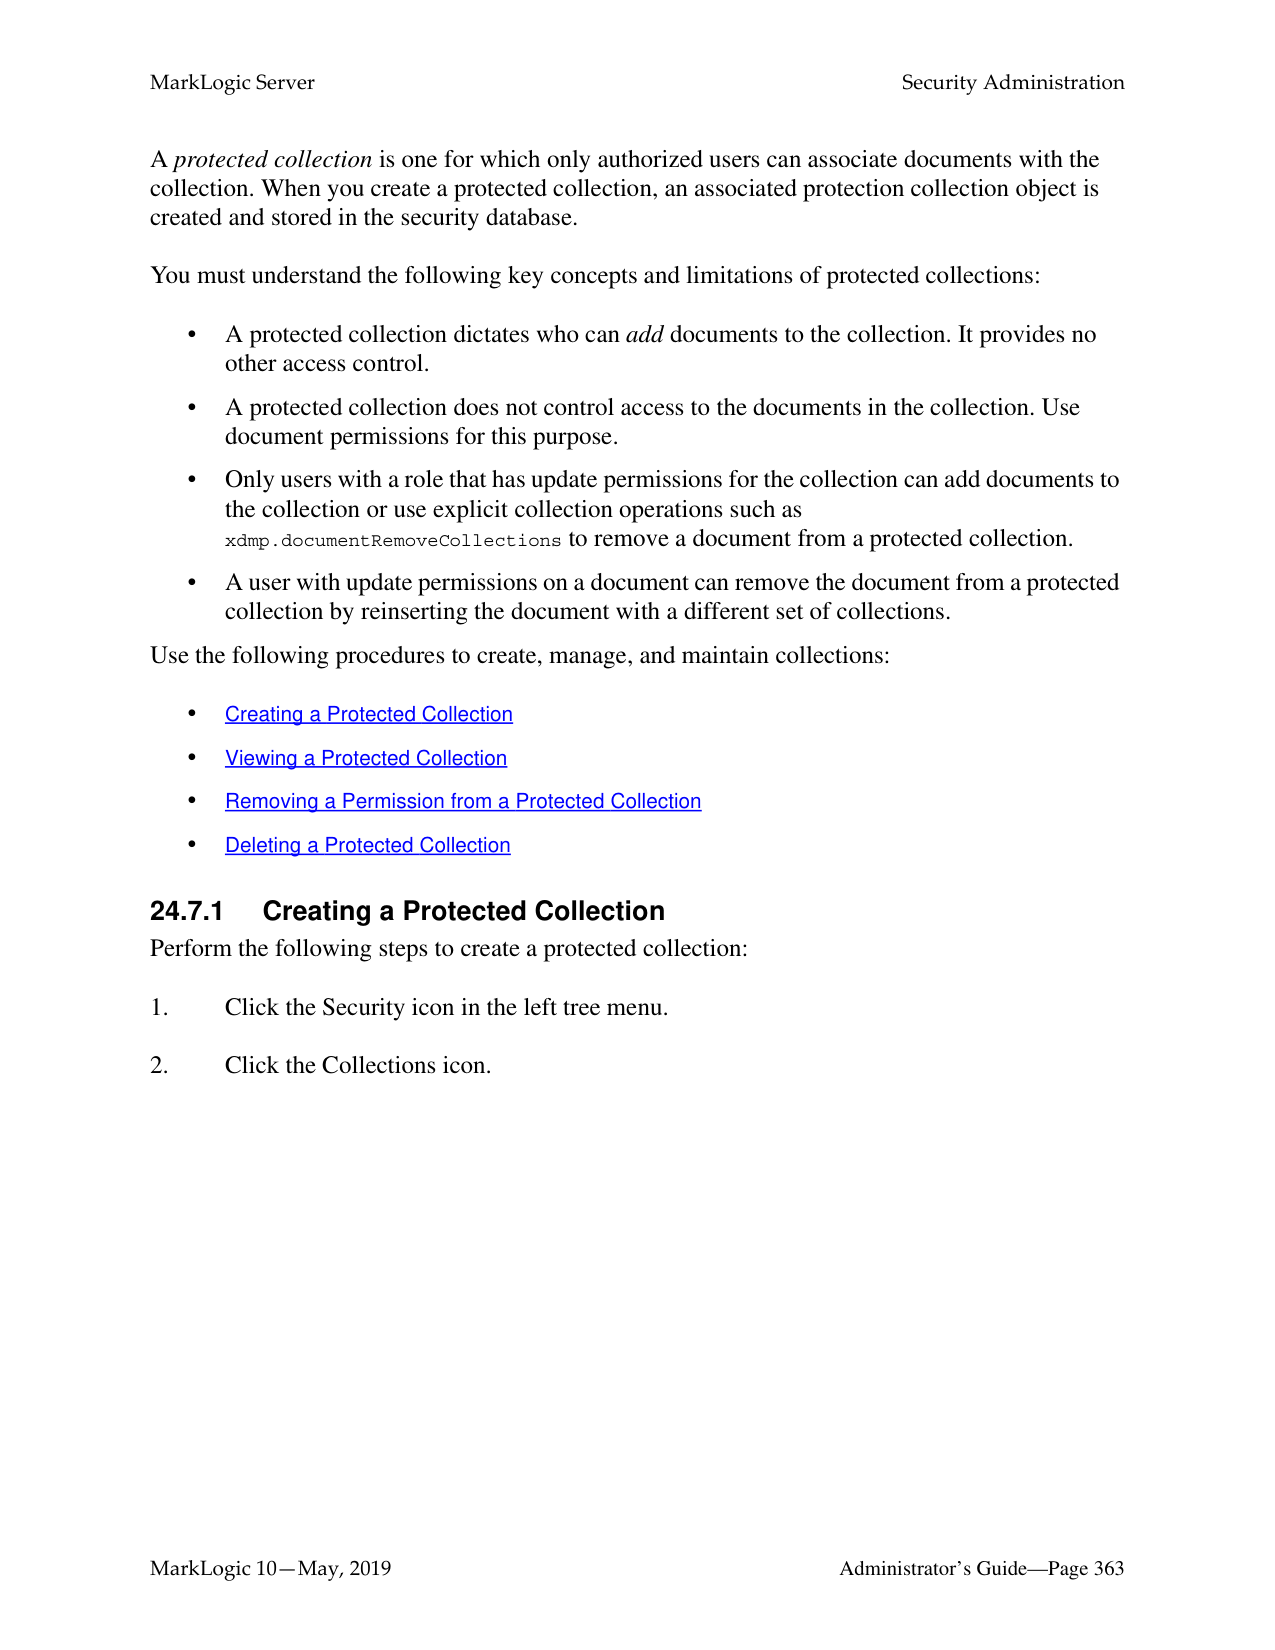
######### 23.13 Rolling Back a Prepared XA Transaction Branch
MarkLogic Server transactions may participate in global, distributed XA transactions. The XA Transaction Manager usually manages the life cycle of transactions participating in an XA transaction, independent of MarkLogic Server. However, it may be necessary to manually rollback the MarkLogic Server portion of a global transaction (called a branch) if the Transaction Manager is unreachable for a long time. For details, see Heuristically Completing a Stalled Transaction in the XCC Developer’s Guide.
Note: Heuristic completion bypasses the Transaction Manager and the Two Phase Commit process, so it can lead to data integrity problems. Use heuristic completion only as a last resort.
Before the MarkLogic Server branch of an XA transaction is prepared, the transaction may be rolled back from the host status page of the host evaluating the transaction. See “Rolling Back a Transaction” on page 318.
Once the MarkLogic Server branch of an XA transaction enters the prepared state, the transaction appears only on the forest status page of the coordinating forest. To find the coordinating forest, examine the Forest Status page for each forest belonging to the participating database. The transaction will only appear on the status page for the coordinating forest.
To heuristically rollback the MarkLogic Server portion of an XA transaction using the Admin Interface, follow these steps:
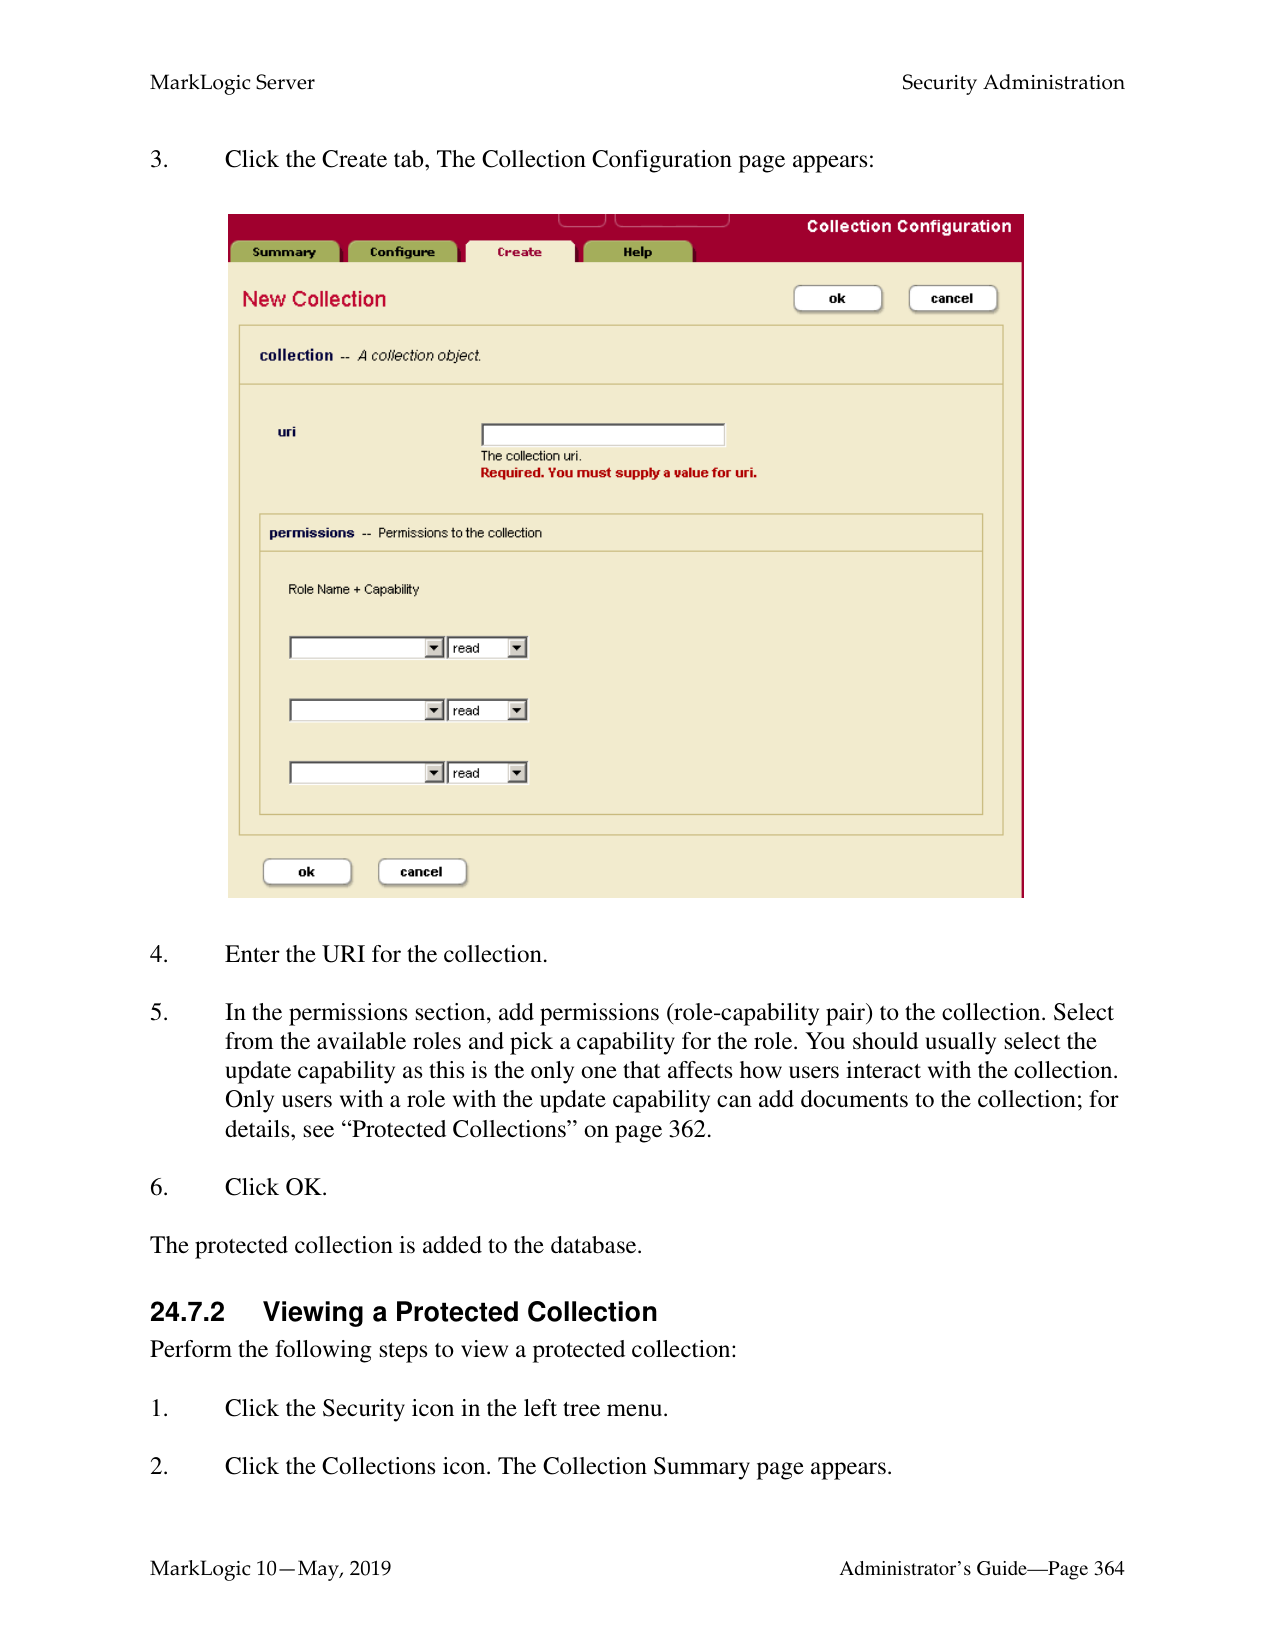

The rolled back transaction enters the “remember abort” state, indicating MarkLogic Server should remember that the local transaction was aborted until the Transaction Manager re-synchronizes the global transaction. Once re-synchronization occurs, the transaction no longer appears in the forest status. For details, see Heuristically Completing a MarkLogic Server Transaction in the XCC Developer’s Guide.
You may use the Forest Status page to force MarkLogic Server to forget the rollback without waiting for the Transaction Manager. This is not recommended as it leads to errors and, potentially, a loss of data integrity when the Transaction Manager attempts to re-synchronize the global transaction. If forgetting the rollback is necessary, use the [forget] link in the transaction list on the Forest Status:

##### 24.0 Security Administration
MarkLogic Server uses a role-based security model. A user’s privileges and permissions are based on the roles assigned to the user. For background information on understanding the security model in MarkLogic Server, see Security Guide. This section describes administration tasks related to security, and includes the following sections:
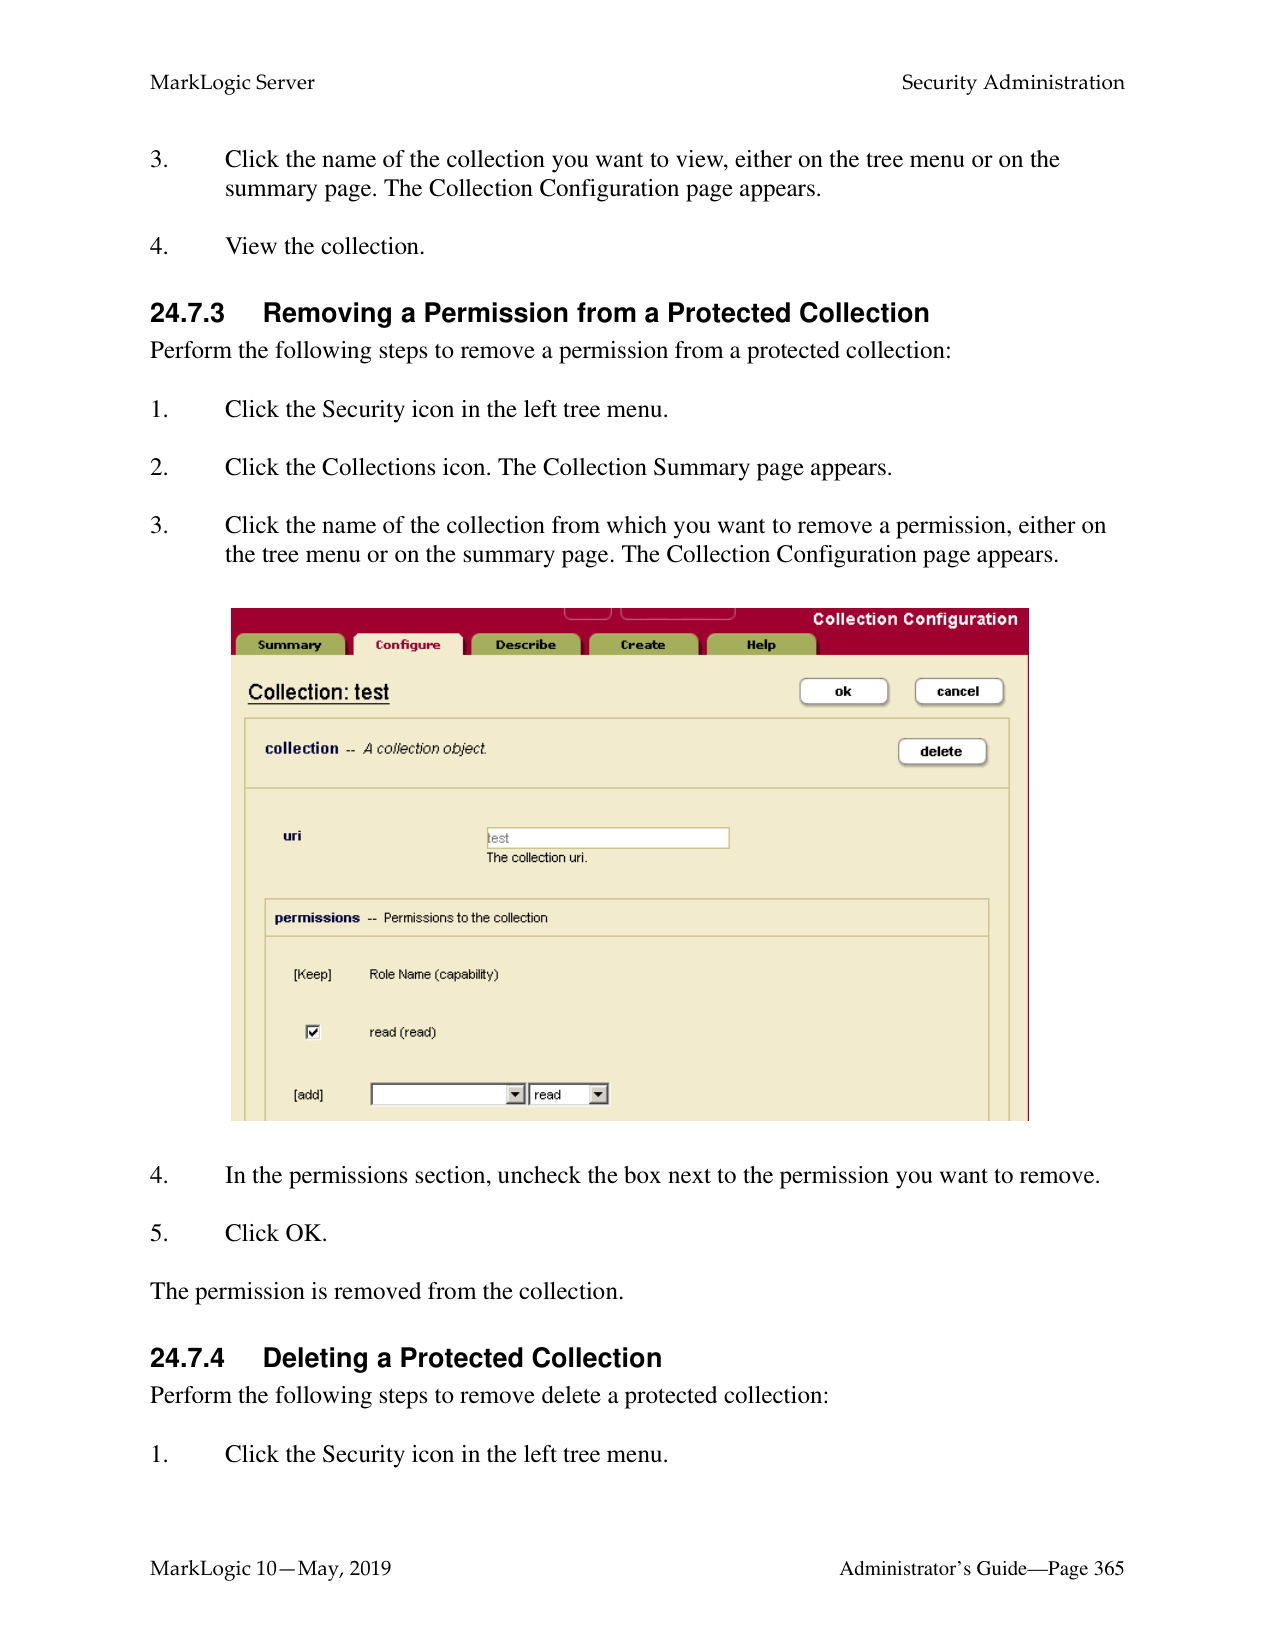
This chapter describes how to use the Admin Interface to manage security objects. For details on how to manage security objects programmatically, see Creating and Configuring Roles and Users and User Maintenance Operations in the Scripting Administrative Tasks Guide.
A user within the model has a set of roles. A user has privileges and permissions within the system based on the roles he is given.
A role gives privileges and permissions to a user. A role may inherit from multiple roles. Role inheritance is an “is-a” relationship. Hence, an inherited role also has the privileges and permissions of its parent(s).
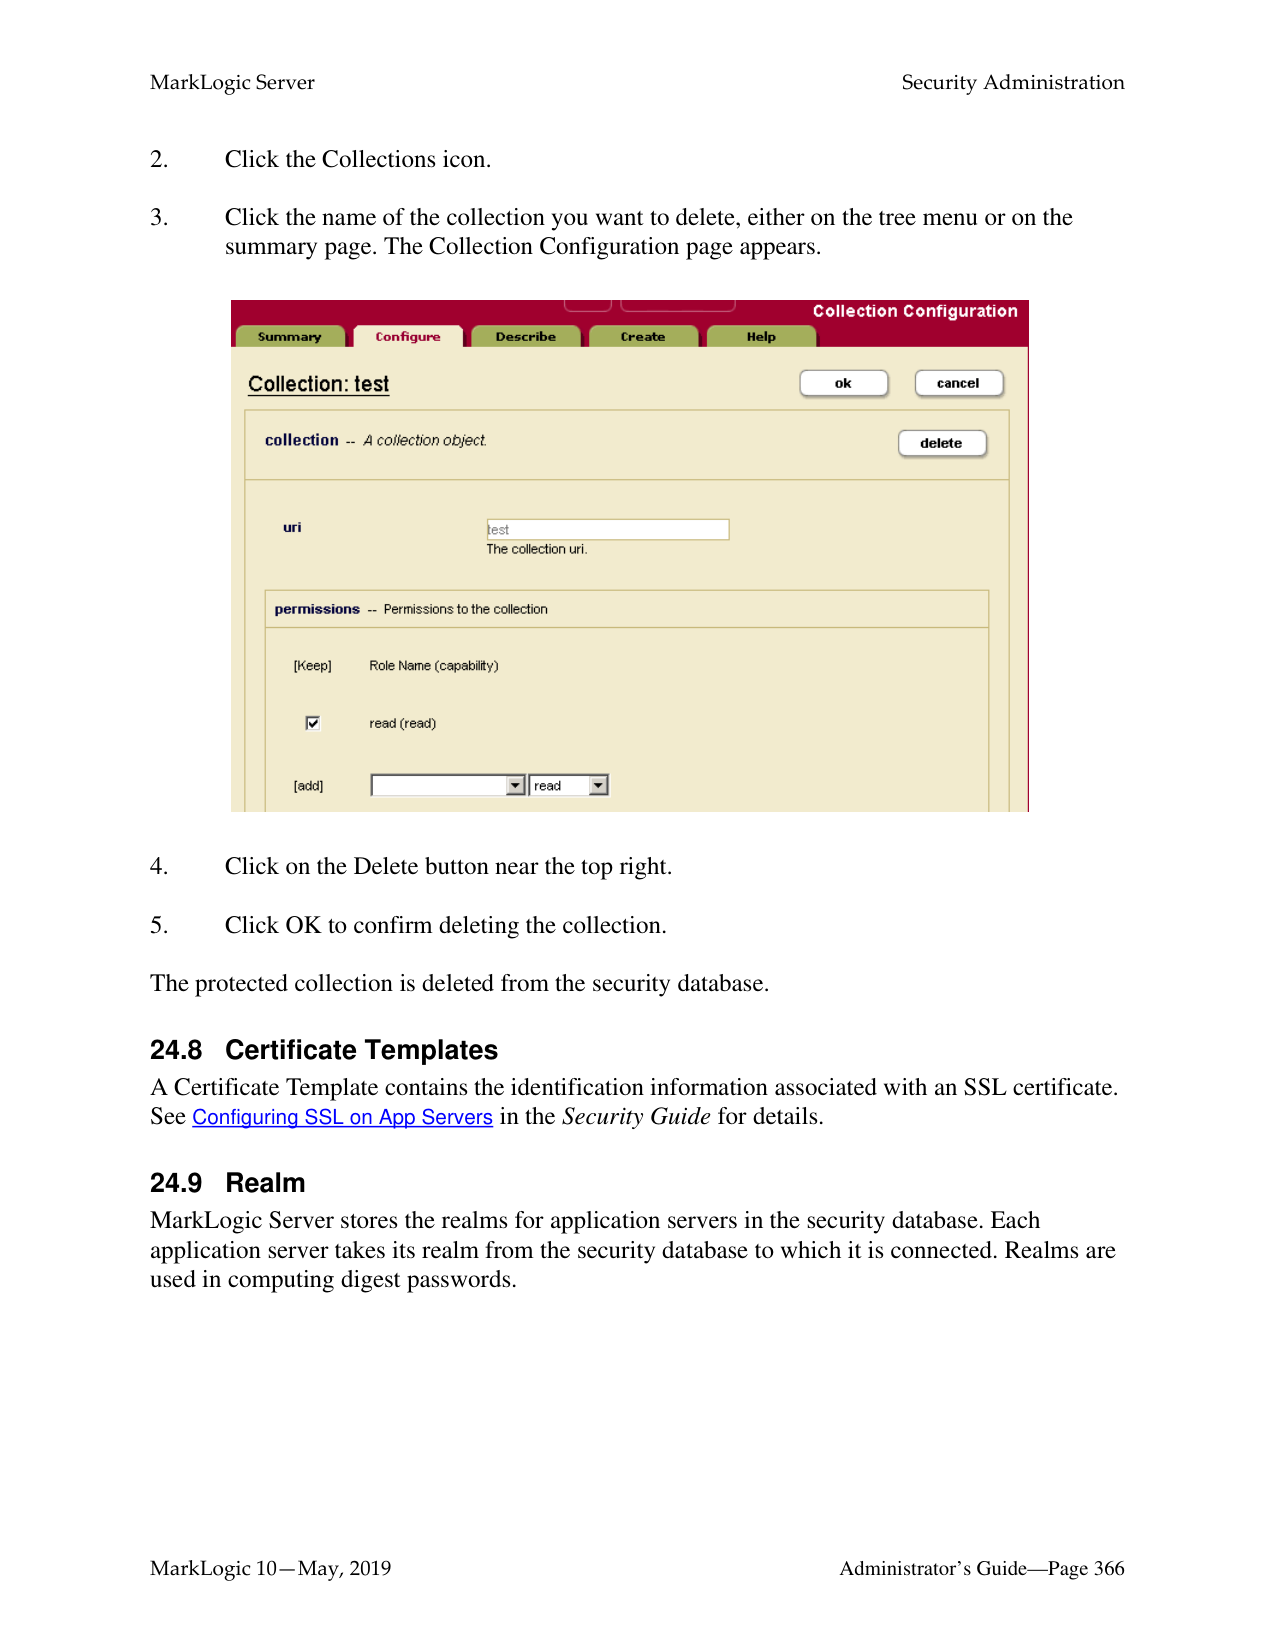
An execute privilege grants authorization to perform a protected action. Only roles (and their inherited roles) specified in the execute privilege can perform the action.
A URI privilege grants authorization to create a document within a protected base URI. Only roles (and their inherited roles) specified in the URI privilege can create the document within the protected base URI.
A permission protects a document or a collection. Each permission associates a single role with a capability (Read, Update, Insert). A protected document or collection has a set of associated permissions.
A collection groups a set of documents that are related. A document may belong to any number of collections. A collection exists in the system when a document in the system states that it is part of that collection. However, an associated collection object is not created and stored in the Security database unless it is protected.
Permissions created at the collection level apply to the collection but not to documents within the collection. A user needs to have permissions at the both the collection and document level to be able to add documents to a protected collection.
An amp gives the User additional roles temporarily while the user is performing a certain task (executing a function).
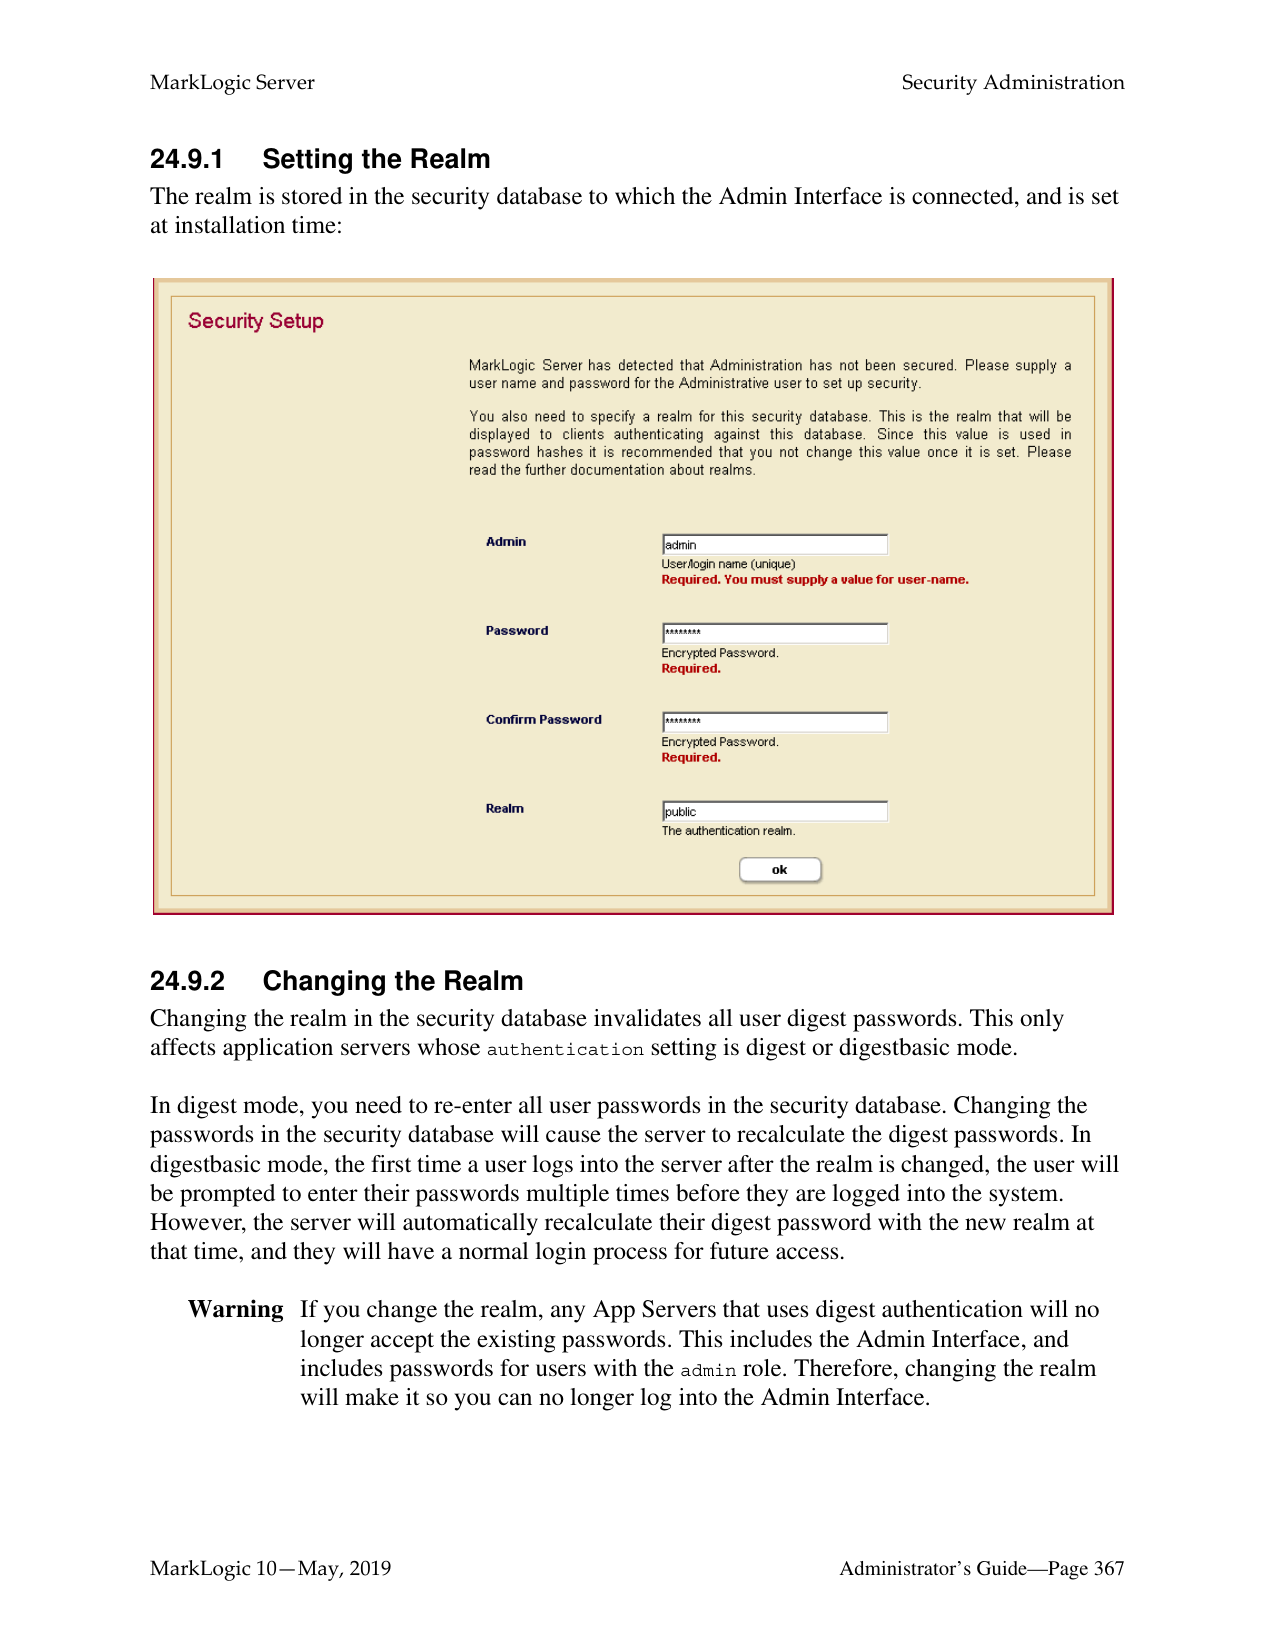
A certificate authority (CA) is a trusted third party that certifies the identity of entities, such as users, databases, administrators, clients, and servers. A CA is used by the SSL (Secure Sockets Layer) security standard to provide encrypted protection between browsers and App Servers. When an entity requests certification, the CA verifies its identity and grants a certificate, which is signed with the CA's private key. If the CA is trusted, then any certificate it issues is trusted unless it has been revoked. For details on SSL support in the MarkLogic Server, see Configuring SSL on App Servers in the Security Guide.
A certificate template is a MarkLogic construct that is used to generate certificate requests for the various hosts in a cluster. A certificate template is used by the SSL (Secure Sockets Layer) security standard to provide encrypted protection between browsers and App Servers. The template defines the name of the certificate, a description, and identity information about the owner of the certificate. For details on SSL support in the MarkLogic Server, see Configuring SSL on App Servers in the Security Guide.
An External Authentication Configuration Object is used to configure MarkLogic Server for external authentication by LDAP or Kerberos. An external authentication configuration object specifies which authentication protocol and authorization scheme to use, along with any other parameters necessary for LDAP authentication. For details on
external authentication with MarkLogic Server, see the External Security chapter in the Security Guide.
The following diagram illustrates the relationships between the different entities in the MarkLogic Server security model.
Amp function name namespace document URI roles
Execute Privilege name action role
| |User|
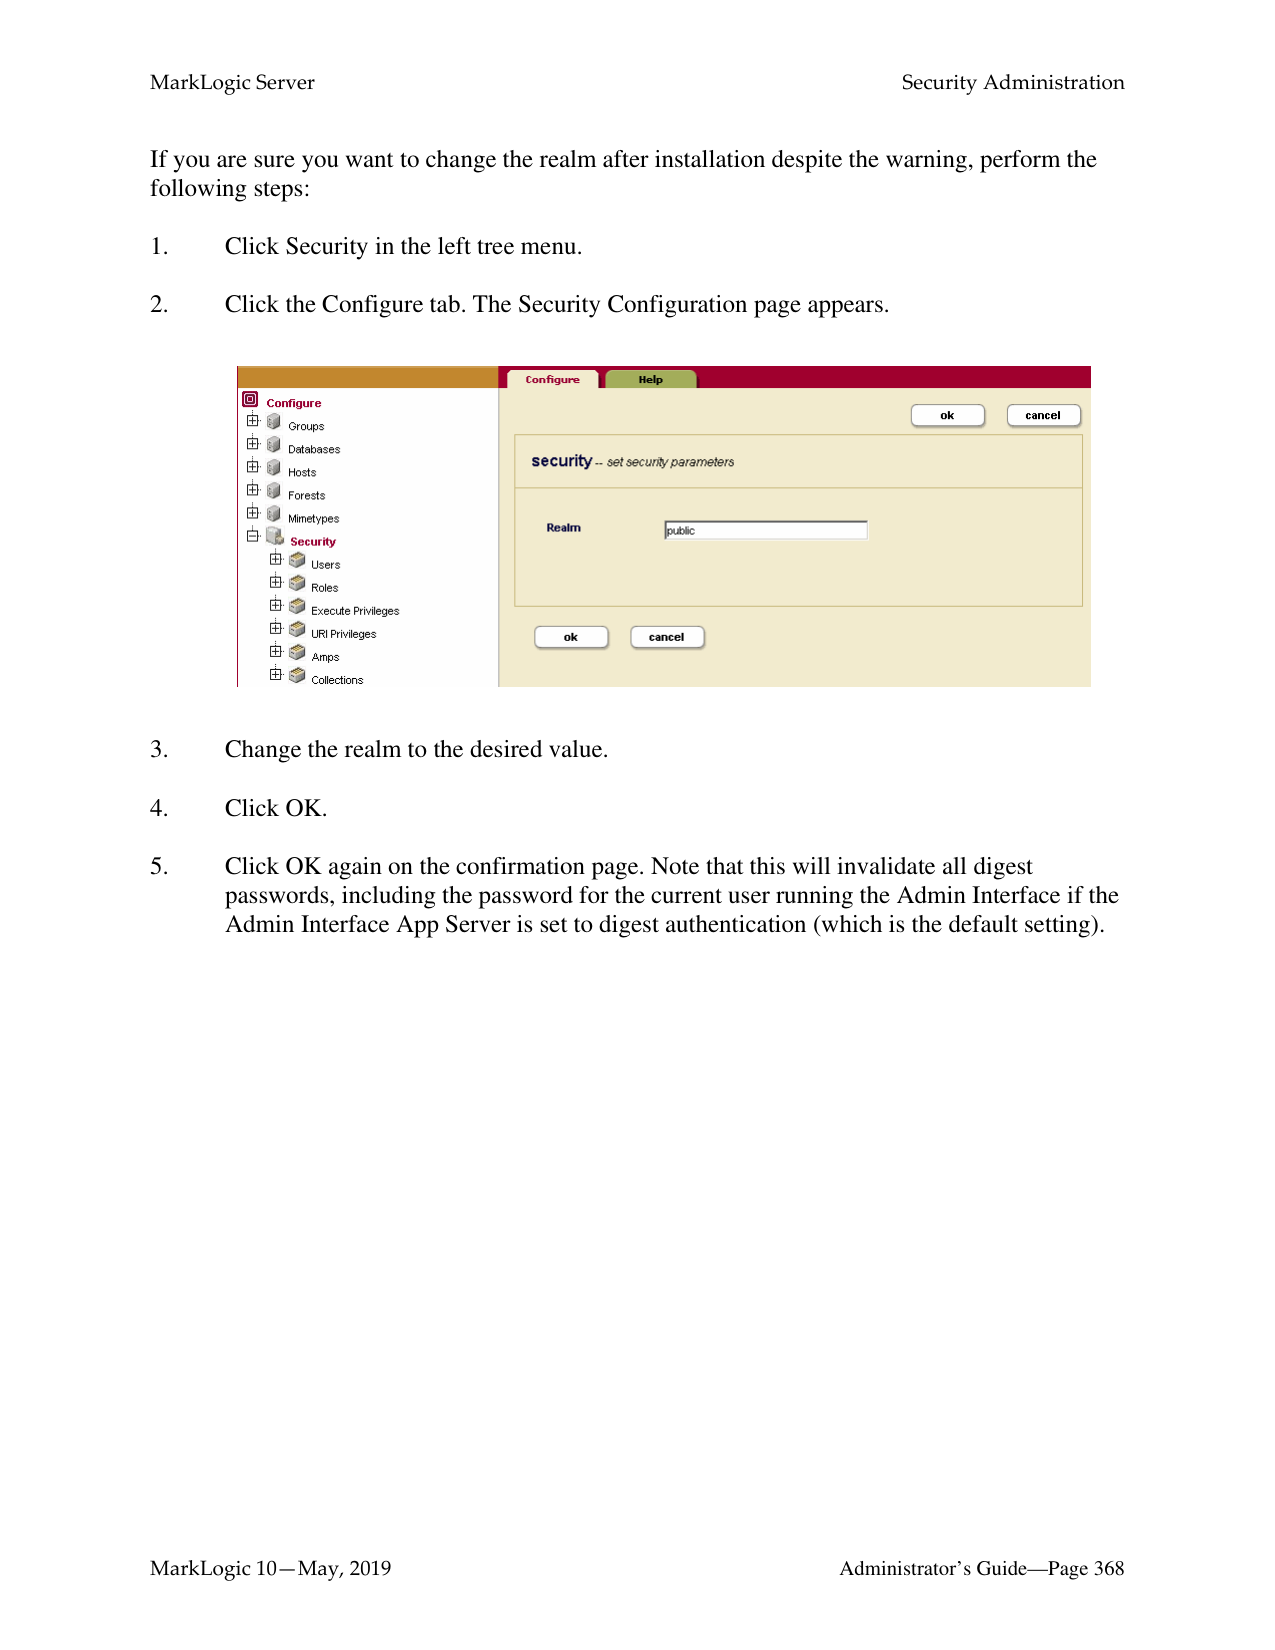
|---|---| | |name| | |password| | |roles| | |roles| | |default permissions| | |default collections|
Role name action roles default permissions
URI Privilege name action roles
default collections
|Document| | |---|---| |URI| | |permission| | |permission| |
|Collection|
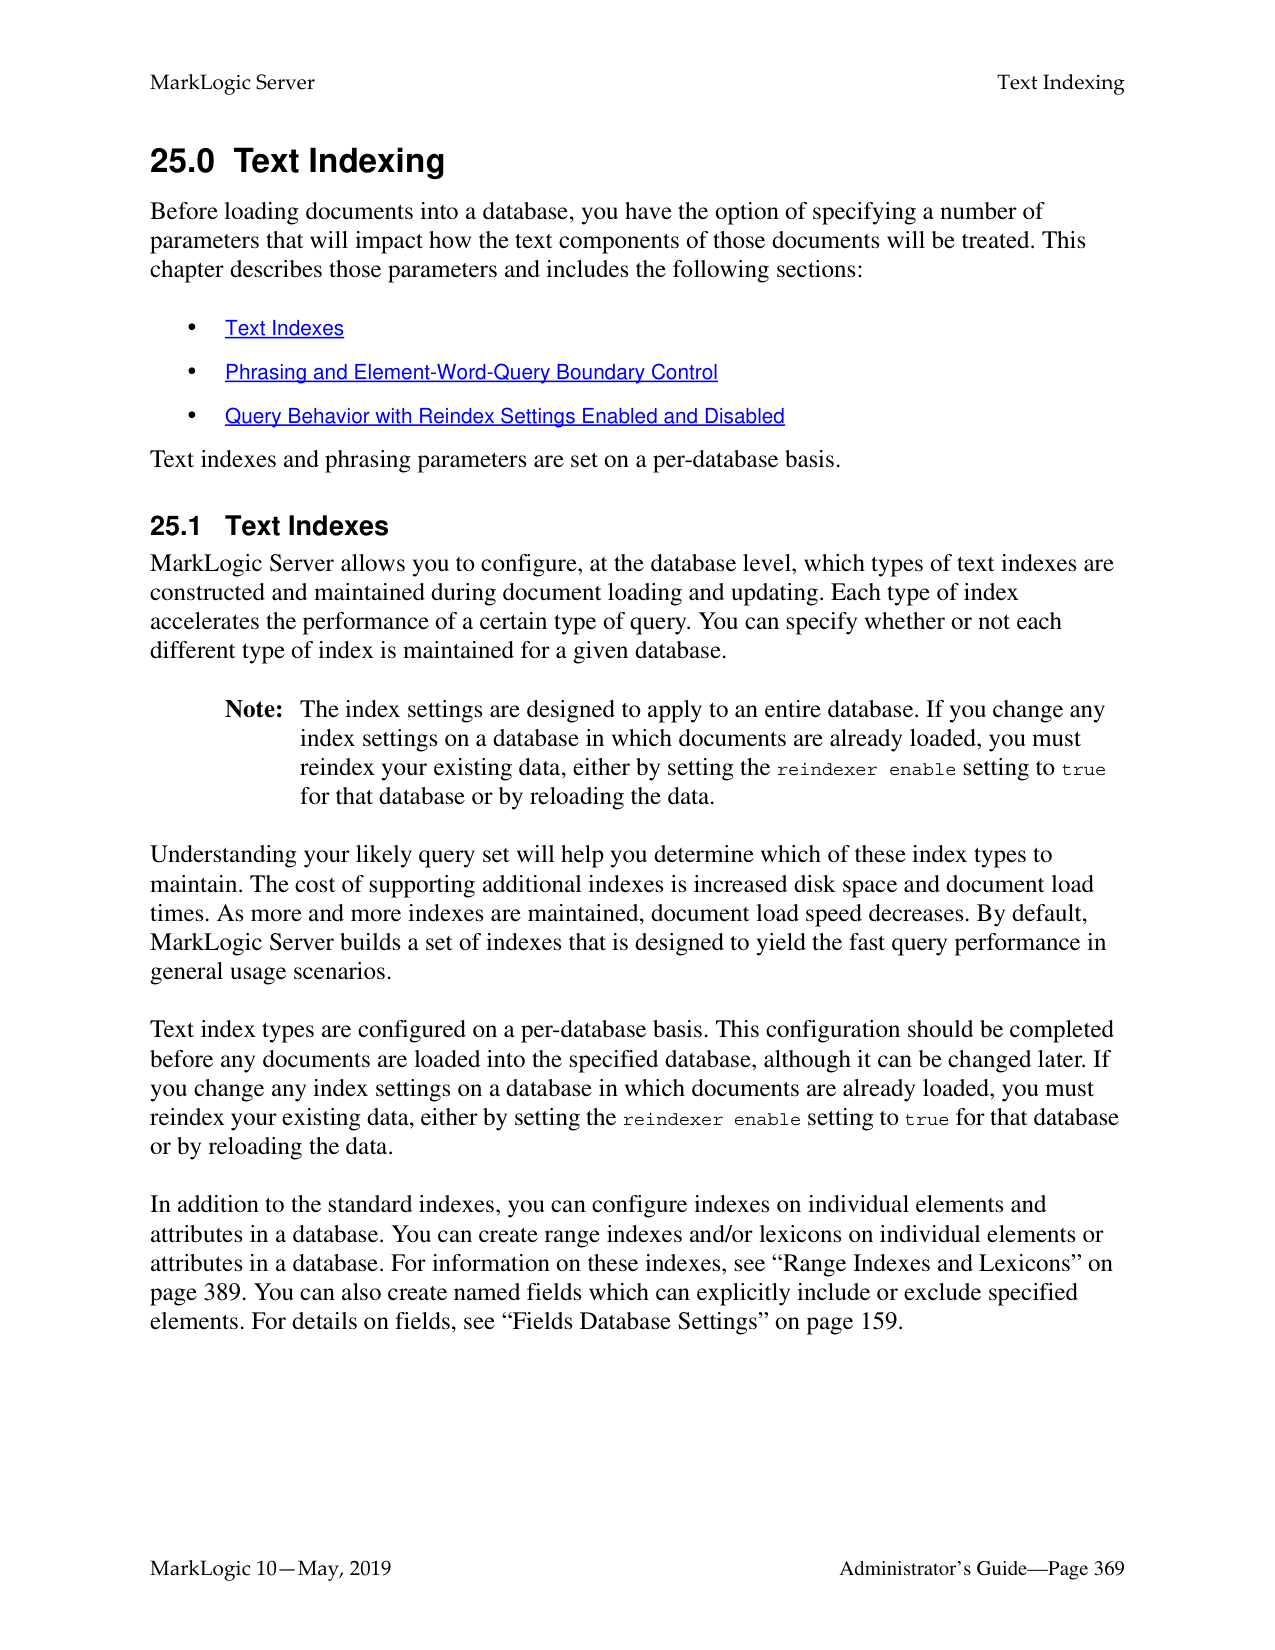
|---| |URI| |permission|
Permission role capability
########### Legend
|one-to-many one-to-one
| |---|
The remaining sections of this chapter detail the procedures to administer MarkLogic Server security entities. All security administrative tasks are “hot”— the changes take effect immediately without a server restart.
Permissions are not administered through the administrative interface and are not described in detail in this document. For more information on using permissions in MarkLogic Server, see the MarkLogic XQuery and XSLT Function Reference.
######### 24.2 Users
A User has a set of roles. A user has privileges and permissions within the system based on the roles he is given. A user can perform tasks (execute functions) based on his privileges and access data based on his permissions.
Each user has an associated user name and password. A user also has default collections. When a user creates a document but does not explicitly associate the document with a set of collections, the document is automatically added to the user’s default collections. Default permissions can be created for a user. When a user creates a document but does not explicitly set the permissions for the document, the document will be given the user’s default permissions.
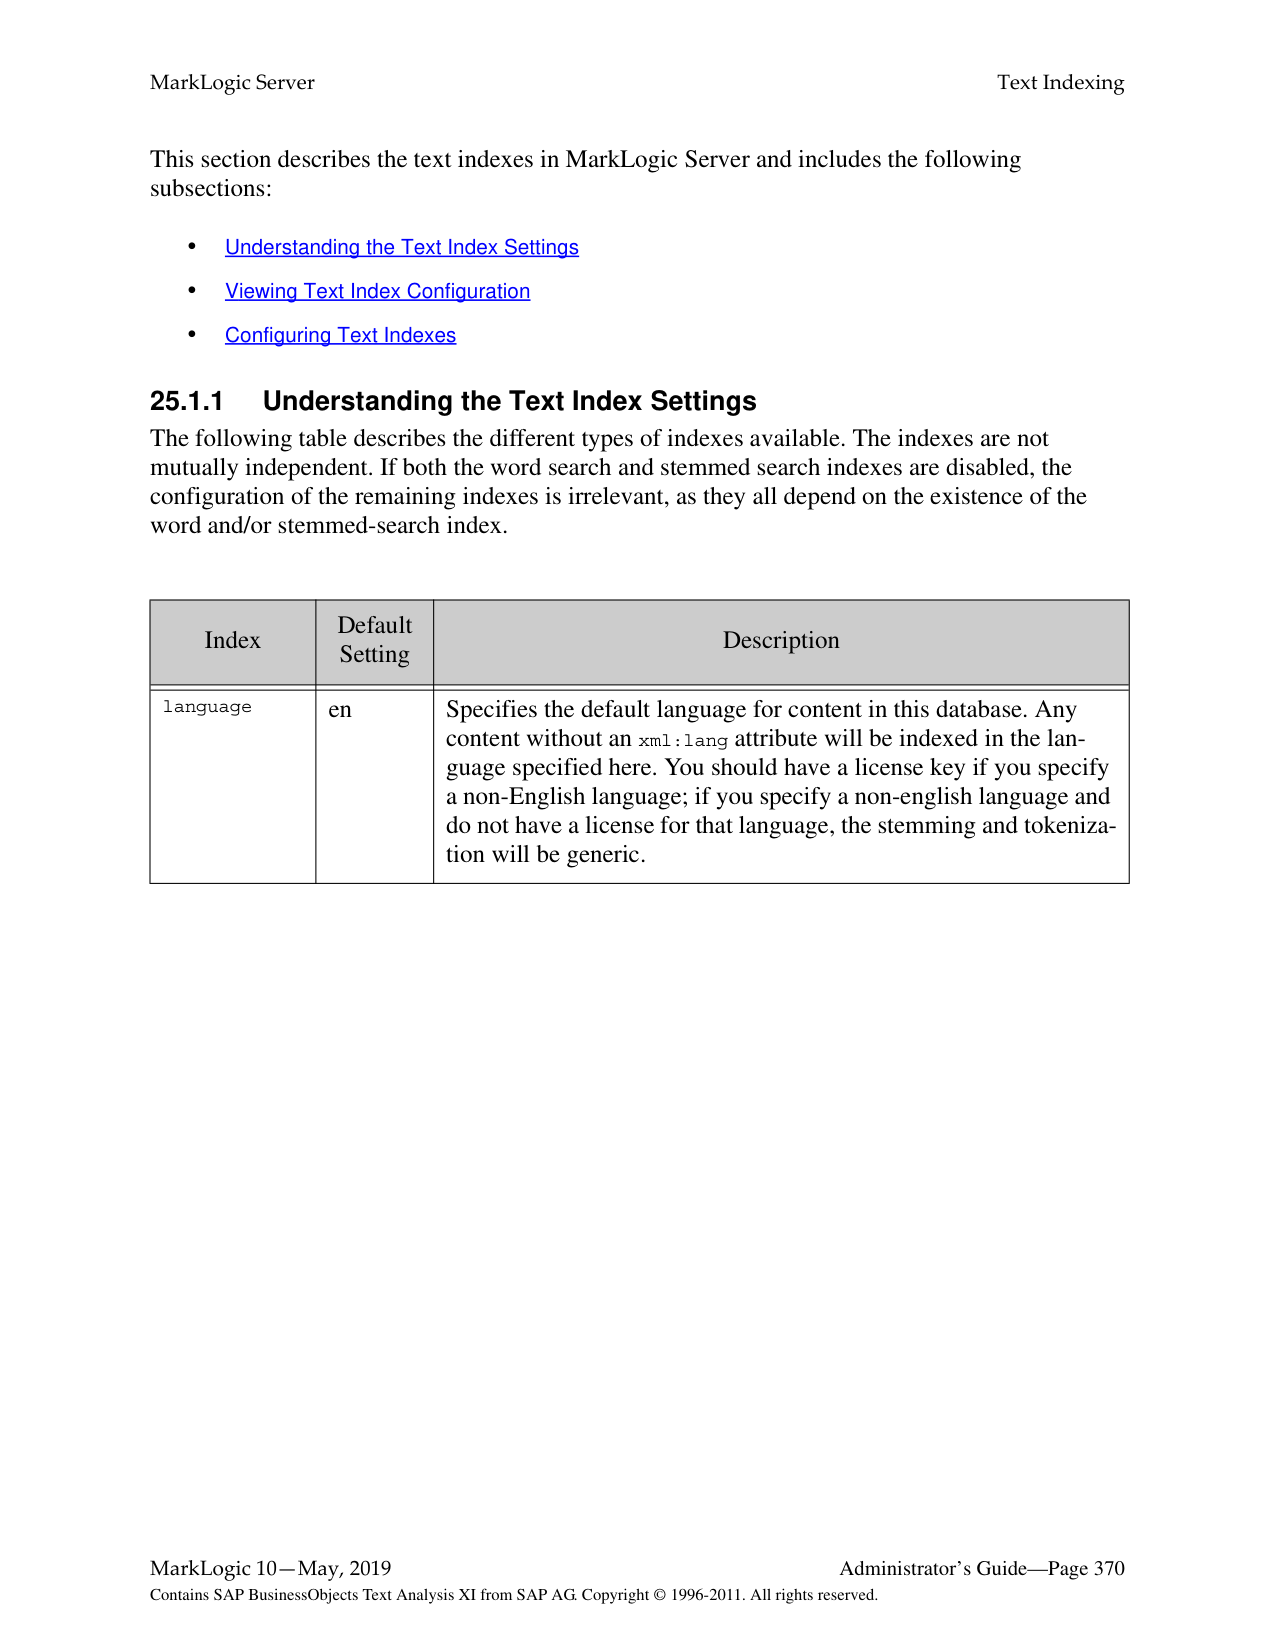
If security is turned on for an HTTP, ODBC, or XDBC server, all users in the security database will have access to the server. Finer granularity security control to functions in XQuery programs running on the HTTP, ODBC, or XDBC servers are accomplished through the use of xdmp:security-assert() within the code. Granular secured access to documents is achieved through the use of permissions associated with each protected document. Use the following procedures to create, manage and maintain users:


The user is now added to the system and the user configuration page appears. If you want to add more default permissions or collections to the user, scroll down to the section for default permissions or collections.
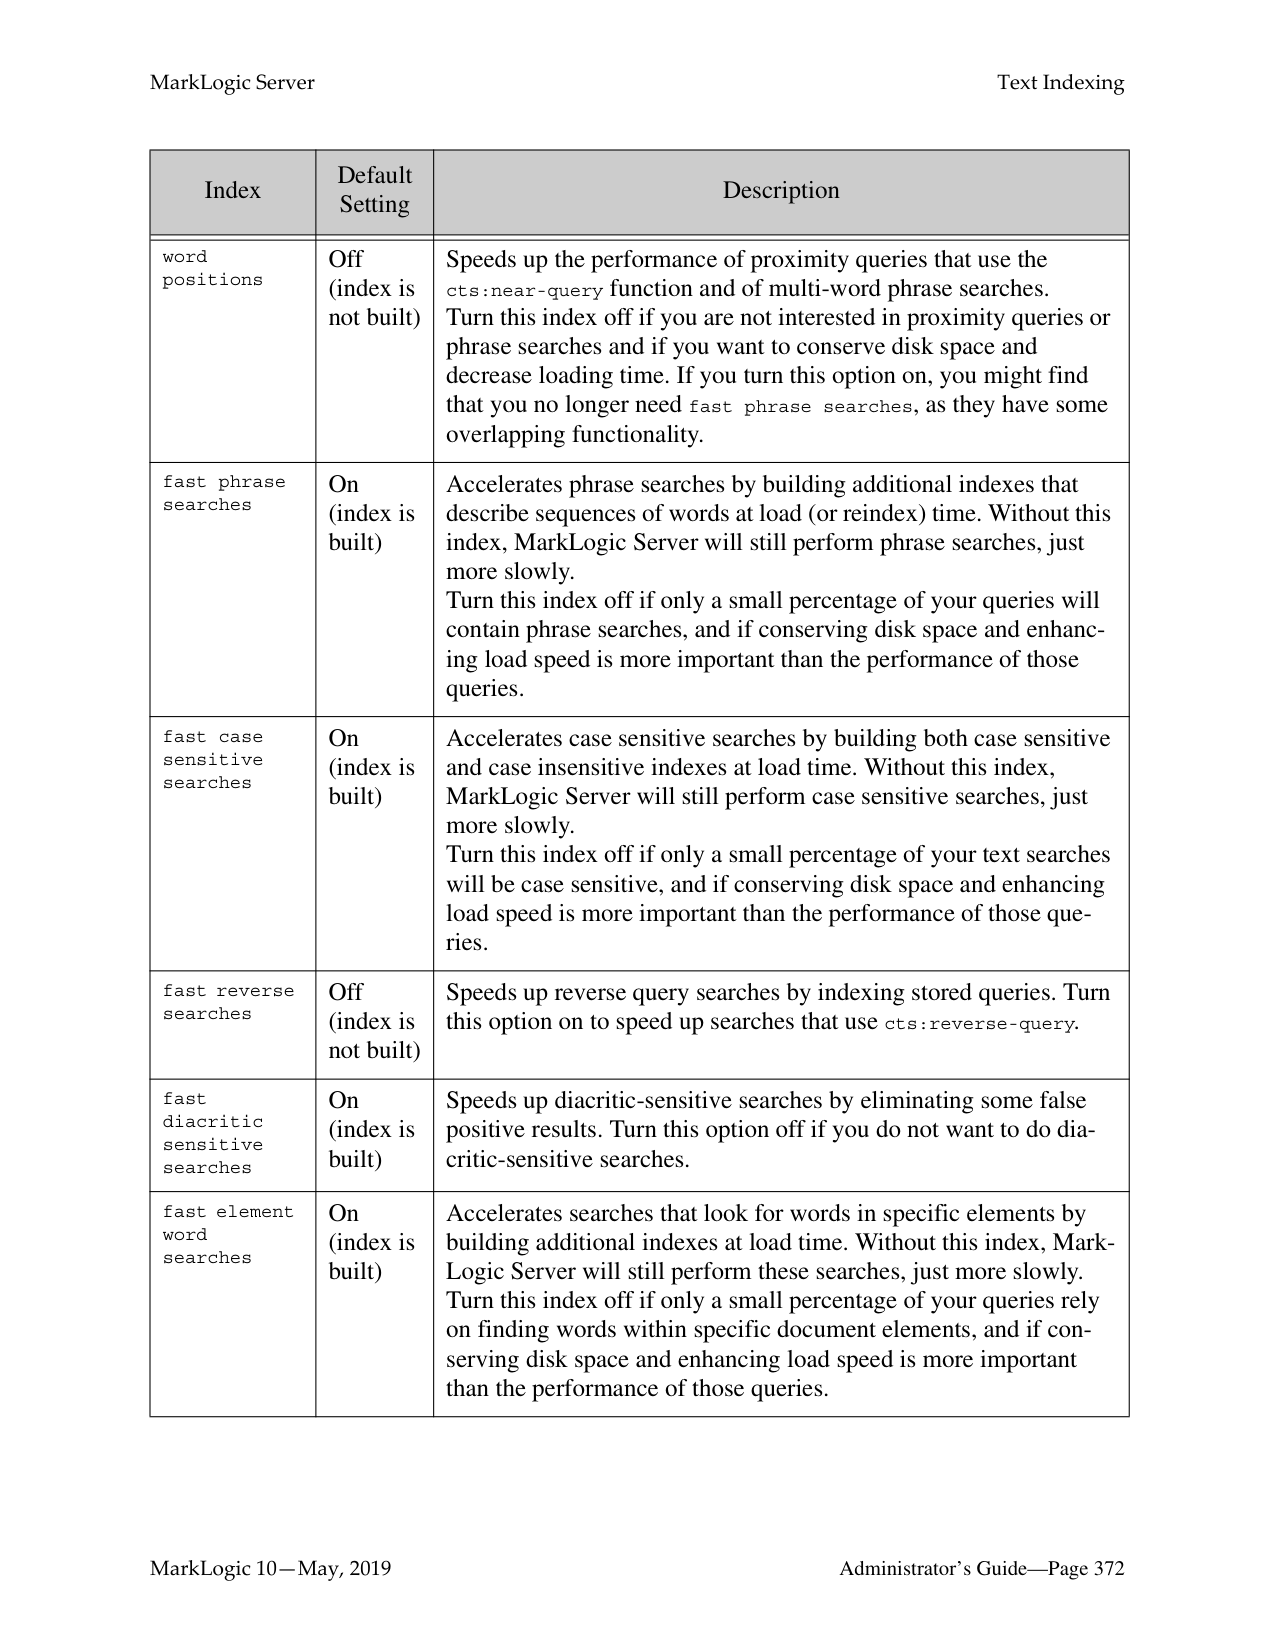

Warning Making changes to the to the user configuration affects the access control policy for that user, which can either increase or decrease the activities authorized for the user. For more details on how the security system works, see Security Guide.

######### 24.3 Roles
MarkLogic Server implements a role-base security model. Therefore, the Role is a central security concept in MarkLogic Server. A role gives a user privileges (both Execute and URI) to perform certain actions in a system. An Execute Privilege allows a user to perform a protected action. A URI Privilege allows a user to create a document under a protected URI. A role also gives a user the permissions to access protected documents.
A role may inherit from multiple roles. The inheritance relationship for roles is an “is-a” relationship. Therefore, a role gets the privileges and permissions of the roles from which they inherit.
MarkLogic Server is installed with the following pre-defined roles:
|Role|Description| |---|---| | | | |admin|This role has the privileges and permissions needed to perform administrative tasks. This role has the highest level of access in the system.| |admin-builtins|This role has the privileges needed to call the adminbuiltins functions.| |filesystem-access|This role has the privileges to access the filesystem.| |merge|This role has the privileges needed to force a merge in the system.| |security|This role has the privileges to perform all the securityrelated administrative functions.|
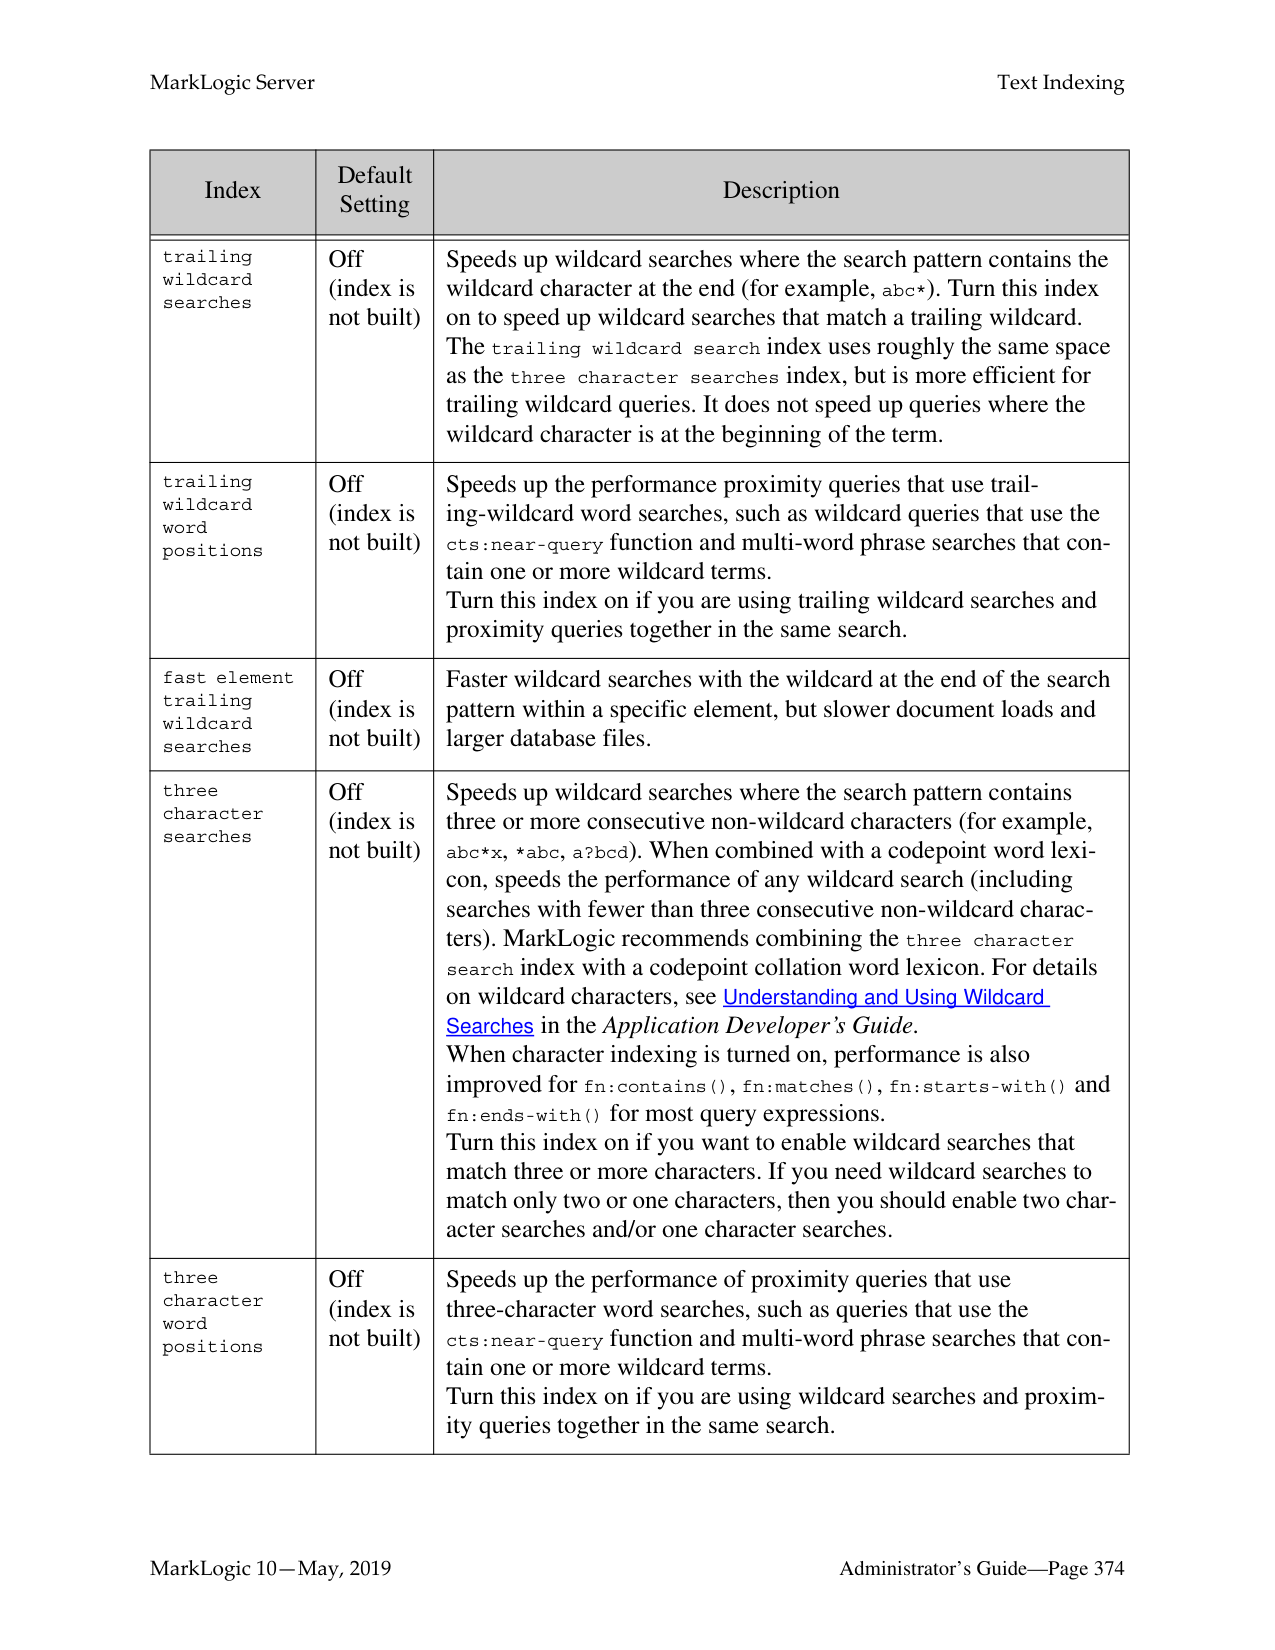
While you are able to change the configuration settings of these pre-defined roles (except for the admin role) or delete any of them, we strongly recommend that you proceed with caution.
A role has default collections. When a user of a role creates a document but does not explicitly associate the document with a set of collections, the document is automatically added to a set of default collections. This set of default collections is the union of the default collections defined for the user, the roles the user has, and the roles from which the user’s directly assigned roles inherit.
A role has default permissions. When a user of a role creates a document but does not explicitly set the permissions for the document, the document will be given a set of default permissions. This set of default permissions is the union of the default permissions defined for the user, the roles the user has, and the roles from which the user’s directly assigned roles inherit.
For more details about the role-based security model in MarkLogic Server, see Security Guide. Use the following procedures to create, manage and maintain roles:
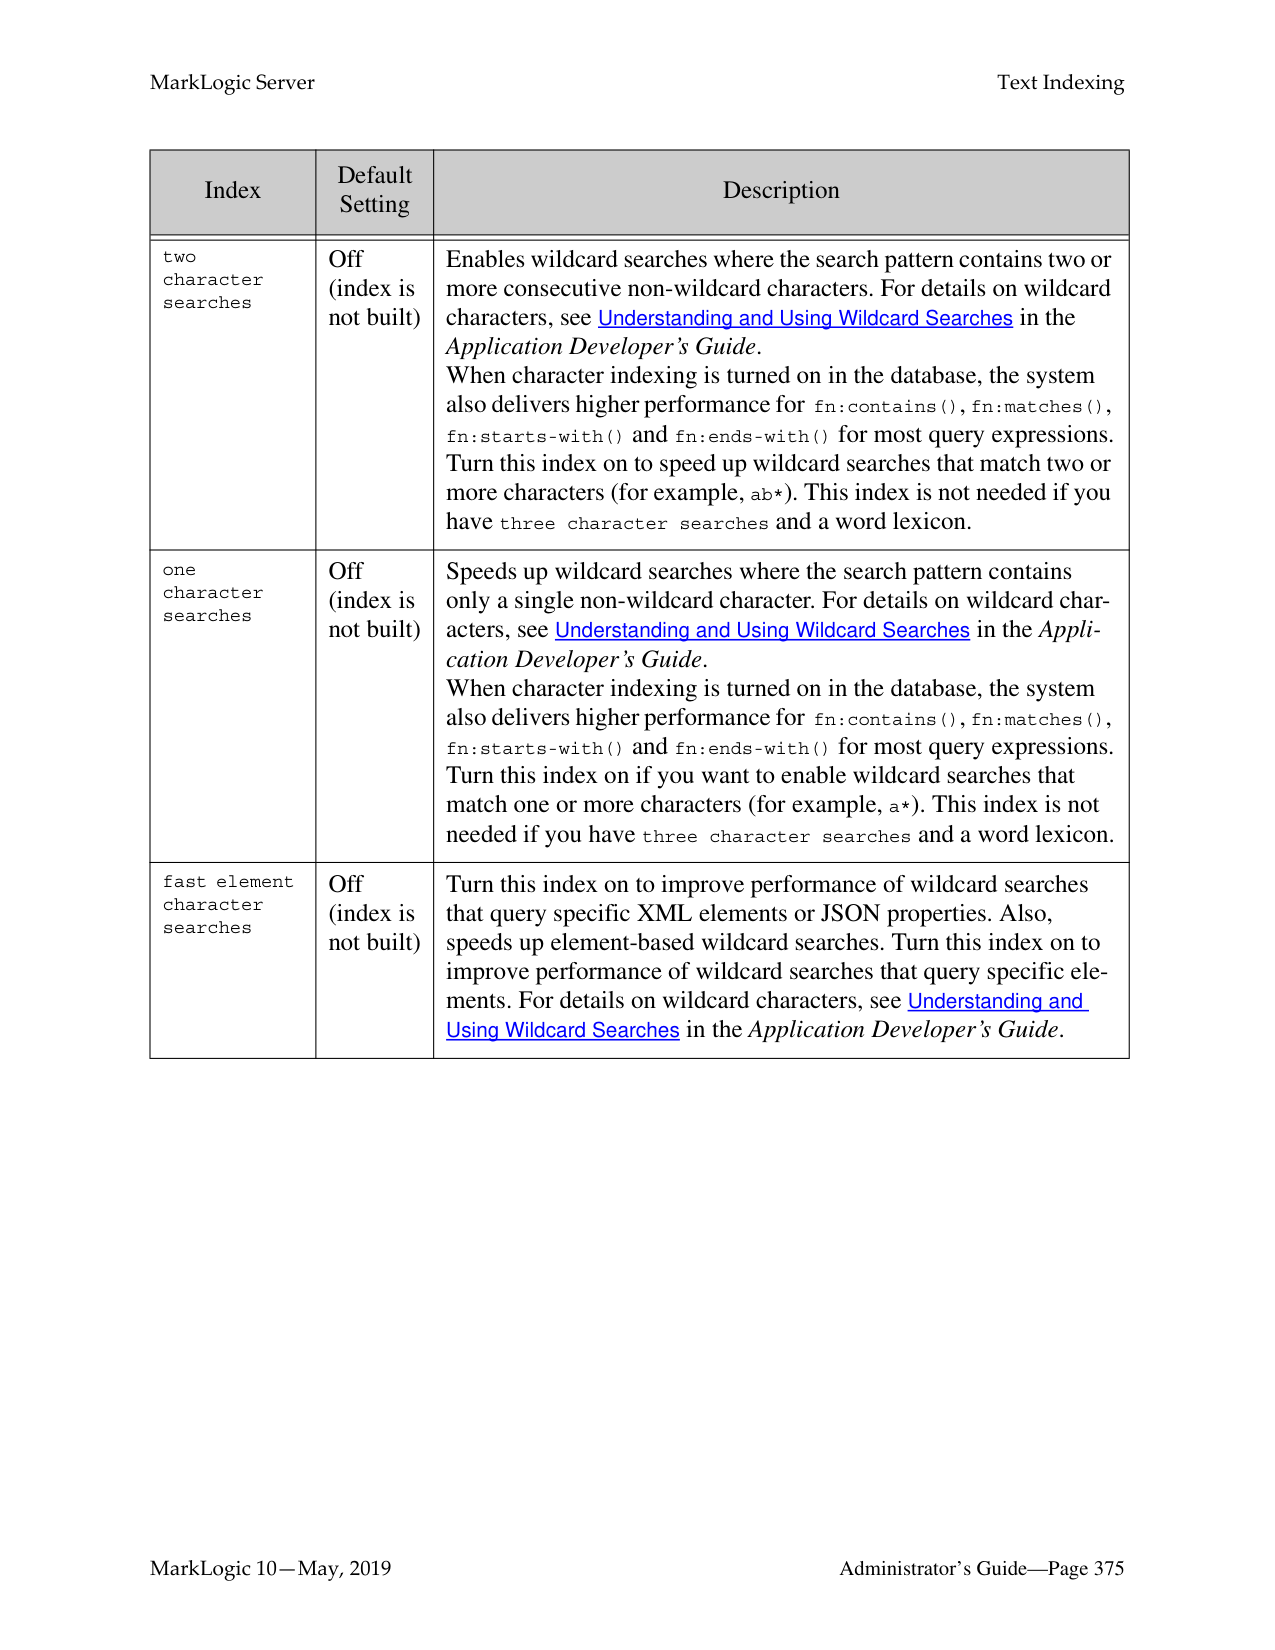

The role is now added to the system and the Role Configuration page appears. If you want to add more default permissions or collections to the role, scroll down to the section for default permissions or collections.


View the configuration for the role.
Warning Making changes to the to the role configuration affects the access control policy
for that role, which can either increase or decrease the activities authorized for any users who have that role (either directly or indirectly). For more details on how the security system works, see Security Guide.
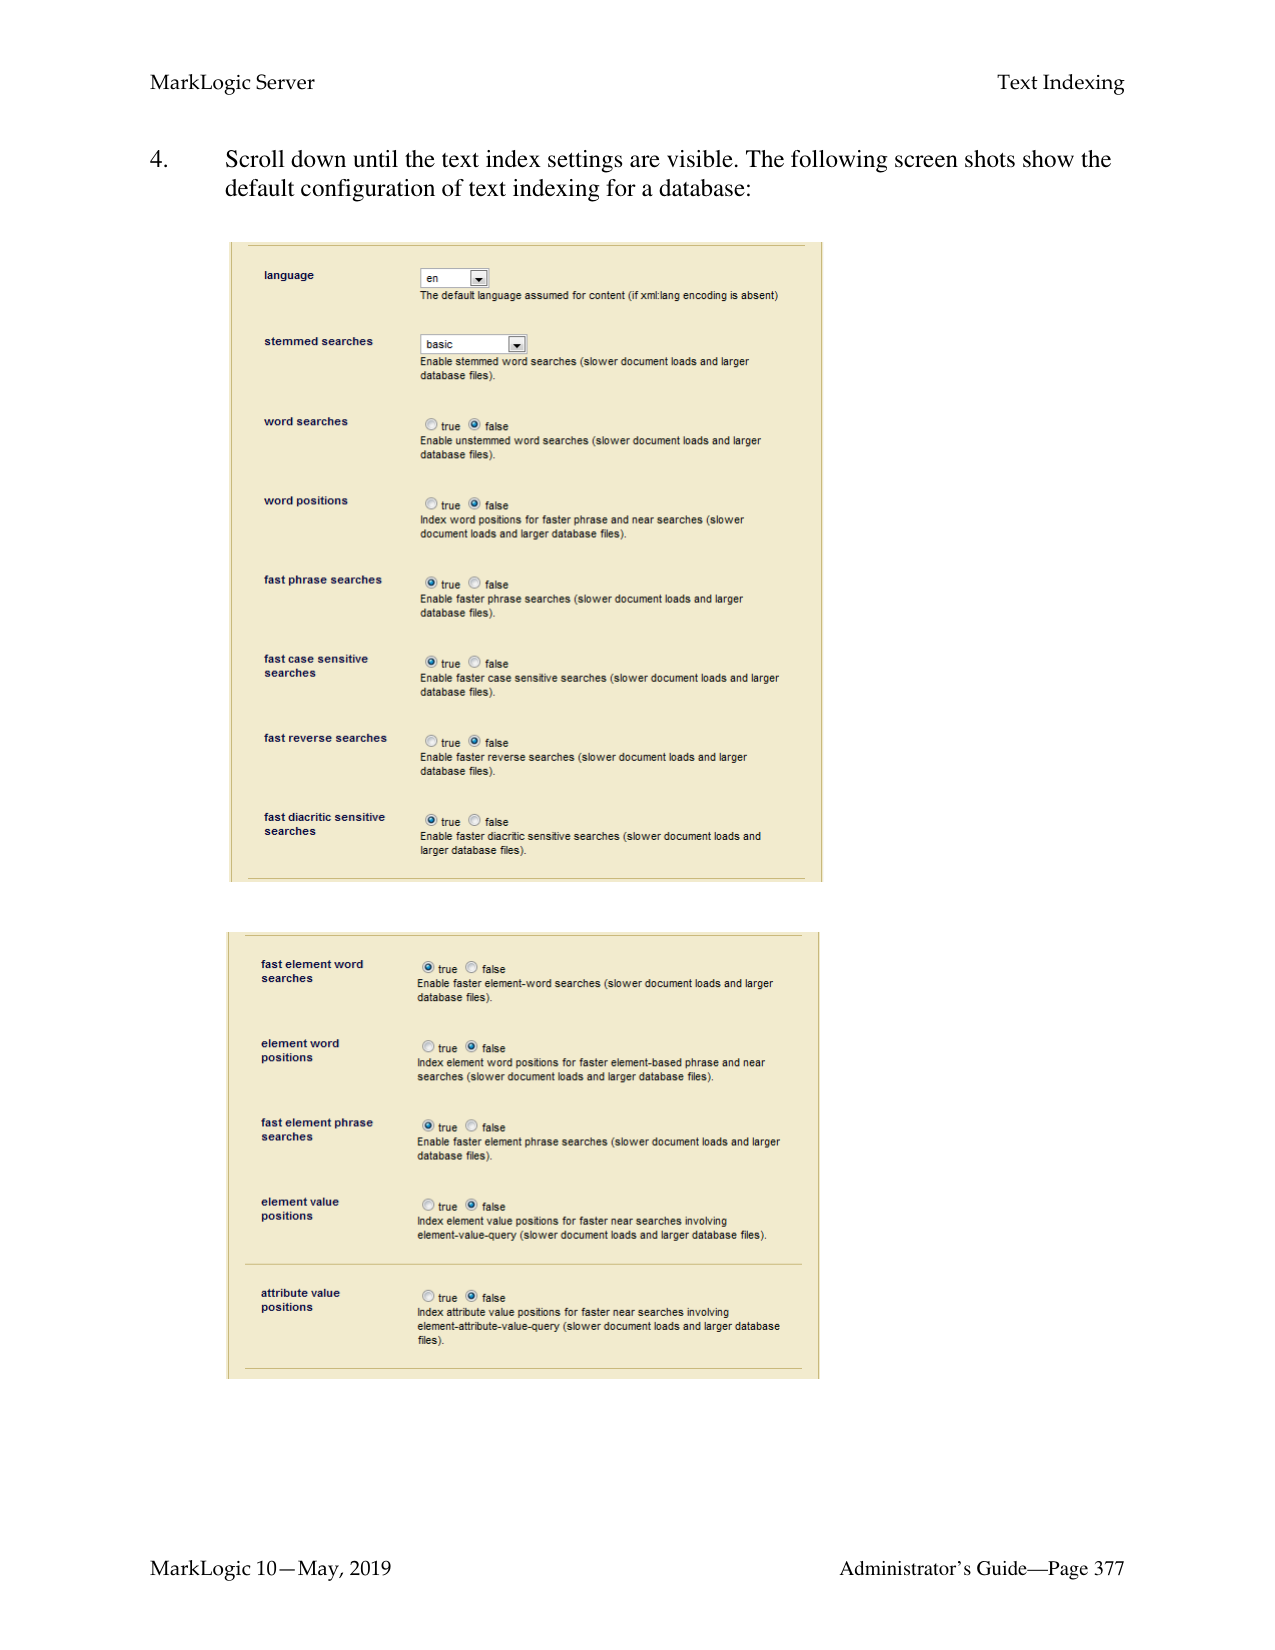
######### 24.3.4 Deleting a Role
You can delete a role from the security database. The system does not check to see if there are any users with that role before deleting it. A deleted role is automatically removed from all users still assigned to that role. Users who were assigned to the deleted role lose the permissions and privileges given by that role.
Perform the following steps to delete a role.
######### 24.4 Execute Privileges
The actions that a user can perform in the server are determined by the set of privileges that they possess. Privileges are connected to users with roles. An Execute Privilege grants authorization to perform a protected action. An execute privilege specifies a protected action, and the roles that can perform the action. Roles that inherit from the specified roles can also perform the protected action. The protected action is represented as a URI.
Once an execute privilege is created, it is enforced in XQuery programs through the use of xdmp:security-assert(
Use the following procedures to create, manage and maintain execute privileges:
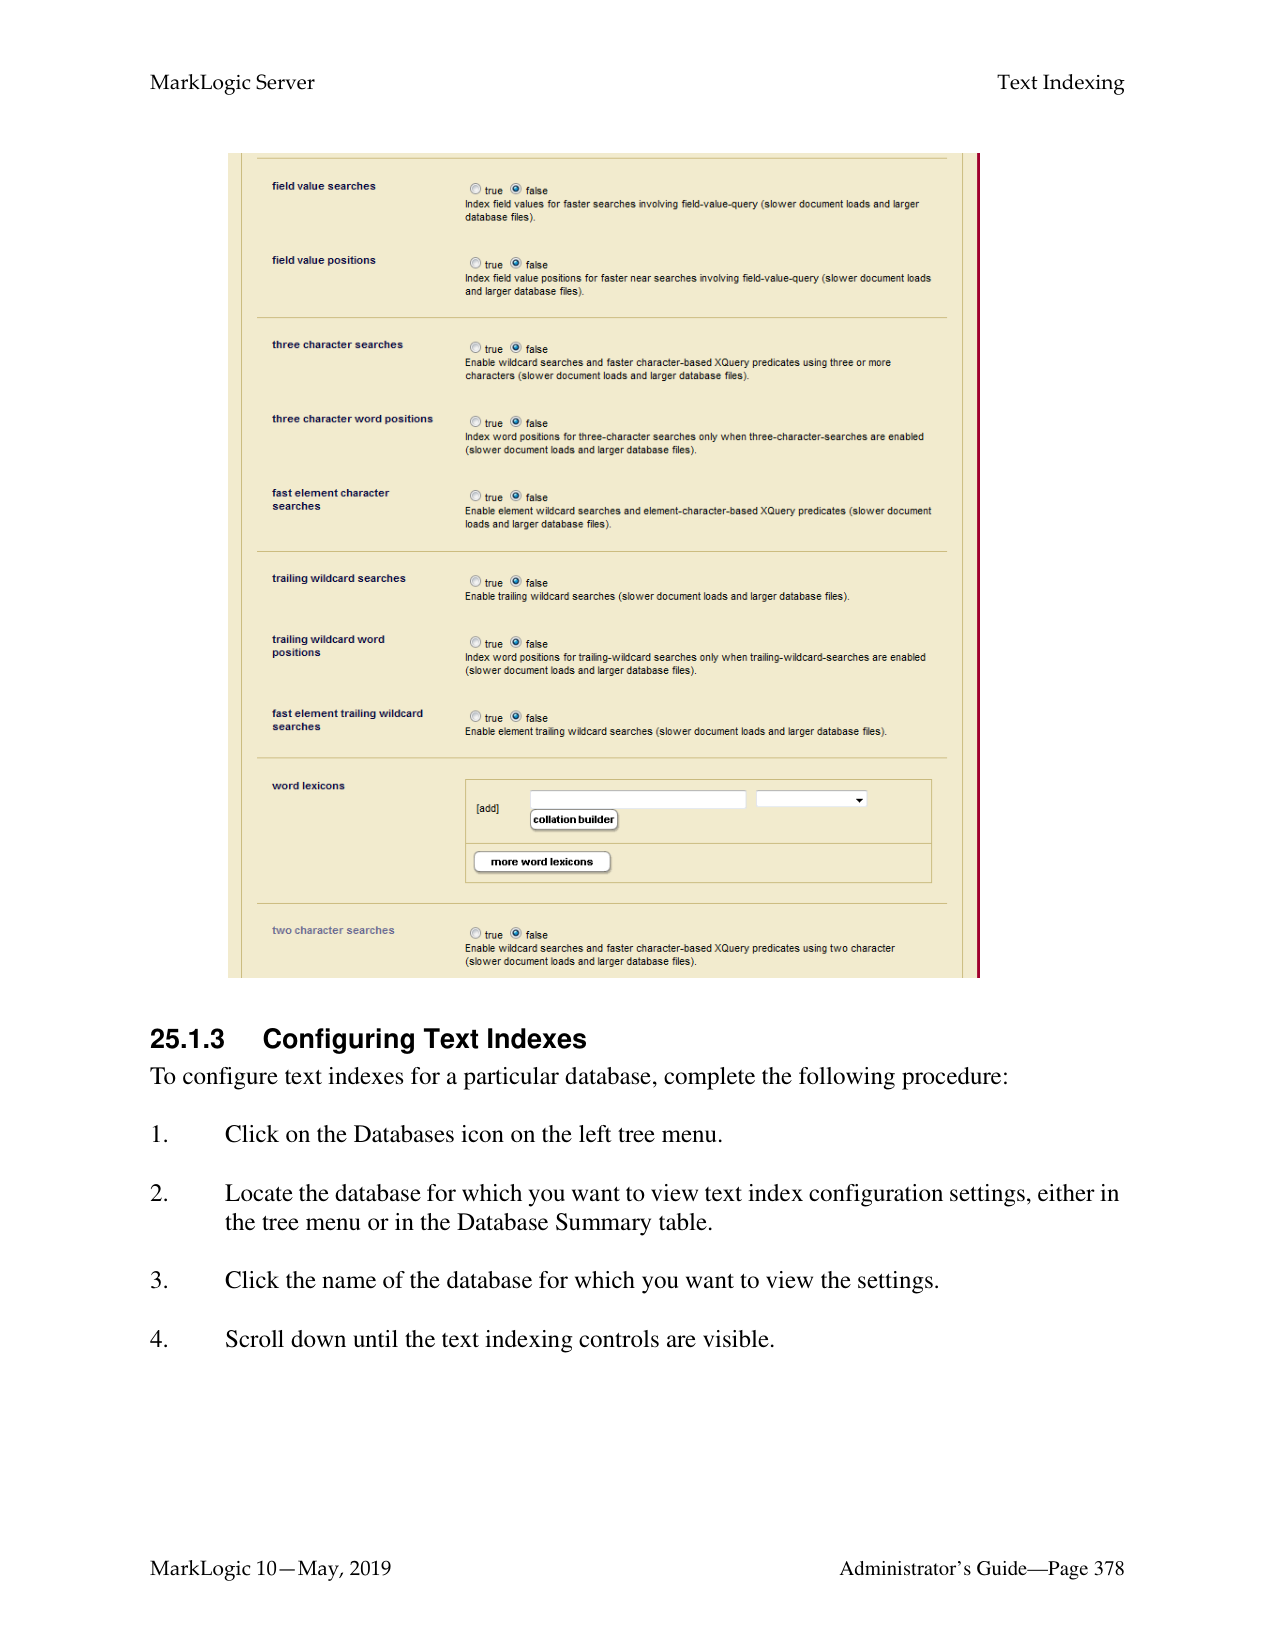

mmmmmp
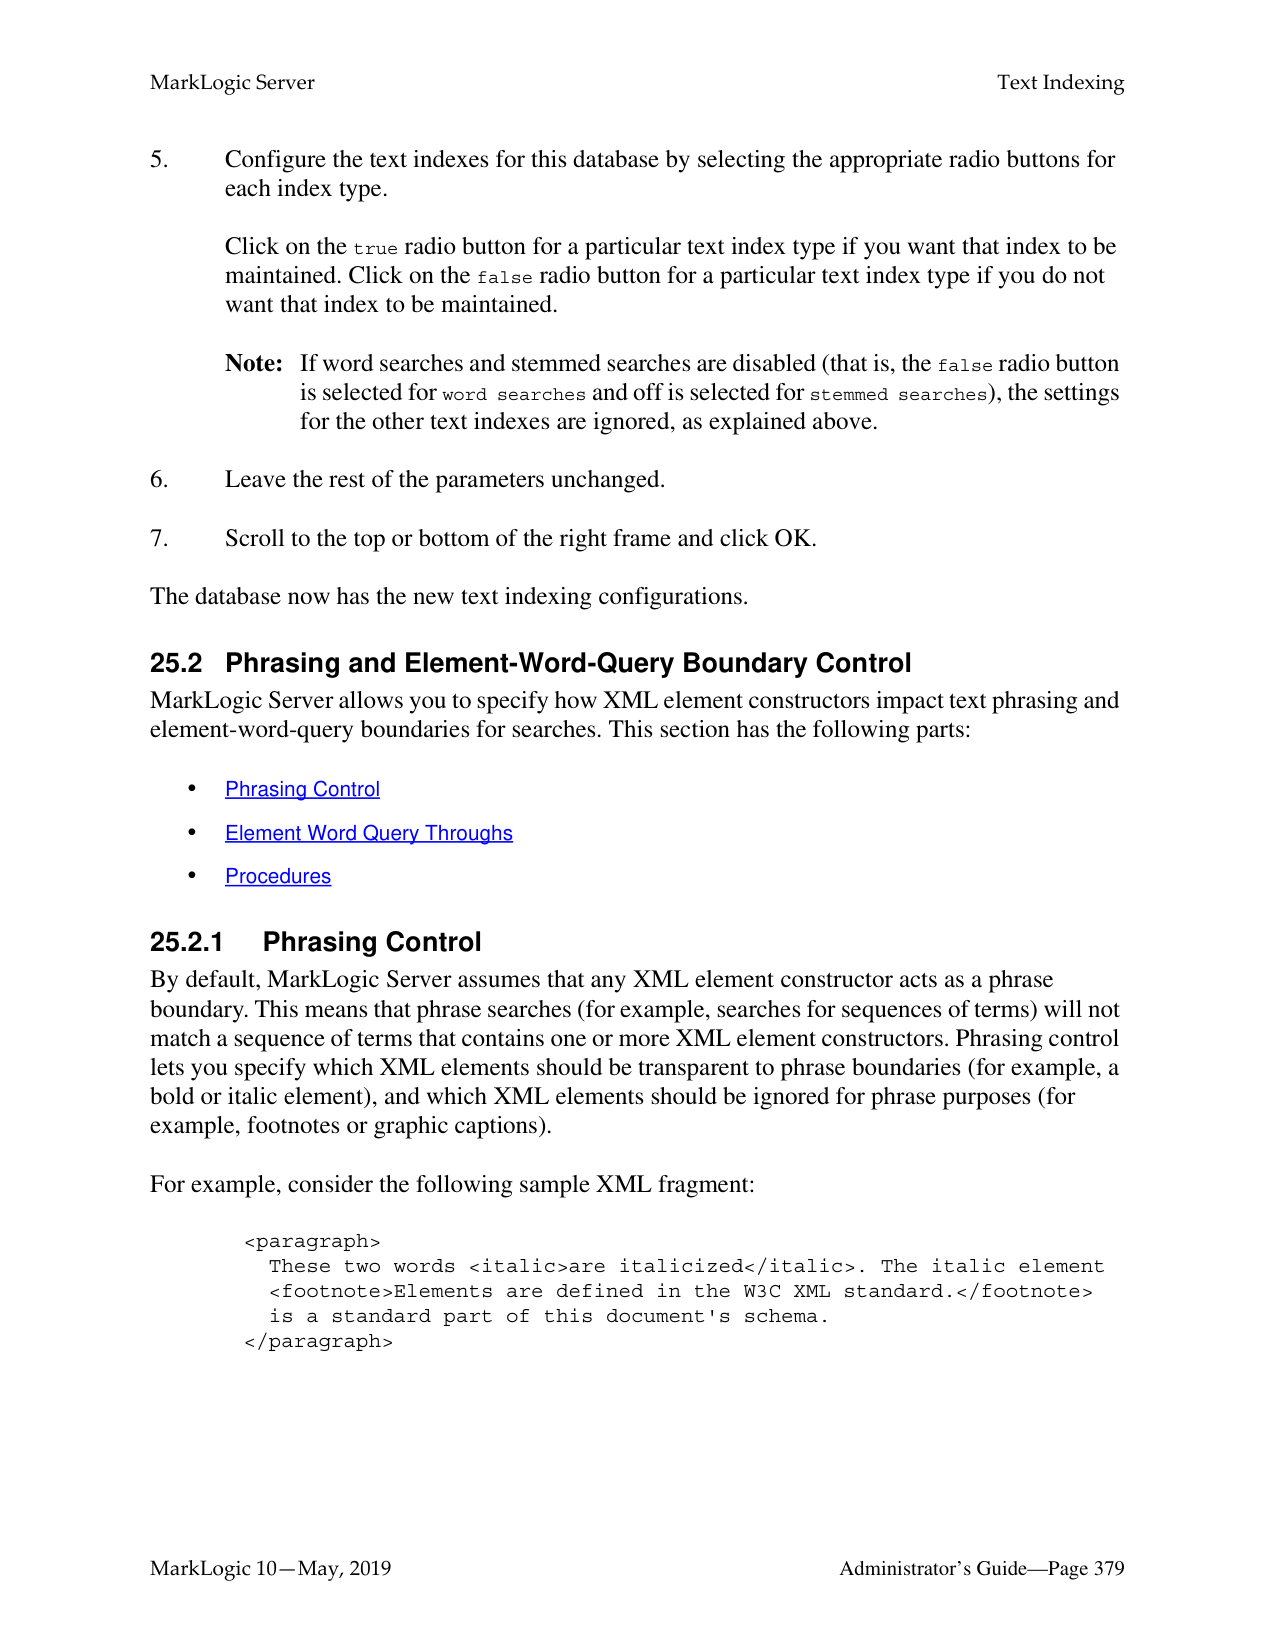
The execute privilege is now added to the security database. You can now use the xdmp:securityassert() function in your code to associate this privilege with a protected operation.
######### 24.4.2 Execute Privilege: grant-my-privilege
In MarkLogic 10.0-3 and later, the “grant my privilege” feature be used as part of Executive Privileges to assign some privileges to roles. In the context of Data Hub Service, non-admin users (users with the “manage” role but not “admin”, “Security”, or “manage-admin” roles) need to be able to assign some privileges to roles so that they become available to the users in possession of those roles.
A user with the grant-my-privileges privilege can assign privileges that they already possess to roles that they are allowed to modify. This feature works in conjunction with the “data roles” feature. The grant-my-privileges privilege is useless in isolation, as its only purpose is to assign privileges to roles.
To access the grant-my-privilege feature in the Admin UI:

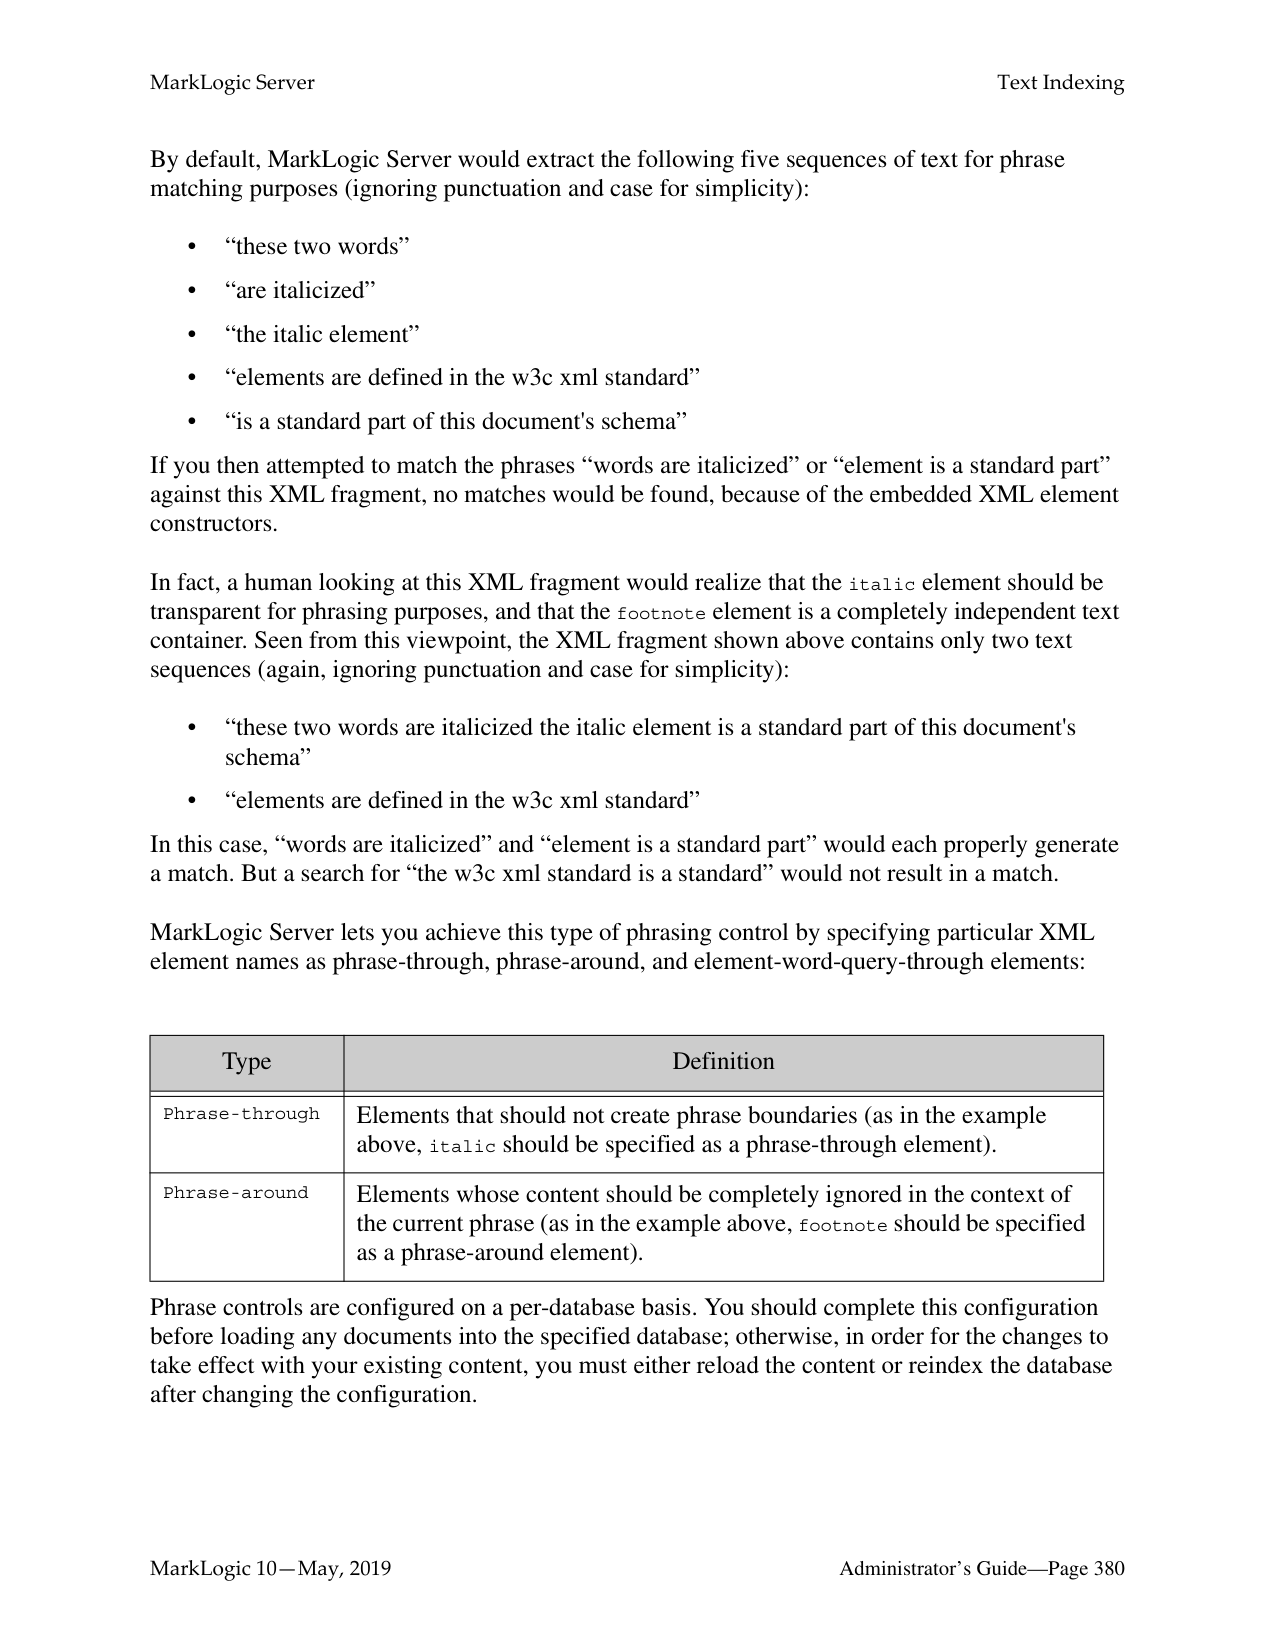
The Execute Privilege: grant-my-privileges screen opens, where you can select the roles assigned this privilege.

The precise set of privileges that a user can assign is determined by the privileges that they already possess. It is not possible for a user to assign a privilege that they do not possess (admin, for example). If a user attempts to change the privileges associated with a role, the request will succeed if (and only if) the following conditions apply:
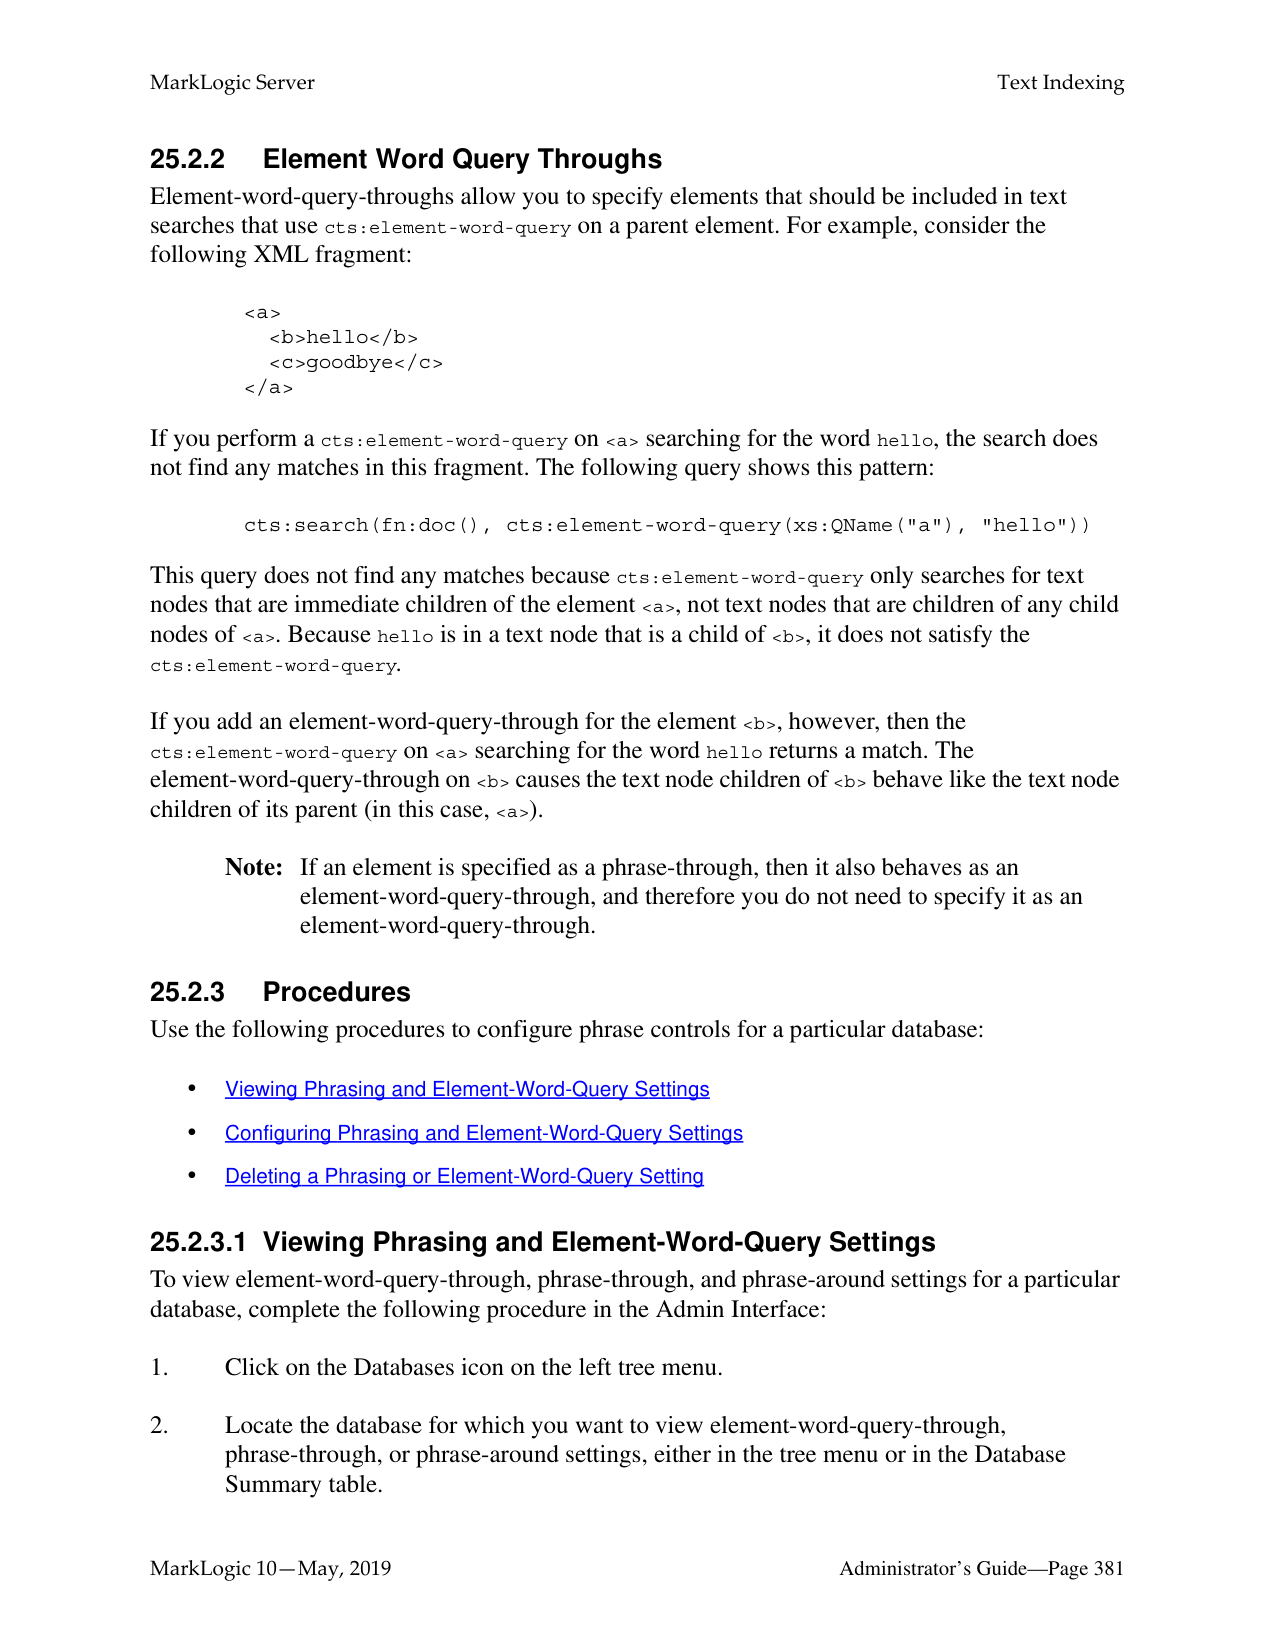

Warning Making changes to the to the execute privilege configuration affects the access control policy for that privilege, which can either increase or decrease the activities authorized for any users who have any of assigned roles (either directly or indirectly). For more details on how the security system works, see Security Guide.
######### 24.4.5 Deleting an Execute Privilege
You can delete an execute privilege from the security database. However, an exception will be thrown when a security-assert() on the protected action specified in the deleted execute privilege is encountered. That is, a deleted execute privilege behaves like an execute privilege for which no role has been given access to the protected action. Follow these steps to delete an execute privilege:
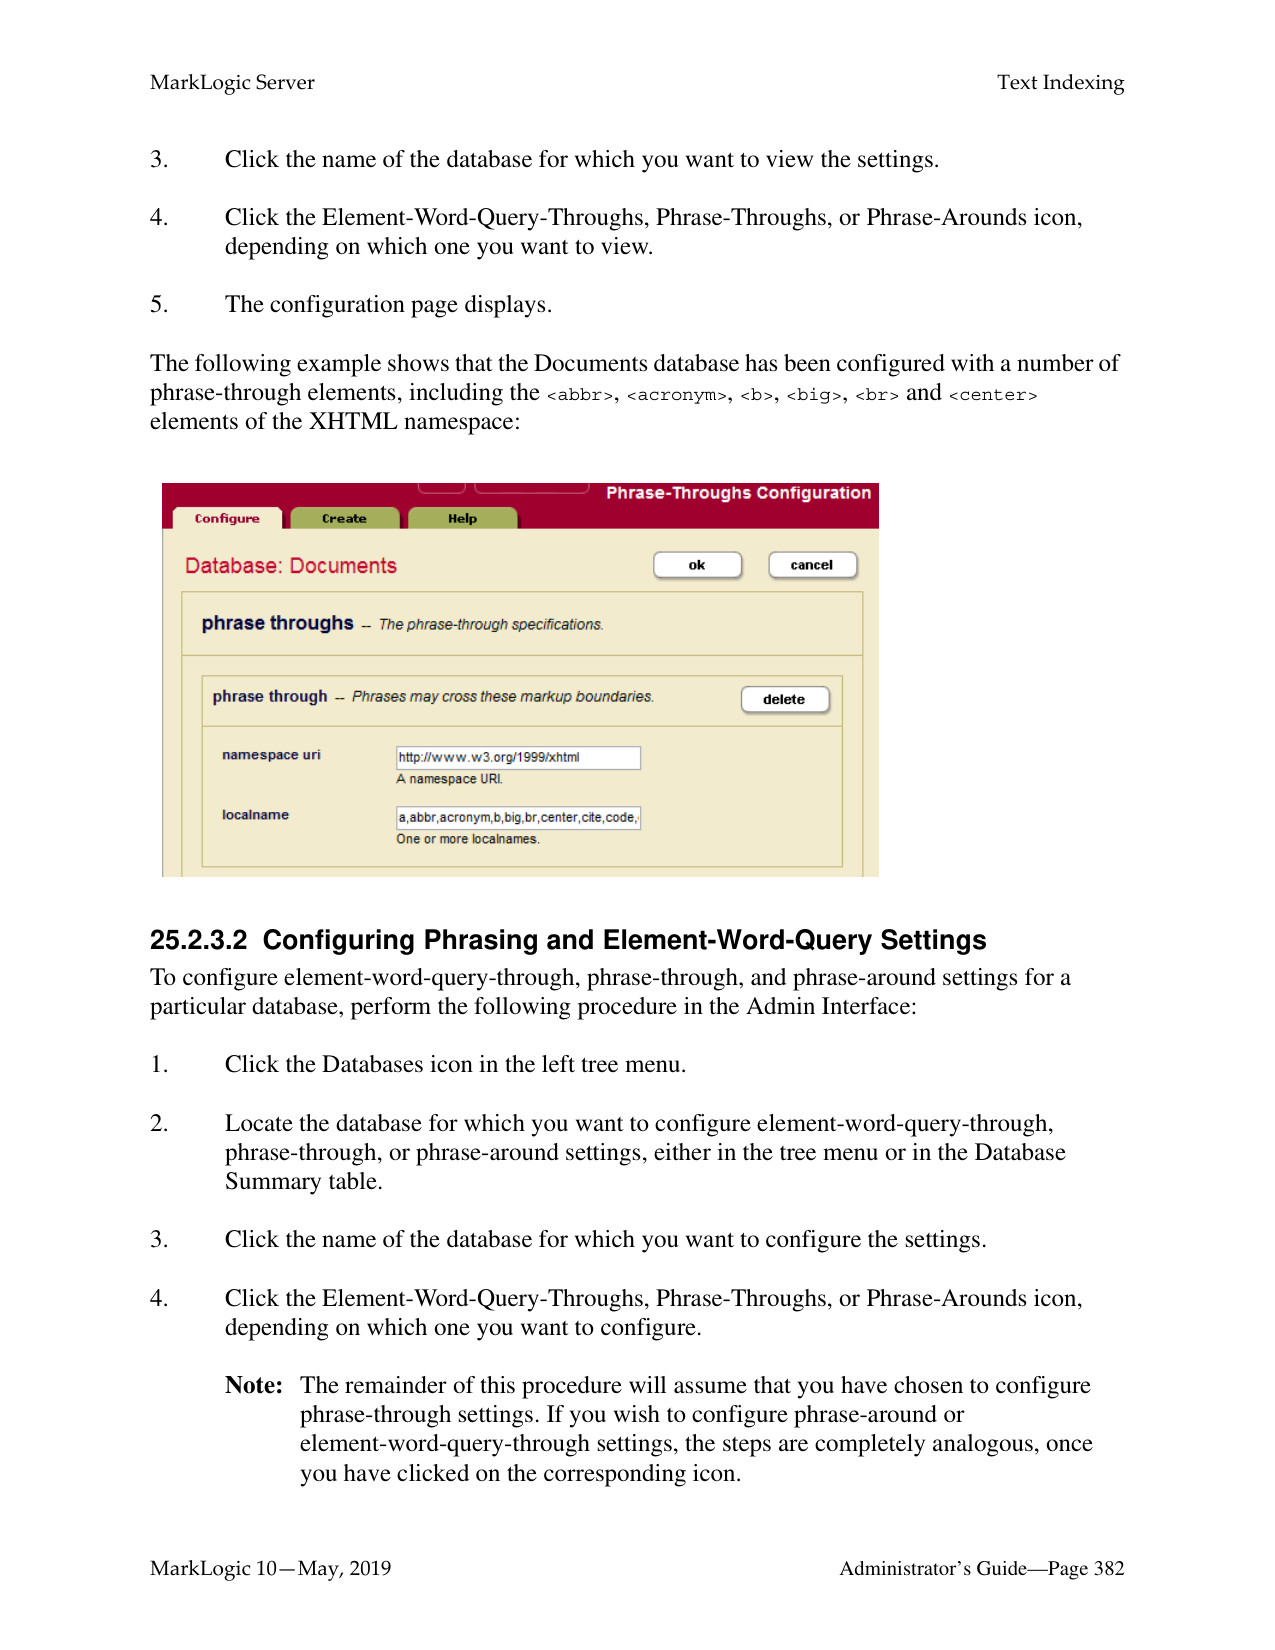

######### 24.5 URI Privileges
A URI Privilege grants authorization to create documents under a protected URI. That is, a URI privilege specifies the roles that are allowed to create documents with the protected URI as the base URI (prefix) in the document URI. Roles that inherit from the specified roles can also create the documents under the protected URI.
Unlike an execute privilege, where xdmp:security-assert() needs to be called explicitly to protect a function, a URI privilege is automatically enforced. When xdmp:document-insert() is called, the system checks the base URIs (prefix) of the document URI specified to see if they might be protected by a URI privilege. If the base URI has an associated URI privilege, it checks the roles of the user to see if any of the user’s roles gives the user authorization to create the document within the protected base URI. If the user has the requisite authorization, the document is inserted into the database. Otherwise, an exception is thrown.
Use the following procedures to create, manage and maintain URI privileges:
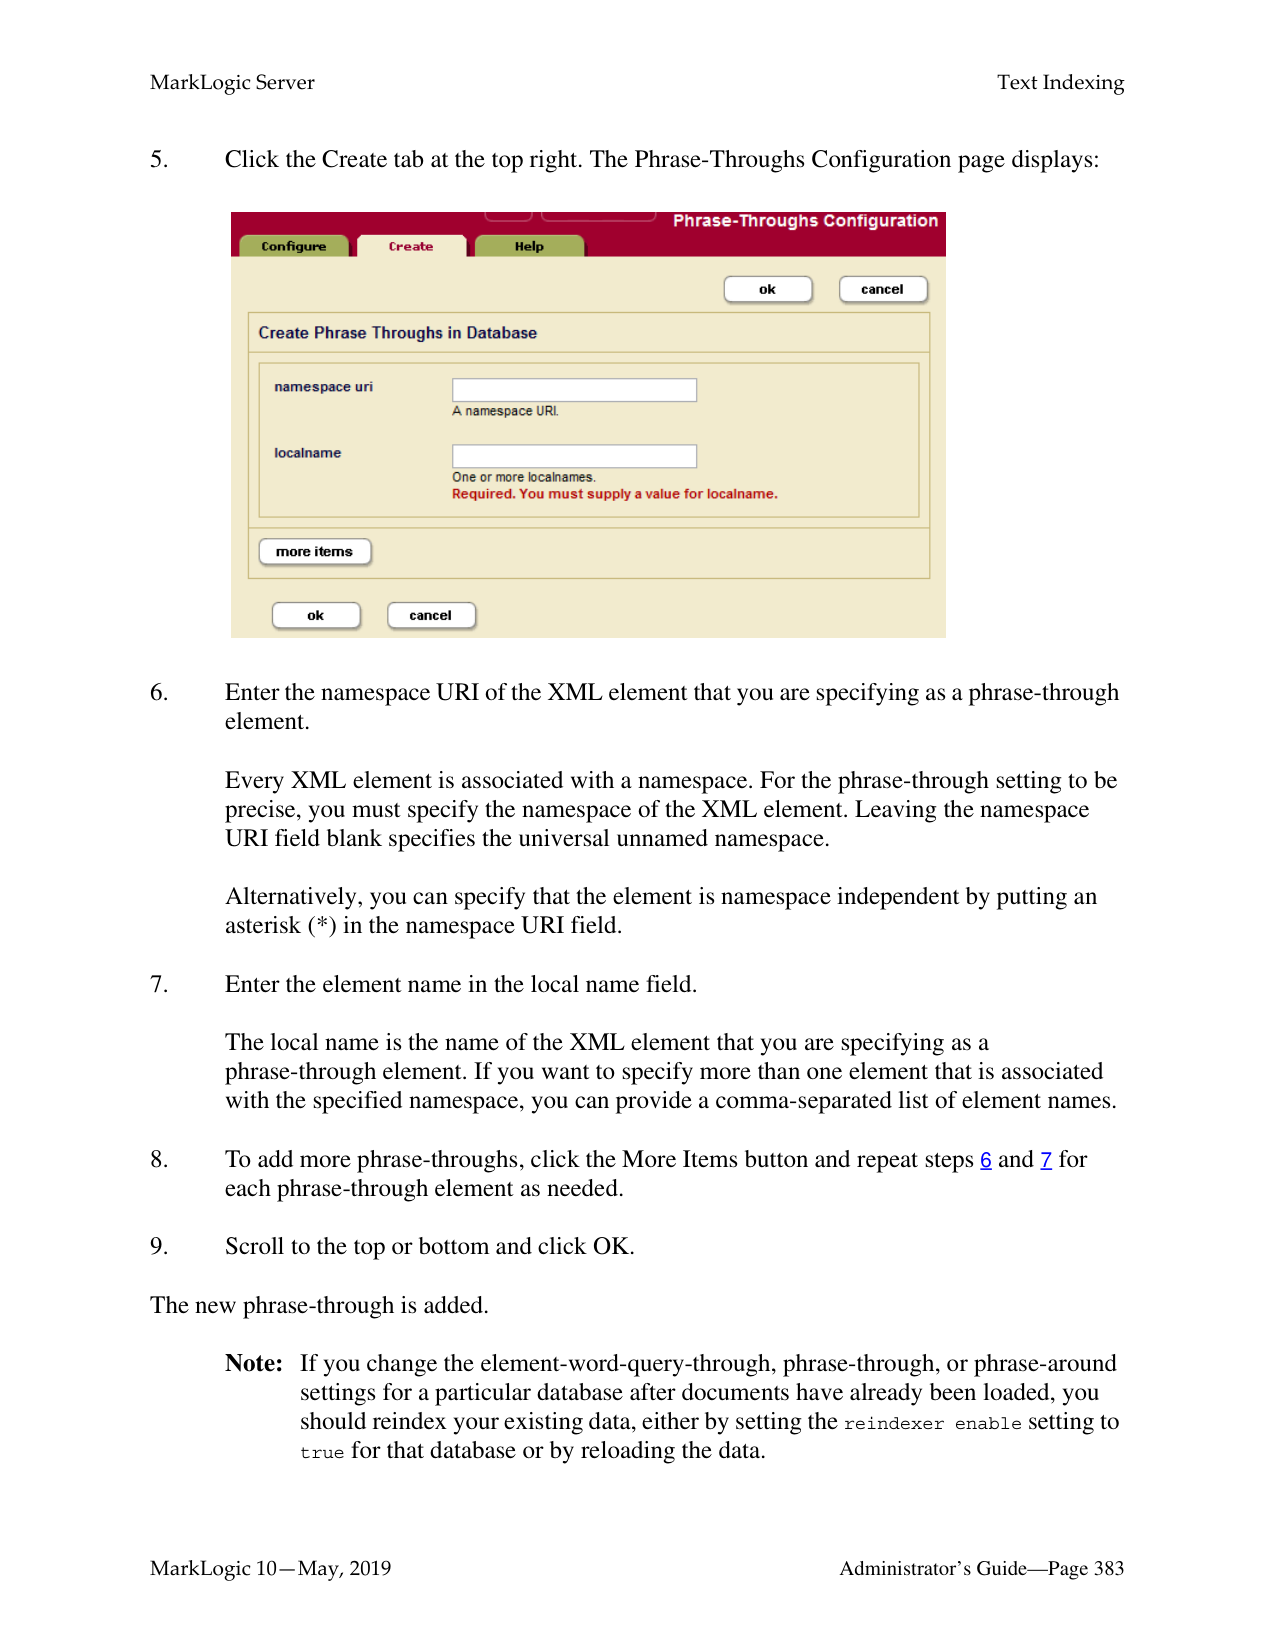
Warning Making changes to the to the URI privilege configuration affects the access control policy for that privilege, which can either increase or decrease the activities authorized for any users who have any of assigned roles (either directly or indirectly). For more details on how the security system works, see Security Guide.
You can delete a URI privilege from the security database. Perform the following steps to delete a URI privilege:
######### 24.6 Amps
An Amp gives the user additional roles temporarily while the user is performing a certain task (executing a function). While the user is executing the “amp-ed” function, the user receives additional privileges and permissions given by the additional roles. An amp is useful when a user needs additional privileges and permissions only while the user is executing a certain function.
Giving the user additional roles permanently could compromise the security of the system. On the other hand, an amp enables granular security control by limiting the effect of the additional roles (privileges and permissions) to a specific function. For example, a user may need a count of all the documents in the database when the user is creating a report. However, the user does not have read permissions on all the documents in the database, and hence does not know the existence of all the documents in the database. An amp can be created for the document-count() function to elevate the user to an admin role temporarily while the user is executing the function to count the documents in the system.
An amp is defined by the local name of the function, the namespace and the document URI. The document URI must begin with a forward slash “/” and is treated as being rooted relative to the Modules directory in the installation path. When resolving an amp, MarkLogic Server looks for the file using a path rooted relative to the Modules directory in the installation path. If it finds a function that matches the local name and namespace using the specified path, it applies the amp to the function.
Note: Starting in 9.0-7 for triggers and 10.0-2 for amps, Database names can be used in the trigger and amp creation apis, thus making it easy to support the same functionality on replica clusters for databases with the same names.
For more details about amps, see Security Guide. For examples of amps, look at one of the amps created during installation. To view an amp, follow the instructions in the section “Viewing an Amp” on page 361.
Use the following procedures to create, manage and maintain amps:

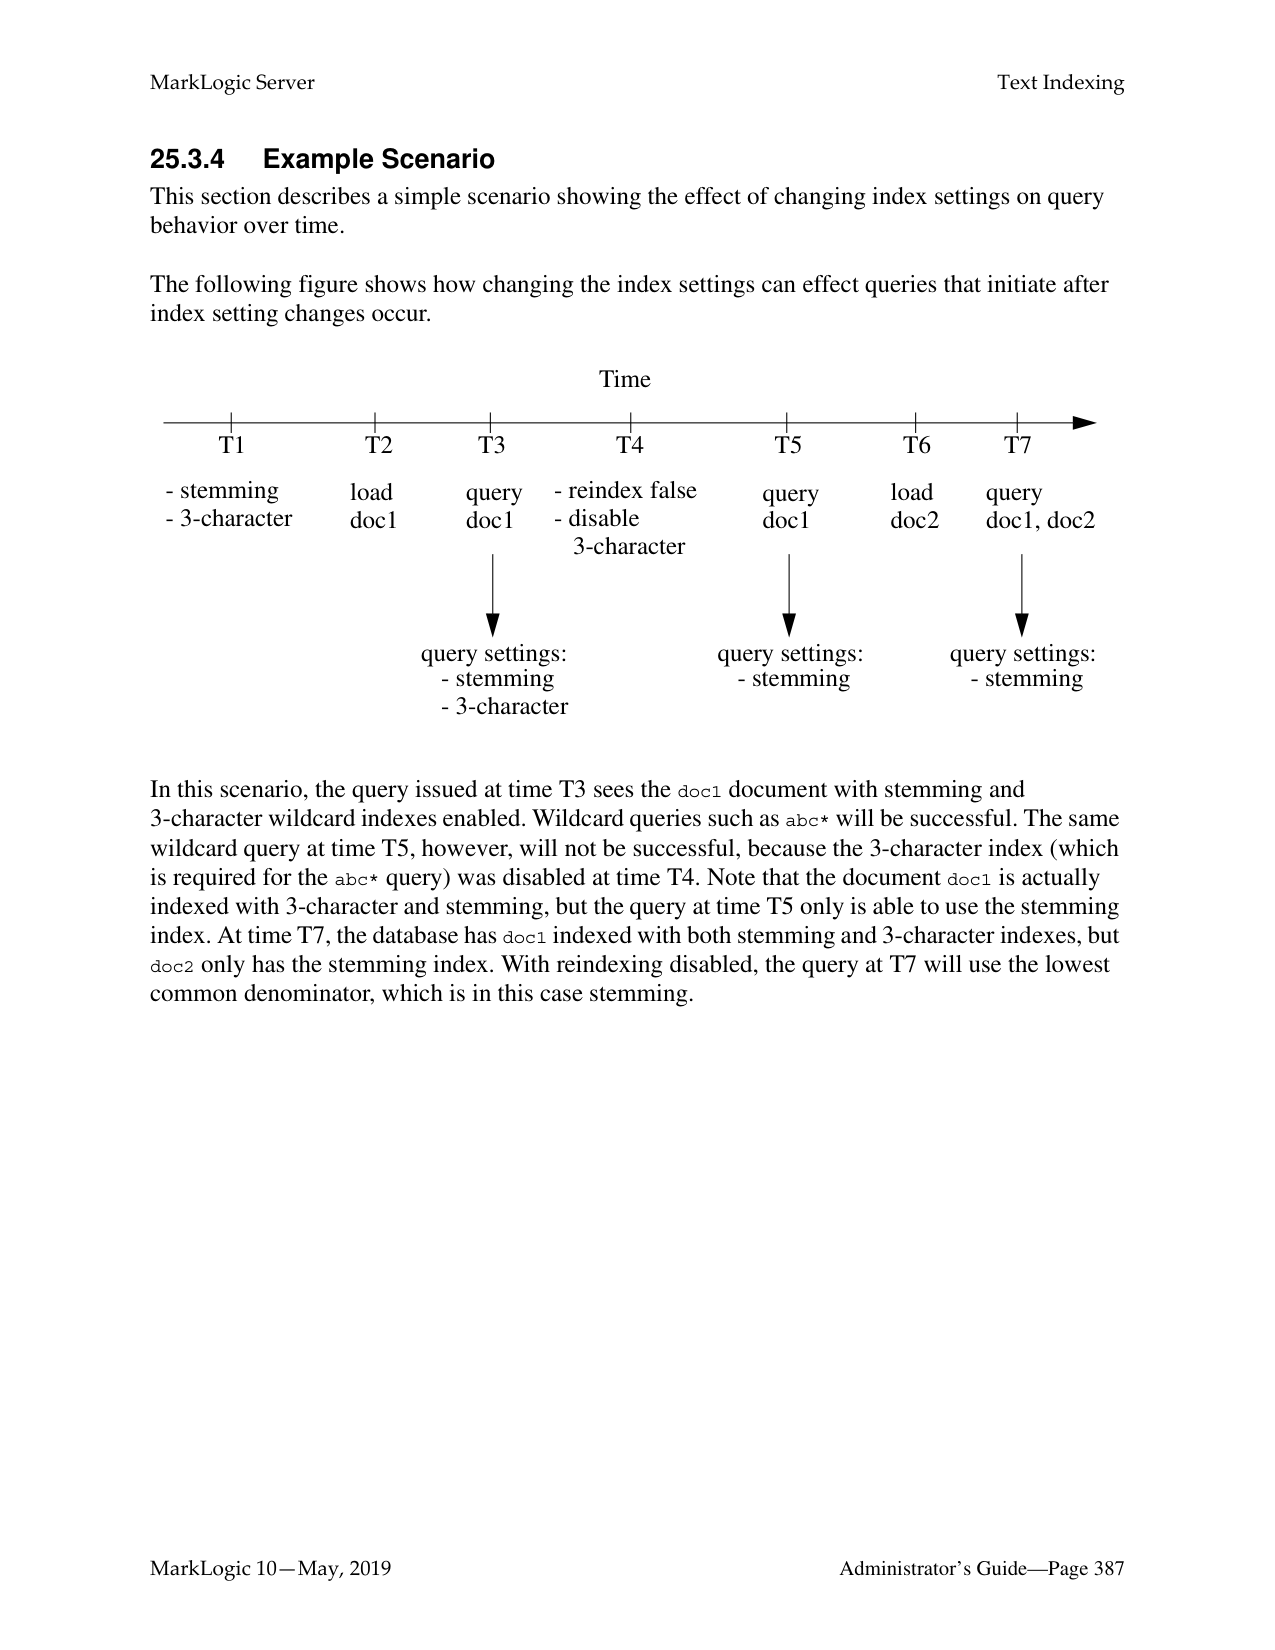

Warning Making changes to the to the amp configuration affects the access control policy for that amp, which can either increase or decrease the activities authorized for any users who have any of assigned roles (either directly or indirectly). For more details on how the security system works, see Security Guide.


######### 24.7 Protected Collections
A collection groups a set of documents that are related and enables queries to target subsets of documents within a database efficiently. A document may belong to any number of collections simultaneously. A collection exists in the system when a document in the system states that it is part of that collection.
A protected collection is one for which only authorized users can associate documents with the collection. When you create a protected collection, an associated protection collection object is created and stored in the security database.
You must understand the following key concepts and limitations of protected collections:
Use the following procedures to create, manage, and maintain collections:

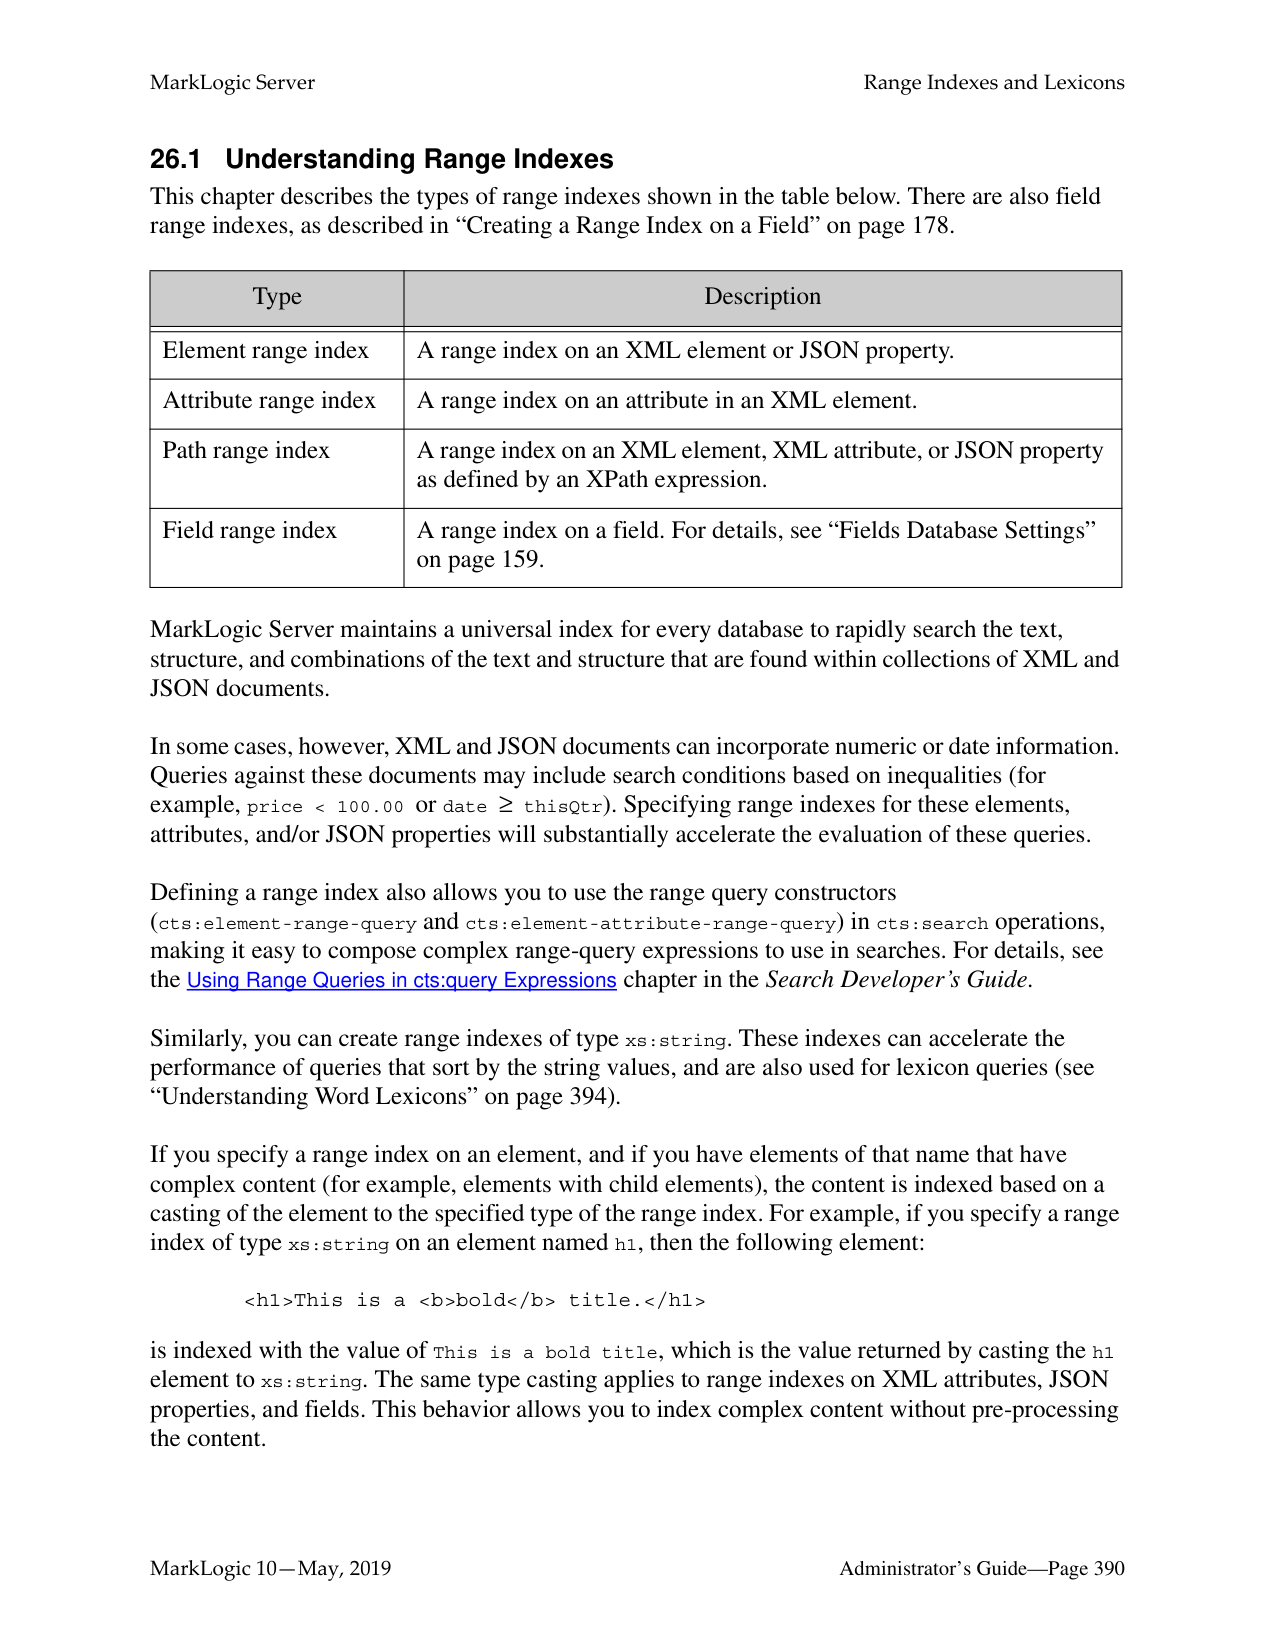

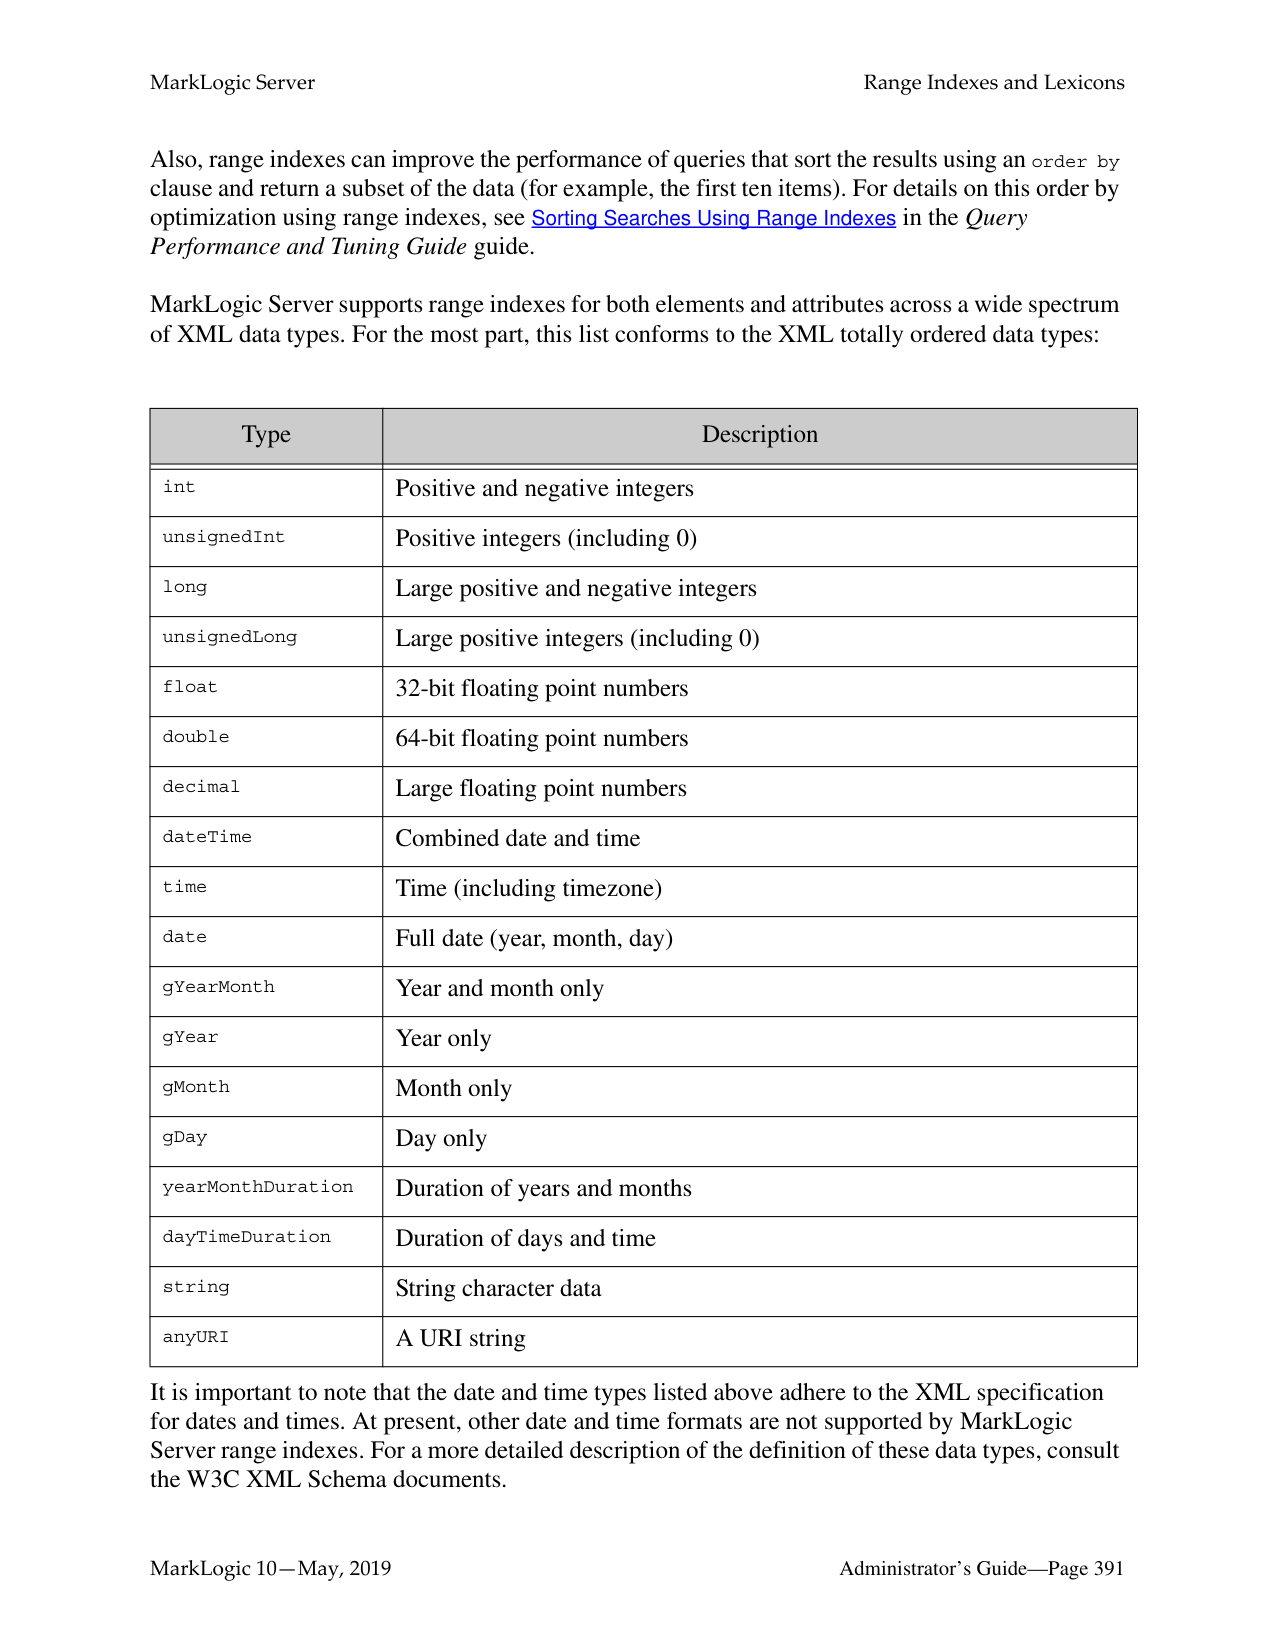

######### 24.8 Certificate Templates
A Certificate Template contains the identification information associated with an SSL certificate. See Configuring SSL on App Servers in the Security Guide for details.
######### 24.9 Realm
MarkLogic Server stores the realms for application servers in the security database. Each application server takes its realm from the security database to which it is connected. Realms are used in computing digest passwords.
######### 24.9.1 Setting the Realm
The realm is stored in the security database to which the Admin Interface is connected, and is set at installation time:

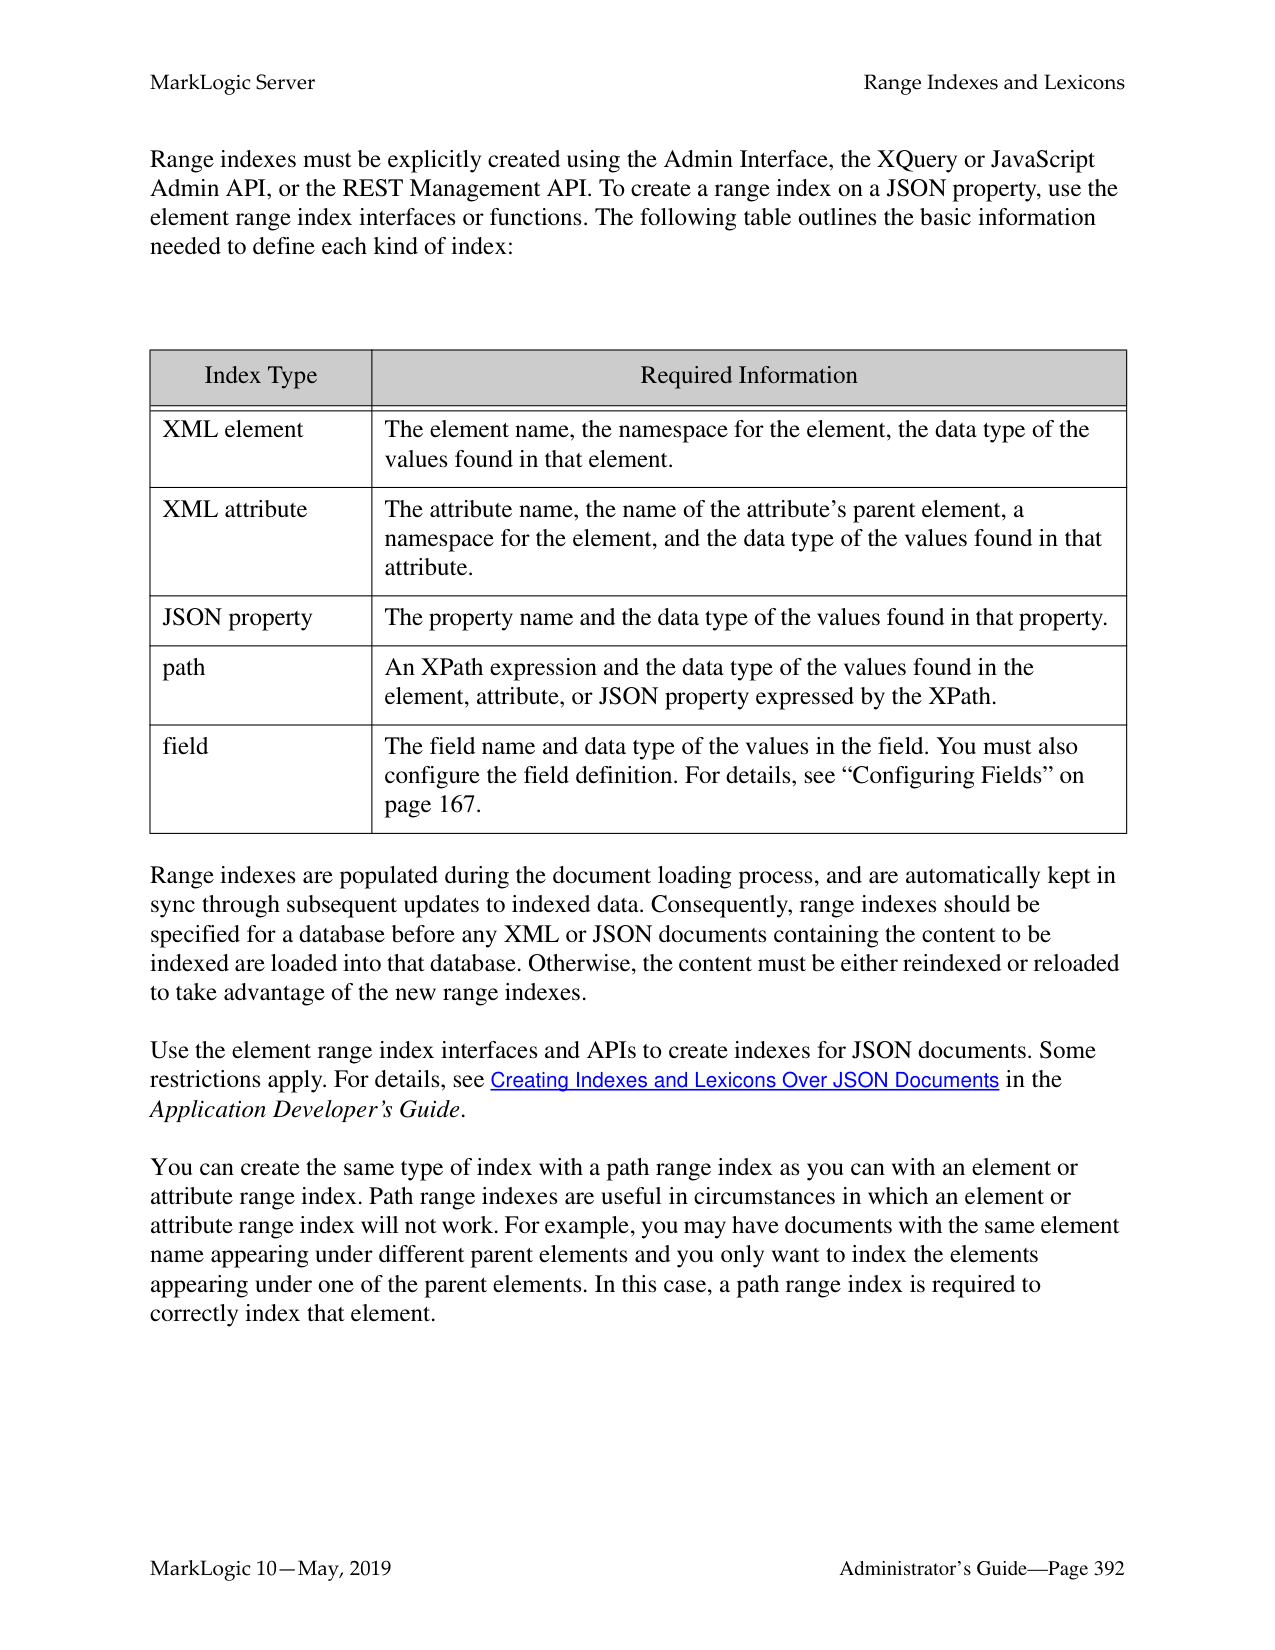
######### 24.9.2 Changing the Realm
Changing the realm in the security database invalidates all user digest passwords. This only affects application servers whose authentication setting is digest or digestbasic mode.
In digest mode, you need to re-enter all user passwords in the security database. Changing the passwords in the security database will cause the server to recalculate the digest passwords. In digestbasic mode, the first time a user logs into the server after the realm is changed, the user will be prompted to enter their passwords multiple times before they are logged into the system. However, the server will automatically recalculate their digest password with the new realm at that time, and they will have a normal login process for future access.
Warning If you change the realm, any App Servers that uses digest authentication will no longer accept the existing passwords. This includes the Admin Interface, and includes passwords for users with the admin role. Therefore, changing the realm will make it so you can no longer log into the Admin Interface.
If you are sure you want to change the realm after installation despite the warning, perform the following steps:

##### 25.0 Text Indexing
Before loading documents into a database, you have the option of specifying a number of parameters that will impact how the text components of those documents will be treated. This chapter describes those parameters and includes the following sections:
Text indexes and phrasing parameters are set on a per-database basis.
######### 25.1 Text Indexes
MarkLogic Server allows you to configure, at the database level, which types of text indexes are constructed and maintained during document loading and updating. Each type of index accelerates the performance of a certain type of query. You can specify whether or not each different type of index is maintained for a given database.
Note: The index settings are designed to apply to an entire database. If you change any index settings on a database in which documents are already loaded, you must reindex your existing data, either by setting the reindexer enable setting to true for that database or by reloading the data.
Understanding your likely query set will help you determine which of these index types to maintain. The cost of supporting additional indexes is increased disk space and document load times. As more and more indexes are maintained, document load speed decreases. By default, MarkLogic Server builds a set of indexes that is designed to yield the fast query performance in general usage scenarios.
Text index types are configured on a per-database basis. This configuration should be completed before any documents are loaded into the specified database, although it can be changed later. If you change any index settings on a database in which documents are already loaded, you must reindex your existing data, either by setting the reindexer enable setting to true for that database or by reloading the data.
In addition to the standard indexes, you can configure indexes on individual elements and attributes in a database. You can create range indexes and/or lexicons on individual elements or attributes in a database. For information on these indexes, see “Range Indexes and Lexicons” on page 389. You can also create named fields which can explicitly include or exclude specified elements. For details on fields, see “Fields Database Settings” on page 159.
This section describes the text indexes in MarkLogic Server and includes the following subsections:
######### 25.1.1 Understanding the Text Index Settings
The following table describes the different types of indexes available. The indexes are not mutually independent. If both the word search and stemmed search indexes are disabled, the configuration of the remaining indexes is irrelevant, as they all depend on the existence of the word and/or stemmed-search index.
|Index|Default Setting|Description| |---|---|---| | | | | |language|en|Specifies the default language for content in this database. Any content without an xml:lang attribute will be indexed in the language specified here. You should have a license key if you specify a non-English language; if you specify a non-english language and do not have a license for that language, the stemming and tokenization will be generic.|
MarkLogic 10—May, 2019 Administrator’s Guide—Page 370 Contains SAP BusinessObjects Text Analysis XI from SAP AG. Copyright © 1996-2011. All rights reserved.
|Index|Default Setting|Description| |---|---|---| | | | |
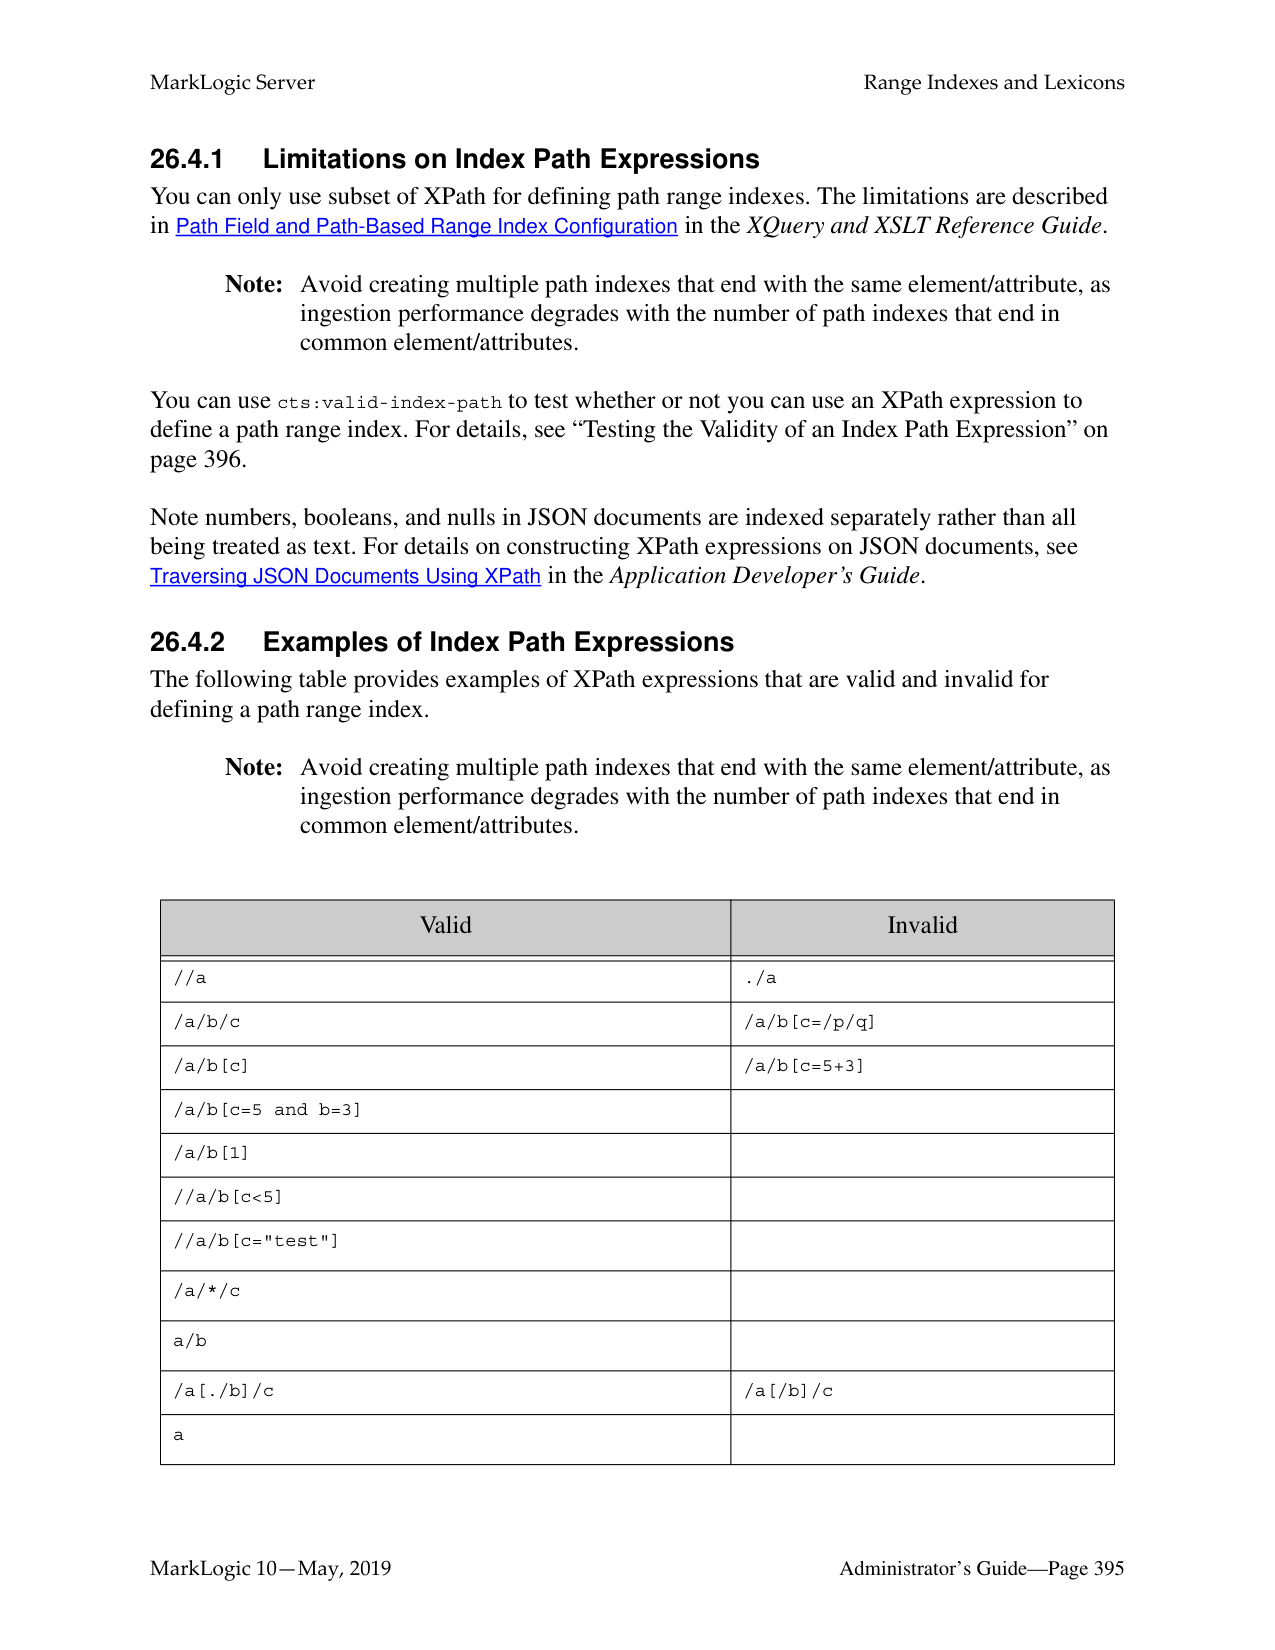
|stemmed searches|Off (index is not built)|Controls whether searches return relevance ranked results by matching word stems. A word stem is the part of a word that is common to all of its inflected variants. For example, in English, "run" is the stem of "run", "runs", "ran", and "running". A stemmed search returns more matching results than the exact words specified in the query. A stemmed search for a word finds the same terms as an unstemmed search, plus terms that derive from the same meaning and part of speech as the search term. For example, a stemmed search for run returns results containing run, running, runs, and ran. For details on stemming, see the chapter Understanding and Using Stemmed Searches in the Search Developer’s Guide. There are three types of stemming: basic (one stem per word), advanced (one or more stems per word), and decompounding (advanced plus smaller component words of large compound words). Without either this index or the word searches index, MarkLogic Server is unable to perform relevance ranking and will refuse to execute any cts:word-query()-related built-in function. If both the stemmed search and word search indexes are enabled, MarkLogic Server defaults to performing stemmed searches (unless an unstemmed search is explicitly specified). Turn this index off if you want to disable stemmed searches. If word and stemmed search indexes are both off, then full-text searches are effectively disabled.
| |word searches (unstemmed)|On (index is built)|Enables MarkLogic Server to return relevance ranked results which match exact words in text elements. Either this index or the stemmed search index is needed for MarkLogic Server to execute any cts:word-query()-related function. For many applications, keeping this word search index off and the stemmed search index on is sufficient to return the desired results for queries. Turn this index on if you want to do exact word-only matches. If word and stemmed search indexes are both off, then full-text searches are effectively disabled.|
|Index|Default Setting|Description| |---|---|---| | | | | |word positions|Off (index is not built)|Speeds up the performance of proximity queries that use the cts:near-query function and of multi-word phrase searches. Turn this index off if you are not interested in proximity queries or phrase searches and if you want to conserve disk space and decrease loading time. If you turn this option on, you might find that you no longer need fast phrase searches, as they have some overlapping functionality.| |fast phrase searches|On (index is built)|Accelerates phrase searches by building additional indexes that describe sequences of words at load (or reindex) time. Without this index, MarkLogic Server will still perform phrase searches, just more slowly. Turn this index off if only a small percentage of your queries will contain phrase searches, and if conserving disk space and enhancing load speed is more important than the performance of those queries.| |fast case sensitive searches|On (index is built)|Accelerates case sensitive searches by building both case sensitive and case insensitive indexes at load time. Without this index, MarkLogic Server will still perform case sensitive searches, just more slowly. Turn this index off if only a small percentage of your text searches will be case sensitive, and if conserving disk space and enhancing load speed is more important than the performance of those queries.| |fast reverse searches|Off (index is not built)|Speeds up reverse query searches by indexing stored queries. Turn this option on to speed up searches that use cts:reverse-query.| |fast diacritic sensitive searches|On (index is built)|Speeds up diacritic-sensitive searches by eliminating some false positive results. Turn this option off if you do not want to do diacritic-sensitive searches.| |fast element word searches|On (index is built)|Accelerates searches that look for words in specific elements by building additional indexes at load time. Without this index, MarkLogic Server will still perform these searches, just more slowly. Turn this index off if only a small percentage of your queries rely on finding words within specific document elements, and if conserving disk space and enhancing load speed is more important than the performance of those queries.|
|Index|Default Setting|Description| |---|---|---| | | | | |element word positions|Off (index is not built)|Speeds up the performance of proximity queries that use the cts:near-query function in an element and of multi-word element phrase searches. Turn this index off if you are not interested in proximity queries and if you want to conserve disk space and decrease loading time.| |fast element phrase searches|On (index is built)|Accelerates phrase searches on elements by building additional indexes that describe sequences of words in elements at load (or reindex) time. Without this index, MarkLogic Server will still perform phrase searches, just more slowly. Turn this index off if only a small percentage of your queries will contain phrase searches at the element level, and if conserving disk space and enhancing load speed is more important than the performance of those queries.| |element value positions|Off (index is not built)|Speeds up the performance of proximity queries that use the cts:element-value-query function. Turn this index off if you are not interested in proximity queries and if you want to conserve disk space and decrease loading time.| |attribute value positions|Off (index is not built)|Speeds up the performance of proximity queries that use the cts:element-attribute-value-query function and speeds up cts:element-query searches that us attribute query constructors. Turn this index off if you are not interested in proximity queries and if you want to conserve disk space and decrease loading time.| |field value searches|Off (index is not built)|Speeds up the performance of field value searches that use the cts:field-value-query function. Without this index or the corresponding index on the field definition, queries that use cts:field-value-query will throw an exception. Turn this index off if you are not interested in field value queries and if you want to conserve disk space and decrease loading time.|
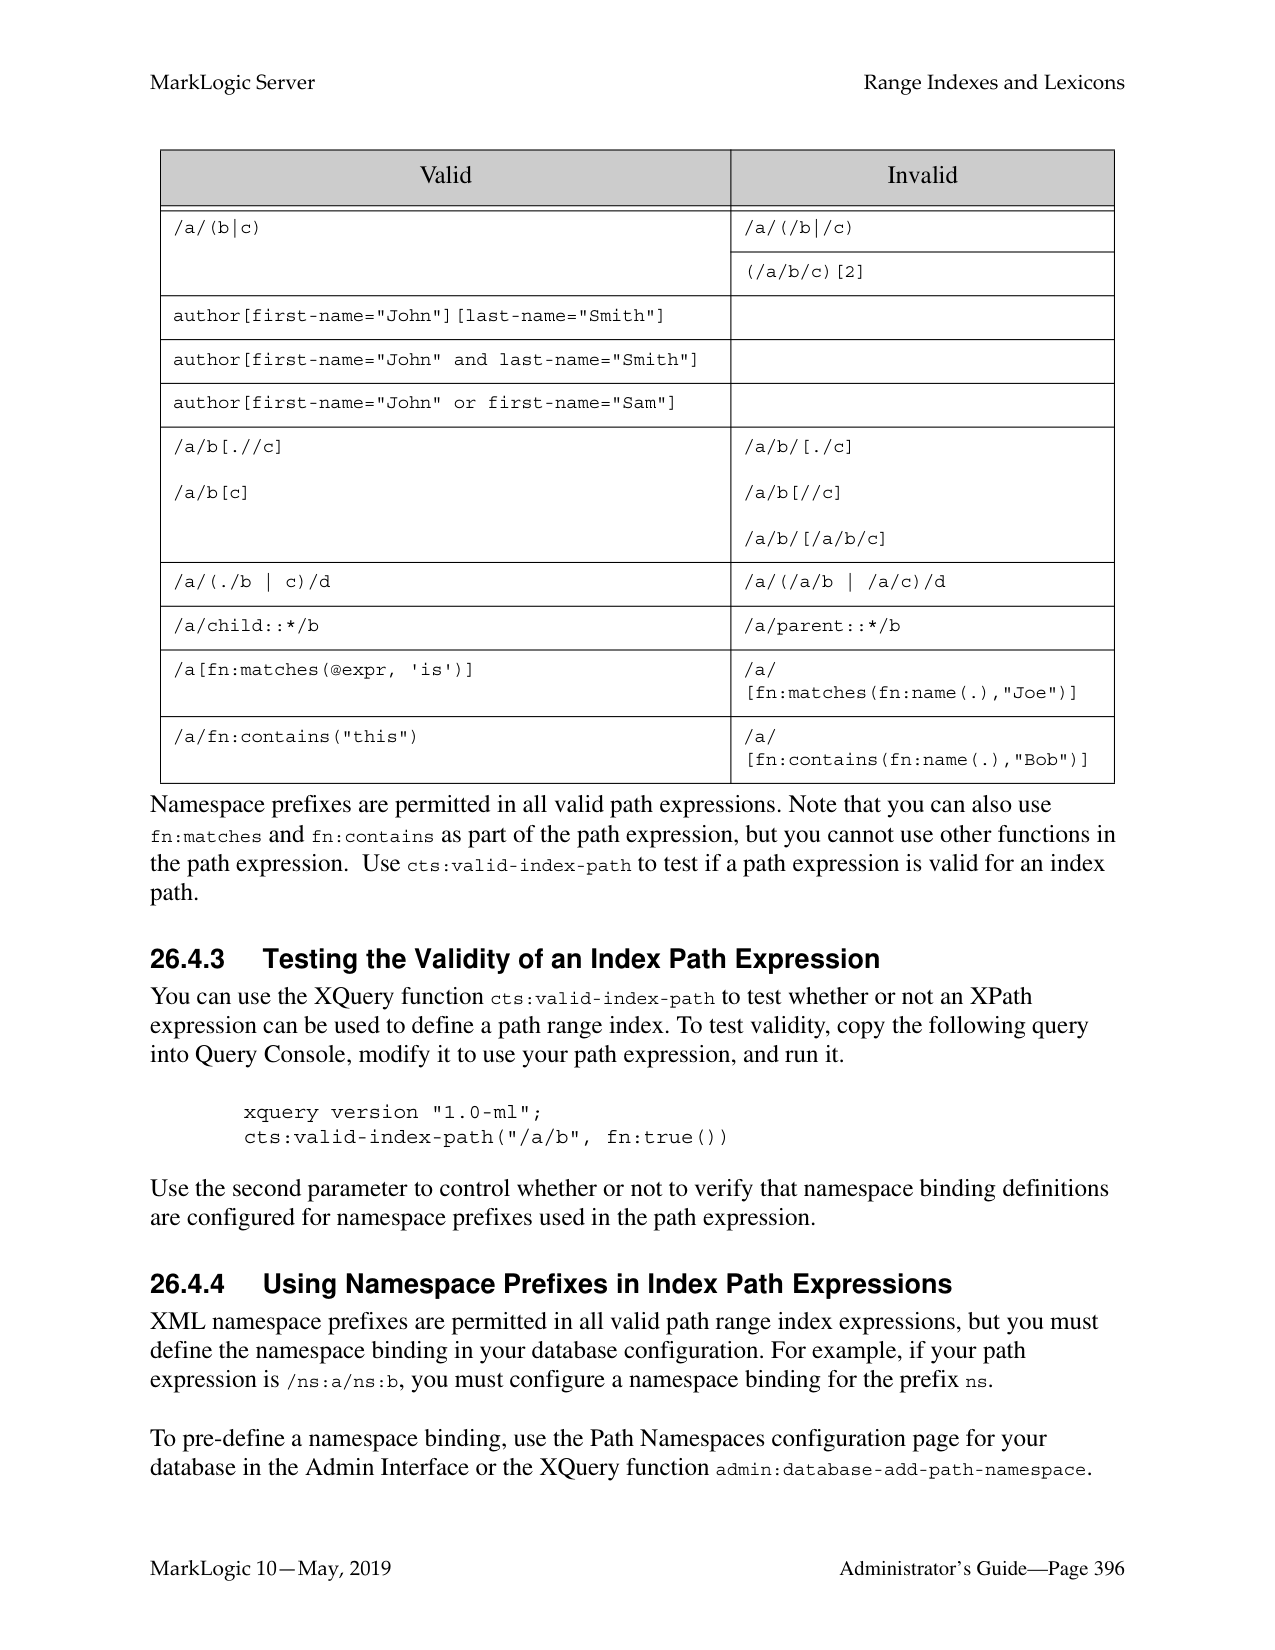
|field value positions|Off (index is not built)|Speeds up the performance of proximity queries that use the cts:field-value-query function. Turn this index off if you are not interested in proximity queries and if you want to conserve disk space and decrease loading time.|
|Index|Default Setting|Description| |---|---|---| | | | | |trailing wildcard searches|Off (index is not built)|Speeds up wildcard searches where the search pattern contains the wildcard character at the end (for example, abc*). Turn this index on to speed up wildcard searches that match a trailing wildcard. The trailing wildcard search index uses roughly the same space as the three character searches index, but is more efficient for trailing wildcard queries. It does not speed up queries where the wildcard character is at the beginning of the term.| |trailing wildcard word positions|Off (index is not built)|Speeds up the performance proximity queries that use trailing-wildcard word searches, such as wildcard queries that use the cts:near-query function and multi-word phrase searches that contain one or more wildcard terms. Turn this index on if you are using trailing wildcard searches and proximity queries together in the same search.| |fast element trailing wildcard searches|Off (index is not built)|Faster wildcard searches with the wildcard at the end of the search pattern within a specific element, but slower document loads and larger database files.| |three character searches|Off (index is not built)|Speeds up wildcard searches where the search pattern contains three or more consecutive non-wildcard characters (for example, abc*x, *abc, a?bcd). When combined with a codepoint word lexicon, speeds the performance of any wildcard search (including searches with fewer than three consecutive non-wildcard characters). MarkLogic recommends combining the three character search index with a codepoint collation word lexicon. For details on wildcard characters, see Understanding and Using Wildcard Searches in the Application Developer’s Guide. When character indexing is turned on, performance is also improved for fn:contains(), fn:matches(), fn:starts-with() and fn:ends-with() for most query expressions. Turn this index on if you want to enable wildcard searches that match three or more characters. If you need wildcard searches to match only two or one characters, then you should enable two character searches and/or one character searches.
| |three character word positions|Off (index is not built)|Speeds up the performance of proximity queries that use three-character word searches, such as queries that use the cts:near-query function and multi-word phrase searches that contain one or more wildcard terms. Turn this index on if you are using wildcard searches and proximity queries together in the same search.|
|Index|Default Setting|Description| |---|---|---| | | | | |two character searches|Off (index is not built)|Enables wildcard searches where the search pattern contains two or more consecutive non-wildcard characters. For details on wildcard characters, see Understanding and Using Wildcard Searches in the
Application Developer’s Guide. When character indexing is turned on in the database, the system also delivers higher performance for fn:contains(), fn:matches(), fn:starts-with() and fn:ends-with() for most query expressions. Turn this index on to speed up wildcard searches that match two or more characters (for example, ab*). This index is not needed if you have three character searches and a word lexicon.| |one character searches|Off (index is not built)|Speeds up wildcard searches where the search pattern contains only a single non-wildcard character. For details on wildcard characters, see Understanding and Using Wildcard Searches in the Application Developer’s Guide. When character indexing is turned on in the database, the system also delivers higher performance for fn:contains(), fn:matches(), fn:starts-with() and fn:ends-with() for most query expressions. Turn this index on if you want to enable wildcard searches that match one or more characters (for example, a*). This index is not needed if you have three character searches and a word lexicon.
| |fast element character searches|Off (index is not built)|Turn this index on to improve performance of wildcard searches that query specific XML elements or JSON properties. Also, speeds up element-based wildcard searches. Turn this index on to improve performance of wildcard searches that query specific elements. For details on wildcard characters, see Understanding and Using Wildcard Searches in the Application Developer’s Guide.
|
|Index|Default Setting|Description| |---|---|---|
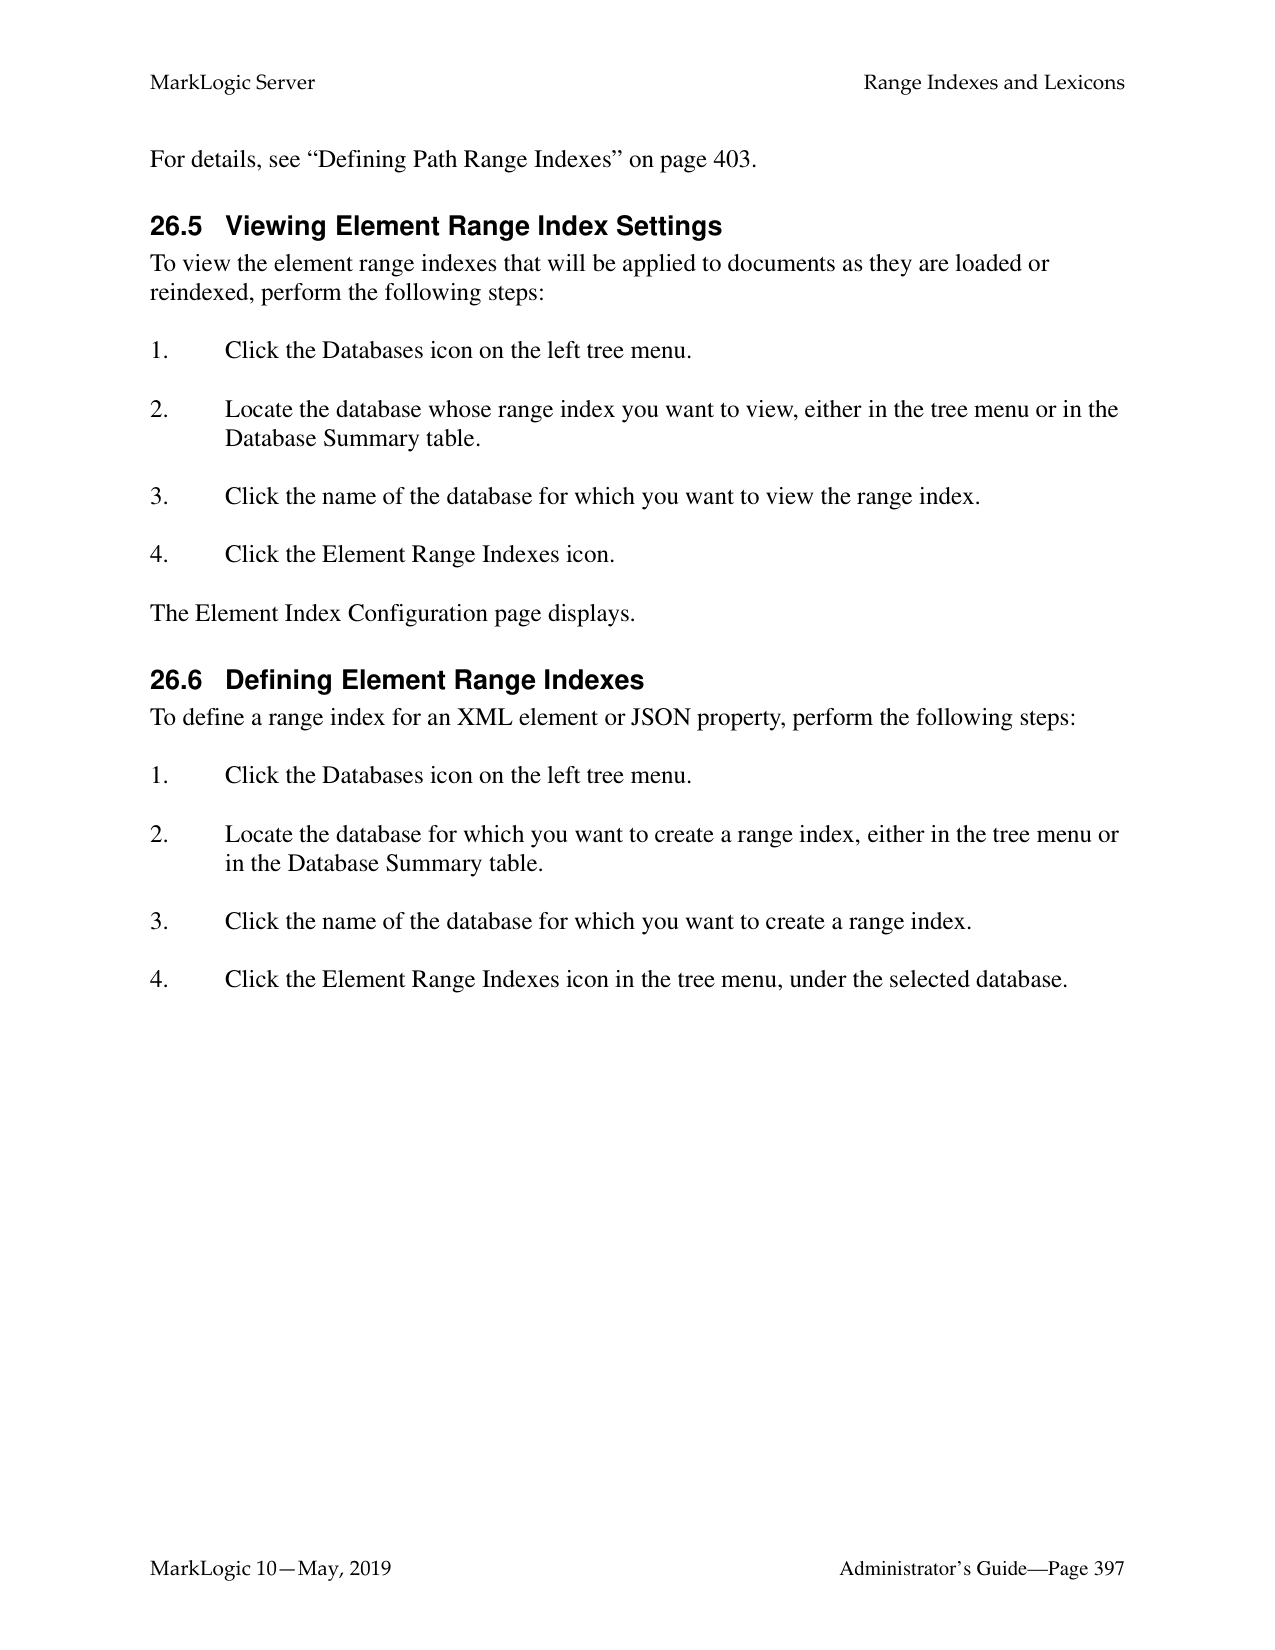
| | | | |word lexicons|Off (index is not built)|Maintains a lexicon of all of the words in a database, with uniqueness determined by a specified collation. For details on lexicons, see “Range Indexes and Lexicons” on page 389 and the chapter on lexicons in the Application Developer’s Guide. For details on collations, see the Language Support in MarkLogic Server chapter in the Search Developer’s Guide.
Speeds up wildcard searches. Works in combination with any other available wildcard indexes to improve search index resolution and performance. When used in conjunction with the three character search index, improves wildcard index resolution and speeds up
wildcard searches. If you have three character search and a word lexicon enabled for a database, then there is no need for either the one character or two character search indexes. For best performance, the word lexicon should be in the codepoint collation (http://marklogic.com/collation/codepoint). For details on wildcard searches, see the chapter on wildcard searches in the Application Developer’s Guide.| |uri lexicon|On (index is built)|Maintains a lexicon of all of the URIs used in a database. The URI lexicon speeds up queries that constrain on URIs. It is like a range index of all of the URIs in the database. To access values from the URI lexicon, use the cts:uris or cts:uri-match APIs.| |collection lexicon|On (index is built)|Maintains a lexicon of all of the collection URIs used in a database. The collection lexicon speeds up queries that constrain on collections. It is like a range index of all of the collection URIs in the database. To access values from the collection lexicon, use the cts:collections or cts:collection-match APIs.|
############ 4. Scroll down until the text index settings are visible. The following screen shots show thedefault configuration of text indexing for a database:


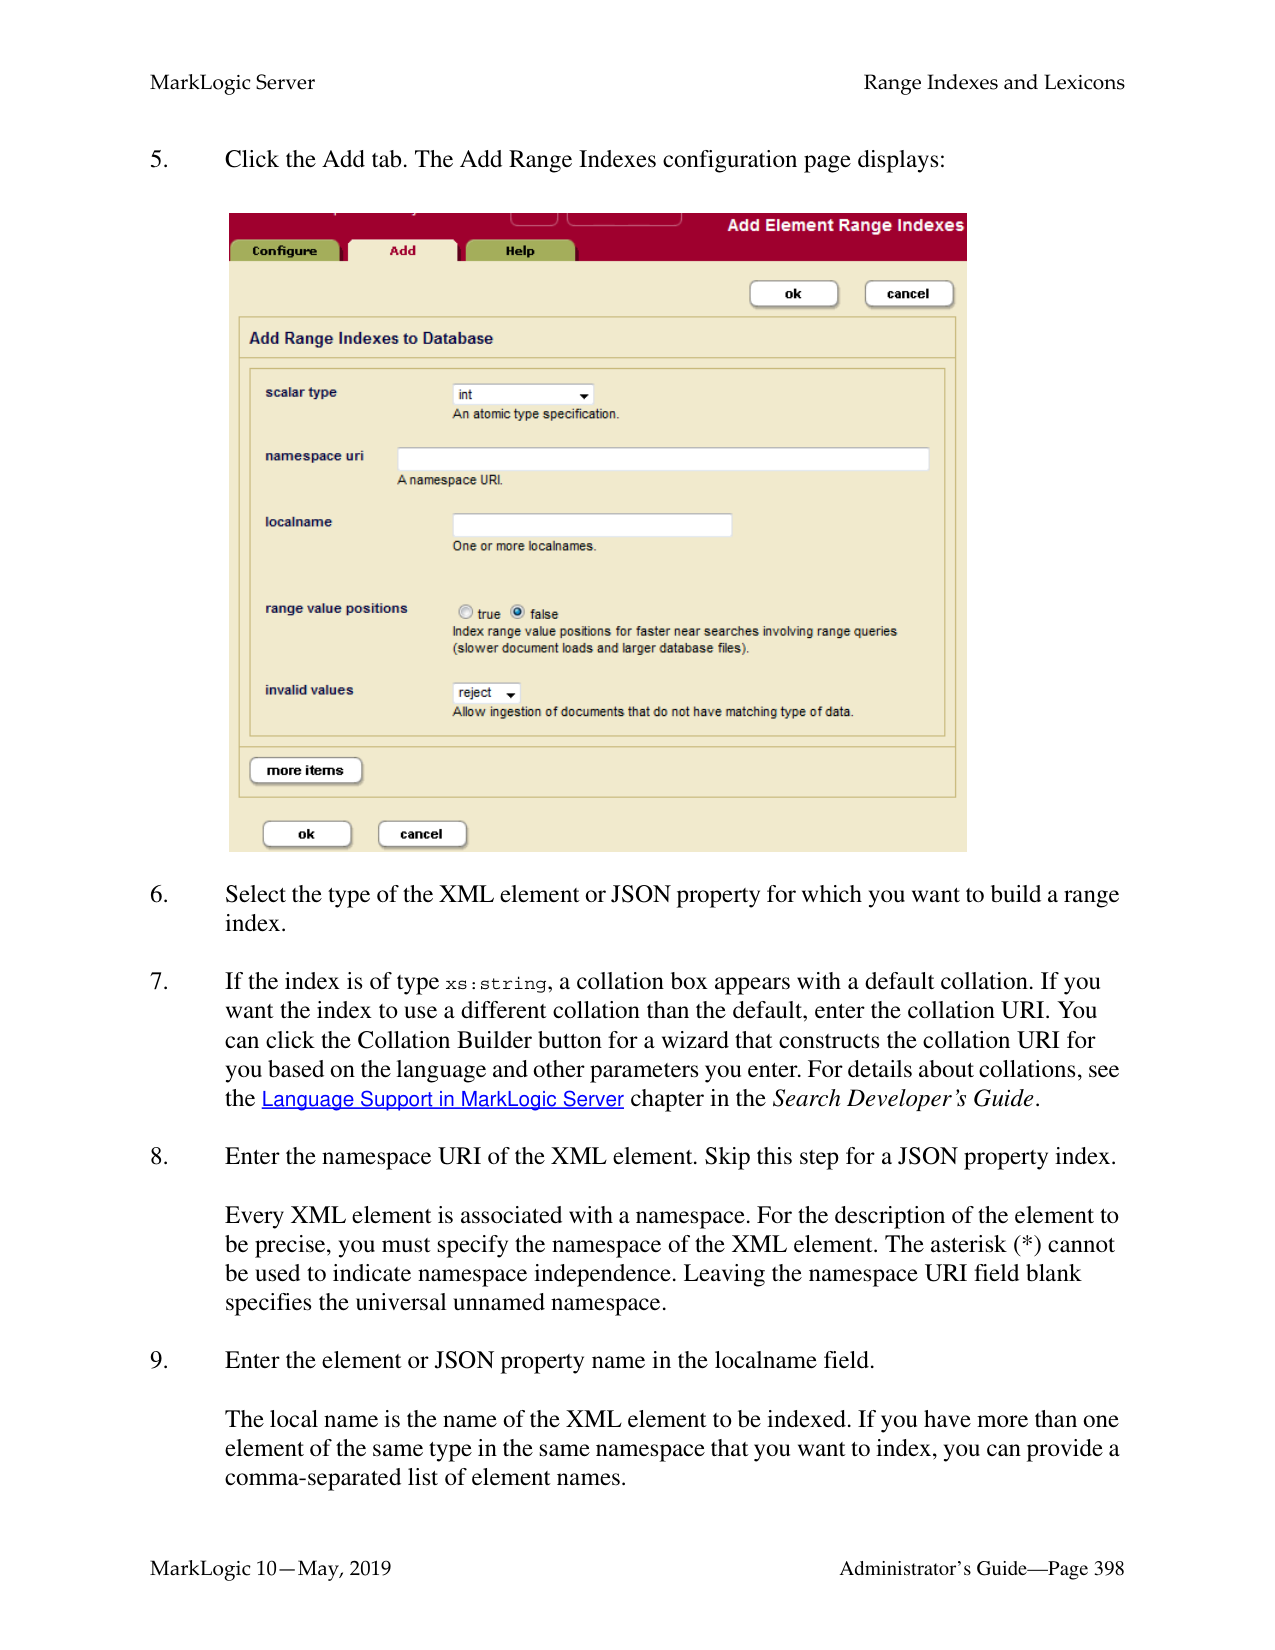
Click on the true radio button for a particular text index type if you want that index to be maintained. Click on the false radio button for a particular text index type if you do not want that index to be maintained.
Note: If word searches and stemmed searches are disabled (that is, the false radio button is selected for word searches and off is selected for stemmed searches), the settings for the other text indexes are ignored, as explained above.
######### 25.2 Phrasing and Element-Word-Query Boundary Control
MarkLogic Server allows you to specify how XML element constructors impact text phrasing and element-word-query boundaries for searches. This section has the following parts:
######### 25.2.1 Phrasing Control
By default, MarkLogic Server assumes that any XML element constructor acts as a phrase boundary. This means that phrase searches (for example, searches for sequences of terms) will not match a sequence of terms that contains one or more XML element constructors. Phrasing control lets you specify which XML elements should be transparent to phrase boundaries (for example, a bold or italic element), and which XML elements should be ignored for phrase purposes (for example, footnotes or graphic captions).
For example, consider the following sample XML fragment:
By default, MarkLogic Server would extract the following five sequences of text for phrase matching purposes (ignoring punctuation and case for simplicity):
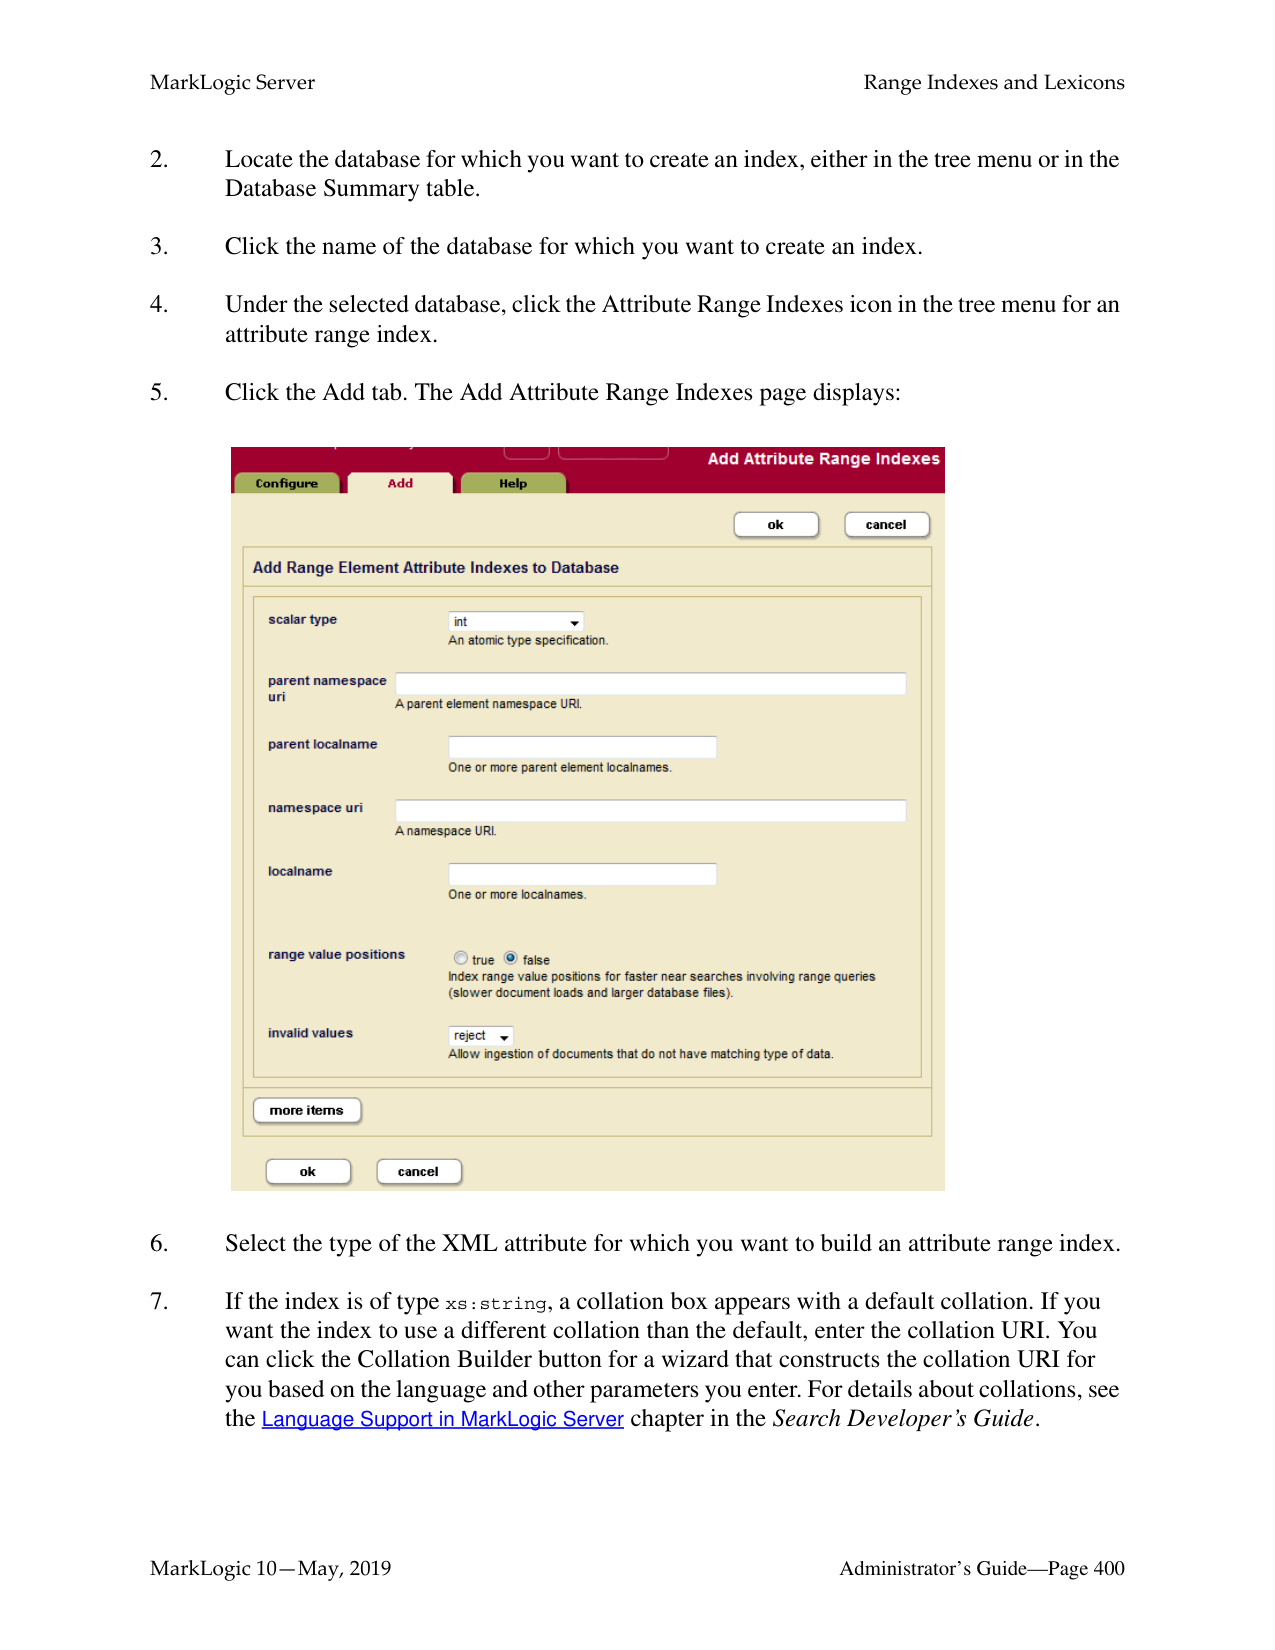
If you then attempted to match the phrases “words are italicized” or “element is a standard part” against this XML fragment, no matches would be found, because of the embedded XML element constructors.
In fact, a human looking at this XML fragment would realize that the italic element should be transparent for phrasing purposes, and that the footnote element is a completely independent text container. Seen from this viewpoint, the XML fragment shown above contains only two text sequences (again, ignoring punctuation and case for simplicity):
In this case, “words are italicized” and “element is a standard part” would each properly generate a match. But a search for “the w3c xml standard is a standard” would not result in a match.
MarkLogic Server lets you achieve this type of phrasing control by specifying particular XML element names as phrase-through, phrase-around, and element-word-query-through elements:
|Type|Definition| |---|---| | | | |Phrase-through|Elements that should not create phrase boundaries (as in the example above, italic should be specified as a phrase-through element).| |Phrase-around|Elements whose content should be completely ignored in the context of the current phrase (as in the example above, footnote should be specified as a phrase-around element).|
Phrase controls are configured on a per-database basis. You should complete this configuration before loading any documents into the specified database; otherwise, in order for the changes to take effect with your existing content, you must either reload the content or reindex the database after changing the configuration.
######### 25.2.2 Element Word Query Throughs
Element-word-query-throughs allow you to specify elements that should be included in text searches that use cts:element-word-query on a parent element. For example, consider the following XML fragment:
If you perform a cts:element-word-query on searching for the word hello, the search does not find any matches in this fragment. The following query shows this pattern:
cts:search(fn:doc(), cts:element-word-query(xs:QName("a"), "hello"))
This query does not find any matches because cts:element-word-query only searches for text nodes that are immediate children of the element , not text nodes that are children of any child nodes of . Because hello is in a text node that is a child of , it does not satisfy the cts:element-word-query.
If you add an element-word-query-through for the element , however, then the cts:element-word-query on searching for the word hello returns a match. The element-word-query-through on causes the text node children of behave like the text node children of its parent (in this case, ).
Note: If an element is specified as a phrase-through, then it also behaves as an element-word-query-through, and therefore you do not need to specify it as an element-word-query-through.
########## 25.2.3 ProceduresUse the following procedures to configure phrase controls for a particular database:
######### 25.2.3.1 Viewing Phrasing and Element-Word-Query Settings
To view element-word-query-through, phrase-through, and phrase-around settings for a particular database, complete the following procedure in the Admin Interface:
The following example shows that the Documents database has been configured with a number of phrase-through elements, including the , , , ,
and

######### 25.2.3.2 Configuring Phrasing and Element-Word-Query Settings
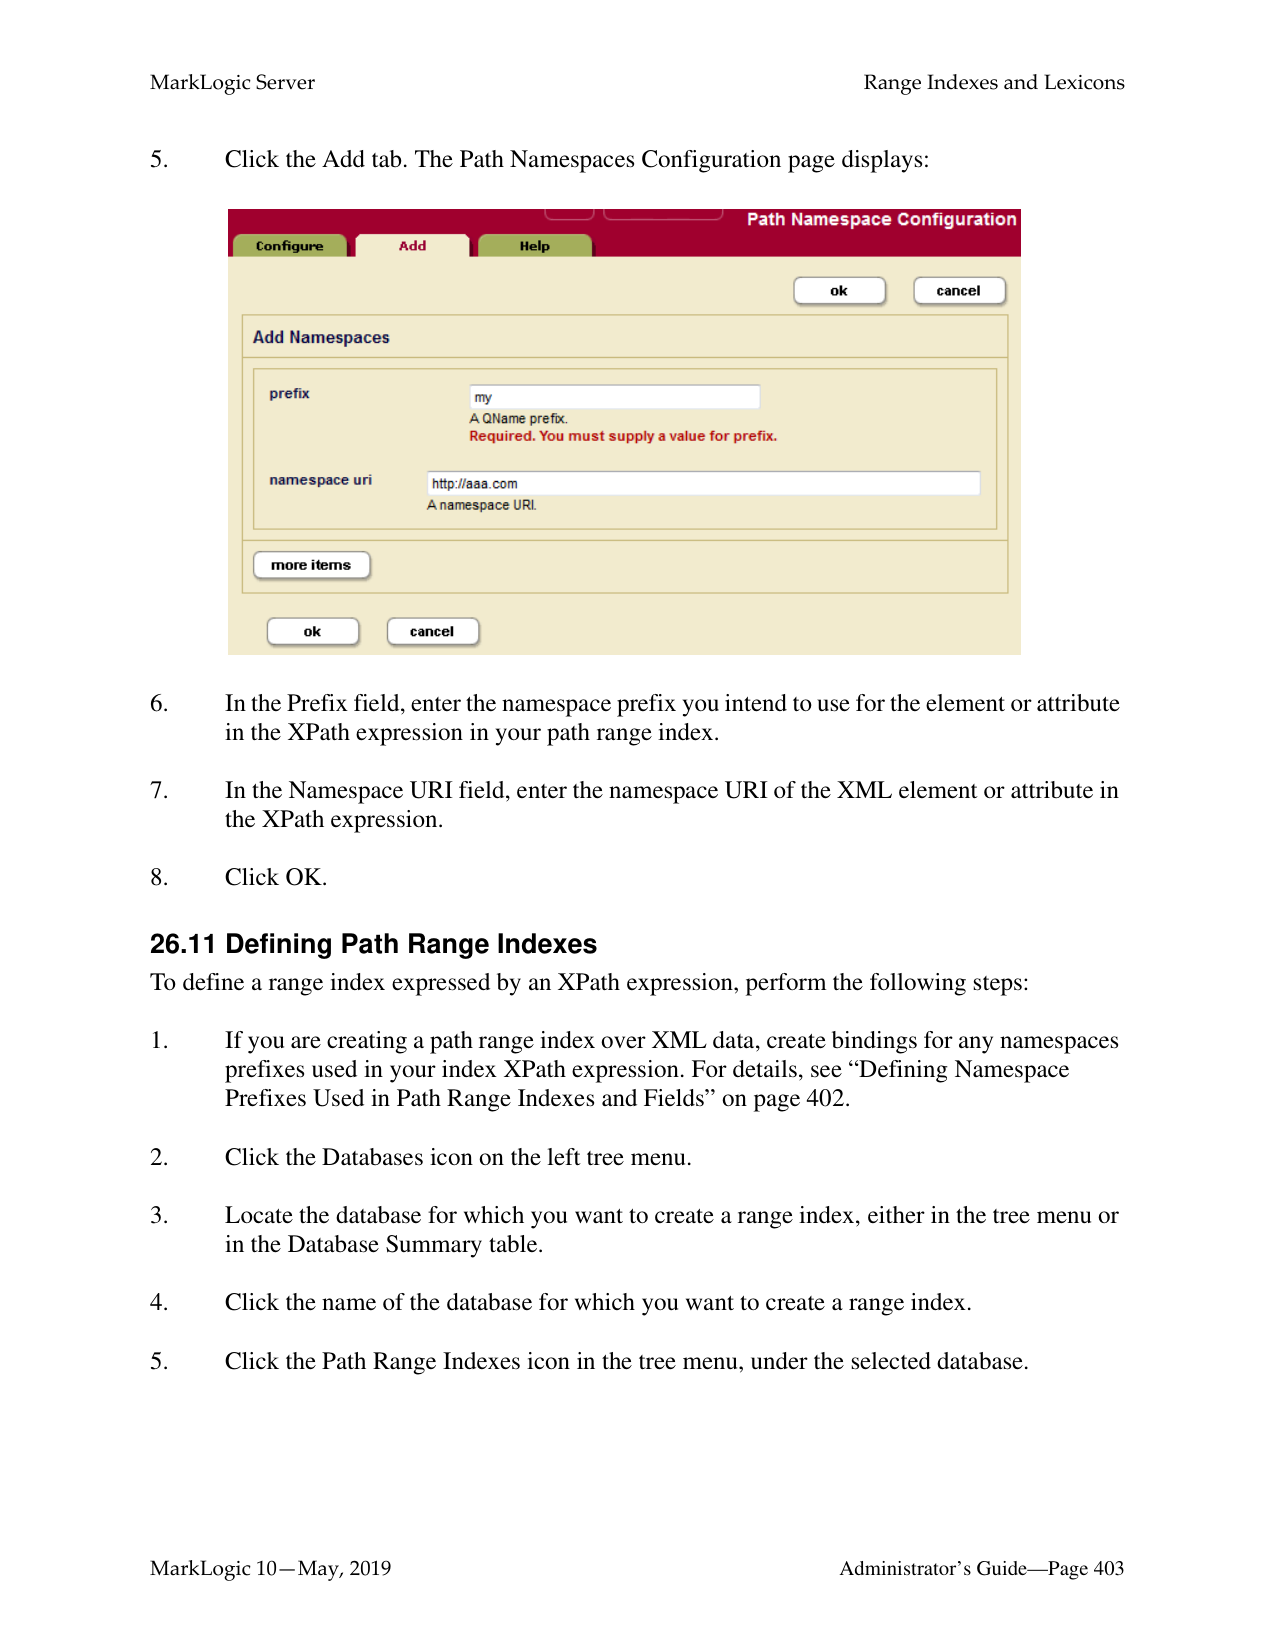
To configure element-word-query-through, phrase-through, and phrase-around settings for a particular database, perform the following procedure in the Admin Interface:
Note: The remainder of this procedure will assume that you have chosen to configure phrase-through settings. If you wish to configure phrase-around or element-word-query-through settings, the steps are completely analogous, once you have clicked on the corresponding icon.
Every XML element is associated with a namespace. For the phrase-through setting to be precise, you must specify the namespace of the XML element. Leaving the namespace URI field blank specifies the universal unnamed namespace.
Alternatively, you can specify that the element is namespace independent by putting an asterisk (*) in the namespace URI field.
The local name is the name of the XML element that you are specifying as a phrase-through element. If you want to specify more than one element that is associated with the specified namespace, you can provide a comma-separated list of element names.
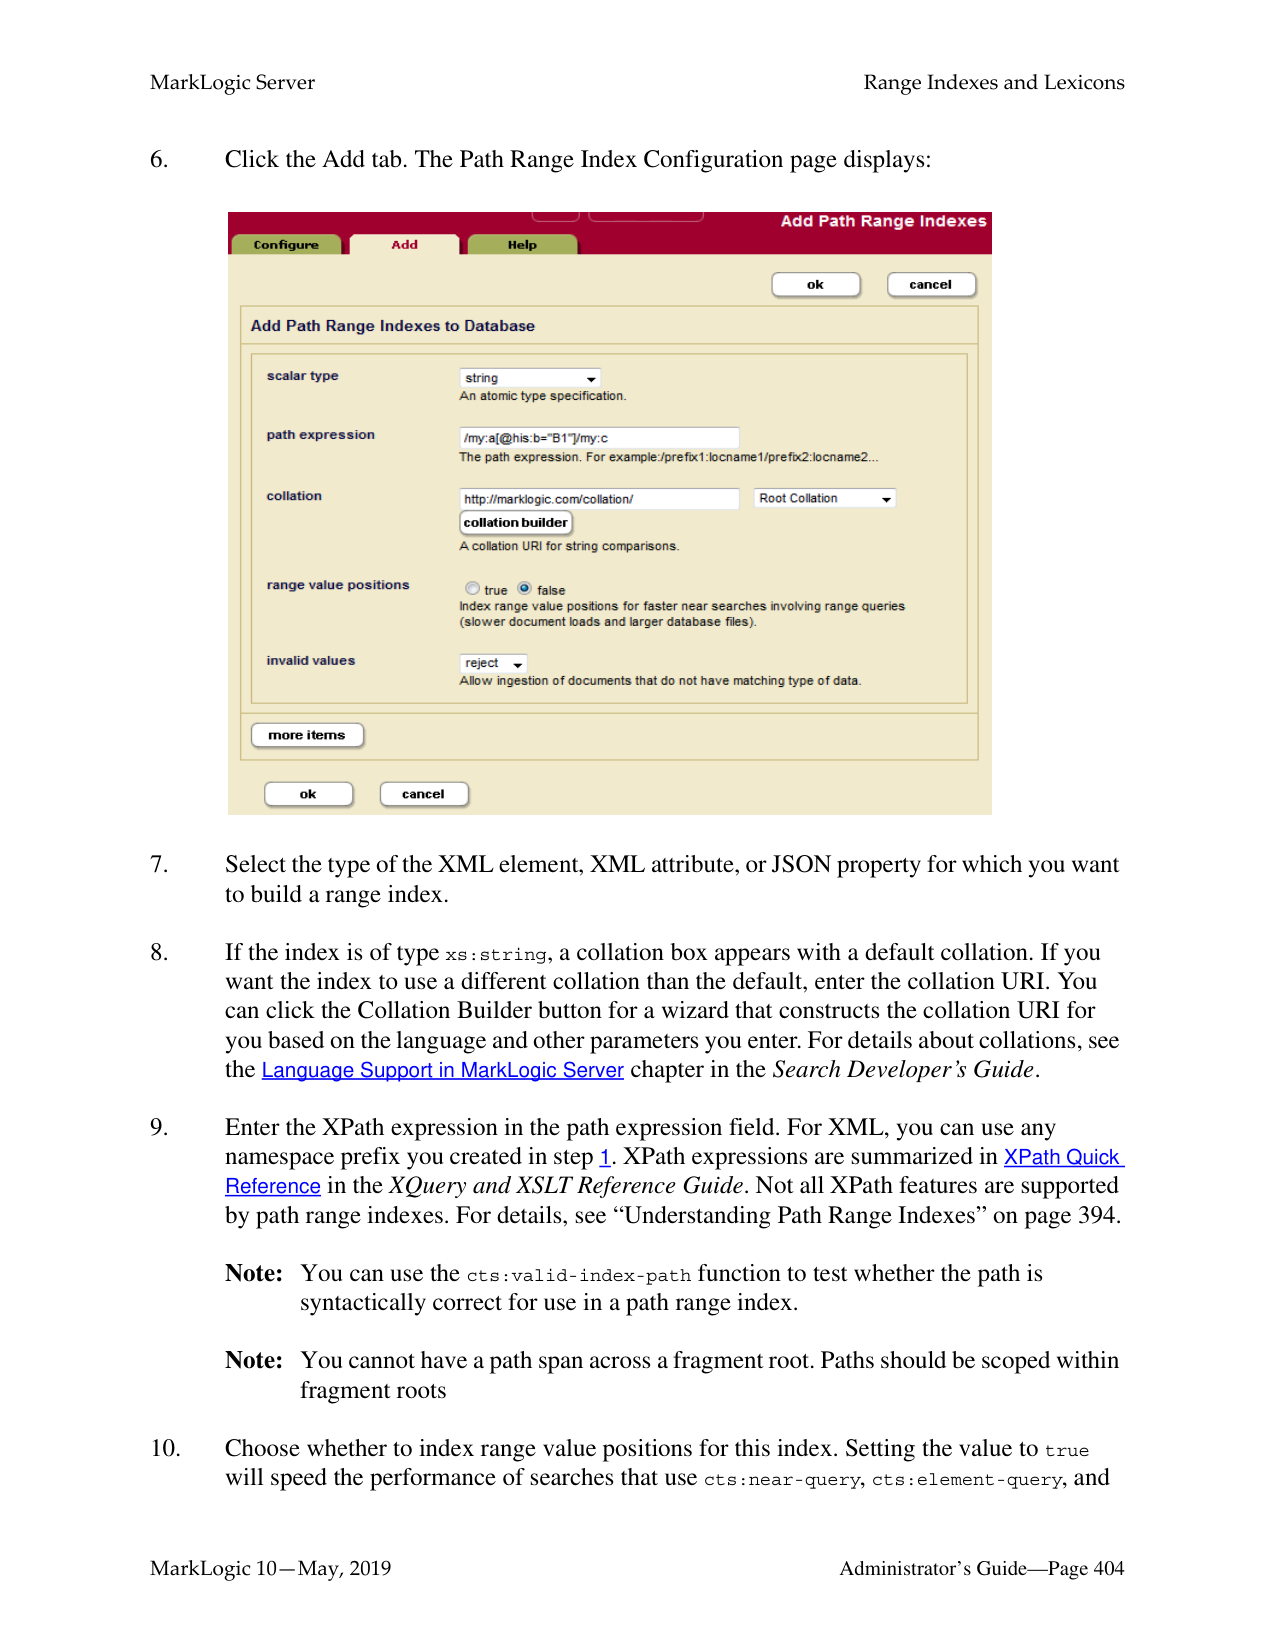

Note: If you change the element-word-query-through, phrase-through, or phrase-around settings for a particular database after documents have already been loaded, you should reindex your existing data, either by setting the reindexer enable setting to true for that database or by reloading the data.
######### 25.2.3.3 Deleting a Phrasing or Element-Word-Query Setting
To delete an element-word-query-through, phrase-through, or phrase-around setting for a particular database, perform the following procedure in the Admin Interface:
Note: If you change the element-word-query-through, phrase-through, or phrase-around settings for a particular database after documents have already been loaded, you should reindex your existing data, either by setting the reindexer enable setting to true for that database or by reloading the data.
######### 25.3 Query Behavior with Reindex Settings Enabled and Disabled
When you load a document into a database, it is indexed based on the index settings at the time of the load. When you issue a query to a database, it is evaluated based on a consistent view of the index settings. This consistent view might not include all of the index features that are enabled in the database. This section describes the behavior of queries at various index-setting states of the database, and includes the following parts:
######### 25.3.1 Understanding the Reindexer Enable Settings
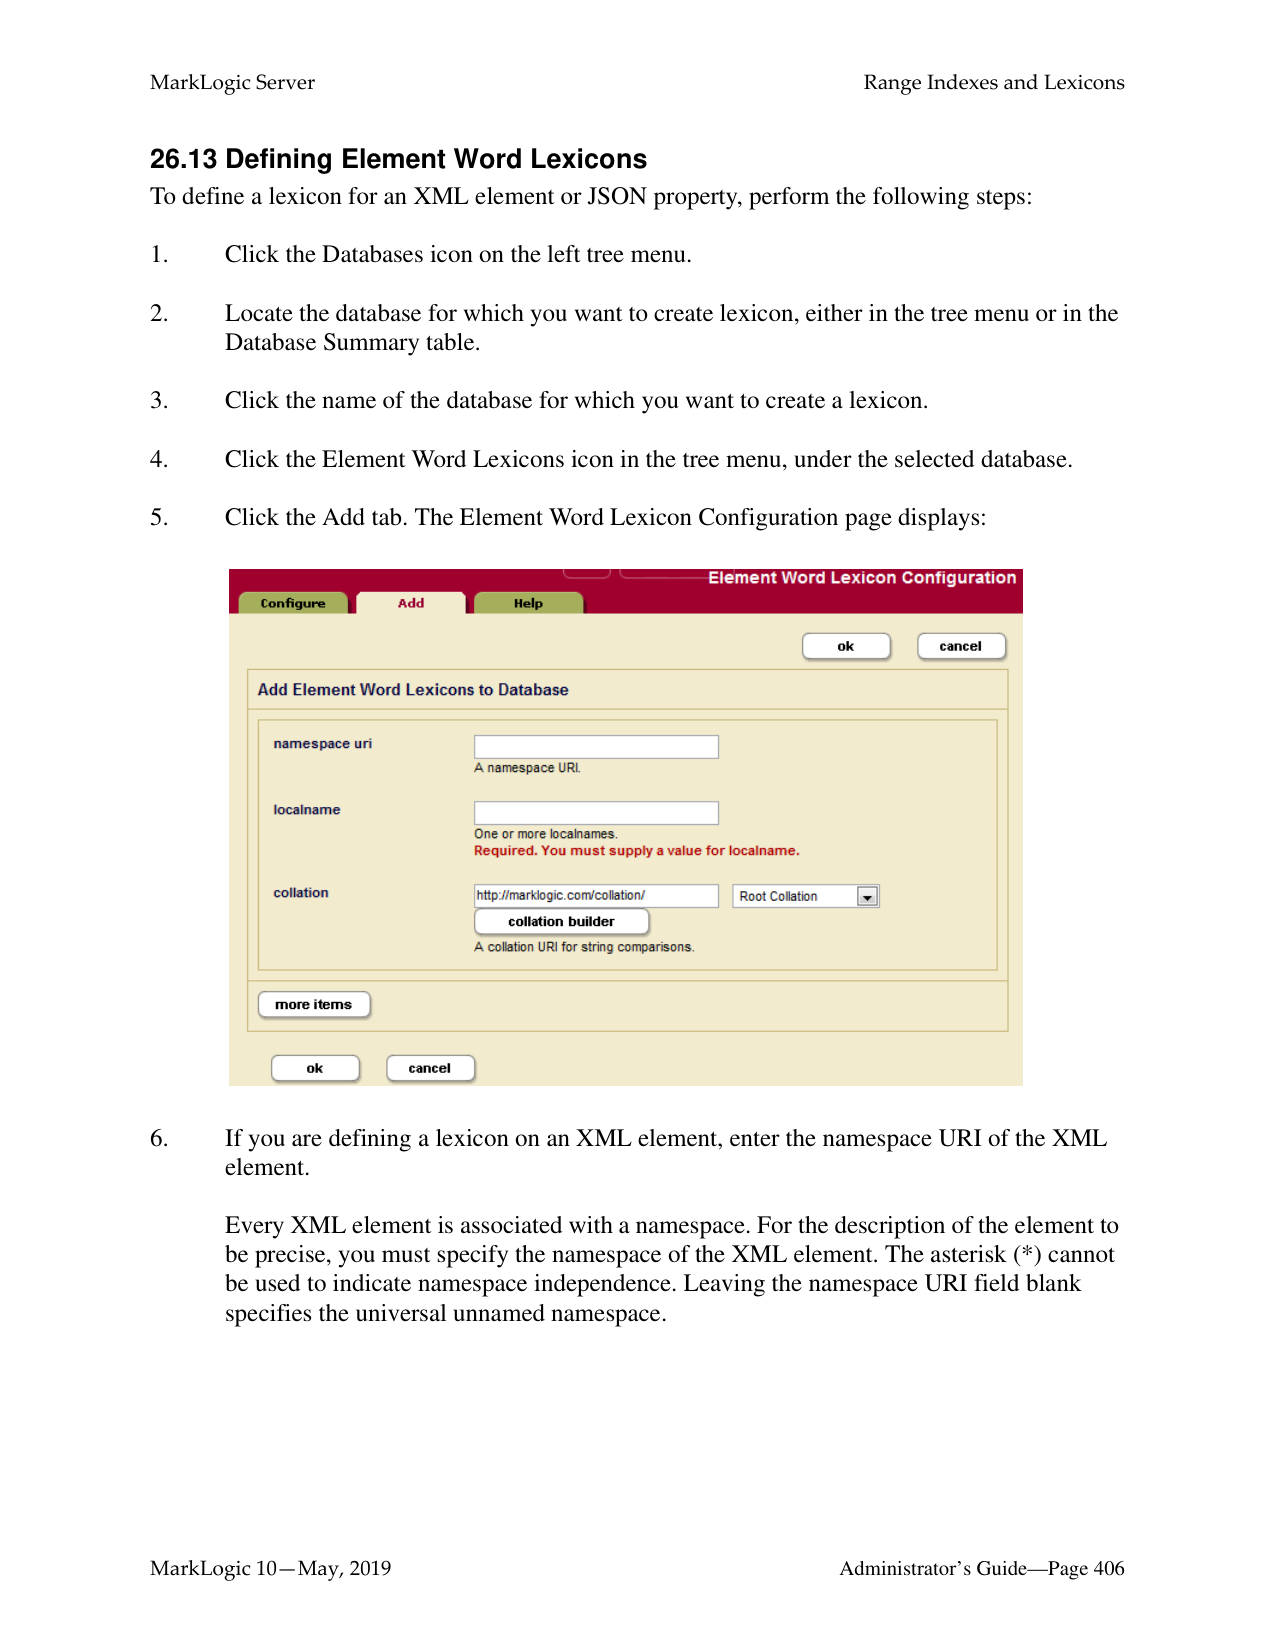
######### 25.3.2 Query Evaluation According to the Lowest Common Denominator
When queries are evaluated, they use the index settings that are calculated for the database at a given time. The current index settings for a query are determined at the time of query evaluation, and are based on the lowest common denominator of (that is, the index/fragmentation settings that are the least of) the following:
At any given time, the current lowest common denominator is invalidated upon the following events:
If the lowest common denominator is invalidated, it is recalculated the next time a query is issued against the database.
The net impact is that, when index/fragmentation settings have changed on a database after any data is loaded, queries cannot take advantage of the new settings until the new settings meet the lowest common denominator criteria. Depending on the types of index setting changes you make, this can cause queries that behaved one way before index settings were changed to behave differently after the changes. The next section provides a sample scenario to help illustrate this behavior.
######### 25.3.3 Reindexing Does Not Apply to Point-In-Time Versions ofFragments
If you have set a merge timestamp on the database to retain older versions of fragments for point-in-time queries, the older versions of the fragments will retain the indexing properties of the
######### 25.3.4 Example Scenario
This section describes a simple scenario showing the effect of changing index settings on query behavior over time.
The following figure shows how changing the index settings can effect queries that initiate after index setting changes occur.
Time
| | | | | | | | | |---|---|---|---|---|---|---|---| | | | | | | | | |
T1 T2 T3 T4 T6 T7
T5

load doc1
query doc1
load doc2
query doc1, doc2
query doc1
query settings:
query settings: - stemming
query settings: - stemming

In this scenario, the query issued at time T3 sees the doc1 document with stemming and
##### 26.0 Range Indexes and Lexicons
MarkLogic Server allows you to create, at the database level, indexes and lexicons on elements and attributes according to their QNames. This chapter describes these range indexes and lexicons. The following sections are included:
Additionally, you can create range indexes on fields, as described in “Creating a Range Index on a Field” on page 178.
This chapter describes how to use the Admin Interface to create range indexes and lexicons. For details on how to create range indexes programmatically, see Adding Indexes to a Database in the Scripting Administrative Tasks Guide.
######### 26.1 Understanding Range Indexes
This chapter describes the types of range indexes shown in the table below. There are also field range indexes, as described in “Creating a Range Index on a Field” on page 178.
|Type|Description| |---|---| | | | |Element range index|A range index on an XML element or JSON property.| |Attribute range index|A range index on an attribute in an XML element.| |Path range index|A range index on an XML element, XML attribute, or JSON property as defined by an XPath expression.| |Field range index|A range index on a field. For details, see “Fields Database Settings” on page 159.|
MarkLogic Server maintains a universal index for every database to rapidly search the text, structure, and combinations of the text and structure that are found within collections of XML and JSON documents.
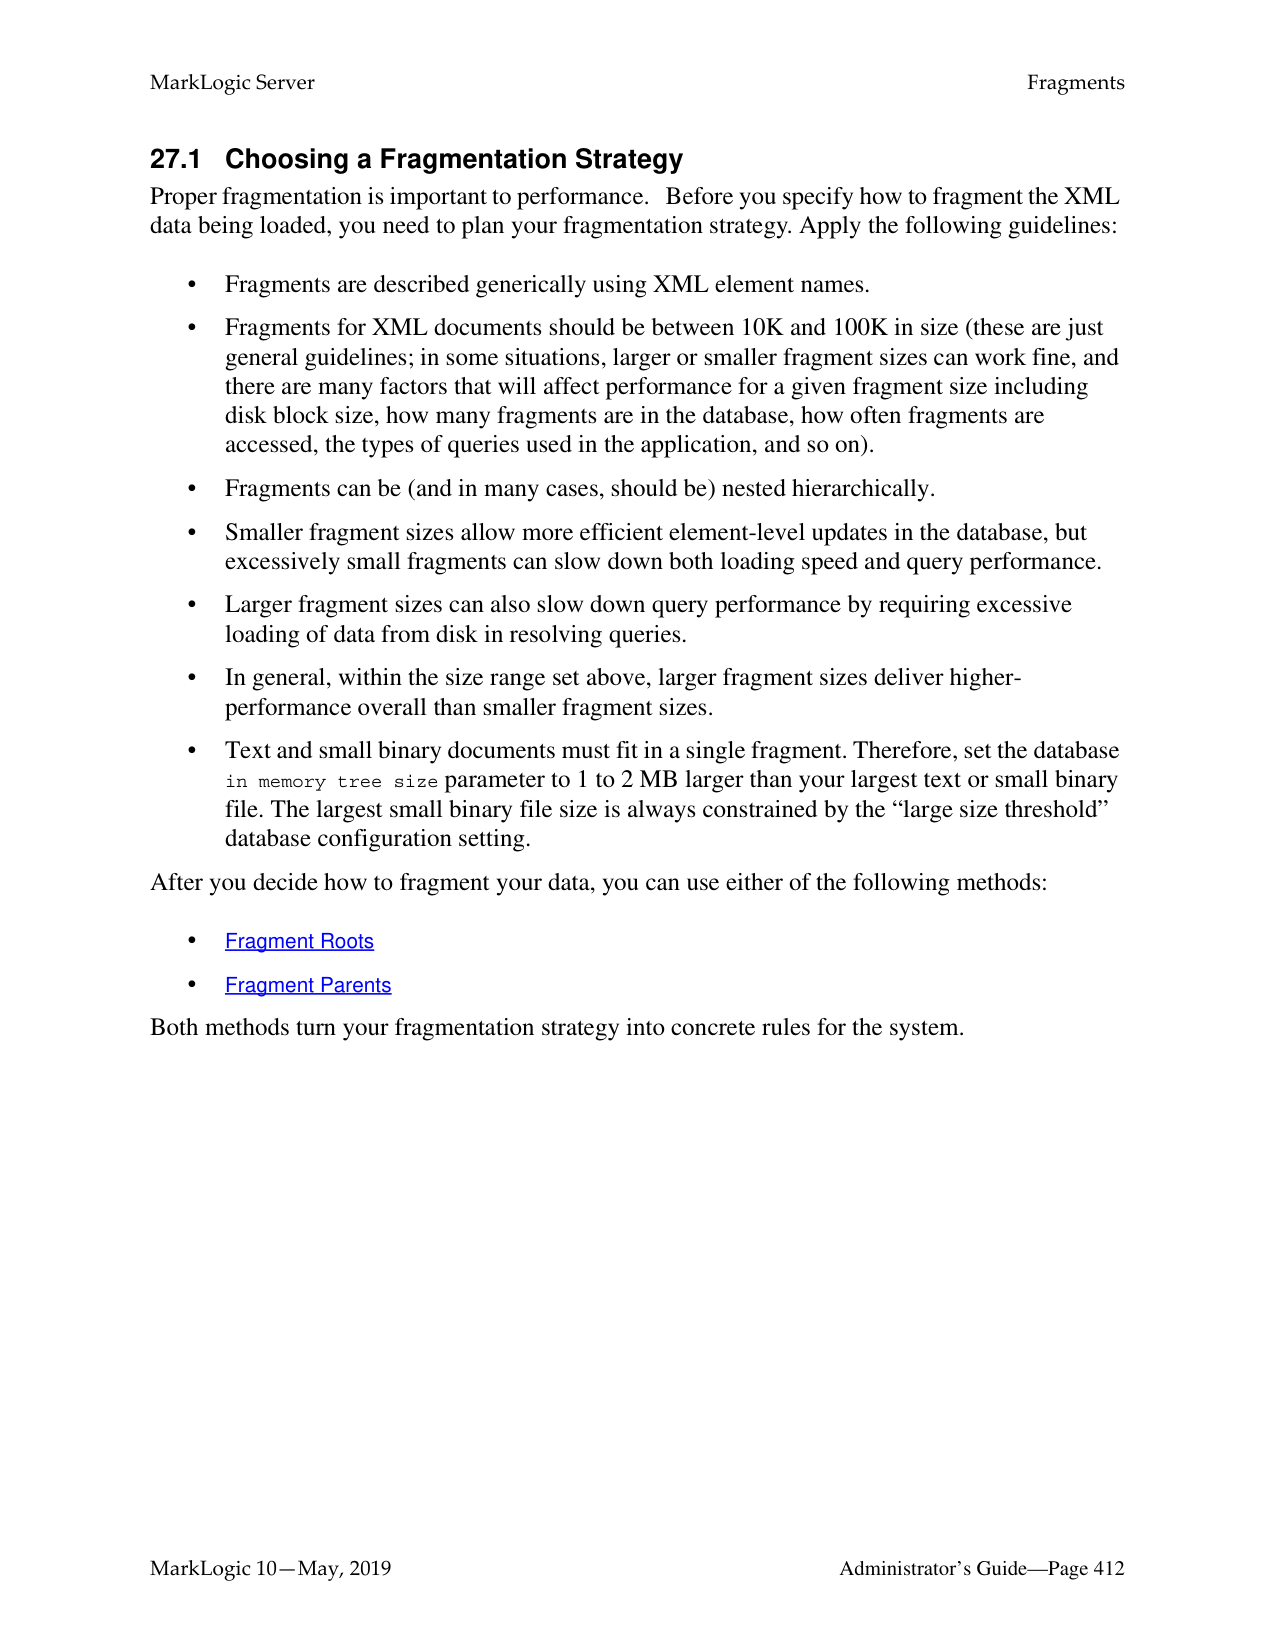
In some cases, however, XML and JSON documents can incorporate numeric or date information. Queries against these documents may include search conditions based on inequalities (for example, price < 100.00 or date ≥ thisQtr). Specifying range indexes for these elements, attributes, and/or JSON properties will substantially accelerate the evaluation of these queries.
Defining a range index also allows you to use the range query constructors (cts:element-range-query and cts:element-attribute-range-query) in cts:search operations, making it easy to compose complex range-query expressions to use in searches. For details, see the Using Range Queries in cts:query Expressions chapter in the Search Developer’s Guide.
Similarly, you can create range indexes of type xs:string. These indexes can accelerate the performance of queries that sort by the string values, and are also used for lexicon queries (see “Understanding Word Lexicons” on page 394).
If you specify a range index on an element, and if you have elements of that name that have complex content (for example, elements with child elements), the content is indexed based on a casting of the element to the specified type of the range index. For example, if you specify a range index of type xs:string on an element named h1, then the following element:
This is a bold title.
is indexed with the value of This is a bold title, which is the value returned by casting the h1 element to xs:string. The same type casting applies to range indexes on XML attributes, JSON properties, and fields. This behavior allows you to index complex content without pre-processing the content.
Also, range indexes can improve the performance of queries that sort the results using an order by clause and return a subset of the data (for example, the first ten items). For details on this order by optimization using range indexes, see Sorting Searches Using Range Indexes in the Query
Performance and Tuning Guide guide.
MarkLogic Server supports range indexes for both elements and attributes across a wide spectrum of XML data types. For the most part, this list conforms to the XML totally ordered data types:
|Type|Description| |---|---| | | | |int|Positive and negative integers| |unsignedInt|Positive integers (including 0)|
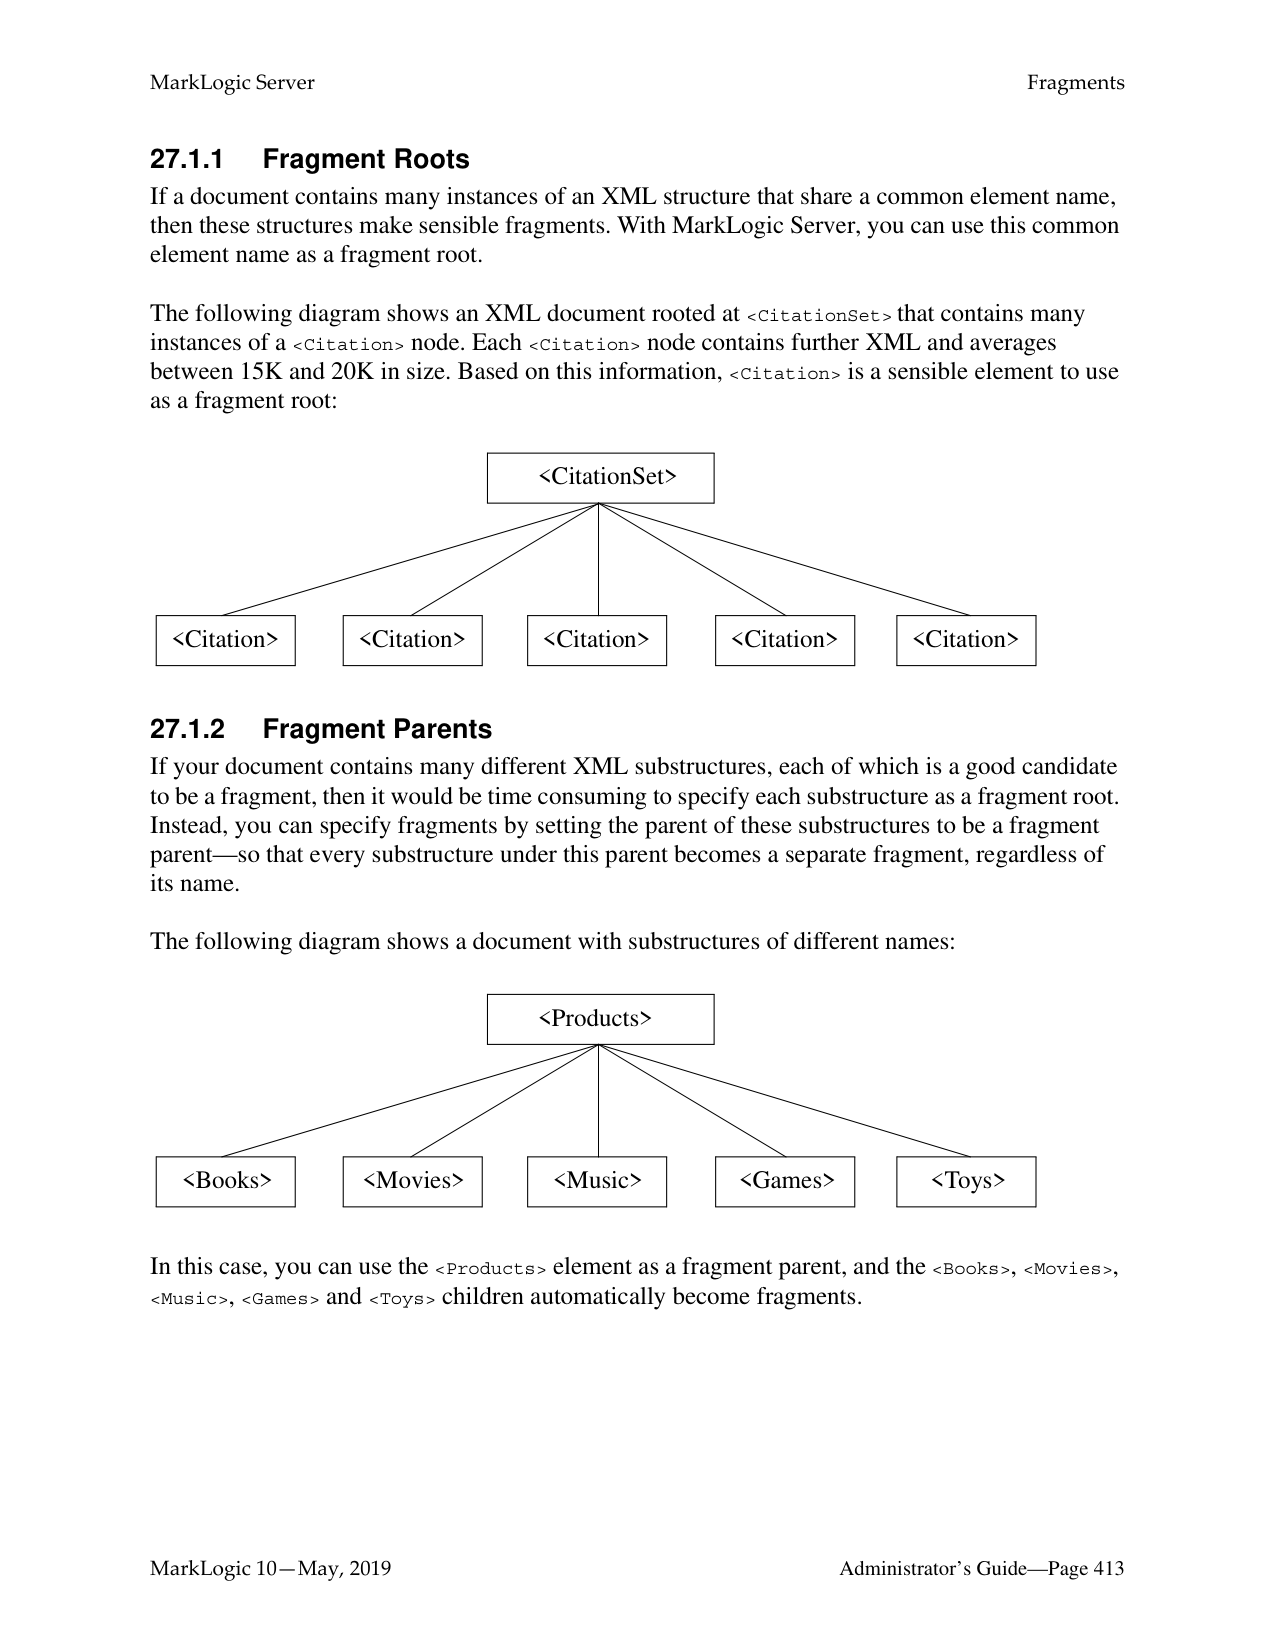
|long|Large positive and negative integers| |unsignedLong|Large positive integers (including 0)| |float|32-bit floating point numbers| |double|64-bit floating point numbers| |decimal|Large floating point numbers| |dateTime|Combined date and time| |time|Time (including timezone)| |date|Full date (year, month, day)| |gYearMonth|Year and month only| |gYear|Year only| |gMonth|Month only| |gDay|Day only| |yearMonthDuration|Duration of years and months| |dayTimeDuration|Duration of days and time| |string|String character data| |anyURI|A URI string|
It is important to note that the date and time types listed above adhere to the XML specification for dates and times. At present, other date and time formats are not supported by MarkLogic Server range indexes. For a more detailed description of the definition of these data types, consult the W3C XML Schema documents.
Range indexes must be explicitly created using the Admin Interface, the XQuery or JavaScript Admin API, or the REST Management API. To create a range index on a JSON property, use the element range index interfaces or functions. The following table outlines the basic information needed to define each kind of index:
|Index Type|Required Information|
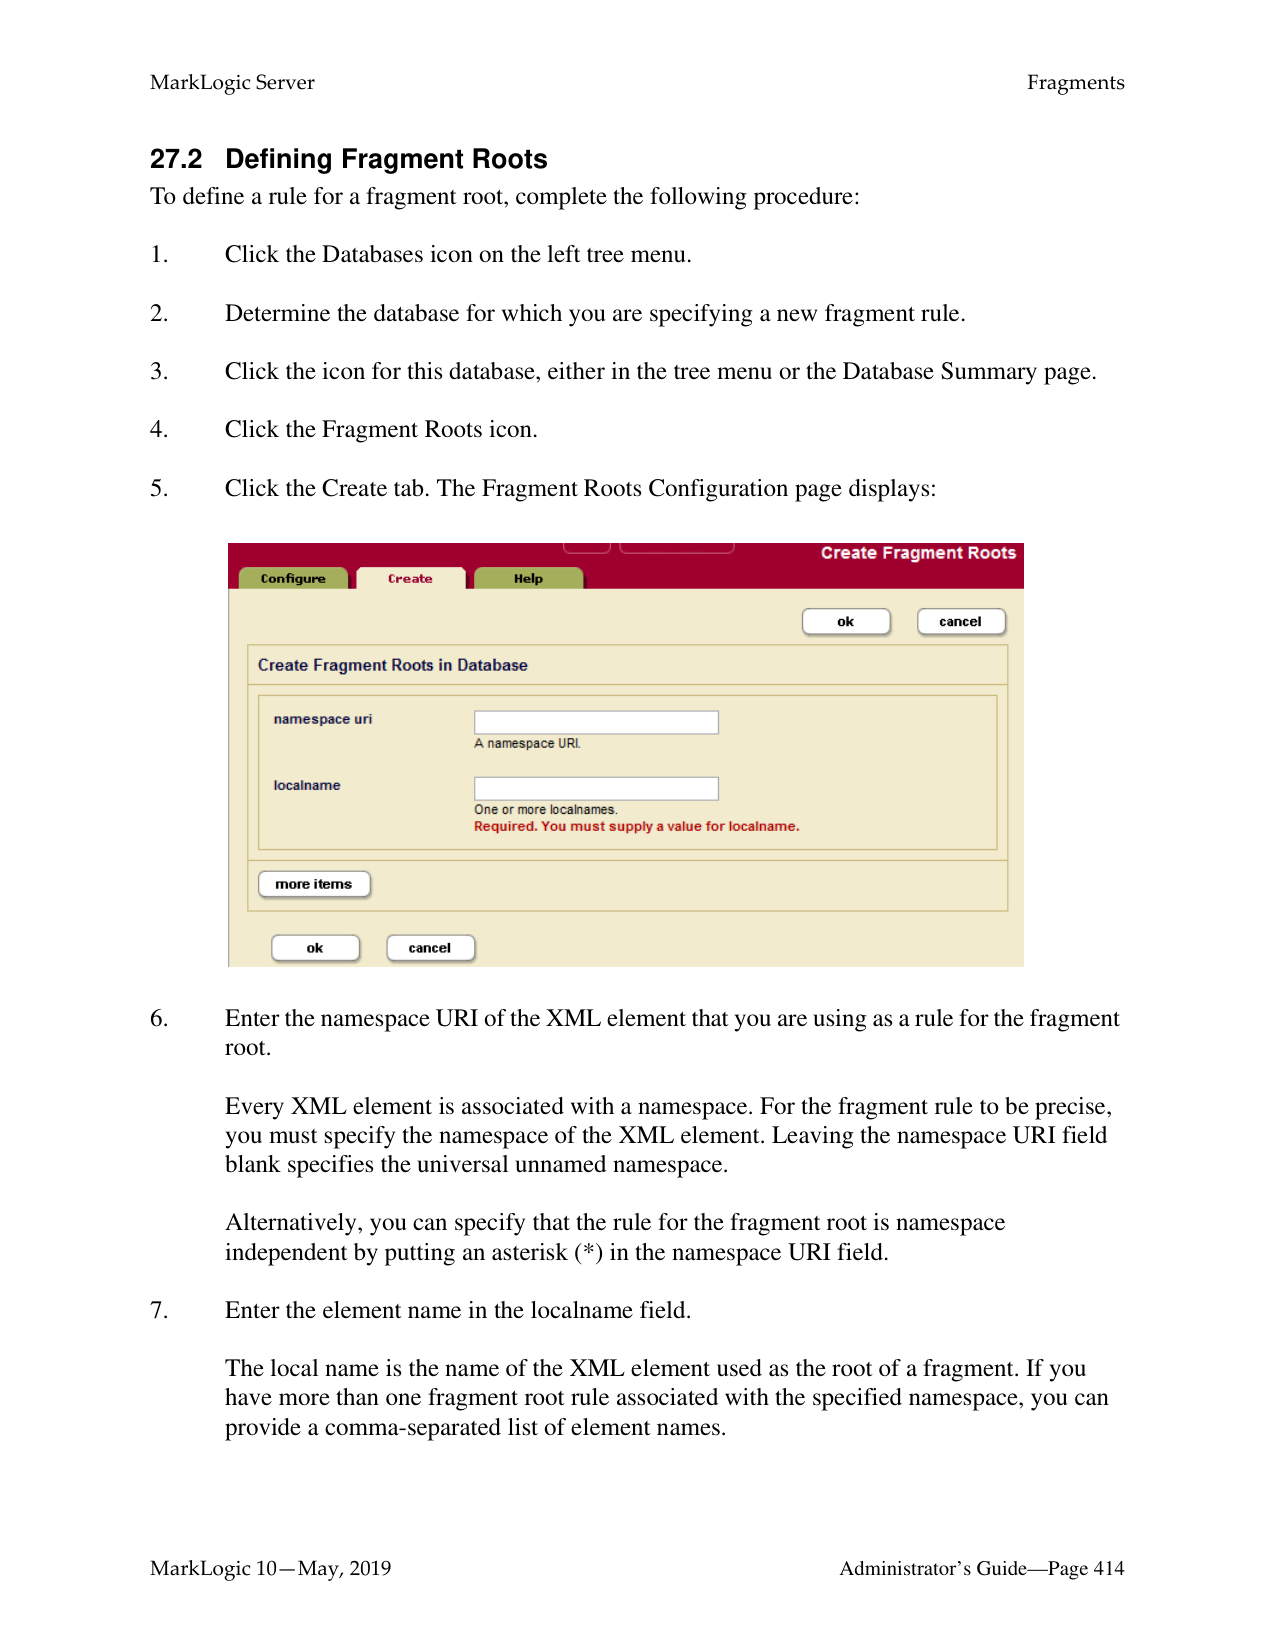
|---|---| | | | |XML element|The element name, the namespace for the element, the data type of the values found in that element.| |XML attribute|The attribute name, the name of the attribute’s parent element, a namespace for the element, and the data type of the values found in that attribute.| |JSON property|The property name and the data type of the values found in that property.| |path|An XPath expression and the data type of the values found in the element, attribute, or JSON property expressed by the XPath.| |field|The field name and data type of the values in the field. You must also configure the field definition. For details, see “Configuring Fields” on page 167.|
Range indexes are populated during the document loading process, and are automatically kept in sync through subsequent updates to indexed data. Consequently, range indexes should be specified for a database before any XML or JSON documents containing the content to be indexed are loaded into that database. Otherwise, the content must be either reindexed or reloaded to take advantage of the new range indexes.
Use the element range index interfaces and APIs to create indexes for JSON documents. Some restrictions apply. For details, see Creating Indexes and Lexicons Over JSON Documents in the Application Developer’s Guide.
You can create the same type of index with a path range index as you can with an element or attribute range index. Path range indexes are useful in circumstances in which an element or attribute range index will not work. For example, you may have documents with the same element name appearing under different parent elements and you only want to index the elements appearing under one of the parent elements. In this case, a path range index is required to correctly index that element.
When creating a range index with a scalar type of string (xs:string), specify a collation as well as the element/attribute QNames or JSON property name. The collation specifies the unique ordering for the string values. You can have multiple range indexes on the same element, attribute, or JSON property with different collations; that is, the collation is part of the unique identifier for the string range index. For details about collations, see the Encodings and Collations chapter in the Search Developer’s Guide.
Because a range index stores typed data, if the data you load does not conform to that type, or if it cannot be coerced to conform to the specified type, it cannot be loaded into the document. For each range index, you can specify what to do for invalid values, either reject them and have the document load throw an exception and fail, or ignore them and log the coercion errors in the ErrorLog.txt file at Debug level. The default is to reject invalid data.
Range indexes use disk space and consume memory. That is the trade-off for improved performance. Additionally, if you have a large amount of range index data and if your system is updated regularly, you might need to increase the size of your journals. For details on the database journal settings, see “Memory and Journal Settings” on page 137.
######### 26.2 Using Range Indexes for Value Lexicons
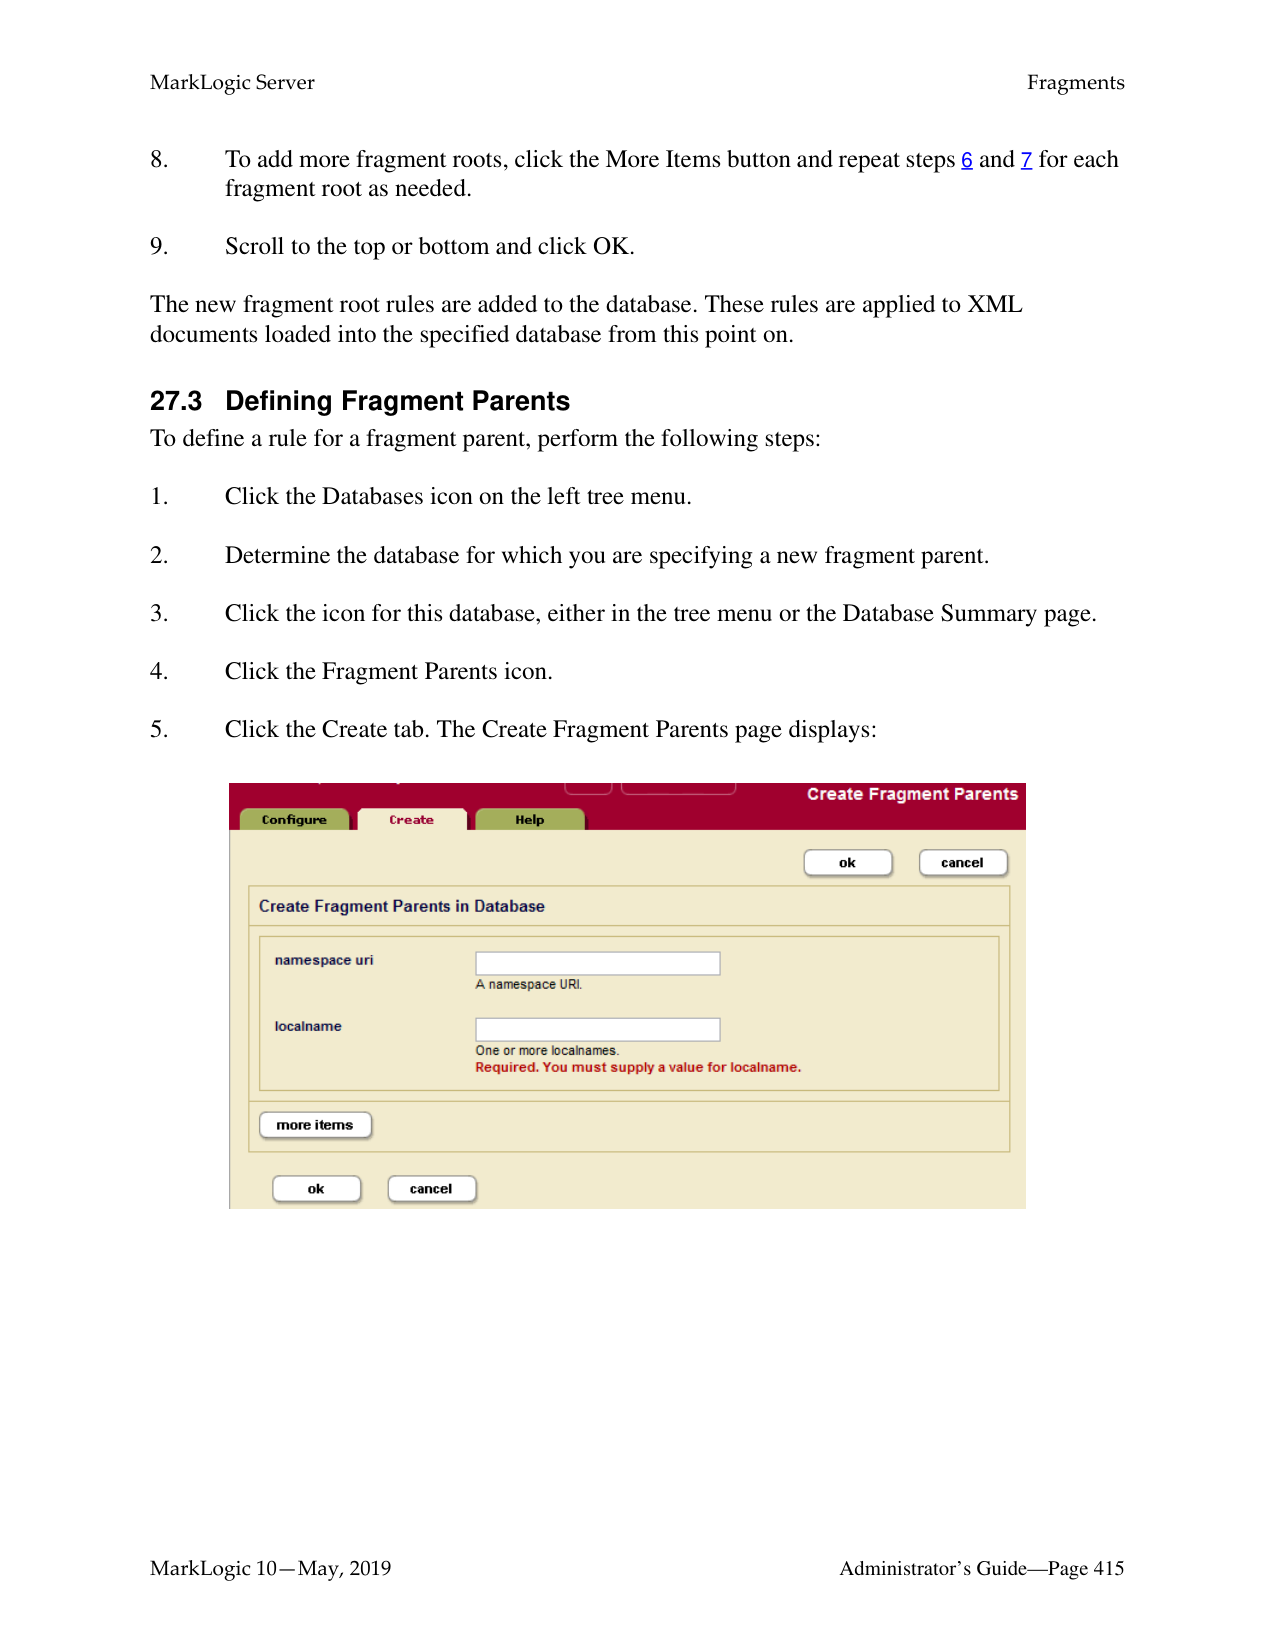
In addition to speeding up sorting and comparison queries, MarkLogic Server uses range indexes to resolve XML element, XML attribute, JSON property, and field value lexicon queries. These are queries that use the following search APIs:
The cts:values and cts:value-match functions work on any kind of range index and are equivalent to the corresponding index-specific function when called with a reference to the same type of index. For example, the following two function calls are equivalent:
cts:values(cts:element-reference(xs:QName("some-element"))) cts:element-values(xs:QName("some-element")
In order to use any of these APIs, you must create range indexes on the element(s), attribute(s), JSON property(s), or field(s) specified in the query. The type of the range index must match the type specified in the lexicon API.
For details about lexicons, see the Browsing With Lexicons chapter of the Search Developer’s Guide. For more details on the lexicon APIs, see the MarkLogic XQuery and XSLT Function Reference.
######### 26.3 Understanding Word Lexicons
MarkLogic Server allows you to create a word lexicon that is restricted to a particular XML element, XML attribute, JSON property, or field. You can also define a field word lexicon across a collation. A word lexicon stores all of the unique words that are stored in the specified element, attribute, or JSON property. The words are stored case-sensitive and diacritic sensitive, so the words Ford and ford would be separate entries in the lexicon.
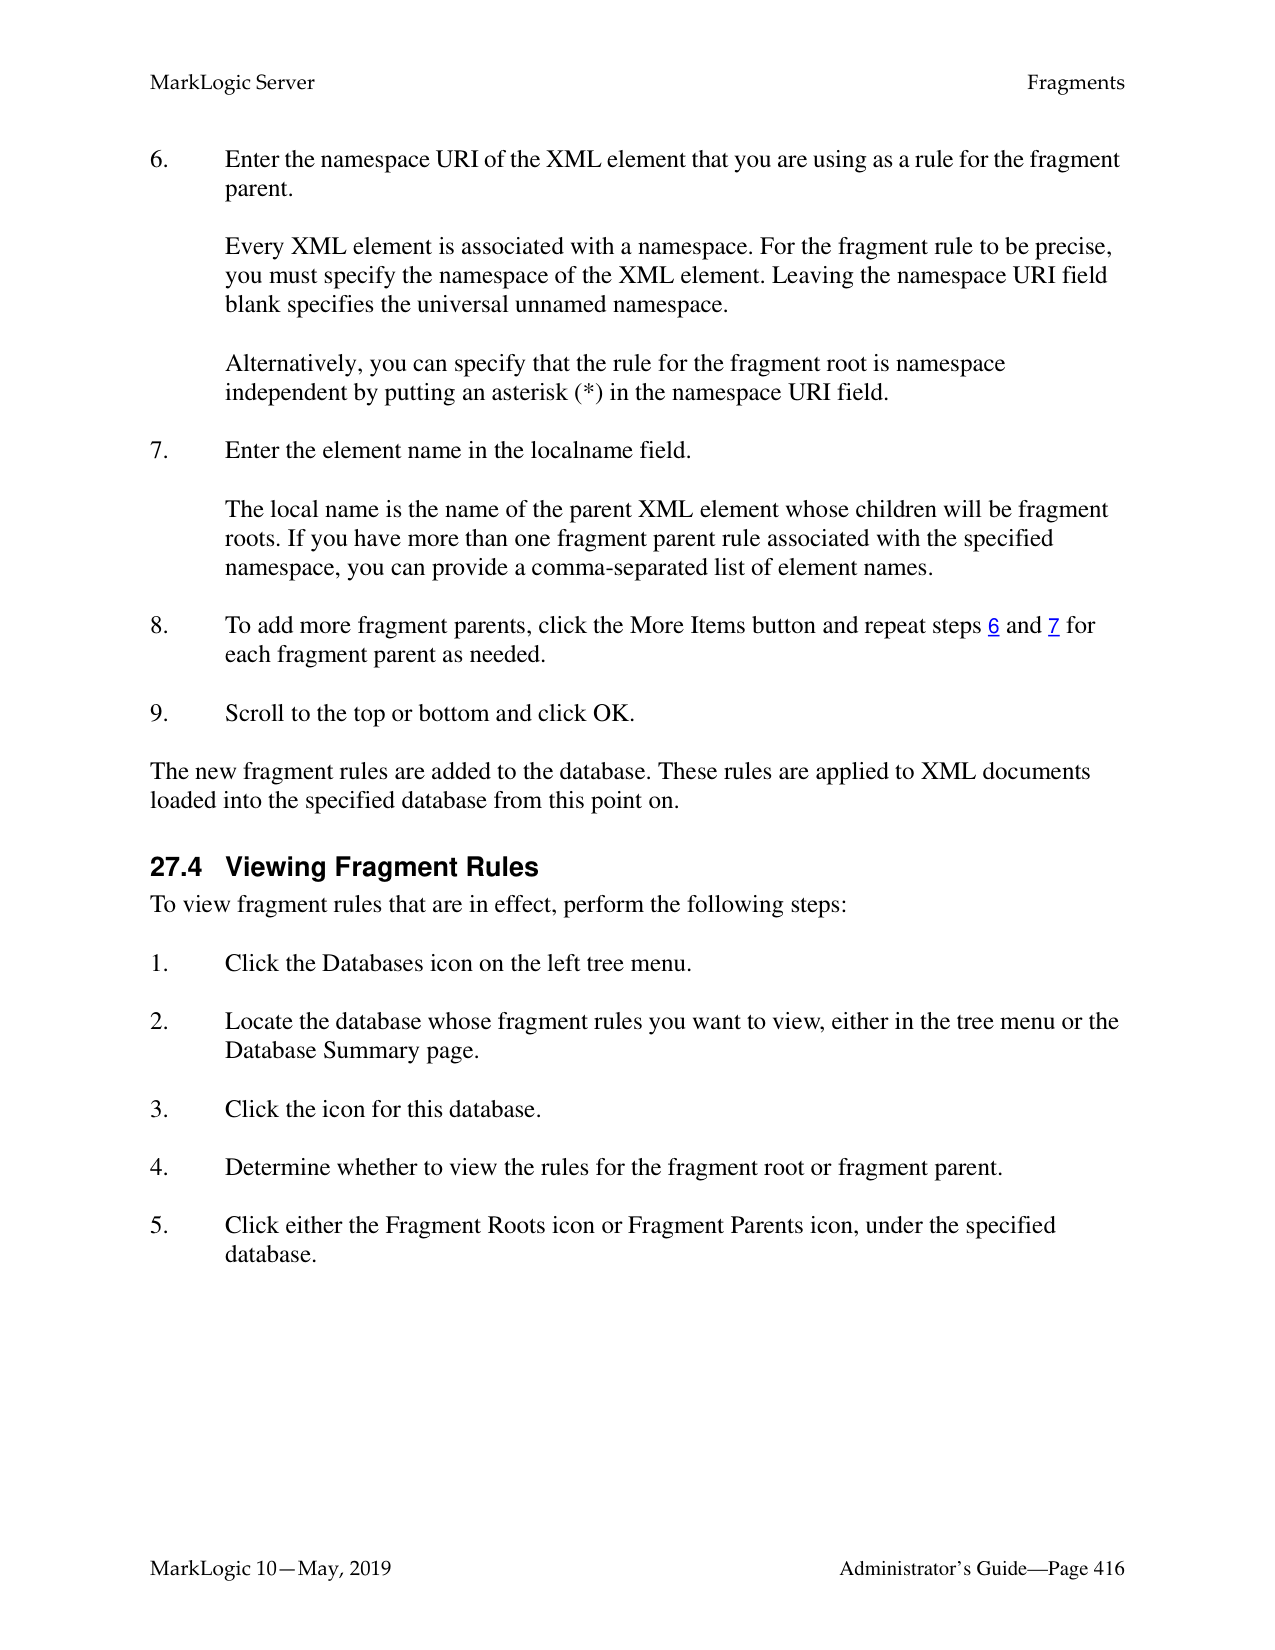
Word lexicons are used in wildcard searches (when wildcarding is enabled). For details, see Understanding and Using Wildcard Searches in the Search Developer’s Guide.
To use a word lexicon, use the following search APIs:
######### 26.4 Understanding Path Range Indexes
A path range index enables you to define a range index on an XML element, XML attribute, or JSON property using an XPath expression. A path range index can give you finer control over what is indexed. For example, if your content contains elements with the same name at multiple levels, but you only want to index one of them, you can use a path range index to target just that one.
This section describes the XPath expressions you can use to define a path range index. For performance reasons, MarkLogic Server restricts you to a subset of XPath when defining a path range index.
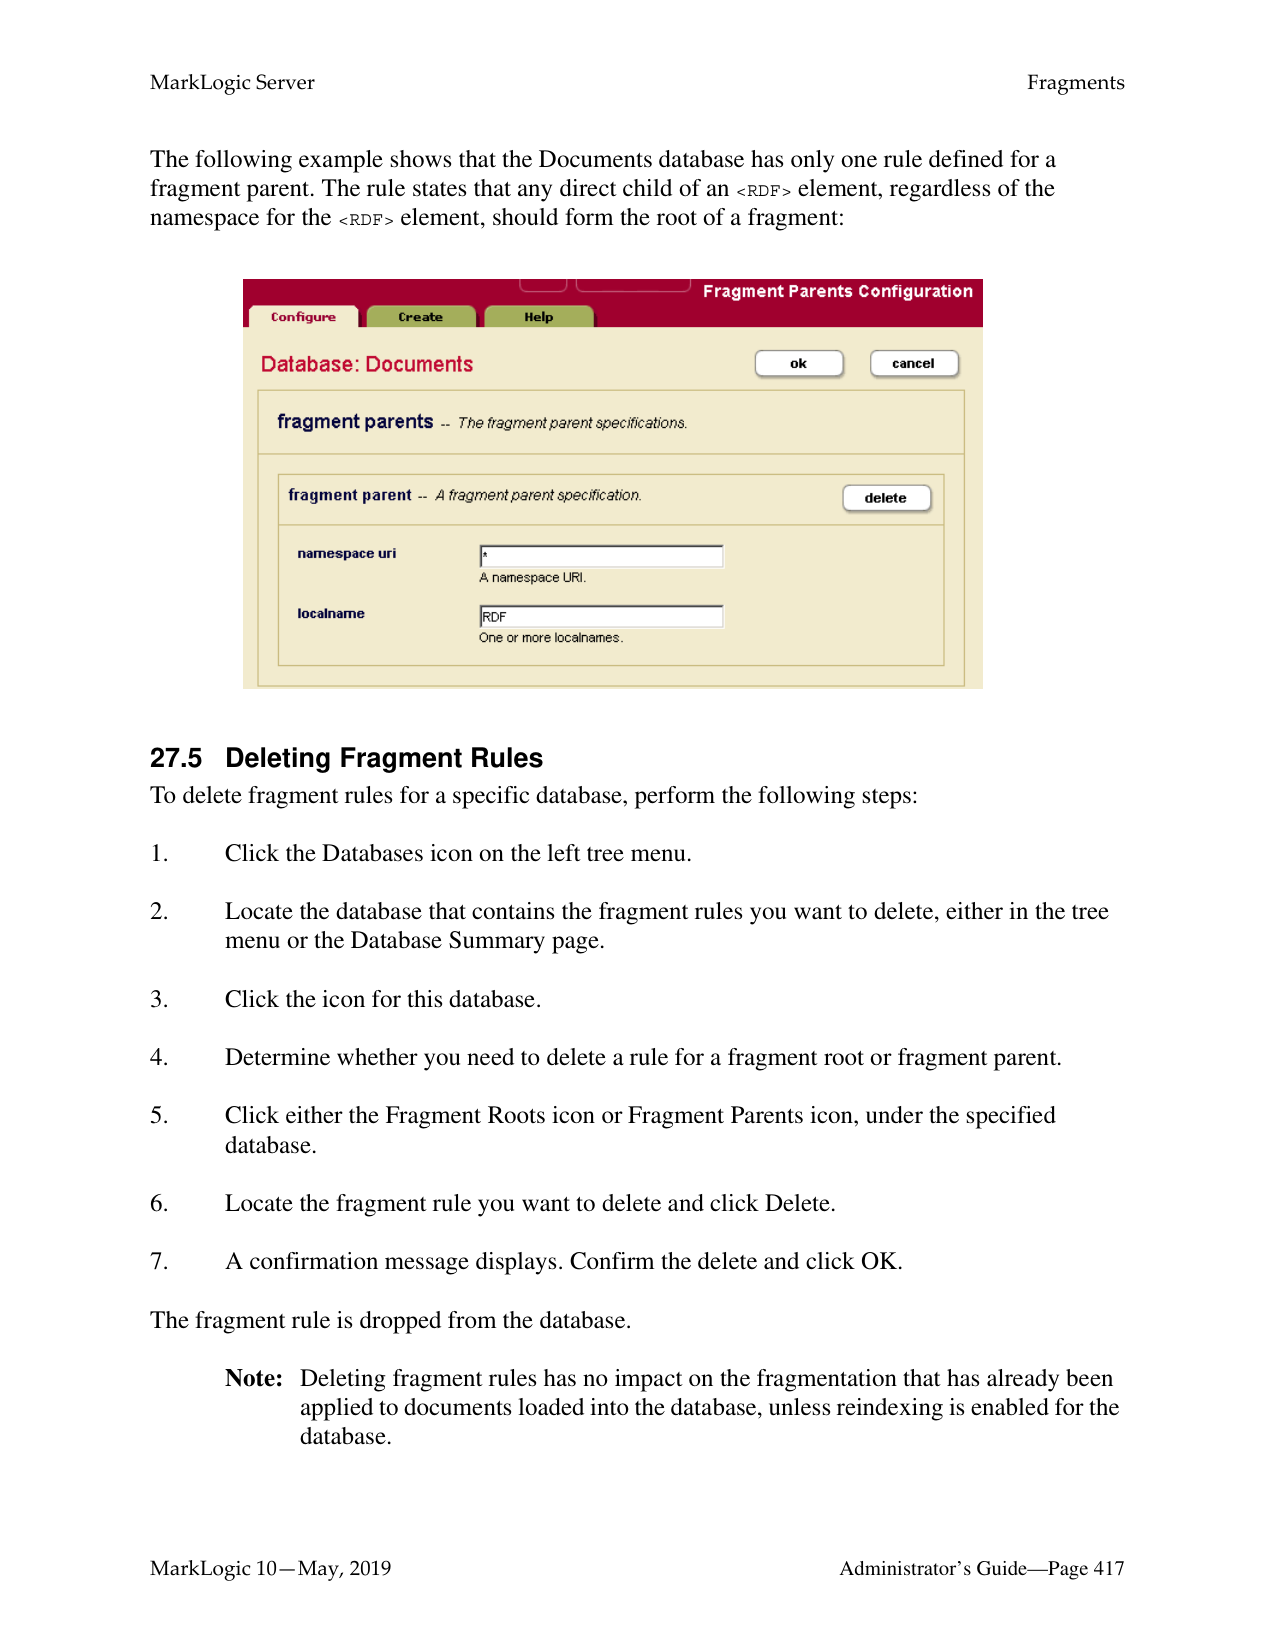
######### 26.4.1 Limitations on Index Path Expressions
You can only use subset of XPath for defining path range indexes. The limitations are described in Path Field and Path-Based Range Index Configuration in the XQuery and XSLT Reference Guide.
Note: Avoid creating multiple path indexes that end with the same element/attribute, as ingestion performance degrades with the number of path indexes that end in common element/attributes.
You can use cts:valid-index-path to test whether or not you can use an XPath expression to define a path range index. For details, see “Testing the Validity of an Index Path Expression” on page 396.
Note numbers, booleans, and nulls in JSON documents are indexed separately rather than all being treated as text. For details on constructing XPath expressions on JSON documents, see Traversing JSON Documents Using XPath in the Application Developer’s Guide.
######### 26.4.2 Examples of Index Path Expressions
The following table provides examples of XPath expressions that are valid and invalid for defining a path range index.
Note: Avoid creating multiple path indexes that end with the same element/attribute, as ingestion performance degrades with the number of path indexes that end in common element/attributes.

|Valid|Invalid| |---|---| | | | |//a|./a| |/a/b/c|/a/b[c=/p/q]| |/a/b[c]|/a/b[c=5+3]| |/a/b[c=5 and b=3]| | |/a/b[1]| | |//a/b[c<5]| | |//a/b[c="test"]| | |/a/*/c| | |a/b| | |/a[./b]/c|/a[/b]/c| |a| |
|Valid|Invalid| |---|---| | | | |/a/(b|c)|/a/(/b|/c)| |/a/(b|c)|(/a/b/c)[2]| |author[first-name="John"][last-name="Smith"]| | |author[first-name="John" and last-name="Smith"]| |
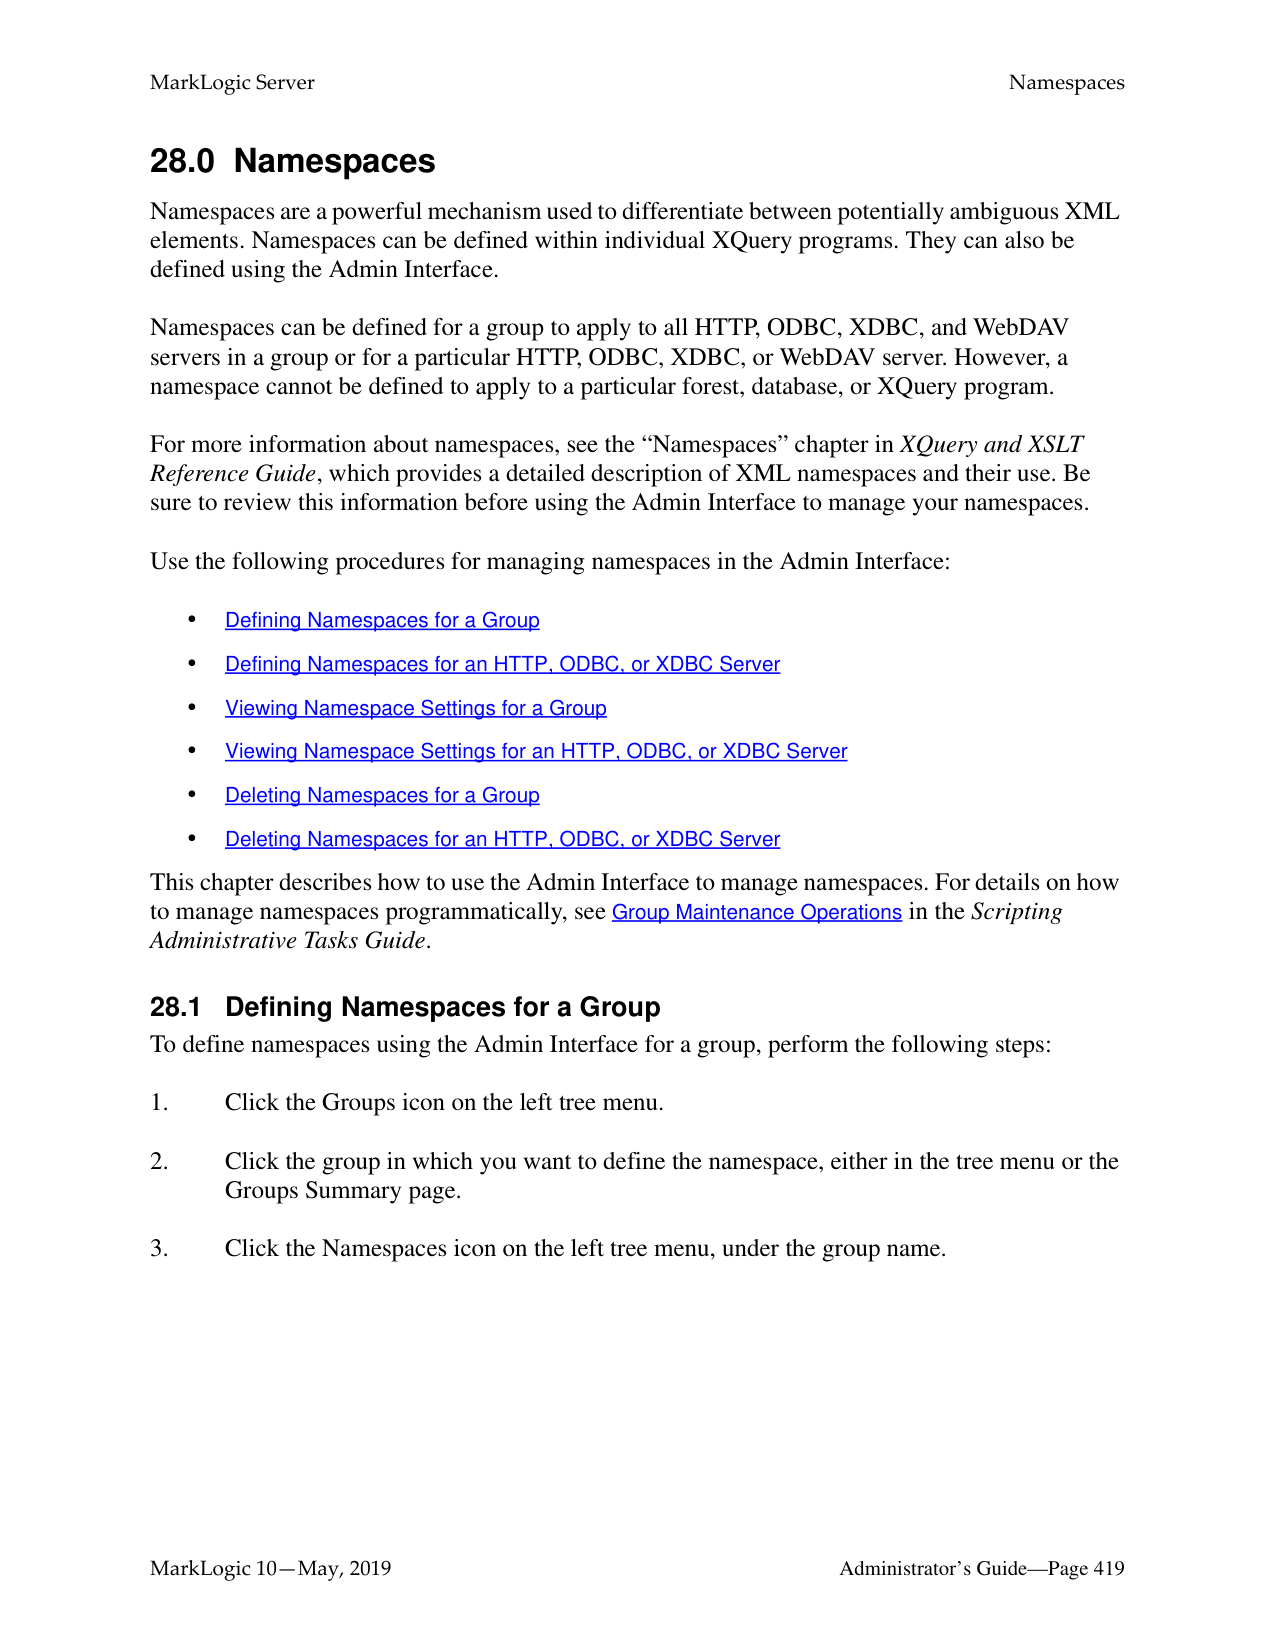
|author[first-name="John" or first-name="Sam"]| | |/a/b[.//c] /a/b[c]|/a/b/[./c] /a/b[//c] /a/b/[/a/b/c]| |/a/(./b | c)/d|/a/(/a/b | /a/c)/d| |/a/child::*/b|/a/parent::*/b| |/a[fn:matches(@expr, 'is')]|/a/ [fn:matches(fn:name(.),"Joe")]| |/a/fn:contains("this")|/a/ [fn:contains(fn:name(.),"Bob")]|
Namespace prefixes are permitted in all valid path expressions. Note that you can also use fn:matches and fn:contains as part of the path expression, but you cannot use other functions in the path expression. Use cts:valid-index-path to test if a path expression is valid for an index path.
######### 26.4.3 Testing the Validity of an Index Path Expression
You can use the XQuery function cts:valid-index-path to test whether or not an XPath expression can be used to define a path range index. To test validity, copy the following query into Query Console, modify it to use your path expression, and run it.
xquery version "1.0-ml"; cts:valid-index-path("/a/b", fn:true())
Use the second parameter to control whether or not to verify that namespace binding definitions are configured for namespace prefixes used in the path expression.
######### 26.4.4 Using Namespace Prefixes in Index Path Expressions
XML namespace prefixes are permitted in all valid path range index expressions, but you must define the namespace binding in your database configuration. For example, if your path expression is /ns:a/ns:b, you must configure a namespace binding for the prefix ns.
To pre-define a namespace binding, use the Path Namespaces configuration page for your database in the Admin Interface or the XQuery function admin:database-add-path-namespace.

For details, see “Defining Path Range Indexes” on page 403.
######### 26.5 Viewing Element Range Index Settings
To view the element range indexes that will be applied to documents as they are loaded or reindexed, perform the following steps:
########## 26.6 Defining Element Range IndexesTo define a range index for an XML element or JSON property, perform the following steps:
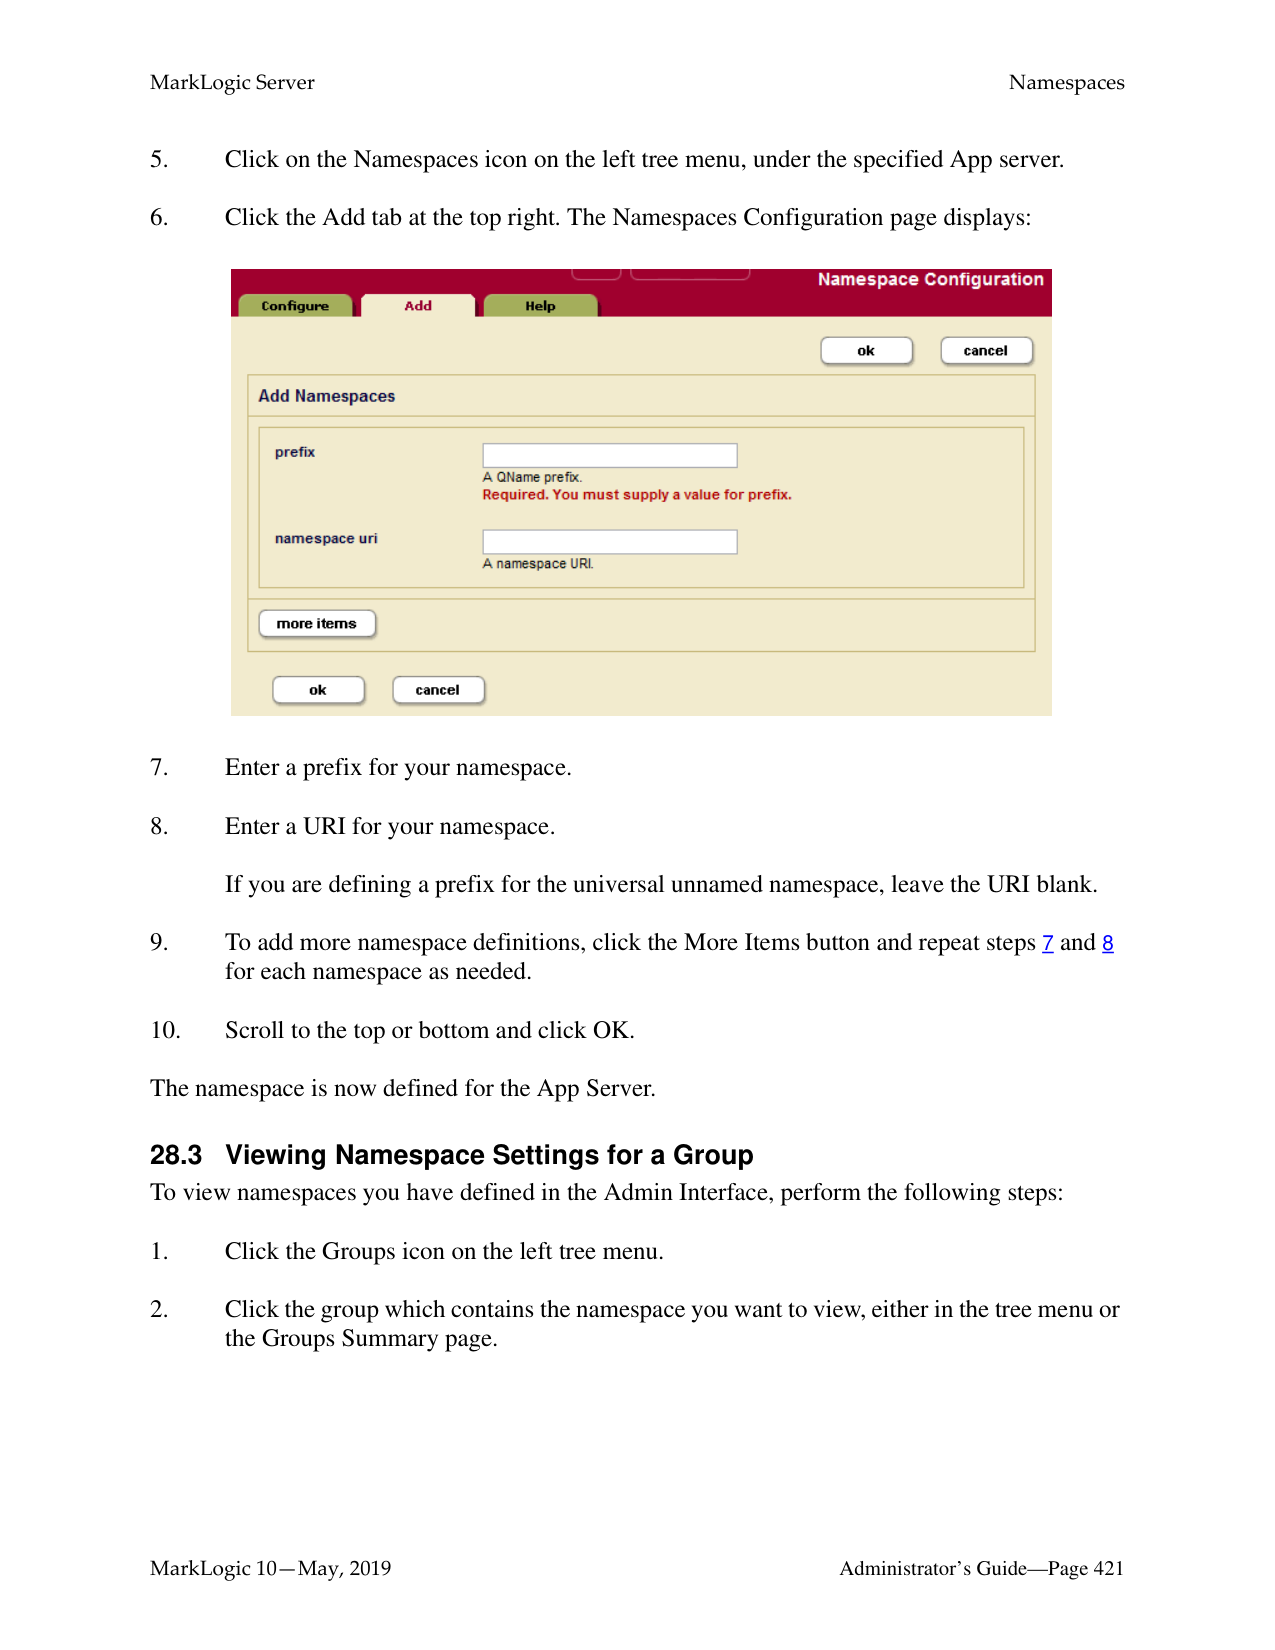
Every XML element is associated with a namespace. For the description of the element to be precise, you must specify the namespace of the XML element. The asterisk (*) cannot be used to indicate namespace independence. Leaving the namespace URI field blank specifies the universal unnamed namespace.

The local name is the name of the XML element to be indexed. If you have more than one element of the same type in the same namespace that you want to index, you can provide a comma-separated list of element names.
The new element range index or element word lexicon is added to the database. These rules are applied to XML and JSON documents loaded into the specified database from this point on.
Note: If you have reindexing enabled for the database and you specify an element that exists in a document, reindexing will run in the background. When the reindexing is complete, the new index will become available to queries.
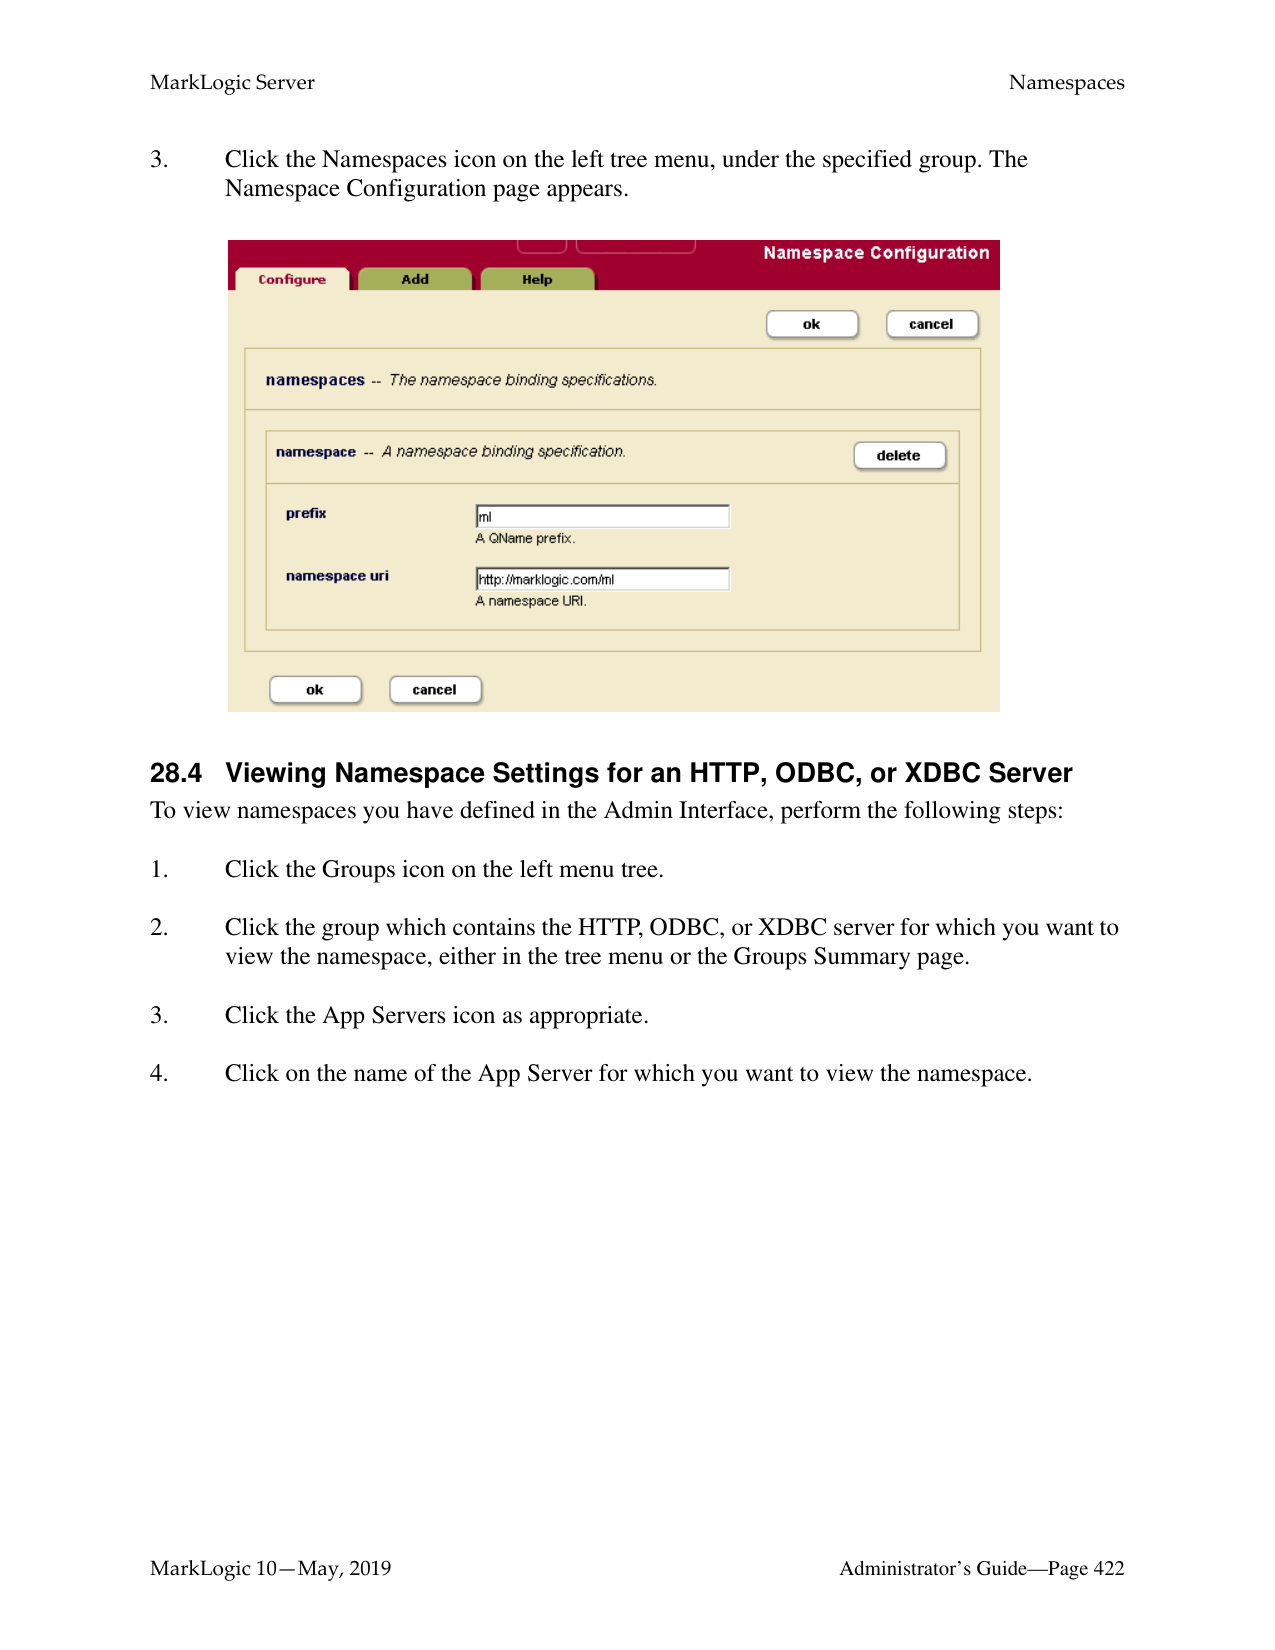
######### 26.7 Viewing Attribute Range Index Settings
To view the attribute range indexes that will be applied to documents as they are loaded or reindexed, perform the following steps:
########## 26.8 Defining Attribute Range IndexesTo define a range index for an attribute of a particular element, perform the following steps:


Every XML element is associated with a namespace. For the description of the element to be precise, you must specify the namespace of the XML element. The asterisk (*) cannot be used to indicate namespace independence. Leaving the namespace URI field blank specifies the universal unnamed namespace.
The local name is the name of the XML element that contains the attribute to be indexed. If you have more than one element in the same namespace that contains the attribute you want to index, you can provide a comma-separated list of element names.
Every XML attribute is associated with a namespace. For the description of the attribute to be precise, you must specify the namespace of the XML attribute. The asterisk (*) cannot be used to indicate namespace independence. Leaving the namespace URI field blank specifies the universal unnamed namespace.
The local name is the name of the XML attribute to be indexed. If you have more than one attribute in the same namespace within the specified parent element(s) that you want to index, you can provide a comma-separated list of attribute names.
The new attribute index is added to the database. These rules are applied to XML documents loaded into the specified database from this point on.
Note: If you have reindexing enabled for the database and you specify an element-attribute pair that exists in a document, reindexing will run in the background. When the reindexing is complete, the new index will become available to queries.
######### 26.9 Viewing Path Range Index Settings
To view the path range indexes that will be applied to documents as they are loaded or reindexed, perform the following steps:
######### 26.10 Defining Namespace Prefixes Used in Path Range Indexes and Fields
When you define a path range index over XML documents and your path uses namespace prefixes, you must pre-define any namespace bindings used in the path expression. These namespace bindings can be used by multiple path range indexes.
To define a namespace binding, perform the following steps:

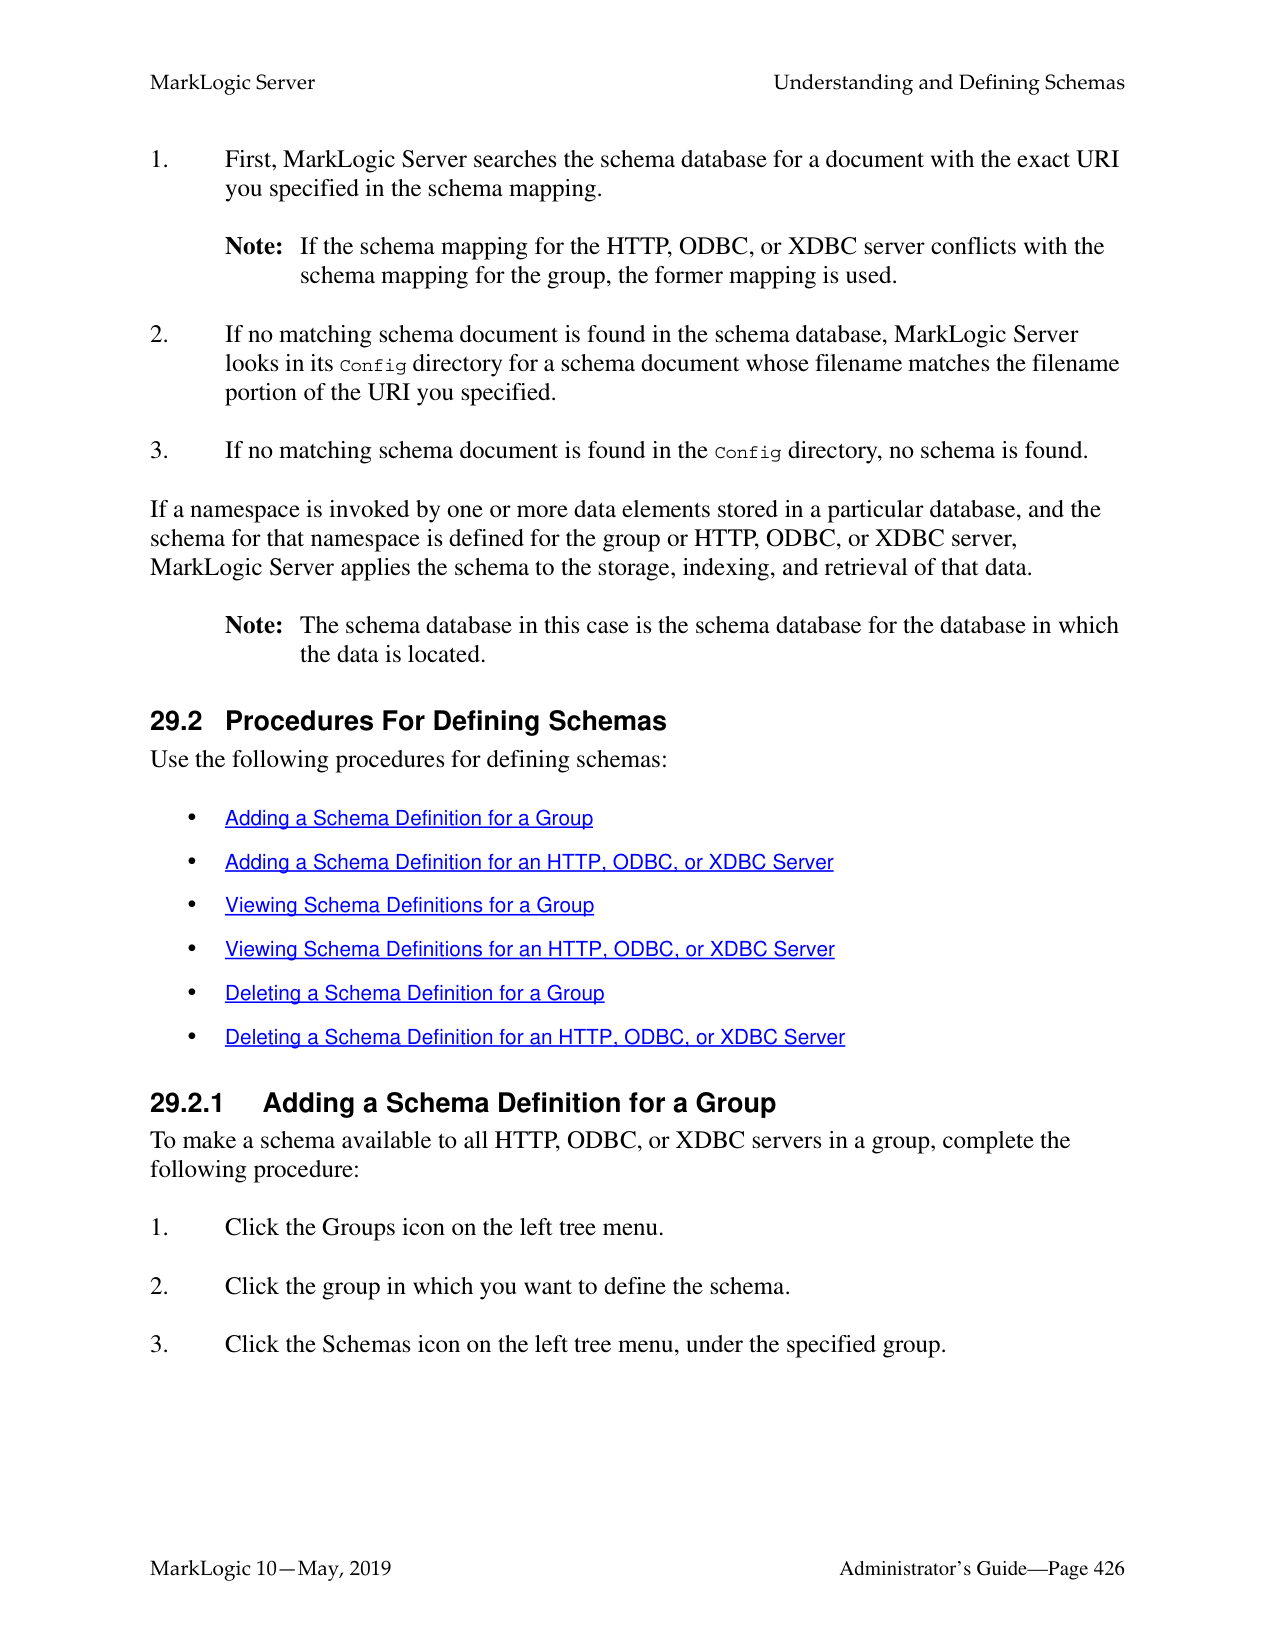
Note: You can use the cts:valid-index-path function to test whether the path is
syntactically correct for use in a path range index.
Note: You cannot have a path span across a fragment root. Paths should be scoped within
fragment roots

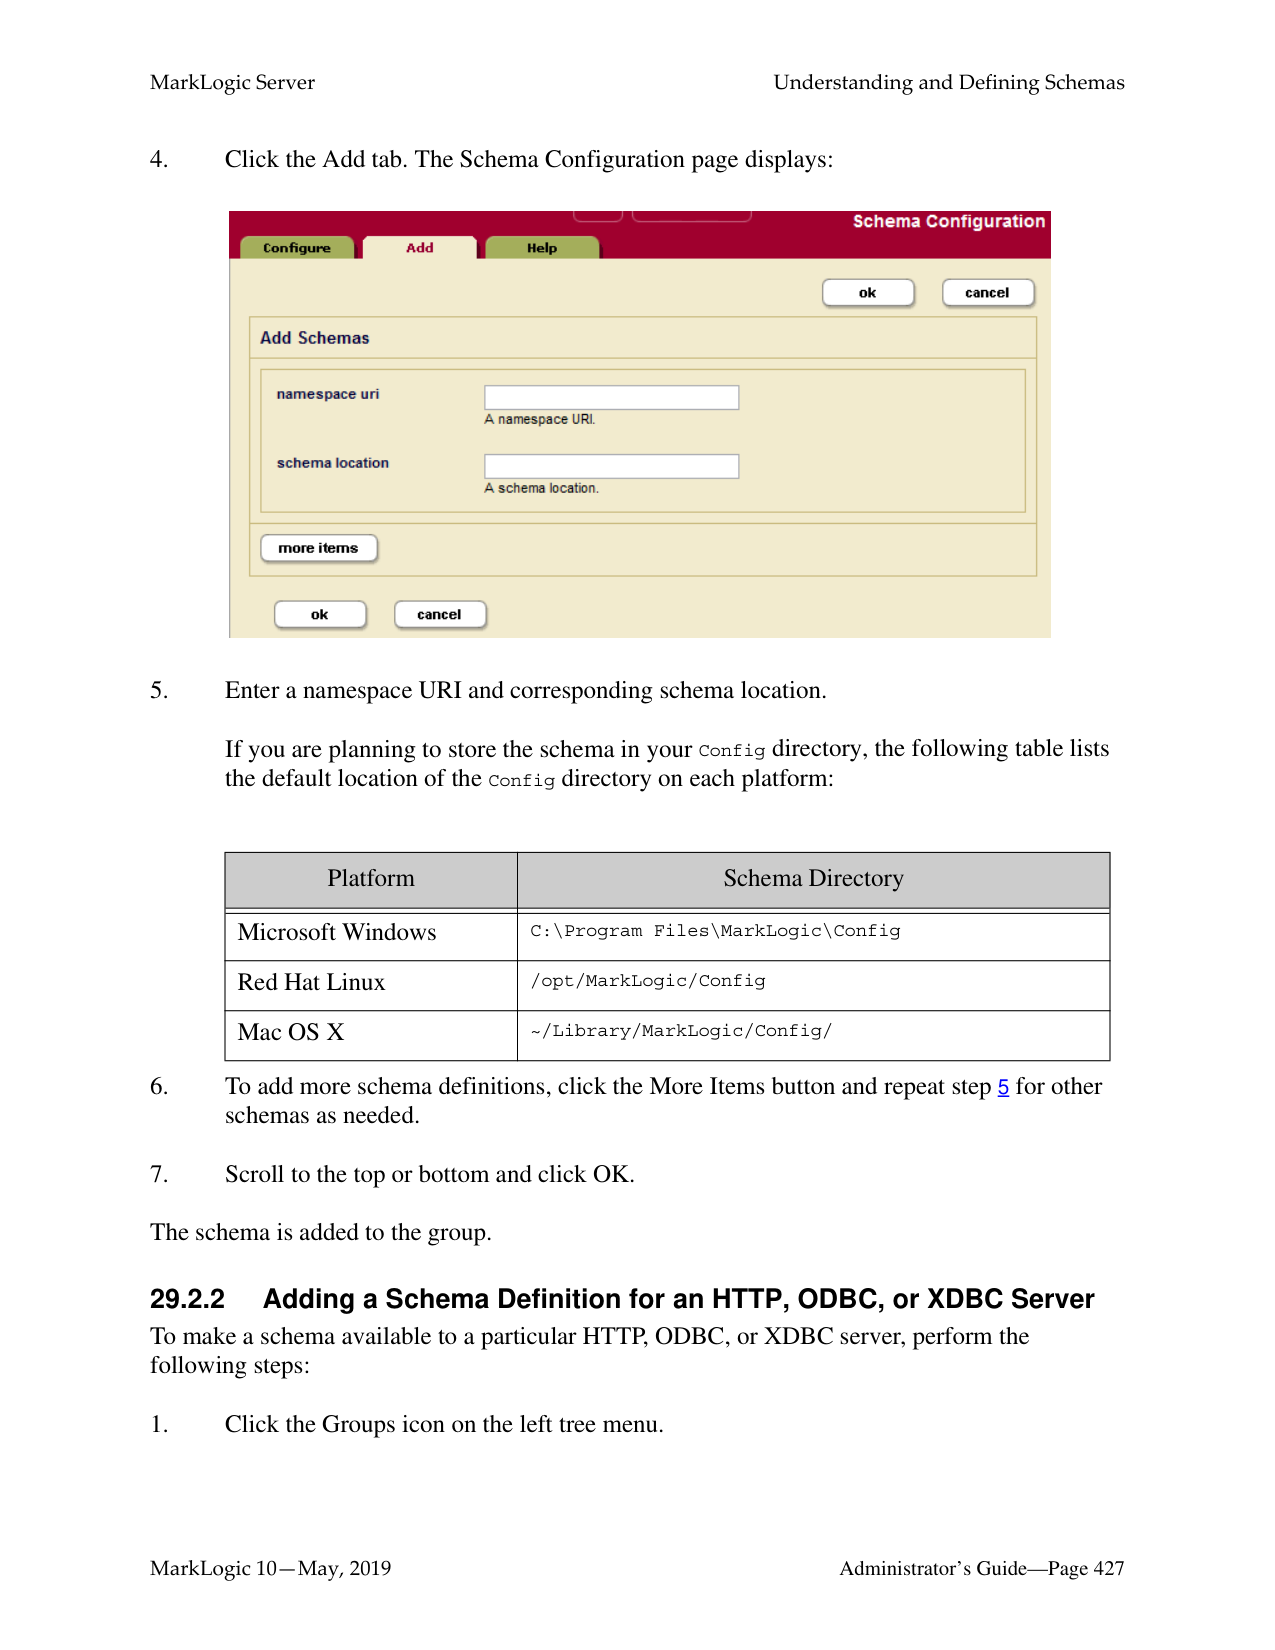
The new path range index is added to the database. These rules are applied to XML or JSON documents loaded into the specified database from this point on.
Note: If you have reindexing enabled for the database and you specify an XML element, XML attribute, or JSON property that exists in a document, reindexing will run in the background. When the reindexing is complete, the new index will become available to queries.
Note: Once you have created a path range index, you cannot change the path expression. Instead, you must remove the existing path range index and create a new one with the updated path expression.
######### 26.12 Viewing Element Word Lexicon Settings
To view the lexicon that will be applied to documents as they are loaded or reindexed, perform the following steps:
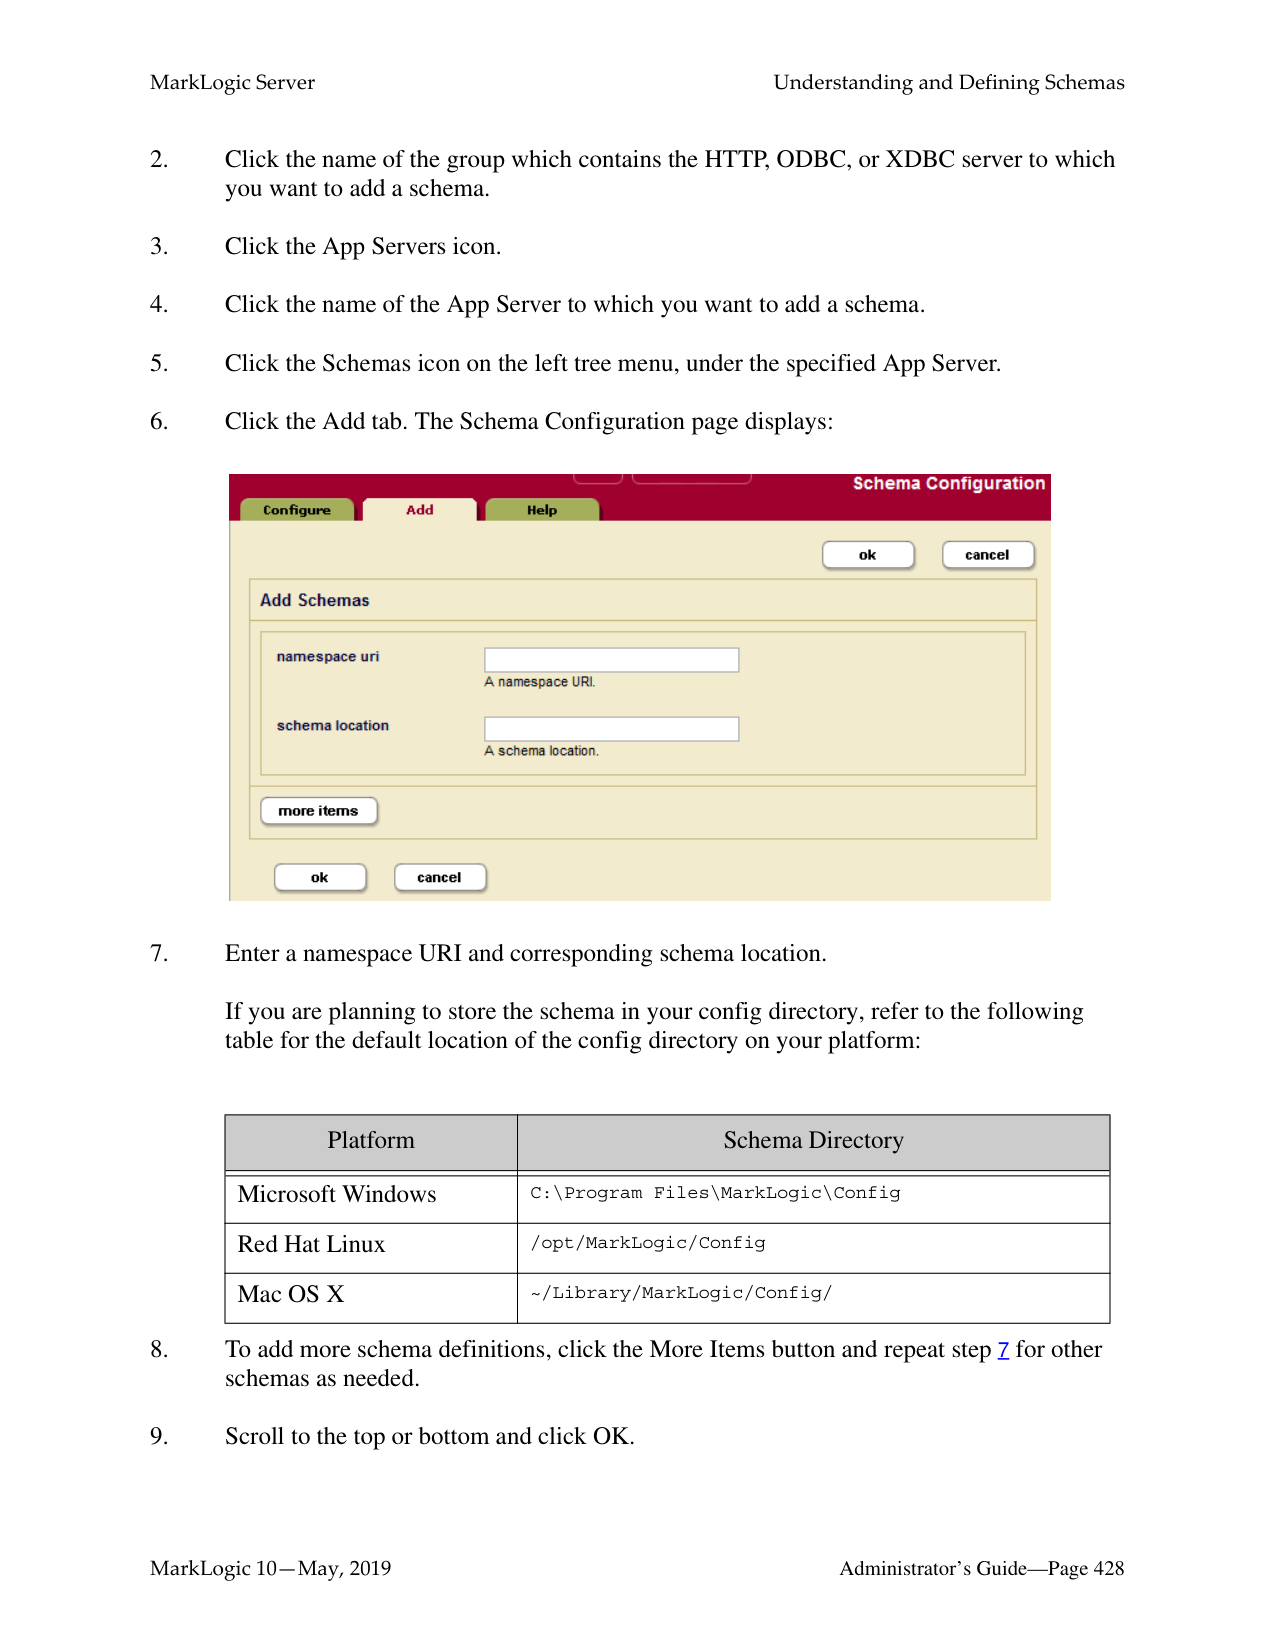

Every XML element is associated with a namespace. For the description of the element to be precise, you must specify the namespace of the XML element. The asterisk (*) cannot be used to indicate namespace independence. Leaving the namespace URI field blank specifies the universal unnamed namespace.
The local name is the name of the XML element or JSON property to be indexed. If you have more than one element of the same type in the same namespace that you want to index or more than one property name, you can provide a comma-separated list of names.

The new range index or word lexicon is added to the database. These rules are applied to XML or JSON documents loaded into the specified database from this point on.
Note: If you have reindexing enabled for the database and you specify an element that exists in a document, reindexing will run in the background. When the reindexing is complete, the new index will become available to queries.
######### 26.14 Viewing Attribute Word Lexicon Settings
To view the lexicon that will be applied to documents as they are loaded or reindexed, perform the following steps:
########## 26.15 Defining Attribute Word LexiconsTo define a lexicon for an attribute of a particular element, perform the following steps:
Every XML element is associated with a namespace. For the description of the element to be precise, you must specify the namespace of the XML element. The asterisk (*) cannot be used to indicate namespace independence. Leaving the namespace URI field blank specifies the universal unnamed namespace.
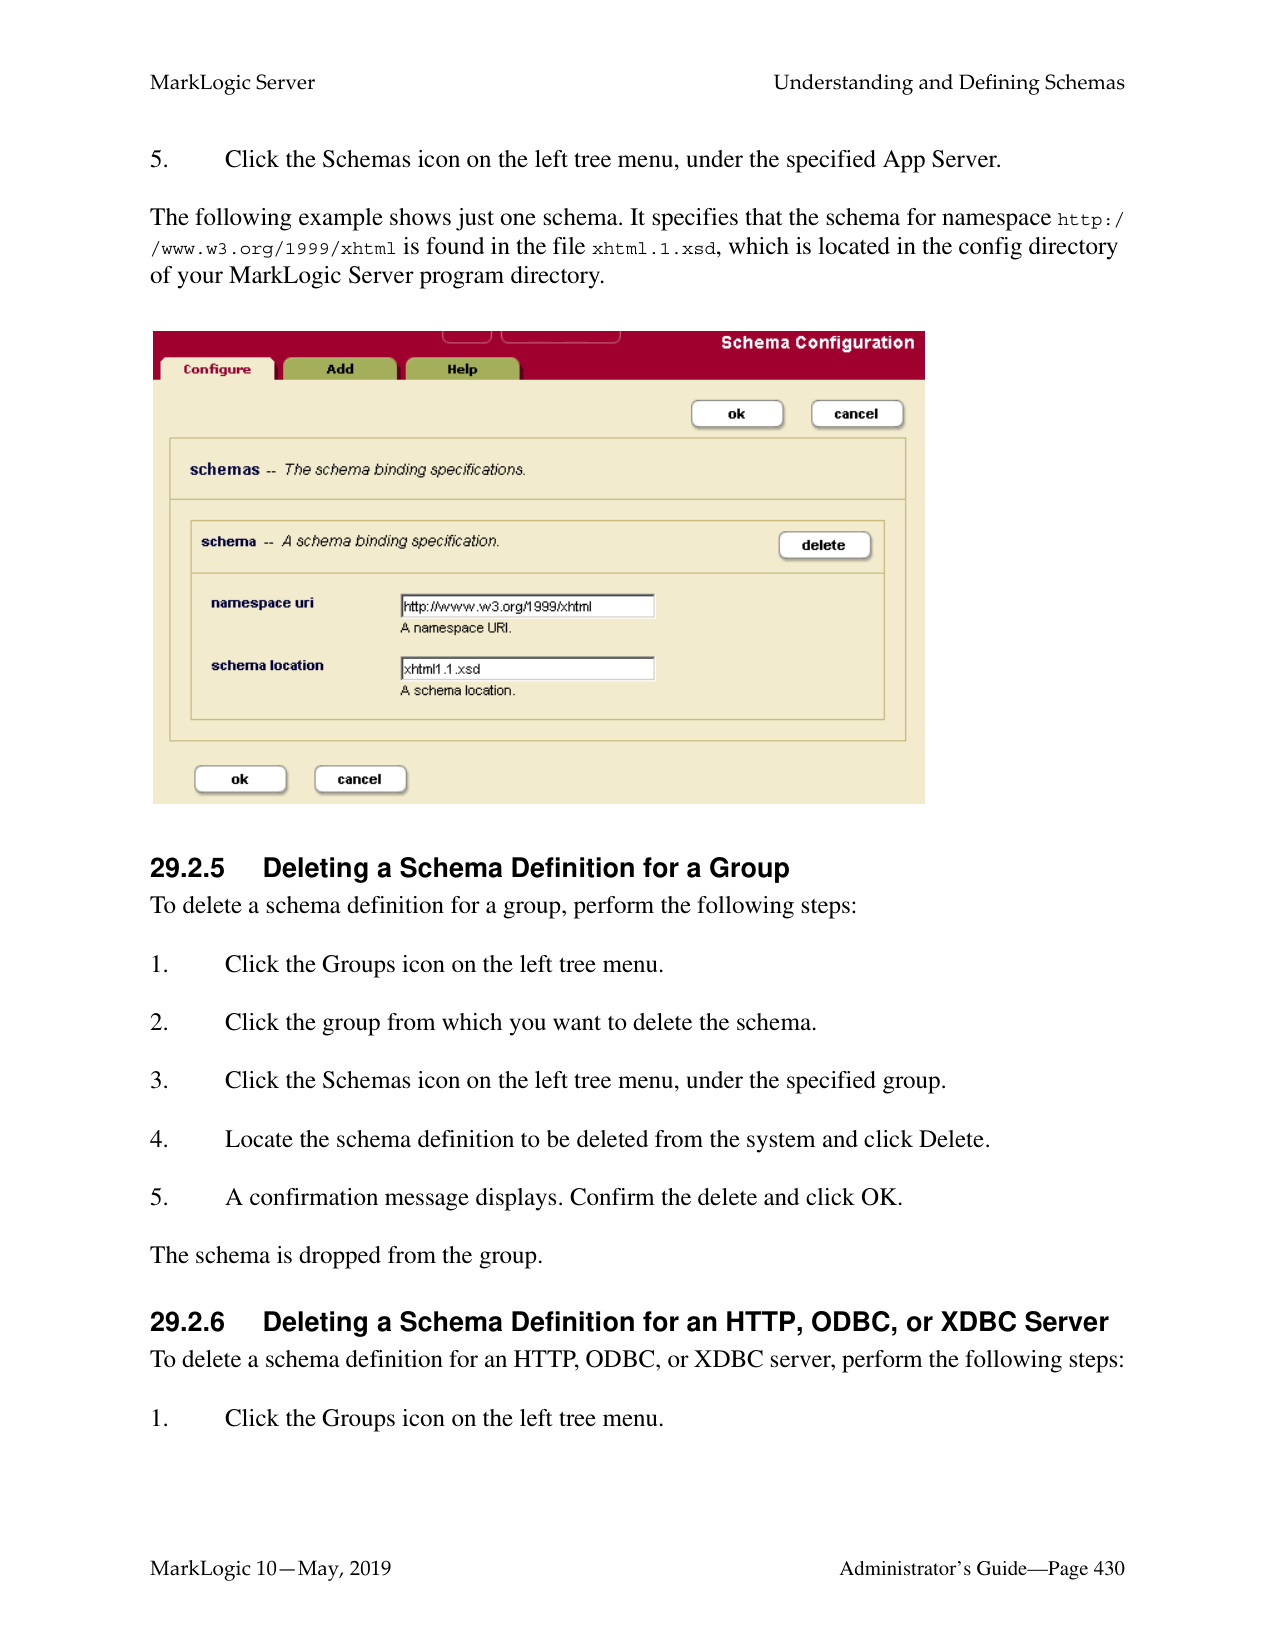

The local name is the name of the XML element that contains the attribute to be indexed. If you have more than one element in the same namespace that contains the attribute you want to index, you can provide a comma-separated list of element names.
Every XML attribute is associated with a namespace. For the description of the attribute to be precise, you must specify the namespace of the XML attribute. The asterisk (*) cannot be used to indicate namespace independence. Leaving the namespace URI field blank specifies the universal unnamed namespace.
The local name is the name of the XML attribute to be indexed. If you have more than one attribute in the same namespace within the specified parent element(s) that you want to index, you can provide a comma-separated list of attribute names.
The new attribute index or attribute word lexicon is added to the database. These rules are applied to XML documents loaded into the specified database from this point on.
Note: If you have reindexing enabled for the database and you specify an element-attribute pair that exists in a document, reindexing will run in the background. When the reindexing is complete, the new index will become available to queries.
######### 26.16 Defining Value Lexicons
Value lexicons are implemented using range indexes of type xs:string on the element(s), attribute(s), JSON properties, or fields specified in a query. Therefore, to create a value lexicon, you create a range index of type xs:string for the specified element(s), attribute(s), JSON properties, or fields. Use an element range index for a JSON property value lexicon.
######### 26.17 Deleting Range Indexes or Lexicons
To delete element or attribute indexes or lexicons for a specific database, perform the following steps:
######### 26.18 Defining Field Range Indexes
Fields provide a convenient mechanism for querying a portion of the database based on XML element QNames or JSON property names. You can define a field, and then create a range index or word or value lexicon over it. For details, see “Fields Database Settings” on page 159.

##### 27.0 Fragments
When loading data into a database, you have the option of specifying how XML documents are partitioned for storage into smaller blocks of information called fragments. For large XML documents, size can be an issue, and using fragments may help manage performance of your system. In general, fragments for XML documents should be sized between 10K and 100K. Fragments set too small or too big can slow down performance, so proper fragment sizing is important.
The actual fragmentation of an XML document is completely transparent to an application developer. At the application level, the document appears to be a single integral structure, regardless of how it is stored and managed as fragments on disk. Fragmentation is an application-transparent tuning mechanism.
However, fragmentation does impact relevance ranking. The relevance-ranking algorithm considers both term frequency within a target piece of content and overall term frequency within the database to rank results by relevance. Rather than consider term frequency across the entire XML document for ranking purposes, MarkLogic Server considers term frequency within the individual fragment (and its descendants) being ranked. Consequently, different fragmentation strategies may impact relevance rankings—particularly in situations when a single fragment may straddle multiple XML structures that you are trying to differentiate on a relevance basis.
With MarkLogic Server, you specify fragmentation rules that are used to partition your XML documents. These rules are applied one document at a time. However, fragmentation rules are specified at the database level—on the assumption that databases contain many documents with similar structures where the same fragmentation rules should be applied.
Fragmentation rules are applied to documents during document loads, updates, and database reindexing. Specifying additional fragmentation rules after documents have been loaded causes future updates and/or reindexing of those documents to use the new fragmentation rules, but does not change the fragmentation of existing documents (if reindex enable is set to true, however, the documents will eventually be reindexed and take on the new fragmentation policy). As a result, if you want to change the fragmentation rules for already loaded content, you will have to reload your documents or reindex the database so that your new fragmentation rules can take effect.
Use the following procedures for managing fragmentation rules:
######### 27.1 Choosing a Fragmentation Strategy
Proper fragmentation is important to performance. Before you specify how to fragment the XML data being loaded, you need to plan your fragmentation strategy. Apply the following guidelines:
After you decide how to fragment your data, you can use either of the following methods:
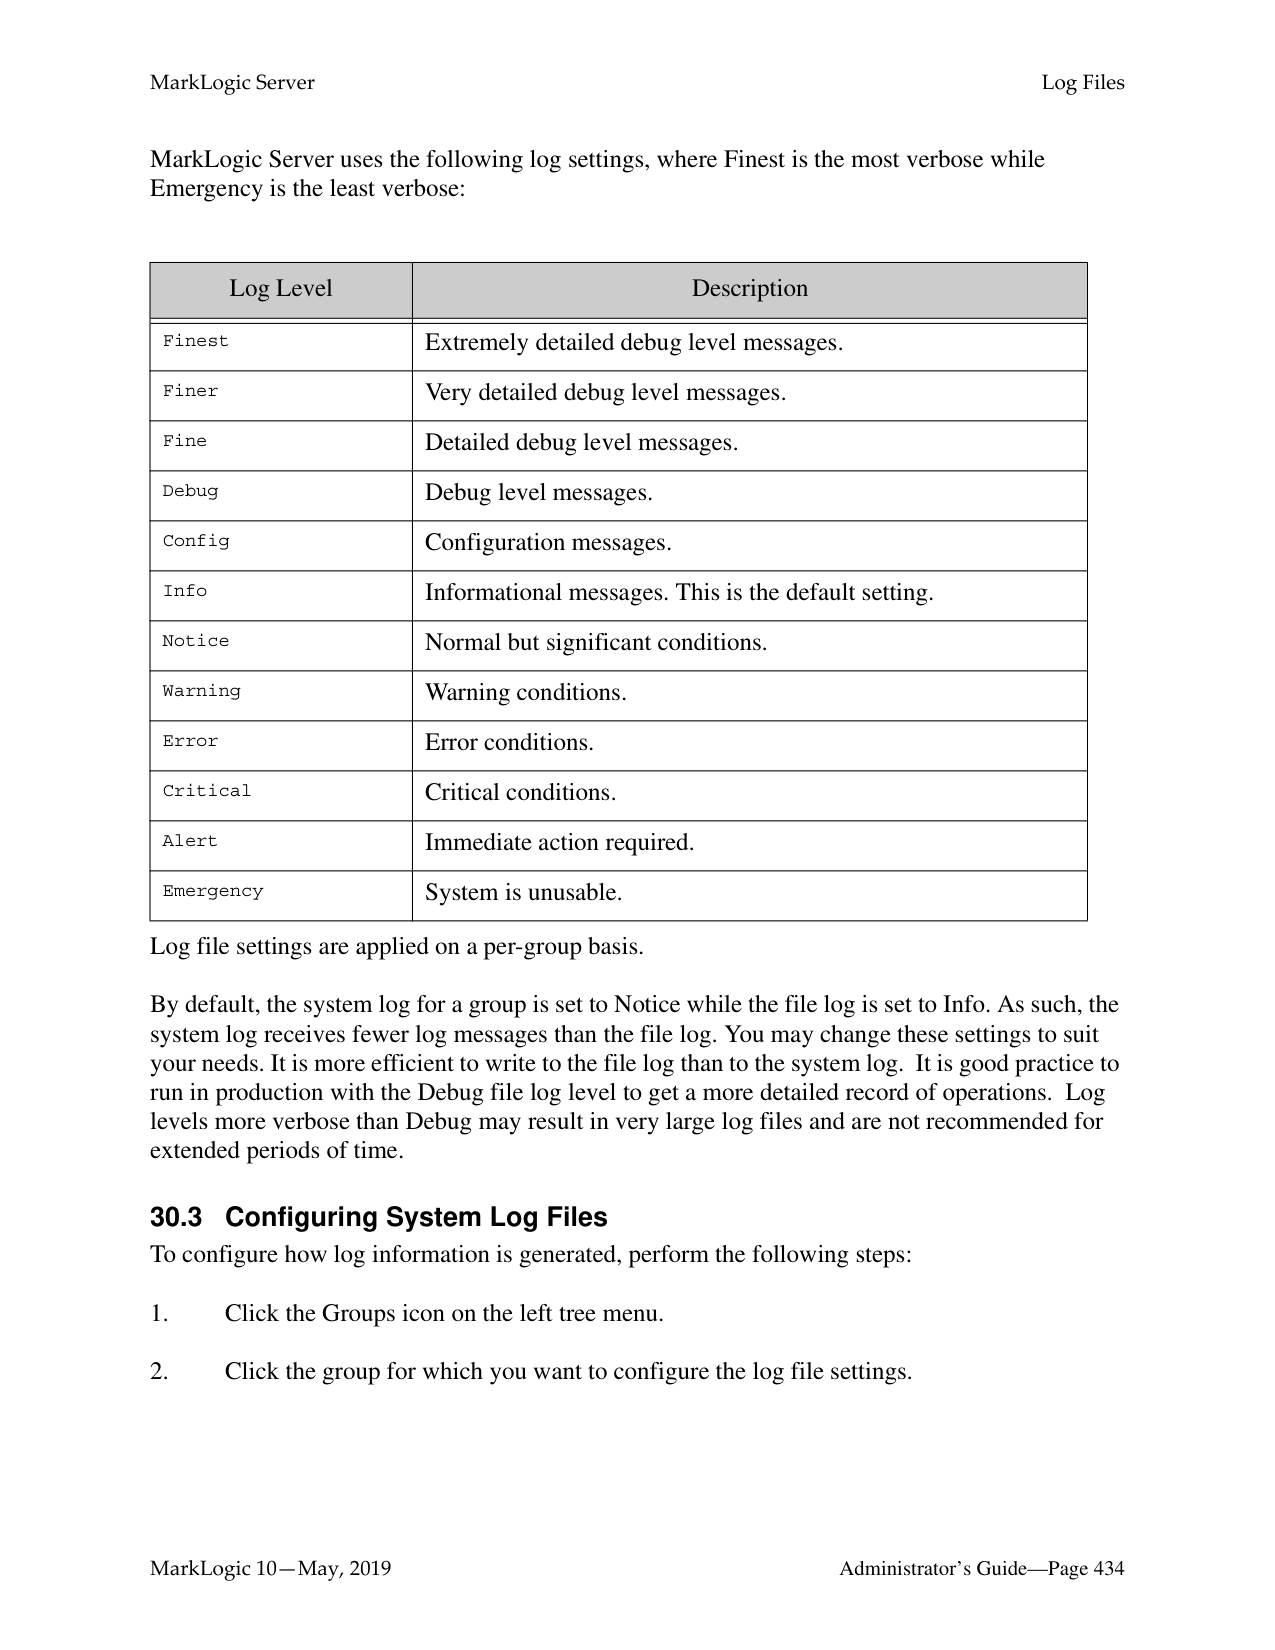
Both methods turn your fragmentation strategy into concrete rules for the system.
######### 27.1.1 Fragment Roots
If a document contains many instances of an XML structure that share a common element name, then these structures make sensible fragments. With MarkLogic Server, you can use this common element name as a fragment root.
The following diagram shows an XML document rooted at
|
|
|

|
######### 27.1.2 Fragment Parents
If your document contains many different XML substructures, each of which is a good candidate to be a fragment, then it would be time consuming to specify each substructure as a fragment root. Instead, you can specify fragments by setting the parent of these substructures to be a fragment parent—so that every substructure under this parent becomes a separate fragment, regardless of its name.
The following diagram shows a document with substructures of different names:
|
|
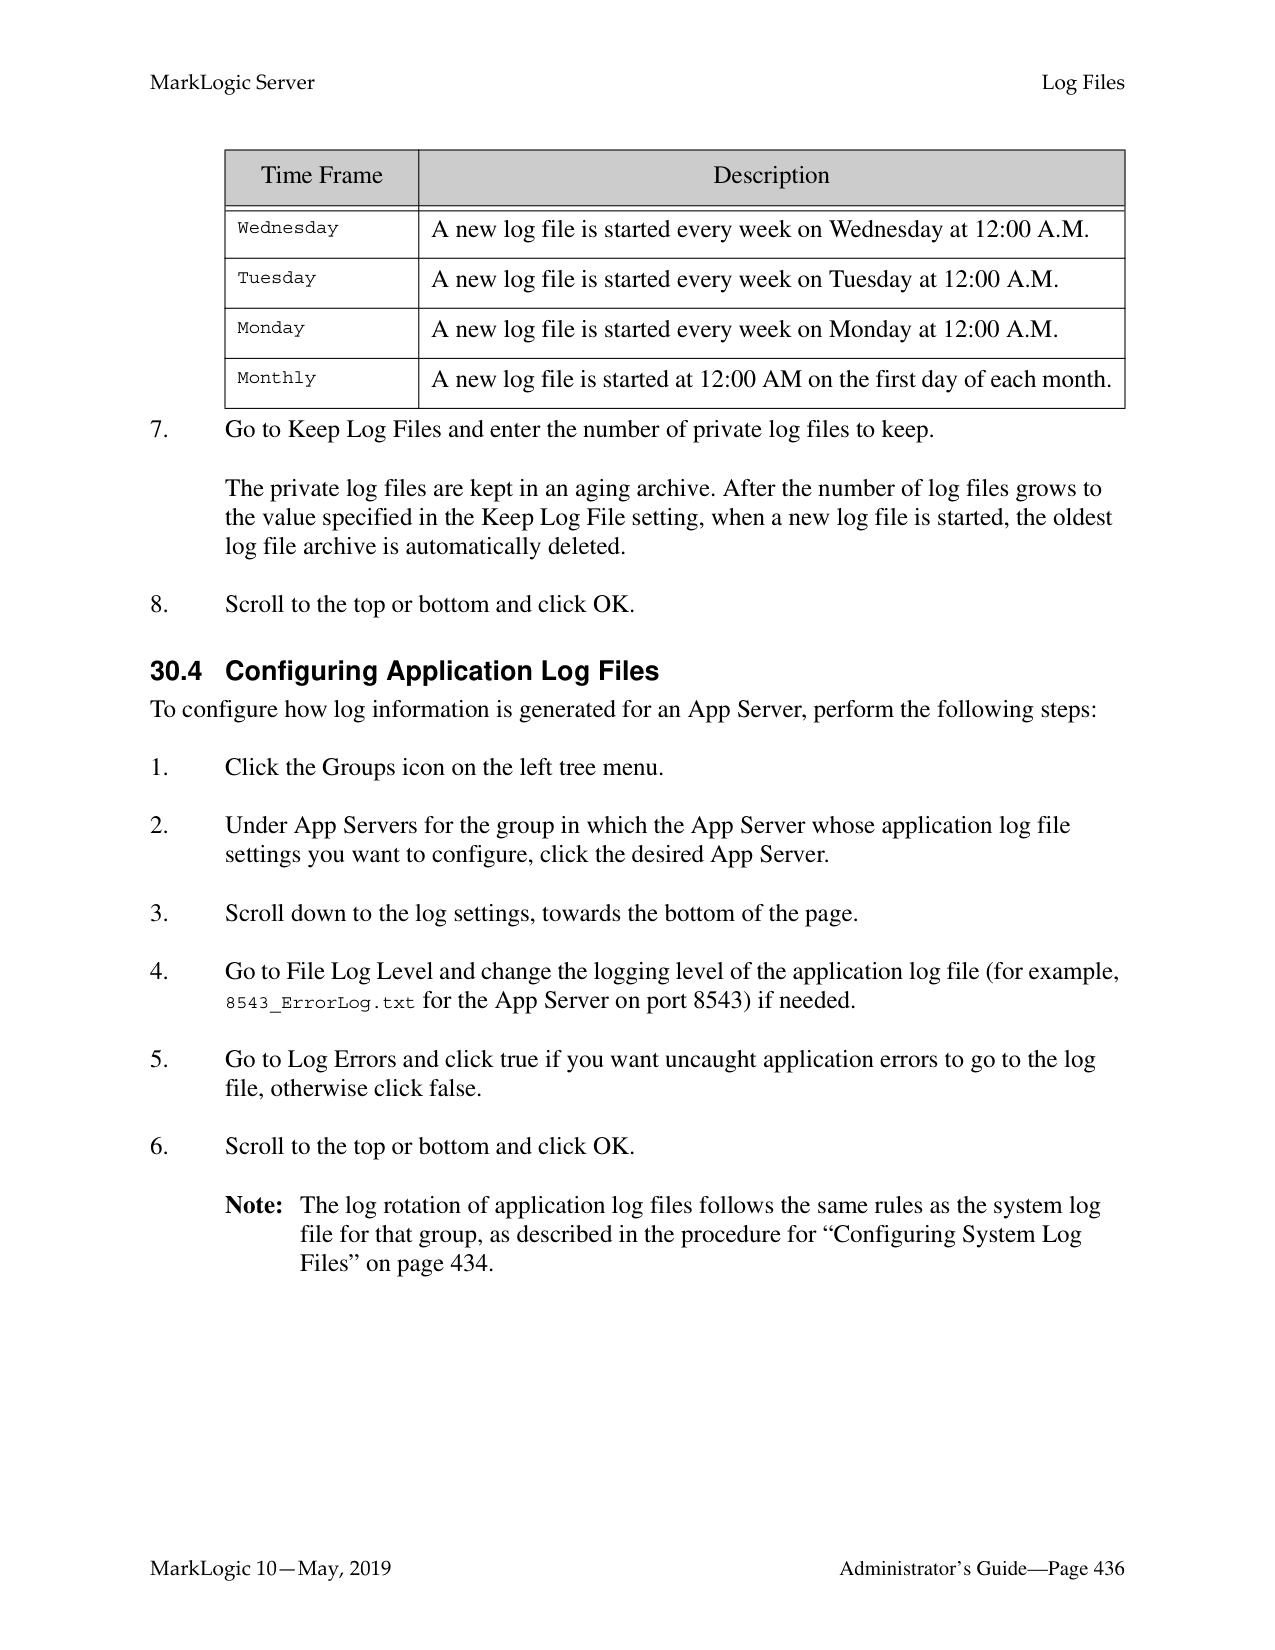
|
|
In this case, you can use the
Every XML element is associated with a namespace. For the fragment rule to be precise, you must specify the namespace of the XML element. Leaving the namespace URI field blank specifies the universal unnamed namespace.
Alternatively, you can specify that the rule for the fragment root is namespace independent by putting an asterisk (*) in the namespace URI field.
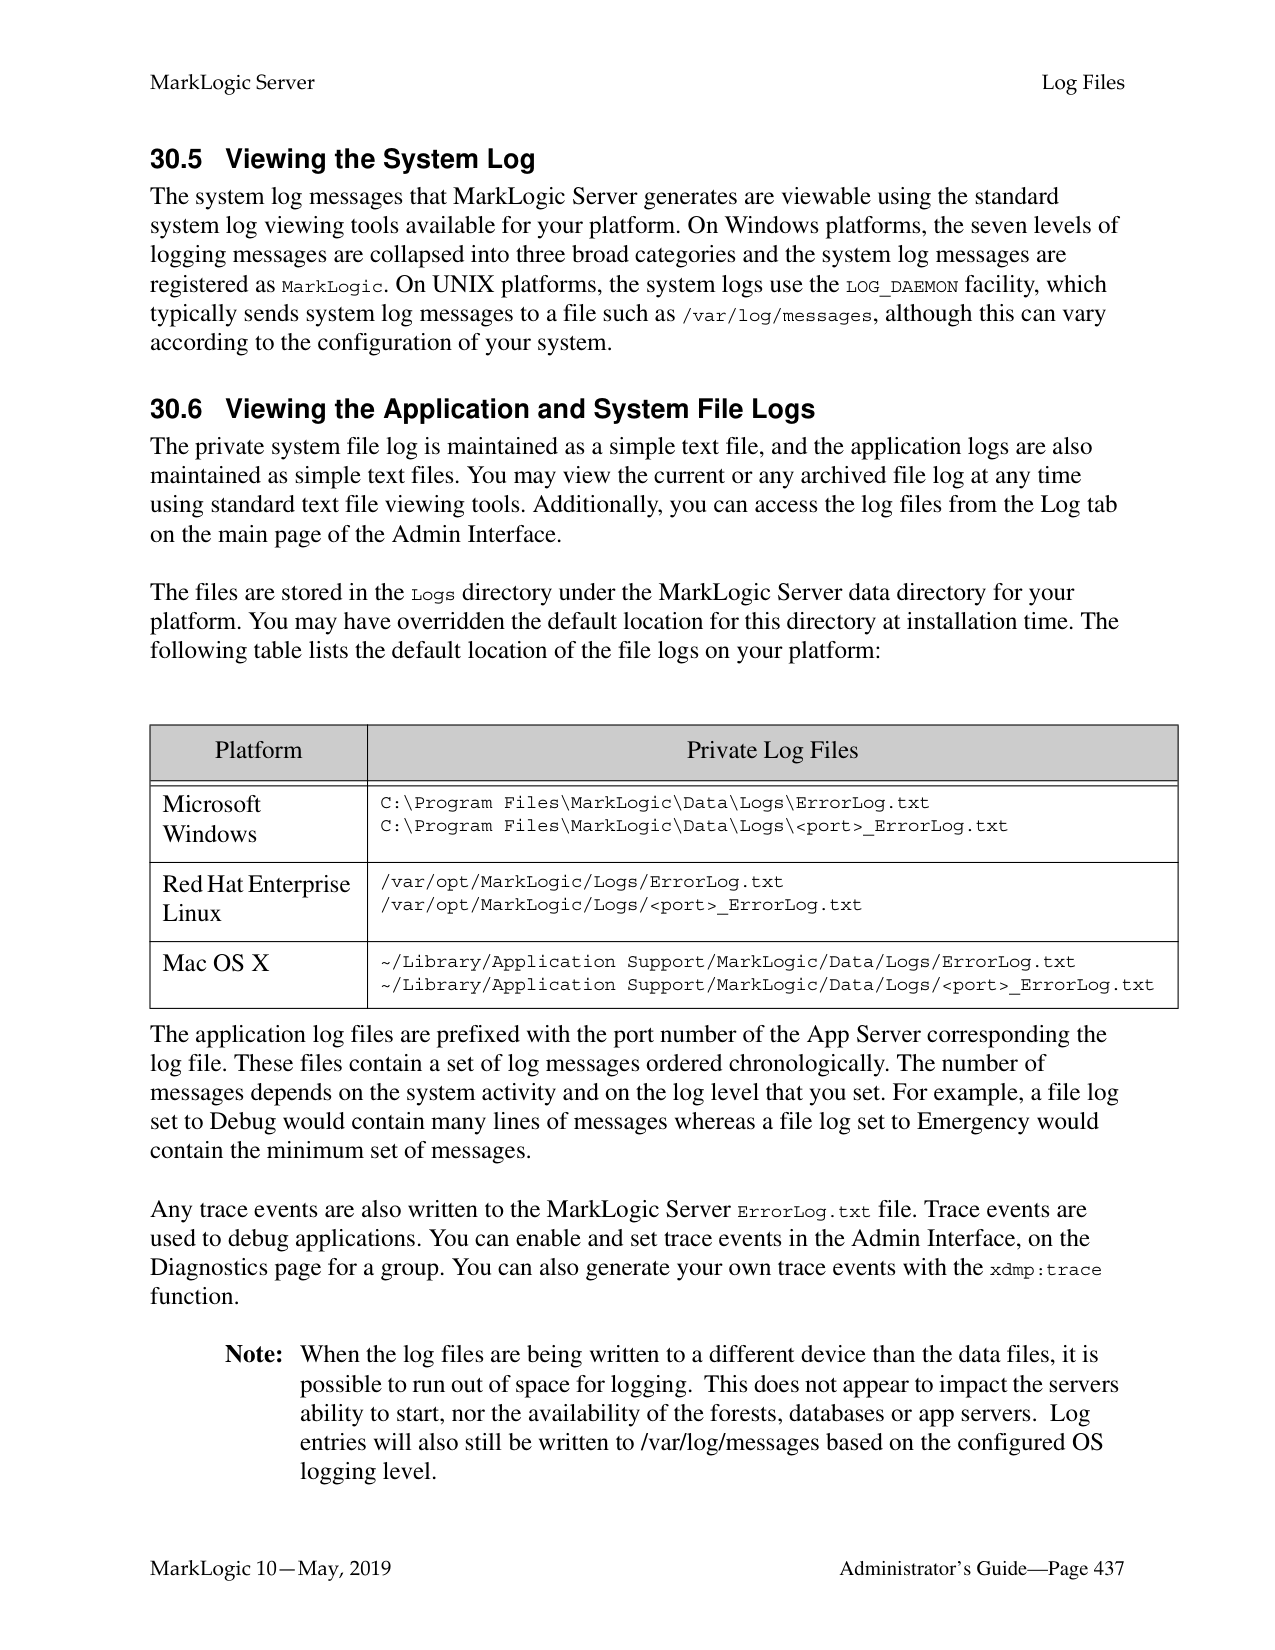

The local name is the name of the XML element used as the root of a fragment. If you have more than one fragment root rule associated with the specified namespace, you can provide a comma-separated list of element names.
The new fragment root rules are added to the database. These rules are applied to XML documents loaded into the specified database from this point on.

Every XML element is associated with a namespace. For the fragment rule to be precise, you must specify the namespace of the XML element. Leaving the namespace URI field blank specifies the universal unnamed namespace.
Alternatively, you can specify that the rule for the fragment root is namespace independent by putting an asterisk (*) in the namespace URI field.
The local name is the name of the parent XML element whose children will be fragment roots. If you have more than one fragment parent rule associated with the specified namespace, you can provide a comma-separated list of element names.
The new fragment rules are added to the database. These rules are applied to XML documents loaded into the specified database from this point on.
The following example shows that the Documents database has only one rule defined for a fragment parent. The rule states that any direct child of an

Note: Deleting fragment rules has no impact on the fragmentation that has already been applied to documents loaded into the database, unless reindexing is enabled for the database.
##### 28.0 Namespaces
Namespaces are a powerful mechanism used to differentiate between potentially ambiguous XML elements. Namespaces can be defined within individual XQuery programs. They can also be defined using the Admin Interface.
Namespaces can be defined for a group to apply to all HTTP, ODBC, XDBC, and WebDAV servers in a group or for a particular HTTP, ODBC, XDBC, or WebDAV server. However, a namespace cannot be defined to apply to a particular forest, database, or XQuery program.
For more information about namespaces, see the “Namespaces” chapter in XQuery and XSLT
Reference Guide, which provides a detailed description of XML namespaces and their use. Be sure to review this information before using the Admin Interface to manage your namespaces.
Use the following procedures for managing namespaces in the Admin Interface:
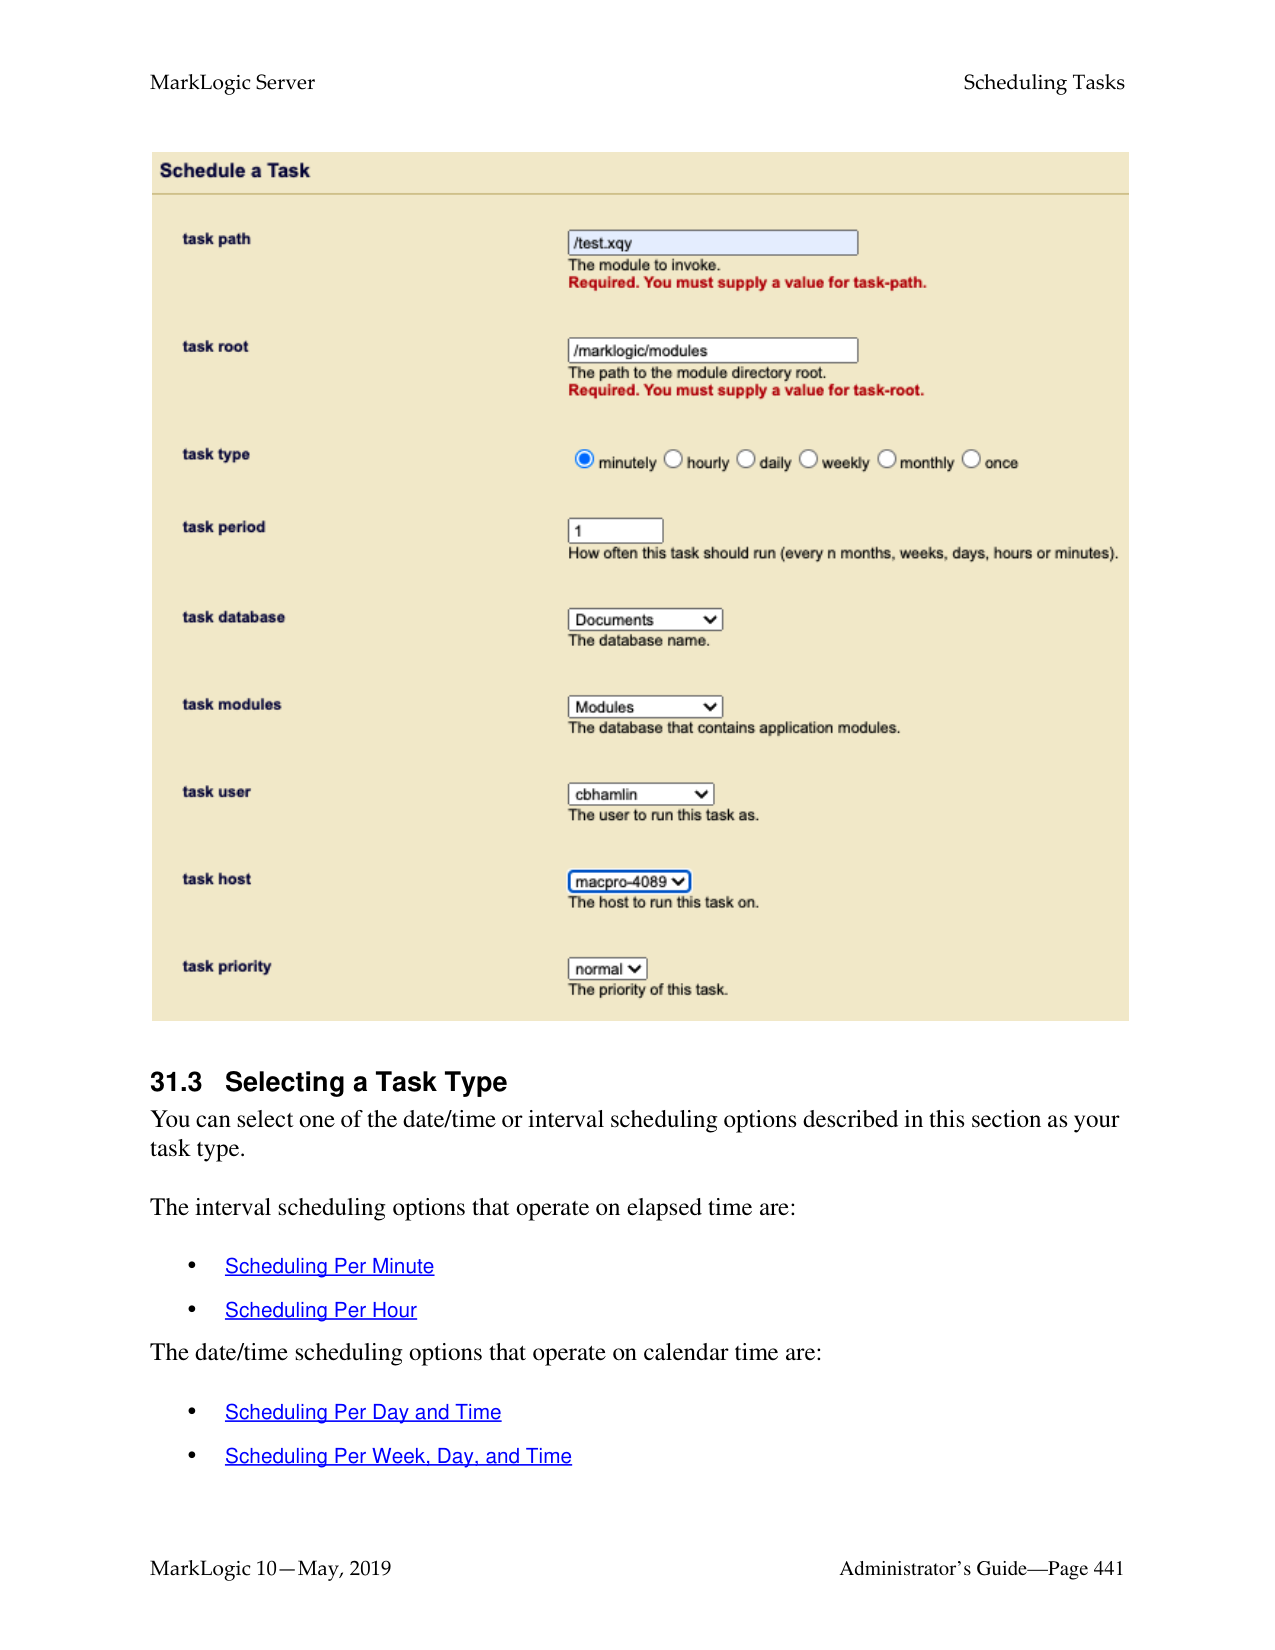
This chapter describes how to use the Admin Interface to manage namespaces. For details on how to manage namespaces programmatically, see Group Maintenance Operations in the Scripting Administrative Tasks Guide.
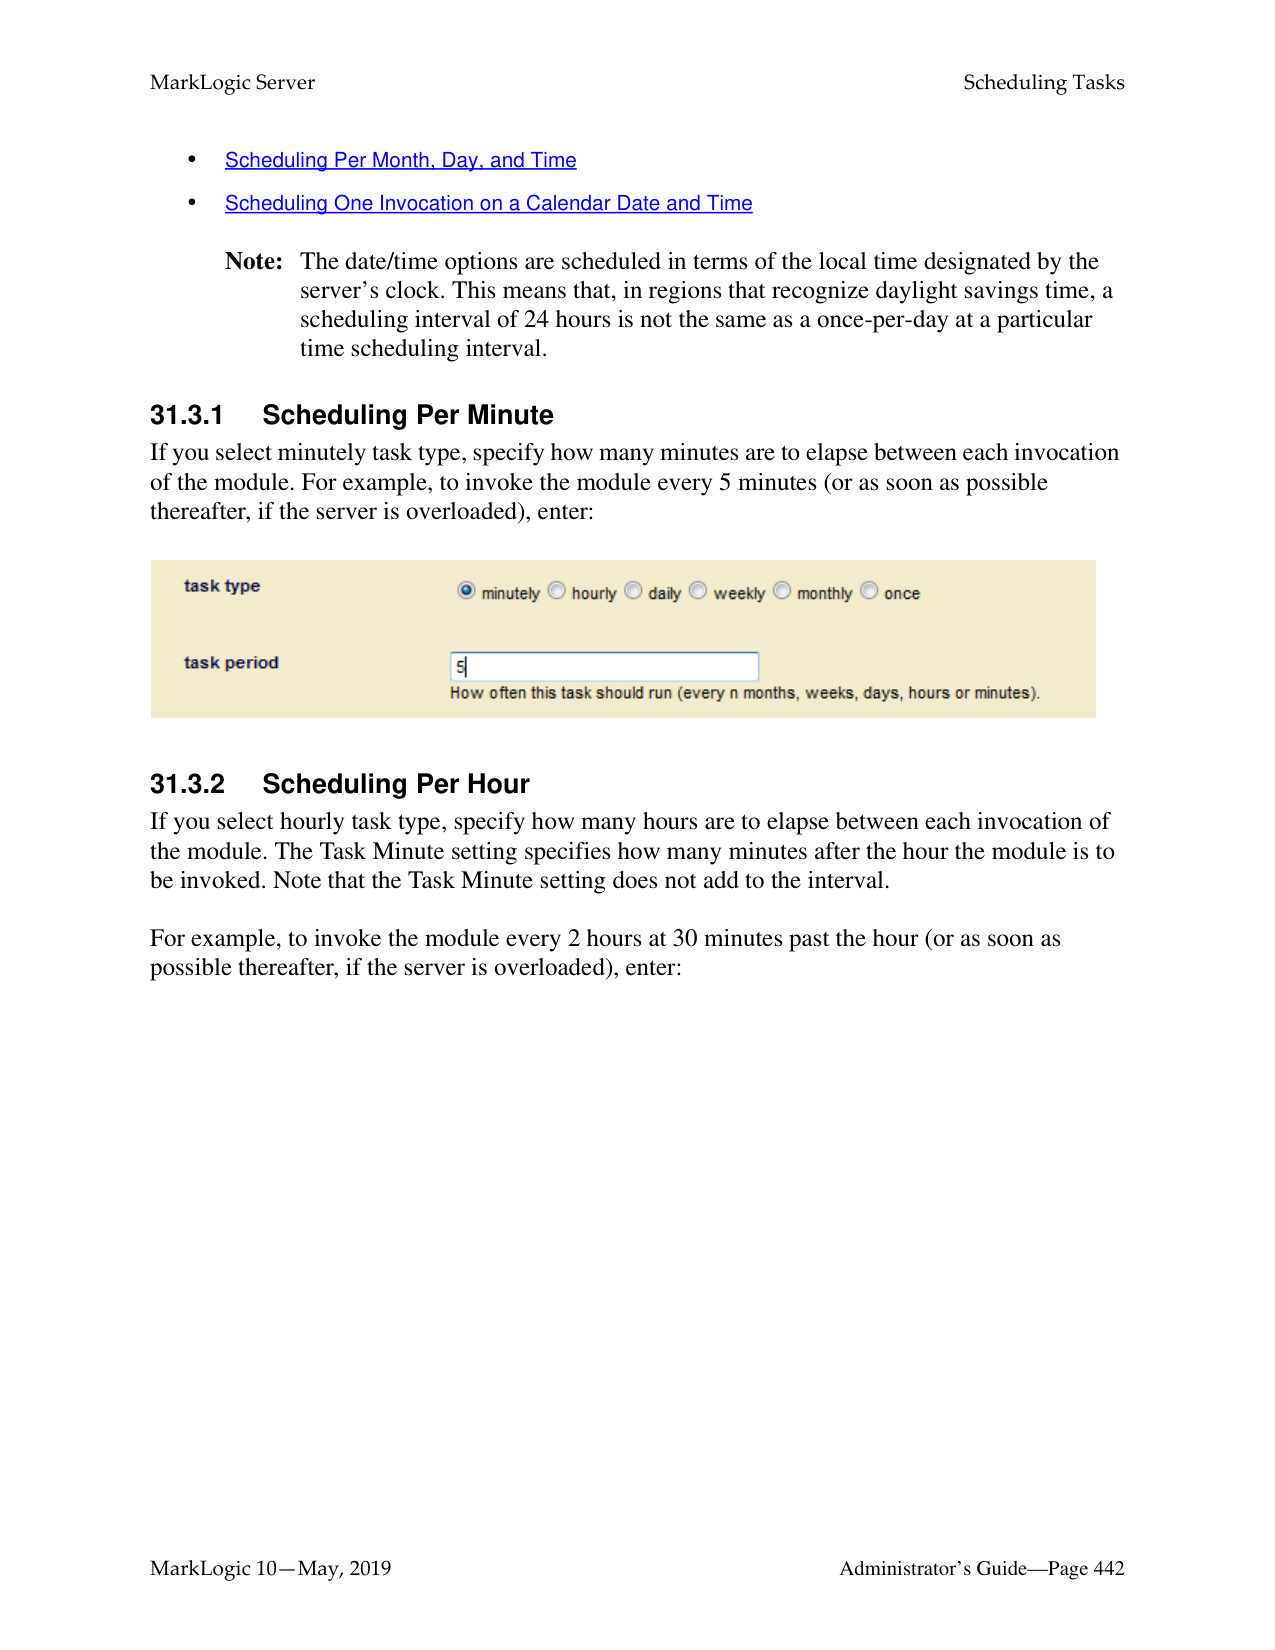

######### 28.2 Defining Namespaces for an HTTP, ODBC, or XDBC Server
To define namespaces using the Admin Interface for an HTTP, ODBC, or XDBC Server, perform the following steps:

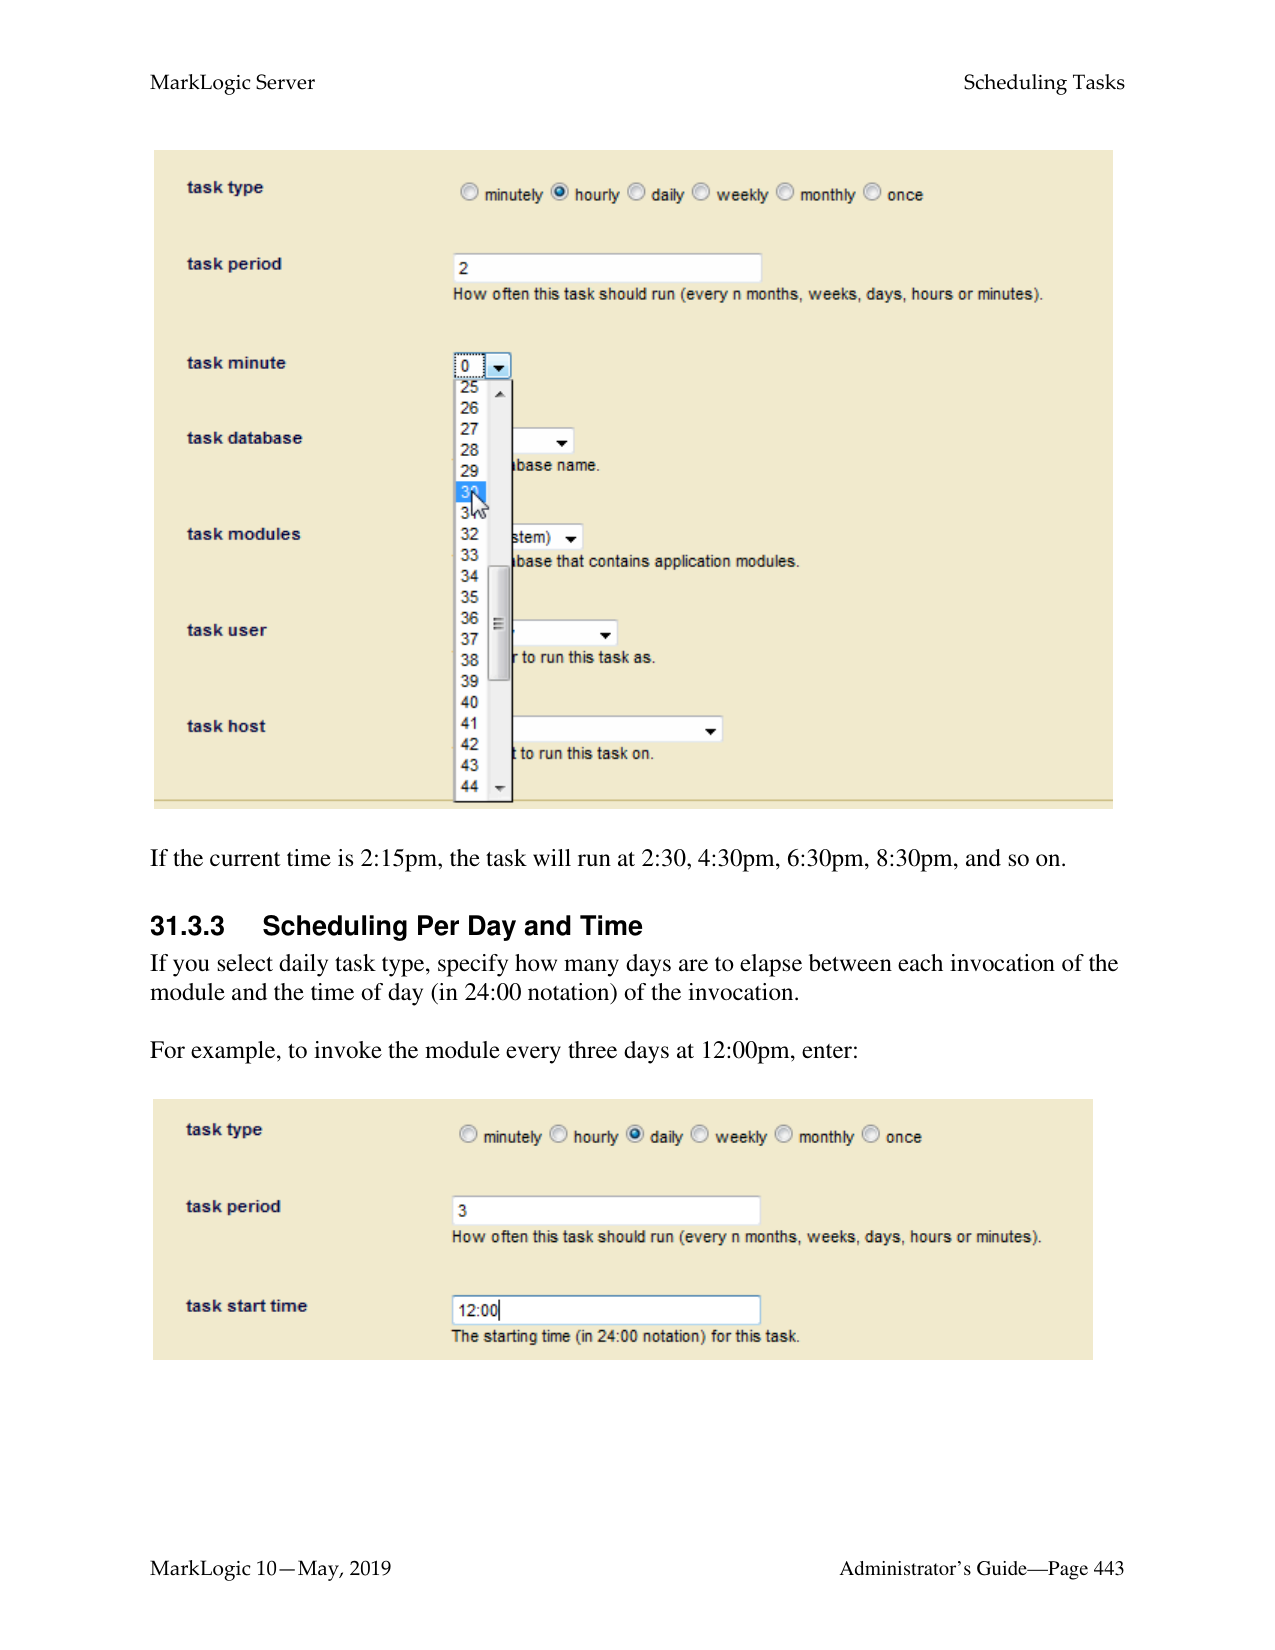

######### 28.4 Viewing Namespace Settings for an HTTP, ODBC, or XDBC ServerTo view namespaces you have defined in the Admin Interface, perform the following steps:
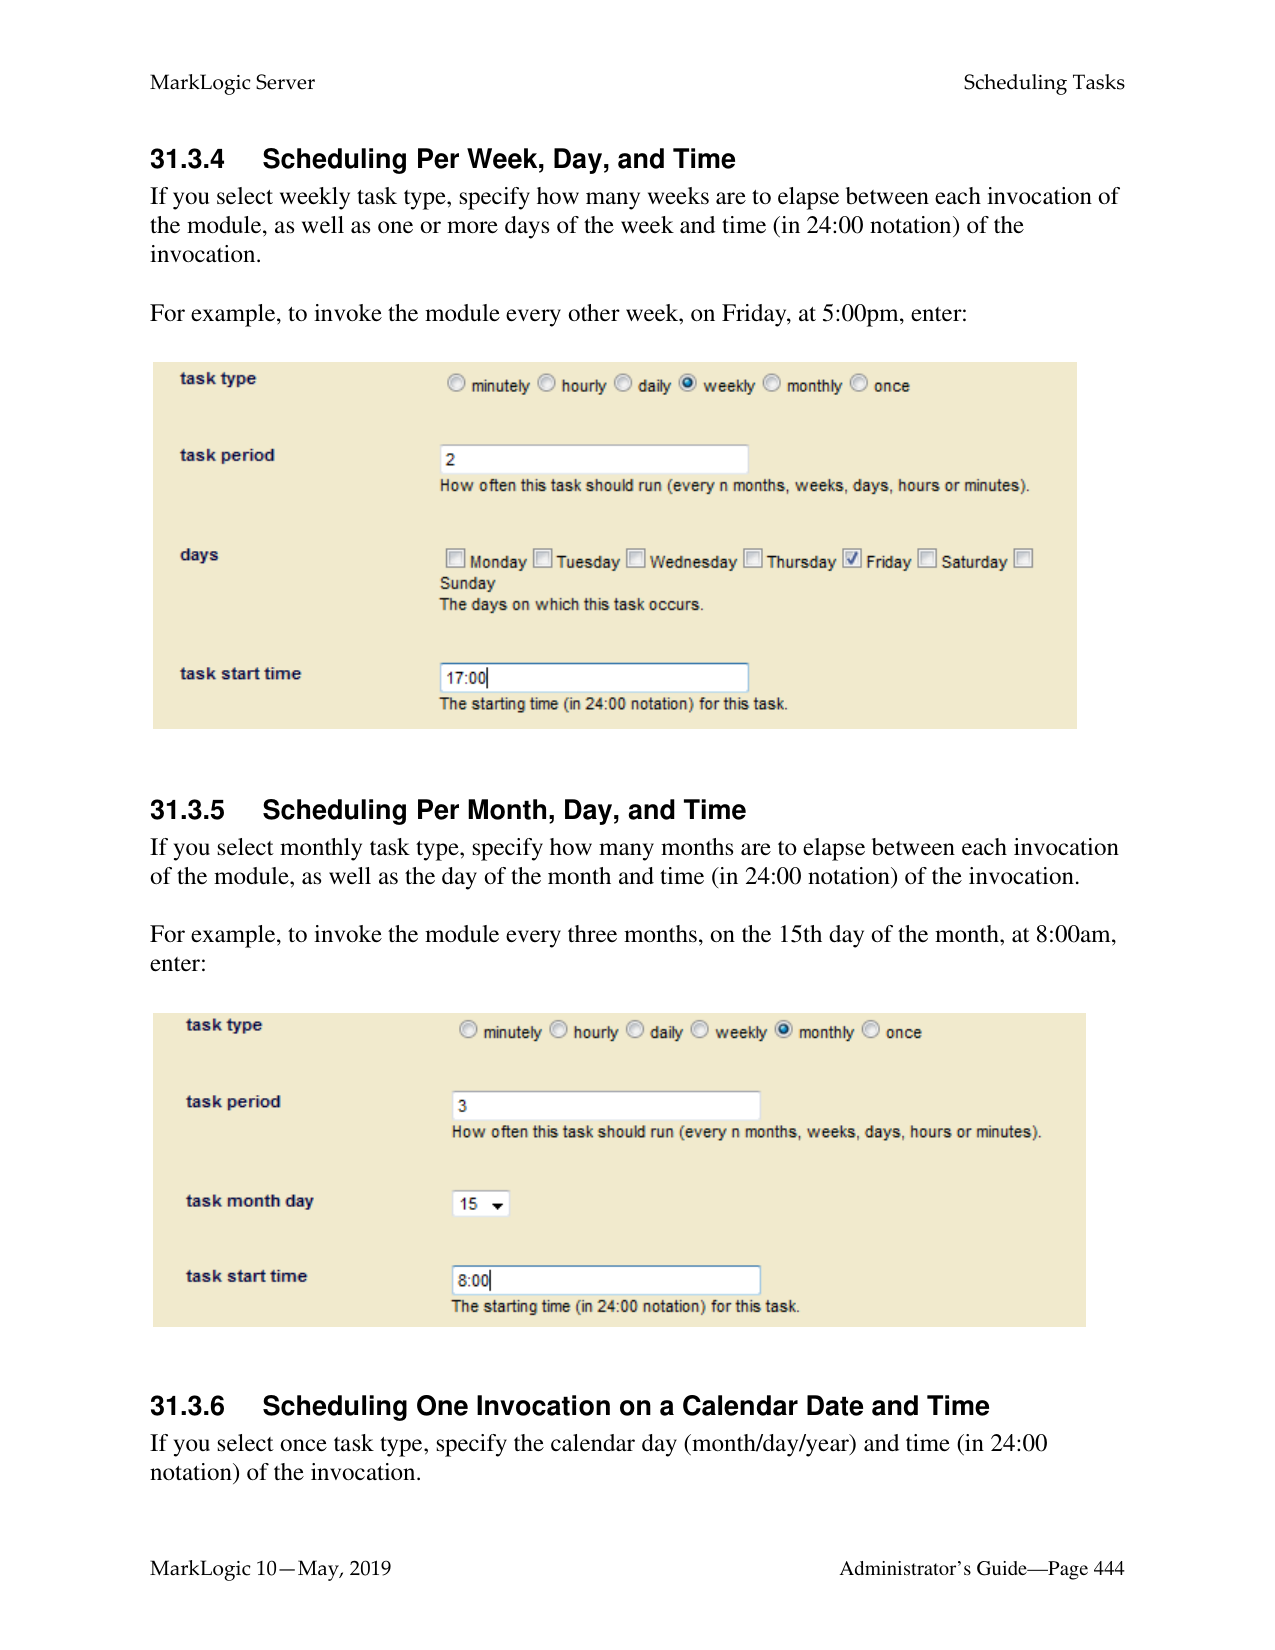

######### 28.6 Deleting Namespaces for an HTTP, ODBC, or XDBC Server
To delete namespaces that you defined in the Admin Interface for an HTTP, ODBC, or XDBC server, perform the following steps:
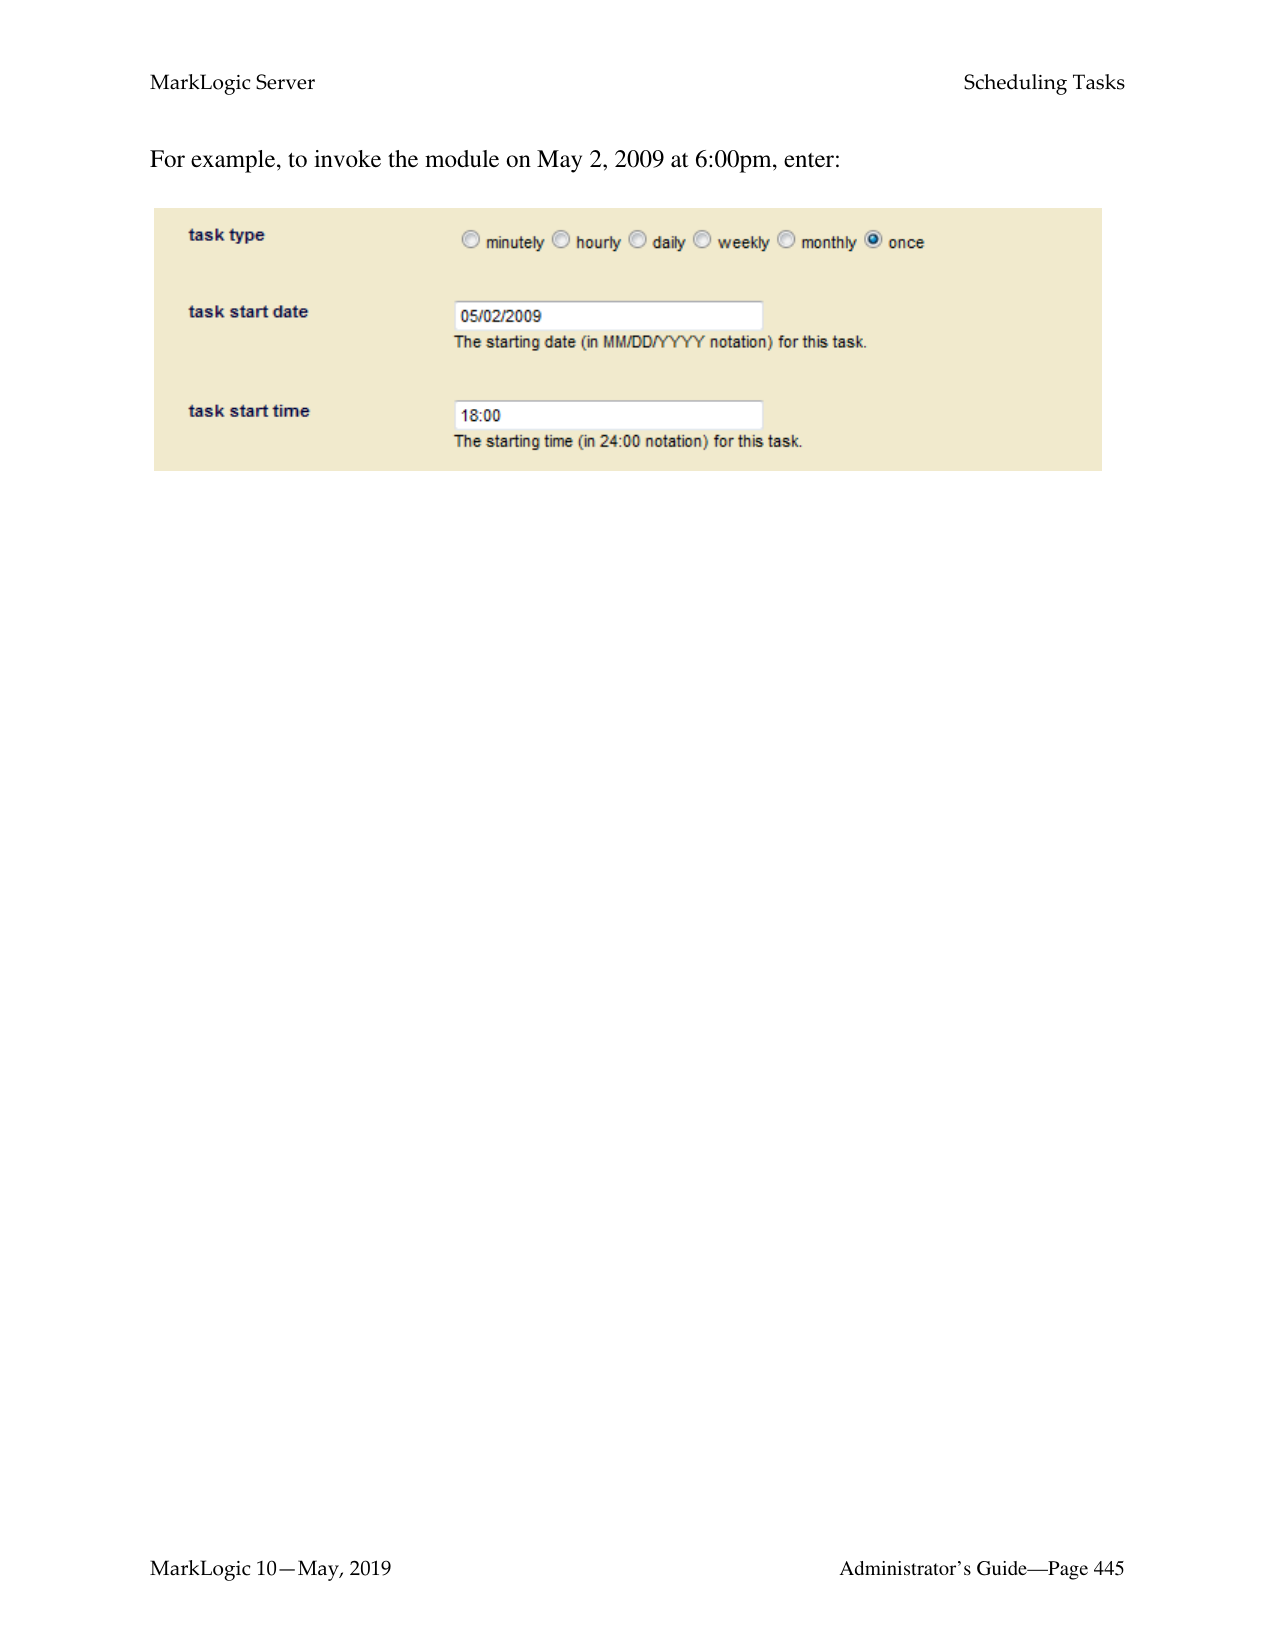
##### 29.0 Understanding and Defining Schemas
This chapter describes schemas and lists procedures for defining them. The following topics are included:
For more information on the Schema database, loading schemas into MarkLogic Server, and using schemas in your applications, see the “Loading Schemas” chapter of the Application Developer’s Guide.
######### 29.1 Understanding Schemas
A schema is a data dictionary for your XML content. To specify a schema, you need to define the namespace to which the schema applies as well as the location of the schema file.
Schemas define the types of elements within XML documents. When knowing the type of an XML element would be beneficial to evaluating an XQuery program, MarkLogic Server will look for the relevant schema document (based on that element's namespace) using the following strategy:

Problems can arise in step 2 above when there are multiple schema documents in the schema database whose target namespace matches the namespace of the element that MarkLogic Server is trying to type. In this case, it is convenient to be able to use the Admin Interface to specify a default mapping.
Schema mappings can be specified for the HTTP, ODBC, or XDBC servers individually or for the group to apply to all HTTP, ODBC, or XDBC servers in the group. If the schema mapping defined for an HTTP, ODBC, or XDBC server conflicts with the schema mapping defined for the group, the former mapping is used.
When you specify a schema mapping in the Admin Interface, MarkLogic Server uses the following strategy to locate the schema:
Note: If the schema mapping for the HTTP, ODBC, or XDBC server conflicts with the
schema mapping for the group, the former mapping is used.
If a namespace is invoked by one or more data elements stored in a particular database, and the schema for that namespace is defined for the group or HTTP, ODBC, or XDBC server, MarkLogic Server applies the schema to the storage, indexing, and retrieval of that data.
Note: The schema database in this case is the schema database for the database in which
the data is located.
######### 29.2.1 Adding a Schema Definition for a Group
To make a schema available to all HTTP, ODBC, or XDBC servers in a group, complete the following procedure:
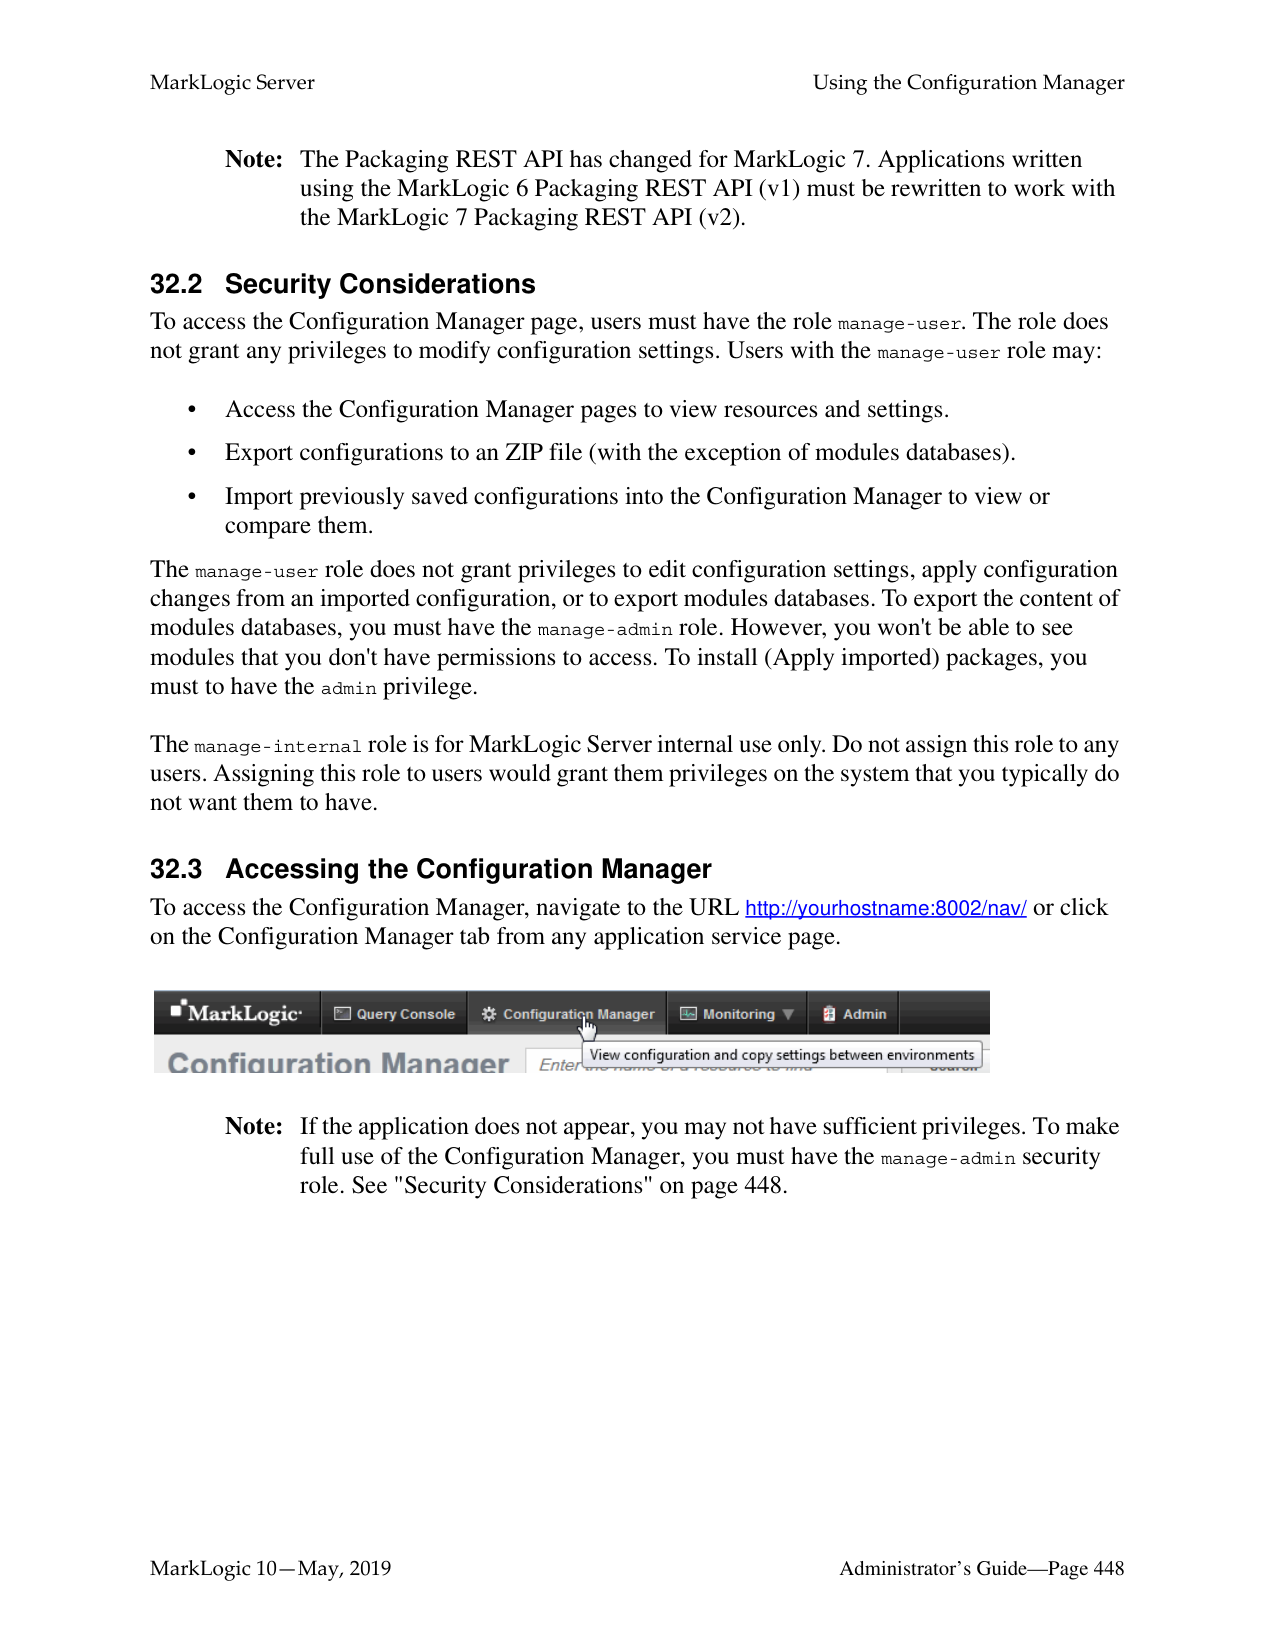
If you are planning to store the schema in your Config directory, the following table lists the default location of the Config directory on each platform:

|Platform|Schema Directory| |---|---| | | | |Microsoft Windows|C:\Program Files\MarkLogic\Config| |Red Hat Linux|/opt/MarkLogic/Config| |Mac OS X|~/Library/MarkLogic/Config/|
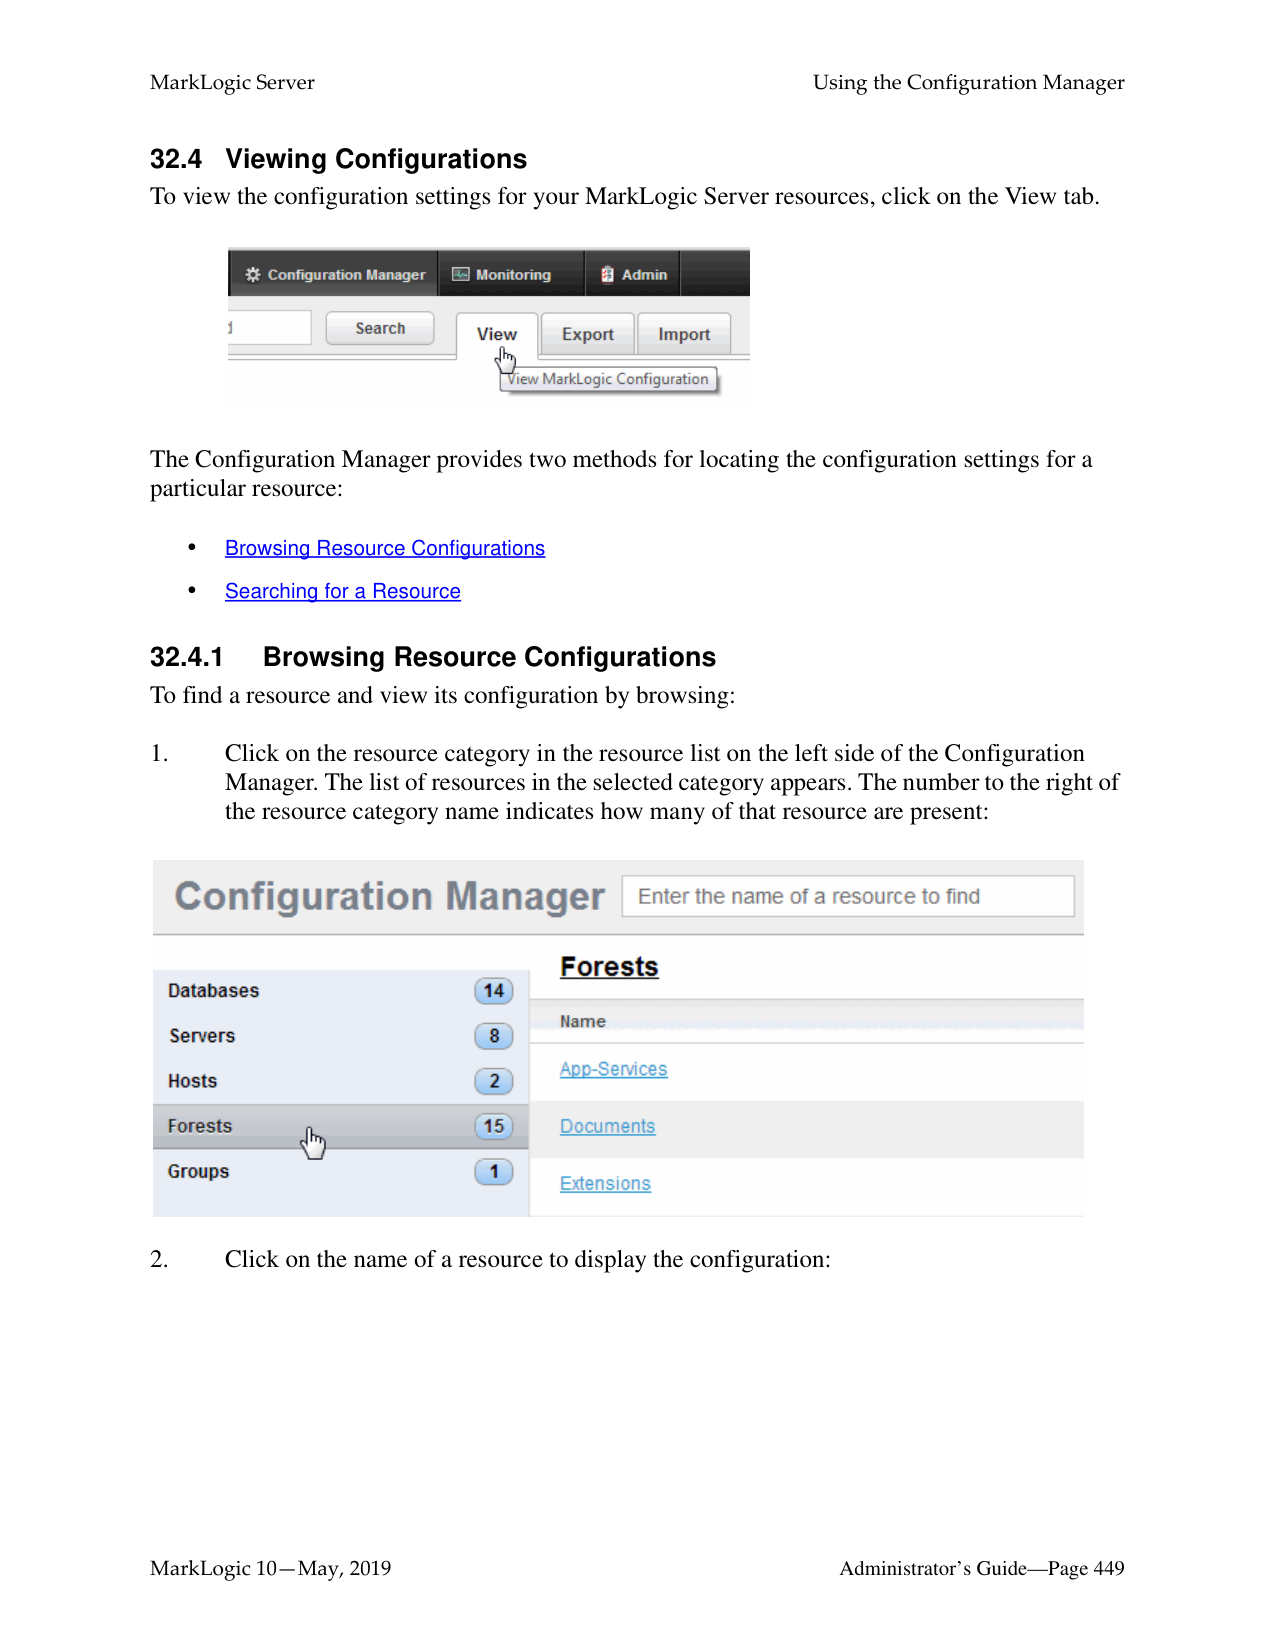
######### 29.2.2 Adding a Schema Definition for an HTTP, ODBC, or XDBC Server
To make a schema available to a particular HTTP, ODBC, or XDBC server, perform the following steps:
If you are planning to store the schema in your config directory, refer to the following table for the default location of the config directory on your platform:


|Platform|Schema Directory| |---|---| | | | |Microsoft Windows|C:\Program Files\MarkLogic\Config| |Red Hat Linux|/opt/MarkLogic/Config| |Mac OS X|~/Library/MarkLogic/Config/|
The schema is added to the HTTP, ODBC, or XDBC server.
The following example shows just one schema. It specifies that the schema for namespace http:/ /www.w3.org/1999/xhtml is found in the file xhtml.1.xsd, which is located in the config directory of your MarkLogic Server program directory.

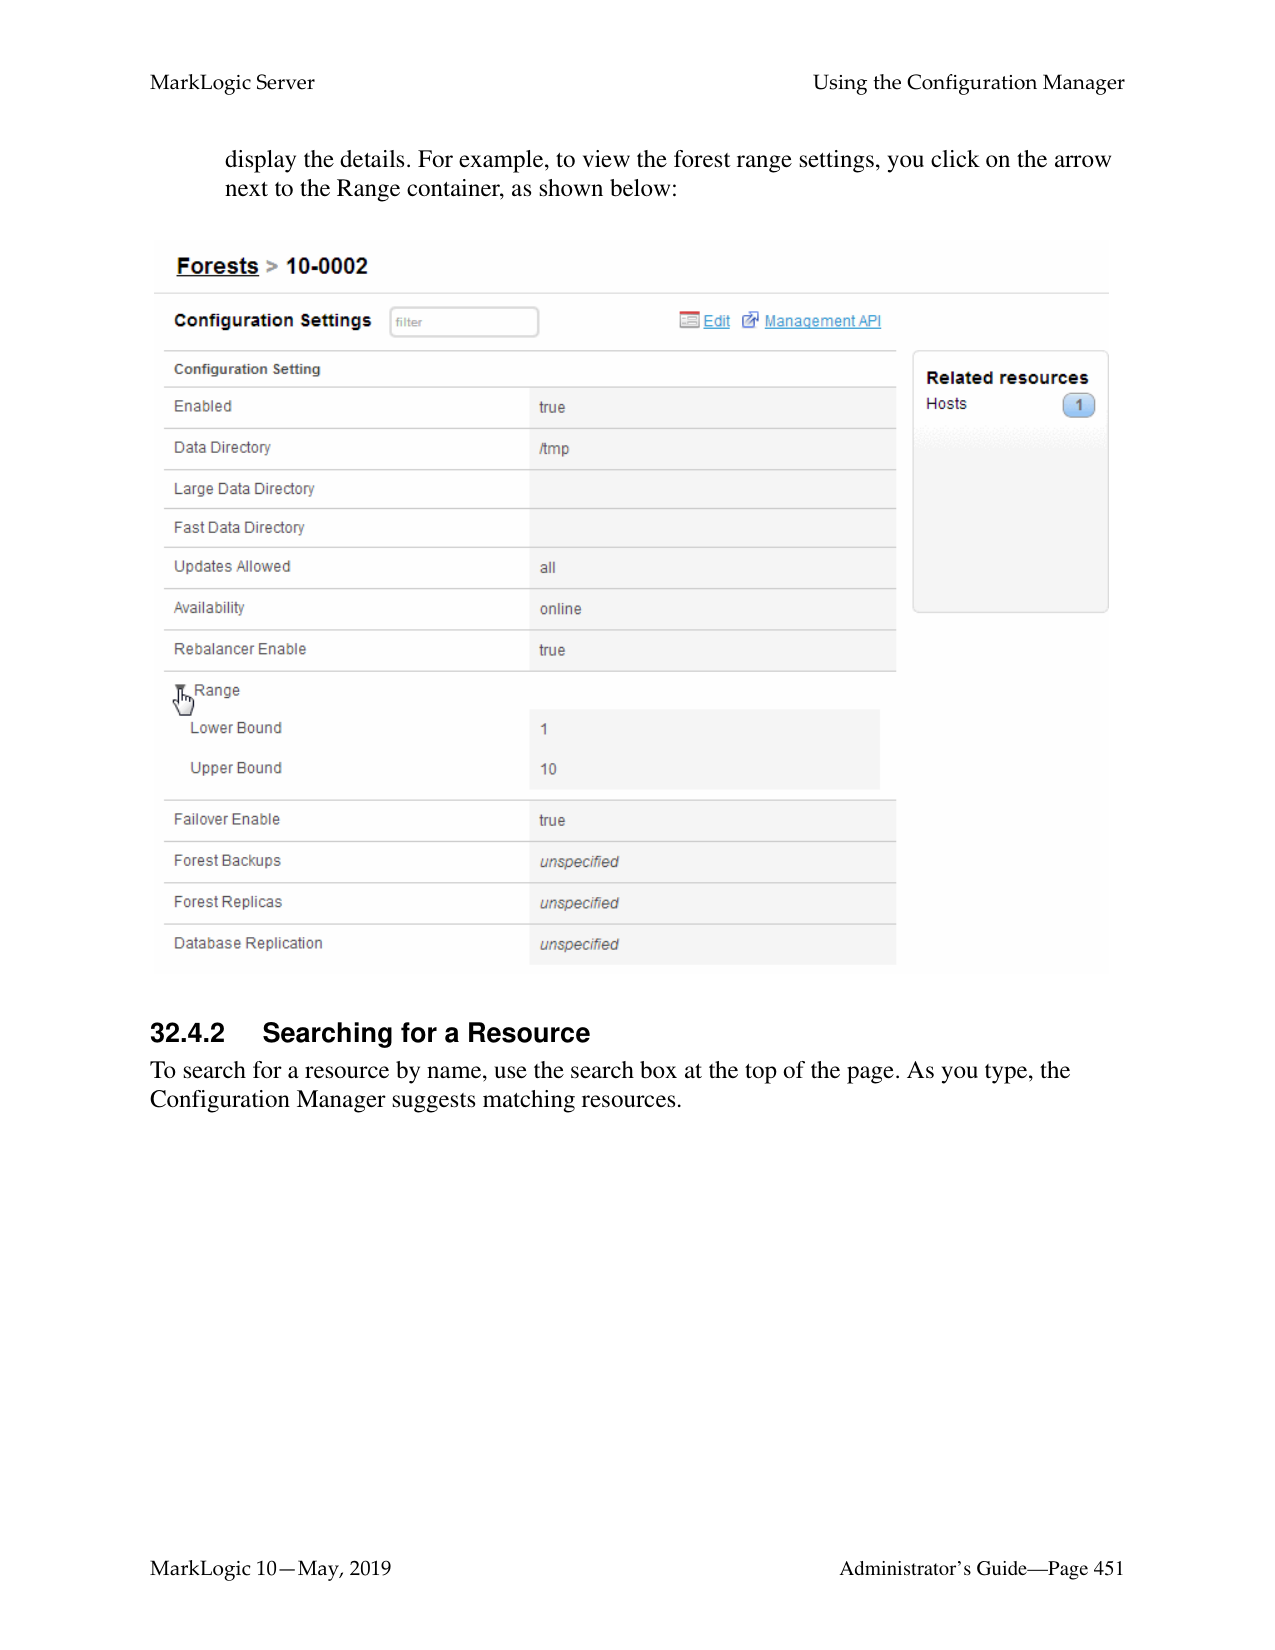
######### 29.2.4 Viewing Schema Definitions for an HTTP, ODBC, or XDBC ServerTo view a schema definition for an HTTP or XDBC Server, perform the following steps:
The following example shows just one schema. It specifies that the schema for namespace http:/ /www.w3.org/1999/xhtml is found in the file xhtml.1.xsd, which is located in the config directory of your MarkLogic Server program directory.

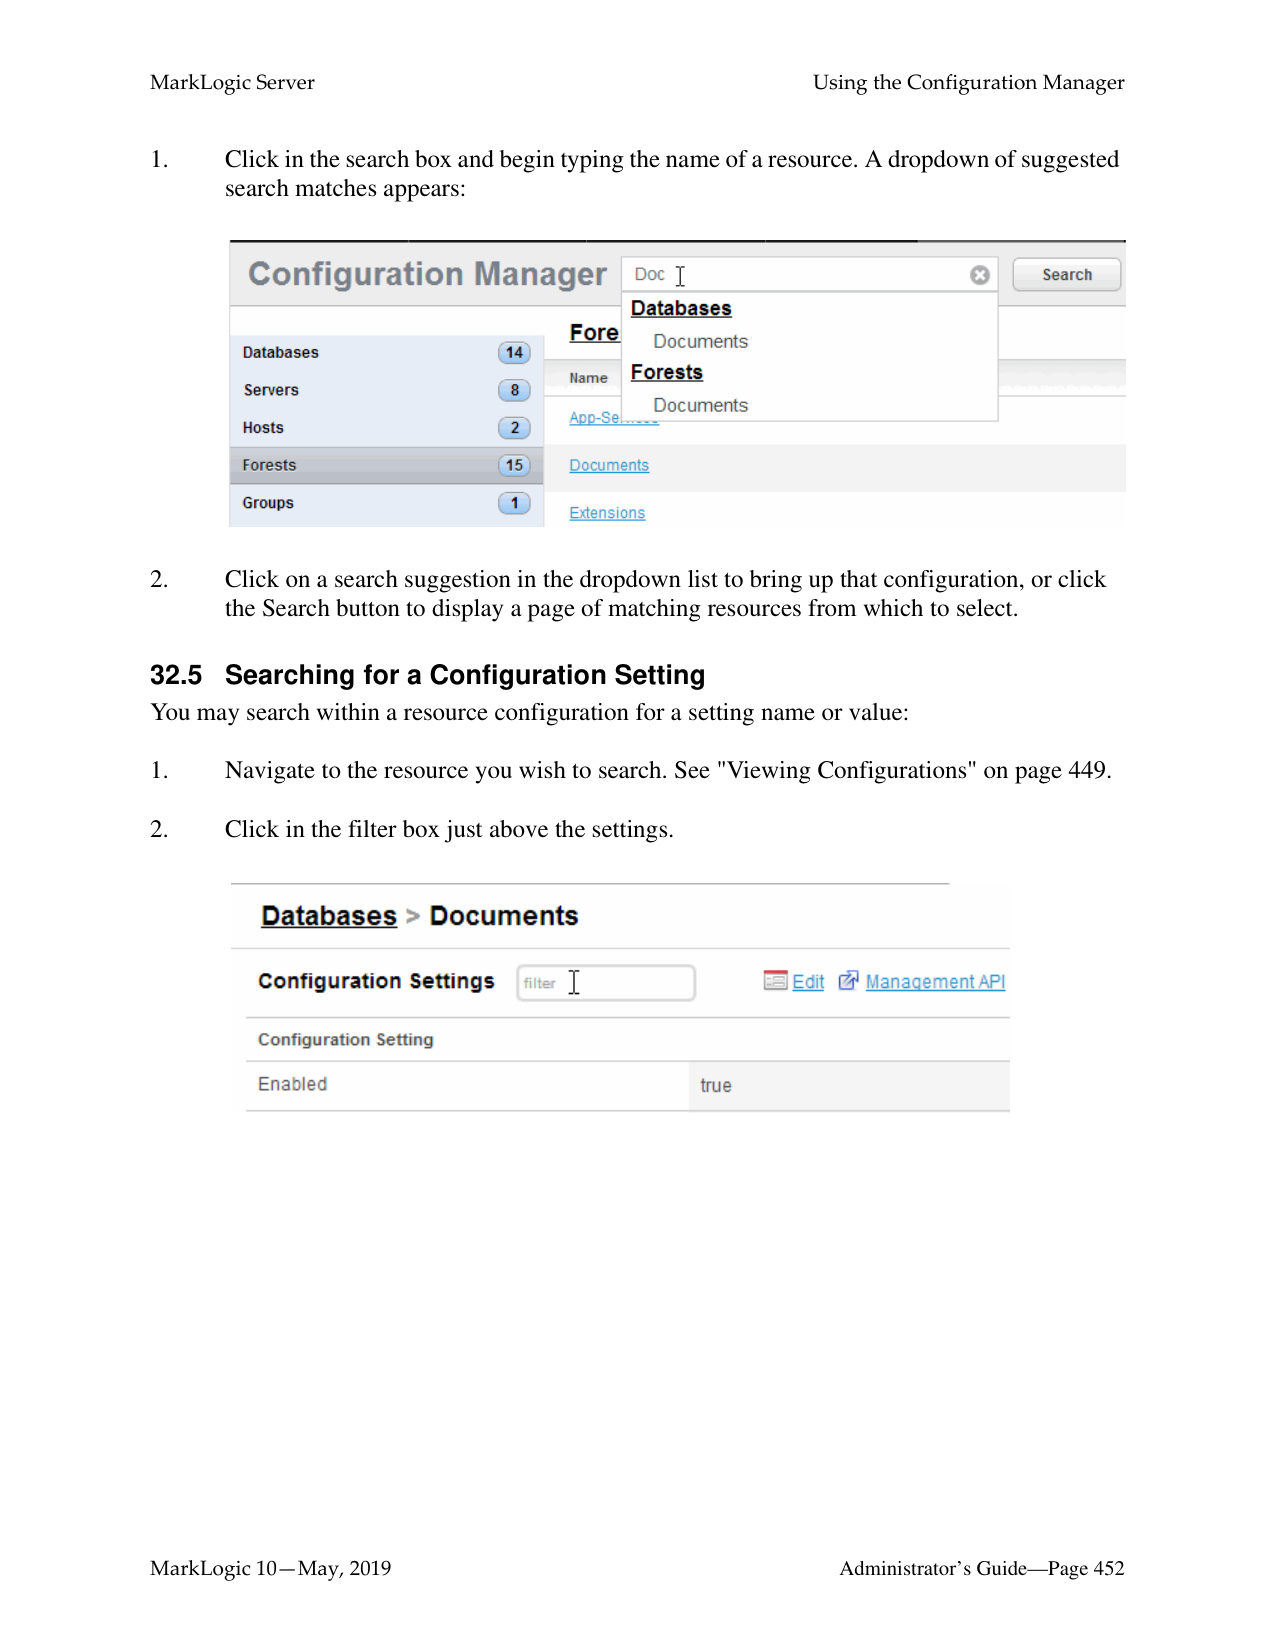

For information on the audit log files, see “Auditing Events” on page 111.
######### 30.1 Application and System Log Files
There are separate log files for application-generated messages and for system-generated messages. This allows for separation of personally identifiable information (such as social security numbers, for example) and system messages (such as merge notices and other system activity). The application log files are configured on a per-App Server basis, and the system log files are configured at the group level. Each host has its own set of log files (both application and system log files). Things like uncaught application errors, which might contain data from an application, are sent to the application logs. Things like MarkLogic Server system activity are sent to the system log files.
######### 30.2 Understanding the Log Levels
MarkLogic Server sends log messages to both the operating system log and the MarkLogic Server system file log. Additionally, application log messages (messages generated from application code) are sent to the application logs. Depending on how you configure your logging functions, both operating system and file logs may or may not receive the equivalent number of messages. To enhance performance, the system log should receive fewer messages than the MarkLogic Server file log.
MarkLogic Server uses the following log settings, where Finest is the most verbose while Emergency is the least verbose:
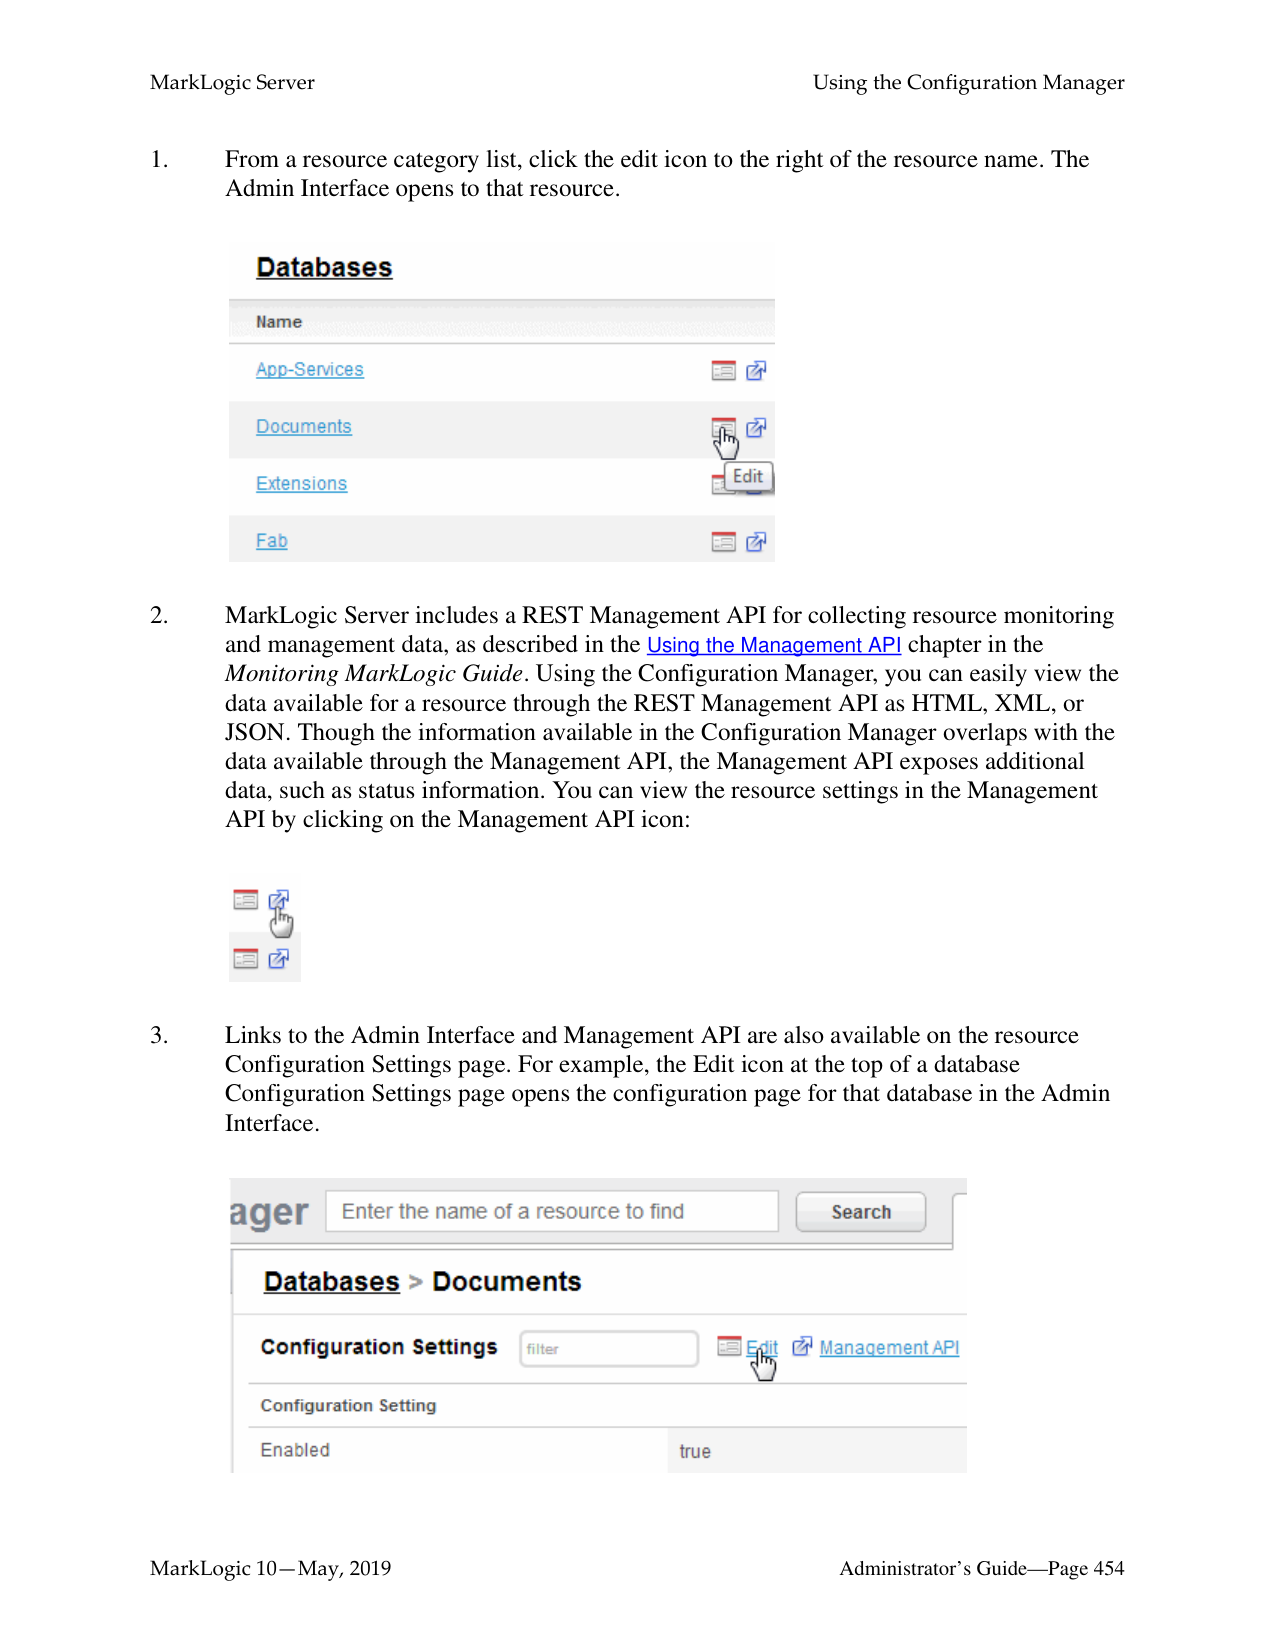
|Log Level|Description| |---|---| | | | |Finest|Extremely detailed debug level messages.| |Finer|Very detailed debug level messages.| |Fine|Detailed debug level messages.| |Debug|Debug level messages.| |Config|Configuration messages.| |Info|Informational messages. This is the default setting.| |Notice|Normal but significant conditions.| |Warning|Warning conditions.| |Error|Error conditions.| |Critical|Critical conditions.| |Alert|Immediate action required.| |Emergency|System is unusable.|
Log file settings are applied on a per-group basis. By default, the system log for a group is set to Notice while the file log is set to Info. As such, the system log receives fewer log messages than the file log. You may change these settings to suit your needs. It is more efficient to write to the file log than to the system log. It is good practice to run in production with the Debug file log level to get a more detailed record of operations. Log levels more verbose than Debug may result in very large log files and are not recommended for extended periods of time.
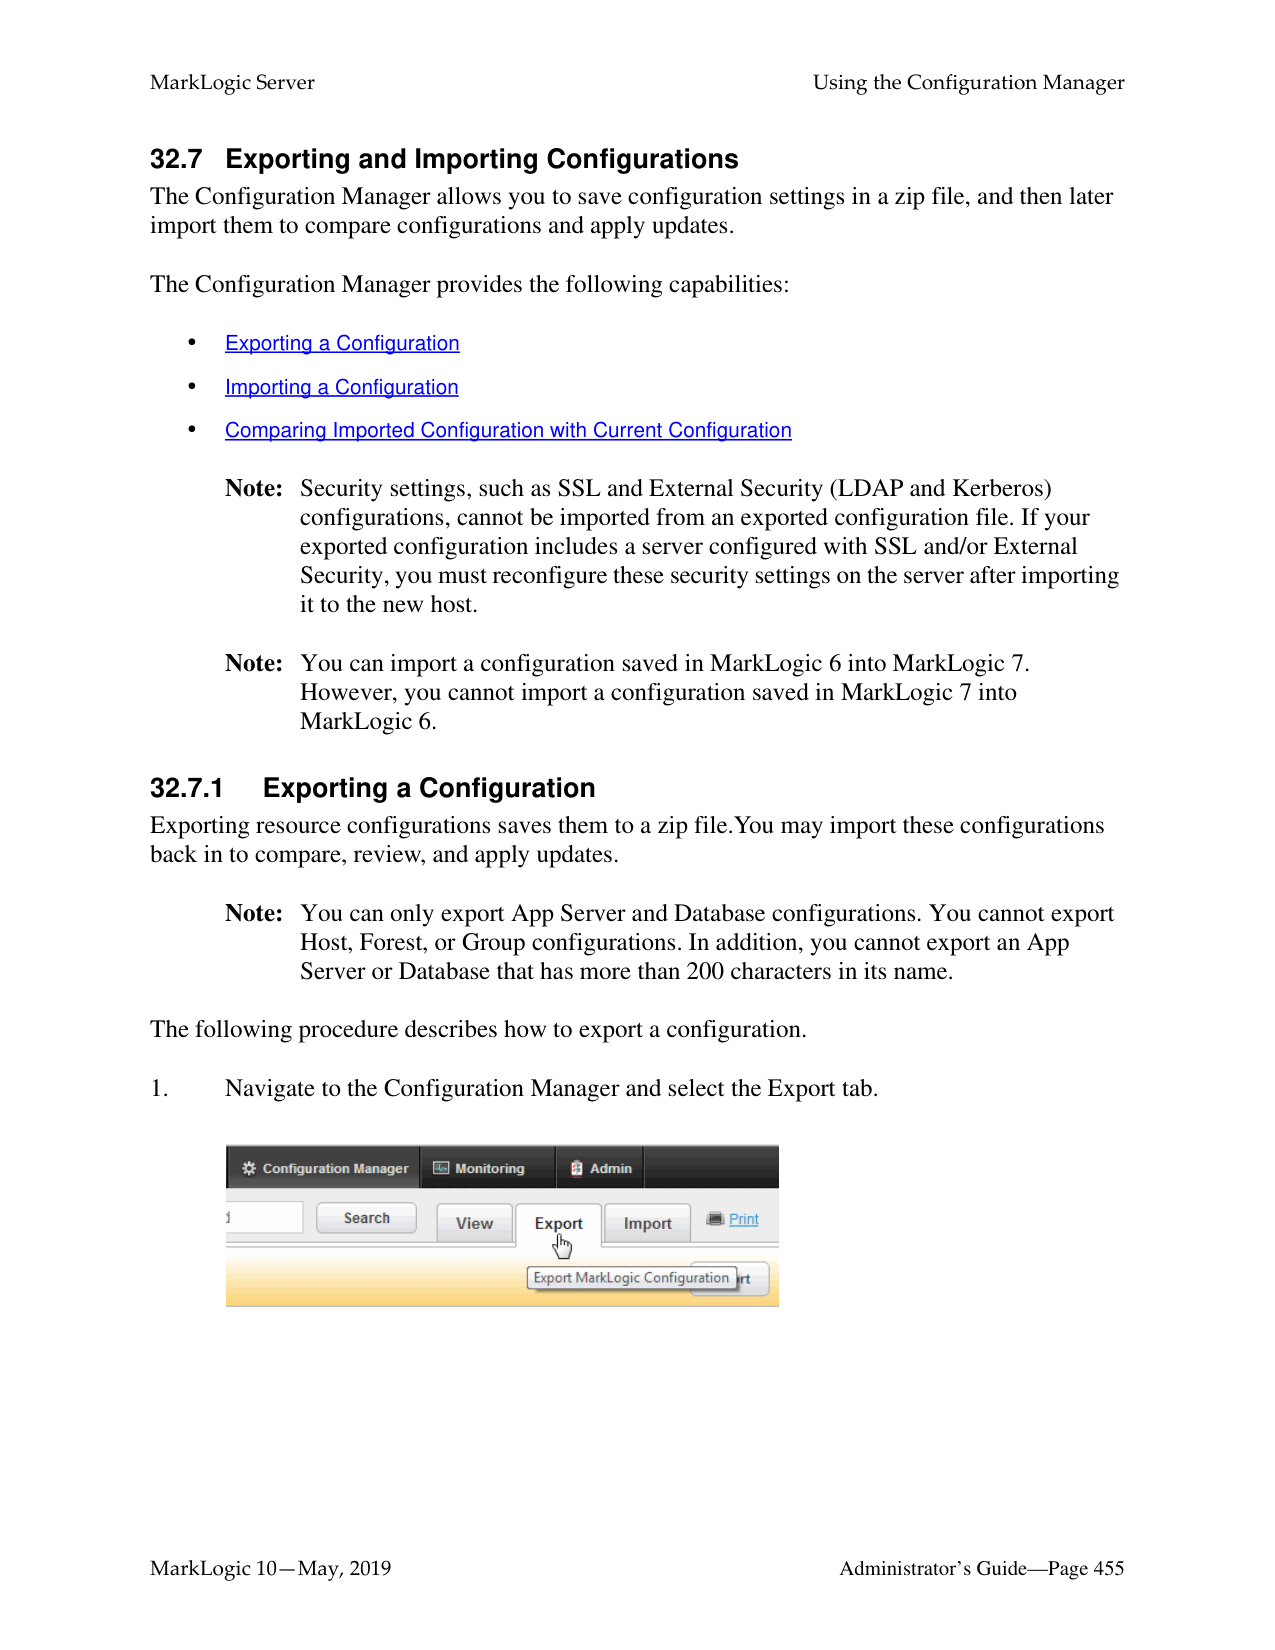

|Time Frame|Description| |---|---| | | | |Never|The log file grows without bound.| |Daily|A new log file is started every day at 12:00 A.M.| |Sunday|A new log file is started every week on Sunday at 12:00 A.M.| |Saturday|A new log file is started every week on Saturday at 12:00 A.M.| |Friday|A new log file is started every week on Friday at 12:00 A.M.| |Thursday|A new log file is started every week on Thursday at 12:00 A.M.|
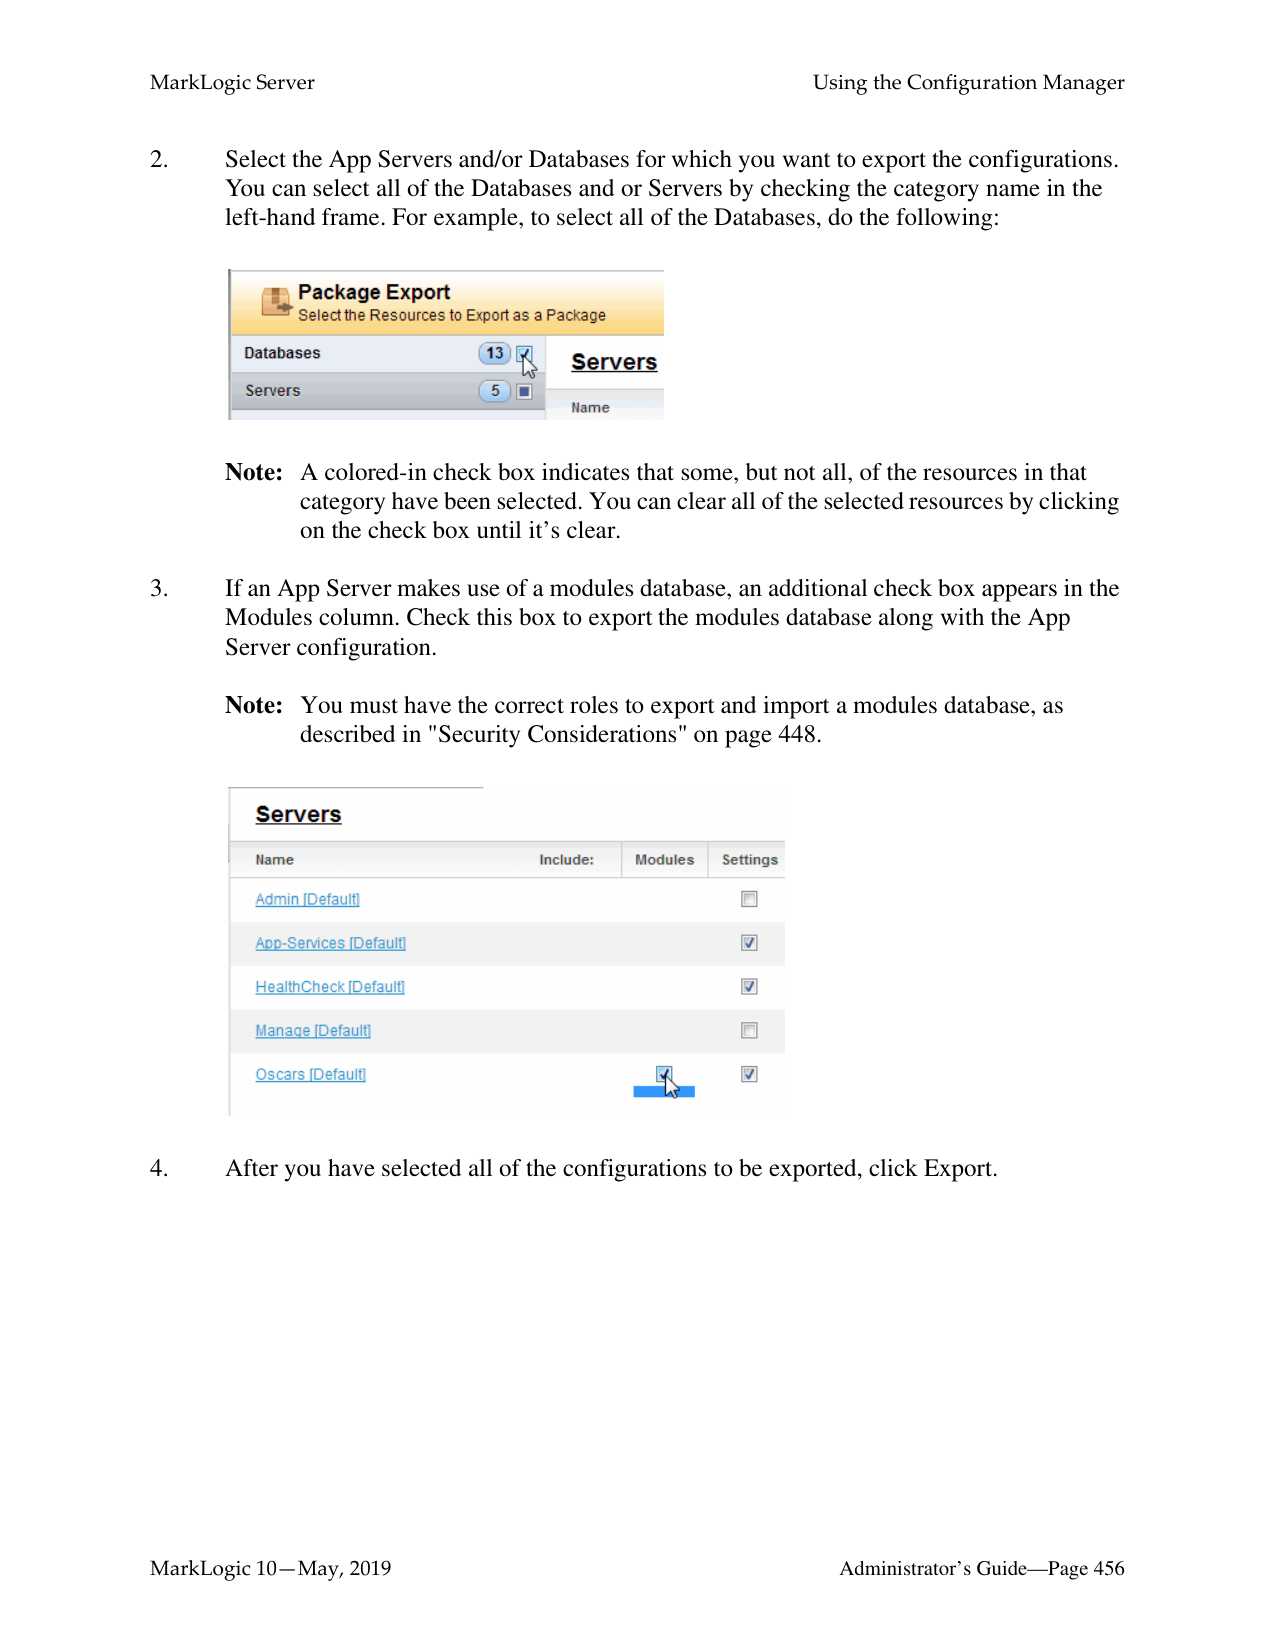
|Time Frame|Description| |---|---| | | | |Wednesday|A new log file is started every week on Wednesday at 12:00 A.M.| |Tuesday|A new log file is started every week on Tuesday at 12:00 A.M.| |Monday|A new log file is started every week on Monday at 12:00 A.M.| |Monthly|A new log file is started at 12:00 AM on the first day of each month.|
The private log files are kept in an aging archive. After the number of log files grows to the value specified in the Keep Log File setting, when a new log file is started, the oldest log file archive is automatically deleted.
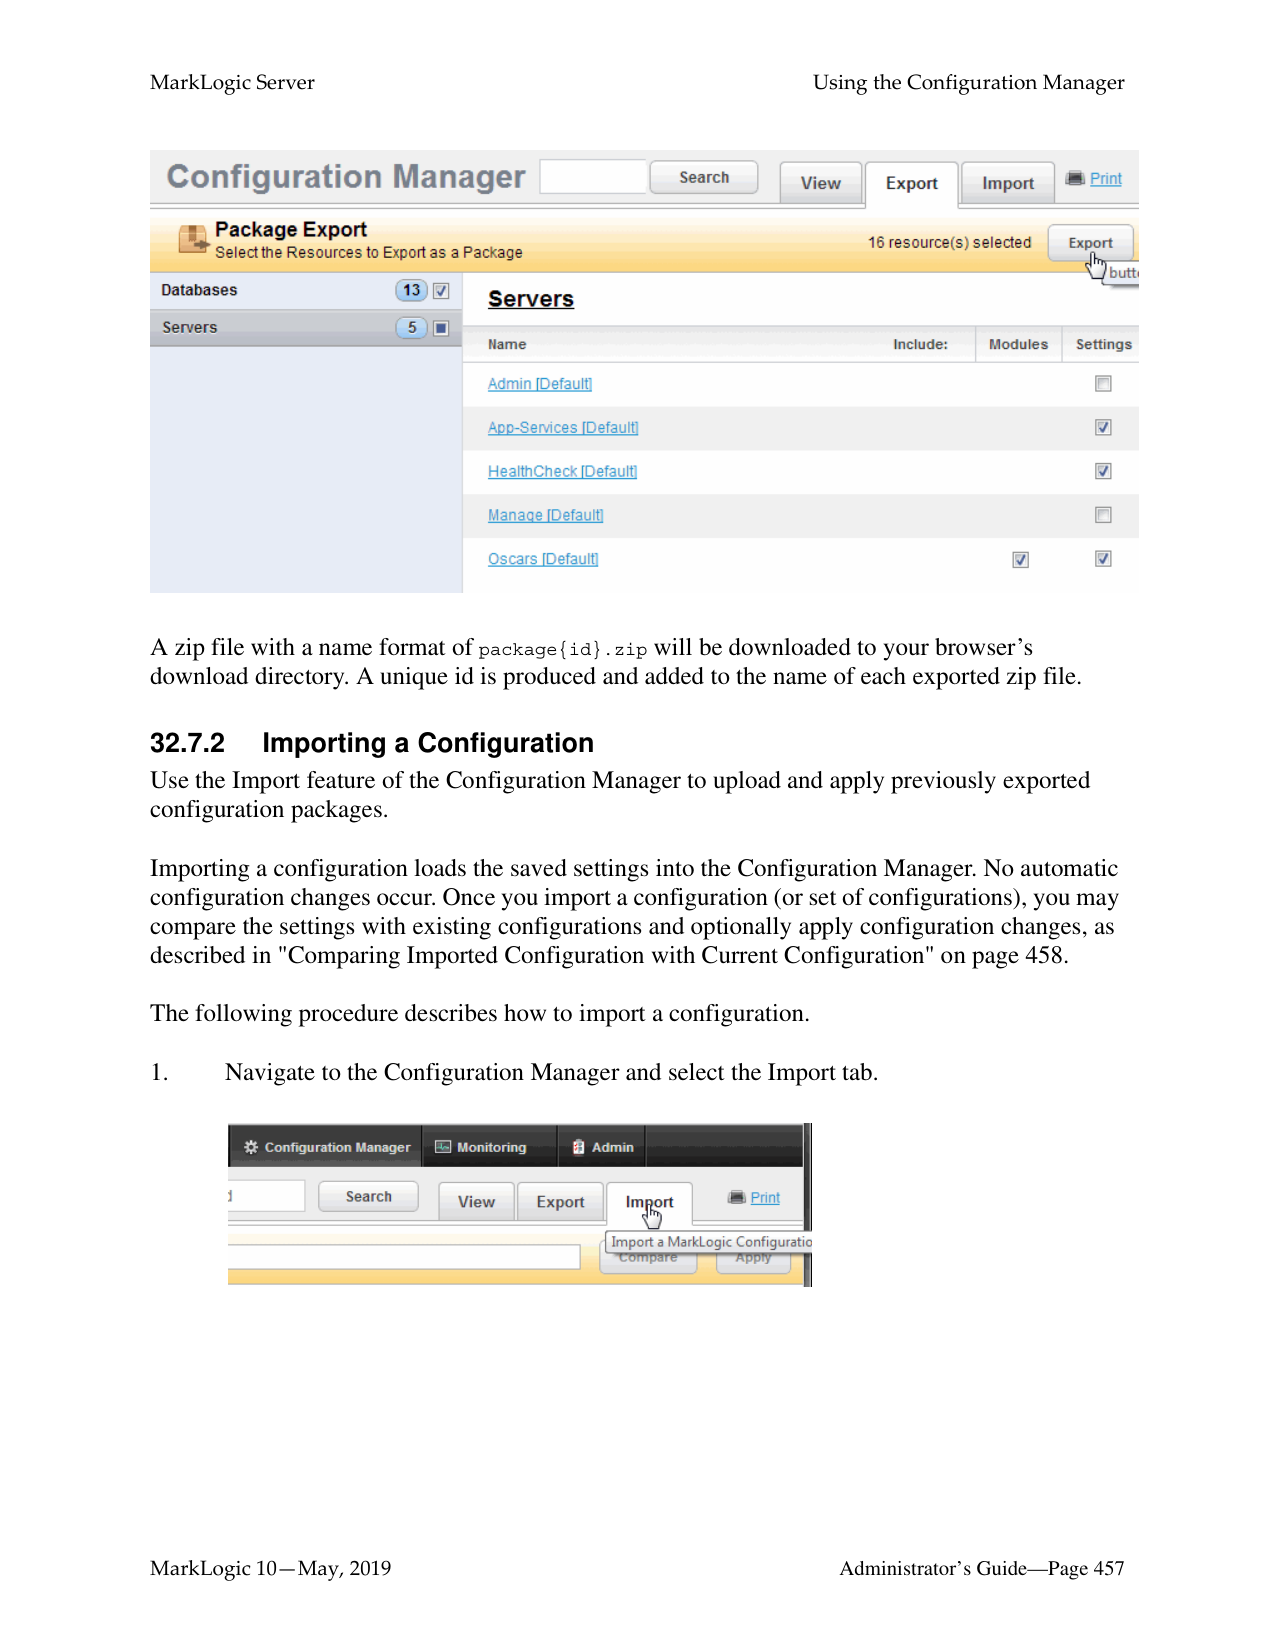
Note: The log rotation of application log files follows the same rules as the system log file for that group, as described in the procedure for “Configuring System Log Files” on page 434.
######### 30.5 Viewing the System Log
The system log messages that MarkLogic Server generates are viewable using the standard system log viewing tools available for your platform. On Windows platforms, the seven levels of logging messages are collapsed into three broad categories and the system log messages are registered as MarkLogic. On UNIX platforms, the system logs use the LOG_DAEMON facility, which typically sends system log messages to a file such as /var/log/messages, although this can vary according to the configuration of your system.
######### 30.6 Viewing the Application and System File Logs
The private system file log is maintained as a simple text file, and the application logs are also maintained as simple text files. You may view the current or any archived file log at any time using standard text file viewing tools. Additionally, you can access the log files from the Log tab on the main page of the Admin Interface.
The files are stored in the Logs directory under the MarkLogic Server data directory for your platform. You may have overridden the default location for this directory at installation time. The following table lists the default location of the file logs on your platform:
|Platform|Private Log Files| |---|---| | | | |Microsoft Windows|C:\Program Files\MarkLogic\Data\Logs\ErrorLog.txt C:\Program Files\MarkLogic\Data\Logs\
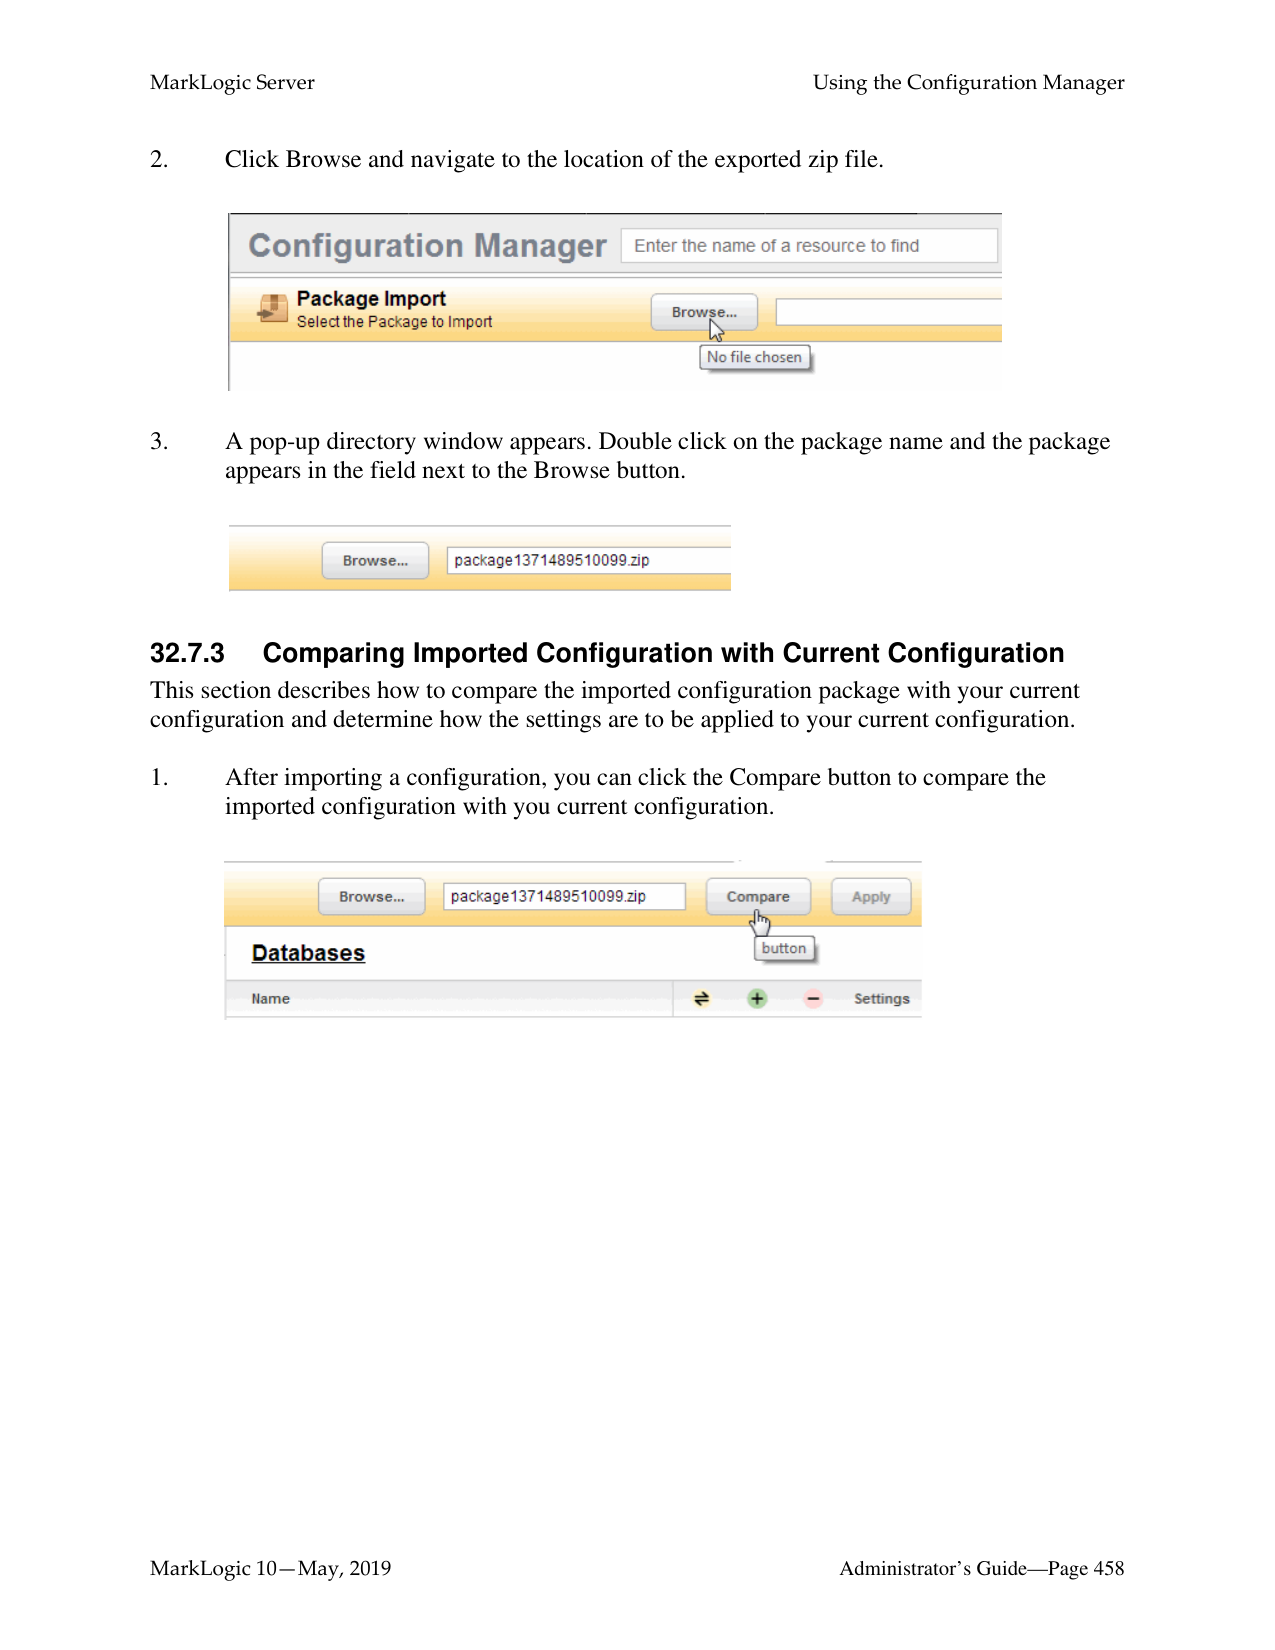
The application log files are prefixed with the port number of the App Server corresponding the log file. These files contain a set of log messages ordered chronologically. The number of messages depends on the system activity and on the log level that you set. For example, a file log set to Debug would contain many lines of messages whereas a file log set to Emergency would contain the minimum set of messages.
Any trace events are also written to the MarkLogic Server ErrorLog.txt file. Trace events are used to debug applications. You can enable and set trace events in the Admin Interface, on the Diagnostics page for a group. You can also generate your own trace events with the xdmp:trace function.
Note: When the log files are being written to a different device than the data files, it is possible to run out of space for logging. This does not appear to impact the servers ability to start, nor the availability of the forests, databases or app servers. Log entries will also still be written to /var/log/messages based on the configured OS logging level.
######### 30.7 Accessing Log Files
MarkLogic Server also produces access log files for each App Server. The access logs are in the NCSA combined log format, and show the requests made against each App Server. The access log files are in the same directory as the ErrorLog.txt logs, and have the port number encoded into their name. For example, the access log files for the Admin Interface is named 8001_AccessLog.txt. You may view the current or any archived file log at any time using standard text file viewing tools. Additionally, you can access the log files from the Log tab on the main page of the Admin Interface. Older versions of the access logs are aged from the system according to the settings configured at the group level, as described in “Configuring System Log Files” on page 434.
##### 31.0 Scheduling Tasks
This chapter describes how to schedule tasks that execute XQuery main modules at a predefined date/time or interval. The following topics are included:
This chapter describes how to use the Admin Interface to manage scheduled tasks. For details on how to manage scheduled tasks programmatically, see Group Maintenance Operations in the Scripting Administrative Tasks Guide.
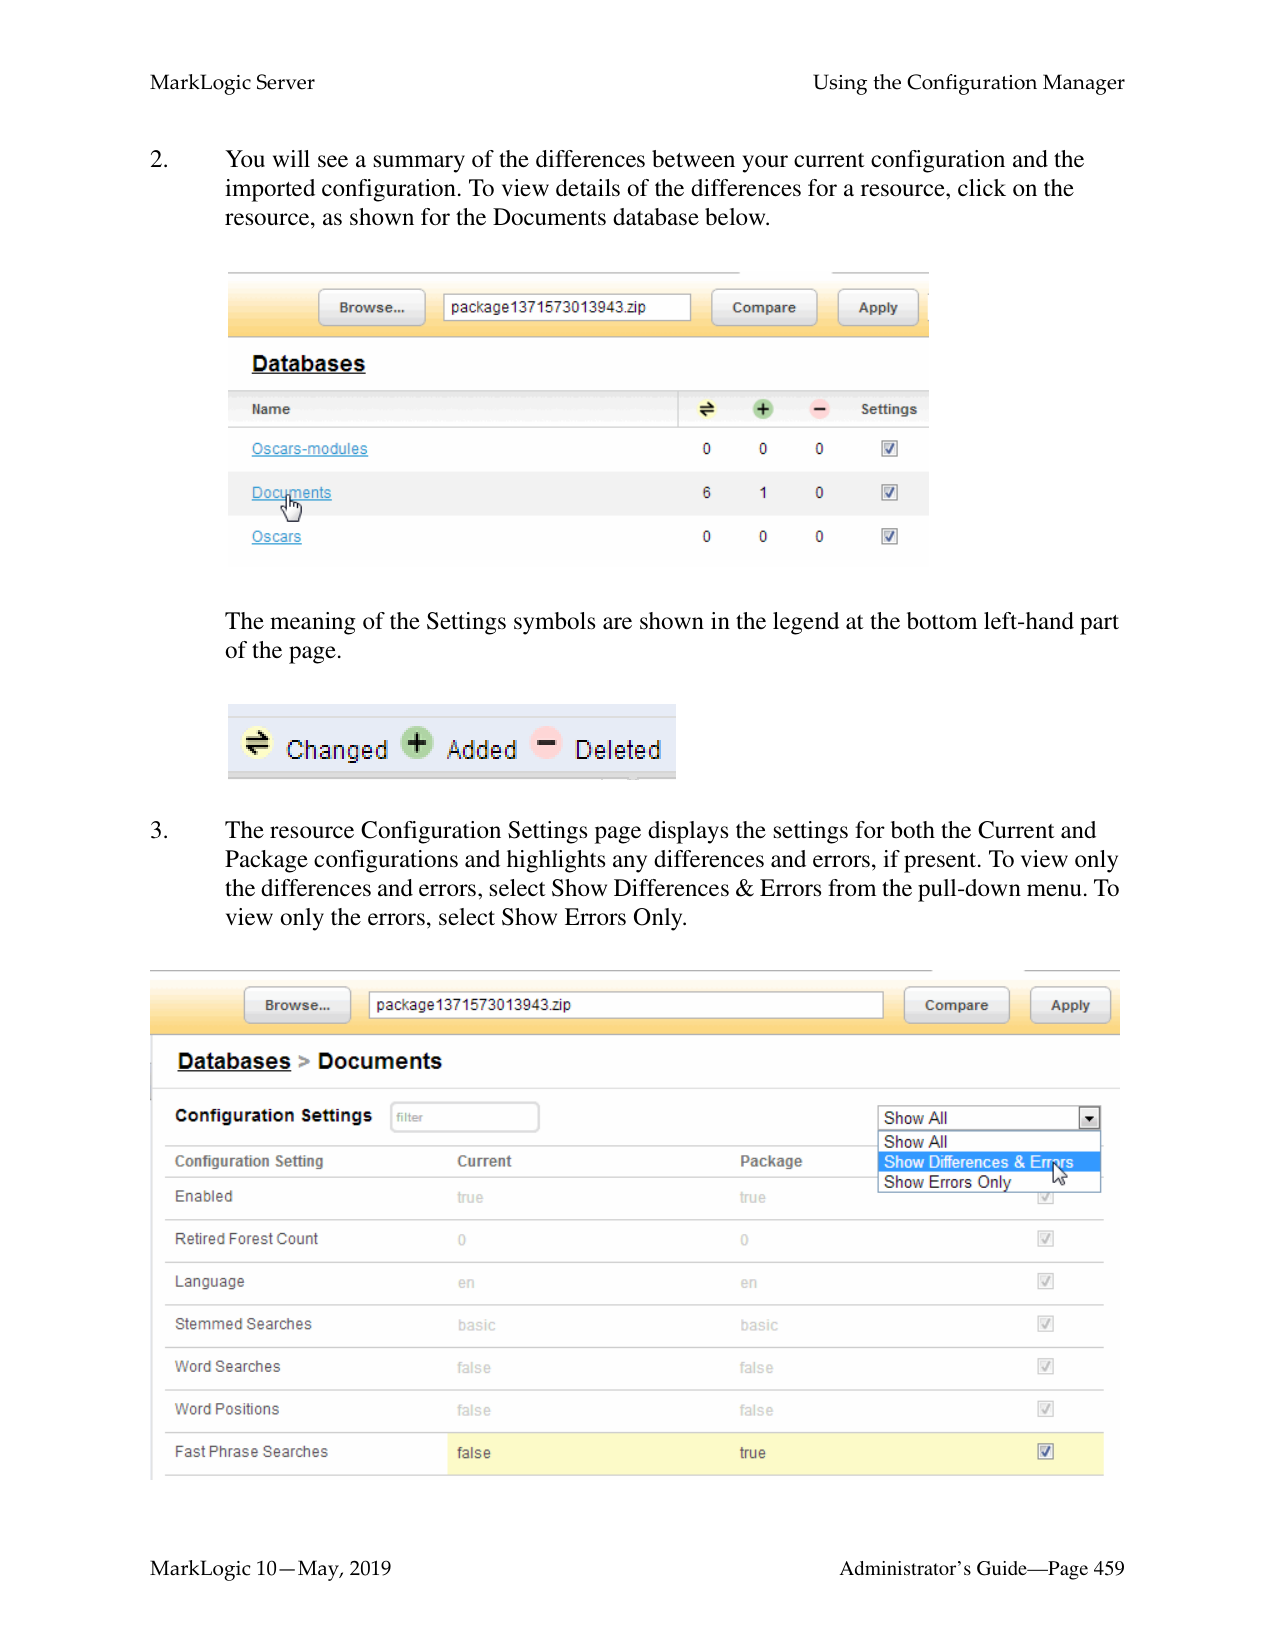
######### 31.1 Understanding Scheduled Tasks
MarkLogic Server allows you to schedule the execution of XQuery main modules. The ability to schedule module execution is useful for:
Tasks can be scheduled to run at a particular time on a particular date, or at a specified interval. MarkLogic Server attempts to place the task on the task server's queue at the specified time, but the actual execution of the task might not start at this time. If the queue is full, the task fails and will not be re-tried until the next scheduled interval.
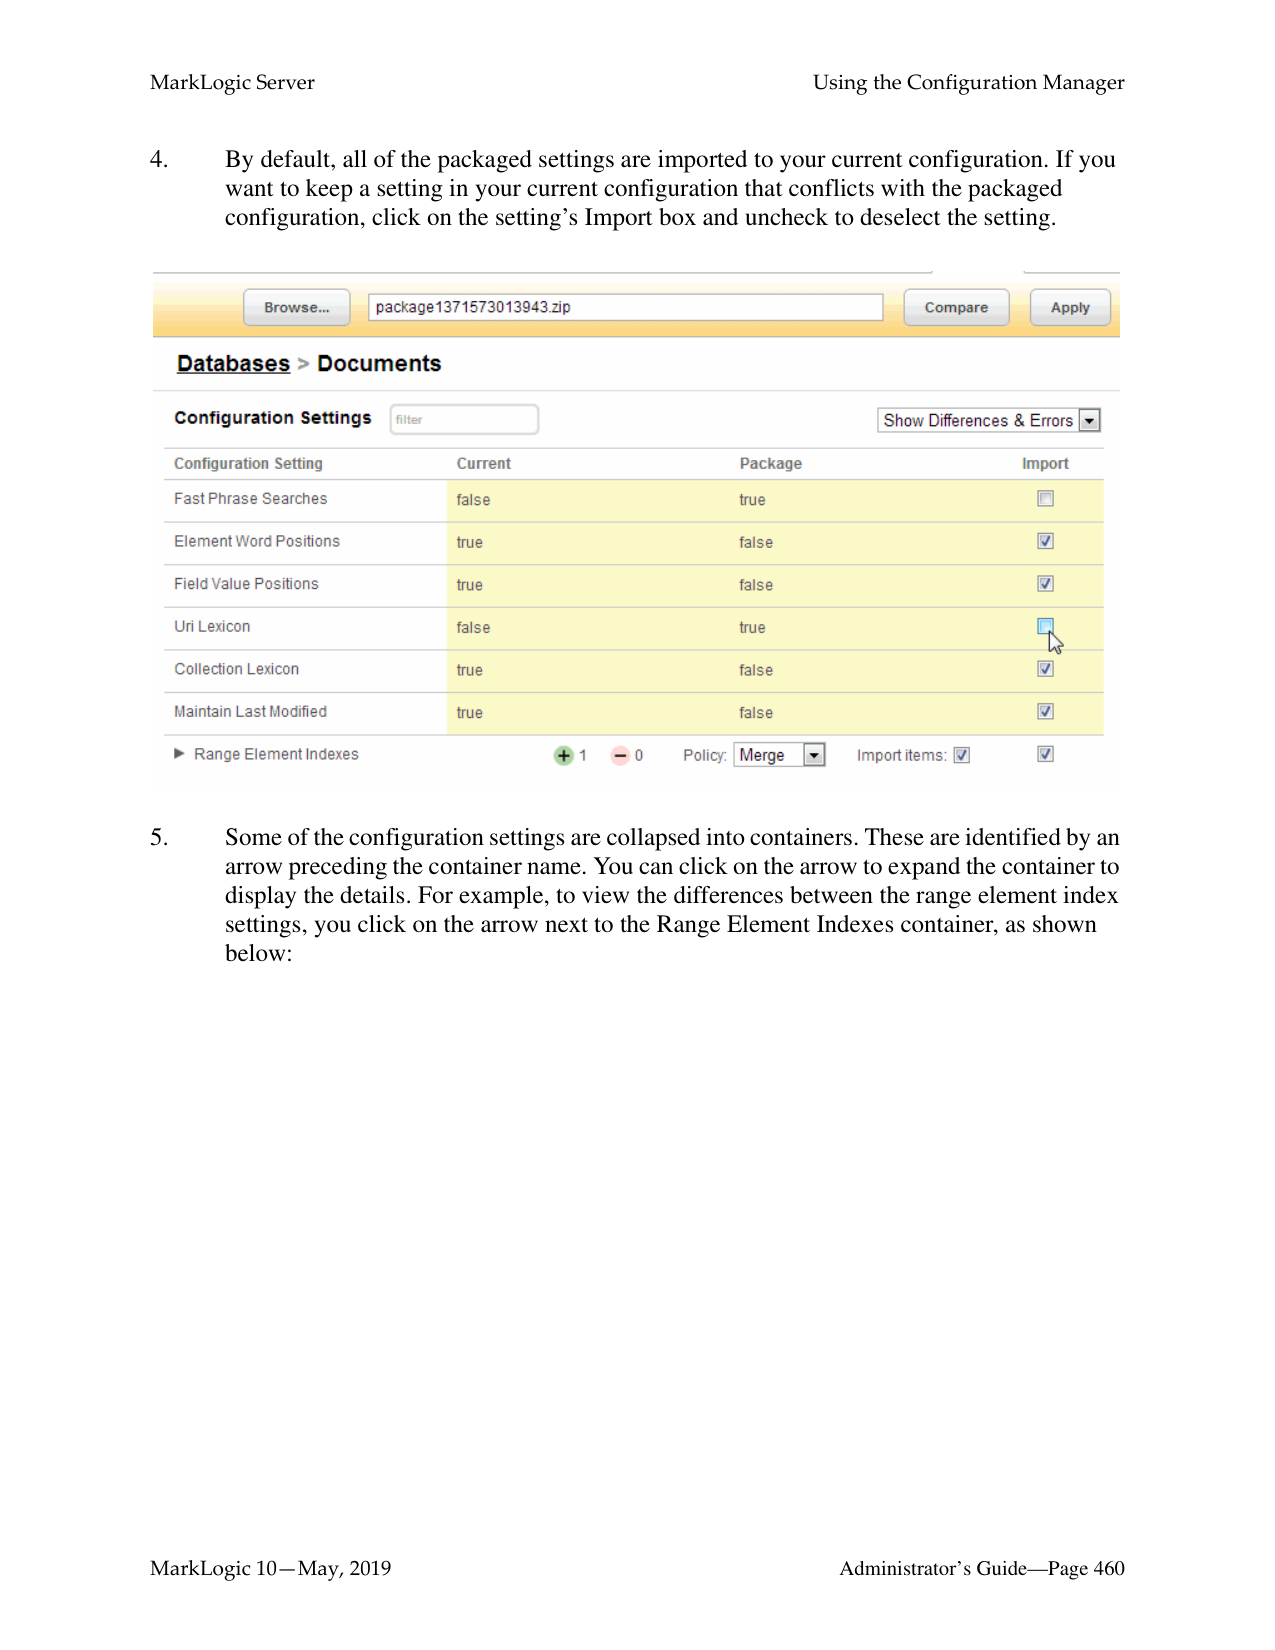
If Task Modules is set to (file system), then place the module in or below the directory specified by Task Root. The file will be located on disk with a path that is the Task Root combined with the Task Path. For example, if the Task Root is /marklogic/modules and the Task Path is /tasks/test.xqy, then test.xqy should be located at /marklogic/
modules/tasks/test.xqy on the file system.
If Task Modules is set to a database, then load the module into that database at or under the URI root specified by Task Root. For example, for the configuration shown in Step 10, test.xqy should be inserted in the Modules datase at URI /marklogic/modules/test.xqy.
Note: The user specified in the Task User field must have the privileges required to execute the functions used in the module. See “Appendix B: Pre-defined Execute Privileges” on page 469 for the full list of execute privileges.
Example of a Scheduled Task configuration:

######### 31.3 Selecting a Task Type
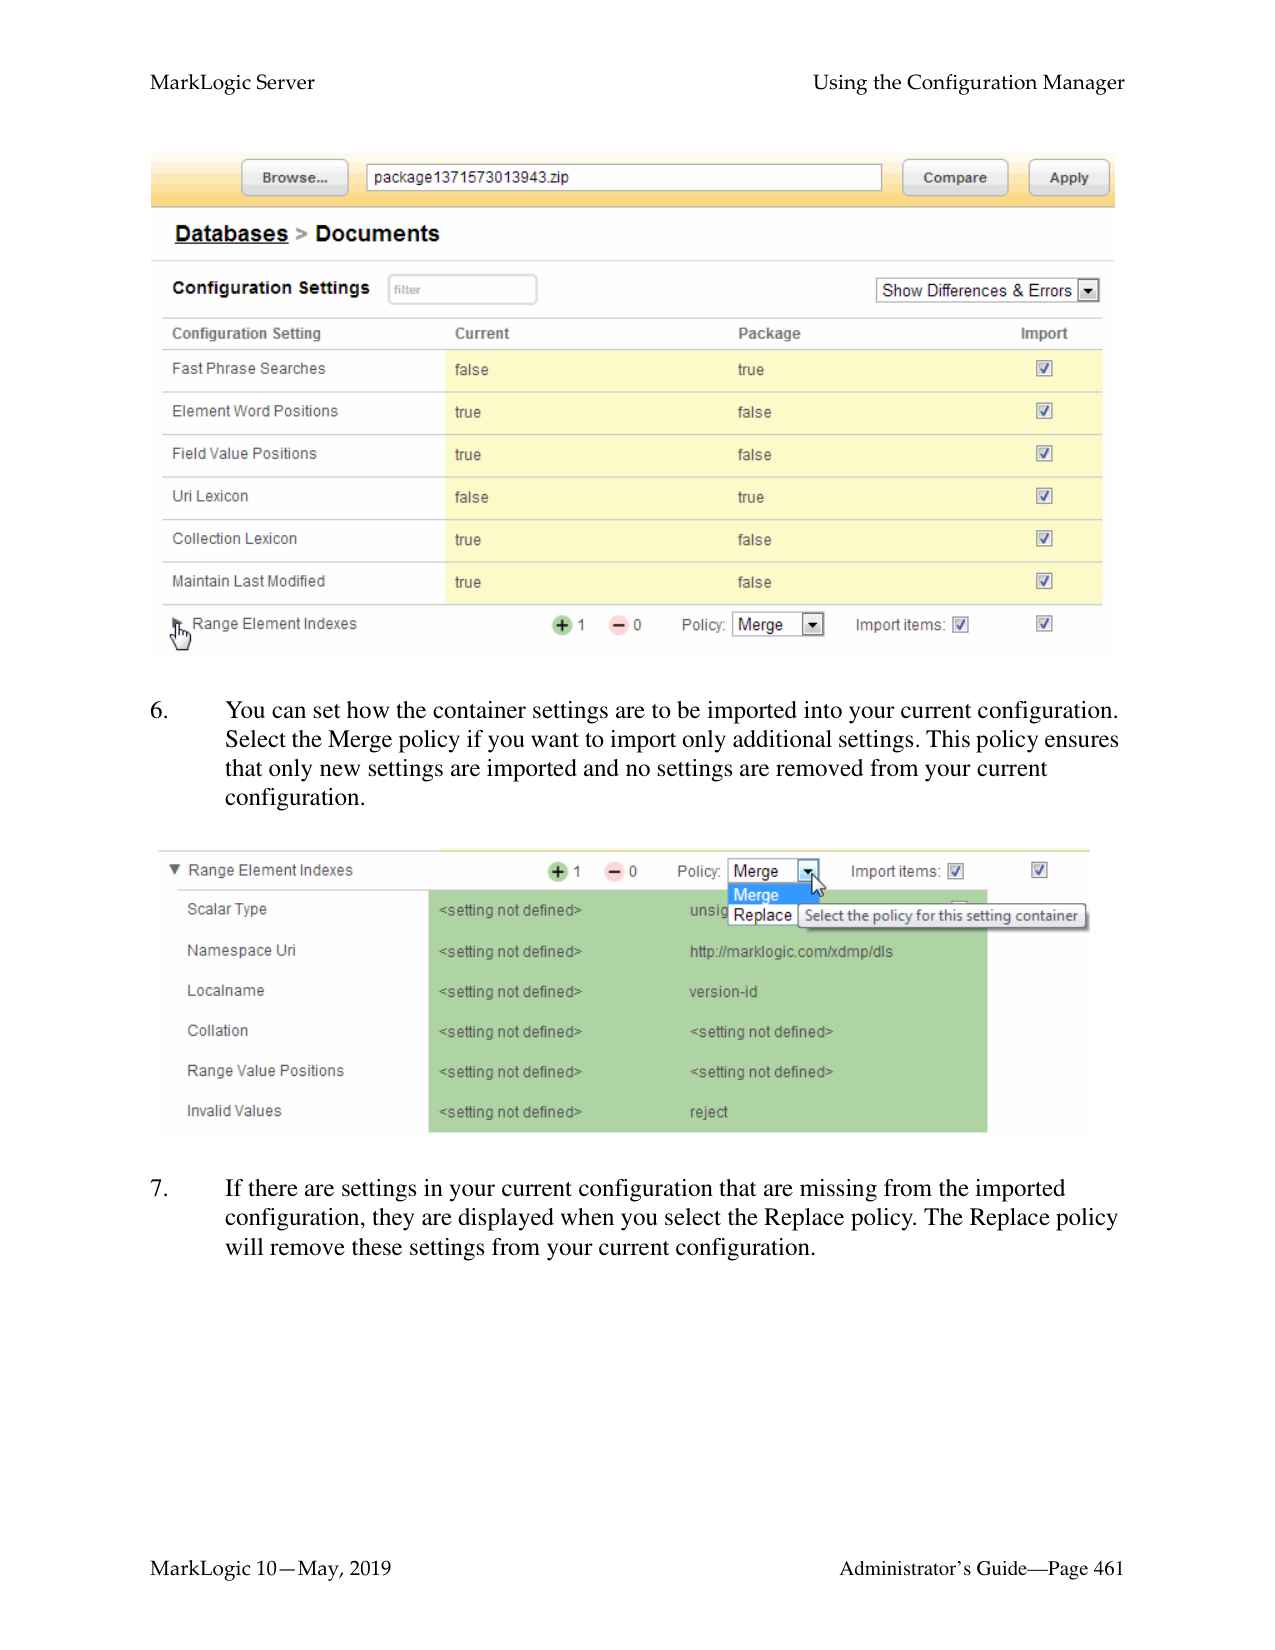
You can select one of the date/time or interval scheduling options described in this section as your task type.
The interval scheduling options that operate on elapsed time are:
Note: The date/time options are scheduled in terms of the local time designated by the server’s clock. This means that, in regions that recognize daylight savings time, a scheduling interval of 24 hours is not the same as a once-per-day at a particular time scheduling interval.
######### 31.3.1 Scheduling Per Minute
If you select minutely task type, specify how many minutes are to elapse between each invocation of the module. For example, to invoke the module every 5 minutes (or as soon as possible thereafter, if the server is overloaded), enter:


######### 31.3.2 Scheduling Per Hour
If you select hourly task type, specify how many hours are to elapse between each invocation of the module. The Task Minute setting specifies how many minutes after the hour the module is to be invoked. Note that the Task Minute setting does not add to the interval.
For example, to invoke the module every 2 hours at 30 minutes past the hour (or as soon as possible thereafter, if the server is overloaded), enter:

If the current time is 2:15pm, the task will run at 2:30, 4:30pm, 6:30pm, 8:30pm, and so on.
######### 31.3.3 Scheduling Per Day and Time
If you select daily task type, specify how many days are to elapse between each invocation of the module and the time of day (in 24:00 notation) of the invocation.
For example, to invoke the module every three days at 12:00pm, enter:

######### 31.3.4 Scheduling Per Week, Day, and Time

If you select weekly task type, specify how many weeks are to elapse between each invocation of the module, as well as one or more days of the week and time (in 24:00 notation) of the invocation.
For example, to invoke the module every other week, on Friday, at 5:00pm, enter:

######### 31.3.5 Scheduling Per Month, Day, and Time
If you select monthly task type, specify how many months are to elapse between each invocation of the module, as well as the day of the month and time (in 24:00 notation) of the invocation.
For example, to invoke the module every three months, on the 15th day of the month, at 8:00am, enter:

######### 31.3.6 Scheduling One Invocation on a Calendar Date and Time
If you select once task type, specify the calendar day (month/day/year) and time (in 24:00 notation) of the invocation.
############ For example, to invoke the module on May 2, 2009 at 6:00pm, enter:

##### 32.0 Using the Configuration Manager

[DEPRECATED: the Configuration Manager tool is deprecated starting with MarkLogic release 10.0-3 and will be removed from the MarkLogic Server in the future.]
The MarkLogic Server Configuration Manager provides a read-only interface to the Admin Interface and a tool for saving and restoring configuration settings. This chapter includes the following sections:
######### 32.1 Configuration Manager Overview

The Configuration Manager allows you to view the configuration settings for MarkLogic Server resources. A resource is a MarkLogic Server object, such as a database, forest, App Server, group or host.
Use the Configuration Manager to:
For details about the Management REST API, see Using the Management API in the Monitoring MarkLogic Guide.
Note: The Packaging REST API has changed for MarkLogic 7. Applications written using the MarkLogic 6 Packaging REST API (v1) must be rewritten to work with the MarkLogic 7 Packaging REST API (v2).
######### 32.2 Security Considerations
To access the Configuration Manager page, users must have the role manage-user. The role does not grant any privileges to modify configuration settings. Users with the manage-user role may:
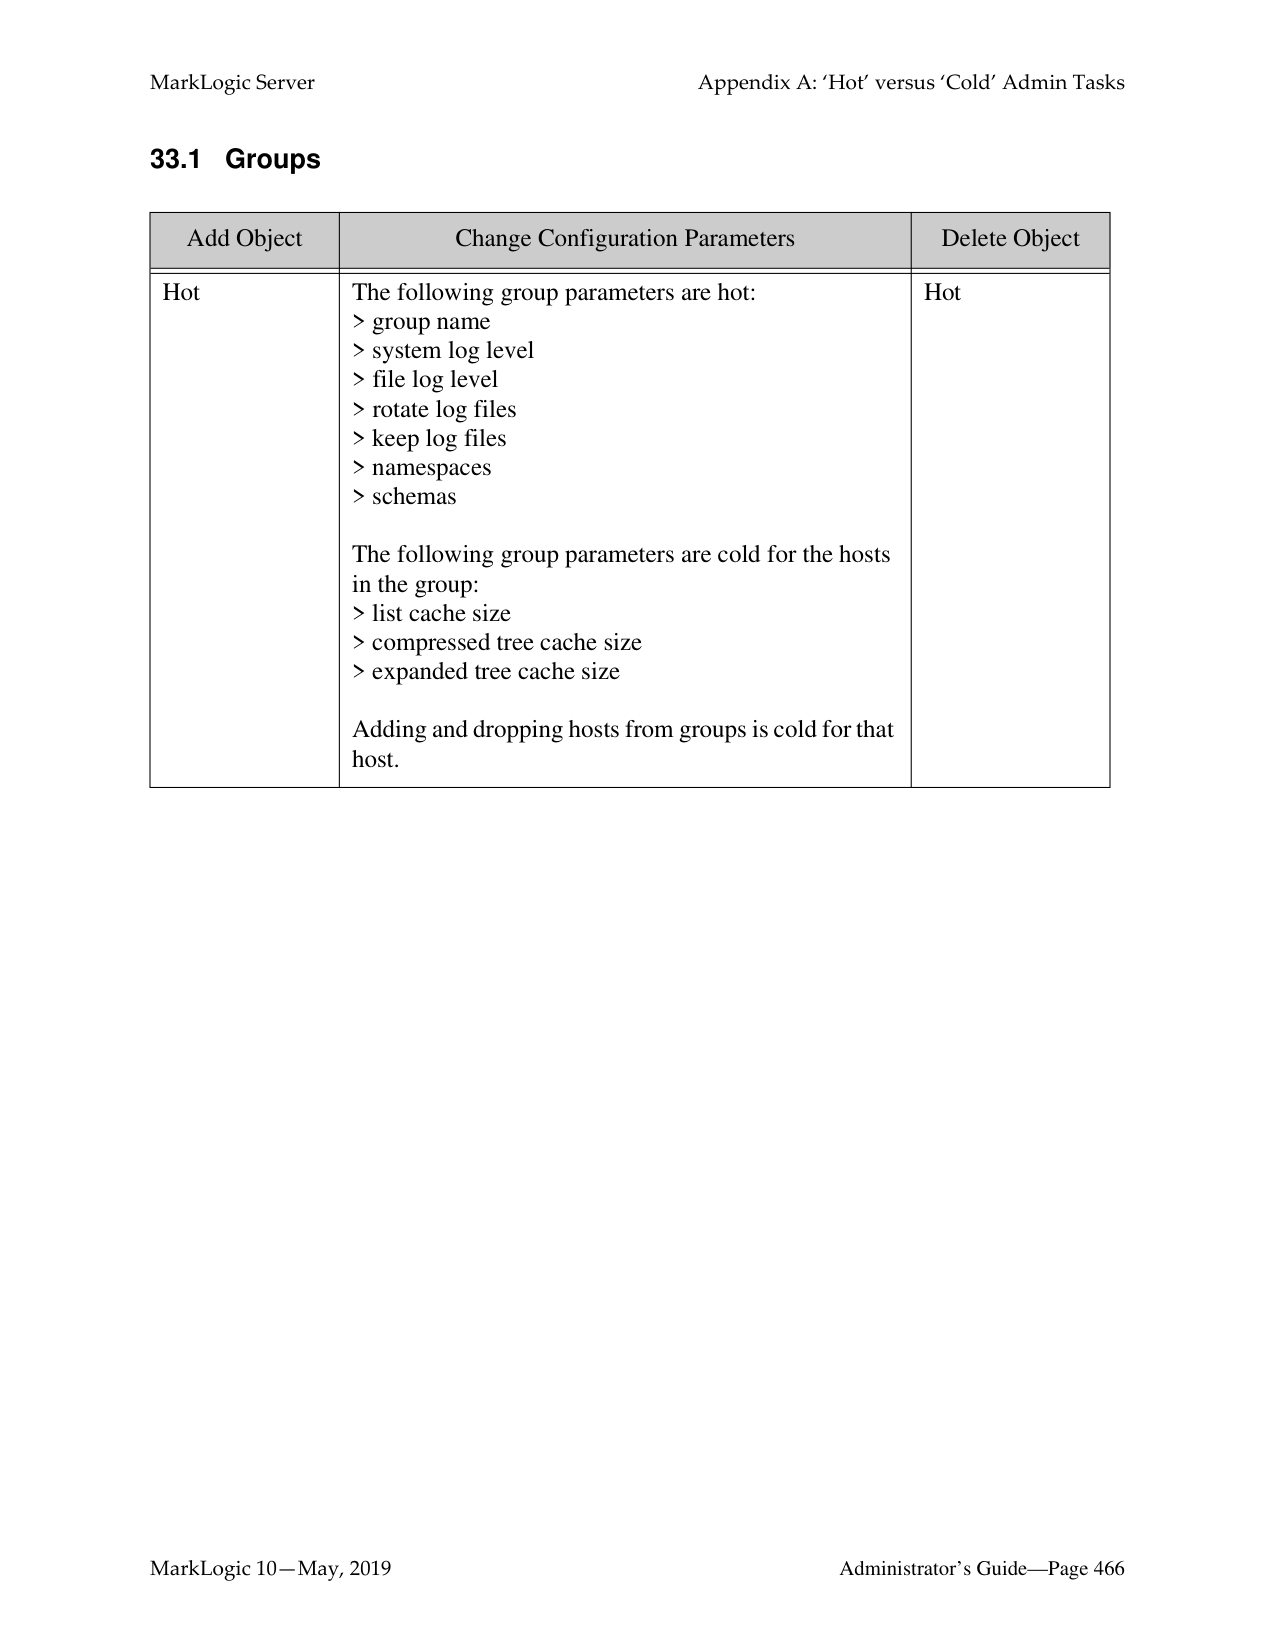
The manage-user role does not grant privileges to edit configuration settings, apply configuration changes from an imported configuration, or to export modules databases. To export the content of modules databases, you must have the manage-admin role. However, you won't be able to see modules that you don't have permissions to access. To install (Apply imported) packages, you must to have the admin privilege.
The manage-internal role is for MarkLogic Server internal use only. Do not assign this role to any users. Assigning this role to users would grant them privileges on the system that you typically do not want them to have.
######### 32.3 Accessing the Configuration Manager
To access the Configuration Manager, navigate to the URL http://yourhostname:8002/nav/ or click on the Configuration Manager tab from any application service page.

Note: If the application does not appear, you may not have sufficient privileges. To make full use of the Configuration Manager, you must have the manage-admin security role. See "Security Considerations" on page 448.

The Configuration Manager provides two methods for locating the configuration settings for a particular resource:
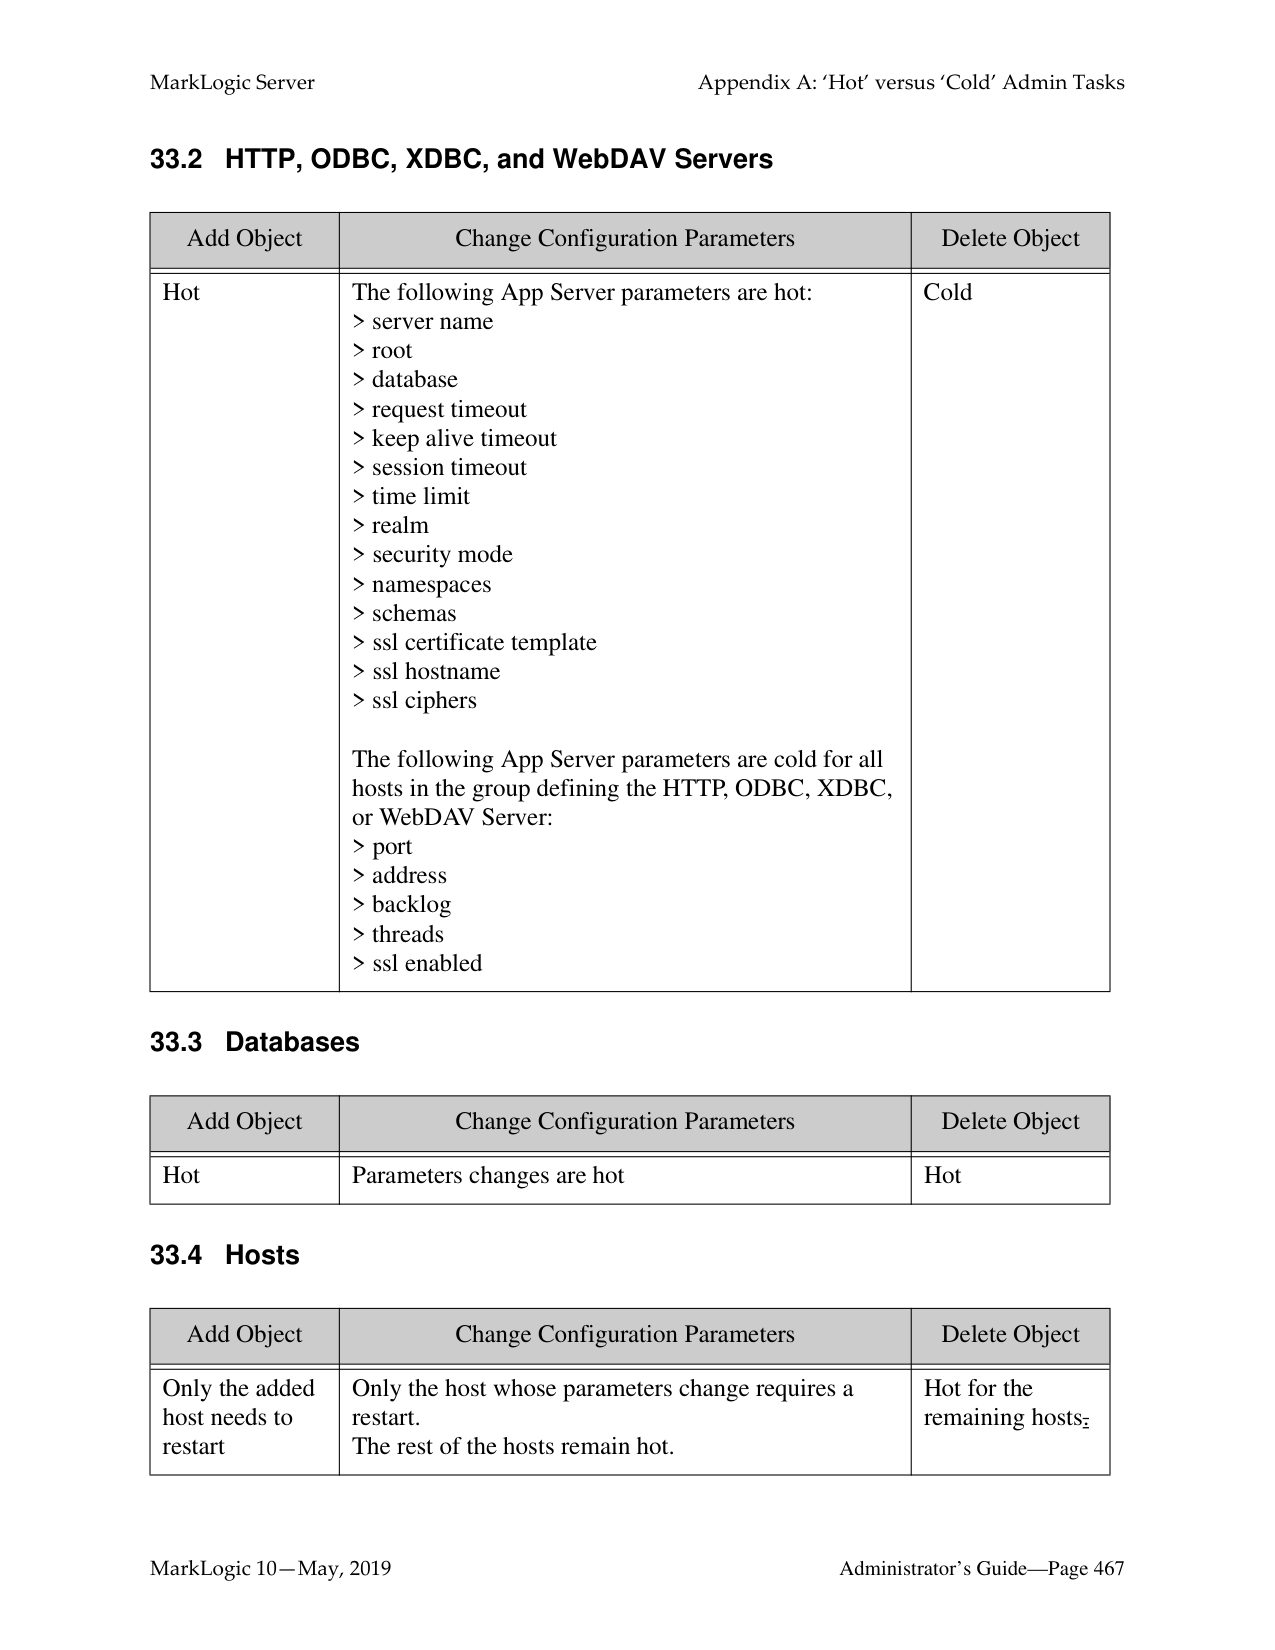


############ 3. The Configuration Settings page displays the settings for the selected resource. In theright-hand frame, the resources that are related to the resource are also listed. You canclick on a related resource to view its configuration.
Note: For forests with partitions, a Partitions link will be included under related
resources.

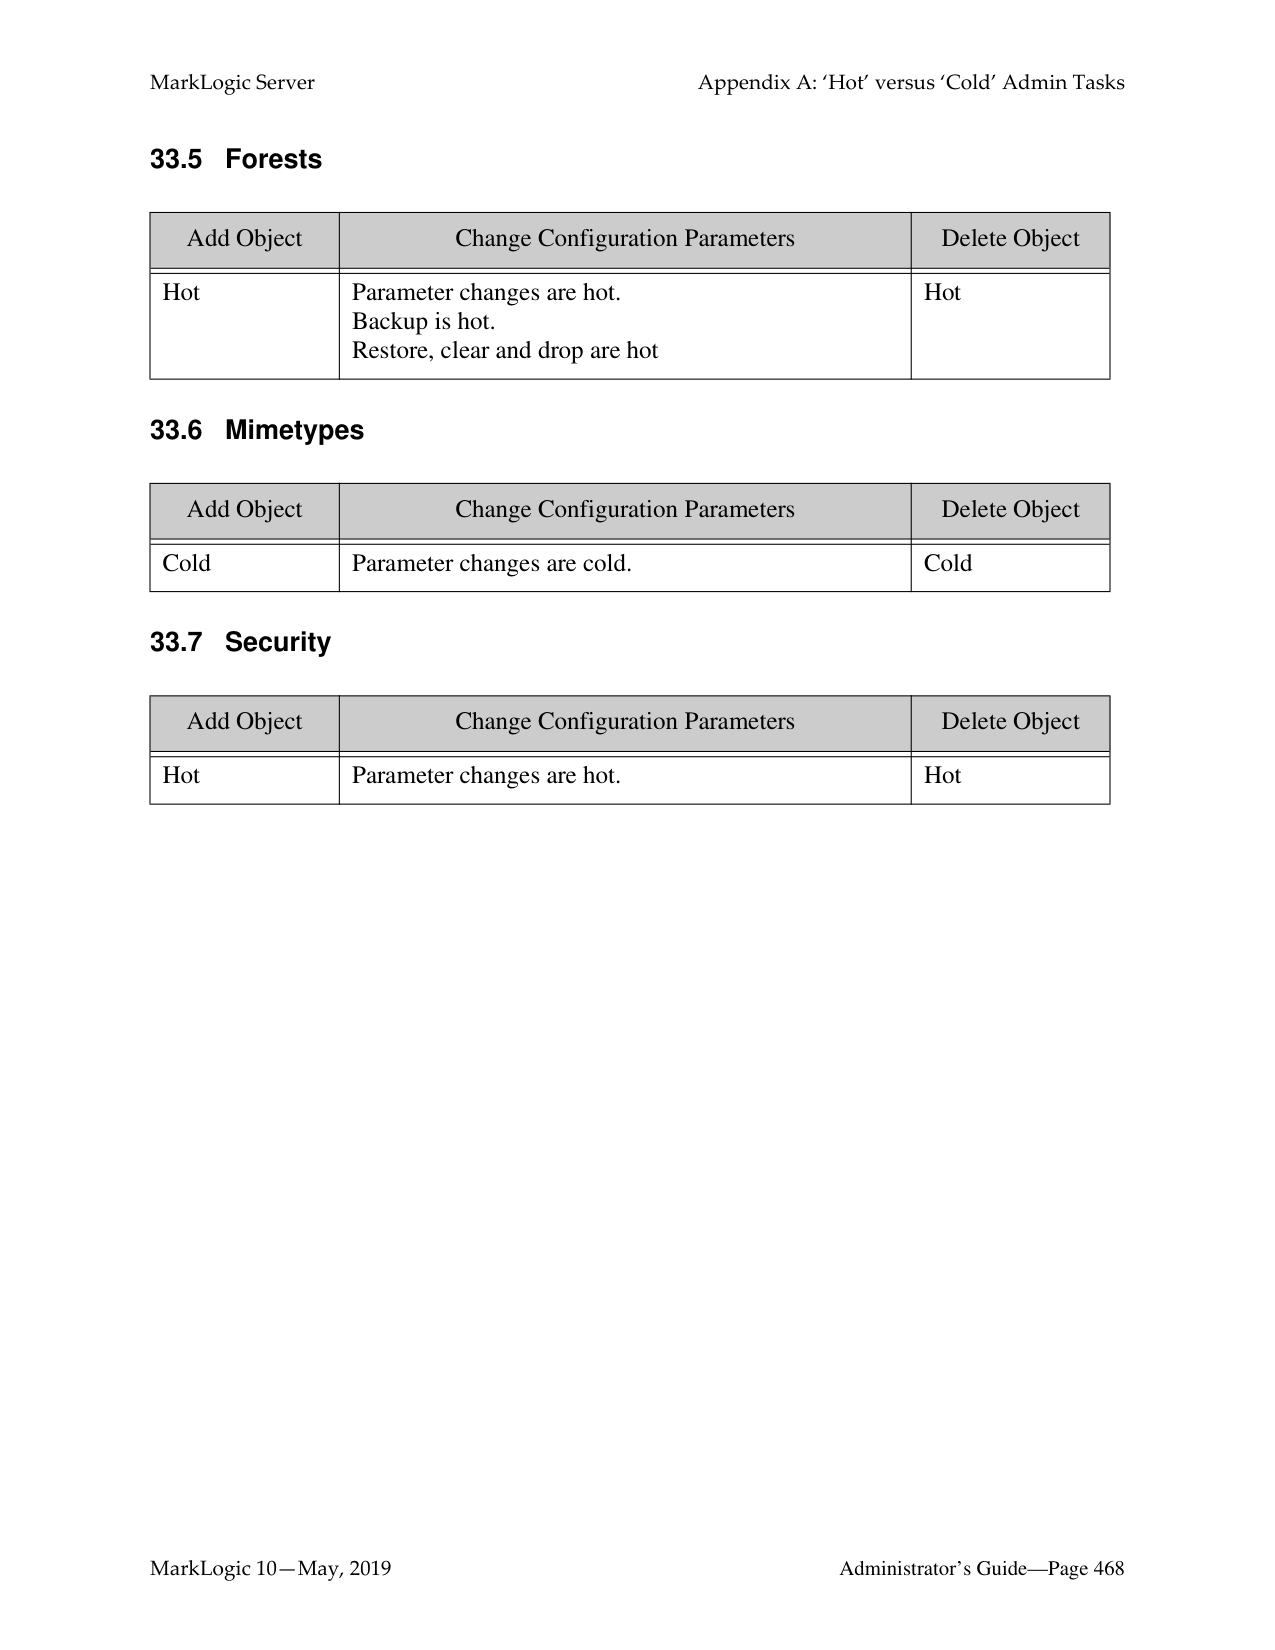
############ 4. Some of the configuration settings are collapsed into containers. These are identified by anarrow preceding the container name. You can click on the arrow to expand the container to
display the details. For example, to view the forest range settings, you click on the arrow next to the Range container, as shown below:

######### 32.4.2 Searching for a Resource
To search for a resource by name, use the search box at the top of the page. As you type, the Configuration Manager suggests matching resources.

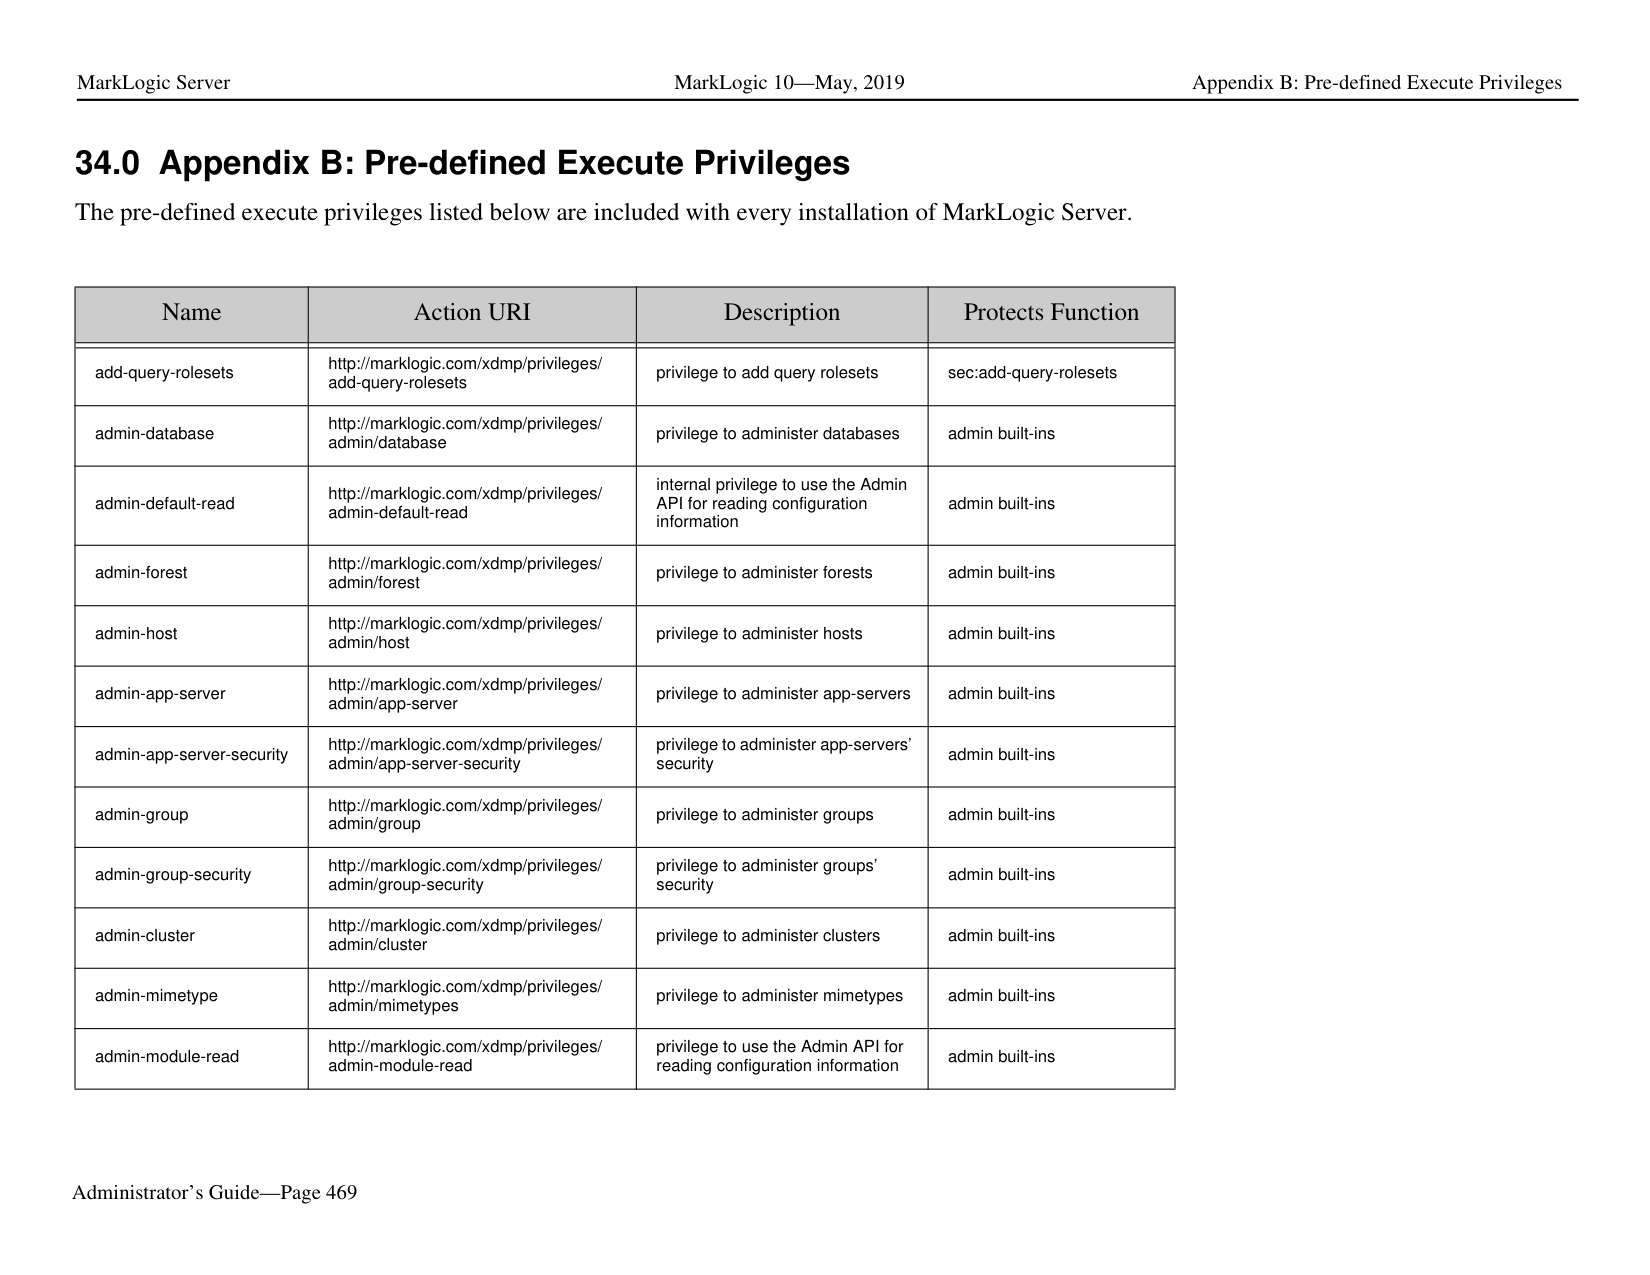


######### 32.6 Editing Configuration Settings
Use the Edit feature to open the Admin UI at a particular resource and modify the settings. You may edit resource settings from a resource category list page or from the settings page for a resource.
Note: To edit configuration settings, you must have administrative privileges. To edit configuration settings for a resource:


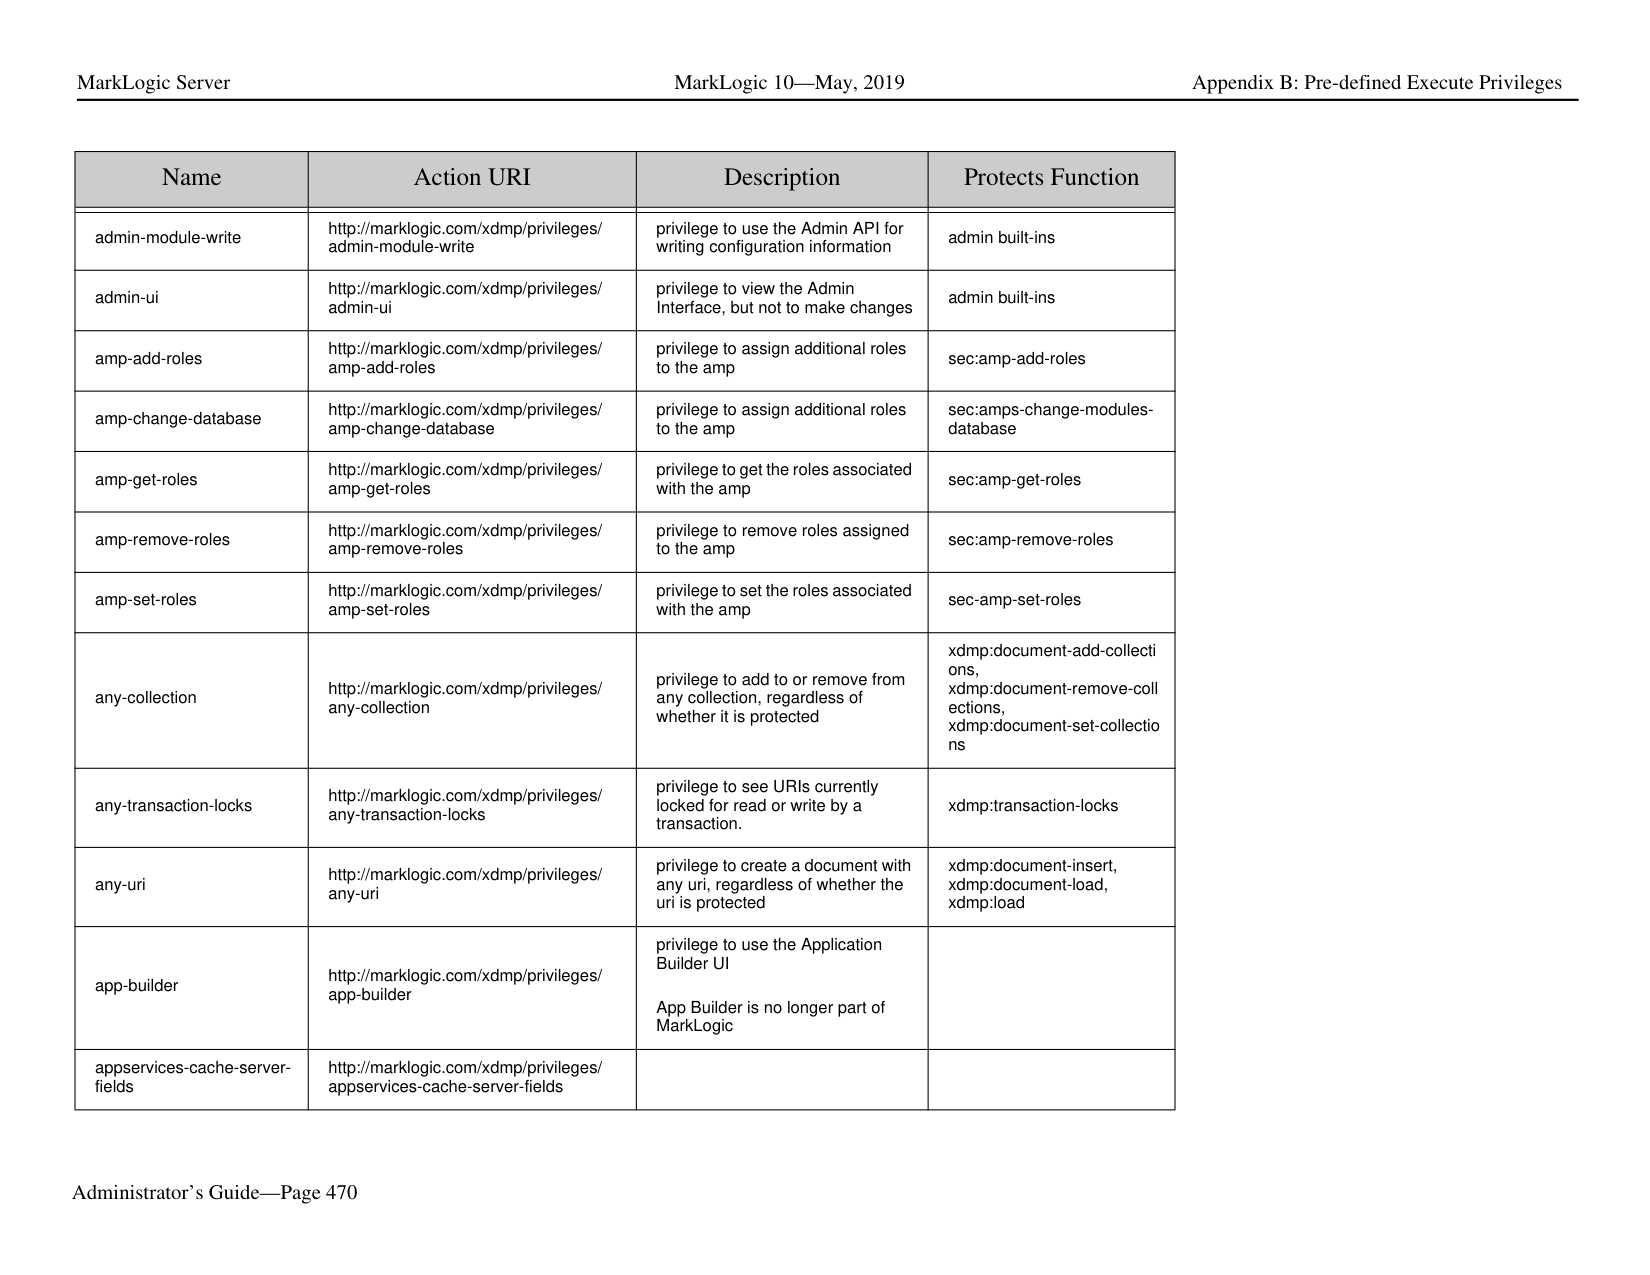

######### 32.7 Exporting and Importing Configurations
The Configuration Manager allows you to save configuration settings in a zip file, and then later import them to compare configurations and apply updates.
The Configuration Manager provides the following capabilities:
• Exporting a Configuration • Importing a Configuration • Comparing Imported Configuration with Current Configuration
Note: Security settings, such as SSL and External Security (LDAP and Kerberos) configurations, cannot be imported from an exported configuration file. If your exported configuration includes a server configured with SSL and/or External Security, you must reconfigure these security settings on the server after importing it to the new host.
Note: You can import a configuration saved in MarkLogic 6 into MarkLogic 7. However, you cannot import a configuration saved in MarkLogic 7 into MarkLogic 6.
######### 32.7.1 Exporting a Configuration
Exporting resource configurations saves them to a zip file.You may import these configurations back in to compare, review, and apply updates.
Note: You can only export App Server and Database configurations. You cannot export Host, Forest, or Group configurations. In addition, you cannot export an App Server or Database that has more than 200 characters in its name.
The following procedure describes how to export a configuration.
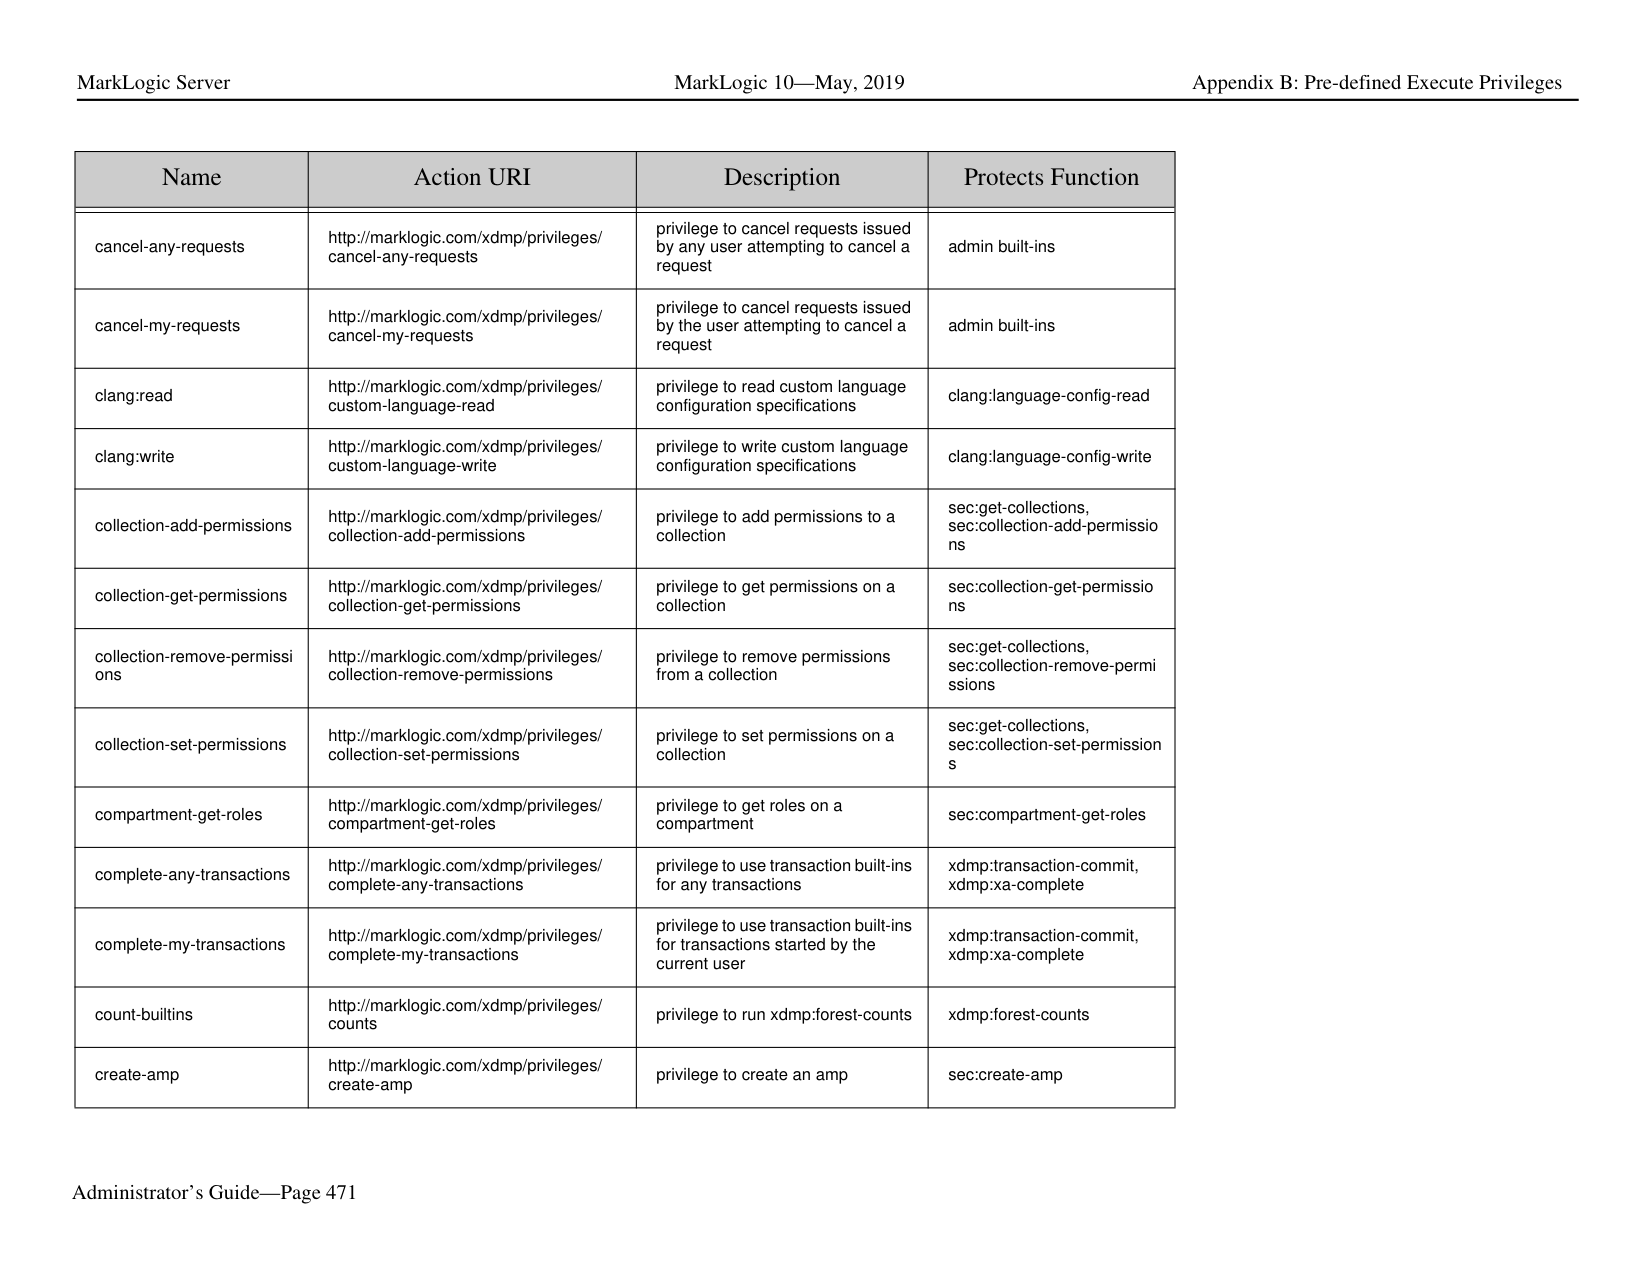

############ 2. Select the App Servers and/or Databases for which you want to export the configurations.You can select all of the Databases and or Servers by checking the category name in theleft-hand frame. For example, to select all of the Databases, do the following:

Note: A colored-in check box indicates that some, but not all, of the resources in that category have been selected. You can clear all of the selected resources by clicking on the check box until it’s clear.
############ 3. If an App Server makes use of a modules database, an additional check box appears in theModules column. Check this box to export the modules database along with the AppServer configuration.
Note: You must have the correct roles to export and import a modules database, as
described in "Security Considerations" on page 448.

############ 4. After you have selected all of the configurations to be exported, click Export.

A zip file with a name format of package{id}.zip will be downloaded to your browser’s download directory. A unique id is produced and added to the name of each exported zip file.

######### 32.7.2 Importing a Configuration
Use the Import feature of the Configuration Manager to upload and apply previously exported configuration packages.
Importing a configuration loads the saved settings into the Configuration Manager. No automatic configuration changes occur. Once you import a configuration (or set of configurations), you may compare the settings with existing configurations and optionally apply configuration changes, as described in "Comparing Imported Configuration with Current Configuration" on page 458.
The following procedure describes how to import a configuration.


######### 32.7.3 Comparing Imported Configuration with Current Configuration
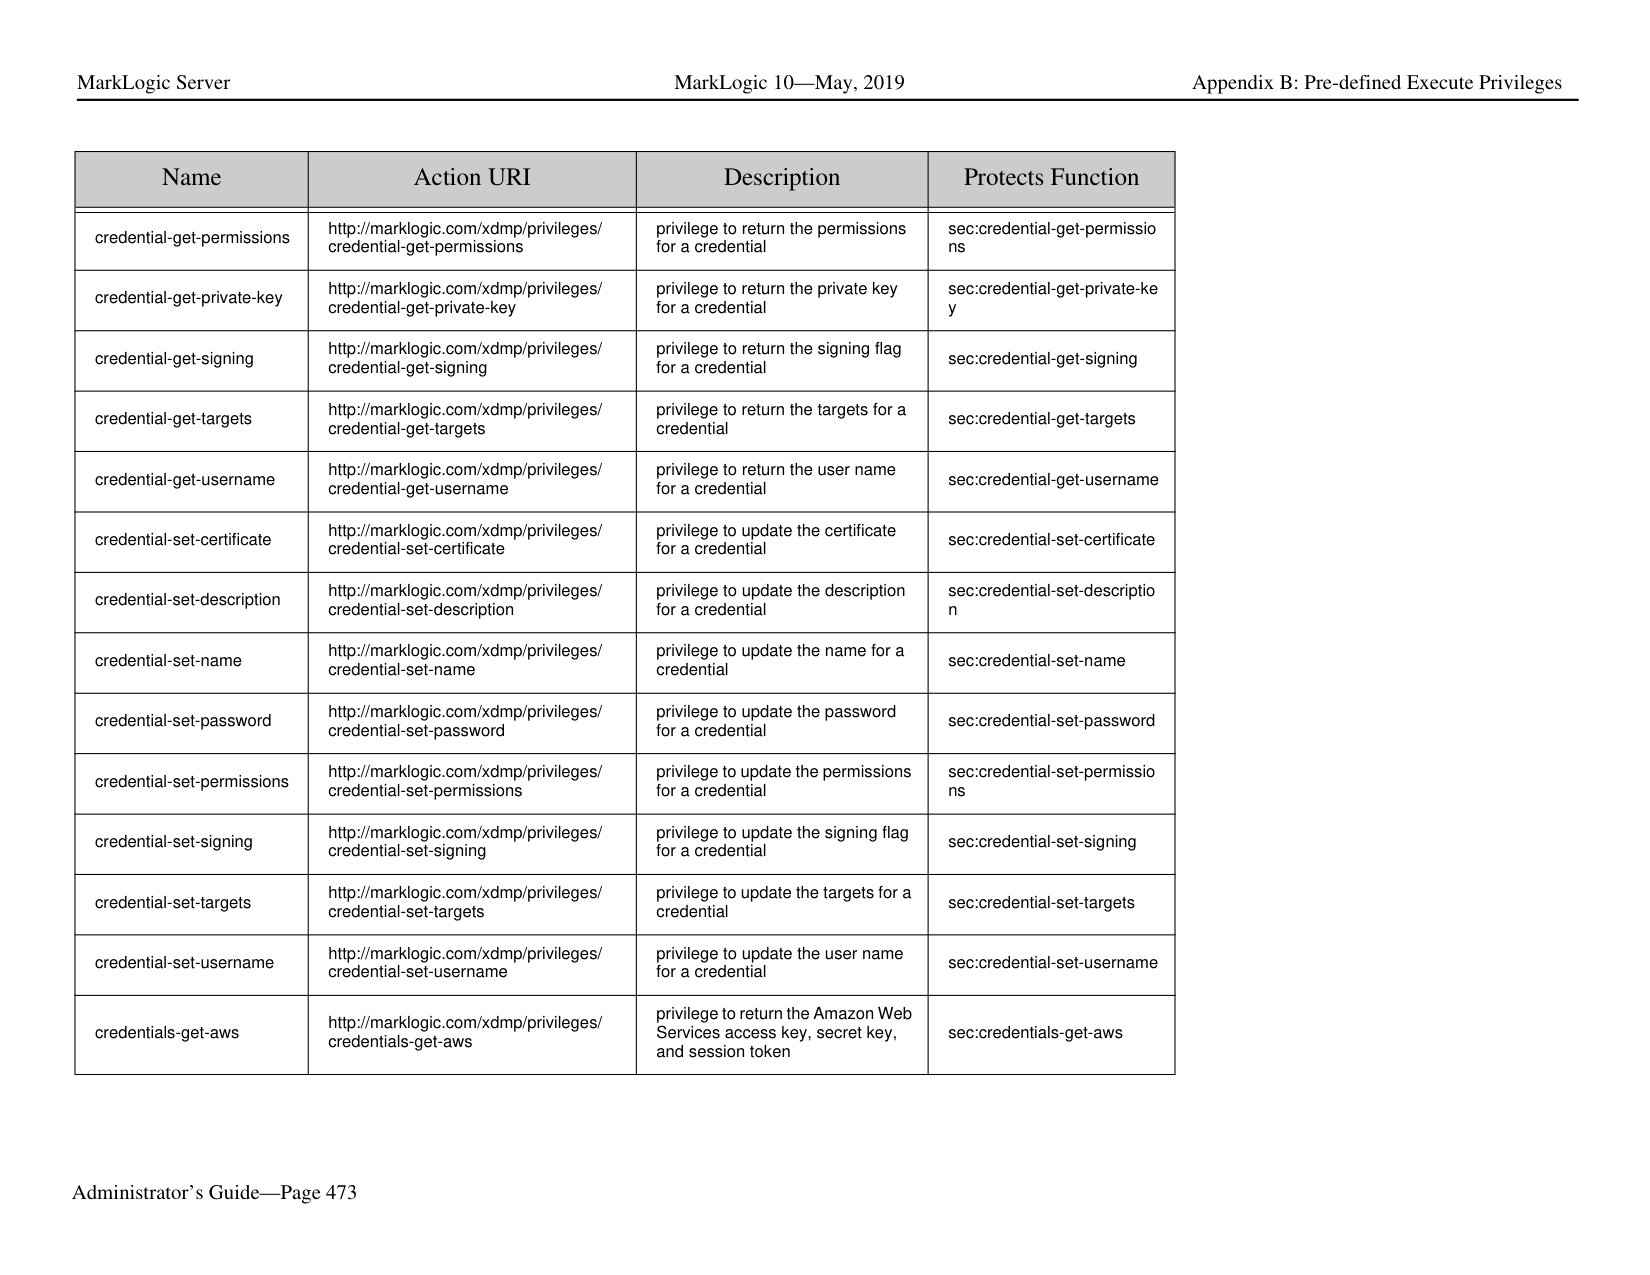
This section describes how to compare the imported configuration package with your current configuration and determine how the settings are to be applied to your current configuration.

############ 2. You will see a summary of the differences between your current configuration and theimported configuration. To view details of the differences for a resource, click on theresource, as shown for the Documents database below.

The meaning of the Settings symbols are shown in the legend at the bottom left-hand part of the page.

############ 3. The resource Configuration Settings page displays the settings for both the Current andPackage configurations and highlights any differences and errors, if present. To view onlythe differences and errors, select Show Differences & Errors from the pull-down menu. Toview only the errors, select Show Errors Only.

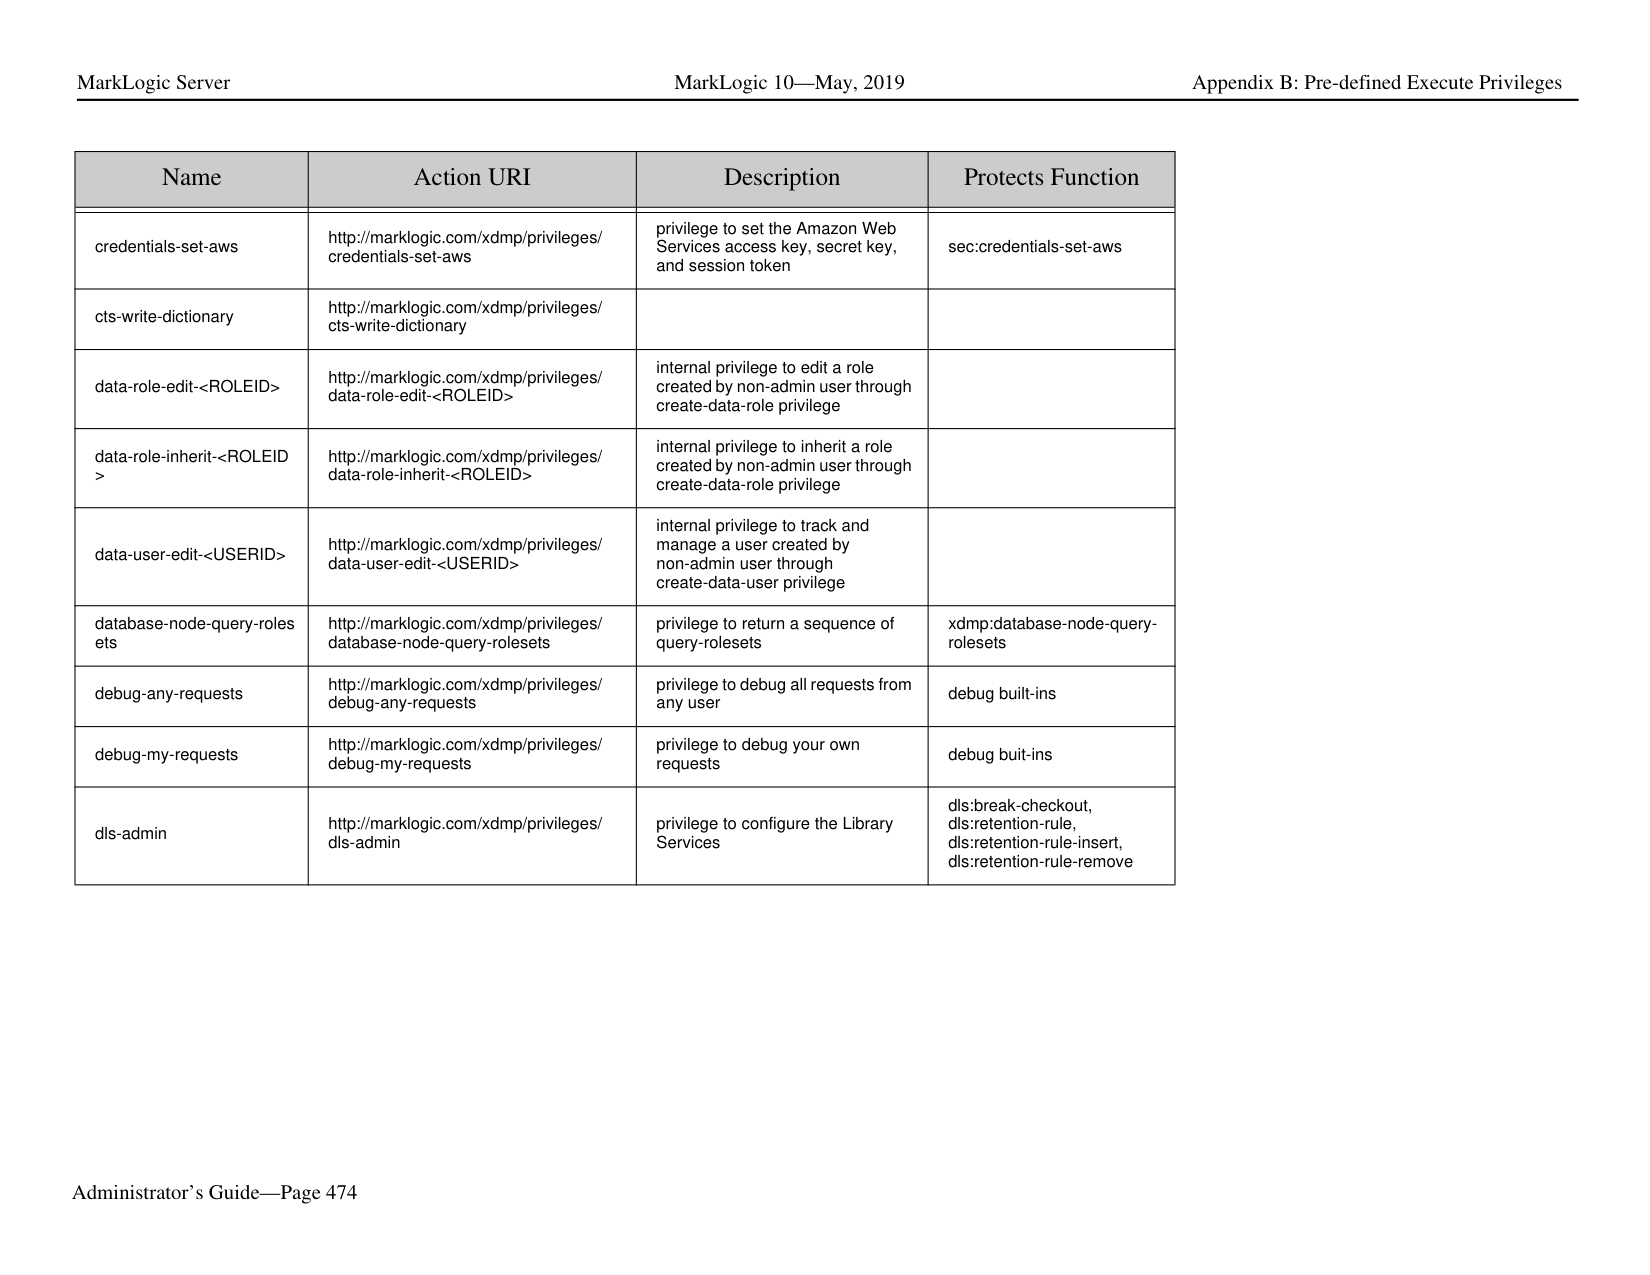


######### 32.8 Applying Imported Configuration Settings
Once you have selected the settings to be used to modify your current configuration, click the Apply button:

If the Apply Import operation is successful, a summary count of the imported settings is displayed. The import operation generated a ticket that provides the details of the imported resources. You can view this ticket by clicking on Link to Details Ticket. Should you wish to roll back the import operation to restore your previous configuration, click on Link to Rollback.

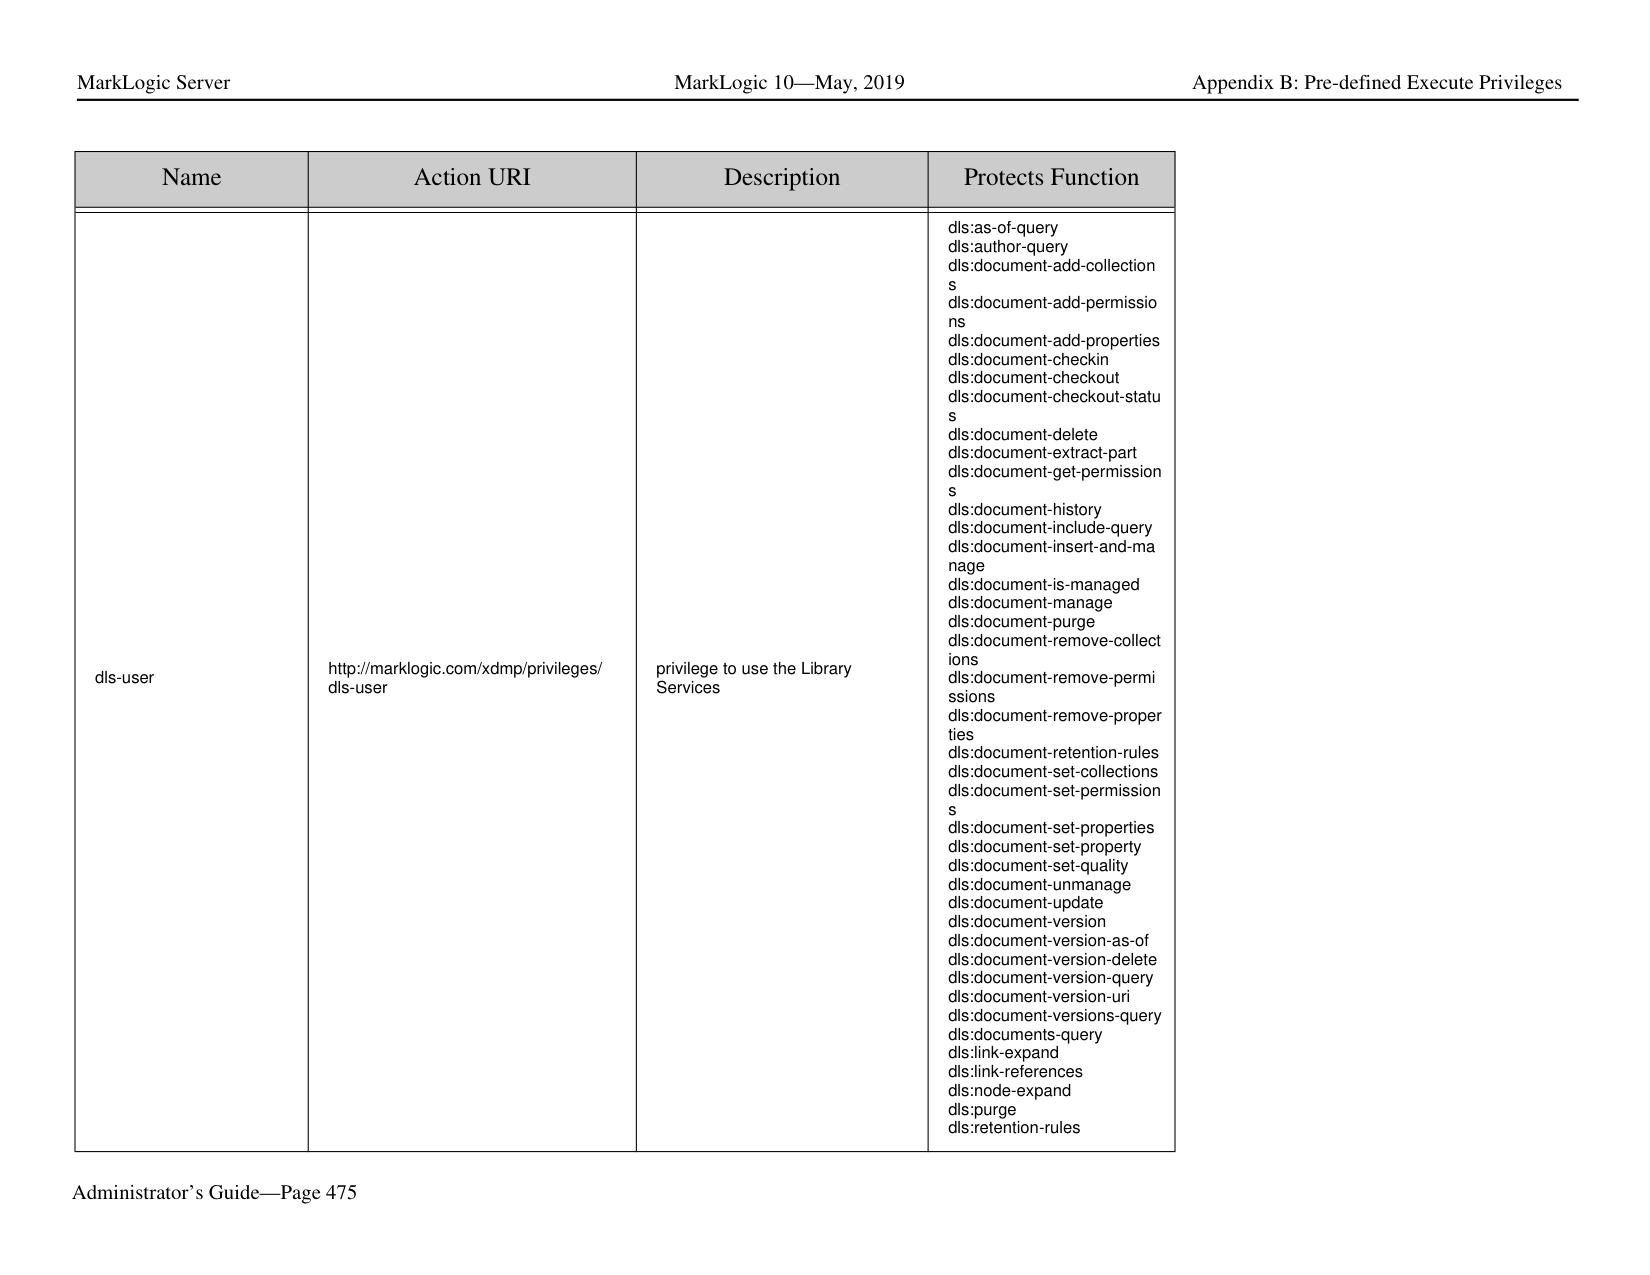
Note: Rolling back an import operation does not remove the imported forests.
##### 33.0 Appendix A: ‘Hot’ versus ‘Cold’ Admin Tasks
“Hot” admin tasks are defined as tasks that take effect immediately and do not require the server to restart. “Cold” admin tasks are defined as tasks that require one or more instances of the server to restart to reflect the changes. Cold tasks have an asterisk (*) next to the setting in the Admin UI.
In a clustered deployment, “cold” tasks will require one or more hosts in the cluster to restart their instance of MarkLogic in order to reflect the changes. In an single-server deployments, “cold” tasks will cause MarkLogic to restart in order to reflect the changes.
The tables below show the “hot” or “cold” status for adding objects, changing configuration parameters, and dropping objects for the following object types:
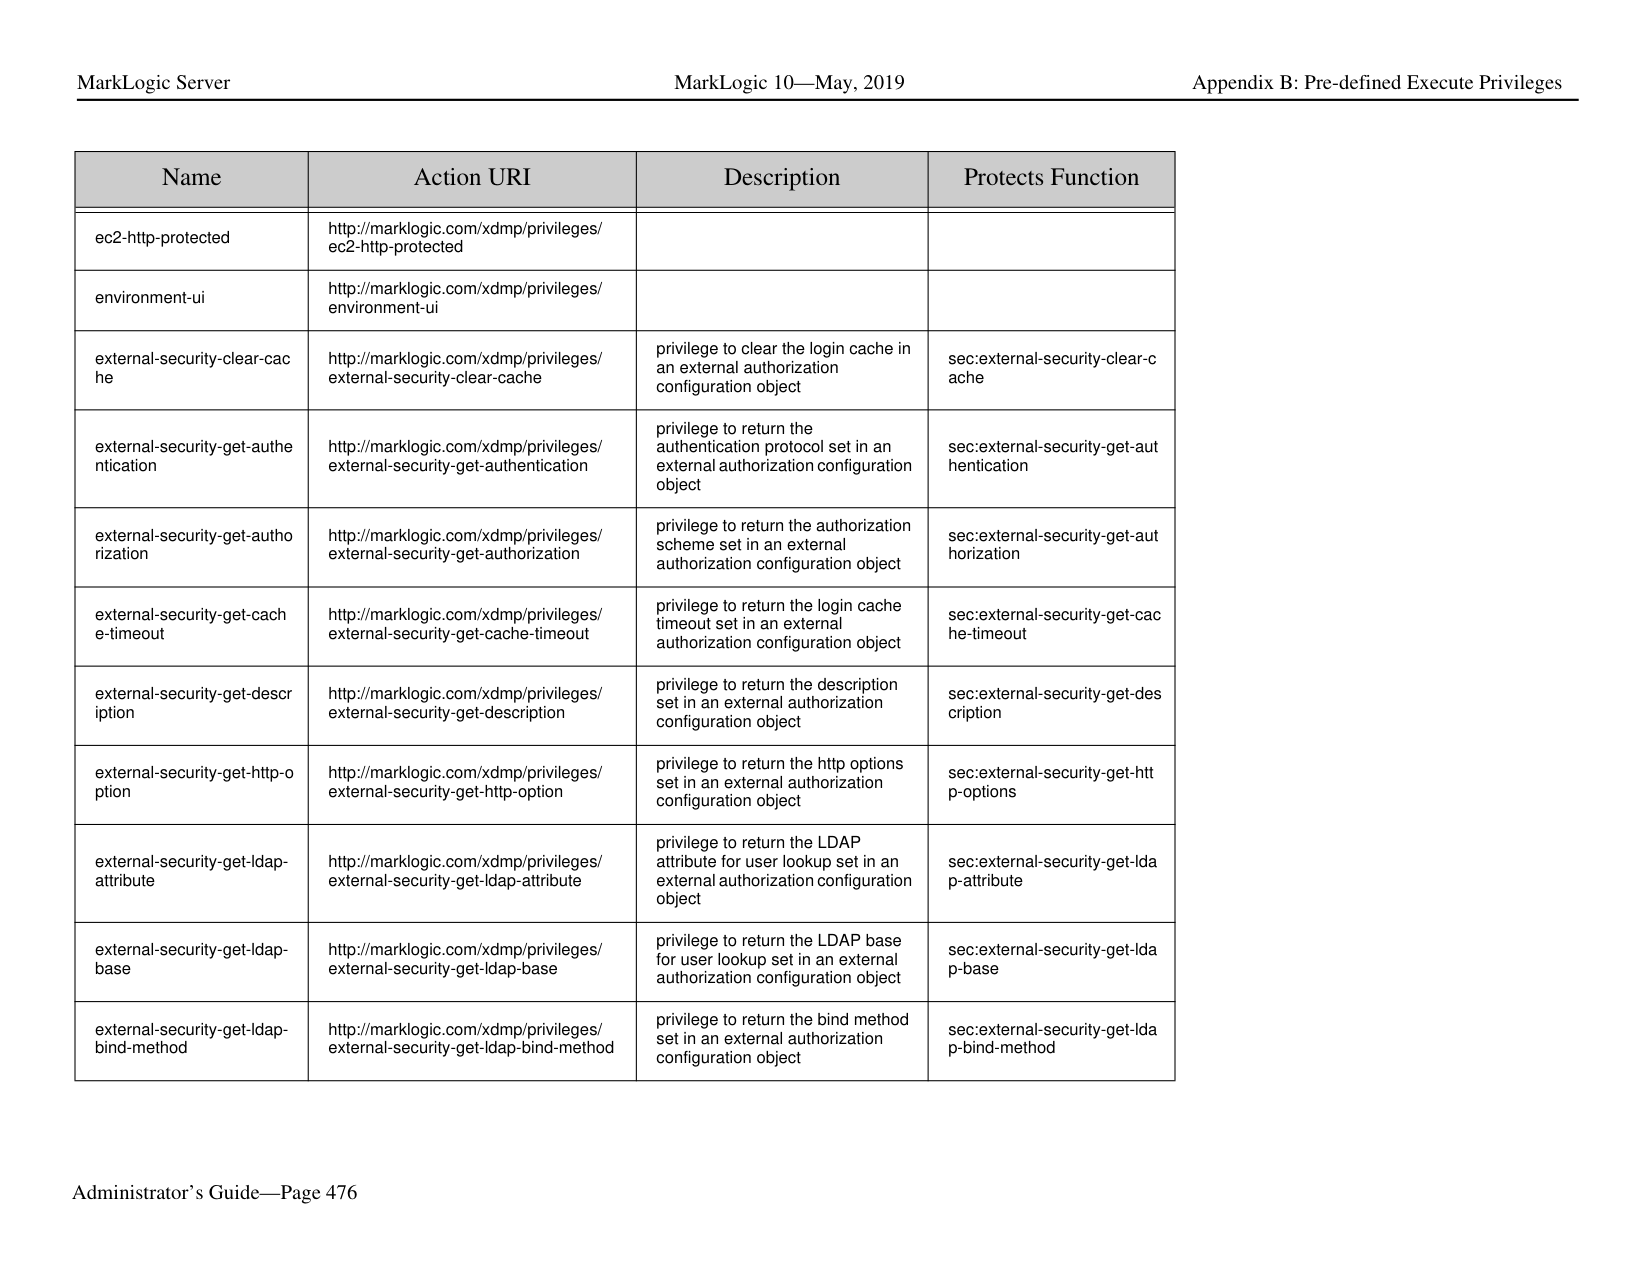
######### 33.1 Groups
|Add Object|Change Configuration Parameters|Delete Object| |---|---|---| | | | | |Hot|The following group parameters are hot: > group name > system log level > file log level > rotate log files > keep log files > namespaces > schemas
The following group parameters are cold for the hosts in the group: > list cache size > compressed tree cache size > expanded tree cache size
Adding and dropping hosts from groups is cold for that host.|Hot|
|Add Object|Change Configuration Parameters|Delete Object| |---|---|---| | | | | |Hot|The following App Server parameters are hot: > server name > root > database > request timeout > keep alive timeout > session timeout > time limit > realm > security mode > namespaces > schemas > ssl certificate template > ssl hostname > ssl ciphers
The following App Server parameters are cold for all hosts in the group defining the HTTP, ODBC, XDBC, or WebDAV Server: > port > address > backlog > threads > ssl enabled|Cold|
|Add Object|Change Configuration Parameters|Delete Object|
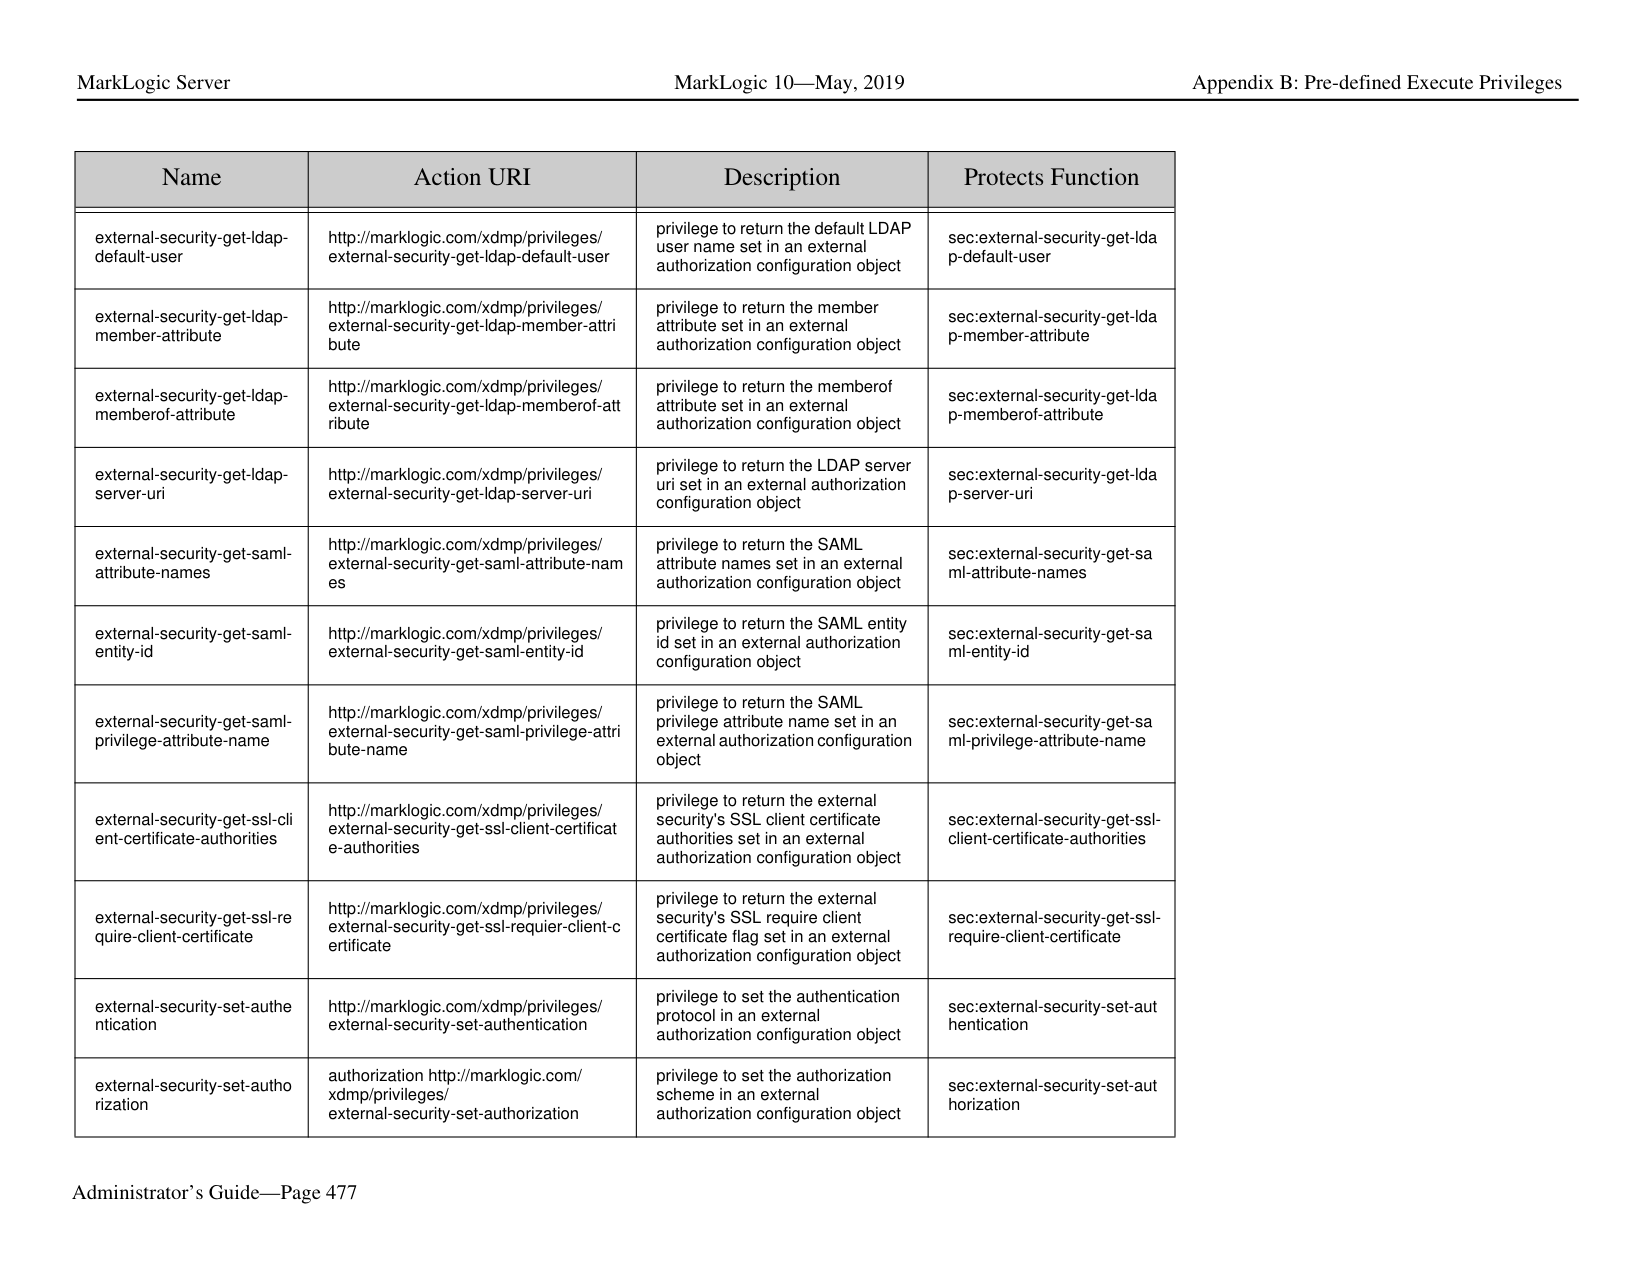
|---|---|---| | | | | |Hot|Parameters changes are hot|Hot|
|Add Object|Change Configuration Parameters|Delete Object| |---|---|---| | | | | |Only the added host needs to restart|Only the host whose parameters change requires a restart. The rest of the hosts remain hot.|Hot for the remaining hosts.
|
|Add Object|Change Configuration Parameters|Delete Object| |---|---|---| | | | | |Hot|Parameter changes are hot. Backup is hot. Restore, clear and drop are hot|Hot|
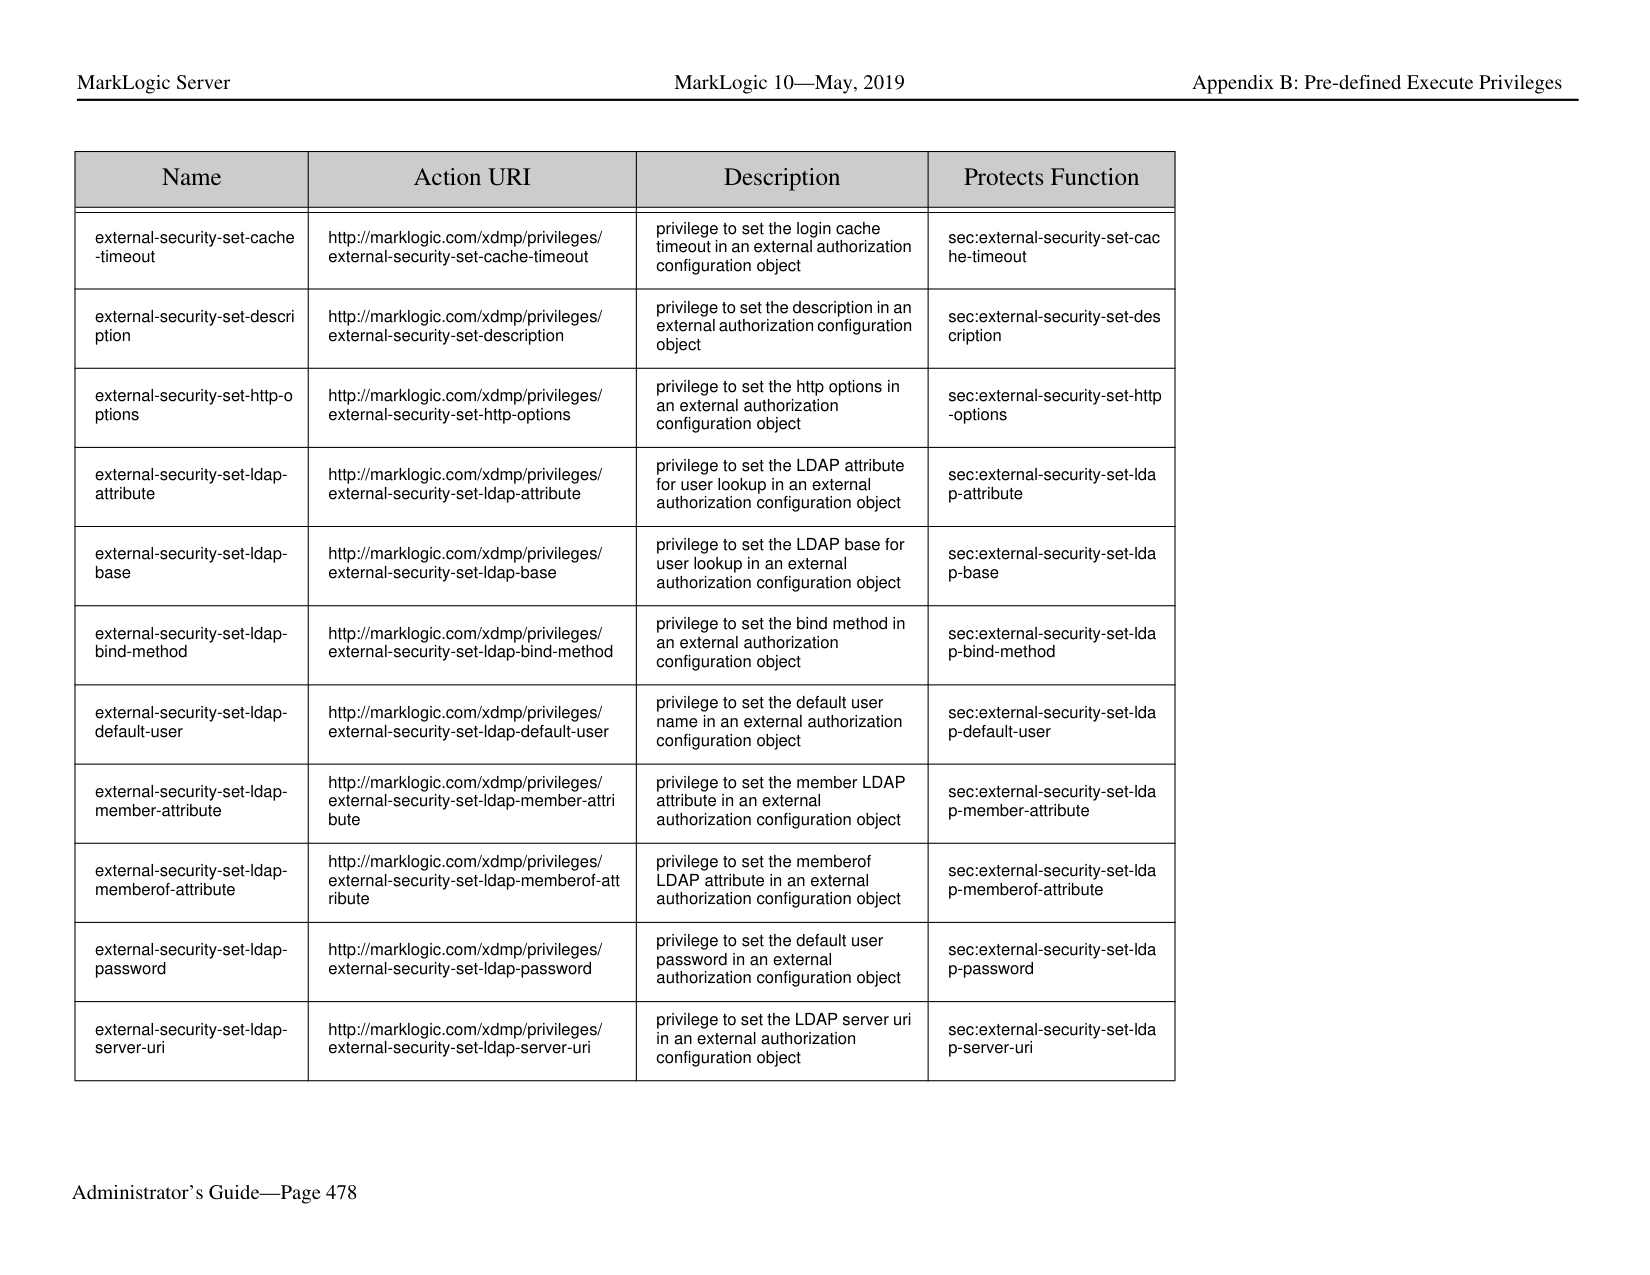
|Add Object|Change Configuration Parameters|Delete Object| |---|---|---| | | | | |Cold|Parameter changes are cold.|Cold|
|Add Object|Change Configuration Parameters|Delete Object| |---|---|---| | | | | |Hot|Parameter changes are hot.|Hot|
###### 34.0 Appendix B: Pre-defined Execute Privileges The pre-defined execute privileges listed below are included with every installation of MarkLogic Server.
|Name|Action URI|Description|Protects Function| |---|---|---|---| | | | | |
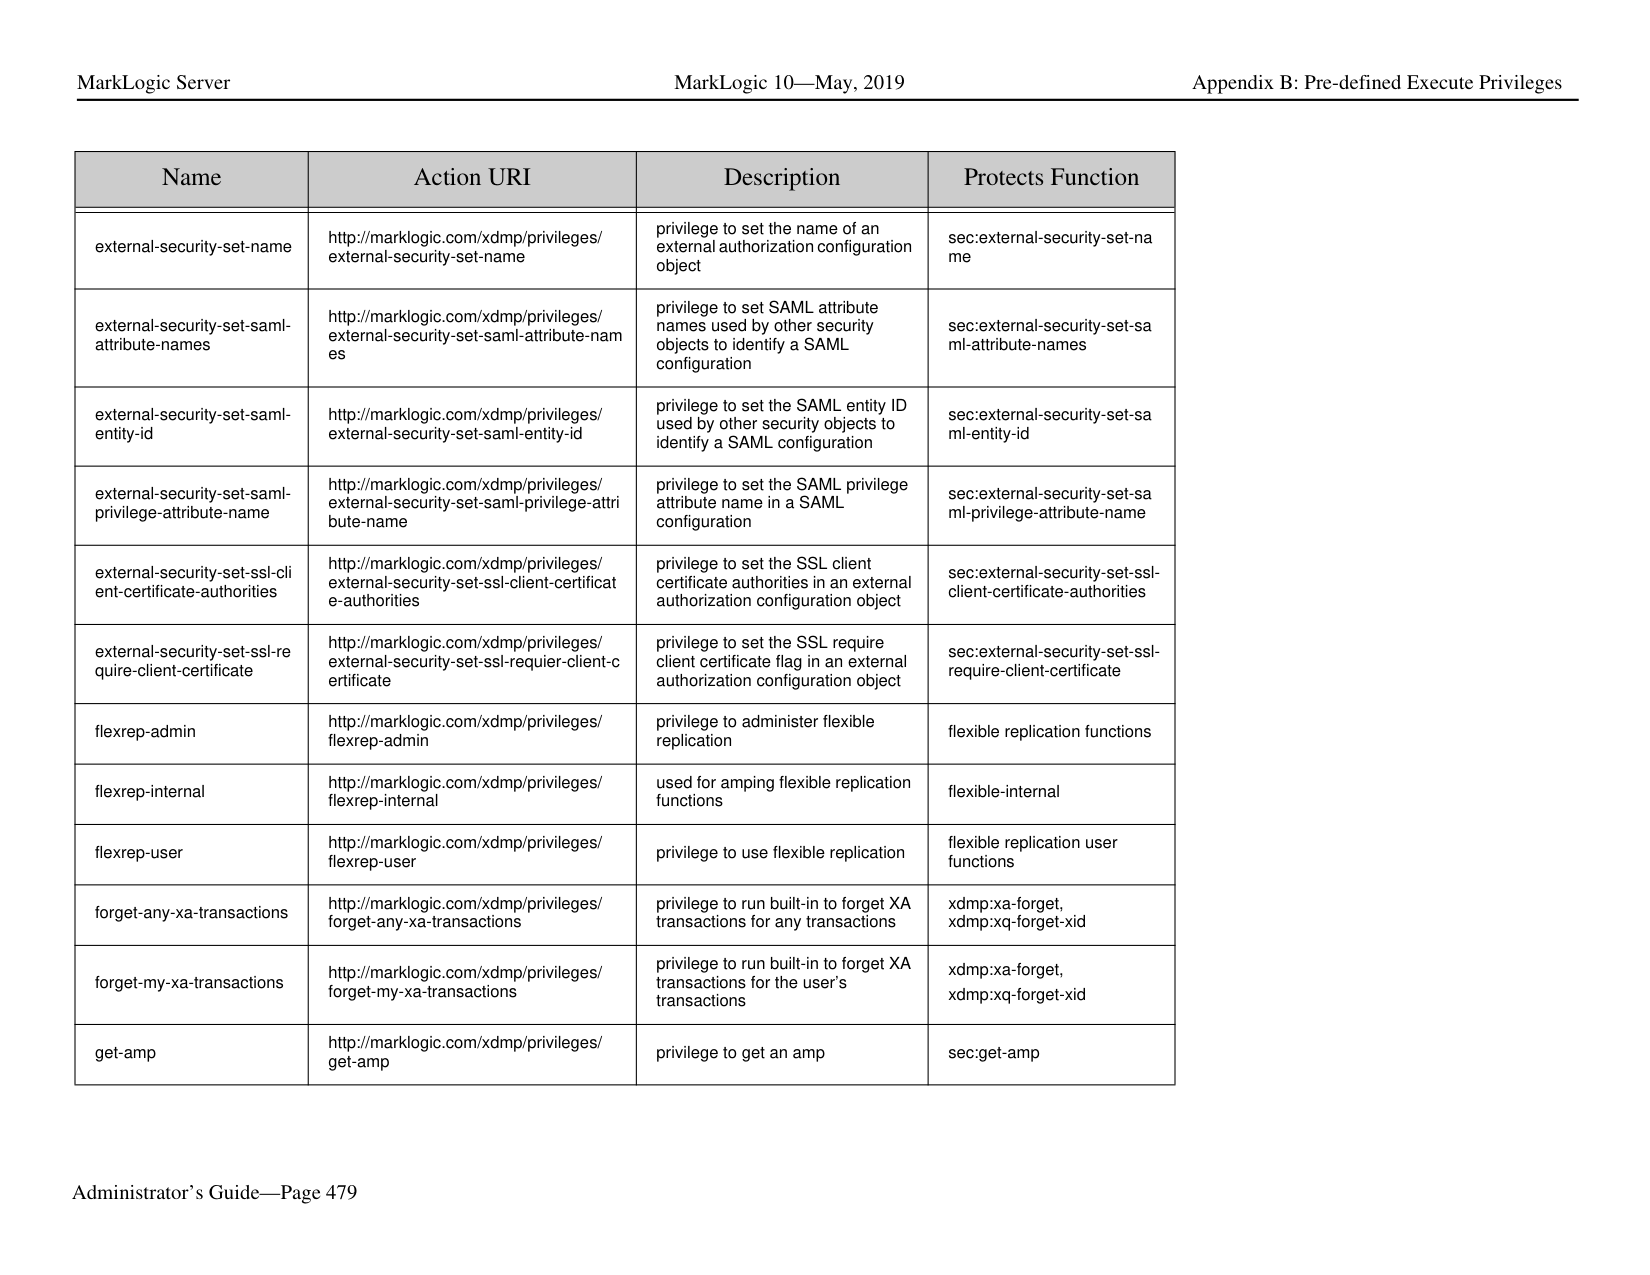
|add-query-rolesets|http://marklogic.com/xdmp/privileges/ add-query-rolesets|privilege to add query rolesets|sec:add-query-rolesets| |admin-database|http://marklogic.com/xdmp/privileges/ admin/database|privilege to administer databases|admin built-ins| |admin-default-read|http://marklogic.com/xdmp/privileges/ admin-default-read|internal privilege to use the Admin API for reading configuration information|admin built-ins| |admin-forest|http://marklogic.com/xdmp/privileges/ admin/forest|privilege to administer forests|admin built-ins| |admin-host|http://marklogic.com/xdmp/privileges/ admin/host|privilege to administer hosts|admin built-ins| |admin-app-server|http://marklogic.com/xdmp/privileges/ admin/app-server|privilege to administer app-servers|admin built-ins| |admin-app-server-security|http://marklogic.com/xdmp/privileges/ admin/app-server-security|privilege to administer app-servers’ security|admin built-ins| |admin-group|http://marklogic.com/xdmp/privileges/ admin/group|privilege to administer groups|admin built-ins| |admin-group-security|http://marklogic.com/xdmp/privileges/ admin/group-security|privilege to administer groups’ security|admin built-ins| |admin-cluster|http://marklogic.com/xdmp/privileges/ admin/cluster|privilege to administer clusters|admin built-ins| |admin-mimetype|http://marklogic.com/xdmp/privileges/ admin/mimetypes|privilege to administer mimetypes|admin built-ins| |admin-module-read|http://marklogic.com/xdmp/privileges/ admin-module-read|privilege to use the Admin API for reading configuration information|admin built-ins|
|Name|Action URI|Description|Protects Function| |---|---|---|---| | | | | | |admin-module-write|http://marklogic.com/xdmp/privileges/ admin-module-write|privilege to use the Admin API for writing configuration information|admin built-ins| |admin-ui|http://marklogic.com/xdmp/privileges/ admin-ui|privilege to view the Admin Interface, but not to make changes|admin built-ins| |amp-add-roles|http://marklogic.com/xdmp/privileges/ amp-add-roles|privilege to assign additional roles to the amp|sec:amp-add-roles| |amp-change-database|http://marklogic.com/xdmp/privileges/ amp-change-database|privilege to assign additional roles to the amp|sec:amps-change-modulesdatabase| |amp-get-roles|http://marklogic.com/xdmp/privileges/ amp-get-roles|privilege to get the roles associated with the amp|sec:amp-get-roles| |amp-remove-roles|http://marklogic.com/xdmp/privileges/ amp-remove-roles|privilege to remove roles assigned to the amp|sec:amp-remove-roles|

|amp-set-roles|http://marklogic.com/xdmp/privileges/ amp-set-roles|privilege to set the roles associated with the amp|sec-amp-set-roles| |any-collection|http://marklogic.com/xdmp/privileges/ any-collection|privilege to add to or remove from any collection, regardless of whether it is protected|xdmp:document-add-collecti ons, xdmp:document-remove-coll ections, xdmp:document-set-collectio ns| |any-transaction-locks|http://marklogic.com/xdmp/privileges/ any-transaction-locks|privilege to see URIs currently locked for read or write by a transaction.|xdmp:transaction-locks| |any-uri|http://marklogic.com/xdmp/privileges/ any-uri|privilege to create a document with any uri, regardless of whether the uri is protected|xdmp:document-insert, xdmp:document-load, xdmp:load| |app-builder|http://marklogic.com/xdmp/privileges/ app-builder|privilege to use the Application Builder UI
App Builder is no longer part of MarkLogic| | |appservices-cache-serverfields|http://marklogic.com/xdmp/privileges/ appservices-cache-server-fields| | |
|Name|Action URI|Description|Protects Function| |---|---|---|---| | | | | | |cancel-any-requests|http://marklogic.com/xdmp/privileges/ cancel-any-requests|privilege to cancel requests issued by any user attempting to cancel a request|admin built-ins| |cancel-my-requests|http://marklogic.com/xdmp/privileges/ cancel-my-requests|privilege to cancel requests issued by the user attempting to cancel a request|admin built-ins| |clang:read|http://marklogic.com/xdmp/privileges/ custom-language-read|privilege to read custom language configuration specifications|clang:language-config-read| |clang:write|http://marklogic.com/xdmp/privileges/ custom-language-write|privilege to write custom language configuration specifications|clang:language-config-write| |collection-add-permissions|http://marklogic.com/xdmp/privileges/ collection-add-permissions|privilege to add permissions to a collection|sec:get-collections, sec:collection-add-permissio ns| |collection-get-permissions|http://marklogic.com/xdmp/privileges/ collection-get-permissions|privilege to get permissions on a collection|sec:collection-get-permissio ns| |collection-remove-permissi ons|http://marklogic.com/xdmp/privileges/ collection-remove-permissions|privilege to remove permissions from a collection|sec:get-collections, sec:collection-remove-permi ssions| |collection-set-permissions|http://marklogic.com/xdmp/privileges/ collection-set-permissions|privilege to set permissions on a collection|sec:get-collections, sec:collection-set-permission s| |compartment-get-roles|http://marklogic.com/xdmp/privileges/ compartment-get-roles|privilege to get roles on a compartment|sec:compartment-get-roles| |complete-any-transactions|http://marklogic.com/xdmp/privileges/ complete-any-transactions|privilege to use transaction built-ins for any transactions|xdmp:transaction-commit, xdmp:xa-complete| |complete-my-transactions|http://marklogic.com/xdmp/privileges/ complete-my-transactions|privilege to use transaction built-ins for transactions started by the current user|xdmp:transaction-commit, xdmp:xa-complete| |count-builtins|http://marklogic.com/xdmp/privileges/ counts|privilege to run xdmp:forest-counts|xdmp:forest-counts|
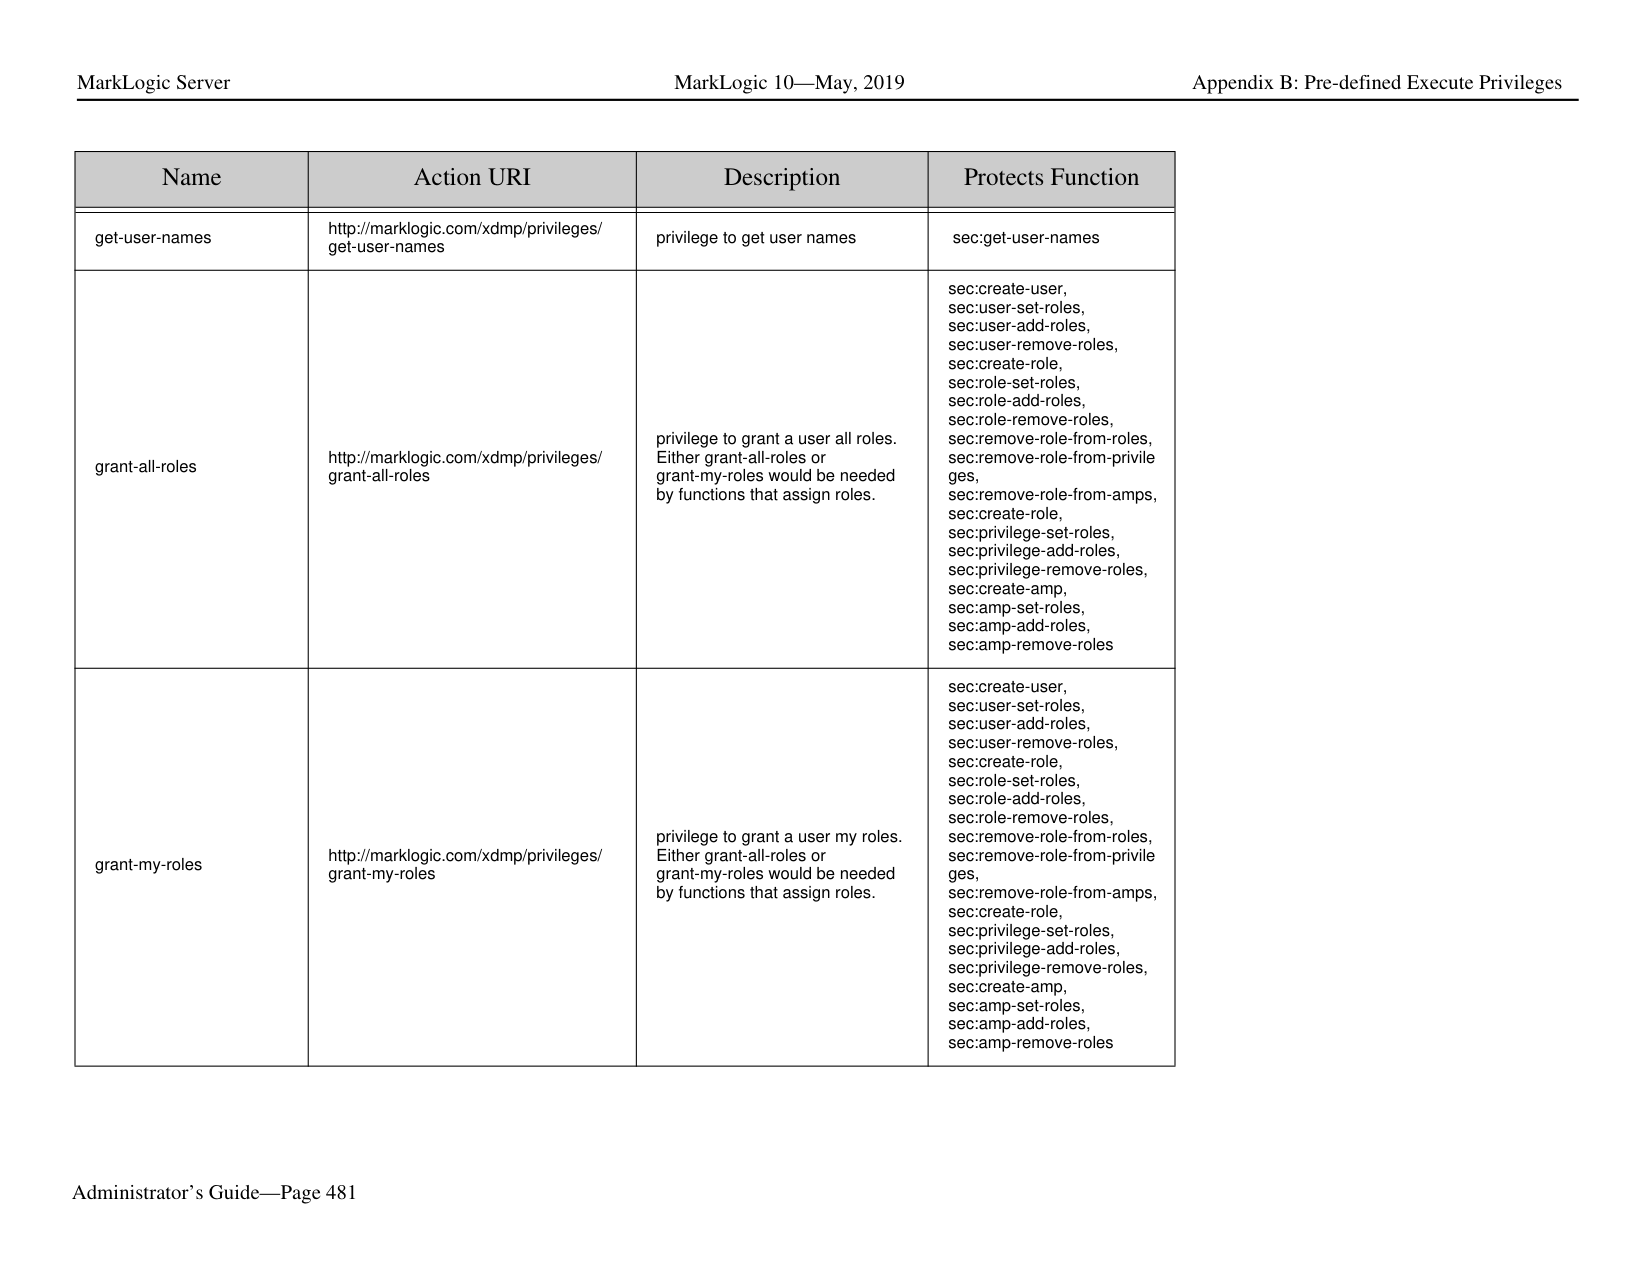
|create-amp|http://marklogic.com/xdmp/privileges/ create-amp|privilege to create an amp|sec:create-amp|
|Name|Action URI|Description|Protects Function| |---|---|---|---| | | | | | |create-credential|http://marklogic.com/xdmp/privileges/ create-credential|privilege to create security credentials|sec:create-credential| |create-data-role|http://marklogic.com/xdmp/privileges/ create-data-role|privilege for non-admin users (with manage role) to create and manage roles| | |create-data-user|http://marklogic.com/xdmp/privileges/ create-data-user|privilege for non-admin users (with manage role) to create and manage users| | |create-domain|http://marklogic.com/xdmp/privileges/ create-domain|privilege to create domains|dom:create| |create-external-security|http://marklogic.com/xdmp/privileges/ create-external-security|privilege to create an external authentication configuration|sec:create-external-security| |create-pipeline|http://marklogic.com/xdmp/privileges/ create-pipeline|privilege to create a pipeline|p:insert p:create| |create-privilege|http://marklogic.com/xdmp/privileges/ create-privilege|privilege to create a privilege|sec:create-role| |create-role|http://marklogic.com/xdmp/privileges/ create-role|privilege to create a role|sec:create-role| |create-trigger|http://marklogic.com/xdmp/privileges/ create-trigger|privilege to create a trigger|trgr:create-trigger| |create-user|http://marklogic.com/xdmp/privileges/ create-user|privilege to create a user|sec:create-user| |credential-get-certificate|http://marklogic.com/xdmp/privileges/ credential-get-certificate|privilege to return the certificate for a credential|sec:credential-get-certificate| |credential-get-description|http://marklogic.com/xdmp/privileges/ credential-get-description|privilege to return the description of a credential|sec:credential-get-descriptio n| |credential-get-id|http://marklogic.com/xdmp/privileges/ credential-get-id|privilege to return the id of a credential|sec:credential-get-id| |credential-get-password|http://marklogic.com/xdmp/privileges/ credential-get-password|privilege to return the password for a credential|sec:credential-get-password|
|Name|Action URI|Description|Protects Function|
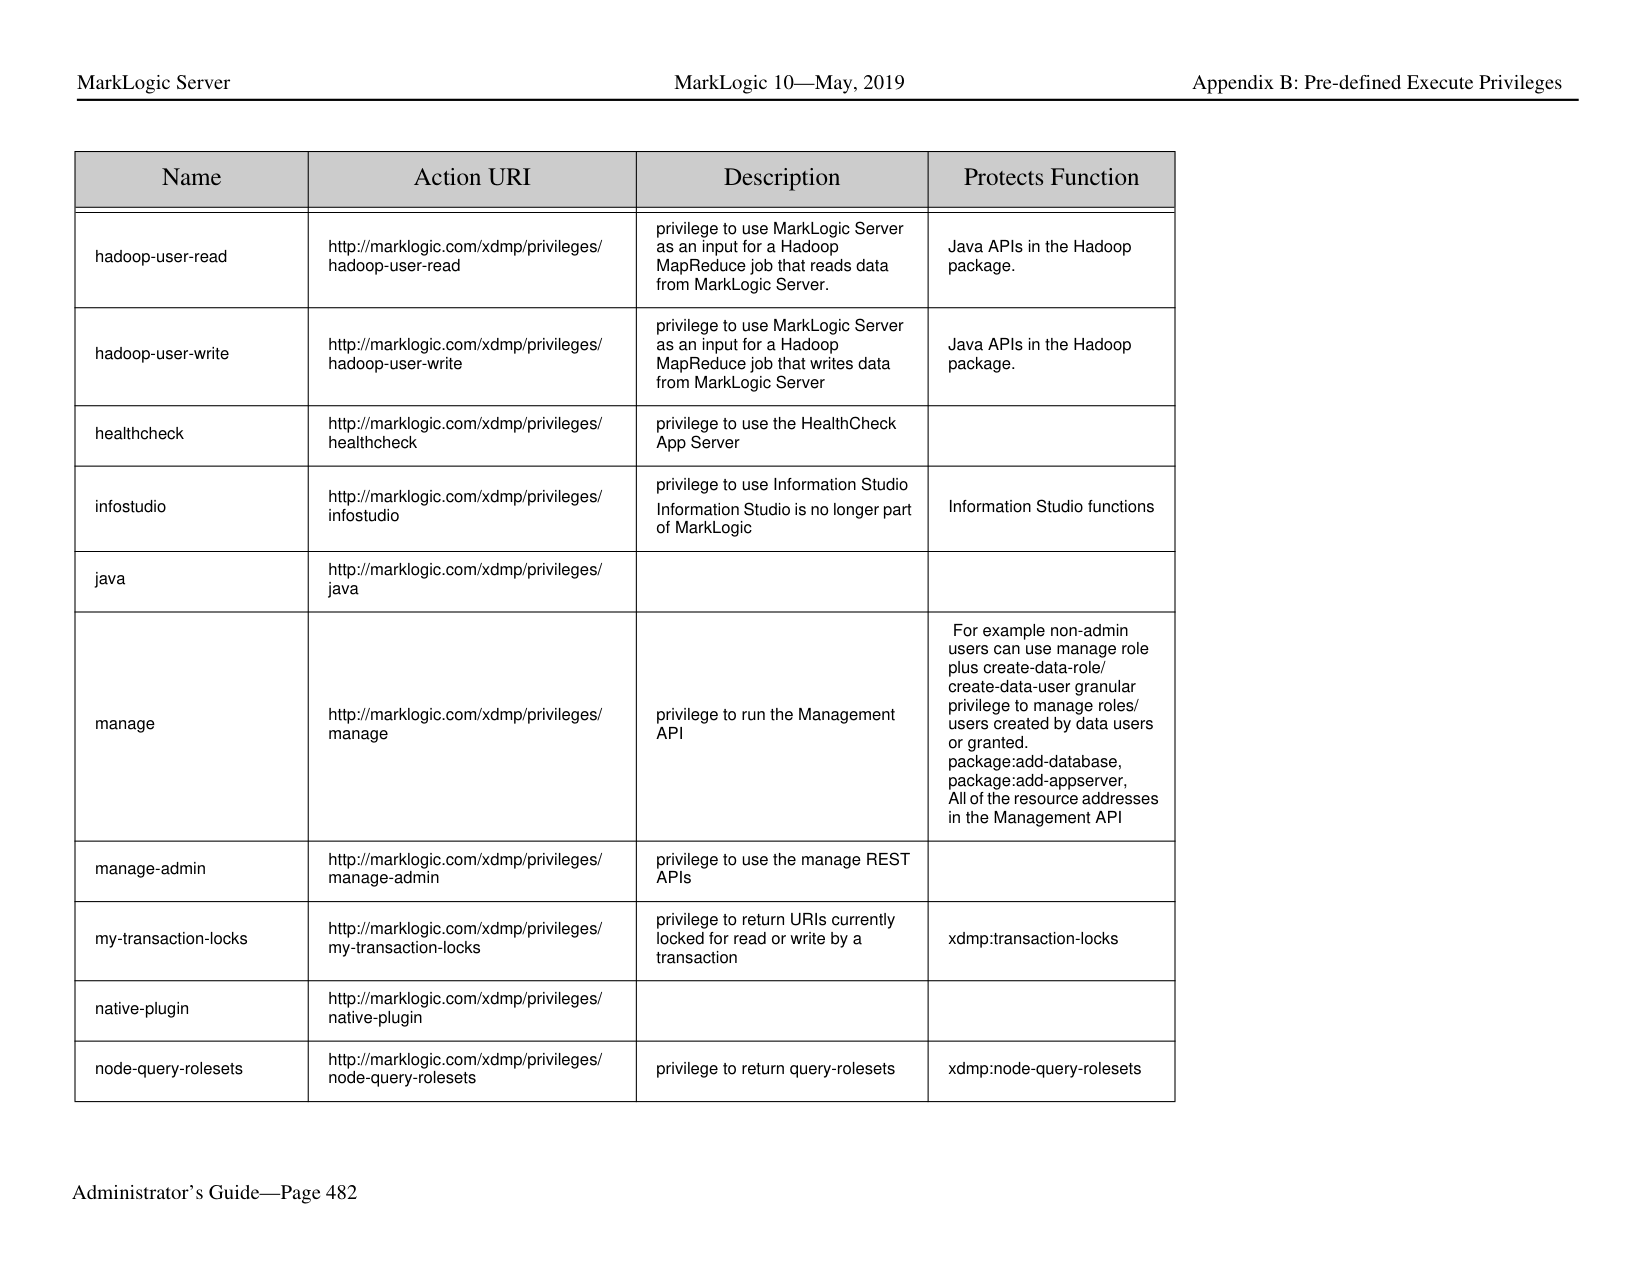
|---|---|---|---| | | | | | |credential-get-permissions|http://marklogic.com/xdmp/privileges/ credential-get-permissions|privilege to return the permissions for a credential|sec:credential-get-permissio ns| |credential-get-private-key|http://marklogic.com/xdmp/privileges/ credential-get-private-key|privilege to return the private key for a credential|sec:credential-get-private-ke y| |credential-get-signing|http://marklogic.com/xdmp/privileges/ credential-get-signing|privilege to return the signing flag for a credential|sec:credential-get-signing| |credential-get-targets|http://marklogic.com/xdmp/privileges/ credential-get-targets|privilege to return the targets for a credential|sec:credential-get-targets| |credential-get-username|http://marklogic.com/xdmp/privileges/ credential-get-username|privilege to return the user name for a credential|sec:credential-get-username| |credential-set-certificate|http://marklogic.com/xdmp/privileges/ credential-set-certificate|privilege to update the certificate for a credential|sec:credential-set-certificate| |credential-set-description|http://marklogic.com/xdmp/privileges/ credential-set-description|privilege to update the description for a credential|sec:credential-set-descriptio n| |credential-set-name|http://marklogic.com/xdmp/privileges/ credential-set-name|privilege to update the name for a credential|sec:credential-set-name| |credential-set-password|http://marklogic.com/xdmp/privileges/ credential-set-password|privilege to update the password for a credential|sec:credential-set-password| |credential-set-permissions|http://marklogic.com/xdmp/privileges/ credential-set-permissions|privilege to update the permissions for a credential|sec:credential-set-permissio ns| |credential-set-signing|http://marklogic.com/xdmp/privileges/ credential-set-signing|privilege to update the signing flag for a credential|sec:credential-set-signing| |credential-set-targets|http://marklogic.com/xdmp/privileges/ credential-set-targets|privilege to update the targets for a credential|sec:credential-set-targets| |credential-set-username|http://marklogic.com/xdmp/privileges/ credential-set-username|privilege to update the user name for a credential|sec:credential-set-username| |credentials-get-aws|http://marklogic.com/xdmp/privileges/ credentials-get-aws|privilege to return the Amazon Web Services access key, secret key, and session token|sec:credentials-get-aws|
|Name|Action URI|Description|Protects Function| |---|---|---|---| | | | | | |credentials-set-aws|http://marklogic.com/xdmp/privileges/ credentials-set-aws|privilege to set the Amazon Web Services access key, secret key, and session token|sec:credentials-set-aws| |cts-write-dictionary|http://marklogic.com/xdmp/privileges/ cts-write-dictionary| | |
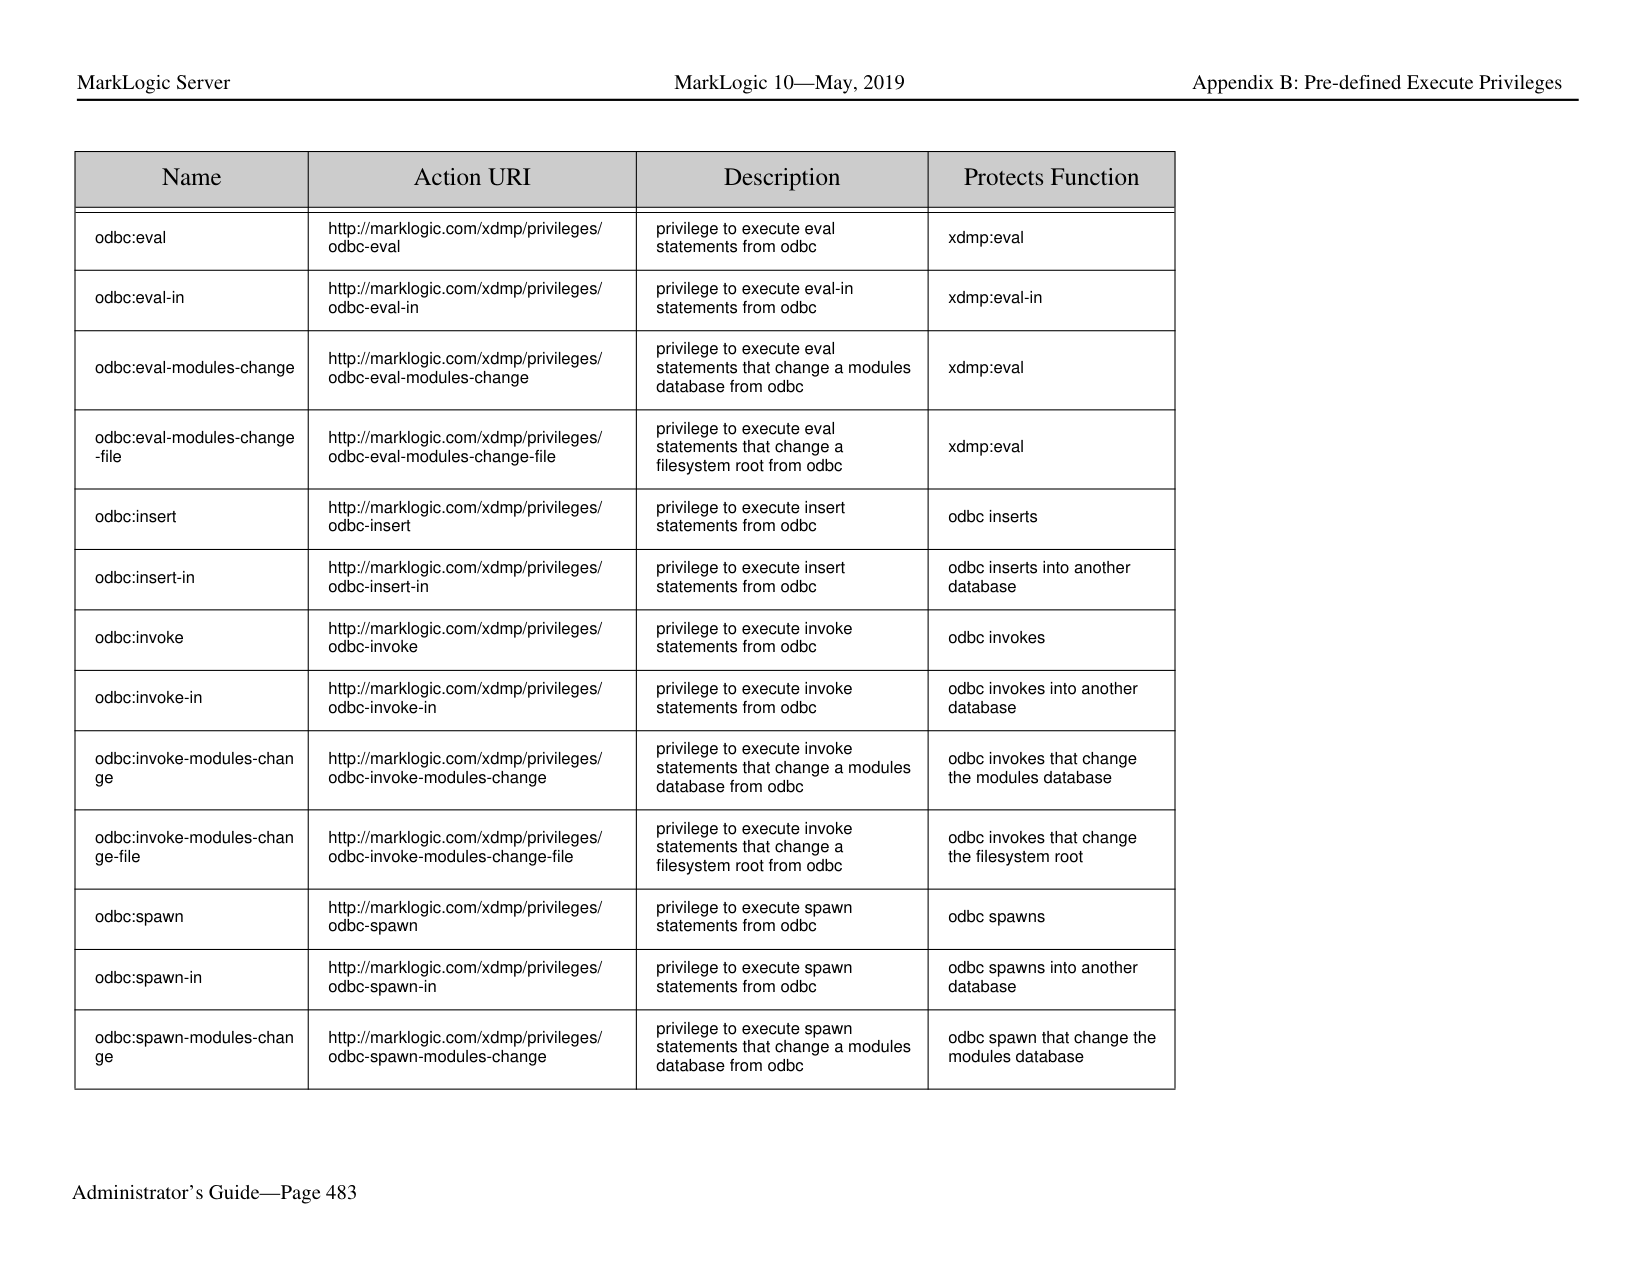
|data-role-edit-
|Name|Action URI|Description|Protects Function| |---|---|---|---| | | | | | |dls-user|http://marklogic.com/xdmp/privileges/ dls-user|privilege to use the Library Services|dls:as-of-query dls:author-query dls:document-add-collection s dls:document-add-permissio ns dls:document-add-properties dls:document-checkin dls:document-checkout dls:document-checkout-statu s dls:document-delete dls:document-extract-part dls:document-get-permission s dls:document-history dls:document-include-query dls:document-insert-and-ma nage dls:document-is-managed dls:document-manage dls:document-purge dls:document-remove-collect ions dls:document-remove-permi ssions dls:document-remove-proper ties dls:document-retention-rules dls:document-set-collections dls:document-set-permission s dls:document-set-properties dls:document-set-property dls:document-set-quality dls:document-unmanage dls:document-update dls:document-version dls:document-version-as-of dls:document-version-delete dls:document-version-query dls:document-version-uri dls:document-versions-query dls:documents-query dls:link-expand dls:link-references dls:node-expand dls:purge dls:retention-rules|
|Name|Action URI|Description|Protects Function| |---|---|---|---| | | | | | |ec2-http-protected|http://marklogic.com/xdmp/privileges/ ec2-http-protected| | | |environment-ui|http://marklogic.com/xdmp/privileges/ environment-ui| | | |external-security-clear-cac he|http://marklogic.com/xdmp/privileges/ external-security-clear-cache|privilege to clear the login cache in an external authorization configuration object|sec:external-security-clear-c ache| |external-security-get-authe ntication|http://marklogic.com/xdmp/privileges/ external-security-get-authentication|privilege to return the authentication protocol set in an external authorization configuration object|sec:external-security-get-aut hentication| |external-security-get-autho rization|http://marklogic.com/xdmp/privileges/ external-security-get-authorization|privilege to return the authorization scheme set in an external authorization configuration object|sec:external-security-get-aut horization|
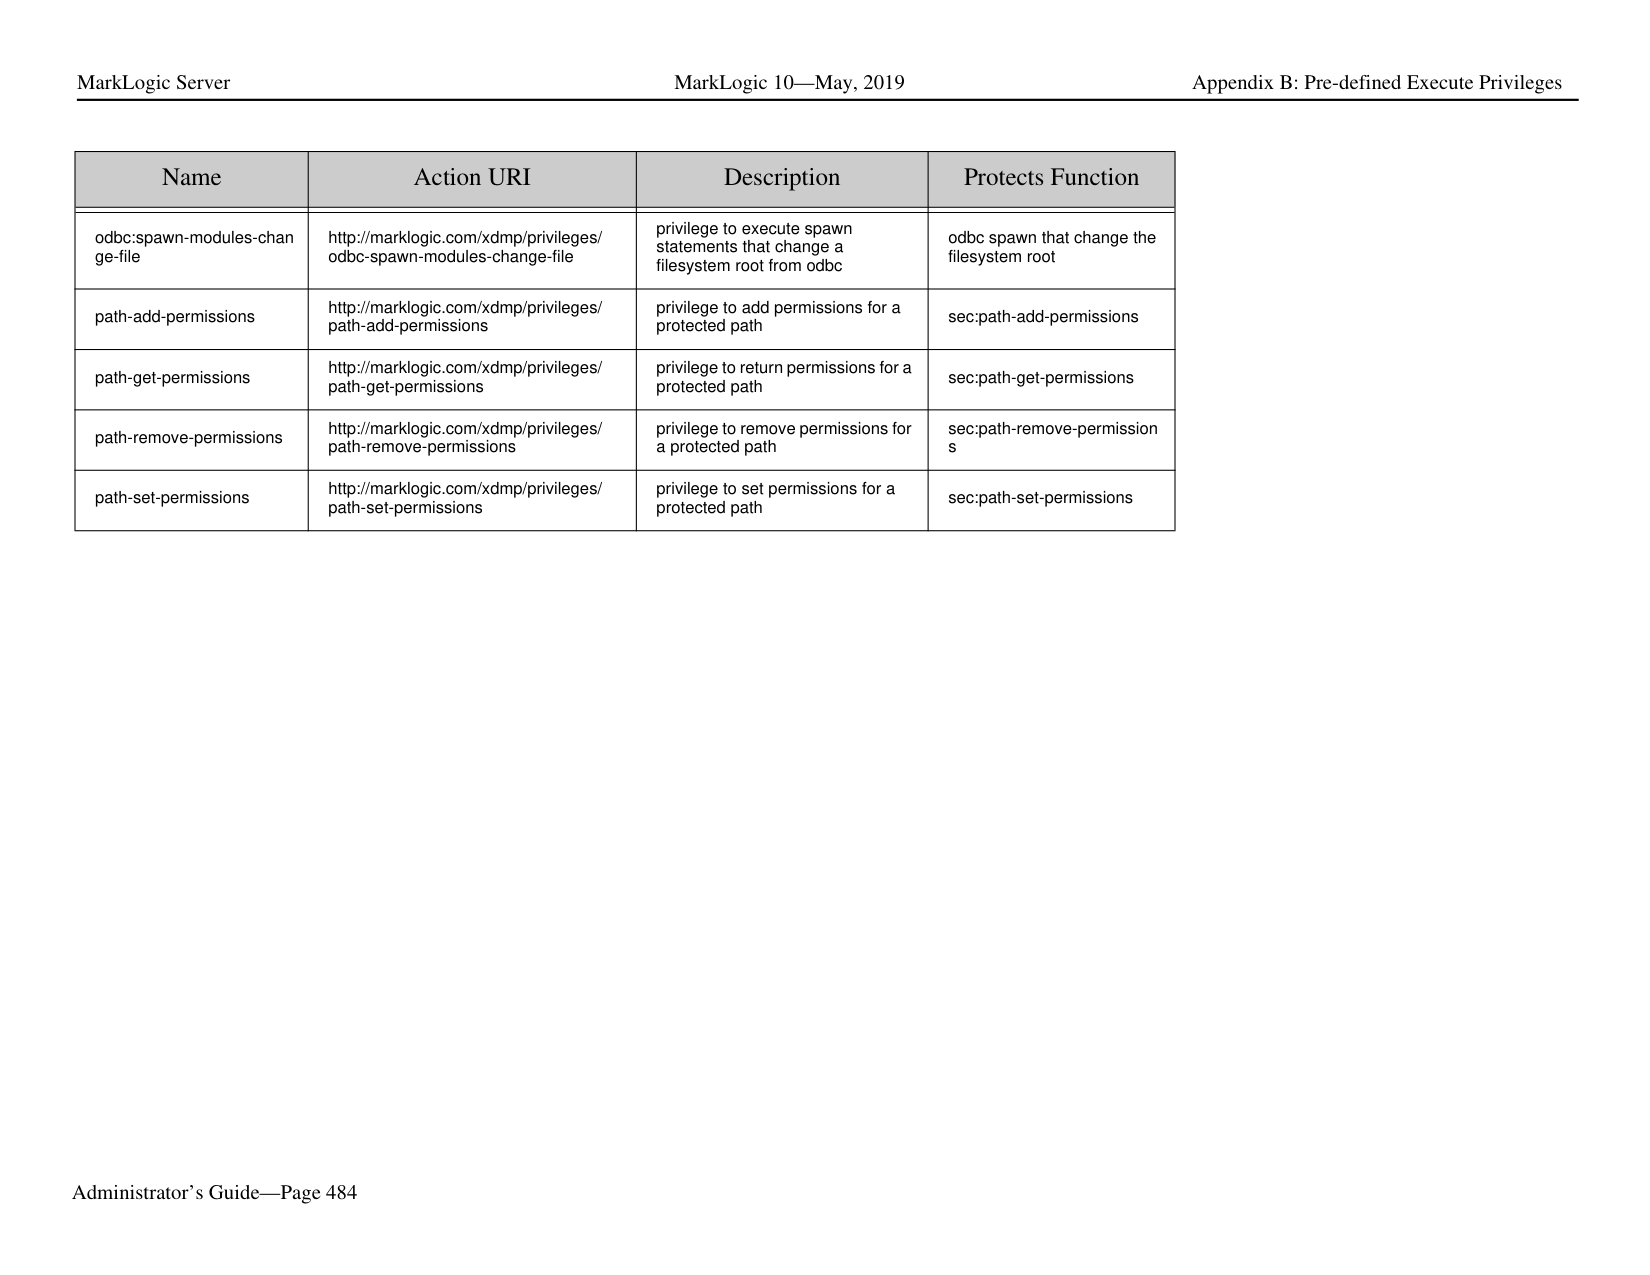
|external-security-get-cach e-timeout|http://marklogic.com/xdmp/privileges/ external-security-get-cache-timeout|privilege to return the login cache timeout set in an external authorization configuration object|sec:external-security-get-cac he-timeout| |external-security-get-descr iption|http://marklogic.com/xdmp/privileges/ external-security-get-description|privilege to return the description set in an external authorization configuration object|sec:external-security-get-des cription| |external-security-get-http-o ption|http://marklogic.com/xdmp/privileges/ external-security-get-http-option|privilege to return the http options set in an external authorization configuration object|sec:external-security-get-htt p-options| |external-security-get-ldapattribute|http://marklogic.com/xdmp/privileges/ external-security-get-ldap-attribute|privilege to return the LDAP attribute for user lookup set in an external authorization configuration object|sec:external-security-get-lda p-attribute| |external-security-get-ldapbase|http://marklogic.com/xdmp/privileges/ external-security-get-ldap-base|privilege to return the LDAP base for user lookup set in an external authorization configuration object|sec:external-security-get-lda p-base| |external-security-get-ldapbind-method|http://marklogic.com/xdmp/privileges/ external-security-get-ldap-bind-method|privilege to return the bind method set in an external authorization configuration object|sec:external-security-get-lda p-bind-method|
|Name|Action URI|Description|Protects Function| |---|---|---|---| | | | | | |external-security-get-ldapdefault-user|http://marklogic.com/xdmp/privileges/ external-security-get-ldap-default-user|privilege to return the default LDAP user name set in an external authorization configuration object|sec:external-security-get-lda p-default-user| |external-security-get-ldapmember-attribute|http://marklogic.com/xdmp/privileges/ external-security-get-ldap-member-attri bute|privilege to return the member attribute set in an external authorization configuration object|sec:external-security-get-lda p-member-attribute| |external-security-get-ldapmemberof-attribute|http://marklogic.com/xdmp/privileges/ external-security-get-ldap-memberof-att ribute|privilege to return the memberof attribute set in an external authorization configuration object|sec:external-security-get-lda p-memberof-attribute| |external-security-get-ldapserver-uri|http://marklogic.com/xdmp/privileges/ external-security-get-ldap-server-uri|privilege to return the LDAP server uri set in an external authorization configuration object|sec:external-security-get-lda p-server-uri| |external-security-get-samlattribute-names|http://marklogic.com/xdmp/privileges/ external-security-get-saml-attribute-nam es|privilege to return the SAML attribute names set in an external authorization configuration object|sec:external-security-get-sa ml-attribute-names| |external-security-get-samlentity-id|http://marklogic.com/xdmp/privileges/ external-security-get-saml-entity-id|privilege to return the SAML entity id set in an external authorization configuration object|sec:external-security-get-sa ml-entity-id| |external-security-get-samlprivilege-attribute-name|http://marklogic.com/xdmp/privileges/ external-security-get-saml-privilege-attri bute-name|privilege to return the SAML privilege attribute name set in an external authorization configuration object|sec:external-security-get-sa ml-privilege-attribute-name| |external-security-get-ssl-cli ent-certificate-authorities|http://marklogic.com/xdmp/privileges/ external-security-get-ssl-client-certificat e-authorities|privilege to return the external security's SSL client certificate authorities set in an external authorization configuration object|sec:external-security-get-sslclient-certificate-authorities| |external-security-get-ssl-re quire-client-certificate|http://marklogic.com/xdmp/privileges/ external-security-get-ssl-requier-client-c ertificate|privilege to return the external security's SSL require client certificate flag set in an external authorization configuration object|sec:external-security-get-sslrequire-client-certificate| |external-security-set-authe ntication|http://marklogic.com/xdmp/privileges/ external-security-set-authentication|privilege to set the authentication protocol in an external authorization configuration object|sec:external-security-set-aut hentication| |external-security-set-autho rization|authorization http://marklogic.com/ xdmp/privileges/ external-security-set-authorization|privilege to set the authorization scheme in an external authorization configuration object|sec:external-security-set-aut horization|
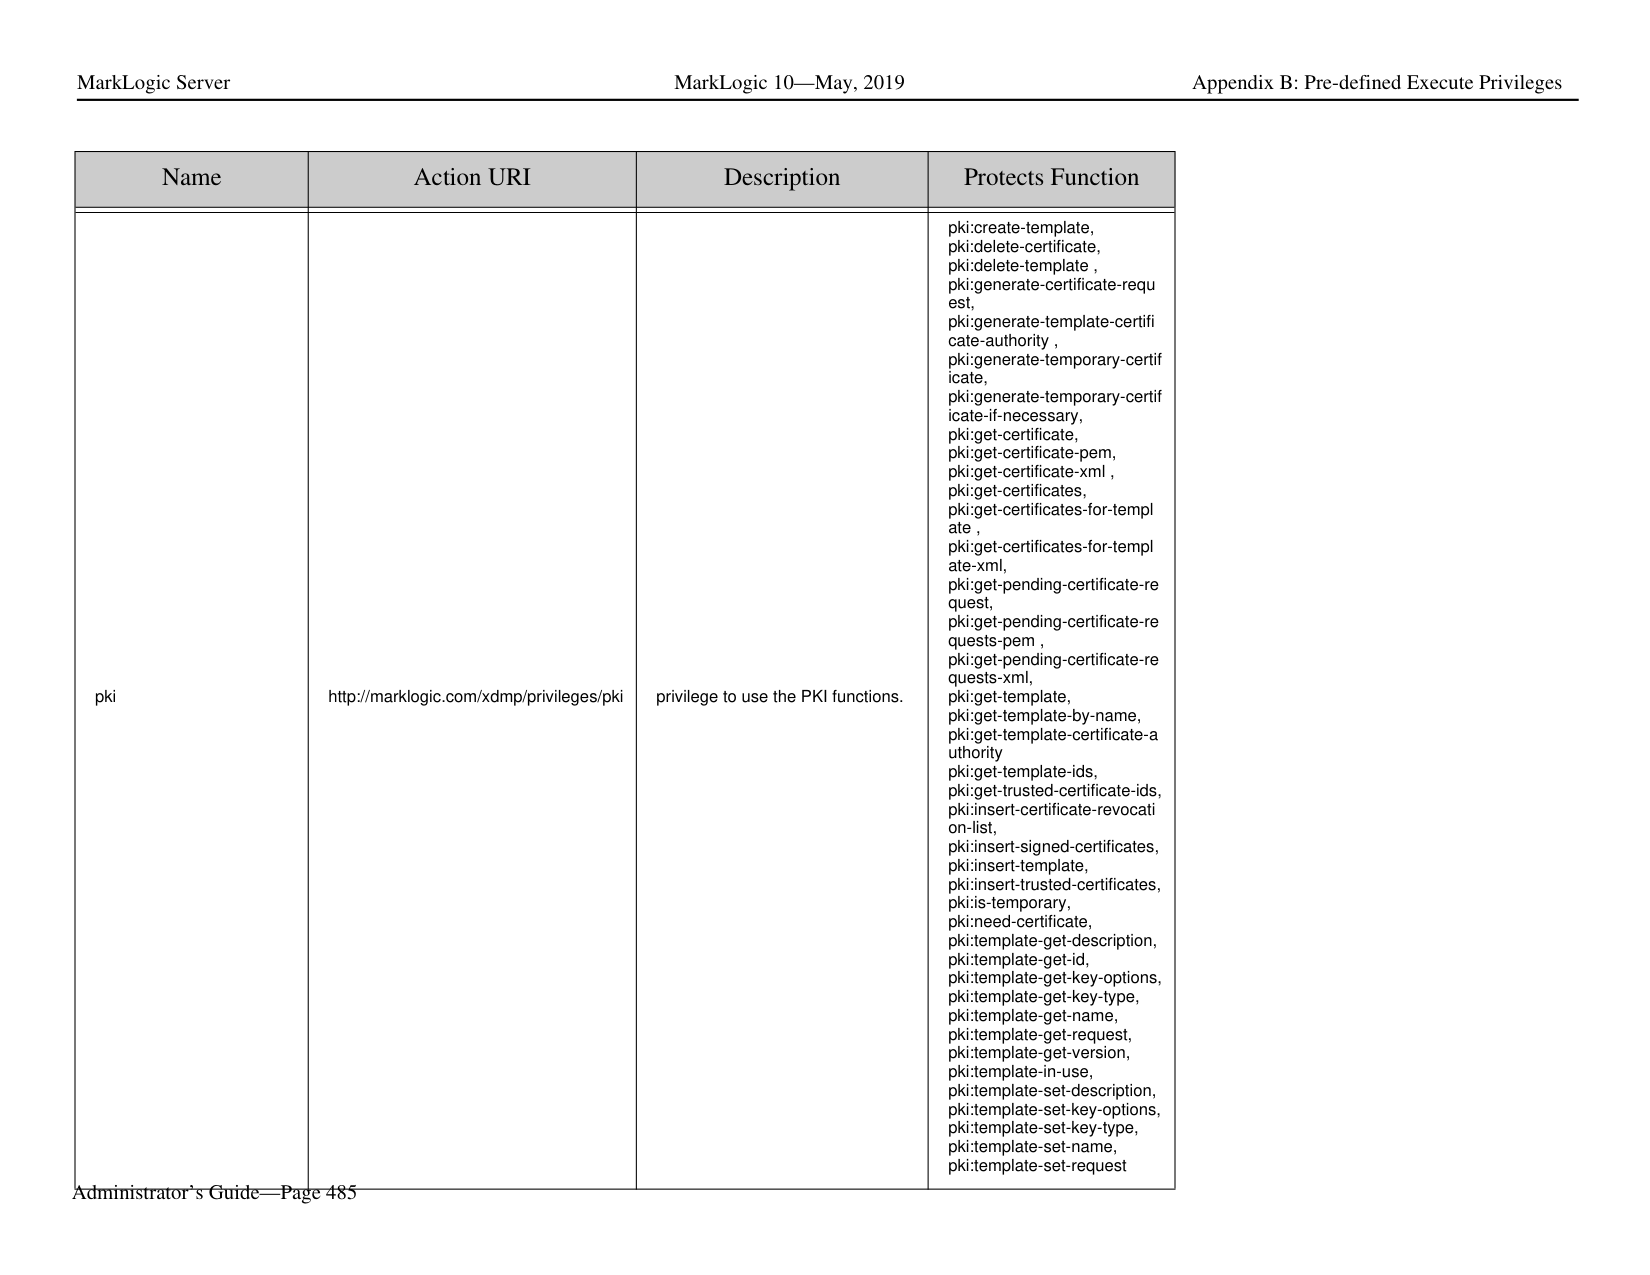
|Name|Action URI|Description|Protects Function| |---|---|---|---| | | | | | |external-security-set-cache
-timeout|http://marklogic.com/xdmp/privileges/ external-security-set-cache-timeout|privilege to set the login cache timeout in an external authorization configuration object|sec:external-security-set-cac he-timeout| |external-security-set-descri ption|http://marklogic.com/xdmp/privileges/ external-security-set-description|privilege to set the description in an external authorization configuration object|sec:external-security-set-des cription| |external-security-set-http-o ptions|http://marklogic.com/xdmp/privileges/ external-security-set-http-options|privilege to set the http options in an external authorization configuration object|sec:external-security-set-http
-options| |external-security-set-ldapattribute|http://marklogic.com/xdmp/privileges/ external-security-set-ldap-attribute|privilege to set the LDAP attribute for user lookup in an external authorization configuration object|sec:external-security-set-lda p-attribute| |external-security-set-ldapbase|http://marklogic.com/xdmp/privileges/ external-security-set-ldap-base|privilege to set the LDAP base for user lookup in an external authorization configuration object|sec:external-security-set-lda p-base| |external-security-set-ldapbind-method|http://marklogic.com/xdmp/privileges/ external-security-set-ldap-bind-method|privilege to set the bind method in an external authorization configuration object|sec:external-security-set-lda p-bind-method| |external-security-set-ldapdefault-user|http://marklogic.com/xdmp/privileges/ external-security-set-ldap-default-user|privilege to set the default user name in an external authorization configuration object|sec:external-security-set-lda p-default-user| |external-security-set-ldapmember-attribute|http://marklogic.com/xdmp/privileges/ external-security-set-ldap-member-attri bute|privilege to set the member LDAP attribute in an external authorization configuration object|sec:external-security-set-lda p-member-attribute| |external-security-set-ldapmemberof-attribute|http://marklogic.com/xdmp/privileges/ external-security-set-ldap-memberof-att ribute|privilege to set the memberof LDAP attribute in an external authorization configuration object|sec:external-security-set-lda p-memberof-attribute| |external-security-set-ldappassword|http://marklogic.com/xdmp/privileges/ external-security-set-ldap-password|privilege to set the default user password in an external authorization configuration object|sec:external-security-set-lda p-password| |external-security-set-ldapserver-uri|http://marklogic.com/xdmp/privileges/ external-security-set-ldap-server-uri|privilege to set the LDAP server uri in an external authorization configuration object|sec:external-security-set-lda p-server-uri|
|Name|Action URI|Description|Protects Function| |---|---|---|---| | | | | | |external-security-set-name|http://marklogic.com/xdmp/privileges/ external-security-set-name|privilege to set the name of an external authorization configuration object|sec:external-security-set-na me| |external-security-set-samlattribute-names|http://marklogic.com/xdmp/privileges/ external-security-set-saml-attribute-nam es|privilege to set SAML attribute names used by other security objects to identify a SAML configuration|sec:external-security-set-sa ml-attribute-names| |external-security-set-samlentity-id|http://marklogic.com/xdmp/privileges/ external-security-set-saml-entity-id|privilege to set the SAML entity ID used by other security objects to identify a SAML configuration|sec:external-security-set-sa ml-entity-id|
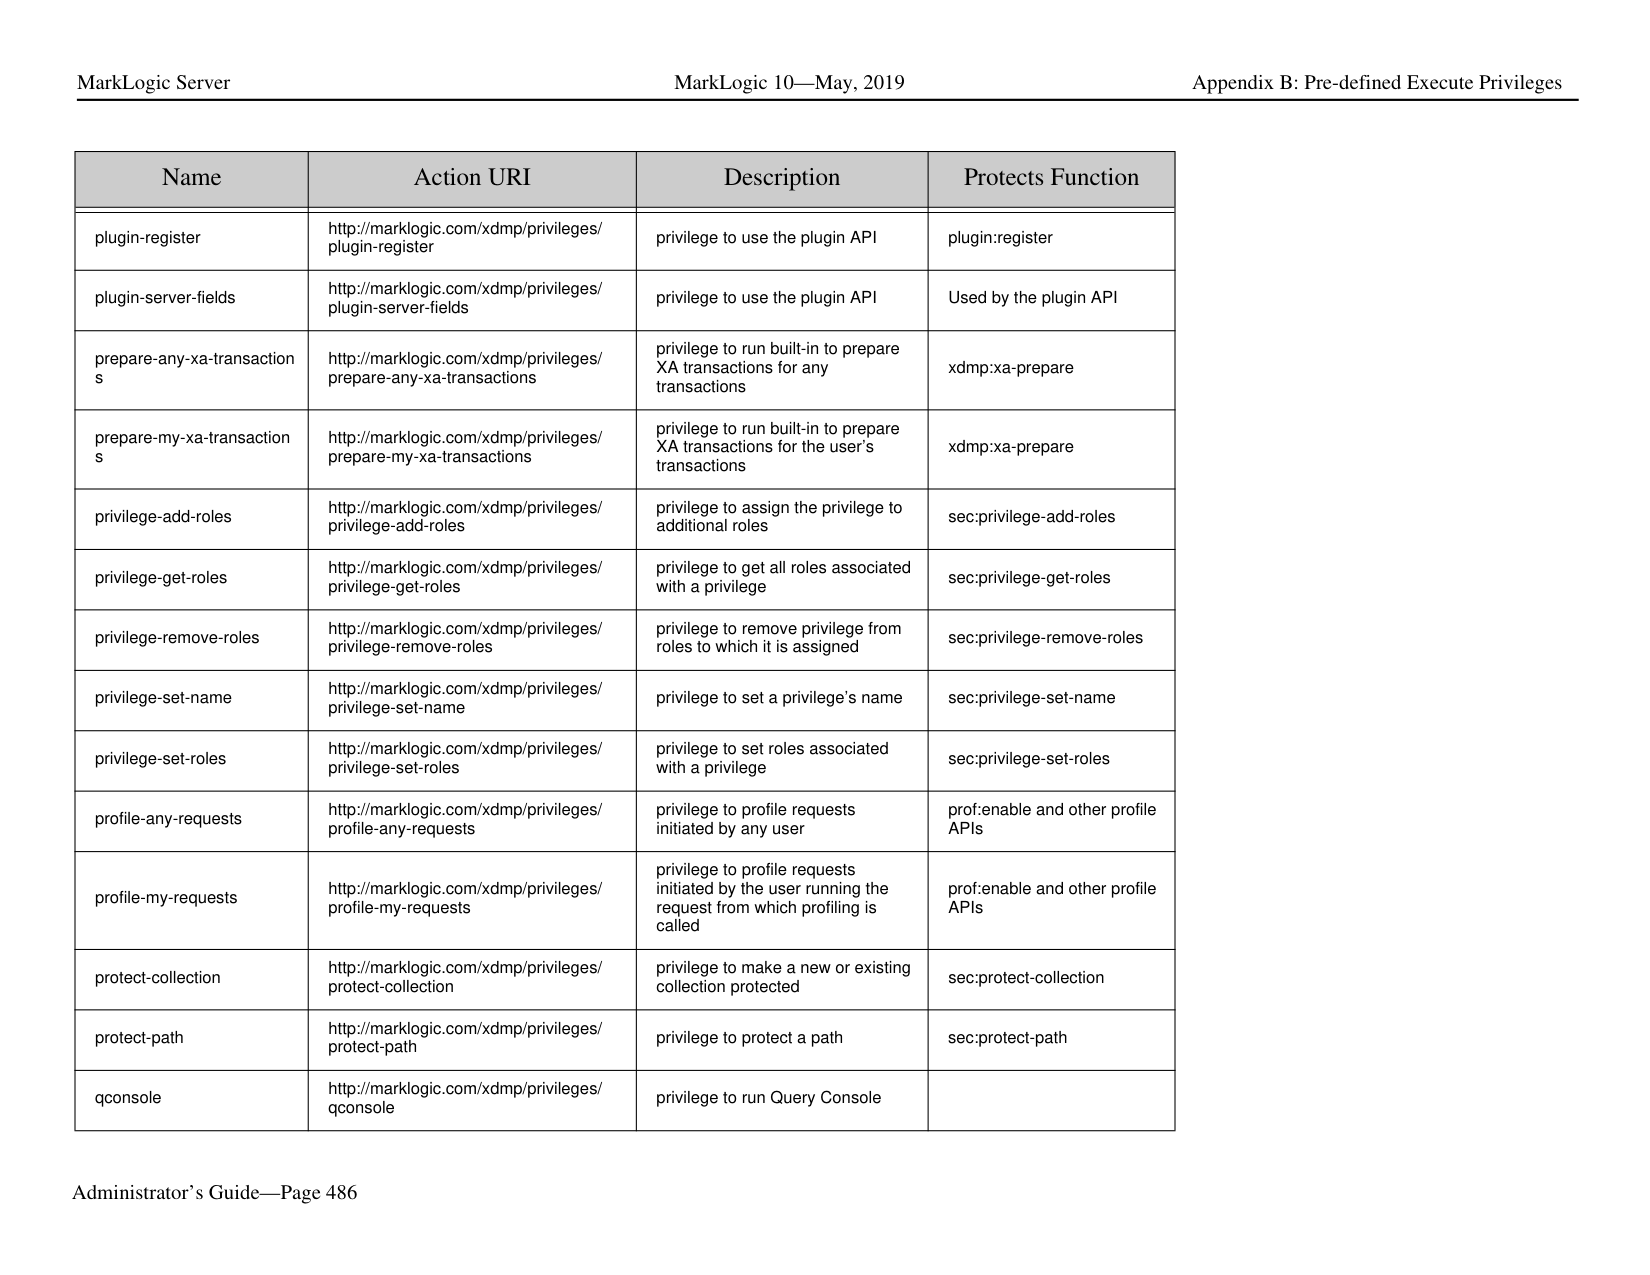
|external-security-set-samlprivilege-attribute-name|http://marklogic.com/xdmp/privileges/ external-security-set-saml-privilege-attri bute-name|privilege to set the SAML privilege attribute name in a SAML configuration|sec:external-security-set-sa ml-privilege-attribute-name| |external-security-set-ssl-cli ent-certificate-authorities|http://marklogic.com/xdmp/privileges/ external-security-set-ssl-client-certificat e-authorities|privilege to set the SSL client certificate authorities in an external authorization configuration object|sec:external-security-set-sslclient-certificate-authorities| |external-security-set-ssl-re quire-client-certificate|http://marklogic.com/xdmp/privileges/ external-security-set-ssl-requier-client-c ertificate|privilege to set the SSL require client certificate flag in an external authorization configuration object|sec:external-security-set-sslrequire-client-certificate| |flexrep-admin|http://marklogic.com/xdmp/privileges/ flexrep-admin|privilege to administer flexible replication|flexible replication functions| |flexrep-internal|http://marklogic.com/xdmp/privileges/ flexrep-internal|used for amping flexible replication functions|flexible-internal| |flexrep-user|http://marklogic.com/xdmp/privileges/ flexrep-user|privilege to use flexible replication|flexible replication user functions| |forget-any-xa-transactions|http://marklogic.com/xdmp/privileges/ forget-any-xa-transactions|privilege to run built-in to forget XA transactions for any transactions|xdmp:xa-forget, xdmp:xq-forget-xid| |forget-my-xa-transactions|http://marklogic.com/xdmp/privileges/ forget-my-xa-transactions|privilege to run built-in to forget XA transactions for the user’s transactions|xdmp:xa-forget, xdmp:xq-forget-xid| |get-amp|http://marklogic.com/xdmp/privileges/ get-amp|privilege to get an amp|sec:get-amp|
|Name|Action URI|Description|Protects Function| |---|---|---|---| | | | | | |get-an-admin-user-id|http://marklogic.com/xdmp/privileges/ get-an-admin-user-id|privilege to get an admin user id| | |get-appserver-logs|http://marklogic.com/xdmp/privileges/ logs/appserver|privilege to get App Server logs| | |get-compartments|http://marklogic.com/xdmp/privileges/ get-compartments|privilege to get a the compartments|sec:get-compartments| |get-credential|http://marklogic.com/xdmp/privileges/ get-credential|privilege to get a PEM encoded X509 certificate|sec:get-credential| |get-credential-by-id|http://marklogic.com/xdmp/privileges/ get-credential-by-id|privilege to get a PEM encoded X509 certificate| | |get-credential-ids|http://marklogic.com/xdmp/privileges/ get-credential-ids|privilege to get all of the credential IDs in the security database| | |get-credential-names|http://marklogic.com/xdmp/privileges/ get-credential-names|privilege to get all of the credential names in the security database| | |get-credentials-encoded-k ek|http://marklogic.com/xdmp/privileges/ get-credentials-encoded-kek| | | |get-logs|http://marklogic.com/xdmp/privileges/ logs|privilege to get logs| |
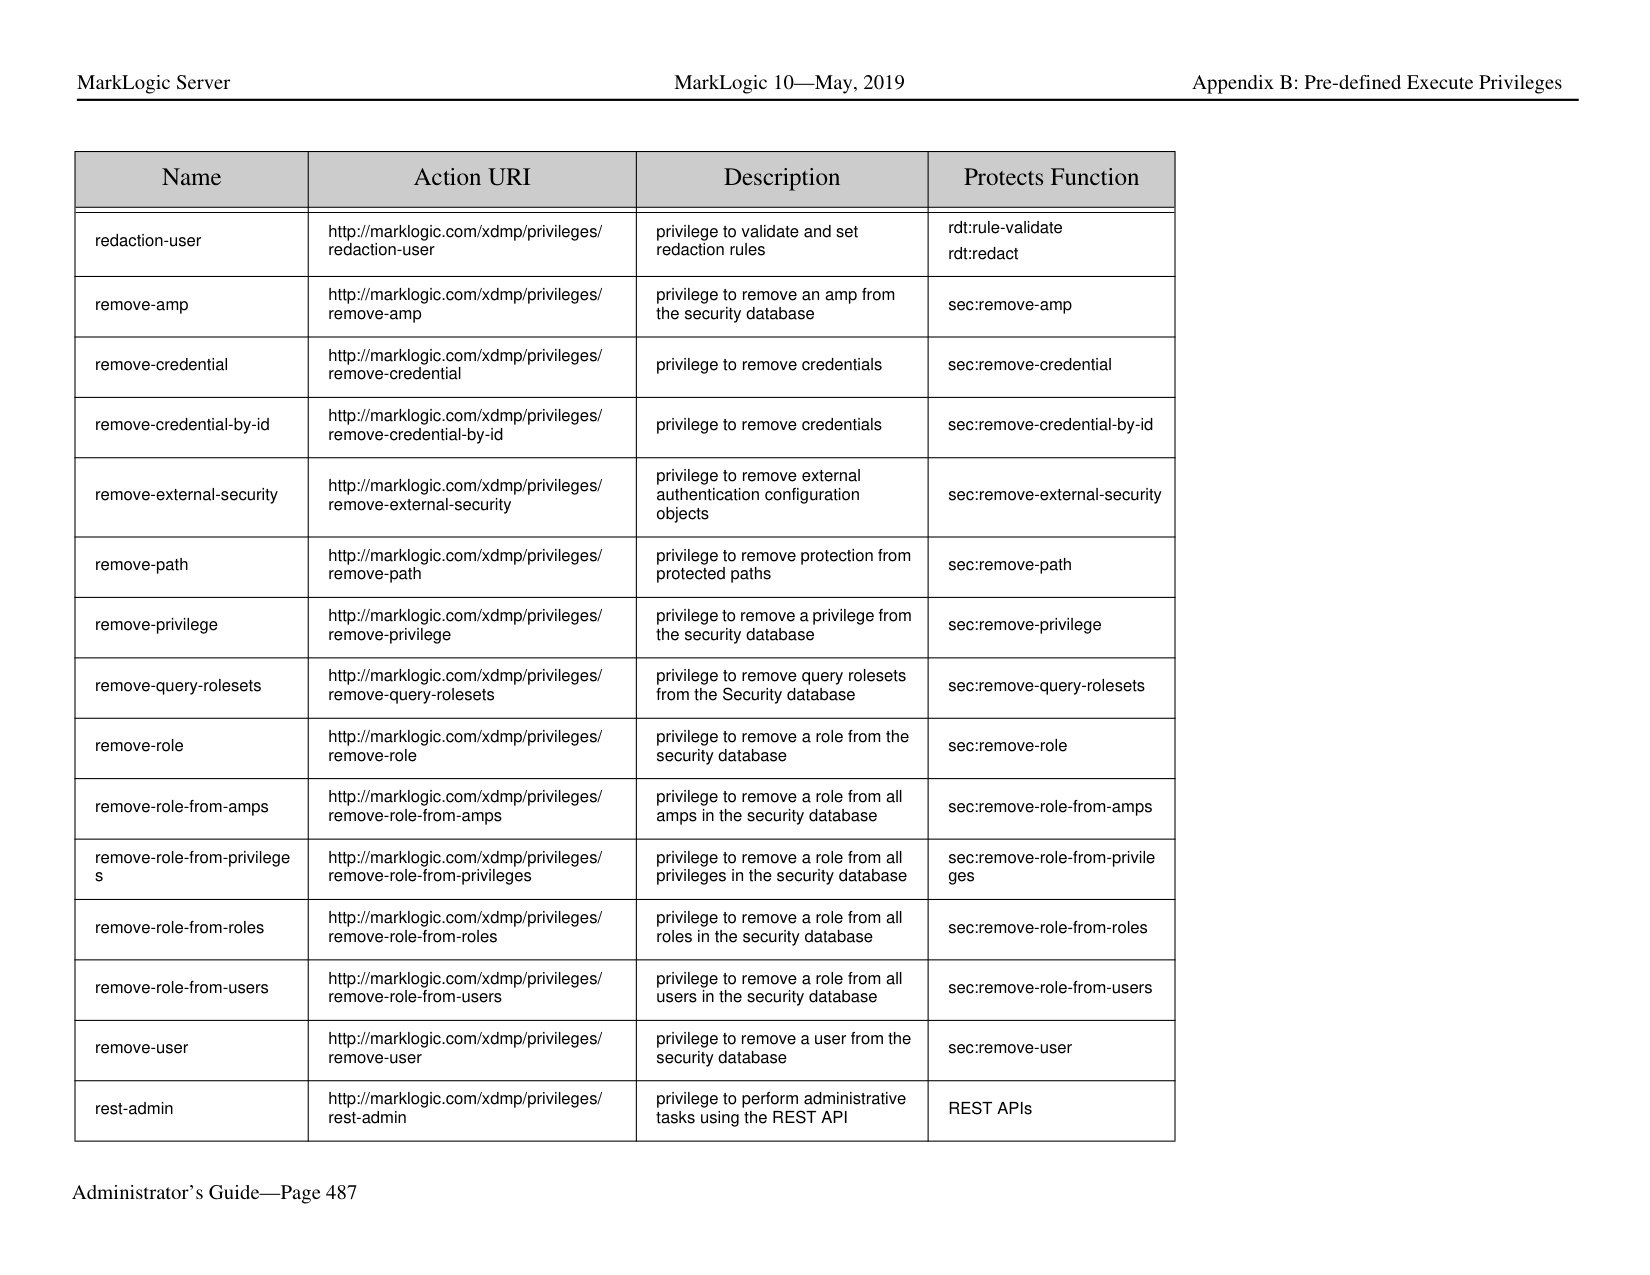
|get-privilege|http://marklogic.com/xdmp/privileges/ get-privilege|privilege to get a privilege from action uri and type|sec:get-privilege| |get-role-ids|http://marklogic.com/xdmp/privileges/ get-role-ids|privilege to get role ids|internal functions| |get-role-names|http://marklogic.com/xdmp/privileges/ get-role-names|privilege to get role names|internal functions| |get-saml-entity-ids|http://marklogic.com/xdmp/privileges/ get-saml-entity-ids|privilege to get the SAML entity ids stored in the Security database|sec:get-saml-entity-ids| |get-system-logs|http://marklogic.com/xdmp/privileges/ logs/system|privilege to get system logs| | |get-taskserver-logs|http://marklogic.com/xdmp/privileges/ logs/taskserver|privilege to get taskserver logs| |
|Name|Action URI|Description|Protects Function| |---|---|---|---| | | | | | |get-user-names|http://marklogic.com/xdmp/privileges/ get-user-names|privilege to get user names|sec:get-user-names| |grant-all-roles|http://marklogic.com/xdmp/privileges/ grant-all-roles|privilege to grant a user all roles. Either grant-all-roles or grant-my-roles would be needed by functions that assign roles.|sec:create-user, sec:user-set-roles, sec:user-add-roles, sec:user-remove-roles, sec:create-role, sec:role-set-roles, sec:role-add-roles, sec:role-remove-roles, sec:remove-role-from-roles, sec:remove-role-from-privile ges, sec:remove-role-from-amps, sec:create-role, sec:privilege-set-roles, sec:privilege-add-roles, sec:privilege-remove-roles, sec:create-amp, sec:amp-set-roles, sec:amp-add-roles, sec:amp-remove-roles| |grant-my-roles|http://marklogic.com/xdmp/privileges/ grant-my-roles|privilege to grant a user my roles. Either grant-all-roles or grant-my-roles would be needed by functions that assign roles.|sec:create-user, sec:user-set-roles, sec:user-add-roles, sec:user-remove-roles, sec:create-role, sec:role-set-roles, sec:role-add-roles, sec:role-remove-roles, sec:remove-role-from-roles, sec:remove-role-from-privile ges, sec:remove-role-from-amps, sec:create-role, sec:privilege-set-roles, sec:privilege-add-roles, sec:privilege-remove-roles, sec:create-amp, sec:amp-set-roles, sec:amp-add-roles, sec:amp-remove-roles|
|Name|Action URI|Description|Protects Function| |---|---|---|---| | | | | | |hadoop-user-read|http://marklogic.com/xdmp/privileges/ hadoop-user-read|privilege to use MarkLogic Server as an input for a Hadoop MapReduce job that reads data from MarkLogic Server.|Java APIs in the Hadoop package.| |hadoop-user-write|http://marklogic.com/xdmp/privileges/ hadoop-user-write|privilege to use MarkLogic Server as an input for a Hadoop MapReduce job that writes data from MarkLogic Server|Java APIs in the Hadoop package.| |healthcheck|http://marklogic.com/xdmp/privileges/ healthcheck|privilege to use the HealthCheck App Server| | |infostudio|http://marklogic.com/xdmp/privileges/ infostudio|privilege to use Information Studio Information Studio is no longer part of MarkLogic|Information Studio functions|
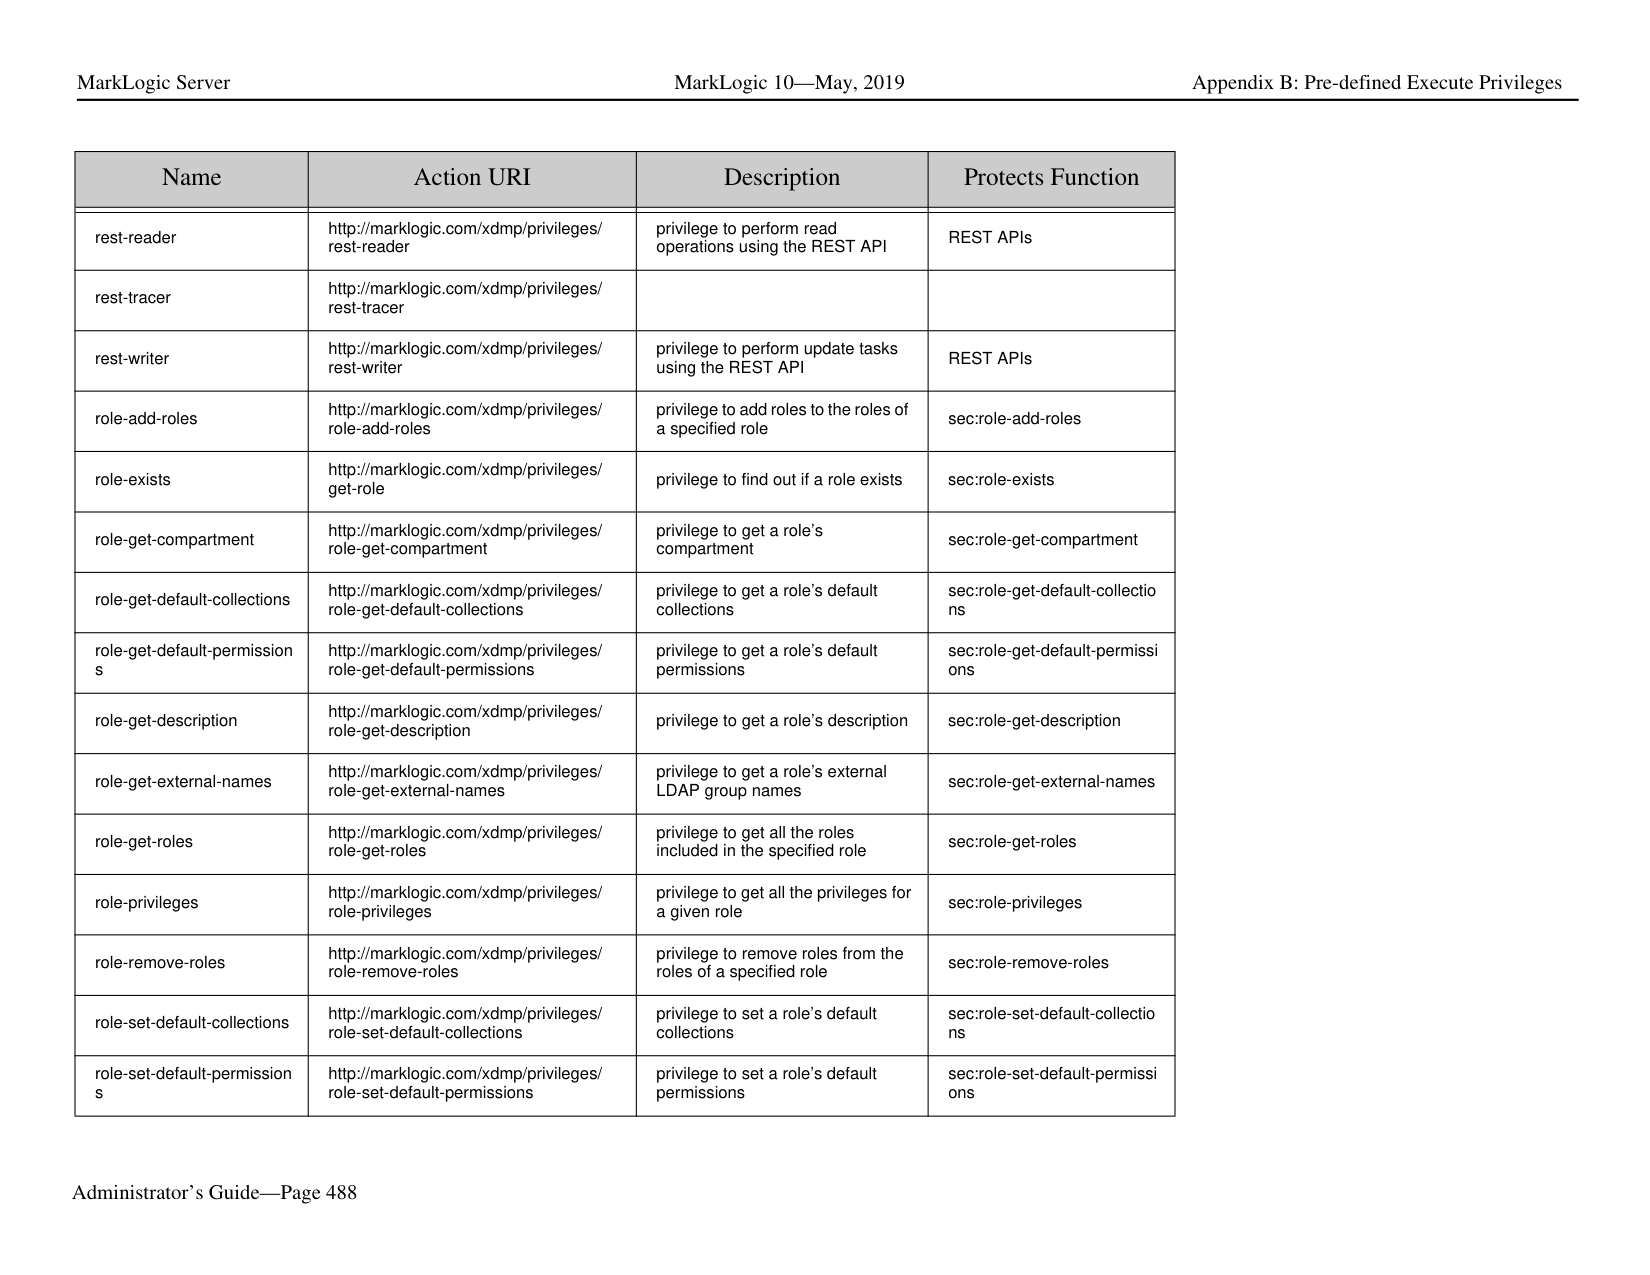
|java|http://marklogic.com/xdmp/privileges/ java| | | |manage|http://marklogic.com/xdmp/privileges/ manage|privilege to run the Management API|For example non-admin users can use manage role plus create-data-role/ create-data-user granular privilege to manage roles/ users created by data users or granted. package:add-database, package:add-appserver, All of the resource addresses in the Management API| |manage-admin|http://marklogic.com/xdmp/privileges/ manage-admin|privilege to use the manage REST APIs| | |my-transaction-locks|http://marklogic.com/xdmp/privileges/ my-transaction-locks|privilege to return URIs currently locked for read or write by a transaction|xdmp:transaction-locks| |native-plugin|http://marklogic.com/xdmp/privileges/ native-plugin| | | |node-query-rolesets|http://marklogic.com/xdmp/privileges/ node-query-rolesets|privilege to return query-rolesets|xdmp:node-query-rolesets|
|Name|Action URI|Description|Protects Function| |---|---|---|---| | | | | | |odbc:eval|http://marklogic.com/xdmp/privileges/ odbc-eval|privilege to execute eval statements from odbc|xdmp:eval| |odbc:eval-in|http://marklogic.com/xdmp/privileges/ odbc-eval-in|privilege to execute eval-in statements from odbc|xdmp:eval-in| |odbc:eval-modules-change|http://marklogic.com/xdmp/privileges/ odbc-eval-modules-change|privilege to execute eval statements that change a modules database from odbc|xdmp:eval| |odbc:eval-modules-change
-file|http://marklogic.com/xdmp/privileges/ odbc-eval-modules-change-file|privilege to execute eval statements that change a filesystem root from odbc|xdmp:eval| |odbc:insert|http://marklogic.com/xdmp/privileges/ odbc-insert|privilege to execute insert statements from odbc|odbc inserts| |odbc:insert-in|http://marklogic.com/xdmp/privileges/ odbc-insert-in|privilege to execute insert statements from odbc|odbc inserts into another database| |odbc:invoke|http://marklogic.com/xdmp/privileges/ odbc-invoke|privilege to execute invoke statements from odbc|odbc invokes| |odbc:invoke-in|http://marklogic.com/xdmp/privileges/ odbc-invoke-in|privilege to execute invoke statements from odbc|odbc invokes into another database| |odbc:invoke-modules-chan ge|http://marklogic.com/xdmp/privileges/ odbc-invoke-modules-change|privilege to execute invoke statements that change a modules database from odbc|odbc invokes that change the modules database| |odbc:invoke-modules-chan ge-file|http://marklogic.com/xdmp/privileges/ odbc-invoke-modules-change-file|privilege to execute invoke statements that change a filesystem root from odbc|odbc invokes that change the filesystem root| |odbc:spawn|http://marklogic.com/xdmp/privileges/ odbc-spawn|privilege to execute spawn statements from odbc|odbc spawns| |odbc:spawn-in|http://marklogic.com/xdmp/privileges/ odbc-spawn-in|privilege to execute spawn statements from odbc|odbc spawns into another database|
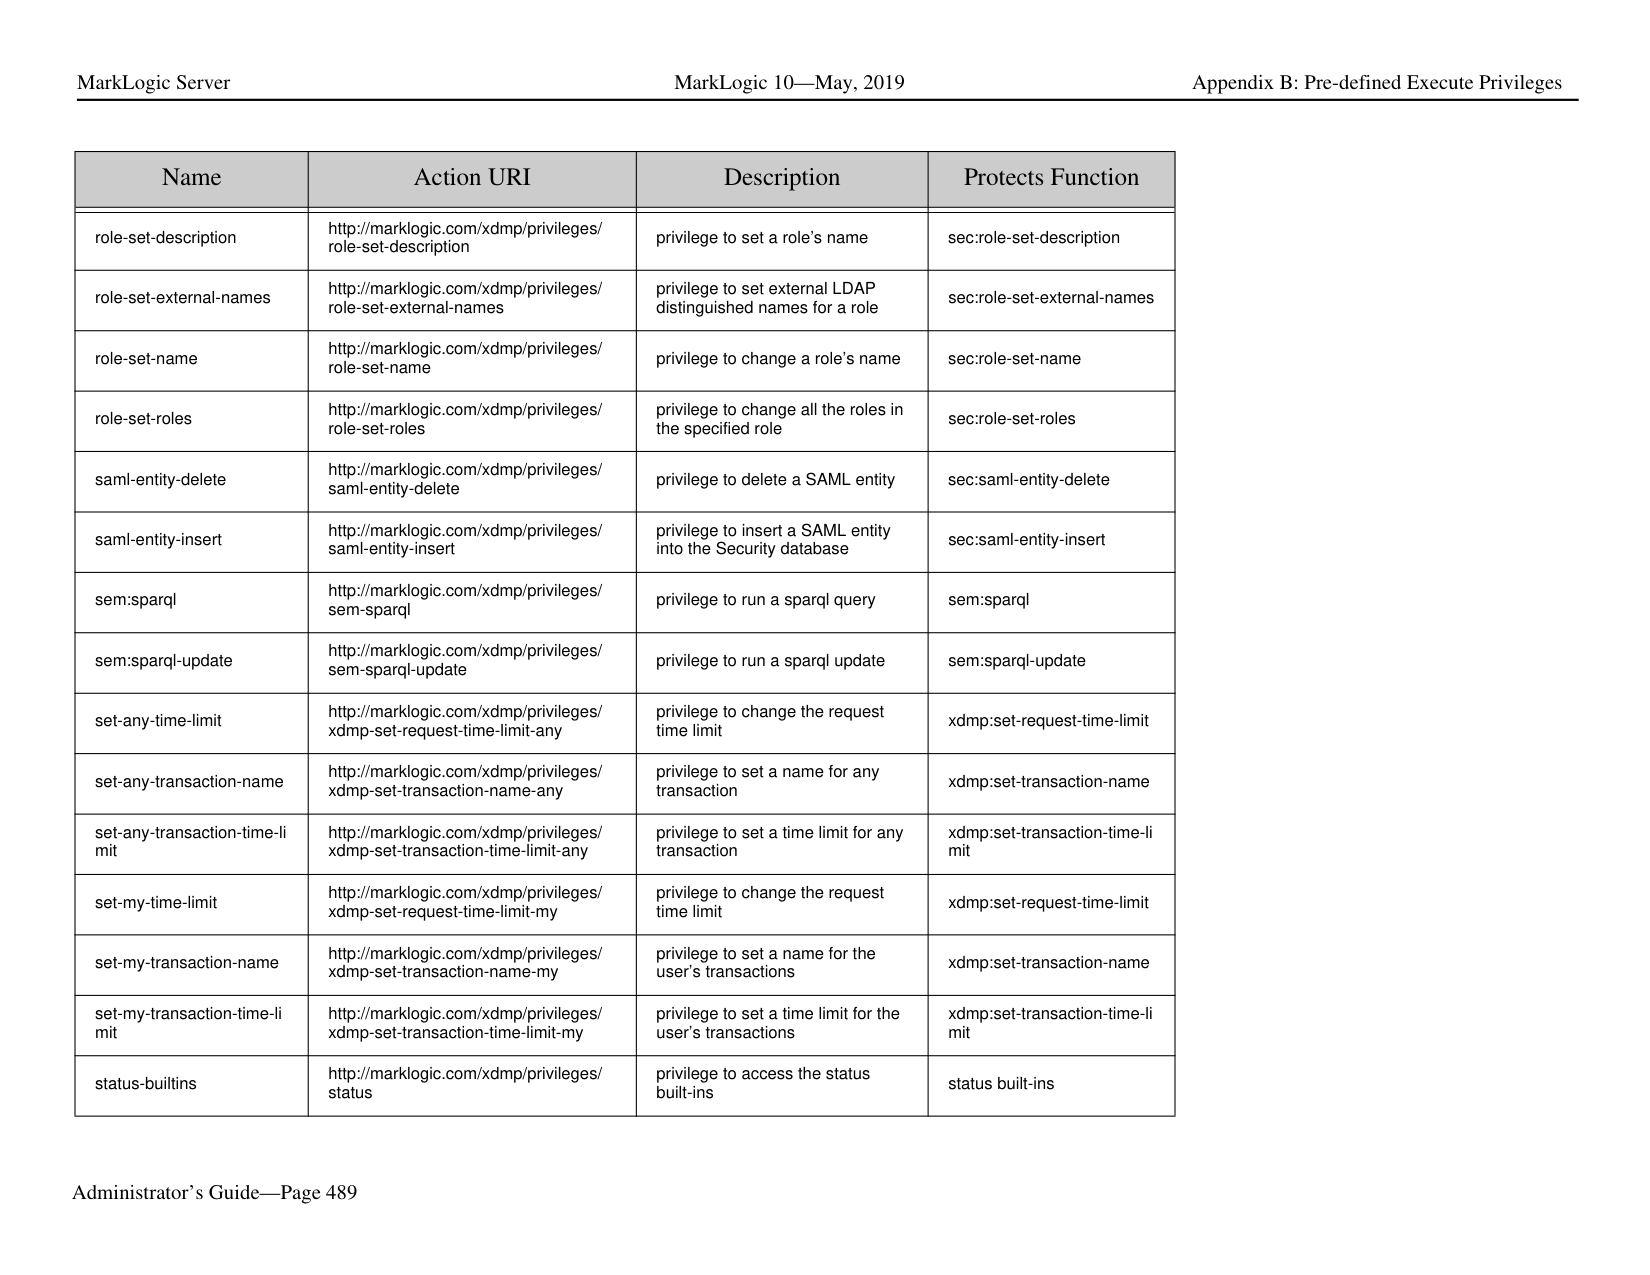
|odbc:spawn-modules-chan ge|http://marklogic.com/xdmp/privileges/ odbc-spawn-modules-change|privilege to execute spawn statements that change a modules database from odbc|odbc spawn that change the modules database|
|Name|Action URI|Description|Protects Function| |---|---|---|---| | | | | | |odbc:spawn-modules-chan ge-file|http://marklogic.com/xdmp/privileges/ odbc-spawn-modules-change-file|privilege to execute spawn statements that change a filesystem root from odbc|odbc spawn that change the filesystem root| |path-add-permissions|http://marklogic.com/xdmp/privileges/ path-add-permissions|privilege to add permissions for a protected path|sec:path-add-permissions| |path-get-permissions|http://marklogic.com/xdmp/privileges/ path-get-permissions|privilege to return permissions for a protected path|sec:path-get-permissions| |path-remove-permissions|http://marklogic.com/xdmp/privileges/ path-remove-permissions|privilege to remove permissions for a protected path|sec:path-remove-permission s| |path-set-permissions|http://marklogic.com/xdmp/privileges/ path-set-permissions|privilege to set permissions for a protected path|sec:path-set-permissions|
|Name|Action URI|Description|Protects Function| |---|---|---|---| | | | | | |pki|http://marklogic.com/xdmp/privileges/pki|privilege to use the PKI functions.|pki:create-template, pki:delete-certificate, pki:delete-template , pki:generate-certificate-requ est, pki:generate-template-certifi cate-authority , pki:generate-temporary-certif icate, pki:generate-temporary-certif icate-if-necessary, pki:get-certificate, pki:get-certificate-pem, pki:get-certificate-xml , pki:get-certificates, pki:get-certificates-for-templ ate , pki:get-certificates-for-templ ate-xml, pki:get-pending-certificate-re quest, pki:get-pending-certificate-re quests-pem , pki:get-pending-certificate-re quests-xml, pki:get-template, pki:get-template-by-name, pki:get-template-certificate-a uthority pki:get-template-ids, pki:get-trusted-certificate-ids, pki:insert-certificate-revocati on-list, pki:insert-signed-certificates, pki:insert-template, pki:insert-trusted-certificates, pki:is-temporary, pki:need-certificate, pki:template-get-description, pki:template-get-id, pki:template-get-key-options, pki:template-get-key-type, pki:template-get-name, pki:template-get-request, pki:template-get-version, pki:template-in-use, pki:template-set-description, pki:template-set-key-options, pki:template-set-key-type, pki:template-set-name, pki:template-set-request|
|Name|Action URI|Description|Protects Function| |---|---|---|---| | | | | | |plugin-register|http://marklogic.com/xdmp/privileges/ plugin-register|privilege to use the plugin API|plugin:register|
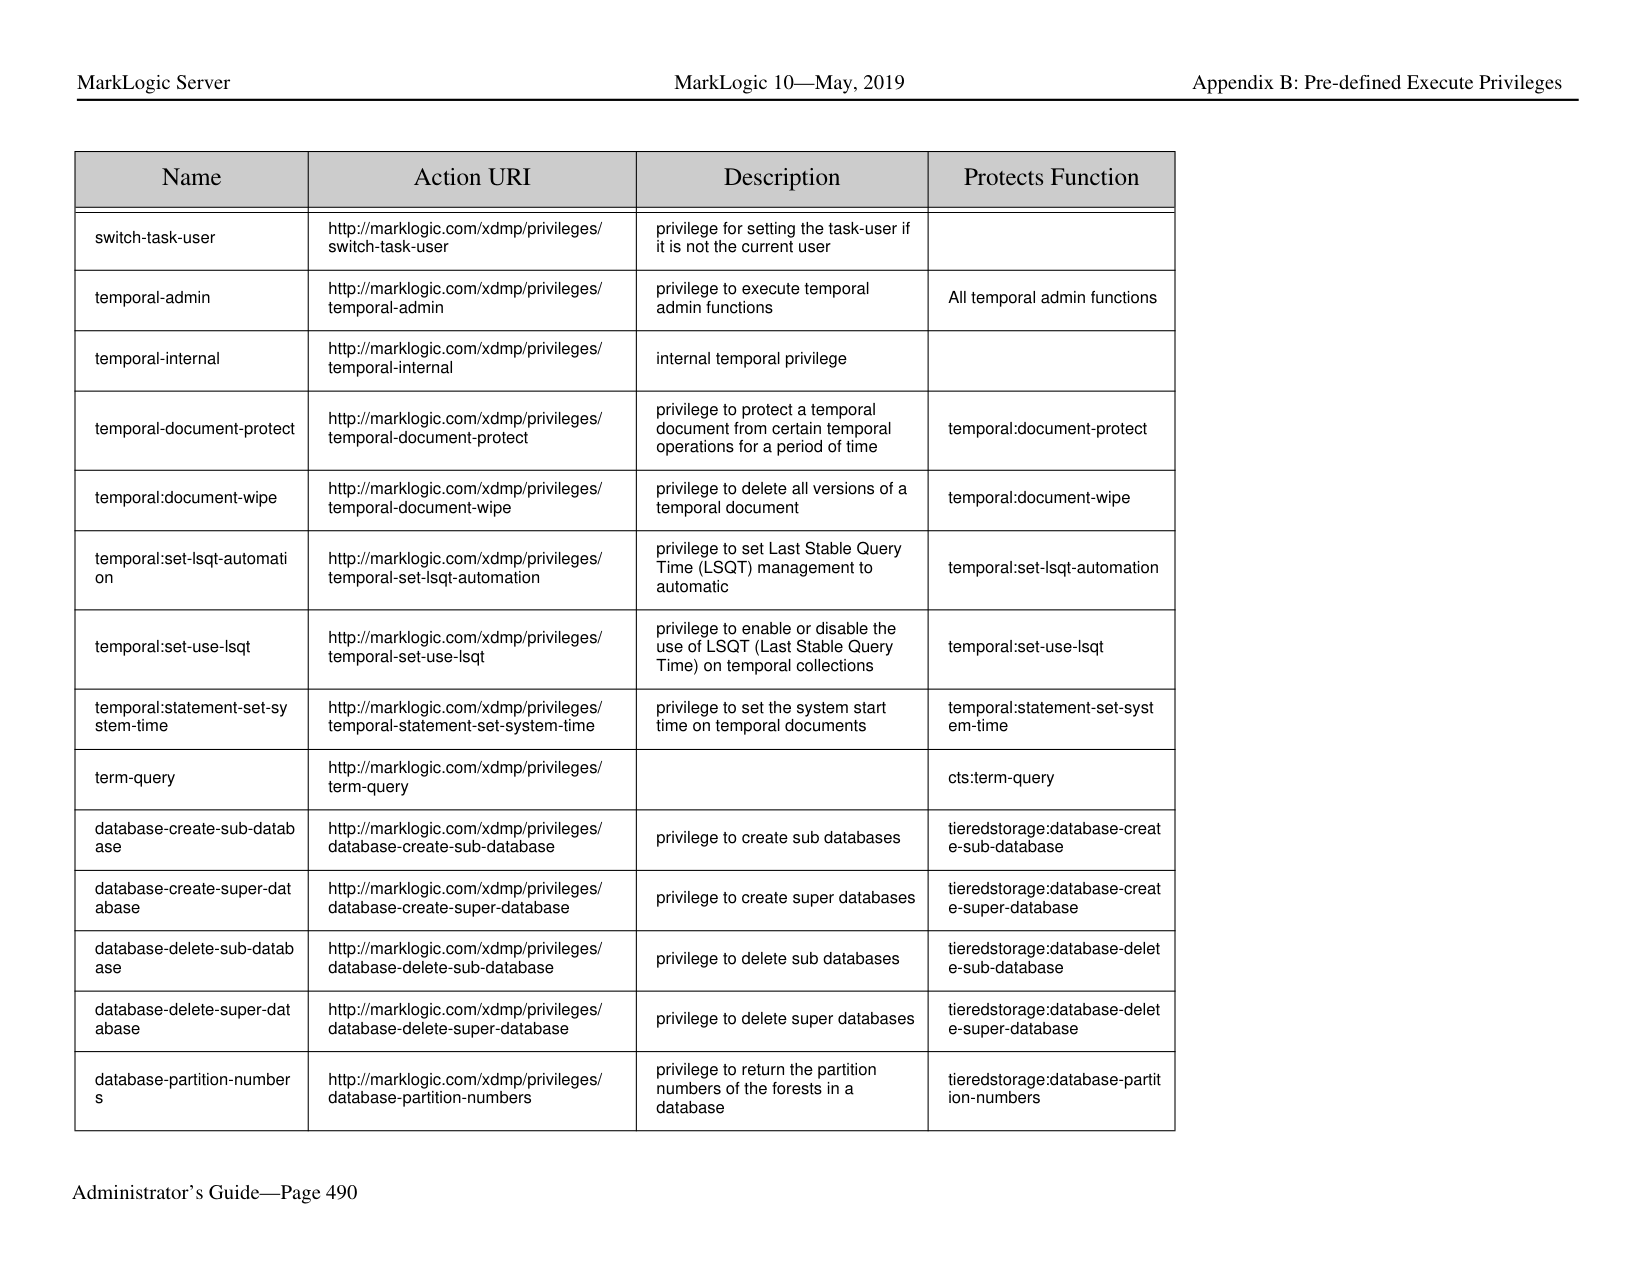
|plugin-server-fields|http://marklogic.com/xdmp/privileges/ plugin-server-fields|privilege to use the plugin API|Used by the plugin API| |prepare-any-xa-transaction s|http://marklogic.com/xdmp/privileges/ prepare-any-xa-transactions|privilege to run built-in to prepare XA transactions for any transactions|xdmp:xa-prepare| |prepare-my-xa-transaction s|http://marklogic.com/xdmp/privileges/ prepare-my-xa-transactions|privilege to run built-in to prepare XA transactions for the user’s transactions|xdmp:xa-prepare| |privilege-add-roles|http://marklogic.com/xdmp/privileges/ privilege-add-roles|privilege to assign the privilege to additional roles|sec:privilege-add-roles| |privilege-get-roles|http://marklogic.com/xdmp/privileges/ privilege-get-roles|privilege to get all roles associated with a privilege|sec:privilege-get-roles| |privilege-remove-roles|http://marklogic.com/xdmp/privileges/ privilege-remove-roles|privilege to remove privilege from roles to which it is assigned|sec:privilege-remove-roles| |privilege-set-name|http://marklogic.com/xdmp/privileges/ privilege-set-name|privilege to set a privilege’s name|sec:privilege-set-name| |privilege-set-roles|http://marklogic.com/xdmp/privileges/ privilege-set-roles|privilege to set roles associated with a privilege|sec:privilege-set-roles| |profile-any-requests|http://marklogic.com/xdmp/privileges/ profile-any-requests|privilege to profile requests initiated by any user|prof:enable and other profile APIs| |profile-my-requests|http://marklogic.com/xdmp/privileges/ profile-my-requests|privilege to profile requests initiated by the user running the request from which profiling is called|prof:enable and other profile APIs| |protect-collection|http://marklogic.com/xdmp/privileges/ protect-collection|privilege to make a new or existing collection protected|sec:protect-collection| |protect-path|http://marklogic.com/xdmp/privileges/ protect-path|privilege to protect a path|sec:protect-path| |qconsole|http://marklogic.com/xdmp/privileges/ qconsole|privilege to run Query Console| |
|Name|Action URI|Description|Protects Function| |---|---|---|---| | | | | | |redaction-user|http://marklogic.com/xdmp/privileges/ redaction-user|privilege to validate and set redaction rules|rdt:rule-validate rdt:redact| |remove-amp|http://marklogic.com/xdmp/privileges/ remove-amp|privilege to remove an amp from the security database|sec:remove-amp| |remove-credential|http://marklogic.com/xdmp/privileges/ remove-credential|privilege to remove credentials|sec:remove-credential| |remove-credential-by-id|http://marklogic.com/xdmp/privileges/ remove-credential-by-id|privilege to remove credentials|sec:remove-credential-by-id| |remove-external-security|http://marklogic.com/xdmp/privileges/ remove-external-security|privilege to remove external authentication configuration objects|sec:remove-external-security|
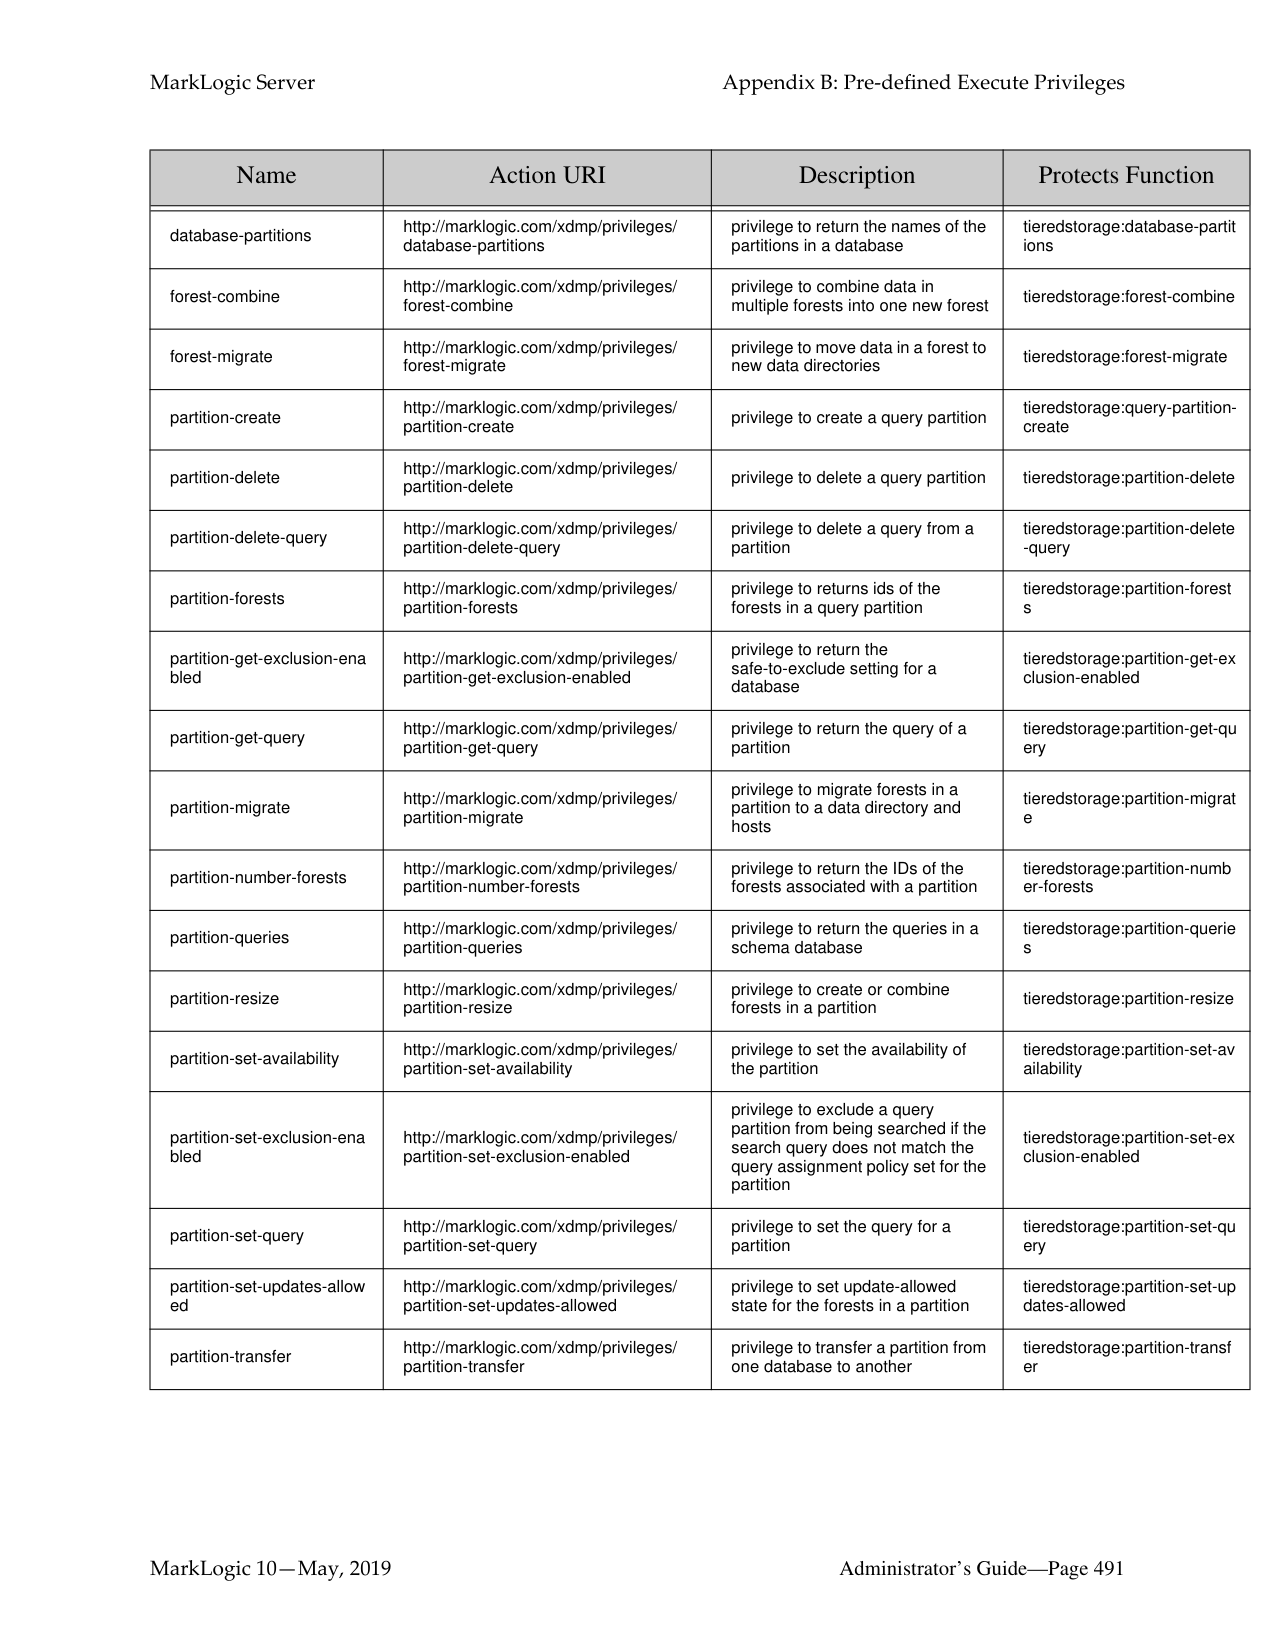
|remove-path|http://marklogic.com/xdmp/privileges/ remove-path|privilege to remove protection from protected paths|sec:remove-path| |remove-privilege|http://marklogic.com/xdmp/privileges/ remove-privilege|privilege to remove a privilege from the security database|sec:remove-privilege| |remove-query-rolesets|http://marklogic.com/xdmp/privileges/ remove-query-rolesets|privilege to remove query rolesets from the Security database|sec:remove-query-rolesets| |remove-role|http://marklogic.com/xdmp/privileges/ remove-role|privilege to remove a role from the security database|sec:remove-role| |remove-role-from-amps|http://marklogic.com/xdmp/privileges/ remove-role-from-amps|privilege to remove a role from all amps in the security database|sec:remove-role-from-amps| |remove-role-from-privilege s|http://marklogic.com/xdmp/privileges/ remove-role-from-privileges|privilege to remove a role from all privileges in the security database|sec:remove-role-from-privile ges| |remove-role-from-roles|http://marklogic.com/xdmp/privileges/ remove-role-from-roles|privilege to remove a role from all roles in the security database|sec:remove-role-from-roles| |remove-role-from-users|http://marklogic.com/xdmp/privileges/ remove-role-from-users|privilege to remove a role from all users in the security database|sec:remove-role-from-users| |remove-user|http://marklogic.com/xdmp/privileges/ remove-user|privilege to remove a user from the security database|sec:remove-user| |rest-admin|http://marklogic.com/xdmp/privileges/ rest-admin|privilege to perform administrative tasks using the REST API|REST APIs|
|Name|Action URI|Description|Protects Function| |---|---|---|---| | | | | | |rest-reader|http://marklogic.com/xdmp/privileges/ rest-reader|privilege to perform read operations using the REST API|REST APIs| |rest-tracer|http://marklogic.com/xdmp/privileges/ rest-tracer| | | |rest-writer|http://marklogic.com/xdmp/privileges/ rest-writer|privilege to perform update tasks using the REST API|REST APIs| |role-add-roles|http://marklogic.com/xdmp/privileges/ role-add-roles|privilege to add roles to the roles of a specified role|sec:role-add-roles| |role-exists|http://marklogic.com/xdmp/privileges/ get-role|privilege to find out if a role exists|sec:role-exists| |role-get-compartment|http://marklogic.com/xdmp/privileges/ role-get-compartment|privilege to get a role’s compartment|sec:role-get-compartment| |role-get-default-collections|http://marklogic.com/xdmp/privileges/ role-get-default-collections|privilege to get a role’s default collections|sec:role-get-default-collectio ns| |role-get-default-permission s|http://marklogic.com/xdmp/privileges/ role-get-default-permissions|privilege to get a role’s default permissions|sec:role-get-default-permissi ons|
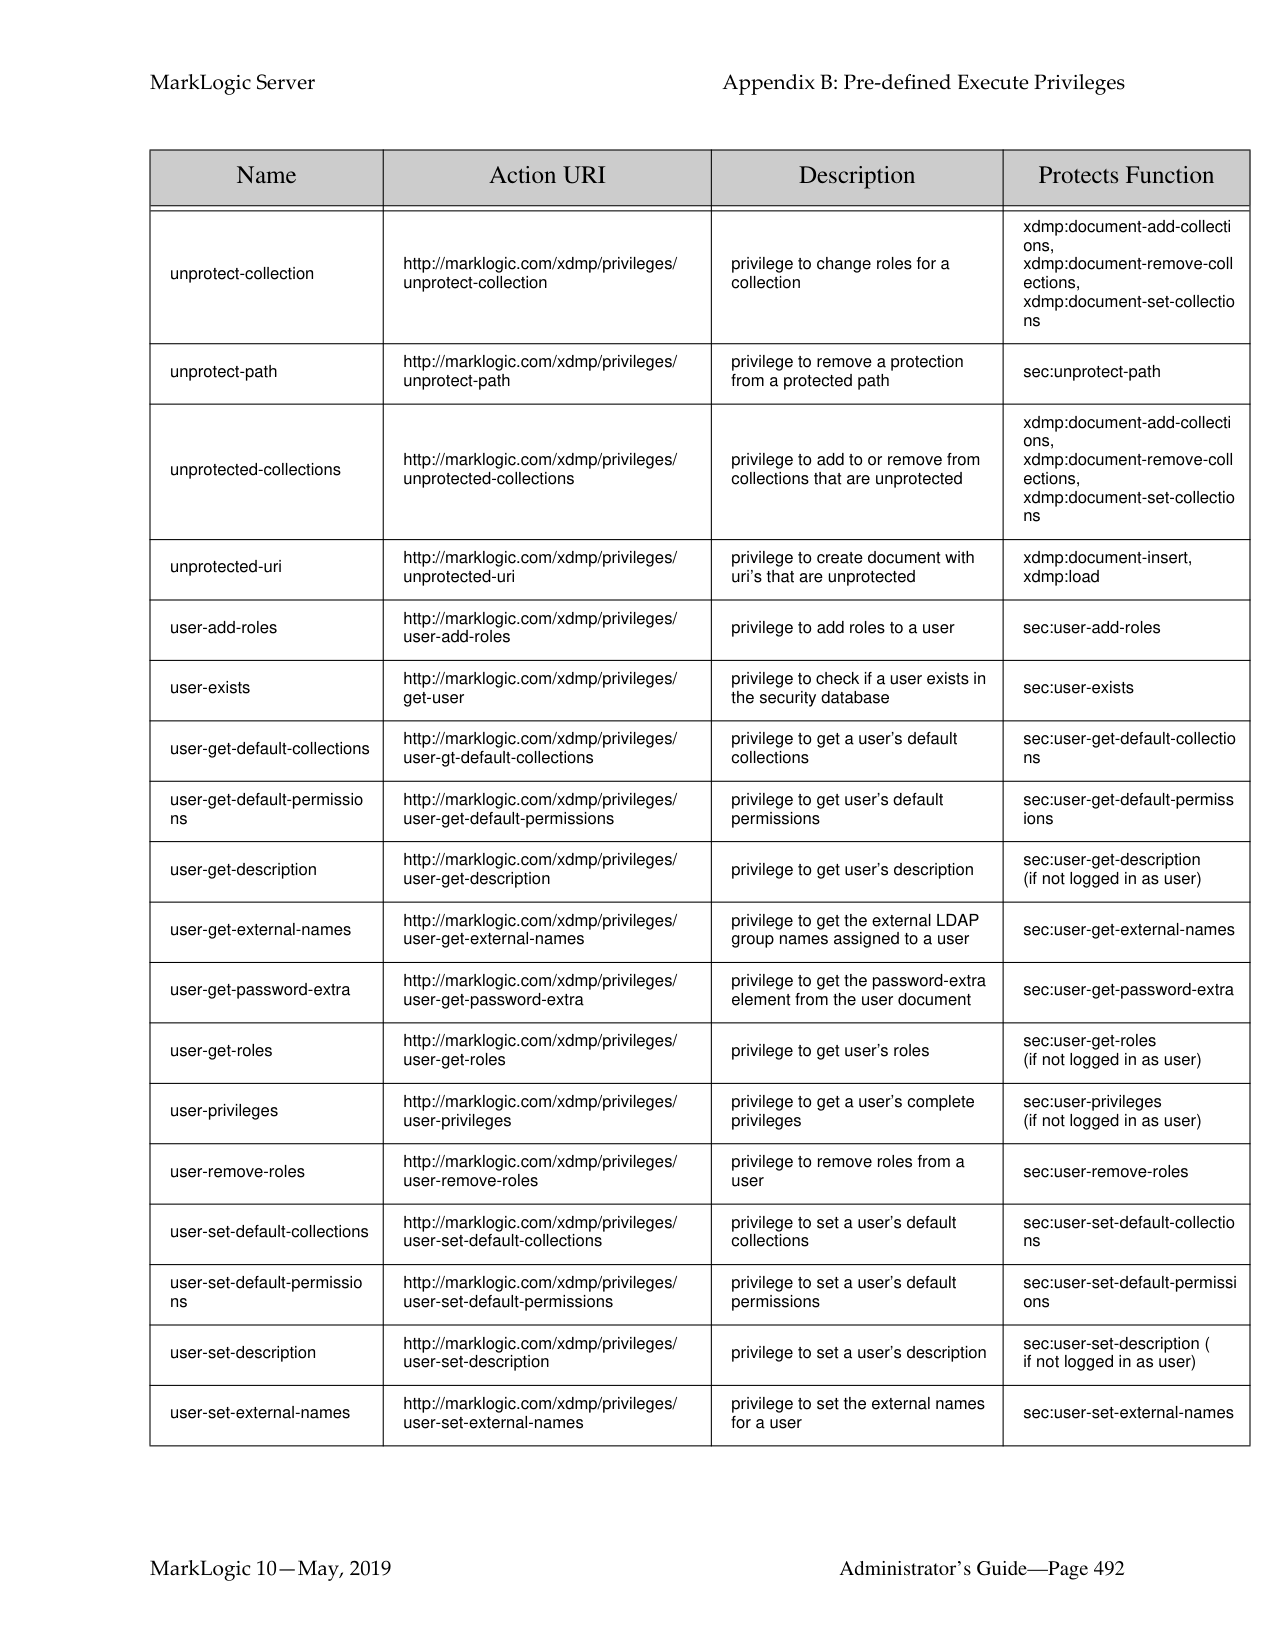
|role-get-description|http://marklogic.com/xdmp/privileges/ role-get-description|privilege to get a role’s description|sec:role-get-description| |role-get-external-names|http://marklogic.com/xdmp/privileges/ role-get-external-names|privilege to get a role’s external LDAP group names|sec:role-get-external-names| |role-get-roles|http://marklogic.com/xdmp/privileges/ role-get-roles|privilege to get all the roles included in the specified role|sec:role-get-roles| |role-privileges|http://marklogic.com/xdmp/privileges/ role-privileges|privilege to get all the privileges for a given role|sec:role-privileges| |role-remove-roles|http://marklogic.com/xdmp/privileges/ role-remove-roles|privilege to remove roles from the roles of a specified role|sec:role-remove-roles| |role-set-default-collections|http://marklogic.com/xdmp/privileges/ role-set-default-collections|privilege to set a role’s default collections|sec:role-set-default-collectio ns| |role-set-default-permission s|http://marklogic.com/xdmp/privileges/ role-set-default-permissions|privilege to set a role’s default permissions|sec:role-set-default-permissi ons|
|Name|Action URI|Description|Protects Function| |---|---|---|---| | | | | | |role-set-description|http://marklogic.com/xdmp/privileges/ role-set-description|privilege to set a role’s name|sec:role-set-description| |role-set-external-names|http://marklogic.com/xdmp/privileges/ role-set-external-names|privilege to set external LDAP distinguished names for a role|sec:role-set-external-names| |role-set-name|http://marklogic.com/xdmp/privileges/ role-set-name|privilege to change a role’s name|sec:role-set-name| |role-set-roles|http://marklogic.com/xdmp/privileges/ role-set-roles|privilege to change all the roles in the specified role|sec:role-set-roles| |saml-entity-delete|http://marklogic.com/xdmp/privileges/ saml-entity-delete|privilege to delete a SAML entity|sec:saml-entity-delete| |saml-entity-insert|http://marklogic.com/xdmp/privileges/ saml-entity-insert|privilege to insert a SAML entity into the Security database|sec:saml-entity-insert| |sem:sparql|http://marklogic.com/xdmp/privileges/ sem-sparql|privilege to run a sparql query|sem:sparql| |sem:sparql-update|http://marklogic.com/xdmp/privileges/ sem-sparql-update|privilege to run a sparql update|sem:sparql-update| |set-any-time-limit|http://marklogic.com/xdmp/privileges/ xdmp-set-request-time-limit-any|privilege to change the request time limit|xdmp:set-request-time-limit| |set-any-transaction-name|http://marklogic.com/xdmp/privileges/ xdmp-set-transaction-name-any|privilege to set a name for any transaction|xdmp:set-transaction-name| |set-any-transaction-time-li mit|http://marklogic.com/xdmp/privileges/ xdmp-set-transaction-time-limit-any|privilege to set a time limit for any transaction|xdmp:set-transaction-time-li mit|
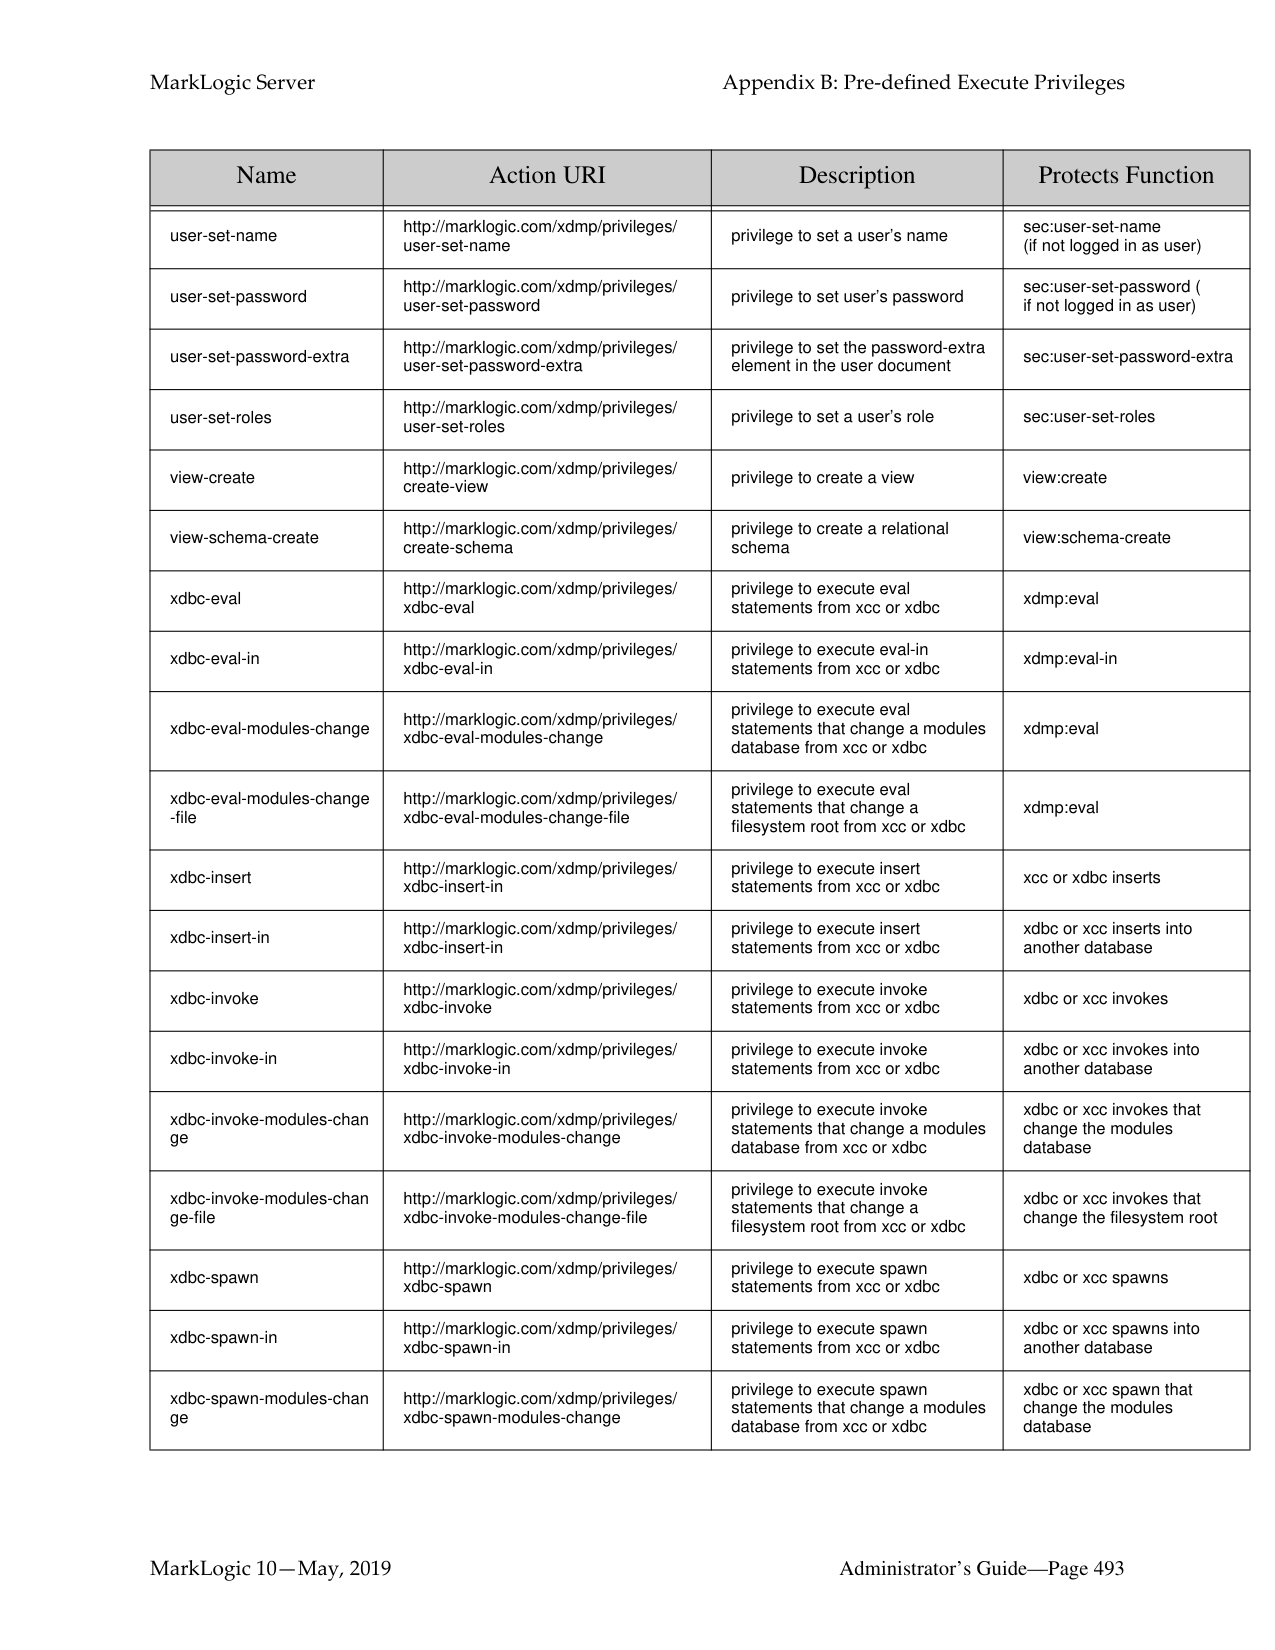
|set-my-time-limit|http://marklogic.com/xdmp/privileges/ xdmp-set-request-time-limit-my|privilege to change the request time limit|xdmp:set-request-time-limit| |set-my-transaction-name|http://marklogic.com/xdmp/privileges/ xdmp-set-transaction-name-my|privilege to set a name for the user’s transactions|xdmp:set-transaction-name| |set-my-transaction-time-li mit|http://marklogic.com/xdmp/privileges/ xdmp-set-transaction-time-limit-my|privilege to set a time limit for the user’s transactions|xdmp:set-transaction-time-li mit| |status-builtins|http://marklogic.com/xdmp/privileges/ status|privilege to access the status built-ins|status built-ins|
|Name|Action URI|Description|Protects Function| |---|---|---|---| | | | | | |switch-task-user|http://marklogic.com/xdmp/privileges/ switch-task-user|privilege for setting the task-user if it is not the current user| | |temporal-admin|http://marklogic.com/xdmp/privileges/ temporal-admin|privilege to execute temporal admin functions|All temporal admin functions| |temporal-internal|http://marklogic.com/xdmp/privileges/ temporal-internal|internal temporal privilege| | |temporal-document-protect|http://marklogic.com/xdmp/privileges/ temporal-document-protect|privilege to protect a temporal document from certain temporal operations for a period of time|temporal:document-protect| |temporal:document-wipe|http://marklogic.com/xdmp/privileges/ temporal-document-wipe|privilege to delete all versions of a temporal document|temporal:document-wipe| |temporal:set-lsqt-automati on|http://marklogic.com/xdmp/privileges/ temporal-set-lsqt-automation|privilege to set Last Stable Query Time (LSQT) management to automatic|temporal:set-lsqt-automation| |temporal:set-use-lsqt|http://marklogic.com/xdmp/privileges/ temporal-set-use-lsqt|privilege to enable or disable the use of LSQT (Last Stable Query Time) on temporal collections|temporal:set-use-lsqt| |temporal:statement-set-sy stem-time|http://marklogic.com/xdmp/privileges/ temporal-statement-set-system-time|privilege to set the system start time on temporal documents|temporal:statement-set-syst em-time| |term-query|http://marklogic.com/xdmp/privileges/ term-query| |cts:term-query| |database-create-sub-datab ase|http://marklogic.com/xdmp/privileges/ database-create-sub-database|privilege to create sub databases|tieredstorage:database-creat e-sub-database| |database-create-super-dat abase|http://marklogic.com/xdmp/privileges/ database-create-super-database|privilege to create super databases|tieredstorage:database-creat e-super-database| |database-delete-sub-datab ase|http://marklogic.com/xdmp/privileges/ database-delete-sub-database|privilege to delete sub databases|tieredstorage:database-delet e-sub-database| |database-delete-super-dat abase|http://marklogic.com/xdmp/privileges/ database-delete-super-database|privilege to delete super databases|tieredstorage:database-delet e-super-database| |database-partition-number s|http://marklogic.com/xdmp/privileges/ database-partition-numbers|privilege to return the partition numbers of the forests in a database|tieredstorage:database-partit ion-numbers|
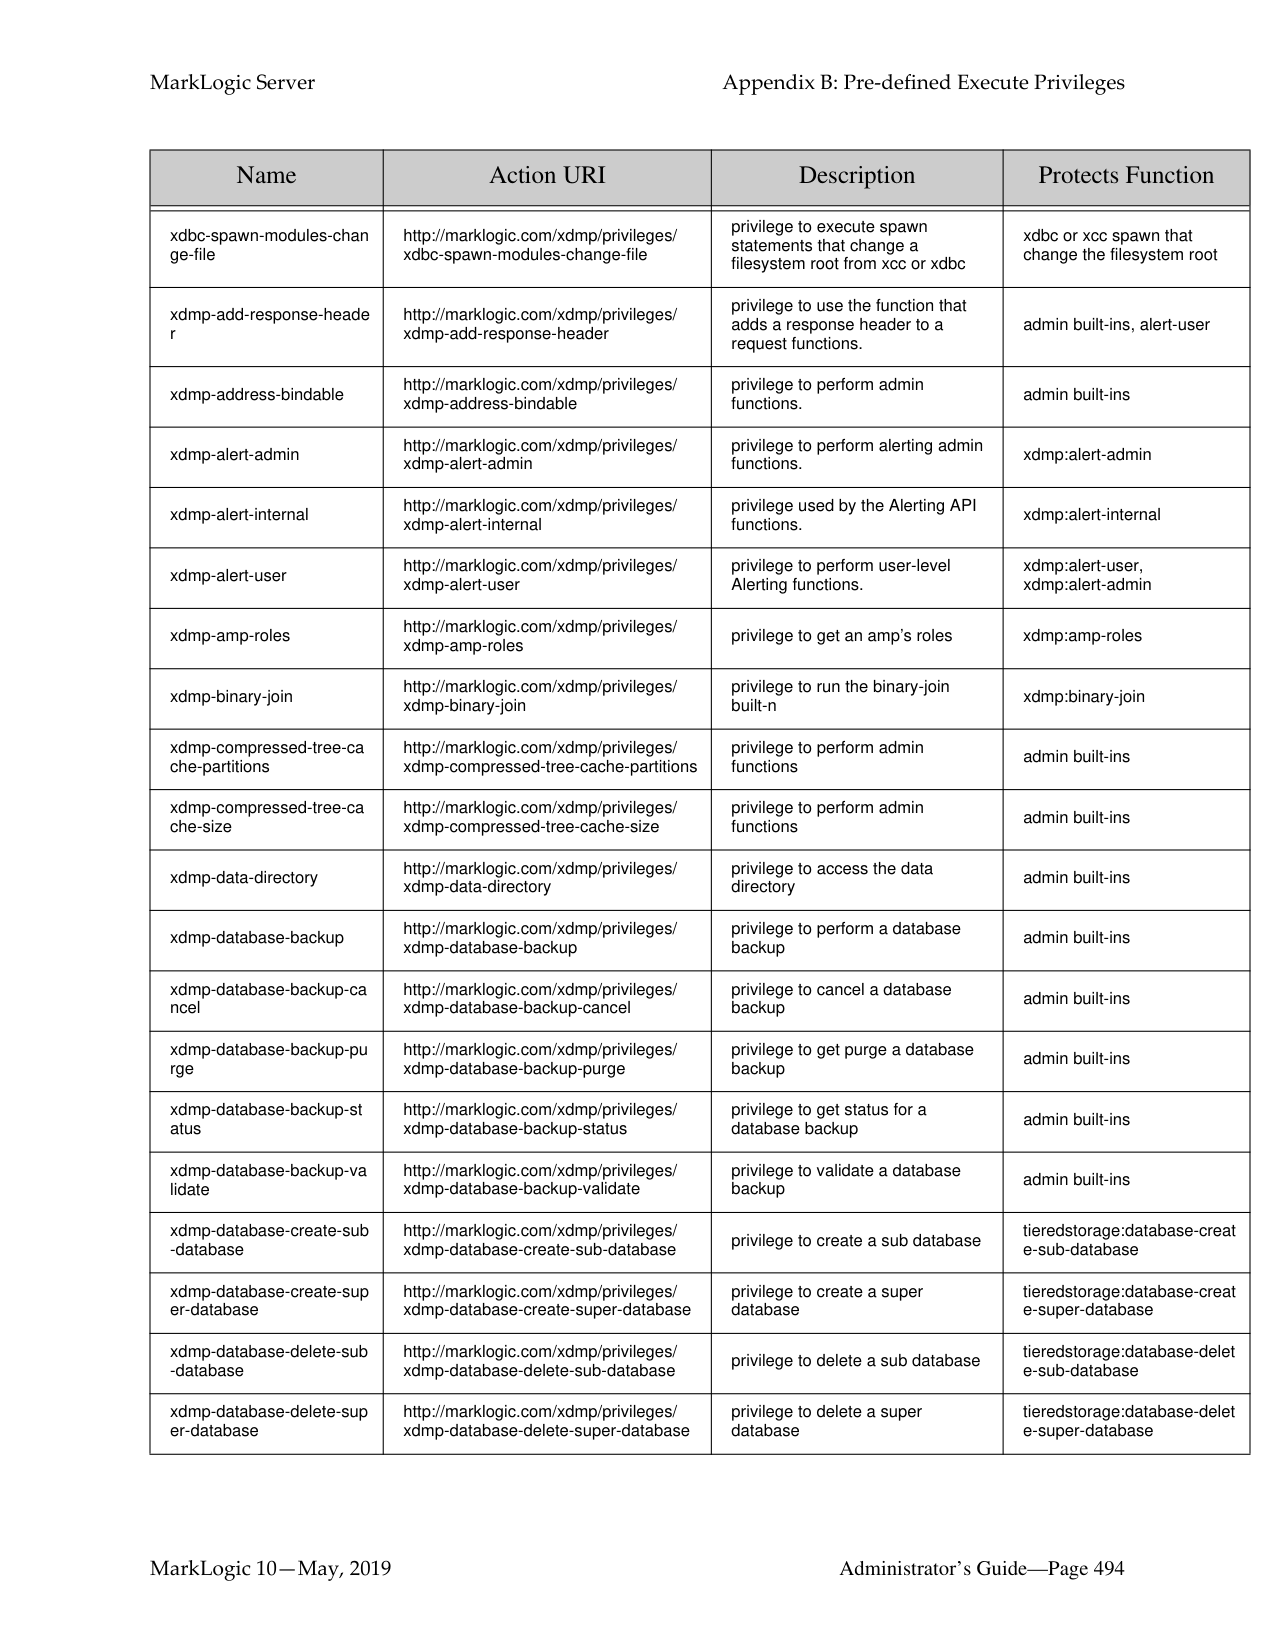
|Name|Action URI|Description|Protects Function| |---|---|---|---| | | | | | |database-partitions|http://marklogic.com/xdmp/privileges/ database-partitions|privilege to return the names of the partitions in a database|tieredstorage:database-partit ions| |forest-combine|http://marklogic.com/xdmp/privileges/ forest-combine|privilege to combine data in multiple forests into one new forest|tieredstorage:forest-combine| |forest-migrate|http://marklogic.com/xdmp/privileges/ forest-migrate|privilege to move data in a forest to new data directories|tieredstorage:forest-migrate| |partition-create|http://marklogic.com/xdmp/privileges/ partition-create|privilege to create a query partition|tieredstorage:query-partitioncreate| |partition-delete|http://marklogic.com/xdmp/privileges/ partition-delete|privilege to delete a query partition|tieredstorage:partition-delete| |partition-delete-query|http://marklogic.com/xdmp/privileges/ partition-delete-query|privilege to delete a query from a partition|tieredstorage:partition-delete
-query| |partition-forests|http://marklogic.com/xdmp/privileges/ partition-forests|privilege to returns ids of the forests in a query partition|tieredstorage:partition-forest s| |partition-get-exclusion-ena bled|http://marklogic.com/xdmp/privileges/ partition-get-exclusion-enabled|privilege to return the safe-to-exclude setting for a database|tieredstorage:partition-get-ex clusion-enabled| |partition-get-query|http://marklogic.com/xdmp/privileges/ partition-get-query|privilege to return the query of a partition|tieredstorage:partition-get-qu ery| |partition-migrate|http://marklogic.com/xdmp/privileges/ partition-migrate|privilege to migrate forests in a partition to a data directory and hosts|tieredstorage:partition-migrat e| |partition-number-forests|http://marklogic.com/xdmp/privileges/ partition-number-forests|privilege to return the IDs of the forests associated with a partition|tieredstorage:partition-numb er-forests| |partition-queries|http://marklogic.com/xdmp/privileges/ partition-queries|privilege to return the queries in a schema database|tieredstorage:partition-querie s| |partition-resize|http://marklogic.com/xdmp/privileges/ partition-resize|privilege to create or combine forests in a partition|tieredstorage:partition-resize| |partition-set-availability|http://marklogic.com/xdmp/privileges/ partition-set-availability|privilege to set the availability of the partition|tieredstorage:partition-set-av ailability| |partition-set-exclusion-ena bled|http://marklogic.com/xdmp/privileges/ partition-set-exclusion-enabled|privilege to exclude a query partition from being searched if the search query does not match the query assignment policy set for the partition|tieredstorage:partition-set-ex clusion-enabled| |partition-set-query|http://marklogic.com/xdmp/privileges/ partition-set-query|privilege to set the query for a partition|tieredstorage:partition-set-qu ery| |partition-set-updates-allow ed|http://marklogic.com/xdmp/privileges/ partition-set-updates-allowed|privilege to set update-allowed state for the forests in a partition|tieredstorage:partition-set-up dates-allowed| |partition-transfer|http://marklogic.com/xdmp/privileges/ partition-transfer|privilege to transfer a partition from one database to another|tieredstorage:partition-transf er|
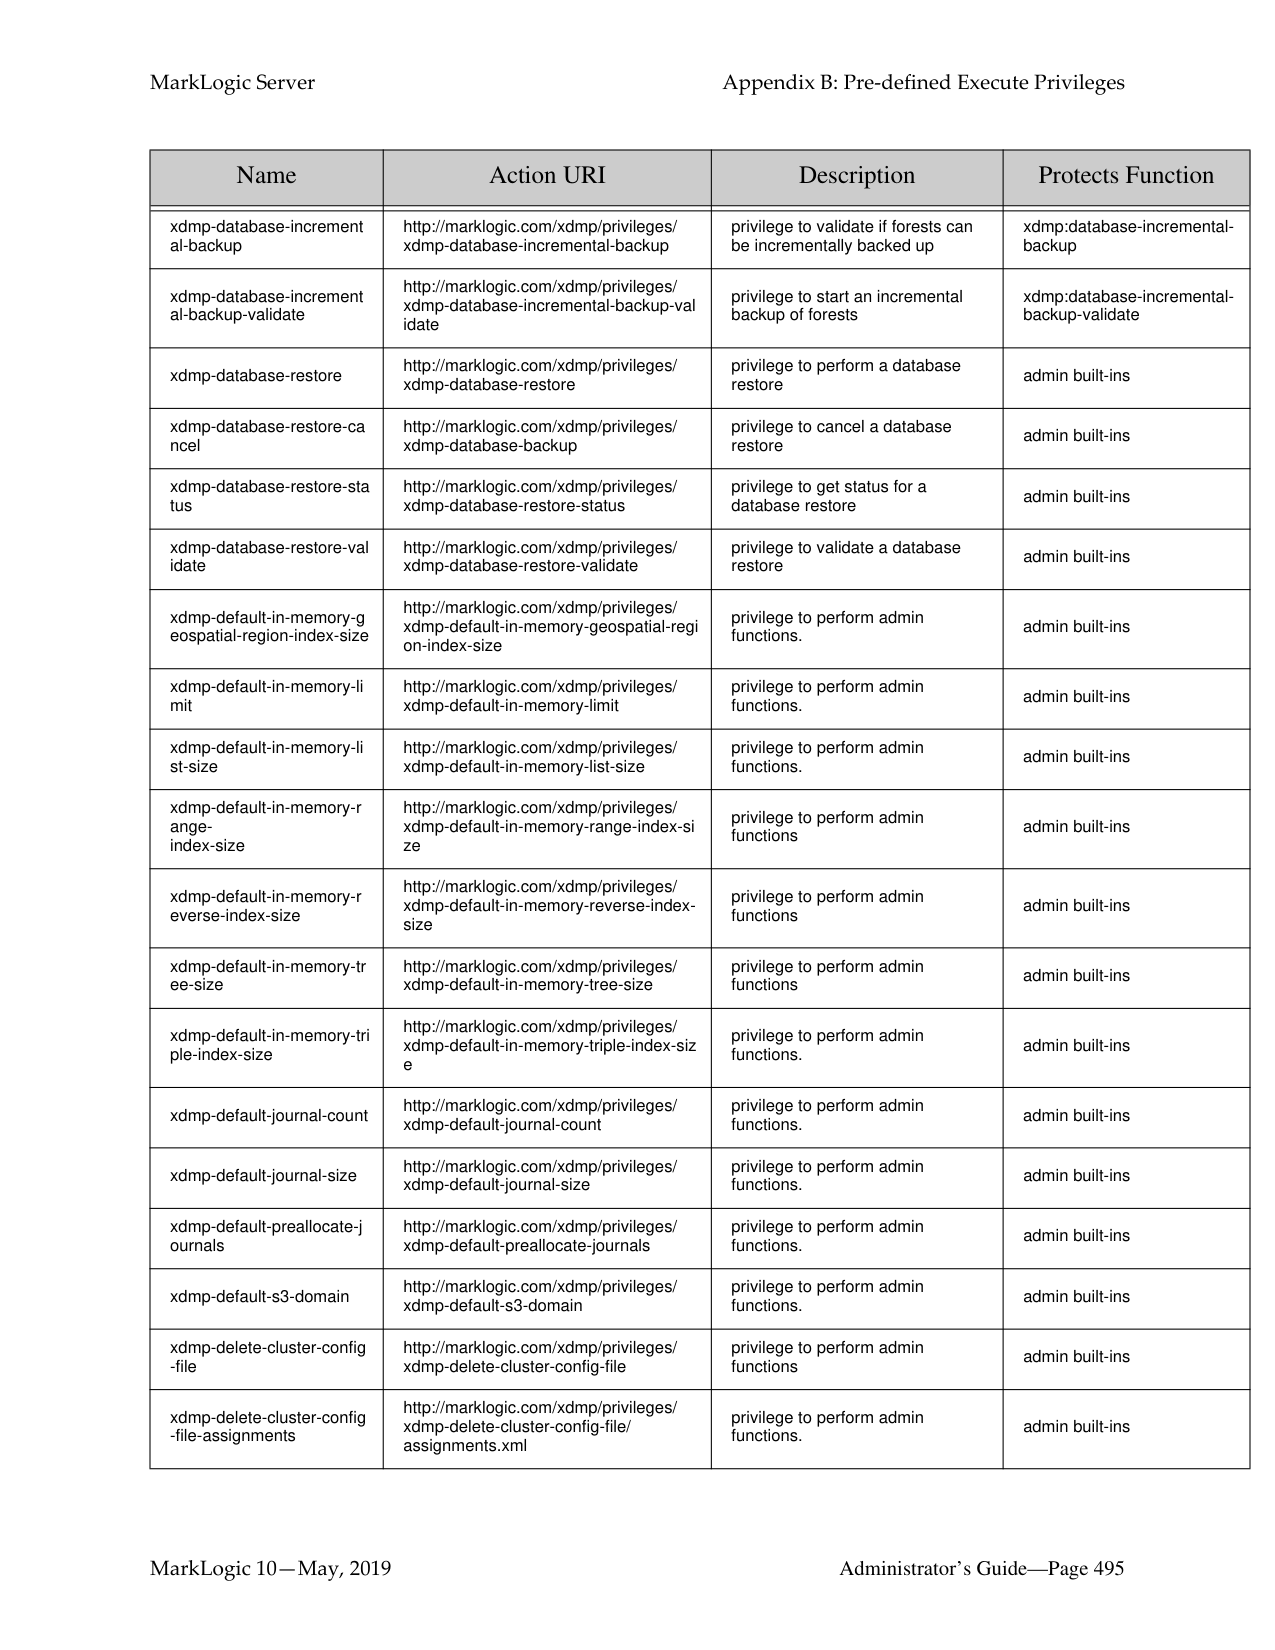
|Name|Action URI|Description|Protects Function| |---|---|---|---| | | | | | |unprotect-collection|http://marklogic.com/xdmp/privileges/ unprotect-collection|privilege to change roles for a collection|xdmp:document-add-collecti ons, xdmp:document-remove-coll ections, xdmp:document-set-collectio ns| |unprotect-path|http://marklogic.com/xdmp/privileges/ unprotect-path|privilege to remove a protection from a protected path|sec:unprotect-path| |unprotected-collections|http://marklogic.com/xdmp/privileges/ unprotected-collections|privilege to add to or remove from collections that are unprotected|xdmp:document-add-collecti ons, xdmp:document-remove-coll ections, xdmp:document-set-collectio ns| |unprotected-uri|http://marklogic.com/xdmp/privileges/ unprotected-uri|privilege to create document with uri’s that are unprotected|xdmp:document-insert, xdmp:load| |user-add-roles|http://marklogic.com/xdmp/privileges/ user-add-roles|privilege to add roles to a user|sec:user-add-roles| |user-exists|http://marklogic.com/xdmp/privileges/ get-user|privilege to check if a user exists in the security database|sec:user-exists| |user-get-default-collections|http://marklogic.com/xdmp/privileges/ user-gt-default-collections|privilege to get a user’s default collections|sec:user-get-default-collectio ns| |user-get-default-permissio ns|http://marklogic.com/xdmp/privileges/ user-get-default-permissions|privilege to get user’s default permissions|sec:user-get-default-permiss ions| |user-get-description|http://marklogic.com/xdmp/privileges/ user-get-description|privilege to get user’s description|sec:user-get-description (if not logged in as user)| |user-get-external-names|http://marklogic.com/xdmp/privileges/ user-get-external-names|privilege to get the external LDAP group names assigned to a user|sec:user-get-external-names| |user-get-password-extra|http://marklogic.com/xdmp/privileges/ user-get-password-extra|privilege to get the password-extra element from the user document|sec:user-get-password-extra| |user-get-roles|http://marklogic.com/xdmp/privileges/ user-get-roles|privilege to get user’s roles|sec:user-get-roles (if not logged in as user)| |user-privileges|http://marklogic.com/xdmp/privileges/ user-privileges|privilege to get a user’s complete privileges|sec:user-privileges (if not logged in as user)| |user-remove-roles|http://marklogic.com/xdmp/privileges/ user-remove-roles|privilege to remove roles from a user|sec:user-remove-roles| |user-set-default-collections|http://marklogic.com/xdmp/privileges/ user-set-default-collections|privilege to set a user’s default collections|sec:user-set-default-collectio ns| |user-set-default-permissio ns|http://marklogic.com/xdmp/privileges/ user-set-default-permissions|privilege to set a user’s default permissions|sec:user-set-default-permissi ons| |user-set-description|http://marklogic.com/xdmp/privileges/ user-set-description|privilege to set a user’s description|sec:user-set-description ( if not logged in as user)| |user-set-external-names|http://marklogic.com/xdmp/privileges/ user-set-external-names|privilege to set the external names for a user|sec:user-set-external-names|
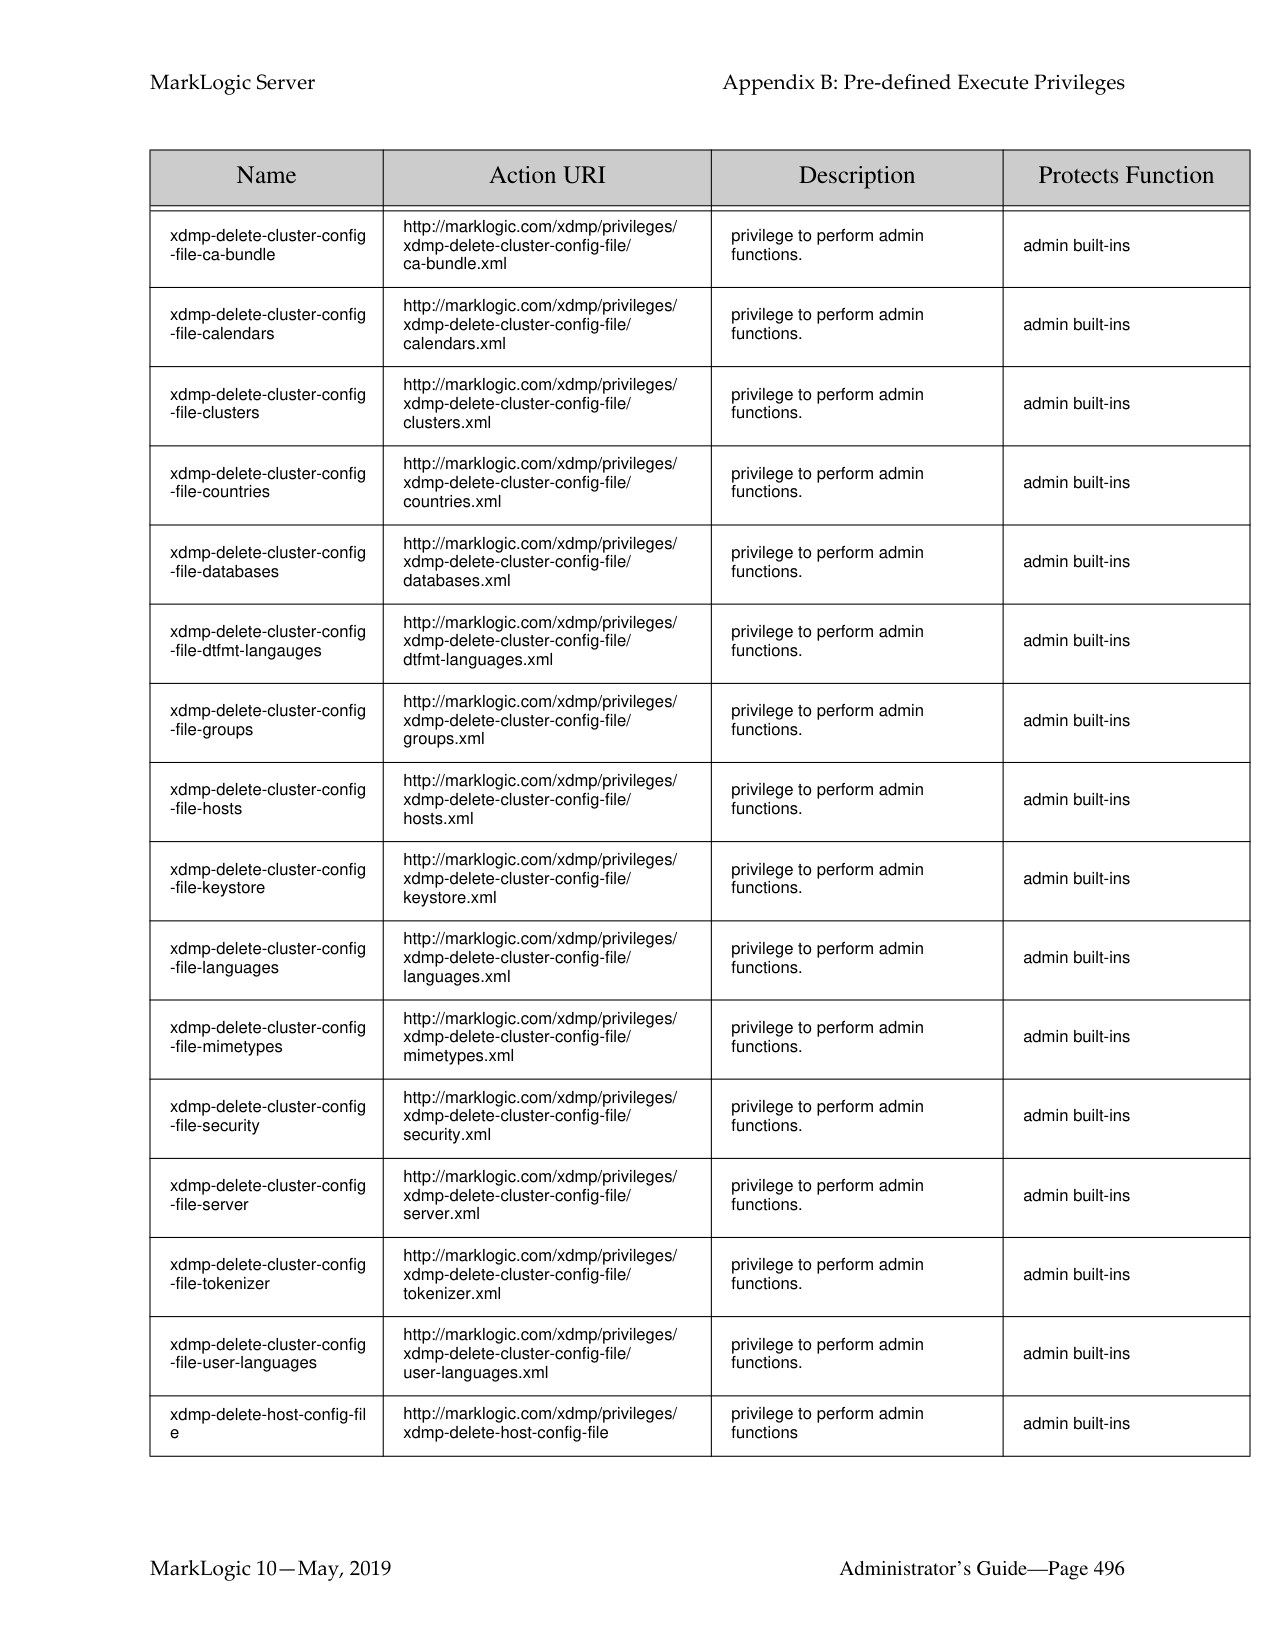
|Name|Action URI|Description|Protects Function| |---|---|---|---| | | | | | |user-set-name|http://marklogic.com/xdmp/privileges/ user-set-name|privilege to set a user’s name|sec:user-set-name (if not logged in as user)| |user-set-password|http://marklogic.com/xdmp/privileges/ user-set-password|privilege to set user’s password|sec:user-set-password ( if not logged in as user)| |user-set-password-extra|http://marklogic.com/xdmp/privileges/ user-set-password-extra|privilege to set the password-extra element in the user document|sec:user-set-password-extra| |user-set-roles|http://marklogic.com/xdmp/privileges/ user-set-roles|privilege to set a user’s role|sec:user-set-roles| |view-create|http://marklogic.com/xdmp/privileges/ create-view|privilege to create a view|view:create| |view-schema-create|http://marklogic.com/xdmp/privileges/ create-schema|privilege to create a relational schema|view:schema-create| |xdbc-eval|http://marklogic.com/xdmp/privileges/ xdbc-eval|privilege to execute eval statements from xcc or xdbc|xdmp:eval| |xdbc-eval-in|http://marklogic.com/xdmp/privileges/ xdbc-eval-in|privilege to execute eval-in statements from xcc or xdbc|xdmp:eval-in| |xdbc-eval-modules-change|http://marklogic.com/xdmp/privileges/ xdbc-eval-modules-change|privilege to execute eval statements that change a modules database from xcc or xdbc|xdmp:eval| |xdbc-eval-modules-change
-file|http://marklogic.com/xdmp/privileges/ xdbc-eval-modules-change-file|privilege to execute eval statements that change a filesystem root from xcc or xdbc|xdmp:eval| |xdbc-insert|http://marklogic.com/xdmp/privileges/ xdbc-insert-in|privilege to execute insert statements from xcc or xdbc|xcc or xdbc inserts| |xdbc-insert-in|http://marklogic.com/xdmp/privileges/ xdbc-insert-in|privilege to execute insert statements from xcc or xdbc|xdbc or xcc inserts into another database| |xdbc-invoke|http://marklogic.com/xdmp/privileges/ xdbc-invoke|privilege to execute invoke statements from xcc or xdbc|xdbc or xcc invokes| |xdbc-invoke-in|http://marklogic.com/xdmp/privileges/ xdbc-invoke-in|privilege to execute invoke statements from xcc or xdbc|xdbc or xcc invokes into another database| |xdbc-invoke-modules-chan ge|http://marklogic.com/xdmp/privileges/ xdbc-invoke-modules-change|privilege to execute invoke statements that change a modules database from xcc or xdbc|xdbc or xcc invokes that change the modules database| |xdbc-invoke-modules-chan ge-file|http://marklogic.com/xdmp/privileges/ xdbc-invoke-modules-change-file|privilege to execute invoke statements that change a filesystem root from xcc or xdbc|xdbc or xcc invokes that change the filesystem root| |xdbc-spawn|http://marklogic.com/xdmp/privileges/ xdbc-spawn|privilege to execute spawn statements from xcc or xdbc|xdbc or xcc spawns| |xdbc-spawn-in|http://marklogic.com/xdmp/privileges/ xdbc-spawn-in|privilege to execute spawn statements from xcc or xdbc|xdbc or xcc spawns into another database|

|xdbc-spawn-modules-chan ge|http://marklogic.com/xdmp/privileges/ xdbc-spawn-modules-change|privilege to execute spawn statements that change a modules database from xcc or xdbc|xdbc or xcc spawn that change the modules database|
|Name|Action URI|Description|Protects Function| |---|---|---|---| | | | | | |xdbc-spawn-modules-chan ge-file|http://marklogic.com/xdmp/privileges/ xdbc-spawn-modules-change-file|privilege to execute spawn statements that change a filesystem root from xcc or xdbc|xdbc or xcc spawn that change the filesystem root| |xdmp-add-response-heade r|http://marklogic.com/xdmp/privileges/ xdmp-add-response-header|privilege to use the function that adds a response header to a request functions.|admin built-ins, alert-user| |xdmp-address-bindable|http://marklogic.com/xdmp/privileges/ xdmp-address-bindable|privilege to perform admin functions.|admin built-ins| |xdmp-alert-admin|http://marklogic.com/xdmp/privileges/ xdmp-alert-admin|privilege to perform alerting admin functions.|xdmp:alert-admin| |xdmp-alert-internal|http://marklogic.com/xdmp/privileges/ xdmp-alert-internal|privilege used by the Alerting API functions.|xdmp:alert-internal| |xdmp-alert-user|http://marklogic.com/xdmp/privileges/ xdmp-alert-user|privilege to perform user-level Alerting functions.|xdmp:alert-user, xdmp:alert-admin| |xdmp-amp-roles|http://marklogic.com/xdmp/privileges/ xdmp-amp-roles|privilege to get an amp’s roles|xdmp:amp-roles| |xdmp-binary-join|http://marklogic.com/xdmp/privileges/ xdmp-binary-join|privilege to run the binary-join built-n|xdmp:binary-join| |xdmp-compressed-tree-ca che-partitions|http://marklogic.com/xdmp/privileges/ xdmp-compressed-tree-cache-partitions|privilege to perform admin functions|admin built-ins| |xdmp-compressed-tree-ca che-size|http://marklogic.com/xdmp/privileges/ xdmp-compressed-tree-cache-size|privilege to perform admin functions|admin built-ins| |xdmp-data-directory|http://marklogic.com/xdmp/privileges/ xdmp-data-directory|privilege to access the data directory|admin built-ins| |xdmp-database-backup|http://marklogic.com/xdmp/privileges/ xdmp-database-backup|privilege to perform a database backup|admin built-ins| |xdmp-database-backup-ca ncel|http://marklogic.com/xdmp/privileges/ xdmp-database-backup-cancel|privilege to cancel a database backup|admin built-ins| |xdmp-database-backup-pu rge|http://marklogic.com/xdmp/privileges/ xdmp-database-backup-purge|privilege to get purge a database backup|admin built-ins| |xdmp-database-backup-st atus|http://marklogic.com/xdmp/privileges/ xdmp-database-backup-status|privilege to get status for a database backup|admin built-ins| |xdmp-database-backup-va lidate|http://marklogic.com/xdmp/privileges/ xdmp-database-backup-validate|privilege to validate a database backup|admin built-ins| |xdmp-database-create-sub
-database|http://marklogic.com/xdmp/privileges/ xdmp-database-create-sub-database|privilege to create a sub database|tieredstorage:database-creat e-sub-database|
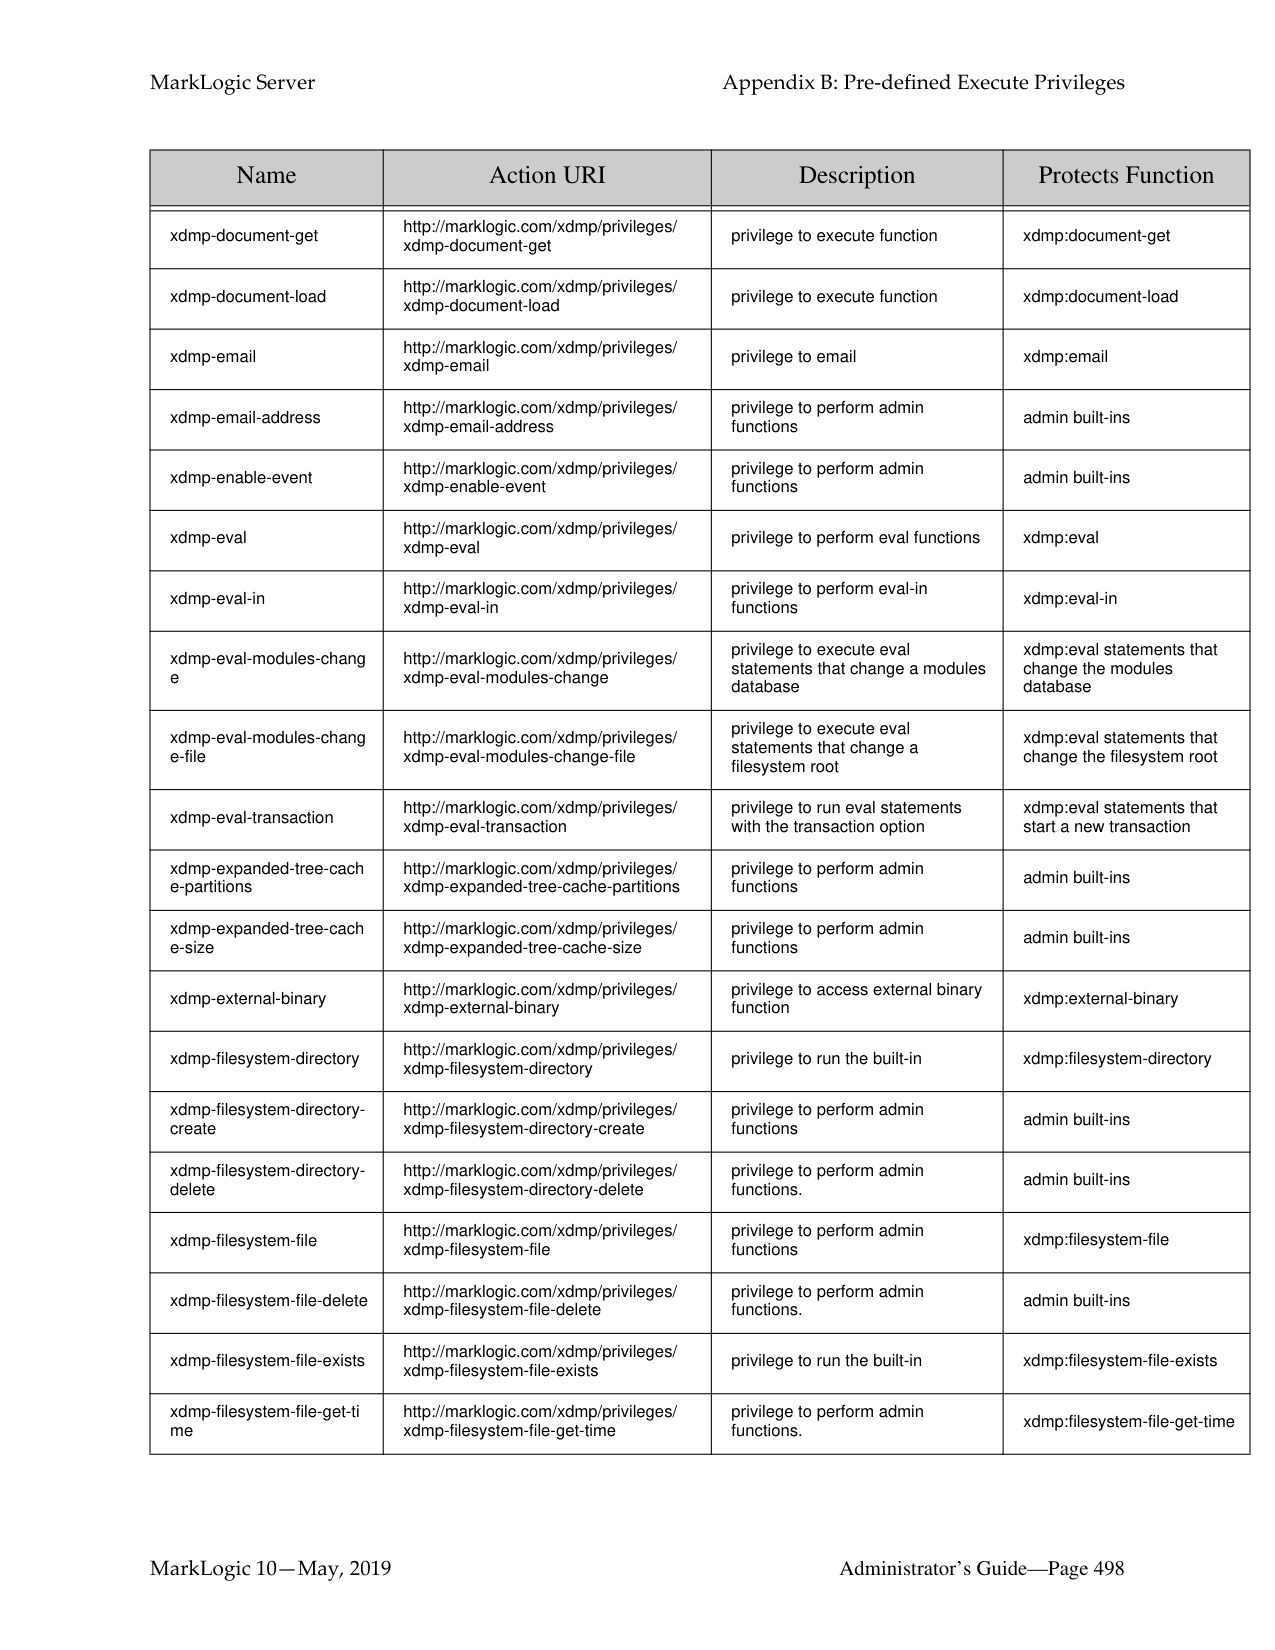
|xdmp-database-create-sup er-database|http://marklogic.com/xdmp/privileges/ xdmp-database-create-super-database|privilege to create a super database|tieredstorage:database-creat e-super-database| |xdmp-database-delete-sub
-database|http://marklogic.com/xdmp/privileges/ xdmp-database-delete-sub-database|privilege to delete a sub database|tieredstorage:database-delet e-sub-database| |xdmp-database-delete-sup er-database|http://marklogic.com/xdmp/privileges/ xdmp-database-delete-super-database|privilege to delete a super database|tieredstorage:database-delet e-super-database|
|Name|Action URI|Description|Protects Function| |---|---|---|---| | | | | | |xdmp-database-increment al-backup|http://marklogic.com/xdmp/privileges/ xdmp-database-incremental-backup|privilege to validate if forests can be incrementally backed up|xdmp:database-incrementalbackup| |xdmp-database-increment al-backup-validate|http://marklogic.com/xdmp/privileges/ xdmp-database-incremental-backup-val idate|privilege to start an incremental backup of forests|xdmp:database-incrementalbackup-validate| |xdmp-database-restore|http://marklogic.com/xdmp/privileges/ xdmp-database-restore|privilege to perform a database restore|admin built-ins| |xdmp-database-restore-ca ncel|http://marklogic.com/xdmp/privileges/ xdmp-database-backup|privilege to cancel a database restore|admin built-ins| |xdmp-database-restore-sta tus|http://marklogic.com/xdmp/privileges/ xdmp-database-restore-status|privilege to get status for a database restore|admin built-ins| |xdmp-database-restore-val idate|http://marklogic.com/xdmp/privileges/ xdmp-database-restore-validate|privilege to validate a database restore|admin built-ins| |xdmp-default-in-memory-g eospatial-region-index-size|http://marklogic.com/xdmp/privileges/ xdmp-default-in-memory-geospatial-regi on-index-size|privilege to perform admin functions.|admin built-ins| |xdmp-default-in-memory-li mit|http://marklogic.com/xdmp/privileges/ xdmp-default-in-memory-limit|privilege to perform admin functions.|admin built-ins| |xdmp-default-in-memory-li st-size|http://marklogic.com/xdmp/privileges/ xdmp-default-in-memory-list-size|privilege to perform admin functions.|admin built-ins| |xdmp-default-in-memory-r angeindex-size|http://marklogic.com/xdmp/privileges/ xdmp-default-in-memory-range-index-si ze|privilege to perform admin functions|admin built-ins| |xdmp-default-in-memory-r everse-index-size|http://marklogic.com/xdmp/privileges/ xdmp-default-in-memory-reverse-indexsize|privilege to perform admin functions|admin built-ins| |xdmp-default-in-memory-tr ee-size|http://marklogic.com/xdmp/privileges/ xdmp-default-in-memory-tree-size|privilege to perform admin functions|admin built-ins| |xdmp-default-in-memory-tri ple-index-size|http://marklogic.com/xdmp/privileges/ xdmp-default-in-memory-triple-index-siz e|privilege to perform admin functions.|admin built-ins| |xdmp-default-journal-count|http://marklogic.com/xdmp/privileges/ xdmp-default-journal-count|privilege to perform admin functions.|admin built-ins| |xdmp-default-journal-size|http://marklogic.com/xdmp/privileges/ xdmp-default-journal-size|privilege to perform admin functions.|admin built-ins|
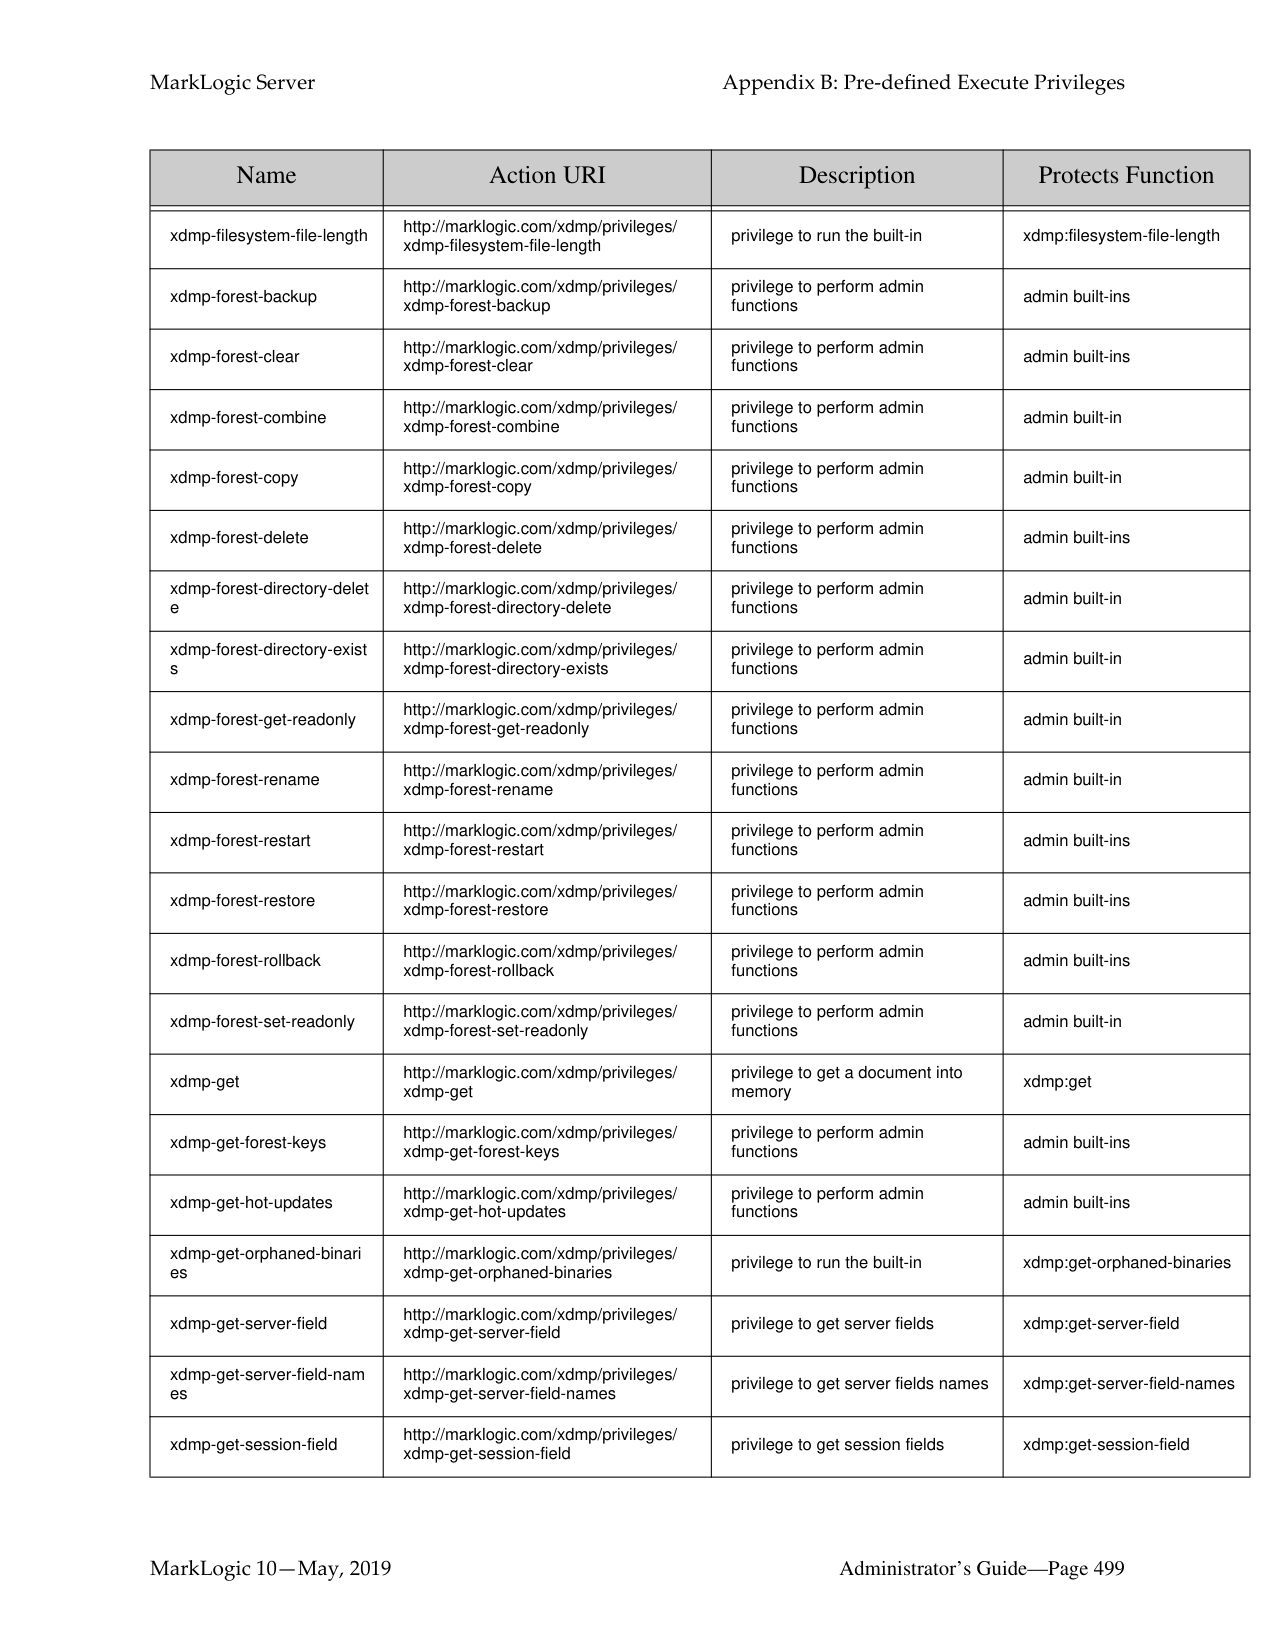
|xdmp-default-preallocate-j ournals|http://marklogic.com/xdmp/privileges/ xdmp-default-preallocate-journals|privilege to perform admin functions.|admin built-ins| |xdmp-default-s3-domain|http://marklogic.com/xdmp/privileges/ xdmp-default-s3-domain|privilege to perform admin functions.|admin built-ins| |xdmp-delete-cluster-config
-file|http://marklogic.com/xdmp/privileges/ xdmp-delete-cluster-config-file|privilege to perform admin functions|admin built-ins| |xdmp-delete-cluster-config
-file-assignments|http://marklogic.com/xdmp/privileges/ xdmp-delete-cluster-config-file/ assignments.xml|privilege to perform admin functions.|admin built-ins|
|Name|Action URI|Description|Protects Function| |---|---|---|---| | | | | | |xdmp-delete-cluster-config
-file-ca-bundle|http://marklogic.com/xdmp/privileges/ xdmp-delete-cluster-config-file/ ca-bundle.xml|privilege to perform admin functions.|admin built-ins| |xdmp-delete-cluster-config
-file-calendars|http://marklogic.com/xdmp/privileges/ xdmp-delete-cluster-config-file/ calendars.xml|privilege to perform admin functions.|admin built-ins| |xdmp-delete-cluster-config
-file-clusters|http://marklogic.com/xdmp/privileges/ xdmp-delete-cluster-config-file/ clusters.xml|privilege to perform admin functions.|admin built-ins| |xdmp-delete-cluster-config
-file-countries|http://marklogic.com/xdmp/privileges/ xdmp-delete-cluster-config-file/ countries.xml|privilege to perform admin functions.|admin built-ins| |xdmp-delete-cluster-config
-file-databases|http://marklogic.com/xdmp/privileges/ xdmp-delete-cluster-config-file/ databases.xml|privilege to perform admin functions.|admin built-ins| |xdmp-delete-cluster-config
-file-dtfmt-langauges|http://marklogic.com/xdmp/privileges/ xdmp-delete-cluster-config-file/ dtfmt-languages.xml|privilege to perform admin functions.|admin built-ins| |xdmp-delete-cluster-config
-file-groups|http://marklogic.com/xdmp/privileges/ xdmp-delete-cluster-config-file/ groups.xml|privilege to perform admin functions.|admin built-ins| |xdmp-delete-cluster-config
-file-hosts|http://marklogic.com/xdmp/privileges/ xdmp-delete-cluster-config-file/ hosts.xml|privilege to perform admin functions.|admin built-ins| |xdmp-delete-cluster-config
-file-keystore|http://marklogic.com/xdmp/privileges/ xdmp-delete-cluster-config-file/ keystore.xml|privilege to perform admin functions.|admin built-ins| |xdmp-delete-cluster-config
-file-languages|http://marklogic.com/xdmp/privileges/ xdmp-delete-cluster-config-file/ languages.xml|privilege to perform admin functions.|admin built-ins| |xdmp-delete-cluster-config
-file-mimetypes|http://marklogic.com/xdmp/privileges/ xdmp-delete-cluster-config-file/ mimetypes.xml|privilege to perform admin functions.|admin built-ins| |xdmp-delete-cluster-config
-file-security|http://marklogic.com/xdmp/privileges/ xdmp-delete-cluster-config-file/ security.xml|privilege to perform admin functions.|admin built-ins| |xdmp-delete-cluster-config
-file-server|http://marklogic.com/xdmp/privileges/ xdmp-delete-cluster-config-file/ server.xml|privilege to perform admin functions.|admin built-ins| |xdmp-delete-cluster-config
-file-tokenizer|http://marklogic.com/xdmp/privileges/ xdmp-delete-cluster-config-file/ tokenizer.xml|privilege to perform admin functions.|admin built-ins|
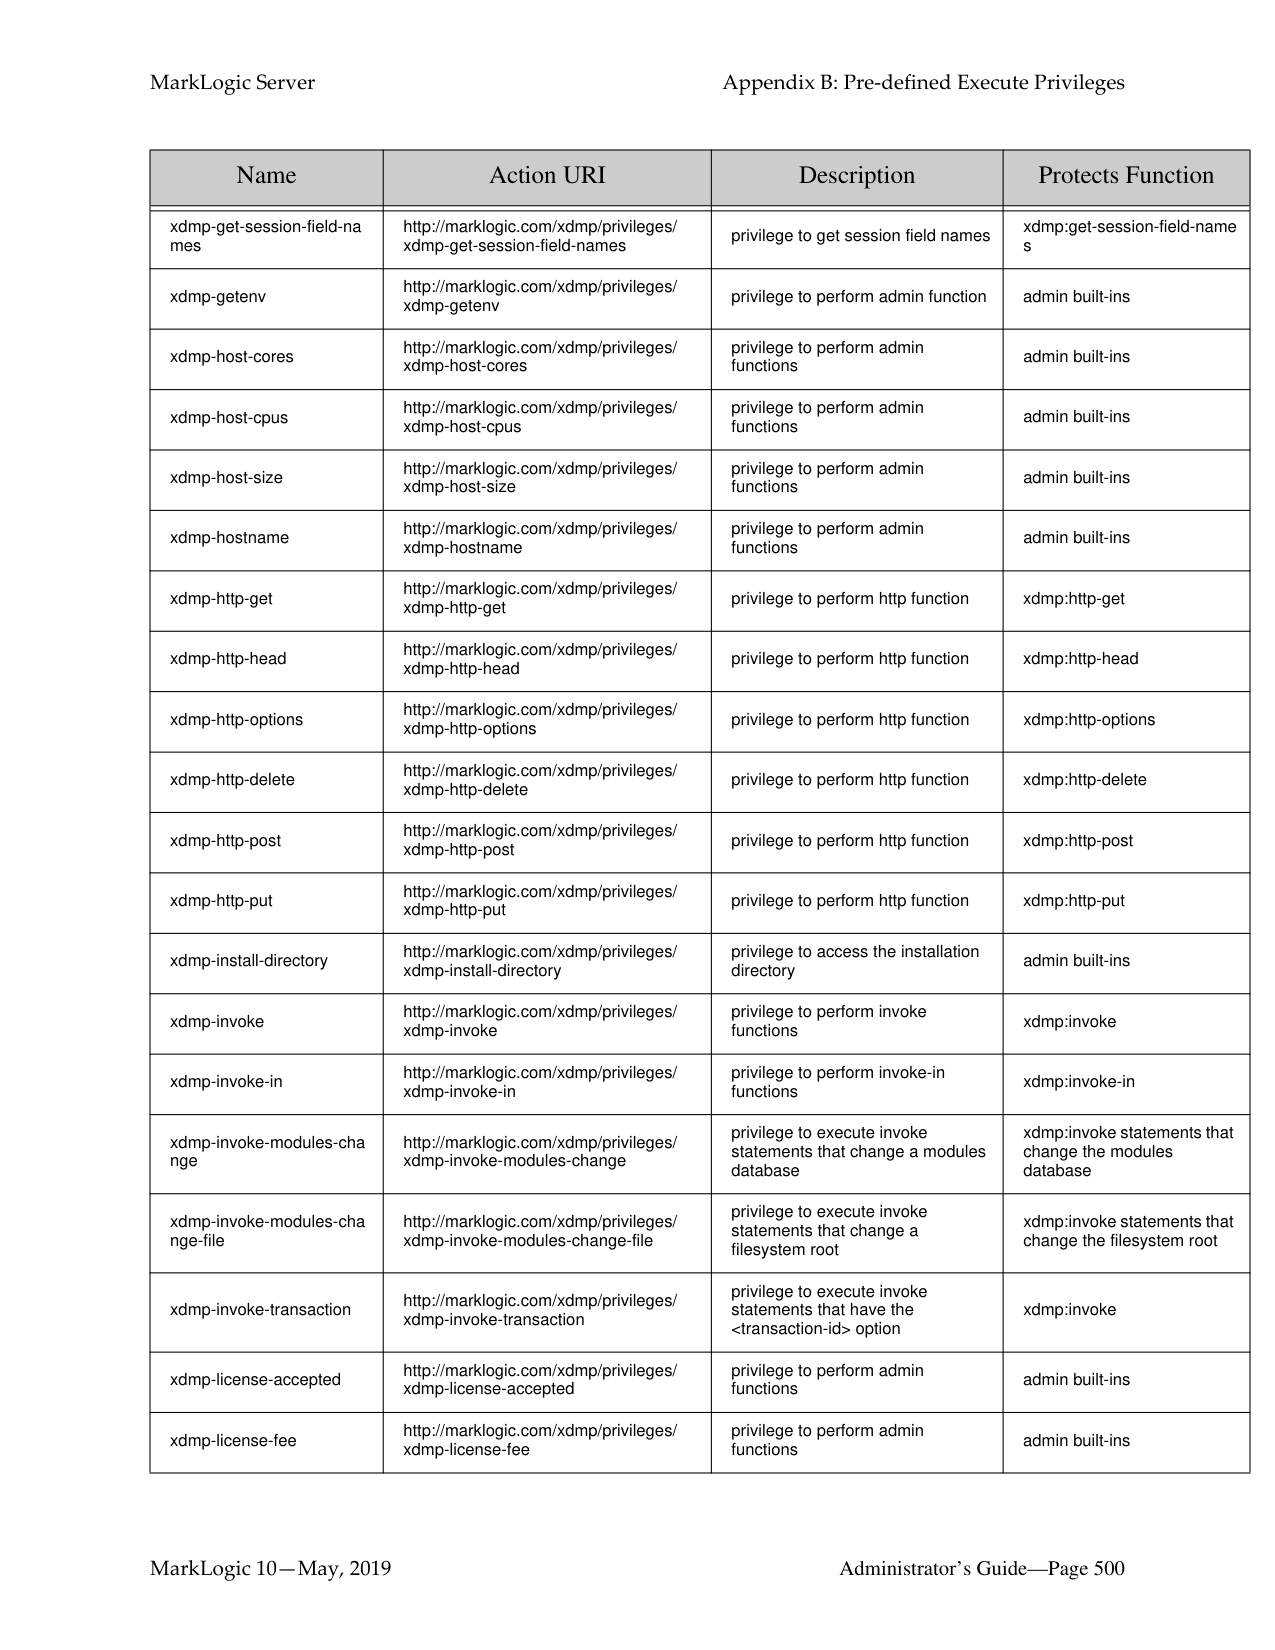
|xdmp-delete-cluster-config
-file-user-languages|http://marklogic.com/xdmp/privileges/ xdmp-delete-cluster-config-file/ user-languages.xml|privilege to perform admin functions.|admin built-ins| |xdmp-delete-host-config-fil e|http://marklogic.com/xdmp/privileges/ xdmp-delete-host-config-file|privilege to perform admin functions|admin built-ins|
|Name|Action URI|Description|Protects Function| |---|---|---|---| | | | | | |xdmp-delete-host-config-fil e-assignments|http://marklogic.com/xdmp/privileges/ xdmp-delete-host-config-file/ assignments.xml|privilege to perform admin functions.|admin built-ins| |xdmp-delete-host-config-fil e-ca-bundle|http://marklogic.com/xdmp/privileges/ xdmp-delete-host-config-file/ ca-bundle.xml|privilege to perform admin functions.|admin built-ins| |xdmp-delete-host-config-fil e-calendars|http://marklogic.com/xdmp/privileges/ xdmp-delete-host-config-file/ calendars.xml|privilege to perform admin functions.|admin built-ins| |xdmp-delete-host-config-fil e-clusters|http://marklogic.com/xdmp/privileges/ xdmp-delete-host-config-file/ clusters.xml|privilege to perform admin functions.|admin built-ins| |xdmp-delete-host-config-fil e-countries|http://marklogic.com/xdmp/privileges/ xdmp-delete-host-config-file/ countries.xml|privilege to perform admin functions.|admin built-ins| |xdmp-delete-host-config-fil e-databases|http://marklogic.com/xdmp/privileges/ xdmp-delete-host-config-file/ databases.xml|privilege to perform admin functions.|admin built-ins| |xdmp-delete-host-config-fil e-dtfmt-langauges|http://marklogic.com/xdmp/privileges/ xdmp-delete-host-config-file/ dtfmt-languages.xml|privilege to perform admin functions.|admin built-ins| |xdmp-delete-host-config-fil e-groups|http://marklogic.com/xdmp/privileges/ xdmp-delete-host-config-file/groups.xml|privilege to perform admin functions.|admin built-ins| |xdmp-delete-host-config-fil e-hosts|http://marklogic.com/xdmp/privileges/ xdmp-delete-host-config-file/hosts.xml|privilege to perform admin functions.|admin built-ins| |xdmp-delete-host-config-fil e-keystore|http://marklogic.com/xdmp/privileges/ xdmp-delete-host-config-file/ keystore.xml|privilege to perform admin functions.|admin built-ins| |xdmp-delete-host-config-fil e-languages|http://marklogic.com/xdmp/privileges/ xdmp-delete-host-config-file/ languages.xml|privilege to perform admin functions.|admin built-ins| |xdmp-delete-host-config-fil e-mimetypes|http://marklogic.com/xdmp/privileges/ xdmp-delete-host-config-file/ mimetypes.xml|privilege to perform admin functions.|admin built-ins| |xdmp-delete-host-config-fil e-security|http://marklogic.com/xdmp/privileges/ xdmp-delete-host-config-file/ security.xml|privilege to perform admin functions.|admin built-ins| |xdmp-delete-host-config-fil e-server|http://marklogic.com/xdmp/privileges/ xdmp-delete-host-config-file/server.xml|privilege to perform admin functions.|admin built-ins| |xdmp-delete-host-config-fil e-tokenizer|http://marklogic.com/xdmp/privileges/ xdmp-delete-host-config-file/ tokenizer.xml|privilege to perform admin functions.|admin built-ins| |xdmp-delete-host-config-fil e-user-languages|http://marklogic.com/xdmp/privileges/ xdmp-delete-host-config-file/ user-languages.xml|privilege to perform admin functions.|admin built-ins|
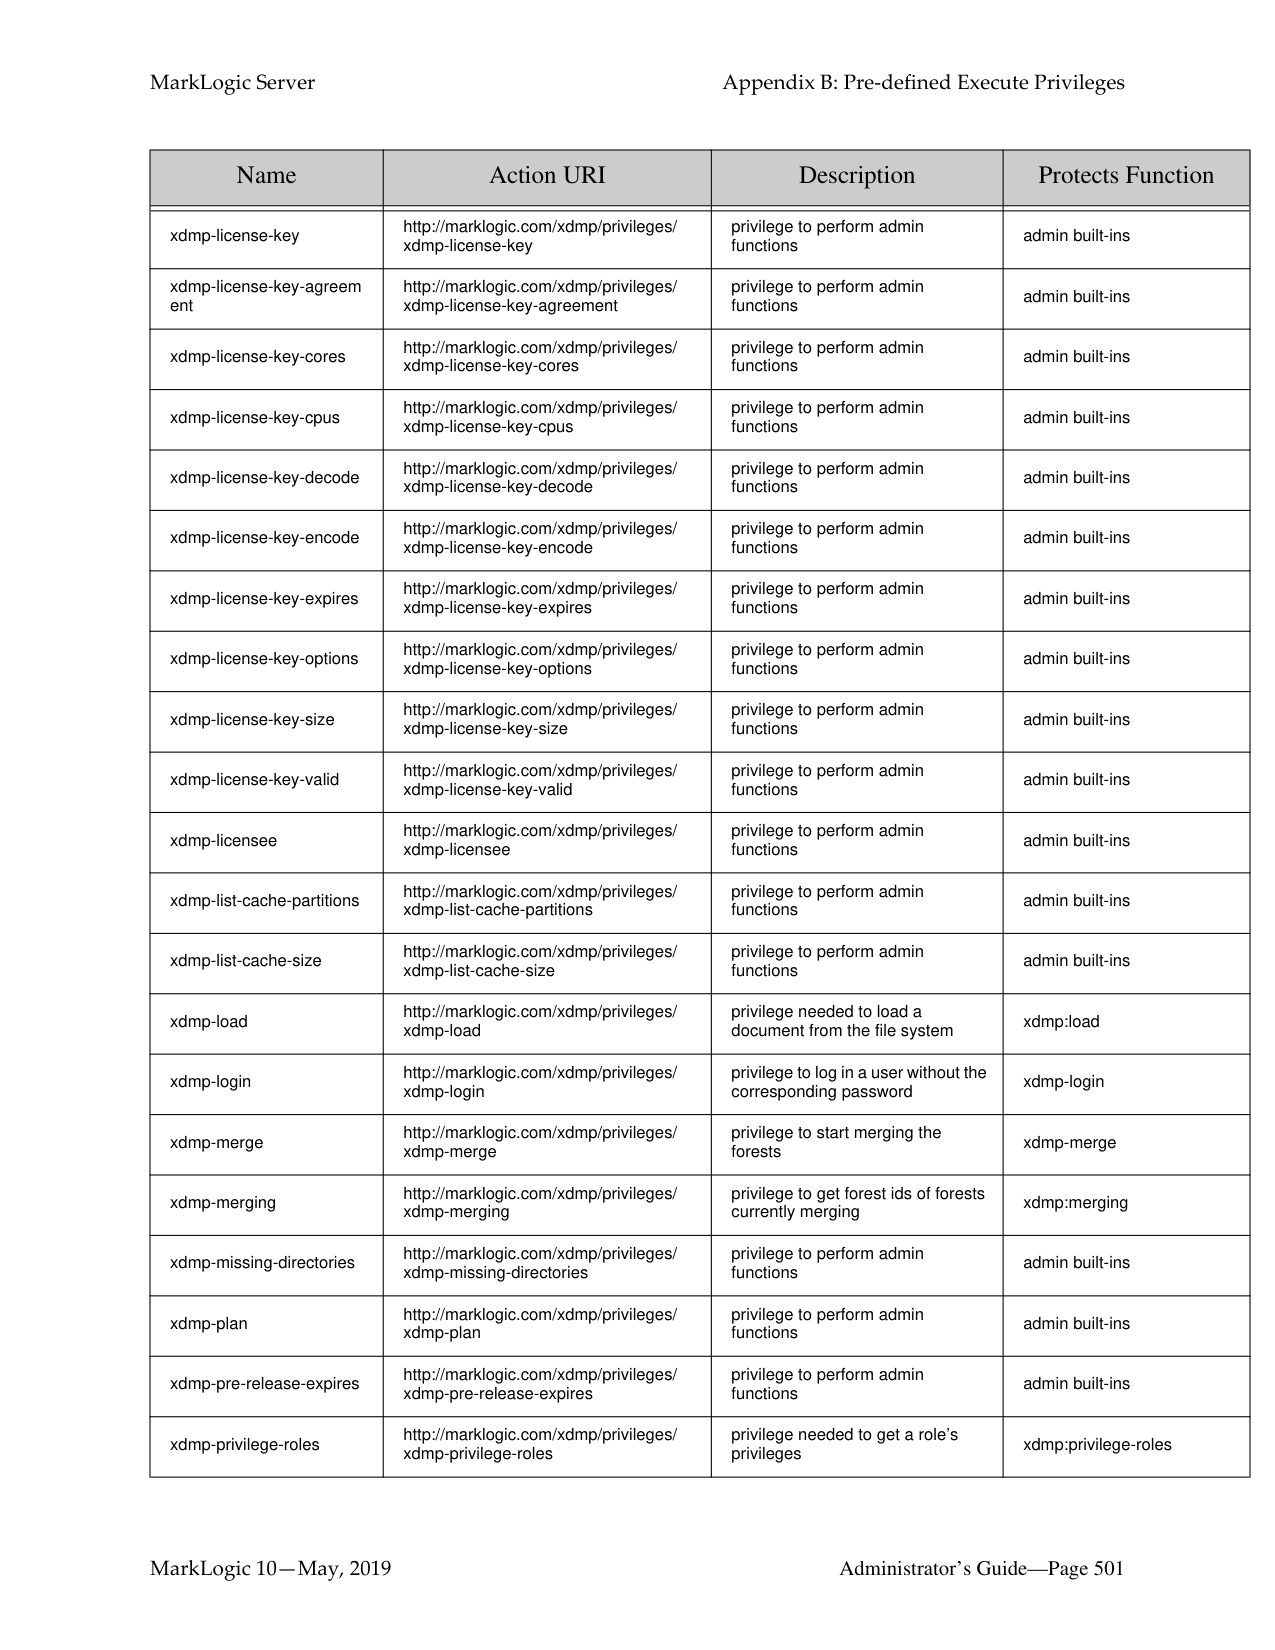
|xdmp-disable-event|http://marklogic.com/xdmp/privileges/ xdmp-disable-event|privilege to perform admin functions|admin built-ins|
|Name|Action URI|Description|Protects Function| |---|---|---|---| | | | | | |xdmp-document-get|http://marklogic.com/xdmp/privileges/ xdmp-document-get|privilege to execute function|xdmp:document-get| |xdmp-document-load|http://marklogic.com/xdmp/privileges/ xdmp-document-load|privilege to execute function|xdmp:document-load| |xdmp-email|http://marklogic.com/xdmp/privileges/ xdmp-email|privilege to email|xdmp:email| |xdmp-email-address|http://marklogic.com/xdmp/privileges/ xdmp-email-address|privilege to perform admin functions|admin built-ins| |xdmp-enable-event|http://marklogic.com/xdmp/privileges/ xdmp-enable-event|privilege to perform admin functions|admin built-ins| |xdmp-eval|http://marklogic.com/xdmp/privileges/ xdmp-eval|privilege to perform eval functions|xdmp:eval| |xdmp-eval-in|http://marklogic.com/xdmp/privileges/ xdmp-eval-in|privilege to perform eval-in functions|xdmp:eval-in| |xdmp-eval-modules-chang e|http://marklogic.com/xdmp/privileges/ xdmp-eval-modules-change|privilege to execute eval statements that change a modules database|xdmp:eval statements that change the modules database| |xdmp-eval-modules-chang e-file|http://marklogic.com/xdmp/privileges/ xdmp-eval-modules-change-file|privilege to execute eval statements that change a filesystem root|xdmp:eval statements that change the filesystem root| |xdmp-eval-transaction|http://marklogic.com/xdmp/privileges/ xdmp-eval-transaction|privilege to run eval statements with the transaction option|xdmp:eval statements that start a new transaction| |xdmp-expanded-tree-cach e-partitions|http://marklogic.com/xdmp/privileges/ xdmp-expanded-tree-cache-partitions|privilege to perform admin functions|admin built-ins| |xdmp-expanded-tree-cach e-size|http://marklogic.com/xdmp/privileges/ xdmp-expanded-tree-cache-size|privilege to perform admin functions|admin built-ins| |xdmp-external-binary|http://marklogic.com/xdmp/privileges/ xdmp-external-binary|privilege to access external binary function|xdmp:external-binary| |xdmp-filesystem-directory|http://marklogic.com/xdmp/privileges/ xdmp-filesystem-directory|privilege to run the built-in|xdmp:filesystem-directory| |xdmp-filesystem-directorycreate|http://marklogic.com/xdmp/privileges/ xdmp-filesystem-directory-create|privilege to perform admin functions|admin built-ins| |xdmp-filesystem-directorydelete|http://marklogic.com/xdmp/privileges/ xdmp-filesystem-directory-delete|privilege to perform admin functions.|admin built-ins| |xdmp-filesystem-file|http://marklogic.com/xdmp/privileges/ xdmp-filesystem-file|privilege to perform admin functions|xdmp:filesystem-file|
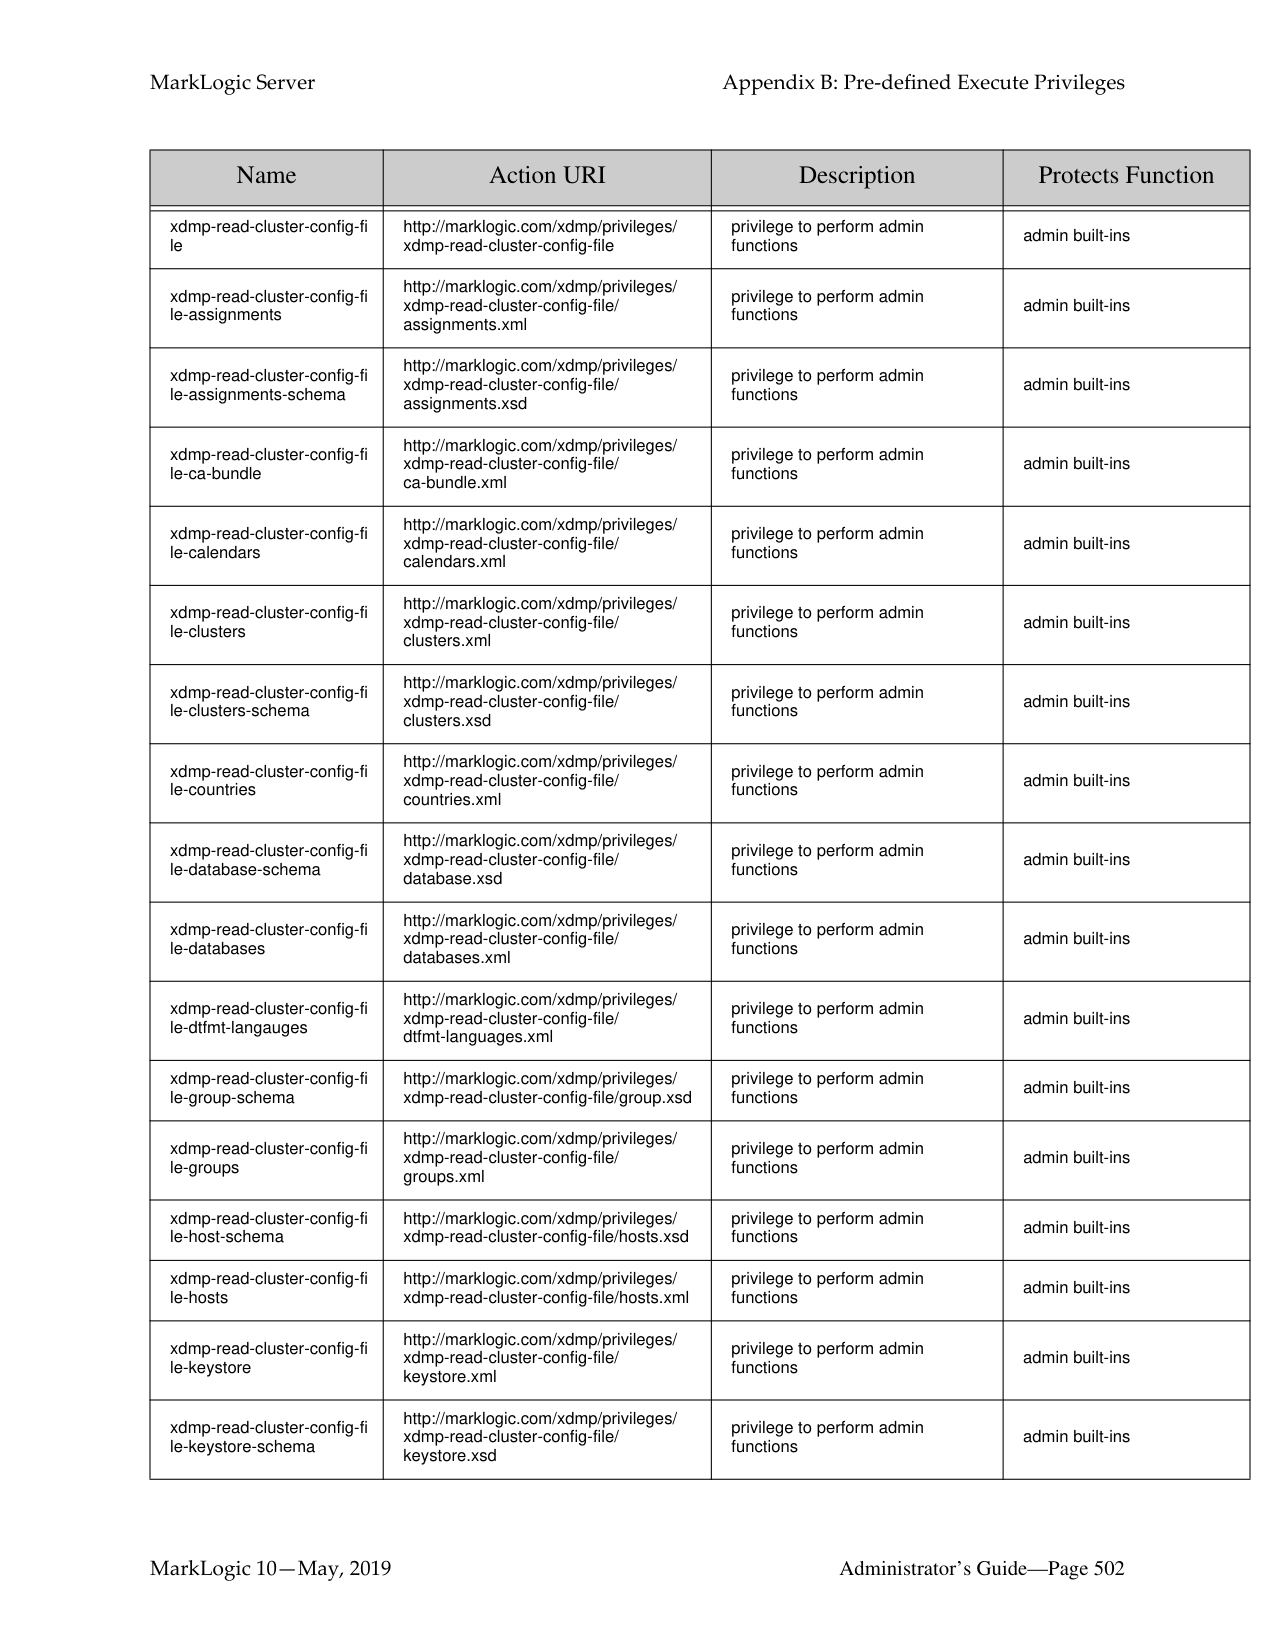
|xdmp-filesystem-file-delete|http://marklogic.com/xdmp/privileges/ xdmp-filesystem-file-delete|privilege to perform admin functions.|admin built-ins| |xdmp-filesystem-file-exists|http://marklogic.com/xdmp/privileges/ xdmp-filesystem-file-exists|privilege to run the built-in|xdmp:filesystem-file-exists| |xdmp-filesystem-file-get-ti me|http://marklogic.com/xdmp/privileges/ xdmp-filesystem-file-get-time|privilege to perform admin functions.|xdmp:filesystem-file-get-time|
|Name|Action URI|Description|Protects Function| |---|---|---|---| | | | | | |xdmp-filesystem-file-length|http://marklogic.com/xdmp/privileges/ xdmp-filesystem-file-length|privilege to run the built-in|xdmp:filesystem-file-length| |xdmp-forest-backup|http://marklogic.com/xdmp/privileges/ xdmp-forest-backup|privilege to perform admin functions|admin built-ins| |xdmp-forest-clear|http://marklogic.com/xdmp/privileges/ xdmp-forest-clear|privilege to perform admin functions|admin built-ins| |xdmp-forest-combine|http://marklogic.com/xdmp/privileges/ xdmp-forest-combine|privilege to perform admin functions|admin built-in| |xdmp-forest-copy|http://marklogic.com/xdmp/privileges/ xdmp-forest-copy|privilege to perform admin functions|admin built-in| |xdmp-forest-delete|http://marklogic.com/xdmp/privileges/ xdmp-forest-delete|privilege to perform admin functions|admin built-ins| |xdmp-forest-directory-delet e|http://marklogic.com/xdmp/privileges/ xdmp-forest-directory-delete|privilege to perform admin functions|admin built-in| |xdmp-forest-directory-exist s|http://marklogic.com/xdmp/privileges/ xdmp-forest-directory-exists|privilege to perform admin functions|admin built-in| |xdmp-forest-get-readonly|http://marklogic.com/xdmp/privileges/ xdmp-forest-get-readonly|privilege to perform admin functions|admin built-in| |xdmp-forest-rename|http://marklogic.com/xdmp/privileges/ xdmp-forest-rename|privilege to perform admin functions|admin built-in| |xdmp-forest-restart|http://marklogic.com/xdmp/privileges/ xdmp-forest-restart|privilege to perform admin functions|admin built-ins| |xdmp-forest-restore|http://marklogic.com/xdmp/privileges/ xdmp-forest-restore|privilege to perform admin functions|admin built-ins| |xdmp-forest-rollback|http://marklogic.com/xdmp/privileges/ xdmp-forest-rollback|privilege to perform admin functions|admin built-ins| |xdmp-forest-set-readonly|http://marklogic.com/xdmp/privileges/ xdmp-forest-set-readonly|privilege to perform admin functions|admin built-in| |xdmp-get|http://marklogic.com/xdmp/privileges/ xdmp-get|privilege to get a document into memory|xdmp:get|
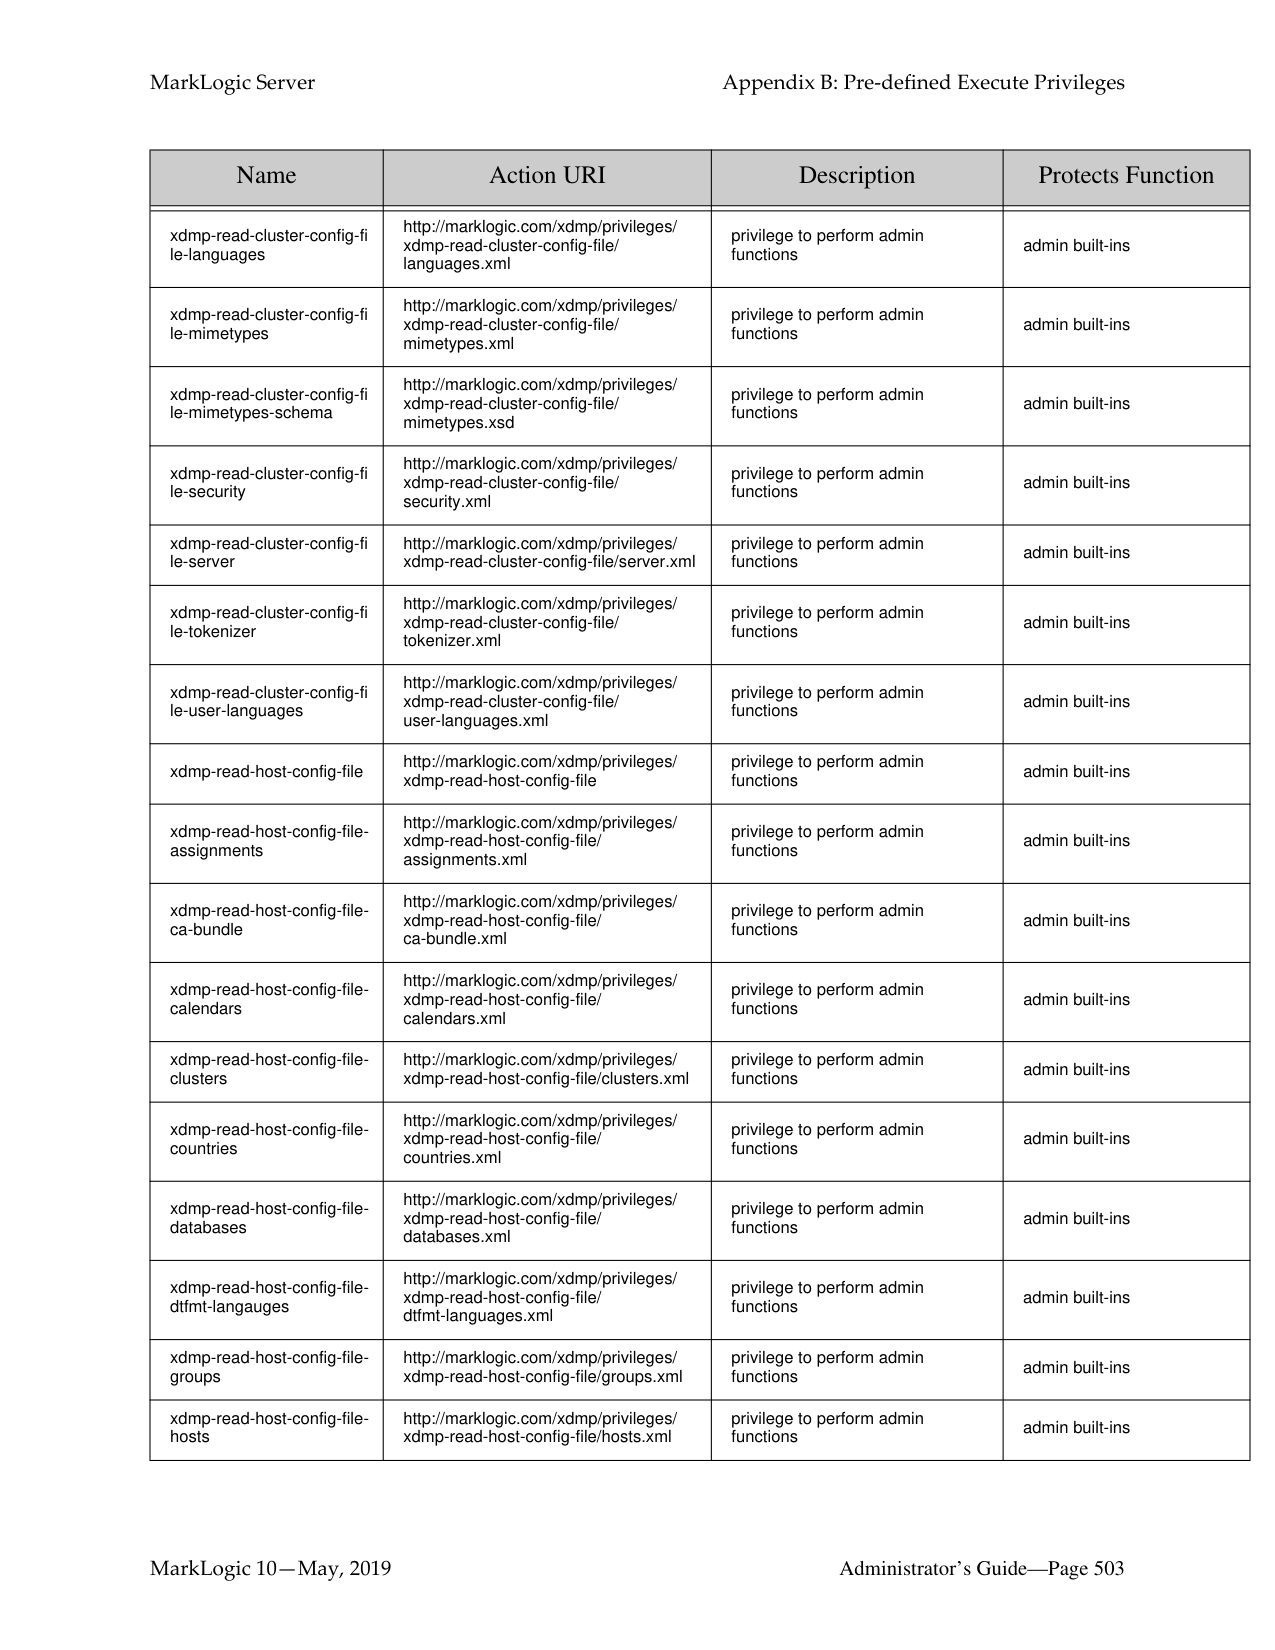
|xdmp-get-forest-keys|http://marklogic.com/xdmp/privileges/ xdmp-get-forest-keys|privilege to perform admin functions|admin built-ins| |xdmp-get-hot-updates|http://marklogic.com/xdmp/privileges/ xdmp-get-hot-updates|privilege to perform admin functions|admin built-ins| |xdmp-get-orphaned-binari es|http://marklogic.com/xdmp/privileges/ xdmp-get-orphaned-binaries|privilege to run the built-in|xdmp:get-orphaned-binaries| |xdmp-get-server-field|http://marklogic.com/xdmp/privileges/ xdmp-get-server-field|privilege to get server fields|xdmp:get-server-field| |xdmp-get-server-field-nam es|http://marklogic.com/xdmp/privileges/ xdmp-get-server-field-names|privilege to get server fields names|xdmp:get-server-field-names| |xdmp-get-session-field|http://marklogic.com/xdmp/privileges/ xdmp-get-session-field|privilege to get session fields|xdmp:get-session-field|
|Name|Action URI|Description|Protects Function| |---|---|---|---| | | | | | |xdmp-get-session-field-na mes|http://marklogic.com/xdmp/privileges/ xdmp-get-session-field-names|privilege to get session field names|xdmp:get-session-field-name s| |xdmp-getenv|http://marklogic.com/xdmp/privileges/ xdmp-getenv|privilege to perform admin function|admin built-ins| |xdmp-host-cores|http://marklogic.com/xdmp/privileges/ xdmp-host-cores|privilege to perform admin functions|admin built-ins| |xdmp-host-cpus|http://marklogic.com/xdmp/privileges/ xdmp-host-cpus|privilege to perform admin functions|admin built-ins| |xdmp-host-size|http://marklogic.com/xdmp/privileges/ xdmp-host-size|privilege to perform admin functions|admin built-ins| |xdmp-hostname|http://marklogic.com/xdmp/privileges/ xdmp-hostname|privilege to perform admin functions|admin built-ins| |xdmp-http-get|http://marklogic.com/xdmp/privileges/ xdmp-http-get|privilege to perform http function|xdmp:http-get| |xdmp-http-head|http://marklogic.com/xdmp/privileges/ xdmp-http-head|privilege to perform http function|xdmp:http-head| |xdmp-http-options|http://marklogic.com/xdmp/privileges/ xdmp-http-options|privilege to perform http function|xdmp:http-options| |xdmp-http-delete|http://marklogic.com/xdmp/privileges/ xdmp-http-delete|privilege to perform http function|xdmp:http-delete| |xdmp-http-post|http://marklogic.com/xdmp/privileges/ xdmp-http-post|privilege to perform http function|xdmp:http-post| |xdmp-http-put|http://marklogic.com/xdmp/privileges/ xdmp-http-put|privilege to perform http function|xdmp:http-put|
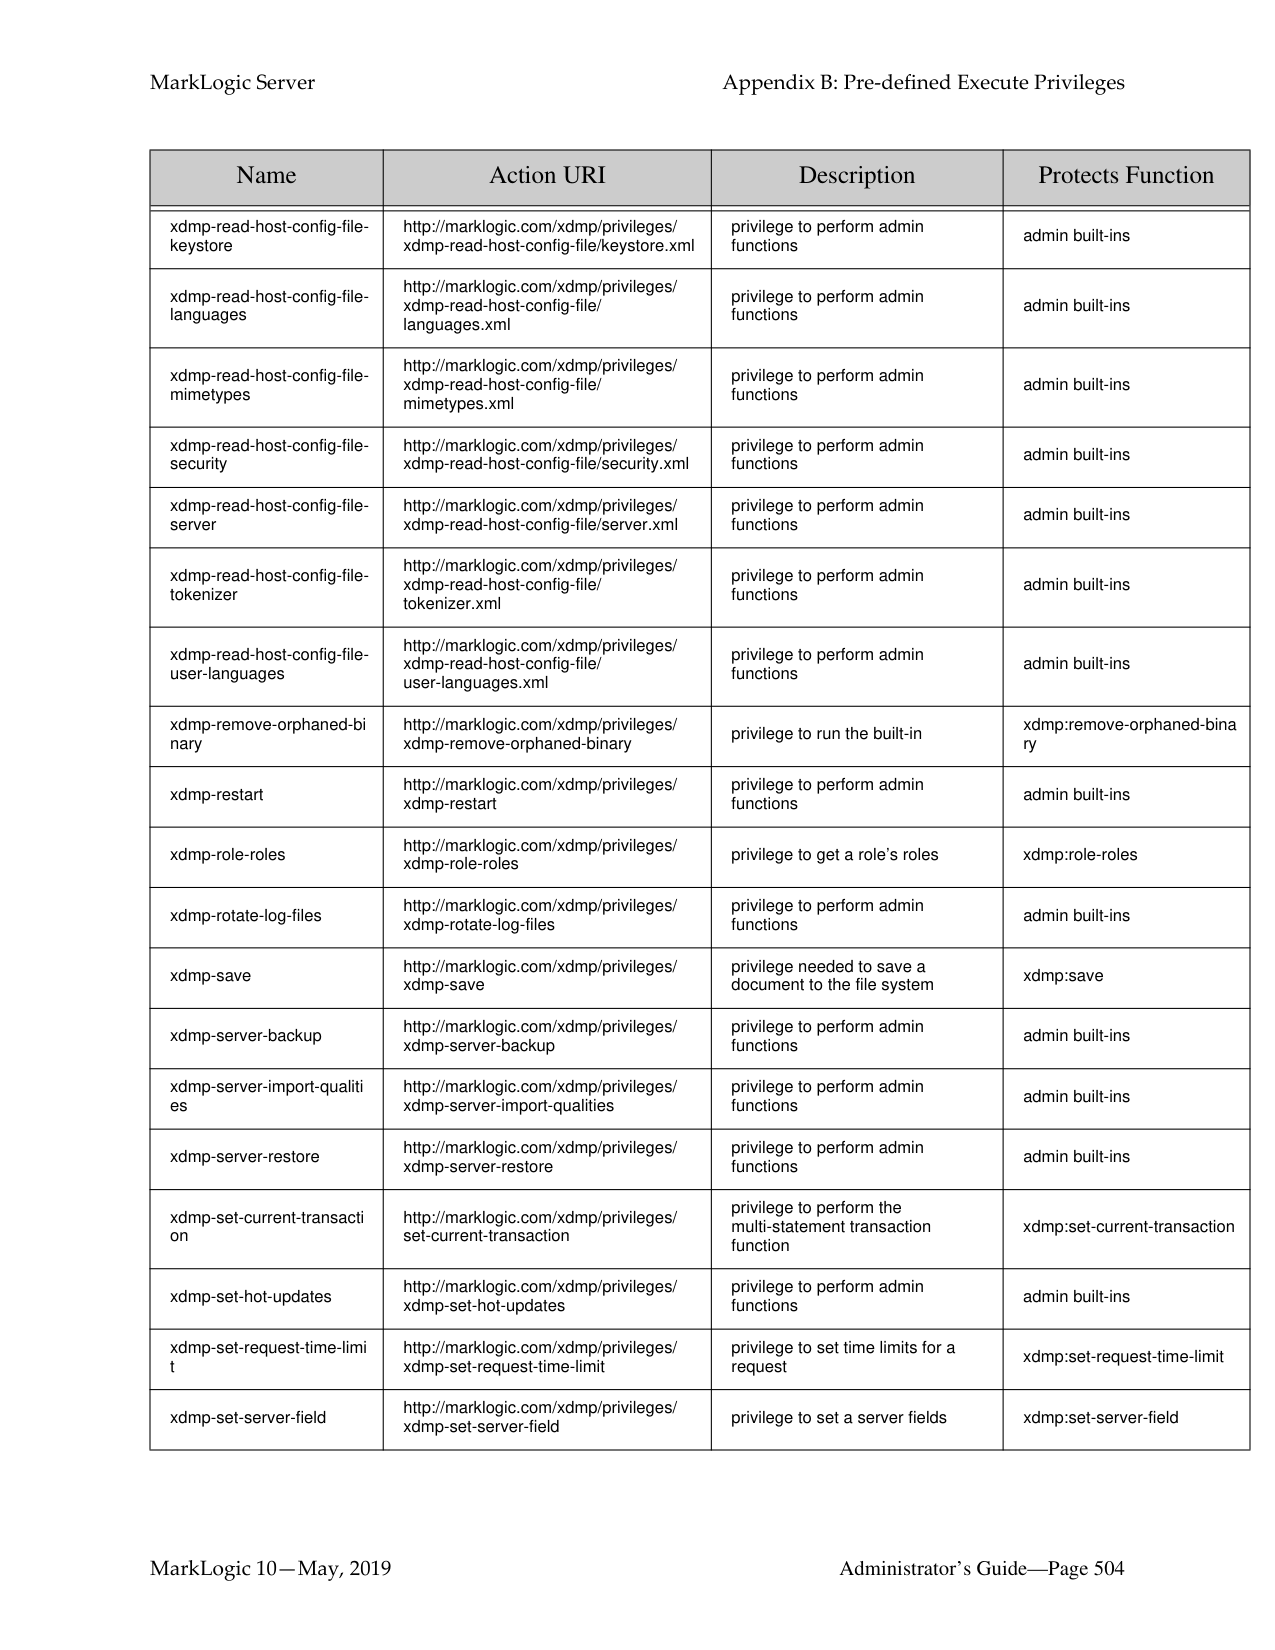
|xdmp-install-directory|http://marklogic.com/xdmp/privileges/ xdmp-install-directory|privilege to access the installation directory|admin built-ins| |xdmp-invoke|http://marklogic.com/xdmp/privileges/ xdmp-invoke|privilege to perform invoke functions|xdmp:invoke| |xdmp-invoke-in|http://marklogic.com/xdmp/privileges/ xdmp-invoke-in|privilege to perform invoke-in functions|xdmp:invoke-in| |xdmp-invoke-modules-cha nge|http://marklogic.com/xdmp/privileges/ xdmp-invoke-modules-change|privilege to execute invoke statements that change a modules database|xdmp:invoke statements that change the modules database| |xdmp-invoke-modules-cha nge-file|http://marklogic.com/xdmp/privileges/ xdmp-invoke-modules-change-file|privilege to execute invoke statements that change a filesystem root|xdmp:invoke statements that change the filesystem root| |xdmp-invoke-transaction|http://marklogic.com/xdmp/privileges/ xdmp-invoke-transaction|privilege to execute invoke statements that have the
|Name|Action URI|Description|Protects Function| |---|---|---|---| | | | | | |xdmp-license-key|http://marklogic.com/xdmp/privileges/ xdmp-license-key|privilege to perform admin functions|admin built-ins| |xdmp-license-key-agreem ent|http://marklogic.com/xdmp/privileges/ xdmp-license-key-agreement|privilege to perform admin functions|admin built-ins| |xdmp-license-key-cores|http://marklogic.com/xdmp/privileges/ xdmp-license-key-cores|privilege to perform admin functions|admin built-ins| |xdmp-license-key-cpus|http://marklogic.com/xdmp/privileges/ xdmp-license-key-cpus|privilege to perform admin functions|admin built-ins| |xdmp-license-key-decode|http://marklogic.com/xdmp/privileges/ xdmp-license-key-decode|privilege to perform admin functions|admin built-ins| |xdmp-license-key-encode|http://marklogic.com/xdmp/privileges/ xdmp-license-key-encode|privilege to perform admin functions|admin built-ins| |xdmp-license-key-expires|http://marklogic.com/xdmp/privileges/ xdmp-license-key-expires|privilege to perform admin functions|admin built-ins| |xdmp-license-key-options|http://marklogic.com/xdmp/privileges/ xdmp-license-key-options|privilege to perform admin functions|admin built-ins| |xdmp-license-key-size|http://marklogic.com/xdmp/privileges/ xdmp-license-key-size|privilege to perform admin functions|admin built-ins| |xdmp-license-key-valid|http://marklogic.com/xdmp/privileges/ xdmp-license-key-valid|privilege to perform admin functions|admin built-ins|
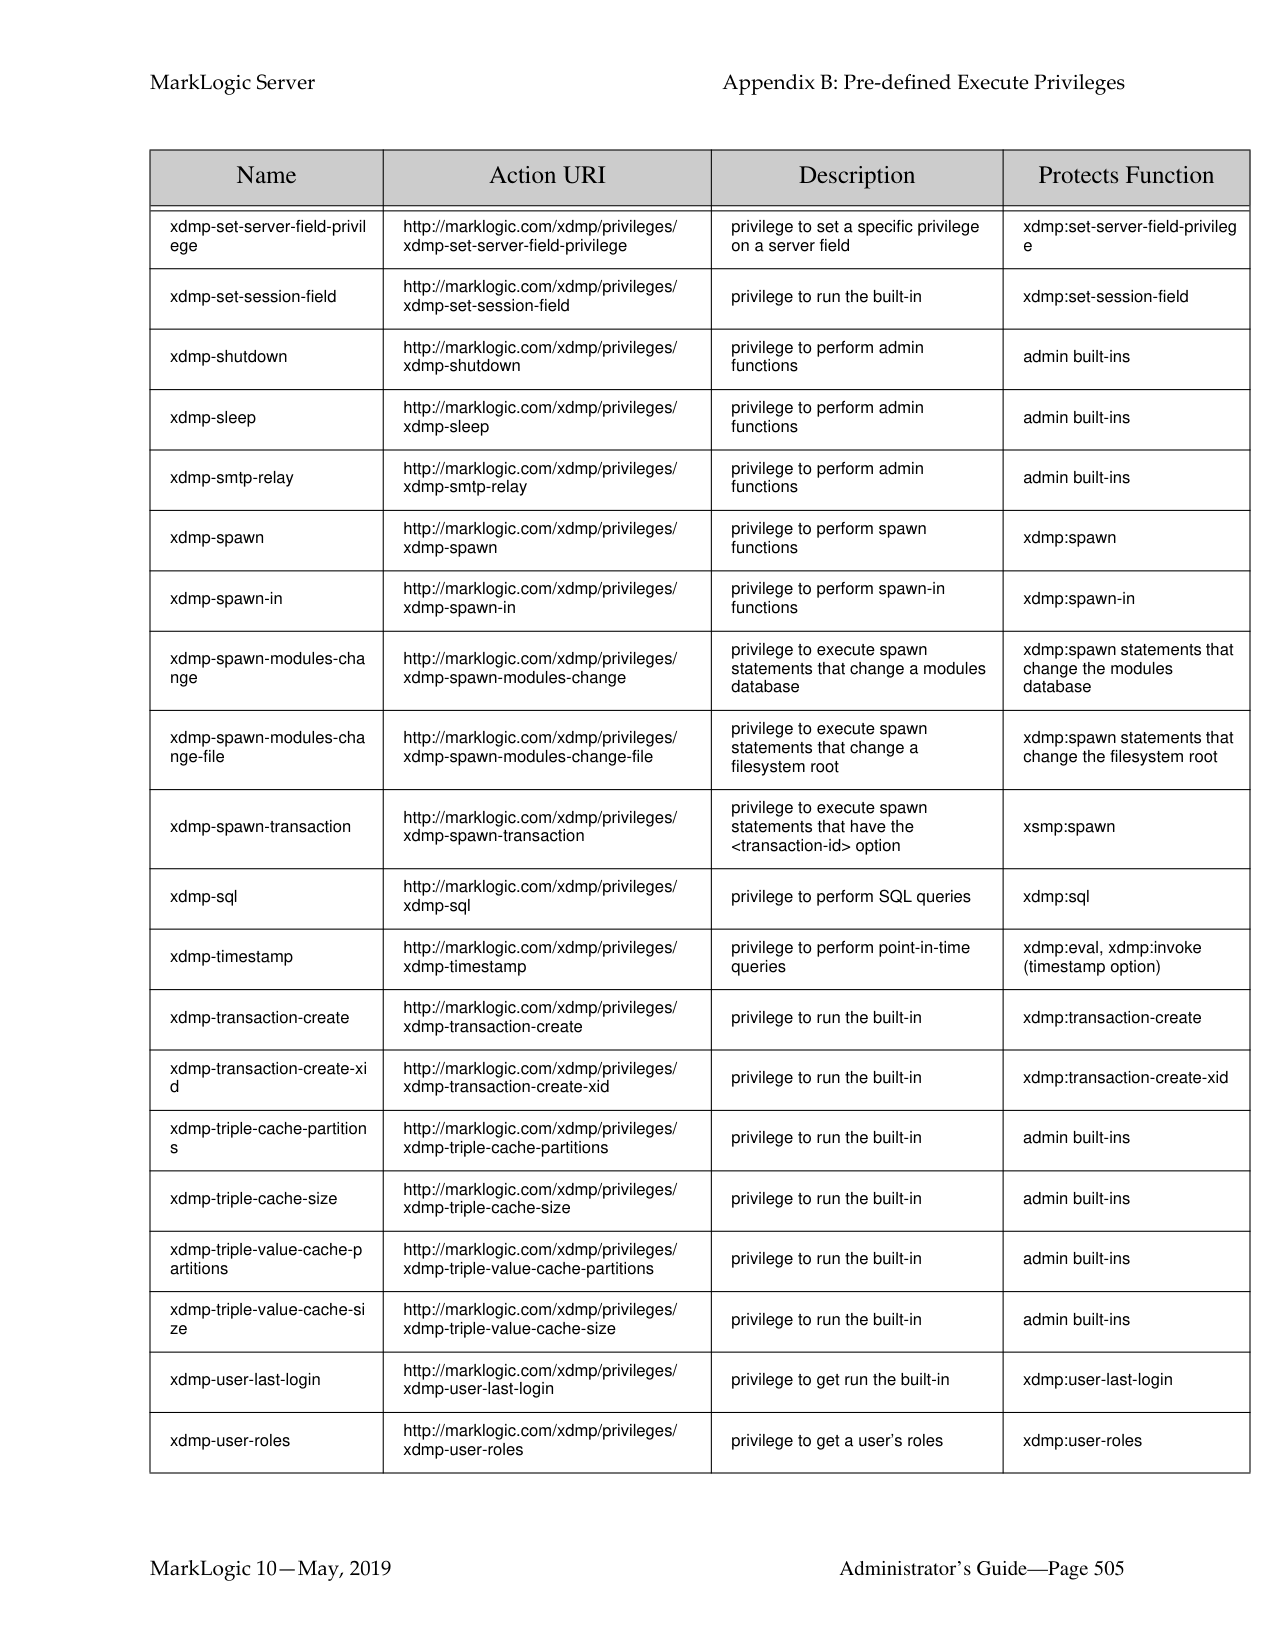
|xdmp-licensee|http://marklogic.com/xdmp/privileges/ xdmp-licensee|privilege to perform admin functions|admin built-ins| |xdmp-list-cache-partitions|http://marklogic.com/xdmp/privileges/ xdmp-list-cache-partitions|privilege to perform admin functions|admin built-ins| |xdmp-list-cache-size|http://marklogic.com/xdmp/privileges/ xdmp-list-cache-size|privilege to perform admin functions|admin built-ins| |xdmp-load|http://marklogic.com/xdmp/privileges/ xdmp-load|privilege needed to load a document from the file system|xdmp:load| |xdmp-login|http://marklogic.com/xdmp/privileges/ xdmp-login|privilege to log in a user without the corresponding password|xdmp-login| |xdmp-merge|http://marklogic.com/xdmp/privileges/ xdmp-merge|privilege to start merging the forests|xdmp-merge| |xdmp-merging|http://marklogic.com/xdmp/privileges/ xdmp-merging|privilege to get forest ids of forests currently merging|xdmp:merging| |xdmp-missing-directories|http://marklogic.com/xdmp/privileges/ xdmp-missing-directories|privilege to perform admin functions|admin built-ins| |xdmp-plan|http://marklogic.com/xdmp/privileges/ xdmp-plan|privilege to perform admin functions|admin built-ins| |xdmp-pre-release-expires|http://marklogic.com/xdmp/privileges/ xdmp-pre-release-expires|privilege to perform admin functions|admin built-ins| |xdmp-privilege-roles|http://marklogic.com/xdmp/privileges/ xdmp-privilege-roles|privilege needed to get a role’s privileges|xdmp:privilege-roles|
|Name|Action URI|Description|Protects Function| |---|---|---|---| | | | | | |xdmp-read-cluster-config-fi le|http://marklogic.com/xdmp/privileges/ xdmp-read-cluster-config-file|privilege to perform admin functions|admin built-ins| |xdmp-read-cluster-config-fi le-assignments|http://marklogic.com/xdmp/privileges/ xdmp-read-cluster-config-file/ assignments.xml|privilege to perform admin functions|admin built-ins| |xdmp-read-cluster-config-fi le-assignments-schema|http://marklogic.com/xdmp/privileges/ xdmp-read-cluster-config-file/ assignments.xsd|privilege to perform admin functions|admin built-ins| |xdmp-read-cluster-config-fi le-ca-bundle|http://marklogic.com/xdmp/privileges/ xdmp-read-cluster-config-file/ ca-bundle.xml|privilege to perform admin functions|admin built-ins| |xdmp-read-cluster-config-fi le-calendars|http://marklogic.com/xdmp/privileges/ xdmp-read-cluster-config-file/ calendars.xml|privilege to perform admin functions|admin built-ins| |xdmp-read-cluster-config-fi le-clusters|http://marklogic.com/xdmp/privileges/ xdmp-read-cluster-config-file/ clusters.xml|privilege to perform admin functions|admin built-ins| |xdmp-read-cluster-config-fi le-clusters-schema|http://marklogic.com/xdmp/privileges/ xdmp-read-cluster-config-file/ clusters.xsd|privilege to perform admin functions|admin built-ins|
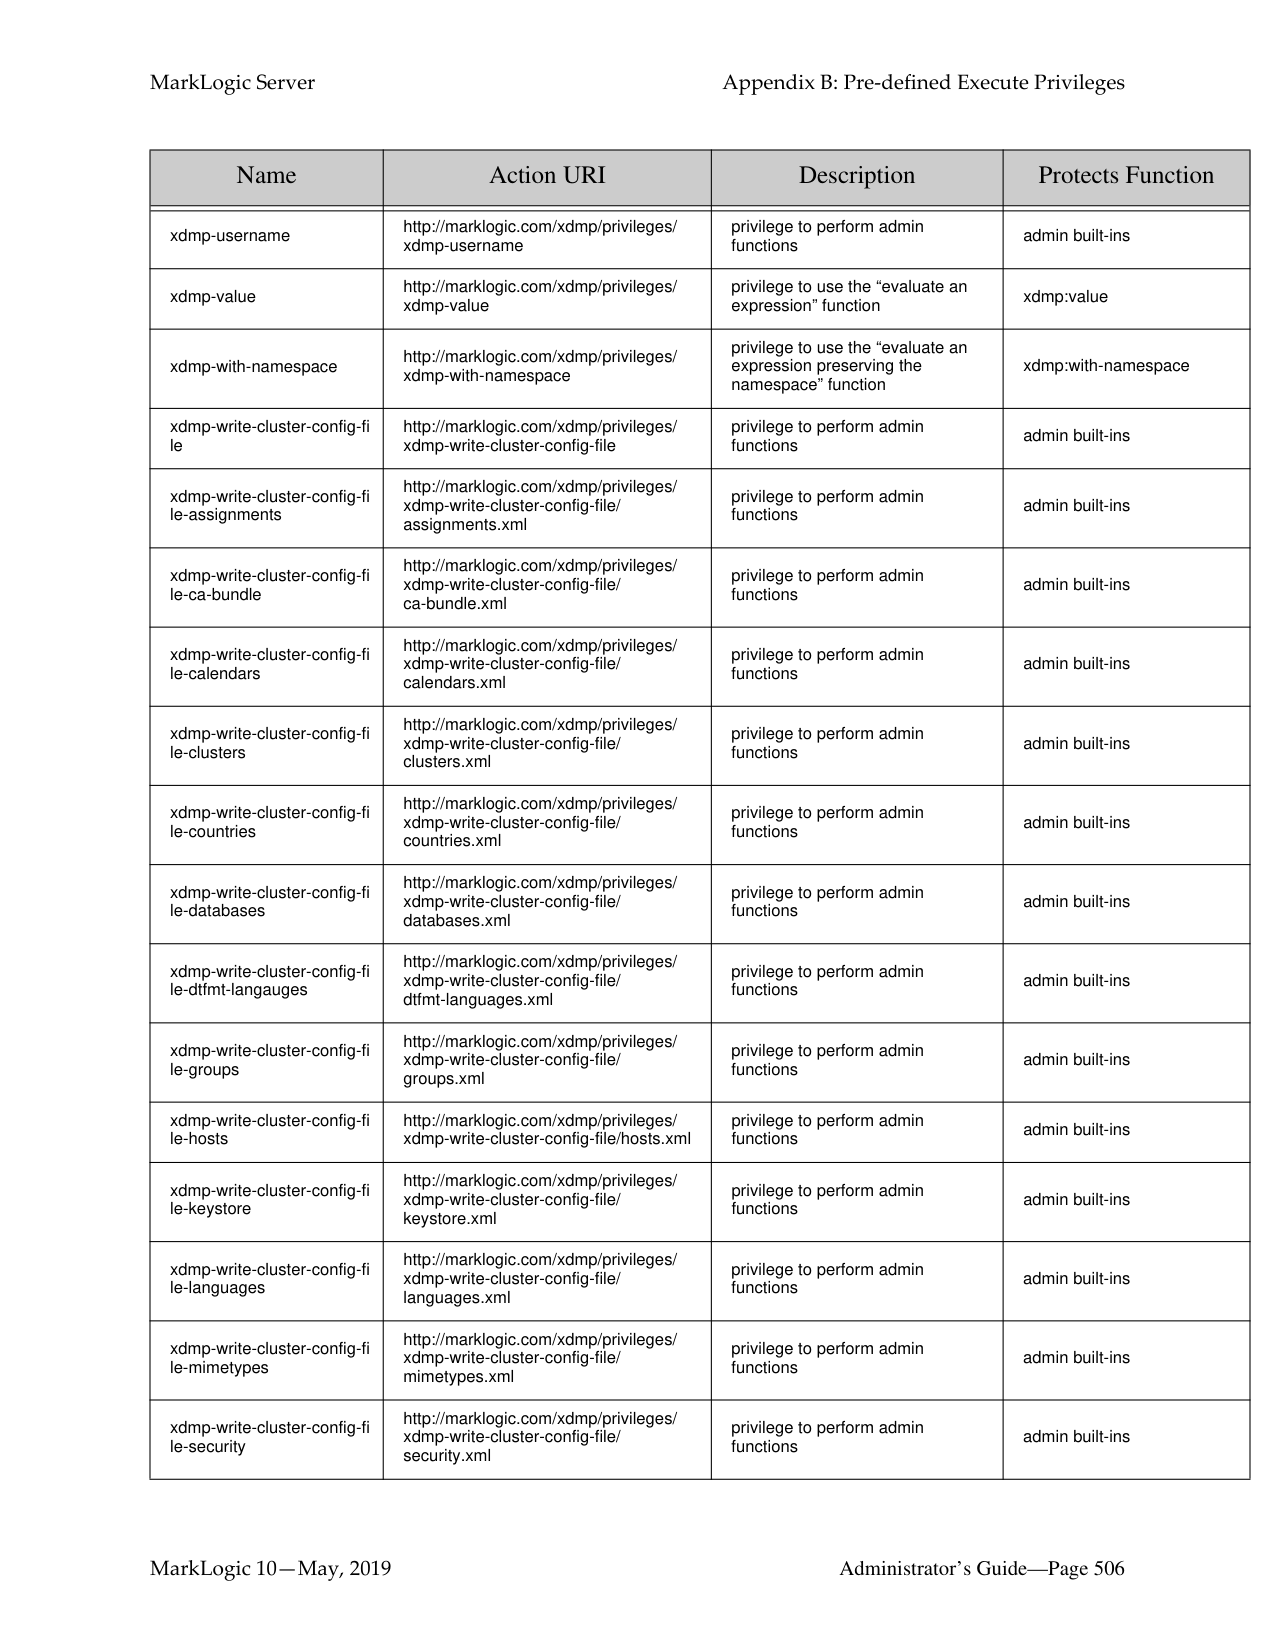
|xdmp-read-cluster-config-fi le-countries|http://marklogic.com/xdmp/privileges/ xdmp-read-cluster-config-file/ countries.xml|privilege to perform admin functions|admin built-ins| |xdmp-read-cluster-config-fi le-database-schema|http://marklogic.com/xdmp/privileges/ xdmp-read-cluster-config-file/ database.xsd|privilege to perform admin functions|admin built-ins| |xdmp-read-cluster-config-fi le-databases|http://marklogic.com/xdmp/privileges/ xdmp-read-cluster-config-file/ databases.xml|privilege to perform admin functions|admin built-ins| |xdmp-read-cluster-config-fi le-dtfmt-langauges|http://marklogic.com/xdmp/privileges/ xdmp-read-cluster-config-file/ dtfmt-languages.xml|privilege to perform admin functions|admin built-ins| |xdmp-read-cluster-config-fi le-group-schema|http://marklogic.com/xdmp/privileges/ xdmp-read-cluster-config-file/group.xsd|privilege to perform admin functions|admin built-ins| |xdmp-read-cluster-config-fi le-groups|http://marklogic.com/xdmp/privileges/ xdmp-read-cluster-config-file/ groups.xml|privilege to perform admin functions|admin built-ins| |xdmp-read-cluster-config-fi le-host-schema|http://marklogic.com/xdmp/privileges/ xdmp-read-cluster-config-file/hosts.xsd|privilege to perform admin functions|admin built-ins| |xdmp-read-cluster-config-fi le-hosts|http://marklogic.com/xdmp/privileges/ xdmp-read-cluster-config-file/hosts.xml|privilege to perform admin functions|admin built-ins| |xdmp-read-cluster-config-fi le-keystore|http://marklogic.com/xdmp/privileges/ xdmp-read-cluster-config-file/ keystore.xml|privilege to perform admin functions|admin built-ins| |xdmp-read-cluster-config-fi le-keystore-schema|http://marklogic.com/xdmp/privileges/ xdmp-read-cluster-config-file/ keystore.xsd|privilege to perform admin functions|admin built-ins|
|Name|Action URI|Description|Protects Function| |---|---|---|---| | | | | | |xdmp-read-cluster-config-fi le-languages|http://marklogic.com/xdmp/privileges/ xdmp-read-cluster-config-file/ languages.xml|privilege to perform admin functions|admin built-ins| |xdmp-read-cluster-config-fi le-mimetypes|http://marklogic.com/xdmp/privileges/ xdmp-read-cluster-config-file/ mimetypes.xml|privilege to perform admin functions|admin built-ins| |xdmp-read-cluster-config-fi le-mimetypes-schema|http://marklogic.com/xdmp/privileges/ xdmp-read-cluster-config-file/ mimetypes.xsd|privilege to perform admin functions|admin built-ins| |xdmp-read-cluster-config-fi le-security|http://marklogic.com/xdmp/privileges/ xdmp-read-cluster-config-file/ security.xml|privilege to perform admin functions|admin built-ins| |xdmp-read-cluster-config-fi le-server|http://marklogic.com/xdmp/privileges/ xdmp-read-cluster-config-file/server.xml|privilege to perform admin functions|admin built-ins| |xdmp-read-cluster-config-fi le-tokenizer|http://marklogic.com/xdmp/privileges/ xdmp-read-cluster-config-file/ tokenizer.xml|privilege to perform admin functions|admin built-ins| |xdmp-read-cluster-config-fi le-user-languages|http://marklogic.com/xdmp/privileges/ xdmp-read-cluster-config-file/ user-languages.xml|privilege to perform admin functions|admin built-ins| |xdmp-read-host-config-file|http://marklogic.com/xdmp/privileges/ xdmp-read-host-config-file|privilege to perform admin functions|admin built-ins|
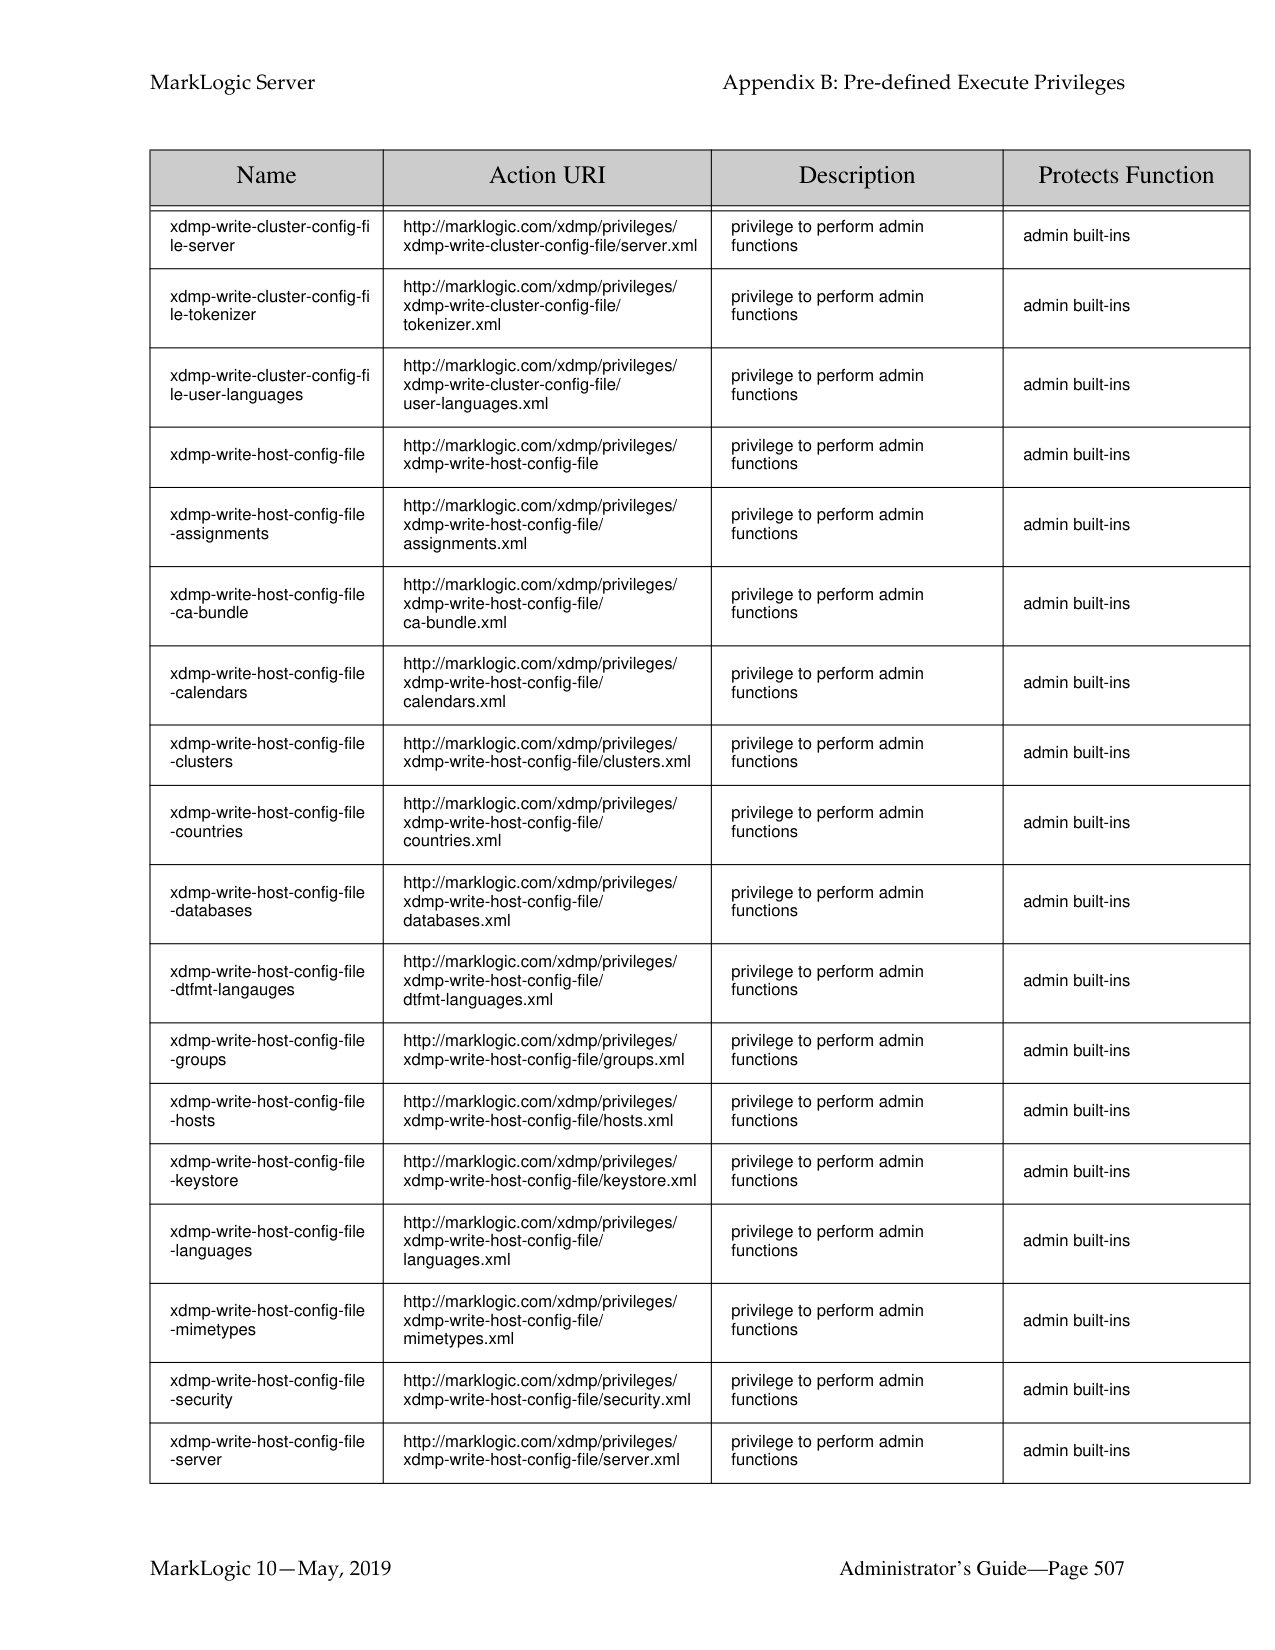
|xdmp-read-host-config-fileassignments|http://marklogic.com/xdmp/privileges/ xdmp-read-host-config-file/ assignments.xml|privilege to perform admin functions|admin built-ins| |xdmp-read-host-config-fileca-bundle|http://marklogic.com/xdmp/privileges/ xdmp-read-host-config-file/ ca-bundle.xml|privilege to perform admin functions|admin built-ins| |xdmp-read-host-config-filecalendars|http://marklogic.com/xdmp/privileges/ xdmp-read-host-config-file/ calendars.xml|privilege to perform admin functions|admin built-ins| |xdmp-read-host-config-fileclusters|http://marklogic.com/xdmp/privileges/ xdmp-read-host-config-file/clusters.xml|privilege to perform admin functions|admin built-ins| |xdmp-read-host-config-filecountries|http://marklogic.com/xdmp/privileges/ xdmp-read-host-config-file/ countries.xml|privilege to perform admin functions|admin built-ins| |xdmp-read-host-config-filedatabases|http://marklogic.com/xdmp/privileges/ xdmp-read-host-config-file/ databases.xml|privilege to perform admin functions|admin built-ins| |xdmp-read-host-config-filedtfmt-langauges|http://marklogic.com/xdmp/privileges/ xdmp-read-host-config-file/ dtfmt-languages.xml|privilege to perform admin functions|admin built-ins| |xdmp-read-host-config-filegroups|http://marklogic.com/xdmp/privileges/ xdmp-read-host-config-file/groups.xml|privilege to perform admin functions|admin built-ins| |xdmp-read-host-config-filehosts|http://marklogic.com/xdmp/privileges/ xdmp-read-host-config-file/hosts.xml|privilege to perform admin functions|admin built-ins|
|Name|Action URI|Description|Protects Function| |---|---|---|---| | | | | | |xdmp-read-host-config-filekeystore|http://marklogic.com/xdmp/privileges/ xdmp-read-host-config-file/keystore.xml|privilege to perform admin functions|admin built-ins| |xdmp-read-host-config-filelanguages|http://marklogic.com/xdmp/privileges/ xdmp-read-host-config-file/ languages.xml|privilege to perform admin functions|admin built-ins| |xdmp-read-host-config-filemimetypes|http://marklogic.com/xdmp/privileges/ xdmp-read-host-config-file/ mimetypes.xml|privilege to perform admin functions|admin built-ins| |xdmp-read-host-config-filesecurity|http://marklogic.com/xdmp/privileges/ xdmp-read-host-config-file/security.xml|privilege to perform admin functions|admin built-ins| |xdmp-read-host-config-fileserver|http://marklogic.com/xdmp/privileges/ xdmp-read-host-config-file/server.xml|privilege to perform admin functions|admin built-ins| |xdmp-read-host-config-filetokenizer|http://marklogic.com/xdmp/privileges/ xdmp-read-host-config-file/ tokenizer.xml|privilege to perform admin functions|admin built-ins| |xdmp-read-host-config-fileuser-languages|http://marklogic.com/xdmp/privileges/ xdmp-read-host-config-file/ user-languages.xml|privilege to perform admin functions|admin built-ins| |xdmp-remove-orphaned-bi nary|http://marklogic.com/xdmp/privileges/ xdmp-remove-orphaned-binary|privilege to run the built-in|xdmp:remove-orphaned-bina ry| |xdmp-restart|http://marklogic.com/xdmp/privileges/ xdmp-restart|privilege to perform admin functions|admin built-ins|
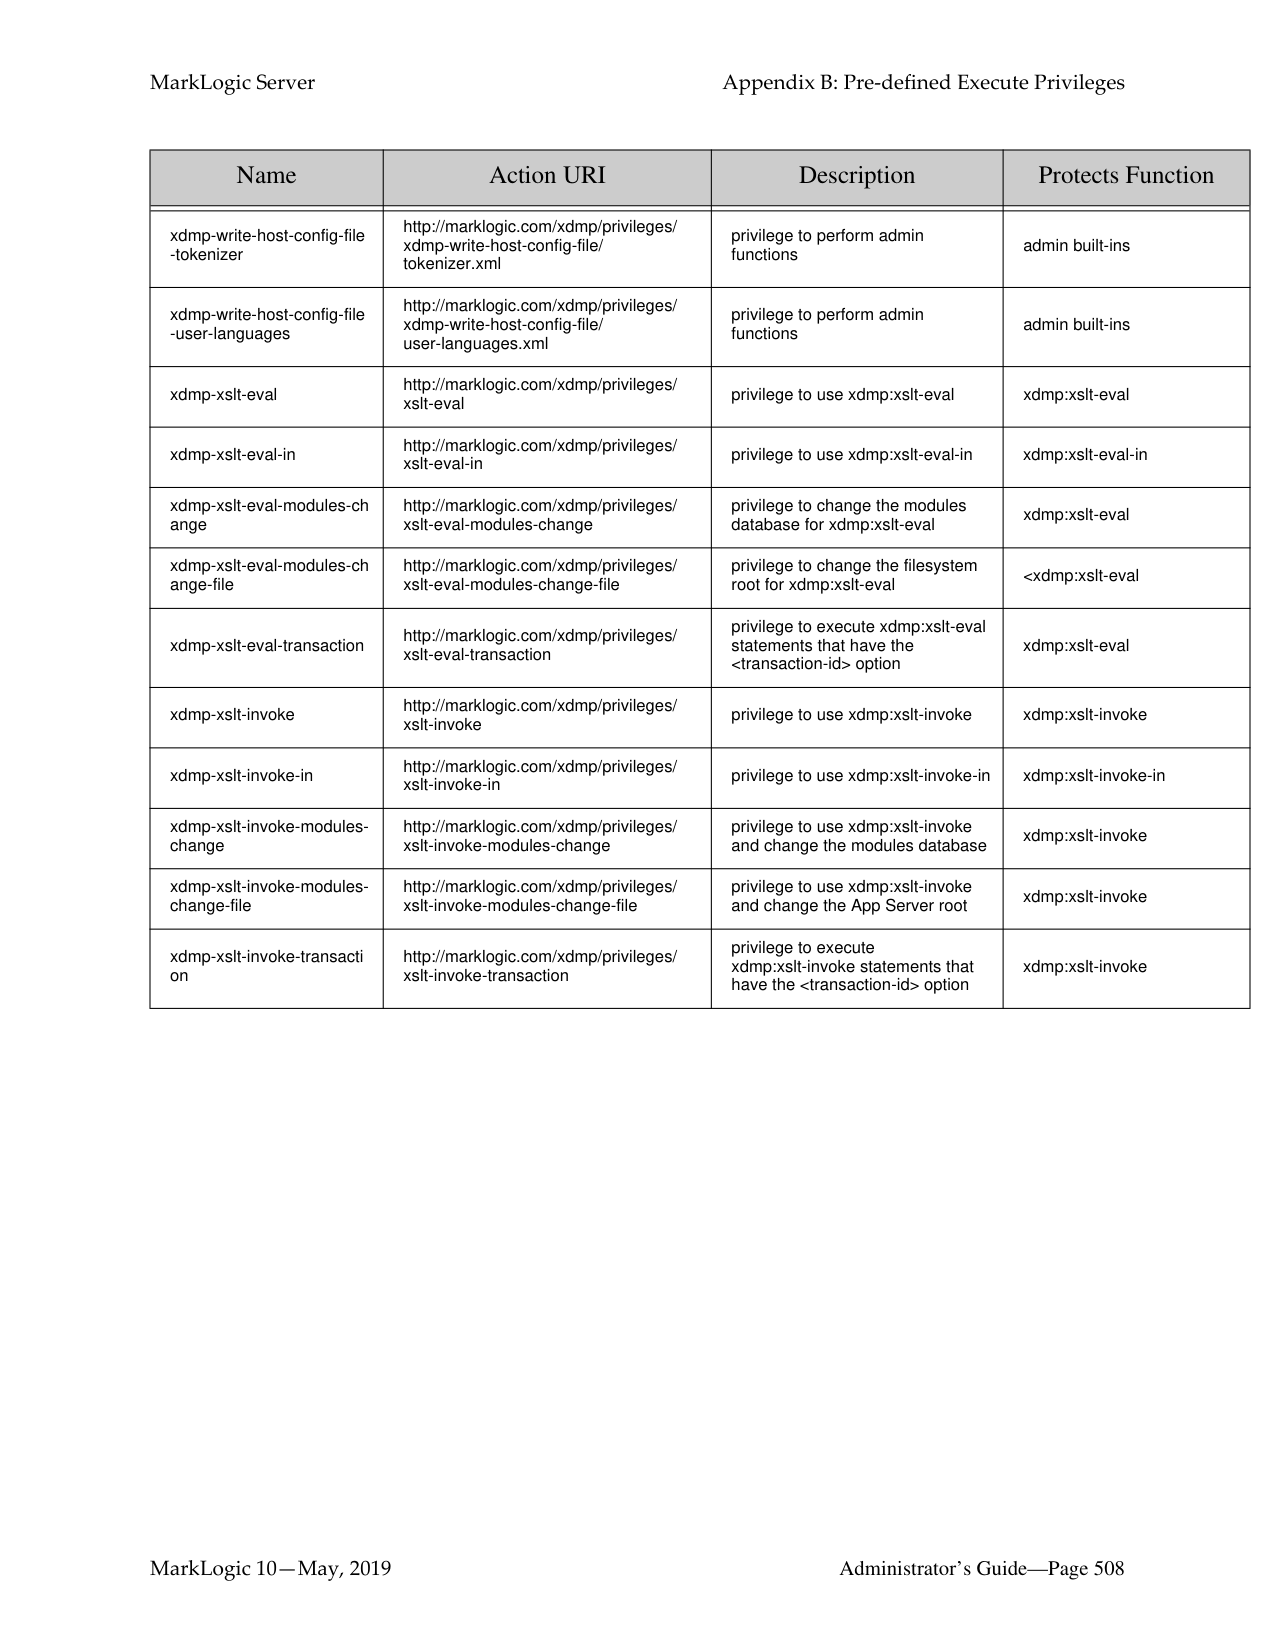
|xdmp-role-roles|http://marklogic.com/xdmp/privileges/ xdmp-role-roles|privilege to get a role’s roles|xdmp:role-roles| |xdmp-rotate-log-files|http://marklogic.com/xdmp/privileges/ xdmp-rotate-log-files|privilege to perform admin functions|admin built-ins| |xdmp-save|http://marklogic.com/xdmp/privileges/ xdmp-save|privilege needed to save a document to the file system|xdmp:save| |xdmp-server-backup|http://marklogic.com/xdmp/privileges/ xdmp-server-backup|privilege to perform admin functions|admin built-ins| |xdmp-server-import-qualiti es|http://marklogic.com/xdmp/privileges/ xdmp-server-import-qualities|privilege to perform admin functions|admin built-ins| |xdmp-server-restore|http://marklogic.com/xdmp/privileges/ xdmp-server-restore|privilege to perform admin functions|admin built-ins| |xdmp-set-current-transacti on|http://marklogic.com/xdmp/privileges/ set-current-transaction|privilege to perform the multi-statement transaction function|xdmp:set-current-transaction| |xdmp-set-hot-updates|http://marklogic.com/xdmp/privileges/ xdmp-set-hot-updates|privilege to perform admin functions|admin built-ins| |xdmp-set-request-time-limi t|http://marklogic.com/xdmp/privileges/ xdmp-set-request-time-limit|privilege to set time limits for a request|xdmp:set-request-time-limit| |xdmp-set-server-field|http://marklogic.com/xdmp/privileges/ xdmp-set-server-field|privilege to set a server fields|xdmp:set-server-field|
|Name|Action URI|Description|Protects Function| |---|---|---|---| | | | | | |xdmp-set-server-field-privil ege|http://marklogic.com/xdmp/privileges/ xdmp-set-server-field-privilege|privilege to set a specific privilege on a server field|xdmp:set-server-field-privileg e| |xdmp-set-session-field|http://marklogic.com/xdmp/privileges/ xdmp-set-session-field|privilege to run the built-in|xdmp:set-session-field| |xdmp-shutdown|http://marklogic.com/xdmp/privileges/ xdmp-shutdown|privilege to perform admin functions|admin built-ins| |xdmp-sleep|http://marklogic.com/xdmp/privileges/ xdmp-sleep|privilege to perform admin functions|admin built-ins| |xdmp-smtp-relay|http://marklogic.com/xdmp/privileges/ xdmp-smtp-relay|privilege to perform admin functions|admin built-ins| |xdmp-spawn|http://marklogic.com/xdmp/privileges/ xdmp-spawn|privilege to perform spawn functions|xdmp:spawn| |xdmp-spawn-in|http://marklogic.com/xdmp/privileges/ xdmp-spawn-in|privilege to perform spawn-in functions|xdmp:spawn-in| |xdmp-spawn-modules-cha nge|http://marklogic.com/xdmp/privileges/ xdmp-spawn-modules-change|privilege to execute spawn statements that change a modules database|xdmp:spawn statements that change the modules database|
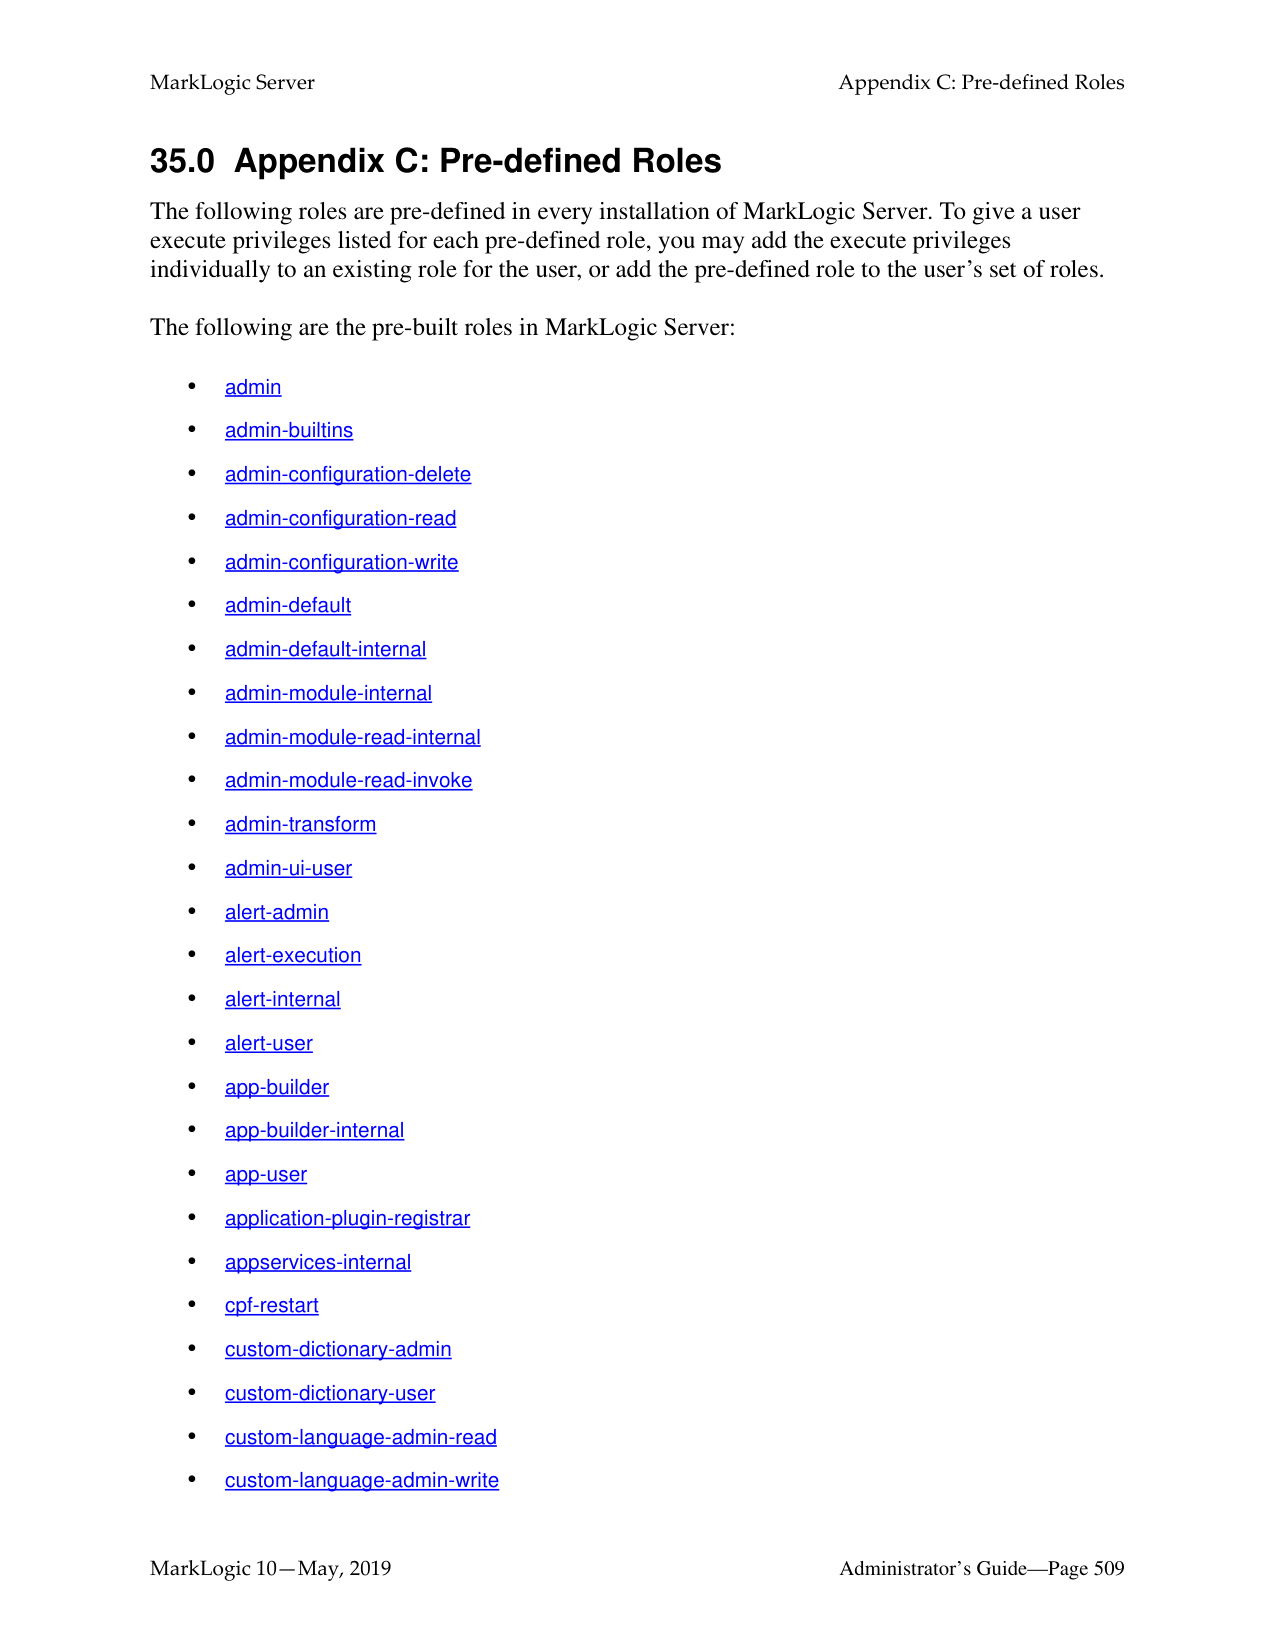
|xdmp-spawn-modules-cha nge-file|http://marklogic.com/xdmp/privileges/ xdmp-spawn-modules-change-file|privilege to execute spawn statements that change a filesystem root|xdmp:spawn statements that change the filesystem root| |xdmp-spawn-transaction|http://marklogic.com/xdmp/privileges/ xdmp-spawn-transaction|privilege to execute spawn statements that have the
|Name|Action URI|Description|Protects Function| |---|---|---|---| | | | | | |xdmp-username|http://marklogic.com/xdmp/privileges/ xdmp-username|privilege to perform admin functions|admin built-ins| |xdmp-value|http://marklogic.com/xdmp/privileges/ xdmp-value|privilege to use the “evaluate an expression” function|xdmp:value| |xdmp-with-namespace|http://marklogic.com/xdmp/privileges/ xdmp-with-namespace|privilege to use the “evaluate an expression preserving the namespace” function|xdmp:with-namespace| |xdmp-write-cluster-config-fi le|http://marklogic.com/xdmp/privileges/ xdmp-write-cluster-config-file|privilege to perform admin functions|admin built-ins| |xdmp-write-cluster-config-fi le-assignments|http://marklogic.com/xdmp/privileges/ xdmp-write-cluster-config-file/ assignments.xml|privilege to perform admin functions|admin built-ins| |xdmp-write-cluster-config-fi le-ca-bundle|http://marklogic.com/xdmp/privileges/ xdmp-write-cluster-config-file/ ca-bundle.xml|privilege to perform admin functions|admin built-ins|
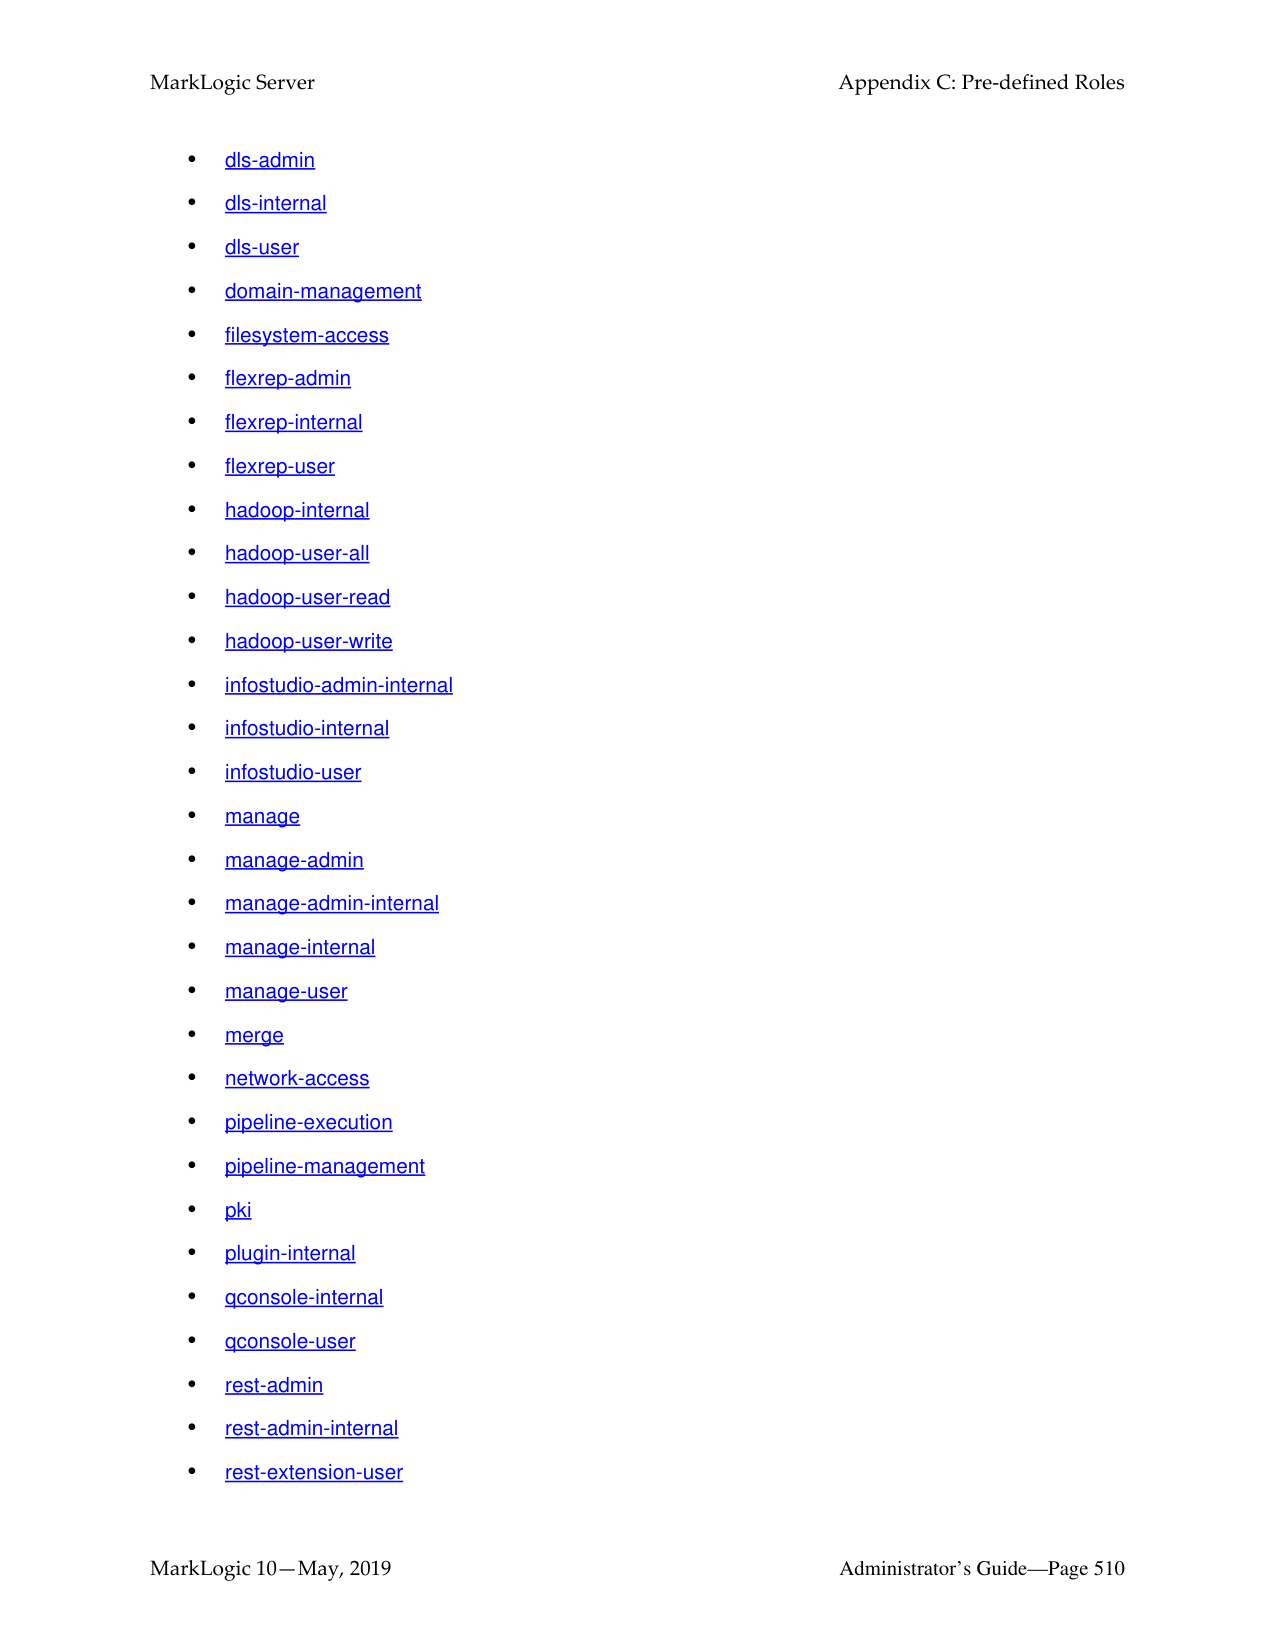
|xdmp-write-cluster-config-fi le-calendars|http://marklogic.com/xdmp/privileges/ xdmp-write-cluster-config-file/ calendars.xml|privilege to perform admin functions|admin built-ins| |xdmp-write-cluster-config-fi le-clusters|http://marklogic.com/xdmp/privileges/ xdmp-write-cluster-config-file/ clusters.xml|privilege to perform admin functions|admin built-ins| |xdmp-write-cluster-config-fi le-countries|http://marklogic.com/xdmp/privileges/ xdmp-write-cluster-config-file/ countries.xml|privilege to perform admin functions|admin built-ins| |xdmp-write-cluster-config-fi le-databases|http://marklogic.com/xdmp/privileges/ xdmp-write-cluster-config-file/ databases.xml|privilege to perform admin functions|admin built-ins| |xdmp-write-cluster-config-fi le-dtfmt-langauges|http://marklogic.com/xdmp/privileges/ xdmp-write-cluster-config-file/ dtfmt-languages.xml|privilege to perform admin functions|admin built-ins| |xdmp-write-cluster-config-fi le-groups|http://marklogic.com/xdmp/privileges/ xdmp-write-cluster-config-file/ groups.xml|privilege to perform admin functions|admin built-ins| |xdmp-write-cluster-config-fi le-hosts|http://marklogic.com/xdmp/privileges/ xdmp-write-cluster-config-file/hosts.xml|privilege to perform admin functions|admin built-ins| |xdmp-write-cluster-config-fi le-keystore|http://marklogic.com/xdmp/privileges/ xdmp-write-cluster-config-file/ keystore.xml|privilege to perform admin functions|admin built-ins| |xdmp-write-cluster-config-fi le-languages|http://marklogic.com/xdmp/privileges/ xdmp-write-cluster-config-file/ languages.xml|privilege to perform admin functions|admin built-ins| |xdmp-write-cluster-config-fi le-mimetypes|http://marklogic.com/xdmp/privileges/ xdmp-write-cluster-config-file/ mimetypes.xml|privilege to perform admin functions|admin built-ins| |xdmp-write-cluster-config-fi le-security|http://marklogic.com/xdmp/privileges/ xdmp-write-cluster-config-file/ security.xml|privilege to perform admin functions|admin built-ins|
|Name|Action URI|Description|Protects Function| |---|---|---|---| | | | | | |xdmp-write-cluster-config-fi le-server|http://marklogic.com/xdmp/privileges/ xdmp-write-cluster-config-file/server.xml|privilege to perform admin functions|admin built-ins| |xdmp-write-cluster-config-fi le-tokenizer|http://marklogic.com/xdmp/privileges/ xdmp-write-cluster-config-file/ tokenizer.xml|privilege to perform admin functions|admin built-ins| |xdmp-write-cluster-config-fi le-user-languages|http://marklogic.com/xdmp/privileges/ xdmp-write-cluster-config-file/ user-languages.xml|privilege to perform admin functions|admin built-ins| |xdmp-write-host-config-file|http://marklogic.com/xdmp/privileges/ xdmp-write-host-config-file|privilege to perform admin functions|admin built-ins| |xdmp-write-host-config-file
-assignments|http://marklogic.com/xdmp/privileges/ xdmp-write-host-config-file/ assignments.xml|privilege to perform admin functions|admin built-ins| |xdmp-write-host-config-file
-ca-bundle|http://marklogic.com/xdmp/privileges/ xdmp-write-host-config-file/ ca-bundle.xml|privilege to perform admin functions|admin built-ins| |xdmp-write-host-config-file
-calendars|http://marklogic.com/xdmp/privileges/ xdmp-write-host-config-file/ calendars.xml|privilege to perform admin functions|admin built-ins|
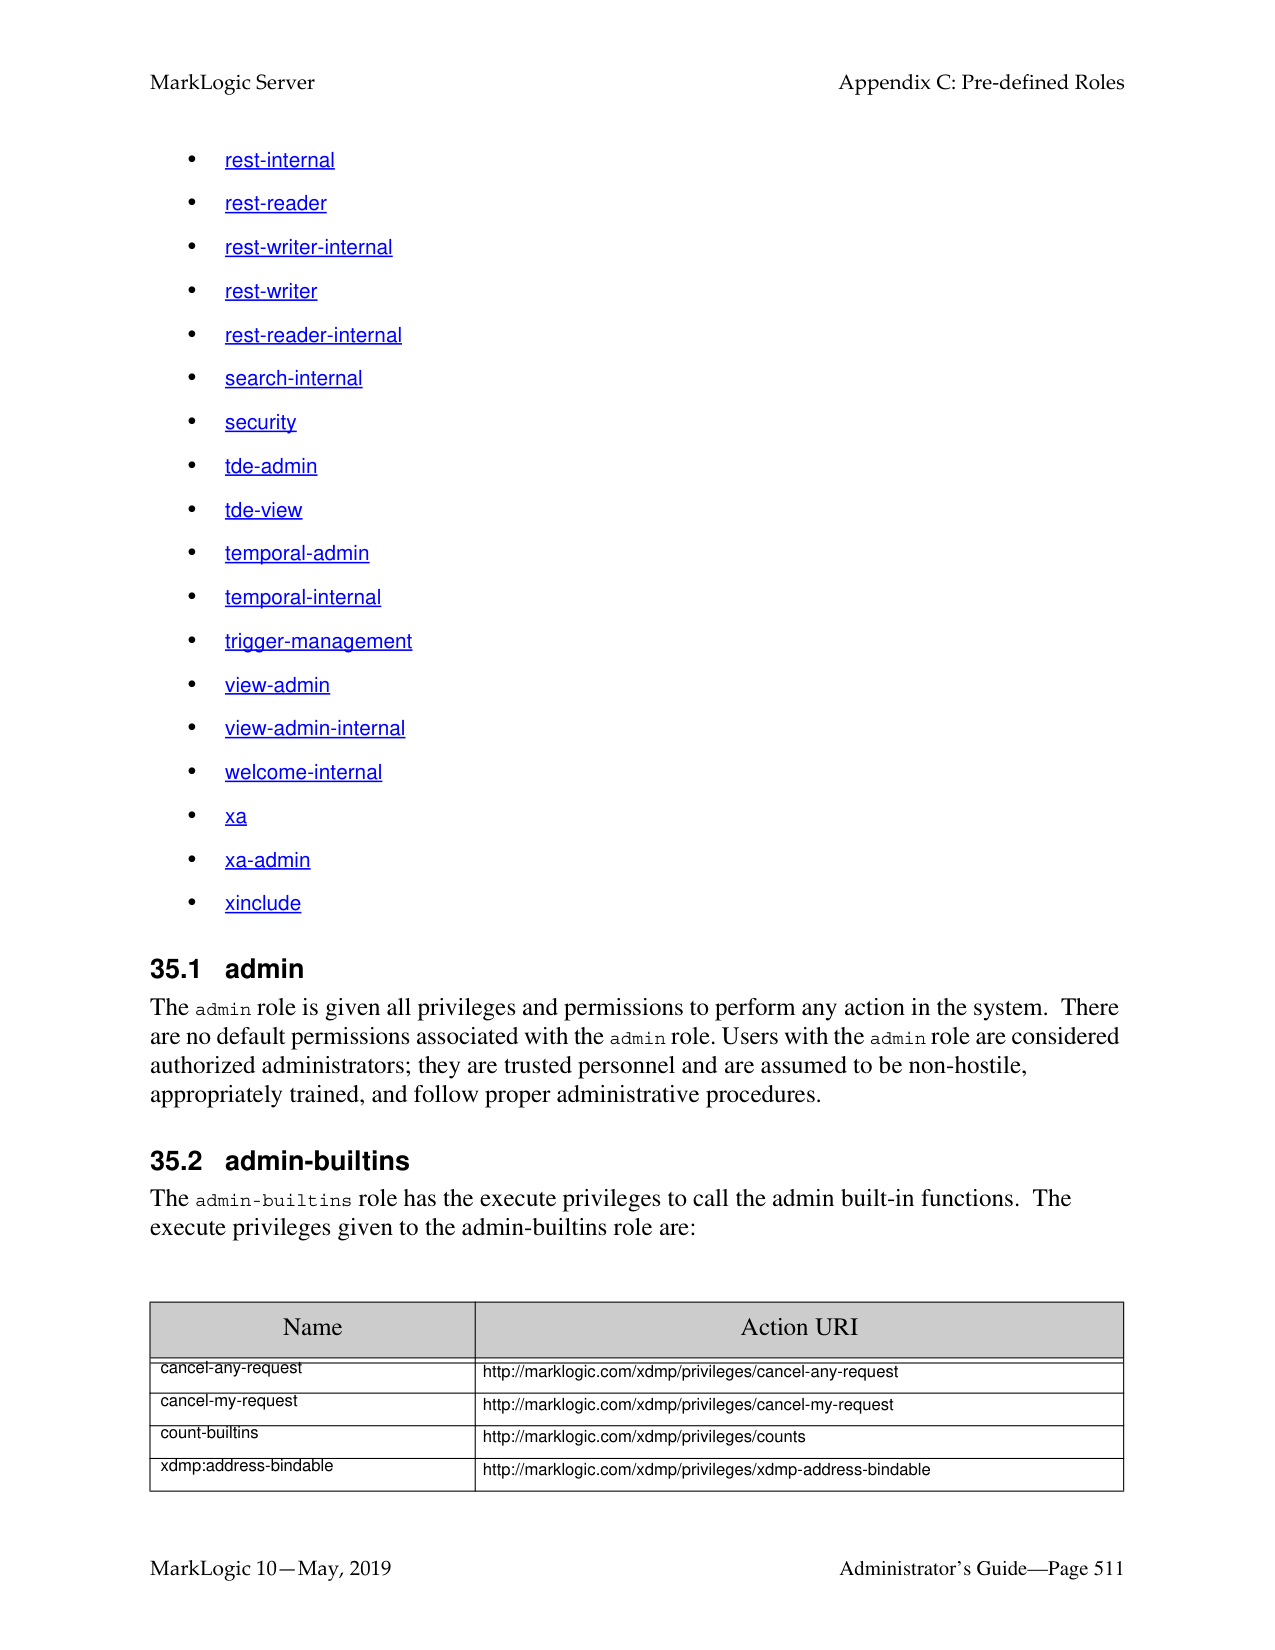
|xdmp-write-host-config-file
-clusters|http://marklogic.com/xdmp/privileges/ xdmp-write-host-config-file/clusters.xml|privilege to perform admin functions|admin built-ins| |xdmp-write-host-config-file
-countries|http://marklogic.com/xdmp/privileges/ xdmp-write-host-config-file/ countries.xml|privilege to perform admin functions|admin built-ins| |xdmp-write-host-config-file
-databases|http://marklogic.com/xdmp/privileges/ xdmp-write-host-config-file/ databases.xml|privilege to perform admin functions|admin built-ins| |xdmp-write-host-config-file
-dtfmt-langauges|http://marklogic.com/xdmp/privileges/ xdmp-write-host-config-file/ dtfmt-languages.xml|privilege to perform admin functions|admin built-ins| |xdmp-write-host-config-file
-groups|http://marklogic.com/xdmp/privileges/ xdmp-write-host-config-file/groups.xml|privilege to perform admin functions|admin built-ins| |xdmp-write-host-config-file
-hosts|http://marklogic.com/xdmp/privileges/ xdmp-write-host-config-file/hosts.xml|privilege to perform admin functions|admin built-ins| |xdmp-write-host-config-file
-keystore|http://marklogic.com/xdmp/privileges/ xdmp-write-host-config-file/keystore.xml|privilege to perform admin functions|admin built-ins| |xdmp-write-host-config-file
-languages|http://marklogic.com/xdmp/privileges/ xdmp-write-host-config-file/ languages.xml|privilege to perform admin functions|admin built-ins| |xdmp-write-host-config-file
-mimetypes|http://marklogic.com/xdmp/privileges/ xdmp-write-host-config-file/ mimetypes.xml|privilege to perform admin functions|admin built-ins| |xdmp-write-host-config-file
-security|http://marklogic.com/xdmp/privileges/ xdmp-write-host-config-file/security.xml|privilege to perform admin functions|admin built-ins| |xdmp-write-host-config-file
-server|http://marklogic.com/xdmp/privileges/ xdmp-write-host-config-file/server.xml|privilege to perform admin functions|admin built-ins|
|Name|Action URI|Description|Protects Function| |---|---|---|---| | | | | | |xdmp-write-host-config-file
-tokenizer|http://marklogic.com/xdmp/privileges/ xdmp-write-host-config-file/ tokenizer.xml|privilege to perform admin functions|admin built-ins| |xdmp-write-host-config-file
-user-languages|http://marklogic.com/xdmp/privileges/ xdmp-write-host-config-file/ user-languages.xml|privilege to perform admin functions|admin built-ins| |xdmp-xslt-eval|http://marklogic.com/xdmp/privileges/ xslt-eval|privilege to use xdmp:xslt-eval|xdmp:xslt-eval| |xdmp-xslt-eval-in|http://marklogic.com/xdmp/privileges/ xslt-eval-in|privilege to use xdmp:xslt-eval-in|xdmp:xslt-eval-in| |xdmp-xslt-eval-modules-ch ange|http://marklogic.com/xdmp/privileges/ xslt-eval-modules-change|privilege to change the modules database for xdmp:xslt-eval|xdmp:xslt-eval| |xdmp-xslt-eval-modules-ch ange-file|http://marklogic.com/xdmp/privileges/ xslt-eval-modules-change-file|privilege to change the filesystem root for xdmp:xslt-eval|
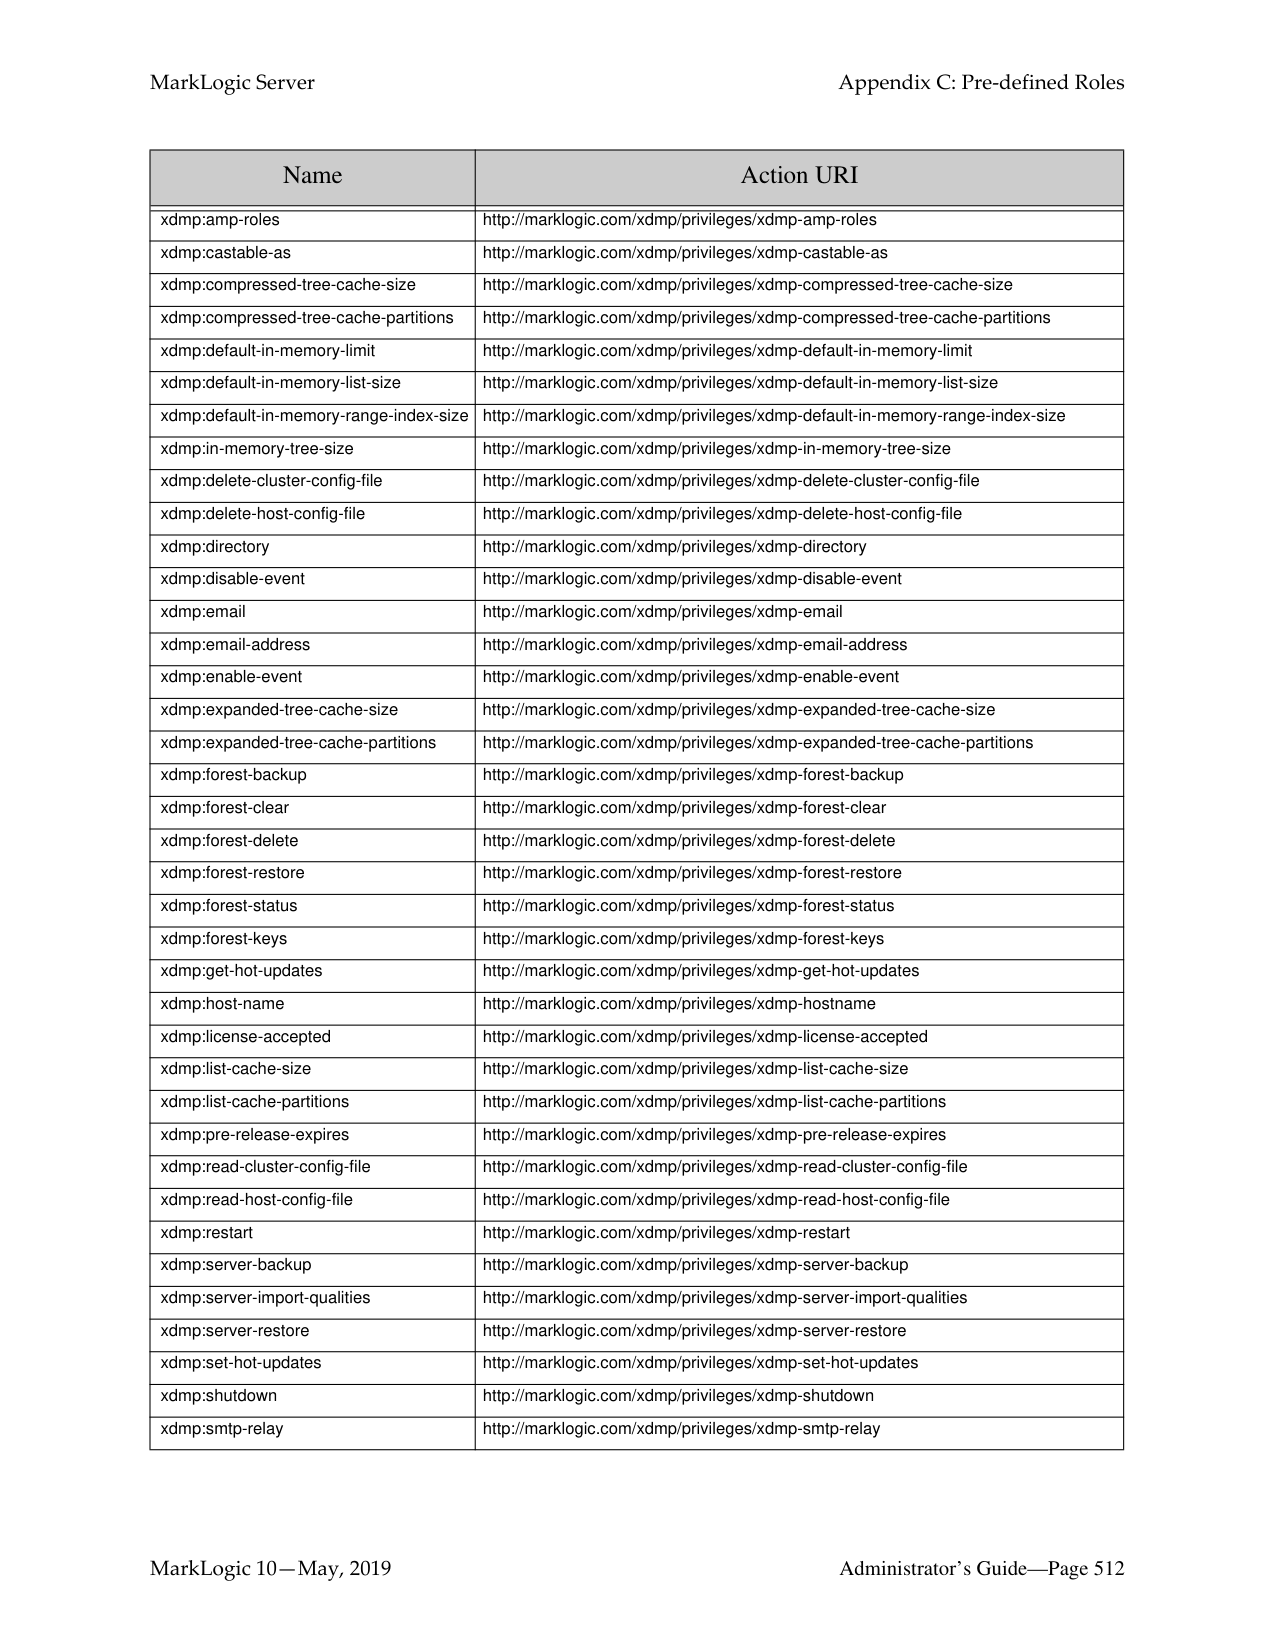
|xdmp-xslt-invoke|http://marklogic.com/xdmp/privileges/ xslt-invoke|privilege to use xdmp:xslt-invoke|xdmp:xslt-invoke| |xdmp-xslt-invoke-in|http://marklogic.com/xdmp/privileges/ xslt-invoke-in|privilege to use xdmp:xslt-invoke-in|xdmp:xslt-invoke-in| |xdmp-xslt-invoke-moduleschange|http://marklogic.com/xdmp/privileges/ xslt-invoke-modules-change|privilege to use xdmp:xslt-invoke and change the modules database|xdmp:xslt-invoke| |xdmp-xslt-invoke-moduleschange-file|http://marklogic.com/xdmp/privileges/ xslt-invoke-modules-change-file|privilege to use xdmp:xslt-invoke and change the App Server root|xdmp:xslt-invoke| |xdmp-xslt-invoke-transacti on|http://marklogic.com/xdmp/privileges/ xslt-invoke-transaction|privilege to execute xdmp:xslt-invoke statements that have the
##### 35.0 Appendix C: Pre-defined Roles
The following roles are pre-defined in every installation of MarkLogic Server. To give a user execute privileges listed for each pre-defined role, you may add the execute privileges individually to an existing role for the user, or add the pre-defined role to the user’s set of roles.
The following are the pre-built roles in MarkLogic Server:
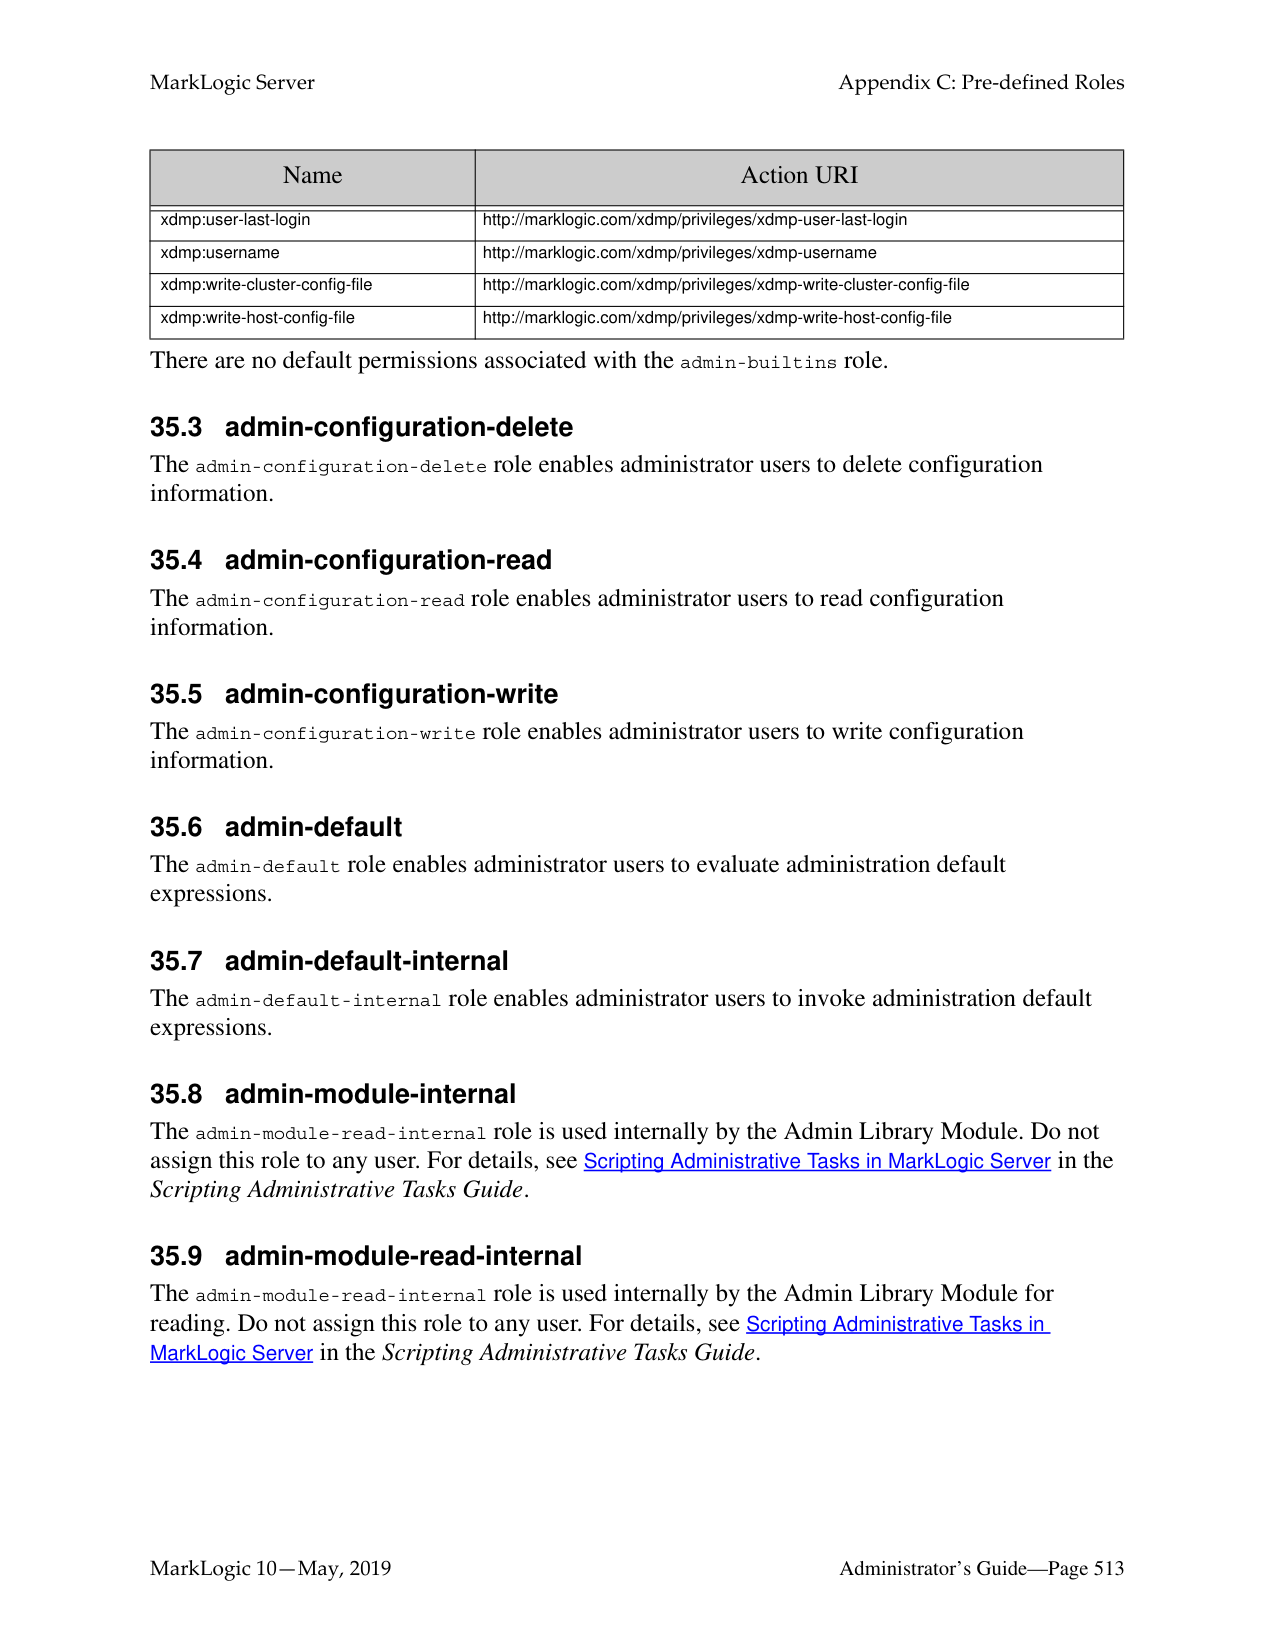

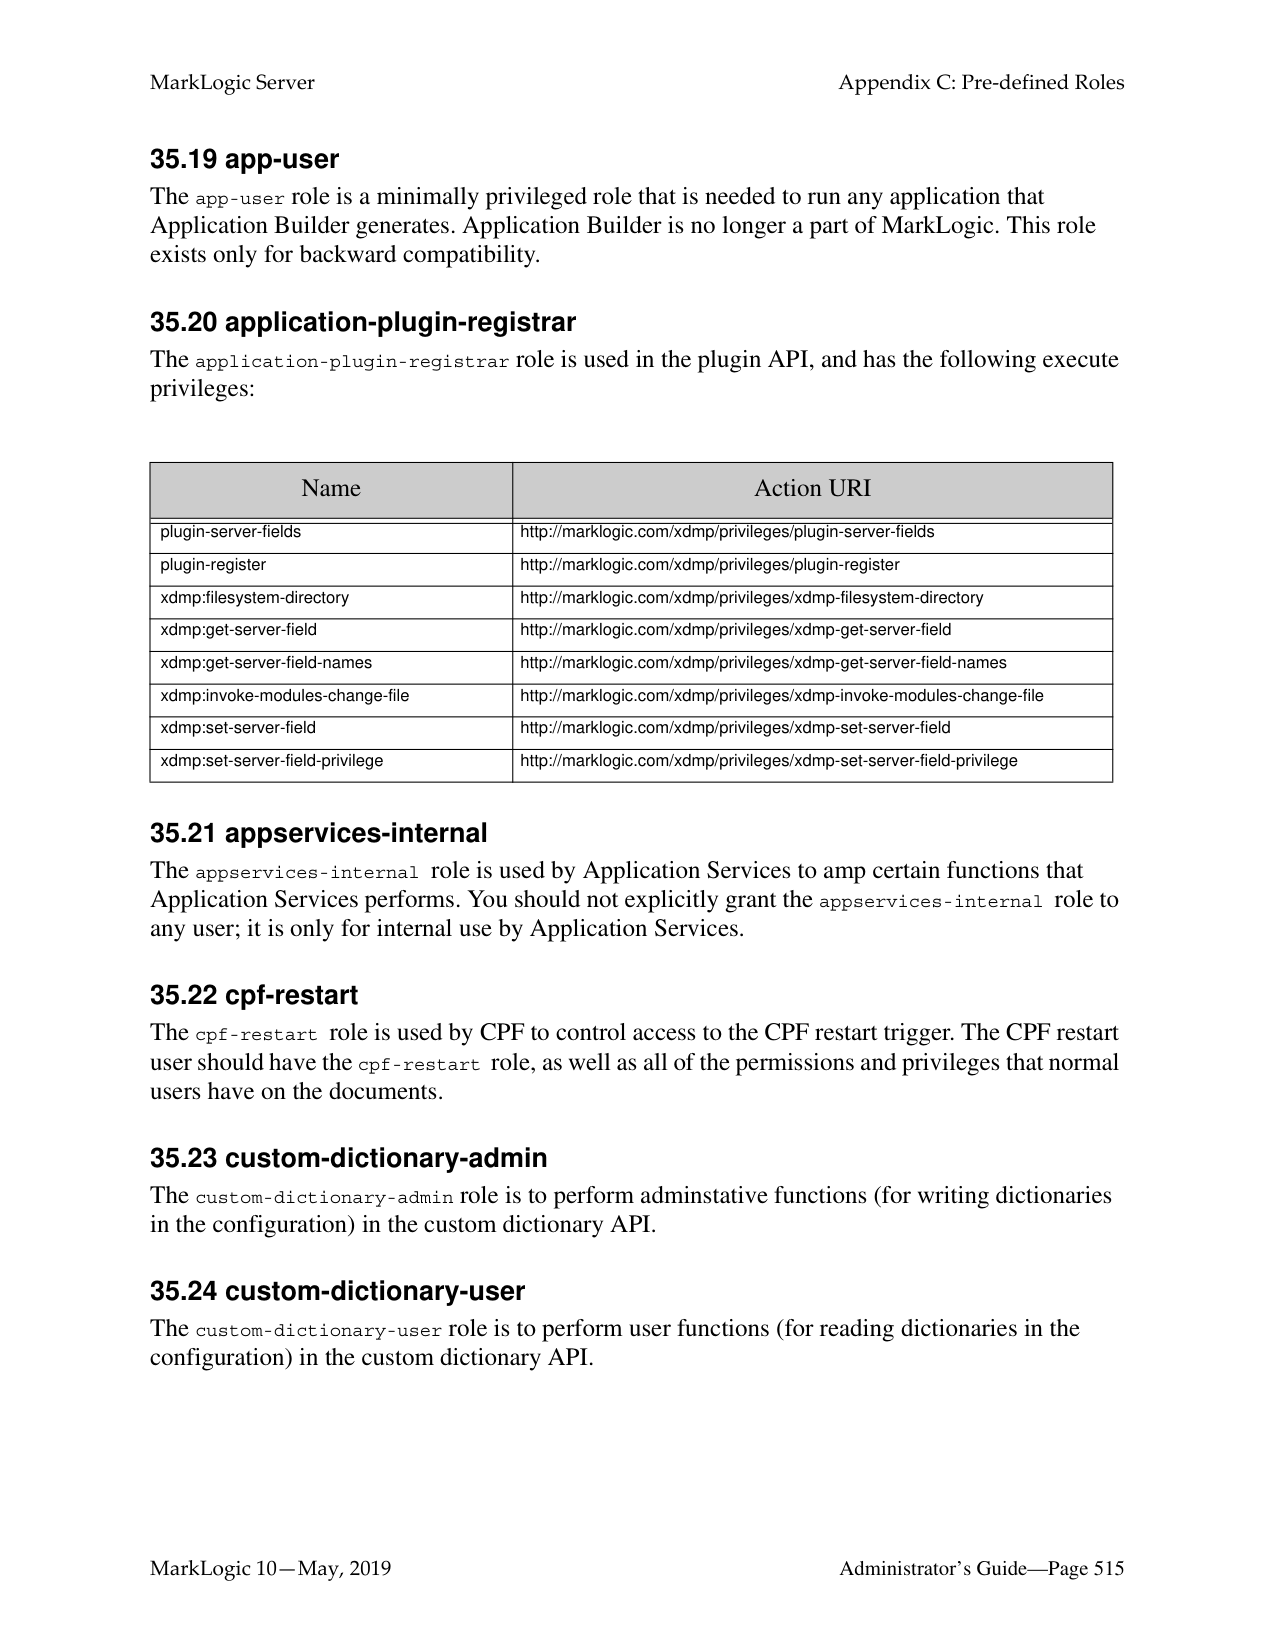
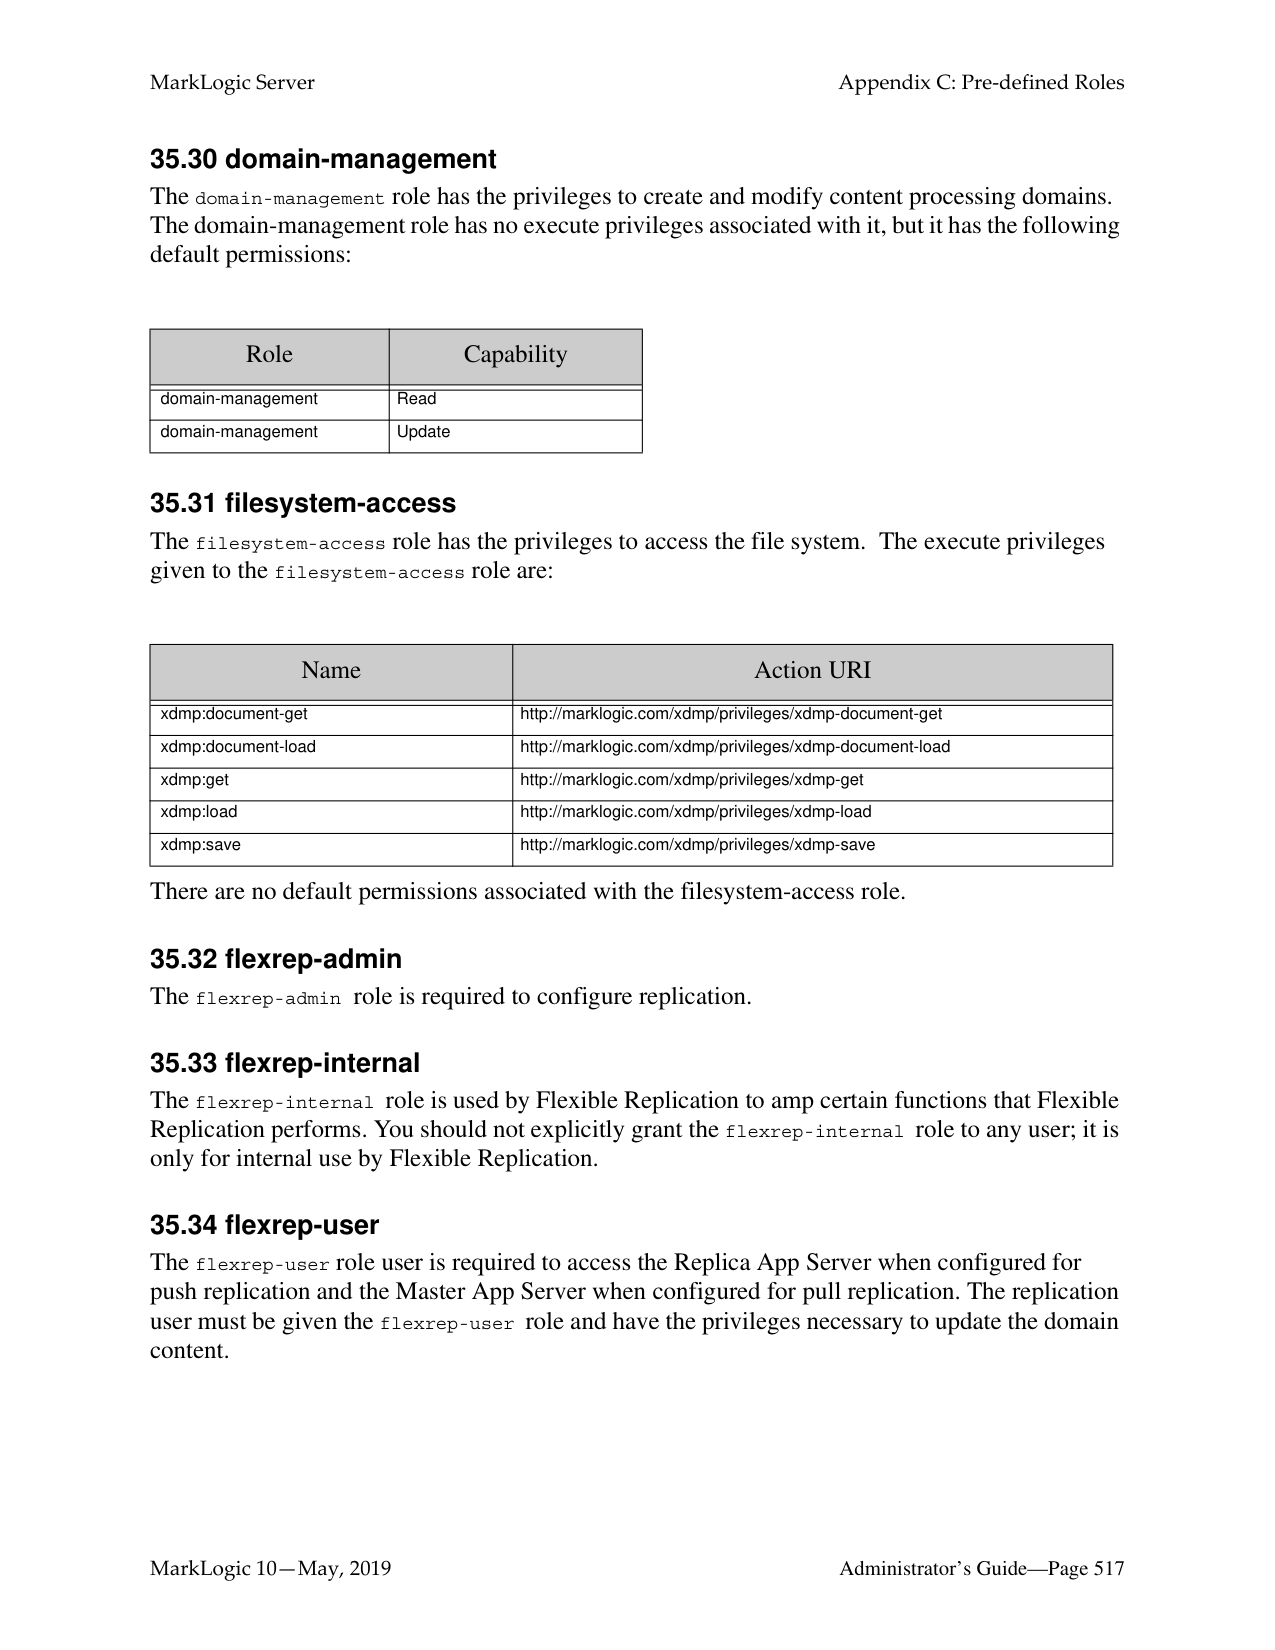
######### 35.1 admin
The admin role is given all privileges and permissions to perform any action in the system. There are no default permissions associated with the admin role. Users with the admin role are considered authorized administrators; they are trusted personnel and are assumed to be non-hostile, appropriately trained, and follow proper administrative procedures.
######### 35.2 admin-builtins
The admin-builtins role has the execute privileges to call the admin built-in functions. The execute privileges given to the admin-builtins role are:
|Name|Action URI| |---|---| | | | |cancel-any-request|http://marklogic.com/xdmp/privileges/cancel-any-request| |cancel-my-request|http://marklogic.com/xdmp/privileges/cancel-my-request| |count-builtins|http://marklogic.com/xdmp/privileges/counts| |xdmp:address-bindable|http://marklogic.com/xdmp/privileges/xdmp-address-bindable|
|Name|Action URI|
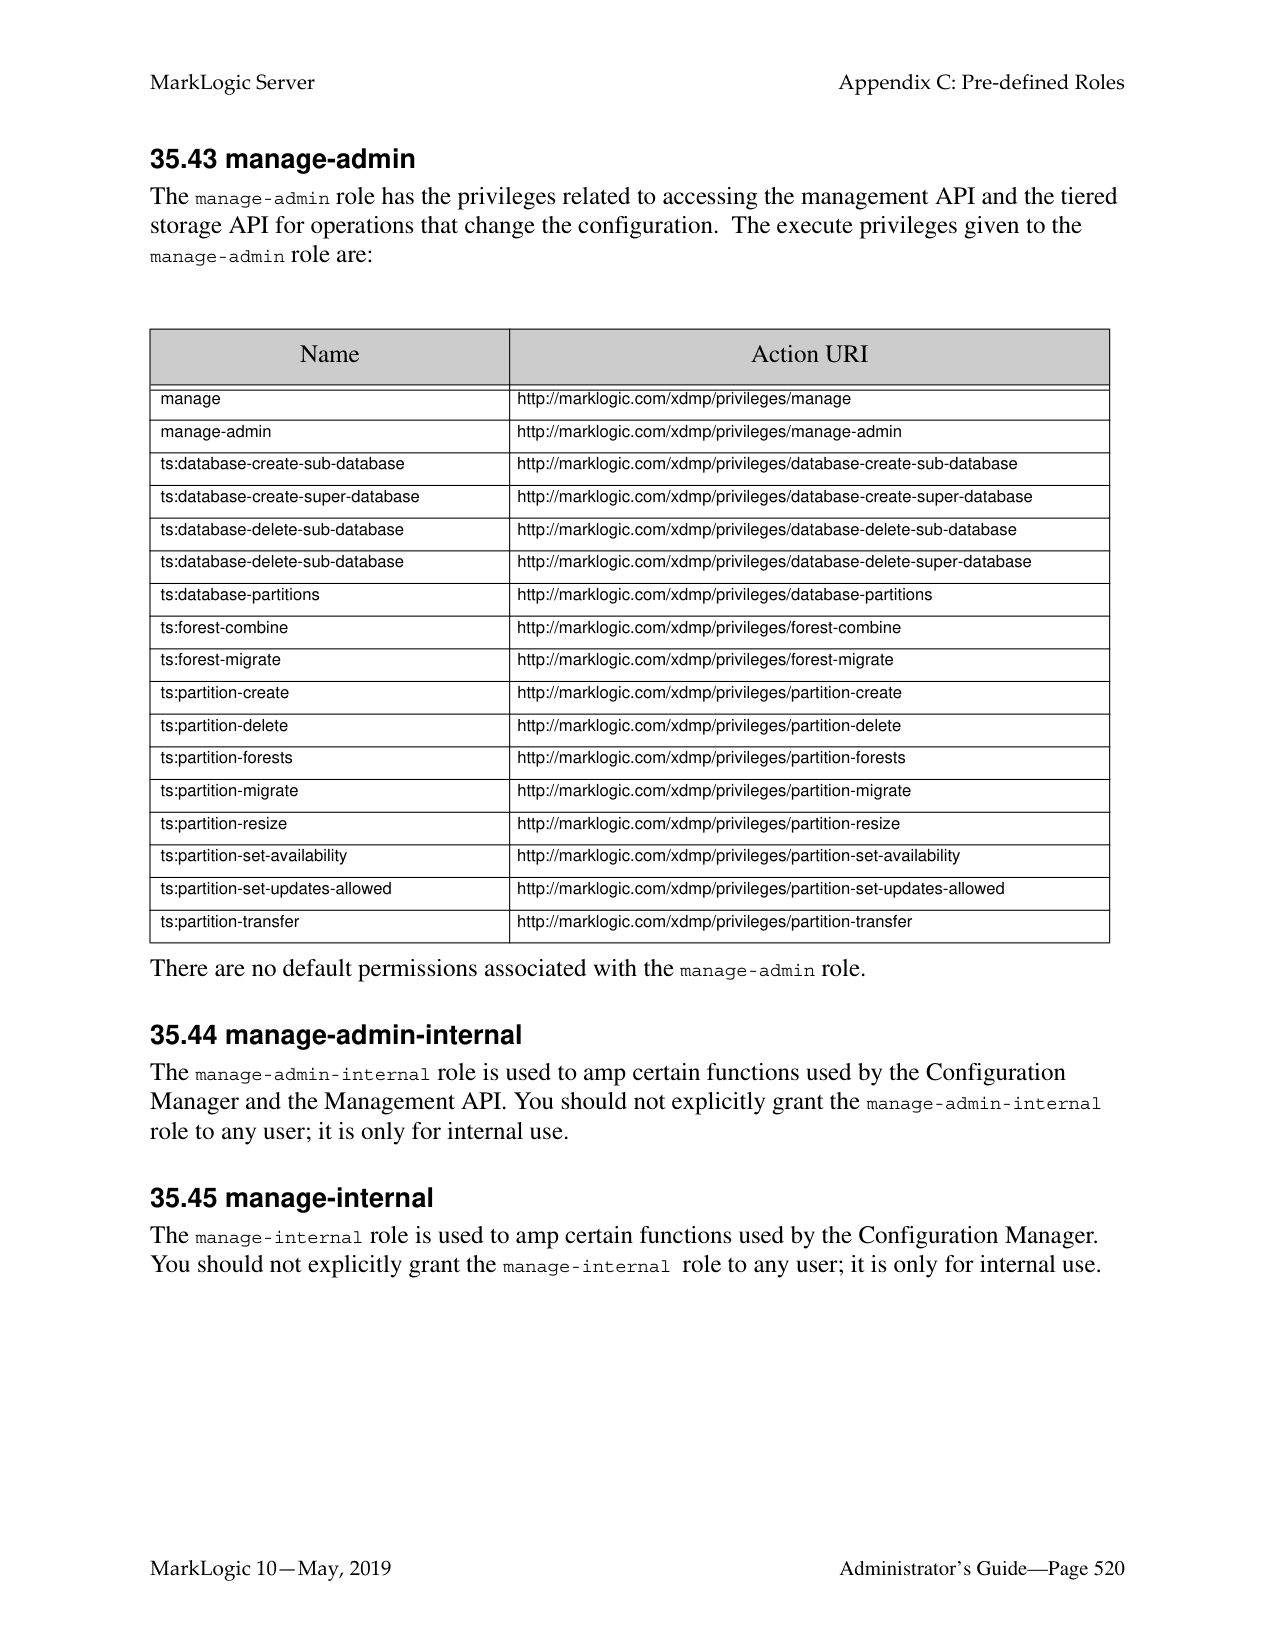
|---|---| | | | |xdmp:amp-roles|http://marklogic.com/xdmp/privileges/xdmp-amp-roles| |xdmp:castable-as|http://marklogic.com/xdmp/privileges/xdmp-castable-as| |xdmp:compressed-tree-cache-size|http://marklogic.com/xdmp/privileges/xdmp-compressed-tree-cache-size| |xdmp:compressed-tree-cache-partitions|http://marklogic.com/xdmp/privileges/xdmp-compressed-tree-cache-partitions| |xdmp:default-in-memory-limit|http://marklogic.com/xdmp/privileges/xdmp-default-in-memory-limit| |xdmp:default-in-memory-list-size|http://marklogic.com/xdmp/privileges/xdmp-default-in-memory-list-size| |xdmp:default-in-memory-range-index-size|http://marklogic.com/xdmp/privileges/xdmp-default-in-memory-range-index-size| |xdmp:in-memory-tree-size|http://marklogic.com/xdmp/privileges/xdmp-in-memory-tree-size| |xdmp:delete-cluster-config-file|http://marklogic.com/xdmp/privileges/xdmp-delete-cluster-config-file| |xdmp:delete-host-config-file|http://marklogic.com/xdmp/privileges/xdmp-delete-host-config-file| |xdmp:directory|http://marklogic.com/xdmp/privileges/xdmp-directory| |xdmp:disable-event|http://marklogic.com/xdmp/privileges/xdmp-disable-event| |xdmp:email|http://marklogic.com/xdmp/privileges/xdmp-email| |xdmp:email-address|http://marklogic.com/xdmp/privileges/xdmp-email-address| |xdmp:enable-event|http://marklogic.com/xdmp/privileges/xdmp-enable-event| |xdmp:expanded-tree-cache-size|http://marklogic.com/xdmp/privileges/xdmp-expanded-tree-cache-size| |xdmp:expanded-tree-cache-partitions|http://marklogic.com/xdmp/privileges/xdmp-expanded-tree-cache-partitions| |xdmp:forest-backup|http://marklogic.com/xdmp/privileges/xdmp-forest-backup| |xdmp:forest-clear|http://marklogic.com/xdmp/privileges/xdmp-forest-clear| |xdmp:forest-delete|http://marklogic.com/xdmp/privileges/xdmp-forest-delete| |xdmp:forest-restore|http://marklogic.com/xdmp/privileges/xdmp-forest-restore|
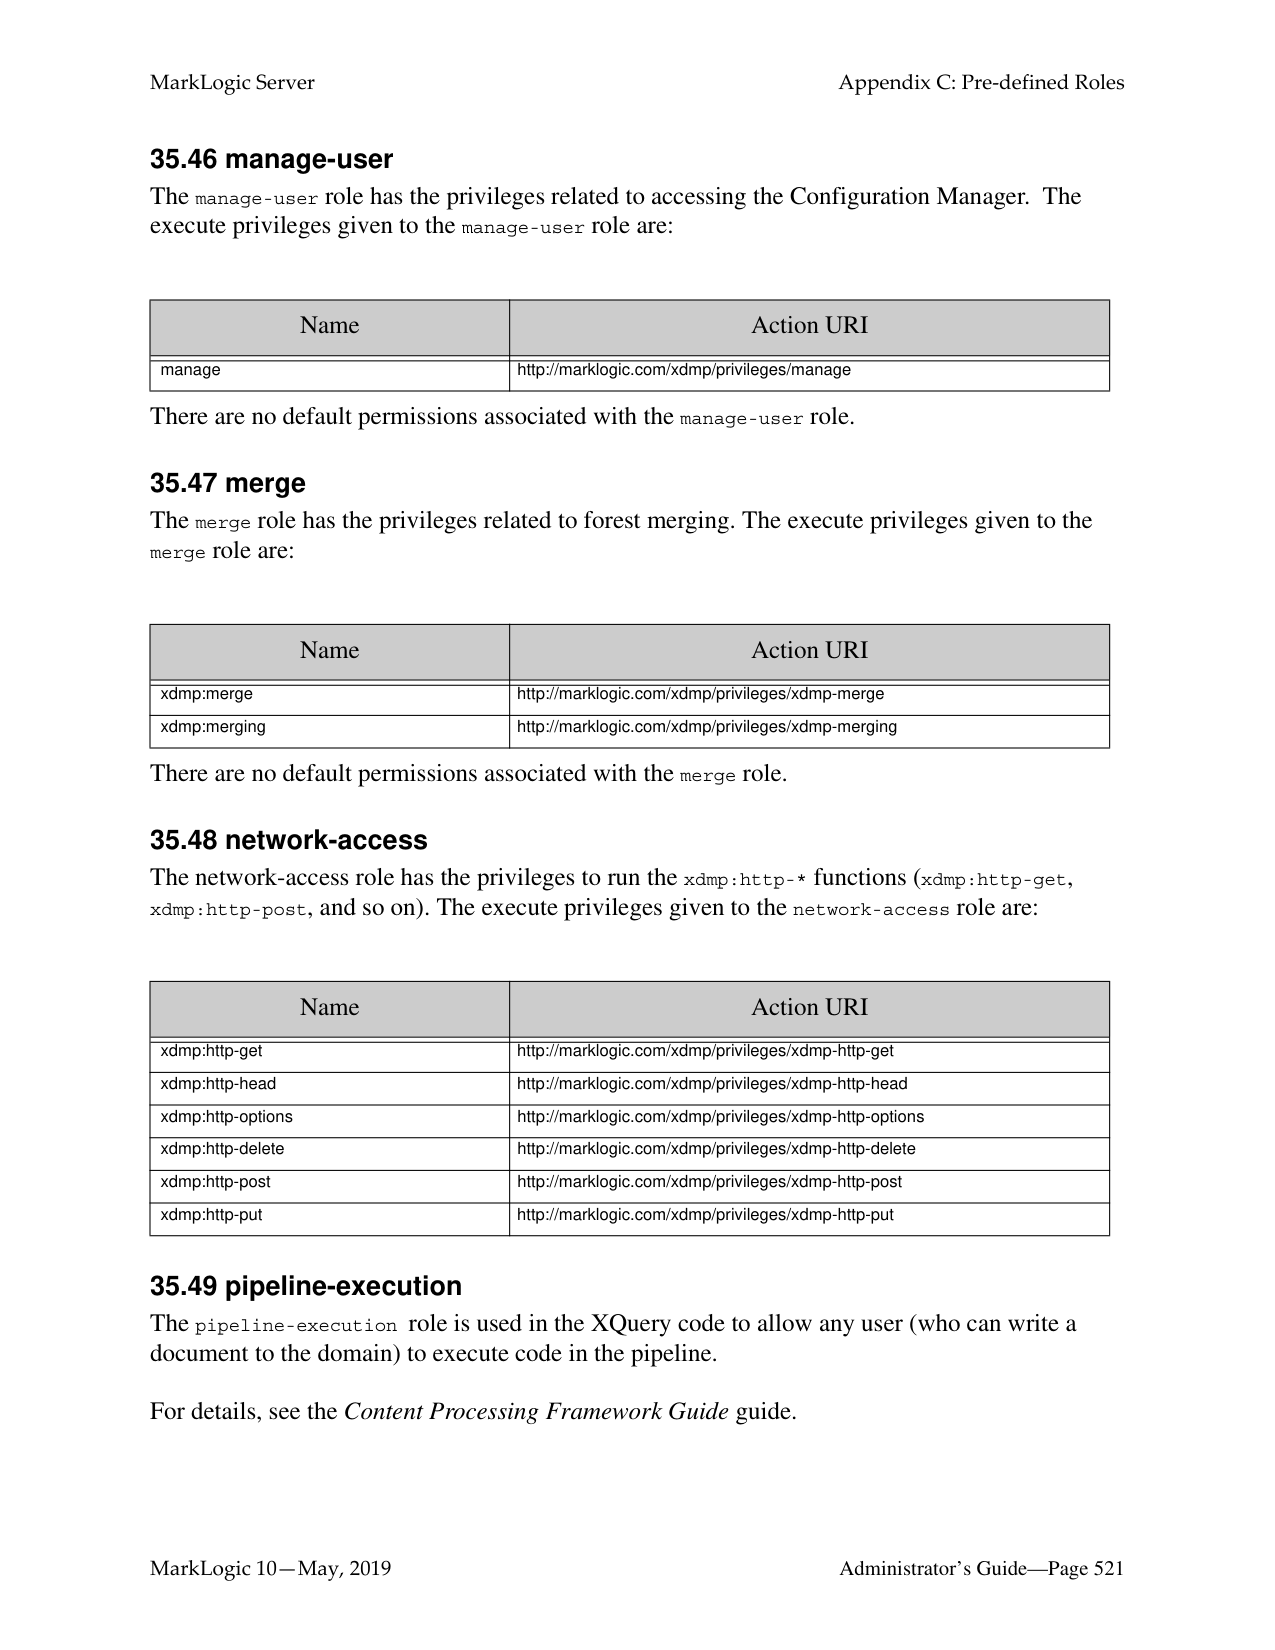
|xdmp:forest-status|http://marklogic.com/xdmp/privileges/xdmp-forest-status| |xdmp:forest-keys|http://marklogic.com/xdmp/privileges/xdmp-forest-keys| |xdmp:get-hot-updates|http://marklogic.com/xdmp/privileges/xdmp-get-hot-updates| |xdmp:host-name|http://marklogic.com/xdmp/privileges/xdmp-hostname| |xdmp:license-accepted|http://marklogic.com/xdmp/privileges/xdmp-license-accepted| |xdmp:list-cache-size|http://marklogic.com/xdmp/privileges/xdmp-list-cache-size| |xdmp:list-cache-partitions|http://marklogic.com/xdmp/privileges/xdmp-list-cache-partitions| |xdmp:pre-release-expires|http://marklogic.com/xdmp/privileges/xdmp-pre-release-expires| |xdmp:read-cluster-config-file|http://marklogic.com/xdmp/privileges/xdmp-read-cluster-config-file| |xdmp:read-host-config-file|http://marklogic.com/xdmp/privileges/xdmp-read-host-config-file| |xdmp:restart|http://marklogic.com/xdmp/privileges/xdmp-restart| |xdmp:server-backup|http://marklogic.com/xdmp/privileges/xdmp-server-backup| |xdmp:server-import-qualities|http://marklogic.com/xdmp/privileges/xdmp-server-import-qualities| |xdmp:server-restore|http://marklogic.com/xdmp/privileges/xdmp-server-restore| |xdmp:set-hot-updates|http://marklogic.com/xdmp/privileges/xdmp-set-hot-updates| |xdmp:shutdown|http://marklogic.com/xdmp/privileges/xdmp-shutdown| |xdmp:smtp-relay|http://marklogic.com/xdmp/privileges/xdmp-smtp-relay|
|Name|Action URI| |---|---| | | | |xdmp:user-last-login|http://marklogic.com/xdmp/privileges/xdmp-user-last-login|
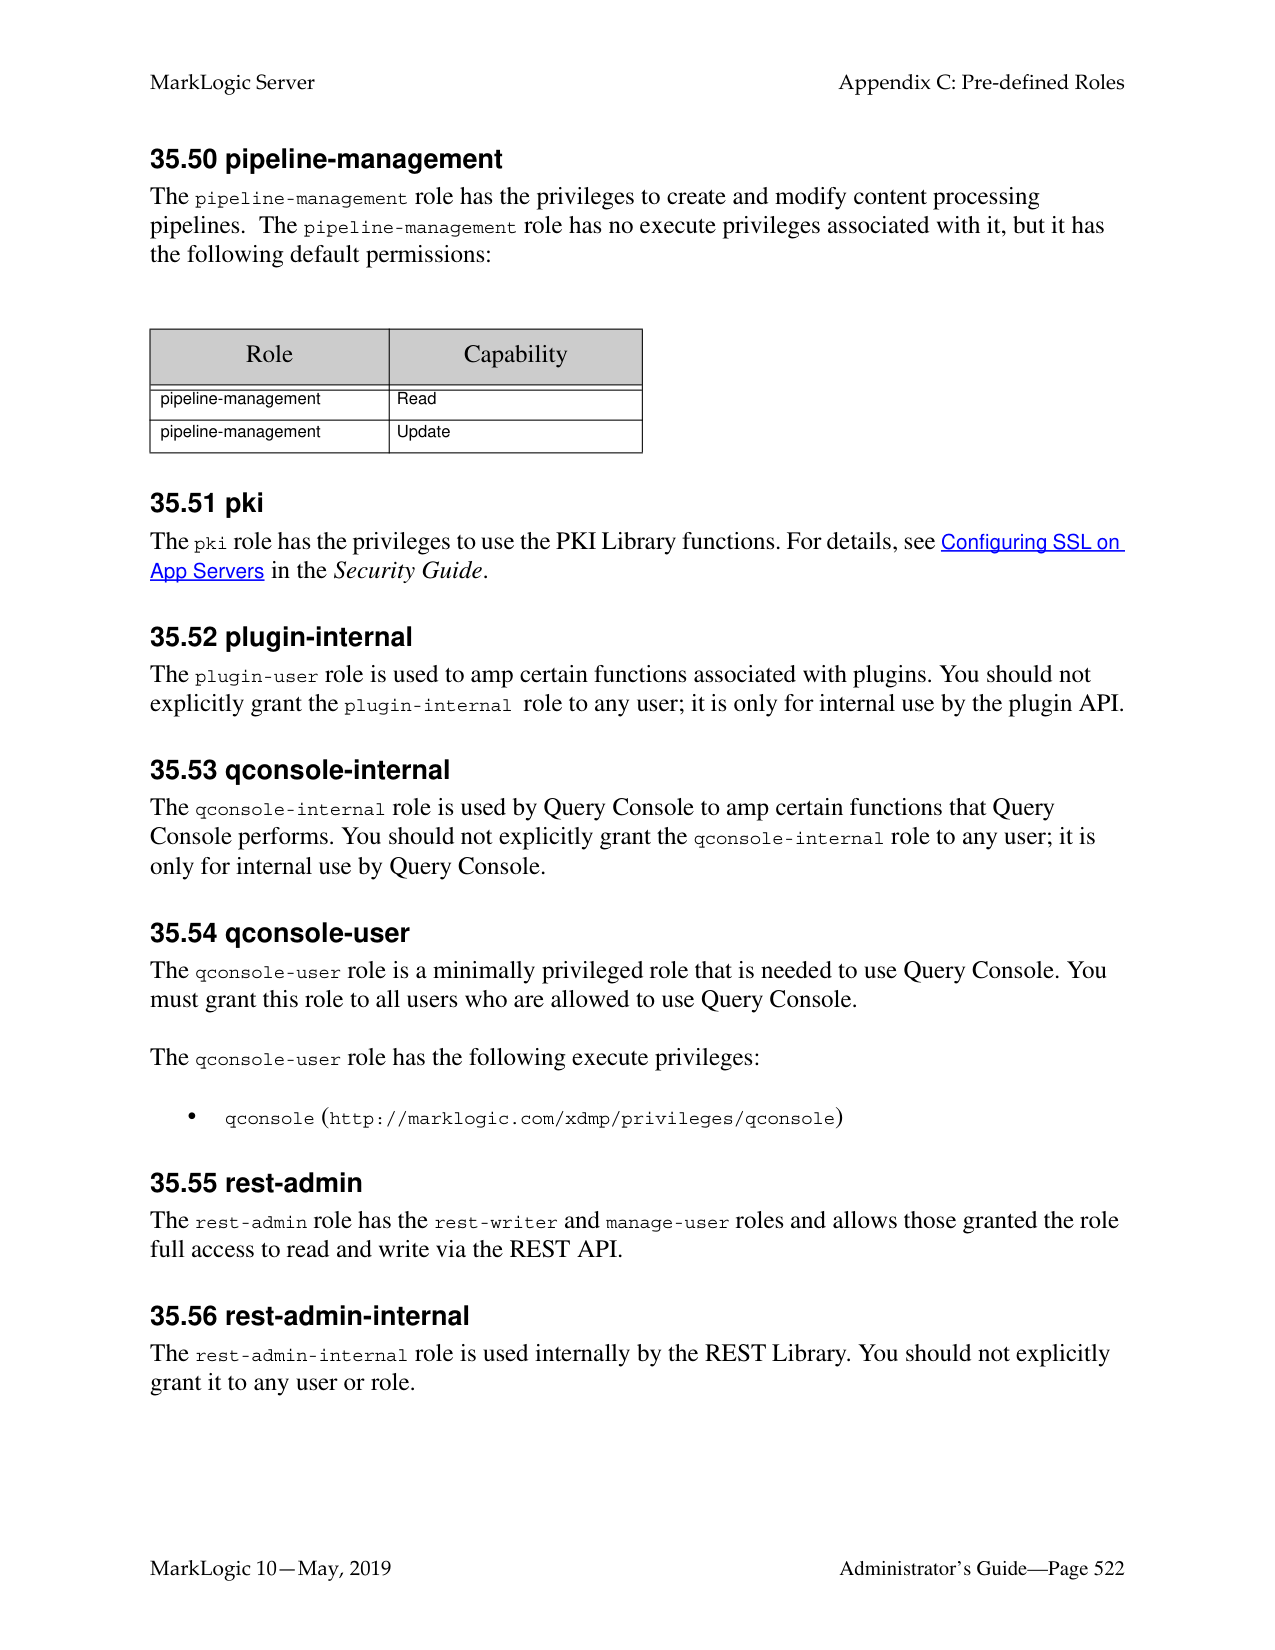
|xdmp:username|http://marklogic.com/xdmp/privileges/xdmp-username| |xdmp:write-cluster-config-file|http://marklogic.com/xdmp/privileges/xdmp-write-cluster-config-file| |xdmp:write-host-config-file|http://marklogic.com/xdmp/privileges/xdmp-write-host-config-file|
There are no default permissions associated with the admin-builtins role.
######### 35.3 admin-configuration-delete
The admin-configuration-delete role enables administrator users to delete configuration information.
######### 35.4 admin-configuration-read
The admin-configuration-read role enables administrator users to read configuration information.
######### 35.5 admin-configuration-write
The admin-configuration-write role enables administrator users to write configuration information.
######### 35.6 admin-default
The admin-default role enables administrator users to evaluate administration default expressions.
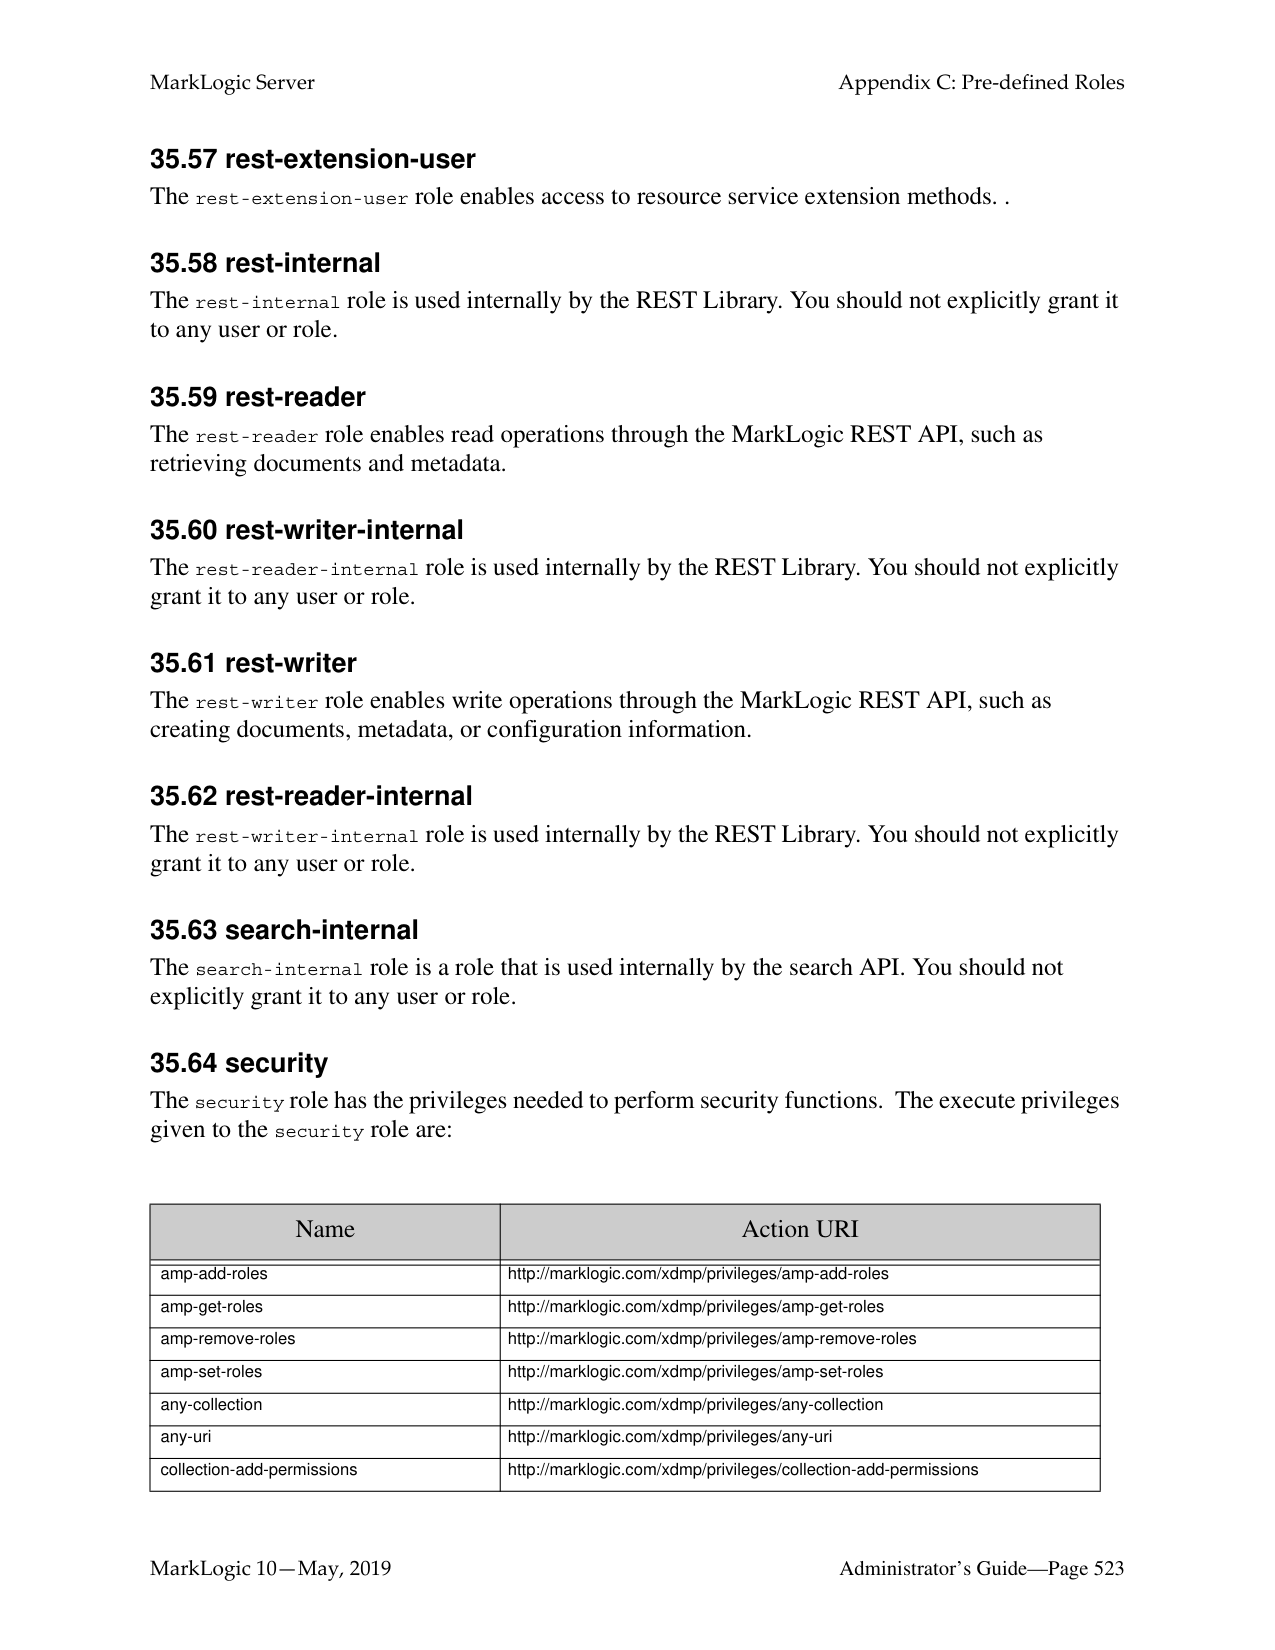
######### 35.7 admin-default-internal
The admin-default-internal role enables administrator users to invoke administration default expressions.
######### 35.8 admin-module-internal
The admin-module-read-internal role is used internally by the Admin Library Module. Do not assign this role to any user. For details, see Scripting Administrative Tasks in MarkLogic Server in the Scripting Administrative Tasks Guide.
######### 35.9 admin-module-read-internal
The admin-module-read-internal role is used internally by the Admin Library Module for reading. Do not assign this role to any user. For details, see Scripting Administrative Tasks in MarkLogic Server in the Scripting Administrative Tasks Guide.
The admin-module-read-internal role is used internally by the Admin Library Module for invoking functions with granular privileges. Do not assign this role to any user. For details, see Scripting Administrative Tasks in MarkLogic Server in the Scripting Administrative Tasks Guide.
The admin-transform role enables administrator users to evaluate transformations within the Admin API.
The admin-ui-user role enables users to have a read-only view of the Admin UI, without providing access to data, to security configuration, or write access to server configuration.
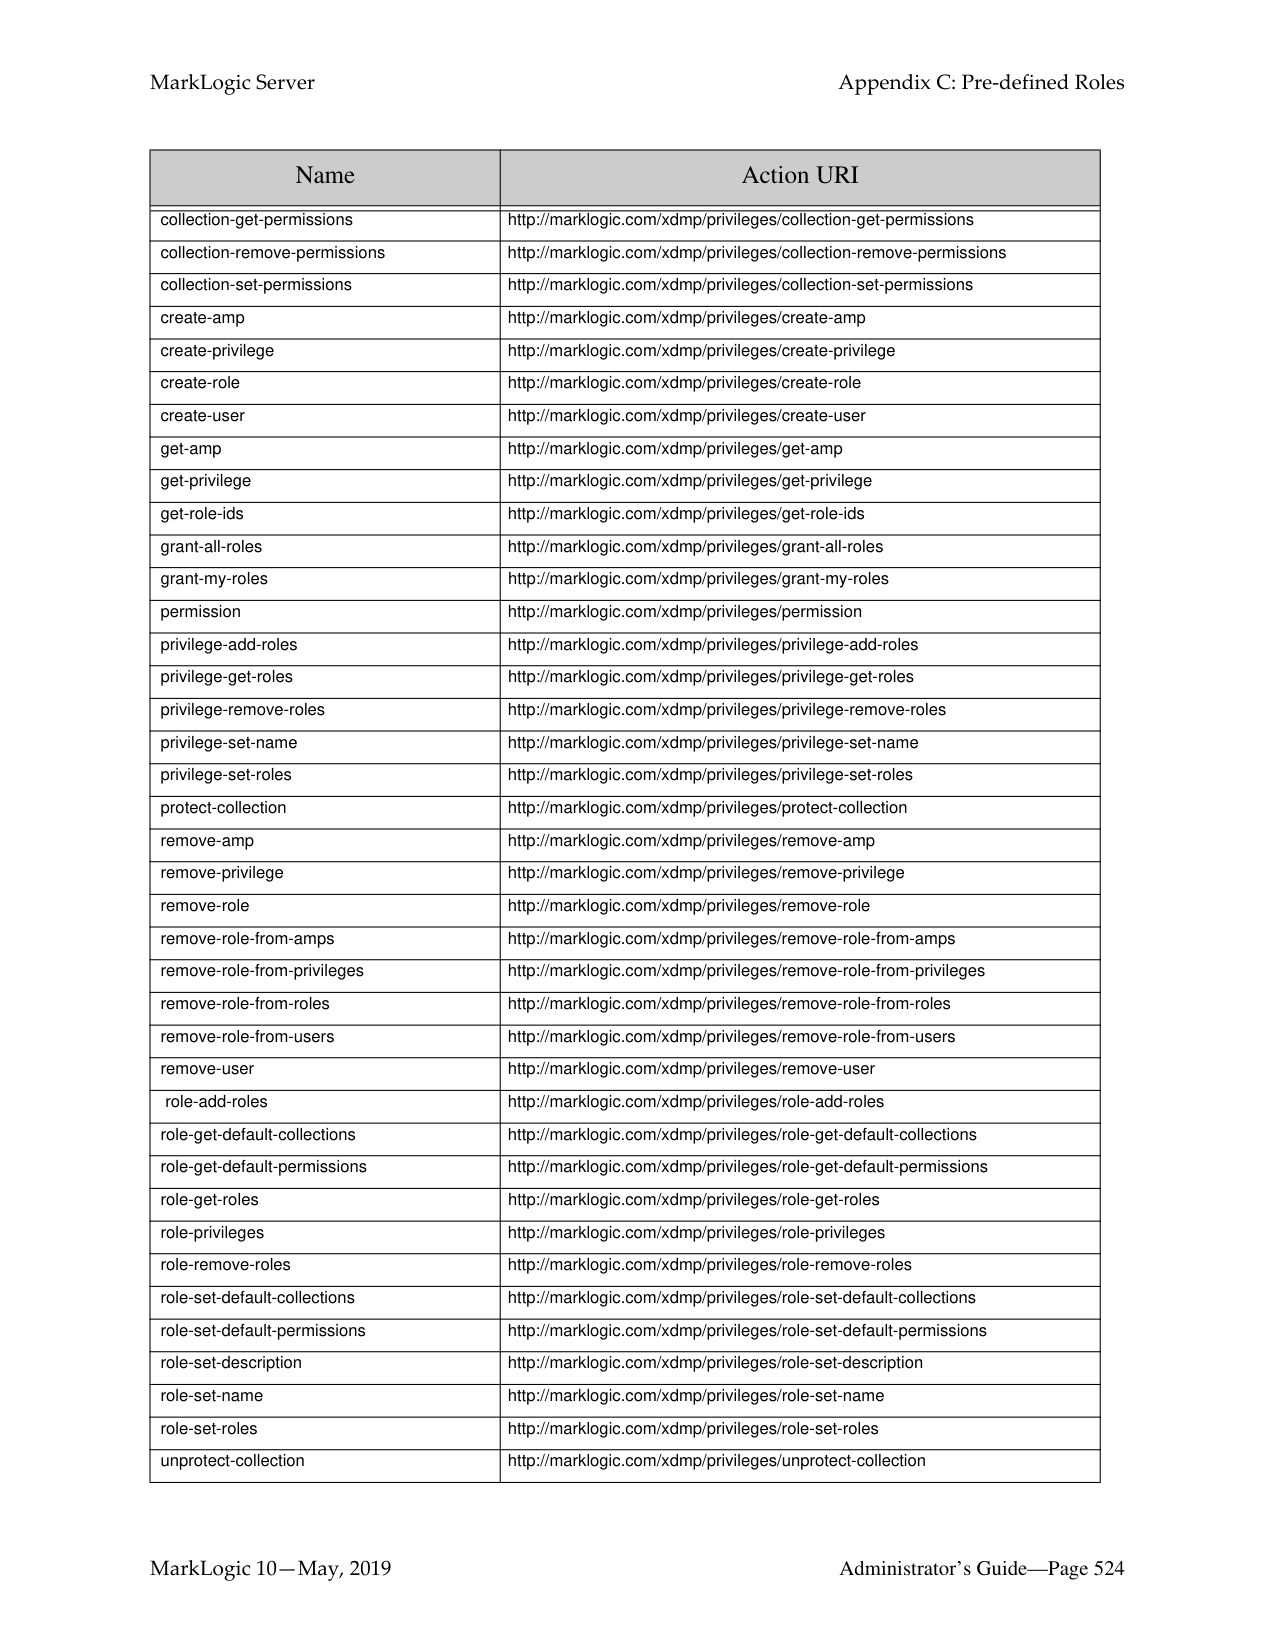
The alert-admin role is used for administrators of an alerting application. For details, see the Creating Alerting Applications chapter of the Search Developer’s Guide.
The alert-execution role is used internally by the Alerting API to amp privileges in a protected way. Do not give this role to any individual users. For details, see the Creating Alerting Applications chapter of the Search Developer’s Guide.
The alert-internal role is used internally by the Alerting API to amp privileges in a protected way. You should not give this role to any individual users. For details, see the Creating Alerting Applications chapter of the Search Developer’s Guide.
The app-builder role provides the privileges needed to run Application Builder. Application Builder is no longer a part of MarkLogic. This role exists only for backward compatibility.
Application Builder is no longer a part of MarkLogic. This role exists only for backward compatibility.
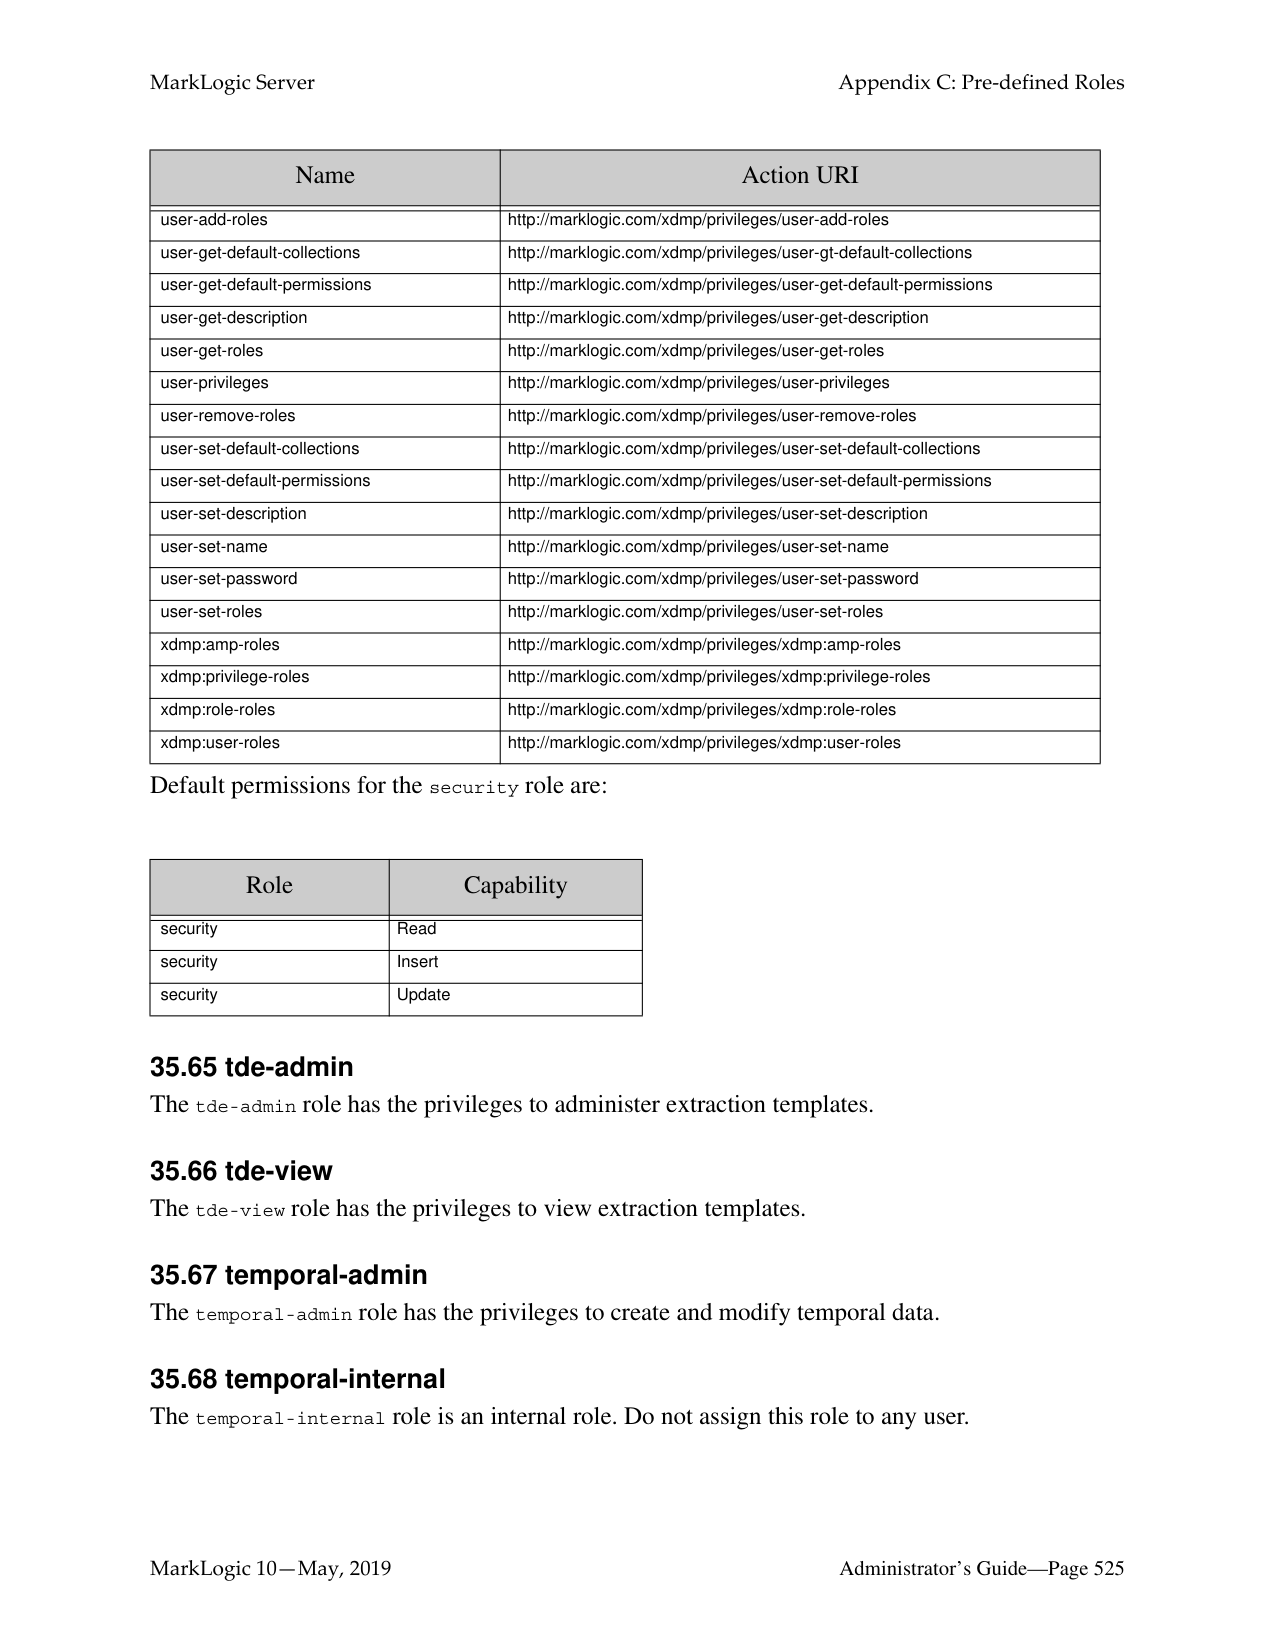
######### 35.19 app-user
The app-user role is a minimally privileged role that is needed to run any application that Application Builder generates. Application Builder is no longer a part of MarkLogic. This role exists only for backward compatibility.
######### 35.20 application-plugin-registrar
The application-plugin-registrar role is used in the plugin API, and has the following execute privileges:
|Name|Action URI| |---|---| | | | |plugin-server-fields|http://marklogic.com/xdmp/privileges/plugin-server-fields| |plugin-register|http://marklogic.com/xdmp/privileges/plugin-register| |xdmp:filesystem-directory|http://marklogic.com/xdmp/privileges/xdmp-filesystem-directory| |xdmp:get-server-field|http://marklogic.com/xdmp/privileges/xdmp-get-server-field| |xdmp:get-server-field-names|http://marklogic.com/xdmp/privileges/xdmp-get-server-field-names| |xdmp:invoke-modules-change-file|http://marklogic.com/xdmp/privileges/xdmp-invoke-modules-change-file| |xdmp:set-server-field|http://marklogic.com/xdmp/privileges/xdmp-set-server-field| |xdmp:set-server-field-privilege|http://marklogic.com/xdmp/privileges/xdmp-set-server-field-privilege|
######### 35.21 appservices-internal
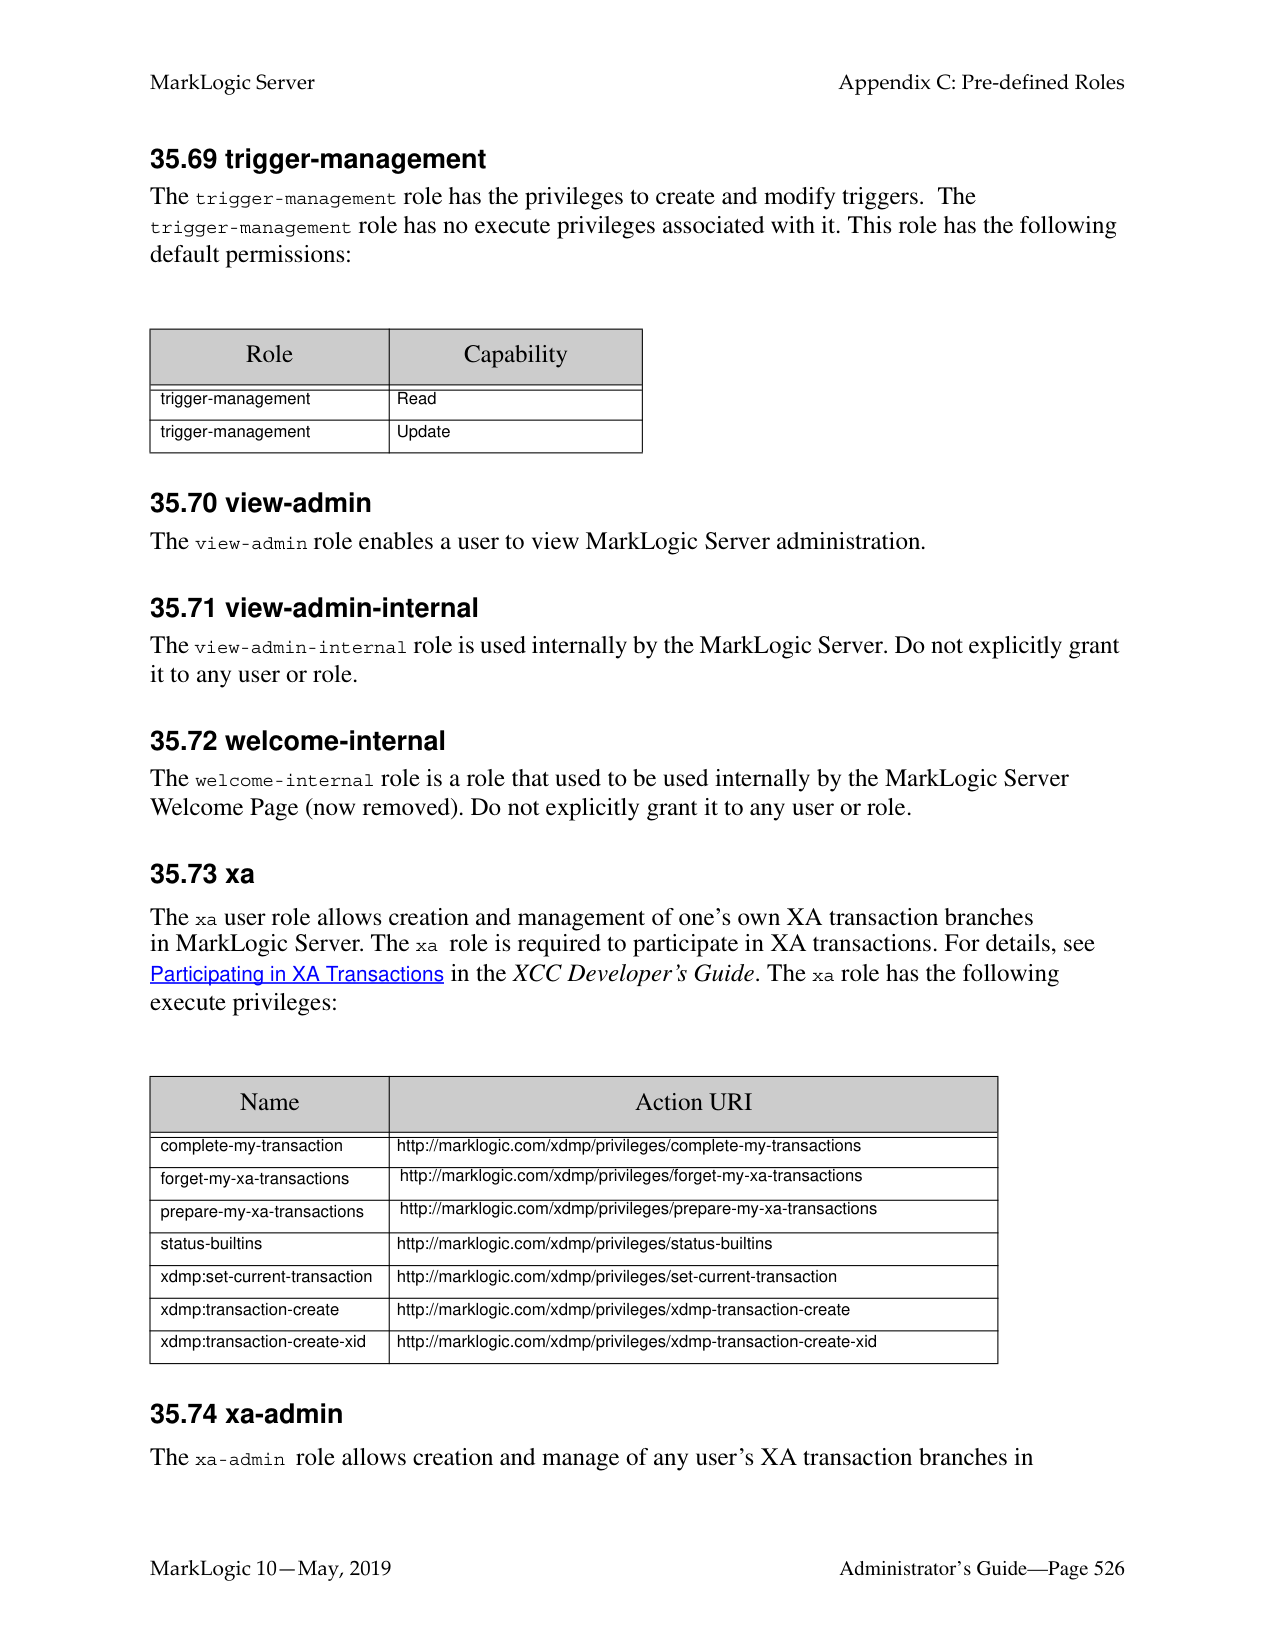
The appservices-internal role is used by Application Services to amp certain functions that Application Services performs. You should not explicitly grant the appservices-internal role to any user; it is only for internal use by Application Services.
######### 35.22 cpf-restart
The cpf-restart role is used by CPF to control access to the CPF restart trigger. The CPF restart user should have the cpf-restart role, as well as all of the permissions and privileges that normal users have on the documents.
######### 35.23 custom-dictionary-admin
The custom-dictionary-admin role is to perform adminstative functions (for writing dictionaries in the configuration) in the custom dictionary API.
######### 35.24 custom-dictionary-user
The custom-dictionary-user role is to perform user functions (for reading dictionaries in the configuration) in the custom dictionary API.
######### 35.25 custom-language-admin-read
The custom-language-admin-read role enables a user to read custom language configuration. That is, to use functions such as clang:language-config-read.
######### 35.26 custom-language-admin-write
The custom-language-admin-write role enables a user to modify custom language configuration. That is, to use functions such as clang:language-config-write and clang-language-config-delete. These operations change the cluster configuration file and cause a cluster-wide restart when used.
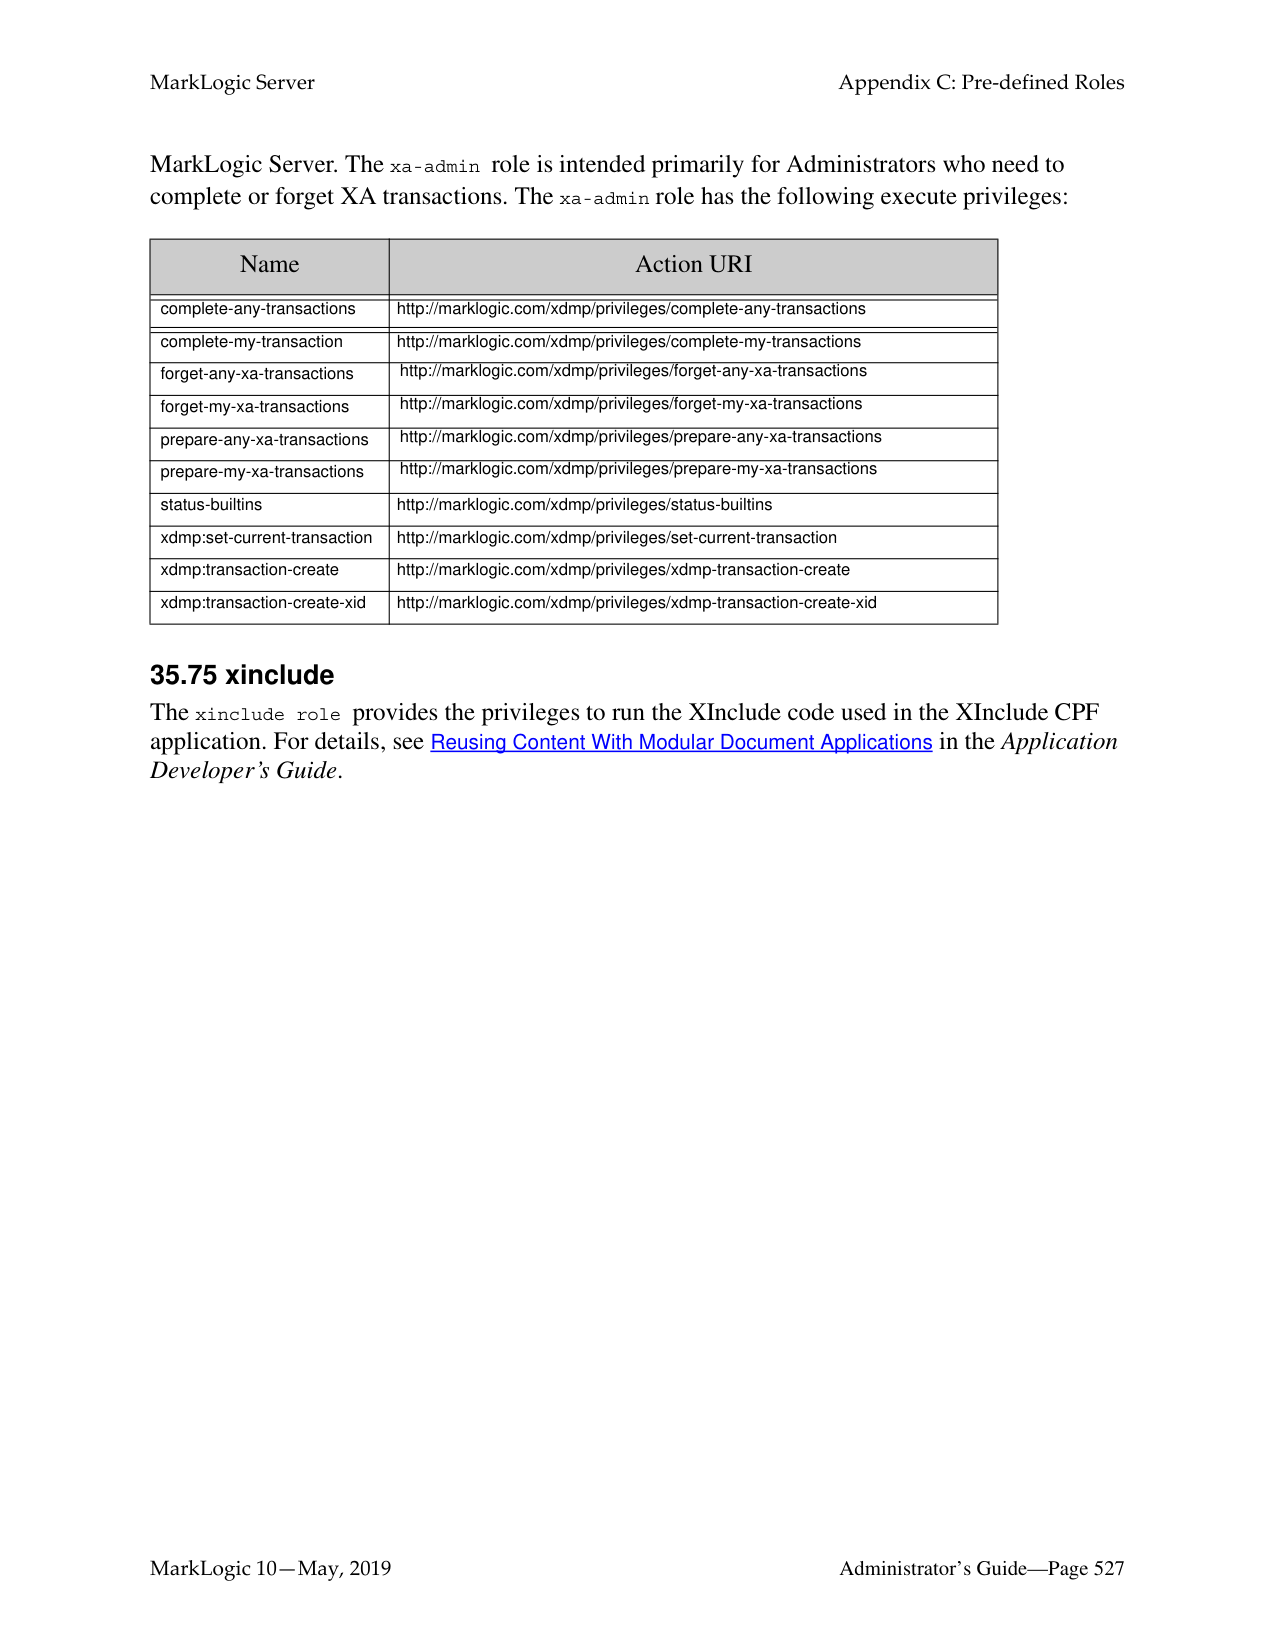
######### 35.27 dls-admin
The dls-admin role is designed to give administrators of Library Services applications all of the privileges that are needed to use the Library Services API. It has the needed privileges to perform operations such as inserting retention policies and breaking checkouts, so only trusted users (users who are assumed to be non-hostile, appropriately trained, and follow proper administrative procedures) should be granted the dls-admin role. Assign the dls-admin role to administrators of your Library Services application.
For details, see the Library Services Applications chapter in the Application Developer’s Guide.
######### 35.28 dls-internal
The dls-internal role is a role that is used internally by the Library Services API, but you should not explicitly grant it to any user or role. This role is used to amp special privileges within the context of certain functions of the Library Services API. Assigning this role to users would give them privileges on the system that you typically do not want them to have; do not assign this role to any users.
For details, see the Library Services Applications chapter in the Application Developer’s Guide.
######### 35.29 dls-user
The dls-user role is a minimally privileged role. It is used in the Library Services API to allow regular users of the Library Services application (as opposed to dls-admin users) to be able to execute code in the Library Services API. It allows users, with document update permission, to manage, checkout, and checkin managed documents.
The dls-user role only has privileges that are needed to run the Library Services API; it does not provide execute privileges to any functions outside the scope of the Library Services API. The Library Services API uses the dls-user role as a mechanism to amp more privileged operations in a controlled way. It is therefore reasonably safe to assign this role to any user whom you trust to use your Library Services application. Assign the dls-user role to all users of your Library Services application.
For details, see the Library Services Applications chapter in the Application Developer’s Guide.
The domain-management role has the privileges to create and modify content processing domains. The domain-management role has no execute privileges associated with it, but it has the following default permissions:

The filesystem-access role has the privileges to access the file system. The execute privileges given to the filesystem-access role are:
There are no default permissions associated with the filesystem-access role.
The flexrep-internal role is used by Flexible Replication to amp certain functions that Flexible Replication performs. You should not explicitly grant the flexrep-internal role to any user; it is only for internal use by Flexible Replication.
|Role|Capability| |---|---| | | | |domain-management|Read| |domain-management|Update|
|Name|Action URI|
|---|---| | | | |xdmp:document-get|http://marklogic.com/xdmp/privileges/xdmp-document-get| |xdmp:document-load|http://marklogic.com/xdmp/privileges/xdmp-document-load| |xdmp:get|http://marklogic.com/xdmp/privileges/xdmp-get| |xdmp:load|http://marklogic.com/xdmp/privileges/xdmp-load| |xdmp:save|http://marklogic.com/xdmp/privileges/xdmp-save|
The flexrep-user role user is required to access the Replica App Server when configured for push replication and the Master App Server when configured for pull replication. The replication user must be given the flexrep-user role and have the privileges necessary to update the domain content.
The hadoop-internal role is for internal use only. Do not assign this role to any users. This role is used to amp special privileges within the context of certain functions of the Hadoop MapReduce Connector. Assigning this role to users would give them privileges on the system that you typically do not want them to have.
The hadoop-user-read role allows use of MarkLogic Server as an input source for a MapReduce job. This role does not grant any other privileges, so the mapreduce.marklogic.input.user may still require additional privileges to read content from the target database. The hadoop-user-read role has the following execute privileges:

|Name|Action URI| |---|---| | | | |hadoop-user-read|http://marklogic.com/xdmp/privileges/hadoop-user-read| | | | |xdbc:eval|http://marklogic.com/xdmp/privileges/xdbc-eval| |xdbc:eval-in|http://marklogic.com/xdmp/privileges/xdbc-eval-in| |xdmp:value|http://marklogic.com/xdmp/privileges/xdmp-value| |xdmp:with-namespaces|http://marklogic.com/xdmp/privileges/xdmp-with-namespace|
The hadoop-user-write role allows use of MarkLogic Server as an output destination for a MapReduce job. This role does not grant any other privileges, so the mapreduce.marklogic.output.user may still require additional privileges to insert or update content in the target database. The hadoop-user-write role has the following execute privileges:
|Name|Action URI| |---|---| | | | |any-uri|http://marklogic.com/xdmp/privileges/any-uri| | | | |hadoop-user-write|http://marklogic.com/xdmp/privileges/hadoop-user-write| | | | |unprotected-collections|http://marklogic.com/xdmp/privileges/unprotected-collections| | | | |xdbc:eval|http://marklogic.com/xdmp/privileges/xdbc-eval|
|xdbc:insert-in|http://marklogic.com/xdmp/privileges/xdbc-insert-in| |xdmp:with-namespaces|http://marklogic.com/xdmp/privileges/xdmp-with-namespace|
######### 35.39 infostudio-admin-internal
Information Studio is no longer a part of MarkLogic. This role exists only for backward compatibility.
The infostudio-admin-user role provides the privileges needed to handle CPF restart and resume unfinished Information Studio tasks in the event of an unexpected shutdown and restart of MarkLogic Server. When MarkLogic Server is restarted, long-running collectors resume loading documents in the database. In this situation, the original user that started the collector is unknown, so the purpose of the infostudio-admin user is to resume control of the collector.
######### 35.40 infostudio-internal
Information Studio is no longer a part of MarkLogic. This role exists only for backward compatibility.
The infostudio-user role is used by Information Studio to amp certain functions that Information Studio performs. You should not explicitly grant the infostudio-internal role to any user; it is only for internal use by Information Studio.
######### 35.41 infostudio-user
Information Studio is no longer a part of MarkLogic. This role exists only for backward compatibility.
The infostudio-user role is a minimally privileged role that is needed to use Information Studio. You must grant this role to all users who are allowed to access Information Studio.
The infostudio-user role has the following execute privileges:

######### 35.42 manage
The manage role has the execute privilege http://marklogic.com/xdmp/privileges/manage to run the Management API. For example, non-admin users can use manage role plus create-data-role or create-data-user granular privileges to manage roles and create data users.
|Name|Action URI| |---|---| | | | |manage|http://marklogic.com/xdmp/privileges/manage|
There are no default permissions associated with the manage role.
######### 35.43 manage-admin
The manage-admin role has the privileges related to accessing the management API and the tiered storage API for operations that change the configuration. The execute privileges given to the manage-admin role are:
|Name|Action URI| |---|---| | | | |manage|http://marklogic.com/xdmp/privileges/manage| |manage-admin|http://marklogic.com/xdmp/privileges/manage-admin| |ts:database-create-sub-database|http://marklogic.com/xdmp/privileges/database-create-sub-database| |ts:database-create-super-database|http://marklogic.com/xdmp/privileges/database-create-super-database| |ts:database-delete-sub-database|http://marklogic.com/xdmp/privileges/database-delete-sub-database| |ts:database-delete-sub-database|http://marklogic.com/xdmp/privileges/database-delete-super-database| |ts:database-partitions|http://marklogic.com/xdmp/privileges/database-partitions| |ts:forest-combine|http://marklogic.com/xdmp/privileges/forest-combine| |ts:forest-migrate|http://marklogic.com/xdmp/privileges/forest-migrate| |ts:partition-create|http://marklogic.com/xdmp/privileges/partition-create| |ts:partition-delete|http://marklogic.com/xdmp/privileges/partition-delete| |ts:partition-forests|http://marklogic.com/xdmp/privileges/partition-forests| |ts:partition-migrate|http://marklogic.com/xdmp/privileges/partition-migrate| |ts:partition-resize|http://marklogic.com/xdmp/privileges/partition-resize| |ts:partition-set-availability|http://marklogic.com/xdmp/privileges/partition-set-availability| |ts:partition-set-updates-allowed|http://marklogic.com/xdmp/privileges/partition-set-updates-allowed| |ts:partition-transfer|http://marklogic.com/xdmp/privileges/partition-transfer|
There are no default permissions associated with the manage-admin role.
######### 35.44 manage-admin-internal
The manage-admin-internal role is used to amp certain functions used by the Configuration Manager and the Management API. You should not explicitly grant the manage-admin-internal role to any user; it is only for internal use.
######### 35.45 manage-internal
The manage-internal role is used to amp certain functions used by the Configuration Manager. You should not explicitly grant the manage-internal role to any user; it is only for internal use.
######### 35.46 manage-user
The manage-user role has the privileges related to accessing the Configuration Manager. The execute privileges given to the manage-user role are:
|Name|Action URI| |---|---| | | | |manage|http://marklogic.com/xdmp/privileges/manage|
There are no default permissions associated with the manage-user role.
######### 35.47 merge
The merge role has the privileges related to forest merging. The execute privileges given to the merge role are:
|Name|Action URI| |---|---| | | | |xdmp:merge|http://marklogic.com/xdmp/privileges/xdmp-merge| |xdmp:merging|http://marklogic.com/xdmp/privileges/xdmp-merging|
There are no default permissions associated with the merge role.
######### 35.48 network-access
The network-access role has the privileges to run the xdmp:http-* functions (xdmp:http-get, xdmp:http-post, and so on). The execute privileges given to the network-access role are:
|Name|Action URI| |---|---| | | | |xdmp:http-get|http://marklogic.com/xdmp/privileges/xdmp-http-get| |xdmp:http-head|http://marklogic.com/xdmp/privileges/xdmp-http-head| |xdmp:http-options|http://marklogic.com/xdmp/privileges/xdmp-http-options| |xdmp:http-delete|http://marklogic.com/xdmp/privileges/xdmp-http-delete| |xdmp:http-post|http://marklogic.com/xdmp/privileges/xdmp-http-post| |xdmp:http-put|http://marklogic.com/xdmp/privileges/xdmp-http-put|
######### 35.49 pipeline-execution
The pipeline-execution role is used in the XQuery code to allow any user (who can write a document to the domain) to execute code in the pipeline.
For details, see the Content Processing Framework Guide guide.
The pipeline-management role has the privileges to create and modify content processing pipelines. The pipeline-management role has no execute privileges associated with it, but it has the following default permissions:
The plugin-user role is used to amp certain functions associated with plugins. You should not explicitly grant the plugin-internal role to any user; it is only for internal use by the plugin API.
The qconsole-internal role is used by Query Console to amp certain functions that Query Console performs. You should not explicitly grant the qconsole-internal role to any user; it is only for internal use by Query Console.
The qconsole-user role is a minimally privileged role that is needed to use Query Console. You must grant this role to all users who are allowed to use Query Console.
The qconsole-user role has the following execute privileges:
• qconsole (http://marklogic.com/xdmp/privileges/qconsole)
The rest-admin role has the rest-writer and manage-user roles and allows those granted the role full access to read and write via the REST API.
|Role|Capability| |---|---| | | | |pipeline-management|Read| |pipeline-management|Update|
The rest-admin-internal role is used internally by the REST Library. You should not explicitly grant it to any user or role.
The rest-internal role is used internally by the REST Library. You should not explicitly grant it to any user or role.
The rest-reader role enables read operations through the MarkLogic REST API, such as retrieving documents and metadata.
The rest-reader-internal role is used internally by the REST Library. You should not explicitly grant it to any user or role.
The rest-writer role enables write operations through the MarkLogic REST API, such as creating documents, metadata, or configuration information.
The rest-writer-internal role is used internally by the REST Library. You should not explicitly grant it to any user or role.
The search-internal role is a role that is used internally by the search API. You should not explicitly grant it to any user or role.
The security role has the privileges needed to perform security functions. The execute privileges given to the security role are:
|Name|Action URI| |---|---| | | | |amp-add-roles|http://marklogic.com/xdmp/privileges/amp-add-roles| |amp-get-roles|http://marklogic.com/xdmp/privileges/amp-get-roles| |amp-remove-roles|http://marklogic.com/xdmp/privileges/amp-remove-roles| |amp-set-roles|http://marklogic.com/xdmp/privileges/amp-set-roles| |any-collection|http://marklogic.com/xdmp/privileges/any-collection| |any-uri|http://marklogic.com/xdmp/privileges/any-uri| |collection-add-permissions|http://marklogic.com/xdmp/privileges/collection-add-permissions|
|Name|Action URI| |---|---| | | | |collection-get-permissions|http://marklogic.com/xdmp/privileges/collection-get-permissions| |collection-remove-permissions|http://marklogic.com/xdmp/privileges/collection-remove-permissions| |collection-set-permissions|http://marklogic.com/xdmp/privileges/collection-set-permissions| |create-amp|http://marklogic.com/xdmp/privileges/create-amp| |create-privilege|http://marklogic.com/xdmp/privileges/create-privilege| |create-role|http://marklogic.com/xdmp/privileges/create-role| |create-user|http://marklogic.com/xdmp/privileges/create-user| |get-amp|http://marklogic.com/xdmp/privileges/get-amp| |get-privilege|http://marklogic.com/xdmp/privileges/get-privilege| |get-role-ids|http://marklogic.com/xdmp/privileges/get-role-ids| |grant-all-roles|http://marklogic.com/xdmp/privileges/grant-all-roles| |grant-my-roles|http://marklogic.com/xdmp/privileges/grant-my-roles| |permission|http://marklogic.com/xdmp/privileges/permission| |privilege-add-roles|http://marklogic.com/xdmp/privileges/privilege-add-roles| |privilege-get-roles|http://marklogic.com/xdmp/privileges/privilege-get-roles| |privilege-remove-roles|http://marklogic.com/xdmp/privileges/privilege-remove-roles| |privilege-set-name|http://marklogic.com/xdmp/privileges/privilege-set-name| |privilege-set-roles|http://marklogic.com/xdmp/privileges/privilege-set-roles| |protect-collection|http://marklogic.com/xdmp/privileges/protect-collection| |remove-amp|http://marklogic.com/xdmp/privileges/remove-amp| |remove-privilege|http://marklogic.com/xdmp/privileges/remove-privilege| |remove-role|http://marklogic.com/xdmp/privileges/remove-role| |remove-role-from-amps|http://marklogic.com/xdmp/privileges/remove-role-from-amps| |remove-role-from-privileges|http://marklogic.com/xdmp/privileges/remove-role-from-privileges| |remove-role-from-roles|http://marklogic.com/xdmp/privileges/remove-role-from-roles| |remove-role-from-users|http://marklogic.com/xdmp/privileges/remove-role-from-users| |remove-user|http://marklogic.com/xdmp/privileges/remove-user| |role-add-roles|http://marklogic.com/xdmp/privileges/role-add-roles| |role-get-default-collections|http://marklogic.com/xdmp/privileges/role-get-default-collections| |role-get-default-permissions|http://marklogic.com/xdmp/privileges/role-get-default-permissions| |role-get-roles|http://marklogic.com/xdmp/privileges/role-get-roles| |role-privileges|http://marklogic.com/xdmp/privileges/role-privileges| |role-remove-roles|http://marklogic.com/xdmp/privileges/role-remove-roles| |role-set-default-collections|http://marklogic.com/xdmp/privileges/role-set-default-collections| |role-set-default-permissions|http://marklogic.com/xdmp/privileges/role-set-default-permissions| |role-set-description|http://marklogic.com/xdmp/privileges/role-set-description| |role-set-name|http://marklogic.com/xdmp/privileges/role-set-name| |role-set-roles|http://marklogic.com/xdmp/privileges/role-set-roles| |unprotect-collection|http://marklogic.com/xdmp/privileges/unprotect-collection|
|Name|Action URI| |---|---| | | | |user-add-roles|http://marklogic.com/xdmp/privileges/user-add-roles| |user-get-default-collections|http://marklogic.com/xdmp/privileges/user-gt-default-collections| |user-get-default-permissions|http://marklogic.com/xdmp/privileges/user-get-default-permissions| |user-get-description|http://marklogic.com/xdmp/privileges/user-get-description| |user-get-roles|http://marklogic.com/xdmp/privileges/user-get-roles| |user-privileges|http://marklogic.com/xdmp/privileges/user-privileges| |user-remove-roles|http://marklogic.com/xdmp/privileges/user-remove-roles| |user-set-default-collections|http://marklogic.com/xdmp/privileges/user-set-default-collections| |user-set-default-permissions|http://marklogic.com/xdmp/privileges/user-set-default-permissions| |user-set-description|http://marklogic.com/xdmp/privileges/user-set-description| |user-set-name|http://marklogic.com/xdmp/privileges/user-set-name| |user-set-password|http://marklogic.com/xdmp/privileges/user-set-password| |user-set-roles|http://marklogic.com/xdmp/privileges/user-set-roles| |xdmp:amp-roles|http://marklogic.com/xdmp/privileges/xdmp:amp-roles| |xdmp:privilege-roles|http://marklogic.com/xdmp/privileges/xdmp:privilege-roles| |xdmp:role-roles|http://marklogic.com/xdmp/privileges/xdmp:role-roles| |xdmp:user-roles|http://marklogic.com/xdmp/privileges/xdmp:user-roles|
Default permissions for the security role are:
|Role|Capability| |---|---| | | | |security|Read| |security|Insert| |security|Update|
The trigger-management role has the privileges to create and modify triggers. The trigger-management role has no execute privileges associated with it. This role has the following default permissions:
The view-admin-internal role is used internally by the MarkLogic Server. Do not explicitly grant it to any user or role.
The welcome-internal role is a role that used to be used internally by the MarkLogic Server Welcome Page (now removed). Do not explicitly grant it to any user or role.
The xa user role allows creation and management of one’s own XA transaction branches in MarkLogic Server. The xa role is required to participate in XA transactions. For details, see Participating in XA Transactions in the XCC Developer’s Guide. The xa role has the following execute privileges:
|Role|Capability| |---|---| | | | |trigger-management|Read| |trigger-management|Update|
|Name|Action URI| |---|---| | | | |complete-my-transaction|http://marklogic.com/xdmp/privileges/complete-my-transactions| |forget-my-xa-transactions|http://marklogic.com/xdmp/privileges/forget-my-xa-transactions| |prepare-my-xa-transactions|http://marklogic.com/xdmp/privileges/prepare-my-xa-transactions| |status-builtins|http://marklogic.com/xdmp/privileges/status-builtins| |xdmp:set-current-transaction|http://marklogic.com/xdmp/privileges/set-current-transaction| |xdmp:transaction-create|http://marklogic.com/xdmp/privileges/xdmp-transaction-create| |xdmp:transaction-create-xid|http://marklogic.com/xdmp/privileges/xdmp-transaction-create-xid|
MarkLogic Server. The xa-admin role is intended primarily for Administrators who need to complete or forget XA transactions. The xa-admin role has the following execute privileges:
|Name|Action URI| |---|---| | | | |complete-any-transactions|http://marklogic.com/xdmp/privileges/complete-any-transactions| | | | |complete-my-transaction|http://marklogic.com/xdmp/privileges/complete-my-transactions| |forget-any-xa-transactions|http://marklogic.com/xdmp/privileges/forget-any-xa-transactions| |forget-my-xa-transactions|http://marklogic.com/xdmp/privileges/forget-my-xa-transactions| |prepare-any-xa-transactions|http://marklogic.com/xdmp/privileges/prepare-any-xa-transactions| |prepare-my-xa-transactions|http://marklogic.com/xdmp/privileges/prepare-my-xa-transactions| |status-builtins|http://marklogic.com/xdmp/privileges/status-builtins| |xdmp:set-current-transaction|http://marklogic.com/xdmp/privileges/set-current-transaction| |xdmp:transaction-create|http://marklogic.com/xdmp/privileges/xdmp-transaction-create| |xdmp:transaction-create-xid|http://marklogic.com/xdmp/privileges/xdmp-transaction-create-xid|
######### 35.75 xinclude
The xinclude role provides the privileges to run the XInclude code used in the XInclude CPF application. For details, see Reusing Content With Modular Document Applications in the Application Developer’s Guide.
##### 36.0 Technical Support
MarkLogic provides technical support according to the terms detailed in your Software License Agreement or End User License Agreement.
We invite you to visit our support website at http://help.marklogic.com to access information on known and fixed issues, knowledge base articles, and more. For licensed customers with an active maintenance contract, see the Support Handbook for instructions on registering support contacts and on working with the MarkLogic Technical Support team.
Complete product documentation, the latest product release downloads, and other useful information is available for all developers at http://developer.marklogic.com. For technical questions, we encourage you to ask your question on Stack Overflow.
##### 37.0 Copyright
MarkLogic Server 10.0 and supporting products. Last updated: February, 2022
Copyright © 2022 MarkLogic Corporation. All rights reserved. This technology is protected by U.S. Patent No. 7,127,469B2, U.S. Patent No. 7,171,404B2, U.S. Patent No. 7,756,858 B2, and U.S. Patent No 7,962,474 B2, US 8,892,599, and US 8,935,267.
The MarkLogic software is protected by United States and international copyright laws, and incorporates certain third party libraries and components which are subject to the attributions, terms, conditions and disclaimers set forth below.
For all copyright notices, including third-party copyright notices, see the Combined Product Notices for your version of MarkLogic.