
Ask AI
— answers from the official manualAnswers from the official manual.
Common questions
Common Questions
10 totalHow do I turn off the Air Fryer Toaster Oven?
Turn both the ON/Oven Timer dial and the ON/Toast Timer dial to the OFF position. The power light will turn off. (Page 6)
What should I do before using my Air Fryer Toaster Oven for the first time?
Place the oven on a flat surface and move it 2 to 4 inches away from the wall or any objects on the countertop. Do not use on heat-sensitive surfaces. Remove all objects from the top of the oven before turning it on. (Page 5)
How do I properly position the oven rack for toasting?
The oven rack must always be in Position 2 for even toasting. If toasting two items, center them in the middle of the rack. Four items should be evenly spaced (two in front, two in back), and six items should be evenly spaced (three in front, three in back). (Page 6)
Can I use aluminum foil to cover the accessories in the oven?
Aluminum foil is not recommended for covering accessories as it prevents fat from dripping into the drip tray, causing grease to accumulate on the foil surface which may catch fire. If you must use foil, ensure it is cut to fit neatly in the pan and does not touch the walls or heating elements. (Page 5)
What is the proper way to clean the interior of the oven?
Allow the oven to cool completely and unplug it from the electrical outlet. Use a damp cloth and a mild liquid soap solution or spray solution on a sponge. Never use harsh abrasives, corrosive products, or steel wool pads as these could damage the oven surface. (Page 7)
Are the oven racks and pans dishwasher safe?
No, the Oven Rack, Baking Pan, AirFryer Basket, and Crumb Tray are NOT dishwasher safe. They should be hand-washed in hot, sudsy water or cleaned with a nylon scouring pad or nylon brush. (Page 7)
Full Manual
66 pages
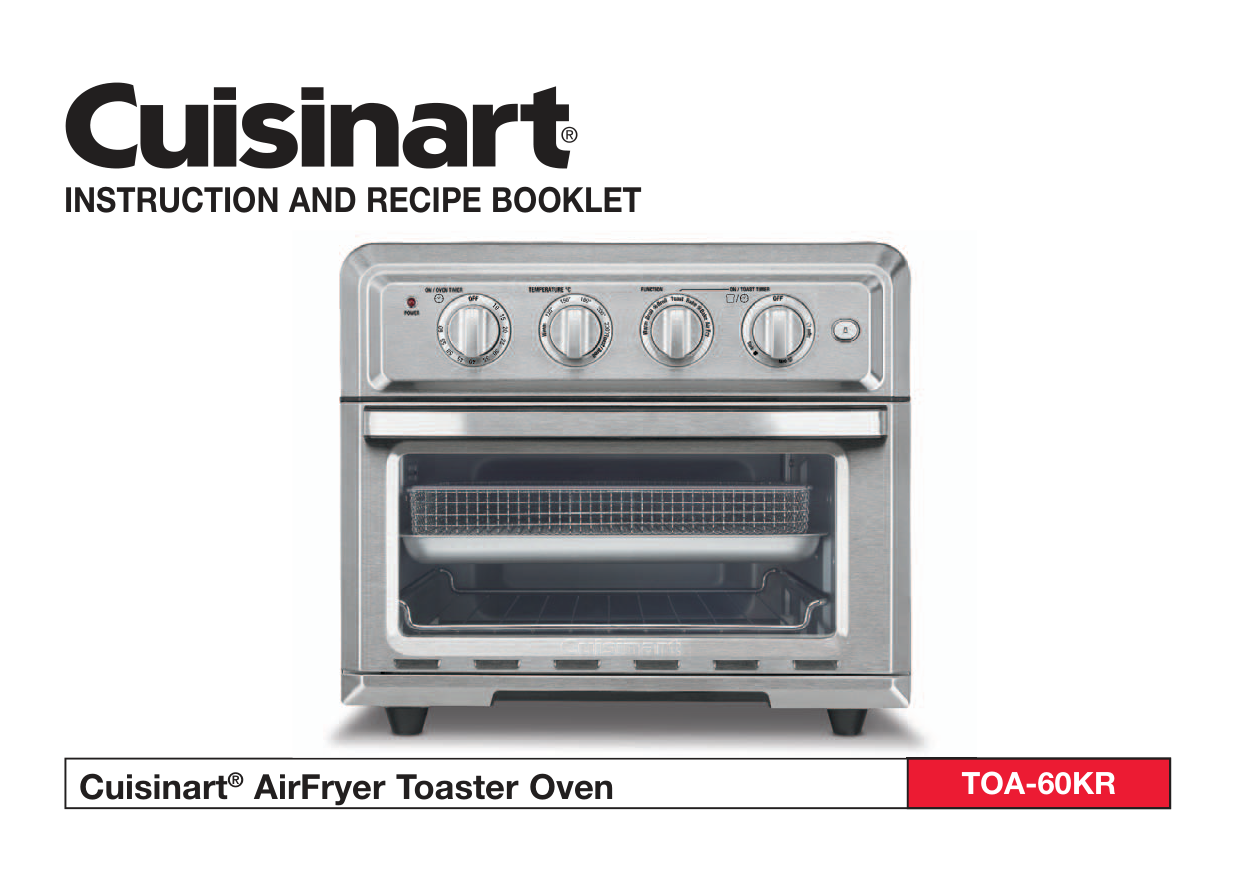
Instruction And Recipe Booklet
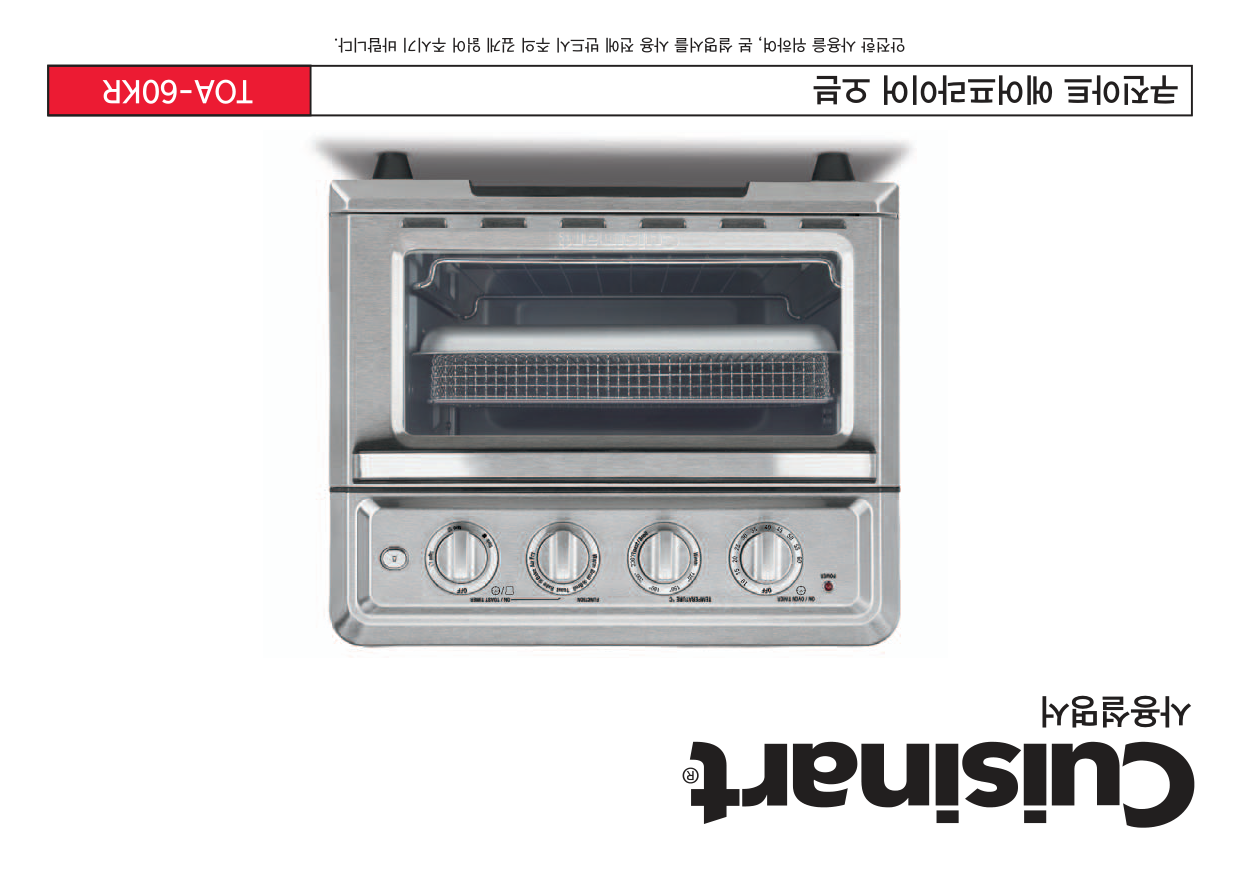
Cuisinart® AirFryer Toaster OvenToa-60Kr
2
Contents
Important Safeguards. . . . . . . . . . . . . . . . . . . . . . . . . . . . . . . . . . . . . . . . . . . 2 Special Cord Set Instructions . . . . . . . . . . . . . . . . . . . . . . . . . . . . . . . . . . . . 3 Features . . . . . . . . . . . . . . . . . . . . . . . . . . . . . . . . . . . . . . . . . . . . . . . . . . . . . 4 Before First Use . . . . . . . . . . . . . . . . . . . . . . . . . . . . . . . . . . . . . . . . . . . . . . . 5 General Guidelines. . . . . . . . . . . . . . . . . . . . . . . . . . . . . . . . . . . . . . . . . . . . . 5 Oven Rack and Pan Positions . . . . . . . . . . . . . . . . . . . . . . . . . . . . . . . . . . . . 5 Operation . . . . . . . . . . . . . . . . . . . . . . . . . . . . . . . . . . . . . . . . . . . . . . . . . . . . 6 Cleaning and Maintenance . . . . . . . . . . . . . . . . . . . . . . . . . . . . . . . . . . . . . . 7 Recipes. . . . . . . . . . . . . . . . . . . . . . . . . . . . . . . . . . . . . . . . . . . . . . . . . . . . . . 9 Warranty . . . . . . . . . . . . . . . . . . . . . . . . . . . . . . . . . . . . . . . . . . . . . . . . . . . . 34Important Safeguards
When using an electrical appliance, especially when children are present, basic safety precautions should always be taken, including the following:2. Unplug From Outlet When Not In Use And Before Cleaning.
Allow to cool before cleaning or handling, putting on or taking off parts.
3
Save These Instructions
Please read and keep these instructions handy. These instructions will help you use your Cuisinart® AirFryer Toaster Oven to its fullest so that you will achieve consistent, professional results.Special Cord Set Instructions
A short power-supply cord is provided to reduce the risks resulting from becoming entangled in or tripping over a longer cord. Extension cords are available and may be used if care is exercised in their use. If an extension cord is used, the marked electrical rating of the extension cord must be at least as great as the electrical rating of the appliance, and the longer cord should be arranged so that it will not drape over the countertop or tabletop, where it can be tripped over unintentionally or pulled on by children.Notice
This appliance is under 220V use only. If the plug does not fit fully in the outlet, please do not plug in. Please follow the safeguards of this instruction booklet.For Household Use Only
Not Intended
For Commercial Use
4
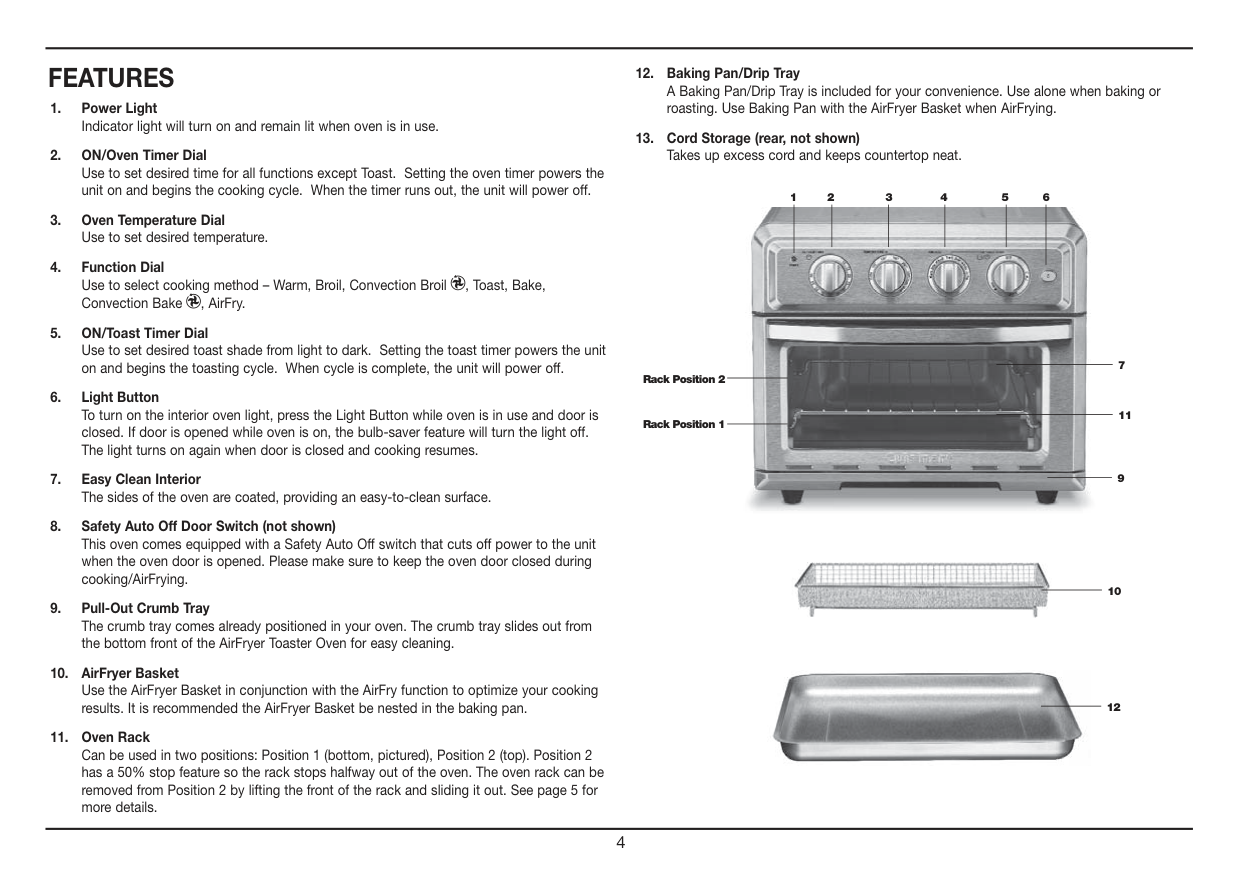
Features
5
Before First Use
Place your AirFryer Toaster Oven on a flat surface. Before using, move oven 2 to 4 inches away from the wall or from any objects on the countertop. Do not use on heat-sensitive surfaces.Objects Should Not Be Stored On The Top Of The Oven. If They
Are, Remove All Objects Before You Turn On Your Oven. The
Exterior Walls Get Very Hot When In Use. Keep Out Of Reach
Of Children.
General Guidelines
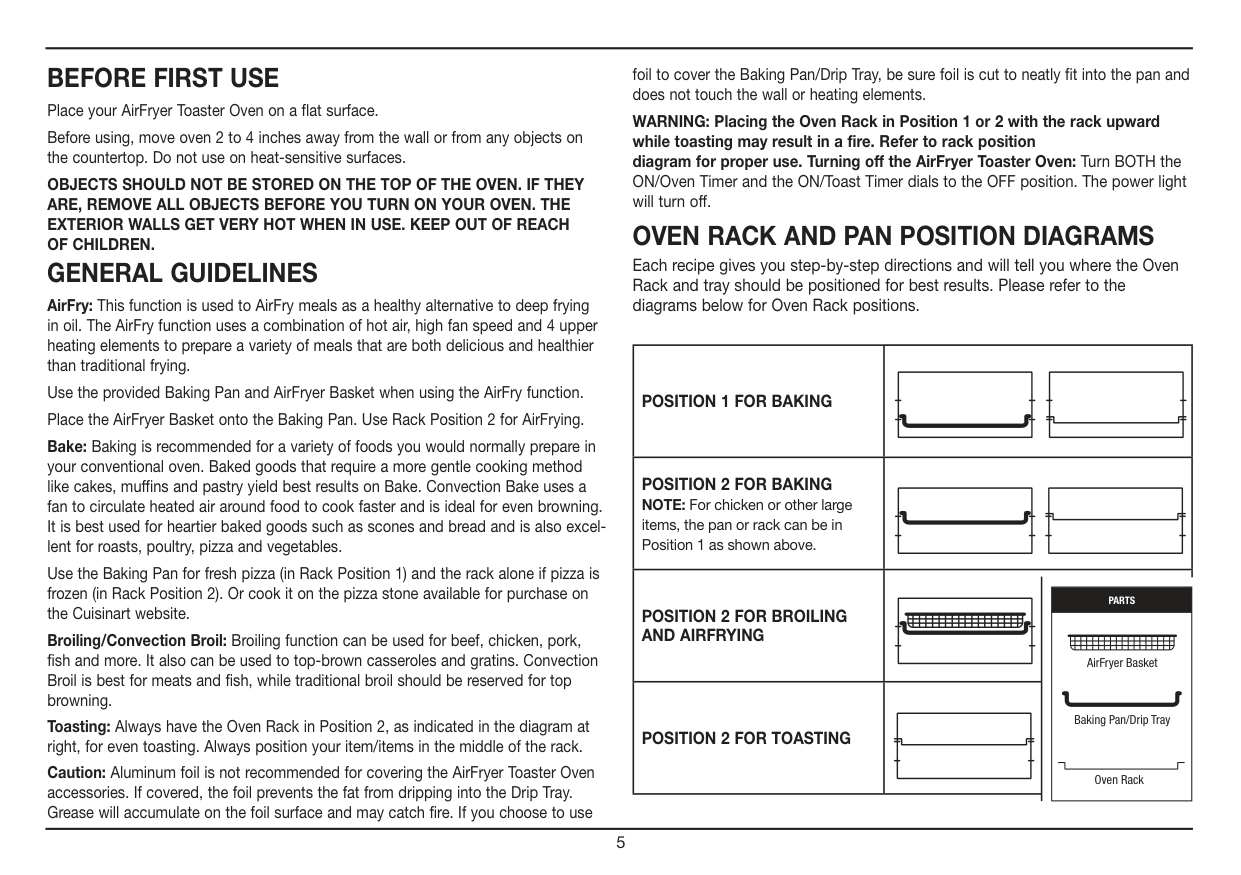
AirFry: This function is used to AirFry meals as a healthy alternative to deep frying in oil. The AirFry function uses a combination of hot air, high fan speed and 4 upper heating elements to prepare a variety of meals that are both delicious and healthier than traditional frying. Use the provided Baking Pan and AirFryer Basket when using the AirFry function. Place the AirFryer Basket onto the Baking Pan. Use Rack Position 2 for AirFrying. Bake: Baking is recommended for a variety of foods you would normally prepare in your conventional oven. Baked goods that require a more gentle cooking method like cakes, muffins and pastry yield best results on Bake. Convection Bake uses a fan to circulate heated air around food to cook faster and is ideal for even browning. It is best used for heartier baked goods such as scones and bread and is also excel- lent for roasts, poultry, pizza and vegetables. Use the Baking Pan for fresh pizza (in Rack Position 1) and the rack alone if pizza is frozen (in Rack Position 2). Or cook it on the pizza stone available for purchase on the Cuisinart website. Broiling/Convection Broil: Broiling function can be used for beef, chicken, pork, fish and more. It also can be used to top-brown casseroles and gratins. Convection Broil is best for meats and fish, while traditional broil should be reserved for top browning. Toasting: Always have the Oven Rack in Position 2, as indicated in the diagram at right, for even toasting. Always position your item/items in the middle of the rack. Caution: Aluminum foil is not recommended for covering the AirFryer Toaster Oven accessories. If covered, the foil prevents the fat from dripping into the Drip Tray. Grease will accumulate on the foil surface and may catch fire. If you choose to use foil to cover the Baking Pan/Drip Tray, be sure foil is cut to neatly fit into the pan and does not touch the wall or heating elements. WARNING: Placing the Oven Rack in Position 1 or 2 with the rack upward while toasting may result in a fire. Refer to rack position diagram for proper use. Turning off the AirFryer Toaster Oven: Turn BOTH the ON/Oven Timer and the ON/Toast Timer dials to the OFF position. The power light will turn off.Oven Rack And Pan Position Diagrams
Each recipe gives you step-by-step directions and will tell you where the Oven Rack and tray should be positioned for best results. Please refer to the diagrams below for Oven Rack positions.Position 1 For Baking
Position 2 For Baking
NOTE: For chicken or other large items, the pan or rack can be in Position 1 as shown above.Position 2 For Broiling
And Airfrying
Position 2 For Toasting
Oven Rack Baking Pan/Drip Tray AirFryer BasketParts
6
Operation
Unwind the power cord. Check that the Crumb Tray is in place and that there is nothing in the oven. Plug power cord into the wall outlet. Broil or Convection Broil Place the AirFryer Basket on top of the Baking Pan to use to Broil in Rack Position 2. Set the Function Dial to either Broil or Convection Broil. Set Temperature Dial to Toast/Broil. Then turn the ON/Oven Timer dial to the desired cooking time to turn on the oven and begin broiling. The power light will illuminate. The timer will ring once when the cycle is complete and the oven will power off when the time expires. To stop broiling, turn the ON/Oven Timer dial to the OFF position. Broiling Tips: For best results, use the provided AirFryer Basket fitted inside the Baking Pan to broil. Never use glass oven dishes to broil. Be sure to keep an eye on food – items can get dark quickly while broiling. Bake or Convection Bake Fit the Baking Pan or Oven Rack into either rack position. (See Rack Positions, page 5.) Set the Function Dial to Bake or Convection Bake. Set the Temperature Dial to desired temperature. Then turn the ON/Oven Timer dial to the recommended cooking time to turn on the oven. It’s recommended to preheat oven for 5 minutes prior to baking delicate items such as cakes and muffins. (Incorporate this time into the total baking time.) The power light will illuminate. The timer will ring once when time has expired and cycle is complete; the oven will power off. To stop baking mid-cycle, turn the ON/Oven Timer dial to the OFF position. Baking Tips: Select Bake for more delicate items like custards, cakes and eggs. Most baked goods, as well as larger items like chicken, are baked in rack Position 1. Use Baking Pan in Position 1 for fresh pizza. Place frozen pizza directly on the Rack in Position 2 to cook. Convection Baking Tips: Select Convection Bake for hearty baked goods that require even browning such as scones and breads, as well as for roasts and poultry. Convection Bake is also perfect for baking evenly browned and crispy homemade pizzas. Most recipes recommend reducing heat or temperature by 3-4°C when Convection Baking. Always check for doneness 10 minutes before end of suggested cooking time.Important
All of our recipes have been tested in our test kitchen and are specially developed to work in the Cuisinart® AirFryer Toaster Oven. Warm Fit provided Baking Pan or Oven Rack into Rack Position 2. Set the Temperature Dial to Warm. Set the Function Dial to Warm. Then turn the ON/ Oven Timer Dial to the desired warming time to start the oven and begin warming. The power light will illuminate. The timer will ring once when the cycle is complete and the oven will power off when the time expires. To stop warming, turn the ON/Oven Timer dial to the OFF position. Toast Fit Oven Rack into Position 2. If toasting two items, center them in the middle of the Oven Rack. Four items should be evenly spaced – two in front, two in back. Six items should be evenly spaced – three in front, three in back. Set the Function Dial to Toast. Set the Temperature Dial to Toast/Broil. Turn the ON/ Toast Timer Dial to desired shade setting from light to dark within the marked settings to turn on the oven and begin toasting. The oven power light will illuminate. When completed, the timer will ring and turn off.
7 To stop toasting, turn the ON/Toast Timer dial to the OFF position. Important Notes on Toasting The Oven Rack must be in Position 2 as indicated in the diagram on page 5. AirFry (Refer to Chart on page 8) Place the AirFryer Basket onto the Baking Pan. AirFry in Rack Position 2. Set the Function Dial to AirFry. Set Temperature Dial to desired temperature. Then turn the ON/Oven Timer dial to the desired cooking time to turn on the oven and begin AirFrying. The oven power light will illuminate. The timer will ring once when the cycle is complete, and the oven will power off when the time expires. To stop AirFrying, turn the ON/Oven Timer dial to the OFF position. AirFrying Tips: AirFrying is a healthy alternative to frying. Many foods that can be fried, can be AirFried without using excess amounts of oil. AirFried foods will taste lighter and less greasy than deep-fried foods. Most oils can be used for AirFrying. Olive oil is preferred for a richer flavor. Vegetable, canola or grapeseed oil is recommended for a mild flavor. Distribute oil evenly on food to achieve the crispiest and most golden results. Oil can be sprayed or brushed onto foods for AirFrying. Alternatively, olive oil and non stick cooking sprays can be used. An assortment of coatings can be used on AirFry foods. Some examples of different crumb mixtures include: breadcrumbs, seasoned breadcrumbs, panko breadcrumbs, cornflakes, potato chip crumbs, graham cracker crumbs, quinoa, various flours, etc. Most foods do not need to be flipped during cooking, but larger items, like chicken cutlets, should be flipped halfway during cooking to ensure quick, even cooking and browning. When AirFrying large quantities of food that crowd the pan, toss food halfway through cooking to ensure even cooking and coloring. Use higher temperatures for foods that cook quickly, like bacon and chips, and lower temperatures for foods that take longer to cook like breaded chicken. Foods will cook more evenly if they are cut to the same size. Line the Baking Tray with aluminum foil for easy cleanup. Please note that when most foods cook, they release water. When cooking large quantities for an extended period of time, condensation may build up, which could leave moisture on your countertop.
Cleaning And Maintenance
Always allow the oven to cool completely before cleaning. Always unplug the oven from the electrical outlet. Do not use abrasive cleaners, as they will damage the finish. Simply wipe the exterior with a clean, damp cloth and dry thoroughly. Apply the cleansing agent to a cloth, not directly onto the toaster oven, before cleaning. To clean interior walls, use a damp cloth and a mild liquid soap solution or a spray solution on a sponge. Never use harsh abrasives or corrosive products. These could damage the oven surface. Never use steel wool pads, etc., on interior of oven. Oven Rack, Baking Pan, AirFryer Basket and Crumb Tray should be hand-washed in hot, sudsy water or use a nylon scouring pad or nylon brush. They are NOT dishwasher safe. After cooking greasy foods and after your oven has cooled, always clean top interior of oven. If this is done on a regular basis, your oven will perform like new. Removing the grease will help to keep toasting consistent, cycle after cycle. To remove crumbs, slide out the Crumb Tray and discard crumbs. Wipe clean and replace. To remove baked-on grease, soak the tray in hot, sudsy water or use nonabrasive cleaners. Never operate the oven without the Crumb Tray in place. Never wrap the cord around the outside of the oven. Use the cord storage cleats on the back of the oven. Any other servicing should be performed by an authorized service representative.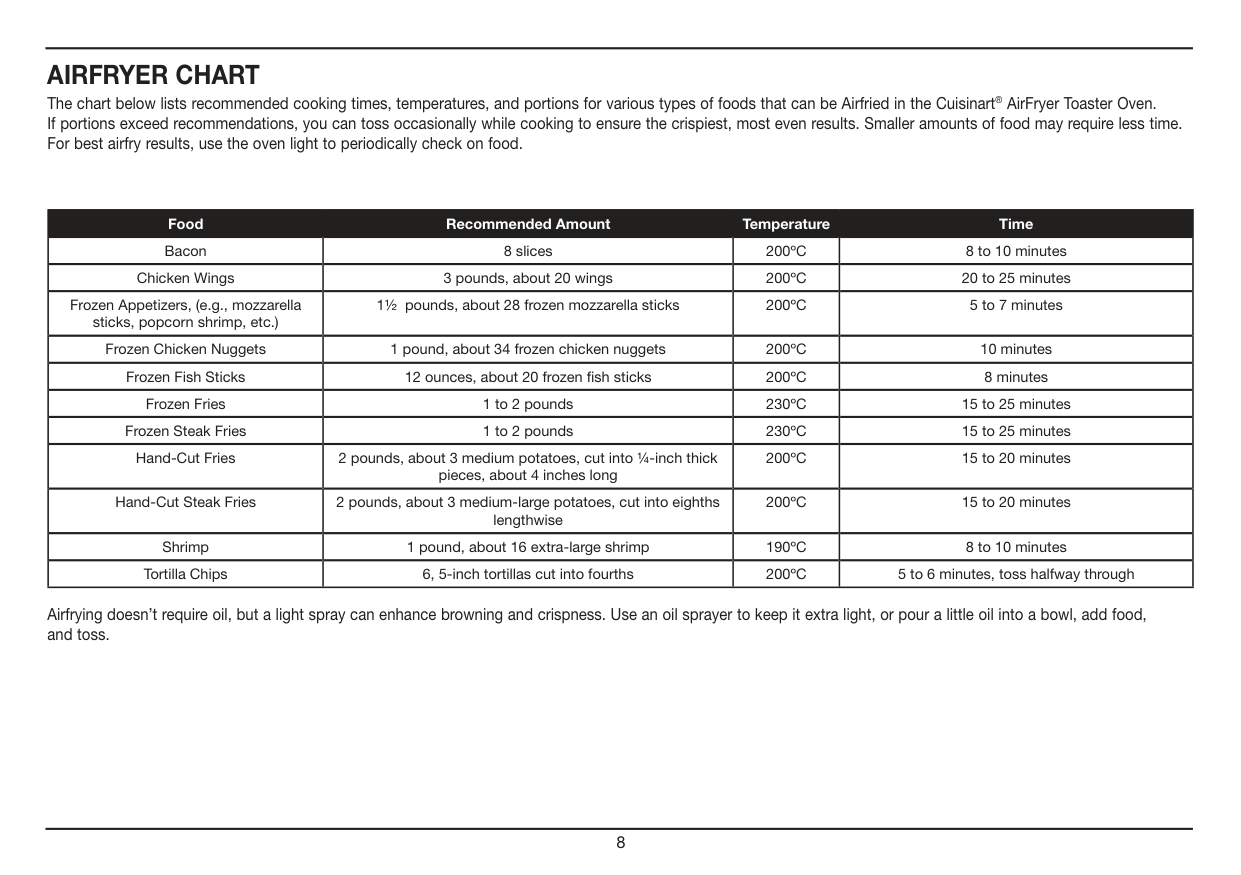
8 Food Recommended Amount Temperature Time Bacon 8 slices 200ºC 8 to 10 minutes Chicken Wings 3 pounds, about 20 wings 200ºC 20 to 25 minutes Frozen Appetizers, (e.g., mozzarella sticks, popcorn shrimp, etc.) 1½ pounds, about 28 frozen mozzarella sticks 200ºC 5 to 7 minutes Frozen Chicken Nuggets 1 pound, about 34 frozen chicken nuggets 200ºC 10 minutes Frozen Fish Sticks 12 ounces, about 20 frozen fi sh sticks 200ºC 8 minutes Frozen Fries 1 to 2 pounds 230ºC 15 to 25 minutes Frozen Steak Fries 1 to 2 pounds 230ºC 15 to 25 minutes Hand-Cut Fries 2 pounds, about 3 medium potatoes, cut into ¼ -inch thick pieces, about 4 inches long 200ºC 15 to 20 minutes Hand-Cut Steak Fries 2 pounds, about 3 medium-large potatoes, cut into eighths lengthwise 200ºC 15 to 20 minutes Shrimp 1 pound, about 16 extra-large shrimp 190ºC 8 to 10 minutes Tortilla Chips 6, 5-inch tortillas cut into fourths 200ºC 5 to 6 minutes, toss halfway through
Airfryer Chart
The chart below lists recommended cooking times, temperatures, and portions for various types of foods that can be Airfried in the Cuisinart® AirFryer Toaster Oven. If portions exceed recommendations, you can toss occasionally while cooking to ensure the crispiest, most even results. Smaller amounts of food may require less time. For best airfry results, use the oven light to periodically check on food. Airfrying doesn’t require oil, but a light spray can enhance browning and crispness. Use an oil sprayer to keep it extra light, or pour a little oil into a bowl, add food, and toss.
9
Recipes
These mouthwatering recipes are just a sampling of what this appliance can do.Appetizers And Small Bites
Beet Chips with Fresh Dill . . . . . . . . . . . . . . . . . . . . . . . . . . . . . . . . . . . . . . 10 Blooming Onion . . . . . . . . . . . . . . . . . . . . . . . . . . . . . . . . . . . . . . . . . . . . . . 10 Chicken Wings, Two Ways. . . . . . . . . . . . . . . . . . . . . . . . . . . . . . . . . . . . . . 11 Buffalo Sauce for Chicken Wings. . . . . . . . . . . . . . . . . . . . . . . . . . . . . . 11 Sesame Ginger Sauce for Chicken Wings . . . . . . . . . . . . . . . . . . . . . . . 11 Crab Cakes . . . . . . . . . . . . . . . . . . . . . . . . . . . . . . . . . . . . . . . . . . . . . . . . . 12 Crispy Chickpeas . . . . . . . . . . . . . . . . . . . . . . . . . . . . . . . . . . . . . . . . . . . . . 13 Fried Pickles. . . . . . . . . . . . . . . . . . . . . . . . . . . . . . . . . . . . . . . . . . . . . . . . . 13 Italian Rice Balls. . . . . . . . . . . . . . . . . . . . . . . . . . . . . . . . . . . . . . . . . . . . . . 13 Kale Chips . . . . . . . . . . . . . . . . . . . . . . . . . . . . . . . . . . . . . . . . . . . . . . . . . . 14 Nachos with Shredded Chicken and Homemade Tortilla Chips . . . . . . . . . 14 Pork and Ginger Wontons . . . . . . . . . . . . . . . . . . . . . . . . . . . . . . . . . . . . . . 15 Potato Wedges with Crumbled Bacon and Blue Cheese . . . . . . . . . . . . . . 16 Shrimp Diablo. . . . . . . . . . . . . . . . . . . . . . . . . . . . . . . . . . . . . . . . . . . . . . . . 16 Spinach, Gruyère and Artichoke Dip . . . . . . . . . . . . . . . . . . . . . . . . . . . . . . 17 Spring Rolls with Sweet Chile Dipping Sauce. . . . . . . . . . . . . . . . . . . . . . . 17 Veggie Sticks with Herbed Yogurt Dip. . . . . . . . . . . . . . . . . . . . . . . . . . . . . 18Main Courses
Chicken Tenders. . . . . . . . . . . . . . . . . . . . . . . . . . . . . . . . . . . . . . . . . . . . . . 19 Classic Roast Chicken . . . . . . . . . . . . . . . . . . . . . . . . . . . . . . . . . . . . . . . . . 20 Fish Tacos with Peach Salsa . . . . . . . . . . . . . . . . . . . . . . . . . . . . . . . . . . . . 20 Maple-Pecan BLT. . . . . . . . . . . . . . . . . . . . . . . . . . . . . . . . . . . . . . . . . . . . . 21 Meatball Grinder. . . . . . . . . . . . . . . . . . . . . . . . . . . . . . . . . . . . . . . . . . . . . . 21 Pan-Roasted Salmon Dinner . . . . . . . . . . . . . . . . . . . . . . . . . . . . . . . . . . . . 22 Pizza with Arugula, Prosciutto and Fig Jam . . . . . . . . . . . . . . . . . . . . . . . . 22 Pizza Margherita. . . . . . . . . . . . . . . . . . . . . . . . . . . . . . . . . . . . . . . . . . . . . . 23 Roasted Chicken Thighs with Smoked Paprika and Lime . . . . . . . . . . . . . 23 Roasted Lamb Chops with Rosemary and Garlic . . . . . . . . . . . . . . . . . . . . 24 Sausage and Kale Quiche . . . . . . . . . . . . . . . . . . . . . . . . . . . . . . . . . . . . . . 24 Simply Broiled Burgers. . . . . . . . . . . . . . . . . . . . . . . . . . . . . . . . . . . . . . . . . 25Sides
Brussels Sprouts with Pancetta. . . . . . . . . . . . . . . . . . . . . . . . . . . . . . . . . . 26 French Fries . . . . . . . . . . . . . . . . . . . . . . . . . . . . . . . . . . . . . . . . . . . . . . . . . 27 Roasted Acorn Squash . . . . . . . . . . . . . . . . . . . . . . . . . . . . . . . . . . . . . . . . 27 Roasted Fennel, Carrots and Parsnips . . . . . . . . . . . . . . . . . . . . . . . . . . . . 27 Sweet Potato Fries with Chipotle Mayonnaise . . . . . . . . . . . . . . . . . . . . . . 28Sweet Treats
Baked Apples. . . . . . . . . . . . . . . . . . . . . . . . . . . . . . . . . . . . . . . . . . . . . . . . 28 Blueberry Muffins . . . . . . . . . . . . . . . . . . . . . . . . . . . . . . . . . . . . . . . . . . . . . 29 Cinnamon Sugar Doughnut Bites . . . . . . . . . . . . . . . . . . . . . . . . . . . . . . . . 29 Cherry-Ginger Scones . . . . . . . . . . . . . . . . . . . . . . . . . . . . . . . . . . . . . . . . . 30 Chocolate Layer Cake with Salted Caramel Frosting . . . . . . . . . . . . . . . . . 31 Crunchy Granola . . . . . . . . . . . . . . . . . . . . . . . . . . . . . . . . . . . . . . . . . . . . . 32 “Fried” Apples . . . . . . . . . . . . . . . . . . . . . . . . . . . . . . . . . . . . . . . . . . . . . . . 32 Peanut Butter Swirl Brownies . . . . . . . . . . . . . . . . . . . . . . . . . . . . . . . . . . . 33
10
Appetizers And Small Bites
Traditionally deep-fried favorites are transformed into lighter, healthier versions in the Cuisinart® AirFryer Toaster Oven, which requires only a few spritzes of oil to AirFry. Plus, we offer many interchangeable dipping sauces that can be enjoyed with more than just the recipes they accompany. Beet Chips with Fresh Dill Any root vegetable can be sliced thin and airfried for a healthier alternative to packaged potato chips. Makes about 1 to 2 servings 1 medium beet (about 5 ounces)Olive oil, for spraying ¼ teaspoon kosher salt 1 tablespoon fresh dill, chopped ½ teaspoon white wine vinegar
Nonstick cooking spray
Olive oil, for spraying

11 Chicken Wings, Two Ways For a healthier option than deep-frying, AirFry chicken wings. Here, we give you two versions, plain and beer-battered for extra crispiness. Both can be enjoyed right out of the AirFryer Toaster Oven, or tossed in your favorite sauce. Makes about 20 wing sections
Nonstick cooking spray Beer-Battered Chicken Wings: 2 pounds chicken wings, tips removed, drumettes and flats separated* ½ cup unbleached, all-purpose flour ½ cup light beer ¾ teaspoon kosher salt Plain Chicken Wings: 2 pounds chicken wings, tips removed, drumettes and flats separated ¾ teaspoon kosher salt

12 6 green onions, thinly sliced
Hot sauce (optional)
Olive oil, for spraying
Lemon wedges, for serving

13 Crispy Chickpeas Quickly transform a plain can of chickpeas into a crispy snack. Thanks to the AirFry function of the Cuisinart® AirFryer Toaster Oven, you will have a great new appetizer for guests. 1 can (15.5 ounces) chickpeas, drained and blotted dry, about 1½ cups
Olive oil, for spraying ¼ teaspoon kosher salt ¼ teaspoon ground cumin
Pinch freshly ground black pepper
Nonstick cooking spray 6 kosher dill pickles (about 10 ounces), cut into ¼-inch discs
Olive oil, for spraying

14 1 ounce mozzarella cheese, cut into 1-inch x ¼-inch pieces ¼ cup Italian-style breadcrumbs
Olive oil, for spraying 1 cup prepared marinara sauce*, for dipping, optional
Olive oil, for spraying ¼ teaspoon kosher salt
Olive oil, for spraying ½ teaspoon kosher salt, divided 1 pound chicken thighs, shredded (see recipe on page 23)

15 1 can (15.5 ounces) black beans, drained and rinsed 2 plum tomatoes, chopped 1 can (7.25 ounces) pitted black olives, chopped 2 jalapeños, thinly sliced 4 ounces Monterey Jack cheese, shredded 2 green onions, thinly sliced
Salsa, for serving
Water and cornstarch, for assembling dumplings 48 wonton wrappers
Vegetable oil, for spraying

16 Potato Wedges with Crumbled Bacon and Blue Cheese Top these with a fried egg for the ultimate breakfast. Makes 3 to 4 servings 5 slices bacon 1 pound russet potatoes, scrubbed
Olive oil, for spraying ½ teaspoon kosher salt 3 tablespoons crumbled blue cheese
Olive oil for spraying
Crusty bread, for dipping
17 Spinach, Gruyère and Artichoke Dip A bit of a twist on the standard spinach artichoke dip, for the more grown-up palate. The combination of Gruyère and Parmesan gives the dip a pleasant nuttiness. No special pan required – we found that using a pie plate was the best and quickest way to warm this dish. Makes about 2 cups
Olive oil or nonstick cooking spray 12 ounces cream cheese, room temperature and cut into 1-inch pieces (regular or reduced-fat style, such as Neufchâtel, may be used) 2 ounces Gruyère cheese, finely grated 1 ounce Parmesan cheese, finely grated 1 garlic clove, finely chopped ½ small shallot, finely chopped 8 ounces frozen spinach, thawed and drained well 1 can (15 ounces) quartered artichoke hearts, drained 2 tablespoons heavy cream ½ teaspoon crushed red pepper
18
Olive oil, for spraying
Lemon, for serving, optional
19 spices and salt into another container, also large enough to dip the vegetables into.
Main Courses
The Cuisinart® AirFryer Toaster Oven, not only can AirFry, but it also bakes and broils — with convection if you’d like — to put a full meal on your table in record time! Chicken Tenders Kids of all ages will love this homemade version of the frozen standby. Makes about 6 servings 1 cup unbleached, all-purpose flour 2 large eggs, lightly beaten 1 cup panko breadcrumbs 1 to 1½ pounds thinly sliced chicken breast ¾ teaspoon kosher salt ¾ teaspoon freshly ground black pepperOlive oil, for spraying
20 Classic Roast Chicken Simple spices go a long way in this roast chicken recipe. Makes 4 to 6 servings 1 Whole chicken (4 pounds) 1 teaspoon kosher salt ½ teaspoon freshly ground black pepper 1 lemon, halved 1 teaspoon extra virgin olive oil 2 teaspoons herbes de Provence or other dried herbs like rosemary and thyme 3 garlic cloves, smashed
Olive oil, for spraying
Nonstick cooking spray 8 radishes, cut into matchsticks
Lime wedges, for garnish
21
Pinch kosher salt 4 green leafy lettuce leaves 1 medium tomato, sliced 1 tablespoon pure maple syrup 2 tablespoons finely chopped pecans
22 Meatball Grinders: 4 mini grinder rolls (about 5 inches long) ½ cup prepared marinara sauce*, plus extra for serving 6 ounces fresh mozzarella, thinly sliced
Nonstick cooking spray or 1 tablespoon extra virgin olive oil 1 pound pizza dough, room temperature ¼ cup fig jam ¼ pound prosciutto, thinly sliced 3 ounces goat cheese 1 cup baby arugula
23
Nonstick cooking spray or 1 tablespoon extra virgin olive oil 1 pound pizza dough, room temperature ¾ cup pizza sauce 2 tablespoons grated Parmesan 3 ounces fresh mozzarella, thinly sliced 6 to 8 basil leaves, torn into pieces
24
Pinch freshly ground black pepper 4 large lacinato kale leaves, tough stems removed and thinly sliced ¼ teaspoon fresh thyme leaves 1 hot Italian sausage link (about 3 ounces), chopped or crumbled (if using fresh, remove casing) ½ cup whole milk ½ cup heavy cream 4 large eggs 1 ounce Gruyère or Swiss cheese, shredded
25
26
Sides
Perfect accompaniments to main courses cooked quickly with minimal ingredients and barely any cleanup. Brussels Sprouts with Pancetta A perfect side dish to any meal – the saltiness of the pancetta comple- ments the earthiness of the sprouts, and a finish of red wine vinegar provides an unexpected, but welcome tang. Makes 4 servings 1 pound Brussels sprouts, trimmed and halved 1 shallot, thinly sliced 1 ounce pancetta, diced 1 tablespoon olive oil 1/8 teaspoon kosher salt 1/8 teaspoon freshly ground black pepper 2 teaspoons red wine vinegar
27 French Fries These crispy fries can be served with any of your favorite seasonings or sauces. Makes 2 to 3 servings 1 pound (about 3 medium) russet potatoes
Olive oil, for spraying 1 teaspoon kosher or seasoned salt
Pinch ground cinnamon 1 teaspoon fresh thyme leaves
28 Nutritional information per serving: Calories 170 (54% from fat) • carb. 18g • pro. 2g • fat 11g • sat. fat 2g • chol. 0mg sod. 360mg • calc. 85mg • fiber 6g Sweet Potato Fries with Chipotle Mayonnaise A more nutritious alternative to regular French fries. Makes 2 to 3 servings Chipotle Mayonnaise: ½ cup mayonnaise 1 chipotle chile in adobo, finely chopped ¼ teaspoon fresh lemon juice Sweet Potato Fries: 1 pound sweet potatoes (about 2 medium), cut into ¼-inch thick pieces, about 4 inches long
Olive oil, for spraying ½ teaspoon kosher salt
Sweet Treats
From Blueberry Muffins for breakfast to a rich Chocolate Cake with salted Caramel Frosting for dessert, the Cuisinart® AirFryer Toaster Oven can handle any baking task. Plus, the AirFrying feature makes making fried treats, like doughnuts, possible with less calories and barely any mess! Baked Apples Your kitchen will be filled with the smell of warm, fall spices while these bake. Makes 4 servings 4 firm apples, a sweet-tart variety works well, such as Pink Lady ¼ cup rolled oats (not quick cooking) 2 tablespoons chopped pecans 1 tablespoon unbleached, all-purpose flour 1 tablespoon light brown sugar 2 pinches ground cinnamonPinch kosher salt
Pinch ground nutmeg 2 tablespoons unsalted butter, cubed
29
Pinch ground cinnamon 4 tablespoons (½ stick) unsalted butter, room temperature ¾ cup granulated sugar 1 large egg ½ teaspoon pure vanilla extract ¼ cup whole milk 1 cup blueberries, fresh or frozen
Softened butter or nonstick cooking spray
Pinch ground nutmeg 1 large egg, lightly beaten 2 tablespoons buttermilk ½ teaspoon pure vanilla extract 1 tablespoon unsalted butter, room temperature and cubed
Nonstick cooking spray
Melted butter for finishing (approximately 2 tablespoons)
Cinnamon sugar, for finishing (if preparing at home, combine ¼ cup granulated sugar with 1 tablespoon ground cinnamon)
30
31 Chocolate Layer Cake with Salted Caramel Frosting Chocolate, caramel and salt are an unstoppable combination. If looking to save time, you can purchase caramel sauce to mix into the frosting. Makes 1 cake, 12 servings Chocolate Cake: 1 cup unbleached, all-purpose flour 1/3 cup cocoa powder, sifted 1 teaspoon espresso powder ½ teaspoon baking soda ¼ teaspoon baking powder ¼ teaspoon kosher salt 8 tablespoons (1 stick) unsalted butter, cubed and room temperature ½ cup granulated sugar ¼ cup packed light brown sugar 1 large egg 1 large egg yolk 1 teaspoon pure vanilla extract ½ cup buttermilk Frosting: 16 tablespoons (2 sticks) plus 2 tablespoons unsalted butter, cubed and room temperature, divided 1½ cups confectioners’ sugar, sifted ¼ teaspoon kosher salt ½ teaspoon pure vanilla extract 4 tablespoons heavy cream, divided ¼ cup granulated sugar
Water
Flaked sea salt, for sprinkling (optional)
32 plate and top with half of the frosting. Place the second layer on top and finish with the remainder of the frosting. Decorate as desired and drizzle with the reserved caramel sauce and a pinch of flaked sea salt, if desired. Nutritional information per serving: Calories 399 (41% from fat) • carb. 41g • pro. 3g • fat 25g • sat. fat 15g • chol. 98mg sod. 175mg • calc. 18mg • fiber 1g Crunchy Granola Granola is an easy and healthy alternative to packaged cereals. Accompany this fragrant granola with a scoop of your favorite yogurt or fruit. Makes about 4 cups 1½ cups rolled oats (not quick cooking) ¾ cup raw nuts (pecans or pistachios work very well) ½ cup unsweetened coconut, shredded or flaked ¼ cup hulled sunflower seeds ¼ cup hulled pumpkin seeds (pepitas) ¼ cup coconut oil, melted ¼ cup pure maple syrup ½ teaspoon kosher salt ¼ teaspoon ground cinnamon
Pinch ground nutmeg ½ cup dried fruit (chopped if larger than berry-sized)
Peanut Butter Swirl Brownies Fudgy and rich, these brownies are just the thing when you need a quick chocolate fix. Makes 16 brownies
Nonstick cooking spray 1½ sticks (¾ cup) unsalted butter, cubed 4 ounces unsweetened chocolate, chopped 4 ounces bittersweet chocolate, chopped 2 tablespoons cocoa powder 2 teaspoons espresso powder 3 large eggs 1½ cups granulated sugar 2 teaspoons pure vanilla extract ½ cup unbleached, all-purpose flour ¾ teaspoon kosher salt ½ cup peanut butter ¼ cup confectioners’ sugar 2 tablespoons unsalted butter, melted and cooled
Pinch kosher salt

34
Limited 2 Year Warranty
This Cuisinart® appliance has a limited warranty for domestic consumer use for 2 years. The warranty covers defects under normal use from date of purchase and ceases to be valid in the event of alteration or repair by unauthorized persons. If the appliance does not perform satisfactorily due to defects of material or manufacture, please contact local distributor for maintenance service. For information of local distributor, please refers to the Korean version. Notice: Korean version is taken as standard for warrenty period and specifications.Warranty Card /Registration
Thank you for purchasing Cuisinart Products. To obtain 2 Year Warranty, please visit Cuisinart Korea Website (www. cuisinart.co.kr) and register your product. We strongly recommend to keep this Warranty Card/Instruction Booklet.
35
Notes:

©2018 Cuisinart Cuisinart ® is a registered trademark of Cuisinart Conair Korea Trading Limited #1304~1306 Seoul Soop Dream Tower, 66 Seongsui-ro, Seongdong-gu, Seoul, Korea 수입원(상호명) : 콘에어코리아트레이딩주식회사 주소: 서울시 성동구 성수이로 66 서울숲드림타워 1304~1306호
고객상담실: 1899-0209 자사의 A/S 전문대행업체인 필일렉 www.fillelec.co.kr의 홈페이지를 통해서
가까운 A/S센터(전국 38개점)를 확인하세요
Printed in China Cuisinart는 지금까지 경험해 보지 못한 편리한 주방생활을 제공해 드리기 위해 최고 품질의 다양한 제품을 공급하고 있습니다. 저희의 다양한 제품과 주방용품을 경험하시고 보다 나은 삶의 풍미를 만끽하시기 바랍니다. www.cuisinart.co.kr Toaster Coffeemaker Blender Bl d Kettle GrinderG Ib-18/069
Any other trademarks or service marks referred to herein are the trademarks or service marks of their respective owners.
G Ib-18/069
Any other trademarks or service marks referred to herein are the trademarks or service marks of their respective owners. ©2018 Cuisinart Cuisinart ® is a registered trademark of Cuisinart Conair Korea Trading Limited #1304~1306 Seoul Soop Dream Tower, 66 Seongsui-ro, Seongdong-gu, Seoul, Korea 수입원(상호명) : 콘에어코리아트레이딩주식회사 주소: 서울시 성동구 성수이로 66 서울숲드림타워 1304~1306호고객상담실: 1899-0209 자사의 A/S 전문대행업체인 필일렉 www.fillelec.co.kr의 홈페이지를 통해서
가까운 A/S센터(전국 38개점)를 확인하세요
Printed in China Cuisinart는 지금까지 경험해 보지 못한 편리한 주방생활을 제공해 드리기 위해 최고 품질의 다양한 제품을 공급하고 있습니다. 저희의 다양한 제품과 주방용품을 경험하시고 보다 나은 삶의 풍미를 만끽하시기 바랍니다. www.cuisinart.co.kr Toaster Coffeemaker Blender Bl d Kettle Grinder
28 품질보증

27
들러붙지 않도록 오일 스프레이 (또는 1큰스푼 부드러운 버터) 1컵
약 1.2cm정도로 네모썰기한 식빵 (롤빵, 브리오슈, 크로와상 등 본인 취향에 맞는 빵종류 선택) ½컵
우유 1개
계란 ½티스푼 바닐라 익스트랙 약간
소금 1큰스푼 설탕 2-3큰스푼 초콜릿 칩
주의: 뚜껑을 열면 브레드 푸딩이 조금 오그라들 수 있으나 이는 정상적인 현상 입니다. 1인분 기준 영양성분함량 열량 270(지방 유래 열량 31%) • 탄수화물 38g • 단백질 9g • 지방 9g, • 포화지방 4g

26 크런치 그래놀라 시판용 시리얼보다 건강하고 간편한 그래놀라입니다. 요거트 혹은 과일과 곁들여 드세요. 4컵 분량 1½컵
통 오트밀 ¾컵
견과 (피칸, 피스타치오 등) ½컵
무과당 코코넛 후레이크 ¼컵
해바라기 씨 ¼컵
호박씨 ¼컵
코코넛 오일 (녹은 것) ¼컵
퓨어 메이플 시럽 ½티스푼 정제(코셔) 소금 ¼티스푼 시나몬 가루
넛메그 한 꼬집 ½컵
말린 과일(블루베리 크기로 자른 것)
무염 버터 조각(약 ¾컵) 113g
카카오 70%이상 무가당 초콜릿칩 113g
카카오 50%이상 다크 초콜릿칩 2큰술
코코아 파우더 2큰술
에스프레소 파우더 3개
큰 달걀 1½컵
설탕 2티스푼 퓨어 바닐라 익스트랙 ½컵
무표백 중력분 ¾티스푼 정제(코셔) 소금 ½컵
피넛버터 2큰술
무염버터, 녹여서 식힌 것
한 꼬집 정제(코셔) 소금

25 캐러멜 초콜릿 케이크 12인분 훌 케이크 1개 초콜릿 케이크: 1컵
무표백 중력분 ⅓컵
채로 친 코코아 파우더 1티스푼 에스프레소 파우더 ½티스푼 베이킹소다 ¼티스푼 베이킹파우더 ¼티스푼 정제(코셔) 소금 9큰술
무염 버터, 실온의 큐브형태 ½컵
설탕 ¼컵
갈색 설탕 1개
달걀 1개
달걀 노른자 1티스푼 퓨어 바닐라 익스트랙 ½컵
버터밀크 프로스팅: 16큰술 + 2큰술 무염 버터, 실온의 큐브형태 1½컵
채로 친 슈가 파우더 ¼티스푼 정제(코셔) 소금 ½티스푼 퓨어 바닐라 익스트랙 4큰술
생크림 ¼컵
설탕
물
천일염 (데코용으로 기호에 따라 준비)

24
설탕 2티스푼 베이킹파우더 ¼티스푼 정제(코셔) 소금 2큰술
생강 설탕 절임 6큰술
무염버터, 차가운 큐브형태 ⅔컵
버터밀크 1개
큰 달걀(부드럽게 풀어주세요) 1컵
건 체리 1개
달걀 흰자 (풀어서 준비, 코팅용)

23 블루베리 머핀 아침식사용 블루베리 머핀부터 초콜릿이 가득한 카라멜 초콜릿 케이크까지 쿠진아트! 에어프라이어 토스터 오븐이 당신의 베이킹을 가능하게 합니다. 추가로 에어프라이는 도넛과 같은 튀김 요리도 적은 열량으로 간편하게 가능하게 합니다. 머핀 6개 분량 1컵+1큰술 무표백 중력분 1½티스푼 베이킹파우더 ¼티스푼 정제(코셔) 소금 한 꼬집 시나몬 가루 4큰술
실온상태의 무염버터 ¾컵
설탕 1개
큰 달걀 ½티스푼 퓨어 바닐라 익스트랙 ¼컵
우유 1컵
블루베리 (냉동/냉장 모두 가능)
녹인 버터 혹은 논스틱 쿠킹 스프레이
따뜻한 우유 (40 -43℃) ¾컵
강력분, (여분의 ¼컵 추가 준비) 2꼬집
정제(코셔) 소금 2꼬집
시나몬 가루 1꼬집 넛메그 파우더 1개
큰 달걀 (부드럽게 풀어주세요) 2큰술
버터밀크 ½티스푼 퓨어 바닐라 익스트랙 1큰술
무염버터, 큐브형태의 실온보관 상태
논스틱 쿠킹 스프레이
마무리용 녹인 버터(약 2큰술)
시나몬 설탕 (직접 만들경우 ¼컵 설탕과 1큰술 시나몬 가루를 섞어주세요)

22 [사이드 요리] 프렌치 프라이 바삭한 감자 튀김은 어느 소스와도 잘 어울립니다. 2~3인분 450g 감자 1티스푼 정제(코셔) 소금 혹은 조미소금
마요네즈 1캔
잘게 썬 아도보 소스 치폴레 칠리 ¼티스푼 신선한 레몬즙 고구마 튀김: 450g
5mm두께, 12㎝길이로 채 썬 고구마 (약 2개)
올리브 오일 (스프레이용) ½티스푼 정제(코셔) 소금

21 로즈마리와 마늘을 곁들인 양갈비구이 4인분 기준 4쪽
다진 마늘 1큰술 잘게 썬 로즈마리 (로즈마리 잔가지 3~4개) ¼티스푼 후추 2큰술 엑스트라 버진 올리브 오일 8조각 양고기 등심 (약 900g) ½티스푼 정제(코셔) 소금

20 마르게리타 피자 8조각 피자 한 판 논스틱 쿠킹 스프레이 혹은 엑스트라 버진 올리브 오일 450g 실온상태의 피자 도우 ¾컵
피자소스 2큰술 파메르산 치즈 가루 85g
모짜렐라 치즈 슬라이스 6-8장 잘게 찢은 바질 잎
닭다리 1큰술
엑스트라 버진 올리브 오일 ½티스푼 정제(코셔) 소금 ½개
훈제 피망 ½티스푼 후추 티스푼
커민 가루 ¼
라임 반쪽 즙

19 연어 구이 2인분 256g 연어 1컵
방울 토마토 ½단
손질한 아스파라거스 1컵 잘게 썬 칼라마타 올리브 1쪽
얇게 저민 마늘 1-2 큰술 엑스트라 버진 올리브오일 ½티스푼 정제(코셔) 소금 ¼티스푼 후추
무화과 잼 110g 프로슈토 햄 슬라이스 85g
모짜렐라 치즈(*염소 치즈에서 바꿈) 1컵
어린 루꼴라 잎

18
메이플-피칸 Blt 샌드위치
샌드위치 2개 분량 3장반으로 자른 베이컨 반쪽
아보카도 한 꼬집 정제(코셔) 소금 4장
상추 1개
토마토 (슬라이스 컷) 1큰술 메이플 시럽 2큰술 잘게 부순 피칸
길다란 샌드위치 빵 ½컵
마리나라 소스* 160g 잘게 썬 모짜렐라 치즈

17 메인요리 치킨 텐더 6인분 1컵
무표백 중력분 1컵 2개
큰 달걀 2개 (부드럽게 풀어주세요) 1컵
빵가루 1컵 450g~680g 닭가슴살 슬라이스 450~680g ¾티스푼 정제(코셔) 소금 ¾티스푼 후추
올리브오일 (스프레이용)
반으로 자른 레몬 1티스푼 엑스트라 버진 올리브 오일 2티스푼 로즈마리, 타임과 같은 말린 허브 3쪽
다진 마늘

16
게 드시거나 상온상태로 식힌 후 드세요. Note: 식을수록 젤리 같은 식감으로
변합니다.마늘 1쪽 1장
민트 잎 1장 200g
무지방 플레인 그릭 요거트 약 200g 1티스푼 레몬즙 ¼티스푼 정제(코셔) 소금 채소스틱: ½컵
무표백 중력분 2개
큰 달걀 (잘 풀어주세요) 1½컵 빵가루 2큰술 페코리노 로마노 치즈 가루 1티스푼 건조 오레가노 1티스푼 건조 파슬리 ½티스푼 정제(코셔) 소금 1개
50mm두께, 7㎝길이로 길게 썬 애호박 (약 170g) 10개
완두콩 줄기 (약 60g) 1개
8조각으로 나눈 아보카도
올리브 오일(스프레이용)
레몬 (기호에 따라)

15 쉬림프 디아블로 전채요리로 4-5인 분량 ¼컵
엑스트라 버진 올리브 오일 2쪽
으깬 마늘 1½~2 티스푼 고춧가루 790g 잘게 썬 토마토 2¼티스푼 정제(코셔) 소금 450g 손질된 큰 새우 (약 16마리) ¼컵
쌀가루
올리브오일 (스프레이용)
바게트 빵 (Crusty bread 대체)
다진 마늘 1큰술 달지 않은 쌀식초 1컵
물 ⅓컵
백설탕 (일반 과립 설탕)
옥수수전분물 (옥수수 전분 1큰술, 물 1큰술) ¼티스푼 정제(코셔) 소금 스프링 롤: 6장
채로 썬 양배추 잎 (약 180g) 3개
채로 썬 당근 (약 170g) 1개
껍질 벗겨 채썬 생강 3대
잘게 썬 쪽파 ½개
다진 그린칠리 혹은 할라피뇨 ⅓장
얇게 썬 바질 잎 2큰술 식용유 1큰술 피시소스(액젓) ½개
라임 ½티스푼 정제(코셔) 소금 ½모
채로 썬 단단한 두부 28장
춘권피

14 돼지고기 만두 약 만두 48개 분량 340g 돼지고기 1개
껍질을 벗겨 잘게 썬 작은 크기의 생강 (약 7㎝) 1대
잘게 썬 대파 1티스푼 저염 간장 1티스푼 참기름 ½티스푼 곡물식초
물에 갠 옥수수 전분물 (삭제 검토) 48장
만두피
식용유 (스프레이용)
베이컨 슬라이스 450g 껍질 깐 감자
올리브오일 (스프레이용) ½티스푼 정제(코셔) 소금 3 큰술 으깬 블루치즈

13 라이스 볼 라이스 볼 8개 분량 1~1.5공기 흰 쌀밥 1개
큰 달걀 (계란물) ¼티스푼 정제(코셔) 소금 ¼컵
리코타 치즈 ¼컵
모짜렐라 치즈 ¼컵
파슬리가루 혹은 얇게 썬 바질잎 ¼티스푼 후추 ¼컵
빵가루
올리브 오일(스프레이용) 1컵
마리나라 소스 (기호에 따라 추가하세요)
올리브유를 살짝 뿌려주세요.
4등분한 토르티아
올리브오일(스프레이용) ½티스푼 정제(코셔) 소금 450g 잘게 찢은 닭가슴살 혹은 넓적다리 살 (23페이지 조리법 참 고) 1캔
물기 뺀 통조림 콩 (약 440g) 2개
토마토 (잘게 썰어 준비) 1캔
블랙 올리브 (약 200g) (잘게 썰어 준비) 2개
얇게 썬 할라피뇨 100g 잘게 찢은 몬터레이 잭 치즈 (체다치즈로 사용 가능) 2대
송송 썬 쪽파
살사 소스

12 크랩 케이크 약 16조각의 크랩 케이크 450g 게살 1티스푼 엑스트라버진 올리브 오일 1개
잘게 썬 빨간 피망 1개
씨를 제거하여 잘게 썬 할라피뇨 1대
송송 썬 쪽파 1쪽
다진 마늘 1개
부드럽게 풀어진 달걀 (계란물) 1컵
빵가루 + 여분의 ½컵 ½컵
마요네즈 1티스푼 우스터 소스 1티스푼 홀그레인 머스타드 1½티스푼 씨푸드 시즈닝
핫소스(기호에 따라 빼셔도 됩니다)
스프레이용 올리브오일 1조각 레몬
올리브 오일(스프레이용) ¼티스푼 정제(코셔) 소금 ¼티스푼 커민
후추 한 꼬집

11 두 가지 방법의 치킨 윙 약 20개 윙 맥주 튀김옷 치킨 윙: 900g 날개 끝(윙팁) 제거한 닭 날개와 닭봉* ½컵
무표백 중력분 ½컵 ½컵
맥주 ½컵 ¾티스푼 정제(코셔) 소금 ¾티스푼 일반 치킨 윙: 900g 날개 끝(윙팁) 제거한 닭 날개와 닭봉 ¾티스푼 정제(고셔) 소금 ¾티스푼
핫소스 1티스푼
코코넛오일
참기름 2큰술 간장 1큰술 꿀 5㎝정도 생강을 껍질을 벗겨 다져주세요. 2쪽
다진 마늘 ¼컵
볶은 참깨 6대
송송 썬 쪽파

10 비트 칩 약 1-2인분 1개
비트 (약 430g) 올리브오일 혹은 오일 스프레이 ¼티스푼 정제(코셔)소금 1큰술 잘게자른 신선한 허브 (기호에 따라 생략가능) ½티스푼 화이트 와인 식초
1회 섭취당 영양정보(총 2회 분량): 칼로리 51(지방 41%)• 탄수화물 7g • 단백질 1g • 지방 2g • 포화지방 0g • 콜레스테롤 0mg • 나트륨 322g • 칼슘 12mg • 섬유소 2g 양파 튀김 약 2-3인분 ½컵
무표백 중력분 ½ 컵 2개
큰 달걀 2개 (잘 풀어서 준비해 주세요) 1큰술
버터밀크 ½컵
빵가루 ½컵 1½티스푼 해산물 시즈닝 올리브 오일을 살짝 뿌린 큰 양파

9 요리법 아래 요리법은 본 제품을 통해 조리 가능한 예입니다. 에피타이져/간식 비트 칩. . . . . . . . . . . . . . . . . . . . . . . . . . . . . . . . . . . . . . . . . . . . . . . . . . . . . .10 양파 튀김 . . . . . . . . . . . . . . . . . . . . . . . . . . . . . . . . . . . . . . . . . . . . . . . . . . . .10 두 가지 방법의 치킨 윙. . . . . . . . . . . . . . . . . . . . . . . . . . . . . . . . . . . . . . . . . . .11 버팔로 소스 치킨 윙. . . . . . . . . . . . . . . . . . . . . . . . . . . . . . . . . . . . . . . . . .11 참깨 생강 소스 치킨 윙. . . . . . . . . . . . . . . . . . . . . . . . . . . . . . . . . . . . . . . .11 크랩 케이크. . . . . . . . . . . . . . . . . . . . . . . . . . . . . . . . . . . . . . . . . . . . . . . . . . .12 구운 병아리콩. . . . . . . . . . . . . . . . . . . . . . . . . . . . . . . . . . . . . . . . . . . . . . . . .12 라이스 볼 . . . . . . . . . . . . . . . . . . . . . . . . . . . . . . . . . . . . . . . . . . . . . . . . . . . .13 치킨 나쵸 . . . . . . . . . . . . . . . . . . . . . . . . . . . . . . . . . . . . . . . . . . . . . . . . . . . .13 돼지고기 만두. . . . . . . . . . . . . . . . . . . . . . . . . . . . . . . . . . . . . . . . . . . . . . . . .14 베이컨&블루치즈 웨지감자. . . . . . . . . . . . . . . . . . . . . . . . . . . . . . . . . . . . . . . .14 쉬림프 디아블로 . . . . . . . . . . . . . . . . . . . . . . . . . . . . . . . . . . . . . . . . . . . . . . .15 칠리소스 스프링 롤 . . . . . . . . . . . . . . . . . . . . . . . . . . . . . . . . . . . . . . . . . . . . .15 채소스틱 & 요거트 딥 소스. . . . . . . . . . . . . . . . . . . . . . . . . . . . . . . . . . . . . . . .16 메인 요리 치킨 텐더 . . . . . . . . . . . . . . . . . . . . . . . . . . . . . . . . . . . . . . . . . . . . . . . . . . . .17 로스트 치킨. . . . . . . . . . . . . . . . . . . . . . . . . . . . . . . . . . . . . . . . . . . . . . . . . . .17 메이플-피칸 BLT 샌드위치. . . . . . . . . . . . . . . . . . . . . . . . . . . . . . . . . . . . . . . .18 미트볼 샌드위치 . . . . . . . . . . . . . . . . . . . . . . . . . . . . . . . . . . . . . . . . . . . . . . .18 연어 구이 . . . . . . . . . . . . . . . . . . . . . . . . . . . . . . . . . . . . . . . . . . . . . . . . . . . .19 루꼴라& 프로슈토 피자 . . . . . . . . . . . . . . . . . . . . . . . . . . . . . . . . . . . . . . . . . .19 마르게리타 피자 . . . . . . . . . . . . . . . . . . . . . . . . . . . . . . . . . . . . . . . . . . . . . . .20 훈제 파프리카와 라임을 곁들인 닭다리 구이. . . . . . . . . . . . . . . . . . . . . . . . . . . .20 로즈마리와 마늘을 곁들인 양갈비구이 . . . . . . . . . . . . . . . . . . . . . . . . . . . . . . . .21 햄버거 패티. . . . . . . . . . . . . . . . . . . . . . . . . . . . . . . . . . . . . . . . . . . . . . . . . . .21 사이드 요리 프렌치 프라이. . . . . . . . . . . . . . . . . . . . . . . . . . . . . . . . . . . . . . . . . . . . . . . . .22 고구마 프라이 & 치폴레 마요네즈 . . . . . . . . . . . . . . . . . . . . . . . . . . . . . . . . . . .22 디저트 블루베리 머핀. . . . . . . . . . . . . . . . . . . . . . . . . . . . . . . . . . . . . . . . . . . . . . . . .23 시나몬 도너츠. . . . . . . . . . . . . . . . . . . . . . . . . . . . . . . . . . . . . . . . . . . . . . . . .23 스콘. . . . . . . . . . . . . . . . . . . . . . . . . . . . . . . . . . . . . . . . . . . . . . . . . . . . . . . .24 카라멜 초콜릿 케이크. . . . . . . . . . . . . . . . . . . . . . . . . . . . . . . . . . . . . . . . . . . .25 크런치 그래놀라 . . . . . . . . . . . . . . . . . . . . . . . . . . . . . . . . . . . . . . . . . . . . . . .26 피넛버터 브라우니. . . . . . . . . . . . . . . . . . . . . . . . . . . . . . . . . . . . . . . . . . . . . .26 초콜릿 칩 브레드 푸딩 . . . . . . . . . . . . . . . . . . . . . . . . . . . . . . . . . . . . . . . . . . .27

8 식품 적정 조리량 조리 온도 조리 시간 베이컨 8장 200℃ 8-10분 치킨 윙 약 20개 (약 1.3kg) 200℃ 20-25분 냉동 간식(모짜렐라 치즈스틱, 팝콘새우, 등) 약 28개 치즈스틱 (약 680g) 200℃ 5-7 분 냉동 치킨 너겟 약 34개 치킨 너겟 (약 450g) 200℃ 10 분 냉동 생선 조각 약 20개 생선조각 (약 340g) 200℃ 8 분 냉동 감자튀김 약 450~900g 230℃ 15-25 분 냉동 웨지감자 약 450~900g 230℃ 15-25 분 핸드컷 감자튀김 약 900g(중간 크기 감자 3개정도 – 길이 10cm두께 6mm정도) 200℃ 15-20 분 핸드컷 웨지감자 약 900g(큰 사이즈 감자 3개 정도 – 8cm길이) 200℃ 15-20 분 새우 약 450g(약 16개 큰 새우) 190℃ 8-10 분 토르티야 칩 6장의 15cm길이의 토르티야 1/4컷 200℃ 5-6 분, (조리 중 한번 뒤집어주세요) 에어프라이어 조리 안내표 아래의 표에서 쿠진아트 에어프라이어 토스트 오븐(Cuisinart! AirFryer Toaster Oven )을 사용해 에어프라이를 할 수 있는 다양한 종류의 음식에 대한 권장 조리시간과 온도 및 양을 확인하실 수 있습니다. 만약 권장된 양을 초과하여 조리할 경우 조리 중 뒤집어주어 고르게 조리할 수 있습니다. 적은양의 조리 시에는 조리시간이 단축됩니다. 최상의 에어프라이 조리를 하고자 하실 경우 오븐 조명을 사용하여 조리과정을 확인 하시기 바랍니다. 에어프라이 기능은 오일 없이 가능하지만, 음식 표면에 오일을 살짝 바르거나 뿌려주면 보다 노릇하고 바삭한 식감을 얻으실 수 있습니다.
오일을 사용하실 경우 아주 소량만 음식 겉면에 뿌리거나, 조리용 그릇 안에 살짝 부어 주세요.
7 에어프라이 기능 (8페이지 표를 참고하세요) 에어프라이어 바구니를 베이킹 팬 위에 올려 랙 위치# 2에서 사용하세요. 기능 다이얼을 에어프라이(AirFry)로 설정하세요. 온도 다이얼을 원하시는 온도로 설정 후 전원/ 오븐 타이머 다이얼을 원하시는 조리시간으로 돌려 오븐을 켜고 에어프라이를 시작하세요. 전원 표시등에 불이 켜집니다. 작동이 완료되면 타이머가 울리고 시간이 완료되면 오븐의 전원 이 꺼집니다.
에어프라잉을 멈추려면, 전원/오븐 타이머 다이얼을 Off위치로 돌려주세요,
에어프라잉 팁 에어프라이로 건강한 튀김요리를 즐기실 수 있습니다. 기름에 직접 튀기지 않고도 에어프라이 를 이용하여 많은 튀김요리를 하실 수 있으며, 기름에 직접 튀긴 요리보다 덜 느끼하고 담백한 맛을 느낄 수 있습니다. 에어프라잉 시 대부분의 오일이 사용 가능하며 올리브유는 더욱 깊은 풍미를 제공합니다. 식용유와 카놀라유 혹은 포도씨유는 부드러운 맛을 내고자 할 때 권장합니다. 조리 시 골고루 기름을 둘러 바삭하고 노릇하게 잘 구워진 최상의 요리를 완성하세요. 오일을 뿌리거나 브러시로 발라서 에어프라이 기능으로 조리하세요. 혹은 올리브 오일과 논스틱 조리 용 스프레이(Non stick cooking spray) 등을 사용하실 수 있습니다. 에어프라이용 음식에는 빵 가루, 양념된 빵 가루, 판코(Panko) 빵 가루, 콘플래이크, 감자 칩 가루, 통밀크래커 가루, 퀴노아, 다양한 밀가루 등 여러가지 혼합물의 다양한 종류의 코팅을 사용 할 수 있습니다. 대부분의 음식은 조리 중 뒤집을 필요가 없지만, 닭고기 커틀렛과 같은 부피가 큰 음식들이나 에어프라이 기능으로 많은 양의 음식을 조리 시에는, 조리 중간에 한 번 뒤집어주어 빠르고 골고루 노릇하게 조리하세요. 베이컨이나 칩과 같이 빠른 조리가 필요할 시에는 높은 온도를 사용하고, 오랜 조리 시간이 필요한 튀김옷을 입힌 닭 요리는 낮은 온도를 사용해 주세요. 음식을 동일한 크기로 잘라 사용하시면 보다 골고루 조리됩니다. 베이킹 트레이에 알루미늄 호일을 깔아 사용하시면 쉽게 청소가 가능합니다. 많은 양의 요리를 장시간 할 때는 수분이 발생하여 결로가 생길 수 있으므로 이점 유의해 주시기 바랍니다. 세척 및 관리 반드시 전기 콘센트에서 오븐의 전기코드를 빼고 오븐을 완전히 식힌 후 청소하여 주세요. 깨끗한 젖은 천으로 외부를 닦고 완전히 건조합니다. 세제를 직접 제품에 묻히지 말고 천에 묻혀 청소하세요. 연마제를 사용할 경우 마감재가 훼손될 수 있습니다. 젖은 천과 순한 액상세제를 사용하거나 스펀지에 스프레이 용액을 묻혀 내부 벽을 청소하세요. 오븐 표면 및 내부에 거친 연마제나 부식성 제품 그리고 금속성 수세미를 절대로 사용해서는 안됩니다. 제품 손상의 원인이 됩니다. 오븐랙, 베이킹 팬, 에어프라이어 바스켓, 빵 부스러기 받침대는 거품 온수 에서 손으로 씻거나 나일론 수세미 혹은 나일론 솔을 사용하세요.식기 세척기 사용은 금해주세요. 기름진 음식을 조리한 후 오븐이 식은 후에 오븐 내부의 상부를 반드시 청소하세요. 이를 정기적 으로 하시면 오븐을 항상 새 것 처럼 사용하실 수 있고, 매 사용시마다 일관된 조리결과를 얻으실 수 있습니다. 빵 부스러기 받침대를 꺼내 빵 부스러기를 버린 후 깨끗하게 닦아 다시 넣어주세요. 구이 후 잔여 기름기를 제거하려면, 거품 온수 혹은 비연마성 세제를 사용하세요. 빵 부스러기 받침대를 넣지 않은 상태에서 오븐을 절대 작동하지 마세요. 오븐 주변에 절대 전기코드를 감지 마시고, 오븐 뒷 편의 전기코드 보관걸이에 감아주세요. 기타 모든 서비스는 공인된 쿠진아트 서비스센터를 통해 받으셔야 합니다.

6 제품 사용법 감겨 있는 코드를 풀고 전원 플러그에 연결하여 주세요. 부스러기 받침대의 장착여부와 에어프라 이어 오븐 내부가 비었는지 꼭 확인하여 주세요. 브로일 / 컨벡션( ) 브로일 기능 재료를 담은 에어프라이용 바스켓을 베이킹 팬안에 넣고 위치#2 랙에서 브로일 기능 사용을 시작합니다. 기능선택 다이얼을 브로일(Broil) 또는 컨벡션 브로일(Conv. Broil)로 선택한 후, 원하는 온도로 온도설정 다이얼을 돌려주세요. 전원/오븐 타이머 다이얼을 원하는 시간으로 돌려주세요. 전원표시등이 켜지며 해당 기능이 작동됩니다. 설정된 시간이 완료되면 알림 소리와 함께 전원이 자동으로 꺼집니다. 중간에 조리를 멈추려면 전원/오븐 타이머 다이얼을 Off위치로 돌려서 꺼주세요. 브로일 팁: 요리의 위 표면을 노릇하게 굽는 기능으로 베이킹 팬에 에어프라이용 바스켓을 넣어서
사용하시는 것이 가장 적합합니다. 브로일 기능을 사용하실 때에는, 절대로 오븐용 유리그릇을 사용하지 마세요. 브로일 기능은 단시간에 표면이 탈 수 있으니, 조리 시 반드시 유의하여 자주 확인하여 주세요. 베이크 / 컨벡션( ) 베이크 기능 베이킹팬이나 오븐용 선반을 원하시는 랙 위치에 넣어 사용하세요.
(자세한 랙 위치는 5페이지를 참조) 기능선택 다이얼을 베이크(Bake) 또는 컨벡션 베이크(Conv. Bake)로 선택한 후, 원하는 온도로 온도설정 다이얼을 돌려주세요. 전원/오븐 타이머 다이얼을 원하는 시간으로 돌리면 전원표시등이 켜지며 해당 기능이 작동됩니다. 케이크나 머핀 등을 베이킹 시, 약 5분 정도의 예열을 권장하며, 예열 시간을 포함 하여 시간을 설정해 주세요. 설정된 시간이 완료되면 알림 소리와 함께 전원이 자동으로 꺼집니다. 중간에 조리를 멈추려면 전원/오븐 타이머 다이얼을 Off위치로 돌려서 꺼주세요. 베이킹 팁:
커스터드, 케이크 그리고 계란요리와 같이 부서지기 쉬운 음식류는 베이크(Bake) 기능을
선택하세요. 치킨요리와 같이 부피가 큰 대부분의 베이크 요리 시에는 랙 위치#1에 넣어 요리하세요. 신선한 피자는 랙 위치#1, 냉동피자는 랙 위치#2에서 조리하세요. 컨벡션 베이킹 팁: 스콘이나 빵 또는 고기나 가금류 등 노릇하게 구울 필요가 있는 음식들은 컨벡션 굽기(Convection Bake) 기능을 선택 하세요.
컨벡션 굽기(Convection Bake)는 노릇노릇하고 바삭한 홈메이드 피자 만들기에 최적의
기능입니다. 컨벡션 굽기 사용시 열을 줄이거나 온도를 3-4℃낮추어 조리하시길 권장합니다. 설정된 조리 시간이 끝나기 10분전에 알맞게 조리가 되었는지 항상 확인하세요. 중요 모든 레시피는 당사의 테스트 키친(Test Kitchen)에서 시험되었으며, 쿠진아트 에어프라이어 토스터 오븐을 위해 특별히 개발되었습니다. 예열 기능 베이킹팬이나 오븐용 선반을 랙 위치#2에 넣어 사용하세요. 온도 설정 다이얼을 예열(Warm)으로 설정하세요. 기능선택 다이얼을 예열(Warm)로 선택한 후 전원/오븐 타이머 다이얼을 원하는 온도로 돌려 오븐작동과 예열을 시작하세요. 전원 표시등에 불이 켜집니다. 예열이 완료되면 타이머가 한번 울리고 시간이 만료되면 오븐의 전원이 꺼집니다.예열을 멈추려면 전원/오븐 타이머 다이얼을 Off위치로 돌려주세요.
토스트 기능 오븐용 선반을 랙 위치#2에 넣어 사용하세요. 한번에 두 개를 토스트 할 경우 랙의 중앙에 놓아주세요. 4개를 토스트 할 경우 고르게 간격을 두어 조리하세요 – 앞쪽에 2개, 뒤쪽에 2개. 6개를 토스트 할 경우 고르게 간격을 두어 조리하세요 – 앞쪽에 3개, 뒤쪽에 3개. 기능 다이얼을 토스트(Toast)로 설정하세요. 온도 설정 다이얼을 토스트/브로일(Toast/Broil) 로 선택한 후 토스트 타이머 다이얼을 표시된 설정 내에서 밝은쪽에서 어두운쪽으로 굽기정도(Shade)를 설정한 후 오븐을 켜고 토스트 기능을 시작하세요.
오븐 전원 표시등이 켜집니다. 완료되면 타이머가 울리고 전원이 꺼집니다.토스트 기능을 멈추려면 전원/토스트 타이어 다이얼을 Off위치로 돌려주세요.
주의: 토스트(Toast)는 다른 기능과 다른 타이머 설정 버튼을 이용합니다.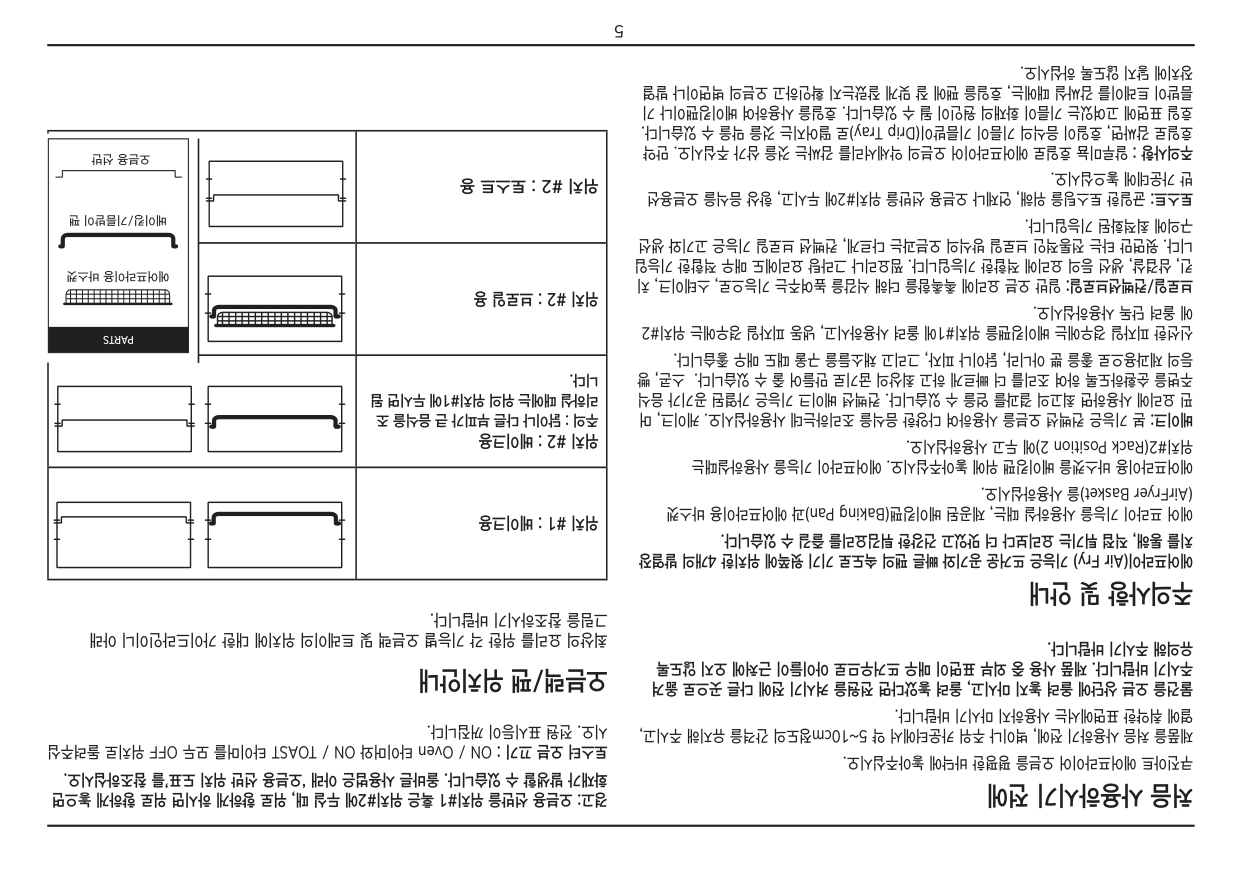
5 처음 사용하시기 전에 쿠진아트 에어프라이어 오븐을 평평한 바닥에 놓아주십시오. 제품을 처음 사용하기 전에, 벽이나 주위 카운터에서 약 5~10cm정도의 간격을 유지해 주시고, 열에 취약한 표면에서는 사용하지 마시기 바랍니다. 물건을 오븐 상단에 올려 놓지 마시고, 올려 놓았다면 전원을 켜시기 전에 다른 곳으로 옮겨 주시기 바랍니다. 제품 사용 중 외부 표면이 매우 뜨거우므로 아이들이 근처에 오지 않도록 유의해 주시기 바랍니다. 주의사항 및 안내 에어프라이(Air Fry) 기능은 뜨거운 공기와 빠른 팬의 속도로 기기 윗쪽에 위치한 4개의 발열장 치를 통해, 직접 튀기는 요리보다 더 맛있고 건강한 튀김요리를 즐길 수 있습니다. 에어 프라이 기능을 사용하실 때는, 제공된 베이킹팬(Baking Pan)과 에어프라이용 바스켓 (AirFryer Basket)을 사용하십시오. 에어프라이용 바스켓을 베이킹팬 위에 놓아주십시오. 에어프라이 기능을 사용하실때는
위치#2(Rack Position 2)에 두고 사용하십시오. 베이크: 본 기능은 컨벡션 오븐을 사용하여 다양한 음식을 조리하는데 사용하십시오. 케이크, 머 핀 요리에 사용하면 최고의 결과를 얻을 수 있습니다. 컨벡션 베이크 기능은 가열된 공기가 음식 주변을 순환하도록 하여 조리를 더 빠르게 하고 최상의 굽기로 만들어 줄 수 있습니다. 스콘, 빵 등의 제과용으로 좋을 뿐 아니라, 닭이나 피자, 그리고 채소들을 구울 때도 매우 좋습니다. 신선한 피자일 경우에는 베이킹팬을 위치#1에 올려 사용하시고, 냉동 피자일 경우에는 위치#2 에 올려 단독 사용하십시오. 브로일/컨벡션브로일: 일반 오븐 요리에 촉촉함을 더해 식감을 높여주는 기능으로, 스테이크, 치 킨, 삼겹살, 생선 등의 요리에 적합한 기능입니다. 찜요리나 그라탕 요리에도 매우 적합한 기능입 니다. 윗면만 타는 전통적인 브로일 방식의 오븐과는 다르게, 컨벡션 브로일 기능은 고기와 생선 구의에 최적화된 기능입니다. 토스트: 균일한 토스팅을 위해, 언제나 오븐용 선반을 위치#2에 두시고, 항상 음식을 오븐용선 반 가운데에 놓으십시오. 주의사항 : 알루미늄 호일로 에어프라이어 오븐의 악세서리를 감싸는 것을 삼가 주십시오. 만약 호일로 감싸면, 호일이 음식의 기름이 기름받이(Drip Tray)로 떨어지는 것을 막을 수 있습니다. 호일 표면에 고여있는 기름이 화재의 원인이 될 수 있습니다. 호일을 사용하여 베이킹팬이나 기 름받이 트레이를 감싸실 때에는, 호일을 팬에 잘 맞게 잘랐는지 확인하고 오븐의 벽면이나 발열 장치에 닿지 않도록 하십시오. 경고: 오븐용 선반을 위치#1 혹은 위치#2에 두실 때, 위로 향하게 하시면 위로 향하게 놓으면 화재가 발생할 수 있습니다. 올바른 사용법은 아래 ‘오븐용 선반 위치 도표’를 참조하십시오. 토스터 오븐 끄기 : ON / Oven 타이머와 ON / TOAST 타이머를 모두 OFF 위치로 돌려주십 시오. 전원 표시등이 꺼집니다. 오븐랙/팬 위치안내 최상의 요리를 위한 각 기능별 오븐랙 및 트레이의 위치에 대한 가이드라인이니 아래 그림을 참조하시기 바랍니다. 위치 #1 : 베이크용 위치 #2 : 베이크용 주의 : 닭이나 다른 부피가 큰 음식을 조 리하실 때에는 위의 위치#1에 두시면 됩 니다. 위치 #2 : 브로일 용 위치 #2 : 토스트 용 오븐용 선반 베이킹/기름받이 팬 에어프라이용 바스켓
Parts
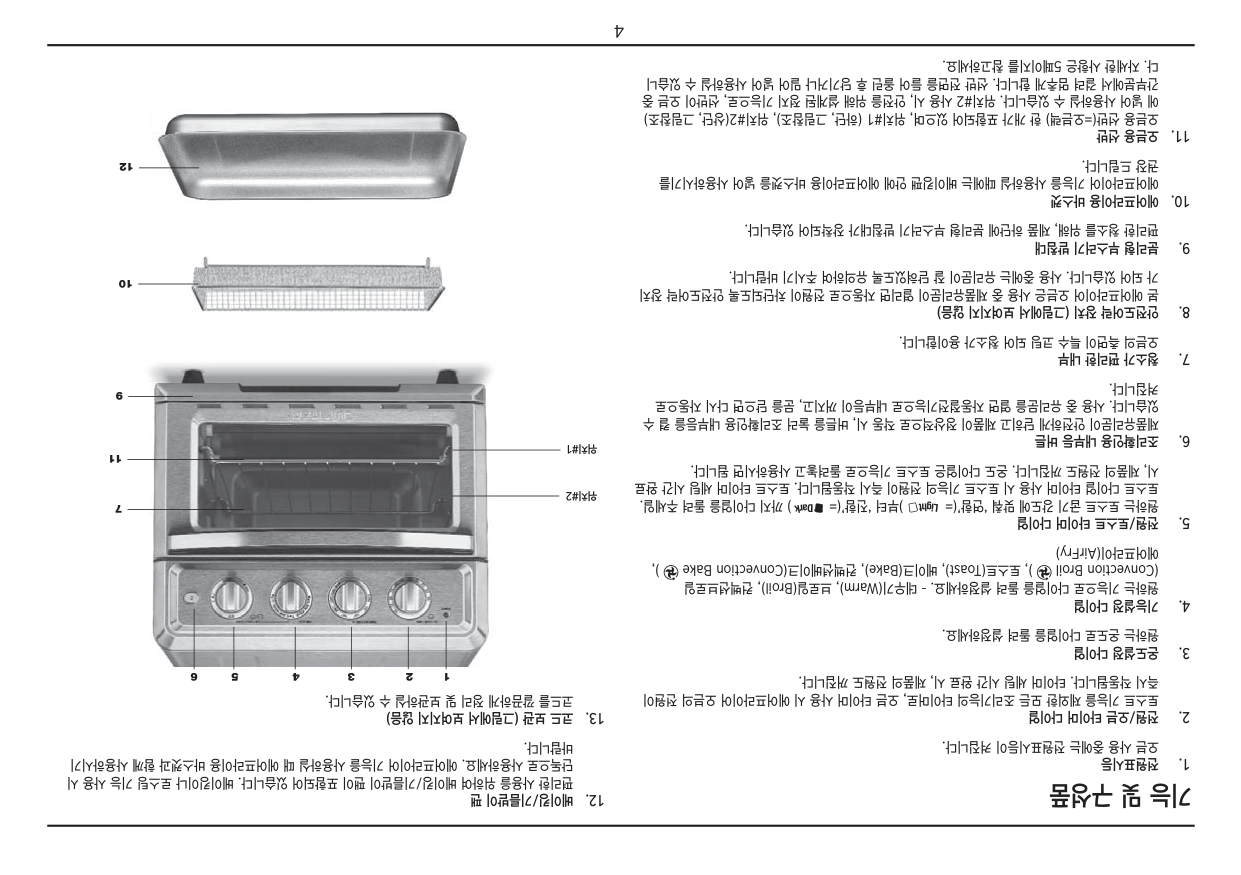
4 기능 및 구성품
오븐용 선반(=오븐랙) 한 개가 포함되어 있으며, 위치#1 (하단, 그림참조), 위치#2(상단, 그림참조) 에 넣어 사용하실 수 있습니다. 위치#2 사용 시, 안전을 위해 설계된 정지 기능으로, 선반이 오븐 중 간부분에서 걸려 멈추게 합니다. 선반 전면을 들어 올린 후 당기거나 밀어 넣어 사용하실 수 있습니 다. 자세한 사항은 5페이지를 참고하세요.
코드를 깔끔하게 정리 및 보관하실 수 있습니다. 1 2 3 4 5 6 7 11 위치#1 위치#2 9 12 10

3
절대로 기기가 식기 전에 만지지 마세요. 사용설명서를 잘 보관하시기 바랍니다. 제품의 올바르고 전문적인 사용을 위해서 반드시 본 사용설명서를 읽고 참고하여 주시기 바랍니다. 코드 사용 시 주의사항 본 제품의 코드는 걸림 및 엉킴 방지를 위하여 짧게 제작 되었습니다. 멀티탭을 이용하실 수 있으나, 사용 시 주의를 부탁 드립니다. 긴 멀티탭 사용의 경우, 멀티탭에 표기된 전류 최대용량이 제품의 전류 최대 용량보다 커야 합니다. 멀티탭을 어린이나 애완동물로부터 멀리 보관하여 주시기 바랍니다. 주의
본 제품은 220V 전용 제품입니다.
•반드시 220V에서만 사용하시기 바랍니다.
• 만약 플러그가 콘센트와 맞지 않을 경우 강제로 연결하지 않도록 합니다. • 본 사용설명서의 안전사항을 반드시 지켜주시기 바랍니다. 본 제품은 가정용으로 제작 되었으며, 상업 용도 및 그 외의 목적으로 사용 시 품질보증기간이 단축될 수 있습니다.
2 목 차 안전주의사항. . . . . . . . . . . . . . . . . . . . . . . . . . . . . . . . . . . . . . . . . . . . . . . . . . .2 코드 사용 시 주의사항 . . . . . . . . . . . . . . . . . . . . . . . . . . . . . . . . . . . . . . . . . . . .3 기능 및 구성품 . . . . . . . . . . . . . . . . . . . . . . . . . . . . . . . . . . . . . . . . . . . . . . . . .4 처음 사용하기 전. . . . . . . . . . . . . . . . . . . . . . . . . . . . . . . . . . . . . . . . . . . . . . . .5 주의사항 및 안내. . . . . . . . . . . . . . . . . . . . . . . . . . . . . . . . . . . . . . . . . . . . . . . .5 오븐랙/팬 위치안내. . . . . . . . . . . . . . . . . . . . . . . . . . . . . . . . . . . . . . . . . . . . . .5 제품 사용법. . . . . . . . . . . . . . . . . . . . . . . . . . . . . . . . . . . . . . . . . . . . . . . . . . . .6 세척 및 관리. . . . . . . . . . . . . . . . . . . . . . . . . . . . . . . . . . . . . . . . . . . . . . . . . . .7 레시피 . . . . . . . . . . . . . . . . . . . . . . . . . . . . . . . . . . . . . . . . . . . . . . . . . . . . . . .9 품질보증서 . . . . . . . . . . . . . . . . . . . . . . . . . . . . . . . . . . . . . . . . . . . . . . . . . . .34 안전주의사항 아래의 안전주의사항은 제품을 안전하고 올바르게 사용하여, 예기치 못한 위험이나 손해를 사전에 방지하기 위한 것입니다. 기본적인 주의사항은 다음과 같습니다.
사용설명서 쿠진아트 에어프라이어 오븐
Toa-60Kr
안전한 사용을 위하여, 본 설명서를 사용 전에 반드시 주의 깊게 읽어 주시기 바랍니다.
Version No: TOA60KR IB-18/069 Open Size: 148x420MM Fold Size: 148x210MM Number of Page: Materal: 105gsm gloss artpaper for whole book Coating: Gloss varnishing in cover Front Cover: 4C(CMYK)+0C PDF version: TOA60KR IB-18/069(0.0) Hugo Code: SIL 2200 IB-1-1 Operator:LKF Hugo Diecut: