
Ikea Akterskarp Ceiling Fan With Led Light
Ask AI
— answers from the official manualAnswers from the official manual.
Common questions
Common Questions
28 totalWhat should I do if my Akterskarp ceiling fan won't start?
First, ensure the wall switch is in the 'on' position and check the main and branch circuit fuses or breakers. Also confirm the device is connected to a power source, and if your model has a remote control, check the battery and make sure the remote is successfully paired. (Page 4)
How do I fix excessive wobbling on my Akterskarp ceiling fan?
Make sure you are using the blades designated for this ceiling fan, and check that the screws attaching the fan blade bracket to the motor hub are securely tightened. If wobbling persists after confirming all connections are secure, use the included balancing kit to adjust the fan. (Page 4)
How do I use the balancing kit to reduce fan wobble?
Turn the fan on to the speed where wobble is most noticeable, then turn it off and attach the balance clip halfway between the blade holder and tip on the trailing edge of one blade. Test each blade to find which one shows the most improvement, then secure a balancing weight to the top of that blade at the clip's position. (Page 4)
What should I do if the LED light on my Akterskarp ceiling fan is not working?
First, check the power connection from the fan to the electrical power supply. If the issue persists, contact a local electrician or your IKEA store. (Page 4)
What should I do if the remote control is not controlling my Akterskarp ceiling fan?
Interference from other remote controls operating on the same frequency may be the cause. You may need to re-pair the remote control according to the provided instructions. (Page 4)
How often should I inspect the connections and blade attachments on my Akterskarp ceiling fan?
You should check the support connections, brackets, and blade attachments twice per year to ensure they are secure. Due to the natural movement of the fan, some connections may loosen over time, but the fan does not need to be removed from the ceiling to perform this check. (Page 4)
Show 22 more questions
Can I use water to clean my Akterskarp ceiling fan?
What should I check if my Akterskarp ceiling fan is making noise?
Does the Akterskarp ceiling fan motor need to be oiled or lubricated?
How do I factory reset the Akterskarp Ceiling Fan?
What should I check if my fan does not start?
What should I do if my fan emits noise?
Why do my blades seem loose despite regular checks?
How do I clean the fan without damaging it?
How often should I balance my fan?
What do I do if my remote control stops working?
Why does my fan rotate clockwise and counterclockwise at startup?
How do I clean the lighting source on my fan safely?
What should I do if the light source is not working?
What should I do if unusual oscillating movements are observed with my Akterskarp Ceiling Fan?
Can I use any type of outlet box for installing the Akterskarp Ceiling Fan?
Where can I find more information on maintenance and troubleshooting the Akterskarp Ceiling Fan?
What is the recommended frequency for maintenance of my Akterskarp Ceiling Fan?
Is there a specific type of light source I should use for replacement when it fails on my Akterskarp Ceiling Fan?
Are there any safety concerns while installing the Akterskarp Ceiling Fan?
What type of speed control devices should I use with my Akterskarp Ceiling Fan?
Is there anything important I should know about replacing parts or altering my Akterskarp Ceiling Fan?
How do I properly disconnect power supply for maintenance or component replacement on my fan?
Full Manual
55 pages

AKTERSKARP
English T2416
##### READ AND SAVE THESE INSTRUCTIONS

WARNING: To avoid possible electrical shock - turn the electricity off at the main circuit panel before wiring. If you feel you do not have enough electrical wiring knowledge or experience, contact a qualified licensed electrician.

WARNING: To reduce the risk of fire, electric shock or personal injury, mount the ceiling fan to outlet box marked "Acceptable for Fan Support of 15.9 kg (35 lbs) or less” and use mounting screws provided with the outlet box.
##### WARNING:
To reduce the risk of fire or electric shock, do not use this fan with any solid-state speed control device.

WARNING: To reduce the risk of fire, electric shock or injury to persons, do not use replacement parts that have not been recommended by the manufacturer (e.g. parts made at home using a 3D printer)
WARNING: The light source of this luminaire is not replaceable. When the light source reaches its end of life, the whole luminaire shall be replaced.
WARNING: To reduce the risk of fire or electric shock, this fan should only be used with fan speed control parts no. ZLUB43350W—008 and E2552, manufactured by LEEDARSON LIGHTING CO., LTD.
WARNING: To reduce the risk of fire or electric shock, this fan must be installed with an isolating (grounded) wall switch.

WARNING: All replacement of parts and the mounting of the safety suspension system device shall be performed by a qualified licensed electrician.
WARNING: To reduce the risk of personal injury, if unusual oscillating movement is observed - immediately stop using the ceiling fan and contact a qualified licensed electrician.
WARNING: To reduce the risk of personal injury, do not bend the blade brackets, when installing the brackets, balancing the blades or cleaning the fan. Do not insert foreign objects between rotating fan blades.
WARNING: To reduce the risk of electric shock, disconnect the electrical supply circuit to the fan before installing the light kit.
##### WARNING:
The installation must be in accordance with the National Electrical Code ANSI/ NFPA 70 and local codes.
WARNING: Remember to make sure the power is off before attempting installation.

CAUTION: To reduce the risk of personal injury, use only the screws provided with the outlet box.
FCC testing This device complies with part 15 of the FCC Rules. Operation is subject to the following two conditions: (1) This device may not cause harmful interference, and (2) this device must accept any interference received, including interference that may cause undesired operation. NOTE: This equipment has been tested and found to comply with the limits for a Class B digital device, pursuant to part 15 of the FCC Rules. These limits are designed to provide reasonable protection against harmful interference in a residential installation. This equipment generates, uses and can radiate radio frequency energy and, if not installed and used in accordance with the instructions, may cause harmful interference to radio communications. However, there is no guarantee that interference will not occur in a particular installation. If this equipment does cause harmful interference to radio or television reception, which can be determined by turning the equipment off and on, the user is encouraged to try to correct the interference by one or more of the following measures:
— Reorient or relocate the receiving antenna.
— Increase the separation between the equipment and receiver.
— Connect the equipment into an outlet on a circuit different from that to which the receiver is connected.
— Consult the dealer or an experienced radio/TV technician for help.
Please note that changes or modifications of this product is not expressly approved by the party responsible for compliance could void the user's authority to operate the equipment.
N.W.: 17.2 lbs/ 7.8 kg G.W.: 22.7 lbs/ 10.3 kg
Maintenance cycle: twice per year For more information and electronic manuals, please visit the ikea.com website.
##### SAVE THESE INSTRUCTIONS
Français T2416
##### LIRE ET CONSERVER CES INSTRUCTIONS
ATTENTION: pour éviter tout risque de choc électrique, couper le courant électrique au disjoncteur principal avant tout branchement. Si vous estimez ne pas avoir suffisamment de connaissances ou d'expérience dans le domaine électrique, contactez un électricien agréé et qualifié.
ATTENTION: pour réduire le risque d'incendie, choc électrique ou blessure corporelle, raccorder le ventilateur à la boîte de jonction marquée "Acceptable for Fan Support", et pouvant supporter en toute sécurité un min. de 35 lbs (15,9 kg) ou moins, et utiliser les vis de fixation fournies avec la boîte de jonction.
##### ATTENTION:
pour éviter tout risque d'incendie ou de choc électrique, ne pas utiliser ce ventilateur avec un dispositif à semiconducteurs de commande de vitesse.
ATTENTION: pour réduire le risque d'incendie, d'électrocution ou de blessure, ne jamais utiliser des pièces de rechange non recommandées par le fabricant (ex. des pièces fabriquées à domicile avec une imprimante 3D).
ATTENTION: la source lumineuse de ce luminaire n’est pas remplaçable. Lorsque la source lumineuse atteint la fin de sa durée de vie, le luminaire entier doit être remplacé.
ATTENTION: pour éviter tout risque d'incendie ou de choc électrique, ce ventilateur doit être utilisé uniquement avec les pièces de commande de vitesse no. ZLUB43350W—008 et E2552, fabriquées par (LEEDARSON LIGHTING CO., LTD).
ATTENTION: pour éviter tout risque d'incendie ou de choc électrique, ce ventilateur doit être installé avec un interrupteur mural isolant (mis à la terre).
ATTENTION: tout remplacement de pièce ainsi que le montage du dispositif de sécurité de la suspension doivent être réalisés par un électricien agréé et qualifié.
ATTENTION: pour réduire le risque de blessure corporelle, si vous observez un mouvement d'oscillation inhabituel, il faut immédiatement arrêter le ventilateur et contacter un électricien agréé et qualifié.
ATTENTION: pour réduire le risque de blessure corporelle, ne pas plier le support des pales au moment où vous les installez, quand vous réglez les pales ou quand vous nettoyez le ventilateur. Ne pas bloquer la rotation des pales avec un quelconque objet.
ATTENTION: pour réduire le risque de choc électrique, couper le circuit d'alimentation du ventilateur avant d'installer le kit lumineux.
ATTENTION: l'installation doit être conforme au National Electrical Code ANSI/NFPA 70 et aux normes locales en vigueur.
ATTENTION: rappelez-vous de couper le courant avant l'installation.
MISE EN GARDE: pour réduire le risque de blessure corporelle, utiliser uniquement les vis fournies avec la boîte de jonction.
Test FCC Cet appareil est conforme à la partie 15 des règles de la FCC. Son fonctionnement est soumis aux deux conditions suivantes : (1) Cet appareil ne doit pas causer d’interférence nuisible et (2) cet appareil doit accepter toutes les interférences reçues, y compris celles qui peuvent causer un fonctionnement indésirable. NB : cet appareil a été testé et est conforme aux exigences relatives aux appareils électroniques de classe B, selon la partie 15 des règles de la FCC (Commission fédérale des communications). Ces limites sont conçues pour assurer une protection suffisante contre les interférences nuisibles dans les installations résidentielles. Cet équipement génère, utilise et peut dégager de l'énergie de radiofréquence et, s'il n'est pas installé et utilisé conformément aux instructions du fabricant, provoquer un brouillage préjudiciable aux communications radio. Il n'existe toutefois aucune garantie qu'un équipement particulier ne sera pas victime de brouillage. Si cet équipement entraîne un brouillage préjudiciable à la réception des émissions radio ou de télévision, identifiable en mettant le terminal hors puis sous tension, il est recommandé à l'utilisateur de tenter de résoudre ce problème au moyen d'une ou plusieurs des mesures suivantes :
— Réorienter l'antenne réceptrice différemment ou la changer de place.
— Augmenter la distance séparant l'équipement du récepteur.
— Connecter l’appareil à une prise sur un circuit différent de celui auquel est branché le récepteur. — Obtenir de l'aide auprès du revendeur ou d'un technicien radio/ TV expérimenté.
Noter que tout changement ou modification apportés à cet appareil sans approbation expresse de la partie responsable de la conformité peut rendre nulle la capacité de l’utilisateur à utiliser cet appareil.
Poids net : 17.2 lbs/ 7,8 kg Poids brut : 22.7 lbs/ 10,3 kg
Fréquence d'entretien : deux fois par an Pour plus d'information et pour consulter les manuels numériques, rendez-vous sur le site IKEA.fr
##### CONSERVER CES MESURES DE SÉCURITÉ

Español T2416
##### LEE Y GUARDA ESTAS INSTRUCCIONES
ADVERTENCIA: Para evitar posibles descargas eléctricas, corta el suministro eléctrico en el panel general antes de instalar el cableado. Si no tienes los conocimientos o experiencia necesarios para encargarte del cableado eléctrico, ponte en contacto con un electricista profesional cualificado.
ADVERTENCIA: Para reducir el riesgo de incendio, descarga eléctrica o lesión personal, monta el ventilador de techo en una caja de salida marcada como apta para soportar un ventilador de 15,9 kg o menos, y usa los tornillos incluidos en la caja.
ADVERTENCIA: Para reducir el riesgo de que se produzca un incendio o descarga eléctrica, no uses este ventilador con ningún dispositivo de control de velocidad de estado sólido.
ADVERTENCIA: Para reducir el riesgo de incendio, descarga eléctrica o lesiones a personas, no utilices piezas de repuesto que no hayan sido recomendadas por el fabricante (por ejemplo, piezas hechas en casa con una impresora 3D).
ADVERTENCIA: La fuente de luz de esta luminaria no es reemplazable. Cuando finalice la vida útil de la fuente de luz, se deberá reemplazar la luminaria por completo.
ADVERTENCIA: Para reducir el riesgo de que se produzca un incendio o descarga eléctrica, este ventilador solo debería usarse con el control de velocidad del ventilador con ref. ZLUB43350W—008 y E2552, fabricado por LEEDARSON LIGHTING CO., LTD.
ADVERTENCIA: Para reducir el riesgo de descarga eléctrica, el ventilador debe instalarse con un interruptor de pared de aislamiento (con toma a tierra).
ADVERTENCIA: La sustitución de cualquier pieza y el montaje del sistema de suspensión de seguridad deben realizarlos electricistas profesionales cualificados.
ADVERTENCIA: Para reducir el riesgo de lesiones personales, si detectas algún movimiento de oscilación inusual, deja inmediatamente de usar el ventilador de techo y ponte en contacto con un electricista profesional cualificado.
ADVERTENCIA: Para reducir el riesgo de lesiones, no dobles los soportes de las aspas al instalar dichos soportes, equilibrar las aspas o limpiar el ventilador. No introduzcas ningún objeto entre las aspas del ventilador.
ADVERTENCIA: Para reducir el riesgo de descarga eléctrica, desconecta el suministro eléctrico del ventilador antes de instalar el kit de iluminación.
ADVERTENCIA: Toda la instalación debe ser conforme con el National Electrical Code (ANSI/ NFPA 70) y con la normativa local.
ADVERTENCIA: No olvides cortar la electricidad antes de la instalación.
PRECAUCIÓN: Para reducir el riesgo de lesiones personales, usa solo los tornillos proporcionados con la caja de salida. Pruebas de conformidad con la FCC Este aparato es conforme al artículo 15 del Reglamento FCC. El funcionamiento está sometido a las condiciones siguientes: (1) este aparato no puede causar interferencias perjudiciales y (2) debe aceptar cualquier interferencia que reciba, incluidas las que podrían suponer un funcionamiento no deseado. NOTA: Este equipo ha sido probado para comprobar que cumple los límites establecidos en los dispositivos digitales de Clase B, según la parte 15 de las normas de la FCC. Estos límites se han marcado para garantizar suficiente protección contra interferencias perjudiciales en instalaciones domésticas. Este aparato genera, utiliza y puede emitir energía en forma de radiofrecuencia. Si el aparato no se instala o utiliza conforme a las instrucciones, puede provocar interferencias que perturben las comunicaciones por radio. Sin embargo, es imposible garantizar la ausencia total de interferencias en una instalación concreta. Se puede determinar si este aparato produce interferencias perjudiciales en la recepción de señales de radio/ televisión encendiendo y apagando el aparato, y aconsejamos al usuario intentar solucionar el problema inmediatamente siguiendo uno de estos procedimientos:
— Reorientar o cambiar de sitio la antena receptora.
— Aumentar la distancia entre el aparato y el receptor.
— Conectar el aparato a una toma situada en un circuito diferente al del receptor.
— Ponerse en contacto con el vendedor o con un técnico de radio/ TV cualificado para obtener ayuda.
Cualquier cambio o modificación que se realice en este producto sin la aprobación expresa de la parte responsable de la conformidad puede anular la capacidad del usuario para utilizar el aparato.
Peso neto: 7,8 kg Peso bruto: 10,3 kg
Ciclo de mantenimiento: dos veces al año
Para obtener más información y consultar los manuales electrónicos, visita el sitio web ikea.com
##### GUARDA ESTAS INSTRUCCIONES
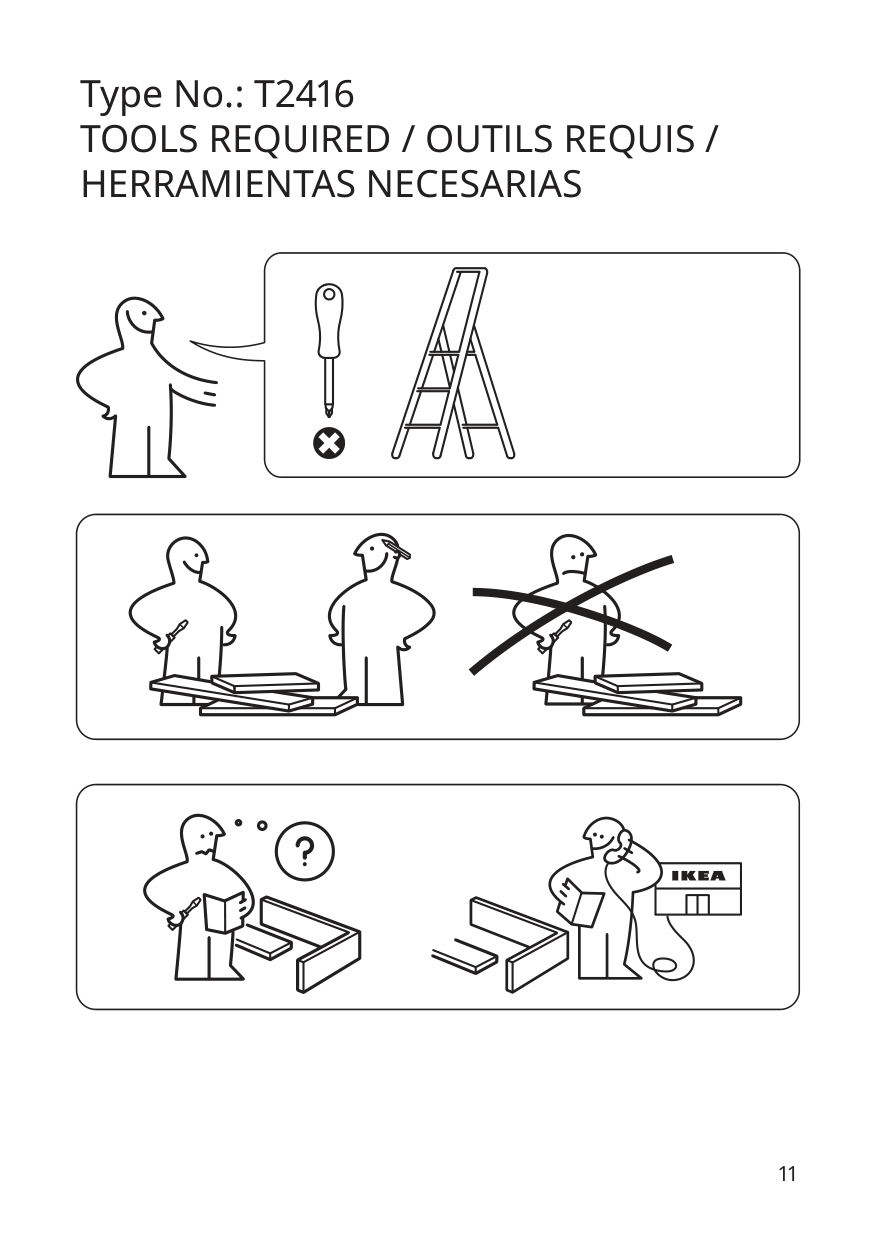
###### Type No.: T2416 TOOLS REQUIRED / OUTILS REQUIS / HERRAMIENTAS NECESARIAS
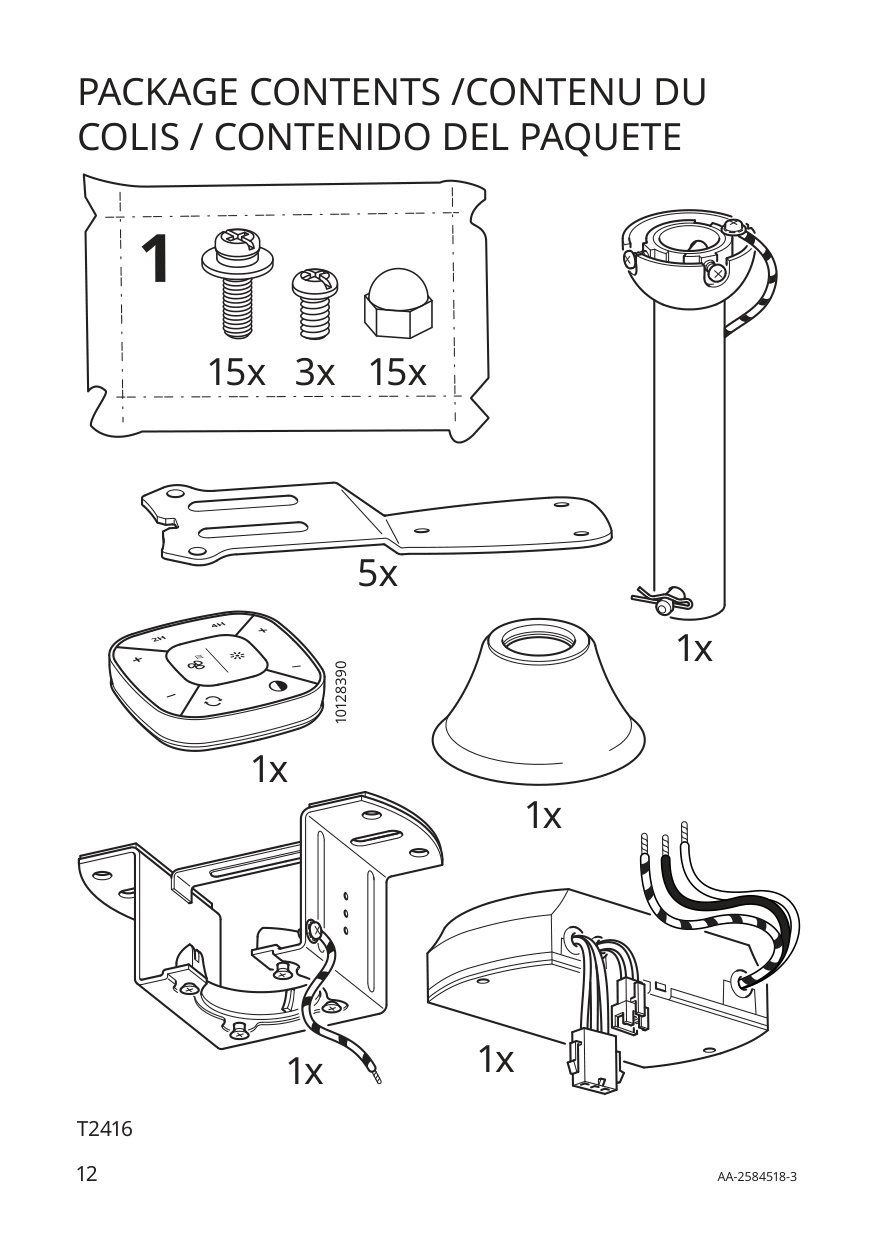
###### PACKAGE CONTENTS /CONTENU DU COLIS / CONTENIDO DEL PAQUETE
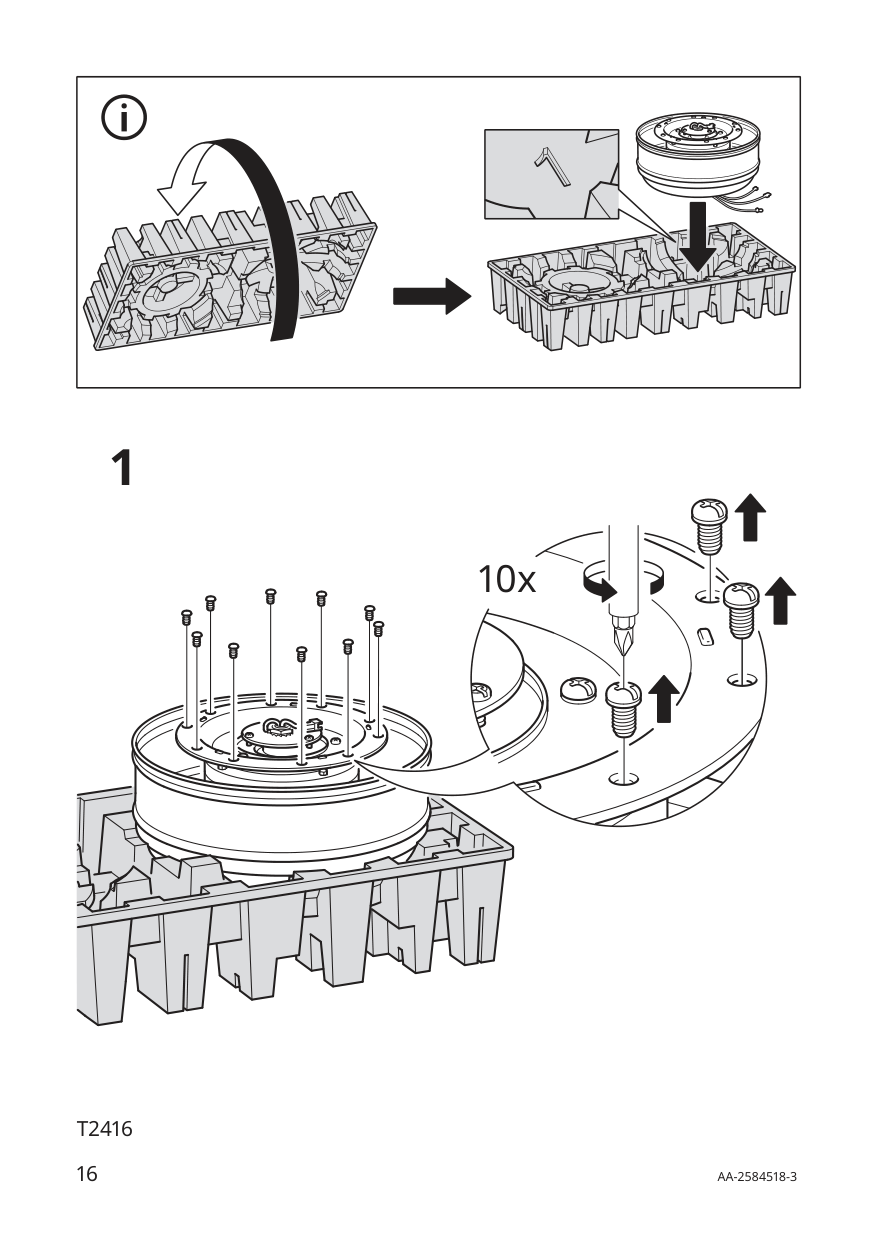
1

15x 15x3x
5x
1x
10128390
1x
1x
1x
1x
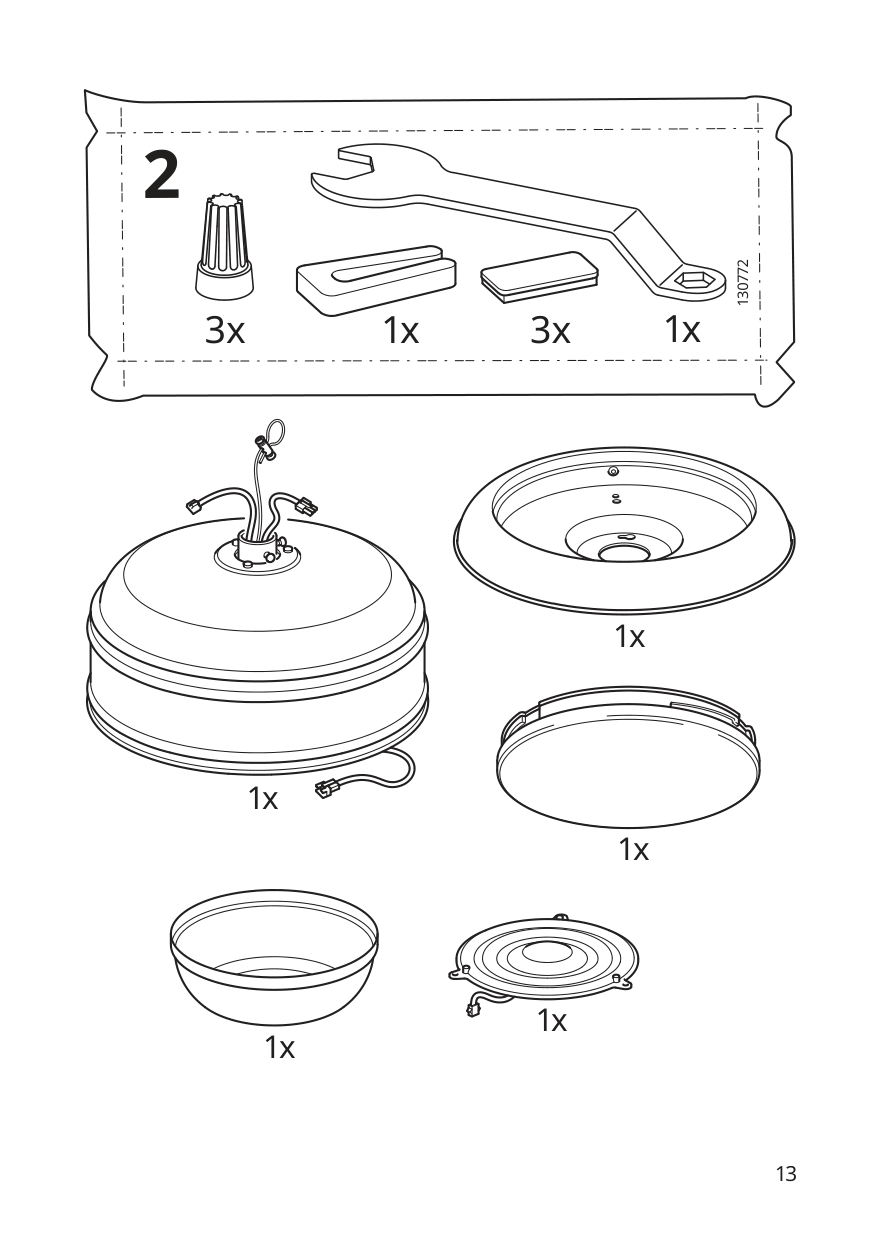
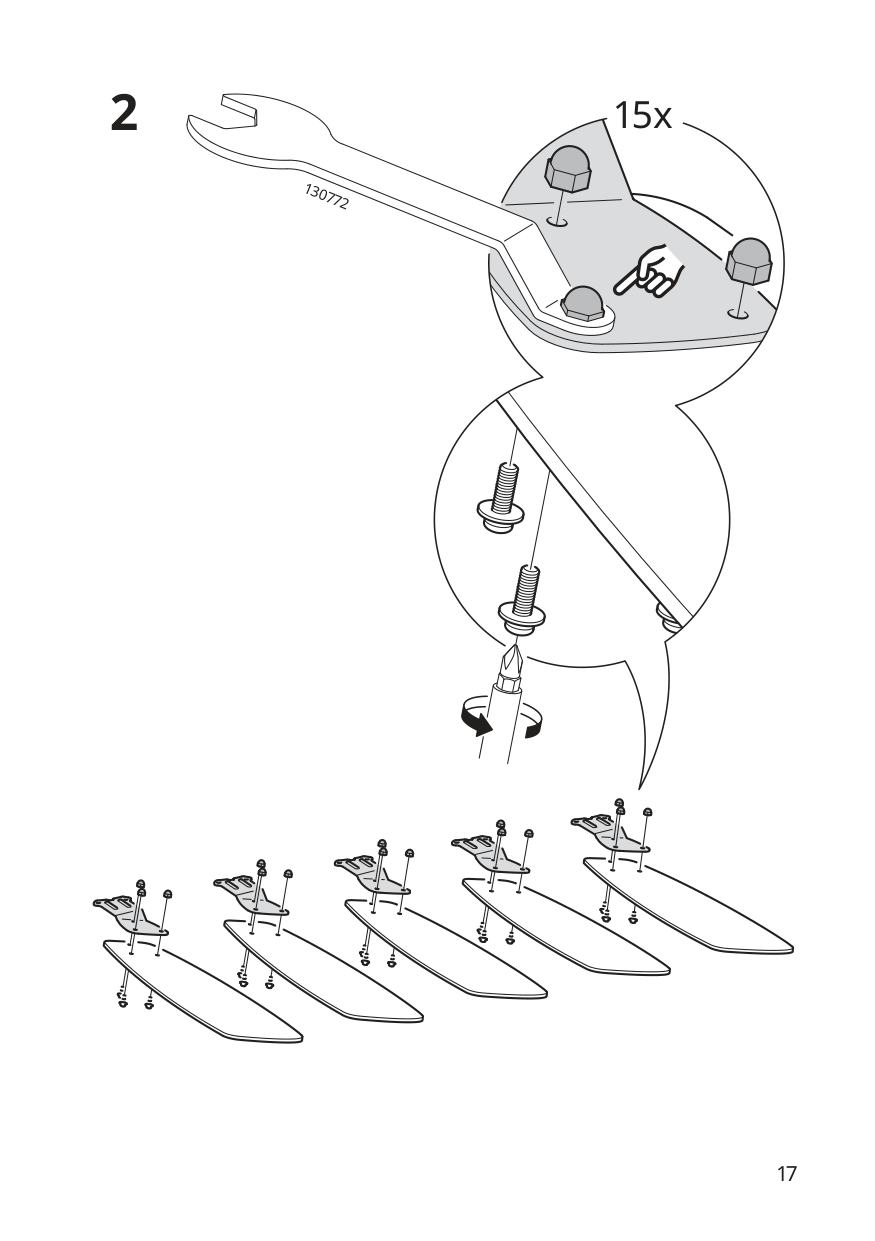
2
3x 1x
3x1x
130772
1x
1x
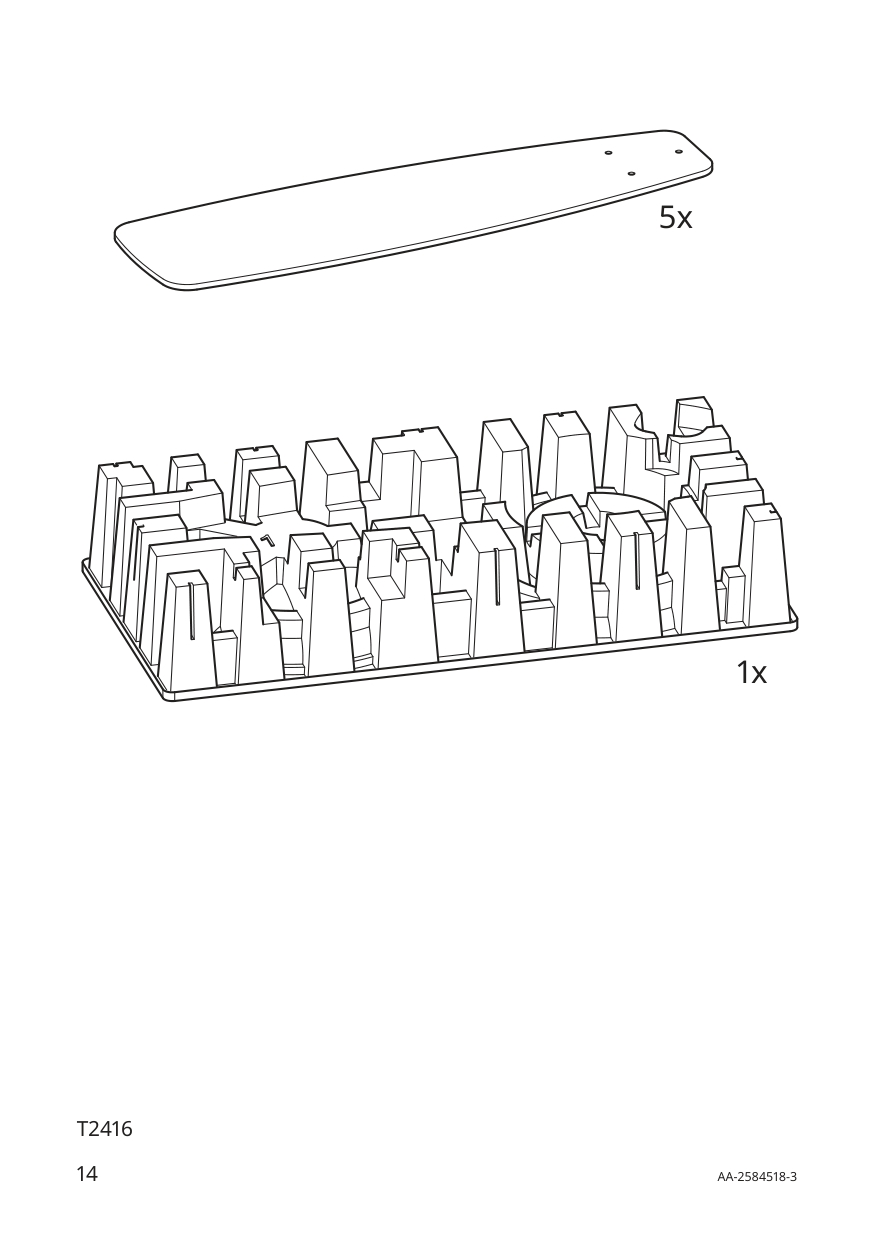
5x
1x
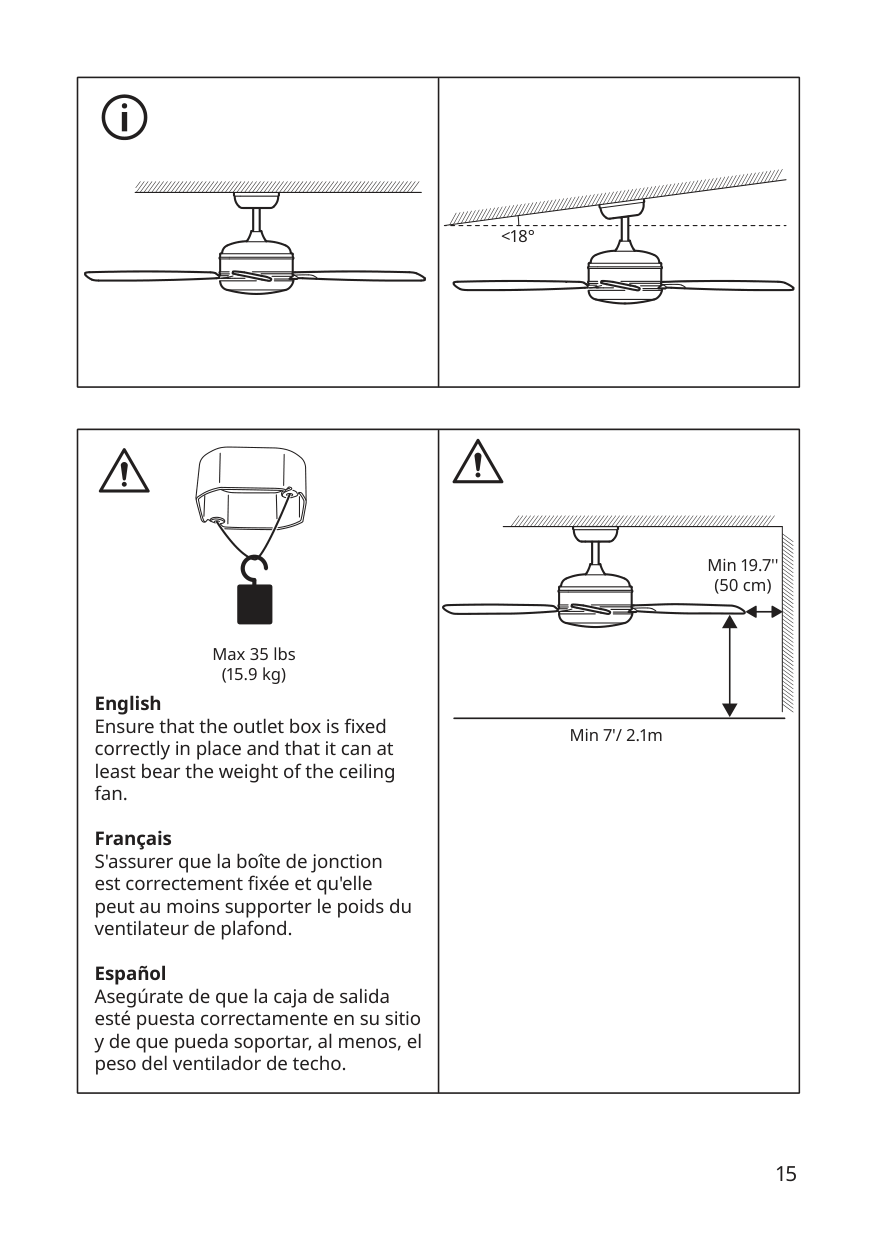
| |<18°| |---|---|
|Max 35 lbs (15.9 kg)
English Ensure that the outlet box is fixed correctly in place and that it can at least bear the weight of the ceiling fan.
Français S'assurer que la boîte de jonction est correctement fixée et qu'elle peut au moins supporter le poids du ventilateur de plafond.
Español Asegúrate de que la caja de salida esté puesta correctamente en su sitio y de que pueda soportar, al menos, el peso del ventilador de techo.|Min 7'/ 2.1m
Min 19.7'' (50 cm)| |---|---|
1
10x
#### 2 15x
130772
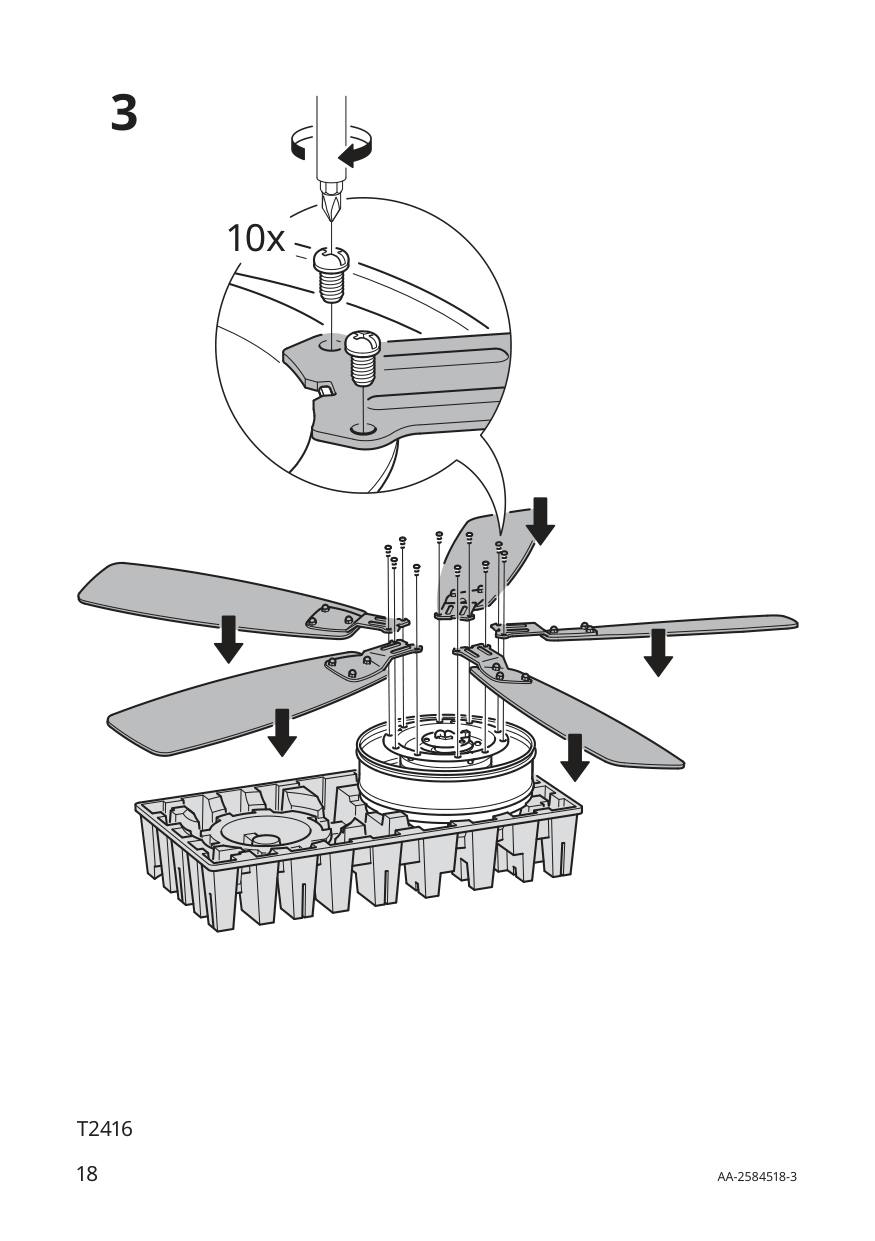
3
10x
|4
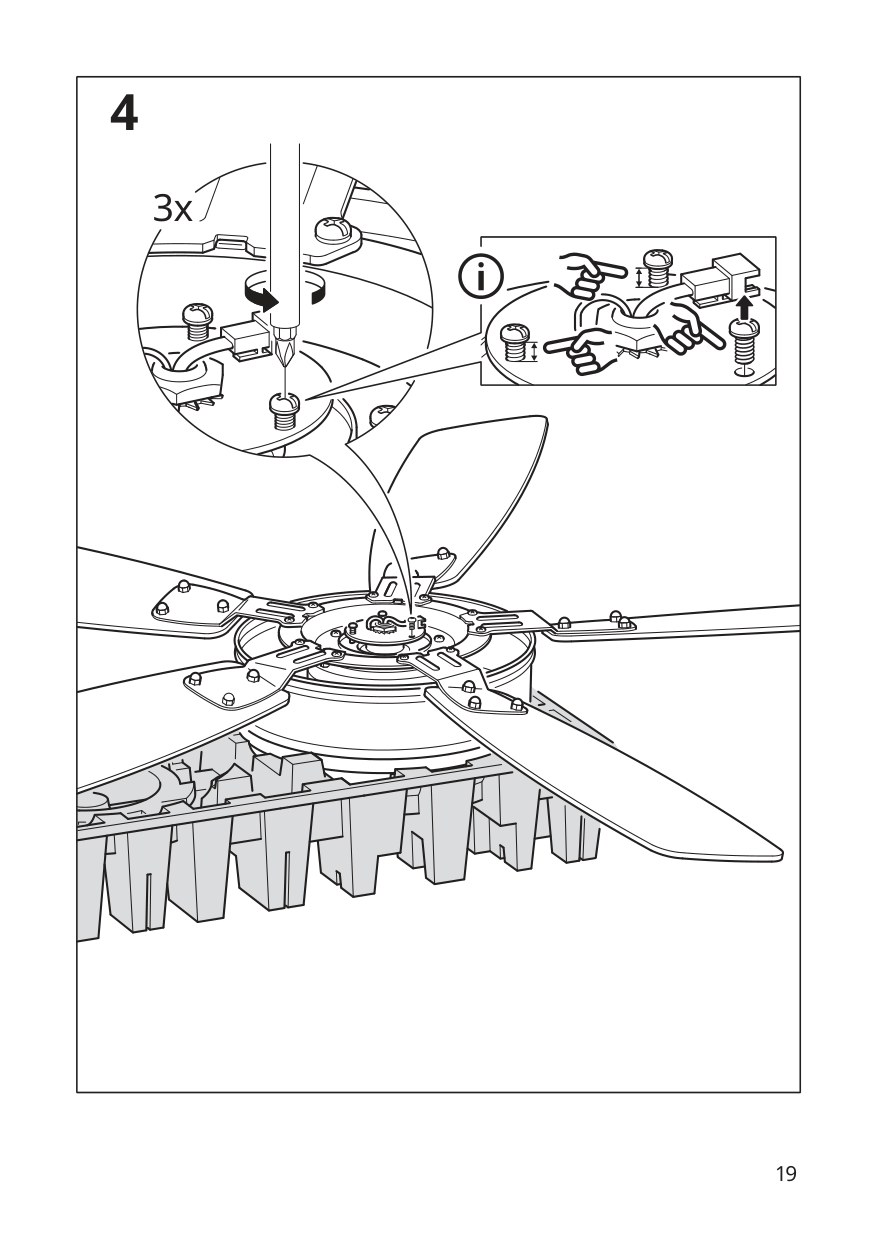
3x| |---|
|5| |---|
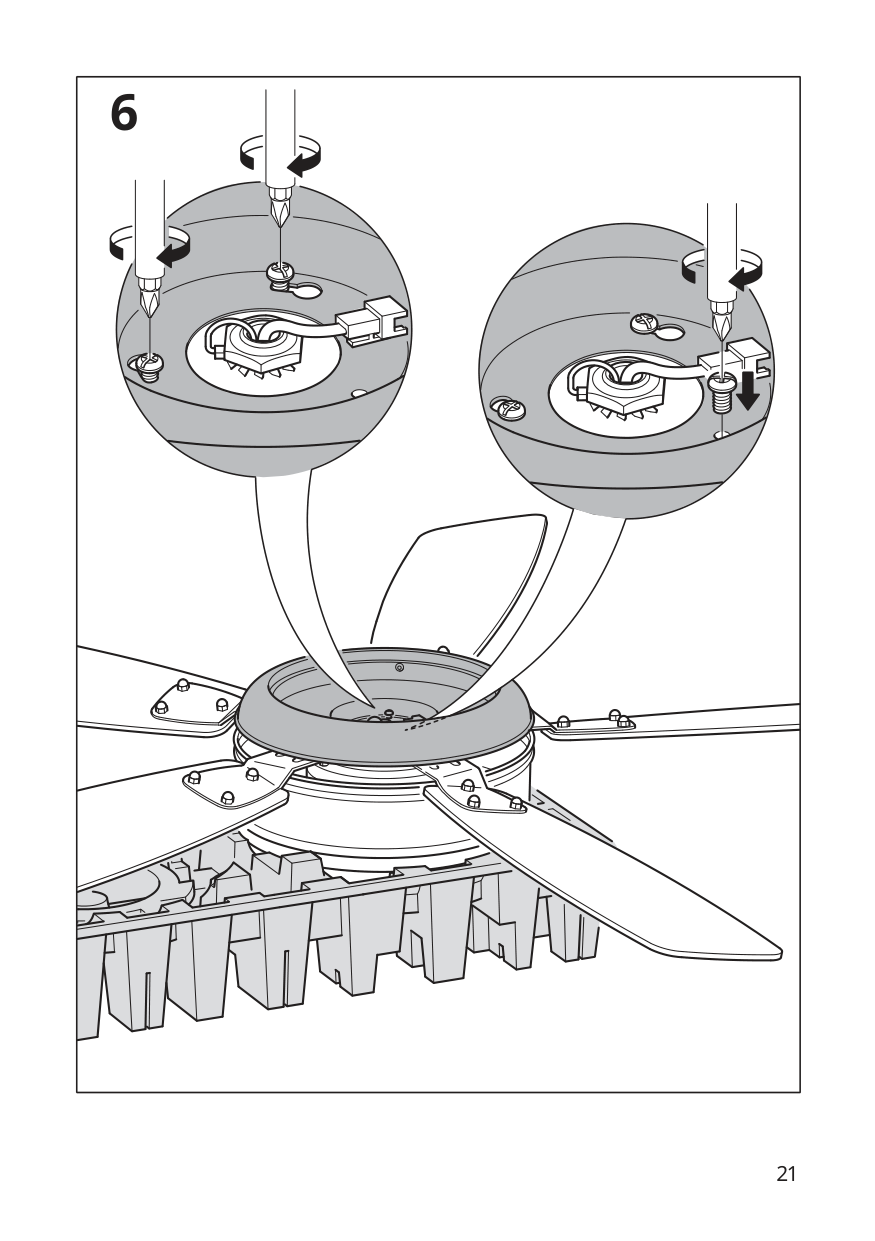
|6| |---|
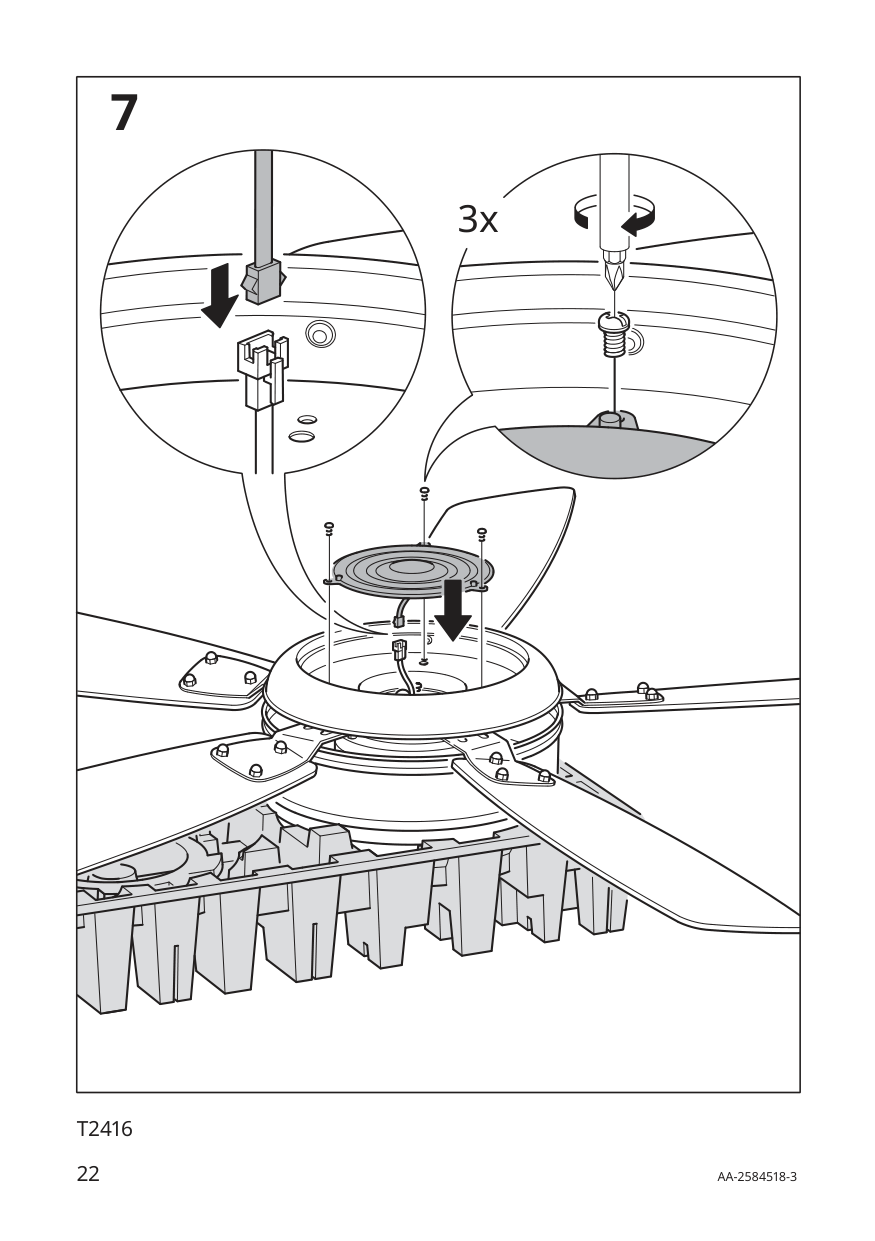
|7
3x| |---|
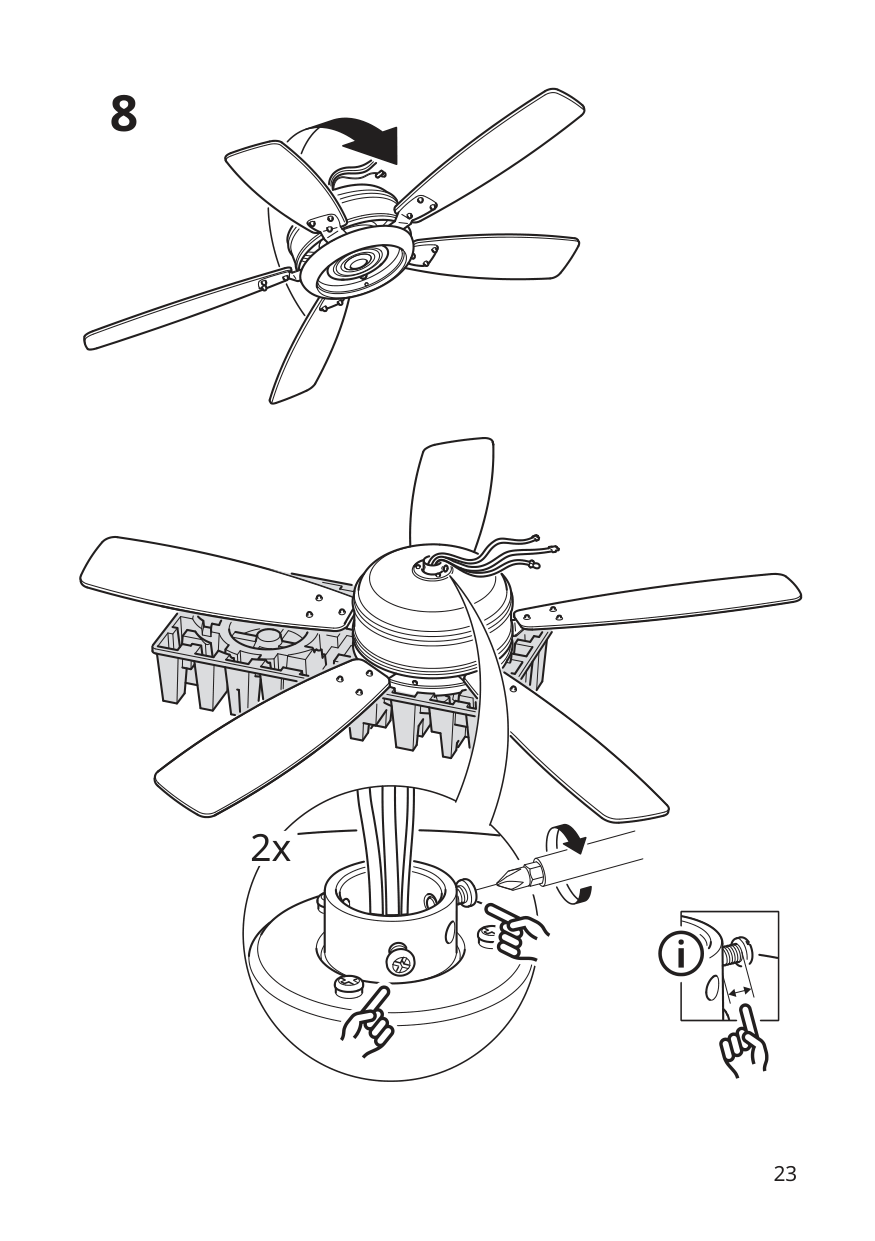
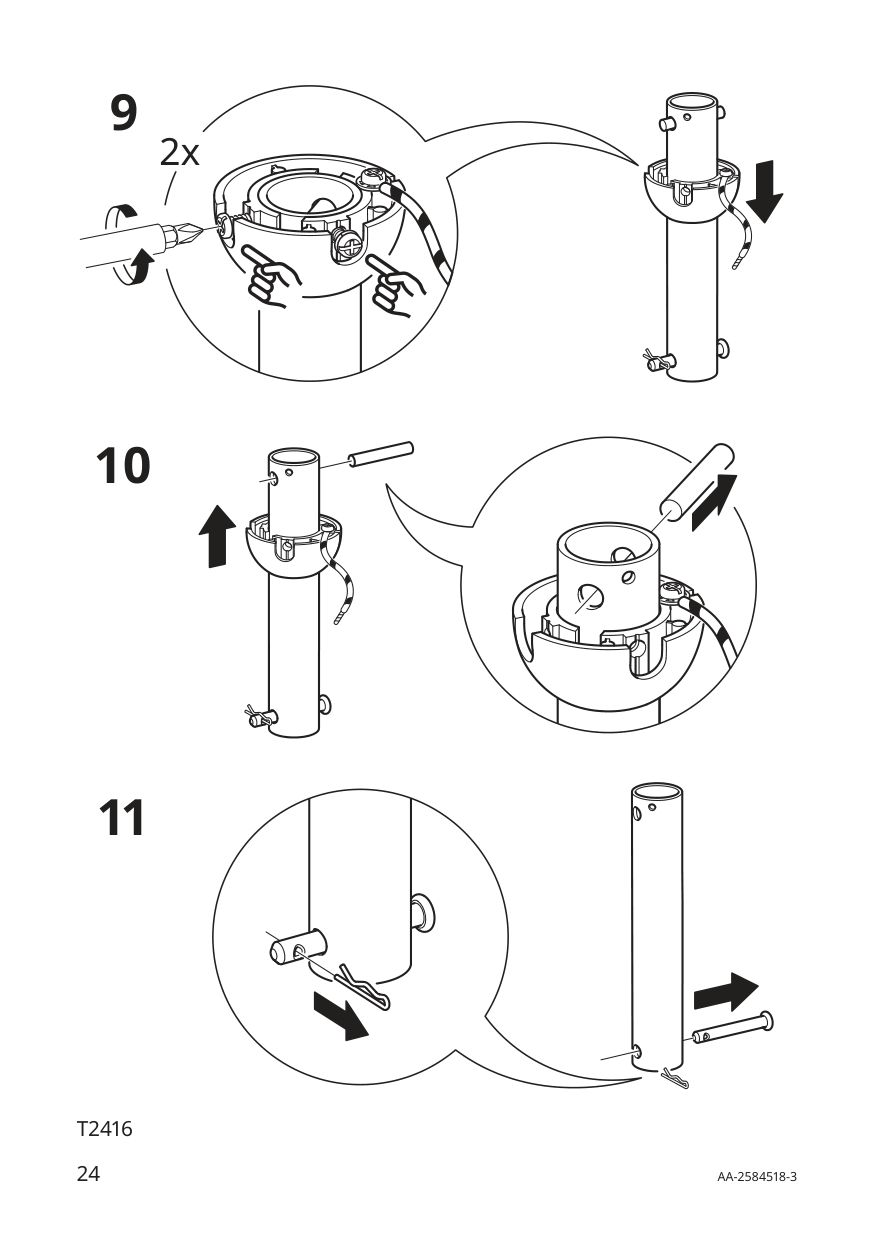
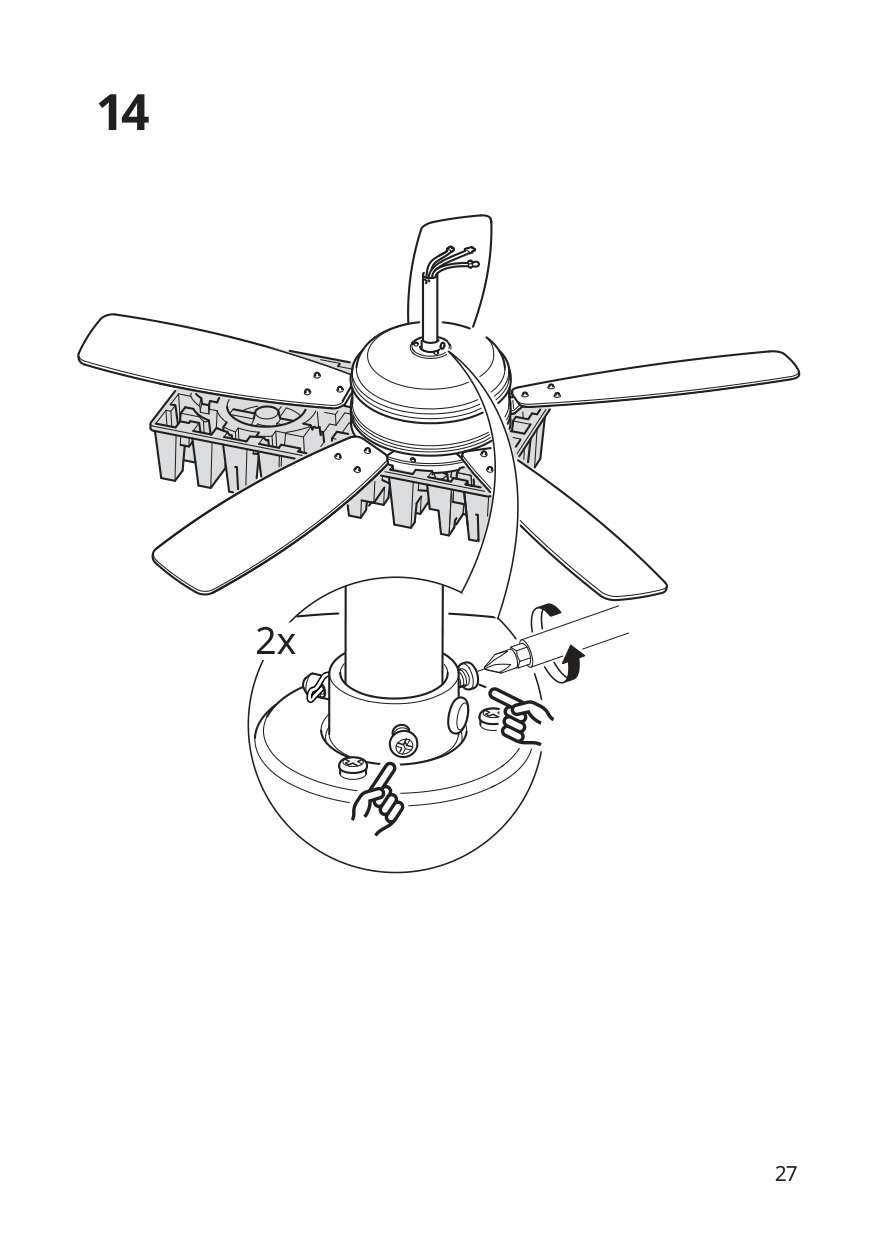
###### 2x
2x
10
11
###### 2x
16
17
|18| |---|
| | |
|---|---|
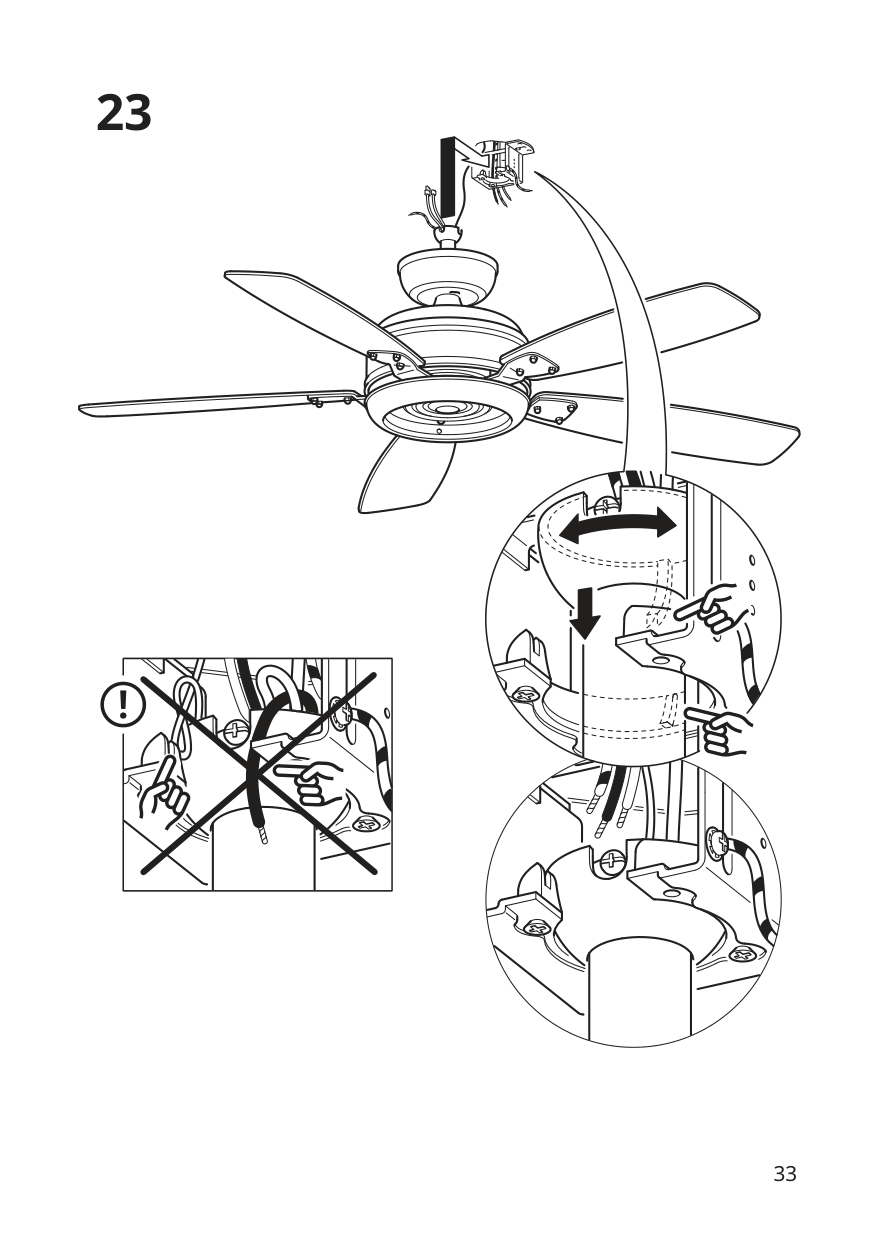
|24| |---|
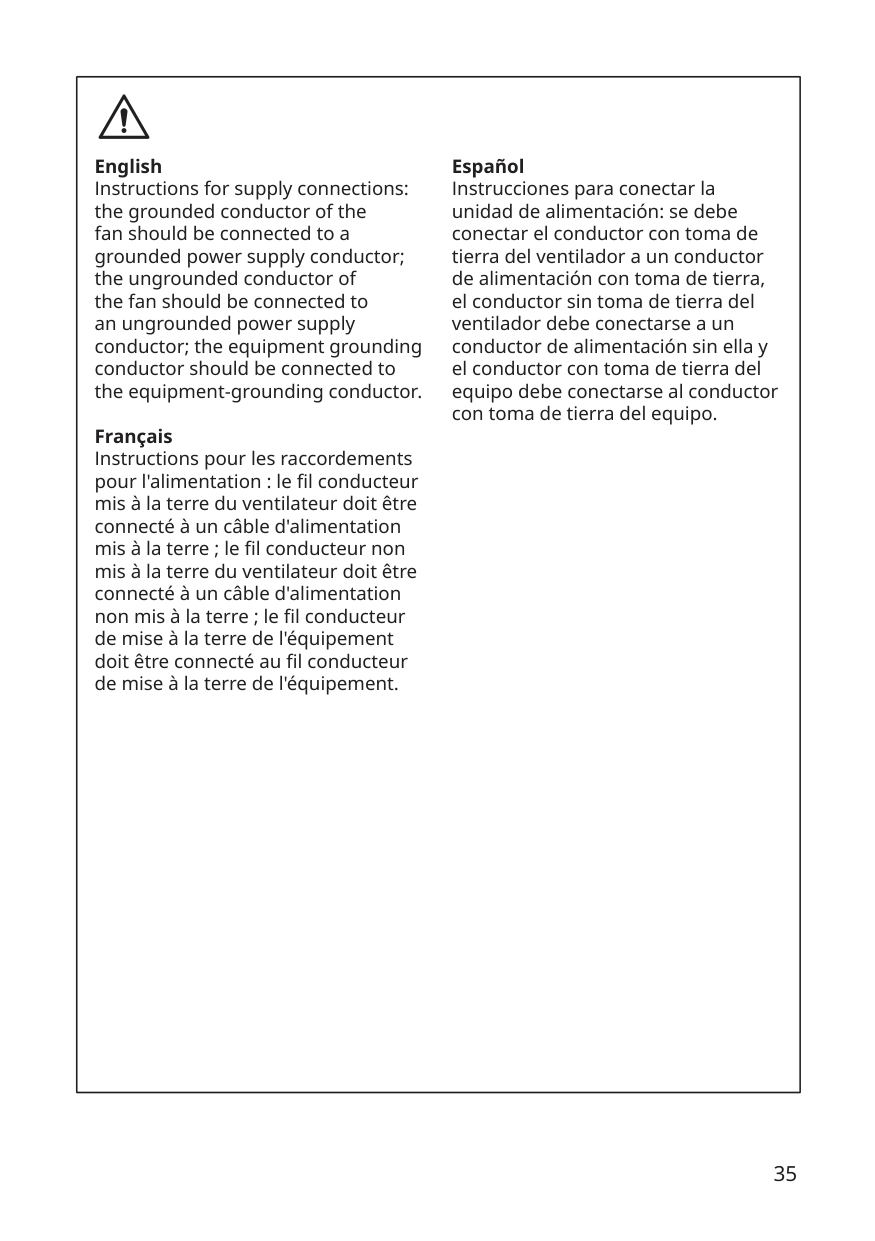
|English Instructions for supply connections: the grounded conductor of the fan should be connected to a grounded power supply conductor; the ungrounded conductor of the fan should be connected to an ungrounded power supply conductor; the equipment grounding conductor should be connected to the equipment-grounding conductor.
Français Instructions pour les raccordements pour l'alimentation : le fil conducteur mis à la terre du ventilateur doit être connecté à un câble d'alimentation mis à la terre ; le fil conducteur non mis à la terre du ventilateur doit être connecté à un câble d'alimentation non mis à la terre ; le fil conducteur de mise à la terre de l'équipement doit être connecté au fil conducteur de mise à la terre de l'équipement.
Español Instrucciones para conectar la unidad de alimentación: se debe conectar el conductor con toma de tierra del ventilador a un conductor de alimentación con toma de tierra, el conductor sin toma de tierra del ventilador debe conectarse a un conductor de alimentación sin ella y el conductor con toma de tierra del equipo debe conectarse al conductor con toma de tierra del equipo.| |---|
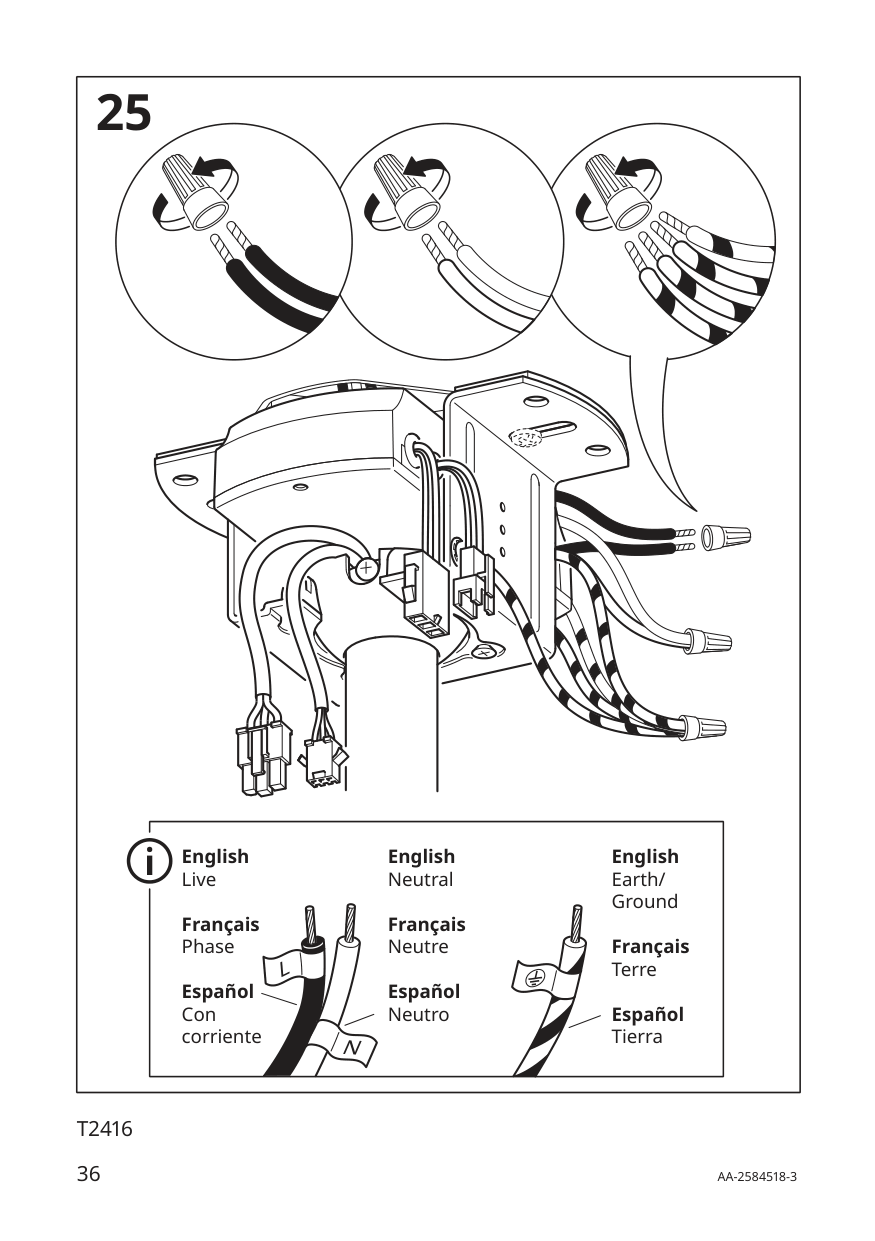
|25
English Live
Français Phase
Español Con corriente
English Neutral
Français Neutre
Español Neutro
English Earth/ Ground
Français Terre
Español Tierra| |---|
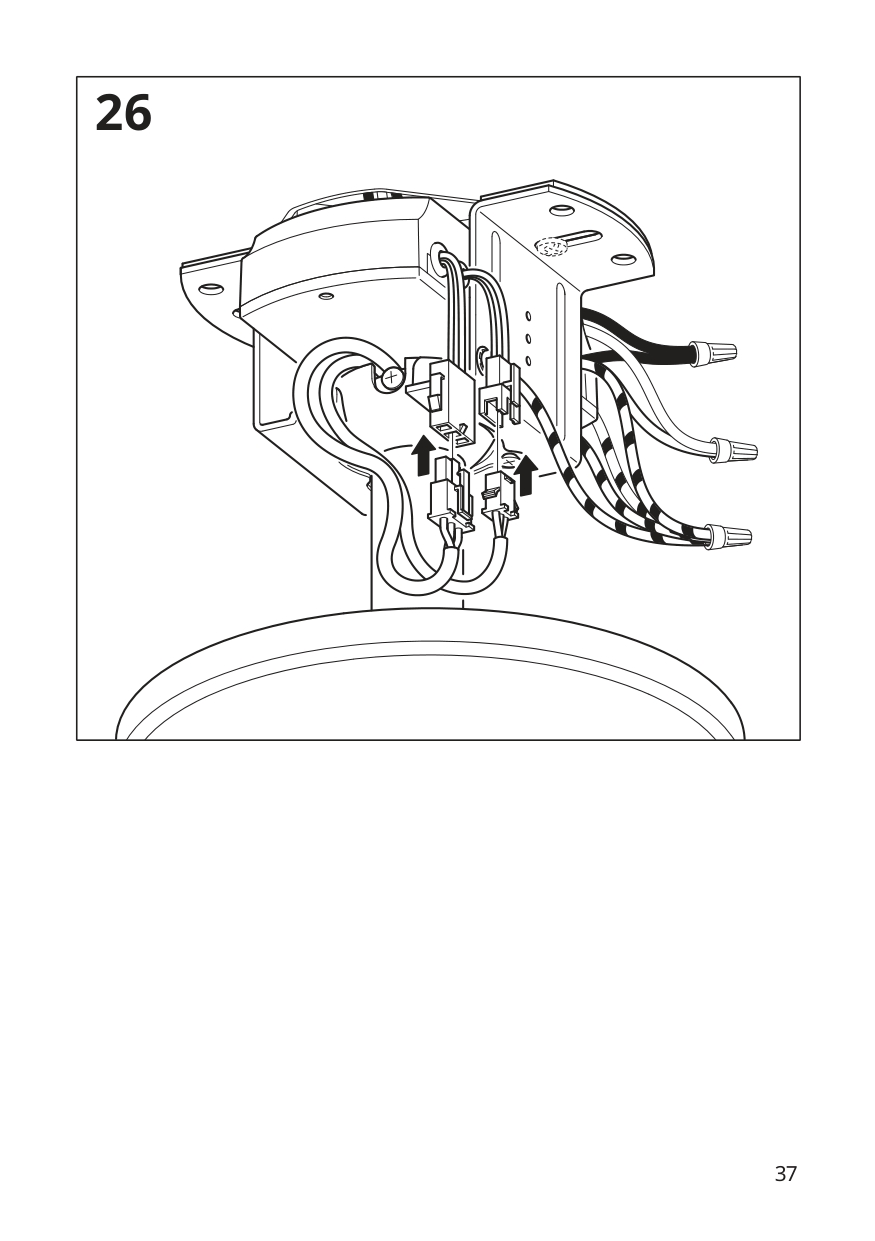
|26| |---|
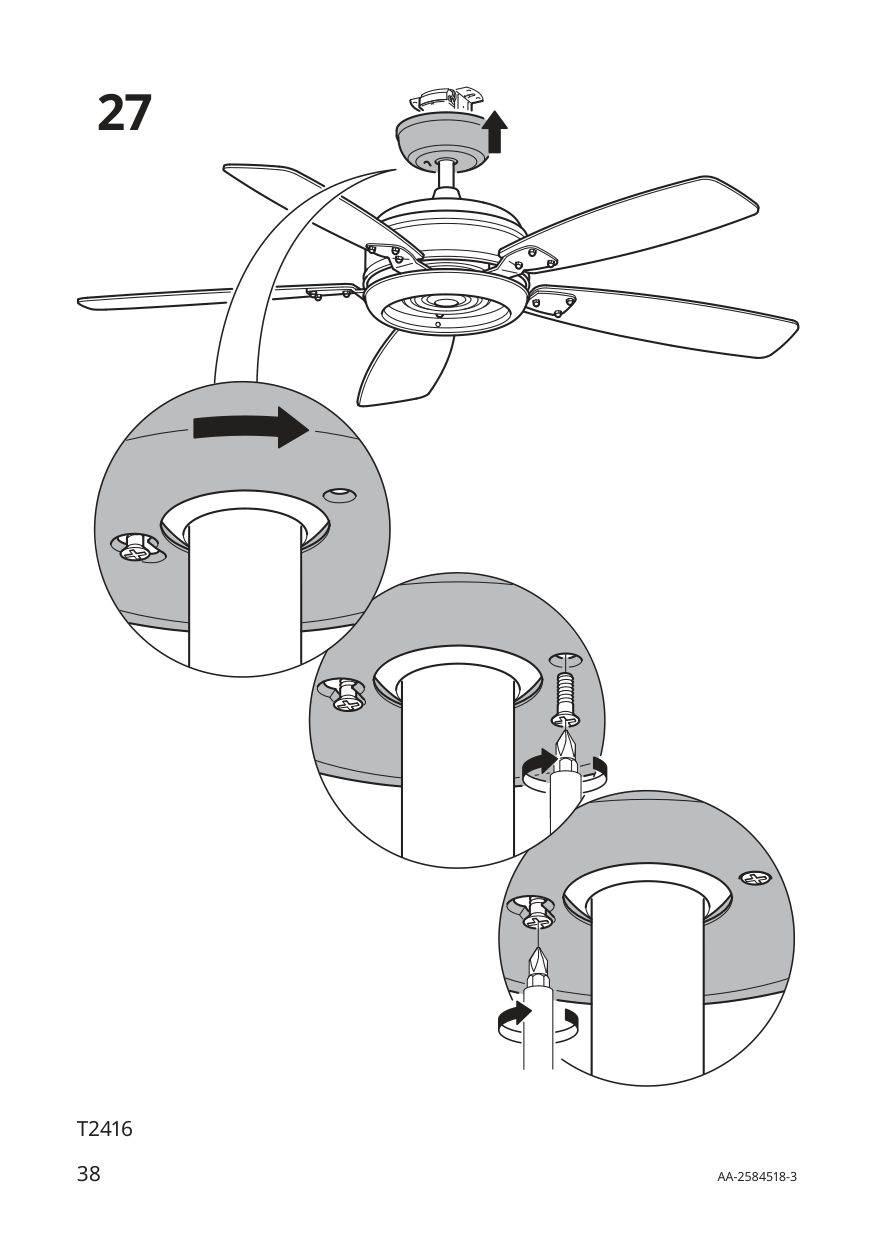
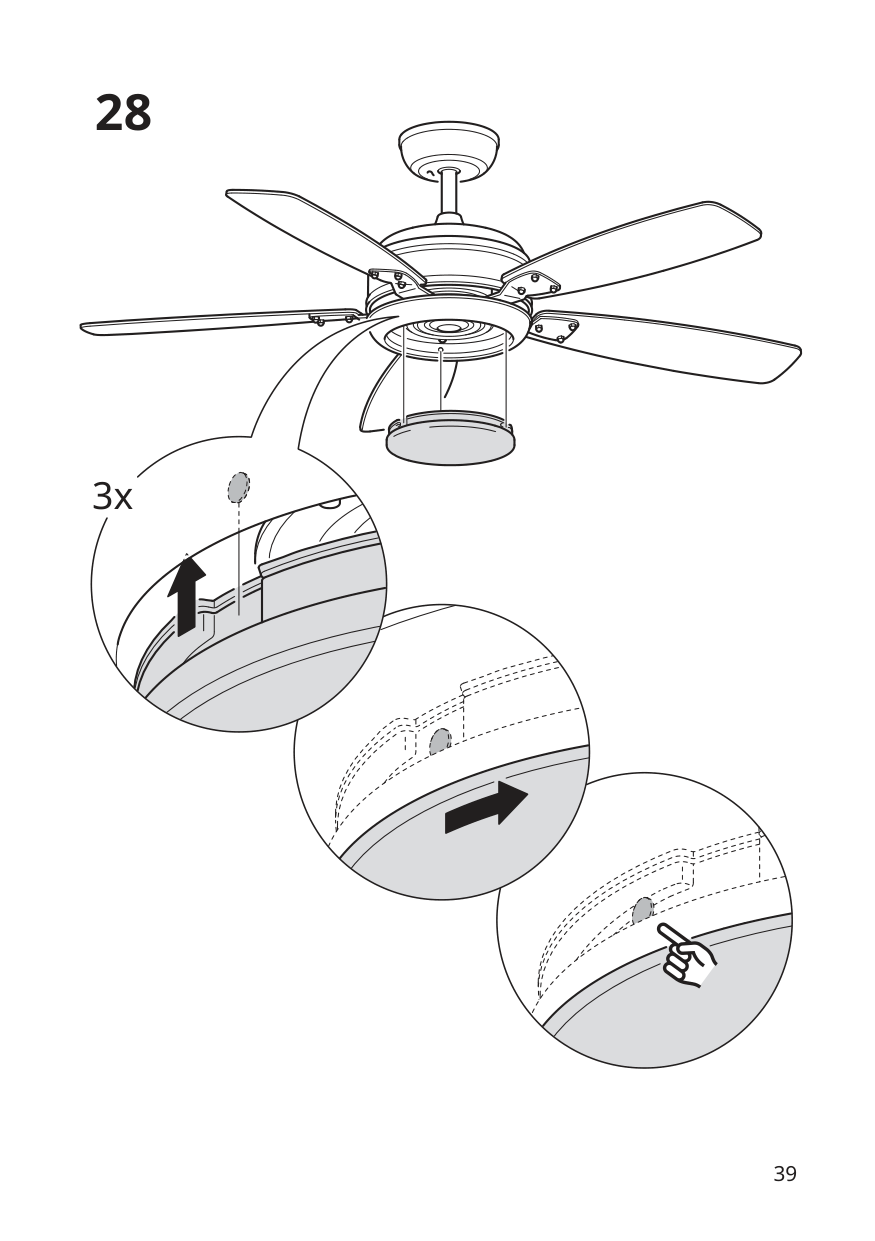
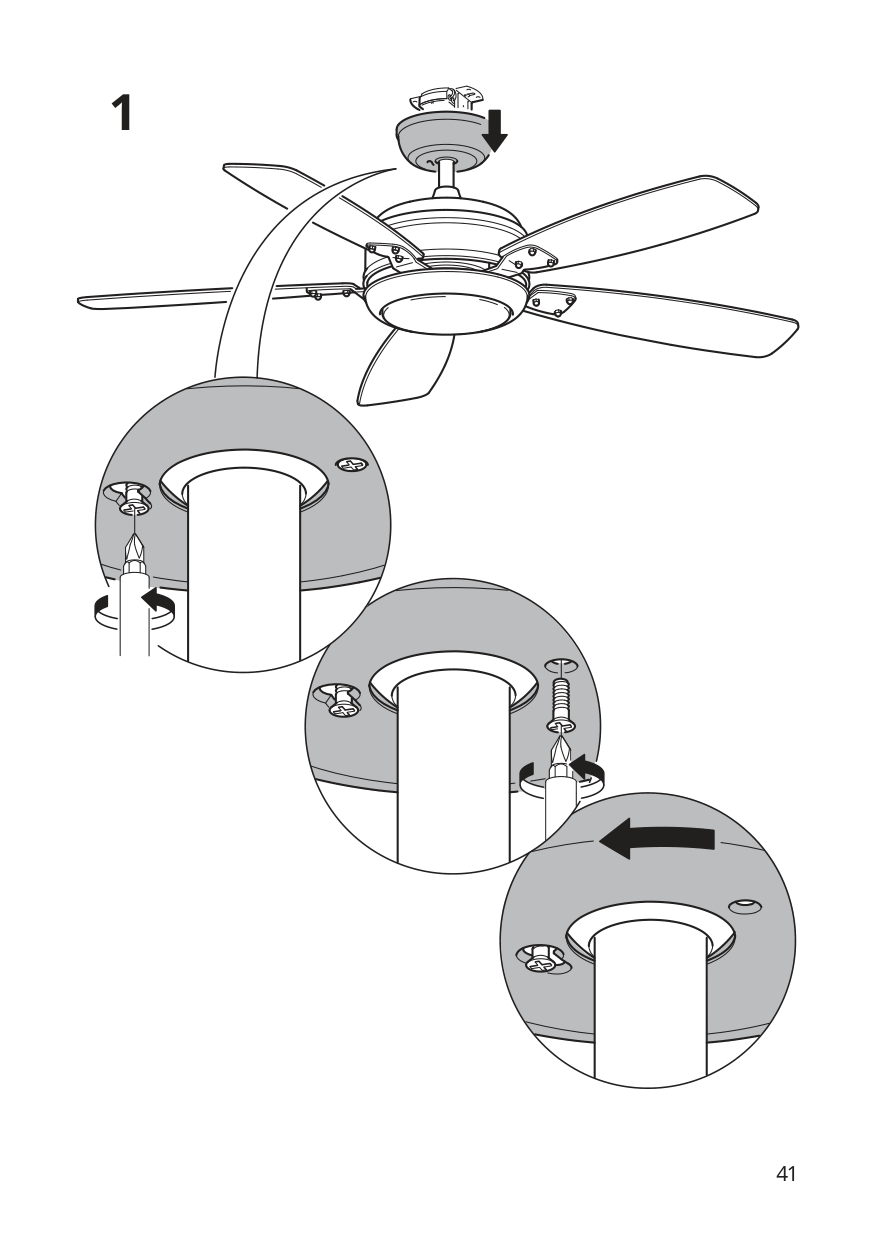
###### 3x
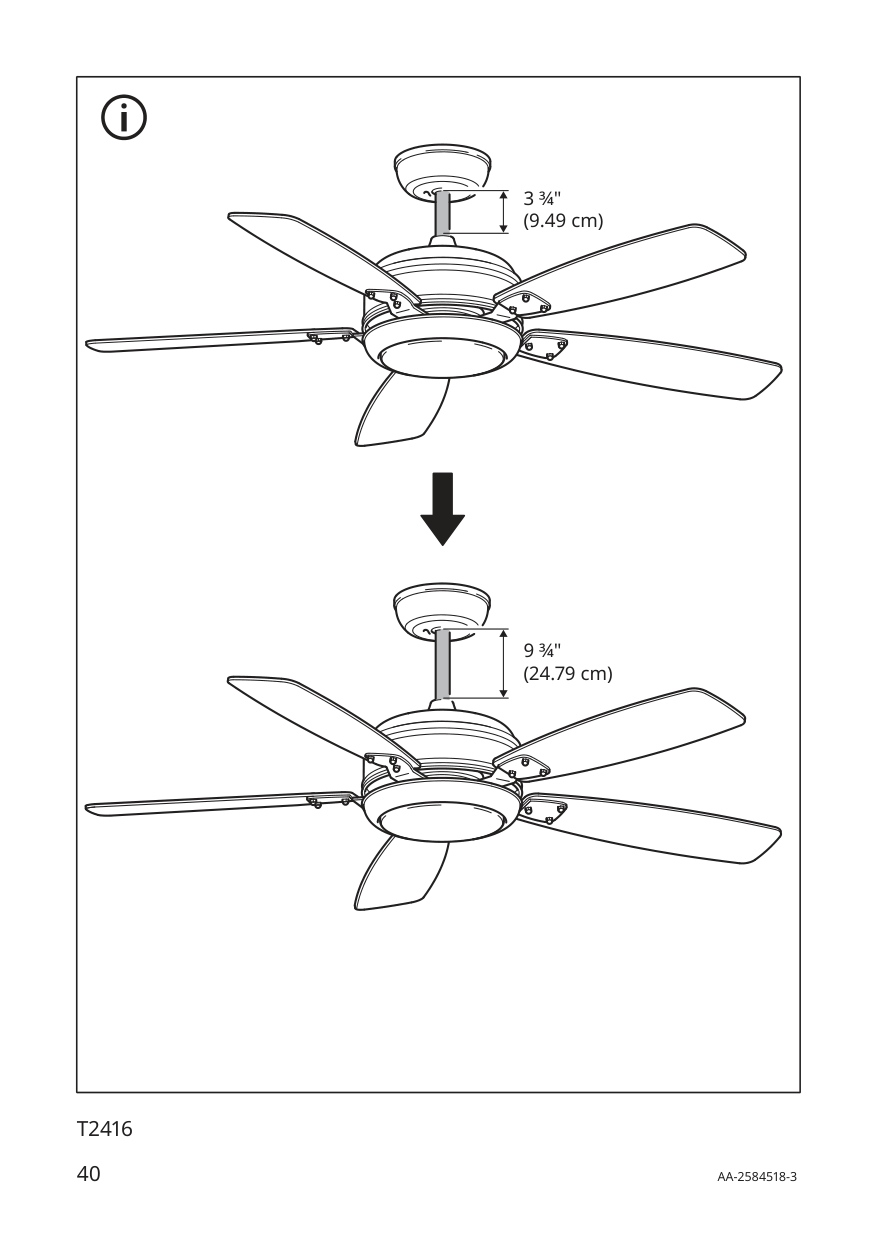
|3 ¾" (9.49 cm)
9 ¾" (24.79 cm)
| |---|
1
|2|
|---|
3
3x
|4| |---|
|5| |---|
|6| |---|
|7| |---|
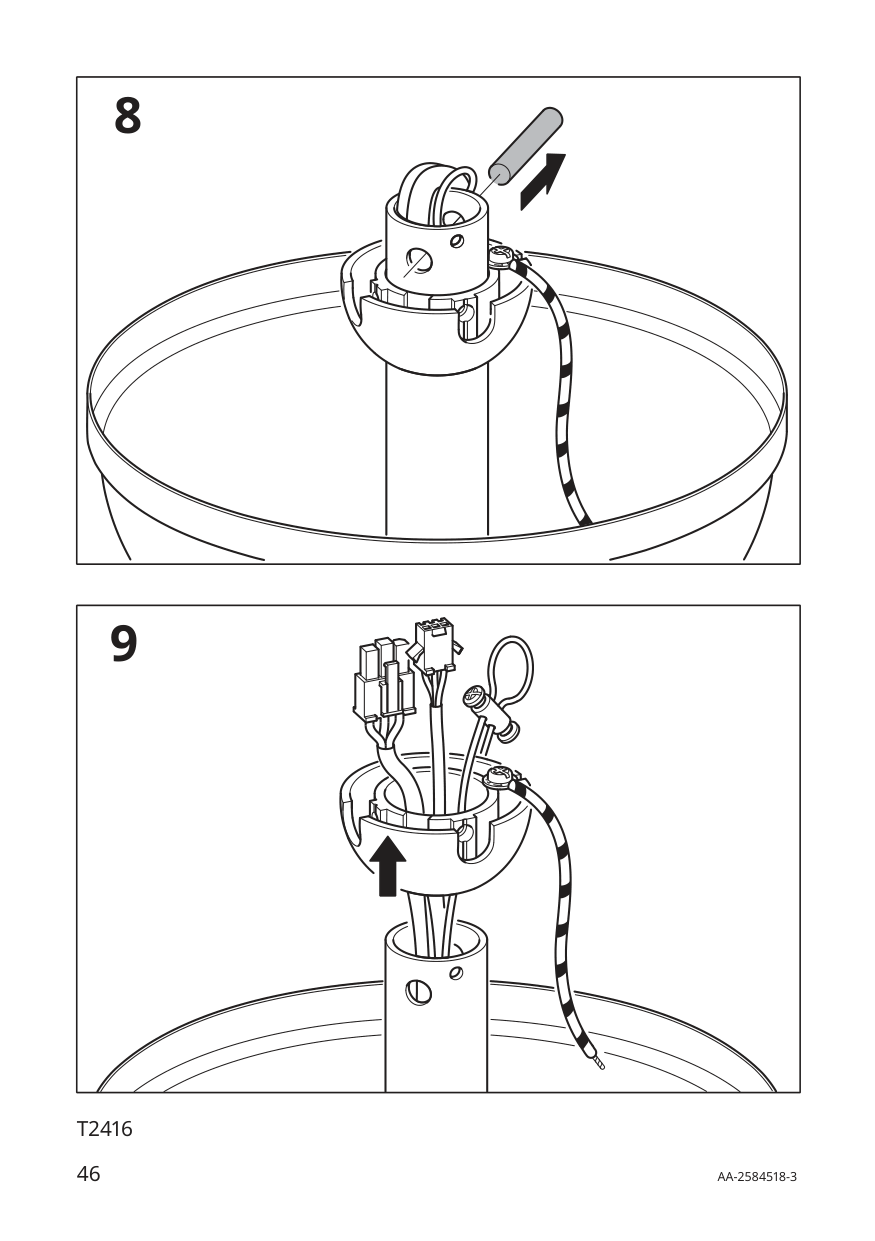
|8
| |---|
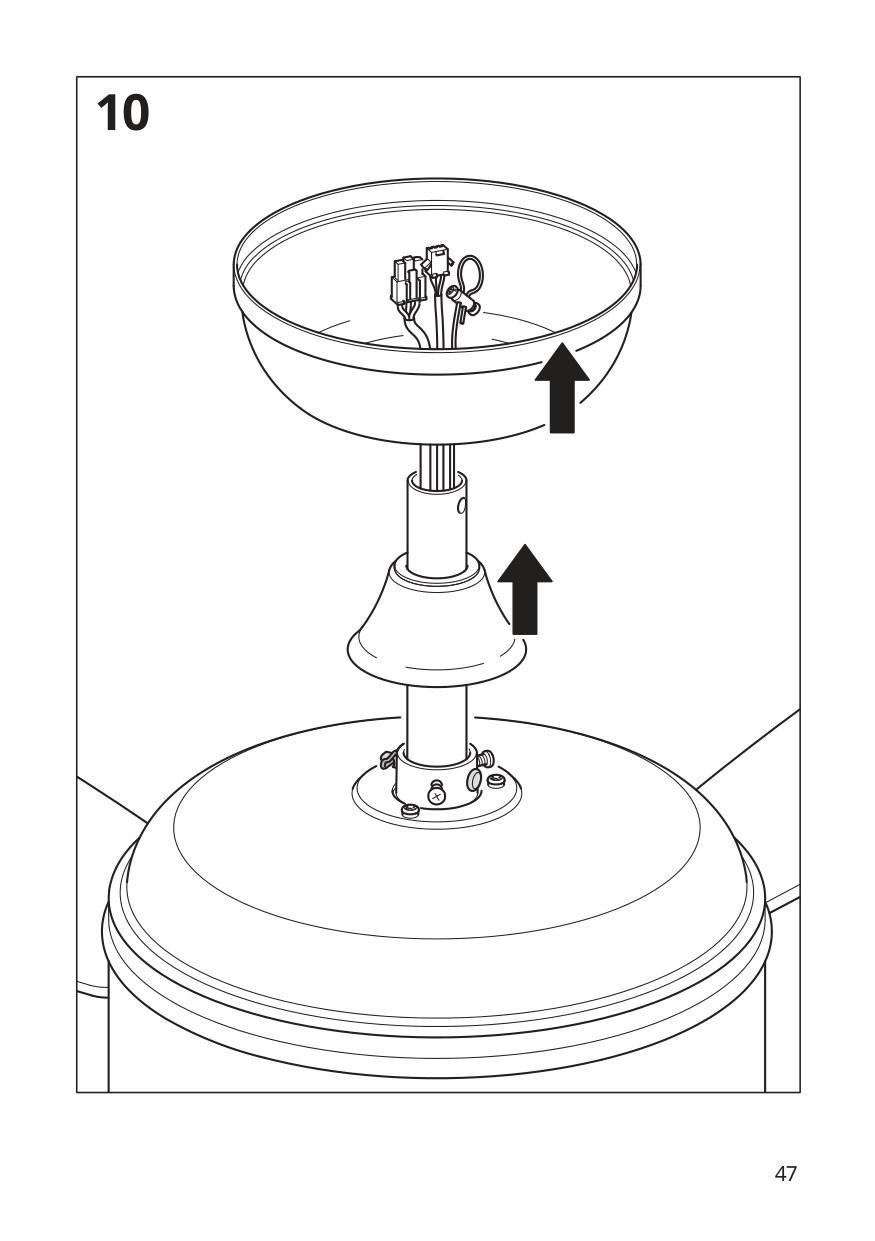
9
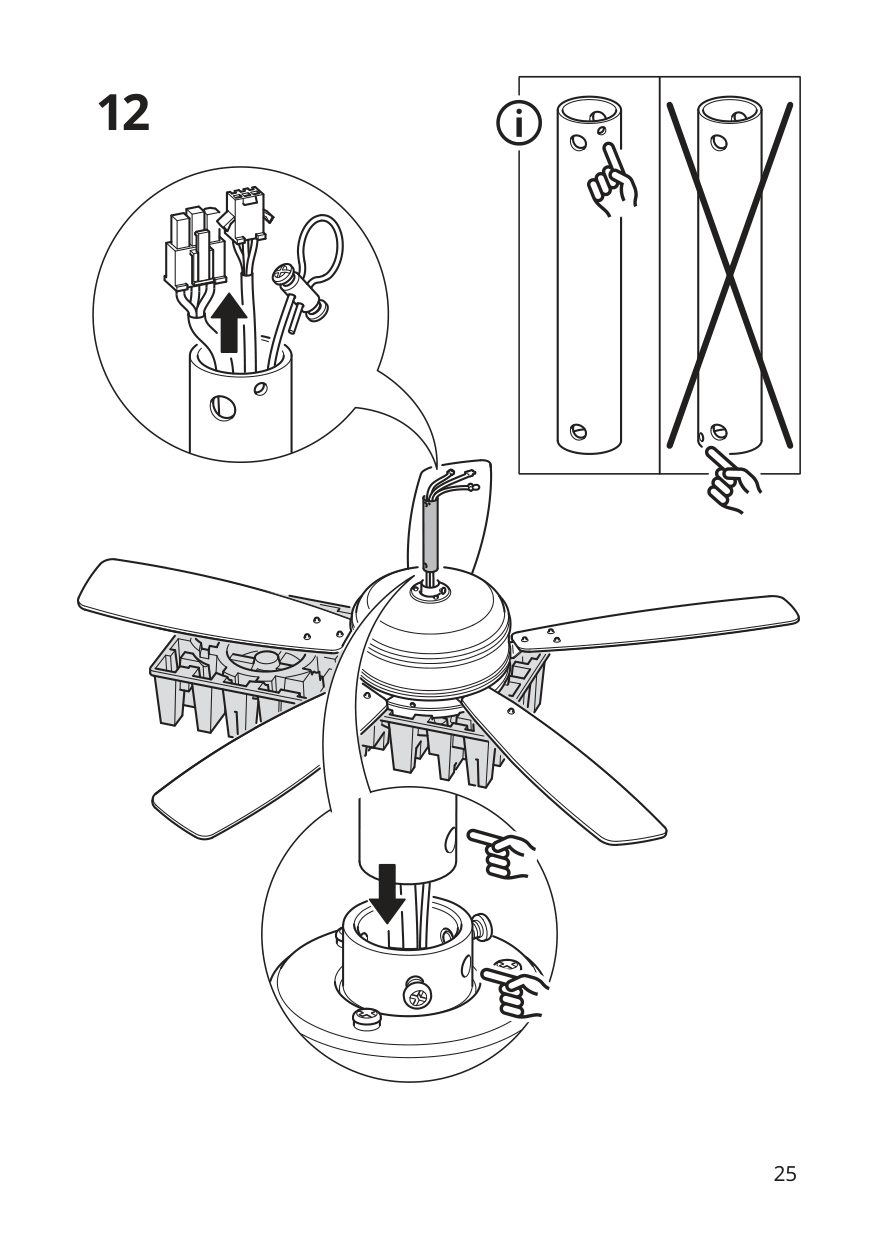
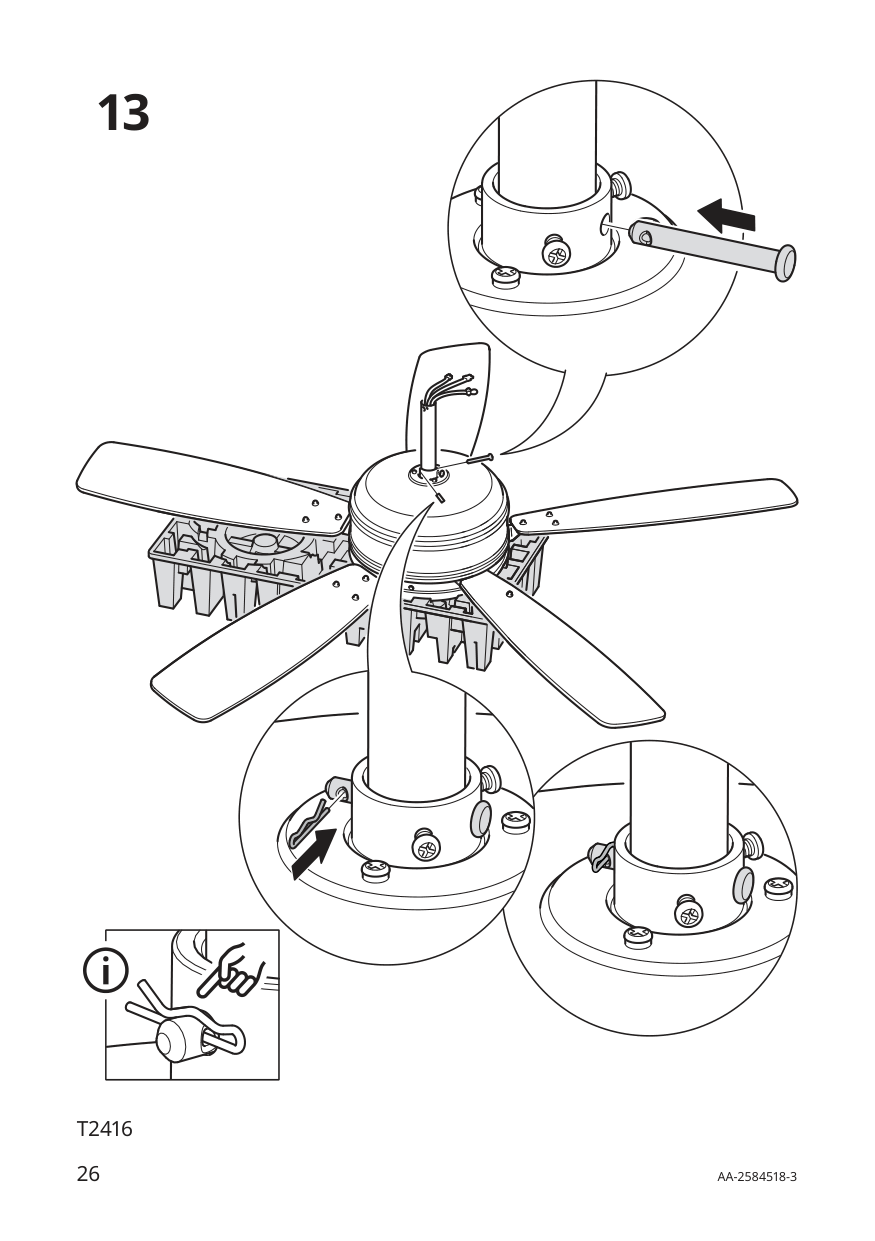
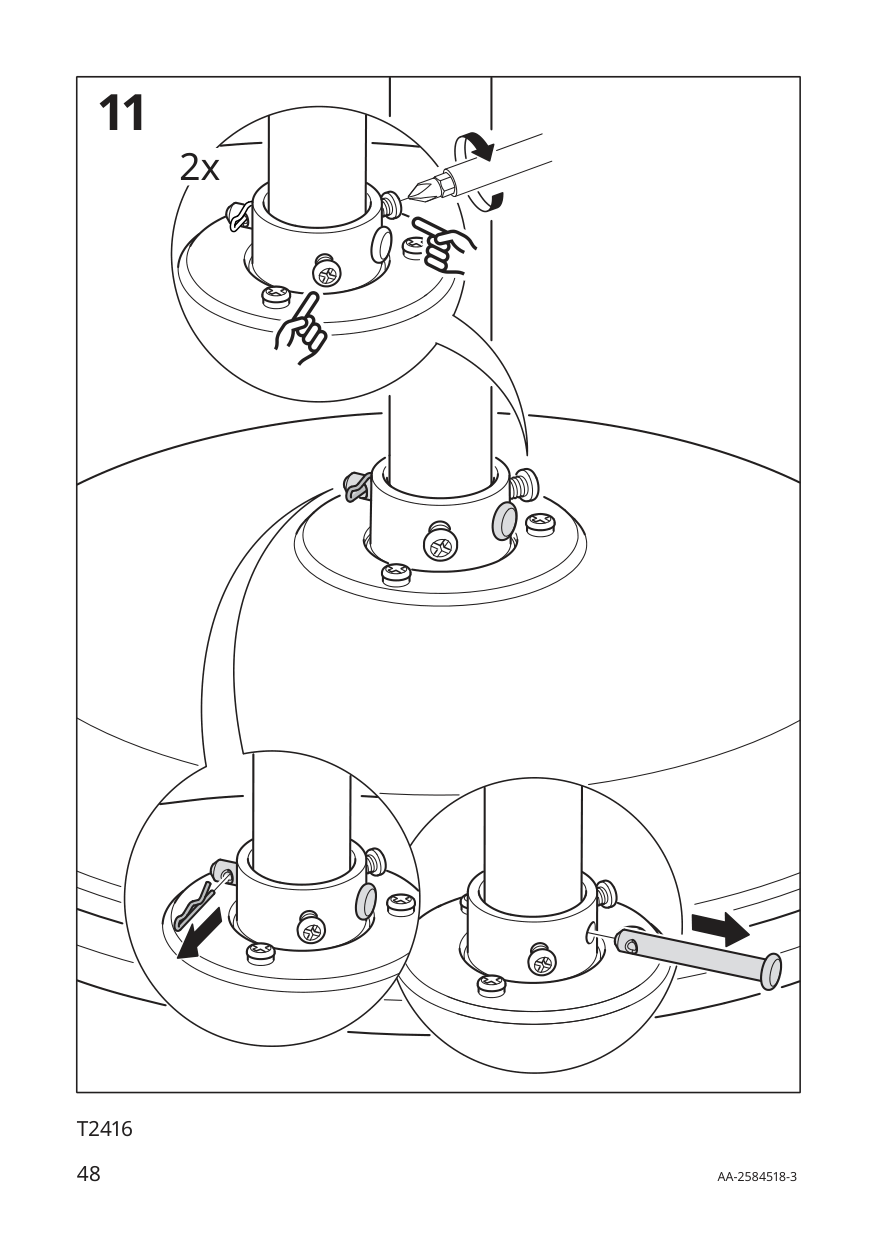
###### 2x
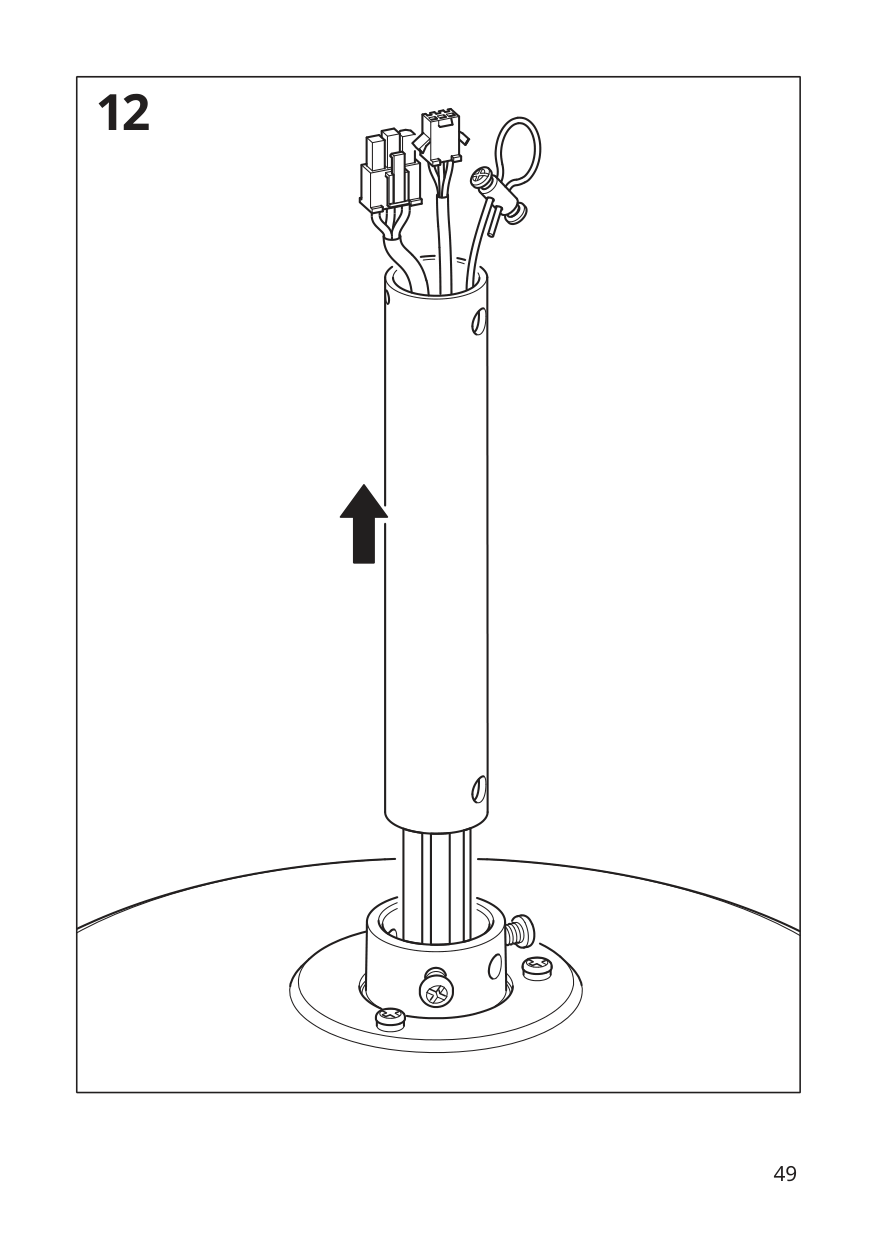
|12| |---|
|13| |---|
|14
2x| |---|
|15| |---|
16

|17| |---|
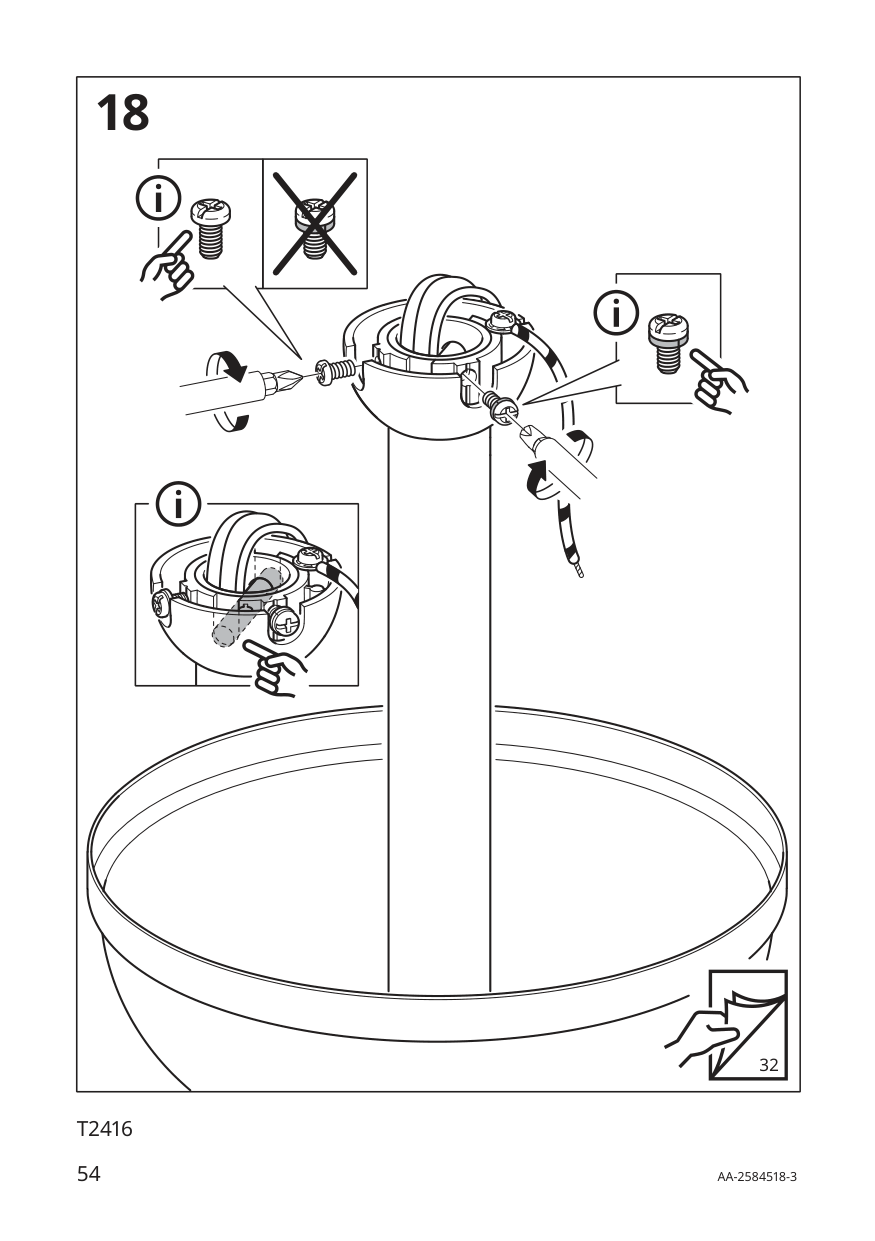
|18
32| |---|

####### T2416
56 AA-2584518-3
© Inter IKEA Systems B.V. 2024 2025-04-22