
Ask AI
— answers from the official manualAnswers from the official manual.
Common questions
Common Questions
10 totalHow do I assemble the MARCY MWM 990 safely?
It is recommended to have at least two people for assembly to avoid possible injury. Use appropriate tools like adjustable wrenches and Allen wrenches as specified. Ensure all bolts are assembled before tightening them, and wait until all components are ready before making any adjustments.
What should I do if the cable tension is too loose or tight on my MARCY MWM 990?
Adjust the lower pulley position on the Double Floating Pulley Brackets to tighten or loosen cable tension accordingly. Move the lower pulley up by one hole for looser tension, and down for tighter tension.
How do I perform maintenance on my MARCY MWM 990?
Periodically lubricate moving parts with WD-40 or light oil. Inspect and tighten all components before each use, clean the equipment using a damp cloth and mild non-abrasive detergent.
How do I adjust the combination lock after receiving my new MARCY MWM 990 home gym?
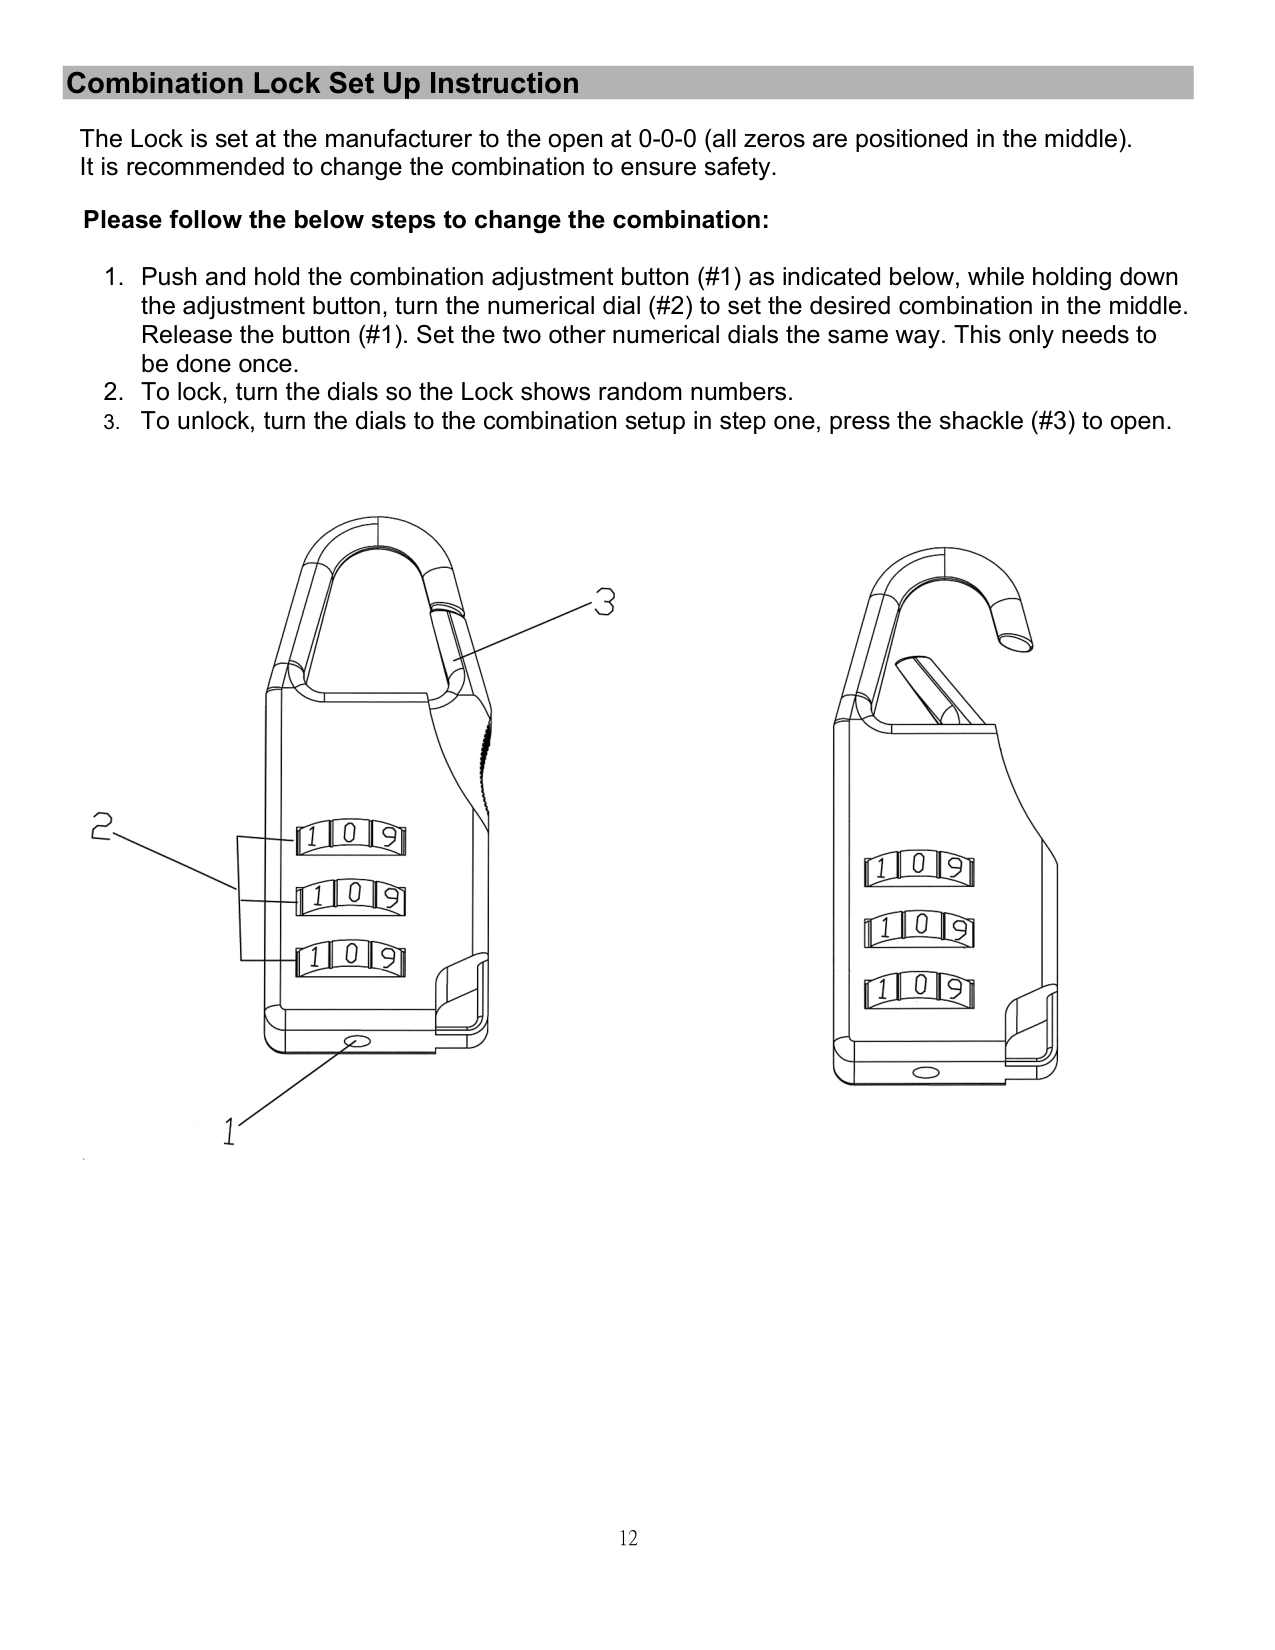
Press and hold the combination adjustment button (#1) while setting the desired numbers on the dial (#2). Release the button, set the remaining dials to match. This setup needs only be done once.
What should I do if my MARCY MWM 990 starts malfunctioning?
Do not use the equipment until it is properly examined, repaired or replaced under warranty. Contact IMPEX’s service centers for assistance and pre-authorization.
How do I clean my MARCY MWM 990 if there's dirt on the machine?
The equipment can be cleaned using a damp cloth and mild non-abrasive detergent, avoiding use of solvents or harsh cleaning agents.
Full Manual
29 pages
|NOTE: Please read all instructions carefully before using this product NOTA: Por favor lea atentamente las instrucciones antes de utilizar este producto
Table of Contents / Índice Safety Notice / Aviso de seguridad Important Assembly Information / Información importante de montaje Care and Maintenance / Cuidado y mantenimiento Parts List / Lista de piezas Warranty / Garantía Ordering Parts / Solicitud de piezas
Model / Modelo
MWM-990
Retain This Manual for Reference / Conserve este manual para futura referencia
230110
OWNER'S MANUAL / MANUAL DEL USUARIO
|
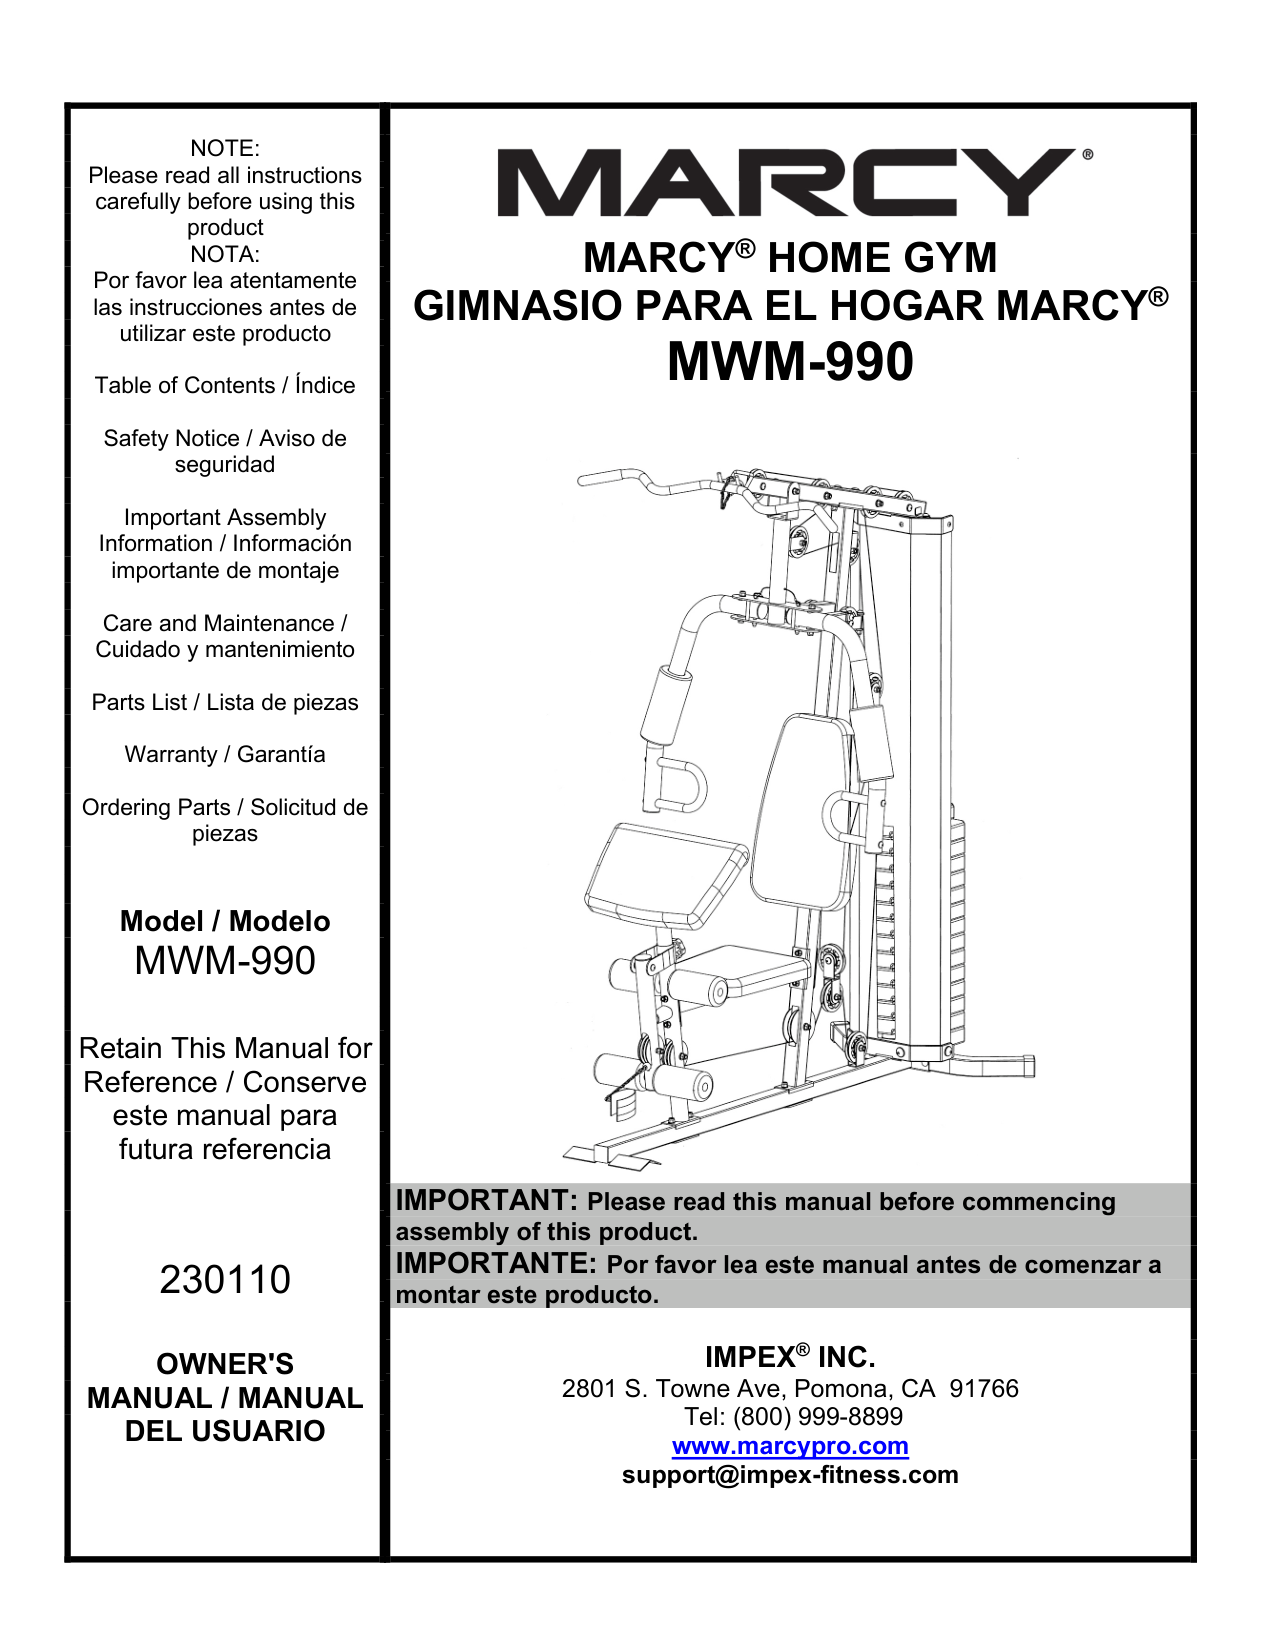
MARCY® HOME GYM GIMNASIO PARA EL HOGAR MARCY® MWM-990

IMPORTANT: Please read this manual before commencing assembly of this product. IMPORTANTE: Por favor lea este manual antes de comenzar a montar este producto.
IMPEX® INC. 2801 S. Towne Ave, Pomona, CA 91766 Tel: (800) 999-8899 www.marcypro.com [email protected]
| |---|---|
####### TABLE OF CONTENTS
BEFORE YOU BEGIN 1 IMPORTANT SAFETY NOTICES 2 EXERCISE GUIDELINES 3 WARNING LABEL PLACEMENT 5 IMPORTANT ASSEMBLY INFORMATION 6 CARE AND MAINTENANCE, WEIGHT CAPACITY AND DIMENSION
8
PARTS LIST 9 EXPLODED DIAGRAM 11 COMBINATION LOCK SETUP INSTRUCTION 12 WEIGHT RESISTANCE CHART 13 WARRANTY 14 ORDERING PARTS 14
####### BEFORE YOU BEGIN
Thank you for selecting the MARCY HOME GYM MWM-990 by IMPEX® INC. For your safety and benefit, read this manual carefully before using the equipment. As a manufacturer, we are committed to provide you complete customer satisfaction. If you have any questions, or find there are missing or damaged parts, we guarantee you complete satisfaction through direct assistance from our factory. To avoid unnecessary delays, please call our TOLL-FREE customer service number. Our Customer Service Agents will provide immediate assistance to you.
|Toll-Free Customer Service Number 1-800-999-8899 Mon. – Fri. 9 a.m. – 5 p.m. PST www.marcypro.com [email protected]
| |---|
######## IMPORTANT SAFETY NOTICE
This exercise equipment is built for optimum safety. However, certain precautions apply whenever you operate a piece of exercise equipment. Be sure to read the entire manual before you assemble or operate your equipment. In particular, note the following safety precautions:
WARNING: BEFORE BEGINNING ANY EXERCISE PROGRAM, CONSULT YOUR PHYSICIAN. THIS IS ESPECIALLY IMPORTANT FOR INDIVIDUALS OVER THE AGE OF 35 OR PERSONS WITH PRE-EXISTING HEALTH PROBLEMS. READ ALL INSTRUCTIONS BEFORE USING ANY FITNESS EQUIPMENT. IMPEX INC. ASSUMES NO RESPONSIBILITY FOR PERSONAL INJURY OR PROPERTY DAMAGE SUSTAINED BY OR THROUGH THE USE OF THIS PRODUCT.
SAVE THESE INSTRUCTIONS.
######## EXERCISE GUIDELINES
######### Building Muscle and Gaining Weight
Unlike aerobic exercise, which emphasizes endurance training, anaerobic exercise focuses on strength training. A gradual weight gain can occur while building the size and strength of muscles. While developing muscle mass, your body adapts to the stress placed upon it. You can modify your diet to include foods such as meat, fish and vegetables. These foods help muscles recover and replenish important nutrients after a strenuous workout.
######### Muscle Strength and Endurance
To achieve the greatest benefit from exercise, it is important to develop an exercise program that allows you to work all of the major muscle groups equally.
To increase muscles strength; follow this principle: Increasing resistance and maintaining the number of repetitions of an exercise results in increased muscle strength.
To tone your body, follow the principle: Decreasing resistance plus increasing the number of repetitions of an exercise results in increased body tone.
Once you feel comfortable with an exercise, you can change the resistance, the number of repetitions, or the speed at which you do the exercise. It is not necessary to change all three variables. For example, let’s say that you are training at 50 lbs and performing the exercise 10 times in 3 minutes. When this becomes too easy, you may decide to move up lifting 60 lbs for the same number of repetitions in the same amount of time. Lifting more weights fewer times most often develops muscle strength. To gain both muscle strength and endurance, it is recommended that you perform each exercise 15 to 20 reps per set.
######### Training Intensity
How hard you begin to train depends on your overall level of fitness. The soreness you experienced can be lessened by decreasing the load you place on your muscles and by performing fewer sets. To avoid injury, you should gradually work into an exercise program and set the load to your individual fitness level. The load should increase as your fitness level increases.
Muscle soreness is common, especially when you first start exercising. If you are painfully sore for a long time, it may be time to change your program. Eventually, your muscle system will become accustomed to the stress and strain placed on it.
######## Beginning a Strength Building Program Warming Up
To begin strength training, it is important to stretch and perform light exercise for 5 to 10 minutes. This helps prepare the body for more strenuous exercise by increasing circulation, raising your body temperature and developing more oxygen to your muscles.
######### Workout
Each workout to keep in mind that muscle soreness that lasts for a long period in not desirable and may mean that injury has occurred.
######### Cool Down
At the end of each workout, perform slow stretching exercises for 5 to 10 minutes. Ease into each stretch only going as far as you can. This stage allows your muscles wind down after training.
To provide a total workout program it is also recommended that 2 to 3 days of aerobic exercise is performed in addition to the strength training.
######### Drinking Water
For the body to function properly, it must be properly hydrated. If you are exercising, you should increase your fluid intake. The reason for this is that the water you take in will leave your system through the sweating mechanism that cools your body during exercise. The water you lose through exercise must be replaced so that the muscles can recover properly.
######### Rest Day
Although you may not feel like doing it, taking a rest day at least once a week is important because it gives you body a chance to heal it self. Continuously working your muscle will result in over training which will not benefit in the long run.
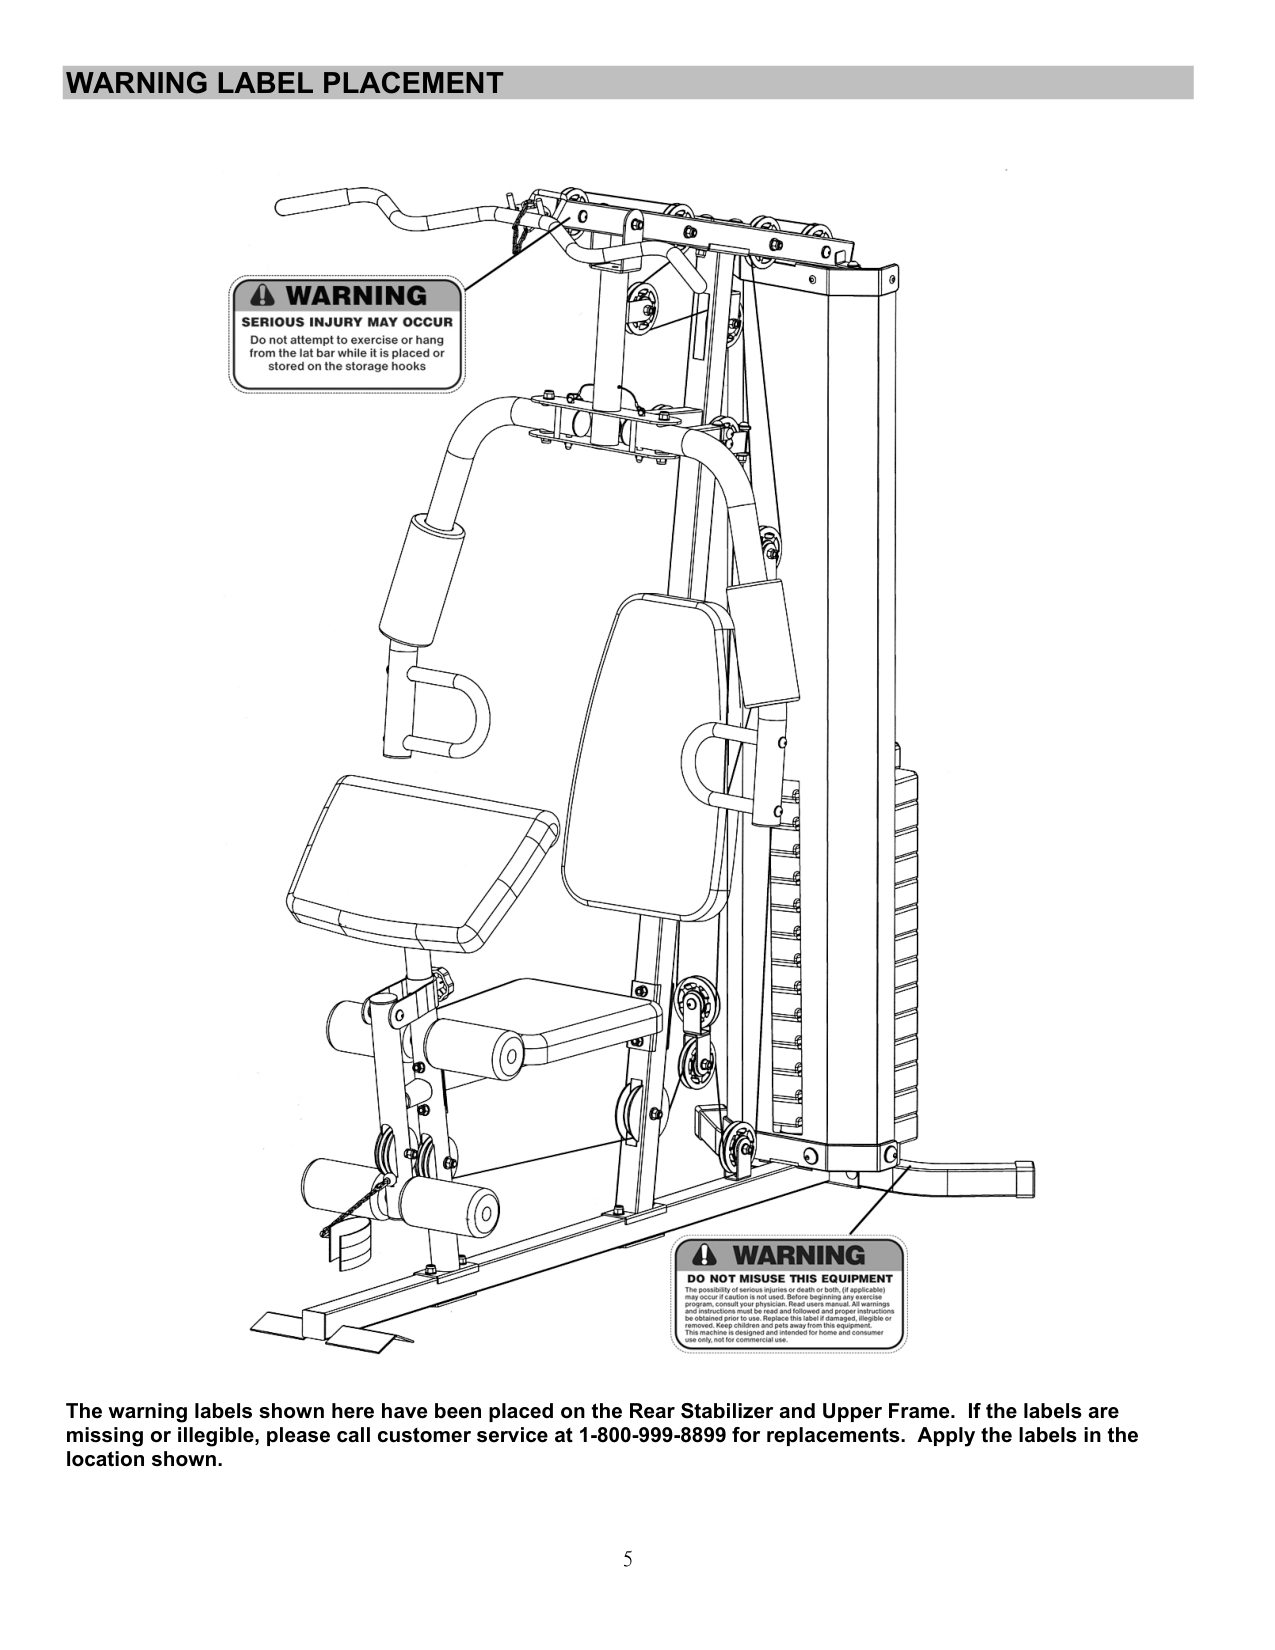
######## WARNING LABEL PLACEMENT

The warning labels shown here have been placed on the Rear Stabilizer and Upper Frame. If the labels are missing or illegible, please call customer service at 1-800-999-8899 for replacements. Apply the labels in the location shown.
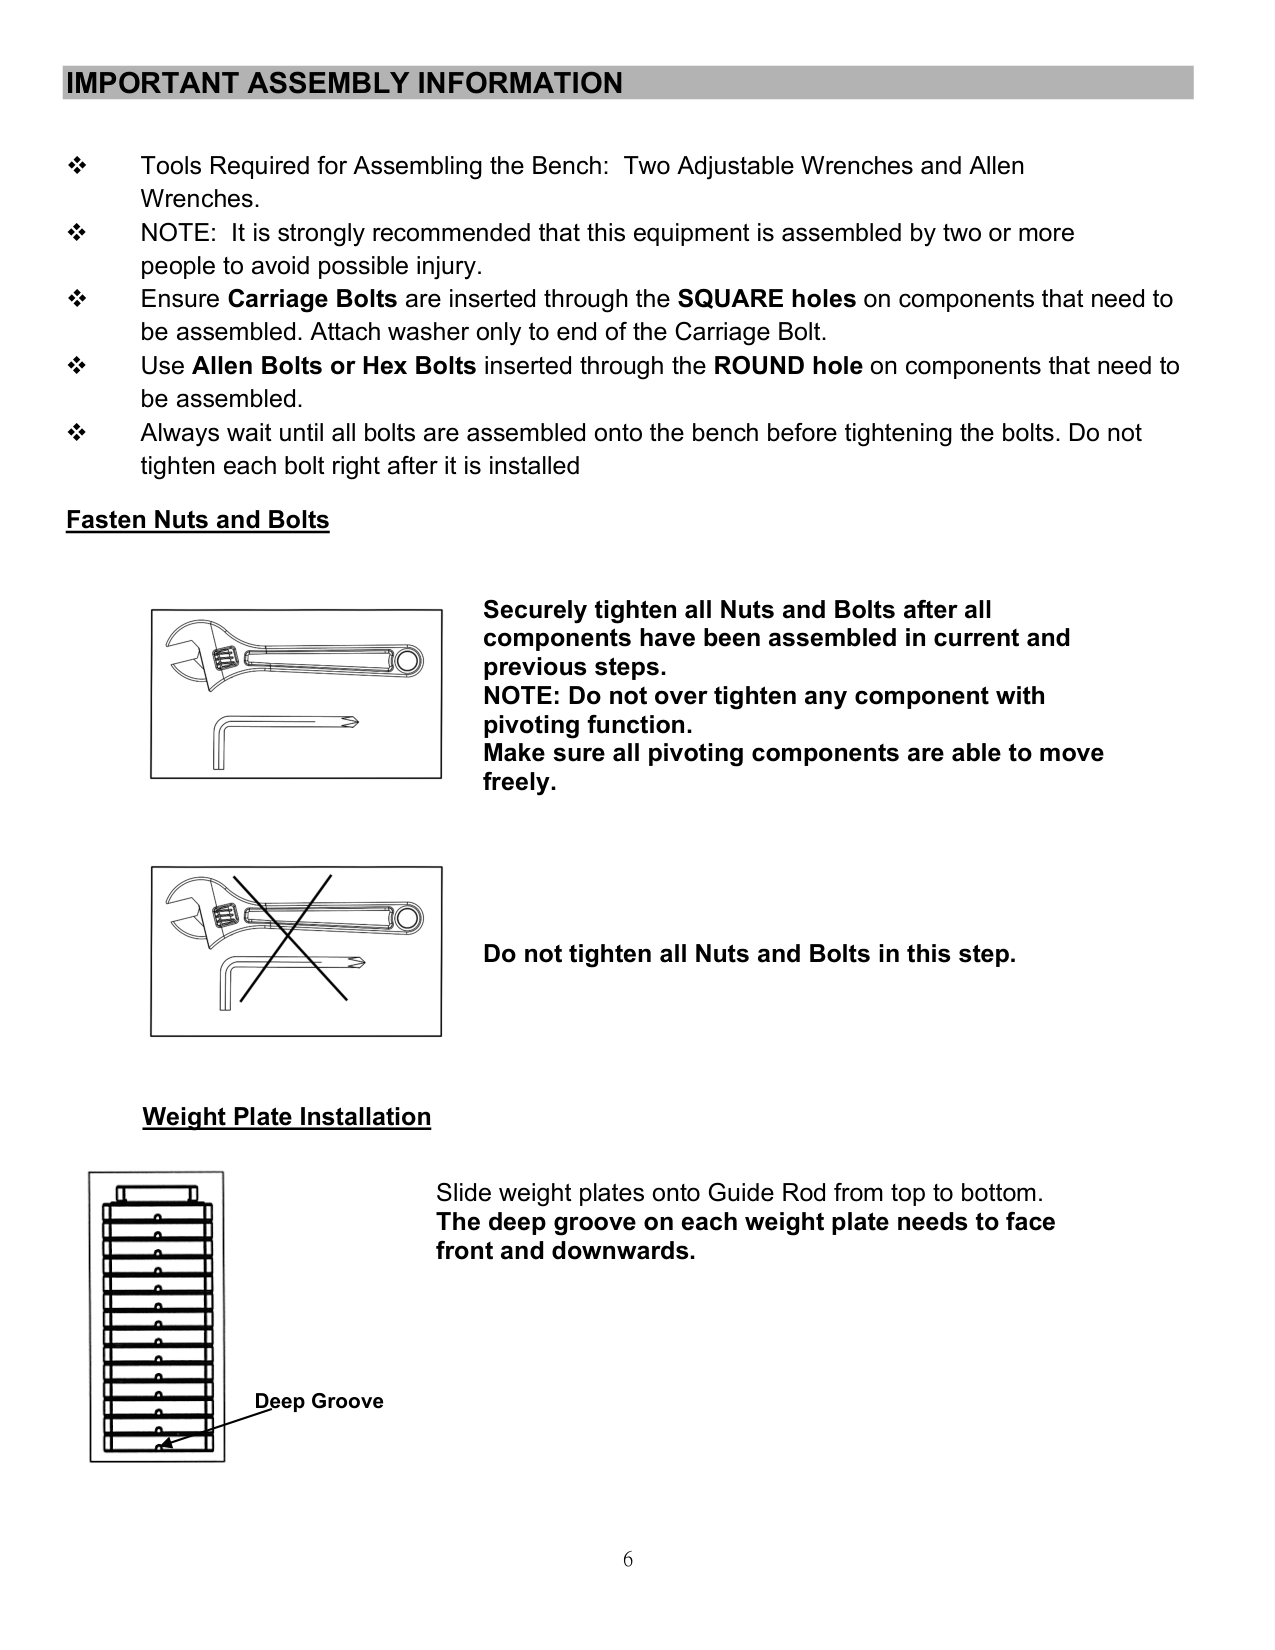
######## IMPORTANT ASSEMBLY INFORMATION
Fasten Nuts and Bolts

Securely tighten all Nuts and Bolts after all components have been assembled in current and previous steps. NOTE: Do not over tighten any component with pivoting function. Make sure all pivoting components are able to move freely.

Do not tighten all Nuts and Bolts in this step.
Weight Plate Installation

Deep Groove
Slide weight plates onto Guide Rod from top to bottom. The deep groove on each weight plate needs to face front and downwards.
######## OPERATION NOTES Weight Plate Selection
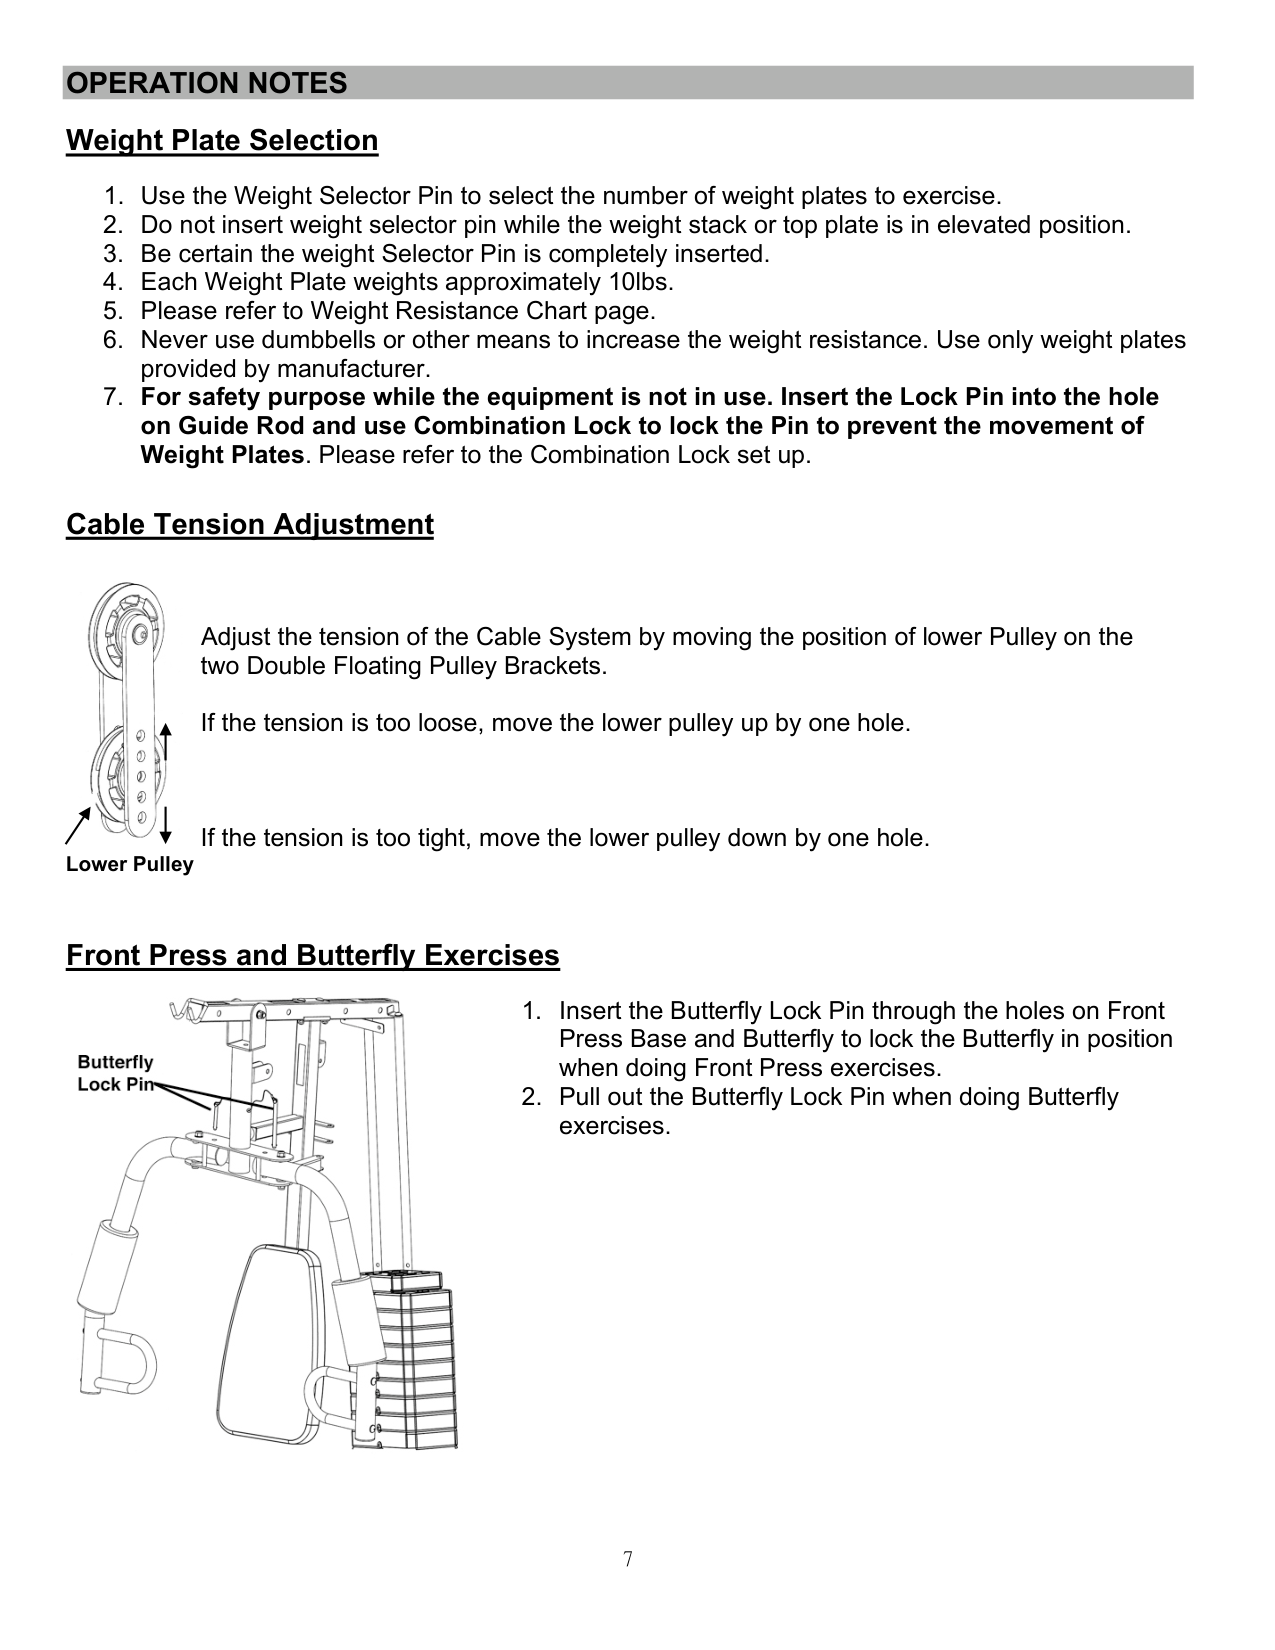
######## Cable Tension Adjustment

Adjust the tension of the Cable System by moving the position of lower Pulley on the two Double Floating Pulley Brackets.
If the tension is too loose, move the lower pulley up by one hole.
If the tension is too tight, move the lower pulley down by one hole. Lower Pulley
######## Front Press and Butterfly Exercises

######## CARE AND MAINTENANCE
######## WEIGHT CAPACITY AND DIMENSION
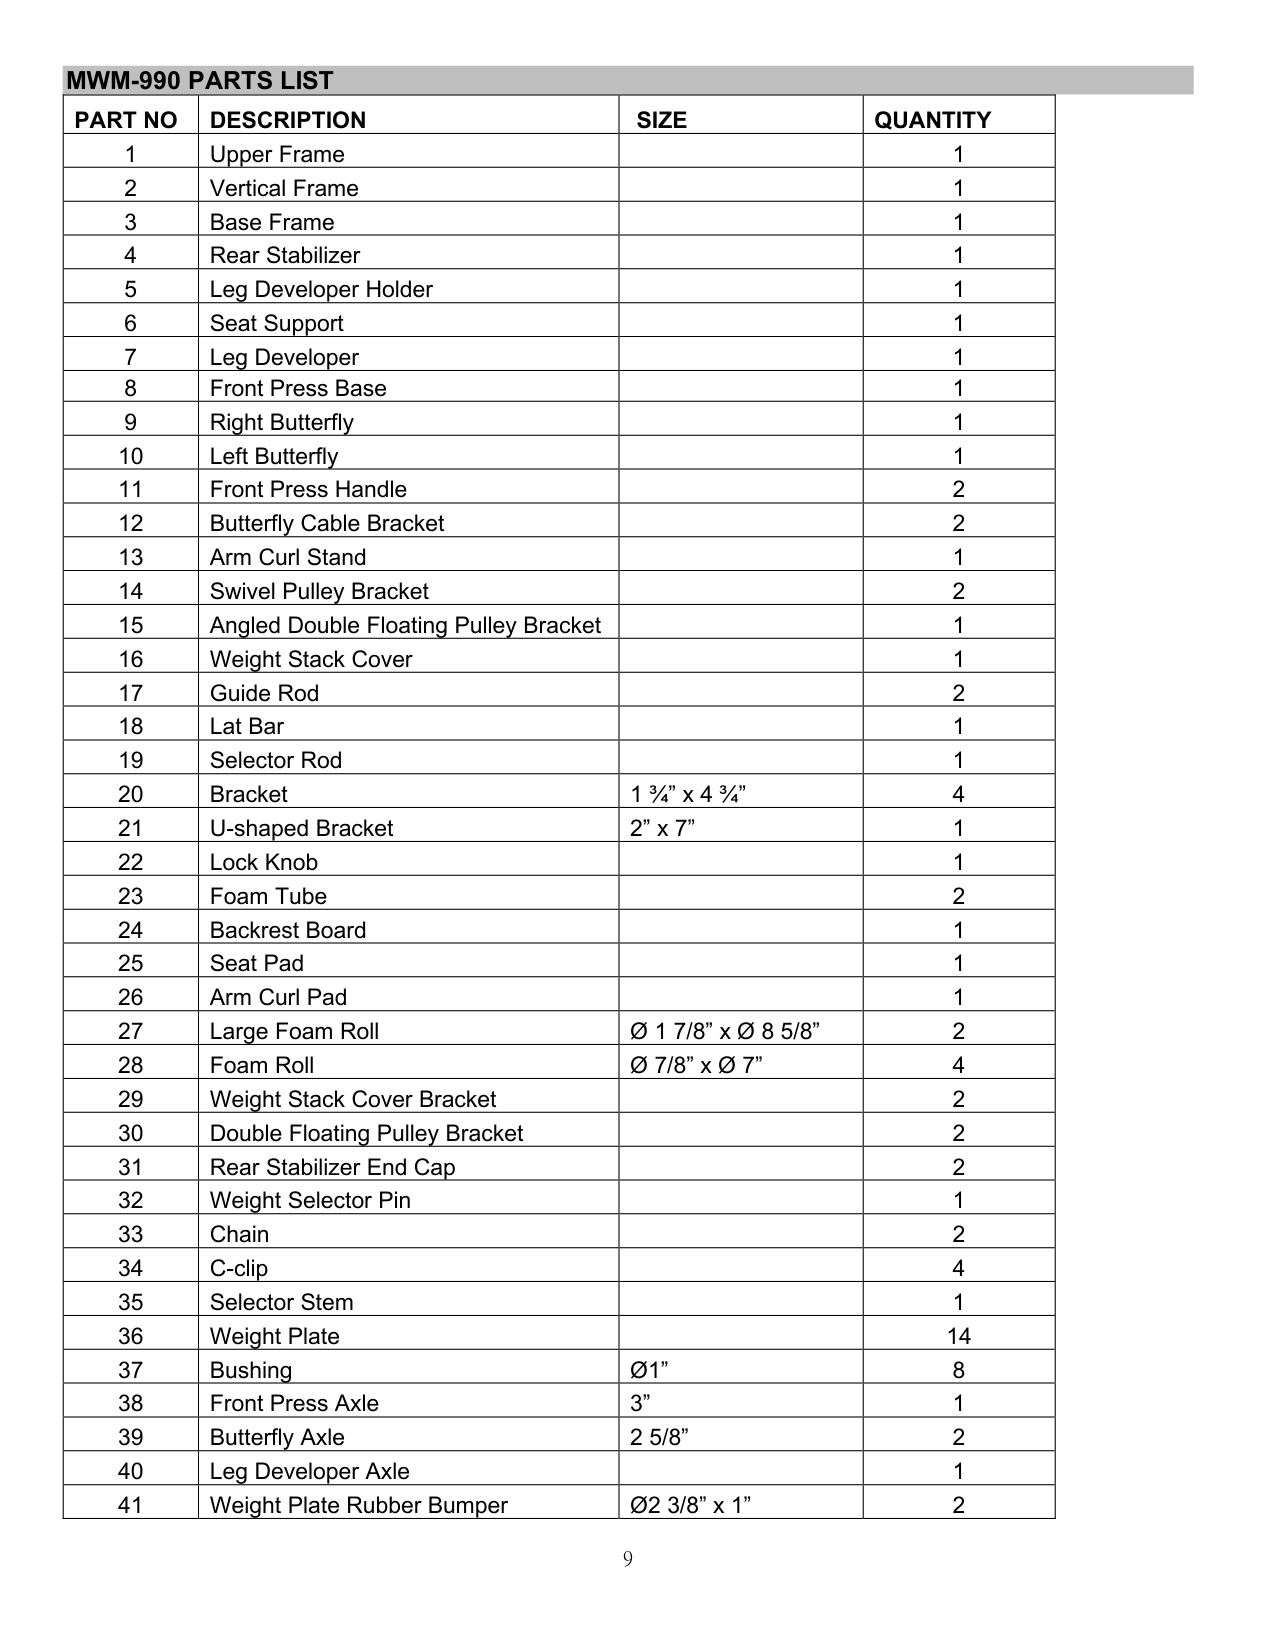
######### MWM-990 PARTS LIST
|PART NO|DESCRIPTION|SIZE|QUANTITY|
|---|---|---|---| |1|Upper Frame| |1| |2|Vertical Frame| |1| |3|Base Frame| |1| |4|Rear Stabilizer| |1| |5|Leg Developer Holder| |1| |6|Seat Support| |1| |7|Leg Developer| |1| |8|Front Press Base| |1| |9|Right Butterfly| |1| |10|Left Butterfly| |1| |11|Front Press Handle| |2| |12|Butterfly Cable Bracket| |2| |13|Arm Curl Stand| |1| |14|Swivel Pulley Bracket| |2| |15|Angled Double Floating Pulley Bracket| |1| |16|Weight Stack Cover| |1| |17|Guide Rod| |2| |18|Lat Bar| |1| |19|Selector Rod| |1| |20|Bracket|1 ¾” x 4 ¾”|4| |21|U-shaped Bracket|2” x 7”|1| |22|Lock Knob| |1| |23|Foam Tube| |2|

|24|Backrest Board| |1| |25|Seat Pad| |1| |26|Arm Curl Pad| |1| |27|Large Foam Roll|Ø 1 7/8” x Ø 8 5/8”|2| |28|Foam Roll|Ø 7/8” x Ø 7”|4| |29|Weight Stack Cover Bracket| |2| |30|Double Floating Pulley Bracket| |2| |31|Rear Stabilizer End Cap| |2| |32|Weight Selector Pin| |1| |33|Chain| |2| |34|C-clip| |4| |35|Selector Stem| |1| |36|Weight Plate| |14| |37|Bushing|Ø1”|8| |38|Front Press Axle|3”|1| |39|Butterfly Axle|2 5/8”|2| |40|Leg Developer Axle| |1| |41|Weight Plate Rubber Bumper|Ø2 3/8” x 1”|2|
|42|Pulley| |16| |---|---|---|---| |43|Pulley Bushing|Ø 7/8” x ½”|14| |44|Rubber Bumper|Ø1 7/8” x 2 ½”|1|
|45|Rubber Bumper|Ø1 ½” x 5/8”|1| |46|Butterfly Lock Pin| |2| |47|Ankle Strap| |1| |48|Upper Cable|116”|1| |49|Butterfly Cable|91”|1| |50|Lower Cable|134”|1| |51|Cone-shaped End Cap|Ø1”|1| |52|End Cap|2” x 2”|3| |53|End Cap|Ø 2”|7| |54|End Cap|Ø1”|4| |55|Carriage Bolt|M10 x 2 ¾”|10| |56|Allen Bolt|M10 x 2 ¾”|9| |57|Allen Bolt|M10 x 2 ½”|2| |58|Allen Bolt|M10 x 2”|2| |59|Allen Bolt|M10 x 1 ¾”|9| |60|Allen Bolt|M10 x ¾”|13| |61|Allen Bolt|M8 x 2 ¾”|2| |62|Allen Bolt|M8 x 5/8”|6| |63|Allen Bolt|M6 x ¾”|8| |64|Philips Screw|M6 x 5/8”|2| |65|Washer|Ø ¾”|50| |66|Washer|Ø 5/8”|8| |67|Washer|Ø ½”|10| |68|Spacer|Ø 1” x Ø 3/8”|6|
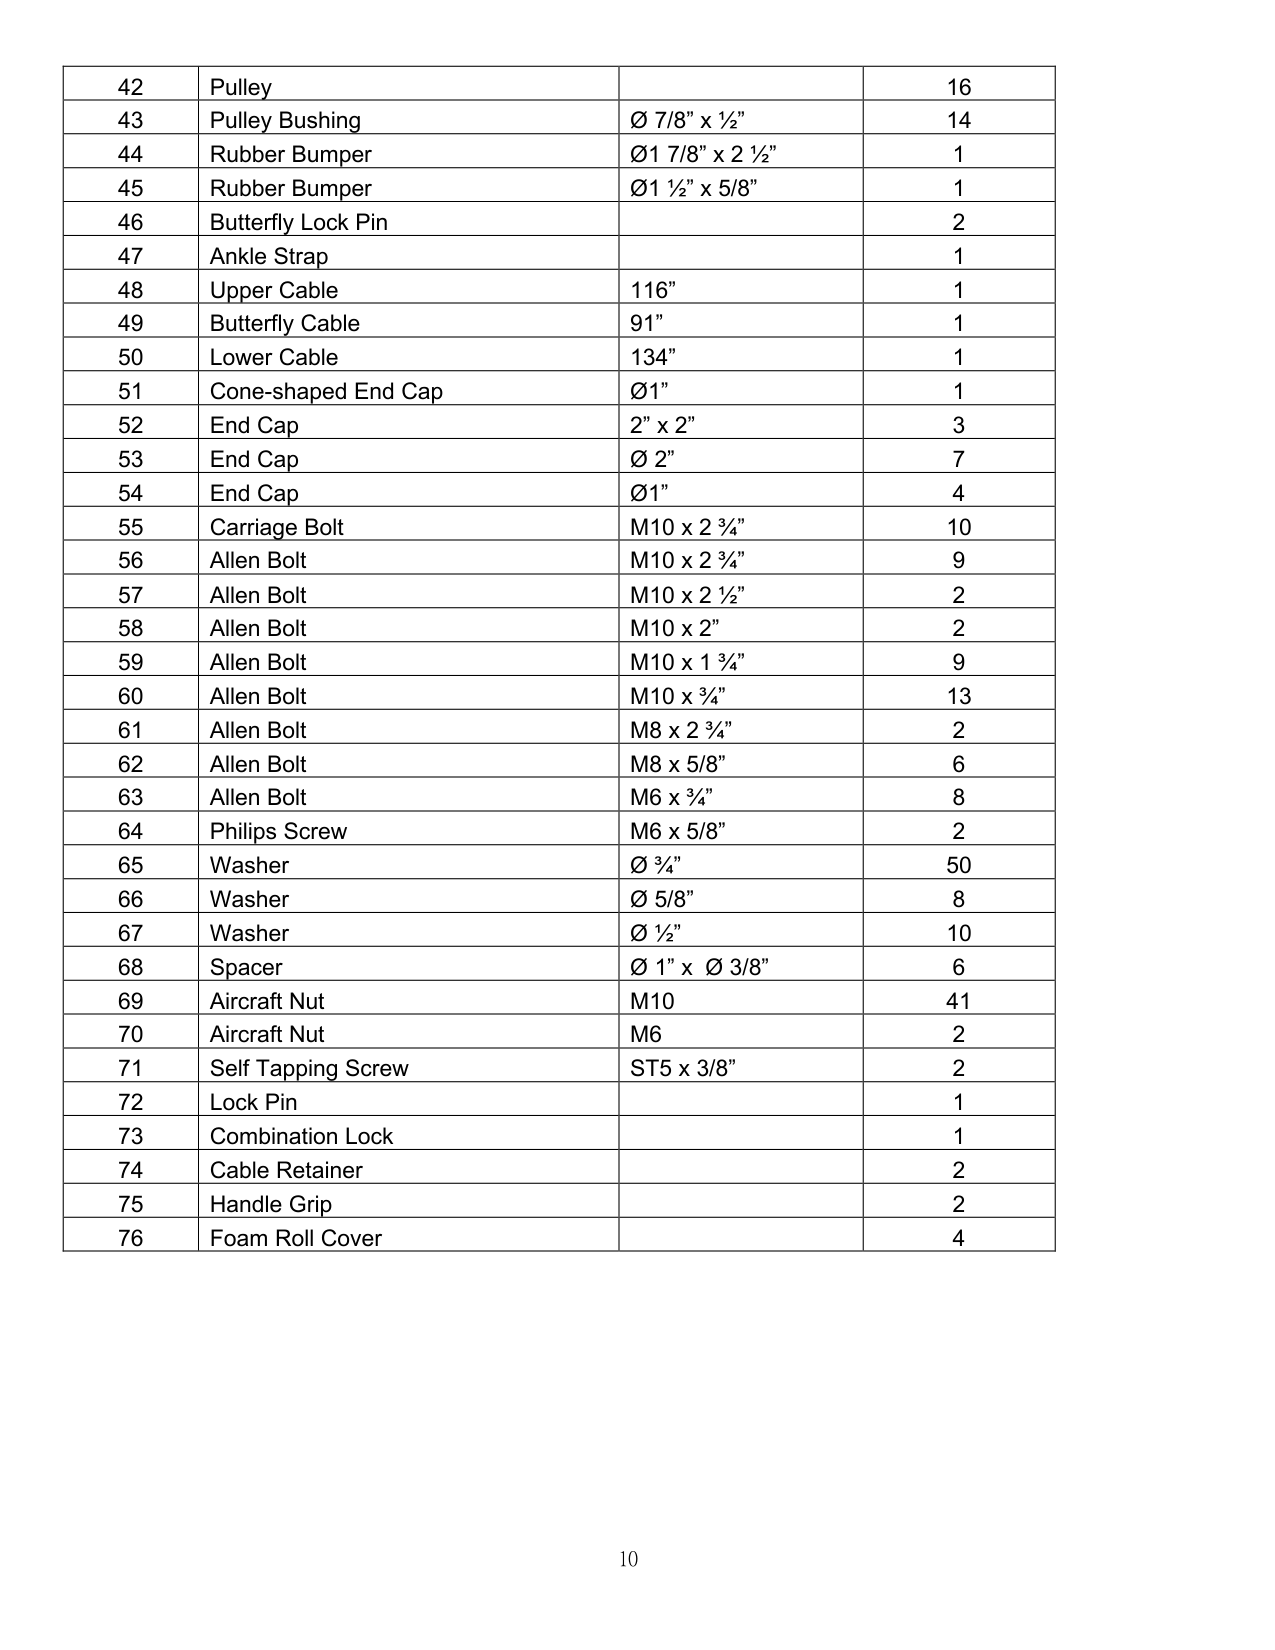
|69|Aircraft Nut|M10|41| |70|Aircraft Nut|M6|2| |71|Self Tapping Screw|ST5 x 3/8”|2| |72|Lock Pin| |1| |73|Combination Lock| |1| |74|Cable Retainer| |2| |75|Handle Grip| |2| |76|Foam Roll Cover| |4|
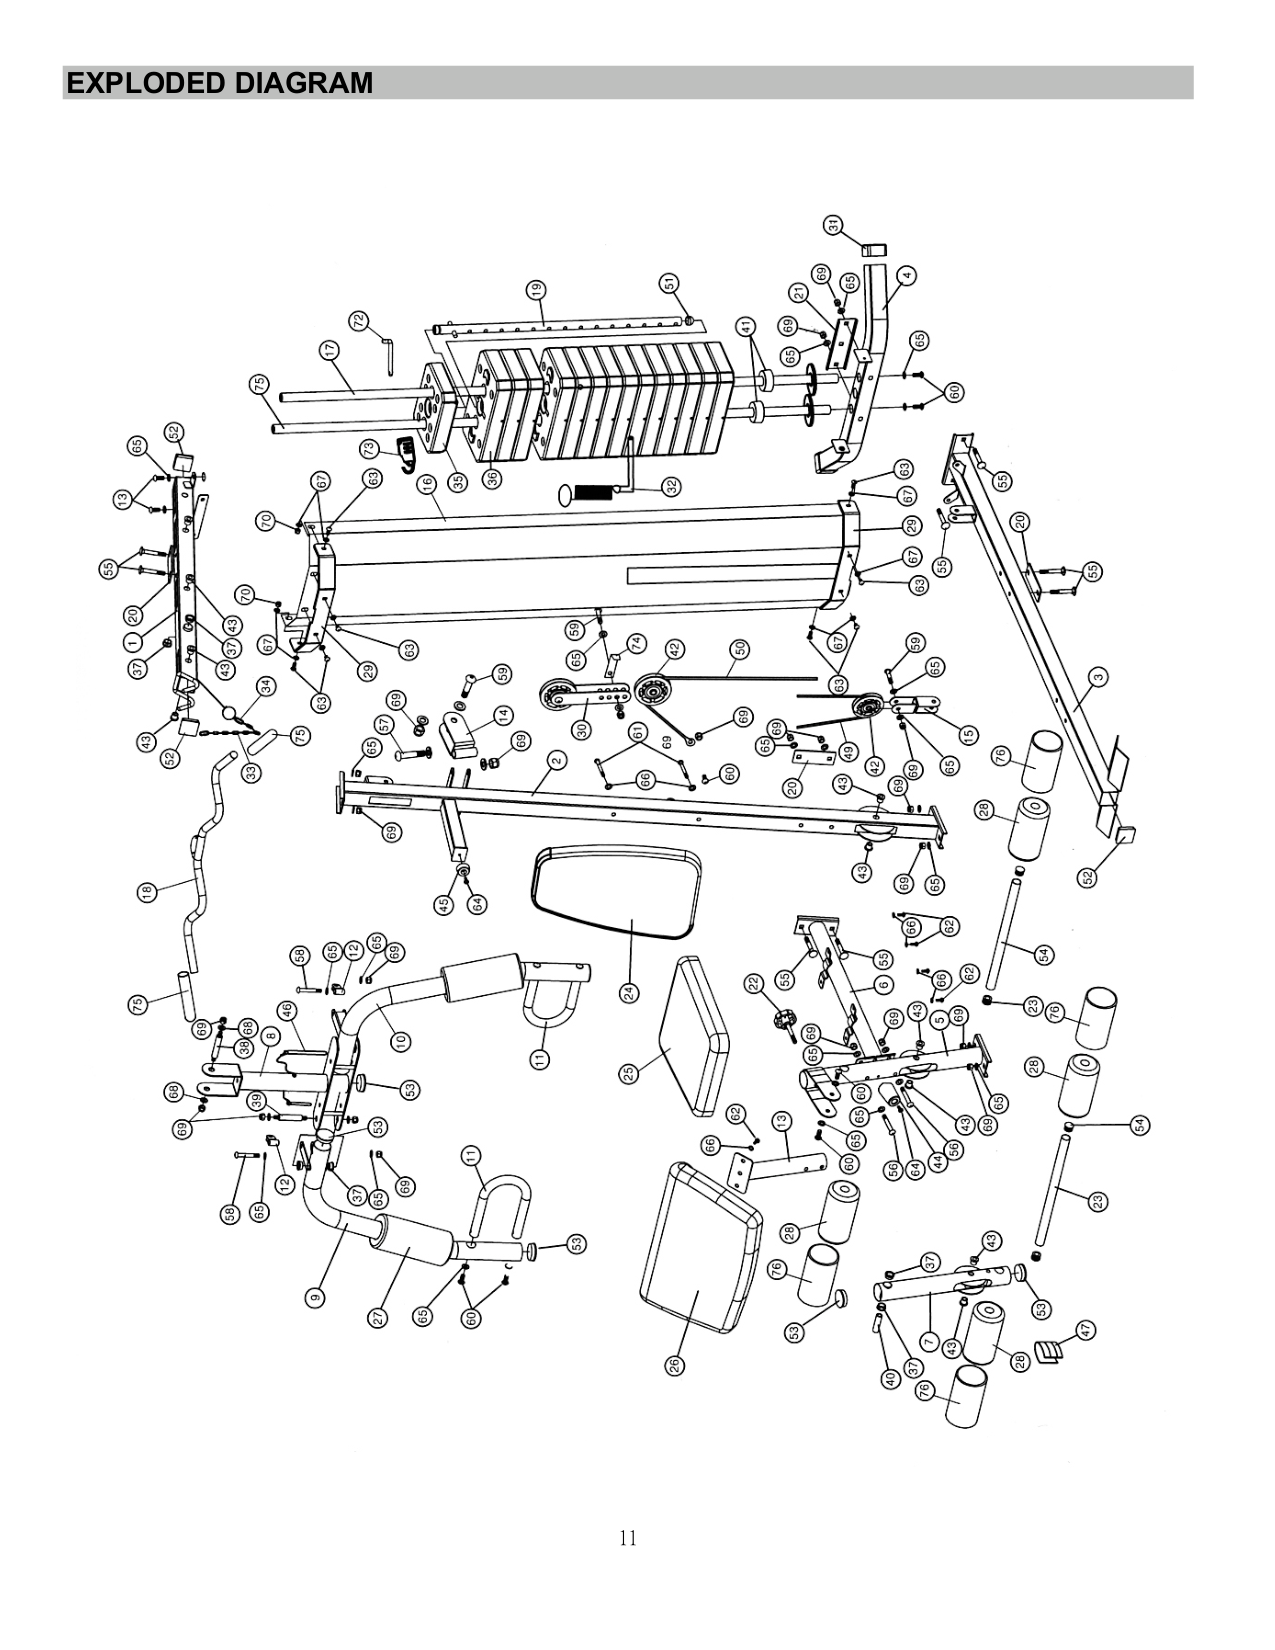
######## EXPLODED DIAGRAM

######## Combination Lock Set Up Instruction
The Lock is set at the manufacturer to the open at 0-0-0 (all zeros are positioned in the middle). It is recommended to change the combination to ensure safety.
######### Please follow the below steps to change the combination:

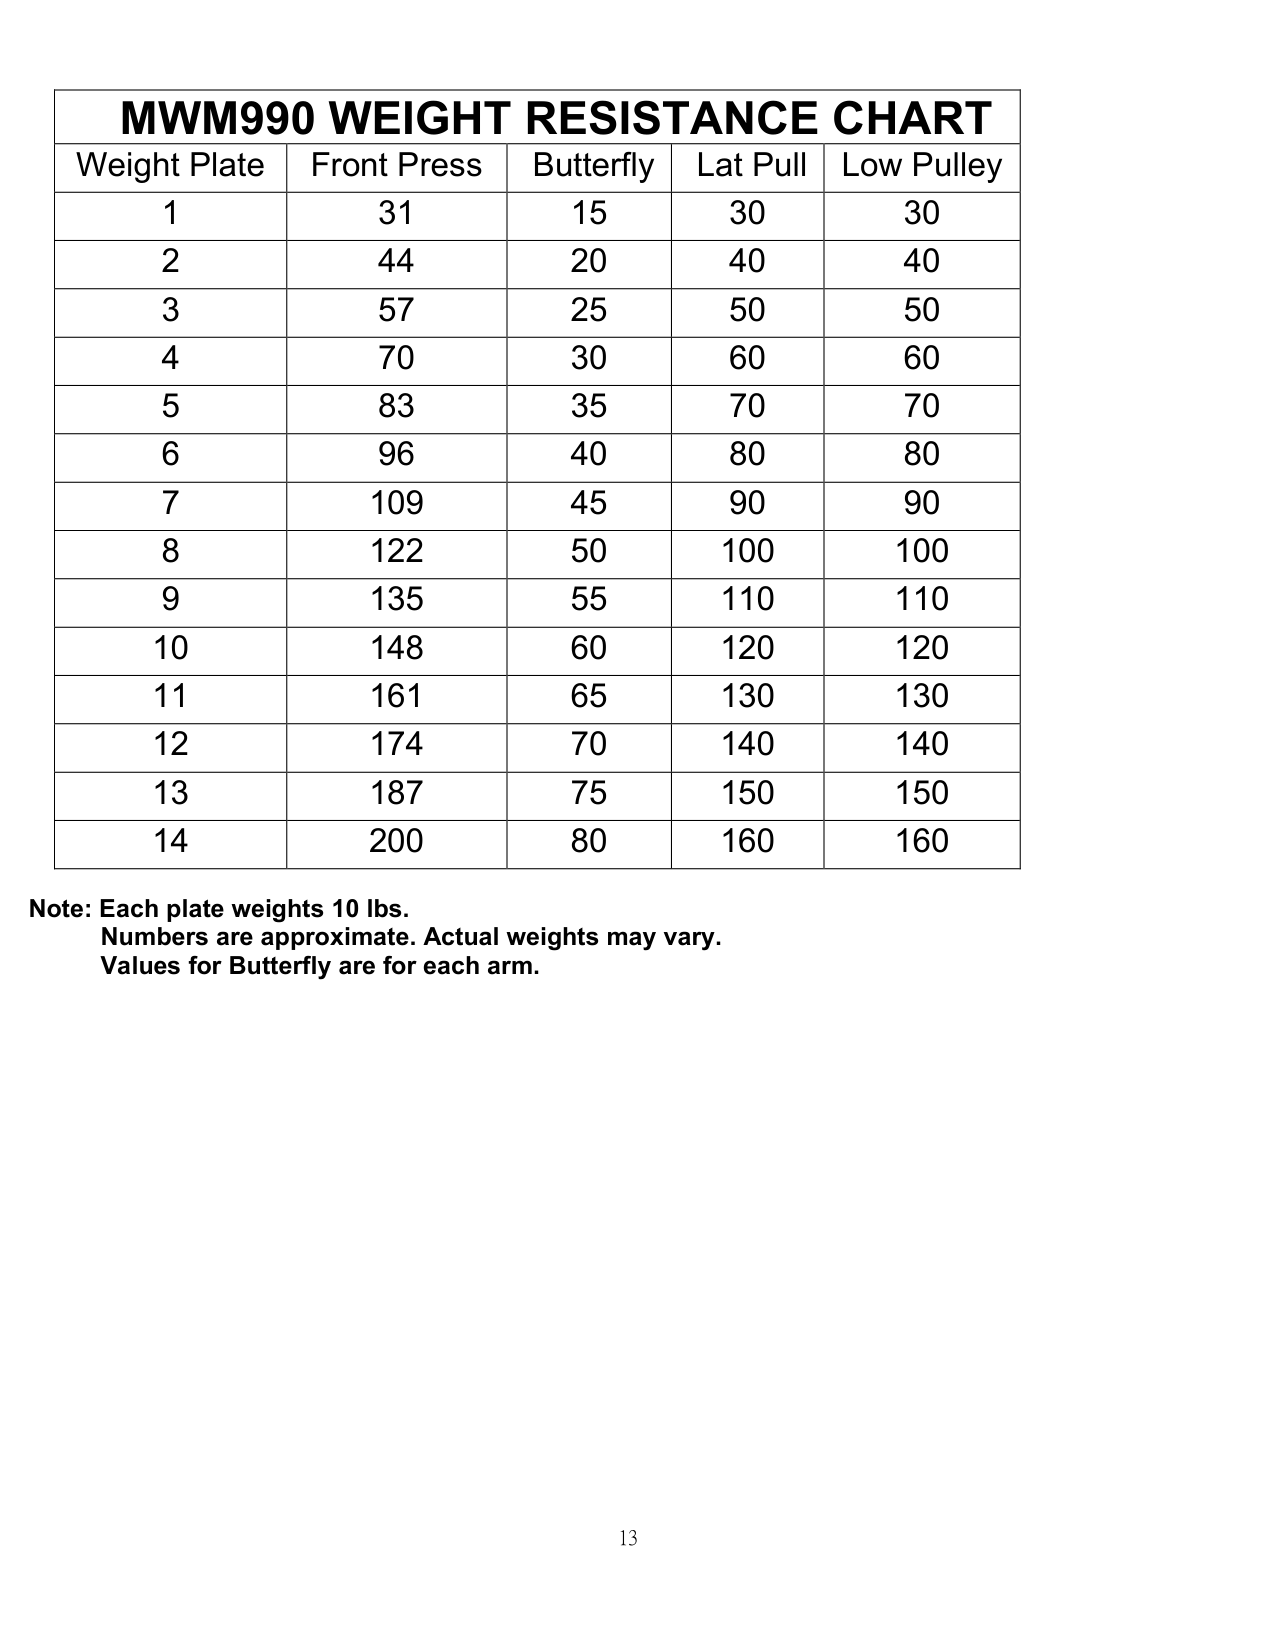
|MWM990 WEIGHT RESISTANCE CHART|MWM990 WEIGHT RESISTANCE CHART|MWM990 WEIGHT RESISTANCE CHART|MWM990 WEIGHT RESISTANCE CHART|MWM990 WEIGHT RESISTANCE CHART| |---|---|---|---|---| |Weight Plate|Front Press|Butterfly|Lat Pull|Low Pulley| |1|31|15|30|30| |2|44|20|40|40| |3|57|25|50|50| |4|70|30|60|60| |5|83|35|70|70| |6|96|40|80|80| |7|109|45|90|90| |8|122|50|100|100| |9|135|55|110|110| |10|148|60|120|120| |11|161|65|130|130| |12|174|70|140|140| |13|187|75|150|150| |14|200|80|160|160|
######### Note: Each plate weights 10 lbs. Numbers are approximate. Actual weights may vary. Values for Butterfly are for each arm.
IMPEX® INC.
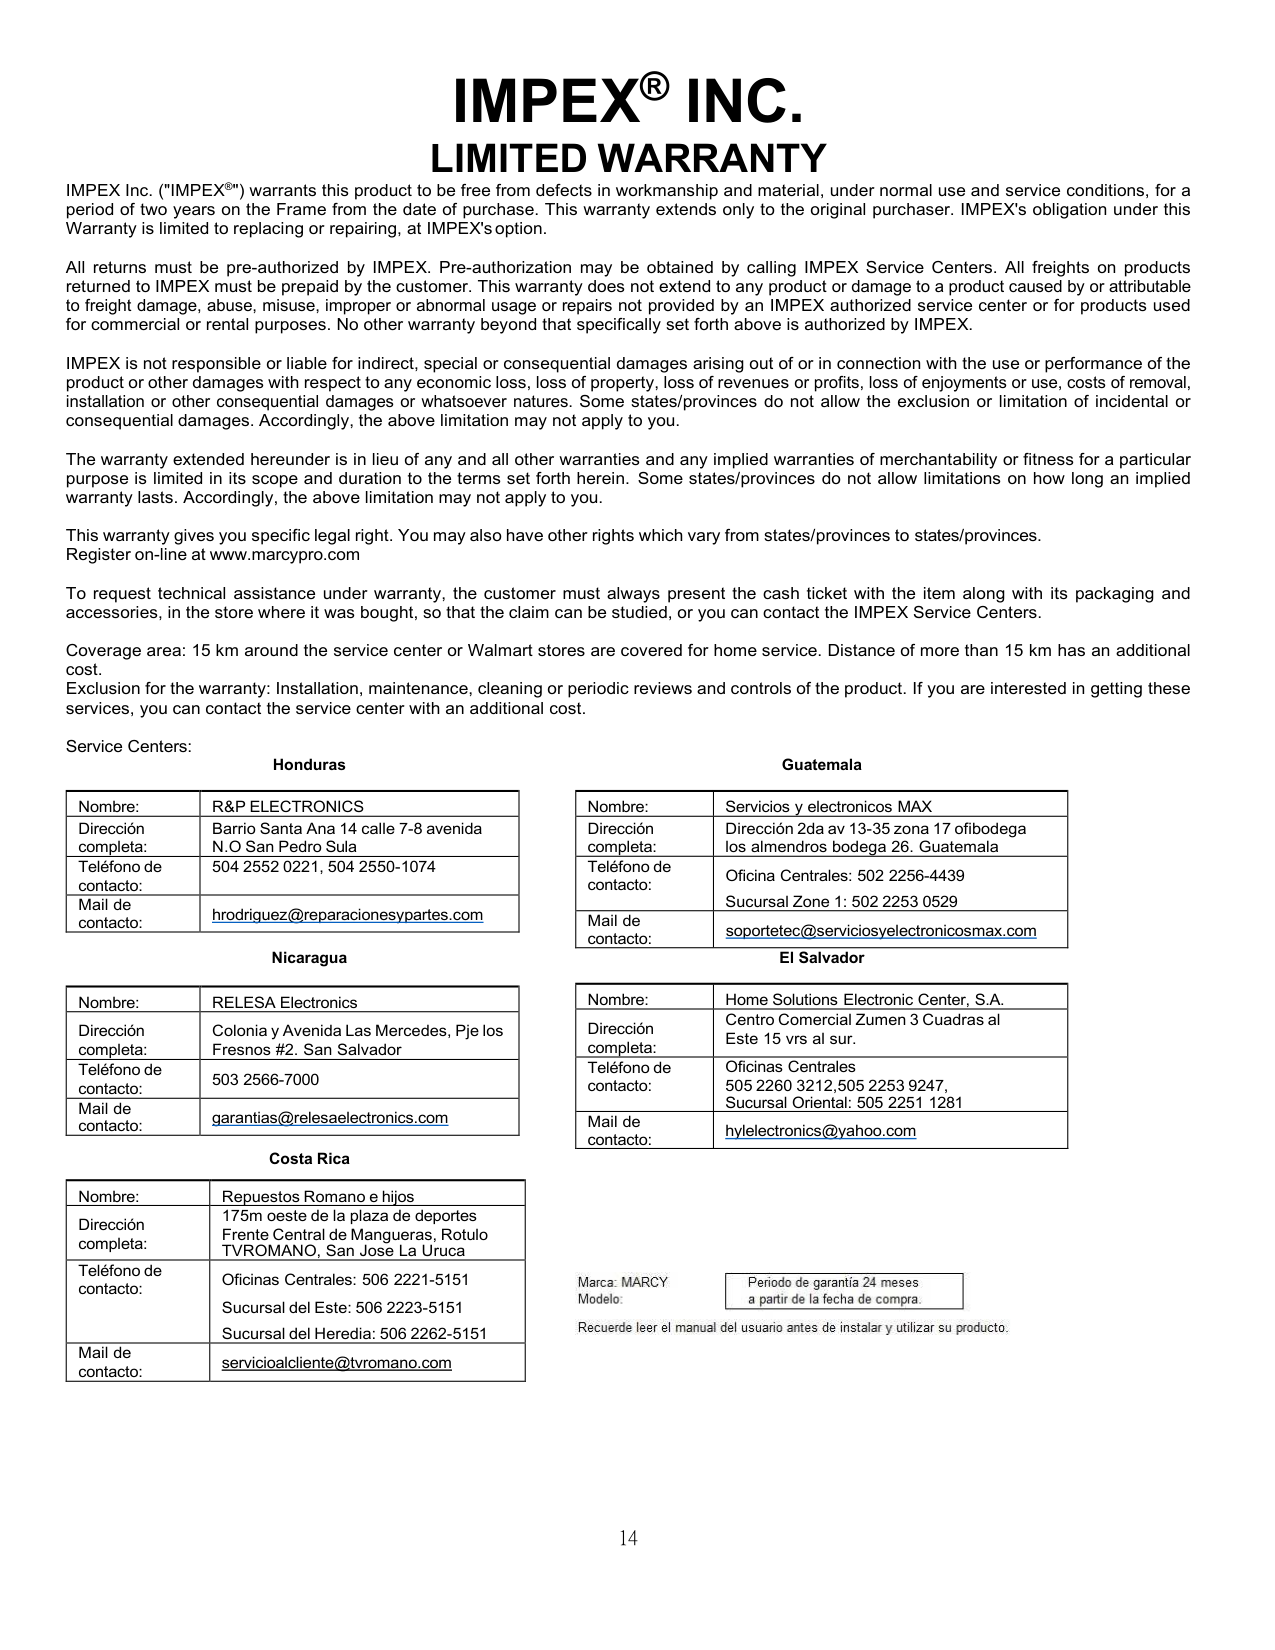
LIMITED WARRANTY IMPEX Inc. ("IMPEX®") warrants this product to be free from defects in workmanship and material, under normal use and service conditions, for a period of two years on the Frame from the date of purchase. This warranty extends only to the original purchaser. IMPEX's obligation under this Warranty is limited to replacing or repairing, at IMPEX'soption.
All returns must be pre-authorized by IMPEX. Pre-authorization may be obtained by calling IMPEX Service Centers. All freights on products returned to IMPEX must be prepaid by the customer. This warranty does not extend to any product or damage to a product caused by or attributable to freight damage, abuse, misuse, improper or abnormal usage or repairs not provided by an IMPEX authorized service center or for products used for commercial or rental purposes. No other warranty beyond that specifically set forth above is authorized by IMPEX.
IMPEX is not responsible or liable for indirect, special or consequential damages arising out of or in connection with the use or performance of the product or other damages with respect to any economic loss, loss of property, loss of revenues or profits, loss of enjoyments or use, costs of removal, installation or other consequential damages or whatsoever natures. Some states/provinces do not allow the exclusion or limitation of incidental or consequential damages. Accordingly, the above limitation may not apply to you.
The warranty extended hereunder is in lieu of any and all other warranties and any implied warranties of merchantability or fitness for a particular purpose is limited in its scope and duration to the terms set forth herein. Some states/provinces do not allow limitations on how long an implied warranty lasts. Accordingly, the above limitation may not apply to you.
This warranty gives you specific legal right. You may also have other rights which vary from states/provinces to states/provinces. Register on-line at www.marcypro.com
To request technical assistance under warranty, the customer must always present the cash ticket with the item along with its packaging and accessories, in the store where it was bought, so that the claim can be studied, or you can contact the IMPEX Service Centers.
Coverage area: 15 km around the service center or Walmart stores are covered for home service. Distance of more than 15 km has an additional cost. Exclusion for the warranty: Installation, maintenance, cleaning or periodic reviews and controls of the product. If you are interested in getting these services, you can contact the service center with an additional cost.
Service Centers:
Honduras
|Nombre:|R&P ELECTRONICS| |---|---| |Dirección completa:|Barrio Santa Ana 14 calle 7-8 avenida N.O San Pedro Sula| |Teléfono de contacto:|504 2552 0221, 504 2550-1074|
|Mail de contacto:|[email protected]
|
Nicaragua
|Nombre:|RELESA Electronics| |---|---| |Dirección completa:|Colonia y Avenida Las Mercedes, Pje los Fresnos #2. San Salvador| |Teléfono de contacto:|503 2566-7000| |Mail de contacto:|[email protected]
|
Costa Rica
|Nombre:|Repuestos Romano e hijos| |---|---| |Dirección completa:|175m oeste de la plaza de deportes Frente Central de Mangueras, Rotulo TVROMANO, San Jose La Uruca| |Teléfono de contacto:|Oficinas Centrales: 506 2221-5151 Sucursal del Este: 506 2223-5151 Sucursal del Heredia: 506 2262-5151| |Mail de contacto:|[email protected]
|
Guatemala
|Nombre:|Servicios y electronicos MAX|
|---|---| |Dirección completa:|Dirección 2da av 13-35 zona 17 ofibodega los almendros bodega 26. Guatemala| |Teléfono de contacto:|Oficina Centrales: 502 2256-4439 Sucursal Zone 1: 502 2253 0529| |Mail de contacto:|[email protected]
|
El Salvador
|Nombre:|Home Solutions Electronic Center, S.A.| |---|---| |Dirección completa:|Centro Comercial Zumen 3 Cuadras al Este 15 vrs al sur.| |Teléfono de contacto:|Oficinas Centrales 505 2260 3212,505 2253 9247, Sucursal Oriental: 505 2251 1281| |Mail de contacto:|[email protected]
|

####### TABLA DE CONTENIDOS
ANTES DE COMENZAR 15 AVISOS IMPORTANTES DE SEGURIDAD 16 DIRECTRICES DE EJERCICIO 17 COLOCACIÓN DE ETIQUETAS DE ADVERTENCIA 19 INFORMACIÓN IMPORTANTE SOBRE EL MONTAJE 20 CUIDADO Y MANTENIMIENTO, CAPACIDAD DE PESO, NOTAS DE FUNCIONAMIENTO
22
LISTA DE PIEZAS 23 DIAGRAMA ESQUEMÁTICO 25 INSTRUCCIÓN PARA ESTABLECER EL CANDADO DE COMBINACIÓN
26
TABLA DE RESISTENCIA DE PESO 27 GARANTÍA 28 PEDIDO DE REPUESTOS 28
####### ANTES DE COMENZAR
Gracias por elegir el GINMASIO PARA EL HOGAR MWM-990 de MARCY hecho por IMPEX® INC. Para su seguridad y beneficio, lea atentamente este manual antes de utilizar el equipo. Como fabricante, nos comprometemos con proporcionarle completa satisfacción al cliente. Si tiene alguna pregunta, o le faltan piezas o las mismas están dañadas, le garantizamos completa satisfacción a través de la asistencia directa de nuestra fábrica. Para evitar demoras innecesarias, por favor llame a nuestra línea de servicio al cliente gratuita. Nuestros agentes de servicio al cliente le proporcionarán asistencia inmediata
|Número de servicio al cliente gratuito 1-800-999-8899 Lunes a Viernes de 9 a.m. a 5 p.m. PST www.marcypro.com [email protected]
| |---|
######## AVISOS IMPORTANTES DE SEGURIDAD
Este equipo de ejercicio está construido para una seguridad óptima. Sin embargo, deben aplicarse ciertas precauciones al operar un equipo de ejercicio. Asegúrese de leer todo el manual antes de montar o de operar el equipo. Principalmente, observe las siguientes precauciones:
los niños sin supervisión en la misma habitación con el equipo.
para precalentarse adecuadamente. 11.No utilice el equipo si el equipo no está funcionando correctamente. 12.Se recomienda que haya un observador cerca mientras hace ejercicio. 13.Este equipo está diseñado y tiene el propósito de ser utilizado en el hogar y para
consumo, solamente, no es para uso comercial.
ADVERTENCIA: ANTES DE COMENZAR CUALQUIER PROGRAMA DE EJERCICIOS, CONSULTE A SU MÉDICO. ESTO ES ESPECIALMENTE IMPORTANTE PARA LAS PERSONAS MAYORES DE 35 AÑOS O PERSONAS CON PROBLEMAS DE SALUD PREEXISTENTES. LEA TODAS LAS INSTRUCCIONES ANTES DE UTILIZAR CUALQUIER EQUIPO DE EJERCICIOS. IMPEX INC. NO ASUME NINGUNA RESPONSABILIDAD POR LESIONES PERSONALES O DAÑOS MATERIALES SUFRIDOS POR O MEDIANTE EL USO DE ESTE PRODUCTO.
GUARDE ESTAS INSTRUCCIONES.
######## DIRECTRICES DE EJERCICIO
######### Crear músculo y aumentar el peso
A diferencia del ejercicio aeróbico, que hace hincapié en el entrenamiento de resistencia, el ejercicio anaeróbico se centra en el entrenamiento de fuerza. Un aumento de peso gradual puede ocurrir mientras crea el tamaño y la fuerza de los músculos. Mientras se desarrolla la masa muscular, su cuerpo se adapta a la tensión colocada sobre él. Usted puede modificar su dieta para incluir alimentos tales como carne, pescado y verduras. Estos alimentos ayudan a los músculos a recuperarse y reponer los nutrientes importantes después de un entrenamiento intenso.
######### Resistencia y fuerza muscular
Para obtener el mayor beneficio del ejercicio, es importante desarrollar un programa de ejercicios que permite que todos los grupos musculares principales trabajen la misma cantidad.
Para aumentar la fuerza de los músculos, siga este principio: Aumentar la resistencia y mantener el número de repeticiones de un ejercicio resulta en fuerza muscular creciente.
Para tonificar su cuerpo, siga este principio: Reducir la resistencia además de aumentar el número de repeticiones de un ejercicio resulta en tono creciente del cuerpo.
Una vez que se sienta cómodo con un ejercicio, puede cambiar la velocidad a la que hace el ejercicio, el número de repeticiones o la resistencia. No es necesario cambiar las tres variables. Por ejemplo, supongamos que está entrenando con 50 libras y realiza el ejercicio 10 veces en 3 minutos. Cuando esto se vuelve demasiado fácil, puede decidir levantar 60 libras por la misma cantidad de repeticiones en la misma cantidad de tiempo. Levantar más peso menos veces más a menudo desarrolla la fuerza muscular. Para ganar fuerza muscular y resistencia, se recomienda que realice cada ejercicio de 15 a 20 repeticiones por set.
######### Intensidad de entrenamiento
Que tan duro comienza a entrenar depende de su nivel general de aptitud. El dolor que experimentó puede reducirse disminuyendo la carga en los músculos y realizando menos sets. Para evitar lesiones, debe trabajar en un programa de ejercicios gradualmente y establecer la carga a su nivel de condición física individual. La carga debe aumentar a medida que su nivel de aptitud aumenta.
El dolor muscular es común, especialmente cuando se empieza a hacer ejercicio. Si usted tiene mucho dolor por mucho tiempo, puede ser momento de cambiar el programa. Eventualmente, su sistema muscular se acostumbra al estrés y la tensión colocada en él.
######## Iniciar un programa de musculación Calentamiento
Para comenzar el entrenamiento de fuerza, es importante estirarse y realizar ejercicio ligero por 5 a 10 minutos. Esto ayuda a preparar el cuerpo para ejercicios más intensos aumentando la circulación, elevando la temperatura de su cuerpo y desarrollando más oxígeno a los músculos.
######### Entrenamiento
En cada sesión de ejercicio, tenga en cuenta que el dolor muscular que se prolonga durante un largo periodo no es deseable y puede significar que se ha lesionado.
######### Enfriamiento
Al final de cada sesión de ejercicio, realice ejercicios de estiramiento lentos de 5 a 10 minutos. Haga estos suavemente, estirándose tanto como usted pueda, si estirarse de más. Esta etapa permite que sus músculos se relajen después del entrenamiento.
Para proporcionar un programa de entrenamiento total también se recomienda que realice ejercicio aeróbico 2 a 3 días además del entrenamiento de fuerza.
######### Beber agua
Para que el cuerpo funcione correctamente, debe estar adecuadamente hidratado. Si usted hace ejercicio, usted debe aumentar su ingesta de líquidos. La razón es que el agua dejará su sistema a través del mecanismo de sudoración que refresca su cuerpo durante el ejercicio. El agua que se pierde a través del ejercicio debe ser sustituida para que los músculos puedan recuperarse correctamente.
######### Día de descanso
Aunque no quera hacerlo, es importante tomar un día de descanso por lo menos una vez por semana porque le da a su cuerpo la oportunidad de sanarse a sí mismo. Trabajar sus músculos continuamente producirá sobre entrenamiento que no es beneficioso a largo plazo.
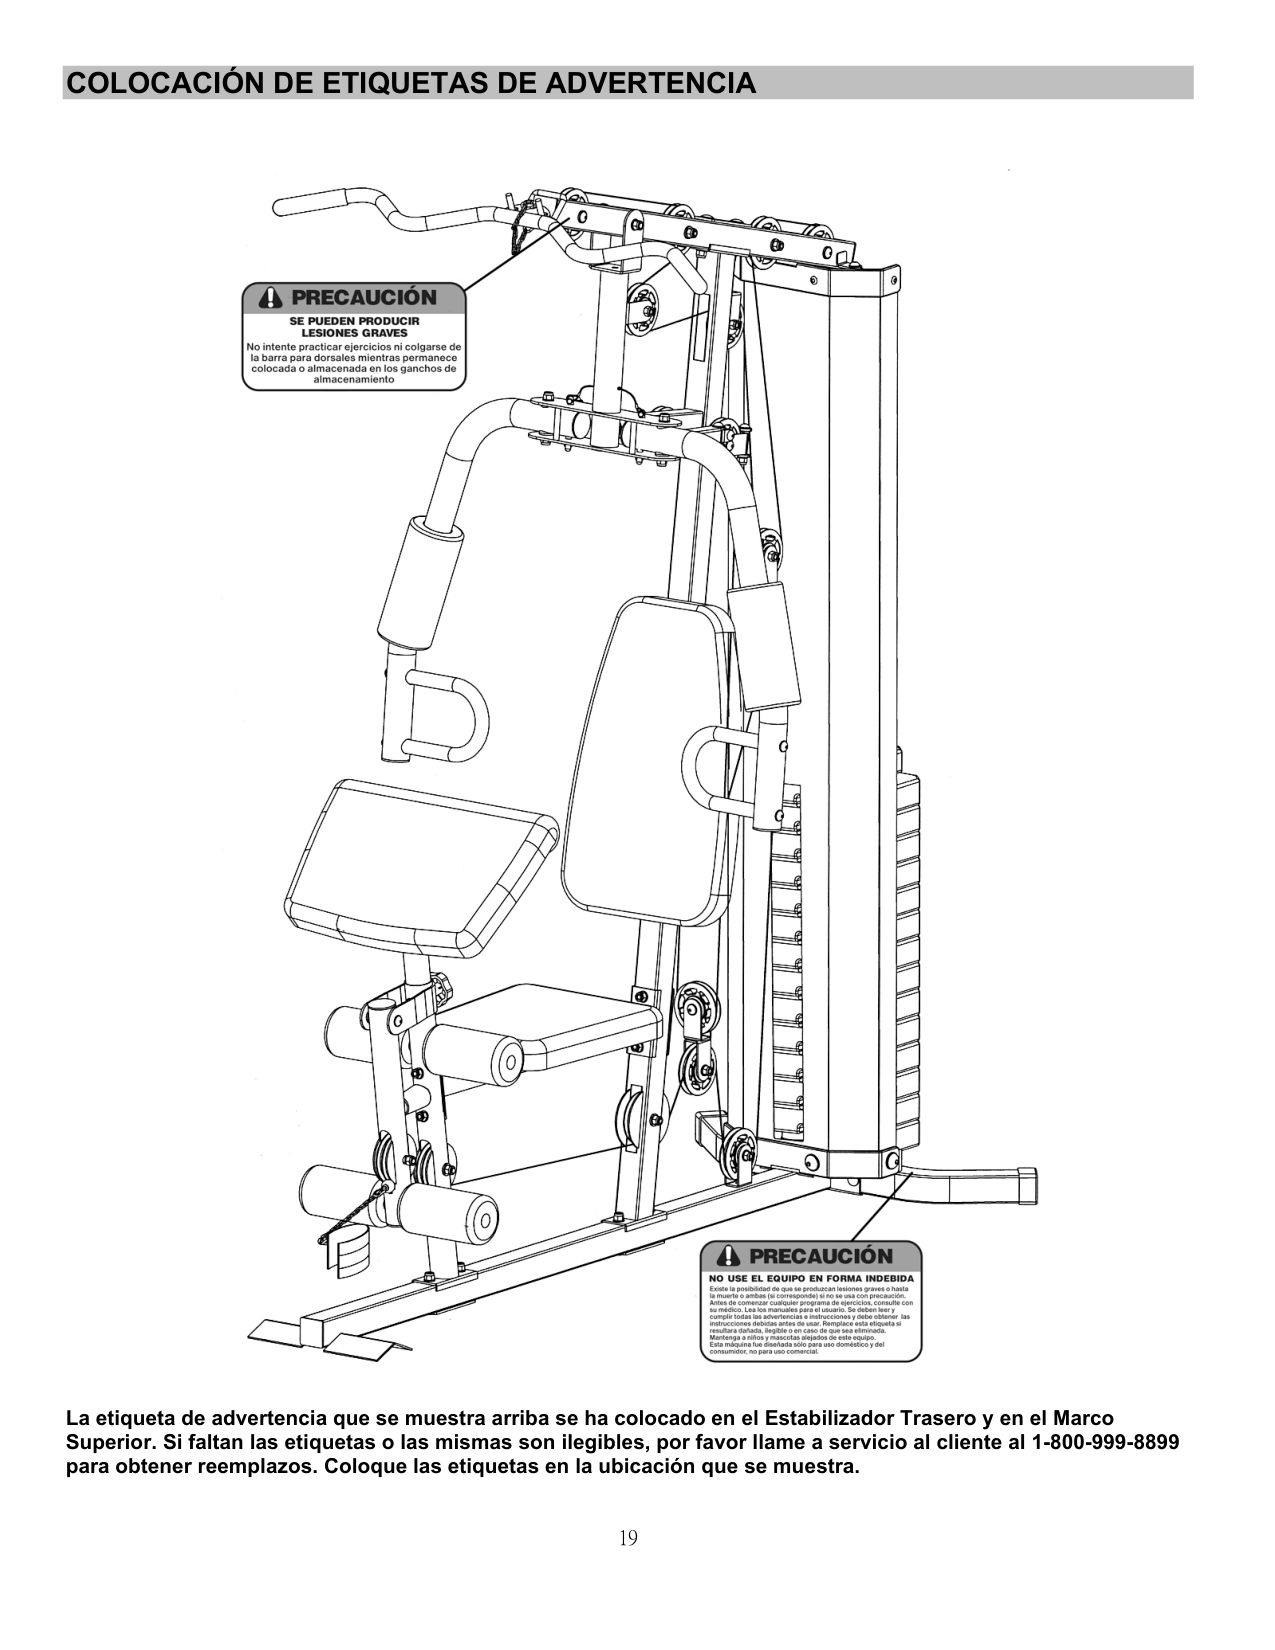
######## COLOCACIÓN DE ETIQUETAS DE ADVERTENCIA

La etiqueta de advertencia que se muestra arriba se ha colocado en el Estabilizador Trasero y en el Marco Superior. Si faltan las etiquetas o las mismas son ilegibles, por favor llame a servicio al cliente al 1-800-999-8899 para obtener reemplazos. Coloque las etiquetas en la ubicación que se muestra.
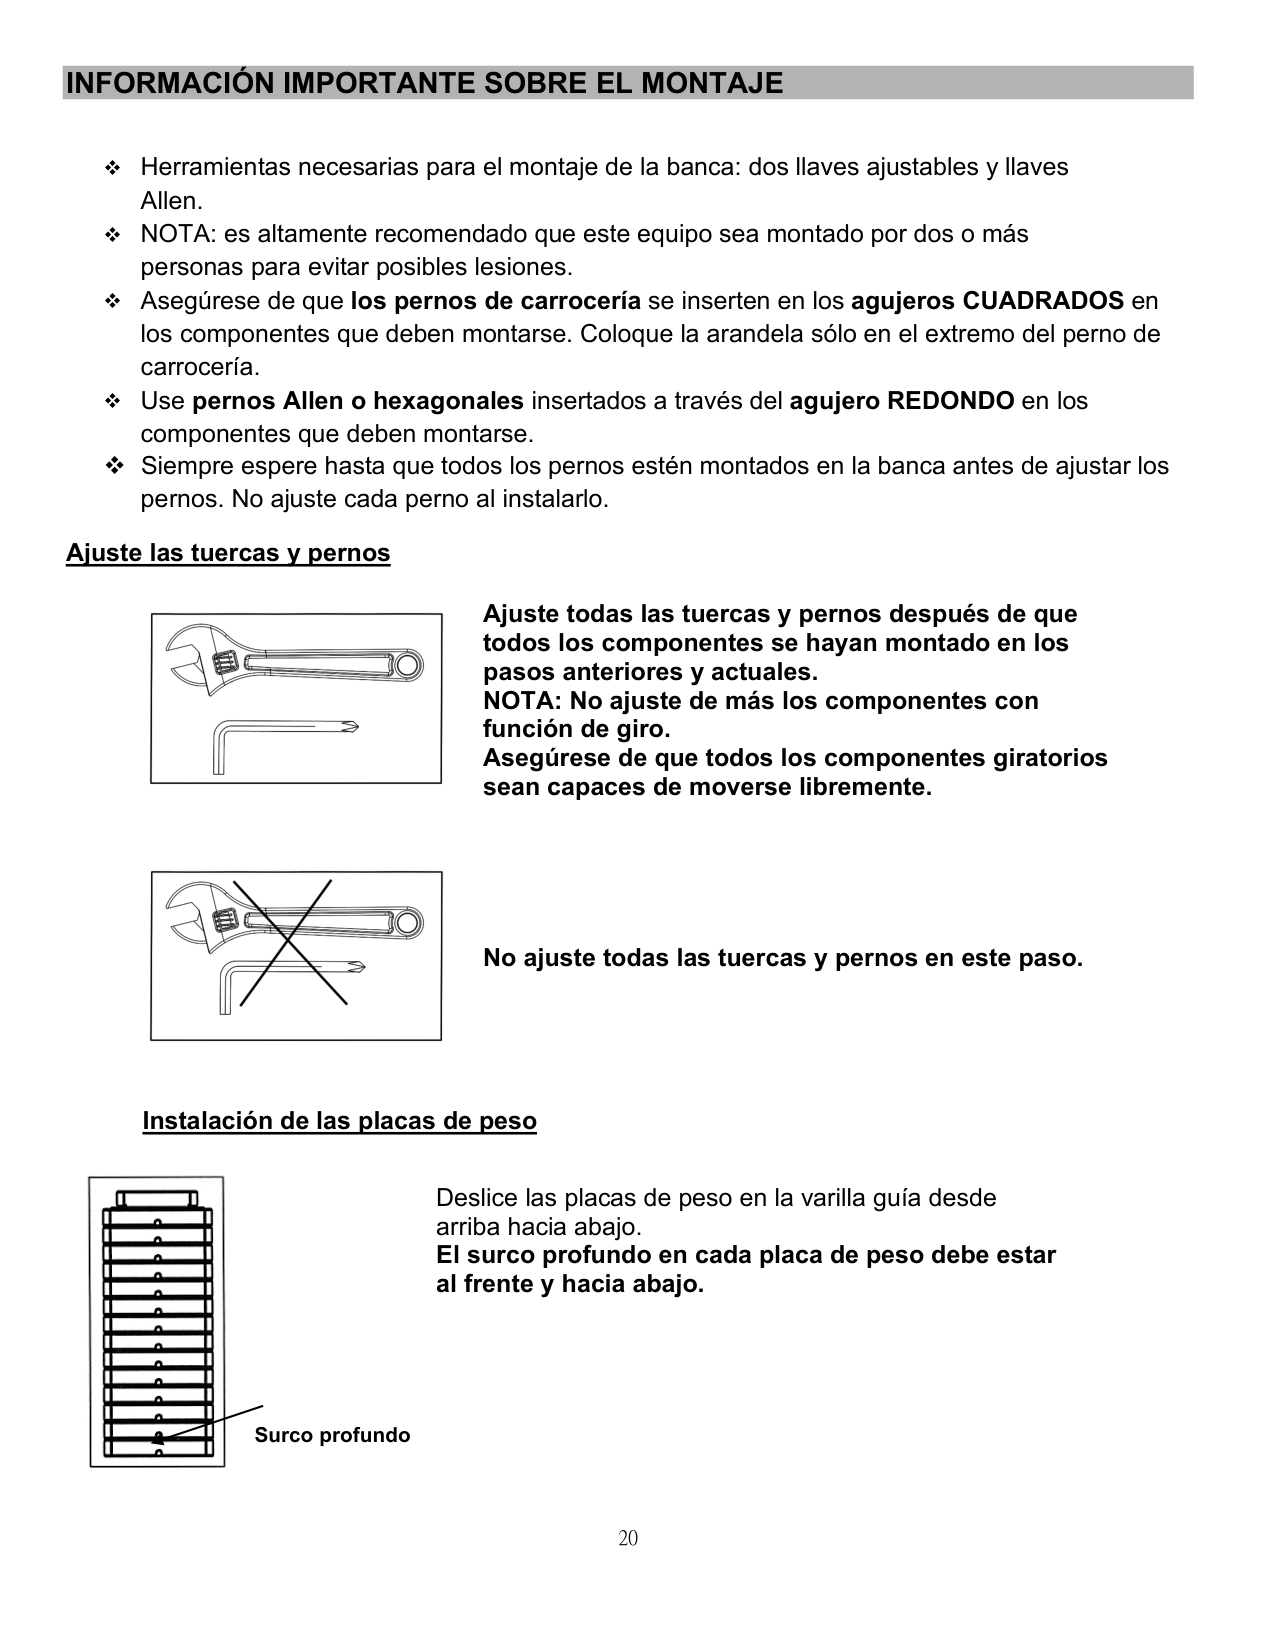
######## INFORMACIÓN IMPORTANTE SOBRE EL MONTAJE
Ajuste las tuercas y pernos

Ajuste todas las tuercas y pernos después de que todos los componentes se hayan montado en los pasos anteriores y actuales. NOTA: No ajuste de más los componentes con función de giro. Asegúrese de que todos los componentes giratorios sean capaces de moverse libremente.

No ajuste todas las tuercas y pernos en este paso.
Instalación de las placas de peso

Surco profundo
Deslice las placas de peso en la varilla guía desde arriba hacia abajo. El surco profundo en cada placa de peso debe estar al frente y hacia abajo.
######## NOTAS DE FUNCIONAMIENTO Selección de placas de peso
######## Ajuste de tensión del cable

Ajuste la tensión del sistema de cable moviendo la posición de la polea inferior en los dos soportes de polea flotante doble.
Si la tensión es demasiado floja, suba la polea inferior un agujero.
Si la tensión está demasiado ajustada, mueva la polea inferior un agujero hacia abajo. Polea inferior
######## Ejercicios de prensa frontal y de mariposa

Pasador de traba de mariposa

######## CUIDADO Y MANTENIMIENTO
######## CAPACIDAD DE PESO Y DIMENSIONES
######### LISTA DE PIEZAS PARA MWM-990
|NO. DE PARTE|DESCRIPCIÓN|TAMAÑO|CANTIDAD| |---|---|---|---| |1|Marco superior| |1|

|2|Marco vertical| |1| |3|Marco base| |1| |4|Estabilizador trasero| |1| |5|Sostenedor del desarrollador de pierna| |1| |6|Soporte del asiento| |1| |7|Ejercitador de pierna| |1| |8|Base de prensa frontal| |1| |9|Mariposa derecha| |1| |10|Mariposa izquierda| |1| |11|Manija de prensa frontal| |2| |12|Soporte del cable de la mariposa| |2| |13|Stand de ejercitador de brazo| |1| |14|Soporte de polea giratoria| |2| |15|Soporte de polea flotante doble en ángulo| |1| |16|Cubierta de pila de peso| |1| |17|Varilla guía| |2| |18|Barra lat| |1| |19|Varilla selector| |1| |20|Soporte|1 ¾” x 4 ¾”|4| |21|Soporte en forma de U|2” x 7”|1| |22|Perilla de traba| |1| |23|Tubo de goma espuma| |2| |24|Tabla de respaldo| |1| |25|Cojín del asiento| |1|
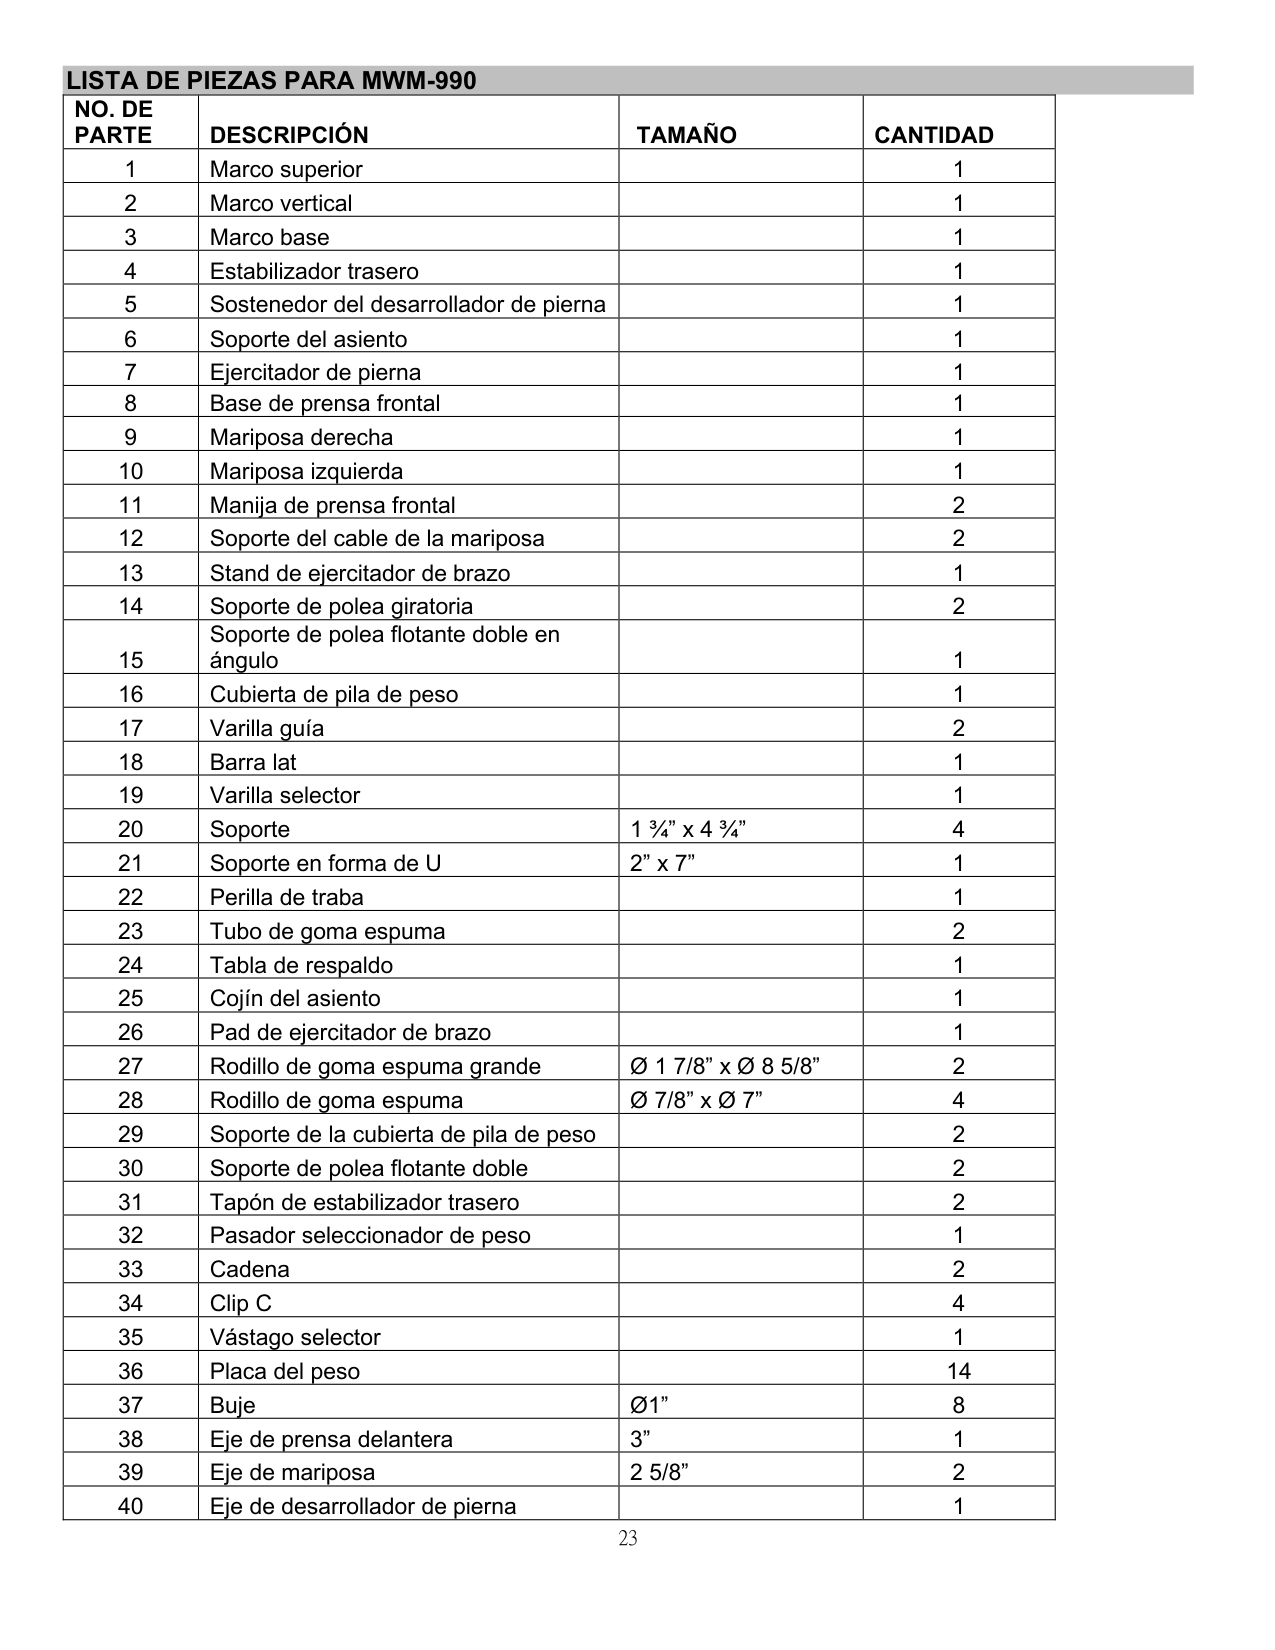
|26|Pad de ejercitador de brazo| |1| |27|Rodillo de goma espuma grande|Ø 1 7/8” x Ø 8 5/8”|2| |28|Rodillo de goma espuma|Ø 7/8” x Ø 7”|4| |29|Soporte de la cubierta de pila de peso| |2| |30|Soporte de polea flotante doble| |2| |31|Tapón de estabilizador trasero| |2| |32|Pasador seleccionador de peso| |1| |33|Cadena| |2| |34|Clip C| |4| |35|Vástago selector| |1| |36|Placa del peso| |14| |37|Buje|Ø1”|8| |38|Eje de prensa delantera|3”|1| |39|Eje de mariposa|2 5/8”|2| |40|Eje de desarrollador de pierna| |1|
|41|Tope de goma de placa de peso|Ø2 3/8” x 1”|2| |---|---|---|---| |42|Polea| |16| |43|Buje de polea|Ø 7/8” x ½”|14| |44|Tope de goma|Ø1 7/8” x 2 ½”|1| |45|Tope de goma|Ø1 ½” x 5/8”|1| |46|Pasador de traba de mariposa| |2|
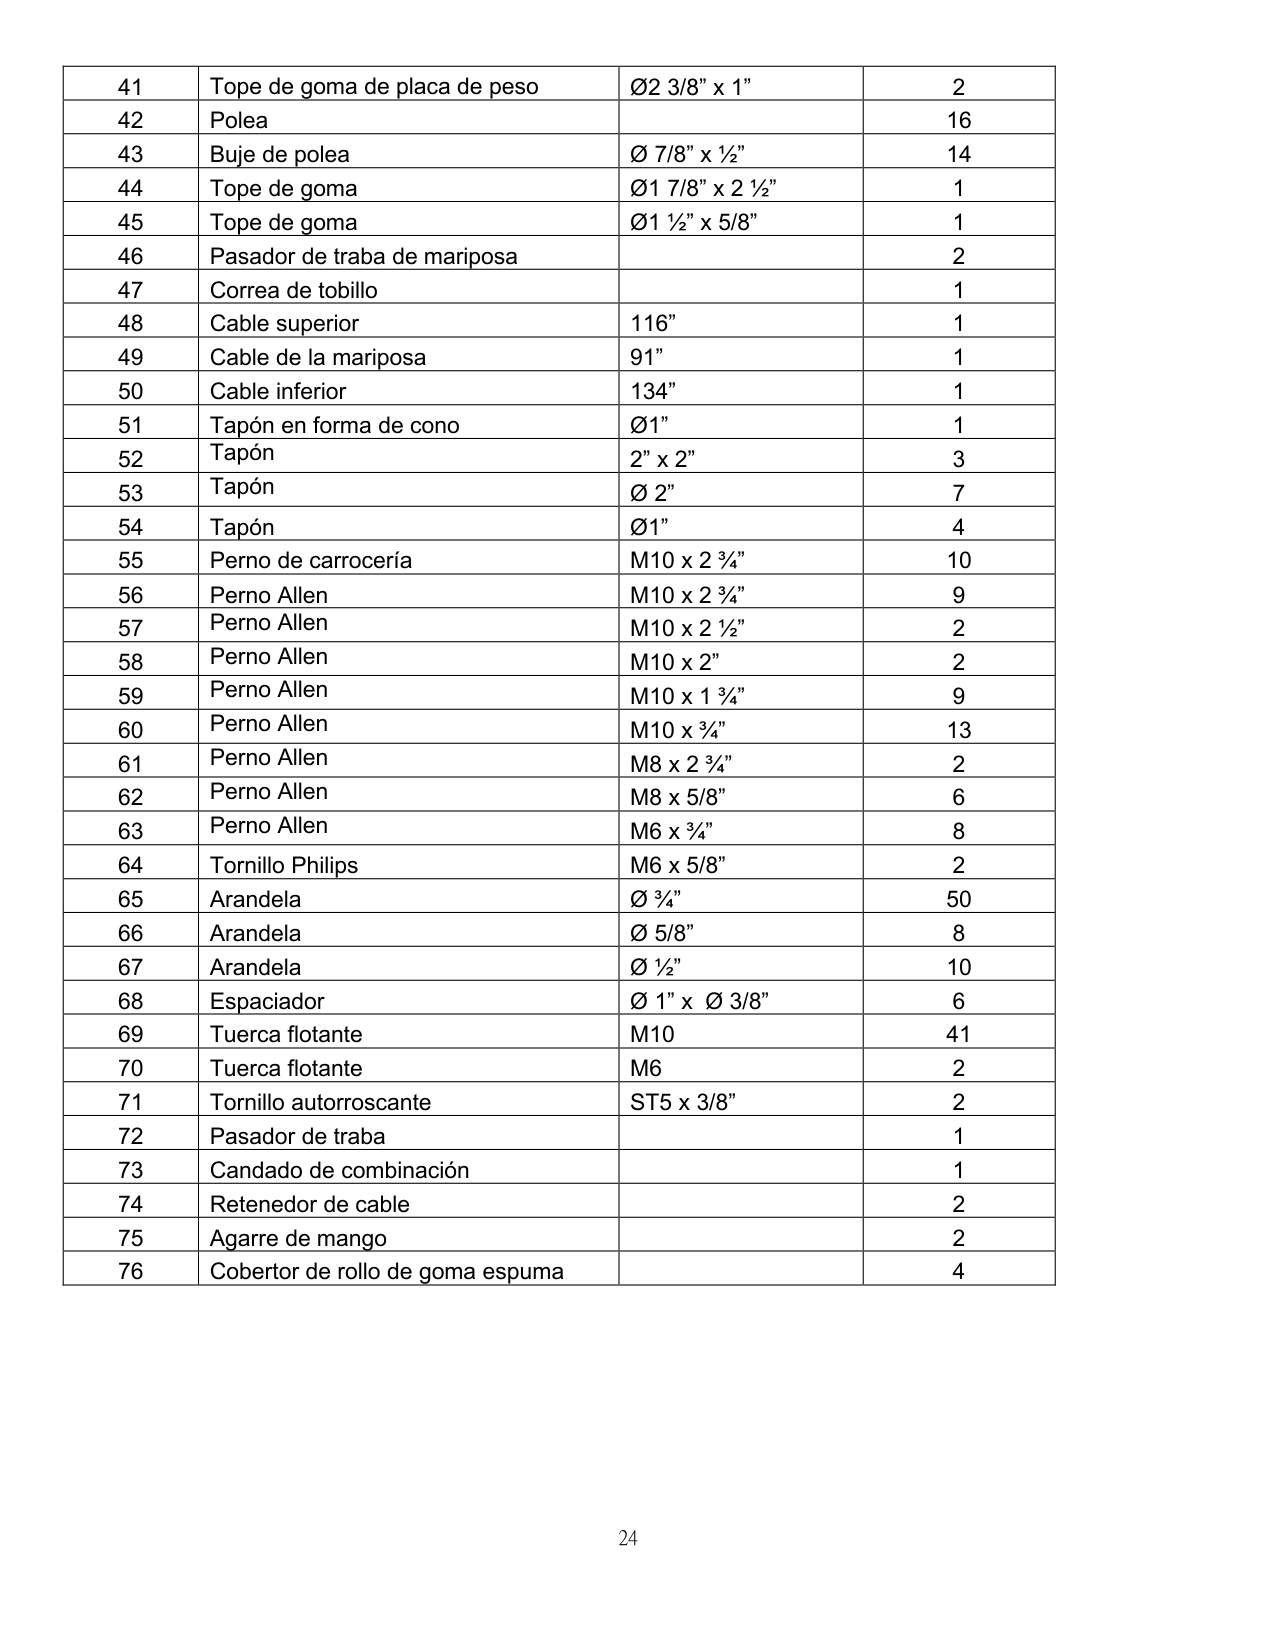
|47|Correa de tobillo| |1| |48|Cable superior|116”|1| |49|Cable de la mariposa|91”|1| |50|Cable inferior|134”|1| |51|Tapón en forma de cono|Ø1”|1| |52|Tapón|2” x 2”|3| |53|Tapón|Ø 2”|7| |54|Tapón|Ø1”|4| |55|Perno de carrocería|M10 x 2 ¾”|10| |56|Perno Allen|M10 x 2 ¾”|9| |57|Perno Allen|M10 x 2 ½”|2| |58|Perno Allen|M10 x 2”|2| |59|Perno Allen|M10 x 1 ¾”|9| |60|Perno Allen|M10 x ¾”|13| |61|Perno Allen|M8 x 2 ¾”|2| |62|Perno Allen|M8 x 5/8”|6| |63|Perno Allen|M6 x ¾”|8| |64|Tornillo Philips|M6 x 5/8”|2| |65|Arandela|Ø ¾”|50| |66|Arandela|Ø 5/8”|8| |67|Arandela|Ø ½”|10| |68|Espaciador|Ø 1” x Ø 3/8”|6| |69|Tuerca flotante|M10|41| |70|Tuerca flotante|M6|2|
|71|Tornillo autorroscante|ST5 x 3/8”|2| |72|Pasador de traba| |1| |73|Candado de combinación| |1| |74|Retenedor de cable| |2| |75|Agarre de mango| |2| |76|Cobertor de rollo de goma espuma| |4|
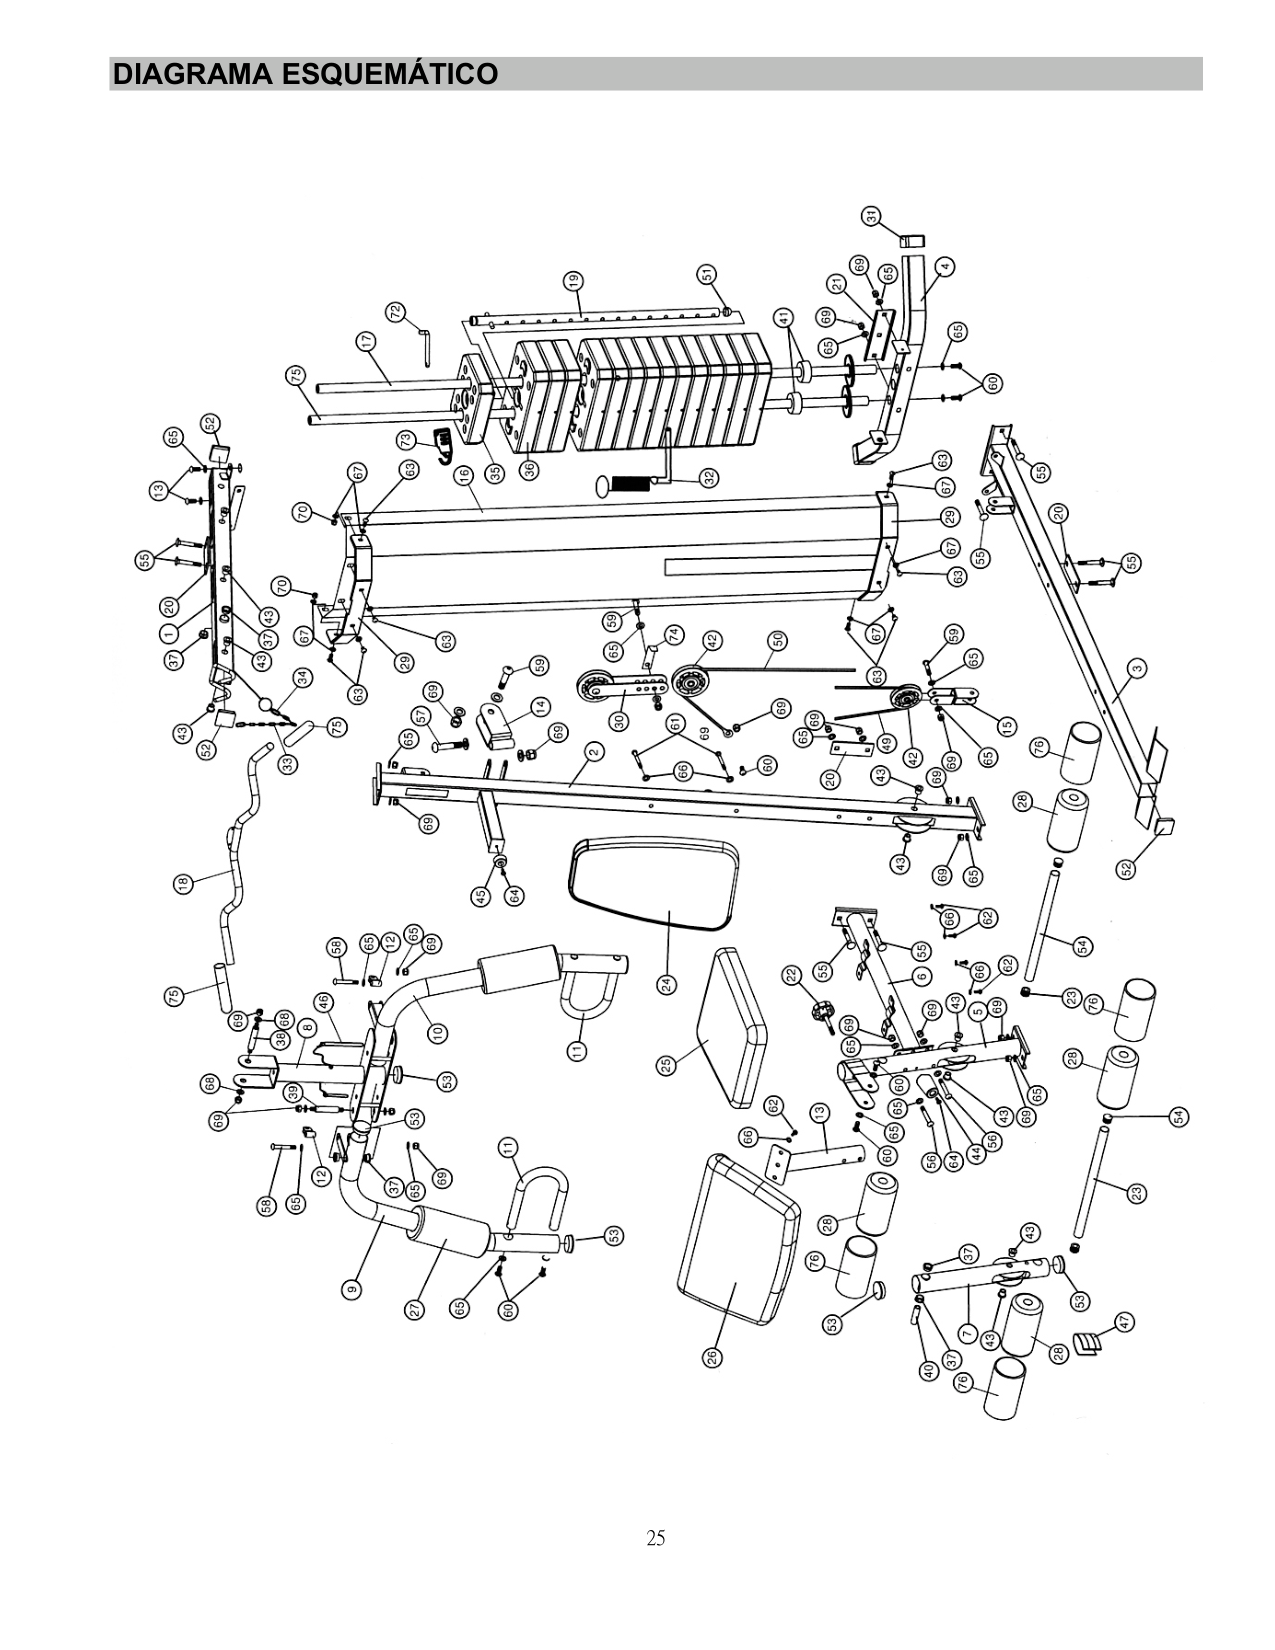
######## DIAGRAMA ESQUEMÁTICO

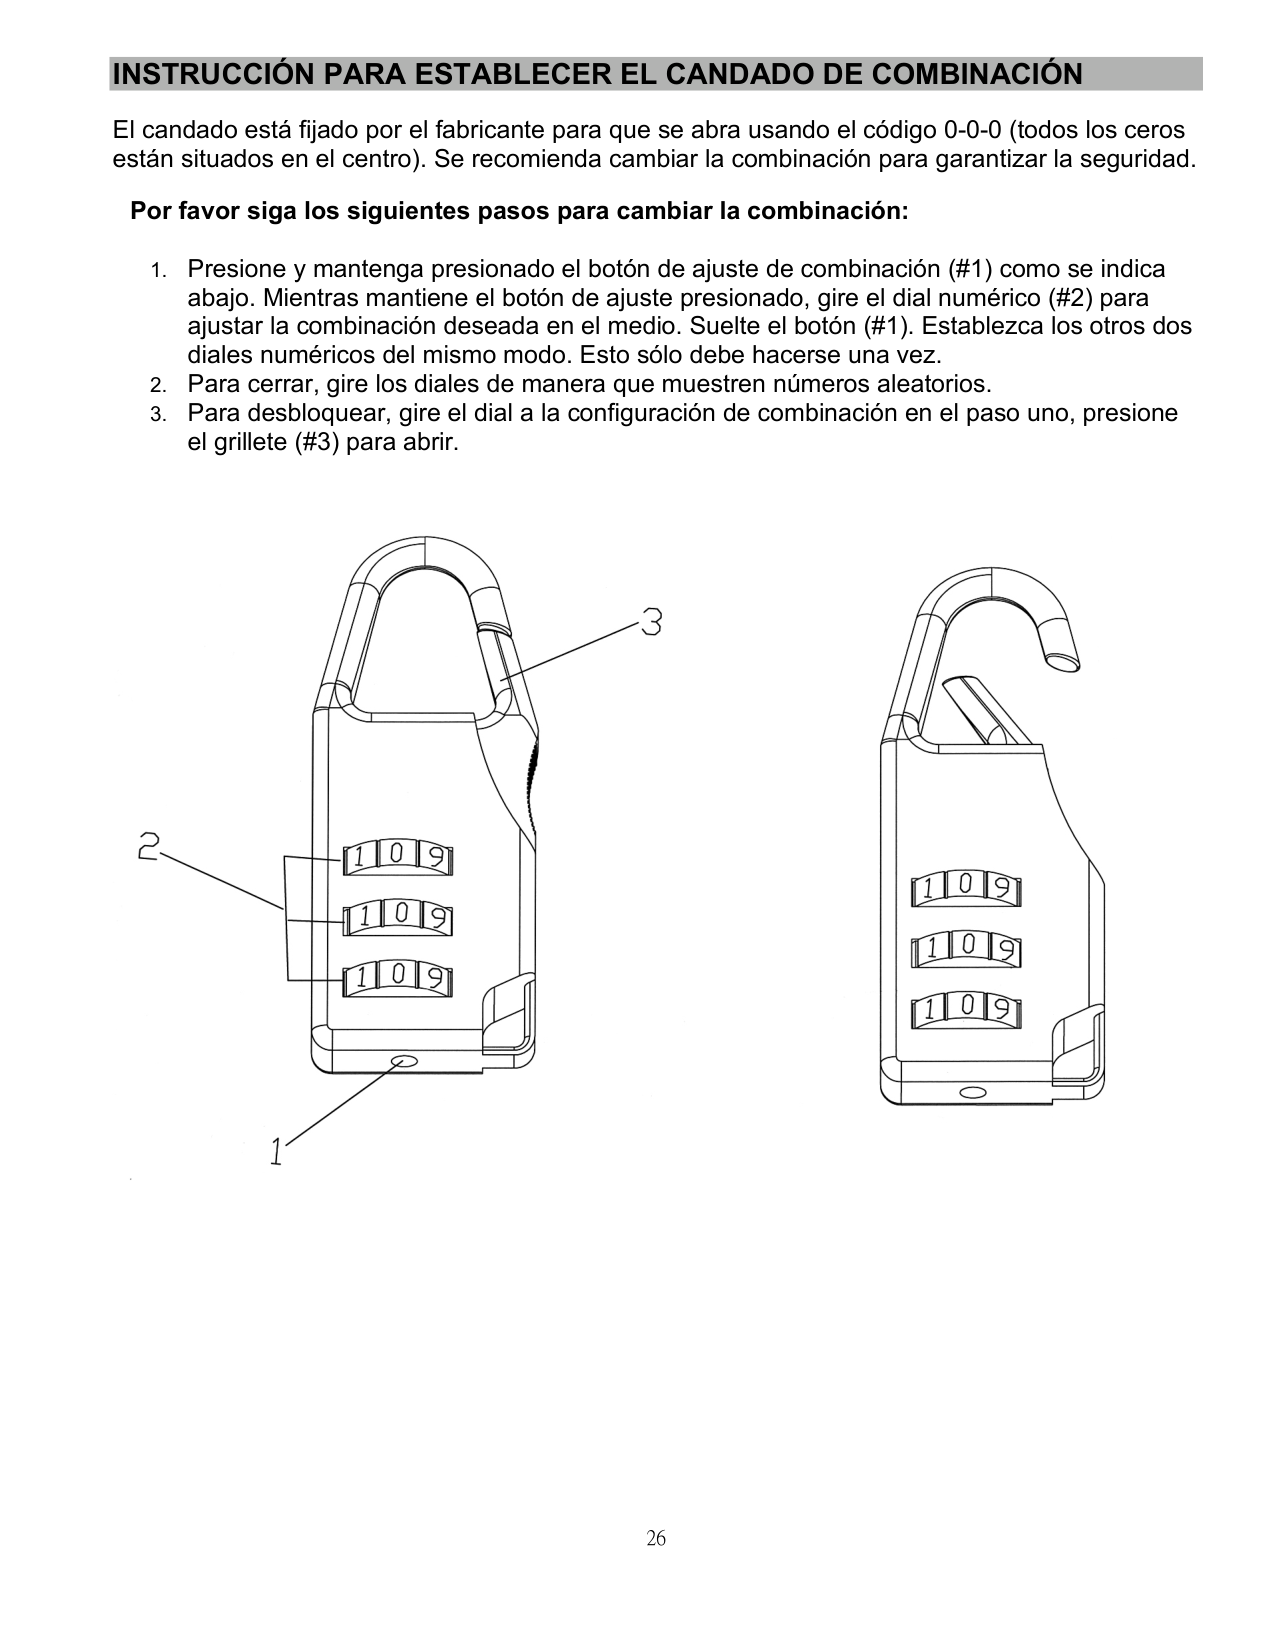
######## INSTRUCCIÓN PARA ESTABLECER EL CANDADO DE COMBINACIÓN
El candado está fijado por el fabricante para que se abra usando el código 0-0-0 (todos los ceros están situados en el centro). Se recomienda cambiar la combinación para garantizar la seguridad.
######### Por favor siga los siguientes pasos para cambiar la combinación:

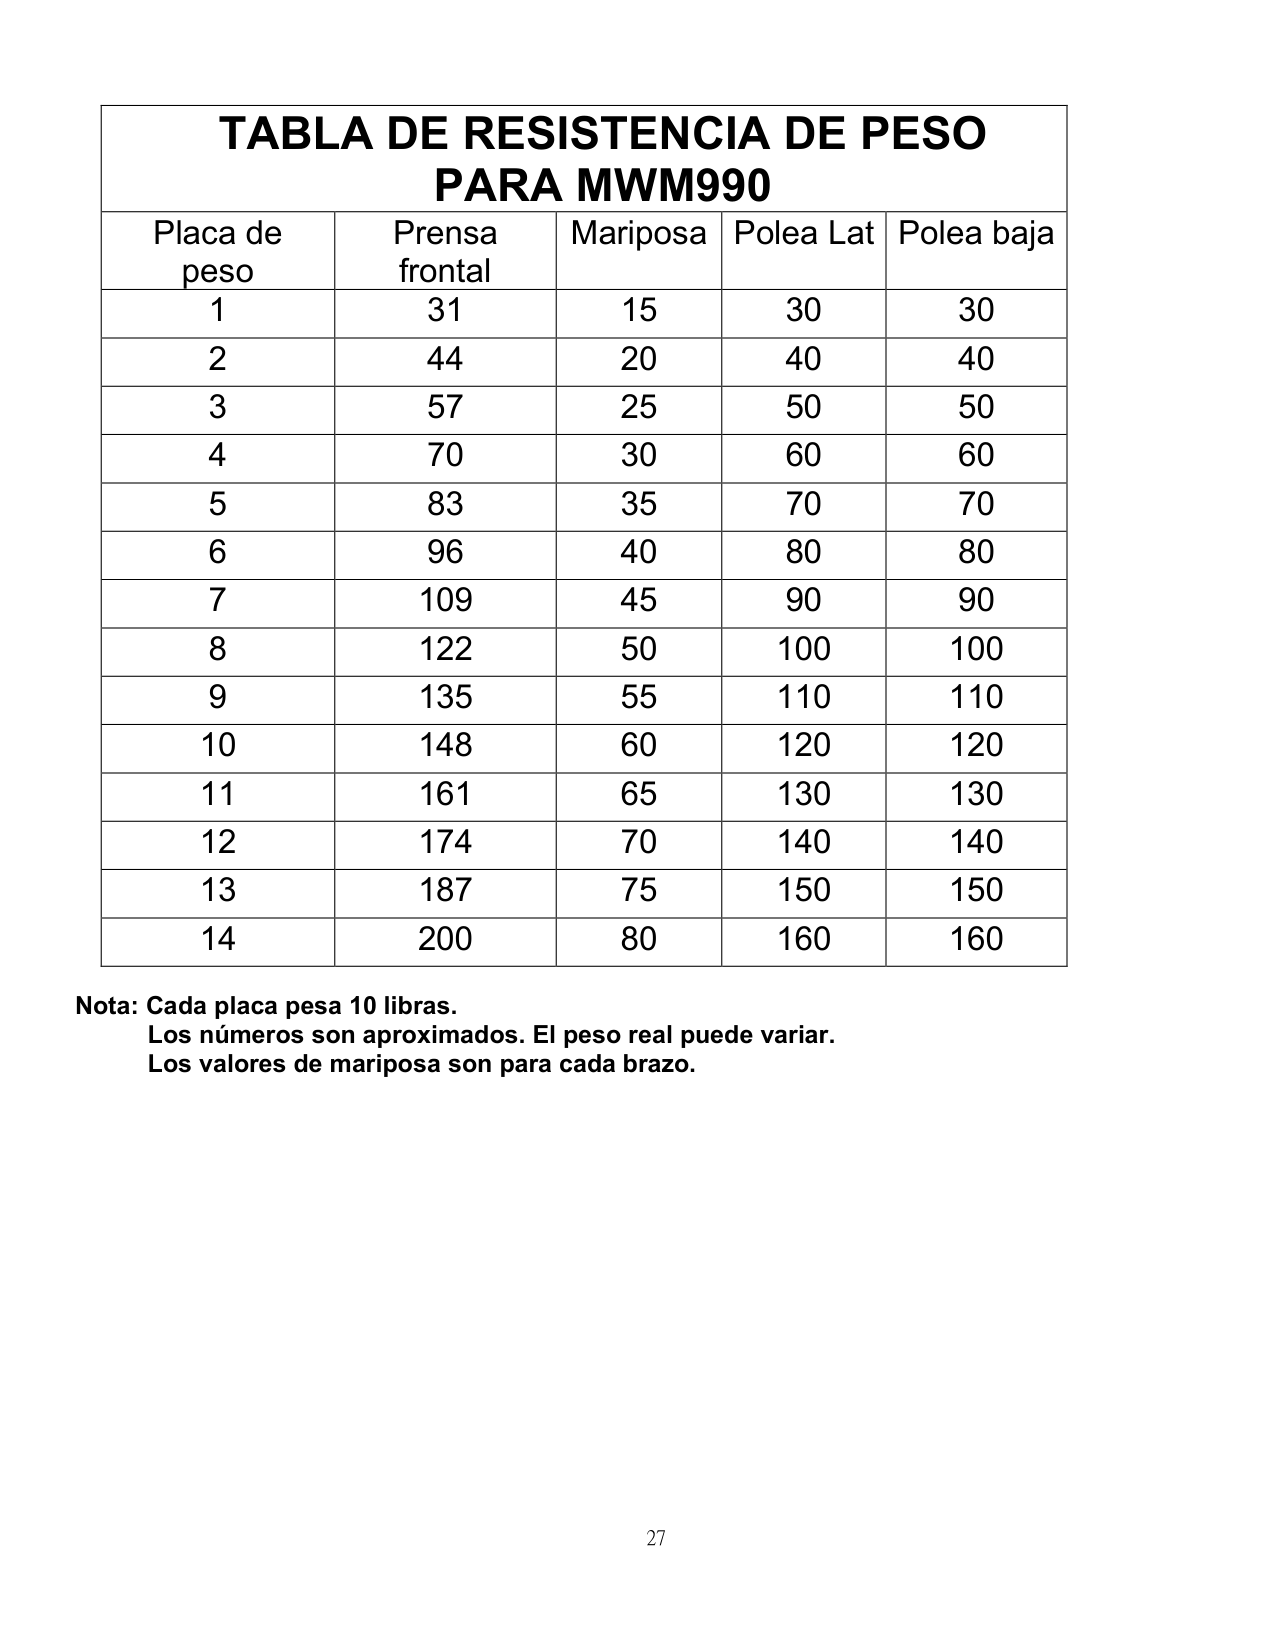
|TABLA DE RESISTENCIA DE PESO PARA MWM990|TABLA DE RESISTENCIA DE PESO PARA MWM990|TABLA DE RESISTENCIA DE PESO PARA MWM990|TABLA DE RESISTENCIA DE PESO PARA MWM990|TABLA DE RESISTENCIA DE PESO PARA MWM990| |---|---|---|---|---| |Placa de peso|Prensa frontal|Mariposa|Polea Lat|Polea baja| |1|31|15|30|30| |2|44|20|40|40| |3|57|25|50|50| |4|70|30|60|60| |5|83|35|70|70| |6|96|40|80|80| |7|109|45|90|90| |8|122|50|100|100| |9|135|55|110|110| |10|148|60|120|120| |11|161|65|130|130| |12|174|70|140|140| |13|187|75|150|150| |14|200|80|160|160|
######### Nota: Cada placa pesa 10 libras. Los números son aproximados. El peso real puede variar. Los valores de mariposa son para cada brazo.
IMPEX® INC.
#### GARANTÍA LIMITADA
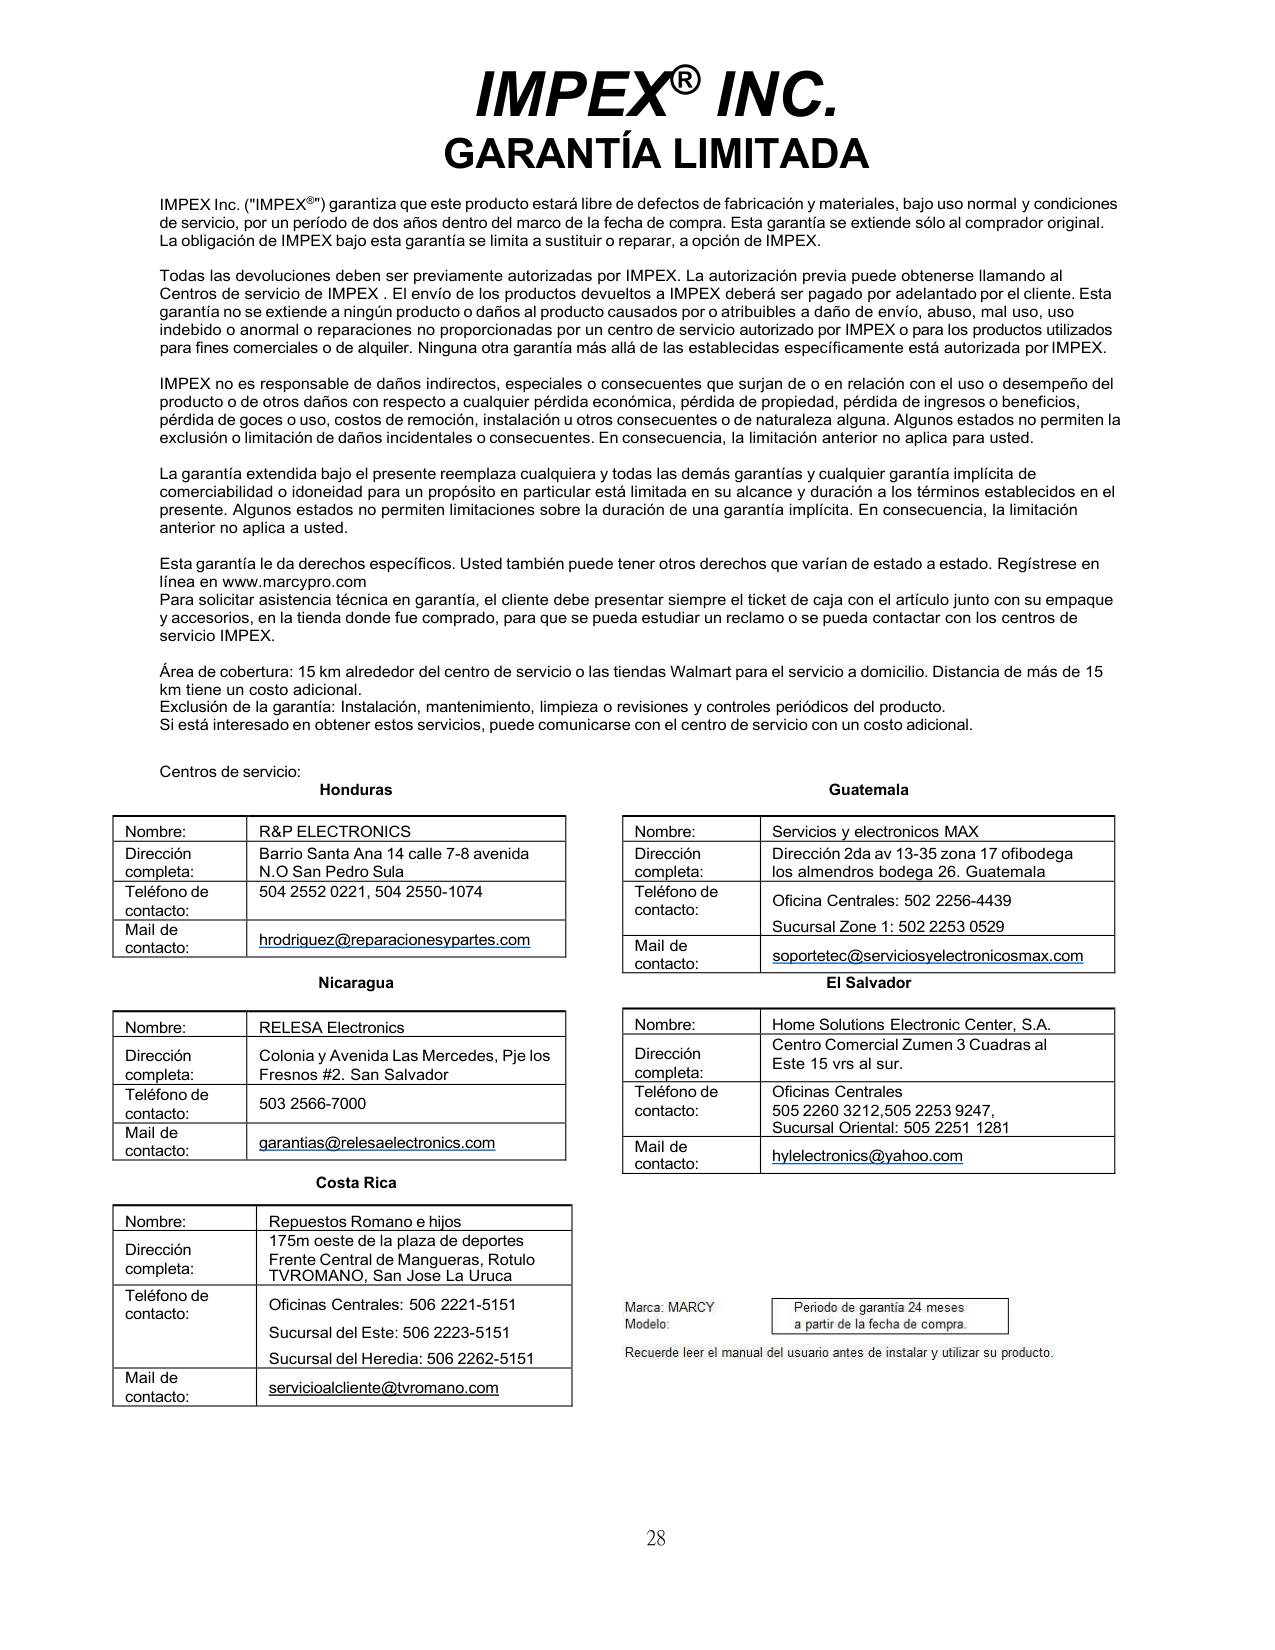
IMPEX Inc. ("IMPEX®") garantiza que este producto estará libre de defectos de fabricación y materiales, bajo uso normal y condiciones de servicio, por un período de dos años dentro del marco de la fecha de compra. Esta garantía se extiende sólo al comprador original. La obligación de IMPEX bajo esta garantía se limita a sustituir o reparar, a opción de IMPEX.
Todas las devoluciones deben ser previamente autorizadas por IMPEX. La autorización previa puede obtenerse llamando al Centros de servicio de IMPEX . El envío de los productos devueltos a IMPEX deberá ser pagado por adelantado por el cliente. Esta garantía no se extiende a ningún producto o daños al producto causados por o atribuibles a daño de envío, abuso, mal uso, uso indebido o anormal o reparaciones no proporcionadas por un centro de servicio autorizado por IMPEX o para los productos utilizados para fines comerciales o de alquiler. Ninguna otra garantía más allá de las establecidas específicamente está autorizada por IMPEX.
IMPEX no es responsable de daños indirectos, especiales o consecuentes que surjan de o en relación con el uso o desempeño del producto o de otros daños con respecto a cualquier pérdida económica, pérdida de propiedad, pérdida de ingresos o beneficios, pérdida de goces o uso, costos de remoción, instalación u otros consecuentes o de naturaleza alguna. Algunos estados no permiten la exclusión o limitación de daños incidentales o consecuentes. En consecuencia, la limitación anterior no aplica para usted. La garantía extendida bajo el presente reemplaza cualquiera y todas las demás garantías y cualquier garantía implícita de comerciabilidad o idoneidad para un propósito en particular está limitada en su alcance y duración a los términos establecidos en el presente. Algunos estados no permiten limitaciones sobre la duración de una garantía implícita. En consecuencia, la limitación anterior no aplica a usted. Esta garantía le da derechos específicos. Usted también puede tener otros derechos que varían de estado a estado. Regístrese en línea en www.marcypro.com Para solicitar asistencia técnica en garantía, el cliente debe presentar siempre el ticket de caja con el artículo junto con su empaque y accesorios, en la tienda donde fue comprado, para que se pueda estudiar un reclamo o se pueda contactar con los centros de servicio IMPEX. Área de cobertura: 15 km alrededor del centro de servicio o las tiendas Walmart para el servicio a domicilio. Distancia de más de 15 km tiene un costo adicional. Exclusión de la garantía: Instalación, mantenimiento, limpieza o revisiones y controles periódicos del producto. Si está interesado en obtener estos servicios, puede comunicarse con el centro de servicio con un costo adicional. Centros de servicio:
Honduras
Guatemala
|Nombre:|R&P ELECTRONICS| |---|---| |Dirección completa:|Barrio Santa Ana 14 calle 7-8 avenida N.O San Pedro Sula| |Teléfono de contacto:|504 2552 0221, 504 2550-1074| |Mail de contacto:|[email protected]
|
Nicaragua
|Nombre:|RELESA Electronics| |---|---| |Dirección completa:|Colonia y Avenida Las Mercedes, Pje los Fresnos #2. San Salvador|
|Teléfono de contacto:|503 2566-7000| |Mail de contacto:|[email protected]
|
Costa Rica
|Nombre:|Repuestos Romano e hijos| |---|---| |Dirección completa:|175m oeste de la plaza de deportes Frente Central de Mangueras, Rotulo TVROMANO, San Jose La Uruca| |Teléfono de contacto:|Oficinas Centrales: 506 2221-5151 Sucursal del Este: 506 2223-5151 Sucursal del Heredia: 506 2262-5151| |Mail de contacto:|[email protected]
|
|Nombre:|Servicios y electronicos MAX| |---|---| |Dirección completa:|Dirección 2da av 13-35 zona 17 ofibodega los almendros bodega 26. Guatemala| |Teléfono de contacto:|Oficina Centrales: 502 2256-4439 Sucursal Zone 1: 502 2253 0529| |Mail de contacto:|[email protected]
|
El Salvador
|Nombre:|Home Solutions Electronic Center, S.A.| |---|---| |Dirección completa:|Centro Comercial Zumen 3 Cuadras al Este 15 vrs al sur.| |Teléfono de contacto:|Oficinas Centrales 505 2260 3212,505 2253 9247, Sucursal Oriental: 505 2251 1281| |Mail de contacto:|[email protected]
|
