
Ask AI
— answers from the official manualAnswers from the official manual.
Common questions
Common Questions
10 totalWhat should I do if my Kozii does not turn on?
Make sure it has been cleaned, descaled, and filled according to instructions. Turn the timer past '3' to switch kozii on.
How often do I need to clean my Kozii warmer?
Clean Kozii every 2-3 days by emptying, adding a mild soap solution and rinsing. Every couple of weeks, use a mild (1:50) bleach solution following the same process.
Why is there no water coming up in Kozii’s chamber during warming?
This is normal if the liquid does not reach the overflow drain hole. For slightly faster warming, you may add a small amount of extra water.
How do I safely dispose of or recycle empty Twist Pouches?
Label pouches with a marker and cap firmly leaving some air inside. When done using the bag and disposing, discard or recycle (check local guidelines for recycling #7 plastic). Discard the cap (#2) separately.
Can I leave Kozii running without a container?
No. Before starting the warmer, ensure there is always a bottle, bag or jar in place to prevent damage and misuse risks.
What do I do when cleaning my nipple brushes?
Wash them thoroughly before first use and after each usage. Top rack dishwasher-safe or hand wash using hot soapy water.
Full Manual
4 pages
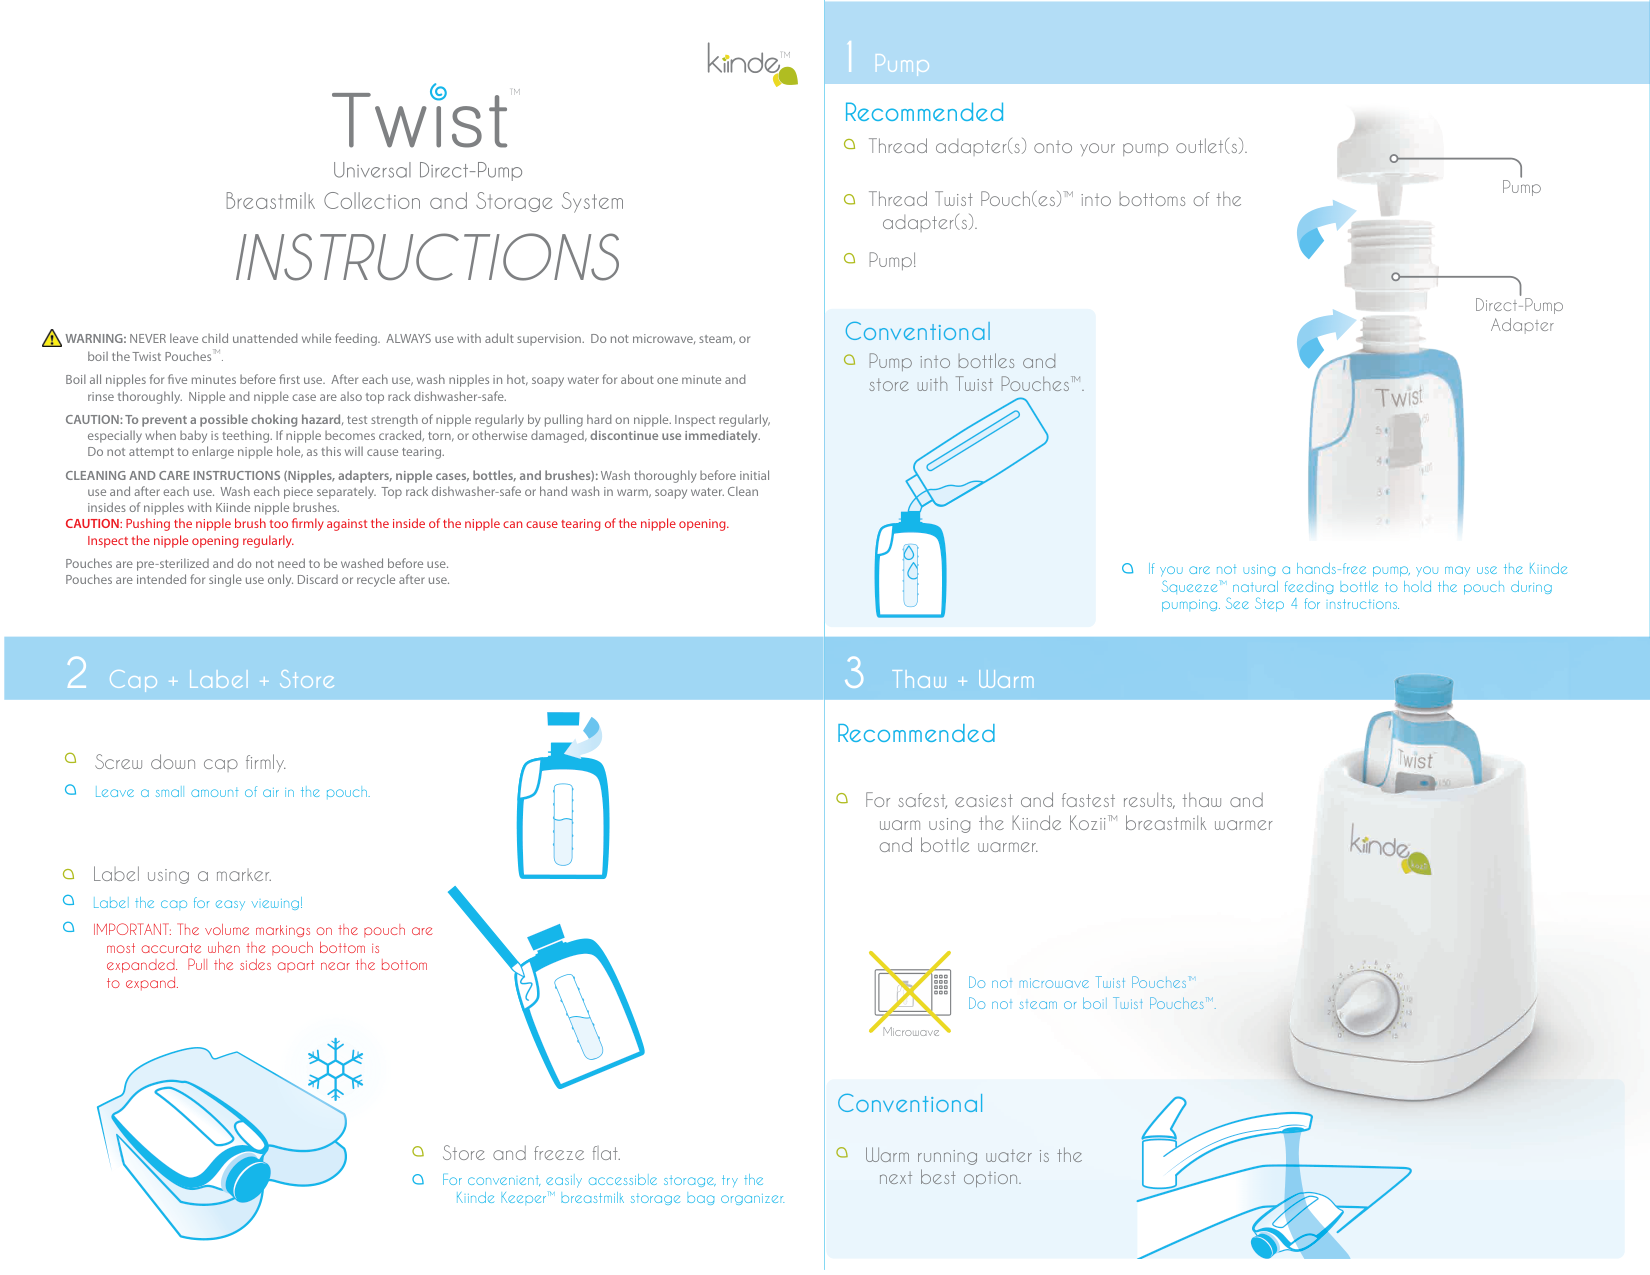
1 Pump
TM
TM
###### Recommended

Thread adapter(s) onto your pump outlet(s).
Pump
Thread Twist Pouch(es)™ into bottoms of the adapter(s).
INSTRUCTIONS
Pump!
Direct-Pump Adapter
Conventional
WARNING: NEVER leave child unattended while feeding. ALWAYS use with adult supervision. Do not microwave, steam, or

boil the Twist Pouches™.
Pump into bottles and store with Twist Pouches™.
Boil all nipples for ve minutes before rst use. After each use, wash nipples in hot, soapy water for about one minute and rinse thoroughly. Nipple and nipple case are also top rack dishwasher-safe.
CAUTION: To prevent a possible choking hazard, test strength of nipple regularly by pulling hard on nipple. Inspect regularly, especially when baby is teething. If nipple becomes cracked, torn, or otherwise damaged, discontinue use immediately. Do not attempt to enlarge nipple hole, as this will cause tearing.
CLEANING AND CARE INSTRUCTIONS (Nipples, adapters, nipple cases, bottles, and brushes): Wash thoroughly before initial use and after each use. Wash each piece separately. Top rack dishwasher-safe or hand wash in warm, soapy water. Clean insides of nipples with Kiinde nipple brushes.
CAUTION: Pushing the nipple brush too rmly against the inside of the nipple can cause tearing of the nipple opening.
Inspect the nipple opening regularly.
Pouches are pre-sterilized and do not need to be washed before use. Pouches are intended for single use only. Discard or recycle after use.

If you are not using a hands-free pump, you may use the Kiinde Squeeze™ natural feeding bottle to hold the pouch during pumping. See Step 4 for instructions.
2 Cap + Label + Store 3 Thaw + Warm
Recommended
Screw down cap firmly. Leave a small amount of air in the pouch.
For safest, easiest and fastest results, thaw and warm using the Kiinde Kozii™ breastmilk warmer and bottle warmer.
Label using a marker.
Label the cap for easy viewing!
IMPORTANT: The volume markings on the pouch are most accurate when the pouch bottom is expanded. Pull the sides apart near the bottom to expand.
|| | |---| | |---|
Microwave
Store and freeze flat.
Warm running water is the next best option.
For convenient, easily accessible storage, try the Kiinde Keeper™ breastmilk storage bag organizer.

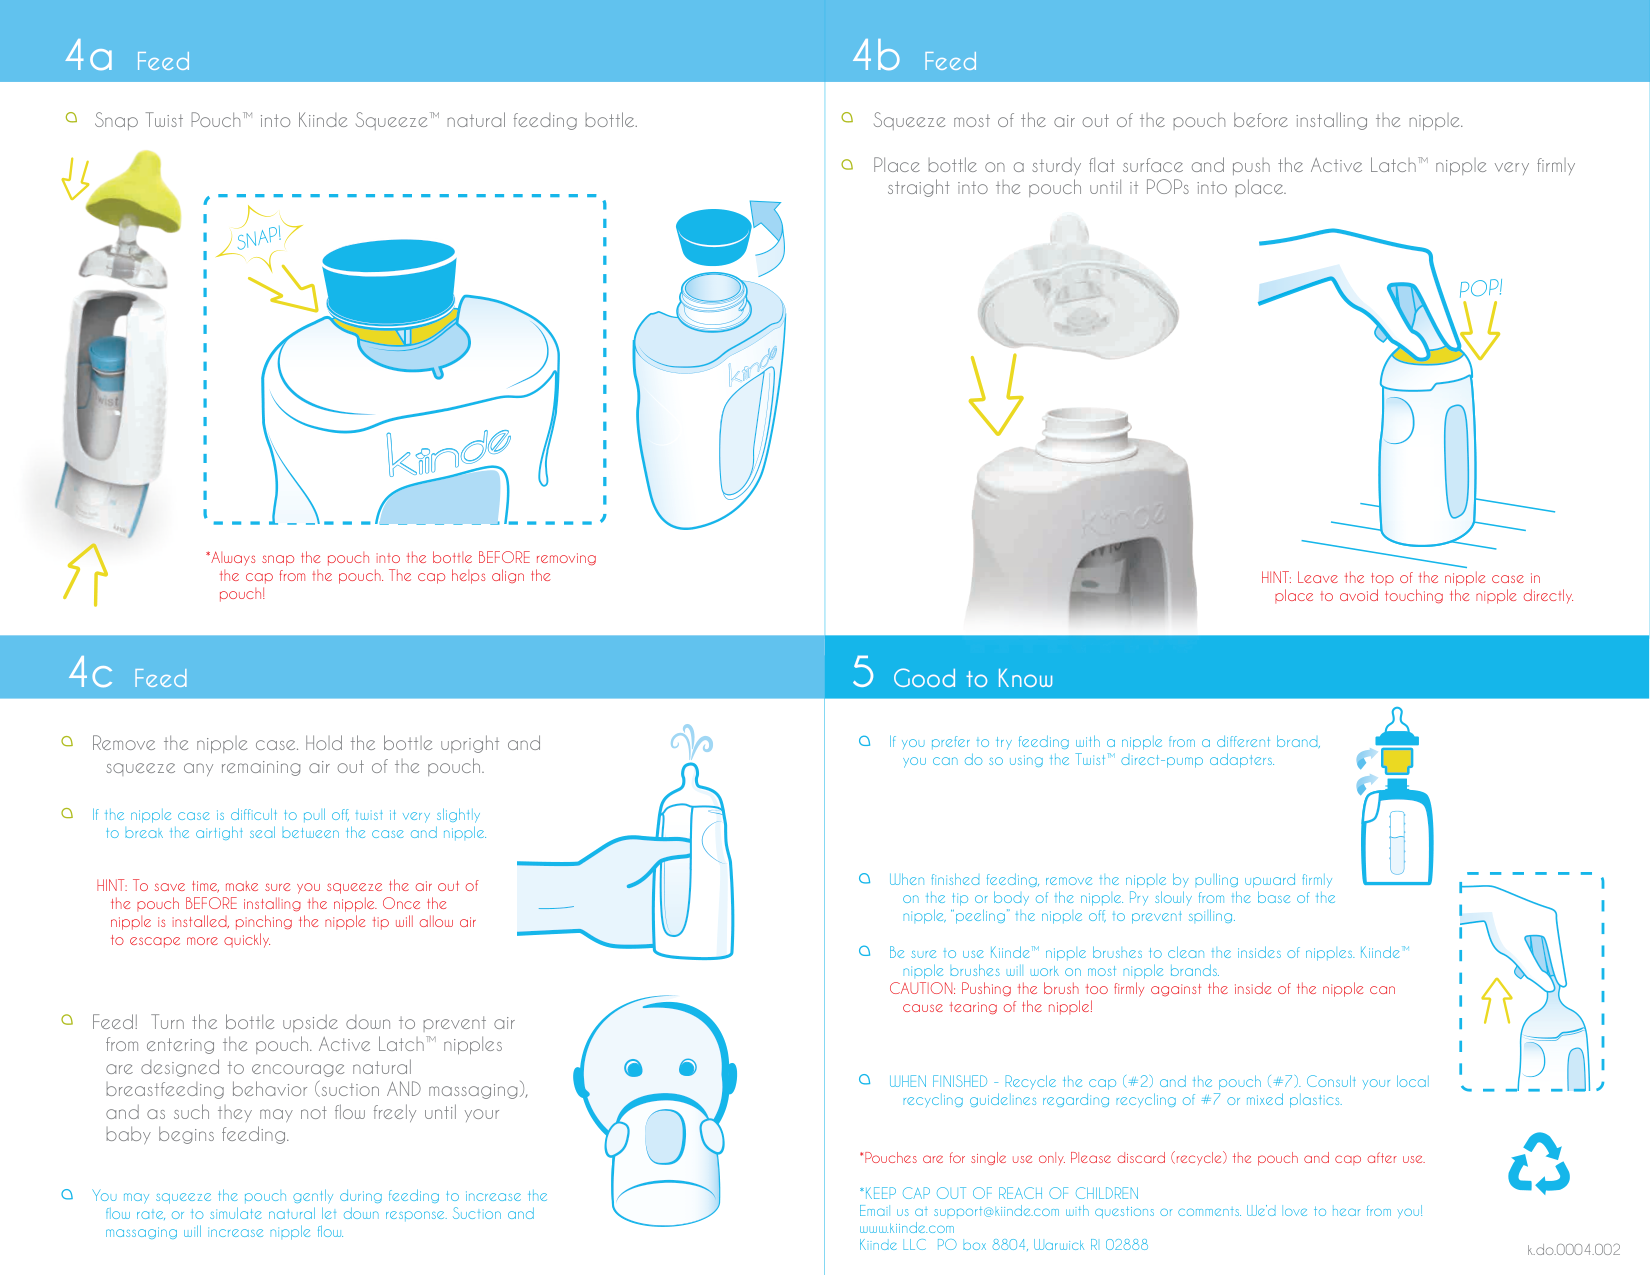
Squeeze most of the air out of the pouch before installing the nipple. Place bottle on a sturdy flat surface and push the Active Latch™ nipple very firmly
######## Snap Twist Pouch™ into Kiinde Squeeze™ natural feeding bottle.

straight into the pouch until it POPs into place.
SNAP!
POP!
*Always snap the pouch into the bottle BEFORE removing the cap from the pouch. The cap helps align the pouch!
HINT: Leave the top of the nipple case in place to avoid touching the nipple directly.
Remove the nipple case. Hold the bottle upright and squeeze any remaining air out of the pouch.
If the nipple case is difficult to pull off, twist it very slightly to break the airtight seal between the case and nipple.
HINT: To save time, make sure you squeeze the air out of the pouch BEFORE installing the nipple. Once the nipple is installed, pinching the nipple tip will allow air to escape more quickly.
Feed! Turn the bottle upside down to prevent air from entering the pouch. Active Latch™ nipples are designed to encourage natural breastfeeding behavior (suction AND massaging), and as such they may not flow freely until your baby begins feeding.
You may squeeze the pouch gently during feeding to increase the flow rate, or to simulate natural let down response. Suction and massaging will increase nipple flow.
If you prefer to try feeding with a nipple from a different brand, you can do so using the Twist™ direct-pump adapters.
When finished feeding, remove the nipple by pulling upward firmly on the tip or body of the nipple. Pry slowly from the base of the nipple, “peeling” the nipple off, to prevent spilling.
Be sure to use Kiinde™ nipple brushes to clean the insides of nipples. Kiinde™ nipple brushes will work on most nipple brands. CAUTION: Pushing the brush too firmly against the inside of the nipple can cause tearing of the nipple!
WHEN FINISHED - Recycle the cap (#2) and the pouch (#7). Consult your local recycling guidelines regarding recycling of #7 or mixed plastics.
k.do.0004.002
IMPORTANT SAFEGUARDS
TROUBLESHOOTING
If Kozii will not turn on, or if the water level does not rise when you set the timer:
Please read and retain this manual its entirety for future reference. When using electrical appliances, basic safety precautions should always be followed, including but not limited to the following:
TM
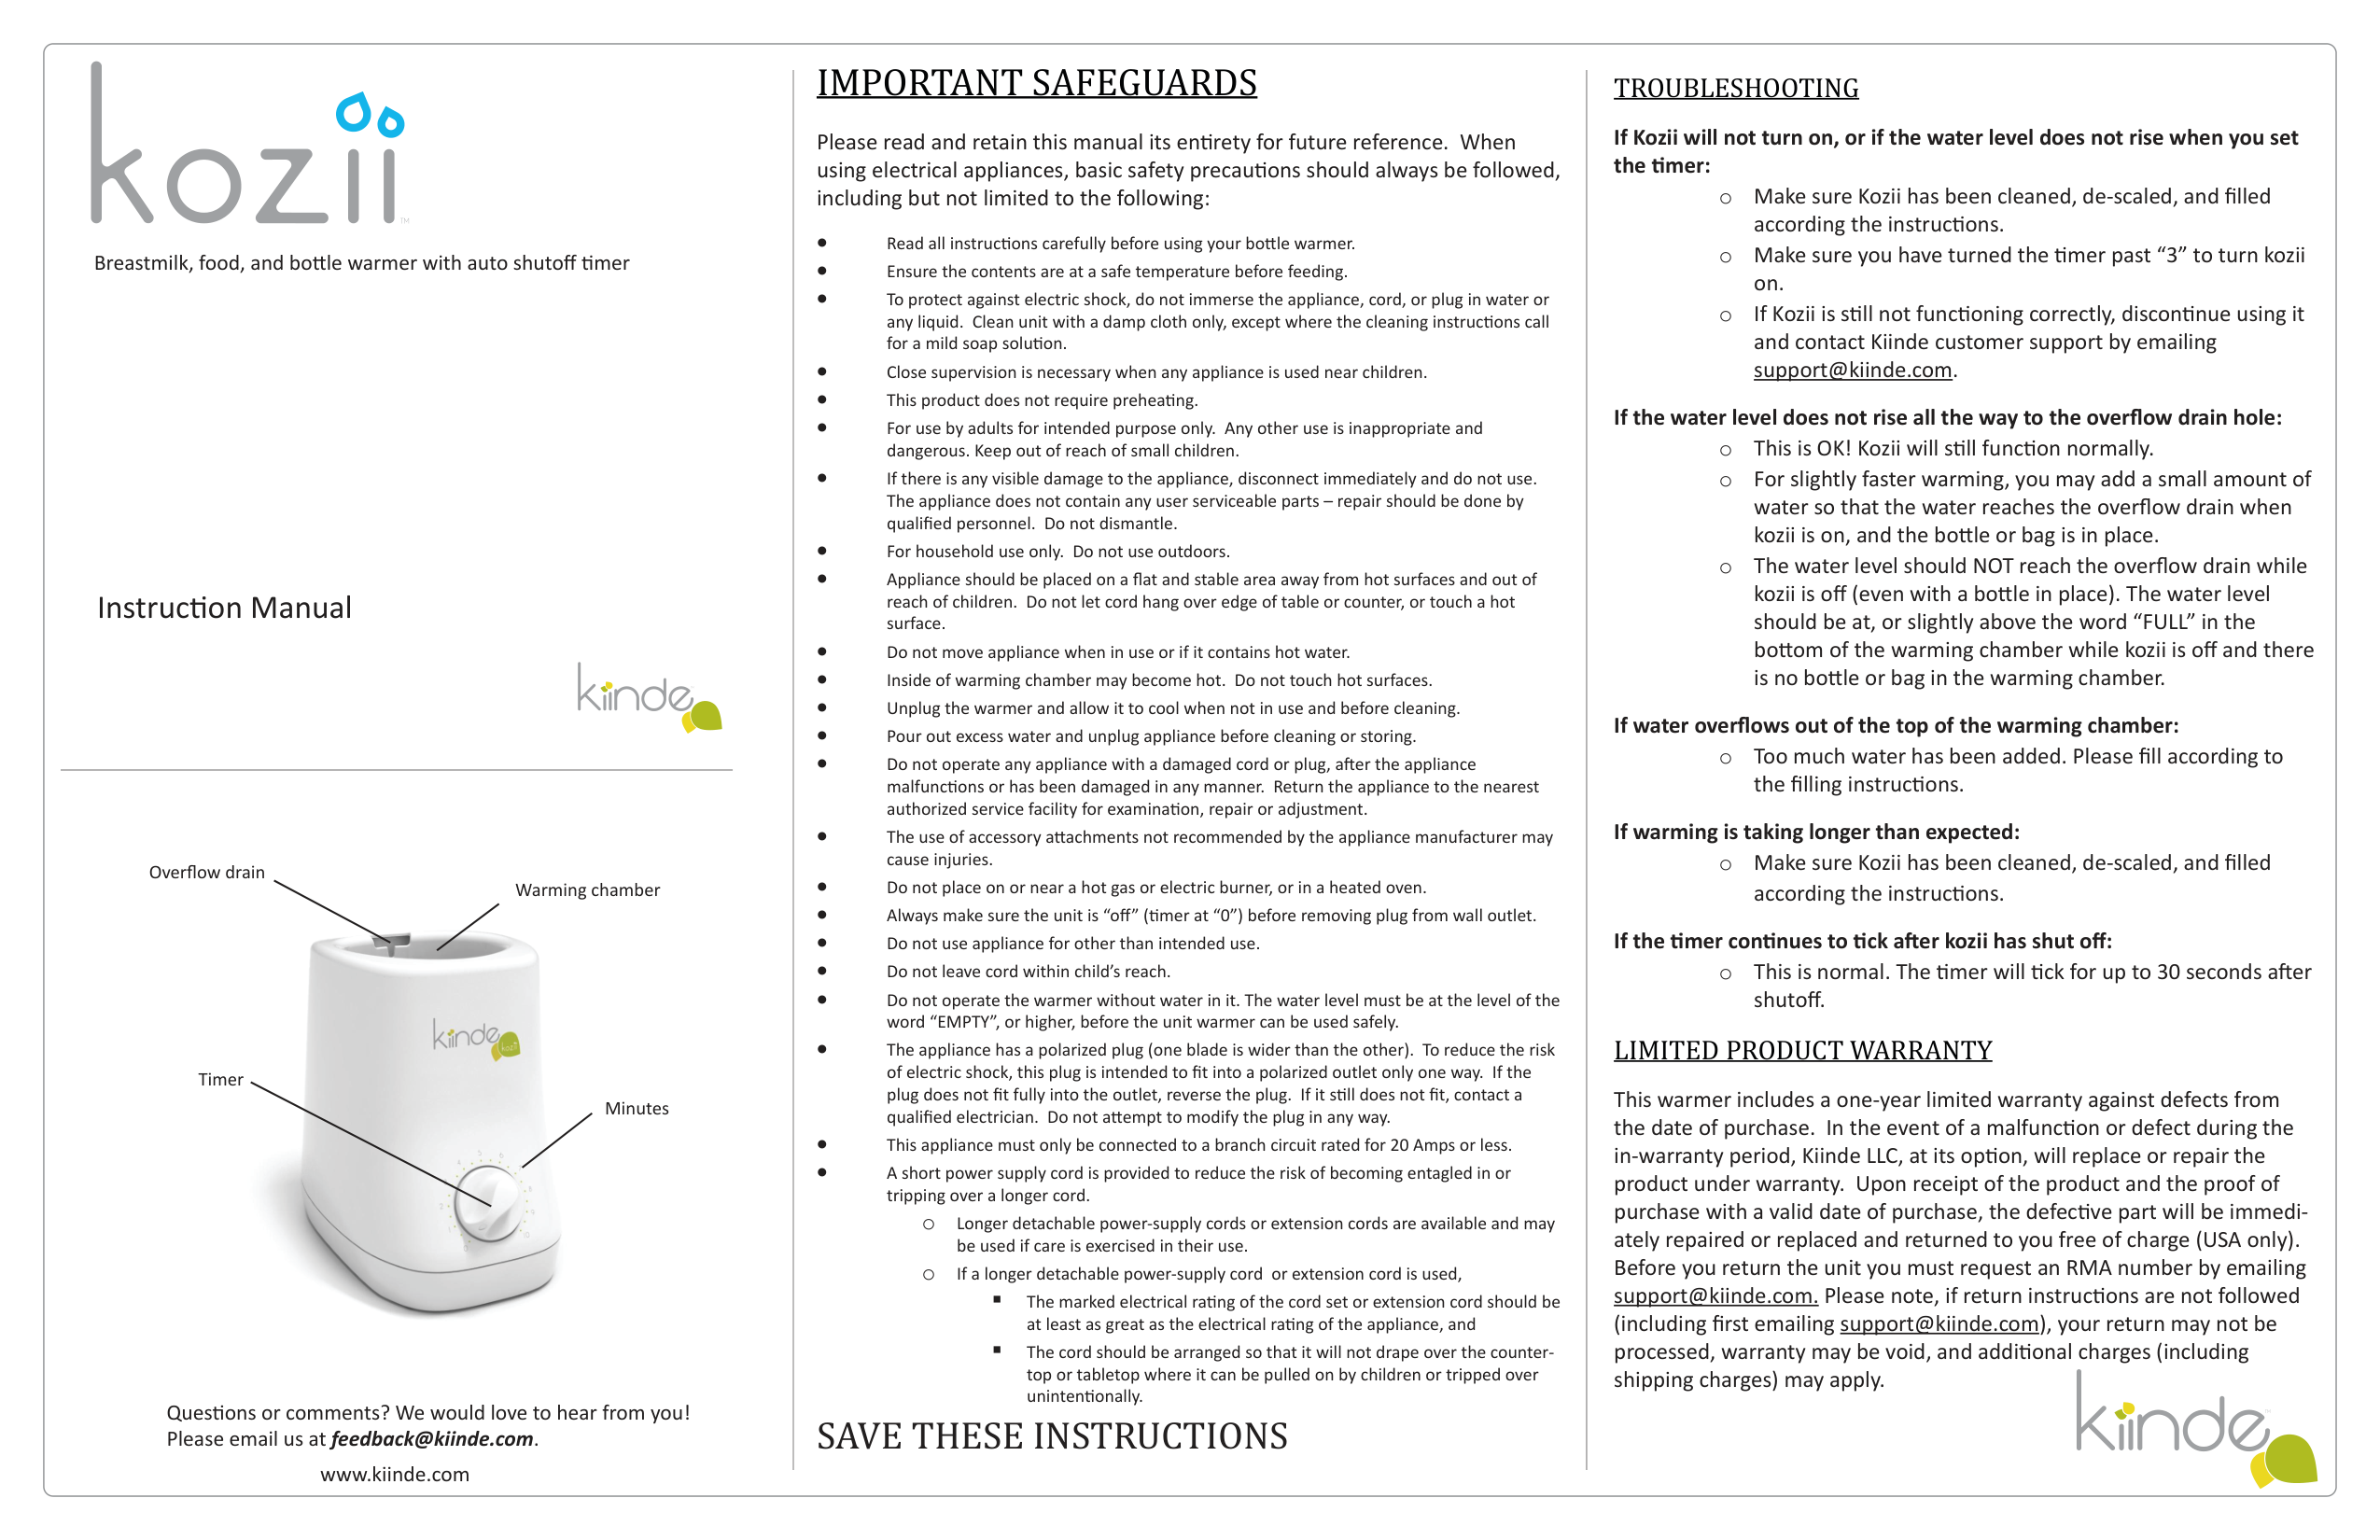
Breastmilk, food, and bottle warmer with auto shutoff timer
####### If the water level does not rise all the way to the overflow drain hole:
Instruction Manual
####### If water overflows out of the top of the warming chamber:
o Too much water has been added. Please fill according to the filling instructions.

####### If warming is taking longer than expected:
o Make sure Kozii has been cleaned, de-scaled, and filled according the instructions.
Overflow drain
Warming chamber
####### If the timer continues to tick after kozii has shut off:
o This is normal. The timer will tick for up to 30 seconds after shutoff.
##### LIMITED PRODUCT WARRANTY
Timer
This warmer includes a one-year limited warranty against defects from the date of purchase. In the event of a malfunction or defect during the in-warranty period, Kiinde LLC, at its option, will replace or repair the product under warranty. Upon receipt of the product and the proof of purchase with a valid date of purchase, the defective part will be immediately repaired or replaced and returned to you free of charge (USA only). Before you return the unit you must request an RMA number by emailing [email protected]. Please note, if return instructions are not followed (including first emailing [email protected]), your return may not be processed, warranty may be void, and additional charges (including shipping charges) may apply.
Minutes
TMQuestions or comments? We would love to hear from you! Please email us at [email protected].
SAVE THESE INSTRUCTIONS
www.kiinde.com
##### INSTRUCTIONS FOR USE
FOR YOUR SAFETY, KOZII WILL SHUT OFF PERMANENTLY IF TOO LITTLE WATER IS USED, OR IF KOZII IS RUN DRY. FOLLOW FILLING INSTRUCTIONS CAREFULLY, AND CHECK WATER LEVEL BEFORE EACH USE.
IMPORTANT: If Kozii feels warm around the base (from recent use), decrease warming time by 30 seconds.
immediately according to the cleaning instructions.
######### im03130731
##### FILLING INSTRUCTIONS
Water must be added periodically to keep Kozii’s reservoir full. Depending on several factors, you will need to add water every 5-10 uses, or every 1-2 days.
##### CLEANING INSTRUCTIONS
Always turn timer to “0” and unplug Kozii before cleaning. Do not immerse in water. Do not use scouring pads, solvents or abrasive cleaners, as these could damage kozii.
#### Every 2-3 days (CLEANING):
#### Every 2 months (DE-SCALING):
TM