
Mika Micky Baby Bassinet Bedside Sleeper Bedside Crib
Ask AI
— answers from the official manualAnswers from the official manual.
Common questions
Common Questions
10 totalHow do I properly assemble the bassinet to avoid safety hazards?
Before assembly, ensure no small parts are left within reach of children under 3 years old. Inspect all hardware for any damaged components or missing pieces before starting assembly and check periodically during use.
What is the maximum weight limit for the bassinet?
The bassinet has a maximum weight limit of 11.3 kg (25 lbs) or when the infant begins to crawl, whichever comes first.
How do I clean and maintain the bassinet for hygiene?
Use mild cleaning solution and a damp cloth on frame parts; avoid submersion. The sheet is machine washable in cold water with no bleach, tumble dry on low heat and remove promptly.
How do I set up the Co-Sleeper mode safely?
Ensure that the adult bed height exceeds the bassinet sides for containment. Adjust straps so they secure the crib to the side of the bed properly without gaps.
How do I adjust the frame height once assembled?
To change the frame's height, slide button A on both sides and lift drop-bar out before setting back into desired holes. Ensure bassinet remains level and secure.
What is the warranty period for this product?
The product is warranted to be free from defects for a period of 90 days from the date of purchase under normal use.
Full Manual
16 pages
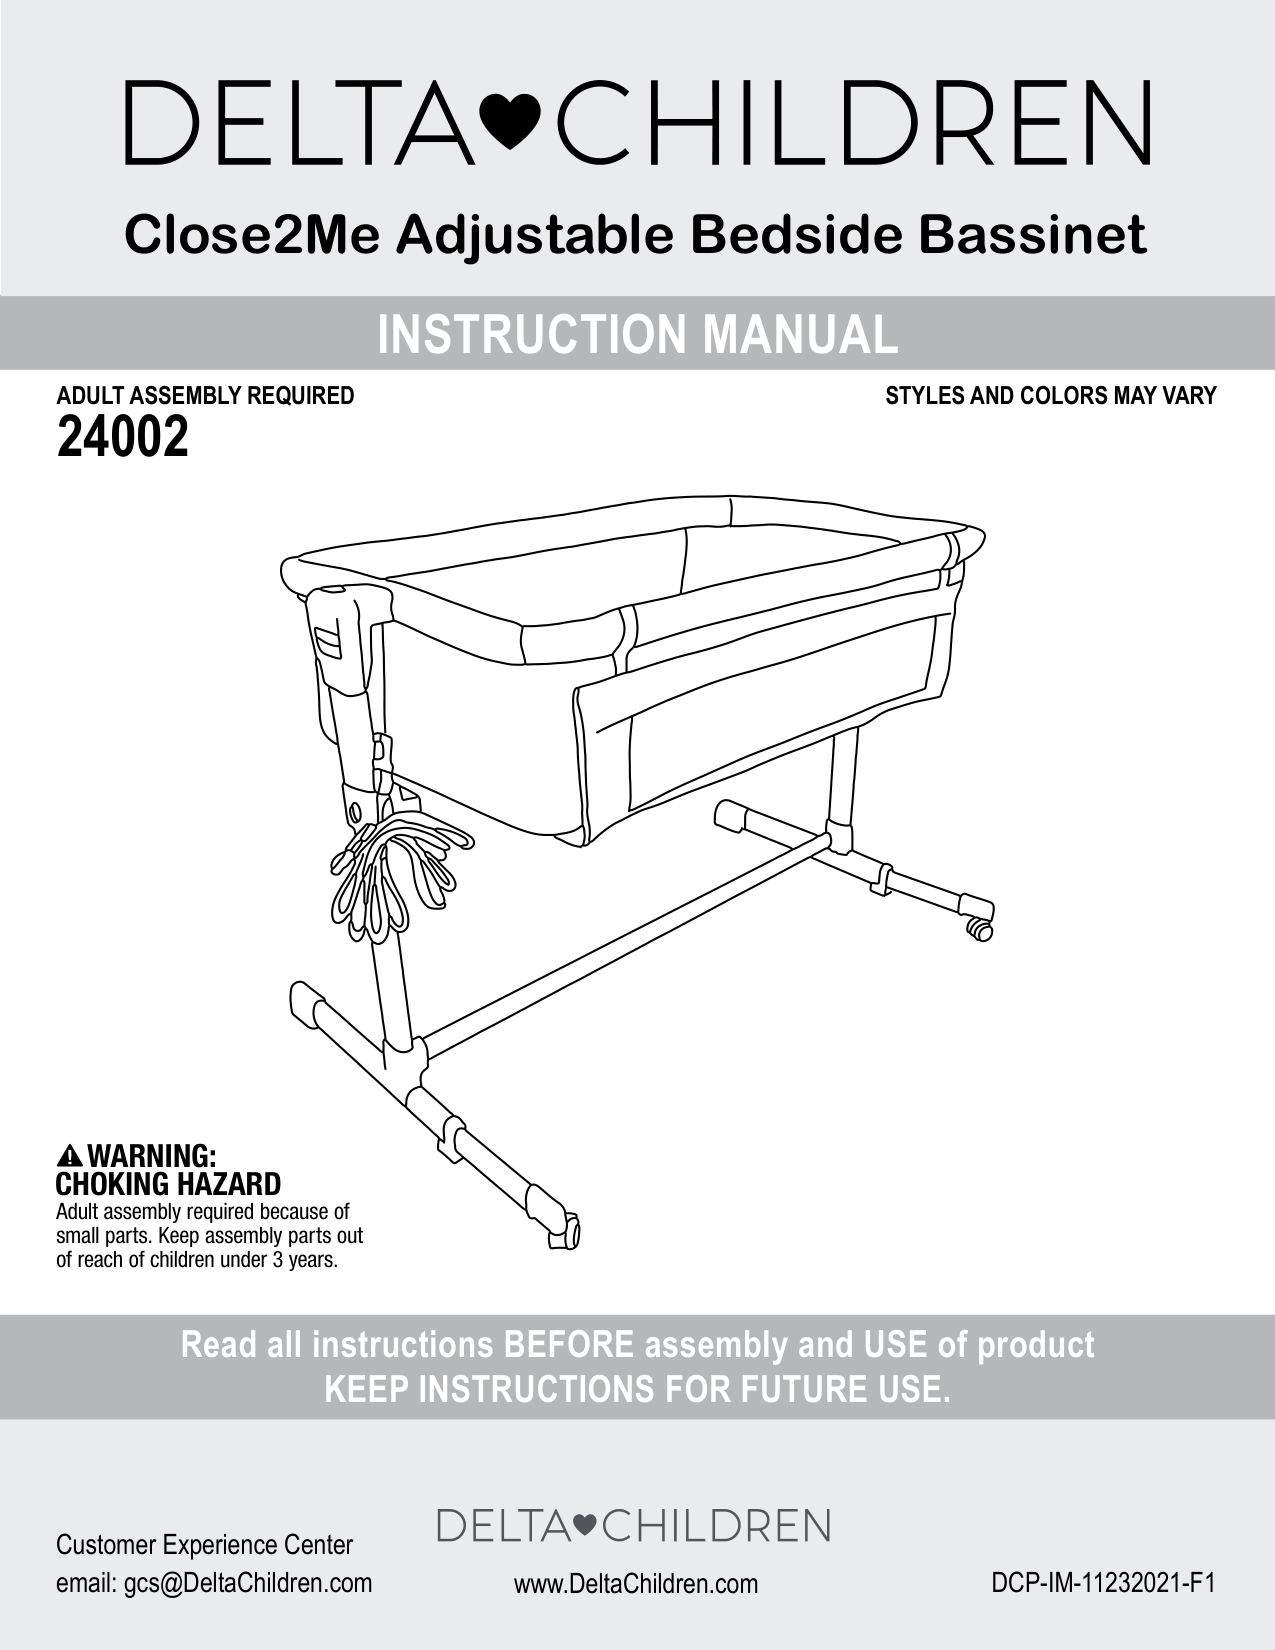
Close2Me Adjustable Bedside Bassinet
INSTRUCTION MANUAL
ADULT ASSEMBLY REQUIRED
24002
STYLES AND COLORS MAY VARY
######## WARNING:
######## CHOKING HAZARD
Adult assembly required because of small parts. Keep assembly parts out of reach of children under 3 years.
Read all instructions BEFORE assembly and USE of product KEEP INSTRUCTIONS FOR FUTURE USE.
Customer Experience Center email: [email protected] DCP-IM-11232021-F1www.DeltaChildren.com
Consumer Information
##### WARNING
WARNING: Do not use this bassinet if you cannot exactly follow the accompanying instructions. Failure to follow these warnings and instructions could result in serious injury or death.
FALL HAZARD: To help prevent falls, DO NOT use this product when the infant begins to push up on hands and knees or has reached manufacturer’s recommended maximum weight of 11.3kg (25lbs), whichever comes first.

| | | | | |---|---|---|---| | | |11.3kg (25lb)| |


#### Before returning this product to the store! Let’s see if we can assist you!
Visit our site for easy to follow instructions along with some Tricks and Tips assembly video’s https://www.deltachildren.com/pages/instructions
Please contact our Consumer Experience Center for assistance at [email protected]. To better assist you please have your Style #, Lot # and Manufacturer Date information available along with the part number that you need assistance with.
In order to protect your investment, don’t forget to register your product. You may also wish to consider purchasing our extended warranty. Visit https://www.deltachildren.com/pages/extended-warranty for more details.
“All Final”, “As Is” or Third Party/Liquidator sales are not covered under our Limited Manufacturer Warranty..
LIMITED MANUFACTURER WARRANTY
This Delta product is warranted to be free from defects for a period of 90 days from the date of purchase under normal use. This warranty extends only to the original retail purchaser and is valid only when supplied with proof of purchase, or if received as a gift, when the registration is on file with Delta. This limited manufacturer warranty does not cover the following:

TO REGISTER YOUR PRODUCT for important safety alerts and updates to your product please visit www.deltachildren.com TO REPORT A PROBLEM, please log on to www.deltachildren.com and click the Consumer Care Tab, or contact us by email at [email protected] Date of Purchase: _____________ (you should also keep your receipt)
EXTENDED WARRANTY
DON’T MISS YOUR CHANCE TO BE COVERED FOR ALL OF LIFES MISHAPS! With Delta’s Extended Warranty, you’re covered for mechanical failure from normal use or if your item stops working due to normal wear and tear, plus all those unexpected surprises.
2 YEARS OF PROTECTION
######### For Additional Information: Simply visit our Website, register your product, and add the Extended Warranty
https://www.deltachildren.com/pages/product-registration Extended Warranty only available in the following States: Arkansas, Colorado, Delaware, District of Columbia, Georgia, Idaho, Illinois, Indiana, Iowa, Kansas, Kentucky, Louisiana, Maryland, Michigan, Mississippi, Missouri, Nebraska, Nevada, New Hampshire, New York, North Carolina, North Dakota, Pennsylvania, Rhode Island, South Dakota, Tennessee, Utah, West Virginia
###### PARTS
########### IMPORTANT! Please remove all parts from the package and identify them before assembly.

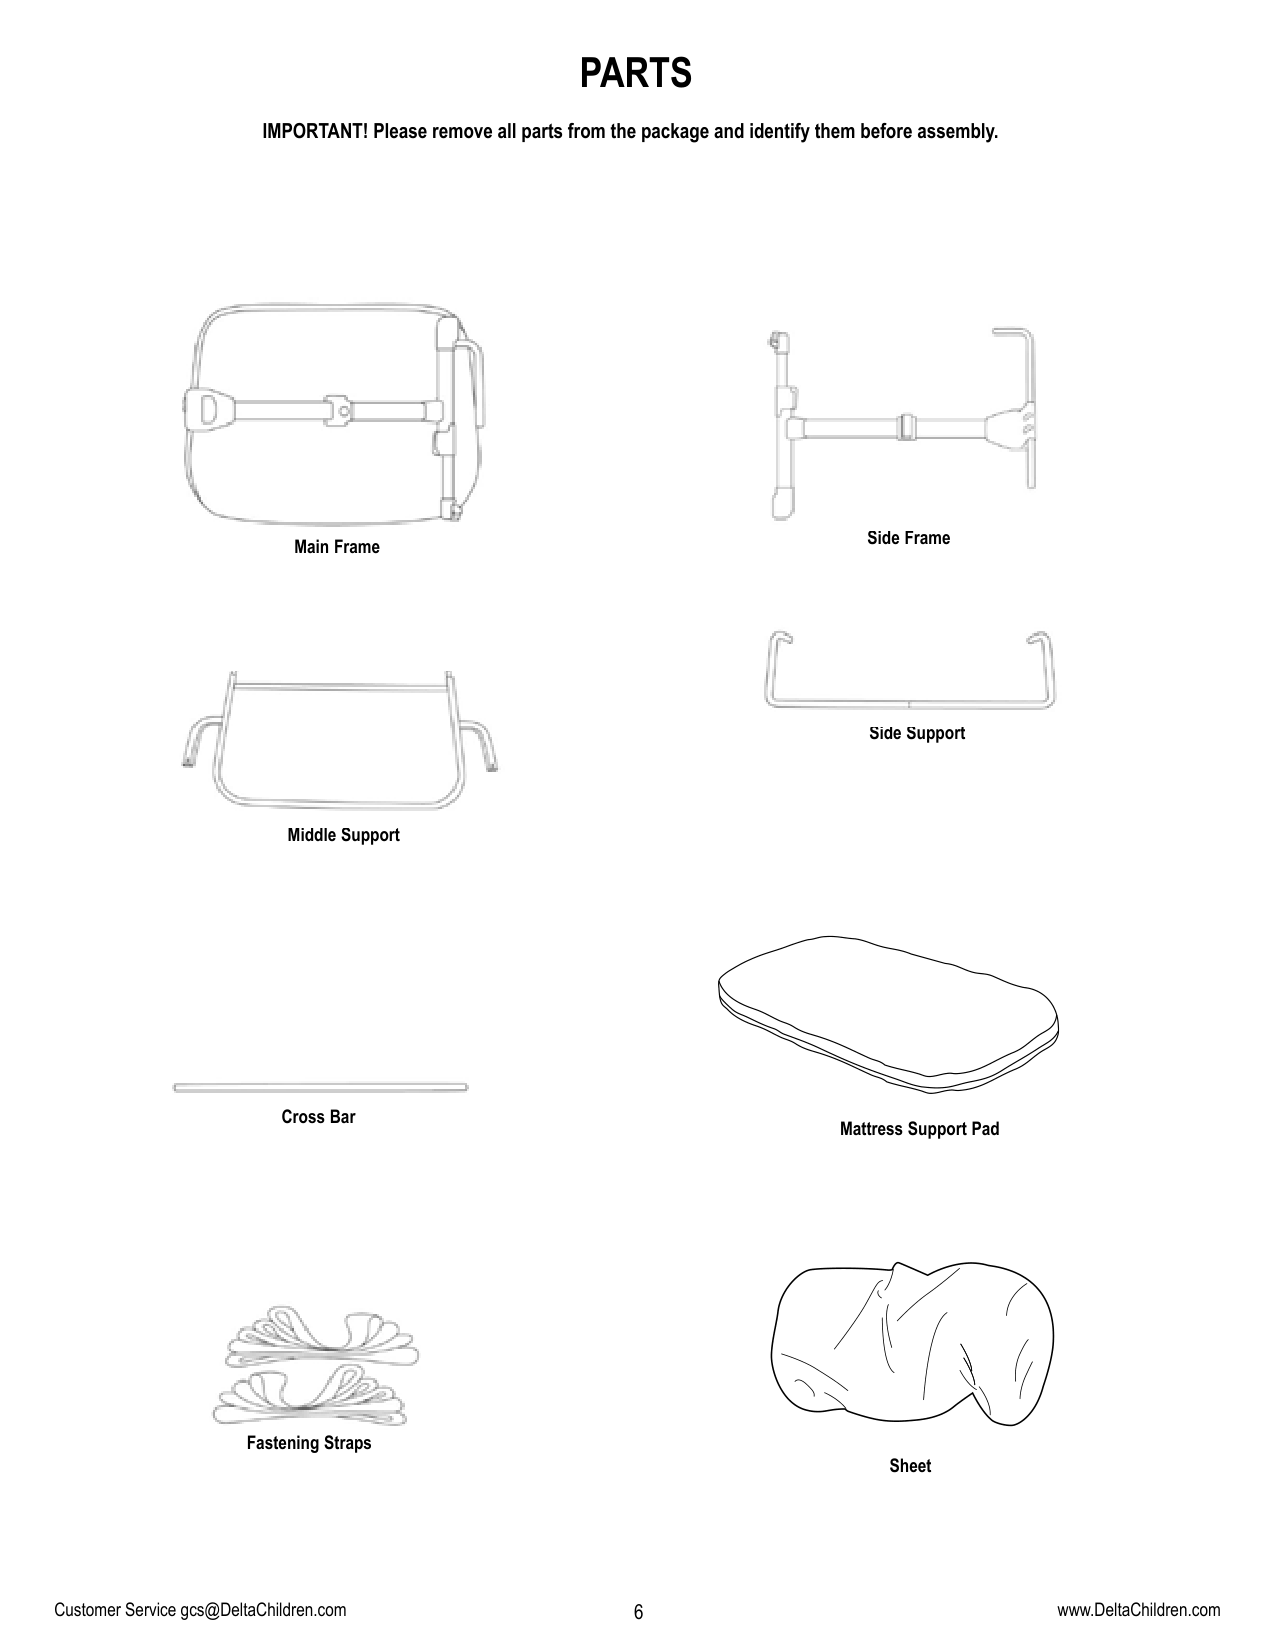

Side Frame Main Frame

Middle Support

Side Support

Cross Bar
Mattress Support Pad

Fastening Straps
Sheet

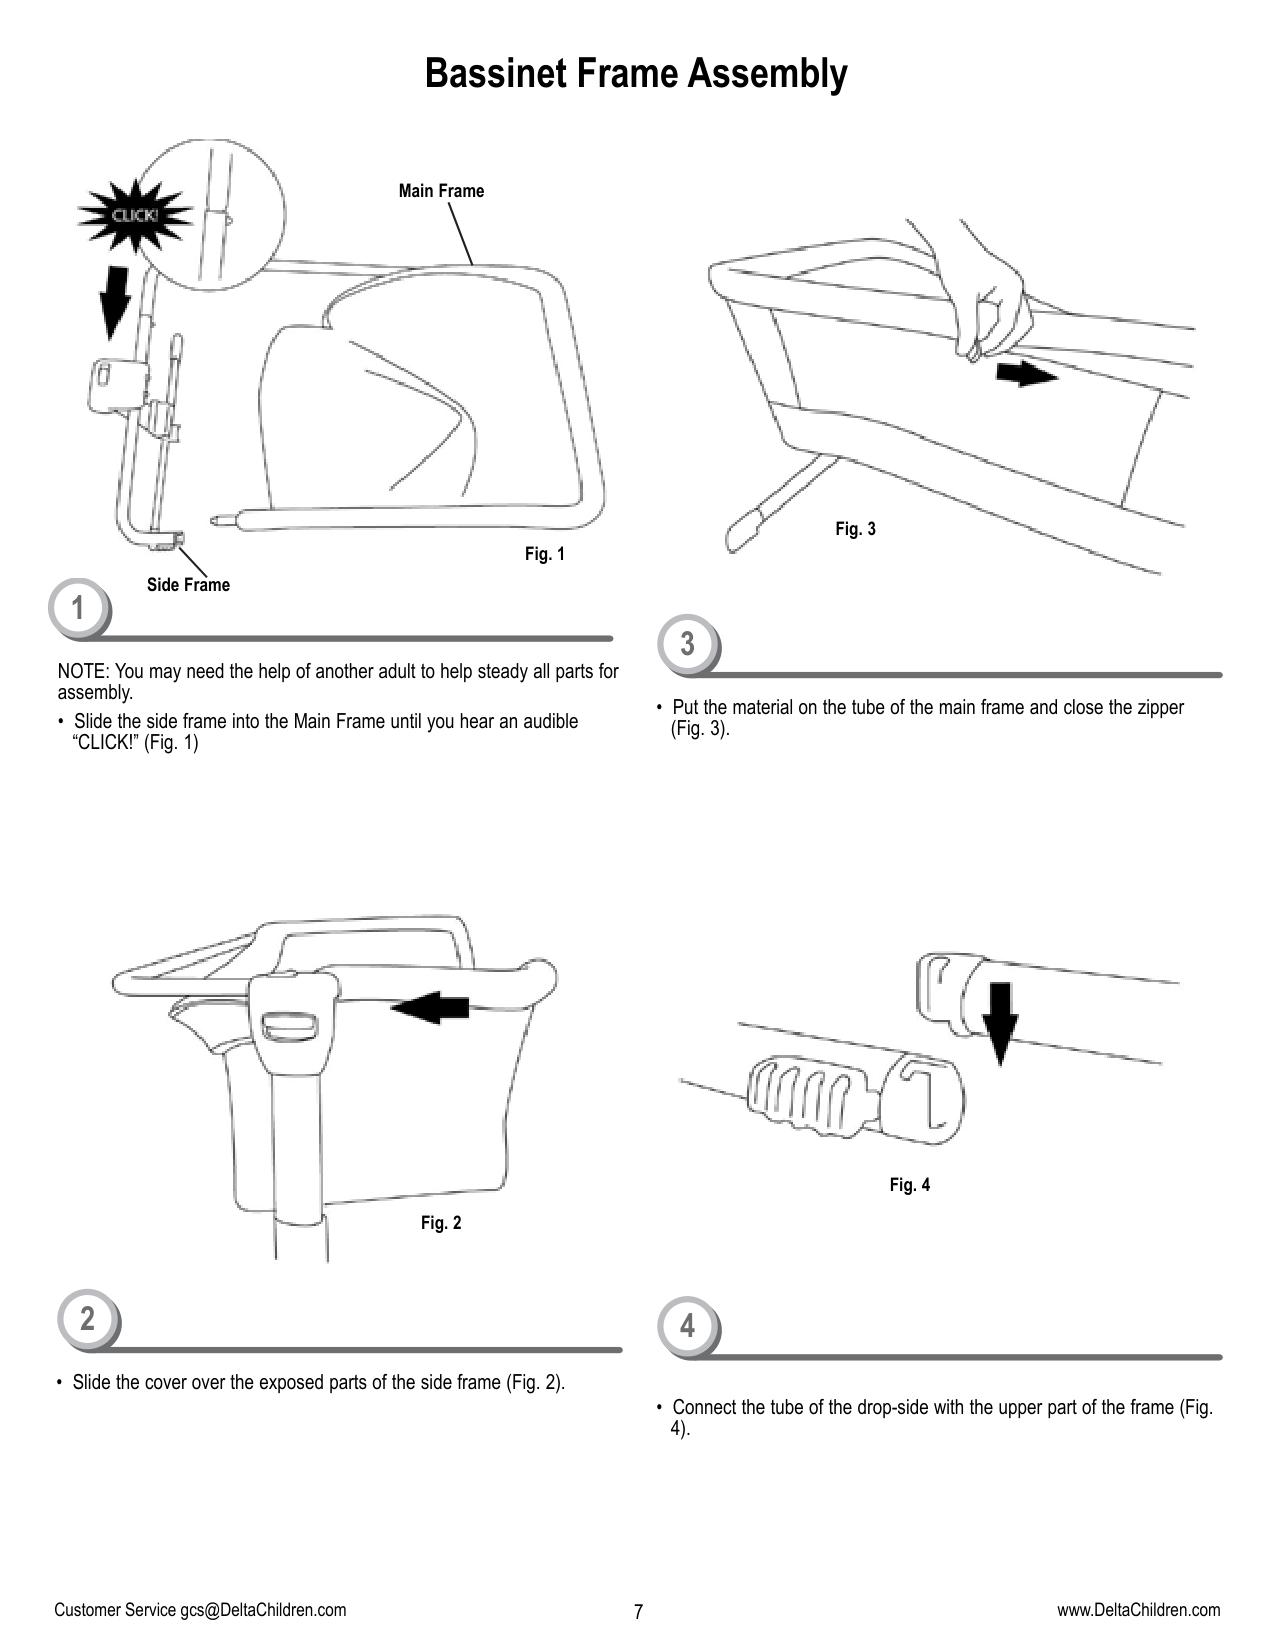
Main Frame

Fig. 3
Fig. 1
Side Frame
####### 1
####### 3
NOTE: You may need the help of another adult to help steady all parts for assembly.
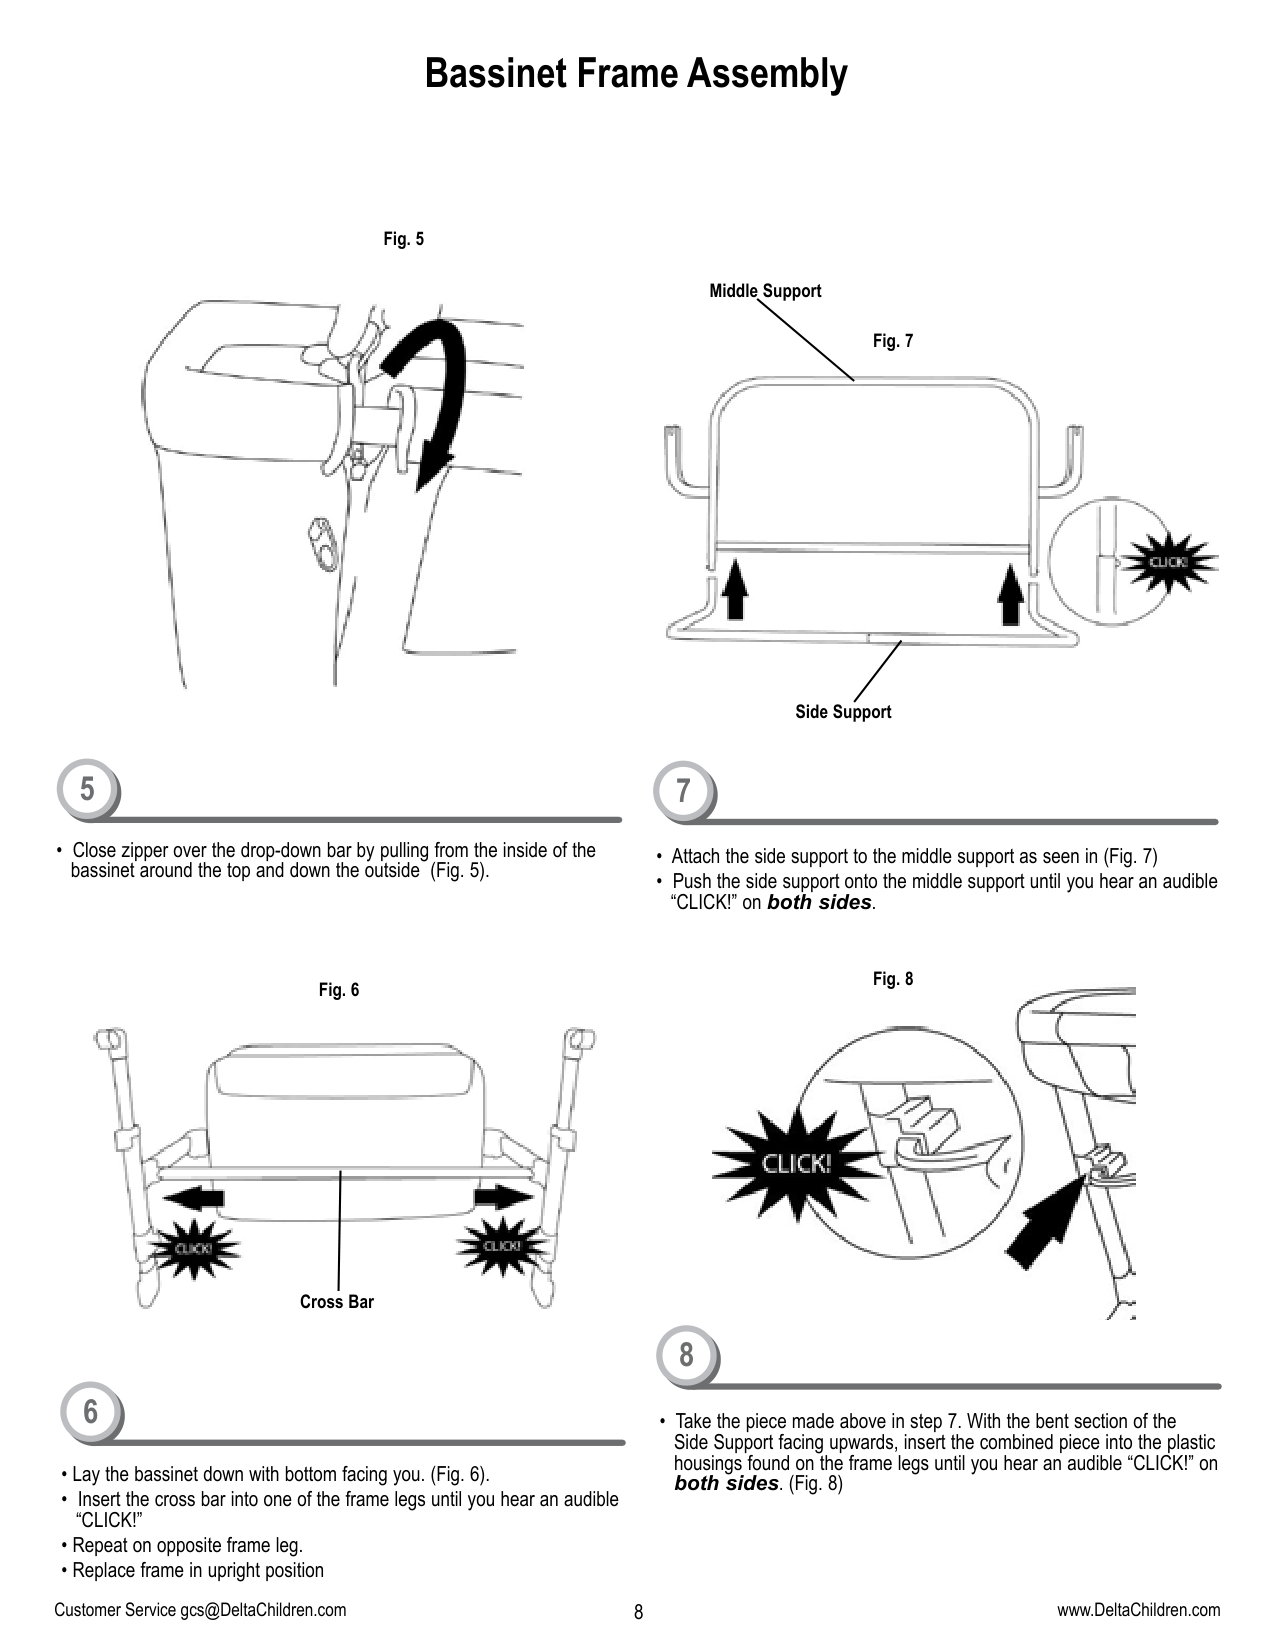


Fig. 4
Fig. 2
####### 42
Fig. 5

Middle Support
Fig. 7

Side Support
Fig. 8
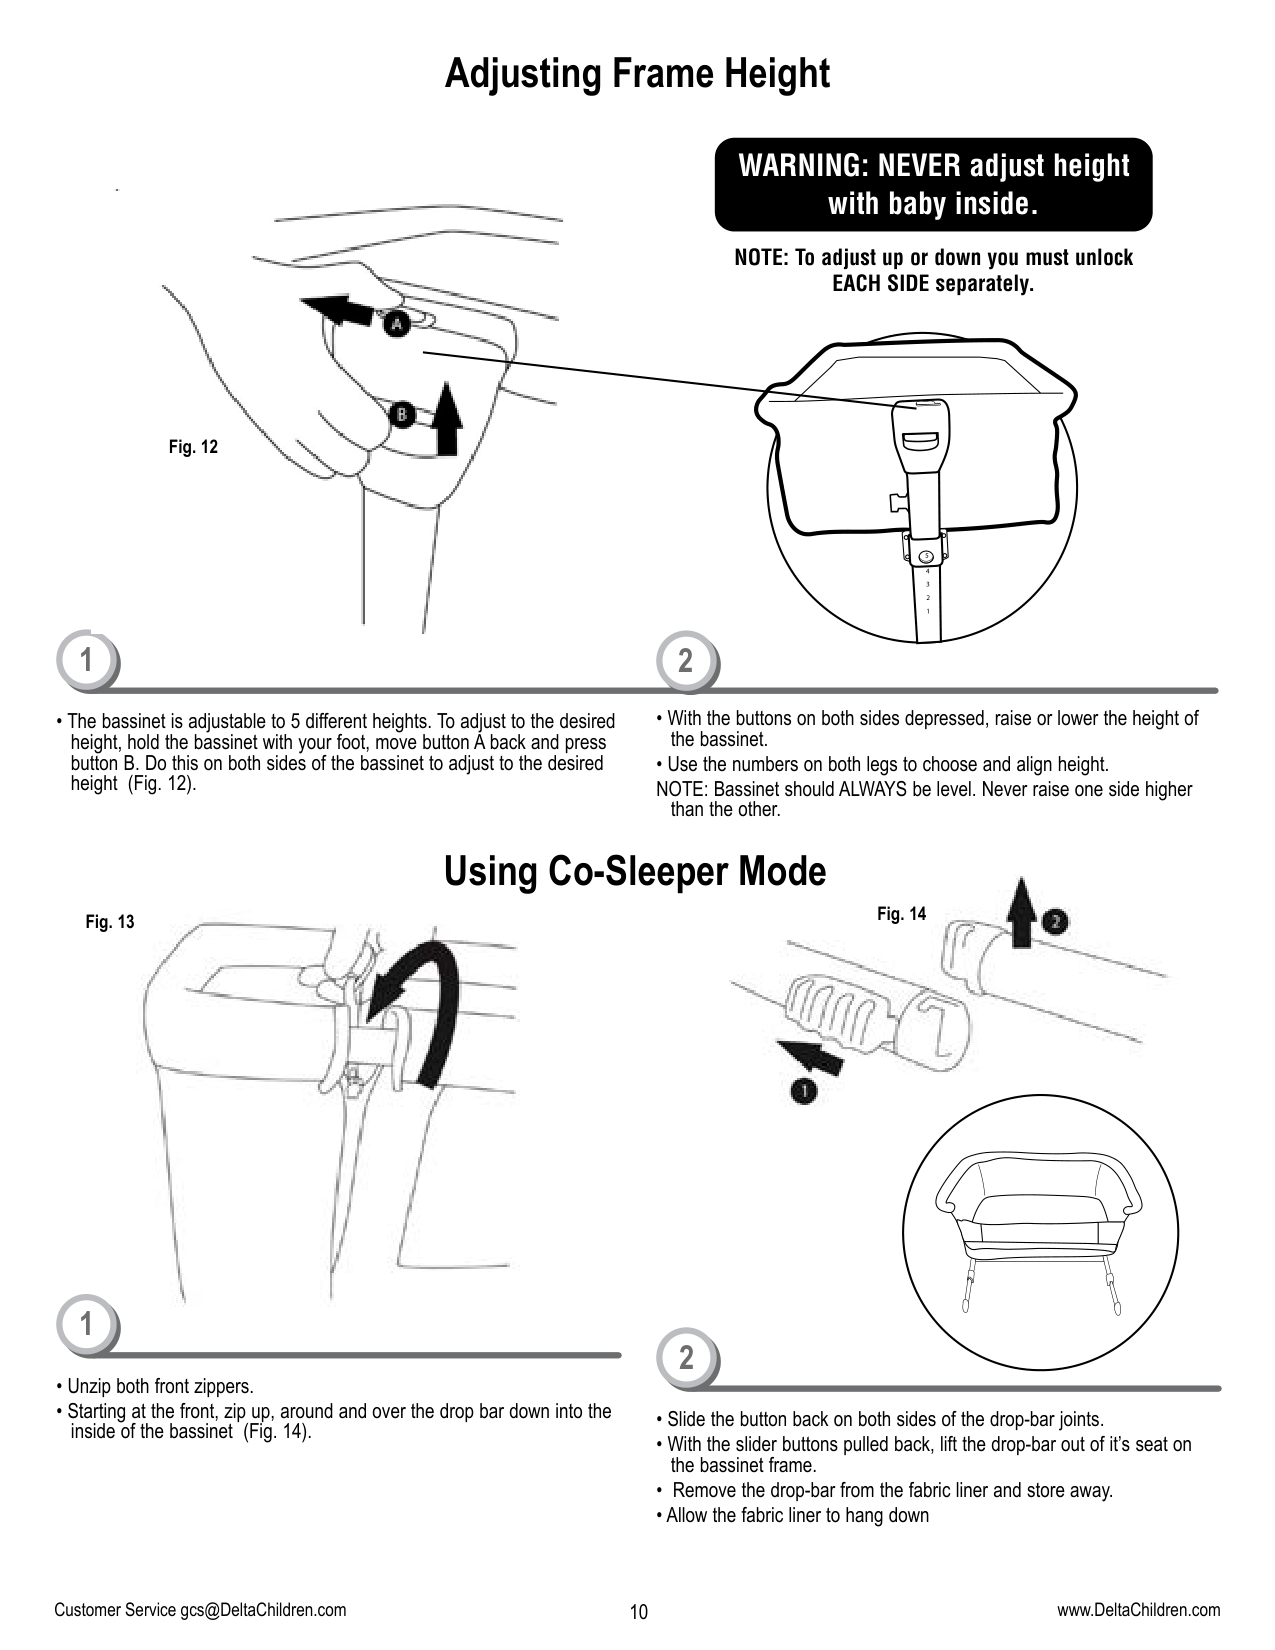

Fig. 6

Cross Bar
both sides. (Fig. 8)• Lay the bassinet down with bottom facing you. (Fig. 6).


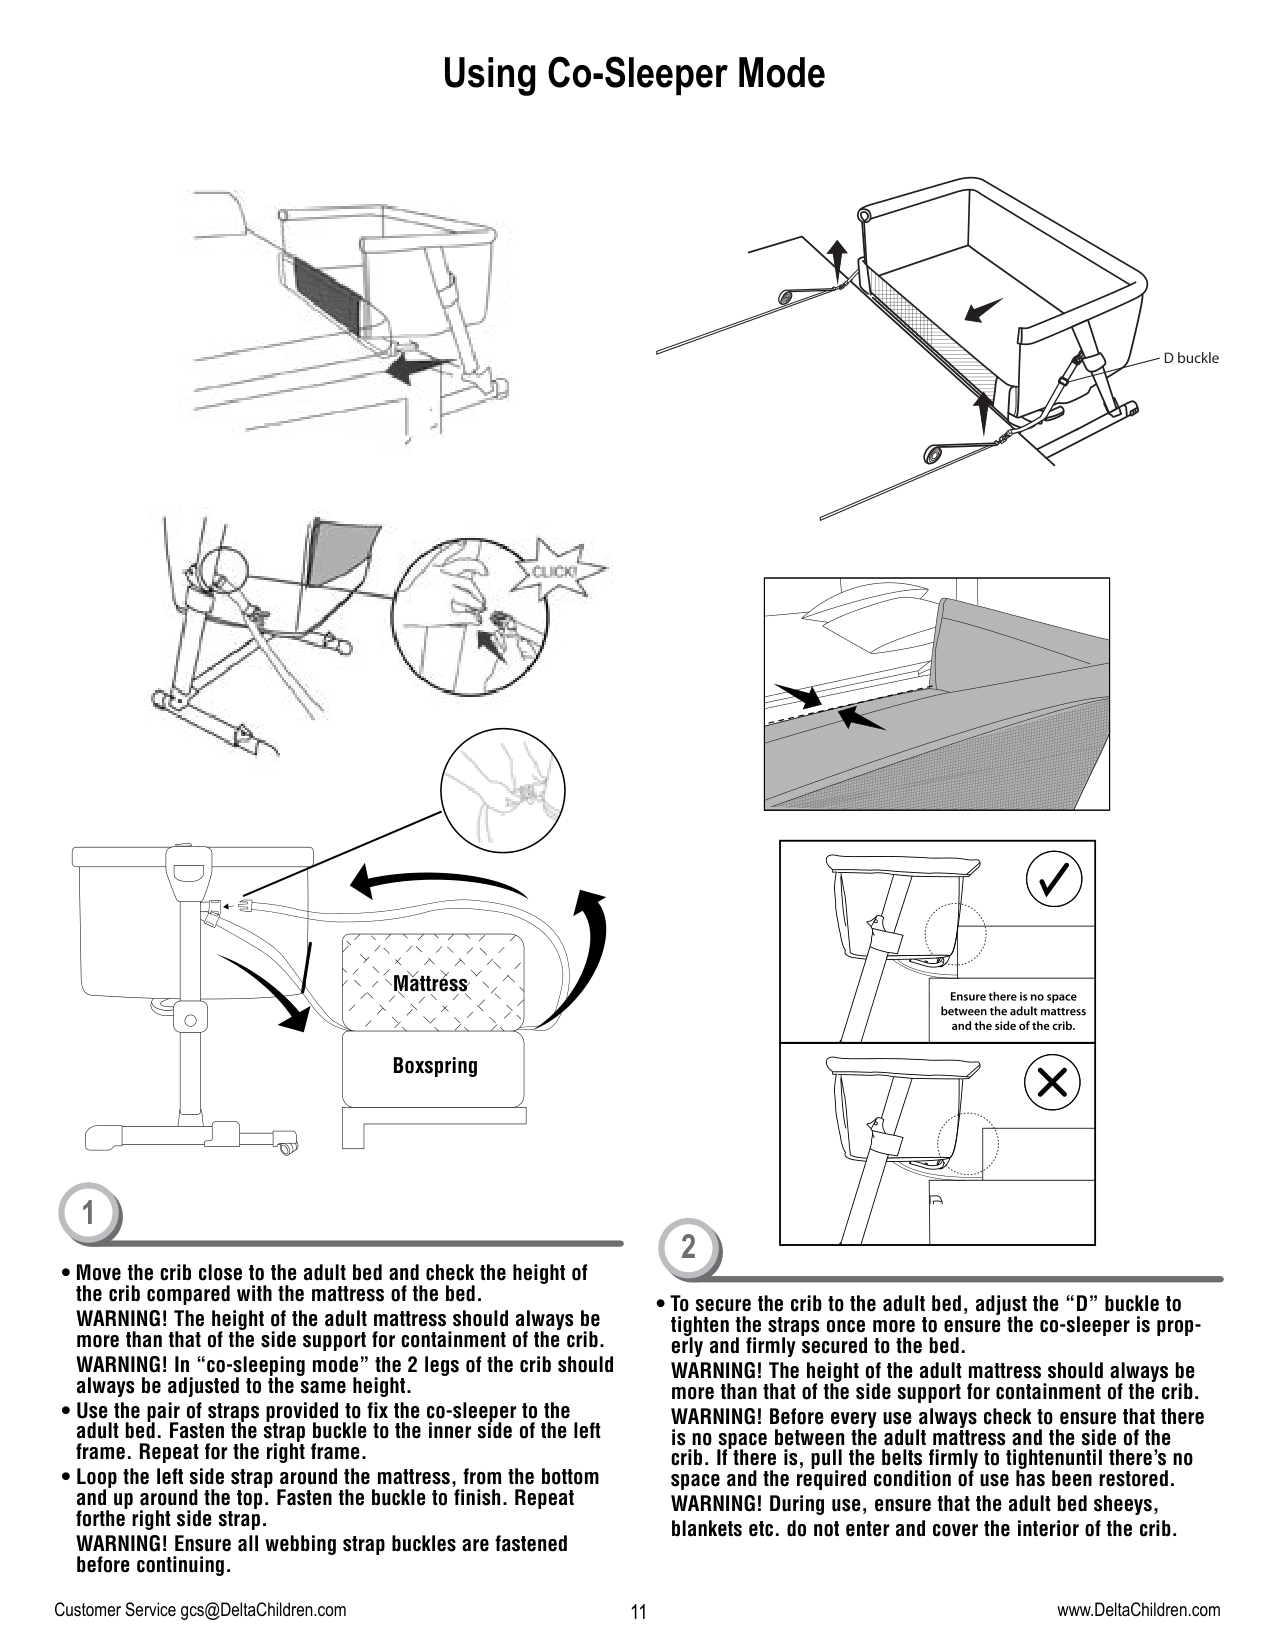


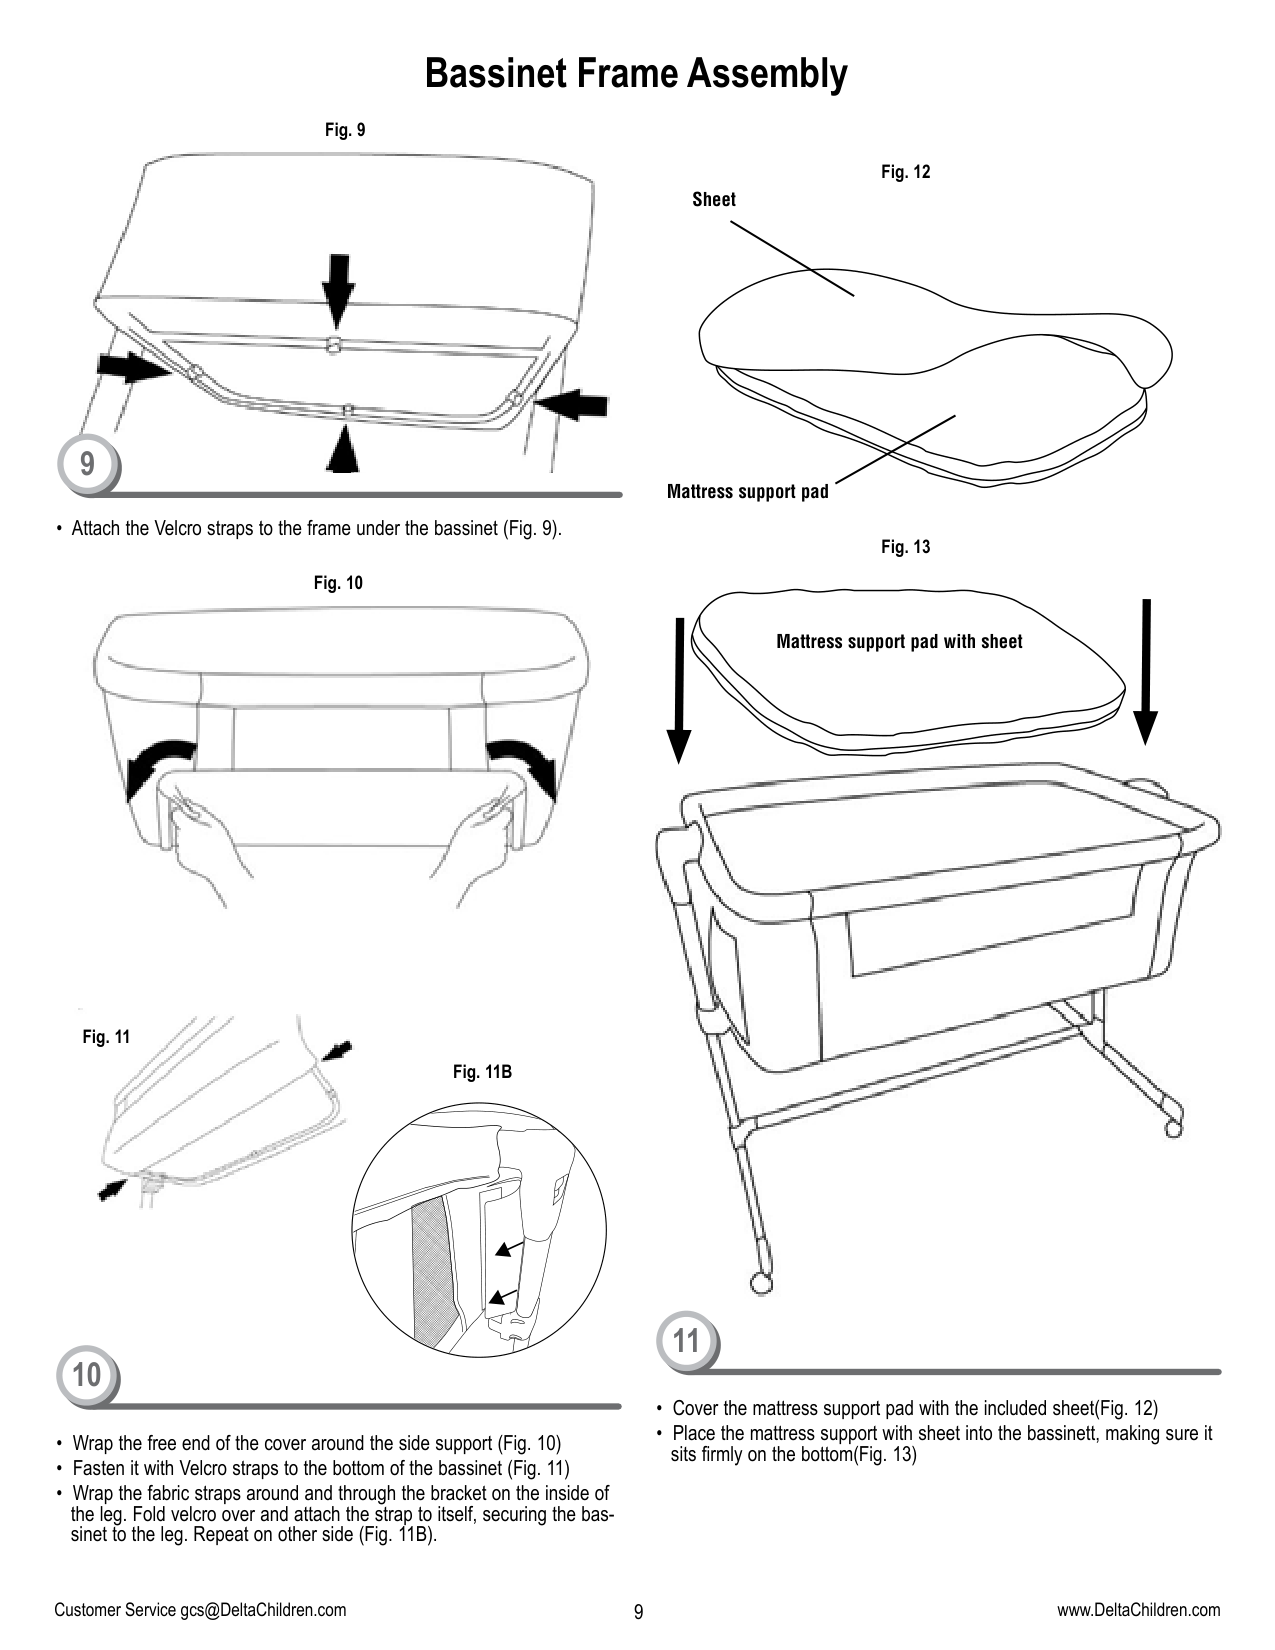
Fig. 11
Fig. 11B
Sheet
Mattress support pad
Mattress support pad with sheet
####### 11
Fig. 12
WARNING: NEVER adjust height with baby inside.
NOTE: To adjust up or down you must unlock EACH SIDE separately.
2
1
Adjusting Frame Height


than the other.
###### Using Co-Sleeper Mode

Fig. 13 Fig. 14
1
2
###### Using Co-Sleeper Mode


Mattress
Boxspring
1
2

• To secure the crib to the adult bed, adjust the “D” buckle to tighten the straps once more to ensure the co-sleeper is properly and firmly secured to the bed. WARNING! The height of the adult mattress should always be more than that of the side support for containment of the crib. WARNING! Before every use always check to ensure that there is no space between the adult mattress and the side of the crib. If there is, pull the belts firmly to tightenuntil there’s no space and the required condition of use has been restored. WARNING! During use, ensure that the adult bed sheeys, blankets etc. do not enter and cover the interior of the crib.
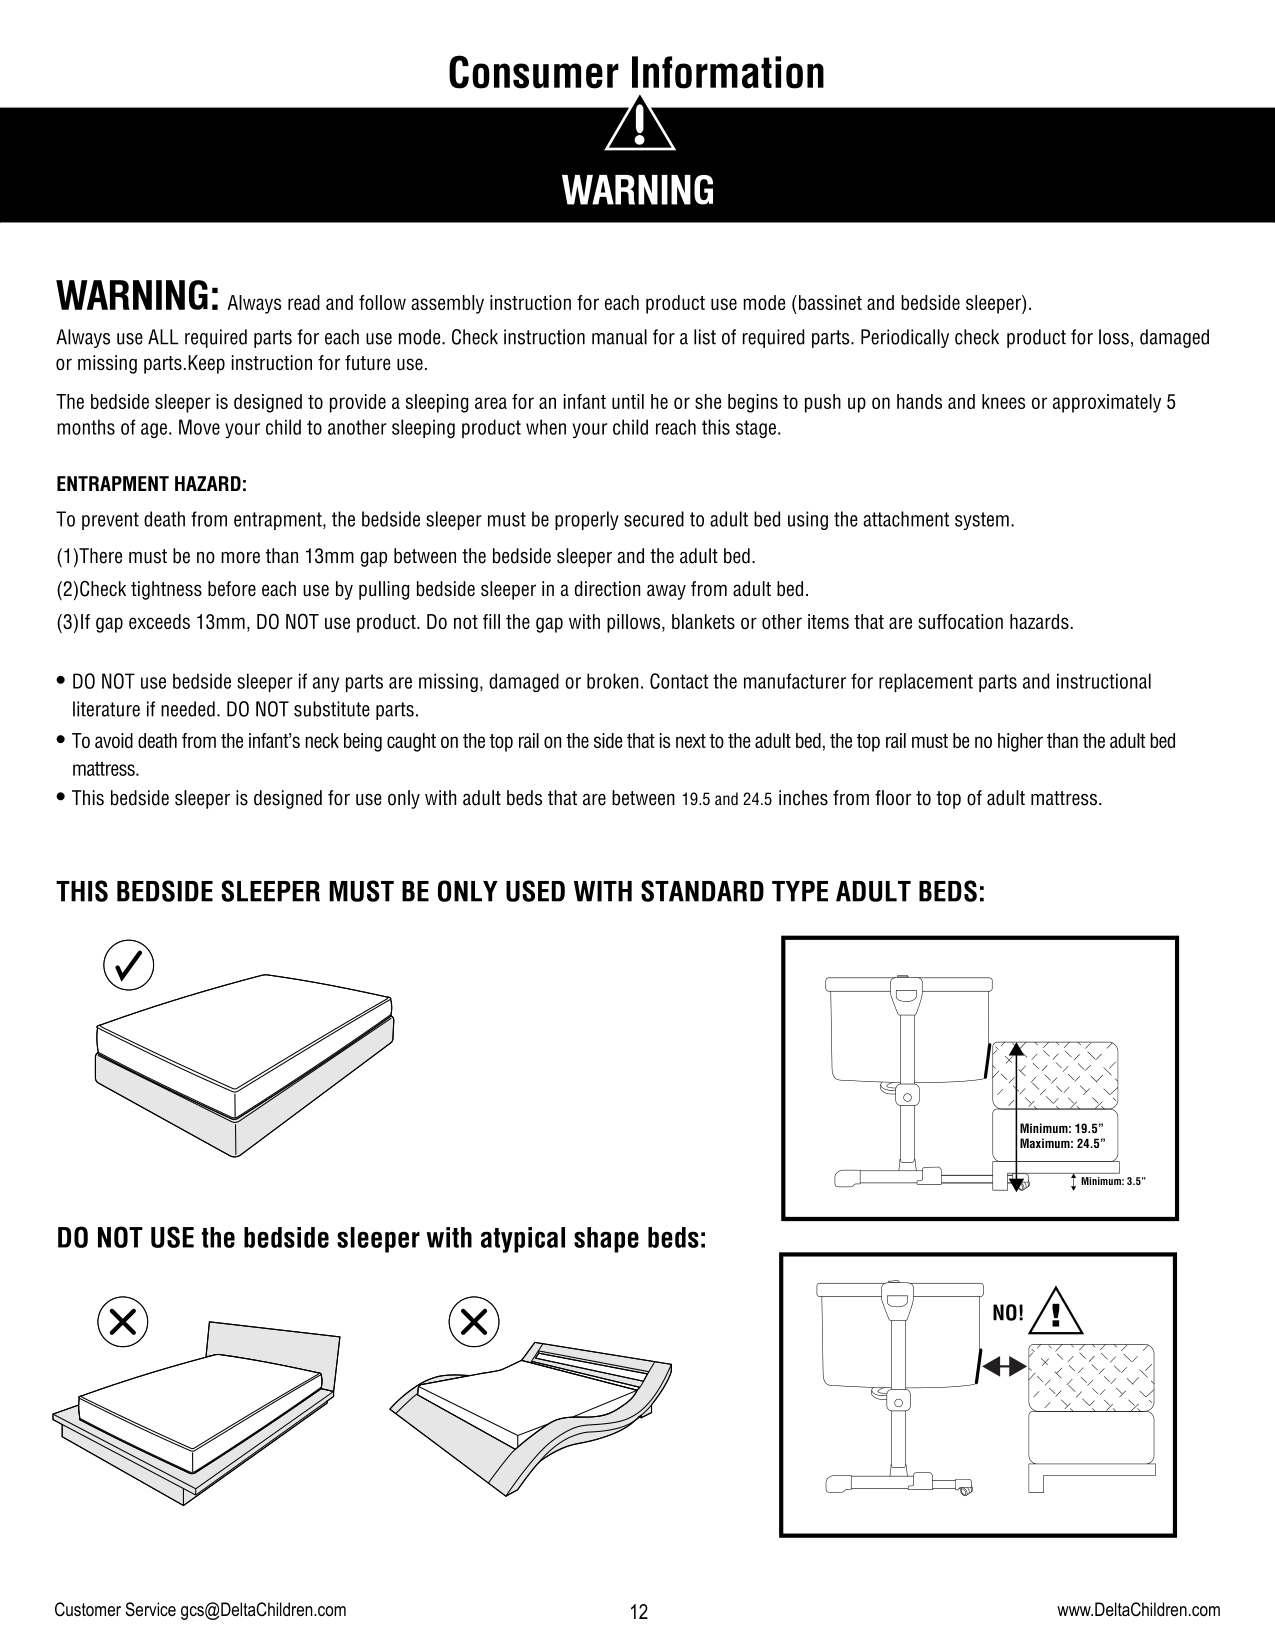
############ 19.5 and 24.5
|Minimum: 19.5” Maximum: 24.5”
Minimum: 3.5”| |---|
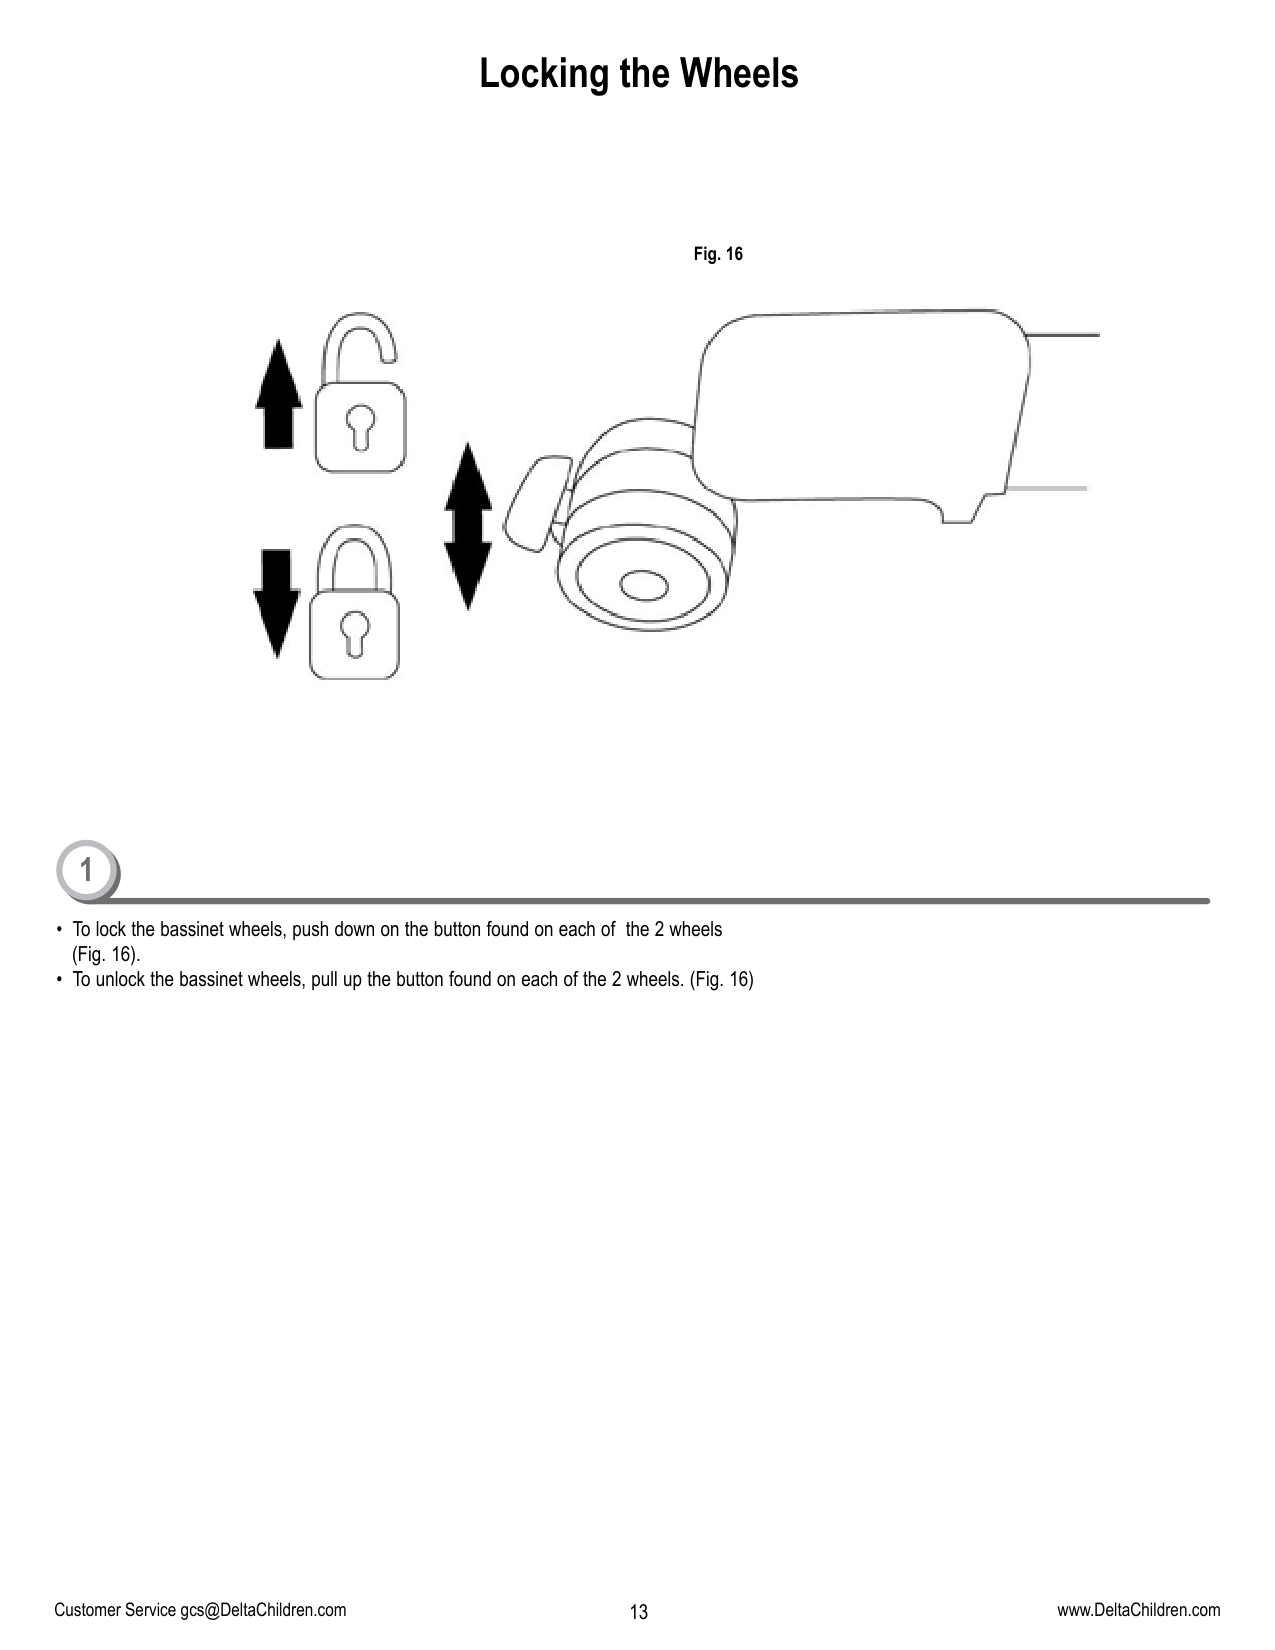
###### Locking the Wheels

Fig. 16
1

###### Consumer Information
########## Read all instructions BEFORE assembly and USE of product. KEEP INSTRUCTIONS FOR FUTURE USE.
CAUTION: - Changes or modifications not expressly approved by the party responsible for compliance could void the user’s authority to operate the equipment.
###### Care and Maintenance
Delta Children's Products Corp. 114 West 26th Street New York, NY 10001 [email protected] www.DeltaChildren.com
| | |---|
© 2022 Delta Children's Products. All rights reserved.