
Ask AI
— answers from the official manualAnswers from the official manual.
Common questions
Common Questions
10 totalHow do I set up the Park Life Parking Disc?
To activate your Park Life, place three fingers on top of the large round button on the back and turn it clockwise until two small dots align and the logo is parallel to the inner display. Within 15 seconds, 'hours' will flash indicating that the unit is ready to be set up (page 2).
What should I do if my Park Life does not adhere properly to the windshield?
Ensure the windscreen temperature is at least +15°C, as adhesive pads are less effective at lower temperatures. Warm the glass using a car heater or carefully with a hairdryer before attaching (page 3).
How do I set the digital clock manually?
Press and hold down the button ❶ for about 10 seconds until 'hours' flashes in the display, then press repeatedly on the upper part of the button ❷ to set the correct hour. Press ❶ once to set 'minutes', adjusting them with the same button ❷ (page 3).
Is it possible to manually activate or deactivate daylight savings time?
To disable automatic adjustment for daylight saving time, press and hold both buttons until 'hours' and 'minutes’ show ‘oN:Su', release button ❶ but continue holding button ❷ until the display shows 'oF:Su'. The clock will now be set without auto-adjustment features (page 4).
How do I manually adjust the time on my Park Life if it’s in parking mode?
Press and hold button ❷ to increment the clock by 15 minute intervals; this manual adjustment is only available when the device is set into a parked state (page 5).
Where should I mount the Park Life on my windshield?
Mount inside at the lower right corner of the windscreen where all four adhesive pads are in contact with the glass and ensure easy access to buttons (page 4).
Full Manual
2 pages
|Udviklet af Needit Denmark Designet af John Sebastian
Brugervejledning
Park Life
G u
a
r a n t e
e d
P
r
o
d
u
c
t
L
i
f
e
t
i
m
e
B
a
t
t
e
r
y|1
Lad os komme i gang med din Park Life
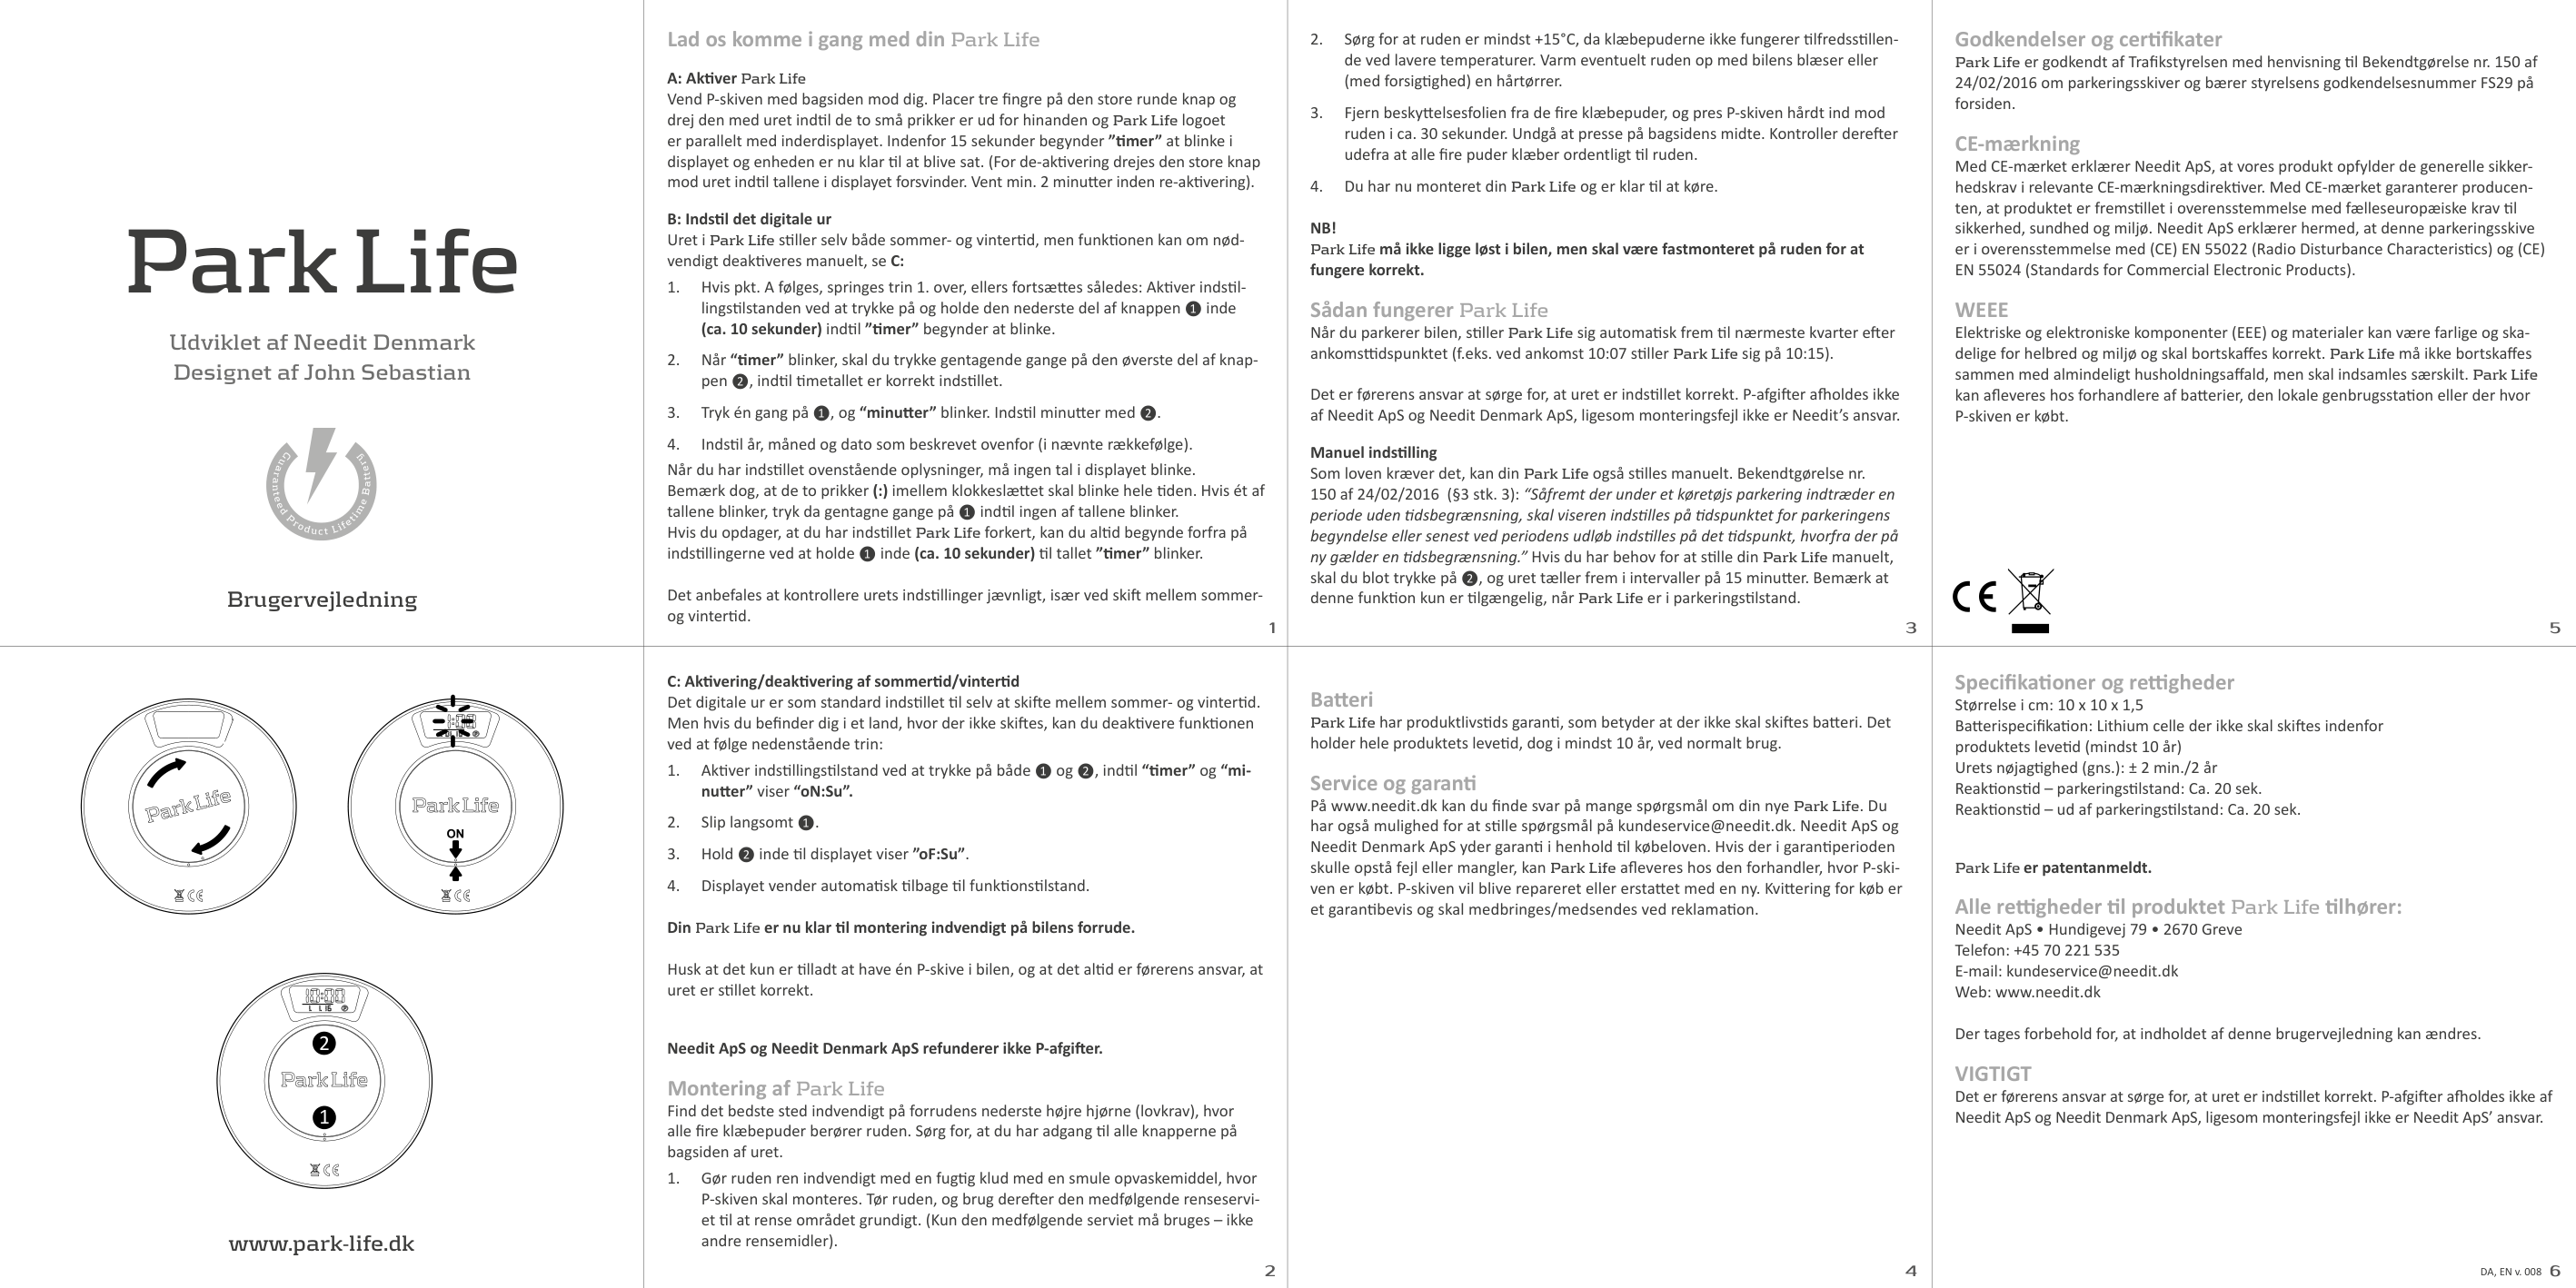
A: Aktiver Park Life Vend P-skiven med bagsiden mod dig. Placer tre fingre på den store runde knap og drej den med uret indtil de to små prikker er ud for hinanden og Park Life logoet er parallelt med inderdisplayet. Indenfor 15 sekunder begynder ”timer” at blinke i displayet og enheden er nu klar til at blive sat. (For de-aktivering drejes den store knap mod uret indtil tallene i displayet forsvinder. Vent min. 2 minutter inden re-aktivering).
B: Indstil det digitale ur Uret i Park Life stiller selv både sommer- og vintertid, men funktionen kan om nødvendigt deaktiveres manuelt, se C:
1. Hvis pkt. A følges, springes trin 1. over, ellers fortsættes således: Aktiver indstillingstilstanden ved at trykke på og holde den nederste del af knappen ❶ inde (ca. 10 sekunder) indtil ”timer” begynder at blinke.
2. Når “timer” blinker, skal du trykke gentagende gange på den øverste del af knappen ❷, indtil timetallet er korrekt indstillet.
3. Tryk én gang på ❶, og “minutter” blinker. Indstil minutter med ❷.
4. Indstil år, måned og dato som beskrevet ovenfor (i nævnte rækkefølge).
Når du har indstillet ovenstående oplysninger, må ingen tal i displayet blinke. Bemærk dog, at de to prikker (:) imellem klokkeslættet skal blinke hele tiden. Hvis ét af tallene blinker, tryk da gentagne gange på ❶ indtil ingen af tallene blinker. Hvis du opdager, at du har indstillet Park Life forkert, kan du altid begynde forfra på indstillingerne ved at holde ❶ inde (ca. 10 sekunder) til tallet ”timer” blinker.
Det anbefales at kontrollere urets indstillinger jævnligt, især ved skift mellem sommerog vintertid.|3
2. Sørg for at ruden er mindst +15°C, da klæbepuderne ikke fungerer tilfredsstillende ved lavere temperaturer. Varm eventuelt ruden op med bilens blæser eller (med forsigtighed) en hårtørrer.
3. Fjern beskyttelsesfolien fra de fire klæbepuder, og pres P-skiven hårdt ind mod ruden i ca. 30 sekunder. Undgå at presse på bagsidens midte. Kontroller derefter udefra at alle fire puder klæber ordentligt til ruden.
4. Du har nu monteret din Park Life og er klar til at køre.
NB! Park Life må ikke ligge løst i bilen, men skal være fastmonteret på ruden for at fungere korrekt.
Sådan fungerer Park Life Når du parkerer bilen, stiller Park Life sig automatisk frem til nærmeste kvarter efter ankomsttidspunktet (f.eks. ved ankomst 10:07 stiller Park Life sig på 10:15).
Det er førerens ansvar at sørge for, at uret er indstillet korrekt. P-afgifter afholdes ikke af Needit ApS og Needit Denmark ApS, ligesom monteringsfejl ikke er Needit’s ansvar.
Manuel indstilling Som loven kræver det, kan din Park Life også stilles manuelt. Bekendtgørelse nr. 150 af 24/02/2016 (§3 stk. 3): “Såfremt der under et køretøjs parkering indtræder en periode uden tidsbegrænsning, skal viseren indstilles på tidspunktet for parkeringens begyndelse eller senest ved periodens udløb indstilles på det tidspunkt, hvorfra der på ny gælder en tidsbegrænsning.” Hvis du har behov for at stille din Park Life manuelt, skal du blot trykke på ❷, og uret tæller frem i intervaller på 15 minutter. Bemærk at denne funktion kun er tilgængelig, når Park Life er i parkeringstilstand.|5
Godkendelser og certifikater Park Life er godkendt af Trafikstyrelsen med henvisning til Bekendtgørelse nr. 150 af 24/02/2016 om parkeringsskiver og bærer styrelsens godkendelsesnummer FS29 på forsiden.
CE-mærkning Med CE-mærket erklærer Needit ApS, at vores produkt opfylder de generelle sikkerhedskrav i relevante CE-mærkningsdirektiver. Med CE-mærket garanterer producenten, at produktet er fremstillet i overensstemmelse med fælleseuropæiske krav til sikkerhed, sundhed og miljø. Needit ApS erklærer hermed, at denne parkeringsskive er i overensstemmelse med (CE) EN 55022 (Radio Disturbance Characteristics) og (CE) EN 55024 (Standards for Commercial Electronic Products).
WEEE Elektriske og elektroniske komponenter (EEE) og materialer kan være farlige og skadelige for helbred og miljø og skal bortskaffes korrekt. Park Life må ikke bortskaffes sammen med almindeligt husholdningsaffald, men skal indsamles særskilt. Park Life kan afleveres hos forhandlere af batterier, den lokale genbrugsstation eller der hvor P-skiven er købt.
| |---|---|---|---| |www.park-life.dk
2
1
|2
C: Aktivering/deaktivering af sommertid/vintertid Det digitale ur er som standard indstillet til selv at skifte mellem sommer- og vintertid. Men hvis du befinder dig i et land, hvor der ikke skiftes, kan du deaktivere funktionen ved at følge nedenstående trin:
1. Aktiver indstillingstilstand ved at trykke på både ❶ og ❷, indtil “timer” og “minutter” viser “oN:Su”.
2. Slip langsomt ❶.
3. Hold ❷ inde til displayet viser ”oF:Su”.
4. Displayet vender automatisk tilbage til funktionstilstand. Din Park Life er nu klar til montering indvendigt på bilens forrude.
Husk at det kun er tilladt at have én P-skive i bilen, og at det altid er førerens ansvar, at uret er stillet korrekt.
Needit ApS og Needit Denmark ApS refunderer ikke P-afgifter. Montering af Park Life
Find det bedste sted indvendigt på forrudens nederste højre hjørne (lovkrav), hvor alle fire klæbepuder berører ruden. Sørg for, at du har adgang til alle knapperne på bagsiden af uret.
1. Gør ruden ren indvendigt med en fugtig klud med en smule opvaskemiddel, hvor P-skiven skal monteres. Tør ruden, og brug derefter den medfølgende renseserviet til at rense området grundigt. (Kun den medfølgende serviet må bruges – ikke andre rensemidler).
2
1
|4
Batteri Park Life har produktlivstids garanti, som betyder at der ikke skal skiftes batteri. Det holder hele produktets levetid, dog i mindst 10 år, ved normalt brug.
Service og garanti På www.needit.dk kan du finde svar på mange spørgsmål om din nye Park Life. Du har også mulighed for at stille spørgsmål på [email protected]. Needit ApS og Needit Denmark ApS yder garanti i henhold til købeloven. Hvis der i garantiperioden skulle opstå fejl eller mangler, kan Park Life afleveres hos den forhandler, hvor P-skiven er købt. P-skiven vil blive repareret eller erstattet med en ny. Kvittering for køb er et garantibevis og skal medbringes/medsendes ved reklamation.|6
Specifikationer og rettigheder Størrelse i cm: 10 x 10 x 1,5 Batterispecifikation: Lithium celle der ikke skal skiftes indenfor produktets levetid (mindst 10 år) Urets nøjagtighed (gns.): ± 2 min./2 år Reaktionstid – parkeringstilstand: Ca. 20 sek. Reaktionstid – ud af parkeringstilstand: Ca. 20 sek.
Park Life er patentanmeldt. Alle rettigheder til produktet Park Life tilhører: Needit ApS • Hundigevej 79 • 2670 Greve Telefon: +45 70 221 535 E-mail: [email protected] Web: www.needit.dk Der tages forbehold for, at indholdet af denne brugervejledning kan ændres. VIGTIGT Det er førerens ansvar at sørge for, at uret er indstillet korrekt. P-afgifter afholdes ikke af Needit ApS og Needit Denmark ApS, ligesom monteringsfejl ikke er Needit ApS’ ansvar.
DA, EN v. 008|
|Developed by Needit Denmark Designed by John Sebastian
Instructions for use
Park Life
G u
a
r a n t e
e d
P
r
o
d
u
c
t
L
i
f
e
t
i
m
e
B
a
t
t
e
r
y|1
Let’s get started with your Park Life
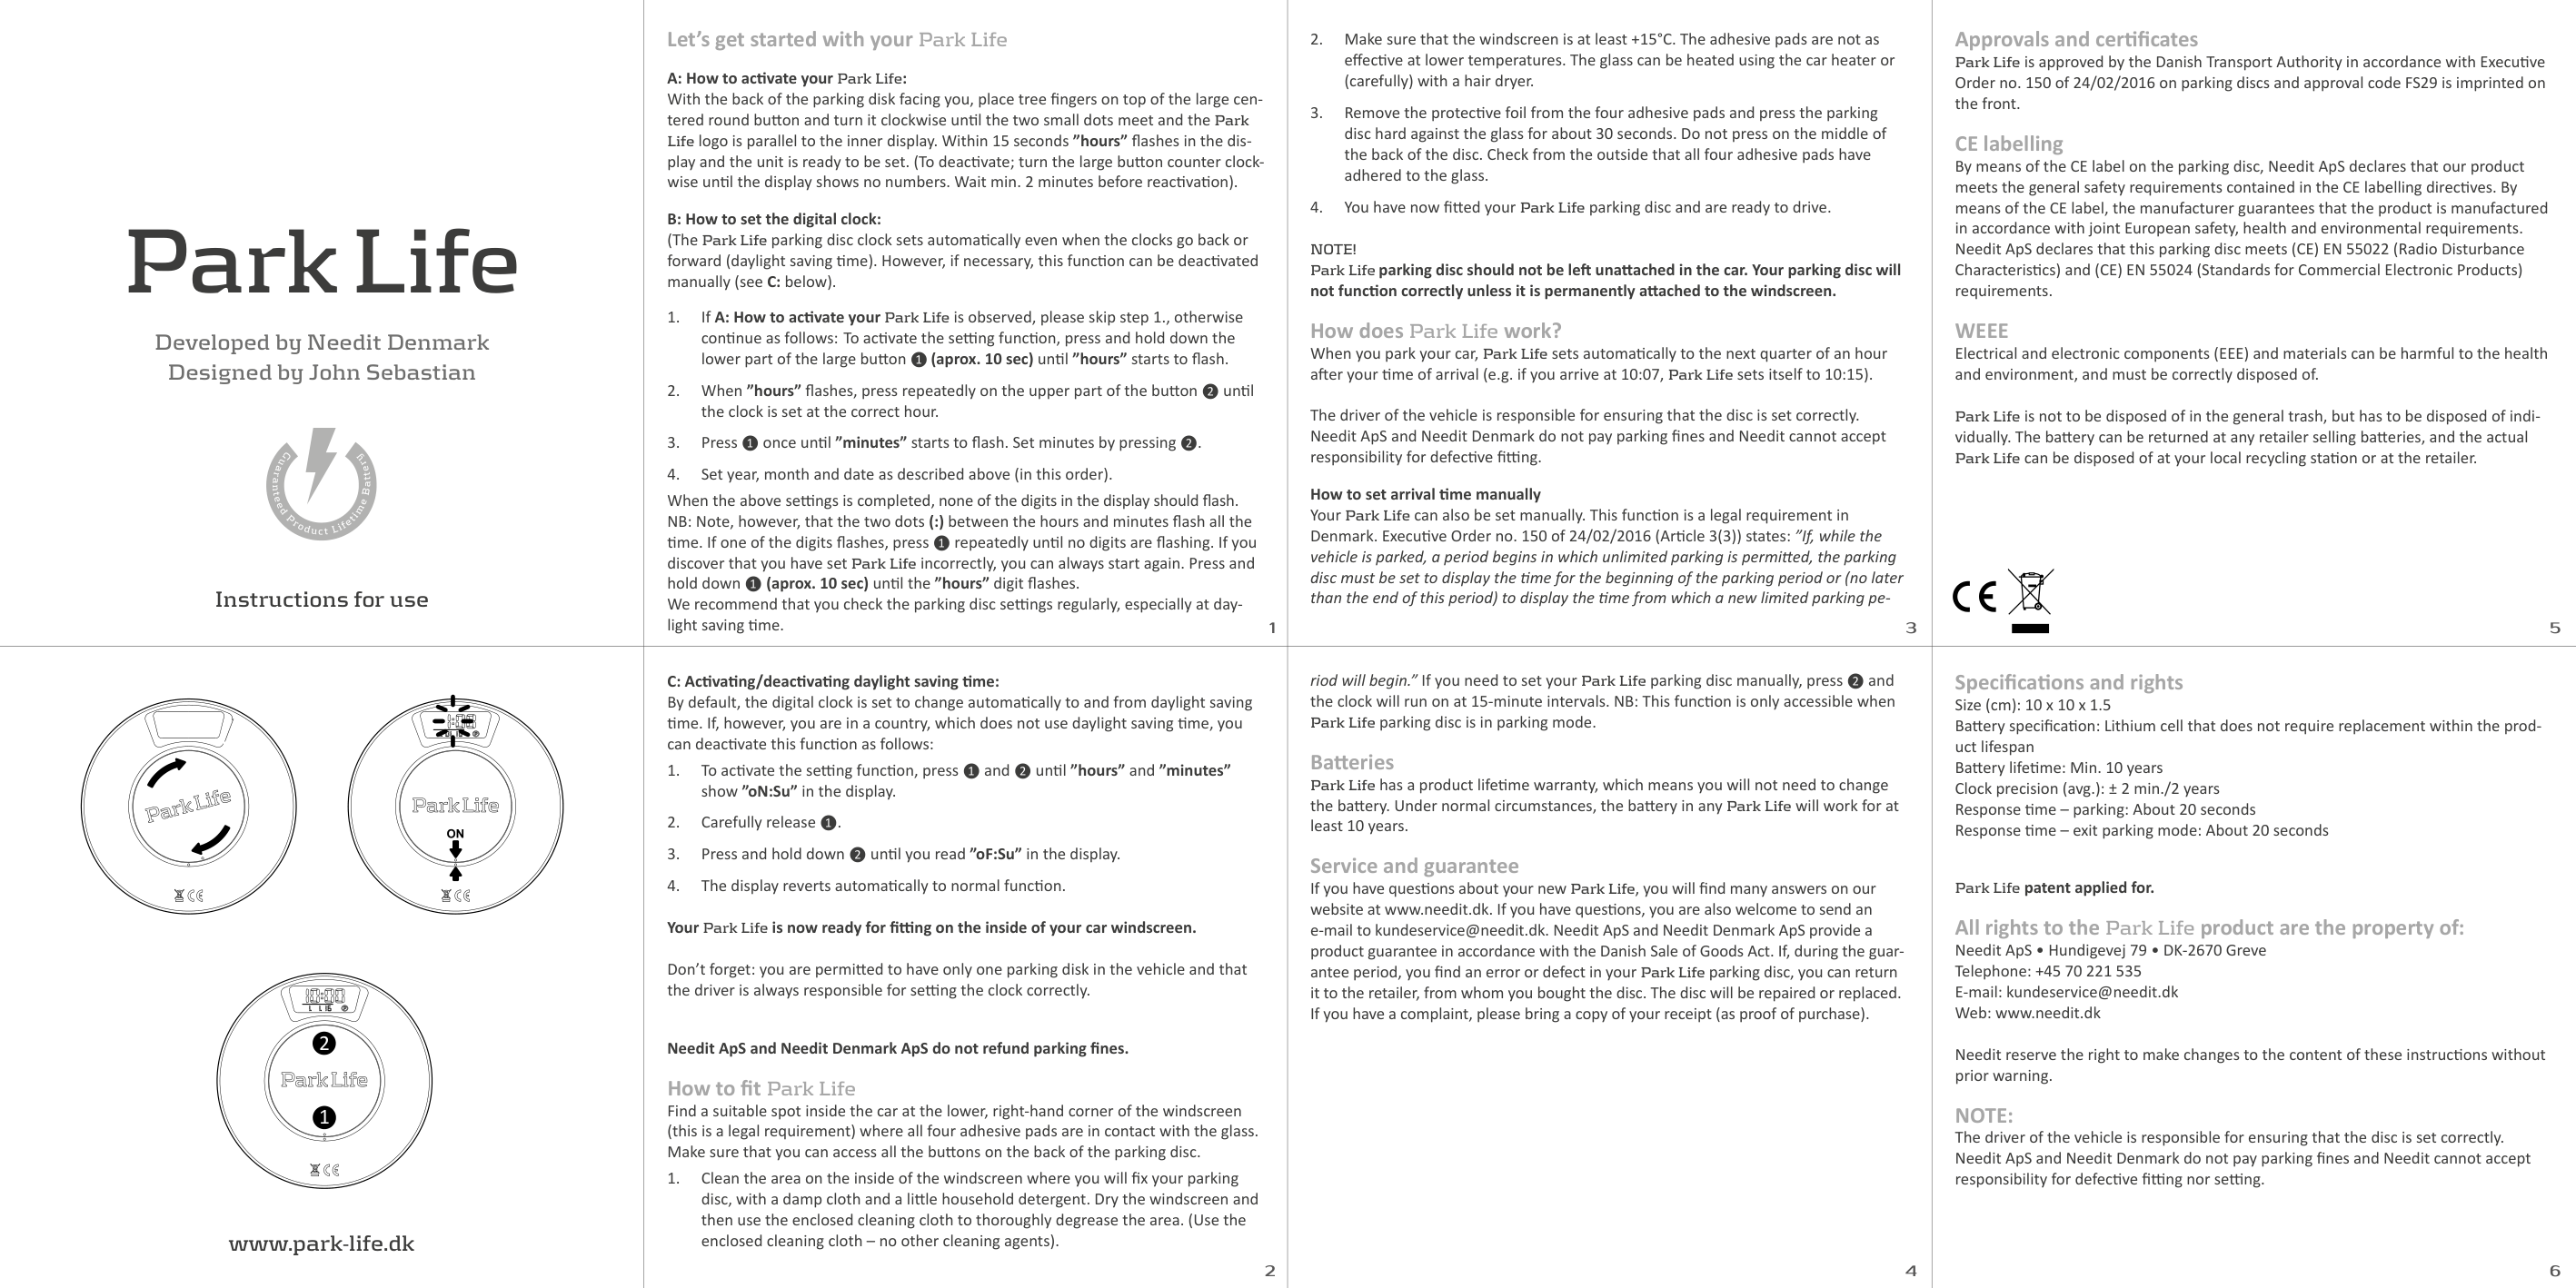
A: How to activate your Park Life: With the back of the parking disk facing you, place tree fingers on top of the large centered round button and turn it clockwise until the two small dots meet and the Park Life logo is parallel to the inner display. Within 15 seconds ”hours” flashes in the display and the unit is ready to be set. (To deactivate; turn the large button counter clockwise until the display shows no numbers. Wait min. 2 minutes before reactivation).
B: How to set the digital clock: (The Park Life parking disc clock sets automatically even when the clocks go back or forward (daylight saving time). However, if necessary, this function can be deactivated manually (see C: below).
1. If A: How to activate your Park Life is observed, please skip step 1., otherwise continue as follows: To activate the setting function, press and hold down the lower part of the large button ❶ (aprox. 10 sec) until ”hours” starts to flash.
2. When ”hours” flashes, press repeatedly on the upper part of the button ❷ until the clock is set at the correct hour.
3. Press ❶ once until ”minutes” starts to flash. Set minutes by pressing ❷.
4. Set year, month and date as described above (in this order).
When the above settings is completed, none of the digits in the display should flash. NB: Note, however, that the two dots (:) between the hours and minutes flash all the time. If one of the digits flashes, press ❶ repeatedly until no digits are flashing. If you discover that you have set Park Life incorrectly, you can always start again. Press and hold down ❶ (aprox. 10 sec) until the ”hours” digit flashes. We recommend that you check the parking disc settings regularly, especially at daylight saving time.|3
2. Make sure that the windscreen is at least +15°C. The adhesive pads are not as effective at lower temperatures. The glass can be heated using the car heater or (carefully) with a hair dryer.
3. Remove the protective foil from the four adhesive pads and press the parking disc hard against the glass for about 30 seconds. Do not press on the middle of the back of the disc. Check from the outside that all four adhesive pads have adhered to the glass.
4. You have now fitted your Park Life parking disc and are ready to drive.
NOTE! Park Life parking disc should not be left unattached in the car. Your parking disc will not function correctly unless it is permanently attached to the windscreen.
How does Park Life work? When you park your car, Park Life sets automatically to the next quarter of an hour after your time of arrival (e.g. if you arrive at 10:07, Park Life sets itself to 10:15).
The driver of the vehicle is responsible for ensuring that the disc is set correctly. Needit ApS and Needit Denmark do not pay parking fines and Needit cannot accept responsibility for defective fitting. How to set arrival time manually Your Park Life can also be set manually. This function is a legal requirement in Denmark. Executive Order no. 150 of 24/02/2016 (Article 3(3)) states: ”If, while the vehicle is parked, a period begins in which unlimited parking is permitted, the parking disc must be set to display the time for the beginning of the parking period or (no later than the end of this period) to display the time from which a new limited parking pe-|5
Approvals and certificates
Park Life is approved by the Danish Transport Authority in accordance with Executive Order no. 150 of 24/02/2016 on parking discs and approval code FS29 is imprinted on the front.
CE labelling By means of the CE label on the parking disc, Needit ApS declares that our product meets the general safety requirements contained in the CE labelling directives. By means of the CE label, the manufacturer guarantees that the product is manufactured in accordance with joint European safety, health and environmental requirements. Needit ApS declares that this parking disc meets (CE) EN 55022 (Radio Disturbance Characteristics) and (CE) EN 55024 (Standards for Commercial Electronic Products) requirements.
WEEE Electrical and electronic components (EEE) and materials can be harmful to the health and environment, and must be correctly disposed of.
Park Life is not to be disposed of in the general trash, but has to be disposed of individually. The battery can be returned at any retailer selling batteries, and the actual Park Life can be disposed of at your local recycling station or at the retailer.
| |---|---|---|---| |www.park-life.dk
2
1
|2
C: Activating/deactivating daylight saving time: By default, the digital clock is set to change automatically to and from daylight saving time. If, however, you are in a country, which does not use daylight saving time, you can deactivate this function as follows:
1. To activate the setting function, press ❶ and ❷ until ”hours” and ”minutes” show ”oN:Su” in the display.
2. Carefully release ❶.
3. Press and hold down ❷ until you read ”oF:Su” in the display.
4. The display reverts automatically to normal function. Your Park Life is now ready for fitting on the inside of your car windscreen.
Don’t forget: you are permitted to have only one parking disk in the vehicle and that the driver is always responsible for setting the clock correctly.
Needit ApS and Needit Denmark ApS do not refund parking fines. How to fit Park Life Find a suitable spot inside the car at the lower, right-hand corner of the windscreen (this is a legal requirement) where all four adhesive pads are in contact with the glass. Make sure that you can access all the buttons on the back of the parking disc.
1. Clean the area on the inside of the windscreen where you will fix your parking disc, with a damp cloth and a little household detergent. Dry the windscreen and then use the enclosed cleaning cloth to thoroughly degrease the area. (Use the enclosed cleaning cloth – no other cleaning agents).
2
1
|4
riod will begin.” If you need to set your Park Life parking disc manually, press ❷ and the clock will run on at 15-minute intervals. NB: This function is only accessible when Park Life parking disc is in parking mode.
Batteries Park Life has a product lifetime warranty, which means you will not need to change the battery. Under normal circumstances, the battery in any Park Life will work for at least 10 years.
Service and guarantee If you have questions about your new Park Life, you will find many answers on our website at www.needit.dk. If you have questions, you are also welcome to send an e-mail to [email protected]. Needit ApS and Needit Denmark ApS provide a product guarantee in accordance with the Danish Sale of Goods Act. If, during the guarantee period, you find an error or defect in your Park Life parking disc, you can return it to the retailer, from whom you bought the disc. The disc will be repaired or replaced. If you have a complaint, please bring a copy of your receipt (as proof of purchase).|6
Specifications and rights Size (cm): 10 x 10 x 1.5 Battery specification: Lithium cell that does not require replacement within the product lifespan Battery lifetime: Min. 10 years Clock precision (avg.): ± 2 min./2 years Response time – parking: About 20 seconds Response time – exit parking mode: About 20 seconds
Park Life patent applied for. All rights to the Park Life product are the property of: Needit ApS • Hundigevej 79 • DK-2670 Greve Telephone: +45 70 221 535 E-mail: [email protected] Web: www.needit.dk
Needit reserve the right to make changes to the content of these instructions without prior warning.
NOTE: The driver of the vehicle is responsible for ensuring that the disc is set correctly. Needit ApS and Needit Denmark do not pay parking fines and Needit cannot accept responsibility for defective fitting nor setting.|