
Ask AI
— answers from the official manualAnswers from the official manual.
Common questions
Common Questions
26 totalHow many indoor units can one remote controller control?
One remote controller can control up to 4 indoor units. This makes it convenient for managing multiple air conditioning units in different rooms. (Page 14)
What is the signal receiving range of the remote controller?
The remote controller has a signal receiving range of 8 meters. Make sure you are within this distance from the unit when using the remote. (Page 3)
How many remote controllers can be used at the same time?
Up to 3 remote controllers can be used at the same time. This allows multiple users to control the air conditioning unit simultaneously. (Page 14)
How many indoor units can be controlled by one remote controller?
Up to 4 indoor units can be controlled by one remote controller. This makes it convenient to manage multiple units from a single device. (Page 14)
Why can't I set the fan speed in Auto mode?
Fan speed cannot be set in Auto mode as it is a limitation of that operating mode. In Auto mode, the unit automatically selects the appropriate settings including COOL, FAN, HEAT, or DRY mode based on the set temperature. (Page 6)
How does the remote controller communicate with the air conditioner?
The remote controller relies on infrared (IR) technology, emitting pulses of infrared light that are detected by a receiver situated on the air conditioning unit. These infrared beams of light are invisible to the naked eye. (Page 15)
Show 20 more questions
Can I set the temperature when using FAN mode?
What temperature range is safe for storing or operating the remote controller?
What batteries does the Sharp Air Conditioner Remote Controller require?
What is the maximum signal receiving range of the remote controller?
Can I adjust the fan speed in Auto or Dry mode?
How does the remote controller communicate with the air conditioning unit?
Is the heat function available on all Sharp air conditioner models?
What modes are available on the Sharp Air Conditioner remote controller?
How do I set the TIMER ON function?
Can I change the fan speed in DRY mode?
What operating temperature range is this remote controller designed for?
How does the infrared remote control technology work?
Is the HEAT function available on all models?
How many remote controllers can I use with one air conditioner unit?
How many indoor units can one remote controller manage?
What is the signal receiving range of this remote controller?
What type of batteries does the remote controller require?
What batteries does the Sharp Air Conditioner Remote Controller use?
How do I set the Timer OFF function to automatically turn off the air conditioner?
How do I use the Timer ON function to schedule the unit to turn on automatically?
Full Manual
15 pages
Sharp Air
Conditioner
Remote
Controller
Instructions Manual
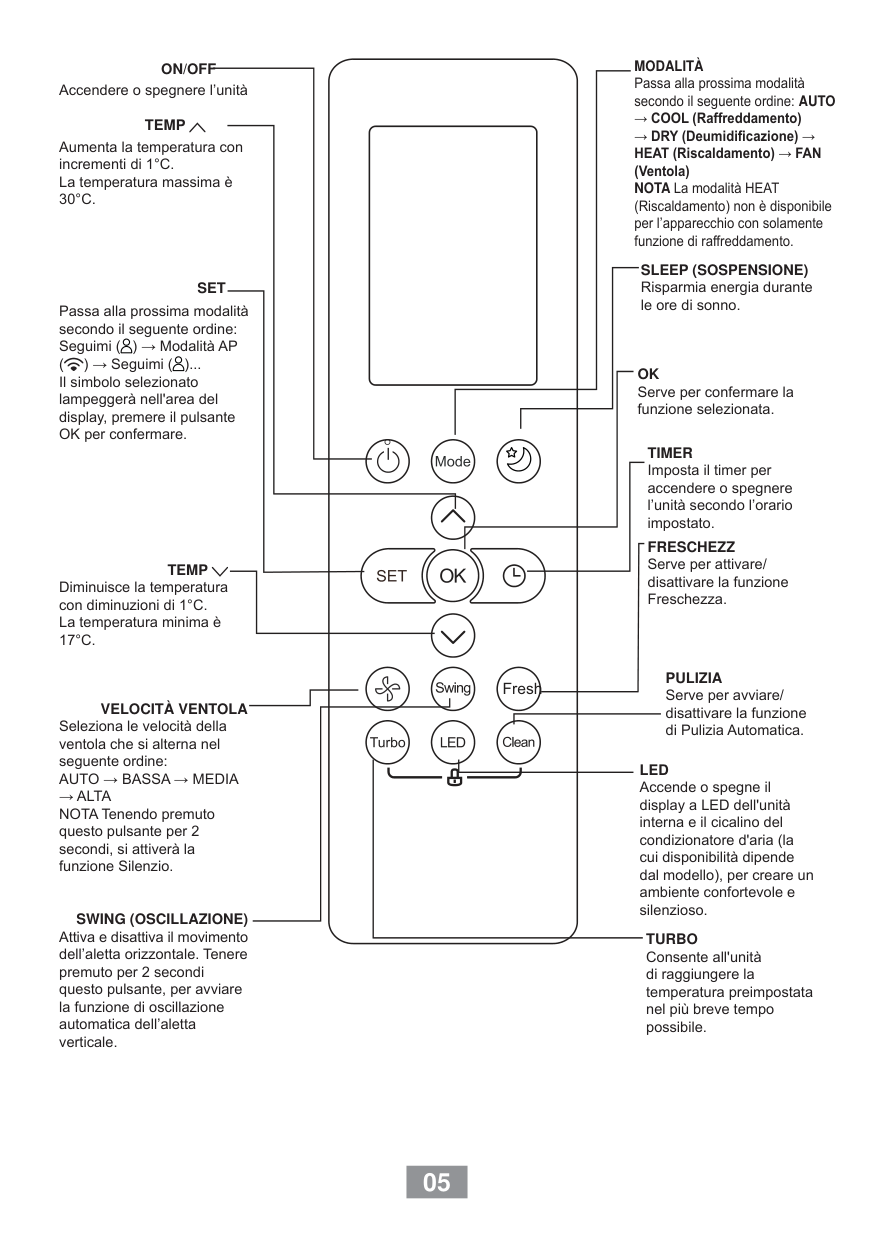
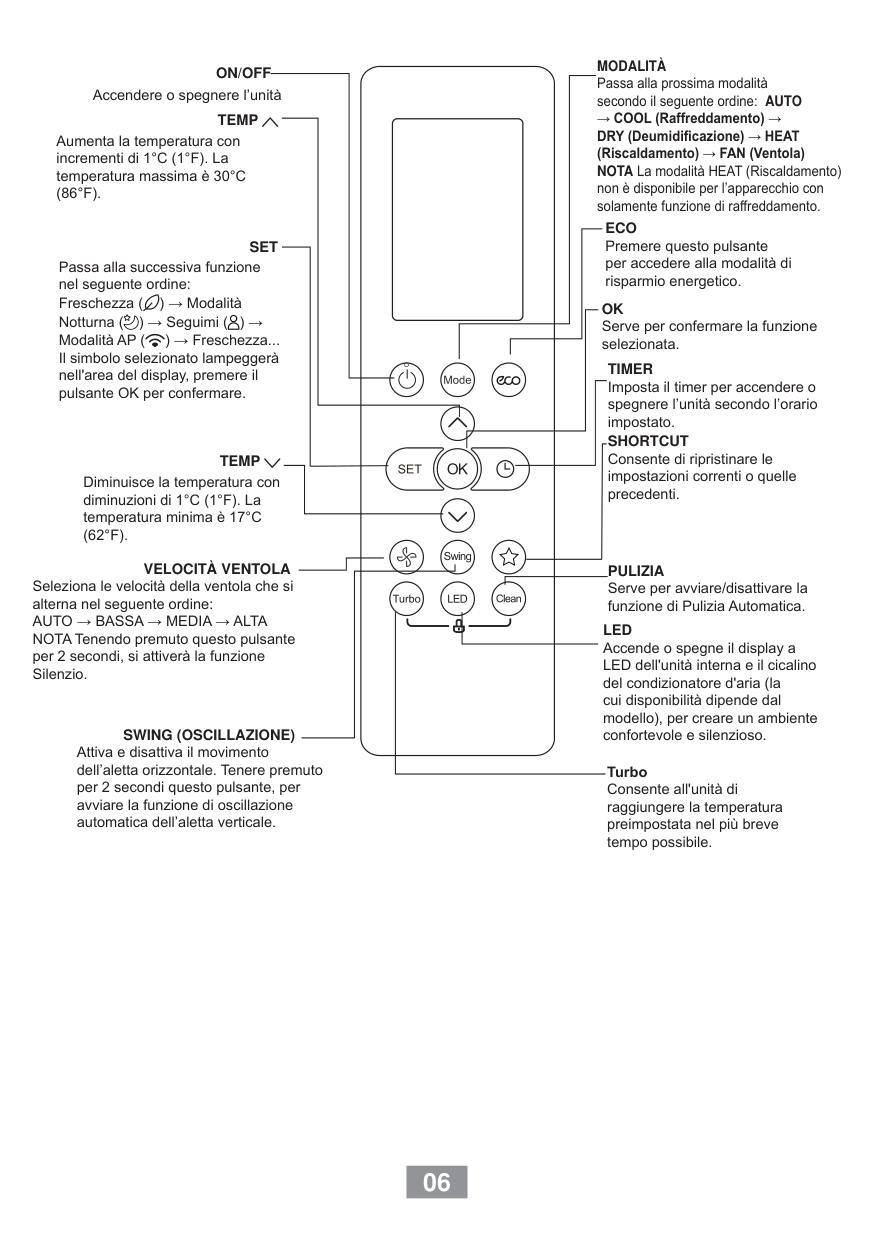
Introduction The SHARP air conditioner remote controller is a device that allows you to control the settings of your SHARP air conditioner without having to get up and manually adjust them on the unit. The SHARP air conditioner remote controller typically features a digital display that shows the current temperature, mode, and other settings. It also has buttons for adjusting the temperature, setting the mode (cooling, heating, fan), adjusting the fan speed, setting the timer, and turning the unit on and off. Some SHARP air conditioner remote controllers may also have additional features such as a sleep mode, which gradually adjusts the temperature throughout the night for improved comfort, and an eco mode, which helps to save energy by adjusting the temperature and fan speed based on the room conditions. To use the SHARP air conditioner remote controller, simply point it at the unit and press the desired button. Some models may require you to first press a button to turn on the remote controller before you can start adjusting the settings. The SHARP air conditioner remote controller is designed to be user-friendly and intuitive, making it easy for anyone to control their air conditioning unit with ease.
Specifications Model
Rg66A1/Bgef
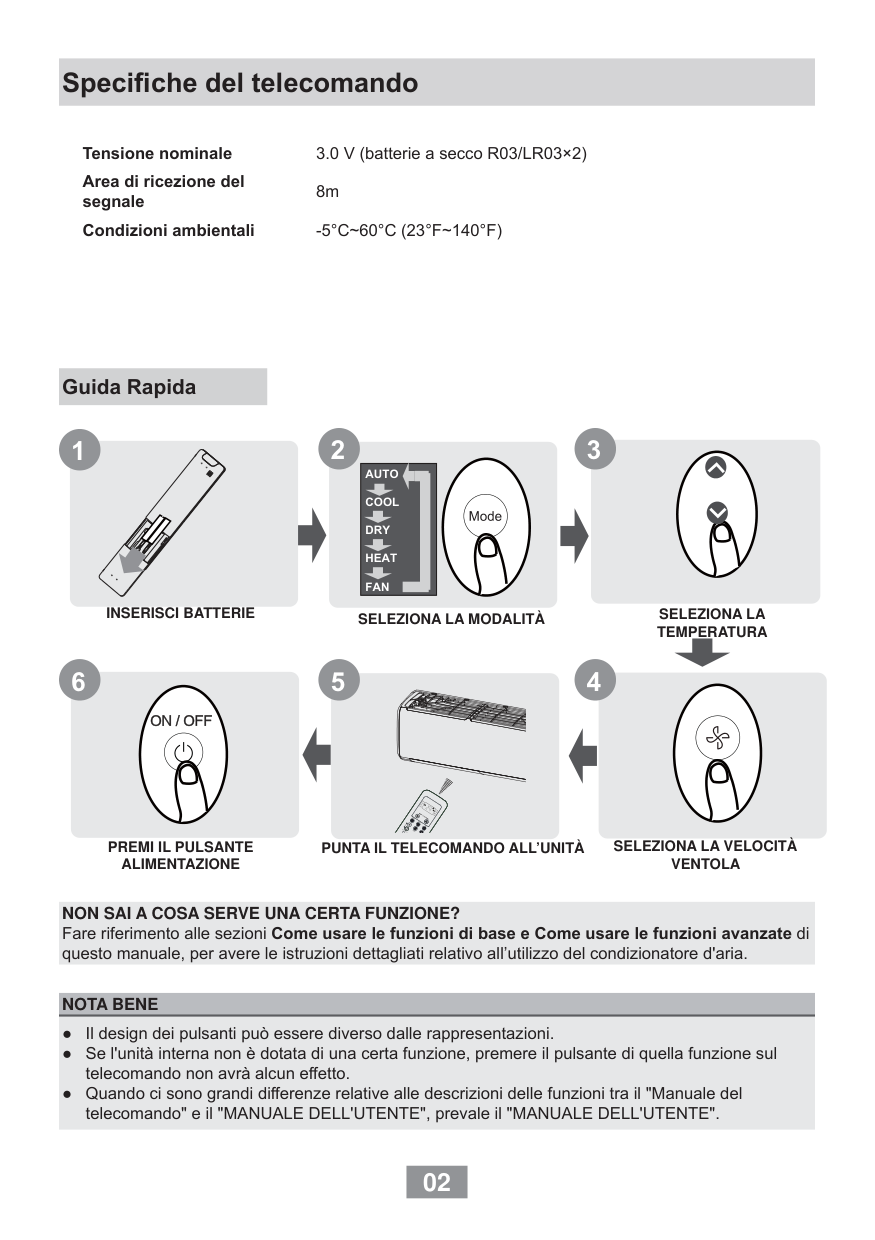
Rated Voltage 3.0V(Dry batteries R03/LR03X 2) Signal Receiving Range 8m Environment·5°C~60°C
Function Buttons ● Before you begin using your new air conditioner, make sure to familiarize yourself with its remote control. The following is a brief introduction to the remote control itself.
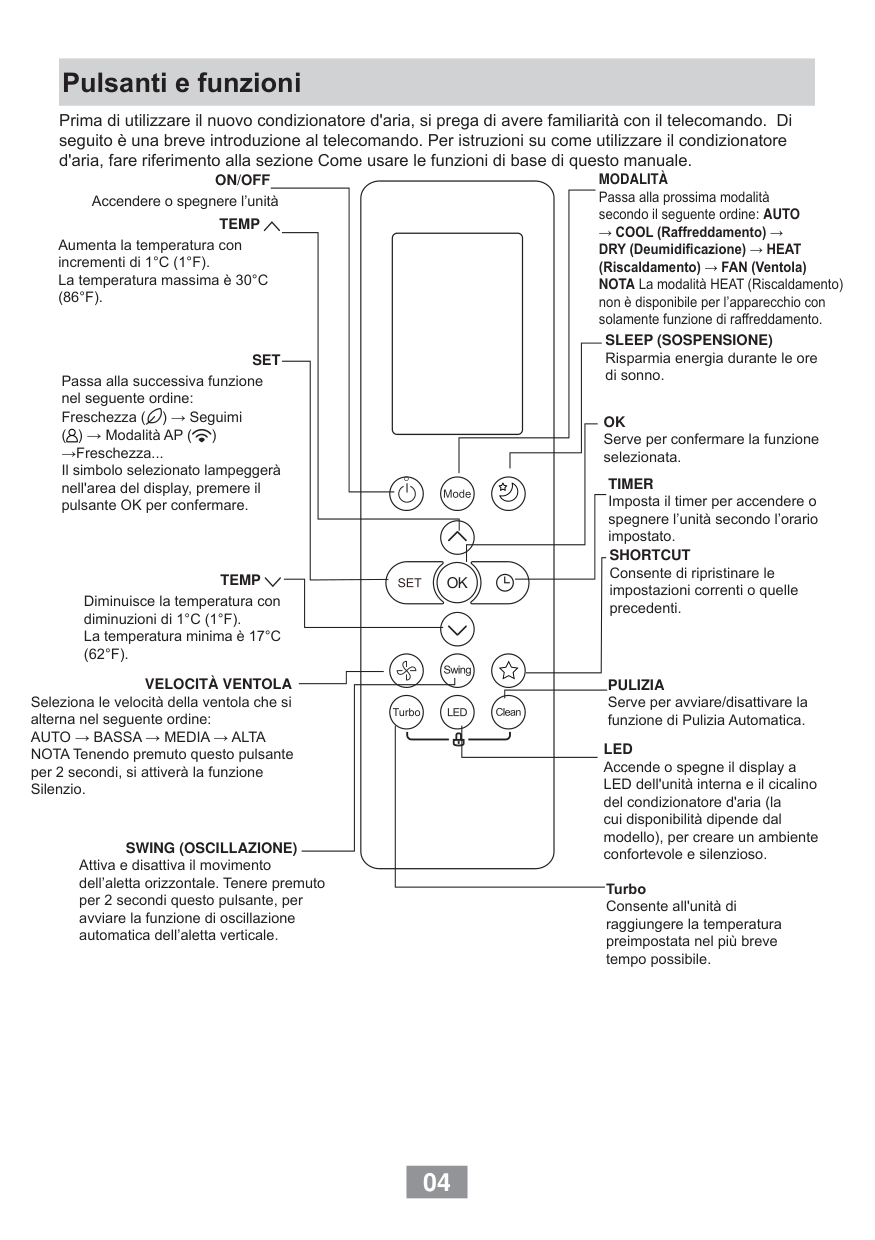
Remote LCD Screen Indicators ● Information is displayed when the remote controller is powered up. Note: All indicators shown in the figure are for the purpose of clear presentation. But during the actual operation, only the relative functional signs are shown on the display window. The heat function is not available for AH-XC9XV and AH-XC12XV.
How To Use The Basic Functions
Auto Operation
In AUTO mode, the unit will automatically select the COOL, FAN, HEAT* or DRY mode based on the set temperature.Ah-Xc12Xv
How To Use The Basic Functions
Cool Operation

How To Use The Basic Functions DRY OPERATION (dehumidifying) NOTE: FAN SPEED can t be changed in DRY mode.

How To Use The Basic Functions
Fan Operation

Setting The TIMER Function Your air conditioning unit has two timer-related functions: TIMER ON function The TIMER ON function allows you to set a period of time after which the unit will automatically turn on, such as when you come home from work.

Setting The TIMER Function TIMER OFF Function The TIMER OFF function allows you to set a period of time after which the unit will automatically turn off, such as when you wake up.

Setting both TIMER ON and TIMER OFF at the same time Setting The TIMER Function Keep in mind that the time periods you set for both functions refer to hours after the current time. For example, say that the current time is 1:00 PM, and you want the unit to turn on automatically at 7:00 PM. You want it to operate for 2 hours, then automatically turn off at 9:00 PM. Do the following:

Setting The TIMER Function Example: Setting the unit to turn on after 6 hours, operate for 2 hours, then turn off (see the figure below)

● How can I reset the remote controller? Please press and hold the power button for 5 seconds to reset the remote controller. ● How many remote controllers can be used at the same time? Up to 3 remote controllers can be used at the same time. ● How many indoor units can be controlled by one remote controller? Up to 4 indoor units can be controlled by one remote controller.

● Can I control more than one outdoor unit with one remote controller? Yes, but you must use a different frequency for each outdoor unit. ● How does an air conditioner controller work? Most air conditioner remote controls rely on infrared technology (IR). A remote control emits pulses of infrared light and those pulses are detected by a receiver, usually situated on the air conditioning unit itself. The infrared beams of light are invisible to the naked eye. ● What are the modes in AC controller? The Standard Modes of A/C include: Cool, Dry, Fan, and Turbo Modes; Sleep mode; Eco Mode.