
Silver Monkey Sma295 Office Wireless Set
Ask AI
— answers from the official manualAnswers from the official manual.
Common questions
Common Questions
10 totalHow do I install the Silver Monkey Sma295 cooling system on an Intel LGA 1200 / 1700 motherboard?
Install the back cooling plate [BI] on the back of the motherboard, putting mounting screws through the holes in the board. Then put appropriate spacers [VI / VII] on the screws, apply thermal paste provided with the processor to the CPU, align the cooling block with the CPU and tighten nuts alternately until resistance is felt.
How do I connect the pump's power cable?
Connect the pump's 3-pin power cable directly to a compatible port on your motherboard, such as 'CPU_FAN', 'CPU_OPT' or similar. If no dedicated port is available, use any spare 3-pin connector.
How do I set up ARGB lighting for the Sma295?
Connect a 3pin ARGB cable to an available 3-pin RGB connector on your motherboard. If no suitable port is found, use the included controller and connect one end of the ARGB cable to it, then plug another end to power directly from the PSU (SATA).
How do I install the cooling system on an Intel LGA 20xx socket?
Firstly, attach appropriate spacer screws [X] to the processor socket on the motherboard. Apply thermal paste provided with your CPU and then align the cooling block properly before tightening the mounting nuts alternately until resistance is felt.
How do I install the Sma295 cooling system for AMD AM4 / AM5 sockets?
Start by removing the stock processor socket blank from your motherboard. Then screw in appropriate spacer screws with washers [XV] to the board rear plate, add thermal paste provided with the CPU and correctly align the cool block before tightening mounting nuts alternately until resistance is felt.
How do I mount the fans on my Sma295 kit?
Secure your fans to the radiator using long screws [III]. Choose a suitable spot in your case and fix the cooler there with short screws. Be careful while handling the hoses when mounting the radiator.
Full Manual
2 pages
SMX AIOSNO 240 Snowy Blackout 240 Snowy Blackout 360 Snowy ARGB 360
🄰
🄱
🄲
X1
X1
X1
X1
LGA 1700 LGA 1200 / 115X
LGA 20xx
|EN| |---|
|PL| |---|
|DE| |---|
User Manual Instrukcja Obsługi Bedienungsanleitung
Manual version 1/20230519
English
🄳
X4
🅀X2
X4
X4
X4
X4
🄹🄴
🄵
🄶
🄷
🄸
X12
X12
X1
X1
X1
X1
| | | | |---|---|---| | | | |
| | | | |---|---|---| | | | |
| | | |---|---| | | | | | |
🄺
| | | |---|---| | | |
Polski
🄻
🄼 🄽 🄾 🄿
| | | |---|---| | | |
Deutsch
Carefully read these instructions before using the product. Keep it for future reference.
Safety information
· Avoid direct contact with water and other liquids. · Do not use the device in a humid environment. · Keep the device out of the reach of children. They may swallow some parts. · Use the device only in accordance with the operating instructions. · If the device stops working properly - contact us.
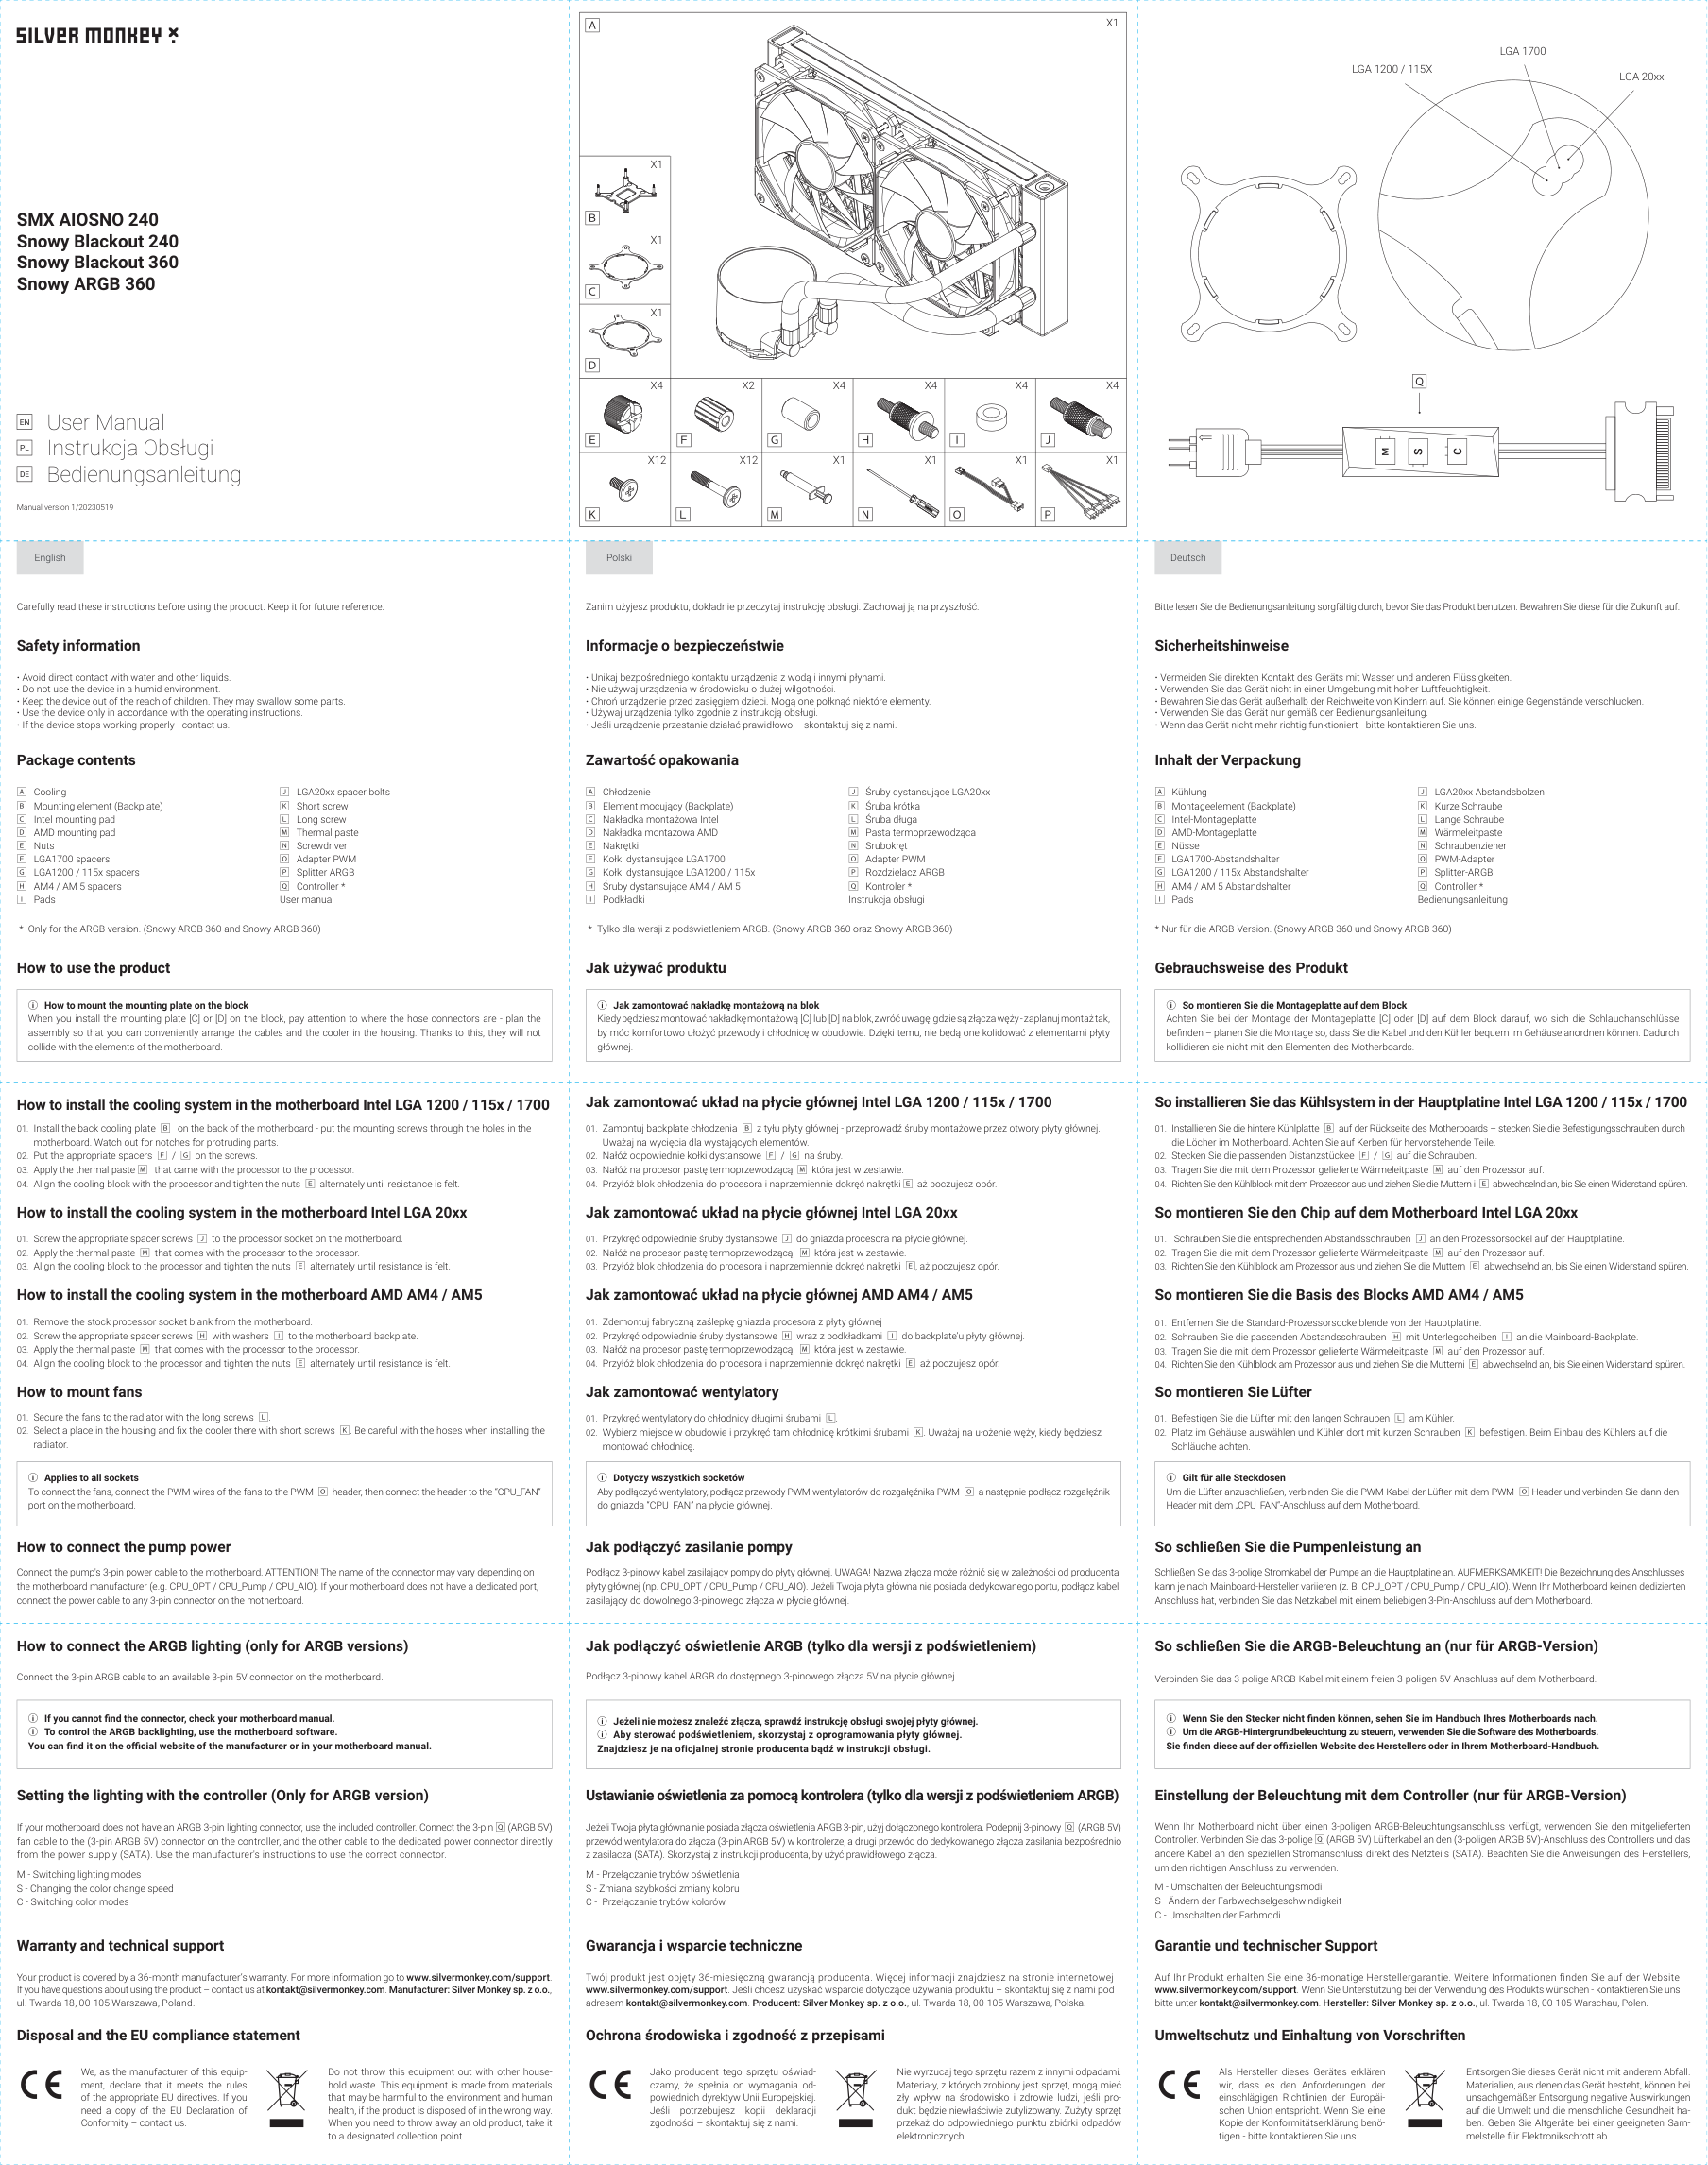
Package contents
🄰 Cooling 🄱 Mounting element (Backplate) 🄲 Intel mounting pad 🄳 AMD mounting pad 🄴 Nuts 🄵 LGA1700 spacers 🄶 LGA1200 / 115x spacers 🄷 AM4 / AM 5 spacers 🄸 Pads
🄹 LGA20xx spacer bolts 🄺 Short screw 🄻 Long screw 🄼 Thermal paste 🄽 Screwdriver 🄾 Adapter PWM 🄿 Splitter ARGB 🅀 Controller * User manual
Zanim użyjesz produktu, dokładnie przeczytaj instrukcję obsługi. Zachowaj ją na przyszłość.
Informacje o bezpieczeństwie
· Unikaj bezpośredniego kontaktu urządzenia z wodą i innymi płynami. · Nie używaj urządzenia w środowisku o dużej wilgotności. · Chroń urządzenie przed zasięgiem dzieci. Mogą one połknąć niektóre elementy. · Używaj urządzenia tylko zgodnie z instrukcją obsługi. · Jeśli urządzenie przestanie działać prawidłowo – skontaktuj się z nami.
Zawartość opakowania
🄰 Chłodzenie 🄱 Element mocujący (Backplate) 🄲 Nakładka montażowa Intel 🄳 Nakładka montażowa AMD 🄴 Nakrętki 🄵 Kołki dystansujące LGA1700 🄶 Kołki dystansujące LGA1200 / 115x 🄷 Śruby dystansujące AM4 / AM 5 🄸 Podkładki
🄹 Śruby dystansujące LGA20xx 🄺 Śruba krótka 🄻 Śruba długa 🄼 Pasta termoprzewodząca 🄽 Srubokręt 🄾 Adapter PWM 🄿 Rozdzielacz ARGB 🅀 Kontroler * Instrukcja obsługi
Bitte lesen Sie die Bedienungsanleitung sorgfältig durch, bevor Sie das Produkt benutzen. Bewahren Sie diese für die Zukunft auf.
Sicherheitshinweise
· Vermeiden Sie direkten Kontakt des Geräts mit Wasser und anderen Flüssigkeiten. · Verwenden Sie das Gerät nicht in einer Umgebung mit hoher Luftfeuchtigkeit. · Bewahren Sie das Gerät außerhalb der Reichweite von Kindern auf. Sie können einige Gegenstände verschlucken. · Verwenden Sie das Gerät nur gemäß der Bedienungsanleitung. · Wenn das Gerät nicht mehr richtig funktioniert - bitte kontaktieren Sie uns.
Inhalt der Verpackung
🄰 Kühlung 🄱 Montageelement (Backplate) 🄲 Intel-Montageplatte 🄳 AMD-Montageplatte 🄴 Nüsse 🄵 LGA1700-Abstandshalter 🄶 LGA1200 / 115x Abstandshalter 🄷 AM4 / AM 5 Abstandshalter 🄸 Pads
🄹 LGA20xx Abstandsbolzen 🄺 Kurze Schraube 🄻 Lange Schraube 🄼 Wärmeleitpaste 🄽 Schraubenzieher 🄾 PWM-Adapter 🄿 Splitter-ARGB 🅀 Controller * Bedienungsanleitung
How to use the product
|ⓘ How to mount the mounting plate on the block
When you install the mounting plate [C] or [D] on the block, pay attention to where the hose connectors are - plan the assembly so that you can conveniently arrange the cables and the cooler in the housing. Thanks to this, they will not collide with the elements of the motherboard.| |---|
Jak używać produktu
|ⓘ Jak zamontować nakładkę montażową na blok
Kiedy będziesz montować nakładkę montażową [C] lub [D] na blok, zwróć uwagę, gdzie są złącza węży - zaplanuj montaż tak, by móc komfortowo ułożyć przewody i chłodnicę w obudowie. Dzięki temu, nie będą one kolidować z elementami płyty głównej.| |---|
Gebrauchsweise des Produkt
|ⓘ So montieren Sie die Montageplatte auf dem Block
Achten Sie bei der Montage der Montageplatte [C] oder [D] auf dem Block darauf, wo sich die Schlauchanschlüsse befinden – planen Sie die Montage so, dass Sie die Kabel und den Kühler bequem im Gehäuse anordnen können. Dadurch kollidieren sie nicht mit den Elementen des Motherboards.| |---|
How to install the cooling system in the motherboard Intel LGA 1200 / 115x / 1700
How to install the cooling system in the motherboard Intel LGA 20xx
How to install the cooling system in the motherboard AMD AM4 / AM5
How to mount fans
|ⓘ Applies to all sockets To connect the fans, connect the PWM wires of the fans to the PWM 🄾 header, then connect the header to the “CPU_FAN” port on the motherboard.| |---|
How to connect the pump power
Connect the pump's 3-pin power cable to the motherboard. ATTENTION! The name of the connector may vary depending on the motherboard manufacturer (e.g. CPU_OPT / CPU_Pump / CPU_AIO). If your motherboard does not have a dedicated port, connect the power cable to any 3-pin connector on the motherboard.
| | | |---|---| | | |
Jak zamontować układ na płycie głównej Intel LGA 1200 / 115x / 1700
Jak zamontować układ na płycie głównej Intel LGA 20xx
Jak zamontować układ na płycie głównej AMD AM4 / AM5
Jak zamontować wentylatory
|ⓘ Dotyczy wszystkich socketów Aby podłączyć wentylatory, podłącz przewody PWM wentylatorów do rozgałęźnika PWM 🄾 a następnie podłącz rozgałęźnik do gniazda “CPU_FAN” na płycie głównej.| |---|
Jak podłączyć zasilanie pompy
Podłącz 3-pinowy kabel zasilający pompy do płyty głównej. UWAGA! Nazwa złącza może różnić się w zależności od producenta płyty głównej (np. CPU_OPT / CPU_Pump / CPU_AIO). Jeżeli Twoja płyta główna nie posiada dedykowanego portu, podłącz kabel zasilający do dowolnego 3-pinowego złącza w płycie głównej.
| | | |---|---| | | |
So installieren Sie das Kühlsystem in der Hauptplatine Intel LGA 1200 / 115x / 1700
So montieren Sie den Chip auf dem Motherboard Intel LGA 20xx
So montieren Sie die Basis des Blocks AMD AM4 / AM5
So montieren Sie Lüfter
|ⓘ Gilt für alle Steckdosen Um die Lüfter anzuschließen, verbinden Sie die PWM-Kabel der Lüfter mit dem PWM 🄾 Header und verbinden Sie dann den Header mit dem „CPU_FAN“-Anschluss auf dem Motherboard.| |---|
So schließen Sie die Pumpenleistung an
Schließen Sie das 3-polige Stromkabel der Pumpe an die Hauptplatine an. AUFMERKSAMKEIT! Die Bezeichnung des Anschlusses kann je nach Mainboard-Hersteller variieren (z. B. CPU_OPT / CPU_Pump / CPU_AIO). Wenn Ihr Motherboard keinen dedizierten Anschluss hat, verbinden Sie das Netzkabel mit einem beliebigen 3-Pin-Anschluss auf dem Motherboard.
How to connect the ARGB lighting (only for ARGB versions)
| | | |---|---| | | |
Jak podłączyć oświetlenie ARGB (tylko dla wersji z podświetleniem)
| | | |---|---| | | |
So schließen Sie die ARGB-Beleuchtung an (nur für ARGB-Version)
Connect the 3-pin ARGB cable to an available 3-pin 5V connector on the motherboard.
|ⓘ If you cannot find the connector, check your motherboard manual.
ⓘ To control the ARGB backlighting, use the motherboard software. You can find it on the official website of the manufacturer or in your motherboard manual.| |---|
Podłącz 3-pinowy kabel ARGB do dostępnego 3-pinowego złącza 5V na płycie głównej.
|ⓘ Jeżeli nie możesz znaleźć złącza, sprawdź instrukcję obsługi swojej płyty głównej.
ⓘ Aby sterować podświetleniem, skorzystaj z oprogramowania płyty głównej. Znajdziesz je na oficjalnej stronie producenta bądź w instrukcji obsługi.| |---|
Verbinden Sie das 3-polige ARGB-Kabel mit einem freien 3-poligen 5V-Anschluss auf dem Motherboard.
|ⓘ Wenn Sie den Stecker nicht finden können, sehen Sie im Handbuch Ihres Motherboards nach. ⓘ Um die ARGB-Hintergrundbeleuchtung zu steuern, verwenden Sie die Software des Motherboards. Sie finden diese auf der offiziellen Website des Herstellers oder in Ihrem Motherboard-Handbuch.| |---|
Setting the lighting with the controller (Only for ARGB version)
If your motherboard does not have an ARGB 3-pin lighting connector, use the included controller. Connect the 3-pin 🅀 (ARGB 5V) fan cable to the (3-pin ARGB 5V) connector on the controller, and the other cable to the dedicated power connector directly from the power supply (SATA). Use the manufacturer's instructions to use the correct connector.
M - Switching lighting modes S - Changing the color change speed C - Switching color modes
Warranty and technical support
Your product is covered by a 36-month manufacturer’s warranty. For more information go to www.silvermonkey.com/support. If you have questions about using the product – contact us at [email protected] Manufacturer: Silver Monkey sp. z o.o. ul. Twarda 18, 00-105 Warszawa, Poland.
Disposal and the EU compliance statement
Ustawianie oświetlenia za pomocą kontrolera (tylko dla wersji z podświetleniem ARGB)
Jeżeli Twoja płyta główna nie posiada złącza oświetlenia ARGB 3-pin, użyj dołączonego kontrolera. Podepnij 3-pinowy 🅀 (ARGB 5V) przewód wentylatora do złącza (3-pin ARGB 5V) w kontrolerze, a drugi przewód do dedykowanego złącza zasilania bezpośrednio z zasilacza (SATA). Skorzystaj z instrukcji producenta, by użyć prawidłowego złącza.
M - Przełączanie trybów oświetlenia S - Zmiana szybkości zmiany koloru C - Przełączanie trybów kolorów
Gwarancja i wsparcie techniczne
Twój produkt jest objęty 36-miesięczną gwarancją producenta. Więcej informacji znajdziesz na stronie internetowej www.silvermonkey.com/support. Jeśli chcesz uzyskać wsparcie dotyczące używania produktu – skontaktuj się z nami pod adresem [email protected]. Producent: Silver Monkey sp. z o.o., ul. Twarda 18, 00-105 Warszawa, Polska.
Ochrona środowiska i zgodność z przepisami
Einstellung der Beleuchtung mit dem Controller (nur für ARGB-Version)
Wenn Ihr Motherboard nicht über einen 3-poligen ARGB-Beleuchtungsanschluss verfügt, verwenden Sie den mitgelieferten Controller. Verbinden Sie das 3-polige 🅀 (ARGB 5V) Lüfterkabel an den (3-poligen ARGB 5V)-Anschluss des Controllers und das andere Kabel an den speziellen Stromanschluss direkt des Netzteils (SATA). Beachten Sie die Anweisungen des Herstellers, um den richtigen Anschluss zu verwenden.
M - Umschalten der Beleuchtungsmodi S - Ändern der Farbwechselgeschwindigkeit C - Umschalten der Farbmodi
Garantie und technischer Support
Auf Ihr Produkt erhalten Sie eine 36-monatige Herstellergarantie. Weitere Informationen finden Sie auf der Website www.silvermonkey.com/support. Wenn Sie Unterstützung bei der Verwendung des Produkts wünschen - kontaktieren Sie uns bitte unter [email protected]. Hersteller: Silver Monkey sp. z o.o., ul. Twarda 18, 00-105 Warschau, Polen.
Umweltschutz und Einhaltung von Vorschriften
We, as the manufacturer of this equipment, declare that it meets the rules of the appropriate EU directives. If you need a copy of the EU Declaration of Conformity – contact us.
Do not throw this equipment out with other household waste. This equipment is made from materials that may be harmful to the environment and human health, if the product is disposed of in the wrong way. When you need to throw away an old product, take it to a designated collection point.
Jako producent tego sprzętu oświadczamy, że spełnia on wymagania odpowiednich dyrektyw Unii Europejskiej. Jeśli potrzebujesz kopii deklaracji zgodności – skontaktuj się z nami.
Nie wyrzucaj tego sprzętu razem z innymi odpadami. Materiały, z których zrobiony jest sprzęt, mogą mieć zły wpływ na środowisko i zdrowie ludzi, jeśli produkt będzie niewłaściwie zutylizowany. Zużyty sprzęt przekaż do odpowiedniego punktu zbiórki odpadów elektronicznych.
Als Hersteller dieses Gerätes erklären wir, dass es den Anforderungen der einschlägigen Richtlinien der Europäischen Union entspricht. Wenn Sie eine Kopie der Konformitätserklärung benötigen - bitte kontaktieren Sie uns.
Entsorgen Sie dieses Gerät nicht mit anderem Abfall. Materialien, aus denen das Gerät besteht, können bei unsachgemäßer Entsorgung negative Auswirkungen auf die Umwelt und die menschliche Gesundheit haben. Geben Sie Altgeräte bei einer geeigneten Sammelstelle für Elektronikschrott ab.
1200 / 1700
01
2011 / 2066
| | | |---|---| | | |
01
| | | |---|---| | | |
AM4 / AM5 01
| | | |---|---| | | |
04
02
| | | |---|---| | | |
02
| | | |---|---| | | |
02
| | | |---|---| | | |
05
03
03
03
06