
Ask AI
— answers from the official manualAnswers from the official manual.
Common questions
Common Questions
8 totalHow can I add an intelligent scene in Smart Life app?
Navigate to the 'Smart' page and click '+' or select 'Automation' for smart configuration. Add conditions using left or arrived (beta), with geographical location settings required. Automated scenes support various actions like executing, triggering automation, sending reminders, and time-lapse activities. Validate times can also be defined. (Pages 34–35)
How do I delete an existing scene or automation?
Go to the 'Intelligent' page and click 'Edit Automation' at the top left corner. Edit scenes by clicking '...' or change automation configuration by adjusting condition actions in the background. To remove, slide left on iOS to delete. (Pages 39-40)
How do I troubleshoot network issues with Smart Life?
Go to 'Help Center - Network Diagnostics' and follow the provided diagnostics that usually take two minutes. This helps in solving connectivity problems efficiently through detailed analysis and fixes. (Page 48-49)
How do I add smart cameras for cloud storage?
Navigate to 'Me - More Services' and enable camera services such as AI-filtered notifications, third-party access service, and cloud storage. With the purchased service, you can view historical videos uploaded by your devices without downloading them, enhancing both security and convenience (Pages 49–50).
How do I factory reset the Smart Life app?
Press and hold the button on the device or use the “Remove Device” option in the more menu to clear all data and return it to its initial state. (Page 29)
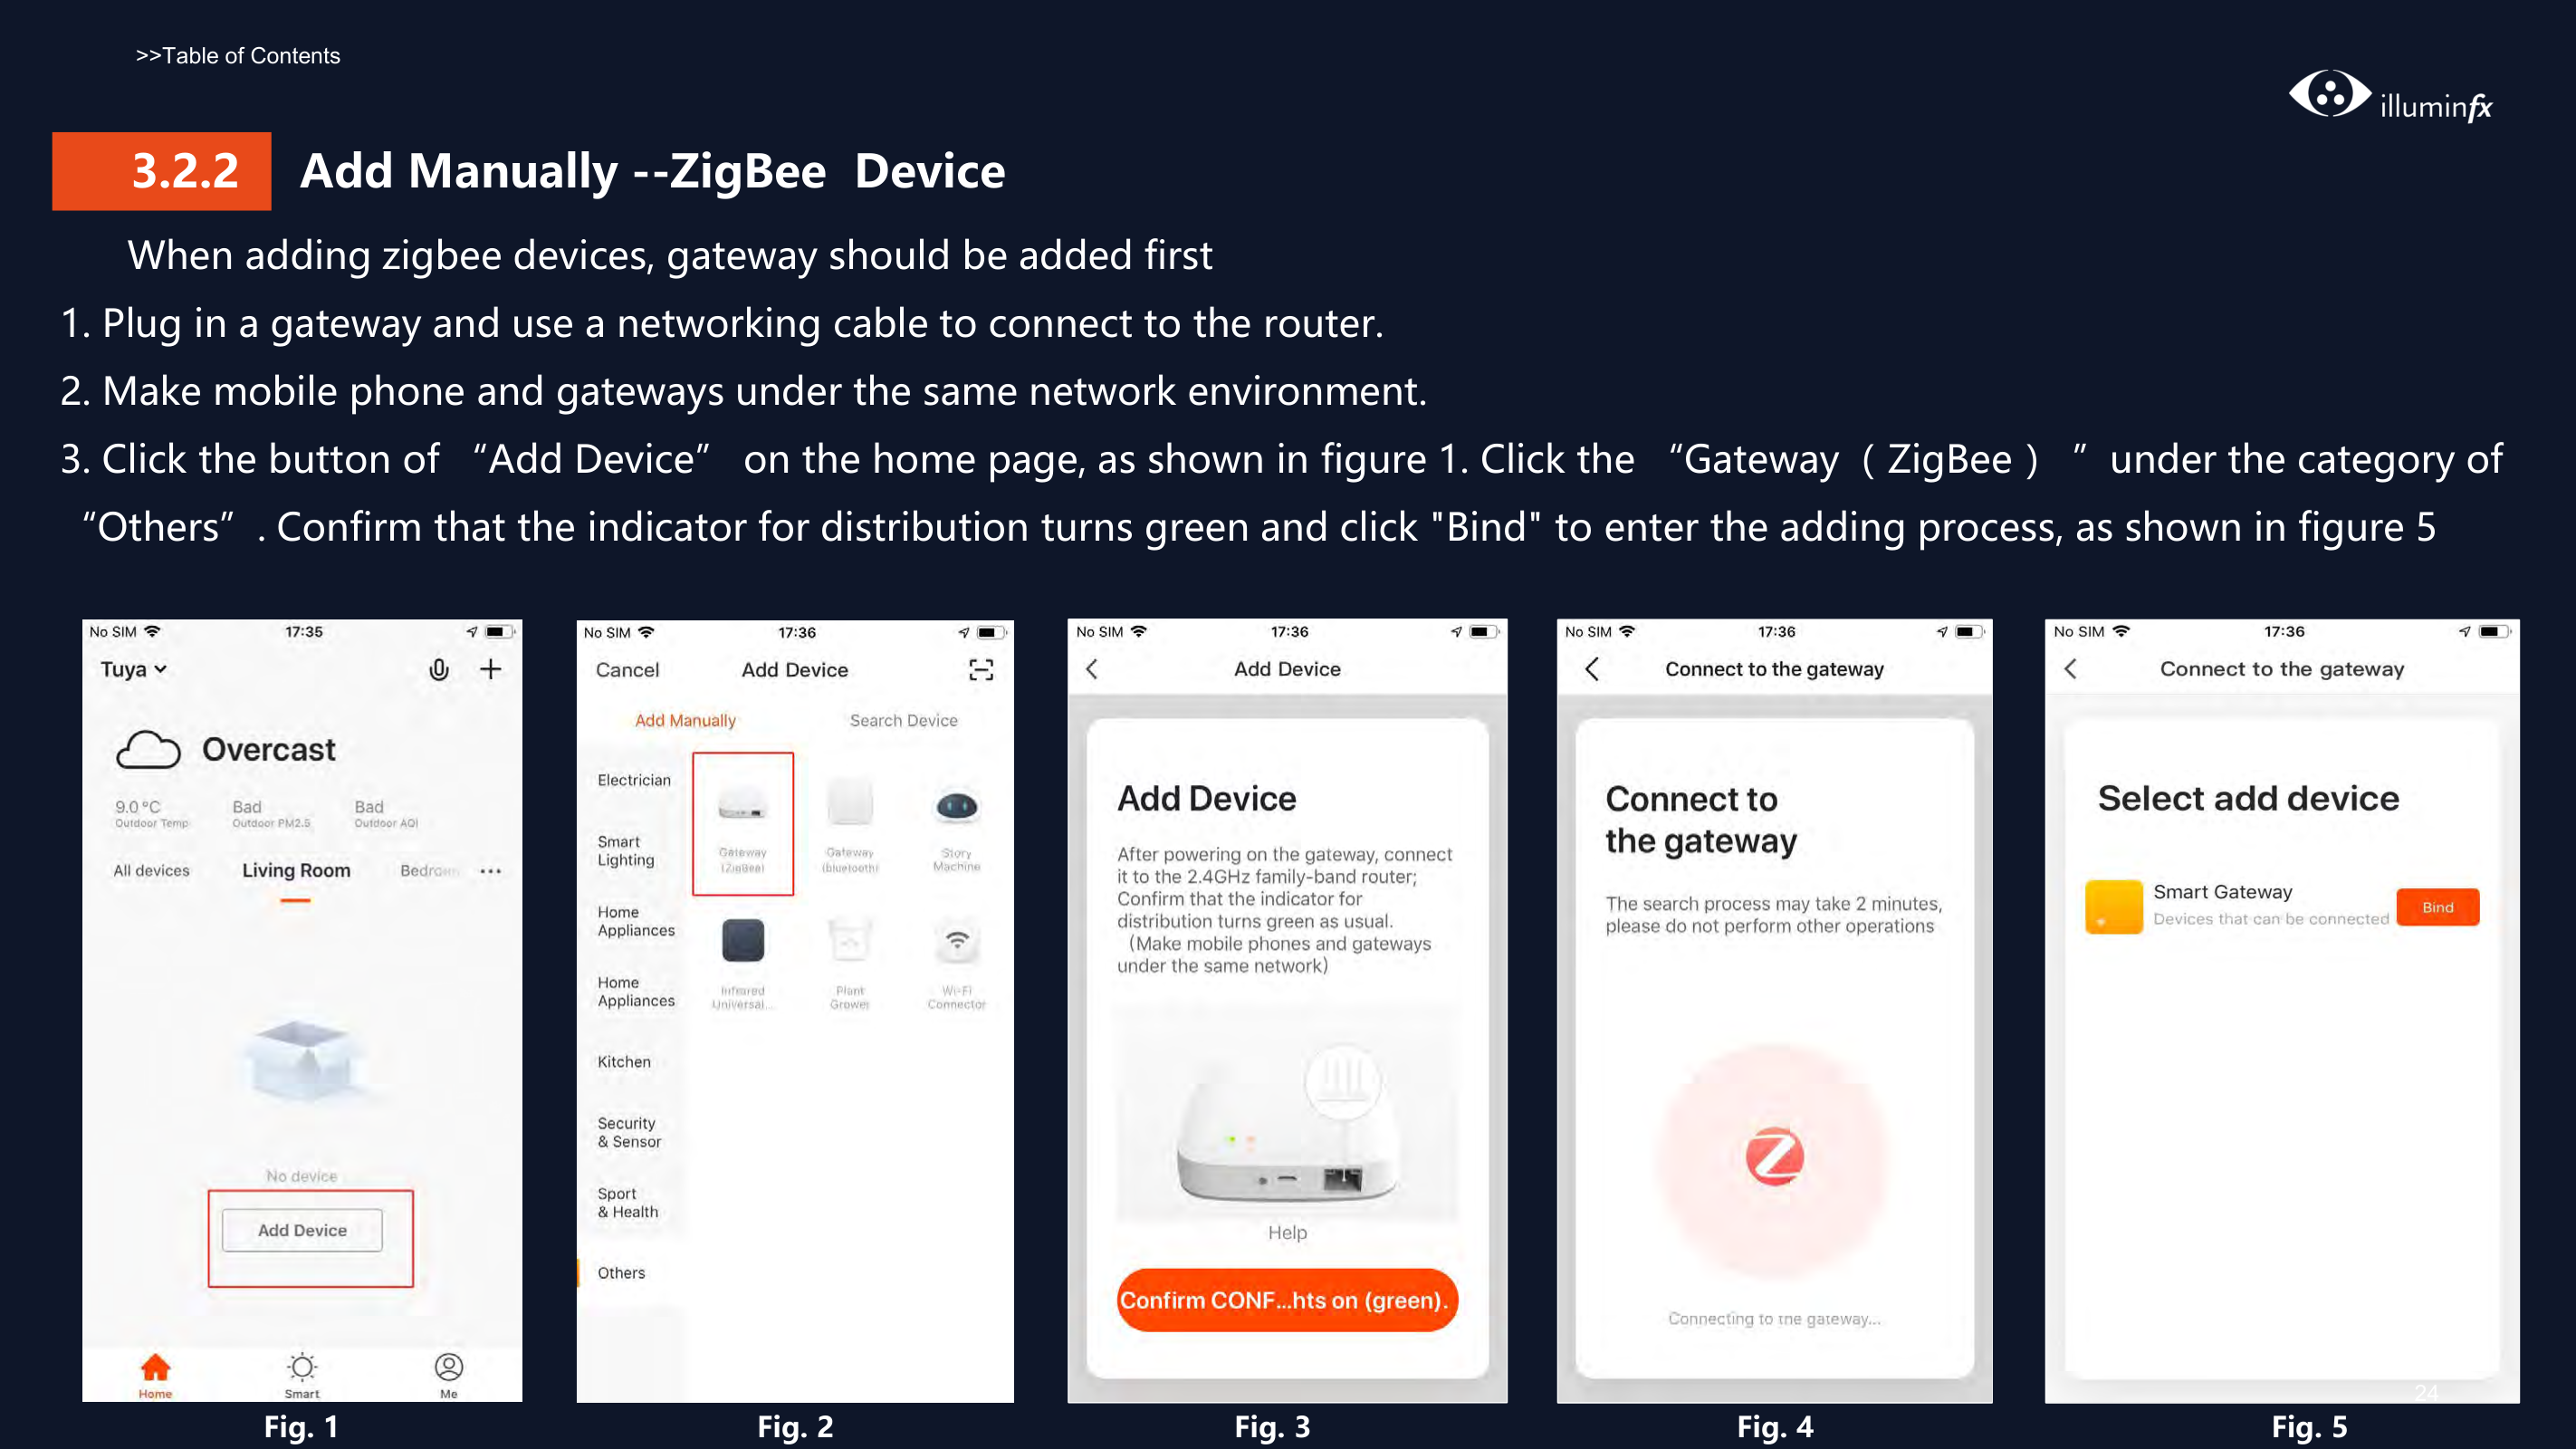
How do I add a new Zigbee device via Smart Life app?
Plug in a gateway, connect it to the router with a network cable, and make sure your mobile phone is on the same network as the gateways. Click 'Add Device' on the home page and select 'Gateway (ZigBee)'. Check if the gateway distribution indicator turns green and click 'Bind' to proceed with configuration. (Page 23)
Full Manual
51 pages

SMART LIFE App
v3.8.0
User Manual

Table of Contents
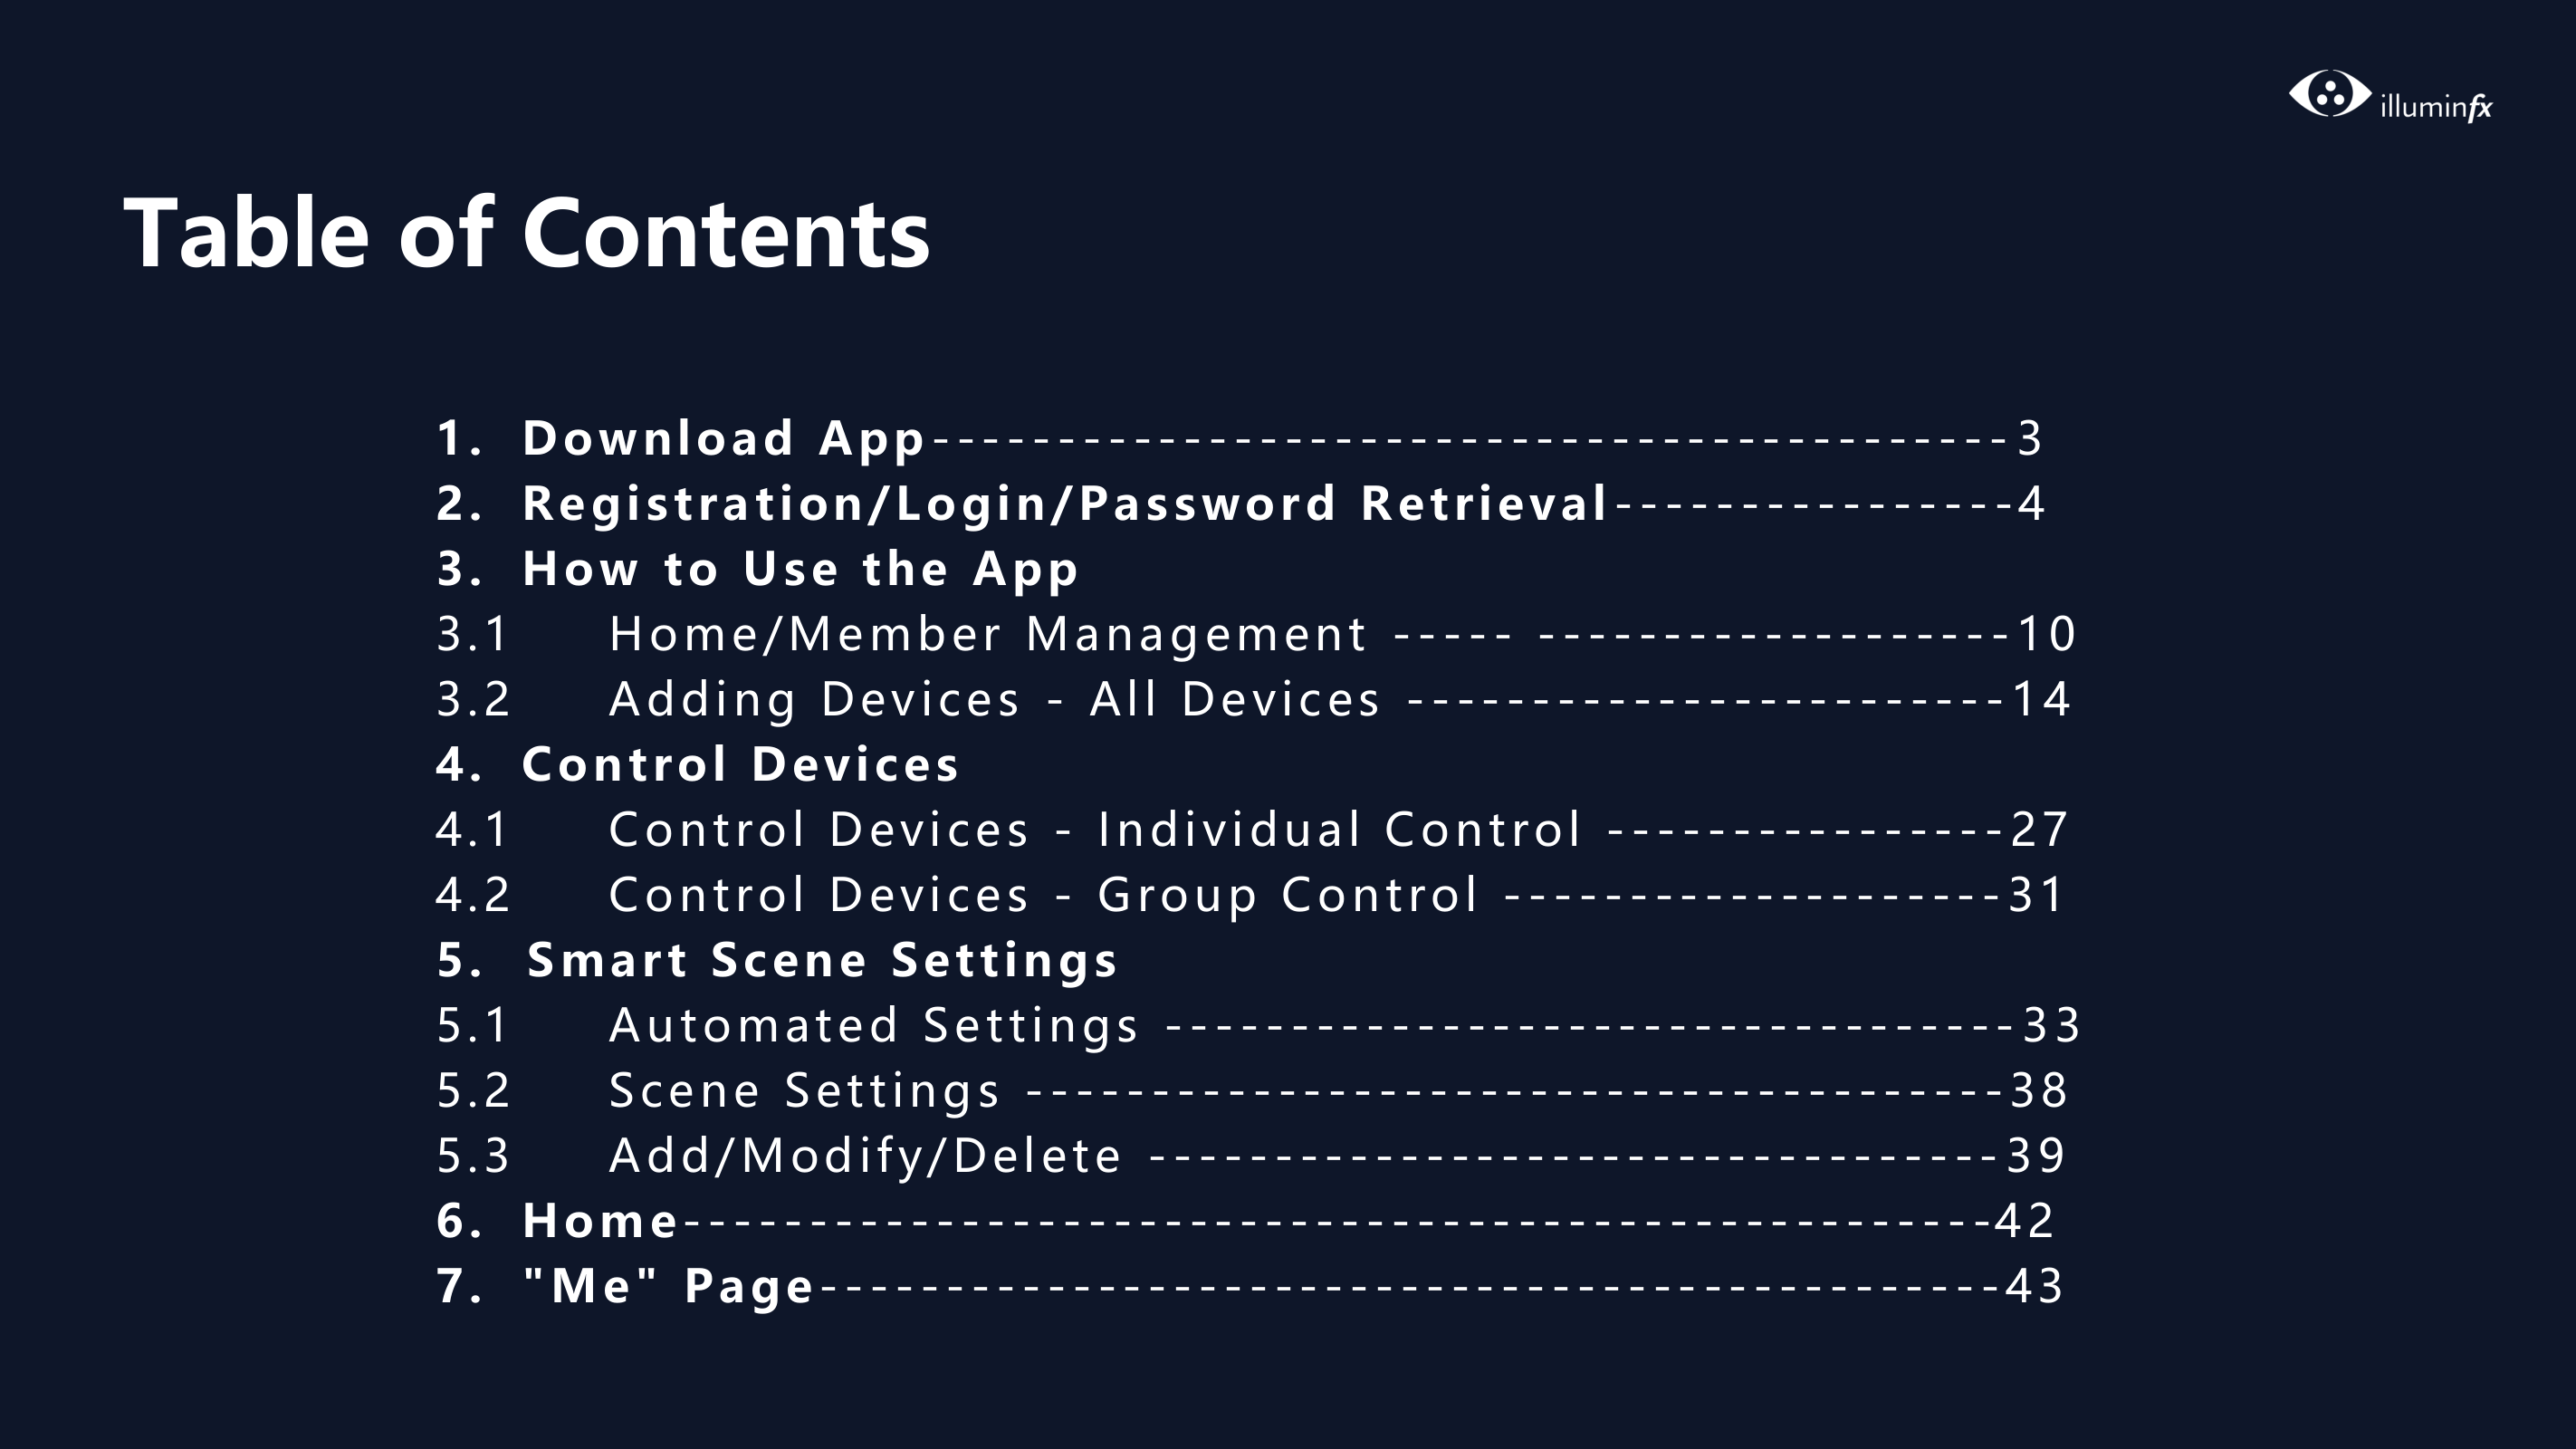
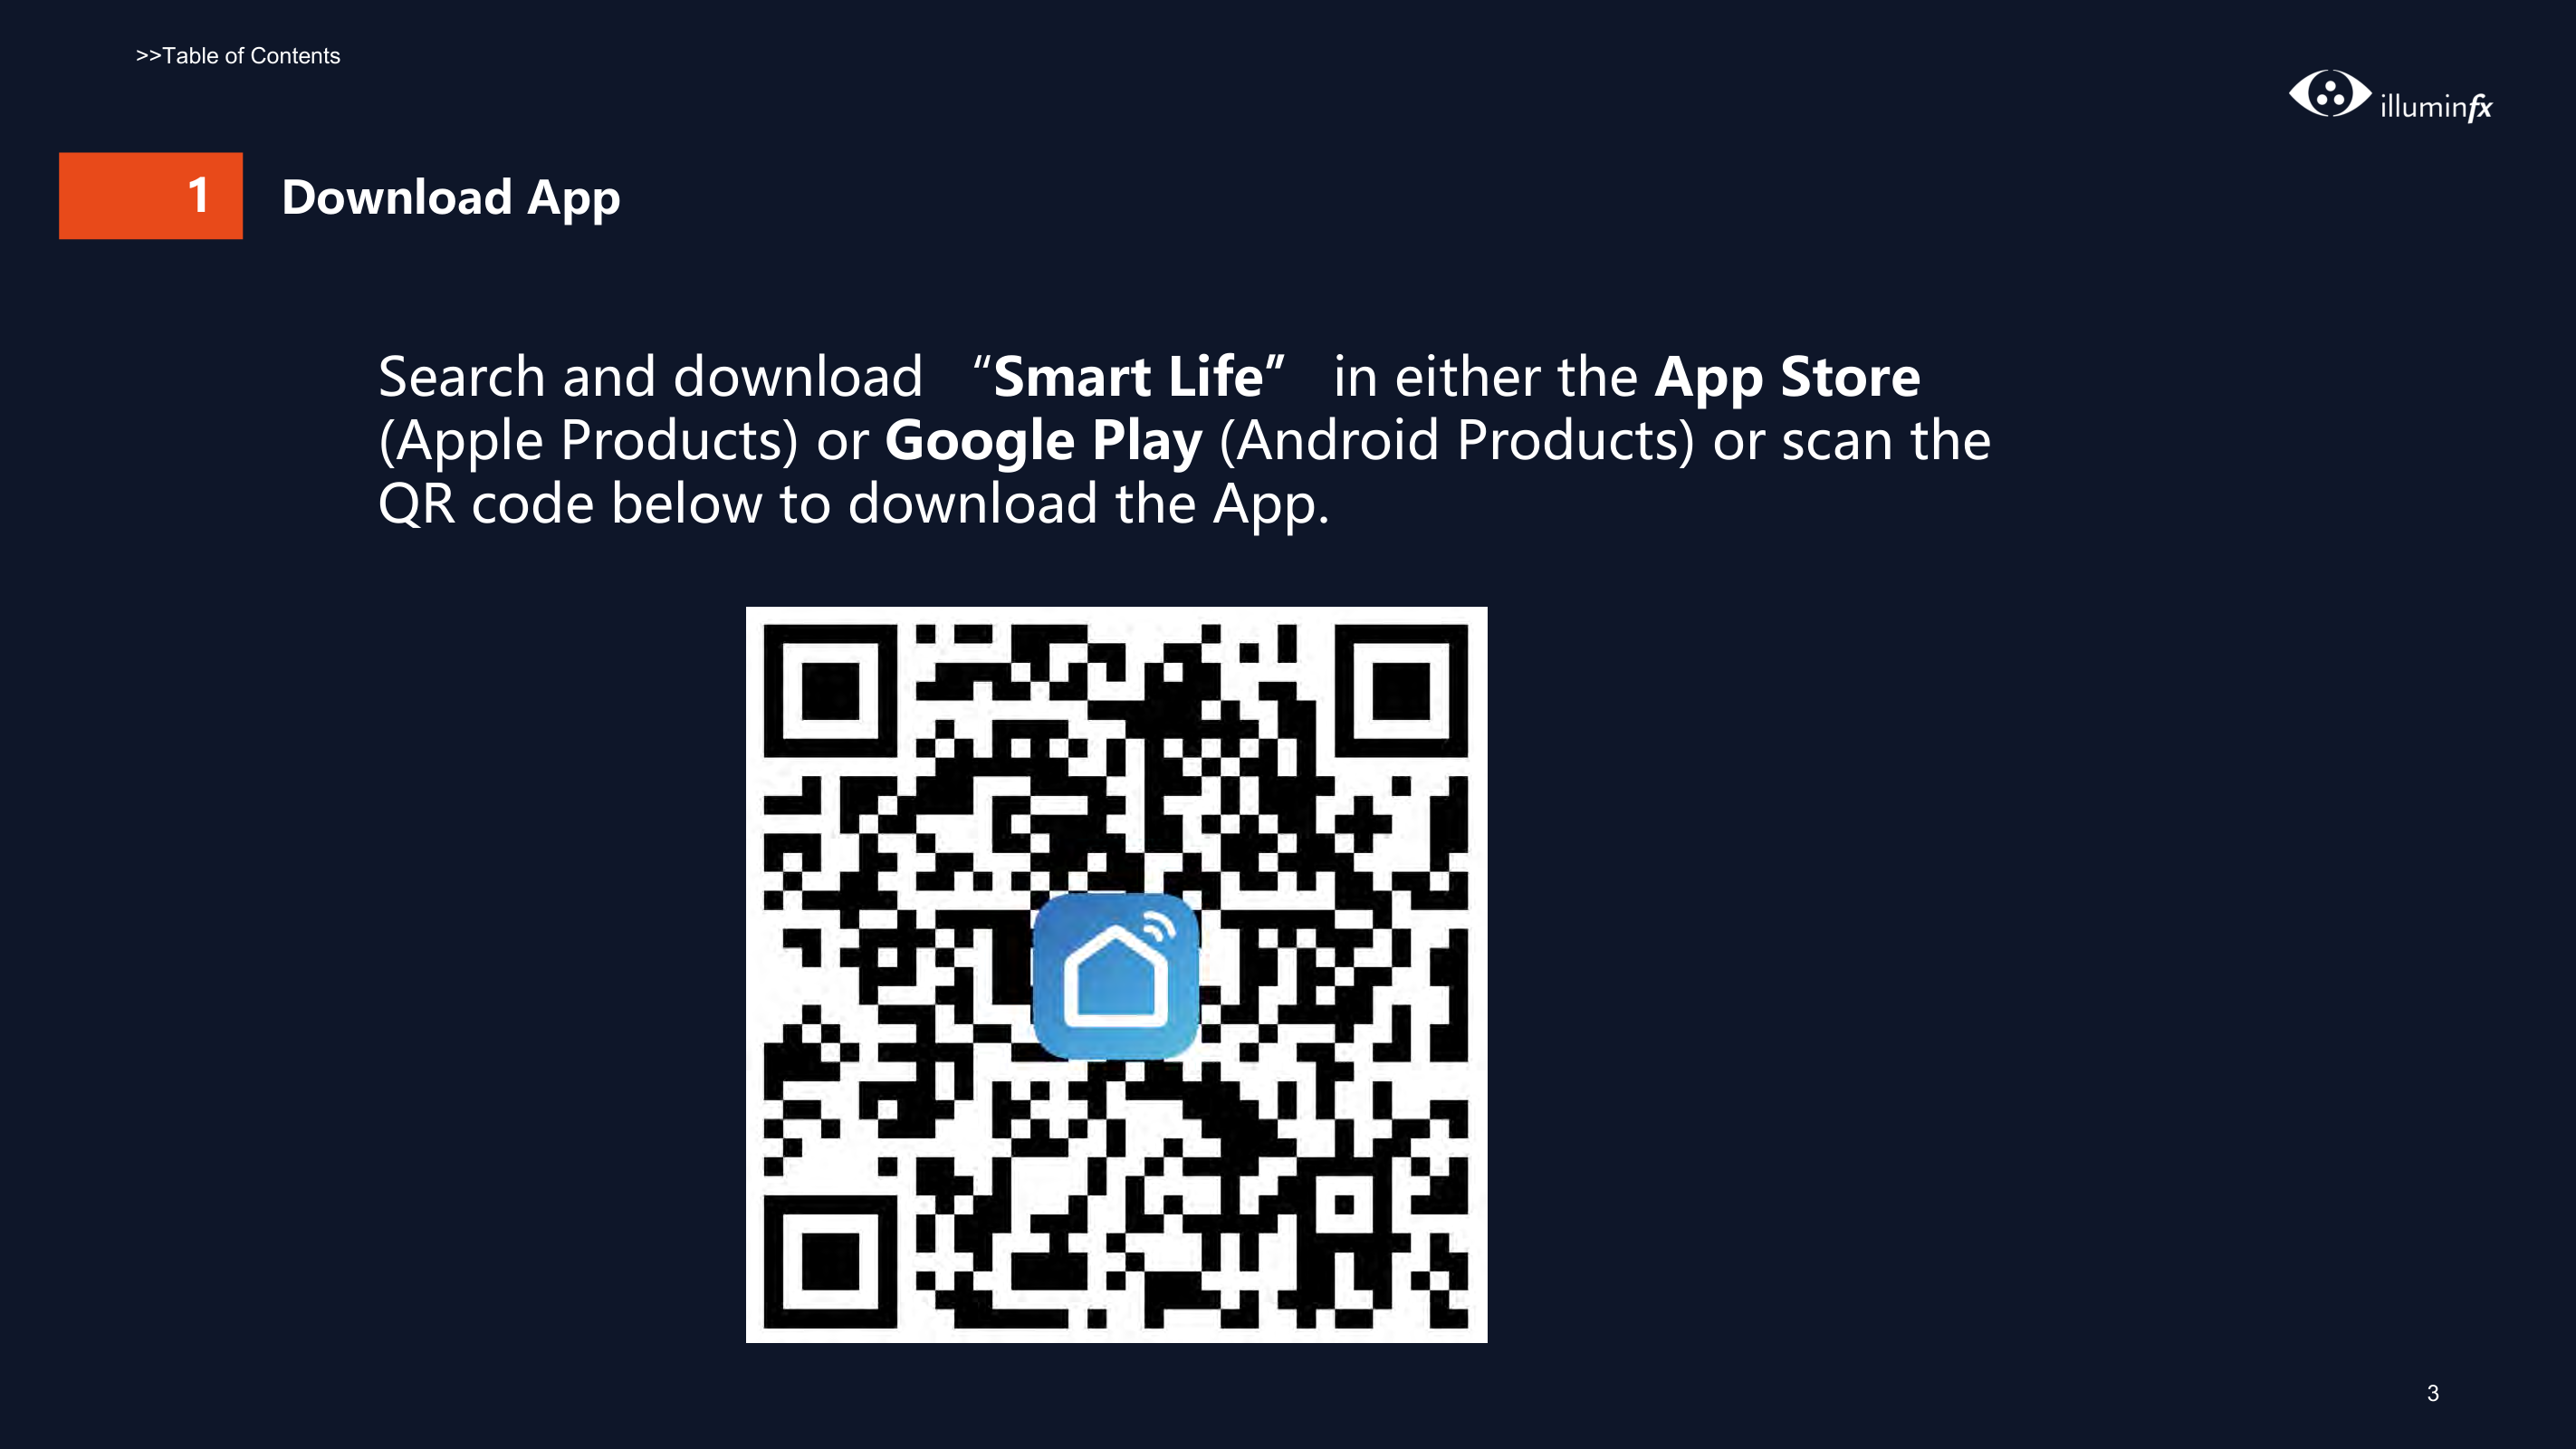

###### 1 Download App
Search and download “Smart Life” in either the App Store (Apple Products) or Google Play (Android Products) or scan the QR code below to download the App.


########### Fig. 1 Fig. 2
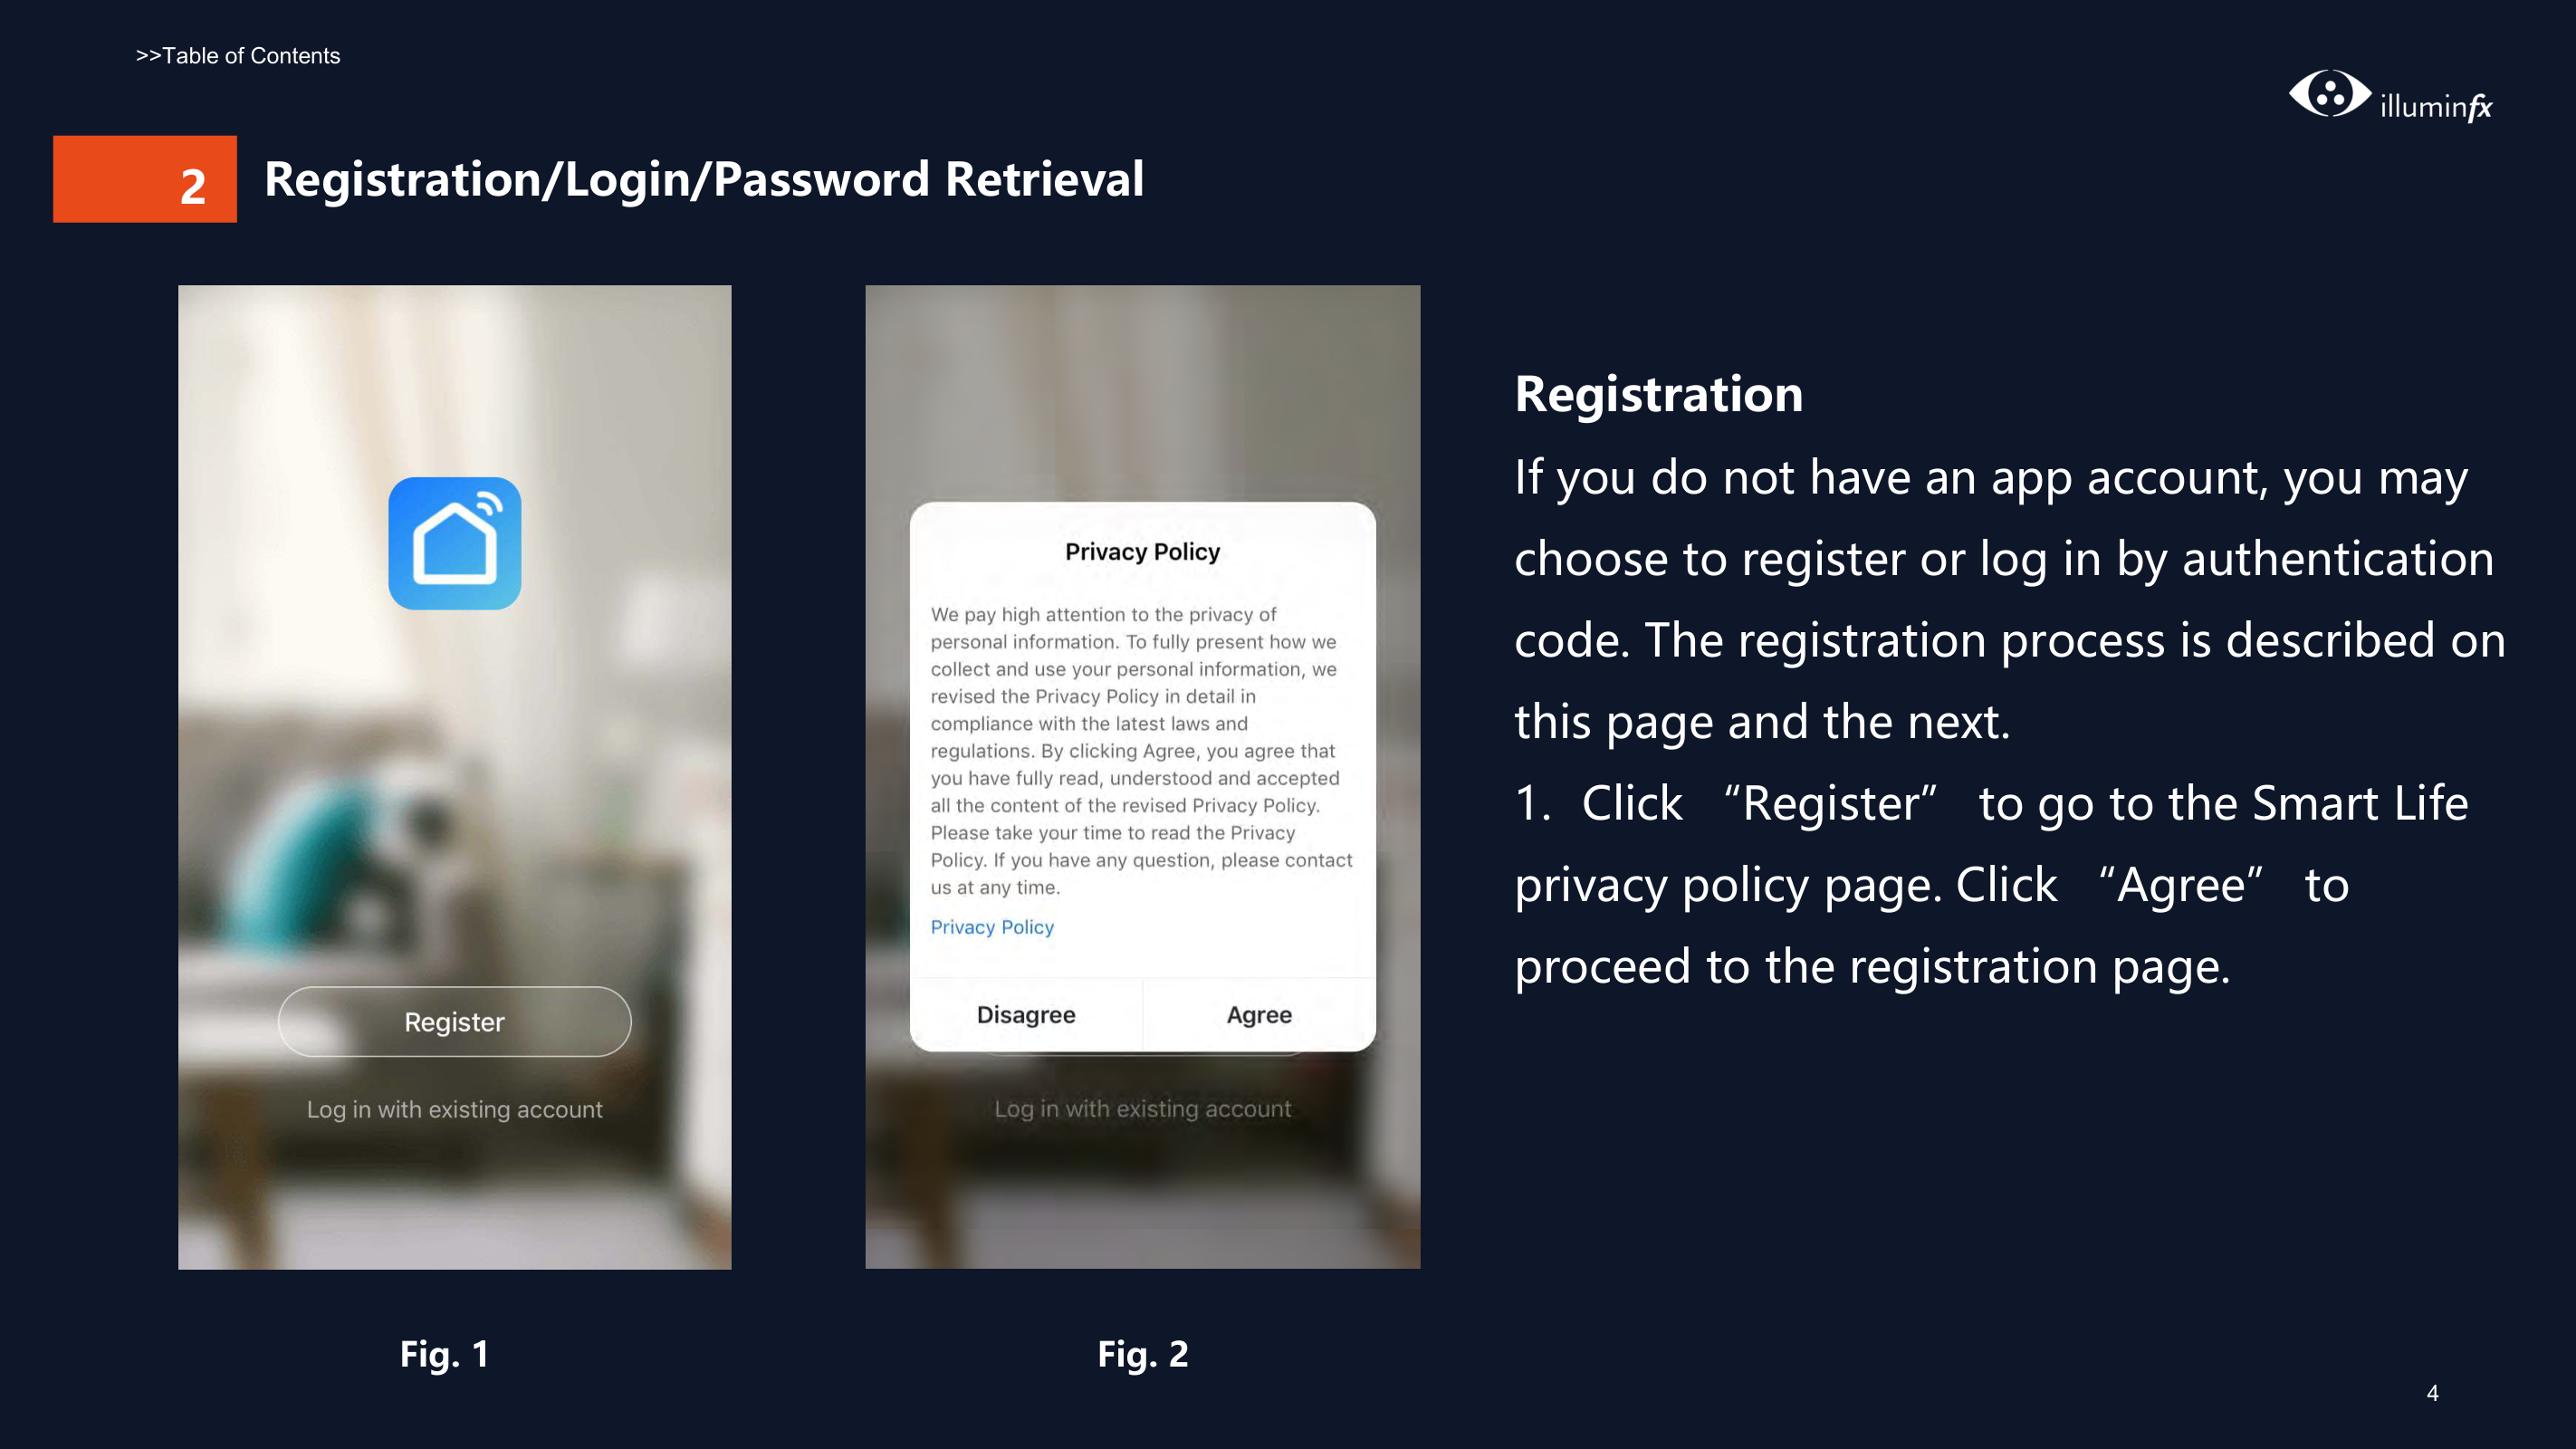
Registration If you do not have an app account, you may choose to register or log in by authentication code. The registration process is described on this page and the next.
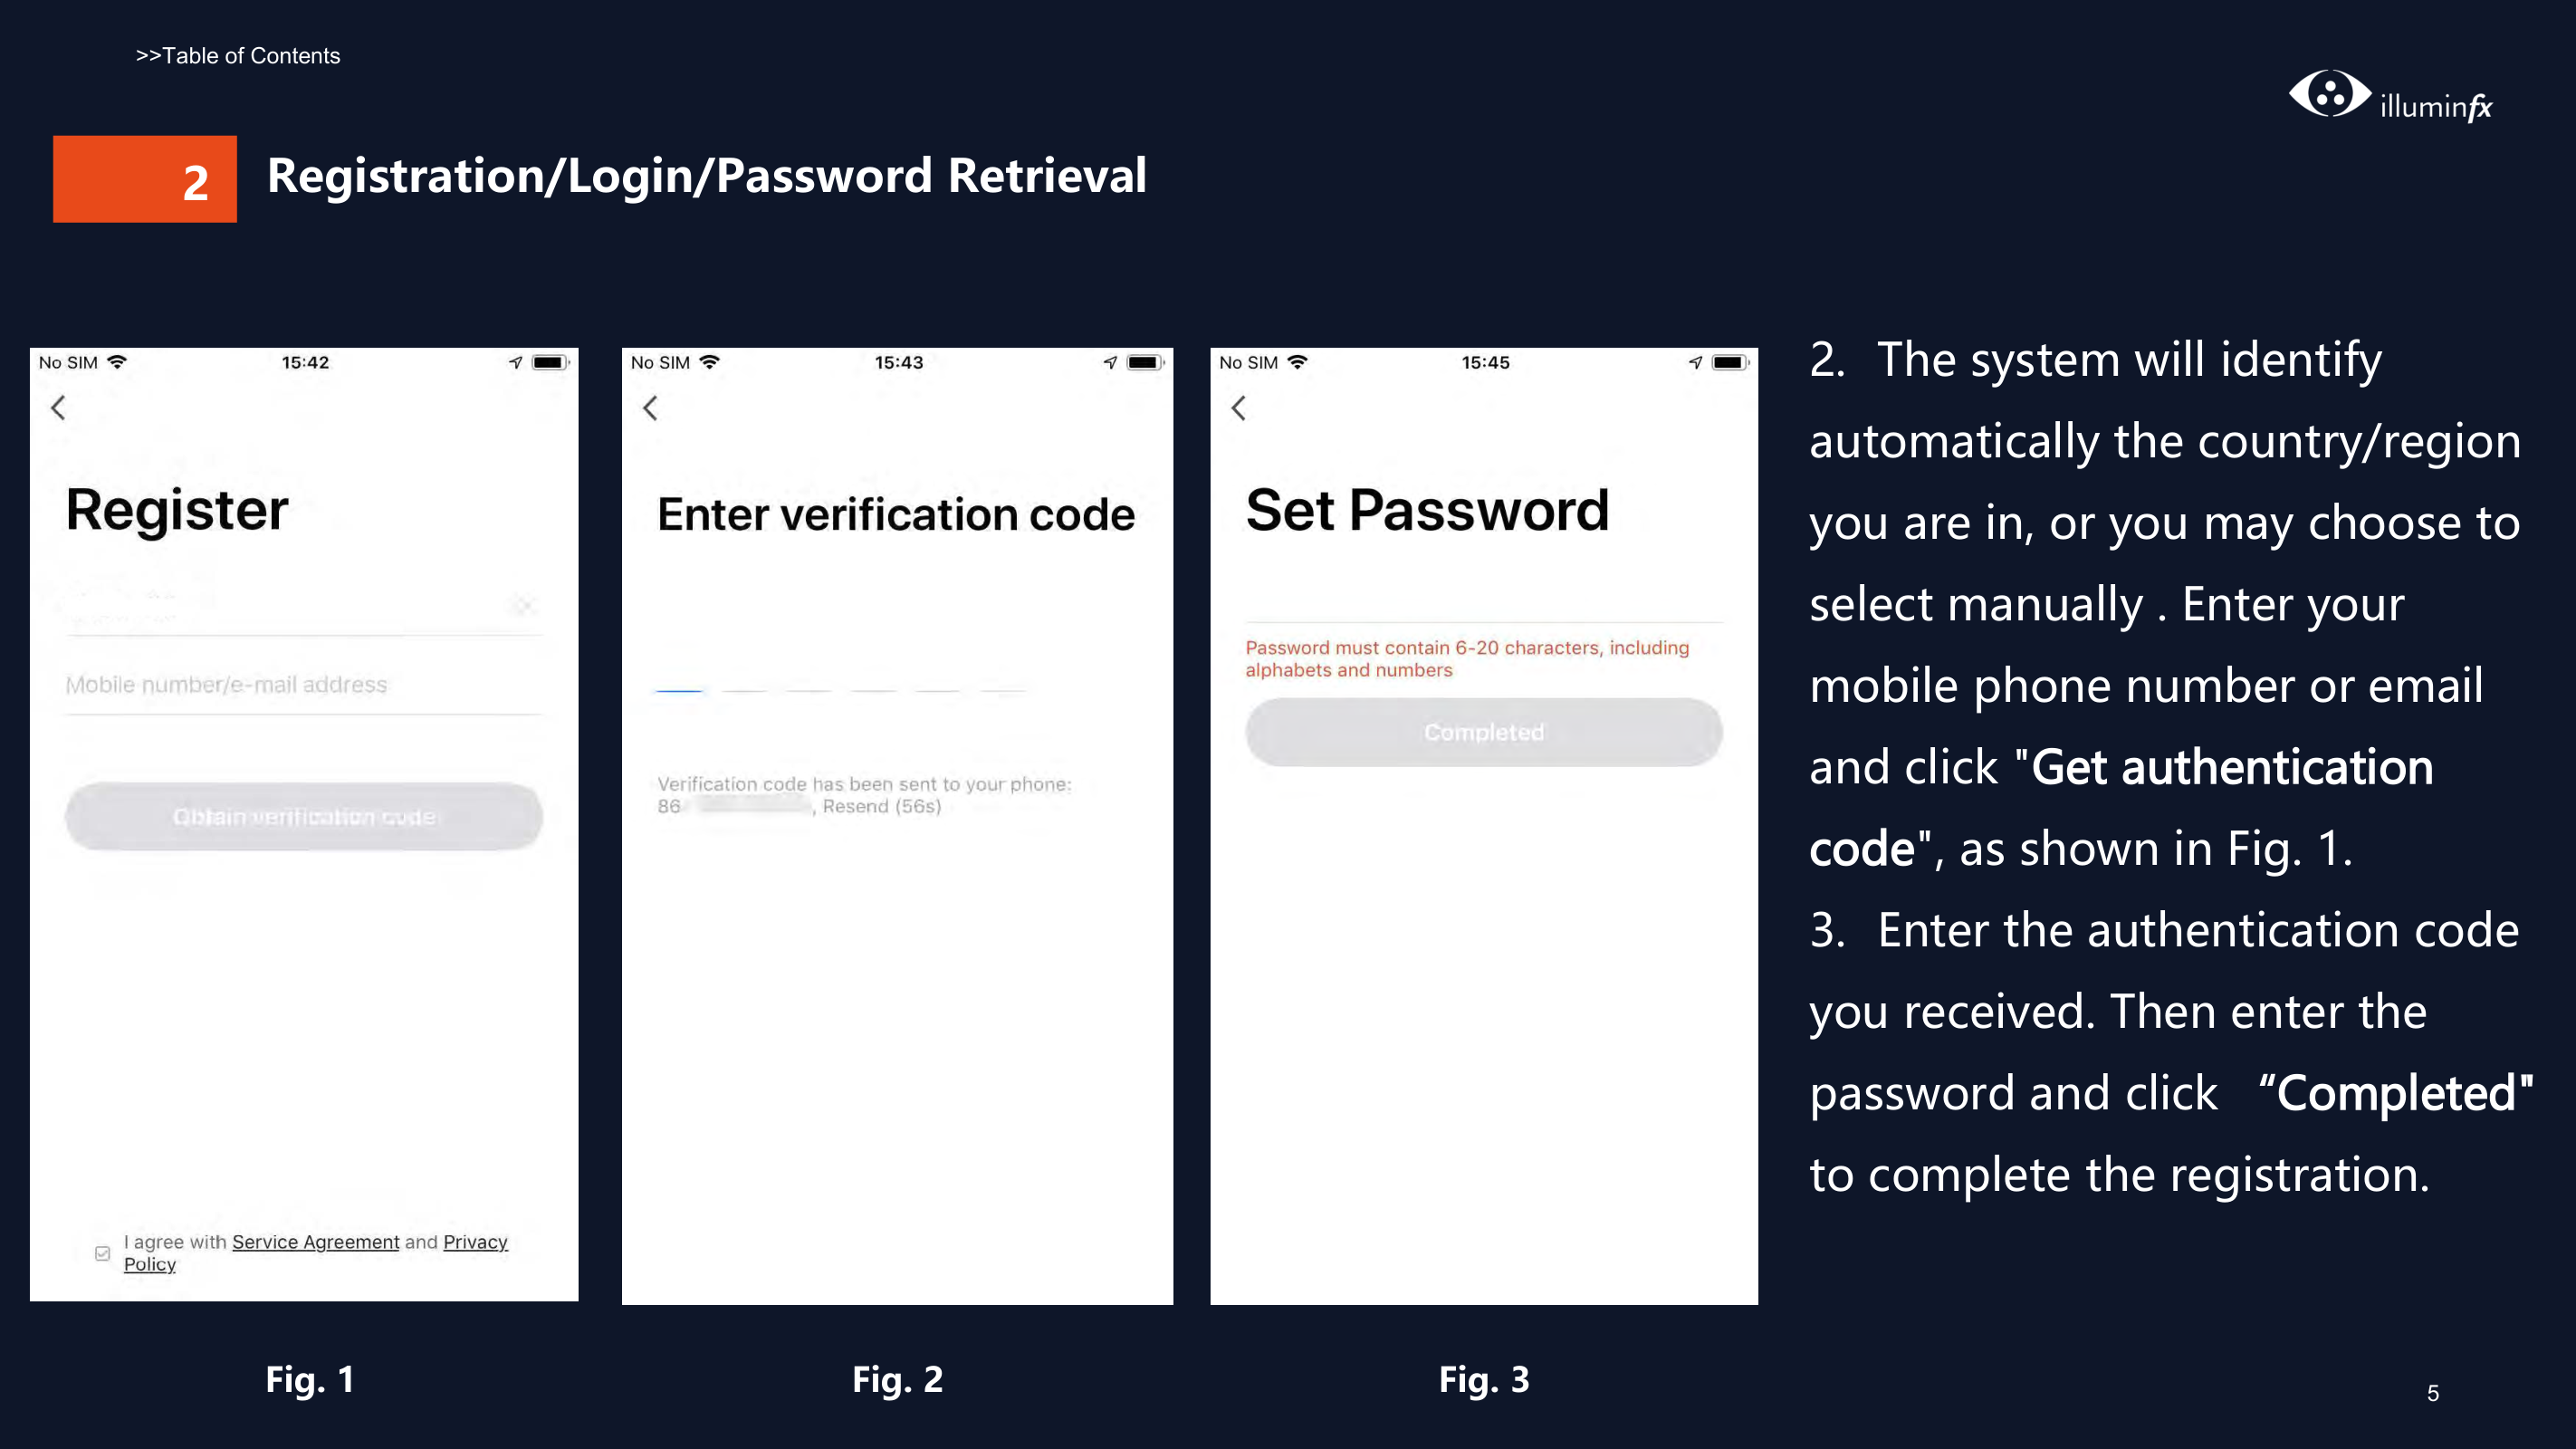


########## Fig. 1 Fig. 2 Fig. 3
#### 2

| | |---|
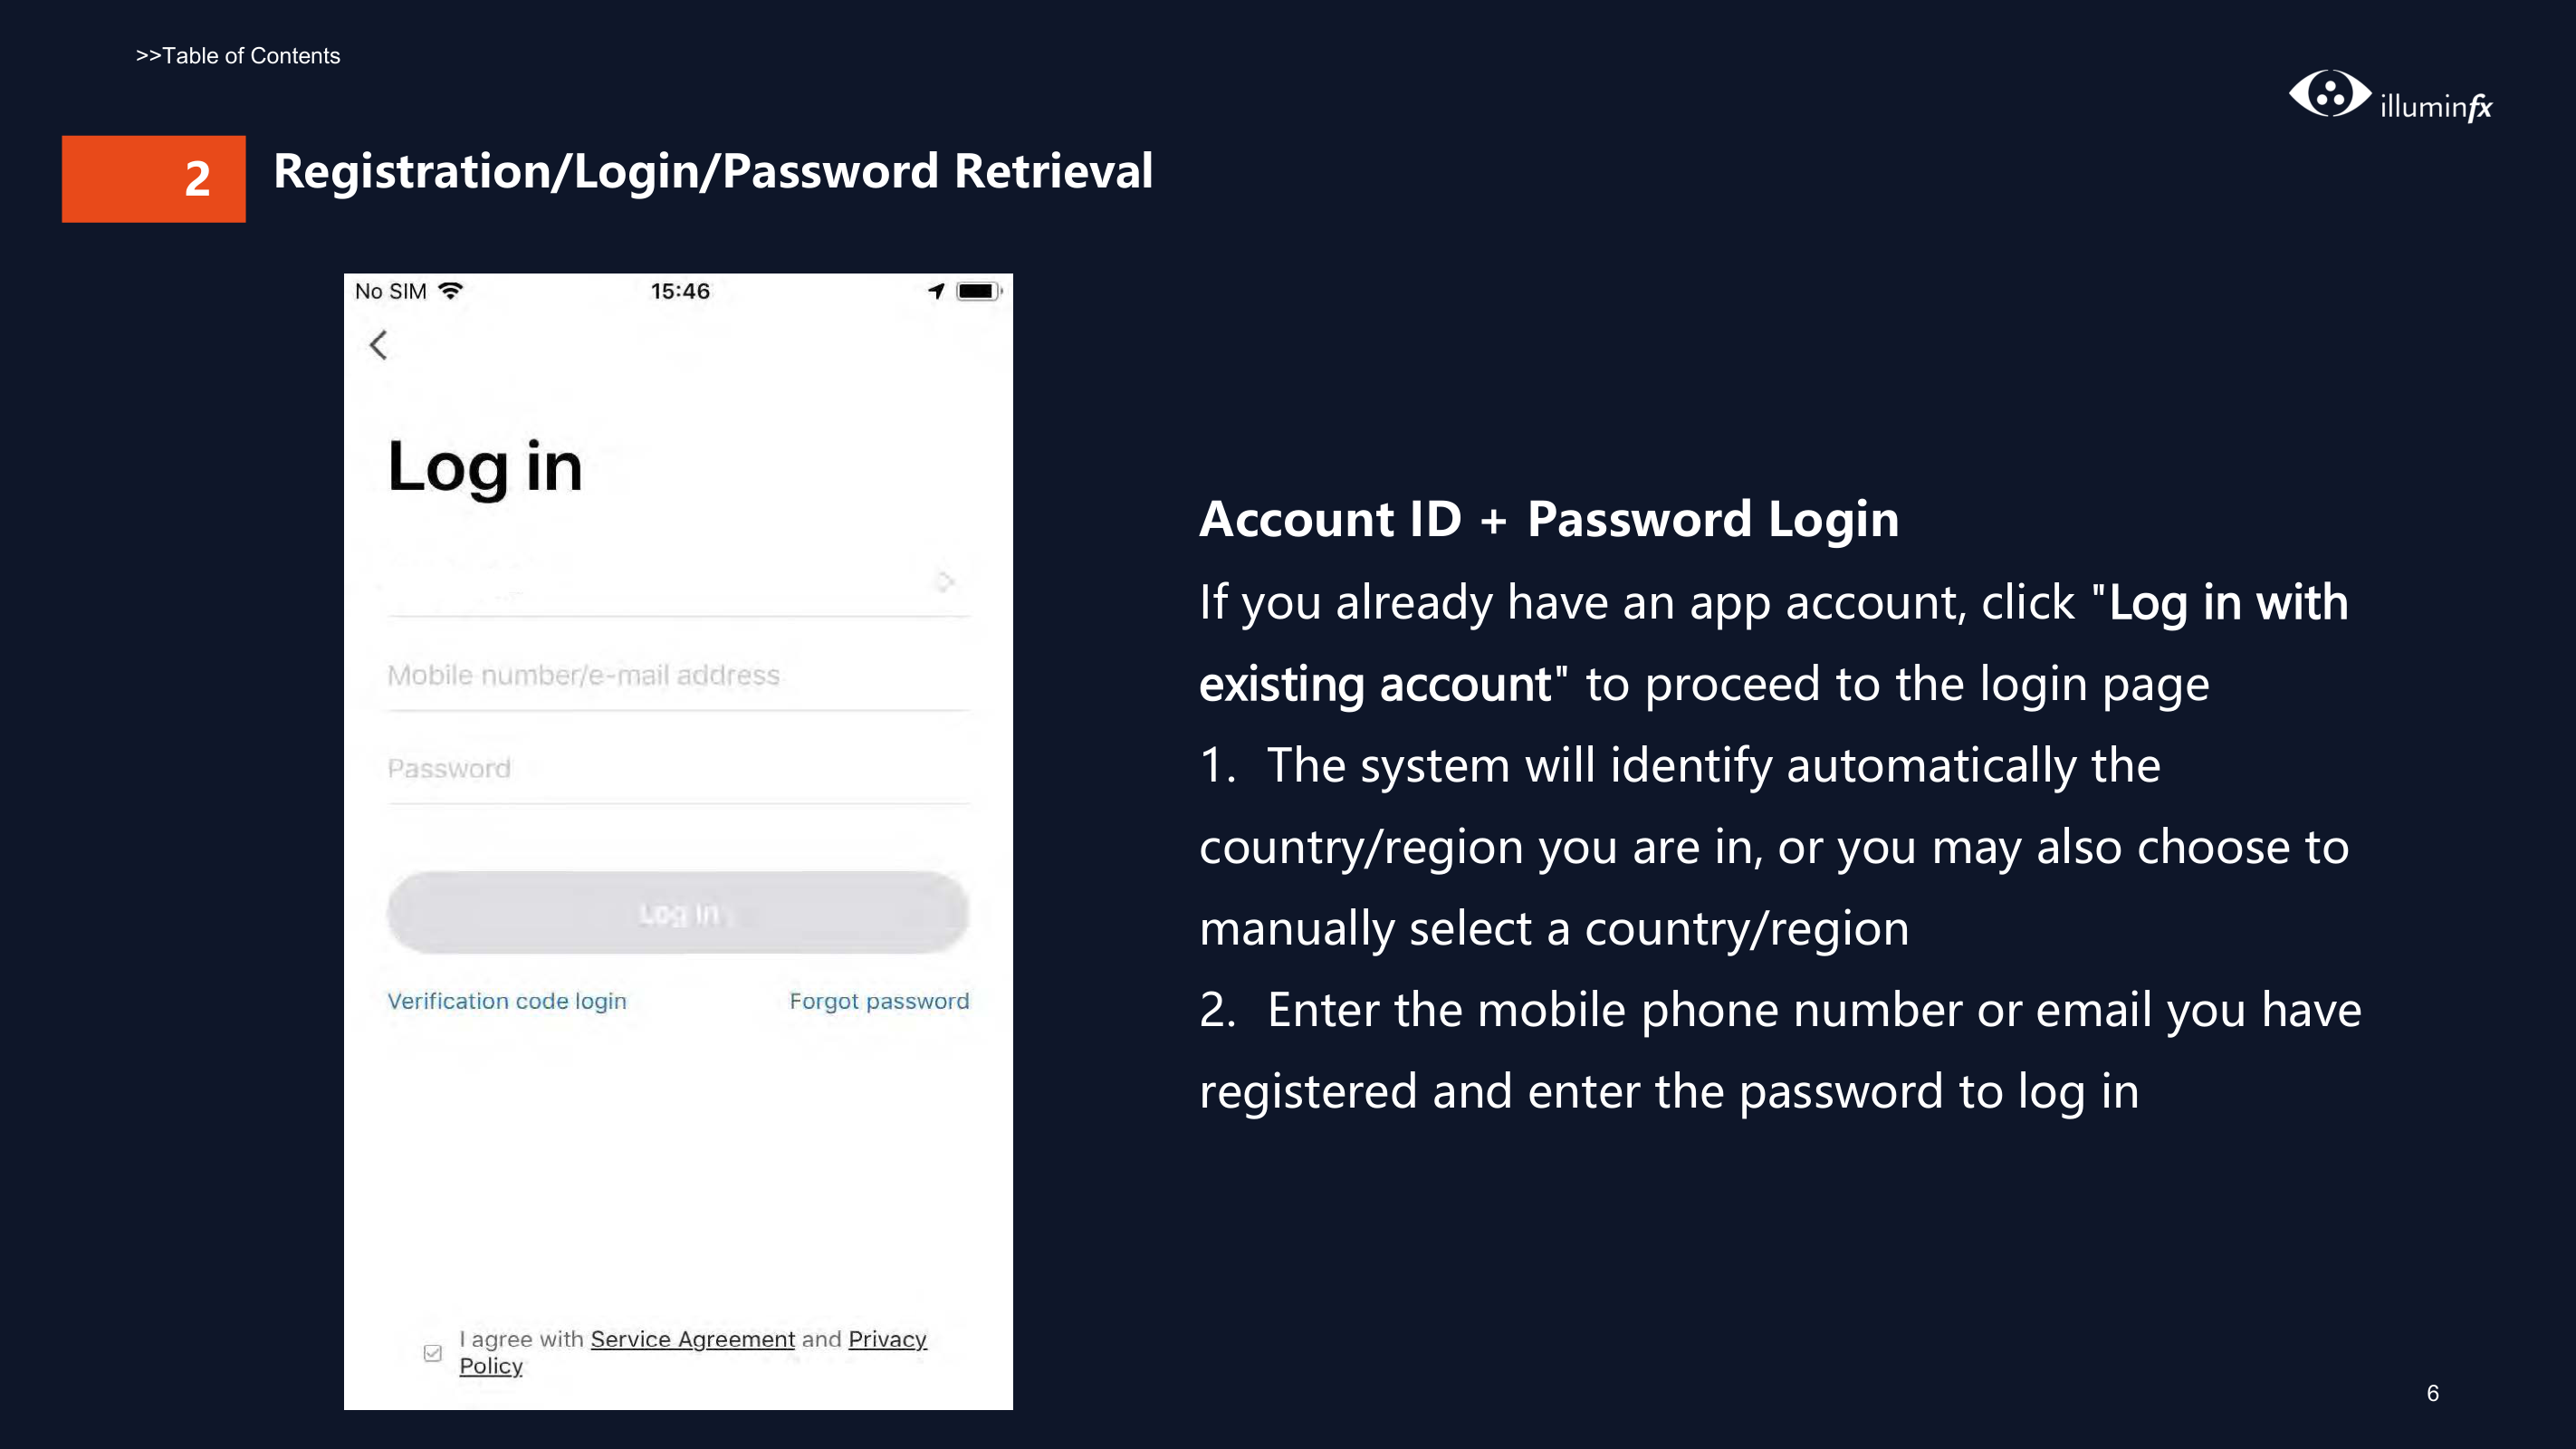
Account ID + Password Login If you already have an app account, click "Log in with existing account" to proceed to the login page
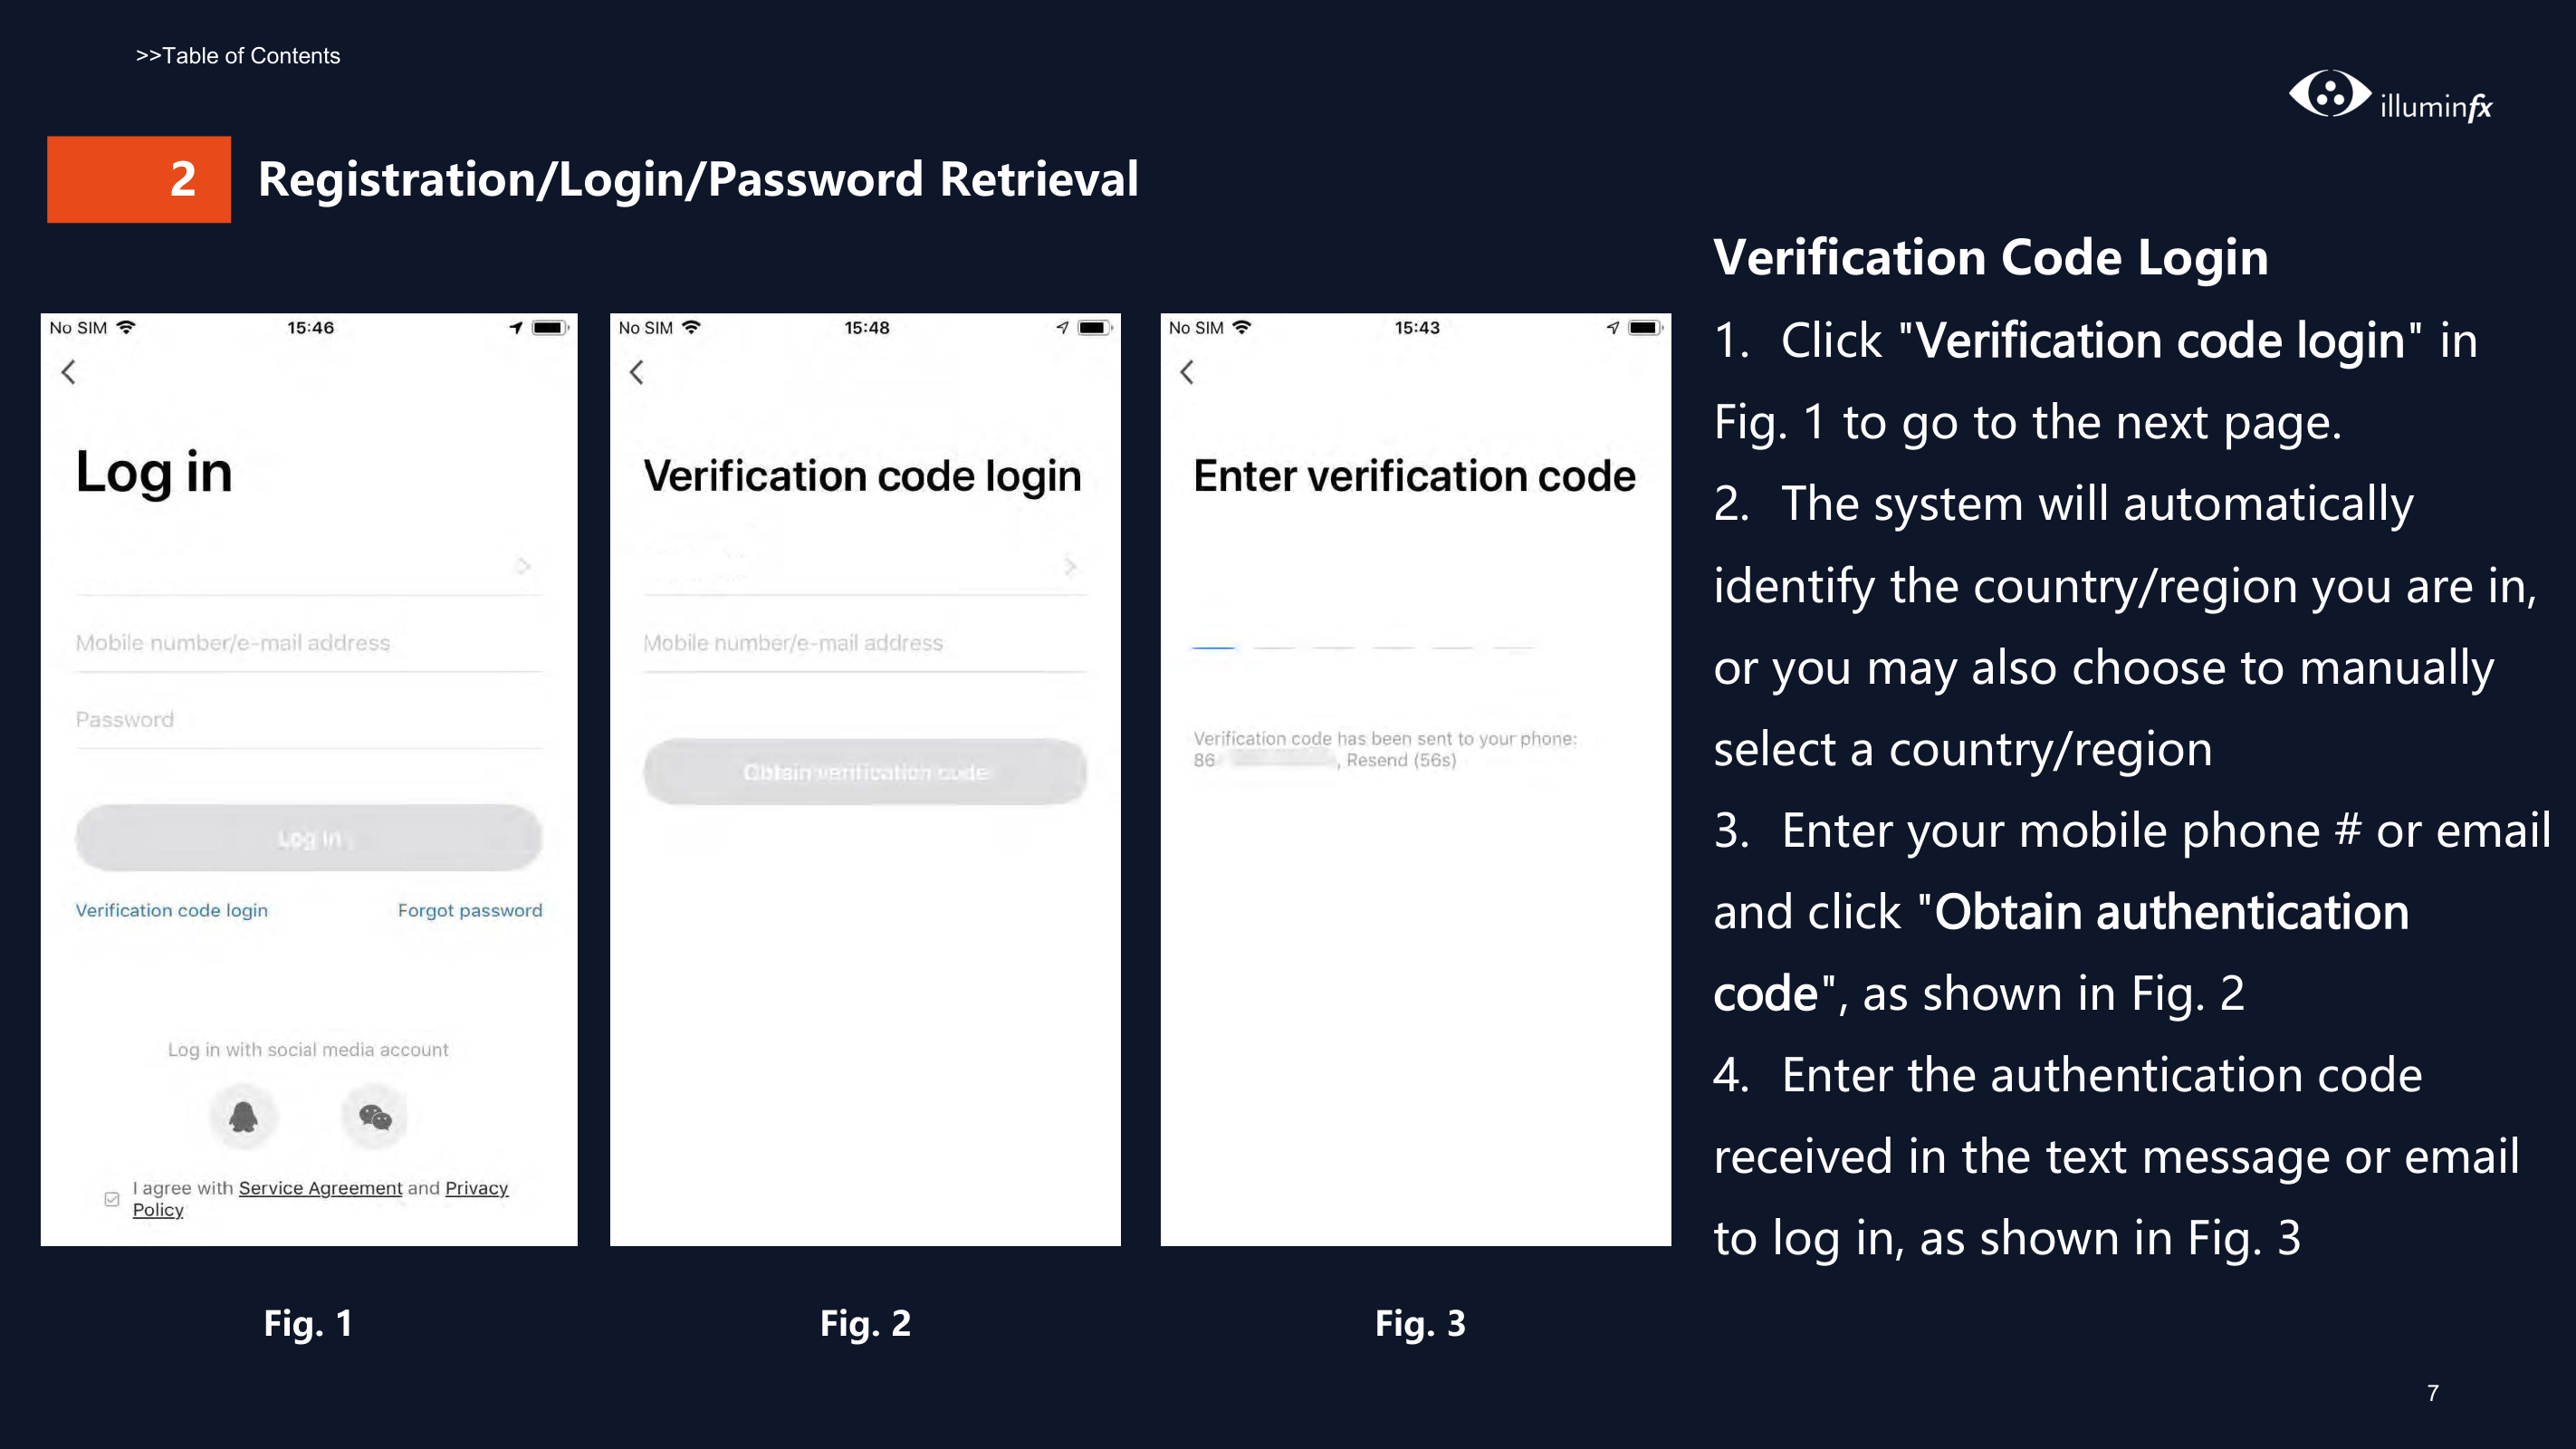
2Verification Code Login

| | |---|

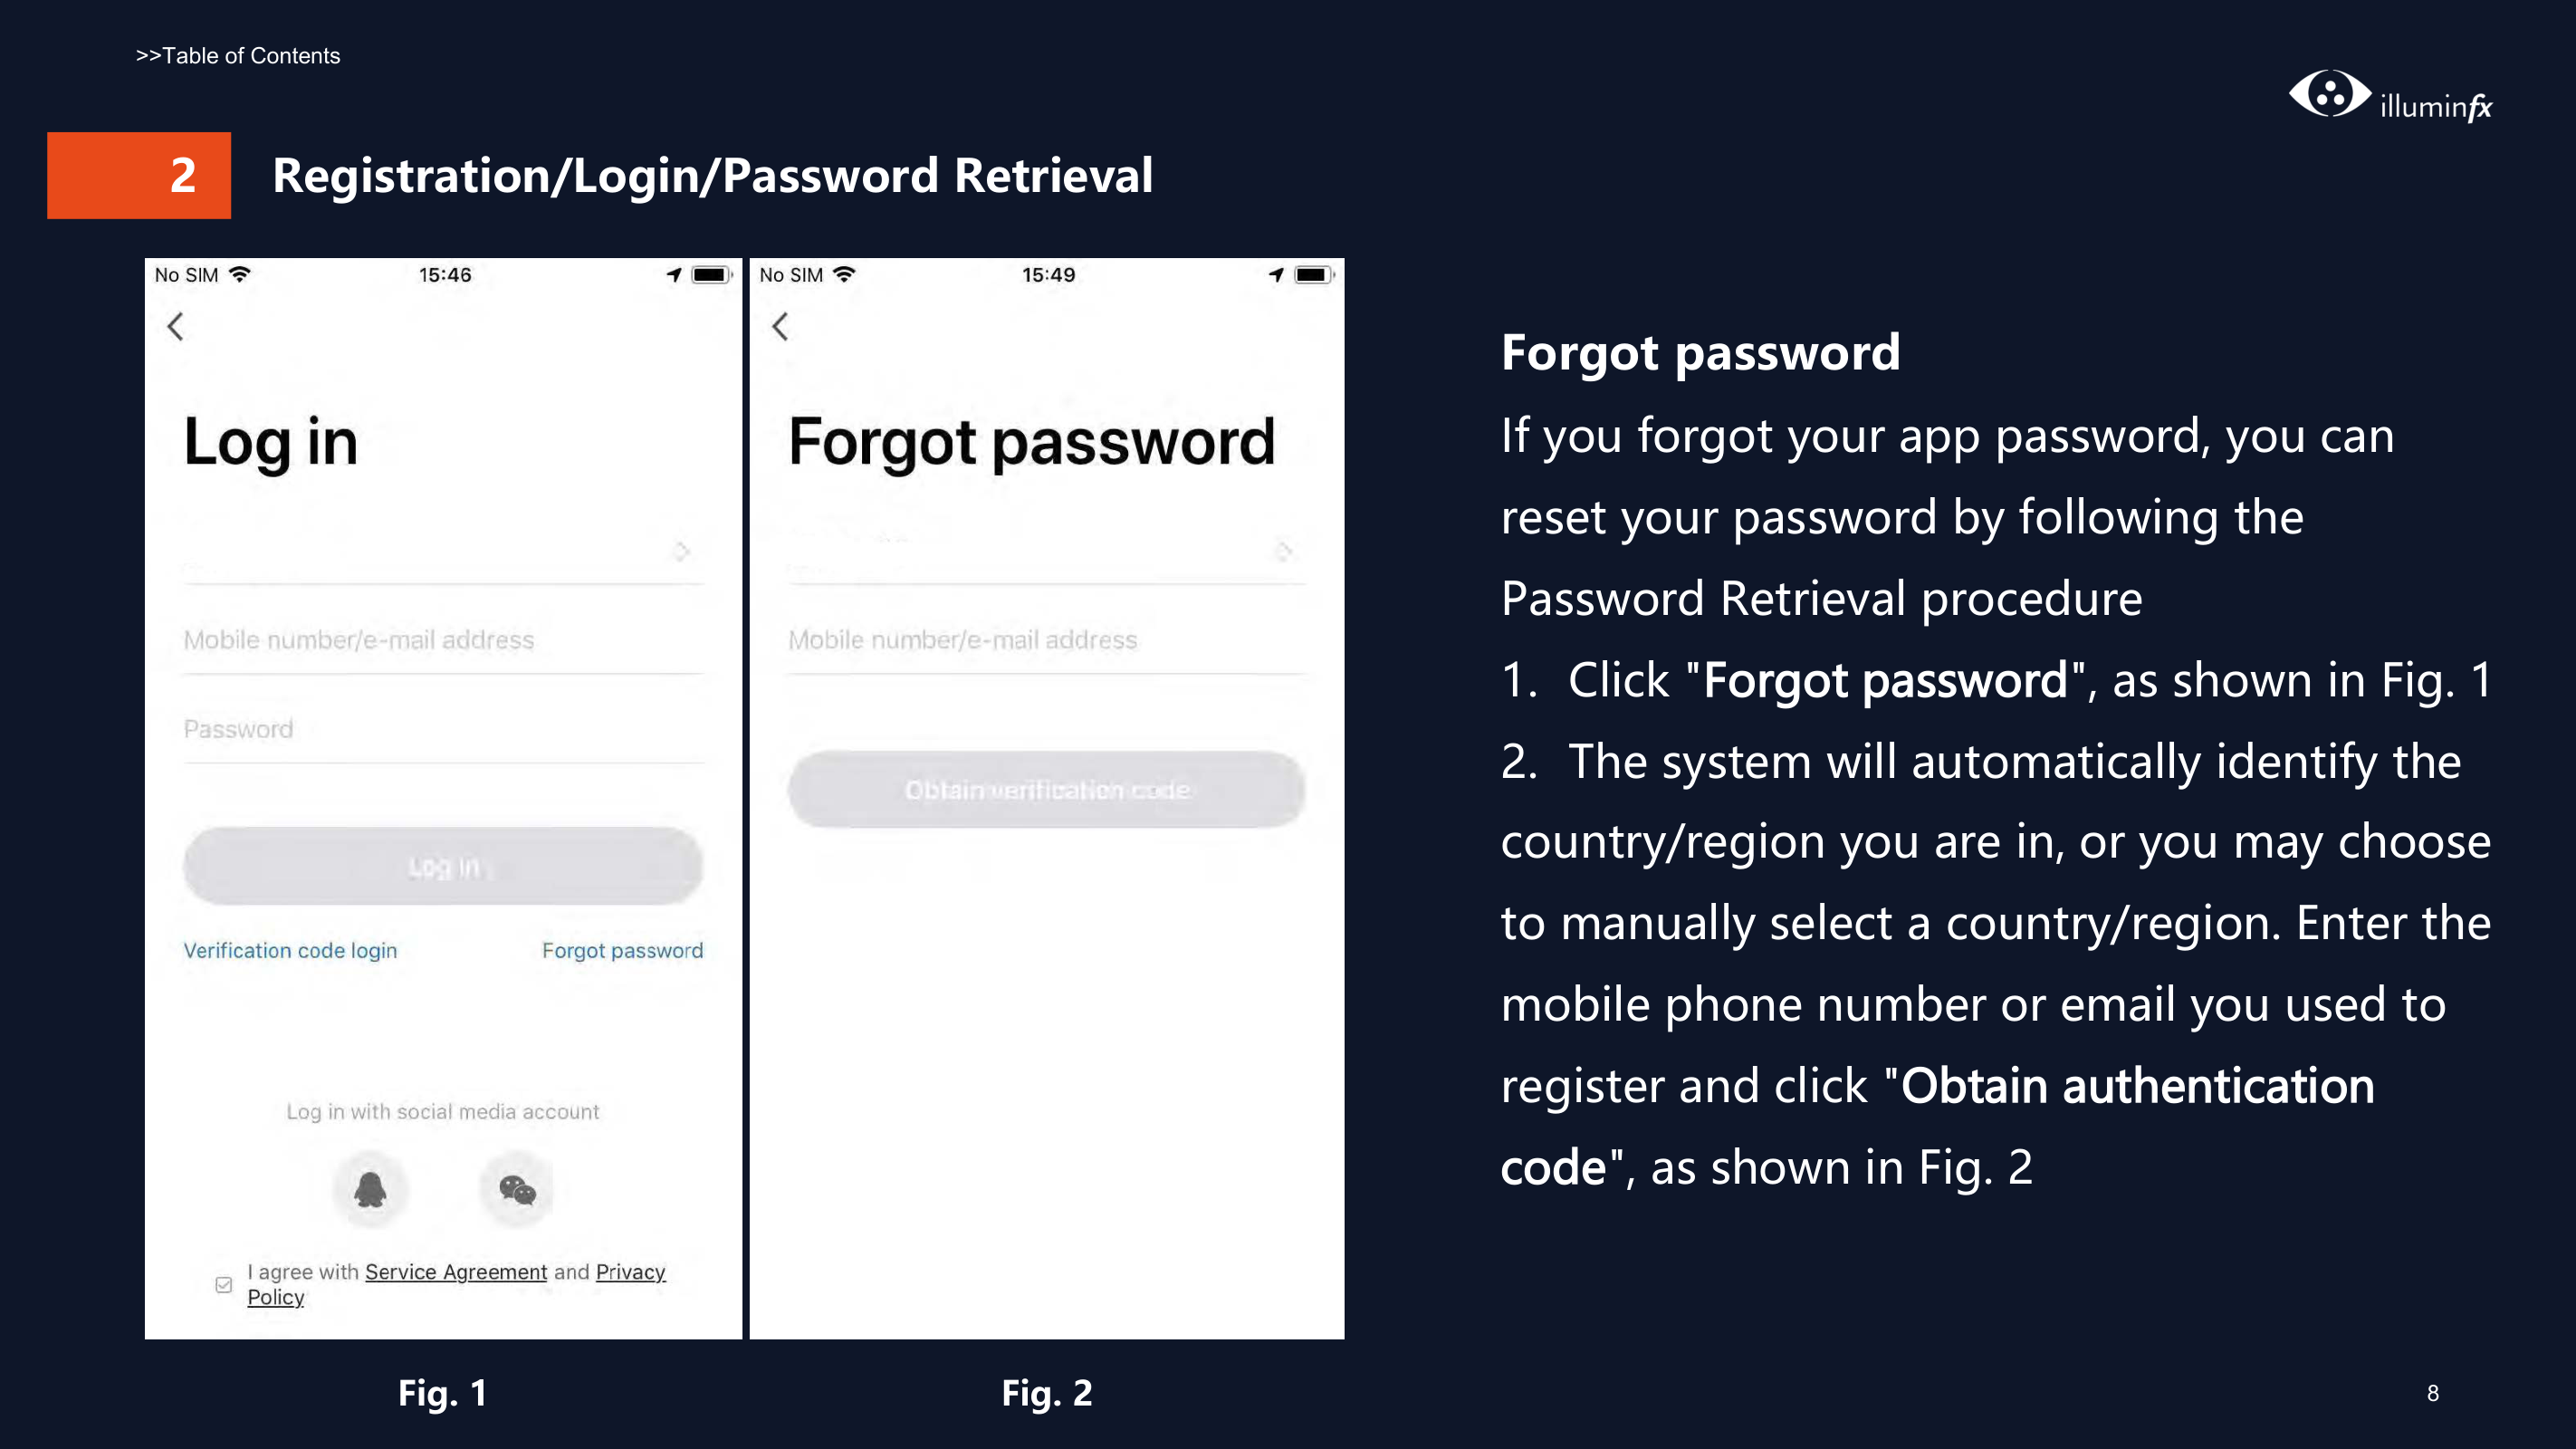

Fig. 1 Fig. 2 Fig. 3
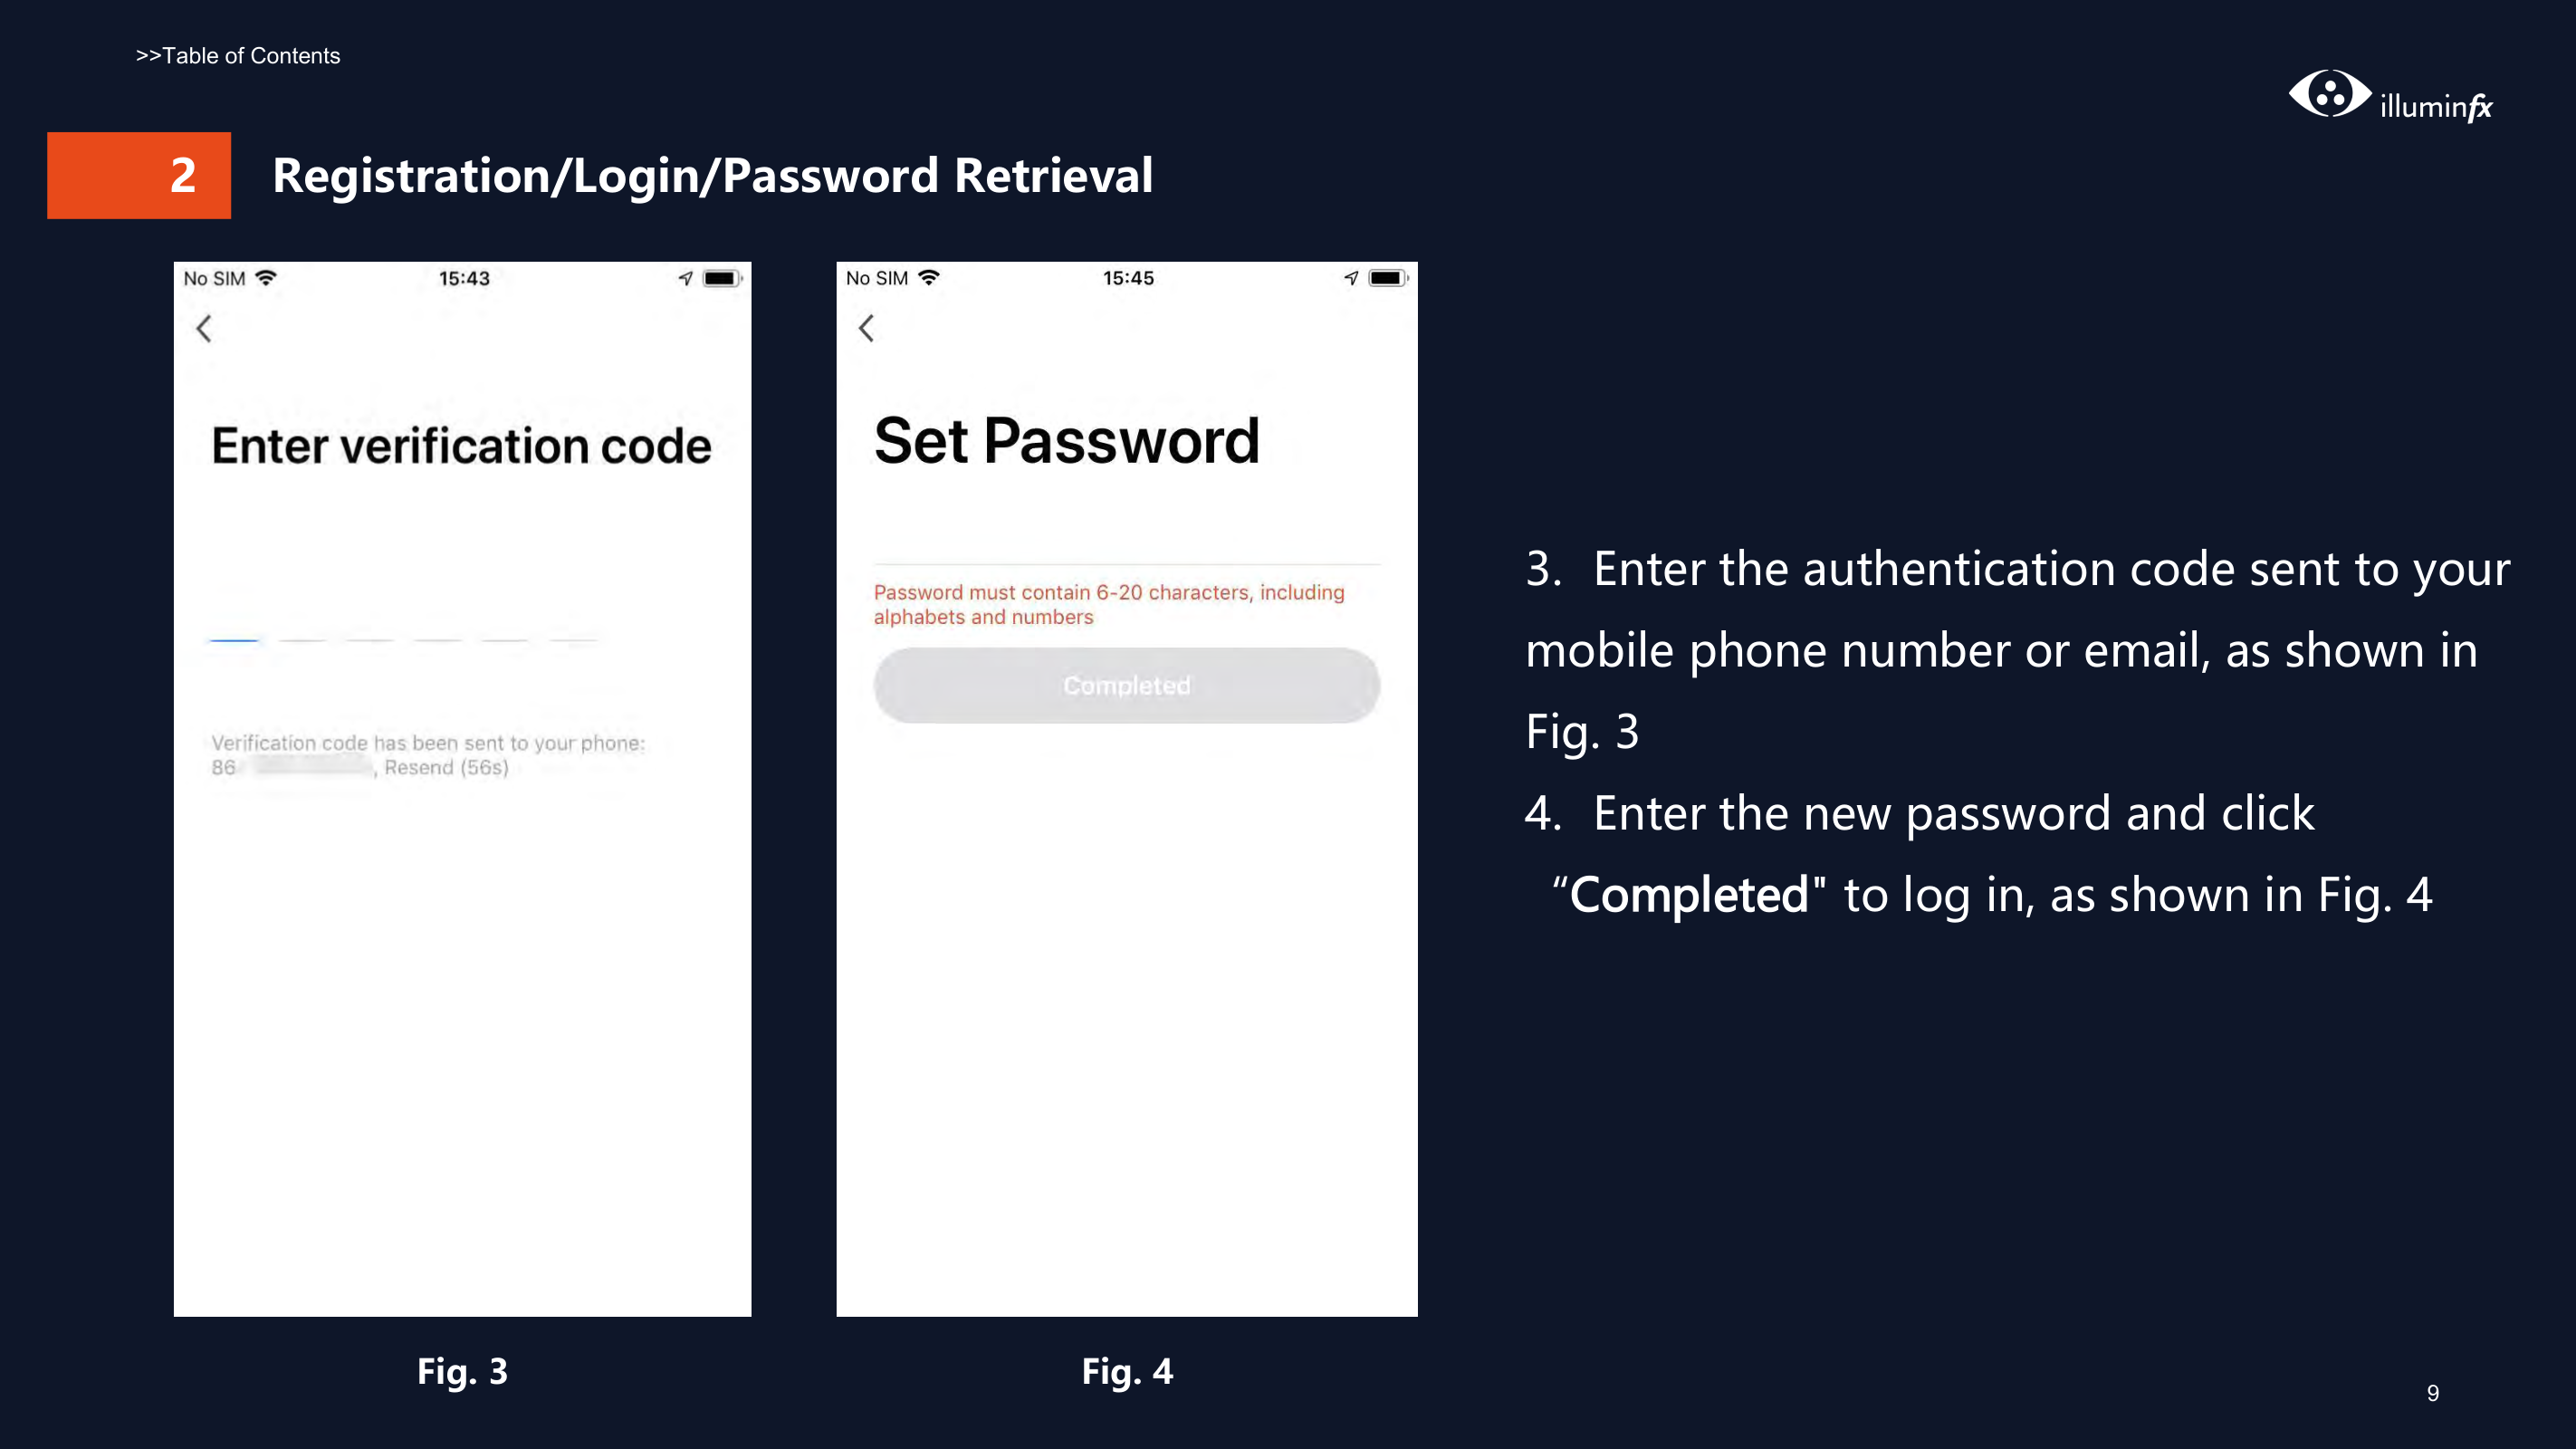
###### 2 Registration/Login/Password Retrieval


|| |---|
########### Fig. 1 Fig. 2
Forgot password If you forgot your app password, you can reset your password by following the Password Retrieval procedure

###### 2 Registration/Login/Password Retrieval


Fig. 3 Fig. 4
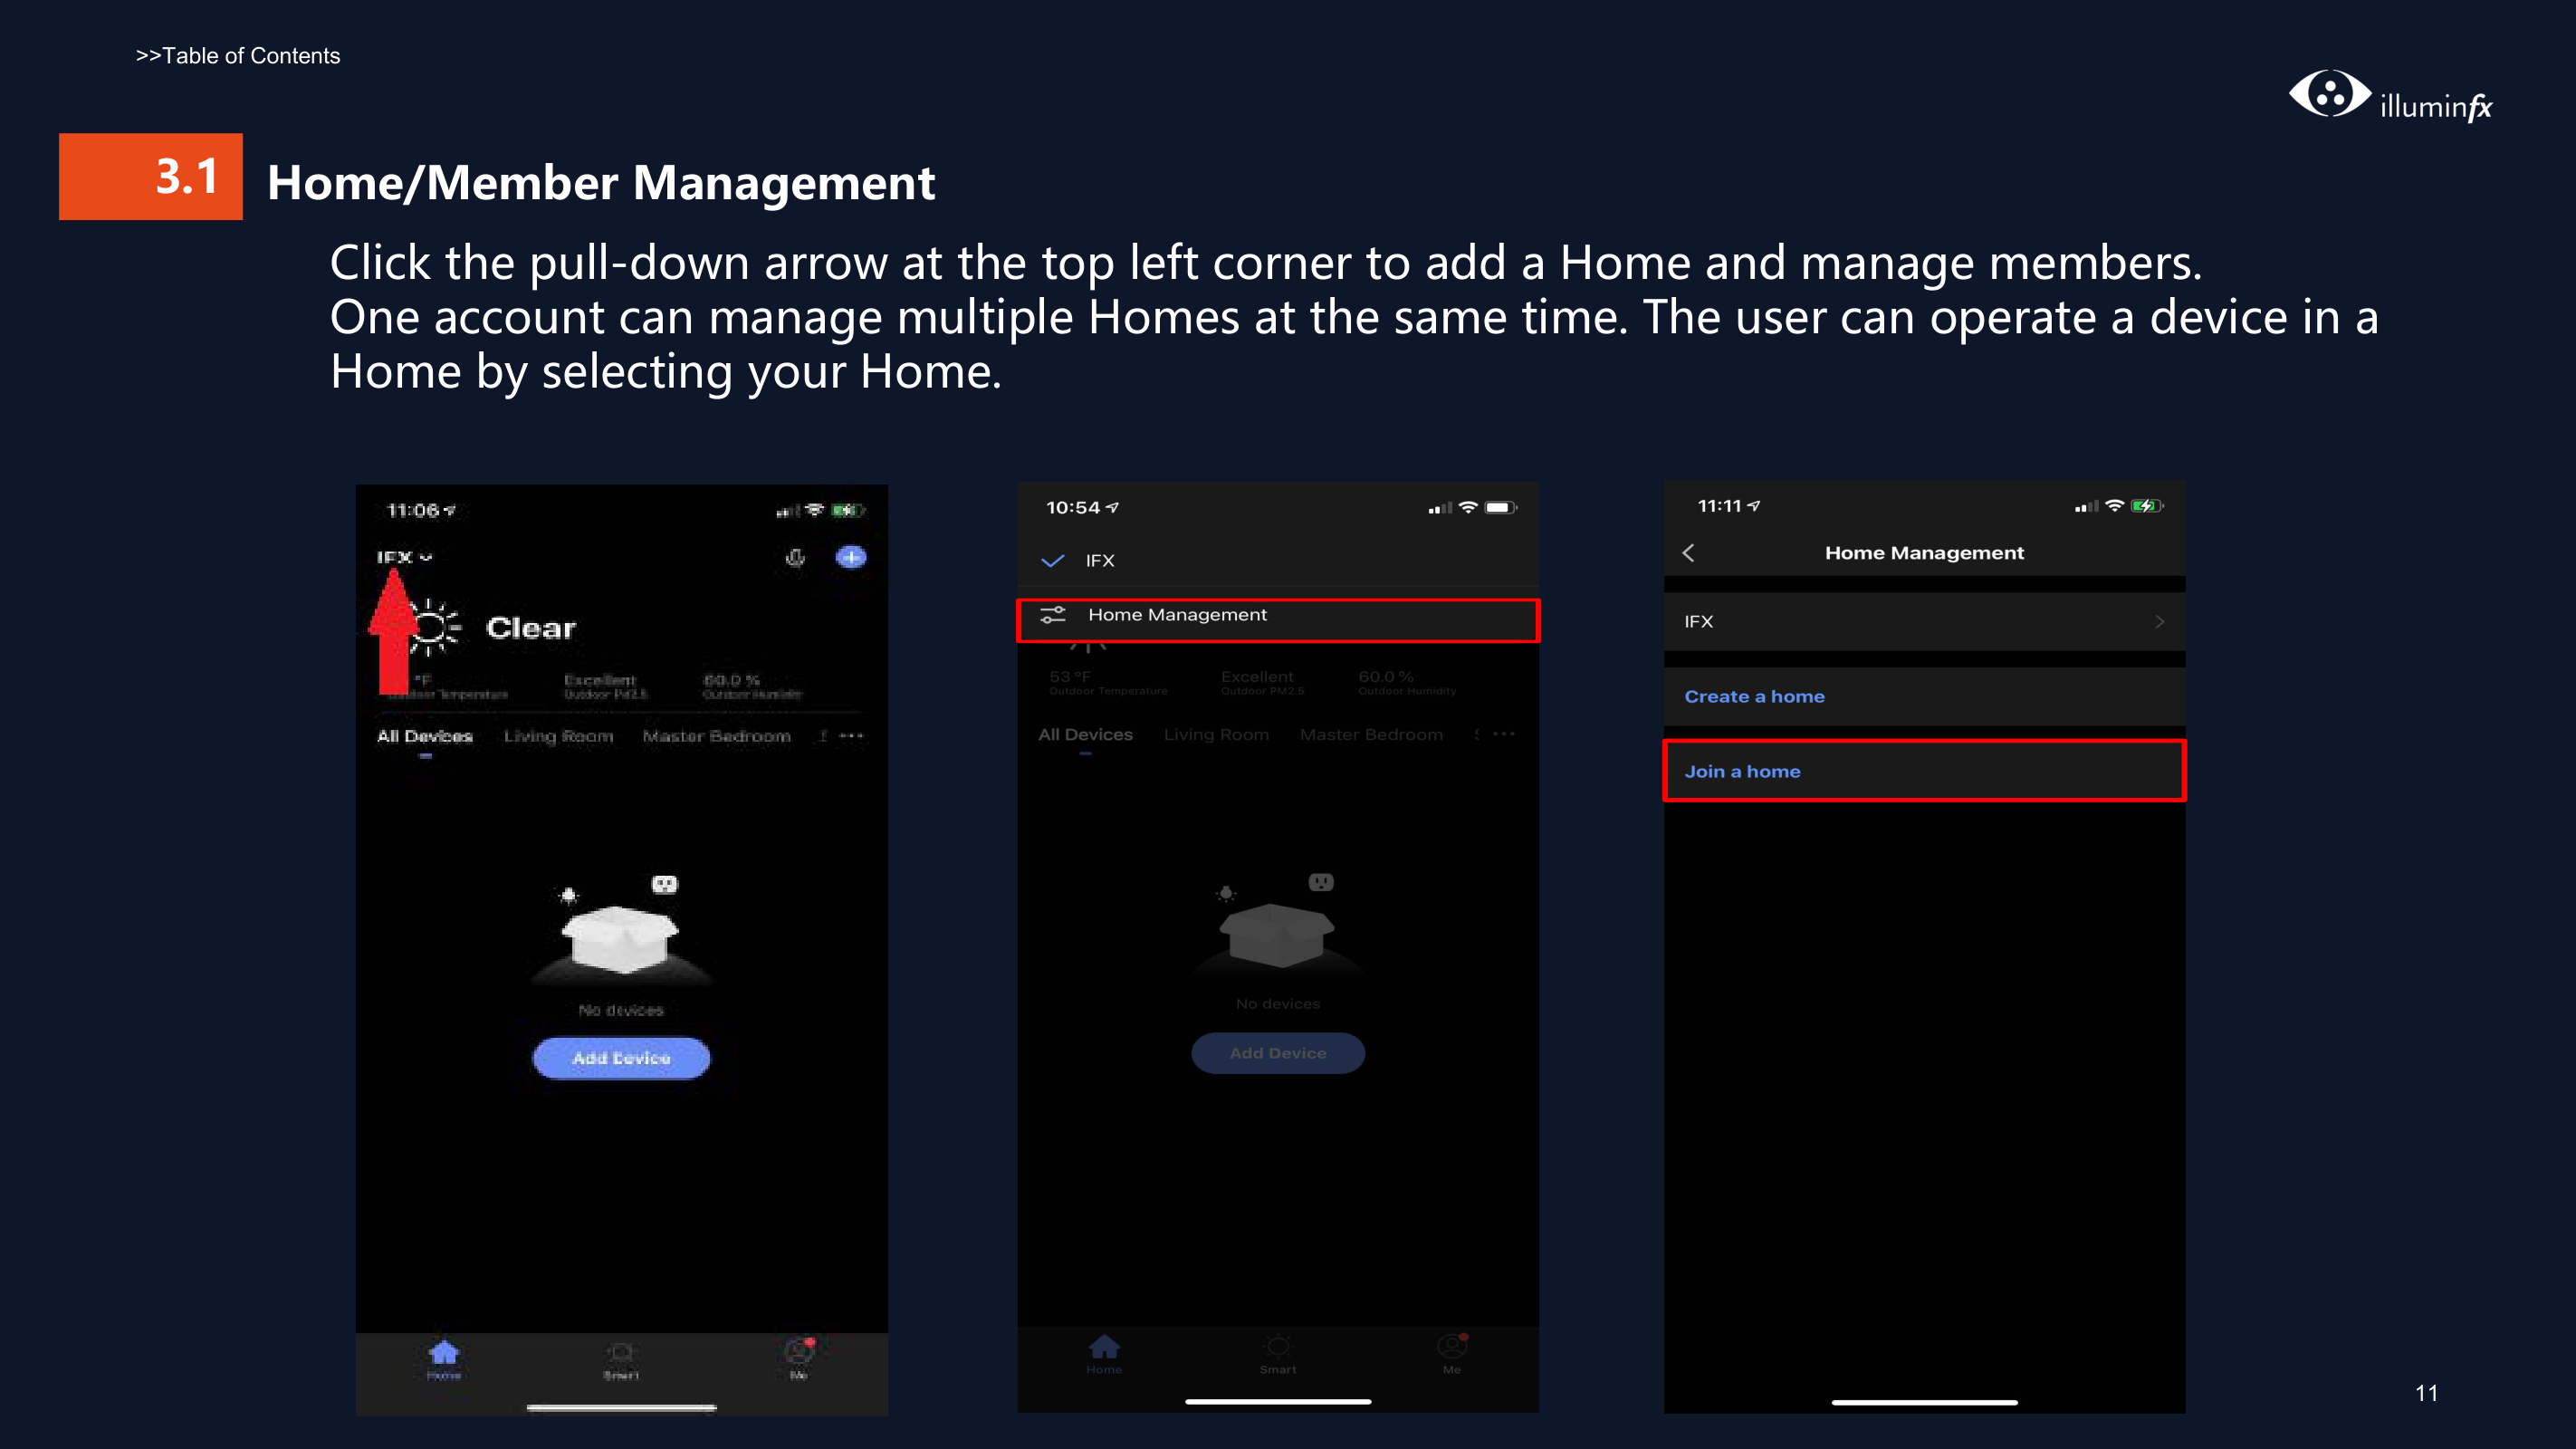


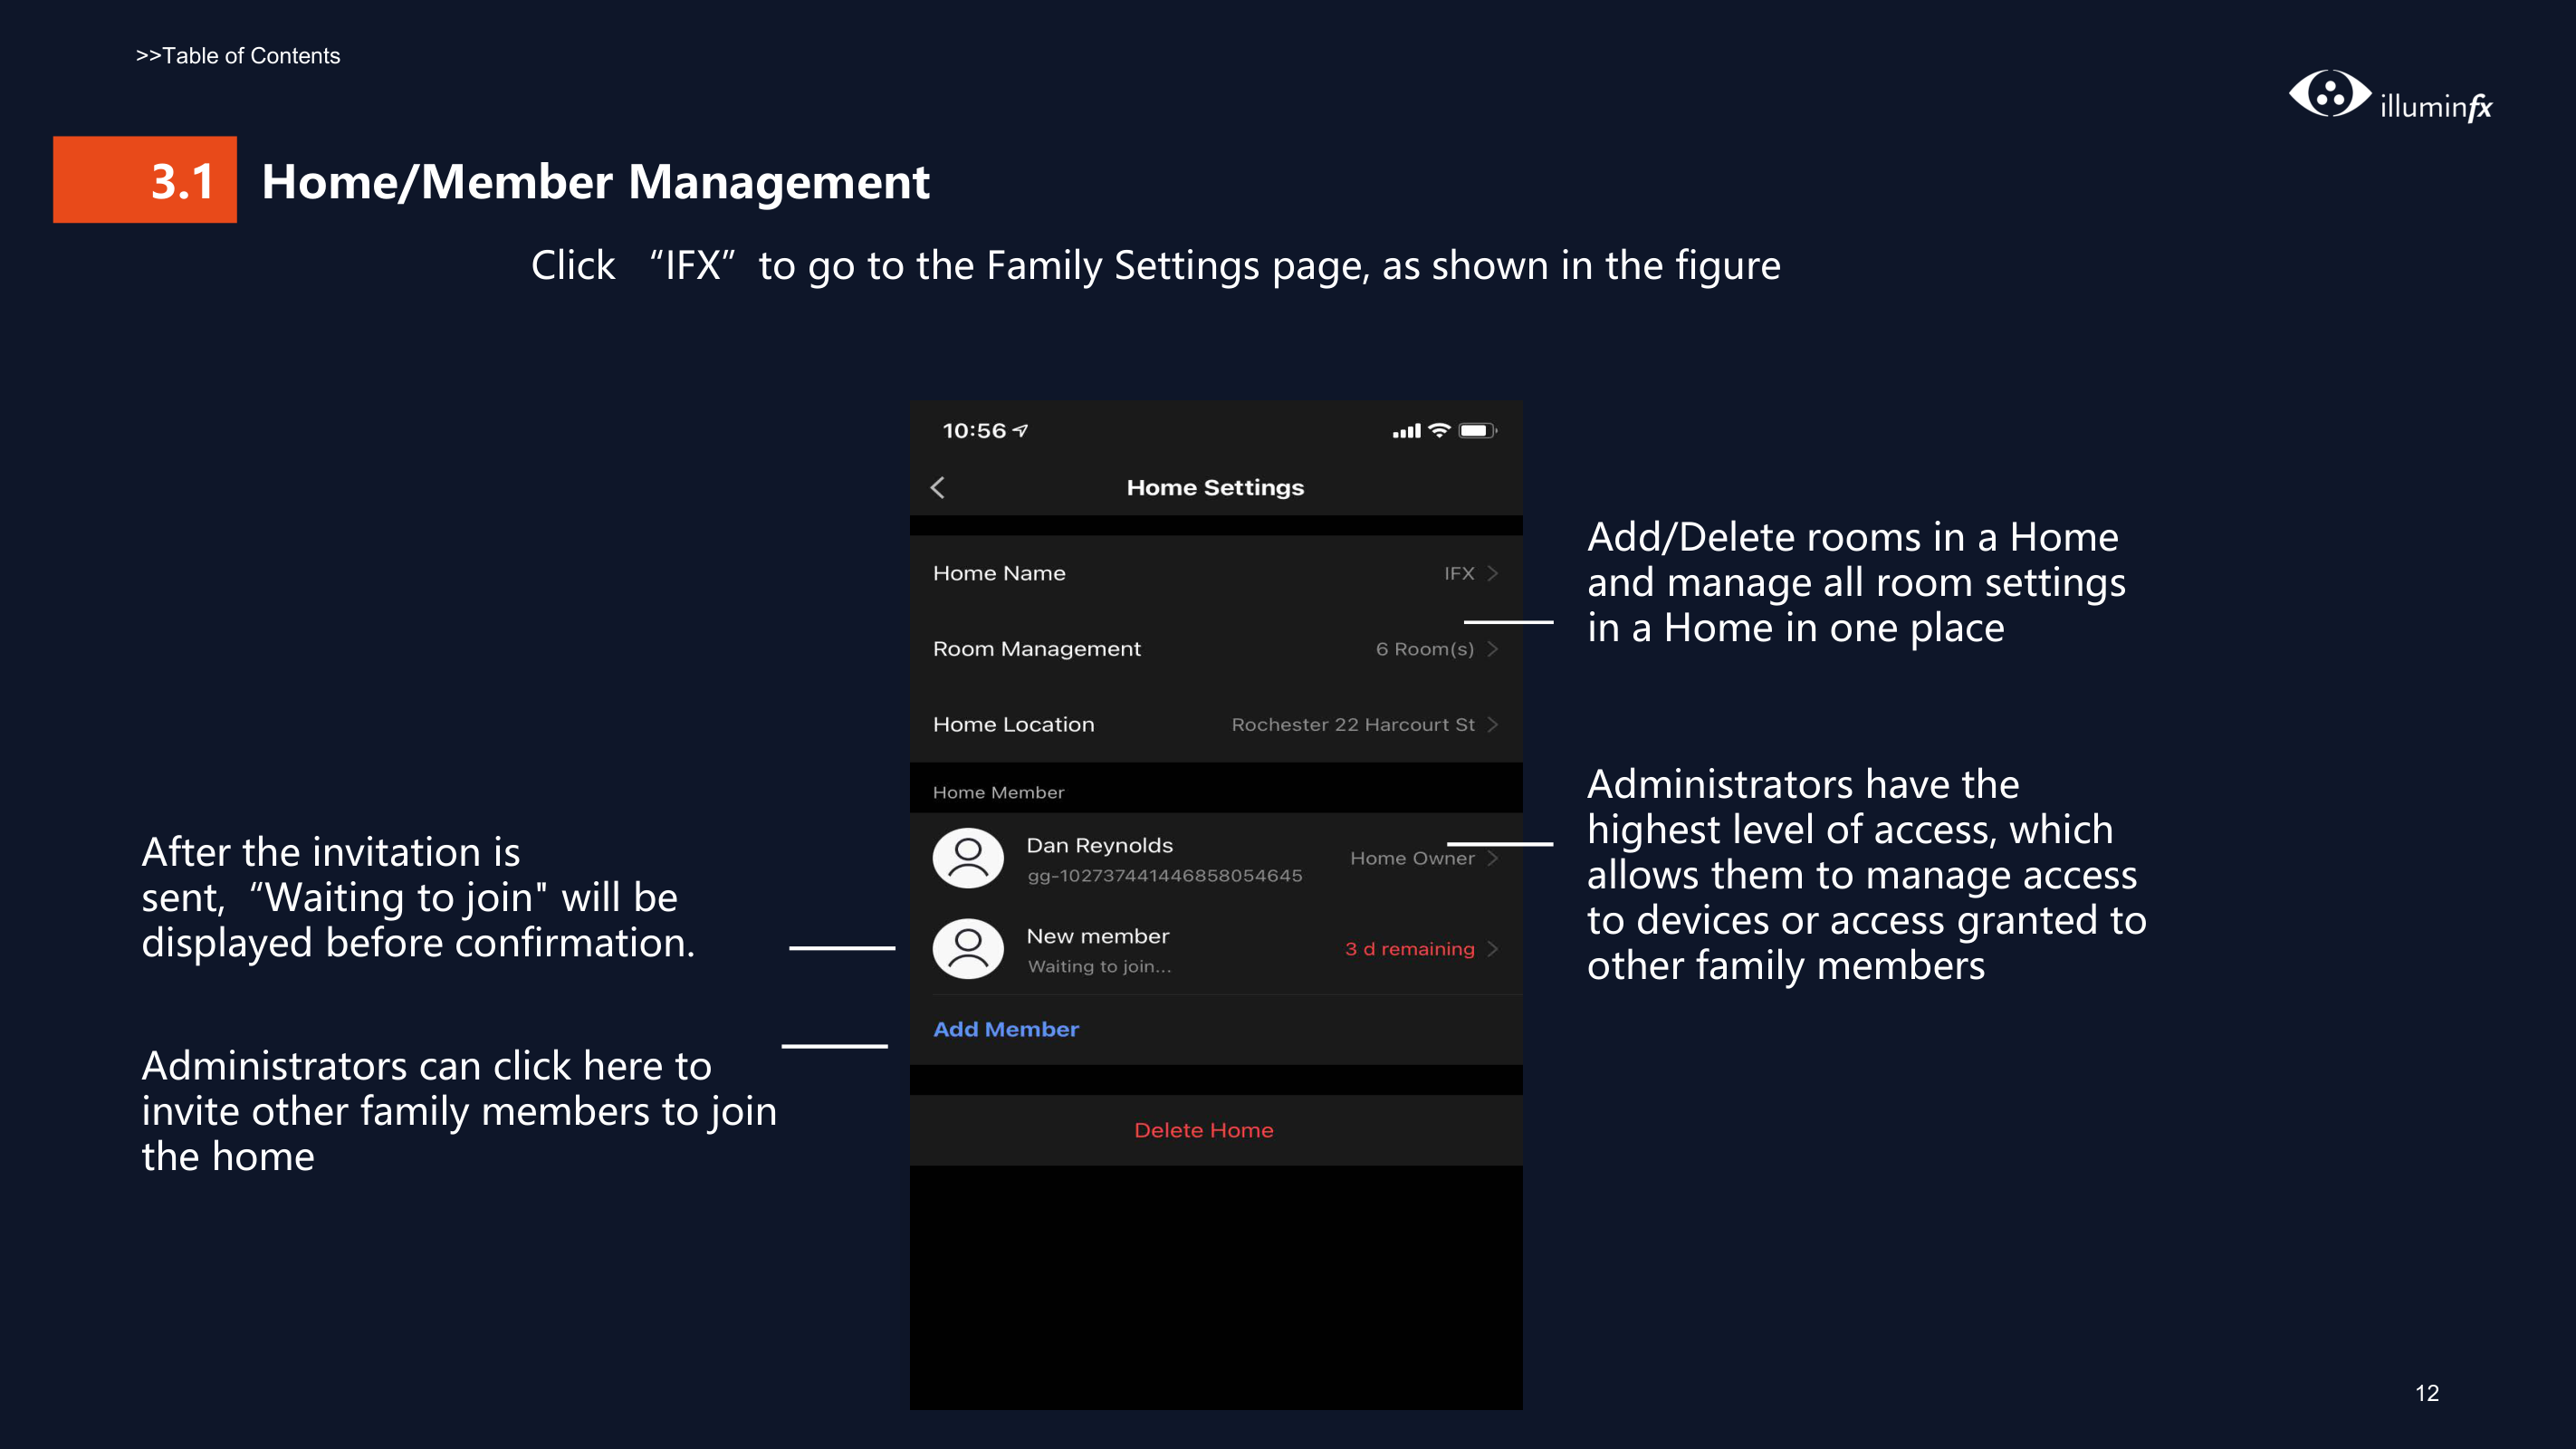

Fig. 1 Fig. 2 Fig. 3 Fig. 4
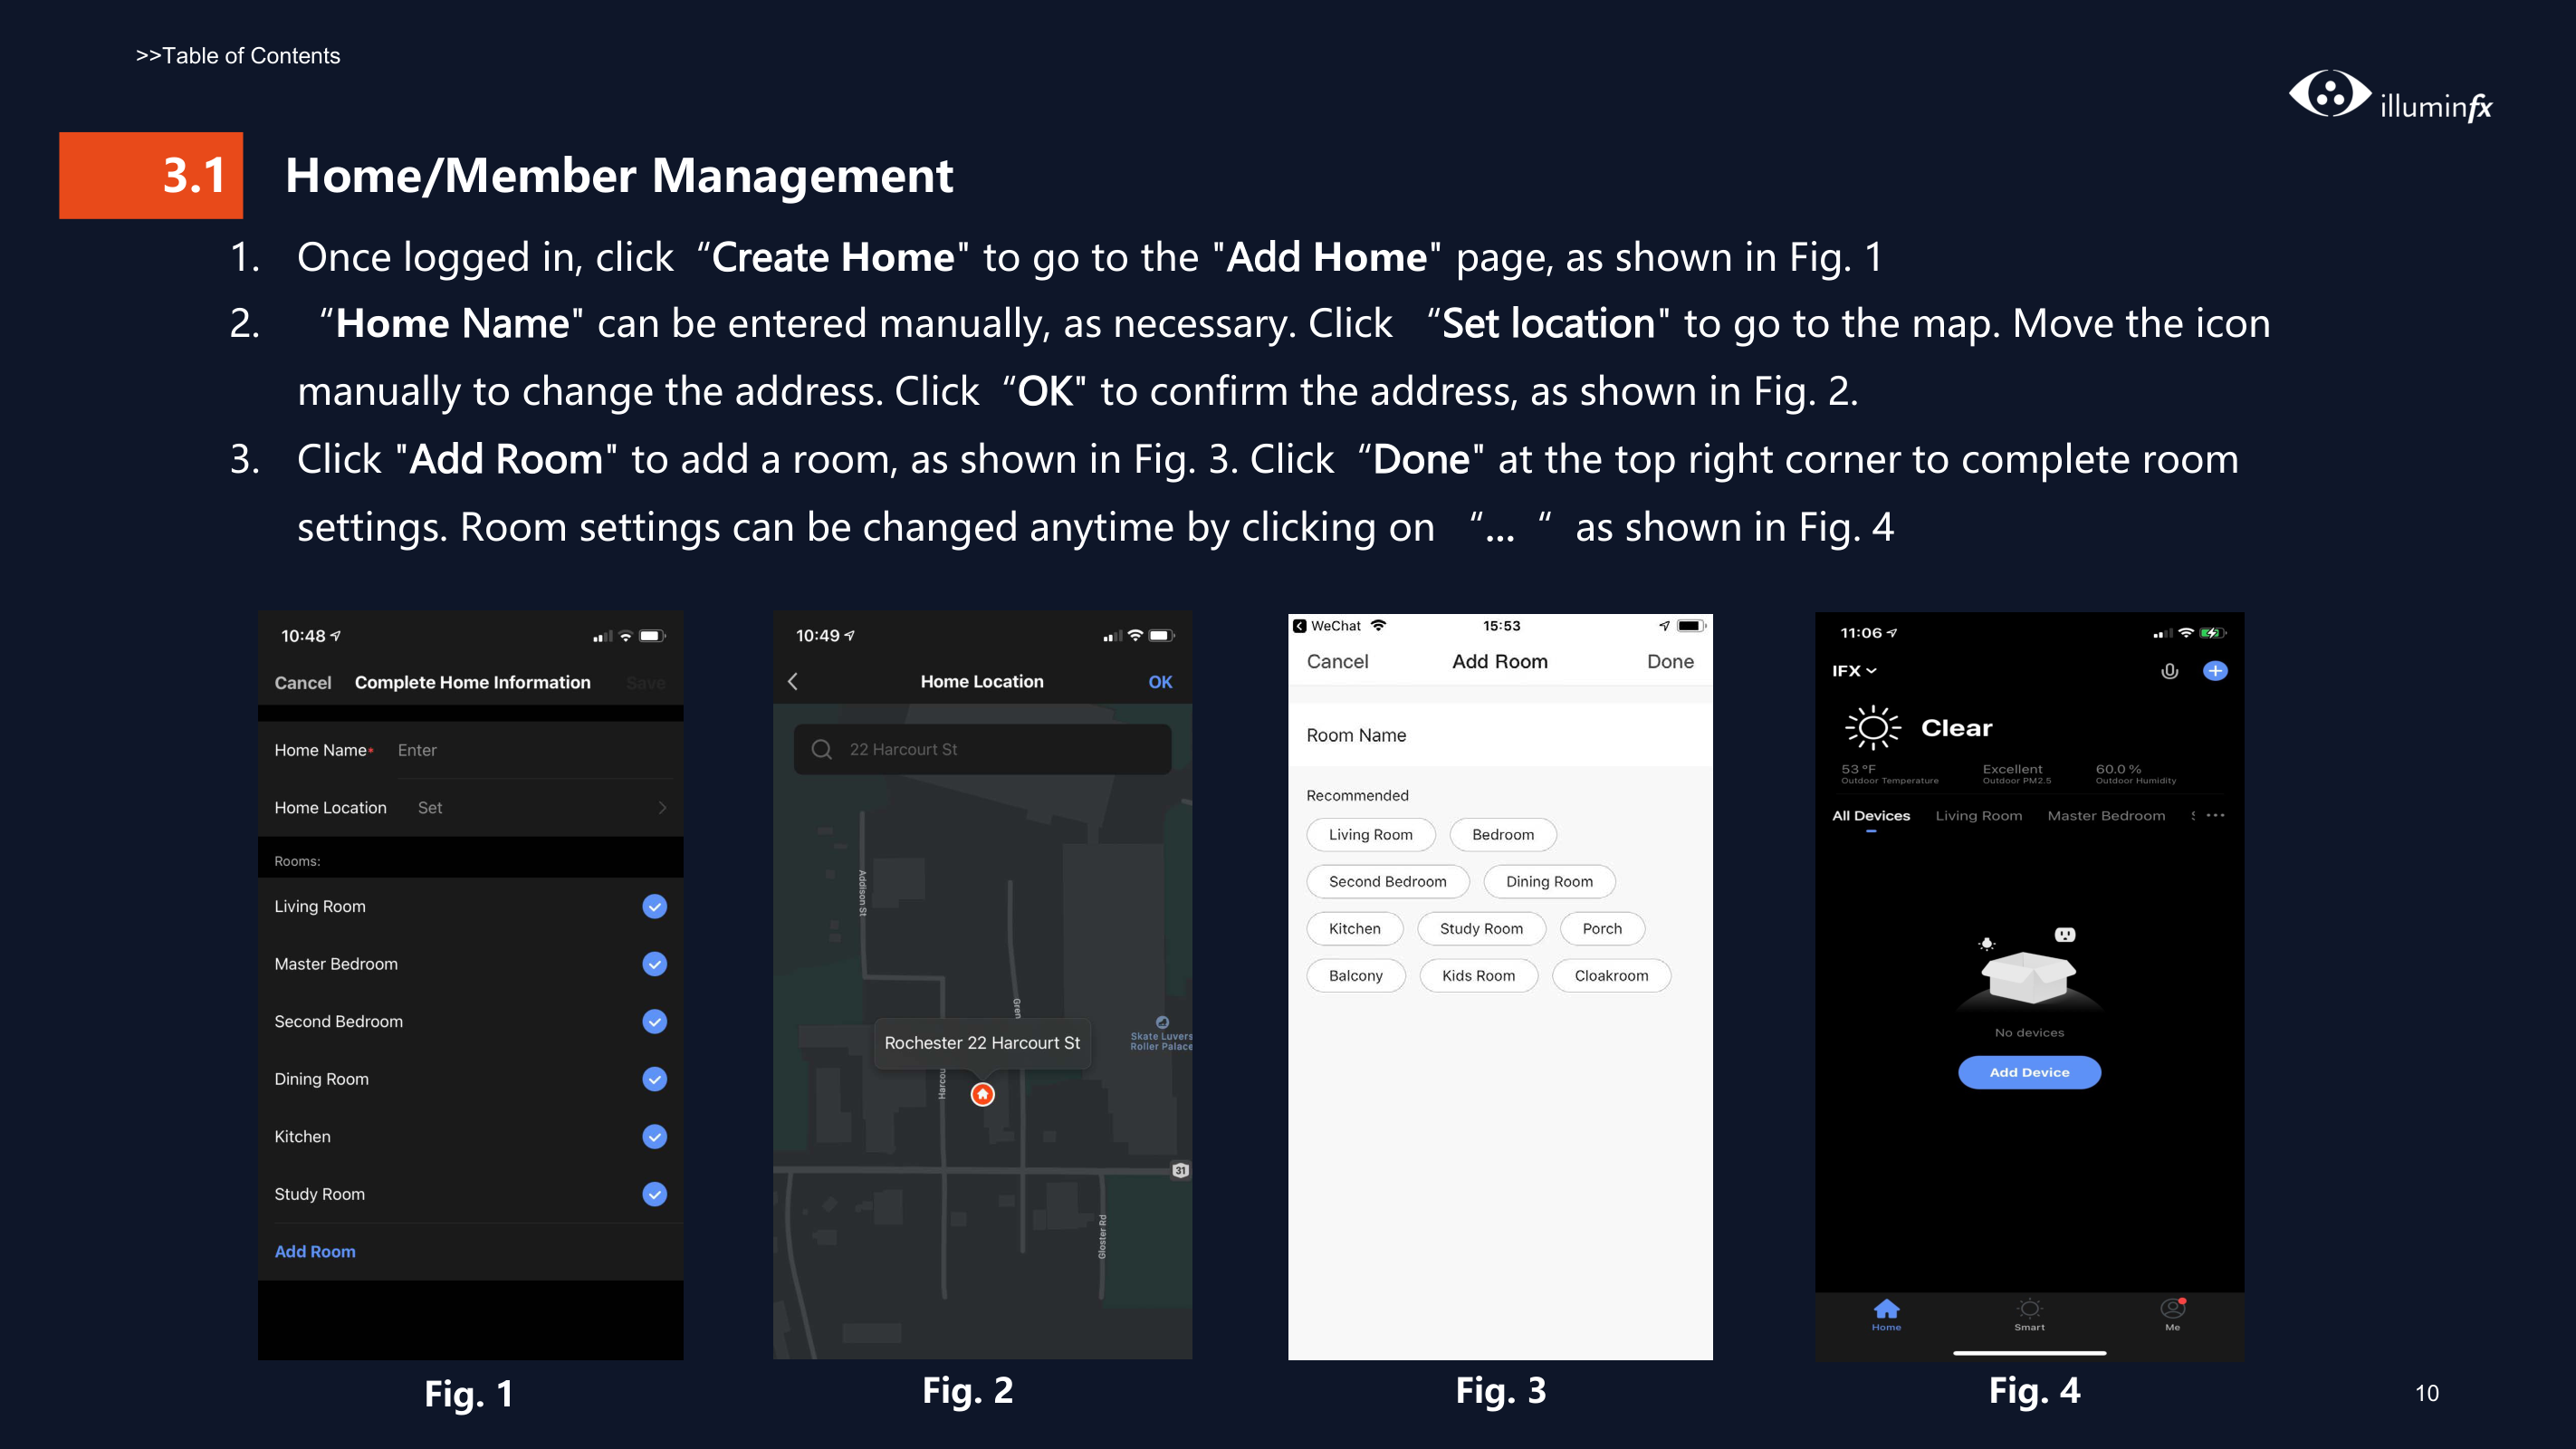
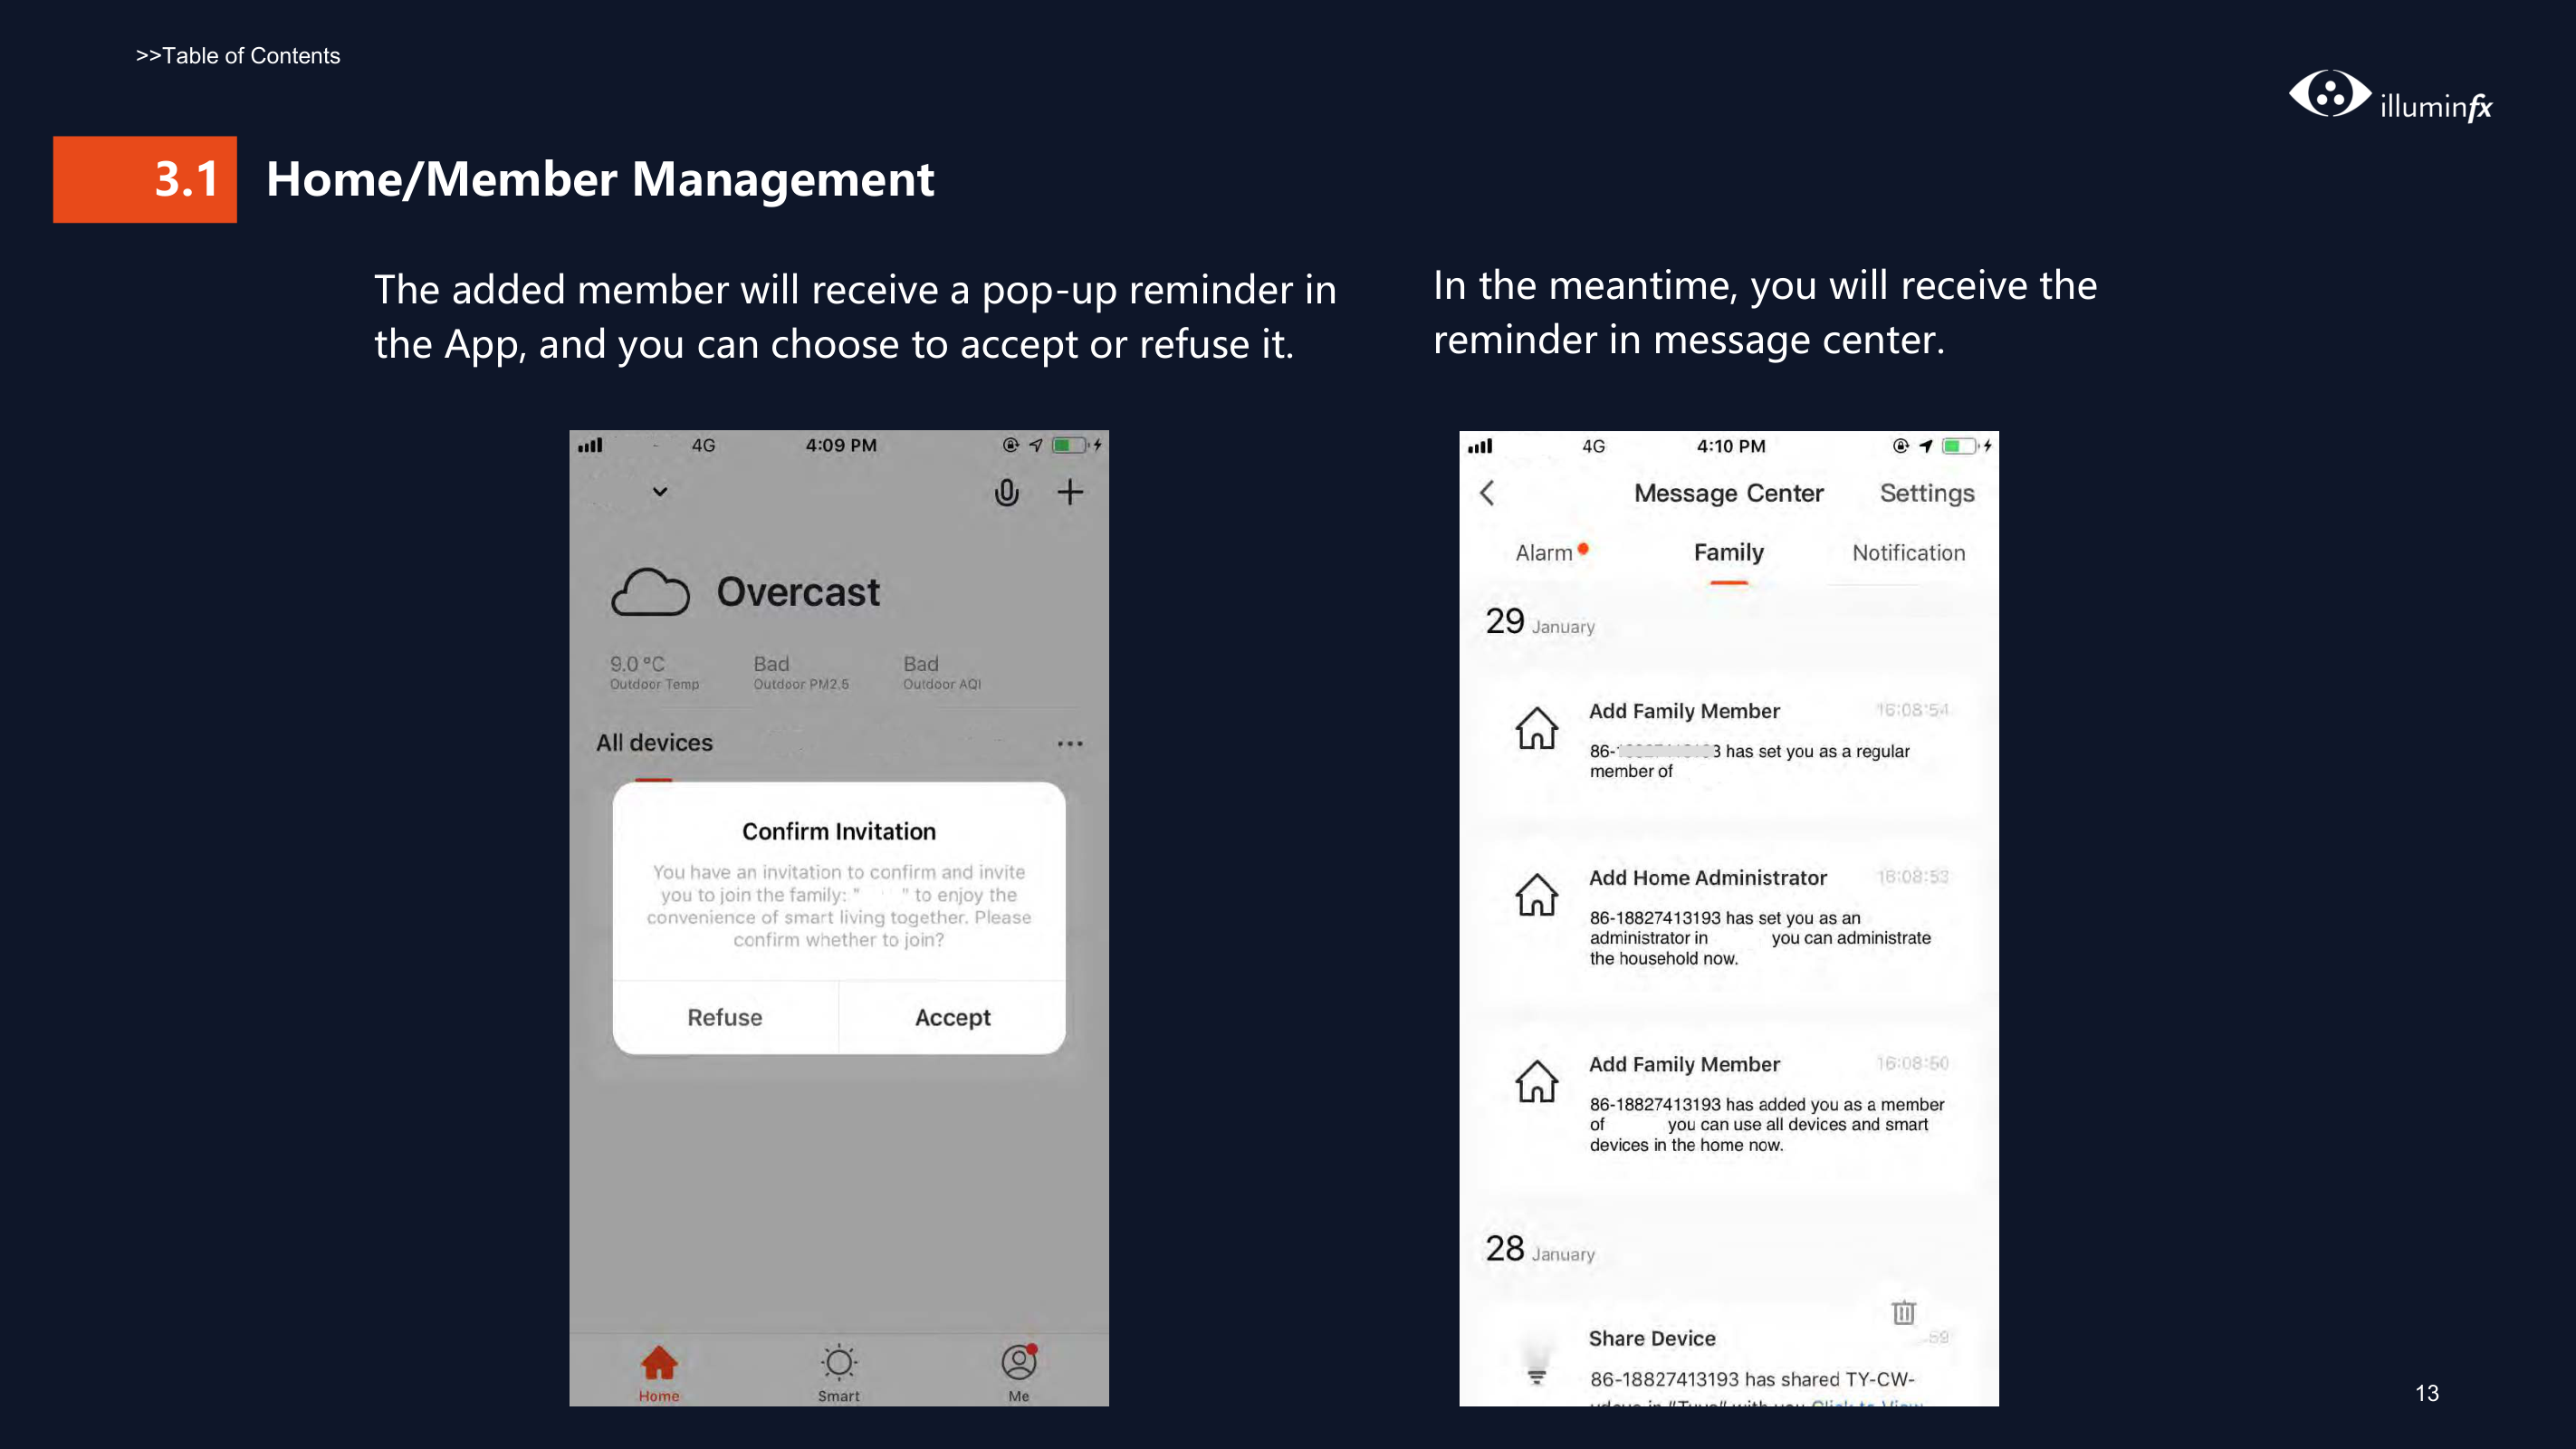
#### 3.1 Home/Member Management
Click the pull-down arrow at the top left corner to add a Home and manage members. One account can manage multiple Homes at the same time. The user can operate a device in a Home by selecting your Home.


| | |---|

| | |---|
Click “IFX”to go to the Family Settings page, as shown in the figure
After the invitation is sent,“Waiting to join" will be displayed before confirmation.
Administrators can click here to invite other family members to join the home

| | |---|
######## Add/Delete rooms in a Home and manage all room settings in a Home in one place
Administrators have the highest level of access, which allows them to manage access to devices or access granted to other family members
The added member will receive a pop-up reminder in the App, and you can choose to accept or refuse it.
In the meantime, you will receive the reminder in message center.


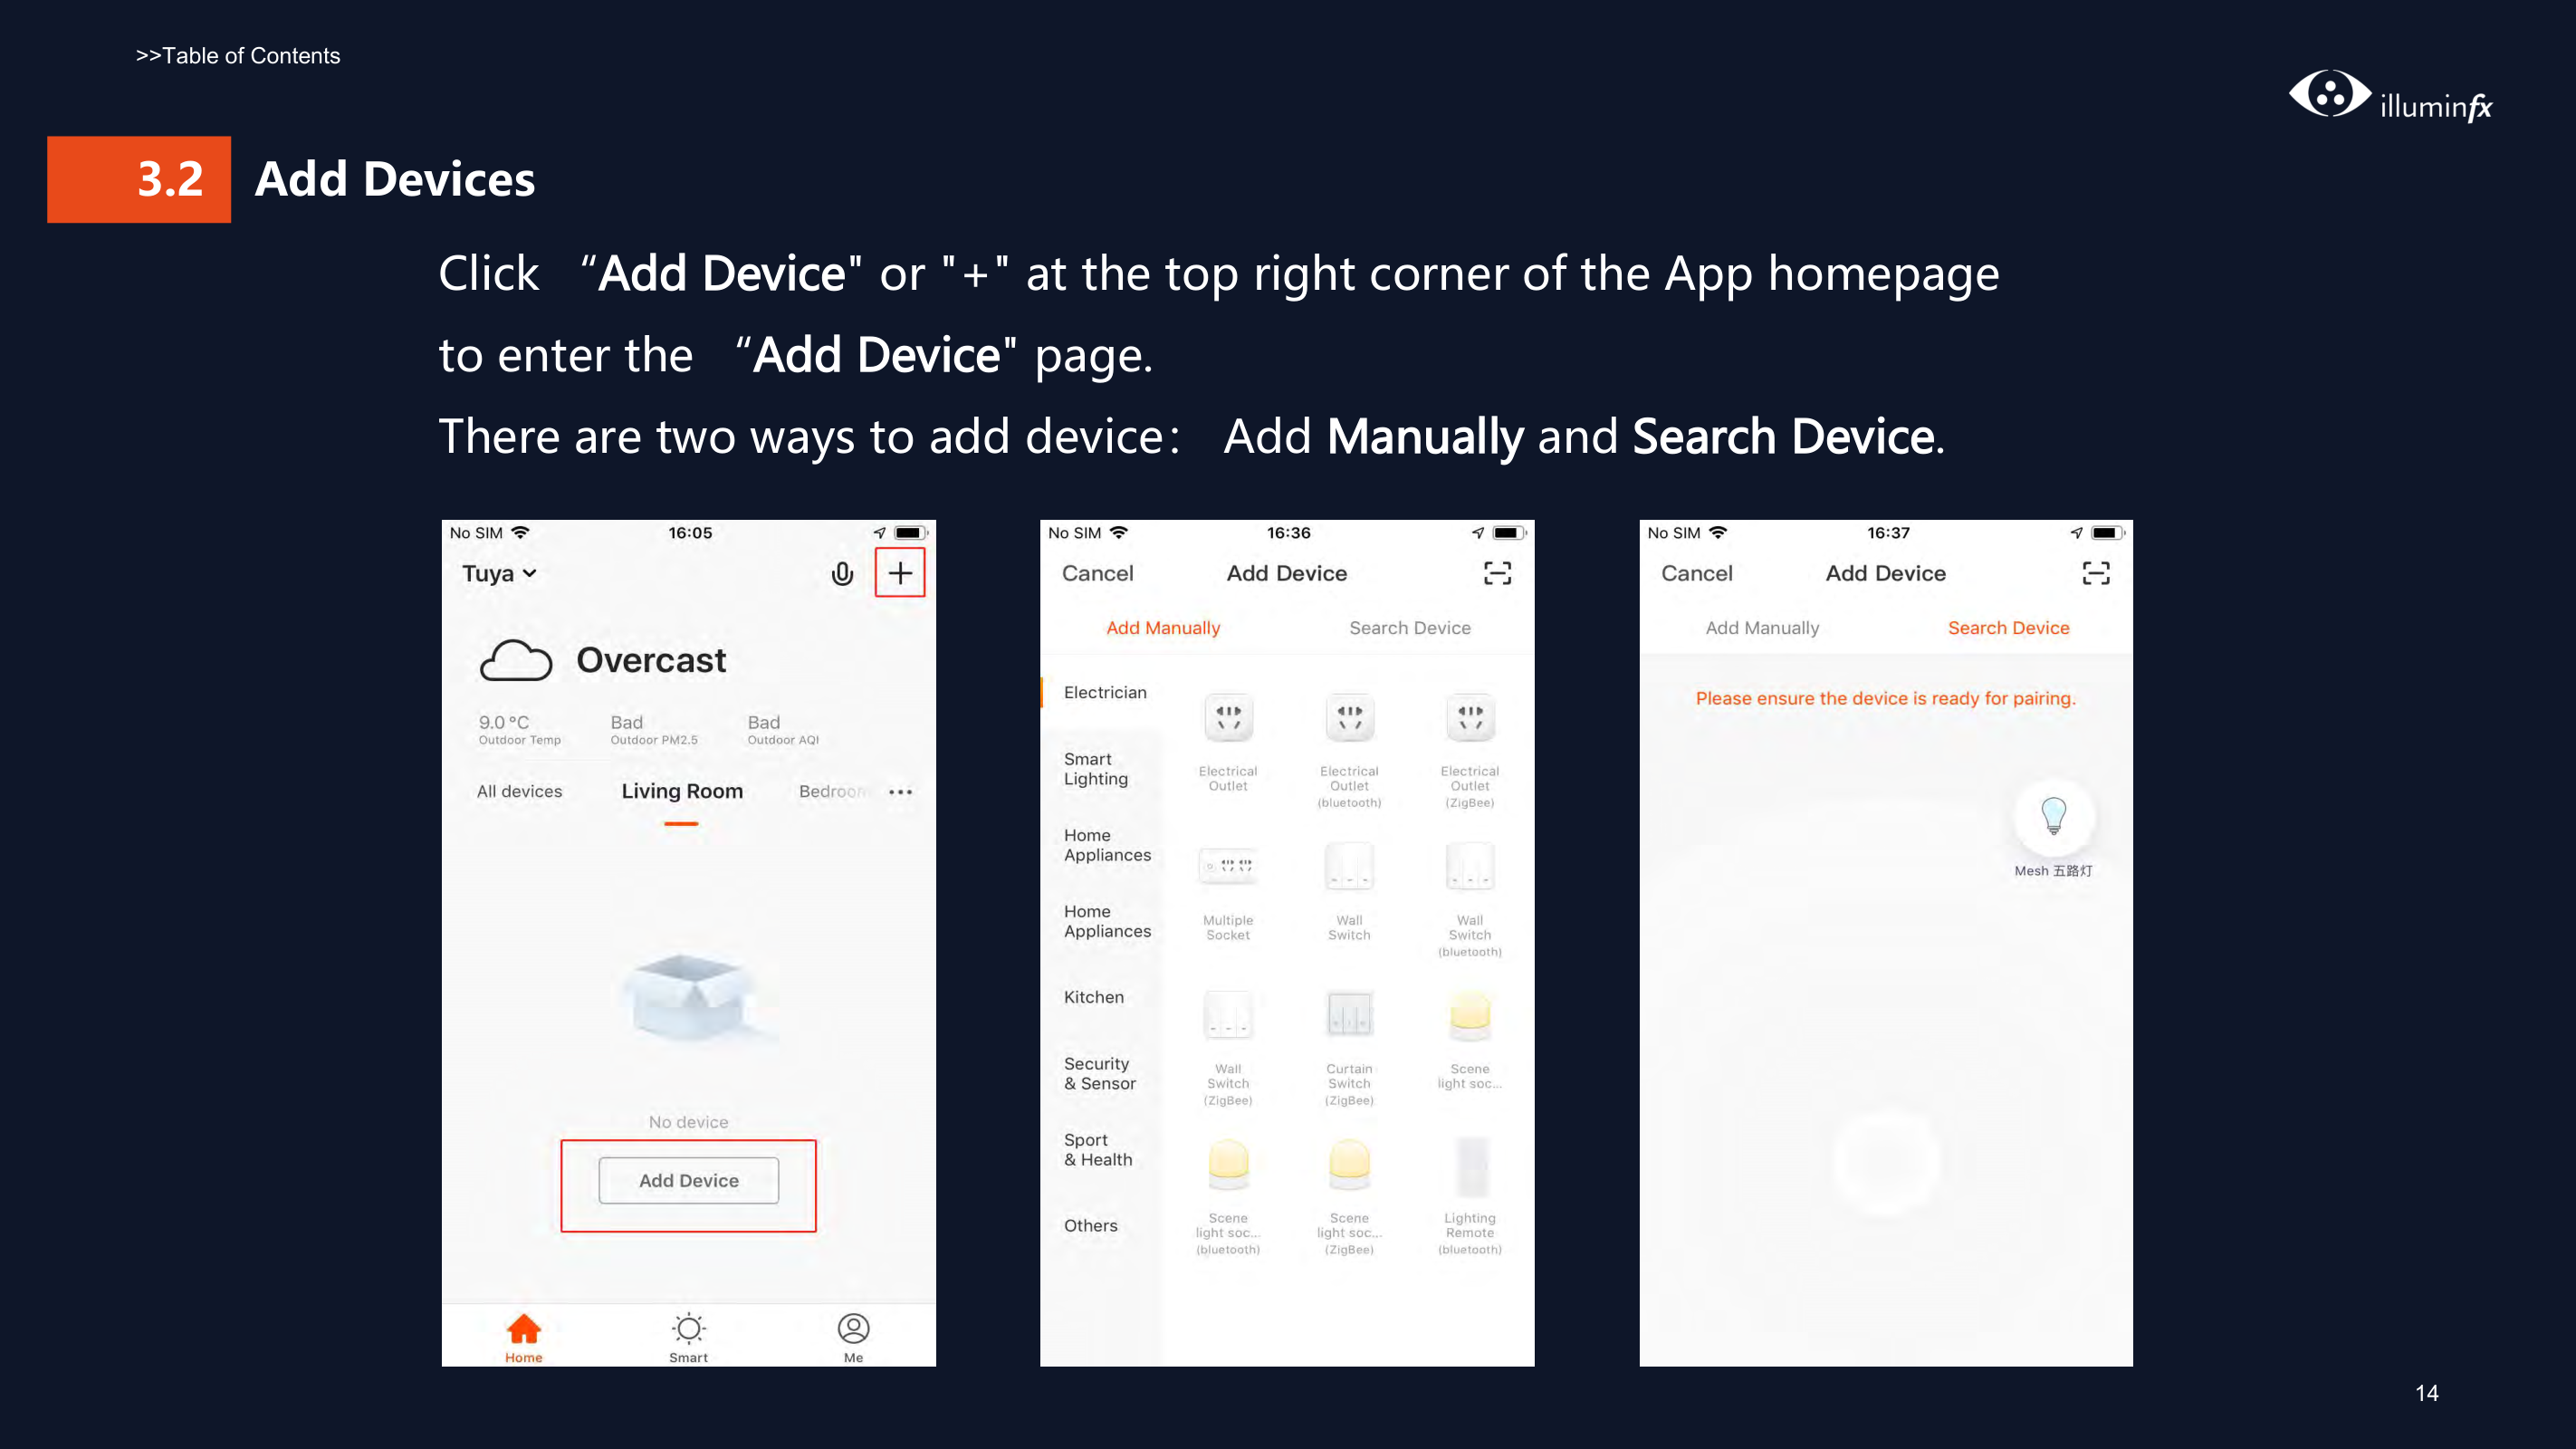
####### 3.2 Add DevicesClick “Add Device" or "+" at the top right corner of the App homepageto enter the “Add Device" page.There are two ways to add device: Add Manually and Search Device.


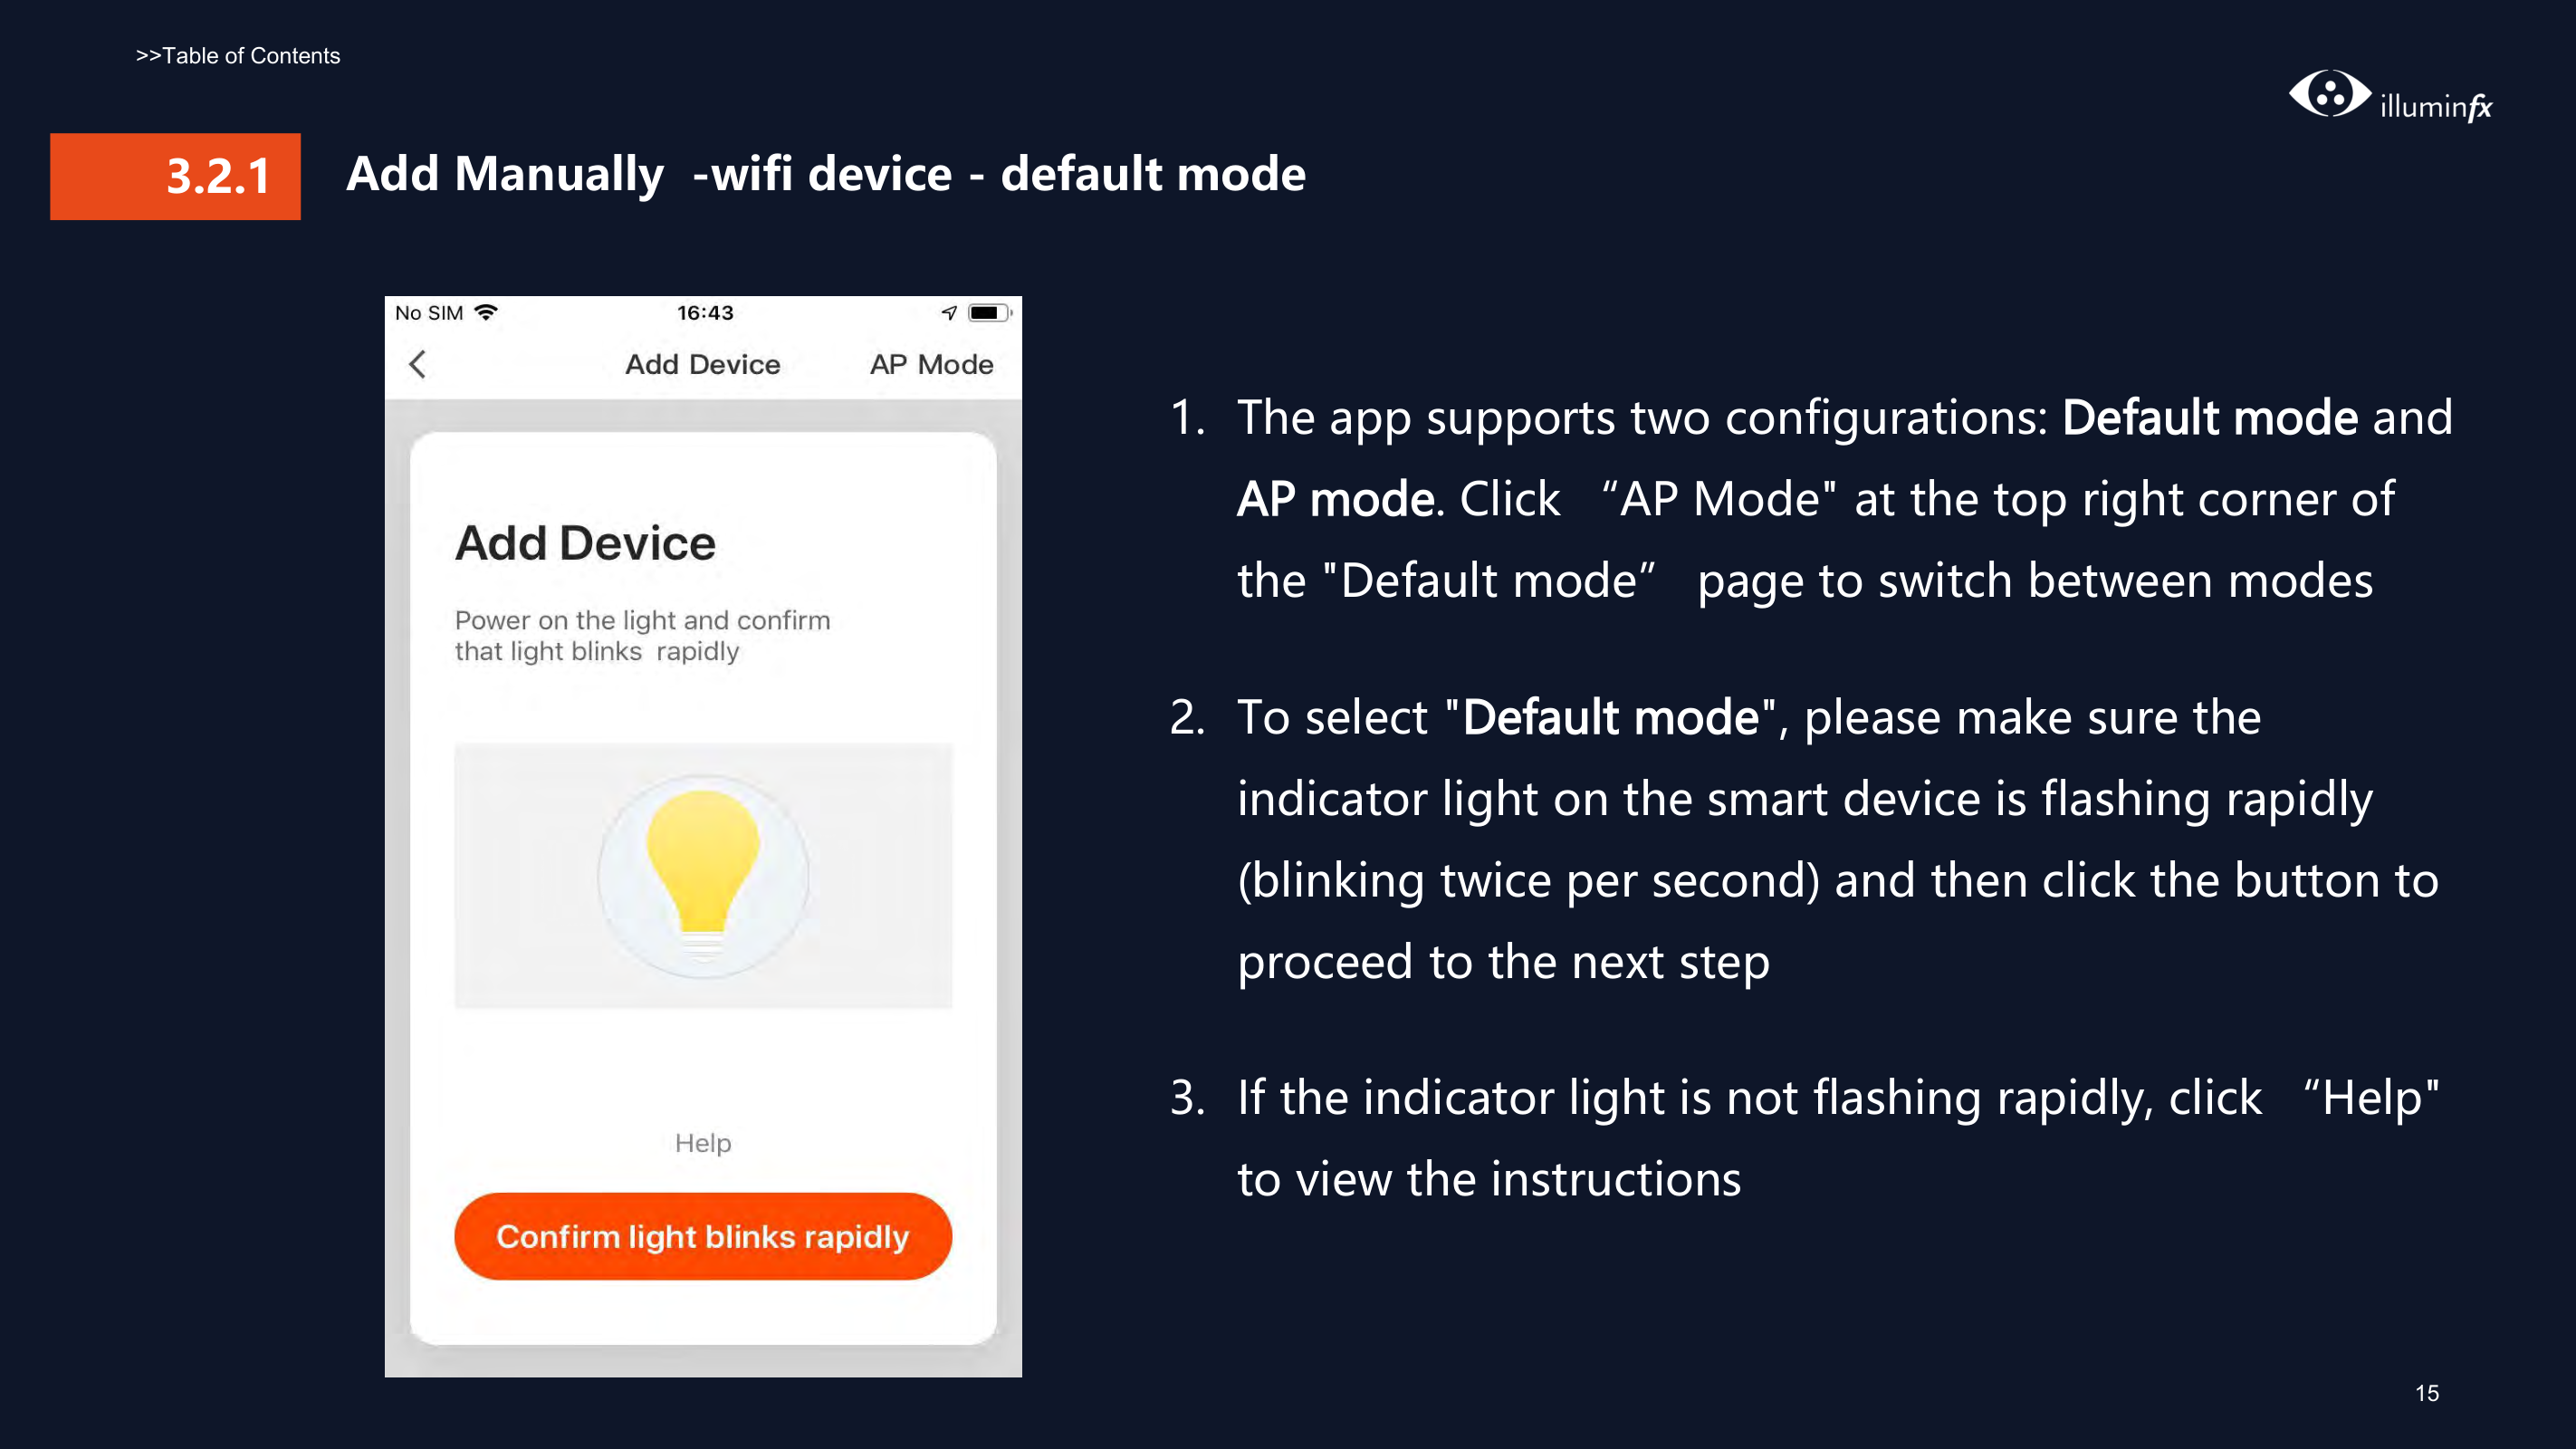
###### Add Manually -wifi device - default mode
#### 3.2.1


#### Add Manually -wifi device - default mode3.2.1
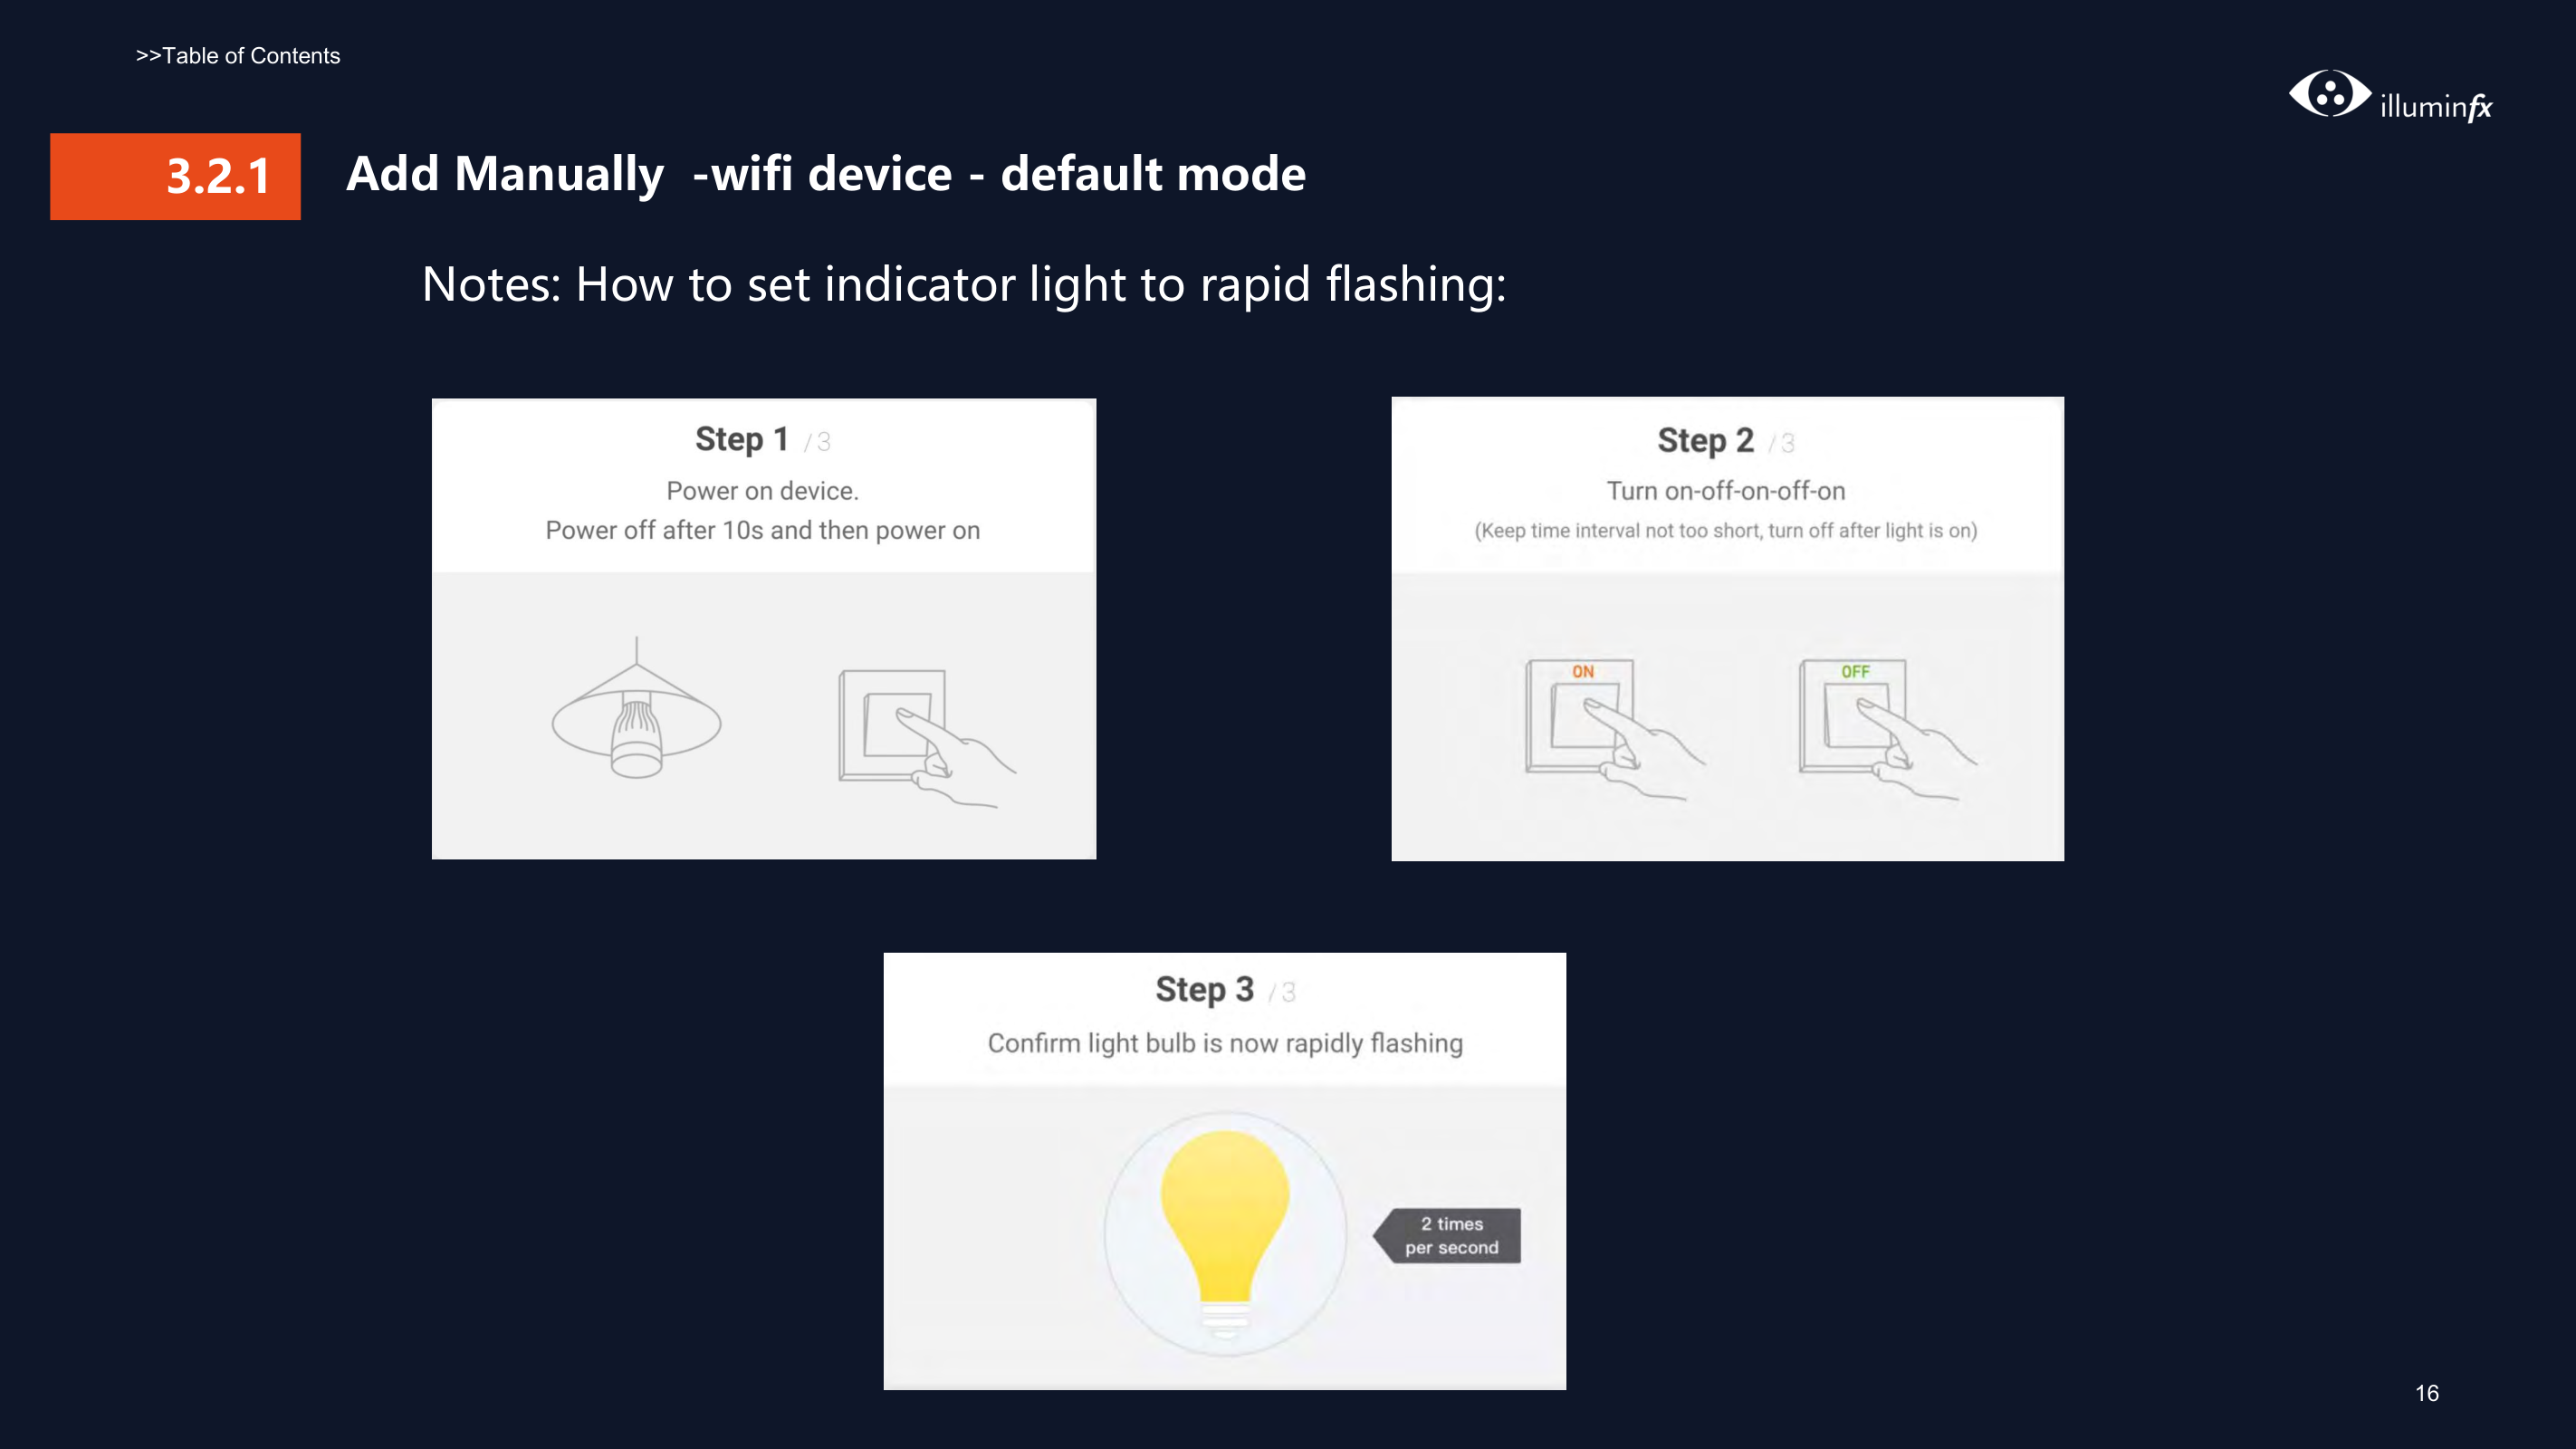
Notes: How to set indicator light to rapid flashing:


#### Add Manually -wifi device - AP Mode3.2.1


#### 3.2.1
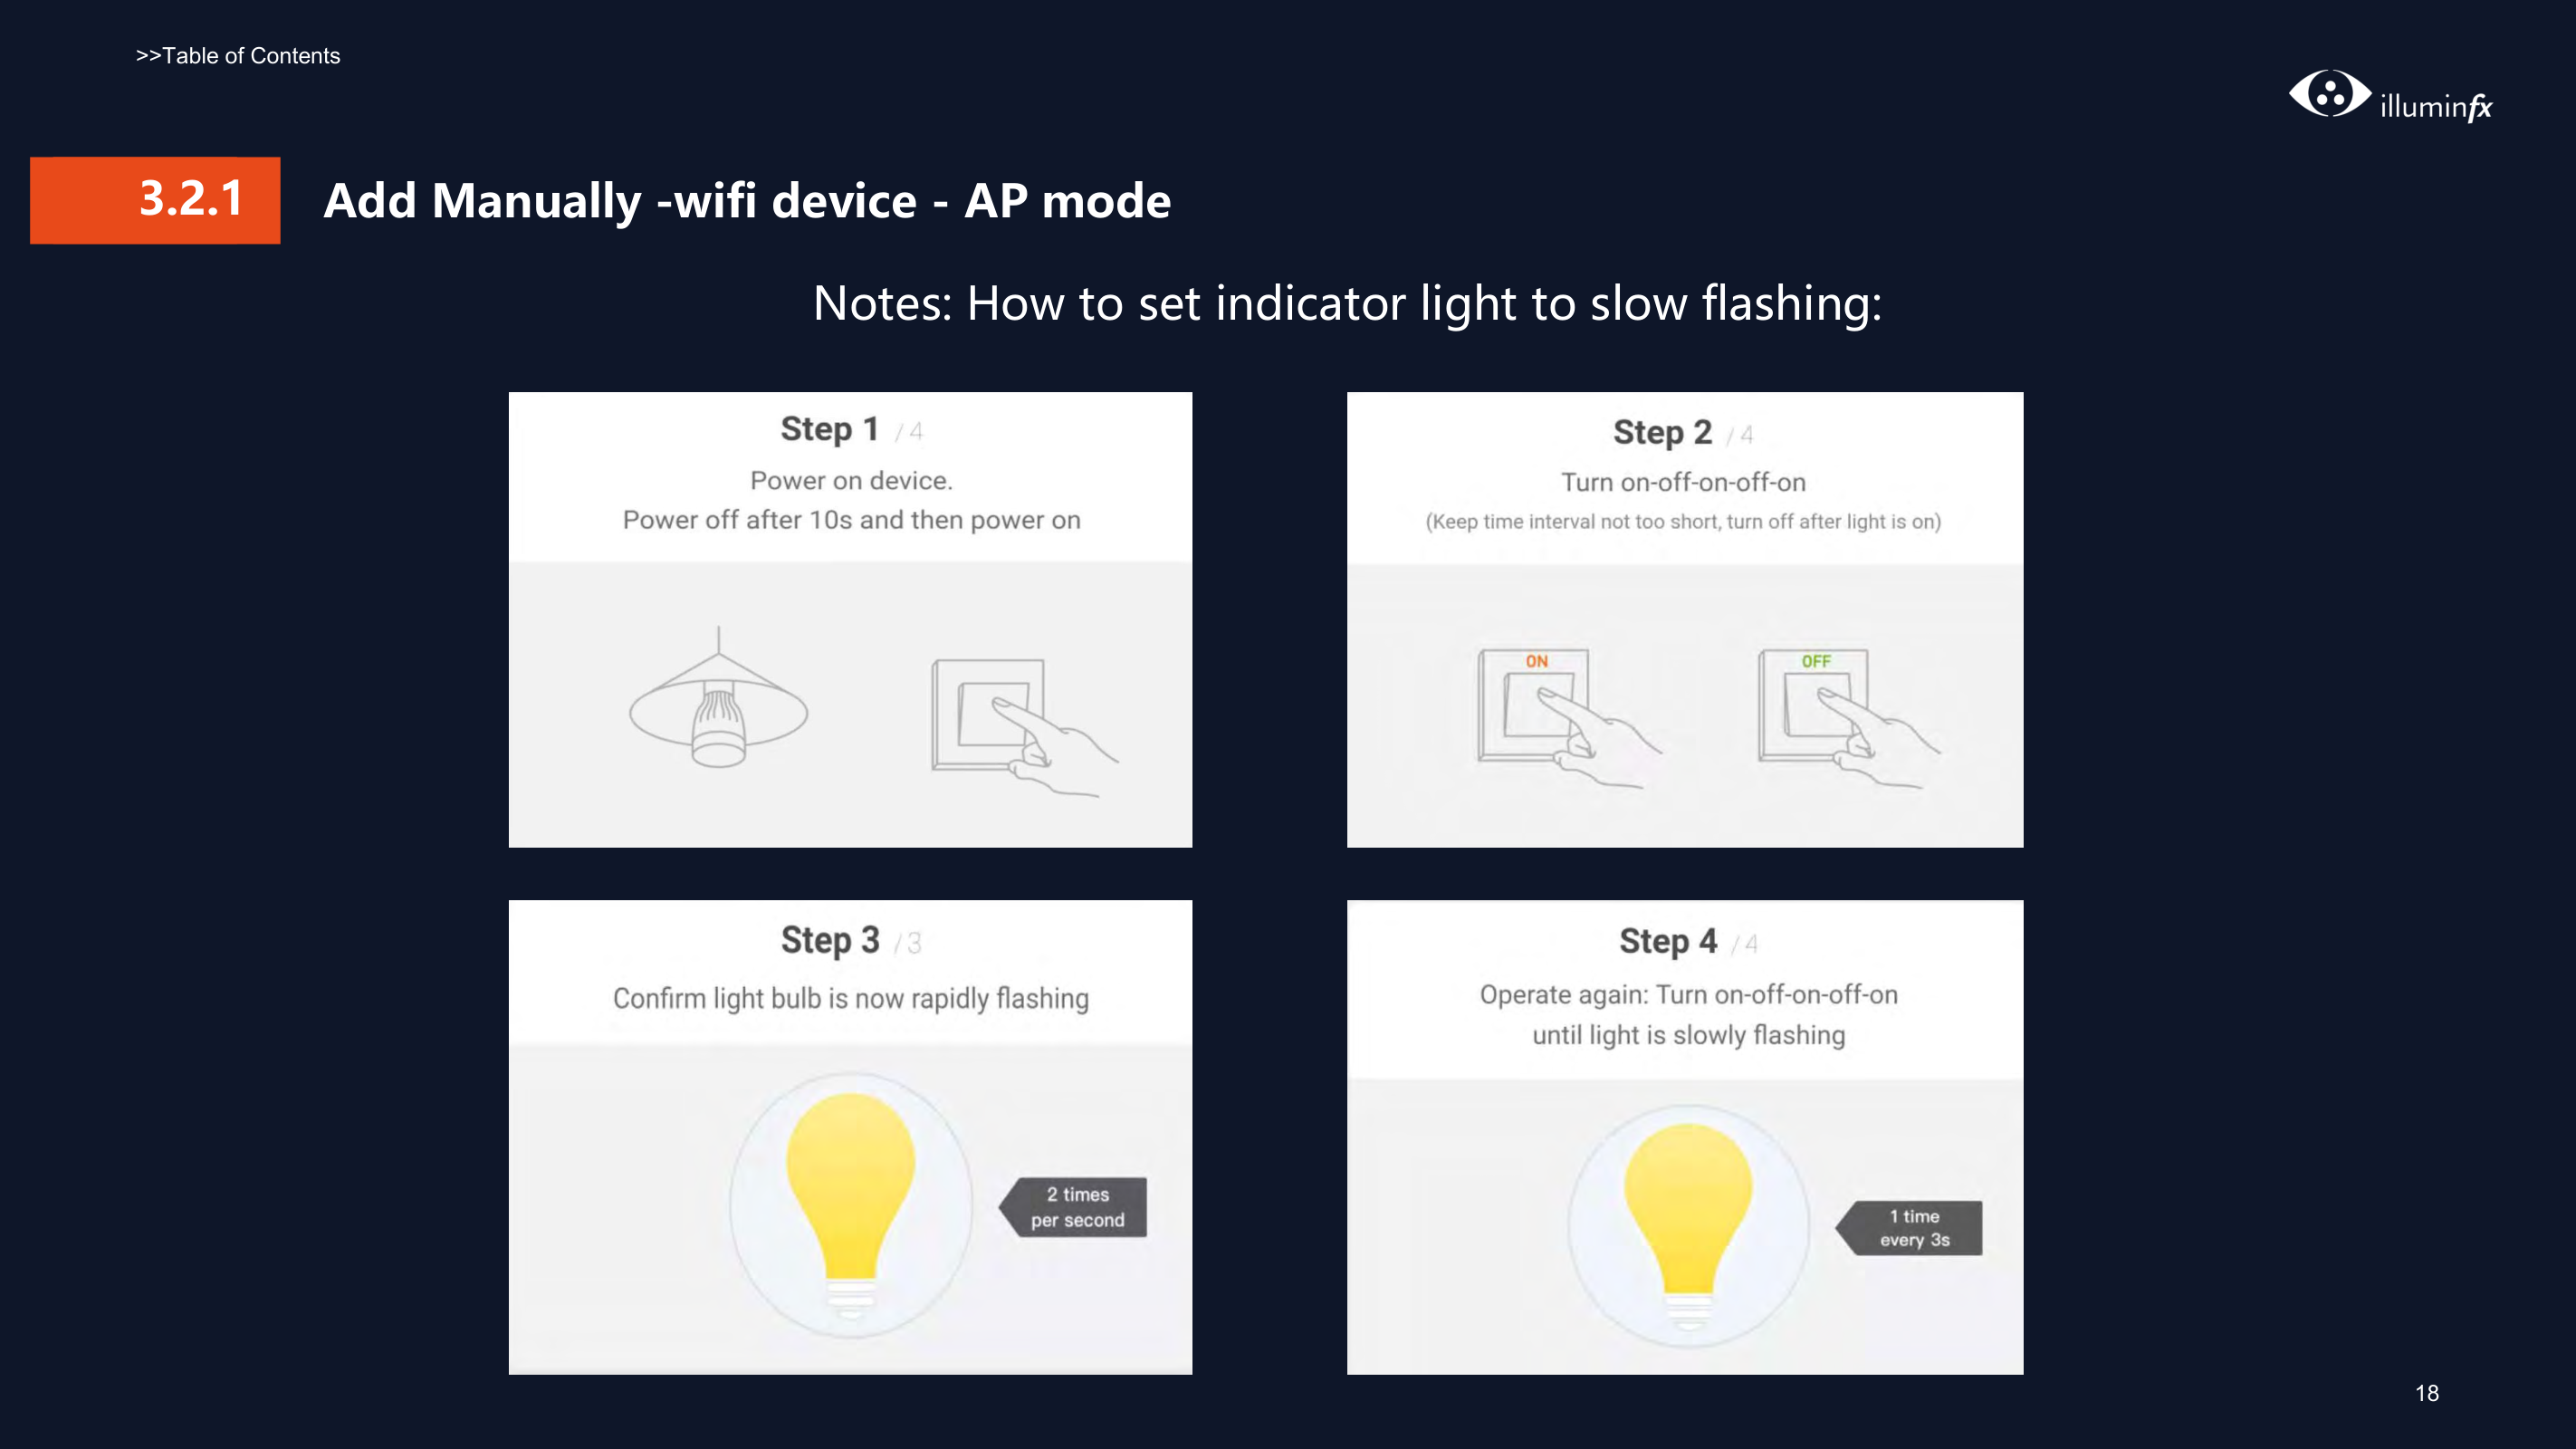
###### Add Manually -wifi device - AP mode
Notes: How to set indicator light to slow flashing:


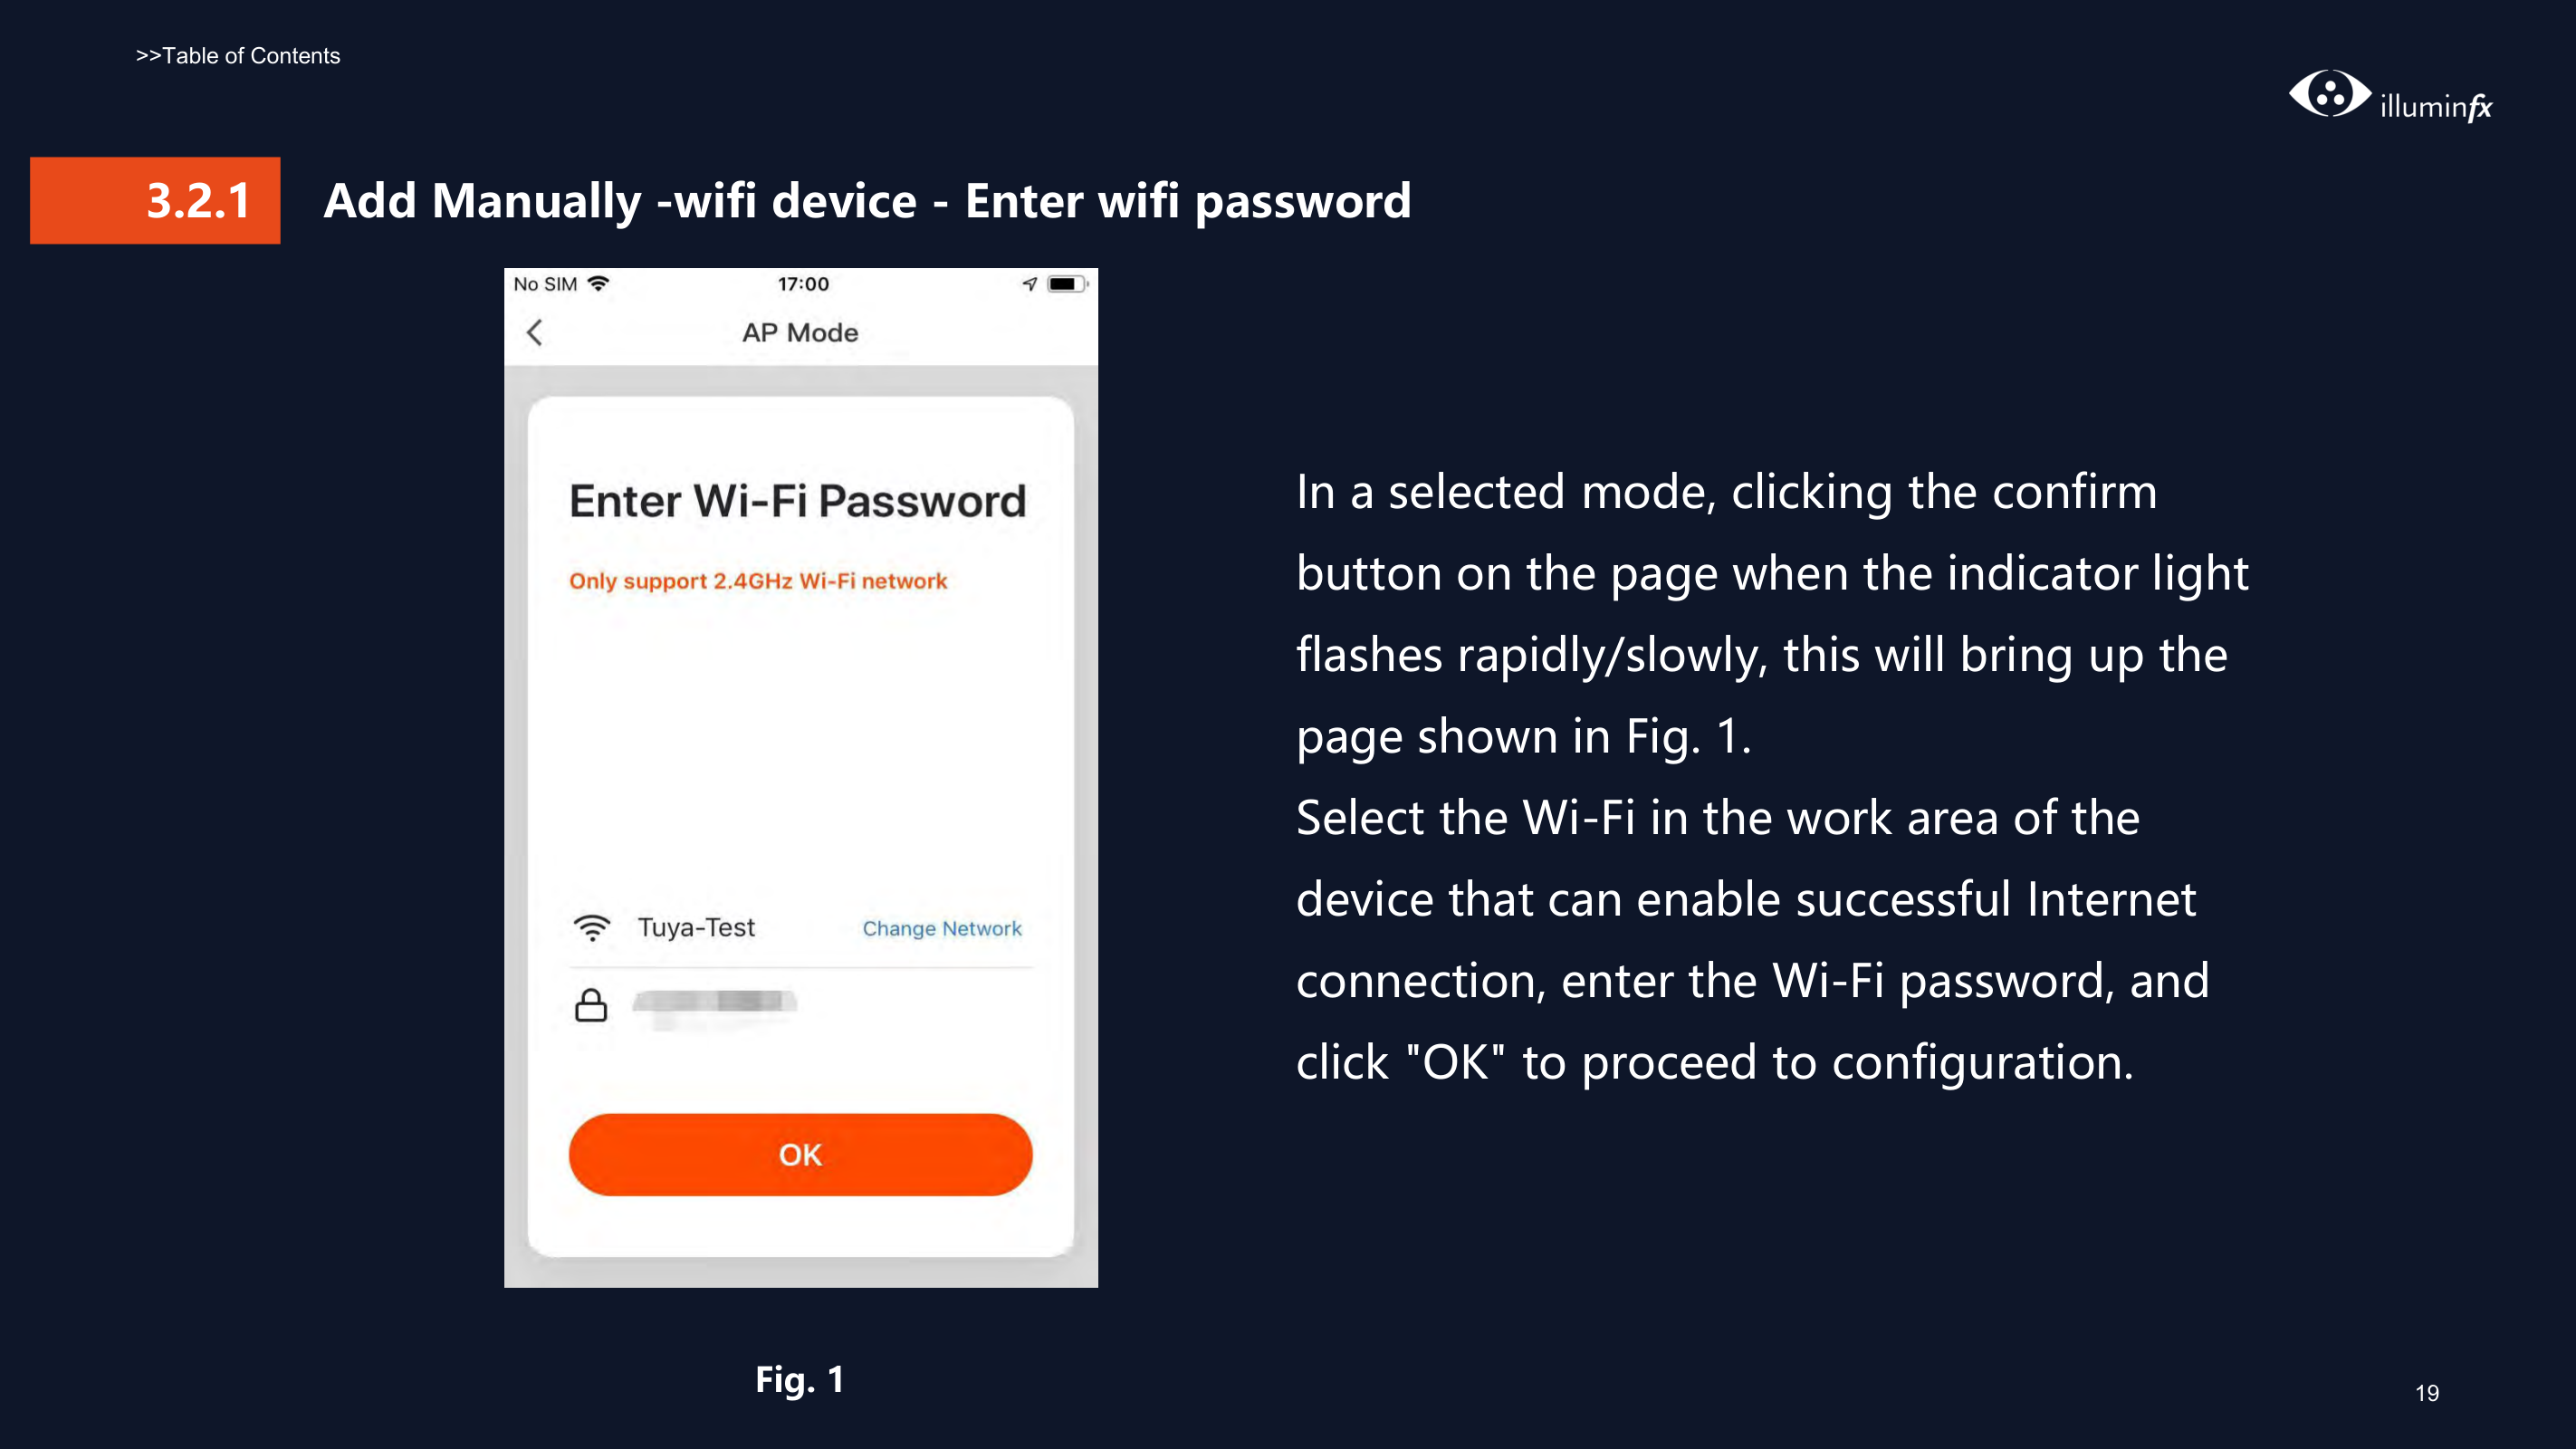
###### Add Manually -wifi device - Enter wifi password3.2.1

In a selected mode, clicking the confirm button on the page when the indicator light flashes rapidly/slowly, this will bring up the page shown in Fig. 1. Select the Wi-Fi in the work area of the device that can enable successful Internet connection, enter the Wi-Fi password, and click "OK" to proceed to configuration.
Fig. 1
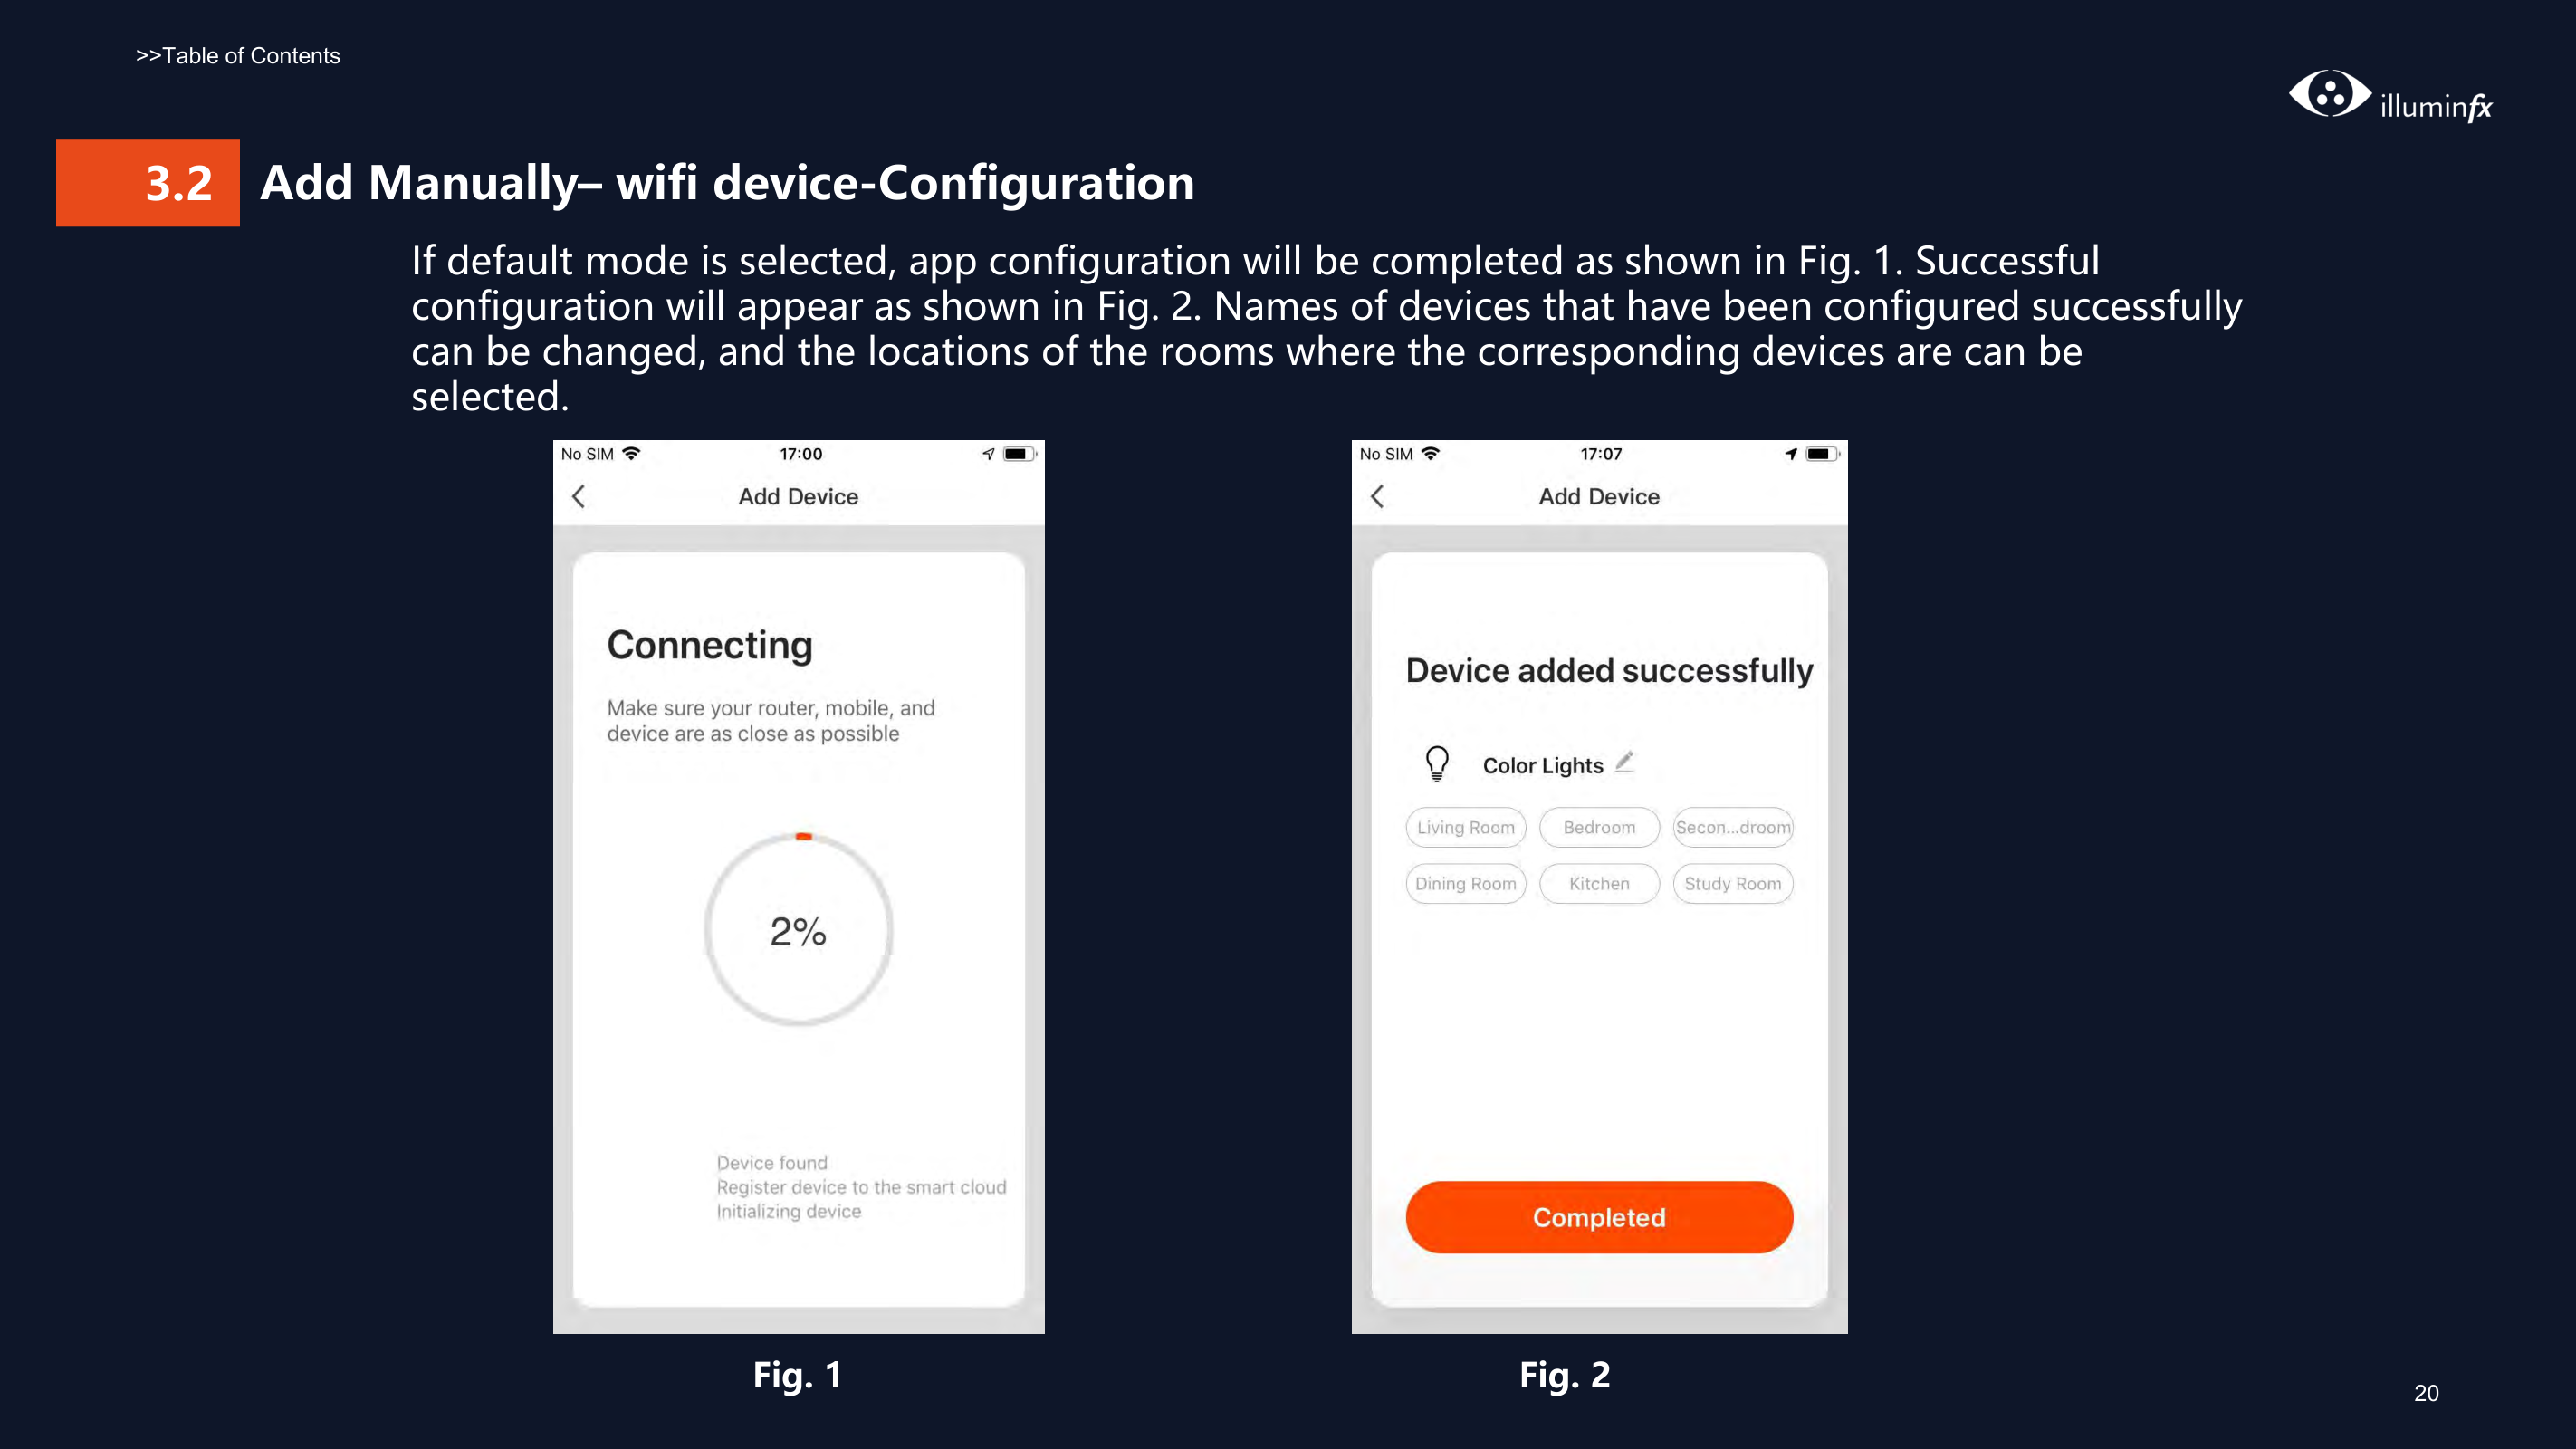
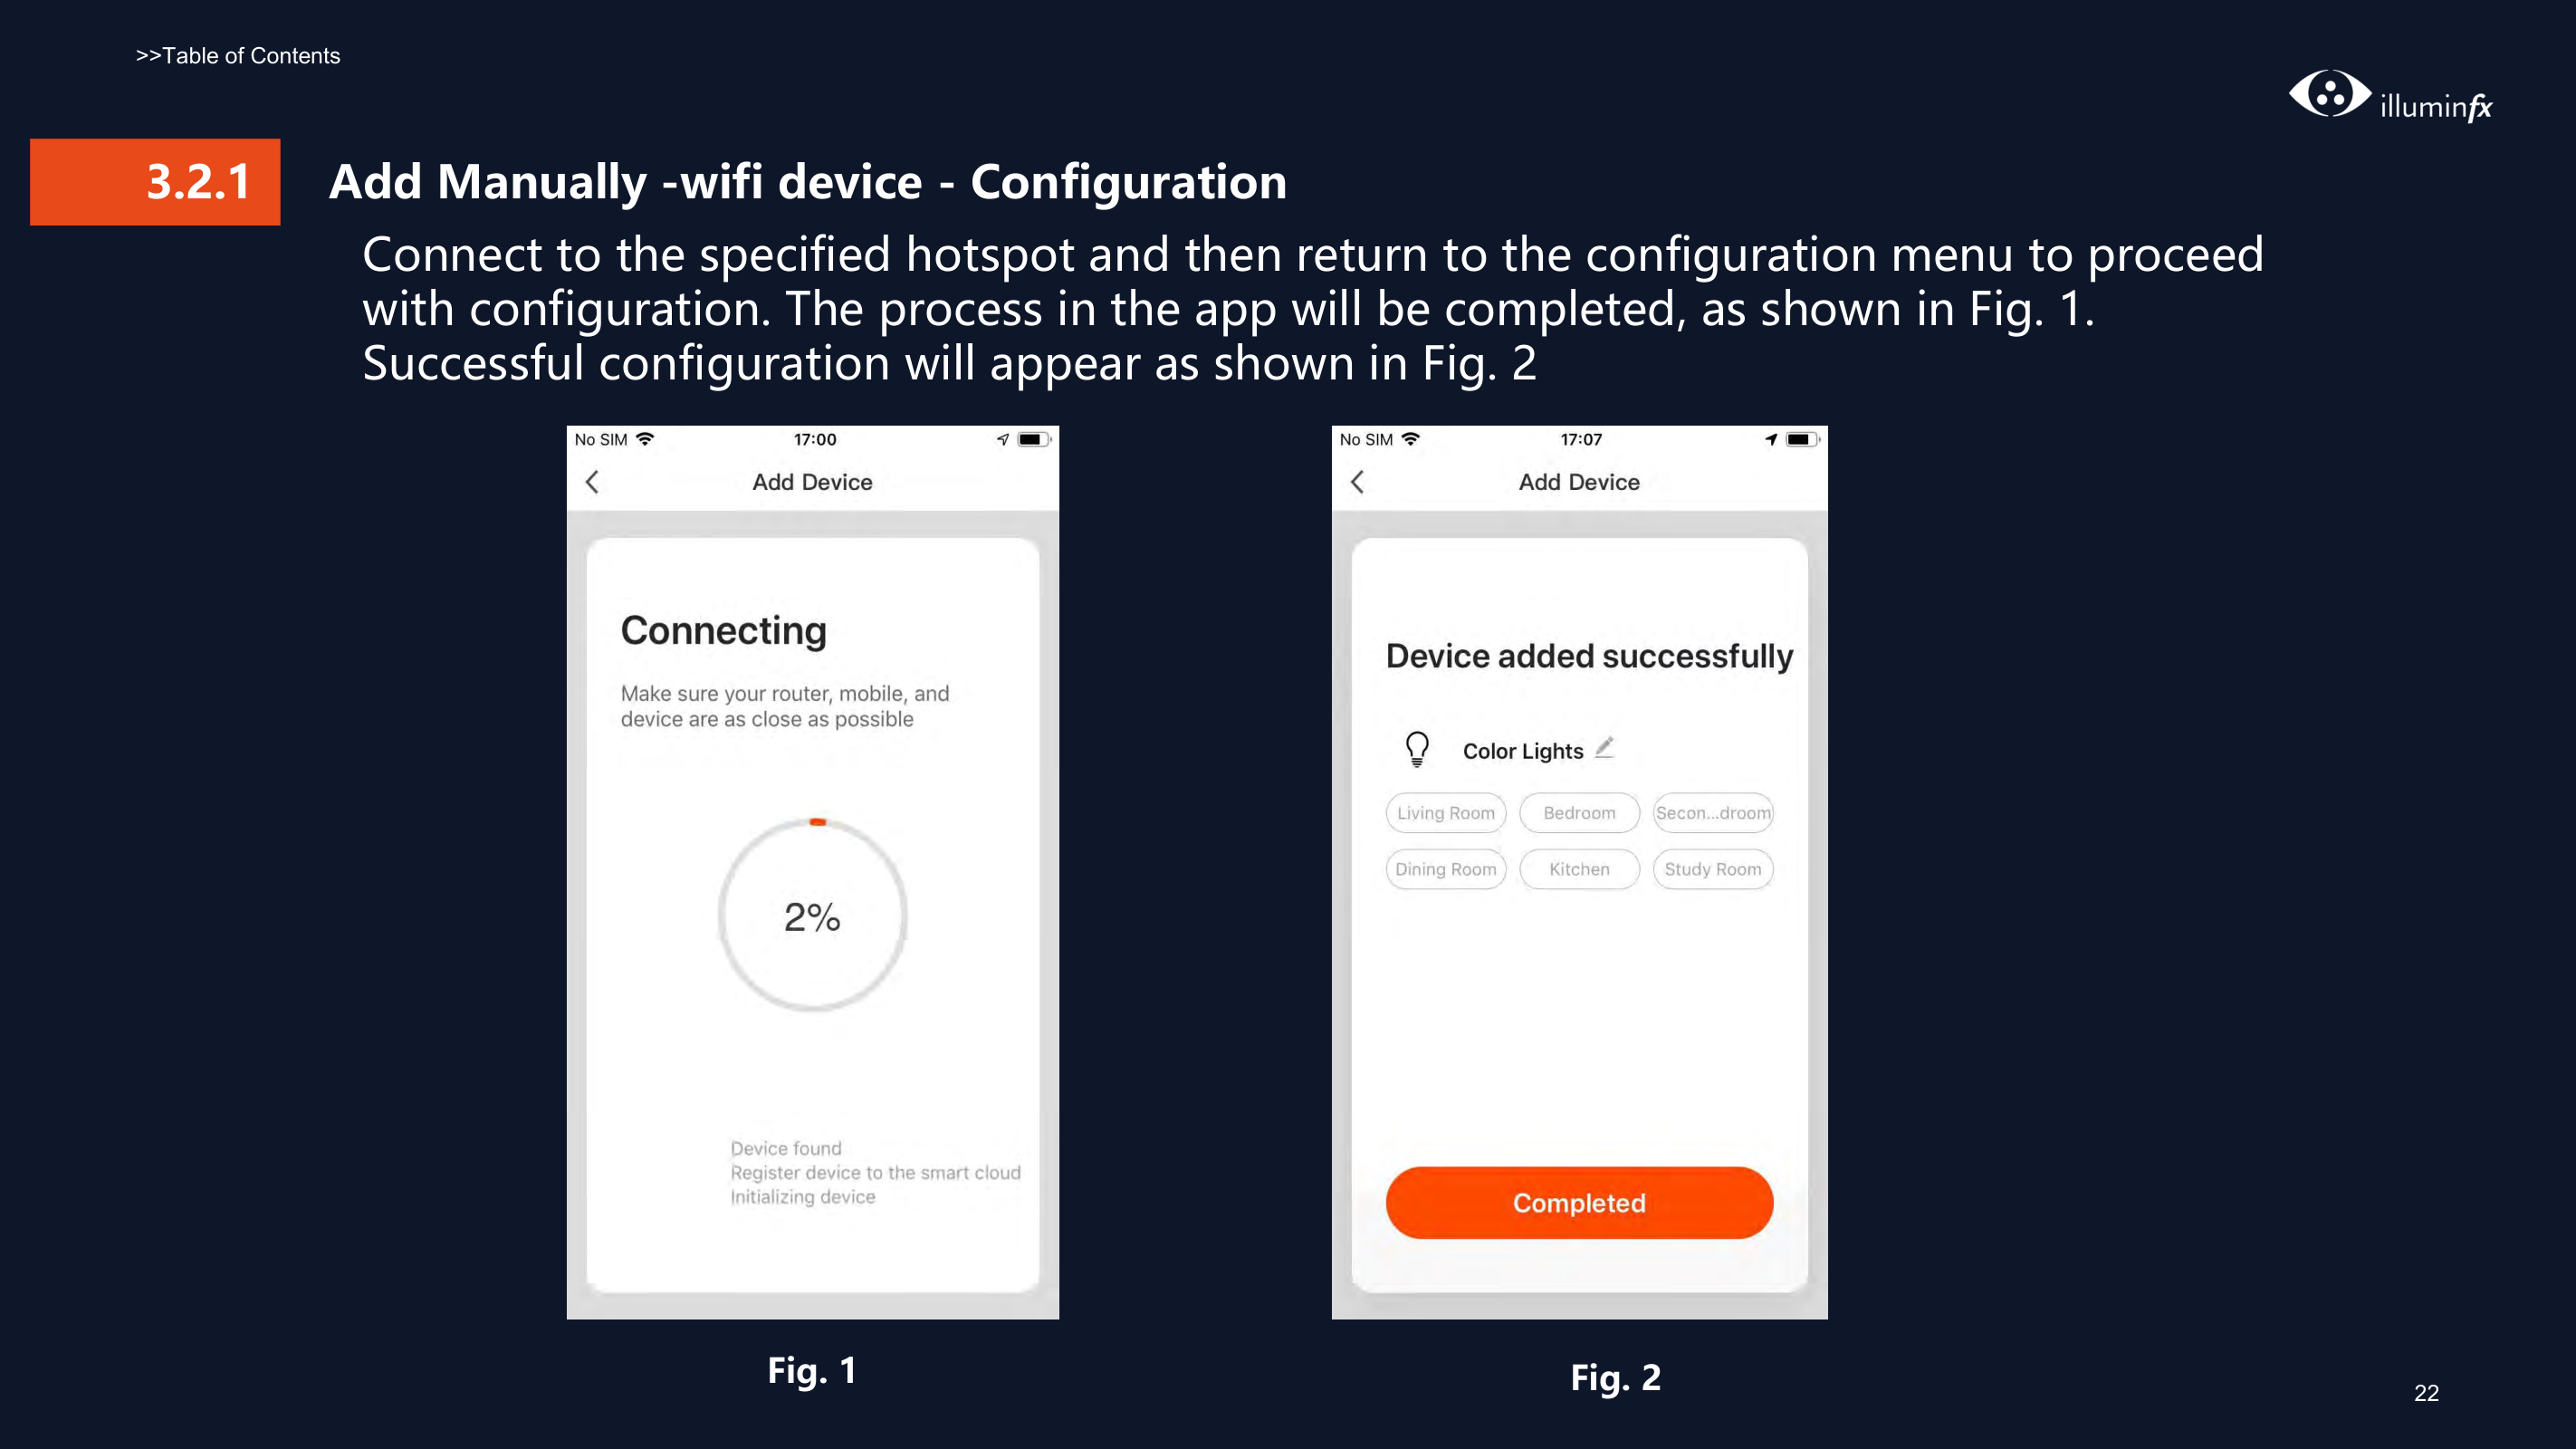
###### 3.2 Add Manually– wifi device-Configuration
If default mode is selected, app configuration will be completed as shown in Fig. 1. Successful configuration will appear as shown in Fig. 2. Names of devices that have been configured successfully can be changed, and the locations of the rooms where the corresponding devices are can be selected.


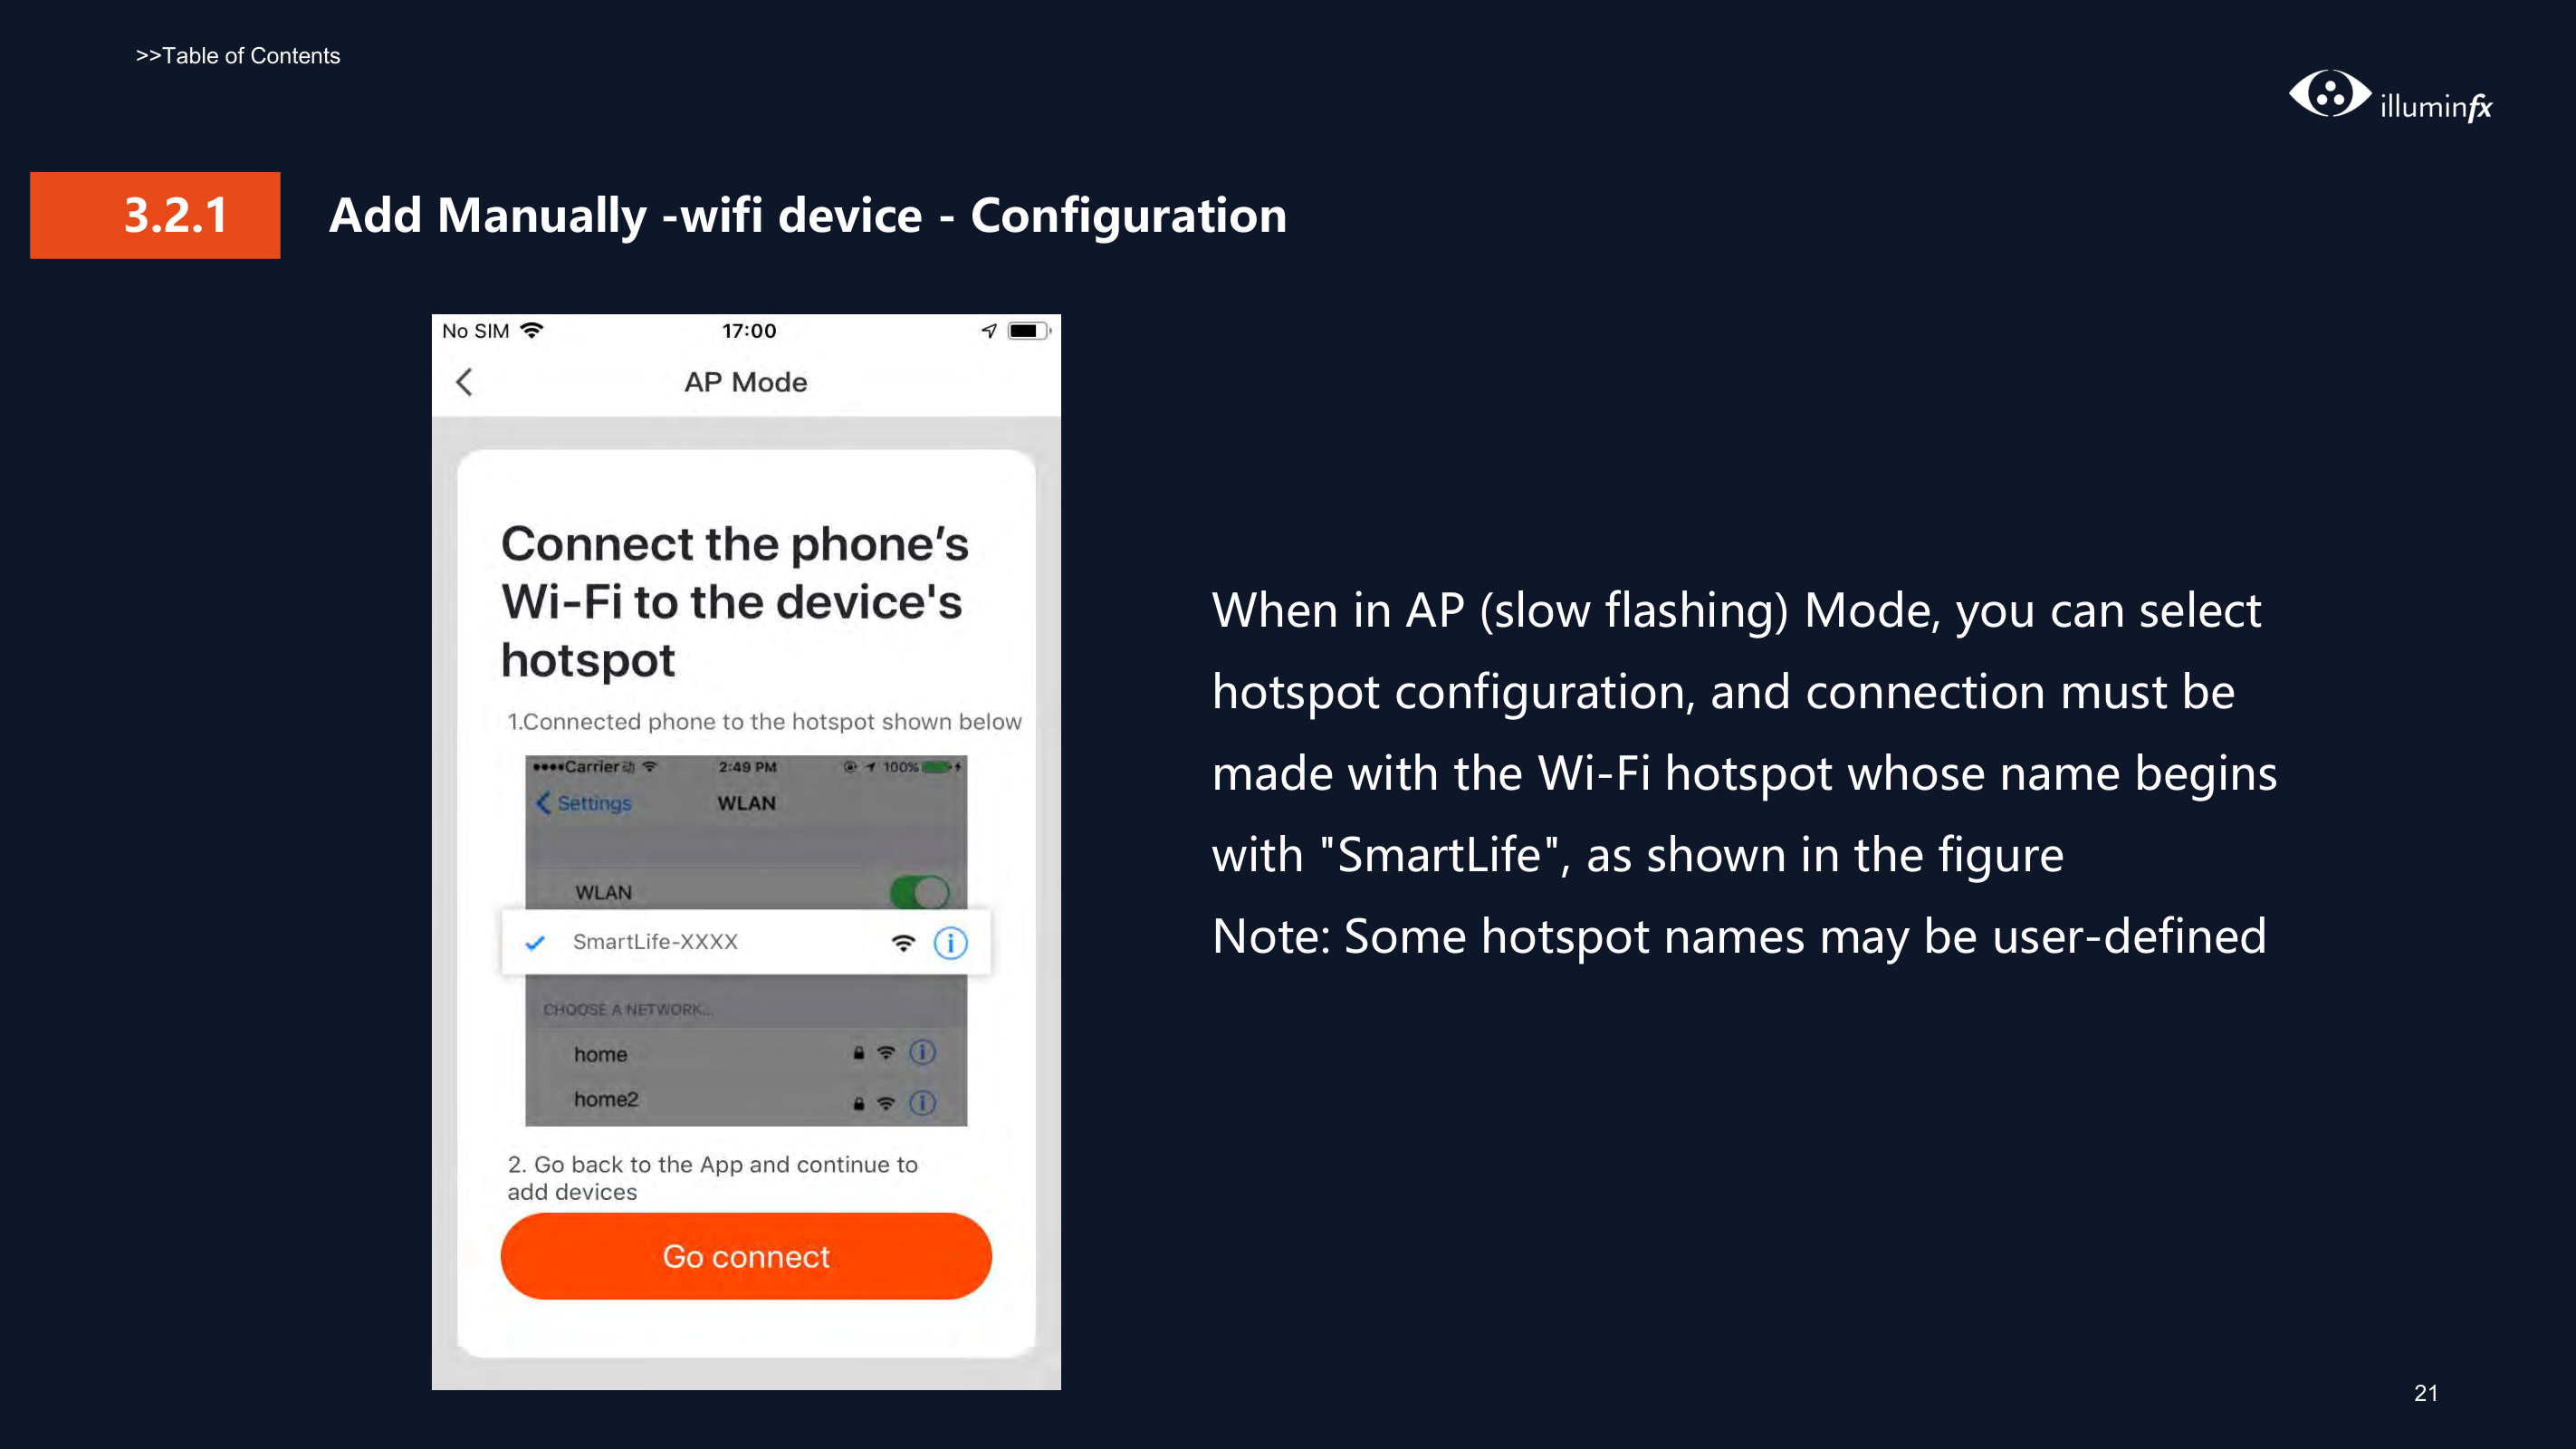


##### When in AP (slow flashing) Mode, you can select hotspot configuration, and connection must be made with the Wi-Fi hotspot whose name begins with "SmartLife", as shown in the figure Note: Some hotspot names may be user-defined
##### Connect to the specified hotspot and then return to the configuration menu to proceed with configuration. The process in the app will be completed, as shown in Fig. 1. Successful configuration will appear as shown in Fig. 2


###### 3.2 Add Manually– wifi device-Failure


If configuration fails, it will appear as shown in the figure. You can choose to click “Got it”to add again or go to “Help”for troubleshooting assistance.
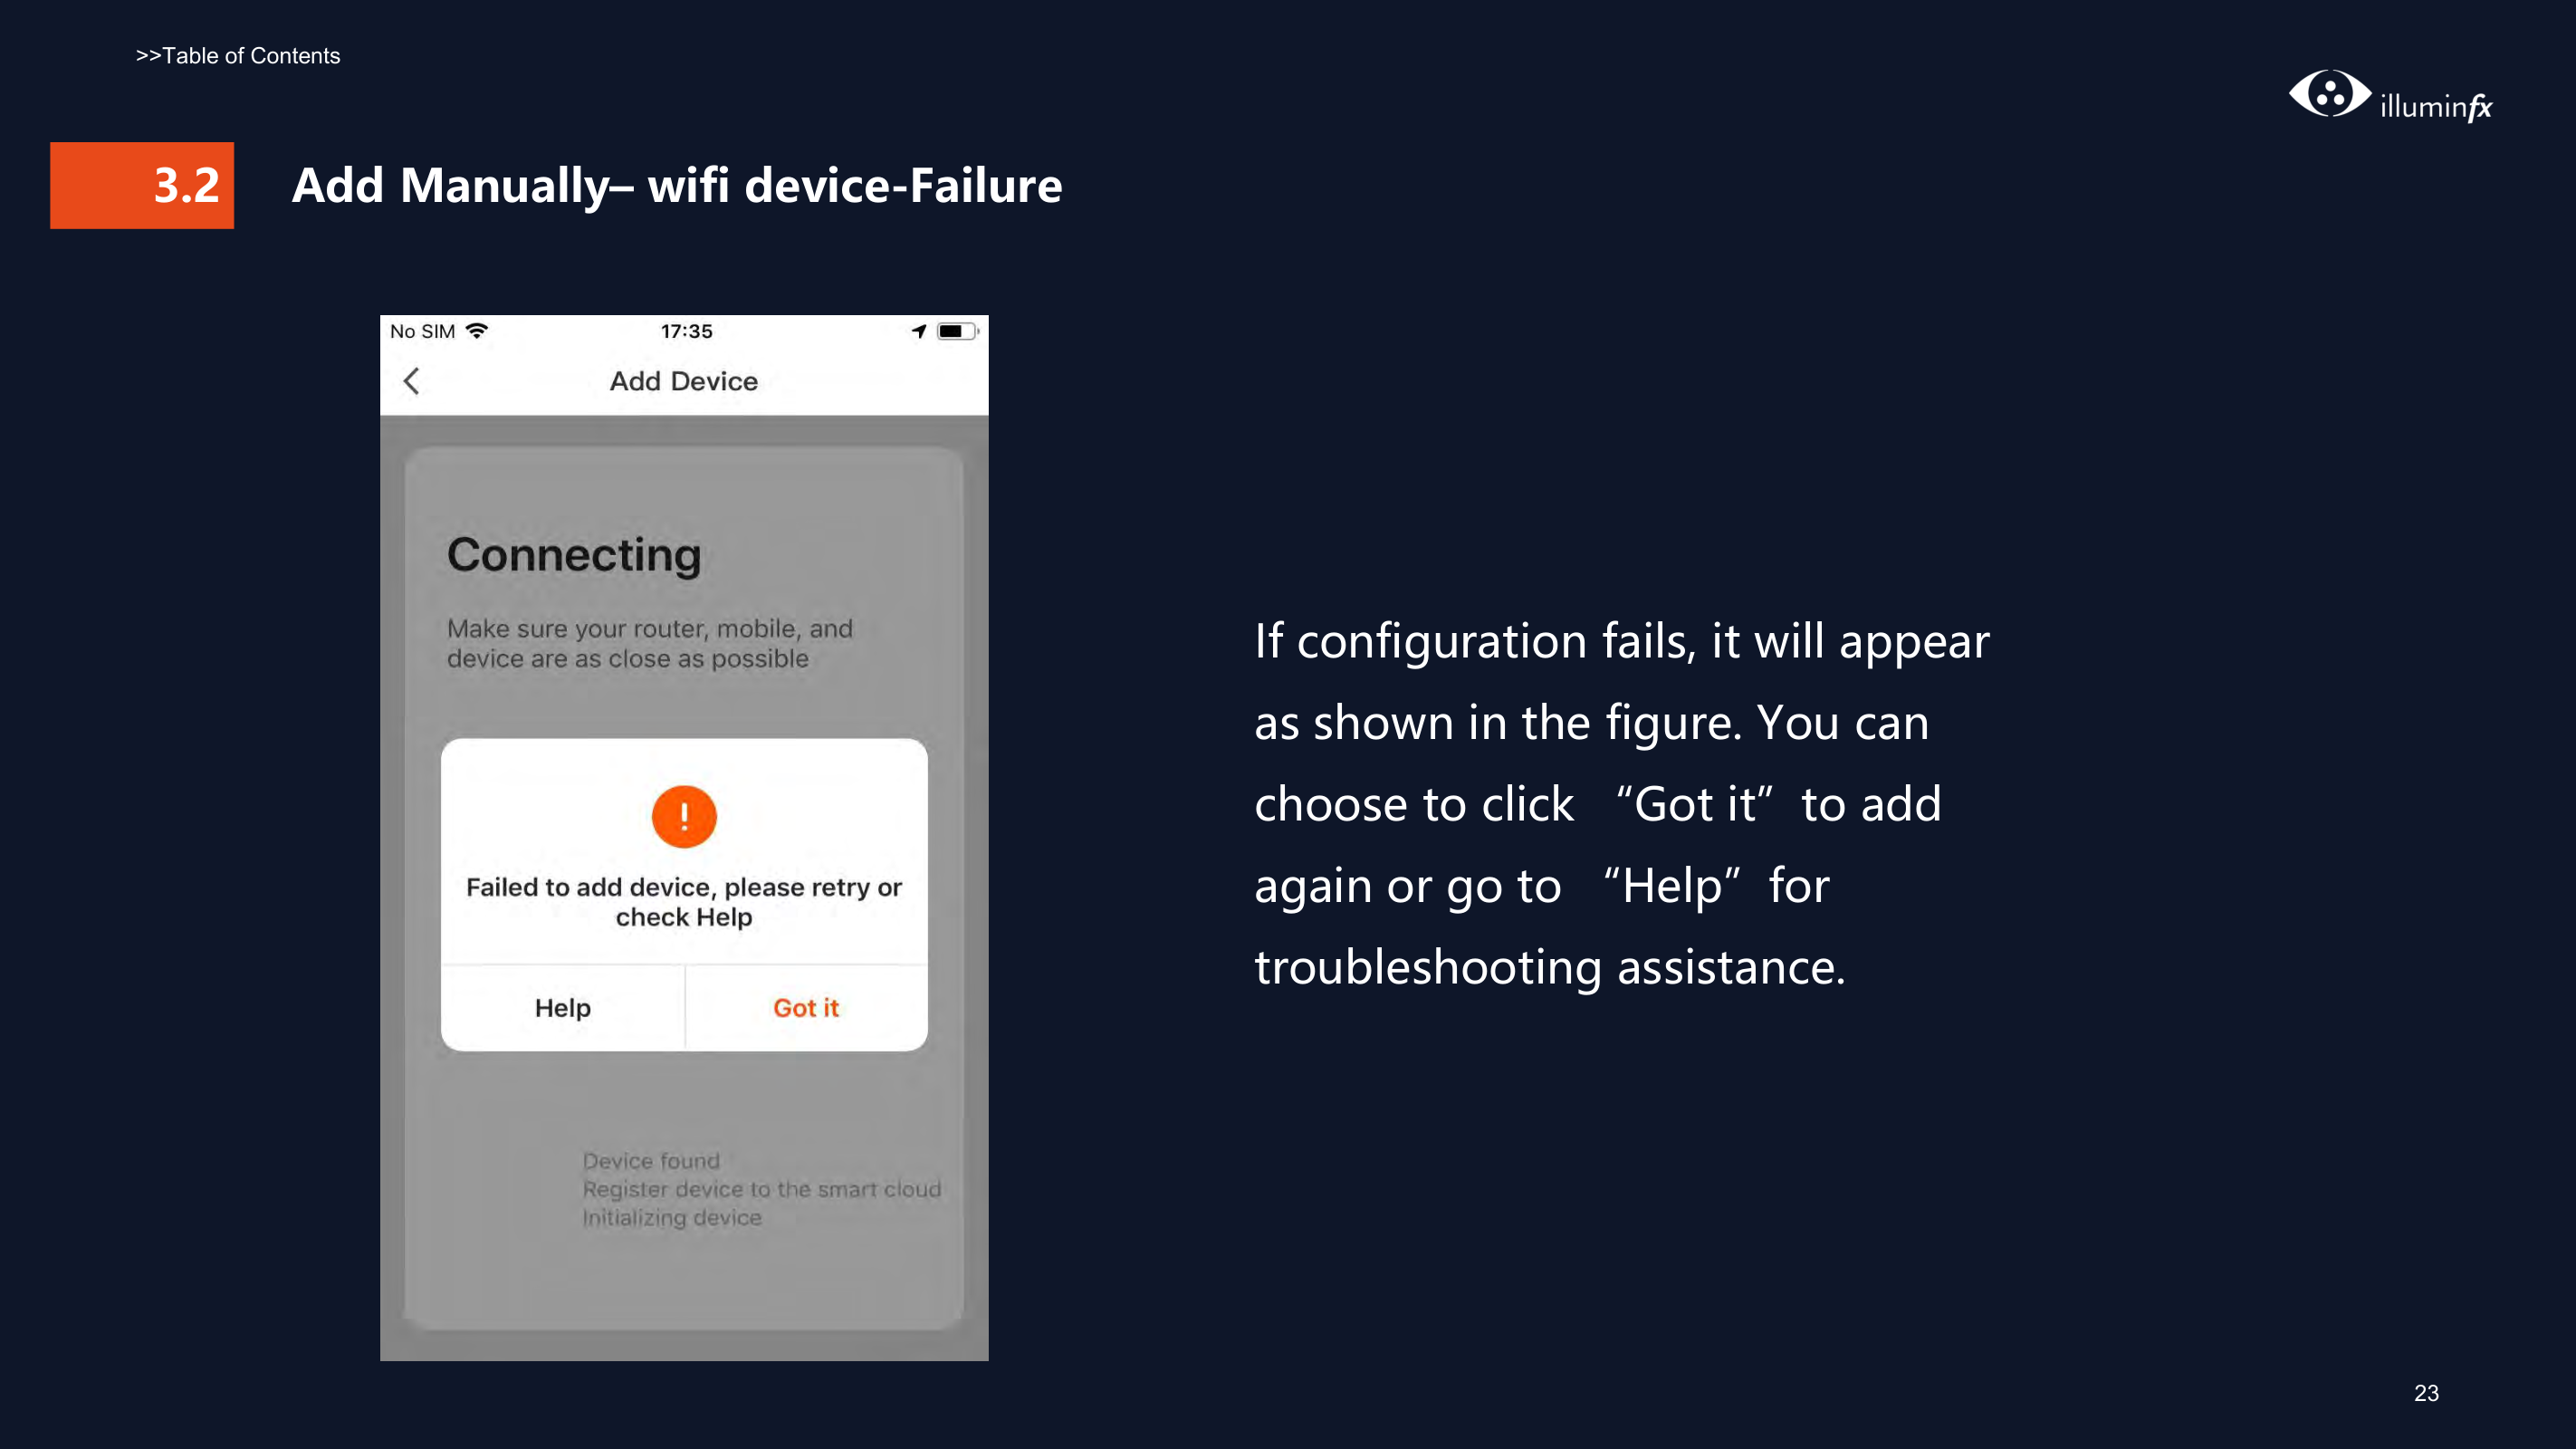


Fig. 1 Fig. 2
|
| |---|
|
| |---|
Fig. 3 Fig. 4
|
| |---|
Fig. 5
#### 3.2.2
###### Add Manually --ZigBee Device
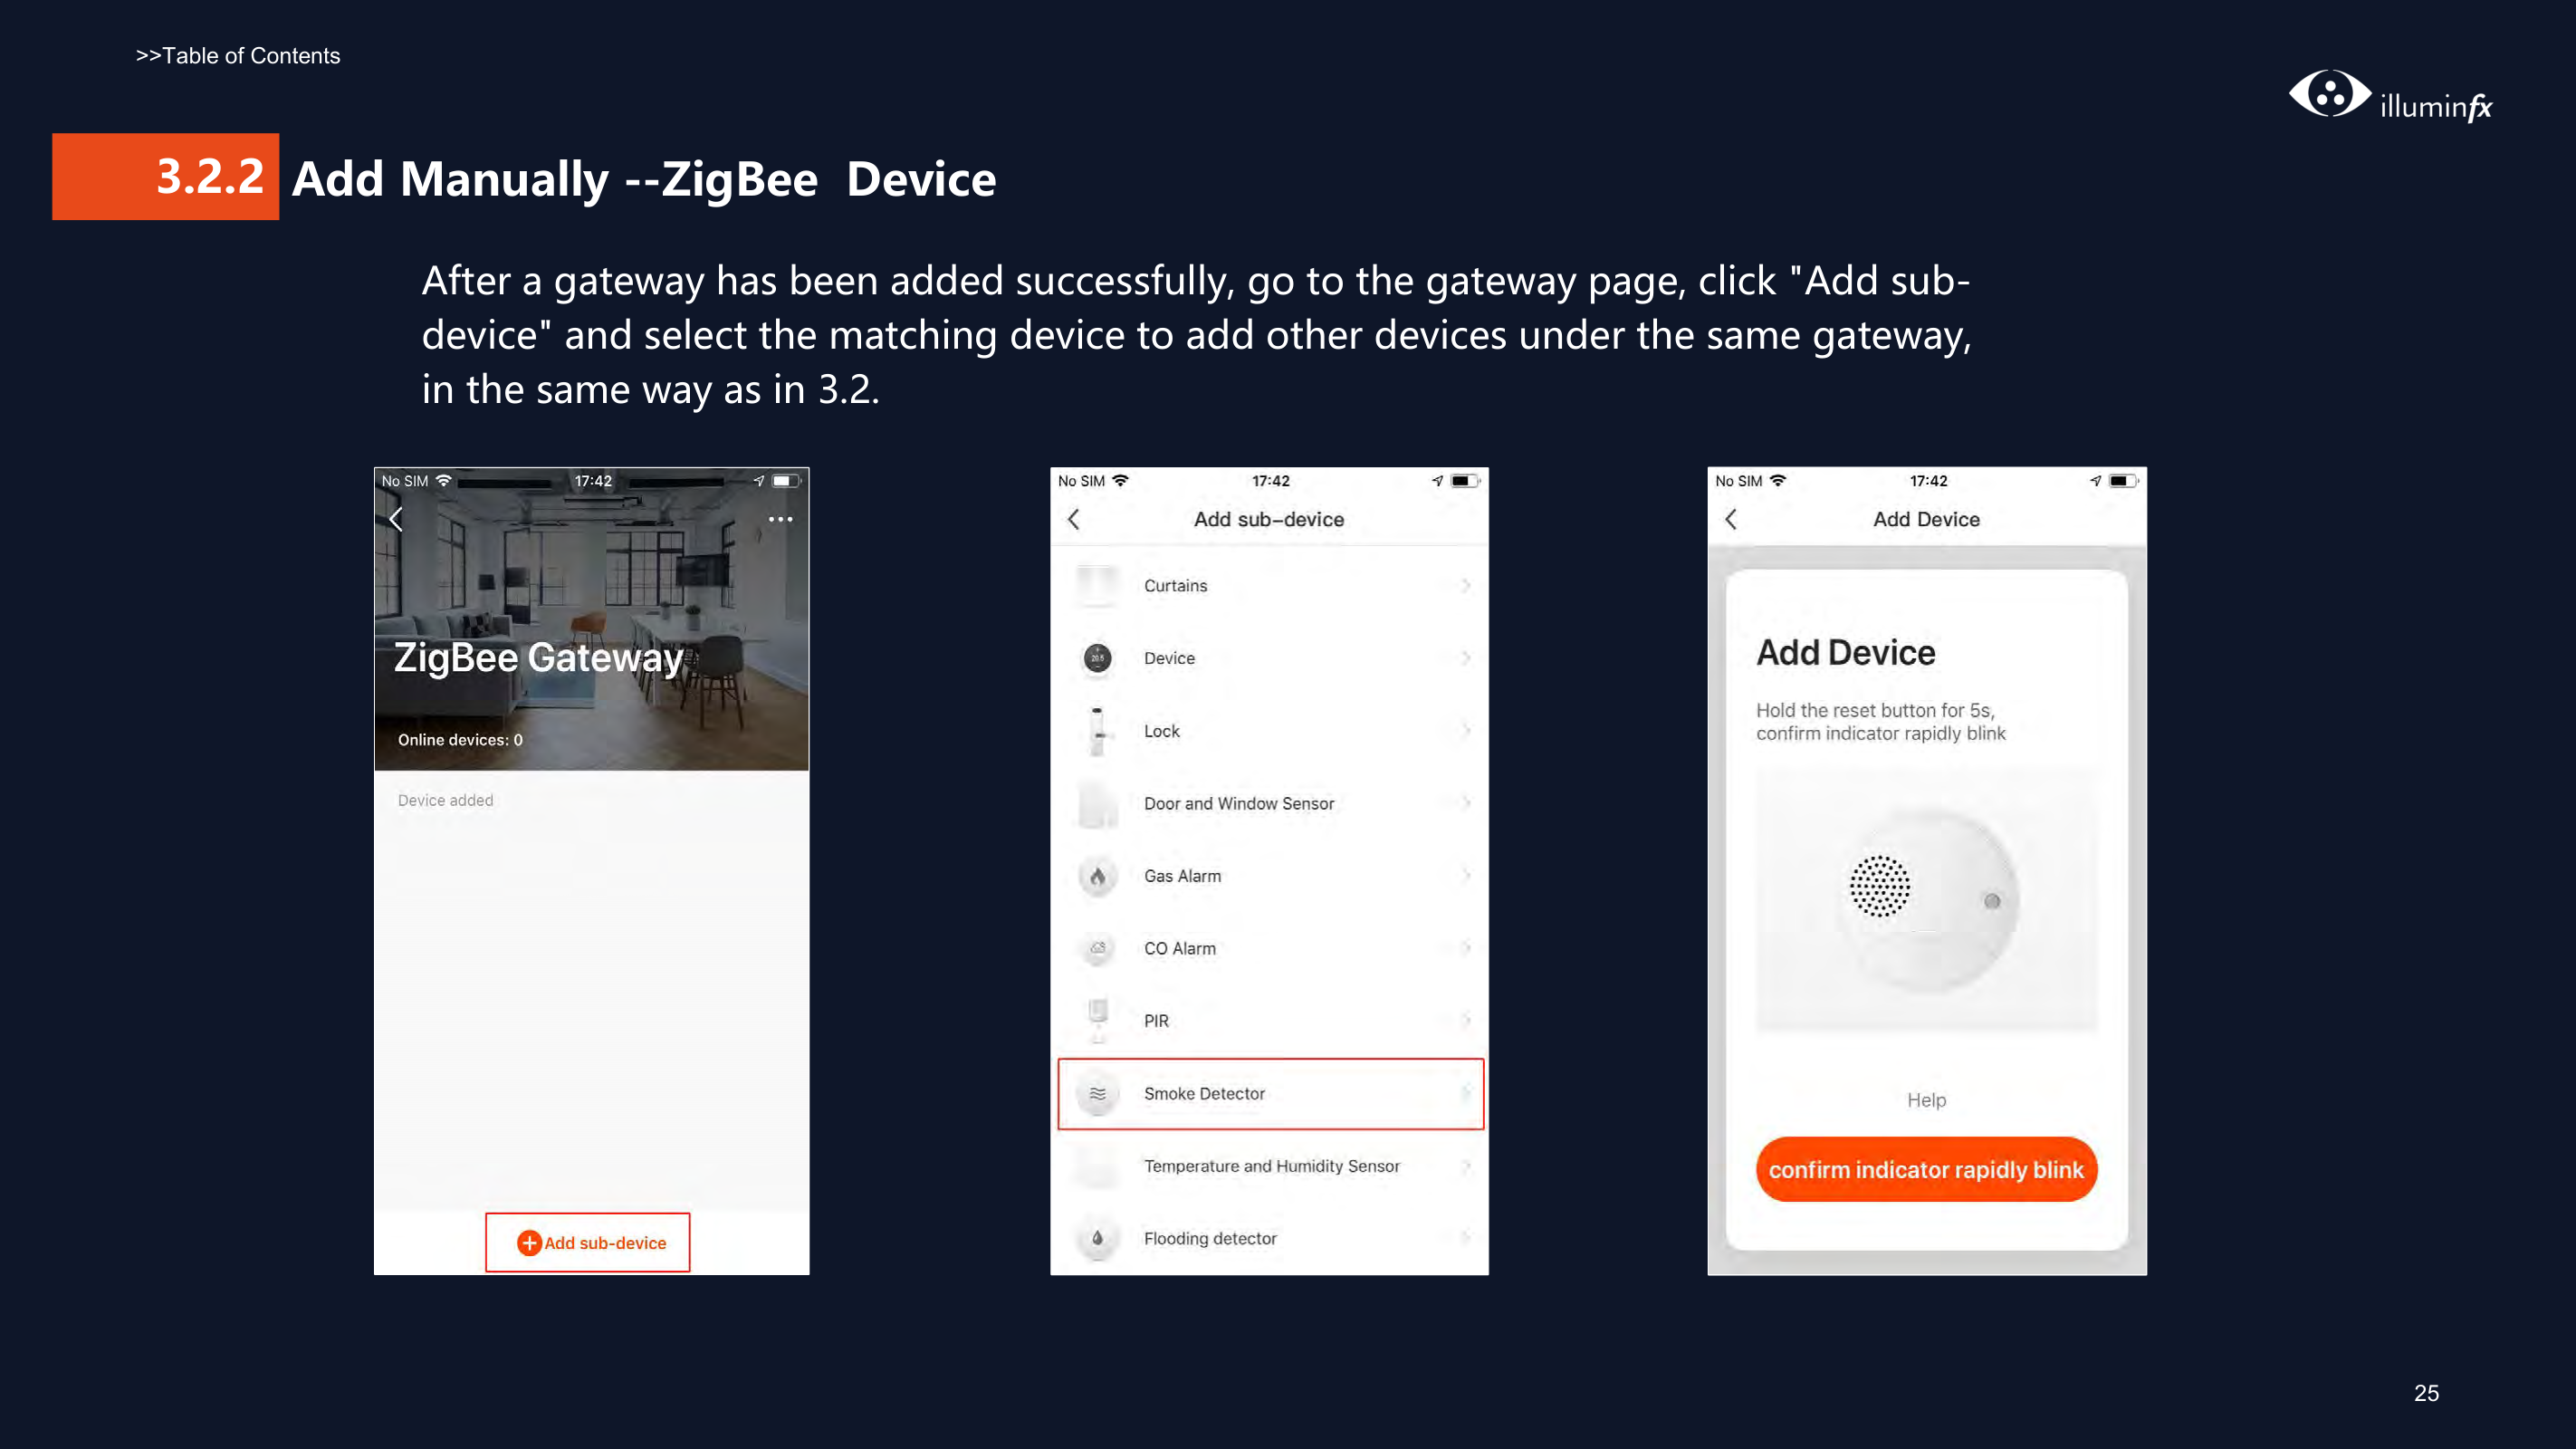
After a gateway has been added successfully, go to the gateway page, click "Add subdevice" and select the matching device to add other devices under the same gateway, in the same way as in 3.2.
|
| |---|
|
| |---|
|
| |---|
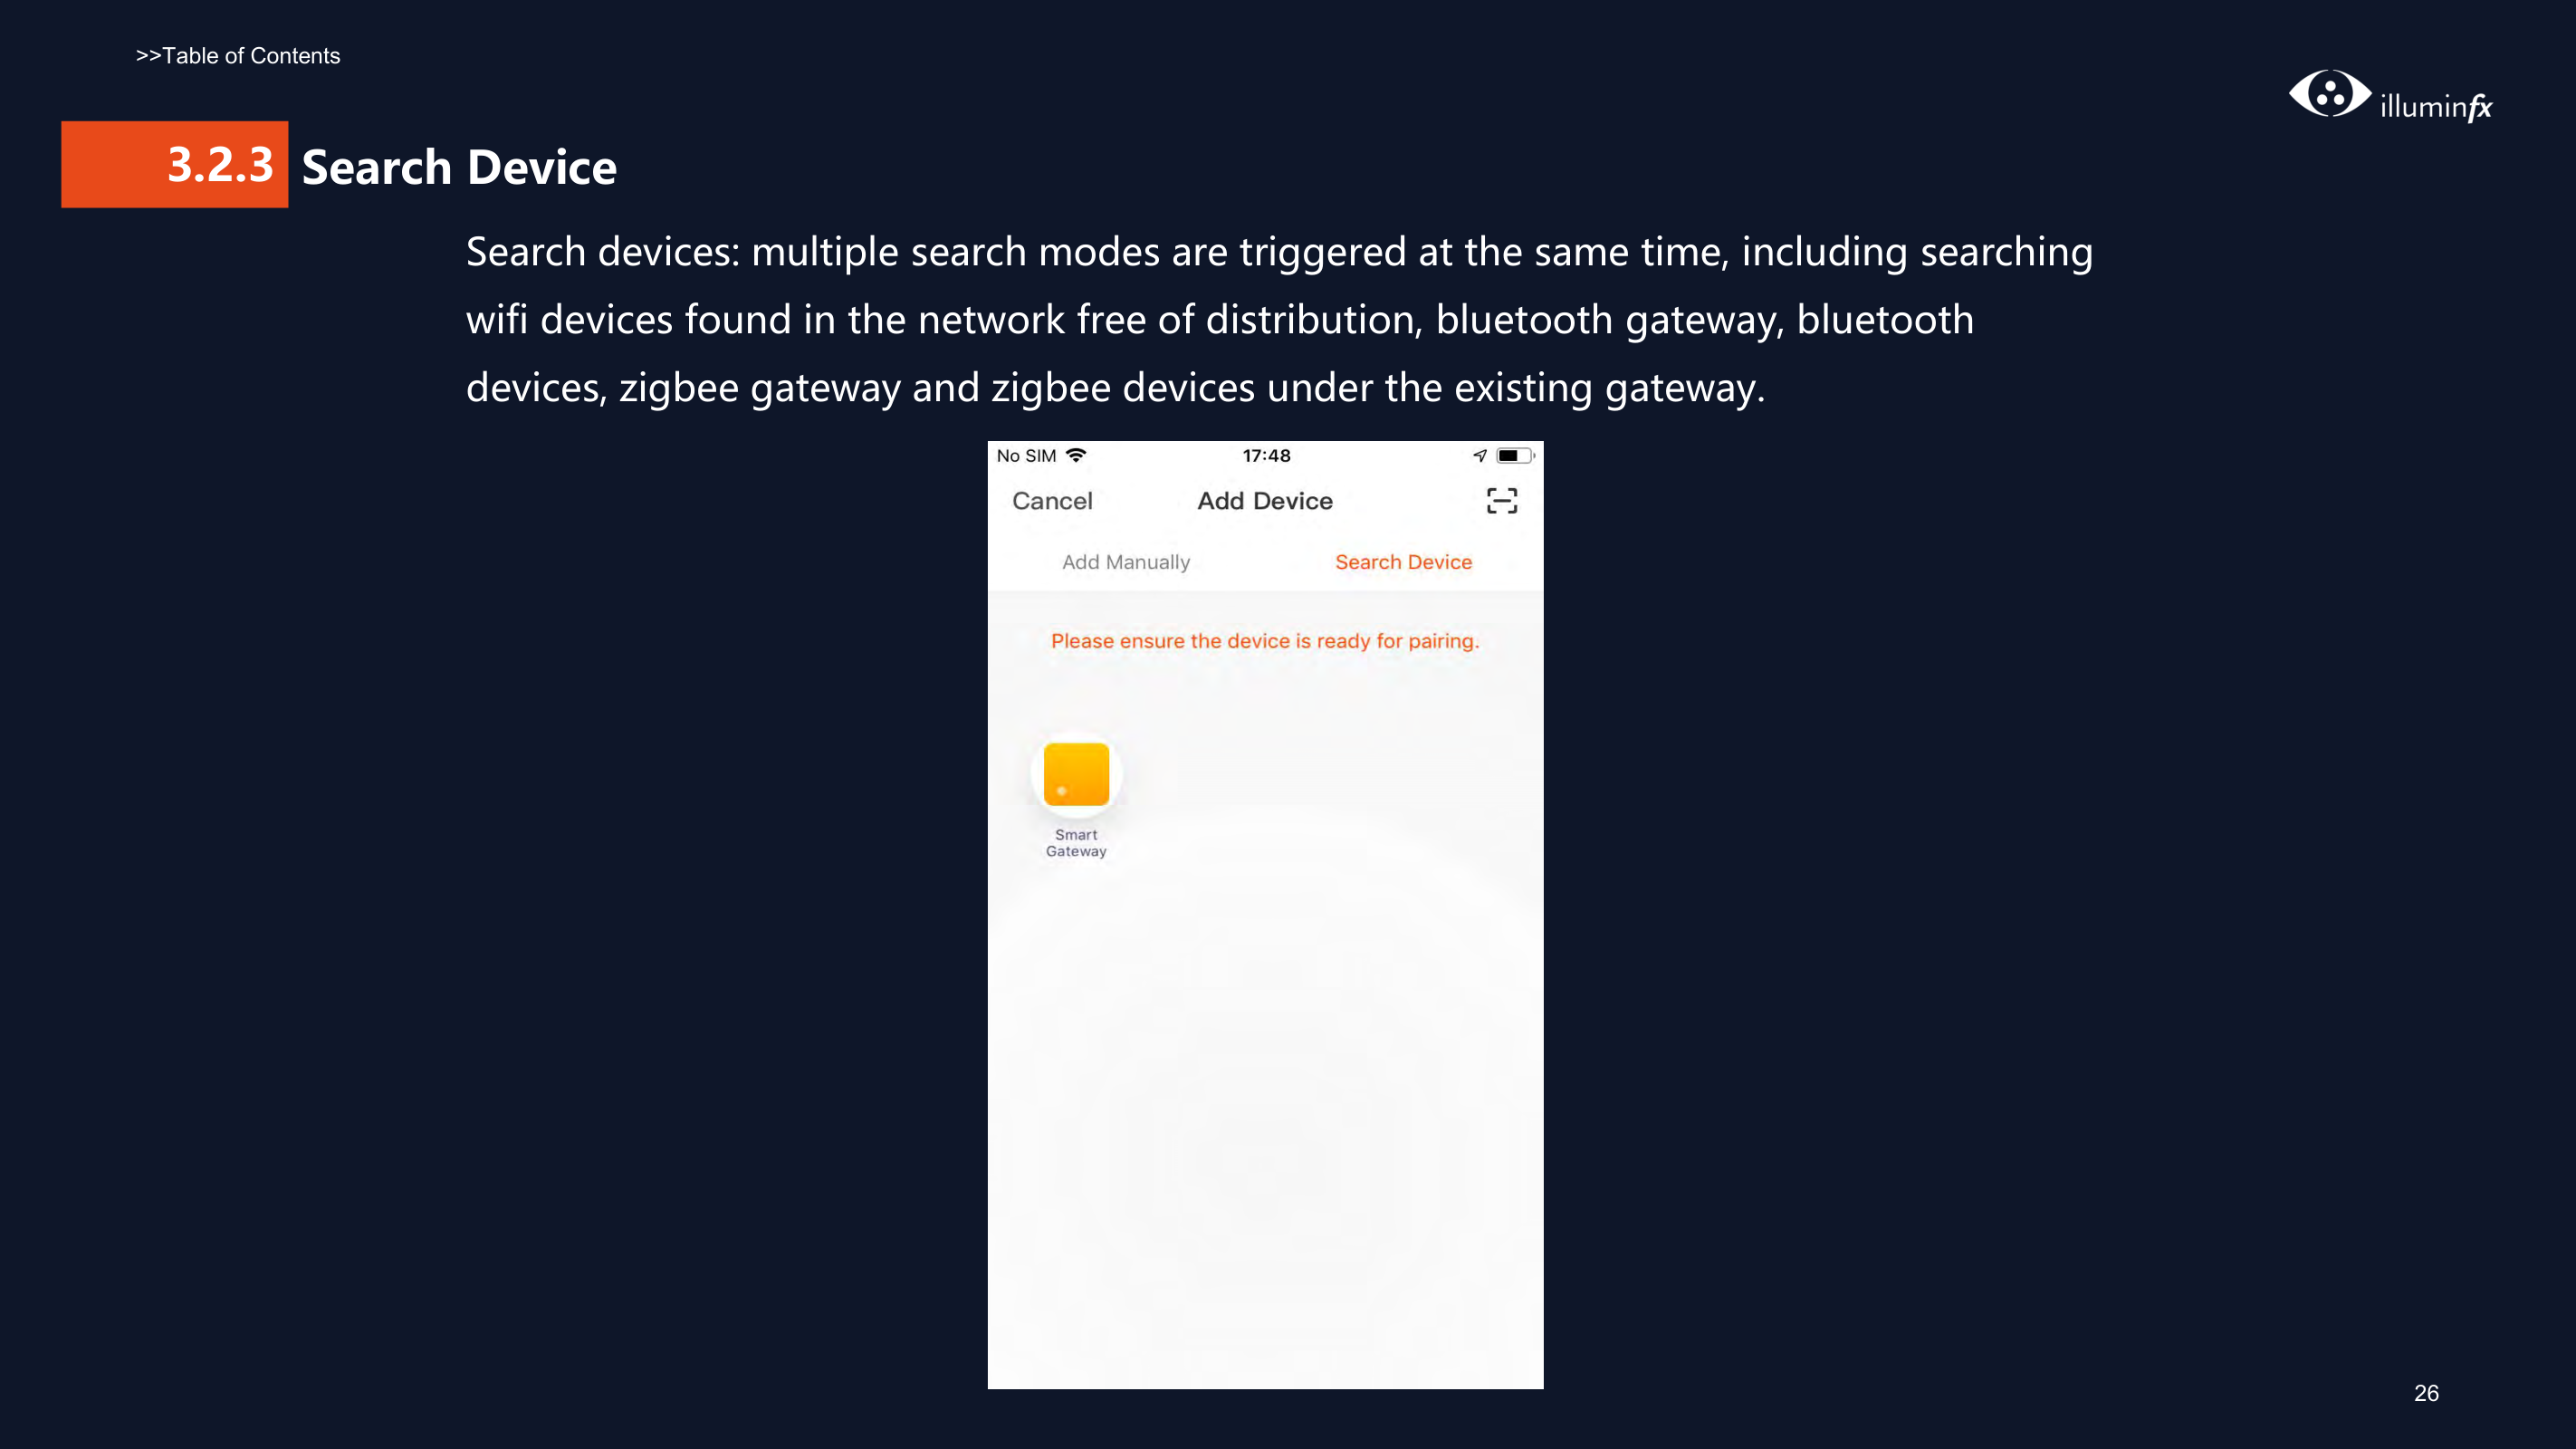
####### 3.2.3 Search Device Search devices: multiple search modes are triggered at the same time, including searching wifi devices found in the network free of distribution, bluetooth gateway, bluetooth devices, zigbee gateway and zigbee devices under the existing gateway.

###### 4
###### Control Devices - Individual Control
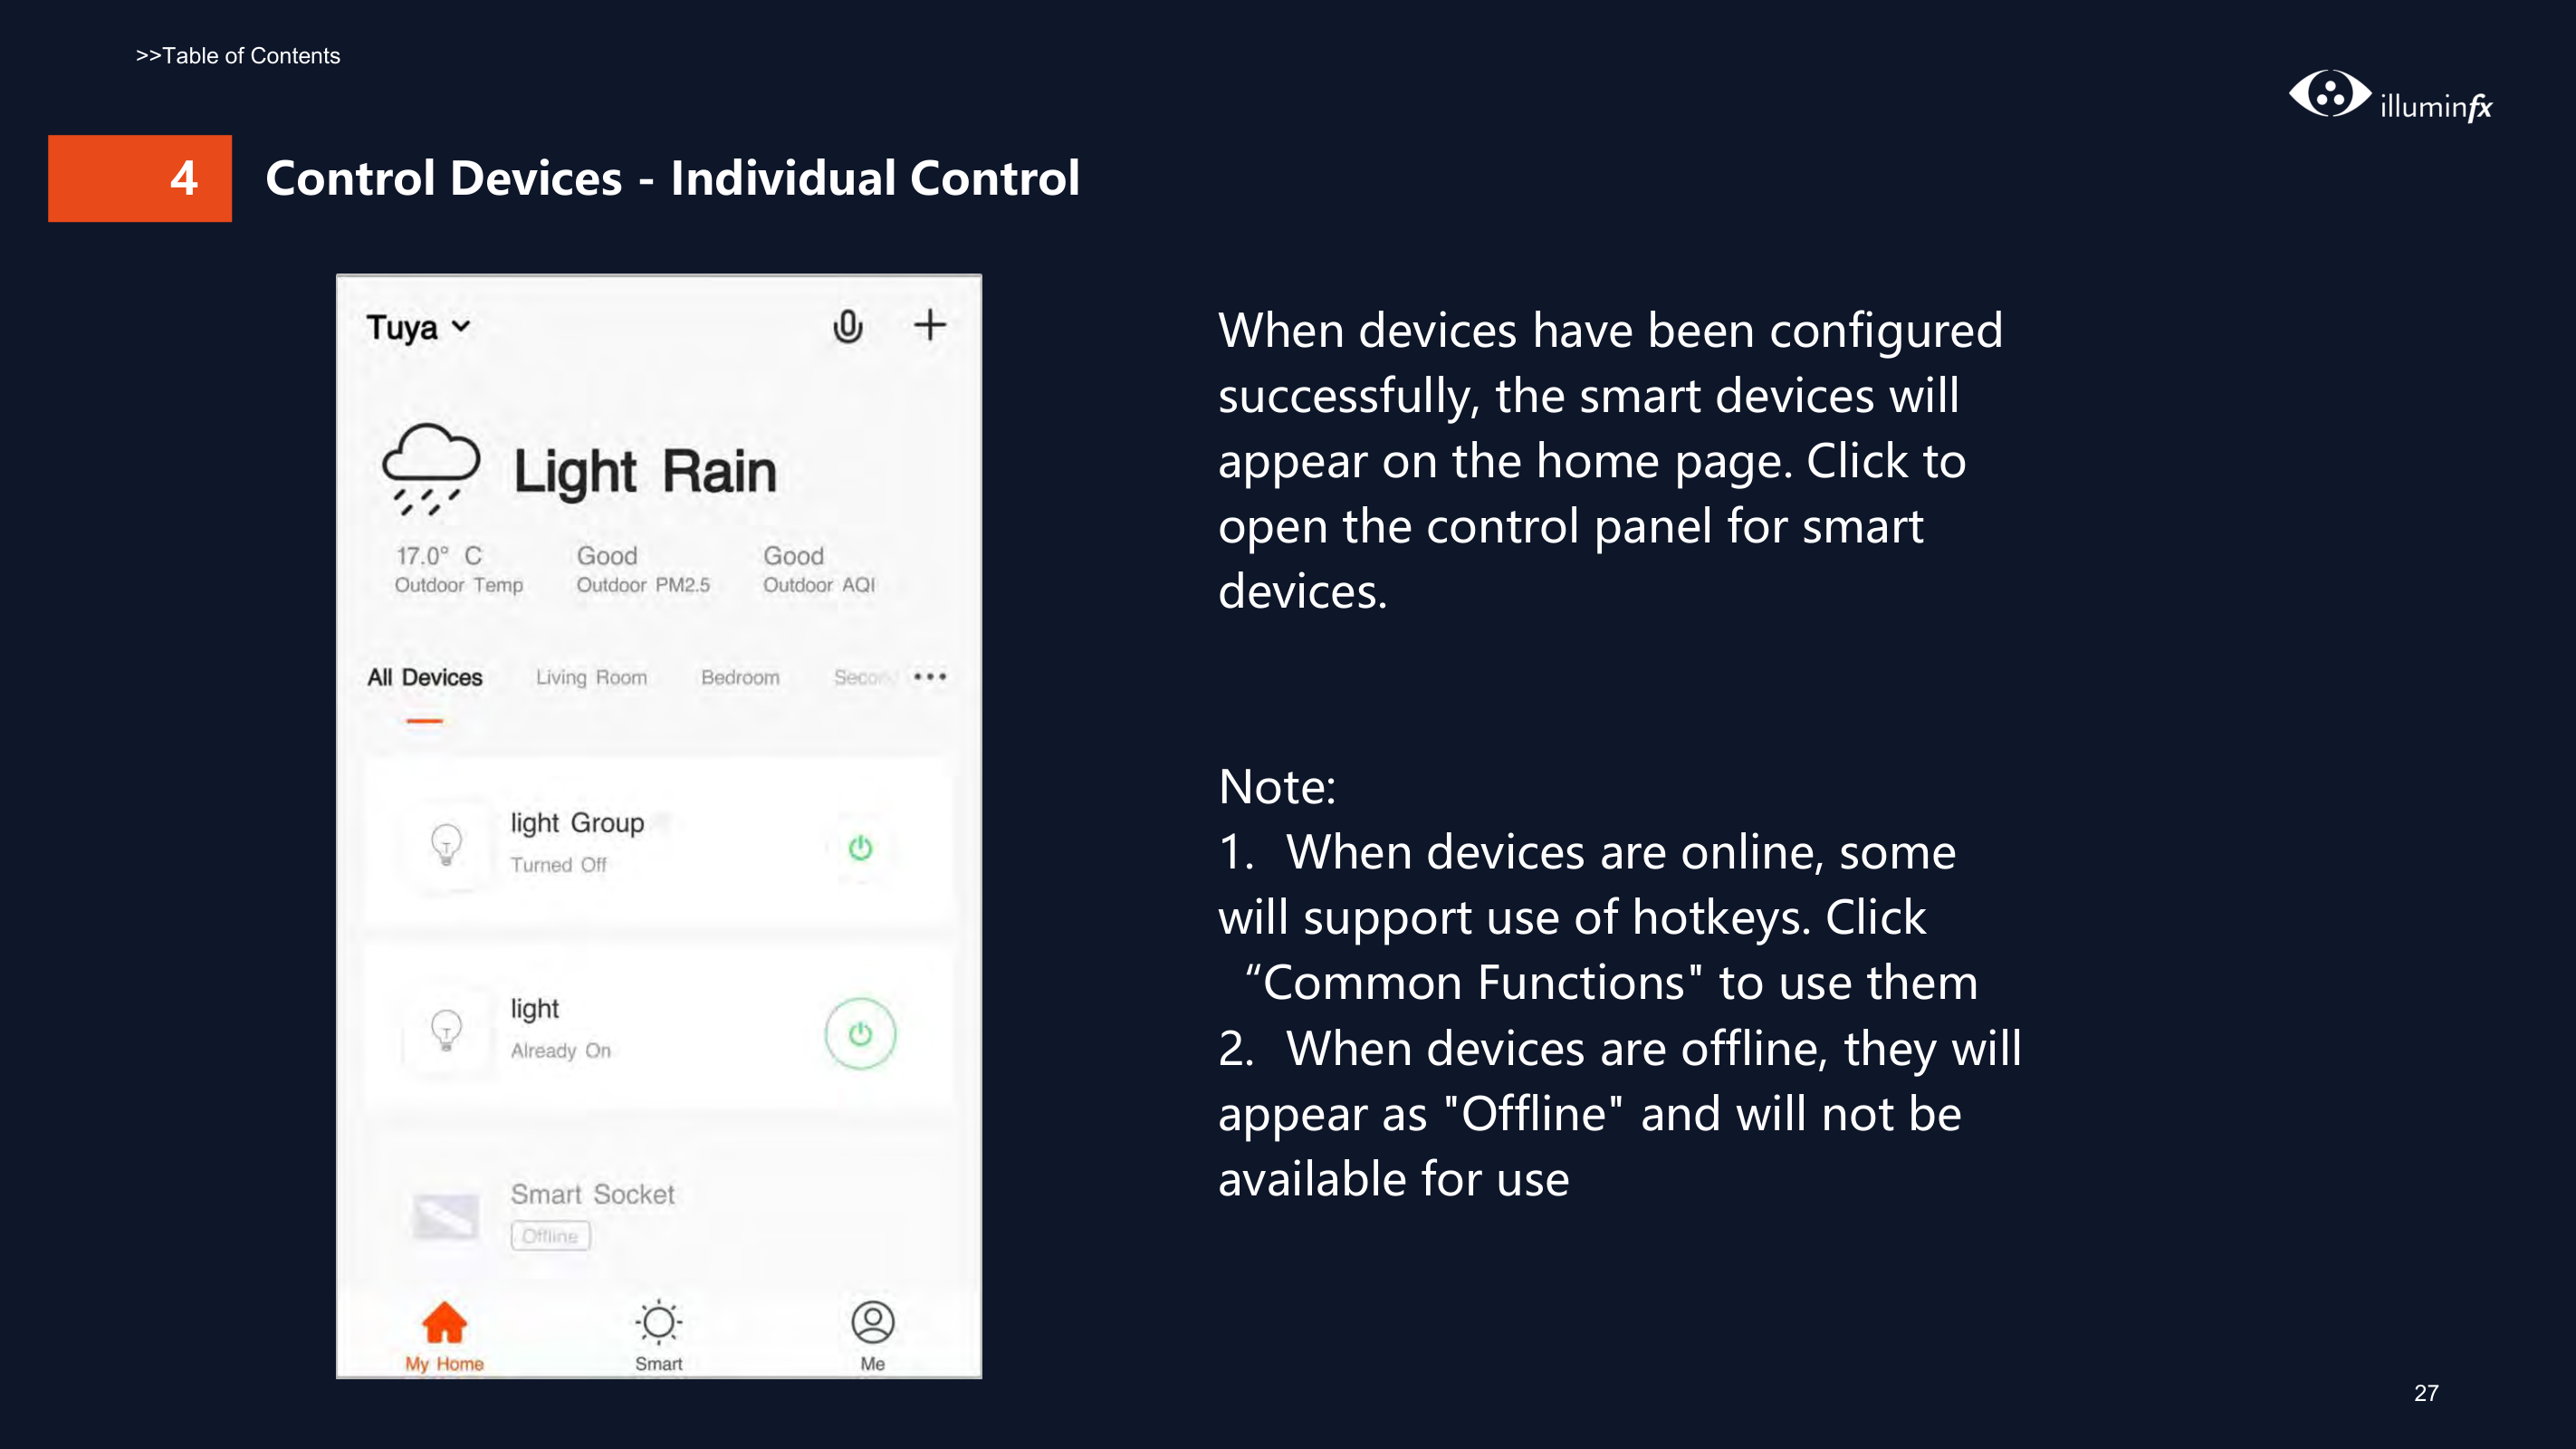

When devices have been configured successfully, the smart devices will appear on the home page. Click to open the control panel for smart devices.
Note:
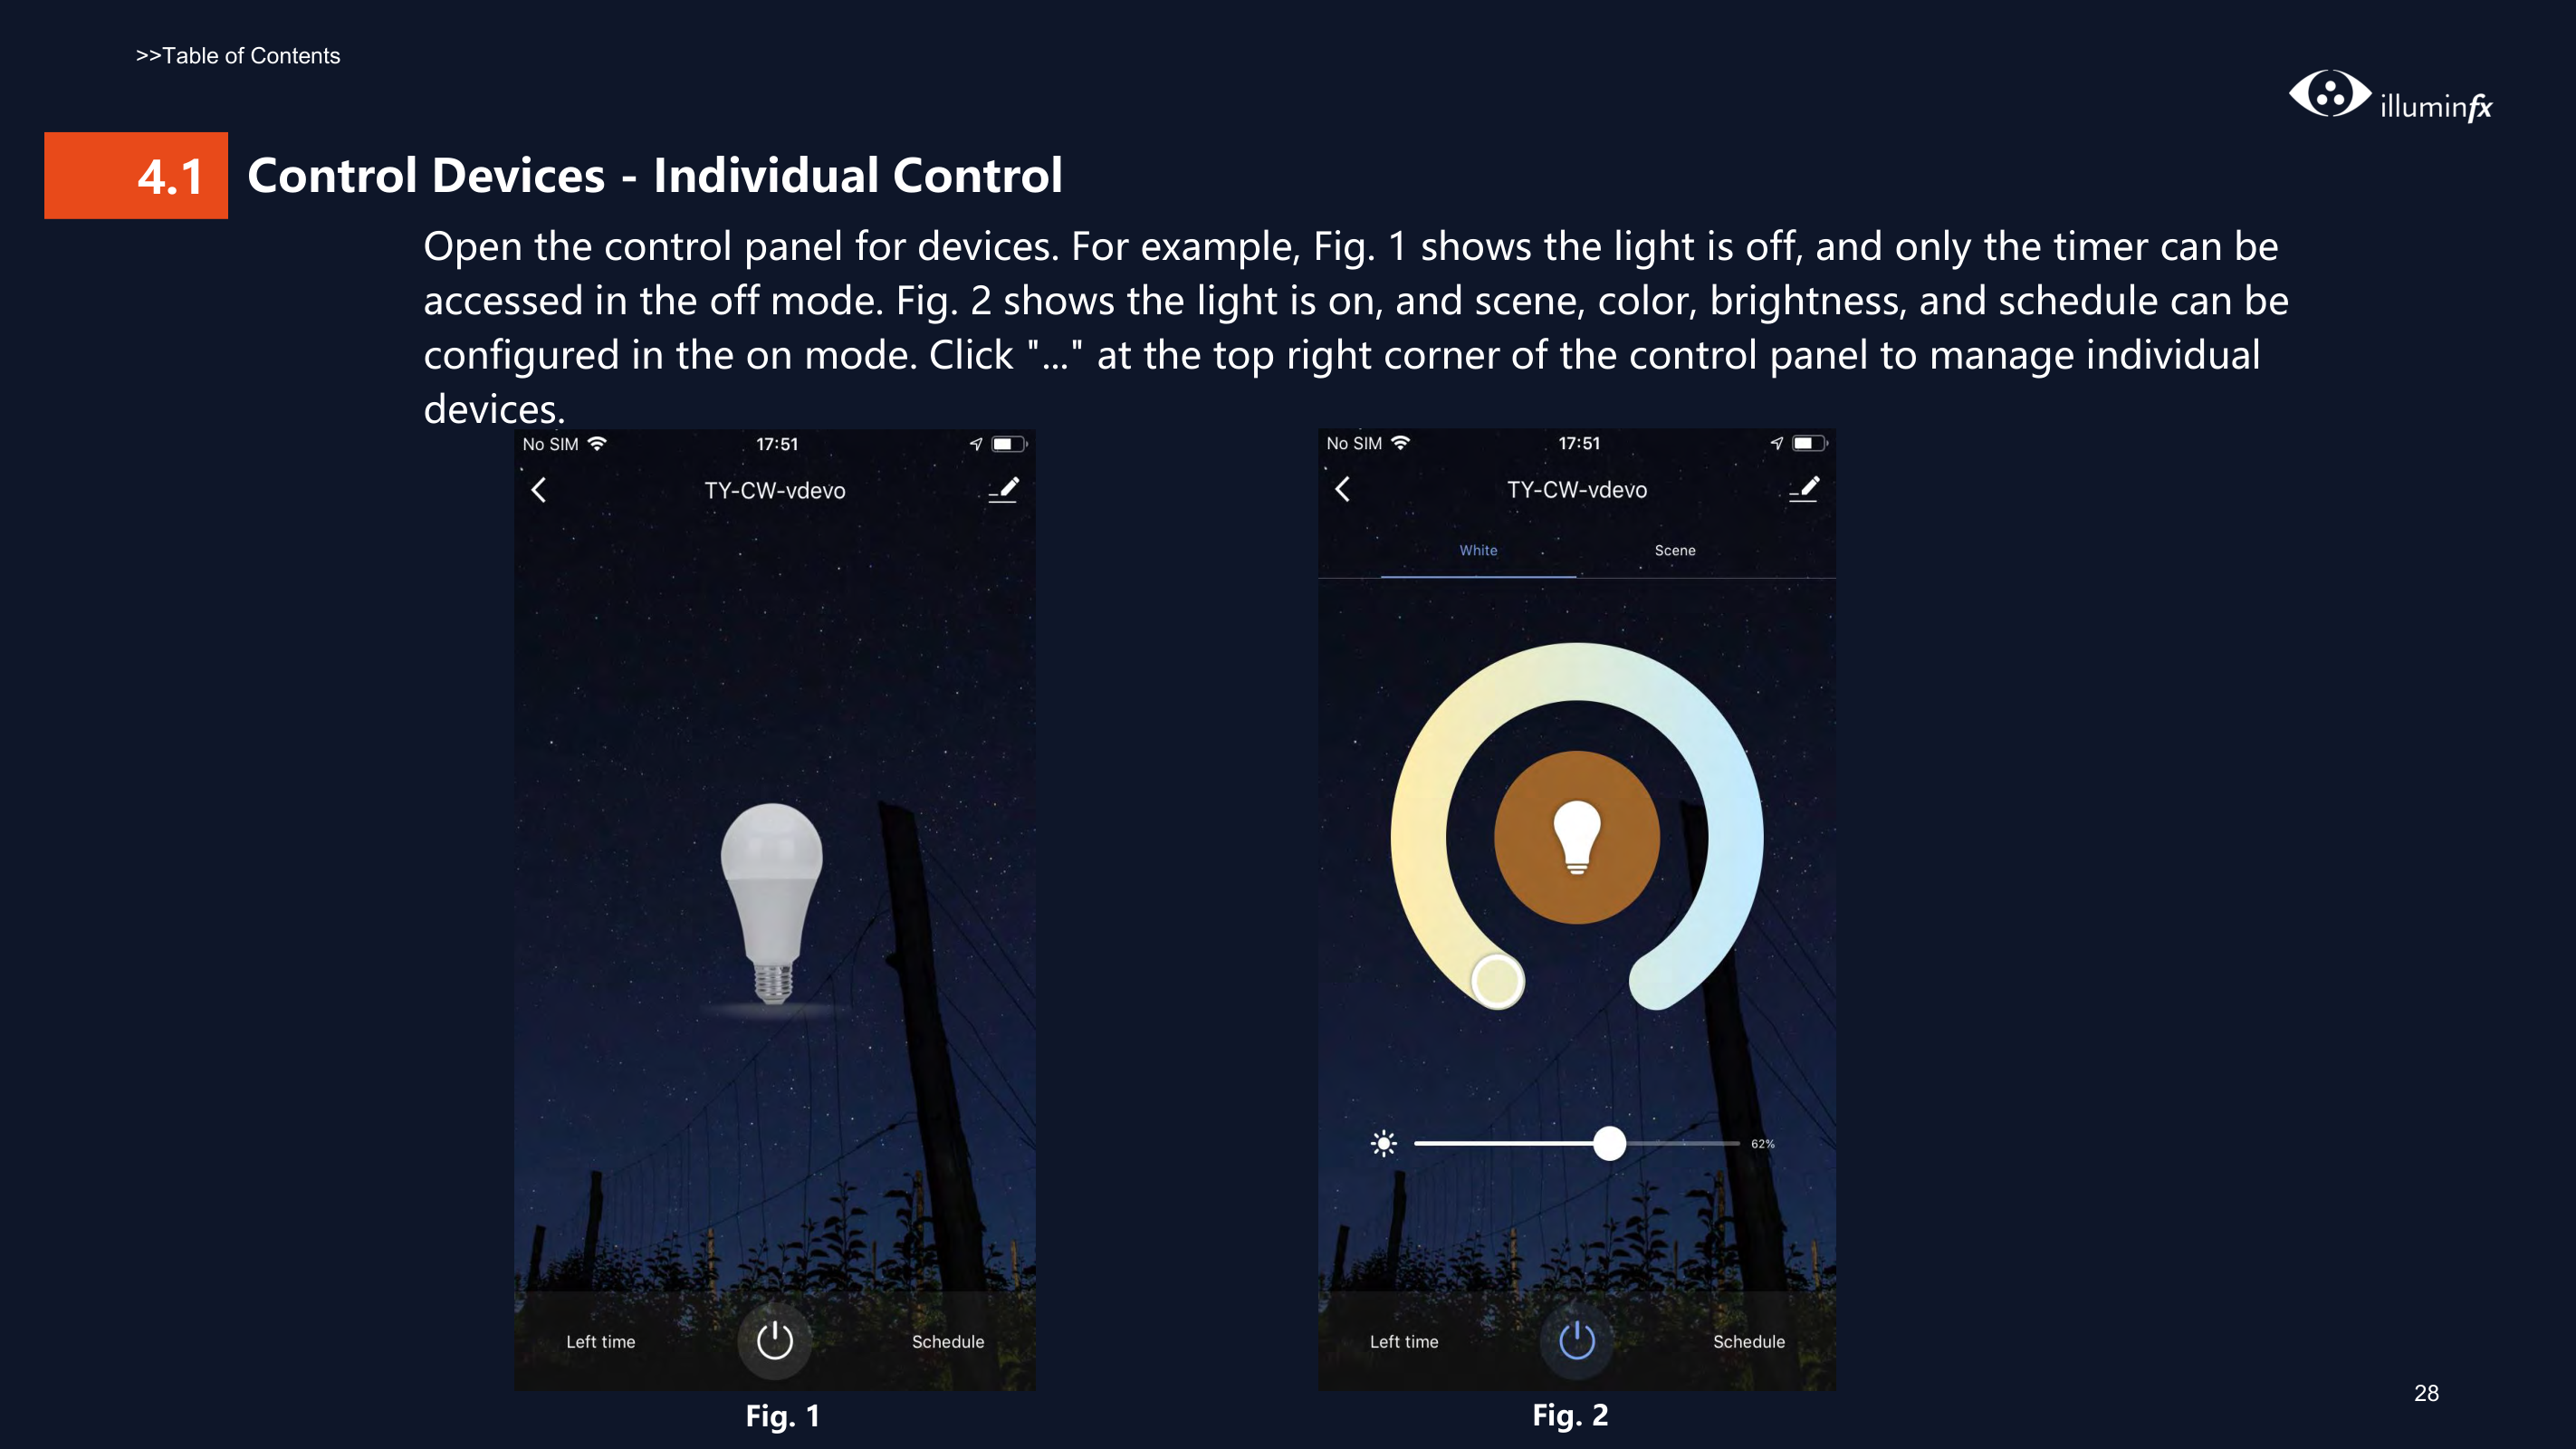
##### 4.1 Control Devices - Individual Control Open the control panel for devices. For example, Fig. 1 shows the light is off, and only the timer can be accessed in the off mode. Fig. 2 shows the light is on, and scene, color, brightness, and schedule can be configured in the on mode. Click "..." at the top right corner of the control panel to manage individual devices.


28
Fig. 1 Fig. 2
###### 4.1 Control Devices - Individual Control


###### The device modification menu is shown in the figure:
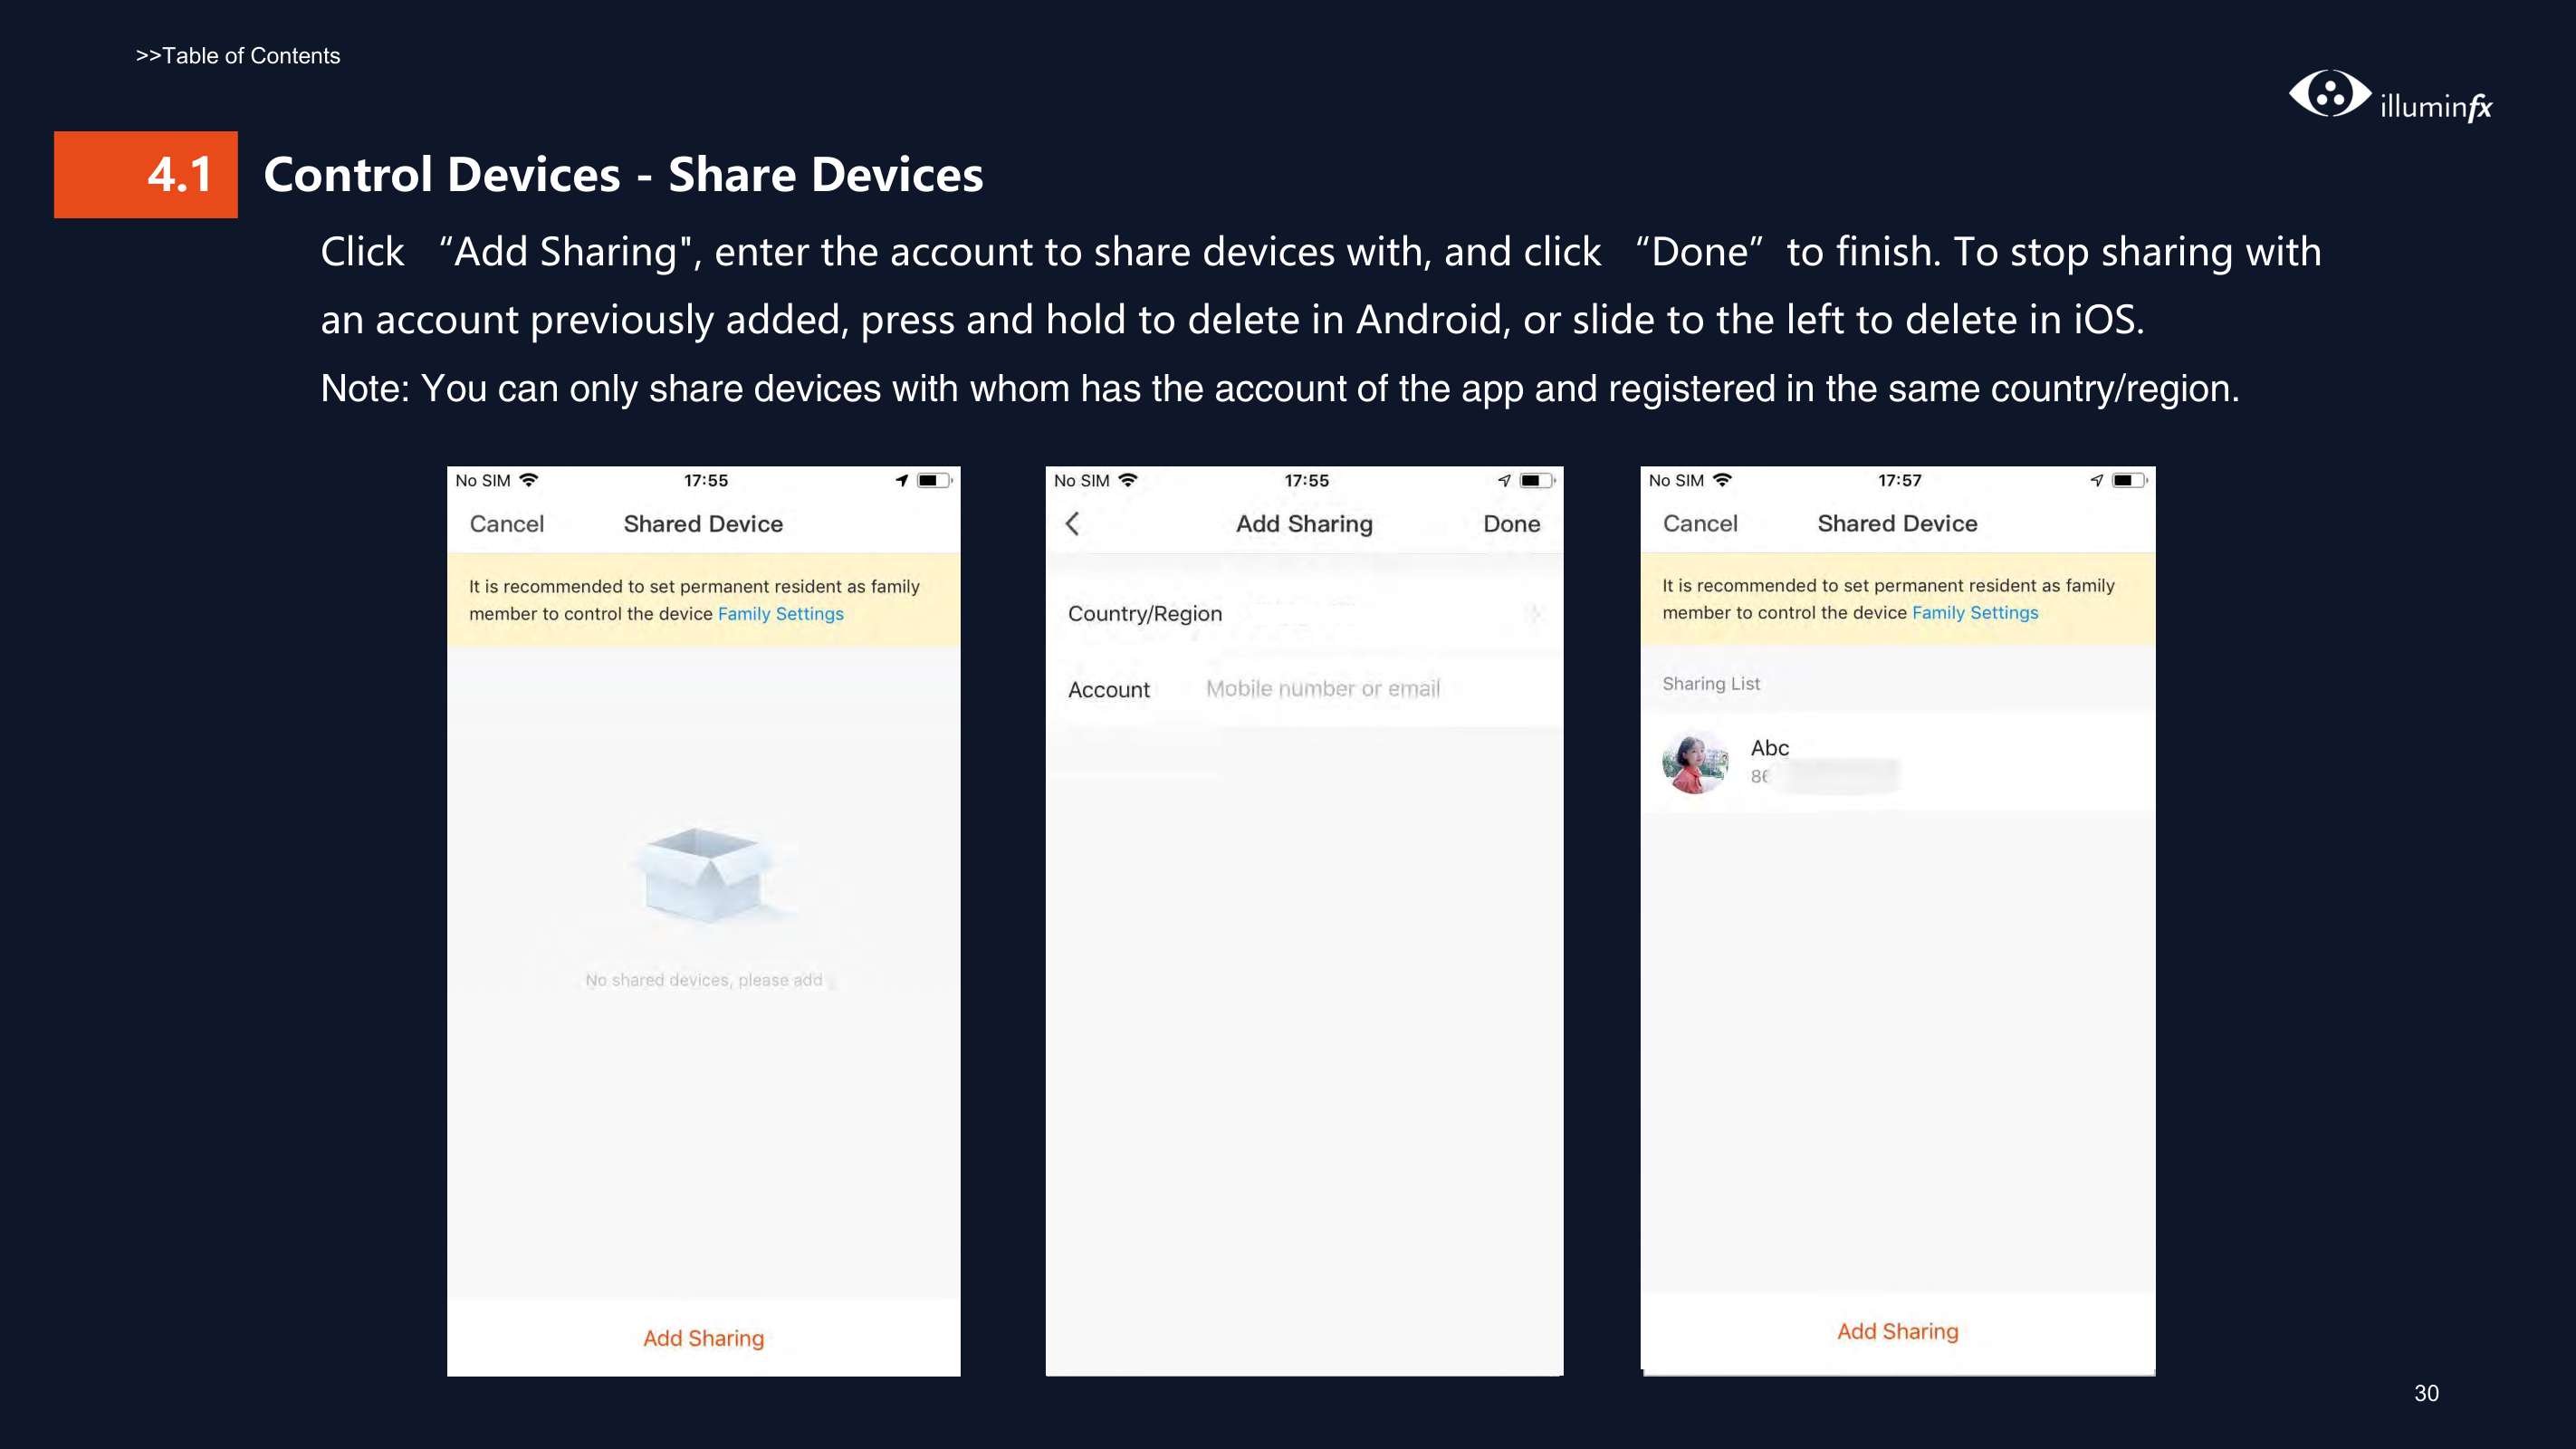
####### 4.1 Control Devices - Share DevicesClick “Add Sharing", enter the account to share devices with, and click “Done”to finish. To stop sharing withan account previously added, press and hold to delete in Android, or slide to the left to delete in iOS.Note: You can only share devices with whom has the account of the app and registered in the same country/region.


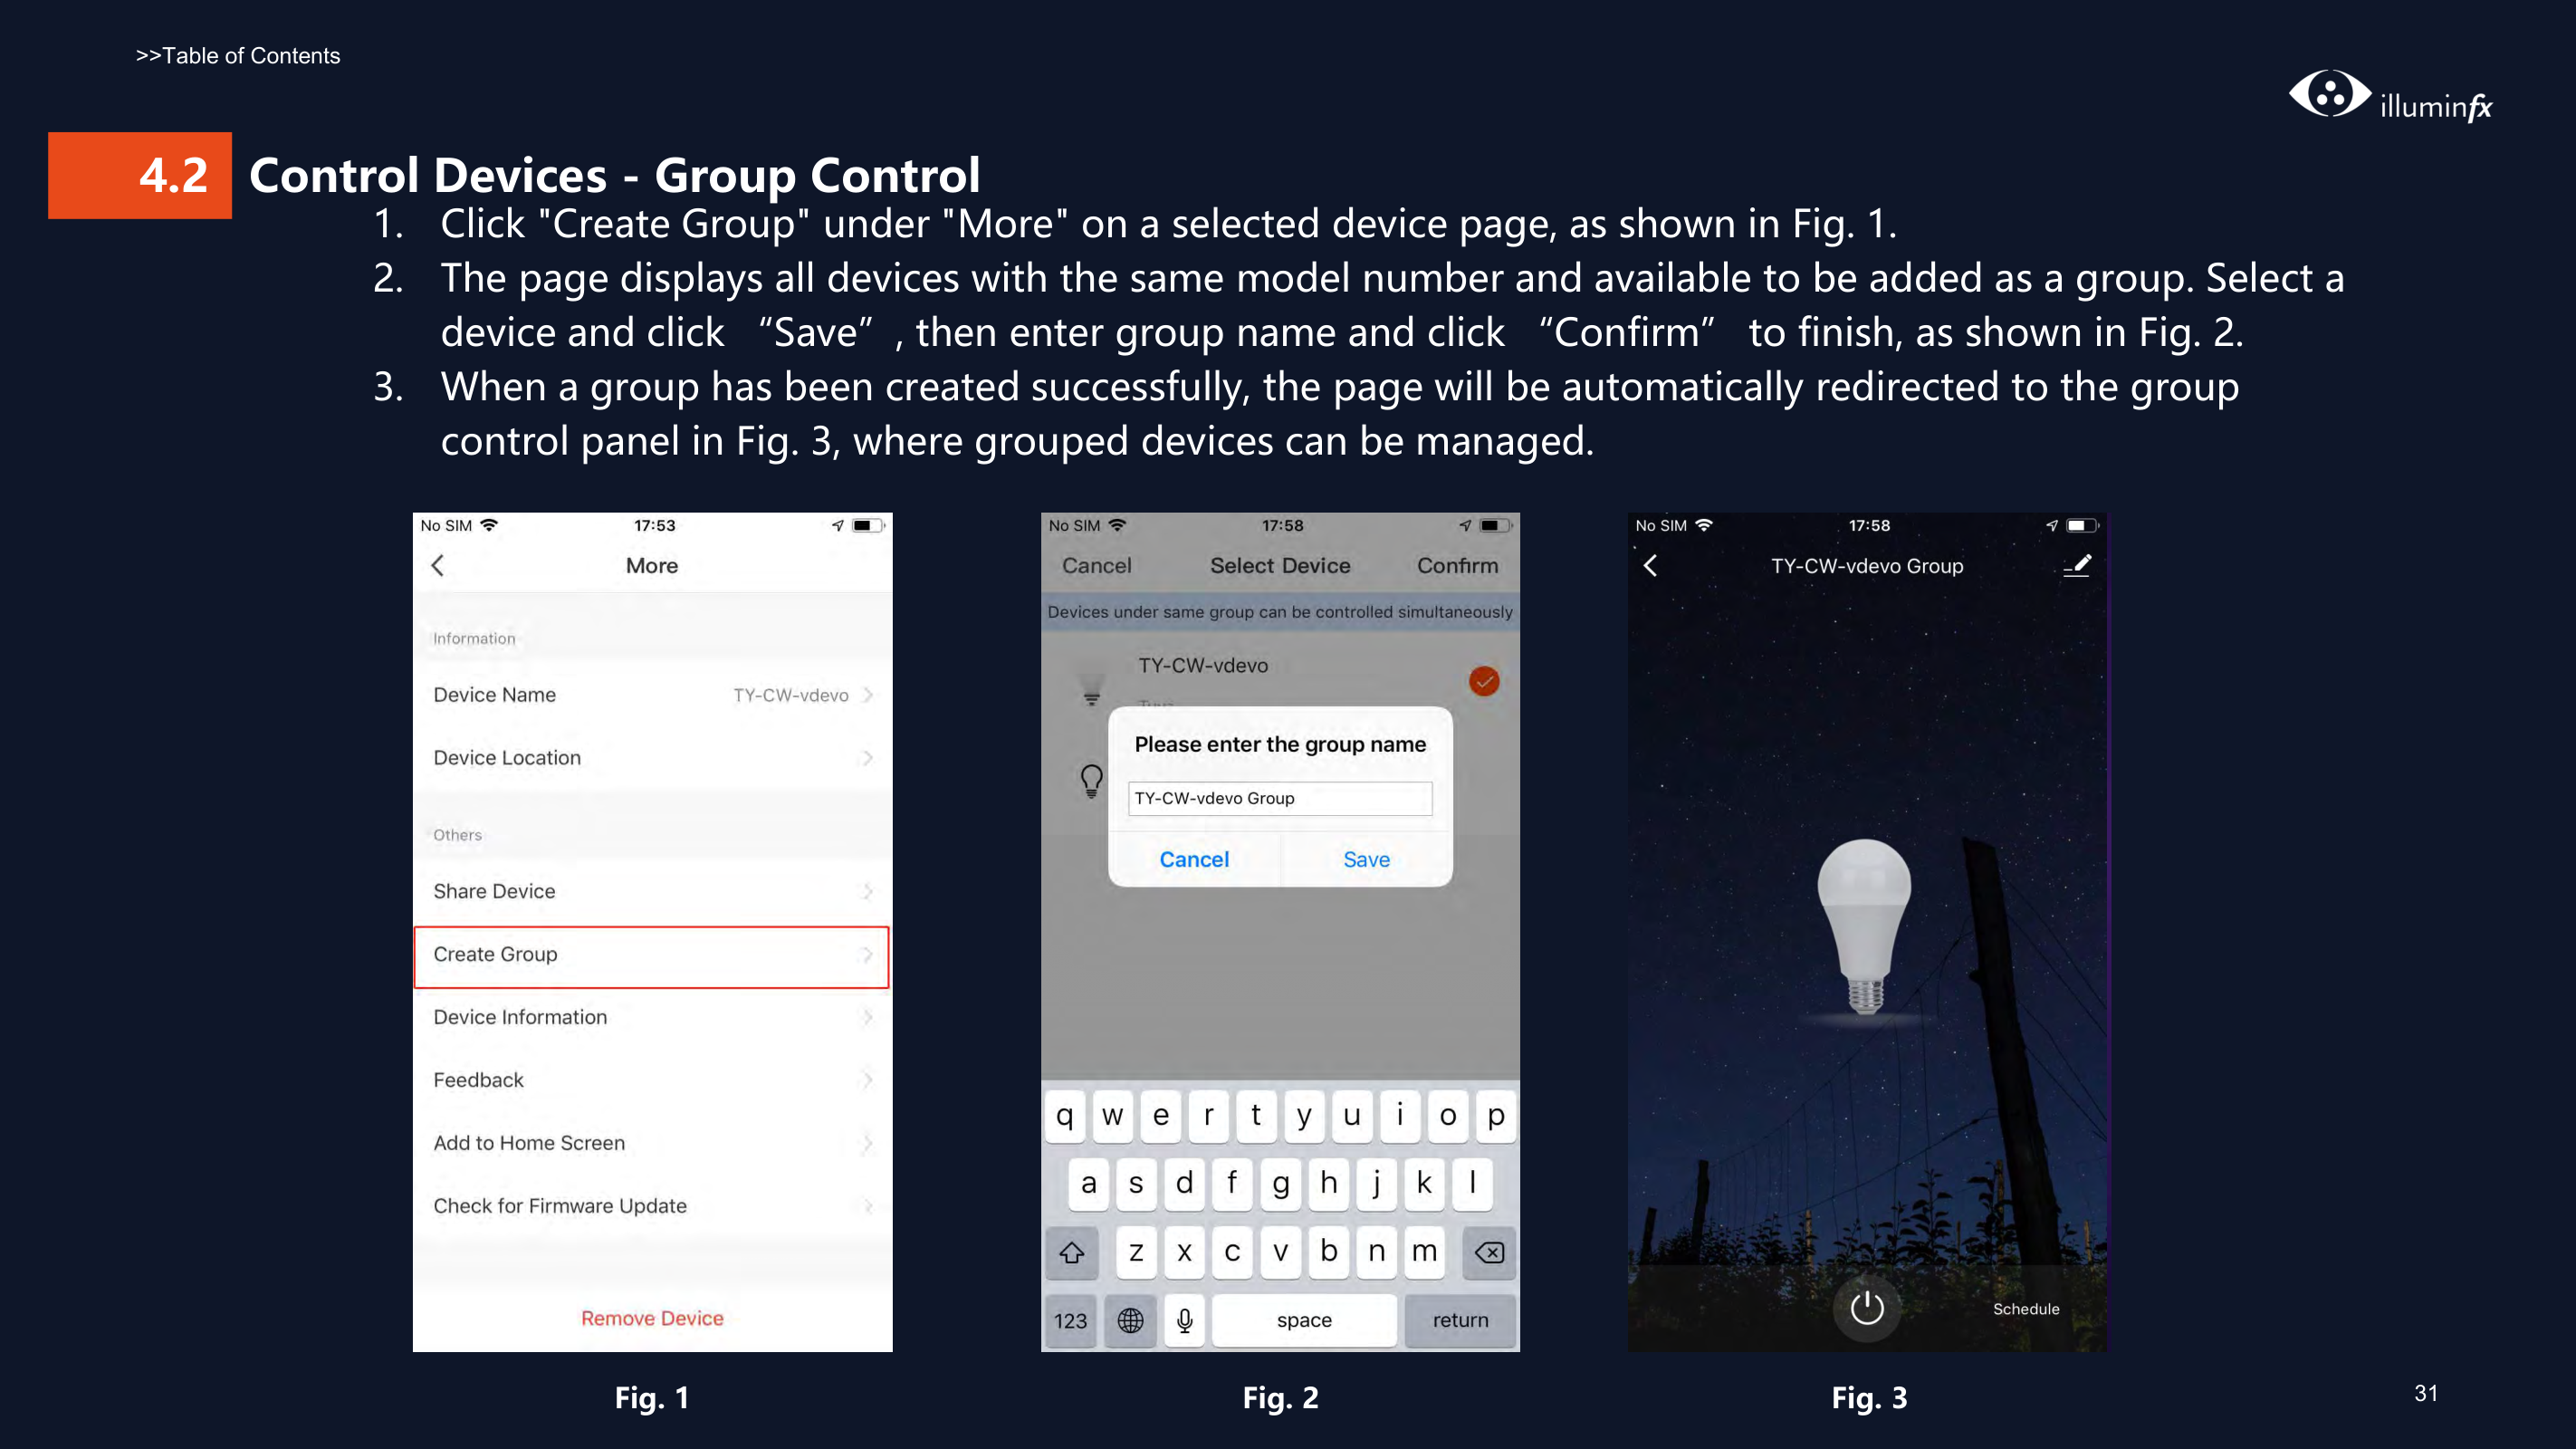

device and click “Save”, then enter group name and click “Confirm” to finish, as shown in Fig. 2. 3. When a group has been created successfully, the page will be automatically redirected to the group
control panel in Fig. 3, where grouped devices can be managed.


############# Fig. 1 Fig. 3Fig. 2
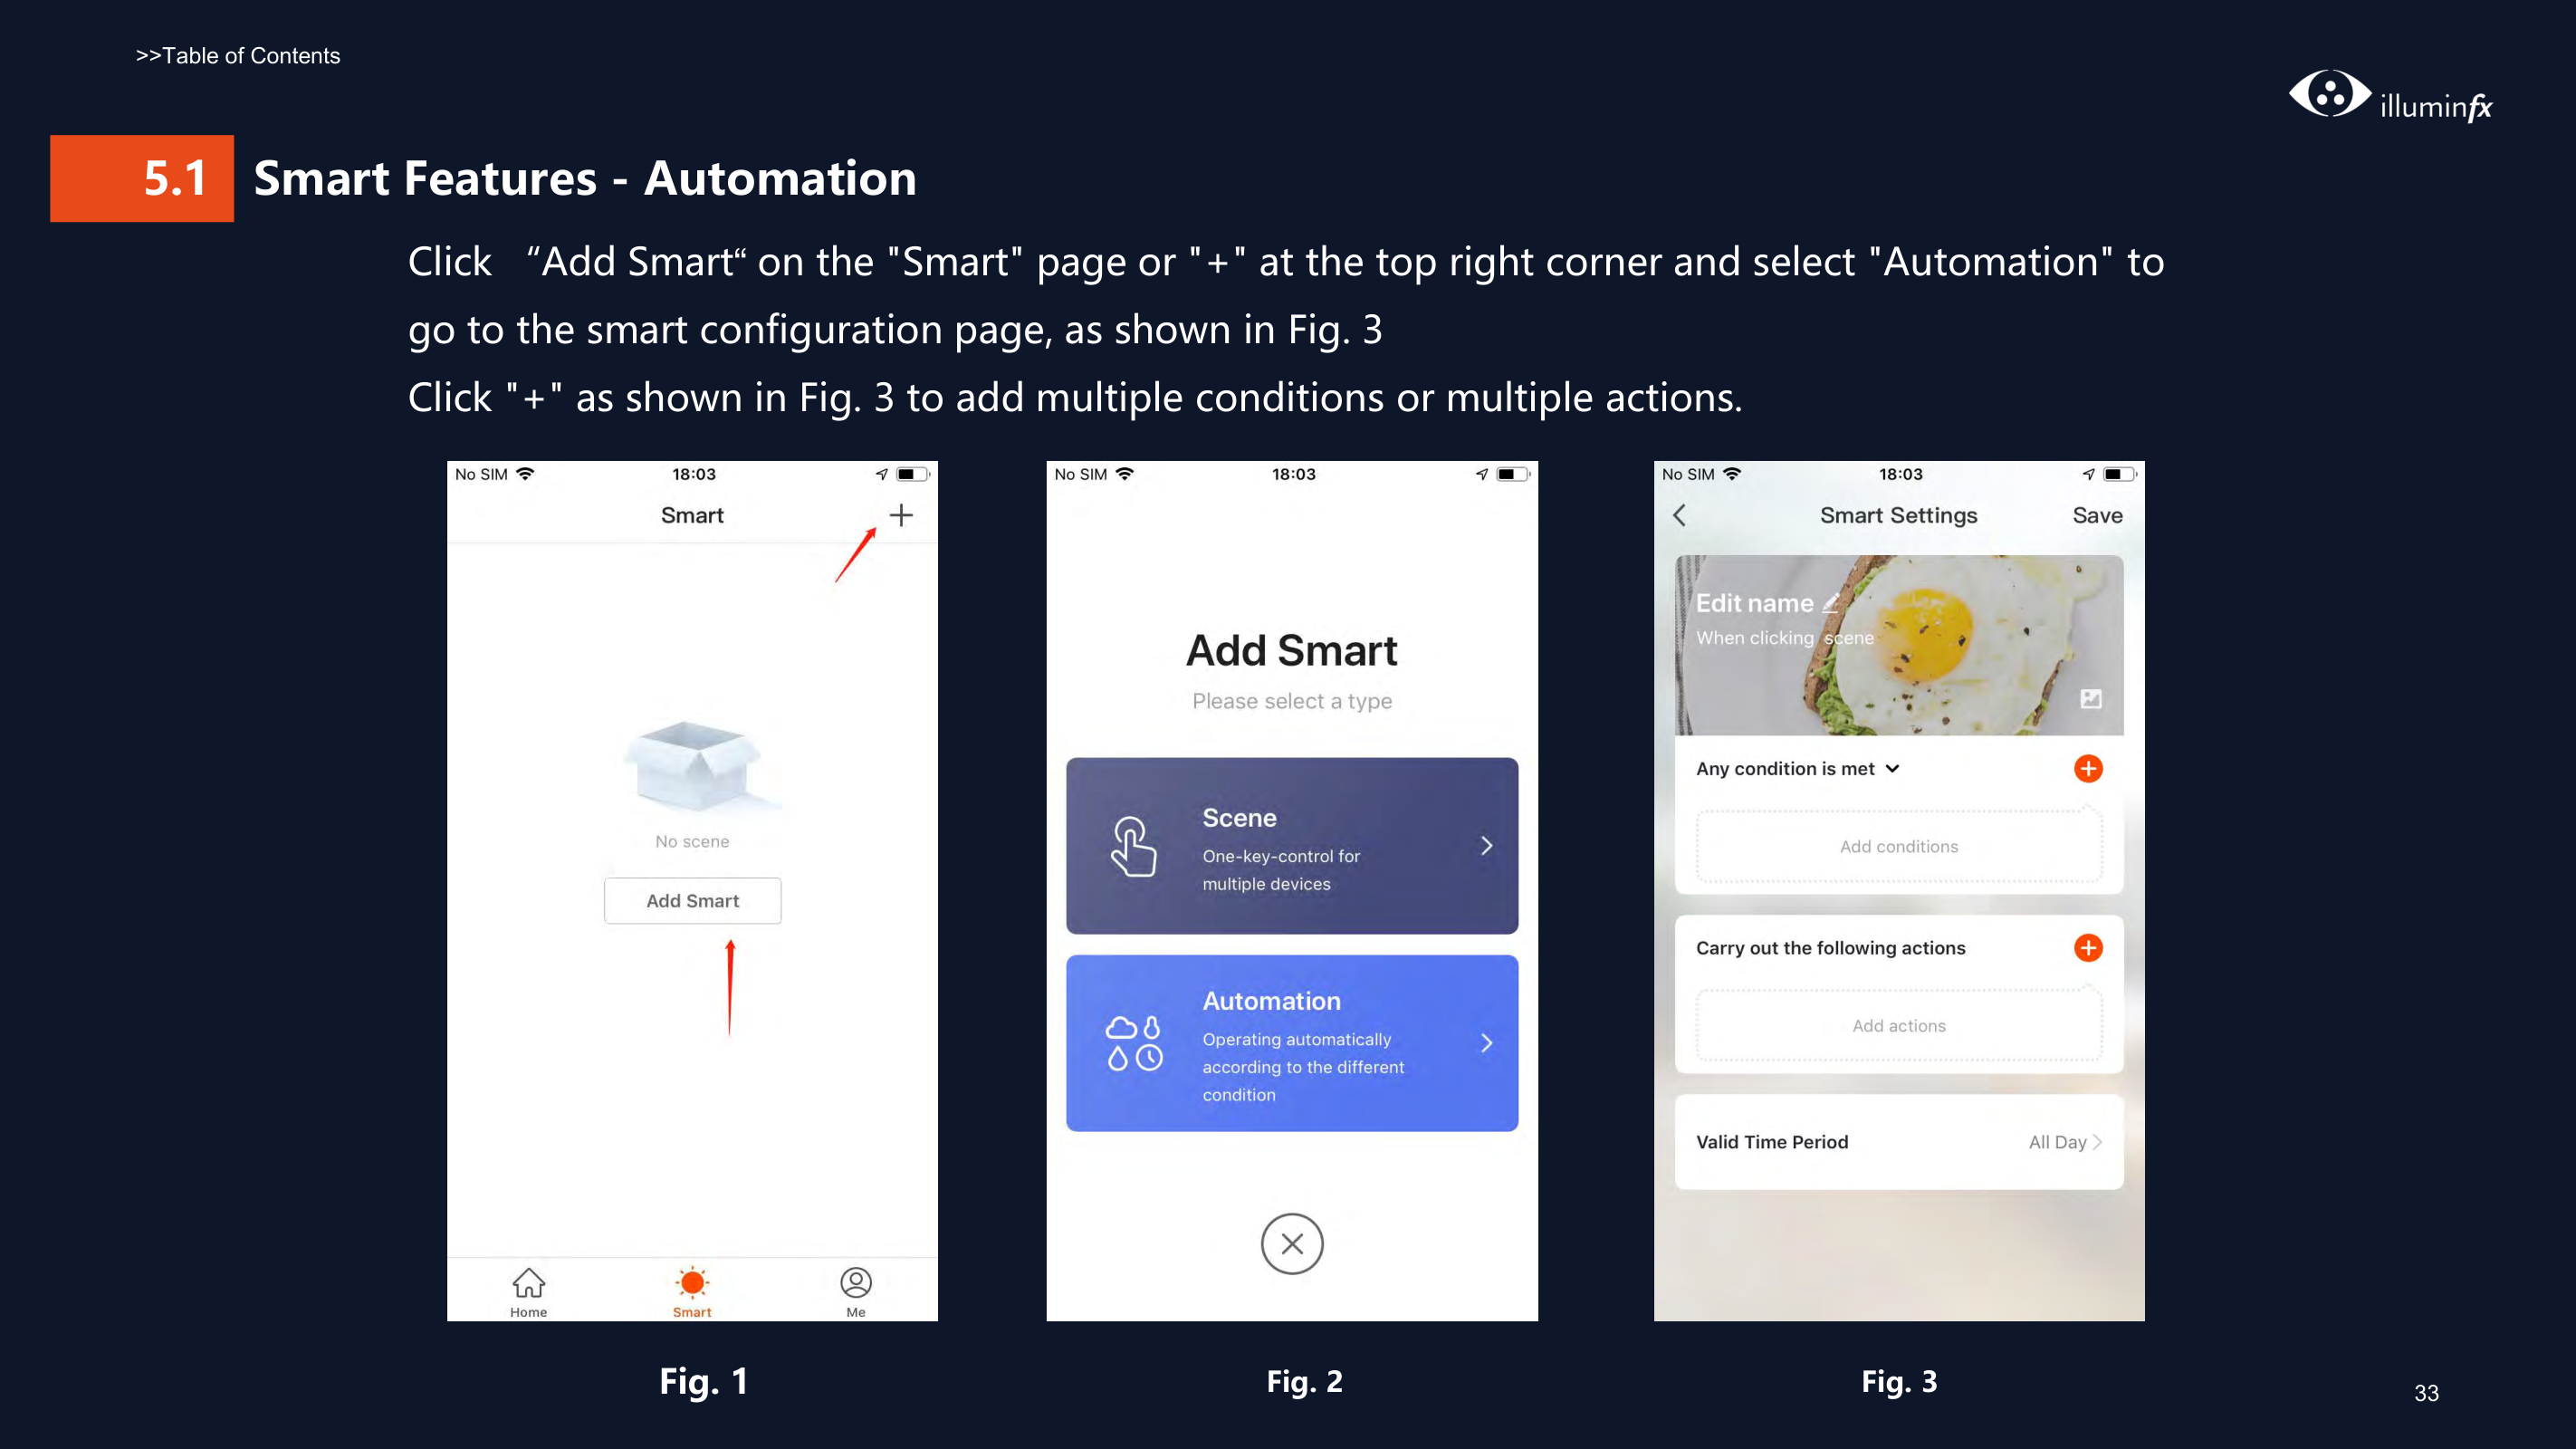


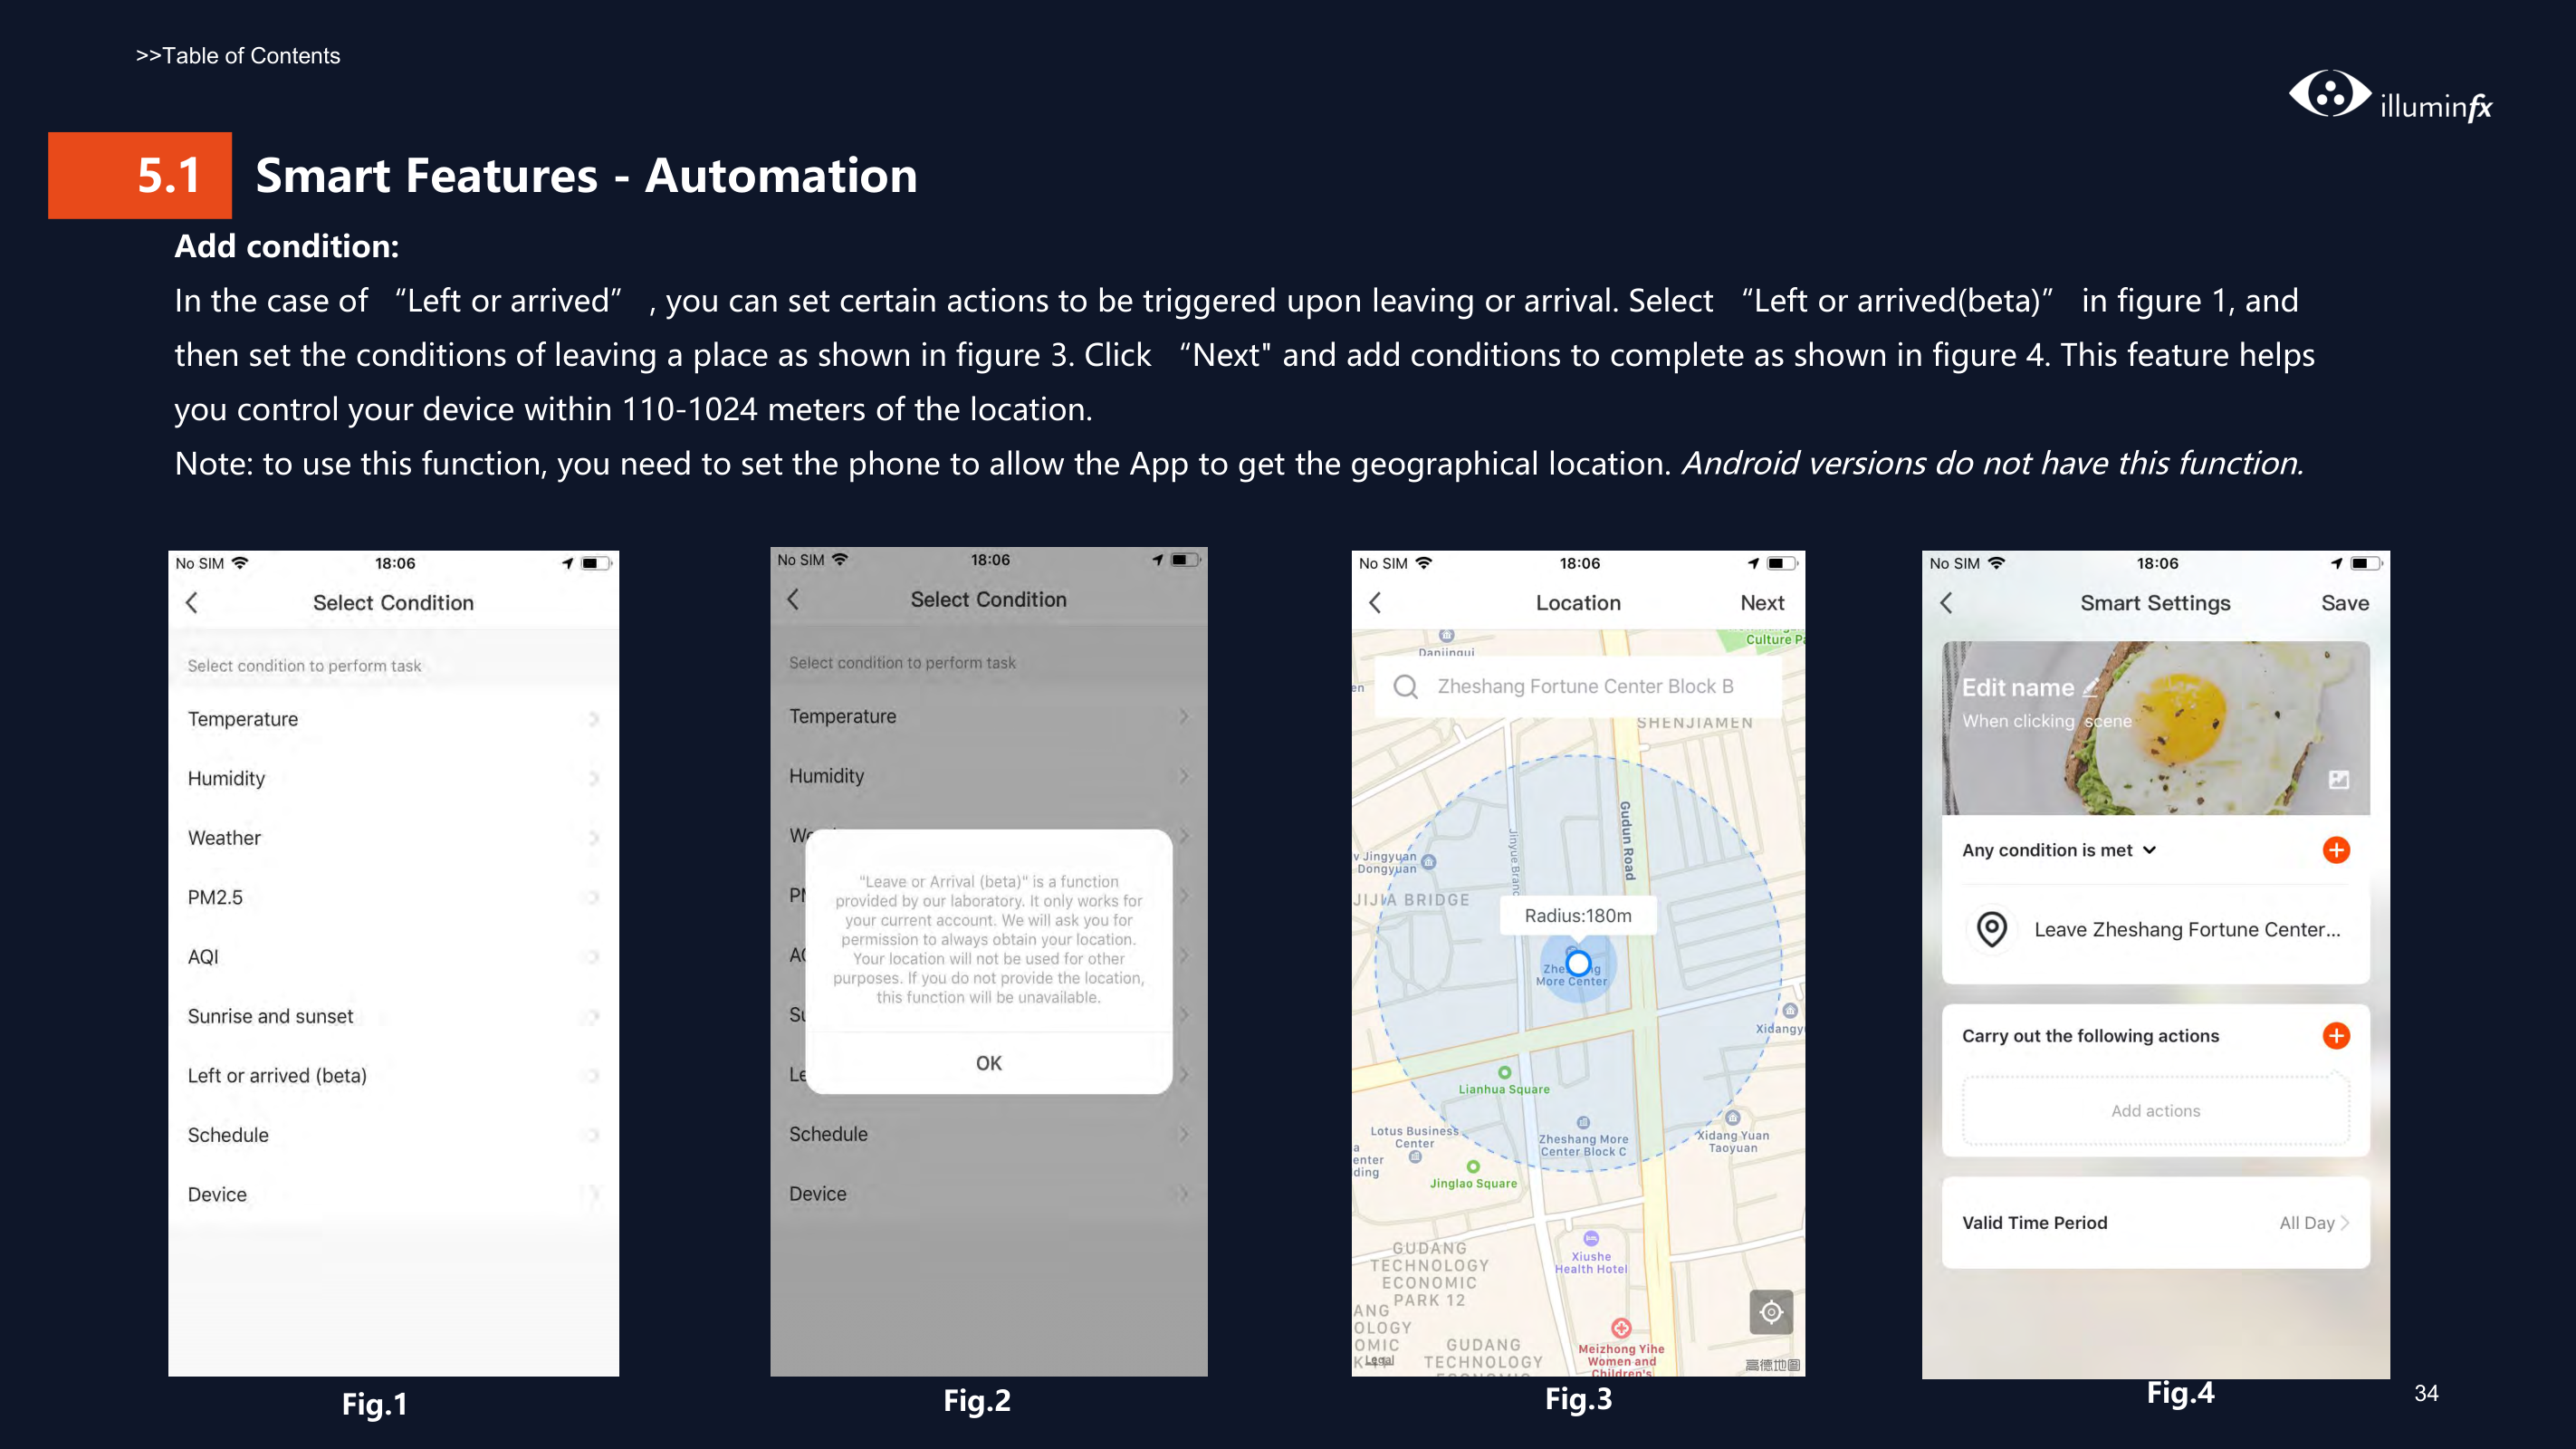
Fig. 1 Fig. 2 Fig. 3
32
######### Click “Add Smart“ on the "Smart" page or "+" at the top right corner and select "Automation" to go to the smart configuration page, as shown in Fig. 3 Click "+" as shown in Fig. 3 to add multiple conditions or multiple actions.


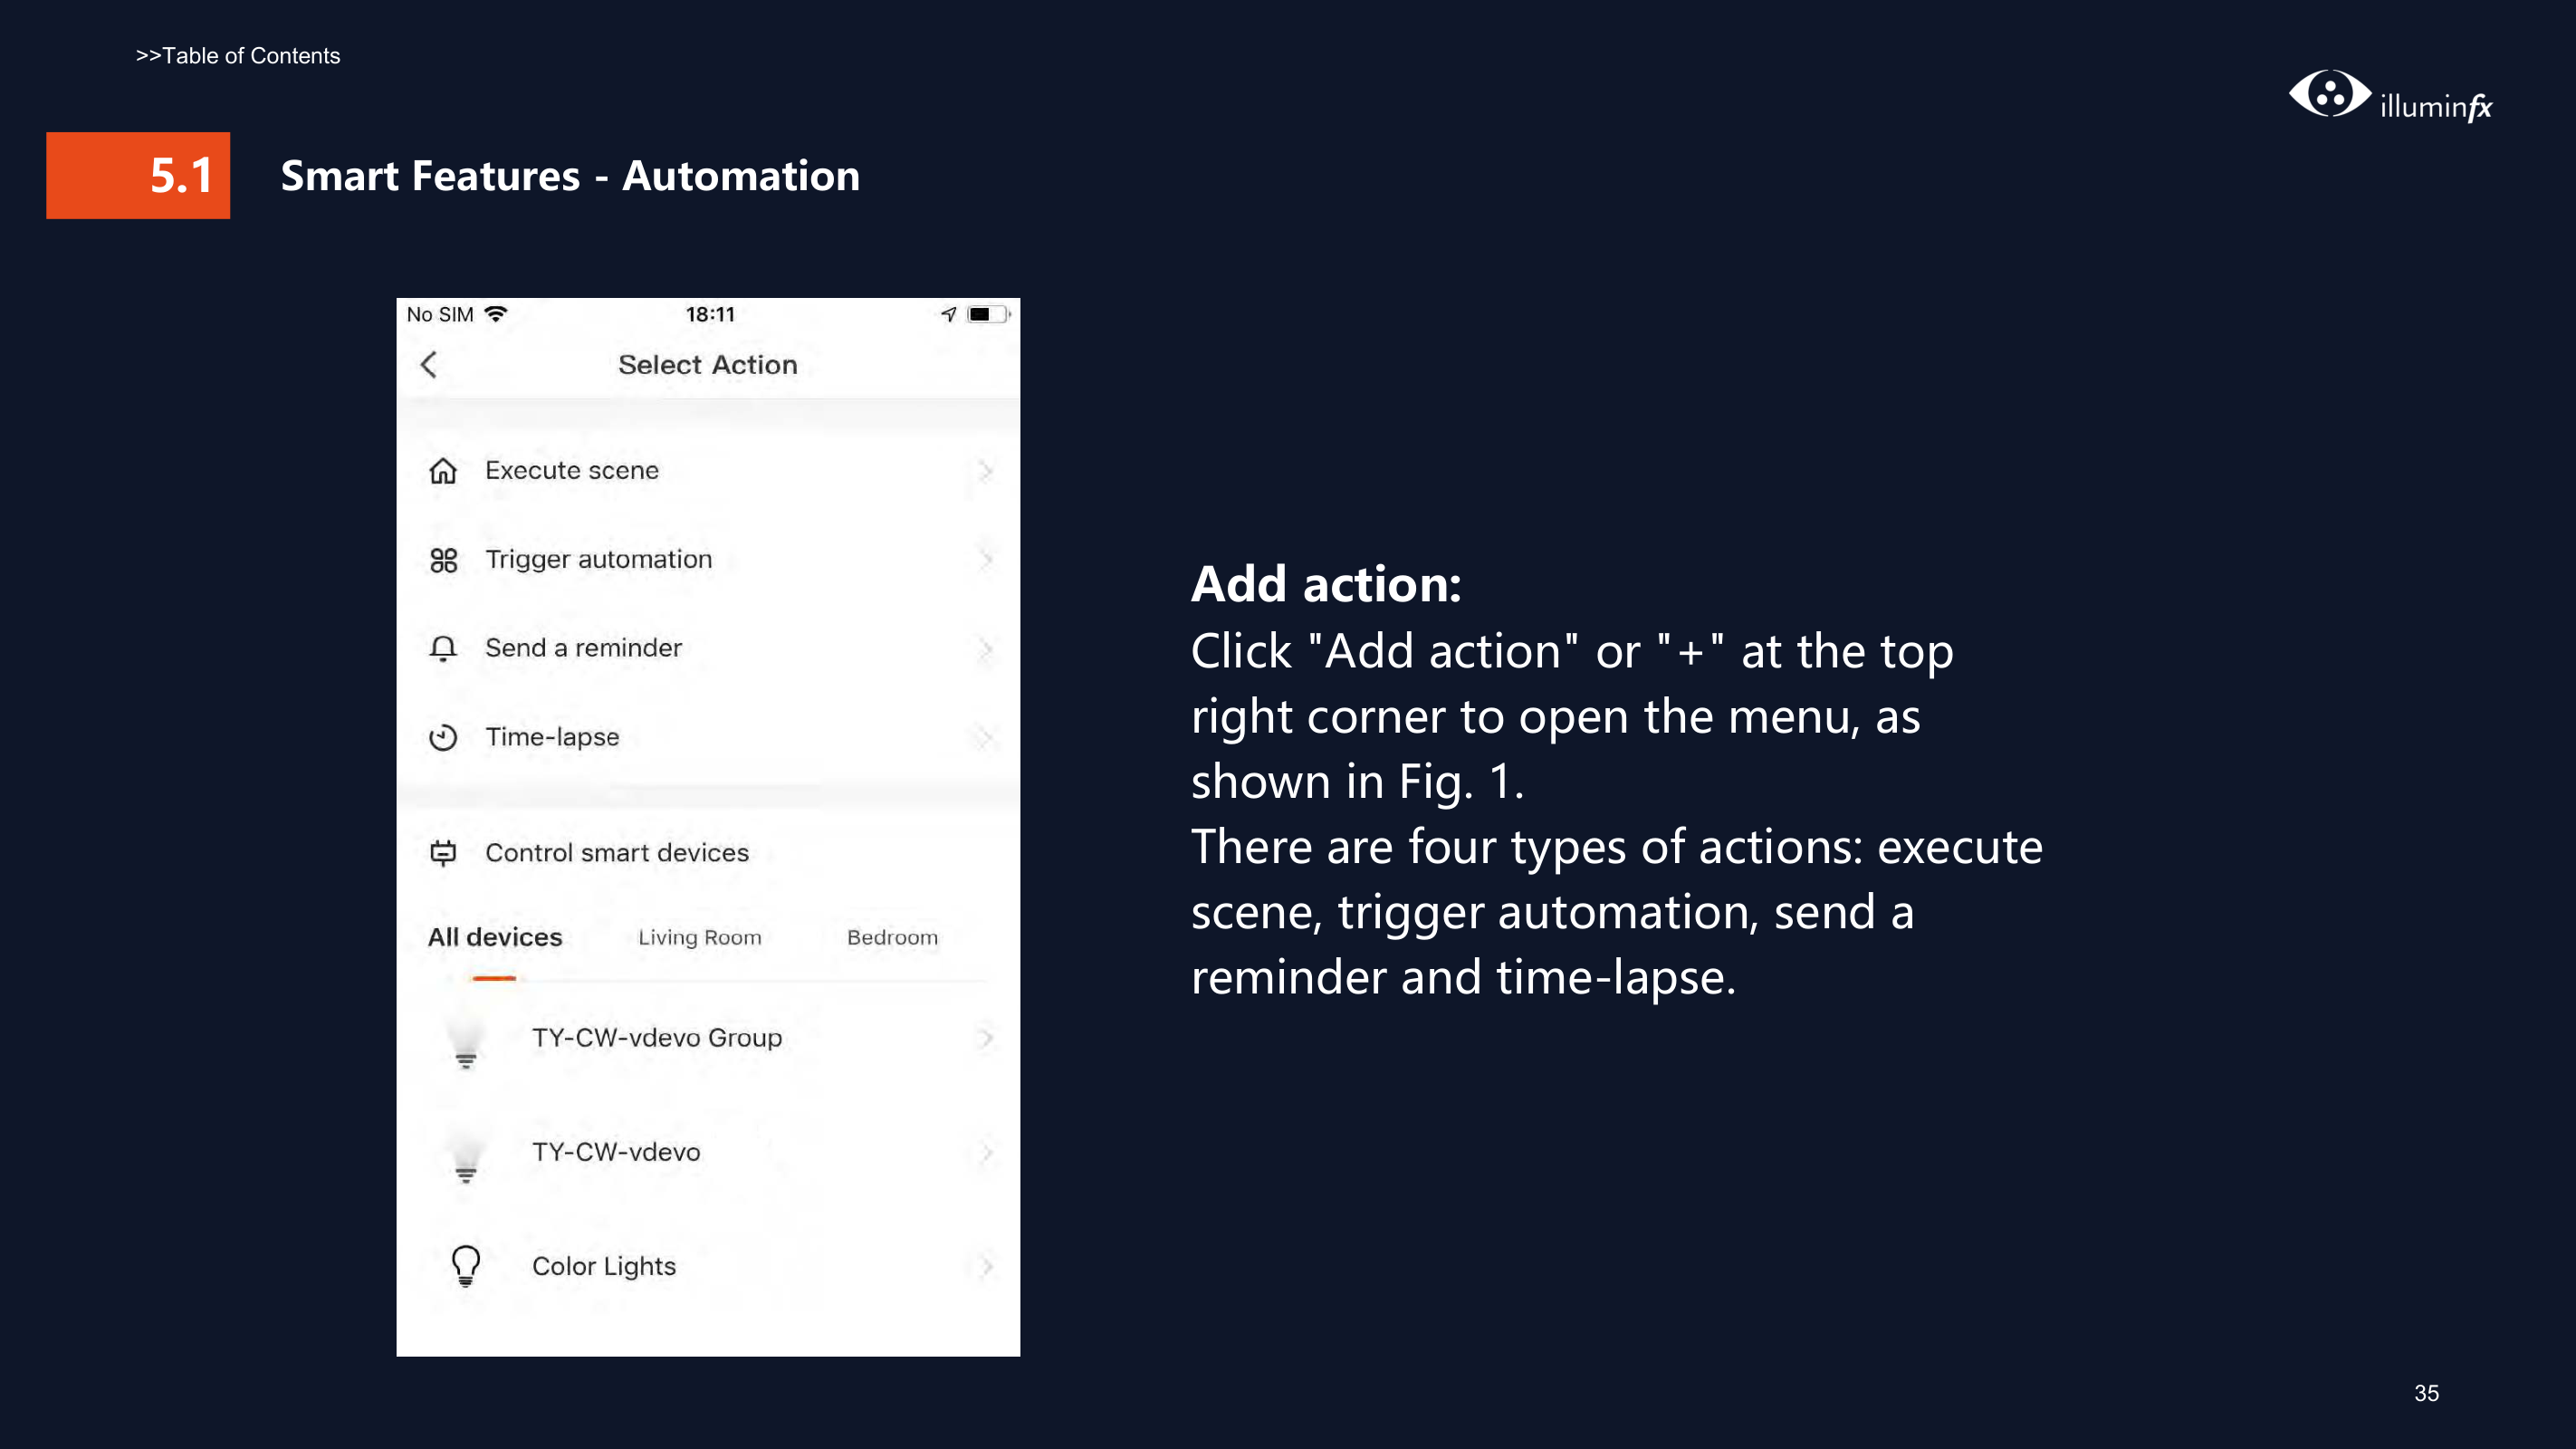
Fig. 3Fig. 2Fig. 1
############ Add condition: In the case of “Left or arrived” , you can set certain actions to be triggered upon leaving or arrival. Select “Left or arrived(beta)” in figure 1, and then set the conditions of leaving a place as shown in figure 3. Click “Next" and add conditions to complete as shown in figure 4. This feature helps you control your device within 110-1024 meters of the location. Note: to use this function, you need to set the phone to allow the App to get the geographical location. Android versionsdo not have this function.


Fig.4Fig.1Fig.2
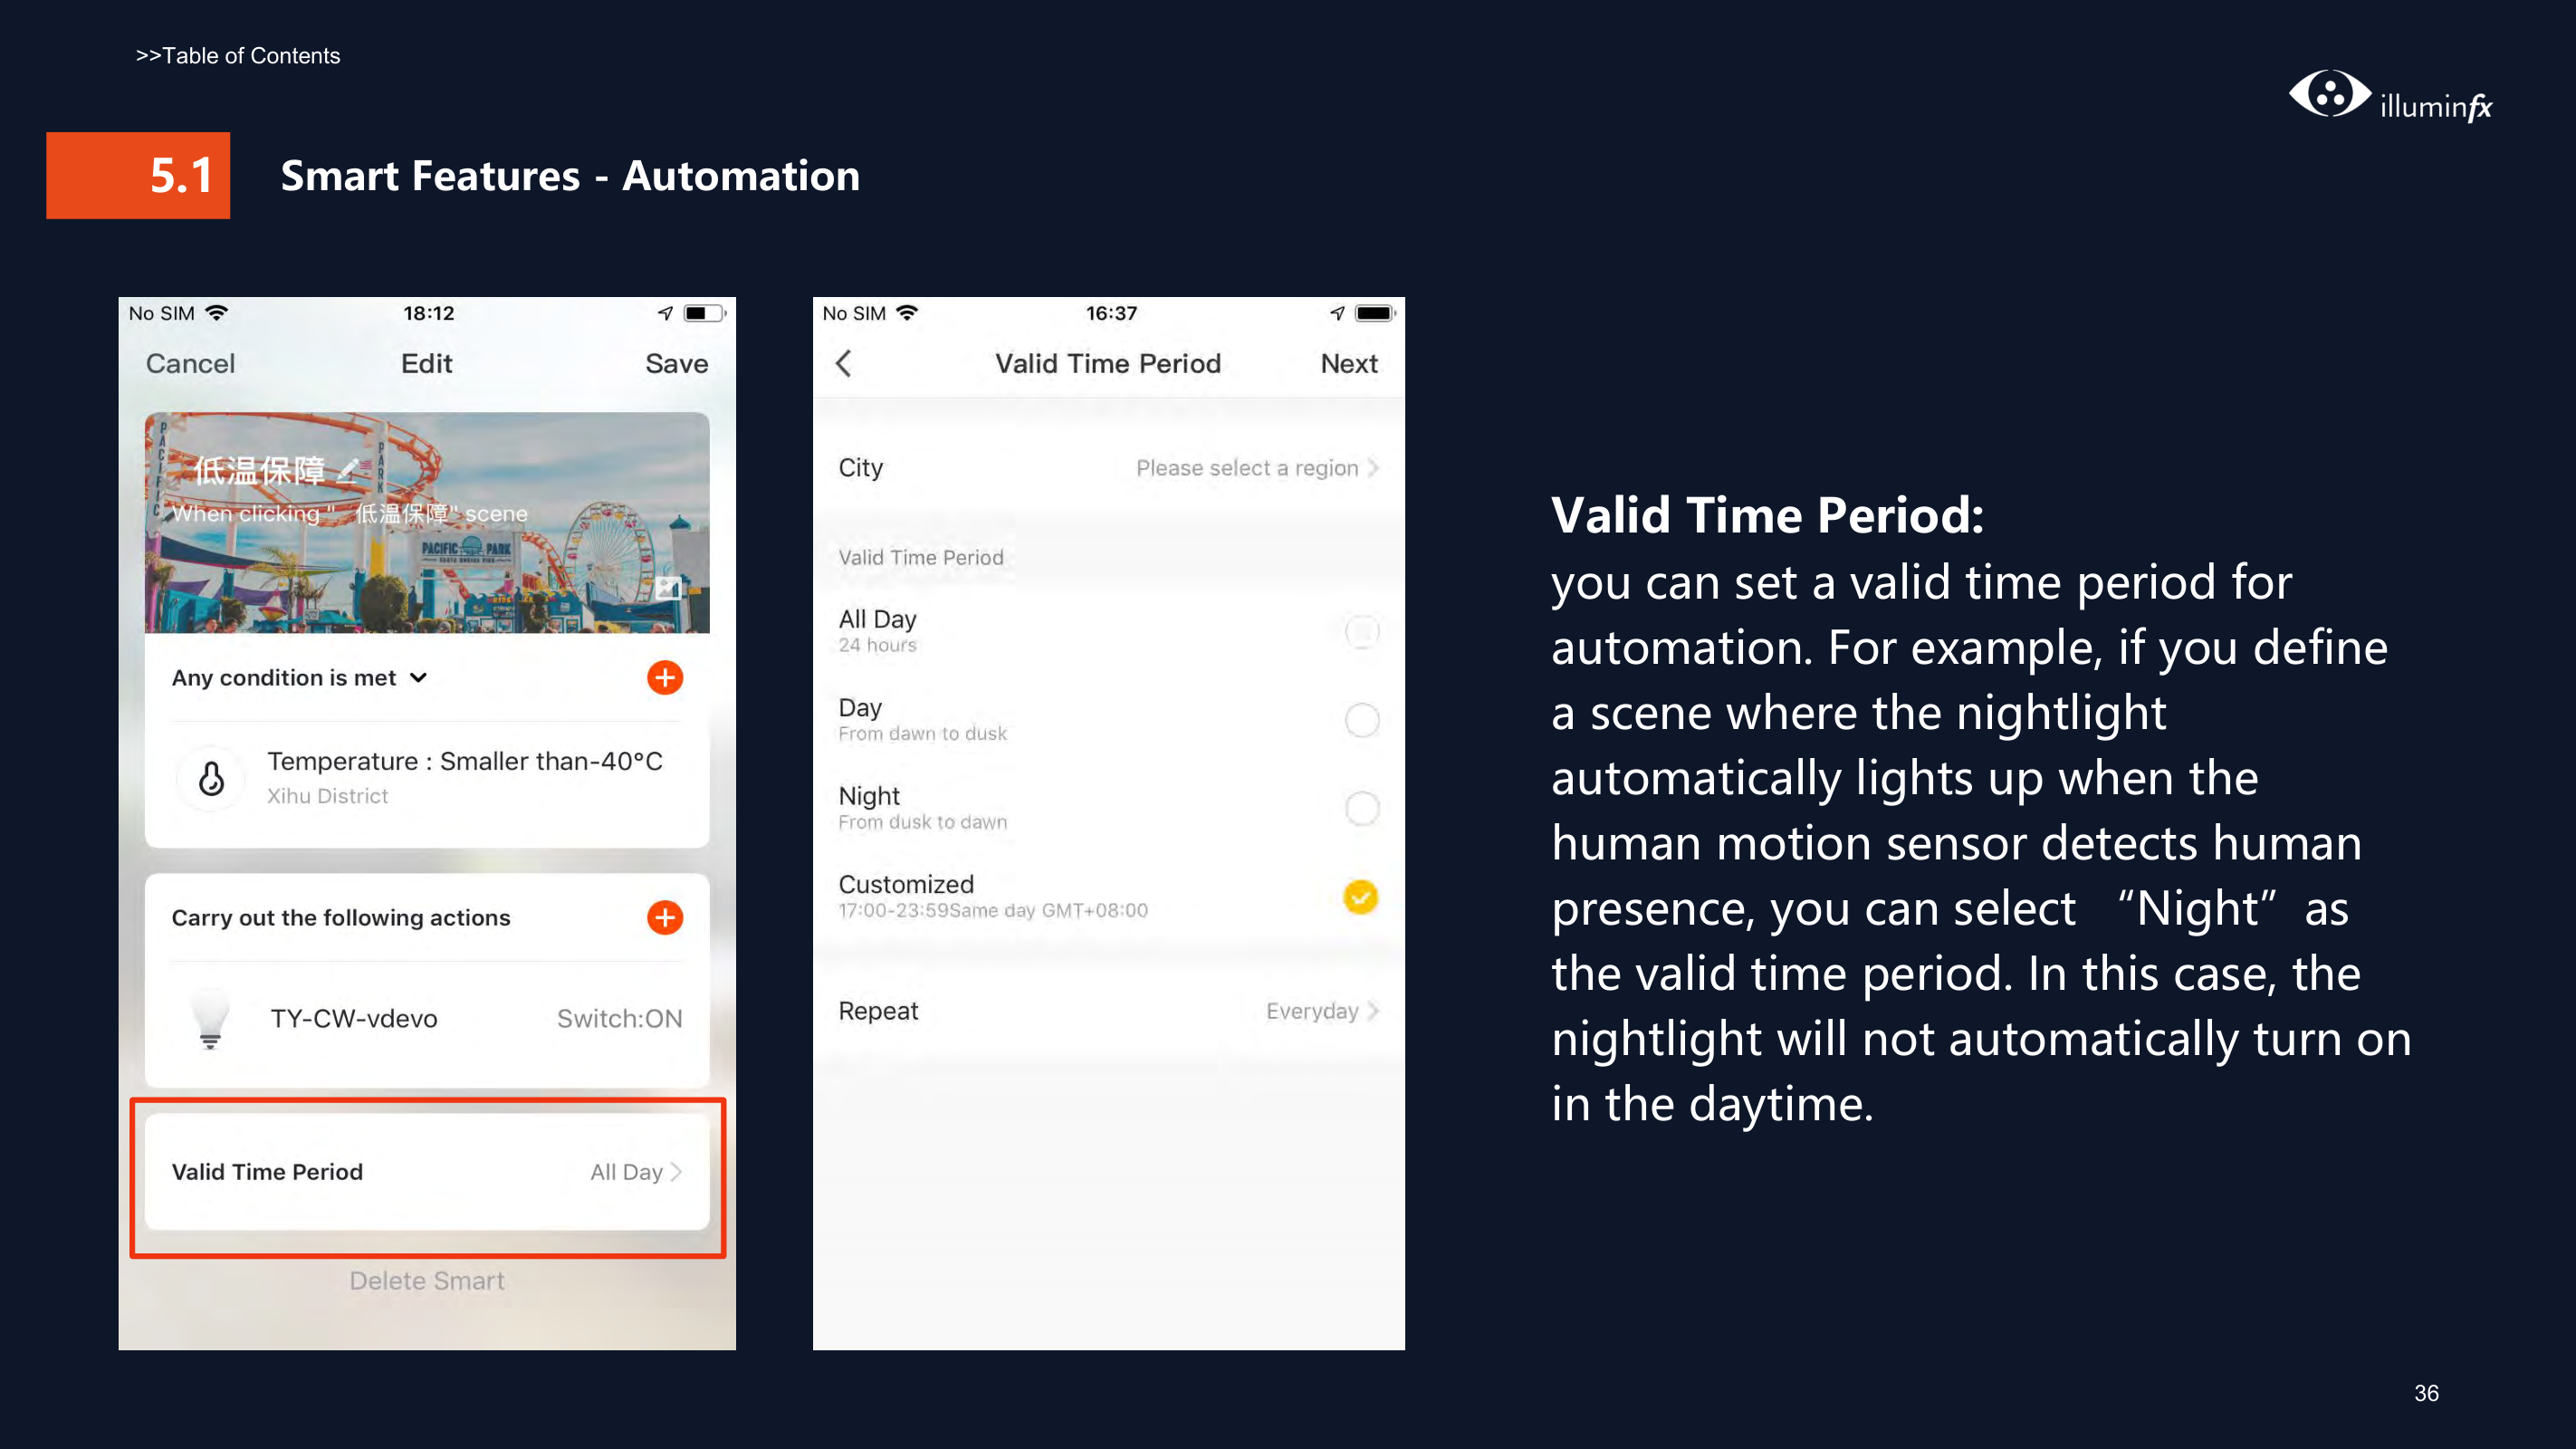
Fig.3

Add action: Click "Add action" or "+" at the top right corner to open the menu, as shown in Fig. 1. There are four types of actions: execute scene, trigger automation, send a reminder and time-lapse.

| | |---|

Valid Time Period: you can set a valid time period for automation. For example, if you define a scene where the nightlight automatically lights up when the human motion sensor detects human presence, you can select “Night”as the valid time period. In this case, the nightlight will not automatically turn on in the daytime.


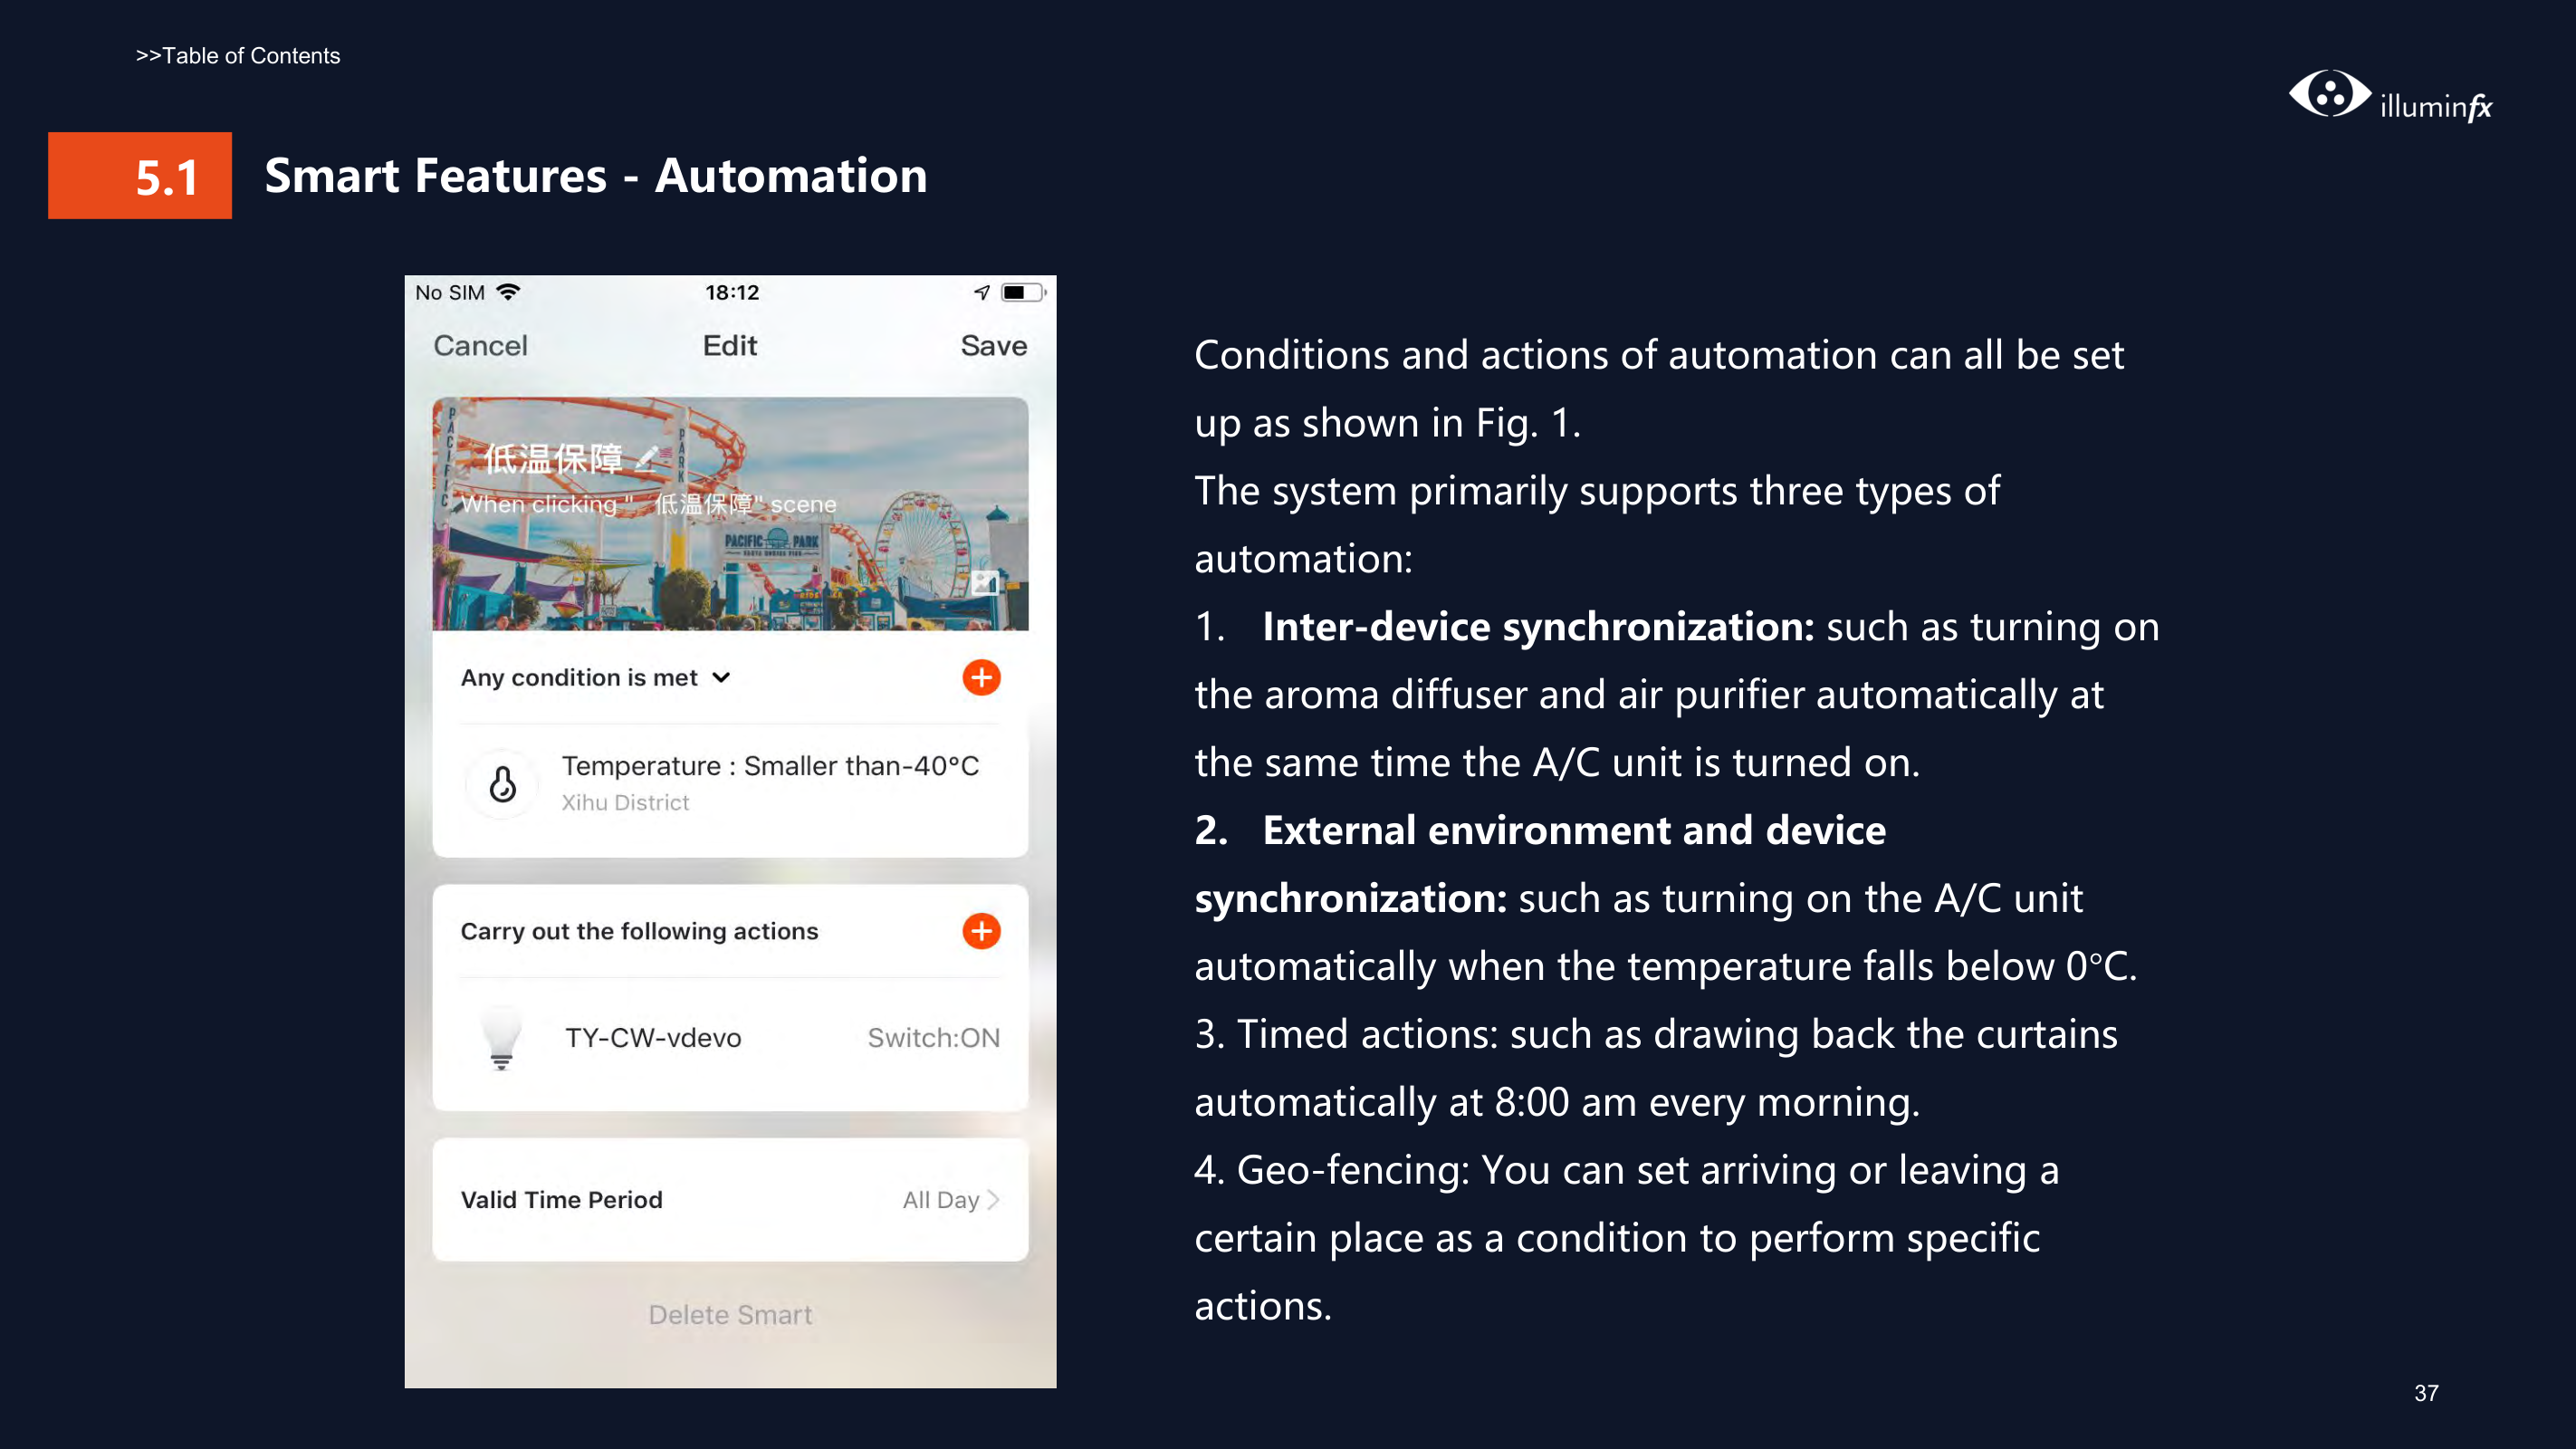
Conditions and actions of automation can all be set up as shown in Fig. 1. The system primarily supports three types of automation:
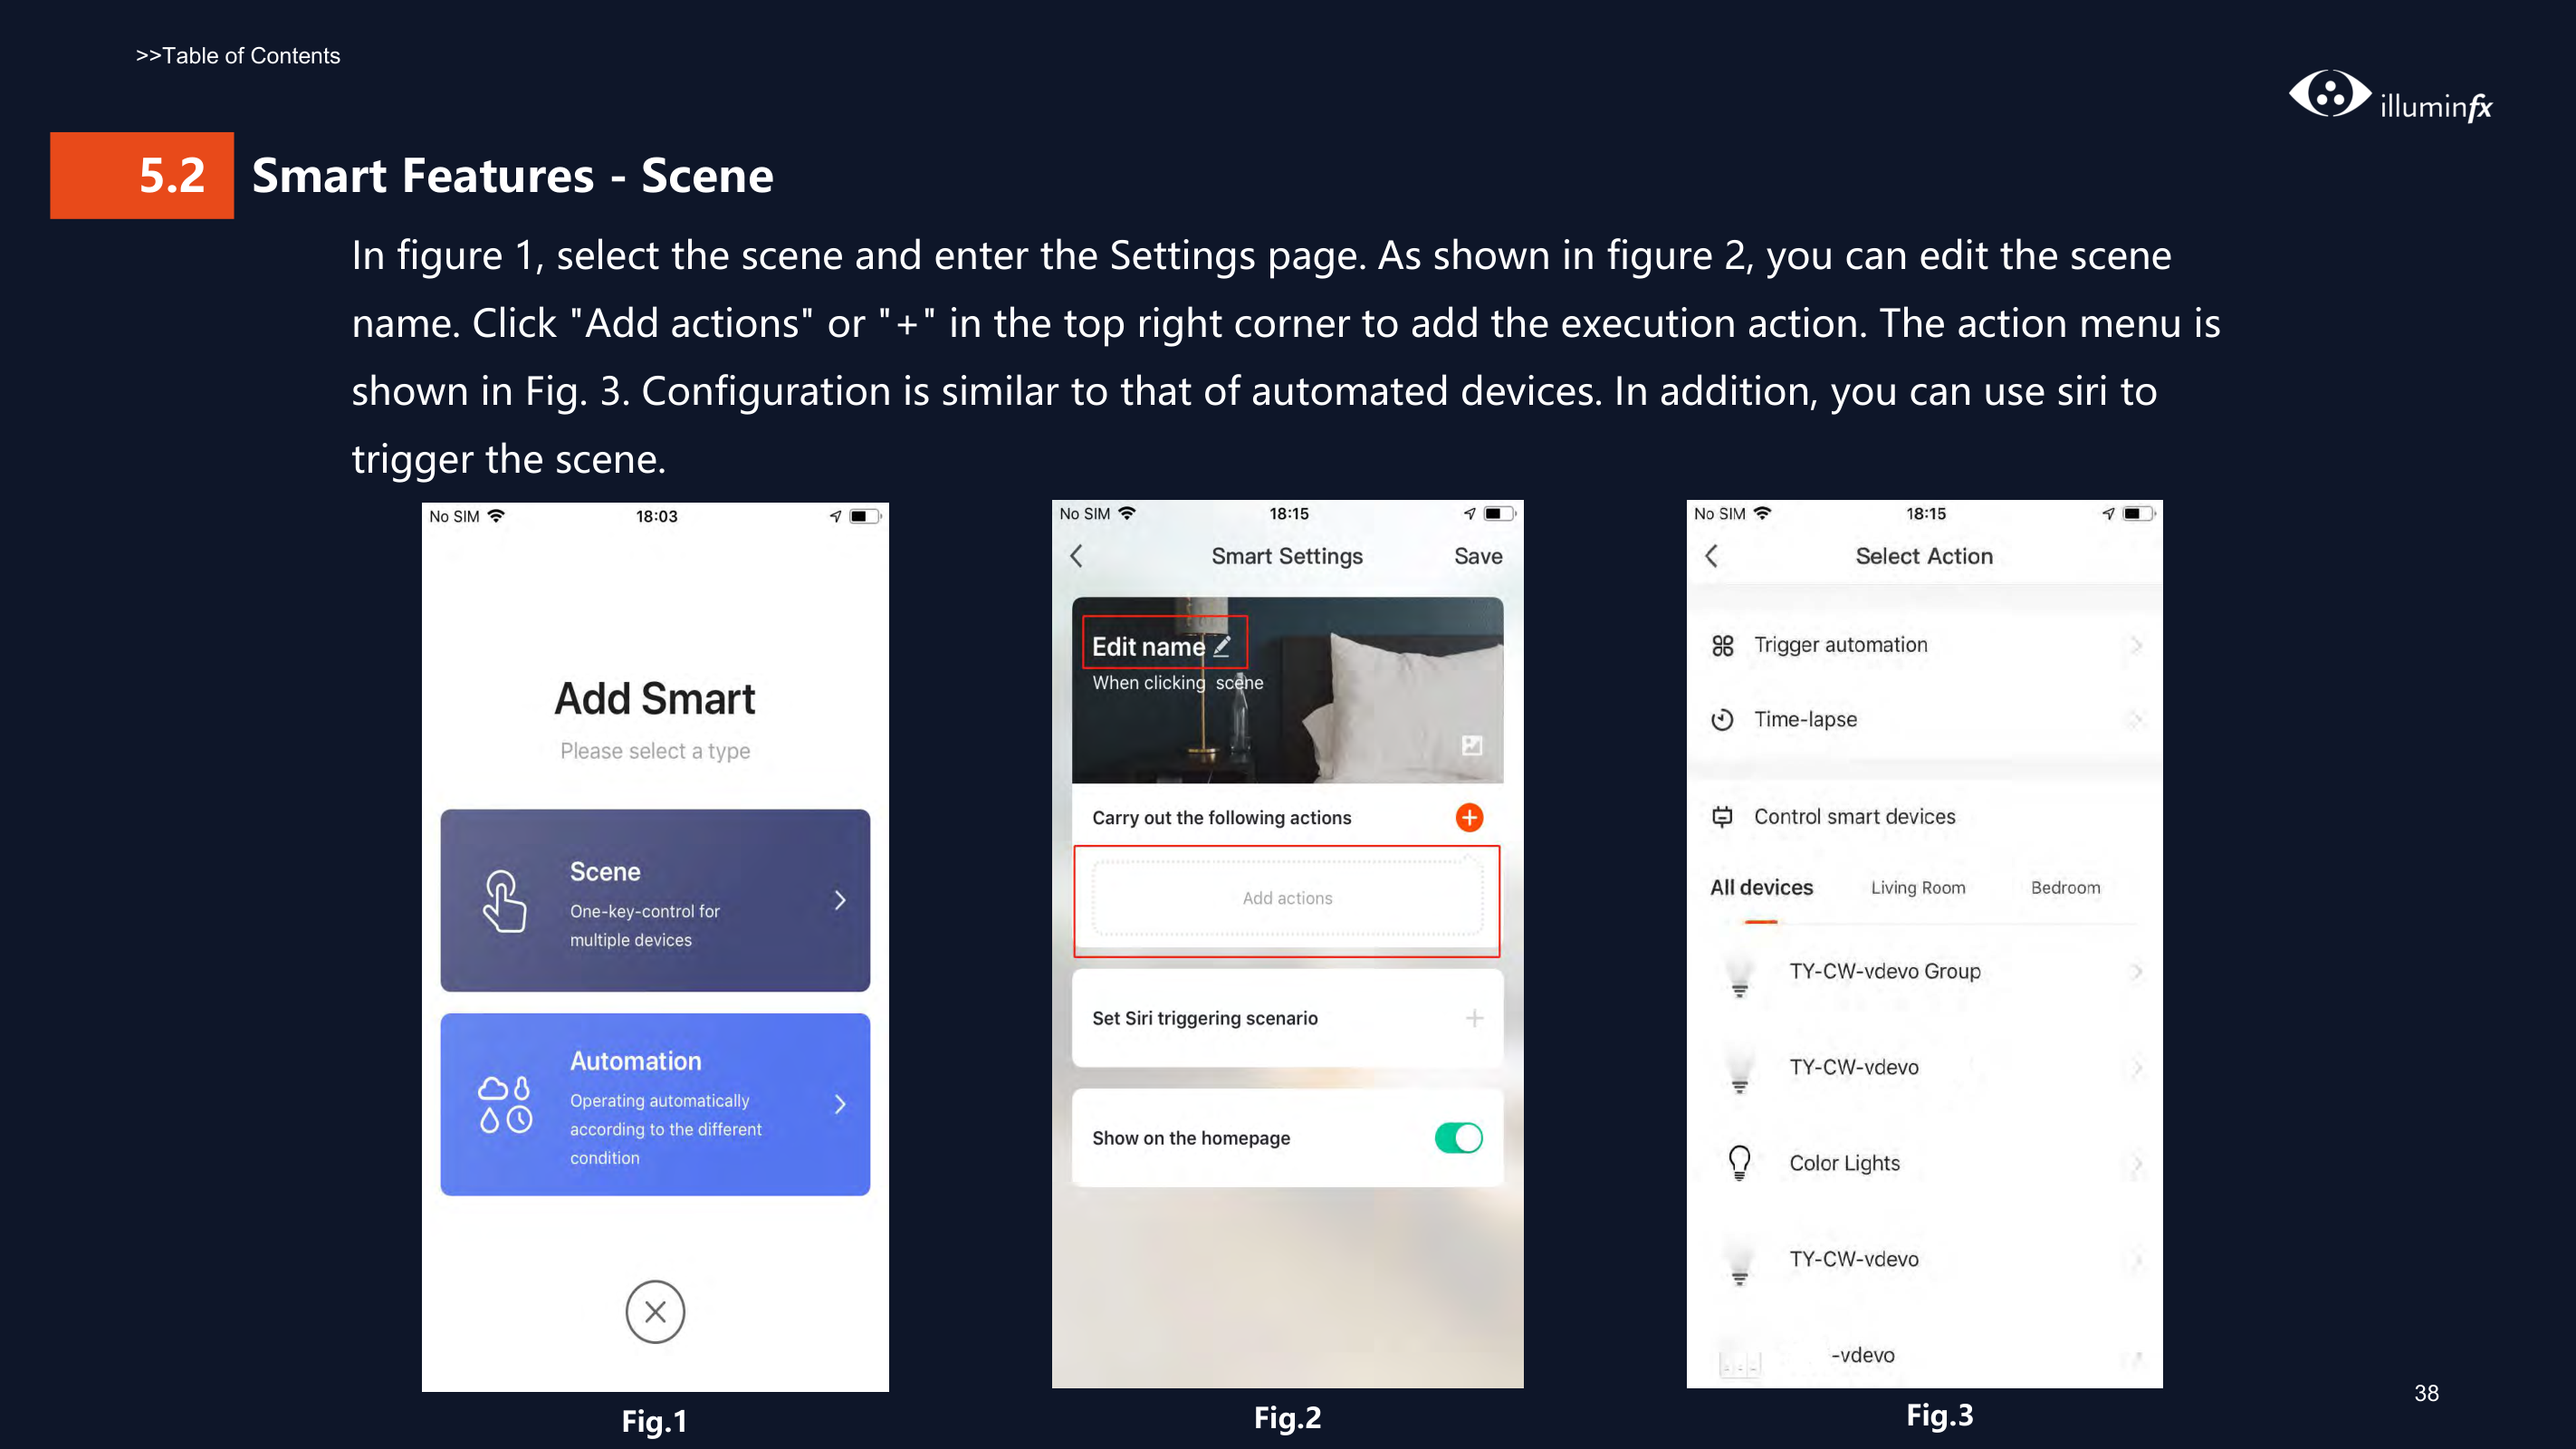
######### In figure 1, select the scene and enter the Settings page. As shown in figure 2, you can edit the scene name. Click "Add actions" or "+" in the top right corner to add the execution action. The action menu is shown in Fig. 3. Configuration is similar to that of automated devices. In addition, you can use siri to trigger the scene.


Fig.1 Fig.2 Fig.3
38
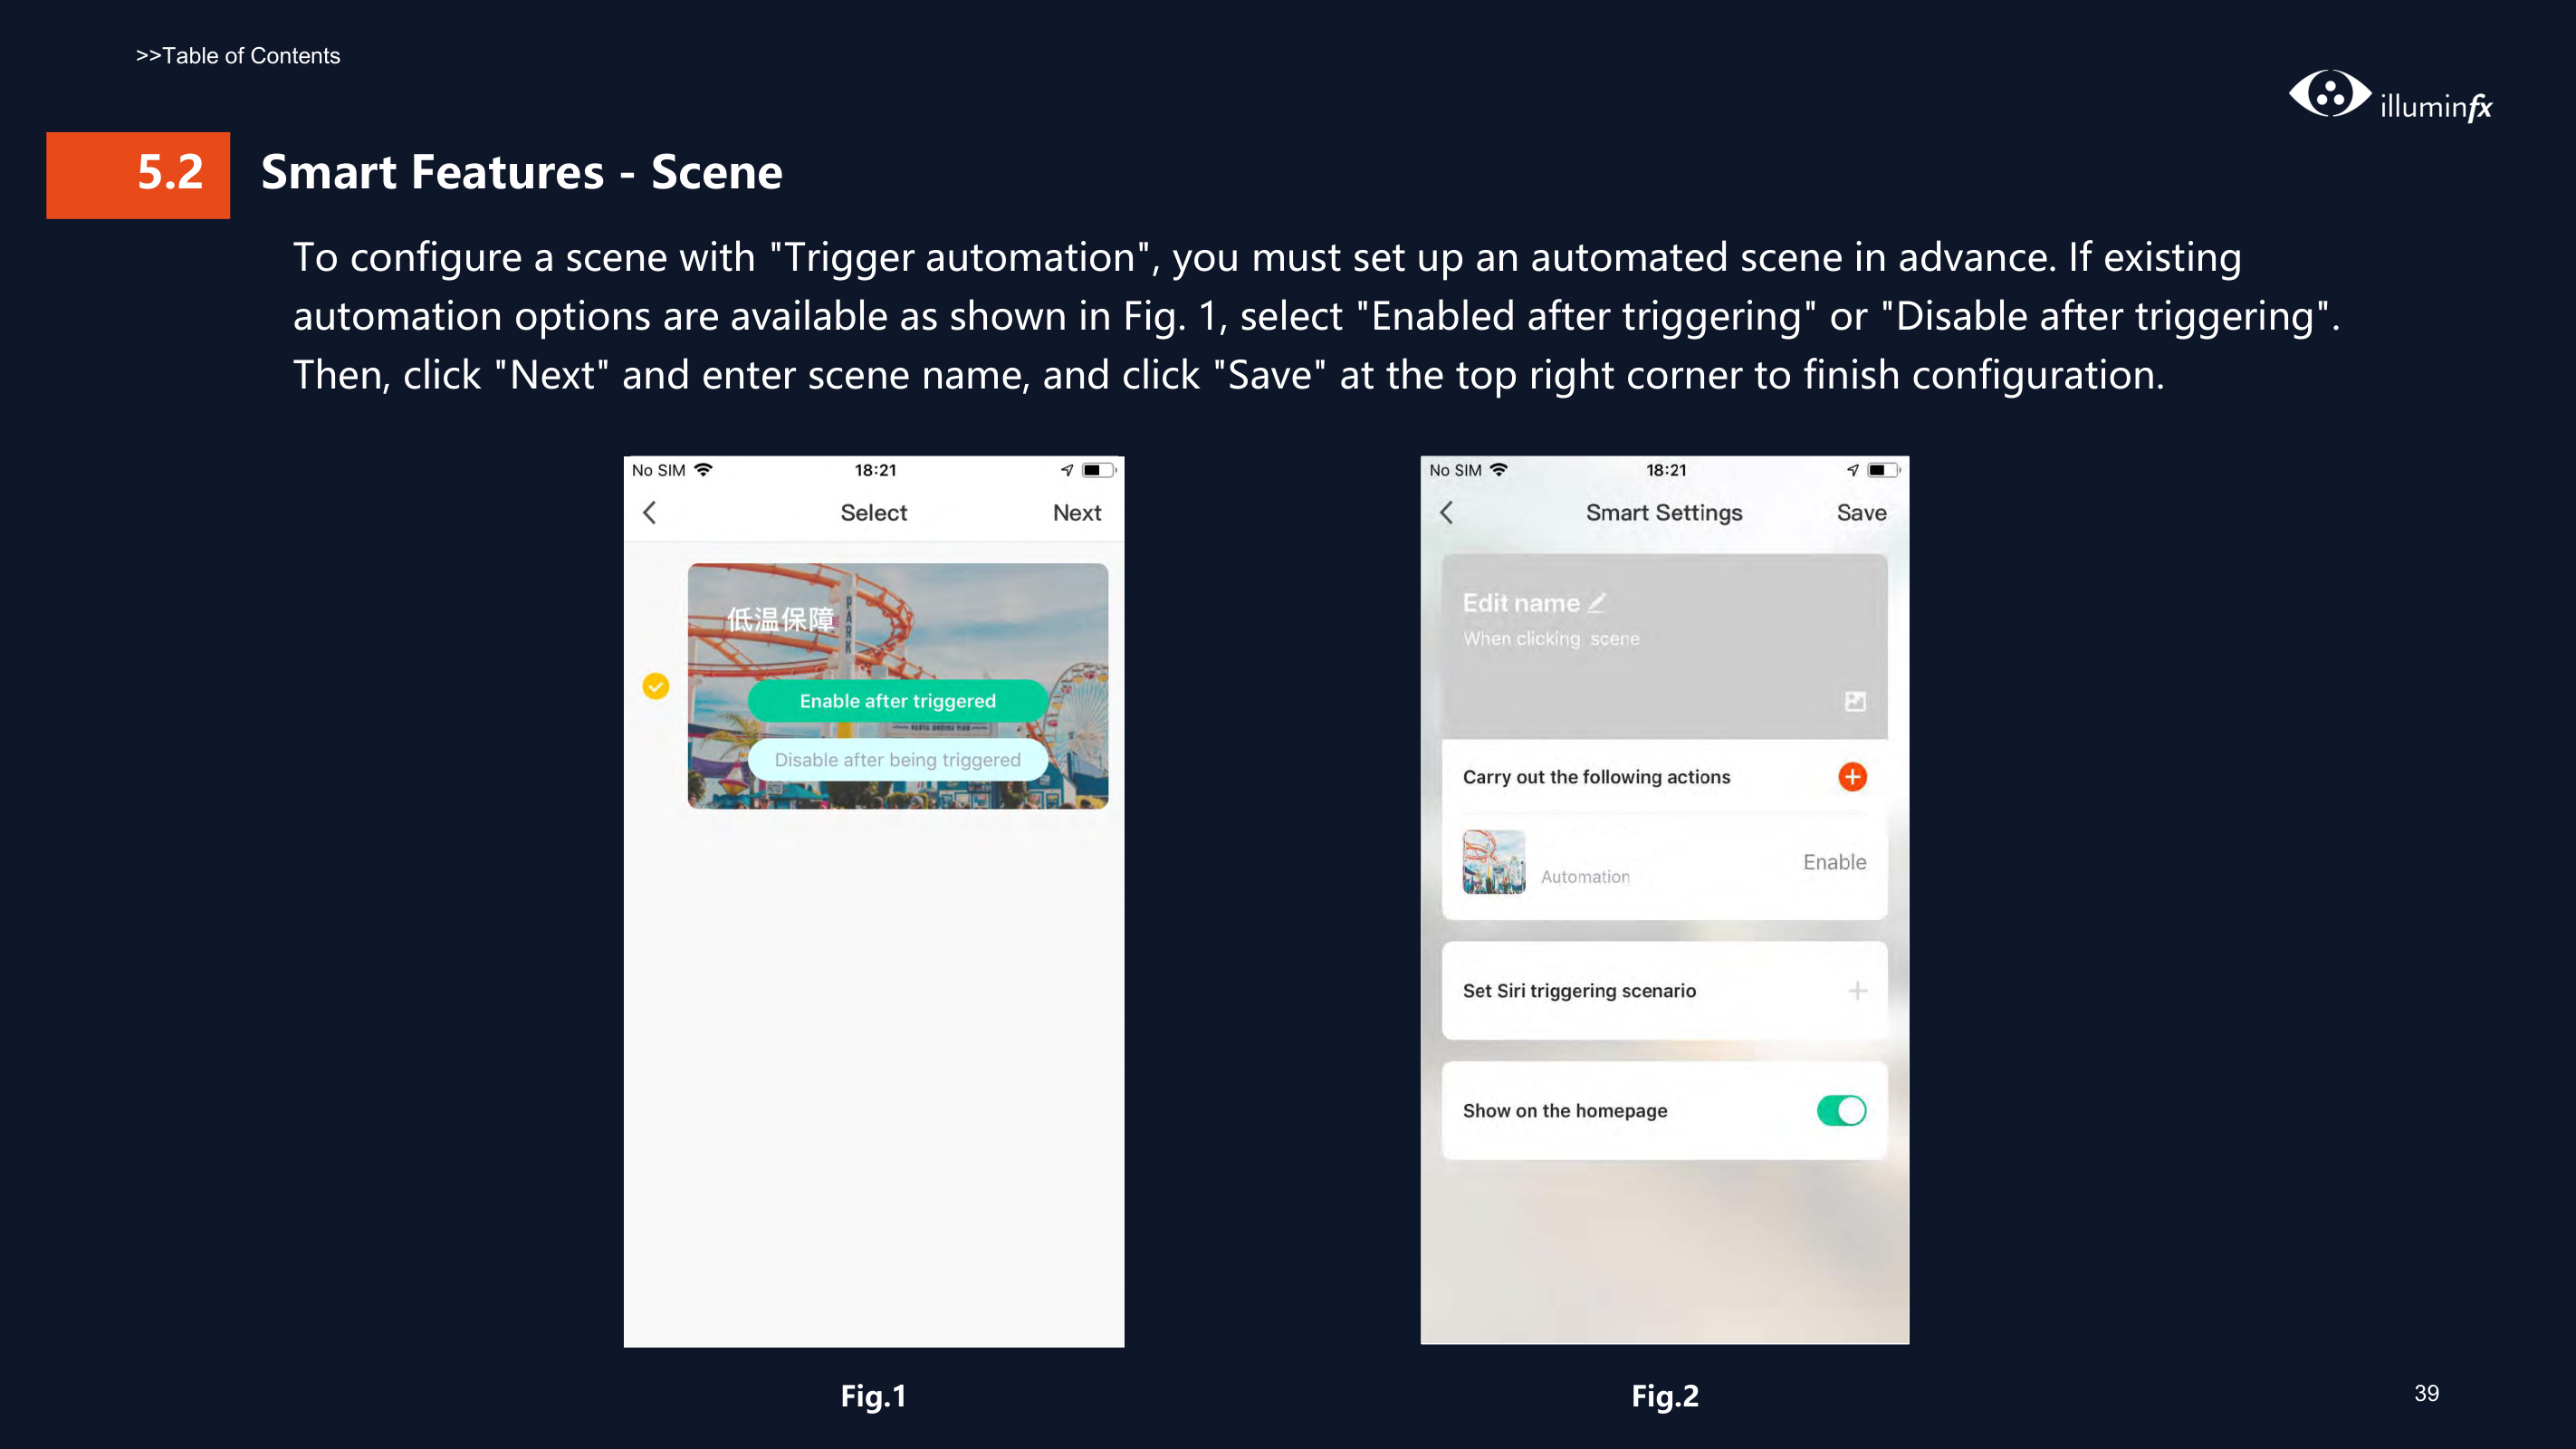
######### To configure a scene with "Trigger automation", you must set up an automated scene in advance. If existing automation options are available as shown in Fig. 1, select "Enabled after triggering" or "Disable after triggering". Then, click "Next" and enter scene name, and click "Save" at the top right corner to finish configuration.
|
| |---|
|
| |---|
Fig.1 Fig.2
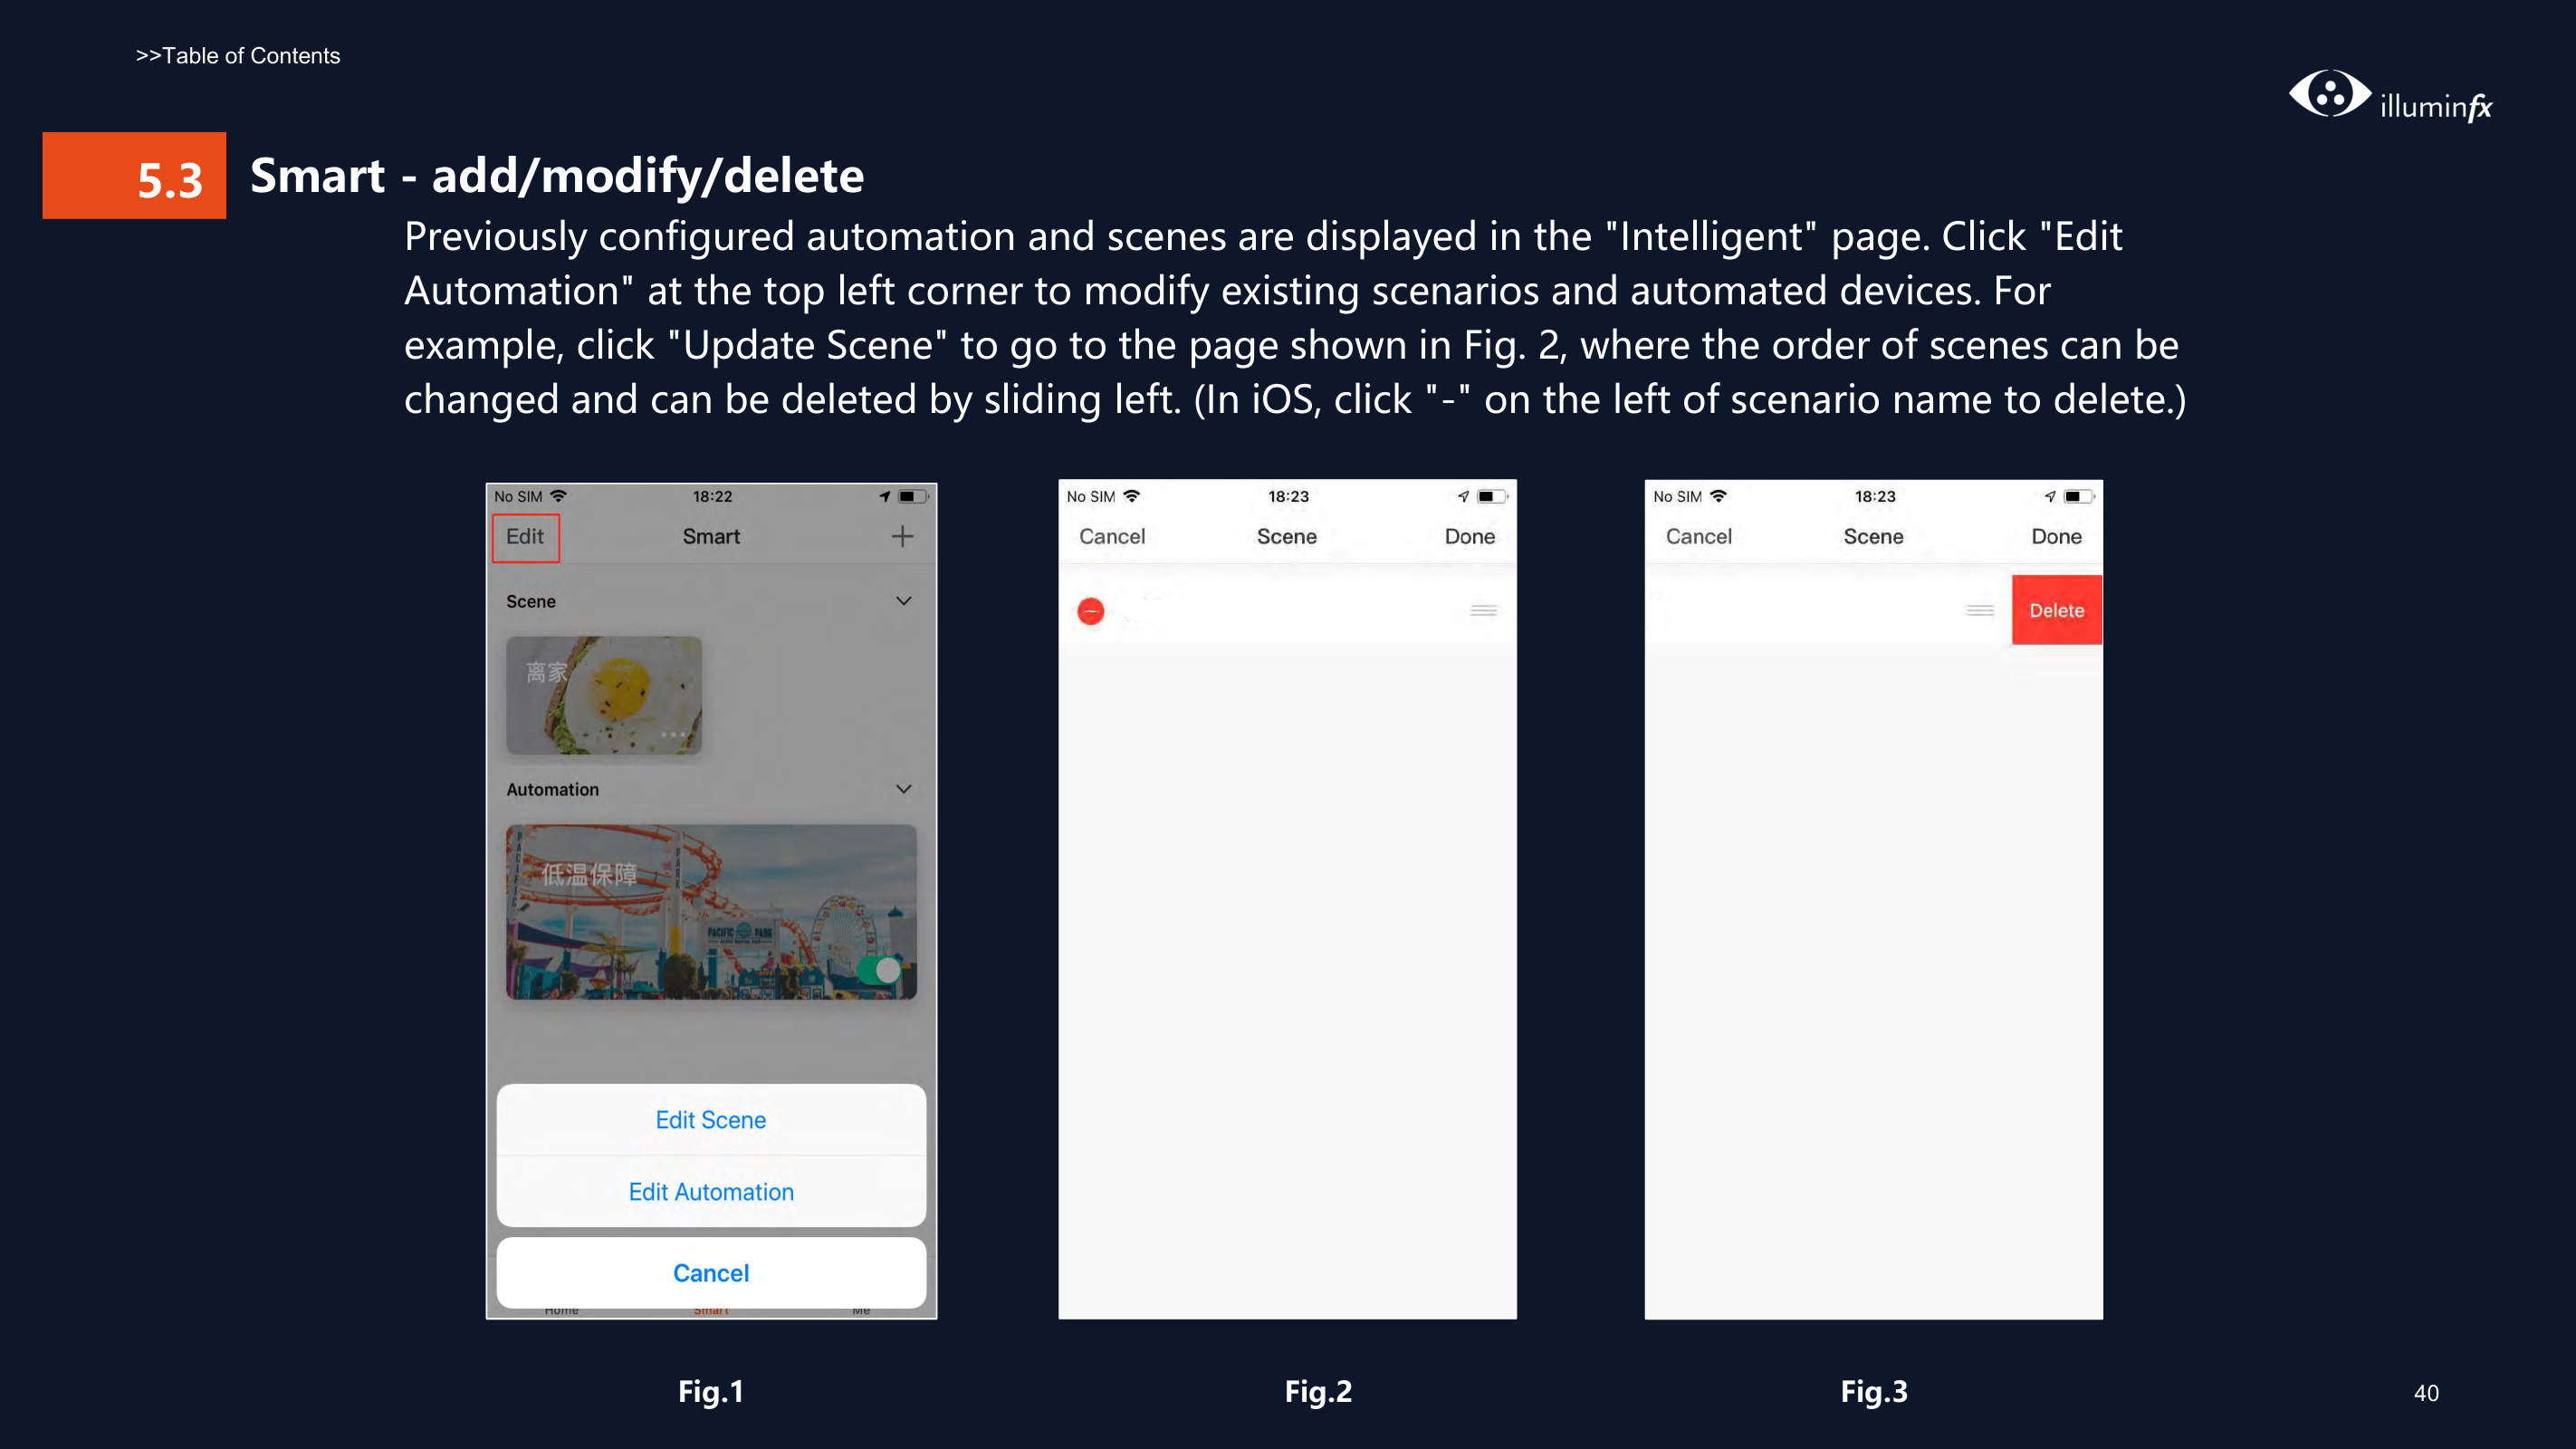
####### 5.3 Smart - add/modify/deletePreviously configured automation and scenes are displayed in the "Intelligent" page. Click "EditAutomation" at the top left corner to modify existing scenarios and automated devices. Forexample, click "Update Scene" to go to the page shown in Fig. 2, where the order of scenes can bechanged and can be deleted by sliding left. (In iOS, click "-" on the left of scenario name to delete.)
|
| |---|
|
| |---|
|
| |---|
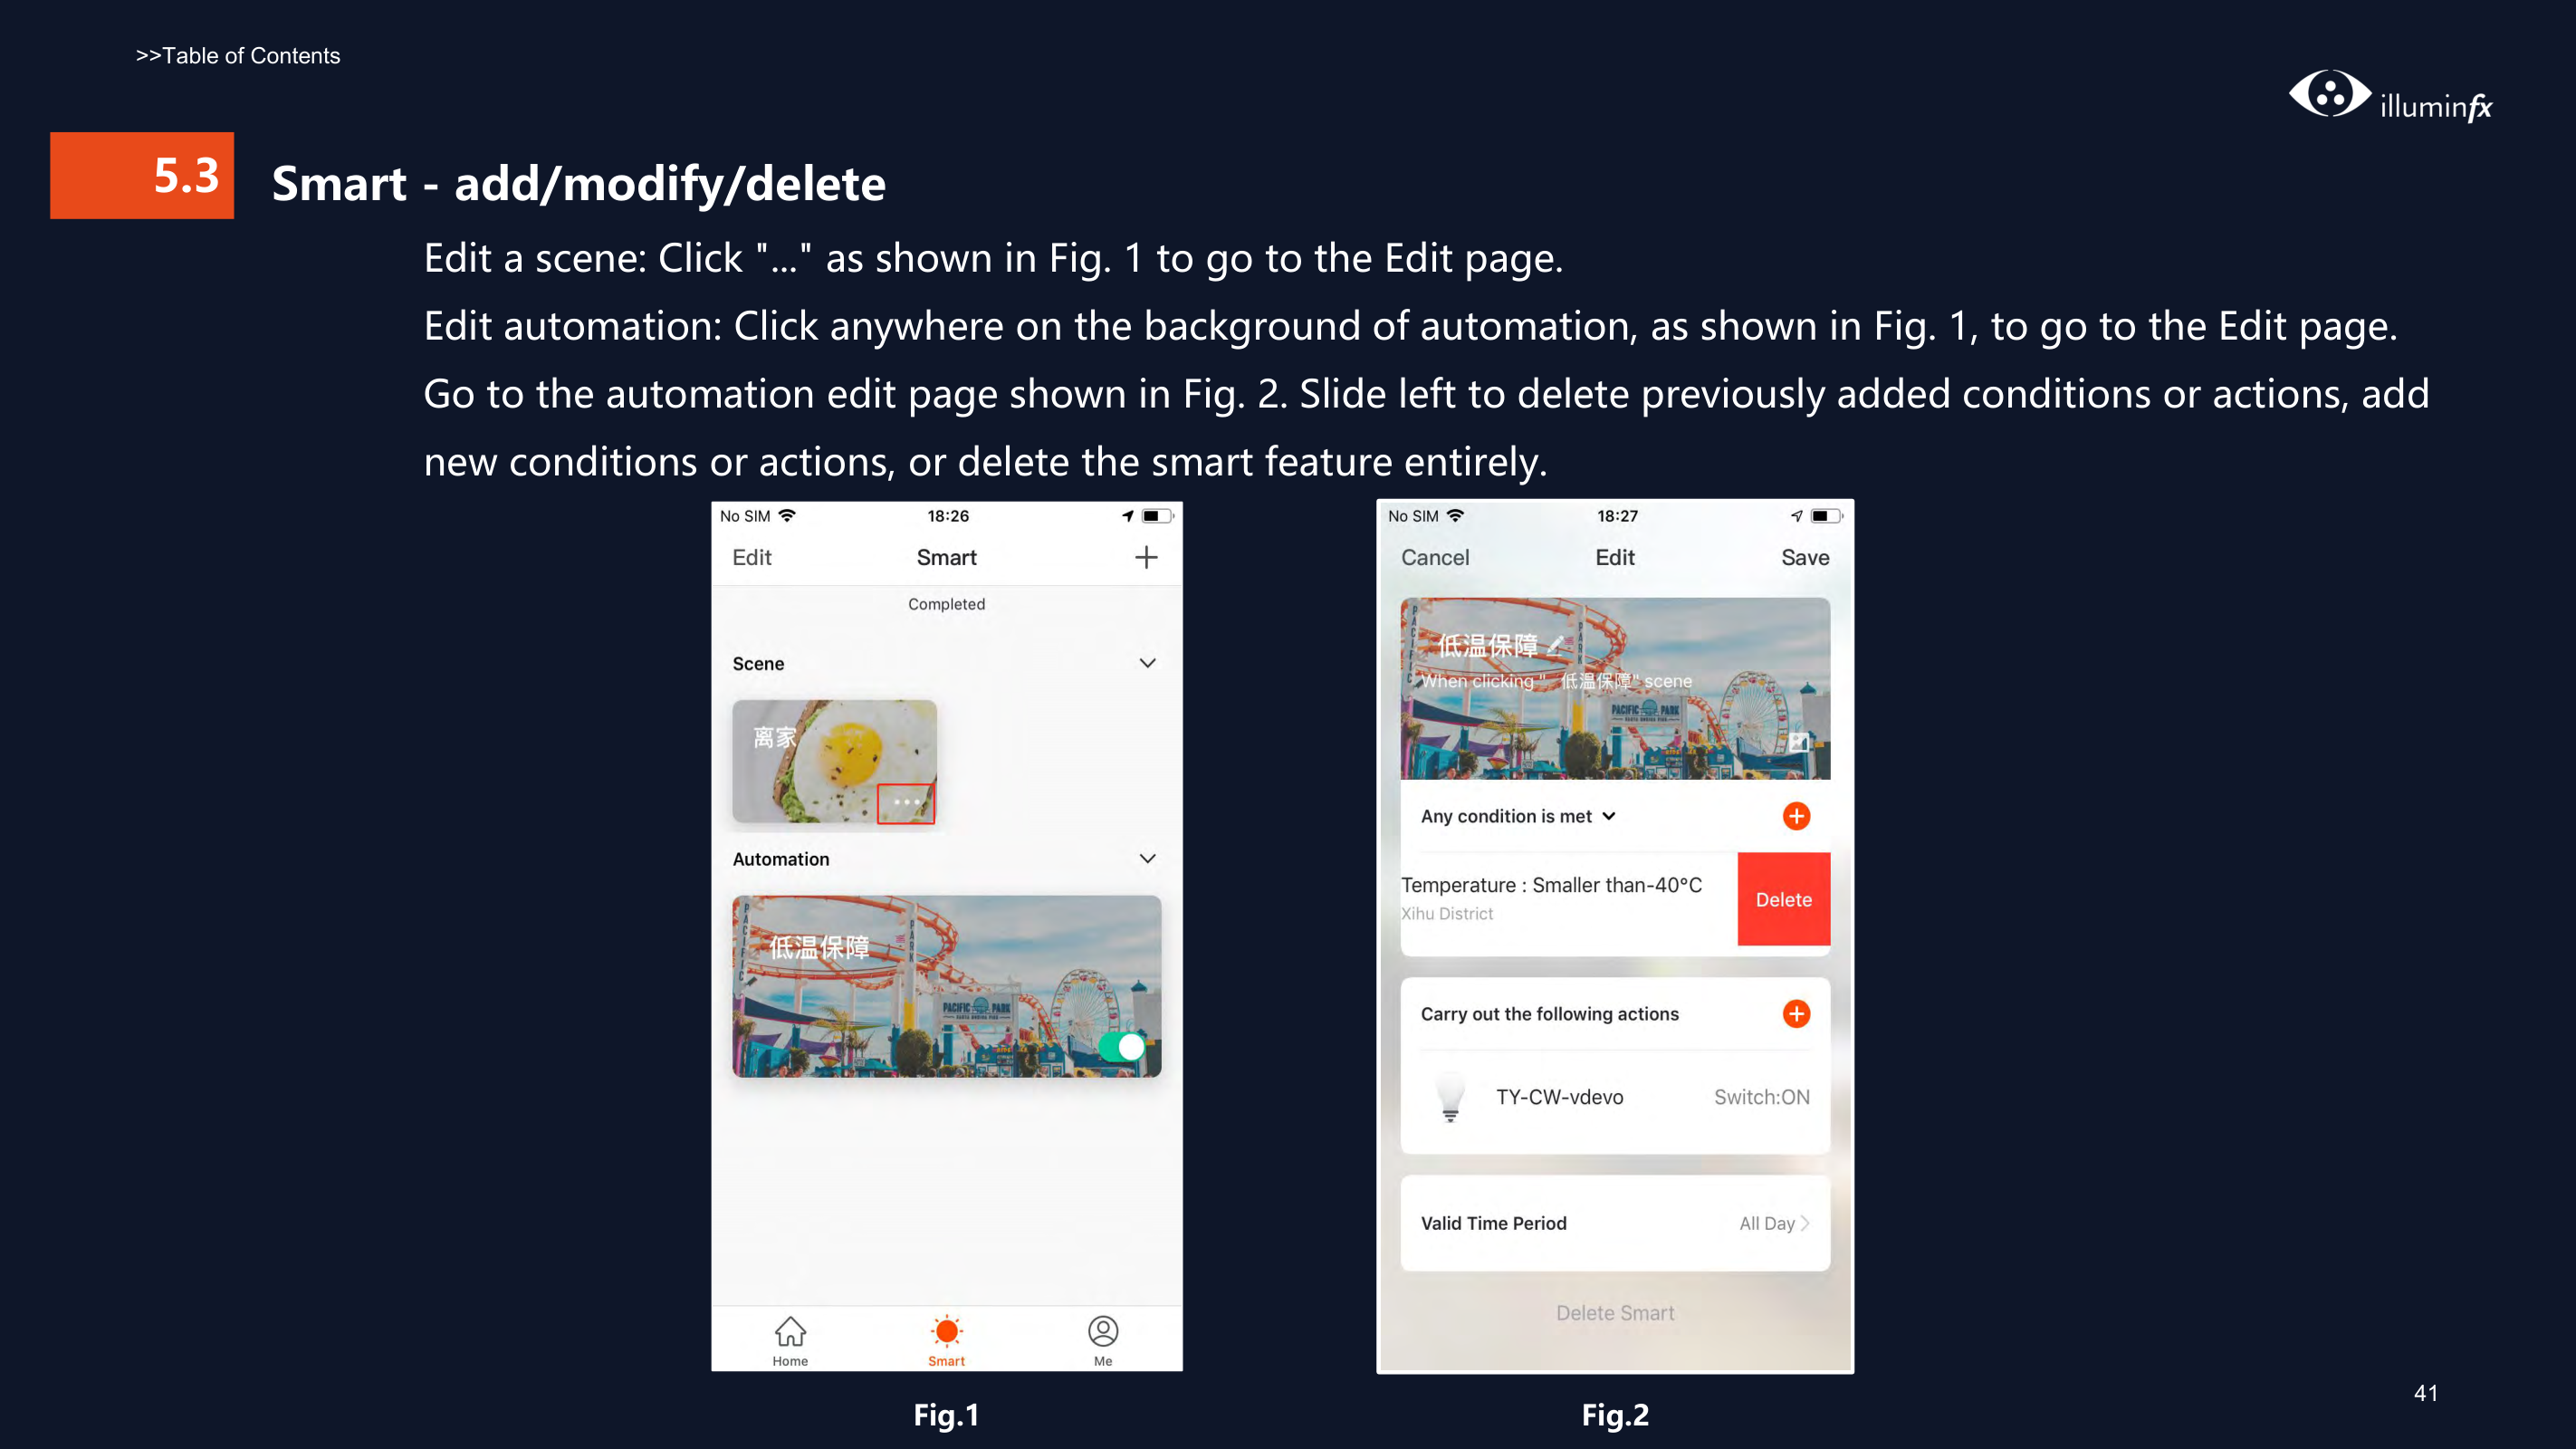
Fig.1 Fig.2 Fig.3
###### 5.3
###### Smart - add/modify/delete
Edit a scene: Click "..." as shown in Fig. 1 to go to the Edit page. Edit automation: Click anywhere on the background of automation, as shown in Fig. 1, to go to the Edit page. Go to the automation edit page shown in Fig. 2. Slide left to delete previously added conditions or actions, add new conditions or actions, or delete the smart feature entirely.
|
| |---|
|
| |---|
Fig.1 Fig.2
41
Supports voice command
>>Table of Contents

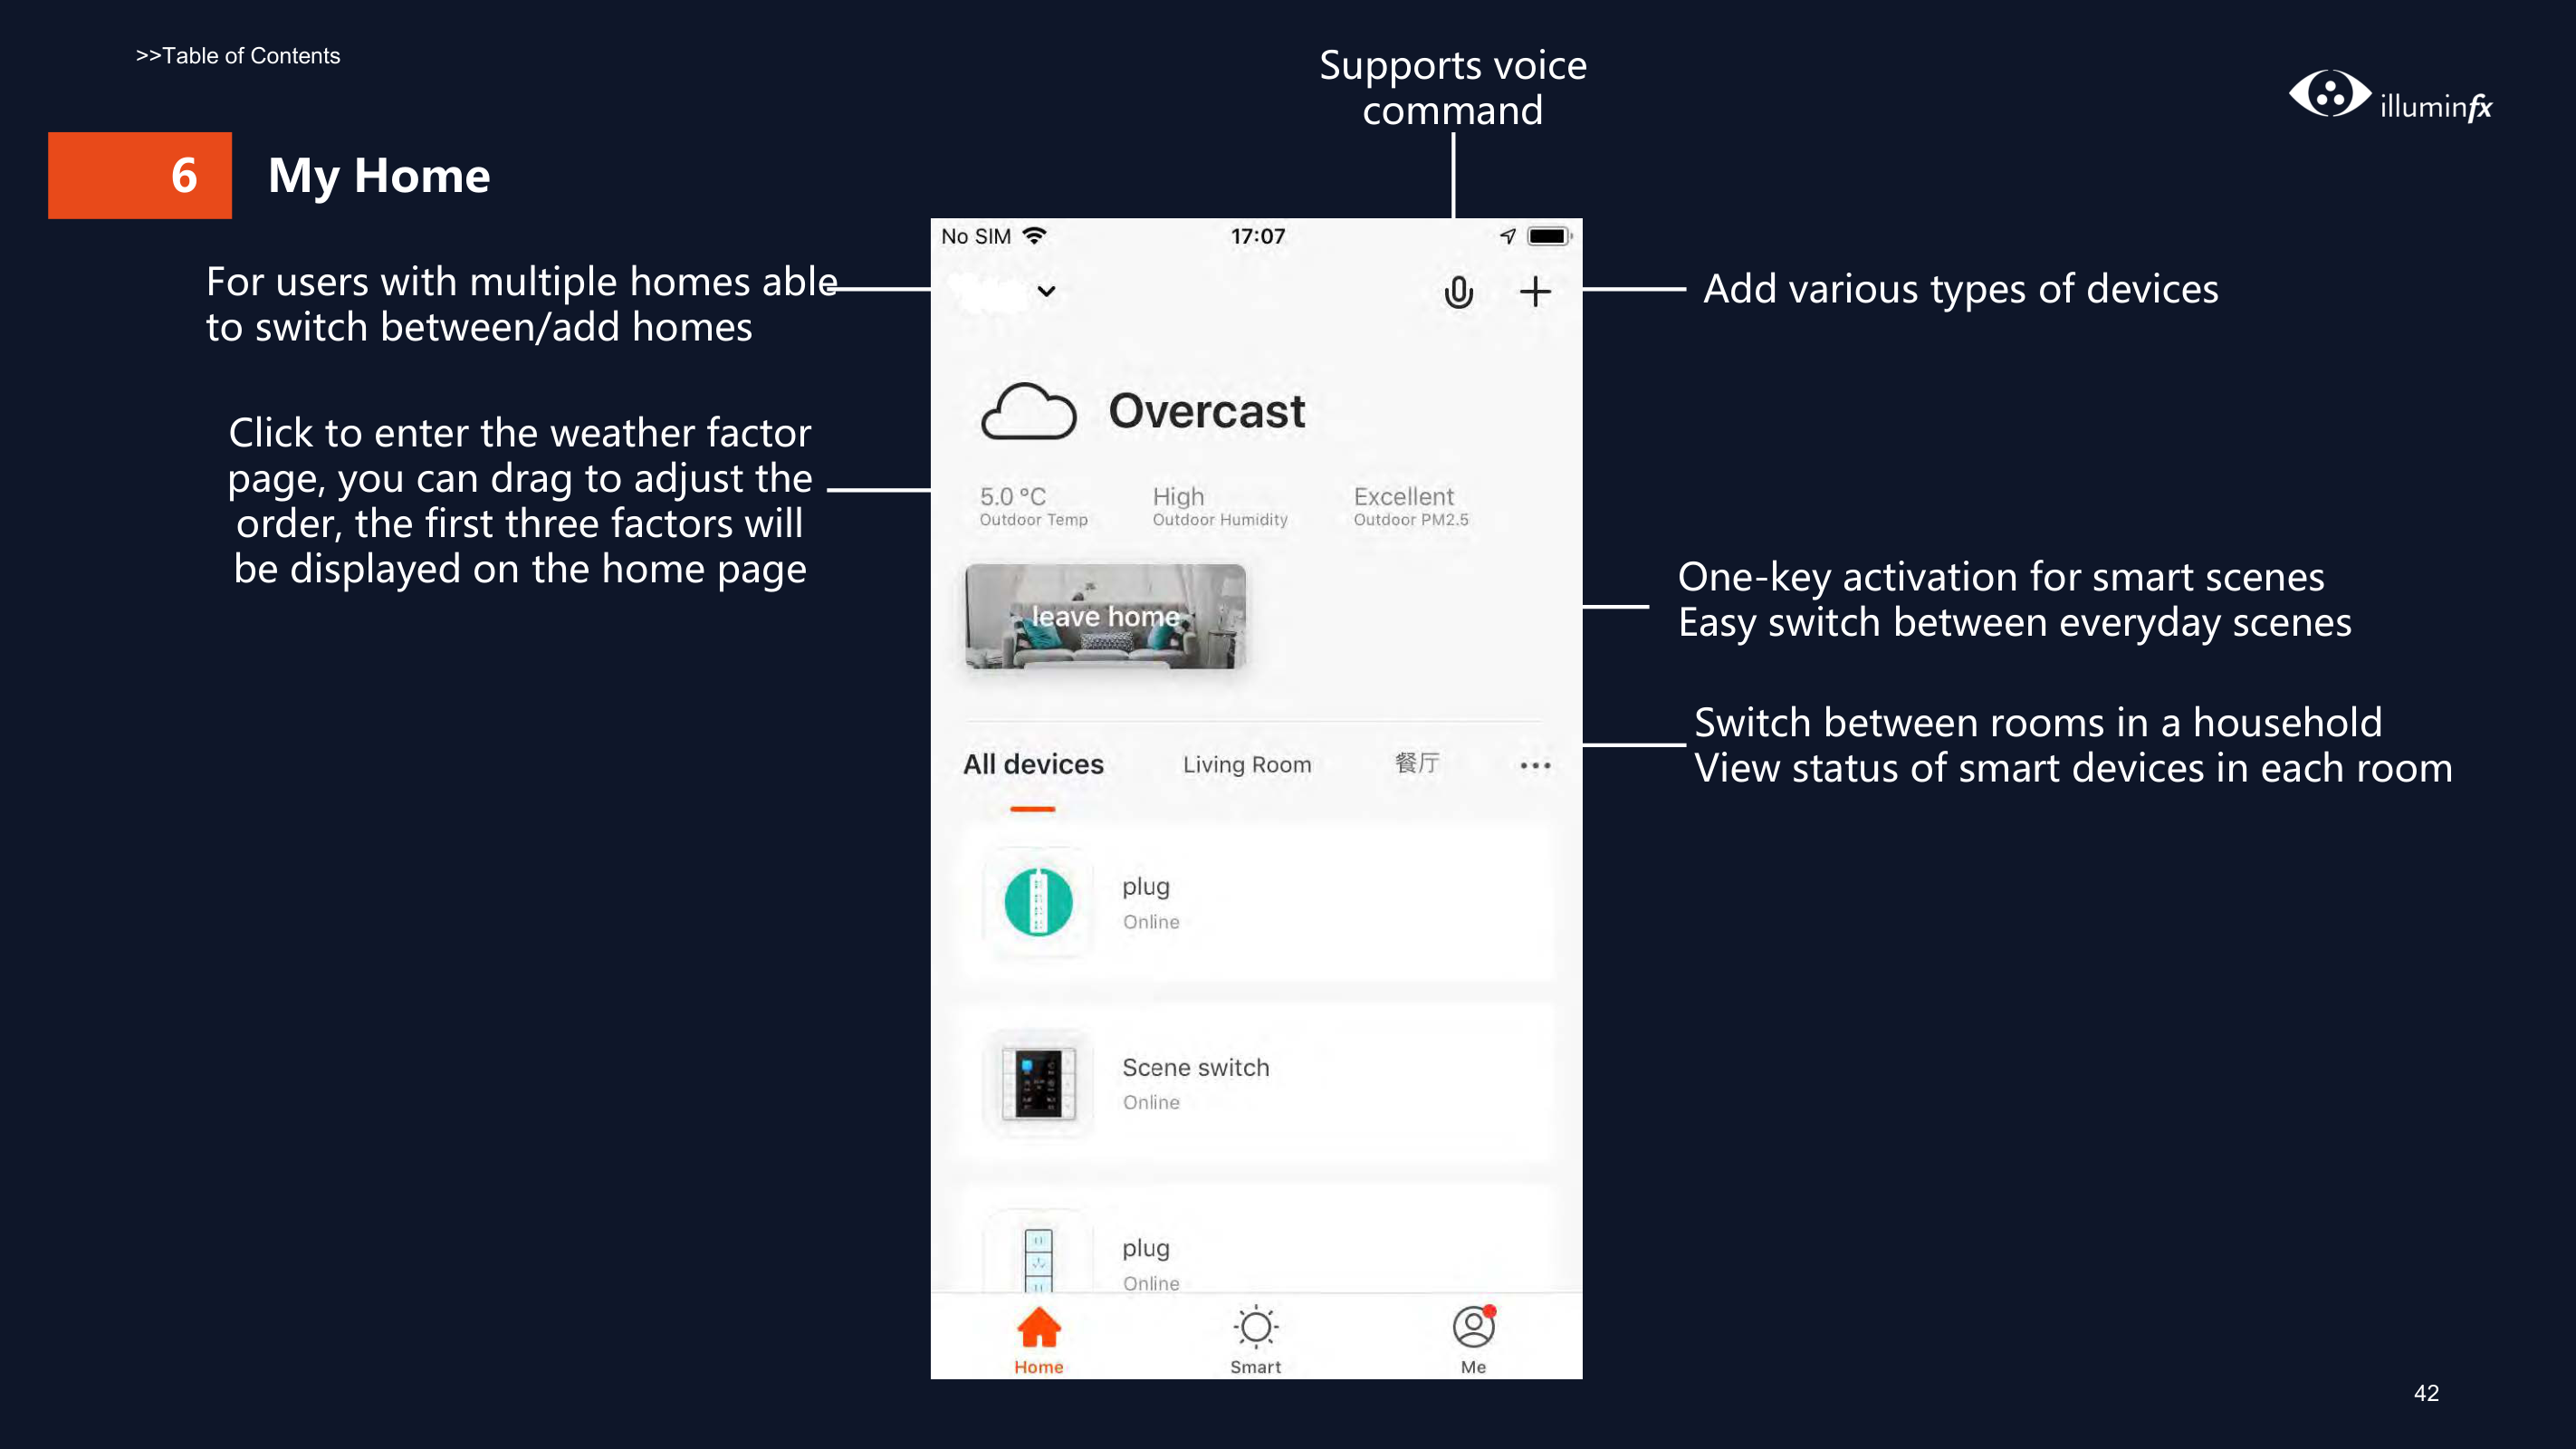
###### 6 My Home

For users with multiple homes able to switch between/add homes
Add various types of devices
Click to enter the weather factor page, you can drag to adjust the order, the first three factors will be displayed on the home page
One-key activation for smart scenes Easy switch between everyday scenes
Switch between rooms in a household View status of smart devices in each room
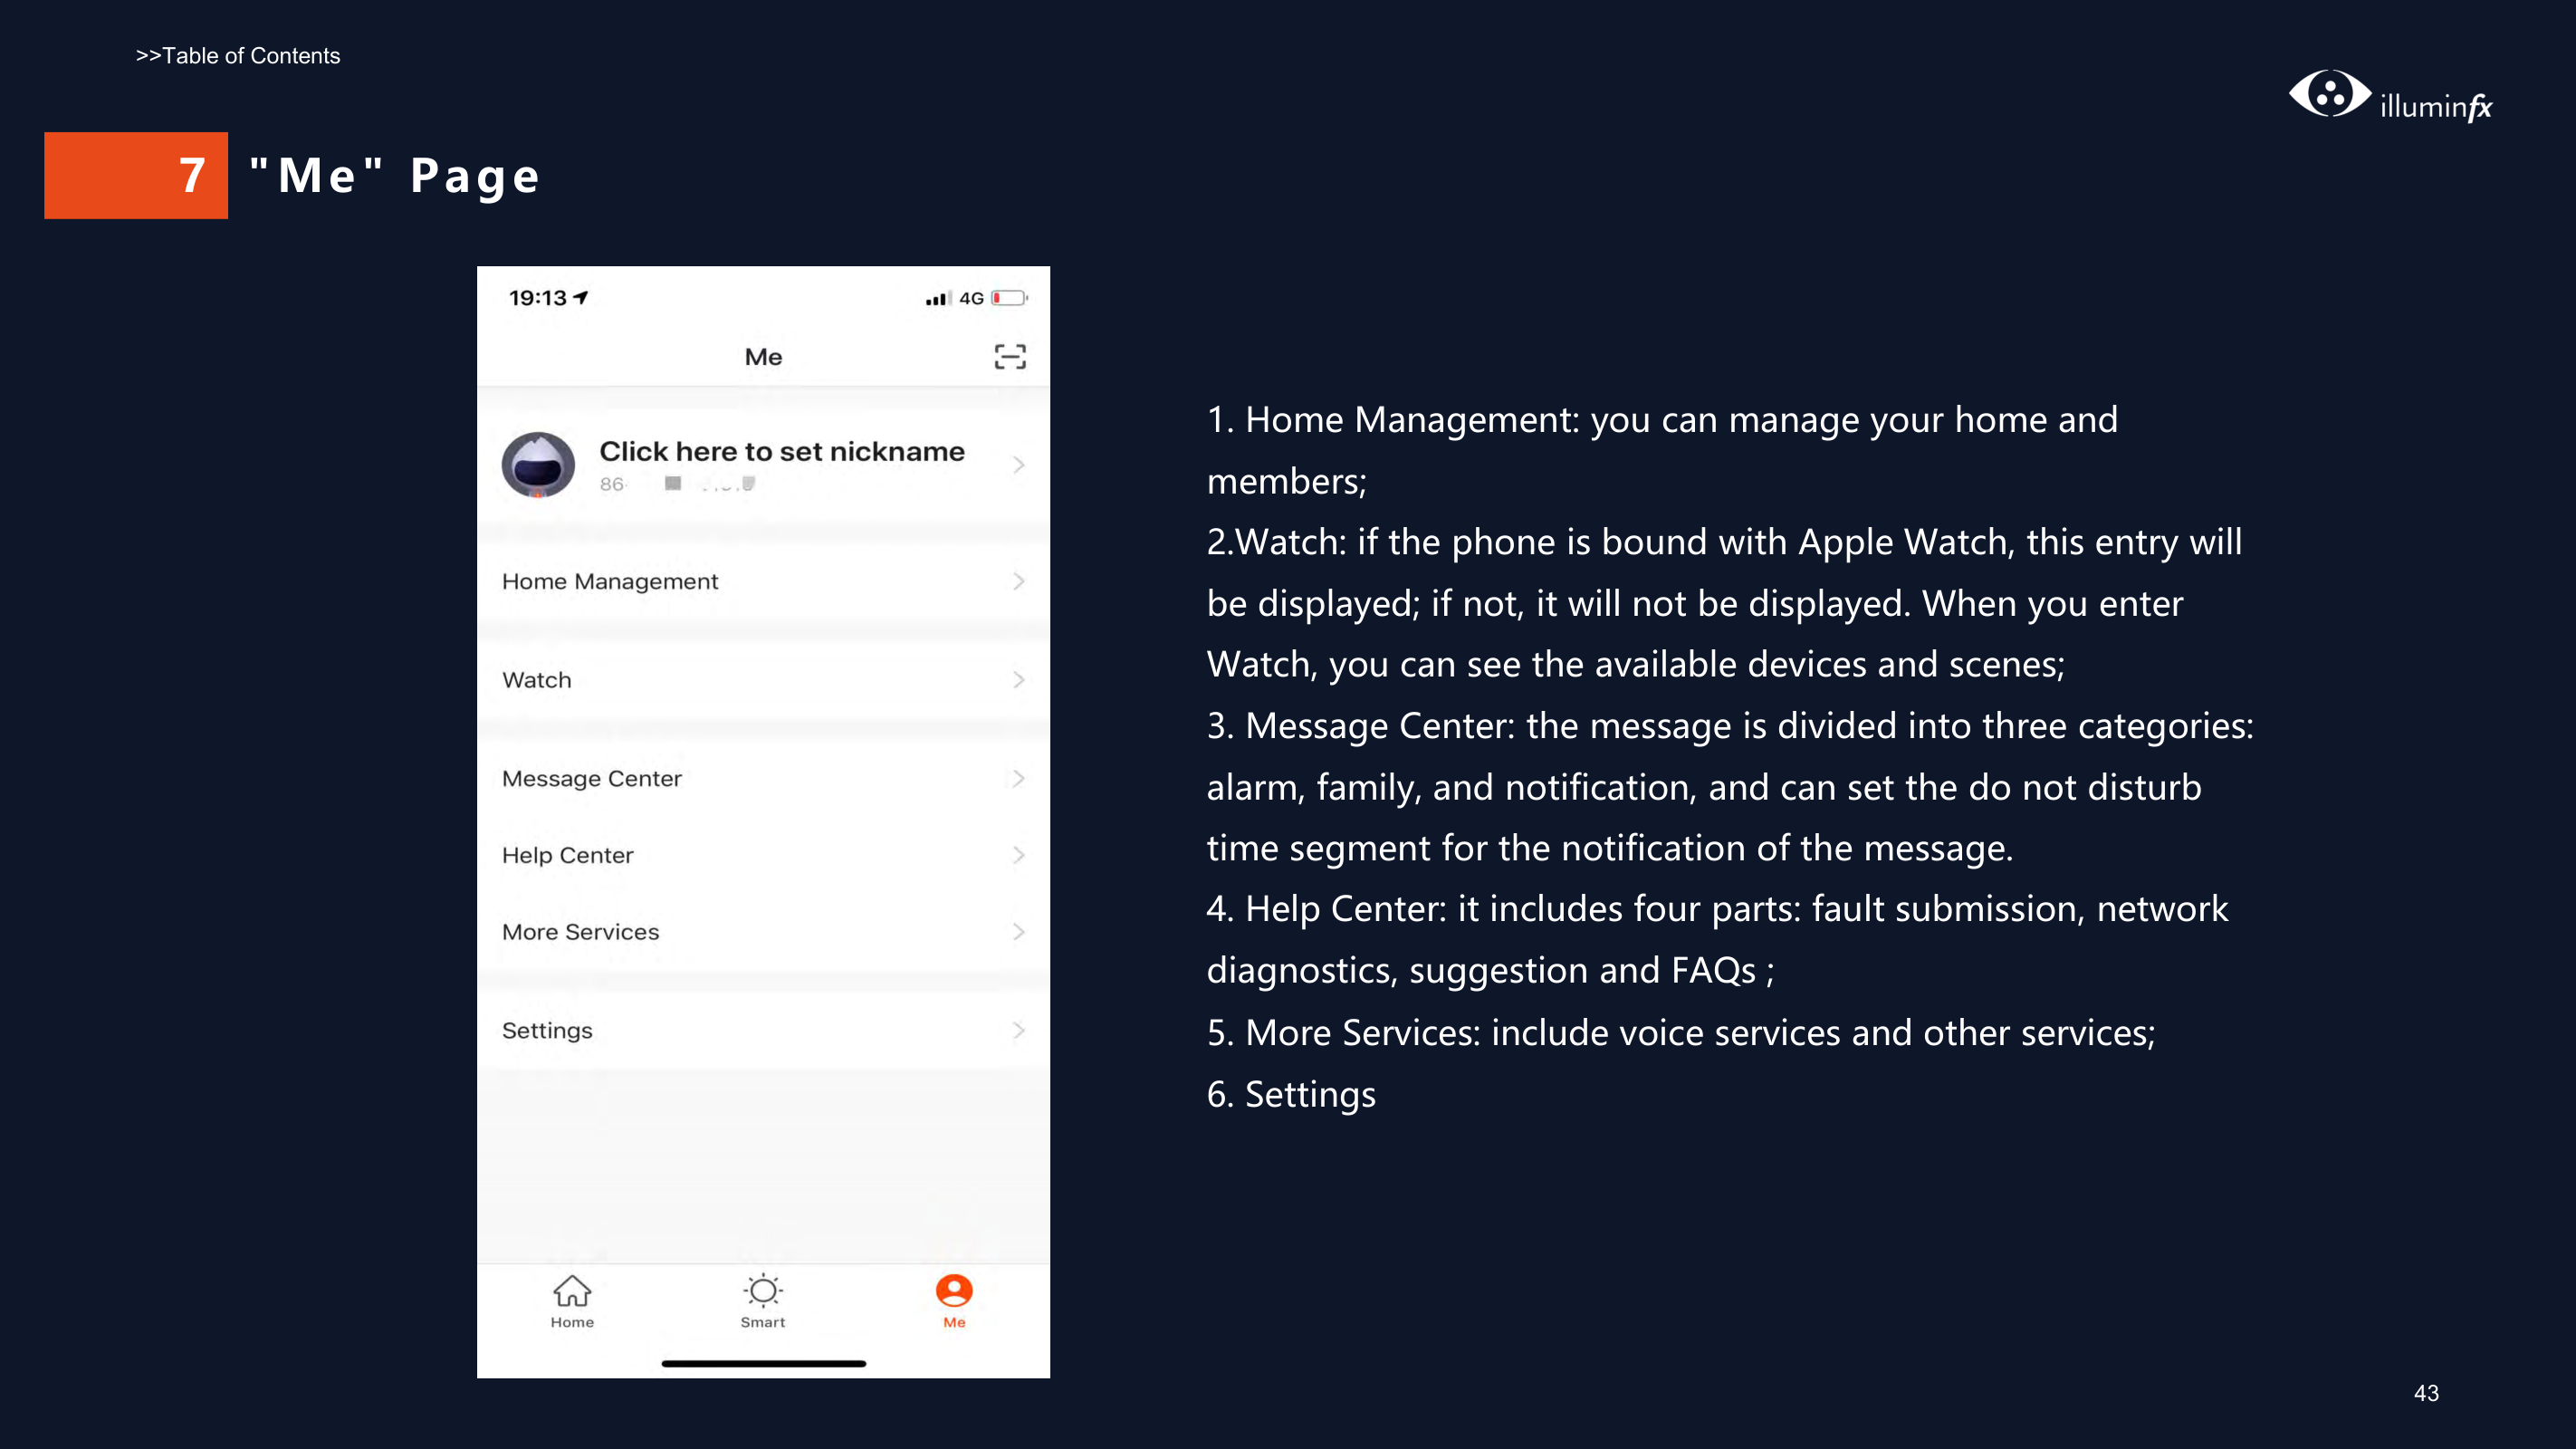
###### 7 "Me" Page


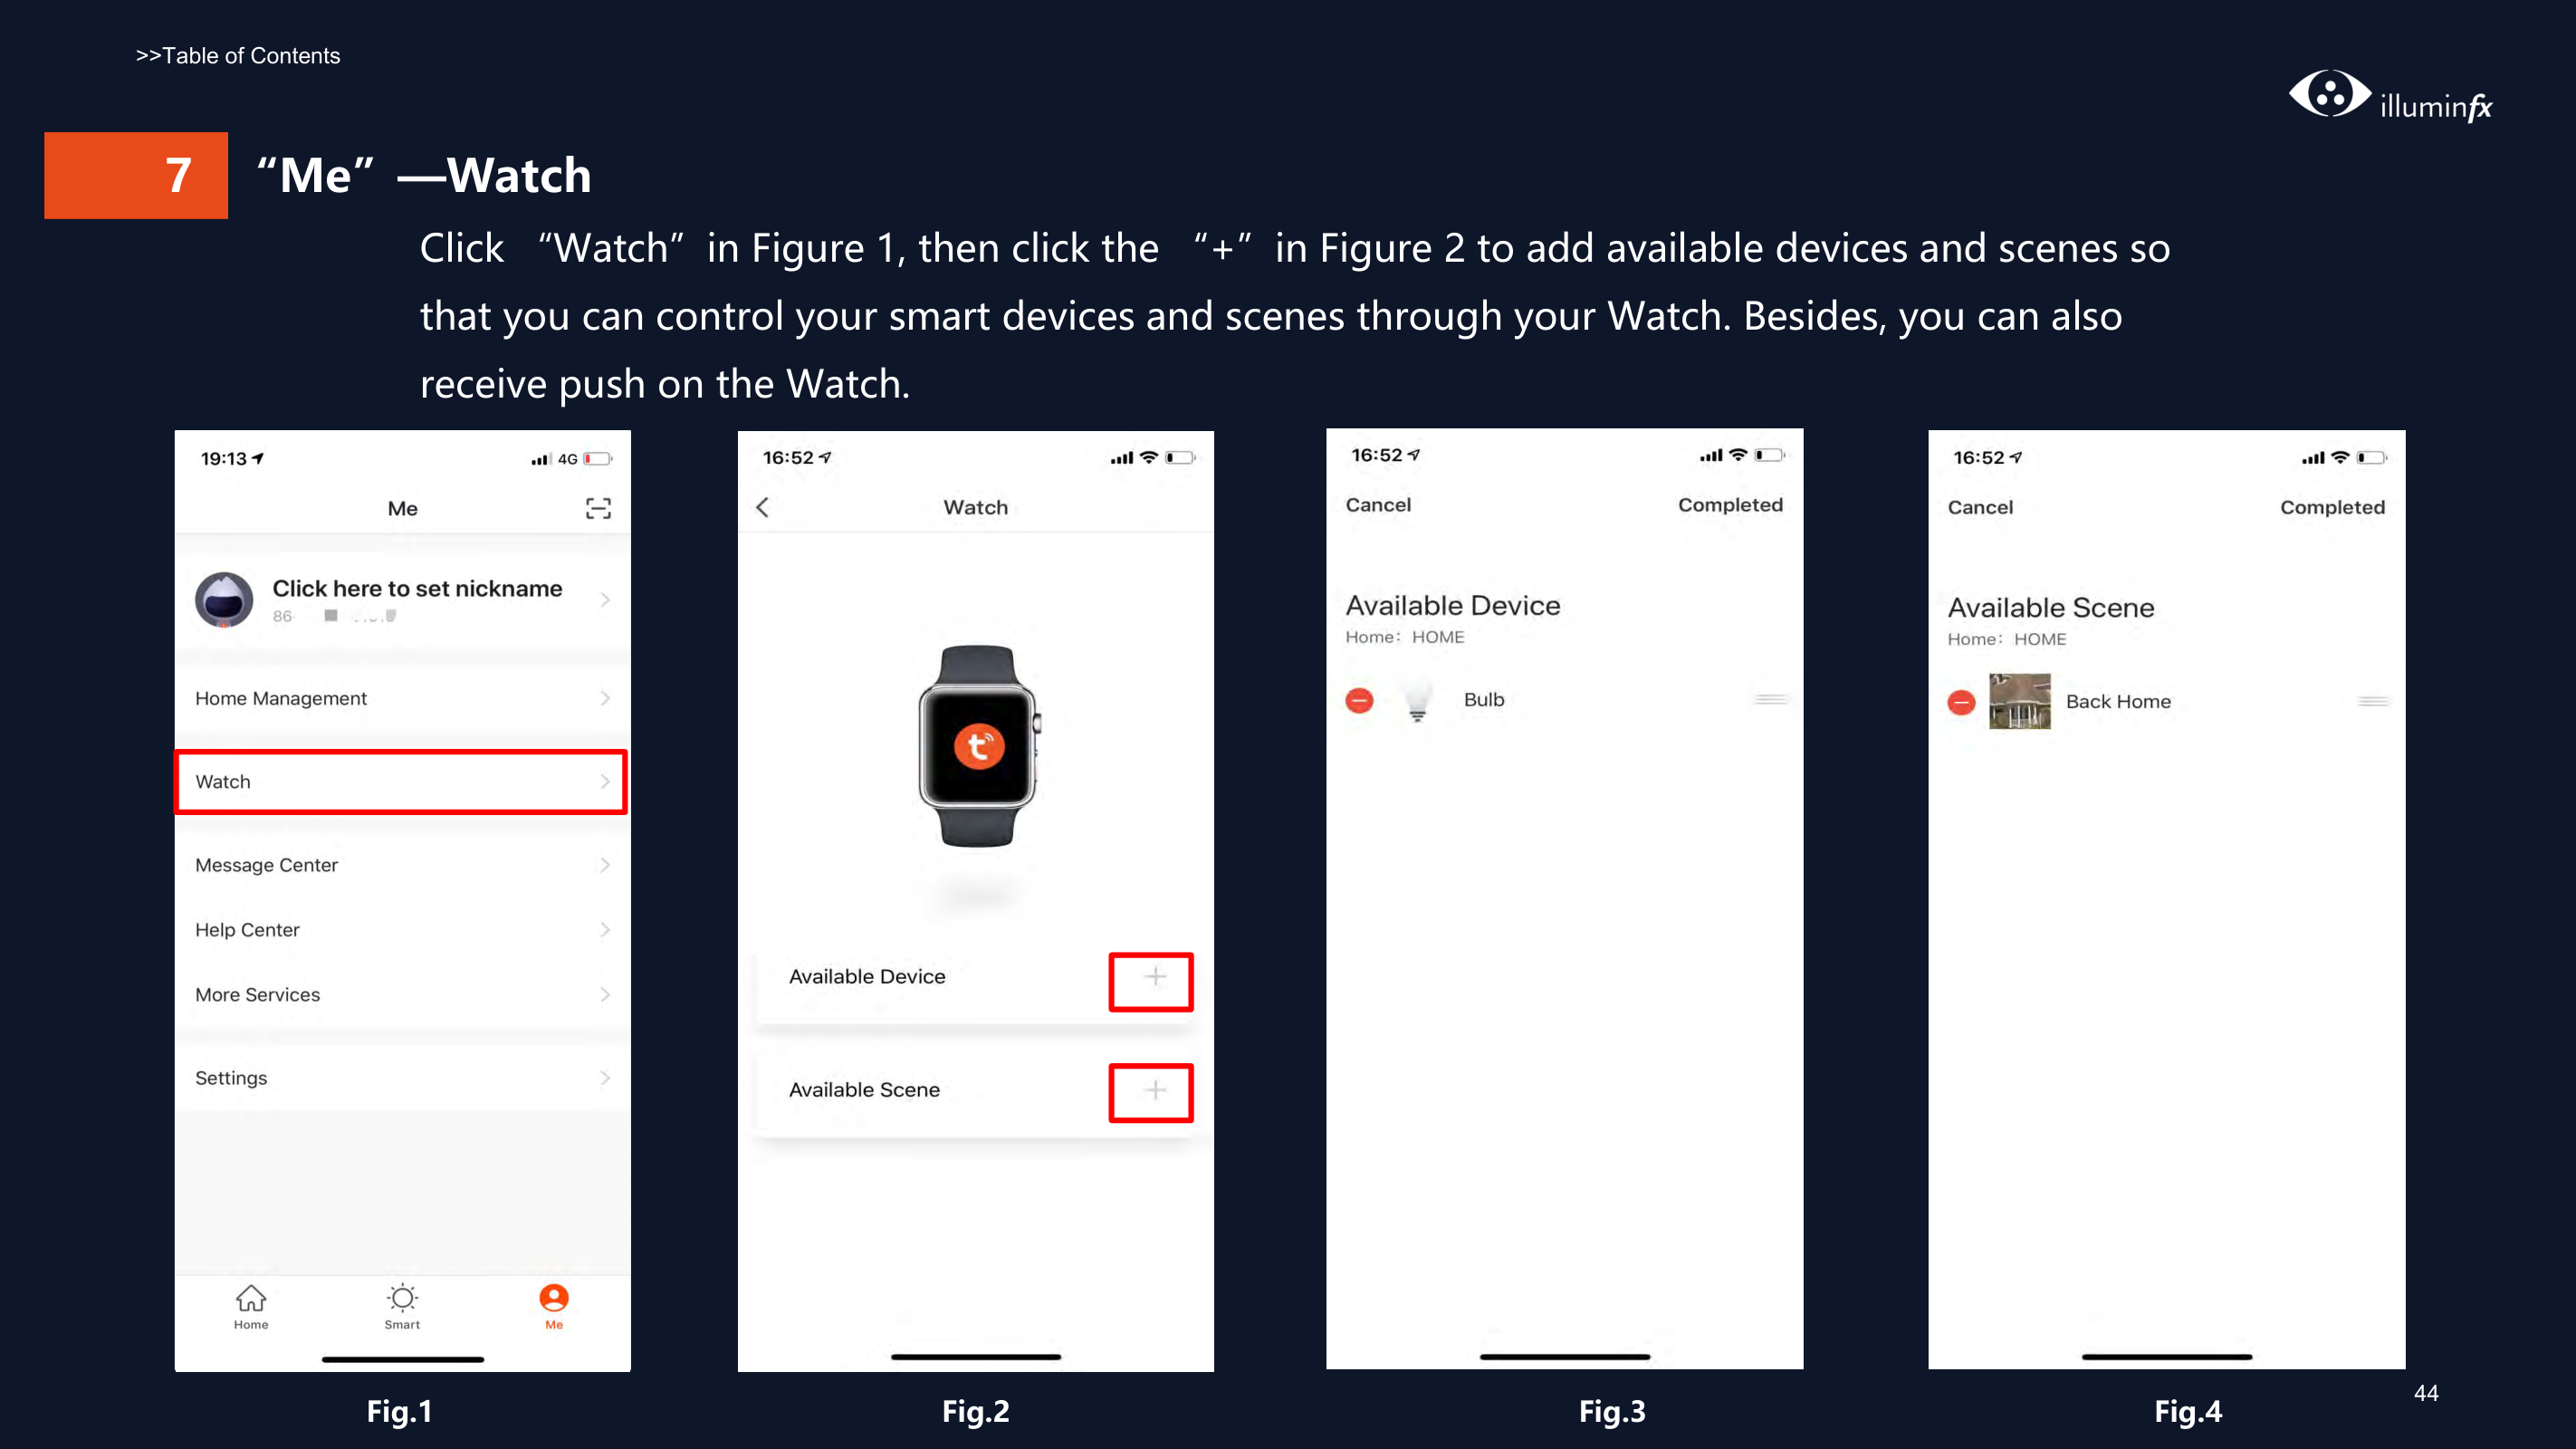
####### 7 “Me”—Watch Click “Watch”in Figure 1, then click the “+”in Figure 2 to add available devices and scenes so that you can control your smart devices and scenes through your Watch. Besides, you can also receive push on the Watch.
| | |---| | | |
|


| | |---|
| | |---|

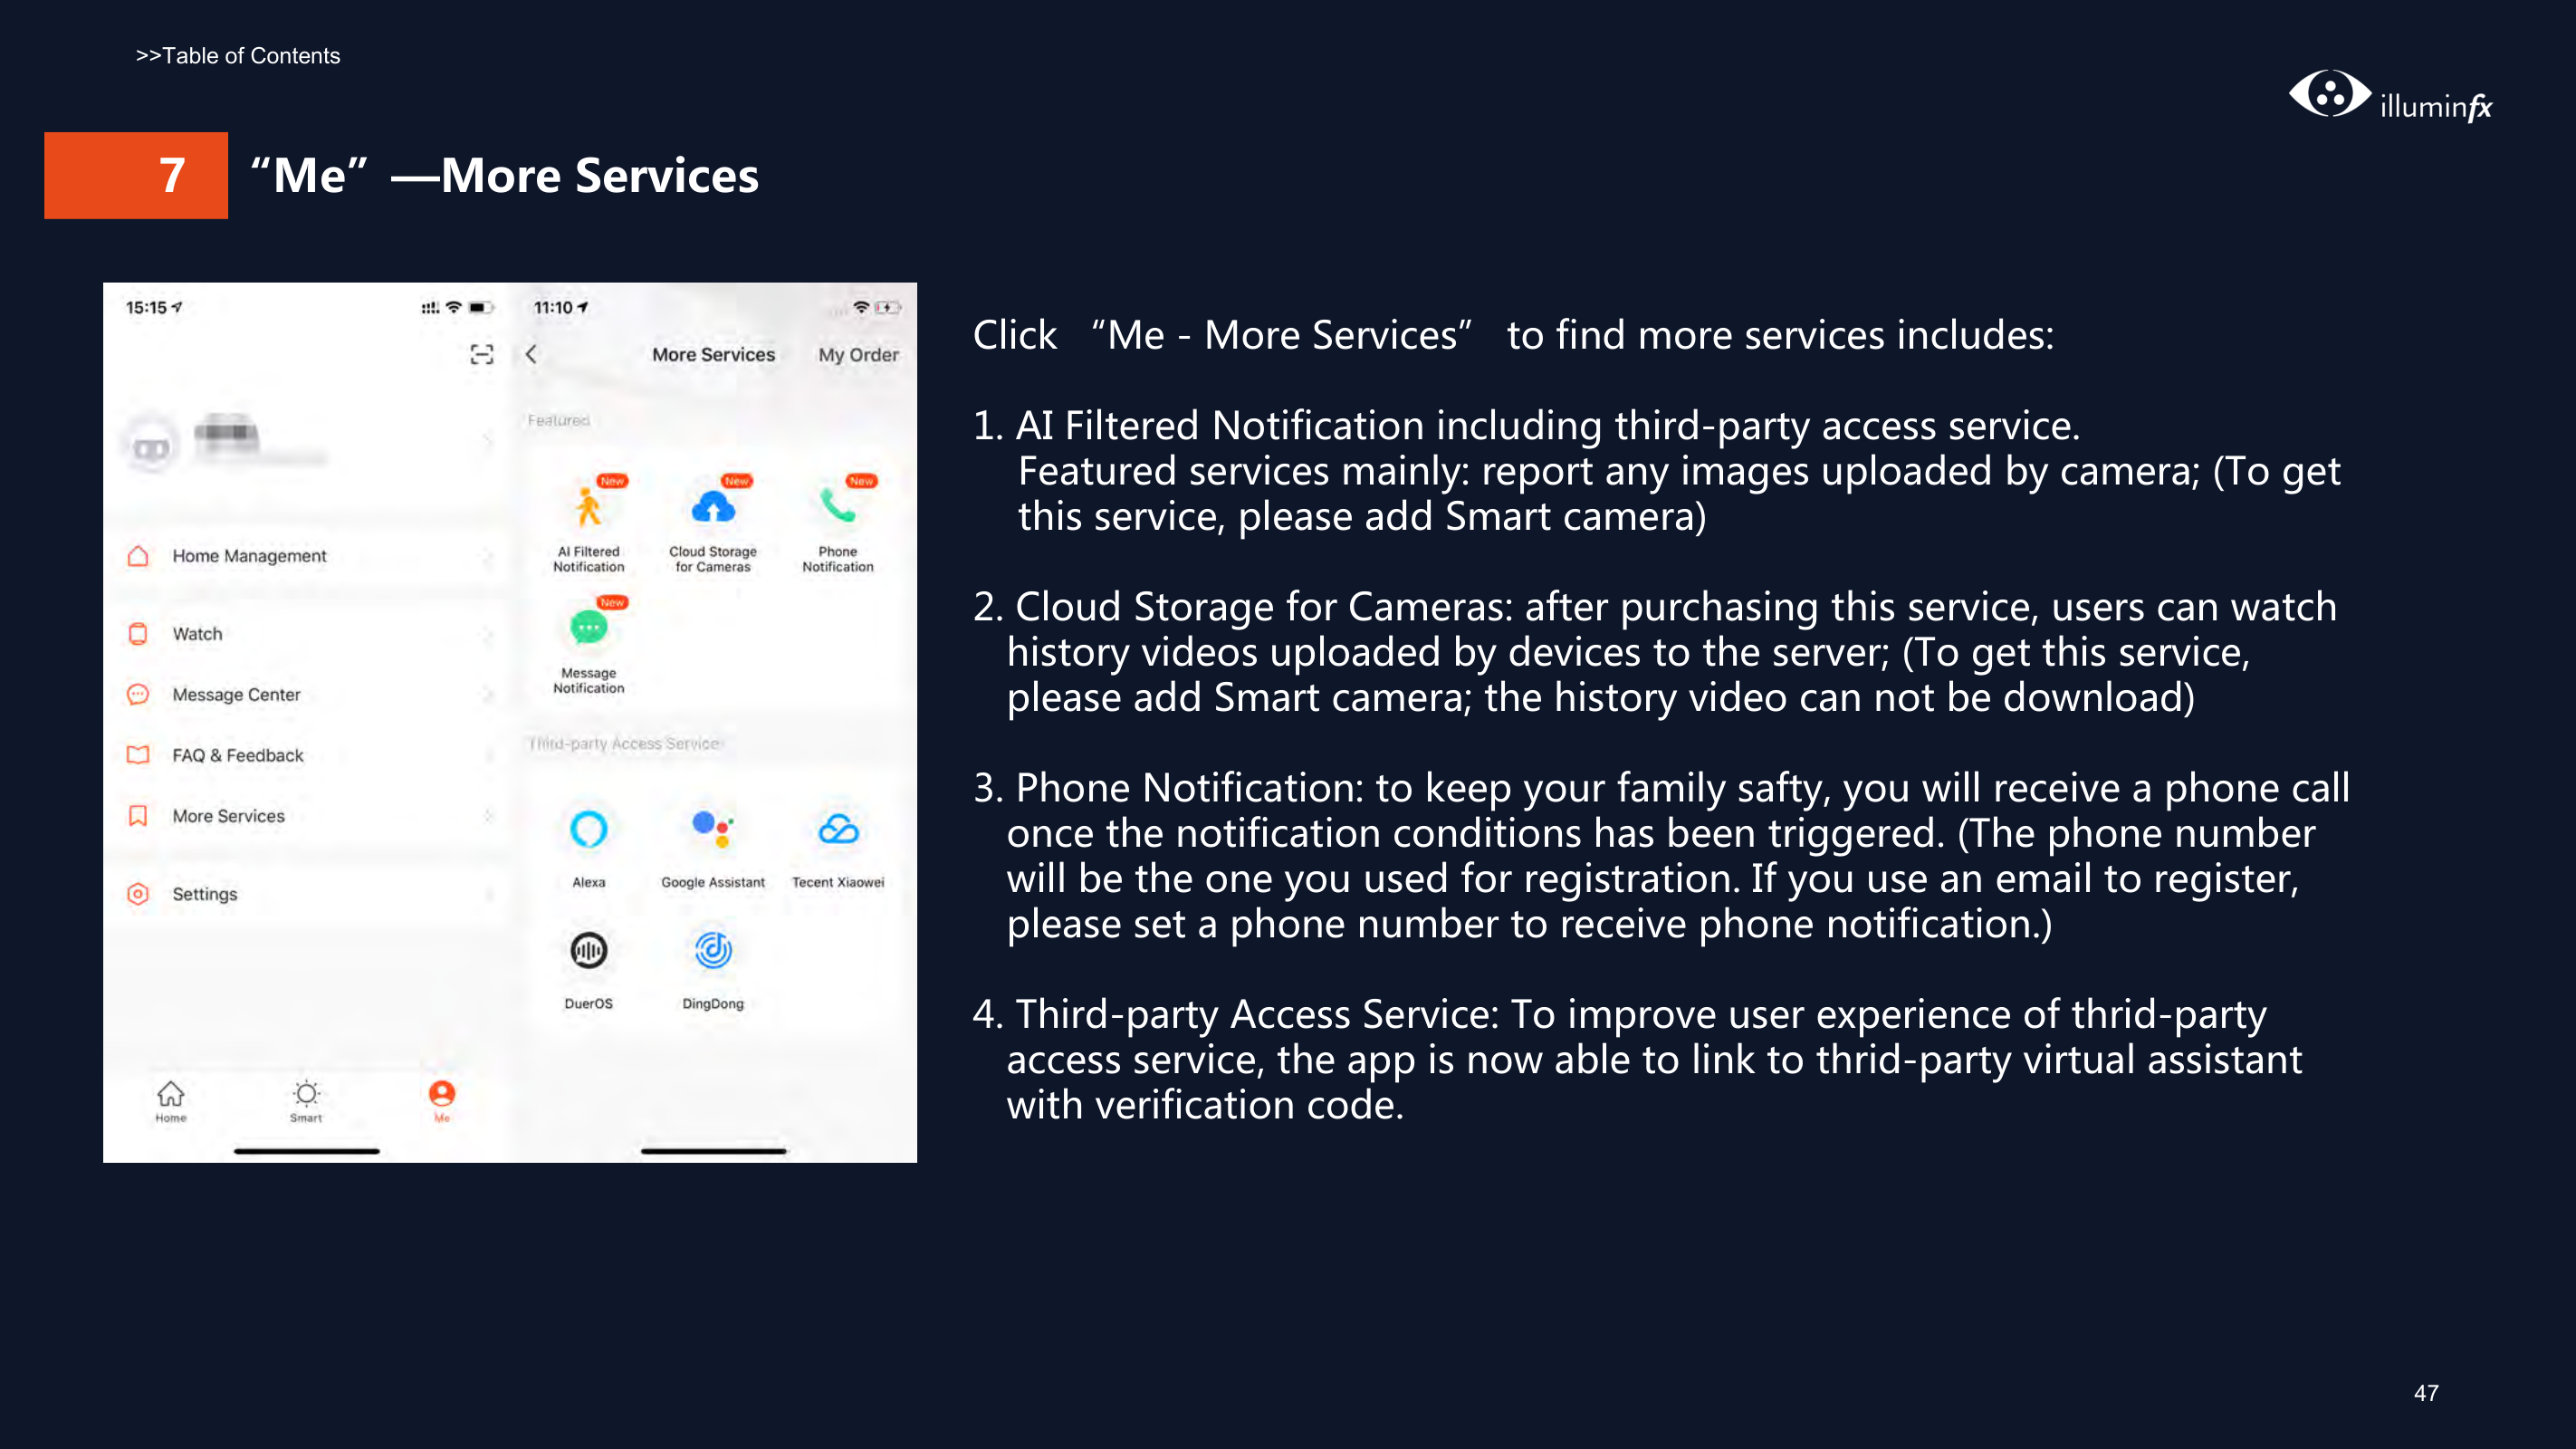


Fig.1 Fig.2 Fig.3 Fig.4
44
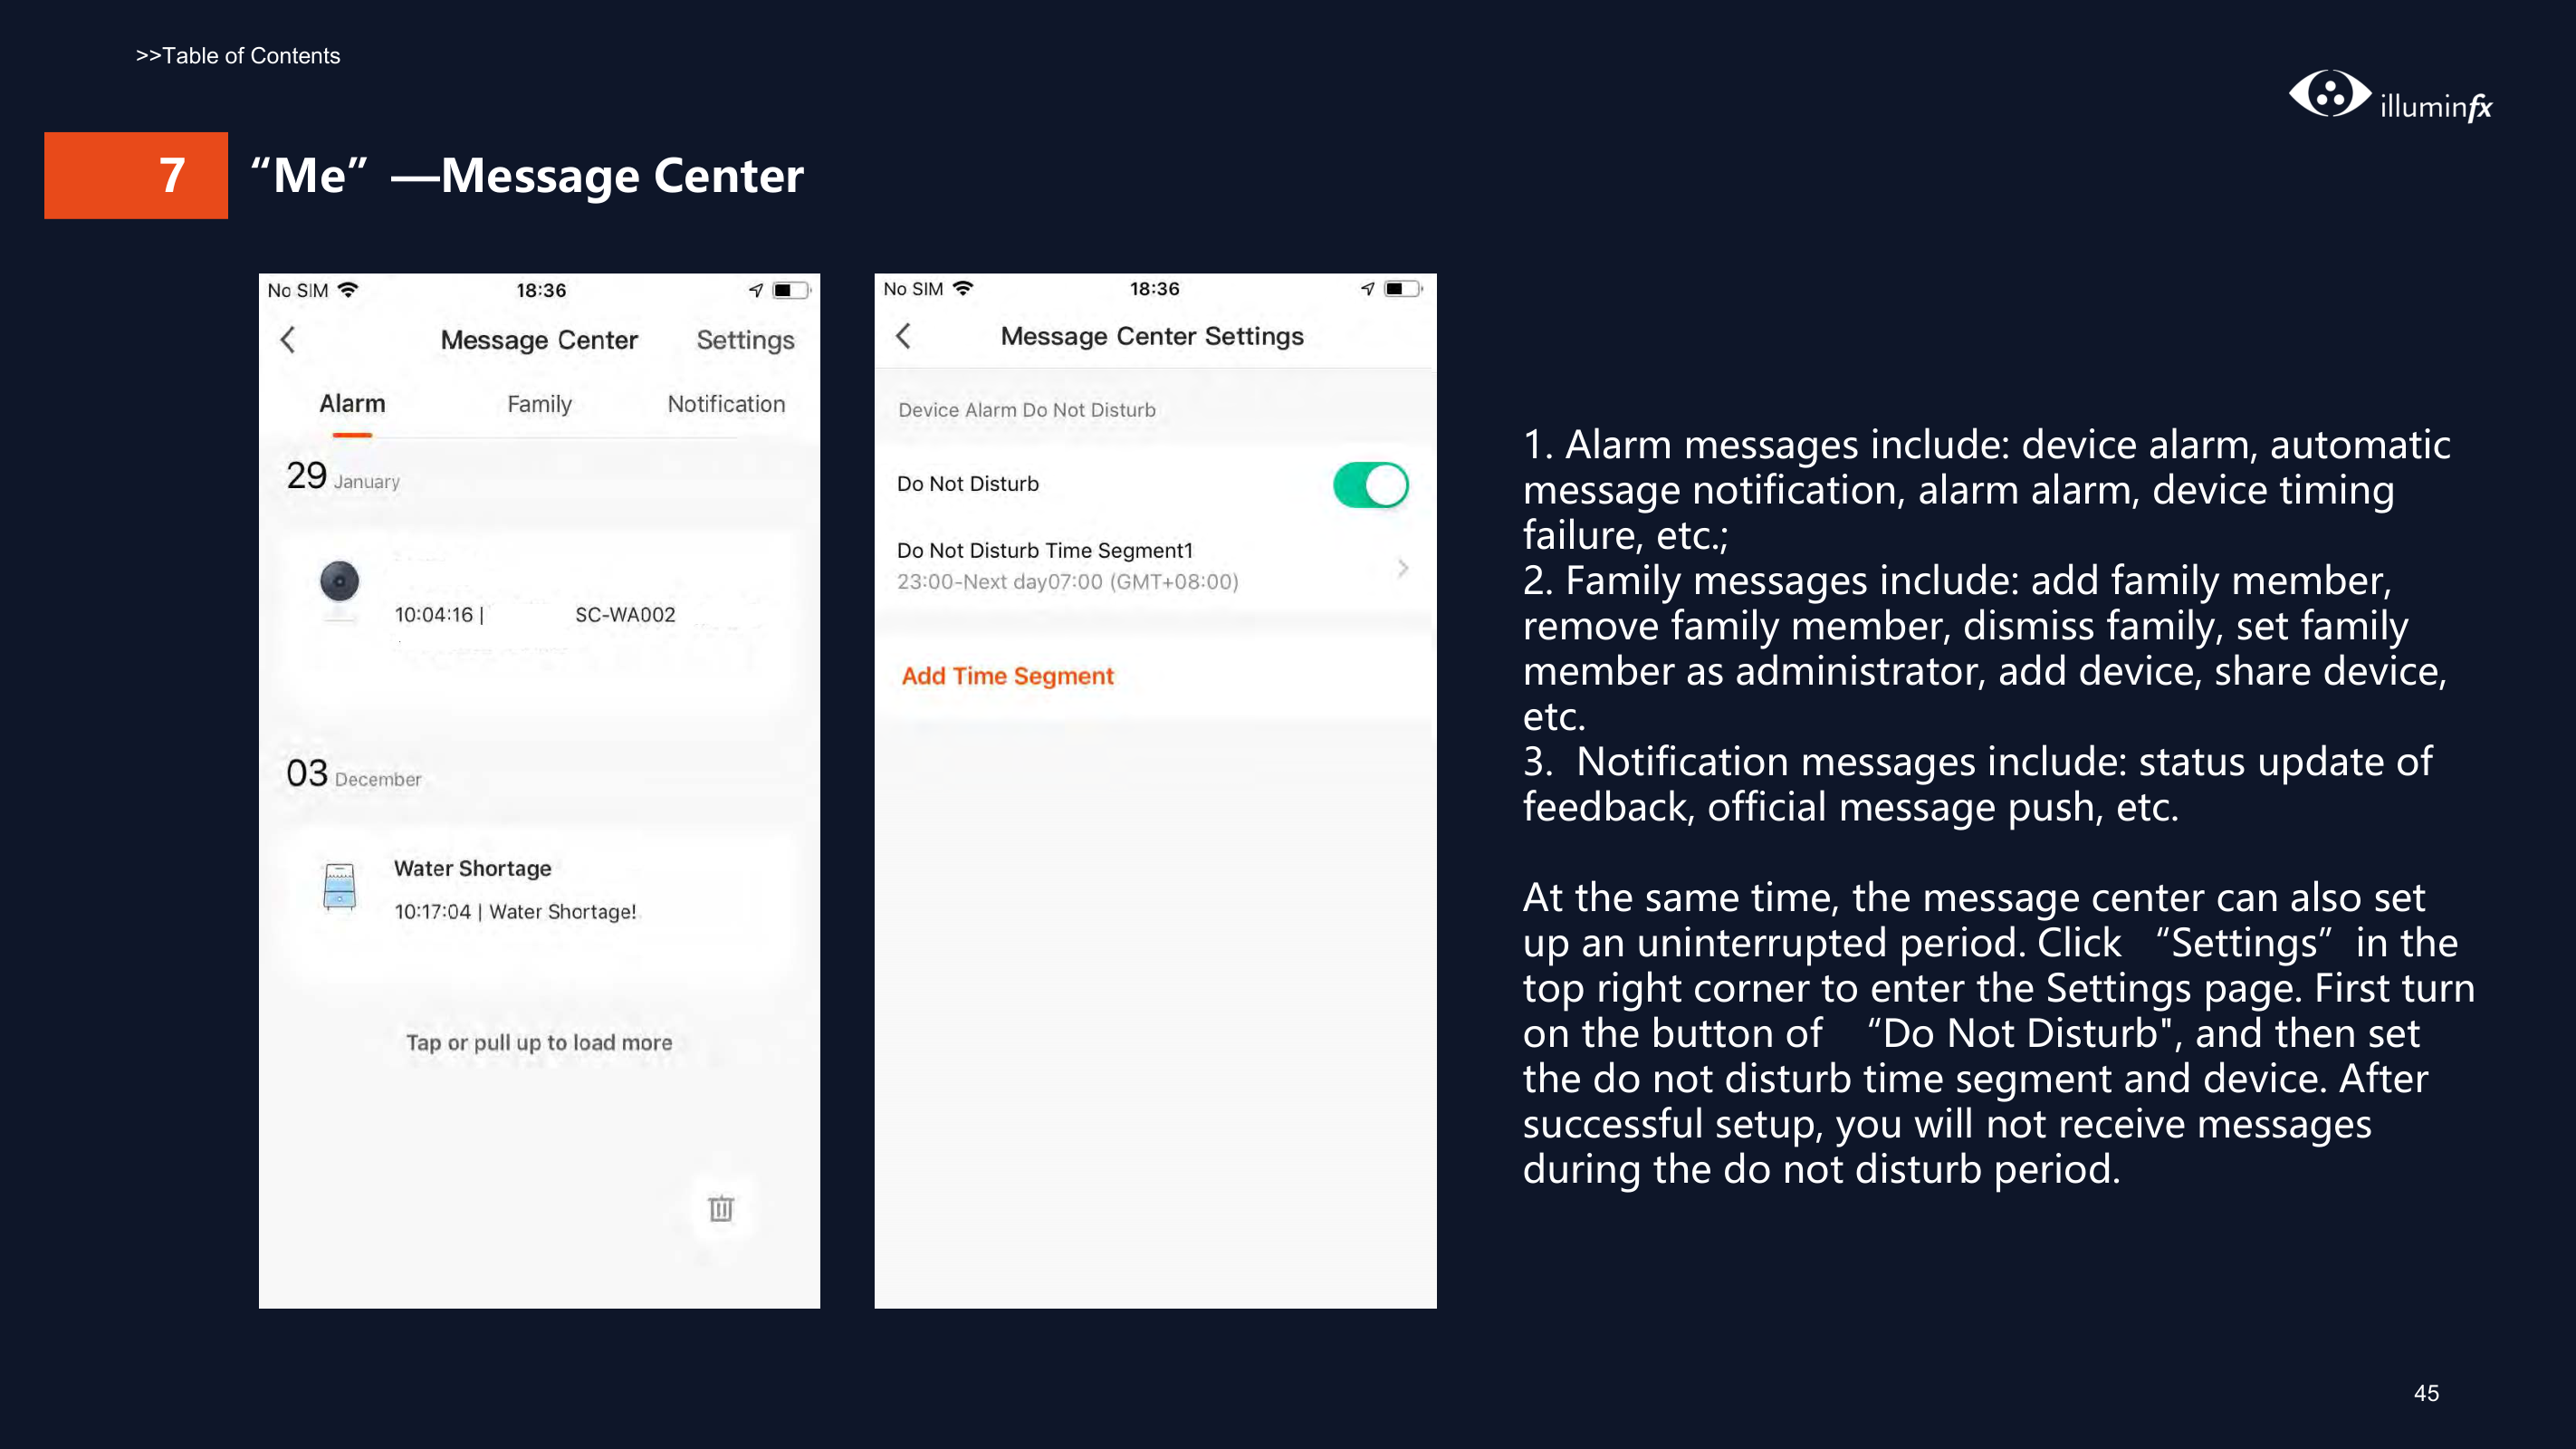
###### 7 “Me”—Message Center


At the same time, the message center can also set up an uninterrupted period. Click “Settings”in the top right corner to enter the Settings page. First turn on the button of “Do Not Disturb", and then set the do not disturb time segment and device. After successful setup, you will not receive messages during the do not disturb period.
###### 7 “Me”—Help Center
|
| |---|
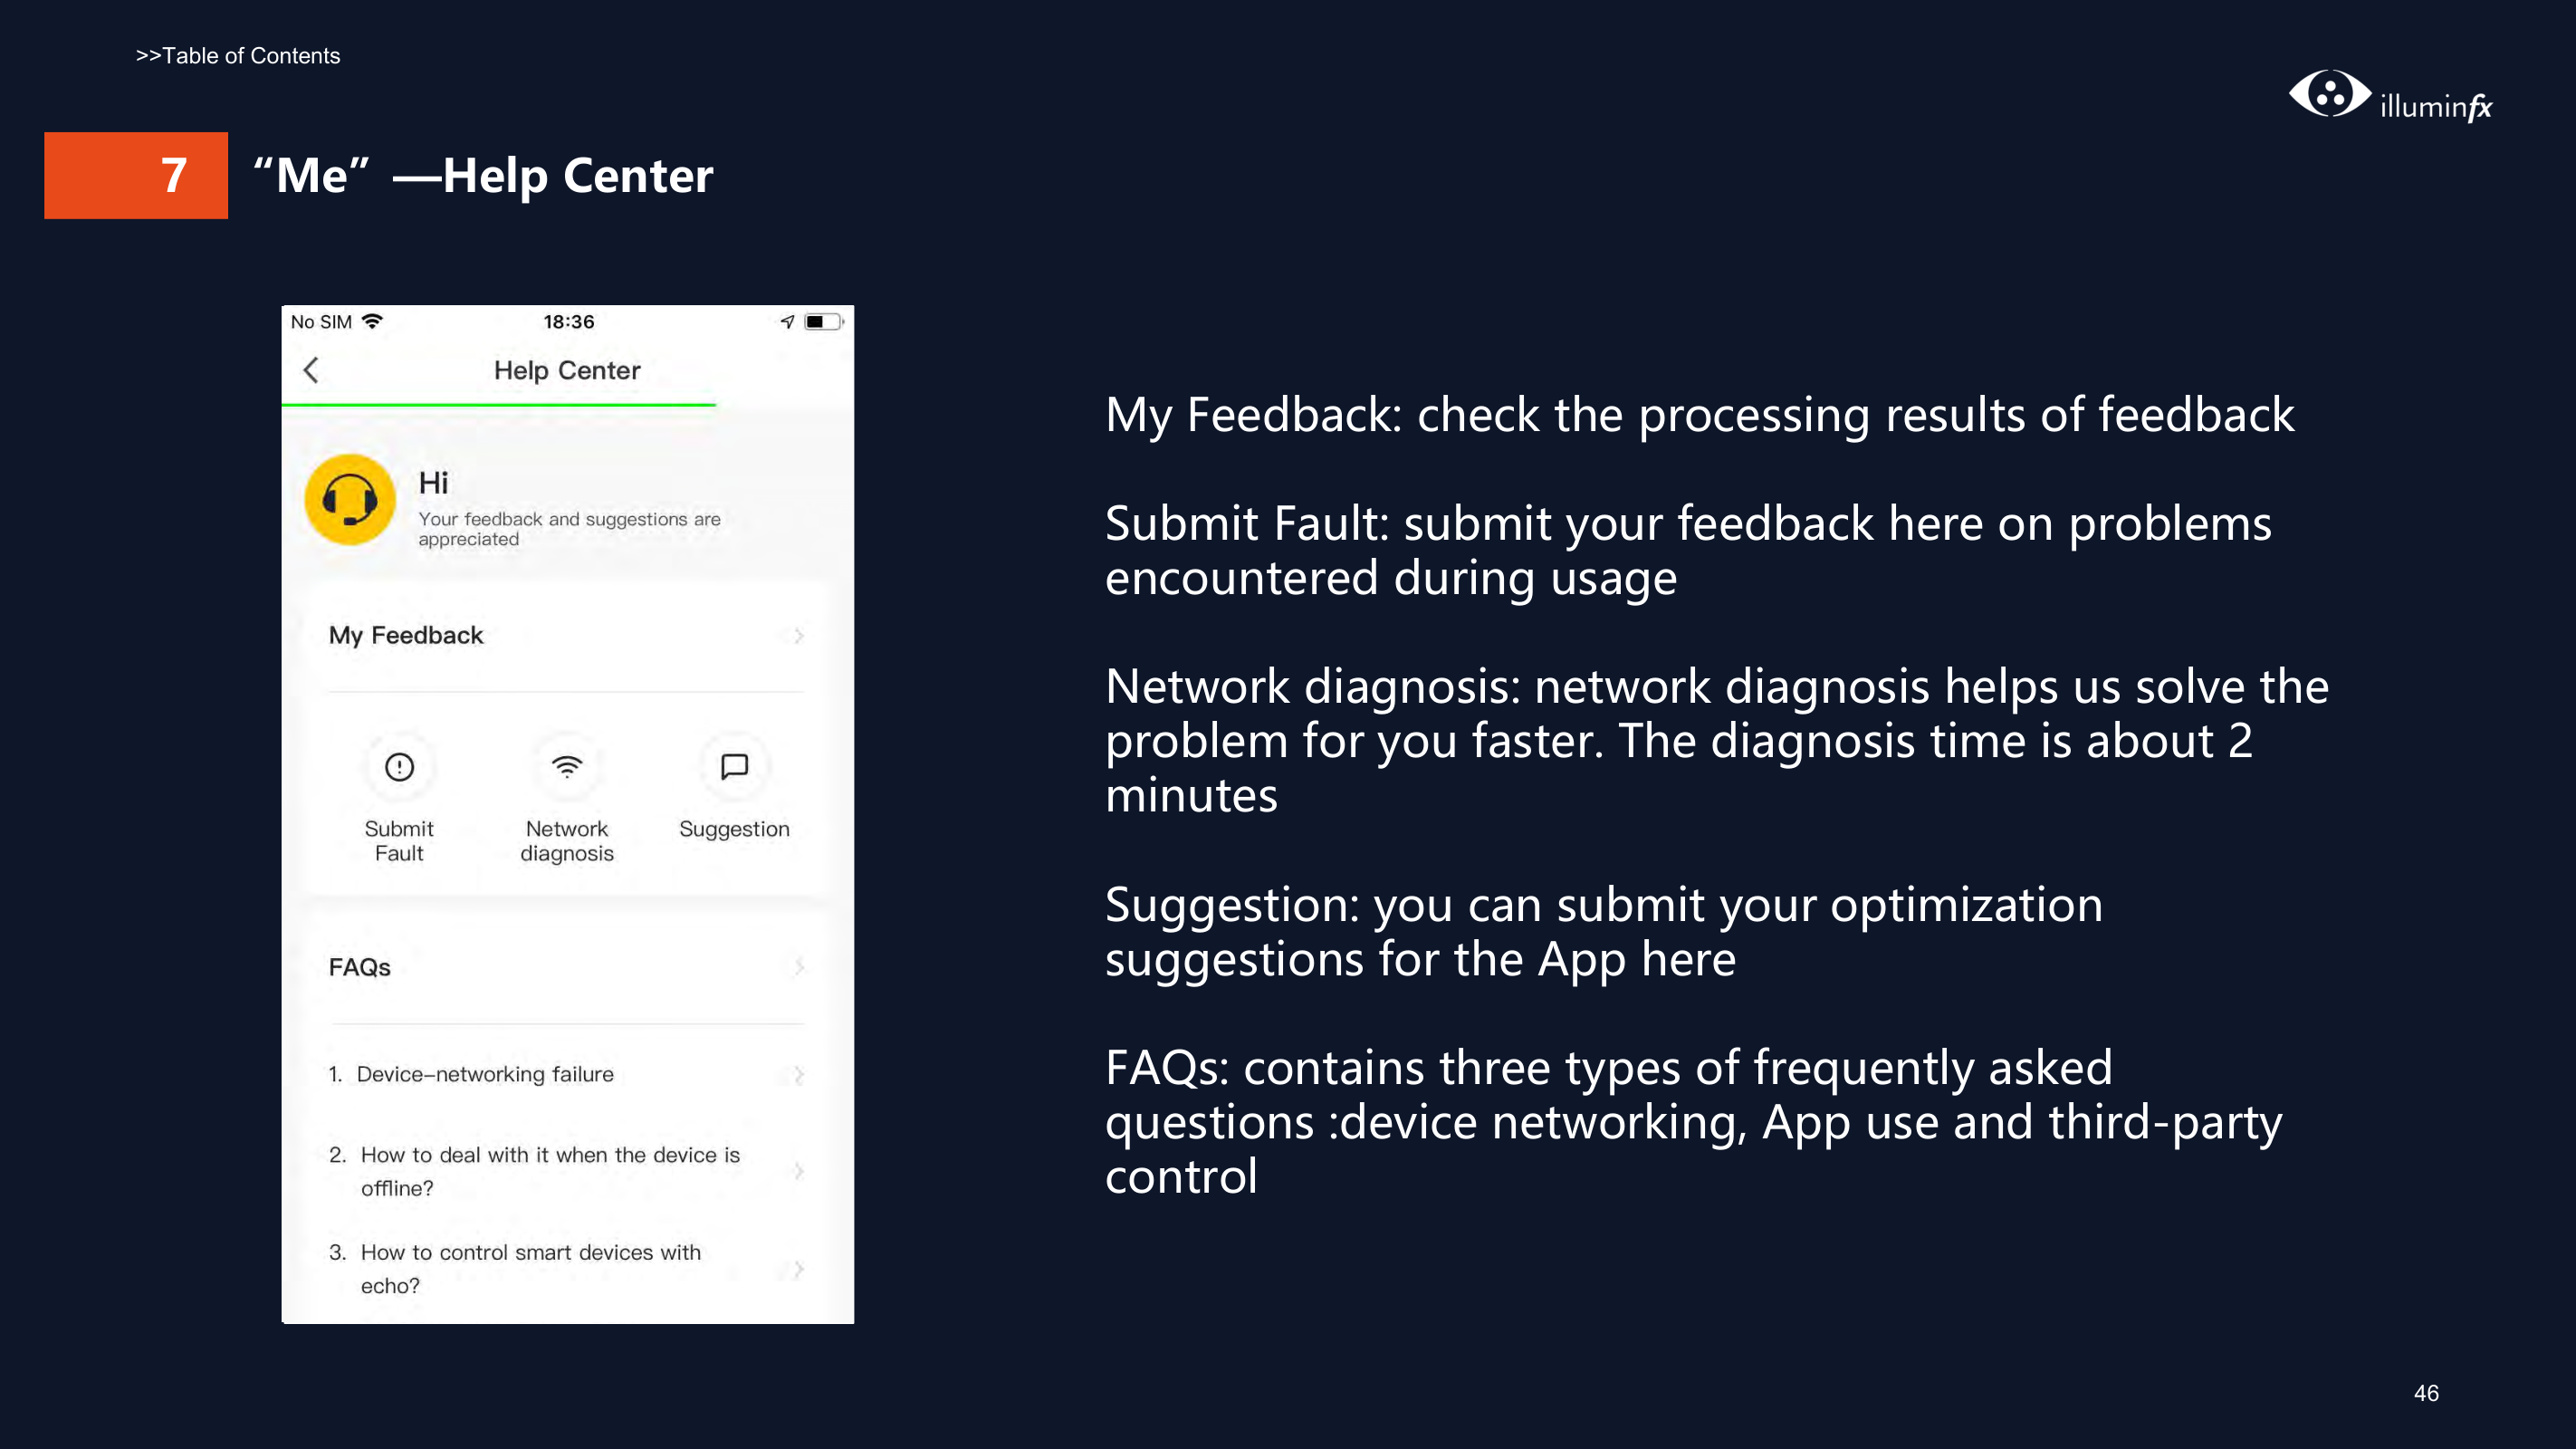
My Feedback: check the processing results of feedback Submit Fault: submit your feedback here on problems encountered during usage Network diagnosis: network diagnosis helps us solve the problem for you faster. The diagnosis time is about 2 minutes
Suggestion: you can submit your optimization suggestions for the App here
FAQs: contains three types of frequently asked questions :device networking, App use and third-party control
###### 7 “Me”—More Services

Click “Me - More Services” to find more services includes:
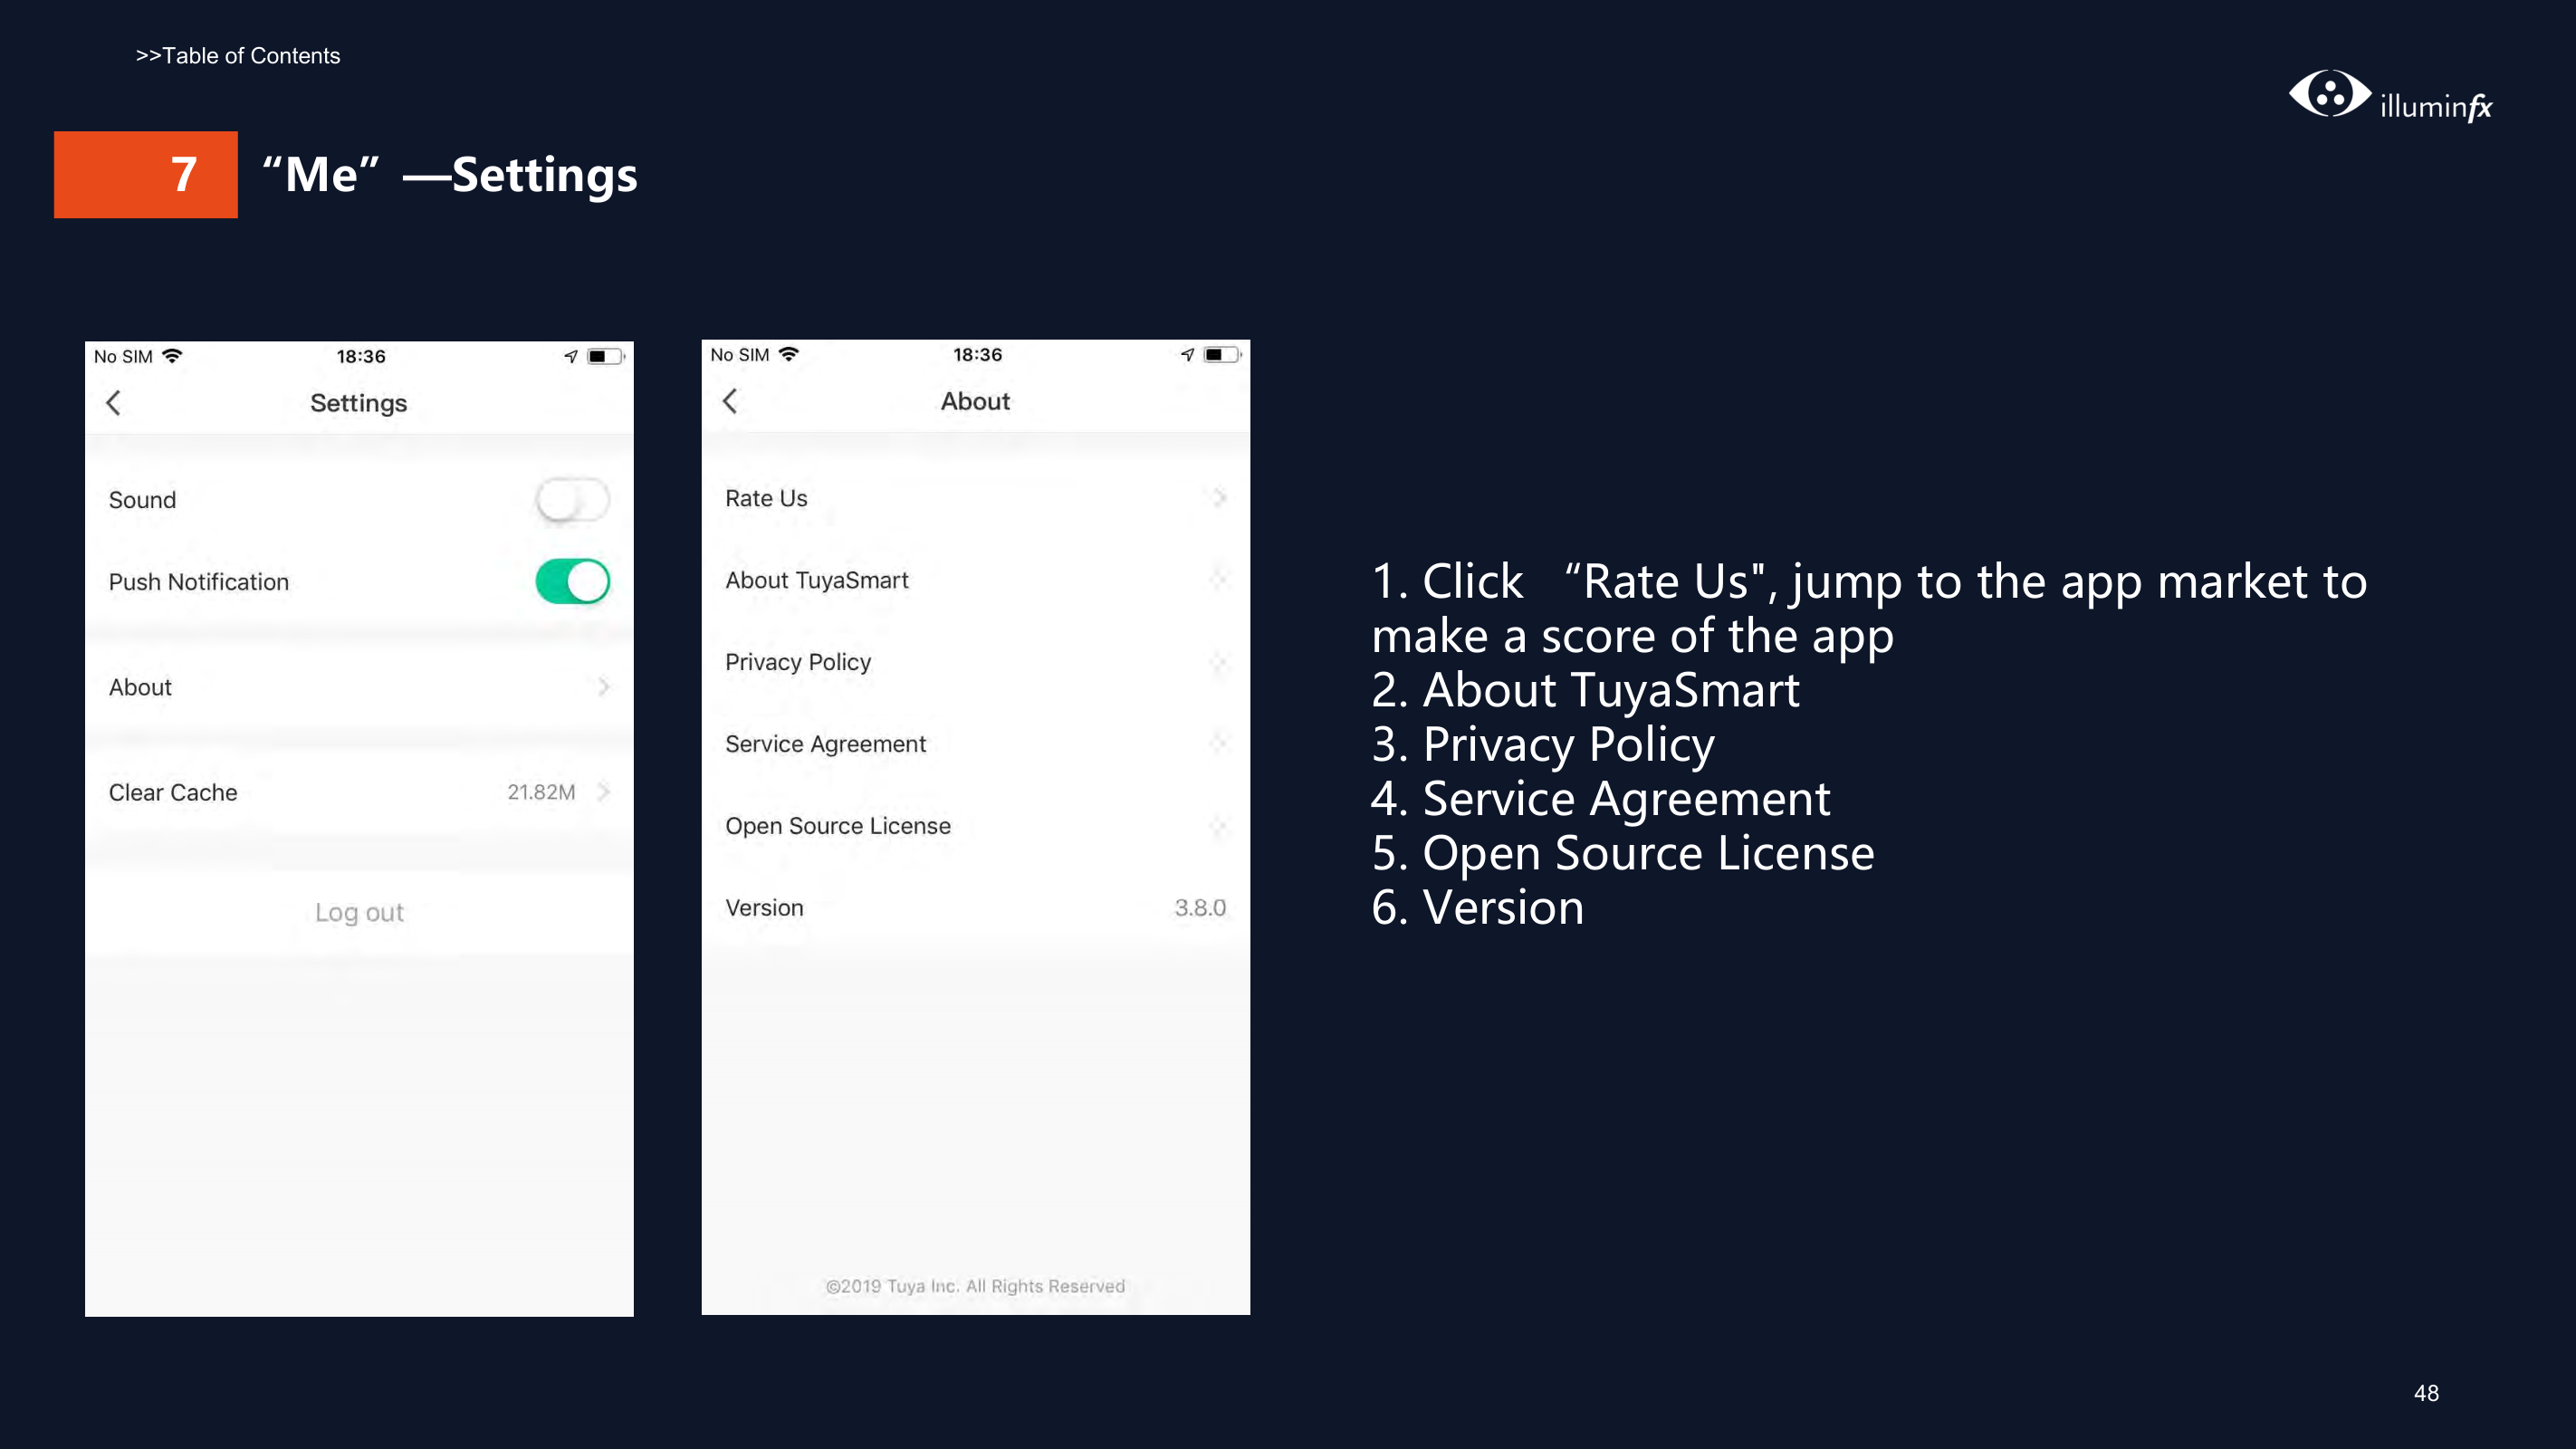
###### 7 “Me”—Settings


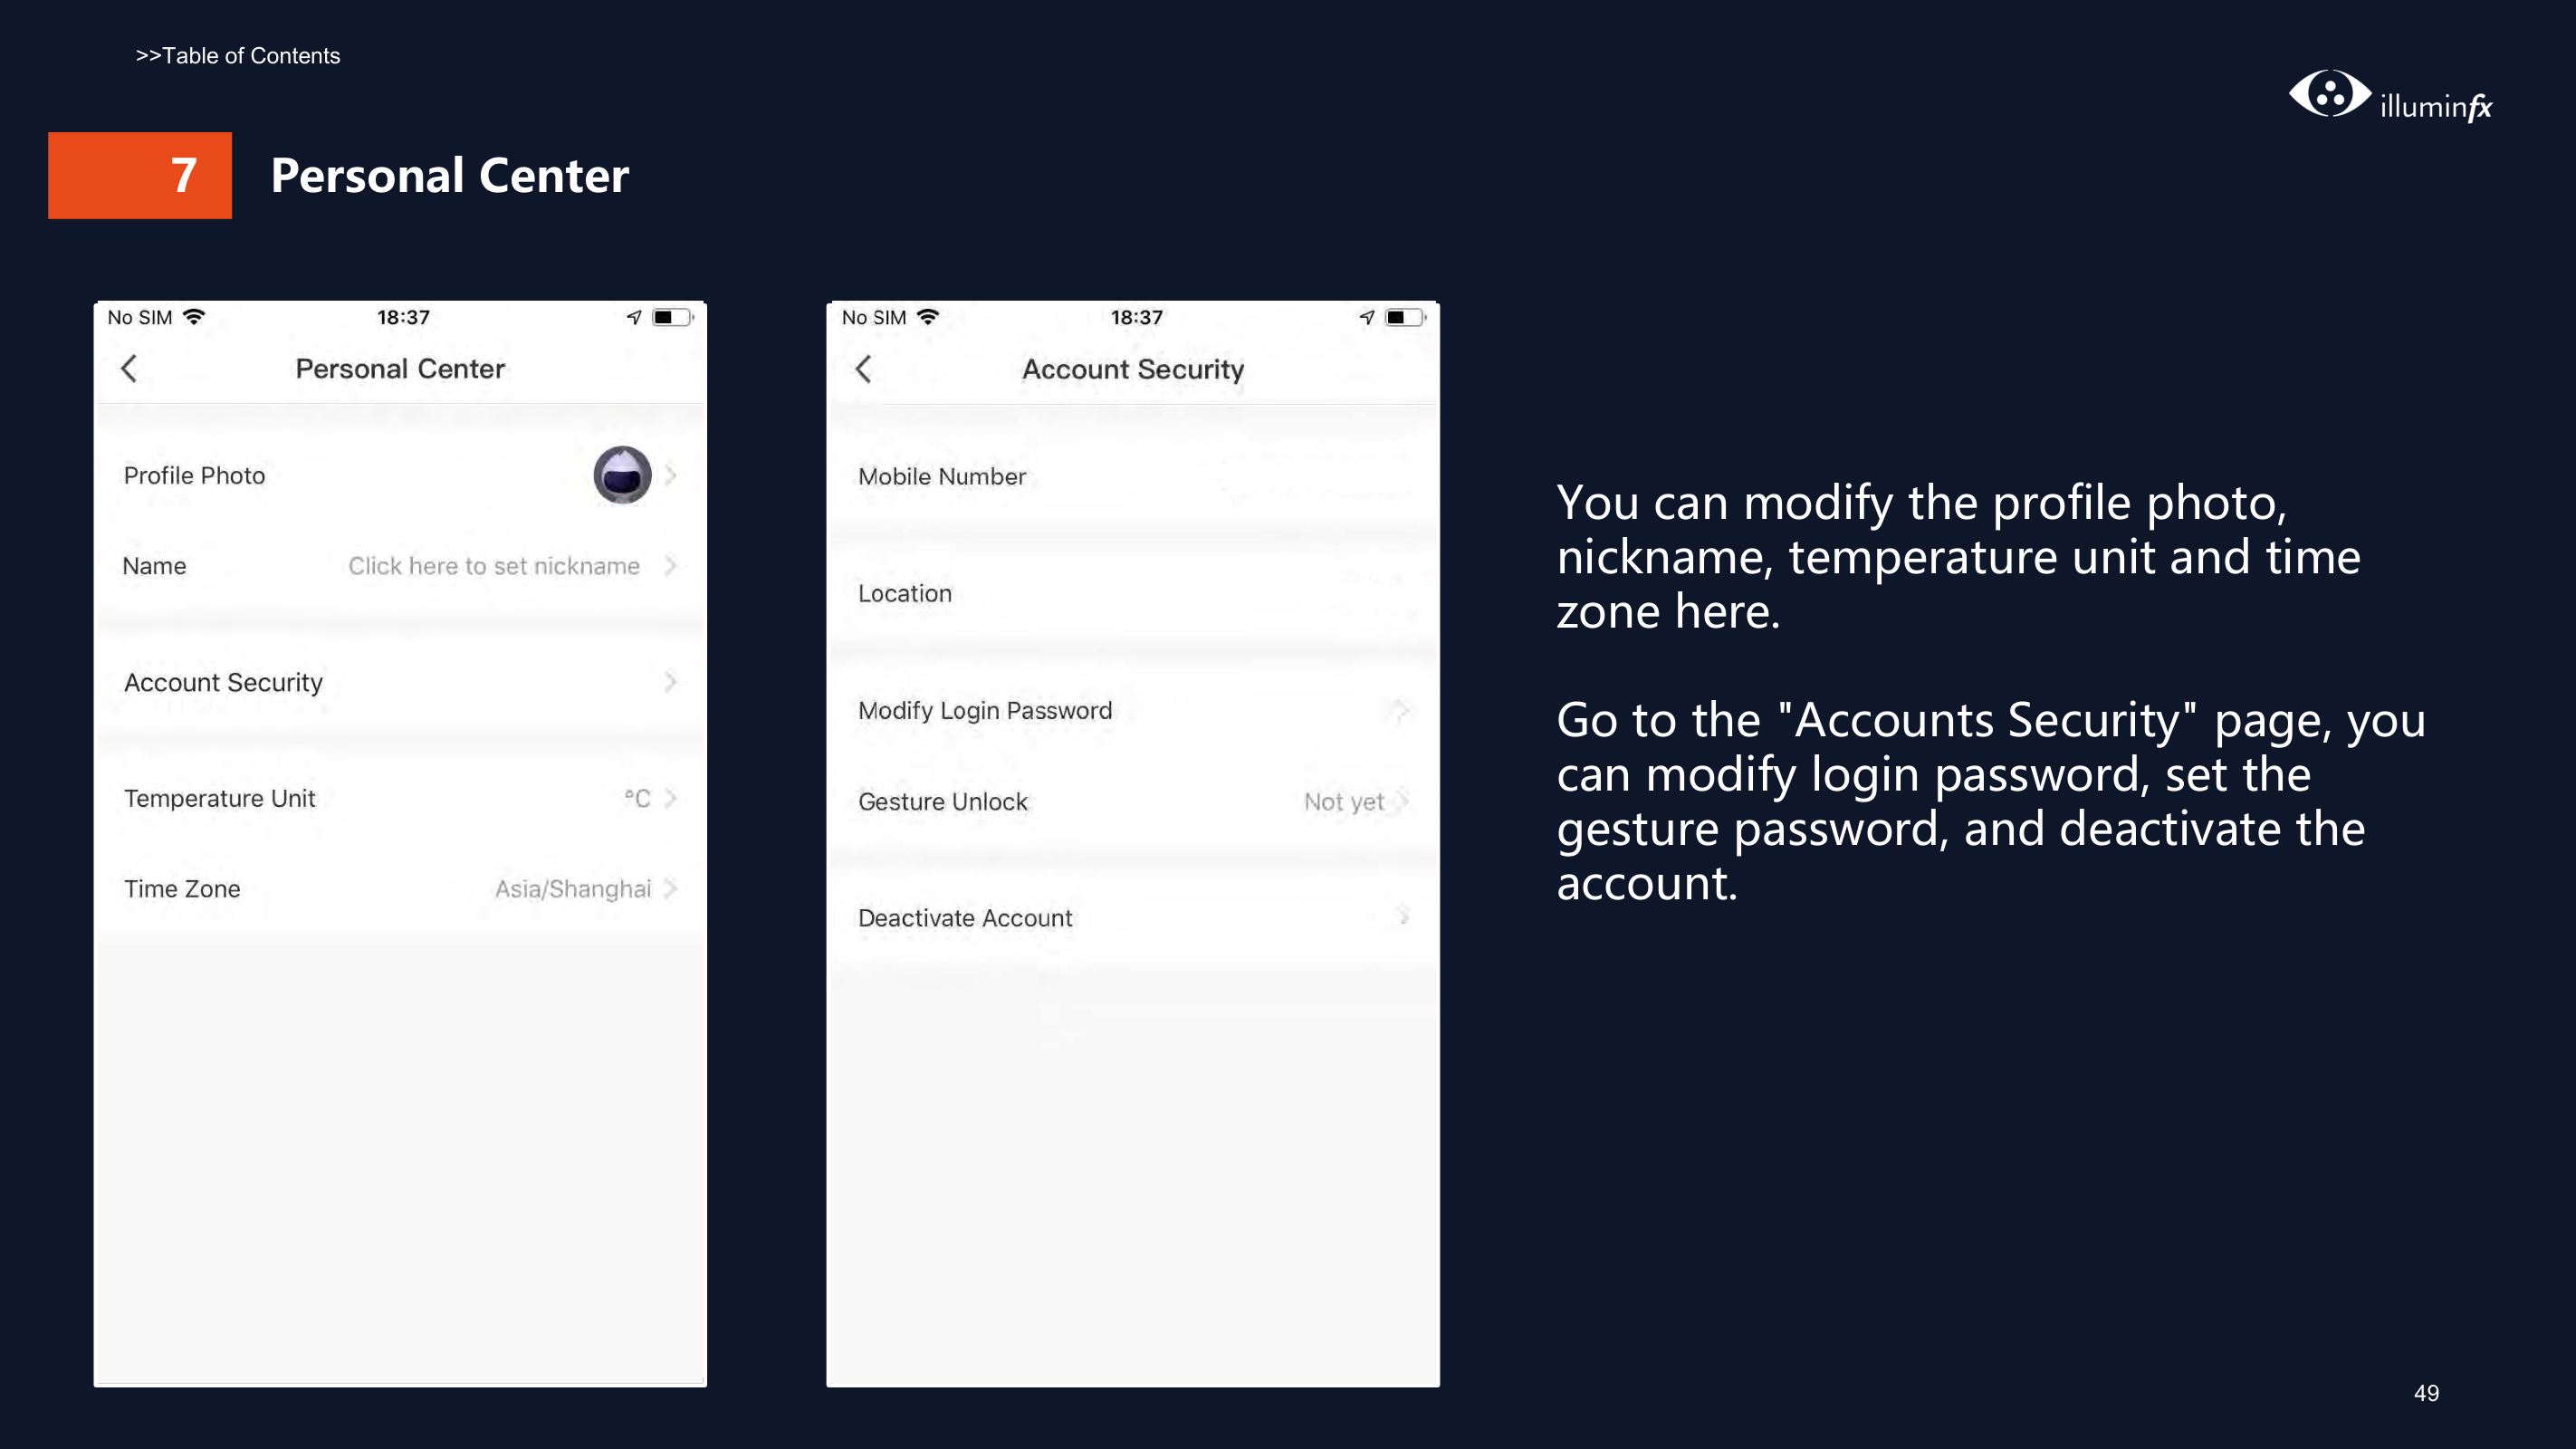
###### 7 Personal Center
|
| |---|
|
| |---|
You can modify the profile photo, nickname, temperature unit and time zone here.
Go to the "Accounts Security" page, you can modify login password, set the gesture password, and deactivate the account.
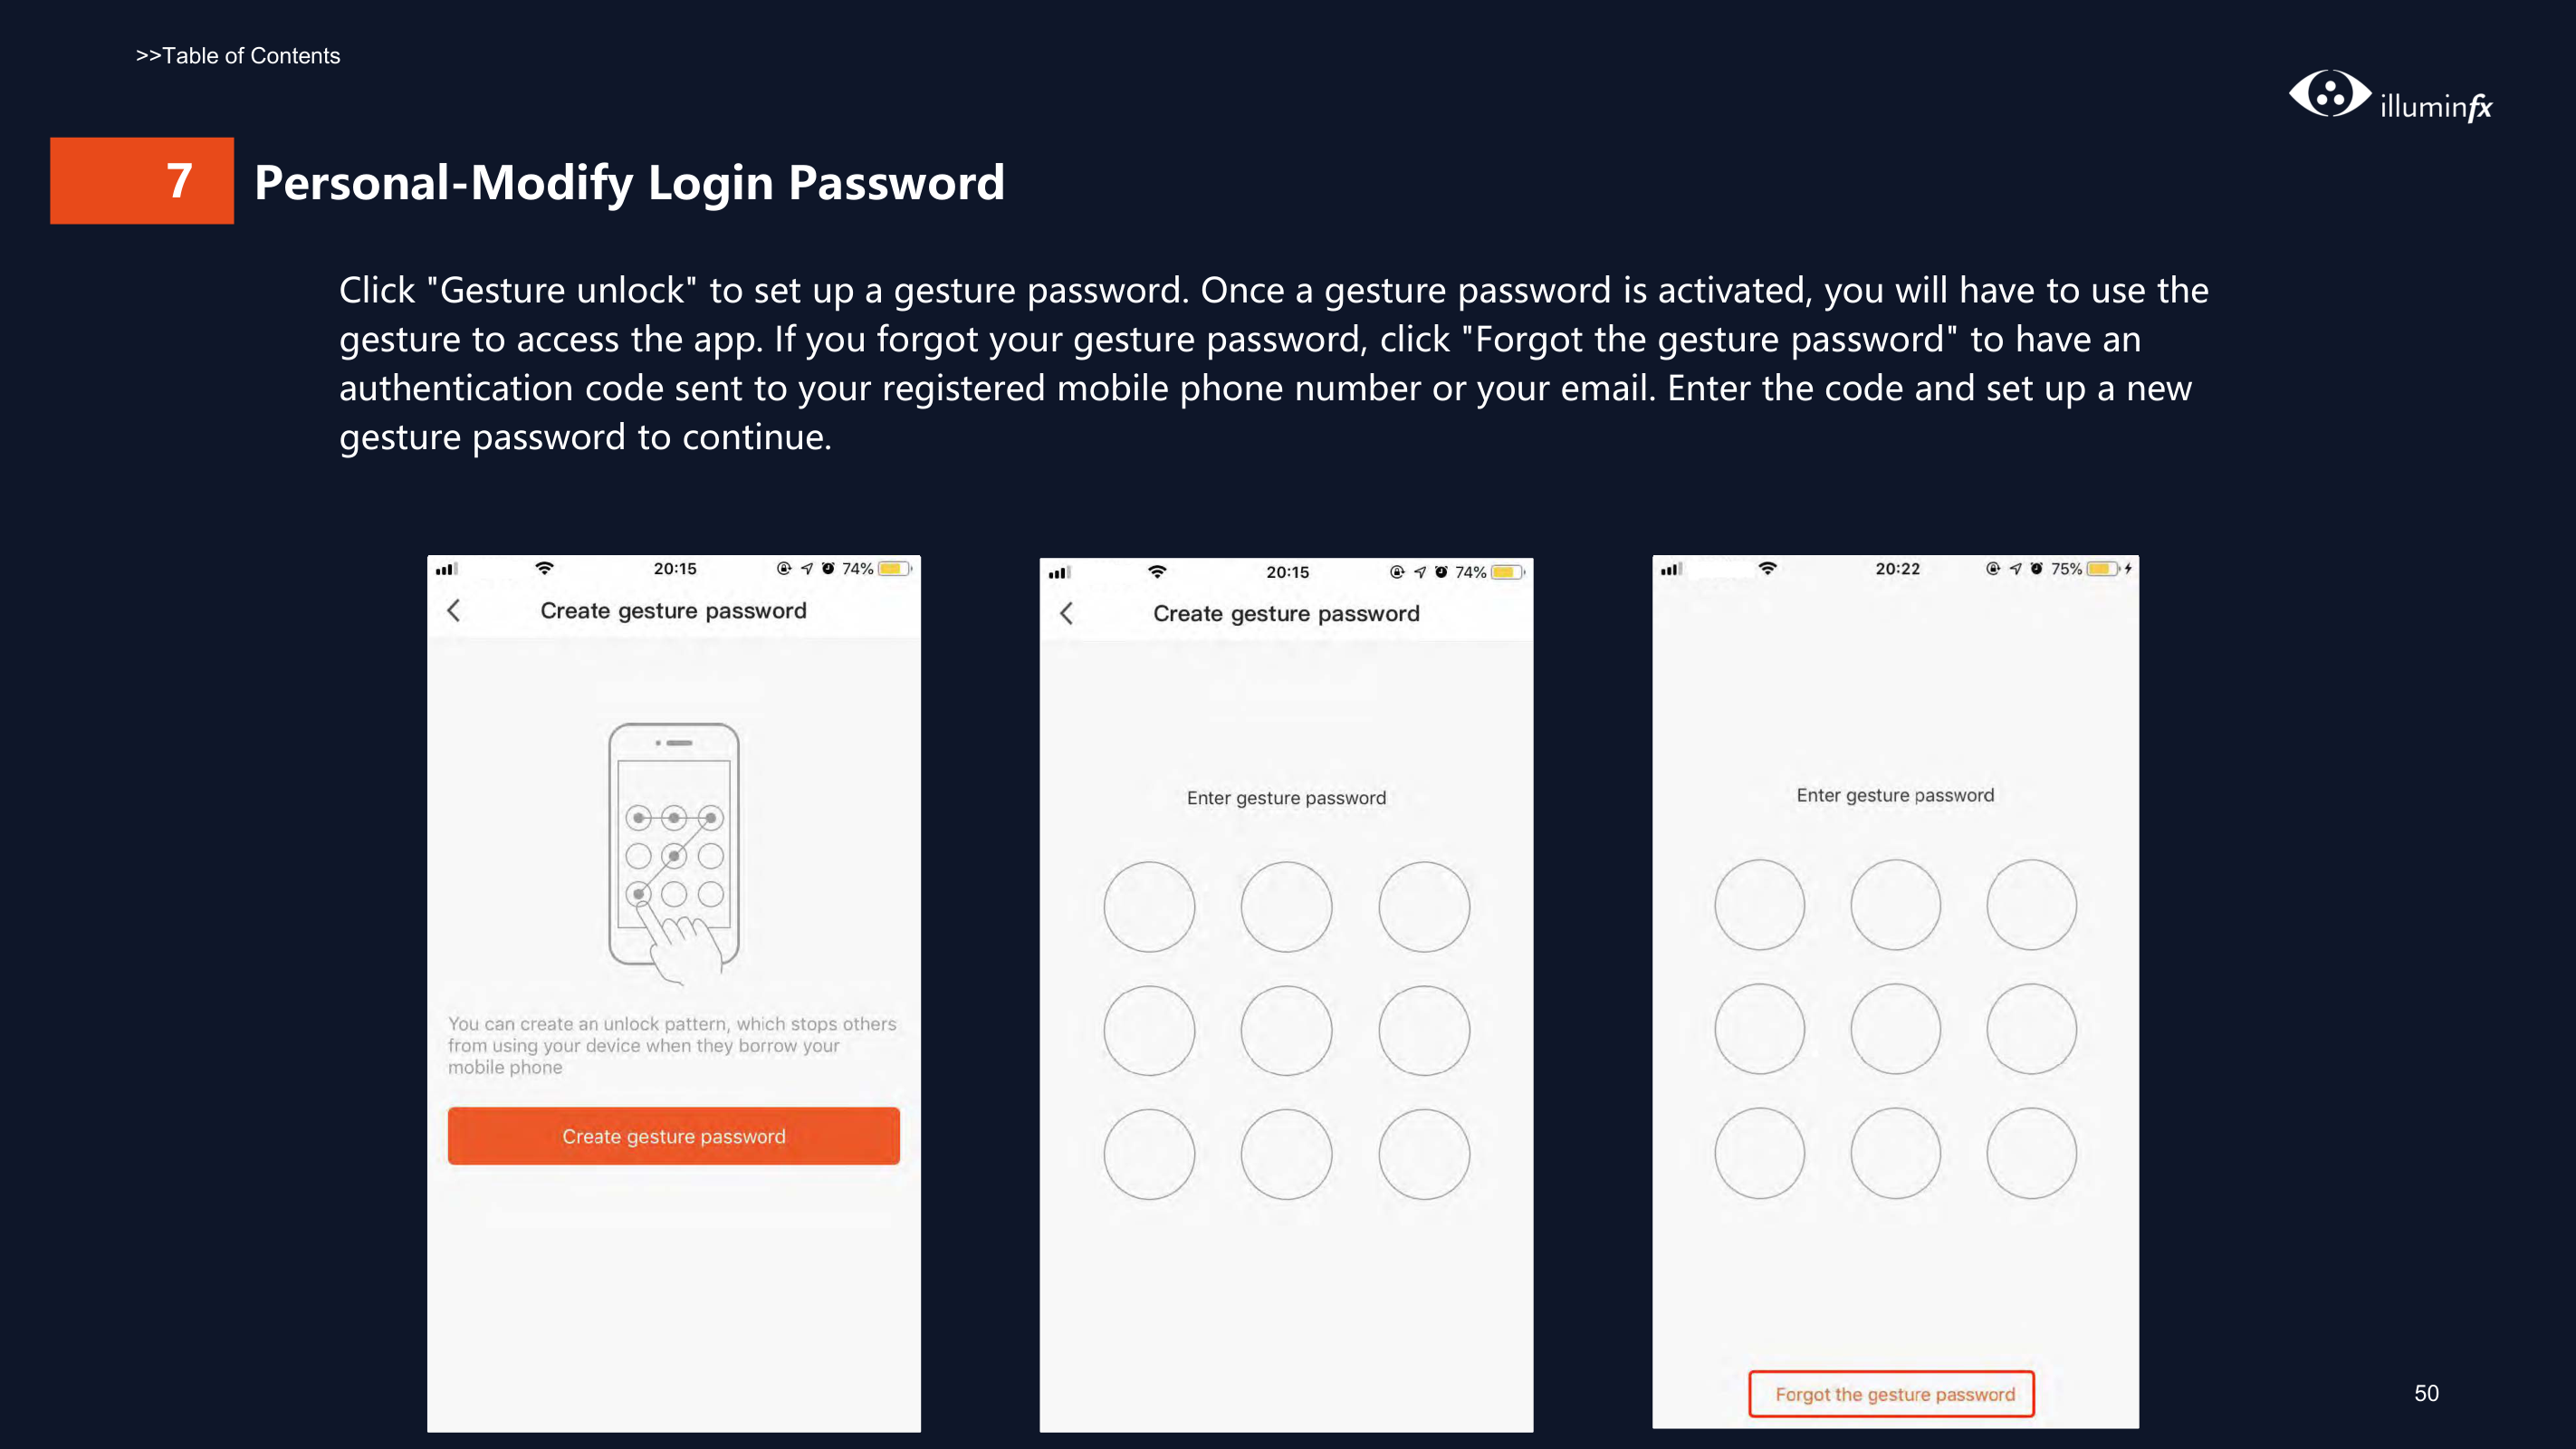
###### 7 Personal-Modify Login Password
Click "Gesture unlock" to set up a gesture password. Once a gesture password is activated, you will have to use the gesture to access the app. If you forgot your gesture password, click "Forgot the gesture password" to have an authentication code sent to your registered mobile phone number or your email. Enter the code and set up a new gesture password to continue.
|
| |---|
|
| |---|
|
| |---|
Thank You
Notes: