
Ask AI
— answers from the official manualAnswers from the official manual.
Common questions
Common Questions
8 totalHow do I factory reset the [product]?
Press and hold the Power button for 10 seconds until the LED flashes red. This clears all settings and returns the device to factory defaults. You will need to re-pair all connected devices after the reset.
How do I insert a new SIM card?
Turn off the device, remove the weatherproof panel with an Allen key if necessary, insert and click the nano SIM into position in the SIM slot located at the bottom of the hub. Then secure the cable into place with the screws.
How do I connect my devices to the outdoor hub via Wi-Fi?
Wirelessly, search for available Wi-Fi networks and select your Three Broadband WiFi name from the list. Enter the password created during eero setup in the app.
What are safety considerations when installing the hub?
Avoid installation or working on equipment during adverse weather conditions. Do not disassemble or attempt to repair the device yourself without professional help.
What is the purpose of the Multi-purpose mounting bracket?
The multi-purpose mounting bracket allows for flexible installation methods such as attaching to walls, windows, poles, or a stand as shown in Figures 3 and 5.
How do I set up my eero inside after setting up the outdoor hub?
Ensure your outdoor hub is not connected at the mains, connect your eero Wi-Fi device to the PoE adaptor using an ethernet cable, plug both into power, and follow the steps in the app to complete setup.
Full Manual
38 pages
Outdoor Hub User guide
Welcome
Welcome and prepare to unleash super-fast speeds for heavier streaming, more powerful gaming, and enhanced multi-user capacity. Ready for the ultimate 5G experience? Then let’s get started.
Contents
Get to know your hub What’s in the box Understanding your hub How to insert your SIM
Installation Finding a place for your hub Installation options Wall mount Pole mount Window mount Stand

4
6 8
10
14 16 18 20 22 24
Get Connected Setting up your eero The eero app Your Three Broadband Account Download the Three App

FAQs Safety information Glossary Still need help?
28
What’s in the box? Initial set up equipment For installation outdoors* For installation indoors
| | | | |---|---|---| | | | |

Allen key
Your 5G Outdoor Hub
Power over Ethernet Adaptor (PoE)
########### 6
For illustration purposes only.

Flat ethernet cable with reel and x5 cable clips**
Note: This user guide is written for the outdoor hub model Y5
Power Adaptor Always use the one provided with your hub
eero Wi-Fi device Found in a separate box
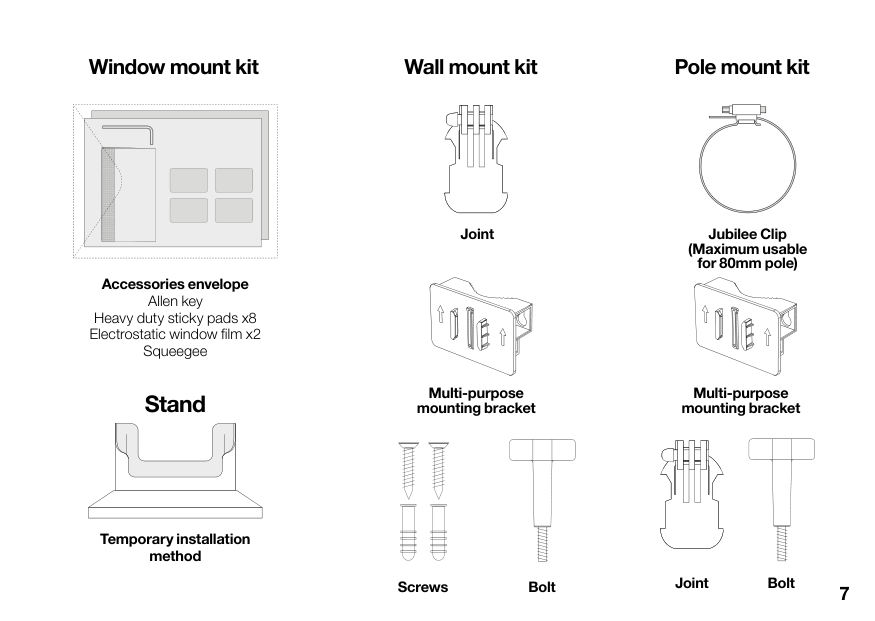
Window mount kit
Wall mount kit Pole mount kit
Joint
Jubilee Clip (Maximum usable for 80mm pole) Accessories envelope Allen key Heavy duty sticky pads x8 Electrostatic window film x2 Squeegee
####### Stand
Temporary installation method
Multi-purpose mounting bracket
Multi-purpose mounting bracket
| | | | |---|---|---| | | | | | | | | | | | |
| | | | | | | | | | | | | | | | | | | | | | | |
| | | | |---|---|---| | | | |
| | | | | | | | | | | | | | | | | | | | | | | | | | | | | | | |
| | | |
|---|---|---| | | | |
| | | | |---|---|---| | | | |
Joint BoltScrewsBolt

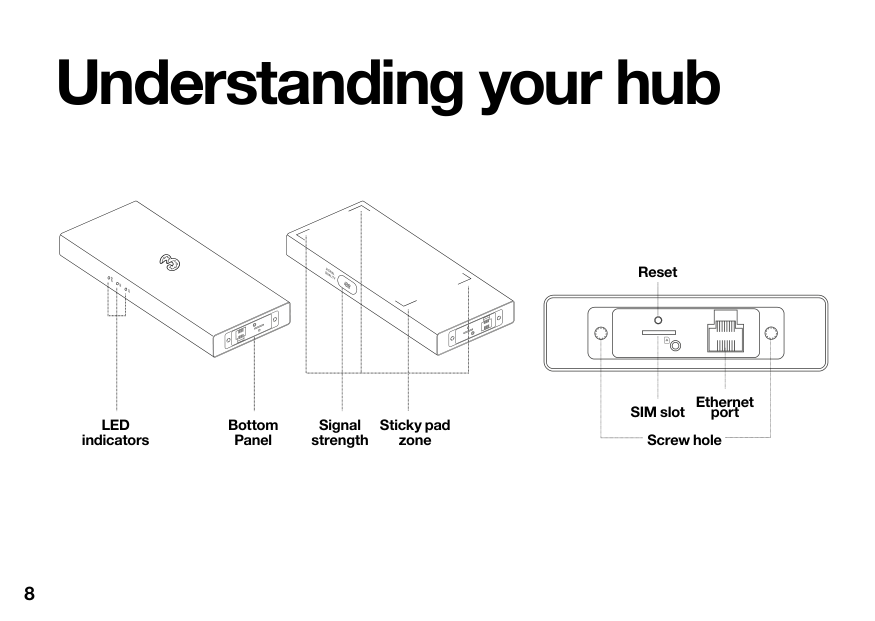
Understanding your hub
LED indicators
Bottom Panel
Signal strength
Sticky pad zone
Reset

Ethernet port Screw hole
SIM slot
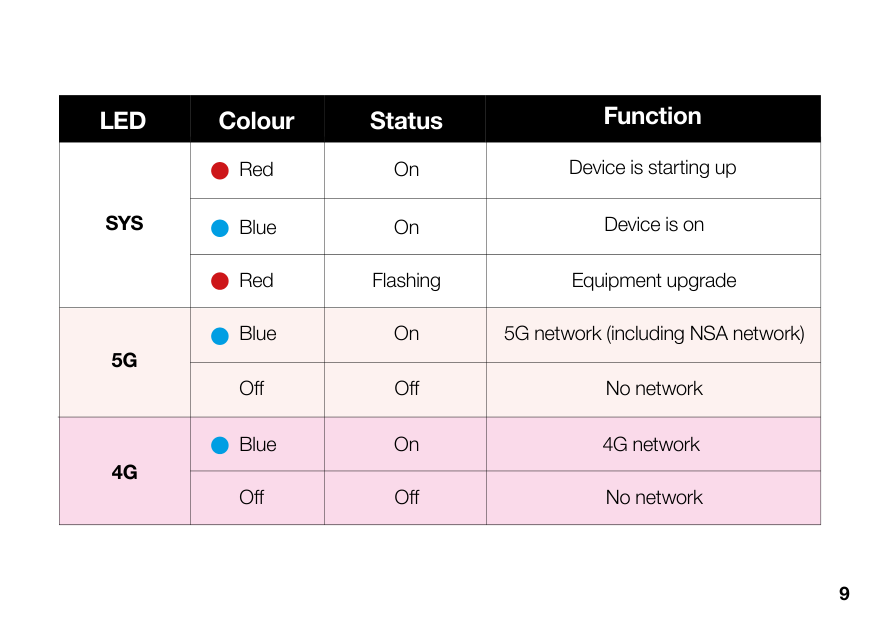
###### LED Colour Status Function
|SYS|Red|On|Device is starting up| |---|---|---|---| |SYS|Blue|On|Device is on| |SYS|Red|Flashing|Equipment upgrade|
|5G|Blue|On|5G network (including NSA network)| |5G|Off|Off|No network| |4G|Blue|On|4G network| |4G|Off|Off|No network|
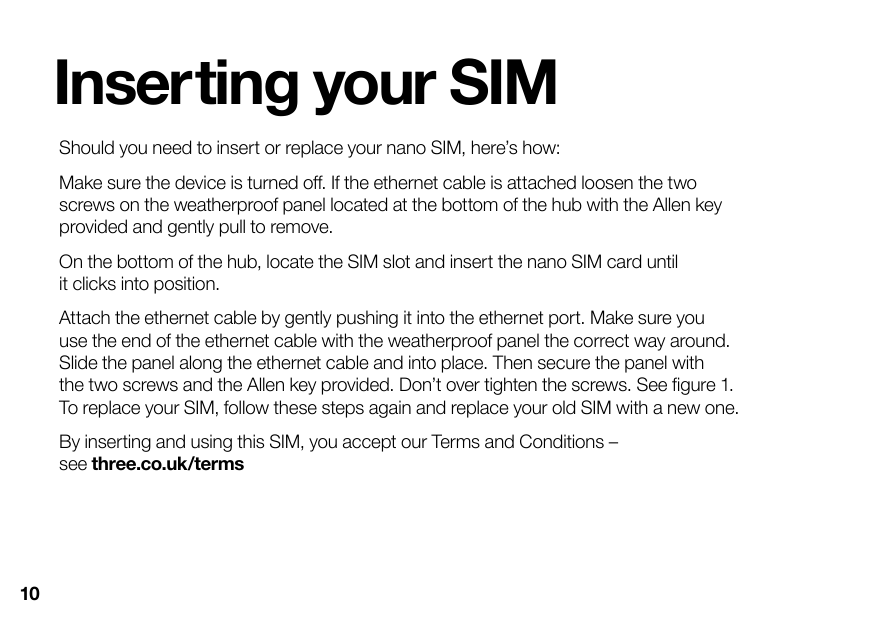
Inserting your SIM
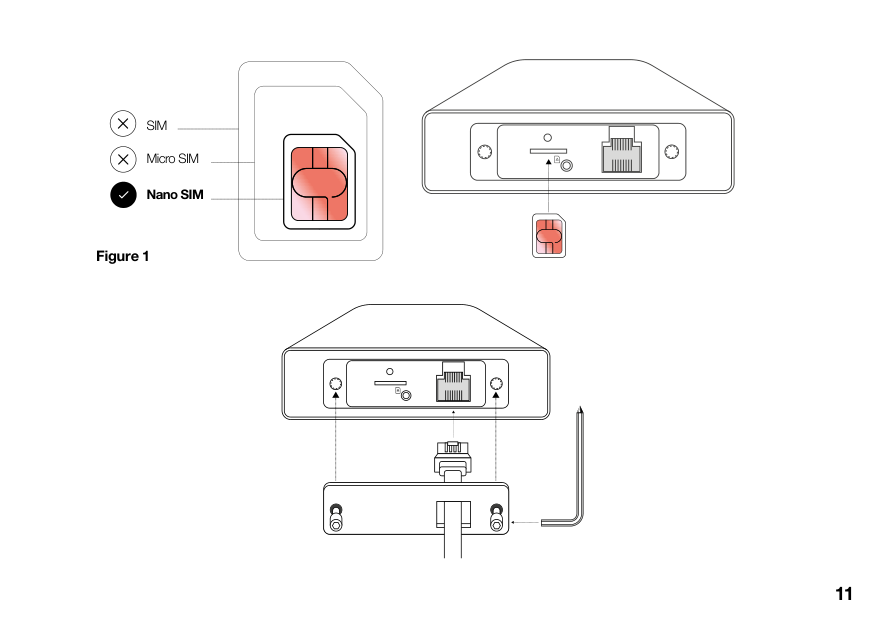
Should you need to insert or replace your nano SIM, here’s how: Make sure the device is turned off. If the ethernet cable is attached loosen the two screws on the weatherproof panel located at the bottom of the hub with the Allen key provided and gently pull to remove. On the bottom of the hub, locate the SIM slot and insert the nano SIM card until it clicks into position. Attach the ethernet cable by gently pushing it into the ethernet port. Make sure you use the end of the ethernet cable with the weatherproof panel the correct way around. Slide the panel along the ethernet cable and into place. Then secure the panel with the two screws and the Allen key provided. Don’t over tighten the screws. See figure 1. To replace your SIM, follow these steps again and replace your old SIM with a new one. By inserting and using this SIM, you accept our Terms and Conditions – see three.co.uk/terms
SIM
Micro SIM
Nano SIM
############ Figure 1
| | | | |---|---|---| | | | | | | | |
Installation
Finding a place for your hub
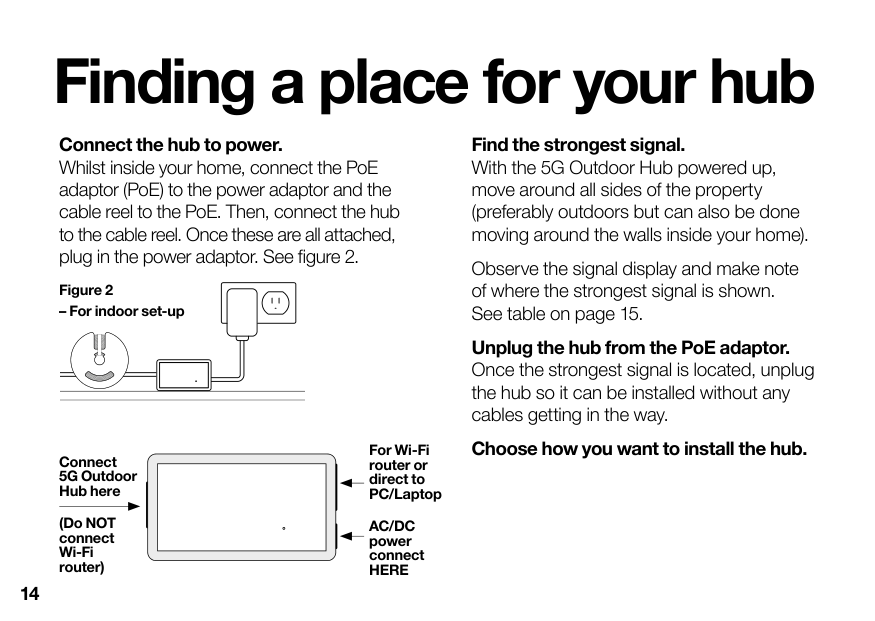
Connect the hub to power. Whilst inside your home, connect the PoE adaptor (PoE) to the power adaptor and the cable reel to the PoE. Then, connect the hub to the cable reel. Once these are all attached, plug in the power adaptor. See figure 2.
Figure 2
– For indoor set-up

For Wi-Fi router or direct to PC/Laptop
Connect 5G Outdoor Hub here
(Do NOT connect Wi-Fi router)
AC/DC power connect HERE
Find the strongest signal. With the 5G Outdoor Hub powered up, move around all sides of the property (preferably outdoors but can also be done moving around the walls inside your home).
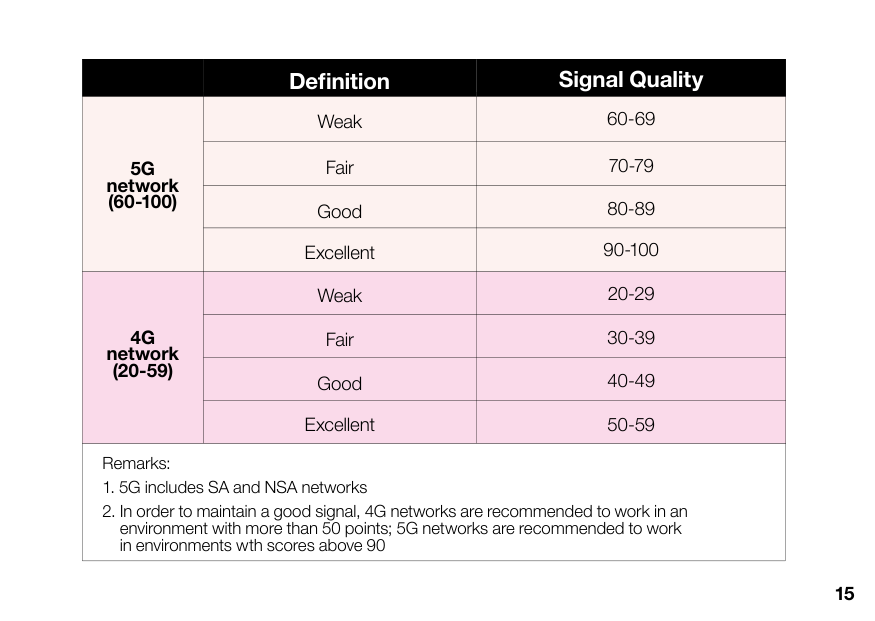
Observe the signal display and make note of where the strongest signal is shown. See table on page 15.
Unplug the hub from the PoE adaptor. Once the strongest signal is located, unplug the hub so it can be installed without any cables getting in the way.
Choose how you want to install the hub.
######## Definition Signal Quality
Weak 60-69 70-79 80-89
Fair Good Excellent Weak Fair Good
5G network (60-100)
90-100 20-29 30-39 40-49
4G network (20-59)
Excellent 50-59 Remarks:
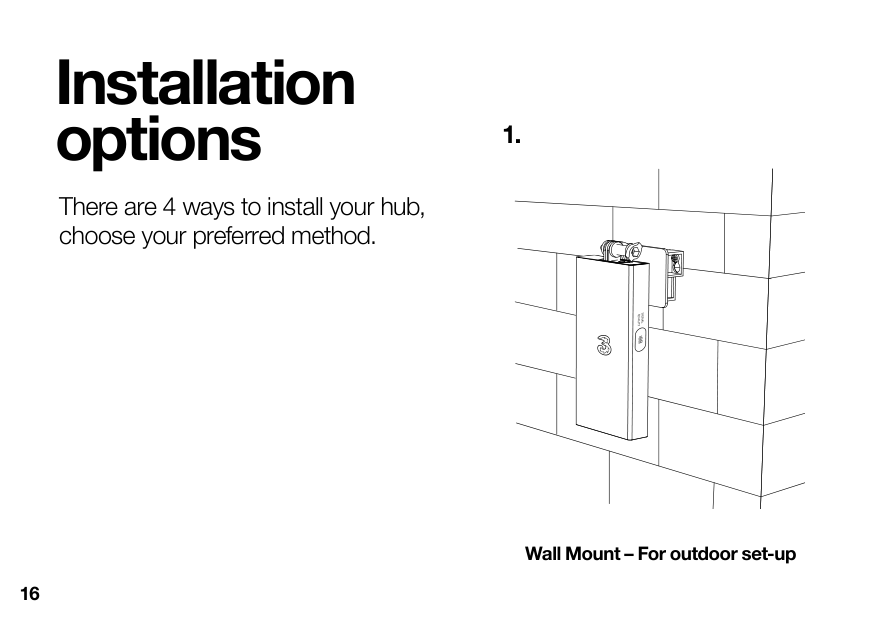
Installation options
There are 4 ways to install your hub, choose your preferred method.
##### 2. 3. 4.
Window MountPole Mount Stand
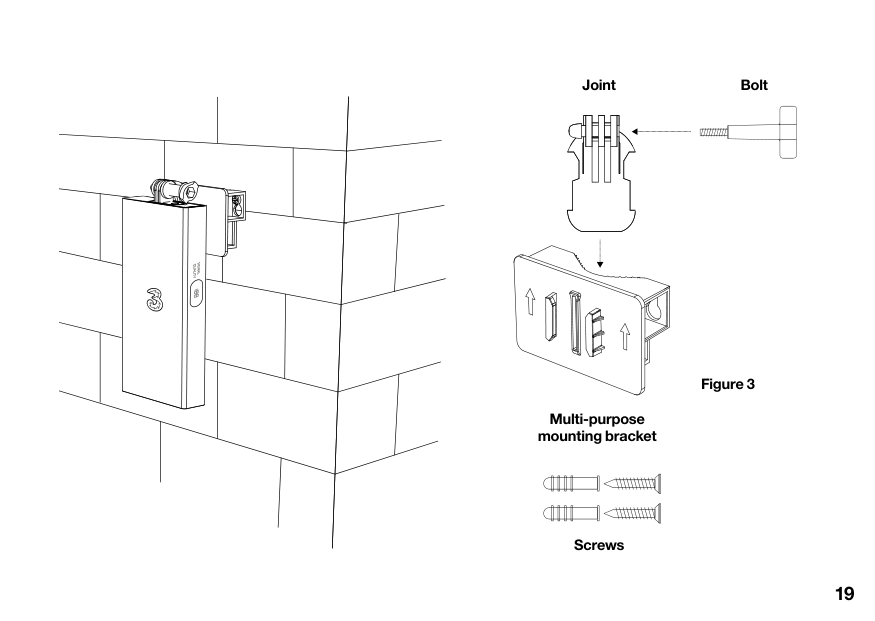
Installation
Wall mount
BoltJoint
| | | |---|---| | | | | | |
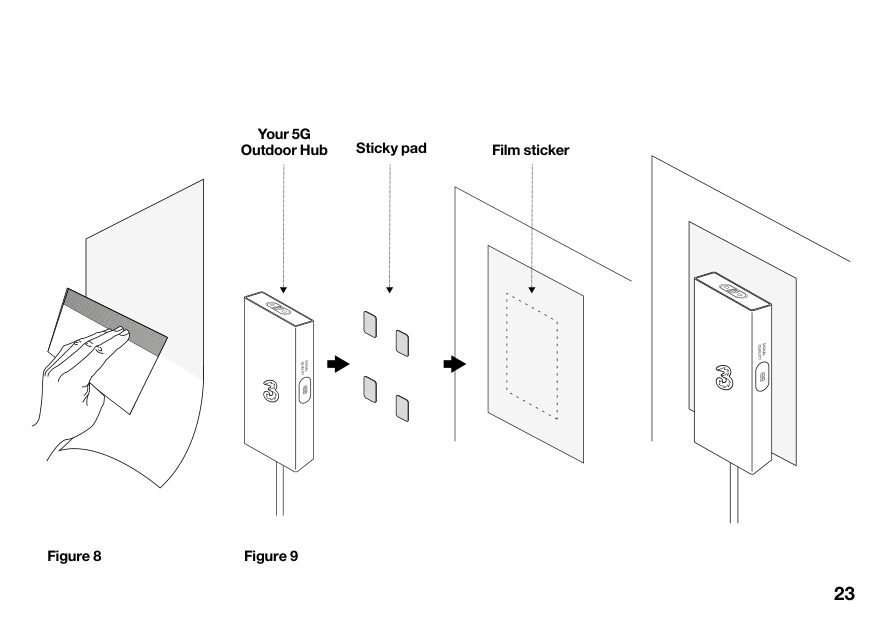
Figure 3
Multi-purpose mounting bracket
| | | | | | | | | | | |---|---|---|---|---|---|---|---|---|---| | | | | | | | | | | | | | | | | | | | | | |
| | | | | | | | | | | |---|---|---|---|---|---|---|---|---|---| | | | | | | | | | | | | | | | | | | | | | |
Screws
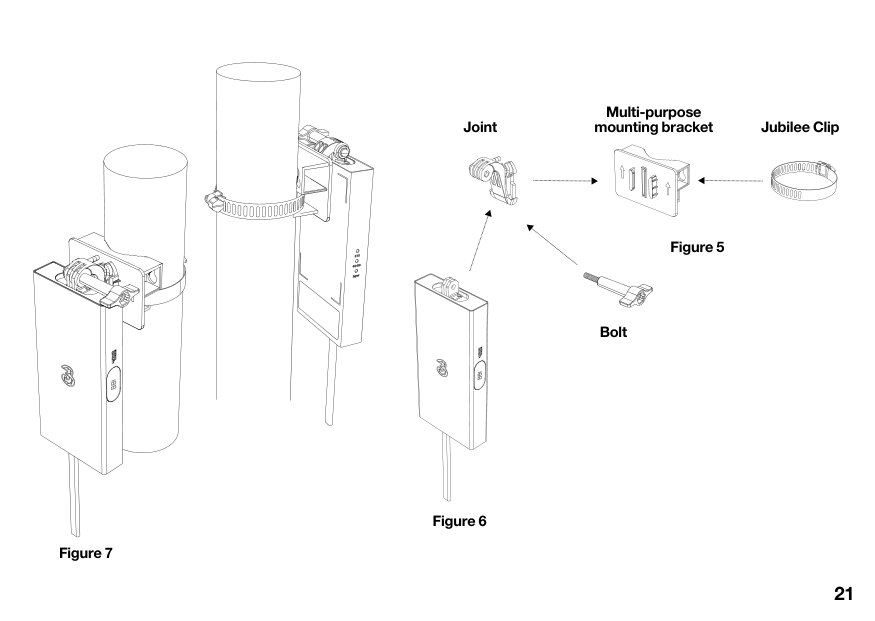
Pole mount
Multi-purpose mounting bracket

Joint Jubilee Clip
Figure 5
Bolt
Figure 6
Window mount

Your 5G Outdoor Hub Sticky pad Film sticker
Stand
NOTE: This installation is intended to be a temporary solution only. It is not recommended as indoor placement may reduce signal strength.
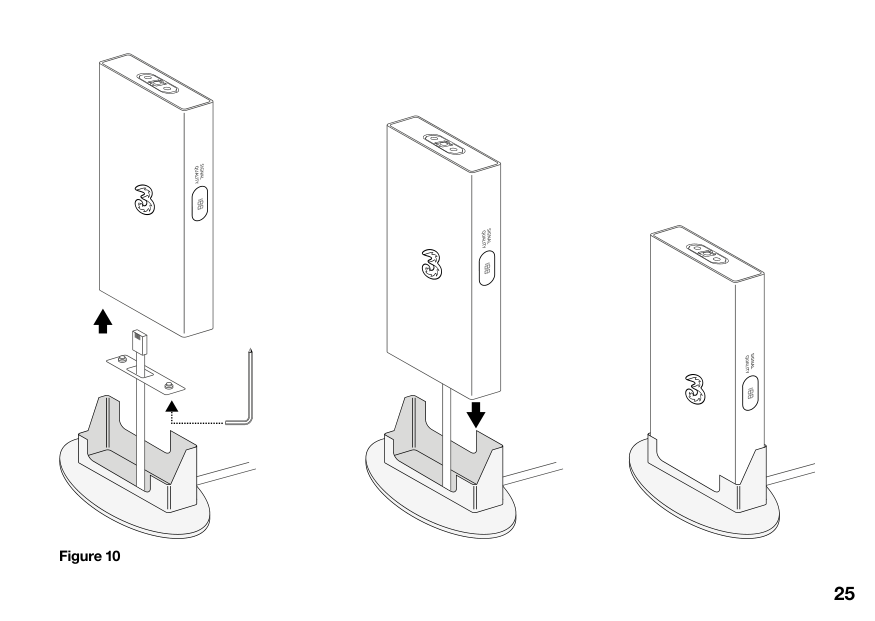
############ Figure 10
Connected
Get
Connecting your eero
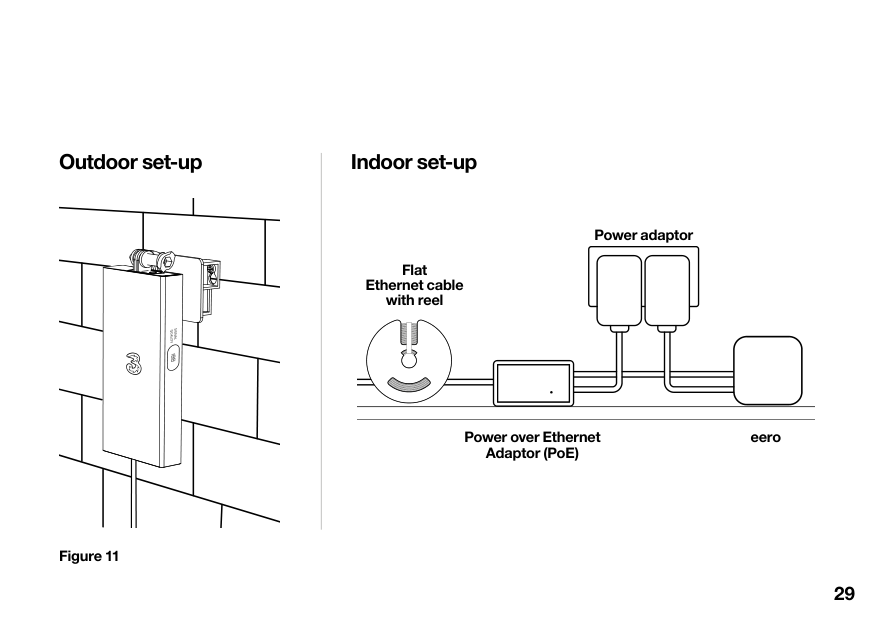
######### Outdoor set-up Indoor set-up
Power adaptor
Flat Ethernet cable with reel

Power over Ethernet Adaptor (PoE)
eero
The eero app
| |
|---|
Scan here to download app
Your Three Broadband account
########### The app’s a great way of managing your Three Broadband account, wherever you are.
You can also check bills, update your details and get access to exclusive offers by creating a My3 account online. three.co.uk/my3
| | |---|
| | | |---|---| | | |
FAQs
Do I need to connect my hub to a phone line to make it work? No, just follow the set-up instructions in this guide.
Is the hub durable? The hub weighs 700g and is weatherproof and built to withstand outdoor conditions.
########### Where do I find my Three Broadband network name and password?
You will need to create this as part of the eero set up process, within the app. Top tip – if you don’t want to update all your Wi-Fi device connections use the same Wi-Fi name and password as your previous hub.
How do I connect my devices to the 5G Outdoor Hub? Wireless: Search for available connections. Select the Wi-Fi name and enter the password you created in the eero setup process.
Wired: Using an ethernet cable, locate the eero’s spare ethernet port at the back and plug in.
How do I access my Three Broadband account? You can register and manage your account at three.co.uk/my3
Can I use my 5G hub to make call over Wi-Fi- including to emergency services?
If you want to call emergency services on 999 using a Wi-Fi calling service, you can do so but please note that your call may be interrupted or end if there’s a power cut or if your Wi-Fi connection fails. If you’re having problems connecting with Wi-Fi, you may wish to instead use a mobile or fixed network connection and/or register (and keep us up to date) on the address where you plan to use your hub for Wi-Fi calling services (so we have you latest location information to hand for emergency organisations in case of an emergency).
Safety information
This information is relevant to the Y5 device. Installation of the hub is at your own risk. Take appropriate steps to remain safe during installation.
Before Installation It is important to comply with the precautions listed below before installing.

Radio frequency interference Observe signs and notices that prohibit or restrict the use of Radio Frequency devices.
Medical device interference The 5G Outdoor Hub contains components that emit electromagnetic waves which may interfere with pacemakers, defibrillators, or other medical devices. Maintain a safe distance of separation from medical devices.
Choking hazard Some small accessories may cause a choking hazard to children. Keep these accessories away from children.

Explosive atmospheres Do not use the 5G Outdoor Hub in any area (petrol station, chemical warehouse, etc.) with a potentially explosive atmosphere,such as areas where the air contains high levels of flammable chemicals, vapours, or particles (such as grain, dust, or metal powders), may be hazardous. Obey all signs and instructions.
Operation environments Avoid installing the 5G Outdoor Hub in any areas which are dusty, humid or are close to magnetic fields. Avoid displaying the hub near a microwave oven or refrigerator or electronic heater. Ensure the working temperature of the hub is within the range -40°C ~ 55°C.
Accessory Using an incompatible or damaged power adaptor/cable might cause fire, electric shock, and/or injury.
Glossary
5G Outdoor Hub The device included in this box which is installed outside to get the best possible signal for the property.
eero Your Wi-Fi router which can be found in a separate box. This is to be kept inside.
Power over Ethernet adaptor (PoE) An adaptor which is installed inside and combines the ethernet cable and power cable. It allows the outdoor device to connect with one ethernet cable only and no power cable.
Allen Key A tool specifically designed for tightening or loosening screws or bolts with hexagonal sockets.
Jubilee Clip Fastening device used to secure and tighten the device onto a pole.
Still need help?
#### We’re here for you.
Call us on: 500 from your Three mobile. 0333 338 1003 from another phone.
Or visit us at three.co.uk/hub-support Or go to three.co.uk/accessibility if you need further advice on accessibility.
For Business customers please use 337 from your Three mobile. Or 0333 338 1004 from any other phone.
############# X803893-4_HBB_Outdoor CPE Digital Installation Guide_A5_V6