
Ask AI
— answers from the official manualAnswers from the official manual.
Common questions
Common Questions
10 totalHow do I assemble the Tutti Bambini Modena Cot Bed?
To assemble, first identify and lay out all components including fixed end (A), detachable end (B), fixed side rail (C), mattress base (D), and triangle supports (E). Use M6x89mm screws (A) and M6x40mm barrels nuts (B) to connect parts. Follow the diagrams provided to complete assembly correctly.
What is the recommended mattress size for this cot bed?
The Modena Cot Bed should use a minimum mattress measuring 70cm x 140cm, or you can use Tutti Bambini’s specific mattress. Ensure the gap between the height of the mattress and the top edge of the cot side is at least 50cm for the lowest position.
How do I convert the Cot Bed into a regular bed?
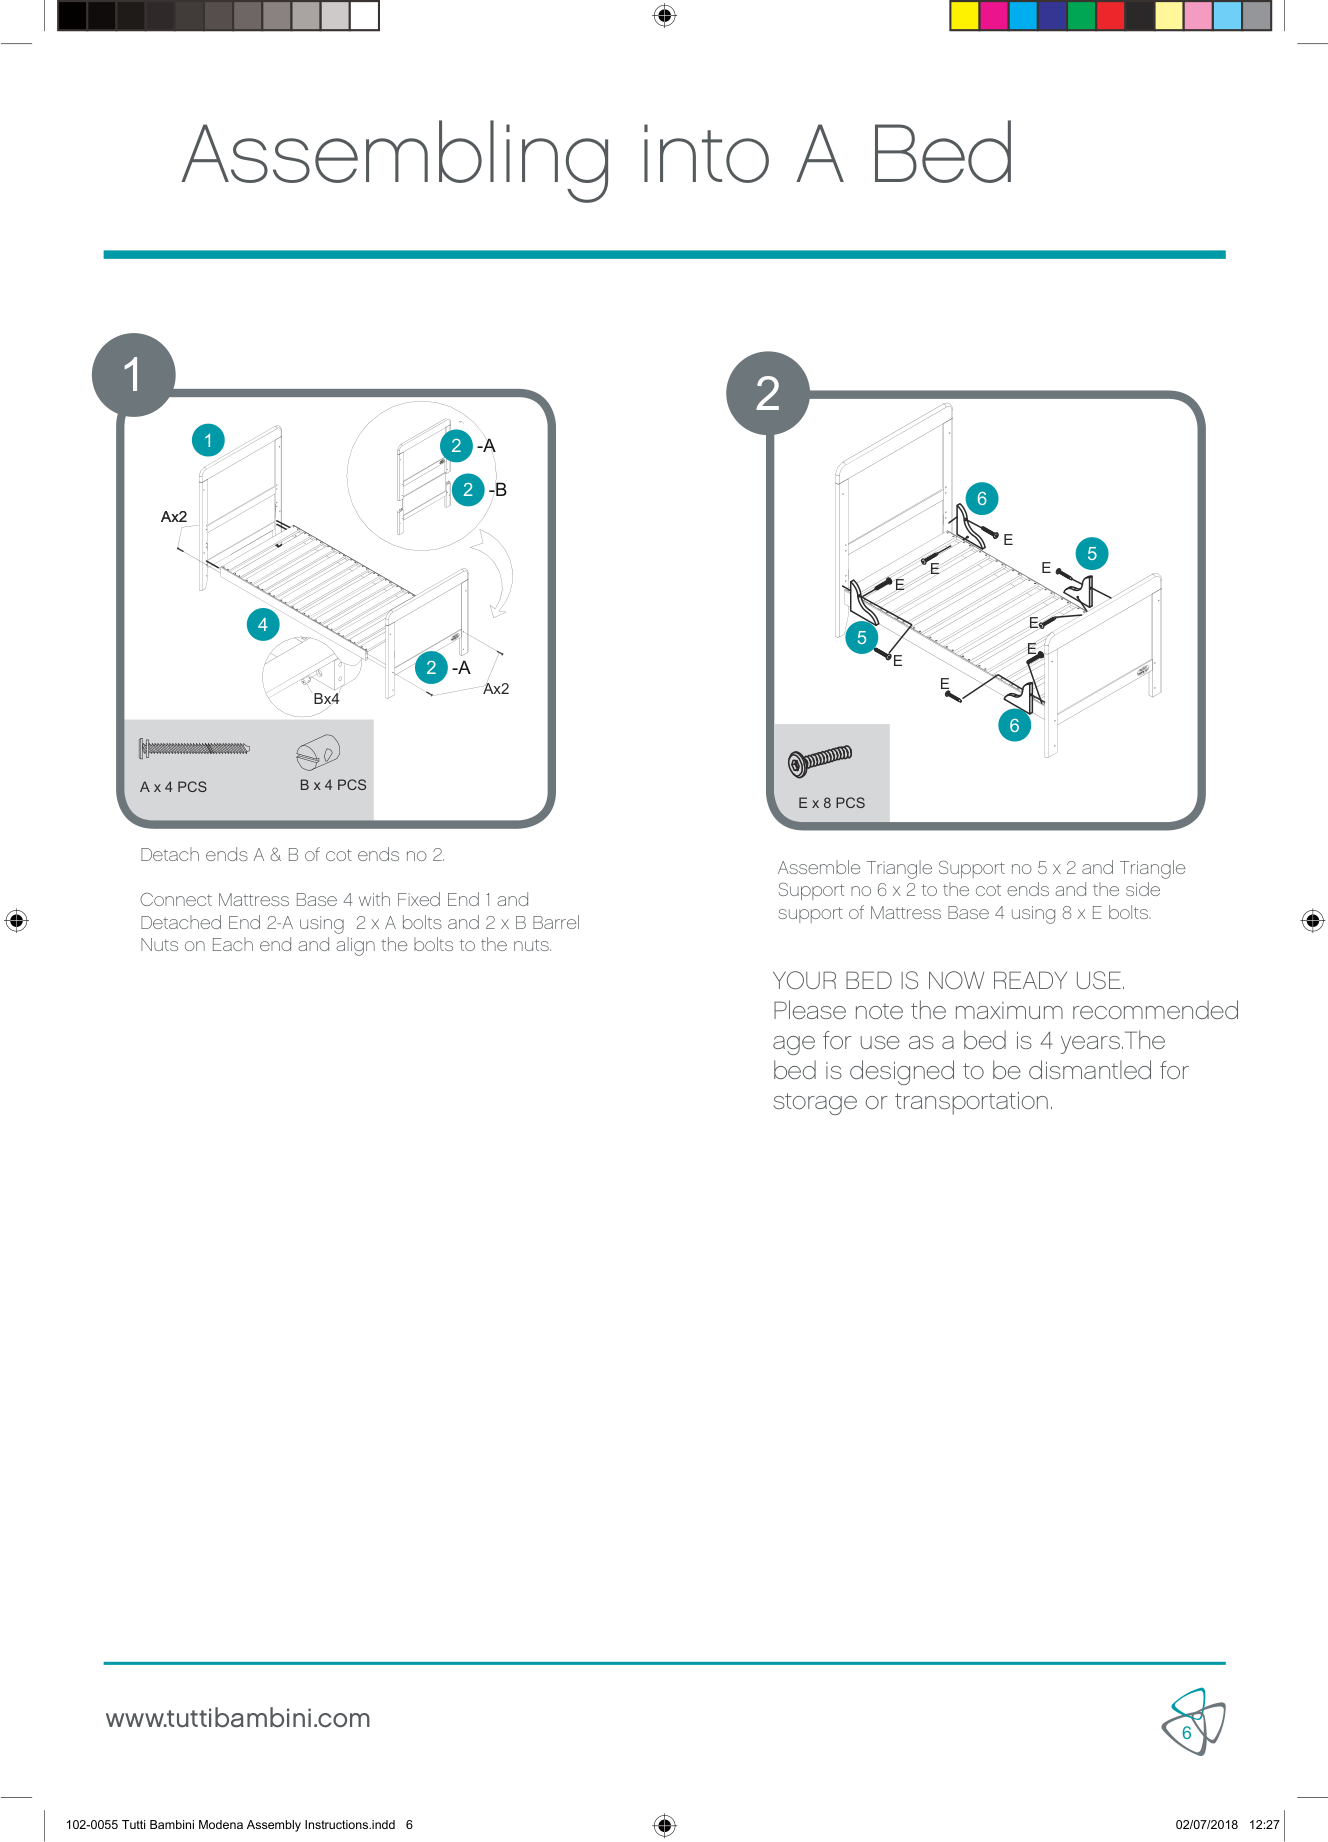
To convert the Modena Cot Bed to a full-sized bed, detach the ends A and B of cot sections 2, attach the fixed end with detached end using bolts (A & B) for mattress base position, assemble triangle support pieces E (5 x 2), then securely fasten all components.
What maintenance should be performed on this cot bed?
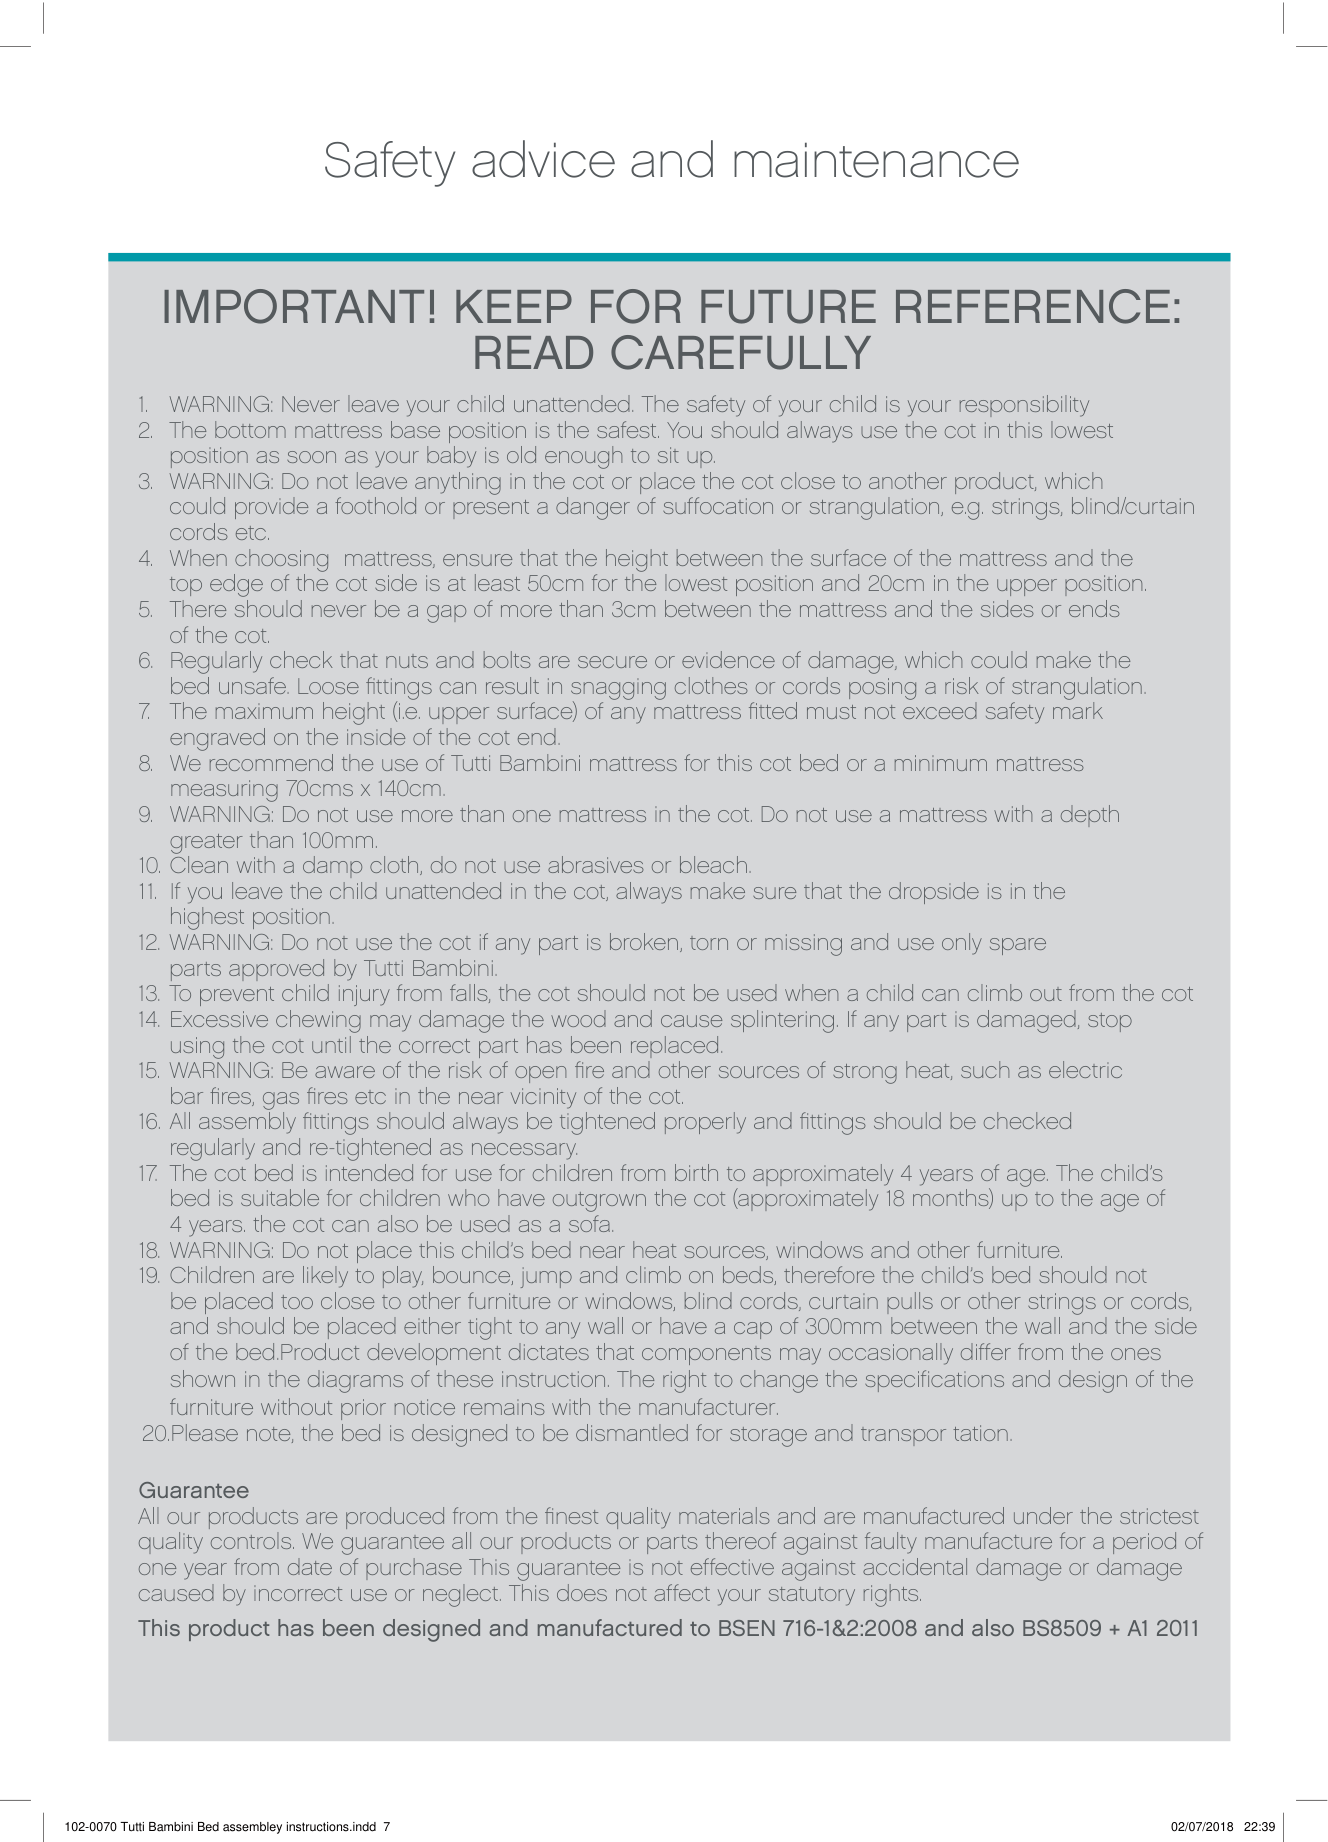
Regularly check that nuts and bolts are secure. Tighten any loose fittings to prevent clothing or cords from catching, which could pose a strangulation risk. Avoid using the cot if there is damage, and clean it with a damp cloth.
What safety measures should be observed while using this product?
Keep a gap of no more than 3cm between the mattress and sides or ends of the cot. Ensure that any parts are not broken, torn, or missing at all times and only use spare parts approved by Tutti Bambini.
What is the recommended age limit for using this cot bed as either a cot or full-sized bed?
The Modena Cot Bed should be used from birth to approximately 4 years old. It can serve as a baby cot until about 18 months, and then transitioned to a regular bed.
Full Manual
10 pages
Bears
Cot/Bed
Assembly Instructions
Conforms to BS EN 1222:12008+A1:2013 Tutti Frutti Direct Ltd, Unit 3, 1000 North Circular Roaad, London, UK, NW2 7 JP t: +44 (0) 208 368 5800 e: customerservice@tuttibambini,co.uk www.tuttibambini.com
Bears
Cot/Bed
########### 211034
###### IMPORTANT: RETAIN FOR FUTURE REFERENCE, READ CAREFULLY
102-0070 Tutti Bambini Bed assembley instructions.indd 2 02/07/2018 22:39
Hello,
############# PLEASE READ THIS LEAFLET BEFORE ASSEMBLY
Dear Customer, Thankyou for buying Tutti Bambini furniture. Follow the instructions carefully and check that you have all the elements including the fittings before attempting assembly. If there are any missing or damaged parts, please inform us before you start the assembly. Please note that incorrect assembly of your furniture will not be a basis for a claim against the product being damaged. In the unlikely event that your furniture is found to be faulty, we ask that you send an email to: [email protected] with the following information that can be found on the white label on the outside parcel.
Tutti Bambini guarantee your product against faulty manufacture for a period of 12 months from date of receipt of purchase. This does not affect your statutory rights.
Team Tutti
3 www.tuttibambini.com
| | | | | | | | | | | | |---|---|---|---|---|---|---|---|---|---|---|
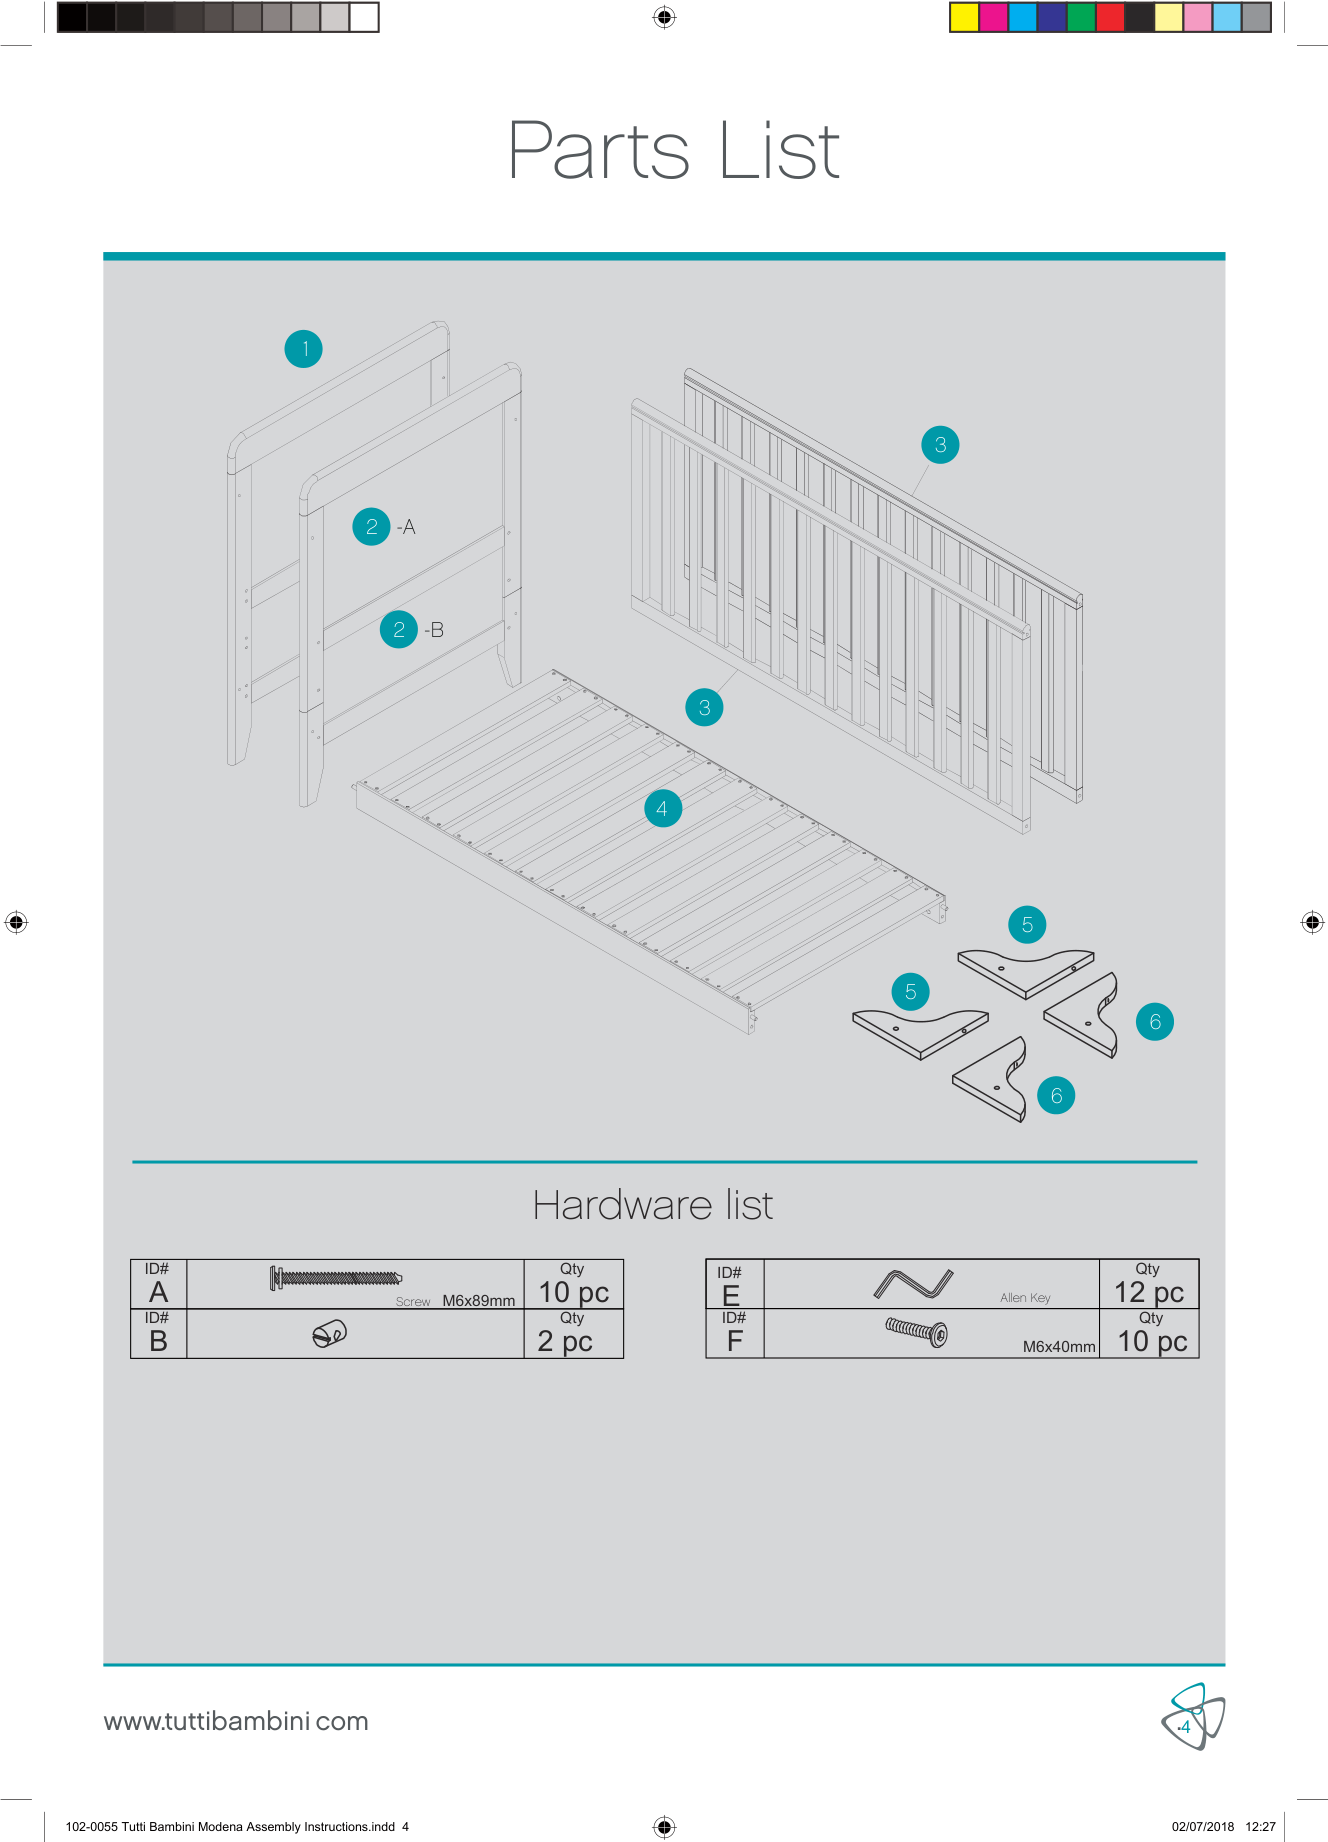
Parts List
| | | | | | | | | | | | |---|---|---|---|---|---|---|---|---|---|---|
1
| | | |---|---| | | |
| | | |---|---|

| | |
3
2 -A
################ 2 -B
| | | | |---|---|---| | | | |
| | | | |---|---|---| | | | | | | | |
| | | | |---|---|---| | | | |
| | | |---|---| | | |
| | | | | |---|---|---|---| | | | | |
| | | | |---|---|---| | | | |
| | | |---|---| | | |
| | | | |---|---|---| | | | |
| | | | |---|---|---| | | | | | | | |
| | | | | |---|---|---|---| | | | | | | | | | |
| | | | |---|---|---| | | | |
| | | | |---|---|---| | | | |
| | | |---|---| | | |
| | | | |---|---|---| | | | |
| | | | |---|---|---| | | | |
| | | | |---|---|---| | | | |
| | | | |---|---|---| | | | |
| | | | |---|---|---| | | | |
| | | | |---|---|---| | | | |
| | | | |---|---|---| | | | |
| | | | |---|---|---| | | | |
3
| | | |
|---|---|---| | | | |
| | | | | |---|---|---|---| | | | | |
| | | | | |---|---|---|---| | | | | |
| | | | |---|---|---| | | | |
4
| | | |---|---| | | |
| | | | |---|---|---| | | | | | | | |
| | | | |---|---|---| | | | | | | | |
| | | | |---|---|---| | | | |
| | | | |---|---|---| | | | |
| | | | |---|---|---| | | | |
| | | | |---|---|---| | | | |
| | | | |---|---|---|
| | | | | | | |
| | | |---|---| | | |
| | | |---|---| | | |
| | | | |---|---|---| | | | |
| | | | |---|---|---| | | | |
| | | | | |---|---|---|---| | | | | |
| | | | |---|---|---| | | | |
| | | |---|---| | | |
5
| | | |---|---| | | |
| | | |---|---| | | |
| | | |---|---| | | |
| | | |---|---| | | |
| | | |---|---| | | |
| | | |---|---| | | |
5
6
6
############ Hardware list
|A
ID#|M6x89mmScrew|10 pc
Qty| |---|---|---| |B
ID#| |2 pc
Qty|
|E
ID#|Allen Key|12 pc
Qty| |---|---|---| |F
ID#|M6x40mm|10 pc
Qty|
4.www.tuttibambinicom
| | | | | | | | | | | | |---|---|---|---|---|---|---|---|---|---|---|
| | | | | | | | | | | | |---|---|---|---|---|---|---|---|---|---|---|
Ass to wardrobe
Assembling into A Cot
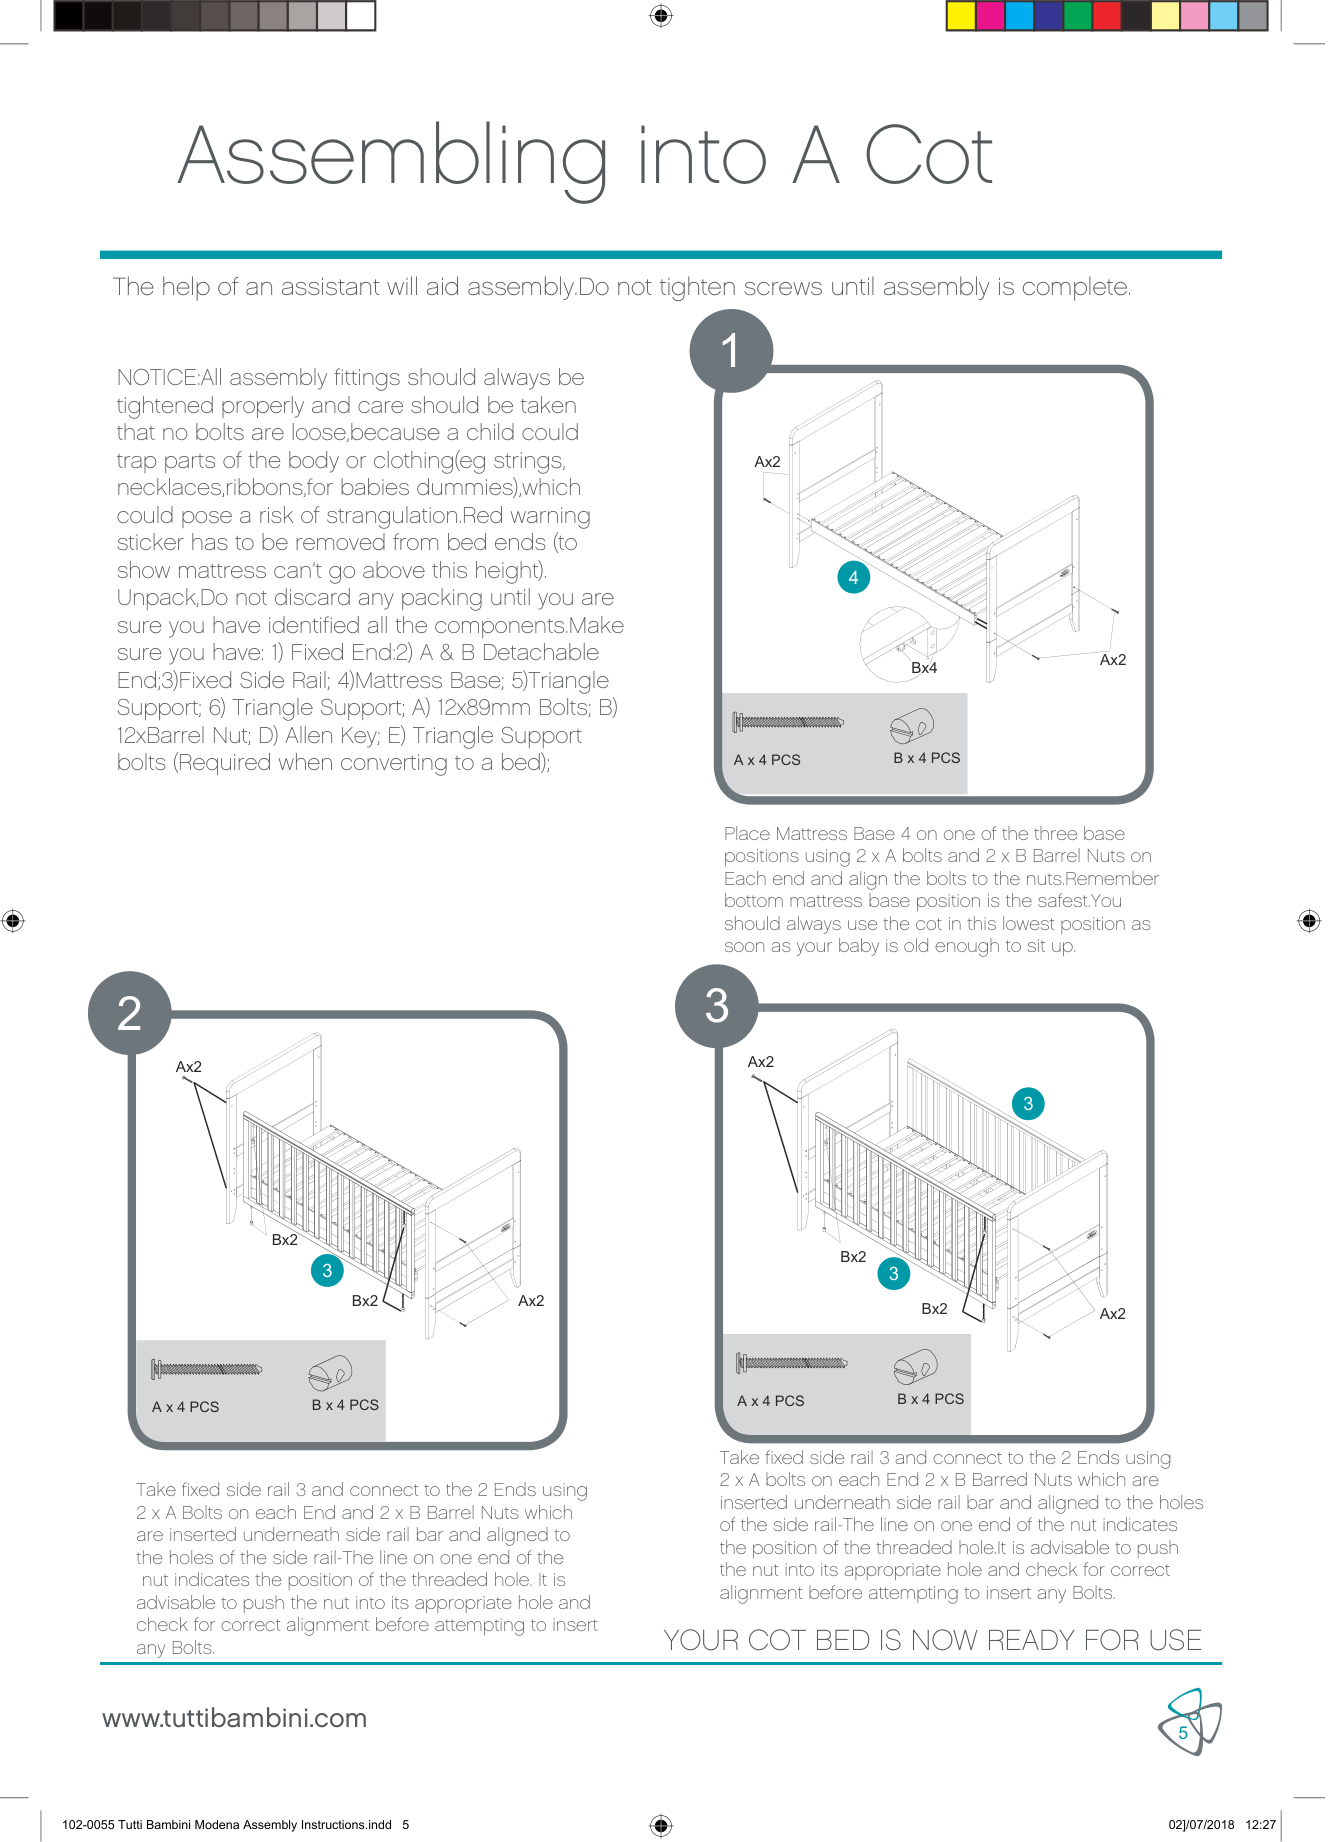
############## The help of an assistant will aid assembly.Do not tighten screws until assembly is complete.
NOTICE:All assembly fittings should always be tightened properly and care should be taken that no bolts are loose,because a child could trap parts of the body or clothing(eg strings, necklaces,ribbons,for babies dummies),which could pose a risk of strangulation.Red warning sticker has to be removed from bed ends (to show mattress can’t go above this height). Unpack,Do not discard any packing until you are sure you have identified all the components.Make sure you have: 1) Fixed End:2) A & B Detachable End;3)Fixed Side Rail; 4)Mattress Base; 5)Triangle Support; 6) Triangle Support; A) 12x89mm Bolts; B) 12xBarrel Nut; D) Allen Key; E) Triangle Support bolts (Required when converting to a bed);
########## 1
Ax2
4
Ax2 Bx4
B x 4 PCS
A x 4 PCS
Place Mattress Base 4 on one of the three base positions using 2 x A bolts and 2 x B Barrel Nuts on Each end and align the bolts to the nuts.Remember bottom mattress base position is the safest.You should always use the cot in this lowest position as soon as your baby is old enough to sit up.
3
########## 2
Ax2
Ax2
| | | | |---|---|---| | | | |
3
Bx2
Bx2
3
3
Bx2
Ax2
Ax2Bx2
A x 4 PCS B x 4 PCS
A x 4 PCS B x 4 PCS
Take fixed side rail 3 and connect to the 2 Ends using 2 x A bolts on each End 2 x B Barred Nuts which are inserted underneath side rail bar and aligned to the holes of the side rail-The line on one end of the nut indicates the position of the threaded hole.It is advisable to push the nut into its appropriate hole and check for correct alignment before attempting to insert any Bolts.
Take fixed side rail 3 and connect to the 2 Ends using 2 x A Bolts on each End and 2 x B Barrel Nuts which are inserted underneath side rail bar and aligned to the holes of the side rail-The line on one end of the
nut indicates the position of the threaded hole. It is advisable to push the nut into its appropriate hole and check for correct alignment before attempting to insert any Bolts.
YOUR COT BED IS NOW READY FOR USE
www.tuttibambini.com
################# 5
102-0055 Tutti Bambini Modena Assembly Instructions.indd 5 02]/07/2018 12:27
| | | | | | | | | | | | |---|---|---|---|---|---|---|---|---|---|---|
| | | | | | | | | | | | |---|---|---|---|---|---|---|---|---|---|---|
Assembling into A Bed
Assembling into bed

########## 1
########## 2
1
| | | |---|---| | | |
6
Ax2
E EE
5
| | | | |---|---|---| | | | |
| | | |---|---|
| | |---| | |
E
| | | |---|---|
| | | |---|---|
| | | | |---|---|---| | | | |
| | | | |---|---|---| | | | |
E

4
5
| | | |---|---| | | |
| | | |---|---|
E
| | | | |---|---|---| | | | |
E
| | |---| | |
2 -A
| | | |---|---| | | |
| | | |---|---| | | |
E
Ax2 Bx4
| | | |---|---| | | |
| | | |---|---|
| | | |---|---| | | |
6
A x 4 PCS B x 4 PCS

E x 8 PCS
Detach ends A & B of cot ends no 2. Connect Mattress Base 4 with Fixed End 1 and Detached End 2-A using 2 x A bolts and 2 x B Barrel Nuts on Each end and align the bolts to the nuts.
Assemble Triangle Support no 5 x 2 and Triangle Support no 6 x 2 to the cot ends and the side support of Mattress Base 4 using 8 x E bolts.
YOUR BED IS NOW READY USE. Please note the maximum recommended age for use as a bed is 4 years.The bed is designed to be dismantled for storage or transportation.
www.tuttibambini.com
6
######## Safety advice and maintenance
######### IMPORTANT! KEEP FOR FUTURE REFERENCE: READ CAREFULLY
############### 20.Please note, the bed is designed to be dismantled for storage and transpor tation.
Guarantee All our products are produced from the finest quality materials and are manufactured under the strictest quality controls. We guarantee all our products or parts thereof against faulty manufacture for a period of one year from date of purchase This guarantee is not effective against accidental damage or damage caused by incorrect use or neglect. This does not affect your statutory rights.
####### www.tuttibambini.com
This product has been designed and manufactured to BSEN 716-1&2:2008 and also BS8509 + A1 2011
102-0070 Tutti Bambini Bed assembley instructions.indd 7 02/07/2018 22:39
######## Notes
Join Us
Join Us
##### Follow us on Facebook TuttiBambiniUK
##### Follow us on Twitter TuttiBambiniUK
##### Follow us on Instagram TuttiBambiniUK
#### www.tuttibambini.com