
Ask AI
— answers from the official manualAnswers from the official manual.
Common questions
Common Questions
17 totalHow do I know when the food hopper is running low?
When the food hopper is short of food, the blue indicator light will flash the next time a meal is dispensed, indicating the motor ran but detected a food shortage. Adding food to the hopper will turn the light off. (Page 7)
How do I manually dispense food from the A36?
Press and hold the Manual Feeding button for 3 seconds to dispense one portion of food. You can also press the manual feeding button once to dispense one portion as stated in the control panel instructions. (Pages 5, 9)
How do I know when the batteries are low, and what type of batteries does the A36 use?
When the batteries are low, a battery indicator will appear on the LCD screen. The A36 requires 4 × D size alkaline batteries, and the indicator will turn off once new batteries are installed. (Page 6)
How do I record and play a voice message on the A36?
Press and hold the Recording button for 3 seconds until the recording indicator lights up, then record for a maximum of 10 seconds. Releasing the button signals the end of the recording. Press the button once to play the recording, or press it twice until the recording indicator blinks 3 times to delete the message. (Page 6)
How often should I change the desiccant bag, and why?
It is recommended to change the desiccant bag every 15 days to prevent mold growth. The desiccant bag keeps pet food dry and fresh and is installed by opening the desiccant box, loading the desiccant, and closing it. (Pages 5, 11)
Which parts of the A36 can be washed, and which cannot?
The hopper, food tray, and stainless steel bowl can be removed and washed. The main host unit of the feeder is not washable. (Page 5)
Show 11 more questions
How do I set the time and switch between 12-hour and 24-hour clock on the A36?
How do I factory reset the Welltobe A36 Automatic Pet Feeder?
What food size is recommended for this feeder?
How often should I replace the desiccant bag in my Welltobe A36?
How can I check for low battery status on the feeder?
What should I do if my pet's food runs out before the next scheduled feeding?
Can I manually feed my pet using the Welltobe A36 feeder?
How do I reset the Welltobe A36 Automatic Pet Feeder?
How many meals and portions can I program per day?
What food size is recommended for the A36 feeder?
What is the maintenance routine suggested for a dual bowl version?
Full Manual
14 pages
A36 Automatic Pet Feeder User Manual
For the convenience of using, please read the user manual carefully and follow the instructions. We appreciate your choice of the automatic pet feeder. We insist on providing premium pet products, helping pet owners feed pets in a scientific and reasonable way and providing pets a healthy lifestyle. We are working for establishing a harmonious relationship between you and your pets. Dear customer,
Warranty
1 Year Warranty Lifetime Support: For guidance on product use and warranty extension, please contact after-sales email: [email protected] If you have any questions related to orders, please contact the seller via the shopping platform.
French German Italian Spanish Japanese English 01-11 12-22 23-33 34-44 45-55 56-66 Chinese 67-76
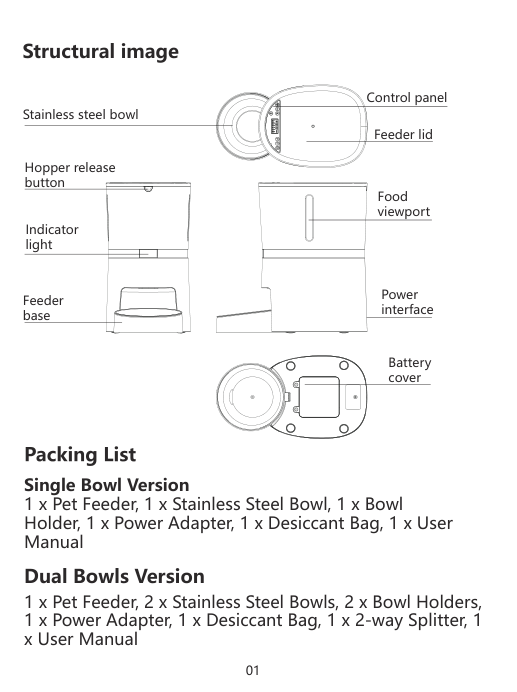
Structural image Battery cover Feeder base Indicator light Hopper release button Power interface Food viewport Feeder lid Control panel Stainless steel bowl 01 Single Bowl Version 1 x Pet Feeder, 1 x Stainless Steel Bowl, 1 x Bowl Holder, 1 x Power Adapter, 1 x Desiccant Bag, 1 x User Manual 1 x Pet Feeder, 2 x Stainless Steel Bowls, 2 x Bowl Holders, 1 x Power Adapter, 1 x Desiccant Bag, 1 x 2-way Splitter, 1 x User Manual Dual Bowls Version
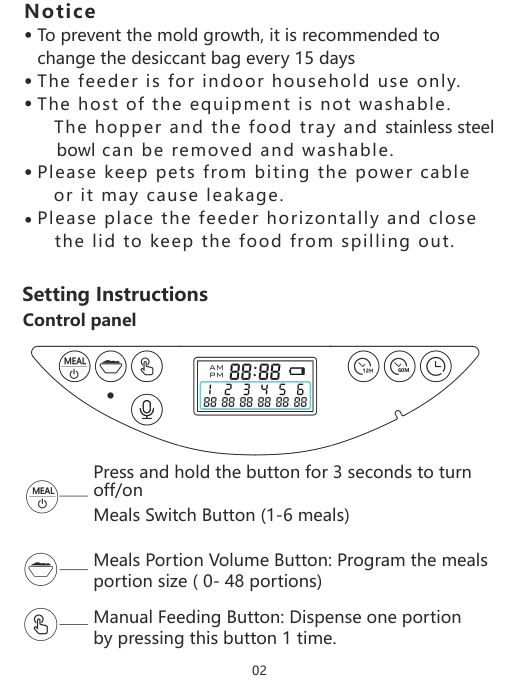
To prevent the mold growth, it is recommended to change the desiccant bag every 15 days The feeder is for indoor household use only. The host of the equipment is not washable. The hopper and the food tray and stainless steel bowl can be removed and washable. Please keep pets from biting the power cable or it may cause leakage. Please place the feeder horizontally and close the lid to keep the food from spilling out. Notice Control panel Setting Instructions Meals Switch Button (1-6 meals) Press and hold the button for 3 seconds to turn off/on Meals Portion Volume Button: Program the meals portion size ( 0- 48 portions) Manual Feeding Button: Dispense one portion by pressing this button 1 time. 02
Meal
Meal
12H
60M
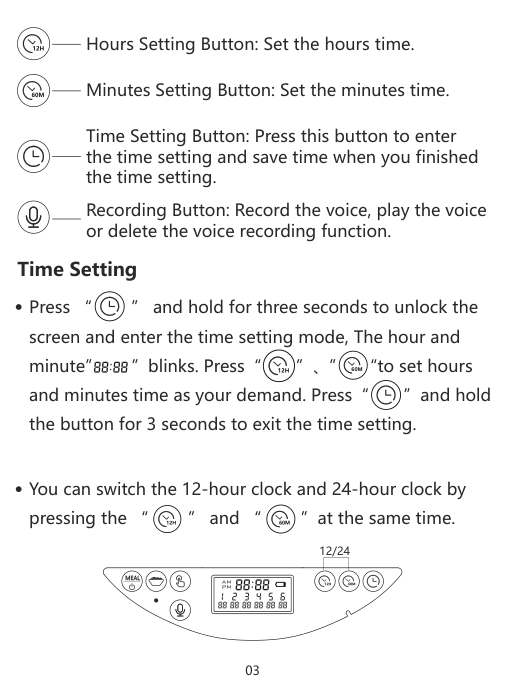
Hours Setting Button: Set the hours time. Minutes Setting Button: Set the minutes time. Time Setting Button: Press this button to enter the time setting and save time when you finished the time setting. Recording Button: Record the voice, play the voice or delete the voice recording function.
12H
60M
Time Setting Press “ ” and hold for three seconds to unlock the screen and enter the time setting mode, The hour and minute” ”blinks. Press“ ”、” “to set hours and minutes time as your demand. Press“ ”and hold the button for 3 seconds to exit the time setting. You can switch the 12-hour clock and 24-hour clock by pressing the “ ” and “ ”at the same time.12H
12H
60M
60M
03 12/24Meal
12H
60M
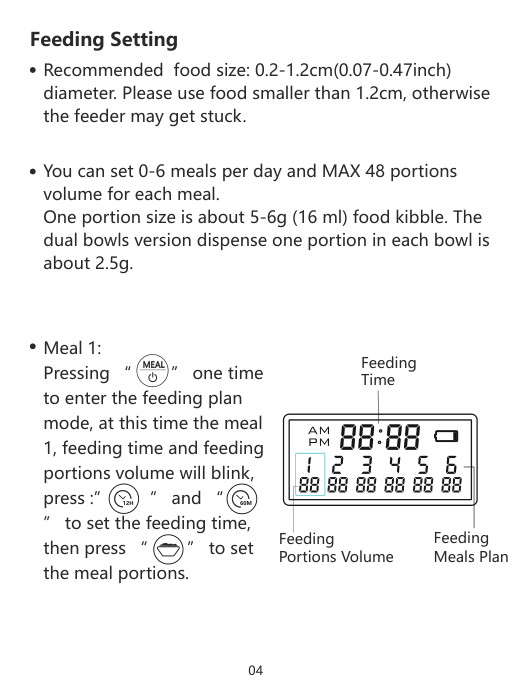
Feeding Setting You can set 0-6 meals per day and MAX 48 portions volume for each meal. One portion size is about 5-6g (16 ml) food kibble. The dual bowls version dispense one portion in each bowl is about 2.5g. Recommended food size: 0.2-1.2cm(0.07-0.47inch) diameter. Please use food smaller than 1.2cm, otherwise the feeder may get stuck. Meal 1: Pressing “ ” one time to enter the feeding plan mode, at this time the meal 1, feeding time and feeding portions volume will blink, press :” ” and “ ” to set the feeding time, then press “ ” to set the meal portions.
12H
60M
Feeding Time Feeding Meals Plan Feeding Portions Volume 04Meal
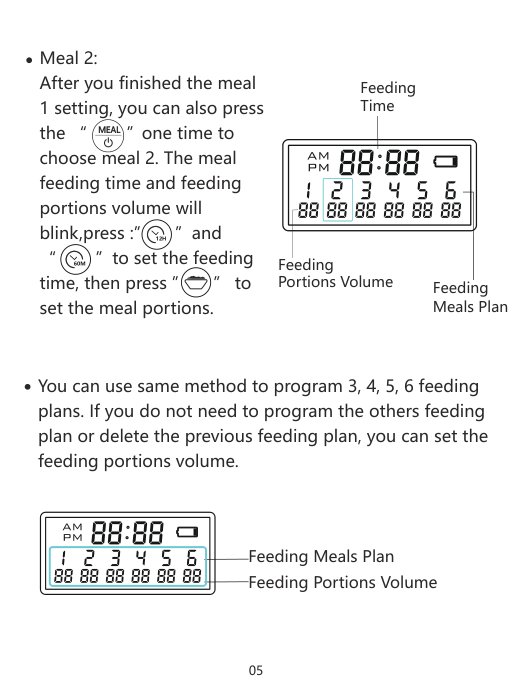
Feeding Time Feeding Meals Plan Feeding Portions Volume Meal 2: After you finished the meal 1 setting, you can also press the “ ”one time to choose meal 2. The meal feeding time and feeding portions volume will blink,press :” ”and “ ”to set the feeding time, then press ” ” to set the meal portions.
12H
60M
You can use same method to program 3, 4, 5, 6 feeding plans. If you do not need to program the others feeding plan or delete the previous feeding plan, you can set the feeding portions volume. Feeding Meals Plan Feeding Portions Volume 05Meal
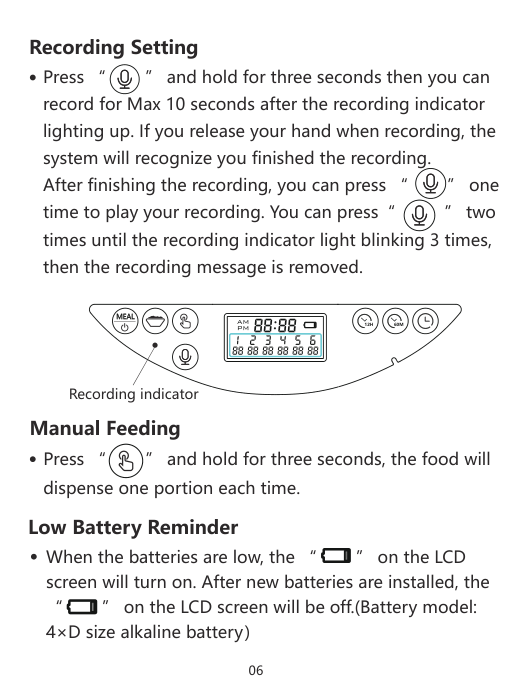
Recording Setting Manual Feeding Press “ ” and hold for three seconds then you can record for Max 10 seconds after the recording indicator lighting up. If you release your hand when recording, the system will recognize you finished the recording. After finishing the recording, you can press “ ” one time to play your recording. You can press“ ” two times until the recording indicator light blinking 3 times, then the recording message is removed. Press “ ” and hold for three seconds, the food will dispense one portion each time. Low Battery Reminder When the batteries are low, the “ ” on the LCD screen will turn on. After new batteries are installed, the “ ” on the LCD screen will be off.(Battery model: 4×D size alkaline battery) 06
12H
60M
Meal
Recording indicator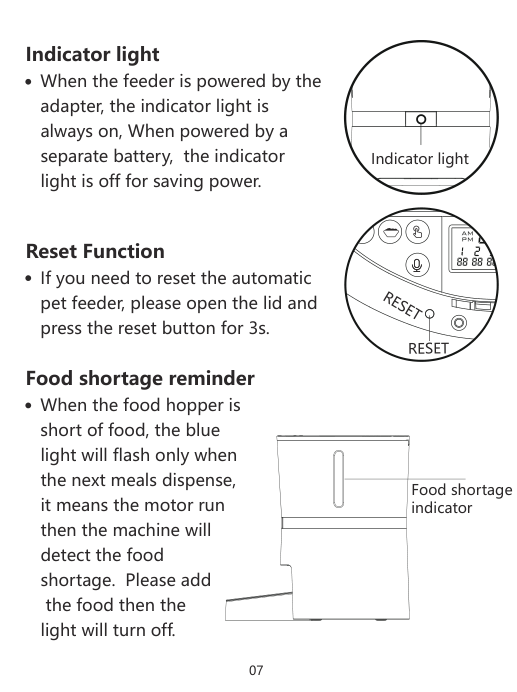
Reset Function If you need to reset the automatic pet feeder, please open the lid and press the reset button for 3s. Food shortage reminder When the food hopper is short of food, the blue light will flash only when the next meals dispense, it means the motor run then the machine will detect the food shortage. Please add the food then the light will turn off. Indicator light When the feeder is powered by the adapter, the indicator light is always on, When powered by a separate battery, the indicator light is off for saving power. 07
Reset
Reset
Indicator light Food shortage indicator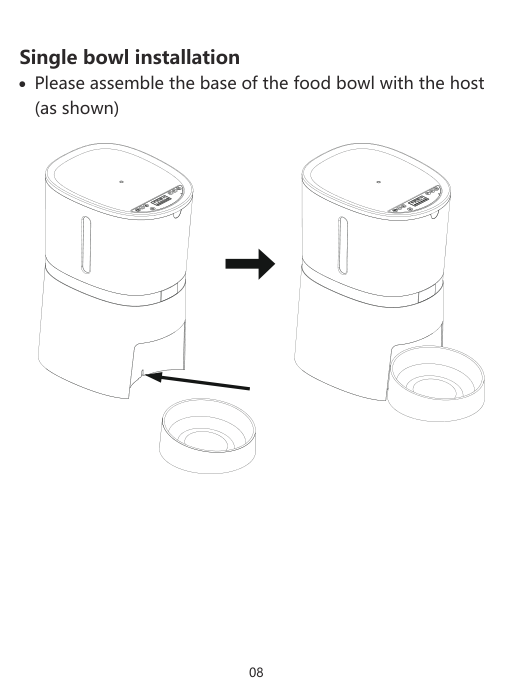
08 Single bowl installation Please assemble the base of the food bowl with the host (as shown)
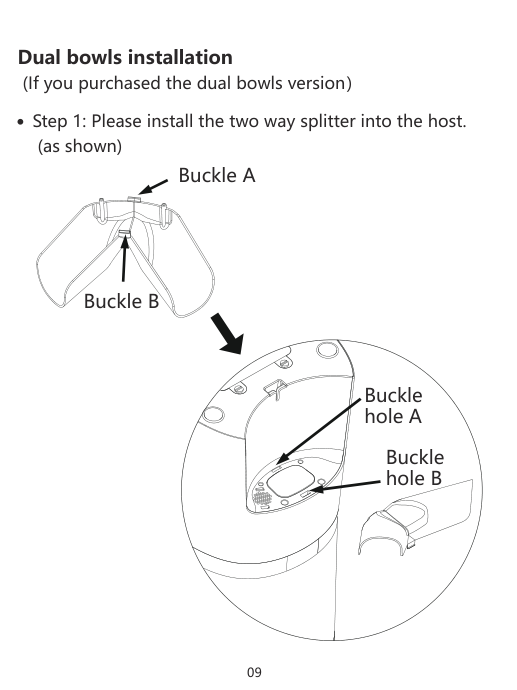
09 Dual bowls installation (If you purchased the dual bowls version) Step 1: Please install the two way splitter into the host. (as shown) Buckle A Buckle B Buckle hole A Buckle hole B
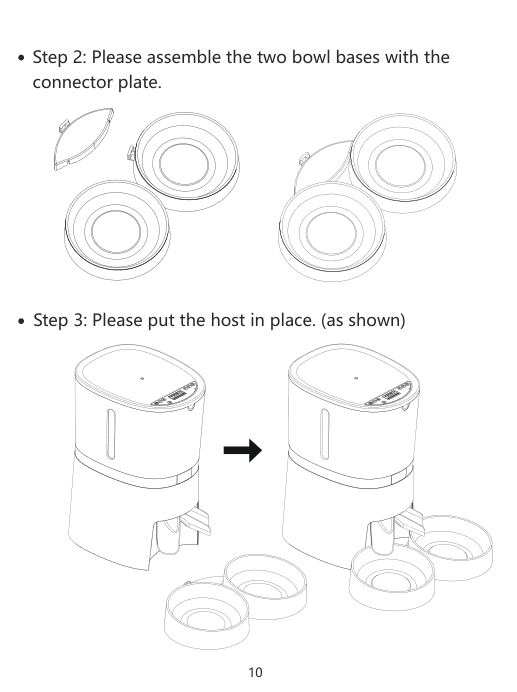
10 Step 3: Please put the host in place. (as shown) Step 2: Please assemble the two bowl bases with the connector plate.
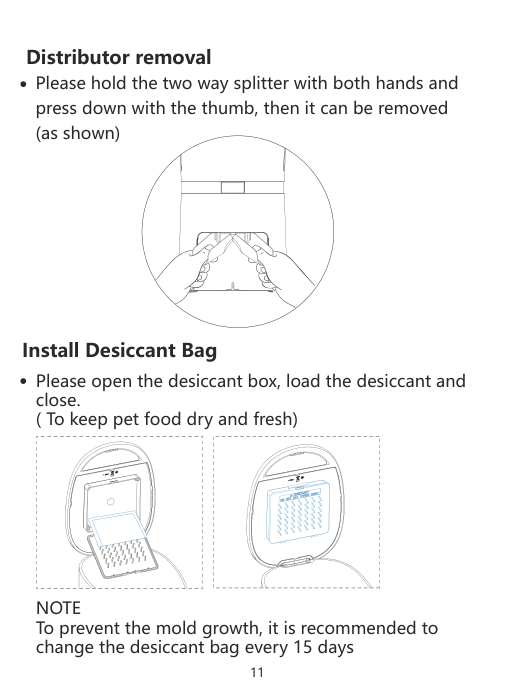
11 Distributor removal Install Desiccant Bag Please hold the two way splitter with both hands and press down with the thumb, then it can be removed (as shown) Please open the desiccant box, load the desiccant and close. ( To keep pet food dry and fresh)