
Ask AI
— answers from the official manualAnswers from the official manual.
Common questions
Common Questions
18 totalWhat should I do if the water level in my air conditioner becomes full?
If the water level reaches an anticipated height, the unit signals with a water full indicator lamp. Remove the rubber blockage at the bottom of the unit and use a drain hose to remove all water from inside.
How often should I clean the air filter on my Beko Bp109c?
Clean the air filter once every two weeks if it becomes clogged with dust or dirt. Open the air inlet grille, remove and clean the filter using neutral detergent in lukewarm water, then dry it up in the shade.
How do I safely handle a unit that uses R290 refrigerant?
R290 is an inflammable refrigerant. Ensure no ignition sources around while repairing or testing as flammable gas may be present. Perform maintenance outside or in specially equipped workshops with proper safety measures and ventilation.
How do I set a timer on the air conditioner?
Set an On time by pressing the Timer button when the AC is Off. Set a desired timer end time similarly while unit running, 'Preset Off Time' will be displayed.
What do the error codes E0, E1, E2, E3, and E4 mean on the Beko Bp109c?
E0 means the room temperature sensor has failed, E1 means the condenser temperature sensor has failed, E2 means the water tank is full during cooling, E3 means the evaporator temperature sensor has failed, and E4 means the water tank is full during heating. For E2, you should remove the rubber stopper and empty the water; for E4, simply empty the water tank. Sensor failures (E0, E1, E3) require replacement of the relevant sensor, though the unit can still operate without replacing the room temperature sensor (E0). (Page 51)
How do I set up the wireless function to connect the unit to the HomeWhiz app?
Long press the Speed button for 5 seconds to enter the wireless factory setup mode. When the wireless indicator flashes slowly, the unit is in setup mode; when it flashes quickly, the unit is connected to wireless. Once connected, you can control most air conditioner functions through the HomeWhiz mobile app. (Page 39)
Show 12 more questions
How often should I clean the air filter, and what is the correct cleaning method?
What is the minimum room size required to safely install and operate the Beko Bp109c?
How do I properly prepare and store the unit when not in use for an extended period?
What are the cooling and heating operating temperature ranges for the Bp109c?
How does the Sleep mode work on the Beko Bp109c?
How do I install the exhaust hose and what are the window kit size requirements?
What safety precautions must be followed when cleaning or servicing the unit?
What actions should be taken if the air conditioner does not start?
How do I use the HEPA filter?
What precautions should I take during installation?
How do I maintain my unit during non-use periods?
What should I do when the water full indicator lamp lights up?
Full Manual
406 pages
Local Air-conditioner User Manual
En
Fr
It
Nl
De
Pt
Hr
06M-8891923200-1121-05
Bp109C
Bp112C
Bp112H
Bp109Ac
Bp109Ah
Bp113H
2 / 396 En
Local Air-conditioner / User ManualContents
English
4-56Français
58-113Italiano
115-169Nederlands
171-225Deutsch
227-281Português
283-338Hrvatski
340-392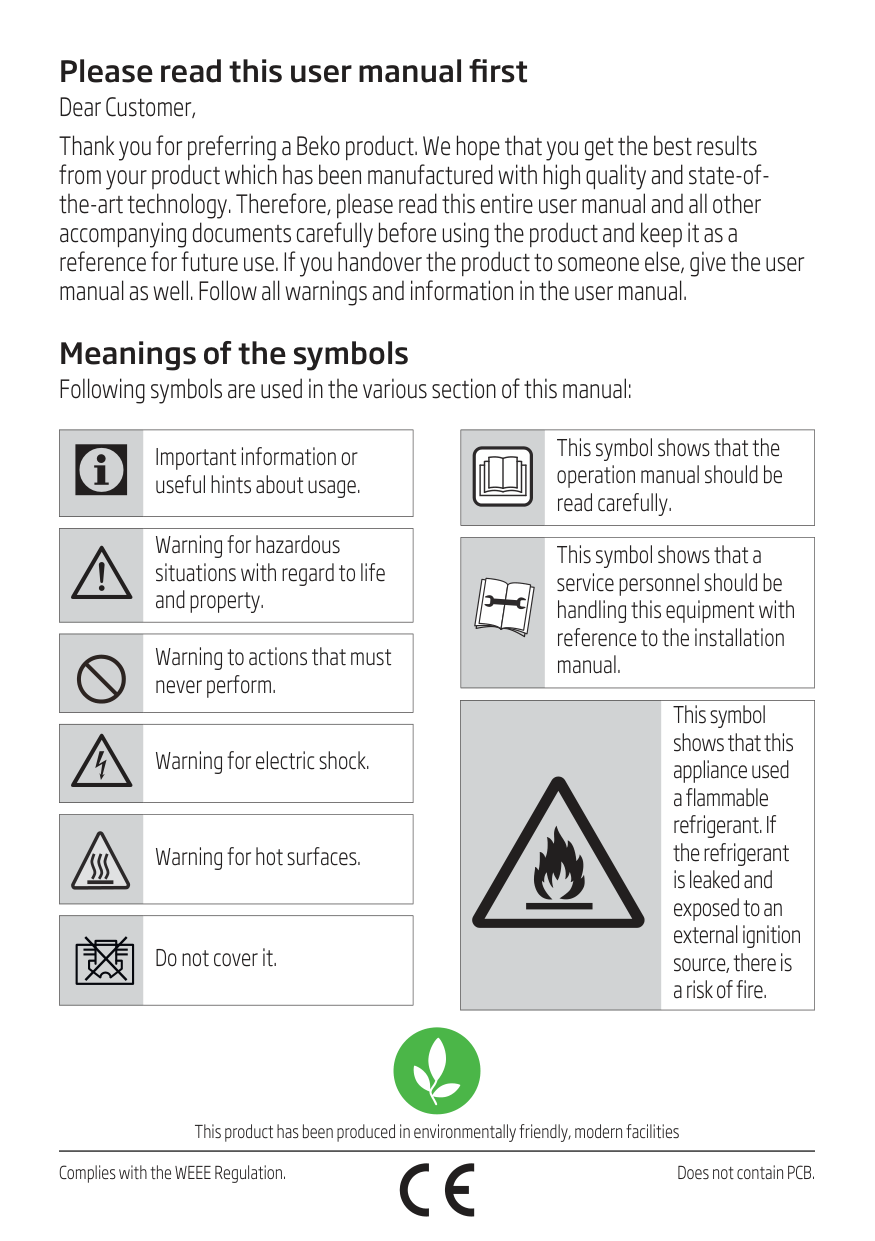
Please read this user manual first Dear Customer, Thank you for preferring a Beko product. We hope that you get the best results from your product which has been manufactured with high quality and state-of- the-art technology. Therefore, please read this entire user manual and all other accompanying documents carefully before using the product and keep it as a reference for future use. If you handover the product to someone else, give the user manual as well. Follow all warnings and information in the user manual. Meanings of the symbols Following symbols are used in the various section of this manual: This product has been produced in environmentally friendly, modern facilities Complies with the WEEE Regulation. Does not contain PCB.
C
Important information or useful hints about usage.A
Warning for hazardous situations with regard to life and property. Warning to actions that must never perform.B
Warning for electric shock. Warning for hot surfaces. Do not cover it. This symbol shows that the operation manual should be read carefully. This symbol shows that a service personnel should be handling this equipment with reference to the installation manual. This symbol shows that this appliance used a flammable refrigerant. If the refrigerant is leaked and exposed to an external ignition source, there is a risk of fire.
4 / 396 En
Local Air-conditioner / User Manual Contents 1 Safety awareness 6 2 Name of parts 30 3 Accessories 31 4 Appearance and function of control panel 32 4.1 Cooling only model (non-reversible). . . . . . . . . . . . . . . . . . . . . . . . . . . . . . . . . . . . . . . . . . . . . . . . . . . . . . . . . . 32 4.2 Cooling & Heat pump model (reversible) . . . . . . . . . . . . . . . . . . . . . . . . . . . . . . . . . . . . . . . . . . . . . . . . . . . . . 33 5 Appearance and function of remote control 34 6 Operation introduction 36 6.1 Before using . . . . . . . . . . . . . . . . . . . . . . . . . . . . . . . . . . . . . . . . . . . . . . . . . . . . . . . . . . . . . . . . . . . . . . . . . . . . . . . . . 36 6.2 Cooling operation . . . . . . . . . . . . . . . . . . . . . . . . . . . . . . . . . . . . . . . . . . . . . . . . . . . . . . . . . . . . . . . . . . . . . . . . . . . . 37 6.3 Dehumidifying operation . . . . . . . . . . . . . . . . . . . . . . . . . . . . . . . . . . . . . . . . . . . . . . . . . . . . . . . . . . . . . . . . . . . . 37 6.4 Fan operation . . . . . . . . . . . . . . . . . . . . . . . . . . . . . . . . . . . . . . . . . . . . . . . . . . . . . . . . . . . . . . . . . . . . . . . . . . . . . . . . 37 6.5 Heating operation (this function is not available for a cold- single unit) . . . . . . . . . . . . . . . . . . . . . 37 6.6 Timer operation . . . . . . . . . . . . . . . . . . . . . . . . . . . . . . . . . . . . . . . . . . . . . . . . . . . . . . . . . . . . . . . . . . . . . . . . . . . . . . 37 6.7 Auto swing . . . . . . . . . . . . . . . . . . . . . . . . . . . . . . . . . . . . . . . . . . . . . . . . . . . . . . . . . . . . . . . . . . . . . . . . . . . . . . . . . . .38 6.8 Sleep mode. . . . . . . . . . . . . . . . . . . . . . . . . . . . . . . . . . . . . . . . . . . . . . . . . . . . . . . . . . . . . . . . . . . . . . . . . . . . . . . . . . .38 6.9 Water drainage . . . . . . . . . . . . . . . . . . . . . . . . . . . . . . . . . . . . . . . . . . . . . . . . . . . . . . . . . . . . . . . . . . . . . . . . . . . . . . .38 6.10 Wireless function . . . . . . . . . . . . . . . . . . . . . . . . . . . . . . . . . . . . . . . . . . . . . . . . . . . . . . . . . . . . . . . . . . . . . . . . 39 6.11 Zone follow function . . . . . . . . . . . . . . . . . . . . . . . . . . . . . . . . . . . . . . . . . . . . . . . . . . . . . . . . . . . . . . . . . . . . . . . . . 39 7 Installation explanations 40 7.1 Installation explanations: . . . . . . . . . . . . . . . . . . . . . . . . . . . . . . . . . . . . . . . . . . . . . . . . . . . . . . . . . . . . . . . . . . . .40 7.2 Introduction to exhaust hose installation. . . . . . . . . . . . . . . . . . . . . . . . . . . . . . . . . . . . . . . . . . . . . . . . . . . . 41 7.3 Universal caulking kit accessory for mobile air conditioner (optional). . . . . . . . . . . . . . . . . . . . . . . .43 7.4 Use the Hepa 13 filter (only for BP113H model). . . . . . . . . . . . . . . . . . . . . . . . . . . . . . . . . . . . . . . . . . . . . .46 7.5 Water full alarm . . . . . . . . . . . . . . . . . . . . . . . . . . . . . . . . . . . . . . . . . . . . . . . . . . . . . . . . . . . . . . . . . . . . . . . . . . . . . . 47
Local Air-conditioner / User Manual
5 / 396 En
ContentsV2012008
8 Maintenance explanations 48 8.1 Clean the air filter . . . . . . . . . . . . . . . . . . . . . . . . . . . . . . . . . . . . . . . . . . . . . . . . . . . . . . . . . . . . . . . . . . . . . . . . . . . .48 8.2 Clean the air-conditioner surface . . . . . . . . . . . . . . . . . . . . . . . . . . . . . . . . . . . . . . . . . . . . . . . . . . . . . . . . . . . .49 9 Maintenance 50 10 Troubleshooting 51 11 European disposal guideline 52 12 Installation instructions 53 12.1 F-Gas instruction. . . . . . . . . . . . . . . . . . . . . . . . . . . . . . . . . . . . . . . . . . . . . . . . . . . . . . . . . . . . . . . . . . . . . . . . . . . . . 53 13 Specifications 54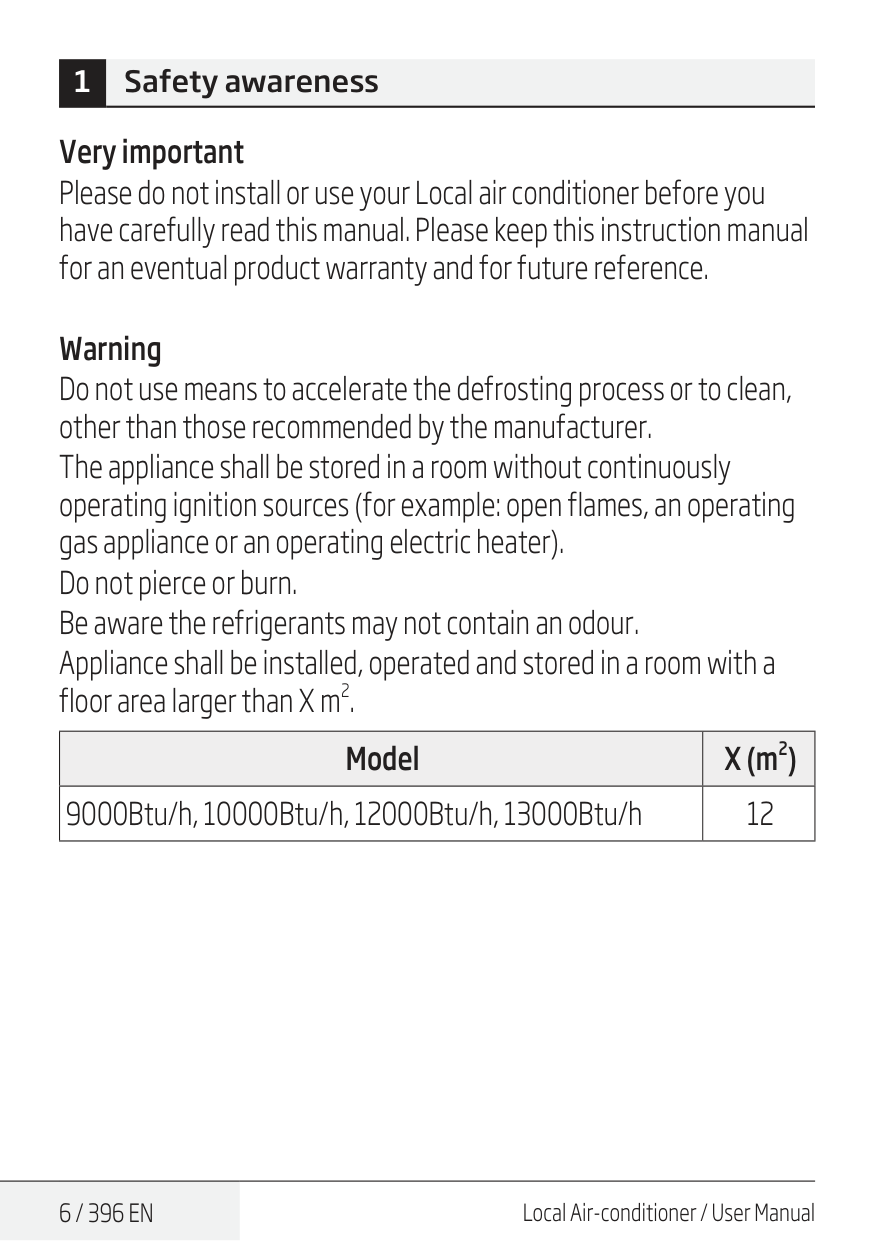
6 / 396 En
Local Air-conditioner / User Manual 1 Safety awareness Very important Please do not install or use your Local air conditioner before you have carefully read this manual. Please keep this instruction manual for an eventual product warranty and for future reference. Warning Do not use means to accelerate the defrosting process or to clean, other than those recommended by the manufacturer. The appliance shall be stored in a room without continuously operating ignition sources (for example: open flames, an operating gas appliance or an operating electric heater). Do not pierce or burn. Be aware the refrigerants may not contain an odour. Appliance shall be installed, operated and stored in a room with a floor area larger than X m
Local Air-conditioner / User Manual
7 / 396 En
Warning (for R290) Specific information regarding appliances with R290 refrigerant gas. •Thoroughly read all of the warnings. •When defrosting and cleaning the appliance, do not use any tools other than those recommended by the manufacturing company. •The appliance must be placed in an area without any continuously sources of ignition (for example: open flames, gas or electrical appliances in operation). •Do not puncture and do not burn. •This appliance contains Y g (see rating label back of unit) of R290 refrigerant gas. •R290 is a refrigerant gas that complies with the European directives on the environment. Do not puncture any part of the refrigerant circuit. •If the appliance is installed, operated or stored in an unventilated area, the room must be designed to prevent to the accumulation of refrigerant leaks resulting in a risk of fire or explosion due to ignition of the refrigerant caused by electric heaters, stoves, or other sources of ignition. •The appliance must be stored in such a way as to prevent mechanical failure. •Individuals who operate or work on the refrigerant circuit must have the appropriate certification issued by an accredited organization that ensures competence in handling refrigerants according to a specific evaluation recognized by associations in the industry. 1 Safety awareness
8 / 396 En
Local Air-conditioner / User Manual •Repairs must be performed based on the recommendation from the manufacturing company. Maintenance and repairs that require the assistance of other qualified personnel must be performed under the supervision of an individual specified in the use of flammable refrigerants. General safety instruction
Local Air-conditioner / User Manual
9 / 396 En
1 Safety awareness
10 / 396 En
Local Air-conditioner / User Manual 1 Safety awareness
Local Air-conditioner / User Manual
11 / 396 En
1 Safety awareness
12 / 396 En
Local Air-conditioner / User Manual 1 Safety awarenessC
Note: •If any parts damage, please contact the dealer or a designated repair shop; •In case of any damage, please turn off the air switch, disconnect the power supply, and contact the dealer or a designated repair shop; •In any case, the power cord shall be firmly grounded. •To avoid the possibility of danger, if power cord is damaged, please turn off the air switch and disconnect the power supply. It must be replaced from the dealer or a designated repair shop.
Local Air-conditioner / User Manual
13 / 396 En
Warnings (for using R290 refrigerant only)
14 / 396 En
Local Air-conditioner / User Manual 1.5 Presence of fire extinguisher If any hot work is to be conducted on the refrigeration equipment or any associated parts, propriate fire extinguishing equipment shall be available to hand. Have a dry powder or CO2 fire extinguisher adjacent to the charging area. 1.6 No ignition sources No person carrying out work in relation to a refrigeration system which involves exposing any pipe work that contains or has contained flammable refrigerant shall use any sources of ignition in such a manner that it may lead to the risk of fire or explosion. All possible ignition sources, including cigarette smoking, should be kept sufficiently far away from the site of installation, repairing, removing and disposal, during which flammable refrigerant can possibly be released to the surrounding space. Prior to work taking place, the area around the equipment is to be surveyed to make sure that there are no flammable hazards or ignition risks. “No Smoking” signs shall be displayed. 1.7 Ventilated area Ensure that the area is in the open or that it is adequately ventilated before breaking into the system or conducting any hot work. A degree of ventilation shall continue during the period that the work is carried out. The ventilation should safely disperse any released refrigerant and preferably expel it externally into the atmosphere. 1 Safety awareness
Local Air-conditioner / User Manual
15 / 396 En
1.8 Checks to the refrigeration equipment Where electrical components are being changed, they shall be fit for the purpose and to the correct specification. At all times the manufacturer’s maintenance and service guidelines shall be followed. If in doubt consult the manufacturer’s technical department for assistance. The following checks shall be applied to installations using flammable refrigerants: the charge size is in accordance with the room size within which the refrigerant containing parts are installed; the ventilation machinery and outlets are operating adequately and are not obstructed; if an indirect refrigerating circuit is being used, the secondary circuit shall be checked for the presence of refrigerant; marking to the equipment continues to be visible and legible. Markings and signs that are illegible shall be corrected; refrigeration pipe or components are installed in a position where they are unlikely to be exposed to any substance which may corrode refrigerant containing components, unless the components are constructed of materials which are inherently resistant to being corroded or are suitably protected against being so corroded. 1.9 Checks to electrical devices Repair and maintenance to electrical components shall include initial safety checks and component inspection procedures. If a fault exists that could compromise safety, then no electrical supply shall be connected to the circuit until it is satisfactorily dealt with. If the fault cannot be corrected immediately but it is necessary to continue operation, an adequate temporary solution shall be used. This shall be reported to the owner of the equipment so all parties are advised. 1 Safety awareness
16 / 396 En
Local Air-conditioner / User Manual Initial safety checks shall include: that capacitors are discharged: this shall be done in a safe manner to avoid possibility of sparking; that there no live electrical components and wiring are exposed while charging, recovering or purging the system; that there is continuity of earth bonding.
Local Air-conditioner / User Manual
17 / 396 En
C
Note: The use of silicon sealant may inhibit the effectiveness of some types of leak detection equipment. Intrinsically safe components do not have to be isolated prior to working on them.
18 / 396 En
Local Air-conditioner / User Manual
Local Air-conditioner / User Manual
19 / 396 En
20 / 396 En
Local Air-conditioner / User Manual
Local Air-conditioner / User Manual
21 / 396 En
d) Pump down refrigerant system,if possible. e) If a vacuum is not possible, make a manifold so that refrigerant can be removed from various parts of the system. f) Make sure that cylinder is situated on the scales before recovery takes place. g) Start the recovery machine and operate in accordance with manufacturer’s instructions. h) Do not overfill cylinders. (No more than 80 % volume liquid charge). i) Do not exceed the maximum working pressure of the cylinder,even temporarily. j) When the cylinders have been filled correctly and the process completed, make sure that the cylinders and the equipment are removed from site promptly and all isolation valves on the equipment are closed off. k) Recovered refrigerant shall not be charged into another refrigeration system unless it has been cleaned and checked.
22 / 396 En
Local Air-conditioner / User Manual
Local Air-conditioner / User Manual
23 / 396 En
If compressors or compressor oils are to be removed, ensure that they have been evacuated to an acceptable level to make certain that flammable refrigerant does not remain within the lubricant. The evacuation process shall be carried out prior to returning the compressor to the suppliers. Only electric heating to the compressor body shall be employed to accelerate this process. When oil is drained from a system, it shall be carried out safely.C
Note about fluorinated gasses:
24 / 396 En
Local Air-conditioner / User Manual In many countries, this training is carried out by national training organizations that are accredited to teach the relevant national competency standards that may be set in legislation. The achieved competence should be documented by a certificate. Training The training should include the substance of the following: Information about the explosion potential of flammable refrigerants to show that flammables may be dangerous when handled without care. Information about potential ignition sources, especially those that are not obvious, such as lighters, light switches, vacuum cleaners, electric heaters. Information about the different safety concepts: Unventilated – (see Clause GG.2) Safety of the appliance does not depend on ventilation of the housing. Switching off the appliance or opening of the housing has no significant effect on the safety. Nevertheless, it is possible that leaking refrigerant may accumulate inside the enclosure and flammable atmosphere will be released when the enclosure is opened. Ventilated enclosure – (see Clause GG.4) Safety of the appliance depends on ventilation of the housing. Switching off the appliance or opening of the enclosure has a significant effect on the safety. Care should be taken to ensure a sufficient ventilation before. 1 Safety awareness
Local Air-conditioner / User Manual
25 / 396 En
Ventilated room – (see Clause GG.5) Safety of the appliance depends on the ventilation of the room. Switching off the appliance or opening of the housing has no significant effect on the safety. The ventilation of the room shall not be switched off during repair procedures. Information about the concept of sealed components and sealed enclosures according to IEC 60079-15:2010. Information about the correct working procedures: a) Commissioning
26 / 396 En
Local Air-conditioner / User Manual c) Repair
Local Air-conditioner / User Manual
27 / 396 En
d) Decommissioning
28 / 396 En
Local Air-conditioner / User Manual 1 Safety awareness
Local Air-conditioner / User Manual
29 / 396 En
Disposal of equipment using flammable refrigerants See national regulations. Storage of equipment/appliances The storage of equipment should be in accordance with the manufacturer’s instructions. Storage of packed (unsold) equipment Storage package protection should be constructed such that mechanical damage to the equipment inside the package will not cause a leak of the refrigerant charge. The maximum number of pieces of equipment permitted to be stored together will be determined by local regulations. 1 Safety awareness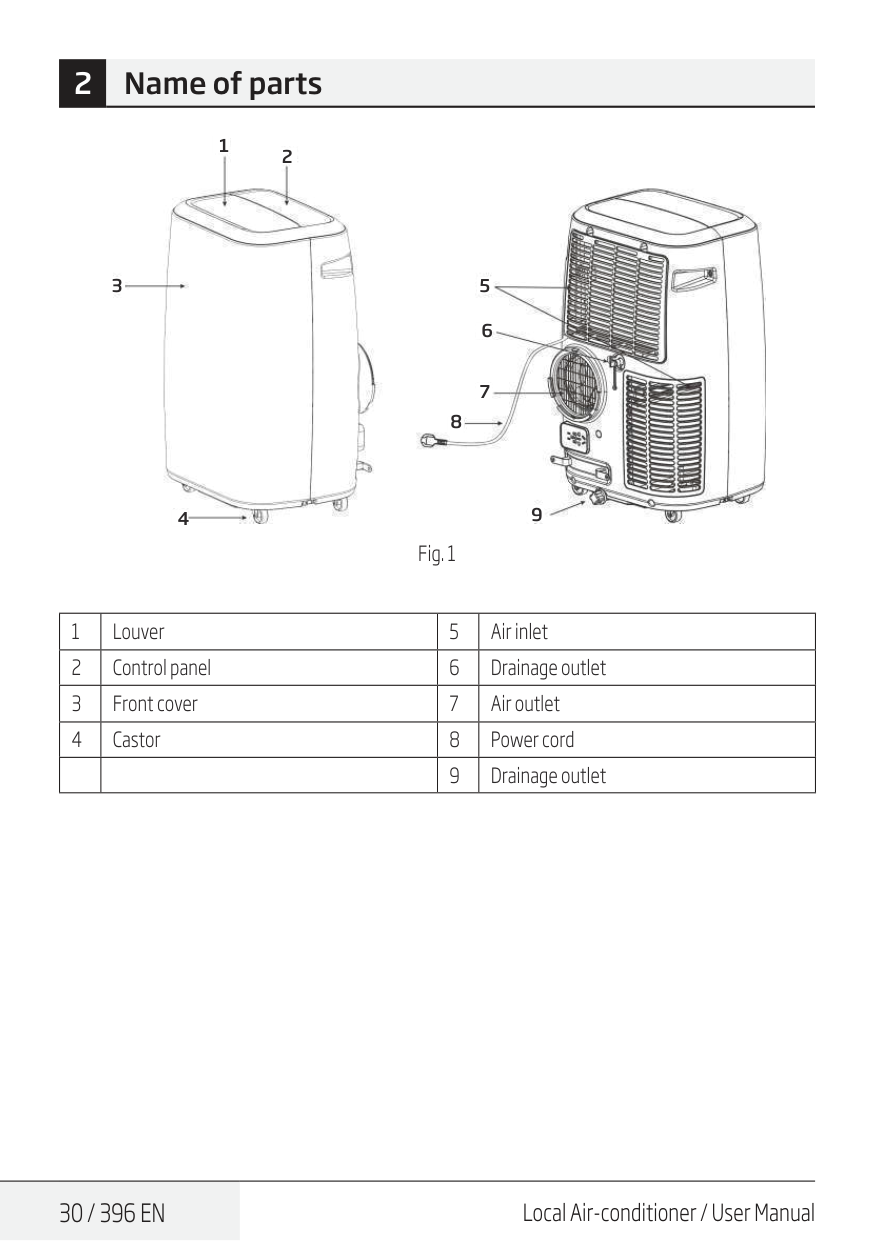
30 / 396 En
Local Air-conditioner / User Manual 2 Name of parts 1 2 3 5 6 7 8 9 4 Fig. 1 1 Louver 5 Air inlet 2 Control panel 6 Drainage outlet 3 Front cover 7 Air outlet 4 Castor 8 Power cord 9 Drainage outlet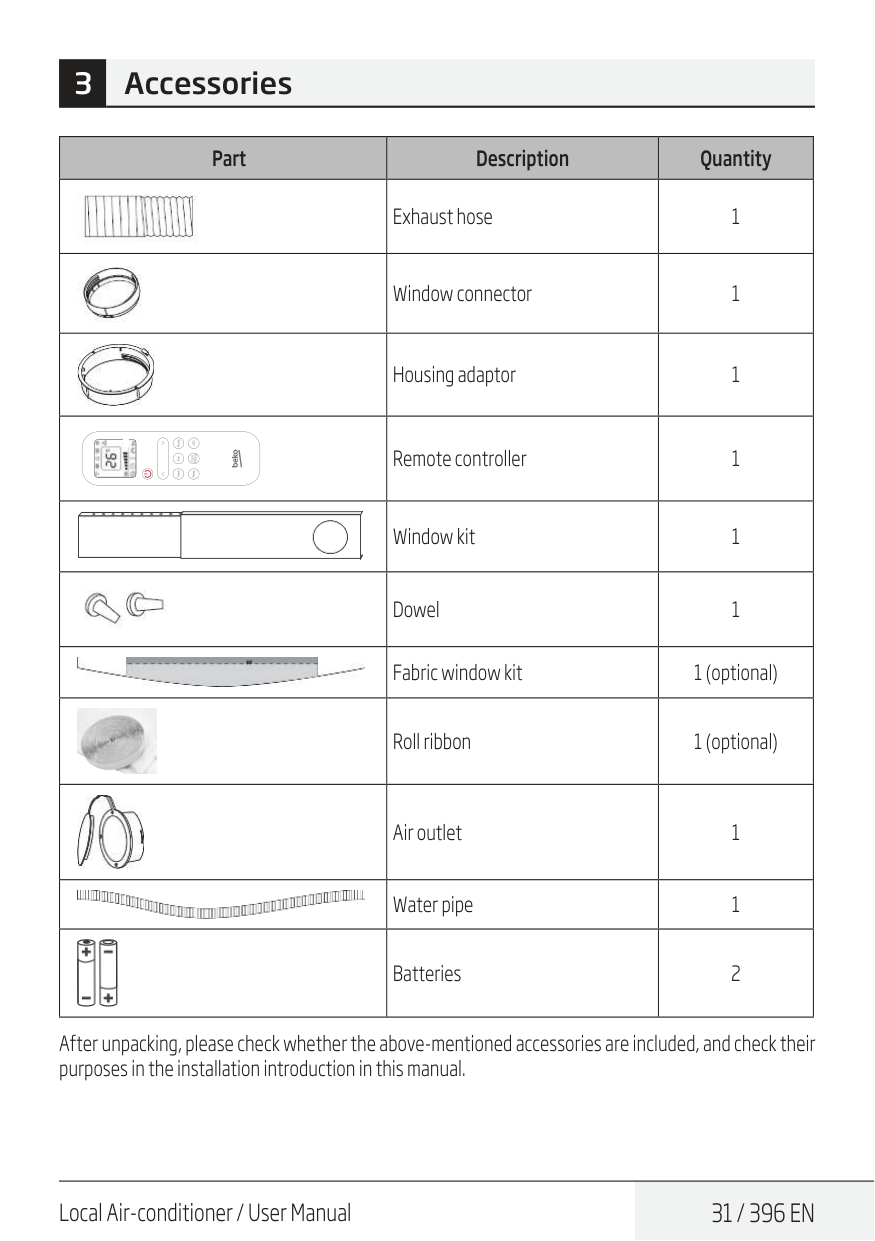
Local Air-conditioner / User Manual
31 / 396 En
Part Description Quantity Exhaust hose 1 Window connector 1 Housing adaptor 1 Remote controller 1 Window kit 1 Dowel 1 Fabric window kit 1 (optional) Roll ribbon 1 (optional) Air outlet 1 Water pipe 1 Batteries 2 After unpacking, please check whether the above-mentioned accessories are included, and check their purposes in the installation introduction in this manual. 3 Accessories
32 / 396 En
Local Air-conditioner / User Manual 4.1 Cooling only model (non-reversible) Timer Mode SpeedF
1 2 3 4 5 6 7 8 9 10E
D
C
B
A
11A
Power on/off 4 FanB
Fan speed 5 Wireless functionC
Temperature up 6 Zone followD
Temperature down 7 Auto swingE
Operation mode 8 Low fan speedF
Timer on/off 9 Medium fan speed 1 Sleep mode 10 High fan speed 2 Cooling 11 Water full 3 Dehumidifying 4 Appearance and function of control panel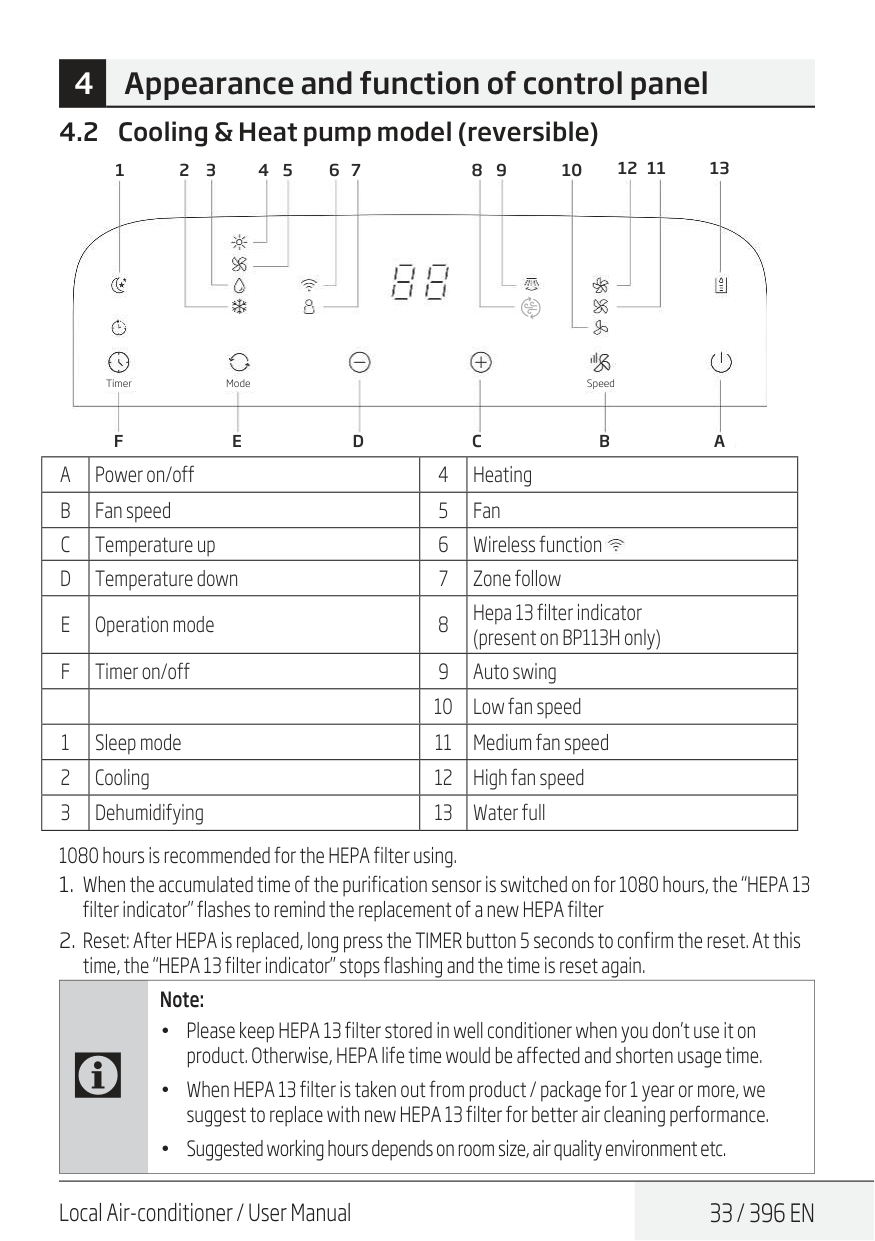
Local Air-conditioner / User Manual
33 / 396 En
4 Appearance and function of control panel 4.2 Cooling & Heat pump model (reversible) 1080 hours is recommended for the HEPA filter using.C
Note:F
1 2 3 4 5 6 7 8 9 10 12 11 13E
D
C
B
A
A
Power on/off 4 HeatingB
Fan speed 5 FanC
Temperature up 6 Wireless functionD
Temperature down 7 Zone followE
Operation mode 8 Hepa 13 filter indicator (present on BP113H only)F
Timer on/off 9 Auto swing 10 Low fan speed 1 Sleep mode 11 Medium fan speed 2 Cooling 12 High fan speed 3 Dehumidifying 13 Water full
34 / 396 En
Local Air-conditioner / User Manual 3 5 7 9 1 2 4 6 8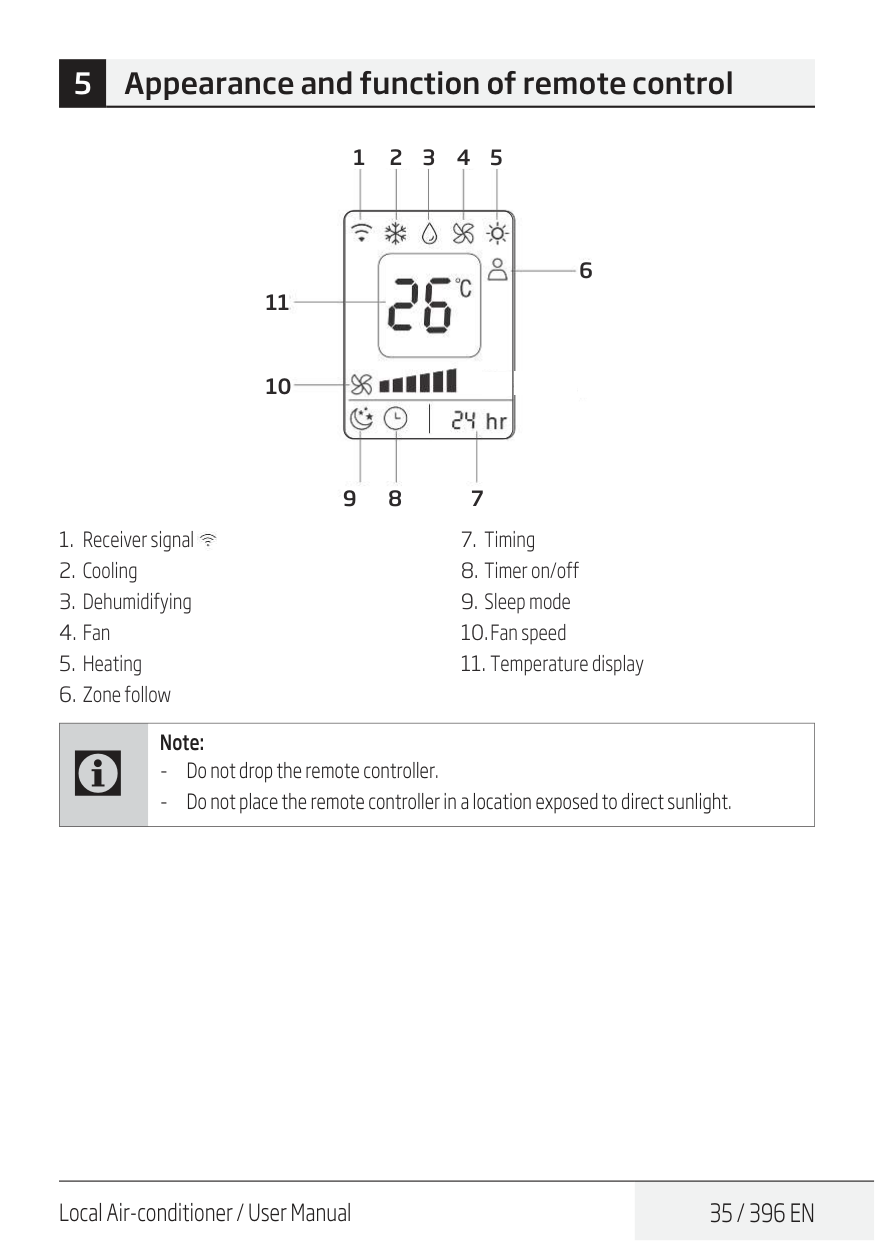
Local Air-conditioner / User Manual
35 / 396 En
5 Appearance and function of remote control 1 2 3 4 5 6 9 8 7 11 10C
Note: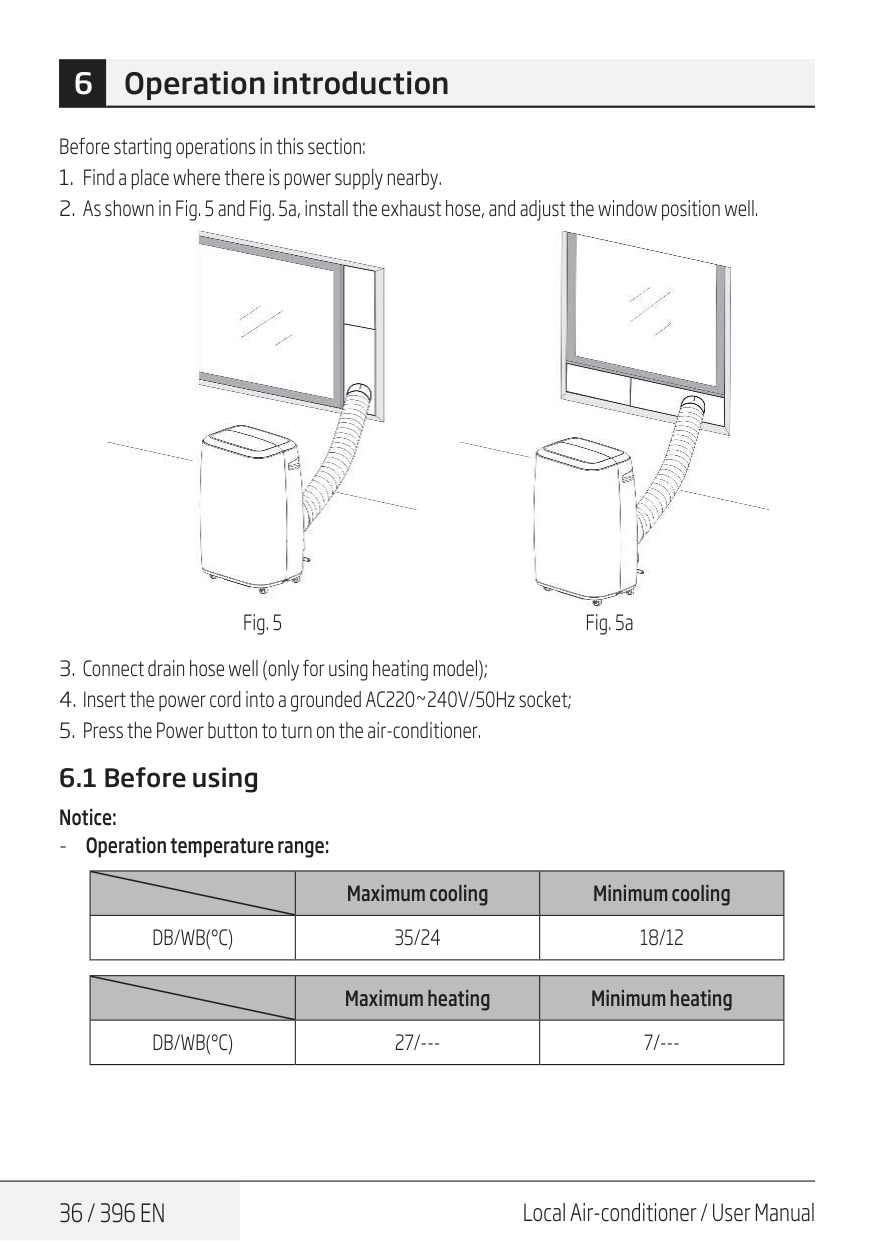
36 / 396 En
Local Air-conditioner / User Manual 6 Operation introduction Before starting operations in this section:Db/Wb(°C)
35/24 18/12 Maximum heating Minimum heatingDb/Wb(°C)
27/--- 7/---
Local Air-conditioner / User Manual
37 / 396 En
Check up whether the exhaust hose has been mounted properly. Cautions for cooling and dehumidifying operations:
38 / 396 En
Local Air-conditioner / User Manual Timer Off setting:
Local Air-conditioner / User Manual
39 / 396 En
6.10 Wireless function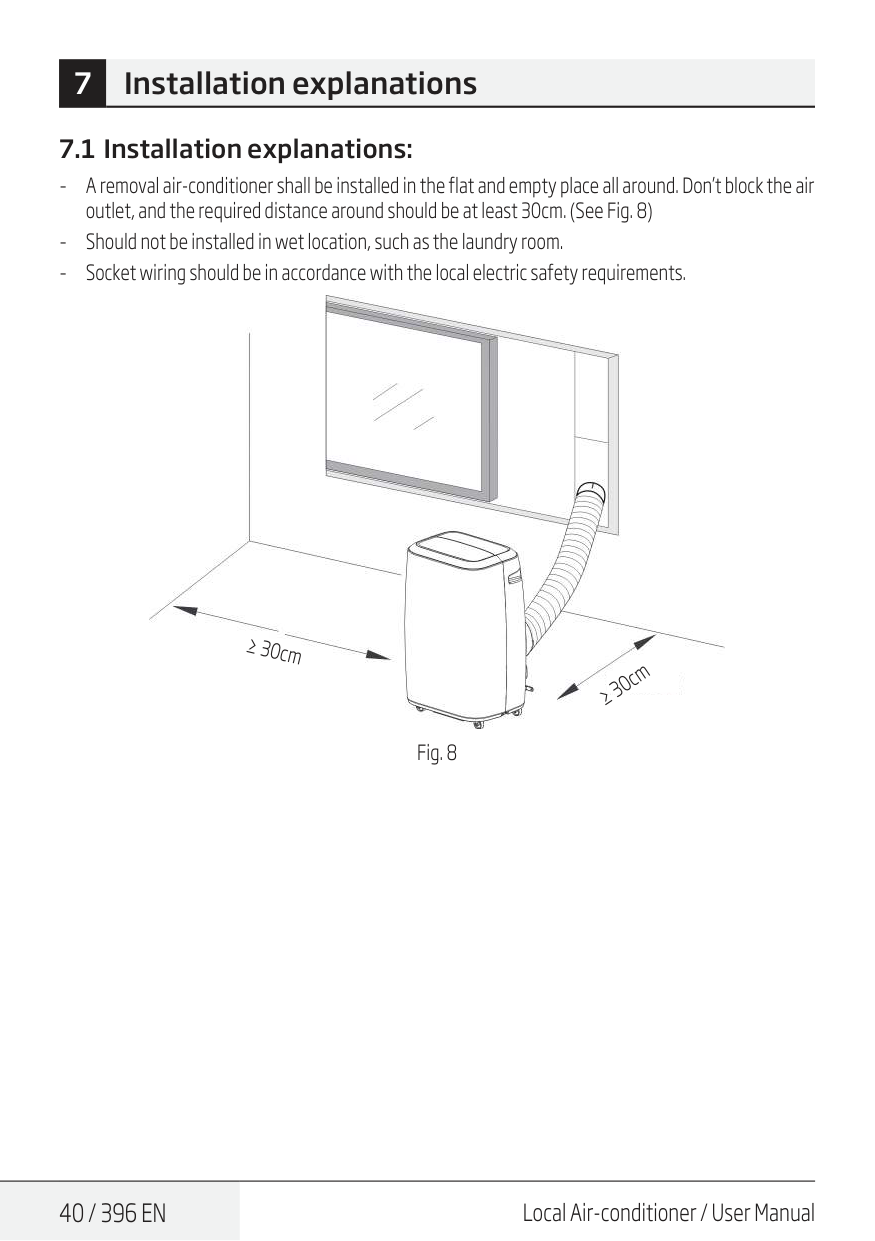
40 / 396 En
Local Air-conditioner / User Manual 7 Installation explanations 7.1 Installation explanations: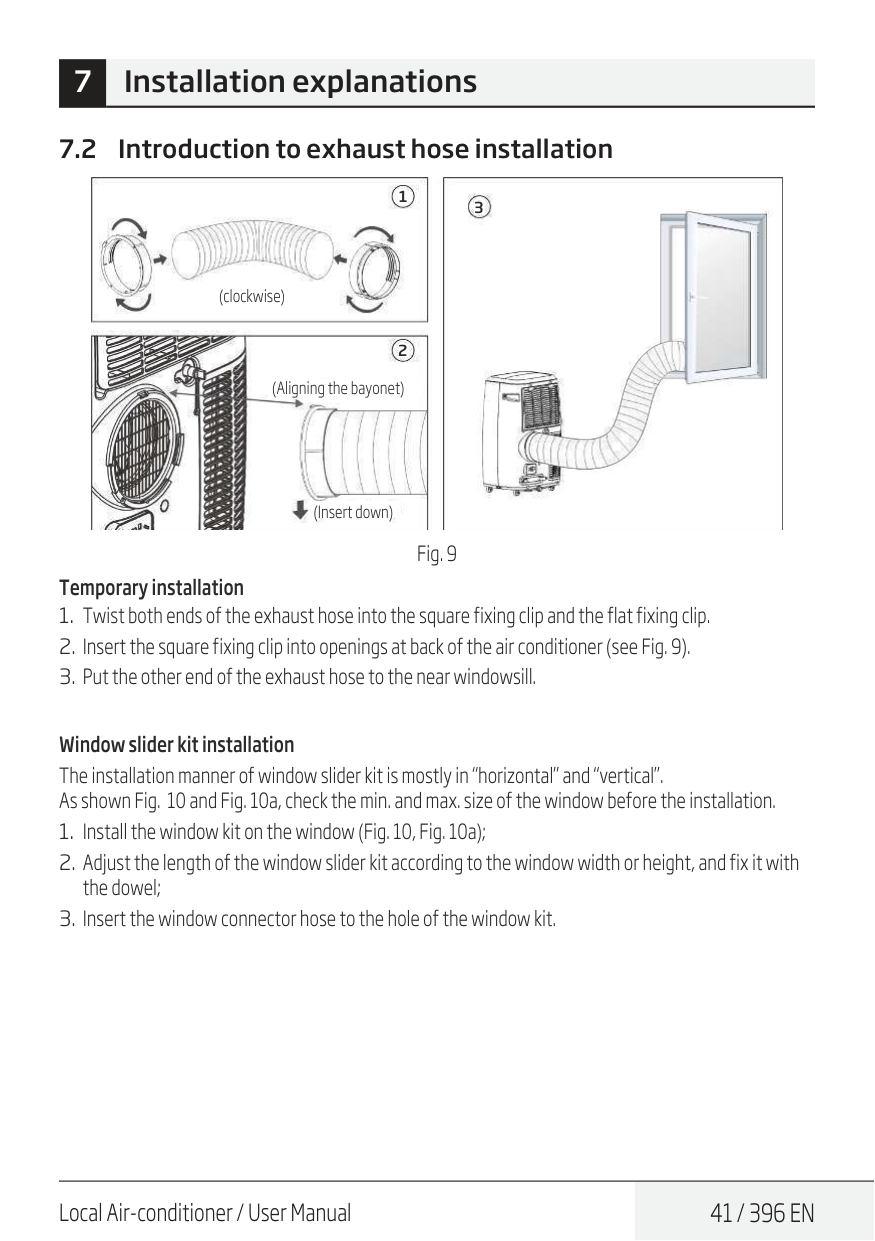
Local Air-conditioner / User Manual
41 / 396 En
7.2 Introduction to exhaust hose installation 1 2 3 (clockwise) (Aligning the bayonet) (Insert down) Fig. 9 Temporary installation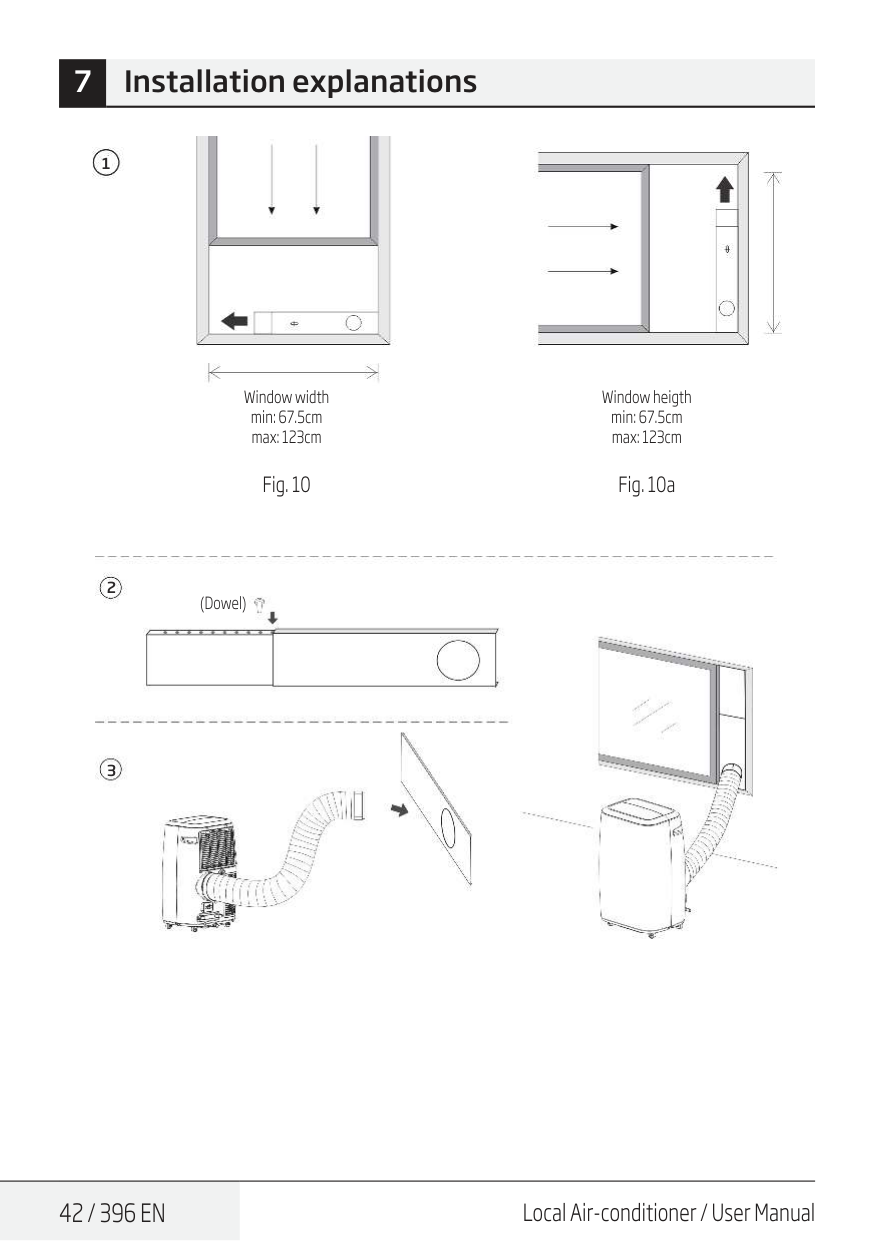
42 / 396 En
Local Air-conditioner / User Manual 1 Window width min: 67.5cm max: 123cm Fig. 10 Window heigth min: 67.5cm max: 123cm Fig. 10a 2 3 (Dowel) 7 Installation explanations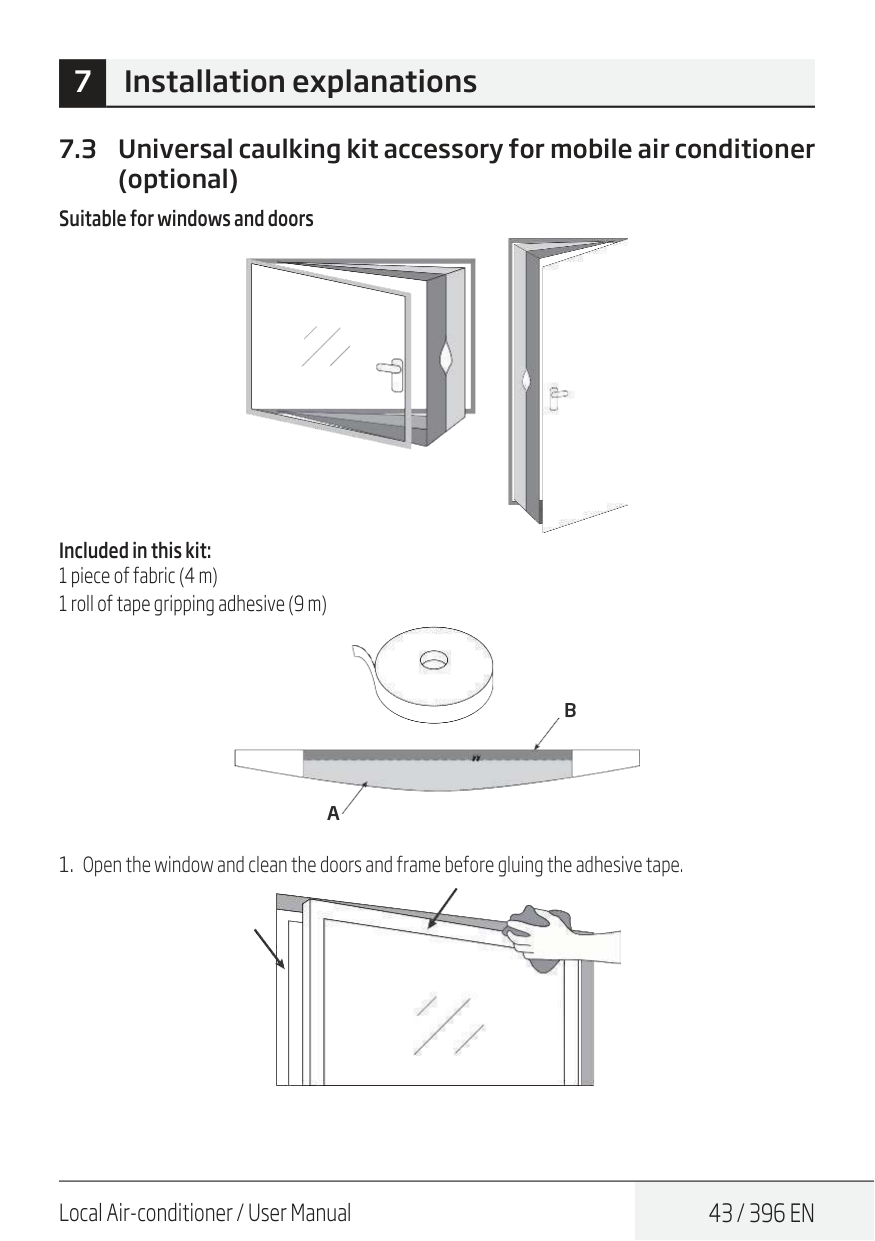
Local Air-conditioner / User Manual
43 / 396 En
7.3 Universal caulking kit accessory for mobile air conditioner (optional) Suitable for windows and doors Included in this kit: 1 piece of fabric (4 m) 1 roll of tape gripping adhesive (9 m)A
B
44 / 396 En
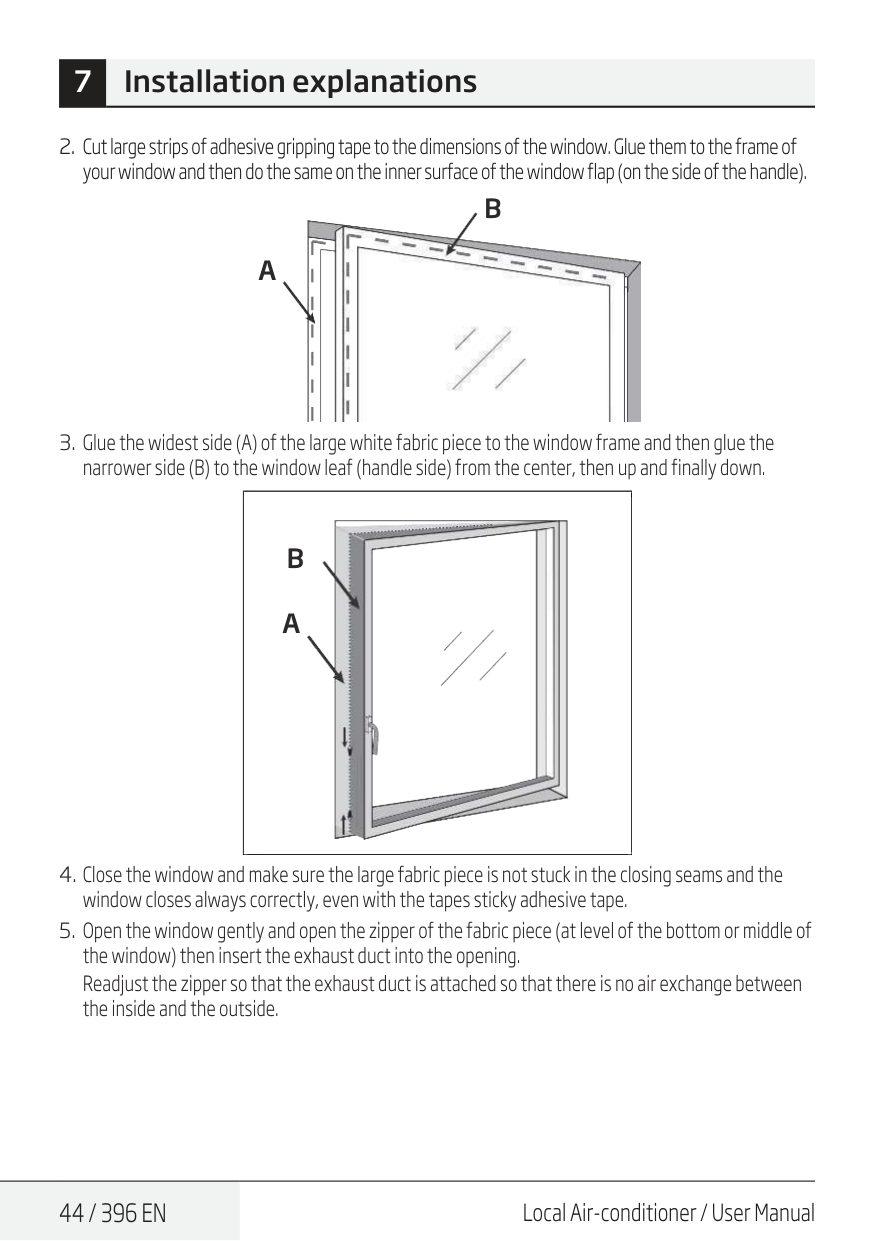
Local Air-conditioner / User Manual 7 Installation explanationsA
B
A
B
Local Air-conditioner / User Manual
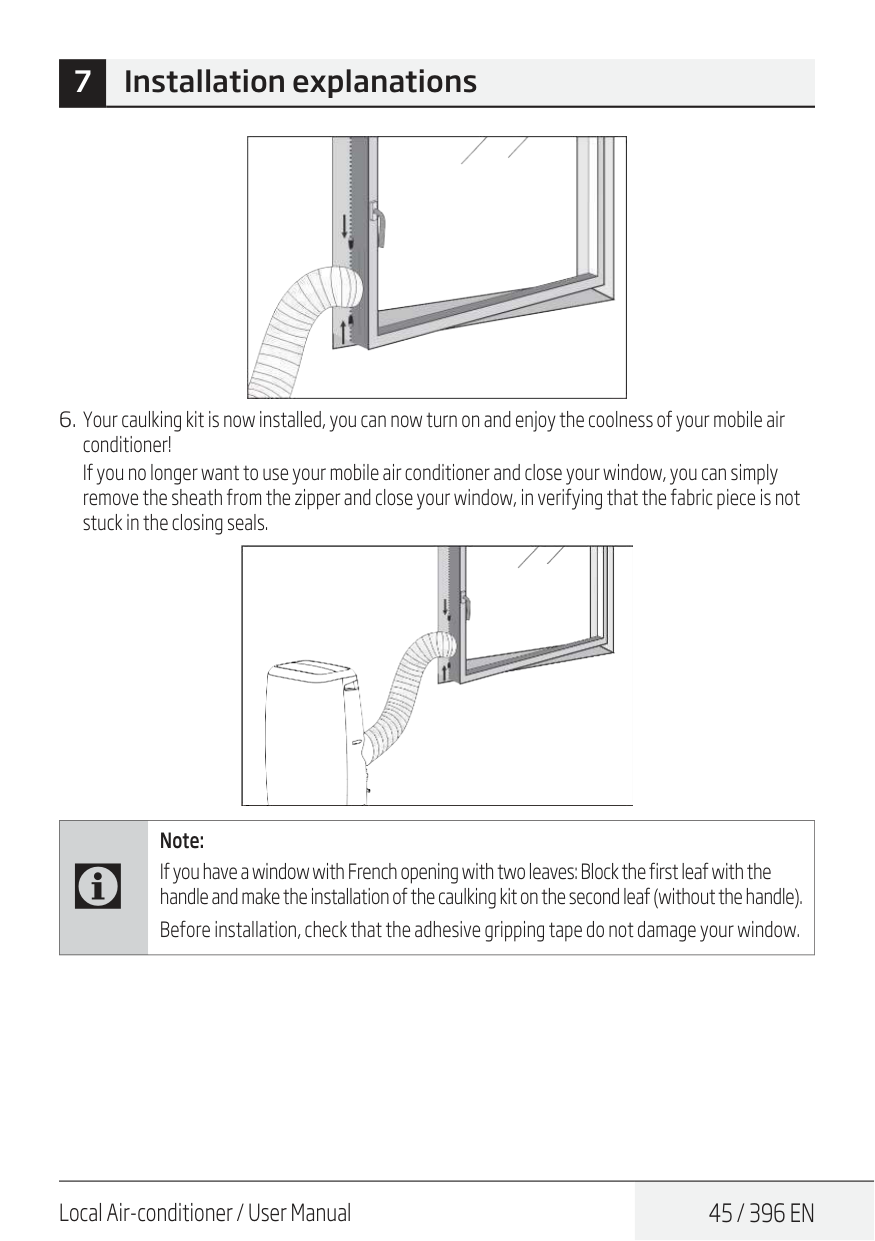
45 / 396 En
7 Installation explanationsC
Note: If you have a window with French opening with two leaves: Block the first leaf with the handle and make the installation of the caulking kit on the second leaf (without the handle). Before installation, check that the adhesive gripping tape do not damage your window.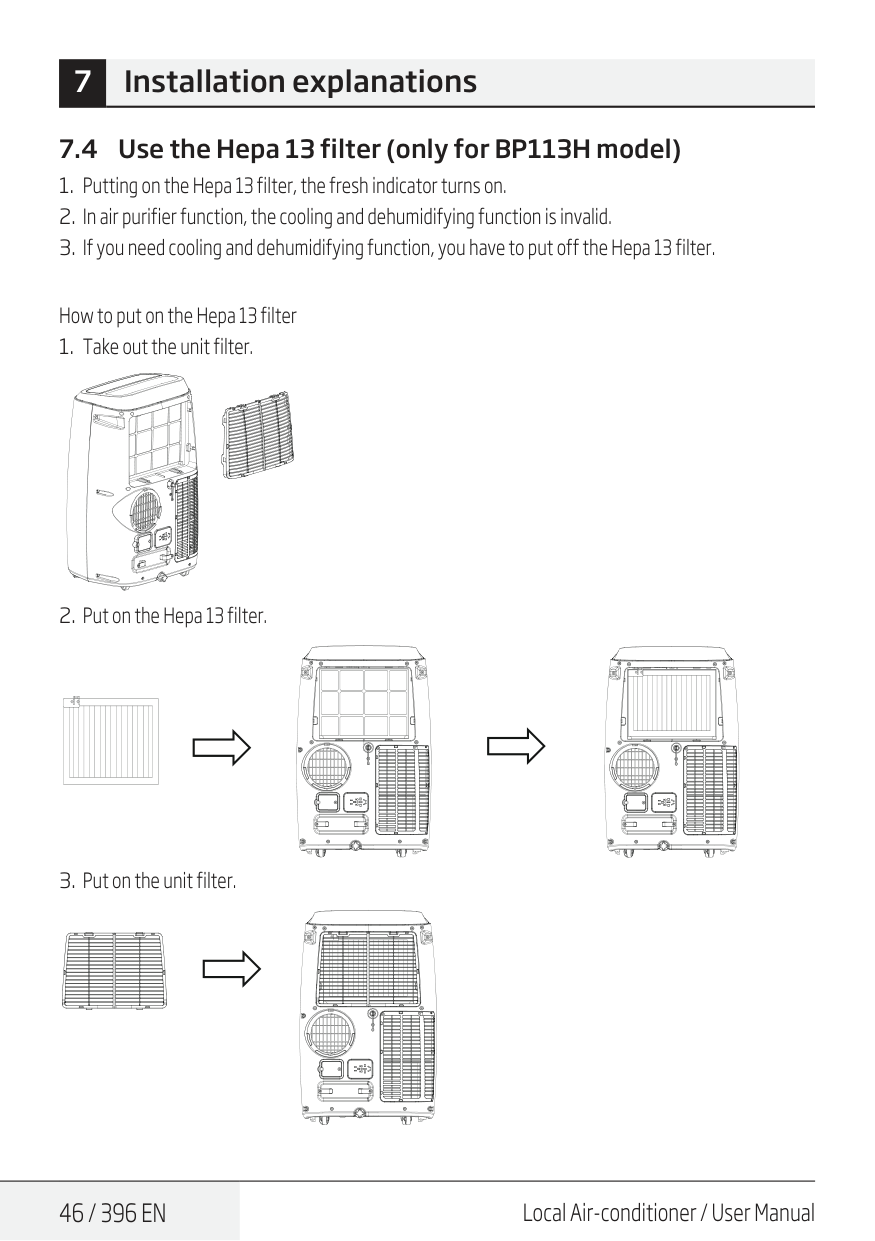
46 / 396 En
Local Air-conditioner / User Manual 7 Installation explanations 7.4 Use the Hepa 13 filter (only for BP113H model)
Local Air-conditioner / User Manual
47 / 396 En
7 Installation explanations 7.5 Water full alarm The inner water tray inside the air-conditioner has one water level safety switches, it controls water level. When water level reaches an anticipated height, the water full indicator lamp lights up. (If water pump is damaged, when the water is full, please remove the rubber blockage at the bottom of unit, and all water will be drained outside.)A
B
Hole (A) which is placed at the top, is to be used to extract the water from the mobile air conditioner (remove the rubber stopper and add the drain hose to the orifice) when there is a lot of humidity in the room (in continuous drainage) or when the product is operating in dehumidification or heating mode. Hole (B) which is placed at the bottom, has a tank and is to be used when it is necessary to empty the tank (water tank alarm). Simply remove the rubber plug and add the drain hose to the hole to drain the water from the tank.C
Note: Attention depending on the filling of the water tank, there will sometimes be a lot of water to evacuate. Then the ideal would be to empty it outside or empty it over a large basin to avoid flooding your room.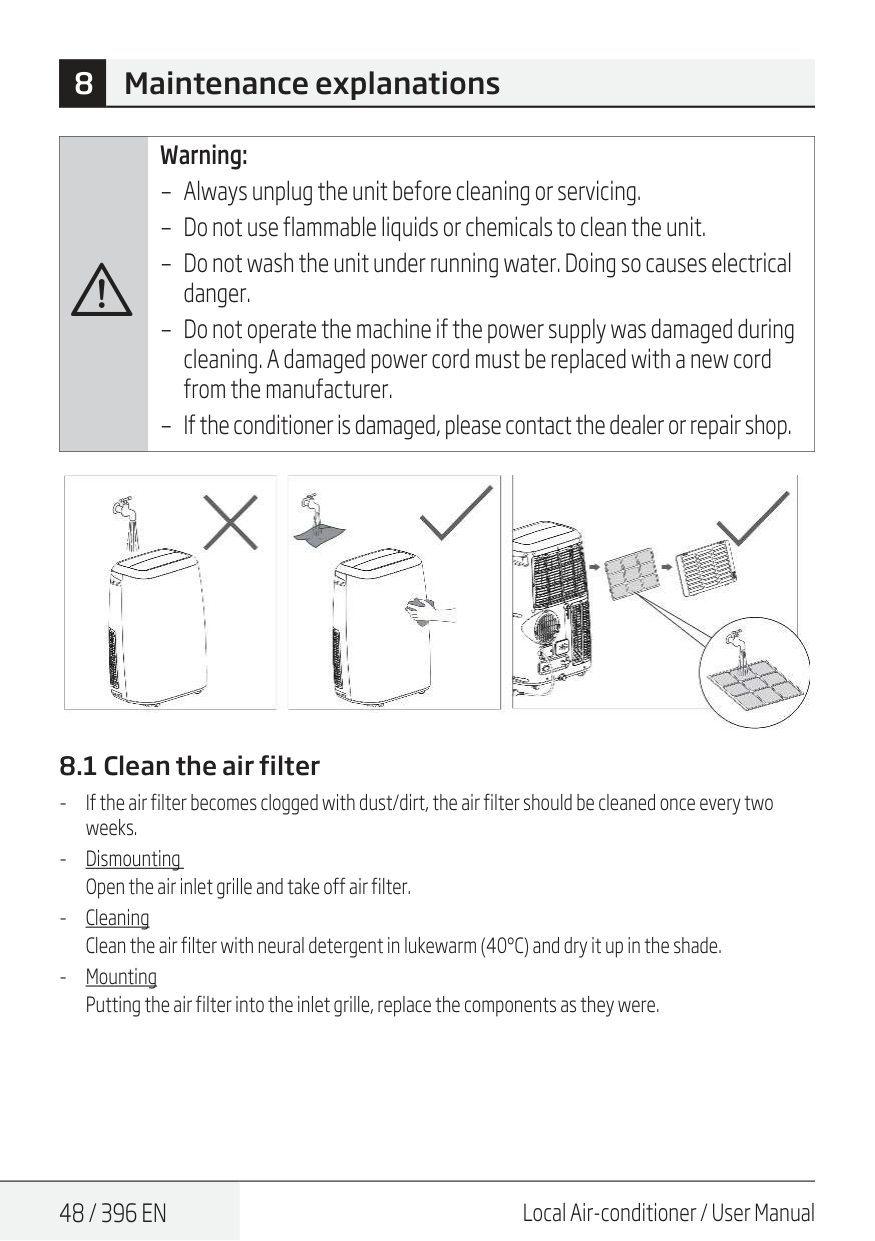
48 / 396 En
Local Air-conditioner / User Manual 8 Maintenance explanationsA
Warning: – Always unplug the unit before cleaning or servicing. – Do not use flammable liquids or chemicals to clean the unit. – Do not wash the unit under running water. Doing so causes electrical danger. – Do not operate the machine if the power supply was damaged during cleaning. A damaged power cord must be replaced with a new cord from the manufacturer. – If the conditioner is damaged, please contact the dealer or repair shop. 8.1 Clean the air filter
Local Air-conditioner / User Manual
49 / 396 En
A
Warning: Do not operate the unit without filter because dirt and lint will clog it and reduce performance. 8.2 Clean the air-conditioner surface First clean the surface with a neutral detergent and wet cloth, and then wipe it with a dry cloth. 8 Maintenance explanations
50 / 396 En
Local Air-conditioner / User Manual 9 Maintenance Maintenance tips Be sure to clean the air filter every 2 weeks for optimal performance. The water collection tray should be drained immediately after P1 error occurs, and before storage to prevent mold. In households with animals, you will have to periodically wipe down the grill to prevent blocked airflow due to animal hair. Clean the unit Clean the unit using a damp, lint-free cloth and mild detergent. Dry the unit with a dry, lint-free cloth. Store the unit when not in use Drain the unit’s water collection tray according to the instructions in the following section. Run the appliance on Fan mode for 12 hours in a warm room to dry it and prevent mold. Turn off the appliance and unplug it. Clean the air filter according to the instructions in the previous section. Reinstall the clean, dry filter before storing. Remove the batteries from the remote control. Be sure to store the unit in a cool, dark place. Exposure to direct sunshine or extreme heat can shorten the lifespan of the unit.C
Note: The cabinet and front may be dusted with an oil-free cloth or washed with a cloth dampened in a solution of warm water and mild liquid dishwashing detergent. Rinse thoroughly and wipe dry. Never use harsh cleansers, wax or polish on the cabinet front. Be sure to wring excess water from the cloth before wiping around the controls. Excess water in or around the controls may cause damage to the unit.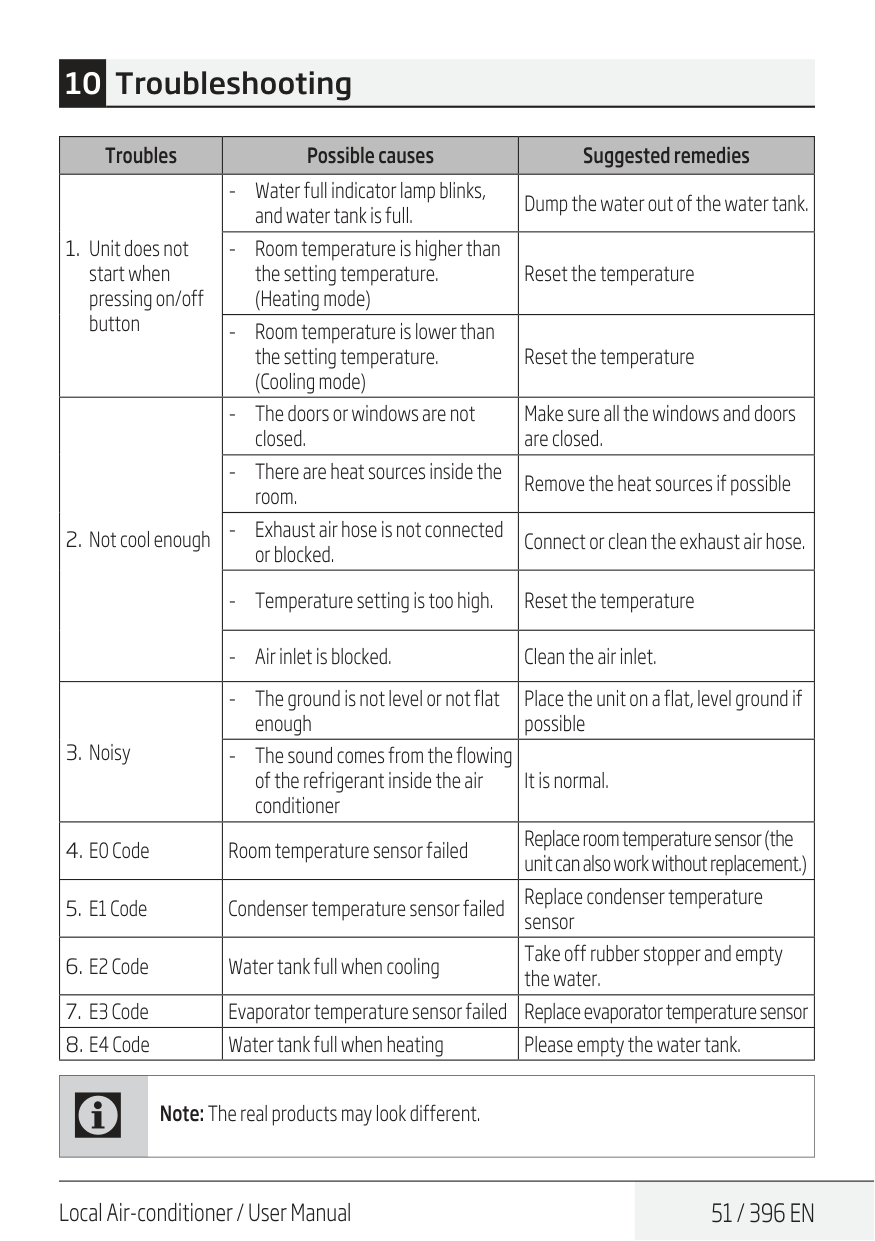
Local Air-conditioner / User Manual
51 / 396 En
Troubles Possible causes Suggested remediesC
Note: The real products may look different. 10 Troubleshooting
52 / 396 En
Local Air-conditioner / User Manual When using this unit in the European countries, the following information must be followed: Disposal: Do not dispose this product as unsorted municipal waste. Collection of such waste separately for special treatment is necessary. It is prohibited to dispose of this appliance in domestic household waste. For disposal, there are several possibilities:This symbol indicates that this product shall not be disposed with other household wastes at the end of its service life. Used device must be returned to official collection point for recycling of electrical and electronic devices. To find these collection systems please contact to your local authorities or retailer where the product was purchased. Each household performs important role in recovering and recycling of old appliance. Appropriate disposal of used appliance helps prevent potential negative consequences for the environment and human health. 11 European disposal guideline
Local Air-conditioner / User Manual
53 / 396 En
12 Installation instructions 12.1 F-Gas instruction This product contains fluorinated greenhouse gases. The fluorinated greehouse gases are contained in hermetically sealed equipment. Installs, services, maintains, repairs, checks for leaks or decommissions equipment and product recycling should be carried out by natural persons that hold relevant certificates. If the system has a leakage detection system installed, leakage checks should be performed at least every 12 months, make sure system operate properly. If product must be performed leakage checks, it should specify Inspection cycle, establish and save records of leakage checks.C
Note: For hermetically sealed equipment, Local air conditioner, window air conditioner and dehumidifier, if CO2 equivalent of fluorinated greenhouse gases is less than 10 tonnes, it should not perform leakage check.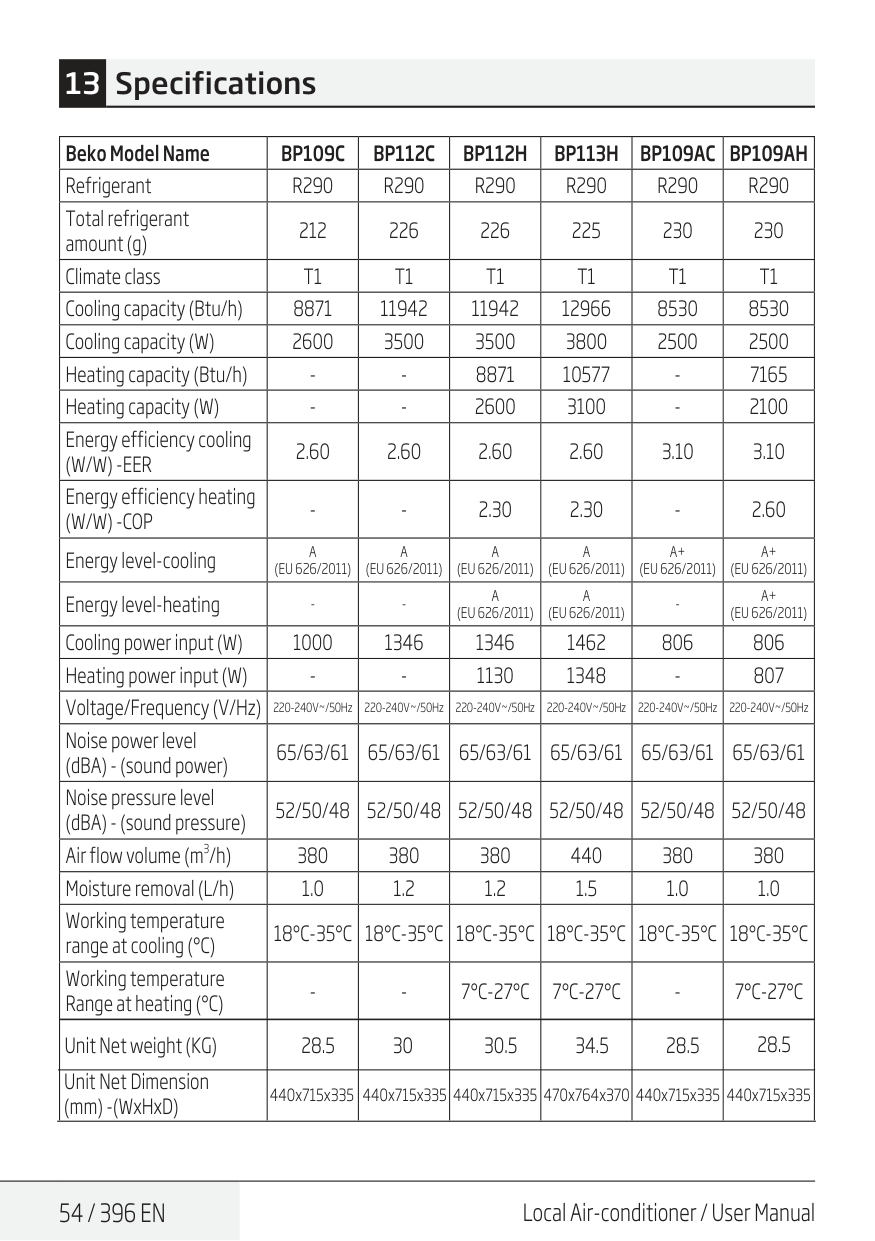
54 / 396 En
Local Air-conditioner / User Manual Beko Model NameBp109C
Bp112C
Bp112H
Bp113H
Bp109Ac Bp109Ah
RefrigerantR290
R290
R290
R290
R290
R290
Total refrigerant amount (g) 212 226 226 225 230 230 Climate classT1
T1
T1
T1
T1
T1
Cooling capacity (Btu/h) 8871 11942 11942 12966 8530 8530 Cooling capacity (W) 2600 3500 3500 3800 2500 2500 Heating capacity (Btu/h)(W/W) -Eer
2.60 2.60 2.60 2.60 3.10 3.10 Energy efficiency heating(W/W) -Cop
A
(Eu 626/2011)
A
(Eu 626/2011)
A
(Eu 626/2011)
A
(Eu 626/2011)
A+
(Eu 626/2011)
A+
(Eu 626/2011)
Energy level-heatingA
(Eu 626/2011)
A
(Eu 626/2011)
A+
(Eu 626/2011)
Cooling power input (W) 1000 1346 1346 1462 806 806 Heating power input (W)18°C-35°C 18°C-35°C 18°C-35°C 18°C-35°C 18°C-35°C 18°C-35°C
Working temperature Range at heating (°C)7°C-27°C
7°C-27°C
7°C-27°C
Local Air-conditioner / User Manual
55 / 396 En

Manufactured by Arcelik A.S. Karaagac Cd. No:2-6 34445 Sutluce, Beyoglu, Istanbul, Turkey.
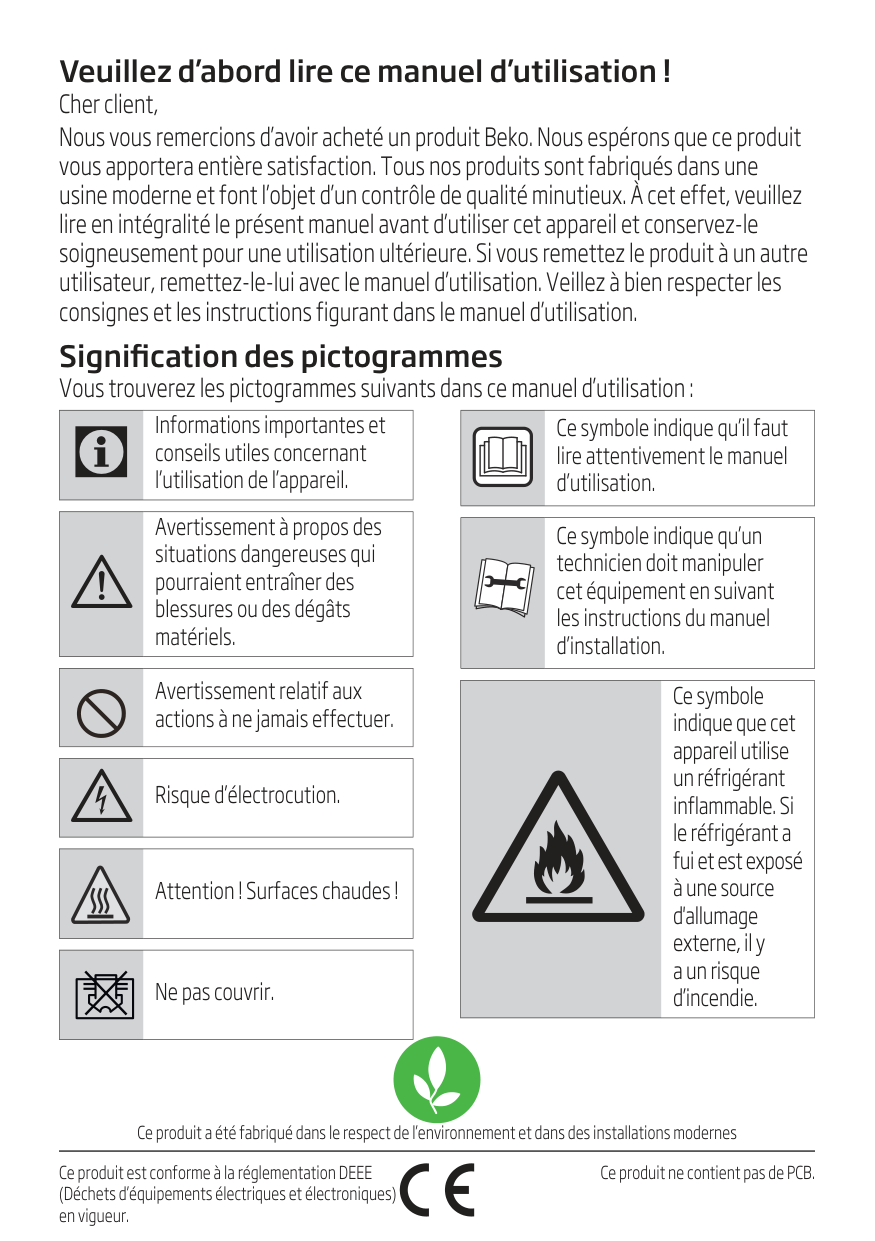
Veuillez d’abord lire ce manuel d’utilisation ! Cher client, Nous vous remercions d’avoir acheté un produit Beko. Nous espérons que ce produit vous apportera entière satisfaction. Tous nos produits sont fabriqués dans une usine moderne et font l’objet d’un contrôle de qualité minutieux. À cet effet, veuillez lire en intégralité le présent manuel avant d’utiliser cet appareil et conservez-le soigneusement pour une utilisation ultérieure. Si vous remettez le produit à un autre utilisateur, remettez-le-lui avec le manuel d’utilisation. Veillez à bien respecter les consignes et les instructions figurant dans le manuel d’utilisation. Signification des pictogrammes Vous trouverez les pictogrammes suivants dans ce manuel d’utilisation : Ce produit a été fabriqué dans le respect de l’environnement et dans des installations modernes Ce produit est conforme à la réglementation DEEE (Déchets d’équipements électriques et électroniques) en vigueur. Ce produit ne contient pas de PCB.
C
Informations importantes et conseils utiles concernant l’utilisation de l’appareil.A
Avertissement à propos des situations dangereuses qui pourraient entraîner des blessures ou des dégâts matériels. Avertissement relatif aux actions à ne jamais effectuer.B
Risque d’électrocution. Attention ! Surfaces chaudes ! Ne pas couvrir. Ce symbole indique qu’il faut lire attentivement le manuel d’utilisation. Ce symbole indique qu’un technicien doit manipuler cet équipement en suivant les instructions du manuel d’installation. Ce symbole indique que cet appareil utilise un réfrigérant inflammable. Si le réfrigérant a fui et est exposé à une source d'allumage externe, il y a un risque d’incendie.
58 / 396 Fr
Climatiseur mobile / Manuel d’utilisation Table des matières 1 Consignes de sécurité 60 2 Description des pièces 86 3 Accessoires 87 4 Fonctionnement du panneau de commande 88 4.1 Modèle refroidissant uniquement (non-réversible). . . . . . . . . . . . . . . . . . . . . . . . . . . . . . . . . . . . . . . . . .88 4.2 Modèle avec pompe à chaleur et refroidissement (réversible). . . . . . . . . . . . . . . . . . . . . . . . . . . . . . .89 5 Fonctionnement de la télécommande 91 6 Présentation du fonctionnement 93 6.1 Avant l’utilisation . . . . . . . . . . . . . . . . . . . . . . . . . . . . . . . . . . . . . . . . . . . . . . . . . . . . . . . . . . . . . . . . . . . . . . . . . . . . 93 6.2 Mode de fonctionnement de refroidissement . . . . . . . . . . . . . . . . . . . . . . . . . . . . . . . . . . . . . . . . . . . . . . .94 6.3 Fonction déshumidificateur . . . . . . . . . . . . . . . . . . . . . . . . . . . . . . . . . . . . . . . . . . . . . . . . . . . . . . . . . . . . . . . . .94 6.4 Mode de fonctionnement de ventilation. . . . . . . . . . . . . . . . . . . . . . . . . . . . . . . . . . . . . . . . . . . . . . . . . . . . .94 6.5 Chauffage (cette fonction n’est pas disponible sur un appareil refroidissant uniquement) 94 6.6 Fonctionnement avec le minuteur . . . . . . . . . . . . . . . . . . . . . . . . . . . . . . . . . . . . . . . . . . . . . . . . . . . . . . . . . . . 95 6.7 Oscillation automatique activée/désactivée. . . . . . . . . . . . . . . . . . . . . . . . . . . . . . . . . . . . . . . . . . . . . . . . . 95 6.8 Mode sommeil. . . . . . . . . . . . . . . . . . . . . . . . . . . . . . . . . . . . . . . . . . . . . . . . . . . . . . . . . . . . . . . . . . . . . . . . . . . . . . . . 95 6.9 Vidange de l’eau. . . . . . . . . . . . . . . . . . . . . . . . . . . . . . . . . . . . . . . . . . . . . . . . . . . . . . . . . . . . . . . . . . . . . . . . . . . . . . 95 6.10 Fonction sans fil . . . . . . . . . . . . . . . . . . . . . . . . . . . . . . . . . . . . . . . . . . . . . . . . . . . . . . . . . . . . . . . . . . . . . . . . .96 6.11 Fonctionnalité Zone follow (Capteur de température dans la télécommande). . . . . . . . . . . . . .96 7 Explications relatives à l’installation 97 7.1 Explications relatives à l’installation . . . . . . . . . . . . . . . . . . . . . . . . . . . . . . . . . . . . . . . . . . . . . . . . . . . . . . . . . 97 7.2 Présentation de l’installation du tuyau d’évacuation . . . . . . . . . . . . . . . . . . . . . . . . . . . . . . . . . . . . . . . .98 7.3 Accessoire : kit de calfeutrage universel pour climatiseur mobile (en option) . . . . . . . . . . . . . .100 7.4 Utilisation du filtre HEPA 13 (uniquement pour le modèle BP113H) . . . . . . . . . . . . . . . . . . . . . . . .103 7.5 Alarme de réservoir d’eau plein . . . . . . . . . . . . . . . . . . . . . . . . . . . . . . . . . . . . . . . . . . . . . . . . . . . . . . . . . . . . .104
Climatiseur mobile / Manuel d’utilisation
59 / 396 Fr
Table des matières 8 Explications sur la maintenance 105 8.1 Nettoyage du filtre à air . . . . . . . . . . . . . . . . . . . . . . . . . . . . . . . . . . . . . . . . . . . . . . . . . . . . . . . . . . . . . . . . . . . . .105 8.2 Nettoyage du climatiseur . . . . . . . . . . . . . . . . . . . . . . . . . . . . . . . . . . . . . . . . . . . . . . . . . . . . . . . . . . . . . . . . . . .106 9 Entretien 107 10 Dépannage 108 11 Directives européennes concernant la mise au rebut 109 12 Instructions d’installation 110 12.1 Consignes de la F-Gaz . . . . . . . . . . . . . . . . . . . . . . . . . . . . . . . . . . . . . . . . . . . . . . . . . . . . . . . . . . . . . . . . . . . . . . . 110 13 Spécifications 111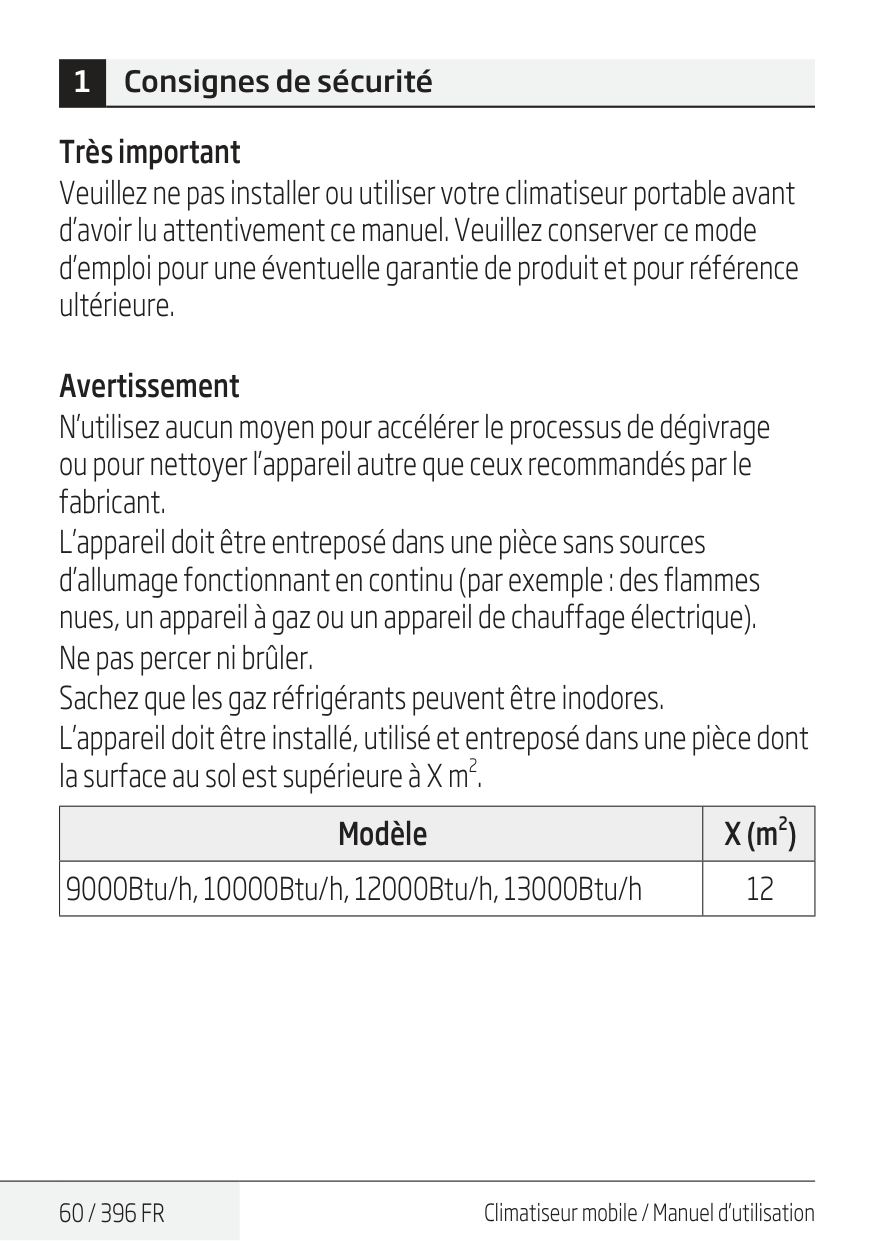
60 / 396 Fr
Climatiseur mobile / Manuel d’utilisation 1 Consignes de sécurité Très important Veuillez ne pas installer ou utiliser votre climatiseur portable avant d’avoir lu attentivement ce manuel. Veuillez conserver ce mode d’emploi pour une éventuelle garantie de produit et pour référence ultérieure. Avertissement N’utilisez aucun moyen pour accélérer le processus de dégivrage ou pour nettoyer l’appareil autre que ceux recommandés par le fabricant. L’appareil doit être entreposé dans une pièce sans sources d’allumage fonctionnant en continu (par exemple : des flammes nues, un appareil à gaz ou un appareil de chauffage électrique). Ne pas percer ni brûler. Sachez que les gaz réfrigérants peuvent être inodores. L’appareil doit être installé, utilisé et entreposé dans une pièce dont la surface au sol est supérieure à X m
Climatiseur mobile / Manuel d’utilisation
61 / 396 Fr
1 Consignes de sécurité Avertissement (pour le R290) Informations spécifiques concernant les appareils avec gaz réfrigérant R290. •Lisez attentivement tous les avertissements. •Lors du dégivrage et du nettoyage de l’appareil, n’utilisez aucun outil autre que ceux recommandés par le fabricant. •L’appareil doit être placé dans une zone sans source permanente d’inflammation (par exemple : flammes nues, appareils à gaz ou électriques en fonctionnement). •Ne percez pas et ne brûlez pas. •Cet appareil contient Y g (voir l’étiquette signalétique au dos de l’appareil) de gaz réfrigérant R290. •R290 est un gaz réfrigérant conforme aux directives européennes sur l’environnement. Ne perforez aucune partie du circuit de réfrigérant. •Si l’appareil est installé, utilisé ou stocké dans une zone non ventilée, la pièce doit être conçue de manière à éviter l’accumulation de fuites de réfrigérant, entraînant un risque d’incendie ou d’explosion provoqué par l’inflammation du réfrigérant elle-même provoquée par des radiateurs électriques, des cuisinières ou autres sources d’inflammation. •L’appareil doit être rangé de manière à éviter les pannes mécaniques.
62 / 396 Fr
Climatiseur mobile / Manuel d’utilisation 1 Consignes de sécurité •Les personnes qui exploitent ou travaillent sur le circuit de réfrigérants doivent avoir la certification appropriée délivrée par un organisme accrédité qui assure la compétence dans la manipulation des réfrigérants selon une évaluation spécifique reconnue par les associations de l’industrie. •Les réparations doivent être effectuées sur recommandation de l’entreprise de fabrication. L’entretien et les réparations qui nécessitent l’assistance d’un autre personnel qualifié doivent être effectués sous la supervision de personnel spécifié dans l’utilisation de réfrigérants inflammables. Consignes générales de sécurité
Climatiseur mobile / Manuel d’utilisation
63 / 396 Fr
1 Consignes de sécurité
64 / 396 Fr
Climatiseur mobile / Manuel d’utilisation 1 Consignes de sécurité
Climatiseur mobile / Manuel d’utilisation
65 / 396 Fr
1 Consignes de sécurité
66 / 396 Fr
Climatiseur mobile / Manuel d’utilisation 1 Consignes de sécuritéC
Remarque : •Si des pièces sont endommagées, veuillez contacter le revendeur ou un atelier de réparation désigné ; •En cas de dommage, fermez le commutateur de débit d'air, débranchez l'alimentation électrique et contactez le revendeur ou un atelier de réparation désigné ; •Dans tous les cas, le cordon d'alimentation doit être fermement mis à la terre. •Pour éviter tout danger, si le cordon d'alimentation est endommagé, fermez le commutateur de débit d’air et débranchez l'alimentation électrique. Il doit être remplacé par le revendeur ou un atelier de réparation désigné.
Climatiseur mobile / Manuel d’utilisation
67 / 396 Fr
1 Consignes de sécurité Avertissements (uniquement si vous utilisez le gaz réfrigérant R290)
68 / 396 Fr
Climatiseur mobile / Manuel d’utilisation 1 Consignes de sécurité 1.4 Vérification de la présence de réfrigérant La zone doit être vérifiée avec un détecteur de réfrigérant approprié avant et pendant le travail, afin que le technicien soit assuré d’être conscient d’atmosphères potentiellement inflammables. Assurez-vous que le matériel utilisé pour détecter les fuites convient à une utilisation avec des réfrigérants inflammables, c’est-à-dire sans étincelles, étanchéifié de façon adéquate ou intrinsèquement sûr. 1.5 Présence d’un extincteur d’incendie Si un travail à chaud est mené sur l’équipement de réfrigération ou des pièces associées, un équipement d’extinction d’incendie approprié doit être à portée de main. Un extincteur à poudre ou au CO2 doit être disponible à proximité de la zone de chargement. 1.6 Pas de sources d’allumage Personne n’effectuant un travail lié à un système de réfrigération impliquant l’exposition de tuyauterie contenant ou ayant contenu un réfrigérant inflammable ne doit utiliser de sources d’allumage de façon à ce que cela puisse provoquer un risque d’incendie ou d’explosion. Toutes les sources d’allumage possibles, y compris la fumée de cigarette, doivent rester à une distance suffisante du site d’installation, de réparation, d’enlèvement et de mise au rebut, durant lesquels un gaz réfrigérant inflammable peut potentiellement être libéré dans l’espace environnant. Avant le début du travail, la zone autour de l’équipement doit être étudiée pour s’assurer qu’il n’y a pas de danger inflammable ni de risque d’allumage. Des pancartes « Interdiction de fumer » doivent être installées.
Climatiseur mobile / Manuel d’utilisation
69 / 396 Fr
1 Consignes de sécurité 1.7 Zone aérée Vérifiez que la zone est en plein air ou aérée correctement avant d’ouvrir le système ou d’effectuer un travail à chaud. Un certain niveau d’aération doit se poursuivre pendant la réalisation du travail. La ventilation doit disperser en toute sécurité tout réfrigérant libéré et de préférence l’expulser de façon externe dans l’atmosphère. 1.8 Vérifications sur l’équipement de réfrigération Si des composants électriques sont en cours de changement, ils doivent convenir à cet usage et à la bonne spécification. Les instructions de maintenance et d’entretien du fabricant doivent toujours être suivies. En cas de doute, consultez le service technique du constructeur pour obtenir une assistance. Vous devez effectuer les contrôles suivants sur les installations utilisant des réfrigérants inflammables : le volume de la charge correspond à la taille du local dans lequel les pièces contenant le réfrigérant sont installées ; le mécanisme de ventilation et les sorties fonctionnent correctement et ne sont pas obstrués ; si un circuit de réfrigération indirect est utilisé, la présence de réfrigérant doit être vérifiée dans le circuit secondaire ; le marquage sur l’équipement continue d’être visible et lisible. Les marquages et les signaux illisibles doivent être corrigés ; les tuyaux ou composants de réfrigération sont installés dans un endroit où il est peu probable qu’ils soient exposés à une substance susceptible de corroder des pièces contenant du réfrigérant, à moins qu’elles ne soient construites dans des matériaux qui sont intrinsèquement résistants à la corrosion ou qui sont convenablement protégés contre celle-ci.
70 / 396 Fr
Climatiseur mobile / Manuel d’utilisation 1 Consignes de sécurité 1.9 Vérifications sur les dispositifs électriques Les réparations et la maintenance des composants électriques doivent inclure des vérifications de sécurité initiales et des procédures d’inspection des composants. S’il y a une défaillance pouvant compromettre la sécurité, alors aucune alimentation électrique ne doit être raccordée au circuit tant que ce problème n’est pas résolu de façon satisfaisante. Si le défaut ne peut pas être corrigé dans l’immédiat mais qu’il faut continuer les opérations, une solution adaptée sera utilisée provisoirement. Cela doit être signalé au propriétaire de l’équipement de façon à ce que toutes les parties soient informées. Les contrôles de sécurité initiaux doivent inclure ce qui suit : vérifier que les condenseurs sont déchargés (cela doit être fait de manière sûre pour éviter la possibilité d’étincelles) ; vérifier qu’il n’y a pas de composants électriques sous tension et de câblage exposés pendant la charge, la récupération ou la purge du système ; vérifier qu’il y a une continuité de la mise à la terre.
Climatiseur mobile / Manuel d’utilisation
71 / 396 Fr
1 Consignes de sécurité 2.2 Soyez particulièrement attentif à ce qui suit pour s’assurer qu’un travail sur des composants électriques n’altérerait pas le boîtier d’une façon qui affecterait le niveau de protection. Cela comprend les dommages aux câbles, le nombre excessif de branchements, les bornes non conformes aux spécifications d’origine, les dommages aux joints, le mauvais montage des presse-étoupes, etc. Assurez-vous que l’appareil est bien monté. Vérifiez que les joints ou les matériaux isolants ne se sont pas dégradés à un tel point qu’ils ne servent plus à empêcher la pénétration d’atmosphères inflammables. Les pièces de rechange doivent être conformes aux spécifications du fabricant.C
Remarque : L'utilisation de produit d'étanchéité en silicone peut inhiber l’efficacité de certains types de matériel de détection des fuites. Les composants intrinsèquement sûrs n’ont pas besoin d’être isolés avant que quelqu'un travaille dessus.
72 / 396 Fr
Climatiseur mobile / Manuel d’utilisation 1 Consignes de sécurité
Climatiseur mobile / Manuel d’utilisation
73 / 396 Fr
1 Consignes de sécurité contenant du chlorure, car le chlorure peut réagir avec le réfrigérant et corroder la tuyauterie en cuivre. En cas de suspicion de fuite, toutes les flammes nues doivent être éliminées/éteintes. Si une fuite de réfrigérant est décelée et nécessite un brasage, tout le réfrigérant doit être récupéré hors du système, ou isolé (par des vannes d’arrêt) dans une partie du système loin de la fuite. De l’azote exempt d’oxygène (OFN) doit ensuite être utilisé pour purger le système avant et pendant le procédé de brasage.
74 / 396 Fr
Climatiseur mobile / Manuel d’utilisation 1 Consignes de sécurité atmosphérique pour permettre l’exécution des travaux. Cette opération est absolument vitale si des opérations de brasage doivent avoir lieu sur la tuyauterie. Vérifiez que la sortie pour la pompe à vide n’est pas fermée pour aucune source d’allumage et vérifiez si une ventilation est disponible.
Climatiseur mobile / Manuel d’utilisation
75 / 396 Fr
1 Consignes de sécurité
76 / 396 Fr
Climatiseur mobile / Manuel d’utilisation 1 Consignes de sécurité i) Ne dépassez pas la pression maximale de service de la bouteille, même temporairement. j) Une fois que les bouteilles sont remplies correctement et que le procédé est terminé, vérifiez que les bouteilles et l’équipement sont enlevés du site rapidement et que toutes les vannes d’isolement sur l’équipement sont fermées. k) Le réfrigérant récupéré ne doit pas être chargé dans un autre système de réfrigération, à moins qu’il n’ait été nettoyé et inspecté.
Climatiseur mobile / Manuel d’utilisation
77 / 396 Fr
1 Consignes de sécurité vides sont évacuées et, si possible, refroidies avant une opération de récupération. L’équipement de récupération doit être en bon état de fonctionnement avec un ensemble d’instructions concernant l’équipement qui est à portée de main et doit être adapté à la récupération des frigorigènes inflammables. En outre, un ensemble de balances étalonnées doit être disponible et en bon état de fonctionnement. Les tuyaux doivent être complets avec des raccords sans fuite et en bon état. Avant d’utiliser la machine de récupération, vérifiez qu’elle est dans un état de marche satisfaisant, qu’elle a été correctement entretenue et que tous les composants électriques associés sont étanchéifiés afin de prévenir l’allumage en cas de libération du réfrigérant. Consultez le fabricant en cas de doute. Le réfrigérant récupéré doit être retourné au fournisseur de réfrigérant dans la bonne bouteille de récupération, et le bordereau de transfert des déchets approprié arrangé. Ne mélangez pas des réfrigérants dans des unités de récupération et surtout pas dans des bouteilles. Si des compresseurs ou des huiles de compresseur doivent être enlevés, assurez-vous qu’ils ont été évacués à un niveau acceptable pour être certain qu’un réfrigérant inflammable ne reste pas dans le lubrifiant. Le procédé d’évacuation doit être effectué avant de retourner le compresseur aux fournisseurs. Seul le chauffage électrique du corps du compresseur doit être utilisé pour accélérer ce processus. La vidange d’huile d’un système doit être effectuée en toute sécurité.
78 / 396 Fr
Climatiseur mobile / Manuel d’utilisation 1 Consignes de sécuritéC
Remarque sur les gaz fluorés:
Climatiseur mobile / Manuel d’utilisation
79 / 396 Fr
1 Consignes de sécurité Des informations sur le potentiel d’explosion des frigorigènes inflammables pour montrer que les produits inflammables peuvent être dangereux lorsqu’ils sont manipulés sans précaution. Des informations sur les sources d’inflammation potentielles, en particulier celles qui ne sont pas évidentes, notamment les briquets, les interrupteurs de lumière, les aspirateurs, les appareils de chauffage électriques. Informations sur les différents concepts de sécurité : Non ventilé – (voir Clause GG.2) La sécurité de l’appareil ne dépend pas de la ventilation du boîtier. L’arrêt de l’appareil ou l’ouverture du boîtier n’a pas d’effet significatif sur la sécurité. Néanmoins, il est possible que des fuites de réfrigérant s’accumulent à l’intérieur du boîtier et que l’atmosphère inflammable s’en échappe à son ouverture. Boîtier ventilé – (voir Clause GG.4) La sécurité de l’appareil dépend de la ventilation du boîtier. L’arrêt de l’appareil ou l’ouverture du boîtier a un effet significatif sur la sécurité. Des précautions doivent être prises pour assurer une ventilation suffisante au préalable. Local ventilé – (voir Clause GG.5) La sécurité de l’appareil dépend de la ventilation du local. L’arrêt de l’appareil ou l’ouverture du boîtier n’a pas d’effet significatif sur la sécurité. La ventilation du local ne doit pas être coupée pendant les procédures de réparation. Informations sur le concept de composants scellés et de boîtiers scellés conformément à la norme CEI 60079-15:2010. Informations sur les procédures de travail adéquates :
80 / 396 Fr
Climatiseur mobile / Manuel d’utilisation 1 Consignes de sécurité a) Mise en service
Climatiseur mobile / Manuel d’utilisation
81 / 396 Fr
1 Consignes de sécurité
82 / 396 Fr
Climatiseur mobile / Manuel d’utilisation 1 Consignes de sécurité d) Mise hors service
Climatiseur mobile / Manuel d’utilisation
83 / 396 Fr
1 Consignes de sécurité e) Mise au rebut
84 / 396 Fr
Climatiseur mobile / Manuel d’utilisation 1 Consignes de sécurité Marquage de l’équipement avec des panneaux Les panneaux correspondant aux appareils similaires utilisés dans une zone de travail sont généralement couverts par les réglementations locales. Celles-ci donnent les prescriptions minimales quant à la signalisation relative à la sécurité et/ou à la santé sur un lieu de travail. Tous les panneaux prescrits doivent être maintenus et les employeurs doivent veiller à ce que les employés reçoivent une instruction et une formation appropriées et suffisantes sur la signification des panneaux de sécurité appropriés et sur les mesures à prendre en ce qui les concerne. L’efficacité des panneaux ne doit pas être amoindrie par la présence d’un trop grand nombre d’entre eux placés ensemble. Les pictogrammes utilisés doivent être aussi simples que possible et ne comporter que des détails essentiels. Mise au rebut d’un équipement utilisant des réfrigérants inflammables Se reporter à la réglementation nationale. Entreposage d’équipements/appareils L’entreposage d’équipements doit être conforme aux indications du constructeur. Entreposage d’équipements emballés (non vendus)
Climatiseur mobile / Manuel d’utilisation
85 / 396 Fr
1 Consignes de sécurité Une protection de l’emballage d’entreposage doit être réalisée de façon à ce que des dommages mécaniques à l’équipement situé à l’intérieur de l’emballage ne causent pas une fuite de la charge de réfrigérant. Le nombre de pièces maximum de l’équipement autorisé à être entreposé ensemble sera déterminé par la réglementation locale.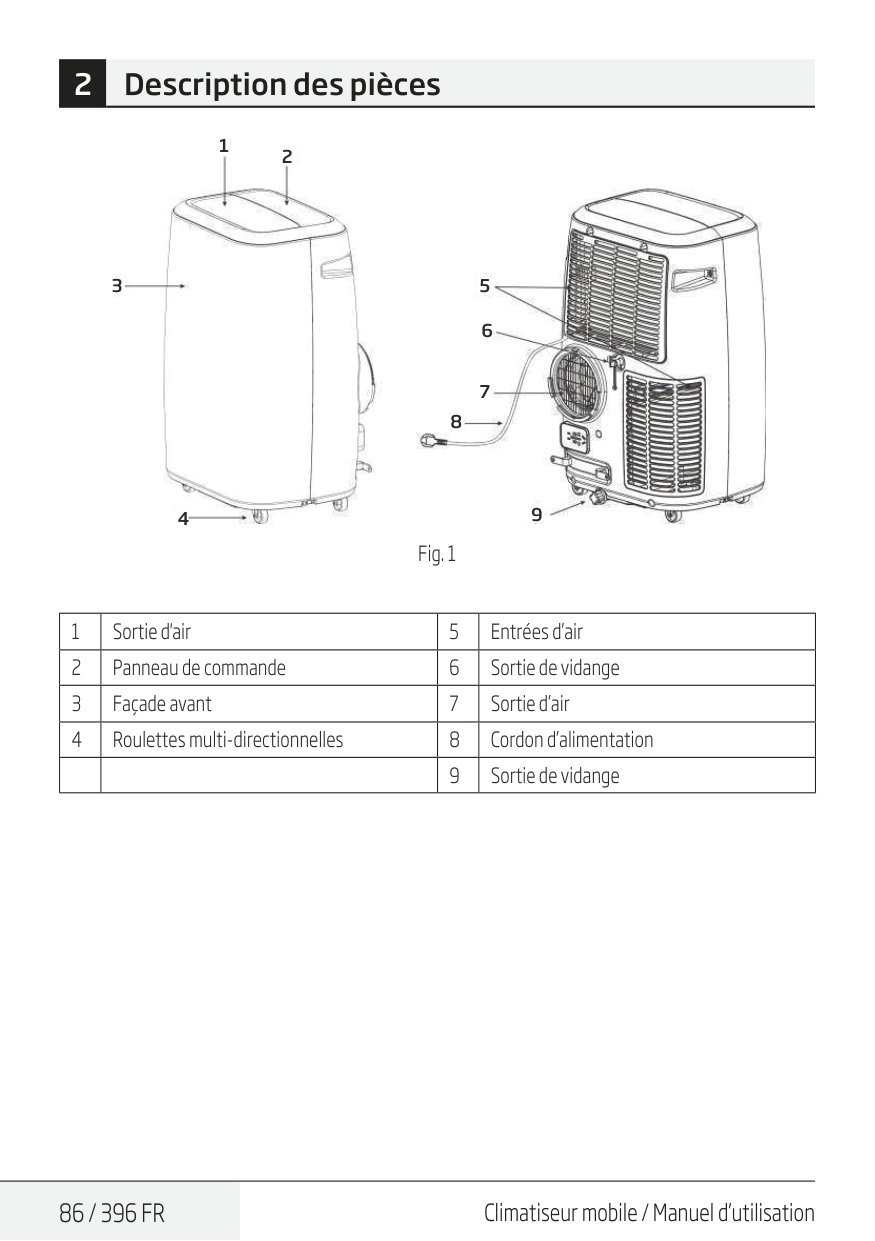
86 / 396 Fr
Climatiseur mobile / Manuel d’utilisation 2 Description des pièces 1 2 3 5 6 7 8 9 4 Fig. 1 1 Sortie d'air 5 Entrées d’air 2 Panneau de commande 6 Sortie de vidange 3 Façade avant 7 Sortie d’air 4 Roulettes multi-directionnelles 8 Cordon d’alimentation 9 Sortie de vidange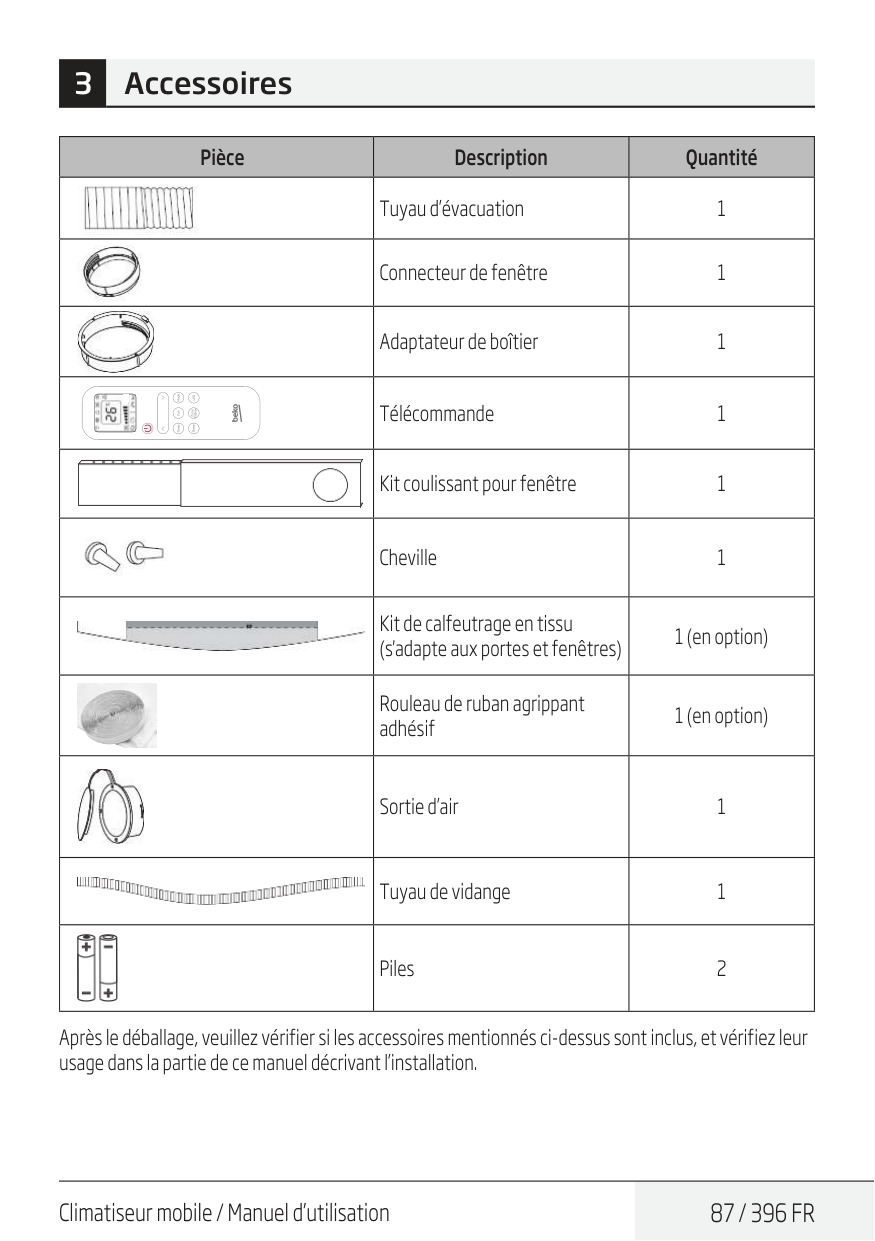
Climatiseur mobile / Manuel d’utilisation
87 / 396 Fr
3 Accessoires Pièce Description Quantité Tuyau d’évacuation 1 Connecteur de fenêtre 1 Adaptateur de boîtier 1 Télécommande 1 Kit coulissant pour fenêtre 1 Cheville 1 Kit de calfeutrage en tissu (s'adapte aux portes et fenêtres) 1 (en option) Rouleau de ruban agrippant adhésif 1 (en option) Sortie d’air 1 Tuyau de vidange 1 Piles 2 Après le déballage, veuillez vérifier si les accessoires mentionnés ci-dessus sont inclus, et vérifiez leur usage dans la partie de ce manuel décrivant l’installation.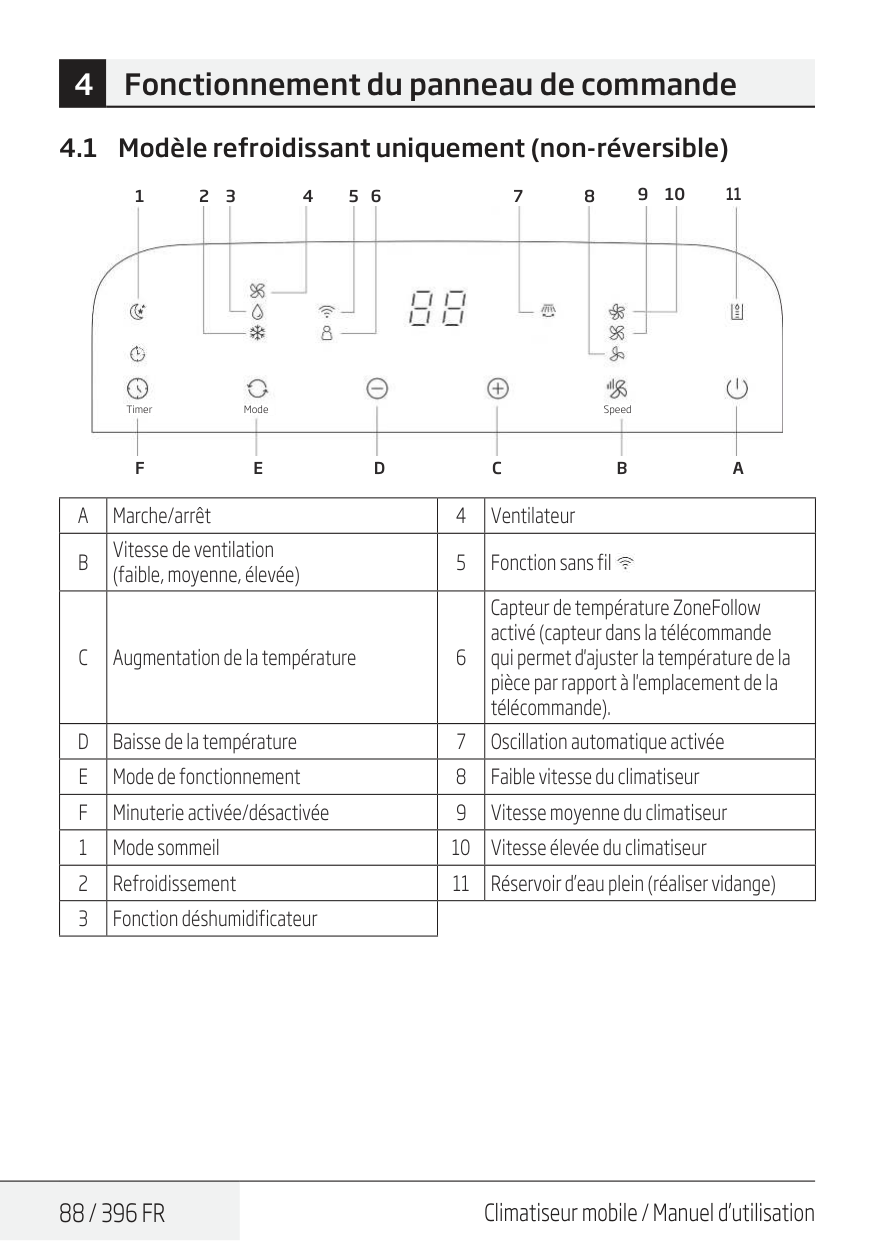
88 / 396 Fr
Climatiseur mobile / Manuel d’utilisation 4 Fonctionnement du panneau de commande 4.1 Modèle refroidissant uniquement (non-réversible) Timer Mode SpeedF
1 2 3 4 5 6 7 8 9 10E
D
C
B
A
11A
Marche/arrêt 4 VentilateurB
Vitesse de ventilation (faible, moyenne, élevée) 5 Fonction sans filC
Augmentation de la température 6 Capteur de température ZoneFollow activé (capteur dans la télécommande qui permet d'ajuster la température de la pièce par rapport à l'emplacement de la télécommande).D
Baisse de la température 7 Oscillation automatique activéeE
Mode de fonctionnement 8 Faible vitesse du climatiseurF
Minuterie activée/désactivée 9 Vitesse moyenne du climatiseur 1 Mode sommeil 10 Vitesse élevée du climatiseur 2 Refroidissement 11 Réservoir d’eau plein (réaliser vidange) 3 Fonction déshumidificateur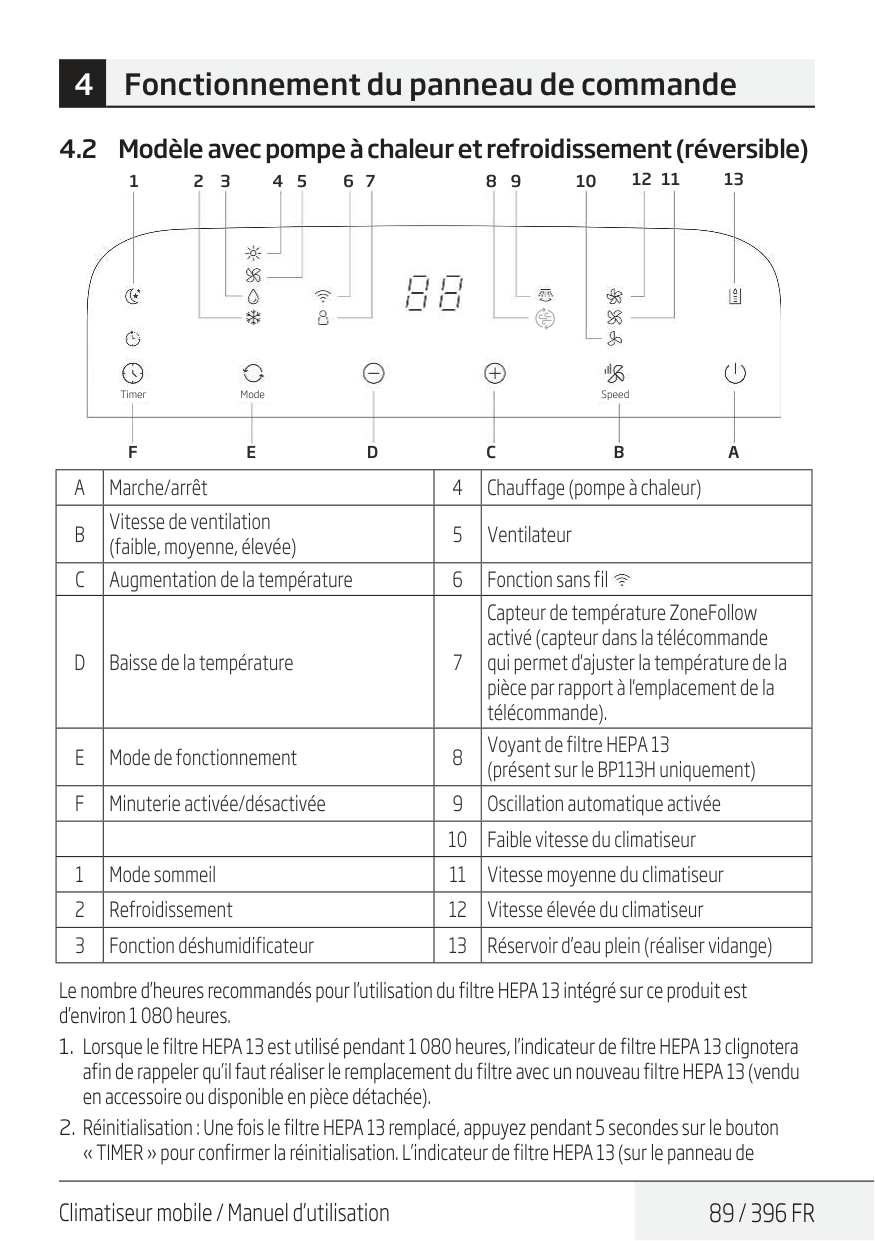
Climatiseur mobile / Manuel d’utilisation
89 / 396 Fr
4 Fonctionnement du panneau de commande 4.2 Modèle avec pompe à chaleur et refroidissement (réversible) Le nombre d’heures recommandés pour l’utilisation du filtre HEPA 13 intégré sur ce produit est d’environ 1 080 heures.F
1 2 3 4 5 6 7 8 9 10 12 11 13E
D
C
B
A
A
Marche/arrêt 4 Chauffage (pompe à chaleur)B
Vitesse de ventilation (faible, moyenne, élevée) 5 VentilateurC
Augmentation de la température 6 Fonction sans filD
Baisse de la température 7 Capteur de température ZoneFollow activé (capteur dans la télécommande qui permet d'ajuster la température de la pièce par rapport à l'emplacement de la télécommande).E
Mode de fonctionnement 8 Voyant de filtre HEPA 13 (présent sur le BP113H uniquement)F
Minuterie activée/désactivée 9 Oscillation automatique activée 10 Faible vitesse du climatiseur 1 Mode sommeil 11 Vitesse moyenne du climatiseur 2 Refroidissement 12 Vitesse élevée du climatiseur 3 Fonction déshumidificateur 13 Réservoir d’eau plein (réaliser vidange)
90 / 396 Fr
Climatiseur mobile / Manuel d’utilisation 4 Fonctionnement du panneau de commande contrôle) cessera ensuite de clignoter et la durée d’utilisation du nouveau filtre sera réinitialisée.C
Remarque :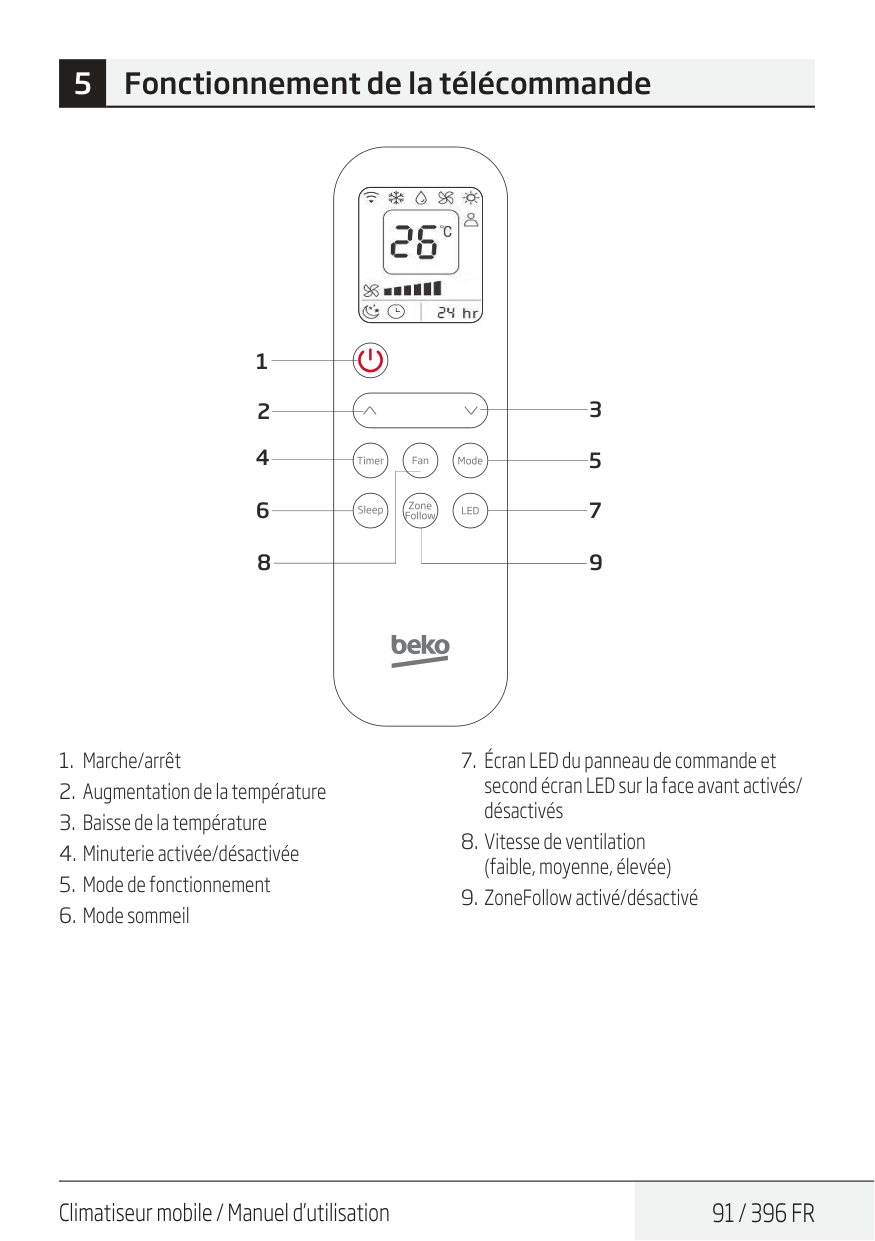
Climatiseur mobile / Manuel d’utilisation
91 / 396 Fr
3 5 7 9 1 2 4 6 8
92 / 396 Fr
Climatiseur mobile / Manuel d’utilisation 5 Fonctionnement de la télécommande 1 2 3 4 5 6 9 8 7 11 10C
Remarque :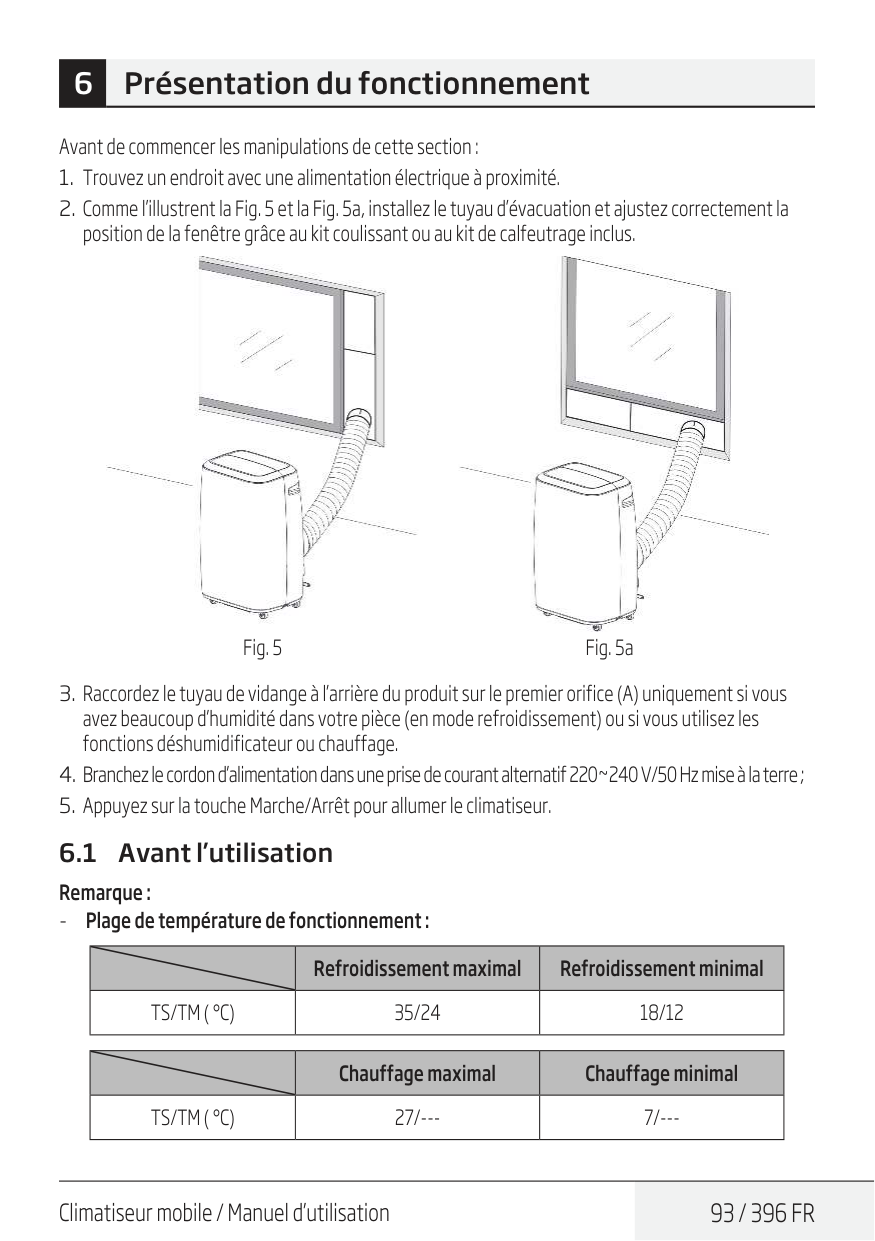
Climatiseur mobile / Manuel d’utilisation
93 / 396 Fr
6 Présentation du fonctionnement Avant de commencer les manipulations de cette section :Ts/Tm ( °C)
35/24 18/12 Chauffage maximal Chauffage minimalTs/Tm ( °C)
27/--- 7/---
94 / 396 Fr
Climatiseur mobile / Manuel d’utilisation 6 Présentation du fonctionnement Vérifiez si le tuyau d’évacuation a été monté correctement. Précautions à prendre pour le refroidissement et la fonction déshumidificateur :
Climatiseur mobile / Manuel d’utilisation
95 / 396 Fr
6.6 Fonctionnement avec le minuteur Réglage de la minuterie de mise en marche :
96 / 396 Fr
Climatiseur mobile / Manuel d’utilisation Drainage continu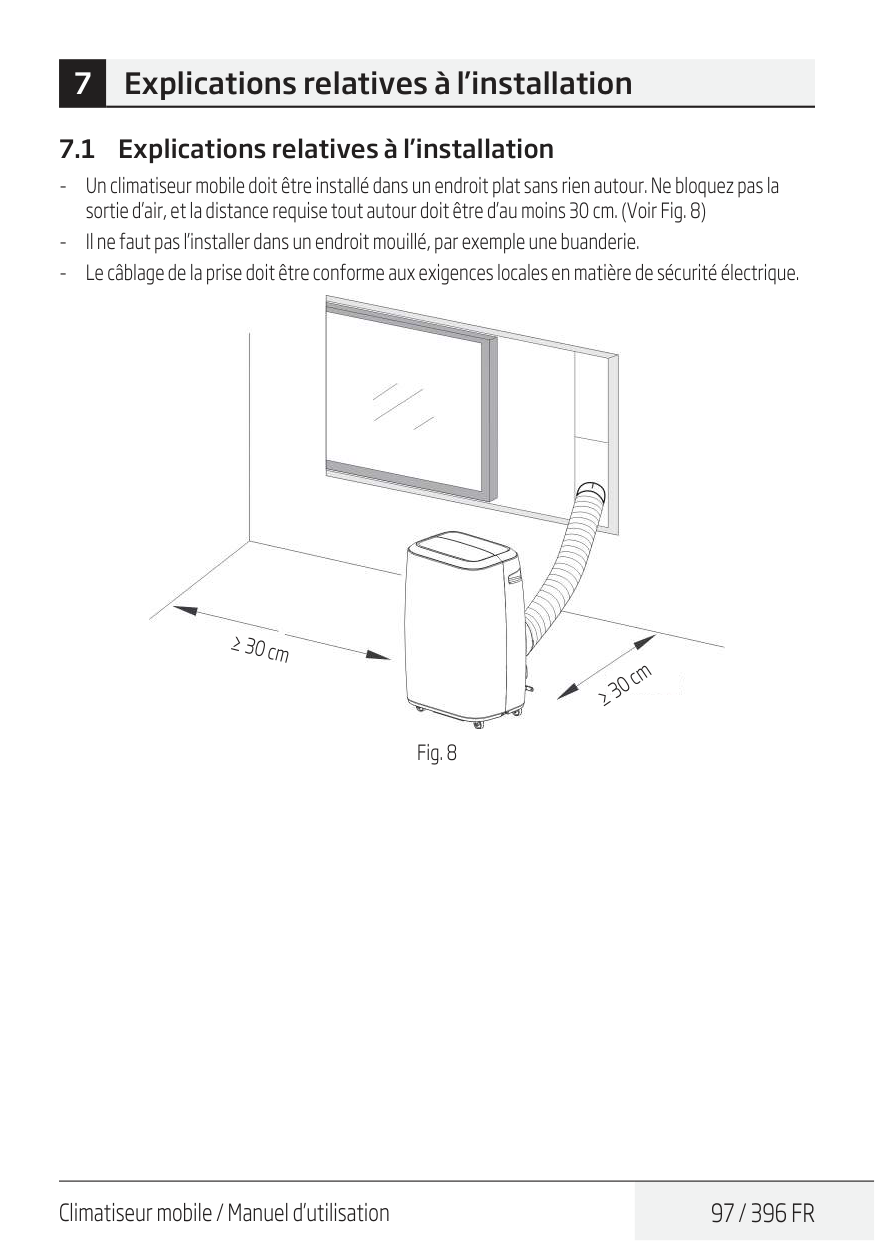
Climatiseur mobile / Manuel d’utilisation
97 / 396 Fr
7 Explications relatives à l’installation 7.1 Explications relatives à l’installation
98 / 396 Fr
Climatiseur mobile / Manuel d’utilisation 7.2 Présentation de l’installation du tuyau d’évacuation 1 2 3 (sens horaire) (Alignement de la baïonnette) (Insérer vers le bas) Fig. 9 Installation temporaire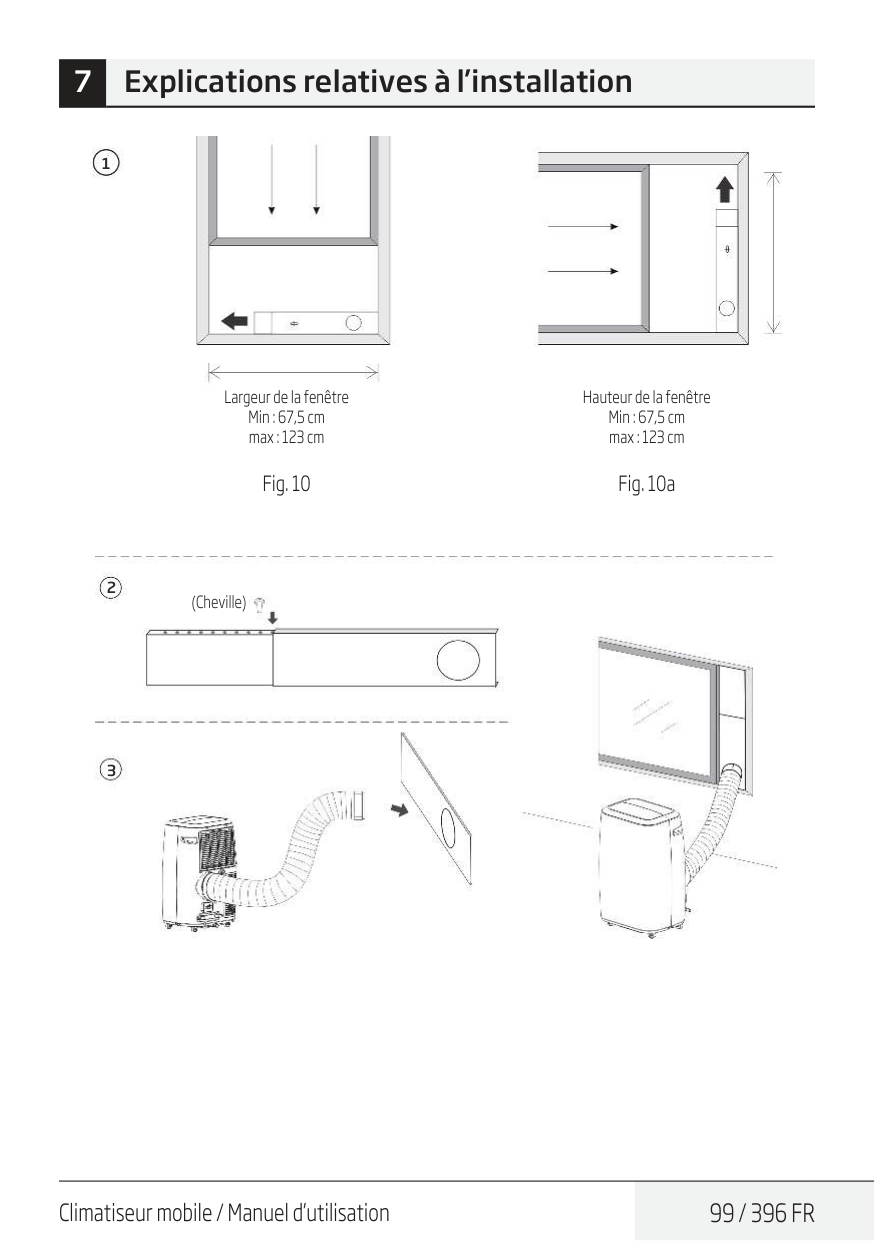
Climatiseur mobile / Manuel d’utilisation
99 / 396 Fr
1 Largeur de la fenêtre Min : 67,5 cm max : 123 cm Fig. 10 Hauteur de la fenêtre Min : 67,5 cm max : 123 cm Fig. 10a 2 3 (Cheville) 7 Explications relatives à l’installation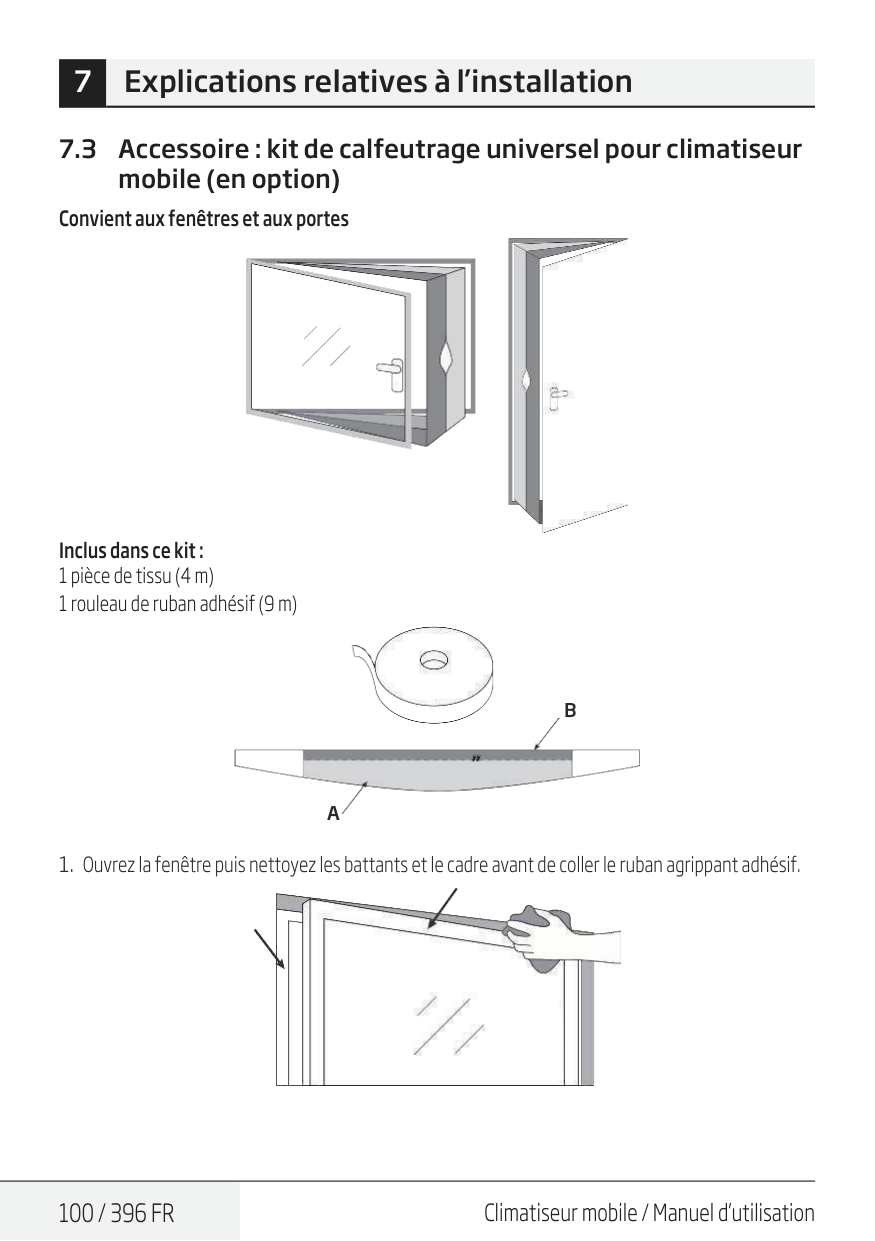
100 / 396 Fr
Climatiseur mobile / Manuel d’utilisation 7.3 Accessoire : kit de calfeutrage universel pour climatiseur mobile (en option) Convient aux fenêtres et aux portes Inclus dans ce kit : 1 pièce de tissu (4 m) 1 rouleau de ruban adhésif (9 m)A
B
Climatiseur mobile / Manuel d’utilisation
101 / 396 Fr
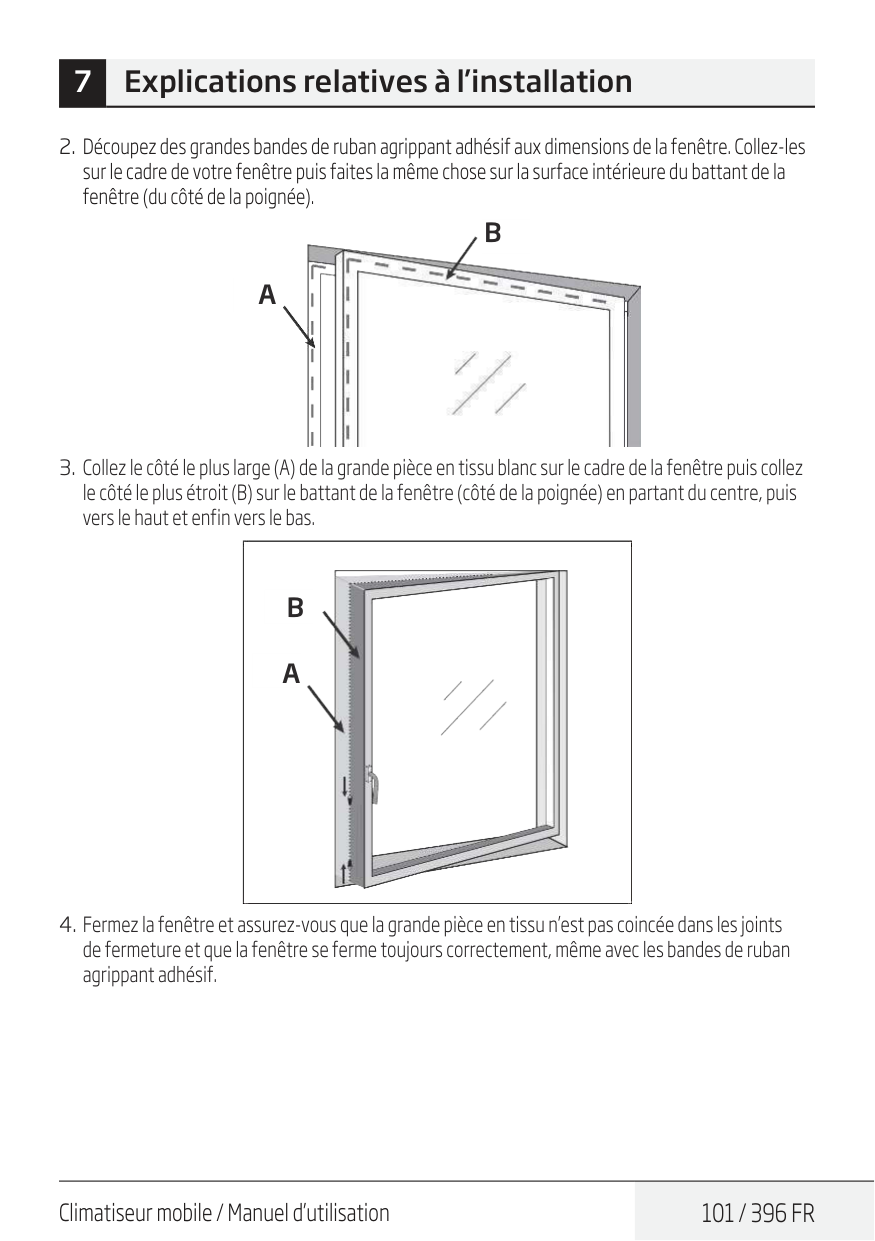
7 Explications relatives à l’installationA
B
A
B
102 / 396 Fr
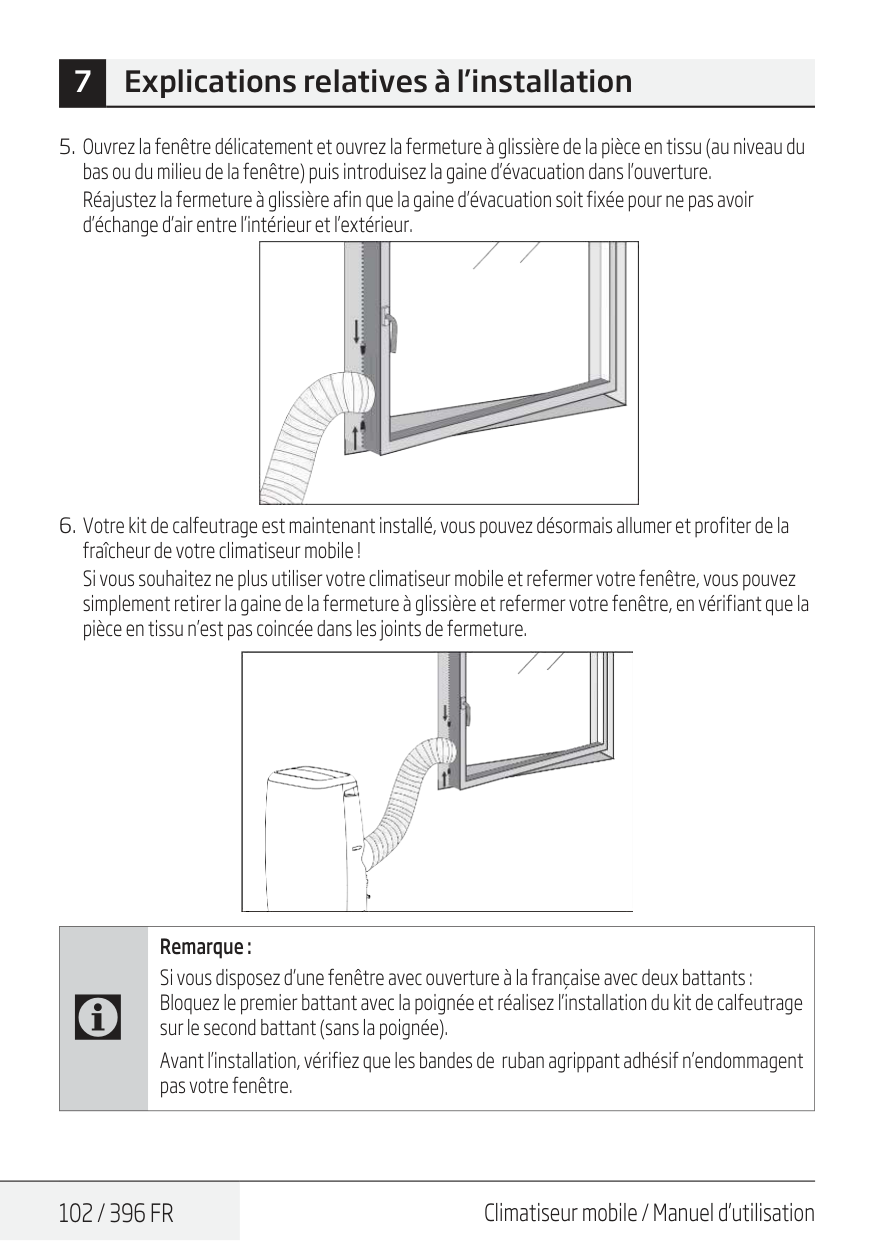
Climatiseur mobile / Manuel d’utilisation 7 Explications relatives à l’installationC
Remarque : Si vous disposez d’une fenêtre avec ouverture à la française avec deux battants : Bloquez le premier battant avec la poignée et réalisez l’installation du kit de calfeutrage sur le second battant (sans la poignée). Avant l’installation, vérifiez que les bandes de ruban agrippant adhésif n’endommagent pas votre fenêtre.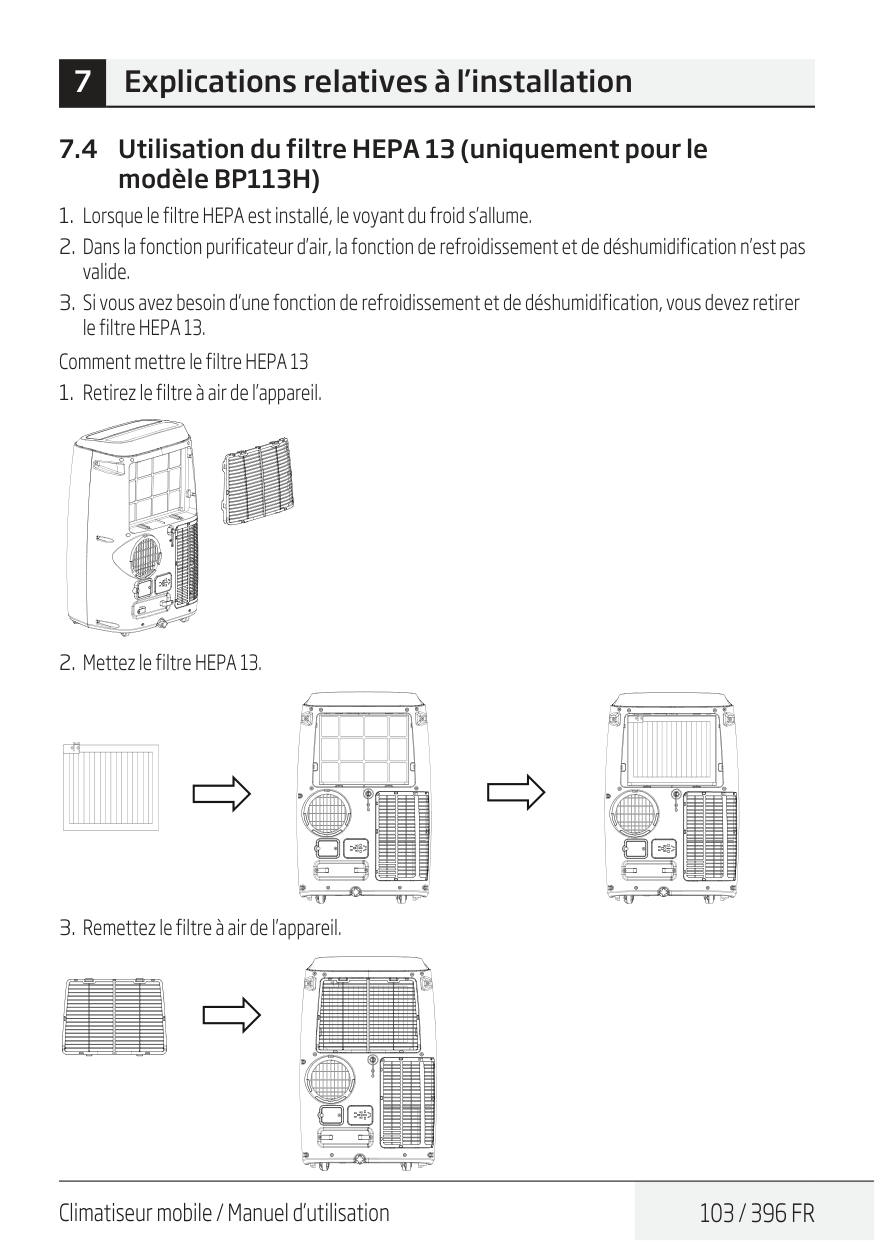
Climatiseur mobile / Manuel d’utilisation
103 / 396 Fr
7 Explications relatives à l’installation 7.4 Utilisation du filtre HEPA 13 (uniquement pour le modèle BP113H)
104 / 396 Fr
Climatiseur mobile / Manuel d’utilisation 7 Explications relatives à l’installation 7.5 Alarme de réservoir d’eau plein Le réservoir d’eau à l’intérieur du climatiseur dispose d’un indicateur de sécurité qui contrôle le niveau d’eau. Lorsque celui-ci atteint une hauteur prévue, le voyant de réservoir d’eau plein s’allume. (Si la pompe à eau est endommagée, lorsque le réservoir est plein, retirez le bouchon en caoutchouc au-dessous de l’appareil, et toute l’eau sera drainée à l’extérieur.)A
B
Orifice (A) qui est placé en haut, est à utiliser pour extraire l’eau du climatiseur mobile (retirez le bouchon en caoutchouc et ajoutez le tuyau de drainage sur l’orifice) lorsqu’il y a beaucoup d’humidité dans la pièce (en drainage continu) ou lorsque le produit fonctionne en mode déshumidification ou chauffage. Orifice (B) qui est placé en bas, dispose d’un réservoir et est à utiliser lorsqu’il est nécessaire de vider le réservoir (alarme réservoir d’eau plein). Il suffit de retirer le bouchon en caoutchouc et d’ajouter le tuyau de drainage sur l’orifice pour évacuer l’eau du réservoir.C
Remarque : Attention en fonction du remplissage du réservoir d’eau, il y aura parfois beaucoup d’eau à évacuer. Alors l’idéal serait d’ouvrir l’orifice et de le vider en extérieur ou de le vider au-dessus d’une grande bassine pour éviter d’inonder votre pièce.
Climatiseur mobile / Manuel d’utilisation
105 / 396 Fr
8 Explications sur la maintenanceA
Avertissement : – Débranchez toujours l’appareil avant de le nettoyer ou d’effectuer un entretien. – N’utilisez pas de liquides ou de produits chimiques inflammables pour nettoyer l’appareil. – Ne lavez pas le module en le plaçant sous l’eau courante. Cela provoque des dangers d’origine électrique. – N’utilisez pas l’appareil si l’alimentation électrique a été endommagée pendant le nettoyage. Un cordon d’alimentation endommagé doit être remplacé par un cordon neuf disponible auprès du fabricant. – Si le climatiseur est endommagé, contactez le revendeur ou un atelier de réparation désigné. 8.1 Nettoyage du filtre à air
106 / 396 Fr
Climatiseur mobile / Manuel d’utilisation 8 Explications sur la maintenanceA
Avertissement : Ne faites pas fonctionner l’appareil sans filtre, car la saleté et les peluches l’encrassent et réduisent les performances. 8.2 Nettoyage du climatiseur Nettoyez d’abord la surface avec un détergent neutre et un chiffon humide, puis essuyez-la avec un chiffon sec.
Climatiseur mobile / Manuel d’utilisation
107 / 396 Fr
9 Entretien Conseils d’entretien Veillez à nettoyer le filtre à air toutes les 2 semaines pour des performances optimales. Le bac collecteur d’eau doit être vidé immédiatement après l’erreur P1 et avant tout entreposage pour éviter la formation de moisissure. Dans les habitations ayant des animaux, vous devrez régulièrement essuyer la grille afin d’éviter que le flux d’air ne soit bloqué par des poils d’animaux. Nettoyage du climatiseur mobile Nettoyez l’appareil à l’aide d’un chiffon humide non pelucheux et d’un détergent neutre. Séchez l’appareil en utilisant un chiffon sec non pelucheux. Entreposez l’appareil lorsqu’il n’est pas utilisé Videz son bac collecteur d’eau en suivant les instructions de la section suivante. Faites fonctionner l’appareil en mode Fan (ventilateur) pendant 12 heures dans une pièce chaude afin de le sécher et d’éviter toute formation de moisissure. Éteignez l’appareil et débranchez-le. Nettoyez le filtre à air conformément aux instructions de la section précédente. Réinstallez le filtre à air séché et propre avant d’entreposer l’appareil. Retirez les piles de la télécommande. Veillez à entreposer l’appareil dans un endroit sombre et frais. L’exposition directe au soleil ou à une chaleur extrême peut réduire sa durée de vie.C
Remarque : La poussière sur le panneau avant peut être enlevée à l’aide d’un chiffon sans huile ou lavée avec un chiffon imbibé d’une solution d’eau tiède et d'un liquide vaisselle doux. Rincez soigneusement et essuyez. N’utilisez jamais de nettoyants forts, de cire ou de lustre sur la façade du boîtier. Veillez à bien essorer le chiffon avant d’essuyer le panneau de commande. Un excès d’eau dans ou autour du panneau de commande peut endommager l’appareil.
108 / 396 Fr
Climatiseur mobile / Manuel d’utilisation 10 Dépannage Pannes Causes possibles Solutions proposéesC
Remarque : Les produits achetés peuvent sembler différents.
Climatiseur mobile / Manuel d’utilisation
109 / 396 Fr
11 Directives européennes concernant la mise au rebut Il faut tenir compte des informations suivantes lors de l’utilisation de cet appareil dans les pays européens : Mise au rebut : Ne jetez pas ce produit comme un déchet ménager non trié. Veuillez effectuer le tri de ces ordures pour un traitement adapté si nécessaire. Il est interdit de jeter cet appareil avec les déchets ménagers. Il existe plusieurs possibilités pour l’élimination :Ce symbole indique que ce produit ne doit pas être jeté avec les déchets ménagers à la fin de sa vie. Les appareils usagés doivent être retournés au point de collecte officiel destiné au recyclage des appareils électriques et électroniques. Pour trouver ces systèmes de collecte, veuillez contacter les autorités locales ou le détaillant auprès duquel vous avez acheté le produit. Chaque ménage joue un rôle important dans la récupération et le recyclage des appareils ménagers usagés. L’élimination appropriée des appareils usagés aide à prévenir les conséquences négatives potentielles pour l’environnement et la santé humaine.
110 / 396 Fr
Climatiseur mobile / Manuel d’utilisation 12.1 Consignes de la F-Gaz Ce produit contient des gaz à effet de serre fluorés. Les gaz à effet de serre fluorés sont contenus dans un dispositif hermétiquement scellé. Les opérations d’installation, d’entretien, de maintenance, de réparation, de vérifications de fuites éventuelles, de mise hors service des équipements obsolètes ainsi que de recyclage des produits doivent être effectuées par une personne physique certifiée. Si le système est doté d’un dispositif de détection des fuites, des vérifications de fuites éventuelles doivent être effectuées au moins une fois par an, afin de s’assurer que le système fonctionne correctement. Si le produit doit faire l’objet de vérifications de fuites éventuelles, il est recommandé de mentionner le cycle d’inspection, et d’établir et sauvegarder les comptes rendus des vérifications effectuées.C
Remarque : Si l’équivalent en CO2 des gaz à effet de serre fluorés contenus dans les équipements hermétiquement scellés, les climatiseurs mobiles, les climatiseurs fixes ainsi que les déshumidificateurs, est inférieur à 10 tonnes, nul besoin d’effectuer des vérifications de fuites éventuelles. 12 Instructions d’installation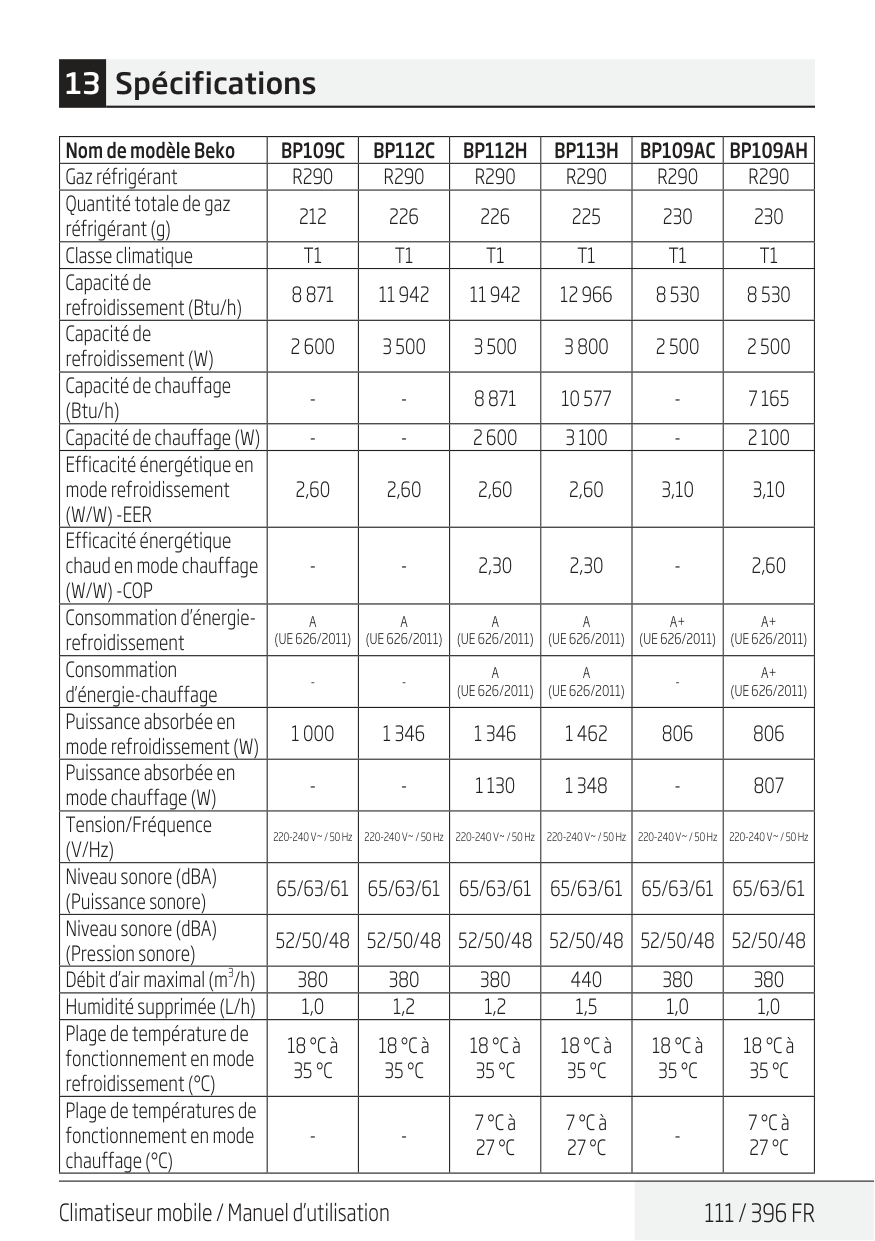
Climatiseur mobile / Manuel d’utilisation
111 / 396 Fr
Nom de modèle BekoBp109C
Bp112C
Bp112H
Bp113H
Bp109Ac Bp109Ah
Gaz réfrigérantR290
R290
R290
R290
R290
R290
Quantité totale de gaz réfrigérant (g) 212 226 226 225 230 230 Classe climatiqueT1
T1
T1
T1
T1
T1
Capacité de refroidissement (Btu/h) 8 871 11 942 11 942 12 966 8 530 8 530 Capacité de refroidissement (W) 2 600 3 500 3 500 3 800 2 500 2 500 Capacité de chauffage (Btu/h)(W/W) -Eer
2,60 2,60 2,60 2,60 3,10 3,10 Efficacité énergétique chaud en mode chauffage(W/W) -Cop
A
(Ue 626/2011)
A
(Ue 626/2011)
A
(Ue 626/2011)
A
(Ue 626/2011)
A+
(Ue 626/2011)
A+
(Ue 626/2011)
Consommation d’énergie-chauffageA
(Ue 626/2011)
A
(Ue 626/2011)
A+
(Ue 626/2011)
Puissance absorbée en mode refroidissement (W) 1 000 1 346 1 346 1 462 806 806 Puissance absorbée en mode chauffage (W)35 °C
18 °C à35 °C
18 °C à35 °C
18 °C à35 °C
18 °C à35 °C
18 °C à35 °C
Plage de températures de fonctionnement en mode chauffage (°C)27 °C
7 °C à27 °C
27 °C
13 Spécifications
112 / 396 Fr
Climatiseur mobile / Manuel d’utilisation
Fabriqué par Arcelik A.S. Karaağaç Cd. N° 2-6 Sütlüce, 34445 Beyoğlu, Istanbul, Turquie.
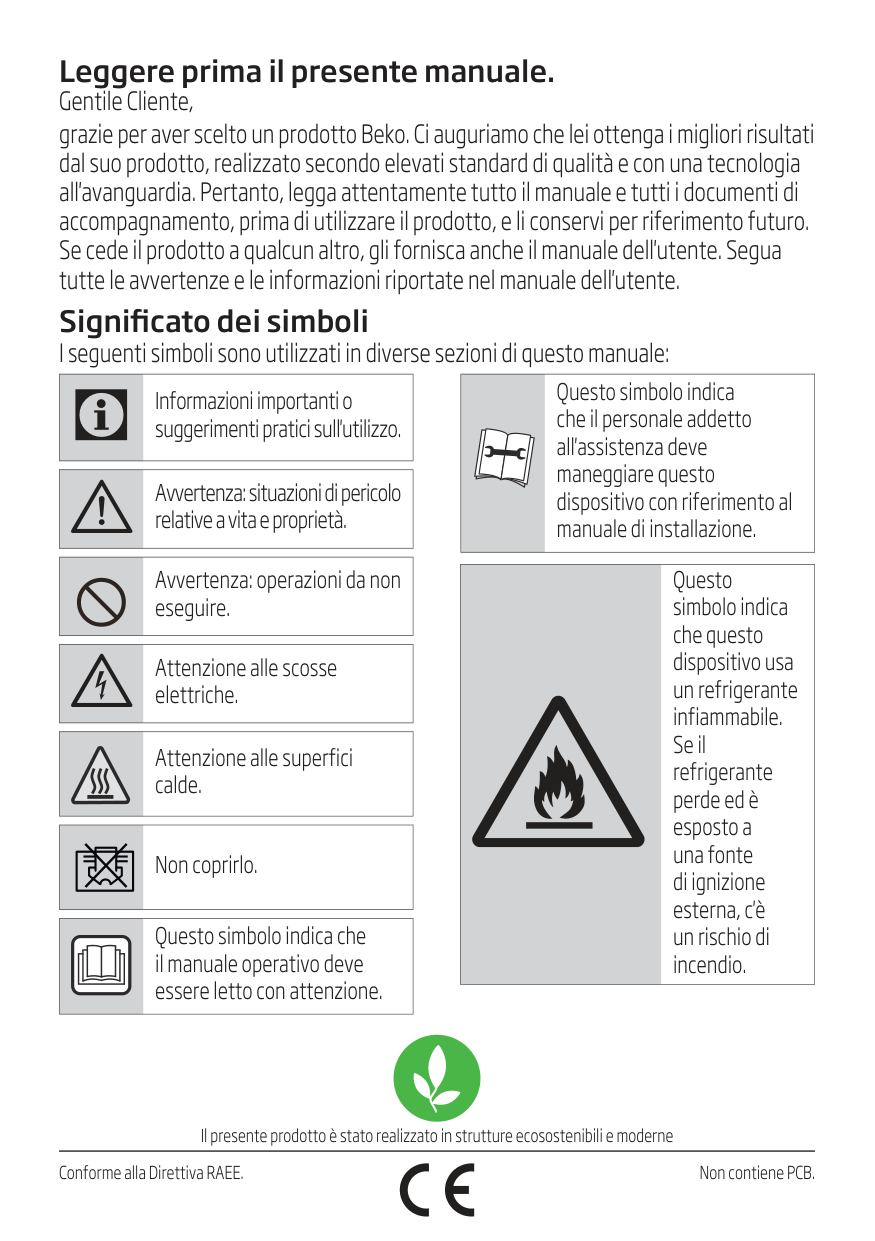
Leggere prima il presente manuale. Gentile Cliente, grazie per aver scelto un prodotto Beko. Ci auguriamo che lei ottenga i migliori risultati dal suo prodotto, realizzato secondo elevati standard di qualità e con una tecnologia all'avanguardia. Pertanto, legga attentamente tutto il manuale e tutti i documenti di accompagnamento, prima di utilizzare il prodotto, e li conservi per riferimento futuro. Se cede il prodotto a qualcun altro, gli fornisca anche il manuale dell'utente. Segua tutte le avvertenze e le informazioni riportate nel manuale dell'utente. Significato dei simboli I seguenti simboli sono utilizzati in diverse sezioni di questo manuale: Il presente prodotto è stato realizzato in strutture ecosostenibili e moderne Conforme alla Direttiva RAEE. Non contiene PCB.
C
Informazioni importanti o suggerimenti pratici sull'utilizzo.A
Avvertenza: situazioni di pericolo relative a vita e proprietà. Avvertenza: operazioni da non eseguire.B
Attenzione alle scosse elettriche. Attenzione alle superfici calde. Non coprirlo. Questo simbolo indica che il manuale operativo deve essere letto con attenzione. Questo simbolo indica che il personale addetto all'assistenza deve maneggiare questo dispositivo con riferimento al manuale di installazione. Questo simbolo indica che questo dispositivo usa un refrigerante infiammabile. Se il refrigerante perde ed è esposto a una fonte di ignizione esterna, c'è un rischio di incendio.
Condizionatore d’aria mobile / Manuale dell’utente
115 / 396 It
Sommario 1 Informazioni sulla sicurezza 117 2 Nome dei componenti 143 3 Accessori 144 4 Aspetto e funzioni del pannello di controllo 145 4.1 Modello solo raffreddamento (non reversibile) . . . . . . . . . . . . . . . . . . . . . . . . . . . . . . . . . . . . . . . . . . . .145 4.2 Modello raffreddamento e pompa di calore (reversibile). . . . . . . . . . . . . . . . . . . . . . . . . . . . . . . . . . . .146 5 Aspetto e funzioni del telecomando 147 6 Funzionamento 149 6.1 Prima dell’uso. . . . . . . . . . . . . . . . . . . . . . . . . . . . . . . . . . . . . . . . . . . . . . . . . . . . . . . . . . . . . . . . . . . . . . . . . . . . . . . .149 6.2 Modalità raffreddamento . . . . . . . . . . . . . . . . . . . . . . . . . . . . . . . . . . . . . . . . . . . . . . . . . . . . . . . . . . . . . . . . . . .150 6.3 Modalità deumidificatore . . . . . . . . . . . . . . . . . . . . . . . . . . . . . . . . . . . . . . . . . . . . . . . . . . . . . . . . . . . . . . . . . . .150 6.4 Modalità Ventilazione . . . . . . . . . . . . . . . . . . . . . . . . . . . . . . . . . . . . . . . . . . . . . . . . . . . . . . . . . . . . . . . . . . . . . . .150 6.5 Modalità di riscaldamento (questa funzione non è disponibile per le unità di solo raffreddamento) . . . . . . . . . . . . . . . . . . . . . . . . . . . . . . . . . . . . . . . . . . . . . . . . . . . . . . . . . . . . . . . . . . . . . . . . . . . .150 6.6 Modalità Timer . . . . . . . . . . . . . . . . . . . . . . . . . . . . . . . . . . . . . . . . . . . . . . . . . . . . . . . . . . . . . . . . . . . . . . . . . . . . . . 151 6.7 Oscillazione automatica. . . . . . . . . . . . . . . . . . . . . . . . . . . . . . . . . . . . . . . . . . . . . . . . . . . . . . . . . . . . . . . . . . . . . 151 6.8 Modalità Notturna. . . . . . . . . . . . . . . . . . . . . . . . . . . . . . . . . . . . . . . . . . . . . . . . . . . . . . . . . . . . . . . . . . . . . . . . . . . 151 6.9 Drenaggio dell’acqua . . . . . . . . . . . . . . . . . . . . . . . . . . . . . . . . . . . . . . . . . . . . . . . . . . . . . . . . . . . . . . . . . . . . . . . . 151 6.10 Funzione wireless . . . . . . . . . . . . . . . . . . . . . . . . . . . . . . . . . . . . . . . . . . . . . . . . . . . . . . . . . . . . . . . . . . . . . .152 6.11 Funzione Zone follow (Temperatura zona) . . . . . . . . . . . . . . . . . . . . . . . . . . . . . . . . . . . . . . . . . . . . . . . . .152 7 Informazioni sull’installazione 153 7.1 Informazioni sull’installazione . . . . . . . . . . . . . . . . . . . . . . . . . . . . . . . . . . . . . . . . . . . . . . . . . . . . . . . . . . . . . .153 7.2 Introduzione all’installazione del tubo di scarico . . . . . . . . . . . . . . . . . . . . . . . . . . . . . . . . . . . . . . . . . . . .154 7.3 Kit di coibentazione universale per condizionatore portatile (opzionale) . . . . . . . . . . . . . . . . .156 7.4 Uso del filtro Hepa 13 (solo modello BP113H) . . . . . . . . . . . . . . . . . . . . . . . . . . . . . . . . . . . . . . . . . . . . . . .159 7.5 Allarme vaschetta dell'acqua piena . . . . . . . . . . . . . . . . . . . . . . . . . . . . . . . . . . . . . . . . . . . . . . . . . . . . . . . . .160
116 / 396 It
Condizionatore d’aria mobile / Manuale dell’utente Sommario 8 Manutenzione 161 8.1 Pulire il filtro dell’aria . . . . . . . . . . . . . . . . . . . . . . . . . . . . . . . . . . . . . . . . . . . . . . . . . . . . . . . . . . . . . . . . . . . . . . . . 161 8.2 Pulire la superficie del condizionatore. . . . . . . . . . . . . . . . . . . . . . . . . . . . . . . . . . . . . . . . . . . . . . . . . . . . . .162 9 Manutenzione 163 10 Risoluzione dei problemi 164 11 Normative europee per lo smaltimento 165 12 Istruzioni per l'installazione 166 12.1 Istruzioni per i gas fluorurati . . . . . . . . . . . . . . . . . . . . . . . . . . . . . . . . . . . . . . . . . . . . . . . . . . . . . . . . . . . . . . . .166 13 Specifiche tecniche 167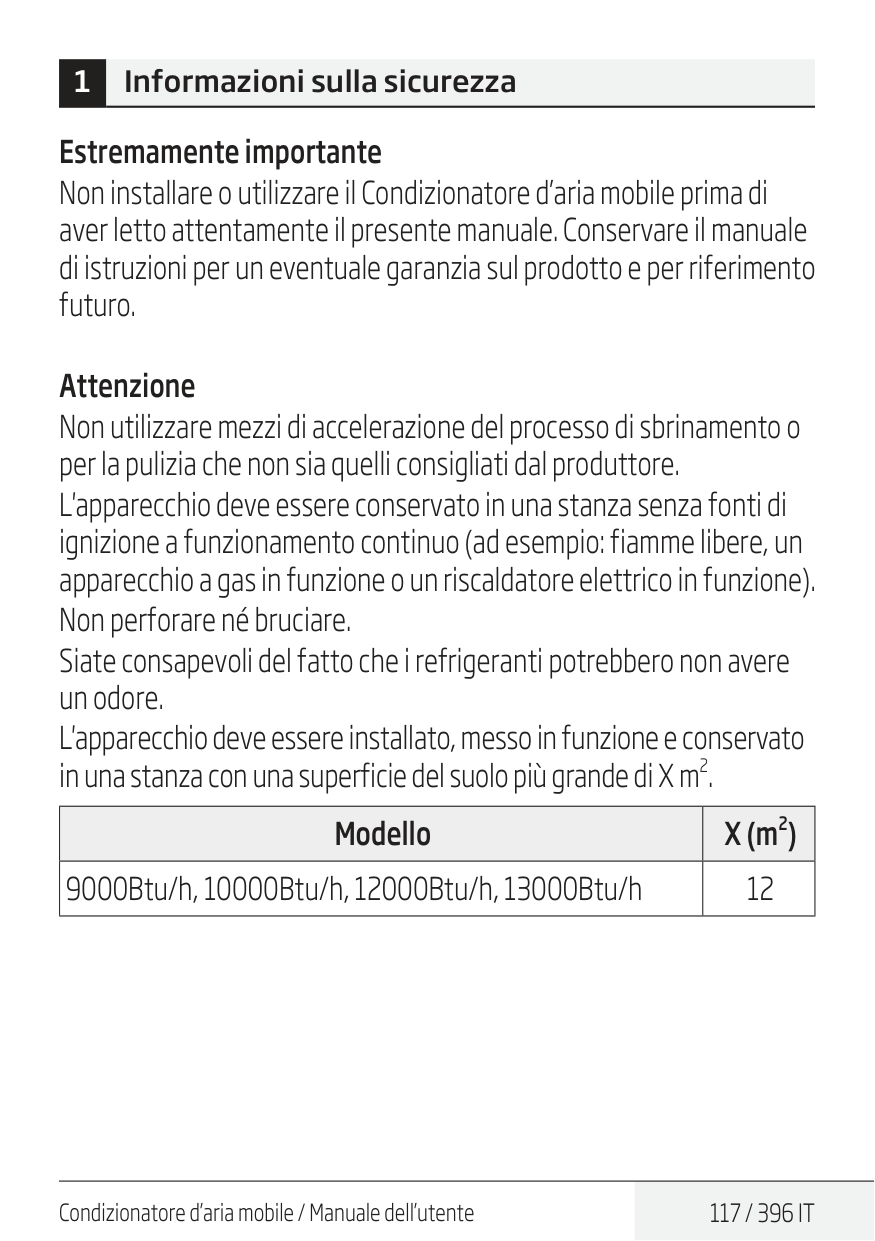
Condizionatore d’aria mobile / Manuale dell’utente
117 / 396 It
1 Informazioni sulla sicurezza Estremamente importante Non installare o utilizzare il Condizionatore d’aria mobile prima di aver letto attentamente il presente manuale. Conservare il manuale di istruzioni per un eventuale garanzia sul prodotto e per riferimento futuro. Attenzione Non utilizzare mezzi di accelerazione del processo di sbrinamento o per la pulizia che non sia quelli consigliati dal produttore. L'apparecchio deve essere conservato in una stanza senza fonti di ignizione a funzionamento continuo (ad esempio: fiamme libere, un apparecchio a gas in funzione o un riscaldatore elettrico in funzione). Non perforare né bruciare. Siate consapevoli del fatto che i refrigeranti potrebbero non avere un odore. L'apparecchio deve essere installato, messo in funzione e conservato in una stanza con una superficie del suolo più grande di X m
118 / 396 It
Condizionatore d’aria mobile / Manuale dell’utente Avvertenza (per R290) Informazioni specifiche concernenti gli apparecchi con gas refrigerante R290. •Leggere attentamente tutte le avvertenze. •Quando si sbrina e pulisce l’apparecchio, non utilizzare strumenti diversi da quelli consigliati dal produttore. •L’apparecchio deve essere collocato in un'area priva di fonti di accensione (ad esempio: fiamme libere, apparecchi a gas o elettrici in funzionamento). •Non perforare e non gettare nelle fiamme. •Questo apparecchio contiene Y g (consultare l’etichetta nominale sul retro dell’unità) del gas refrigerante R290. •L’R290 è un gas refrigerante conforme alle direttive europee sull'ambiente. Non perforare alcuna parte del circuito refrigerante. •Se l’apparecchio è installato, utilizzato o conservato in una zona non ventilata, la stanza deve essere progettata in modo da evitare l'accumulo di perdite di refrigerante onde evitare il rischio di incendi o esplosioni dovuti all’accensione del gas stesso provocata da caloriferi elettrici, stufe o altre fonti di ignizione. •L'apparecchio deve essere conservato in modo da evitare guasti meccanici. •Chiunque utilizzi o lavori sul circuito refrigerante deve disporre di una certificazione adeguata emessa da un’organizzazione accreditata che garantisca le competenze nella manipolazione dei refrigeranti in conformità con una specifica valutazione riconosciuta da associazioni del settore. 1 Informazioni sulla sicurezza
Condizionatore d’aria mobile / Manuale dell’utente
119 / 396 It
•Le riparazioni devono essere eseguita in base a quanto indicato dall'azienda produttrice. La manutenzione e le riparazioni che richiedono l'assistenza di altro personale qualificato saranno eseguite sotto la supervisione di una persona competente nell'uso di refrigeranti infiammabili. Istruzioni generali per la sicurezza
120 / 396 It
Condizionatore d’aria mobile / Manuale dell’utente 1 Informazioni sulla sicurezza
Condizionatore d’aria mobile / Manuale dell’utente
121 / 396 It
1 Informazioni sulla sicurezza
122 / 396 It
Condizionatore d’aria mobile / Manuale dell’utente 1 Informazioni sulla sicurezza0,367Ω.
In caso di necessità, consultare il fornitore per informazioni sull’impedenza di sistema.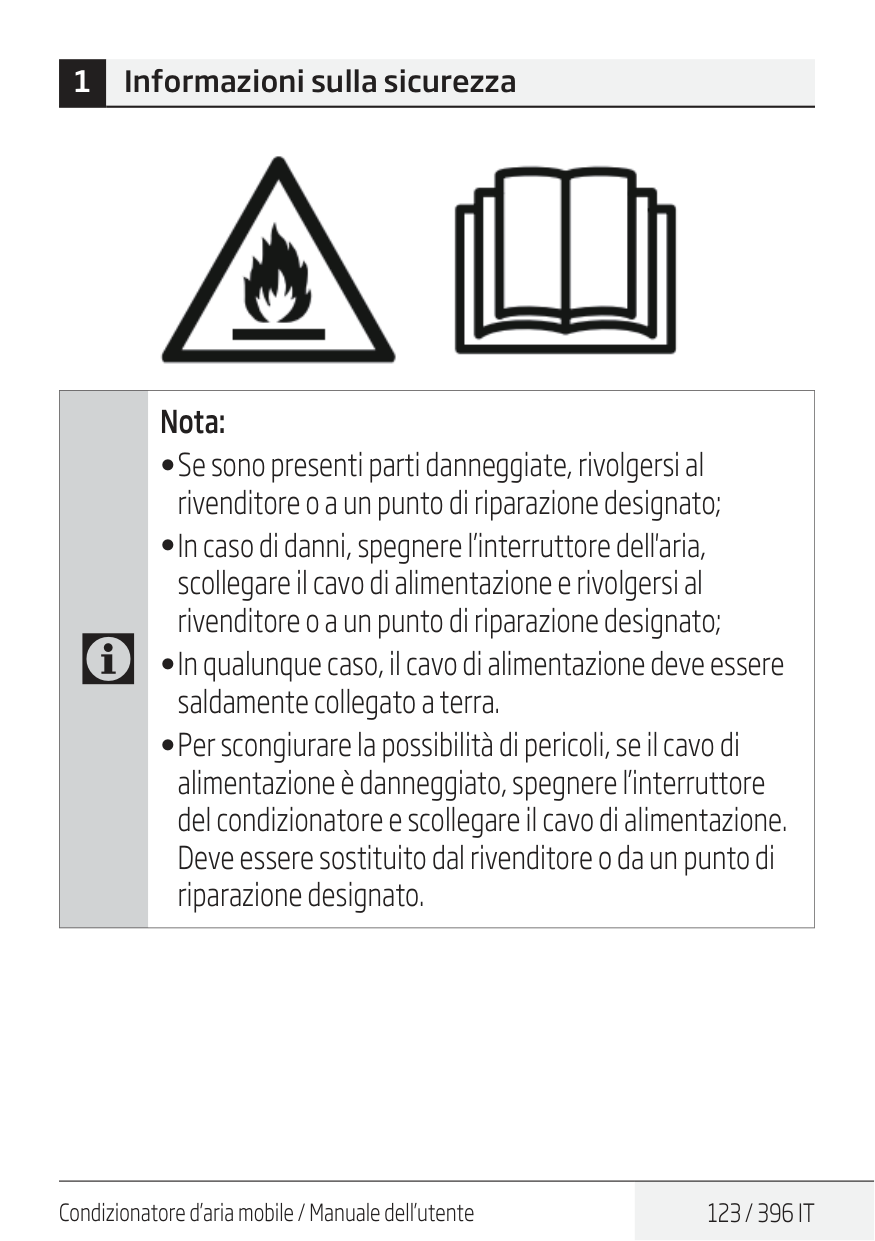
Condizionatore d’aria mobile / Manuale dell’utente
123 / 396 It
1 Informazioni sulla sicurezzaC
Nota: •Se sono presenti parti danneggiate, rivolgersi al rivenditore o a un punto di riparazione designato; •In caso di danni, spegnere l’interruttore dell'aria, scollegare il cavo di alimentazione e rivolgersi al rivenditore o a un punto di riparazione designato; •In qualunque caso, il cavo di alimentazione deve essere saldamente collegato a terra. •Per scongiurare la possibilità di pericoli, se il cavo di alimentazione è danneggiato, spegnere l’interruttore del condizionatore e scollegare il cavo di alimentazione. Deve essere sostituito dal rivenditore o da un punto di riparazione designato.
124 / 396 It
Condizionatore d’aria mobile / Manuale dell’utente Avvertenze (solo per l'utilizzo del refrigerante R290)
Condizionatore d’aria mobile / Manuale dell’utente
125 / 396 It
1.5 Presenza di estintori Se si deve effettuare un intervento a caldo nelle apparecchiature di refrigerazione o in qualsiasi parte associata, tenere a portata di mano dispositivi antincendio. Tenere un estintore a polvere asciutta o con CO2 nei pressi dell'area di carica. 1.6 Nessuna fonte di combustione Il personale che interviene in un sistema di refrigerazione esponendo le tubazioni che contengono o hanno contenuto refrigerante infiammabile non deve utilizzare fonti di combustione in modo che possa comportare il rischio di incendio o esplosione. Il personale non deve essere fumare durante l'intervento. Tutte le possibili fonti di combustione, comprese fumare, devono essere tenuti sufficientemente lontane dal sito di installazione, riparazione, rimozione e smaltimento, durante il quale il refrigerante infiammabile può essere rilasciato nello spazio circostante. Prima dell'intervento, è necessario controllare l'area intorno alle apparecchiature per assicurarsi che non vi siano pericoli infiammabili o rischi di combustione. Devono essere apposti cartelli di “Vietato fumare”. 1.7 Area ventilata Assicurarsi che l'area sia aperta o venga adeguatamente ventilata prima di intervenire nel sistema o effettuare qualsiasi intervento a caldo. Fornire un grado di ventilazione continua durante il periodo dell'intervento. La ventilazione deve disperdere in modo sicuro il refrigerante rilasciato e preferibilmente espellerlo all'esterno nell'atmosfera. 1 Informazioni sulla sicurezza
126 / 396 It
Condizionatore d’aria mobile / Manuale dell’utente 1.8 Controlli alle apparecchiature di refrigerazione I componenti elettrici sostituiti devono essere idonei allo scopo e alle specifiche corrette. Attenersi sempre alle linee guida di manutenzione e assistenza del produttore. In caso di dubbi rivolgersi al reparto tecnico del produttore per assistenza. I seguenti controlli devono essere applicati agli impianti che utilizzano refrigeranti infiammabili: la quantità di carica deve essere conforme alle dimensioni della stanza in cui sono installate le parti contenenti refrigerante; i meccanismi e le prese di ventilazione devono funzionare in modo adeguato e non devono essere ostruiti; se viene utilizzato un circuito di refrigerazione indiretta, il circuito secondario deve essere controllato per verificare la presenza di refrigerante; i contrassegni sull'apparecchiatura devono essere sempre visibili e leggibili. I contrassegni e i segni illeggibili devono essere corretti; il tubo o i componenti di refrigerazione sono installati in una posizione in cui è improbabile che possano essere esposti a qualsiasi sostanza che possa corrodere componenti contenenti refrigerante, a meno che i componenti non siano realizzati con materiali che sono intrinsecamente resistenti alla corrosione o adeguatamente protetti da corrosione. 1 Informazioni sulla sicurezza
Condizionatore d’aria mobile / Manuale dell’utente
127 / 396 It
1.9 Controlli ai dispositivi elettrici La riparazione e la manutenzione di componenti elettrici comprendono controlli di sicurezza iniziali e procedure di ispezione dei componenti. In presenza di un guasto che potrebbe compromettere la sicurezza, l'alimentazione elettrica non deve essere collegata al circuito finché il guasto non viene riparato in modo soddisfacente. Se il guasto non può essere riparato immediatamente, ma è necessario continuare l'operazione, adottare un'adeguata soluzione temporanea. Il proprietario del materiale deve essere informato o avvisato in modo che possa avvisare tutti. I controlli di sicurezza iniziali devono comprendere: lo scaricamento dei condensatori: questa operazione deve essere eseguita in modo sicuro per evitare scintille; non devono esservi componenti elettrici sotto tensione e cavi scoperti durante la carica, il recupero o lo spurgo del sistema; la messa a terra deve essere continua.
128 / 396 It
Condizionatore d’aria mobile / Manuale dell’utente 2.2 Prestare particolare attenzione a quanto segue per garantire che, intervenendo sui componenti elettrici, l'alloggiamento non viene alterato in modo tale da influire negativamente sul livello di protezione. Ciò include danni ai cavi, un numero eccessivo di collegamenti, terminali non conformi alle specifiche originali, danni alle guarnizioni, un'installazione non corretta delle guarnizioni, ecc. Assicurarsi che gli apparecchi siano montati saldamente. Assicurarsi che le guarnizioni o i materiali di tenuta non siano degradati in modo da essere inutilizzabili per impedire l'ingresso di atmosfere infiammabili. Le parti di ricambio devono essere conformi alle specifiche del produttore.C
Nota: L'uso di sigillante siliconico potrebbe inibire l'efficacia di alcuni tipi di apparecchiature di rilevamento di perdite. I componenti a sicurezza intrinseca non devono essere isolati prima di intervenire su di essi.
Condizionatore d’aria mobile / Manuale dell’utente
129 / 396 It
130 / 396 It
Condizionatore d’aria mobile / Manuale dell’utente
Condizionatore d’aria mobile / Manuale dell’utente
131 / 396 It
132 / 396 It
Condizionatore d’aria mobile / Manuale dell’utente
Condizionatore d’aria mobile / Manuale dell’utente
133 / 396 It
a) Acquisire familiarità con le apparecchiature e il relativo funzionamento. b) Isolare elettricamente il sistema. c) Prima di eseguire la procedura, verificare quanto segue: le apparecchiature meccaniche di movimentazione sono disponibili, ove necessario, per la movimentazione di bombole di refrigerante; tutte le attrezzature di protezione individuale sono disponibili e devono essere utilizzate in modo corretto; il processo di recupero è monitorato in ogni momento da personale competente; le apparecchiature di recupero e le bombole devono essere conformi agli standard adeguati. d) Ove possibile, pompare il sistema di refrigerante. e) Se il vuoto non è possibile, fare in modo che un collettore rimuova il refrigerante da varie parti del sistema. f) Assicurarsi che la bombola si trovi sulle bilance prima di effettuare il recupero. g) Avviare la macchina di recupero e azionarla in conformità alle istruzioni del produttore. h) Non riempire eccessivamente le bombole. (Non oltre l'80% del volume di carica del liquido). i) Non superare la pressione massima di esercizio delle bombole, seppure temporaneamente. 1 Informazioni sulla sicurezza
134 / 396 It
Condizionatore d’aria mobile / Manuale dell’utente j) Una volta riempite correttamente le bombole e terminato il processo, assicurarsi che le bombole e le apparecchiature siano state rimosse tempestivamente dal sito e tutte le valvole di isolamento sulle apparecchiature siano chiuse. k) Il refrigerante recuperato non deve essere caricato in un altro sistema di refrigerazione a meno che non sia stato pulito e controllato.
Condizionatore d’aria mobile / Manuale dell’utente
135 / 396 It
Le apparecchiature di recupero devono essere in buone condizioni con una serie di istruzioni relative alle apparecchiature a portata di mano e devono essere adeguate per il recupero dei refrigeranti infiammabili. Inoltre, una serie di bilance calibrate deve essere disponibile e in buone condizioni. I flessibili devono essere dotati di attacchi di scollegamento privi di perdite e in buone condizioni. Prima di utilizzare la macchina di recupero, verificare che sia in condizioni di funzionamento soddisfacente, sia stata effettuata una corretta manutenzione e tutti i componenti elettrici associati siano sigillati per evitare la combustione in caso di rilascio di refrigerante. In caso di dubbi, consultare il produttore. Il refrigerante recuperato deve essere riportato al fornitore del refrigerante nella bombola di recupero adeguata e con la relativa Nota di trasferimento dei rifiuti compilata. Non mischiare i refrigeranti in unità di recupero e, soprattutto, non in bombole. Se si devono rimuovere compressori o olio per compressori, assicurarsi che siano stati evacuati ad un livello accettabile per garantire che il refrigerante infiammabile non rimanga all'interno del lubrificante. Il processo di evacuazione deve essere effettuato prima di riportare il compressore ai fornitori. Adottare esclusivamente il riscaldamento elettrico sul corpo del compressore per accelerare questo processo. Quando si scarica l'olio da un sistema, l'operazione deve essere eseguita in modo sicuro. 1 Informazioni sulla sicurezza
136 / 396 It
Condizionatore d’aria mobile / Manuale dell’utenteC
Nota relativa ai gas fluorurati:
Condizionatore d’aria mobile / Manuale dell’utente
137 / 396 It
Formazione La formazione deve comprendere quanto segue: Informazioni circa il potenziale esplosivo dei refrigeranti infiammabili per istruire sulla pericolosità dei materiali infiammabili se manipolati senza attenzione. Informazioni sulle potenziali fonti di ignizione, in particolari quelle non ovvie come accendini, interruttori della luce, aspirapolveri e termosifoni elettrici. Informazioni sui diversi concetti di sicurezza: Scarsa ventilazione (vedi Clausola GG.2) La sicurezza dell'apparecchio non dipende dalla ventilazione dell’alloggiamento. Lo spegnimento dell'apparecchio o l’apertura dell'alloggiamento non produce effettivi significativi sulla sicurezza. Tuttavia, è possibile che a seguito di perdite possa accumularsi del refrigerante all’interno dell'involucro, rilasciando un'atmosfera infiammabile all'apertura dello stesso. Ventilazione dell’involucro (vedi Clausola GG.4) La sicurezza dell'apparecchio dipende dalla ventilazione dell’alloggiamento. Lo spegnimento dell'apparecchio o l’apertura dell'involucro produce effettivi significativi sulla sicurezza. Occorre garantire una ventilazione sufficiente. Ventilazione dell’ambiente (vedi Clausola GG.4) La sicurezza dell'apparecchio dipende dalla ventilazione dell’ambiente. Lo spegnimento dell'apparecchio o l’apertura dell'alloggiamento non produce effettivi significativi sulla sicurezza. La ventilazione dell'ambiente non deve essere spenta durante le procedure di riparazione. 1 Informazioni sulla sicurezza
138 / 396 It
Condizionatore d’aria mobile / Manuale dell’utente Informazioni sul sigillamento di componenti e involucri in base alla normativa IEC 60079-15:2010. Informazioni sulle procedure di lavoro corrette: a) Messa in servizio
Condizionatore d’aria mobile / Manuale dell’utente
139 / 396 It
1 Informazioni sulla sicurezza c) Riparazione
140 / 396 It
Condizionatore d’aria mobile / Manuale dell’utente
Condizionatore d’aria mobile / Manuale dell’utente
141 / 396 It
e) Smaltimento
142 / 396 It
Condizionatore d’aria mobile / Manuale dell’utente Contrassegni delle apparecchiature utilizzando cartelli Contrassegni per apparecchi simili utilizzati in una zona di lavoro sono generalmente indirizzati da normative locali e forniscono i requisiti minimi per la sicurezza e/o la salute sul luogo di lavoro. Tutti i contrassegni devono essere mantenuti e i datori di lavoro devono garantire che i dipendenti siano adeguatamente istruiti e formati in merito al significato degli stessi e delle operazioni da intraprendere in relazione a questi contrassegni. L’efficacia dei contrassegni non deve essere ridotta dall’apposizione di un numero troppo elevato degli stessi. I pittogrammi utilizzati devono essere il più semplice possibile e contenere solo dettagli essenziali. Smaltimento delle apparecchiature con refrigeranti infiammabili Vedere le normative nazionali. Stoccaggio di attrezzature/apparecchi Lo stoccaggio delle apparecchiature deve essere conforme alle istruzioni del produttore. Stoccaggio di apparecchiature imballate (invendute) La protezione delle confezioni stoccate deve essere costruita in modo tale che il danno meccanico all'apparecchiatura all'interno del pacco non provochi una perdita di carica del refrigerante. Il numero massimo di pezzi di apparecchiature autorizzati per essere stoccati insieme sarà determinato dalle normative locali. 1 Informazioni sulla sicurezza
Condizionatore d’aria mobile / Manuale dell’utente
143 / 396 It
2 Nome dei componenti 1 2 3 5 6 7 8 9 4 Fig. 1 1 Deflettore 5 Presa d'aria 2 Pannello di controllo 6 Sbocco di drenaggio 3 Coperchio anteriore 7 Uscita dell'aria 4 Rotella 8 Cavo di alimentazione 9 Sbocco di drenaggio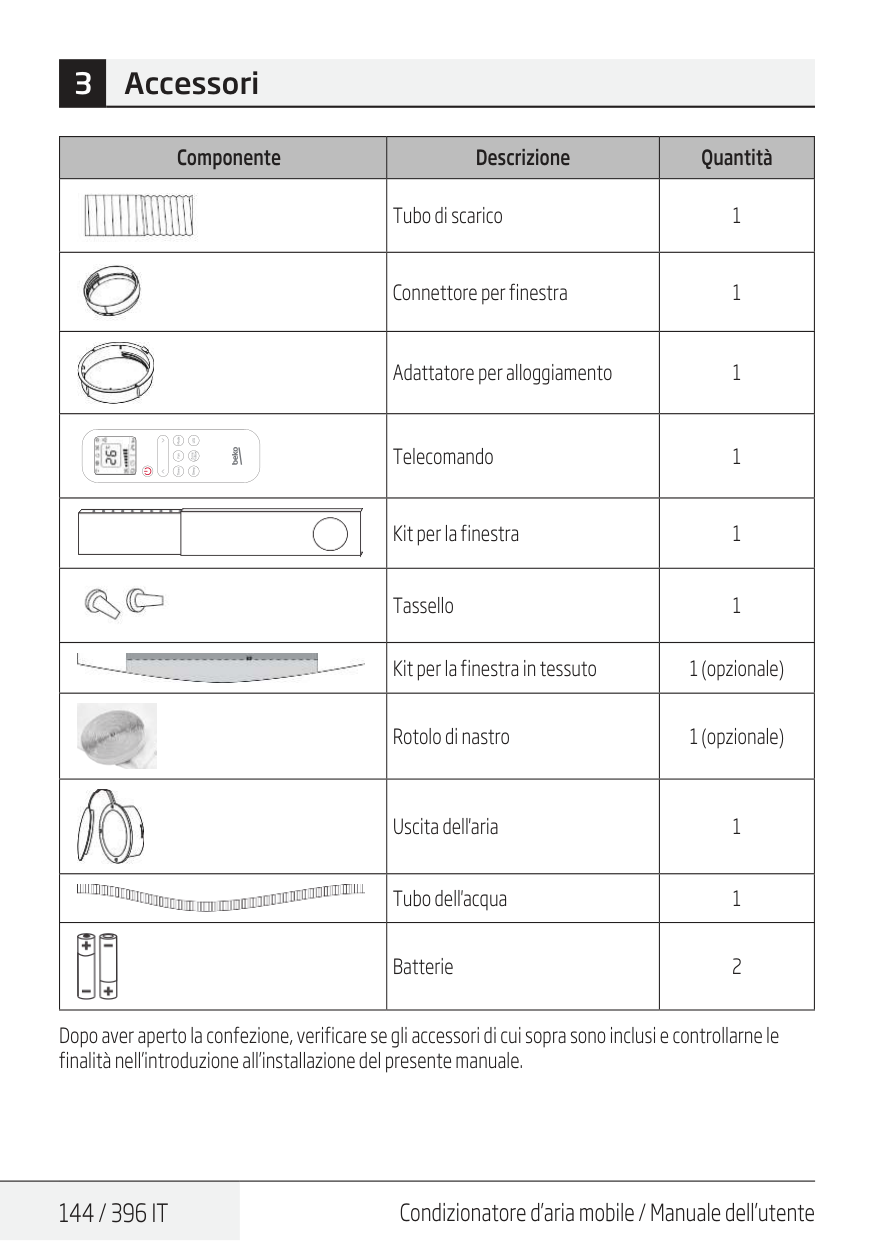
144 / 396 It
Condizionatore d’aria mobile / Manuale dell’utente 3 Accessori Componente Descrizione Quantità Tubo di scarico 1 Connettore per finestra 1 Adattatore per alloggiamento 1 Telecomando 1 Kit per la finestra 1 Tassello 1 Kit per la finestra in tessuto 1 (opzionale) Rotolo di nastro 1 (opzionale) Uscita dell'aria 1 Tubo dell'acqua 1 Batterie 2 Dopo aver aperto la confezione, verificare se gli accessori di cui sopra sono inclusi e controllarne le finalità nell’introduzione all’installazione del presente manuale.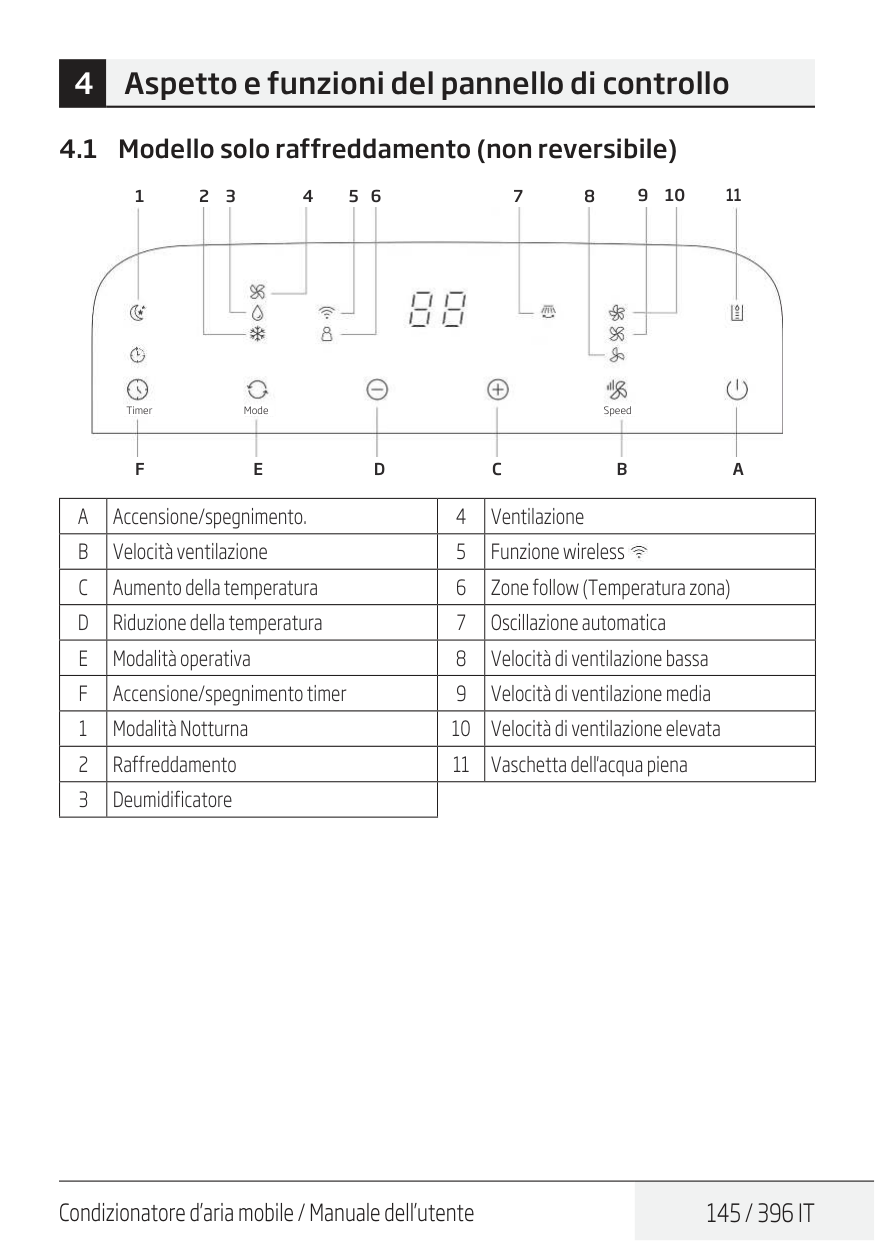
Condizionatore d’aria mobile / Manuale dell’utente
145 / 396 It
4.1 Modello solo raffreddamento (non reversibile) Timer Mode SpeedF
1 2 3 4 5 6 7 8 9 10E
D
C
B
A
11A
Accensione/spegnimento. 4 VentilazioneB
Velocità ventilazione 5 Funzione wirelessC
Aumento della temperatura 6 Zone follow (Temperatura zona)D
Riduzione della temperatura 7 Oscillazione automaticaE
Modalità operativa 8 Velocità di ventilazione bassaF
Accensione/spegnimento timer 9 Velocità di ventilazione media 1 Modalità Notturna 10 Velocità di ventilazione elevata 2 Raffreddamento 11 Vaschetta dell'acqua piena 3 Deumidificatore 4 Aspetto e funzioni del pannello di controllo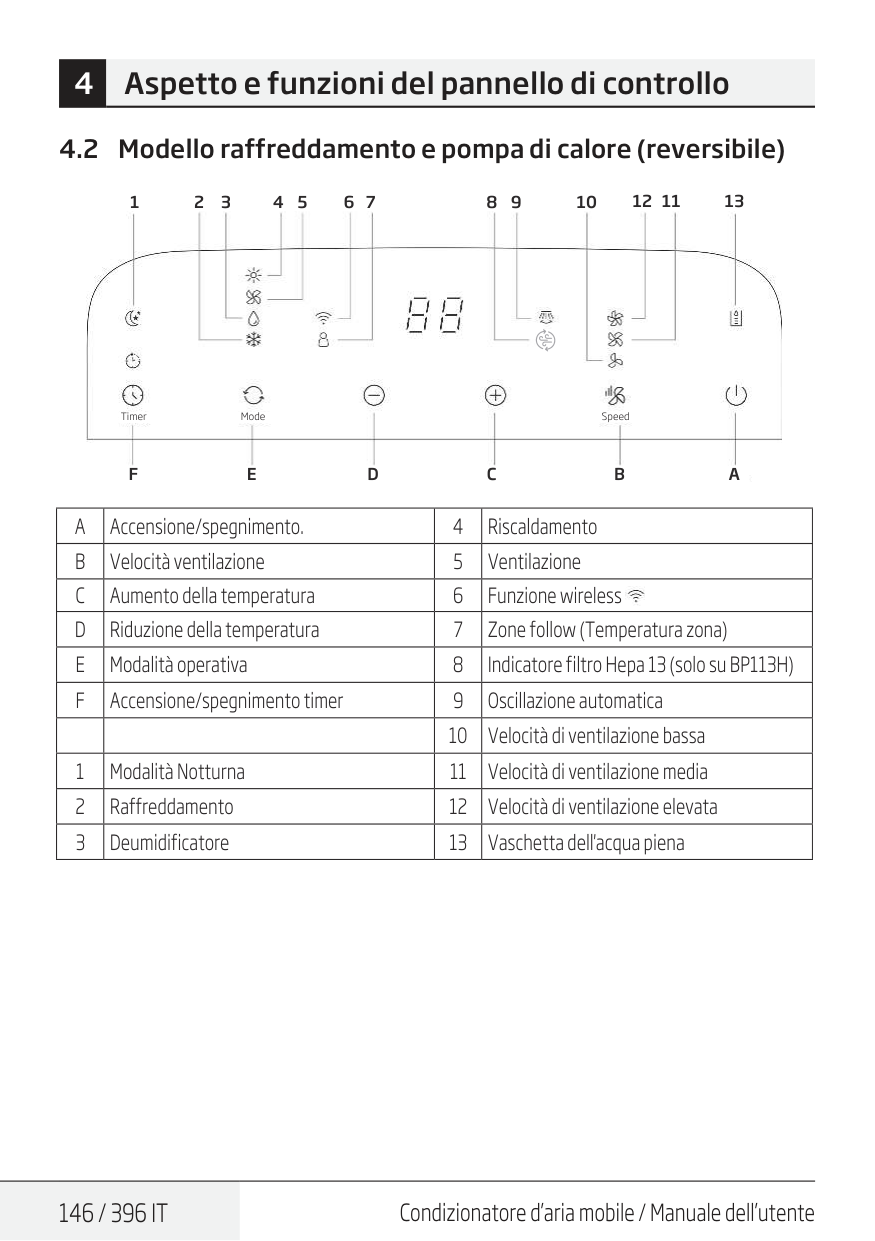
146 / 396 It
Condizionatore d’aria mobile / Manuale dell’utente 4.2 Modello raffreddamento e pompa di calore (reversibile) 4 Aspetto e funzioni del pannello di controllo Timer Mode SpeedF
1 2 3 4 5 6 7 8 9 10 12 11 13E
D
C
B
A
A
Accensione/spegnimento. 4 RiscaldamentoB
Velocità ventilazione 5 VentilazioneC
Aumento della temperatura 6 Funzione wirelessD
Riduzione della temperatura 7 Zone follow (Temperatura zona)E
Modalità operativa 8 Indicatore filtro Hepa 13 (solo su BP113H)F
Accensione/spegnimento timer 9 Oscillazione automatica 10 Velocità di ventilazione bassa 1 Modalità Notturna 11 Velocità di ventilazione media 2 Raffreddamento 12 Velocità di ventilazione elevata 3 Deumidificatore 13 Vaschetta dell'acqua piena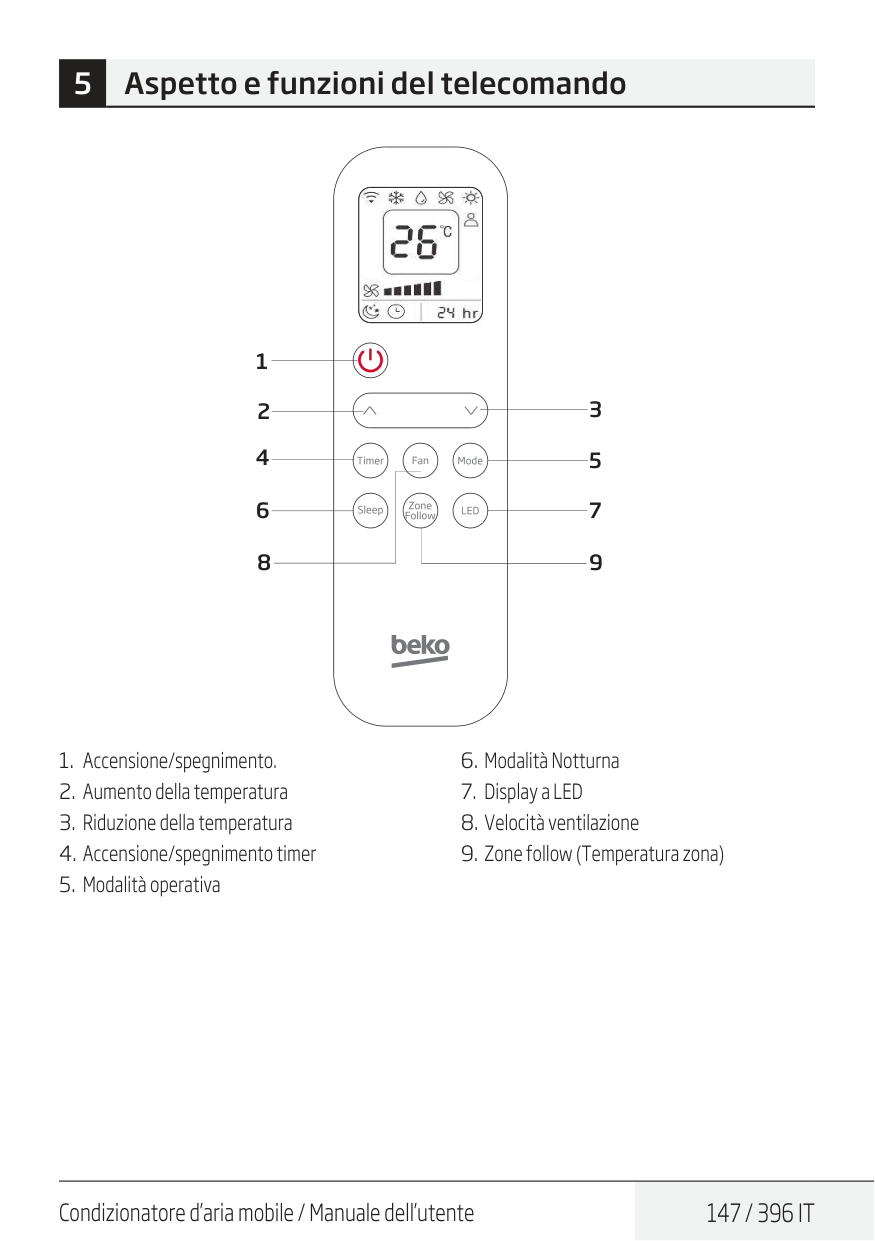
Condizionatore d’aria mobile / Manuale dell’utente
147 / 396 It
5 Aspetto e funzioni del telecomando 3 5 7 9 1 2 4 6 8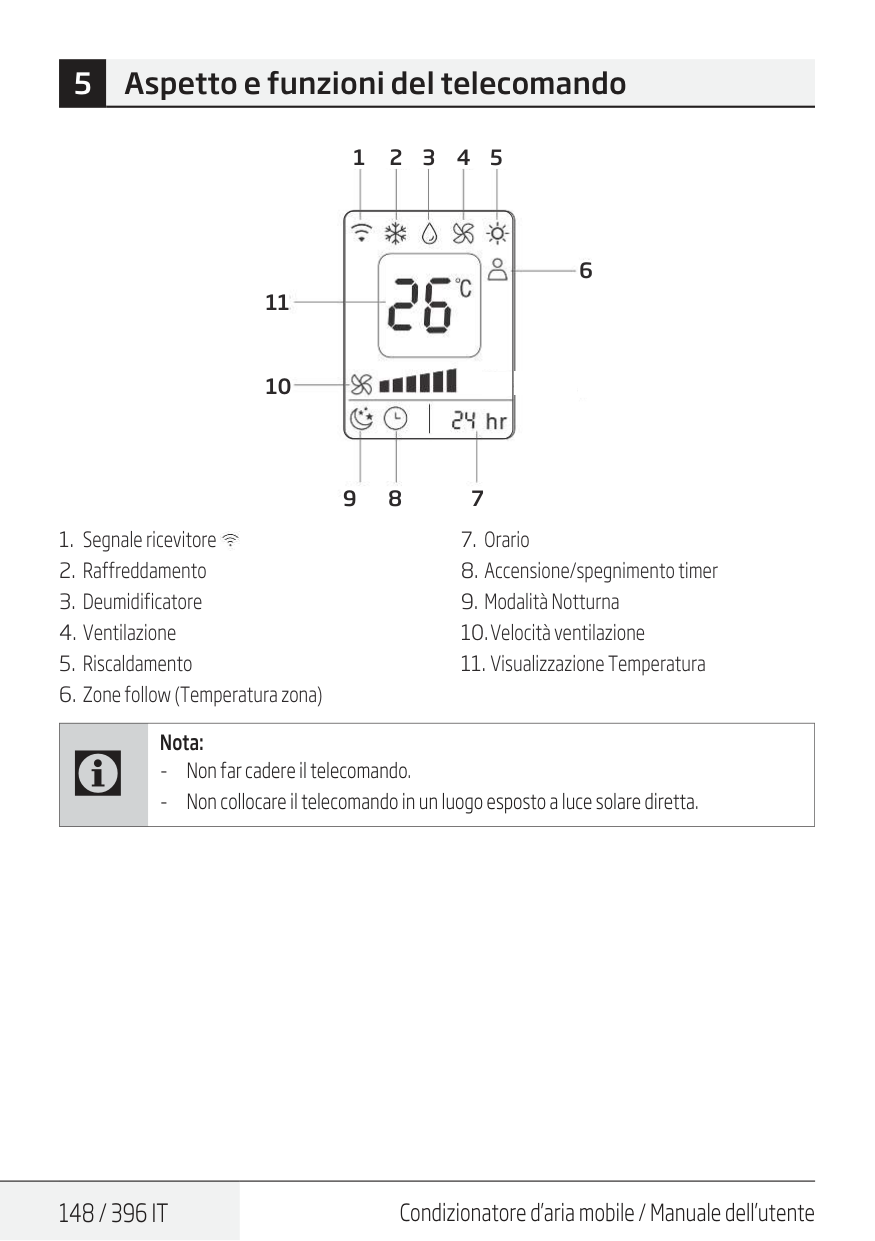
148 / 396 It
Condizionatore d’aria mobile / Manuale dell’utente 1 2 3 4 5 6 9 8 7 11 10C
Nota: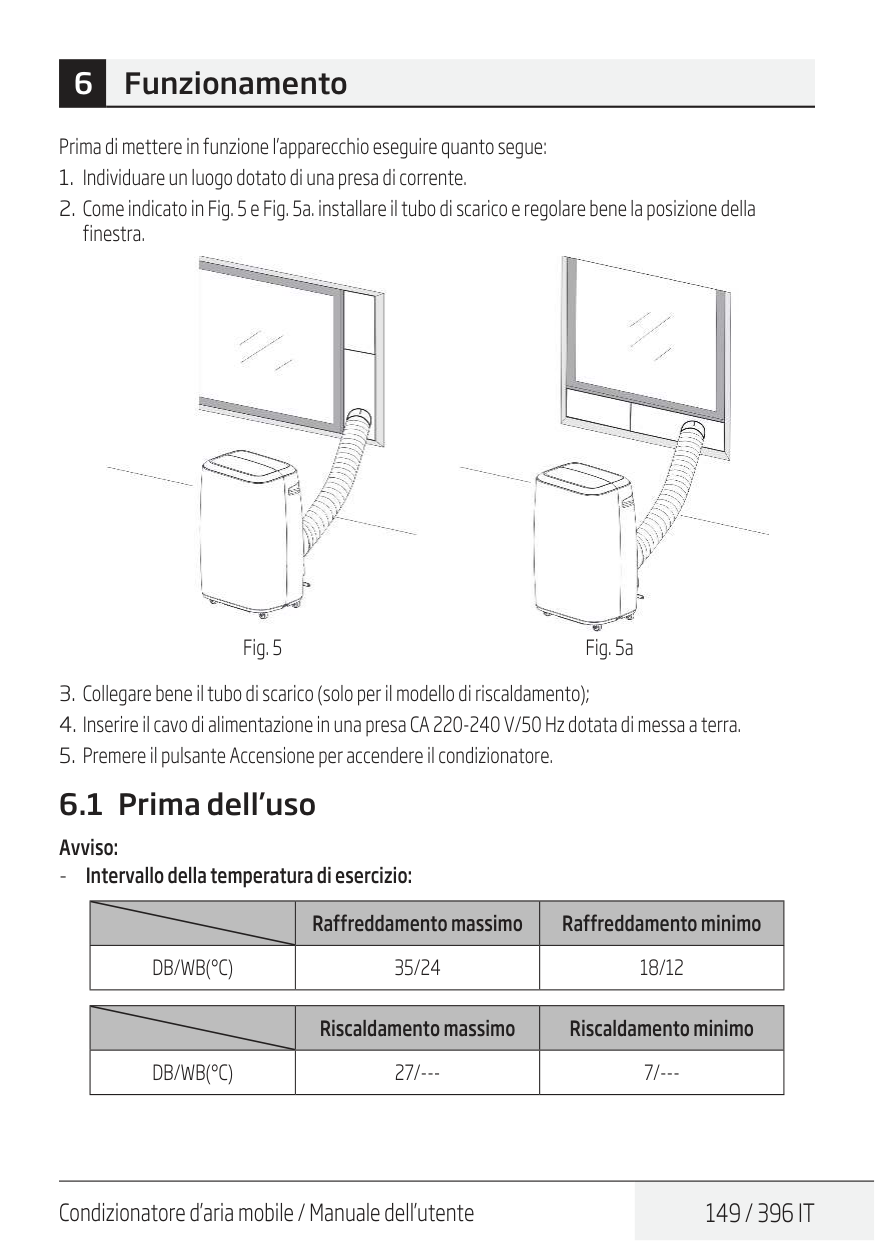
Condizionatore d’aria mobile / Manuale dell’utente
149 / 396 It
Prima di mettere in funzione l’apparecchio eseguire quanto segue:Db/Wb(°C)
35/24 18/12 Riscaldamento massimo Riscaldamento minimoDb/Wb(°C)
27/--- 7/--- 6 Funzionamento
150 / 396 It
Condizionatore d’aria mobile / Manuale dell’utente Verificare se il tubo di scarico è stato montato correttamente. Precauzioni per le operazioni di raffreddamento e deumidificazione:(16°C-31°C)
Condizionatore d’aria mobile / Manuale dell’utente
151 / 396 It
6.6 Modalità Timer Impostazione di accensione del timer:
152 / 396 It
Condizionatore d’aria mobile / Manuale dell’utente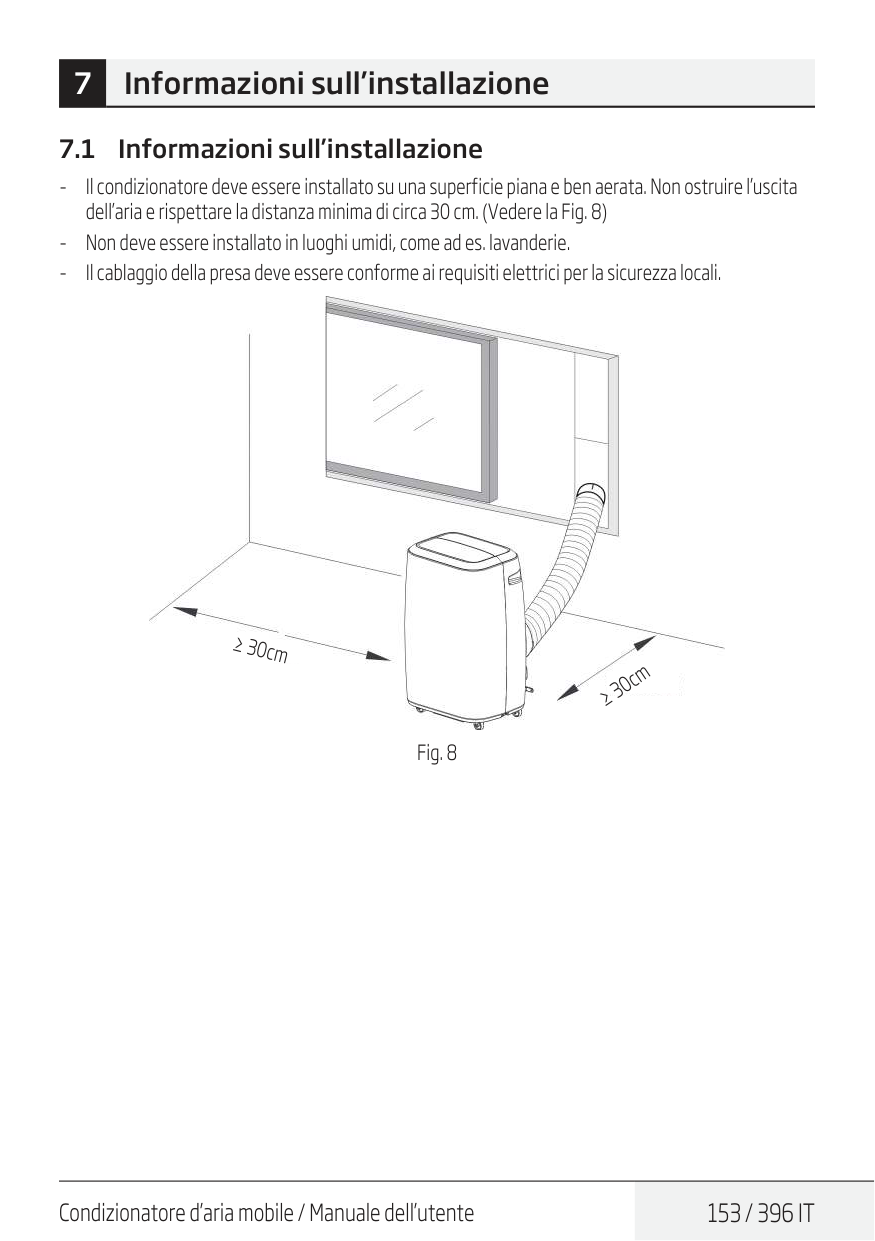
Condizionatore d’aria mobile / Manuale dell’utente
153 / 396 It
7 Informazioni sull’installazione 7.1 Informazioni sull’installazione
154 / 396 It
Condizionatore d’aria mobile / Manuale dell’utente 7.2 Introduzione all’installazione del tubo di scarico 1 2 3 (senso orario) (Allineare il connettore a baionetta) (Inserire verso il basso) Fig. 9 Installazione temporanea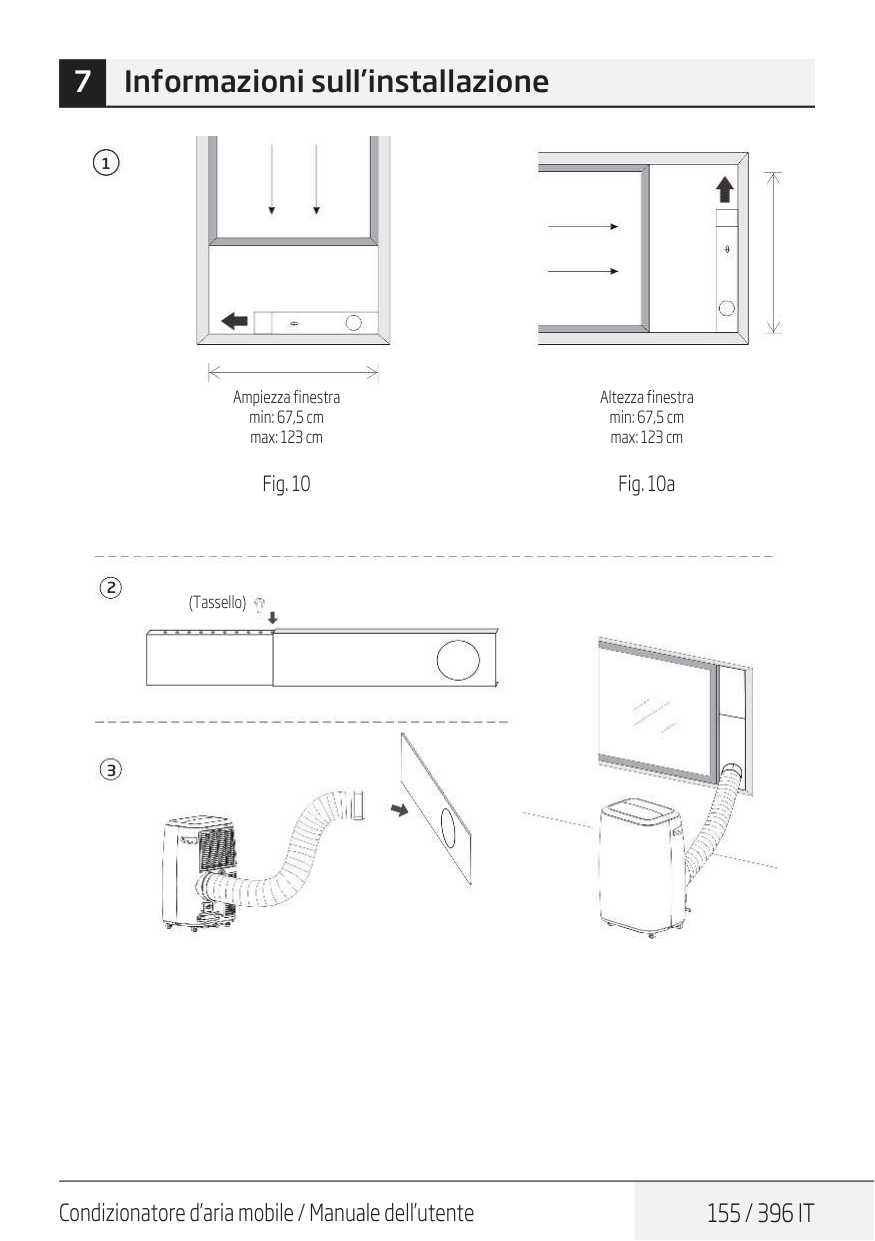
Condizionatore d’aria mobile / Manuale dell’utente
155 / 396 It
1 Ampiezza finestra min: 67,5 cm max: 123 cm Fig. 10 Altezza finestra min: 67,5 cm max: 123 cm Fig. 10a 2 3 (Tassello) 7 Informazioni sull’installazione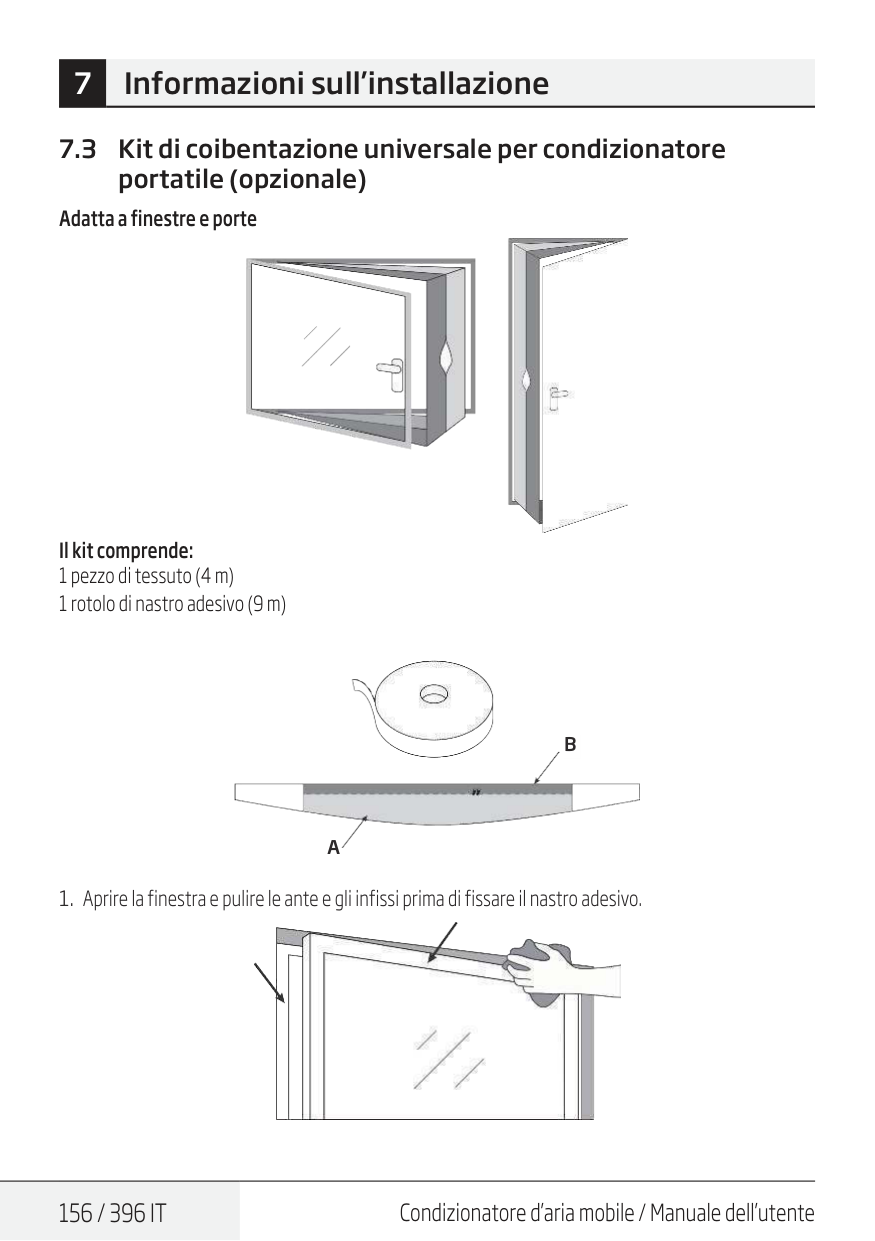
156 / 396 It
Condizionatore d’aria mobile / Manuale dell’utente 7.3 Kit di coibentazione universale per condizionatore portatile (opzionale) Adatta a finestre e porte Il kit comprende: 1 pezzo di tessuto (4 m) 1 rotolo di nastro adesivo (9 m)A
B
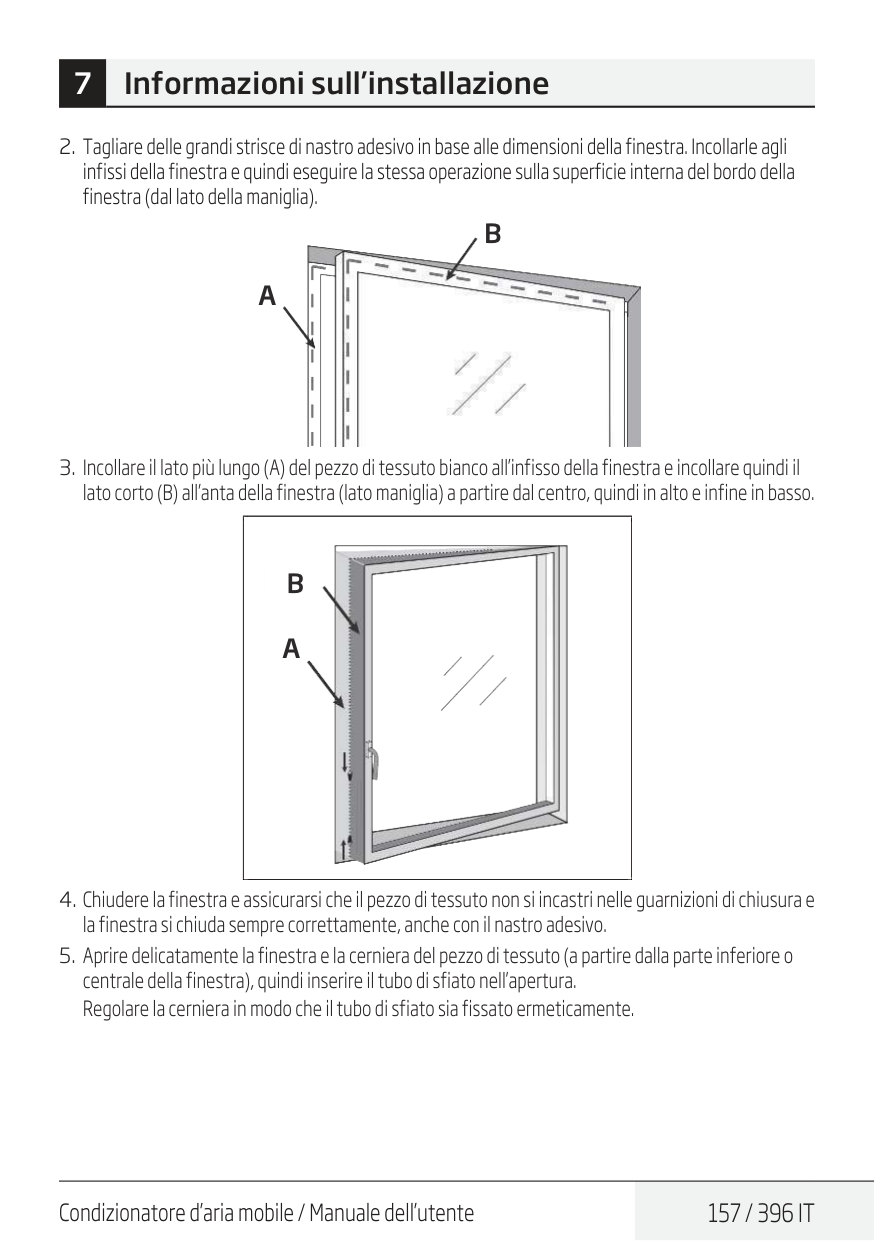
Condizionatore d’aria mobile / Manuale dell’utente
157 / 396 It
A
B
A
B
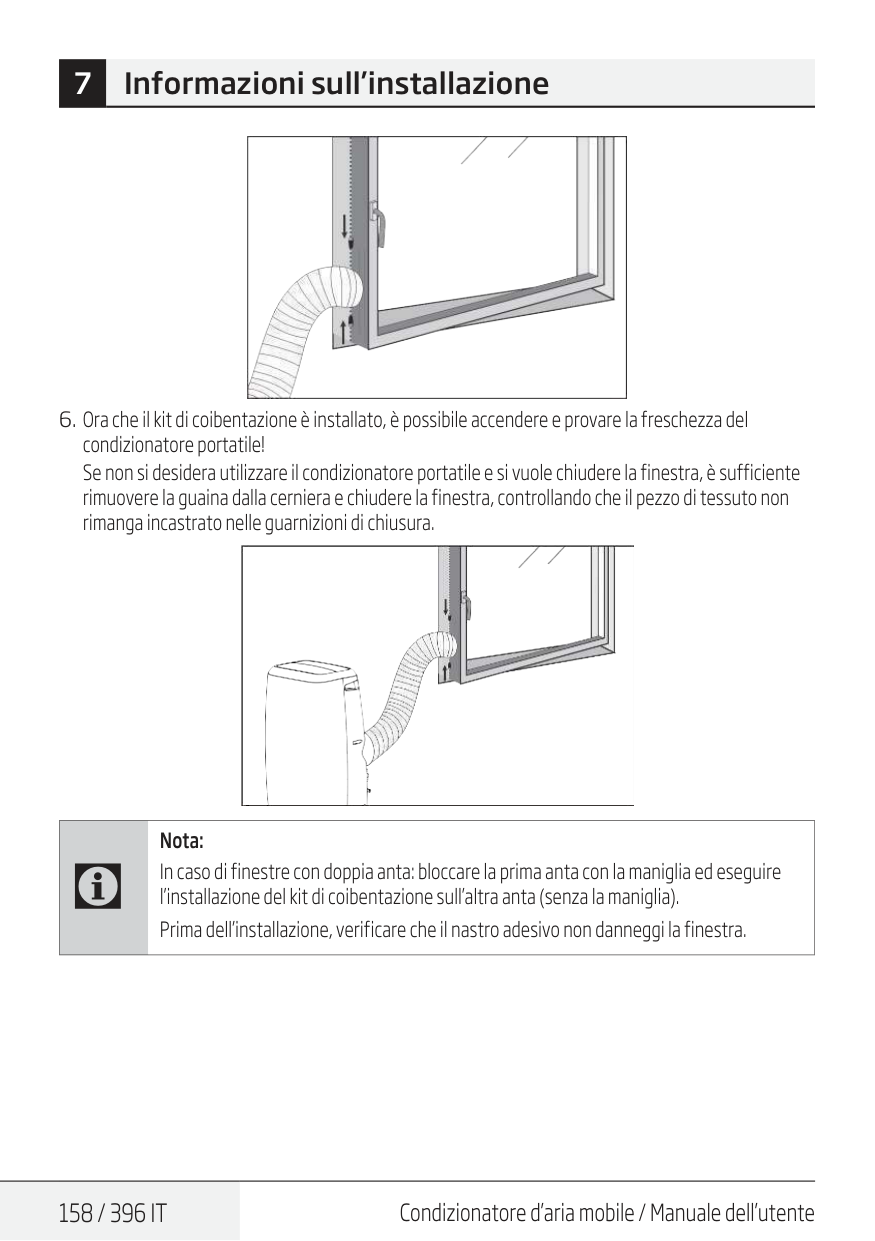
158 / 396 It
Condizionatore d’aria mobile / Manuale dell’utenteC
Nota: In caso di finestre con doppia anta: bloccare la prima anta con la maniglia ed eseguire l’installazione del kit di coibentazione sull’altra anta (senza la maniglia). Prima dell’installazione, verificare che il nastro adesivo non danneggi la finestra. 7 Informazioni sull’installazione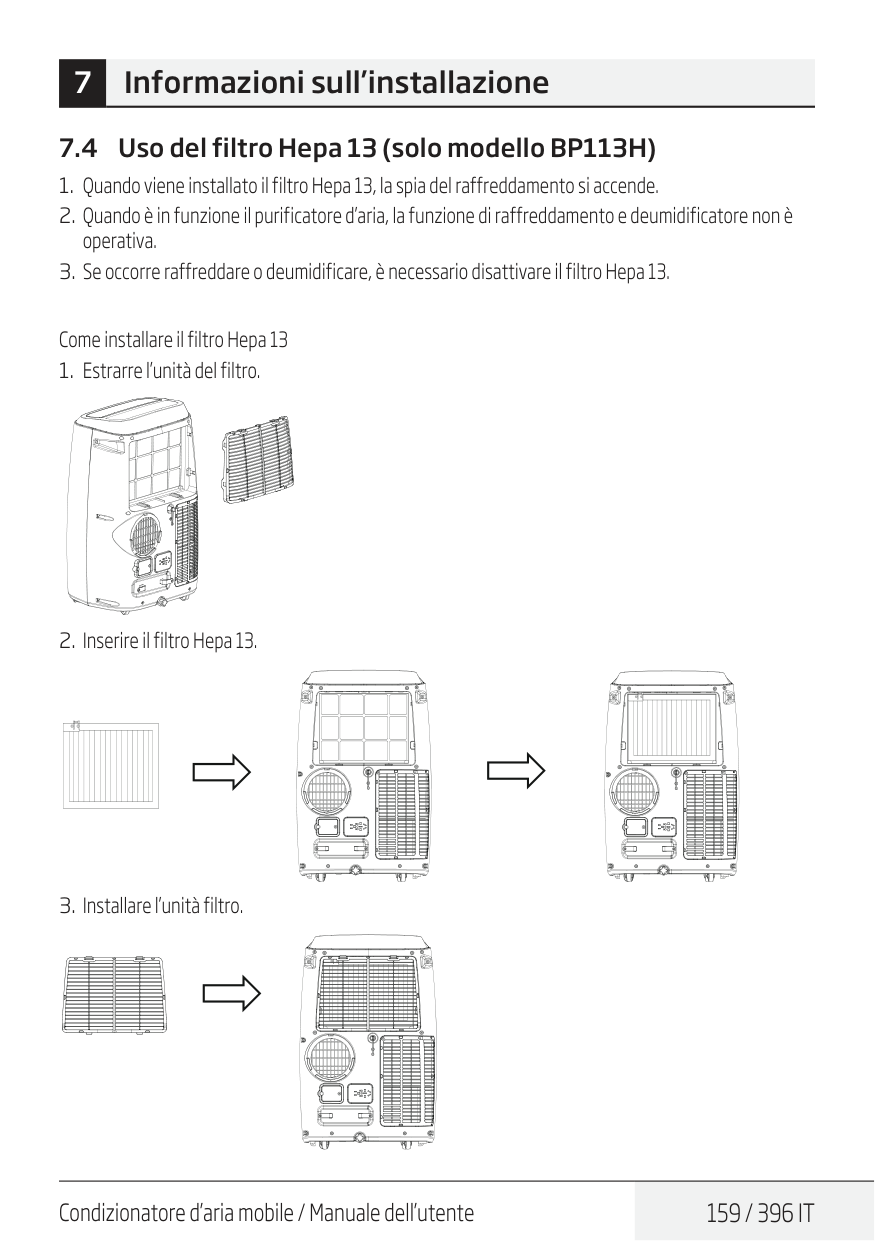
Condizionatore d’aria mobile / Manuale dell’utente
159 / 396 It
7 Informazioni sull’installazione 7.4 Uso del filtro Hepa 13 (solo modello BP113H)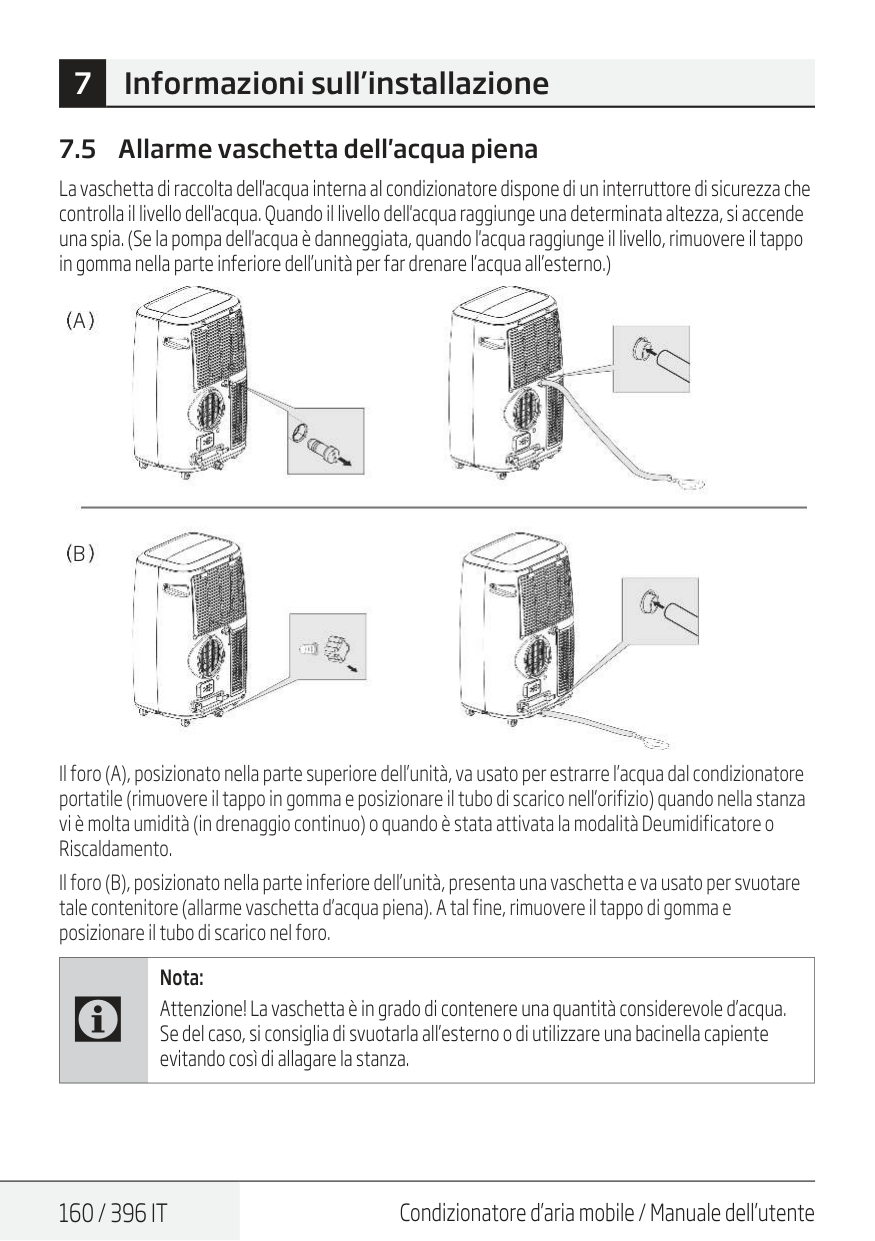
160 / 396 It
Condizionatore d’aria mobile / Manuale dell’utente 7.5 Allarme vaschetta dell'acqua piena La vaschetta di raccolta dell'acqua interna al condizionatore dispone di un interruttore di sicurezza che controlla il livello dell'acqua. Quando il livello dell'acqua raggiunge una determinata altezza, si accende una spia. (Se la pompa dell'acqua è danneggiata, quando l'acqua raggiunge il livello, rimuovere il tappo in gomma nella parte inferiore dell’unità per far drenare l’acqua all’esterno.)A
B
Il foro (A), posizionato nella parte superiore dell’unità, va usato per estrarre l’acqua dal condizionatore portatile (rimuovere il tappo in gomma e posizionare il tubo di scarico nell’orifizio) quando nella stanza vi è molta umidità (in drenaggio continuo) o quando è stata attivata la modalità Deumidificatore o Riscaldamento. Il foro (B), posizionato nella parte inferiore dell’unità, presenta una vaschetta e va usato per svuotare tale contenitore (allarme vaschetta d’acqua piena). A tal fine, rimuovere il tappo di gomma e posizionare il tubo di scarico nel foro.C
Nota: Attenzione! La vaschetta è in grado di contenere una quantità considerevole d’acqua. Se del caso, si consiglia di svuotarla all’esterno o di utilizzare una bacinella capiente evitando così di allagare la stanza. 7 Informazioni sull’installazione
Condizionatore d’aria mobile / Manuale dell’utente
161 / 396 It
8 ManutenzioneA
Avvertenza: – Scollegare sempre l'unità prima di effettuare le operazioni di pulizia o manutenzione. – Non utilizzare liquidi infiammabili o agenti chimici per la pulizia dell'unità. – Non lavare l'unità sotto acqua corrente, in quanto potrebbe comportare scosse elettriche. – Non azionare la macchina se l'alimentazione è stata danneggiata durante la pulizia. Un cavo di alimentazione danneggiato deve essere sostituito con un nuovo cavo ottenuto dal produttore. – In caso di guasti al condizionatore, rivolgersi al rivenditore o a un punto di riparazione. 8.1 Pulire il filtro dell’aria
162 / 396 It
Condizionatore d’aria mobile / Manuale dell’utente 8 ManutenzioneA
Avvertenza: Non mettere in funzione l'unità senza filtro in quanto polvere e lanugine la intaserebbero e ne ridurrebbero le prestazioni. 8.2 Pulire la superficie del condizionatore. Prima pulire la superficie con un detergente neutro e un panno umido, quindi asciugare con un panno asciutto.
Condizionatore d’aria mobile / Manuale dell’utente
163 / 396 It
9 Manutenzione Consigli di manutenzione Assicurarsi di pulire il filtro dell'aria ogni 2 settimane per prestazioni ottimali. La vaschetta di raccolta dell'acqua deve essere drenata immediatamente dopo il verificarsi dell'errore P1 e prima della conservazione per prevenire la formazione di muffa. In abitazioni con animali, è necessario pulire periodicamente la griglia per prevenire il blocco del flusso dell'aria dovuto ai peli degli animali. Pulizia dell'unità Pulire l'unità con un panno morbido privo di lanugine e un detergente delicato. Asciugare l'unità con un panno asciutto privo di lanugine. Conservazione dell'unità quando non è in uso Asciugare la vaschetta di raccolta dell'acqua dell'unità secondo le istruzioni riportate nella seguente sezione. Azionare l'apparecchio in modalità Fan (Ventilazione) per 12 ore in una stanza calda per asciugarlo e prevenire la formazione di muffe. Spegnere l'apparecchio e scollegarlo. Pulire il filtro dell'aria secondo le istruzioni riportate nella sezione precedente. Reinstallare il filtro pulito e asciutto prima della conservazione. Rimuovere le batterie dal telecomando. Assicurarsi di conservare l'unità in un luogo fresco e buio. L'esposizione alla luce solare diretta o a fonti di calore eccessive può abbreviare la durata di vita dell'unità.C
Nota: è possibile spolverare l'alloggiamento e la parte anteriore con un panno privo di olio oppure è possibile lavarli con un panno inumidito con una soluzione di acqua calda e detergente per piatti delicato. Risciacquarli a fondo e asciugarli accuratamente. Non utilizzare mai detergenti aggressivi, paraffina o lucidi sulla parte frontale dell'alloggiamento. Assicurarsi di strizzare l'acqua in eccesso dal panno prima di asciugare l'area dei comandi. L'acqua in eccesso sui comandi o nelle vicinanze può causare danni all'unità.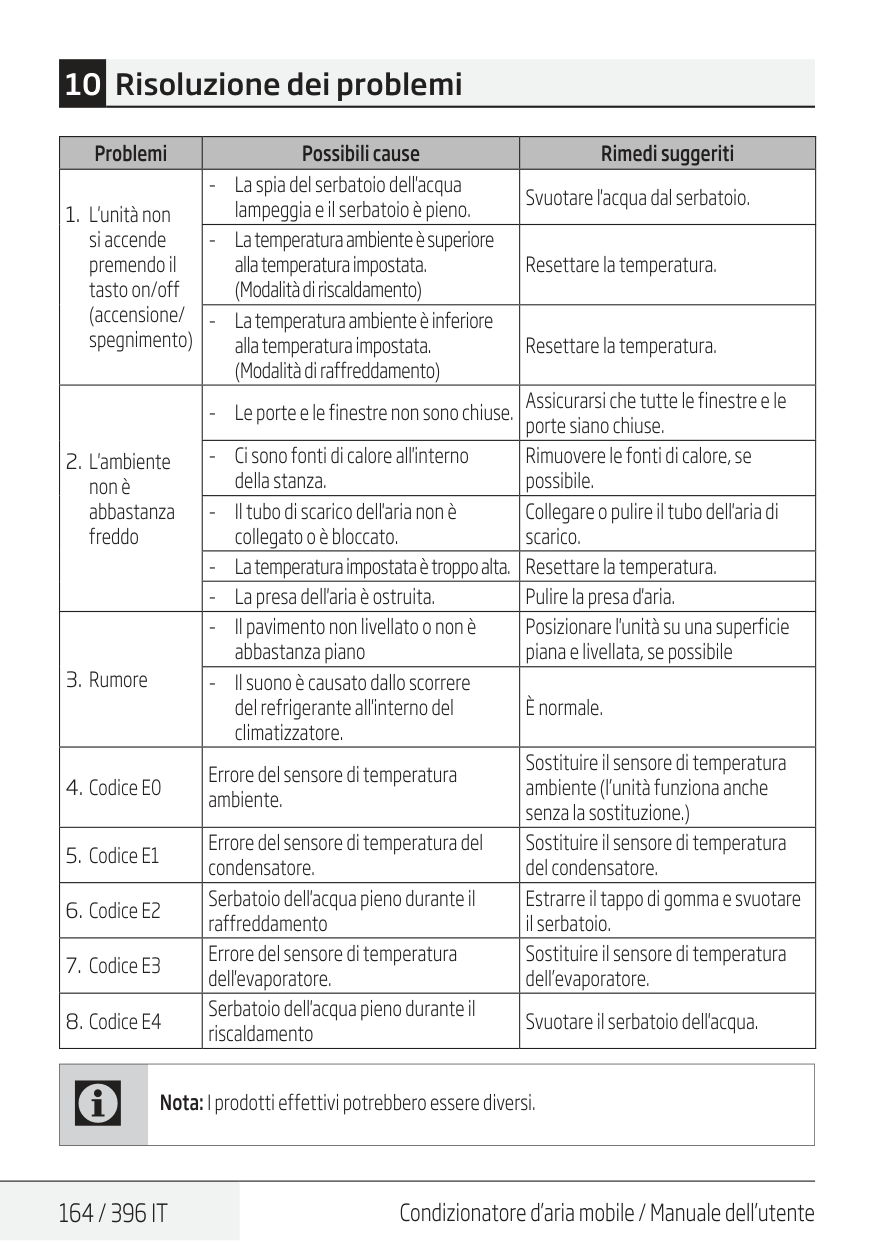
164 / 396 It
Condizionatore d’aria mobile / Manuale dell’utente Problemi Possibili cause Rimedi suggeritiC
Nota: I prodotti effettivi potrebbero essere diversi. 10 Risoluzione dei problemi
Condizionatore d’aria mobile / Manuale dell’utente
165 / 396 It
Se si utilizza l'unità in paesi europei, attenersi alle seguenti informazioni: Smaltimento: Non smaltire il prodotto come rifiuto non differenziato. È necessaria la raccolta separata di tali rifiuti per un trattamento speciale. È vietato smaltire l'elettrodomestico insieme ai rifiuti domestici. Per lo smaltimento, ci sono diverse possibilità:Il presente simbolo indica che questo prodotto non può essere smaltito insieme ai rifiuti domestici al termine del suo ciclo di vita. Il dispositivo usato deve essere conferito presso il punto di raccolta ufficiale di riciclo di dispositivi elettrici ed elettronici. Al fine di individuare tali sistemi di raccolta, contattare le autorità locali o il rivenditore presso il cui negozio è stato acquistato l’articolo. Ciascun utente svolge un ruolo importante nel recupero e nel riciclo di vecchie apparecchiature. Lo smaltimento appropriato aiuta a prevenire potenziali conseguenze negative per l’ambiente e la salute umana. 11 Normative europee per lo smaltimento
166 / 396 It
Condizionatore d’aria mobile / Manuale dell’utente 12 Istruzioni per l'installazione 12.1 Istruzioni per i gas fluorurati Questo prodotto contiene gas fluorurati ad effetto serra. I gas fluorurati ad effetto serra sono contenuti in attrezzatura sigillata ermeticamente. Installazioni, riparazioni, manutenzione, controlli della presenza di perdite, smantellamento e riciclo del prodotto devono essere effettuati da personale qualificato. Se il sistema è dotato di dispositivo per il rilevamento delle perdite, i controlli delle perdite devono essere eseguiti almeno ogni 12 mesi, accertando che il sistema funzioni correttamente. Ogni qual volta vengono eseguiti controlli delle perdite, occorre specificare il ciclo di controllo, creare e conservare dei registri concernenti le verifiche.C
Nota: Non occorre eseguire le verifiche delle perdite per attrezzatura sigillata ermeticamente, condizionatori d'aria portatili, condizionatori d'aria a finestra e deumidificatori, se l'equivalente di CO2 o gas fluorurati ad effetto serra è minore di 10 tonnellate.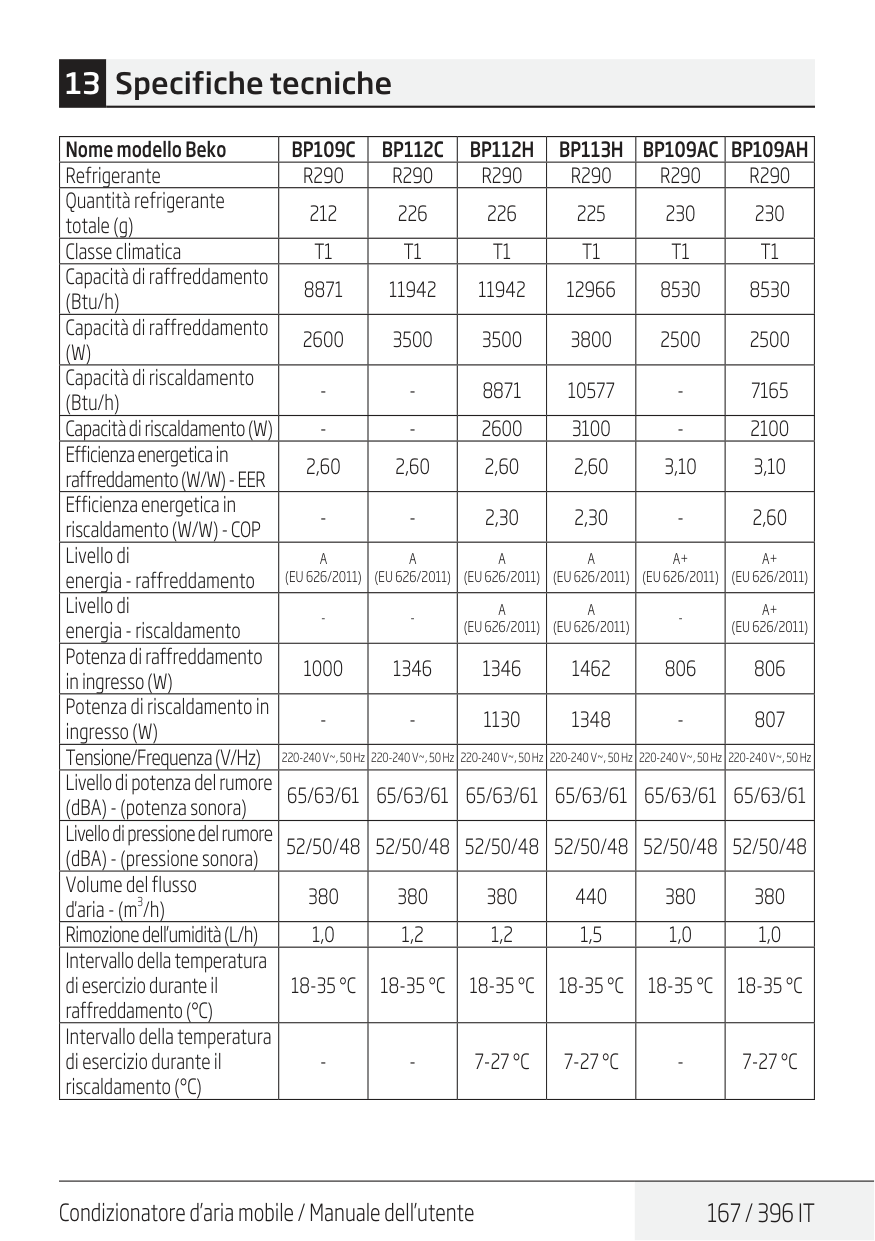
Condizionatore d’aria mobile / Manuale dell’utente
167 / 396 It
13 Specifiche tecniche Nome modello BekoBp109C
Bp112C
Bp112H
Bp113H
Bp109Ac Bp109Ah
RefrigeranteR290
R290
R290
R290
R290
R290
Quantità refrigerante totale (g) 212 226 226 225 230 230 Classe climaticaT1
T1
T1
T1
T1
T1
Capacità di raffreddamento (Btu/h) 8871 11942 11942 12966 8530 8530 Capacità di raffreddamento(W)
2600 3500 3500 3800 2500 2500 Capacità di riscaldamento (Btu/h)A
(Eu 626/2011)
A
(Eu 626/2011)
A
(Eu 626/2011)
A
(Eu 626/2011)
A+
(Eu 626/2011)
A+
(Eu 626/2011)
Livello di energia - riscaldamentoA
(Eu 626/2011)
A
(Eu 626/2011)
A+
(Eu 626/2011)
Potenza di raffreddamento in ingresso (W) 1000 1346 1346 1462 806 806 Potenza di riscaldamento in ingresso (W)18-35 °C
18-35 °C
18-35 °C
18-35 °C
18-35 °C
18-35 °C
Intervallo della temperatura di esercizio durante il riscaldamento (°C)7-27 °C
7-27 °C
7-27 °C
168 / 396 It
Condizionatore d’aria mobile / Manuale dell’utente
Prodotto da Arcelik A.S. Karaagac Cd. No:2-6 34445 Sutluce, Beyoglu, Istanbul, Turchia
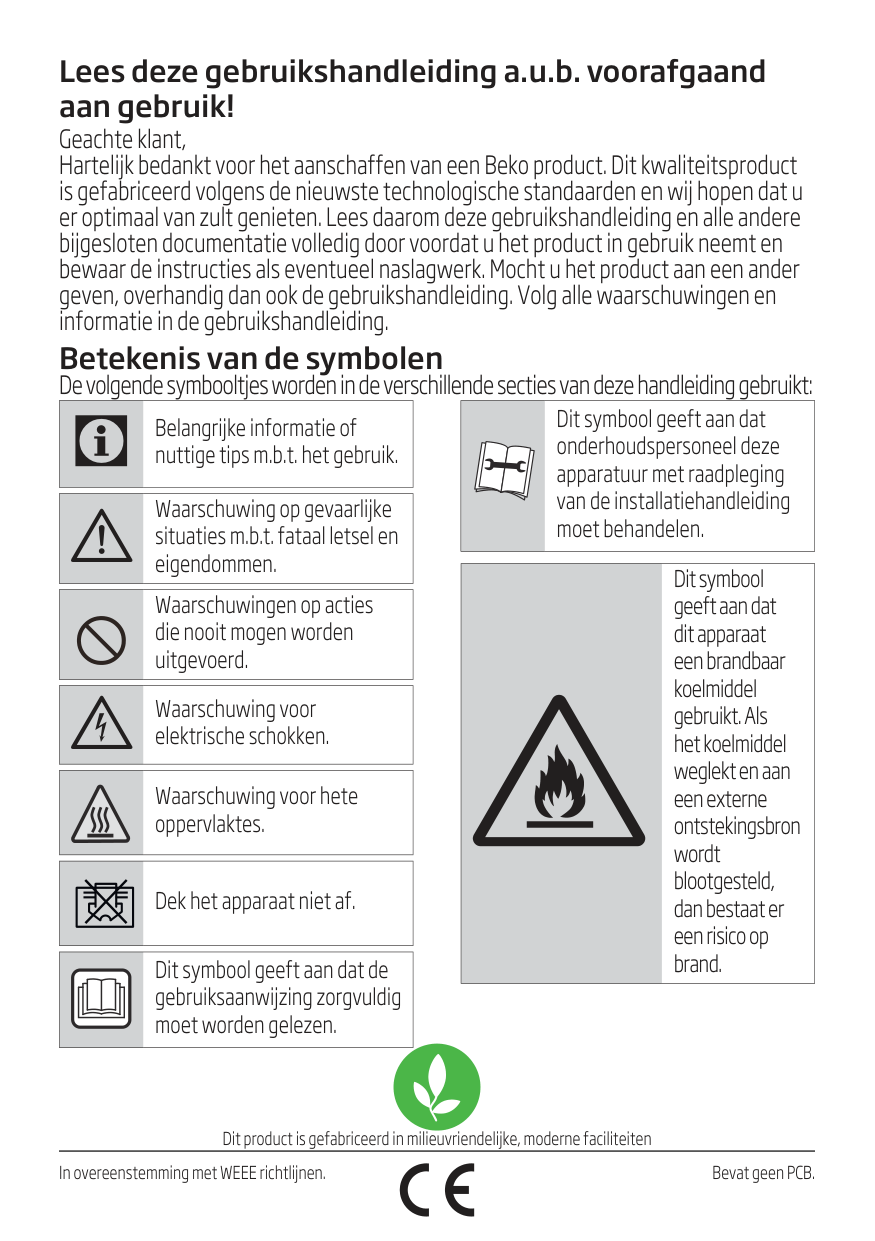
Lees deze gebruikshandleiding a.u.b. voorafgaand aan gebruik! Geachte klant, Hartelijk bedankt voor het aanschaffen van een Beko product. Dit kwaliteitsproduct is gefabriceerd volgens de nieuwste technologische standaarden en wij hopen dat u er optimaal van zult genieten. Lees daarom deze gebruikshandleiding en alle andere bijgesloten documentatie volledig door voordat u het product in gebruik neemt en bewaar de instructies als eventueel naslagwerk. Mocht u het product aan een ander geven, overhandig dan ook de gebruikshandleiding. Volg alle waarschuwingen en informatie in de gebruikshandleiding. Betekenis van de symbolen De volgende symbooltjes worden in de verschillende secties van deze handleiding gebruikt: Dit product is gefabriceerd in milieuvriendelijke, moderne faciliteiten In overeenstemming met WEEE richtlijnen. Bevat geen PCB.
C
Belangrijke informatie of nuttige tips m.b.t. het gebruik.A
Waarschuwing op gevaarlijke situaties m.b.t. fataal letsel en eigendommen. Waarschuwingen op acties die nooit mogen worden uitgevoerd.B
Waarschuwing voor elektrische schokken. Waarschuwing voor hete oppervlaktes. Dek het apparaat niet af. Dit symbool geeft aan dat de gebruiksaanwijzing zorgvuldig moet worden gelezen. Dit symbool geeft aan dat onderhoudspersoneel deze apparatuur met raadpleging van de installatiehandleiding moet behandelen. Dit symbool geeft aan dat dit apparaat een brandbaar koelmiddel gebruikt. Als het koelmiddel weglekt en aan een externe ontstekingsbron wordt blootgesteld, dan bestaat er een risico op brand.
Plaatselijke air conditioner / Gebruikershandleiding
171 / 396 Nl
Inhoud 1 Veiligheidsmaatregelen 173 2 Namen van de onderdelen 199 3 Accessoires 200 4 Uiterlijk en functie van het bedieningspaneel 201 4.1 Model alleen afkoelen (niet omkeerbaar) . . . . . . . . . . . . . . . . . . . . . . . . . . . . . . . . . . . . . . . . . . . . . . . . . .201 4.2 AfModel afkoelen en verwarmingspomp (omkeerbaar) . . . . . . . . . . . . . . . . . . . . . . . . . . . . . . . . . . . .202 5 Uiterlijk en functie van de afstandsbediening 203 6 Introductie bediening 205 6.1 Vóór gebruik . . . . . . . . . . . . . . . . . . . . . . . . . . . . . . . . . . . . . . . . . . . . . . . . . . . . . . . . . . . . . . . . . . . . . . . . . . . . . . . .205 6.2 Koelfunctie . . . . . . . . . . . . . . . . . . . . . . . . . . . . . . . . . . . . . . . . . . . . . . . . . . . . . . . . . . . . . . . . . . . . . . . . . . . . . . . . 206 6.3 Ontvochtigen . . . . . . . . . . . . . . . . . . . . . . . . . . . . . . . . . . . . . . . . . . . . . . . . . . . . . . . . . . . . . . . . . . . . . . . . . . . . . . 206 6.4 Ventilator . . . . . . . . . . . . . . . . . . . . . . . . . . . . . . . . . . . . . . . . . . . . . . . . . . . . . . . . . . . . . . . . . . . . . . . . . . . . . . . . . . 206 6.5 Verwarmen (deze functie is niet beschikbaar voor een koelapparaat) . . . . . . . . . . . . . . . . . . . . 206 6.6 Timer . . . . . . . . . . . . . . . . . . . . . . . . . . . . . . . . . . . . . . . . . . . . . . . . . . . . . . . . . . . . . . . . . . . . . . . . . . . . . . . . . . . . . . . .207 6.7 Automatisch draaien . . . . . . . . . . . . . . . . . . . . . . . . . . . . . . . . . . . . . . . . . . . . . . . . . . . . . . . . . . . . . . . . . . . . . . . .207 6.8 Slaapmodus . . . . . . . . . . . . . . . . . . . . . . . . . . . . . . . . . . . . . . . . . . . . . . . . . . . . . . . . . . . . . . . . . . . . . . . . . . . . . . . . .207 6.9 Waterafvoer. . . . . . . . . . . . . . . . . . . . . . . . . . . . . . . . . . . . . . . . . . . . . . . . . . . . . . . . . . . . . . . . . . . . . . . . . . . . . . . . .207 6.10 Draadloze functie . . . . . . . . . . . . . . . . . . . . . . . . . . . . . . . . . . . . . . . . . . . . . . . . . . . . . . . . . . . . . . . . . . . . . . 208 6.11 Functie Zone volgen . . . . . . . . . . . . . . . . . . . . . . . . . . . . . . . . . . . . . . . . . . . . . . . . . . . . . . . . . . . . . . . . . . . . . . . 208 7 Installatie-uitleg 209 7.1 Installatie-uitleg: . . . . . . . . . . . . . . . . . . . . . . . . . . . . . . . . . . . . . . . . . . . . . . . . . . . . . . . . . . . . . . . . . . . . . . . . . . . 209 7.2 Introductie van de installatie van de uitlaatslang. . . . . . . . . . . . . . . . . . . . . . . . . . . . . . . . . . . . . . . . . . .210 7.3 Universele afdichtset voor een mobiele airconditioner (optioneel) . . . . . . . . . . . . . . . . . . . . . . .212 7.4 Gebruik de hepa 13-filter (alleen voor het BP113H-model) . . . . . . . . . . . . . . . . . . . . . . . . . . . . . . . . .215 7.5 Alarm water vol. . . . . . . . . . . . . . . . . . . . . . . . . . . . . . . . . . . . . . . . . . . . . . . . . . . . . . . . . . . . . . . . . . . . . . . . . . . . . .216
172 / 396 Nl
Plaatselijke air conditioner / Gebruikershandleiding Inhoud 8 Onderhoudsuitleg 217 8.1 De luchtfilter reinigen . . . . . . . . . . . . . . . . . . . . . . . . . . . . . . . . . . . . . . . . . . . . . . . . . . . . . . . . . . . . . . . . . . . . . . .217 8.2 Het oppervlak van de airconditioner reinigen . . . . . . . . . . . . . . . . . . . . . . . . . . . . . . . . . . . . . . . . . . . . . .218 9 Onderhoud 219 10 Problemen oplossen 220 11 Europese richtlijnen voor afvalverwijdering 221 12 Installatie-instructies 222 12.1 F-Gas instructie . . . . . . . . . . . . . . . . . . . . . . . . . . . . . . . . . . . . . . . . . . . . . . . . . . . . . . . . . . . . . . . . . . . . . . . . . . . . .222 13 Specificaties 223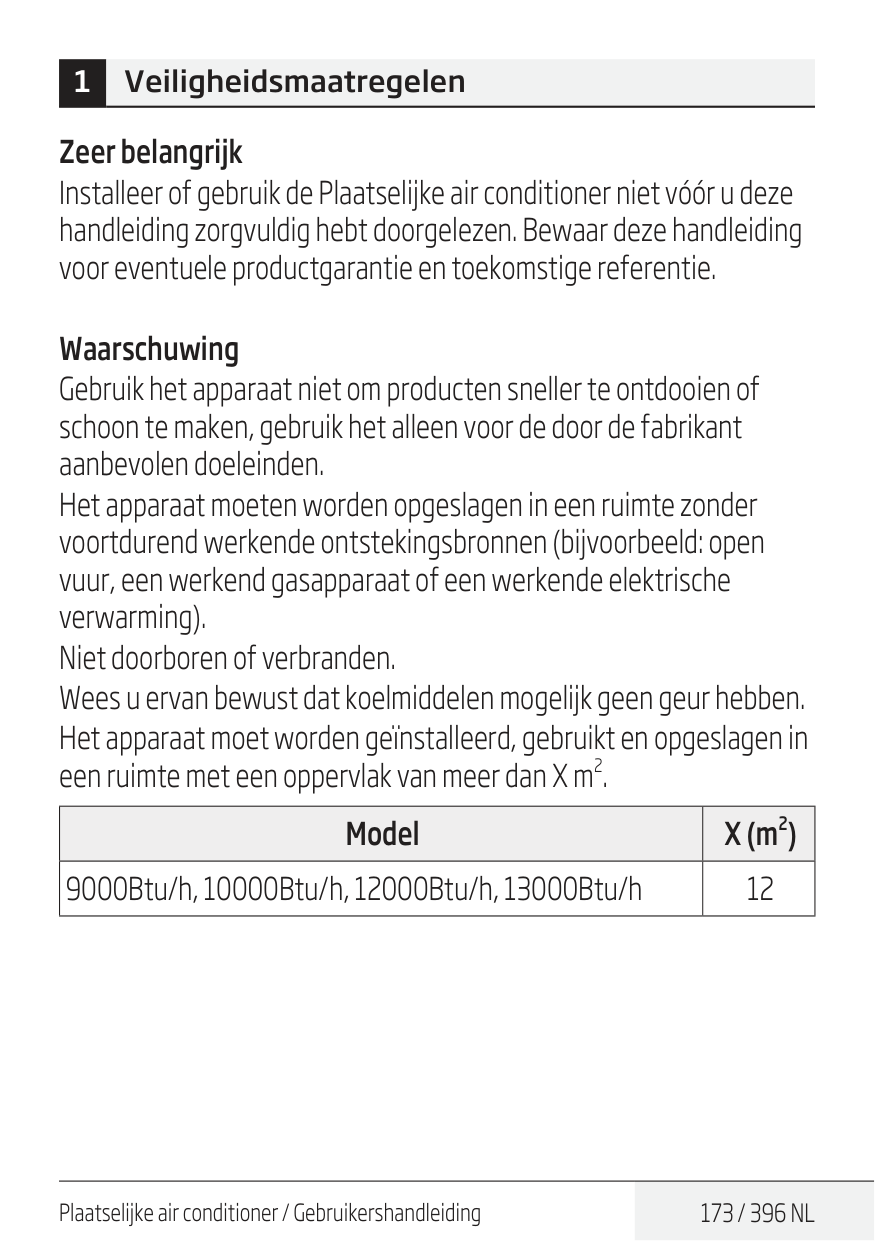
Plaatselijke air conditioner / Gebruikershandleiding
173 / 396 Nl
1 Veiligheidsmaatregelen Zeer belangrijk Installeer of gebruik de Plaatselijke air conditioner niet vóór u deze handleiding zorgvuldig hebt doorgelezen. Bewaar deze handleiding voor eventuele productgarantie en toekomstige referentie. Waarschuwing Gebruik het apparaat niet om producten sneller te ontdooien of schoon te maken, gebruik het alleen voor de door de fabrikant aanbevolen doeleinden. Het apparaat moeten worden opgeslagen in een ruimte zonder voortdurend werkende ontstekingsbronnen (bijvoorbeeld: open vuur, een werkend gasapparaat of een werkende elektrische verwarming). Niet doorboren of verbranden. Wees u ervan bewust dat koelmiddelen mogelijk geen geur hebben. Het apparaat moet worden geïnstalleerd, gebruikt en opgeslagen in een ruimte met een oppervlak van meer dan X m
174 / 396 Nl
Plaatselijke air conditioner / Gebruikershandleiding Waarschuwing (voor R290) Specifieke informatie met betrekking tot apparaten met R290 koelgas. •Lees alle waarschuwingen goed door. •Gebruik tijdens het ontdooien en reinigen van het apparaat geen ander gereedschap dan dat wordt aanbevolen door de fabrikant. •Het apparaat moet in een gebied zonder permanente ontstekingsbronnen worden geplaatst (bijvoorbeeld: open vlammen, gas of werkende elektrische apparaten). •Doorboor en verbrand het apparaat niet. •Dit apparaat bevat Y g (raadpleeg het typeplaatje op de achterkant van het apparaat) R290 koelgas. •R290 is een koelgas dat voldoet aan de Europese richtlijnen met betrekking tot het milieu. Doorboor geen enkel onderdeel van het koelcircuit. •Als het apparaat is geïnstalleerd, wordt gebruikt of wordt bewaard in een ongeventileerde ruimte, moet deze ruimte ontworpen zijn om te voorkomen dat opgehoopt koelgas lekt omdat dit kan leiden tot brand of explosie door ontsteking van het koelmiddel door elektrische verwarmingen, fornuizen of andere ontstekingsbronnen. •Het apparaat moet zodanig worden bewaard dat er geen mechanische defecten kunnen ontstaan. 1 Veiligheidsmaatregelen
Plaatselijke air conditioner / Gebruikershandleiding
175 / 396 Nl
•Personen die het koelcircuit bedienen of hieraan werken, moeten een passende certificering hebben die is uitgegeven door een erkende organisatie die bekwaamheid garandeert wat betreft het behandelen van koelmiddelen volgens een specifieke evaluatie die wordt erkend door associaties in de industrie. •Reparaties moeten worden uitgevoerd gebaseerd op de aanbevelingen van de fabrikant. Onderhoud en reparaties die ander gekwalificeerd personeel vereisen, moeten worden uitgevoerd onder toezicht van een persoon die gekwalificeerd is in het gebruik van ontvlambare koelmiddelen. Algemene veiligheidsinstructies
176 / 396 Nl
Plaatselijke air conditioner / Gebruikershandleiding 1 Veiligheidsmaatregelen
Plaatselijke air conditioner / Gebruikershandleiding
177 / 396 Nl
1 Veiligheidsmaatregelen
178 / 396 Nl
Plaatselijke air conditioner / Gebruikershandleiding 1 Veiligheidsmaatregelen
Plaatselijke air conditioner / Gebruikershandleiding
179 / 396 Nl
1 VeiligheidsmaatregelenC
Opmerking: •Als onderdelen zijn beschadigd, neem dan contact op met de verkoper of een aangewezen reparatiezaak. •Schakel bij schade altijd de luchtschakelaar uit, koppel het stroomsnoer los en neem contact op met de verkoper of een aangewezen reparatiezaak. •Het stroomsnoer moet in elk geval goed geplaatst zijn. •Om gevaar te voorkomen, moet u de luchtschakelaar uitschakelen en het stroomsnoer loskoppelen indien het stroomsnoer beschadigd is. Het moet worden vervangen door de dealer of bij een aangewezen reparatiezaak.
180 / 396 Nl
Plaatselijke air conditioner / Gebruikershandleiding Waarschuwingen (alleen bij het gebruik van R290 koelmiddel)
Plaatselijke air conditioner / Gebruikershandleiding
181 / 396 Nl
1.5 Aanwezigheid van brandblussers Als er enige hete werkzaamheden op de koelapparatuur of enige bijbehorende onderdelen moeten worden uitgevoerd, moet er geschikte brandblusapparatuur binnen handbereik beschikbaar zijn. Zorg voor een poeder- of CO2-brandblusser naast het vulgebied. 1.6 Geen ontstekingsbronnen Niemand die werk uitvoert aan het koelsysteem dat betrekking heeft tot het leidingsysteem dat ontvlambaar koelmiddel bevat of heeft bevat mag ontstekingsbronnen gebruiken omdat hierdoor kans op brand of explosie ontstaat. Alle mogelijke ontstekingsbronnen, waaronder sigaretten roken, moeten op gepaste afstand van de installatie-, reparatie-, verwijderings- en afvoerlocatie worden gehouden op momenten dat ontvlambaar koelmiddel mogelijk kan vrijkomen in de omgeving. De ruimte rondom de apparatuur moet voorafgaand aan het uitvoeren van de werkzaamheden worden geïnspecteerd om te verzekeren dat er zich geen brandgevaar of risico op ontsteking voordoet. Er moeten borden met “Niet roken” worden weergegeven. 1.7 Geventileerd gebied Zorg ervoor dat de ruimte open is of dat deze voldoende is geventileerd voordat u inbreekt in het systeem of enige hete werkzaamheden uitvoert. Er moet een bepaalde mate van ventilatie in stand blijven, tijdens de periode dat de werkzaamheden worden uitgevoerd. De ventilatie moet enige vrijkomend koelmiddel op veilige wijze verspreiden en het bij voorkeur extern in de atmosfeer uitstoten. 1 Veiligheidsmaatregelen
182 / 396 Nl
Plaatselijke air conditioner / Gebruikershandleiding 1.8 Controles van de koelapparatuur Wanneer elektrische componenten worden vervangen, moeten deze geschikt zijn voor het doel en aan de juiste specificaties voldoen. De richtlijnen voor onderhoud en reparaties van de fabrikant moeten te allen tijde worden opgevolgd. Raadpleeg bij twijfel de technische afdeling van de fabrikant voor hulp. De volgende controles moeten worden uitgevoerd bij installaties met ontvlambare koelmiddelen: de ladinggrootte is in overeenstemming met de grootte van de kamer waarin de onderdelen met koelmiddelen worden geplaatst, de ventilatieapparatuur en -uitgangen werken goed en worden niet geblokkeerd, als er een indirect koelcircuit wordt gebruikt, moet het secundaire circuit worden gecontroleerd op aanwezigheid van koelmiddel, markering van de apparatuur moet zichtbaar en leesbaar blijven. Markeringen en tekens die onleesbaar zijn moeten worden gecorrigeerd, koelingsbuizen of -onderdelen moeten worden geplaatst in een positie waarbij ze niet worden blootgesteld aan substanties die onderdelen met koelmiddel kunnen aantasten, tenzij de onderdelen uit materialen bestaan die bestendig zijn tegen aantasting of die beschermd zijn tegen aantasting. 1 Veiligheidsmaatregelen
Plaatselijke air conditioner / Gebruikershandleiding
183 / 396 Nl
1.9 Controles van elektrische apparaten Reparaties en onderhoud aan elektrische componenten moeten procedures voor initiële veiligheidscontroles en inspectie van componenten inhouden. Als er zich een storing voordoet die de veiligheid in gevaar zou kunnen brengen, dan mag er geen elektrische stroomvoorziening op het circuit worden aangesloten totdat de storing bevredigend is verholpen. Als de storing niet onmiddellijk kan worden gecorrigeerd, maar het noodzakelijk is om het bedrijf voort te zetten, moet er een geschikte tijdelijke oplossing worden toegepast. Dit moet aan de eigenaar van de apparatuur worden gerapporteerd, zodat alle partijen worden geïnformeerd. Initiële veiligheidscontroles zijn: de condensators zijn ontladen, dit moet op een veilige manier worden gedaan om de kans op vonken te voorkomen; er mogen geen elektrische onderdelen en kabels zijn blootgesteld tijdens het vullen, terugwinnen of reinigen van het systeem; er moet ononderbroken aardingsverbinding zijn.
184 / 396 Nl
Plaatselijke air conditioner / Gebruikershandleiding 2.2 Er moet met name aandacht worden besteed aan het volgende om te zorgen dat de behuizing tijdens de werkzaamheden aan de elektrische onderdelen niet zodanig wordt aangepast dat het beschermingsniveau wordt beïnvloed. Dit omvat schade aan kabels, een overmatig aantal verbindingen, terminals die niet volgens de oorspronkelijke specificaties zijn gemaakt, schade aan de verzegelingen, onjuiste plaatsing van afdichtingen, enz. Zorg dat het apparaat goed bevestigd is. Zorg dat de verzegelingen of het afdichtingsmateriaal niet zodanig aangetast is dat het niet meer in staat is om bescherming te bieden tegen de binnendringing van ontvlambare atmosferen. Vervangende onderdelen moeten voldoen aan de specificaties van de fabrikant.C
Opmerking: Het gebruik van een silicone afdichting kan de effectiviteit van sommige soorten lekdetectieapparatuur belemmeren. Intrinsiek veilige onderdelen hoeven niet geïsoleerd te worden voordat u ermee aan de slag gaat. 1 Veiligheidsmaatregelen
Plaatselijke air conditioner / Gebruikershandleiding
185 / 396 Nl
186 / 396 Nl
Plaatselijke air conditioner / Gebruikershandleiding
Plaatselijke air conditioner / Gebruikershandleiding
187 / 396 Nl
188 / 396 Nl
Plaatselijke air conditioner / Gebruikershandleiding
Plaatselijke air conditioner / Gebruikershandleiding
189 / 396 Nl
a) Leer de apparatuur en de bediening kennen. b) Isoleer het systeem elektrisch. c) Zorg er óór u de procedure start voor dat: er mechanisch afhandelingsmaterieel beschikbaar is, indien nodig, voor het behandelen van de koelcilinders; alle persoonlijke beschermingsapparatuur beschikbaar is en correct wordt gebruikt; het terugwinproces te allen tijde wordt overzien door een competent persoon; de terugwinningsapparatuur en -cilinders voldoen aan de gepaste normen. d) Pomp het koelsysteem leeg, indien mogelijk. e) Als een vacuüm niet mogelijk is, maak dan een spruitstuk zodat het koelmiddel uit verschillende onderdelen van het systeem kan worden verwijderd. f) Zorg dat de cilinder op de schalen staat vóór de terugwinning plaatsvindt. g) Start de terugwinningsmachine en bedien deze in overeenstemming met de instructies van de fabrikant. h) Vul de cilinders niet te vol. (Niet meer dan 80% vloeibare inhoud). i) Overschrijd de maximale werkdruk van de cilinder niet, ook niet tijdelijk. j) Wanneer de cilinders correct gevuld zijn en het proces voltooid is, verwijder de cilinders en de apparatuur dan snel en zorg dat alle isolatieventielen op het apparaat zijn gesloten. k) Teruggewonnen koelmiddel mag niet in een ander koelsysteem worden gevuld, tenzij het is gereinigd en gecontroleerd. 1 Veiligheidsmaatregelen
190 / 396 Nl
Plaatselijke air conditioner / Gebruikershandleiding
Plaatselijke air conditioner / Gebruikershandleiding
191 / 396 Nl
De terugwinningsapparatuur moet goed werken en instructies bevatten en het moet geschikt zijn voor de terugwinning van ontvlambare koelmiddelen. Daarnaast moet er een set gekalibreerde, goed werkende weegschalen beschikbaar zijn. Slangen moeten een lekvrije loskoppelingen hebben en in goede staat zijn. Voordat u de terugwinningsmachine gebruikt, controleert u of deze goed werkt, goed onderhouden is en dat bijbehorende elektrische onderdelen verzegeld zijn om ontsteking te voorkomen in het geval dat er koelmiddel vrijkomt. Raadpleeg bij twijfel de fabrikant. Het teruggewonnen koelmiddel moet worden teruggebracht naar de leverancier in de juiste terugwinningscilinder en er moet een relevant afvaloverdrachtsnotitie aanwezig zijn. Meng geen koelmiddelen in terugwinningseenheden, vooral niet in cilinders. Als compressors of compressoroliën verwijderd moeten worden, zorg dan dat ze geëvacueerd zijn naar een acceptabel niveau om er zeker van te zijn dat er geen ontvlambaar koelmiddel meer in het smeermiddel zit. Het leegloopproces moet worden uitgevoerd vóór u de compressor naar de leveranciers retourneert. Alleen elektrische verwarming mag worden toegepast bij de compressorbehuizing om dit proces te versnellen. Wanneer olie uit het systeem wordt gelaten, moet dit veilig gebeuren. 1 Veiligheidsmaatregelen
192 / 396 Nl
Plaatselijke air conditioner / GebruikershandleidingC
Opmerkingen over gefluoreerde gassen:
Plaatselijke air conditioner / Gebruikershandleiding
193 / 396 Nl
Training De training moet het volgende bevatten: Informatie over de kans op explosie van ontvlambare koelmiddelen om aan te tonen dat ontvlambare stoffen gevaarlijk kunnen zijn als er niet voorzichtig mee omgegaan wordt. Informatie over mogelijke ontstekingsbronnen, vooral de bronnen die niet vanzelfsprekend zijn, zoals aanstekers, lichtschakelaars, stofzuigers en elektrische verwarmingen. Informatie over de verschillende veiligheidsconcepten: Ongeventileerd – (zie clausule GG.2) Veiligheid van het apparaat is niet afhankelijk van de ventilatie van de behuizing. Als u het apparaat uitschakelt of de behuizing opent heeft dit geen effect op de veiligheid. Het is hoe dan ook mogelijk dat lekkend koelmiddel zich kan ophopen in de behuizing en dat ontvlambare atmosfeer kan vrijkomen wanneer de behuizing wordt geopend. Geventileerde behuizing – (zie clausule GG.4) Veiligheid van het apparaat is afhankelijk van de ventilatie van de behuizing. Als u het apparaat uitschakelt of de behuizing opent heeft dit effect op de veiligheid. Zorg dat er voldoende ventilatie is voor u dit doet. Geventileerde ruimte – (zie clausule GG.5) Veiligheid van het apparaat is afhankelijk van de ventilatie van de ruimte. Als u het apparaat uitschakelt of de behuizing opent heeft dit geen effect op de veiligheid. De ventilatie van de ruimte mag niet worden uitgeschakeld tijdens de reparatieprocedures. Informatie over het concept van verzegelde onderdelen en verzegelde behuizingen volgens IEC 60079-15:2010. 1 Veiligheidsmaatregelen
194 / 396 Nl
Plaatselijke air conditioner / Gebruikershandleiding Informatie over de juiste werkprocedures: a) Inbedrijfstelling
Plaatselijke air conditioner / Gebruikershandleiding
195 / 396 Nl
1 Veiligheidsmaatregelen
196 / 396 Nl
Plaatselijke air conditioner / Gebruikershandleiding d) Buitengebruikstelling
Plaatselijke air conditioner / Gebruikershandleiding
197 / 396 Nl
198 / 396 Nl
Plaatselijke air conditioner / Gebruikershandleiding Tekens voor vergelijkbare apparaten die in een werkgebied worden gebruikt worden meestal geregeld door lokale regels en geven de minimale vereisten voor veiligheids- en/of gezondheidssymbolen voor een werkplek. Er mogen niet teveel symbolen samen worden geplaatst, omdat de effectiviteit hierdoor afneemt. Pictogrammen moeten zo simpel mogelijk zijn en alleen de essentiële details bevatten. Weggooien van apparatuur met ontvlambare koelmiddelen Raadpleeg de landelijke regelgeving. Opslag van apparatuur/apparaten De opslag van apparatuur moet in overeenstemming zijn met de instructies van de fabrikant. Opslag van het verpakte (nog niet verkochte) apparaat Er moet worden voldaan aan de verpakkingsbescherming voor opslag, zodat mechanische schade aan het apparaat in de verpakking geen lek van het koelmiddel kan veroorzaken. Het maximale aantal apparaten dat is toegestaan om samen te kunnen worden opgeslagen wordt bepaald door de lokale toepasbare transportregels. 1 Veiligheidsmaatregelen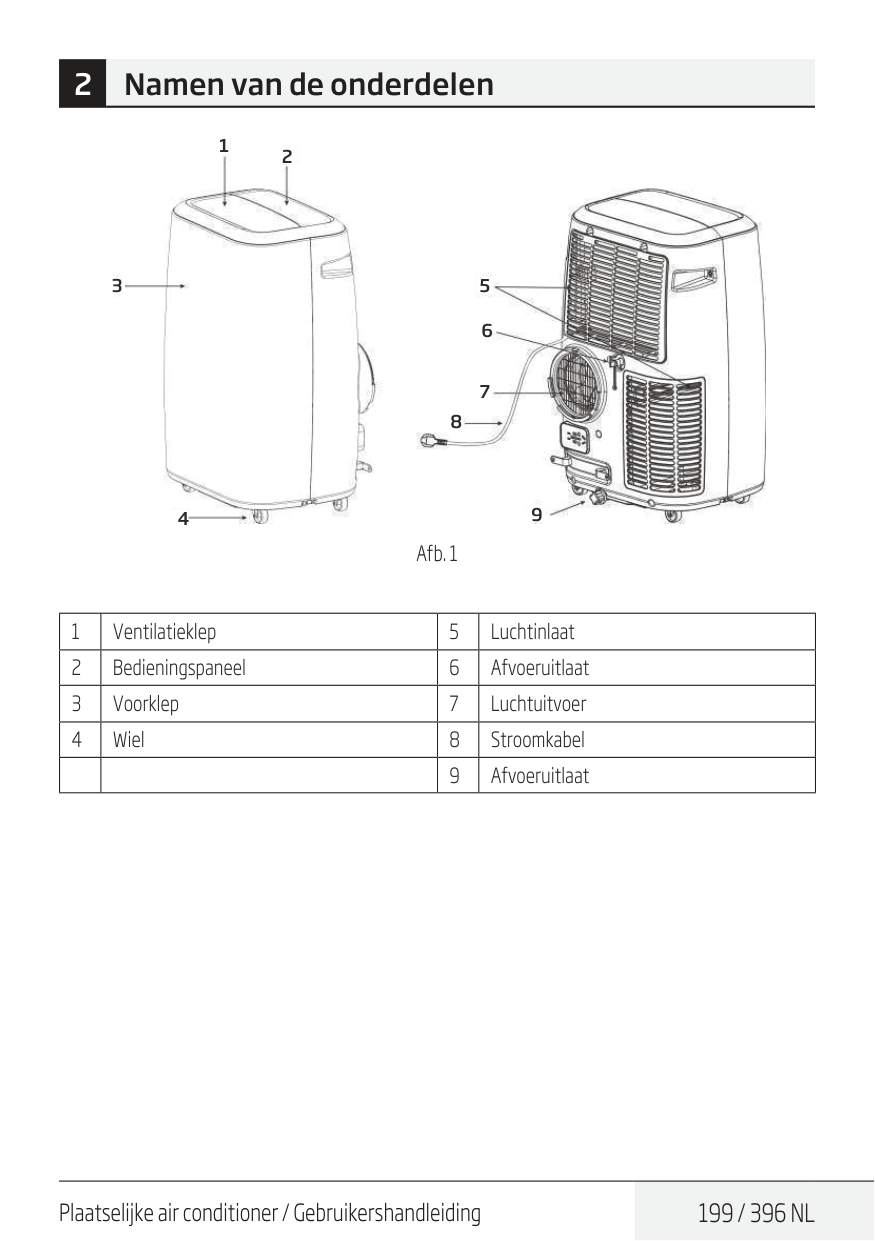
Plaatselijke air conditioner / Gebruikershandleiding
199 / 396 Nl
2 Namen van de onderdelen 1 2 3 5 6 7 8 9 4 Afb. 1 1 Ventilatieklep 5 Luchtinlaat 2 Bedieningspaneel 6 Afvoeruitlaat 3 Voorklep 7 Luchtuitvoer 4 Wiel 8 Stroomkabel 9 Afvoeruitlaat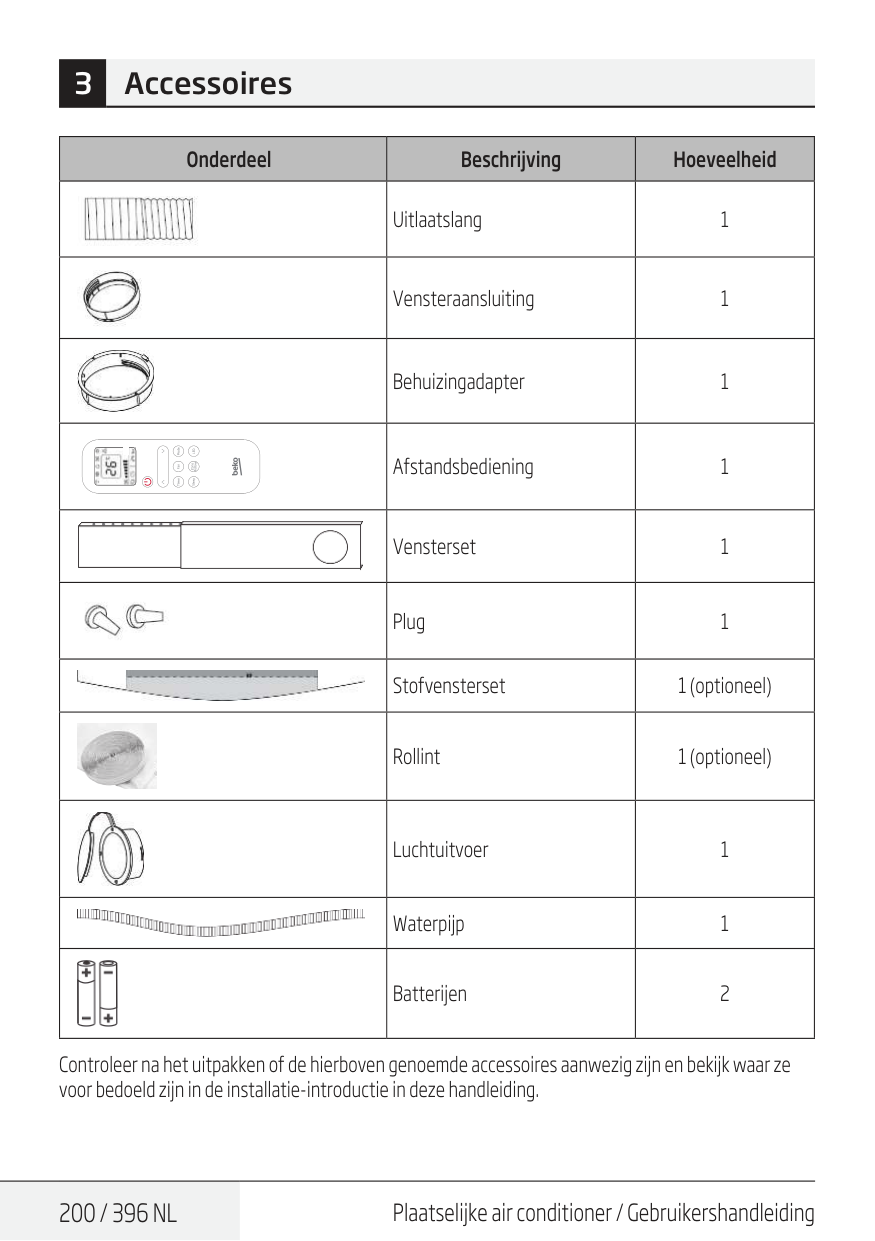
200 / 396 Nl
Plaatselijke air conditioner / Gebruikershandleiding Onderdeel Beschrijving Hoeveelheid Uitlaatslang 1 Vensteraansluiting 1 Behuizingadapter 1 Afstandsbediening 1 Vensterset 1 Plug 1 Stofvensterset 1 (optioneel) Rollint 1 (optioneel) Luchtuitvoer 1 Waterpijp 1 Batterijen 2 Controleer na het uitpakken of de hierboven genoemde accessoires aanwezig zijn en bekijk waar ze voor bedoeld zijn in de installatie-introductie in deze handleiding. 3 Accessoires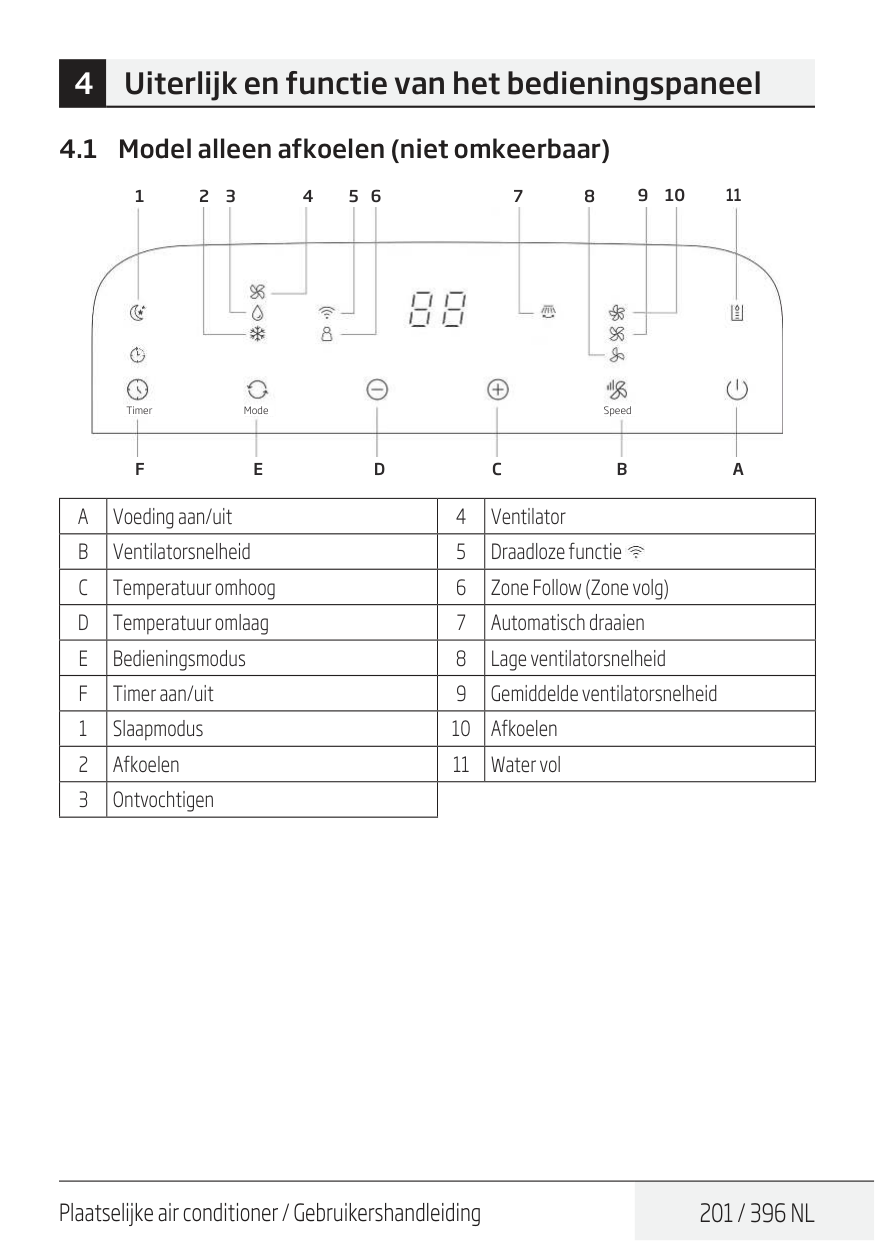
Plaatselijke air conditioner / Gebruikershandleiding
201 / 396 Nl
4.1 Model alleen afkoelen (niet omkeerbaar) Timer Mode SpeedF
1 2 3 4 5 6 7 8 9 10E
D
C
B
A
11A
Voeding aan/uit 4 VentilatorB
Ventilatorsnelheid 5 Draadloze functieC
Temperatuur omhoog 6 Zone Follow (Zone volg)D
Temperatuur omlaag 7 Automatisch draaienE
Bedieningsmodus 8 Lage ventilatorsnelheidF
Timer aan/uit 9 Gemiddelde ventilatorsnelheid 1 Slaapmodus 10 Afkoelen 2 Afkoelen 11 Water vol 3 Ontvochtigen 4 Uiterlijk en functie van het bedieningspaneel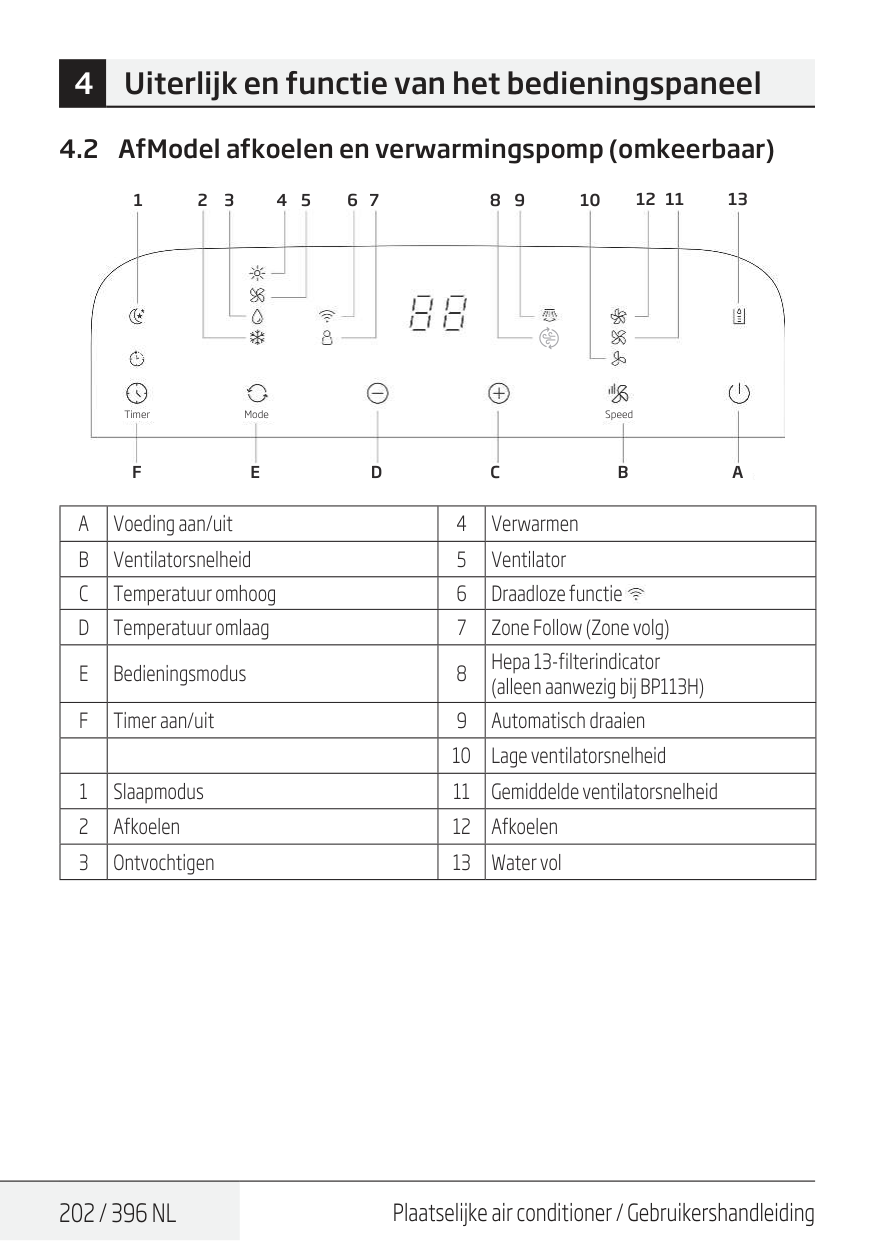
202 / 396 Nl
Plaatselijke air conditioner / Gebruikershandleiding 4 Uiterlijk en functie van het bedieningspaneel 4.2 AfModel afkoelen en verwarmingspomp (omkeerbaar) Timer Mode SpeedF
1 2 3 4 5 6 7 8 9 10 12 11 13E
D
C
B
A
A
Voeding aan/uit 4 VerwarmenB
Ventilatorsnelheid 5 VentilatorC
Temperatuur omhoog 6 Draadloze functieD
Temperatuur omlaag 7 Zone Follow (Zone volg)E
Bedieningsmodus 8 Hepa 13-filterindicator (alleen aanwezig bij BP113H)F
Timer aan/uit 9 Automatisch draaien 10 Lage ventilatorsnelheid 1 Slaapmodus 11 Gemiddelde ventilatorsnelheid 2 Afkoelen 12 Afkoelen 3 Ontvochtigen 13 Water vol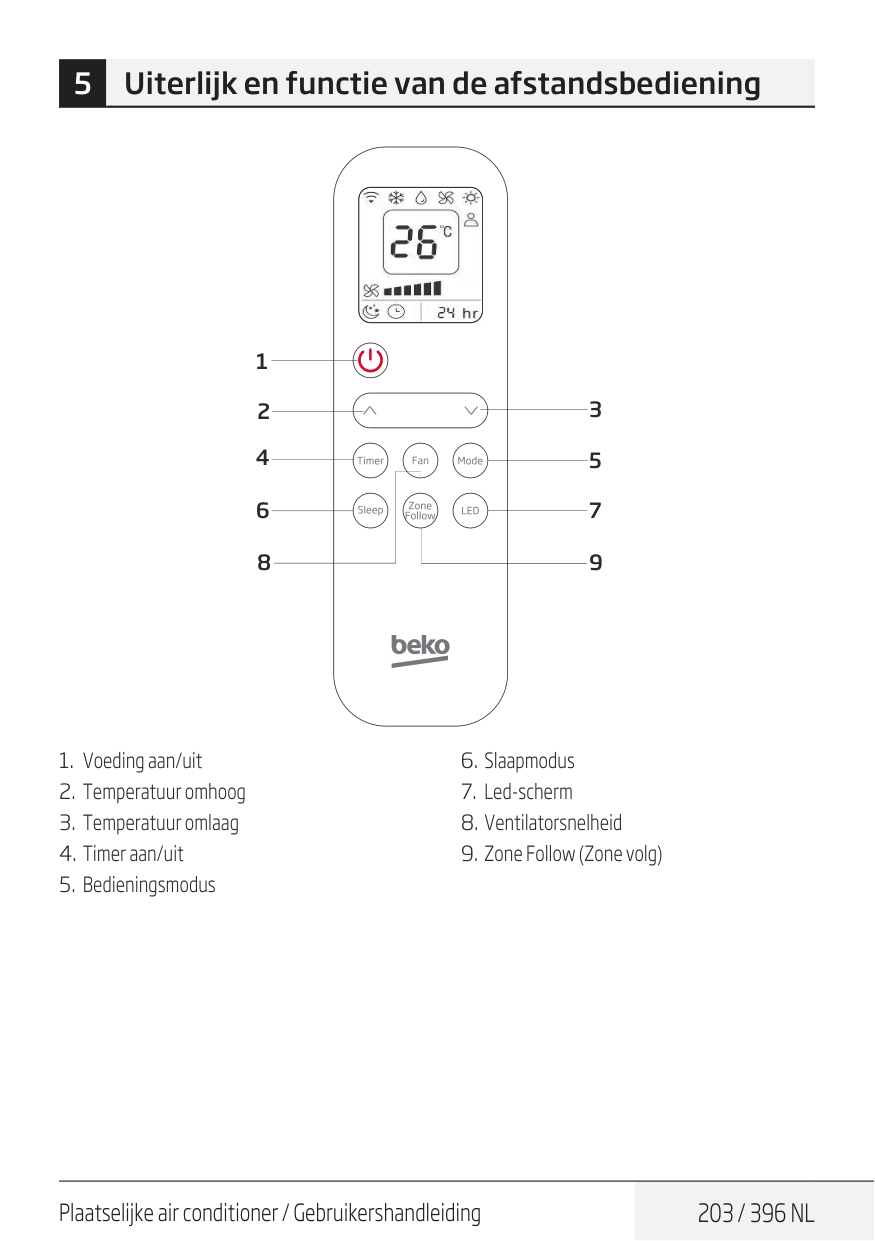
Plaatselijke air conditioner / Gebruikershandleiding
203 / 396 Nl
3 5 7 9 1 2 4 6 8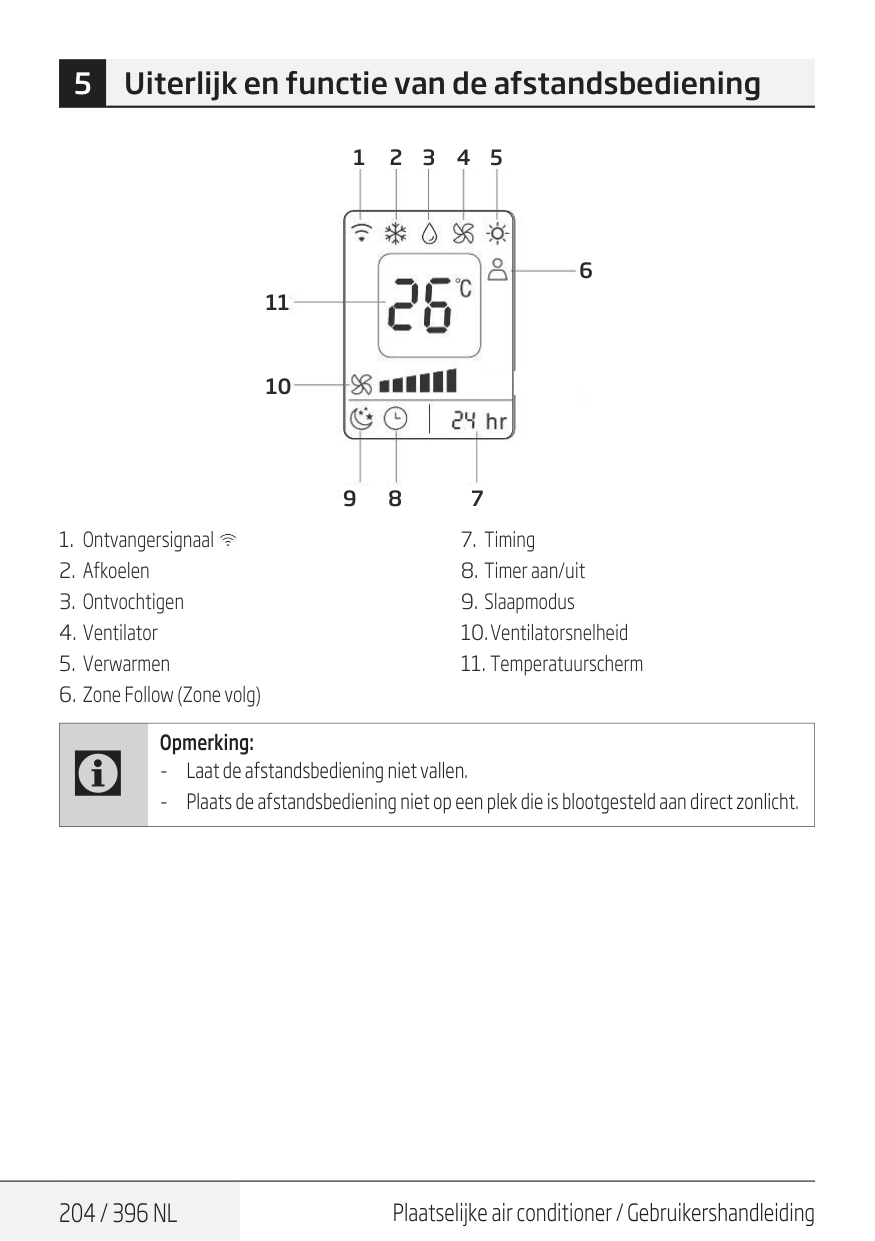
204 / 396 Nl
Plaatselijke air conditioner / Gebruikershandleiding 5 Uiterlijk en functie van de afstandsbediening 1 2 3 4 5 6 9 8 7 11 10C
Opmerking: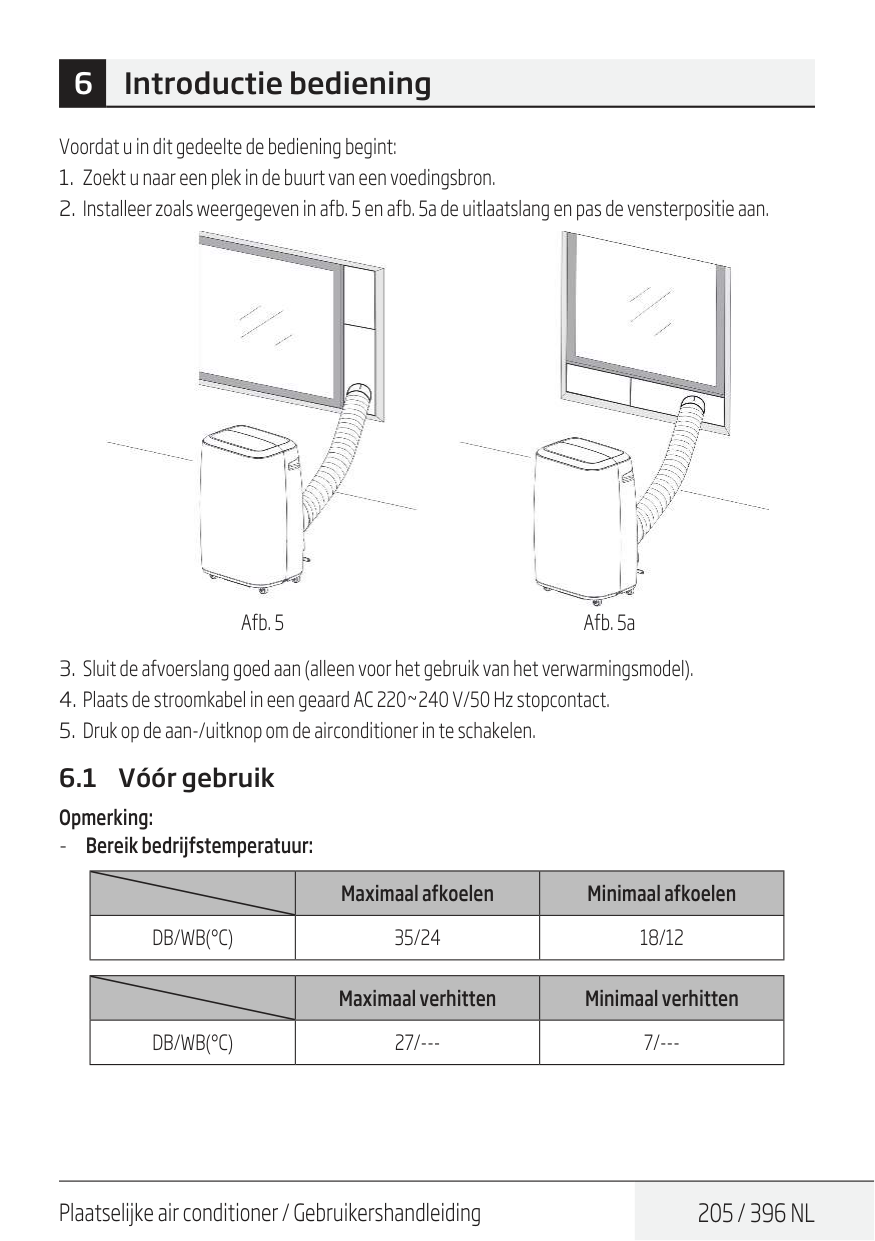
Plaatselijke air conditioner / Gebruikershandleiding
205 / 396 Nl
6 Introductie bediening Voordat u in dit gedeelte de bediening begint:Db/Wb(°C)
35/24 18/12 Maximaal verhitten Minimaal verhittenDb/Wb(°C)
27/--- 7/---
206 / 396 Nl
Plaatselijke air conditioner / Gebruikershandleiding Controleer of de uitlaatslang goed is gemonteerd. Waarschuwingen voor afkoelen en ontvochtigen:(16°C-31°C)
(16°C-31°C)
(16°C-31°C)
Plaatselijke air conditioner / Gebruikershandleiding
207 / 396 Nl
6.6 Timer Timer instellen:
208 / 396 Nl
Plaatselijke air conditioner / Gebruikershandleiding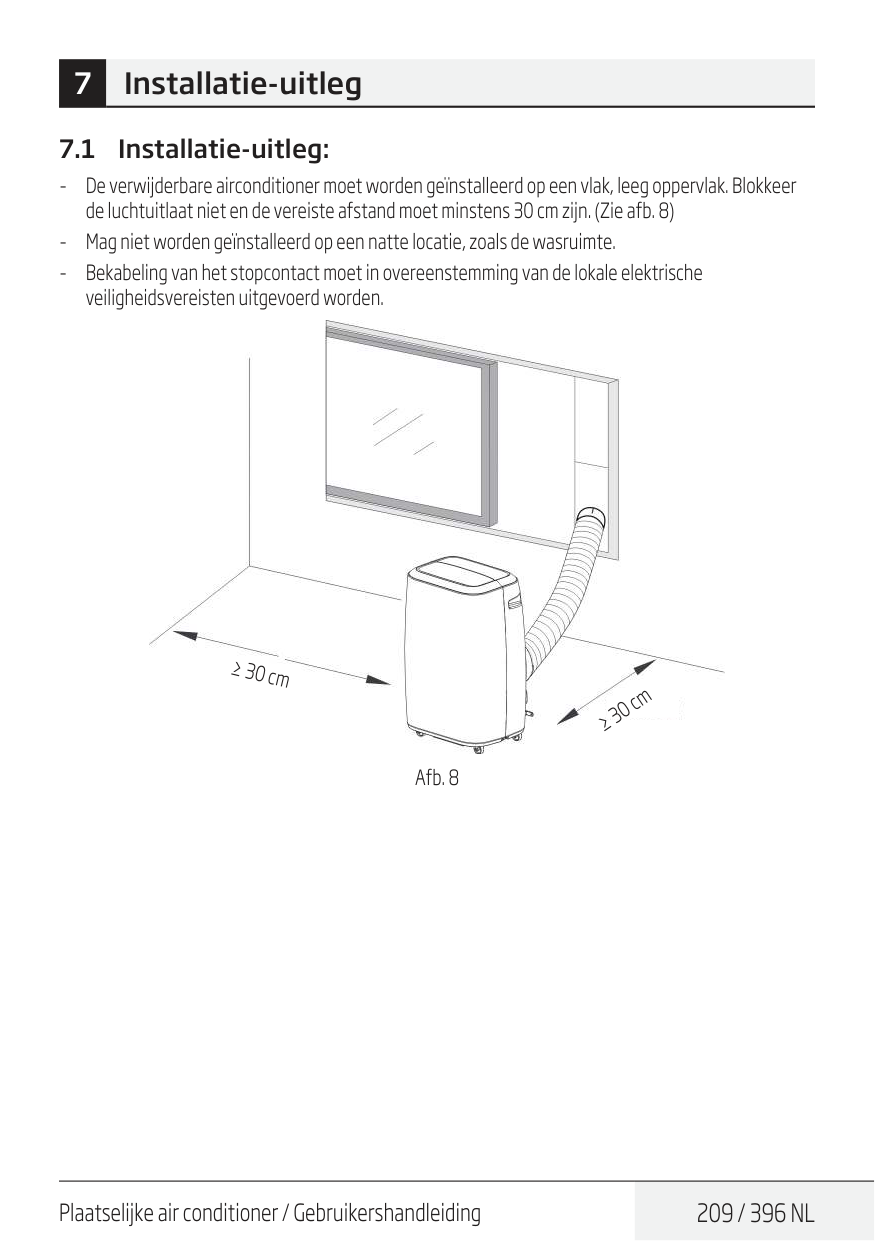
Plaatselijke air conditioner / Gebruikershandleiding
209 / 396 Nl
7 Installatie-uitleg 7.1 Installatie-uitleg: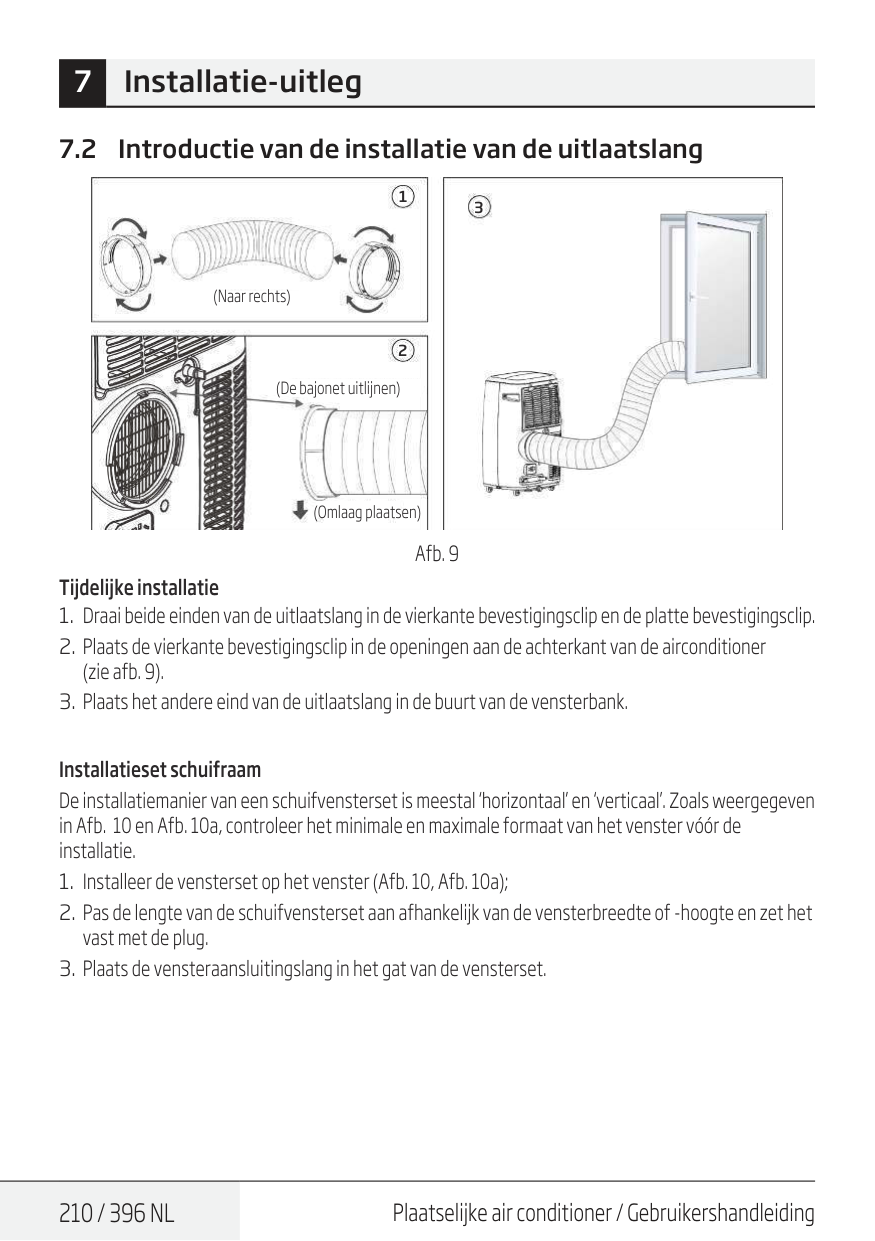
210 / 396 Nl
Plaatselijke air conditioner / Gebruikershandleiding 7.2 Introductie van de installatie van de uitlaatslang 1 2 3 (Naar rechts) (De bajonet uitlijnen) (Omlaag plaatsen) Afb. 9 Tijdelijke installatie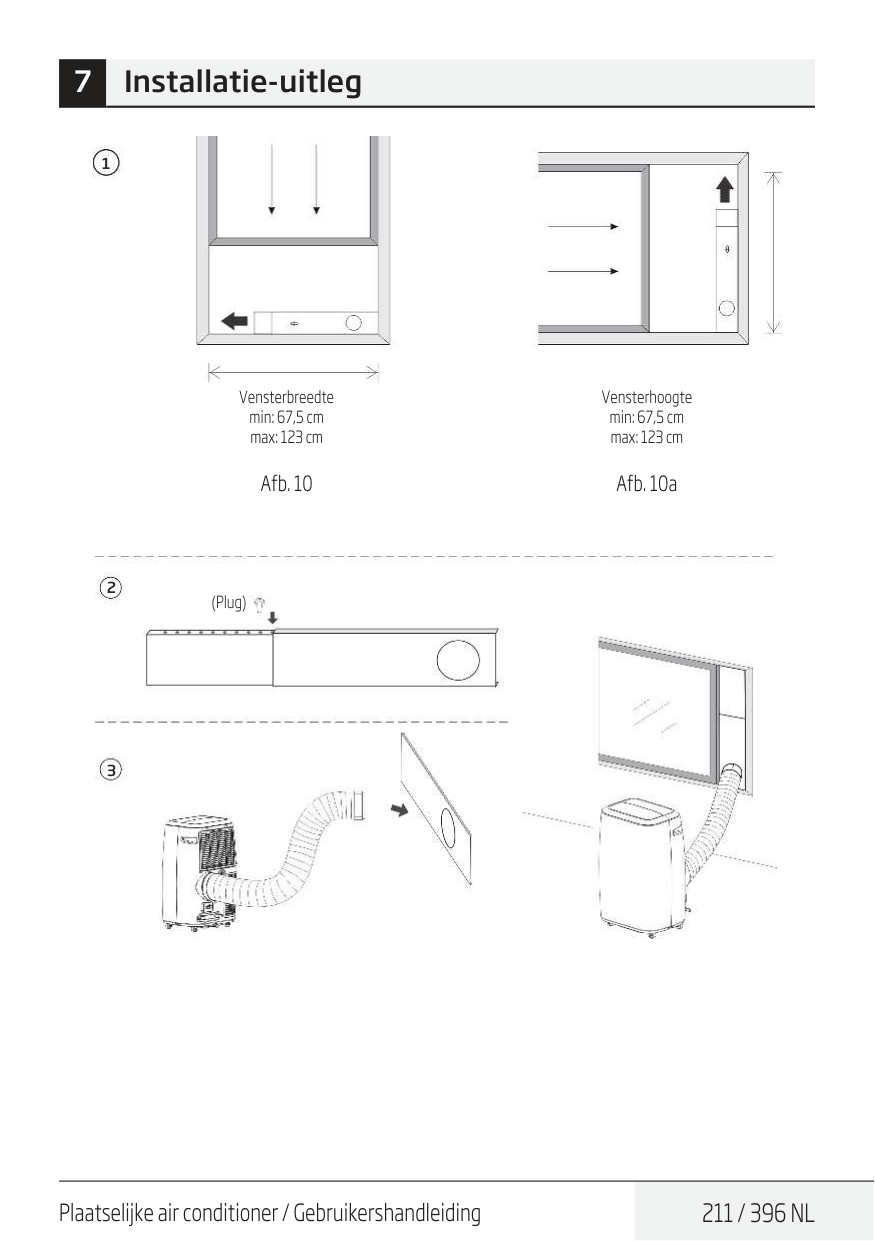
Plaatselijke air conditioner / Gebruikershandleiding
211 / 396 Nl
1 Vensterbreedte min: 67,5 cm max: 123 cm Afb. 10 Vensterhoogte min: 67,5 cm max: 123 cm Afb. 10a 2 3 (Plug) 7 Installatie-uitleg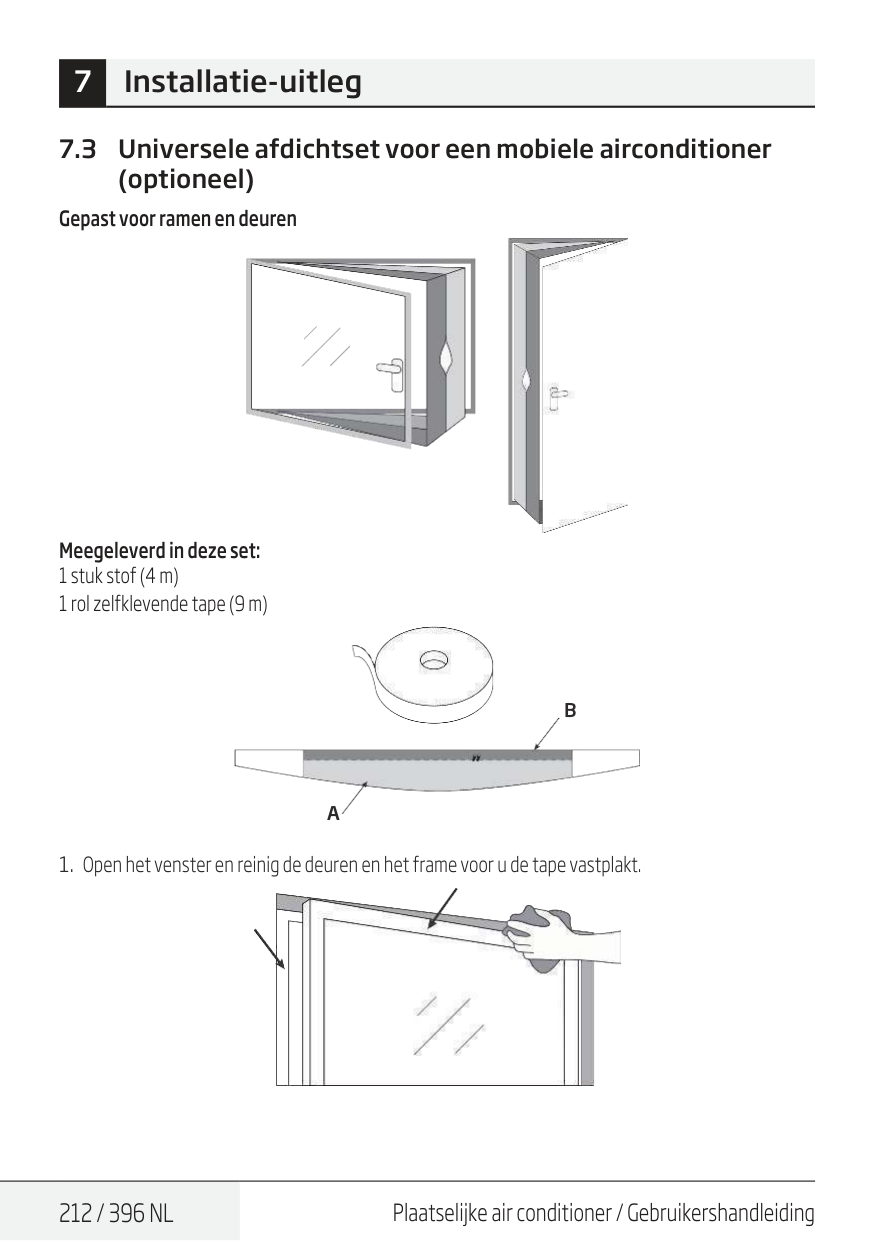
212 / 396 Nl
Plaatselijke air conditioner / Gebruikershandleiding 7.3 Universele afdichtset voor een mobiele airconditioner (optioneel) Gepast voor ramen en deuren Meegeleverd in deze set: 1 stuk stof (4 m) 1 rol zelfklevende tape (9 m)A
B
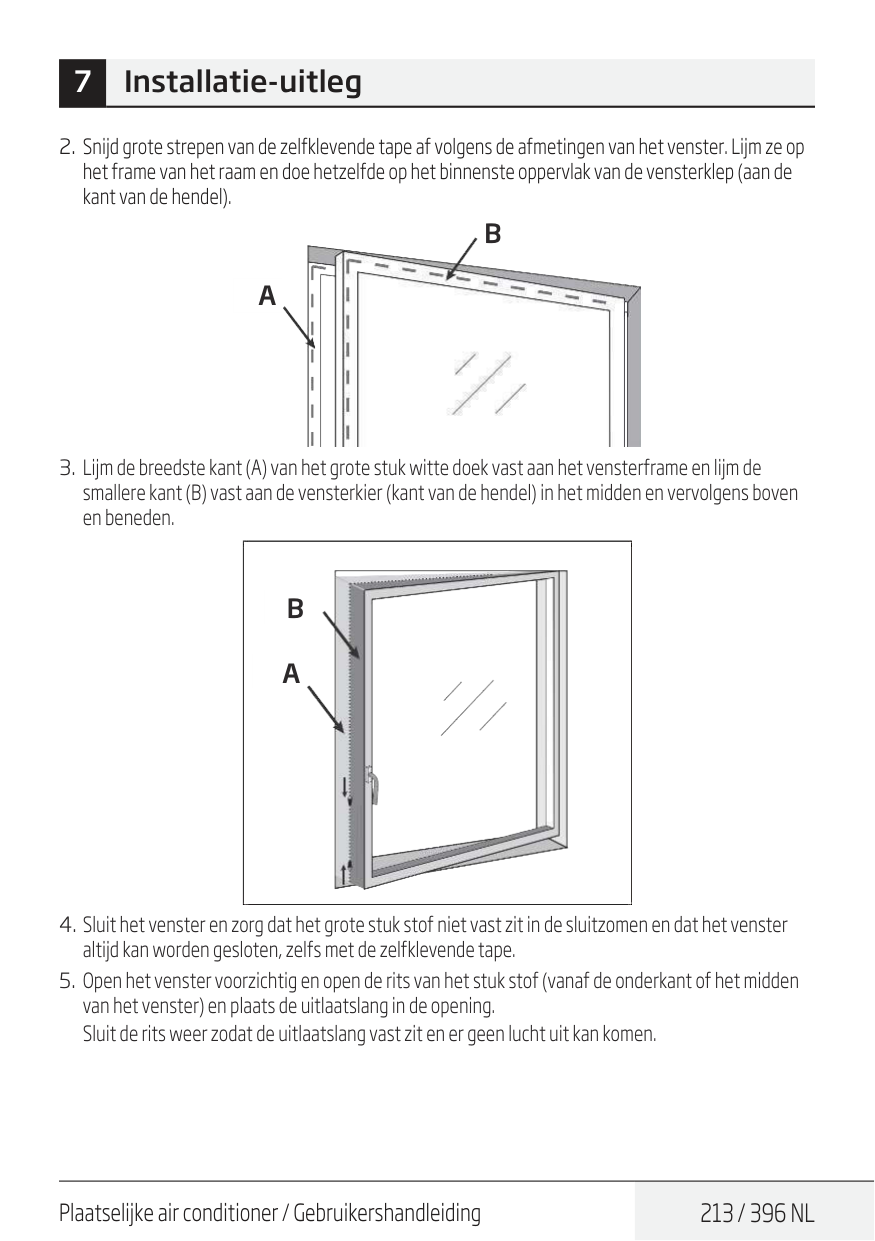
Plaatselijke air conditioner / Gebruikershandleiding
213 / 396 Nl
7 Installatie-uitlegA
B
A
B
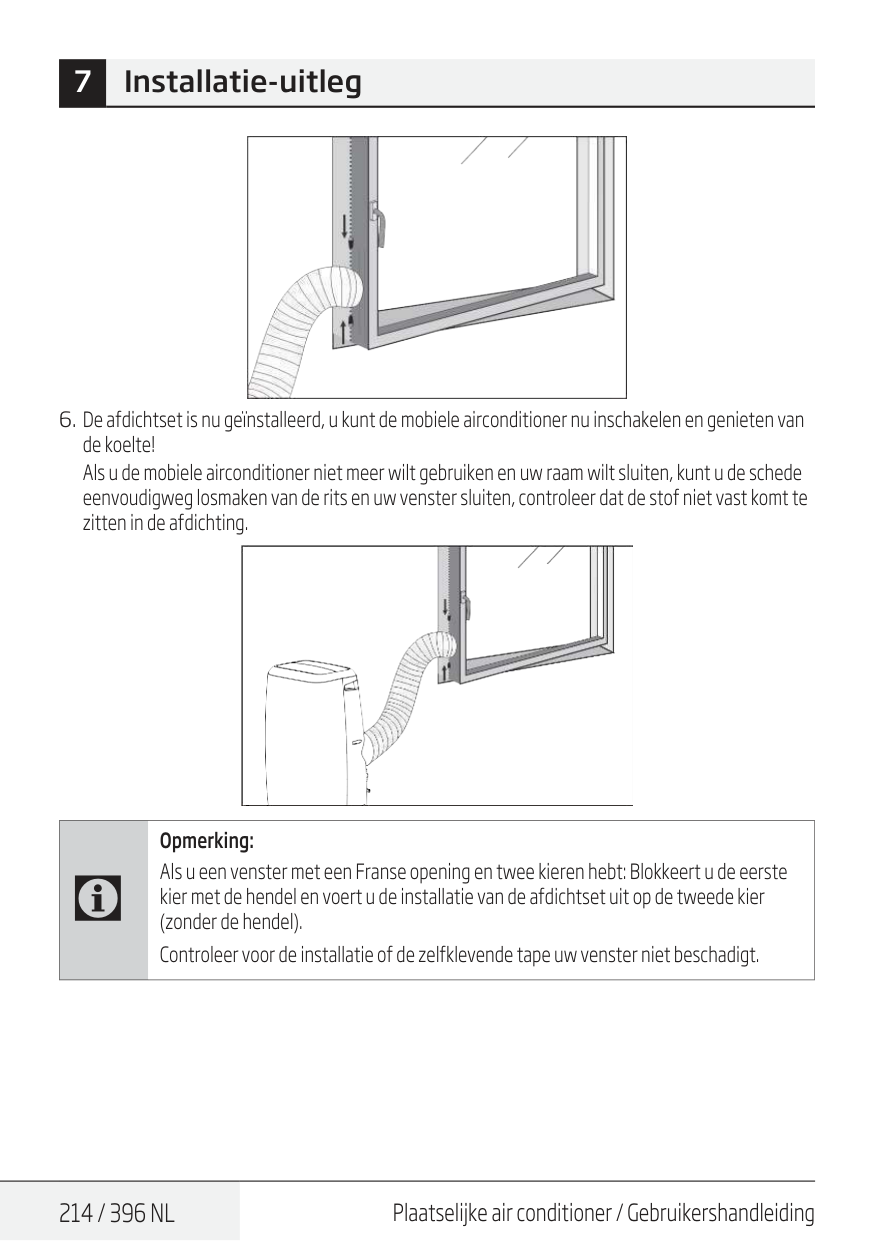
214 / 396 Nl
Plaatselijke air conditioner / Gebruikershandleiding 7 Installatie-uitlegC
Opmerking: Als u een venster met een Franse opening en twee kieren hebt: Blokkeert u de eerste kier met de hendel en voert u de installatie van de afdichtset uit op de tweede kier (zonder de hendel). Controleer voor de installatie of de zelfklevende tape uw venster niet beschadigt.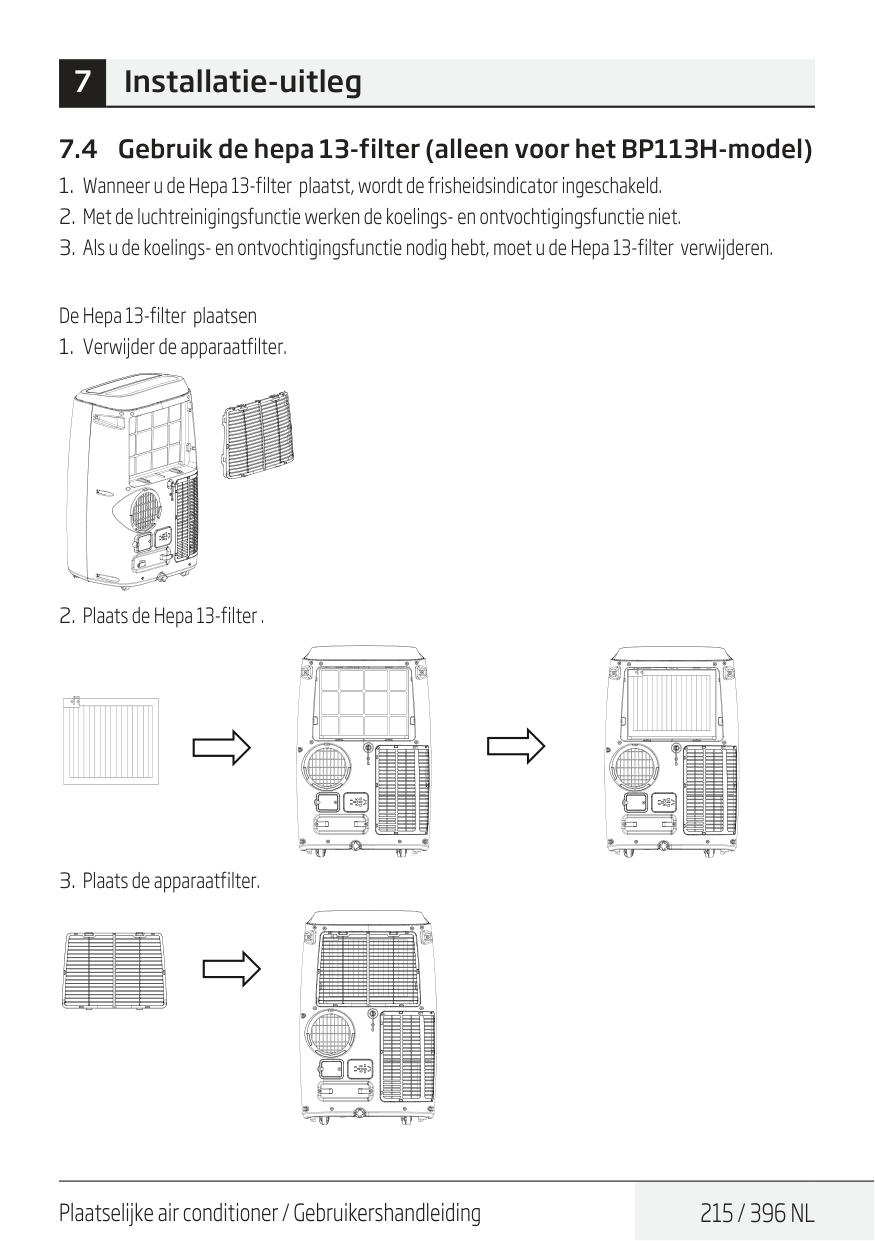
Plaatselijke air conditioner / Gebruikershandleiding
215 / 396 Nl
7 Installatie-uitleg 7.4 Gebruik de hepa 13-filter (alleen voor het BP113H-model)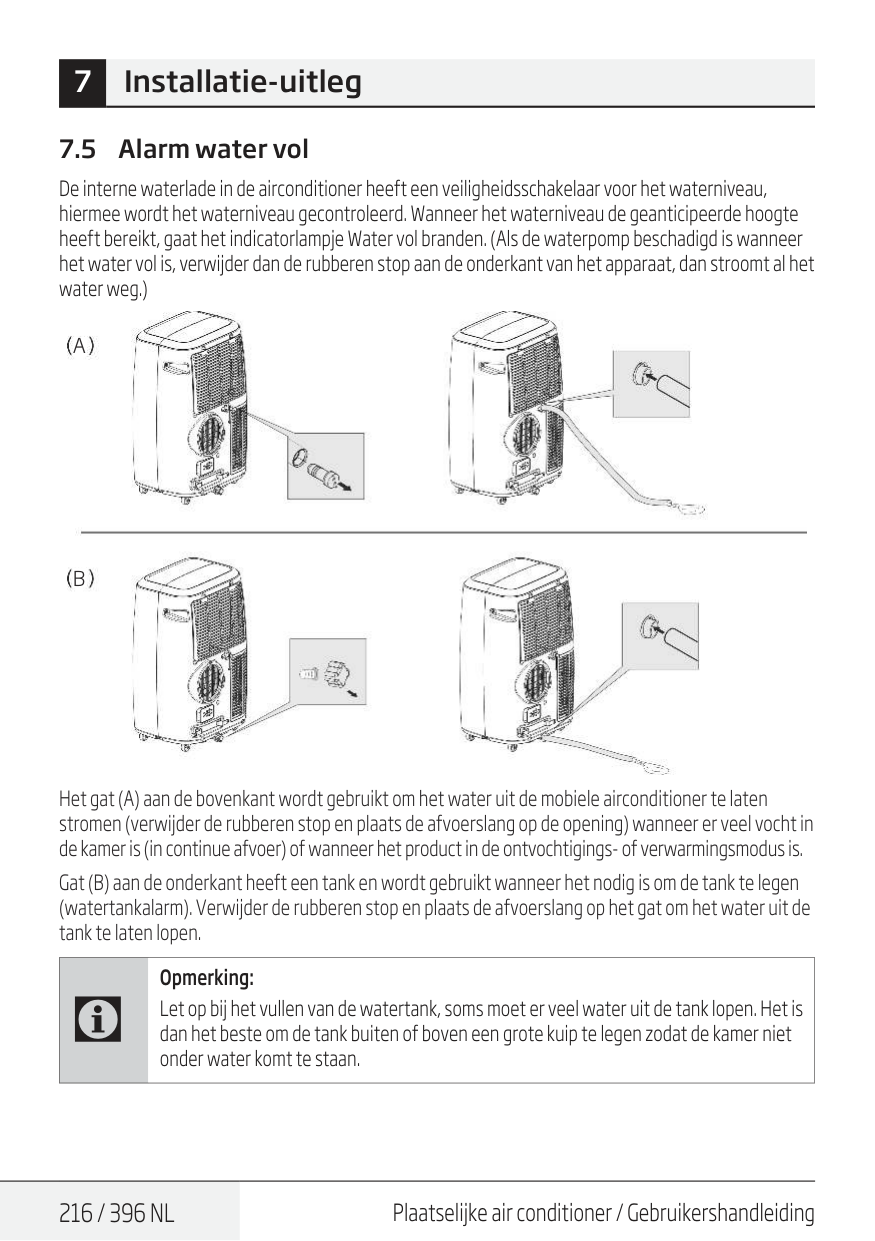
216 / 396 Nl
Plaatselijke air conditioner / Gebruikershandleiding 7 Installatie-uitleg 7.5 Alarm water vol De interne waterlade in de airconditioner heeft een veiligheidsschakelaar voor het waterniveau, hiermee wordt het waterniveau gecontroleerd. Wanneer het waterniveau de geanticipeerde hoogte heeft bereikt, gaat het indicatorlampje Water vol branden. (Als de waterpomp beschadigd is wanneer het water vol is, verwijder dan de rubberen stop aan de onderkant van het apparaat, dan stroomt al het water weg.)A
B
Het gat (A) aan de bovenkant wordt gebruikt om het water uit de mobiele airconditioner te laten stromen (verwijder de rubberen stop en plaats de afvoerslang op de opening) wanneer er veel vocht in de kamer is (in continue afvoer) of wanneer het product in de ontvochtigings- of verwarmingsmodus is. Gat (B) aan de onderkant heeft een tank en wordt gebruikt wanneer het nodig is om de tank te legen (watertankalarm). Verwijder de rubberen stop en plaats de afvoerslang op het gat om het water uit de tank te laten lopen.C
Opmerking: Let op bij het vullen van de watertank, soms moet er veel water uit de tank lopen. Het is dan het beste om de tank buiten of boven een grote kuip te legen zodat de kamer niet onder water komt te staan.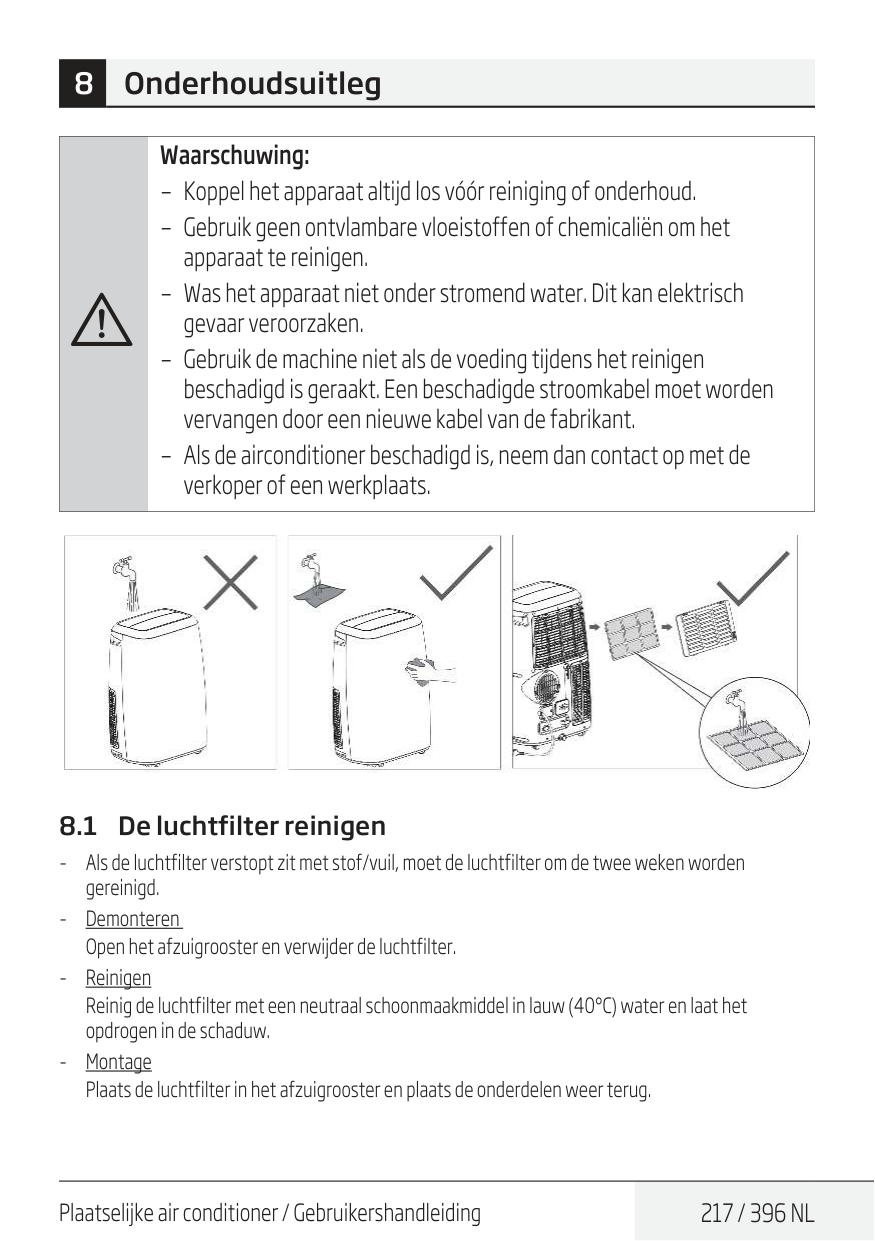
Plaatselijke air conditioner / Gebruikershandleiding
217 / 396 Nl
8 OnderhoudsuitlegA
Waarschuwing: – Koppel het apparaat altijd los vóór reiniging of onderhoud. – Gebruik geen ontvlambare vloeistoffen of chemicaliën om het apparaat te reinigen. – Was het apparaat niet onder stromend water. Dit kan elektrisch gevaar veroorzaken. – Gebruik de machine niet als de voeding tijdens het reinigen beschadigd is geraakt. Een beschadigde stroomkabel moet worden vervangen door een nieuwe kabel van de fabrikant. – Als de airconditioner beschadigd is, neem dan contact op met de verkoper of een werkplaats. 8.1 De luchtfilter reinigen
218 / 396 Nl
Plaatselijke air conditioner / GebruikershandleidingA
Waarschuwing: Gebruik het apparaat niet zonder filter omdat vuil en pluis voor verstopping zorgen en de prestaties verminderen. 8.2 Het oppervlak van de airconditioner reinigen Reinig eerst het oppervlak met een neutraal schoonmaakmiddel en een natte doek en veeg het apparaat vervolgens af met een droge doek. 8 Onderhoudsuitleg
Plaatselijke air conditioner / Gebruikershandleiding
219 / 396 Nl
9 Onderhoud Onderhoudstips Reinig de luchtfilter elke 2 weken voor optimale prestaties. De wateropvangbank moet onmiddellijk worden geleegd bij een P1-fout en vóór opslag om schimmel te voorkomen. In huishoudens met dieren moet u het rooster regelmatig afvegen om te voorkomen dat de luchtstroom wordt geblokkeerd door dierenhaar. Het apparaat reinigen Reinig het apparaat met en vochtige, pluisvrije doek en een mild schoonmaakmiddel. Droog het apparaat af met een droge, pluisvrije doek. Het apparaat opslaan wanneer het niet in gebruik is Laat de wateropvangbak van het apparaat leeglopen volgens de instructies in het volgende gedeelte. Laat het apparaat 12 uur lang in een warme kamer in de ventilatormodus werken zodat het op kan drogen om schimmel te voorkomen. Schakel het apparaat uit en koppel het los. Reinig de luchtfilter volgens de instructies in het vorige gedeelte. Plaats de schone, droge filter terug voor u het apparaat opslaat. Verwijder de batterijen uit de afstandsbediening. Bewaar het apparaat op een koele, donkere plek. Blootstelling aan direct zonlicht of extreme hitte kan de levensduur van het apparaat verkorten.C
Opmerking: De kast en voorkant kunnen worden afgestoft met een olievrije doek, of worden gewassen met een doek vochtig gemaakt met een oplossing van warm water en een mild afwasmiddel. Spoel goed af en veeg het apparaat droog. Gebruik nooit agressieve reinigingsmiddelen, was of poetsmiddel op de voorkant van de kast. Zorg dat u overtollig water uit de doek wringt vóór u rondom de bedieningselementen schoonmaakt. Overtollig water rond de bedieningselementen kan schade aan het apparaat veroorzaken.
220 / 396 Nl
Plaatselijke air conditioner / Gebruikershandleiding Problemen Mogelijke oorzaken Aanbevolen oplossingenC
Opmerking: De daadwerkelijke producten kunnen er anders uitzien. 10 Problemen oplossen
Plaatselijke air conditioner / Gebruikershandleiding
221 / 396 Nl
Wanneer u dit apparaat in Europese landen gebruikt, moet de volgende informatie worden nageleefd: Weggooien: Gooi dit product niet weg als ongesorteerd gemeentelijk afval. Het is noodzakelijk dat dit afval afzonderlijk wordt ingezameld voor speciale behandeling. Het is verboden om dit apparaat weg te gooien met huishoudelijk afval. Er zijn verschillende mogelijkheden om het apparaat weg te gooien.Dit symbool geeft aan dat dit product niet met ander huishoudelijk afval kan worden weggegooid aan het eind van de levensduur. Gebruikte apparaten moeten naar een officieel inzamelingspunt voor elektrische en elektronische apparaten worden gebracht. Voor de locatie van deze inzamelingspunten kunt u contact opnemen met de gemeente of verkoper waar u het product hebt aangeschaft. Elk huishouden speelt een belangrijke rol in het herstellen en recyclen van oude apparaten. Adequate verwijdering van gebruikte apparaten helpt mogelijke negatieve consequenties voor het milieu en de volksgezondheid te voorkomen. 11 Europese richtlijnen voor afvalverwijdering
222 / 396 Nl
Plaatselijke air conditioner / Gebruikershandleiding 12 Installatie-instructies 12.1 F-Gas instructie Dit product bevat gefluoreerde broeikasgassen. Deze gefluoreerde broeikasgassen zitten opgesloten in een hermetisch verzegelde uitrusting. Installaties, services, onderhoud, reparaties, lekkagecontroles of buitendienststelling en terugwinning moeten worden uitgevoerd door natuurlijke personen in bezit van de vereiste certificaten. Als er een systeem voor lekkagedetectie in het systeem is geïnstalleerd, moeten minstens elke 12 maanden lekkagecontroles worden uitgevoerd om te verifiëren dat het systeem nog steeds correct werkt. Als lekkagecontroles op het product moeten worden uitgevoerd, dan dient er een inspectieschema te zijn gespecificeerd en moeten de lekkagecontroles worden genoteerd en bijgehouden.C
Opmerking: Voor hermetisch verzegelde apparatuur, mobiele airconditionings, raamairconditionings en ontvochtigers met een CO2-gehalte van gefluoreerde broeikasgassen van lager dan 10 ton, hoeven geen lekkagecontroles te worden uitgevoerd.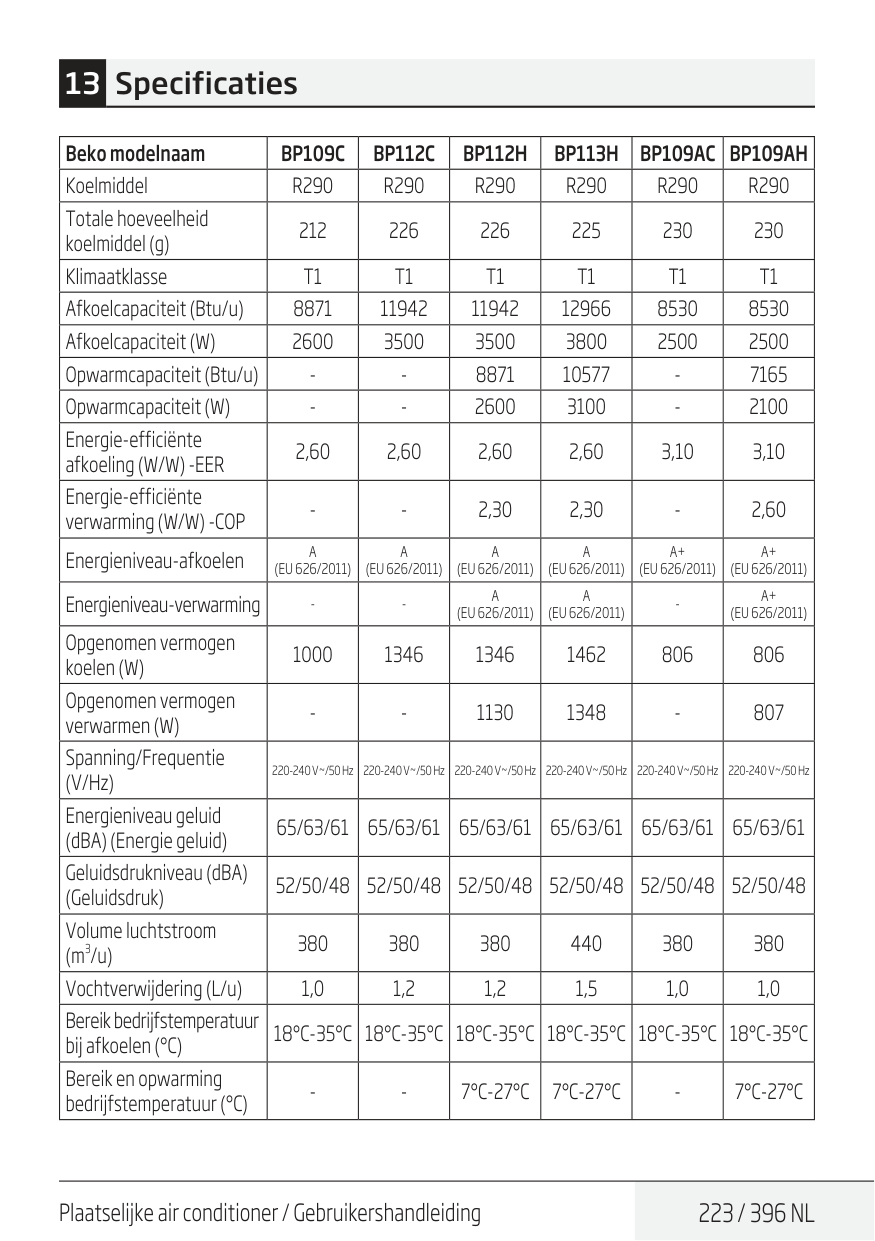
Plaatselijke air conditioner / Gebruikershandleiding
223 / 396 Nl
Beko modelnaamBp109C
Bp112C
Bp112H
Bp113H
Bp109Ac Bp109Ah
KoelmiddelR290
R290
R290
R290
R290
R290
Totale hoeveelheid koelmiddel (g) 212 226 226 225 230 230 KlimaatklasseT1
T1
T1
T1
T1
T1
Afkoelcapaciteit (Btu/u) 8871 11942 11942 12966 8530 8530 Afkoelcapaciteit (W) 2600 3500 3500 3800 2500 2500 Opwarmcapaciteit (Btu/u)A
(Eu 626/2011)
A
(Eu 626/2011)
A
(Eu 626/2011)
A
(Eu 626/2011)
A+
(Eu 626/2011)
A+
(Eu 626/2011)
Energieniveau-verwarmingA
(Eu 626/2011)
A
(Eu 626/2011)
A+
(Eu 626/2011)
Opgenomen vermogen koelen (W) 1000 1346 1346 1462 806 806 Opgenomen vermogen verwarmen (W)18°C-35°C 18°C-35°C 18°C-35°C 18°C-35°C 18°C-35°C 18°C-35°C
Bereik en opwarming bedrijfstemperatuur (°C)7°C-27°C
7°C-27°C
7°C-27°C
224 / 396 Nl
Plaatselijke air conditioner / Gebruikershandleiding
Geproduceerd door Arcelik A.S. Karaagac Cd. No:2-6 34445 Sutluce, Beyoglu, Istanboel, Turkije
Lesen Sie zunächst diese Bedienungsanleitung durch Sehr geehrte Kundinnen und Kunden, vielen Dank, dass Sie sich für ein Produkt von Beko entschieden haben. Wir hoffen, dass Ihnen dieses Produkt optimalen Nutzen bringen wird. Dieses hochwertige Produkt wurde mit modernster Technologie hergestellt. Lesen Sie die gesamte Bedienungsanleitung und alle anderen Begleitdokumente sorgfältig durch, bevor Sie das Produkt verwenden, und heben Sie alle Dokumente gut auf. Falls Sie das Produkt an Dritte weitergeben, überreichen Sie auch diese Bedienungsanleitung. Beachten Sie alle Warnungen und Informationen in dieser Bedienungsanleitung. Erläuterung der Symbole Die folgenden Symbole finden Sie im Verlauf der Bedienungsanleitung: Dieses Produkt wurde in einer umweltgerechten, modernen Produktionsstätte hergestellt. Entspricht der WEEE-Richtlinie. Enthält kein PCB.
C
Wichtige Information oder nützliche Hinweise für den Gebrauch.A
Warnung vor Situationen, die eine Gefahr für Leben und Sacheigentum darstellen. Warnung bzgl. Handlungen, die niemals durchgeführt werden dürfen.B
Warnung vor Stromschlägen. Warnung vor heißen Oberflächen. Nicht abdecken. Dieses Symbol zeigt an, dass die Bedienungsanleitung sorgfältig gelesen werden sollte. Dieses Symbol zeigt an, dass Servicepersonal dieses Gerät unter Bezugnahme auf das Installationshandbuch handhaben sollte. Dieses Symbol zeigt an, dass dieses Gerät ein brennbares Kältemittel verwendet. Wenn das Kältemittel ausläuft und einer externen Zündquelle ausgesetzt ist, besteht Brandgefahr.
Mobiles Klimagerät / Bedienungsanleitung
227 / 396 De
Inhaltsverzeichnis 1 Sicherheitshinweise 229 2 Teileübersicht 256 3 Zubehör 257 4 Aussehen und Funktion des Bedienfeldes 258 4.1 Nur-Kühlungs-Modell (nicht reversibel). . . . . . . . . . . . . . . . . . . . . . . . . . . . . . . . . . . . . . . . . . . . . . . . . . . . 258 4.2 Kühl- und Wärmepumpenmodell (reversibel) . . . . . . . . . . . . . . . . . . . . . . . . . . . . . . . . . . . . . . . . . . . . . . .259 5 Aussehen und Funktion der Fernbedienung 260 6 Bedienungsanleitung 262 6.1 Vor der Benutzung . . . . . . . . . . . . . . . . . . . . . . . . . . . . . . . . . . . . . . . . . . . . . . . . . . . . . . . . . . . . . . . . . . . . . . . . . .262 6.2 Kühlbetrieb . . . . . . . . . . . . . . . . . . . . . . . . . . . . . . . . . . . . . . . . . . . . . . . . . . . . . . . . . . . . . . . . . . . . . . . . . . . . . . . . .263 6.3 Entfeuchterbetrieb . . . . . . . . . . . . . . . . . . . . . . . . . . . . . . . . . . . . . . . . . . . . . . . . . . . . . . . . . . . . . . . . . . . . . . . . .263 6.4 Lüfterbetrieb. . . . . . . . . . . . . . . . . . . . . . . . . . . . . . . . . . . . . . . . . . . . . . . . . . . . . . . . . . . . . . . . . . . . . . . . . . . . . . . .263 6.5 Heizbetrieb (diese Funktion ist nicht für das Nur-Kühlen-Modell verfügbar). . . . . . . . . . . . . . .263 6.6 Timer-Betrieb . . . . . . . . . . . . . . . . . . . . . . . . . . . . . . . . . . . . . . . . . . . . . . . . . . . . . . . . . . . . . . . . . . . . . . . . . . . . . . 264 6.7 Automatisches Schwenken . . . . . . . . . . . . . . . . . . . . . . . . . . . . . . . . . . . . . . . . . . . . . . . . . . . . . . . . . . . . . . . . 264 6.8 Schlafmodus . . . . . . . . . . . . . . . . . . . . . . . . . . . . . . . . . . . . . . . . . . . . . . . . . . . . . . . . . . . . . . . . . . . . . . . . . . . . . . . 264 6.9 Wasserablauf. . . . . . . . . . . . . . . . . . . . . . . . . . . . . . . . . . . . . . . . . . . . . . . . . . . . . . . . . . . . . . . . . . . . . . . . . . . . . . . 264 6.10 Drahtlos-Funktion . . . . . . . . . . . . . . . . . . . . . . . . . . . . . . . . . . . . . . . . . . . . . . . . . . . . . . . . . . . . . . . . . . . . . .265 6.11 Verwendung des Thermostats in der Fernbedienung . . . . . . . . . . . . . . . . . . . . . . . . . . . . . . . . . . . . . .265 7 Montageanleitungen 266 7.1 Montageanleitungen: . . . . . . . . . . . . . . . . . . . . . . . . . . . . . . . . . . . . . . . . . . . . . . . . . . . . . . . . . . . . . . . . . . . . . . 266 7.2 Einführung in die Montage von Abluftschläuchen . . . . . . . . . . . . . . . . . . . . . . . . . . . . . . . . . . . . . . . . . .267 7.3 Universelles Verstemmungssatz-Zubehör für mobiles Klimagerät (optional). . . . . . . . . . . . . 269 7.4 Wasser-voll-Alarm . . . . . . . . . . . . . . . . . . . . . . . . . . . . . . . . . . . . . . . . . . . . . . . . . . . . . . . . . . . . . . . . . . . . . . . . . .272
228 / 396 De
Mobiles Klimagerät / Bedienungsanleitung Inhaltsverzeichnis 8 Tipps zur Wartung 273 8.1 Reinigen des Luftfilters . . . . . . . . . . . . . . . . . . . . . . . . . . . . . . . . . . . . . . . . . . . . . . . . . . . . . . . . . . . . . . . . . . . . .273 8.2 Reinigen der Oberfläche des Klimageräts . . . . . . . . . . . . . . . . . . . . . . . . . . . . . . . . . . . . . . . . . . . . . . . . . .274 9 Wartung und Instandhaltung 275 10 Fehlerbehebung 276 11 Europäische Entsorgungsrichtlinien 277 12 Installationsanleitungen 278 12.1 F-Gas-Anweisung . . . . . . . . . . . . . . . . . . . . . . . . . . . . . . . . . . . . . . . . . . . . . . . . . . . . . . . . . . . . . . . . . . . . . . . . . . .278 13 Technische Daten 279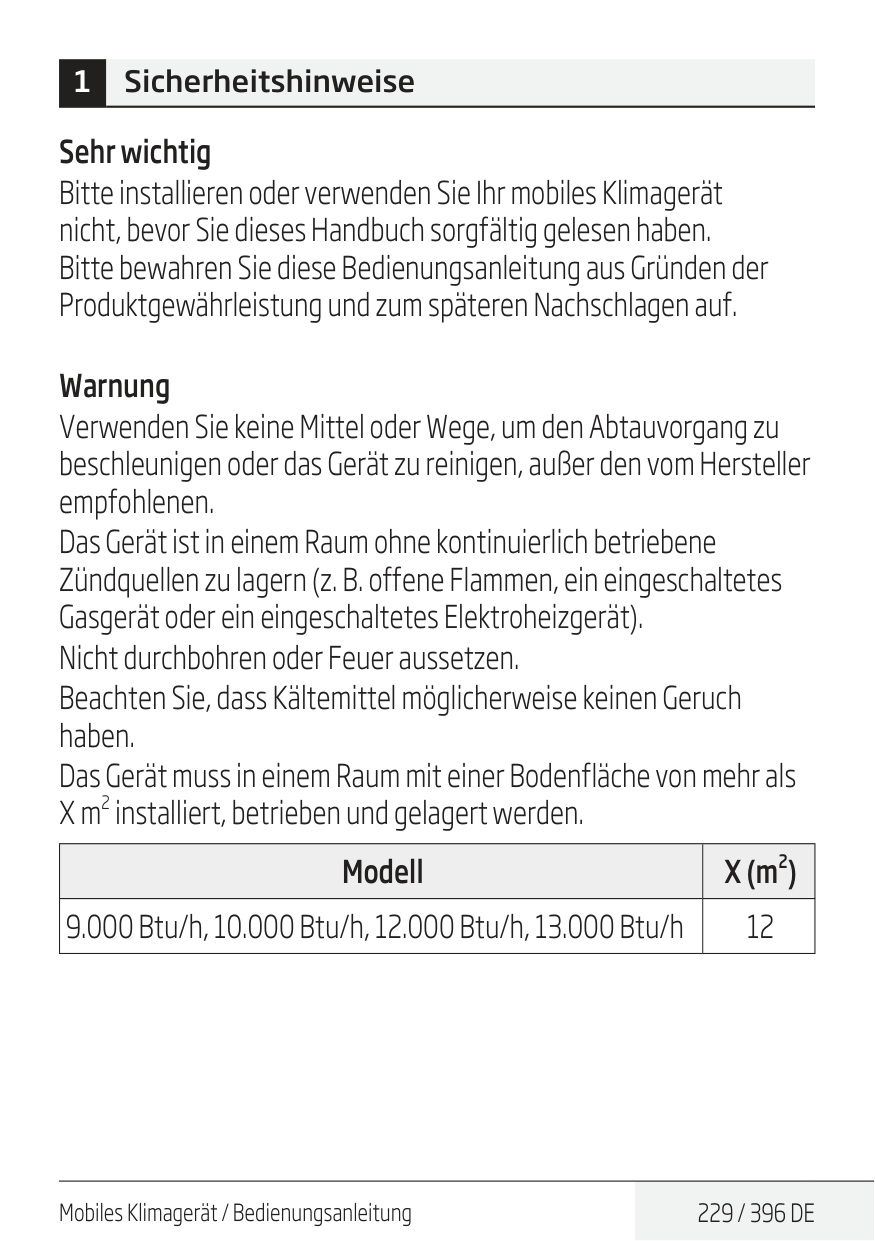
Mobiles Klimagerät / Bedienungsanleitung
229 / 396 De
1 Sicherheitshinweise Sehr wichtig Bitte installieren oder verwenden Sie Ihr mobiles Klimagerät nicht, bevor Sie dieses Handbuch sorgfältig gelesen haben. Bitte bewahren Sie diese Bedienungsanleitung aus Gründen der Produktgewährleistung und zum späteren Nachschlagen auf. Warnung Verwenden Sie keine Mittel oder Wege, um den Abtauvorgang zu beschleunigen oder das Gerät zu reinigen, außer den vom Hersteller empfohlenen. Das Gerät ist in einem Raum ohne kontinuierlich betriebene Zündquellen zu lagern (z. B. offene Flammen, ein eingeschaltetes Gasgerät oder ein eingeschaltetes Elektroheizgerät). Nicht durchbohren oder Feuer aussetzen. Beachten Sie, dass Kältemittel möglicherweise keinen Geruch haben. Das Gerät muss in einem Raum mit einer Bodenfläche von mehr als X m 2 installiert, betrieben und gelagert werden. Modell X (m 2) 9.000 Btu/h, 10.000 Btu/h, 12.000 Btu/h, 13.000 Btu/h 12
230 / 396 De
Mobiles Klimagerät / Bedienungsanleitung Warnhinweis (für R290) Spezifische Informationen zu Geräten mit Kältemittelgas R290. •Lesen Sie alle Warnhinweise gründlich durch. •Verwenden Sie beim Abtauen und Reinigen des Geräts keine anderen als die vom Hersteller empfohlenen Werkzeuge. •Das Gerät muss in einem Bereich ohne ständige Zündquellen (z. B. offene Flammen, in Betrieb befindliche Gas- oder Elektrogeräte) aufgestellt werden. •Nicht durchstechen und keinem Feuer aussetzen. •Dieses Gerät enthält Y g (siehe Typenschild auf der Rückseite des Geräts) des Kältemittelgases R290. •R290 ist ein Kältemittelgas, das den europäischen Umweltrichtlinien entspricht. Kein Teil des Kältemittelkreislaufs darf durchstochen werden. •Wenn das Gerät in einem unbelüfteten Raum installiert, betrieben oder gelagert wird, muss der Raum so beschaffen sein, dass die Bildung von Kältemittelleckagen verhindert wird, die zu einer Brand- oder Explosionsgefahr aufgrund der Entzündung des Kältemittels durch elektrische Heizgeräte, Öfen oder andere Zündquellen führen können. •Das Gerät muss so gelagert werden, dass ein mechanisches Versagen verhindert wird. 1 Sicherheitshinweise
Mobiles Klimagerät / Bedienungsanleitung
231 / 396 De
•Personen, die den Kältemittelkreislauf betreiben oder daran arbeiten, müssen über eine entsprechende Zertifizierung verfügen, die von einer akkreditierten Organisation ausgestellt wurde, die die Kompetenz im Umgang mit Kältemitteln gemäß einer spezifischen, von den Verbänden der Branche anerkannten Bewertung sicherstellt. •Reparaturen müssen auf der Grundlage der Empfehlung der Herstellerfirma durchgeführt werden. Wartungs- und Reparaturarbeiten, die die Unterstützung anderer qualifizierter Personen erfordern, müssen unter der Aufsicht einer Person durchgeführt werden, die für den Umgang mit brennbaren Kältemitteln ausgebildet ist. Allgemeine Sicherheitsbestimmungen
232 / 396 De
Mobiles Klimagerät / Bedienungsanleitung 1 Sicherheitshinweise E: In der Nähe einer Badewanne, einer Waschmaschine, einer Dusche oder eines Swimmingpools.
Mobiles Klimagerät / Bedienungsanleitung
233 / 396 De
1 Sicherheitshinweise
234 / 396 De
Mobiles Klimagerät / Bedienungsanleitung 1 Sicherheitshinweise
Mobiles Klimagerät / Bedienungsanleitung
235 / 396 De
1 Sicherheitshinweise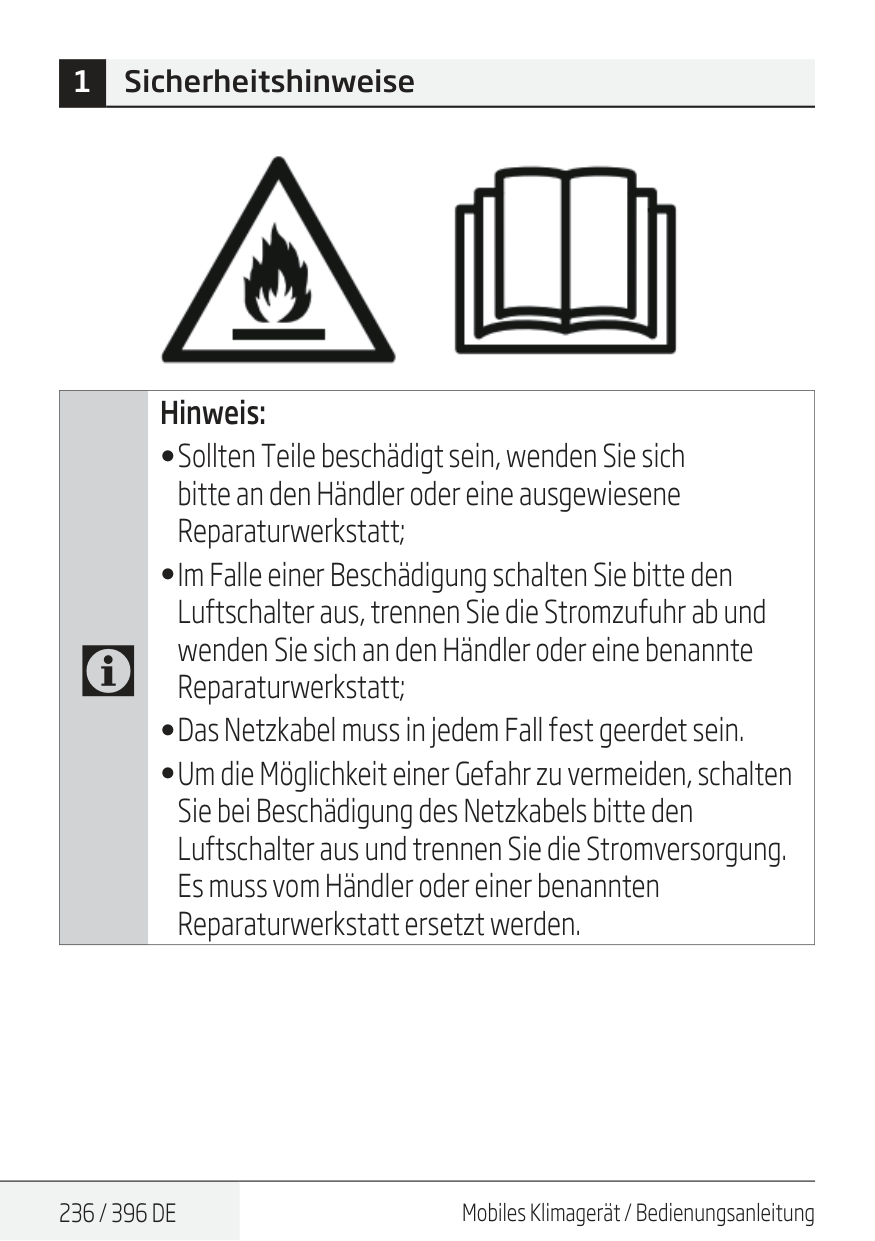
236 / 396 De
Mobiles Klimagerät / Bedienungsanleitung 1 SicherheitshinweiseC
Hinweis: •Sollten Teile beschädigt sein, wenden Sie sich bitte an den Händler oder eine ausgewiesene Reparaturwerkstatt; •Im Falle einer Beschädigung schalten Sie bitte den Luftschalter aus, trennen Sie die Stromzufuhr ab und wenden Sie sich an den Händler oder eine benannte Reparaturwerkstatt; •Das Netzkabel muss in jedem Fall fest geerdet sein. •Um die Möglichkeit einer Gefahr zu vermeiden, schalten Sie bei Beschädigung des Netzkabels bitte den Luftschalter aus und trennen Sie die Stromversorgung. Es muss vom Händler oder einer benannten Reparaturwerkstatt ersetzt werden.
Mobiles Klimagerät / Bedienungsanleitung
237 / 396 De
Warnungen (nur für Kältemittel R290)
238 / 396 De
Mobiles Klimagerät / Bedienungsanleitung 1.5 Vorhandensein eines Feuerlöschers Wenn Heißarbeit an der Kühlanlage oder zugehörigen Teilen durchgeführt werden sollen, müssen geeignete Feuerlöschgeräte zur Verfügung stehen. Halten Sie einen Trockenpulver- oder CO2-Löscher in der Nähe des Ladebereichs bereit. 1.6 Keine Zündquellen Personen, die Arbeiten in Bezug auf ein Kühlsystem durchführen, bei denen Rohrleitungen mit brennbarem Kältemittel freigelegt werden oder brennbares Kältemittel darin enthalten ist, dürfen Zündquellen nicht so einsetzen, dass eine Brand- oder Explosionsgefahr besteht. Alle möglichen Zündquellen, einschließlich des Rauchens von Zigaretten, sollten ausreichend weit vom Installations-, Reparatur-, Demontage- und Entsorgungsort entfernt gehalten werden, wobei möglicherweise entzündbares Kältemittel in die unmittelbare Umgebung abgegeben werden kann. Vor Beginn der Arbeiten ist der Bereich um das Gerät herum zu untersuchen, um sicherzustellen, dass keine entflammbaren Gefahren oder Zündgefahren bestehen. Schilder mit der Aufschrift „Rauchen verboten“ müssen angebracht werden. 1.7 Belüfteter Bereich Stellen Sie sicher, dass sich der Bereich im Freien befindet oder ausreichend belüftet ist, bevor Sie in das System eingreifen oder Heißarbeit ausführen. Während des Zeitraums, in dem die Arbeiten ausgeführt werden, muss ein gewisser Belüftungsgrad gewährleistet werden. Die Belüftung sollte das freigesetzte Kältemittel sicher verteilen und vorzugsweise nach außen in die Atmosphäre ausstoßen. 1 Sicherheitshinweise
Mobiles Klimagerät / Bedienungsanleitung
239 / 396 De
1.8 Überprüfung der Klimaanlage Wenn elektrische Komponenten ausgetauscht werden, müssen sie für den Zweck geeignet sein und die korrekte Spezifikation aufweisen. Die Wartungs- und Servicerichtlinien des Herstellers sind immer zu befolgen. Wenden Sie sich im Zweifelsfall für Unterstützung an die technische Abteilung des Herstellers.Bei Anlagen, die mit brennbaren Kältemitteln arbeiten, sind folgende Überprüfungen durchzuführen: Die Größe der Füllung entspricht der Raumgröße, in der die kältemittelhaltigen Teile installiert sind; die Lüftungsmaschinen und Auslässe arbeiten angemessen und werden nicht verstopft; wenn ein indirekter Kältekreislauf verwendet wird, ist der Sekundärkreislauf auf das Vorhandensein von Kältemittel zu überprüfen; die Kennzeichnung der Geräte ist weiterhin sichtbar und lesbar. Unleserliche Markierungen und Schilder sind zu korrigieren; Kühlrohre oder -komponenten sind an einer Stelle installiert, an denen es unwahrscheinlich ist, dass sie irgendwelchen Stoffen ausgesetzt sind, die kältemittelhaltige Komponenten korrodieren könnten. Ausgenommen sind Komponenten, die aus Materialien bestehen, die von Natur aus korrosionsbeständig sind oder die gegen eine solche Korrosion angemessen geschützt sind. 1.9 Überprüfung elektrischer Geräte Reparaturen und Wartungsarbeiten an elektrischen Komponenten müssen erste Sicherheitsüberprüfungen und Bauteilprüfverfahren umfassen. Wenn ein Fehler vorliegt, der die Sicherheit 1 Sicherheitshinweise
240 / 396 De
Mobiles Klimagerät / Bedienungsanleitung beeinträchtigen könnte, darf an den Stromkreis keine elektrische Versorgung angeschlossen werden, bis der Fehler zufriedenstellend behoben ist. Wenn der Fehler nicht sofort behoben werden kann, der Betrieb jedoch fortgesetzt werden muss, ist eine angemessene vorübergehende Lösung zu verwenden. Dies ist dem Besitzer der Anlage mitzuteilen, damit alle Parteien davon unterrichtet werden. Zu den ersten Sicherheitsprüfungen gehören: dass die Kondensatoren entladen werden: dies muss auf sichere Art und Weise geschehen, um die Möglichkeit einer Funkenbildung zu vermeiden; dass keine stromführenden elektrischen Komponenten und Leitungen während des Ladens, Wiederherstellens oder Spülens des Systems freigelegt werden; dass eine kontinuierliche Erdung vorhanden ist.
Mobiles Klimagerät / Bedienungsanleitung
241 / 396 De
2.2 Folgendes ist besonders zu beachten, um sicherzustellen, dass bei Arbeiten an elektrischen Komponenten das Gehäuse nicht so verändert wird, dass das Schutzniveau beeinträchtigt wird. Dazu gehören Kabelschäden, zu viele Anschlüsse, nicht gemäß den Originalspezifikationen angefertigte Klemmen, Dichtungen, falsche Verschraubungen usw. Stellen Sie sicher, dass das Gerät sicher befestigt ist. Stellen Sie sicher, dass die Dichtungen oder Dichtungsmaterialien nicht so gealtert oder beschädigt sind, dass sie nicht mehr dafür sorgen, das Eindringen von brennbaren Atmosphären zu verhindern. Ersatzteile müssen den Spezifikationen des Herstellers entsprechen.C
Hinweis: Die Verwendung von Silikondichtungsmittel kann die Wirksamkeit einiger Arten von Leckerkennungsgeräten beeinträchtigen. Eigensichere Komponenten müssen vor der Bearbeitung nicht isoliert werden.
242 / 396 De
Mobiles Klimagerät / Bedienungsanleitung
Mobiles Klimagerät / Bedienungsanleitung
243 / 396 De
Chlor mit dem Kältemittel reagieren und die Kupferrohrleitungen korrodieren kann. Wenn ein Leck vermutet wird, müssen alle offenen Flammen entfernt/gelöscht werden. Wenn ein Leck des Kältemittels festgestellt wird, das gelötet werden muss, muss das gesamte Kältemittel aus dem System entfernt oder (durch Absperrventile) in einem vom Leck entfernten Teil des Systems isoliert werden. Sauerstofffreier Stickstoff muss dann sowohl vor als auch während des Lötvorgangs durch das System gespült werden.
244 / 396 De
Mobiles Klimagerät / Bedienungsanleitung muss das System auf Atmosphärendruck entlüftet werden, damit Arbeiten durchgeführt werden können. Dieser Vorgang ist absolut unerlässlich, wenn Lötarbeiten an den Rohrleitungen durchgeführt werden sollen. Stellen Sie sicher, dass sich der Auslass der Vakuumpumpe nicht in der Nähe von Zündquellen befindet und entsprechende Belüftung vorhanden ist.
Mobiles Klimagerät / Bedienungsanleitung
245 / 396 De
246 / 396 De
Mobiles Klimagerät / Bedienungsanleitung g) Schalten Sie das Rückgewinnungsgerät ein und arbeiten Sie gemäß den Anweisungen des Herstellers. h) Überfüllen Sie die Flaschen nicht. (Nicht mehr als 80 % des Volumens bei Flüssigkeitsladung). i) Überschreiten Sie nicht den maximalen Arbeitsdruck der Flasche, auch nicht vorübergehend. j) Wenn die Flaschen korrekt gefüllt und der Prozess abgeschlossen ist, stellen Sie sicher, dass die Flaschen und die Ausrüstung unverzüglich vom Standort entfernt werden und alle Absperrventile der Ausrüstung geschlossen sind. k) Wiedergewonnenes Kältemittel darf nicht in ein anderes Kühlsystem eingefüllt werden, es sei denn, es wurde gereinigt und geprüft.
Mobiles Klimagerät / Bedienungsanleitung
247 / 396 De
248 / 396 De
Mobiles Klimagerät / Bedienungsanleitung Das rückgewonnene Kältemittel muss in der richtigen Rückgewinnungsflasche an den Kältemittellieferanten zurückgegeben und es muss ein entsprechender Entsorgungsnachweis ausgestellt werden. Mischen Sie kein Kältemittel in Rückgewinnungsgeräten und insbesondere nicht in Flaschen. Wenn Kompressoren oder Kompressoröle entfernt werden sollen, stellen Sie sicher, dass sie auf ein akzeptables Niveau evakuiert wurden, um sicherzustellen, dass kein brennbares Kältemittel im Schmiermittel verbleibt. Der Evakuierungsprozess muss vor der Rückgabe des Kompressors an den Lieferanten durchgeführt werden. Zur Beschleunigung dieses Vorgangs darf nur eine elektrische Beheizung des Kompressorgehäuses eingesetzt werden. Wenn Öl aus einem System abgelassen wird, muss dieser Vorgang sicher durchgeführt werden. 1 Sicherheitshinweise
Mobiles Klimagerät / Bedienungsanleitung
249 / 396 De
C
Hinweis zu fluorierten Gasen:
250 / 396 De
Mobiles Klimagerät / Bedienungsanleitung Schulung Die Schulung sollte den Inhalt der folgenden Punkte umfassen: Informationen über das Explosionspotenzial entflammbarer Kältemittel, um zu zeigen, dass entflammbare Stoffe bei unvorsichtigem Umgang gefährlich sein können. Informationen über potenzielle Zündquellen, insbesondere solche, die nicht offensichtlich sind, wie z. B. Feuerzeuge, Lichtschalter, Staubsauger, elektrische Heizgeräte. Informationen über die verschiedenen Sicherheitskonzepte: Unbelüftet - (siehe Abschnitt GG.2) Die Sicherheit des Gerätes hängt nicht von der Belüftung des Gehäuses ab. Das Ausschalten des Gerätes oder das Öffnen des Gehäuses hat keinen wesentlichen Einfluss auf die Sicherheit. Dennoch ist es möglich, dass sich austretendes Kältemittel im Inneren des Gehäuses ansammelt und beim Öffnen des Gehäuses eine entzündliche Atmosphäre freigesetzt wird. Belüftetes Gehäuse - (siehe Abschnitt GG.4) Die Sicherheit des Gerätes hängt von der Belüftung des Gehäuses ab. Das Ausschalten des Gerätes oder das Öffnen des Gehäuses hat einen wesentlichen Einfluss auf die Sicherheit. Zuvor sollte für eine ausreichende Belüftung gesorgt werden. Belüfteter Raum - (siehe Abschnitt GG.5) Die Sicherheit des Gerätes hängt von der Belüftung des Raumes ab. Das Ausschalten des Gerätes oder das Öffnen des Gehäuses hat keinen wesentlichen Einfluss auf die Sicherheit. Die Belüftung des Raumes darf während der Reparaturarbeiten nicht abgeschaltet werden. 1 Sicherheitshinweise
Mobiles Klimagerät / Bedienungsanleitung
251 / 396 De
Informationen über das Konzept der dichten Bauteile und dichten Gehäuse nach IEC 60079-15:2010. Informationen über die richtigen Arbeitsverfahren: a) Inbetriebnahme
252 / 396 De
Mobiles Klimagerät / Bedienungsanleitung 1 Sicherheitshinweise c) Reparatur
Mobiles Klimagerät / Bedienungsanleitung
253 / 396 De
254 / 396 De
Mobiles Klimagerät / Bedienungsanleitung e) Entsorgung
Mobiles Klimagerät / Bedienungsanleitung
255 / 396 De
Kennzeichnung des Geräts mit Schildern. Schilder für ähnliche Geräte, die in einem Arbeitsbereich verwendet werden, werden im Allgemeinen durch örtliche Vorschriften geregelt und geben die Mindestanforderungen für die Bereitstellung von Sicherheits- und/oder Gesundheitsschildern für einen Arbeitsort an. Alle erforderlichen Schilder sind aufrechtzuerhalten. Die Arbeitgeber sollten sicherstellen, dass die Beschäftigten eine geeignete und ausreichende Unterweisung und Schulung über die Bedeutung der entsprechenden Sicherheitsschilder und die im Zusammenhang mit diesen Schildern zu ergreifenden Maßnahmen erhalten. Die Wirksamkeit von Schildern sollte nicht dadurch beeinträchtigt werden, dass zu viele Schilder zusammen aufgestellt werden. Alle verwendeten Piktogramme sollten so einfach wie möglich sein und nur wesentliche Details enthalten. Entsorgung von Geräten, die brennbare Kältemittel verwenden. Siehe nationale Vorschriften. Lagerung von Anlagen/Geräten Die Lagerung von Geräten sollte gemäß den Anweisungen des Herstellers erfolgen. Lagerung von verpackten (nicht verkauften) Geräten Der Schutz der Verpackung zur Aufbewahrung sollte so gestaltet sein, dass ein mechanischer Schaden an den Geräten in der Verpackung nicht zu einem Leck der Kältemittelfüllung führt. Die maximale Anzahl von Geräten, die zusammen gelagert werden dürfen, wird durch örtliche Vorschriften festgelegt. 1 Sicherheitshinweise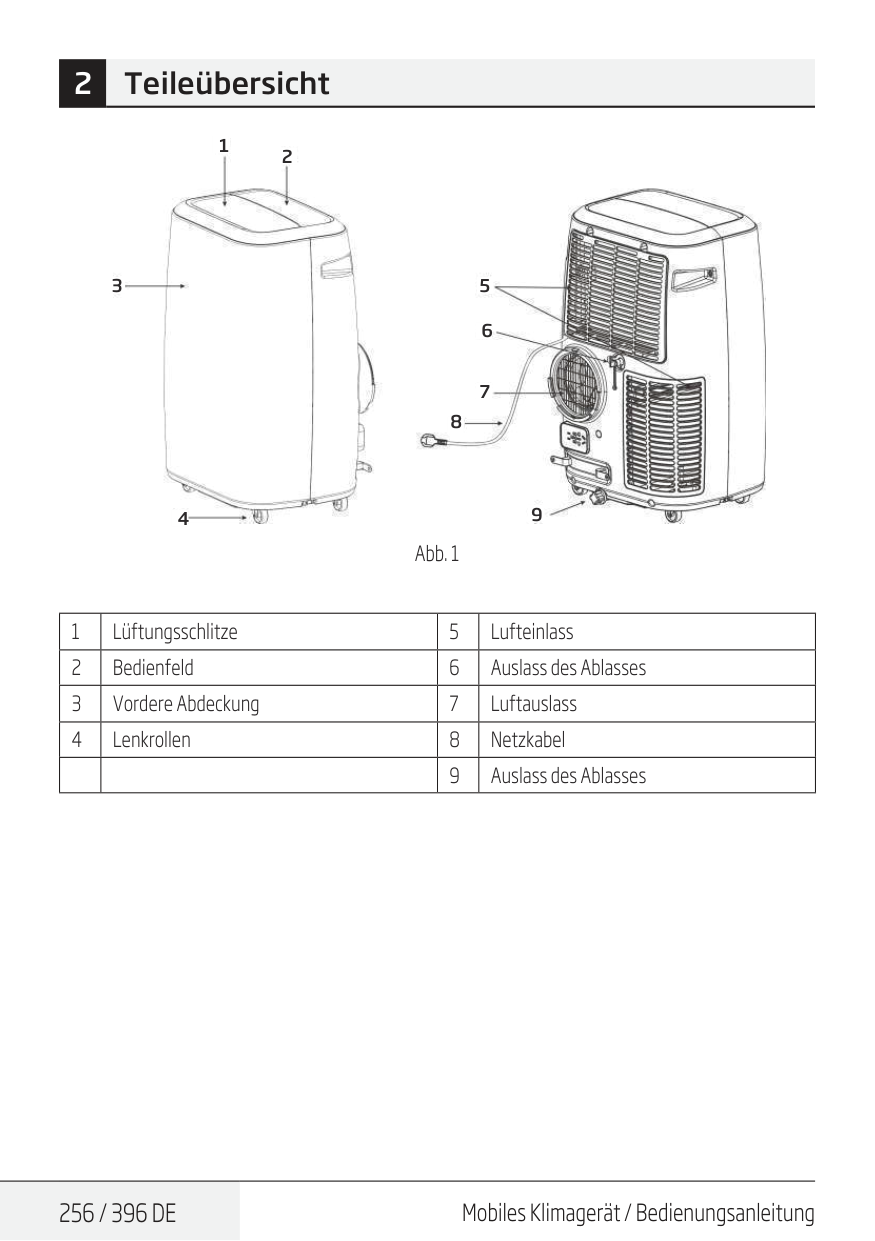
256 / 396 De
Mobiles Klimagerät / Bedienungsanleitung 2 Teileübersicht 1 2 3 5 6 7 8 9 4 Abb. 1 1 Lüftungsschlitze 5 Lufteinlass 2 Bedienfeld 6 Auslass des Ablasses 3 Vordere Abdeckung 7 Luftauslass 4 Lenkrollen 8 Netzkabel 9 Auslass des Ablasses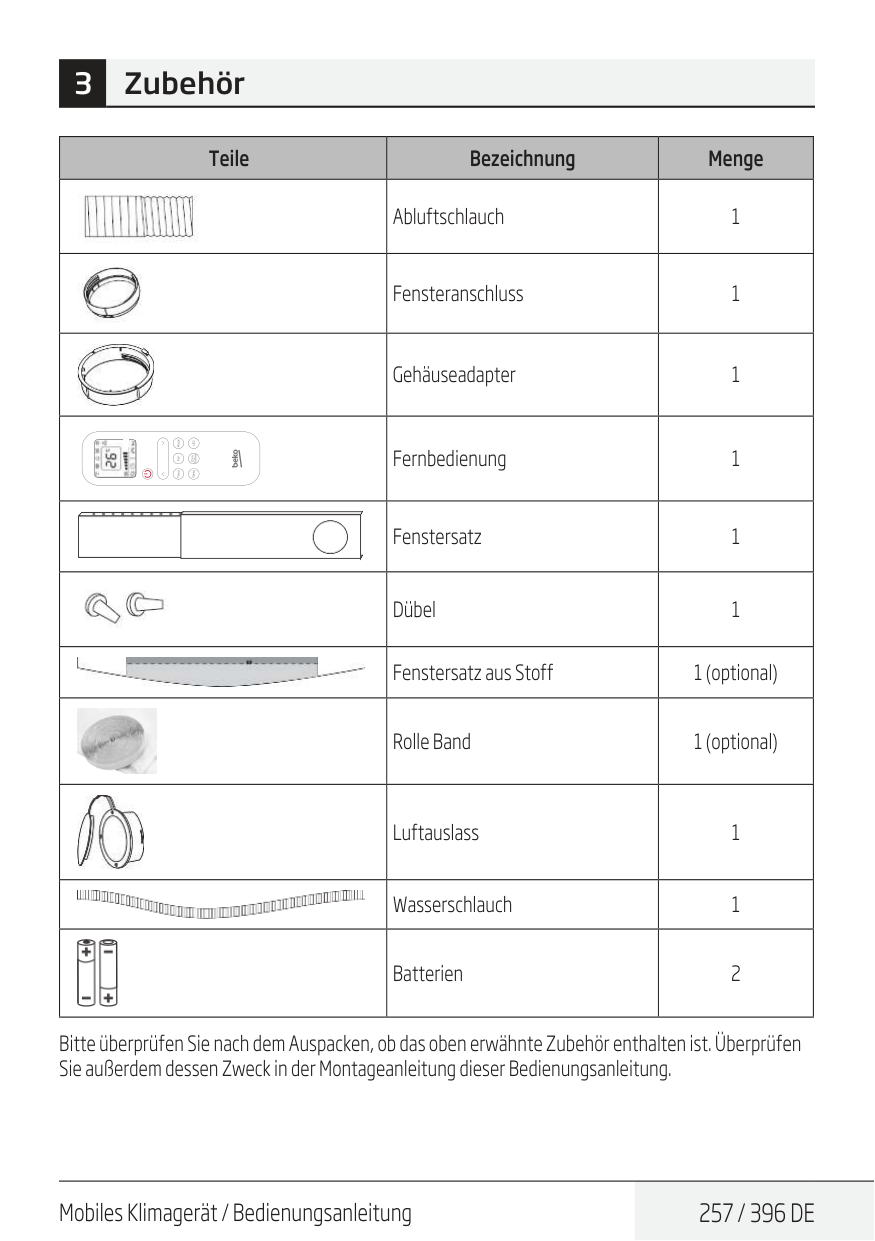
Mobiles Klimagerät / Bedienungsanleitung
257 / 396 De
Teile Bezeichnung Menge Abluftschlauch 1 Fensteranschluss 1 Gehäuseadapter 1 Fernbedienung 1 Fenstersatz 1 Dübel 1 Fenstersatz aus Stoff 1 (optional) Rolle Band 1 (optional) Luftauslass 1 Wasserschlauch 1 Batterien 2 Bitte überprüfen Sie nach dem Auspacken, ob das oben erwähnte Zubehör enthalten ist. Überprüfen Sie außerdem dessen Zweck in der Montageanleitung dieser Bedienungsanleitung. 3 Zubehör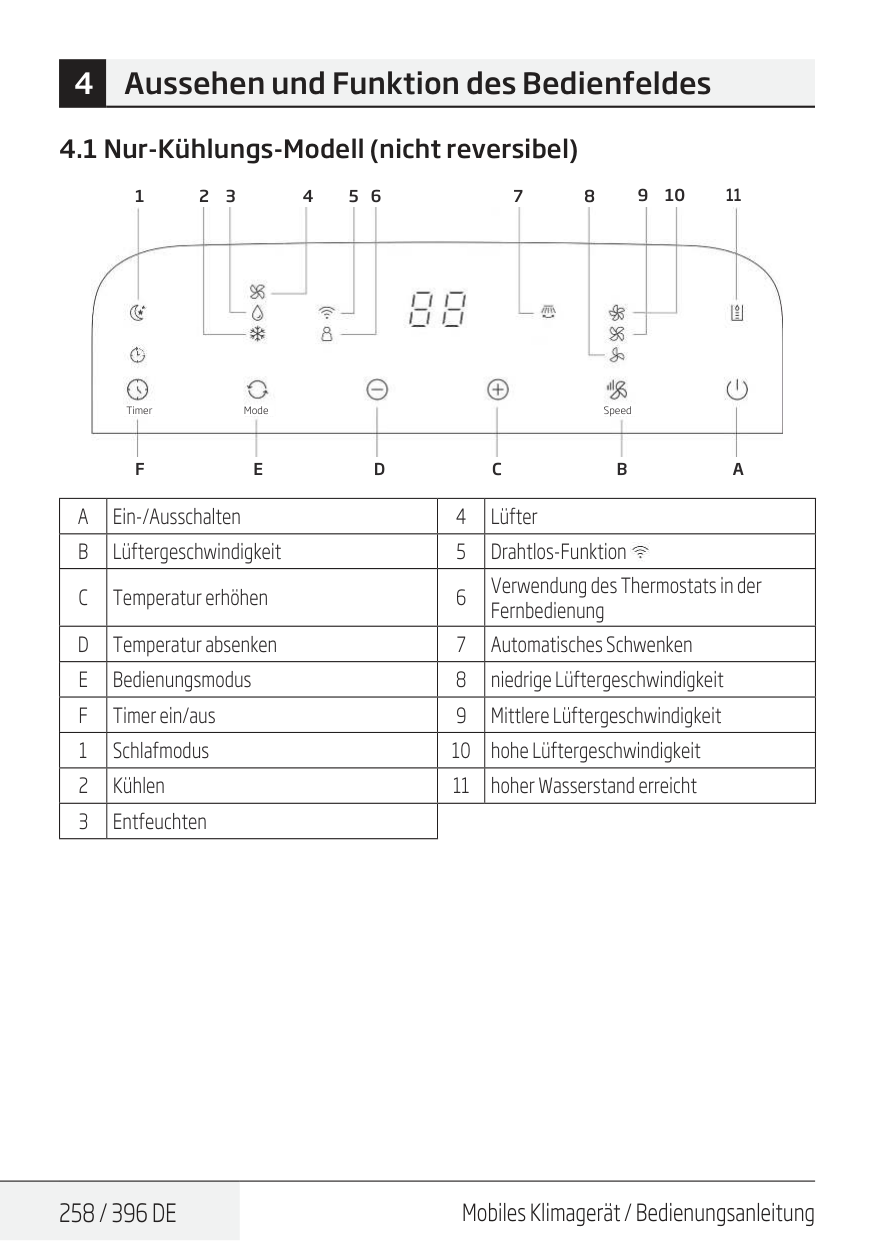
258 / 396 De
Mobiles Klimagerät / Bedienungsanleitung 4.1 Nur-Kühlungs-Modell (nicht reversibel) Timer Mode SpeedF
1 2 3 4 5 6 7 8 9 10E
D
C
B
A
11A
Ein-/Ausschalten 4 LüfterB
Lüftergeschwindigkeit 5 Drahtlos-FunktionC
Temperatur erhöhen 6 Verwendung des Thermostats in der FernbedienungD
Temperatur absenken 7 Automatisches SchwenkenE
Bedienungsmodus 8 niedrige LüftergeschwindigkeitF
Timer ein/aus 9 Mittlere Lüftergeschwindigkeit 1 Schlafmodus 10 hohe Lüftergeschwindigkeit 2 Kühlen 11 hoher Wasserstand erreicht 3 Entfeuchten 4 Aussehen und Funktion des Bedienfeldes
Mobiles Klimagerät / Bedienungsanleitung
259 / 396 De
4 Aussehen und Funktion des Bedienfeldes 4.2 Kühl- und Wärmepumpenmodell (reversibel)A
Ein-/Ausschalten 4 HeizenB
Lüftergeschwindigkeit 5 LüfterC
Temperatur erhöhen 6 Drahtlos-FunktionD
Temperatur absenken 7 Verwendung des Thermostats in der FernbedienungE
Bedienungsmodus 9 Automatisches SchwenkenF
Timer ein/aus 10 niedrige Lüftergeschwindigkeit 11 Mittlere Lüftergeschwindigkeit 1 Schlafmodus 12 hohe Lüftergeschwindigkeit 2 Kühlen 13 hoher Wasserstand erreicht 3 Entfeuchten Timer Mode SpeedF
1 2 3 4 5 6 7 8 9 10 12 11 13E
D
C
B
A
8 Hepa 13 Filteranzeige (nur auf BP113H vorhanden)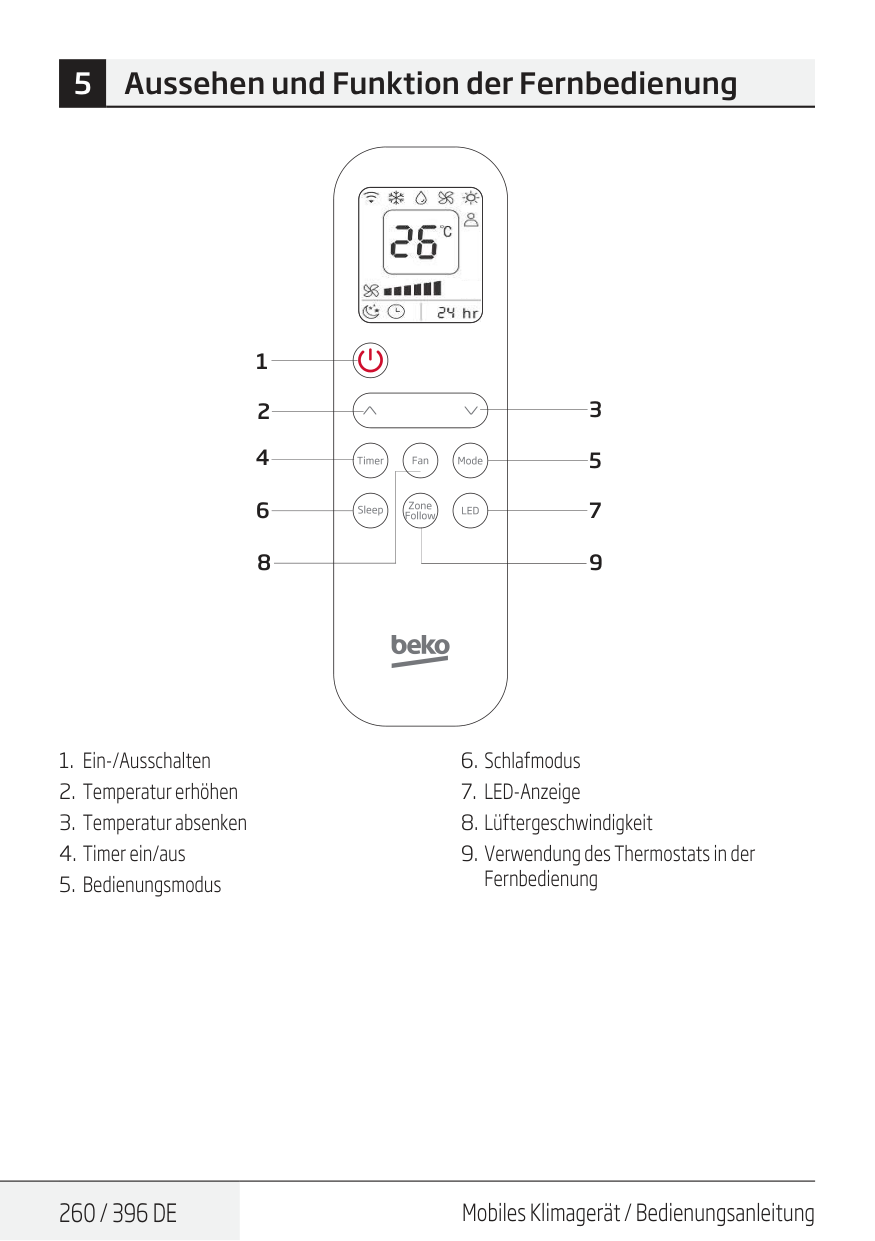
260 / 396 De
Mobiles Klimagerät / Bedienungsanleitung 3 5 7 9 1 2 4 6 8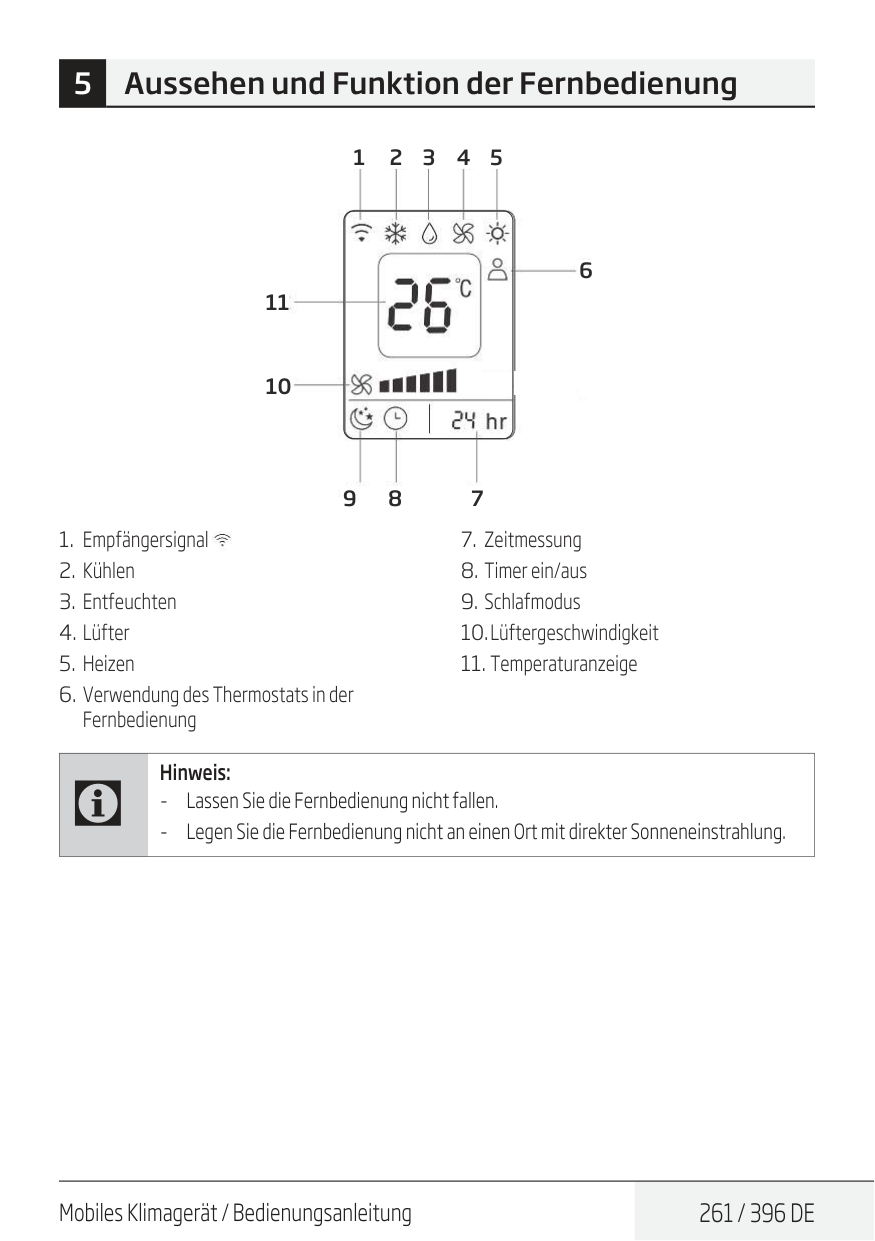
Mobiles Klimagerät / Bedienungsanleitung
261 / 396 De
5 Aussehen und Funktion der Fernbedienung 1 2 3 4 5 6 9 8 7 11 10C
Hinweis: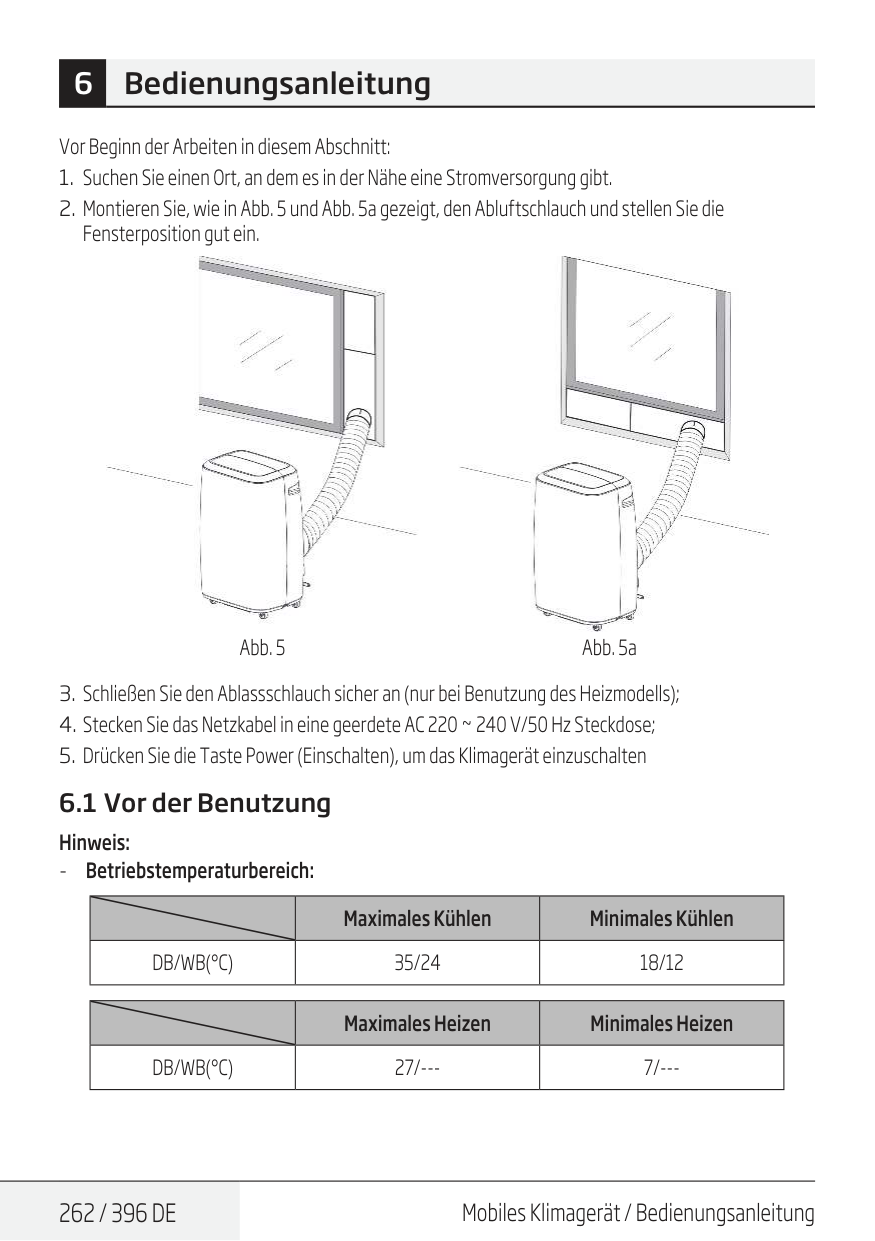
262 / 396 De
Mobiles Klimagerät / Bedienungsanleitung 6 Bedienungsanleitung Vor Beginn der Arbeiten in diesem Abschnitt:Db/Wb(°C)
35/24 18/12 Maximales Heizen Minimales HeizenDb/Wb(°C)
27/--- 7/---
Mobiles Klimagerät / Bedienungsanleitung
263 / 396 De
Überprüfen Sie, ob der Abluftschlauch richtig montiert ist. Vorsichtsmaßnahmen bei Kühl- und Entfeuchtungsvorgängen:
264 / 396 De
Mobiles Klimagerät / Bedienungsanleitung 6.6 Timer-Betrieb Einstellung Timer ein:
Mobiles Klimagerät / Bedienungsanleitung
265 / 396 De
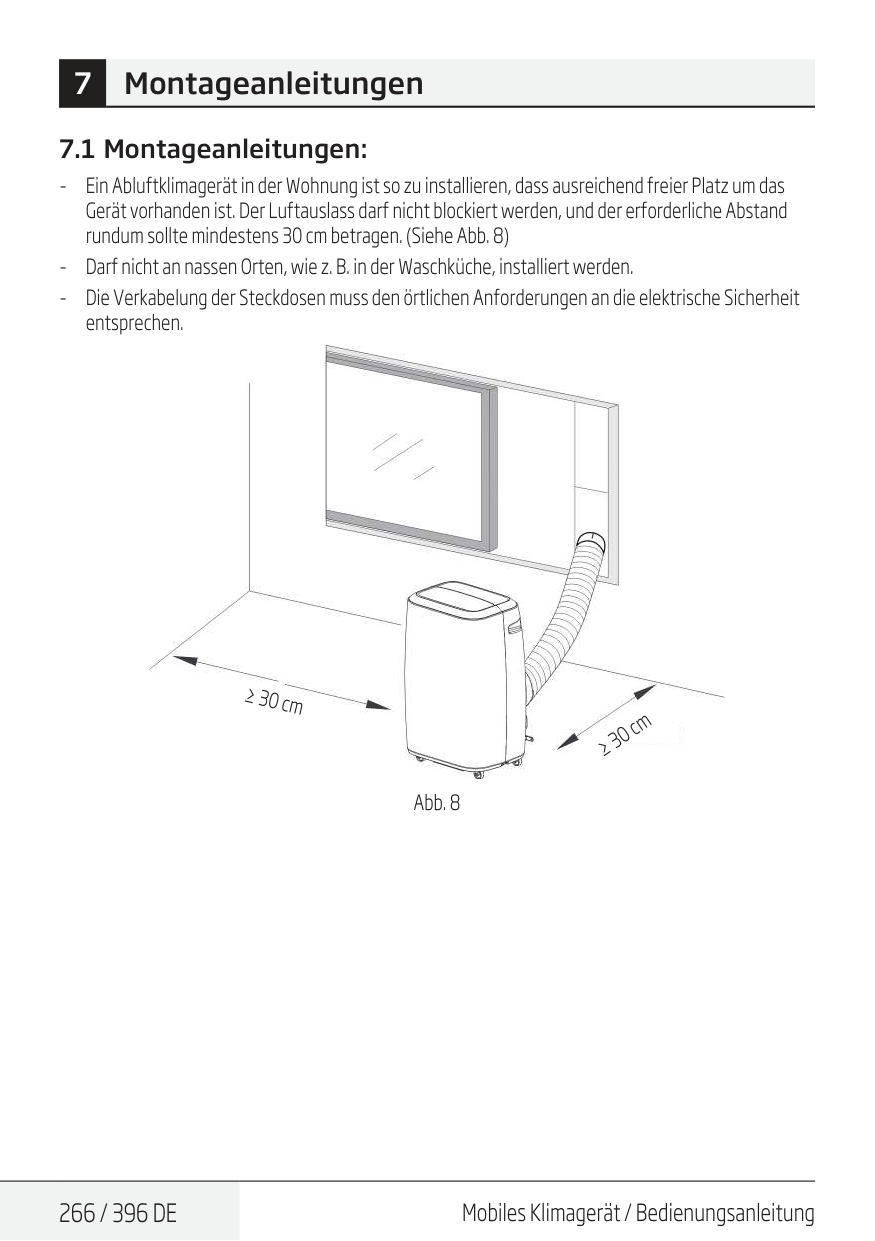
266 / 396 De
Mobiles Klimagerät / Bedienungsanleitung 7 Montageanleitungen 7.1 Montageanleitungen: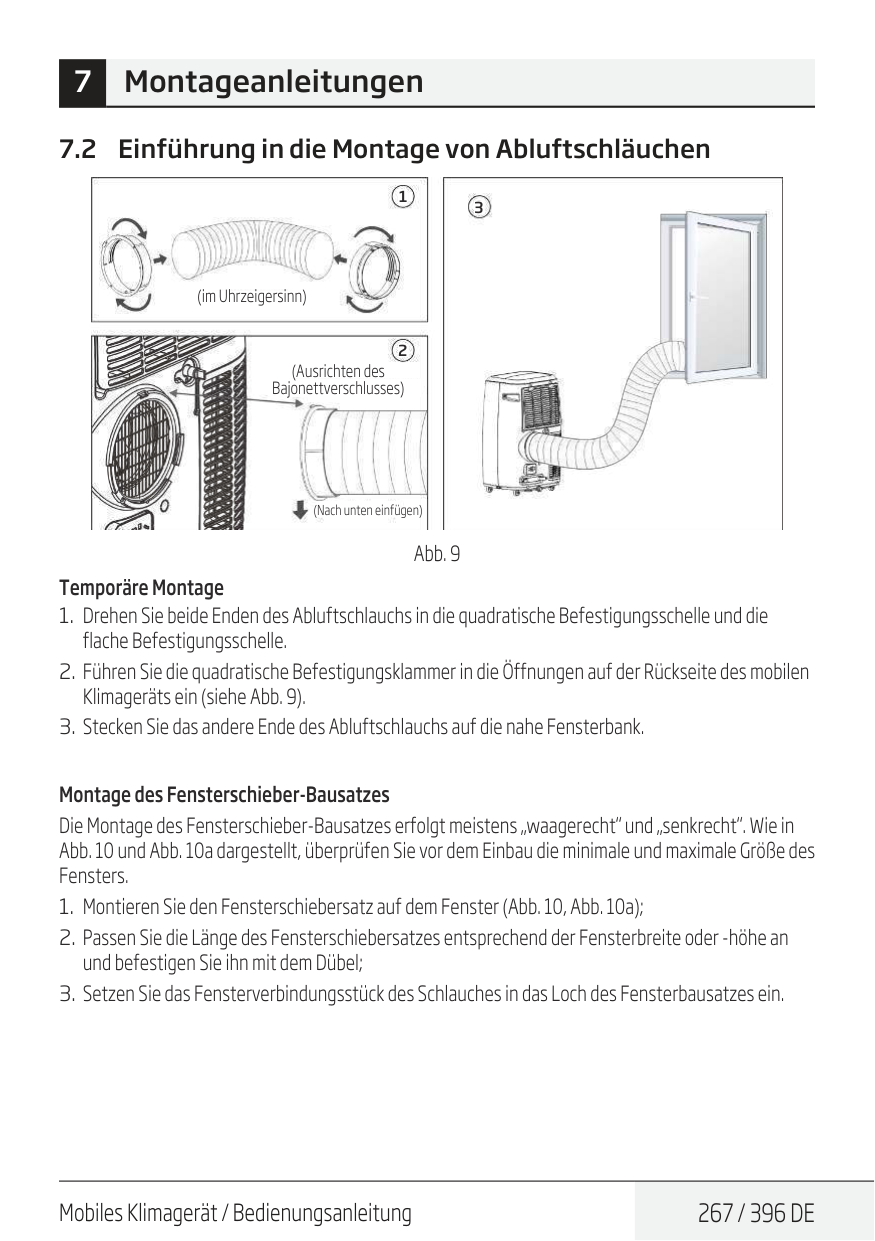
Mobiles Klimagerät / Bedienungsanleitung
267 / 396 De
7.2 Einführung in die Montage von Abluftschläuchen 1 2 3 (im Uhrzeigersinn) (Ausrichten des Bajonettverschlusses) (Nach unten einfügen) Abb. 9 Temporäre Montage
268 / 396 De
Mobiles Klimagerät / Bedienungsanleitung 1 Fensterbreite min.: 67,5 cm max.: 123 cm Abb. 10 Fensterhöhe min.: 67,5 cm max.: 123 cm Abb. 10a 2 3 (Dübel) 7 Montageanleitungen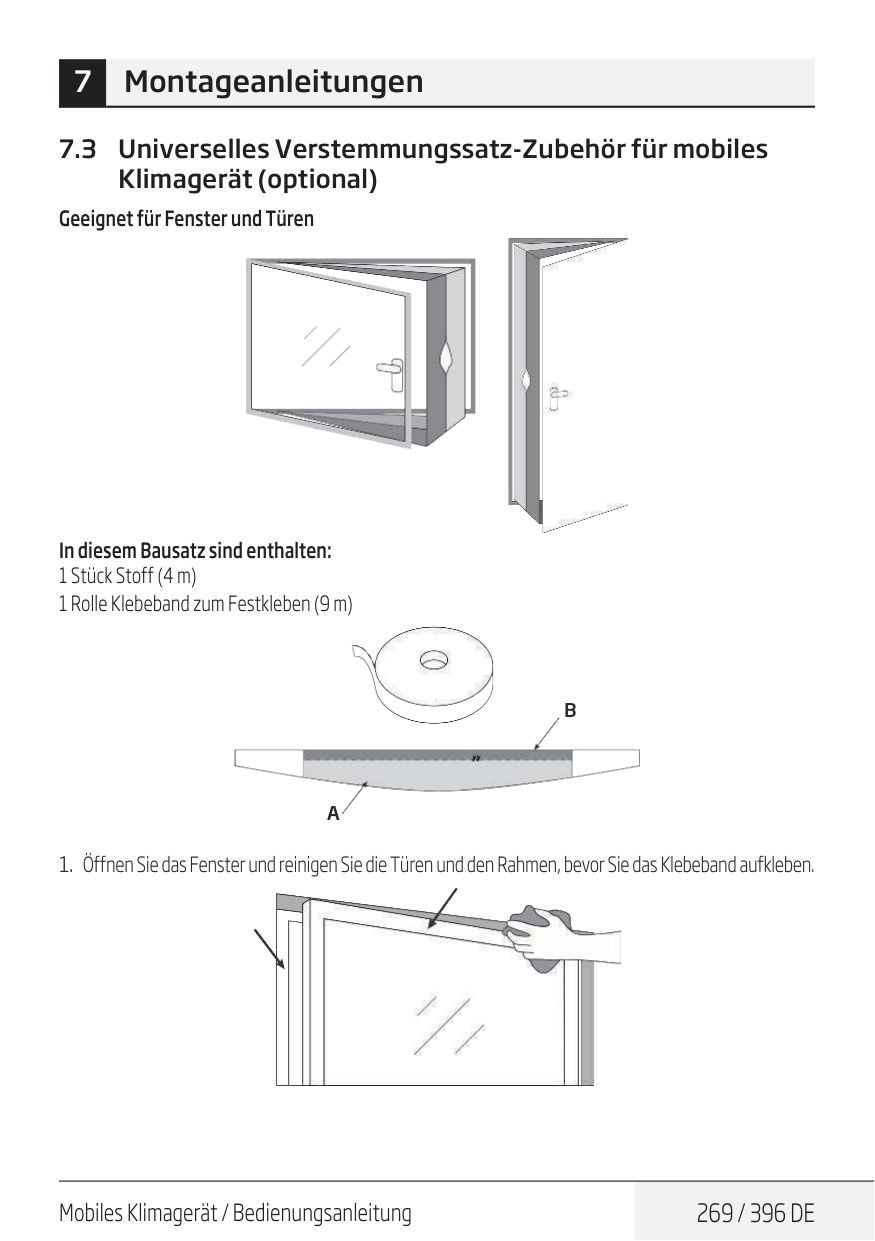
Mobiles Klimagerät / Bedienungsanleitung
269 / 396 De
7.3 Universelles Verstemmungssatz-Zubehör für mobiles Klimagerät (optional) Geeignet für Fenster und Türen In diesem Bausatz sind enthalten: 1 Stück Stoff (4 m) 1 Rolle Klebeband zum Festkleben (9 m)A
B

270 / 396 De
Mobiles Klimagerät / Bedienungsanleitung 7 MontageanleitungenA
B
A
B
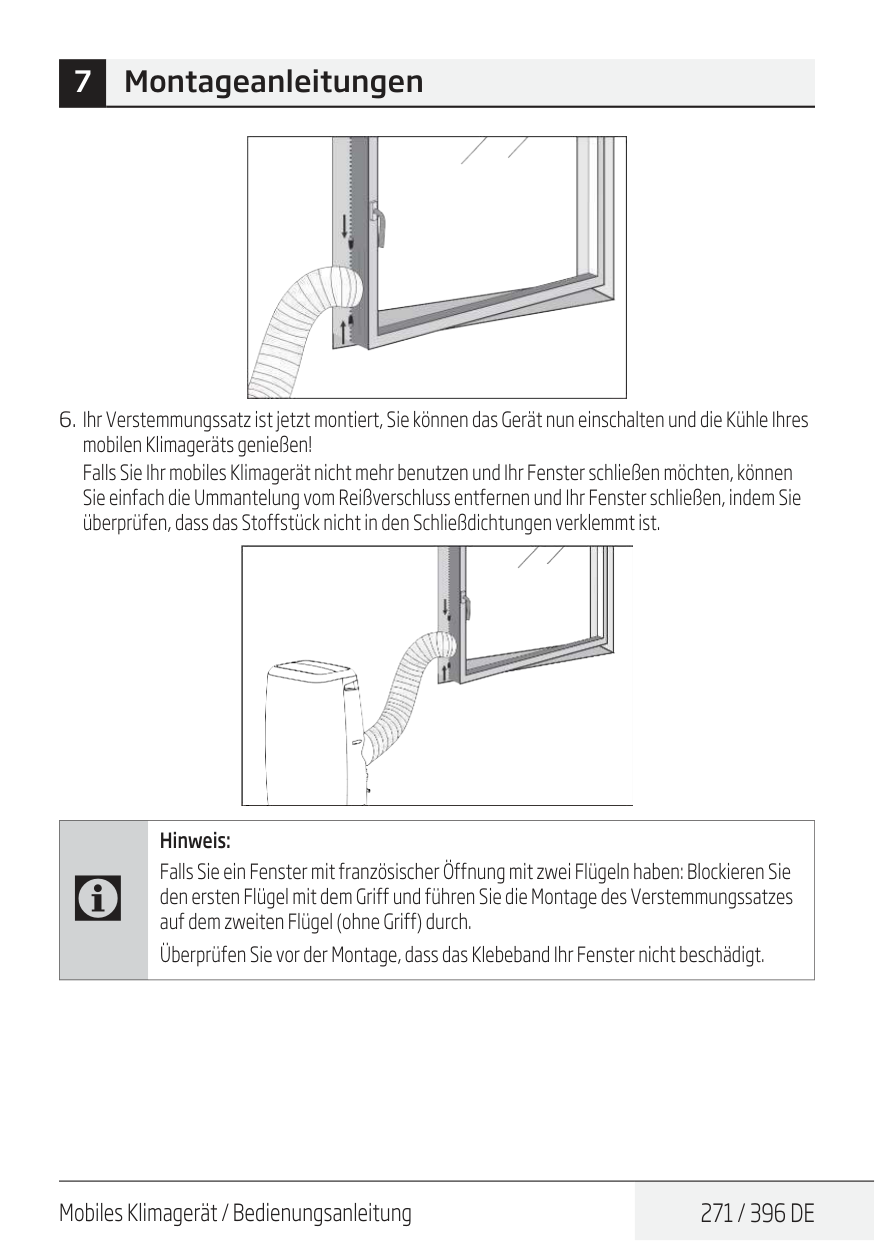
Mobiles Klimagerät / Bedienungsanleitung
271 / 396 De
7 MontageanleitungenC
Hinweis: Falls Sie ein Fenster mit französischer Öffnung mit zwei Flügeln haben: Blockieren Sie den ersten Flügel mit dem Griff und führen Sie die Montage des Verstemmungssatzes auf dem zweiten Flügel (ohne Griff) durch. Überprüfen Sie vor der Montage, dass das Klebeband Ihr Fenster nicht beschädigt.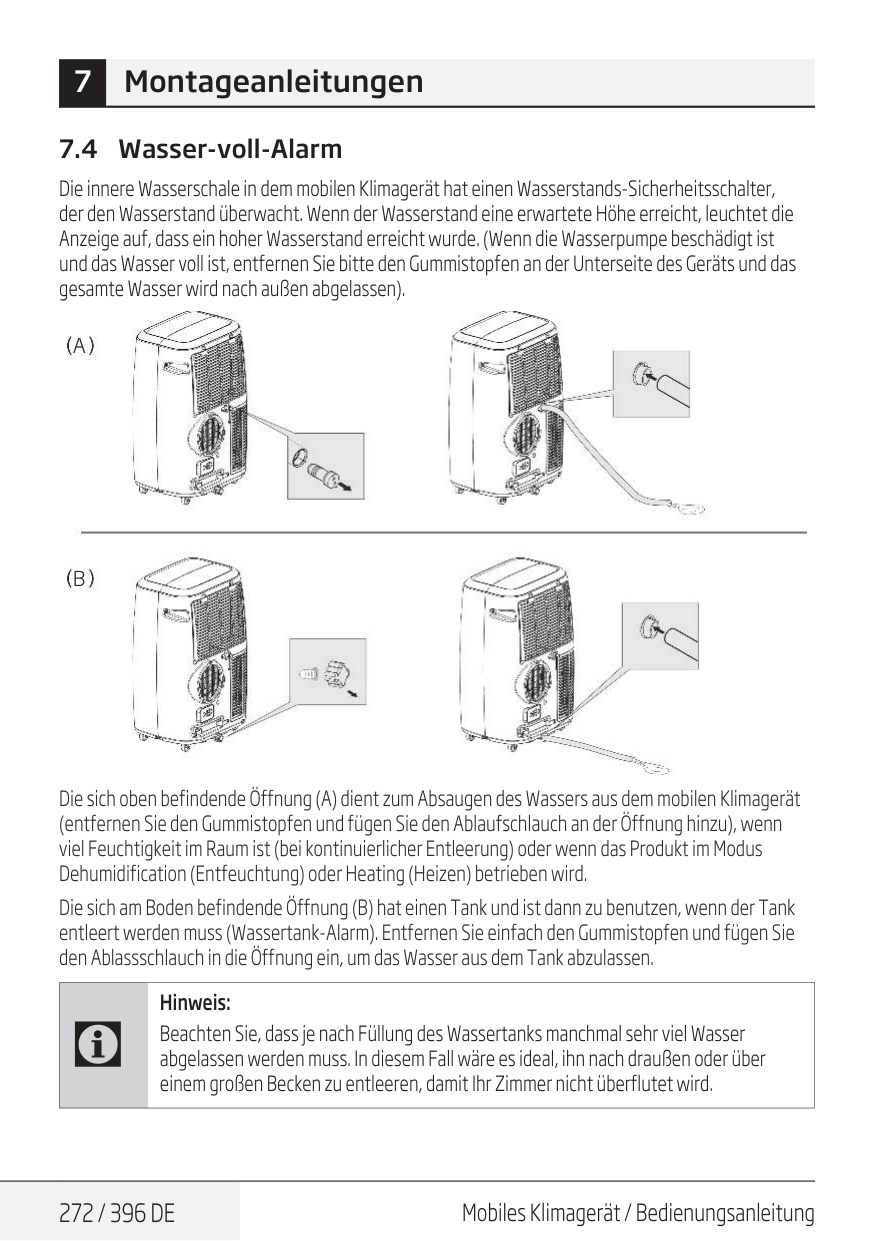
272 / 396 De
Mobiles Klimagerät / Bedienungsanleitung 7 Montageanleitungen 7.4 Wasser-voll-Alarm Die innere Wasserschale in dem mobilen Klimagerät hat einen Wasserstands-Sicherheitsschalter, der den Wasserstand überwacht. Wenn der Wasserstand eine erwartete Höhe erreicht, leuchtet die Anzeige auf, dass ein hoher Wasserstand erreicht wurde. (Wenn die Wasserpumpe beschädigt ist und das Wasser voll ist, entfernen Sie bitte den Gummistopfen an der Unterseite des Geräts und das gesamte Wasser wird nach außen abgelassen).A
B
Die sich oben befindende Öffnung (A) dient zum Absaugen des Wassers aus dem mobilen Klimagerät (entfernen Sie den Gummistopfen und fügen Sie den Ablaufschlauch an der Öffnung hinzu), wenn viel Feuchtigkeit im Raum ist (bei kontinuierlicher Entleerung) oder wenn das Produkt im Modus Dehumidification (Entfeuchtung) oder Heating (Heizen) betrieben wird. Die sich am Boden befindende Öffnung (B) hat einen Tank und ist dann zu benutzen, wenn der Tank entleert werden muss (Wassertank-Alarm). Entfernen Sie einfach den Gummistopfen und fügen Sie den Ablassschlauch in die Öffnung ein, um das Wasser aus dem Tank abzulassen.C
Hinweis: Beachten Sie, dass je nach Füllung des Wassertanks manchmal sehr viel Wasser abgelassen werden muss. In diesem Fall wäre es ideal, ihn nach draußen oder über einem großen Becken zu entleeren, damit Ihr Zimmer nicht überflutet wird.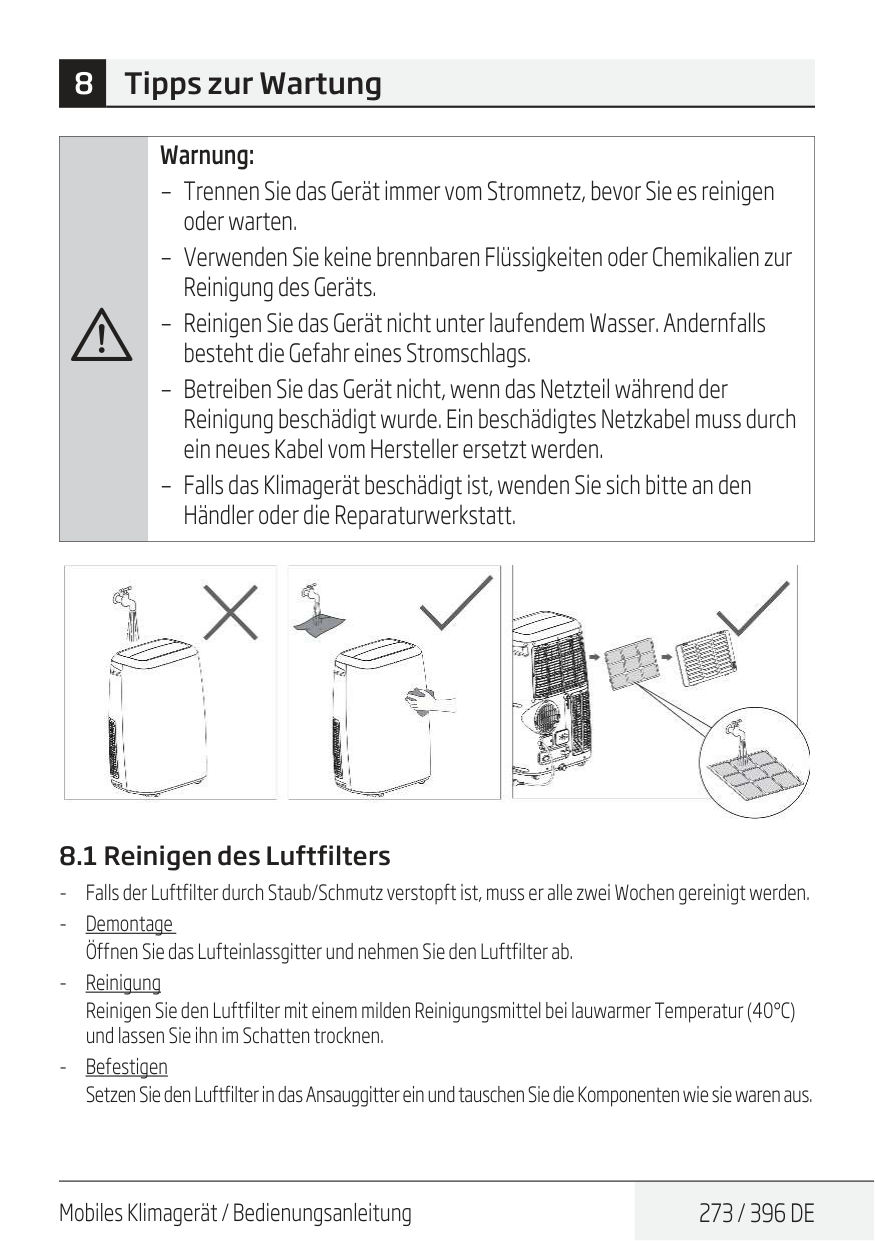
Mobiles Klimagerät / Bedienungsanleitung
273 / 396 De
8 Tipps zur WartungA
Warnung: – Trennen Sie das Gerät immer vom Stromnetz, bevor Sie es reinigen oder warten. – Verwenden Sie keine brennbaren Flüssigkeiten oder Chemikalien zur Reinigung des Geräts. – Reinigen Sie das Gerät nicht unter laufendem Wasser. Andernfalls besteht die Gefahr eines Stromschlags. – Betreiben Sie das Gerät nicht, wenn das Netzteil während der Reinigung beschädigt wurde. Ein beschädigtes Netzkabel muss durch ein neues Kabel vom Hersteller ersetzt werden. – Falls das Klimagerät beschädigt ist, wenden Sie sich bitte an den Händler oder die Reparaturwerkstatt. 8.1 Reinigen des Luftfilters
274 / 396 De
Mobiles Klimagerät / BedienungsanleitungA
Warnung: Betreiben Sie das Gerät nicht ohne Filter, da Schmutz und Fusseln es verstopfen und die Leistung beeinträchtigen können. 8.2 Reinigen der Oberfläche des Klimageräts Reinigen Sie die Oberfläche zunächst mit einem neutralen Reinigungsmittel und einem feuchten Tuch und wischen Sie sie dann mit einem trockenen Tuch ab. 8 Tipps zur Wartung
Mobiles Klimagerät / Bedienungsanleitung
275 / 396 De
9 Wartung und Instandhaltung Pflegetipps Reinigen Sie den Luftfilter alle zwei Wochen, um eine optimale Leistung zu erzielen. Die Wasserauffangschale sollte unmittelbar nach Auftreten des Fehlers P1 und vor der Lagerung entleert werden, um Schimmelbildung zu vermeiden. In Haushalten mit Tieren müssen Sie das Schutzgitter regelmäßig abwischen, um eine Verstopfung durch Tierhaare zu verhindern. Reinigung des Geräts Reinigen Sie das Gerät mit einem feuchten, fusselfreien Tuch und einem milden Reinigungsmittel. Trocknen Sie das Gerät mit einem trockenen, fusselfreien Tuch. Lagern Sie das Gerät, wenn Sie es nicht verwenden. Entleeren Sie die Wasserauffangschale des Geräts gemäß den Anweisungen im folgenden Abschnitt. Lassen Sie das Gerät in einem warmen Raum 12 Stunden im Fan mode (Lüftermodus) laufen, um es zu trocknen und Schimmelbildung zu vermeiden. Schalten Sie das Gerät aus und ziehen Sie den Netzstecker heraus. Reinigen Sie den Luftfilter gemäß den Anweisungen im vorherigen Abschnitt. Setzen Sie den sauberen, trockenen Filter vor der Lagerung wieder ein. Entfernen Sie die Batterien aus der Fernbedienung. Bewahren Sie das Gerät an einem kühlen, dunklen Ort auf. Direkte Sonneneinstrahlung oder extreme Hitze kann die Lebensdauer des Geräts verkürzen.C
Hinweis: Das Gehäuse und die Vorderseite können mit einem ölfreien Tuch abgestaubt oder mit einem Tuch abgewischt werden, das mit einer Lösung aus warmem Wasser und einem milden flüssigen Spülmittel getränkt ist. Gründlich abspülen und trockenwischen. Verwenden Sie niemals scharfe Reinigungsmittel, Wachs oder Poliermittel an der Gehäusefront. Entfernen Sie unbedingt überschüssiges Wasser aus dem Tuch, bevor Sie die Bedienelemente abwischen. Überschüssiges Wasser in den oder um die Bedienelemente herum kann zu Schäden am Gerät führen.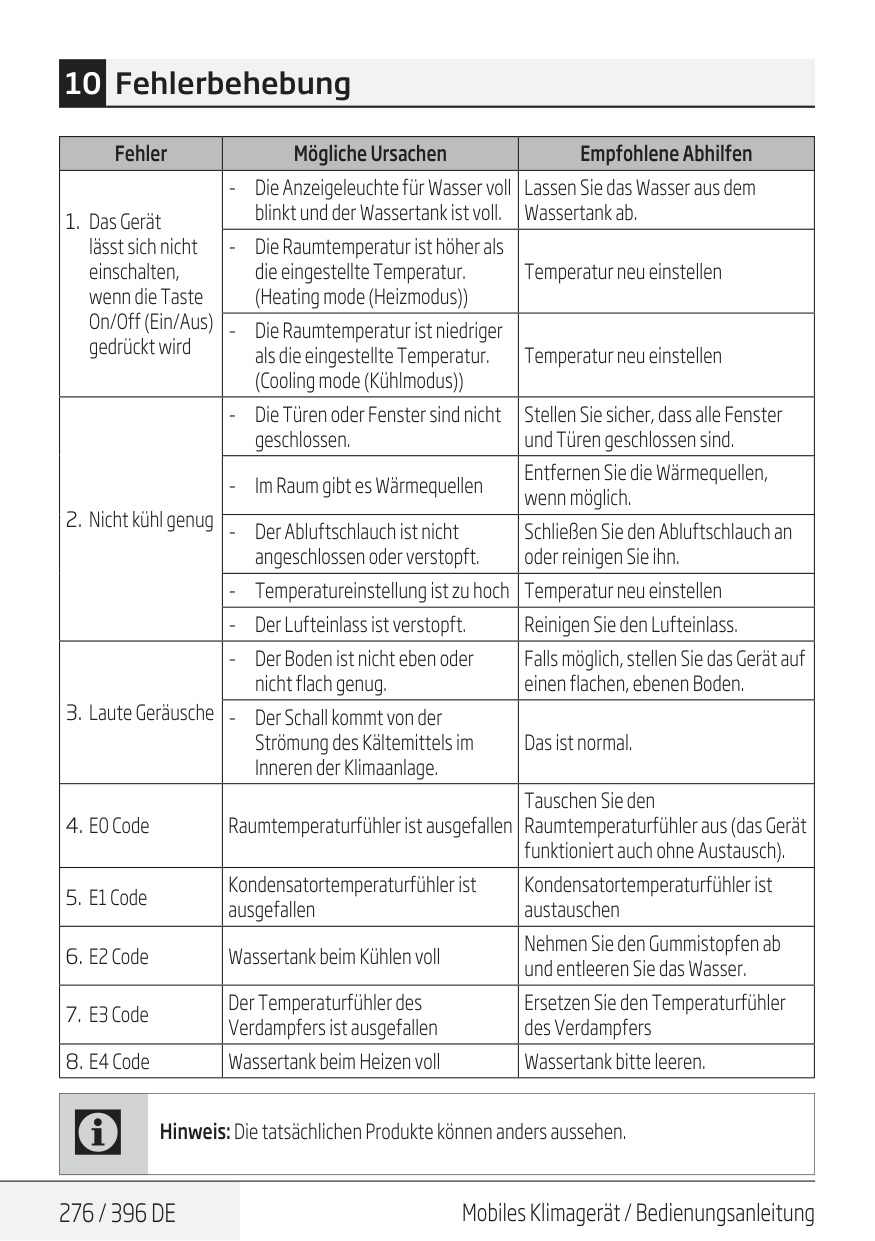
276 / 396 De
Mobiles Klimagerät / Bedienungsanleitung Fehler Mögliche Ursachen Empfohlene AbhilfenC
Hinweis: Die tatsächlichen Produkte können anders aussehen. 10 Fehlerbehebung
Mobiles Klimagerät / Bedienungsanleitung
277 / 396 De
Bei der Verwendung dieses Geräts in europäischen Ländern müssen die folgenden Informationen beachtet werden: Entsorgung: Entsorgen Sie dieses Produkt nicht als unsortierten Hausmüll. Wenn dieses Gerät entsorgt werden soll, muss es zur besonderen Behandlung getrennt abgeholt werden. Es ist verboten, dieses Gerät im Hausmüll zu entsorgen. Es gibt mehrere Möglichkeiten, dieses Gerät zu entsorgen:Dieses Symbol zeigt an, dass dieses Gerät am Ende seiner Einsatzzeit nicht mit anderem Hausmüll entsorgt werden darf. Altgeräte müssen an offizielle Sammelstellen zum Recycling elektrischer und elektronischer Geräte abgegeben werden. Nähere Angaben zu diesen Sammelstellen erhalten Sie von Ihrer Stadtverwaltung oder dem Händler, bei dem Sie das Gerät erworben haben. Der Beitrag jedes Haushalts zum Umweltschutz ist wichtig. Eine angemessene Entsorgung von Altgeräten hilft bei der Verhinderung negativer Auswirkungen auf Umwelt und menschliche Gesundheit. 11 Europäische Entsorgungsrichtlinien
278 / 396 De
Mobiles Klimagerät / Bedienungsanleitung 12 Installationsanleitungen 12.1 F-Gas-Anweisung Dieses Produkt enthält fluorierte Treibhausgase. Die fluorierten Treibhausgase sind in hermetisch verschlossenem Equipment enthalten. Installationen, Dienstleistungen, Wartungen, Reparaturen, Überprüfungen auf Leckstellen oder das Stilllegen von Equipment und das Produktrecycling, sollten von natürlichen Personen, die entsprechenden Zertifizierungen erworben haben, durchgeführt werden. Wenn das System über eine Leckageerkennung verfügt, sollten Leckagekontrollen mindestens alle 12 Monate durchgeführt werden, um sicherzustellen, dass das System ordnungsgemäß arbeitet. Wenn Leckagekontrollen am Produkt durchgeführt werden, sollte der Inspektionszyklus angegeben werden, Festlegung und Datenspeicherung der Leckagekontrollen.C
Hinweis: Falls das CO2-Äquivalent der fluorierten Treibhausgase bei hermetisch verschlossenen Geräten, mobilen Klimageräten, Fenster-Klimageräten und Luftentfeuchtern, weniger als 10 Tonnen beträgt, müssen Sie keine Leckagenüberprüfung durchführen.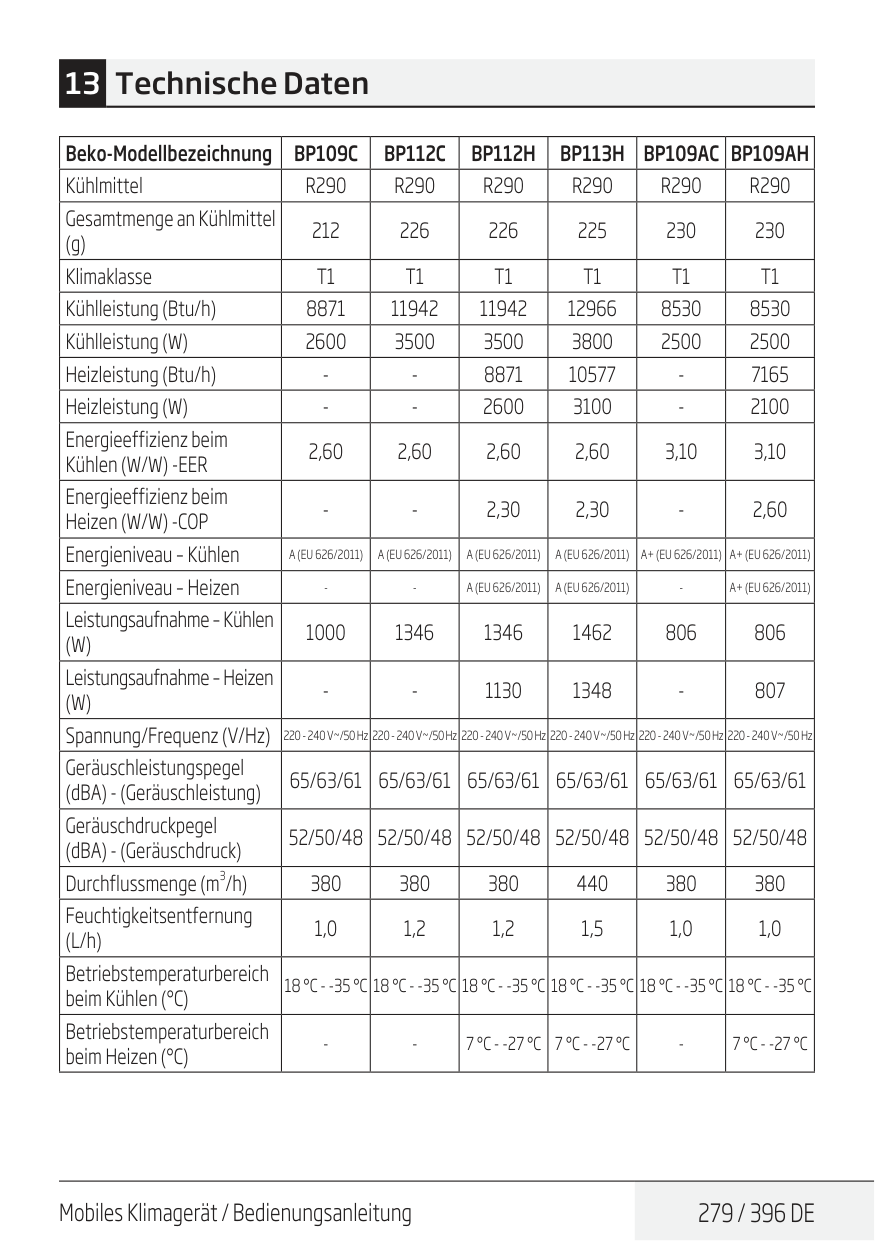
Mobiles Klimagerät / Bedienungsanleitung
279 / 396 De
Beko-ModellbezeichnungBp109C
Bp112C
Bp112H
Bp113H
Bp109Ac Bp109Ah
KühlmittelR290
R290
R290
R290
R290
R290
Gesamtmenge an Kühlmittel (g) 212 226 226 225 230 230 KlimaklasseT1
T1
T1
T1
T1
T1
Kühlleistung (Btu/h) 8871 11942 11942 12966 8530 8530 Kühlleistung (W) 2600 3500 3500 3800 2500 2500 Heizleistung (Btu/h)A (Eu 626/2011)
A (Eu 626/2011)
A (Eu 626/2011)
A (Eu 626/2011)
A+ (Eu 626/2011) A+ (Eu 626/2011)
Energieniveau – HeizenA (Eu 626/2011)
A (Eu 626/2011)
A+ (Eu 626/2011)
(W)
1000 1346 1346 1462 806 806 Leistungsaufnahme – Heizen(W)
7 °C - -27 °C
7 °C - -27 °C
7 °C - -27 °C
280 / 396 De
Mobiles Klimagerät / Bedienungsanleitung
Hersteller: Arcelik A.S. Karaagac Cd. Nr.: 2-6 34445 Sutluce, Beyoglu, Istanbul, Türkei
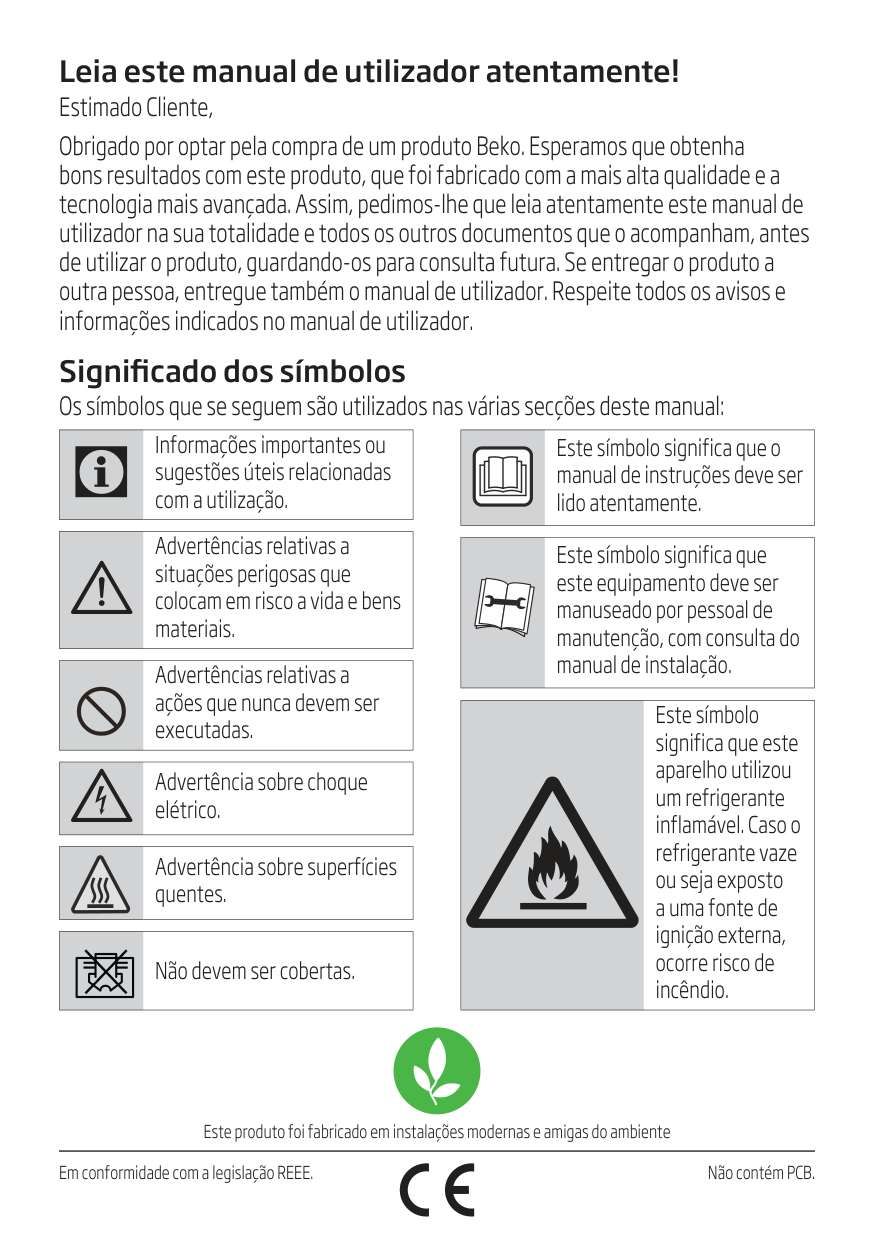
Leia este manual de utilizador atentamente! Estimado Cliente, Obrigado por optar pela compra de um produto Beko. Esperamos que obtenha bons resultados com este produto, que foi fabricado com a mais alta qualidade e a tecnologia mais avançada. Assim, pedimos-lhe que leia atentamente este manual de utilizador na sua totalidade e todos os outros documentos que o acompanham, antes de utilizar o produto, guardando-os para consulta futura. Se entregar o produto a outra pessoa, entregue também o manual de utilizador. Respeite todos os avisos e informações indicados no manual de utilizador. Significado dos símbolos Os símbolos que se seguem são utilizados nas várias secções deste manual: Este produto foi fabricado em instalações modernas e amigas do ambiente Em conformidade com a legislação REEE. Não contém PCB.
C
Informações importantes ou sugestões úteis relacionadas com a utilização.A
Advertências relativas a situações perigosas que colocam em risco a vida e bens materiais. Advertências relativas a ações que nunca devem ser executadas.B
Advertência sobre choque elétrico. Advertência sobre superfícies quentes. Não devem ser cobertas. Este símbolo significa que o manual de instruções deve ser lido atentamente. Este símbolo significa que este equipamento deve ser manuseado por pessoal de manutenção, com consulta do manual de instalação. Este símbolo significa que este aparelho utilizou um refrigerante inflamável. Caso o refrigerante vaze ou seja exposto a uma fonte de ignição externa, ocorre risco de incêndio.
Ar-Condicionado móvel / Manual de Utilizador
283 / 396 Pt
Índice 1 Aviso de segurança 285 2 Nome das peças 312 3 Acessórios 313 4 Aparência e função do painel de controlo 314 4.1 Apenas no modelo de arrefecimento (não reversível) . . . . . . . . . . . . . . . . . . . . . . . . . . . . . . . . . . . . . .314 4.2 Modelo de arrefecimento e bomba de calor (reversível) . . . . . . . . . . . . . . . . . . . . . . . . . . . . . . . . . . . .315 5 Aparência e função do controlo remoto 316 6 Introdução de operação 318 6.1 Antes de utilizar . . . . . . . . . . . . . . . . . . . . . . . . . . . . . . . . . . . . . . . . . . . . . . . . . . . . . . . . . . . . . . . . . . . . . . . . . . . .318 6.2 Operação de arrefecimento . . . . . . . . . . . . . . . . . . . . . . . . . . . . . . . . . . . . . . . . . . . . . . . . . . . . . . . . . . . . . . . .319 6.3 Operação de desumidificação . . . . . . . . . . . . . . . . . . . . . . . . . . . . . . . . . . . . . . . . . . . . . . . . . . . . . . . . . . . . . . .319 6.4 Operação em modo Fan (Ventoinha). . . . . . . . . . . . . . . . . . . . . . . . . . . . . . . . . . . . . . . . . . . . . . . . . . . . . . . .319 6.5 Operação de aquecimento (esta função não está disponível para as unidades apenas de frio- ) . . . . . . . . . . . . . . . . . . . . . . . . . . . . . . . . . . . . . . . . . . . . . . . . . . . . . . . . . . . . . . . . . . . . . . . . . . . . . . . . . . . . .319 6.6 Funcionamento Timer (Temporizador) . . . . . . . . . . . . . . . . . . . . . . . . . . . . . . . . . . . . . . . . . . . . . . . . . . . . .320 6.7 Oscilação automática. . . . . . . . . . . . . . . . . . . . . . . . . . . . . . . . . . . . . . . . . . . . . . . . . . . . . . . . . . . . . . . . . . . . . . . .320 6.8 Modo Sleep (Sono) . . . . . . . . . . . . . . . . . . . . . . . . . . . . . . . . . . . . . . . . . . . . . . . . . . . . . . . . . . . . . . . . . . . . . . . . . .320 6.9 Drenagem de água . . . . . . . . . . . . . . . . . . . . . . . . . . . . . . . . . . . . . . . . . . . . . . . . . . . . . . . . . . . . . . . . . . . . . . . . . .320 6.10 Função sem fios . . . . . . . . . . . . . . . . . . . . . . . . . . . . . . . . . . . . . . . . . . . . . . . . . . . . . . . . . . . . . . . . . . . . . . . .321 6.11 Função Zone follow (Seguir zona) . . . . . . . . . . . . . . . . . . . . . . . . . . . . . . . . . . . . . . . . . . . . . . . . . . . . . . . . . .321 7 Esclarecimentos sobre a instalação 322 7.1 Esclarecimentos sobre a instalação: . . . . . . . . . . . . . . . . . . . . . . . . . . . . . . . . . . . . . . . . . . . . . . . . . . . . . . . .322 7.2 Introdução à instalação da mangueira de exaustão. . . . . . . . . . . . . . . . . . . . . . . . . . . . . . . . . . . . . . . . .323 7.3 Acessório de kit de calafetagem universal para aparelhos de ar-condicionado móveis (opcional). . . . . . . . . . . . . . . . . . . . . . . . . . . . . . . . . . . . . . . . . . . . . . . . . . . . . . . . . . . . . . . . . . . . . . . . . . . . . . . . . . . .325 7.4 Utilize o filtro Hepa 13 (apenas para o modelo BP113H) . . . . . . . . . . . . . . . . . . . . . . . . . . . . . . . . . . . 328 7.5 Alarme de depósito cheio . . . . . . . . . . . . . . . . . . . . . . . . . . . . . . . . . . . . . . . . . . . . . . . . . . . . . . . . . . . . . . . . . . .329
284 / 396 Pt
Ar-Condicionado móvel / Manual de Utilizador Índice 8 Instruções de manutenção 330 8.1 Limpeza do filtro de ar. . . . . . . . . . . . . . . . . . . . . . . . . . . . . . . . . . . . . . . . . . . . . . . . . . . . . . . . . . . . . . . . . . . . . . .330 8.2 Limpe a superfície do aparelho de ar-condicionado . . . . . . . . . . . . . . . . . . . . . . . . . . . . . . . . . . . . . . . .331 9 Manutenção 332 10 Solução de problemas 333 11 Diretrizes europeias relativas à eliminação de resíduos 334 12 Instruções de instalação 335 12.1 Instruções para o gás F. . . . . . . . . . . . . . . . . . . . . . . . . . . . . . . . . . . . . . . . . . . . . . . . . . . . . . . . . . . . . . . . . . . . . .335 13 Especificações 336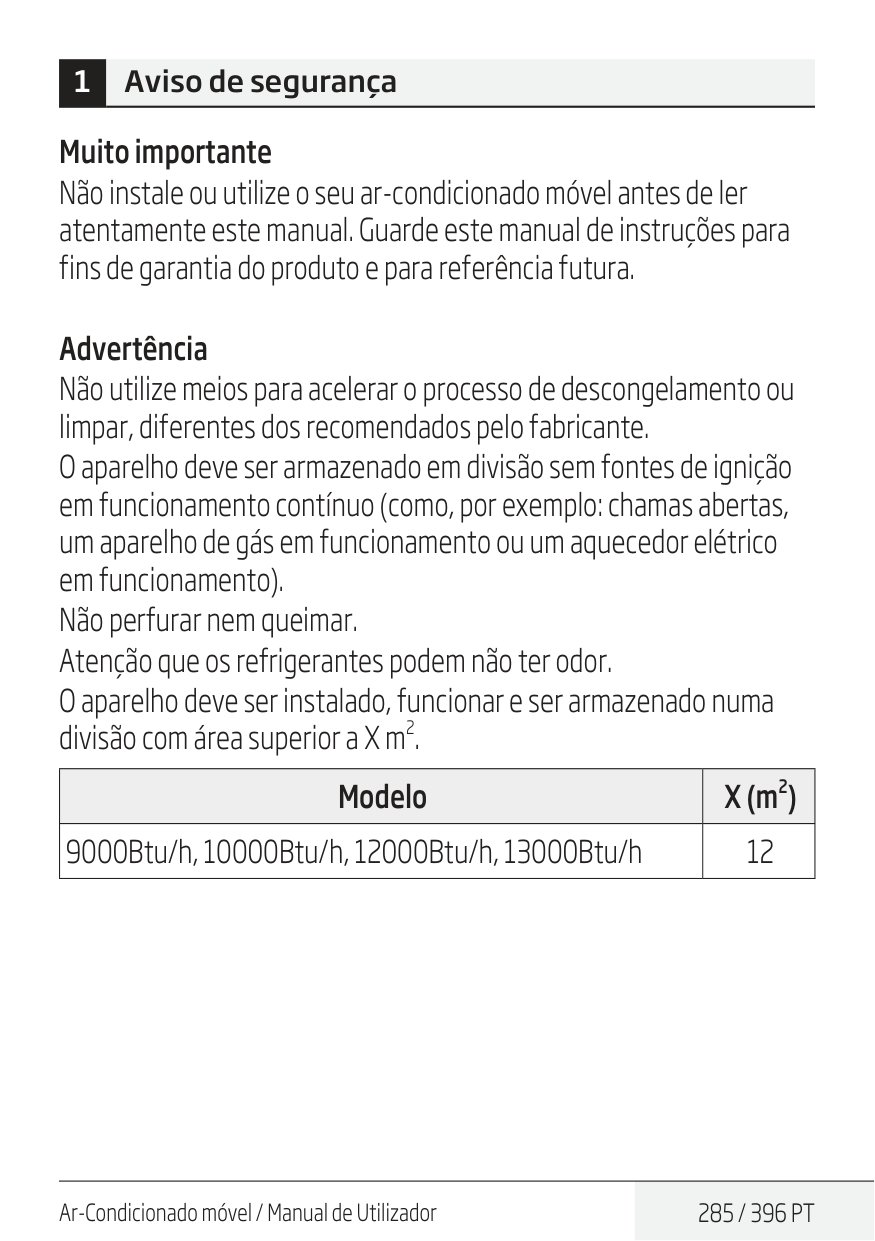
Ar-Condicionado móvel / Manual de Utilizador
285 / 396 Pt
1 Aviso de segurança Muito importante Não instale ou utilize o seu ar-condicionado móvel antes de ler atentamente este manual. Guarde este manual de instruções para fins de garantia do produto e para referência futura. Advertência Não utilize meios para acelerar o processo de descongelamento ou limpar, diferentes dos recomendados pelo fabricante. O aparelho deve ser armazenado em divisão sem fontes de ignição em funcionamento contínuo (como, por exemplo: chamas abertas, um aparelho de gás em funcionamento ou um aquecedor elétrico em funcionamento). Não perfurar nem queimar. Atenção que os refrigerantes podem não ter odor. O aparelho deve ser instalado, funcionar e ser armazenado numa divisão com área superior a X m
286 / 396 Pt
Ar-Condicionado móvel / Manual de Utilizador Aviso (para o R290) Informação específica relativa a aparelhos com gás refrigerante R290. •Leia todos os avisos na íntegra. •Ao descongelar e limpar o aparelho, não utilize ferramentas diferentes das recomendadas pelo fabricante. •O aparelho deve ser colocado numa área sem fontes de ignição contínua (por exemplo: chamas abertas, gás ou aparelhos elétricos em funcionamento). •Não perfure e não queime. •Este aparelho contém Y g (ver etiqueta de classificação na parte traseira da unidade) de gás refrigerante R290. •O R290 é um gás refrigerante que cumpre as diretivas europeias relativas ao ambiente. Não perfure nenhuma parte do circuito refrigerante. •Se o aparelho for instalado, utilizado ou armazenado numa área sem ventilação, a mesma deve ser arranjada de modo a evitar a acumulação de vazamento de refrigerante e o risco de incêndio ou explosão devido à ignição do refrigerante causada por aquecedores elétricos, fogões ou outras fontes de ignição. •O aparelho deve ser armazenado de forma a evitar falhas mecânicas. •Os indivíduos que operem ou trabalhem no circuito do refrigerante devem ter a certificação adequada emitida por uma organização acreditada, que assegure a competência no manuseamento de refrigerantes de acordo com uma avaliação específica reconhecida por associações na indústria. 1 Aviso de segurança
Ar-Condicionado móvel / Manual de Utilizador
287 / 396 Pt
•As reparações devem ser realizadas com base nas recomendações do fabricante. A manutenção e as reparações que requeiram a assistência de pessoal qualificado devem ser realizadas sob a supervisão de um técnico qualificado na utilização de refrigerantes inflamáveis. Instruções de segurança gerais
288 / 396 Pt
Ar-Condicionado móvel / Manual de Utilizador 1 Aviso de segurança
Ar-Condicionado móvel / Manual de Utilizador
289 / 396 Pt
1 Aviso de segurança
290 / 396 Pt
Ar-Condicionado móvel / Manual de Utilizador 1 Aviso de segurança
Ar-Condicionado móvel / Manual de Utilizador
291 / 396 Pt
1 Aviso de segurançaC
Nota: •Se alguma peça se danificar, entre em contacto com o revendedor ou uma loja de reparação designada; •Em caso de danos, desligue o interruptor de ar, desligue a fonte de alimentação e entre em contacto com o revendedor ou uma loja de reparação designada; •Em qualquer caso, o cabo de alimentação deve estar devidamente ligado à terra. •Para evitar a possibilidade de perigo, se o cabo de alimentação estiver danificado, desligue o interruptor de ar e desligue a tomada da corrente. Deve ser substituído através do revendedor ou de uma loja de reparações designada.
292 / 396 Pt
Ar-Condicionado móvel / Manual de Utilizador Avisos (apenas para a utilização de refrigerante R290)
Ar-Condicionado móvel / Manual de Utilizador
293 / 396 Pt
1.5 Presença de extintor de incêndios Caso tenha de ser realizado qualquer trabalho a quente no equipamento de refrigeração ou em qualquer uma das peças associadas, deve encontrar-se disponível e acessível equipamento extintor de incêndios adequado. Tenha um extintor de incêndio de pó seco ou CO2 adjacente à área de carregamento. 1.6 Sem fontes de ignição Nenhuma pessoa que execute trabalhos relativos ao sistema de refrigeração, que envolvam qualquer tipo de trabalho em tubagens que contenham, ou tenham contido, agente refrigerante inflamável, deve utilizar quaisquer fontes de ignição, de forma a que possa provocar risco de incêndio ou de explosão. Todas as possíveis fontes de ignição, incluindo cigarros acesos, devem ser mantidas suficientemente afastadas do local de instalação, reparação, remoção e eliminação, para a eventualidade de serem libertados agentes refrigerantes inflamáveis para o espaço envolvente, durante a realização daqueles trabalhos. Antes de executar os trabalhos, a área envolvente do equipamento deve ser inspecionada para garantir que não existem perigos inflamáveis nem riscos de ignição. Devem ser instalados sinais de "NÃO FUMAR". 1.7 Área ventilada Deve garantir-se que a área se encontra ao ar livre ou que se encontra devidamente ventilada, antes de entrar no sistema ou de realizar qualquer trabalho a quente. Deve continuar a existir alguma ventilação durante o período, no qual o trabalho é realizado. A ventilação deve dispersar com segurança qualquer refrigerante libertado, expelindo-o de preferência para o exterior, para a atmosfera. 1 Aviso de segurança
294 / 396 Pt
Ar-Condicionado móvel / Manual de Utilizador 1.8 Verificações no equipamento de refrigeração Quando os componentes elétricos estiverem a ser alterados, devem ser adequados aos fins específicos e estar em conformidade com a especificação correta. Devem ser sempre seguidas as diretrizes sobre assistência e de manutenção do fabricante. Em caso de dúvida, contactar o departamento técnico do fabricante para obter mais assistência. As verificações a seguir devem ser realizadas em instalações onde sejam utilizados refrigerantes inflamáveis: o tamanho da carga é adequado para o tamanho da divisão onde são instaladas as peças que contêm refrigerante; o mecanismo de ventilação e as saídas estão a funcionar corretamente e não estão obstruídos; se estiver a ser usado um circuito de refrigeração indireto, deve verificar-se a presença de refrigerante no circuito secundário; a marcação do equipamento continua visível e legível. As marcações e os sinais ilegíveis devem ser corrigidos; o tubo ou os componentes de refrigeração são instalados numa posição onde seja improvável serem expostos a qualquer substância que possa corroer os componentes que contêm refrigerante, a menos que os componentes sejam fabricados com materiais inerentemente resistentes à corrosão ou estejam protegidos adequadamente contra a corrosão. 1 Aviso de segurança
Ar-Condicionado móvel / Manual de Utilizador
295 / 396 Pt
1.9 Verificações a dispositivos elétricos A reparação e a manutenção dos componentes elétricos devem incluir verificações de segurança iniciais e procedimentos de inspeção aos componentes. Caso exista alguma falha que possa comprometer a segurança, então não deve ser abastecida corrente elétrica ao circuito até que a falha tenha sido resolvida satisfatoriamente. Caso não seja possível corrigir a falha de imediato, porém seja necessário continuar a operação, deve ser utilizada uma solução temporária adequada. Isto deverá ser comunicado ao proprietário do equipamento, para que todas as partes se encontrem informadas do problema. As verificações iniciais de segurança devem incluir: se os condensadores estão descarregados: isto deve ser feito de forma segura para evitar a possibilidade de faíscas; se não há componentes elétricos e cabos sob tensão expostos durante o carregamento, recuperação ou purga do sistema; se há continuidade da ligação à terra.
296 / 396 Pt
Ar-Condicionado móvel / Manual de Utilizador 2.2 Deve ser tomada especial atenção aos seguintes aspetos, para assegurar que, ao trabalhar com componentes elétricos, a caixa não fique alterada de tal forma que o nível de proteção fique afetado. Isto deverá incluir os danos em cabos, número excessivo de ligações, terminais não fabricados em conformidade com as especificações originais, danos nas vedações, ajuste incorreto de bucins, etc. Garantir que o aparelho é montado com segurança. Garantir que as vedações ou os materiais de vedação não se deterioraram de tal forma que já não sejam úteis para impedir a entrada de atmosferas inflamáveis. As peças sobresselentes devem estar em conformidade com as especificações do fabricante.C
Nota: A utilização de vedante de silicone pode inibir a eficácia de alguns tipos de equipamento de deteção de vazamento. Os componentes intrinsecamente seguros não necessitam de ser isolados, antes de se trabalhar neles.
Ar-Condicionado móvel / Manual de Utilizador
297 / 396 Pt
298 / 396 Pt
Ar-Condicionado móvel / Manual de Utilizador
Ar-Condicionado móvel / Manual de Utilizador
299 / 396 Pt
300 / 396 Pt
Ar-Condicionado móvel / Manual de Utilizador
Ar-Condicionado móvel / Manual de Utilizador
301 / 396 Pt
302 / 396 Pt
Ar-Condicionado móvel / Manual de Utilizador g) Iniciar a máquina de recuperação e operar em conformidade com as instruções do fabricante. h) Não encher excessivamente os cilindros. (Não mais do que 80% da carga líquida do volume). i) Não exceda a pressão de funcionamento máxima, nem mesmo temporariamente. j) Quando os cilindros tiverem sido corretamente cheios e o processo estiver concluído, deve certificar-se de que os cilindros e o equipamento são removidos do local, de imediato, e de que todas as válvulas de isolamento se encontram fechadas, no equipamento. k) O agente refrigerante recuperado não deve ser carregado para outro sistema de refrigeração, exceto se tiver sido limpo e verificado.
Ar-Condicionado móvel / Manual de Utilizador
303 / 396 Pt
304 / 396 Pt
Ar-Condicionado móvel / Manual de Utilizador O agente refrigerante recuperado deve ser devolvido ao fornecedor de agentes refrigerantes, no cilindro de recuperação correto, incluindo a respetiva Nota de transferência de resíduos. Não misturar agentes refrigerantes em unidades de recuperação, nem, especialmente, em cilindros. Caso os compressores ou os óleos do compressor tenham de ser removidos, deve assegurar-se de que foram evacuados até um nível aceitável, para garantir que o agente refrigerante inflamável não permanece misturado com o lubrificante. O processo de evacuação deve ser realizado antes de devolver o compressor aos fornecedores. Só deve ser utilizado aquecimento elétrico no corpo do compressor para acelerar este processo. Quando o óleo é drenado de um sistema, deve ser realizado em segurança.C
Nota acerca de gases fluorados:
Ar-Condicionado móvel / Manual de Utilizador
305 / 396 Pt
Competência do pessoal de assistência técnica Geral É necessária formação especial adicional aos procedimentos usuais de reparação de equipamentos de refrigeração quando são afetados equipamentos com agentes refrigerantes inflamáveis. Em muitos países, esta formação é realizada por organizações nacionais de formação, que são credenciadas para ensinar os padrões de competência nacional relevantes que podem encontrar-se definidos na legislação. A competência obtida deve ser documentada por um certificado. Formação A formação deve incluir o seguinte: Informação sobre o potencial explosivo dos refrigerantes inflamáveis, para mostrar que os produtos inflamáveis podem ser perigosos quando manuseados sem cuidado. Informação sobre potenciais fontes de ignição, especialmente as menos óbvias, como isqueiros, interruptores de luz, aspiradores e aquecedores elétricos. Informação sobre os diferentes termos de segurança: Sem ventilação – (ver Cláusula GG.2) A segurança do aparelho não depende da ventilação da caixa. Desligar o aparelho ou abrir a caixa não tem um efeito significativo na segurança. Ainda assim é possível que o refrigerante vazado se acumule dentro do invólucro e que gás inflamável seja libertado quando o invólucro for aberto. 1 Aviso de segurança
306 / 396 Pt
Ar-Condicionado móvel / Manual de Utilizador Invólucro ventilado – (ver Cláusula GG.4) A segurança do aparelho depende da ventilação da caixa. Desligar o aparelho ou abrir o invólucro tem um efeito significativo na segurança. Deve haver o cuidado de garantir antes se há ventilação suficiente. Divisão ventilada – (ver Cláusula GG.5) A segurança do aparelho depende da ventilação da divisão. Desligar o aparelho ou abrir a caixa não tem um efeito significativo na segurança. A ventilação da divisão não será desligada durante procedimentos de reparação. Informação sobre o conceito de componentes selados e invólucros selados de acordo com a CEI 60079-15:2010. Informação sobre os procedimentos de trabalho corretos: a) Colocação em funcionamento
Ar-Condicionado móvel / Manual de Utilizador
307 / 396 Pt
1 Aviso de segurança
308 / 396 Pt
Ar-Condicionado móvel / Manual de Utilizador
Ar-Condicionado móvel / Manual de Utilizador
309 / 396 Pt
310 / 396 Pt
Ar-Condicionado móvel / Manual de Utilizador Transporte, marcação e armazenamento de unidades que empregam refrigerantes inflamáveis Transporte de equipamento que contém agentes refrigerantes inflamáveis Chama-se a atenção para o facto de poder haver regulamentações de transporte adicionais no que diz respeito a aparelhos que contenham gás inflamável. O número máximo de peças de equipamento ou a configuração do equipamento que é possível transportar em conjunto são determinados pelos regulamentos de transporte aplicáveis. Marcação do equipamento, utilizando sinais A sinalização de aparelhos similares utilizados numa área de trabalho é abordada geralmente pelos regulamentos locais e apresenta os requisitos mínimos para o fornecimento de sinalização de segurança e/ou saúde para um local de trabalho. Toda a sinalização obrigatória deve ser mantida e os empregadores devem garantir que os funcionários recebem informação e formação adequada e suficiente sobre o significado dos sinais de segurança apropriados e as ações a levar a cabo em associação a estes sinais. A eficácia dos sinais não deve ser diminuída por demasiados sinais juntos. Qualquer pictograma utilizado deve ser o mais simples possível e conter apenas os detalhes essenciais. Eliminação de equipamento que contém agentes refrigerantes inflamáveis Consulte a regulamentação nacional. 1 Aviso de segurança
Ar-Condicionado móvel / Manual de Utilizador
311 / 396 Pt
Armazenamento de equipamento/aparelhos O armazenamento de equipamento deve ser realizado em conformidade com as instruções do fabricante. Armazenamento de equipamento embalado (não vendido) A proteção da embalagem para armazenamento deve ser construída de forma a que qualquer dano mecânico no equipamento, dentro da embalagem, não provoque nenhum vazamento da carga refrigerante. O número máximo de peças de equipamento permitido em armazenamento conjunto, será determinado pelos regulamentos locais. 1 Aviso de segurança
312 / 396 Pt
Ar-Condicionado móvel / Manual de Utilizador 2 Nome das peças 1 2 3 5 6 7 8 9 4 Fig. 1 1 Aletas 5 Entrada de ar 2 Painel de controlo 6 Saída de drenagem 3 Painel dianteiro 7 Saída de ar 4 Rodízio 8 Cabo de alimentação 9 Saída de drenagem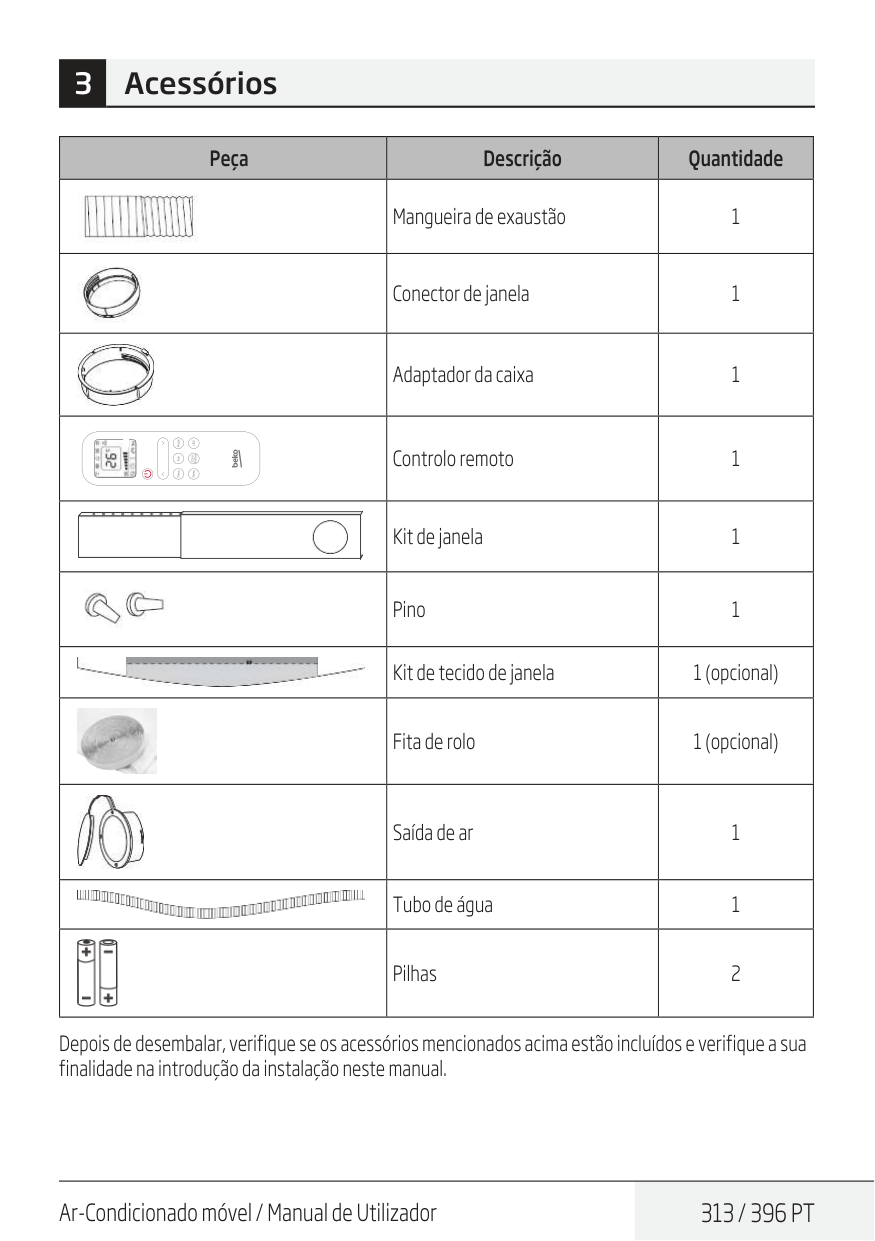
Ar-Condicionado móvel / Manual de Utilizador
313 / 396 Pt
Peça Descrição Quantidade Mangueira de exaustão 1 Conector de janela 1 Adaptador da caixa 1 Controlo remoto 1 Kit de janela 1 Pino 1 Kit de tecido de janela 1 (opcional) Fita de rolo 1 (opcional) Saída de ar 1 Tubo de água 1 Pilhas 2 Depois de desembalar, verifique se os acessórios mencionados acima estão incluídos e verifique a sua finalidade na introdução da instalação neste manual. 3 Acessórios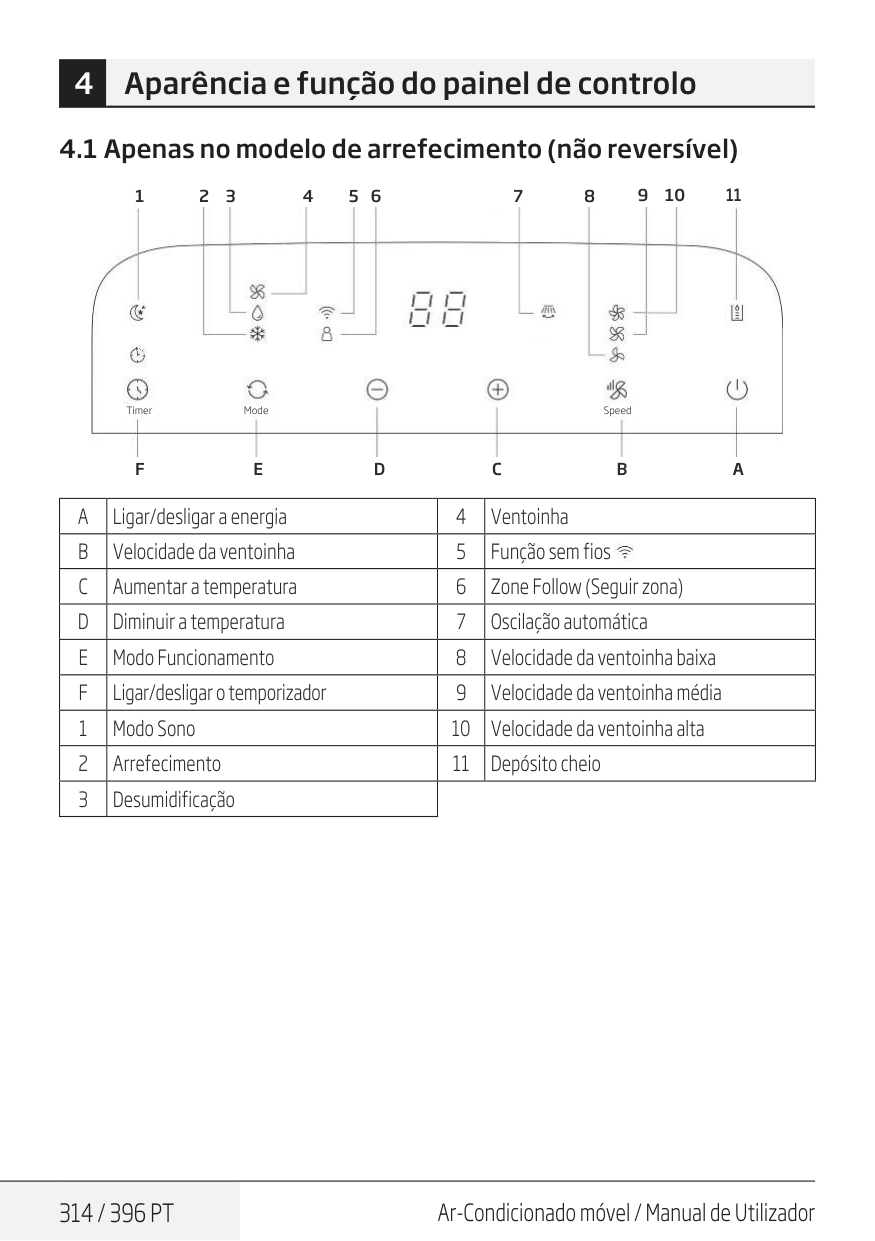
314 / 396 Pt
Ar-Condicionado móvel / Manual de Utilizador 4.1 Apenas no modelo de arrefecimento (não reversível) Timer Mode SpeedF
1 2 3 4 5 6 7 8 9 10E
D
C
B
A
11A
Ligar/desligar a energia 4 VentoinhaB
Velocidade da ventoinha 5 Função sem fiosC
Aumentar a temperatura 6 Zone Follow (Seguir zona)D
Diminuir a temperatura 7 Oscilação automáticaE
Modo Funcionamento 8 Velocidade da ventoinha baixaF
Ligar/desligar o temporizador 9 Velocidade da ventoinha média 1 Modo Sono 10 Velocidade da ventoinha alta 2 Arrefecimento 11 Depósito cheio 3 Desumidificação 4 Aparência e função do painel de controlo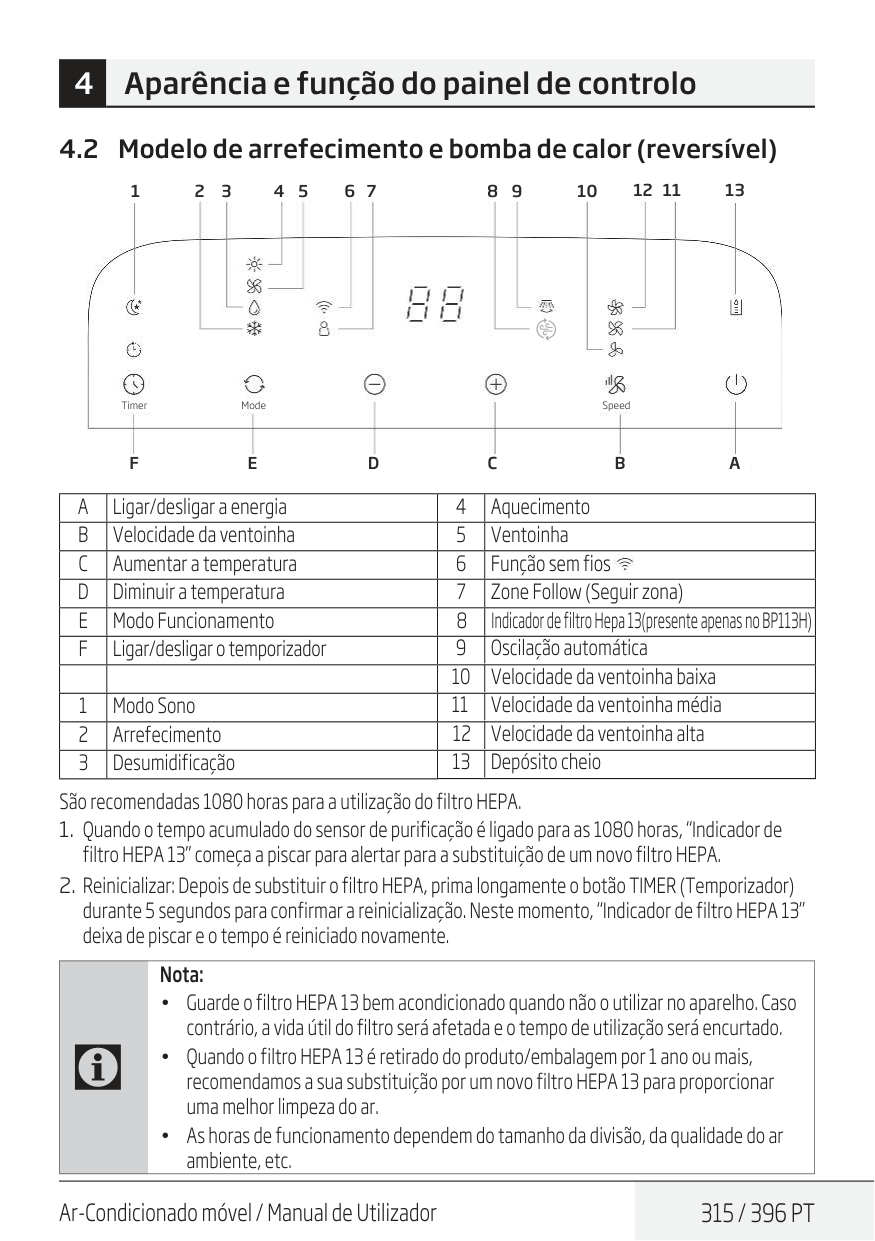
Ar-Condicionado móvel / Manual de Utilizador
315 / 396 Pt
4 Aparência e função do painel de controlo 4.2 Modelo de arrefecimento e bomba de calor (reversível)A
Ligar/desligar a energia 4 AquecimentoB
Velocidade da ventoinha 5 VentoinhaC
Aumentar a temperatura 6 Função sem fiosD
Diminuir a temperatura 7 Zone Follow (Seguir zona)E
Modo Funcionamento 9 Oscilação automáticaF
Ligar/desligar o temporizador 10 Velocidade da ventoinha baixa 11 Velocidade da ventoinha média 1 Modo Sono 12 Velocidade da ventoinha alta 2 Arrefecimento 13 Depósito cheio 3 Desumidificação São recomendadas 1080 horas para a utilização do filtro HEPA.C
Nota: • Guarde o filtro HEPA 13 bem acondicionado quando não o utilizar no aparelho. Caso contrário, a vida útil do filtro será afetada e o tempo de utilização será encurtado. • Quando o filtro HEPA 13 é retirado do produto/embalagem por 1 ano ou mais, recomendamos a sua substituição por um novo filtro HEPA 13 para proporcionar uma melhor limpeza do ar. • As horas de funcionamento dependem do tamanho da divisão, da qualidade do ar ambiente, etc. Timer Mode SpeedF
1 2 3 4 5 6 7 8 9 10 12 11 13E
D
C
B
A
8 Indicador de filtro Hepa 13(presente apenas no BP113H)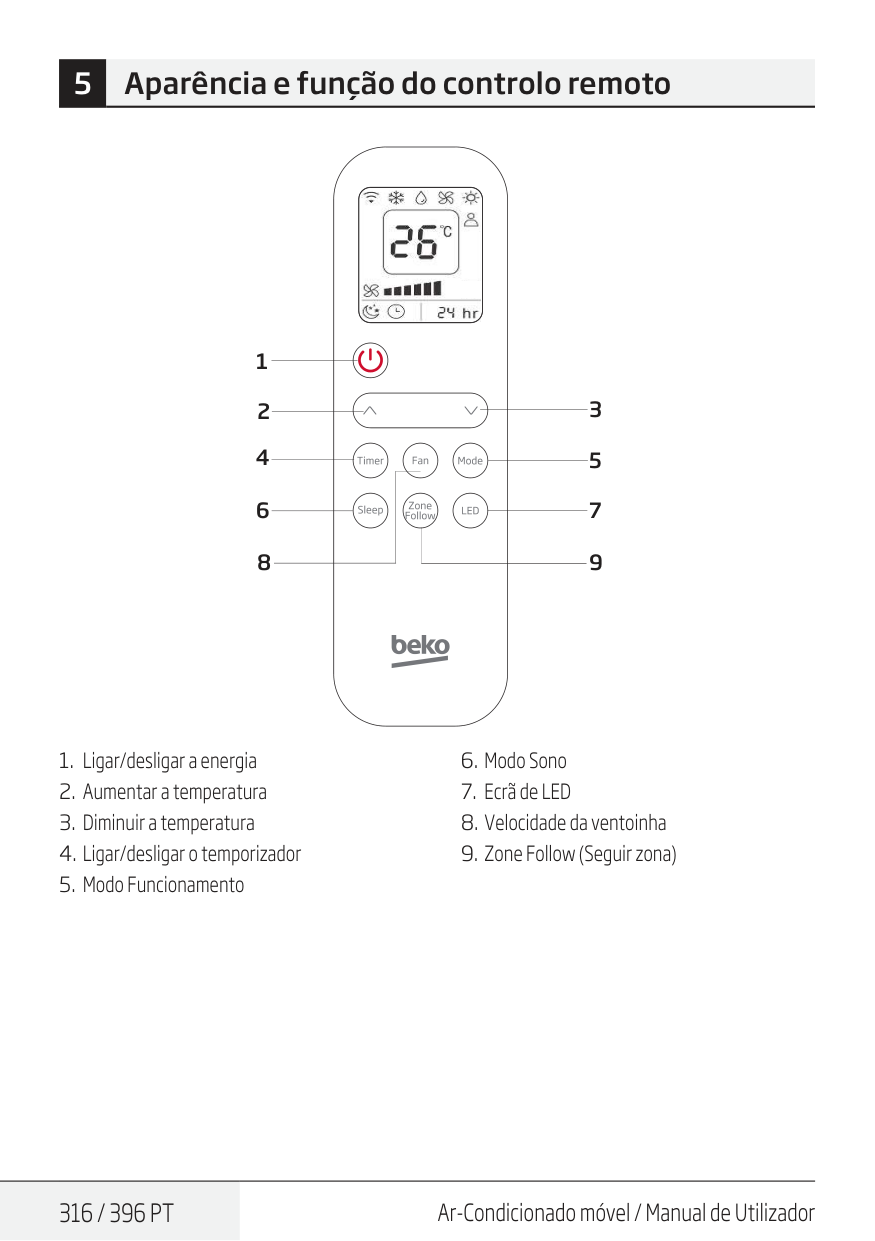
316 / 396 Pt
Ar-Condicionado móvel / Manual de Utilizador 3 5 7 9 1 2 4 6 8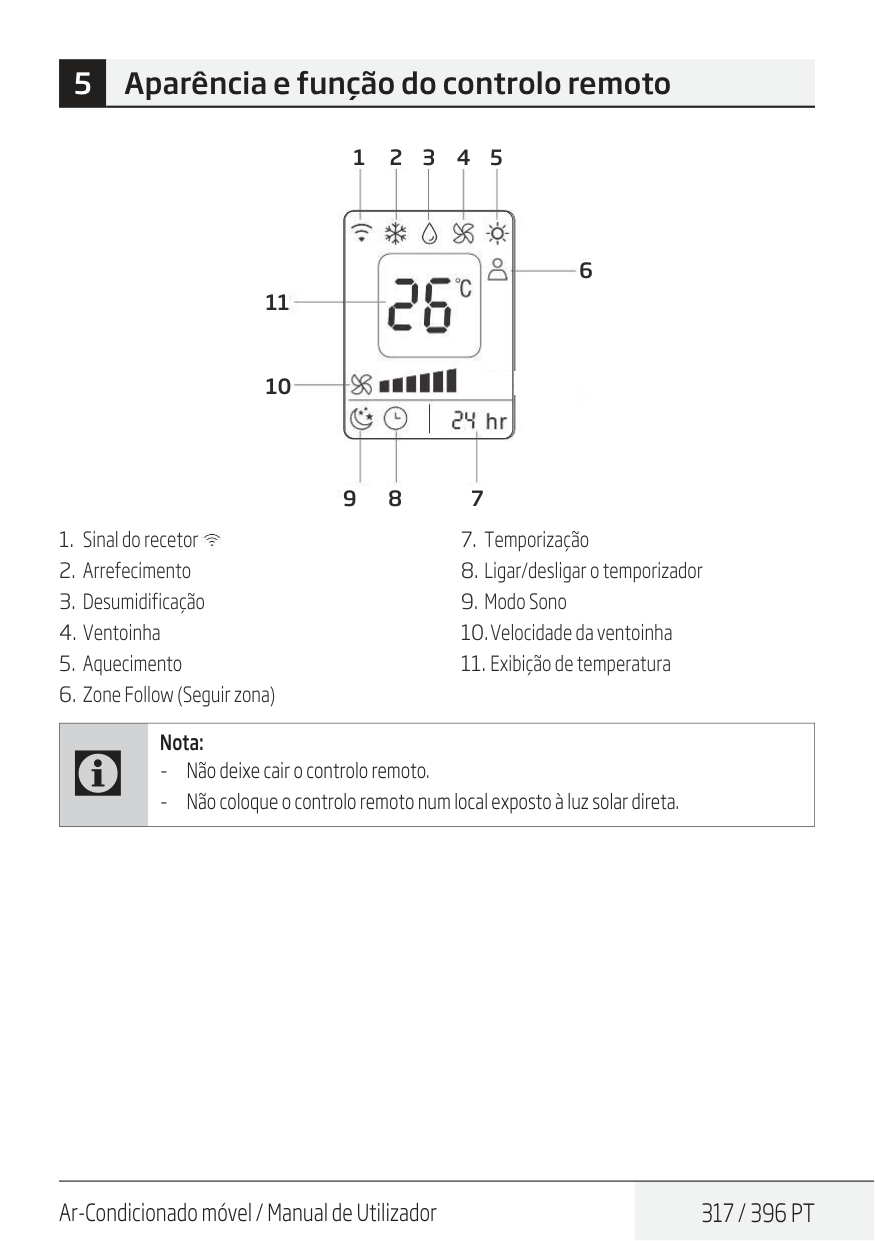
Ar-Condicionado móvel / Manual de Utilizador
317 / 396 Pt
5 Aparência e função do controlo remoto 1 2 3 4 5 6 9 8 7 11 10C
Nota: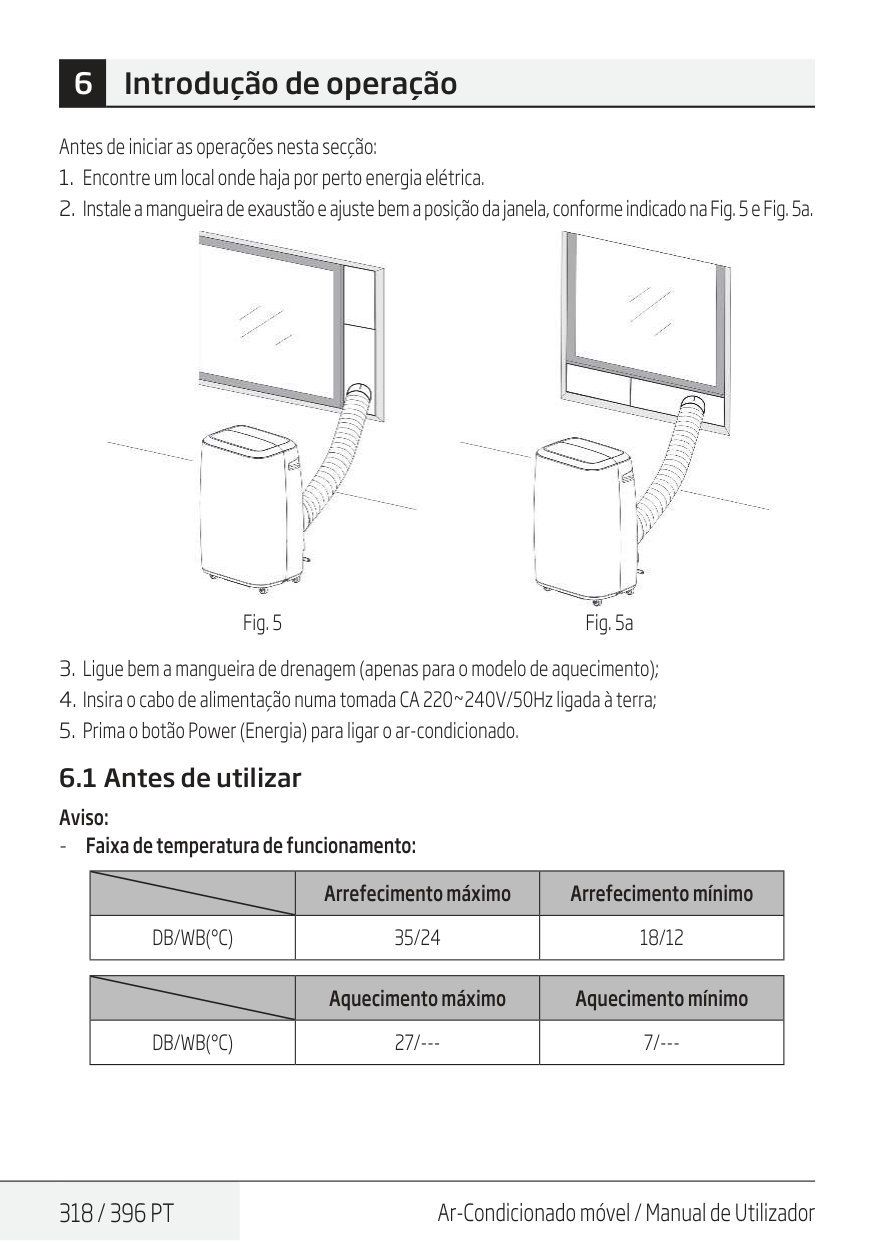
318 / 396 Pt
Ar-Condicionado móvel / Manual de Utilizador 6 Introdução de operação Antes de iniciar as operações nesta secção:Db/Wb(°C)
35/24 18/12 Aquecimento máximo Aquecimento mínimoDb/Wb(°C)
27/--- 7/---
Ar-Condicionado móvel / Manual de Utilizador
319 / 396 Pt
Verifique se a mangueira de exaustão foi montada corretamente. Precauções a ter para as operações de arrefecimento e desumidificação:
320 / 396 Pt
Ar-Condicionado móvel / Manual de Utilizador 6.6 Funcionamento Timer (Temporizador) Definir o Timer On (Temporizador ligado):
Ar-Condicionado móvel / Manual de Utilizador
321 / 396 Pt
Drenagem contínua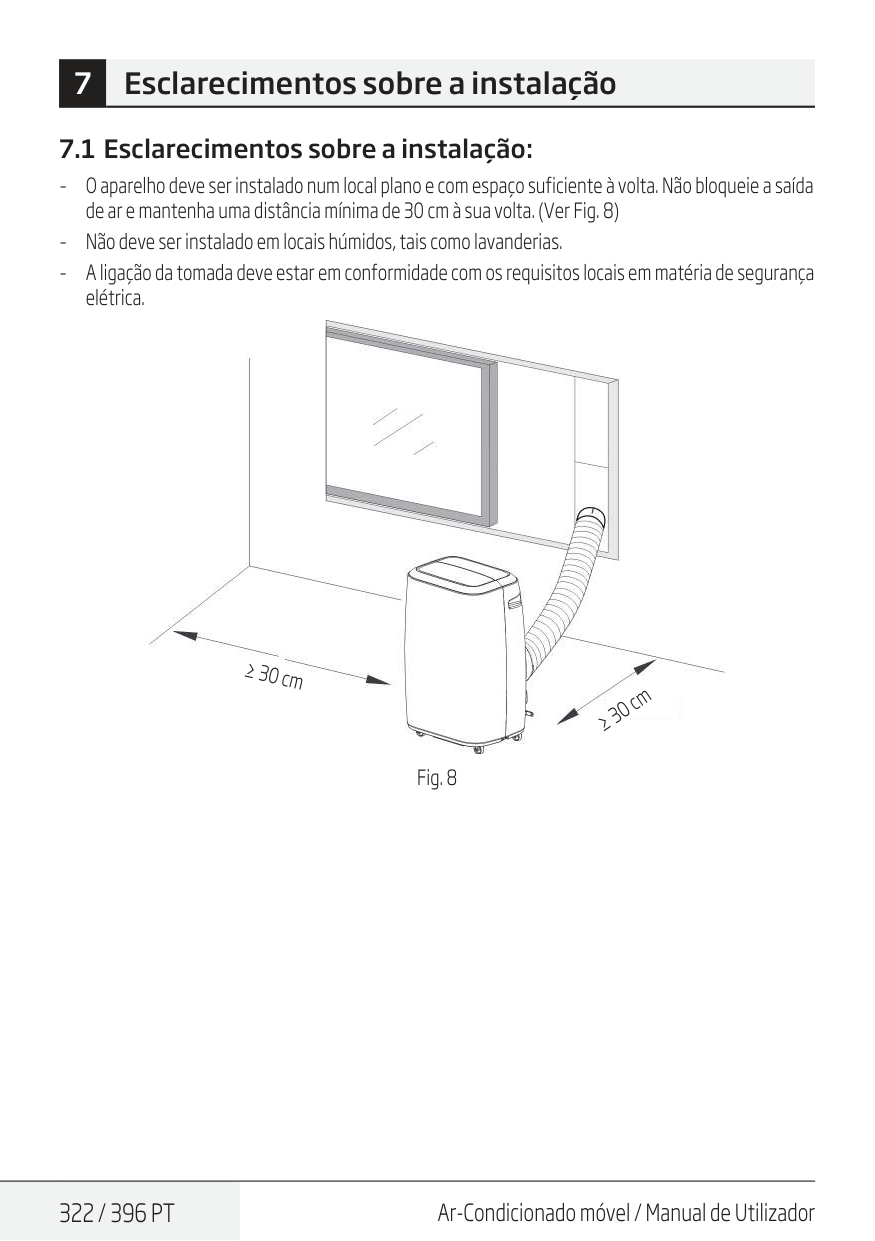
322 / 396 Pt
Ar-Condicionado móvel / Manual de Utilizador 7 Esclarecimentos sobre a instalação 7.1 Esclarecimentos sobre a instalação: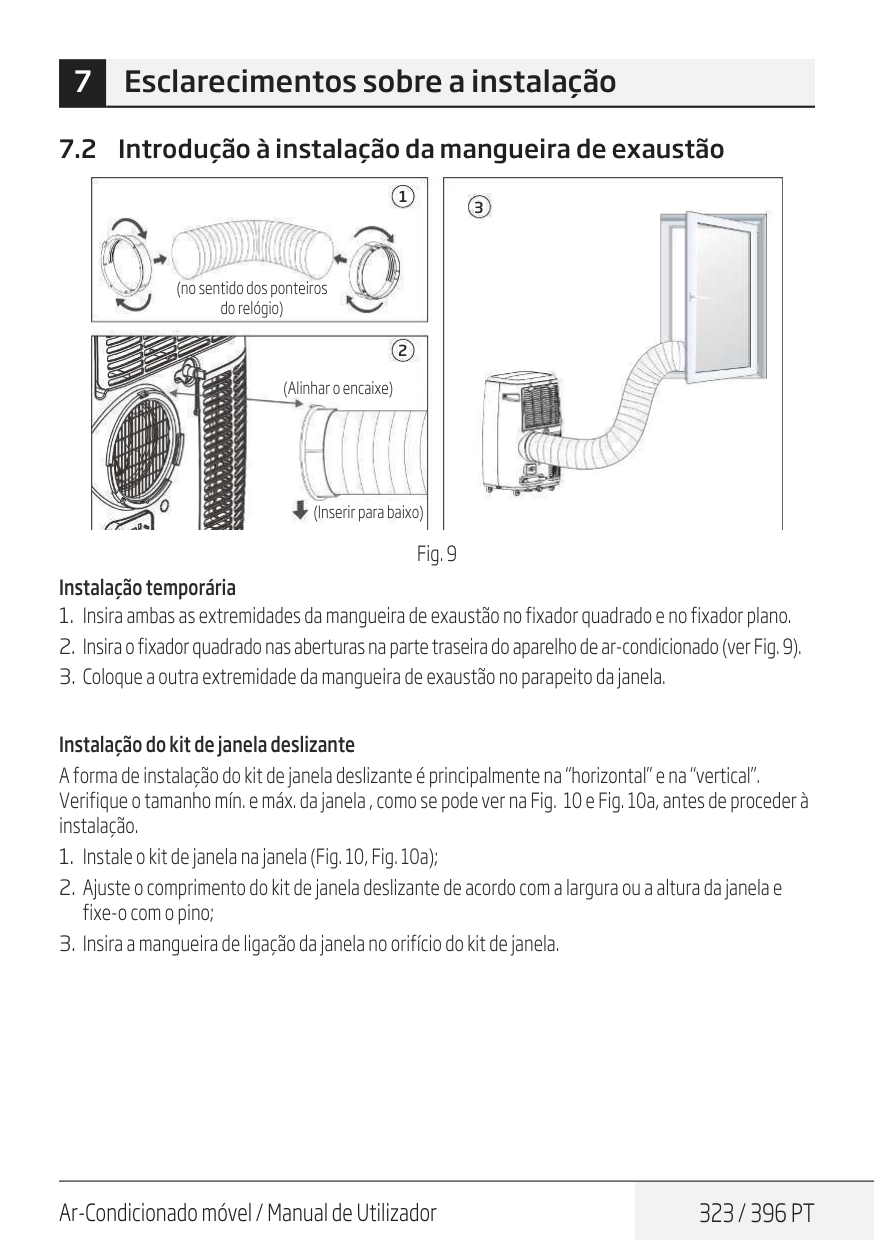
Ar-Condicionado móvel / Manual de Utilizador
323 / 396 Pt
7.2 Introdução à instalação da mangueira de exaustão 1 2 3 (no sentido dos ponteiros do relógio) (Alinhar o encaixe) (Inserir para baixo) Fig. 9 Instalação temporária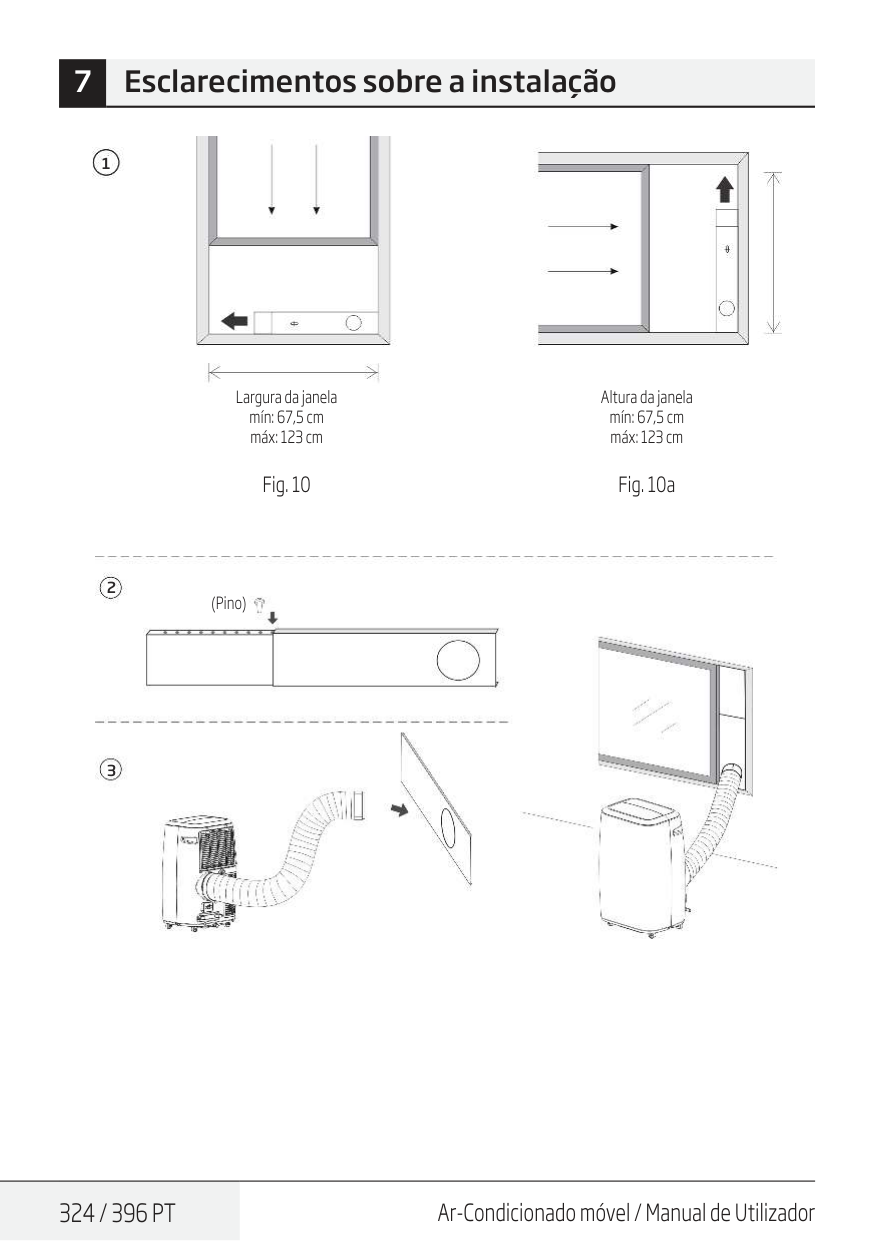
324 / 396 Pt
Ar-Condicionado móvel / Manual de Utilizador 1 Largura da janela mín: 67,5 cm máx: 123 cm Fig. 10 Altura da janela mín: 67,5 cm máx: 123 cm Fig. 10a 2 3 (Pino) 7 Esclarecimentos sobre a instalação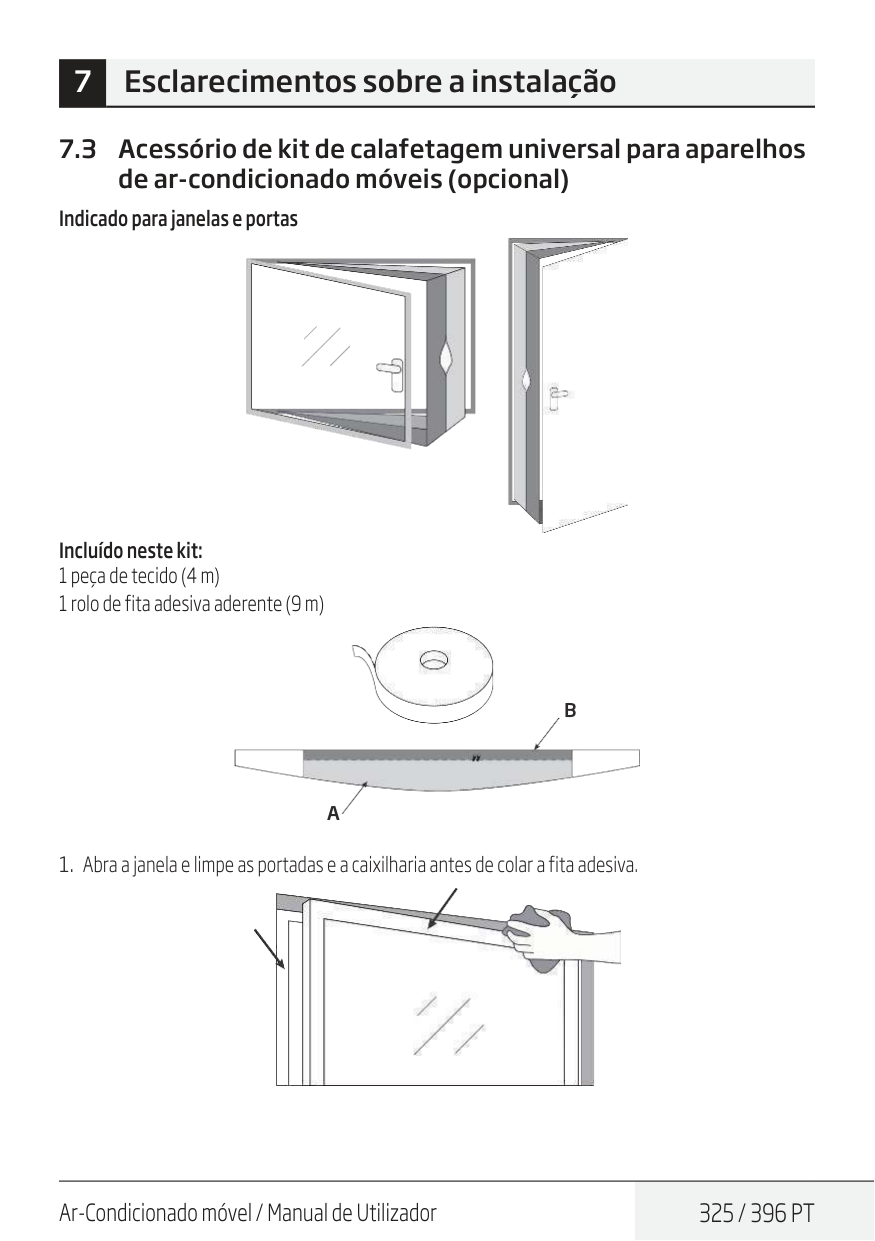
Ar-Condicionado móvel / Manual de Utilizador
325 / 396 Pt
7.3 Acessório de kit de calafetagem universal para aparelhos de ar-condicionado móveis (opcional) Indicado para janelas e portas Incluído neste kit: 1 peça de tecido (4 m) 1 rolo de fita adesiva aderente (9 m)A
B
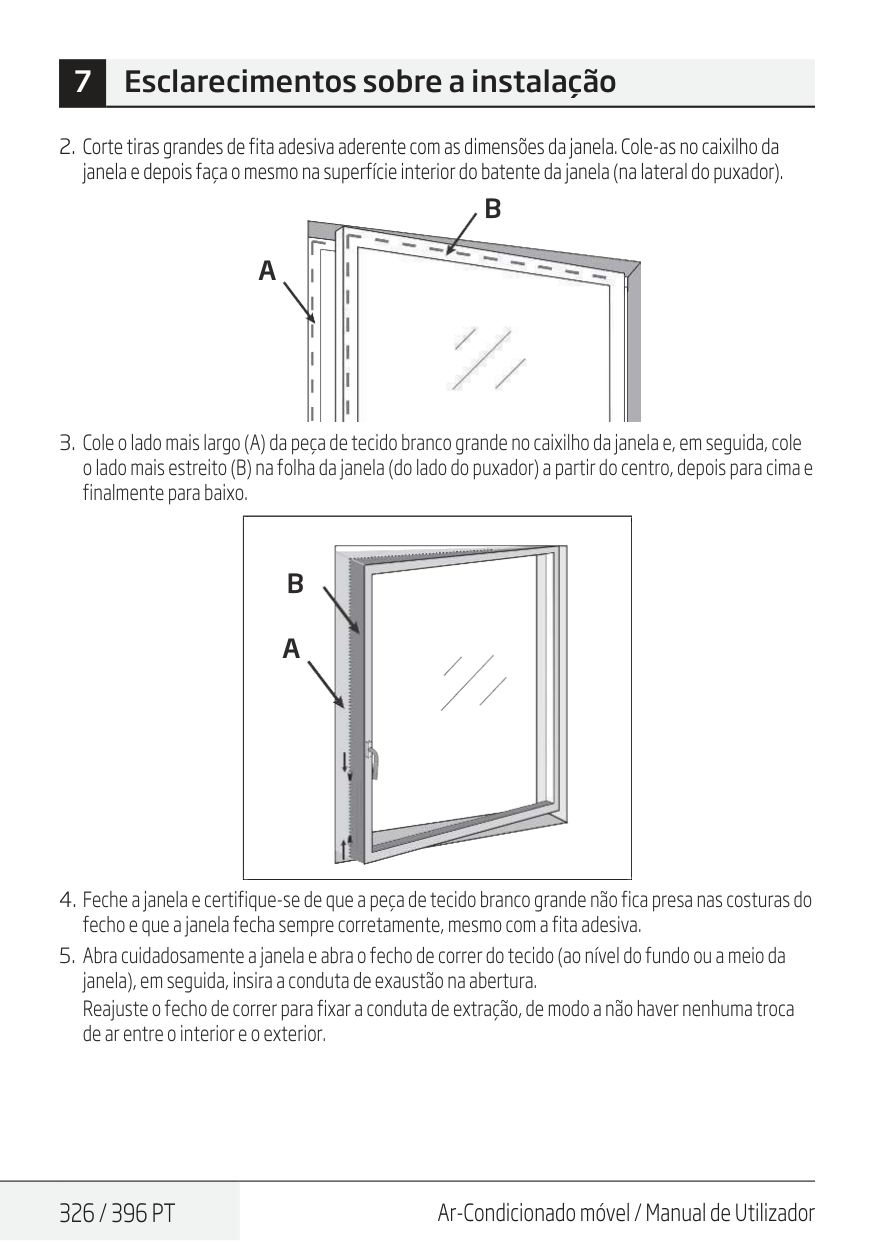
326 / 396 Pt
Ar-Condicionado móvel / Manual de Utilizador 7 Esclarecimentos sobre a instalaçãoA
B
A
B

Ar-Condicionado móvel / Manual de Utilizador
327 / 396 Pt
7 Esclarecimentos sobre a instalaçãoC
Nota: Se tiver uma janela de duas folhas com abertura francesa: Bloqueie a primeira folha com o puxador e instale o kit de calafetagem na segunda folha (sem o puxador). Antes da instalação, verifique se a fita adesiva não danifica a sua janela.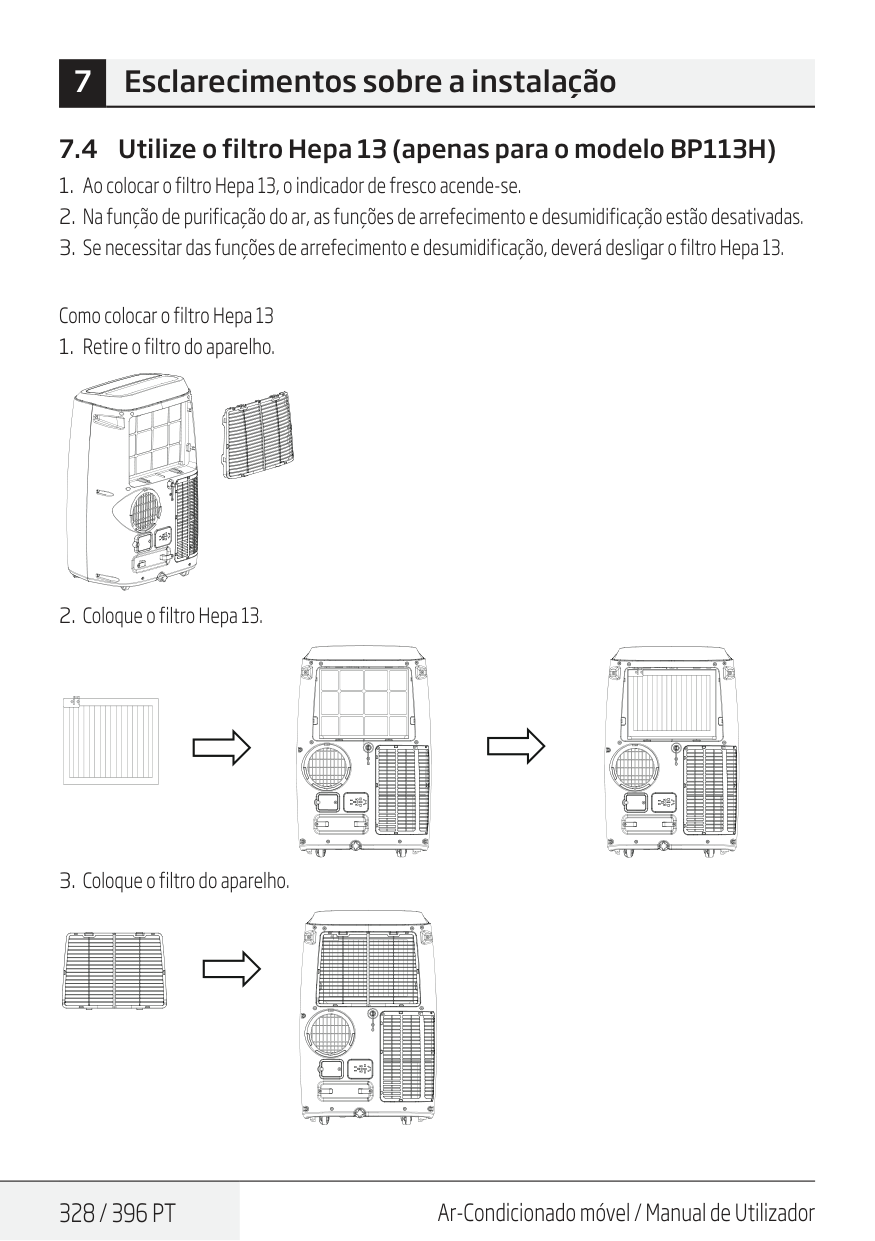
328 / 396 Pt
Ar-Condicionado móvel / Manual de Utilizador 7 Esclarecimentos sobre a instalação 7.4 Utilize o filtro Hepa 13 (apenas para o modelo BP113H)
Ar-Condicionado móvel / Manual de Utilizador
329 / 396 Pt
7 Esclarecimentos sobre a instalação 7.5 Alarme de depósito cheio O depósito de água interno no interior do ar-condicionado tem um interruptor de segurança de nível de água, que controla o nível da água. Quando o nível de água atinge uma altura esperada, a luz indicadora de depósito de água cheio acende-se. (Se a bomba de água estiver danificada quando o depósito está cheio de água, remova a tampa de borracha na parte inferior do aparelho e toda a água é drenada para o exterior.)A
B
O orifício (A), que se encontra no topo, deve ser utilizado para extrair a água do ar-condicionado móvel (retire o bujão de borracha e insira a mangueira de drenagem no orifício) quando há muita humidade no local (em drenagem contínua) ou quando o aparelho está a funcionar nos modos de desumidificação ou aquecimento. O orifício (B), que se encontra no fundo, tem um recipiente e deve ser utilizado quando é necessário esvaziar o depósito (alarme do depósito de água). Simplesmente remova a tampa de borracha e insira a mangueira de drenagem no orifício para drenar a água do depósito.C
Nota: Atenção, dependendo do volume de água no depósito, por vezes, poderá haver muita água para esvaziar. O ideal seria esvaziá-lo no exterior ou numa bacia grande para evitar inundar a divisão.
330 / 396 Pt
Ar-Condicionado móvel / Manual de Utilizador 8 Instruções de manutençãoA
Advertência: – Desligue sempre o aparelho da corrente antes de proceder à sua limpeza ou manutenção. – Não utilize líquidos inflamáveis ou produtos químicos para limpar o aparelho. – Não lave o aparelho em água corrente. Fazê-lo representa um perigo elétrico. – Não utilize o aparelho se a fonte de alimentação for danificada durante a limpeza. Um cabo de alimentação danificado deve ser substituído por um cabo novo do fabricante. – Se o ar-condicionado estiver danificado, entre em contacto com o revendedor ou uma loja de reparacões. 8.1 Limpeza do filtro de ar
Ar-Condicionado móvel / Manual de Utilizador
331 / 396 Pt
A
Advertência: Não utilize o aparelho sem o filtro porque a sujidade irá entupi-lo e reduzir o desempenho. 8.2 Limpe a superfície do aparelho de ar-condicionado Primeiro limpe a superfície com um detergente neutro e um pano húmido e, em seguida, limpe-o com um pano seco. 8 Instruções de manutenção
332 / 396 Pt
Ar-Condicionado móvel / Manual de Utilizador 9 Manutenção Dicas de manutenção Certifique-se de limpar o filtro de ar a cada 2 semanas para conseguir o desempenho ideal. O recipiente de recolha de água deve ser escoado imediatamente a seguir à ocorrência do erro P1 e antes de guardar para impedir o aparecimento de bolor. Em casas com animais de estimação, é necessário limpar periodicamente a grelha para impedir o bloqueio do fluxo de ar devido ao pelo dos mesmos. Limpar o aparelho Limpe o aparelho com um pano húmido, que não largue pelo e um detergente suave. Seque o aparelho com um pano seco, que não largue pelo. Guardar o aparelho quando não é utilizado Escoe o recipiente de recolha de água de acordo com as instruções na secção seguinte. Coloque o aparelho a funcionar no modo Fan (Ventoinha) durante 12 horas numa divisão quente para a secar e impedir o aparecimento de bolor. Desligue o aparelho e retire a ficha da tomada. Limpe o filtro de ar de acordo com as instruções na secção anterior. Reinstale o filtro de ar limpo antes de armazenar. Remova as pilhas do controlo remoto. Guarde o aparelho num local fresco e escuro. A exposição à luz solar direta ou ao calor extremo pode encurtar a vida útil do aparelho.C
Nota: A frente do aparelho pode ser limpa com um pano sem óleo ou lavada com um pano humedecido numa solução de água quente e detergente da louça suave. Enxagúe bem e limpe para secar. Nunca utilize produtos abrasivos, cera ou de polir na frente do aparelho. Tenha o cuidado de tirar o excesso de água do pano antes de limpar à volta dos controlos. O excesso de água nos controlos, ou à volta dos controlos, pode danificar o aparelho.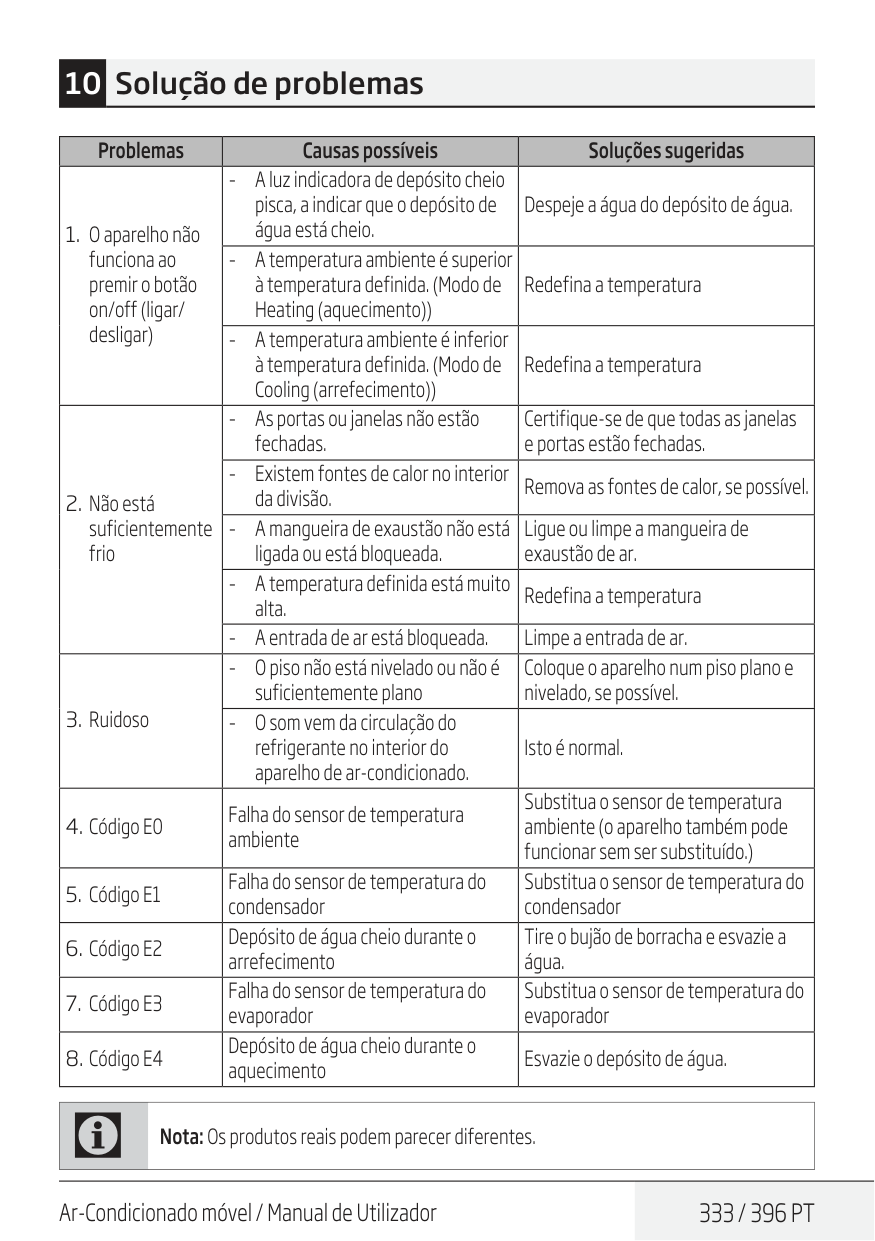
Ar-Condicionado móvel / Manual de Utilizador
333 / 396 Pt
Problemas Causas possíveis Soluções sugeridasC
Nota: Os produtos reais podem parecer diferentes. 10 Solução de problemas
334 / 396 Pt
Ar-Condicionado móvel / Manual de Utilizador Ao utilizar este aparelho em países europeus, devem ser seguidas as seguintes indicações: Eliminação: Não elimine este produto com resíduos municipais não separados. É necessária a recolha separada desses resíduos para tratamento especial. É proibido eliminar este aparelho juntamente com o lixo doméstico. Existem várias possibilidades para a eliminação:Este símbolo indica que, no final da sua vida útil, este equipamento não deverá ser colocado no lixo com outros resíduos domésticos. O equipamento usado deverá ser colocado num ponto oficial de recolha de resíduos de equipamentos elétricos e eletrónicos. Para localizar um ponto de recolha, por favor entre em contato com as autoridades locais ou com o revendedor onde o equipamento foi adquirido. Cada agregado familiar desempenha um papel importante na recuperação e reciclagem dos equipamentos usados. A eliminação adequada do equipamento usado ajuda a prevenir possíveis consequências negativas para o meio ambiente e para a saúde humana. 11 Diretrizes europeias relativas à eliminação de resíduos
Ar-Condicionado móvel / Manual de Utilizador
335 / 396 Pt
12 Instruções de instalação 12.1 Instruções para o gás F Este produto contém gases fluorados com efeitos de estufa. Os gases fluorados com efeitos de estufa estão encerrados em equipamento hermeticamente selado. Instalações, serviços, manutenções, reparações, verificações de fugas ou desmantelamento de equipamento e reciclagem do produto devem ser acarretadas por pessoas certificadas para tal. Se o sistema possuir um sistema de verificação de fugas instalado, as verificações de fugas devem ser feitas, pelo menos, anualmente, para se certificar que o equipamento está a funcionar corretamente. Se forem necessárias verificações de fugas ao produto, o ciclo de inspeção deve ser especificado para se estabelecer e manter um registo destas verificações.C
Nota: Para equipamento selado hermeticamente, aparelhos de ar-condicionado móveis, aparelhos de ar-condicionado de janela e desumidificadores, se o equivalente de CO2 de gases fluorados com efeito de estufa for inferior a 10 toneladas, a verificação de fugas não deve ser realizada.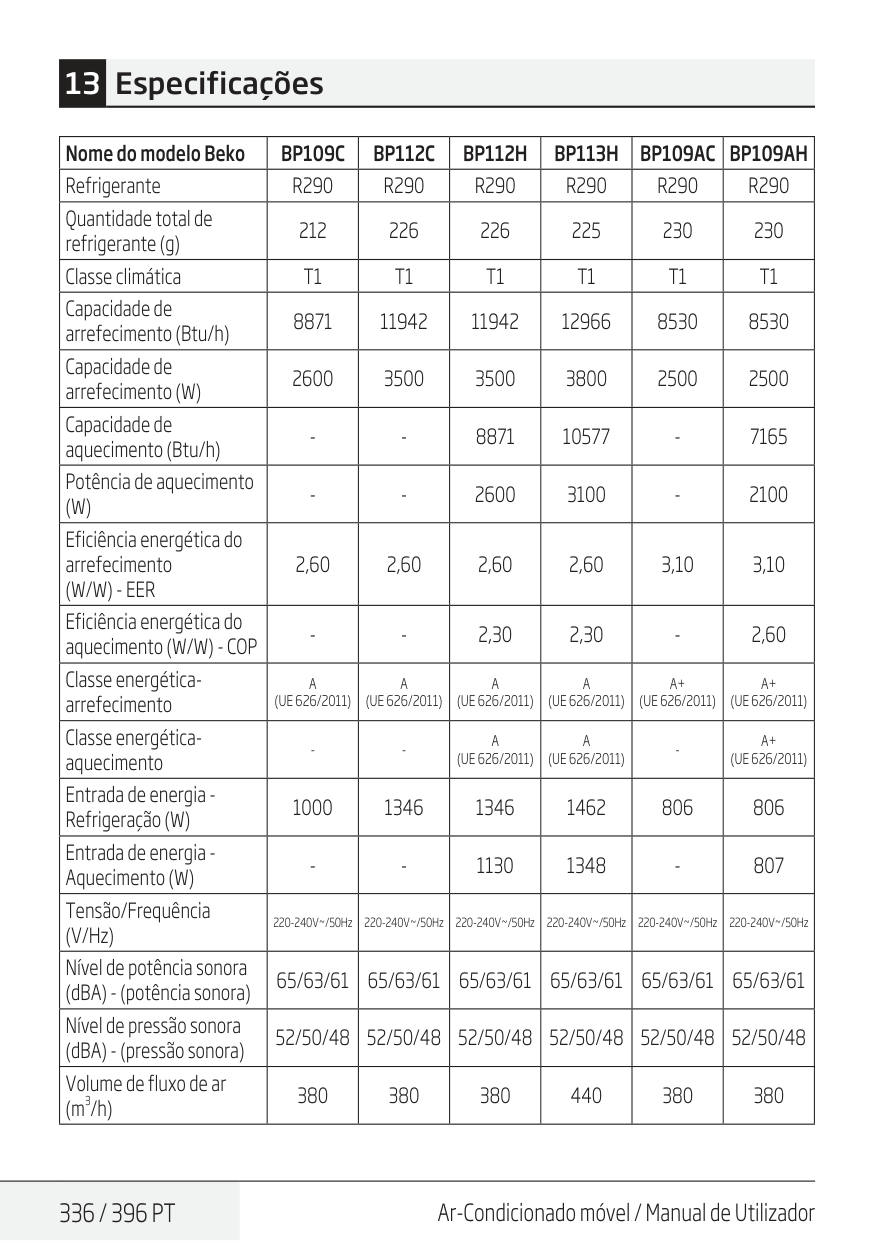
336 / 396 Pt
Ar-Condicionado móvel / Manual de Utilizador Nome do modelo BekoBp109C
Bp112C
Bp112H
Bp113H
Bp109Ac Bp109Ah
RefrigeranteR290
R290
R290
R290
R290
R290
Quantidade total de refrigerante (g) 212 226 226 225 230 230 Classe climáticaT1
T1
T1
T1
T1
T1
Capacidade de arrefecimento (Btu/h) 8871 11942 11942 12966 8530 8530 Capacidade de arrefecimento (W) 2600 3500 3500 3800 2500 2500 Capacidade de aquecimento (Btu/h)(W)
(W/W) - Eer
2,60 2,60 2,60 2,60 3,10 3,10 Eficiência energética do aquecimento (W/W) - COPA
(Ue 626/2011)
A
(Ue 626/2011)
A
(Ue 626/2011)
A
(Ue 626/2011)
A+
(Ue 626/2011)
A+
(Ue 626/2011)
Classe energética- aquecimentoA
(Ue 626/2011)
A
(Ue 626/2011)
A+
(Ue 626/2011)
Entrada de energia - Refrigeração (W) 1000 1346 1346 1462 806 806 Entrada de energia - Aquecimento (W)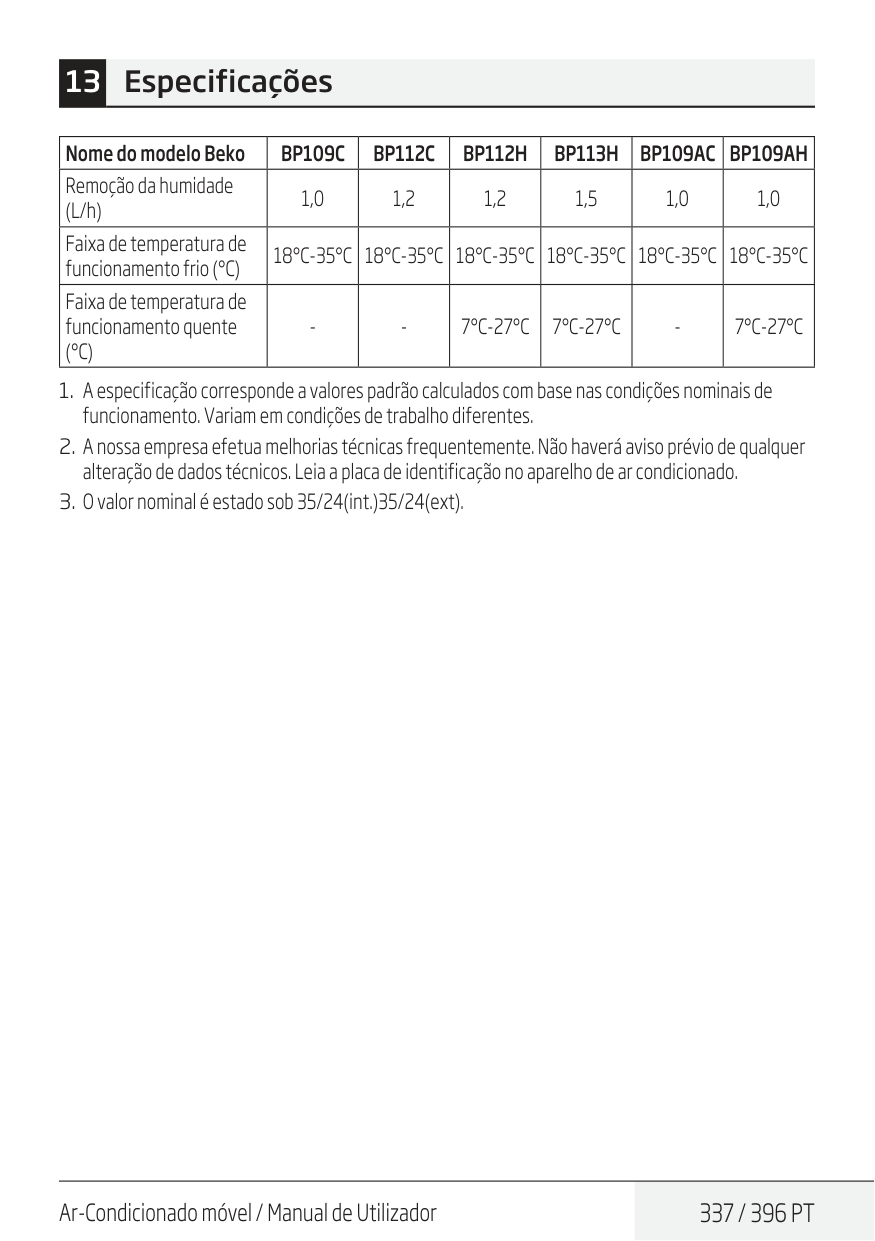
Ar-Condicionado móvel / Manual de Utilizador
337 / 396 Pt
Nome do modelo BekoBp109C
Bp112C
Bp112H
Bp113H
Bp109Ac Bp109Ah
Remoção da humidade (L/h) 1,0 1,2 1,2 1,5 1,0 1,0 Faixa de temperatura de funcionamento frio (°C)18°C-35°C 18°C-35°C 18°C-35°C 18°C-35°C 18°C-35°C 18°C-35°C
Faixa de temperatura de funcionamento quente(°C)
7°C-27°C
7°C-27°C
7°C-27°C

Fabricado por Arcelik A.S. Karaagac Cd. No:2-6 34445 Sutluce, Beyoglu, Istambul, Turquia.
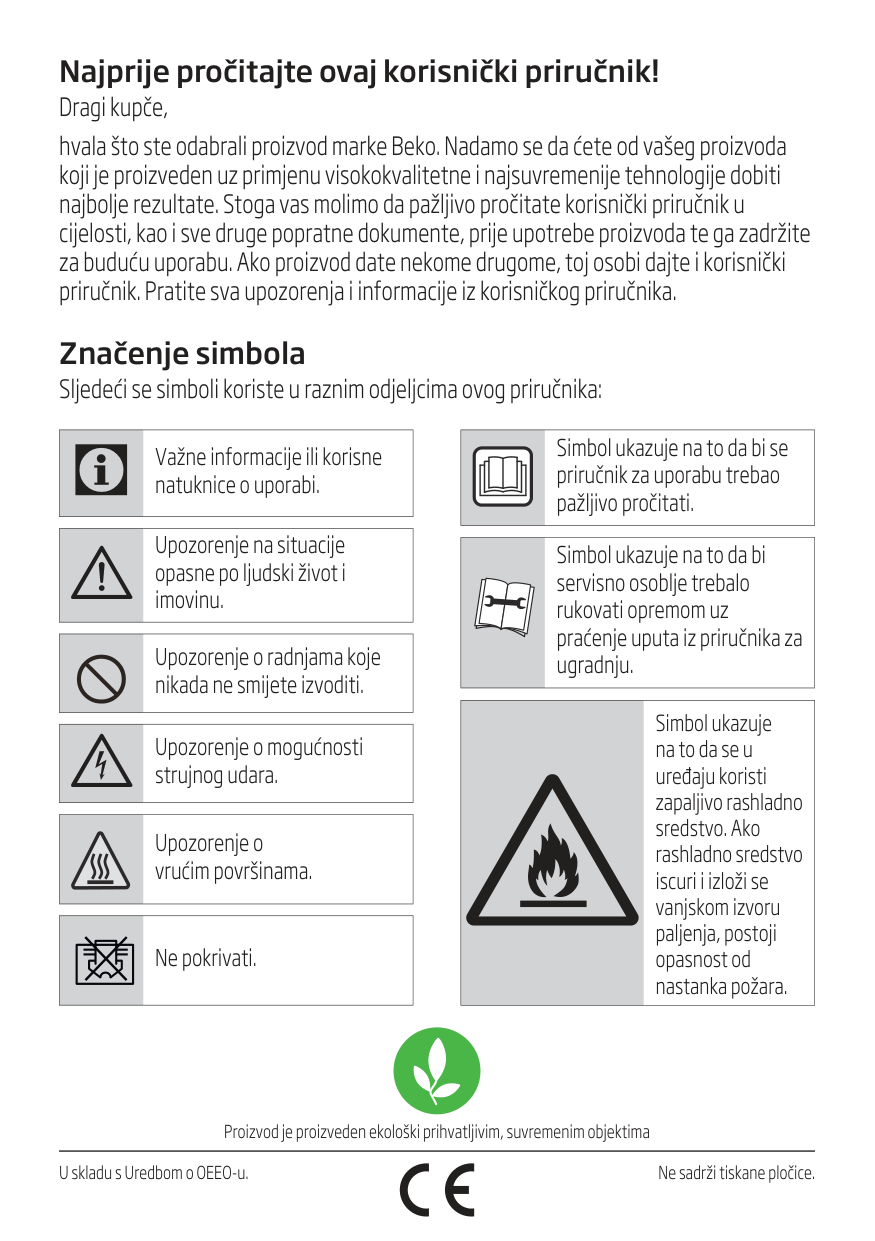
Najprije pročitajte ovaj korisnički priručnik! Dragi kupče, hvala što ste odabrali proizvod marke Beko. Nadamo se da ćete od vašeg proizvoda koji je proizveden uz primjenu visokokvalitetne i najsuvremenije tehnologije dobiti najbolje rezultate. Stoga vas molimo da pažljivo pročitate korisnički priručnik u cijelosti, kao i sve druge popratne dokumente, prije upotrebe proizvoda te ga zadržite za buduću uporabu. Ako proizvod date nekome drugome, toj osobi dajte i korisnički priručnik. Pratite sva upozorenja i informacije iz korisničkog priručnika. Značenje simbola Sljedeći se simboli koriste u raznim odjeljcima ovog priručnika: Proizvod je proizveden ekološki prihvatljivim, suvremenim objektima U skladu s Uredbom o OEEO-u. Ne sadrži tiskane pločice.
C
Važne informacije ili korisne natuknice o uporabi.A
Upozorenje na situacije opasne po ljudski život i imovinu. Upozorenje o radnjama koje nikada ne smijete izvoditi.B
Upozorenje o mogućnosti strujnog udara. Upozorenje o vrućim površinama. Ne pokrivati. Simbol ukazuje na to da bi se priručnik za uporabu trebao pažljivo pročitati. Simbol ukazuje na to da bi servisno osoblje trebalo rukovati opremom uz praćenje uputa iz priručnika za ugradnju. Simbol ukazuje na to da se u uređaju koristi zapaljivo rashladno sredstvo. Ako rashladno sredstvo iscuri i izloži se vanjskom izvoru paljenja, postoji opasnost od nastanka požara.
340 / 396 Hr
Prijenosni klima uređaj / Korisnički priručnik Sadržaj 1 Sigurnosna upozorenja 342 2 Naziv dijelova 366 3 Pribor 367 4 Izgled i funkcije nadzorne ploče 368 4.1 Model koji ima samo hlađenje (nepovratno). . . . . . . . . . . . . . . . . . . . . . . . . . . . . . . . . . . . . . . . . . . . . . . . 368 4.2 Model s hlađenjem i grijanjem (reverzibilni). . . . . . . . . . . . . . . . . . . . . . . . . . . . . . . . . . . . . . . . . . . . . . . . 369 5 Izgled i funkcije daljinskog upravljača 370 6 Uvod u rad 372 6.1 Prije korištenja . . . . . . . . . . . . . . . . . . . . . . . . . . . . . . . . . . . . . . . . . . . . . . . . . . . . . . . . . . . . . . . . . . . . . . . . . . . . . .372 6.2 Hlađenje . . . . . . . . . . . . . . . . . . . . . . . . . . . . . . . . . . . . . . . . . . . . . . . . . . . . . . . . . . . . . . . . . . . . . . . . . . . . . . . . . . . .373 6.3 Odvlaživanje . . . . . . . . . . . . . . . . . . . . . . . . . . . . . . . . . . . . . . . . . . . . . . . . . . . . . . . . . . . . . . . . . . . . . . . . . . . . . . . .373 6.4 Rad u načinu rada Fan (Ventilator). . . . . . . . . . . . . . . . . . . . . . . . . . . . . . . . . . . . . . . . . . . . . . . . . . . . . . . . . .373 6.5 Grijanje (ova funkcija nije dostupna za uređaj koji ima samo funkciju hlađenja) . . . . . . . . . . . .373 6.6 Brojač vremena . . . . . . . . . . . . . . . . . . . . . . . . . . . . . . . . . . . . . . . . . . . . . . . . . . . . . . . . . . . . . . . . . . . . . . . . . . . . .374 6.7 Automatsko njihanje . . . . . . . . . . . . . . . . . . . . . . . . . . . . . . . . . . . . . . . . . . . . . . . . . . . . . . . . . . . . . . . . . . . . . . . .374 6.8 Režim mirovanja. . . . . . . . . . . . . . . . . . . . . . . . . . . . . . . . . . . . . . . . . . . . . . . . . . . . . . . . . . . . . . . . . . . . . . . . . . . . .374 6.9 Ispuštanje vode . . . . . . . . . . . . . . . . . . . . . . . . . . . . . . . . . . . . . . . . . . . . . . . . . . . . . . . . . . . . . . . . . . . . . . . . . . . . .374 6.10 Funkcija bežične veze . . . . . . . . . . . . . . . . . . . . . . . . . . . . . . . . . . . . . . . . . . . . . . . . . . . . . . . . . . . . . . . . . .375 6.11 Funkcija Zone follow (Praćenje zone). . . . . . . . . . . . . . . . . . . . . . . . . . . . . . . . . . . . . . . . . . . . . . . . . . . . . . .375 7 Objašnjenja ugradnje 376 7.1 Objašnjenja ugradnje: . . . . . . . . . . . . . . . . . . . . . . . . . . . . . . . . . . . . . . . . . . . . . . . . . . . . . . . . . . . . . . . . . . . . . . .376 7.2 Uvod u ugradnju ispušne cijevi . . . . . . . . . . . . . . . . . . . . . . . . . . . . . . . . . . . . . . . . . . . . . . . . . . . . . . . . . . . . . .377 7.3 Univerzalni pribor za brtvljenje za prijenosni klima uređaj (dodatna oprema). . . . . . . . . . . . . . .379 7.4 Koristite filtar Hepa 13 (samo za model BP113H) . . . . . . . . . . . . . . . . . . . . . . . . . . . . . . . . . . . . . . . . . . 382 7.5 Upozorenje o napunjenosti vodom. . . . . . . . . . . . . . . . . . . . . . . . . . . . . . . . . . . . . . . . . . . . . . . . . . . . . . . . . 383
Prijenosni klima uređaj / Korisnički priručnik
341 / 396 Hr
Sadržaj 8 Objašnjenja održavanja 384 8.1 Očistite filtar zraka . . . . . . . . . . . . . . . . . . . . . . . . . . . . . . . . . . . . . . . . . . . . . . . . . . . . . . . . . . . . . . . . . . . . . . . . . 384 8.2 Očistite površinu klima uređaja . . . . . . . . . . . . . . . . . . . . . . . . . . . . . . . . . . . . . . . . . . . . . . . . . . . . . . . . . . . . 385 9 Održavanje 386 10 Otklanjanje poteškoća 387 11 Europske smjernice za odlaganje 388 12 Upute za ugradnju 389 12.1 Uputa za fluorirane plinove . . . . . . . . . . . . . . . . . . . . . . . . . . . . . . . . . . . . . . . . . . . . . . . . . . . . . . . . . . . . . . . . 389 13 Specifikacije 390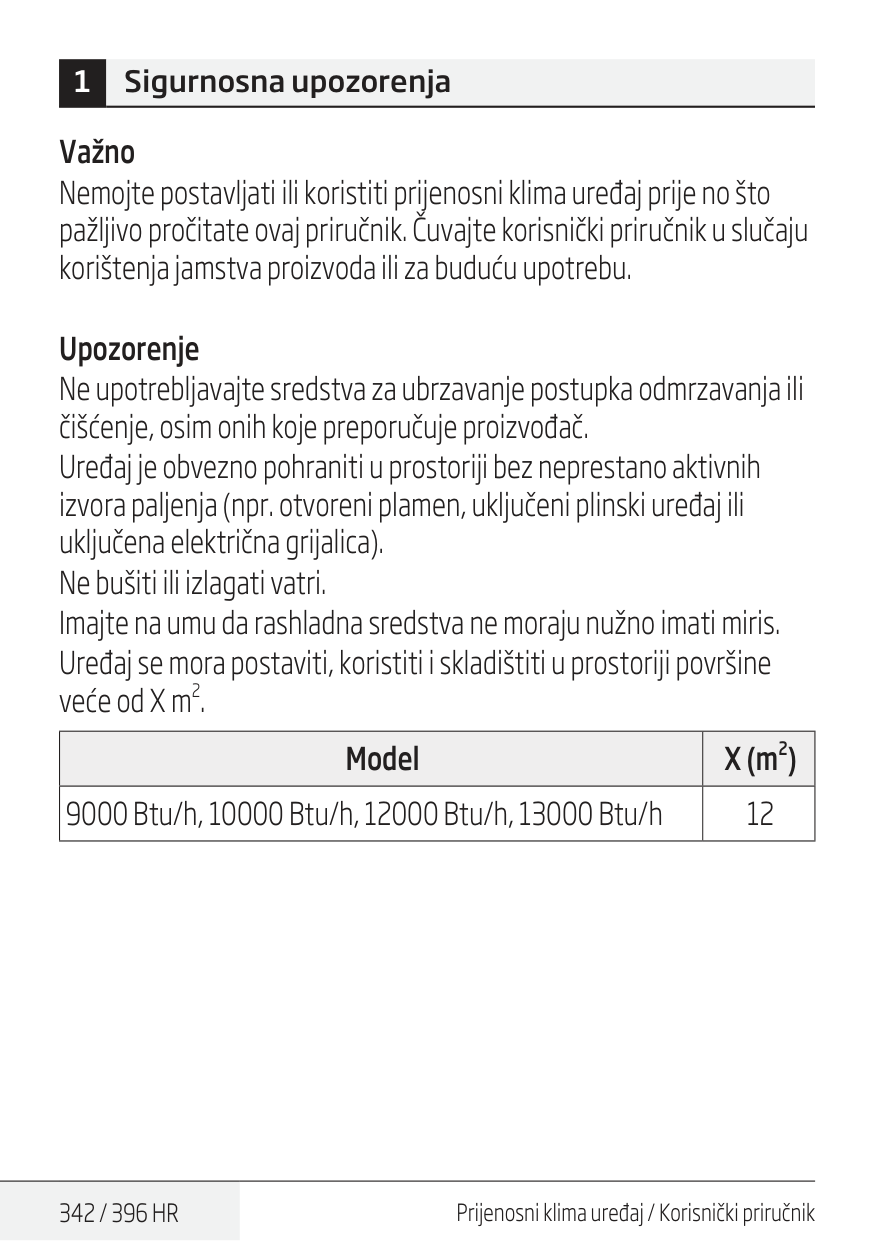
342 / 396 Hr
Prijenosni klima uređaj / Korisnički priručnik 1 Sigurnosna upozorenja Važno Nemojte postavljati ili koristiti prijenosni klima uređaj prije no što pažljivo pročitate ovaj priručnik. Čuvajte korisnički priručnik u slučaju korištenja jamstva proizvoda ili za buduću upotrebu. Upozorenje Ne upotrebljavajte sredstva za ubrzavanje postupka odmrzavanja ili čišćenje, osim onih koje preporučuje proizvođač. Uređaj je obvezno pohraniti u prostoriji bez neprestano aktivnih izvora paljenja (npr. otvoreni plamen, uključeni plinski uređaj ili uključena električna grijalica). Ne bušiti ili izlagati vatri. Imajte na umu da rashladna sredstva ne moraju nužno imati miris. Uređaj se mora postaviti, koristiti i skladištiti u prostoriji površine veće od X m
Prijenosni klima uređaj / Korisnički priručnik
343 / 396 Hr
Upozorenje (za R290) Posebne informacije za uređaje s rashladnim plinom R290. •Pažljivo pročitajte sva upozorenja. •Kada odmrzavate i čistite uređaj koristite isključivo alate koje preporučuje proizvođač. •Uređaj se postavlja u prostoriji bez neprestano aktivnih izvora paljenja (na primjer: otvoreni plamen, plinski ili električni uređaji u radu). •Ne bušiti ili izlagati vatri. •Ovaj uređaj sadrži Y g (vidi naljepnicu s oznakom na stražnjoj strani) rashladnog plina R290. •R290 je rashladni plin koji je u skladu s europskim direktivama o okolišu. Ne bušiti nijedan dio rashladnog kruga. •Ako se uređaj postavlja, koristi ili skladišti u neprozračenom prostoru, prostorija mora biti projektirana tako da spriječi nakupljanje curenja rashladnog sredstva koje dovodi do opasnosti od požara ili eksplozije uslijed paljenja rashladnog sredstva uzrokovanog električnim grijalicama, pećima ili drugim izvorima paljenja. •Uređaj treba skladištiti na način koji će spriječiti mehaničke kvarove. •Pojedinci koji upravljaju ili rade na rashladnom krugu moraju imati odgovarajuću potvrdu organizacije za akreditaciju kojom se osigurava stručnost rukovanja rashladnim sredstvima u skladu sa specifičnim vrednovanjem koje priznaju udruženja u industriji. 1 Sigurnosna upozorenja
344 / 396 Hr
Prijenosni klima uređaj / Korisnički priručnik •Popravci se izvode isključivo na temelju preporuke proizvođača. Održavanje i popravci koji zahtijevaju podršku kvalificiranog osoblja moraju se izvoditi pod nadzorom kvalificirane osobe specijalizirane za upotrebu zapaljivih rashladnih sredstava. Opće sigurnosne upute
Prijenosni klima uređaj / Korisnički priručnik
345 / 396 Hr
1 Sigurnosna upozorenja
346 / 396 Hr
Prijenosni klima uređaj / Korisnički priručnik 1 Sigurnosna upozorenja
Prijenosni klima uređaj / Korisnički priručnik
347 / 396 Hr
1 Sigurnosna upozorenja
348 / 396 Hr
Prijenosni klima uređaj / Korisnički priručnik 1 Sigurnosna upozorenjaC
Napomena: •Ako se oštete neki dijelovi, obratite se ovlaštenom prodavatelju ili serviseru; •U slučaju oštećenja isključite prekidač za zrak i napajanje te se obratite ovlaštenom prodavatelju ili servisu; •Kabel za napajanje uvijek mora biti čvrsto uzemljen. •Ako je kabel za napajanje oštećen, isključite prekidač za zrak i napajanje kako biste izbjegli opasnost. Mora biti zamijenjen kod ovlaštenog prodavača ili servisera.
Prijenosni klima uređaj / Korisnički priručnik
349 / 396 Hr
Upozorenja (samo za upotrebu rashladnog sredstva R290)
350 / 396 Hr
Prijenosni klima uređaj / Korisnički priručnik 1.5 Aparat za gašenje požara Ako je potrebno izvesti toplu obradu na rashladnoj opremi ili povezanim dijelovima, prikladna oprema za gašenje požara mora biti dostupna u blizini. Držite aparat za gašenje sa suhim praškom ili CO2 u blizini mjesta gdje se odvija punjenje. 1.6 Bez izvora paljenja Nijedna osoba koja obavlja radove na rashladnom sustavu koji podrazumijevaju izlaganje cjevovoda koji sadrži ili je sadržavao rashladno sredstvo ne smije koristiti izvore paljenja na način koji može dovesti do opasnosti od požara ili eksplozije. Sve moguće izvore paljenja, uključujući pušenje cigareta, potrebno je držati na dovoljnoj udaljenosti od mjesta na kojem se obavlja ugradnja, popravak, uklanjanje i odlaganje, a za vrijeme čega bi se zapaljiva rashladna sredstva mogla ispustiti u okolni prostor. Prije obavljanja radova područje oko opreme potrebno je pregledati kako bi se osiguralo da ne postoje opasnosti od zapaljenja. Obavezno je postaviti znakove ZABRANJENO PUŠENJE. 1.7 Prozračeno područje Osigurajte da je područje na otvorenom ili da je na odgovarajući način ventilirano prije otvaranja sustava ili izvođenja tople obrade. Mora se održavati određena razina prozračenosti za vrijeme izvođenja radova. Ventilacija bi trebala raspršiti bilo kakvo rashladno sredstvo na siguran način i, po mogućnosti, izbaciti ga u van u atmosferu. 1 Sigurnosna upozorenja
Prijenosni klima uređaj / Korisnički priručnik
351 / 396 Hr
1.8 Provjere opreme za rashladno sredstvo Kada se mijenjaju električni dijelovi, oni moraju odgovarati svrsi i biti ispravnih specifikacija. Obvezno je pratiti smjernice za održavanje i servis proizvođača u svakom trenutku. Ako imate nedoumica, obratite se tehničkom odjelu proizvođača za pomoć. Na instalacije koje koriste zapaljive rashladne tvari primjenjuju se sljedeće provjere: veličina punjenja u skladu je s veličinom prostorije u koju su ugrađeni dijelovi koji sadrže rashladno sredstvo; uređaji i izlazi za ventilaciju ispravni su i nisu začepljeni; ako se koristi neizravni rashladni krug, u sekundarnom krugu mora se provjeriti prisutnost rashladnog sredstva; označavanje na opremi mora biti vidljivo i čitko. Oznake i znakovi koji su nečitki moraju se ispraviti; rashladna cijev ili dijelovi ugrađuju se u položaj u kojem je malo vjerojatno da će biti izloženi bilo kojoj tvari koja može nagrizati komponente koje sadrže rashladno sredstvo, osim ako su komponente izrađene od materijala koji su sami po sebi otporni na koroziju ili su na odgovarajući način zaštićene od korozije. 1.9 Provjere električnih uređaja Popravljanje i održavanje električnih dijelova mora obuhvaćati prve sigurnosne provjere i postupke pregledavanja dijelova. Ako postoji nedostatak koji bi mogao ugroziti sigurnost, obavezno je isključiti napajanje do kruga dok se nedostatak ne ukloni na zadovoljavajući način. Ako se nedostatak ne može ispraviti odmah, a potrebno je nastaviti s radom, obvezno je primijeniti prikladno privremeno rješenje. O tome je obavezno obavijestiti vlasnika opreme tako da sve stranke budu informirane. 1 Sigurnosna upozorenja
352 / 396 Hr
Prijenosni klima uređaj / Korisnički priručnik Početne provjere sigurnosti uključuju: pražnjenje kondenzatora: to se mora učiniti na siguran način kako bi se izbjegla mogućnost iskrenja; da tijekom punjenja, vađenja ili pročišćavanja sustava električne komponente i ožičenje pod naponom nisu izloženi; da postoji kontinuitet uzemljenja.
Prijenosni klima uređaj / Korisnički priručnik
353 / 396 Hr
C
Napomena: Upotreba silikonskog brtvila može ograničiti učinkovitost nekih vrsta opreme za detekciju curenja. Samosigurni dijelovi ne moraju se izolirati prije izvođenja radova na njima.
354 / 396 Hr
Prijenosni klima uređaj / Korisnički priručnik
Prijenosni klima uređaj / Korisnički priručnik
355 / 396 Hr
356 / 396 Hr
Prijenosni klima uređaj / Korisnički priručnik
Prijenosni klima uređaj / Korisnički priručnik
357 / 396 Hr
a) Upoznajte se s opremom i funkcijom te opreme. b) Električki izolirajte sustav. c) Prije postupka osigurajte: dostupnost opreme za mehaničko rukovanje cilindrima rashladnog sredstva (po potrebi); dostupnost i ispravno korištenje sve osobne zaštitne opreme; neprekidan nadzor postupka vađenja od strane kvalificirane osobe; usklađenost opreme za vađenje i cilindara s odgovarajućim standardima. d) Ako je moguće, ispumpajte rashladni sustav. e) Ako nije moguće postići vakuum, ugradite razdjelni priključak tako da se rashladno sredstvo može ukloniti iz različitih dijelova sustava. f) Postavite cilindar na vagu prije pražnjenja. g) Pokrenite stroj za pražnjenje i koristite ga u skladu s uputama proizvođača. h) Nemojte prepuniti cilindre. (Ne više od 80 % obujma kada se puni tekućinom). i) Nemojte prekoračiti maksimalni radni tlak cilindra, čak ni privremeno. j) Nakon što se cilindri pravilno napune i postupak dovrši, osigurajte da se cilindri, kao i oprema, odmah uklone s mjesta rada te da se svi izolacijski ventili na opremi zatvore. k) Izvađeno rashladno sredstvo ne smije se staviti u drugi rashladni sustav osim ako se prethodno ne očisti i provjeri. 1 Sigurnosna upozorenja
358 / 396 Hr
Prijenosni klima uređaj / Korisnički priručnik
Prijenosni klima uređaj / Korisnički priručnik
359 / 396 Hr
električni dijelovi zatvoreni kako bi se spriječilo paljenje u slučaju da dođe do ispuštanja rashladnog sredstva. Posavjetujte se s proizvođačem ako imate nedoumica. Izvađeno rashladno sredstvo mora se vratiti dobavljaču za rashladna sredstva u odgovarajućem cilindru za vađenje rashladnog sredstva i uz odgovarajuću bilješku o prijenosu otpada. Nemojte miješati rashladna sredstva u jedinicama određenim za vađenje, a posebno ne u cilindrima. Ako je potrebno ukloniti kompresore ili ulja kompresora, provjerite jesu li ispražnjeni do prihvatljive razine kako biste osigurali da zapaljivo rashladno sredstvo ne ostane u mazivu. Postupak pražnjenja obavlja se prije vraćanja kompresora dobavljačima. Za ubrzanje postupka smije se koristiti isključivo električno grijanje kućišta kompresora. Kada se iz sustava ispušta ulje, to se mora provoditi na siguran način.C
Napomena o fluoriranim plinovima:
360 / 396 Hr
Prijenosni klima uređaj / Korisnički priručnik Stručnost servisnog osoblja Općenito Uz uobičajene postupke popravljanja rashladne opreme potrebna je posebna obuka za opremu sa zapaljivim rashladnim sredstvima. U mnogim zemljama tu obuku provode nacionalne organizacije za osposobljavanje, akreditirane za poučavanje iz područja relevantnih nacionalnih standarda kompetencija koji mogu biti propisani zakonodavstvom. Postignuta kompetencija treba biti dokumentirana certifikatom. Osposobljavanje Osposobljavanje treba sadržavati sljedeće: Podaci o eksplozivnom potencijalu zapaljivih rashladnih sredstava koji pokazuju da zapaljivi materijali mogu biti opasni ako se njima nepažljivo rukuje. Podaci o potencijalnim izvorima paljenja, posebno onima koji nisu očigledni, poput upaljača, prekidača za svjetlo, usisavača, električnih grijača. Informacije o različitim konceptima sigurnosti: Neprozračeno - (vidi točku GG.2) Sigurnost uređaja ne ovisi o prozračivanju kućišta. Isključivanje uređaja ili otvaranje kućišta nema značajan utjecaj na sigurnost. Ipak, postoji mogućnost nakupljanja rashladnog sredstva koje curi unutar kućišta, a zapaljiva atmosfera će se osloboditi pri otvaranju kućišta. 1 Sigurnosna upozorenja
Prijenosni klima uređaj / Korisnički priručnik
361 / 396 Hr
Prozračeno kućište – (vidi točku GG.4) Sigurnost uređaja ovisi o prozračenosti kućišta. Isključivanje uređaja ili otvaranje kućišta ima značajan utjecaj na sigurnost. Prije toga potrebno je osigurati dostatno prozračivanje. Prozračena prostorija – (vidi točku GG.5) Sigurnost uređaja ovisi o prozračenosti prostorije. Isključivanje uređaja ili otvaranje kućišta nema značajan utjecaj na sigurnost. Prozračivanje prostorije ne smije se isključiti za vrijeme postupaka popravljanja. Informacije o konceptu zabrtvljenih dijelova i kućišta prema normiIec 60079-15:2010.
Informacije o ispravnim radnim postupcima: a) Puštanje u pogon
362 / 396 Hr
Prijenosni klima uređaj / Korisnički priručnik
Prijenosni klima uređaj / Korisnički priručnik
363 / 396 Hr
364 / 396 Hr
Prijenosni klima uređaj / Korisnički priručnik 1 Sigurnosna upozorenja e) Odlaganje
Prijenosni klima uređaj / Korisnički priručnik
365 / 396 Hr
Sve propisane znakove potrebno je održavati, a poslodavci bi trebali osigurati da zaposlenici dobiju prikladne i dostatne upute i obuku o sigurnosnim znakovima i radnjama koje treba poduzeti u vezi s tim znakovima. Potrebno je paziti da se djelotvornost znakova ne umanji stavljanjem prevelikog broja znakova na isto mjesto. Svi korišteni piktogrami trebaju biti što jednostavniji i sadržavati samo bitne detalje. Odlaganje opreme u kojoj se koristi zapaljiva rashladna sredstva Vidi nacionalne propise. Skladištenje opreme/uređaja Oprema se treba skladištiti prema uputama proizvođača. Skladištenje (neprodane) opreme u ambalaži Zaštitu ambalaže u skladištu treba izvesti na način da mehanička oštećenja opreme unutar ambalaže ne prouzroče curenje rashladnog sredstva. Najveći broj komada opreme koja se smije skladištiti zajedno određuje se lokalnim propisima. 1 Sigurnosna upozorenja
366 / 396 Hr
Prijenosni klima uređaj / Korisnički priručnik 2 Naziv dijelova 1 2 3 5 6 7 8 9 4 Slika 1 1 Otvor za zrak 5 Ulaz zraka 2 Upravljačka ploča 6 Ispust 3 Prednji poklopac 7 Izlaz zraka 4 Kotačić 8 Kabel napajanja 9 Ispust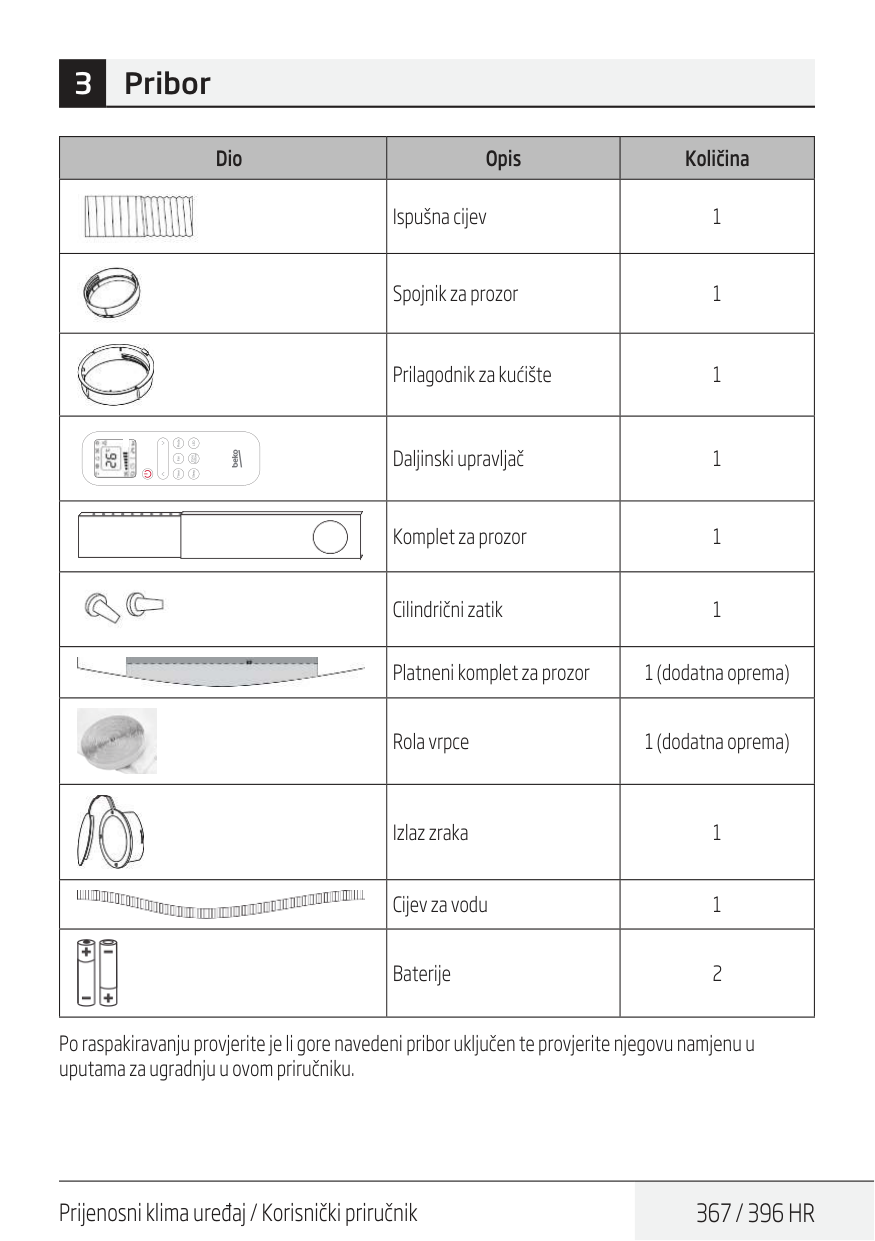
Prijenosni klima uređaj / Korisnički priručnik
367 / 396 Hr
Dio Opis Količina Ispušna cijev 1 Spojnik za prozor 1 Prilagodnik za kućište 1 Daljinski upravljač 1 Komplet za prozor 1 Cilindrični zatik 1 Platneni komplet za prozor 1 (dodatna oprema) Rola vrpce 1 (dodatna oprema) Izlaz zraka 1 Cijev za vodu 1 Baterije 2 Po raspakiravanju provjerite je li gore navedeni pribor uključen te provjerite njegovu namjenu u uputama za ugradnju u ovom priručniku. 3 Pribor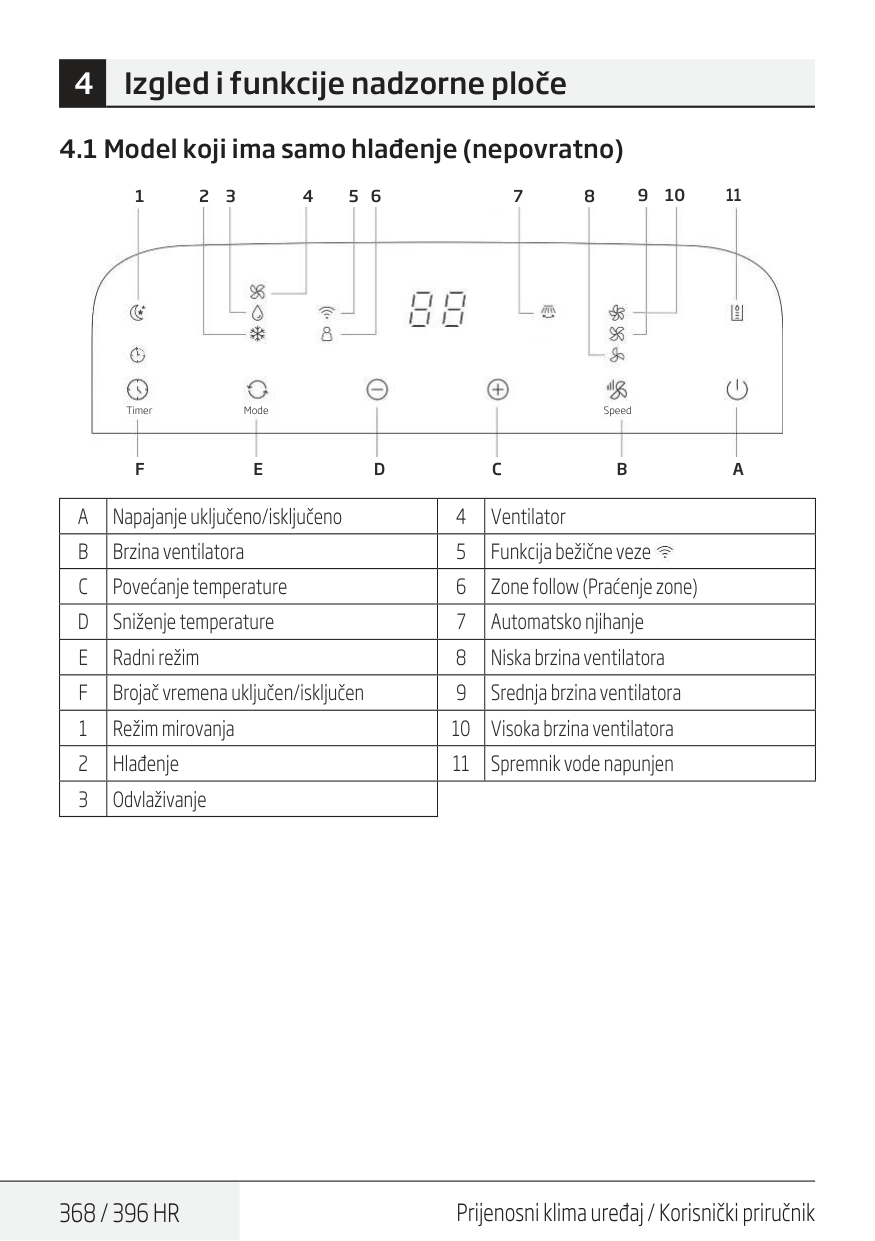
368 / 396 Hr
Prijenosni klima uređaj / Korisnički priručnik 4.1 Model koji ima samo hlađenje (nepovratno) Timer Mode SpeedF
1 2 3 4 5 6 7 8 9 10E
D
C
B
A
11A
Napajanje uključeno/isključeno 4 VentilatorB
Brzina ventilatora 5 Funkcija bežične vezeC
Povećanje temperature 6 Zone follow (Praćenje zone)D
Sniženje temperature 7 Automatsko njihanjeE
Radni režim 8 Niska brzina ventilatoraF
Brojač vremena uključen/isključen 9 Srednja brzina ventilatora 1 Režim mirovanja 10 Visoka brzina ventilatora 2 Hlađenje 11 Spremnik vode napunjen 3 Odvlaživanje 4 Izgled i funkcije nadzorne ploče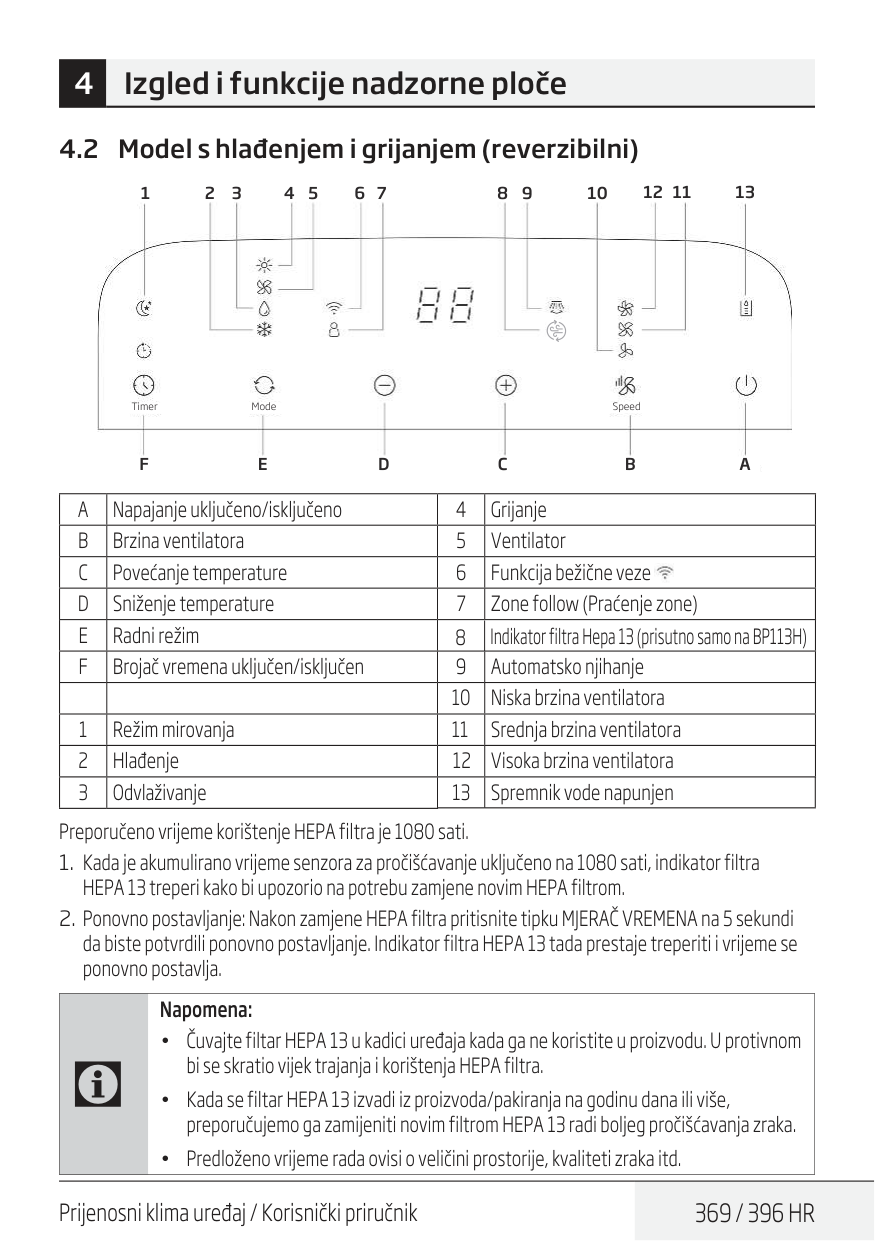
Prijenosni klima uređaj / Korisnički priručnik
369 / 396 Hr
4 Izgled i funkcije nadzorne ploče 4.2 Model s hlađenjem i grijanjem (reverzibilni)A
Napajanje uključeno/isključeno 4 GrijanjeB
Brzina ventilatora 5 VentilatorC
Povećanje temperature 6 Funkcija bežične vezeD
Sniženje temperature 7 Zone follow (Praćenje zone)E
Radni režim 9 Automatsko njihanjeF
Brojač vremena uključen/isključen 10 Niska brzina ventilatora 11 Srednja brzina ventilatora 1 Režim mirovanja 12 Visoka brzina ventilatora 2 Hlađenje 13 Spremnik vode napunjen 3 Odvlaživanje Preporučeno vrijeme korištenje HEPA filtra je 1080 sati.C
Napomena: • Čuvajte filtar HEPA 13 u kadici uređaja kada ga ne koristite u proizvodu. U protivnom bi se skratio vijek trajanja i korištenja HEPA filtra. • Kada se filtar HEPA 13 izvadi iz proizvoda/pakiranja na godinu dana ili više, preporučujemo ga zamijeniti novim filtrom HEPA 13 radi boljeg pročišćavanja zraka. • Predloženo vrijeme rada ovisi o veličini prostorije, kvaliteti zraka itd. Timer Mode SpeedF
1 2 3 4 5 6 7 8 9 10 12 11 13E
D
C
B
A
8 Indikator filtra Hepa 13 (prisutno samo na BP113H)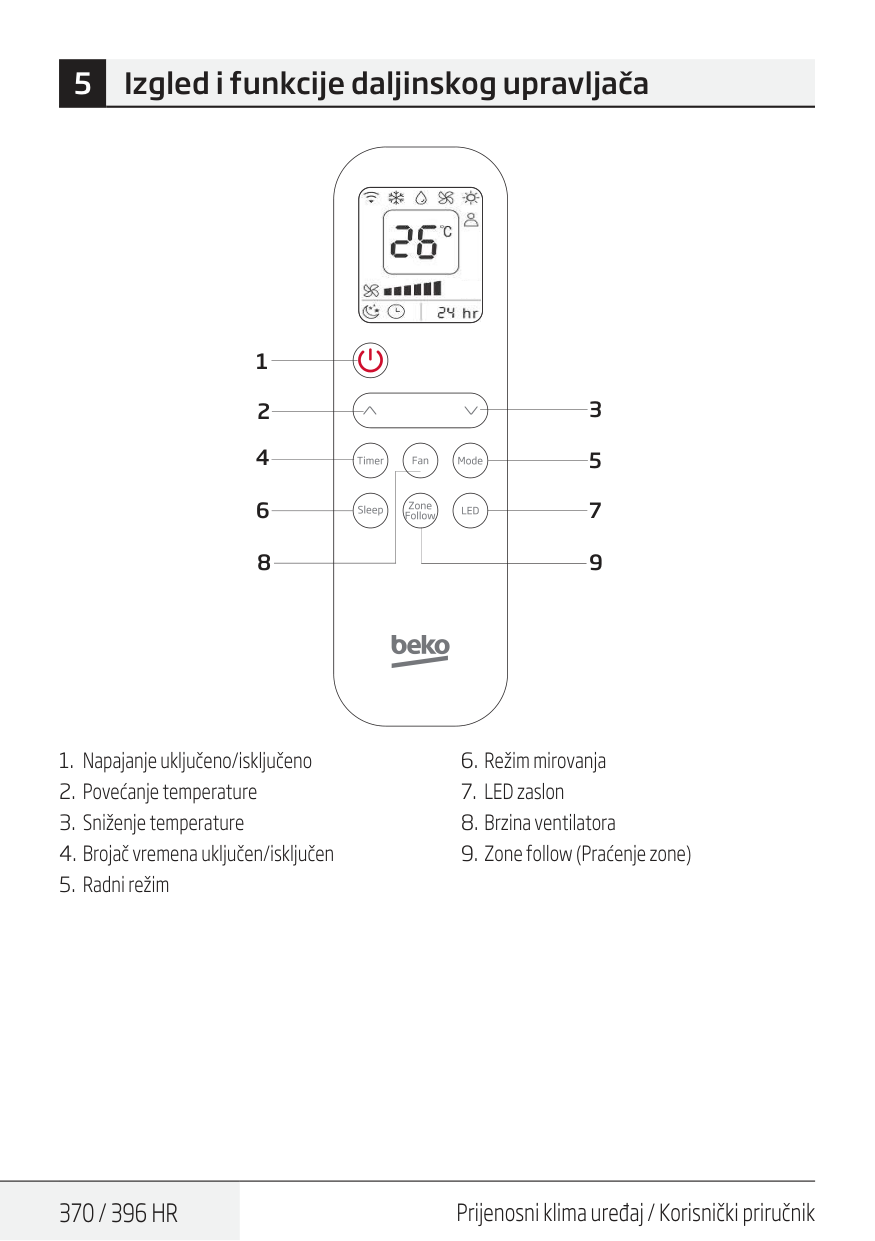
370 / 396 Hr
Prijenosni klima uređaj / Korisnički priručnik 3 5 7 9 1 2 4 6 8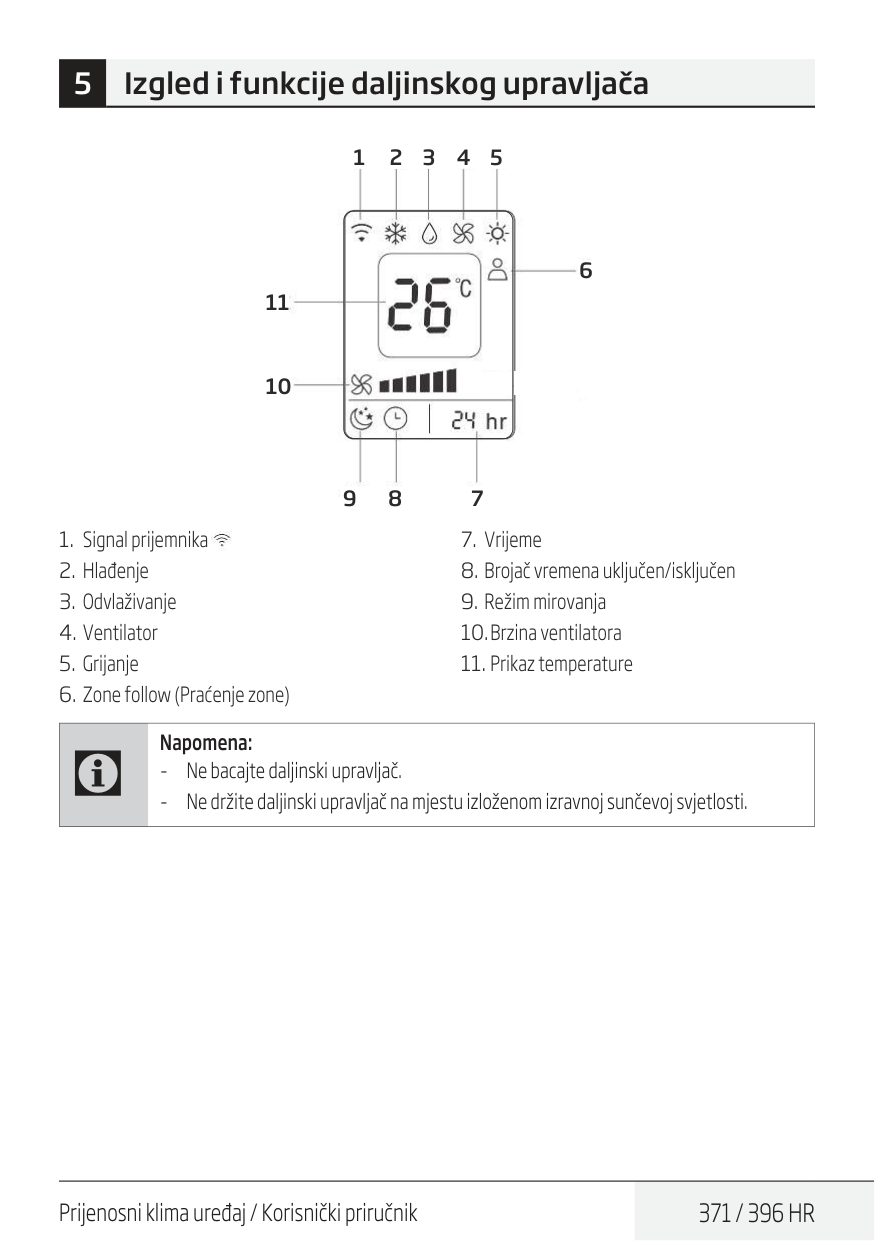
Prijenosni klima uređaj / Korisnički priručnik
371 / 396 Hr
5 Izgled i funkcije daljinskog upravljača 1 2 3 4 5 6 9 8 7 11 10C
Napomena: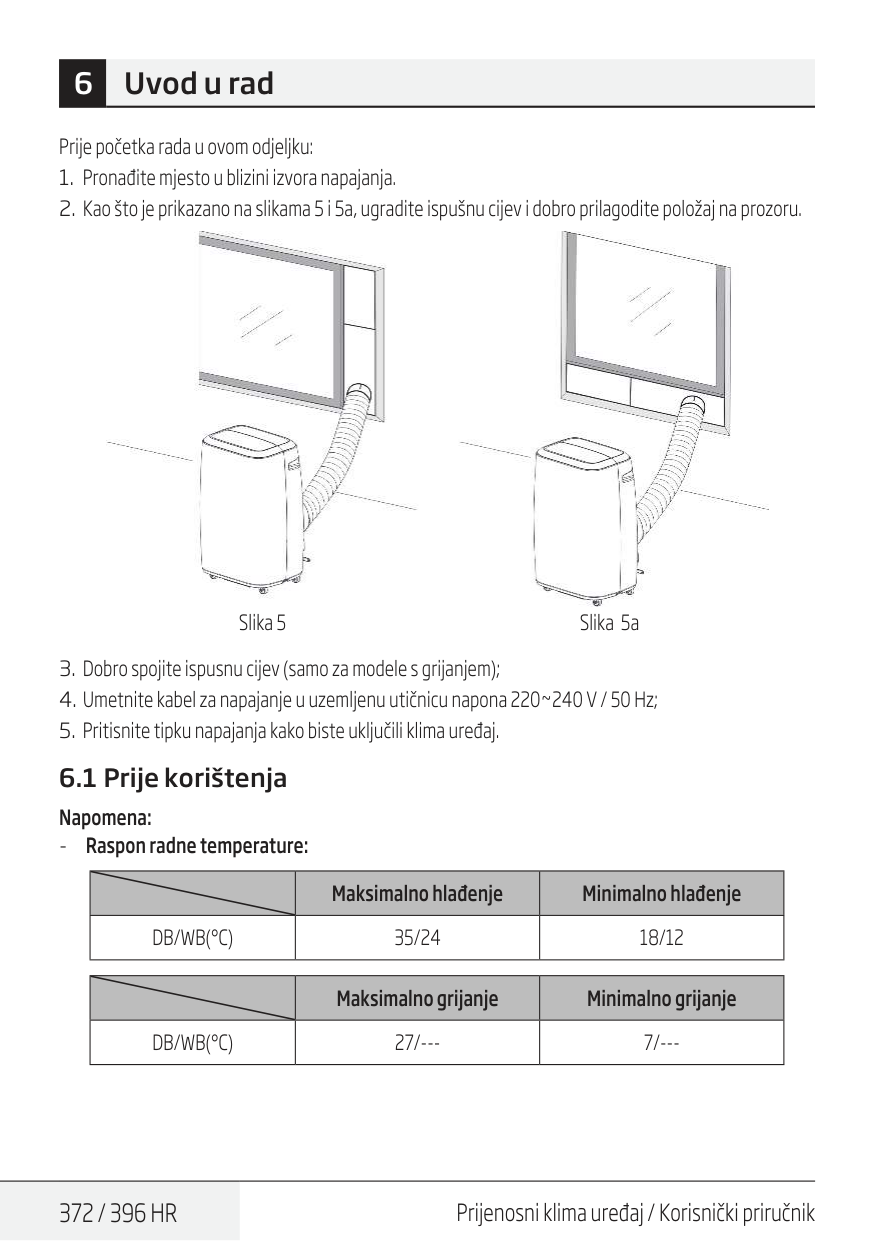
372 / 396 Hr
Prijenosni klima uređaj / Korisnički priručnik 6 Uvod u rad Prije početka rada u ovom odjeljku:Db/Wb(°C)
35/24 18/12 Maksimalno grijanje Minimalno grijanjeDb/Wb(°C)
27/--- 7/---
Prijenosni klima uređaj / Korisnički priručnik
373 / 396 Hr
Provjerite je li ispušna cijev pravilno postavljena. Upozorenja za funkcije hlađenja i odvlaživanja:(16°C – 31°C)
(16°C-31°C)
(16°C – 31°C)
374 / 396 Hr
Prijenosni klima uređaj / Korisnički priručnik 6.6 Brojač vremena Postavljanje brojača vremena do uključenja:
Prijenosni klima uređaj / Korisnički priručnik
375 / 396 Hr
Ako je pumpa za vodu oštećena, možete koristiti i povremenu odvodnju. Pod tim uvjetom, kada zasvijetli indikator napunjenosti vodom spojite odvodnu cijev na donju pričvrsnu stezaljku, a sva voda u kadici za vodu bit će ispuštena. Uređaj može dobro raditi. 6.10 Funkcija bežične veze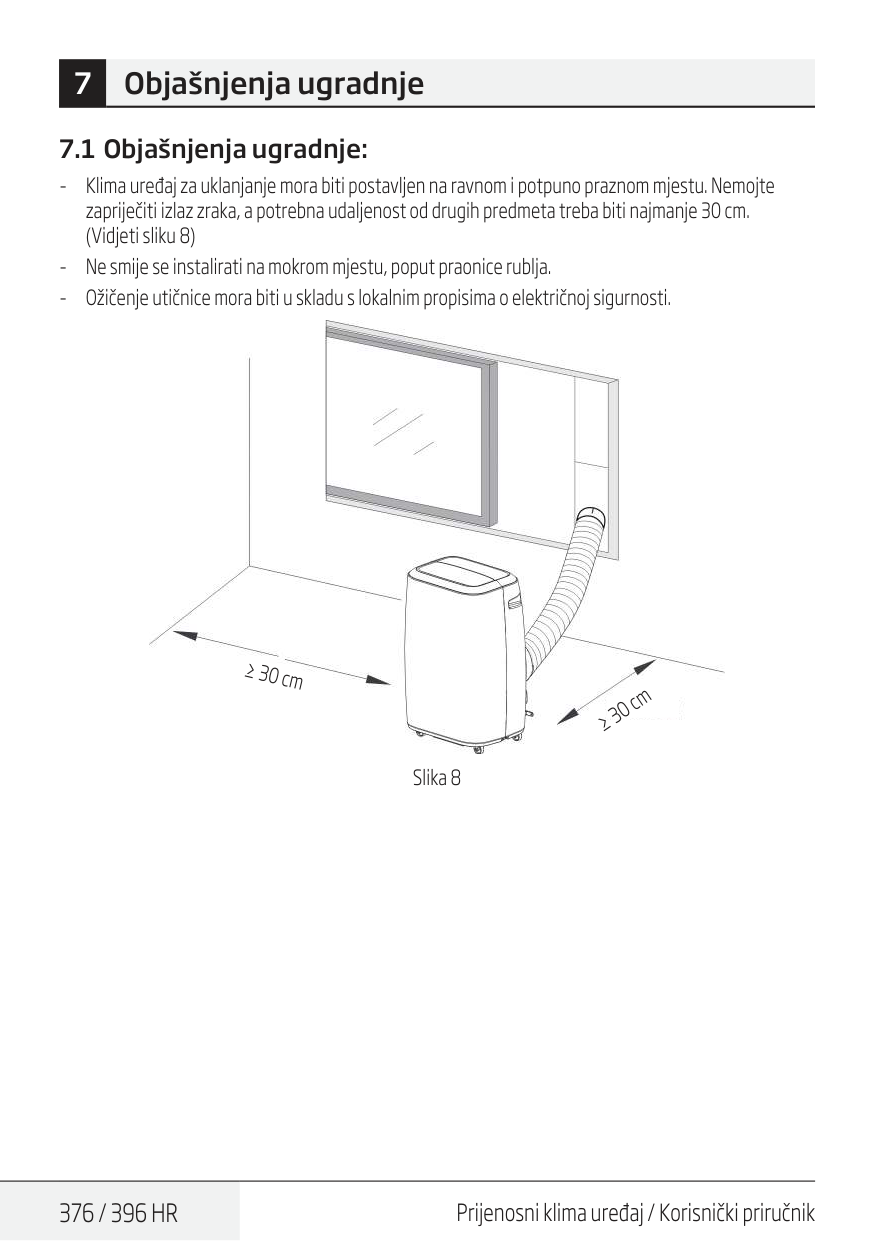
376 / 396 Hr
Prijenosni klima uređaj / Korisnički priručnik 7 Objašnjenja ugradnje 7.1 Objašnjenja ugradnje: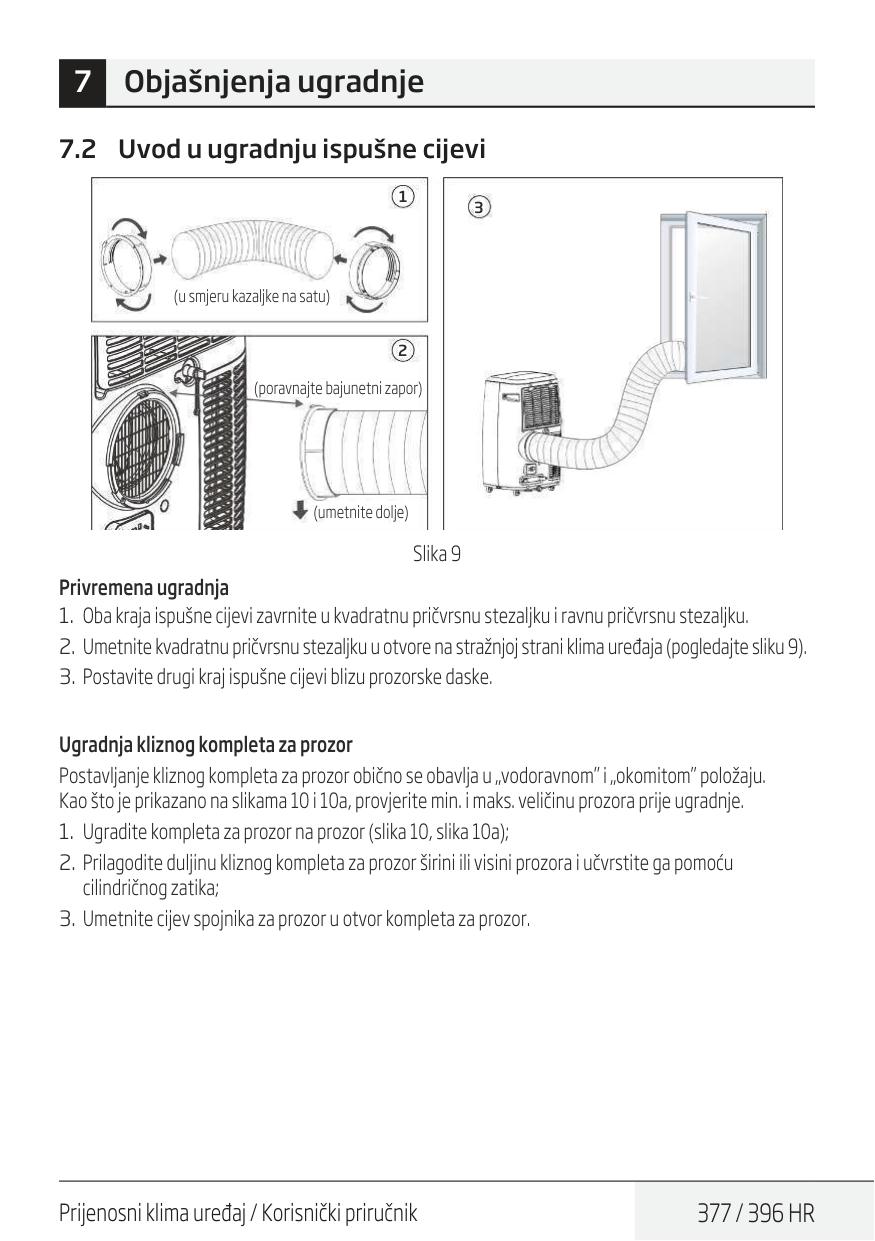
Prijenosni klima uređaj / Korisnički priručnik
377 / 396 Hr
7.2 Uvod u ugradnju ispušne cijevi 1 2 3 (u smjeru kazaljke na satu) (poravnajte bajunetni zapor) (umetnite dolje) Slika 9 Privremena ugradnja
378 / 396 Hr
Prijenosni klima uređaj / Korisnički priručnik 1 Širina prozora min: 67,5 cm maks: 123 cm Slika 10 Visina prozora min: 67,5 cm maks: 123 cm Slika 10a 2 3 (Cilindrični zatik) 7 Objašnjenja ugradnje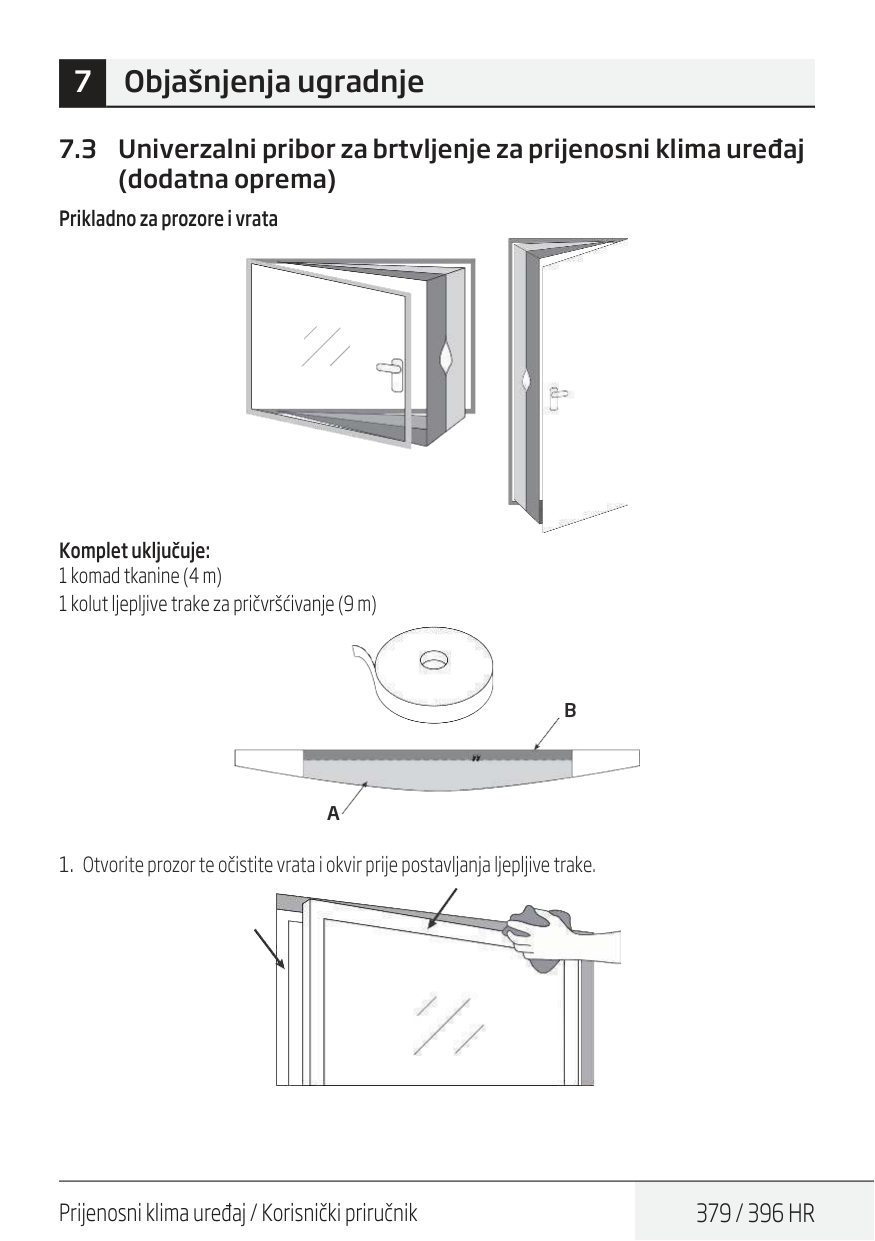
Prijenosni klima uređaj / Korisnički priručnik
379 / 396 Hr
7.3 Univerzalni pribor za brtvljenje za prijenosni klima uređaj (dodatna oprema) Prikladno za prozore i vrata Komplet uključuje: 1 komad tkanine (4 m) 1 kolut ljepljive trake za pričvršćivanje (9 m)A
B
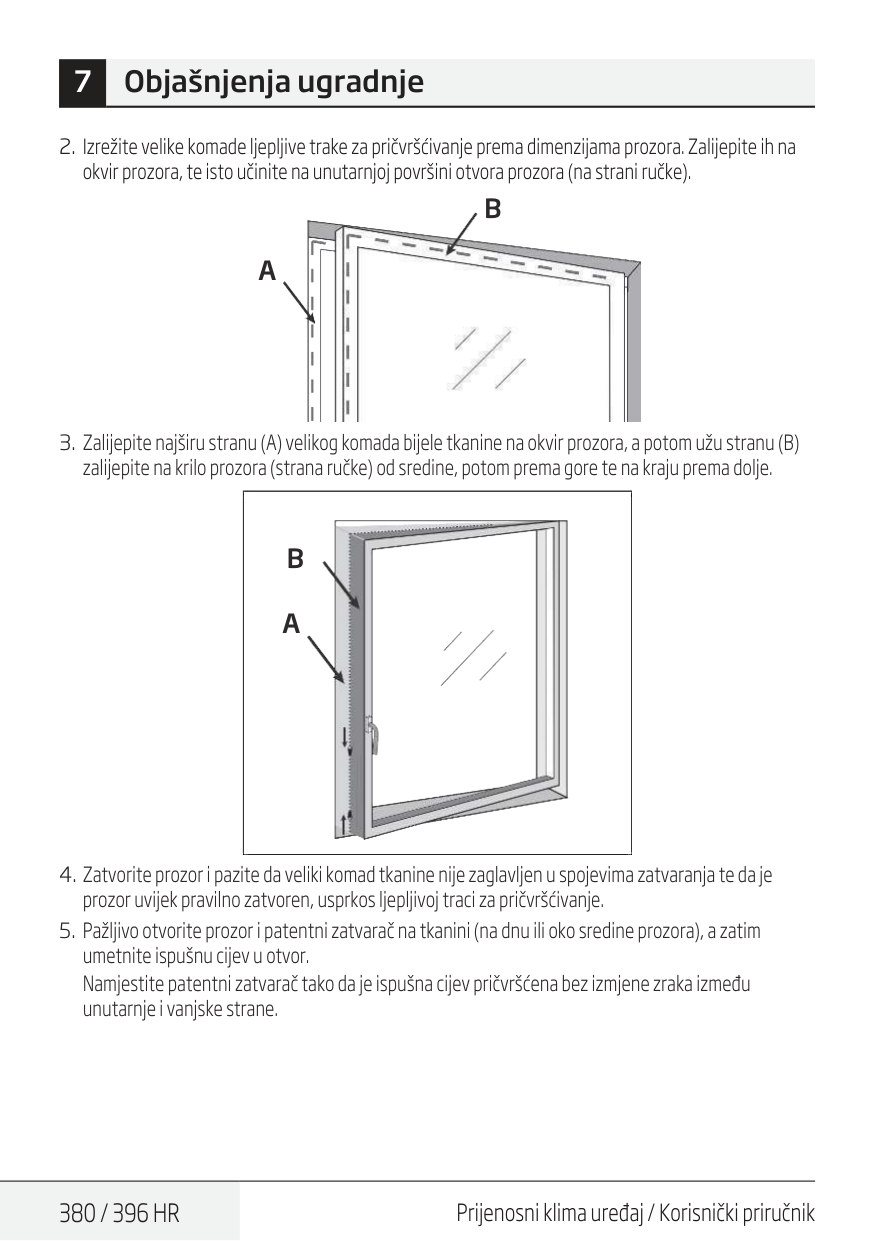
380 / 396 Hr
Prijenosni klima uređaj / Korisnički priručnik 7 Objašnjenja ugradnjeA
B
A
B
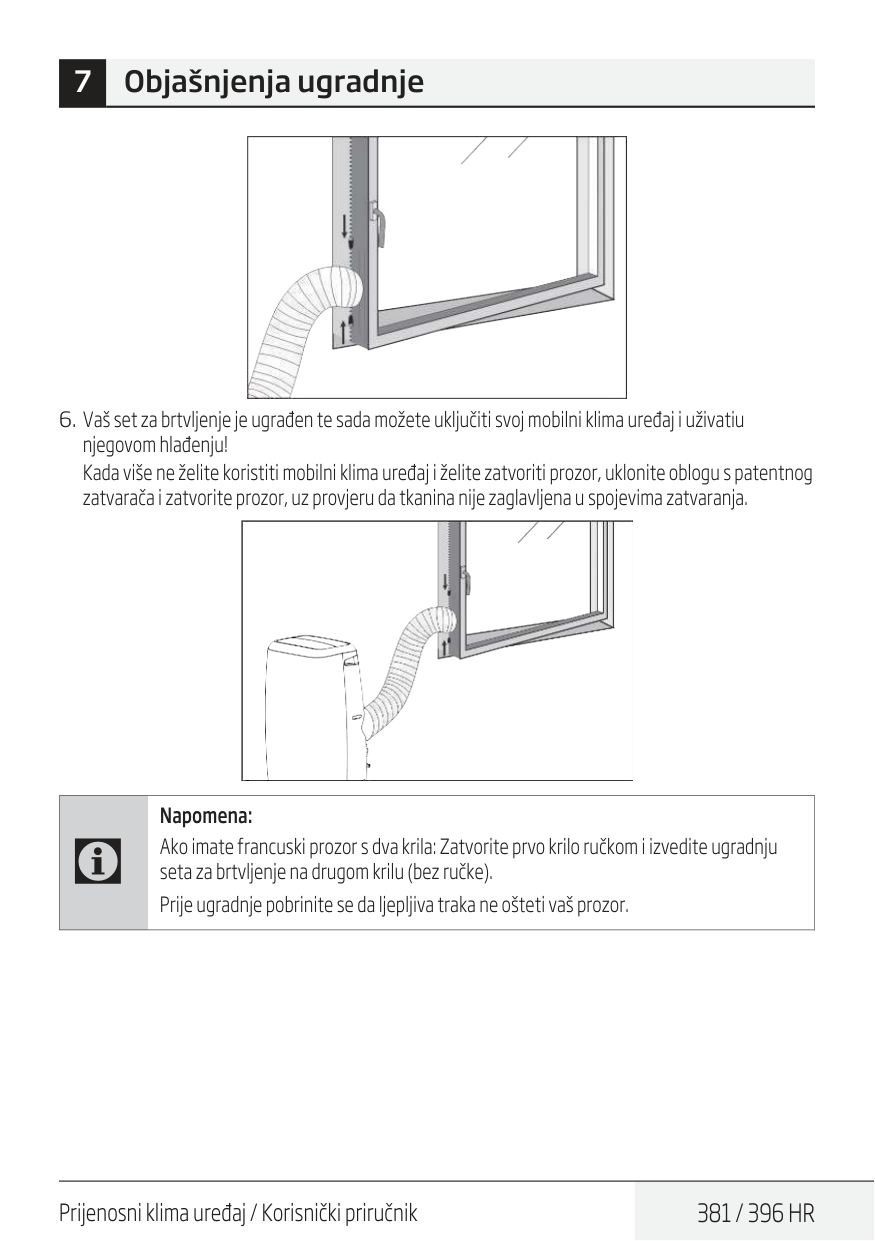
Prijenosni klima uređaj / Korisnički priručnik
381 / 396 Hr
7 Objašnjenja ugradnjeC
Napomena: Ako imate francuski prozor s dva krila: Zatvorite prvo krilo ručkom i izvedite ugradnju seta za brtvljenje na drugom krilu (bez ručke). Prije ugradnje pobrinite se da ljepljiva traka ne ošteti vaš prozor.
382 / 396 Hr
Prijenosni klima uređaj / Korisnički priručnik 7 Objašnjenja ugradnje 7.4 Koristite filtar Hepa 13 (samo za model BP113H)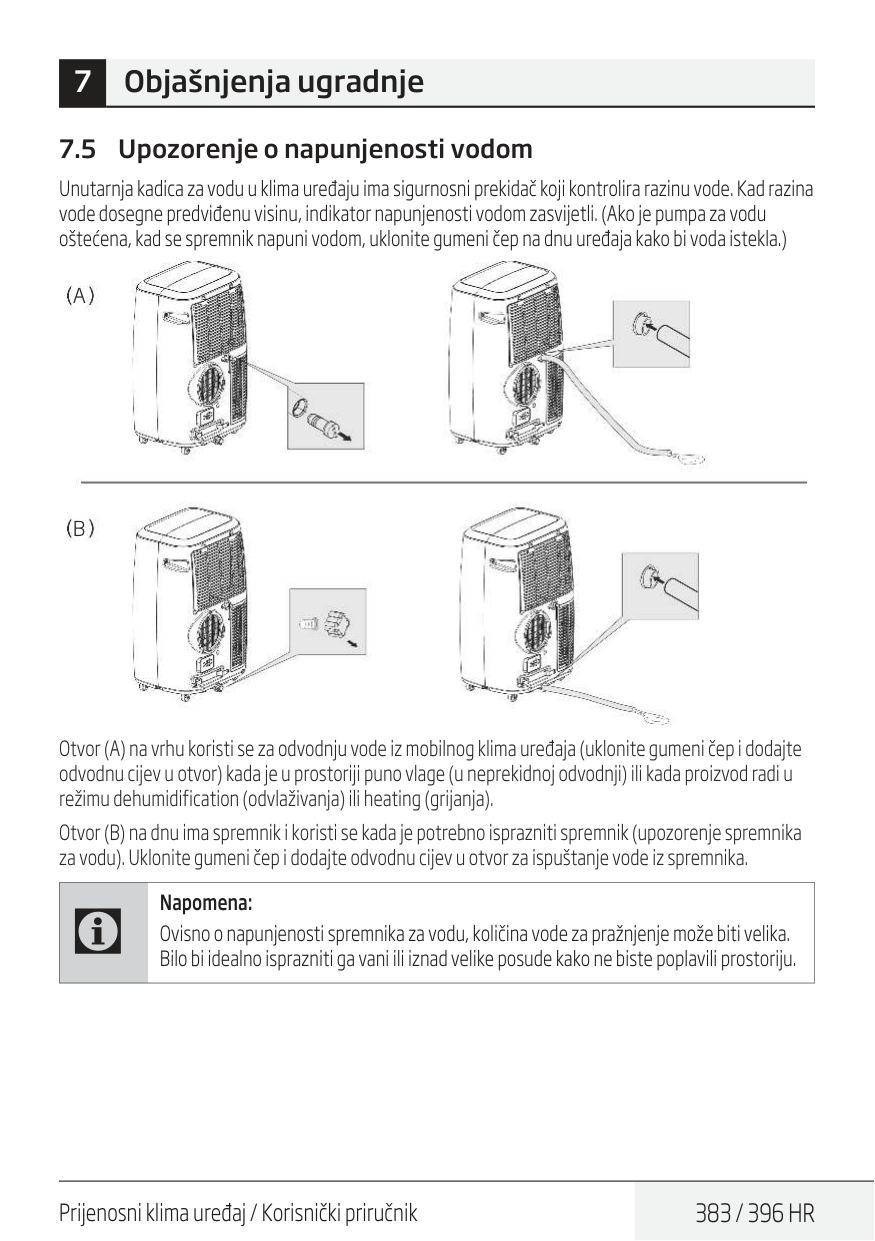
Prijenosni klima uređaj / Korisnički priručnik
383 / 396 Hr
7 Objašnjenja ugradnje 7.5 Upozorenje o napunjenosti vodom Unutarnja kadica za vodu u klima uređaju ima sigurnosni prekidač koji kontrolira razinu vode. Kad razina vode dosegne predviđenu visinu, indikator napunjenosti vodom zasvijetli. (Ako je pumpa za vodu oštećena, kad se spremnik napuni vodom, uklonite gumeni čep na dnu uređaja kako bi voda istekla.)A
B
Otvor (A) na vrhu koristi se za odvodnju vode iz mobilnog klima uređaja (uklonite gumeni čep i dodajte odvodnu cijev u otvor) kada je u prostoriji puno vlage (u neprekidnoj odvodnji) ili kada proizvod radi u režimu dehumidification (odvlaživanja) ili heating (grijanja). Otvor (B) na dnu ima spremnik i koristi se kada je potrebno isprazniti spremnik (upozorenje spremnika za vodu). Uklonite gumeni čep i dodajte odvodnu cijev u otvor za ispuštanje vode iz spremnika.C
Napomena: Ovisno o napunjenosti spremnika za vodu, količina vode za pražnjenje može biti velika. Bilo bi idealno isprazniti ga vani ili iznad velike posude kako ne biste poplavili prostoriju.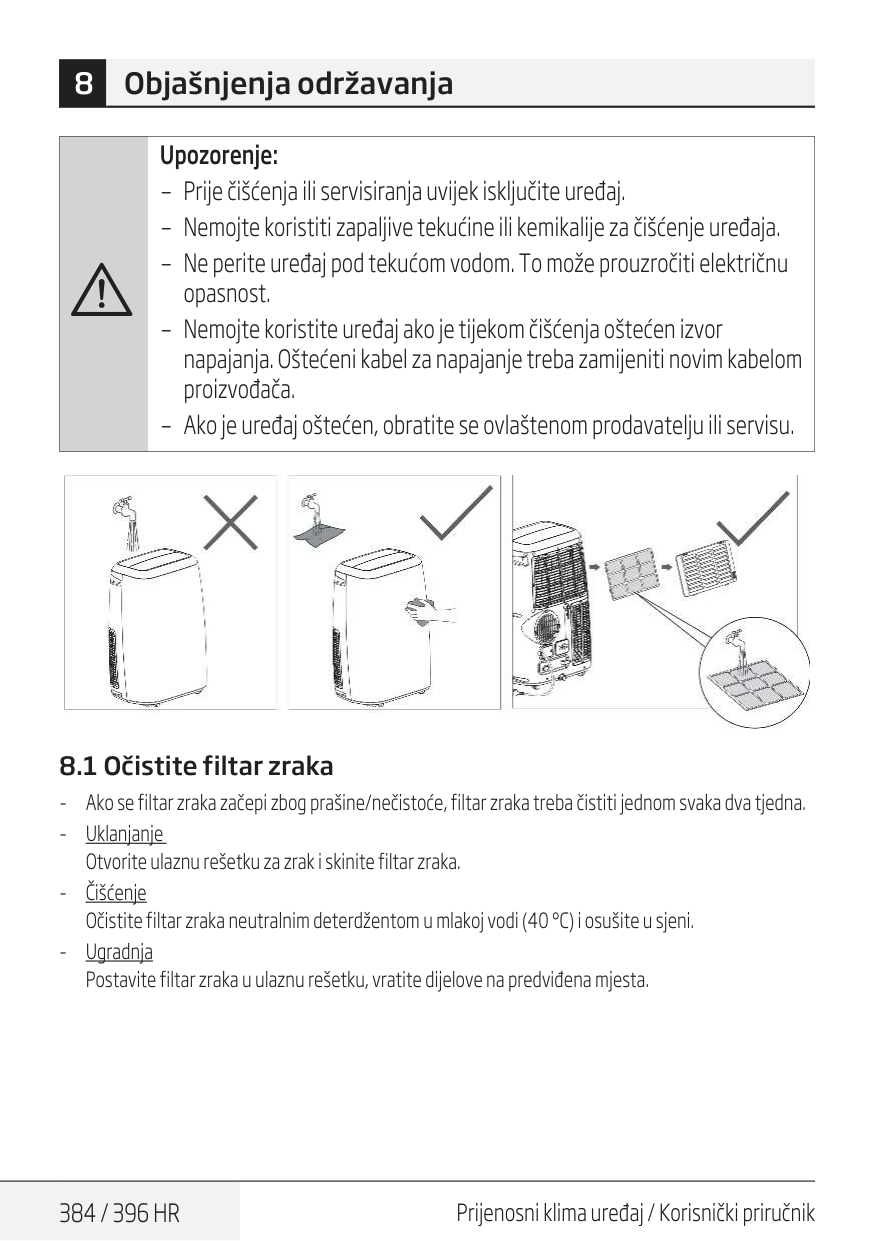
384 / 396 Hr
Prijenosni klima uređaj / Korisnički priručnik 8 Objašnjenja održavanjaA
Upozorenje: – Prije čišćenja ili servisiranja uvijek isključite uređaj. – Nemojte koristiti zapaljive tekućine ili kemikalije za čišćenje uređaja. – Ne perite uređaj pod tekućom vodom. To može prouzročiti električnu opasnost. – Nemojte koristite uređaj ako je tijekom čišćenja oštećen izvor napajanja. Oštećeni kabel za napajanje treba zamijeniti novim kabelom proizvođača. – Ako je uređaj oštećen, obratite se ovlaštenom prodavatelju ili servisu. 8.1 Očistite filtar zraka
Prijenosni klima uređaj / Korisnički priručnik
385 / 396 Hr
A
Upozorenje: Nemojte koristiti uređaj bez filtra jer će ga nečistoća i vlakna začepiti i smanjiti performanse. 8.2 Očistite površinu klima uređaja Površinu prvo očistite neutralnim deterdžentom i vlažnom krpom, a potom obrišite suhom krpom. 8 Objašnjenja održavanja
386 / 396 Hr
Prijenosni klima uređaj / Korisnički priručnik 9 Održavanje Savjeti za održavanje Za optimalan rad očistite filtar zraka svaka 2 tjedna. Kadicu za sakupljanje vode treba isprazniti čim se pojavi pogreška P1 i prije skladištenja kako bi se spriječila plijesan. U kućanstvima sa životinjama povremeno obrišite rešetku kako biste spriječili začepljenje protoka zraka životinjskim dlakama. Čistite uređaj Uređaj očistite vlažnom krpom bez vlakana i neutralnim deterdžentom. Uređaj osušite suhom krpom bez vlakana. Uređaj spremite kada se ne koristi Ispraznite kadicu za prikupljanje vode jedinice prema uputama u sljedećem odjeljku. Kako biste ga osušili i spriječili pojavu plijesni, uređaj koristite u režimu Fan (Ventilator) 12 sati u toploj prostoriji. Ugasite uređaj i isključite ga. Očistite filtar za zrak prema uputama iz prethodnog odjeljka. Ugradite čisti, suhi filtar prije spremanja. Izvadite baterije iz daljinskog upravljača. Uređaj čuvajte na hladnom i tamnom mjestu. Izloženost izravnom suncu ili ekstremnoj vrućini može skratiti životni vijek uređaja.C
Napomena: Kućište i prednja strana mogu se očistiti od prašine krpom bez ulja ili krpom navlaženom u otopini tople vode i blagog tekućeg deterdženta za pranje posuđa. Dobro isprerite i osušite krpom. Nikada ne koristite jaka sredstva za čišćenje, vosak ili sredstvo za poliranje na prednjoj strani kućišta. Ocijedite višak vode s krpe prije brisanja oko kontrolnih tipki. Prevelika količina vode u ili oko kontolnih tipki može dovesti do oštećenja uređaja.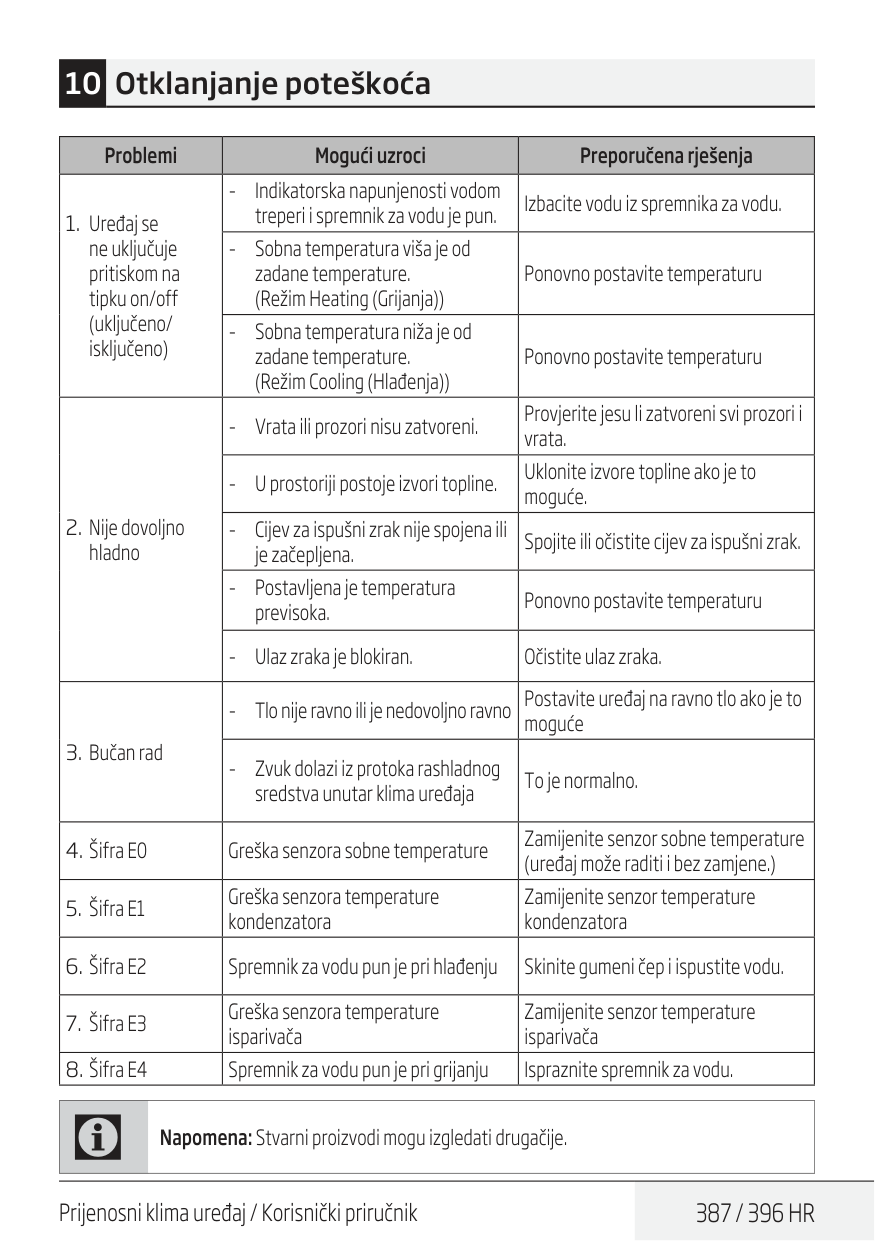
Prijenosni klima uređaj / Korisnički priručnik
387 / 396 Hr
Problemi Mogući uzroci Preporučena rješenjaC
Napomena: Stvarni proizvodi mogu izgledati drugačije. 10 Otklanjanje poteškoća
388 / 396 Hr
Prijenosni klima uređaj / Korisnički priručnik Kada uređaj koristite u europskim zemljama, morate se pridržavati sljedećih uputa: Odlaganje: Nemojte odlagati baterije kao nerazvrstani komunalni otpad. Odvojeno sakupljanje takvog otpada nužno je zbog posebne obrade. Zabranjeno je odložiti ovaj uređaj s kućnim otpadom. Postoji nekoliko mogućnosti za odlaganje:Ovaj simbol označava da se ovaj proizvod ne smije odlagati zajedno s ostalim kućanskim otpadom na kraju njegovog radnog vijeka. Rabljeni uređaj mora se vratiti na službeno sabirno mjesto za recikliranje električnih i elektroničkih uređaja. Da biste pronašli te sustave za prikupljanje, obratite se lokalnim vlastima ili prodavaču gdje je proizvod kupljen. Svako kućanstvo igra važnu ulogu u uporabi i recikliranju starih uređaja. Odgovarajuće odlaganje iskorištenog aparata pomaže u sprečavanju mogućih negativnih posljedica za okoliš i ljudsko zdravlje. 11 Europske smjernice za odlaganje
Prijenosni klima uređaj / Korisnički priručnik
389 / 396 Hr
12 Upute za ugradnju 12.1 Uputa za fluorirane plinove Ovaj proizvod sadrži fluorirane stakleničke plinove. Fluorirani staklenički plinovi sadržani su u hermetički zatvorenoj opremi. Ugradnju, servis, održavanje, popravke, provjere mogućnosti curenja ili stavljanje opreme izvan pogona i recikliranje proizvoda trebaju obavljati fizičke osobe koje posjeduju relevantne certifikate. Ako sustav ima ugrađen sustav za otkrivanje curenja, provjere curenja bi se trebale obavljati barem svakih 12 mjeseci kako bi se osiguralo pravilno funkcioniranje sustava. Ako je na proizvodu potrebno obaviti provjere curenja, trebalo bi navesti koliko često se provjere trebaju obavljati te izraditi i spremiti evidenciju o provjerama curenja.C
Napomena: Za hermetički zatvorenu opremu, prenosivi klima uređaj, prozorski klima uređaj i odvlaživač, ako ekvivalent CO2 fluoriranog stakleničkog plina iznosi manje od 10 tona, ne bi se trebalo obavljati provjere curenja.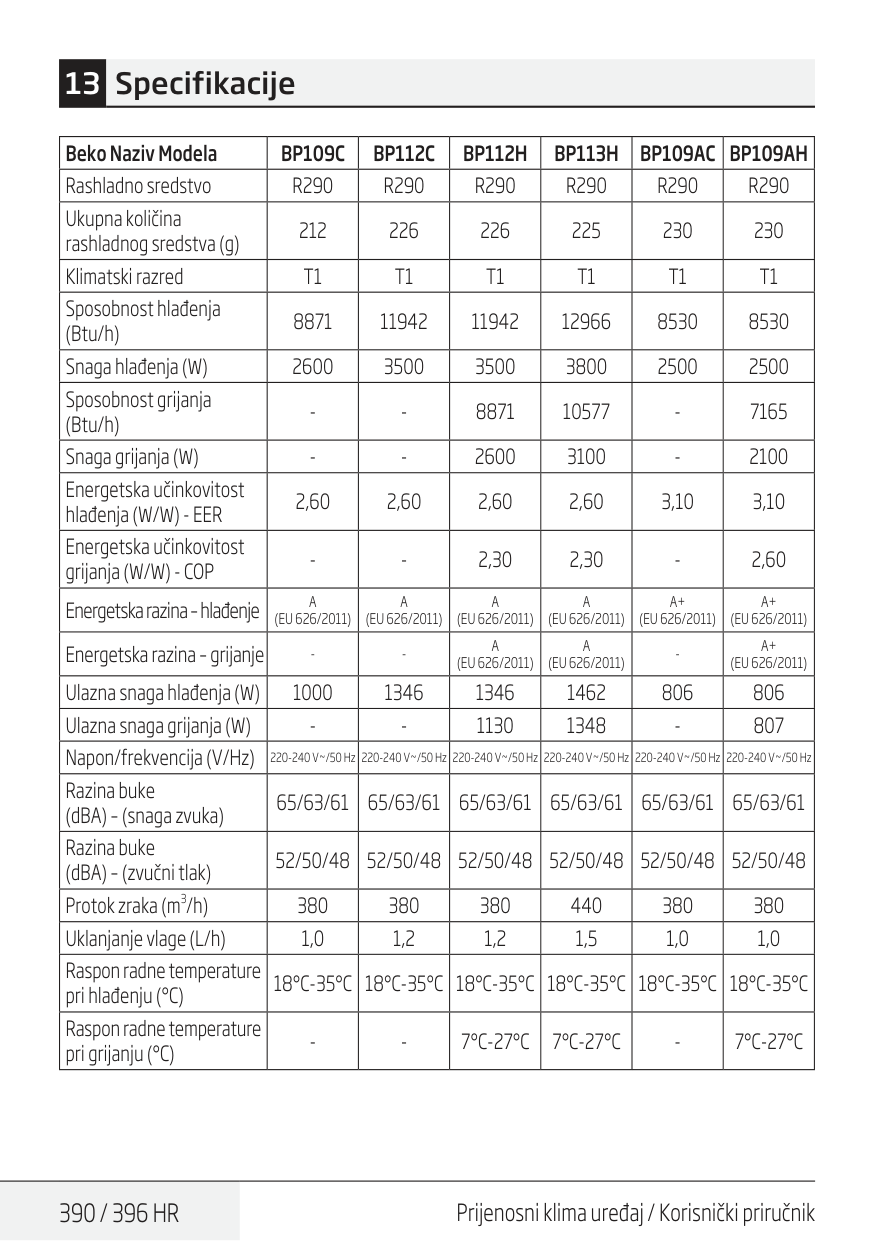
390 / 396 Hr
Prijenosni klima uređaj / Korisnički priručnik Beko Naziv ModelaBp109C
Bp112C
Bp112H
Bp113H
Bp109Ac Bp109Ah
Rashladno sredstvoR290
R290
R290
R290
R290
R290
Ukupna količina rashladnog sredstva (g) 212 226 226 225 230 230 Klimatski razredT1
T1
T1
T1
T1
T1
Sposobnost hlađenja (Btu/h) 8871 11942 11942 12966 8530 8530 Snaga hlađenja (W) 2600 3500 3500 3800 2500 2500 Sposobnost grijanja (Btu/h)A
(Eu 626/2011)
A
(Eu 626/2011)
A
(Eu 626/2011)
A
(Eu 626/2011)
A+
(Eu 626/2011)
A+
(Eu 626/2011)
Energetska razina – grijanjeA
(Eu 626/2011)
A
(Eu 626/2011)
A+
(Eu 626/2011)
Ulazna snaga hlađenja (W) 1000 1346 1346 1462 806 806 Ulazna snaga grijanja (W)18°C-35°C 18°C-35°C 18°C-35°C 18°C-35°C 18°C-35°C 18°C-35°C
Raspon radne temperature pri grijanju (°C)7°C-27°C
7°C-27°C
7°C-27°C
Prijenosni klima uređaj / Korisnički priručnik
391 / 396 Hr

Proizvela tvrtka Arcelik A.S. Karaagac Cd. Br: 2-6 34445 Sutluce, Beyoglu, Istanbul, Turska. Importer in Croatia – Elipso d.o.o. Gospodarska 16c, 10255 Donji Stupnik, Hrvatska

www.beko.com
Application HomeWhiz Manuel d'utilisation
Fr
Bp109C
Bp112C
Bp109Ac
Bp109Ah
Bp112H
Bp113H
16 / 92 Fr
Application HomeWhiz / Manuel d’utilisation Table des matières 1 Fonctionnement de l’application HomeWhiz 17 1.1 Configuration de l’application HomeWhiz et paramètres du compte utilisateur. . . . . . . . . . . 17 1.2 Installation du climatiseur mobile sur plusieurs téléphones portables . . . . . . . . . . . . . . . . . . . . . . 18 1.3 Fonctionnalités réalisables avec HomeWhiz. . . . . . . . . . . . . . . . . . . . . . . . . . . . . . . . . . . . . . . . . . . . . . . . . 19 1.4 Suppression des paramètres HomeWhiz. . . . . . . . . . . . . . . . . . . . . . . . . . . . . . . . . . . . . . . . . . . . . . . . . . . . . 19 1.4.1 Dépannage de l’application HomeWhiz . . . . . . . . . . . . . . . . . . . . . . . . . . . . . . . . . . . . . . . . . . . . . . . . . . . . . . 19 1.5 Fonctionnalités du module de réseau sans fi . . . . . . . . . . . . . . . . . . . . . . . . . . . . . . . . . . . . . . . . . . . . . . . . 20 2 Synchronisation du climatiseur mobile avec Google Assistant 21 3 Synchronisation du climatiseur mobile avec Amazon Alexa 23 3.1 Configurez Amazon Echo et activez l’application HomeWhiz . . . . . . . . . . . . . . . . . . . . . . . . . . . . . . . . 23 3.2 Contrôle du climatiseur via Amazon Echo . . . . . . . . . . . . . . . . . . . . . . . . . . . . . . . . . . . . . . . . . . . . . . . . . . . . 25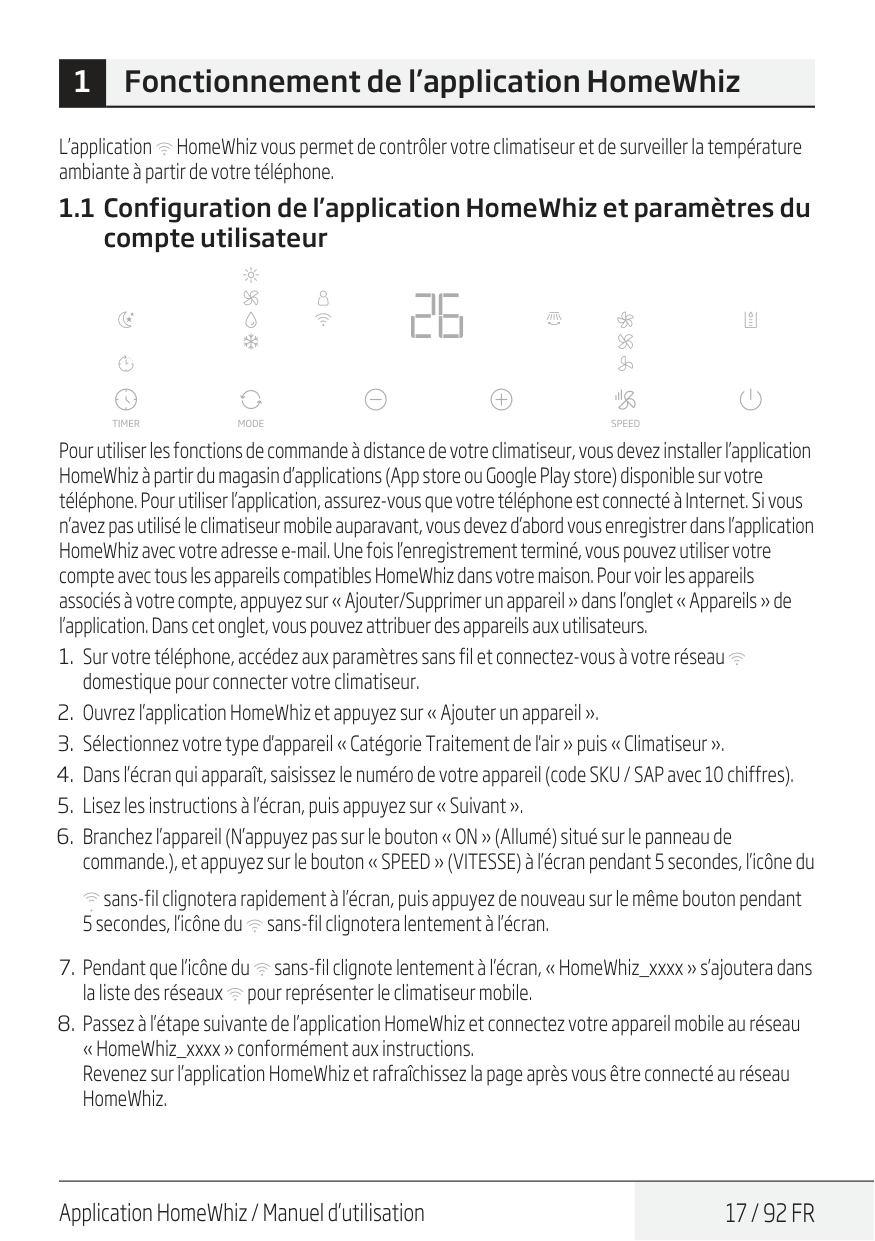
Application HomeWhiz / Manuel d’utilisation
17 / 92 Fr
L’application HomeWhiz vous permet de contrôler votre climatiseur et de surveiller la température ambiante à partir de votre téléphone. 1.1 Configuration de l’application HomeWhiz et paramètres du compte utilisateur Pour utiliser les fonctions de commande à distance de votre climatiseur, vous devez installer l’application HomeWhiz à partir du magasin d’applications (App store ou Google Play store) disponible sur votre téléphone. Pour utiliser l’application, assurez-vous que votre téléphone est connecté à Internet. Si vous n’avez pas utilisé le climatiseur mobile auparavant, vous devez d’abord vous enregistrer dans l’application HomeWhiz avec votre adresse e-mail. Une fois l’enregistrement terminé, vous pouvez utiliser votre compte avec tous les appareils compatibles HomeWhiz dans votre maison. Pour voir les appareils associés à votre compte, appuyez sur « Ajouter/Supprimer un appareil » dans l’onglet « Appareils » de l’application. Dans cet onglet, vous pouvez attribuer des appareils aux utilisateurs.
18 / 92 Fr
Application HomeWhiz / Manuel d’utilisationC
Remarque : Une fois l’installation terminée, votre appareil mobile et votre climatiseur n’ont pas besoin d’être connectés au même réseau. Vous pouvez utiliser votre climatiseur tant que votre téléphone est connecté à Internet. Pour voir les appareils associés à votre compte, appuyez sur « Ajouter/Supprimer un appareil » dans l’onglet « Appareils » de l’application. Ici, vous pouvez attribuer des appareils aux utilisateurs. 1 Fonctionnement de l’application HomeWhiz
Application HomeWhiz / Manuel d’utilisation
19 / 92 Fr
1.3 Fonctionnalités réalisables avec HomeWhiz Vous pouvez piloter toutes les options ci-dessous lorsque vous aurez connecté votre climatiseur mobile à l’application HomeWhiz : Mode de fonctionnement : Refroidissement, chauffage, déshumidification, ventilateur Température désirée : Dans la plage de 16-31 °C Vitesse de ventilation : Faible, moyenne, élevée Mode Nuit : Activé/Désactivé Oscillation : Activée/Désactivée Programmateur : Dans la plage de 1h à 24hC
Remarque : il est également possible de contrôler directement les fonctionnalités du climatiseur à partir du panneau de commande. L’utilisation de l’application HomeWhiz n’est pas obligatoire. 1.4 Suppression des paramètres HomeWhiz Les paramètres HomeWhiz peuvent être supprimés de l’application en suivant les instructions appropriées dans l’application. 1.4.1 Dépannage de l’application HomeWhiz Si vous rencontrez des difficultés pour contrôler ou connecter votre produit, suivez les étapes ci-dessous. Passez à l’étape suivante si celle-ci ne résout pas votre problème.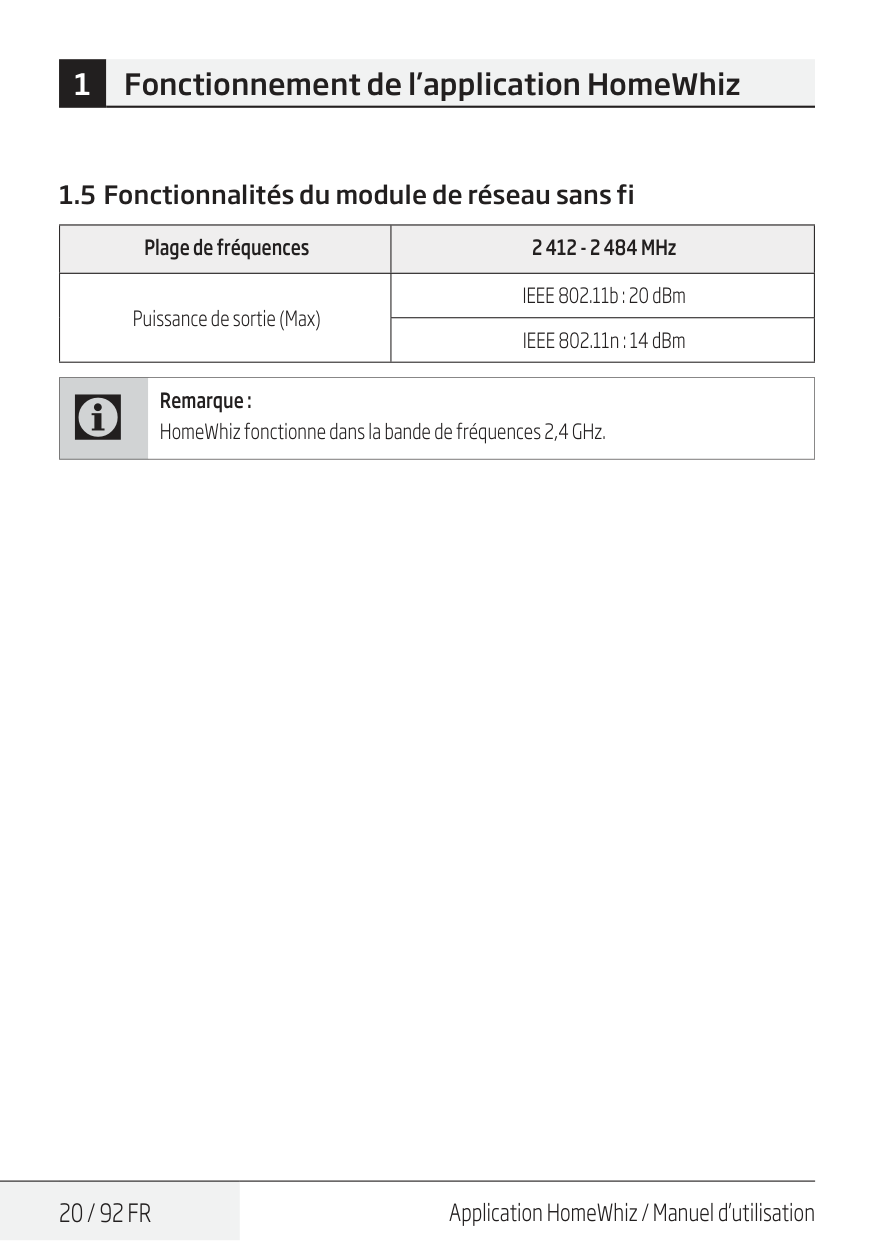
20 / 92 Fr
Application HomeWhiz / Manuel d’utilisation 1.5 Fonctionnalités du module de réseau sans fi Plage de fréquences 2 412 - 2 484 MHz Puissance de sortie (Max) IEEE 802.11b : 20 dBm IEEE 802.11n : 14 dBmC
Remarque : HomeWhiz fonctionne dans la bande de fréquences 2,4 GHz. 1 Fonctionnement de l’application HomeWhiz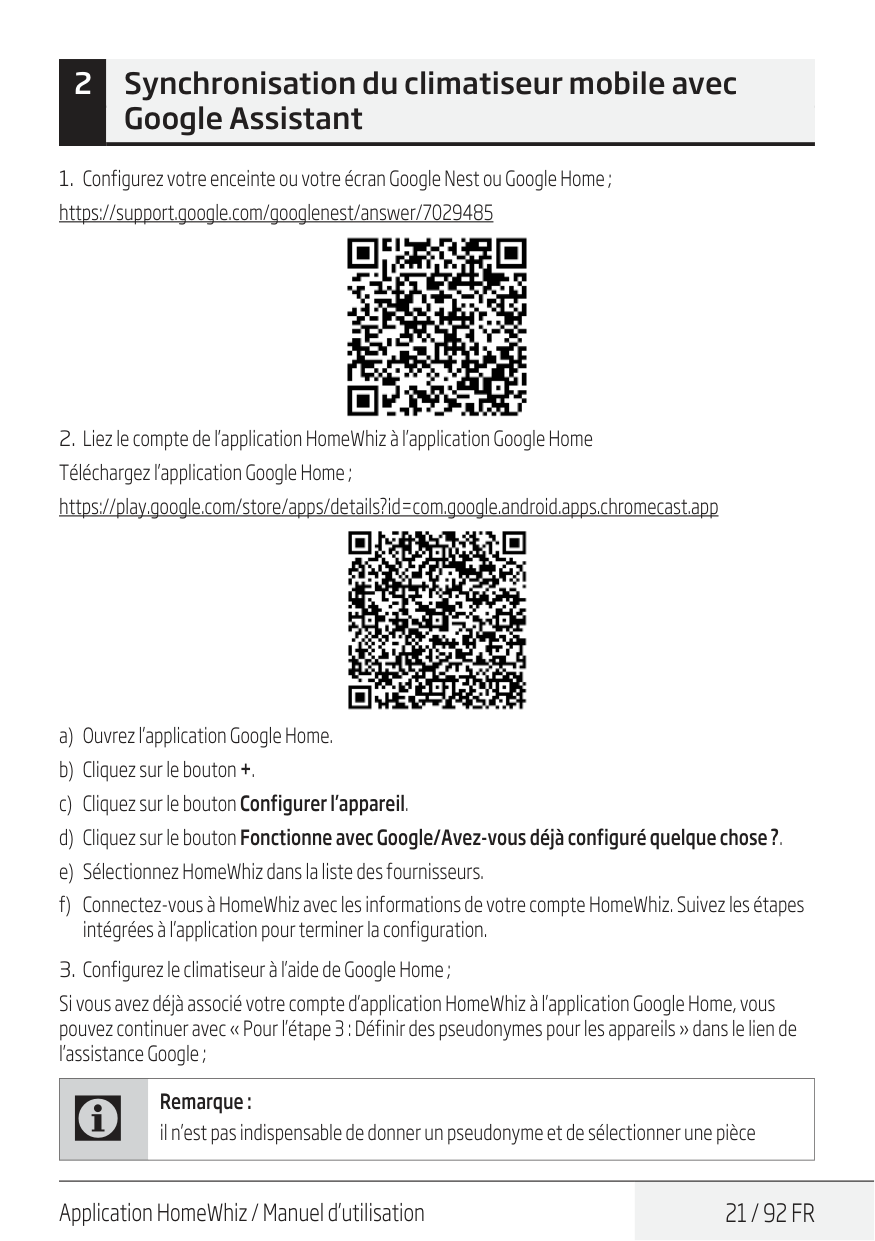
Application HomeWhiz / Manuel d’utilisation
21 / 92 Fr
2 Synchronisation du climatiseur mobile avec Google AssistantC
Remarque : il n’est pas indispensable de donner un pseudonyme et de sélectionner une pièce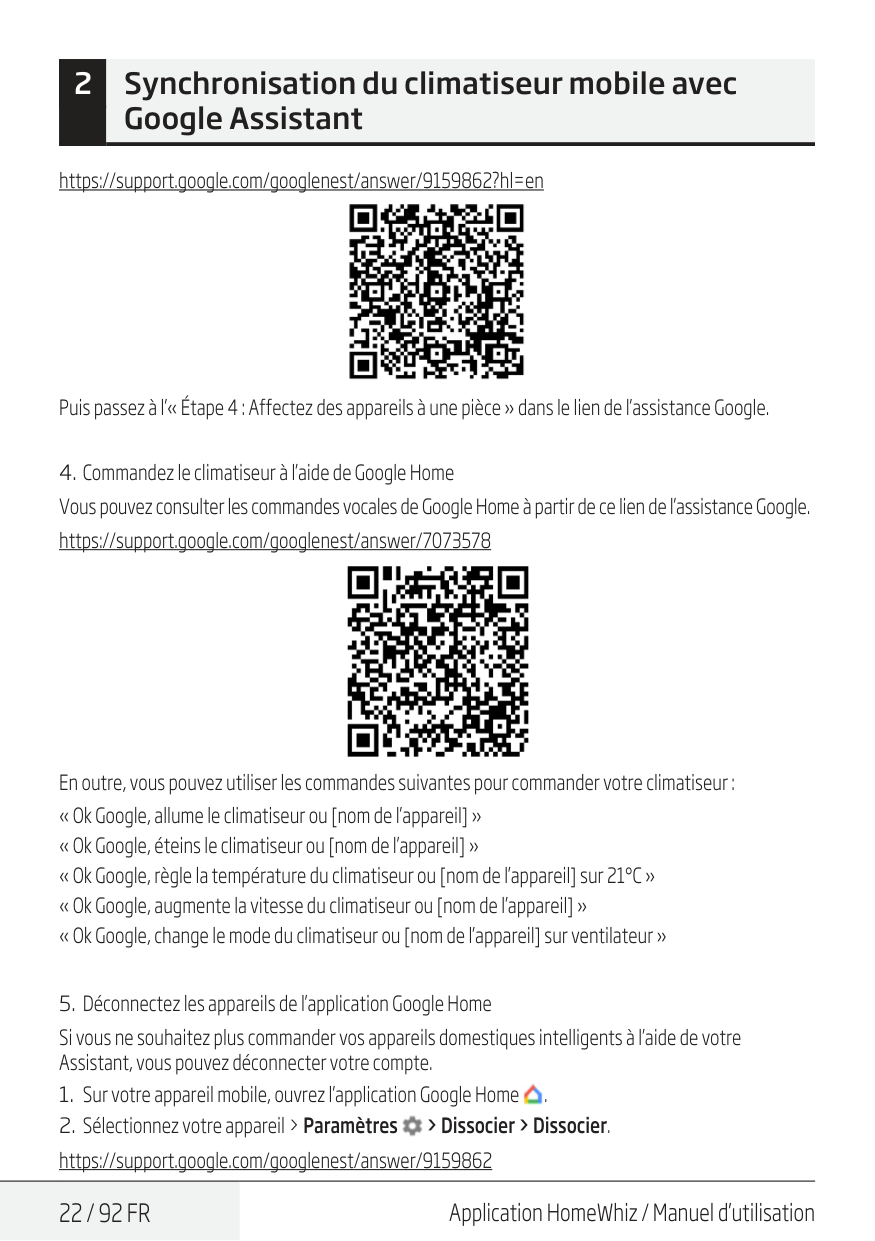
22 / 92 Fr
Application HomeWhiz / Manuel d’utilisation https://support.google.com/googlenest/answer/9159862?hl=en Puis passez à l’« Étape 4 : Affectez des appareils à une pièce » dans le lien de l’assistance Google.
Application HomeWhiz / Manuel d’utilisation
23 / 92 Fr
3 Synchronisation du climatiseur mobile avec Amazon Alexa Amazon Echo est une enceinte mains-libres à commande vocale. Elle permet de se connecter au service vocal Alexa, le cerveau d’Echo. Désormais, vous pouvez simplement demander à Alexa de régler la température de la pièce. Pour cela, il vous suffit de prononcer le mot de sortie de veille « Alexa », et Echo réagit. Arçelik HomeWhiz intègre le contrôle du climatiseur sans fil dans ses appareils domestiques afin de les rendre intelligents et de les doter de la technologie Amazon Alexa. Grâce à la commande vocale, vous pouvez contrôler votre climatiseur et profiter d’un confort à domicile.C
Remarque : Amazon Echo peut être optimisé jusqu’au bout à travers le contrôle vocal via l’application Alexa. 3.1 Configurez Amazon Echo et activez l’application HomeWhiz Recherchez l’application « Amazon Alexa » sur Apple Store pour iOS, ou sur Google Play pour Android, et installez-le sur votre appareil. a) Configuration d’Echo avec l’application AlexaC
Remarque : Vous devez acheter un appareil Amazon Echo pour utiliser cette fonctionnalité. Si vous possédez déjà un appareil Echo configuré, alors vous pouvez ignorer cette étape.Réseau Sans Fil ».
24 / 92 Fr
Application HomeWhiz / Manuel d’utilisation
Application HomeWhiz / Manuel d’utilisation
25 / 92 Fr
Vous serez redirigé vers la page comportant le lien du compte. Saisissez votre compte et votre mot de passe HomeWhiz, puis touchez « Lier maintenant » ou « S’inscrire » pour lier votre compte HomeWhiz.C
Remarque : Le pays, le compte et le mot de passe doivent exactement être ceux définis à l’étape 2. 3.2 Contrôle du climatiseur via Amazon Echo a) Présentation du climatiseur Echo doit rechercher et trouver vos appareils intelligents afin de pouvoir les contrôler. Dites « Alexa, recherche des appareils » à Echo. Echo recherchera et trouvera les appareils préalablement ajoutés à l’application HomeWhiz. Vous pouvez également sélectionner l’option « Maison intelligente » dans le « Menu », puis toucher « RECHERCHER » pour rechercher des appareils intelligents. Les appareils disponibles s’affichent dans une liste.C
Remarque : Chaque fois que vous renommez l’appareil dans l’application HomeWhiz, vous devez reprendre la recherche des appareils sur Echo afin de pouvoir les contrôler. 3 Synchronisation du climatiseur mobile avec Amazon Alexa
26 / 92 Fr
Application HomeWhiz / Manuel d’utilisation b) Contrôle du climatiseur via les commandes vocales Supposons que vous possédez dans votre salon un climatiseur à commande sans fil compatible Alexa, dénommé « climatiseur ». Donnez simplement à Alexa les instructions ci-dessous : « Alexa, règle la température du climatiseur ou [nom de l’appareil] sur 21°C » « Alexa, augmente la vitesse du climatiseur ou [nom de l’appareil] » « Alexa, change le mode du climatiseur ou [nom de l’appareil] sur ventilateur » « Alexa, allume le climatiseur ou [nom de l’appareil] » « Alexa, arrête le climatiseur ou [nom de l’appareil] » « Alexa, sur quel mode est réglé le climatiseur ou [nom de l’appareil] ? » 3 Synchronisation du climatiseur mobile avec Amazon Alexa
Fabriqué par Arcelik A.S. Karaağaç Cd. N° 2-6 Sütlüce, 34445 Beyoğlu, Istanbul, Turquie.