
Ask AI
— answers from the official manualAnswers from the official manual.
Common questions
Common Questions
10 totalWhat safety warnings should I be aware of when using the EC685 coffee maker?
Do not touch the appliance with damp hands or feet, never immerse it in water for cleaning, and always unplug it when left unattended.
How do I descale the EC685 coffee maker?
Once the orange light on the button comes on indicating the appliance needs to be descaled. Follow steps in Section 16.7 to fill the tank with the appropriate descaler solution, then press and hold the ONE button until the lights flash for descaling.
How often should I clean the drip tray?
Empty and clean the drip tray regularly to avoid water overflow that can damage the appliance or surface it rests on. The drip tray is fitted with a level indicator showing when it needs to be cleaned.
What happens if I don't fill the water tank properly?
If no water is detected in the water tank or if the valves on the bottom of the tank are not open, the appliance will either not function or indicate it via flashing lights.
How do I make espresso coffee?
Attach a pre-ground coffee filter to the appliance and press the ONE cup button. Adjust pressing firmness of coffee as necessary for proper delivery.
What if my machine stops making coffee or delivering steam?
Check the status lights for issues such as lack of water, clogged filter holes, insufficient pressure in the boiler, and blockages in the coffee filters. Follow troubleshooting tips in section 18.
Full Manual
17 pages
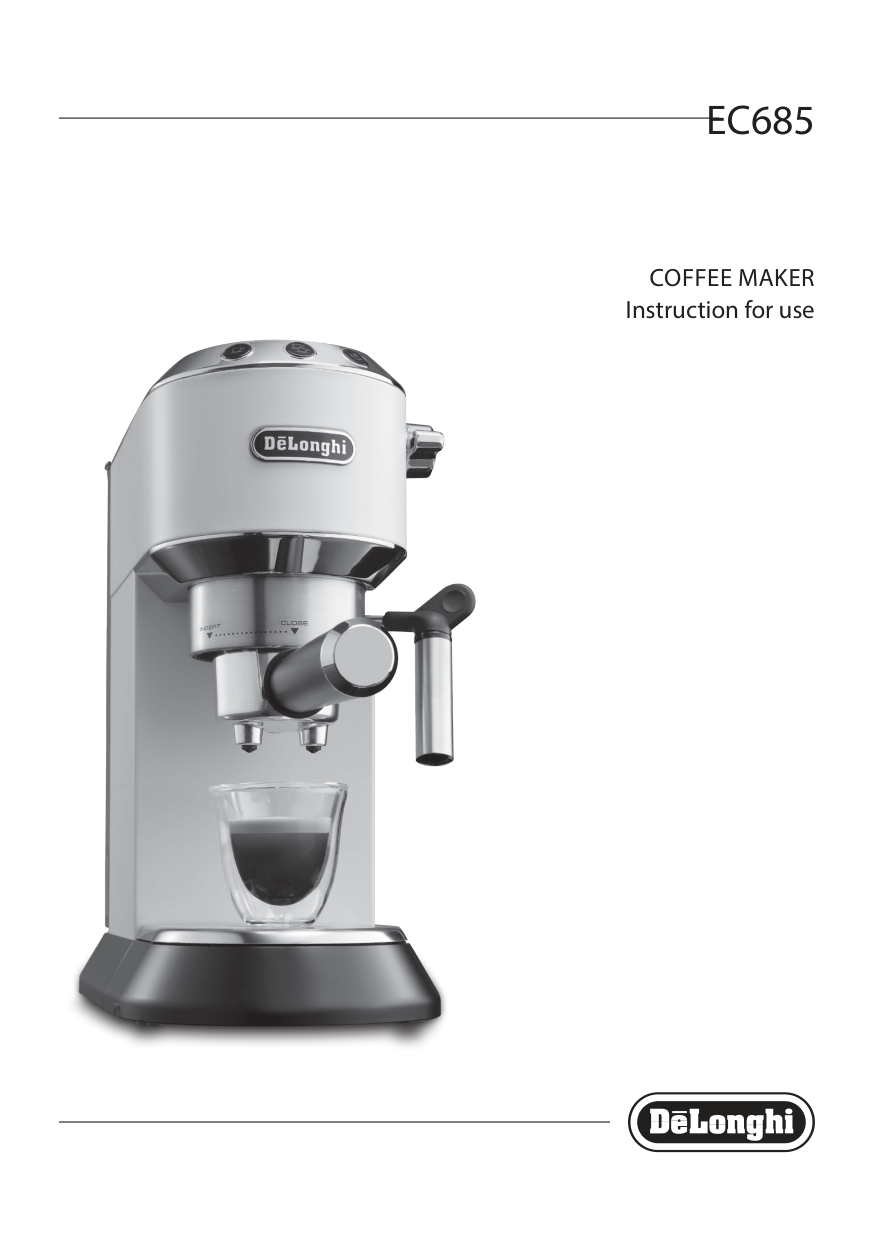

EC685
COFFEE MAKER Instruction for use
|EN| |---|
6
B1
B2
A5
A6
B4 B6
C1
B3 B5 B7
| | |

|---|---|
C6*
A15
| |C2| |---|---| | | |
| |C3| |---|---| | | |
| |C4| |---|---| | | |
C5
| | | | |---|---|---| | | | |
1
|2| |---|
3
4
|5| |---|
|6| |---|
|7| |---|
|8| |---|
|9
2
1| |---|
|10| |---|
|11| |---|
12
12
5°C
max 1/3
13
HOT MILK
14
15
16
17 18
19
2120
22


###### 23 24

1. FUNDAMENTAL SAFETY WARNINGS
#### FOR EUROPEAN MARKETS ONLY:
Surfaces marked with this symbol become hot during use (the symbol is present in certain models only).
####### 2. SAFETY WARNINGS
Danger!Failure to observe the warning may result in life threatening injury by electric shock. This is an electrical appliance and may cause electrical shocks. You should therefore follow these safety warnings:
Important:Failure to observe the warning could result in injury or damage to the appliance. Keep all packaging (plastic bags, polystyrene foam) away from children.
Danger of burns! Failure to observe the warning could result in scalds or burns. This appliance produces hot water and steam may form while it is in operation. Avoid contact with splashes of water or hot steam.
Any other use is considered improper and thus dangerous. The manufacturer is not liable for damage deriving from improper use of the appliance.
######### Please note:
Keep this Instruction for Use. If the appliance is passed to other persons, they must also be provided with this Instruction for Use.
This appliance conforms to EC Regulation 1935/2004 on materials and articles intended to come into contact with food.
None of the components or accessories is dishwasher safe.
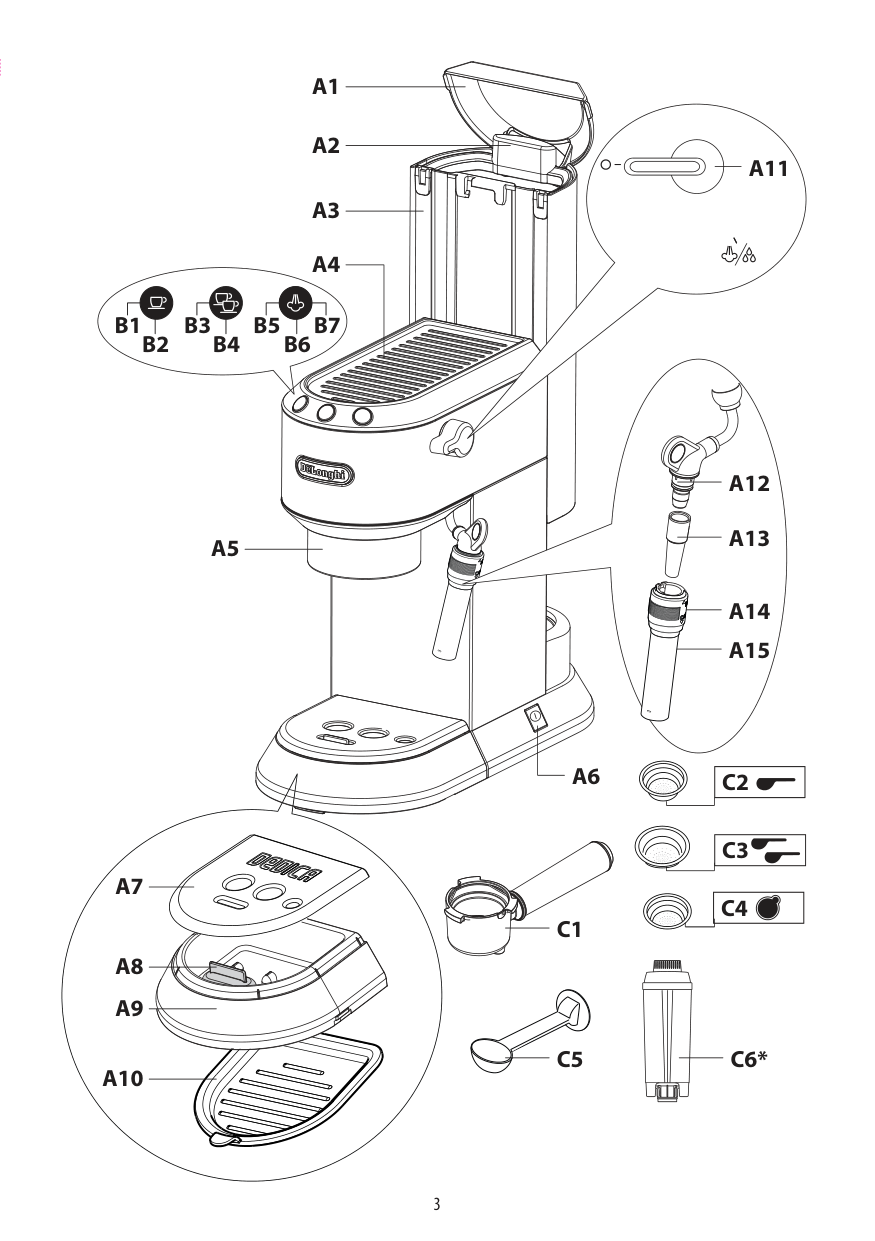
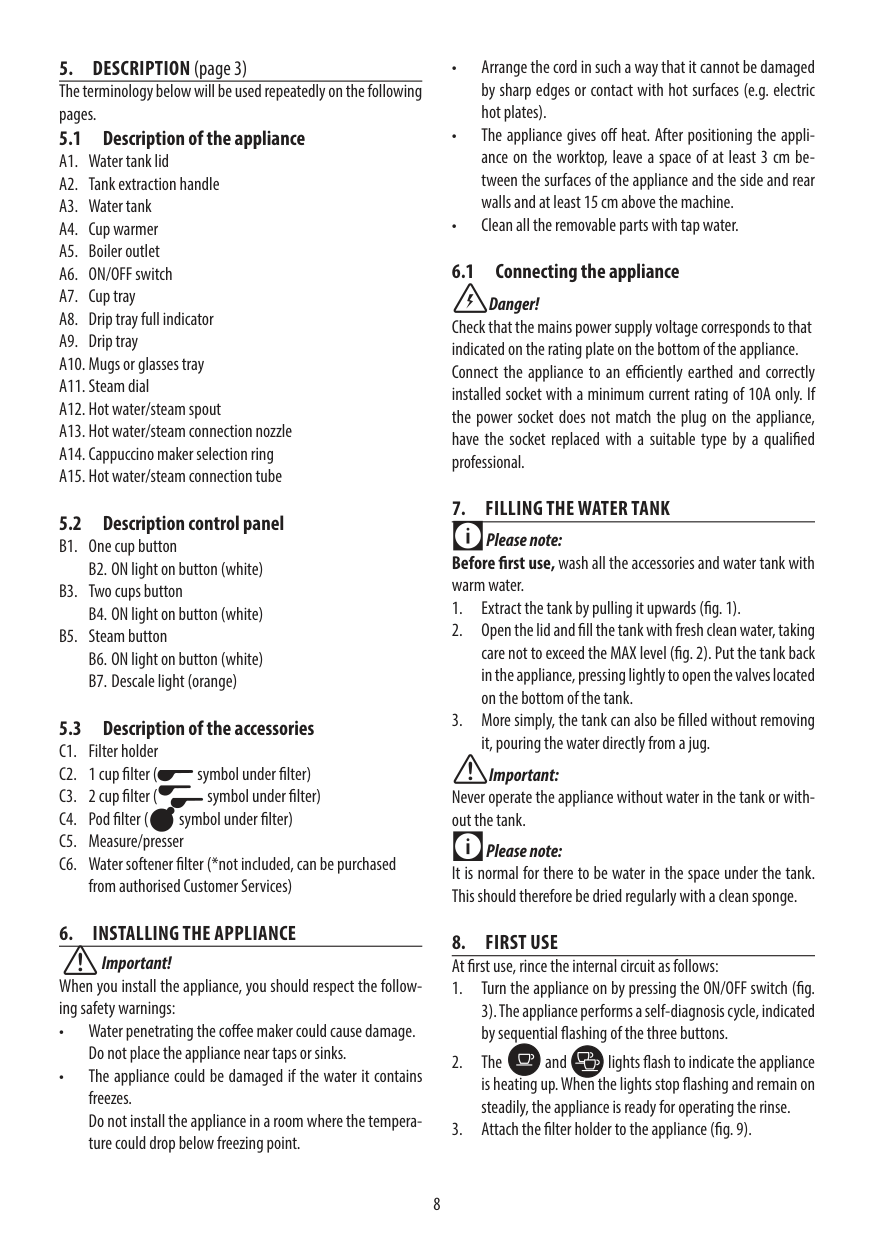
5.3 Description of the accessories C1. Filter holder C2. 1 cup filter ( symbol under filter) C3. 2 cup filter ( symbol under filter) C4. Pod filter ( symbol under filter)
from authorised Customer Services)
####### 6.1 Connecting the appliance
Danger! Check that the mains power supply voltage corresponds to that indicated on the rating plate on the bottom of the appliance. Connect the appliance to an efficiently earthed and correctly installed socket with a minimum current rating of 10A only. If the power socket does not match the plug on the appliance, have the socket replaced with a suitable type by a qualified professional.
####### 7. FILLING THE WATER TANK
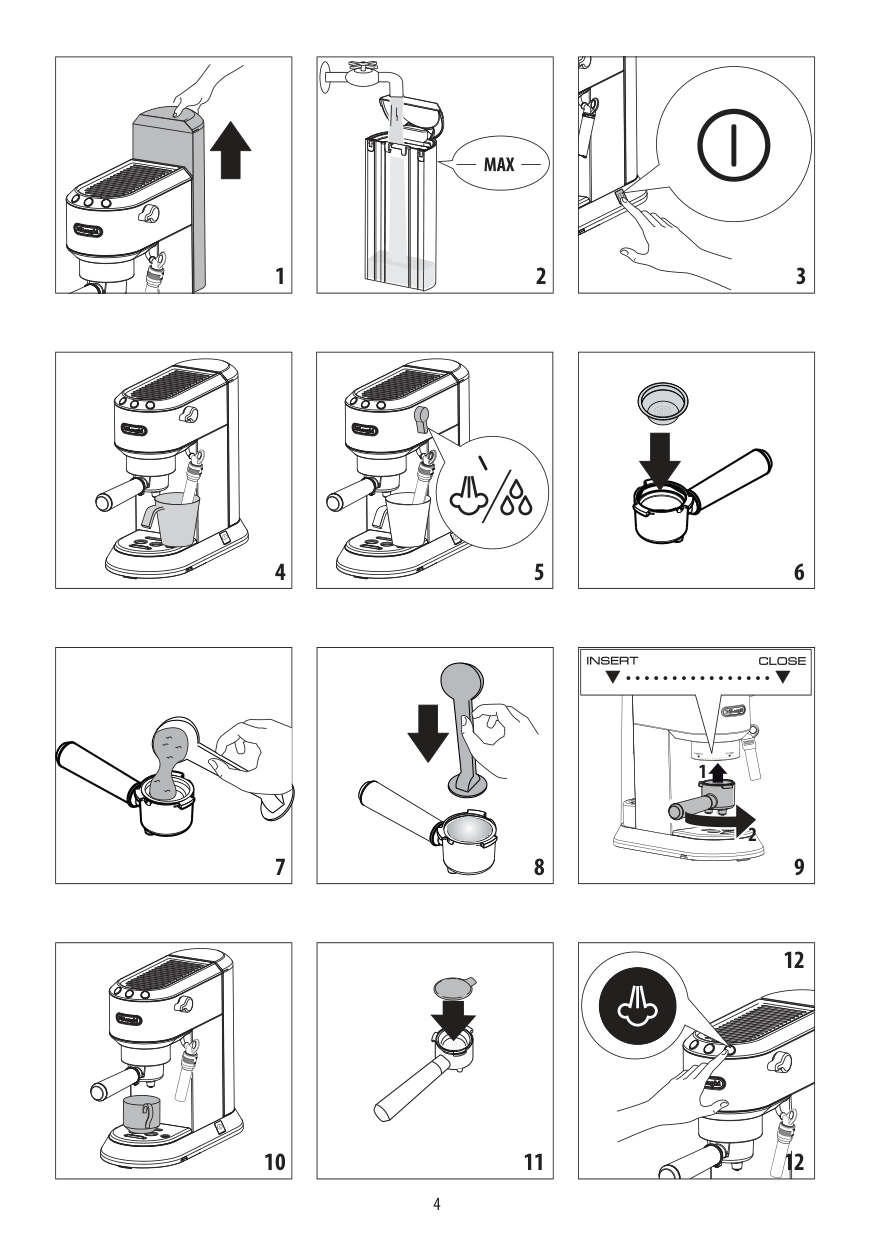
Please note: Before first use, wash all the accessories and water tank with warm water.
Important: Never operate the appliance without water in the tank or without the tank.
Please note: It is normal for there to be water in the space under the tank. This should therefore be dried regularly with a clean sponge.
######## 8. FIRST USEAt first use, rince the internal circuit as follows:
Important! When you install the appliance, you should respect the following safety warnings:
The appliance can also be programmed according to the hardness of the mains water in the various regions so that descaling needs to be performed more or less frequently. Proceed as follows:
soft medium hard
5) and deliver to empty the water tank (A3); then turn the knob to the○position.
then press and hold the button for 10 seconds until the three buttons flash in sequence: The appliance is now in programming mode. Set the coffee maker as you wish, then exit the settings menu by waiting for 15 seconds.
Please note: If no selections are made for 15 seconds, the appliance automatically exits programming and is ready for use again.
|soft water|medium water|hard water| |---|---|---| |<10°dH|10°dH - 20°dH|>20°dH| |<18°fH|18°fH - 36°fH|>36°fH| |<180mg/l CaCo3|180-360mg/l CaCo3|>360mg/l CaCo3|
low medium high
low medium high
The appliance exits the menu and is ready for use.
been saved. The appliance exits the menu and is ready for use. 9.3 Adjusting auto-off (stand-by)
To save energy, an auto-off function turns the appliance off when not used for a long period. To turn it back on again, press any button on the control panel.
9 min 30 min 3 hours
9 min 30 min 3 hours
When the steam dial has been closed, the appliance is ready for use.
######### Danger of burns!
To avoid splashes, never remove the filter holder while the appliance is delivering coffee. Always wait for a few seconds after delivery.
####### 10.3 How to make espresso coffee using pods
Please note: Use pods conforming to the ESE standard, indicated on the pack by the following symbol.
The ESE standard is a system accepted by leading pod producers and enables espresso coffee to be prepared simply and cleanly.
####### 10.2 How to prepare espresso coffee using preground coffee
Proceed as described in points 4 to 6 in the previous section.
######### Please note:
######### Important:
For correct operation, before filling with pre-ground coffee, make sure there are no coffee residues left in the filter from the last time you made coffee.
ton pressed previously. Delivery is automatically interrupted after a few seconds.
• To remove the filter holder, turn the handle from right to left.
######### Danger of burns!
To avoid splashes, never remove the filter holder while the appliance is delivering coffee. Always wait for a few seconds after delivery.
####### 10.4 Programming the quantities of coffee inthe cup
The appliance is set by default to automatically deliver standard quantities. To change these quantities, proceed as follows:
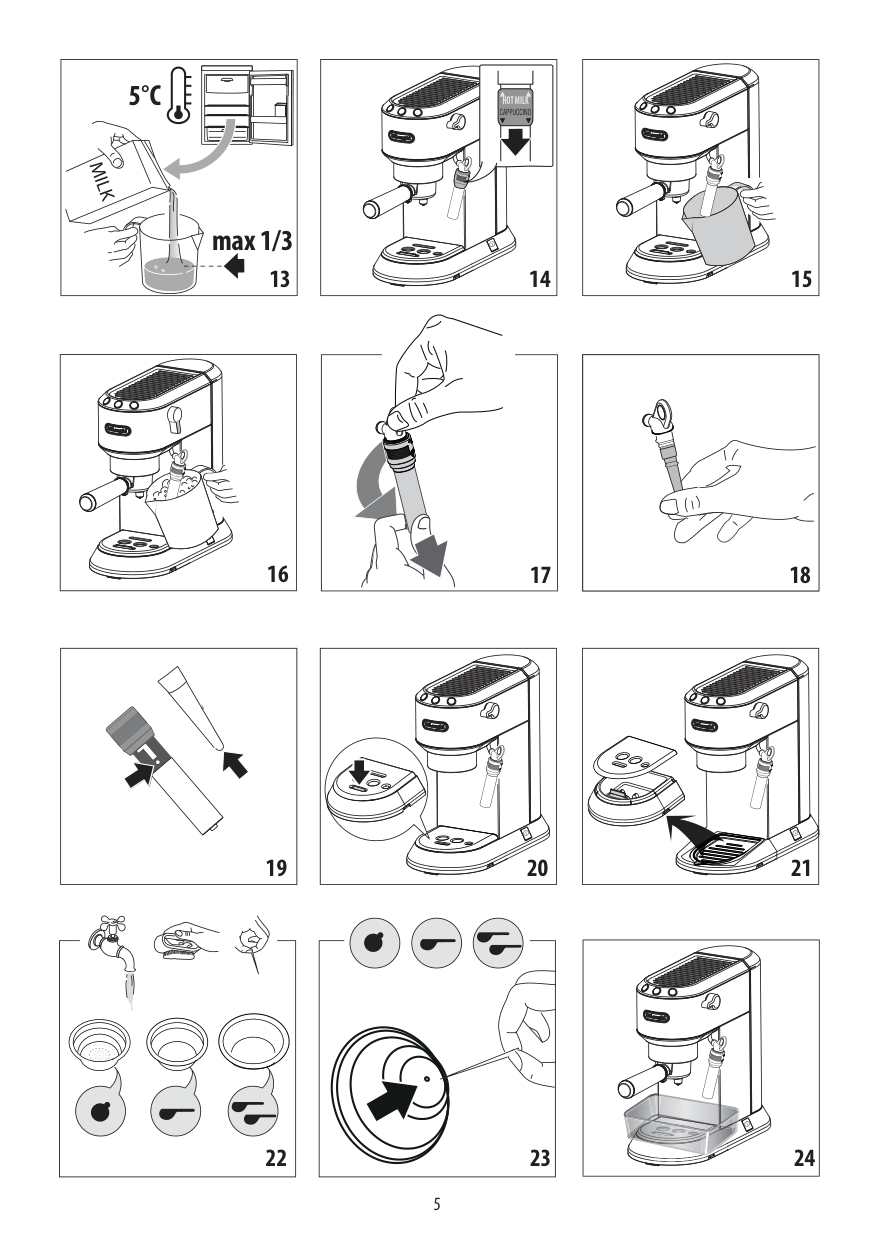
position. Steam is delivered from the cappuccino maker, giving the milk a creamy frothy appearance (fig. 16). To obtain a creamier froth, immerse the cappuccino maker in the milk and rotate the container with slow upward movements.
######### Please note:
##### You should not deliver steam for more than 60 seconds.
####### 11. HOW TO MAKE CAPPUCCINO
Important: For hygiene reasons, the cappuccino maker should always be cleaned after use. Proceed as follows:
• Before cleaning the outside of the appliance, turn it off, unplug from the mains socket and allow to cool.
Important!
The drip tray is fitted with a level indicator (red) showing the level of water it contains (fig. 20). Before the indicator protrudes from the cup tray, the drip tray must be emptied and cleaned otherwise the water may overflow the edge and damage the appliance, the surface it rests on or the surrounding area.
The coffee maker is now ready for use.
You should not deliver hot water for more than 60 seconds.
######### Important!
Danger!
Danger! While cleaning, never immerse the coffee maker in water. It is an electrical appliance.
####### 16.7 Descale
Descale the appliance when the orange light on the button comes on.
######### Important!
Proceed as follows:
Please note:
During descaling, to clean the boiler outlet, close the steam dial from time to time to deliver small quantities of descaler from the boiler outlet.
######### Please note:
During rinsing, to clean the boiler outlet, close the steam dial from time to time to deliver small quantities of water from the boiler outlet.
The appliance is ready for use.
######### Please note!
Repair of damage to the coffee maker caused by limescale is not covered by the guarantee unless descaling is performed regularly as described above.
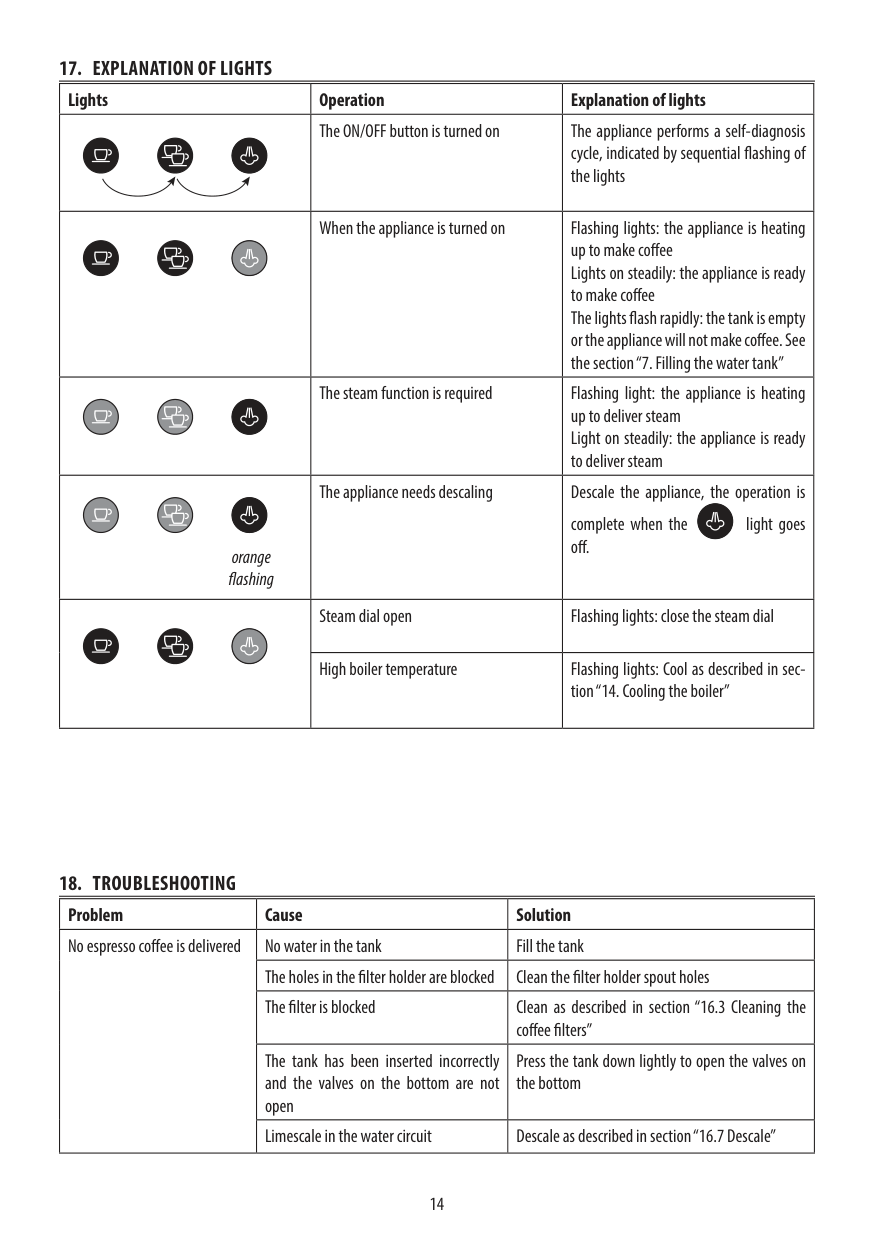
####### 17. EXPLANATION OF LIGHTS
|Lights|Operation|Explanation of lights|
|---|---|---| | |The ON/OFF button is turned on|The appliance performs a self-diagnosis cycle, indicated by sequential flashing of the lights| | |When the appliance is turned on|Flashing lights: the appliance is heating up to make coffee Lights on steadily: the appliance is ready to make coffee The lights flash rapidly: the tank is empty or the appliance will not make coffee. See the section “7. Filling the water tank”| | |The steam function is required|Flashing light: the appliance is heating up to deliver steam Light on steadily: the appliance is ready to deliver steam| |orange flashing|The appliance needs descaling|Descale the appliance, the operation is complete when the light goes off.
| | |Steam dial open|Flashing lights: close the steam dial| | |High boiler temperature|Flashing lights: Cool as described in section “14. Cooling the boiler”|
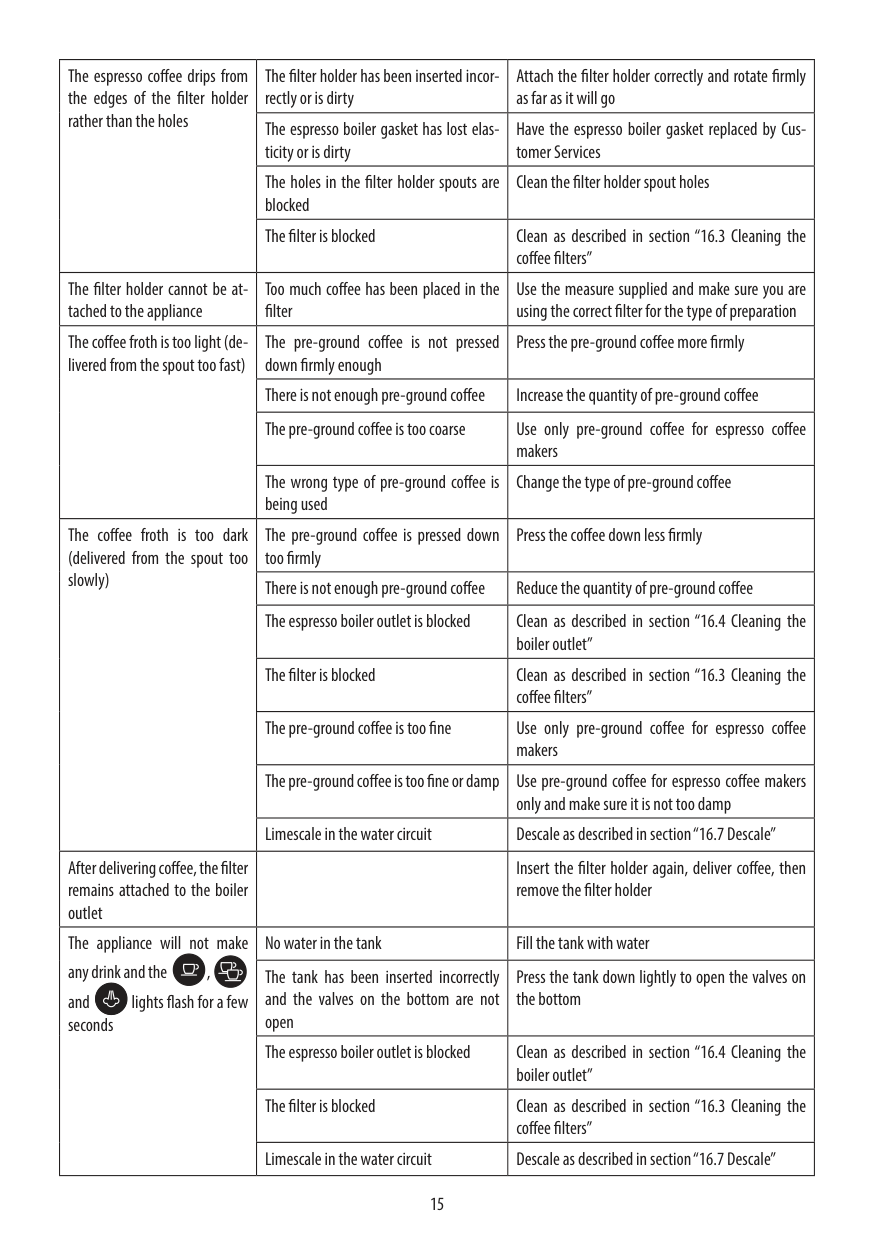
####### 18. TROUBLESHOOTING
|Problem|Cause|Solution| |---|---|---| |No espresso coffee is delivered|No water in the tank|Fill the tank| |No espresso coffee is delivered|The holes in the filter holder are blocked|Clean the filter holder spout holes| |No espresso coffee is delivered|The filter is blocked|Clean as described in section “16.3 Cleaning the coffee filters”| |No espresso coffee is delivered|The tank has been inserted incorrectly and the valves on the bottom are not open|Press the tank down lightly to open the valves on the bottom| |No espresso coffee is delivered|Limescale in the water circuit|Descale as described in section “16.7 Descale”|
|The espresso coffee drips from the edges of the filter holder rather than the holes|The filter holder has been inserted incorrectly or is dirty|Attach the filter holder correctly and rotate firmly as far as it will go| |---|---|---| |The espresso coffee drips from the edges of the filter holder rather than the holes|The espresso boiler gasket has lost elasticity or is dirty|Have the espresso boiler gasket replaced by Customer Services| |The espresso coffee drips from the edges of the filter holder rather than the holes|The holes in the filter holder spouts are blocked|Clean the filter holder spout holes| |The espresso coffee drips from the edges of the filter holder rather than the holes|The filter is blocked|Clean as described in section “16.3 Cleaning the coffee filters”| |The filter holder cannot be attached to the appliance|Too much coffee has been placed in the filter|Use the measure supplied and make sure you are using the correct filter for the type of preparation| |The coffee froth is too light (delivered from the spout too fast)|The pre-ground coffee is not pressed down firmly enough|Press the pre-ground coffee more firmly| |The coffee froth is too light (delivered from the spout too fast)|There is not enough pre-ground coffee|Increase the quantity of pre-ground coffee| |The coffee froth is too light (delivered from the spout too fast)|The pre-ground coffee is too coarse|Use only pre-ground coffee for espresso coffee makers| |The coffee froth is too light (delivered from the spout too fast)|The wrong type of pre-ground coffee is being used|Change the type of pre-ground coffee| |The coffee froth is too dark (delivered from the spout too slowly)|The pre-ground coffee is pressed down too firmly|Press the coffee down less firmly| |The coffee froth is too dark (delivered from the spout too slowly)|There is not enough pre-ground coffee|Reduce the quantity of pre-ground coffee| |The coffee froth is too dark (delivered from the spout too slowly)|The espresso boiler outlet is blocked|Clean as described in section “16.4 Cleaning the boiler outlet”| |The coffee froth is too dark (delivered from the spout too slowly)|The filter is blocked|Clean as described in section “16.3 Cleaning the coffee filters”| |The coffee froth is too dark (delivered from the spout too slowly)|The pre-ground coffee is too fine|Use only pre-ground coffee for espresso coffee makers| |The coffee froth is too dark (delivered from the spout too slowly)|The pre-ground coffee is too fine or damp|Use pre-ground coffee for espresso coffee makers only and make sure it is not too damp| |The coffee froth is too dark (delivered from the spout too slowly)|Limescale in the water circuit|Descale as described in section “16.7 Descale”| |After delivering coffee, the filter remains attached to the boiler outlet| |Insert the filter holder again, deliver coffee, then remove the filter holder| |The appliance will not make any drink and the , and lights flash for a few seconds
|No water in the tank|Fill the tank with water| |The appliance will not make any drink and the , and lights flash for a few seconds
|The tank has been inserted incorrectly and the valves on the bottom are not open|Press the tank down lightly to open the valves on the bottom| |The appliance will not make any drink and the , and lights flash for a few seconds
|The espresso boiler outlet is blocked|Clean as described in section “16.4 Cleaning the boiler outlet”| |The appliance will not make any drink and the , and lights flash for a few seconds
|The filter is blocked|Clean as described in section “16.3 Cleaning the coffee filters”| |The appliance will not make any drink and the , and lights flash for a few seconds
|Limescale in the water circuit|Descale as described in section “16.7 Descale”|
|The appliance does not function and all the lights flash| |Disconnect the appliance immediately and contact authorised Customer Services.| |---|---|---|

|No milk froth is formed when making cappuccino|The ring is in the “HOT MILK” position|Push the ring into the “CAPPUCCINO” position.| |No milk froth is formed when making cappuccino|Milk not cold enough|Always use milk at refrigerator temperature| |No milk froth is formed when making cappuccino|Cappuccino maker dirty|Clean as described in section “13. Cleaning the cappuccino maker after use”| |No milk froth is formed when making cappuccino|Limescale in the water circuit|Descale as described in section “16.7 Descale”| |At the end of descaling, the appliance requests a further rinse|During the rinse cycle, the water tank has not been filled to the MAX level|Repeat the rinse cycle from point 10 of the section "Explanation of lights" “16.7 Descale”|
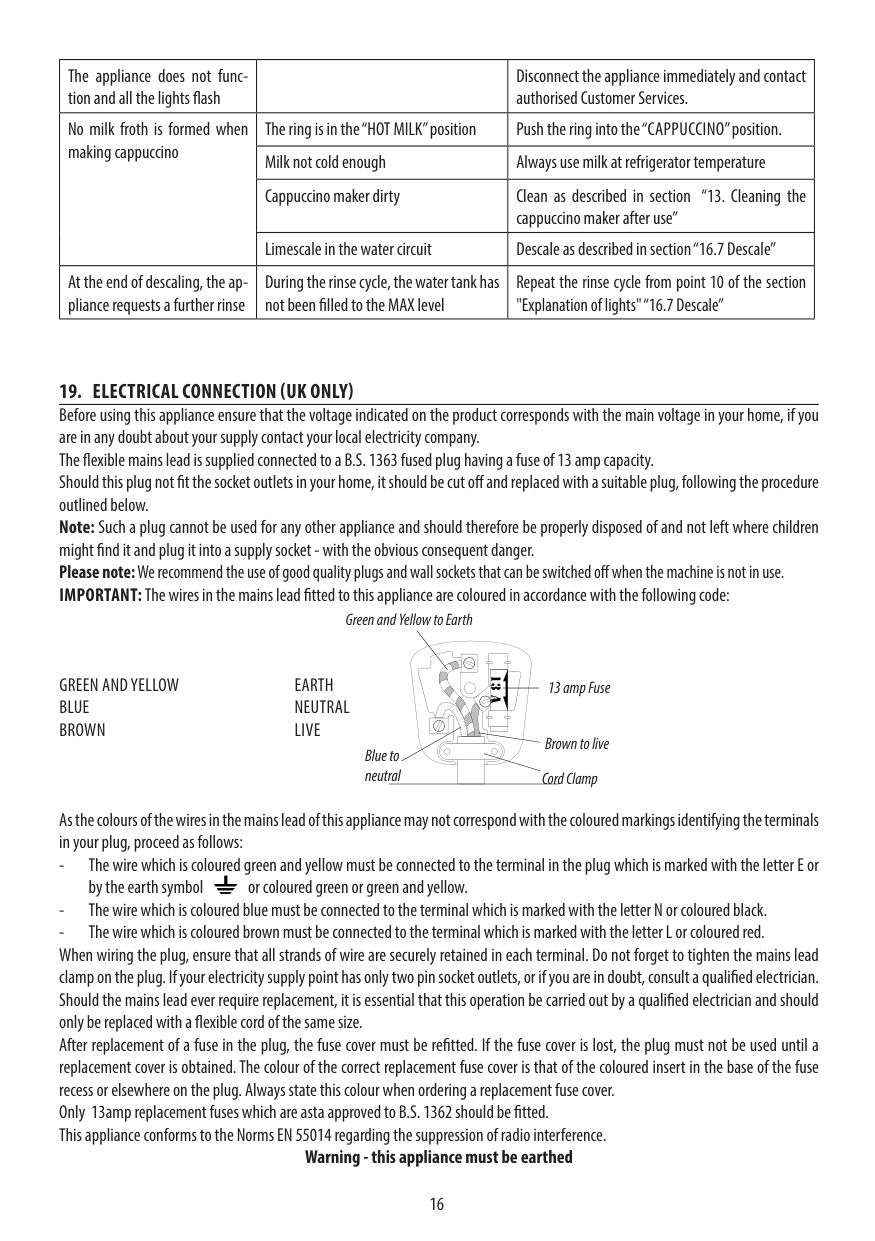
Green and Yellow to Earth
| | | |---|---| | | |
GREEN AND YELLOW EARTH BLUE NEUTRAL BROWN LIVE
13 amp Fuse
| | | |---|---| | | |
Brown to live Cord Clamp
Blue to neutral
As the colours of the wires in the mains lead of this appliance may not correspond with the coloured markings identifying the terminals in your plug, proceed as follows:
Warning - this appliance must be earthed
| | |---|
De’Longhi Appliances via Seitz, 47 31100 Treviso Italia www.delonghi.com
5713233481/12.16