
Duraflame Space Heater with Flame Effect
Ask AI
— answers from the official manualAnswers from the official manual.
Common questions
Common Questions
10 totalWhat are the specifications for the Duraflame Space Heater?
The heater operates at 120 VAC, 60 Hz, draws 12.5 Amps, and has a power rating of 1500 Watts. It provides supplemental heat up to 1000 square feet.
How do I adjust the brightness of the flame effect?
Turning the flame brightness dimmer dial clockwise will increase the brightness of the flame effect. Turning the dial counter-clockwise will decrease the brightness of the flame effect.
Why is there an odor when I first turn on the heater?
When first running the heater there may be an odor, which is normal as the heater has a surface coating on the internal parts. For the first several hours of operation, the coating reacts with the internal parts to permanently protect them. The odor is safe; if you are sensitive to the odor, it is recommended to run the heater in a well-ventilated area until the odor dissipates.
How do I use the thermostat to maintain a comfortable temperature?
Set the thermostat knob by turning it clockwise to allow the heater to warm up the room. When the desired comfort level is reached, lower the thermostat knob counter-clockwise until the unit shuts off. The heater will now automatically maintain the desired comfort level by cycling the heater on and off.
What should I do if the heater doesn't work even though all switches are on and thermostat is set to the highest level?
The thermal protector has likely tripped. Turn all switches to the "OFF" position and unplug the unit from the wall outlet for 5 minutes. After 5 minutes, plug the unit back into the wall outlet and operate as normal.
Why are the flames not moving?
The flames may not be moving due to a defective flame generator drive motor or a spinner that is detached from the motor. Replace the flame generator drive motor, or remove the back panel and check to see if the "spinner" is correctly mounted to the motor.
Full Manual
2 pages
Model: Dfi-7105-01, Dfi-7105-02, Dfi-7105-03, Dfi-7105-09, Dfi-7105-16
© 2019, Twin-Star International, Inc. Delray Beach, FL 33445Voltage
120 VAC, 60 HzAmps
12.5 AmpsWatts
1500 WattsProduct Specifications
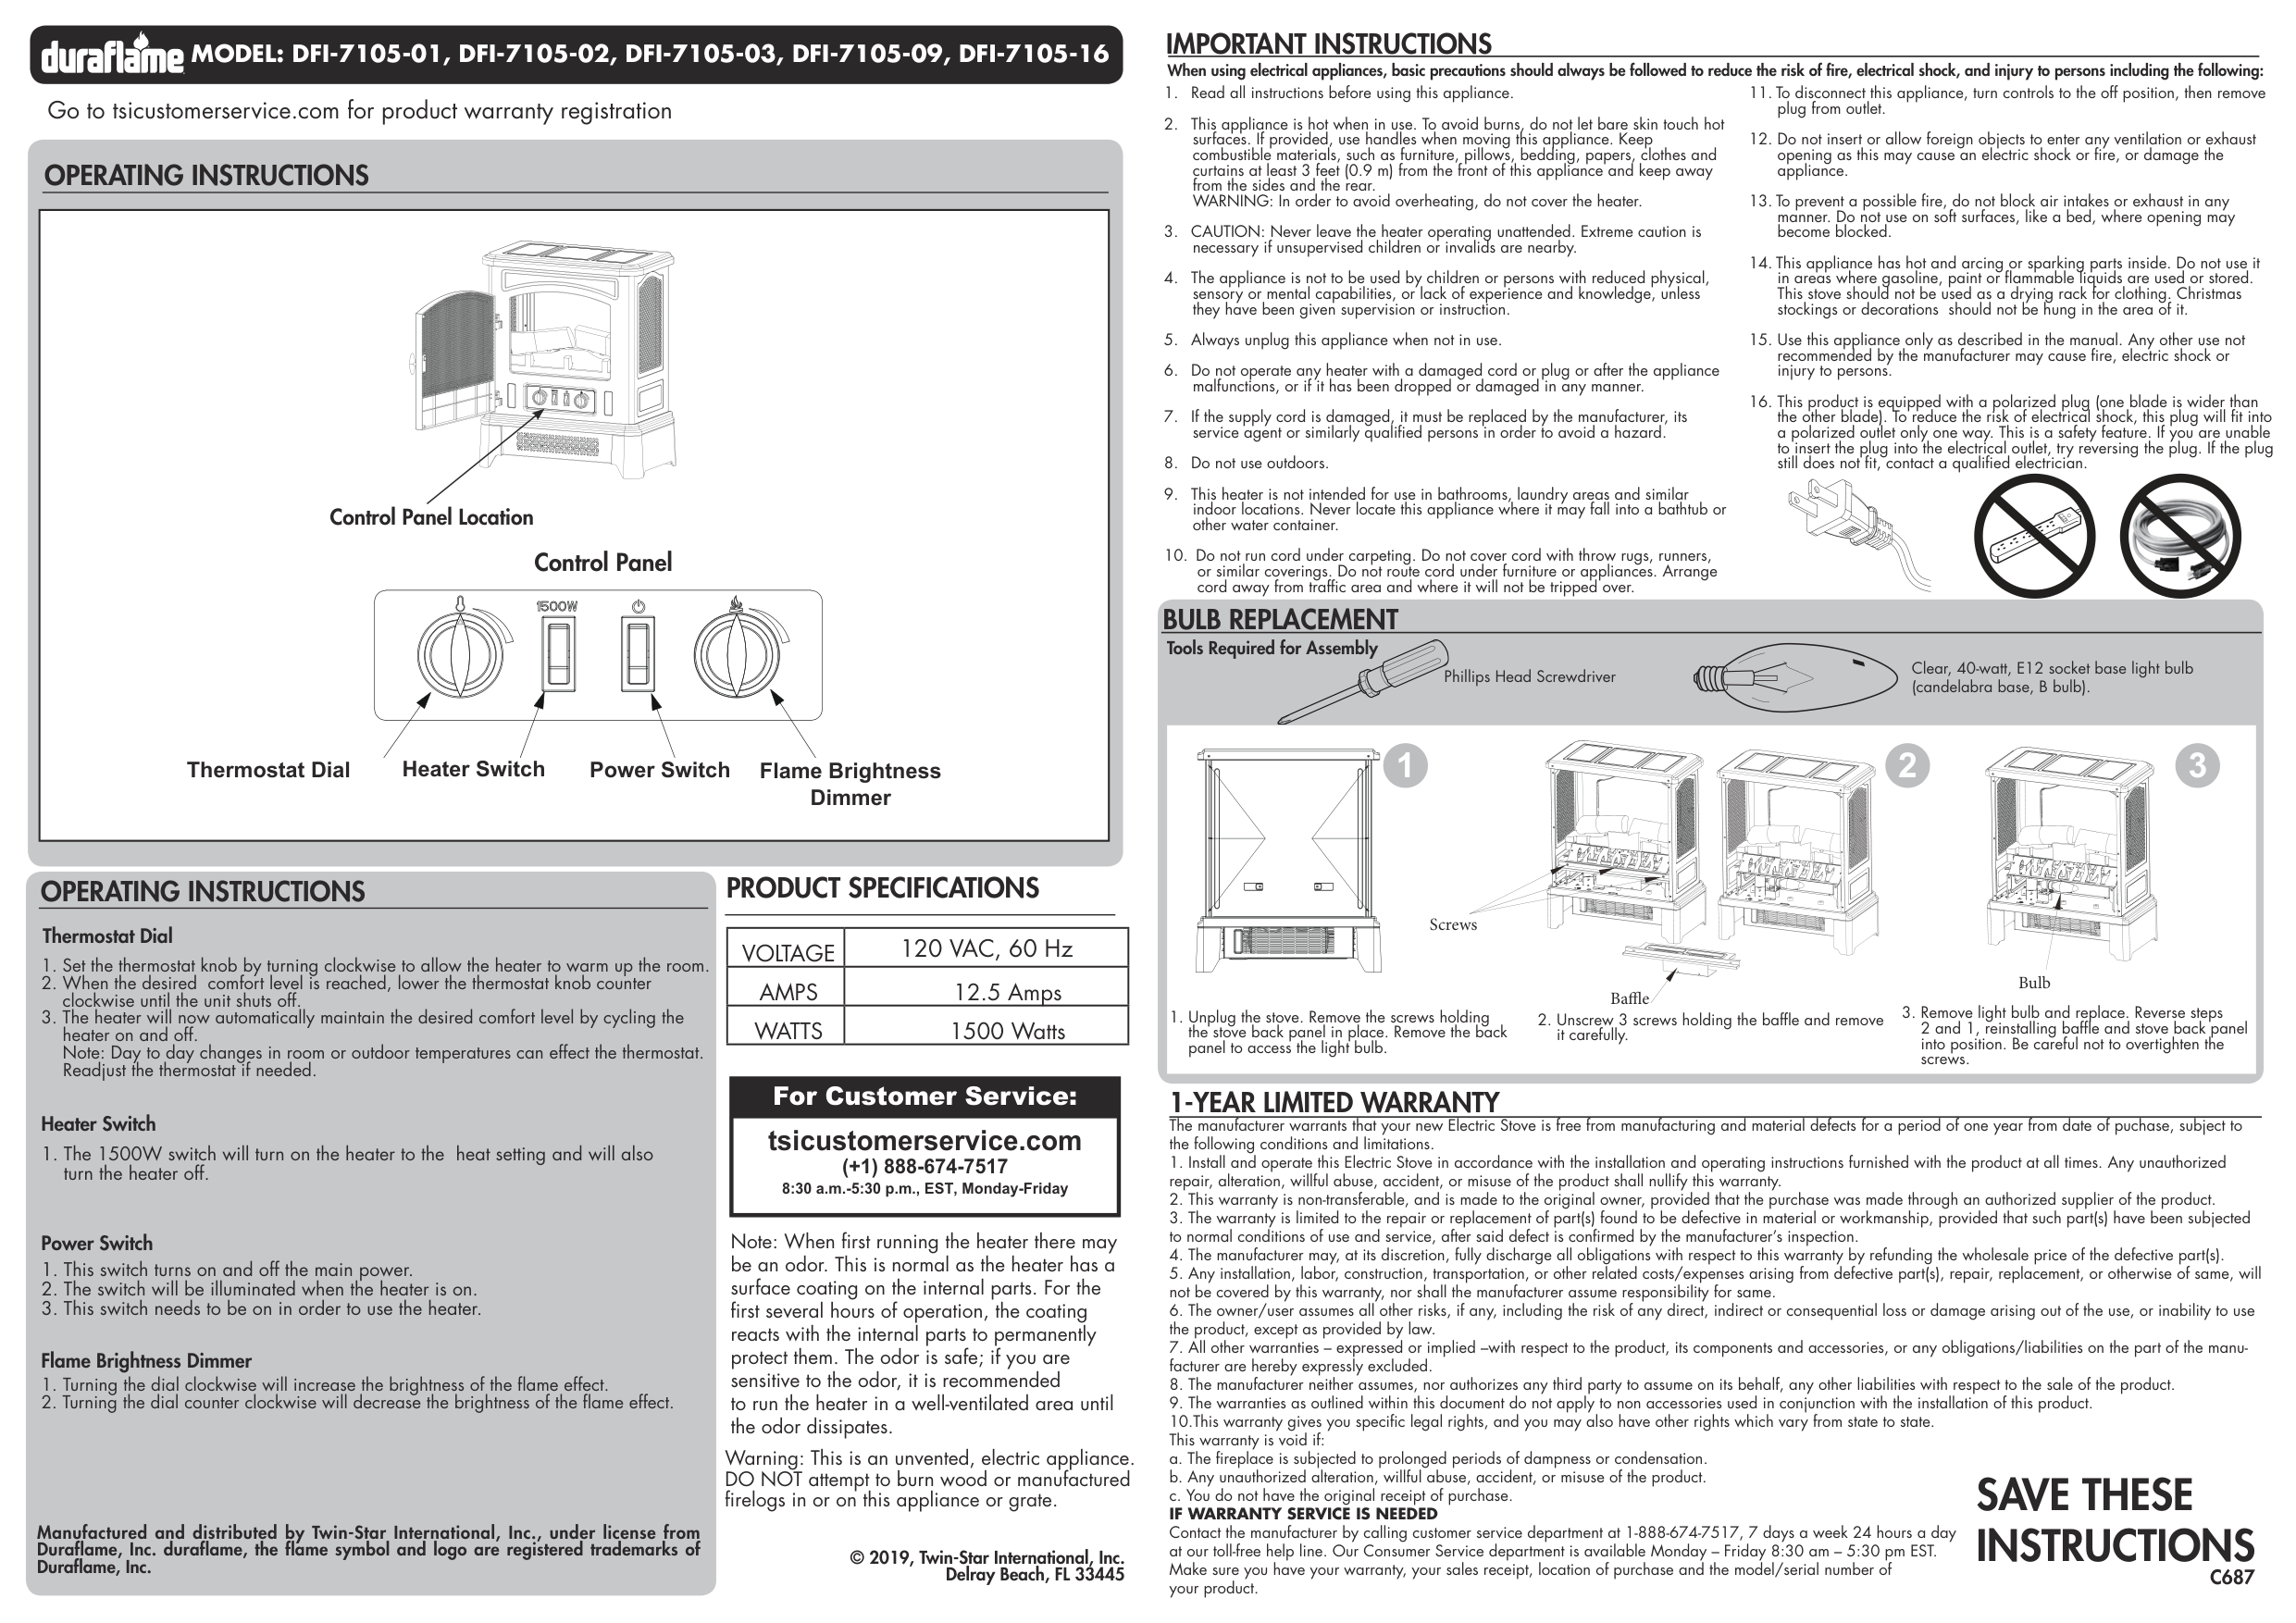
Operating Instructions
For Customer Service: tsicustomerservice.com (+1) 888-674-7517 8:30 a.m.-5:30 p.m., EST, Monday-Friday Manufactured and distributed by Twin-Star International, Inc., under license from Duraflame, Inc. duraflame, the flame symbol and logo are registered trademarks of Duraflame, Inc. Note: When first running the heater there may be an odor. This is normal as the heater has a surface coating on the internal parts. For the first several hours of operation, the coating reacts with the internal parts to permanently protect them. The odor is safe; if you are sensitive to the odor, it is recommended to run the heater in a well-ventilated area until the odor dissipates. Warning: This is an unvented, electric appliance. DO NOT attempt to burn wood or manufactured firelogs in or on this appliance or grate. Go to tsicustomerservice.com for product warranty registration Control Panel Location Thermostat Dial Heater Switch Power Switch Flame Brightness DimmerOperating Instructions
If Warranty Service Is Needed
Contact the manufacturer by calling customer service department at 1-888-674-7517, 7 days a week 24 hours a day at our toll-free help line. Our Consumer Service department is available Monday – Friday 8:30 am – 5:30 pm EST. Make sure you have your warranty, your sales receipt, location of purchase and the model/serial number of your product.Important Instructions
Save These
Instructions
When using electrical appliances, basic precautions should always be followed to reduce the risk of fire, electrical shock, and injury to persons including the following:1-Year Limited Warranty
C687
Thermostat Dial Heater Switch Power Switch Flame Brightness Dimmer Phillips Head Screwdriver Clear, 40-watt, E12 socket base light bulb (candelabra base, B bulb).Bulb Replacement
Tools Required for Assembly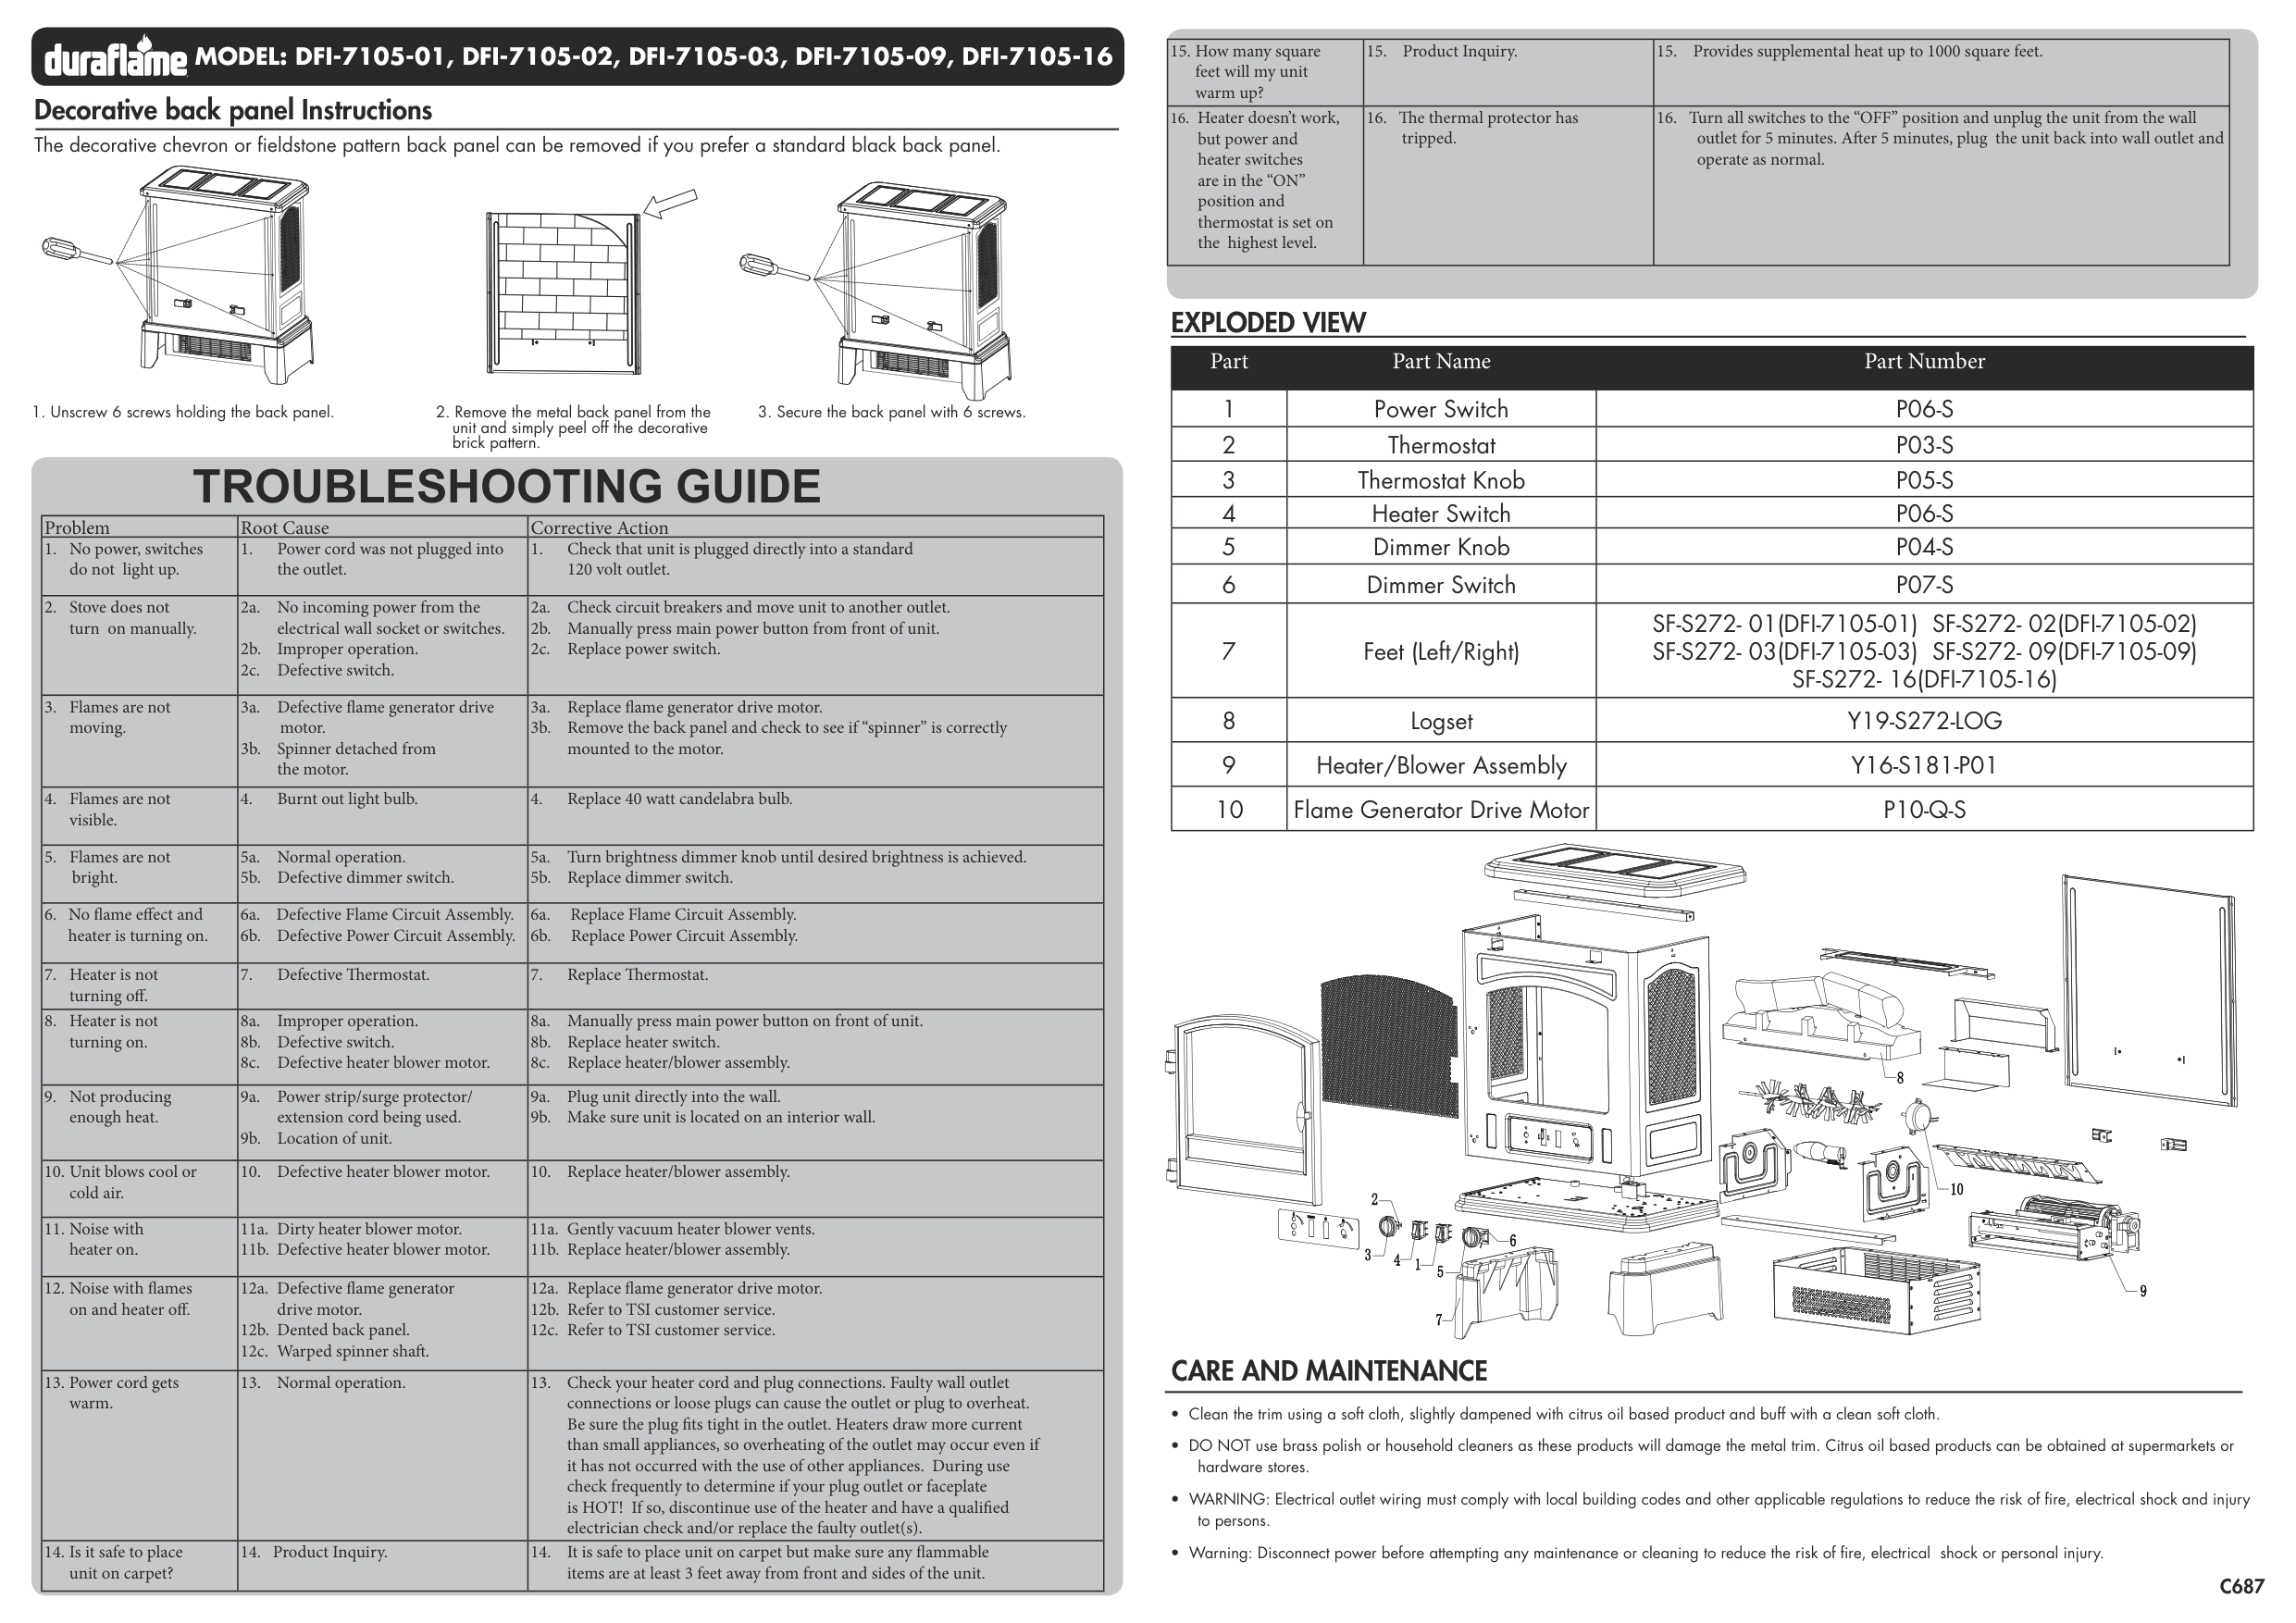
Troubleshooting Guide
Exploded View
Care And Maintenance
C687
Problem Root Cause Corrective Actiondo not light up.
the outlet.
120 volt outlet.
turn on manually. 2a. No incoming power from the
electrical wall socket or switches. 2b. Improper operation. 2c. Defective switch. 2a. Check circuit breakers and move unit to another outlet. 2b. Manually press main power button from front of unit. 2c. Replace power switch.
moving. 3a. Defective flame generator drive motor. 3b. Spinner detached from
the motor. 3a. Replace flame generator drive motor. 3b. Remove the back panel and check to see if “spinner” is correctly
mounted to the motor.
visible.
turning off.
turning on. 8a. Improper operation. 8b. Defective switch. 8c. Defective heater blower motor. 8a. Manually press main power button on front of unit. 8b. Replace heater switch. 8c. Replace heater/blower assembly.
enough heat. 9a. Power strip/surge protector/
extension cord being used. 9b. Location of unit. 9a. Plug unit directly into the wall. 9b. Make sure unit is located on an interior wall.
cold air.
heater on. 11a. Dirty heater blower motor. 11b. Defective heater blower motor. 11a. Gently vacuum heater blower vents. 11b. Replace heater/blower assembly.
on and heater off. 12a. Defective flame generator
drive motor. 12b. Dented back panel. 12c. Warped spinner shaft. 12a. Replace flame generator drive motor. 12b. Refer to TSI customer service. 12c. Refer to TSI customer service.
warm.
connections or loose plugs can cause the outlet or plug to overheat.
Be sure the plug fits tight in the outlet. Heaters draw more current
than small appliances, so overheating of the outlet may occur even if
it has not occurred with the use of other appliances. During use
check frequently to determine if your plug outlet or faceplate
is HOT! If so, discontinue use of the heater and have a qualified
electrician check and/or replace the faulty outlet(s).
unit on carpet?
items are at least 3 feet away from front and sides of the unit.
P06-S
2 ThermostatP03-S
3 Thermostat KnobP05-S
4 Heater SwitchP06-S
5 Dimmer KnobP04-S
6 Dimmer SwitchP07-S
7 Feet (Left/Right)Sf-S272- 01(Dfi-7105-01) Sf-S272- 02(Dfi-7105-02)
Sf-S272- 03(Dfi-7105-03) Sf-S272- 09(Dfi-7105-09)
Sf-S272- 16(Dfi-7105-16)
8 LogsetY19-S272-Log
9 Heater/Blower AssemblyY16-S181-P01
10 Flame Generator Drive MotorP10-Q-S
Model: Dfi-7105-01, Dfi-7105-02, Dfi-7105-03, Dfi-7105-09, Dfi-7105-16
The decorative chevron or fieldstone pattern back panel can be removed if you prefer a standard black back panel.feet will my unit
warm up?