The Flydigi Vader 3 Pro is a wireless / wired / Bluetooth Pro-class controller with Hall-effect joysticks, swappable trigger modes, and broad PC compatibility. The pitch versus an Xbox or DualSense controller comes down to two things: Hall-effect sticks (which are immune to the joystick drift that plagues both Microsoft's and Sony's first-party controllers), and the trigger toggle on the back, which physically switches between two completely different trigger feels.
If you're shopping or already own one, the questions below are the ones that come up.
The thing the marketing leads with: the trigger toggle
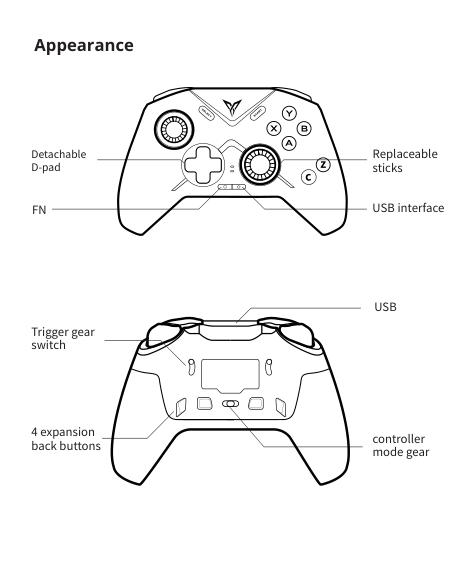
The Vader 3 Pro has a physical switch on the back of each grip that flips the triggers between two modes:
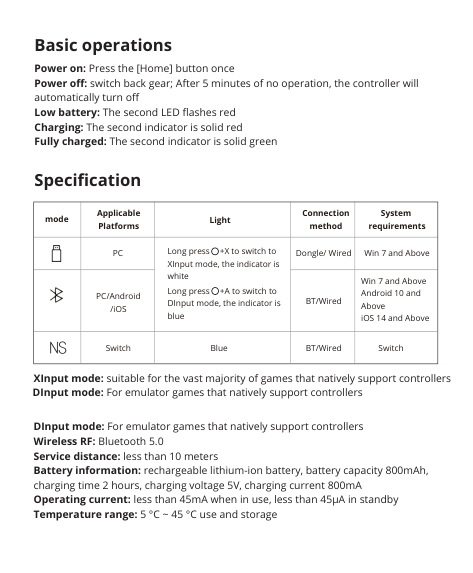
Linear gear (long-throw): 9mm of travel, Hall-effect magnetic sensing, smooth analog response. This is what you want for racing games (analog throttle), driving sims, and anything where you need fine control over partial inputs.
Microswitch gear (short-throw): 0.3mm of travel, mouse-button style click. This is what you want for FPS, fighting games, anything where the trigger is binary and you want it to fire as fast as physically possible. Mouse-level micro-motion is the spec — meaning the click is closer to a mouse click than a controller trigger.
The toggle is a per-grip switch, so you can run mixed: linear left for crouching/aiming, microswitch right for firing. Most FPS players run microswitch on both. Most racing players run linear on both. Mixed is for the niche.
Source: page 2 of the manual
Connection options (and how to switch)
The Vader 3 Pro connects four ways. The back-gear switch (different from the trigger toggle, on the underside near the battery) selects which mode the controller boots into.
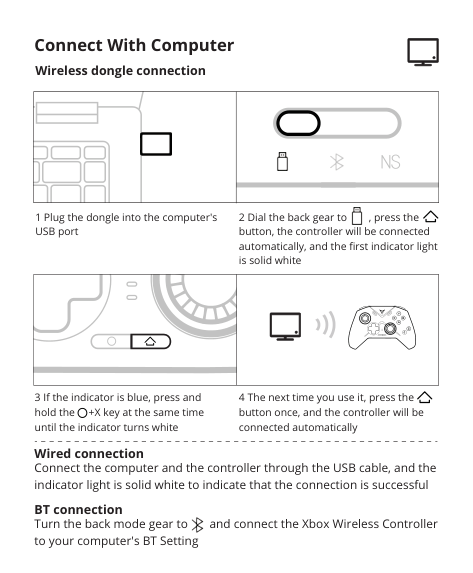
USB-C wired: plug in, controller boots in wired mode automatically. Best latency, no battery drain.
2.4GHz wireless dongle: plug the included USB dongle into your PC, set the back gear to wireless, press the pairing button. Sub-1ms latency, basically tied with wired for competitive play.
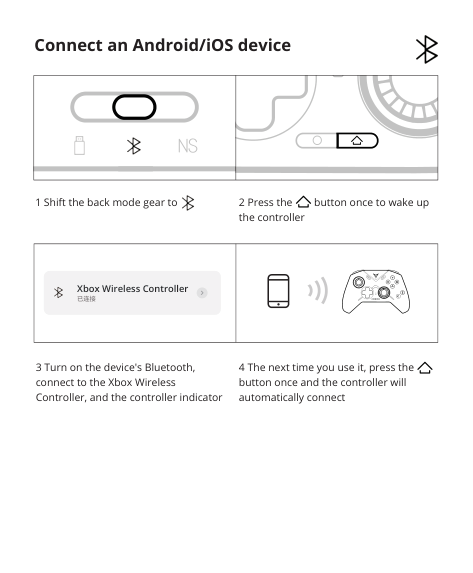
Bluetooth: hold the pairing button until LED enters Bluetooth pairing mode, find on PC/Mac/phone Bluetooth list. Slightly higher latency than the dongle but more universal. Use this for mobile gaming and laptop play.
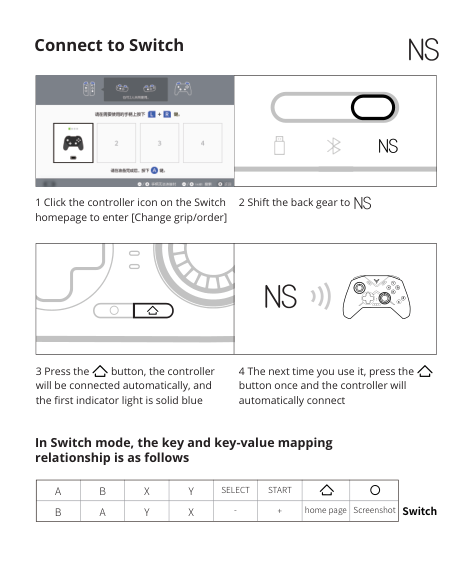
Switch mode: from the Switch homepage, click the controller icon → Change grip/order. Shift the back gear to Switch mode, press the pairing button. The controller appears in the Switch's pairing list.
Switching connection types means flipping the gear and pairing again — the controller doesn't auto-detect.
Source: pages 3-4 of the manual
XInput vs. DInput (the PC-specific switch)
PC games use one of two controller protocols: XInput (modern, used by basically all 2010+ games) or DInput (older, used by some emulators and a few older PC games).
- Long-press Fn + X to switch to XInput mode. Indicator turns white. This is what you want for 99% of modern PC games.
- Long-press Fn + A to switch to DInput mode. Indicator turns blue. Use this for older games or emulators that explicitly require DirectInput.
Most users set this once to XInput and forget. If a specific game won't see the controller, that's the first thing to flip.
Source: page 6 of the manual
Battery and charging
The Vader 3 Pro has an 800mAh lithium-ion battery that takes about 2 hours to fully charge at 5V/800mA. Battery life depends heavily on what's enabled — vibration, RGB lighting, and high polling rates all draw more current — so real-world hours vary by use.
The second LED flashes red when the battery is low. Plug it in.
You can play wired while charging — the controller switches to wired mode automatically when USB-C is connected, regardless of where the back gear is set.
Source: page 6 of the manual
What's good
- Hall-effect sticks: no drift. Period. The single most-cited reason to buy this over an Xbox or DualSense.
- The trigger toggle: nobody else has this in this price range. It's genuinely useful if you play multiple game genres.
- Build quality: better than the price suggests. The buttons feel right, the grips don't slip, the back paddles are responsive without being mushy.
- Software customization (Flydigi Space Station): button remapping, dead-zone tuning, vibration intensity, RGB. Decent if you actually want to tune things, ignorable if you don't.
What's mid
- Battery life is reasonable but not class-leading. 800mAh is mid-range capacity for a Pro-class controller; some competitors with larger batteries last longer between charges.
- Bluetooth latency is noticeable in fast-paced games. Use the 2.4GHz dongle if you can.
- The Flydigi Space Station software is functional but unpolished. Windows compatibility is fine; some users report needing reinstalls after Windows feature updates.
What's not great
- Mac support is limited. Bluetooth pairs, but Flydigi Space Station (the configuration software) is Windows-only, so back-paddle remapping and stick calibration aren't accessible from macOS without a Windows machine.
- Switch mode works but the controller is a third-party device, not a licensed Nintendo accessory. Major Nintendo firmware updates have historically broken third-party controllers; if you depend on Switch use, factor that risk in.
- The boxed manual covers the basics but the configuration depth is in the Flydigi Space Station software, not the printed material.
Things to do on day one
- Plug it into a PC via USB-C and let it charge for 30 minutes before first wireless use.
- Set the XInput mode (Fn + X long press) so it works with Steam, PSN streaming, and almost every PC game.
- Download Flydigi Space Station if you want to remap buttons, tune dead zones, or set custom vibration. Skip this if defaults work for you — they usually do.
- Pick your trigger mode based on what you mostly play. Microswitch for FPS, linear for racing.
- Test the back paddles in a game. They're remappable in software; default they mirror the face buttons.
Care
Operating temperature: 5°C to 45°C (41°F to 113°F). Don't leave it in a hot car. Don't store it somewhere damp.
The thumbsticks and triggers are what fail first on most controllers, but the Hall-effect sticks on the Vader 3 Pro should outlast the rest of the controller. Buttons and back paddles are the next-most likely wear point — Flydigi's warranty covers manufacturing defects within the first year via their support site.
Source: page 6 of the manual
Flydigi support
Software, drivers, and documentation: https://www.flydigi.com (search for "Vader 3 Pro")
Other controllers worth considering
(No internal links yet — AskManual's gaming controller catalog is currently limited. As more are added, this section will reference comparable Hall-effect and Pro-class controllers.)