
Ask AI
— answers from the official manualAnswers from the official manual.
Common questions
Common Questions
10 totalWhat are the height and weight requirements for using this car seat in rear facing mode?
For rear facing mode, your child must be between 40cm and 105cm in height and weigh no more than 19.5kg. This car seat is suitable for infants up to approximately 4 years old when used in rear facing position. (Page 12)
At what age can I switch my child to forward facing mode?
Do not use forward facing mode before your child's age exceeds 15 months, even if they meet the height requirements. Forward facing mode is suitable for children between 76cm and 105cm in height, weighing no more than 19.5kg, and at least 15 months old. (Page 6, 14)
How do I install the car seat base using ISOFIX?
First, fit the ISOFIX guides with the ISOFIX anchor points on your vehicle seat. Place the base on the seat and pull the load leg downward to the floor. Press the ISOFIX adjuster button to extend the ISOFIX connectors until both show completely green indicators, confirming secure attachment. Make sure the load leg indicator also shows green before use. (Page 8-9)
What should I do if the load leg indicator shows red?
When the load leg indicator shows red, it means the load leg is in the wrong position. Squeeze the load leg releasing button and adjust the load leg length until it is in full contact with the vehicle floor pan and the indicator turns green. (Page 9)
How do I adjust the head support and shoulder harness height?
Lift up the head support adjustment lever and pull up or push down on the head support until it snaps into one of the 6 available positions. The shoulder harness height must be even with your child's shoulders in both rear facing and forward facing modes. (Page 11)
Can I use the infant insert in forward facing mode?
No, do not use the infant insert when installing the car seat in forward facing mode. The infant insert is only recommended for use in rear facing mode for children under 60cm in height, as it increases side impact protection. (Page 14-15)
Full Manual
17 pages
☰ Home » Graco » GRACO IM-000922E Car Seat Owner’s Manual Contents [ hide ] 1 GRACO IM-000922E Car Seat 2 Product Information 3 Product Usage Instructions
4 Important! Keep For Future Reference
5 Care and Maintenance 6 Product Information 7 Concerns on Installation 8 Recline Adjustment 9 Using in the Rear Facing Mode 10 Documents / Resources 10.1 References 11 Related Posts GRACO IM-000922E Car Seat Manuals+ GRACO-logo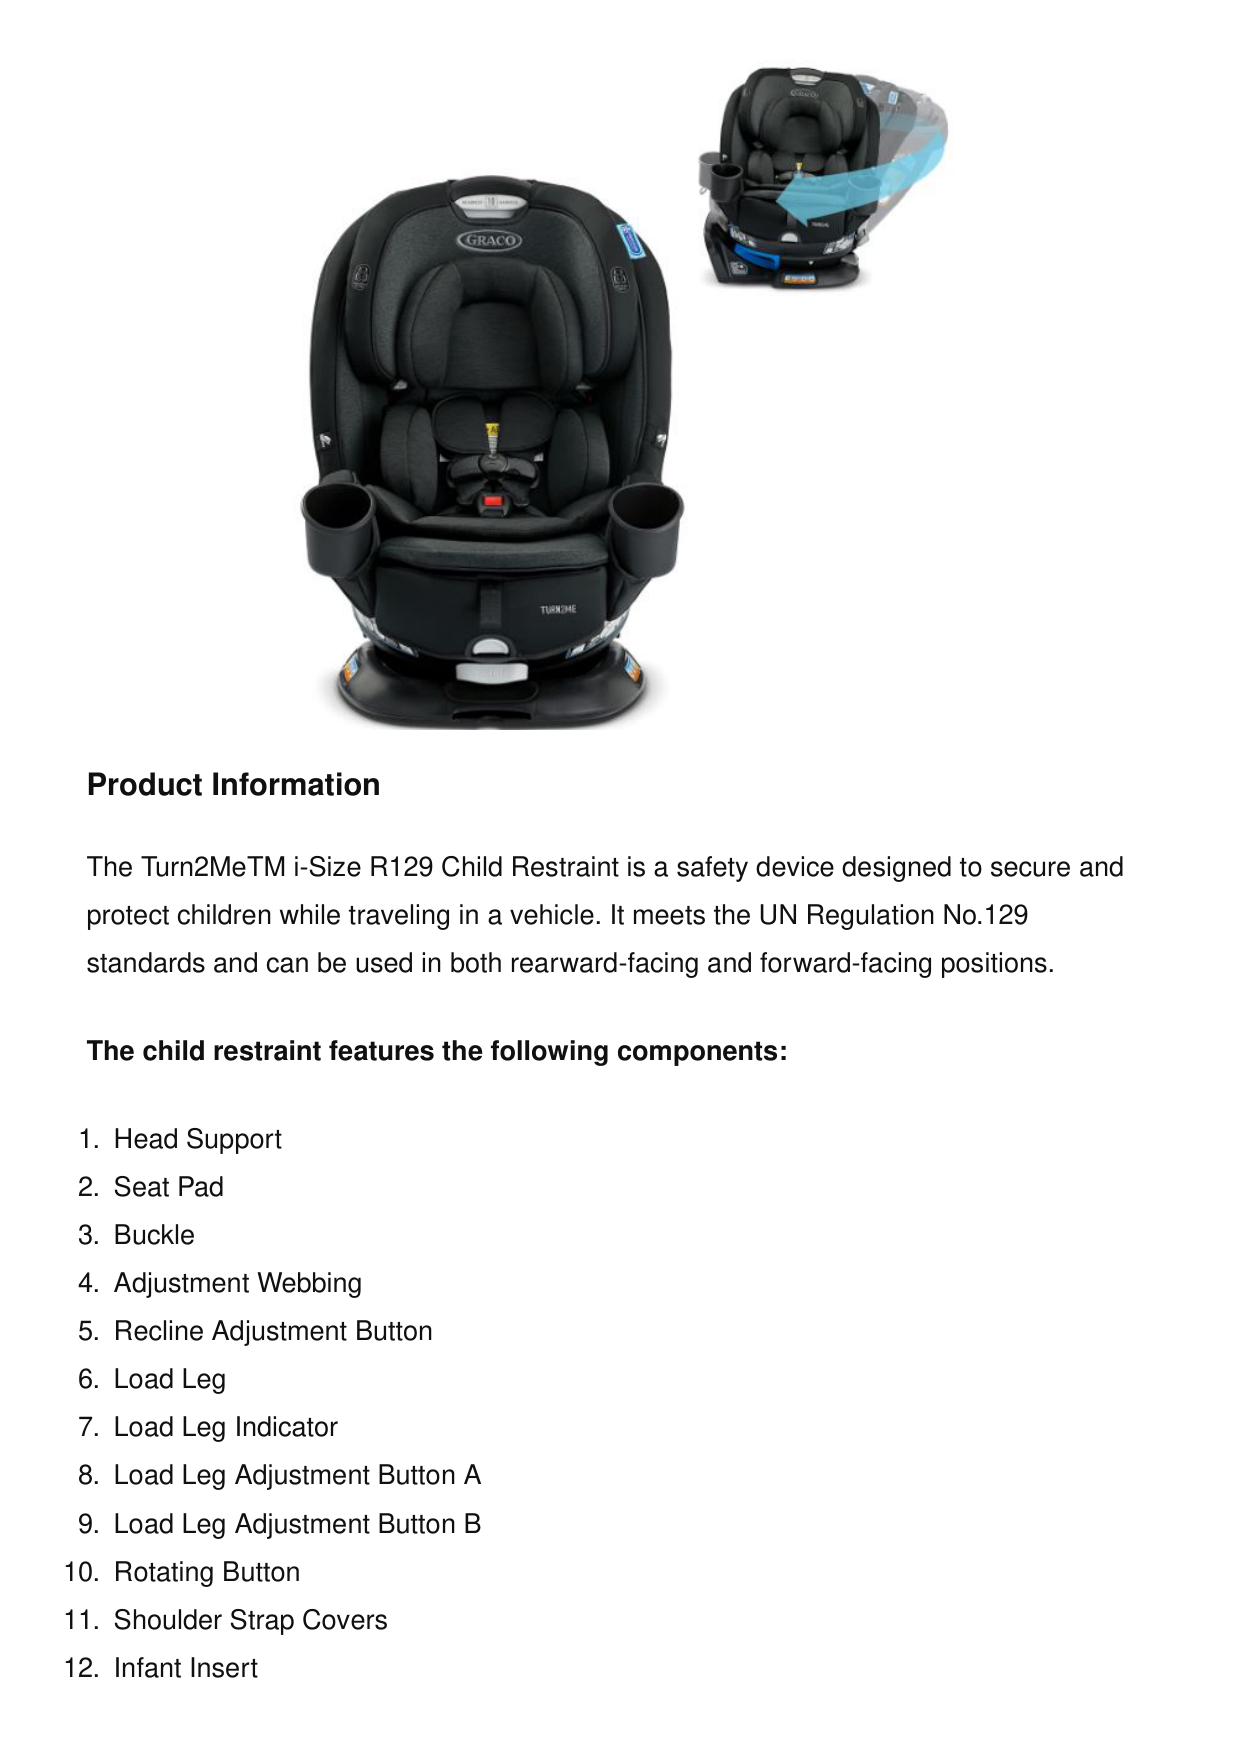
Product Information The Turn2MeTM i-Size R129 Child Restraint is a safety device designed to secure and protect children while traveling in a vehicle. It meets the UN Regulation No.129 standards and can be used in both rearward-facing and forward-facing positions. The child restraint features the following components:
Important: Read These Instructions Carefully Before Use And Keep
Them For Future Reference. Your Child’S Safety May Be Affected If
You Do Not Follow These Instructions.
Warning: Important, Retain For Future Reference: Read Carefully.
Important: Do Not Use Forward Facing Before The Child’S Age
EXCEEDS 15 MONTHS (Refer to instructions).
Important! Keep For Future Reference

Important
Read These Instructions Carefully Before Use And Keep Them For
Future Reference. Your Child’S Safety May Be Affected If You Do
Not Follow These Instructions.
Warning:
Important, Retain For Future Reference: Read Carefully.
BE cautious that the rigid items and plastic parts of the enhanced child restraint system shall be so located and installed that they are not liable to become trapped by a movable seat or in the door of the vehicle. DO NOT use the rearward facing enhanced child restraint systems in seating positions where there is an active frontal airbag installed. To use this enhanced child restraint according to the UN Regulation No.129, your child must meet the following requirements. Rearward Facing: Child height 40cm -105cm / max. 19.5kg Forward Facing: Child height 76cm – 105cm / max. 19.5kg
Important – Do Not Use Forward Facing Before The Child’S Age
EXCEEDS 15 MONTHS (Refer to instructions). The enhanced child restraint may not fit in all approved vehicles. Please refer to the fitting list included for more details. Any support-leg should be in contact with the vehicle floor and any straps restraining the child should be adjusted to the child’s body. The straps should not be twisted. After your child is placed in this enhanced child restraint, the safety belt must be used correctly. Ensure that any lap strap is worn low down, so that the pelvis is firmly engaged, shall be stressed. This enhanced child restraint should be replaced when it has been subject to violent stresses in an accident. An accident can cause damage to it that you cannot see. Consider the danger of making any alterations or additions to the device without approval of the adequate authority, and the danger of not following closely to the installation instructions provided by the enhanced child restraint manufacturer. Please keep this enhanced child restraint away from sunlight, otherwise it may be too hot for child’s skin. Always touch the enhanced child restraint before placing child in it. NEVER leave your child unattended with this enhanced child restraint. Any luggage or other objects liable to cause injuries in the event of a collision shall be properly secured. The enhanced child restraint system shall NOT BE USED without the soft goods. The soft goods should not be replaced with any other than the one recommended by the manufacturer, because the soft goods constitutes an integral part of the restraint performance. Please check if this enhanced child restraint can be installed properly in your vehicle before you purchase it. NO enhanced child restraint can guarantee full protection from injury in an accident. However, proper use of this enhanced child restraint will reduce the risk of serious injury or death to your child. DO NOT install this enhanced child restraint without following the instructions in this manual or you may put your child at serious risk of injury or death. The user shall also be referred to the vehicle manufacturer’s handbook. DO NOT use this enhanced child restraint if it has damaged or missing parts. DO NOT have your child in large/oversized clothes because this may prevent your child from being, properly and securely fastened by the shoulder harness straps and
the crotch strap between the legs. Care and Maintenance After removing the wedge from the insert, please store it somewhere that the child cannot access it. Please wash the seat cover and inner padding with cold water under 30°C. Do not iron the soft goods. Do not bleach or dry clean the soft goods. Do not use undiluted detergents, gasoline or other organic solvent to wash the child restraint. It may cause damage to the child restraint. Do not wring out the seat cover and inner padding to dry. It may leave the seat cover and inner padding with wrinkles. Please hang dry the seat cover and inner padding in the shade. Please remove the child restraint and base from the vehicle seat if not in use for a long period of time. Put the child restraint in a cool, dry place where your child cannot access it. Do not tamper with the harness connectors during cleaning. gracobaby.eu www.gracobaby.pl Product Information
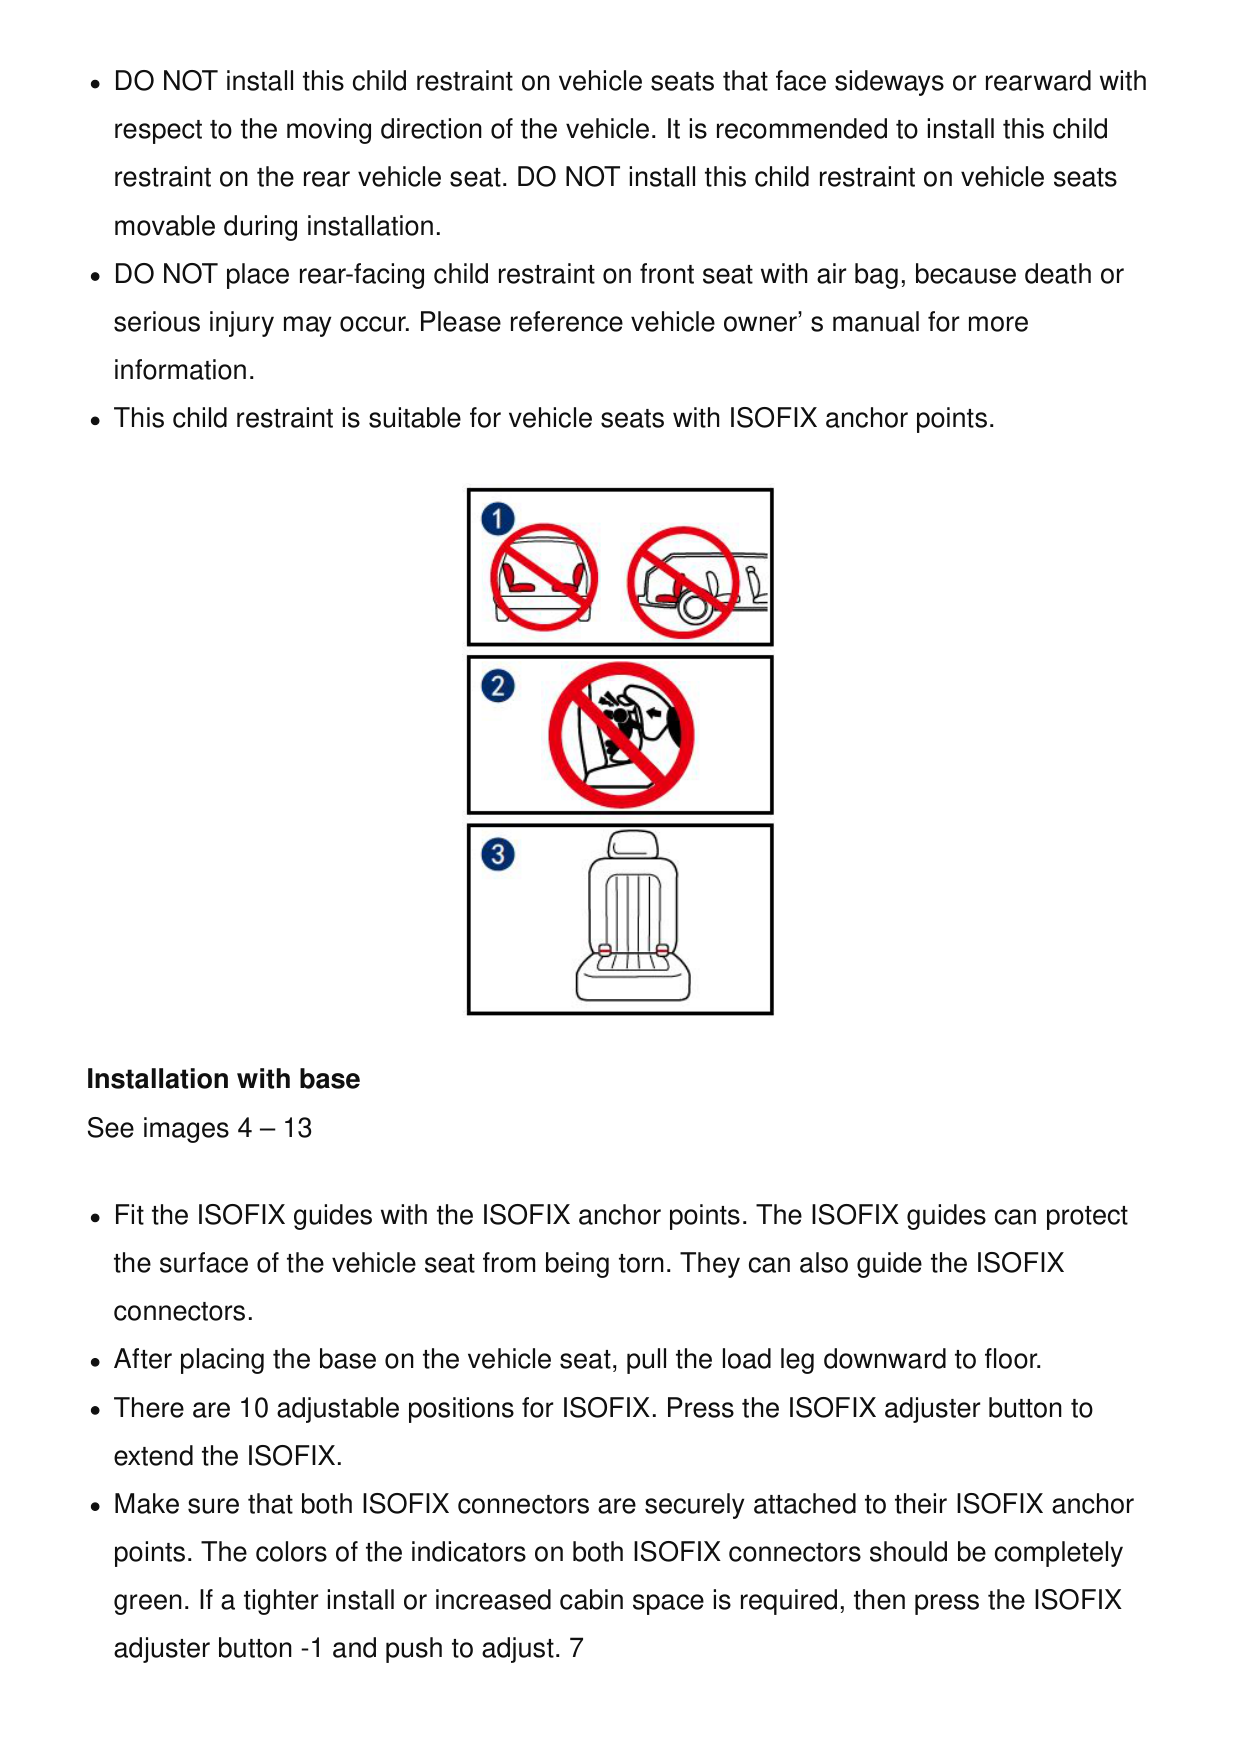
DO NOT install this child restraint on vehicle seats that face sideways or rearward with respect to the moving direction of the vehicle. It is recommended to install this child restraint on the rear vehicle seat. DO NOT install this child restraint on vehicle seats movable during installation. DO NOT place rear-facing child restraint on front seat with air bag, because death or serious injury may occur. Please reference vehicle owner’ s manual for more information. This child restraint is suitable for vehicle seats with ISOFIX anchor points. Installation with base See images 4 – 13 Fit the ISOFIX guides with the ISOFIX anchor points. The ISOFIX guides can protect the surface of the vehicle seat from being torn. They can also guide the ISOFIX connectors. After placing the base on the vehicle seat, pull the load leg downward to floor. There are 10 adjustable positions for ISOFIX. Press the ISOFIX adjuster button to extend the ISOFIX. Make sure that both ISOFIX connectors are securely attached to their ISOFIX anchor points. The colors of the indicators on both ISOFIX connectors should be completely green. If a tighter install or increased cabin space is required, then press the ISOFIX adjuster button -1 and push to adjust. 7
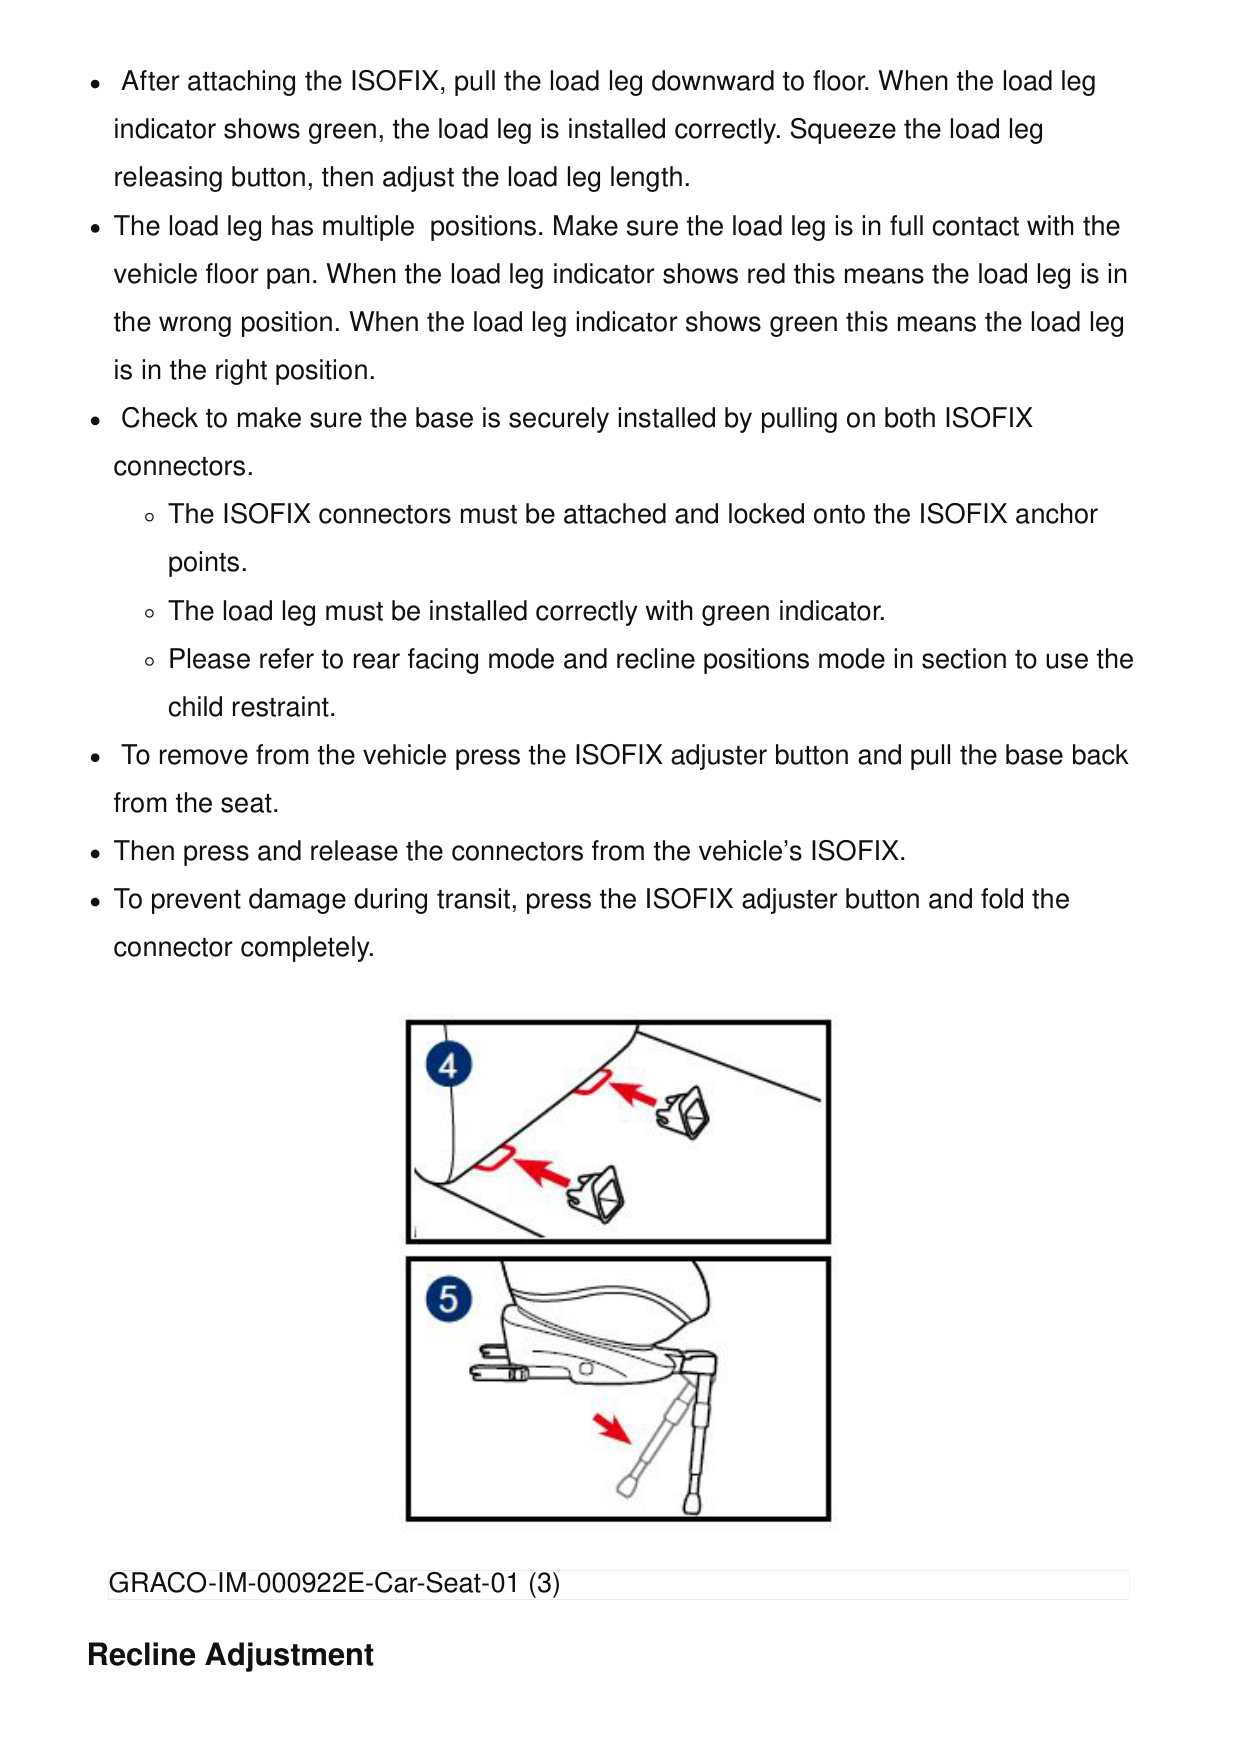
After attaching the ISOFIX, pull the load leg downward to floor. When the load leg indicator shows green, the load leg is installed correctly. Squeeze the load leg releasing button, then adjust the load leg length. The load leg has multiple positions. Make sure the load leg is in full contact with the vehicle floor pan. When the load leg indicator shows red this means the load leg is in the wrong position. When the load leg indicator shows green this means the load leg is in the right position. Check to make sure the base is securely installed by pulling on both ISOFIX connectors. The ISOFIX connectors must be attached and locked onto the ISOFIX anchor points. The load leg must be installed correctly with green indicator. Please refer to rear facing mode and recline positions mode in section to use the child restraint. To remove from the vehicle press the ISOFIX adjuster button and pull the base back from the seat. Then press and release the connectors from the vehicle’s ISOFIX. To prevent damage during transit, press the ISOFIX adjuster button and fold the connector completely. Recline Adjustment GRACO-IM-000922E-Car-Seat-01 (3)
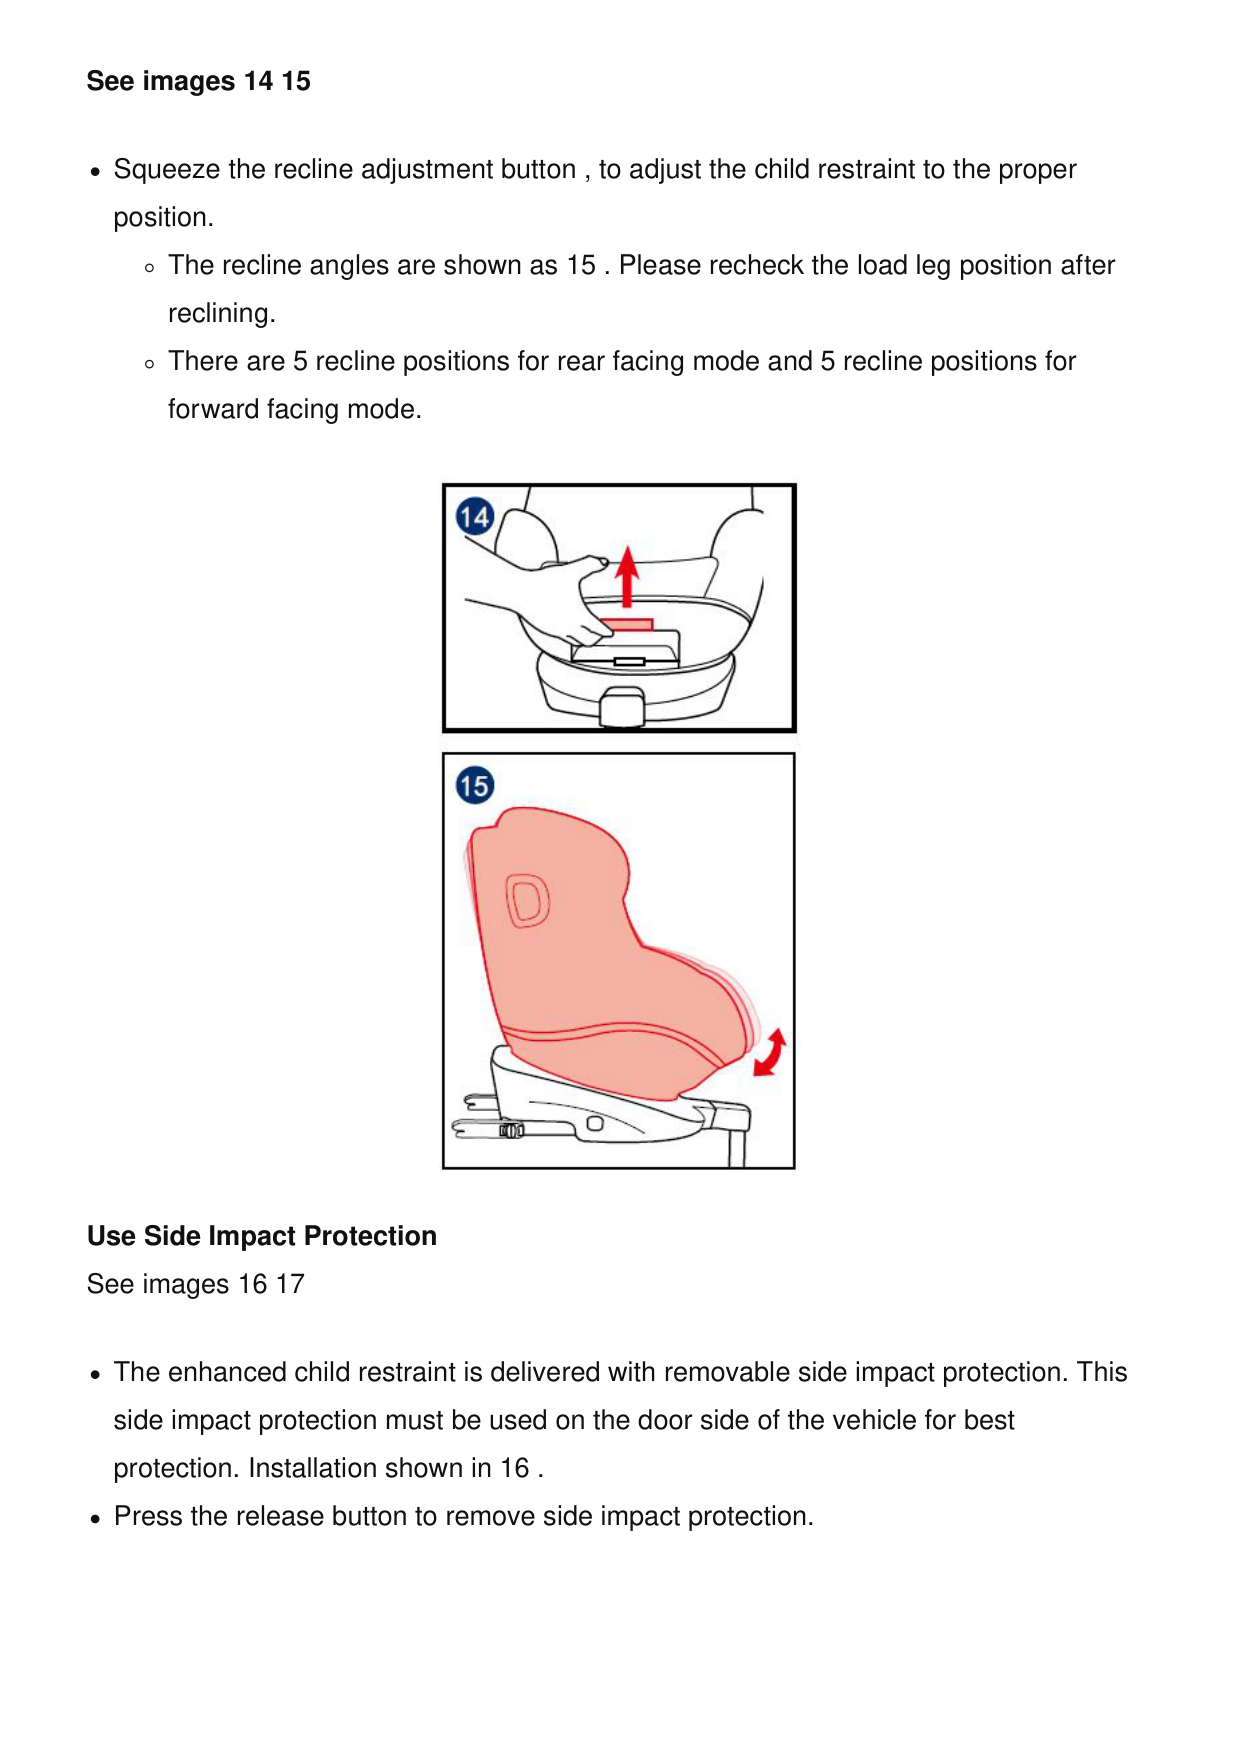
See images 14 15 Squeeze the recline adjustment button , to adjust the child restraint to the proper position. The recline angles are shown as 15 . Please recheck the load leg position after reclining. There are 5 recline positions for rear facing mode and 5 recline positions for forward facing mode. Use Side Impact Protection See images 16 17 The enhanced child restraint is delivered with removable side impact protection. This side impact protection must be used on the door side of the vehicle for best protection. Installation shown in 16 . Press the release button to remove side impact protection.
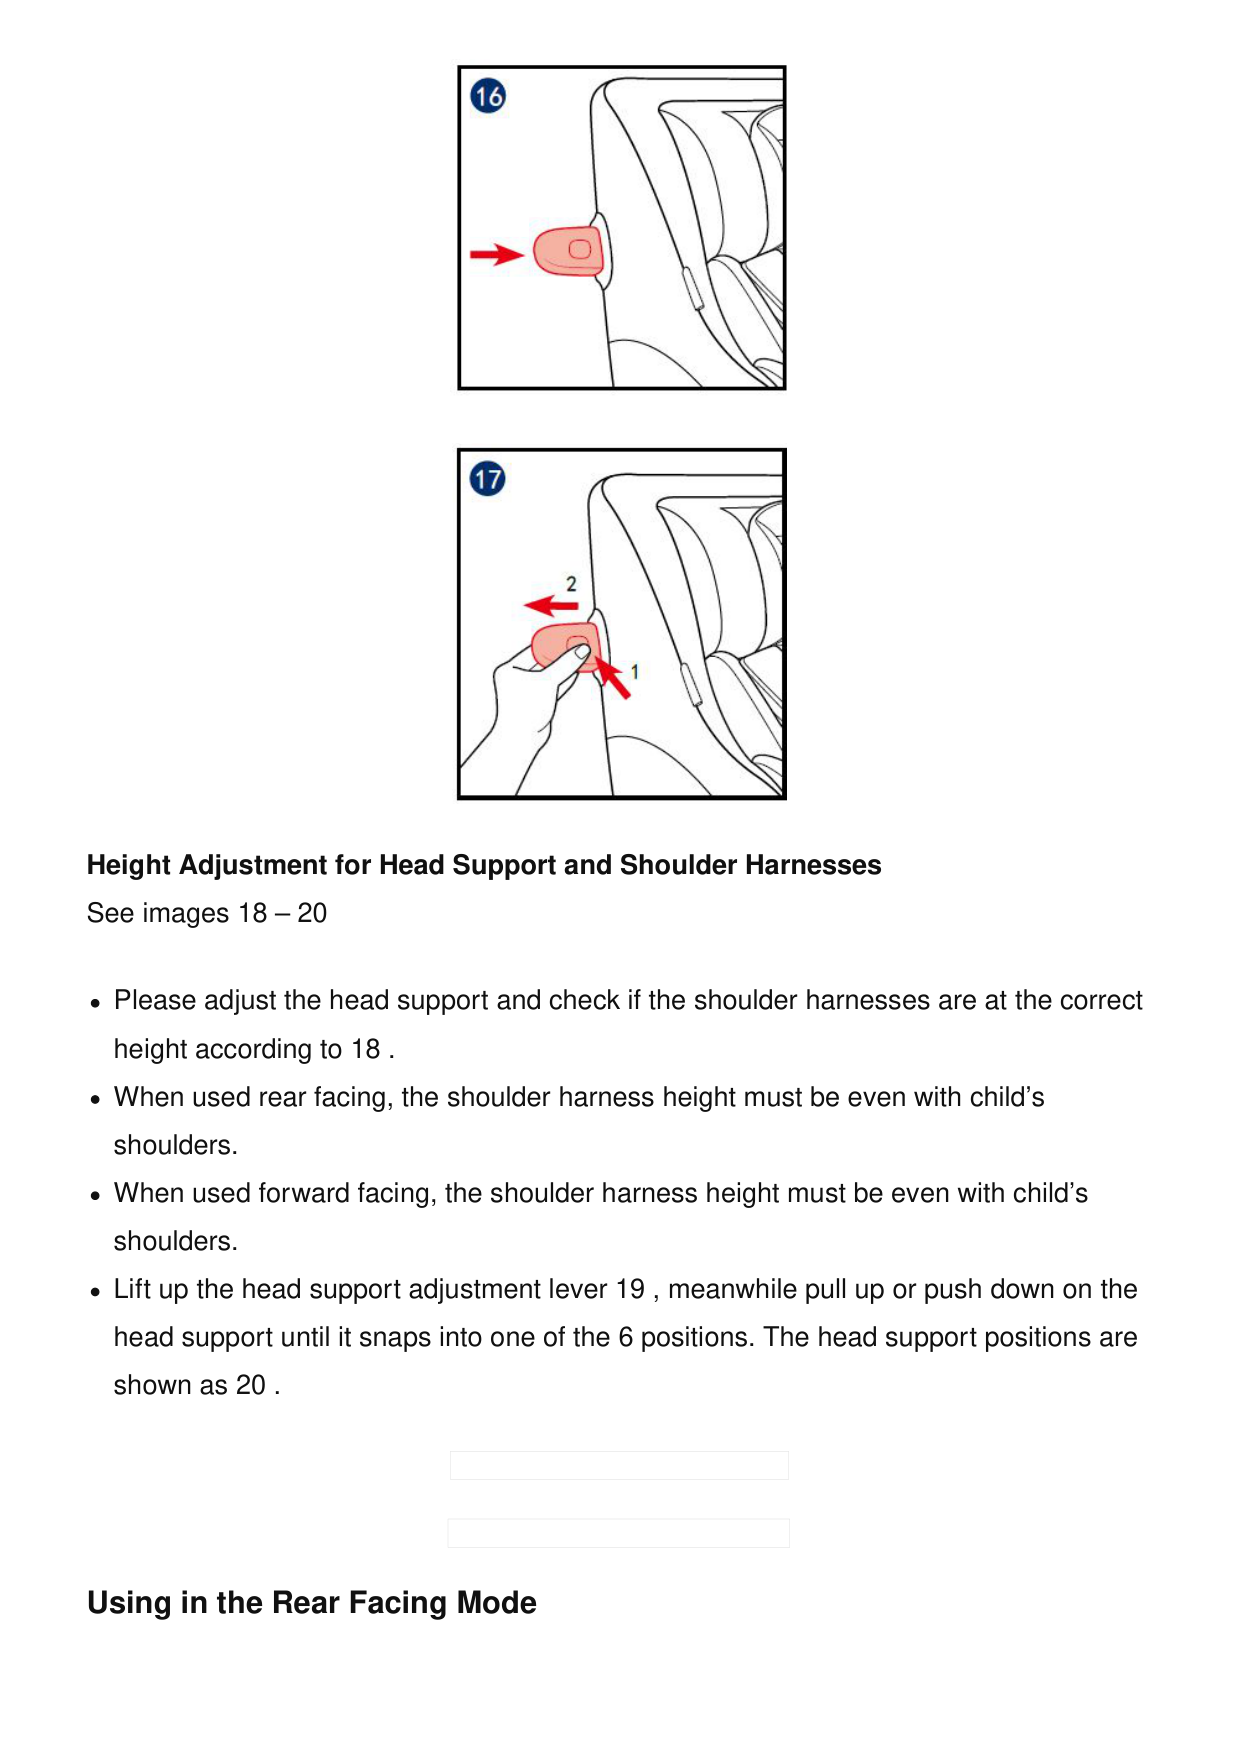
Height Adjustment for Head Support and Shoulder Harnesses See images 18 – 20 Please adjust the head support and check if the shoulder harnesses are at the correct height according to 18 . When used rear facing, the shoulder harness height must be even with child’s shoulders. When used forward facing, the shoulder harness height must be even with child’s shoulders. Lift up the head support adjustment lever 19 , meanwhile pull up or push down on the head support until it snaps into one of the 6 positions. The head support positions are shown as 20 . Using in the Rear Facing Mode
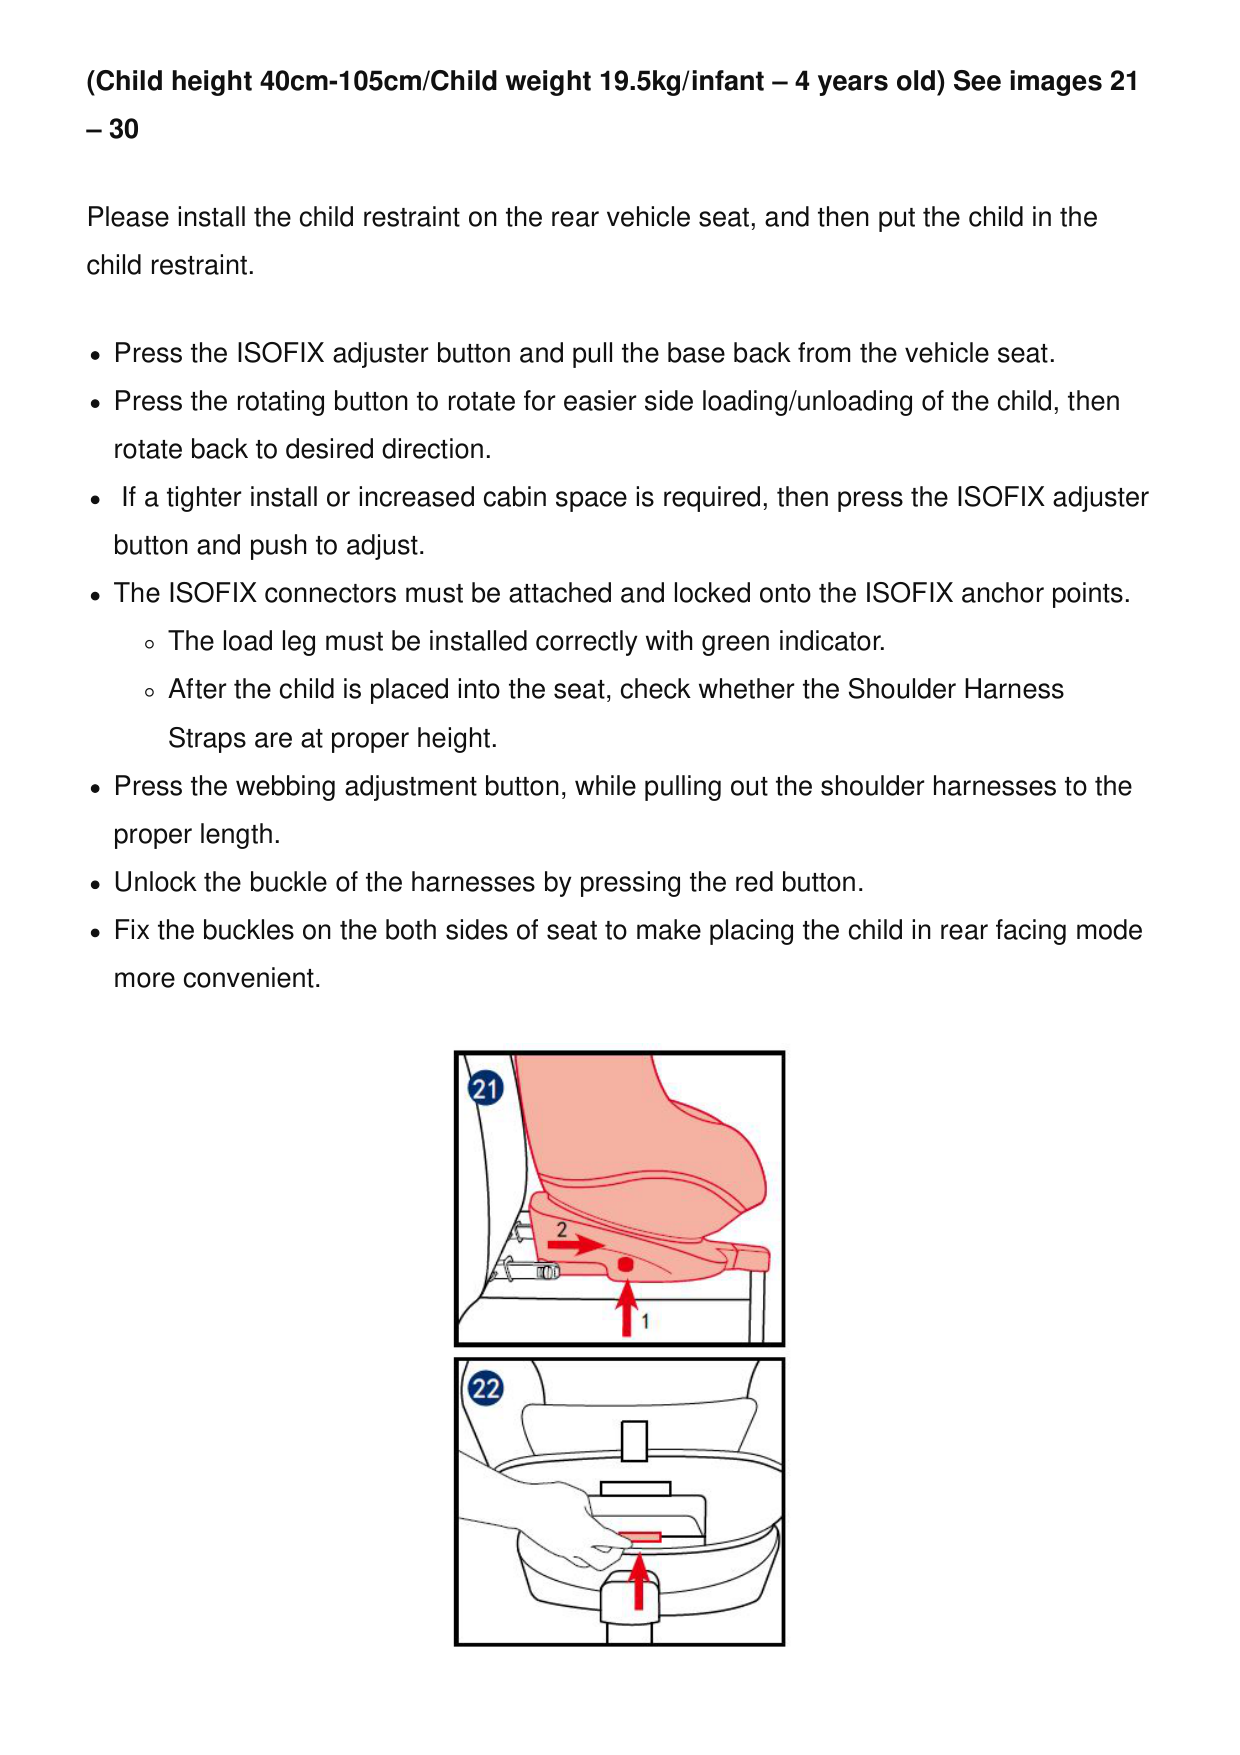
(Child height 40cm-105cm/Child weight 19.5kg/infant – 4 years old) See images 21 – 30 Please install the child restraint on the rear vehicle seat, and then put the child in the child restraint. Press the ISOFIX adjuster button and pull the base back from the vehicle seat. Press the rotating button to rotate for easier side loading/unloading of the child, then rotate back to desired direction. If a tighter install or increased cabin space is required, then press the ISOFIX adjuster button and push to adjust. The ISOFIX connectors must be attached and locked onto the ISOFIX anchor points. The load leg must be installed correctly with green indicator. After the child is placed into the seat, check whether the Shoulder Harness Straps are at proper height. Press the webbing adjustment button, while pulling out the shoulder harnesses to the proper length. Unlock the buckle of the harnesses by pressing the red button. Fix the buckles on the both sides of seat to make placing the child in rear facing mode more convenient.

Use Infant insert is for children’s protection. Place the child into the child restraint and pass both arms through the harnesses. After the child is seated, recheck whether the shoulder harnesses are at the proper height. We recommend using the full infant insert while the baby is under 60cm and can be used until they outgrow the infant insert. The infant insert increases side impact protection. Engage the buckle. Pull down the adjustment webbing and adjust it to the proper length to make sure your child is properly secured. Make sure the space between the child and the Shoulder Harness Straps is about the thickness of one hand. If steps 25 26 27 are taken when arriving at your destination whilst removing the child, then the harness will be positioned so that it is out of the way and ready for loading upon your return to the vehicle. Using in the Forward Facing Mode (Child height 76cm-105cm/Child weight 19.5kg/ 15

months – 4 years old) See images 30 – 37 Please install the child restraint on the vehicle seat, and then put the child in the child restraint. Press the ISOFIX adjuster button and pull the base back from the vehicle seat. Press the rotating button to rotate for easier side loading/unloading of the child, then rotate forwards to desired direction. If a tighter install or increased cabin space is required, then press the ISOFIX adjuster button and push to adjust. The ISOFIX connectors must be attached and locked onto the ISOFIX anchor points. The load leg must be installed correctly with green indicator. After the child is placed into the seat, check whether the Shoulder Harness Straps are at proper height. Press the webbing adjustment button, while pulling out the shoulder harnesses to the proper length. Unlock the buckle of the harnesses by pressing the red button. Fix the buckles on the both sides of seat to make placing the child in forward facing mode more convenient. When installing the child restraint in the forward facing mode, do not use the infant insert. Place the child into the child restraint and pass both arms through the harnesses. Engage the buckle. After the child is seated, recheck whether the shoulder harnesses are at the proper height. Pull down the adjustment webbing and adjust it to the proper length to make sure your child is properly secured. Make sure the space between the child and the Shoulder Harness Straps is about the thickness of one hand. If steps 34 35 36 are taken when arriving at your destination whilst removing the child, then the harness will be positioned so that it is out of the way and ready for loading upon your return to the vehicle. Detach Soft Goods See images 38 – 45 GRACO-IM-000922E-Car-Seat-01 (14)
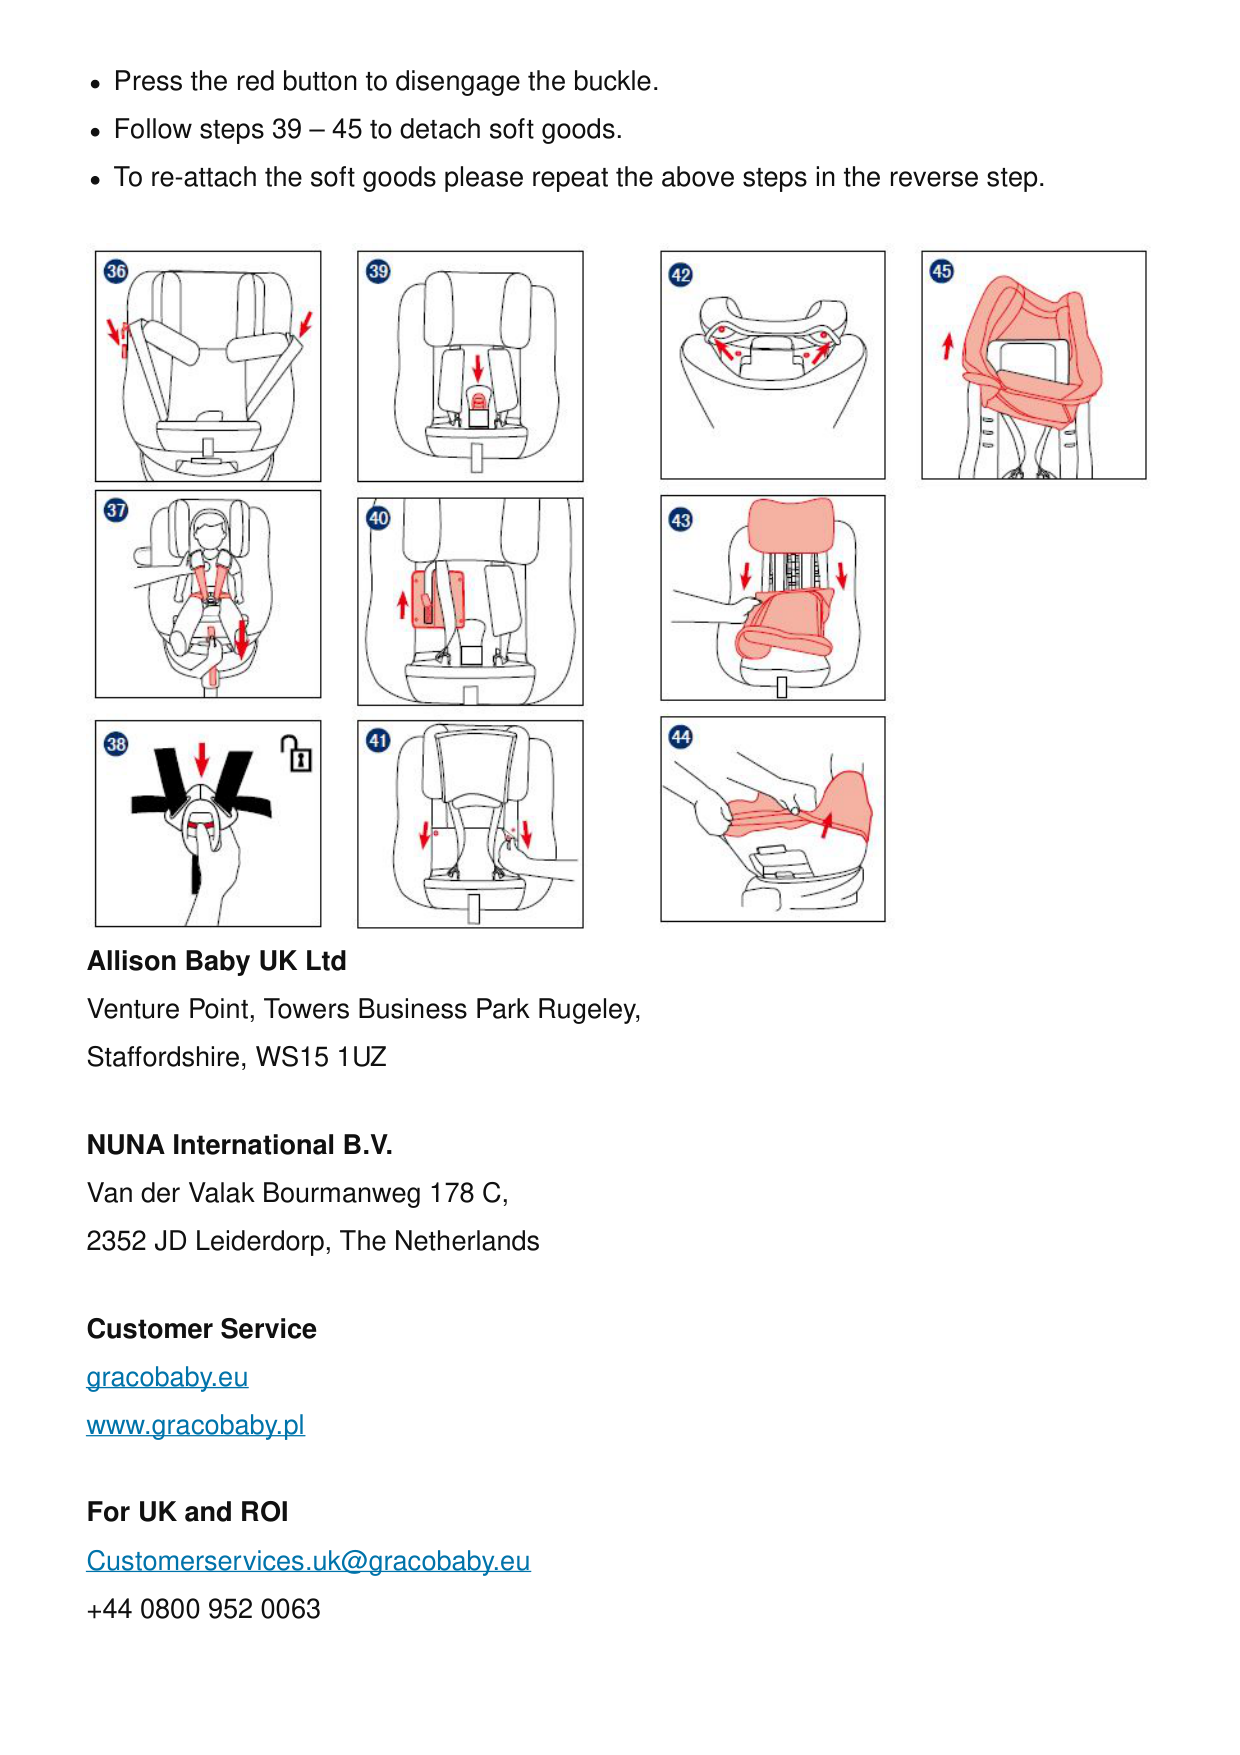
Press the red button to disengage the buckle. Follow steps 39 – 45 to detach soft goods. To re-attach the soft goods please repeat the above steps in the reverse step. Allison Baby UK Ltd Venture Point, Towers Business Park Rugeley, Staffordshire, WS15 1UZ NUNA International B.V. Van der Valak Bourmanweg 178 C, 2352 JD Leiderdorp, The Netherlands Customer Service gracobaby.eu www.gracobaby.pl For UK and ROI [email protected] +44 0800 952 0063
Graco NWL0000726913B CAR SEAT User Manual Graco NWL0000726913B CAR SEAT User Manual Graco Extend2Fit CONVERTIBLE CAR SEAT User Manual Graco Extend2Fit CONVERTIBLE CAR SEAT User Manual GRACO PD349578C INFANT CAR SEAT User Manual GRACO PD349578C INFANT CAR SEAT User Manual
Graco Car Seat Base Compatibility Chart
User ManualGraco Car Seat Base Compatibility Chart
User Manual Documents / Resources GRACO IM-000922E Car Seat [pdf] Owner's Manual 207-1666, IM-000922E, IM-000922E Car Seat, Car Seat, Seat References User Manual Related Posts Graco 207-1666, Car Seat, Graco, IM-000922E, IM-000922E Car Seat, Seat Leave a comment
Search: e.g. whirlpool wrf535swhz
Search This website is an independent publication and is neither affiliated with nor endorsed by any of the trademark owners. The "Bluetooth®" word mark and logos are registered trademarks owned by Bluetooth SIG, Inc. The "Wi-Fi®" word mark and logos are registered trademarks owned by the Wi-Fi Alliance. Any use of these marks on this website does not imply any affiliation with or endorsement. Your email address will not be published. Required fields are marked * Comment * Name Email Website Save my name, email, and website in this browser for the next time I comment. Post Comment