HP Scanjet Pro 2500 F1 Flatbed Scanner
Ask AI
— answers from the official manualAnswers from the official manual.
Common questions
Common Questions
29 totalHow do I reset the HP ScanJet Pro 2500 F1 scanner?
To reset the scanner, close the HP Scan Software and HP Scanner Tools Utility, then press the Power button to turn off the scanner and disconnect the power supply. Wait 30 seconds, then reconnect the power supply and press the Power button to turn the scanner back on. A reset is needed when error messages such as 'Scanner initialization failed' or 'Scanner not found' appear and a simple power cycle did not resolve the issue. (Page 42)
What is the maximum paper capacity of the Automatic Document Feeder (ADF)?
The ADF input tray holds a maximum of 50 sheets of 75 g/m2 (20 lb) paper. When using heavier paper, the maximum capacity is decreased. Supported paper sizes range from a minimum of 148 x 89 mm (5.8 x 3.5 in) to a maximum of 3100 x 216 mm (122 x 8.5 in). (Page 14)
How do I clean the scanner glass on the HP ScanJet Pro 2500 F1?
Lift up the document feeder, then use a clean lint-free cloth moistened with water or glass cleaner to thoroughly clean the flatbed scanner glass. Do not spray glass cleaner directly on the scanner glass as this might cause permanent damage. Dry the scanner glass completely with a dry, soft, lint-free cloth before turning the scanner back on. (Page 27)
What cleaning products should I avoid when cleaning the scanner?
Do not use cleaners that contain abrasives, acetone, benzene, or carbon tetrachloride, as these chemicals can damage the scanning glass and scanning strips. Avoid using isopropyl alcohol as it can leave streaks on the glass and scanning strips. Use only glass cleaner or clean water applied to a lint-free cloth. (Page 27)
Why does my scanner keep turning off automatically?
By default, the scanner will enter Sleep Mode after 15 minutes of inactivity and will turn off automatically after two hours of inactivity to conserve power. On Windows, you can change these defaults by opening the HP Scanner Tools Utility, clicking the Settings tab, and selecting the appropriate Sleep Mode and Auto-Off settings. On Mac OS X, use HP Utility to change these defaults. (Page 51)
How do I clear a paper jam in the HP ScanJet Pro 2500 F1?
Remove any pages from the document feeder, then pull up the document feeder hatch to open it. Remove the originals or any obstructions from the paper path, including any visible debris such as paper, staples, or clips. Check the output tray and lift the input tray to confirm no paper remains in the path, then close the document feeder hatch and reload the originals to scan again. (Page 44)
Show 23 more questions
How often should the roller kit be replaced on the HP ScanJet Pro 2500 F1?
What are the operating environment requirements for the HP ScanJet Pro 2500 F1?
What should I do if my scanned images have streaks or appear fuzzy?
How do I reset the scanner?
How can I troubleshoot a paper jam issue?
What is the procedure for factory resetting the scanner?
How do you clean the scanner glass?
How do I install and configure the scanning software for Windows?
What types of documents should NOT be loaded into the ADF?
How do I adjust sleep mode and auto-off settings?
How do I handle paper jams when scanning multiple pages?
How do I use scan shortcuts on my HP Scanjet Pro 2500 f1?
How do I use OCR software in HP Scanjet Pro 2500 f1?
How do I handle paper feeding issues while using the ADF?
How do I connect the USB cable to start using the HP ScanJet Pro 2500 f1 flatbed scanner on a Mac?
What are the steps to install the scanner software on a Mac?
What should I do if the LED on the power supply case is not lit when connecting the scanner?
How do I safely remove any packaging material from outside the scanner?
How do I properly connect the power supply cable when setting up my HP ScanJet Pro 2500 f1 flatbed scanner?
Where can I find information regarding the regulatory model number for my HP ScanJet Pro 2500 f1 scanner?
What should I do if I encounter an error during software installation?
What measures should I take to protect the scanner during installation?
Is there legal documentation available for regulatory compliance regarding my HP ScanJet Pro 2500 f1 flatbed scanner?
Full Manual
8 pages

ScanJet Pro 2500 f1 flatbed scanner
EN Installation Guide FR Guide d’installation ES Guía de instalación PT Guia de instalação
HE
www.hp.com/support
ES Lea esto primero
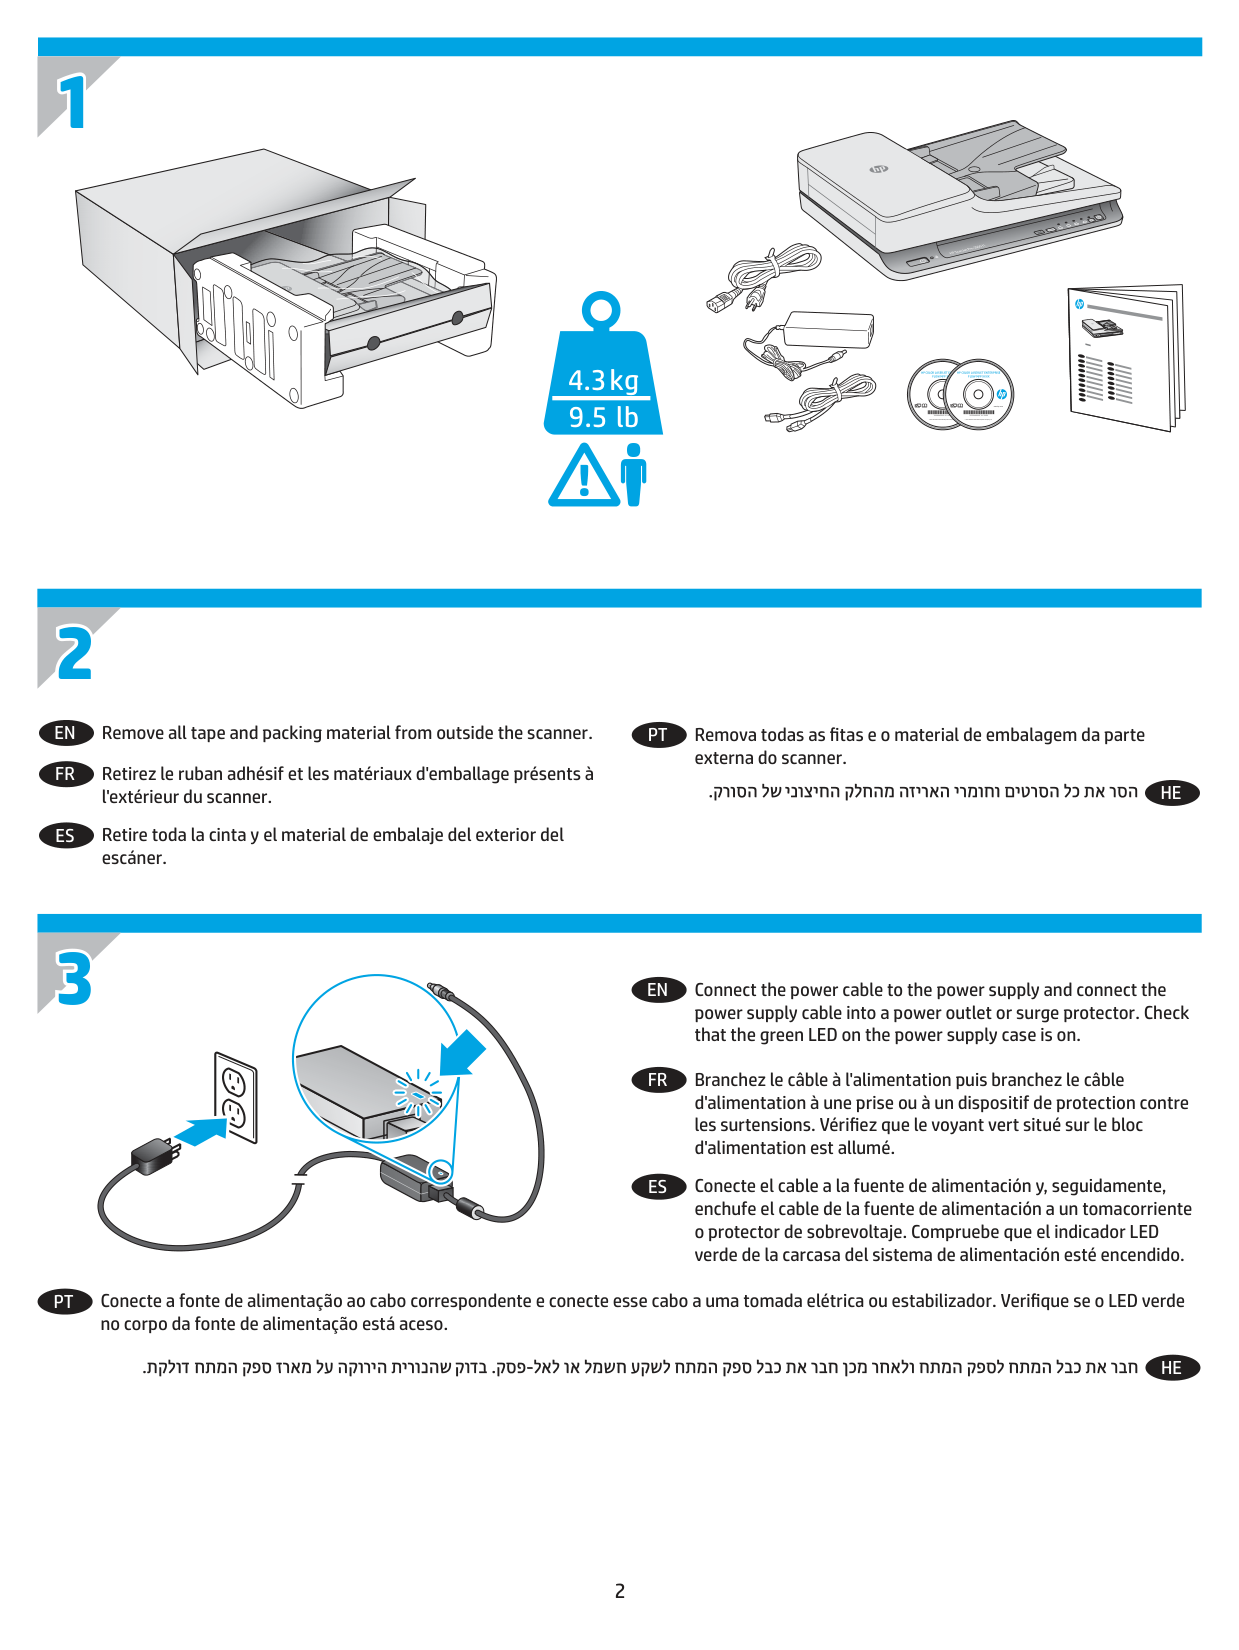
4.3 kg 9.5 lb
##### HP COLOR LASERJET ENTERPRISE FLOW MFP XXXX
##### HP COLOR LASERJET ENTERPRISE FLOW MFP XXXX
www.hp.com
www.hp.com
Remove all tape and packing material from outside the scanner.
EN
Remova todas as fitas e o material de embalagem da parte externa do scanner.
PT
Retirez le ruban adhésif et les matériaux d'emballage présents à l'extérieur du scanner.
FR
HE
Retire toda la cinta y el material de embalaje del exterior del escáner.
ES

Connect the power cable to the power supply and connect the power supply cable into a power outlet or surge protector. Check that the green LED on the power supply case is on.
EN
Branchez le câble à l'alimentation puis branchez le câble d'alimentation à une prise ou à un dispositif de protection contre les surtensions. Vérifiez que le voyant vert situé sur le bloc d'alimentation est allumé.
FR
Conecte el cable a la fuente de alimentación y, seguidamente, enchufe el cable de la fuente de alimentación a un tomacorriente o protector de sobrevoltaje. Compruebe que el indicador LED verde de la carcasa del sistema de alimentación esté encendido.
ES
Conecte a fonte de alimentação ao cabo correspondente e conecte esse cabo a uma tomada elétrica ou estabilizador. Verifique se o LED verde no corpo da fonte de alimentação está aceso.
PT
HE

EN If the green LED is on, plug the power supply into the back of the device (1) and then press the Power button (2).
FR Si le voyant vert est allumé, branchez l'alimentation au dos de l'appareil (1) puis appuyez sur le bouton Power.
ES Si el indicador LED verde está encendido, conecte la fuente de alimentación en la parte posterior del dispositivo (1) y pulse el botón de encendido (2).
1 2
PT Se o LED verde estiver aceso, conecte a fonte de alimentação à parte de trás do dispositivo (1) e pressione o botão Liga/desliga (2).
HE
|| |---|
EN Windows®: After the software is installed successfully, please connect the USB cable to scanner. Mac: Connect the USB cable now.
FR Windows®: After the software is installed successfully, please connect the USB cable to scanner. Mac: Connect the USB cable now.

ES Windows®: After the software is installed successfully, please connect the USB cable to scanner. Mac: Connect the USB cable now.
PT Windows®: After the software is installed successfully, please connect the USB cable to scanner. Mac: Connect the USB cable now.
HEWindows®: After the software is installed successfully, please connect the USB cable to scanner. Mac: Connect the USB cable now.
|| |---|
EN Download and install the scanner software for your Mac from www.hp.com/support.

FR Téléchargez et installer le logiciel du scanner pour votre Mac à l’adresse www.hp.com/support.
ES Descargue e instale el software del escáner para Mac en www.hp.com/support.
PT Baixe e instale o software do scanner para o seu Mac de www.hp.com/support.

HE
EN For more information, refer to the scanner User Guide, or visit www.hp.com/support.
FR Pour plus d’informations, reportez vous au guide d’utilisation du scanner ou rendez-vous sur le site www.hp.com/support.
ES Para obtener más información, consulte el Manual del usuario del escáner o visite www.hp.com/support.
PT Para mais informações, consulte o Guia do Usuário do scanner ou acesse www.hp.com/support.
HE
www.hp.com
© 2016 Copyright HP Development Company, L.P. Reproduction, adaptation or translation without prior written permission is prohibited, except as allowed under the copyright laws. The information contained herein is subject to change without notice. The only warranties for HP products and services are set forth in the express warranty statements accompanying such products and services. Nothing herein should be construed as constituting an additional warranty. HP shall not be liable for technical or editorial errors or omissions contained herein. Edition 1, 1/2016 Trademark Credits Windows® is a U.S. registered trademark of Microsoft Corporation.

#### Regulatory Information
Additional regulatory information about your scanner can be found in the Warranty and Legal Guide.
Regulatory Model Identification Number: For regulatory identification purposes your product is assigned a Regulatory Model Number. The Regulatory Model Number for your product is SHNGD-1402. This regulatory number should not be confused with the marketing name
(HP ScanJet Pro 2500 f1 flatbed) or product number (L2747A).
© 2016 Copyright HP Development Company, L.P. La reproduction, l'adaptation ou la traduction sans autorisation écrite préalable est interdite, sauf dans le cadre des lois sur le droit d'auteur. Les informations contenues dans ce document peuvent être modifiées sans préavis. Les seules garanties pour les produits et services HP sont décrites dans les déclarations de garantie expresses accompagnant ces mêmes produits et services. Les informations contenues dans ce document ne constituent en aucun cas une garantie supplémentaire. HP ne pourra être tenu responsable des erreurs ou omissions de nature technique ou rédactionnelle qui pourraient subsister dans le présent document. Édition 1, 1/2016 Crédits concernant les marques
Windows® est une marque déposée de Microsoft Corporation aux ÉtatsUnis.
#### Informations réglementaires
Des informations légales supplémentaires concernant votre scanner sont disponibles dans le guide de garantie et de dispositions légales.
Numéro d'identification de modèle légal : Afin de permettre son identification sur le plan juridique, un numéro de modèle légal a été attribué à votre produit. Le numéro de modèle légal de votre produit est SHNGD-1402. Ce numéro légal est différent de l'appellation marketing
(scanner de documents à plat HP ScanJet Pro 2500 f1) et du numéro du produit (L2747A).