
Midea Portable Air Conditioner
Ask AI
— answers from the official manualAnswers from the official manual.
Common questions
Common Questions
10 totalWhat safety precautions should I follow for installation?
Installation must be performed according to the installation instructions, as improper installation can cause water leakage, electrical shock, or fire. Use only included accessories and specified tools. Ensure the outlet is grounded and has appropriate voltage. The unit must be installed on a flat, sturdy surface at least 30cm (12 inches) from the nearest wall, with the air outlet at least 50cm (19.7 inches) away from obstacles.
How do I set up the wireless/WiFi connection for my portable air conditioner?
Press and hold the POWER button on the control panel for 3 seconds to initiate wireless connection mode. The LED display will show 'AP' to indicate you can set up the wireless connection. The unit will automatically exit wireless connection mode if successful within 8 minutes, and the wireless indicator light will illuminate. If connection fails within 8 minutes, the unit will automatically exit wireless connection mode and you may need to try again.
What does the P1 error code mean and how do I fix it?
P1 indicates that the bottom water collection tray is full. Turn off the unit, carefully move it to a drain location, remove the bottom drain plug, and let the water drain away. Reinstall the bottom drain plug firmly and restart the machine until the P1 symbol disappears. If the error repeats, call for service.
How often should I clean the air filter?
You should clean the air filter every 2 weeks for optimal performance. To clean it, take the filter out along the arrow direction, wash it by immersing gently in warm water (about 40°C/104°F) with neutral detergent, rinse it, and dry it in a shady place before reinstalling.
What should I do before storing the unit for an extended period?
First, drain the water collection tray according to the instructions. Then run the appliance on FAN mode for 12 hours in a warm room to dry it and prevent mold. Turn off and unplug the unit, clean the machine, clean and reinstall the air filter, and remove the batteries from the remote control. Store the unit in a cool, dark place away from direct sunshine or extreme heat.
How do I turn on the ComfortSense feature?
Point the remote control towards the unit and press the ComfortSense button. The remote's display will show the actual temperature at its location. The remote must be within 26 feet of the air conditioner to work, and it will send this signal to the unit every 3 minutes until you press the ComfortSense button again. If the unit does not receive the signal during any 7 minute interval, the unit will beep to indicate ComfortSense mode has ended.
Full Manual
42 pages
Download the app & activate product
Map08S1Xwt
Map10S1Xwt
Map10Hs1Xwt
User Manual
Before using this product, please read this manual carefully and keep it for future reference. The design and specifications are subject to change without prior notice for product improvement. Consult with your dealer or the manufacturer for details.Portable Air Conditioner
2
Contents
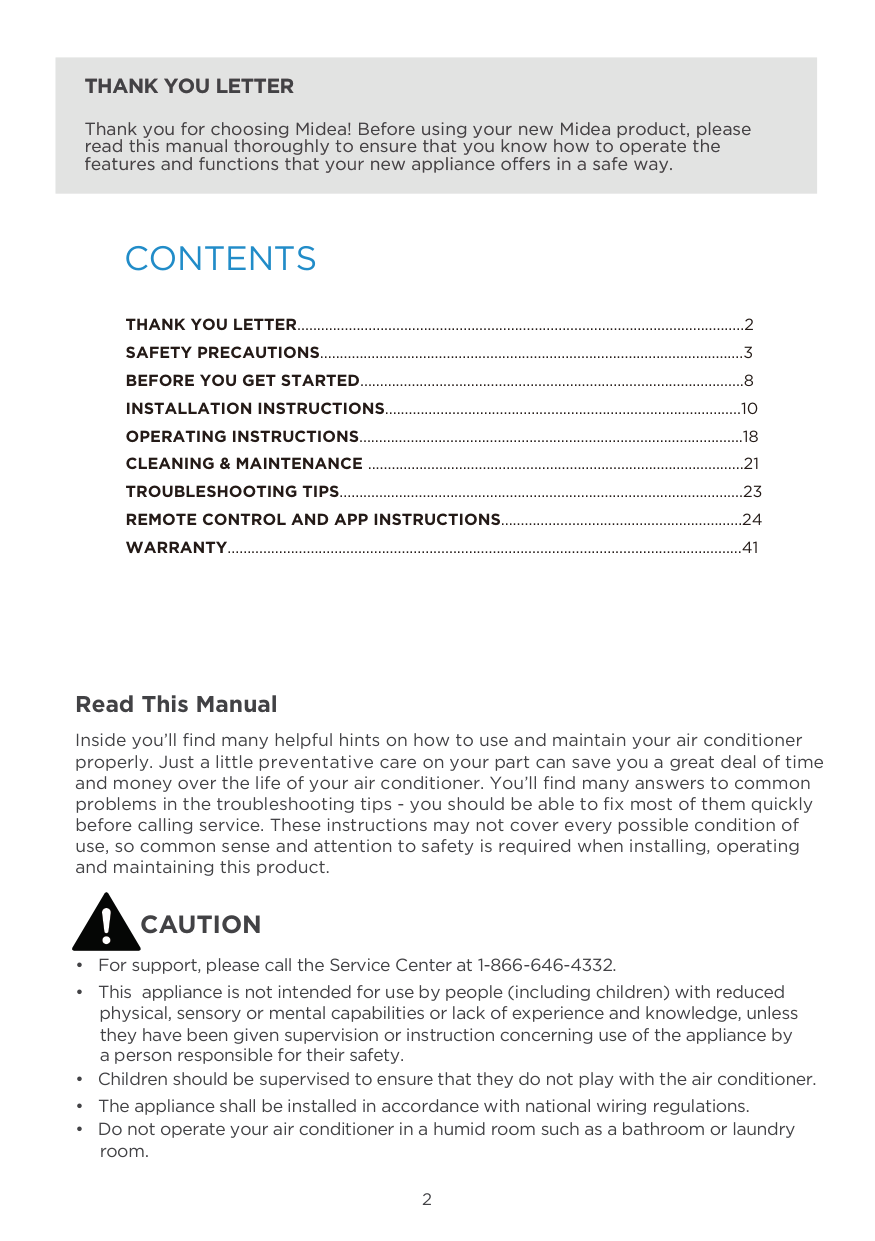
Read This Manual Inside you’ll find many helpful hints on how to use and maintain your air conditioner properly. Just a little preventative care on your part can save you a great deal of time and money over the life of your air conditioner. You’ll find many answers to common problems in the troubleshooting tips - you should be able to fix most of them quickly before calling service. These instructions may not cover every possible condition of use, so common sense and attention to safety is required when installing, operating and maintaining this product.Caution
Thank You Letter
Thank you for choosing Midea! Before using your new Midea product, please read this manual thoroughly to ensure that you know how to operate the THANK YOU LETTER.................................................................................................................2 SAFETY PRECAUTIONS...........................................................................................................3 BEFORE YOU GET STARTED.................................................................................................8 INSTALLATION INSTRUCTIONS..........................................................................................10 OPERATING INSTRUCTIONS.................................................................................................18 CLEANING & MAINTENANCE ...............................................................................................21 TROUBLESHOOTING TIPS......................................................................................................23 REMOTE CONTROL AND APP INSTRUCTIONS.............................................................24 WARRANTY..................................................................................................................................41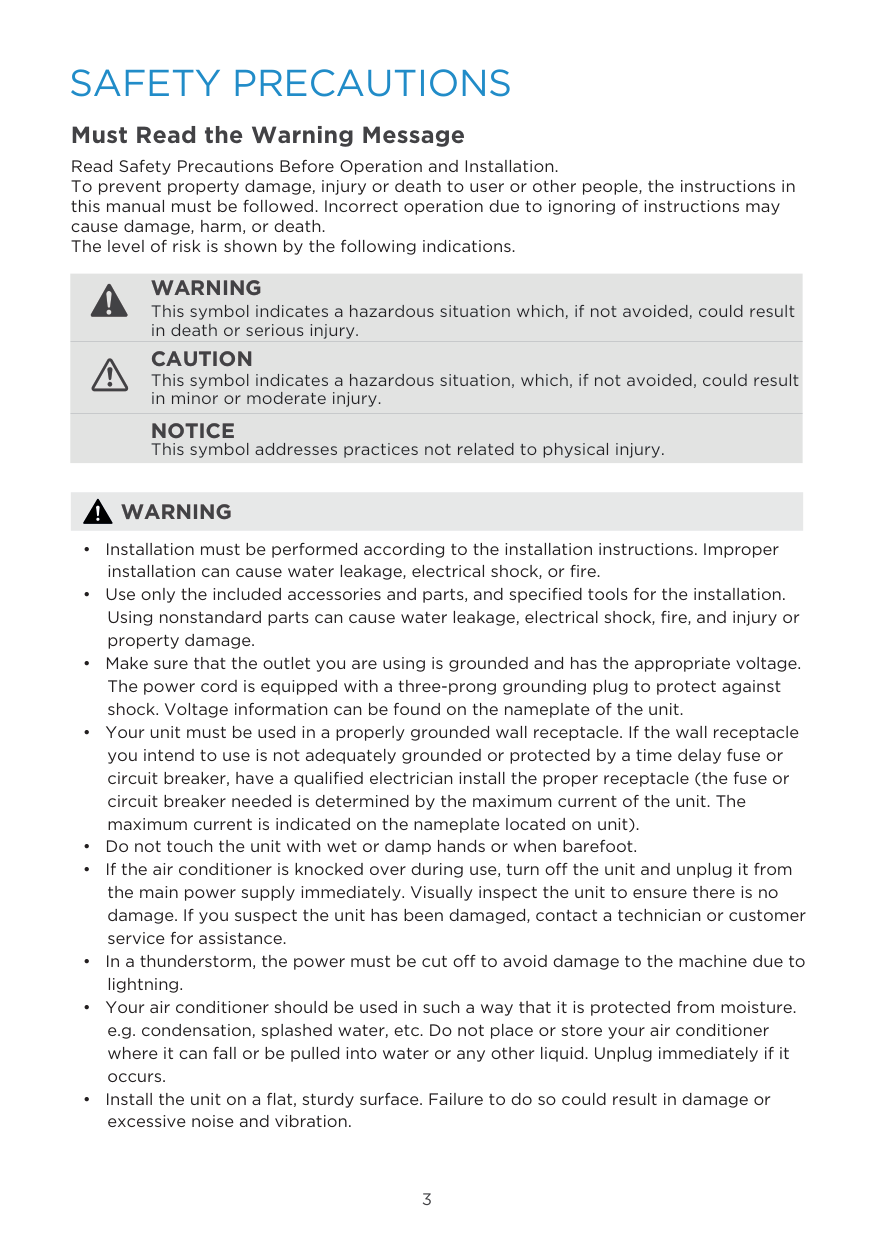
3
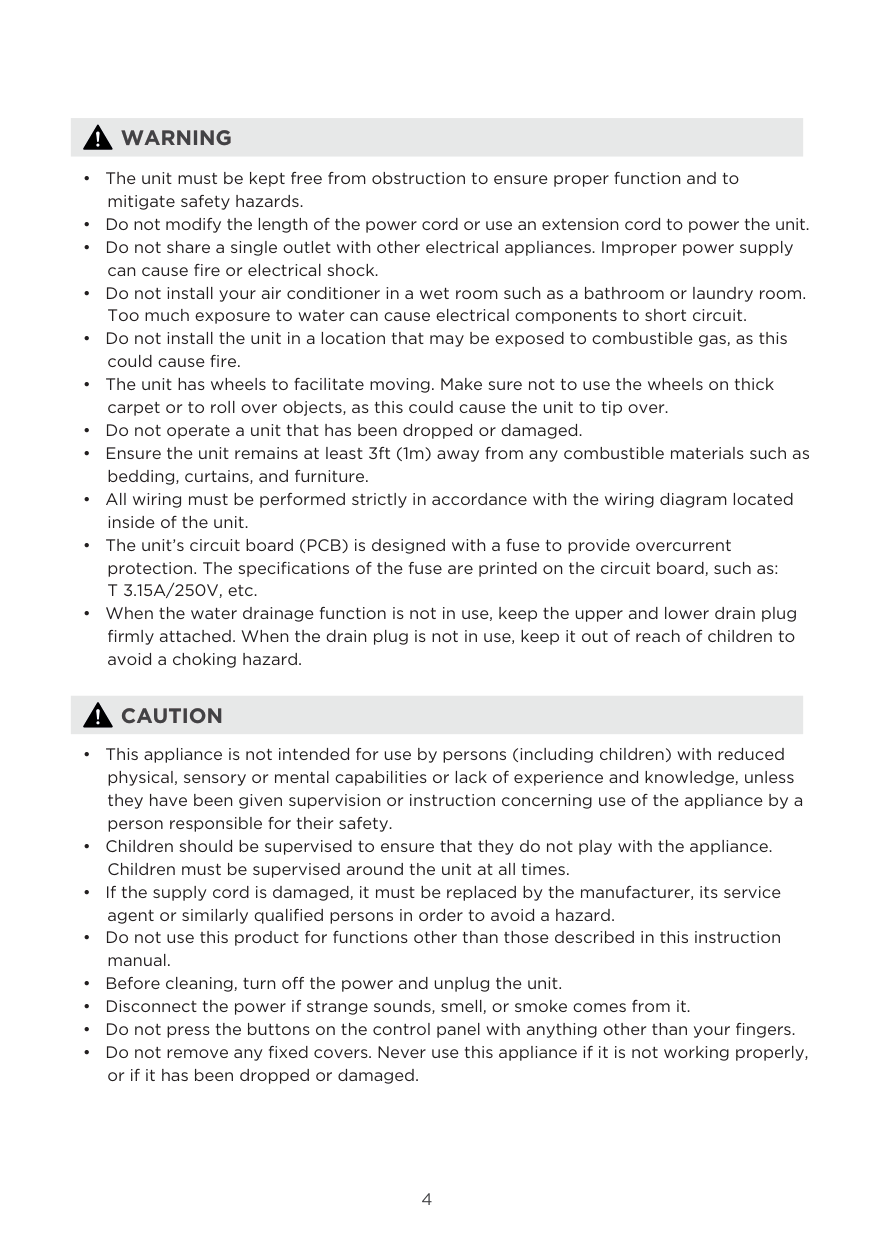
Warning
Caution
This symbol indicates a hazardous situation, which, if not avoided, could result in minor or moderate injury. This symbol indicates a hazardous situation which, if not avoided, could result in death or serious injury. This symbol addresses practices not related to physical injury.Safety Precautions
Must Read the Warning Message Read Safety Precautions Before Operation and Installation. To prevent property damage, injury or death to user or other people, the instructions in this manual must be followed. Incorrect operation due to ignoring of instructions may cause damage, harm, or death. The level of risk is shown by the following indications.Notice
Warning
4
Warning
Caution
5
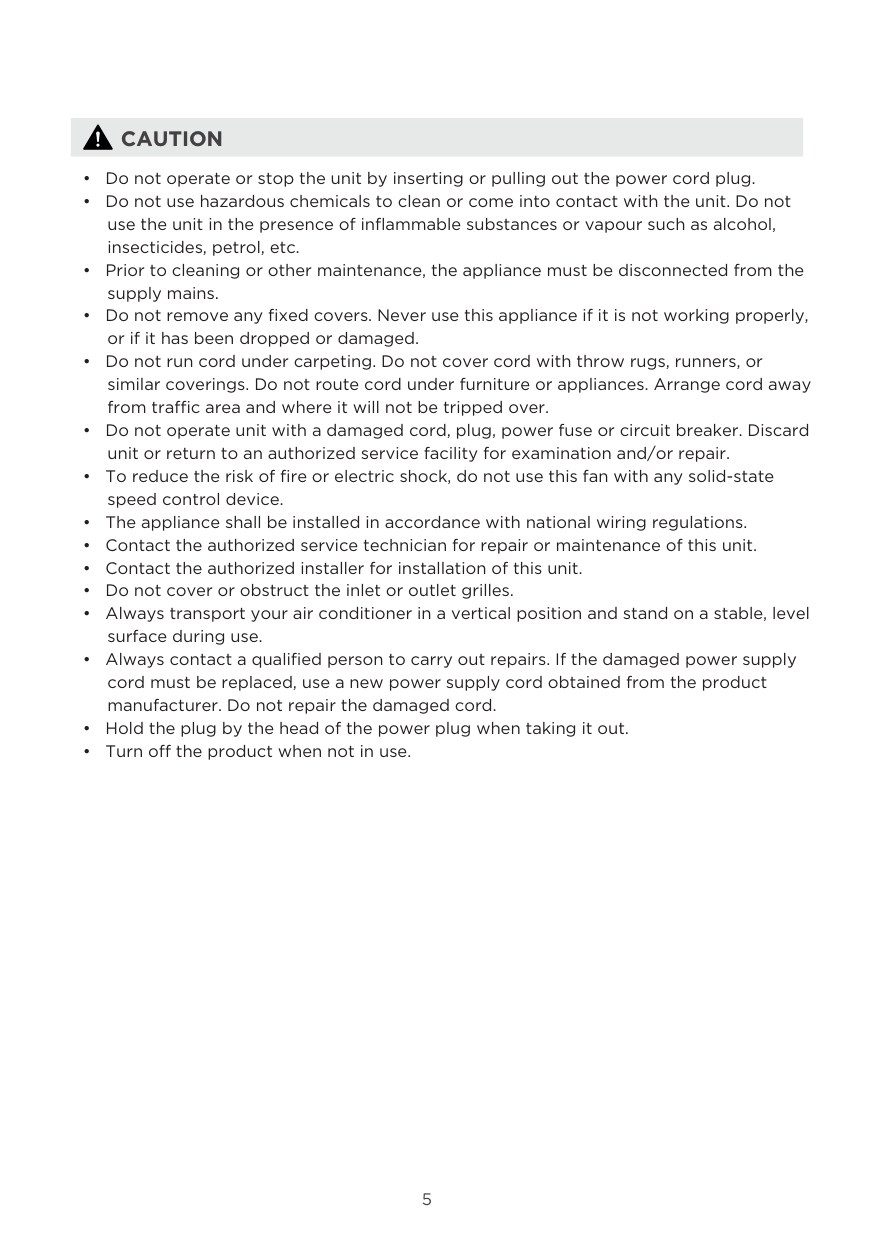
Caution
6
For R32 Refrigerant Model
Caution:
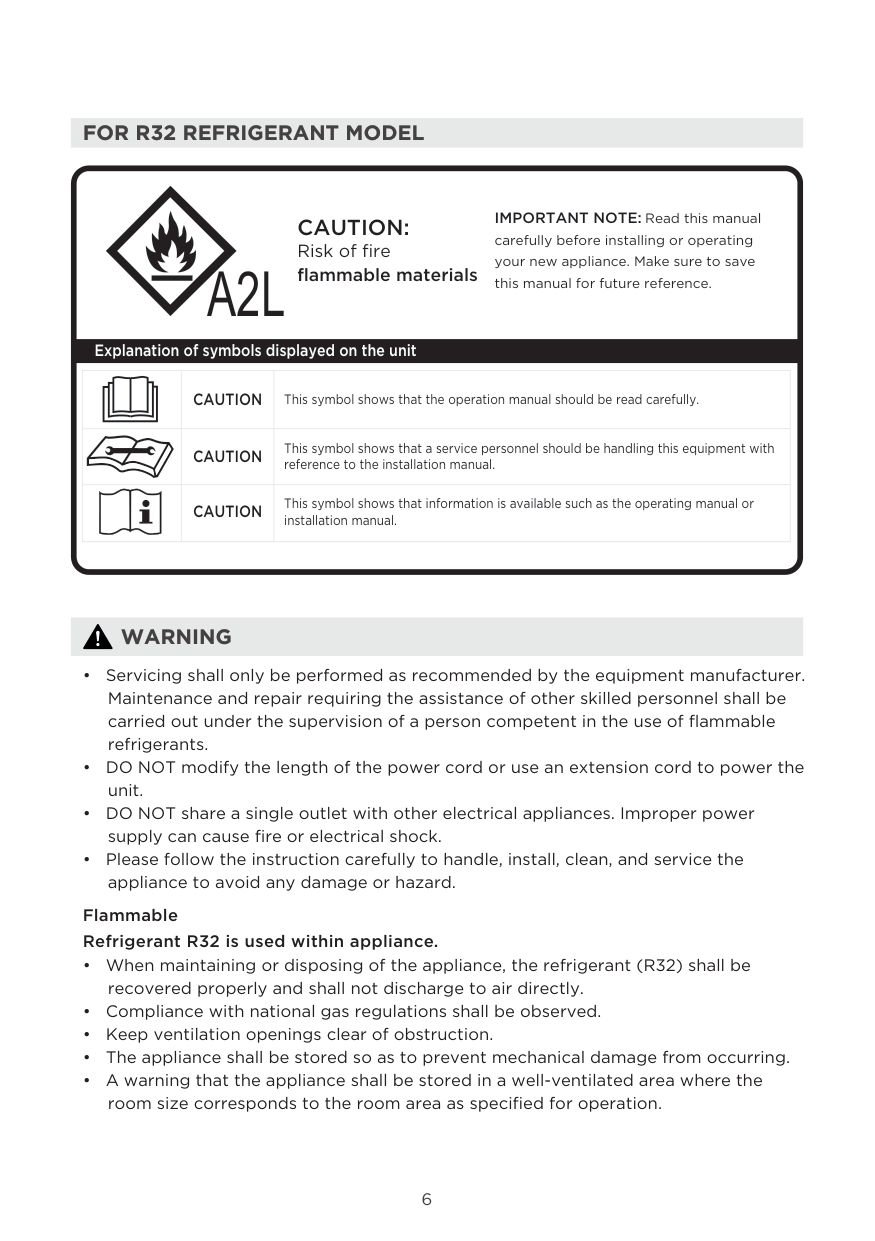
Risk of fire flammable materials IMPORTANT NOTE: Read this manual carefully before installing or operating your new appliance. Make sure to save this manual for future reference. Explanation of symbols displayed on the unitCaution
This symbol shows that the operation manual should be read carefully.Caution
This symbol shows that a service personnel should be handling this equipment with reference to the installation manual.Caution
This symbol shows that information is available such as the operating manual or installation manual.A2L
Warning
7
Warning
8
Before You Get Started
Energy Rating InformationNote:
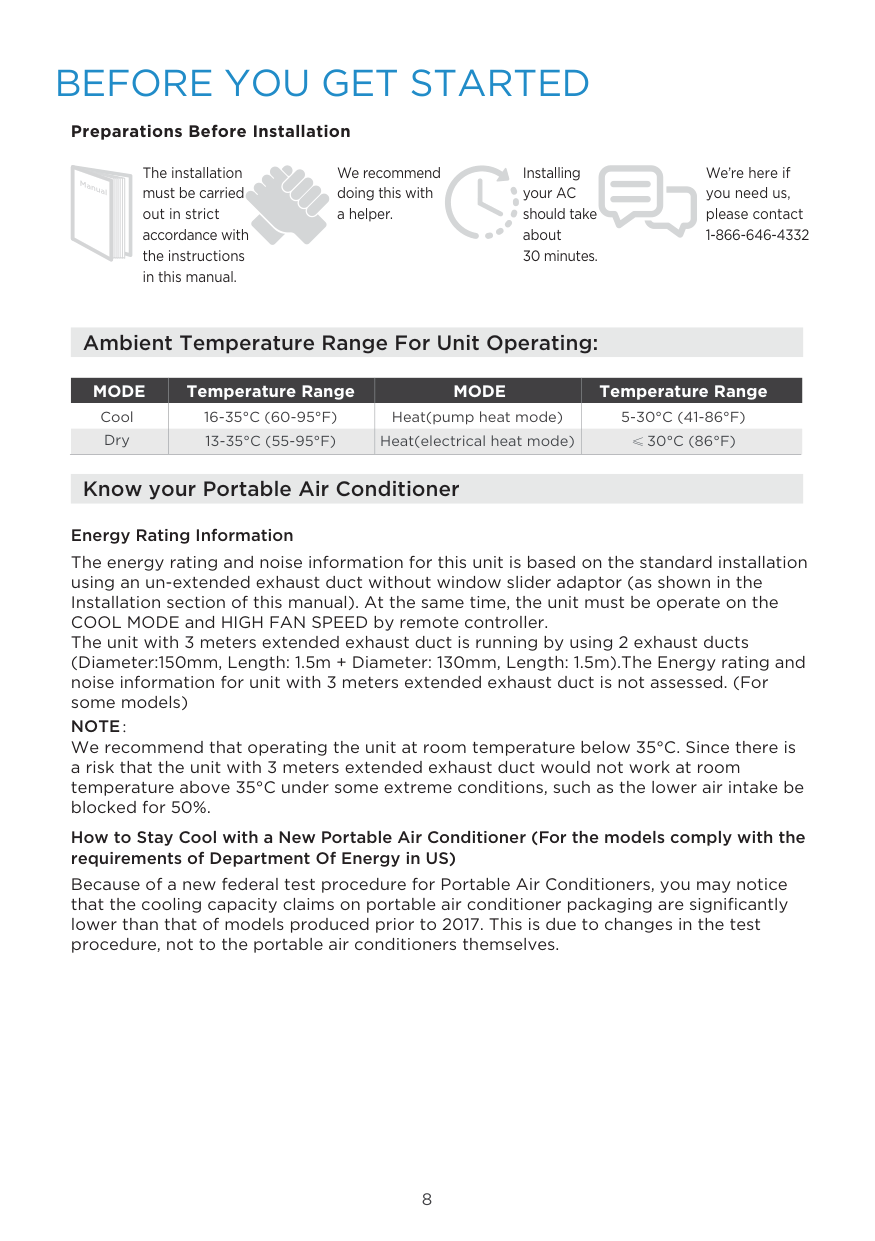
We recommend that operating the unit at room temperature below 35°C. Since there is a risk that the unit with 3 meters extended exhaust duct would not work at room temperature above 35°C under some extreme conditions, such as the lower air intake be blocked for 50%. The energy rating and noise information for this unit is based on the standard installation using an un-extended exhaust duct without window slider adaptor (as shown in the Installation section of this manual). At the same time, the unit must be operate on the COOL MODE and HIGH FAN SPEED by remote controller. The unit with 3 meters extended exhaust duct is running by using 2 exhaust ducts (Diameter:150mm, Length: 1.5m + Diameter: 130mm, Length: 1.5m).The Energy rating and noise information for unit with 3 meters extended exhaust duct is not assessed. (For some models) The installation must be carried out in strict accordance with the instructions in this manual. We recommend doing this with a helper. Installing your AC should take about 30 minutes. We’re here if you need us, please contact 1-866-646-4332 Preparations Before Installation Manual Ambient Temperature Range For Unit Operating: Know your Portable Air Conditioner How to Stay Cool with a New Portable Air Conditioner (For the models comply with the requirements of Department Of Energy in US) Because of a new federal test procedure for Portable Air Conditioners, you may notice that the cooling capacity claims on portable air conditioner packaging are significantly lower than that of models produced prior to 2017. This is due to changes in the test procedure, not to the portable air conditioners themselves.Mode
Temperature RangeMode
Temperature Range Cool16-35°C (60-95°F)
Dry Heat(pump heat mode) Heat(electrical heat mode)13-35°C (55-95°F)
5-30°C (41-86°F)
30°C (86°F)
≥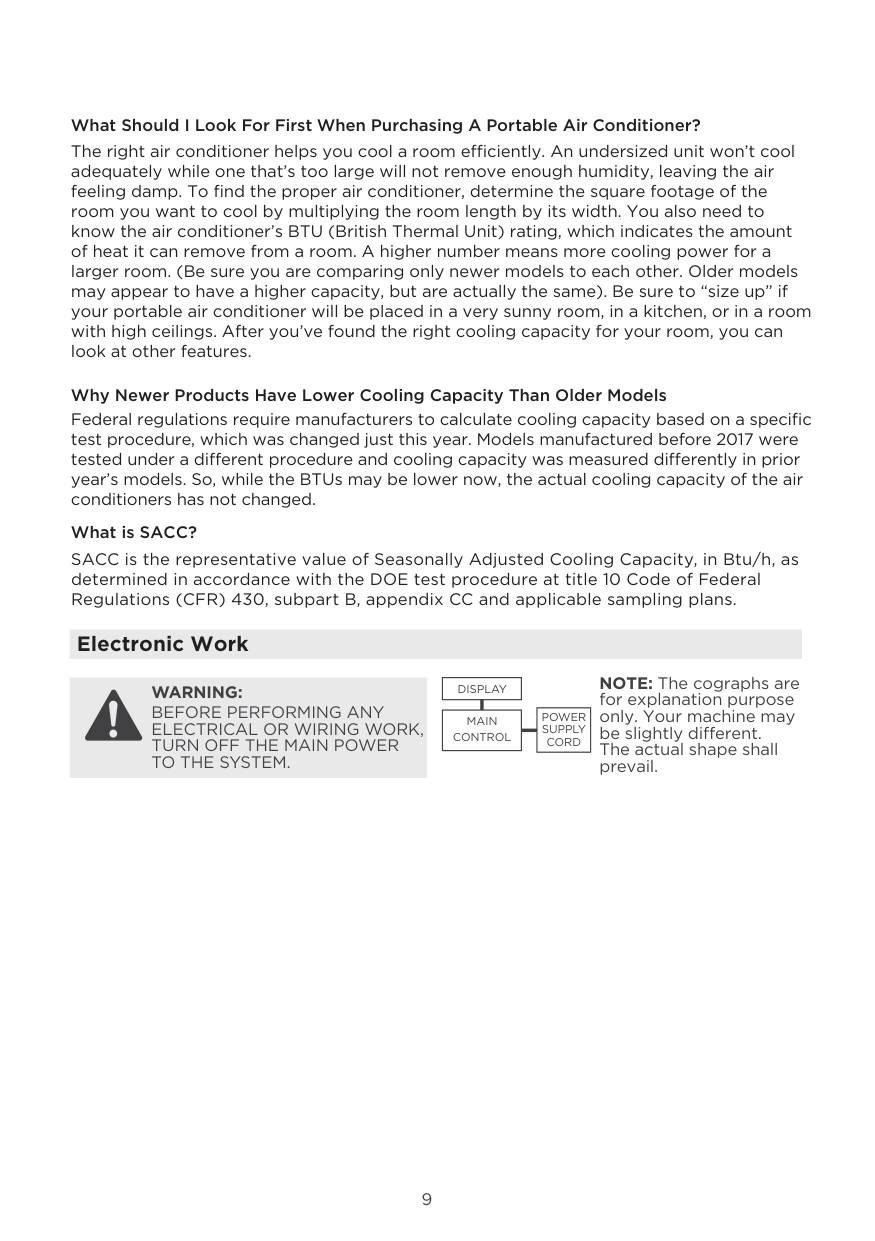
9 What Should I Look For First When Purchasing A Portable Air Conditioner? The right air conditioner helps you cool a room efficiently. An undersized unit won’t cool adequately while one that’s too large will not remove enough humidity, leaving the air feeling damp. To find the proper air conditioner, determine the square footage of the room you want to cool by multiplying the room length by its width. You also need to know the air conditioner’s BTU (British Thermal Unit) rating, which indicates the amount of heat it can remove from a room. A higher number means more cooling power for a larger room. (Be sure you are comparing only newer models to each other. Older models may appear to have a higher capacity, but are actually the same). Be sure to “size up” if your portable air conditioner will be placed in a very sunny room, in a kitchen, or in a room with high ceilings. After you’ve found the right cooling capacity for your room, you can look at other features. Why Newer Products Have Lower Cooling Capacity Than Older Models Federal regulations require manufacturers to calculate cooling capacity based on a specific test procedure, which was changed just this year. Models manufactured before 2017 were tested under a different procedure and cooling capacity was measured differently in prior year’s models. So, while the BTUs may be lower now, the actual cooling capacity of the air conditioners has not changed. What is SACC? SACC is the representative value of Seasonally Adjusted Cooling Capacity, in Btu/h, as determined in accordance with the DOE test procedure at title 10 Code of Federal Regulations (CFR) 430, subpart B, appendix CC and applicable sampling plans. Electronic Work
Warning:
Before Performing Any
Electrical Or Wiring Work,
Turn Off The Main Power
To The System.
Display
Main
Control
Power
Supply
Cord
NOTE: The cographs are for explanation purpose only. Your machine may be slightly different. The actual shape shall prevail.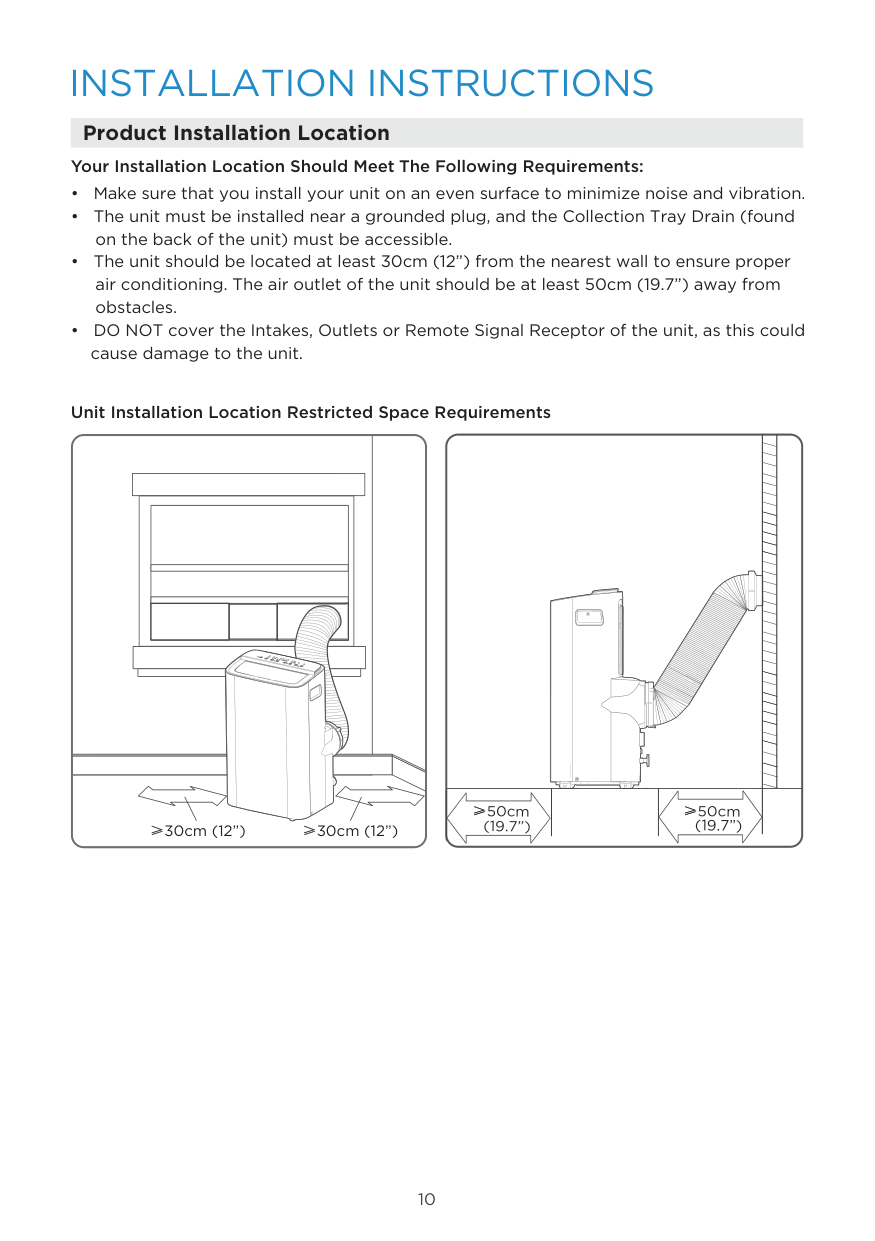
10
Installation Instructions
Product Installation Location Your Installation Location Should Meet The Following Requirements: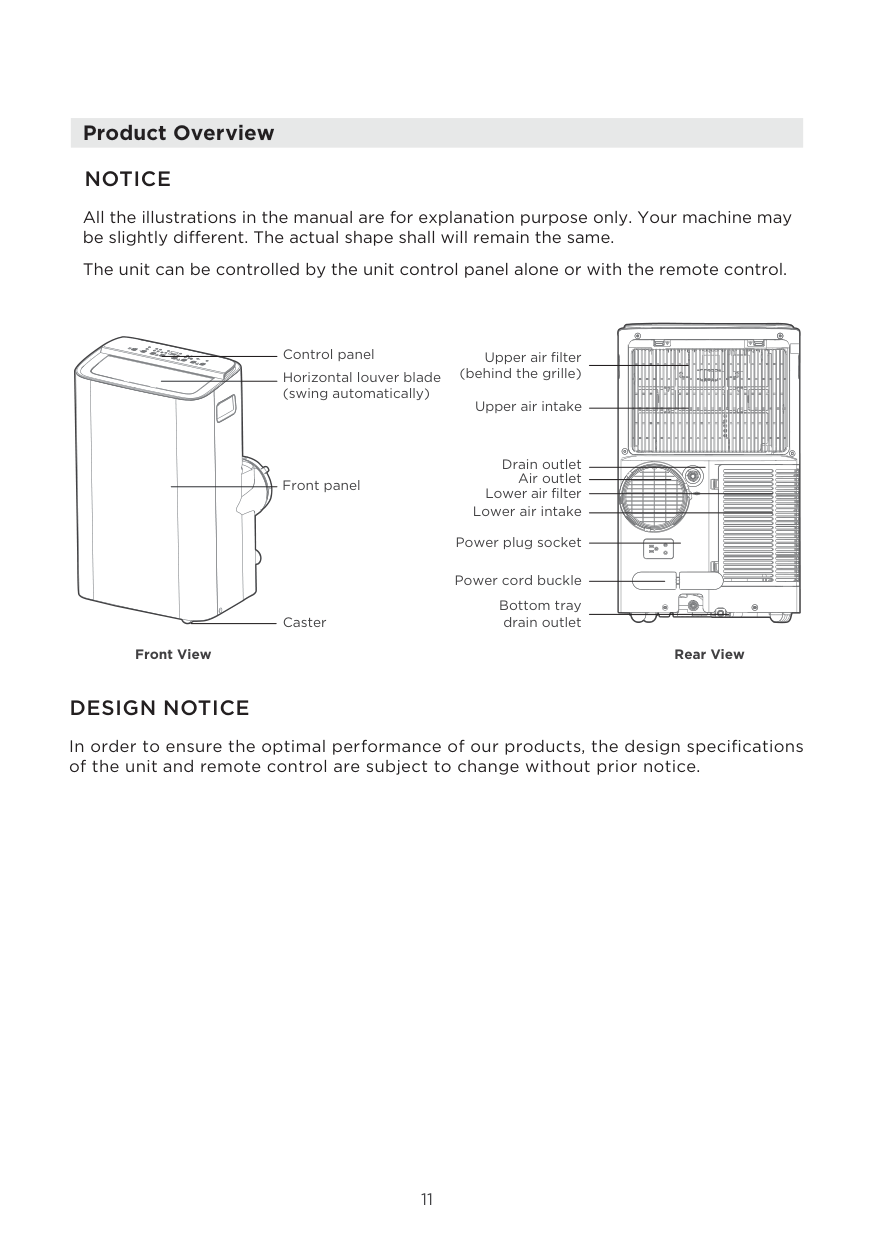
11 Product Overview
Design Notice
In order to ensure the optimal performance of our products, the design specifications of the unit and remote control are subject to change without prior notice.Notice
All the illustrations in the manual are for explanation purpose only. Your machine may be slightly different. The actual shape shall will remain the same. The unit can be controlled by the unit control panel alone or with the remote control. Front View Rear View Drain outlet Caster Horizontal louver blade (swing automatically) Control panel Front panel Power plug socket Power cord buckle Bottom tray drain outlet Upper air filter (behind the grille) Upper air intake Lower air filter Lower air intake Air outlet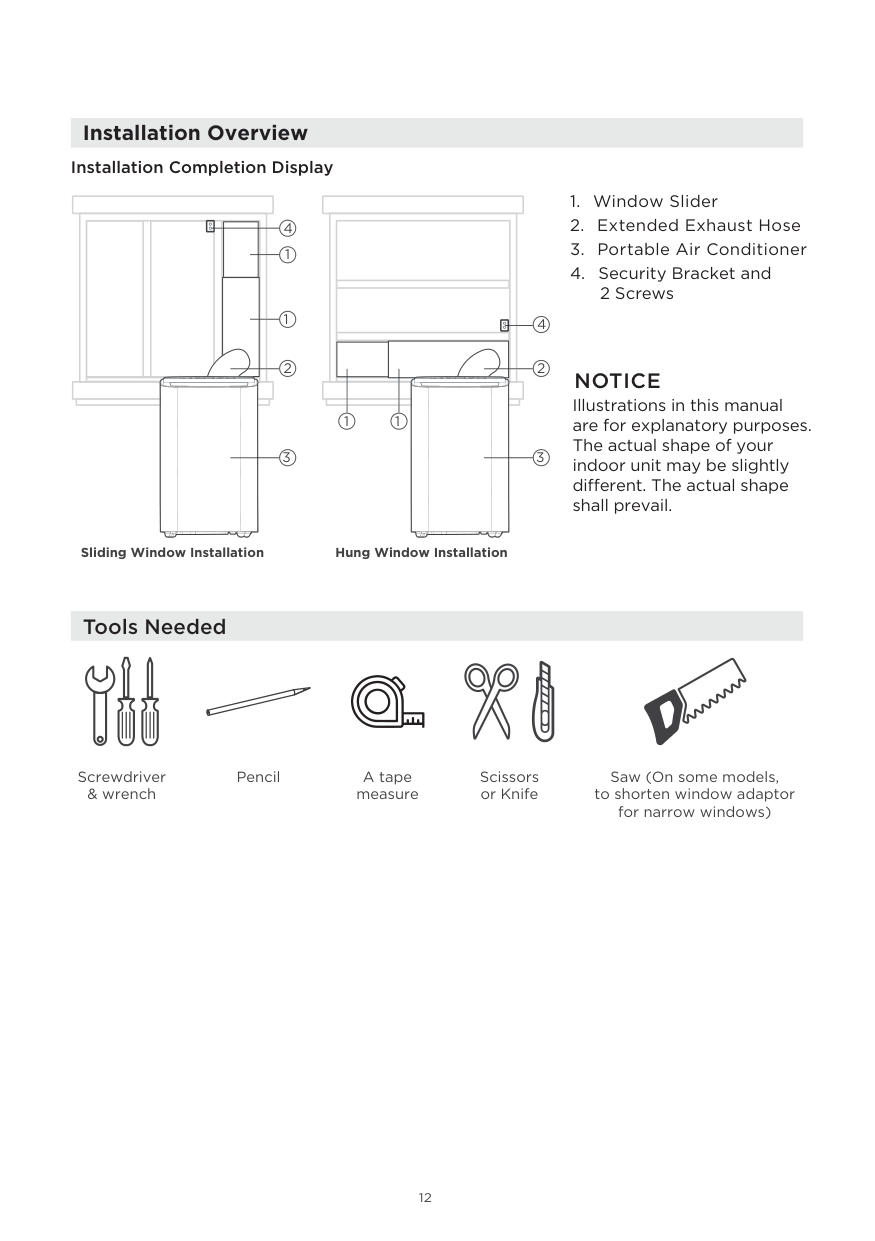
12 Installation Overview
Notice
Illustrations in this manual are for explanatory purposes. The actual shape of your indoor unit may be slightly different. The actual shape shall prevail. Sliding Window Installation Hung Window Installation1 4 1 2 2 1 1 4 3 3
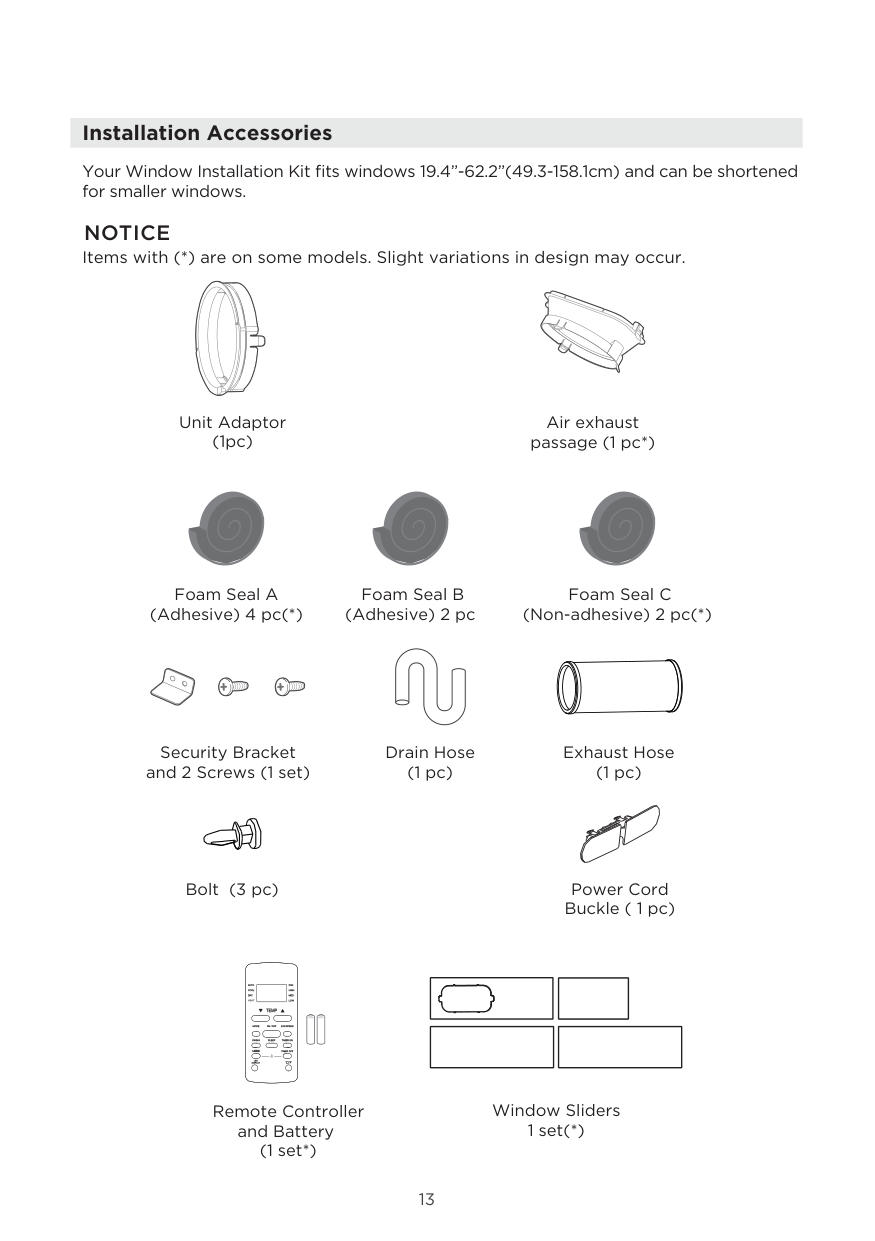
13 Installation Accessories
Notice
Items with (*) are on some models. Slight variations in design may occur. Your Window Installation Kit fits windows 19.4”-62.2”(49.3-158.1cm) and can be shortened for smaller windows. Remote Controller and Battery (1 set*) Bolt (3 pc) Security Bracket and 2 Screws (1 set) (1 pc) Exhaust Hose Drain Hose (1 pc) Foam Seal A (Adhesive) 4 pc(*) Foam Seal B (Adhesive) 2 pc Foam Seal C (Non-adhesive) 2 pc(*) Power Cord Buckle ( 1 pc) Air exhaust passage (1 pc*) (1pc) Unit Adaptor Window Sliders 1 set(*)C-Sense
Heat
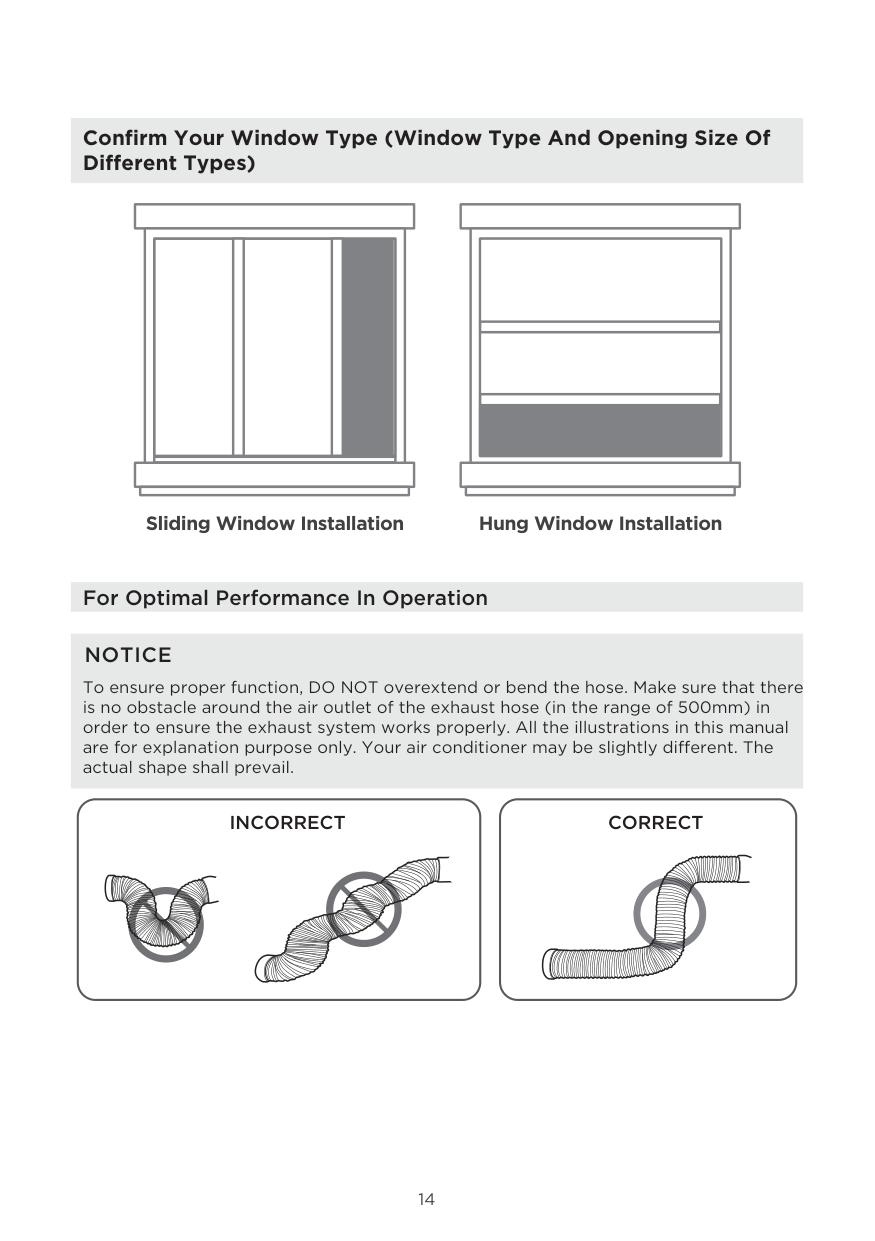
14 For Optimal Performance In Operation Confirm Your Window Type (Window Type And Opening Size Of Different Types) Sliding Window Installation Hung Window Installation
Notice
To ensure proper function, DO NOT overextend or bend the hose. Make sure that there is no obstacle around the air outlet of the exhaust hose (in the range of 500mm) in order to ensure the exhaust system works properly. All the illustrations in this manual are for explanation purpose only. Your air conditioner may be slightly different. The actual shape shall prevail.Correct
Incorrect
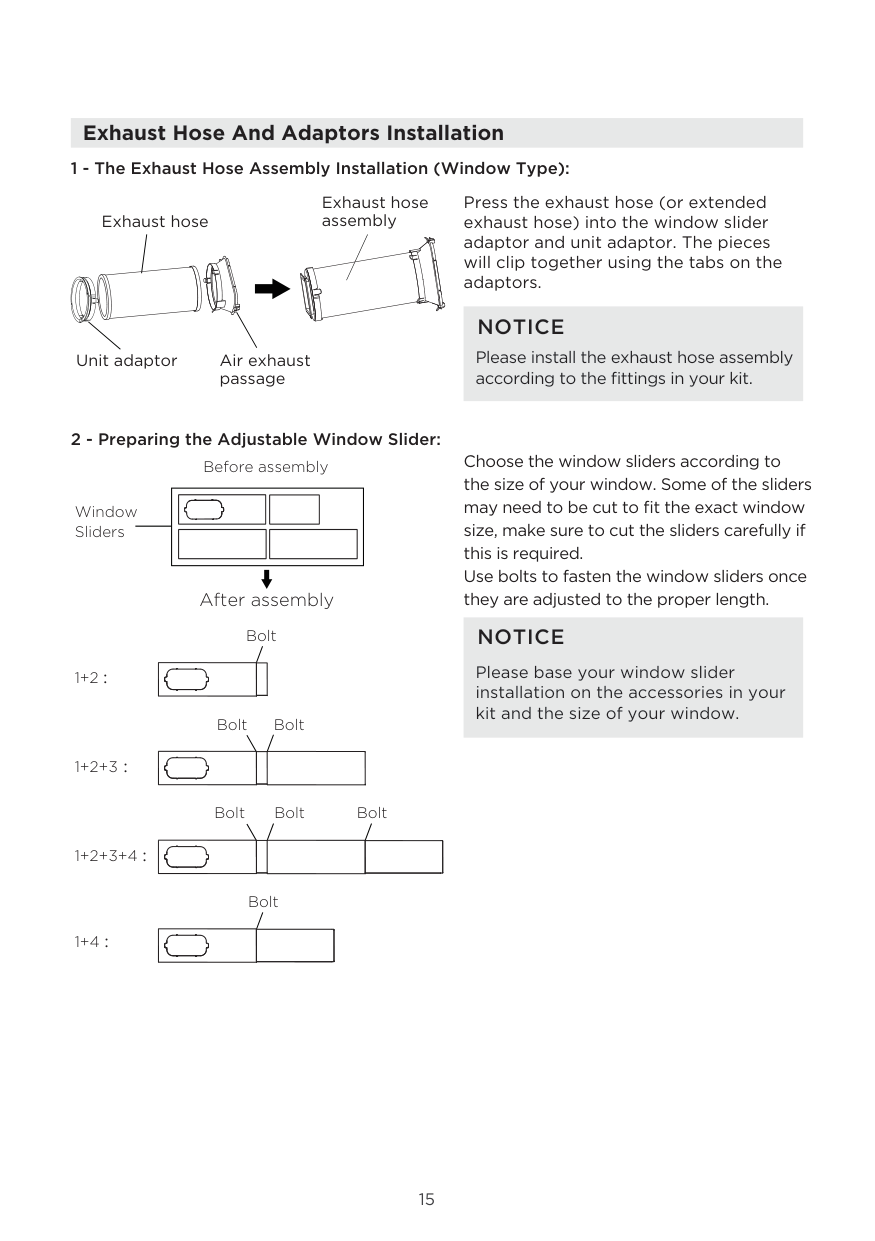
15 Exhaust Hose And Adaptors Installation 1 - The Exhaust Hose Assembly Installation (Window Type): 2 - Preparing the Adjustable Window Slider: Exhaust hose assembly Exhaust hose Unit adaptor Air exhaust passage Press the exhaust hose (or extended exhaust hose) into the window slider adaptor and unit adaptor. The pieces will clip together using the tabs on the adaptors.
Notice
Please install the exhaust hose assembly according to the fittings in your kit. Choose the window sliders according to the size of your window. Some of the sliders may need to be cut to fit the exact window size, make sure to cut the sliders carefully if this is required. Use bolts to fasten the window sliders once they are adjusted to the proper length.Notice
Please base your window slider installation on the accessories in your kit and the size of your window. 1+2: Bolt 1+2+3 : Bolt Bolt 1+2+3+4: Bolt Bolt Bolt 1+4: Bolt Window Sliders After assembly Before assembly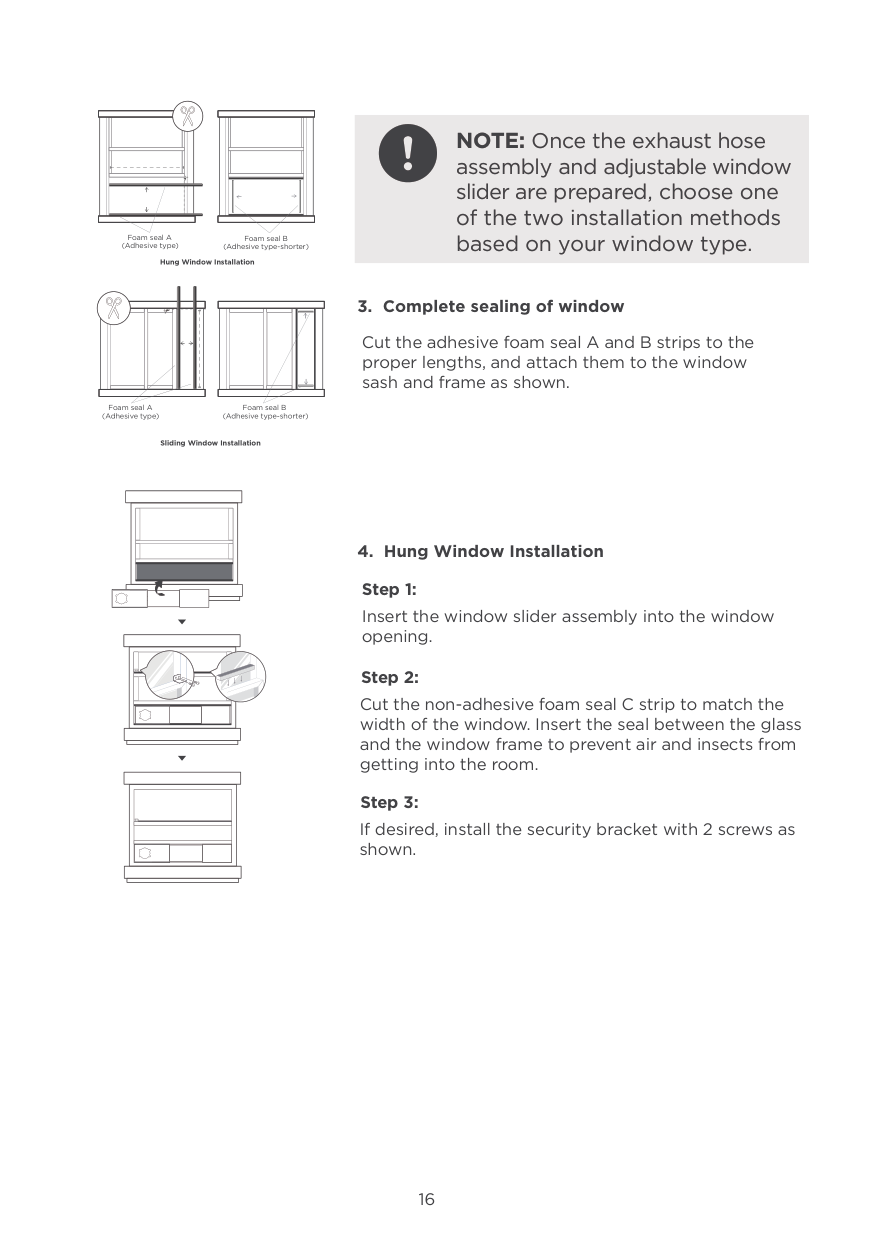
Insert the window slider assembly into the window opening. If desired, install the security bracket with 2 screws as shown. Cut the non-adhesive foam seal C strip to match the width of the window. Insert the seal between the glass and the window frame to prevent air and insects from getting into the room. : 2
p e t
S
:1 p e tS
Step 3: Foam seal B (Adhesive type-shorter) Foam seal A (Adhesive type) Foam seal B (Adhesive type-shorter) Foam seal A (Adhesive type) Hung Window Installation Sliding Window Installation Cut the adhesive foam seal A and B strips to the proper lengths, and attach them to the window sash and frame as shown. 16
17 Hook Hook Seat Lower groove Adapter Make sure the adaptor is inserted into the lower groove of the air outlet. Hung Window Installation Sliding Window Installation
p e t
S
:1 p e tS
Step 3: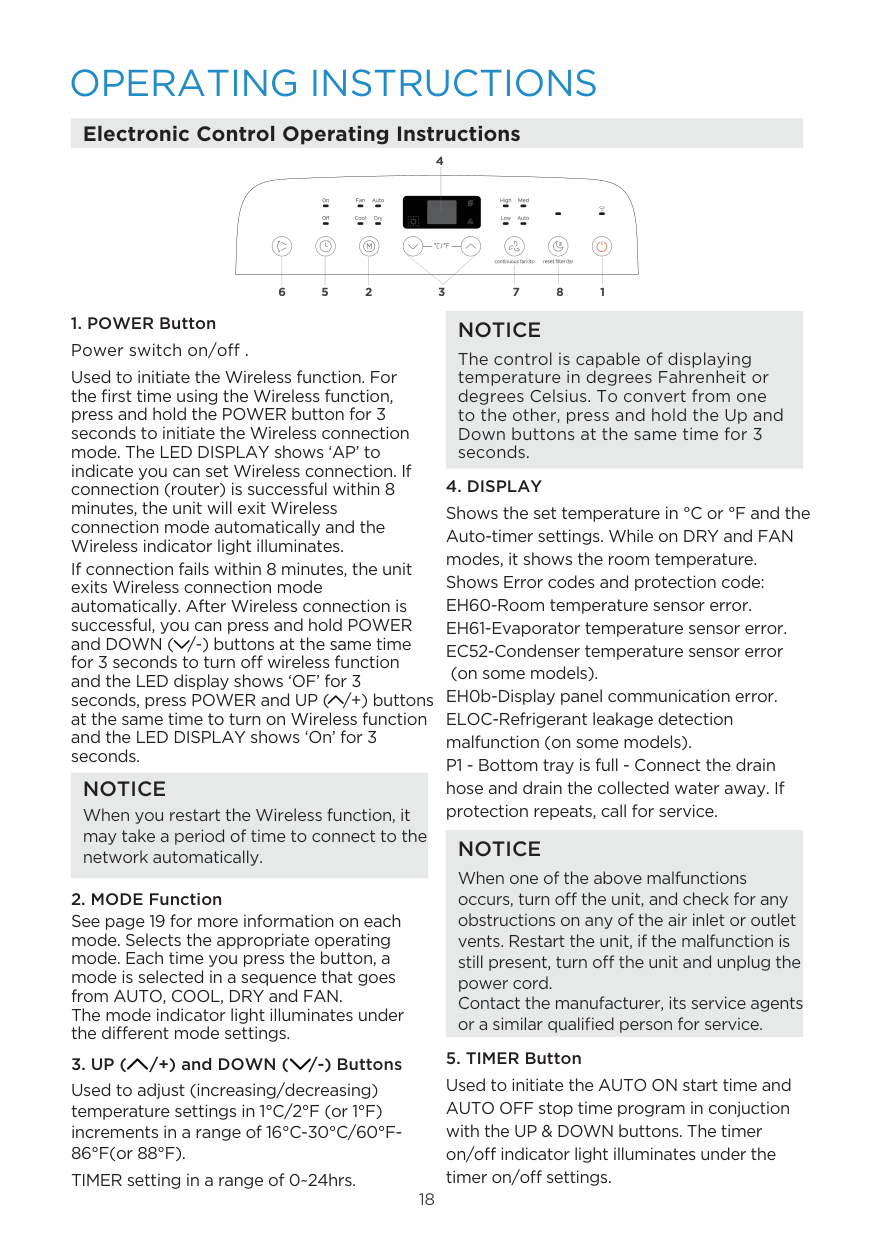
18
Operating Instructions
Electronic Control Operating InstructionsNotice
When you restart the Wireless function, it may take a period of time to connect to the network automatically.Notice
When one of the above malfunctions occurs, turn off the unit, and check for any obstructions on any of the air inlet or outlet vents. Restart the unit, if the malfunction is still present, turn off the unit and unplug the power cord. Contact the manufacturer, its service agents or a similar qualified person for service.Notice
4. Display
Shows the set temperature in °C or °F and the Auto-timer settings. While on DRY and FAN modes, it shows the room temperature. Shows Error codes and protection code: EH60-Room temperature sensor error. EH61-Evaporator temperature sensor error. EC52-Condenser temperature sensor error (on some models). EH0b-Display panel communication error. ELOC-Refrigerant leakage detection malfunction (on some models). P1 - Bottom tray is full - Connect the drain hose and drain the collected water away. If protection repeats, call for service.3. Up (
/+) and DOWN ( /-) Buttons Used to adjust (increasing/decreasing) temperature settings in 1°C/2°F (or 1°F) increments in a range of 16°C-30°C/60°F- 86°F(or 88°F). TIMER setting in a range of 0~24hrs. 1 8 7 2 5 6 3 4
19
Notice
Notice
Notice
20 Drainage Guide Make sure the hose is secure so there are no leaks. Direct the hose toward the drain, making sure that there are no kinks that will stop the water flowing. Place the end of the hose into the drain and make sure the end of the hose is down to let the water flow smoothly. When the continuous drain hose is not used, ensure that the corresponding drain plug and knob are installed firmly to prevent leakage.
Notice
Make sure the drain hose is lower than the bottom tray drain outlet.Notice
Be sure to reinstall the bottom drain plug firmly to prevent leakage before using the unit.Notice
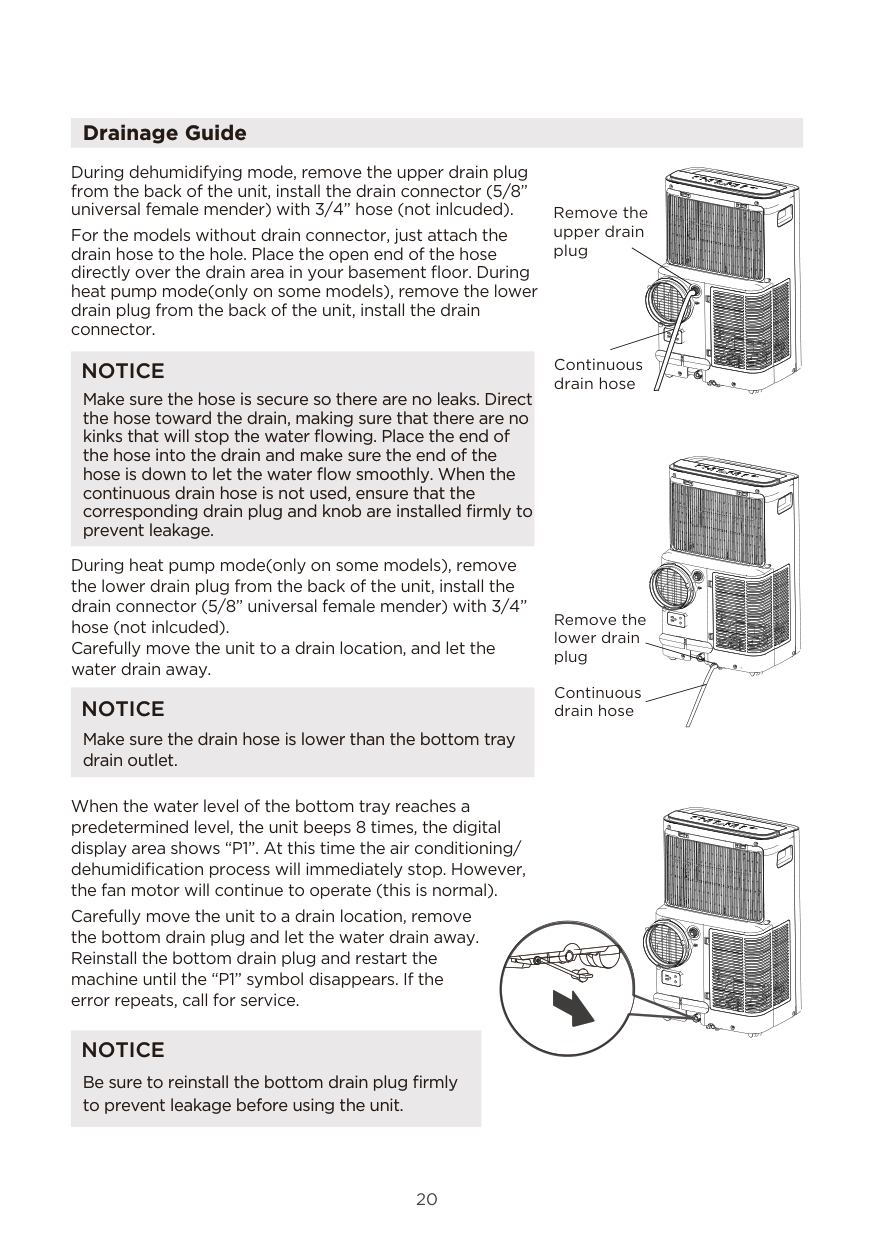
During dehumidifying mode, remove the upper drain plug from the back of the unit, install the drain connector (5/8” universal female mender) with 3/4” hose (not inlcuded). For the models without drain connector, just attach the drain hose to the hole. Place the open end of the hose directly over the drain area in your basement floor. During heat pump mode(only on some models), remove the lower drain plug from the back of the unit, install the drain connector. During heat pump mode(only on some models), remove the lower drain plug from the back of the unit, install the drain connector (5/8” universal female mender) with 3/4” hose (not inlcuded). Carefully move the unit to a drain location, and let the water drain away. Continuous drain hose Remove the upper drain plug Continuous drain hose Remove the lower drain plugWhen the water level of the bottom tray reaches a predetermined level, the unit beeps 8 times, the digital display area shows “P1”. At this time the air conditioning/ dehumidification process will immediately stop. However, the fan motor will continue to operate (this is normal). Carefully move the unit to a drain location, remove the bottom drain plug and let the water drain away. Reinstall the bottom drain plug and restart the machine until the “P1” symbol disappears. If the error repeats, call for service.
21
Cleaning & Maintenance
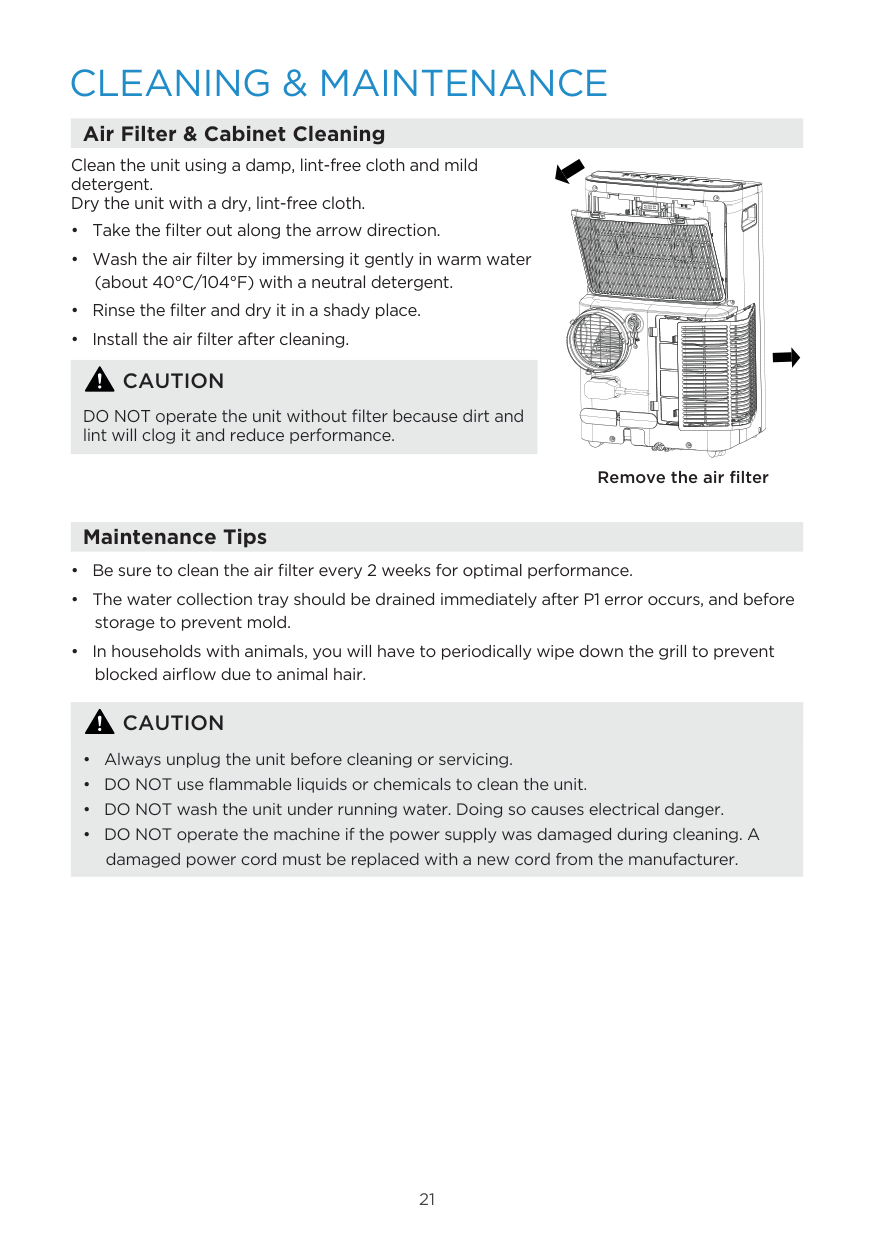
Air Filter & Cabinet Cleaning Maintenance Tips Clean the unit using a damp, lint-free cloth and mild detergent. Dry the unit with a dry, lint-free cloth.Caution
Remove the air filterCaution
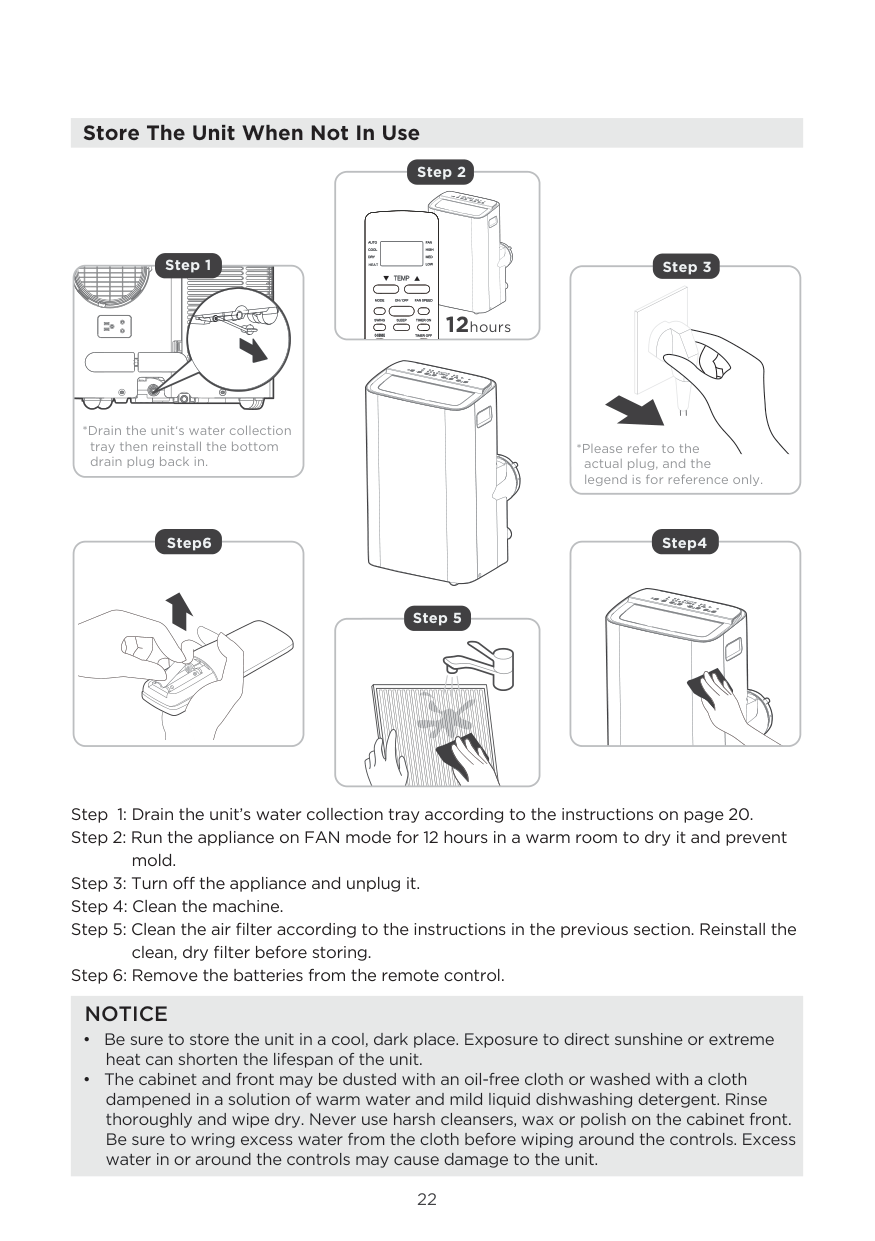
22 Store The Unit When Not In Use Step 1: Drain the unit’s water collection tray according to the instructions on page 20. Step 2: Run the appliance on FAN mode for 12 hours in a warm room to dry it and prevent mold. Step 3: Turn off the appliance and unplug it. Step 4: Clean the machine. Step 5: Clean the air filter according to the instructions in the previous section. Reinstall the clean, dry filter before storing. Step 6: Remove the batteries from the remote control.
Notice
C-Sense
Heat

23 Decrease the set temperature. Call a service technician to inspect the unit and top off refrigerant. The water collection tray is full. Turn off the unit, drain the water from the Water Collection Tray and restart the unit. Common Issues The following problems are not a malfunction and in most situations will not require repairs. Proble Solution Unit does not turn on when pressing ON/OFF button P1 Protection Code. In COOL mode: room temperature is lower than the set temperature. Check the set temperature. Unit does not cool well The air filter is blocked with dust or animal hair. Turn off the unit and clean the filter according to instructions. Exhaust hose is not connected or is blocked. Turn off the unit, disconnect the hose, check for blockage and reconnect the hose. The unit is low on refrigerant. Temperature setting is too high. The windows and doors in the room are open. Make sure all windows and doors are closed. The room area is too large. There are heat sources inside the room. Remove the heat sources if possible. The unit is noisy and vibrates too much The ground is not level Place the unit on a flat, level surface. The air filter is blocked with dust or animal hair. Turn off the unit and clean the filter according to instructions. The unit makes a gurgling sound This sound is caused by the refrigerant flow inside the unit. This is normal. Double-check the cooling area.
Troubleshooting Tips

Remote Control And App Instructions
26.2 ft (8 meters)C-Sense
Location of the remote control Use the remote controller within a distance of 26.2 ft (8 meters) from the air conditioner, pointing it towards the receiver. Reception is confirmed by a beep. Handling the Remote ControlCaution
Notice
-5°C~60°C(23°F~140°F)
Rg51F2(2)/Cefu1 / Rg51F2(2)/Efu1
24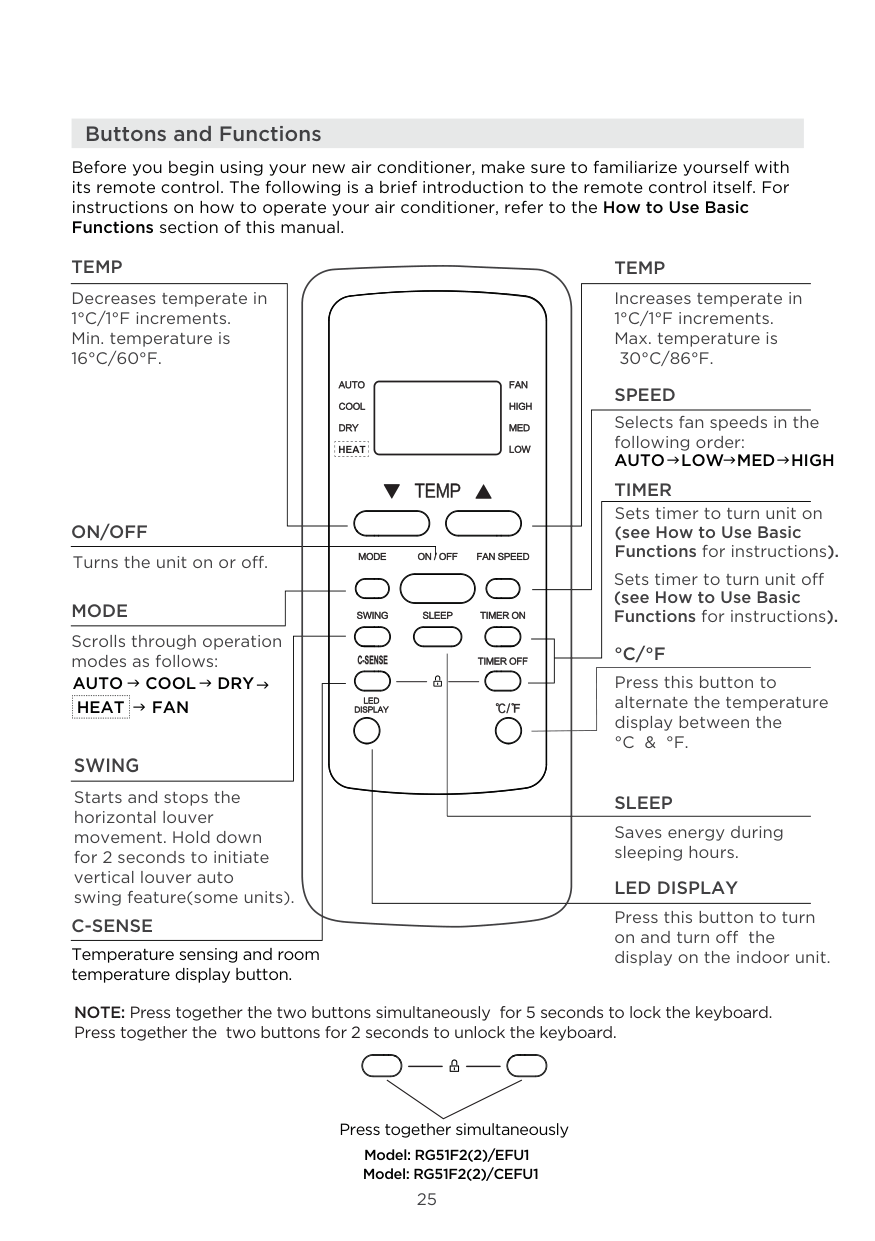
Mode
Scrolls through operation modes as follows:Temp
Increases temperate in 1°C/1°F increments. Max. temperature is30°C/86°F.
Speed
Sleep
Saves energy during sleeping hours.Led Display
Press this button to turn on and turn off the display on the indoor unit.°C/°F
Temp
Decreases temperate in 1°C/1°F increments. Min. temperature is16°C/60°F.
Timer
On/Off
Turns the unit on or off.C-Sense
Temperature sensing and room temperature display button.Swing
Model: RG51F2(2)/CEFU1 Starts and stops the horizontal louver movement. Hold down for 2 seconds to initiate vertical louver auto swing feature(some units).Auto Cool Dry
Heat Fan
Selects fan speeds in the following order:Auto Low Med High
Sets timer to turn unit on (see How to Use Basic Functions for instructions). Sets timer to turn unit off (see How to Use Basic Functions for instructions). Press this button to alternate the temperature display between the°C & °F.
NOTE: Press together the two buttons simultaneously for 5 seconds to lock the keyboard. Press together the two buttons for 2 seconds to unlock the keyboard. Press together simultaneously Before you begin using your new air conditioner, make sure to familiarize yourself with its remote control. The following is a brief introduction to the remote control itself. For instructions on how to operate your air conditioner, refer to the How to Use Basic Functions section of this manual. Buttons and Functions Model: RG51F2(2)/EFU1C-Sense
Heat
25
26 Information are displayed when the remote controller is power up. Note: All indicators shown in the figure are for the purpose of clear presentation. But during the actaul operation, only the relative function signs are shown on the display window. Displayed when data transmitted. Displayed when remote controller is ON. Low speed NO display Medium speed(some units) High speed Auto fan speed Displayed when TIMER ON time is set Displayed when TIMER OFF time is set Indicated all the current settings are locked Shows set temperature or room temperature, or time under TIMER setting
High
Med
Low
Auto
Cool
Fan
Dry
Mode display Fan speed indication Displayed when C-SENSE feature is activated(some units) Displayed when SLEEP feature is activatedAuto
Cool
Dry
Fan
High
Med
Low
Horizontal louver swing display Vertical louver auto swing display Fresh feature display Remote Screen Indicators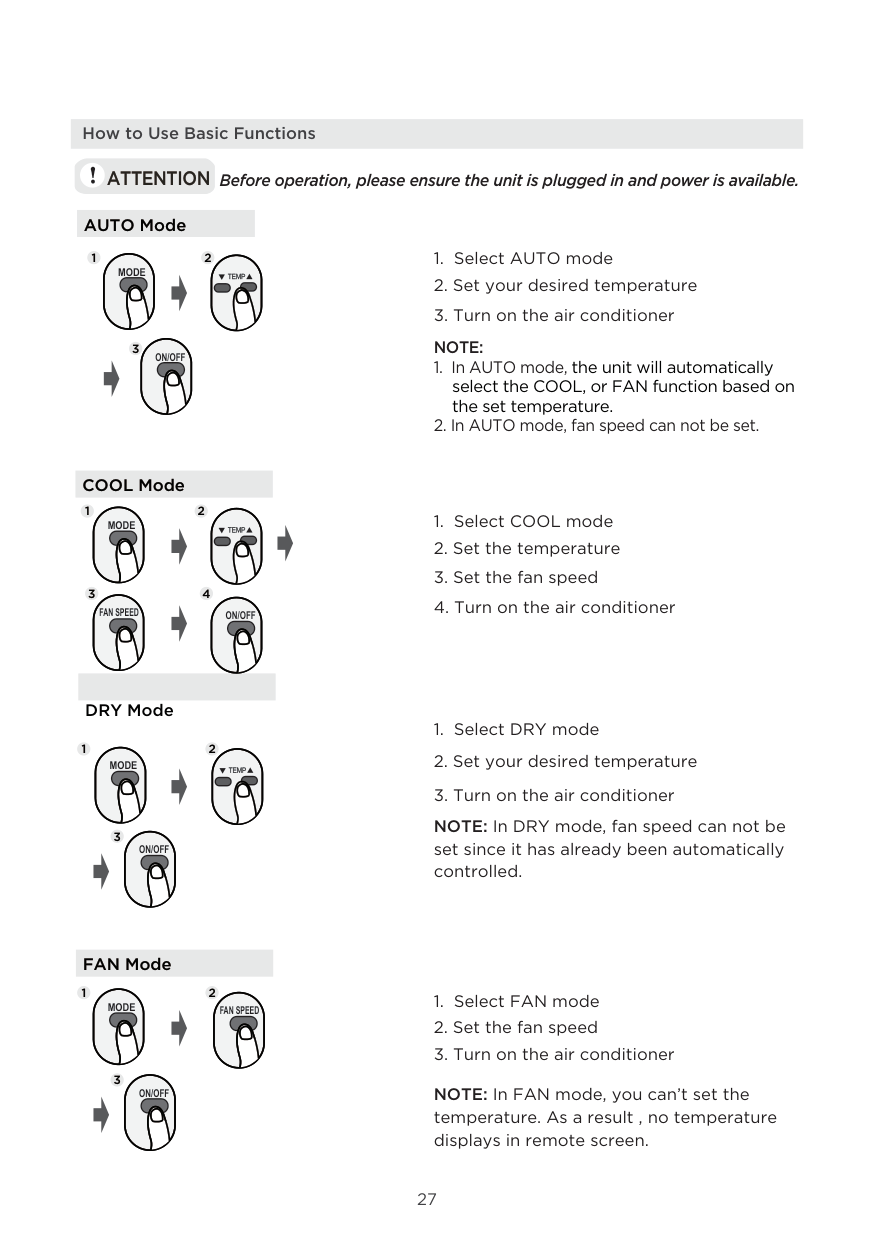
27 AUTO Mode COOL Mode DRY Mode
Mode
Note:
On/Off
Mode
On/Off
Mode
Fan Speed
On/Off
Mode
On/Off
Fan Speed
Attention
How to Use Basic Functions 1 2 3 1 2 3 4 1 2 3 1 2 3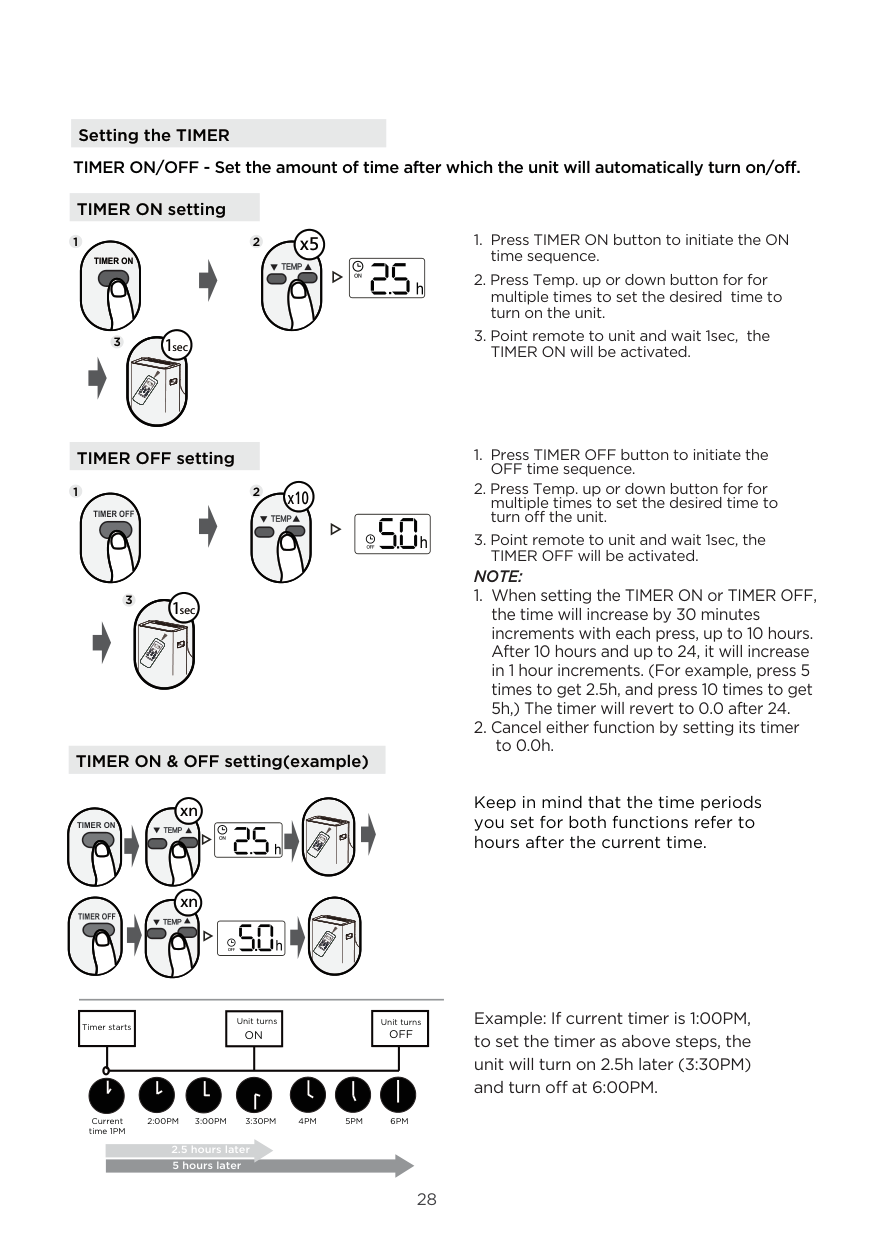
28 Setting the TIMER TIMER ON setting TIMER OFF setting TIMER ON & OFF setting(example) TIMER ON/OFF - Set the amount of time after which the unit will automatically turn on/off.
Note:
Current time 1PM
2:00Pm
3:00Pm
4Pm
5Pm
6Pm
Timer starts Unit turnsOn
Unit turnsOff
2.5 hours later 5 hours later3:30Pm
Example: If current timer is 1:00PM, to set the timer as above steps, the unit will turn on 2.5h later (3:30PM) and turn off at 6:00PM.Keep in mind that the time periods you set for both functions refer to hours after the current time. x5
Timer On
My Mode Follow MeLed
Turbo Ioniser Swing Timer Self Clean Mode On/Off Fan SleepAuto
Cool
Dry
Heat
Fan
High
Med
Low
Set Temperature
1secTimer Off
x10 My Mode Follow MeLed
Turbo Ioniser Swing Timer Self Clean Mode On/Off Fan SleepAuto
Cool
Dry
Heat
Fan
High
Med
Low
Set Temperature
1secTimer Off
xn xn My Mode Follow MeLed
Turbo Ioniser Swing Timer Self Clean Mode On/Off Fan SleepAuto
Cool
Dry
Heat
Fan
High
Med
Low
Set Temperature
Timer On
xn My Mode Follow MeLed
Turbo Ioniser Swing Timer Self Clean Mode On/Off Fan SleepAuto
Cool
Dry
Heat
Fan
High
Med
Low
Set Temperature
1 2 1 2 3 3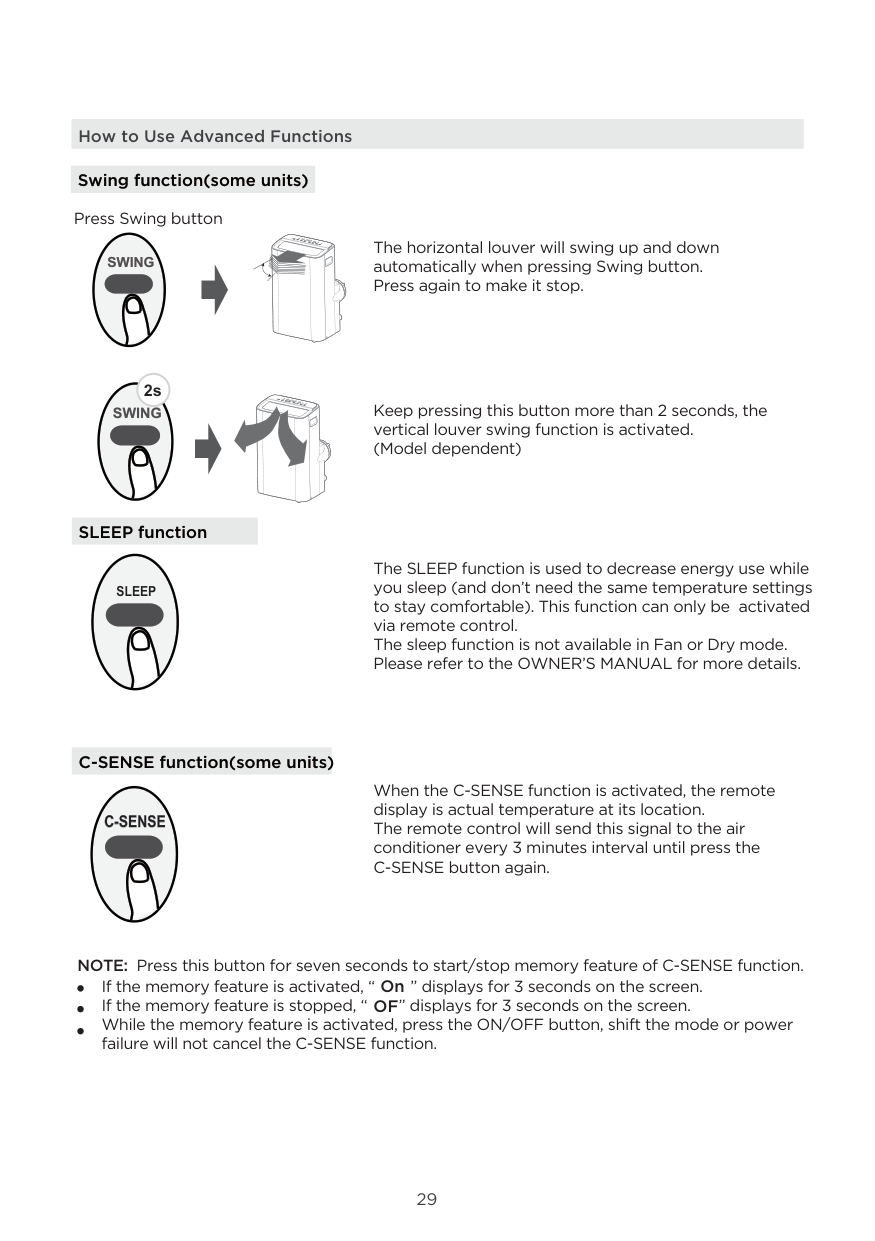
29 If the memory feature is activated, “ ” displays for 3 seconds on the screen. If the memory feature is stopped, “ ” displays for 3 seconds on the screen. While the memory feature is activated, press the ON/OFF button, shift the mode or power failure will not cancel the C-SENSE function.
Swing
How to Use Advanced Functions Swing function(some units) C-SENSE function(some units) SLEEP function Press Swing button The horizontal louver will swing up and down automatically when pressing Swing button. Press again to make it stop. Keep pressing this button more than 2 seconds, the vertical louver swing function is activated. (Model dependent)Swing
2sSleep
The SLEEP function is used to decrease energy use while you sleep (and don’t need the same temperature settings to stay comfortable). This function can only be activated via remote control. The sleep function is not available in Fan or Dry mode. Please refer to the OWNER’S MANUAL for more details. When the C-SENSE function is activated, the remote display is actual temperature at its location. The remote control will send this signal to the air conditioner every 3 minutes interval until press the C-SENSE button again.Of
NOTE: Press this button for seven seconds to start/stop memory feature of C-SENSE function. OnC-Sense
30
Notes

31 Declaration of Conformity We hereby declare that this AC is in compliance with the essential requirements and other relevant provisions of Directive 1999/5/EC. Specification of Wireless Module Model: US-SK109 Dimensions: 41 x 24 x 5 (mm) Operation Temperature: 0°C ~ 45°C / 32°F ~ 113°F Antenna Type: Printed PCB Antenna Operation Humidity: 10% ~ 85% Frequency: WLAN 2400-2483.5 MHz Power Input: DC 5V/500 mA Maximum Transmitted Power: <20 dBm Max
Notice
Precautions

32 1 How to use SmartHome App Ensure that your mobile phone is connected to the wireless network. Bluetooth must be turned on. The device must also be powered up. Scan the QR code below to download the SmartHome app from app store or search for it directly on the Google Play Store or Apple's App Store. Step 1: Download the SmartHome app Open the SmartHome app. Log in directly if you have an existing SmartHome account or create a new account. Alternatively, you can also use a 3rd party login platform. Step 2: Log in Download the app & activate product

33 1) When you log in, you may see the message "Smart devices discovered nearby". Tap to add your device. 2) If no such message appears, proceed as follows: Tap on "+" and select your device in the list of nearby available devices. If your device is not listed, please add your device manually, first selecting the device category e.g. Window AC.
Step 3: Connecting the device

34 After pairing successfully, a card will be created for the device in the SmartHome app. Shortcuts for basic functions will appear on the card such as changing the temperature or switching the device on or off. Tapping on the card, will reveal additional features and settings. The actual UI design may look different from examples due to app updates. Step 4: Controlling the device SmartHome 3) Follow the steps in the app to connect your device to the wireless network. If your device fails to connect, follow the additional instructions in the app. Add device For Window
Ac
For Portable AC Add device
35 2 How to use Matter Connect Your Air Conditioner through Matter
Make sure your mobile device is connected to your wireless router. Wireless router should support and turn on IPv6. Please make sure your smartphone connects to 2.4G but not 5G network. Matter is a connectivity technology that unifies the smart home by allowing devices and ecosystems (such as Alexa, Google Home and Apple Home) to speak the same language thus creating exciting new features and use cases. To use Matter, you will need at least one Matter enabled smart speaker from Amazon, Google or Apple, and it's respective app. -- If you have a Matter enabled smart speaker, please proceed to the "How to use Matter" instructions on the following pages. -- If you don't have a Matter enabled smart speaker, you won't be able to use Matter right now. However, you can still achieve full functionality of the product by using our SmartHome app. To do this, proceed to the "How to use SmartHome app" section back on page 30. Step 1: Connect to smart speaker Select your preferred ecosystem (Alexa, Google Home or Apple Home) and make sure you’ve got one of their Matter enabled products (such as their smart speakers) connected to your wireless router. Apple Home Google Home Alexa For best Matter compatibility, connect the AC to the Alexa, Google Home or Apple Home ecosystems along with at least one of their respective Matter enabled smart speakers.

36 Turn on Bluetooth on your mobile device. Step 2: Turn on Bluetooth Settings Bluetooth Bluetooth Window AC: Hold down the CONNECT / Power button for 3 seconds to begin the pairing process (“AP” will appear on the AC’s display). Portable AC: Hold down the SWING / Power button for 3 seconds to begin the pairing process (“AP” will appear on the AC’s display). Note: Entering AP pairing mode may vary between different AC, please follow instruction of AC panel. Step 3: Enter AP mode
Ap
Connect
Ap
Swing
Window AC Portable AC
37 Open the Alexa, Google Home, Apple Home app on your mobile device. Step 4: Open app Apple Home Google Home Alexa Tap the “+” and “Add Device/Accessory” or tap "+Add" in your app and then select Matter device and scan the Matter QR code found on the side of the AC device. Follow the respective instructions in the Alexa, Google Home or Apple Home app to complete the pairing process. Step 5: Scan matter QR code Add Add Device/Accessory scan Matter QR code

38 After pairing is successful, you can control your AC’s temperature and mode settings, etc. through the respective ecosystem app and smart speaker. Due to a compatibility issue, the temperature value shown in the Alexa, Google Home or Apple Home app may be 1 degree different from that displayed on the air conditioner. However, this will not impact the device's ability to cool the room. Step 6: Control device Air conditioner

39
Note:
The functions shown in the Alexa, Google Home or Apple Home apps may change with updates to their products or apps. Setup processes and features may vary between ecosystems. Make sure the Matter enabled app is up to date to ensure the best experience. Periodically, we will update the device’s software to improve the experience. Device software updates can be accomplished through the SmartHome app. is developed by the Connectivity Standards Alliance TM. This brand, related logos, and marks are trademarks of the Alliance, all rights reserved. Use of the Works with Apple badge means that an accessory has been designed to work specifically with the technology identified in the badge and has been certified by the developer to meet Apple’s performance standards. Apple is not responsible for the operation of this device or its compliance with safety and regulatory standards. App & Smart Speakers can support Matter only when using these versions or above. 9094439556 Google Play services min version: 22.36.15 Google Home app (GHA) min version: 2.58.24.1-dogfood Google Hub firmware min version: 1.56.324896 (appears on hub as Chromecast firmware version) 2.2.536317 16.5 Device Version iOS 16.5 iPhone Apple Home Pod Alexa Echo Device Android Google Home Hub Alexa App
40 This device complies with Part 15 of the FCC Rules and Industry Canada’s licenceexempt RSSs. Operation is subject to the following two conditions: This equipment has been tested and found to comply with the limits for a Class B digital device, pursuant to part 15 of the FCC Rules. These limits are designed to provide reasonable protection against harmful interference in a residential installation. This equipment generates, uses and can radiate radio frequency energy and, if not installed and used in accordance with the instructions, may cause harmful interference to radio communications. However, there is no guarantee that interference will not occur in a particular installation. If this equipment does cause harmful interference to radio or television reception, which can be determined by turning the equipment off and on, the user is encouraged to try to correct the interference by one or more of the following measures: --Reorient or relocate the receiving antenna. --Increase the separation between the equipment and receiver. --Connect the equipment into an outlet on a circuit different from that to which the receiver is connected. --Consult the dealer or an experienced radio/TV technician for help. Hereby, we declare that this AC is in compliance with the essential requirements and other relevant provisions of RE Directive 2014/53/EU. A copy of the full DoC is attached (European Union products only). Only operate the device in accordance with the instructions supplied. Changes or could void the user's authority to operate the equipment.This device complies with FCC radiation exposure limits set forth for an uncontrolled environment. In order to avoid the possibility of exceeding the FCC radio frequency exposure limits, human proximity to the antenna shall not be less than 20cm (8 inches) during normal operation. (1) This device may not cause interference;and (2) This device must accept any interference,including interference that may cause undesired operation of the device. Declaration of conformity
Fcc Id: 2Adqomdna23
Ic: 12575A-Mdna23
Note:

41
Warranty
Air Conditioner Limited Warranty Your product is protected by this Limited Warranty: Warranty service must be obtained from Midea Consumer Services or an authorized Midea servicer. WarrantyNormal Responsabilities Of The Consumer**
This warranty applies only to products in ordinary household use, and the consumer is responsible for the items listed below:Exclusions
This warranty does not cover the following: 1) Failure caused by damage to the unit while in your possesion (other than damage caused by defect or malfunction), by its improper installation, or by unreasonable use of the unit, including without limitation, failure to provide reasonable and necessary maintenance or to follow the written Installation and Operating Instructions. 2) Damages caused by serviced performed by persons other than those authorized by Midea customer service; or external causes such as abuse, misuse, inadequate power supply or acts of God. 3) If the unit is put to commercial, business, rental, or other use or application other than for consumer use, we make no warranties, express or implied, including but not limited to, any implied warranty of merchantability or fitness for use or purpose. 4) Products without original serial numbers or products that have serial numbers which have been altered or cannot be readily determined. NOTICE: Some states do not allow the exclusions or limitation of incidental or consequential damages. So this limitation or exclusion may not apply to you.If You Need Service
Keep your bill of sale, delivery slip, or some other appropriate payment Record. The date on the bill establishes the warranty period, should service be required. If service is performed, its your best interest to obtain and keep all receipts. This written warranty gives you specific legal rights. You may also have other rights that vary from state to state. Service under this warranty must be obtained by following these steps, in order: 1) Contact Midea Consumer Services or an authorized Midea services at 1 866 646 4332. 2) If there is a question as to where to obtain service, contact our consumer relations Departament.