
Ask AI
— answers from the official manualAnswers from the official manual.
Common questions
Common Questions
10 totalWhat does it mean when a '0' flashes on the display?
A flashing '0' on the display means the water tank is empty. Add water to the water tank, turn the knob to standby position and press the brew now button. When the ready indicator light turns solid, the coffeemaker is ready to use.
How often should I descale my coffee maker?
You should descale your coffeemaker every 4-6 months, although this period depends on the hardness of water and frequency of use. Use 1.5 tablespoons of white vinegar and 4 cups of water for the descaling process.
How do I clean the milk frothing wand?
Remove the milk frothing wand cover and wash with warm water and mild liquid soap. Wipe down the metal on the wand with a damp cloth. Fill the water tank and place a jug under the wand, then turn the knob to steam position and press the clean button for a 2-minute clean cycle.
Why is steam coming from the drip tray and the pump operating intermittently?
The coffeemaker has overheated and entered an automatic cool-down cycle that lasts approximately 35 seconds. The ready indicator light will pulse during cool-down and turn solid when complete. The coffeemaker will complete this cycle automatically.
What should I do before using the Mr. Coffee Espresso Machine for the first time?
You should clean and prime the coffeemaker before brewing coffee for the first time. Wash all removable parts in warm water with mild liquid soap, fill the water tank to the MAX marking with clean filtered water, and turn the coffeemaker ON using the power switch. The ready indicator light will pulse while heating and turn solid when ready to use.
How do I turn the coffee maker on and off?
Press the power button to turn the coffee maker on. To turn it off, press and hold the power button for 2 seconds.
Full Manual
34 pages
☰ Home » Mr.Coffee » Mr Coffee Espresso Machine Manual: How to Use BVMC-O-C_19ESM1 The Mr. Coffee Espresso Machine Manual provides detailed instructions on how to use the BVMC-O-C_19ESM1 model of the Mr. Coffee Occasions Coffeemaker. The manual is designed to help users get the best-tasting cup of coffee or espresso every time they use the machine. The manual starts with important safety precautions that users should follow when using electrical appliances to reduce the risk of fire, electric shock, and injury to persons. It also provides a quick start guide for brewing coffee on the Mr. Coffee Occasions Coffeemaker. The user manual covers everything from getting started, cleaning and priming the coffeemaker before use, making the first pot of coffee, and using the various attachments that come with the machine. The manual also includes a list of all the parts and features of the coffeemaker, along with their functions. If users have any questions about their new coffeemaker, they can contact Mr. Coffee customer service or visit their website for more information. Manuals+
Contents [ hide ] 1 Mr Coffee Coffee Maker
2 Introduction
3 Important Safeguards
4 Power Cord Instructions
5 Product Notices
6 Get To Know Your Coffee Maker
6.1 Buttons:
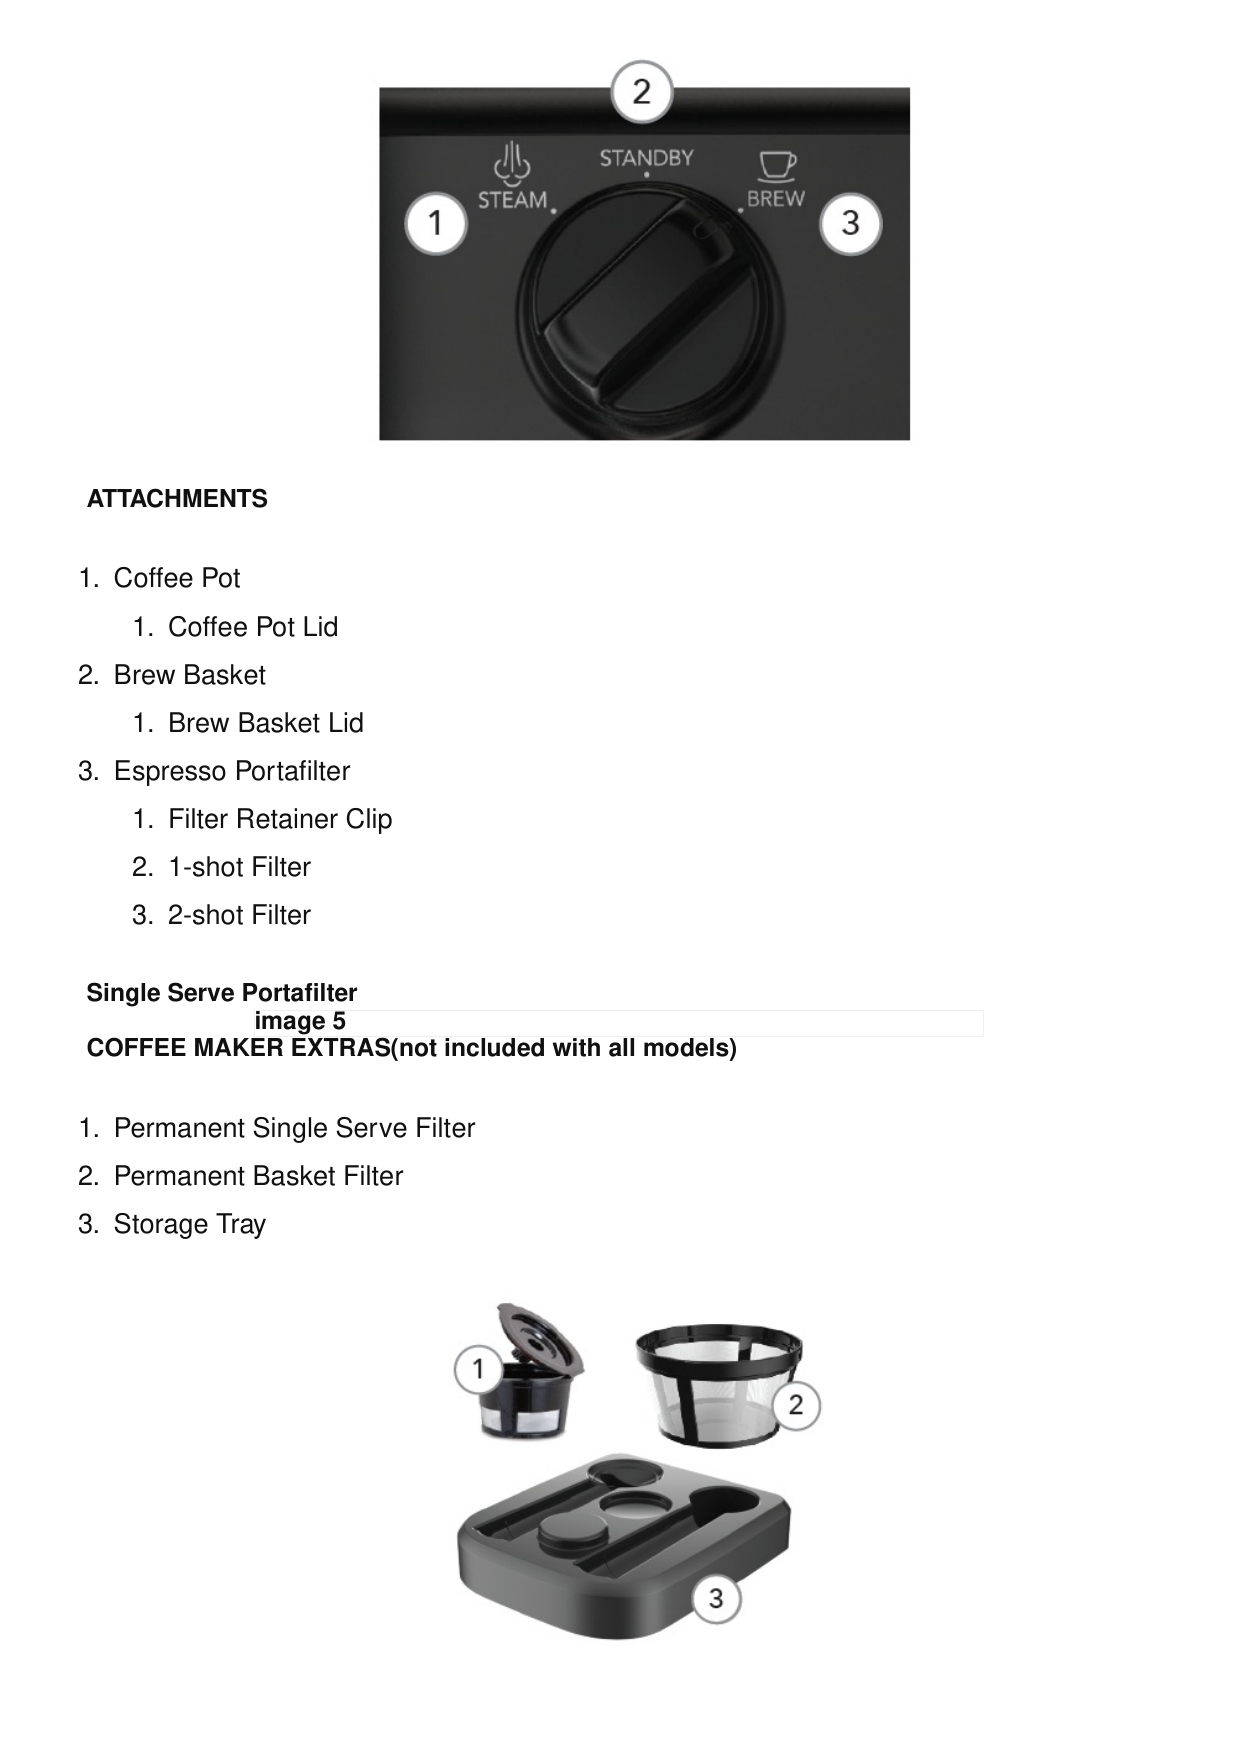
6.2 Knob
6.3 Attachments
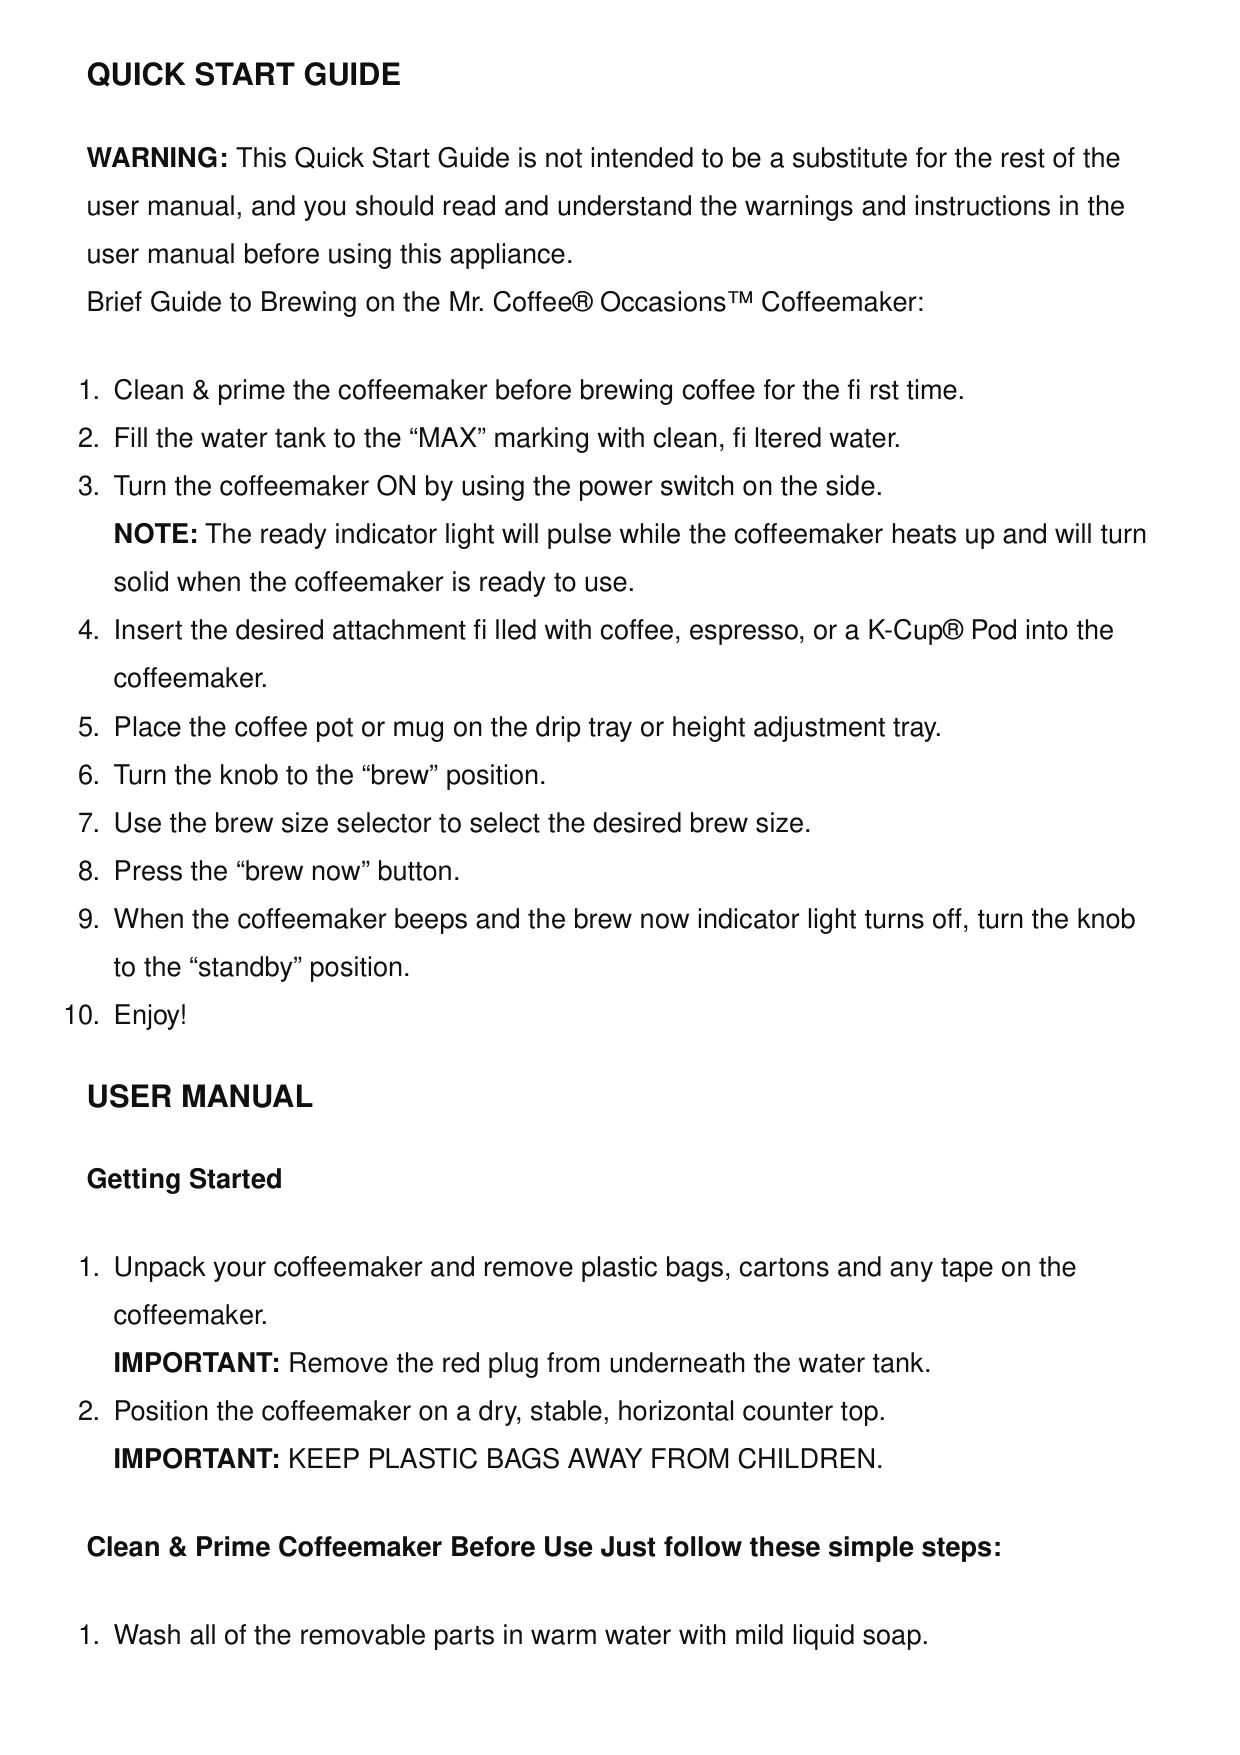
6.4 Single Serve PortafilterCOFFEE MAKER EXTRAS(not included with all models)7 Quick Start Guide
8 User Manual
9 How To Make Your First Pot Of Coffee
10 How To Make Your First Shot(S) Of Espresso
11 How To Make Your First Single Serve Coffee
12 How To Steam Milk
13 Routine Cleaning
14 Routine Cleaning Cont.
15 Descaling
16 Troubleshooting Guide
17 Troubleshooting Guide Cont
18 Recipe Guide
19 User Maintenance
20 Service Maintenance And Warranty
21 Specifications
22 Frequently Asked Questions23 Video
24 Documents / Resources 24.1 References 25 Related Posts logo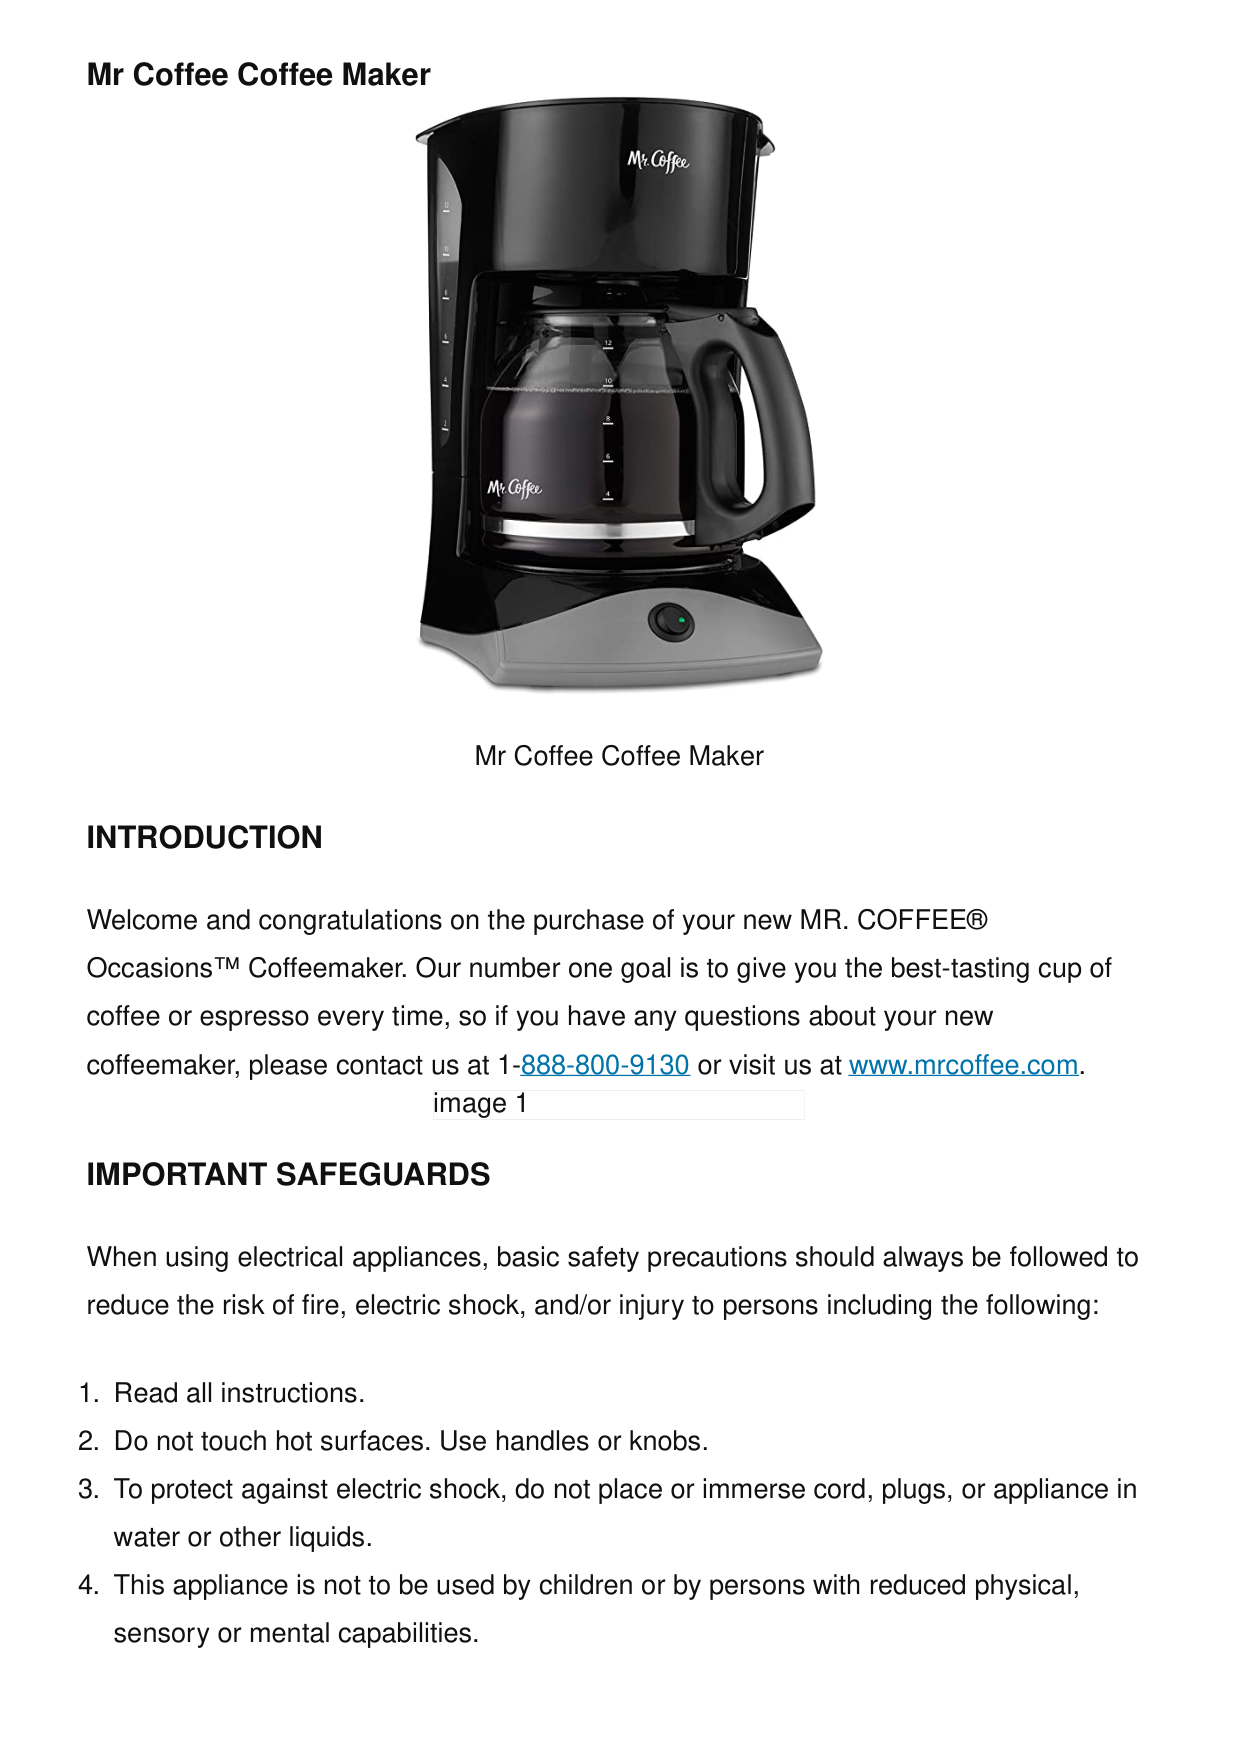
Mr Coffee Coffee Maker Mr Coffee Coffee Maker
Introduction
Welcome and congratulations on the purchase of your new MR. COFFEE® Occasions™ Coffeemaker. Our number one goal is to give you the best-tasting cup of coffee or espresso every time, so if you have any questions about your new coffeemaker, please contact us at 1-888-800-9130 or visit us at www.mrcoffee.com.Important Safeguards
When using electrical appliances, basic safety precautions should always be followed to reduce the risk of fire, electric shock, and/or injury to persons including the following:
Warning: To Reduce The Risk Of Fire Or Electric Shock, Do Not
Remove This Cover. No User-Serviceable Parts Inside. Repair Should
Be Done By Authorized Service Personnel Only
Save These Instructions Household Use Only
Polarized Plug
This appliance has a polarized plug, (one blade is wider than the other). As a safety feature to reduce the risk of electrical shock, this plug is intended to fi t in a polarized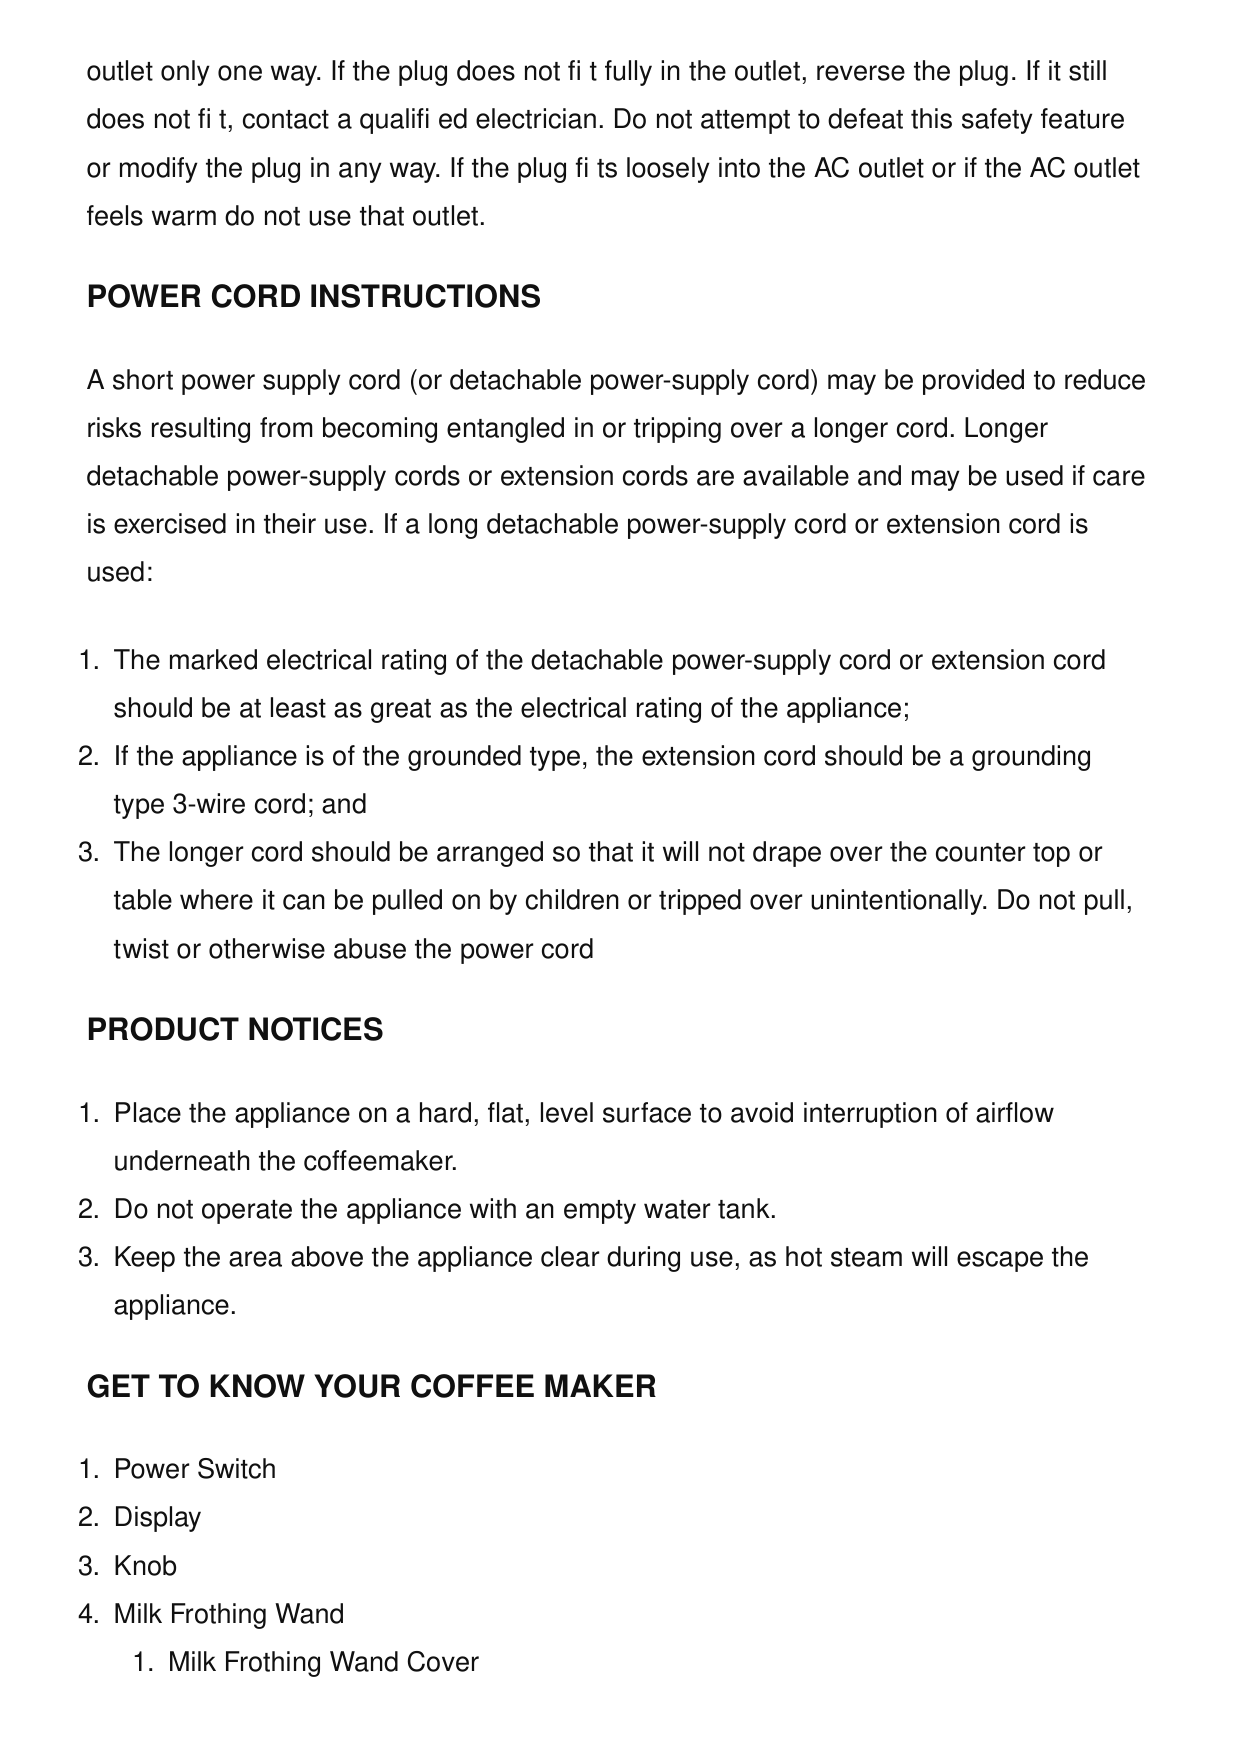
outlet only one way. If the plug does not fi t fully in the outlet, reverse the plug. If it still does not fi t, contact a qualifi ed electrician. Do not attempt to defeat this safety feature or modify the plug in any way. If the plug fi ts loosely into the AC outlet or if the AC outlet feels warm do not use that outlet.
Power Cord Instructions
A short power supply cord (or detachable power-supply cord) may be provided to reduce risks resulting from becoming entangled in or tripping over a longer cord. Longer detachable power-supply cords or extension cords are available and may be used if care is exercised in their use. If a long detachable power-supply cord or extension cord is used:Product Notices
Get To Know Your Coffee Maker
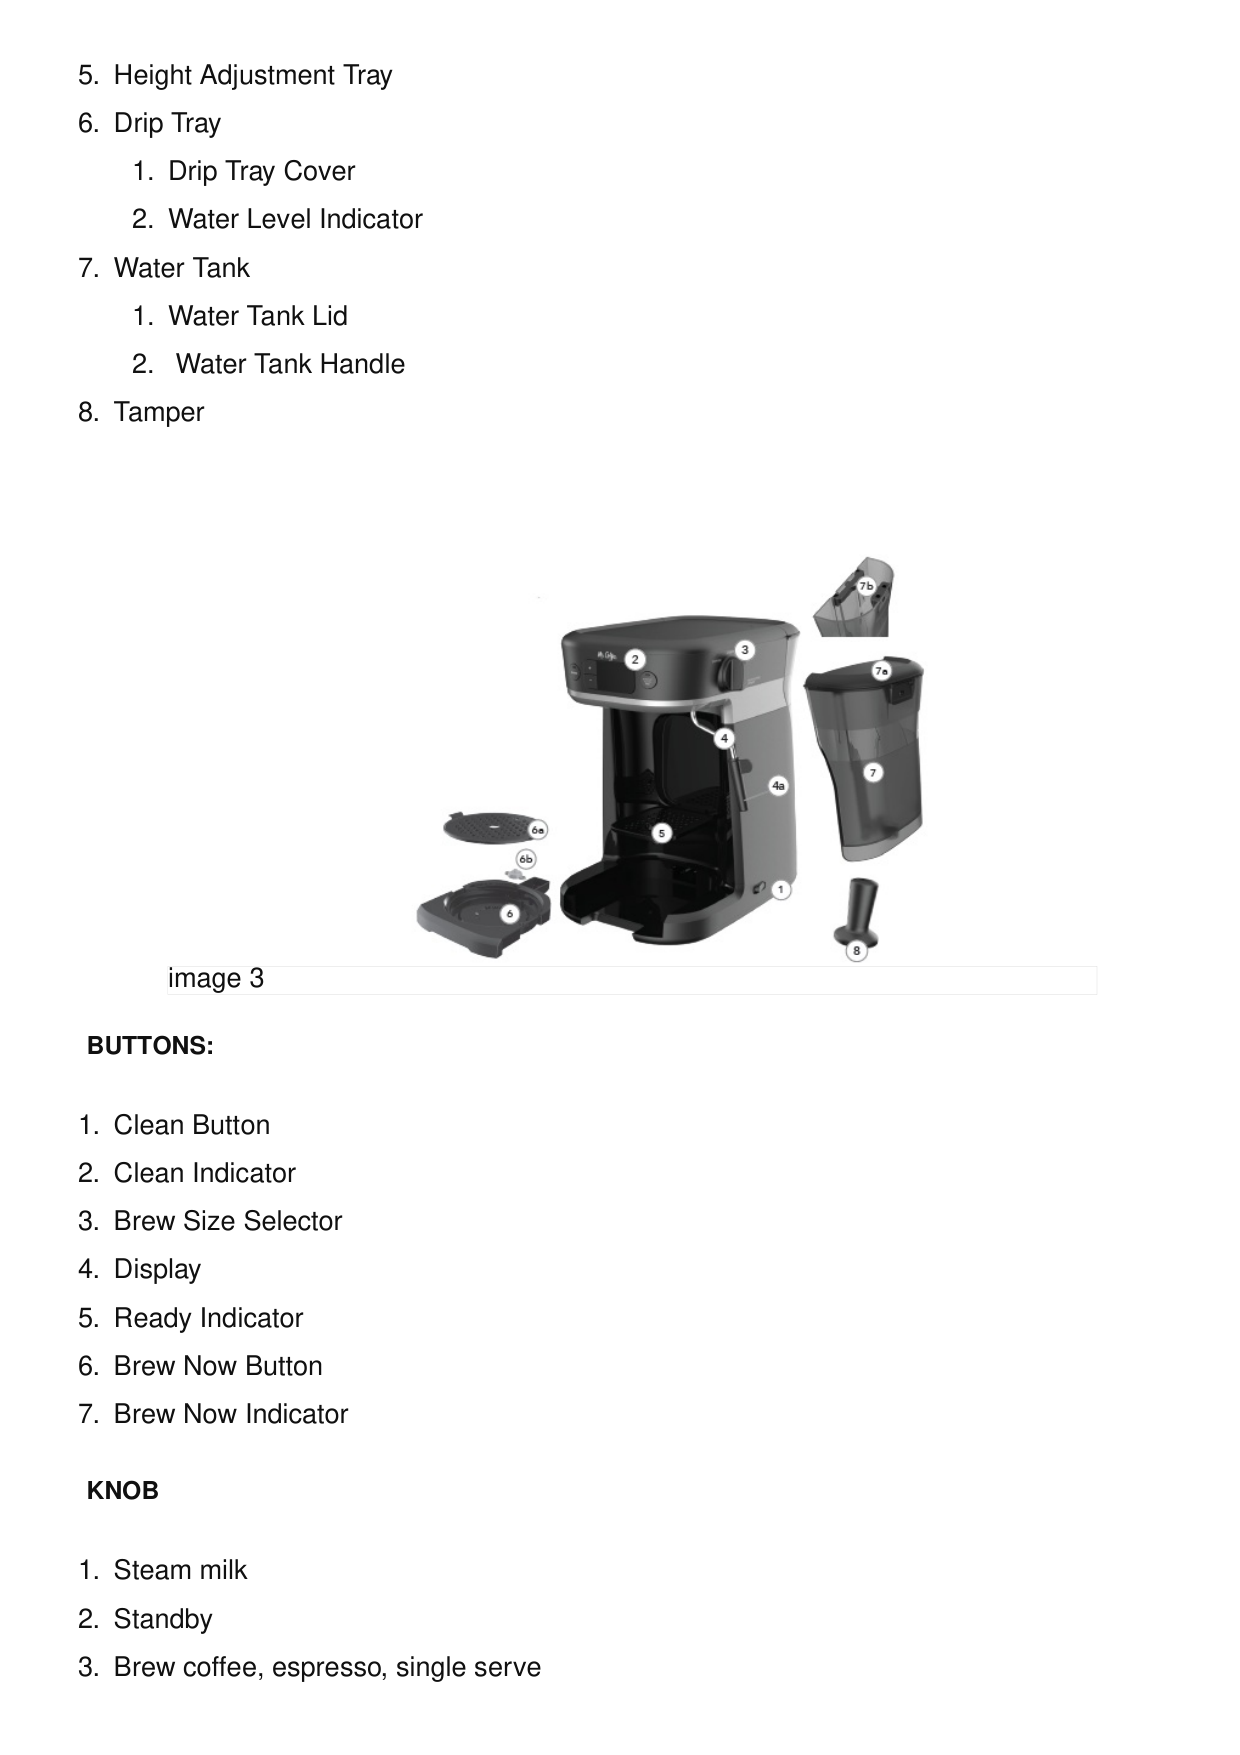
Buttons:
Knob
Attachments
Quick Start Guide
WARNING: This Quick Start Guide is not intended to be a substitute for the rest of the user manual, and you should read and understand the warnings and instructions in the user manual before using this appliance. Brief Guide to Brewing on the Mr. Coffee® Occasions™ Coffeemaker:User Manual
Getting StartedImportant: Keep Plastic Bags Away From Children.
Clean & Prime Coffeemaker Before Use Just follow these simple steps:
How To Make Your First Pot Of Coffee
seconds after all of the coffee grounds have been pre-soaked with water. This allows the coffee grounds to then release the richest coffee flavors during the remaining brew cycle. During this blooming phase, the pump will cycle on and off every few seconds, then return to full brewing mode after 30 seconds.
How To Make Your First Shot(S) Of Espresso
How To Make Your First Single Serve Coffee
be in a centered position.
How To Steam Milk
the “standby” position until the ready indicator light turns solid.
Routine Cleaning
Make sure your coffeemaker is unplugged and has cooled completely before cleaning. We recommend hand washing all removable parts to help preserve their appearance. Pot of Coffee
outside. WARNING: There is a sharp needle at the bottom of the single serve portafilter. Espresso
Routine Cleaning Cont.
Deep Cleaning the Espresso Filters Make sure to deep clean your espresso filters every 90 days for optimal brewing performance. Follow these disassembly instructions and rinse the pieces in a large bowl of warm water. Once rinsed thoroughly, wipe dry and reassemble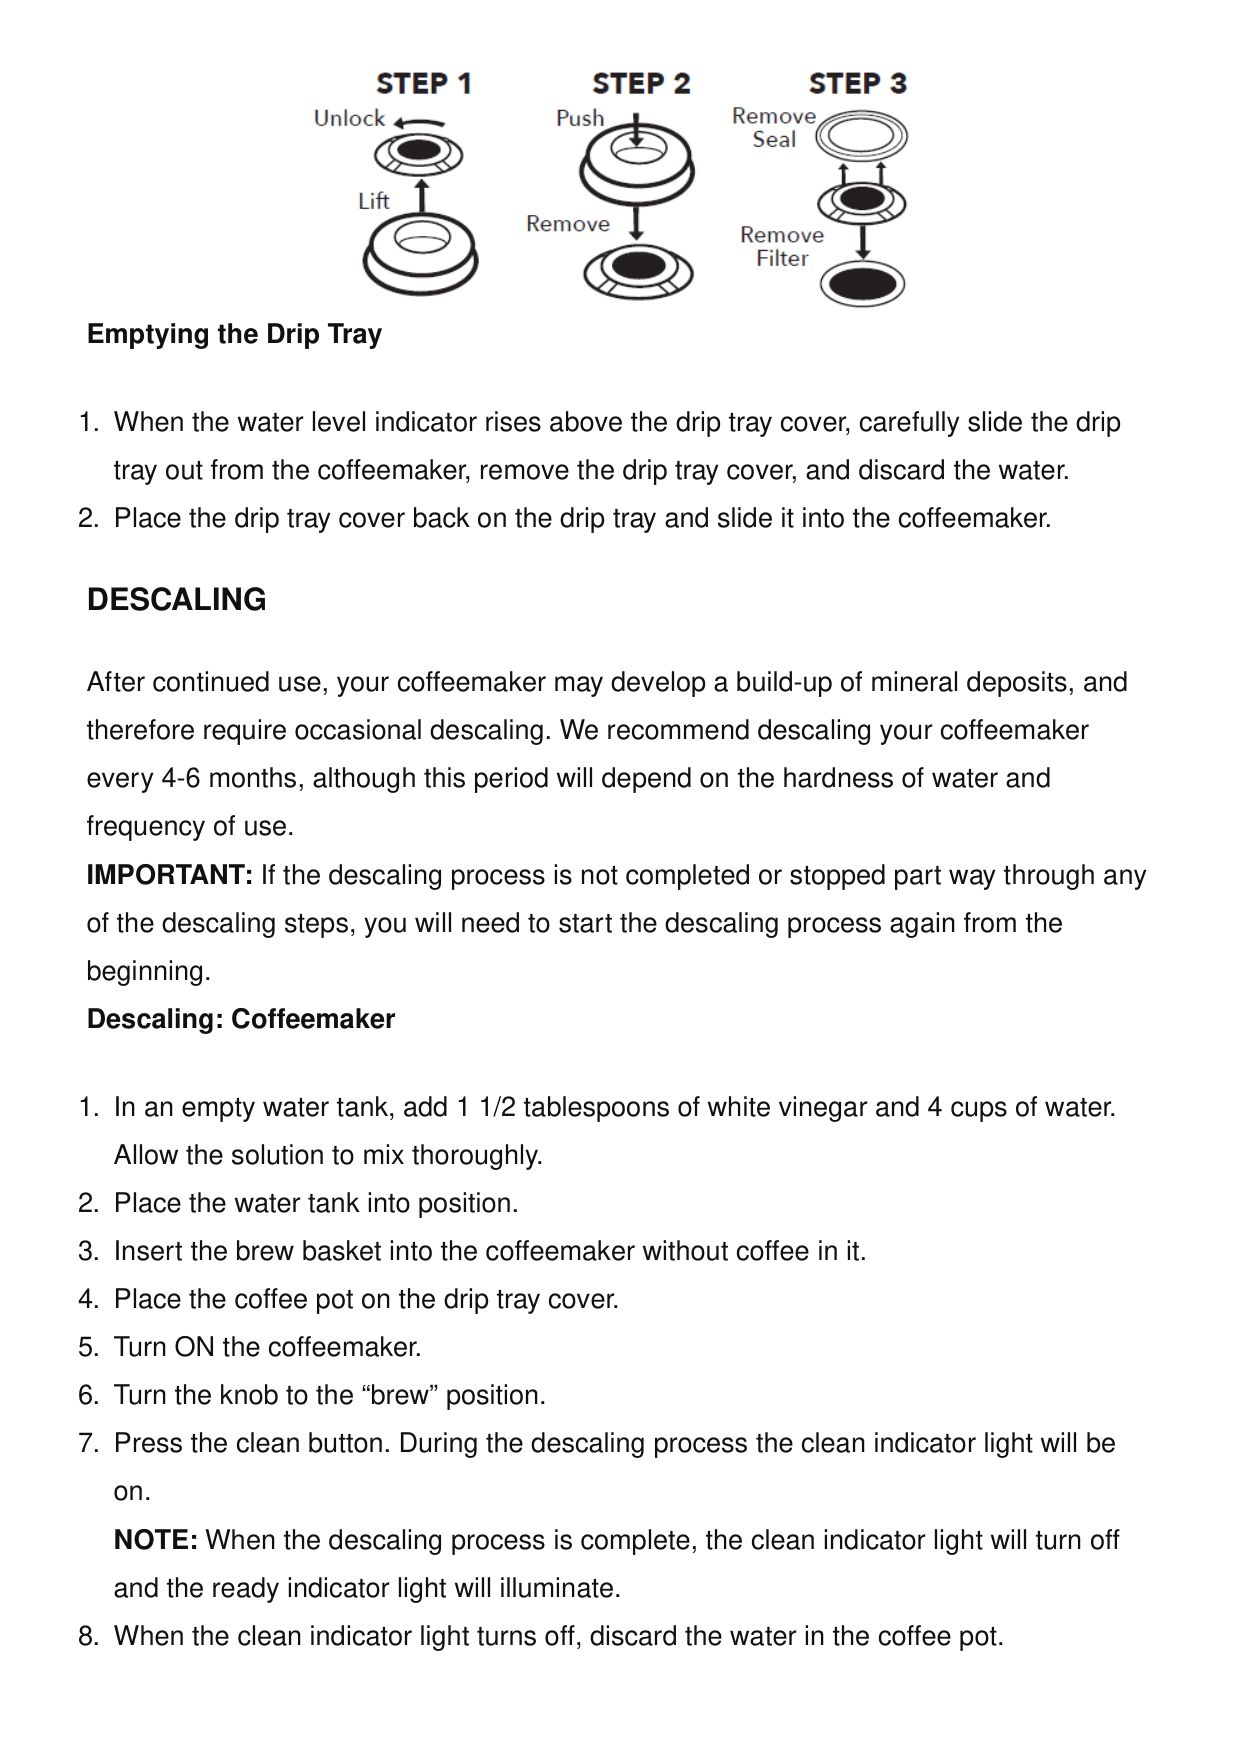
Emptying the Drip Tray
Descaling
After continued use, your coffeemaker may develop a build-up of mineral deposits, and therefore require occasional descaling. We recommend descaling your coffeemaker every 4-6 months, although this period will depend on the hardness of water and frequency of use. IMPORTANT: If the descaling process is not completed or stopped part way through any of the descaling steps, you will need to start the descaling process again from the beginning. Descaling: Coffeemaker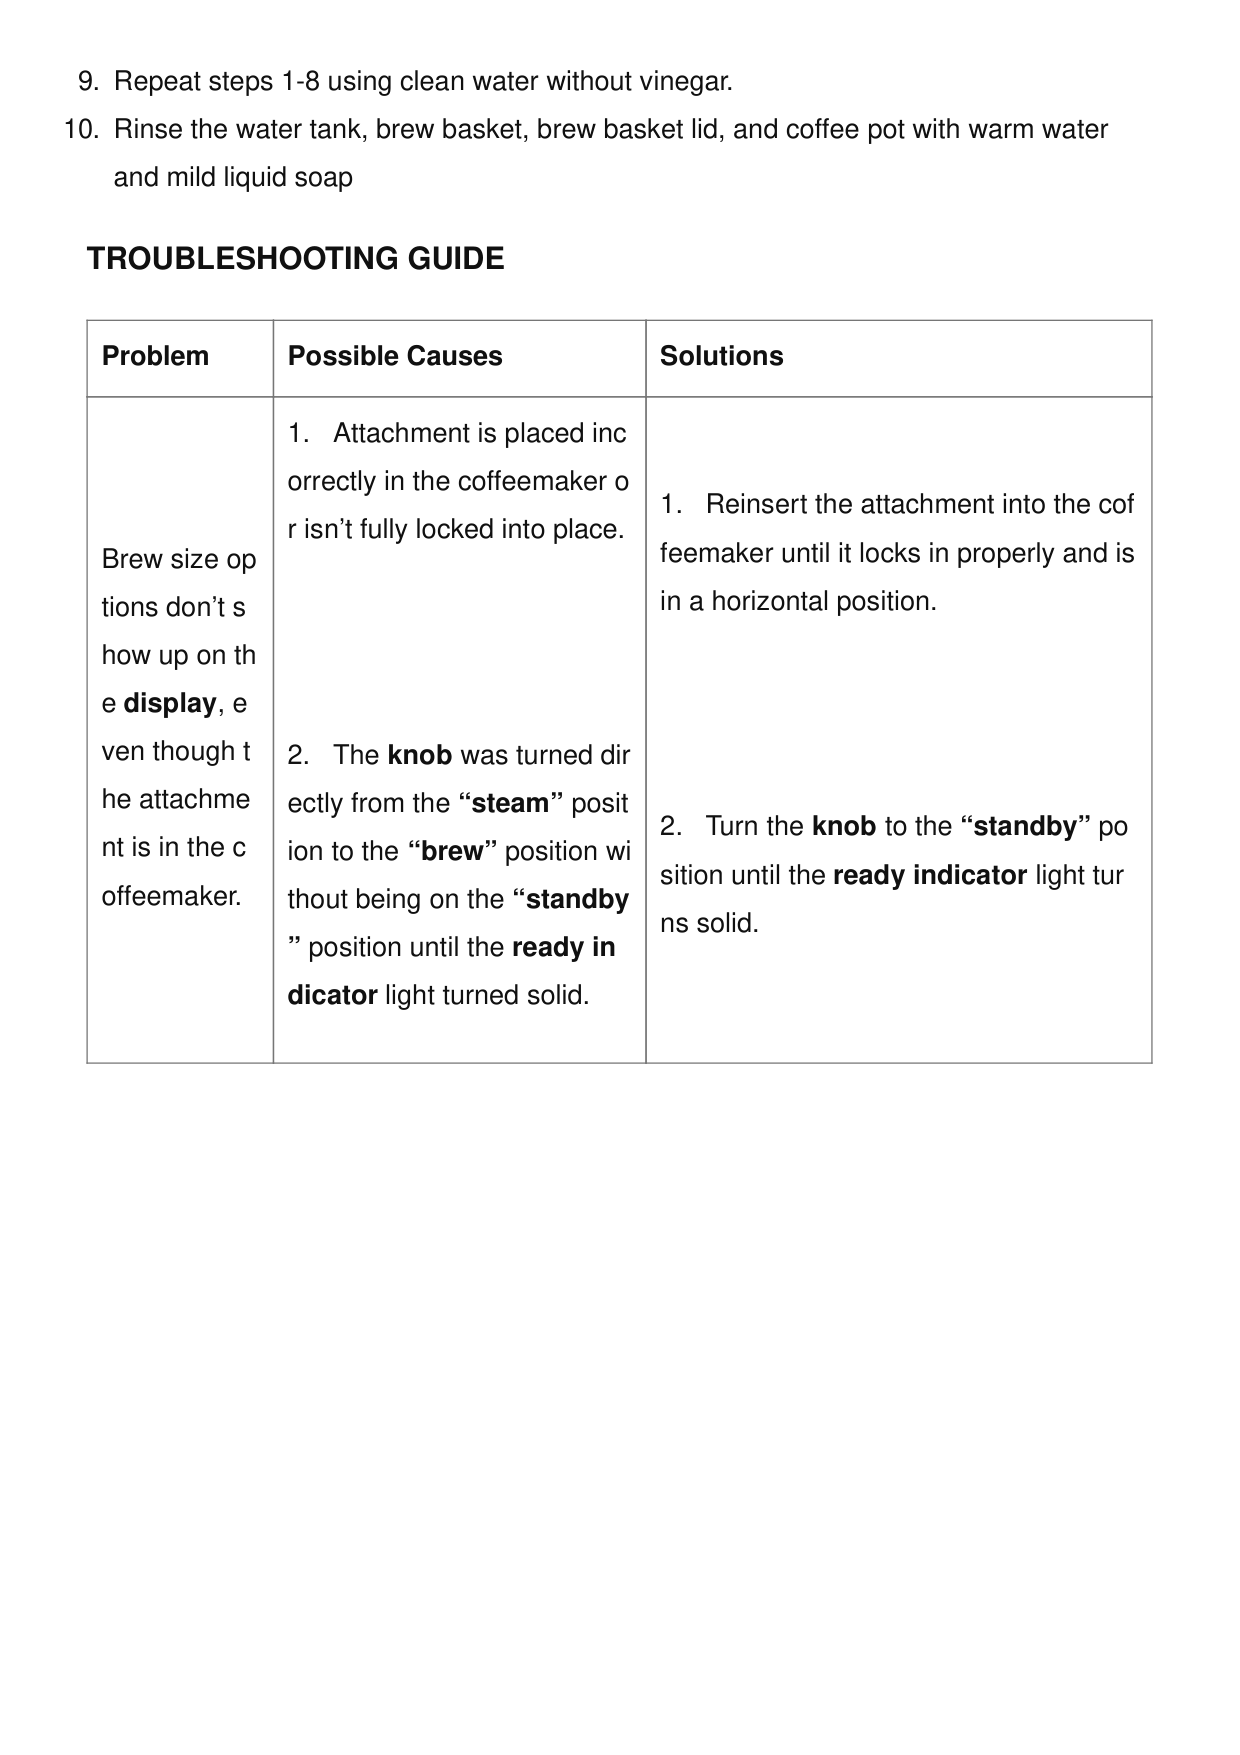
Troubleshooting Guide
Problem Possible Causes Solutions Brew size op tions don’t s how up on th e display, e ven though t he attachme nt is in the c offeemaker.
Single Serve : Coffeemak er leaks whe n brewing si ngle serve p ods.
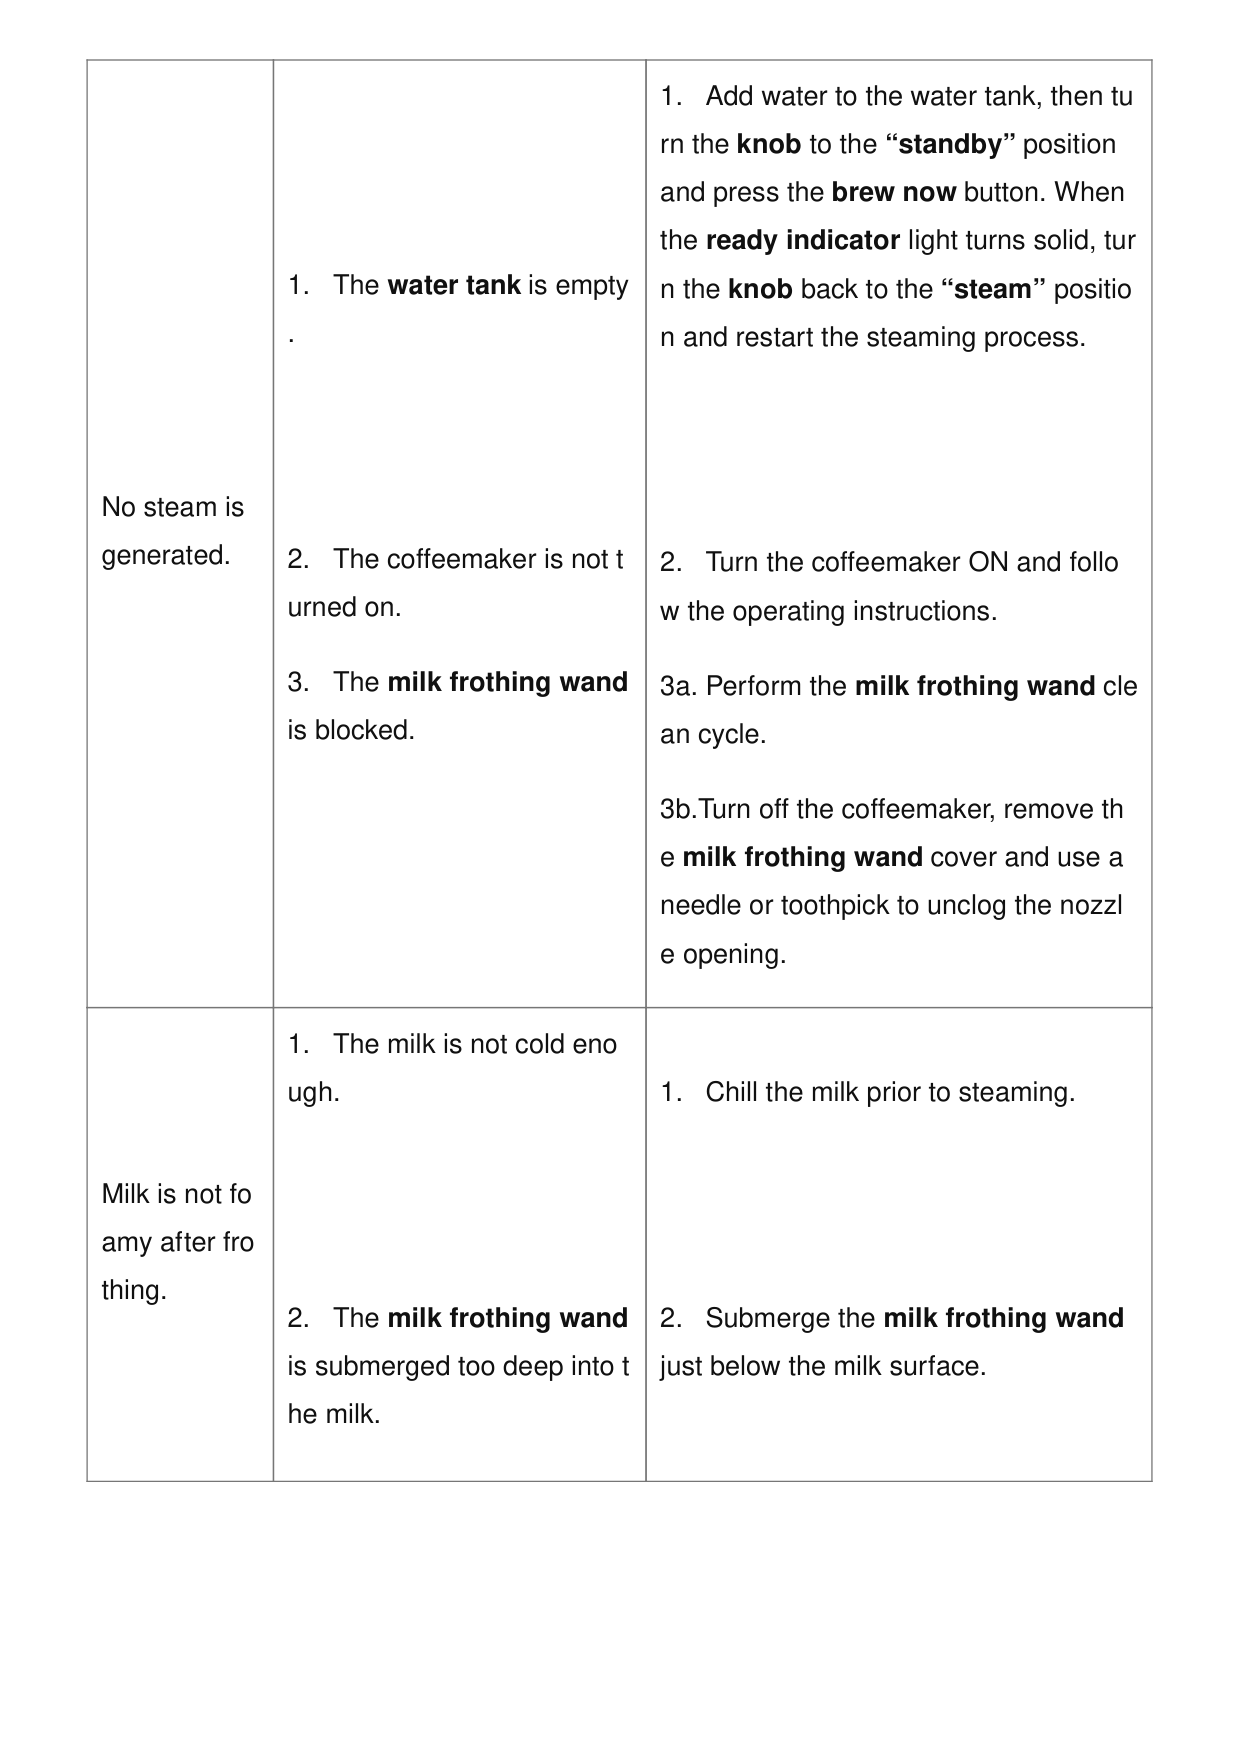
No steam is generated.
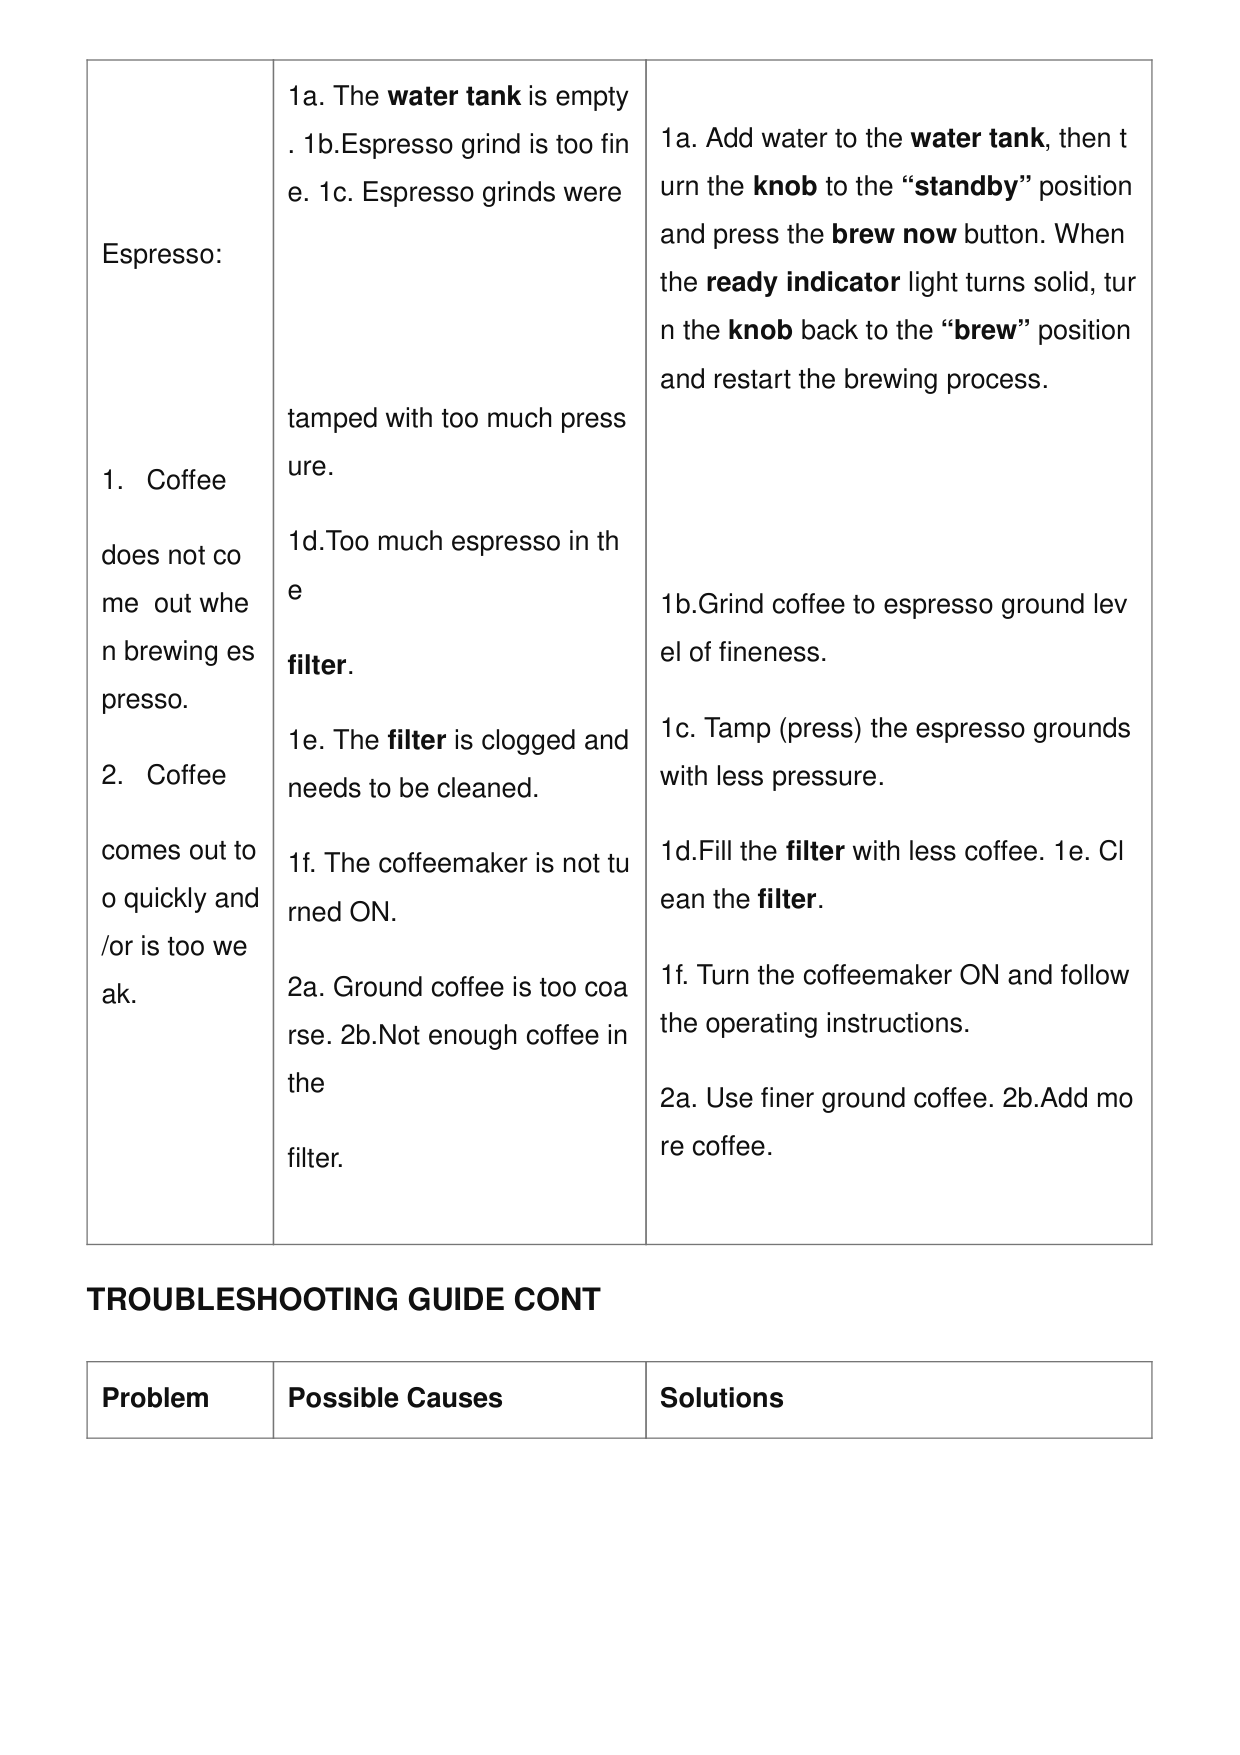
Espresso:
tamped with too much press ure. 1d.Too much espresso in th e filter. 1e. The filter is clogged and needs to be cleaned. 1f. The coffeemaker is not tu rned ON. 2a. Ground coffee is too coa rse. 2b.Not enough coffee in the filter. 1a. Add water to the water tank, then t urn the knob to the “standby” position and press the brew now button. When the ready indicator light turns solid, tur n the knob back to the “brew” position and restart the brewing process.
1b.Grind coffee to espresso ground lev el of fineness. 1c. Tamp (press) the espresso grounds with less pressure. 1d.Fill the filter with less coffee. 1e. Cl ean the filter. 1f. Turn the coffeemaker ON and follow the operating instructions. 2a. Use finer ground coffee. 2b.Add mo re coffee.
Troubleshooting Guide Cont
Problem Possible Causes Solutions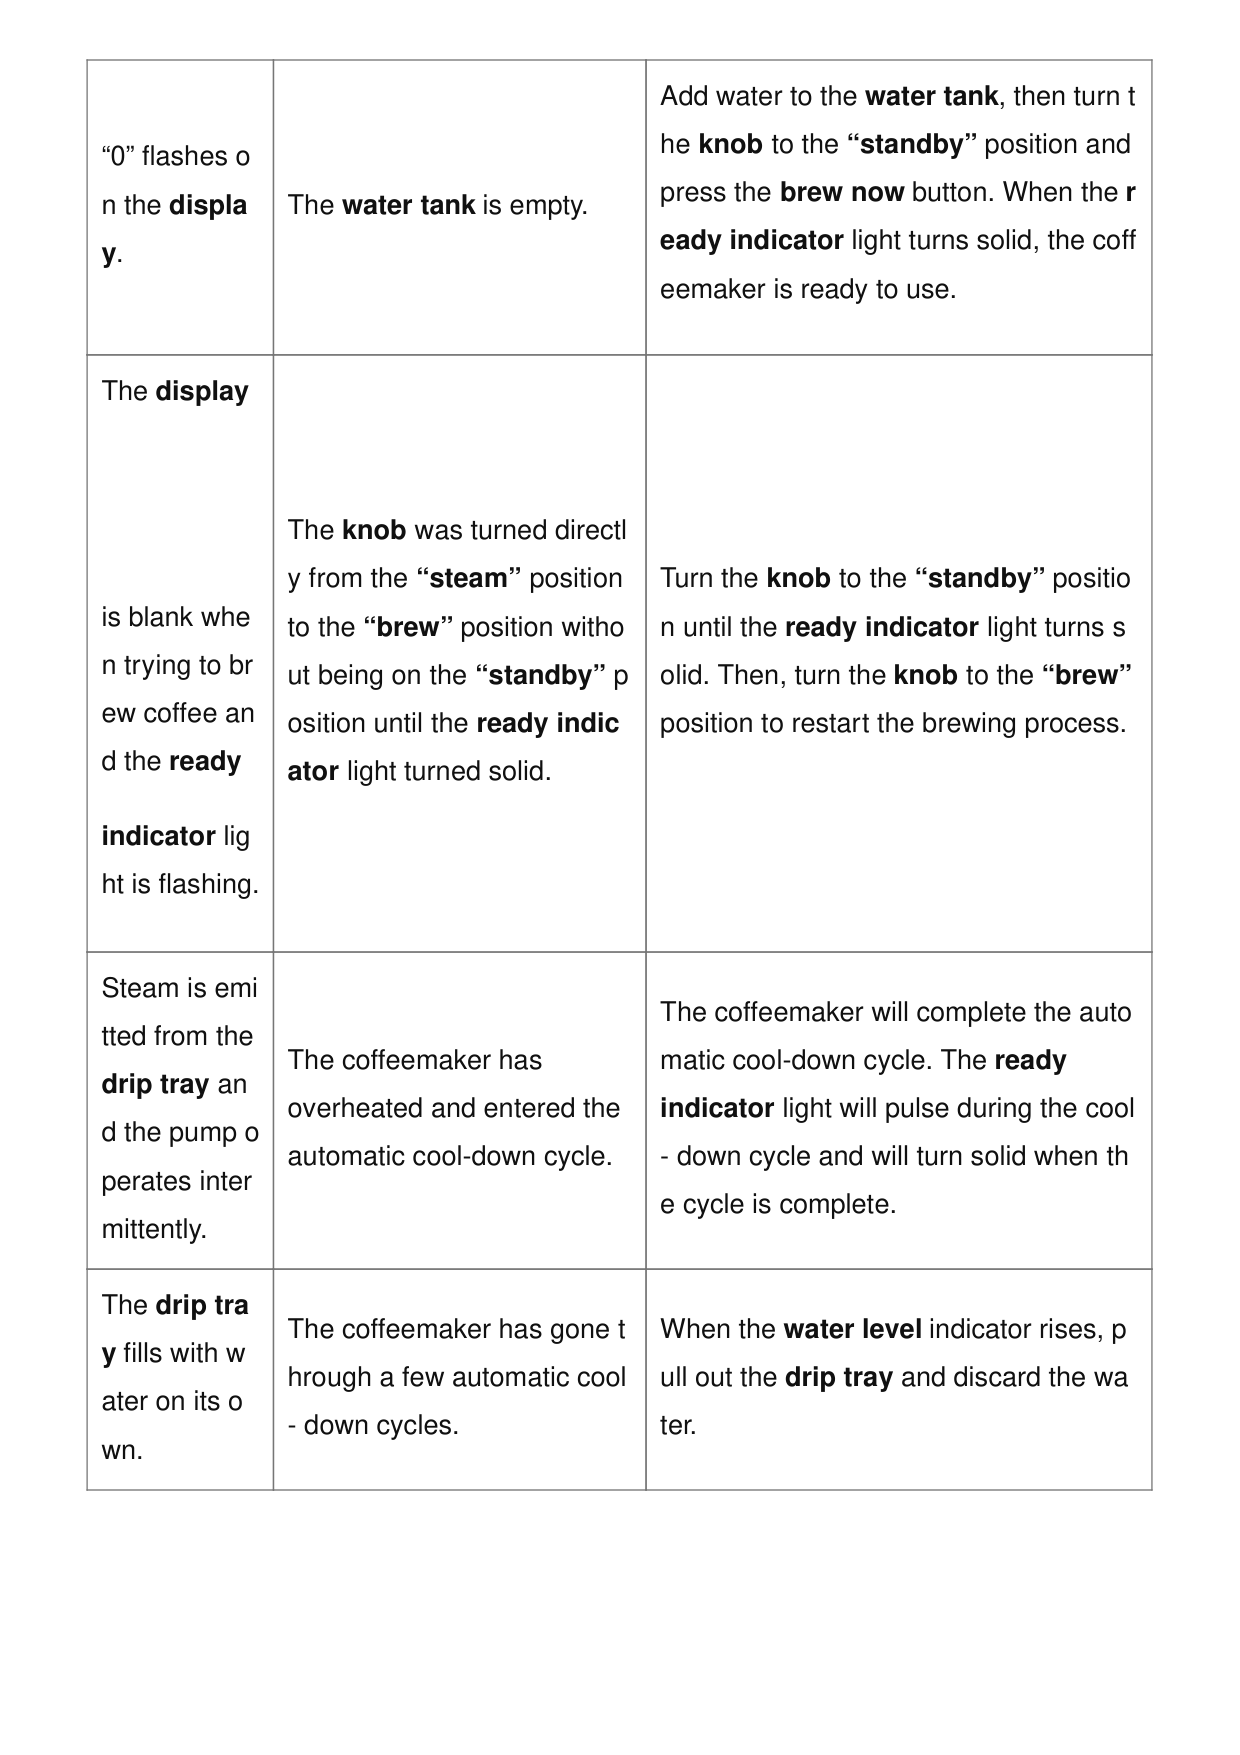
“0” flashes o n the displa y. The water tank is empty. Add water to the water tank, then turn t he knob to the “standby” position and press the brew now button. When the r eady indicator light turns solid, the coff eemaker is ready to use. The display
is blank whe n trying to br ew coffee an d the ready indicator lig ht is flashing. The knob was turned directl y from the “steam” position to the “brew” position witho ut being on the “standby” p osition until the ready indic ator light turned solid. Turn the knob to the “standby” positio n until the ready indicator light turns s olid. Then, turn the knob to the “brew” position to restart the brewing process. Steam is emi tted from the drip tray an d the pump o perates inter mittently. The coffeemaker has overheated and entered the automatic cool-down cycle. The coffeemaker will complete the auto matic cool-down cycle. The ready indicator light will pulse during the cool
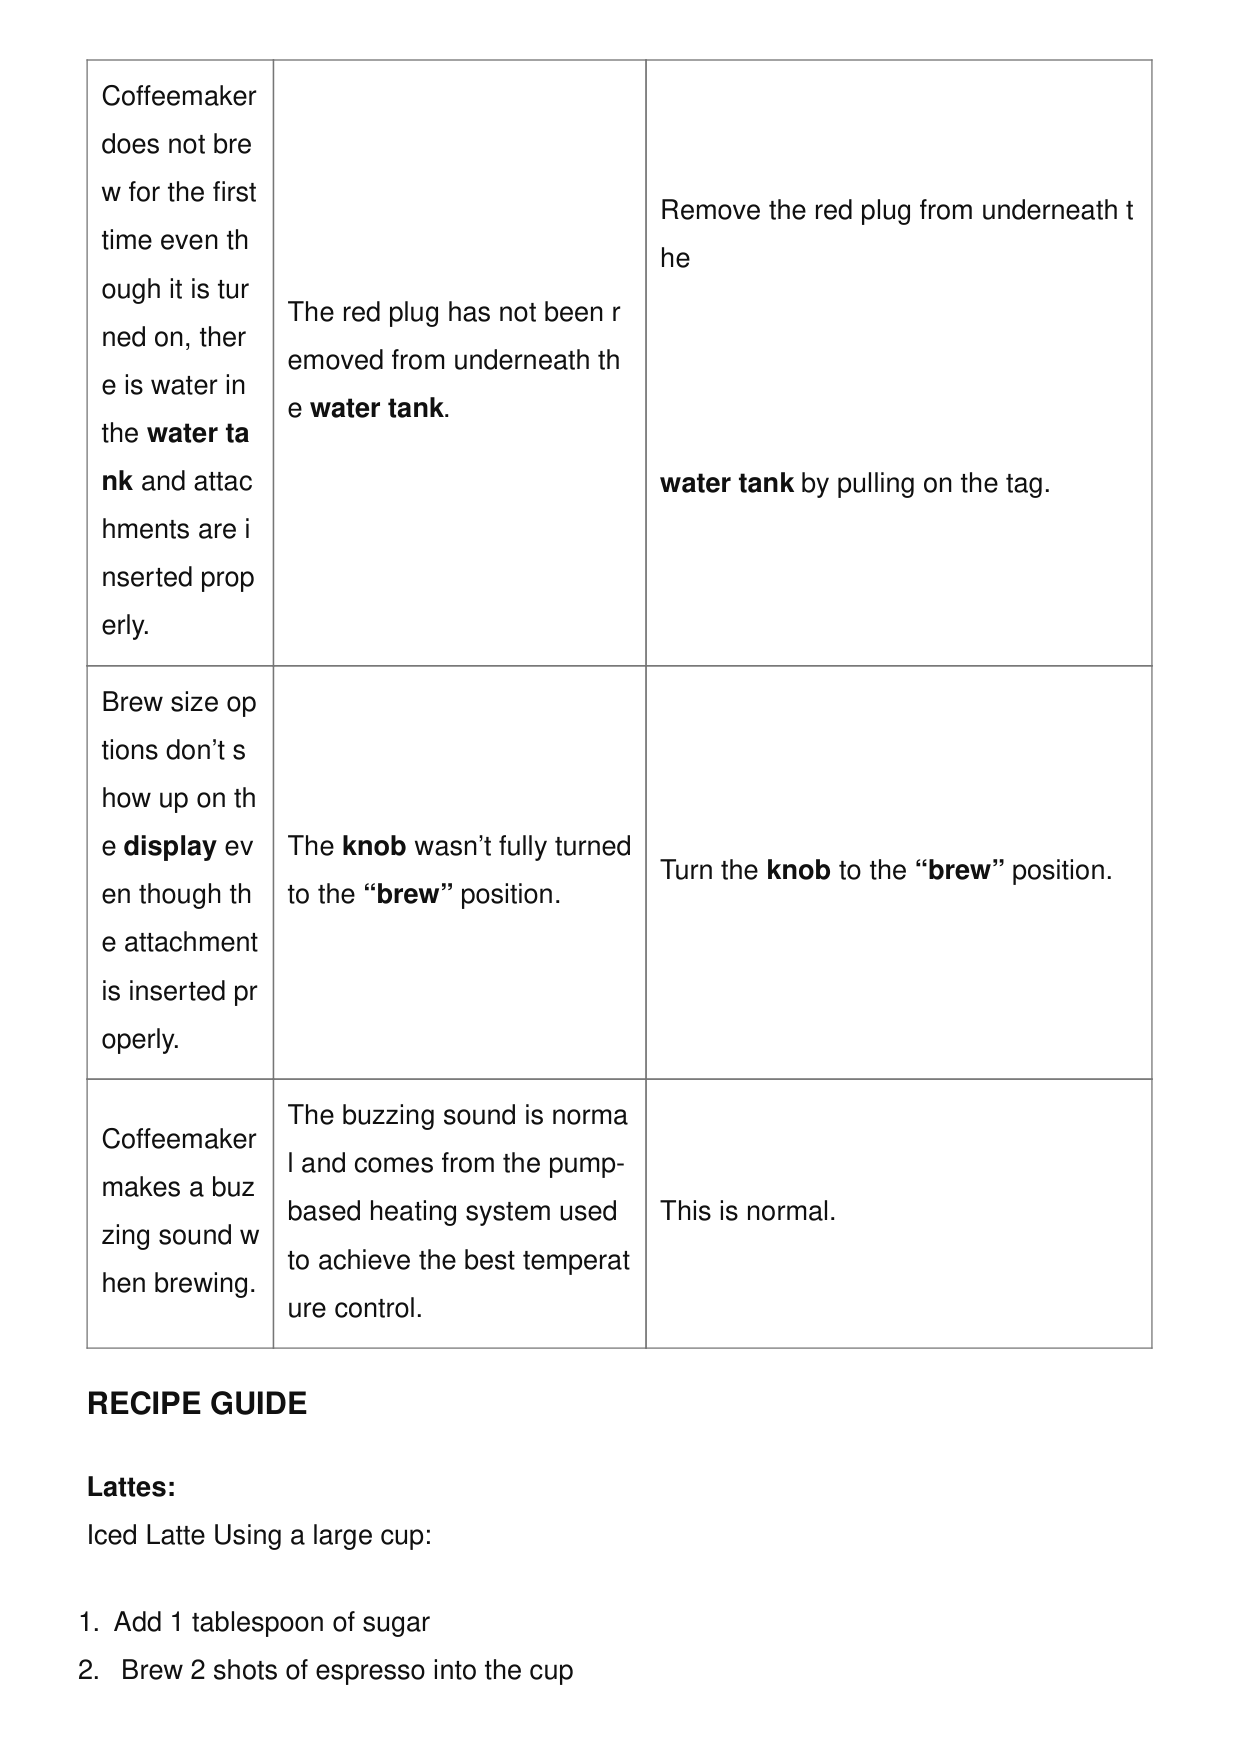
Coffeemaker does not bre w for the first time even th ough it is tur ned on, ther e is water in the water ta nk and attac hments are i nserted prop erly. The red plug has not been r emoved from underneath th e water tank. Remove the red plug from underneath t he
water tank by pulling on the tag. Brew size op tions don’t s how up on th e display ev en though th e attachment is inserted pr operly. The knob wasn’t fully turned to the “brew” position. Turn the knob to the “brew” position. Coffeemaker makes a buz zing sound w hen brewing. The buzzing sound is norma l and comes from the pump- based heating system used to achieve the best temperat ure control. This is normal.
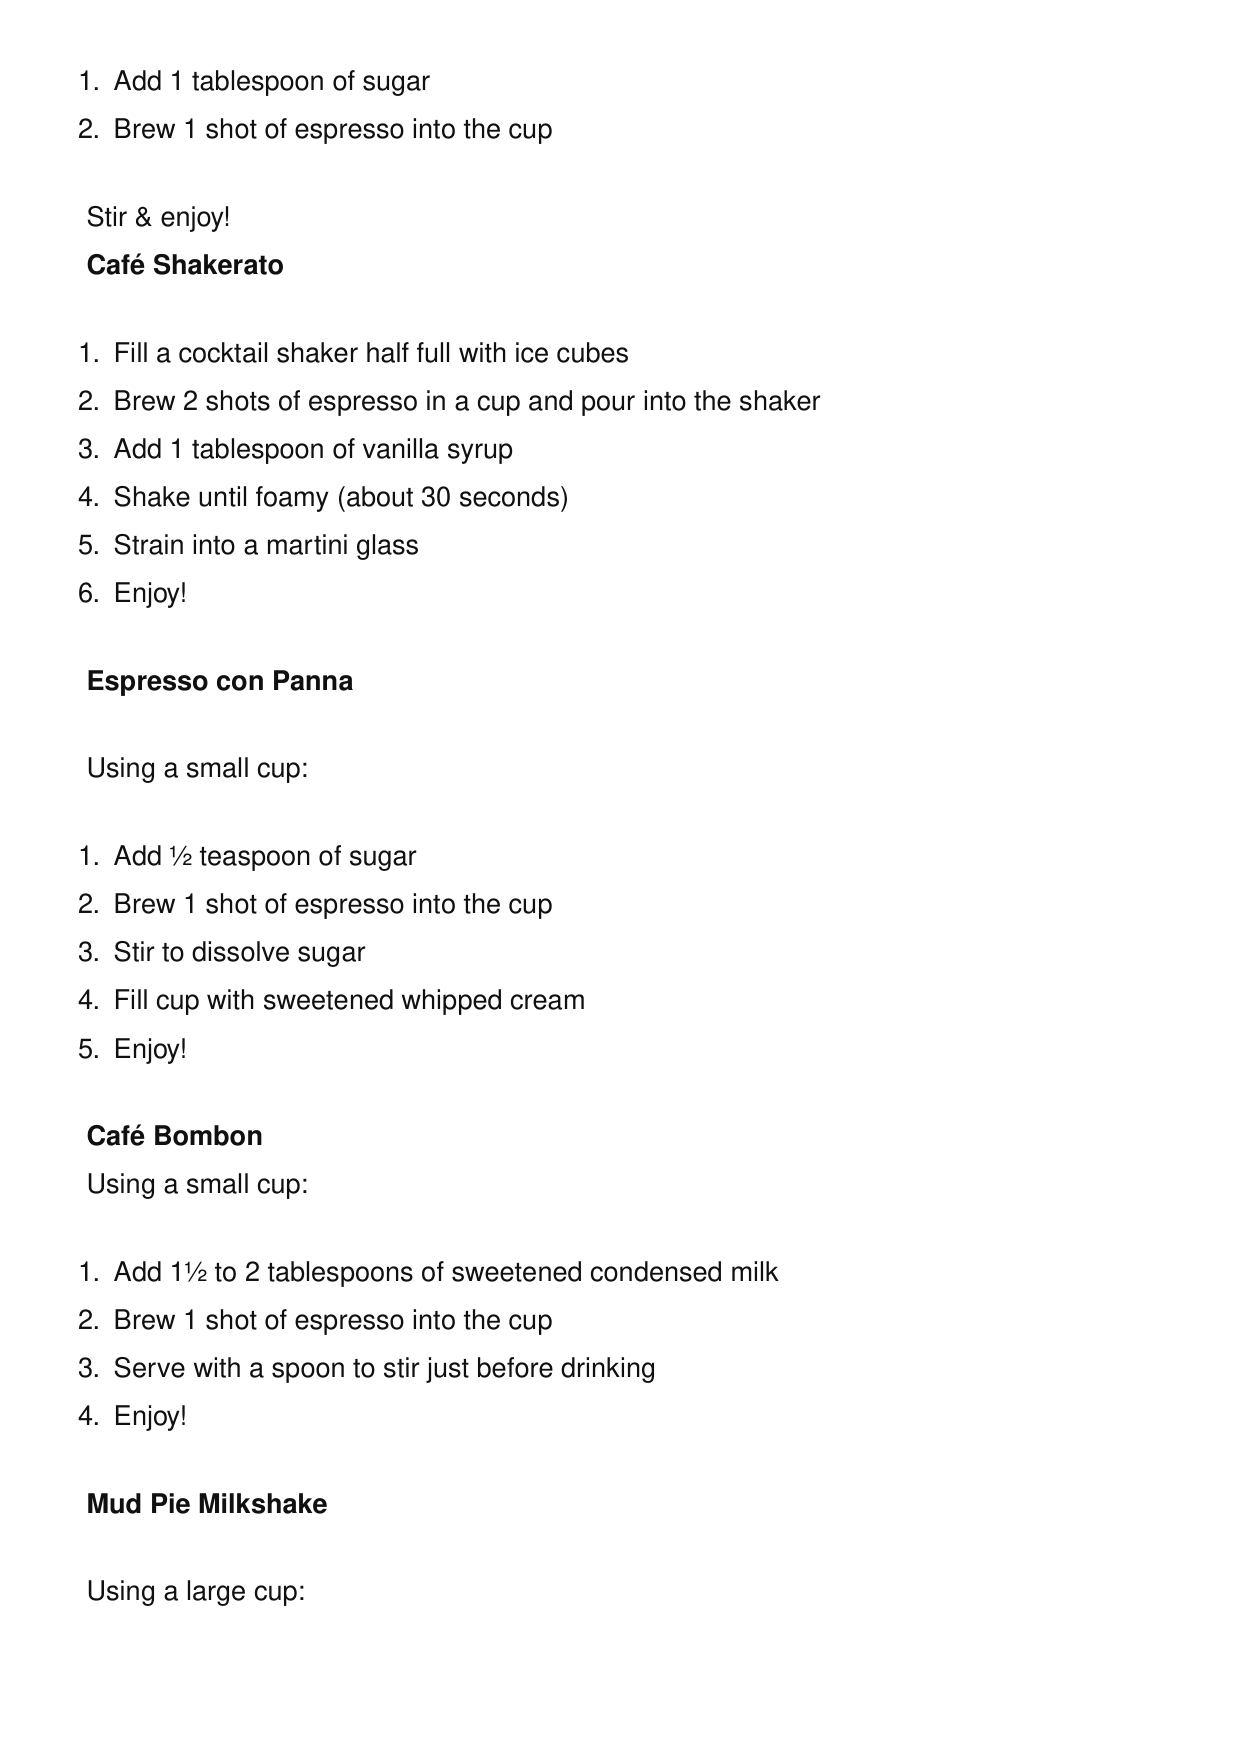
Recipe Guide
Lattes: Iced Latte Using a large cup: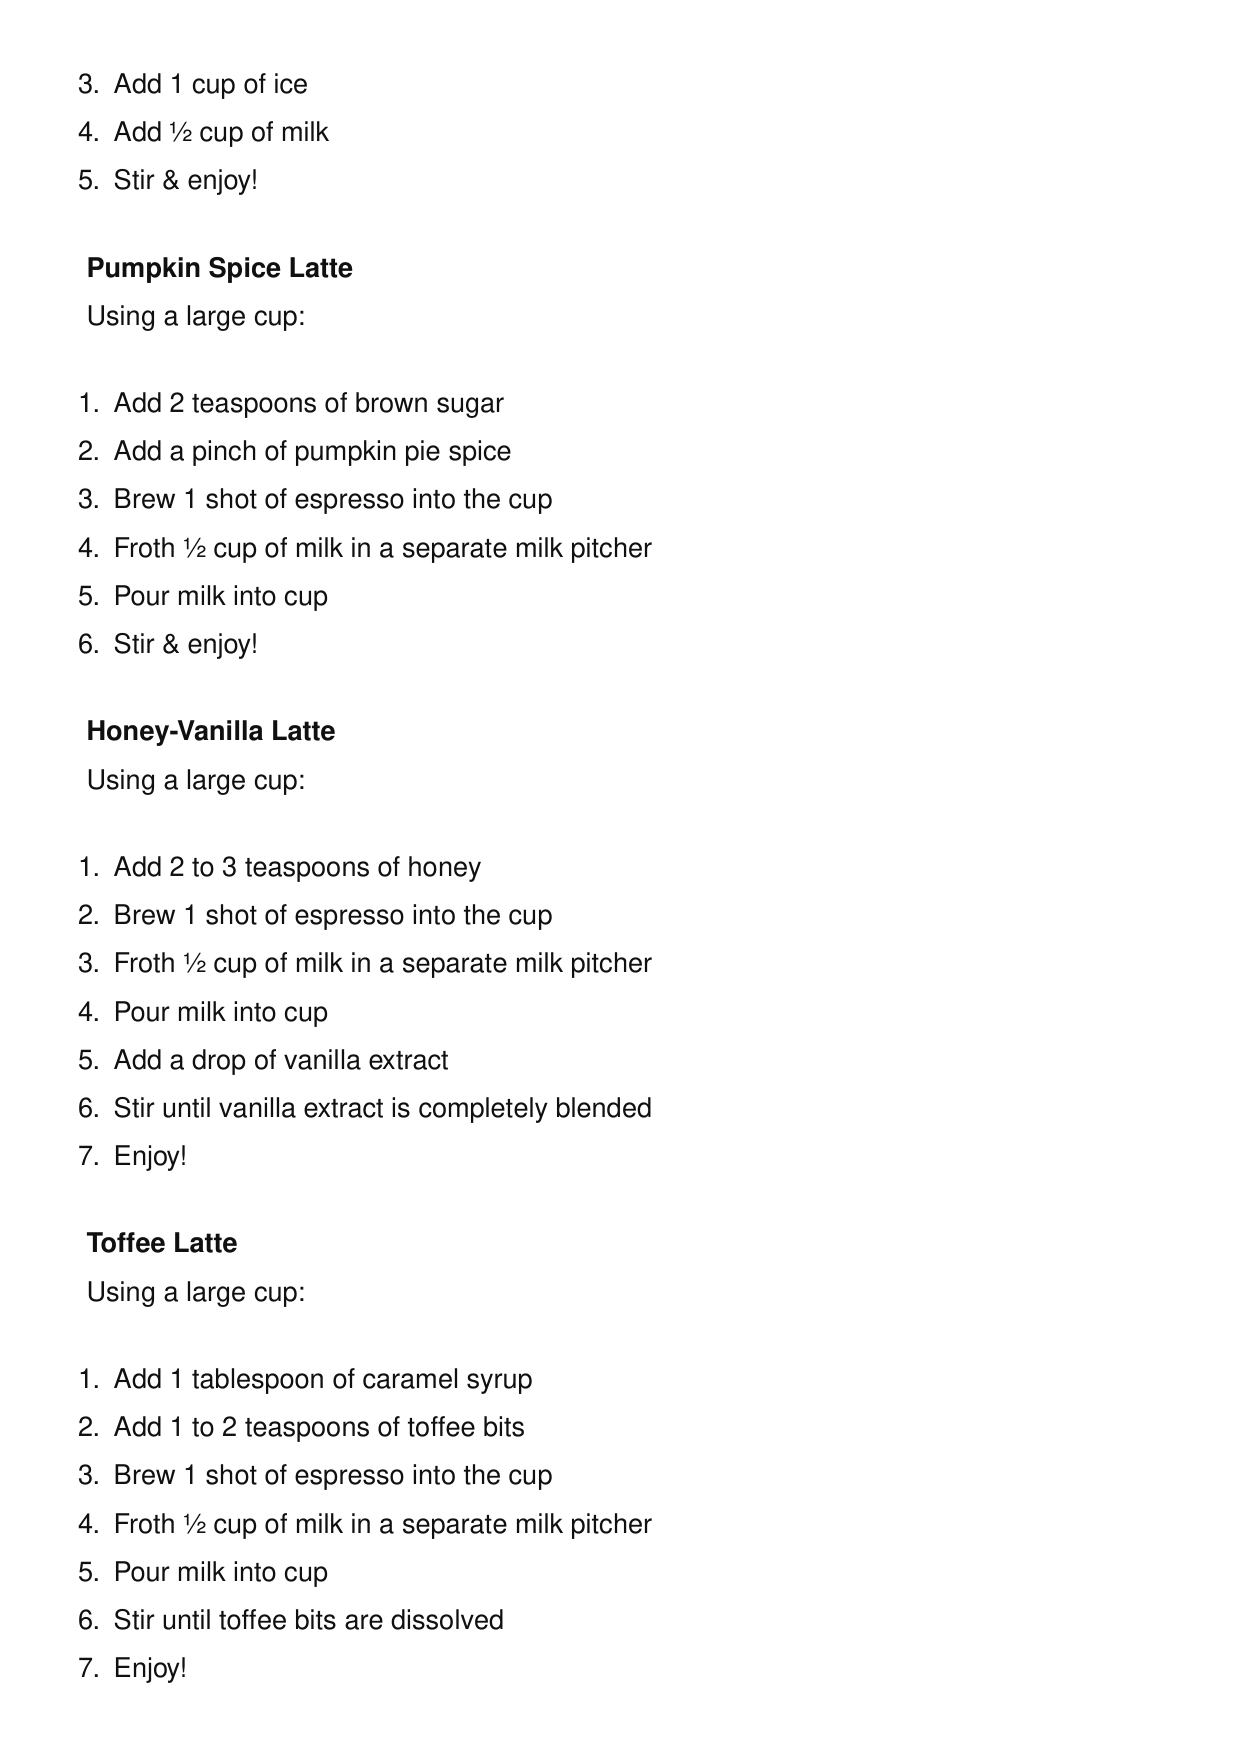
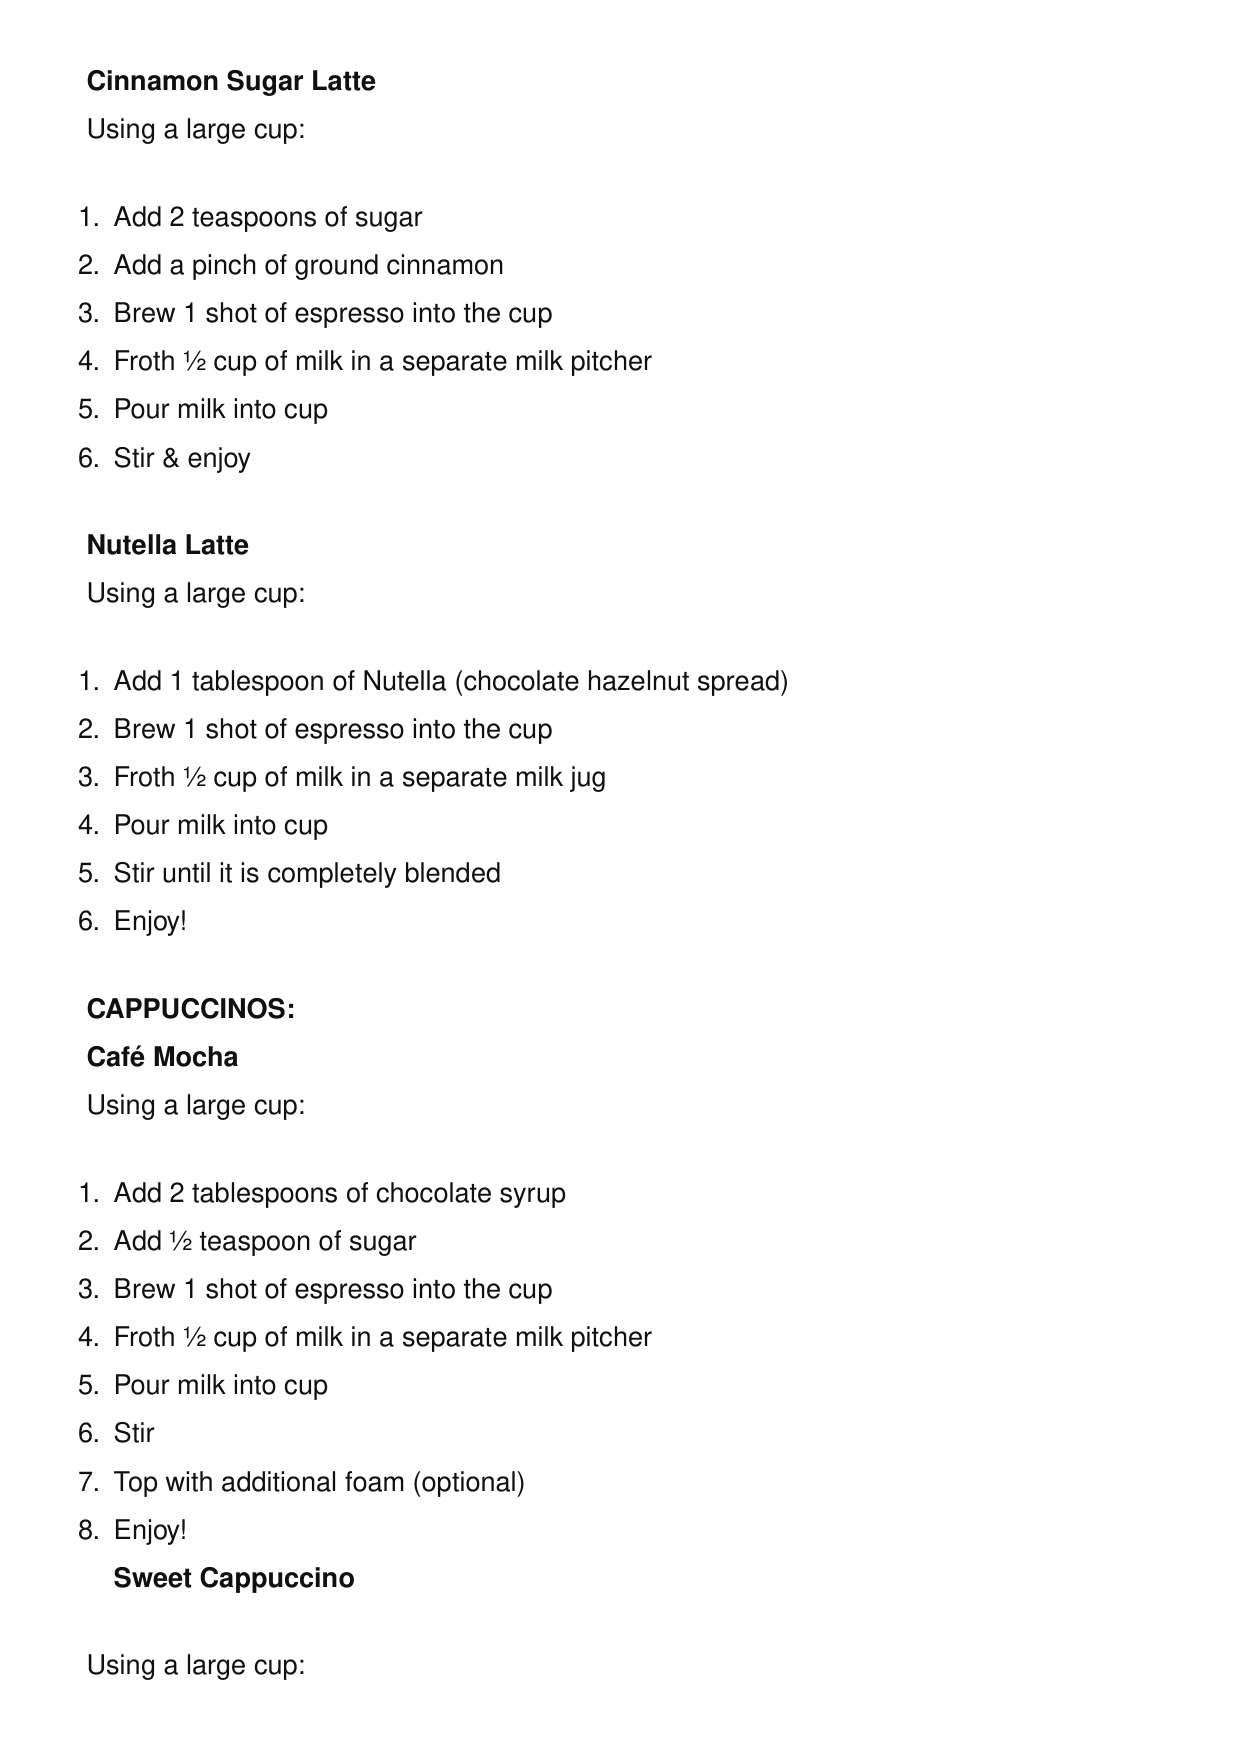
Cinnamon Sugar Latte Using a large cup:
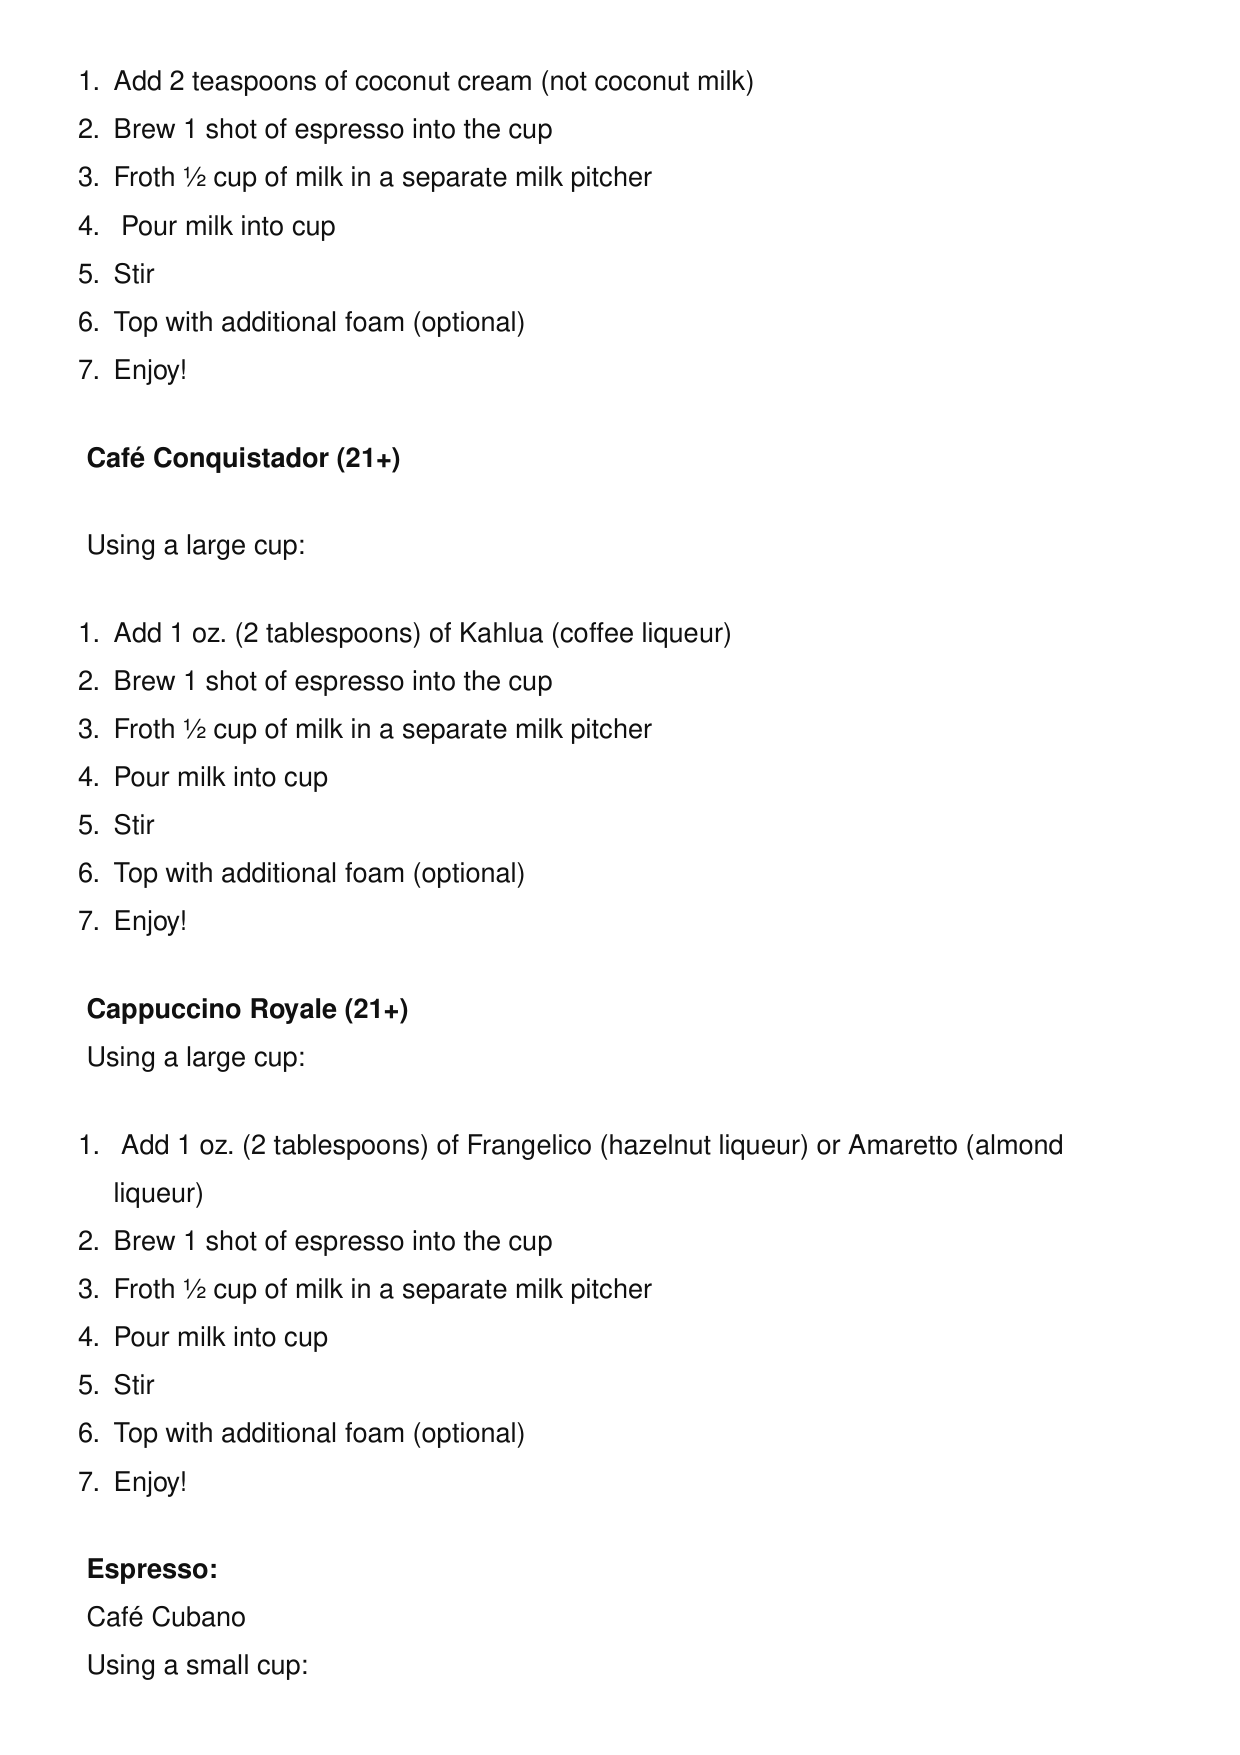
Cappuccinos:
Café Mocha Using a large cup: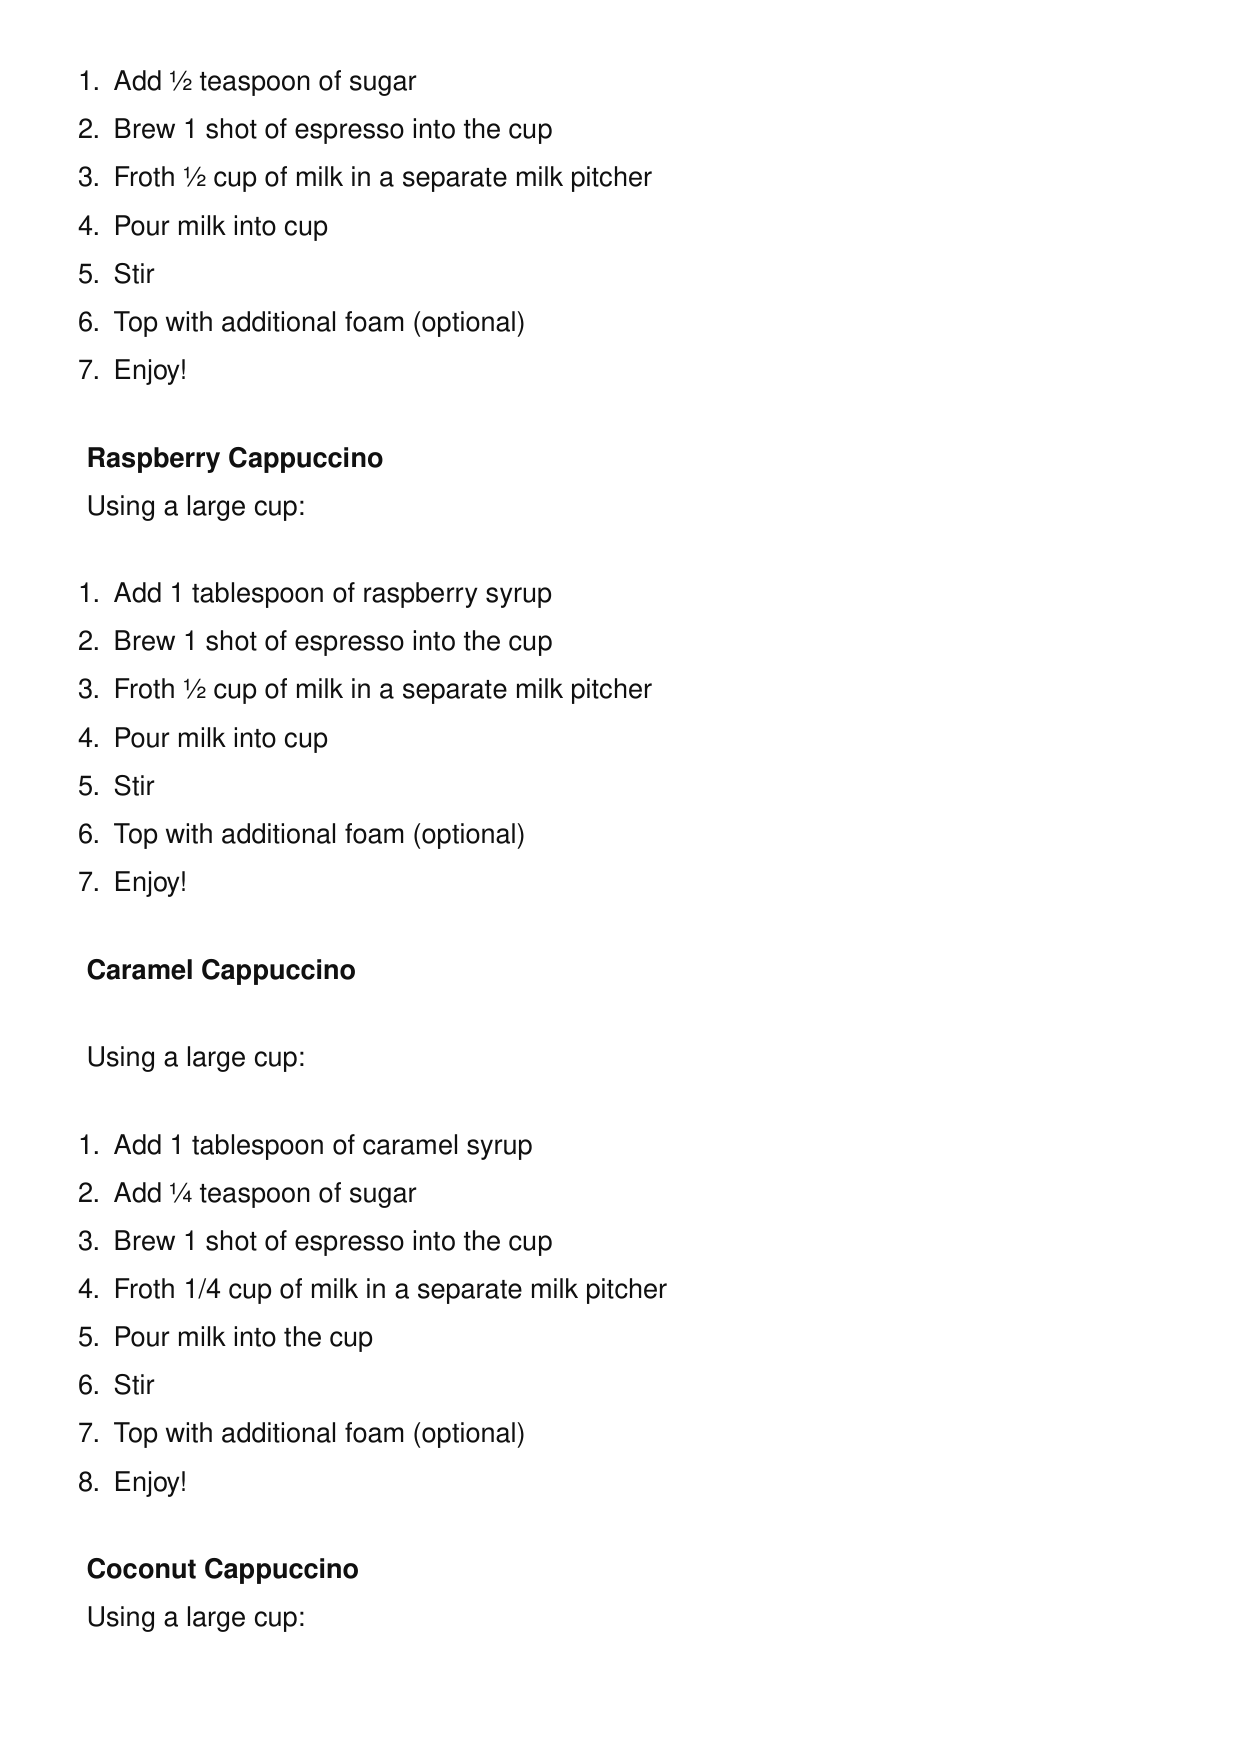
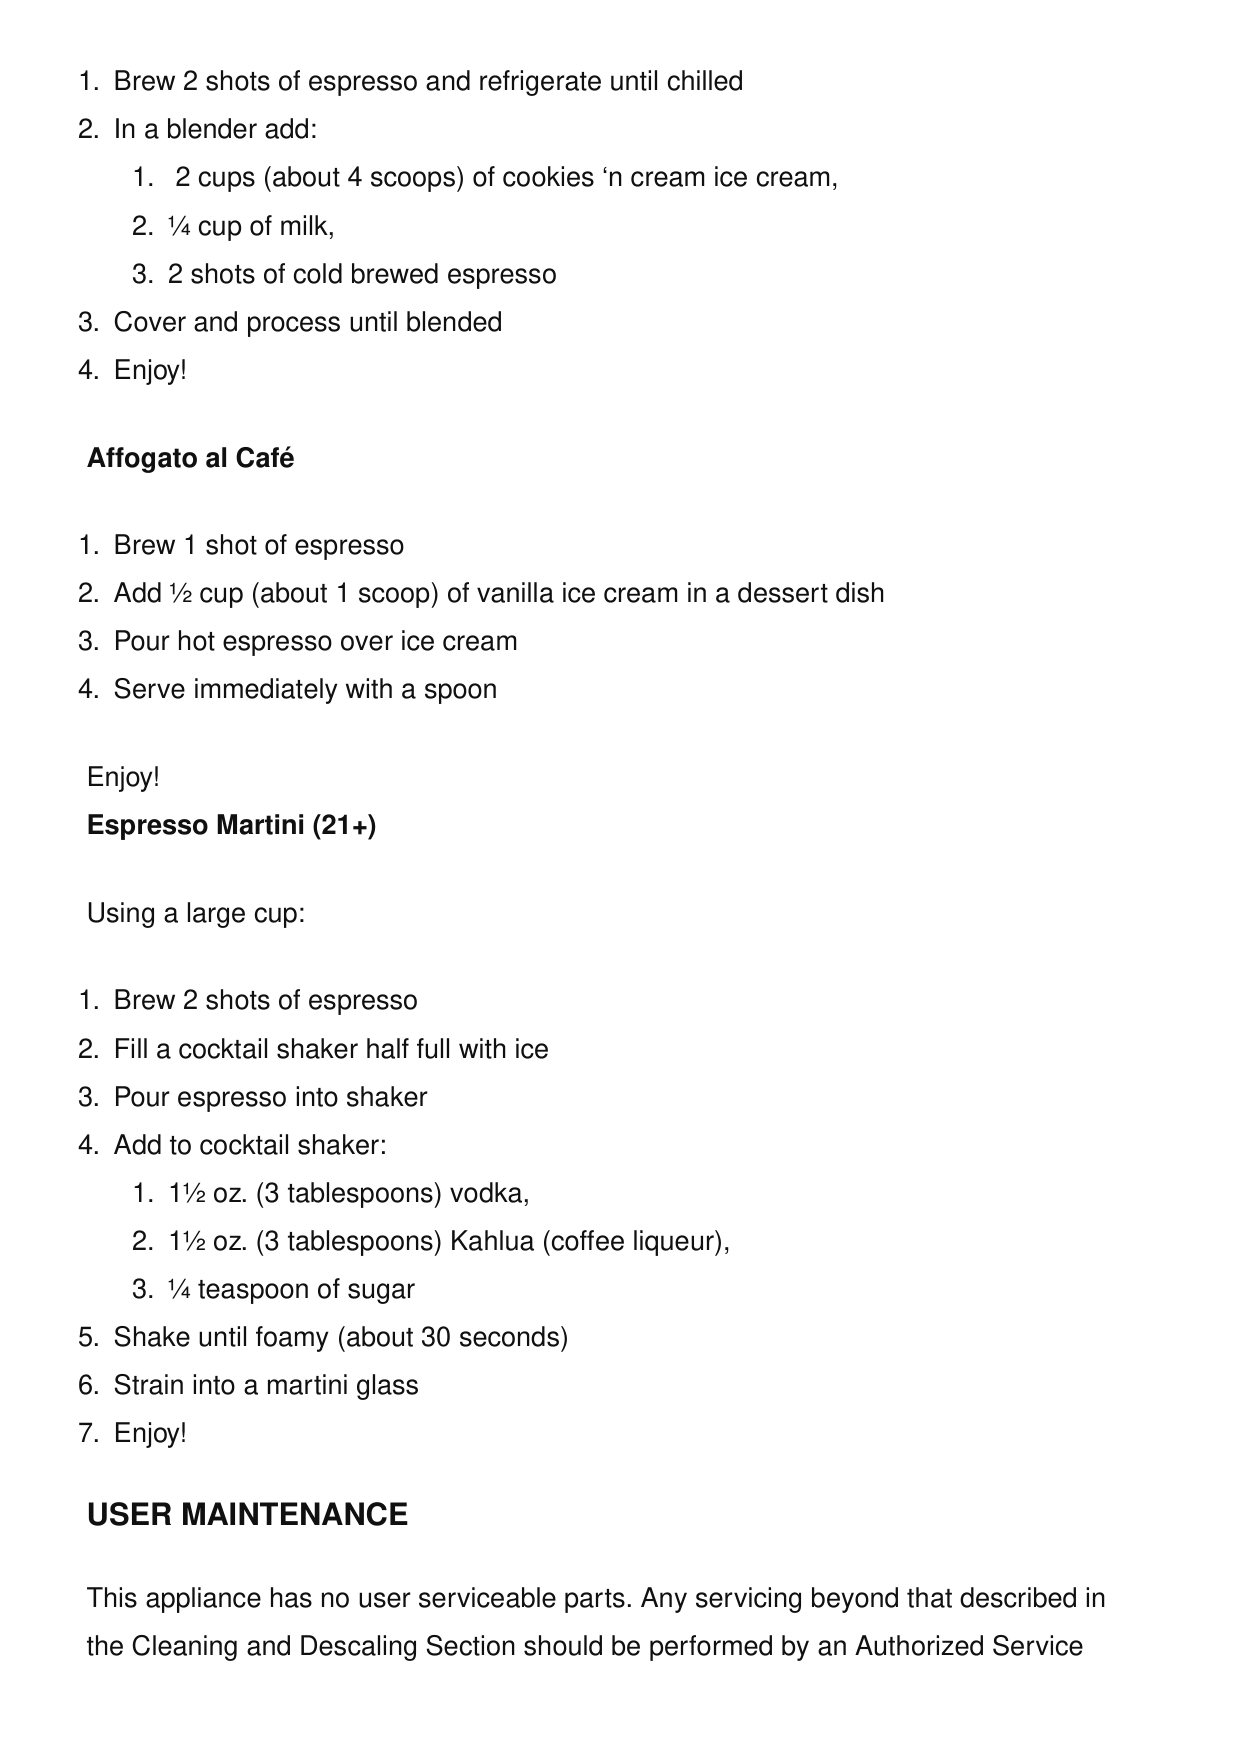
User Maintenance
This appliance has no user serviceable parts. Any servicing beyond that described in the Cleaning and Descaling Section should be performed by an Authorized Service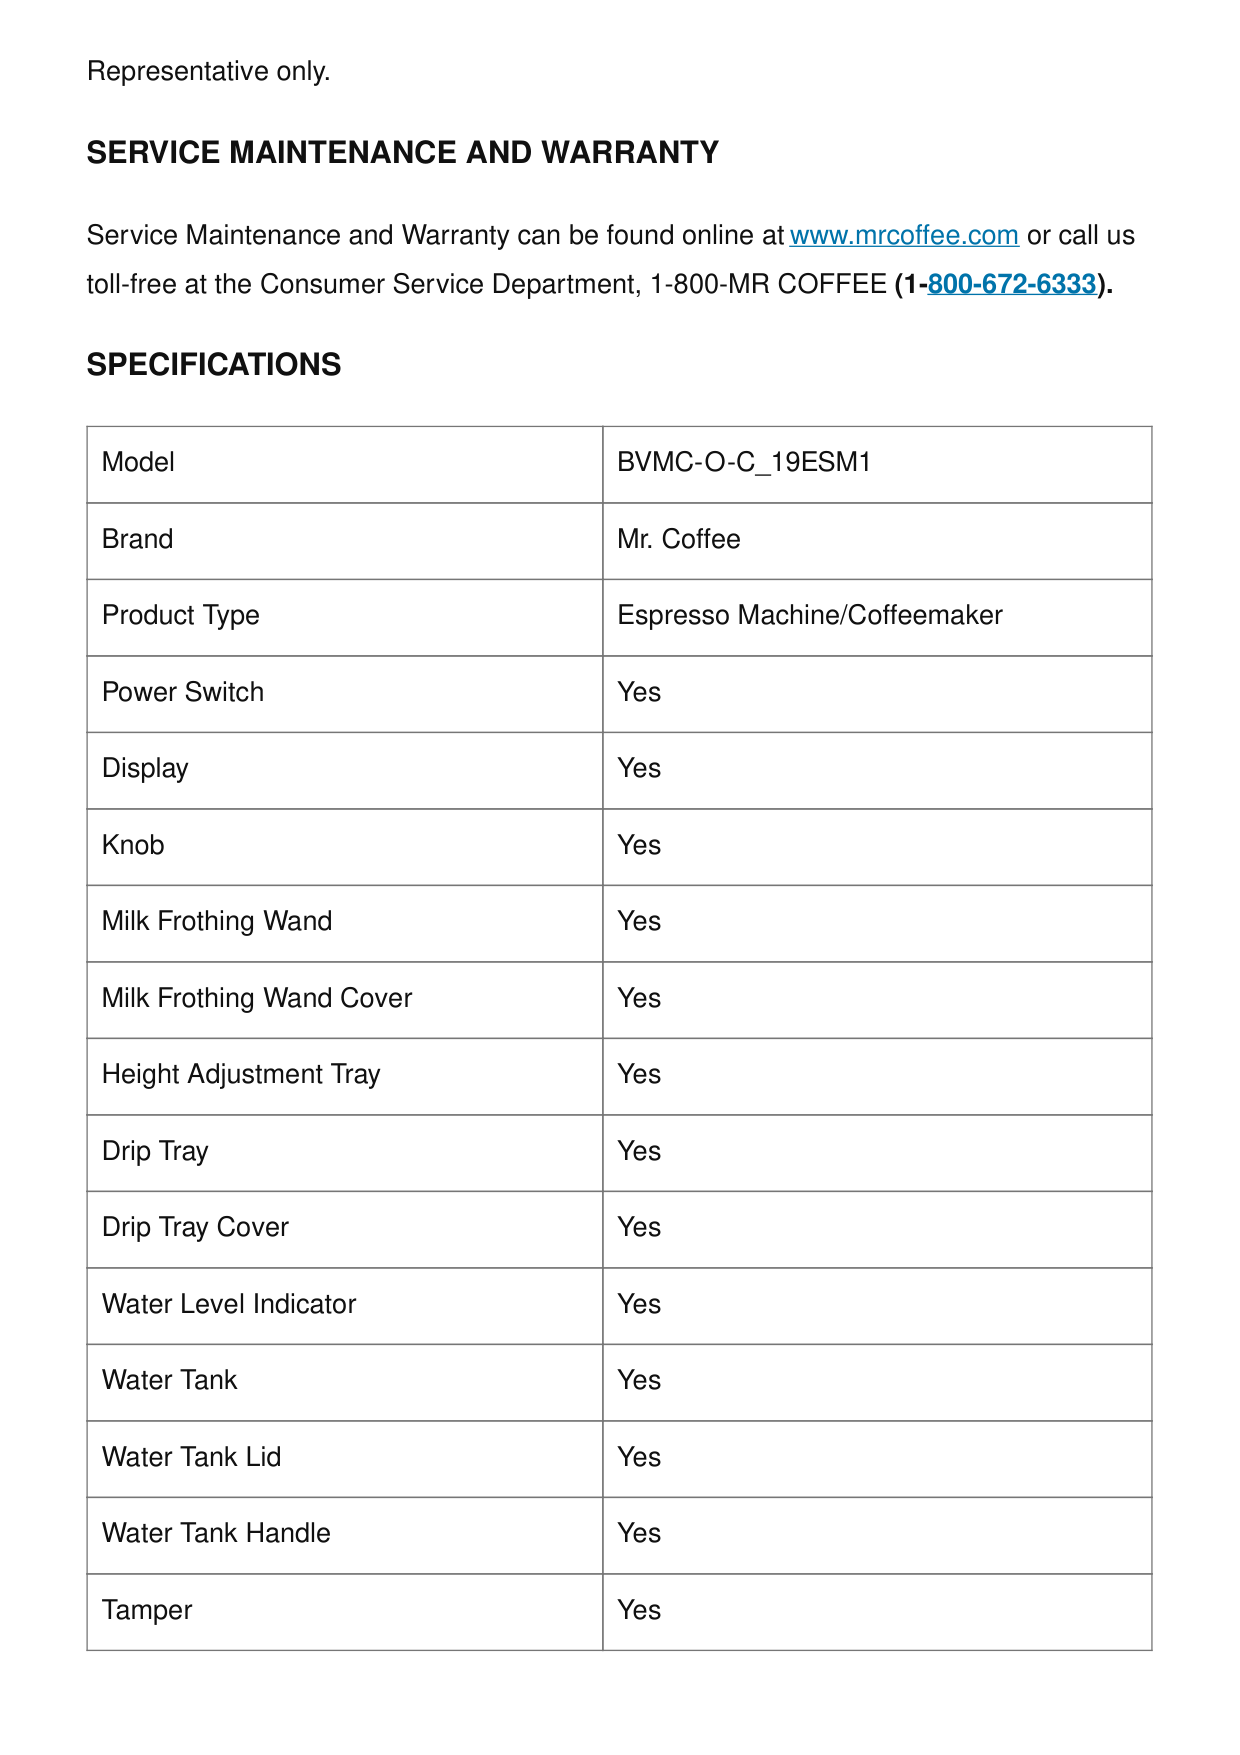
Representative only.
Service Maintenance And Warranty
Service Maintenance and Warranty can be found online at www.mrcoffee.com or call us toll-free at the Consumer Service Department, 1-800-MR COFFEE (1-800-672-6333).Specifications
ModelBvmc-O-C_19Esm1
Brand Mr. Coffee Product Type Espresso Machine/Coffeemaker Power Switch Yes Display Yes Knob Yes Milk Frothing Wand Yes Milk Frothing Wand Cover Yes Height Adjustment Tray Yes Drip Tray Yes Drip Tray Cover Yes Water Level Indicator Yes Water Tank Yes Water Tank Lid Yes Water Tank Handle Yes Tamper Yes
Clean Button Yes Clean Indicator Yes Brew Size Selector Yes Ready Indicator Yes Brew Now Button Yes Brew Now Indicator Yes Espresso Portafilter Yes Filter Retainer Clip Yes 1-shot Filter Yes 2-shot Filter Yes Single Serve Portafilter Yes Coffee Pot Yes Coffee Pot Lid Yes Brew Basket Yes Brew Basket Lid Yes Permanent Single Serve Filter No (optional) Permanent Basket Filter No (optional) Storage Tray No (optional) Frequently Asked Questions How do I turn the coffee maker on? Press the power button.
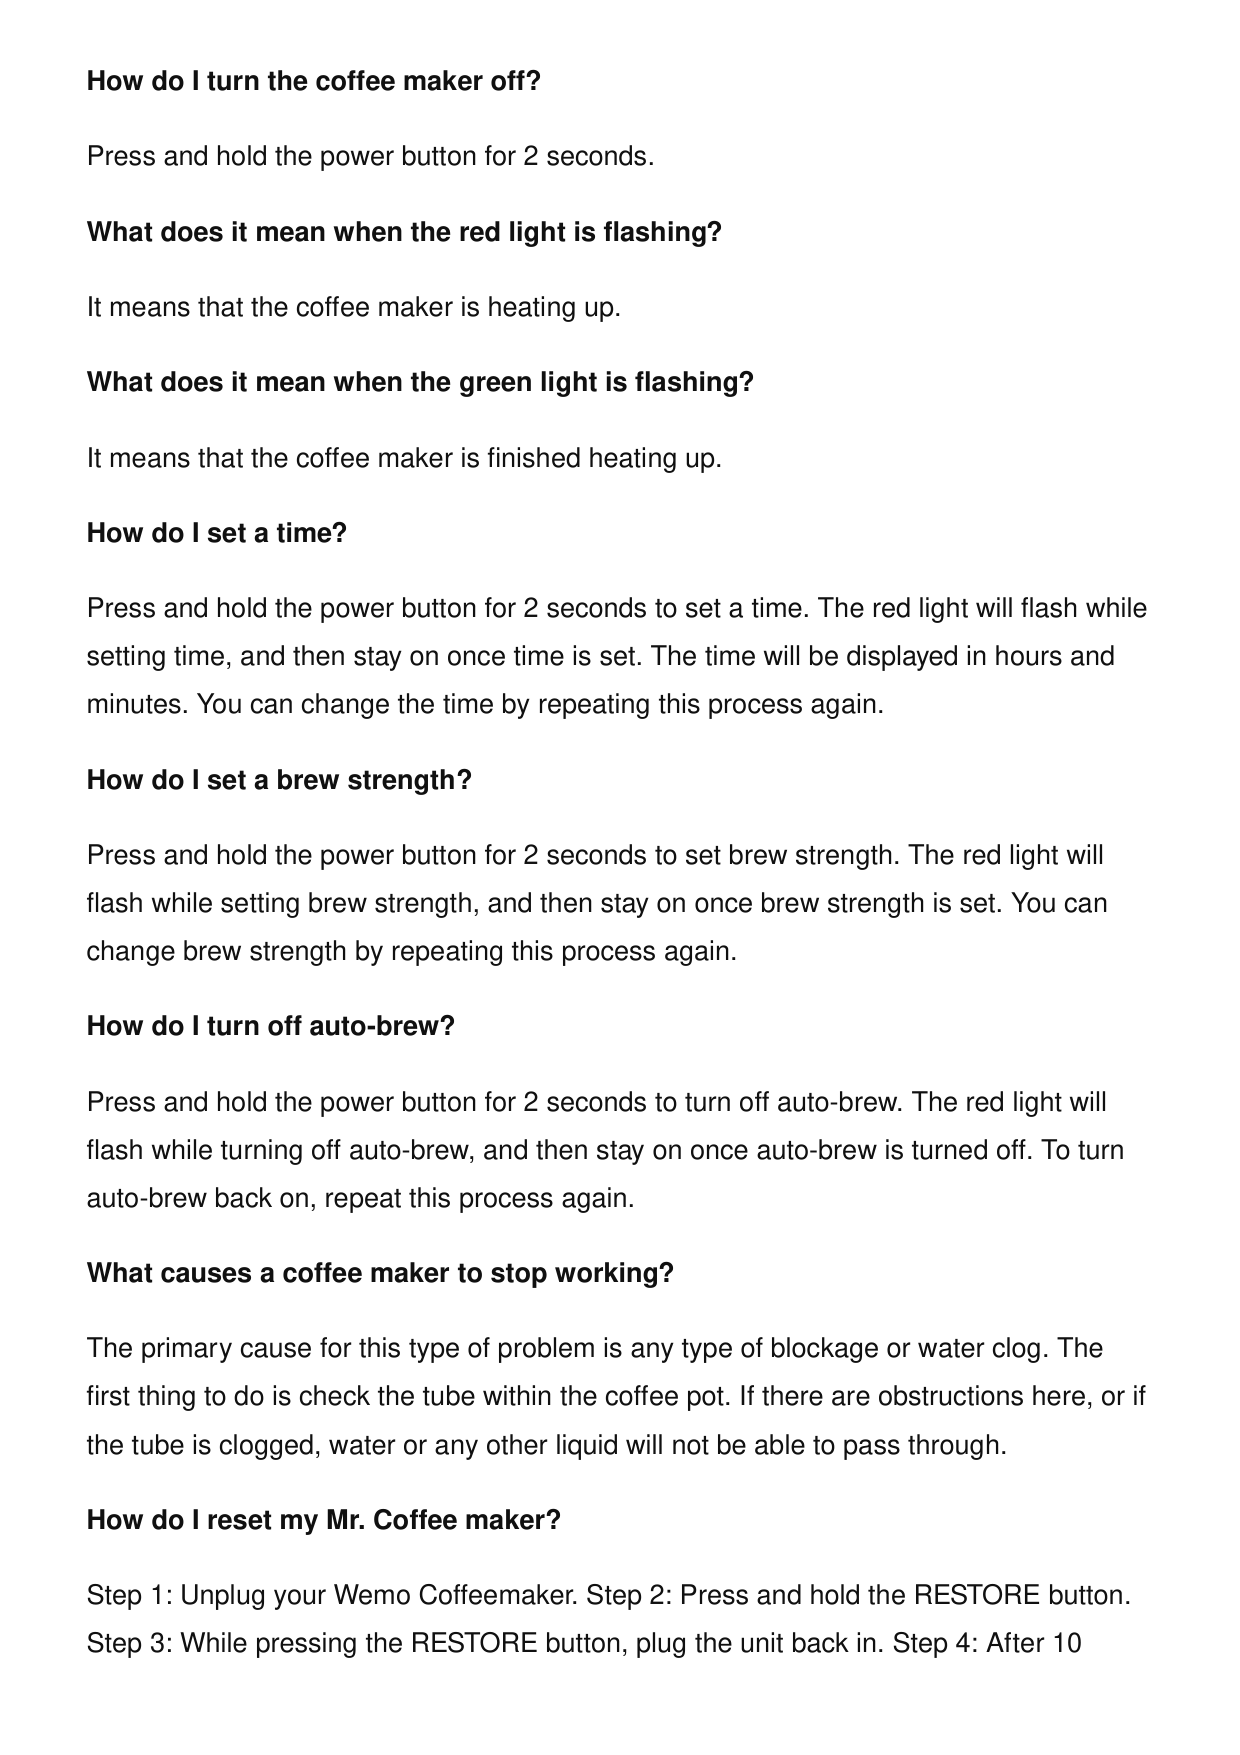
How do I turn the coffee maker off? Press and hold the power button for 2 seconds. What does it mean when the red light is flashing? It means that the coffee maker is heating up. What does it mean when the green light is flashing? It means that the coffee maker is finished heating up. How do I set a time? Press and hold the power button for 2 seconds to set a time. The red light will flash while setting time, and then stay on once time is set. The time will be displayed in hours and minutes. You can change the time by repeating this process again. How do I set a brew strength? Press and hold the power button for 2 seconds to set brew strength. The red light will flash while setting brew strength, and then stay on once brew strength is set. You can change brew strength by repeating this process again. How do I turn off auto-brew? Press and hold the power button for 2 seconds to turn off auto-brew. The red light will flash while turning off auto-brew, and then stay on once auto-brew is turned off. To turn auto-brew back on, repeat this process again. What causes a coffee maker to stop working? The primary cause for this type of problem is any type of blockage or water clog. The first thing to do is check the tube within the coffee pot. If there are obstructions here, or if the tube is clogged, water or any other liquid will not be able to pass through. How do I reset my Mr. Coffee maker? Step 1: Unplug your Wemo Coffeemaker. Step 2: Press and hold the RESTORE button. Step 3: While pressing the RESTORE button, plug the unit back in. Step 4: After 10
seconds, release the RESTORE button. How many scoops of coffee do I put in a Mr coffee maker? Mr. Coffee Coffee Maker – 9 tablespoons (10g/each) per 12 cups (60 fl. oz) Can coffee machines be repaired? Fortunately, many repairs to coffee makers are simple to perform and require only basic tools. So, before you toss that coffee maker or defect to a coffee shop, consider how coffee makers work and what to do when they don’t. Does vinegar damage coffee maker? Vinegar can damage the internal parts of the coffee machine, especially the seals and the rubber gaskets. In addition, it is very difficult to rinse, and its smell and taste will remain for a long time in the espresso machine. What should I do before using the Mr. Coffee Espresso Machine for the first time? You should clean and prime the coffeemaker before brewing coffee for the first time. Wash all of the removable parts in warm water with mild liquid soap. Fill the water tank to the “MAX” marking with clean, filtered water. Turn the coffeemaker ON by using the power switch on the side. The ready indicator light will pulse while the coffeemaker heats up and will turn solid when the coffeemaker is ready to use. Can I use an accessory not recommended by the appliance manufacturer for use with this appliance? No, you should not use an accessory not recommended by the appliance manufacturer for use with this appliance as it may result in fire, electric shock or injury to persons. How should I clean the Mr. Coffee Espresso Machine? You should wash all of the removable parts in warm water with mild liquid soap. Do not operate any appliance with a damaged cord or plug or after the appliance malfunctions, or has been damaged in any manner. Return appliance to an Authorized Service Center for examination, repair or adjustment. Do not attempt to replace or splice a damaged cord.
Can I use the Mr. Coffee Espresso Machine outdoors? No, you should not use the Mr. Coffee Espresso Machine outdoors. How can I contact Mr. Coffee customer service? You can contact Mr. Coffee customer service at 1-888-800-9130 or visit their website for more information. Can children use the Mr. Coffee Espresso Machine? No, this appliance is not to be used by children or by persons with reduced physical, sensory or mental capabilities. Close supervision is necessary when any appliance is used near children. Children should not play with the appliance. How do I make my first pot of coffee? Fill the water tank to the “MAX” marking with clean, filtered water. Turn the coffeemaker ON by using the power switch on the side. Remove the brew basket lid from the brew basket by twisting it to the right. Place a coffee filter into the brew basket and pour the desired amount of coffee into the filter. Lock the brew basket lid onto the brew basket by twisting it to the left. Slide the brew basket into the coffeemaker. Place the coffee pot on the drip tray cover. Turn knob to the “brew” position. Use the brew size selector to select the desired brew size. Press the brew now button.
Video
Generic-480p-16-9-1409173089793-rpcbe5.mp4 Mr Coffee Coffee Maker www://mrcoffee.com/coffee-makers/view-all/mr.-coffee-12-cup-programmable- coffeemaker-with-strong-brew-selector/SAP_2129927.html
KitchenAid Coffee Maker KCM1208 User Manual KitchenAid Coffee Maker KCM1208 User Manual - Optimized PDF KitchenAid Coffee Maker KCM1208 User Manual - Original PDF OAK Cross Coffee Table Instruction Manual Assembly Instruction 42979982 OAK CROSS COFFEE TABLE CARE INSTRUCTIONS: Wipe clean with a soft damp cloth. Do not… IKEA HOGMODIG Coffee Maker for Drip Coffee Instructions IKEA HOGMODIG Coffee Maker for Drip Coffee Instructions Before first use Wash, rinse and dry the coffee maker… Jura WE8 Coffee Machine Instructions Manual Jura WE8 Coffee Machine Instructions Manual - Optimized PDF Jura WE8 Coffee Machine Instructions Manual - Original PDF
Documents / Resources Mr Coffee Coffee Maker [pdf] Instruction Manual Coffee Maker, BVMC-O-C_19ESM1, GCDS-MRC636935-JC References User Manual Related Posts
Mr.Coffee BVMC-O-C_19ESM1, Coffee Maker, GCDS-MRC636935-JC, Mr.Coffee Leave a comment Search: e.g. whirlpool wrf535swhz
Search This website is an independent publication and is neither affiliated with nor endorsed by any of the trademark owners. The "Bluetooth®" word mark and logos are registered trademarks owned by Bluetooth SIG, Inc. The "Wi-Fi®" word mark and logos are registered trademarks owned by the Wi-Fi Alliance. Any use of these marks on this website does not imply any affiliation with or endorsement. Your email address will not be published. Required fields are marked * Comment * Name Email Website Save my name, email, and website in this browser for the next time I comment. Post Comment