
Ask AI
— answers from the official manualAnswers from the official manual.
Common questions
Common Questions
10 totalCan I cook different foods in each zone without cross-contamination?
Yes, you can cook different foods in each zone without worry about cross-contamination. Both zones are self-contained with separate heating elements and fans, so foods cooked in Zone 1 and Zone 2 remain completely isolated from each other.
How do I adjust temperature or time while cooking in both zones?
To adjust the temperature or time while using both zones, select the desired zone first, then use the TEMP arrows to adjust the temperature or the TIME arrows to adjust the time. You can make these adjustments at any time during cooking. To pause or stop one zone while the other continues cooking, select the zone you want to pause, then press START/PAUSE.
What is the warranty coverage and how do I initiate a warranty claim?
The Ninja Dual Zone Air Fryer includes a One (1) Year Limited Warranty that covers the original unit and non-wearable parts from the date of purchase when used under normal household conditions. To initiate a warranty claim, call Customer Service at 1-877-646-5288 with your receipt as proof of purchase. You should also register your product at registeryourninja.com. SharkNinja will cover the cost to send in the unit for repair or replacement, with a $20.95 shipping fee when the repaired or replacement unit is returned.
What should I do before using my Ninja Dual Zone Air Fryer for the first time?
Before first use, remove all packaging materials and promotional labels from the unit. Wash the basket, divider, and crisper plates in hot, soapy water, then rinse and dry thoroughly. Read the manual carefully, paying special attention to operational instructions, warnings, and safety safeguards. Note that the basket, divider, and crisper plates are the only dishwasher-safe parts—never clean the main unit in the dishwasher.
How do I use Smart Finish to cook foods with different cooking times?
To use Smart Finish, insert the divider and crisper plates, then set Zone 1 with your desired function, temperature, and time. Select Zone 2 and set different cooking parameters if needed (note: Air Broil can only be used in one zone). Press the SMART FINISH button, then START/PAUSE to begin. The zone with the longer cooking time will start first, while the other zone displays 'Hold' until both zones have the same time remaining, ensuring they finish simultaneously.
What is the difference between Match Cook and other cooking modes?
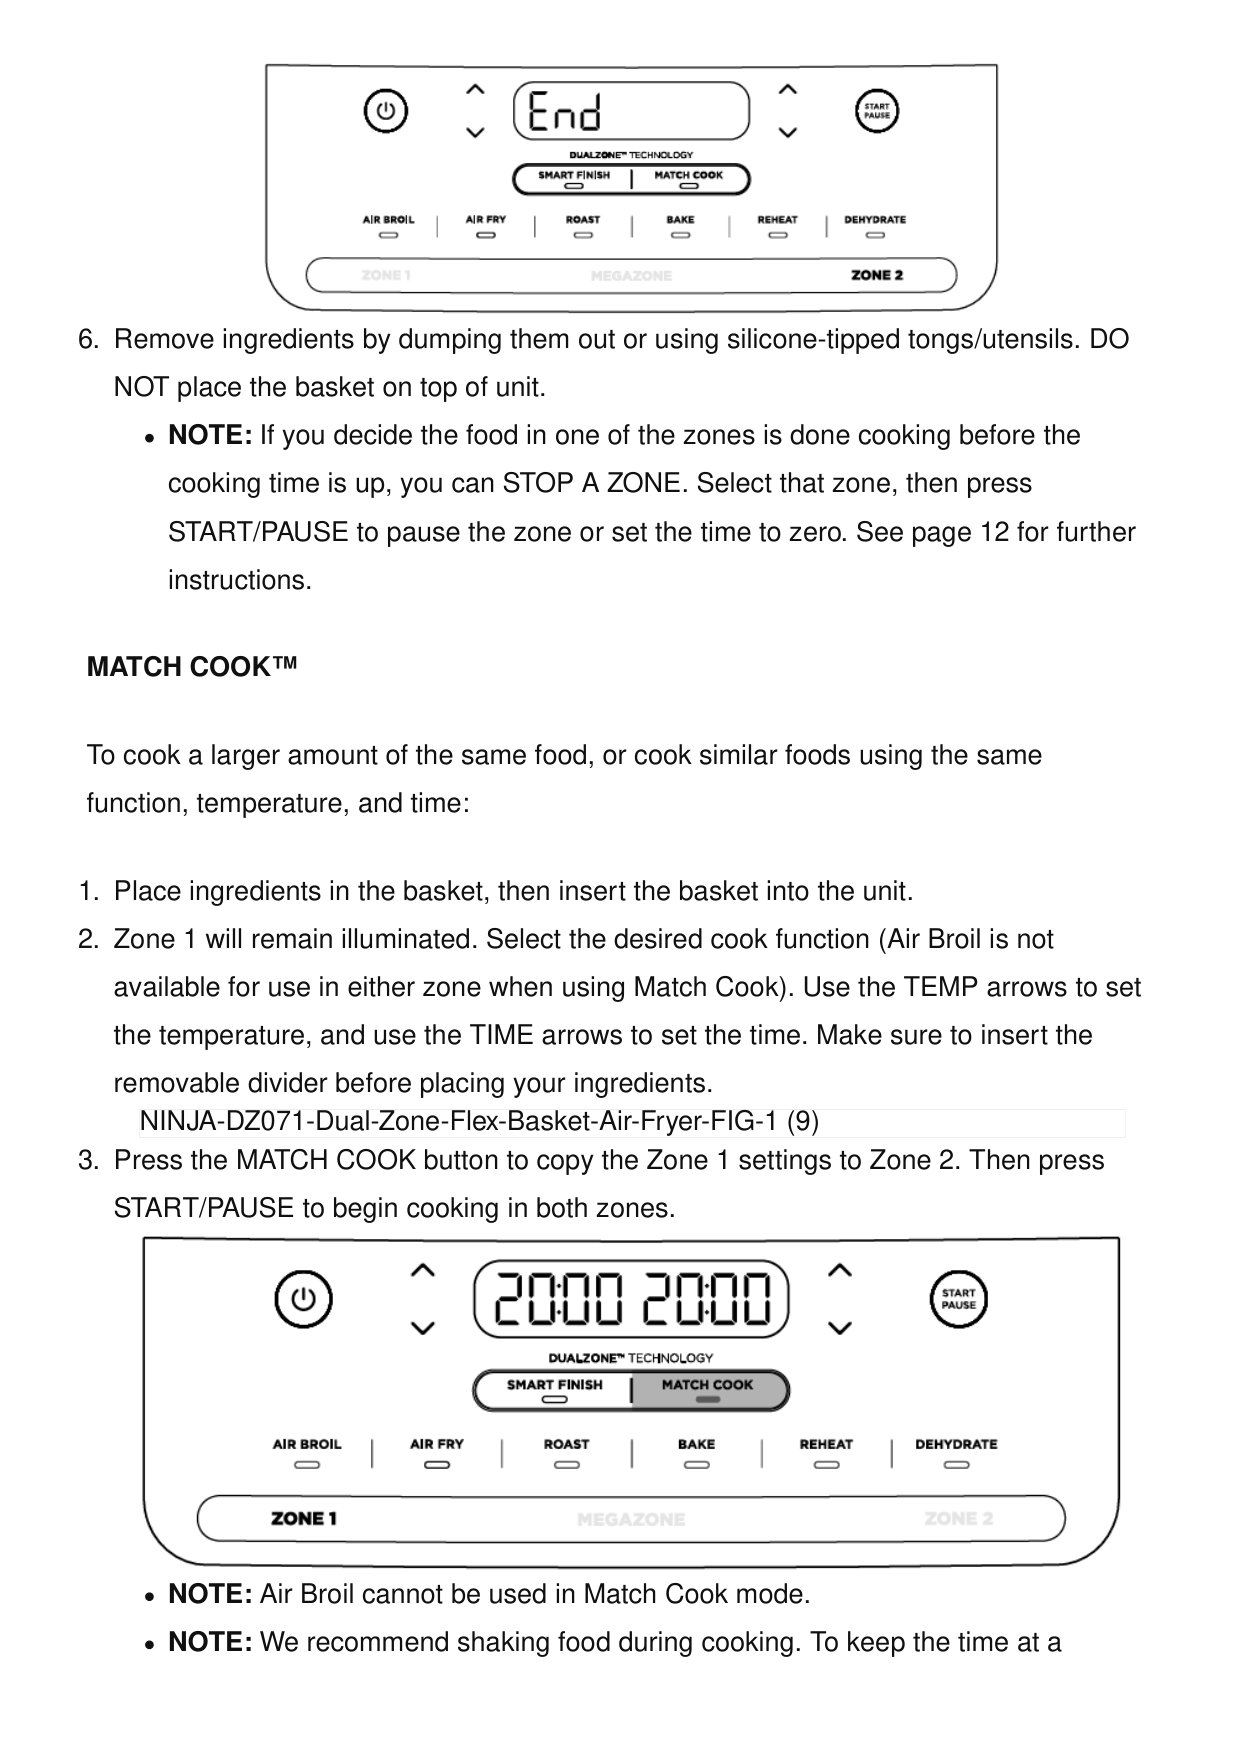
Match Cook automatically copies Zone 1 settings to Zone 2, allowing you to cook a larger amount of the same food or similar foods using identical function, temperature, and time. To use it, set up Zone 1 with your desired settings, press the MATCH COOK button to copy those settings to Zone 2, then press START/PAUSE. Note that Air Broil cannot be used in Match Cook mode.
Full Manual
33 pages
☰ Home » Ninja » NINJA DZ071 Dual Zone Flex Basket Air Fryer Instruction Manual Contents [ hide ] 1 NINJA DZ071 Dual Zone Flex Basket Air Fryer 2 Product Information 3 FAQs
4 Technical Specifications
5 Important Safety Instructions
6 Parts
7 Functions
8 Before First Use
9 Troubleshooting Guide
10 Warranty
11 Documents / Resources 11.1 References NINJA DZ071 Dual Zone Flex Basket Air Fryer Manuals+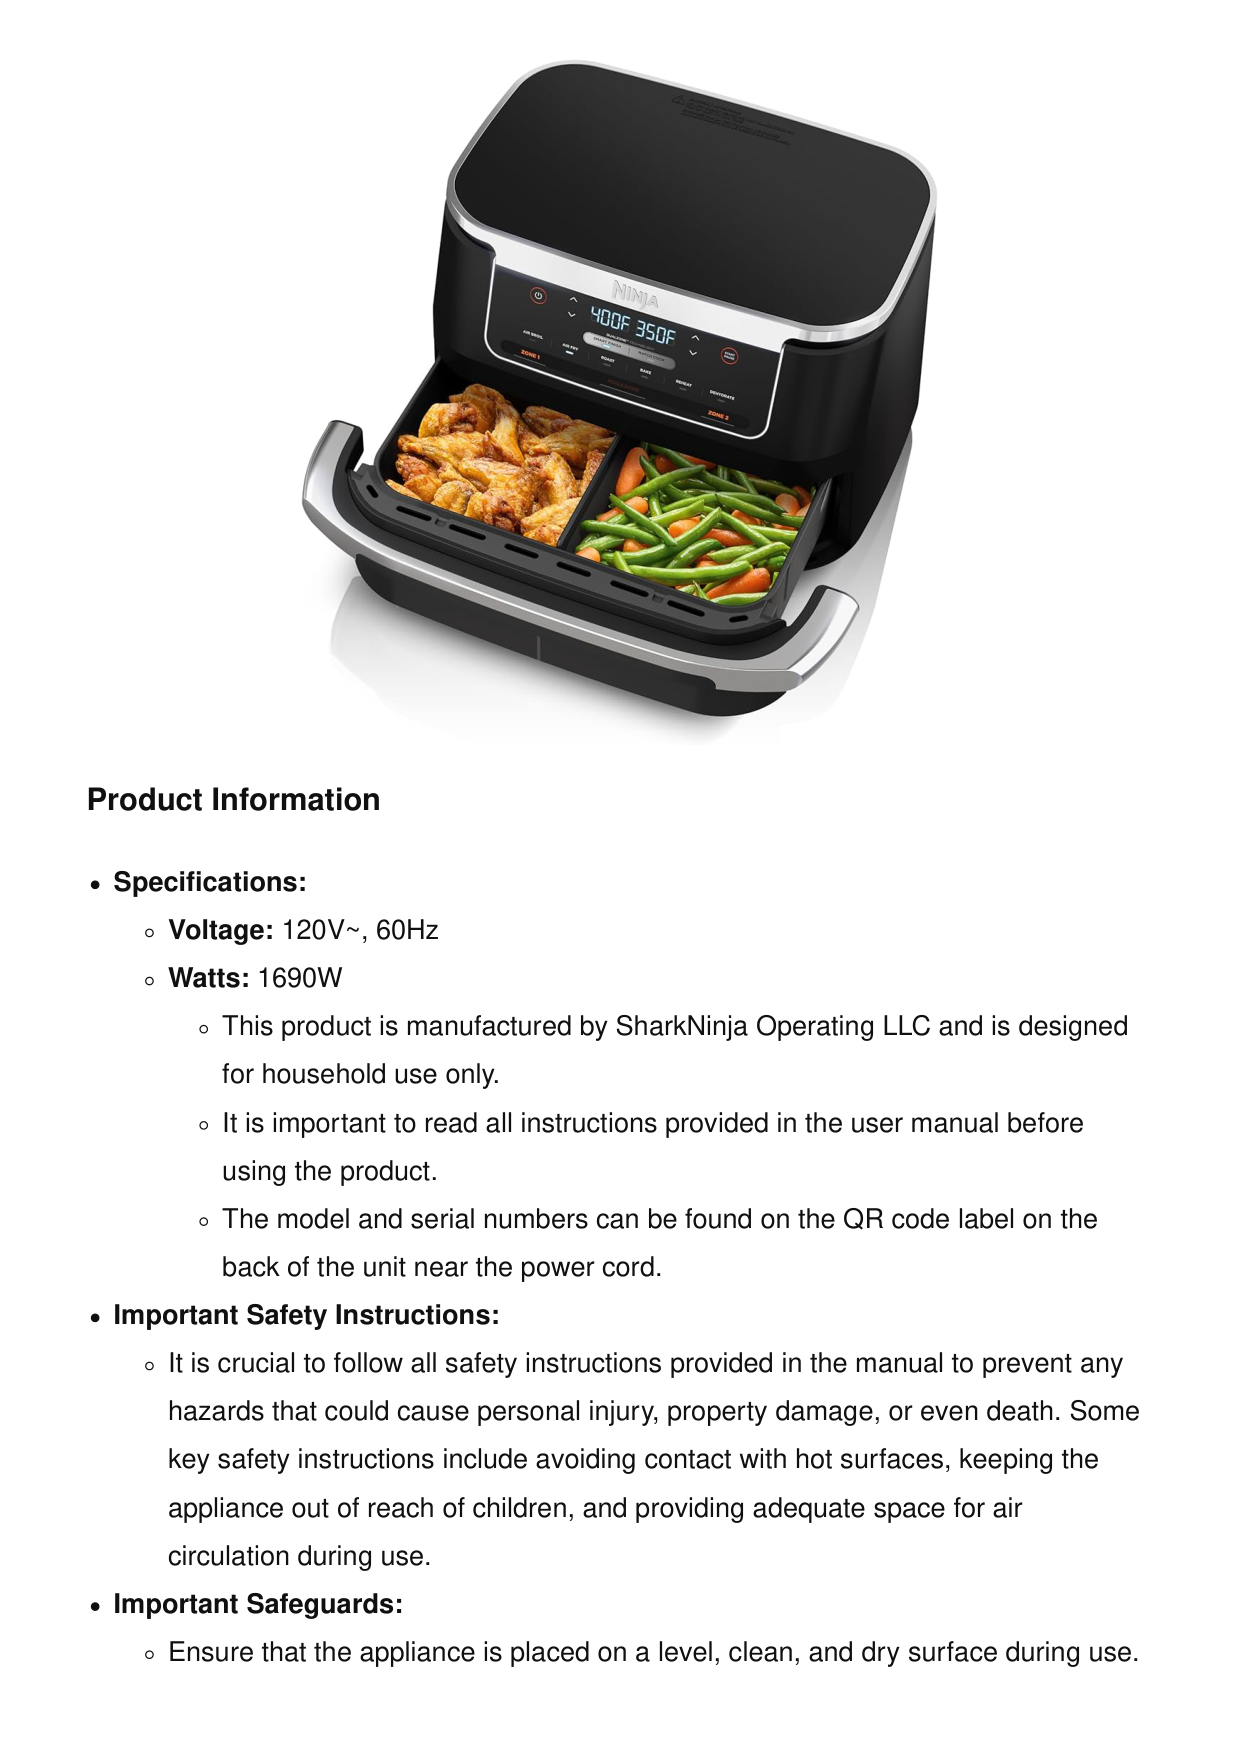
Product Information Specifications: Voltage: 120V~, 60Hz Watts: 1690W This product is manufactured by SharkNinja Operating LLC and is designed for household use only. It is important to read all instructions provided in the user manual before using the product. The model and serial numbers can be found on the QR code label on the back of the unit near the power cord. Important Safety Instructions: It is crucial to follow all safety instructions provided in the manual to prevent any hazards that could cause personal injury, property damage, or even death. Some key safety instructions include avoiding contact with hot surfaces, keeping the appliance out of reach of children, and providing adequate space for air circulation during use. Important Safeguards: Ensure that the appliance is placed on a level, clean, and dry surface during use.
Do not move the appliance while it is in operation. Avoid placing the appliance near the edge of a worktop during use. Only use accessories recommended or sold by SharkNinja to prevent fire, electric shock, or injuries. Product Usage Instructions: Supervision: This appliance can be used by individuals with reduced capabilities if they have received proper supervision or instruction on safe usage. Child Safety: Keep the appliance and its cord out of reach of children. Do not allow children to operate the appliance without supervision. Air Circulation: Provide at least 6 inches of space above and around the appliance for proper air circulation during operation. Cleaning and Maintenance: Regularly inspect the appliance and power cord for any damage. Do not use the appliance if there are any signs of damage. FAQs Q: Where can I find the model and serial numbers of the product? A: The model and serial numbers can be found on the QR code label located on the back of the unit near the power cord. Q: Can children operate this appliance? A: Children should not operate this appliance without proper supervision. Keep the appliance out of reach of children.
Record This Information
Model Number: _________________ Serial Number: __________________ Date of Purchase: _______________ (Keep receipt) Store of Purchase: _______________ TIP: You can find the model and serial numbers on the QR code label on the back of the unit by the power cord.Technical Specifications
Voltage: 120V~, 60Hz Watts: 1690W
Important Safety Instructions
Household Use Only. Read All Instructions Before Use.
WARNING Failure to follow these instructions could result in electric shock, fire, or burn hazard which could cause property damage, personal injury, or death. When using electrical appliances, basic safety precautions should always be followed, including the following:
oven.
prevent burns or personal injury, ALWAYS use protective hot pads or insulated oven mitts and use available handles.
Parts
Getting To Know Your Ninja® Foodi® Flexbasket™ Air Fryer
NINJA-DZ071-Dual-Zone-Flex-Basket-Air-Fryer-FIG-1 (2)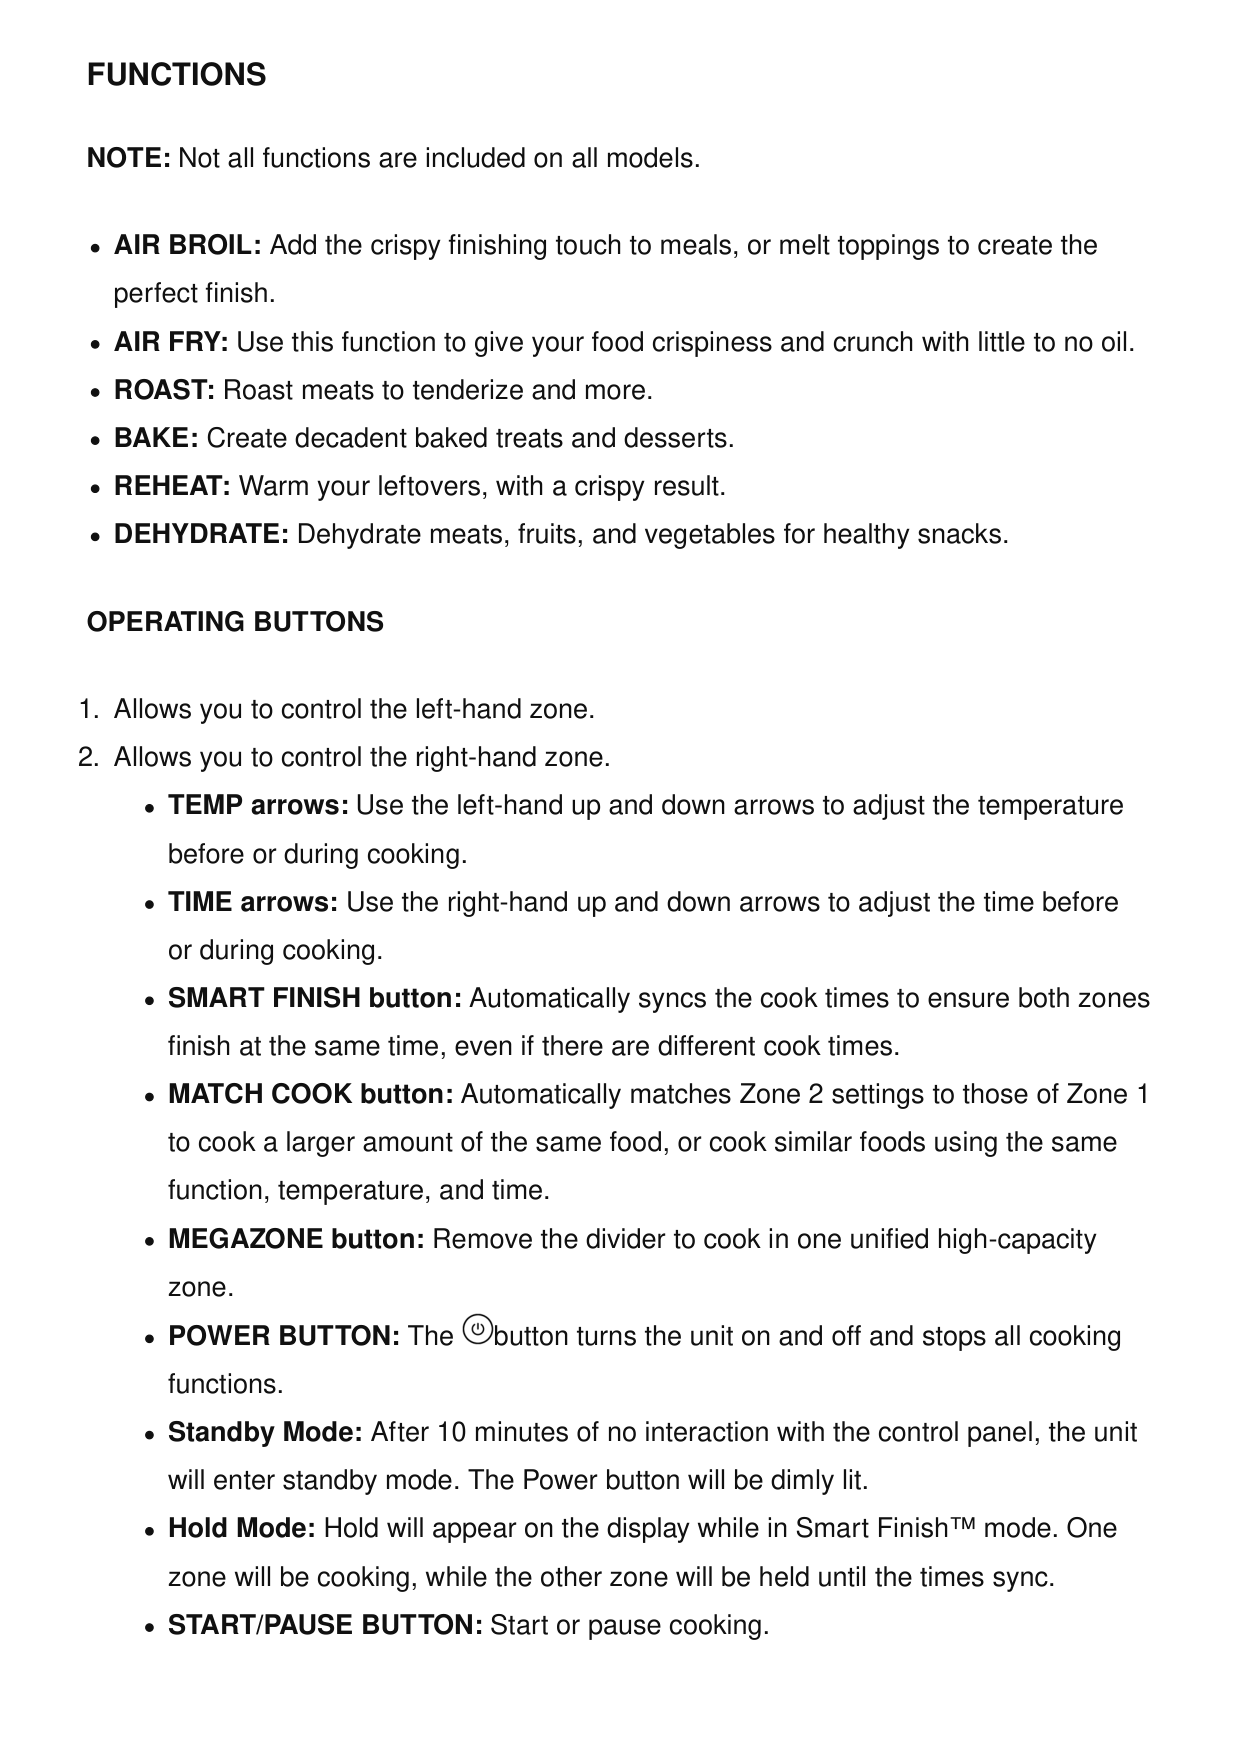
Functions
NOTE: Not all functions are included on all models. AIR BROIL: Add the crispy finishing touch to meals, or melt toppings to create the perfect finish. AIR FRY: Use this function to give your food crispiness and crunch with little to no oil. ROAST: Roast meats to tenderize and more. BAKE: Create decadent baked treats and desserts. REHEAT: Warm your leftovers, with a crispy result. DEHYDRATE: Dehydrate meats, fruits, and vegetables for healthy snacks.Operating Buttons
Before First Use
Cooking In Your Flexbasket™ Air Fryer Reference Quick Start
Guide For Recipes And Cooking Charts
Cooking With Dualzonetm Technology
DualZone Technology utilizes two cooking zones to increase versatility. The Smart Finish feature ensures that, regardless of different cook settings, both zones will finish cooking at the same time. For detailed instructions on using each function, see pages 8–15. NOTE: There is no preheat needed. Once you have made your selections, press the START/PAUSE button to begin cooking.Smart Finish™
To finish cooking at the same time when foods have different cooking times, temps, or functions: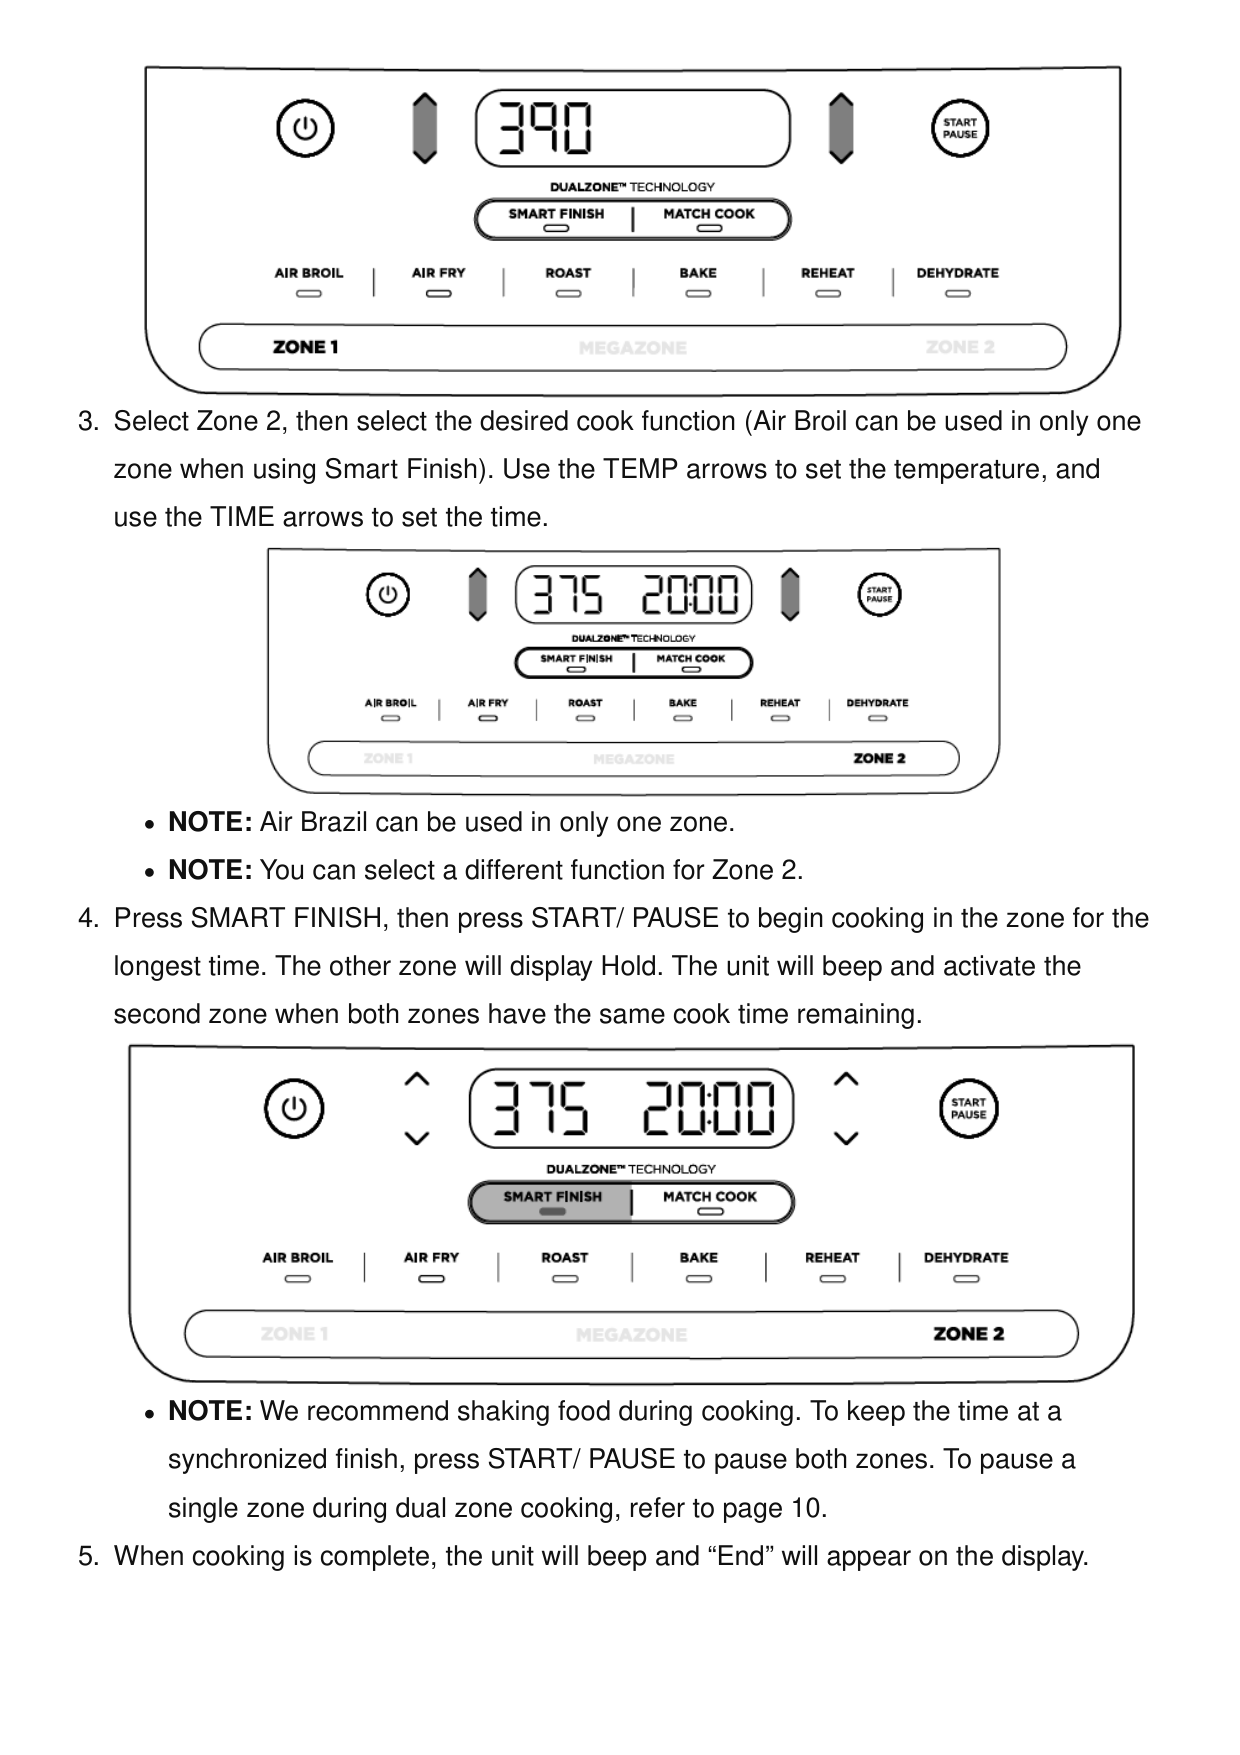
Match Cook™
To cook a larger amount of the same food, or cook similar foods using the same function, temperature, and time: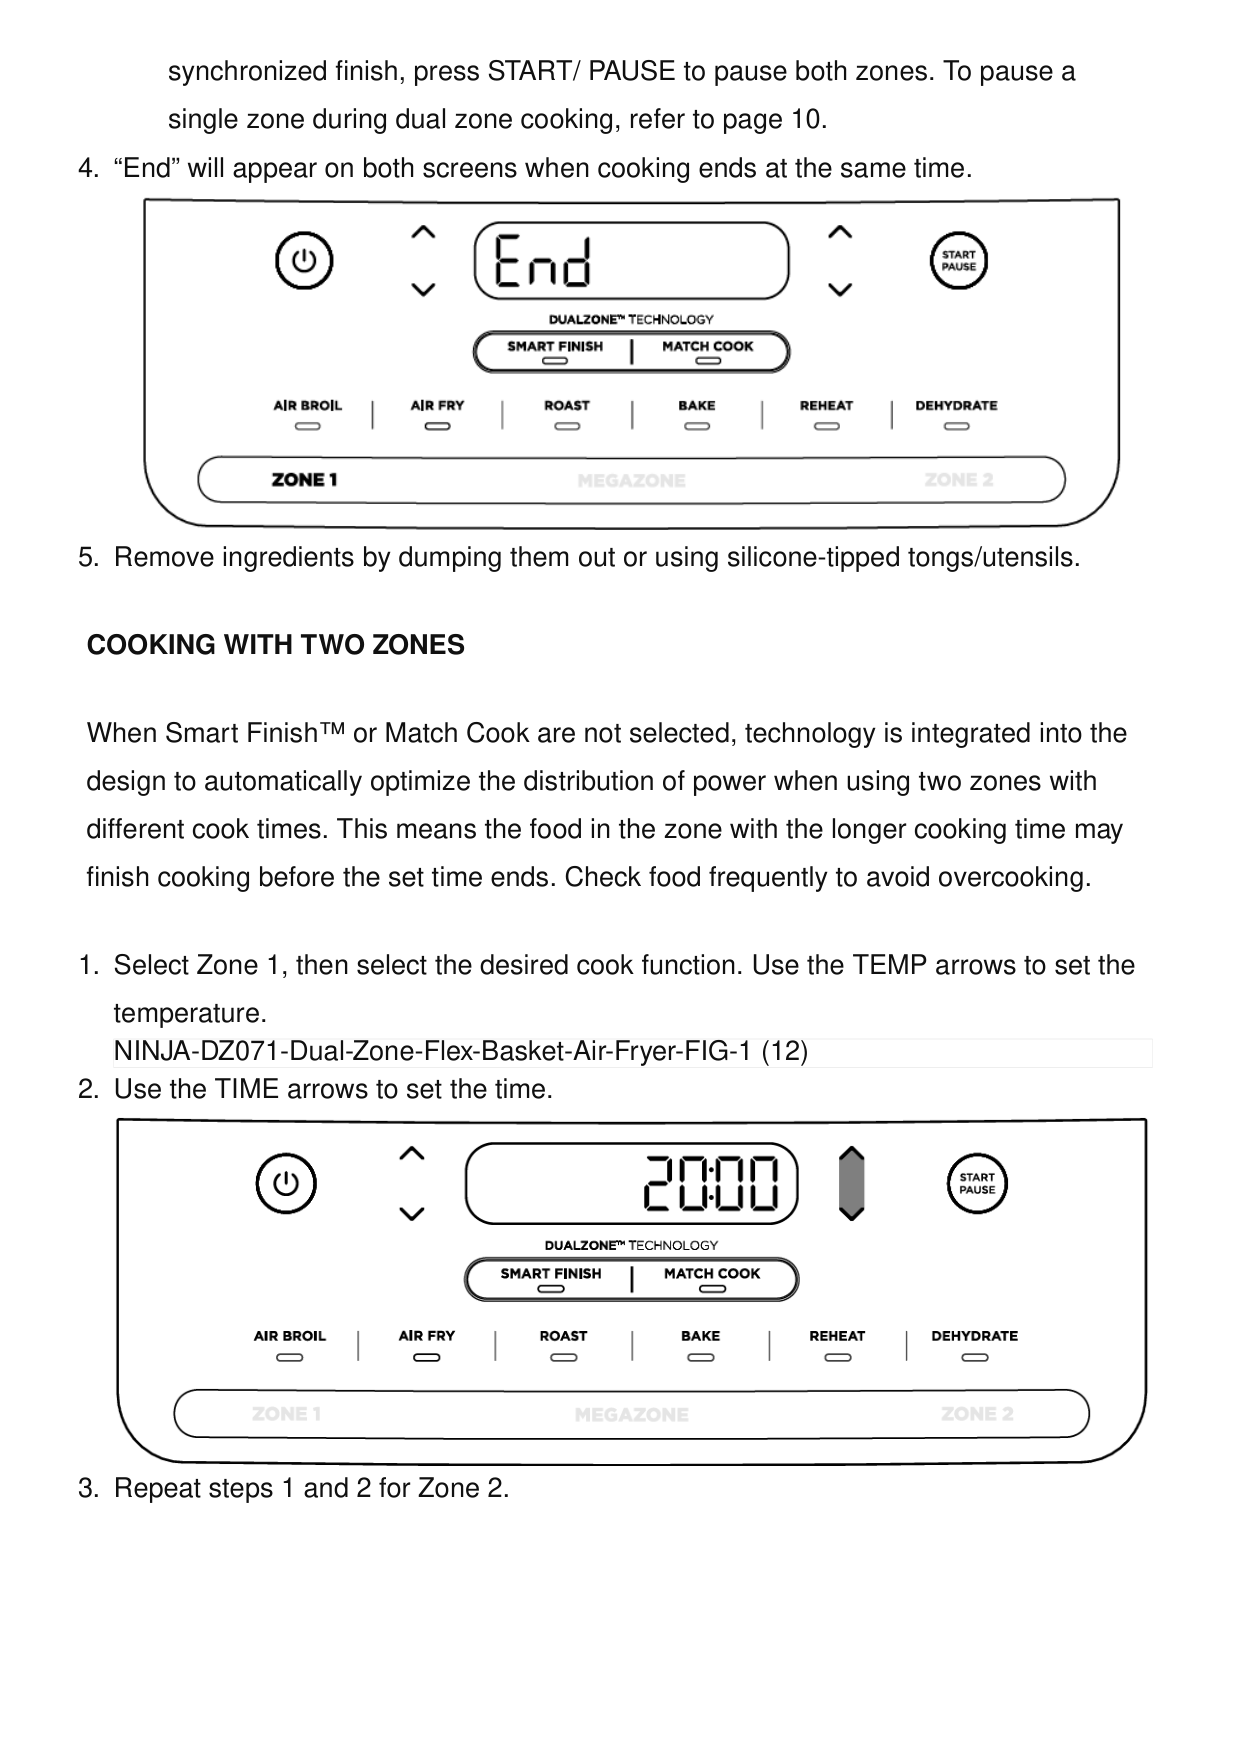
synchronized finish, press START/ PAUSE to pause both zones. To pause a single zone during dual zone cooking, refer to page 10.
Cooking With Two Zones
When Smart Finish™ or Match Cook are not selected, technology is integrated into the design to automatically optimize the distribution of power when using two zones with different cook times. This means the food in the zone with the longer cooking time may finish cooking before the set time ends. Check food frequently to avoid overcooking.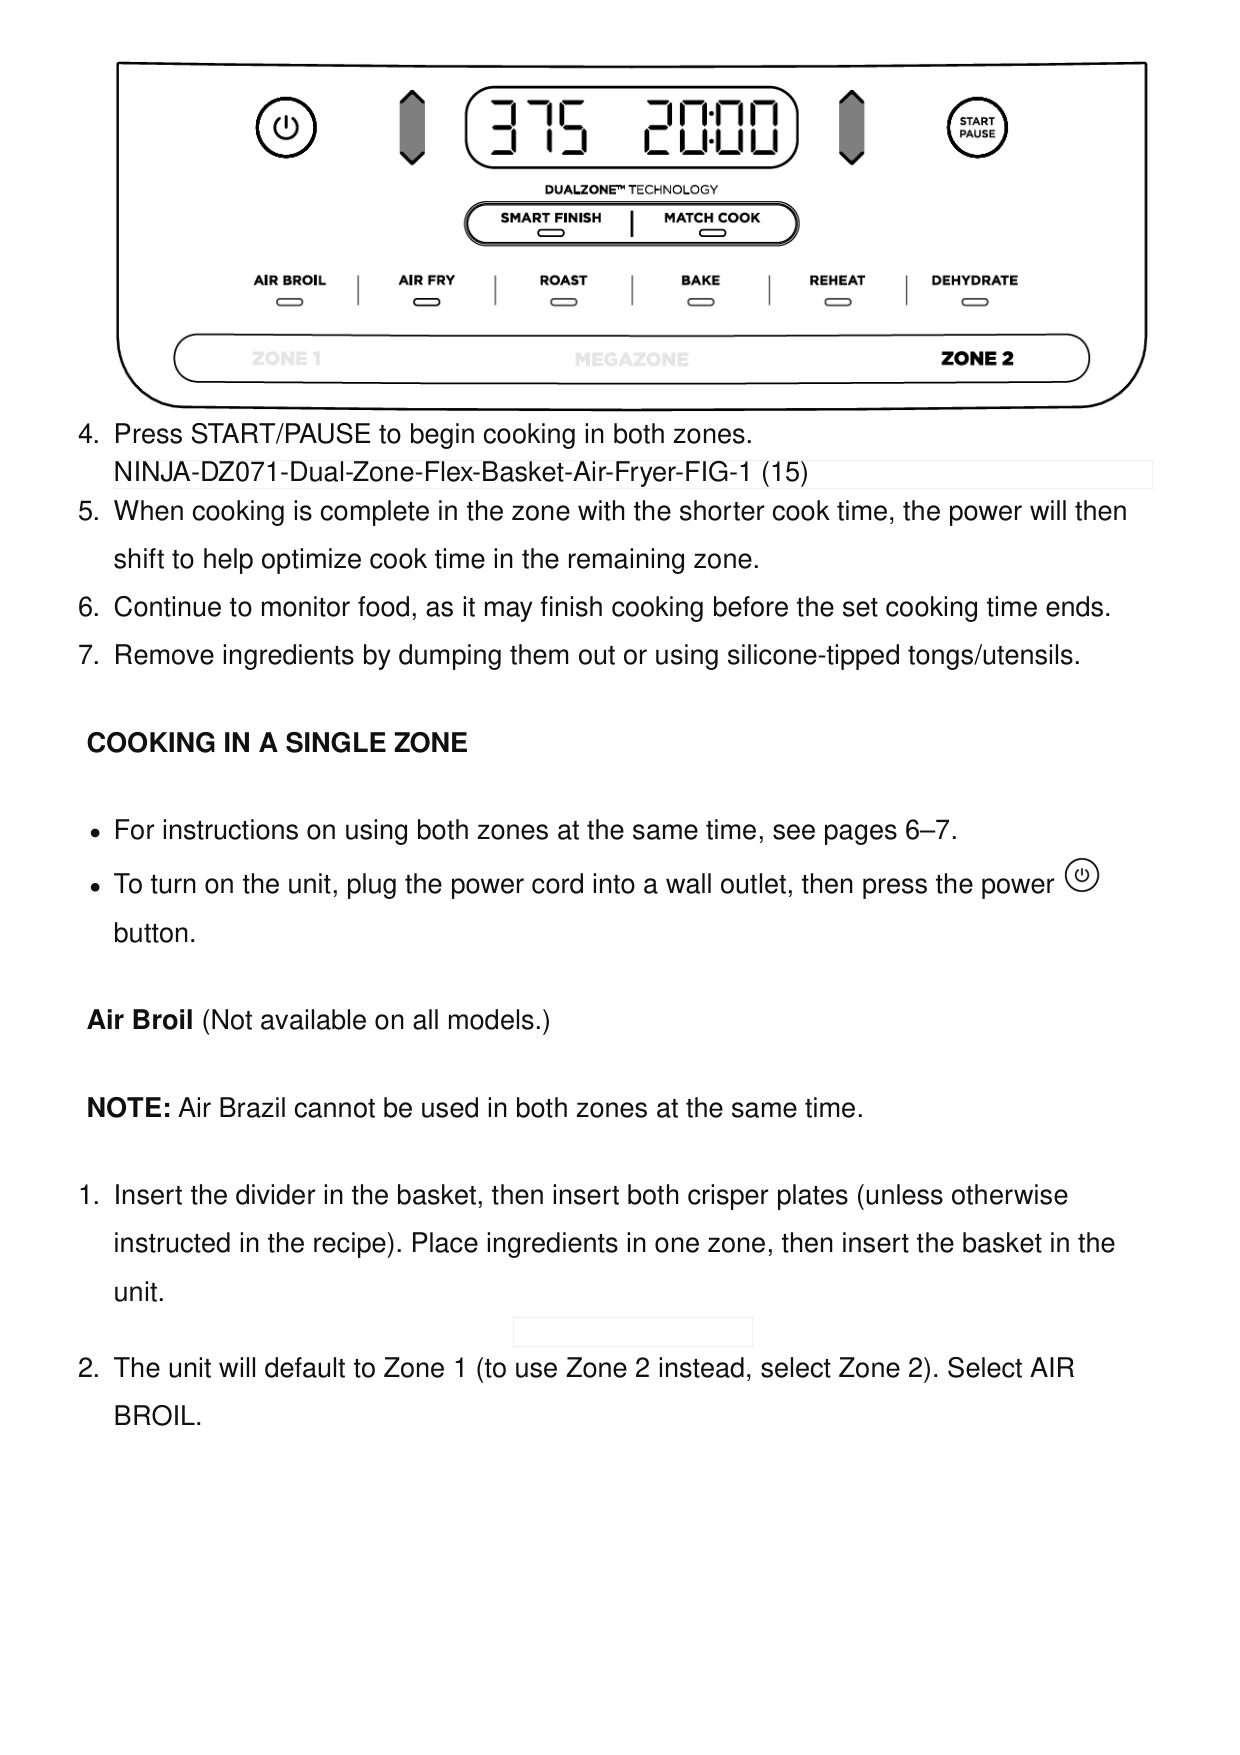
Cooking In A Single Zone
For instructions on using both zones at the same time, see pages 6–7. To turn on the unit, plug the power cord into a wall outlet, then press the power button. Air Broil (Not available on all models.) NOTE: Air Brazil cannot be used in both zones at the same time.Broil.
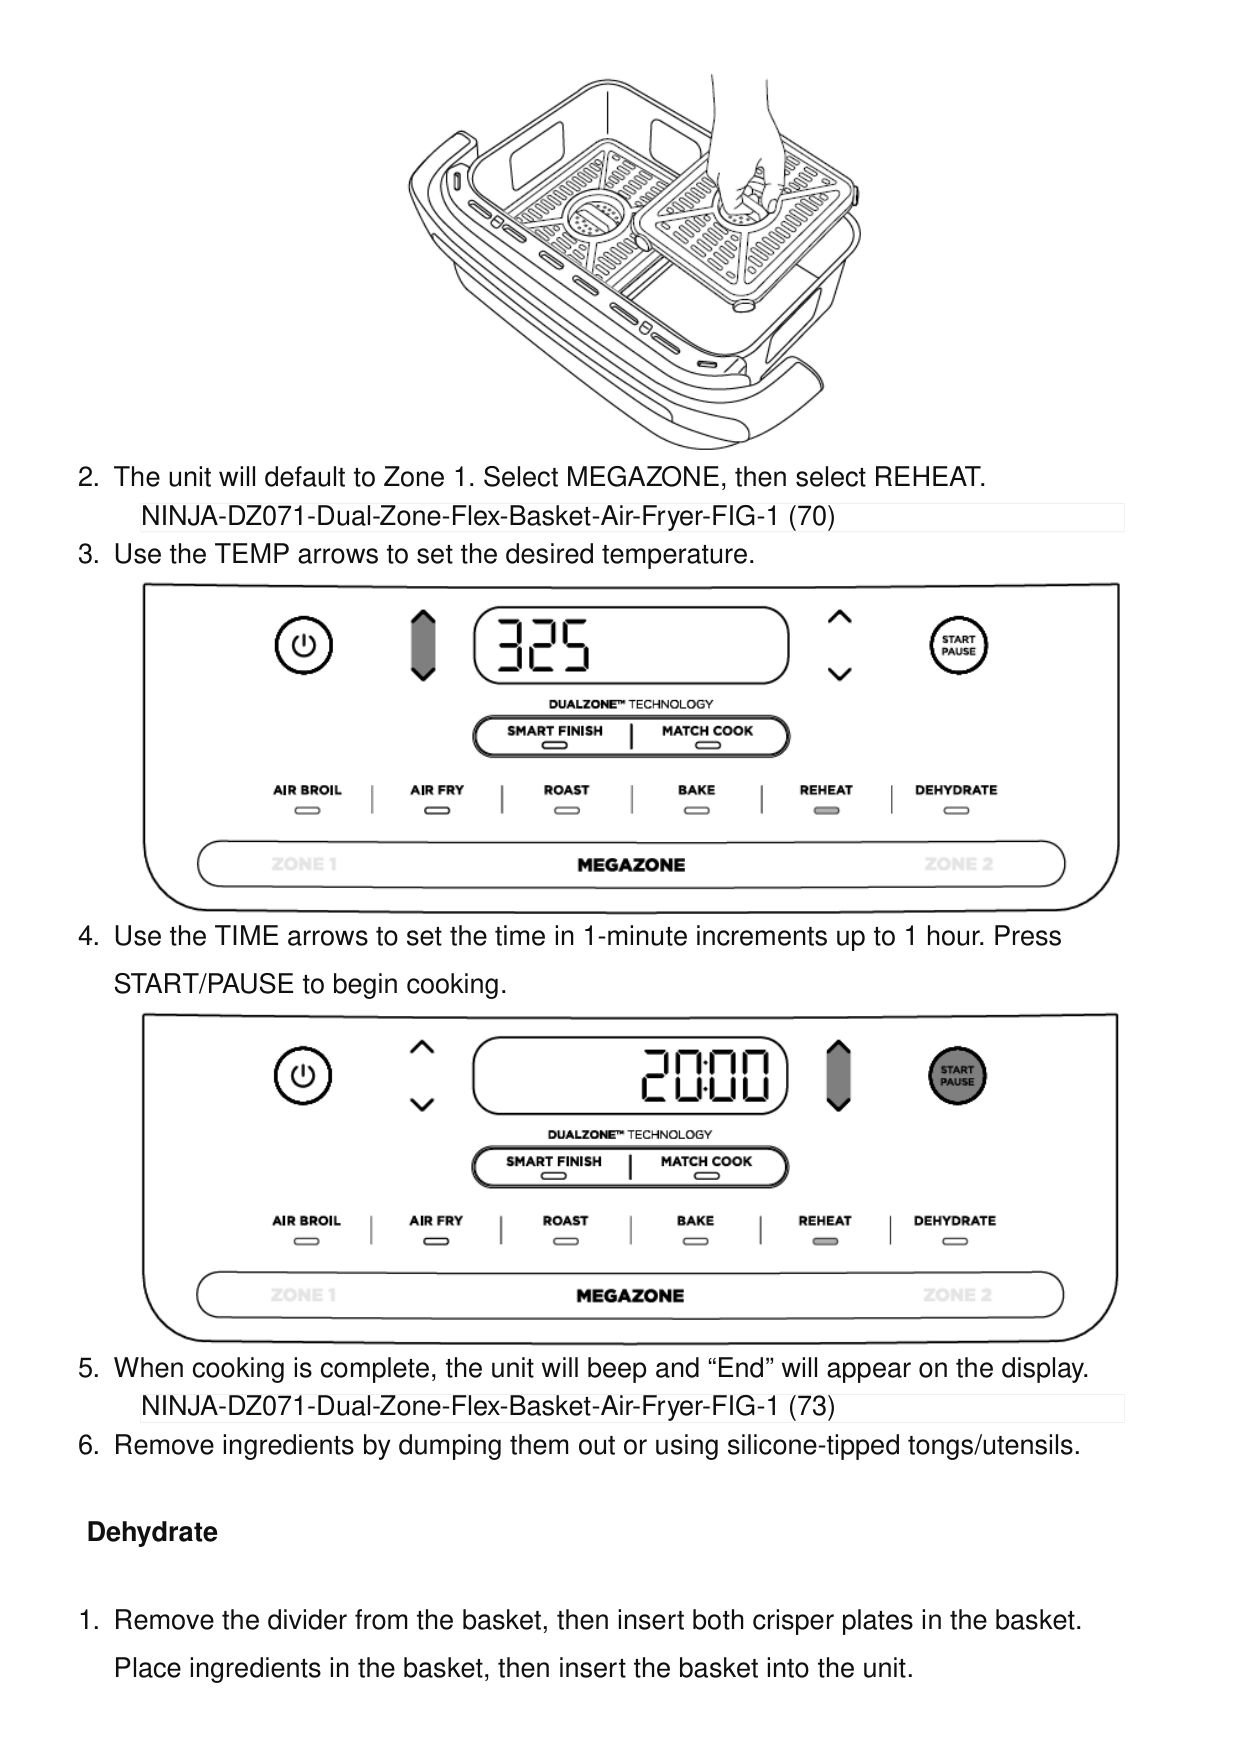
NINJA-DZ071-Dual-Zone-Flex-Basket-Air-Fryer-FIG-1 (15)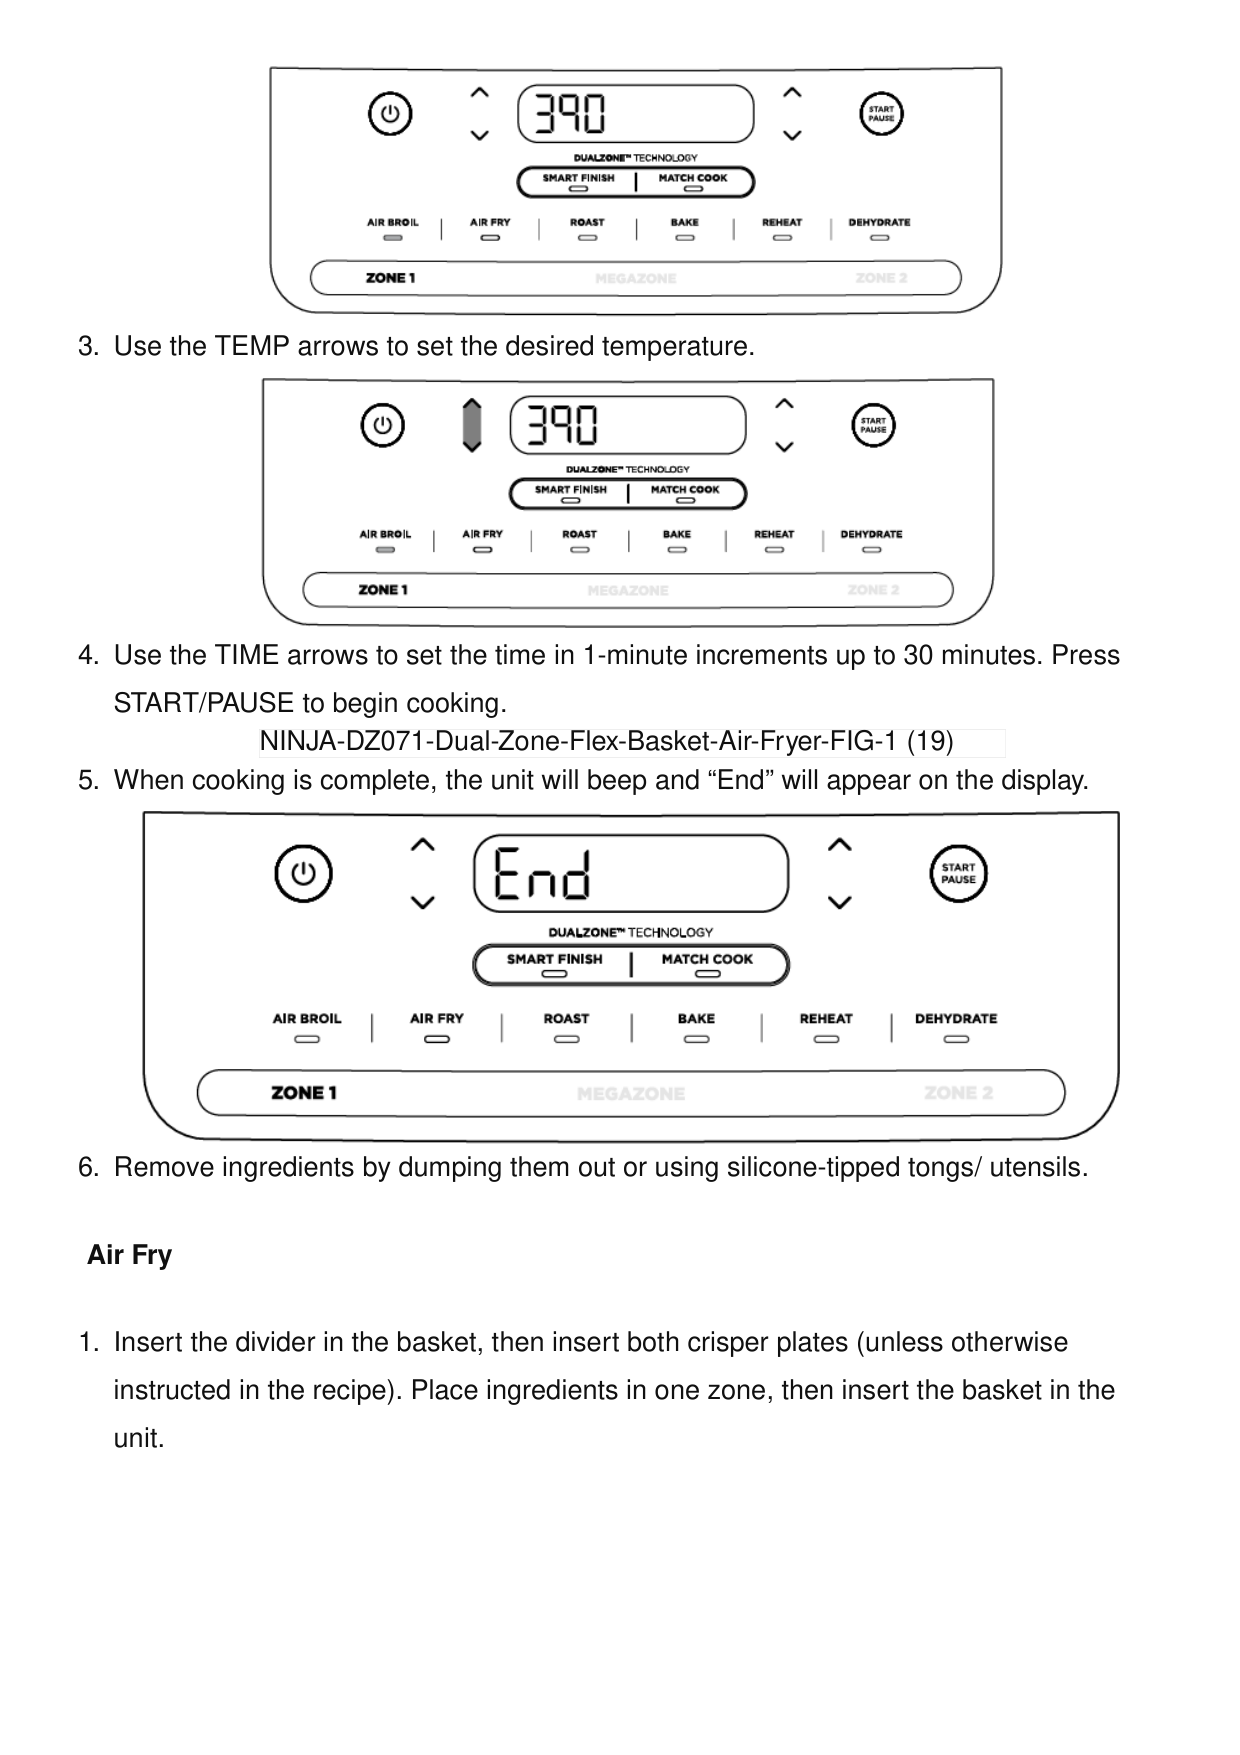
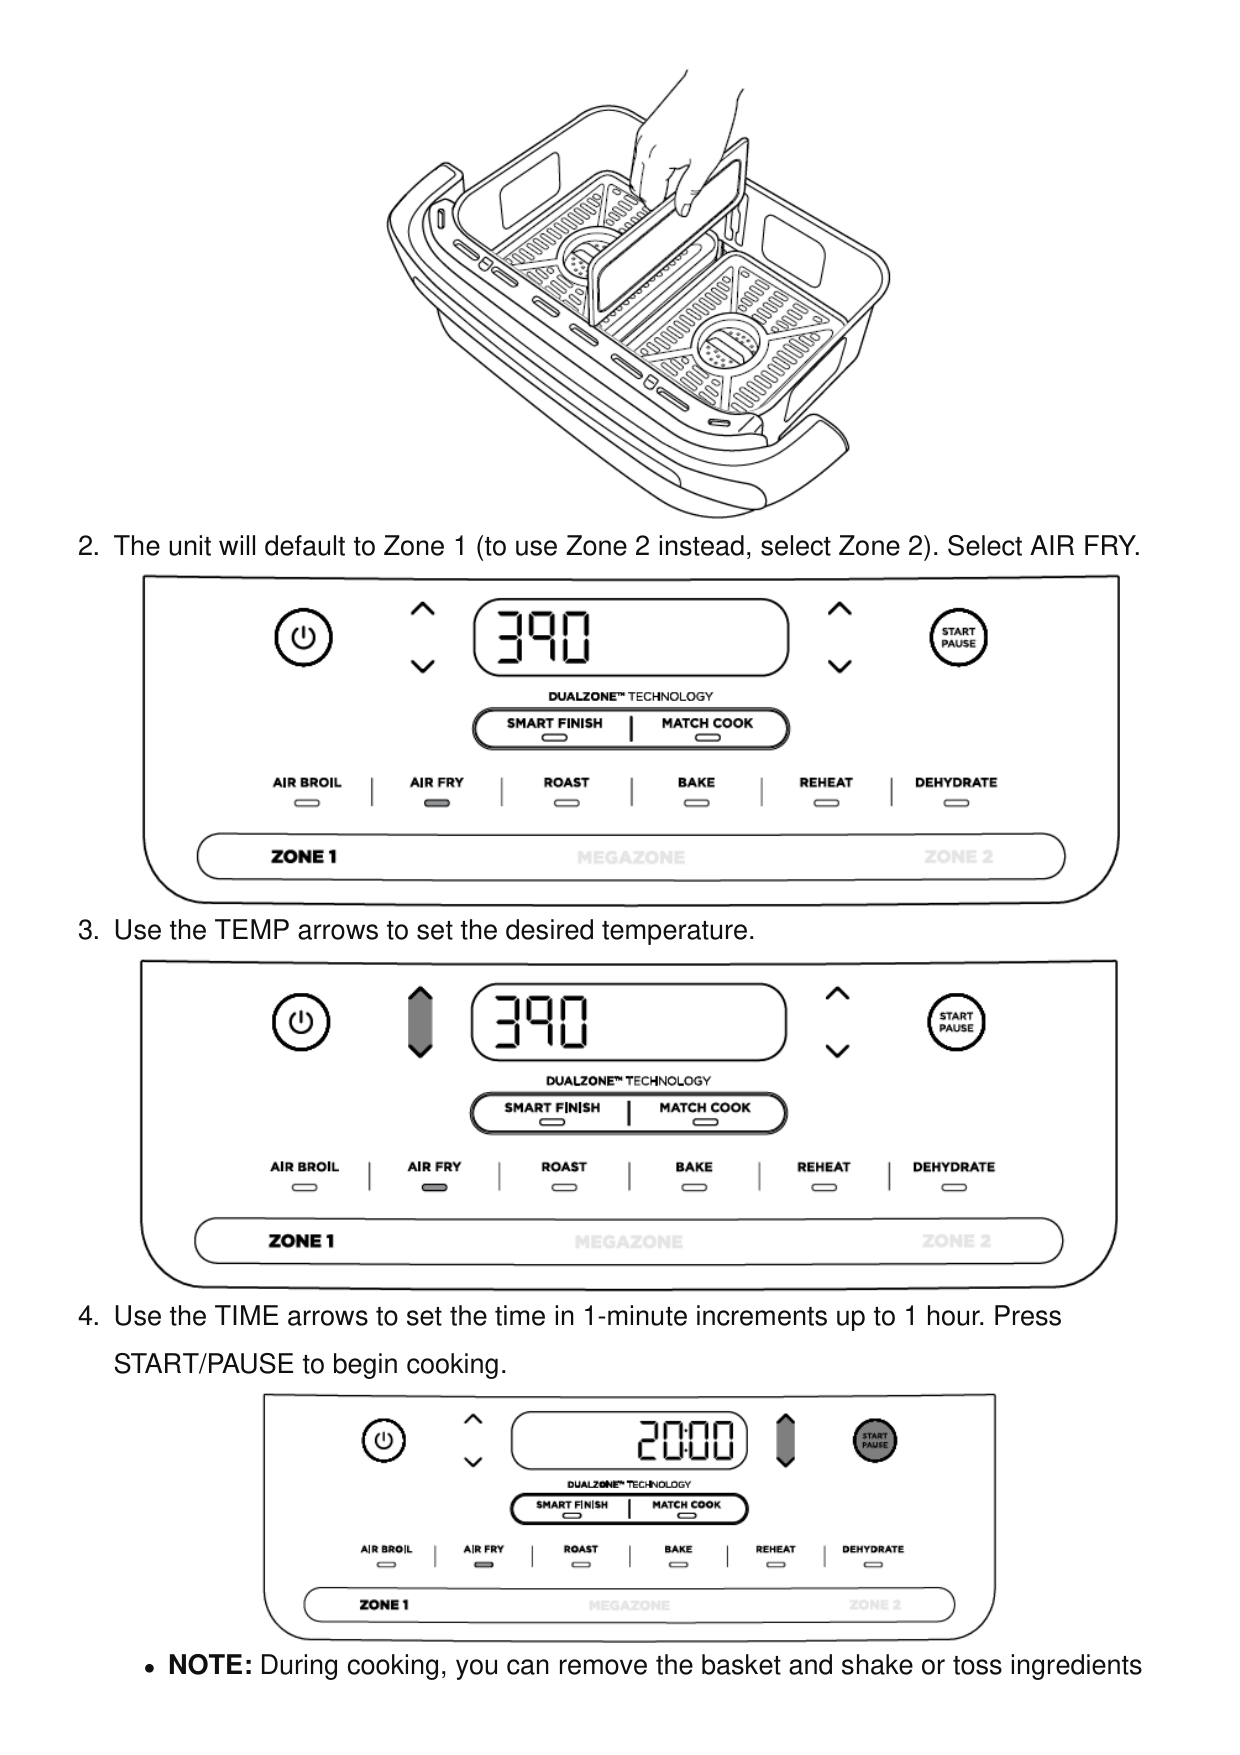
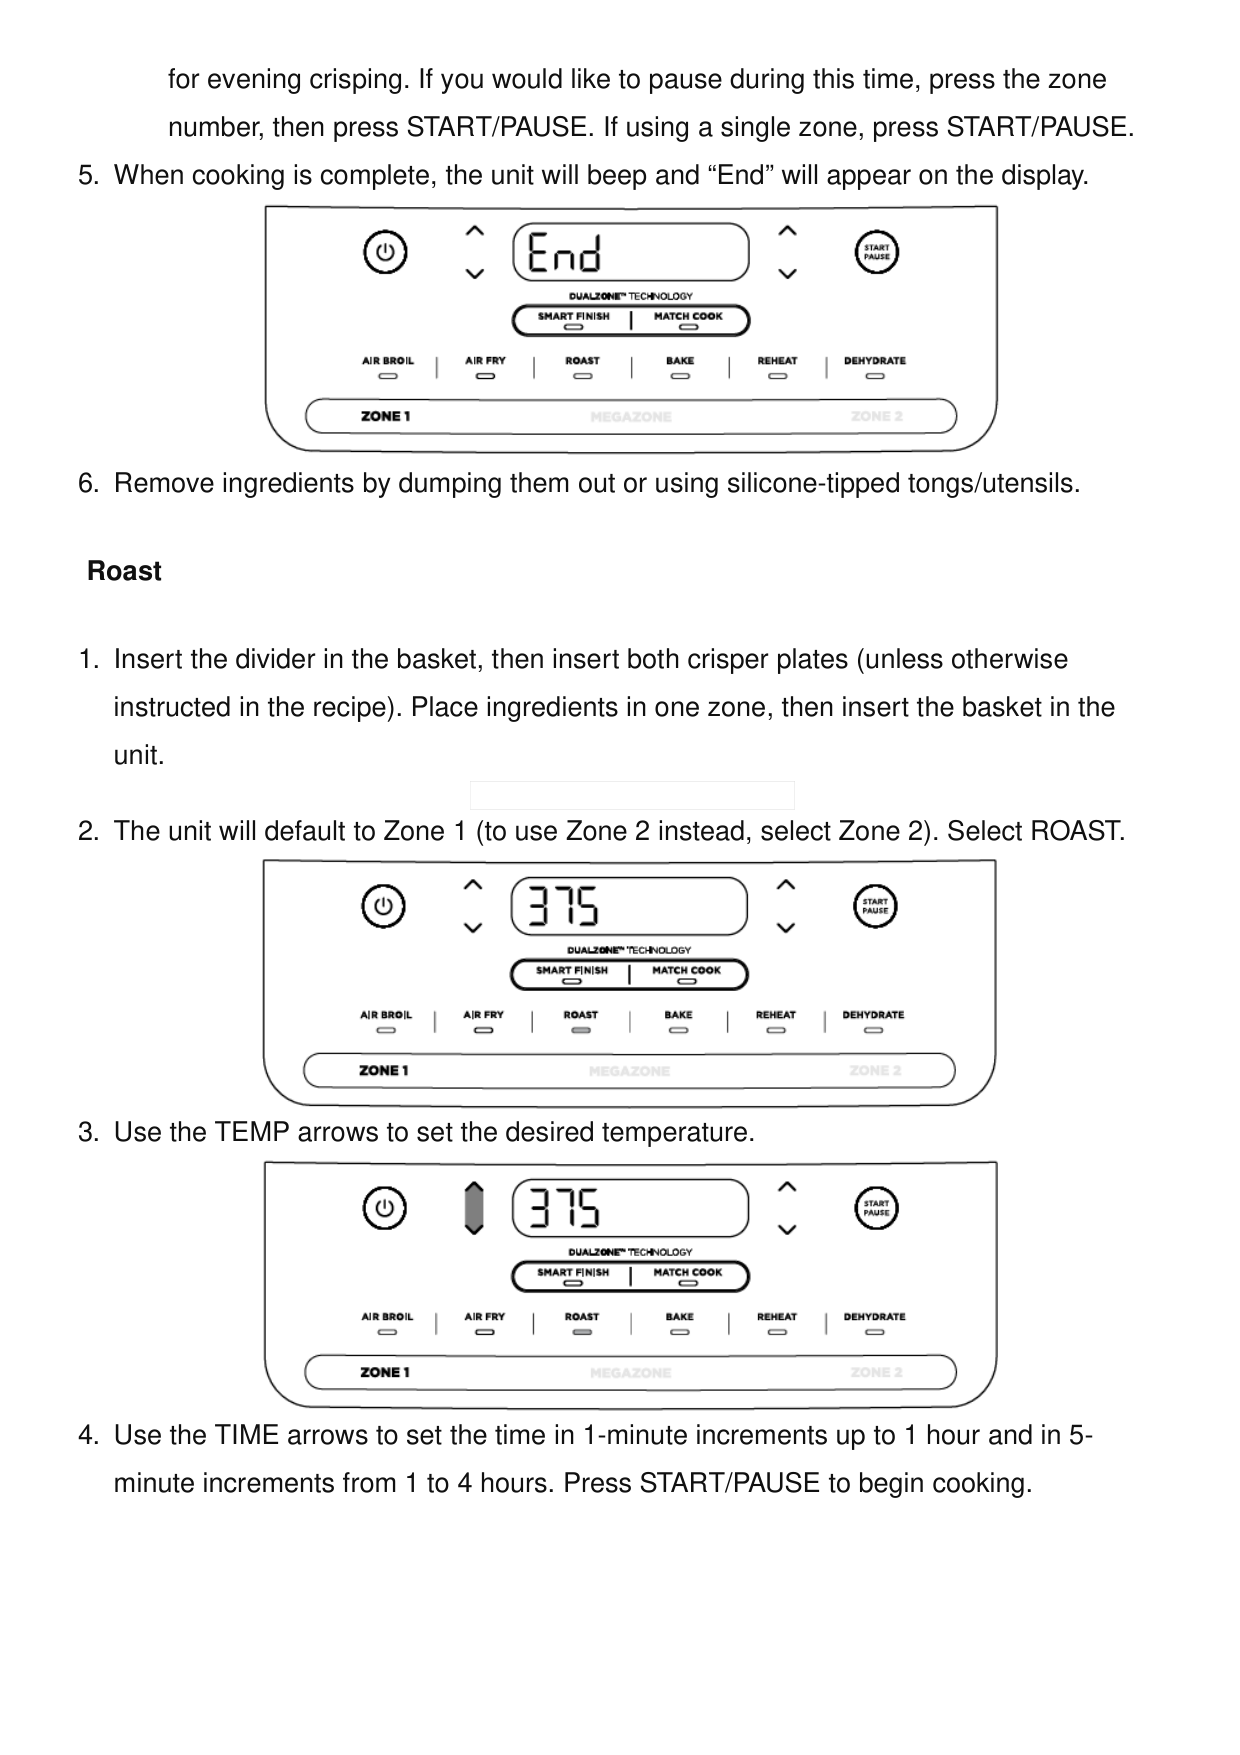
for evening crisping. If you would like to pause during this time, press the zone number, then press START/PAUSE. If using a single zone, press START/PAUSE.
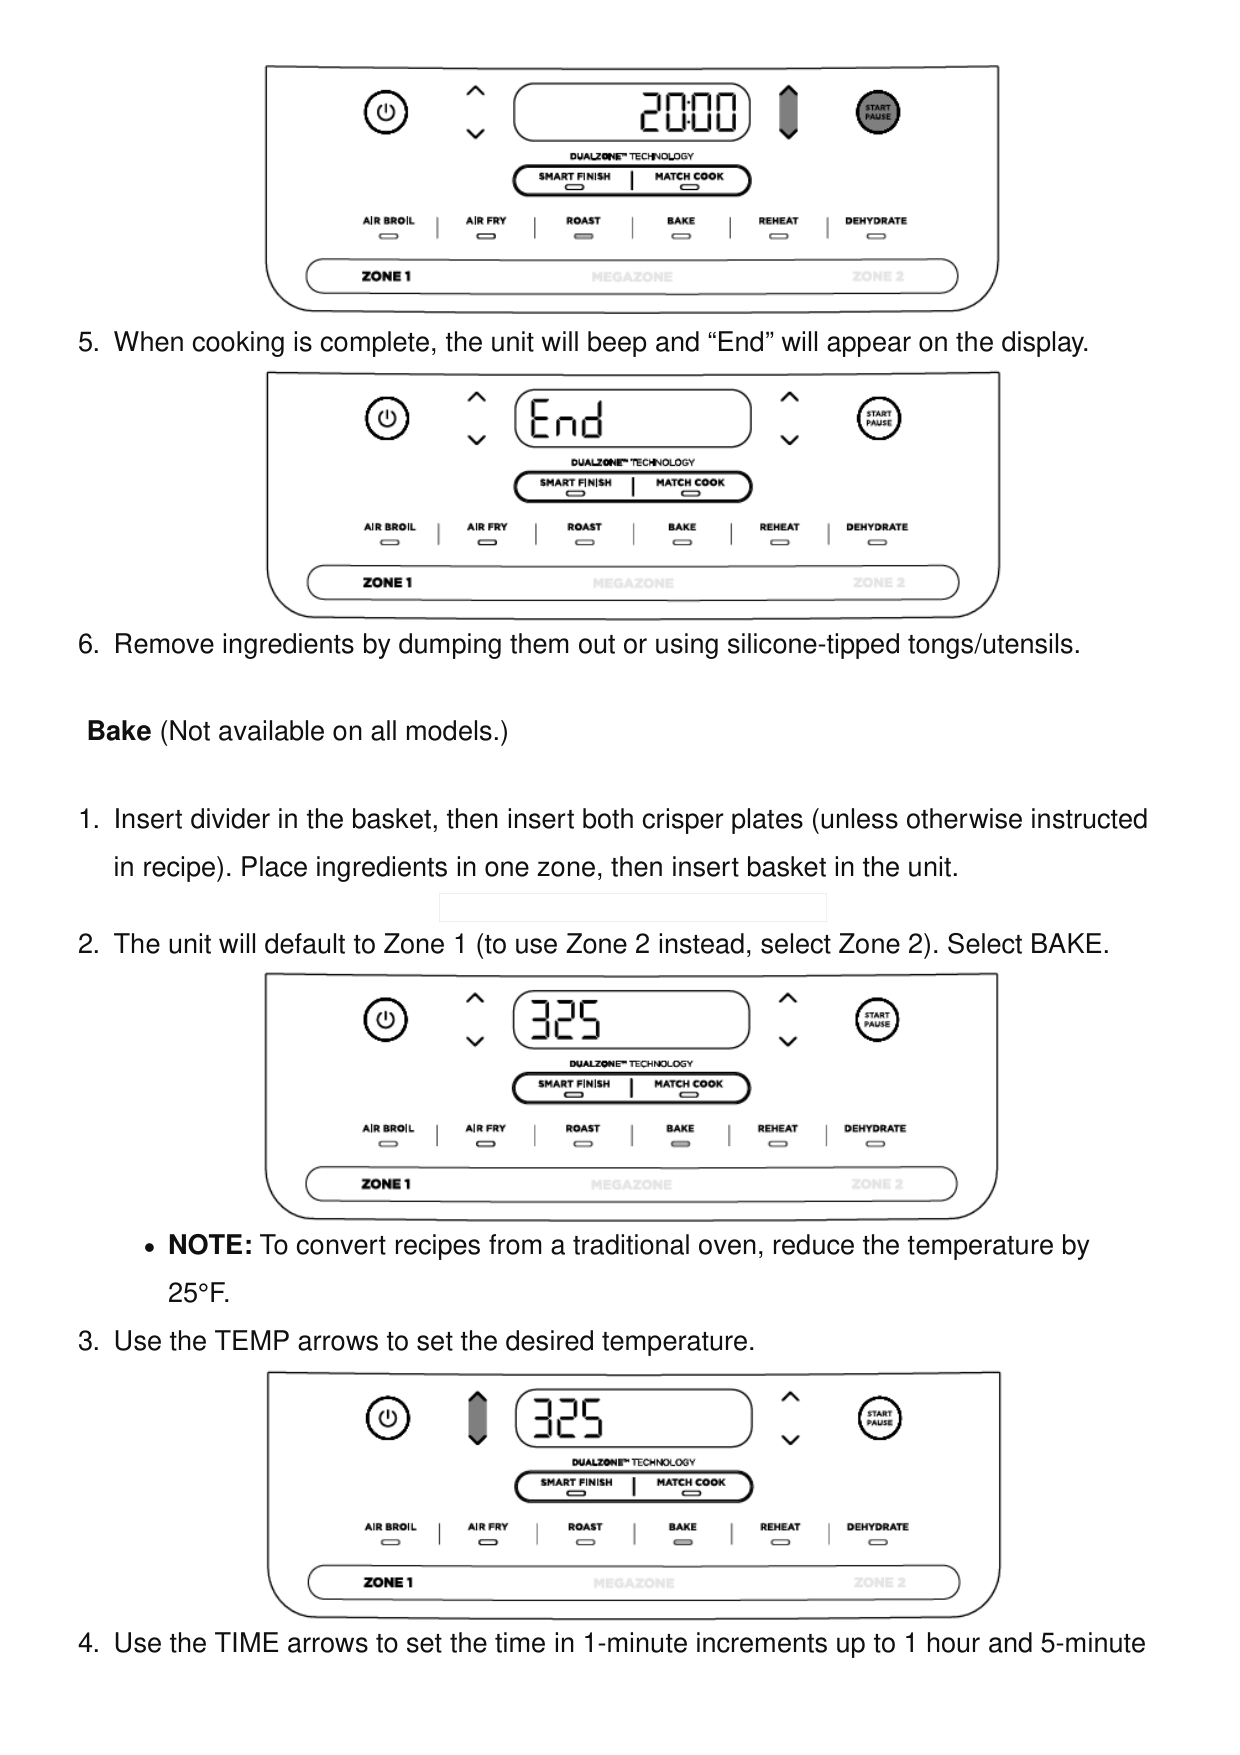
25°F.
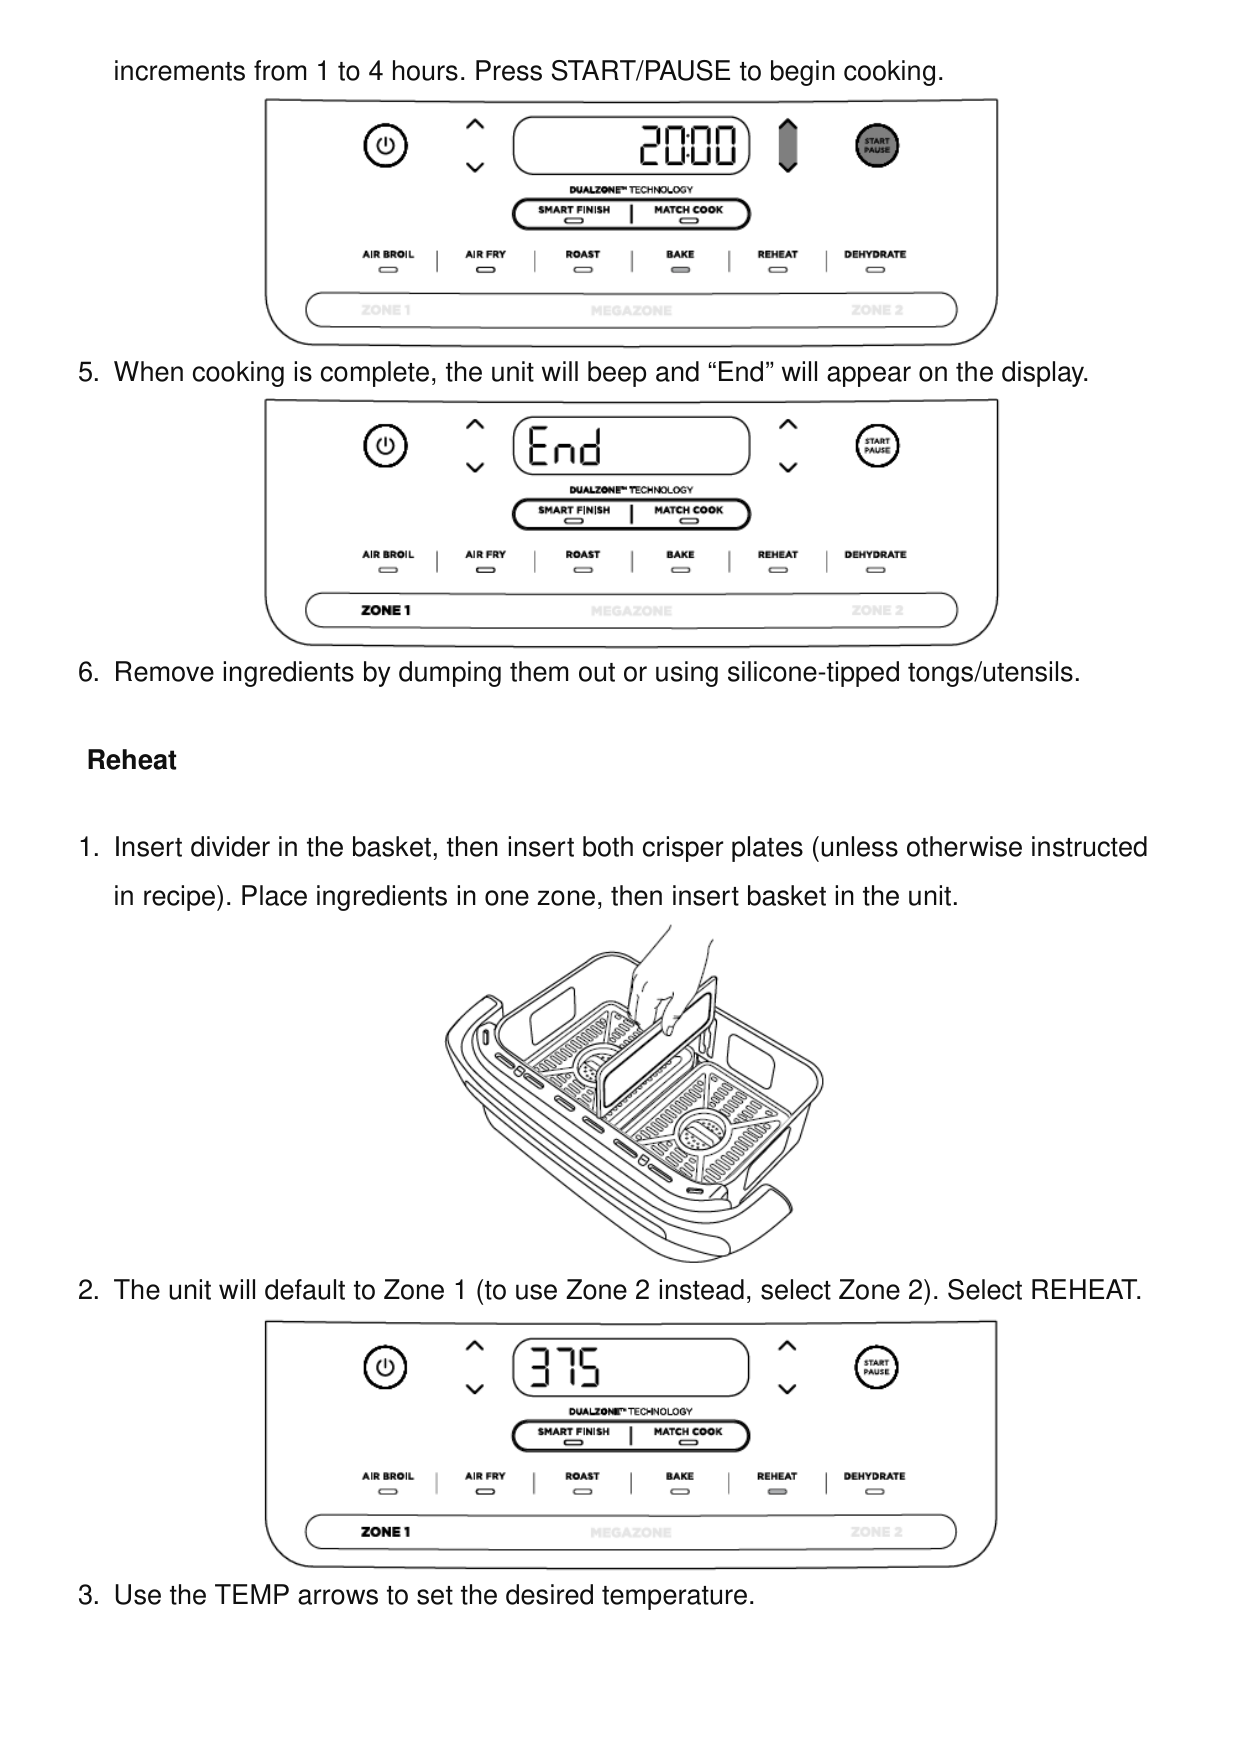
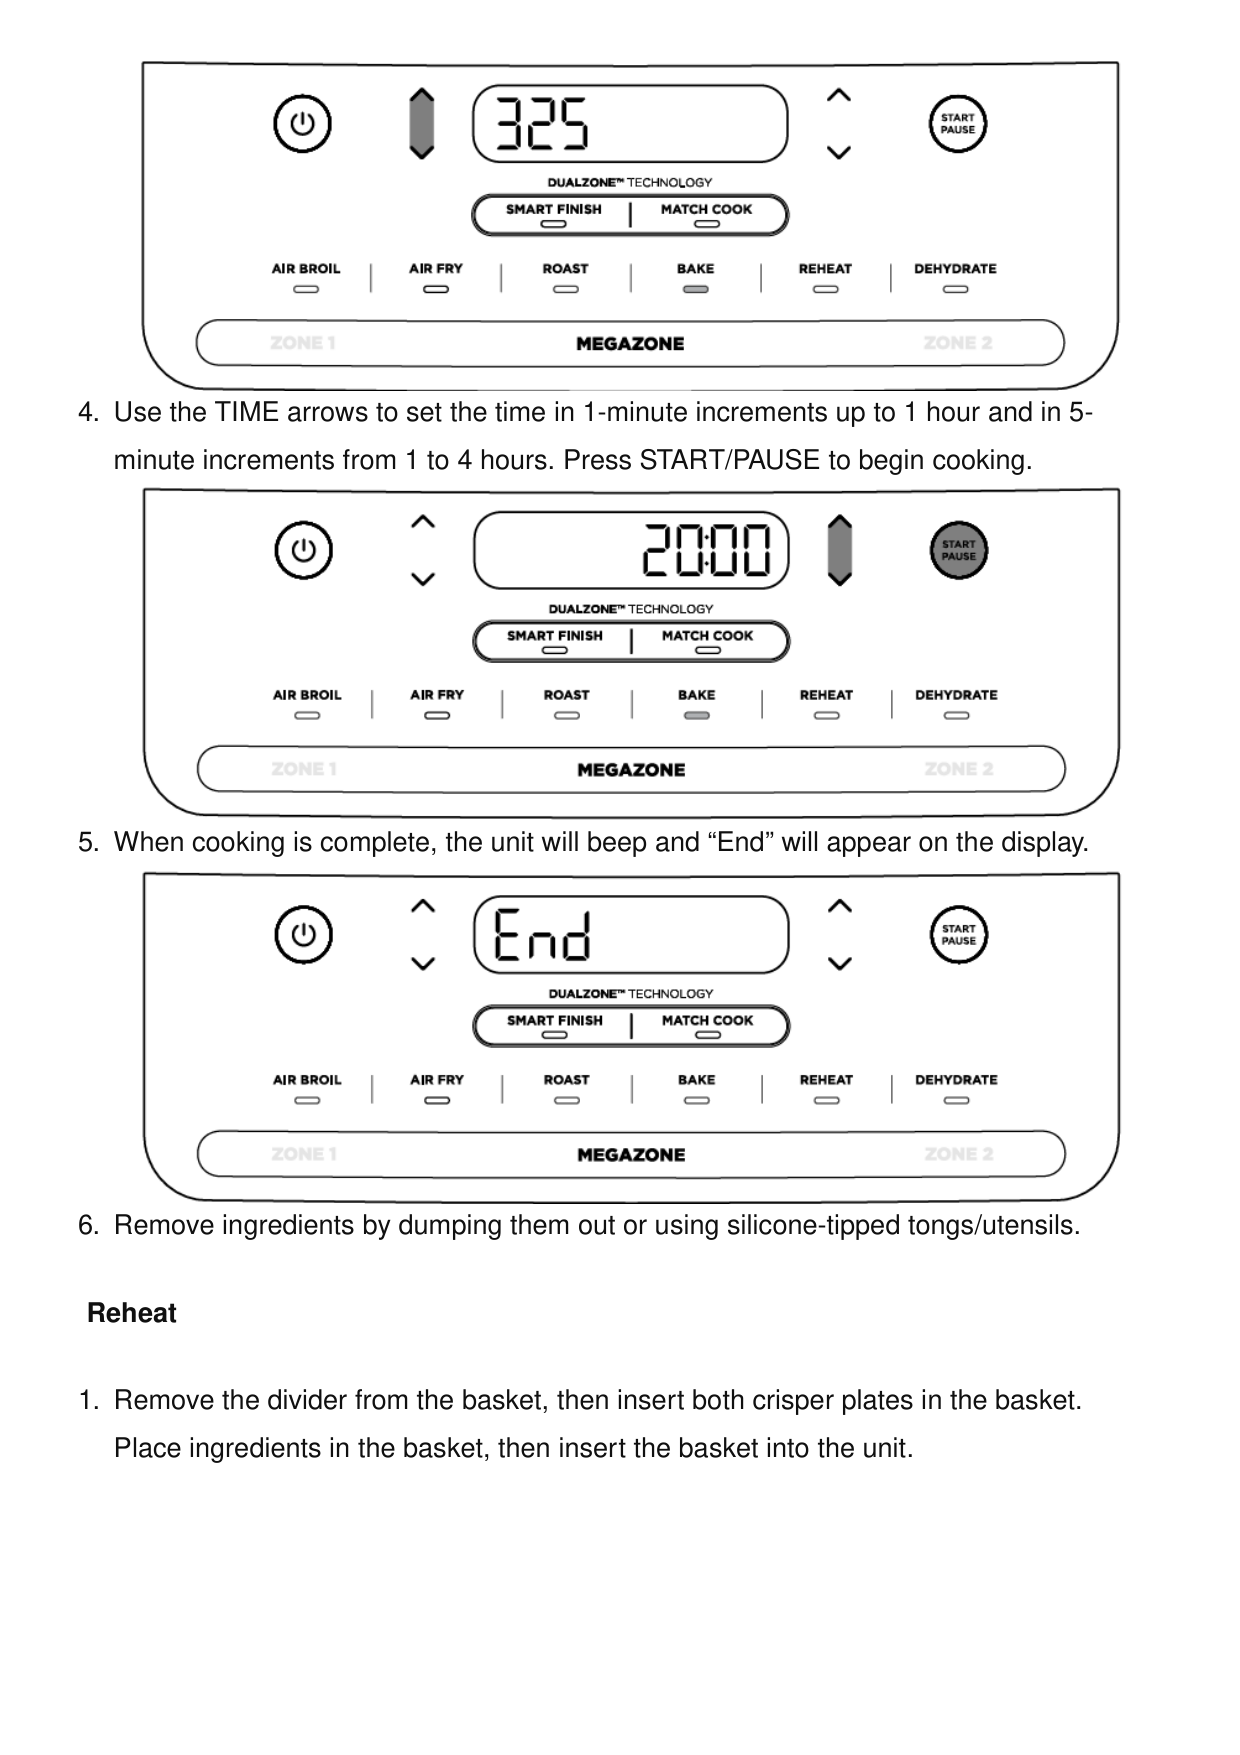
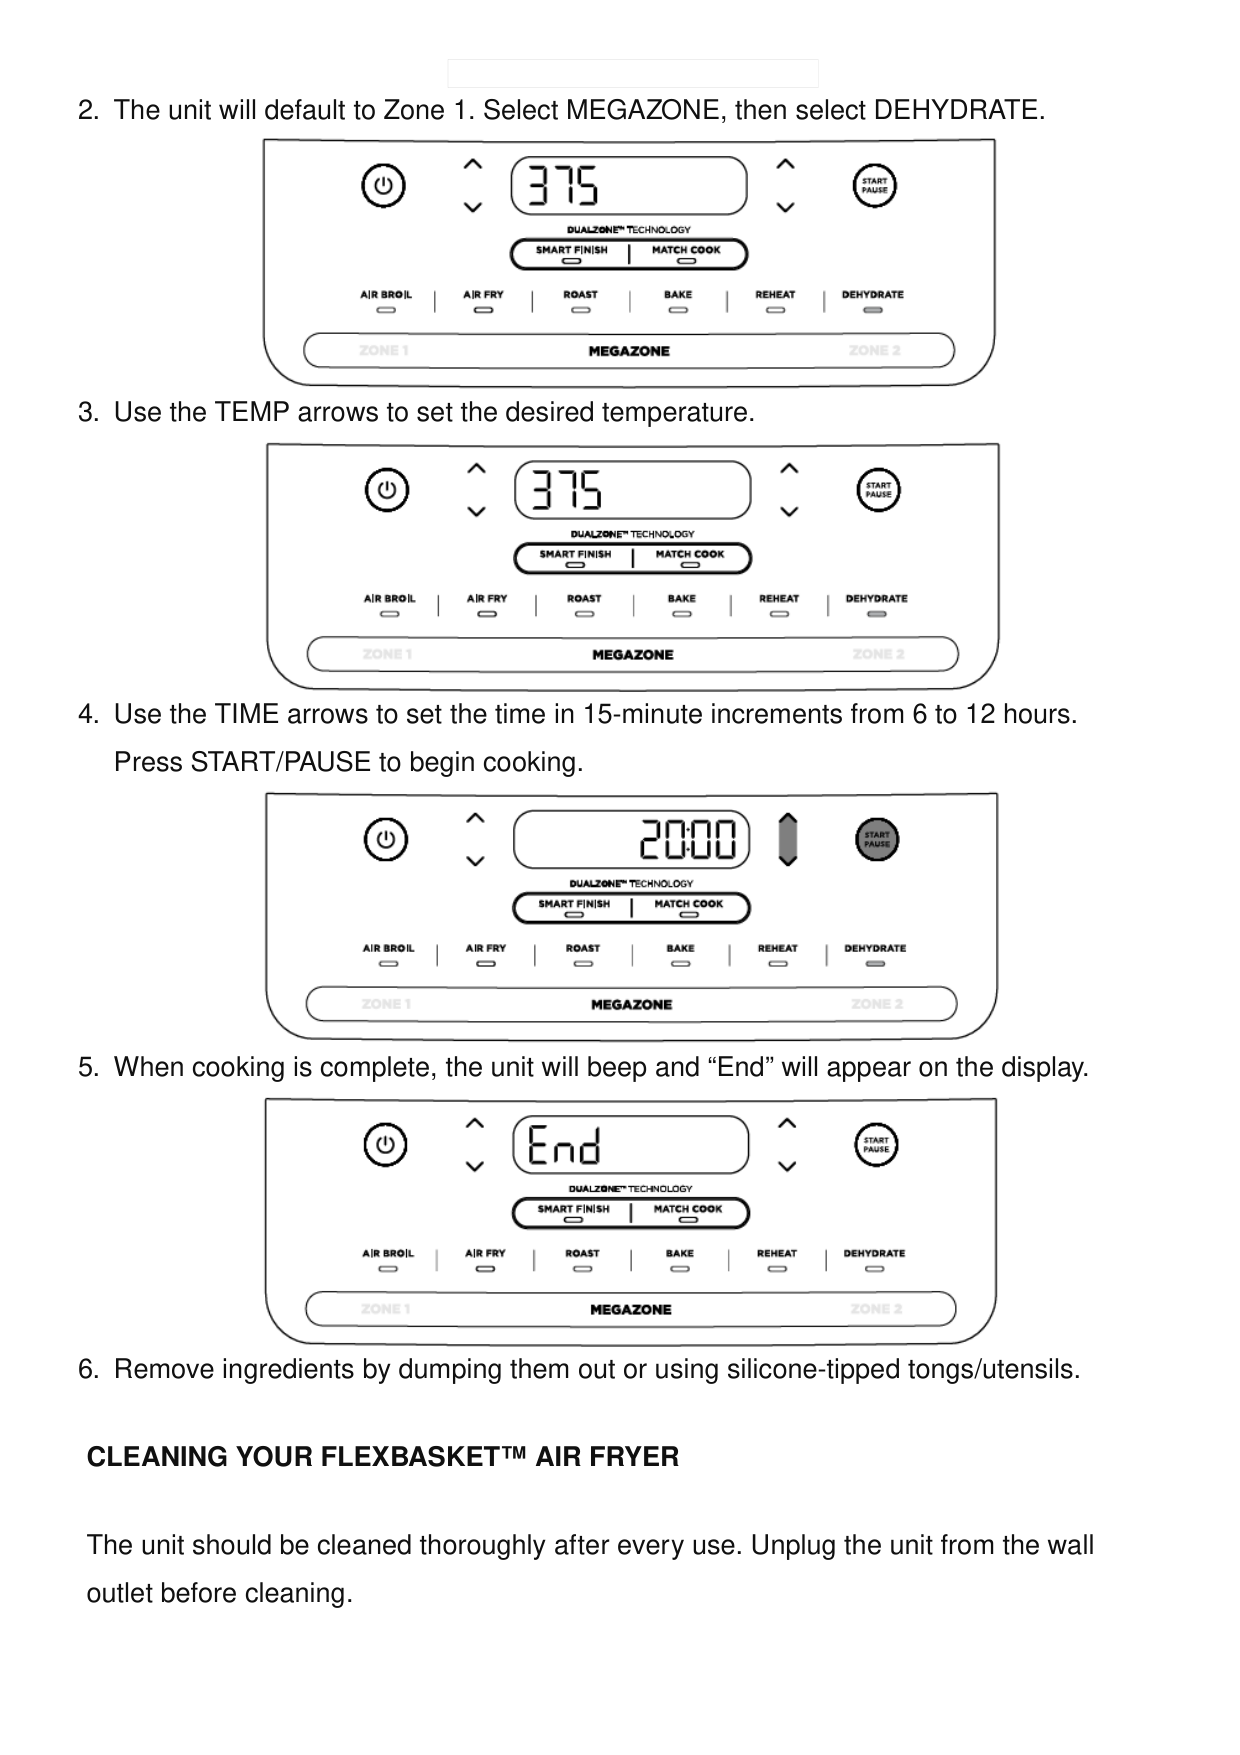
increments from 1 to 4 hours. Press START/PAUSE to begin cooking.
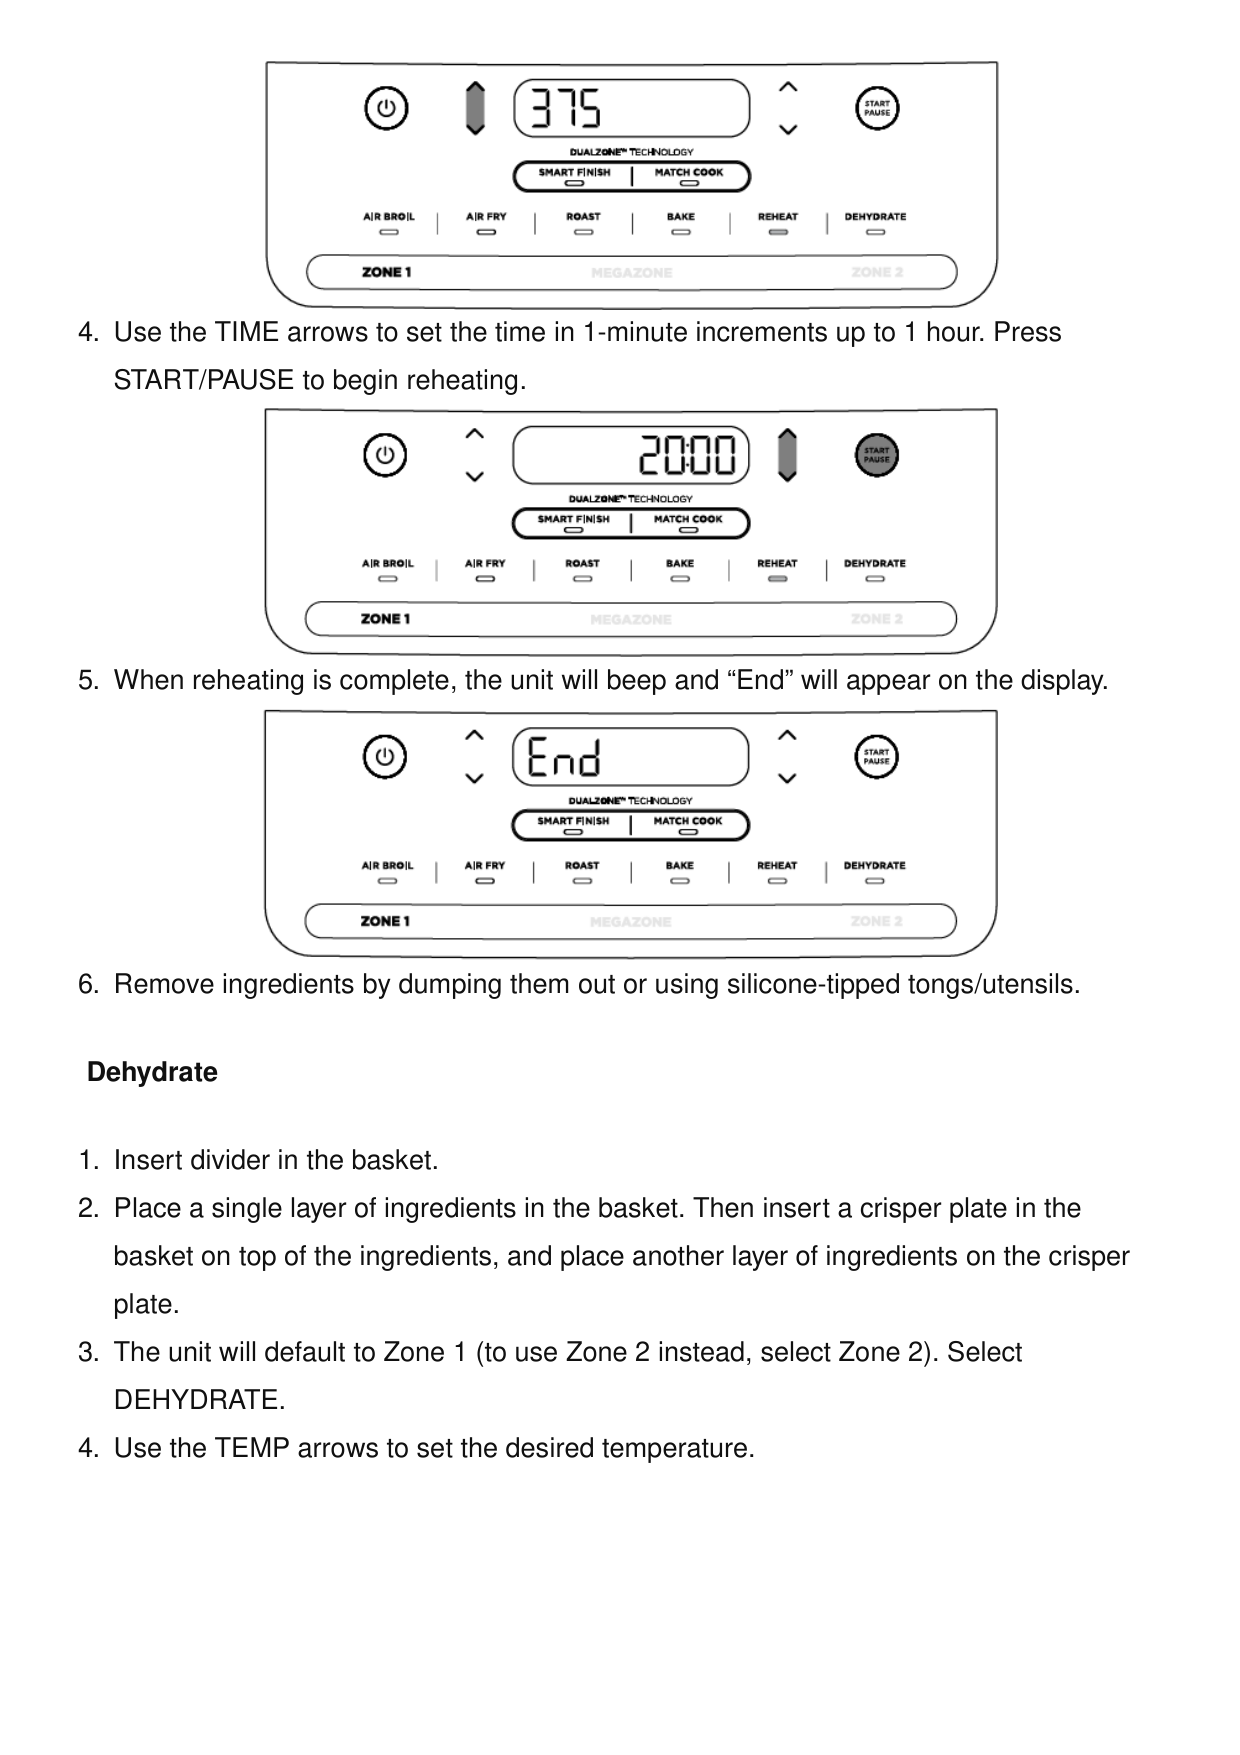
Dehydrate.
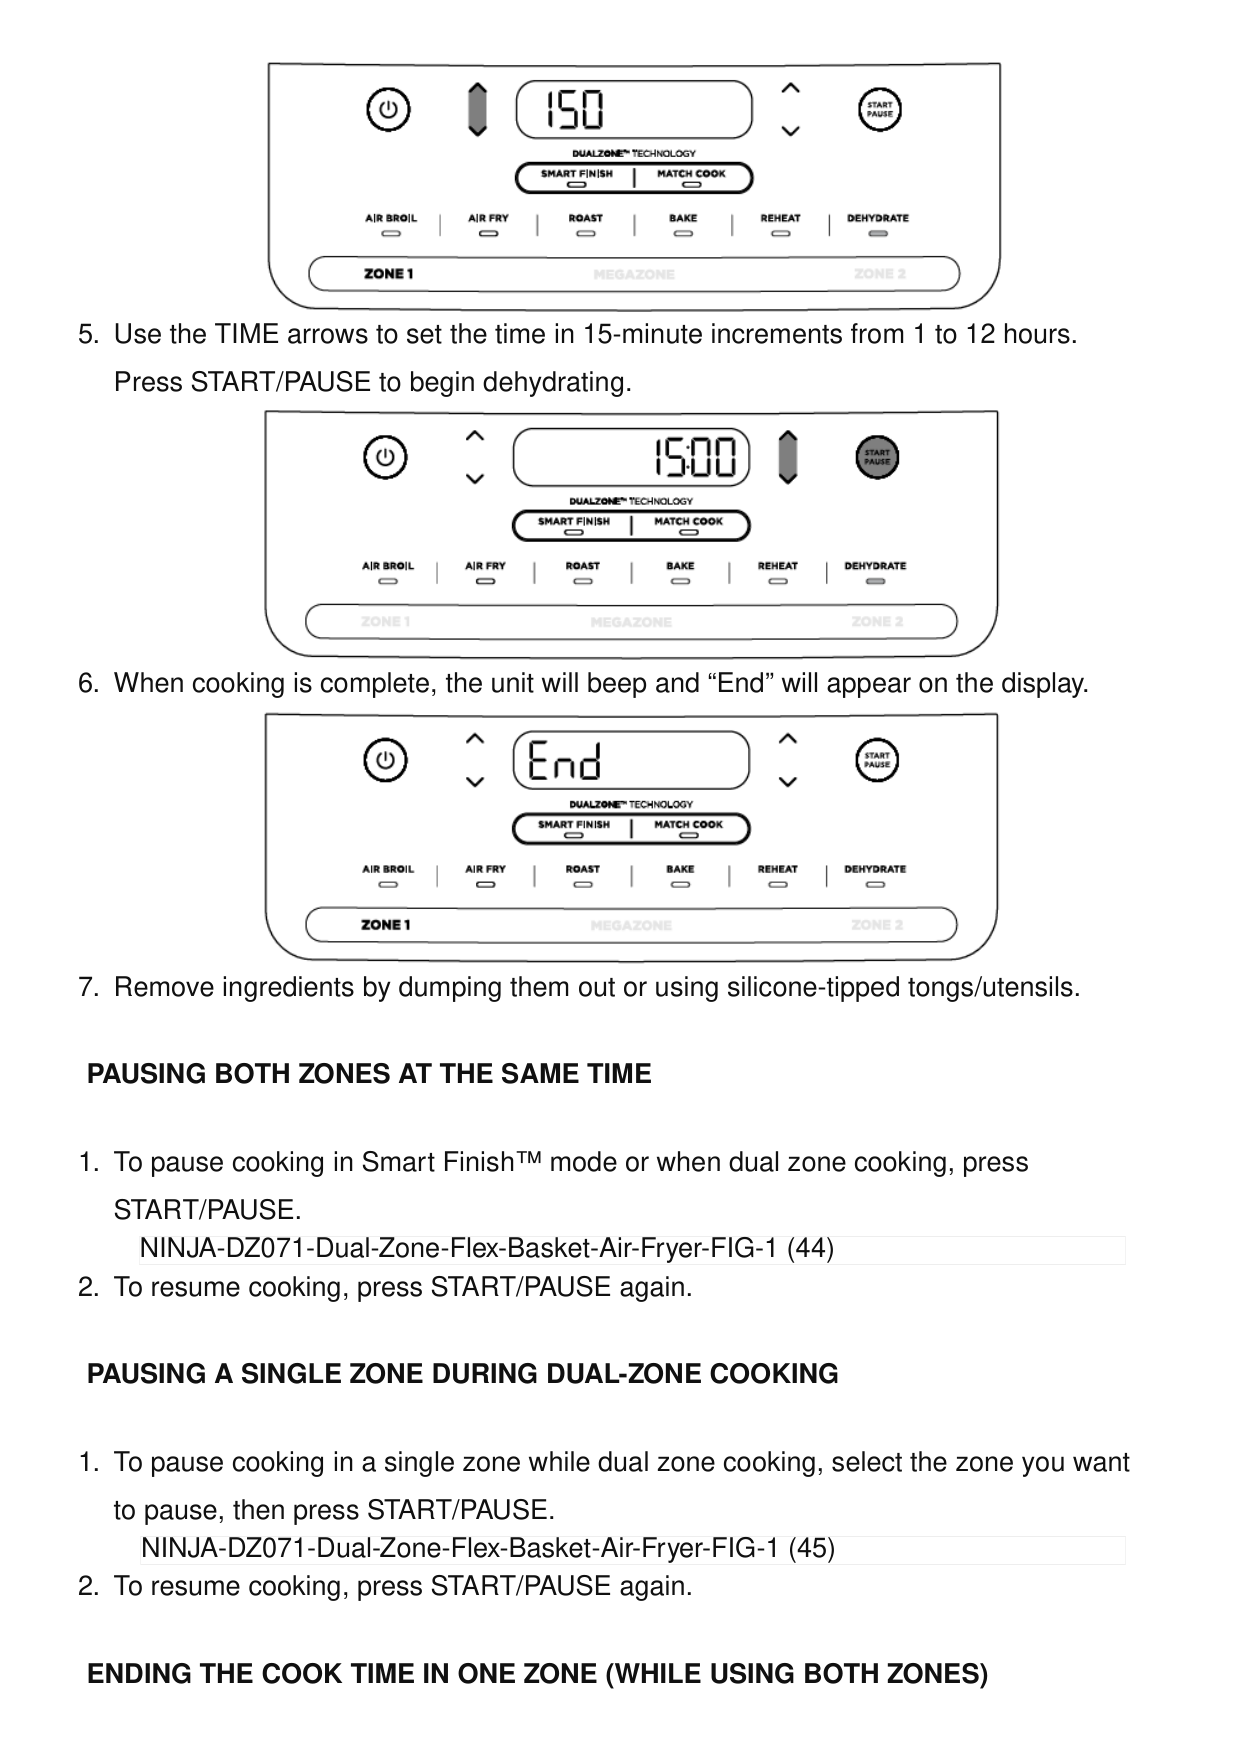
Pausing Both Zones At The Same Time
Start/Pause.
Pausing A Single Zone During Dual-Zone Cooking
Ending The Cook Time In One Zone (While Using Both Zones)
NINJA-DZ071-Dual-Zone-Flex-Basket-Air-Fryer-FIG-1 (44) NINJA-DZ071-Dual-Zone-Flex-Basket-Air-Fryer-FIG-1 (45)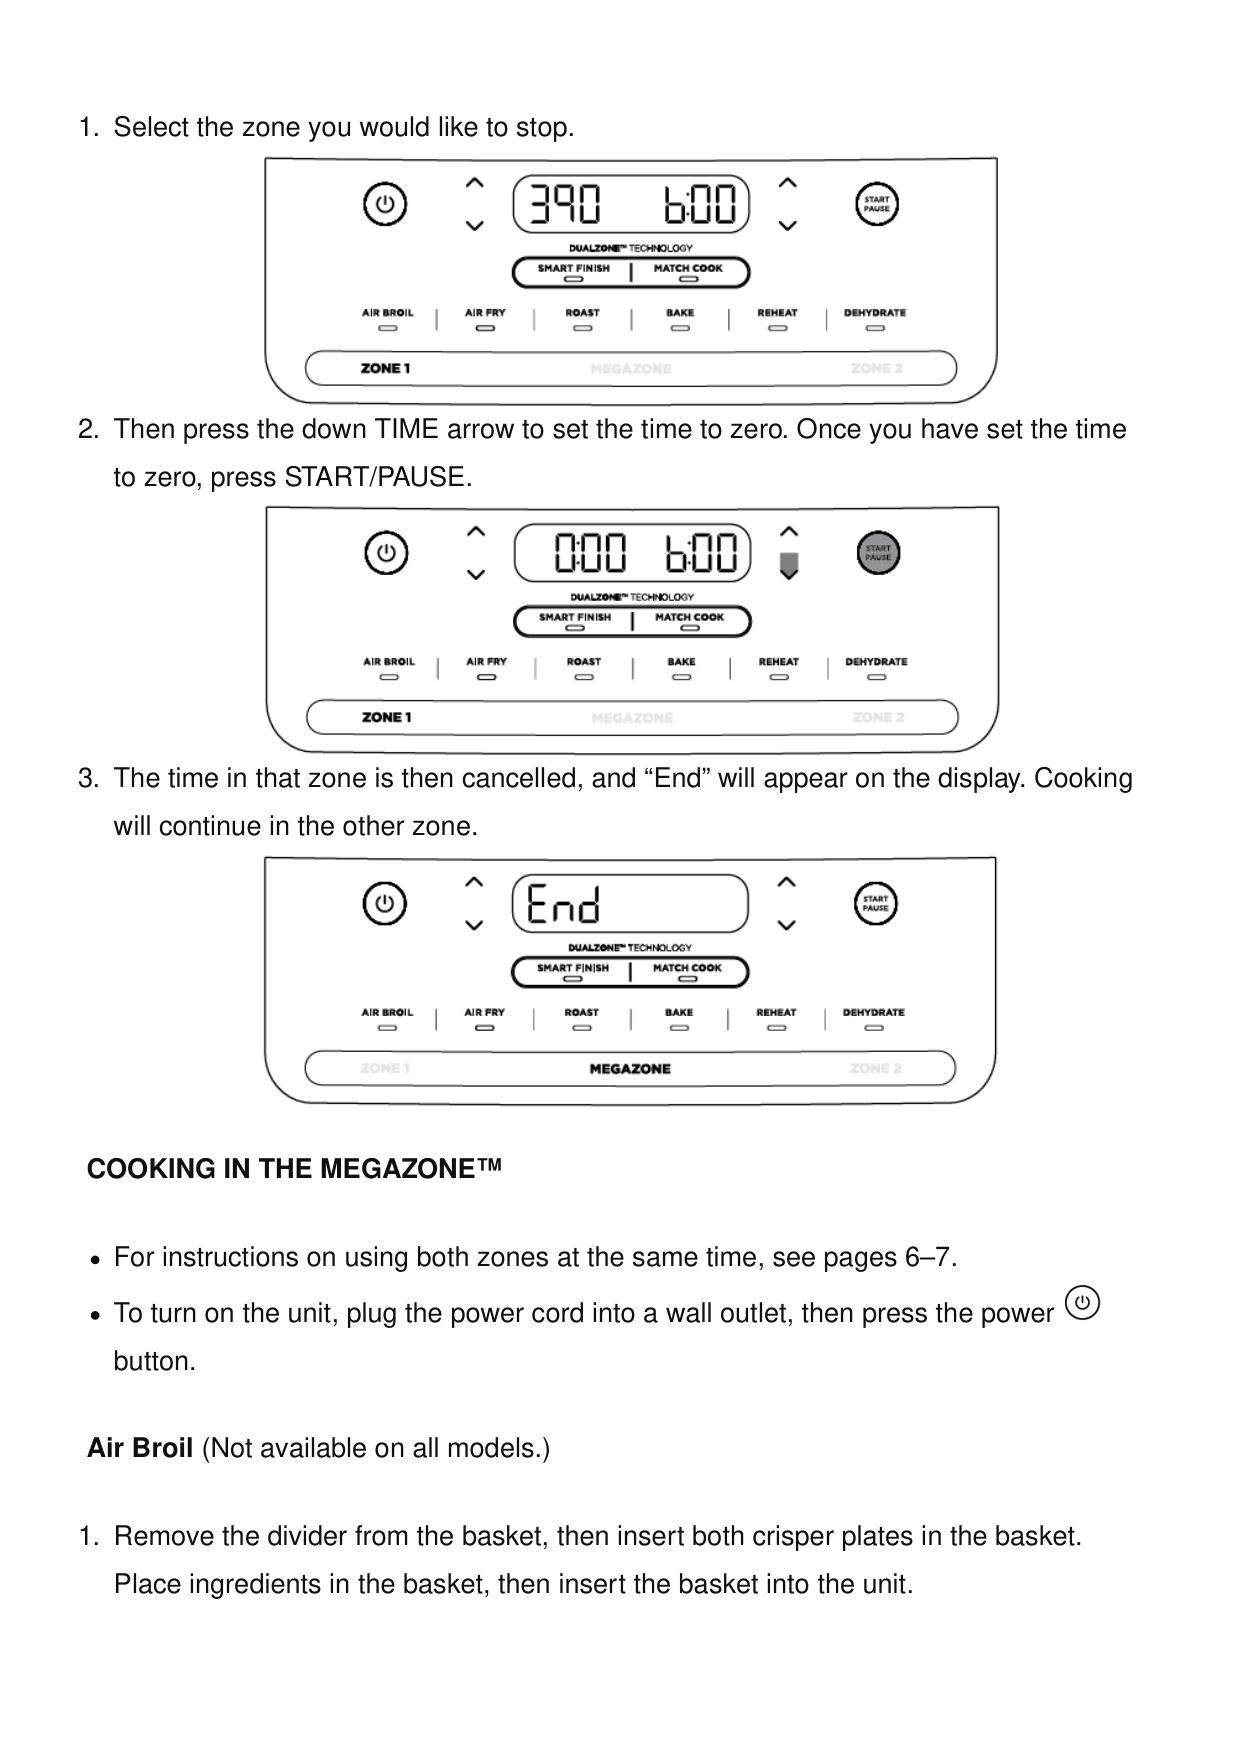
Cooking In The Megazone™
For instructions on using both zones at the same time, see pages 6–7. To turn on the unit, plug the power cord into a wall outlet, then press the power button. Air Broil (Not available on all models.)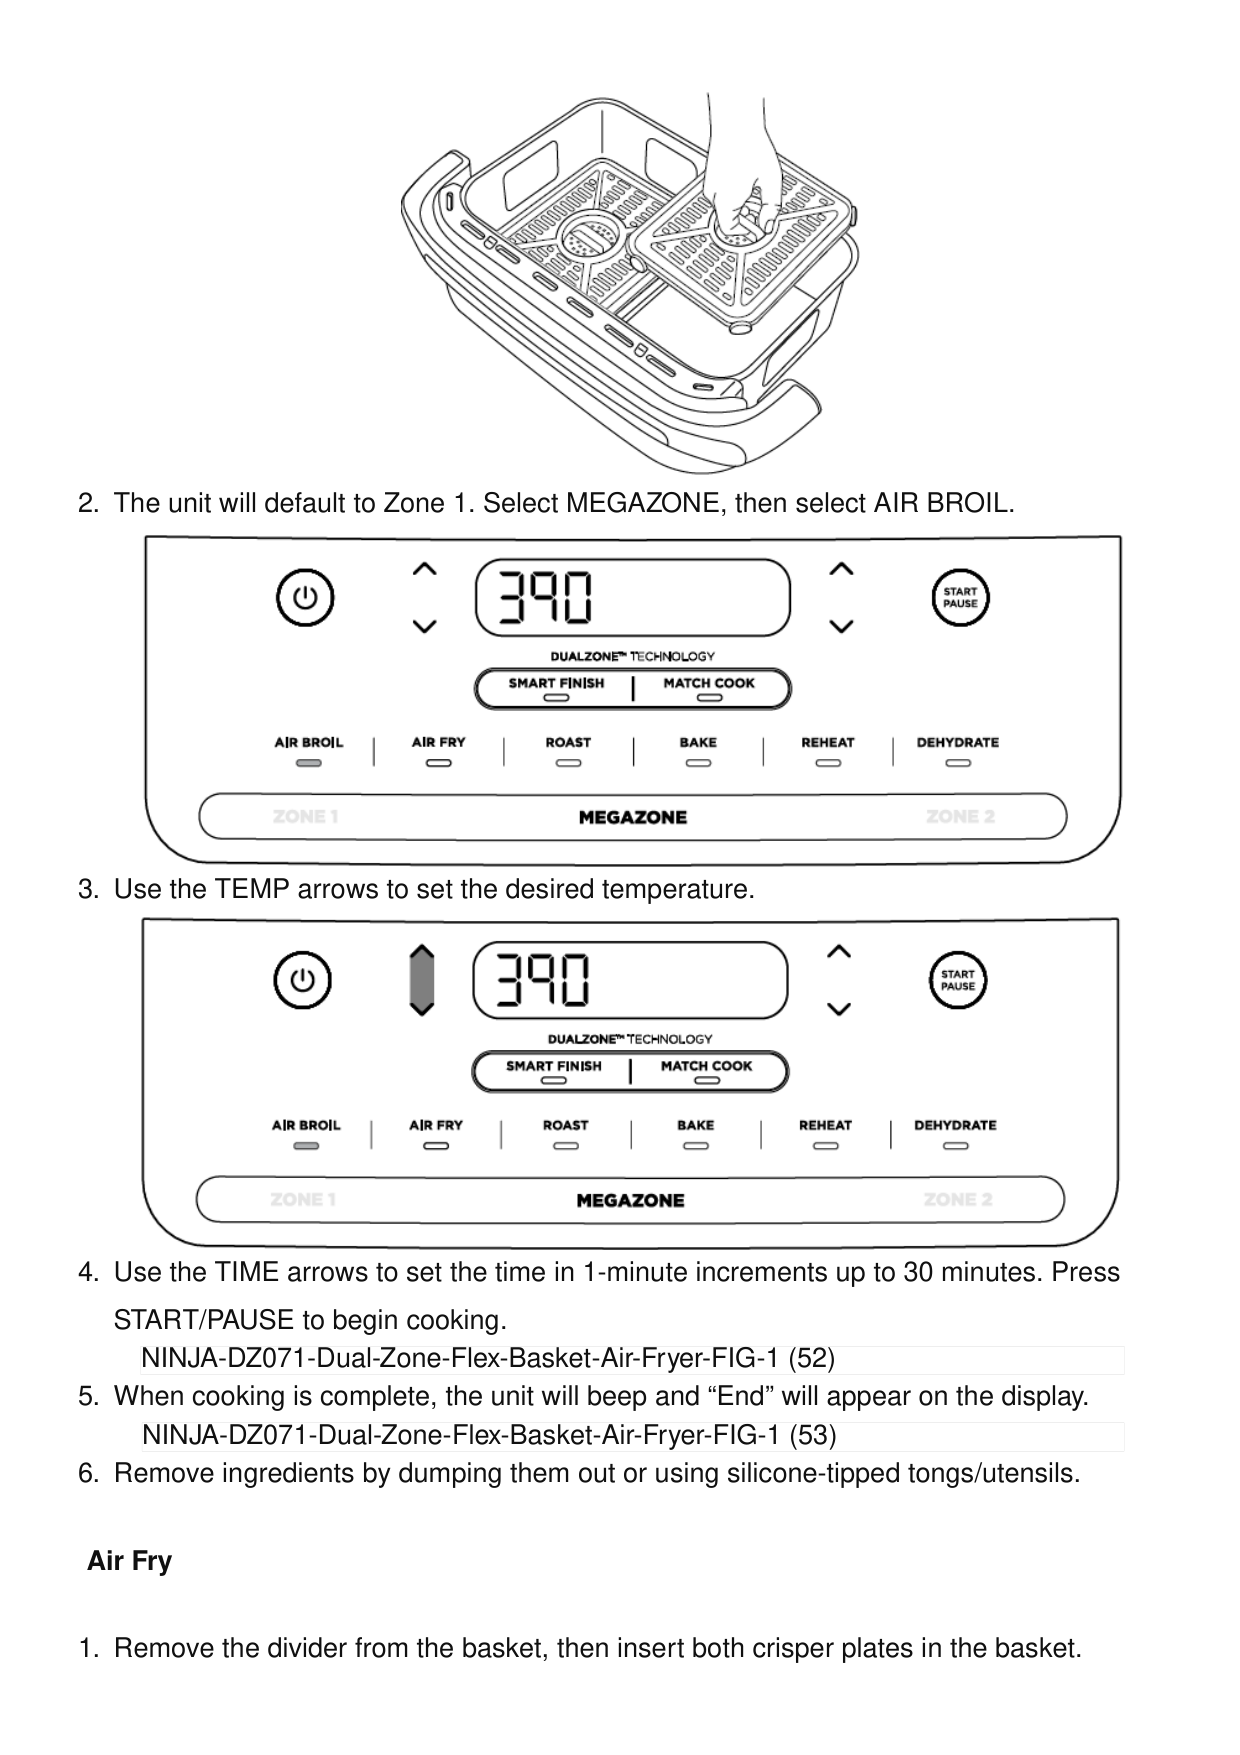
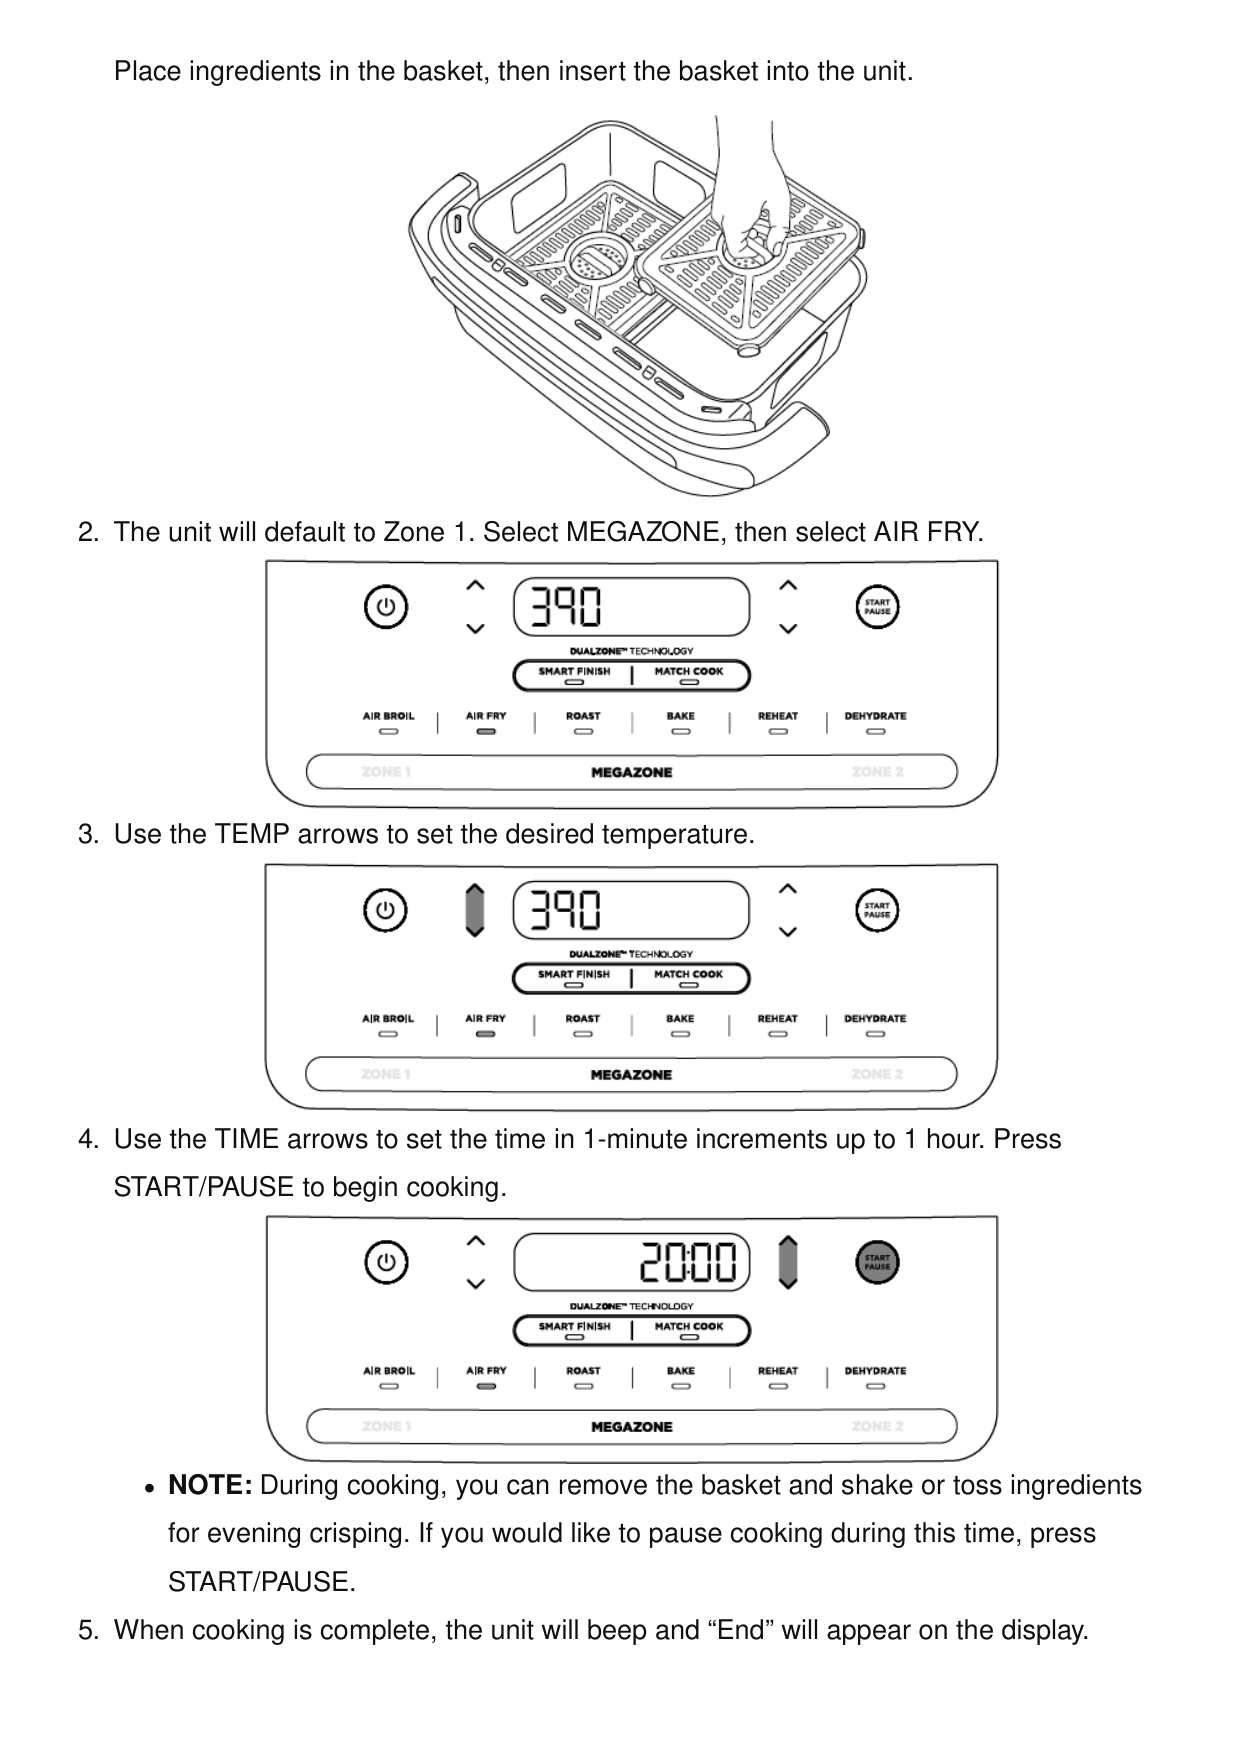
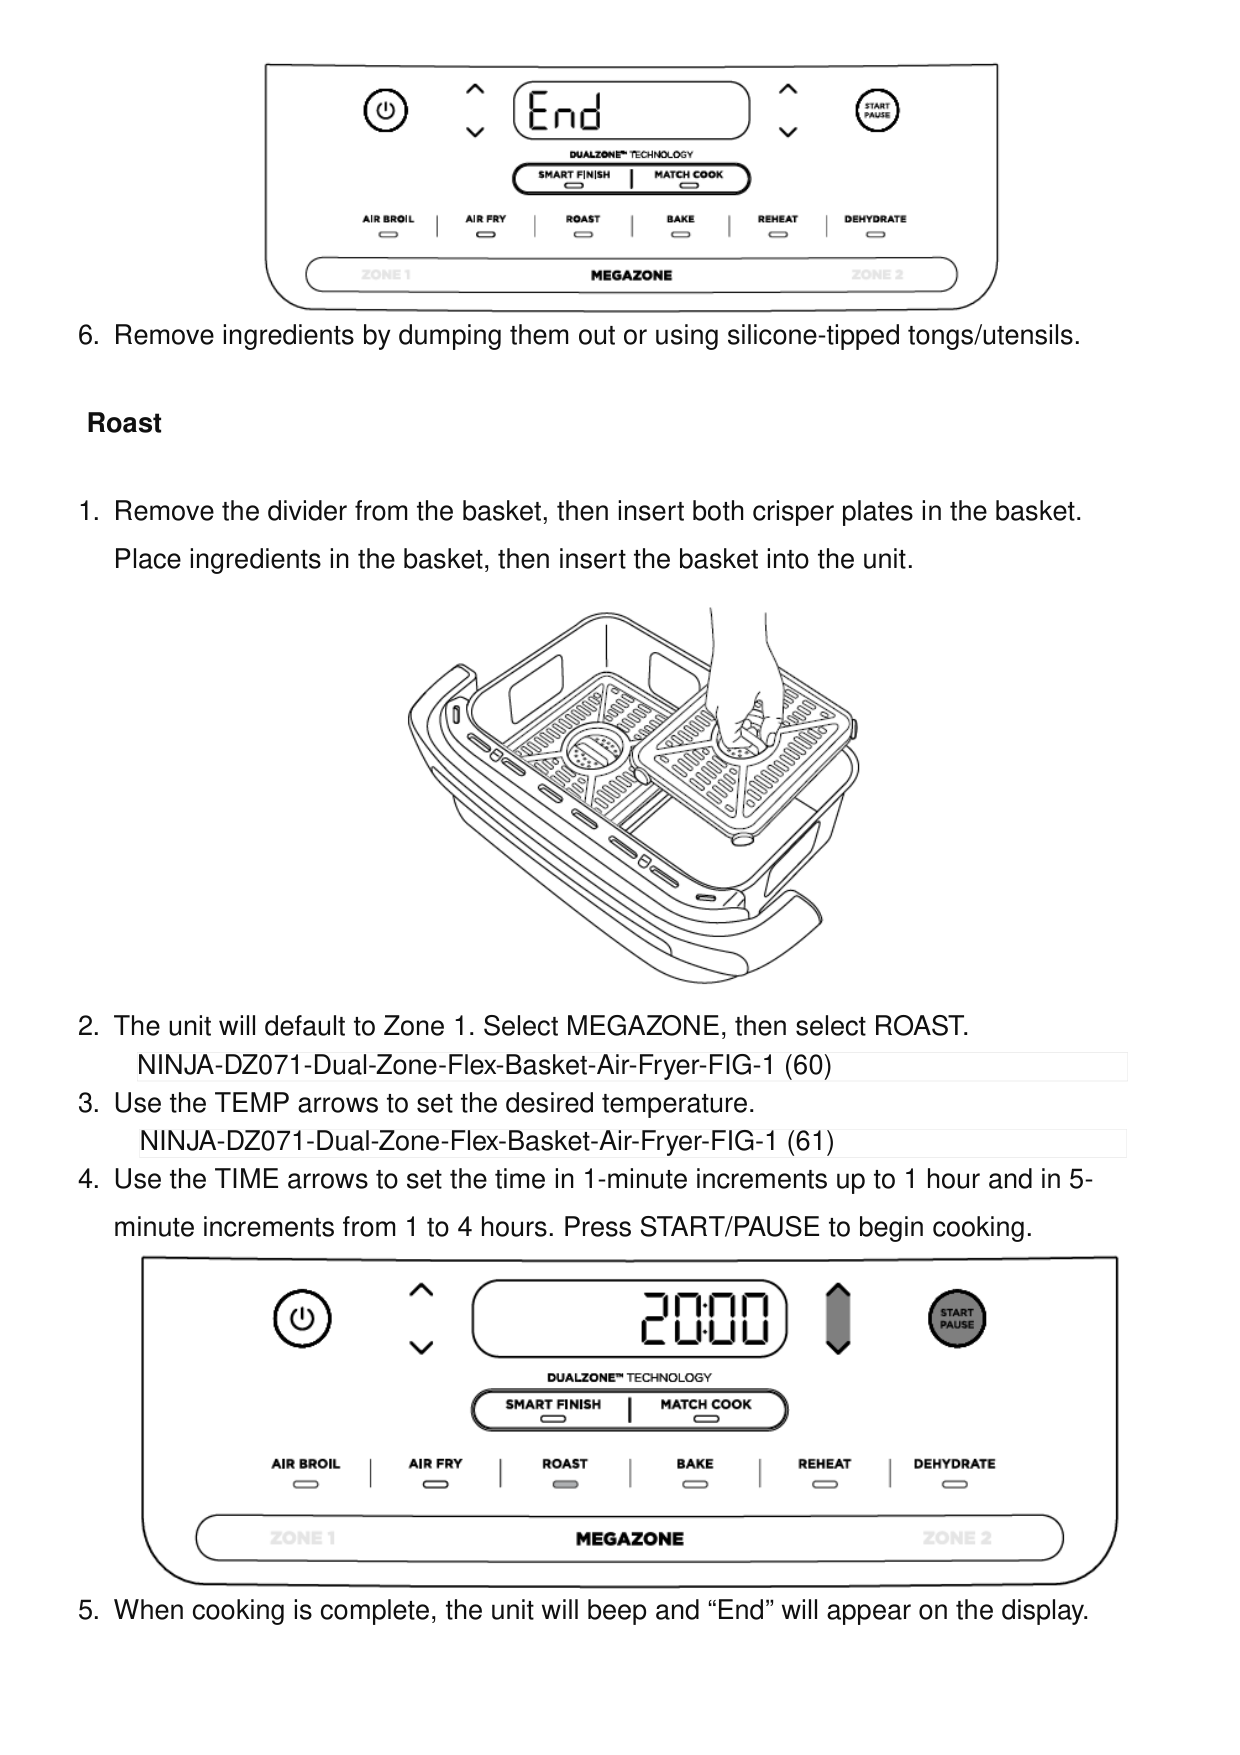
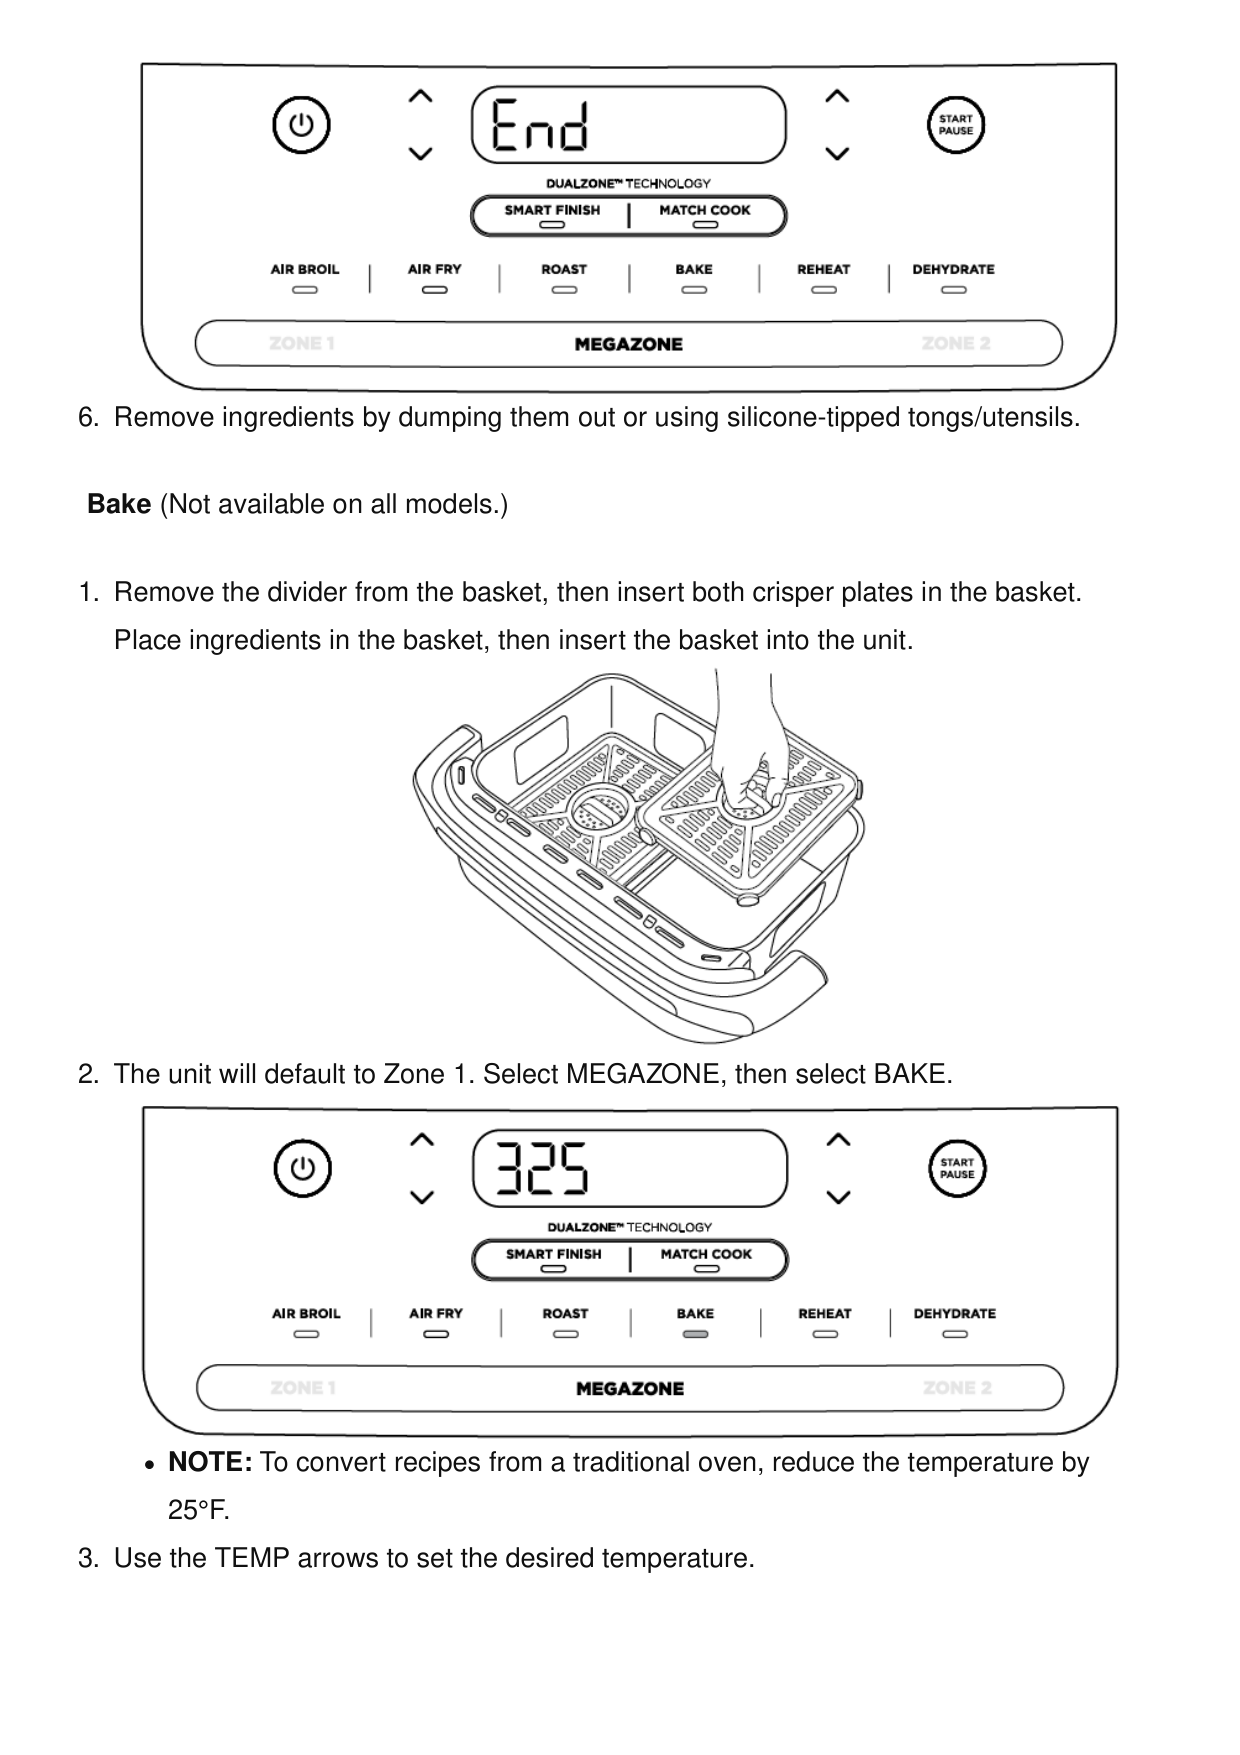
Place ingredients in the basket, then insert the basket into the unit.
Start/Pause.
25°F.
Cleaning Your Flexbasket™ Air Fryer
The unit should be cleaned thoroughly after every use. Unplug the unit from the wall outlet before cleaning.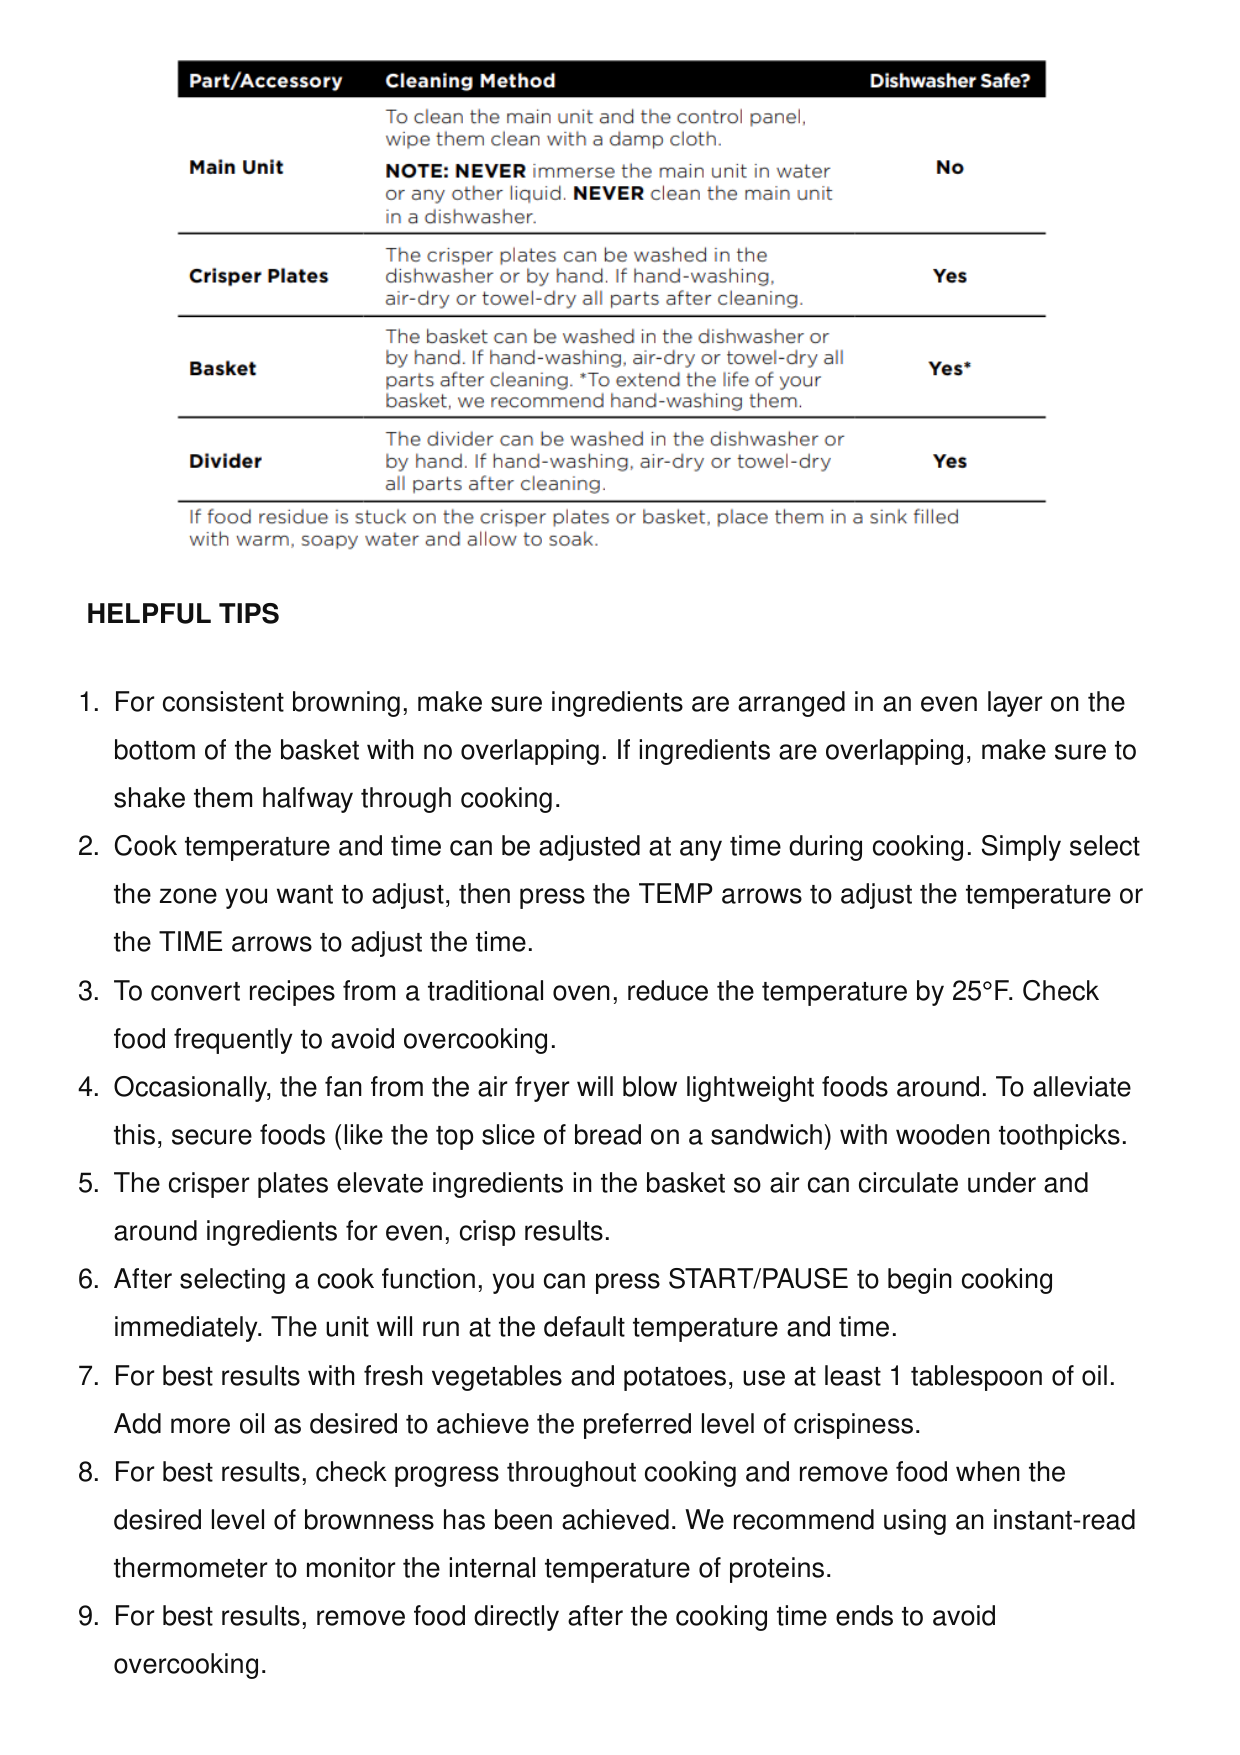
Helpful Tips
Troubleshooting Guide
How do I adjust the temperature or time while using a single zone? When a single zone is running the time or temperature can be adjusted at any time by pressing the up/down arrows. How do I adjust the temperature or time while using both zones? Select the desired zone, then use the TEMP arrows to adjust the temperature or the TIME arrows to adjust the time. Can I cook different foods in each zone and not worry about cross- contamination? Yes, both zones are self-contained with separate heating elements and fans. How do I pause or stop one zone when using both zones? Select the zone you want to pause or stop, then press START/PAUSE. Is the basket safe to put on my countertop? The basket will heat up during cooking. Use caution when handling them, and place them on heat-safe surfaces only. DO NOT place the basket on the top of the unit. When should I use the crisper plate? Use the crisper plate when you want food to come out crispy. The plate elevates the food in the basket so that air can flow under and around it to cook ingredients evenly. Why didn’t my food cook fully? Make sure the basket is fully inserted during cooking. For consistent browning, make sure ingredients are arranged in an even layer on the bottom of the basket with no overlapping. Shake the basket to toss ingredients for even crispiness. Cook temperature and time can be adjusted at any time during cooking. Simply use the TEMP arrows to adjust the temperature or the TIME arrows to adjust the time. Why is my food burned? For best results, check progress throughout cooking and remove food when the desired level of brownness has been achieved. Remove food immediately after the cooking time ends to avoid overcooking. Why do some ingredients blow around when air frying? Occasionally, the fan from the air fryer will blow lightweight foods around. Use
wooden toothpicks to secure loose lightweight food, like the top slice of bread on a sandwich. Can I air-fry wet, battered ingredients? Yes, but use the proper breading technique. It is important to coat foods first with flour, then with egg, and then with bread crumbs. Press breading firmly onto the battered ingredients, so crumbs won’t be blown off by the fan. Why did the display screen go black? The unit is in standby mode. Press the power button to turn it back on. Why is the unit beeping? Either the food is done cooking, or the other zone has started cooking. Why is there an “E” message on the display screen? The unit is not functioning properly. Please contact Customer Service at 1-877- 646-5288. Why did a circuit breaker trip while using the unit? The unit uses 1690 watts of power, so it must be plugged into an outlet on a 15- amp circuit breaker. Using an outlet on a 10-amp breaker will cause the breaker to trip. It is also important that the unit be the only appliance plugged into an outlet when in use. To avoid tripping a breaker, make sure the unit is the only appliance plugged into an outlet on a 15-amp breaker.
Warranty
One (1) Year Limited Warranty
The One (1) Year Limited Warranty applies to purchases made from authorized retailers of SharkNinja Operating LLC. Warranty coverage applies to the original owner and to the original product only and is not transferable. SharkNinja warrants that the unit shall be free from defects in material and workmanship for one (1) year from the date of purchase when it is used under normal household conditions and maintained according to the requirements outlined in the Owner’s Guide, subject to the following conditions and exclusions: What is covered by this warranty?

registeryourninja.com and have the product on hand when you call. SharkNinja will cover the cost for the customer to send in the unit to us for repair or replacement. A fee of $20.95 (subject to change) will be charged when SharkNinja ships the repaired or replacement unit. How to initiate a warranty claim You must call 1-877-646-5288 to initiate a warranty claim. You will need the receipt as proof of purchase. We also ask that you register your product online at registeryourninja.com and have the product on hand when you call, so we may better assist you. A Customer Service Specialist will provide you with return and packing instruction information. How state law applies This warranty gives you specific legal rights, and you also may have other rights that vary from state to state. Some states do not permit the exclusion or limitation of incidental or consequential damages, so the above may not apply to you. ninjakitchen.com. Documents / Resources NINJA DZ071 Dual Zone Flex Basket Air Fryer [pdf] Instruction Manual DZ071 Dual Zone Flex Basket Air Fryer, DZ071, Dual Zone Flex Basket Ai r Fryer, Zone Flex Basket Air Fryer, Flex Basket Air Fryer, Basket Air Fryer References User Manual Ninja

Basket Air Fryer, Dual Zone Flex Basket Air Fryer, DZ071, DZ071 Dual Zone Flex Basket Air Fryer, Flex Basket Air Fryer, Ninja, Zone Flex Basket Air Fryer Leave a comment Search: e.g. whirlpool wrf535swhz
Search This website is an independent publication and is neither affiliated with nor endorsed by any of the trademark owners. The "Bluetooth®" word mark and logos are registered trademarks owned by Bluetooth SIG, Inc. The "Wi-Fi®" word mark and logos are registered trademarks owned by the Wi-Fi Alliance. Any use of these marks on this website does not imply any affiliation with or endorsement. Your email address will not be published. Required fields are marked * Comment * Name Email Website Save my name, email, and website in this browser for the next time I comment. Post Comment