Ask AI
— answers from the official manualAnswers from the official manual.
Common questions
Common Questions
9 totalHow do I set the clock on the rice cooker?
Press the TIME SETTING button while the time display is blinking. Use the up arrow button to advance the time in 1-minute increments or the down arrow to reverse it. Press and hold either button to adjust quickly in 10-minute increments. The time display will stop blinking after 3 seconds when the setting is complete.
What are the basic steps for cooking white rice?
Measure rice with the provided measuring cup, clean the rice and adjust water to the marked line, place the inner cooking pan in the main body with the inner lid set and steam vent set attached, close the outer lid by pushing down until it clicks, insert the power plug, select the WHITE menu setting, and press START/REHEAT. When cooking completes, stir and loosen the rice immediately.
How do I prevent rice from getting scorched?
Make sure no foreign matter such as rice is stuck to the bottom of the inner cooking pan or on the side sensor. Clean rice sufficiently to remove excess bran, and avoid soaking rice for long periods or using the timer function as bran may collect at the bottom and cause scorching. Ensure the inner cooking pan has not deformed.
What is the keep warm mode and how do I use it?
After cooking completes, the rice cooker automatically switches to Regular Keep Warm mode, which keeps rice warm at a higher temperature so it develops odors less easily. You can also select Extended Keep Warm mode by pressing the KEEP WARM button, which maintains the temperature slightly lower for longer storage. Rice can be kept warm for up to 12 hours in Regular mode or 24 hours in Extended mode.
Can I use the timer function with all menu settings?
No, the timer function is not available for QUICK and MIXED menu settings and should not be used for SWEET. For other menu settings, you can set the timer to finish cooking at a specific time. Be sure to set the clock to the current time before using the timer, as inaccurate time will prevent cooking from completing at the set time.
What should I do if there is an odor in the rice cooker?
Fill the inner cooking pan with water up to water level 1 (for 1.0L model) or level 2 (for 1.8L model), close the outer lid, select the QUICK menu setting, and press the START/REHEAT button. When a melody sounds and the cooker switches to keep warm mode, press CANCEL. After the main body cools, discard the water and clean accordingly.
Full Manual
33 pages

"1Ü?Z0 >Jirushi
u s a ] | c a nPressure Induction Heating Rice Cooker & Warmer
Operating Instructions
N P -N W C 1 0 / N P -N W C 1 8
Index
Important Safeguards
2 .............................................................About The Inner Cooking Pan
6 ............................................Part Names And Functions
7 .....................................................Tips For Delicious Rice
9 ..............................................................How To Set The Clock
10 ..............................................................Sound Signals And How To Change Them
10 ....................Cooking Rice
Basic Cooking Steps
11 ..............................................................How To Select The Rinse-Free Setting
13 .....................Tips For Cooking Various Rice Menus
14 . .. .....................Estimated Cooking Time
15 ...................................................Activated Brown Rice (Gaba Brown)
15 ...............................Keeping Rice Warm
Regular Keep Warm And Extended Keep Warm
16 ....Reheating Rice
18 ..............................................................................Using The Timer To Cook Rice
Using The Timer.
19 . ........................................................................Recipes
Congee
.21 ...........................................................................................Hand-Rolled Sushi
21 ...................................................................Sweet Rice Cooked With Adzuki Beans
22 .....................Paella
22 . .............................................................................................Cleaning And Maintenance
23 . ..................................................Troubleshooting Guide
28 ..........................................................Error Displays And Their Meanings
31 .............................Replacement Parts
32 ...................................................................Specifications
32 ...............................................................................Zojirushi Corporation
Important Safeguards
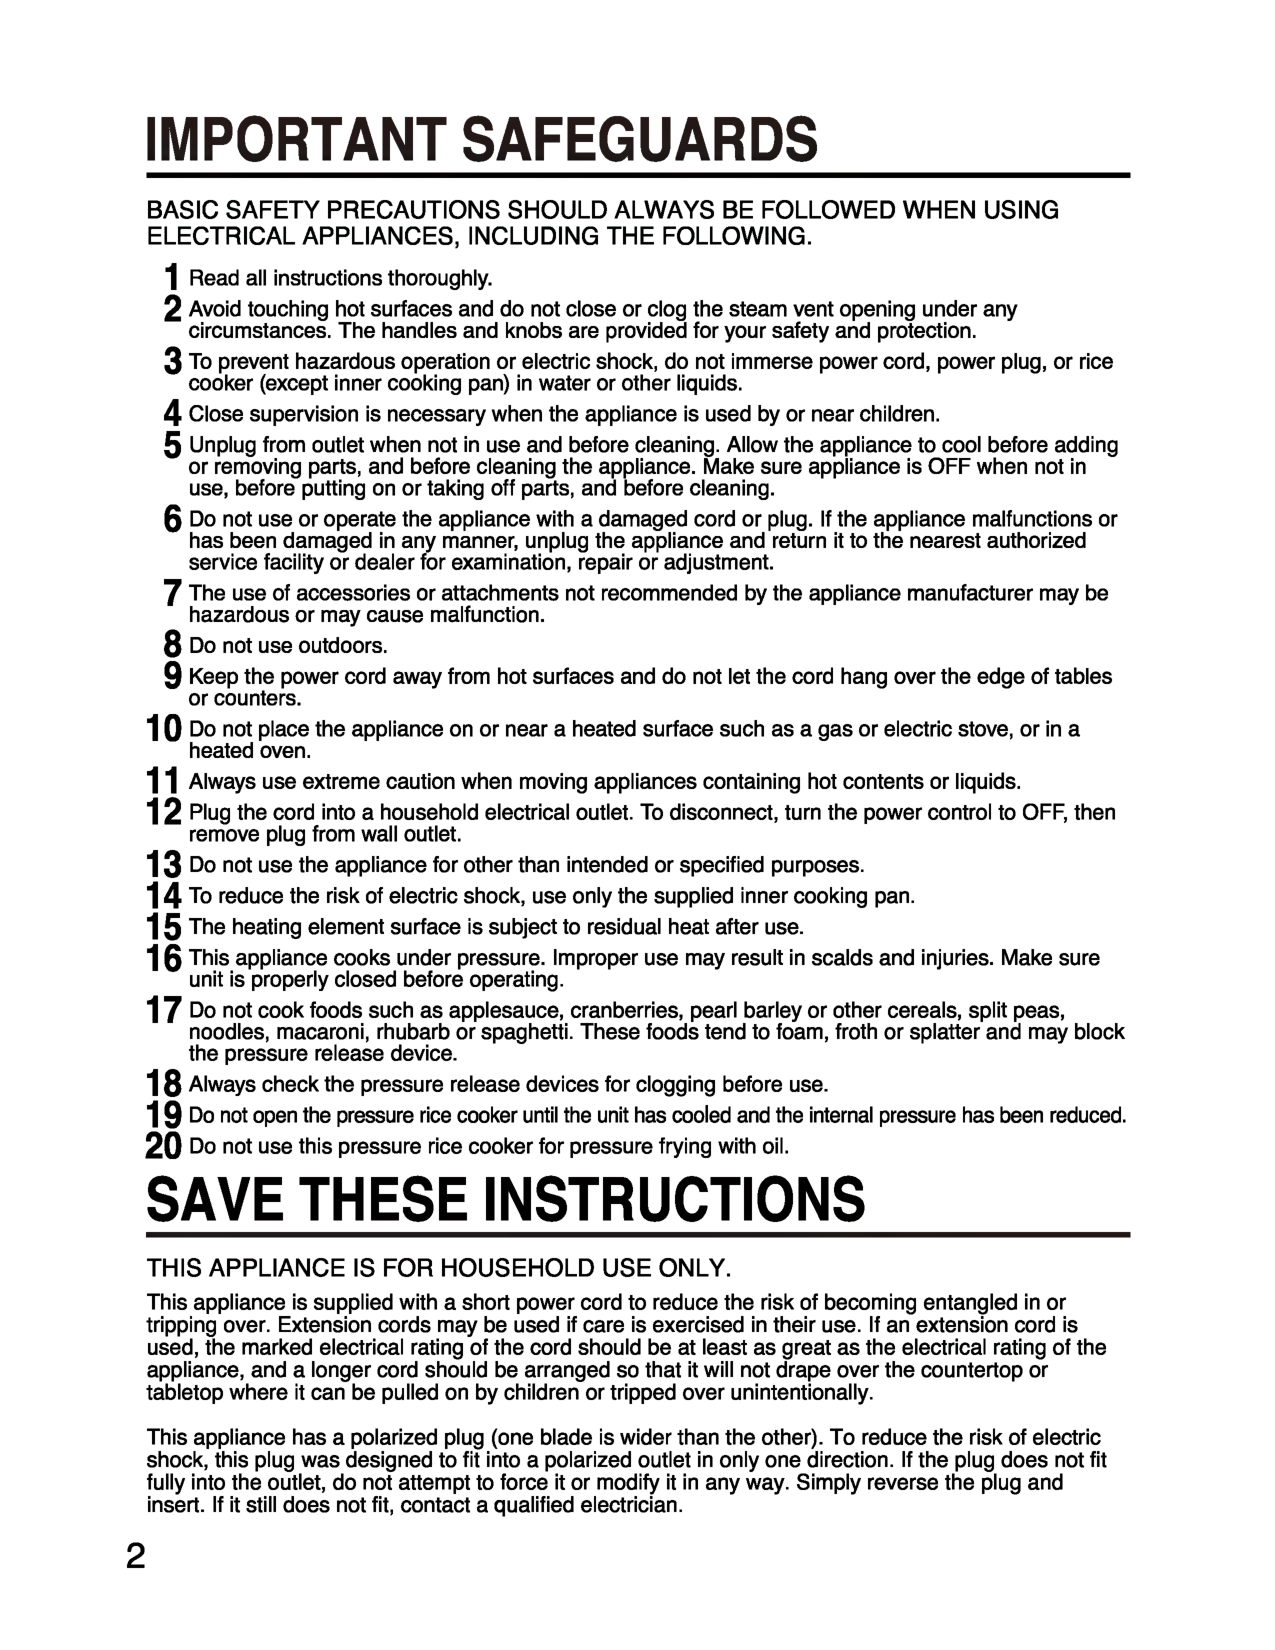
Basic Safety Precautions Should Always Be Followed When Using
Electrical Appliances, Including The Following.
1 Read all instructions thoroughly. 2 Avoid touching hot surfaces and do not close or clog the steam vent opening under any circumstances. The handles and knobs are provided for your safety and protection. 3 To prevent hazardous operation or electric shock, do not immerse power cord, power plug, or rice cooker (except inner cooking pan) in water or other liquids. 4 Close supervision is necessary when the appliance is used by or near children. 5 Unplug from outlet when not in use and before cleaning. Allow the appliance to cool before adding or removing parts, and before cleaning the appliance. Make sure appliance is OFF when not in use, before putting on or taking off parts, and before cleaning. 0 Do not use or operate the appliance with a damaged cord or plug. If the appliance malfunctions or has been damaged in any manner, unplug the appliance and return it to the nearest authorized service facility or dealer for examination, repair or adjustment. 7 The use of accessories or attachments not recommended by the appliance manufacturer may be hazardous or may cause malfunction. 8 Do not use outdoors. 9 Keep the power cord away from hot surfaces and do not let the cord hang over the edge of tables or counters. 10 Do not place the appliance on or near a heated surface such as a gas or electric stove, or in a heated oven. 11 Always use extreme caution when moving appliances containing hot contents or liquids. 12 Plug the cord into a household electrical outlet. To disconnect, turn the power control to OFF, then remove plug from wall outlet. 13 Do not use the appliance for other than intended or specified purposes. 14 To reduce the risk of electric shock, use only the supplied inner cooking pan. 15 The heating element surface is subject to residual heat after use. 16 This appliance cooks under pressure. Improper use may result in scalds and injuries. Make sure unit is properly closed before operating. 17 Do not cook foods such as applesauce, cranberries, pearl barley or other cereals, split peas, noodles, macaroni, rhubarb or spaghetti. These foods tend to foam, froth or splatter and may block the pressure release device. 18 Always check the pressure release devices for clogging before use. 19 Do not open the pressure rice cooker until the unit has cooled and the internal pressure has been reduced. 20 Do not use this pressure rice cooker for pressure frying with oil.Save These Instructions
This Appliance Is For Household Use Only.
This appliance is supplied with a short power cord to reduce the risk of becoming entangled in or tripping over. Extension cords may be used if care is exercised in their use. If an extension cord is used, the marked electrical rating of the cord should be at least as great as the electrical rating of the appliance, and a longer cord should be arranged so that it will not drape over the countertop or tabletop where it can be pulled on by children or tripped over unintentionally. This appliance has a polarized plug (one blade is wider than the other). To reduce the risk of electric shock, this plug was designed to fit into a polarized outlet in only one direction. If the plug does not fit fully into the outlet, do not attempt to force it or modify it in any way. Simply reverse the plug and insert. If it still does not fit, contact a qualified electrician. 2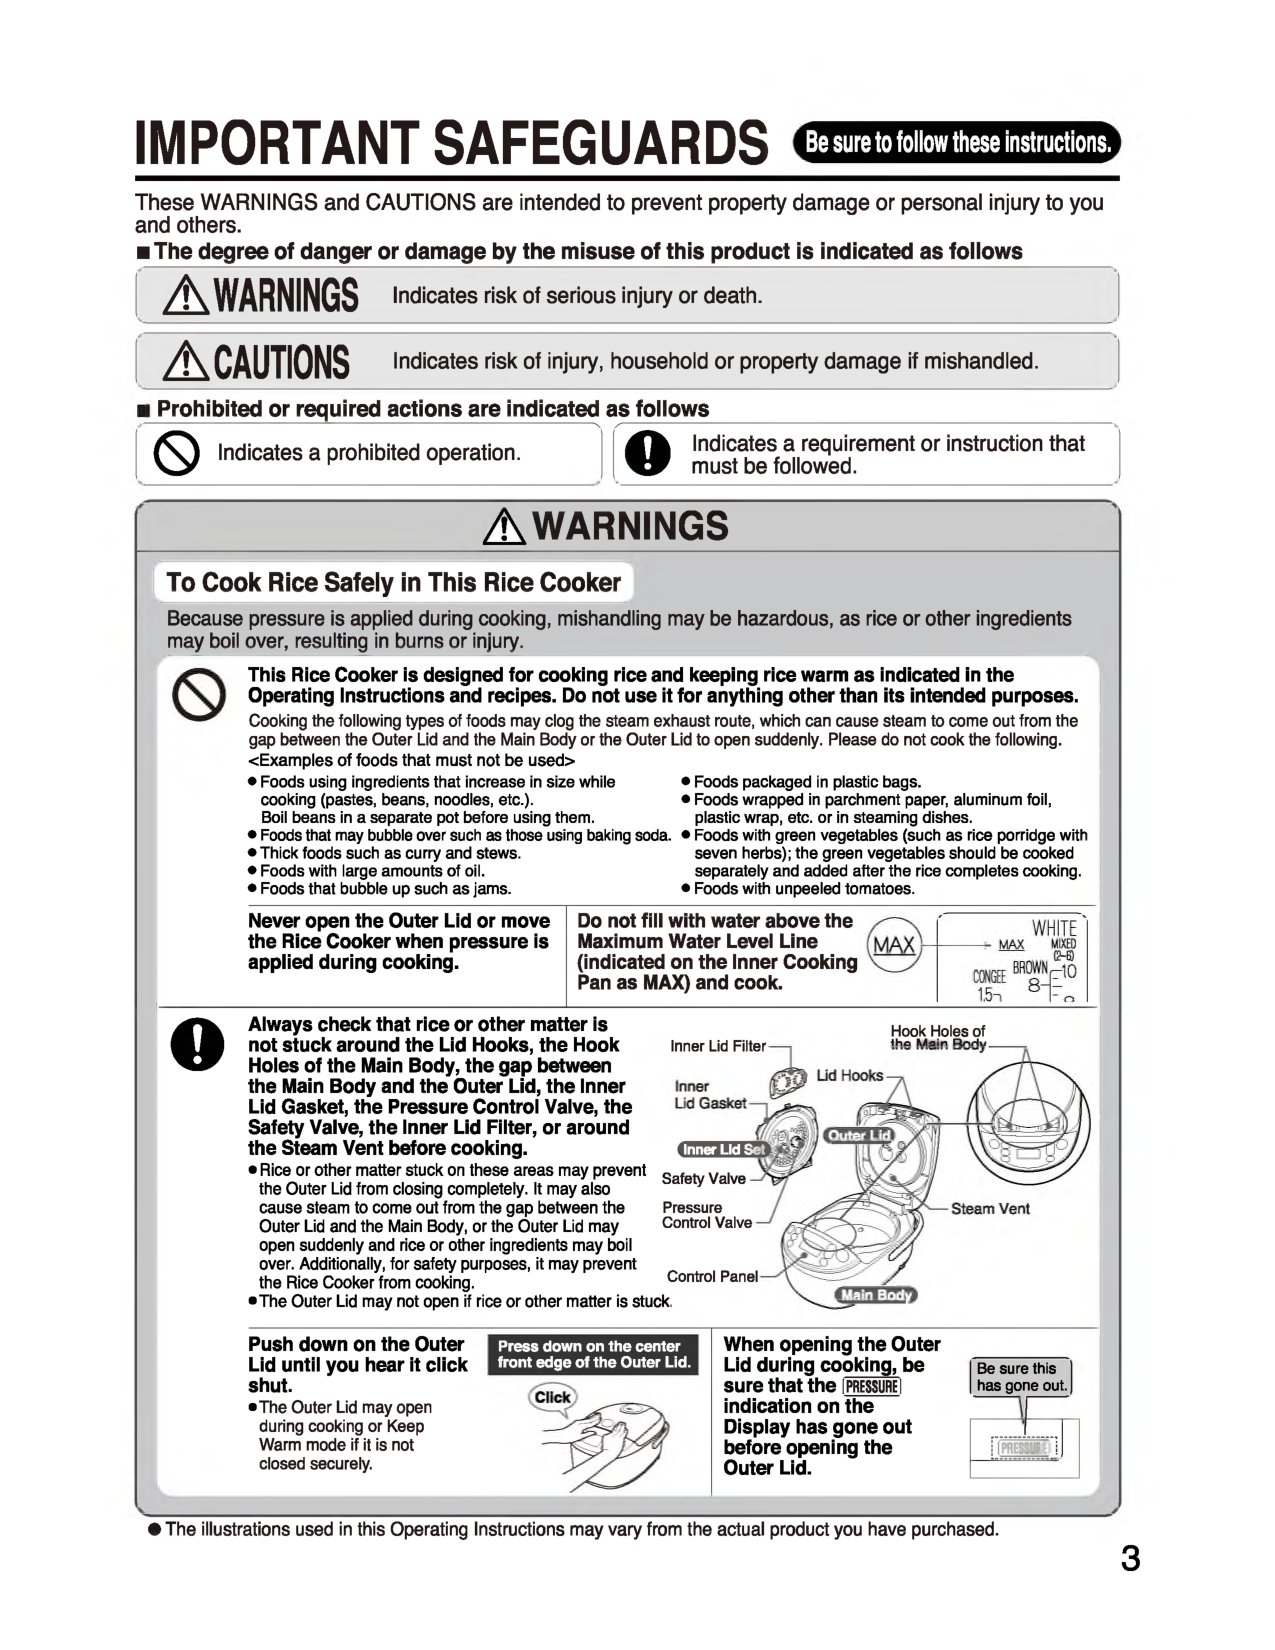
Important Safeguards
Be sure to follow these instructions. These WARNINGS and CAUTIONS are intended to prevent property damage or personal injury to you and others. ■ The degree of danger or damage by the misuse of this product is indicated as followsAwarnings
Indicates risk of serious injury or death.A Cautions
Indicates risk of injury, household or property damage if mishandled. ■Prohibited or required actions are indicated as follows ----------------------------------------------------------------------------•. x---------------- 0 Indicates a prohibited operation.O
Indicates a requirement or instruction that must be followed.Awarnings
To Cook Rice Safely in This Rice Cooker Because pressure is applied during cooking, mishandling may be hazardous, as rice or other ingredients may boil over, resulting in burns or injury. This Rice Cooker is designed for cooking rice and keeping rice warm as indicated in the Operating Instructions and recipes. Do not use it for anything other than its intended purposes. Cooking the following types of foods may clog the steam exhaust route, which can cause steam to come out from the gap between the Outer Lid and the Main Body or the Outer Lid to open suddenly. Please do not cook the following.G E 3E E 3
Safety Valve Pressure Control Valve Control Panel Hook Holes of tha Main RnHw Push down on the Outer Lid until you hear it click shut. •The Outer Lid may open during cooking or Keep Warm mode if it is not closed securely. Press down on the center front edge of the Outer Lid. When opening the Outer Lid during cooking, be sure that the [pr essur e] indication on the Display has gone out before opening the Outer Lid. Be sure this has gone out.Ipressuf
I
IMPORTANT SAFEGUARDS (cont.)
Awarnings
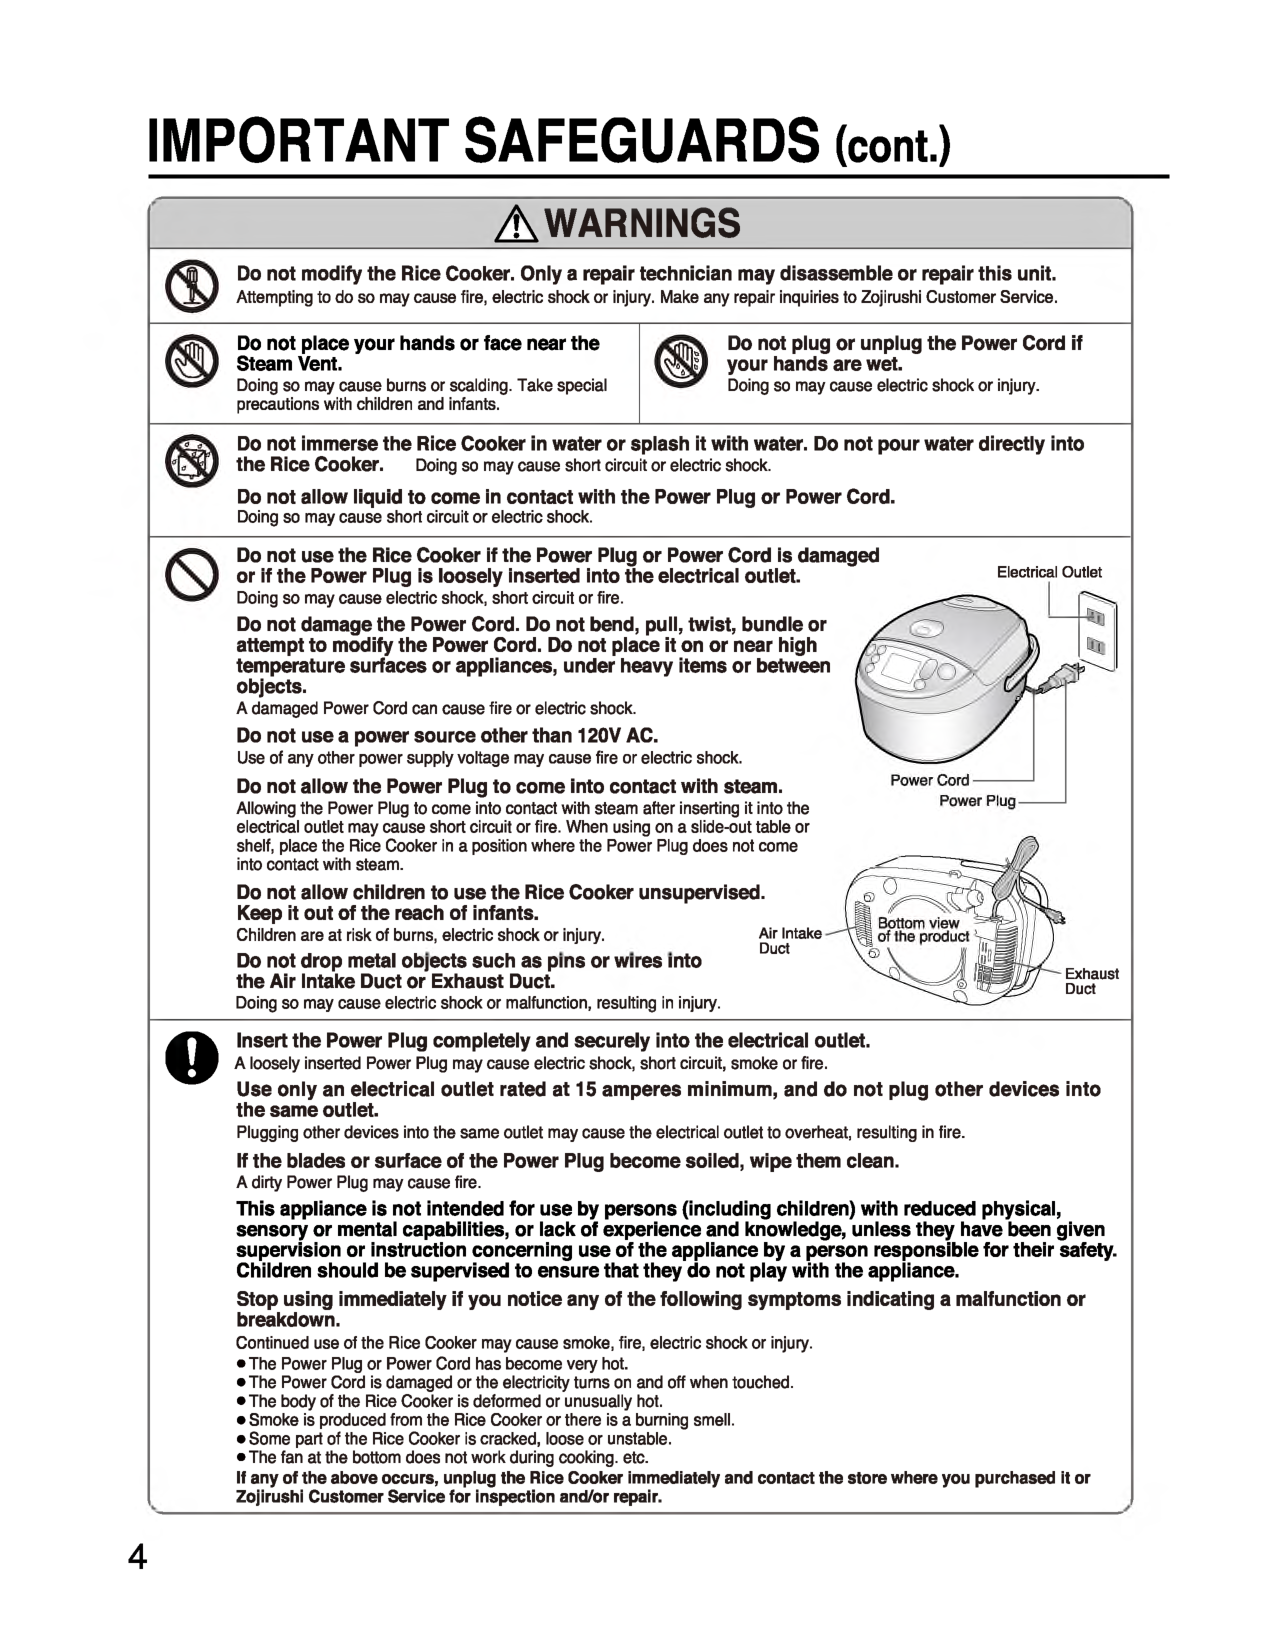
Do not modify the Rice Cooker. Only a repair technician may disassemble or repair this unit. Attempting to do so may cause fire, electric shock or injury. Make any repair inquiries to Zojirushi Customer Sen/ice. Do not place your hands or face near the Steam Vent. Doing so may cause burns or scalding. Take special precautions with children and infants. Do not plug or unplug the Power Cord if your hands are wet. Doing so may cause electric shock or injury. Do not immerse the Rice Cooker in water or splash it with water. Do not pour water directly into the Rice Cooker. Doing so may cause short circuit or electric shock. Do not allow liquid to come in contact with the Power Plug or Power Cord. Doing so may cause short circuit or electric shock. Do not use the Rice Cooker if the Power Plug or Power Cord is damaged or if the Power Plug is loosely inserted into the electrical outlet. Doing so may cause electric shock, short circuit or fire. Do not damage the Power Cord. Do not bend, pull, twist, bundle or attempt to modify the Power Cord. Do not place it on or near high temperature surfaces or appliances, under heavy items or between objects. Electrical Outlet A damaged Power Cord can cause fire or electric shock. Do not use a power source other than 120V AC. Use of any other power supply voltage may cause fire or electric shock. Do not allow the Power Plug to come into contact with steam. Allowing the Power Plug to come into contact with steam after inserting it into the electrical outlet may cause short circuit or fire. When using on a slide-out table or shelf, place the Rice Cooker in a position where the Power Plug does not come into contact with steam. Do not allow children to use the Rice Cooker unsupervised. Keep it out of the reach of infants. Children are at risk of burns, electric shock or injury. Do not drop metal objects such as pins or wires into the Air Intake Duct or Exhaust Duct. Doing so may cause electric shock or malfunction, resulting in injury. Air Intake D uct Exhaust Duct o Insert the Power Plug completely and securely into the electrical outlet. A loosely inserted Power Plug may cause electric shock, short circuit, smoke or fire. Use only an electrical outlet rated at 15 amperes minimum, and do not plug other devices into the same outlet. Plugging other devices into the same outlet may cause the electrical outlet to overheat, resulting in fire. If the blades or surface of the Power Plug become soiled, wipe them clean. A dirty Power Plug may cause fire. This appliance is not intended for use by persons (including children) with reduced physical, sensory or mental capabilities, or lack of experience and knowledge, unless they have been given supervision or instruction concerning use of the appliance by a person responsible for their safety. Children should be supervised to ensure that they do not play with the appliance. Stop using immediately if you notice any of the following symptoms indicating a malfunction or breakdown. Continued use of the Rice Cooker may cause smoke, fire, electric shock or injury.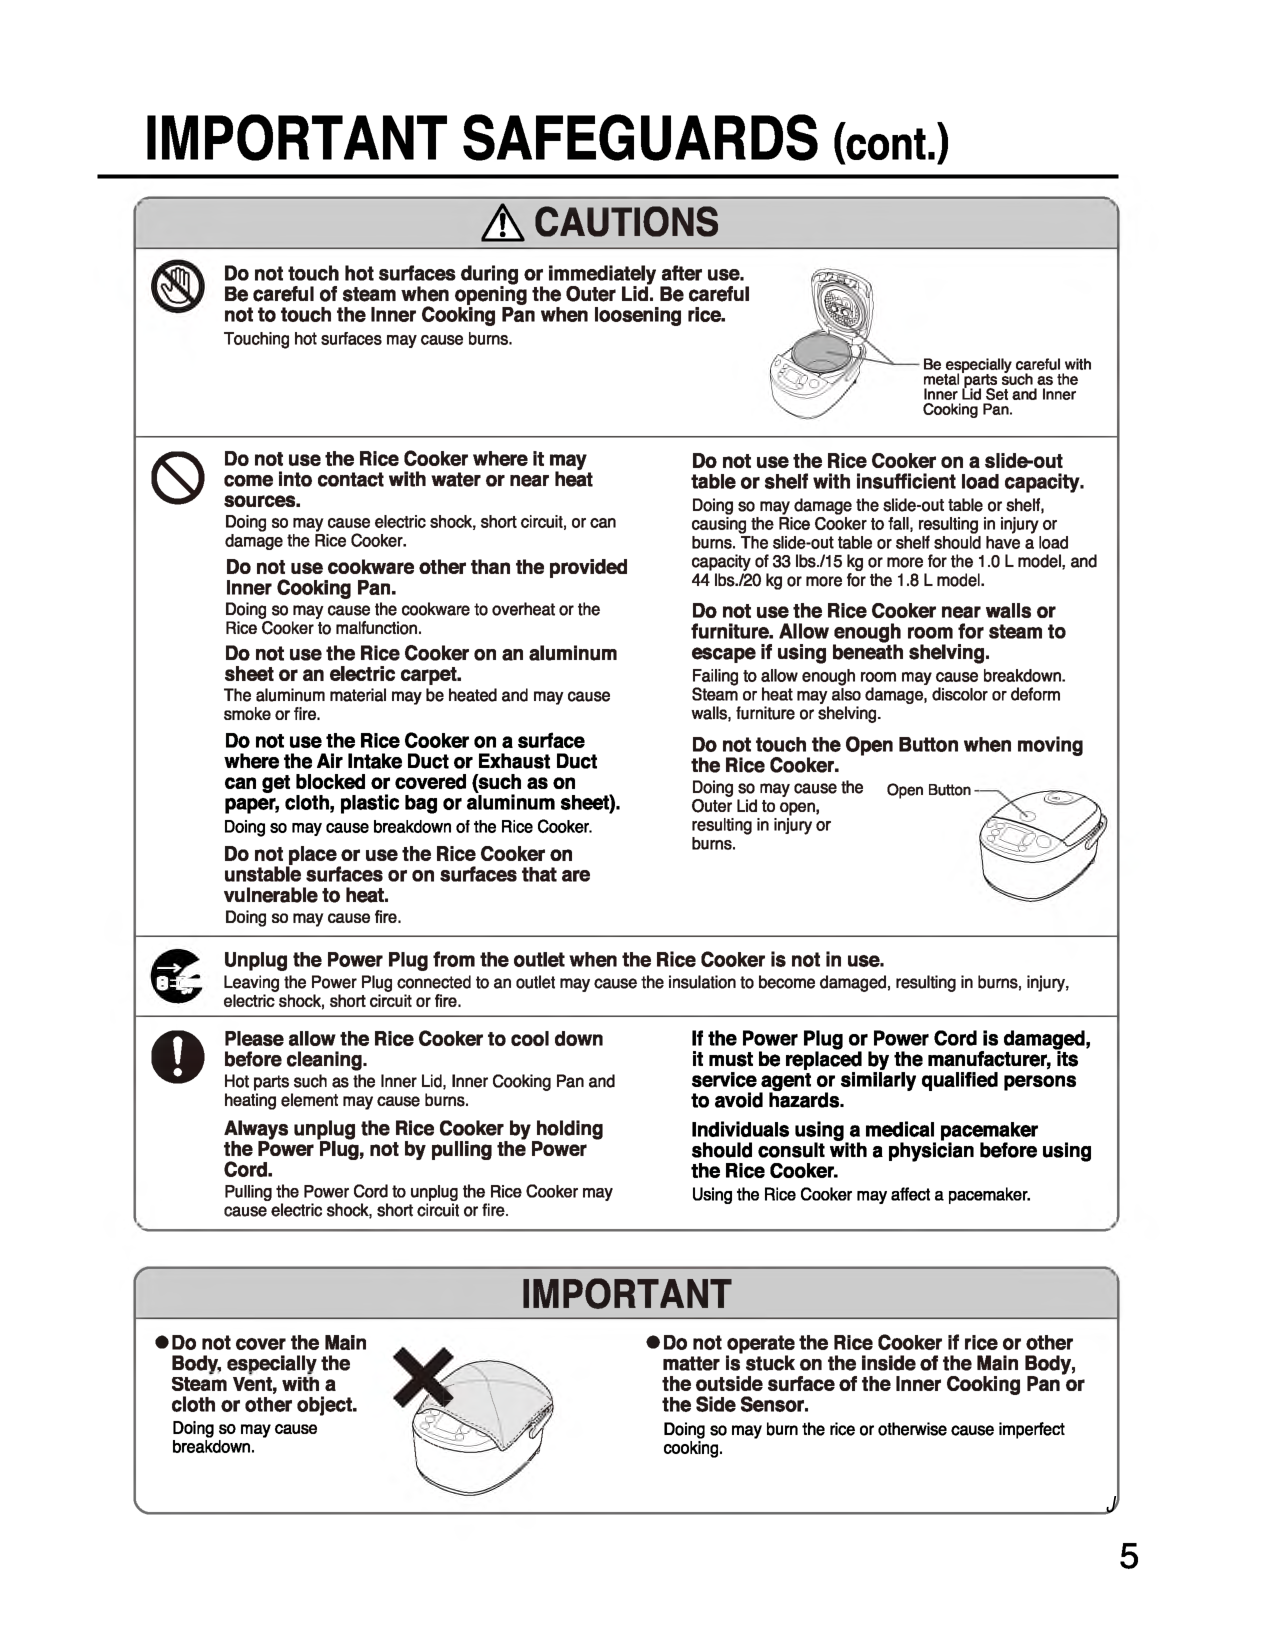
IMPORTANT SAFEGUARDS (cont.)
A Cautions
Do not touch hot surfaces during or immediately after use. Be careful of steam when opening the Outer Lid. Be careful not to touch the Inner Cooking Pan when loosening rice. Touching hot surfaces may cause burns. Be especially careful with metal parts such as the Inner Lid Set and Inner Cooking Pan. 0 Do not use the Rice Cooker where it may come into contact with water or near heat sources. Doing so may cause electric shock, short circuit, or can damage the Rice Cooker. Do not use cookware other than the provided Inner Cooking Pan. Doing so may cause the cookware to overheat or the Rice Cooker to malfunction. Do not use the Rice Cooker on an aluminum sheet or an electric carpet. The aluminum material may be heated and may cause smoke or fire. Do not use the Rice Cooker on a surface where the Air Intake Duct or Exhaust Duct can get blocked or covered (such as on paper, cloth, plastic bag or aluminum sheet). Doing so may cause breakdown of the Rice Cooker. Do not place or use the Rice Cooker on unstable surfaces or on surfaces that are vulnerable to heat. Doing so may cause fire. Do not use the Rice Cooker on a slide-out table or shelf with insufficient load capacity. Doing so may damage the slide-out table or shelf, causing the Rice Cooker to fall, resulting in injury or burns. The slide-out table or shelf should have a load capacity of 33 lbs./15 kg or more for the 1.0 L model, and 44 lbs./20 kg or more for the 1.8 L model. Do not use the Rice Cooker near walls or furniture. Allow enough room for steam to escape if using beneath shelving. Failing to allow enough room may cause breakdown. Steam or heat may also damage, discolor or deform walls, furniture or shelving. Do not touch the Open Button when moving the Rice Cooker. Doing so may cause the Outer Lid to open, resulting in injury or burns. Open Button - Unplug the Power Plug from the outlet when the Rice Cooker is not in use. Leaving the Power Plug connected to an outlet may cause the insulation to become damaged, resulting in burns, injury, electric shock, short circuit or fire. o Please allow the Rice Cooker to cool down before cleaning. Hot parts such as the Inner Lid, Inner Cooking Pan and heating element may cause burns. Always unplug the Rice Cooker by holding the Power Plug, not by pulling the Power Cord. Pulling the Power Cord to unplug the Rice Cooker may cause electric shock, short circuit or fire. If the Power Plug or Power Cord is damaged, it must be replaced by the manufacturer, its service agent or similarly qualified persons to avoid hazards. Individuals using a medical pacemaker should consult with a physician before using the Rice Cooker. Using the Rice Cooker may affect a pacemaker. cImportant
A
/ m p -'~J
J
IMPORTANT (cont.)
About The Inner Cooking Pan
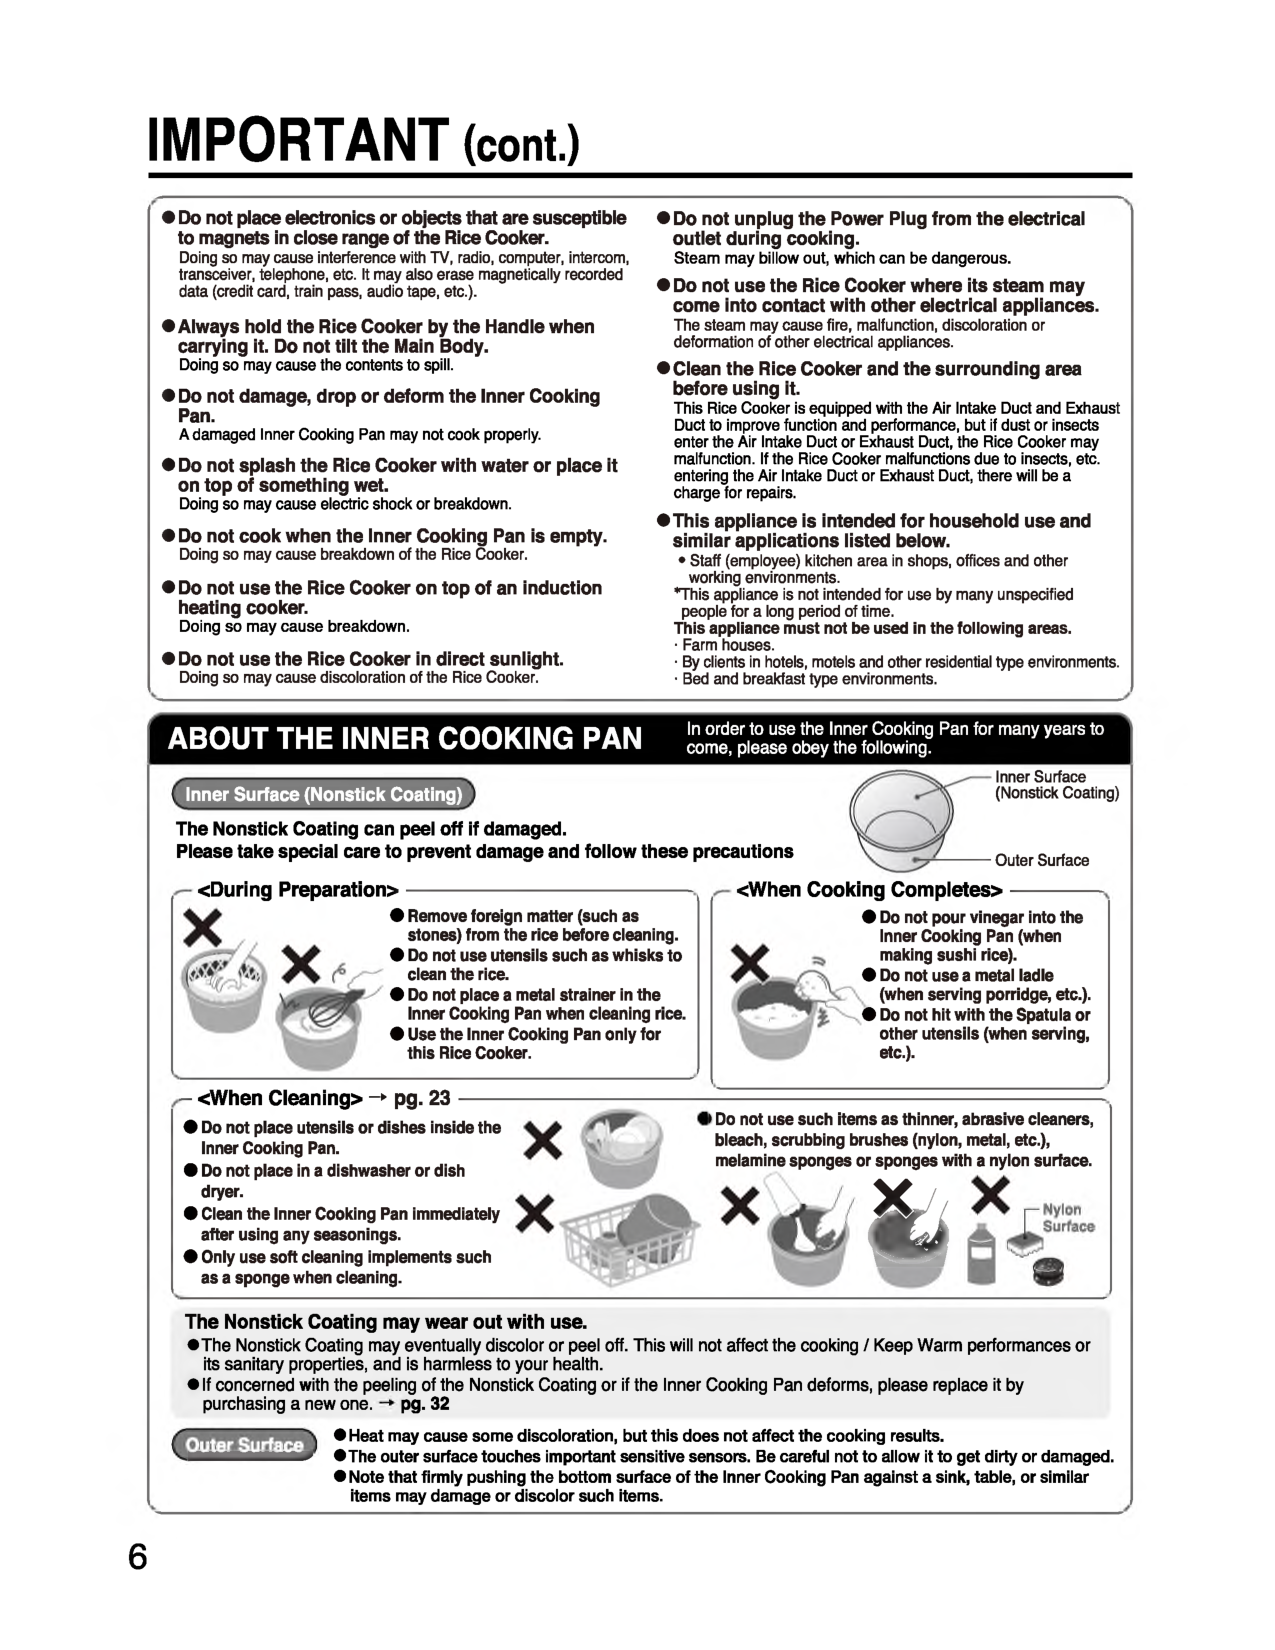
In order to use the Inner Cooking Pan for many years to come, please obey the following. Inner Surface (Nonstick Coating) The Nonstick Coating can peel off if damaged. Please take special care to prevent damage and follow these precautions Inner Surface (Nonstick Coating) Outer SurfaceŁ
The Nonstick Coating may wear out with use. •The Nonstick Coating may eventually discolor or peel off. This will not affect the cooking / Keep Warm performances or its sanitary properties, and is harmless to your health.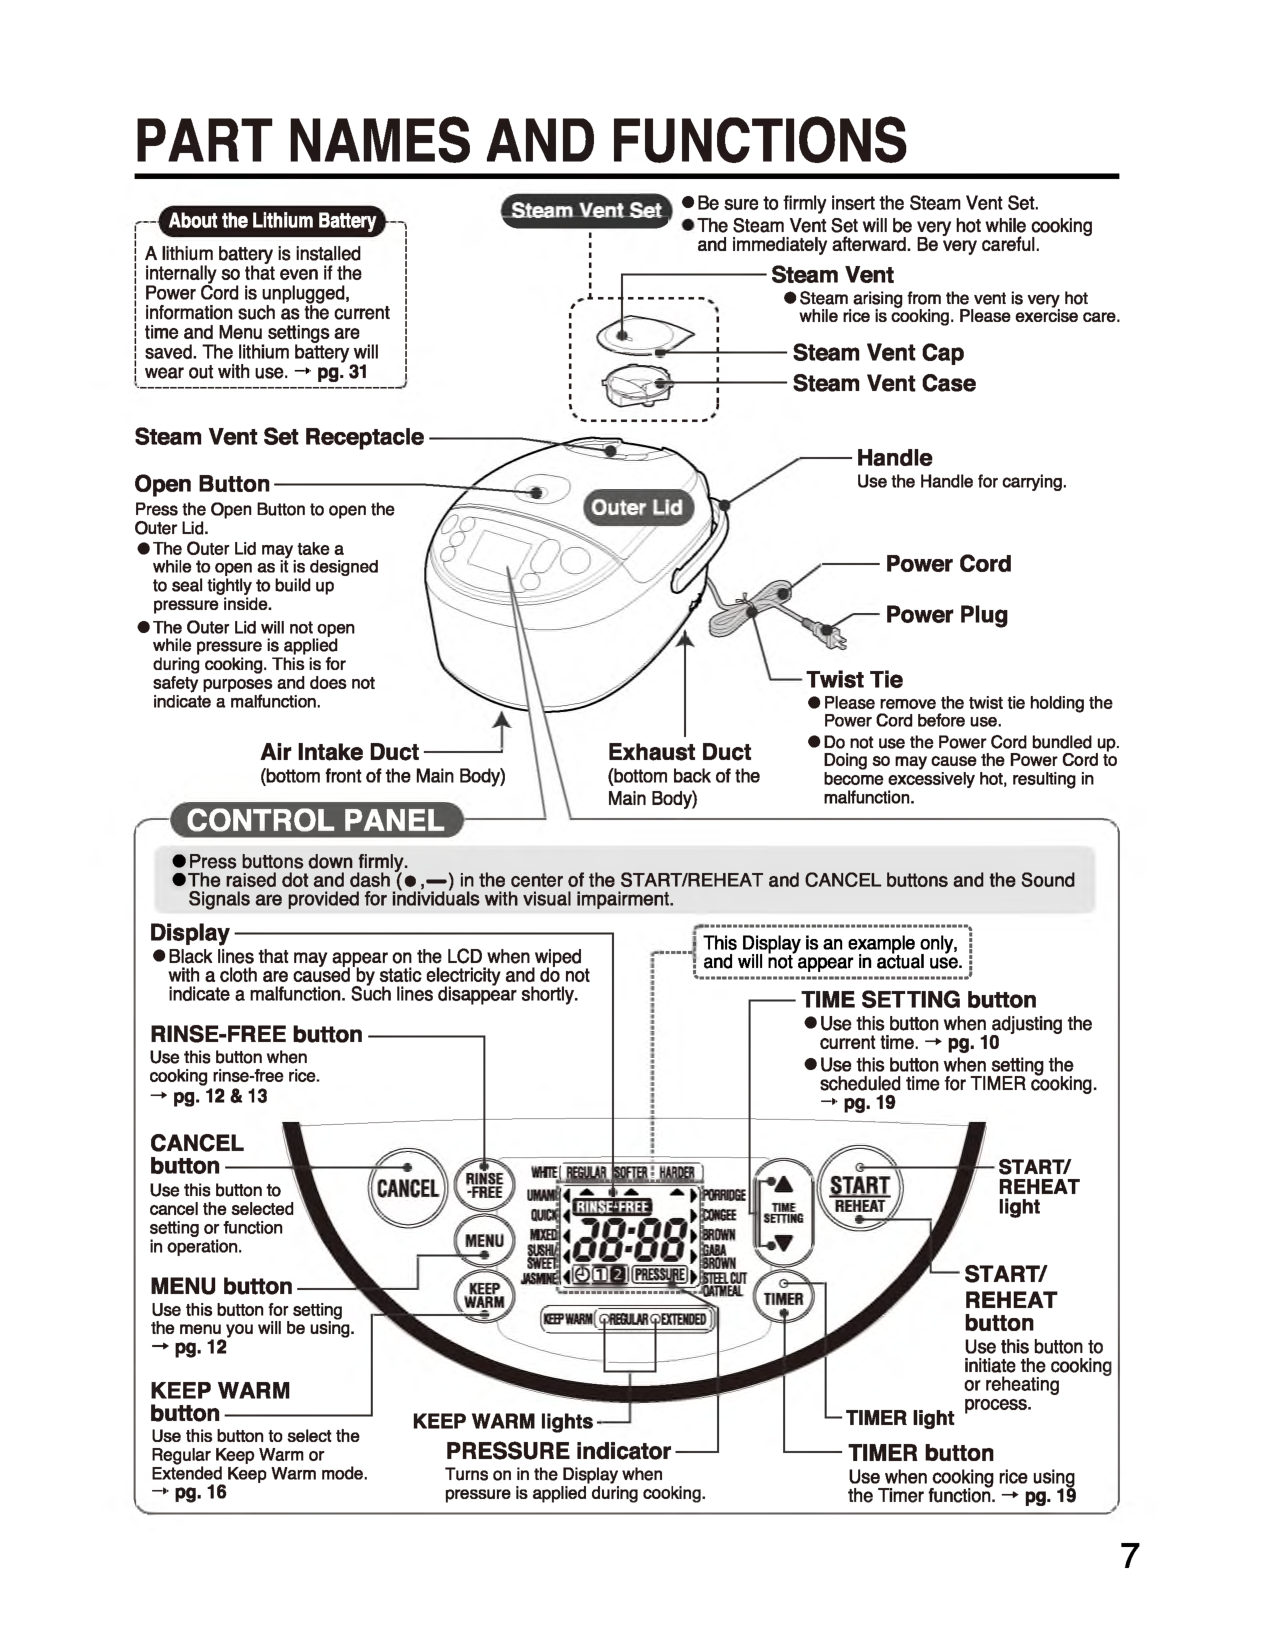
Part Names And Functions
About the Lithium Battery A lithium battery is installed internally so that even if the Power Cord is unplugged, information such as the current time and Menu settings are saved. The lithium battery will wear out with use. -*• pg. 31Control Panel
Cancel
button Use this button to cancel the selected setting or function in operation. MENU button Use this button for setting the menu you will be using.Keep Warm
button----------------- Use this button to select the Regular Keep Warm or Extended Keep Warm mode. -*• pg. 16 ■ This Display is an example only, ; and will not appear in actual use. TIME SETTING buttonStart/
Reheat
light KEEP WARM lights - PRESSURE indicator — Turns on in the Display when pressure is applied during cooking. '—TIMER lightStart/
Reheat
button Use this button to initiate the cooking or reheating process. TIMER button Use when cooking rice using the Timer function. -*• pg. 19 7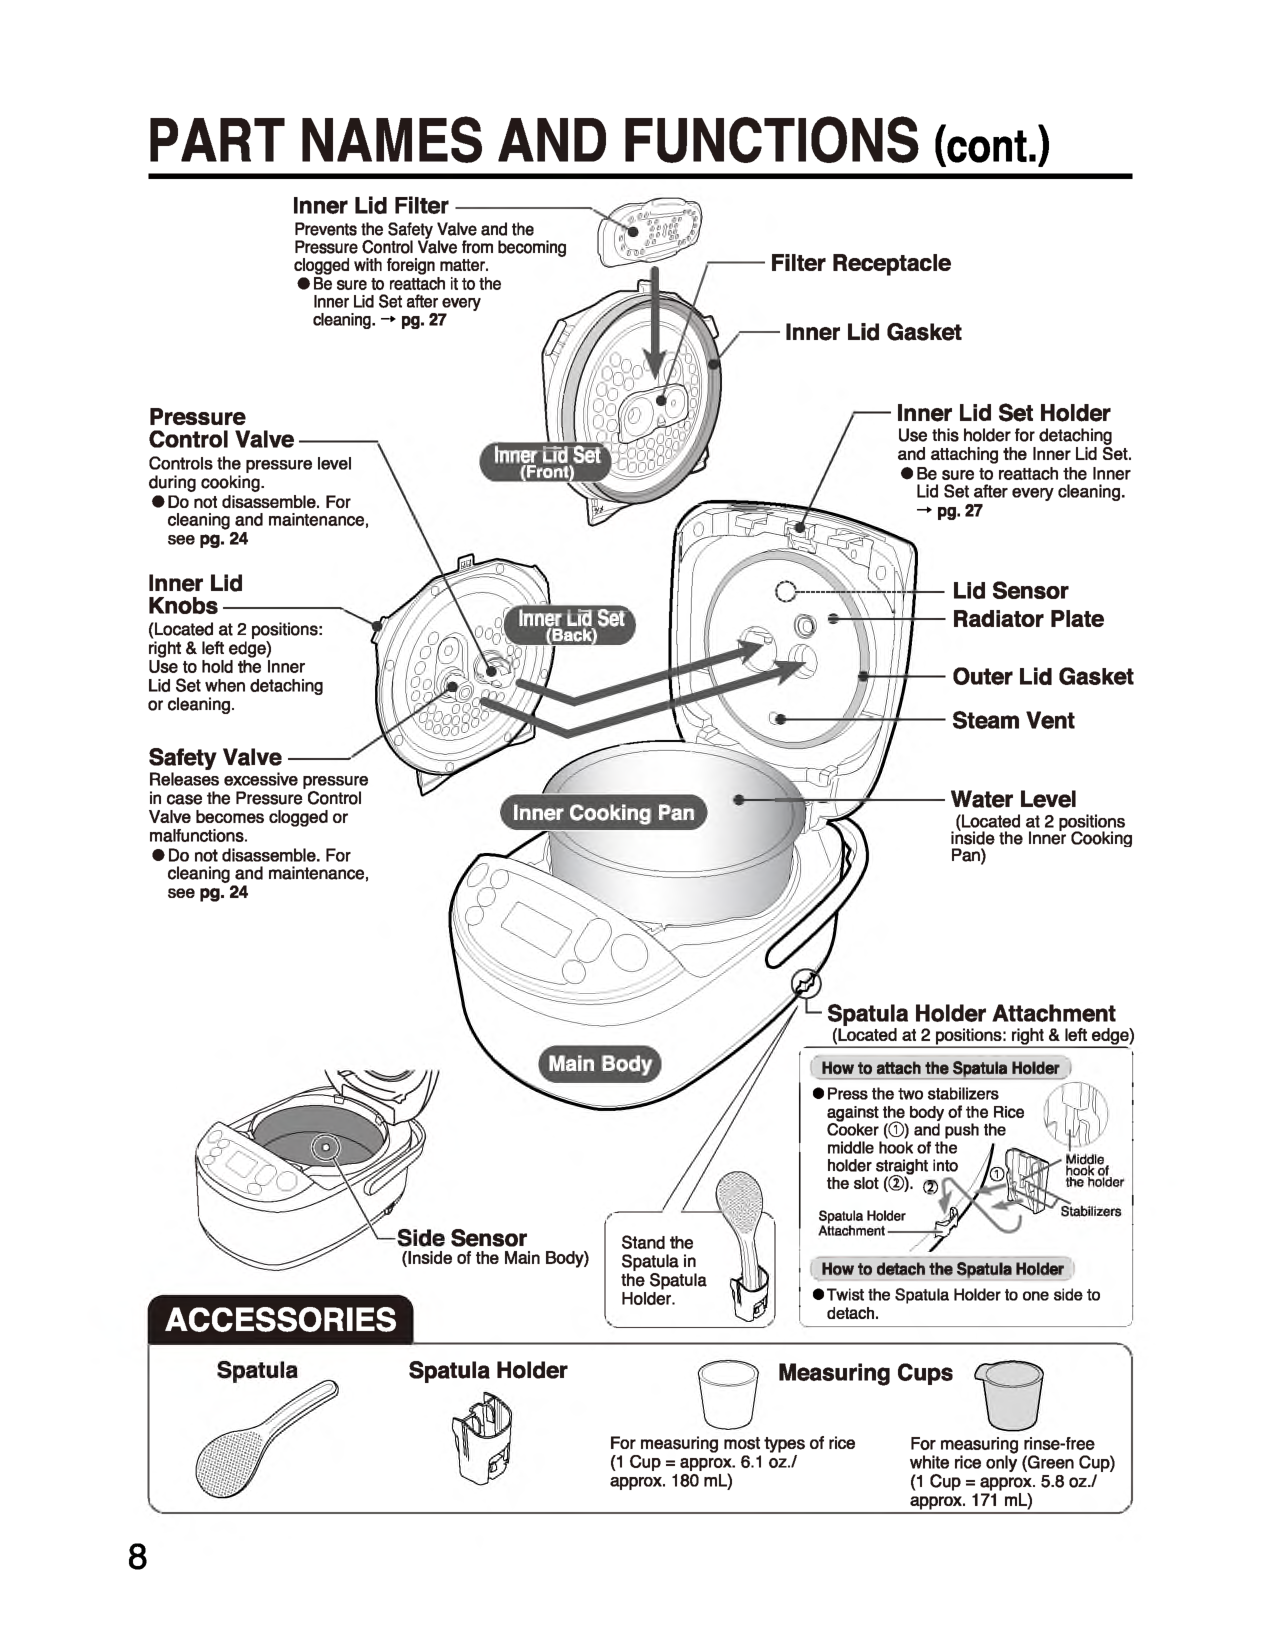
PART NAMES AND FUNCTIONS (cont.) Spatula Holder Attachment (Located at 2 positions: right & left edge) Filter Receptacle Inner Lid Gasket Inner Lid Set Holder Use this holder for detaching and attaching the Inner Lid Set.
Tips For Delicious Rice
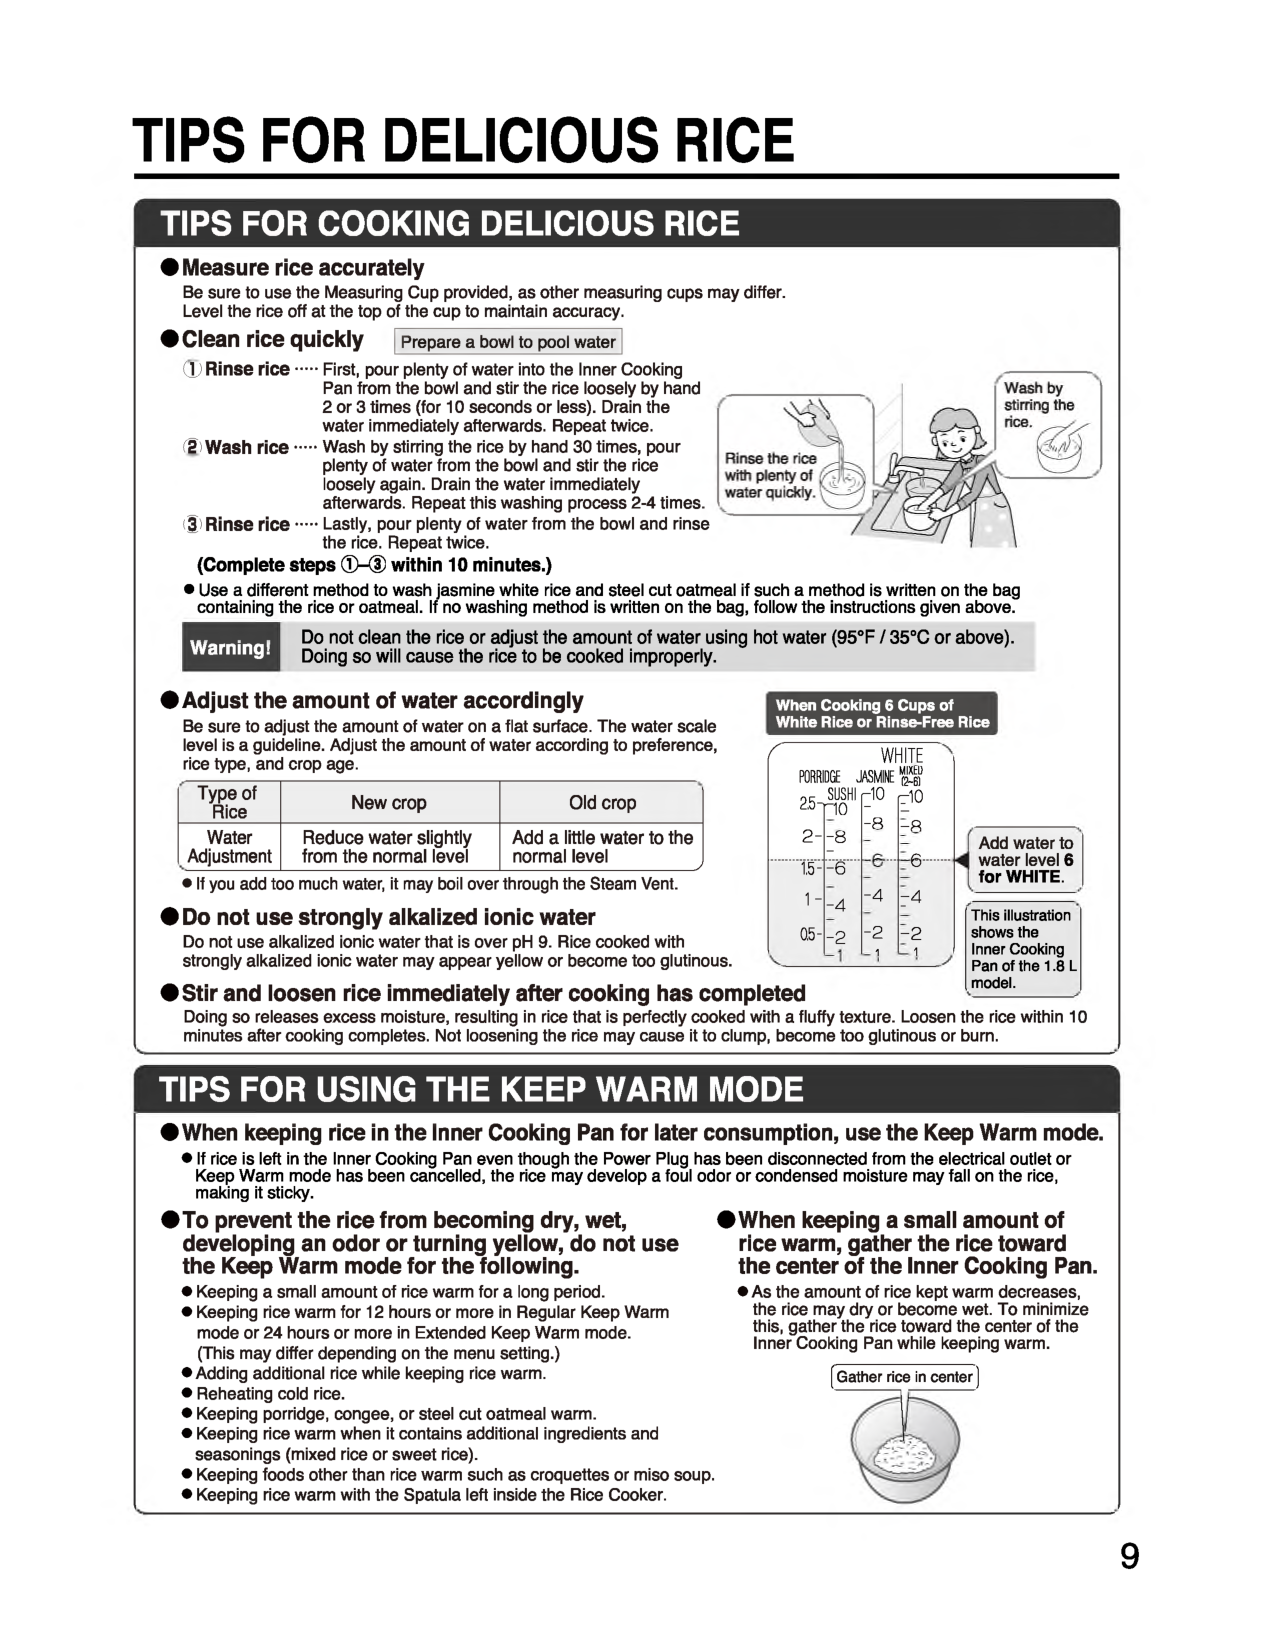
Tips For Cooking Delicious Rice
(Complete steps CD—CD within 10 minutes.)
White
Porridge
JASMINE MIXtU r?~m25-, Sushi
n o r10p 1 °- H
Tips For Using The Keep Warm Mode
•When keeping rice in the Inner Cooking Pan for later consumption, use the Keep Warm mode.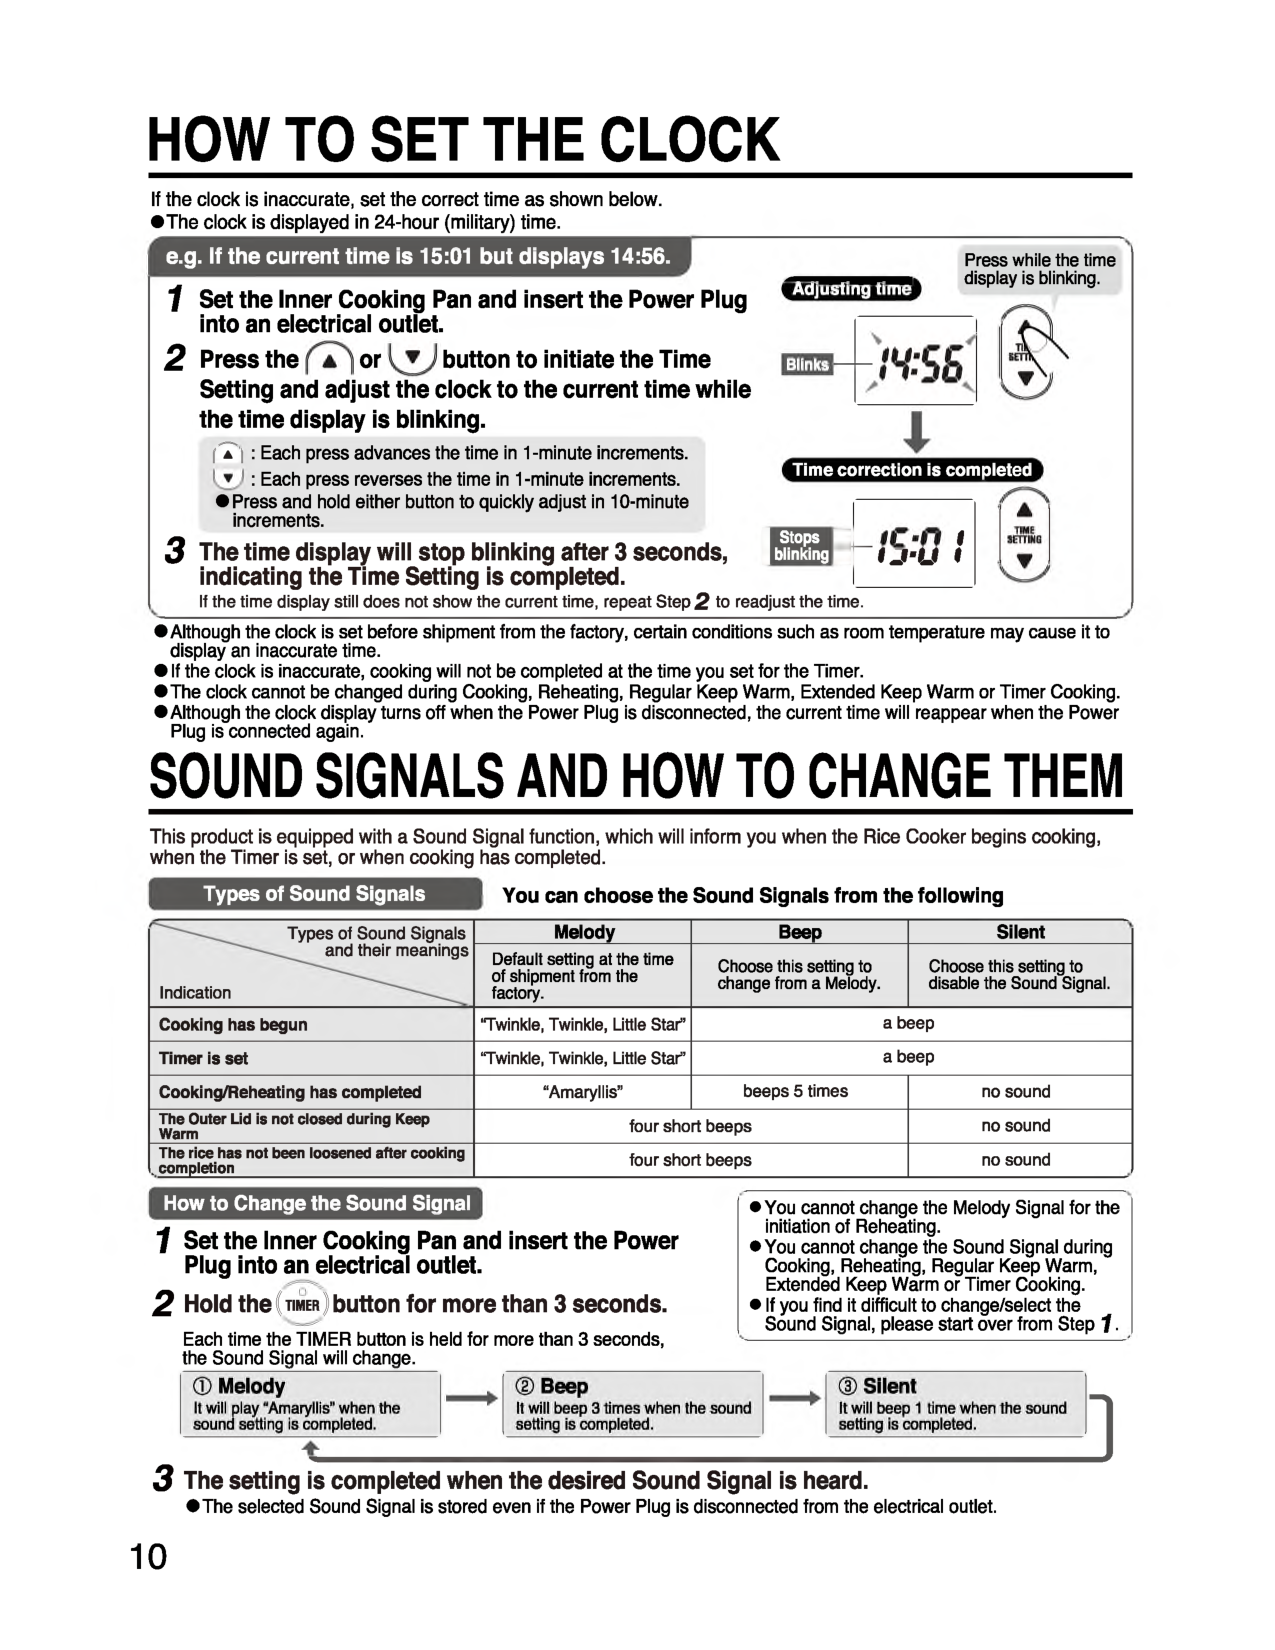
How To Set The Clock
Time correction is completed If the clock is inaccurate, set the correct time as shown below. •The clock is displayed in 24-hour (military) time. e.g. If the current time is 15:01 but displays 14:56. Press while the time display is blinking. 1 Set the Inner Cooking Pan and insert the Power Plug into an electrical outlet. 2 Press the or button to initiate the Time Setting and adjust the clock to the current time while the time display is blinking. |[T) : Each press advances the time in 1-minute increments. : Each press reverses the time in 1 -minute increments. • Press and hold either button to quickly adjust in 10-minute increments. 3 The time display will stop blinking after 3 seconds, indicating the Time Setting is completed. If the time display still does not show the current time, repeat Step 2 to readjust the time. •Although the clock is set before shipment from the factory, certain conditions such as room temperature may cause it to display an inaccurate time. • If the clock is inaccurate, cooking will not be completed at the time you set for the Timer. •The clock cannot be changed during Cooking, Reheating, Regular Keep Warm, Extended Keep Warm or Timer Cooking. •Although the clock display turns off when the Power Plug is disconnected, the current time will reappear when the Power Plug is connected again.Sound Signals And How To Change Them
I Stops ■ t 1 blinking J t J - U 1 This product is equipped with a Sound Signal function, which will inform you when the Rice Cooker begins cooking, when the Timer is set, or when cooking has completed. Types of Sound Signals You can choose the Sound Signals from the following Indication Types of Sound Signals and their meanings Melody Default setting at the time of shipment from the factory- Beep Choose this setting to change from a Melody. Silent Choose this setting to disable the Sound Signal. Cooking has begun 'Twinkle, Twinkle, Little Star” a beep Timer is set ‘Twinkle, Twinkle, Little Star" a beep Cooking/Reheating has completed “Amaryllis” beeps 5 times no sound The Outer Lid is not closed during Keep Warm four short beeps no sound The rice has not been loosened after cooking completion four short beeps no sound . How to Change the Sound Signal 1 Set the Inner Cooking Pan and insert the Power Plug into an electrical outlet. 2 Hold the ((TIMER button for more than 3 seconds. Each time the TIMER button is held for more than 3 seconds, the Sound Signal will change.1MelodyIt will play "Amaryllis" when the sound setting is completed.2BeepIt will beep 3 times when the sound setting is completed.3SilentIt will beep 1 times when the sound setting is completed. ] 3 The setting is completed when the desired Sound Signal is heard. •The selected Sound Signal is stored even if the Power Plug is disconnected from the electrical outlet.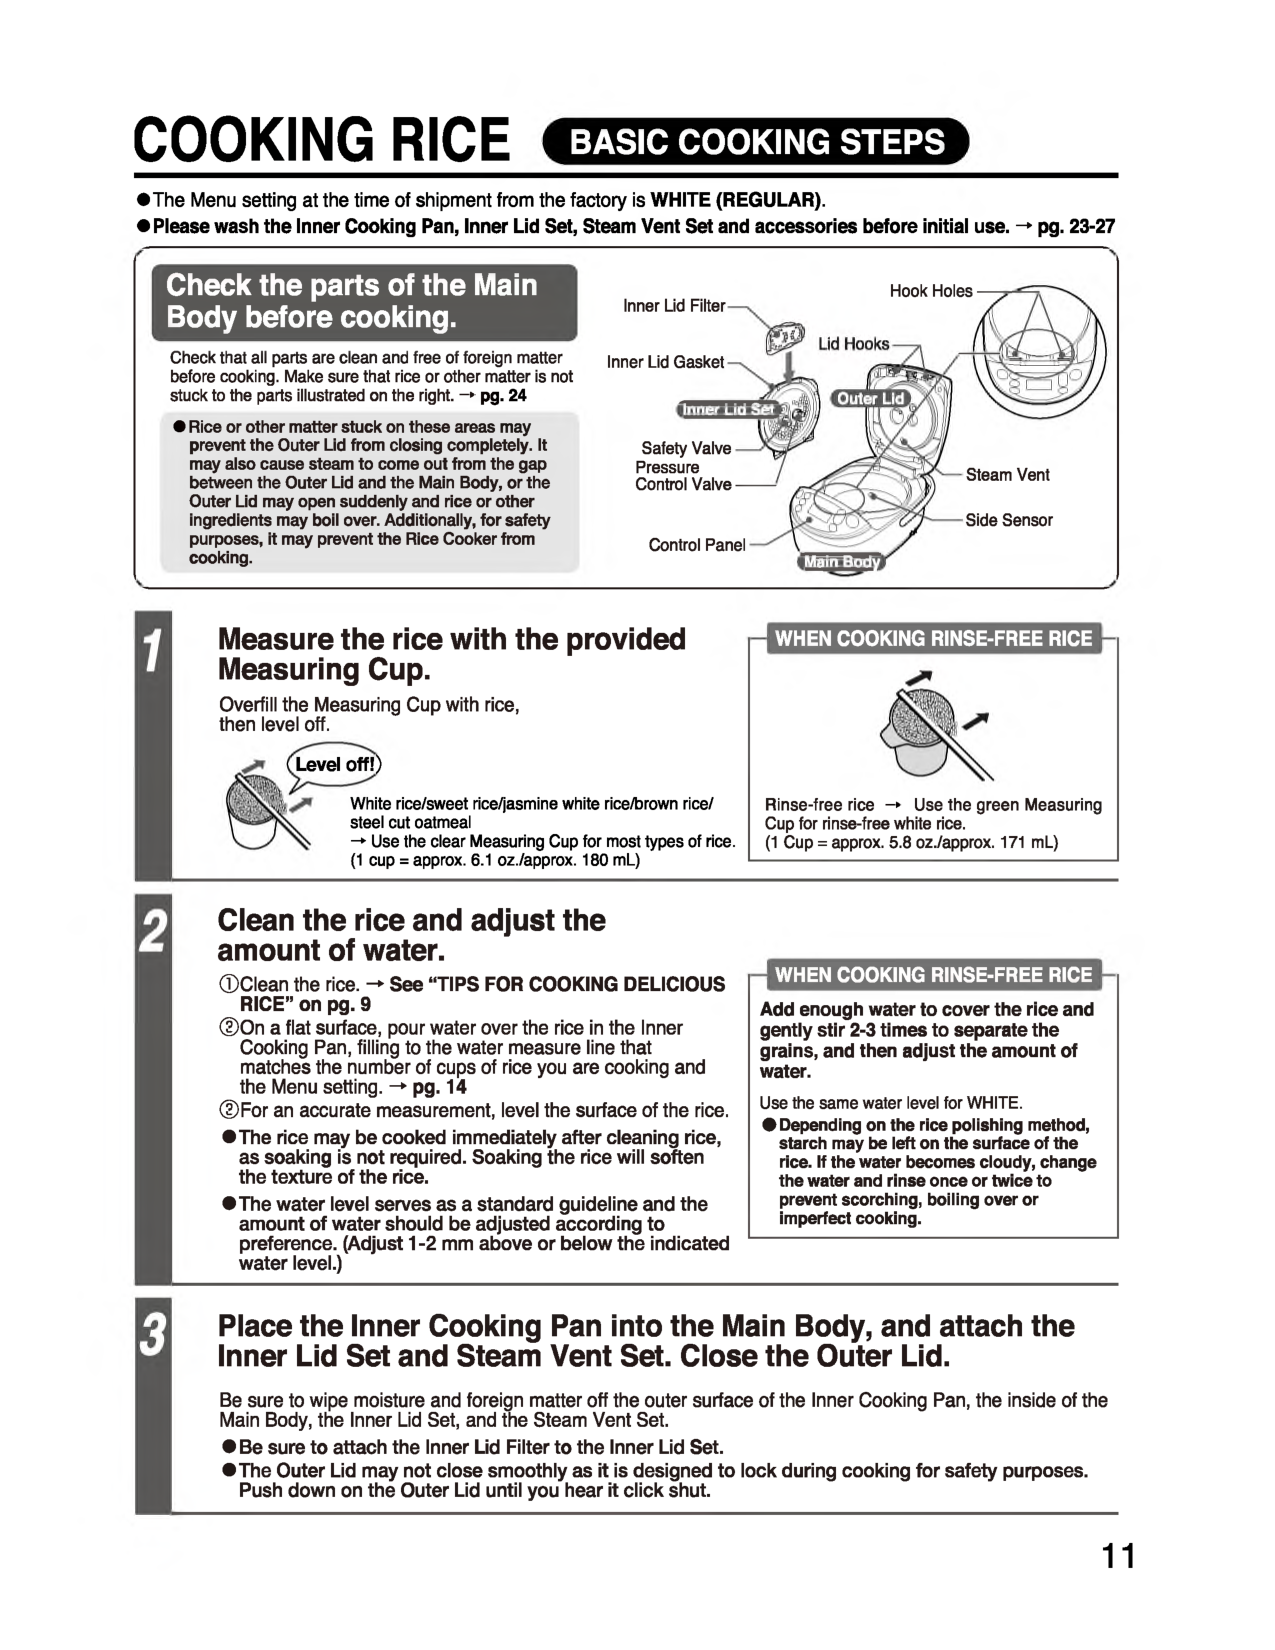
Cooking Rice
Basic Cooking Steps
•The Menu setting at the time of shipment from the factory is WHITE (REGULAR).When Cooking Rinse-Free Rice
Rinse-free rice → Us e the green Measuring Cu p for rinse-free white rice. (1 Cup = approx. 5.8 oz./approx. 171 mL)2 Clean the rice and adjust the amount of water. 1Clean the rice. → See “TIPS FOR COOKING DELICIOUS RICE” on pg. 9 2On a flat surface, pour water over the rice in the Inner Cooking Pan, filling to the water measure line that matches the number of cups of rice you are cooking and the Menu setting. → pg. 14 3For an accurate measurement, level the surface of the rice. •T he rice may be cooked immediately after cleaning rice, as soaking is not required. Soaking the rice will soften the texture of the rice. •T he water level serves as a standard guideline and the amount of water should be adjusted according to preference. (Adjust 1 -2 mm above or below the indicated water level.)When Cooking Rinse-Free Rice
Add enough water to cover the rice and gently stir 2-3 times to separate the grains, and then adjust the amount of water. Use the same water level for WHITE.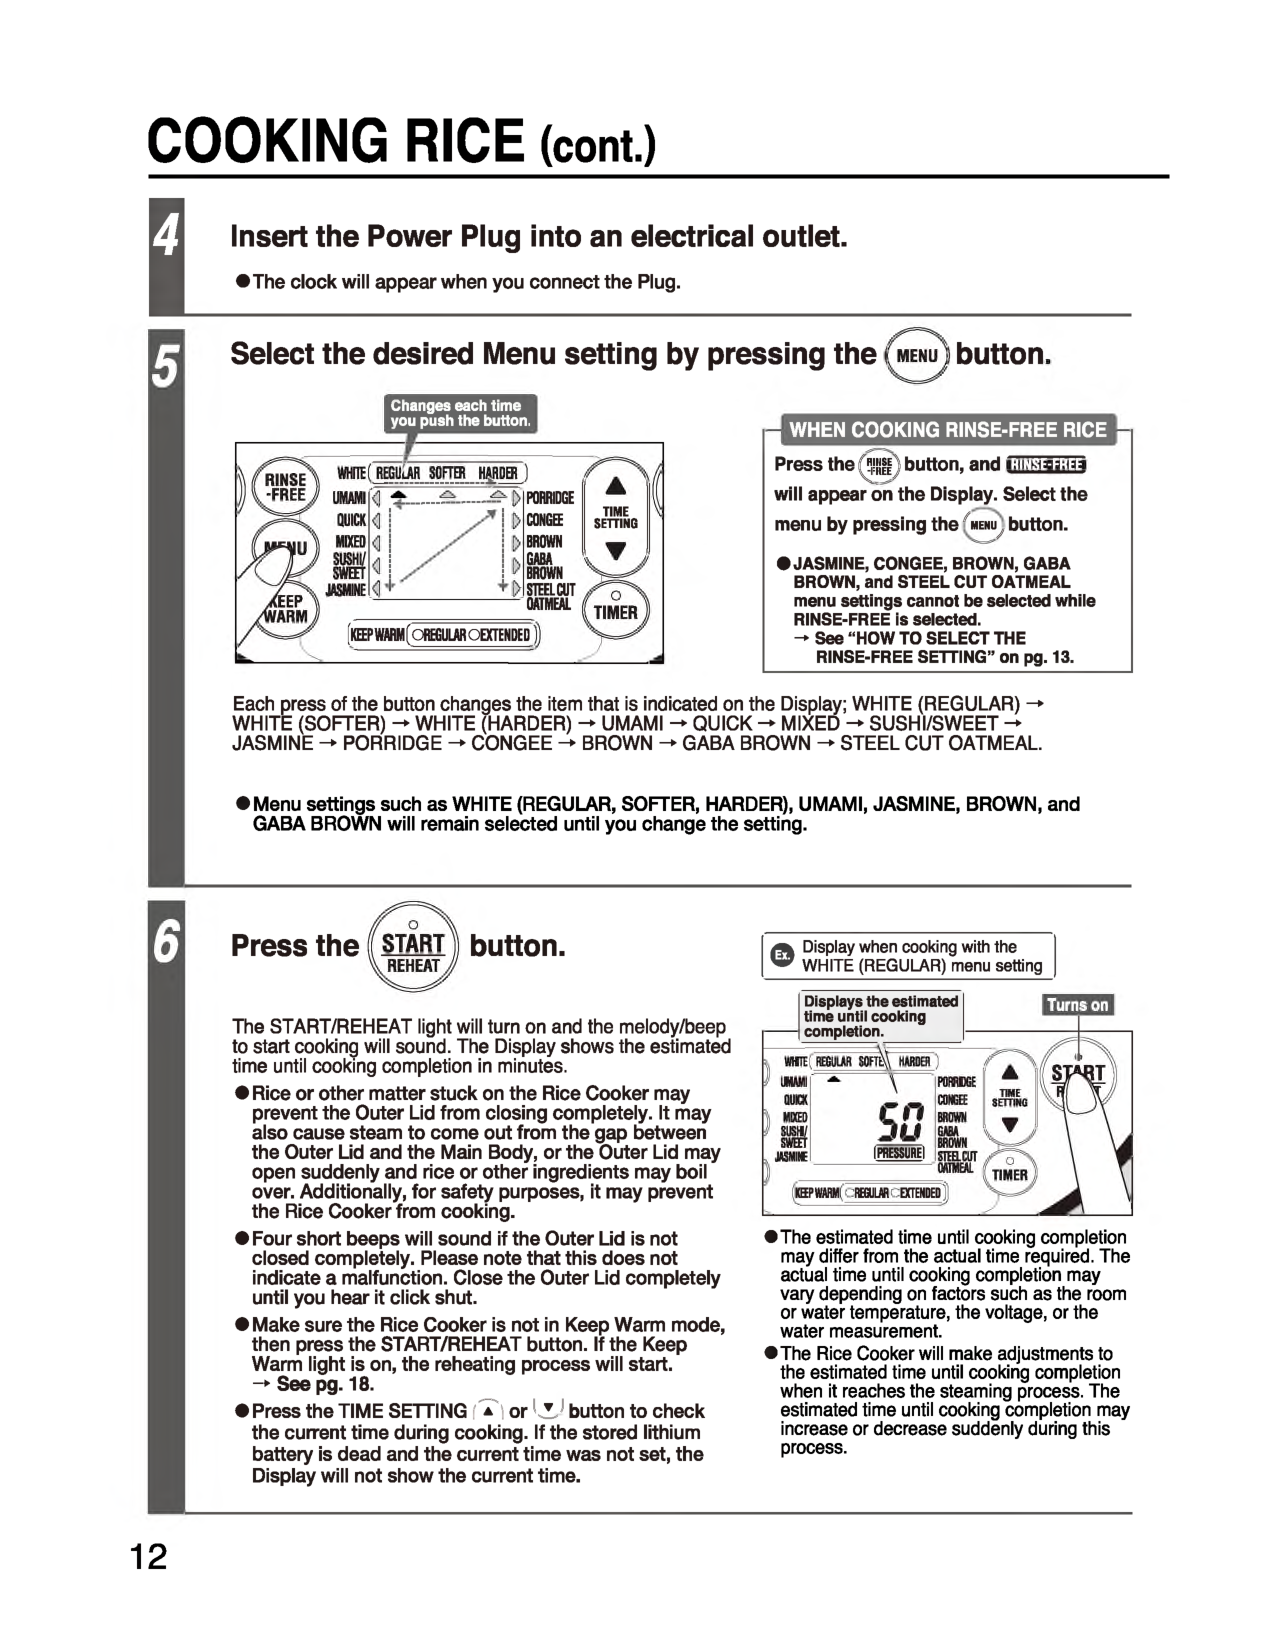
COOKING RICE (cont.) 14 Insert the Power Plug into an electrical outlet. •T he clock will appear when you connect the Plug.5 Select the desired Menu setting by pressing the ME NU button. ) Changes each time you push the button.
Porridge
Conge
Brown
Gaba
Brown
Steelcut
Oatmeal
Time
Setting
(Keep Warm (Oregular Oextended
When Cooking Rinse-Free Rice
Press the RINSE-FREE button , and RINSE-FREE will appear on the Di splay. Select the menu by p ressing the menu button.• Jasmine, Congee, Brown, Gaba
BROWN, and STEEL CUT OATMEAL menu settings cannot be selected while RINSE-FREE is selected. → See “ HOW TO SELECT THE RINSE-FREE SETTING” on pg. 13. Each press of the button changes the item that is indicated on the Display; WHITE (REGULAR) → WHIte (Softer) → W Hite (Harder) → Umami → Qui Ck → Mix Ed → Sus Hi/Sweet → Jas M
Ine → Porridge → Congee → Brown → Gaba Brown → Steel Cut Oatmeal.
Ipbessurei
IB P WAflWReguuir Extended
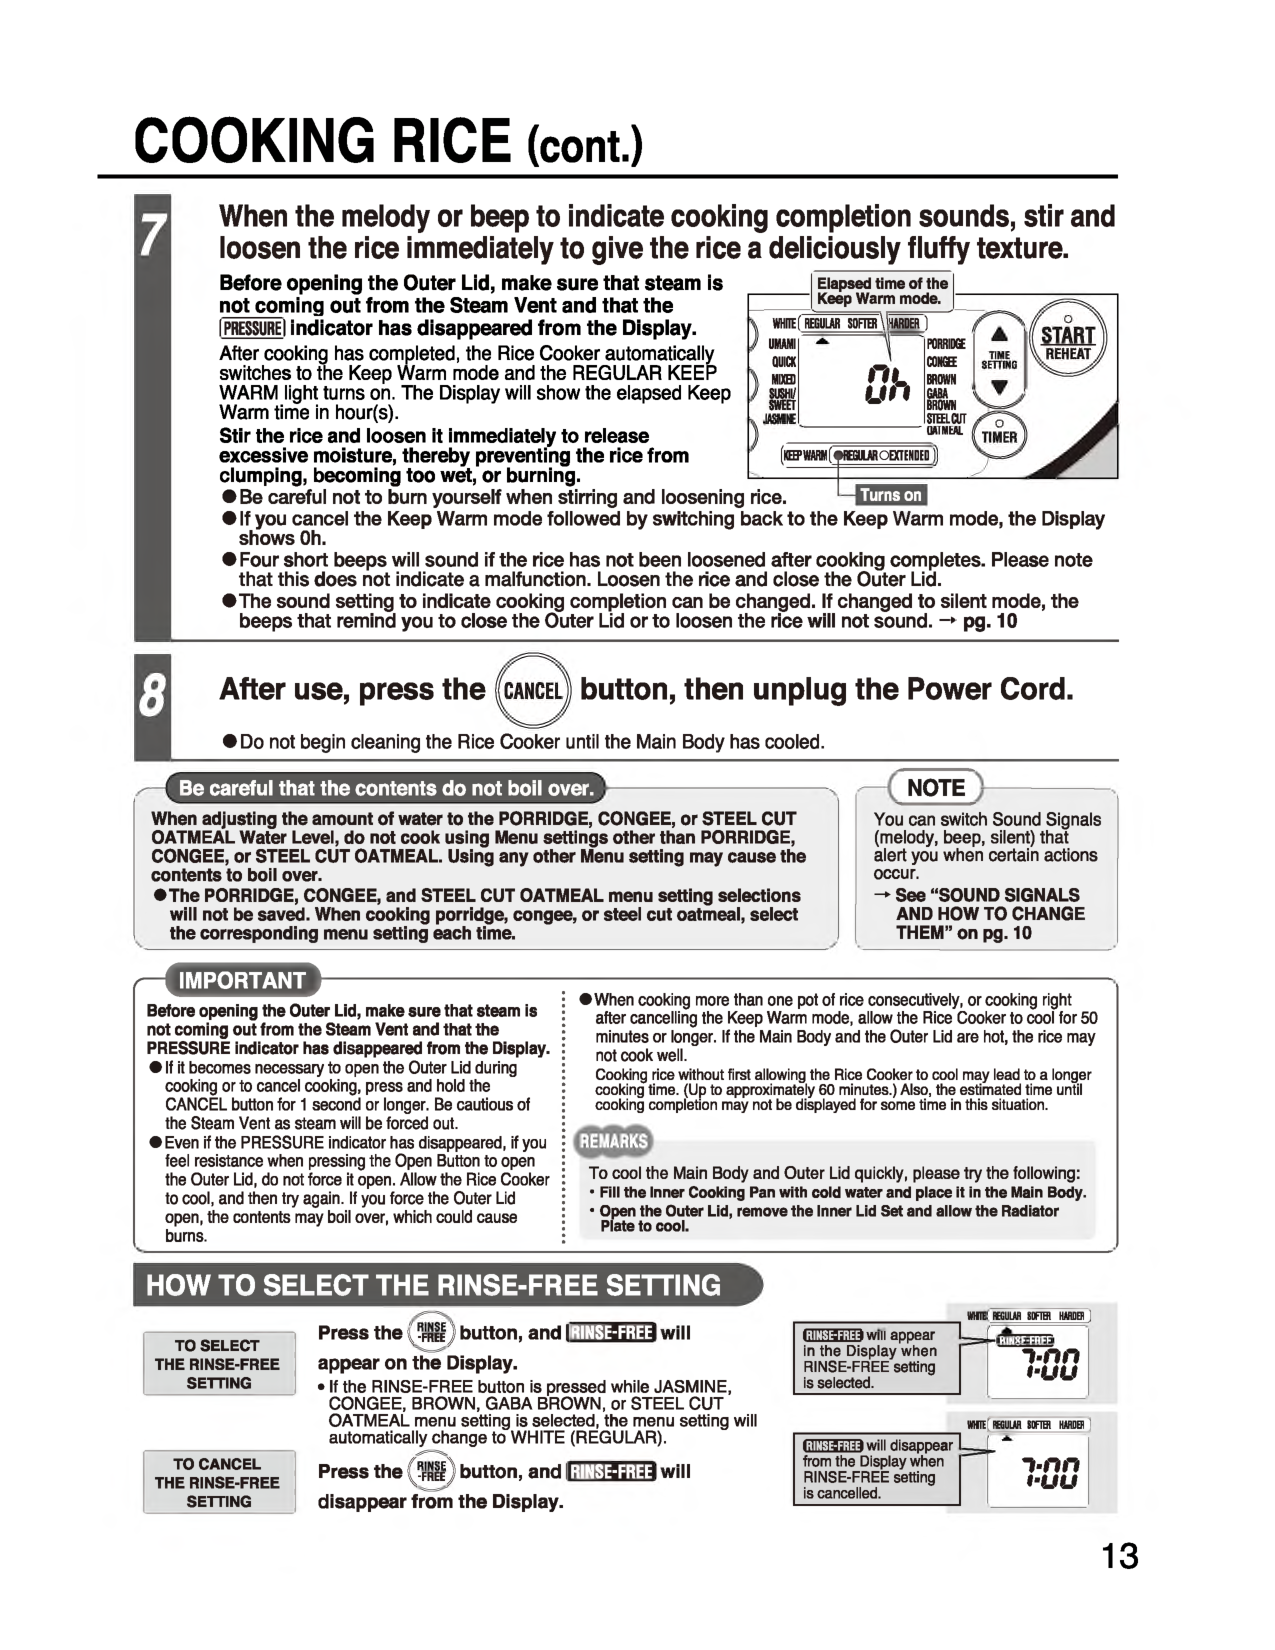
COOKING RICE (cont.)7 When the melody or beep to indicate cooking completion sounds, stir and loosen the rice immediately to give the rice a deliciously fluffy texture. Before opening the Outer Lid, make sure that steam is not coming out from the Steam Vent and that the I PRESSURE! indicator has disappeared from the Display. After cooking has completed, the Rice Cooker automatically switches to the Keep Warm mode and the REGULAR KEEP WARM light turns on. The Display will show the elapsed Keep Warm time in hour(s). Stir the rice and loosen it immediately to release excessive moisture, thereby preventing the rice from clumping, becoming too wet, or burning. Elapsed time of the Keep Warm mode. WIIIIEf REGULAR SOFTER \|HARDER 1
Uniami
Quick
Mkh)
Sushi/
Sweet
Porridge
OhConge
Brown
Gaba
Brown
Sieelcut
Oatmeal
(kEH* WARM ( yR EBLU R OECTEHDED Turns onNote
You can switch Sound Signals (melody, beep, silent) that alert you when certain actions occur. → See “SOUND SIGNALSAnd How To Change
THEM” onpg. 10 r i MMimportant
Before opening the Outer Lid, make sure that steam is not coming out from the Steam Vent and that the PRESSURE indicator has disappeared from the Display.How To Select The Rinse-Free Setting
To Select
The Rinse-Free
Setting
Press the RIN SE-FREE button, and RINSE-FR EE w ill appear on the Display.To Cancel
The Rinse-Free
Setting
Press the RINS E-FREE button, and RINSE-F REE will disappear from the Display.Ihhe Feguiar Softer Harder )
i;im s3:uiw iii appear in the Display when RINSE-FREE setting is selected. i - n n t - u u G E M S will disappear from the Display when RINSE-FREE setting is cancelled. INHIE( HEGU SOFim HARDER ) i - n n t - u u 13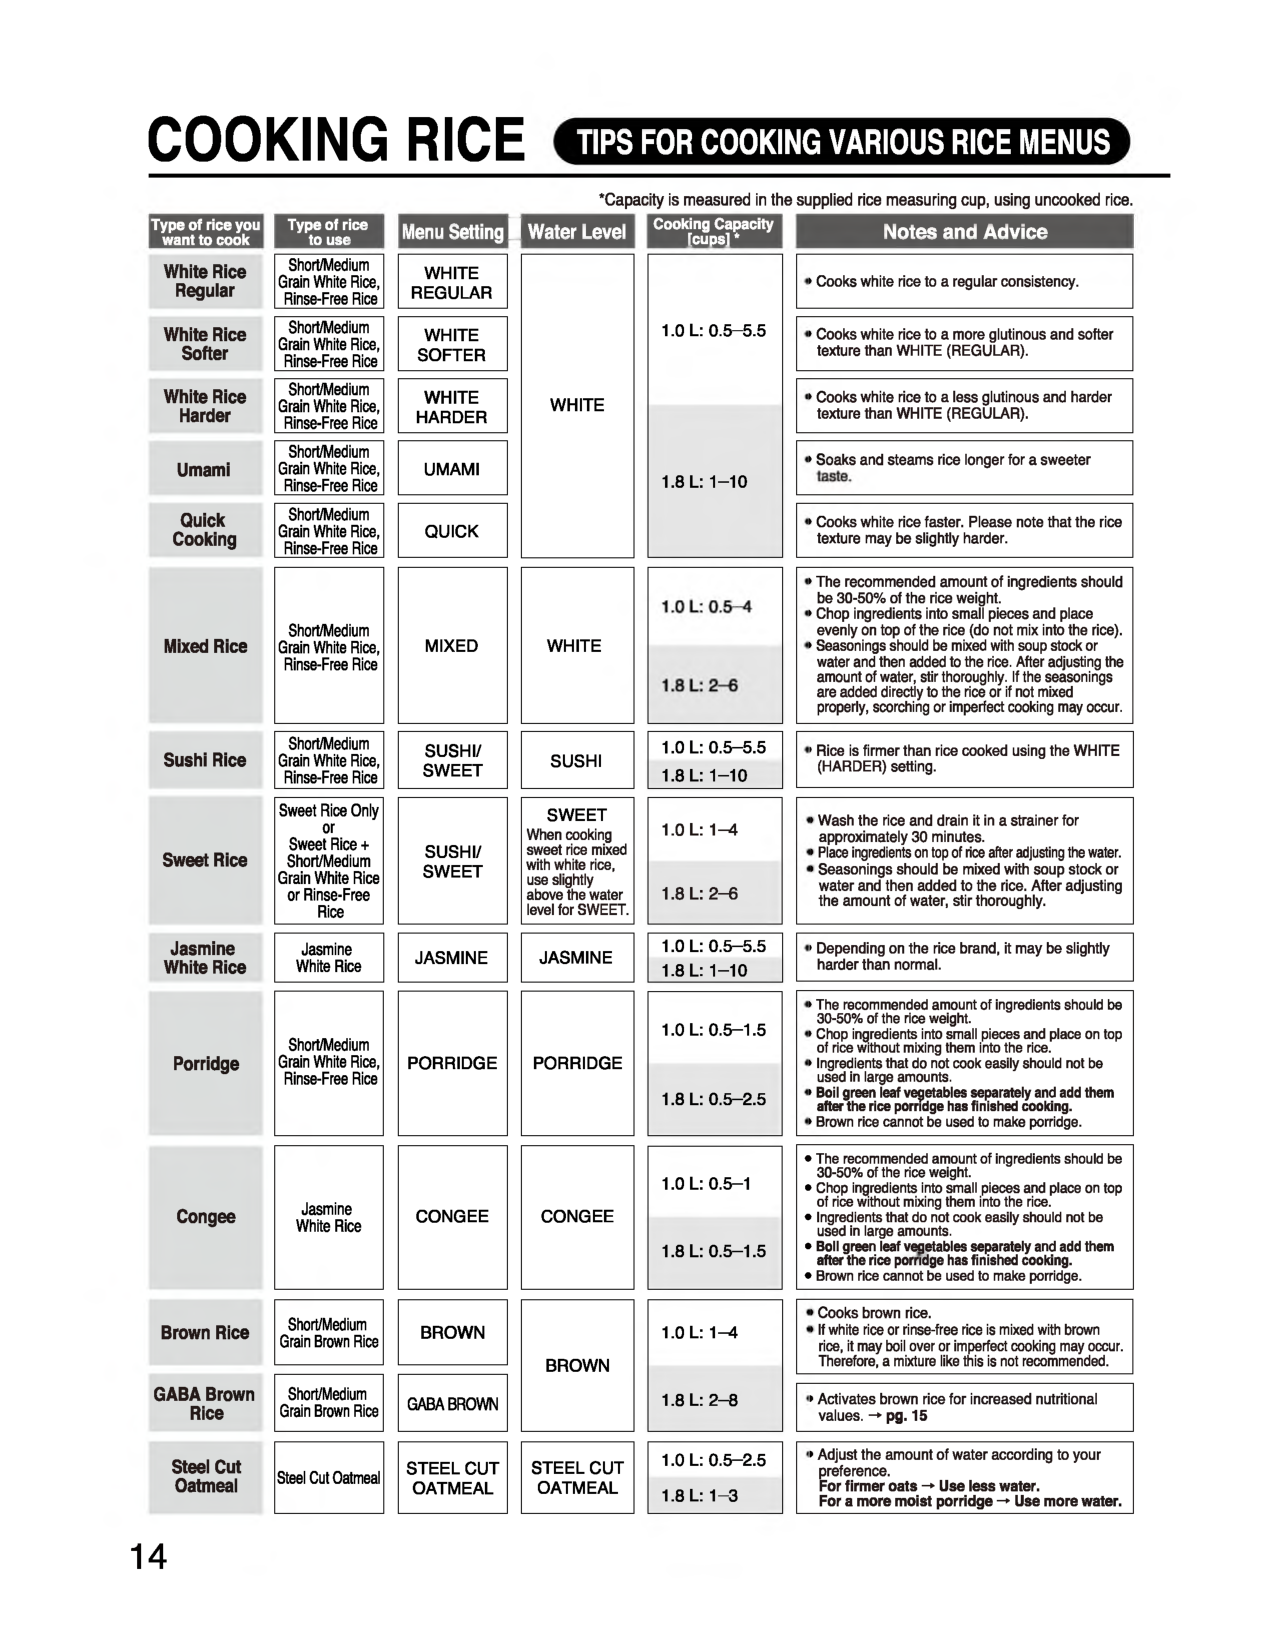
Cooking Rice
Tips For Cooking Various Rice Menus
White
Regular
White
1.0 L: 0.5—5.5
1.8 L: 1-10
•Cooks white rice to a regular consistency. White Rice Softer Short/Medium Grain White Rice, Rinse-Free RiceWhite
Softer
•Cooks white rice to a more glutinous and softer texture than WHITE (REGULAR). White Rice Harder Short/Medium Grain White Rice, Rinse-Free RiceWhite
Harder
•Cooks white rice to a less glutinous and harder texture than WHITE (REGULAR). Umami Short/Medium Grain White Rice, Rinse-Free RiceUmami
•Soaks and steams rice longer for a sweeter taste. Quick Cooking Short/Medium Grain White Rice, Rinse-Free RiceQuick
•Cooks white rice faster. Please note that the rice texture may be slightly harder. Mixed Rice Short/Medium Grain White Rice, Rinse-Free RiceMixed
White1.0 L: 0.5-4
•The recommended amount of ingredients should be 30-50% of the rice weight. •Chop ingredients into small pieces and place evenly on top of the rice (do not mix into the rice). •Seasonings should be mixed with soup stock or water and then added to the rice. After adjusting the amount of water, stir thoroughly. If the seasonings are added directly to the rice or if not mixed properly, scorching or imperfect cooking may occur.1.8 L: 2-6 Sushi Rice Short/Medium Grain White Rice, Rinse-Free RiceSushi/
Sweet
Sushi
1.0 L: 0.5—5.5
1.8 L: 1-10
Sweet Rice Sweet Rice Only or Sweet Rice + Short/Medium Grain White Rice or Rinse-Free RiceSushi/
Sweet
Sweet
When cooking sweet rice mixed with white rice, use slightly above the water level for SWEET.1.0 L: 1-4
•Wash the rice and drain it in a strainer for approximately 30 minutes. •Place ingredients on top of rice after adjusting the water.1.8 L: 2-6
Jasmine White Rice Jasmine White RiceJasmine
Jasmine
1.0 L: 0.5—5.5
•Depending on the rice brand, it may be slightly harder than normal.1.8 L: 1-10
Porridge Short/Medium Grain White Rice, Rinse-Free RicePorridge
Porridge
1.0 L: 0.5-1.5
•The recommended amount of ingredients should be 30-50% of the rice weight. •Chop ingredients into small pieces and place on top of rice without mixing them into the rice. •Ingredients that do not cook easily should not be used in large amounts. •Boil green leaf vegetables separately and add them after the rice porridge has finished cooking. •Brown rice cannot be used to make porridge.1.8 L: 0.5—2.5
Congee Jasmine White RiceCongee
Congee
1.0 L: 0.5-1
1.8 L: 0.5-1.5
Brown Rice Short/Medium Grain Brown RiceBrown
Brown
1.0 L: 1-4
•Cooks brown rice. •If white rice or rinse-free rice is mixed with brown rice, it may boil over or imperfect cooking may occur. Therefore, a mixture like this is not recommended. GABA Brown Rice Short/Medium Grain Brown RiceGaba Brown
1.8 L: 2-8
•Activates brown rice for increased nutritional values. → pg. 15 Steel Cut Oatmeal Steel Cut OatmealSteel Cut
Oatmeal
Steel Cut
Oatmeal
1.0 L: 0.5—2.5
1.8 L: 1-3
•Adjust the amount of water according to your preference. For firmer oats → Use less water. For a more moist porridge -*■Use more water. 14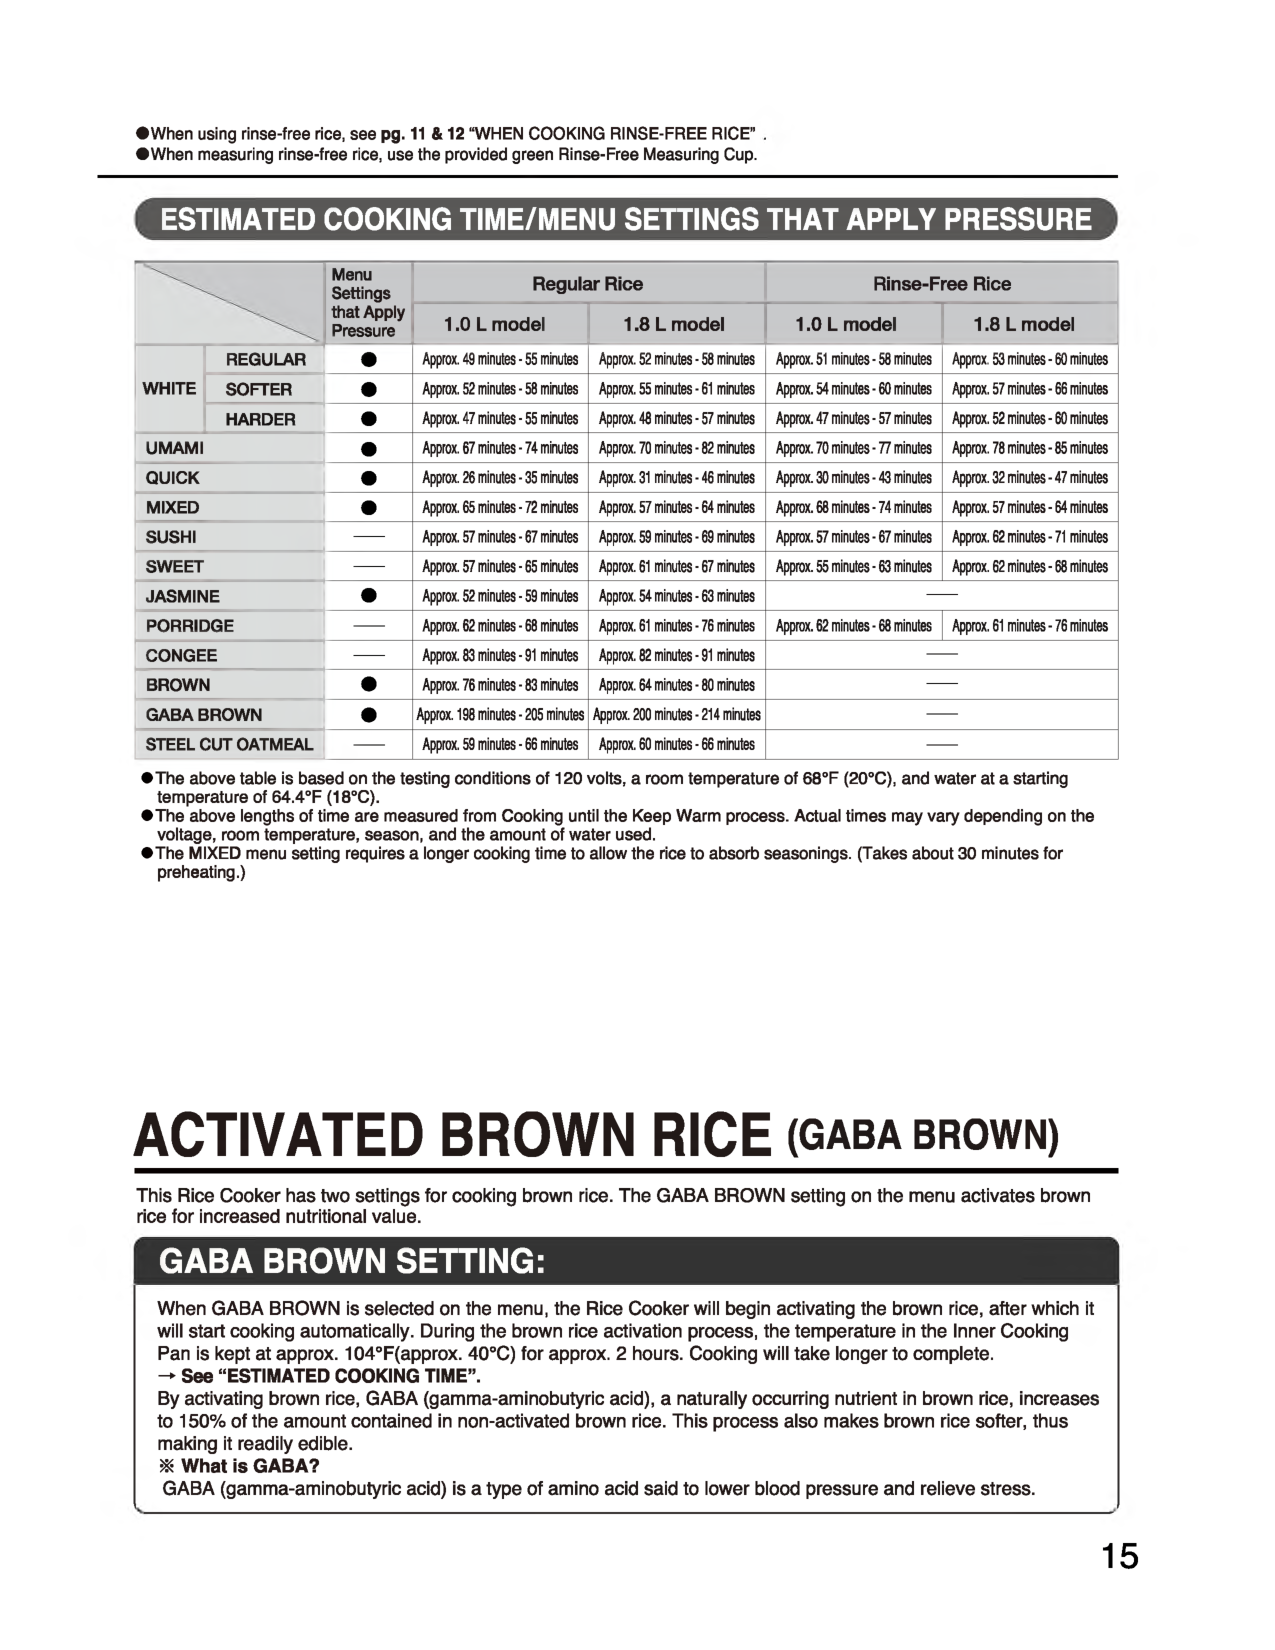
•When using rinse-free rice, see pg. 11 & 12 “WHEN COOKING RINSE-FREE RICE” •When measuring rinse-free rice, use the provided green Rinse-Free Measuring Cup.
Estimated Cooking Time/Menu Settings That Apply Pressure
Menu Settings that Apply Pressure Regular Rice Rinse-Free Rice 1.0 L model 1.8 L model 1.0 L model 1.8 L modelWhite
Regular
• Approx. 49 minutes - 55 minutes Approx. 52 minutes - 58 minutes Approx. 51 minutes - 58 minutes Approx. 53 minutes -60 minutesSofter
• Approx. 52 minutes - 58 minutes Approx. 55 minutes - 61 minutes Approx. 54 minutes - 60 minutes Approx. 57 minutes - 66 minutesHarder
• Approx. 47 minutes - 55 minutes Approx. 48 minutes - 57 minutes Approx. 47 minutes - 57 minutes Approx. 52 minutes - 60 minutesUmami
• Approx. 67 minutes - 74 minutes Approx. 70 minutes - 82 minutes Approx. 70 minutes - 77 minutes Approx. 78 minutes - 85 minutesQuick
• Approx. 26 minutes - 35 minutes Approx. 31 minutes - 46 minutes Approx. 30 minutes - 43 minutes Approx. 32 minutes - 47 minutesMixed
• Approx. 65 minutes - 72 minutes Approx. 57 minutes - 64 minutes Approx. 68 minutes - 74 minutes Approx. 57 minutes - 64 minutesSushi
— Approx. 57 minutes - 67 minutes Approx. 59 minutes - 69 minutes Approx. 57 minutes - 67 minutes Approx. 62 minutes - 71 minutesSweet
— Approx. 57 minutes - 65 minutes Approx. 61 minutes - 67 minutes Approx. 55 minutes - 63 minutes Approx. 62 minutes - 68 minutesJasmine
• Approx. 52 minutes - 59 minutes Approx. 54 minutes - 63 minutes —Porridge
— Approx. 62 minutes - 68 minutes Approx. 61 minutes - 76 minutes Approx. 62 minutes - 68 minutes Approx. 61 minutes - 76 minutesCongee
— Approx. 83 minutes - 91 minutes Approx. 82 minutes - 91 minutes —Brown
• Approx. 76 minutes - 83 minutes Approx. 64 minutes - 80 minutes —Gaba Brown
• Approx. 198 minutes - 205 minutes Approx. 200 minutes - 214 minutes —Steel Cut Oatmeal
— Approx. 59 minutes - 66 minutes Approx. 60 minutes - 66 minutes — •T he above table is based on the testing conditions of 120 volts, a room temperature of 68°F (20°C), and water at a starting temperature of 64.4°F (18°C). •T he above lengths of time are measured from Cooking until the Keep Warm process. Actual times may vary depending on the voltage, room temperature, season, and the amount of water used. •The MIXED menu setting requires a longer cooking time to allow the rice to absorb seasonings. (Takes about 30 minutes for preheating.) ACTIVATED BROWN RICE (gaba brow n) This Rice Cooker has two settings for cooking brown rice. The GABA BROWN setting on the menu activates brown rice for increased nutritional value.Gaba Brown Setting:
When GABA BROWN is selected on the menu, the Rice Cooker will begin activating the brown rice, after which it will start cooking automatically. During the brown rice activation process, the temperature in the Inner Cooking Pan is kept at approx. 104°F(approx. 40°C) for approx. 2 hours. Cooking will take longer to complete. → See “ ESTIMATED COOKING TIME”. By activating brown rice, GABA (gamma-aminobutyric acid), a naturally occurring nutrient in brown rice, increases to 150% of the amount contained in non-activated brown rice. This process also makes brown rice softer, thus making it readily edible.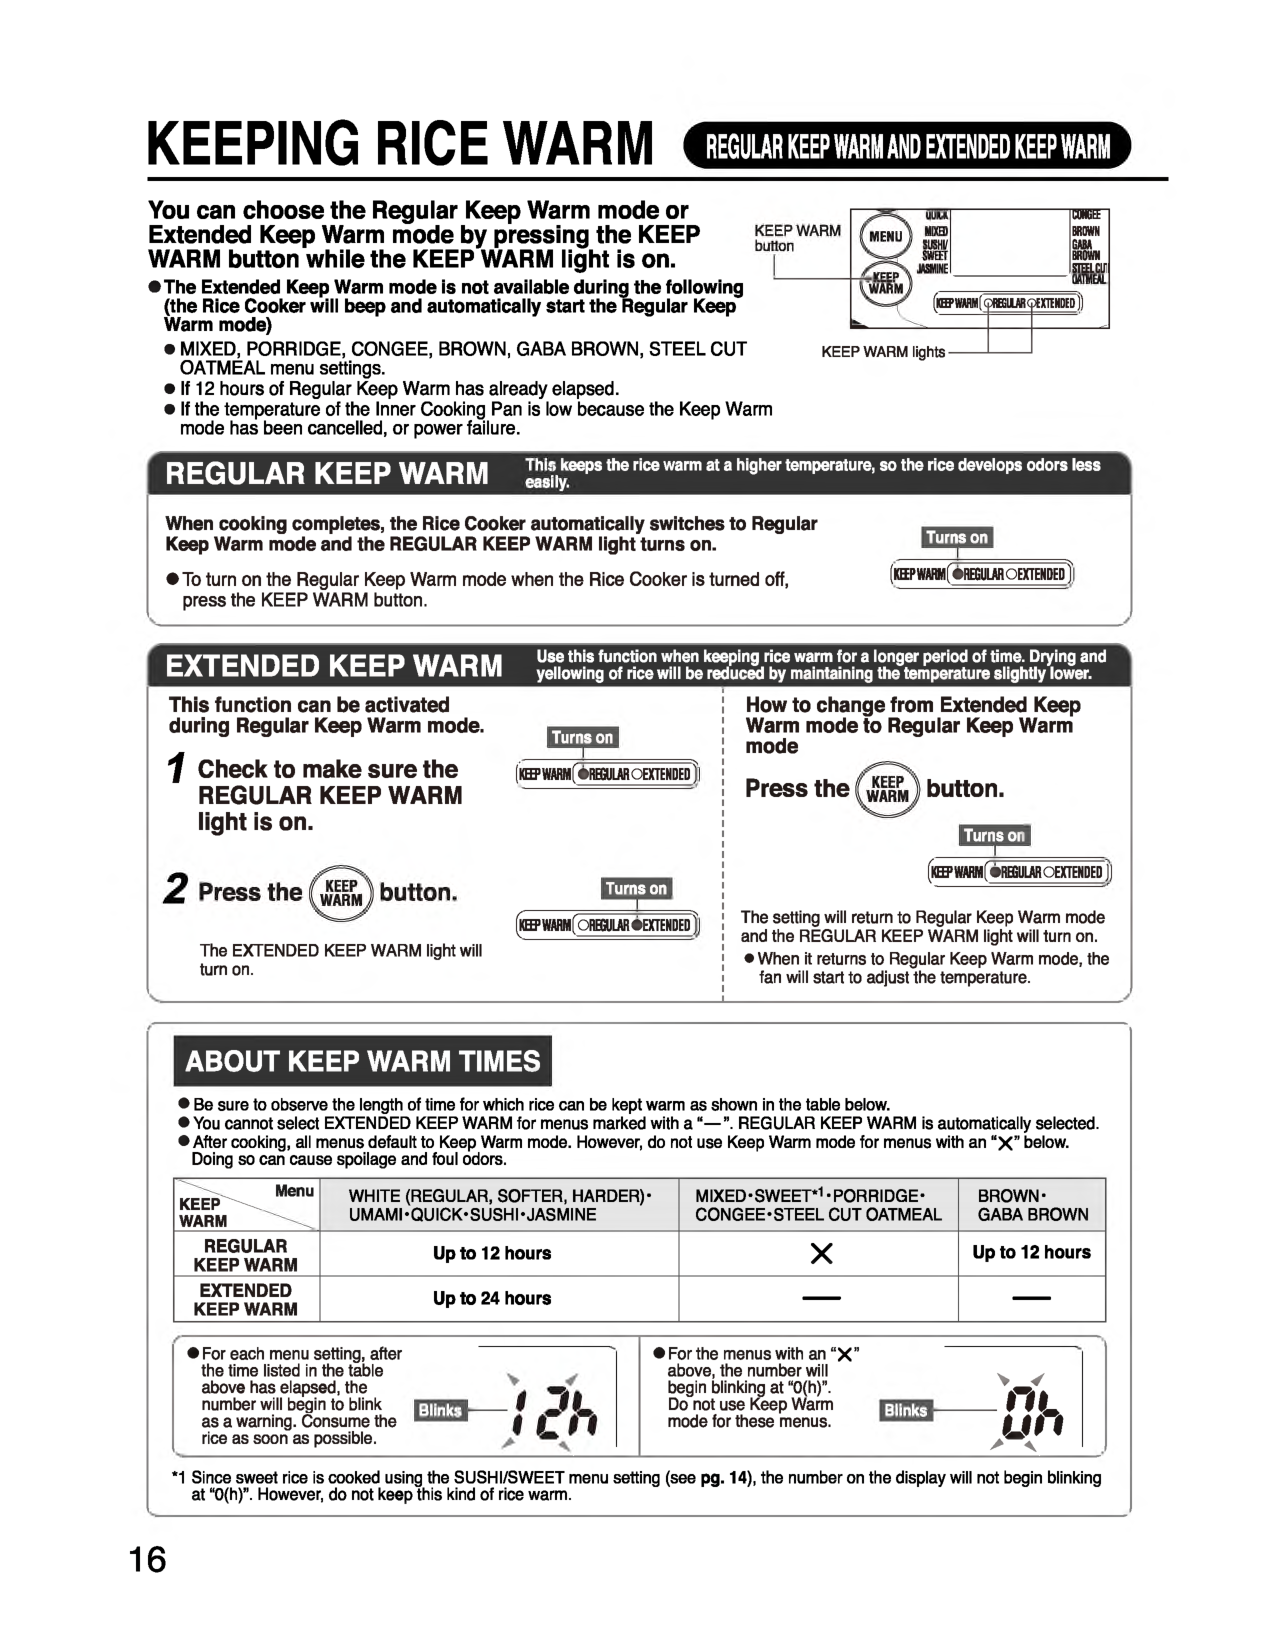
Keeping Rice Warm
Regular Keep Warm And Extended Keep Warm
You can choose the Regular Keep Warm mode or Extended Keep Warm mode by pressing the KEEP WARM button while the KEEP WARM light is on. •The Extended Keep Warm mode is not available during the following (the Rice Cooker will beep and automatically start the Regular Keep Warm mode)• Mixed, Porridge, Congee, Brown, Gaba Brown, Steel Cut
OATMEAL menu settings. ke e p WARM lightsCongee
Mown
Gam
mow* SIEELCUl (HHPWMM[ cpBEGUUB cpEXTtHDEDj)Regular Keep Warm
This keeps the rice warm at a higher temperature, so the rice develops odors less easily. When cooking completes, the Rice Cooker automatically switches to Regular Keep Warm mode and the REGULAR KEEP WARM light turns on.Extended Keep Warm
Use this function when keeping rice warm for a longer period of time. Drying and yellowing of rice will be reduced by maintaining the temperature slightly lower. This function can be activated during Regular Keep Warm mode. 1 Check to make sure theRegular Keep Warm
light is on.2Press the KEEP WARM button. The EXTENDED KEEP WARM light will turn on. Turns on (KgWftRHfeREGULABOEXTENDED f Turns on (ro W ftlM fÕ R im ftR «EXTENDED j How to change from Extended Keep Warm mode to Regular Keep Warm mode Press the KEEP WARM button. Turns on (i(EffWAHMf«REGULftROEXTEHDED ]) The setting will return to Regular Keep Warm mode and the REGULAR KEEP WARM light will turn on.About Keep Warm Times
Menu
K E E P
Warm
^^.White (Regular, Softer, Harder)-
Umami-Quick-Sushi-Jasmine
Mixed-Sweet*1-Porridge-
Congee-Steel Cut Oatmeal
Brown-
Gaba Brown
Regular
Keep Warm
Up to 12 hoursX
Up to 12 hoursExtended
Keep Warm
Up to 24 hours ------ ------V 4
f i tU
t l >-V
*1 Since sweet rice is cooked using the SUSHI/SWEET menu setting (see pg. 14), the number on the display will not begin blinking at “0(h)”. However, do not keep this kind of rice warm. 16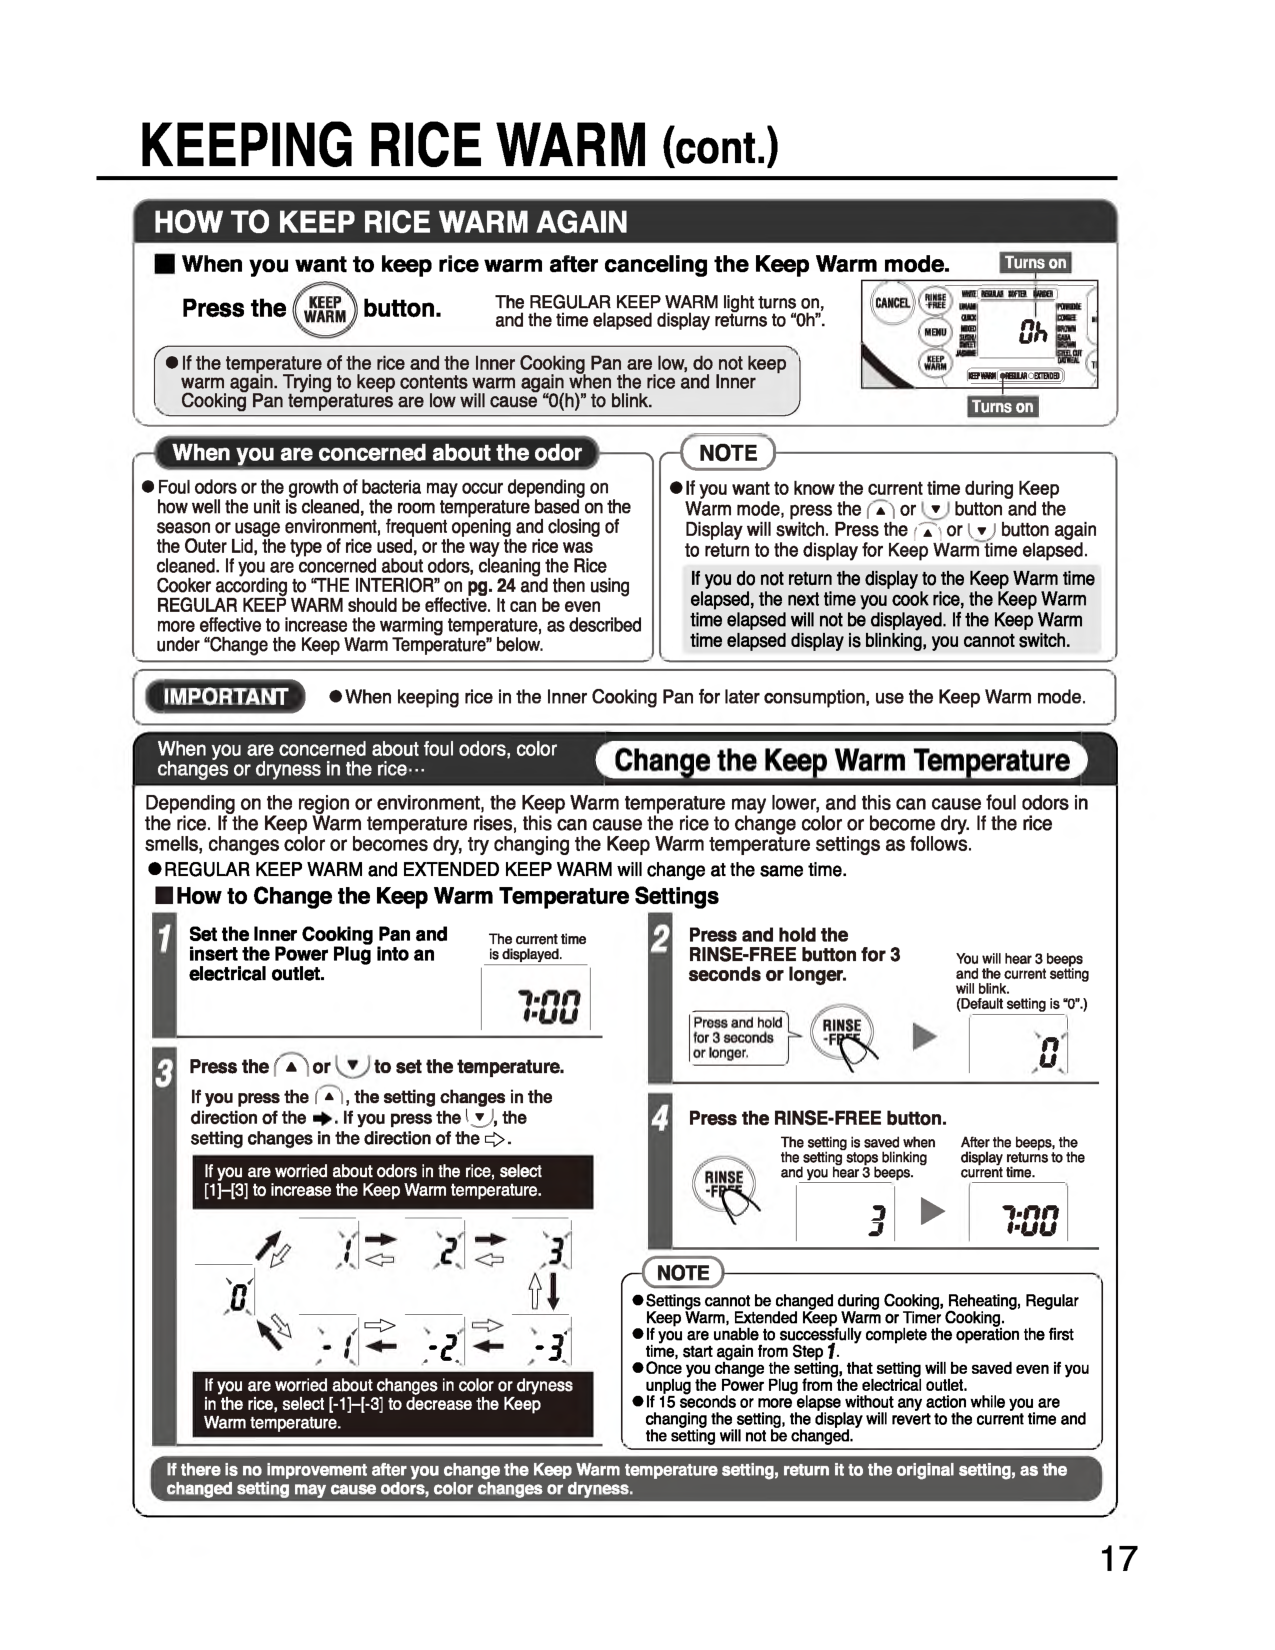
KEEPING RICE WARM (cont.)
How To Keep Rice Warm Again
When you want to keep rice warm after canceling the Keep Warm mode. Press the KEEP WARM button. Turns on The REGULAR KEEP WARM light turns on, and the time elapsed display returns to “Oh”. f 'D
► i-n nJ
t-uu r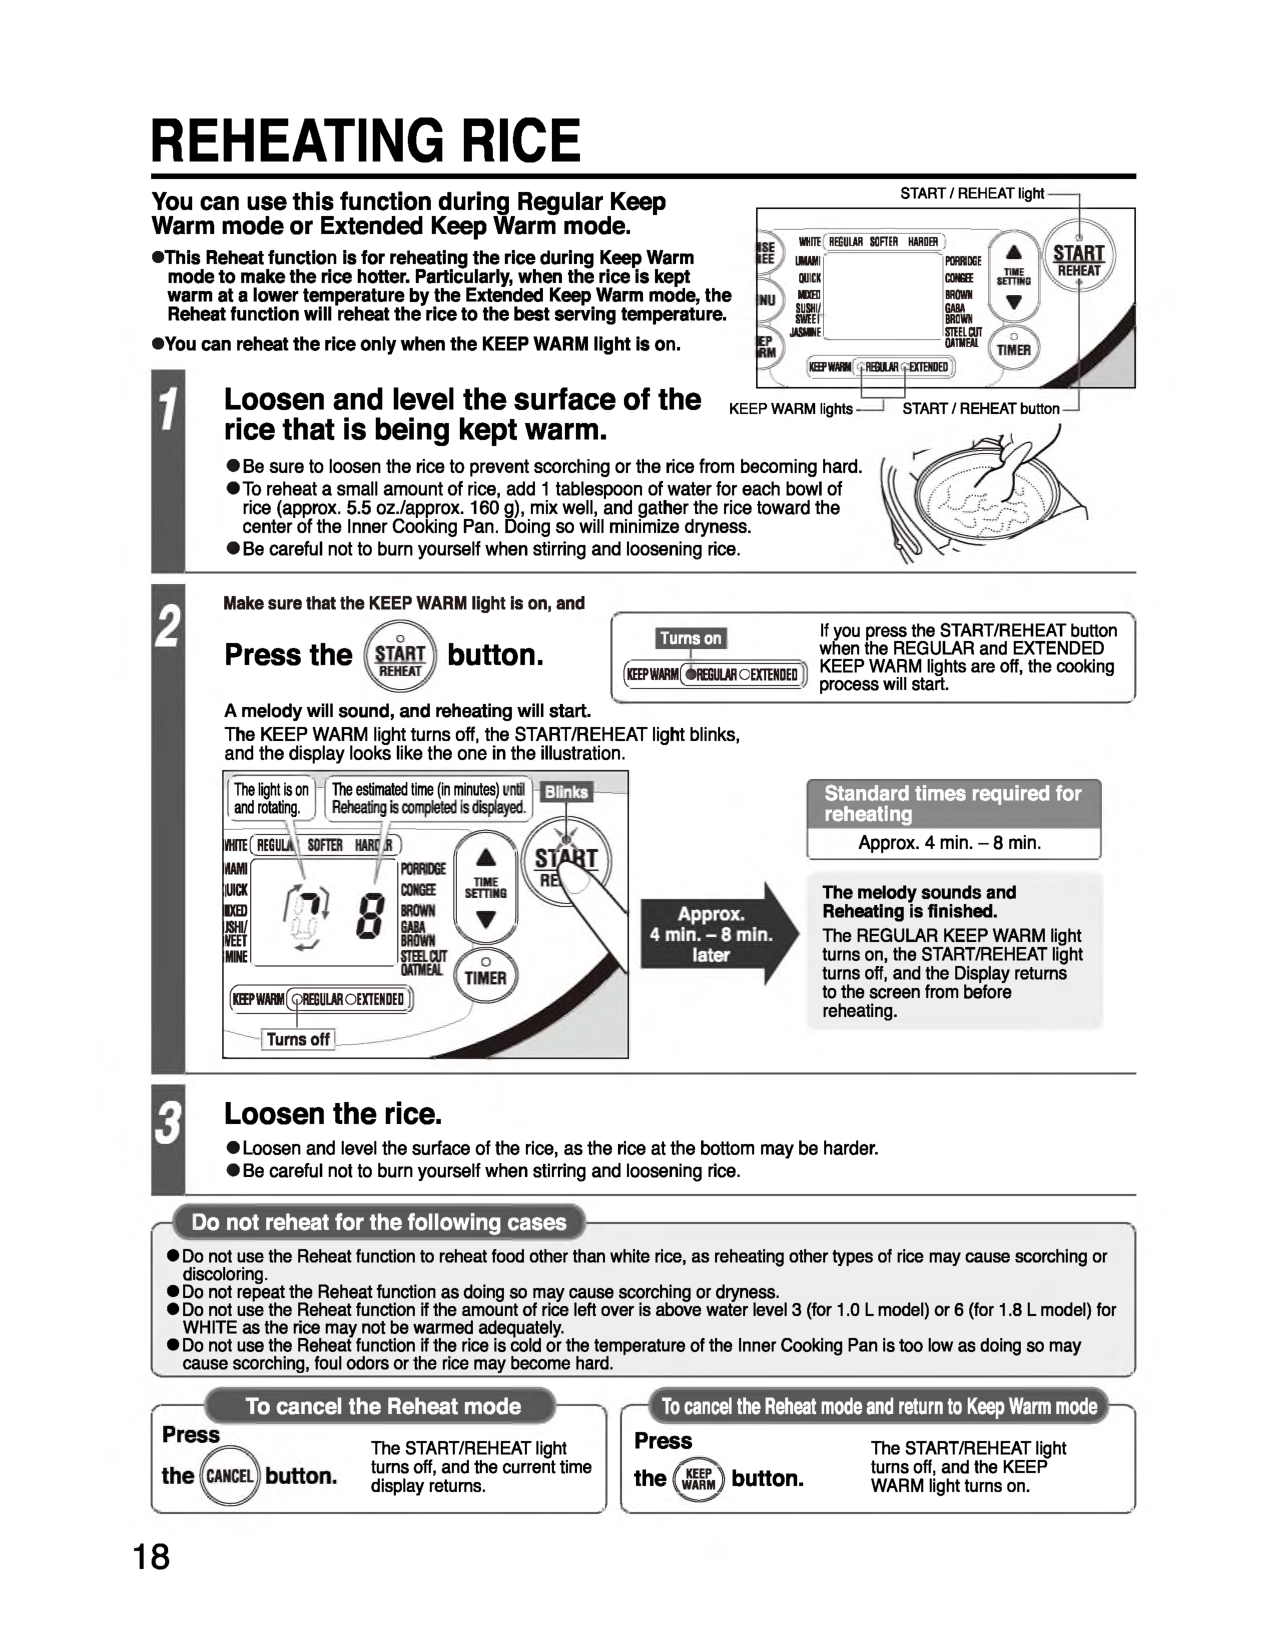
Reheating Rice
You can use this function during Regular Keep Warm mode or Extended Keep Warm mode. •This Reheat function is for reheating the rice during Keep Warm mode to make the rice hotter. Particularly, when the rice is kept warm at a lower temperature by the Extended Keep Warm mode, the Reheat function will reheat the rice to the best serving temperature. •You can reheat the rice only when the KEEP WARM light is on. START/REHEAT lightWhíte
Regular Softer
Harder)
Umami
Porridge
Quick
Conge
Mxed
Brown
Sushi/
Gaba
SWkblBrown
JASfiHESteel Cut
OAlMtAL K g WWW i REGULAR [ EXTENDED KEEP WARM lights-1 Loosen and level the surface of the rice that is being kept warm.START/REHEAT button2 Make sure that the KEEP WARM light is on, and Press the START REHEAT button. Turns on (k e e p w a r m( « 'REGULAR OEXTENDED If you press the START/REHEAT button when the REGULAR and EXTENDED KEEP WARM lights are off, the cooking process will start. A melody will sound, and reheating will start. The KEEP WARM light turns off, the START/REHEAT light blinks, and the display looks like the one in the illustration. The light is on and rotating. The estimated time (in minutes) i KHflE C REGUU MMlf
Iuick
Ixed
m iVeet
Mine
(k f f P WARM (^REGULftR OEXTENDED Turns o ff___ Standard times required for reheating Approx. 4 min. - 8 min. The melody sounds and Reheating is finished. The REGULAR KEEP WARM light turns on, the START/REHEAT light turns off, and the Display returns to the screen from before reheating.3 Loosen the rice. •Loosen and level the surface of the rice, as the rice at the bottom may be harder.
To cancel the Reheat modePress the CANCEL button. The START/REHEAT light turns off, and the current time display returns. To cancel the Reheat mode and return to Keep Warm mode Press the K E E P WARM button. The START/REHEAT light turns off, and the KEEP WARM light turns on. 18
Using The Timer To Cook Rice
Using The Timer
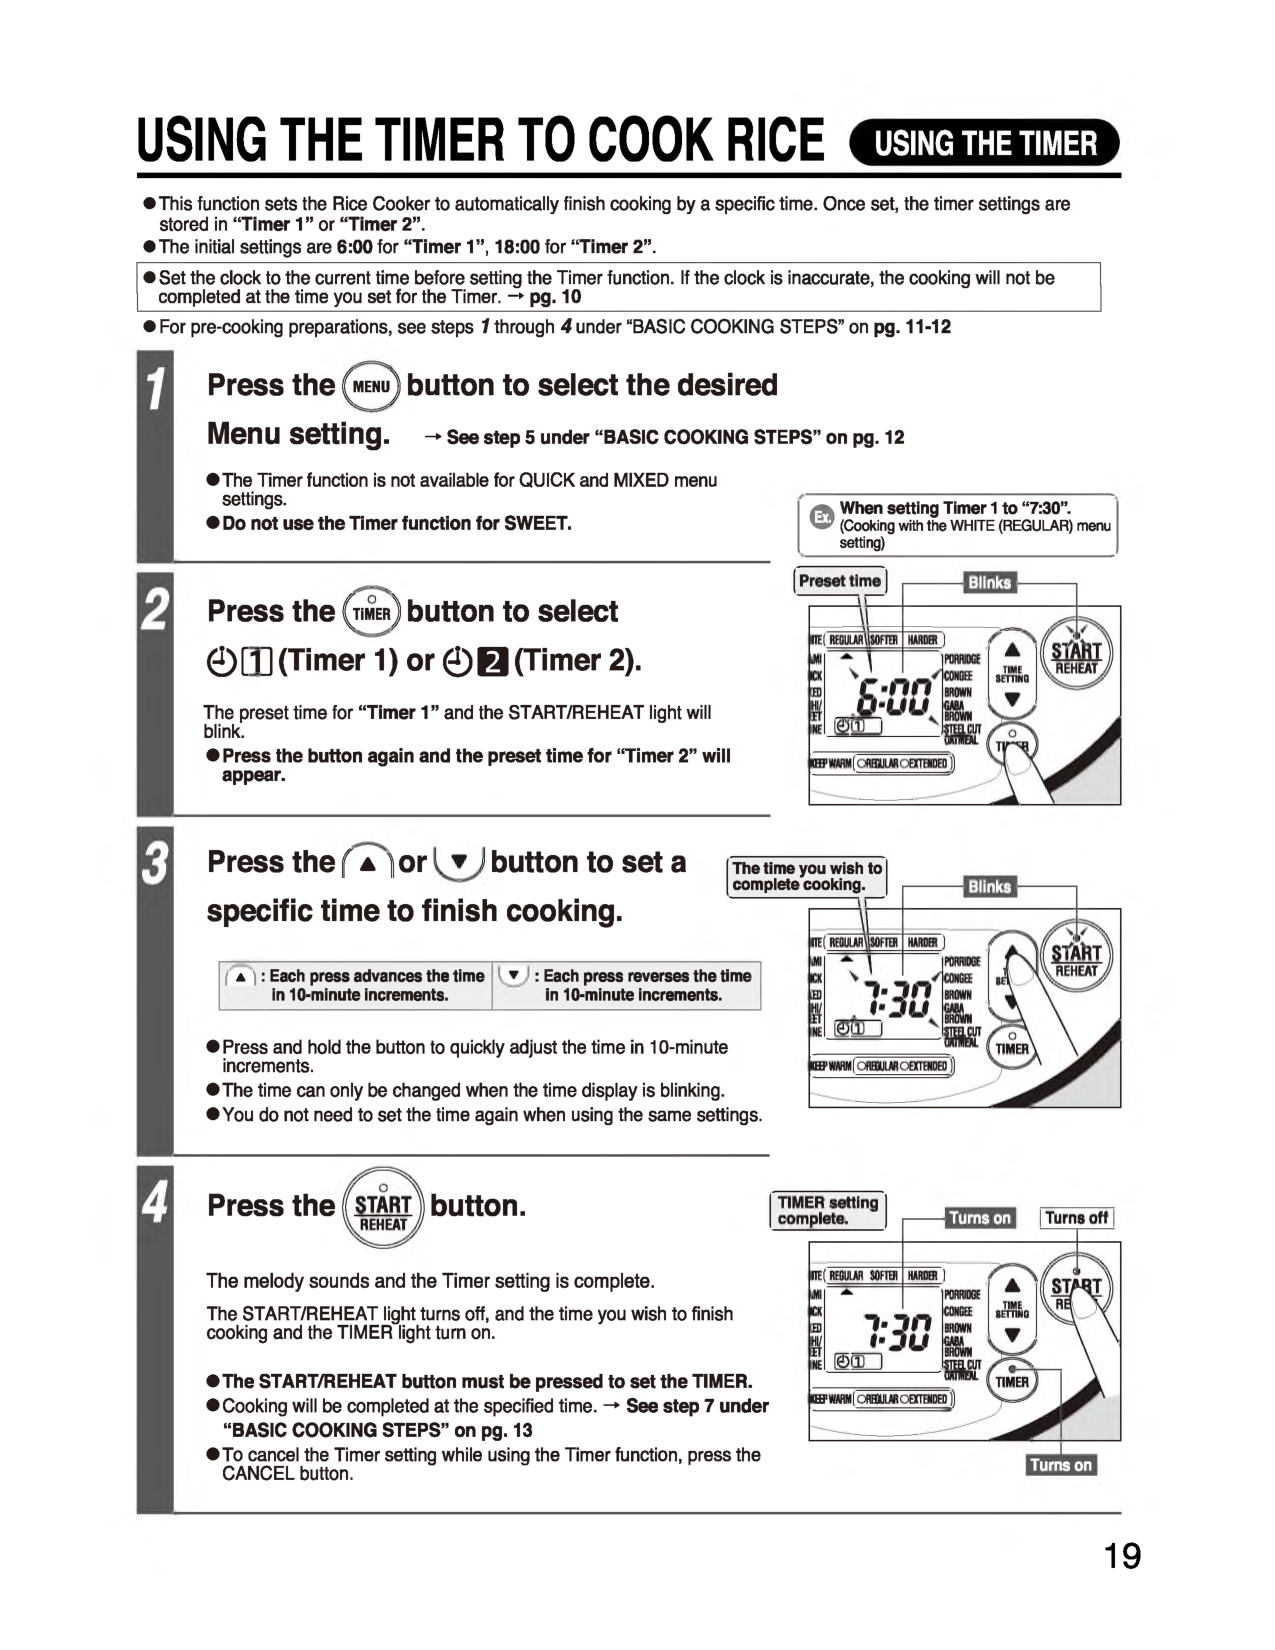
•This function sets the Rice Cooker to automatically finish cooking by a specific time. Once set, the timer settings are stored in “Timer 1 ” or “Timer 2” . •The initial settings are 6:00 for “Timer 1” , 18:00 for “Timer 2” .1 Press the MENU button to select the desired Me nu setting.
T
© When setting Timer 1 to “7:30”. (Cooking with the WHITE (REGULAR) menu setting)2 Press the T I MER b utton to select ©[1] (Timer 1) or © 0 (Timer 2). The preset time for “Timer 1” and the START/REHEAT light will blink.
Turns on 19
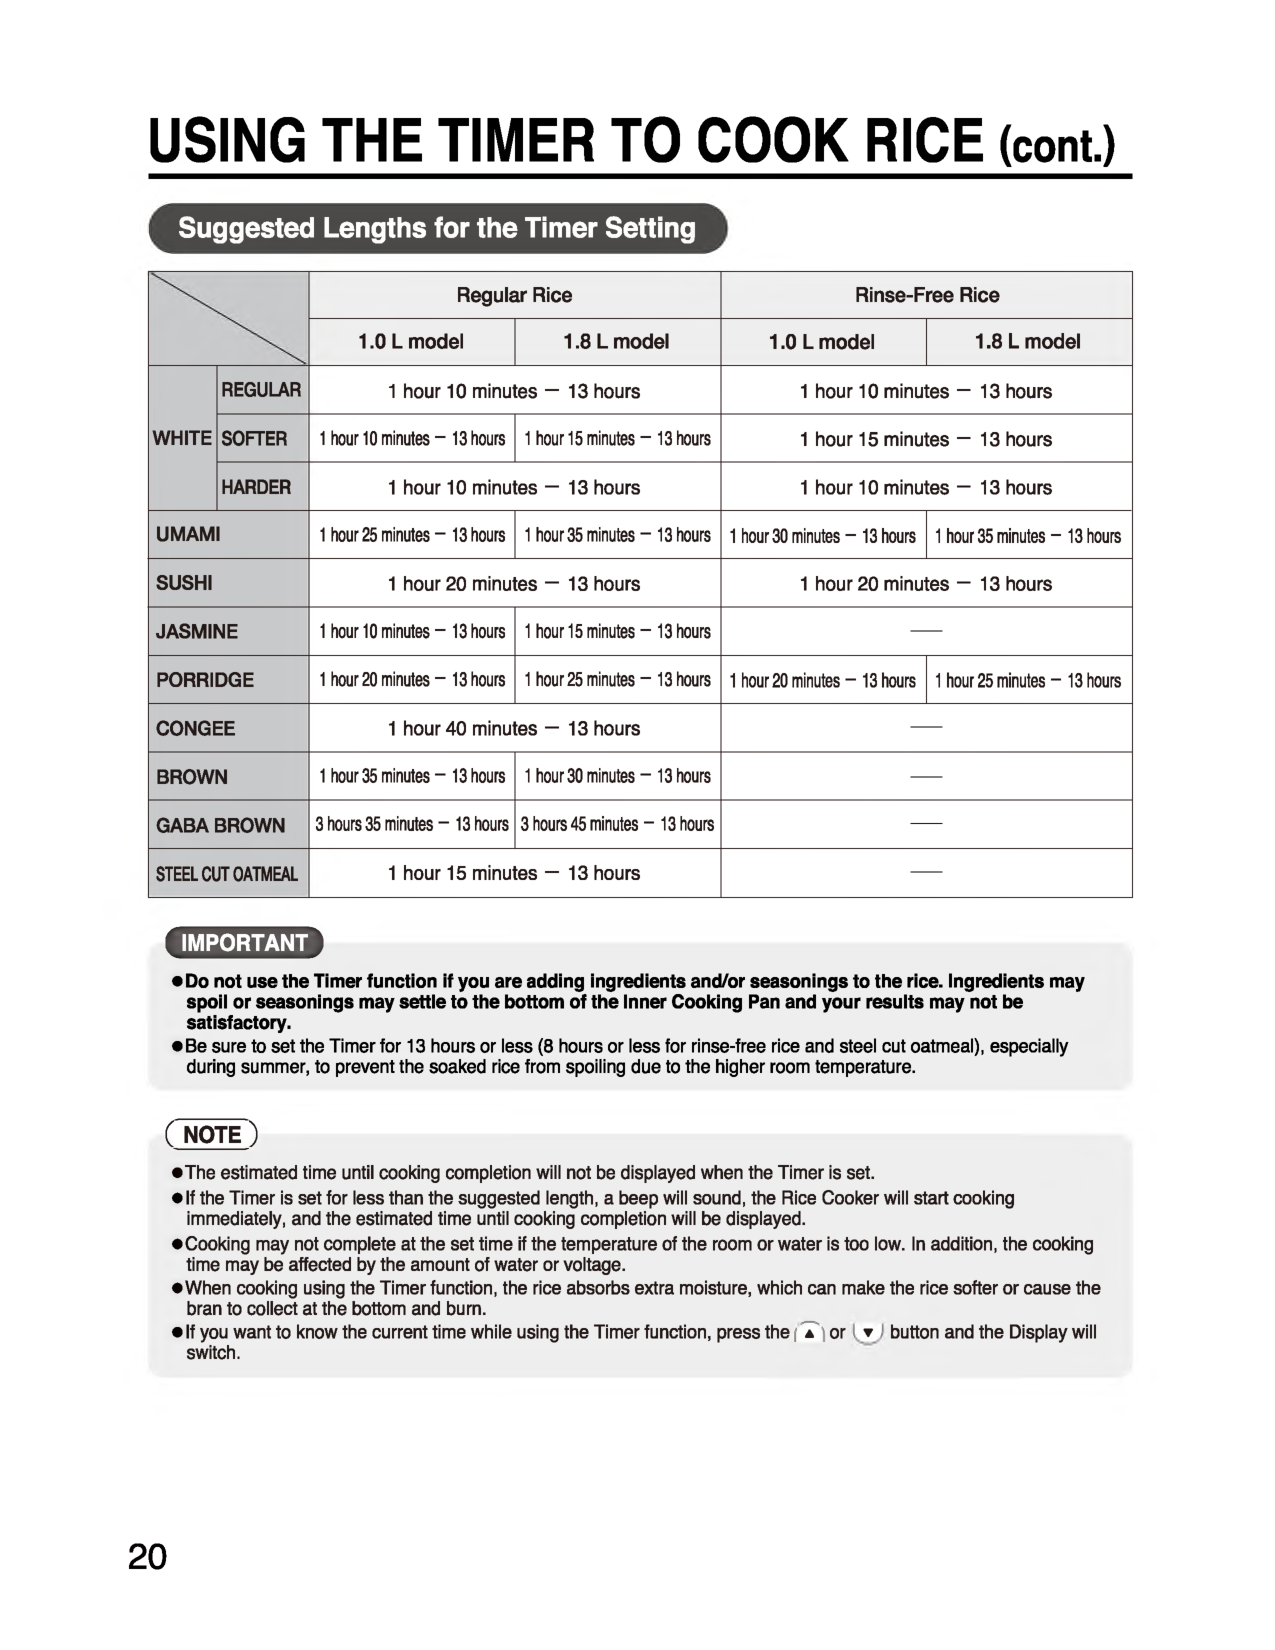
USING THE TIMER TO COOK RICE (cont.) Suggested Lengths for the Timer Setting Regular Rice Rinse-Free Rice 1.0 L model 1.8 L model 1.0 L model 1.8 L model
White
Regular
1 hour 10 minutes — 13 hours 1 hour 10 minutes — 13 hoursSofter
1 hour 10 minutes - 13 hours 1 hour 15 minutes - 13 hours 1 hour 15 minutes — 13 hoursHarder
1 hour 10 minutes — 13 hours 1 hour 10 minutes — 13 hoursUmami
1 hour 25 minutes - 13 hours 1 hour 35 minutes - 13 hours 1 hour 30 minutes - 13 hours 1 hour 35 minutes - 13 hoursSushi
1 hour 20 minutes — 13 hours 1 hour 20 minutes — 13 hoursJasmine
1 hour 10 minutes - 13 hours 1 hour 15 minutes - 13 hours —Porridge
1 hour 20 minutes - 13 hours 1 hour 25 minutes - 13 hours 1 hour 20 minutes - 13 hours 1 hour 25 minutes - 13 hoursCongee
1 hour 40 minutes — 13 hours —Brown
1 hour 35 minutes - 13 hours 1 hour 30 minutes - 13 hours —Gaba Brown
3 hours 35 minutes - 13 hours 3 hours 45 minutes - 13 hours —Steel Cut Oatmeal
1 hour 15 minutes — 13 hours — m a z B BIMPORTANT( Note)
•The estimated time until cooking completion will not be displayed when the Timer is set.20
Recipes
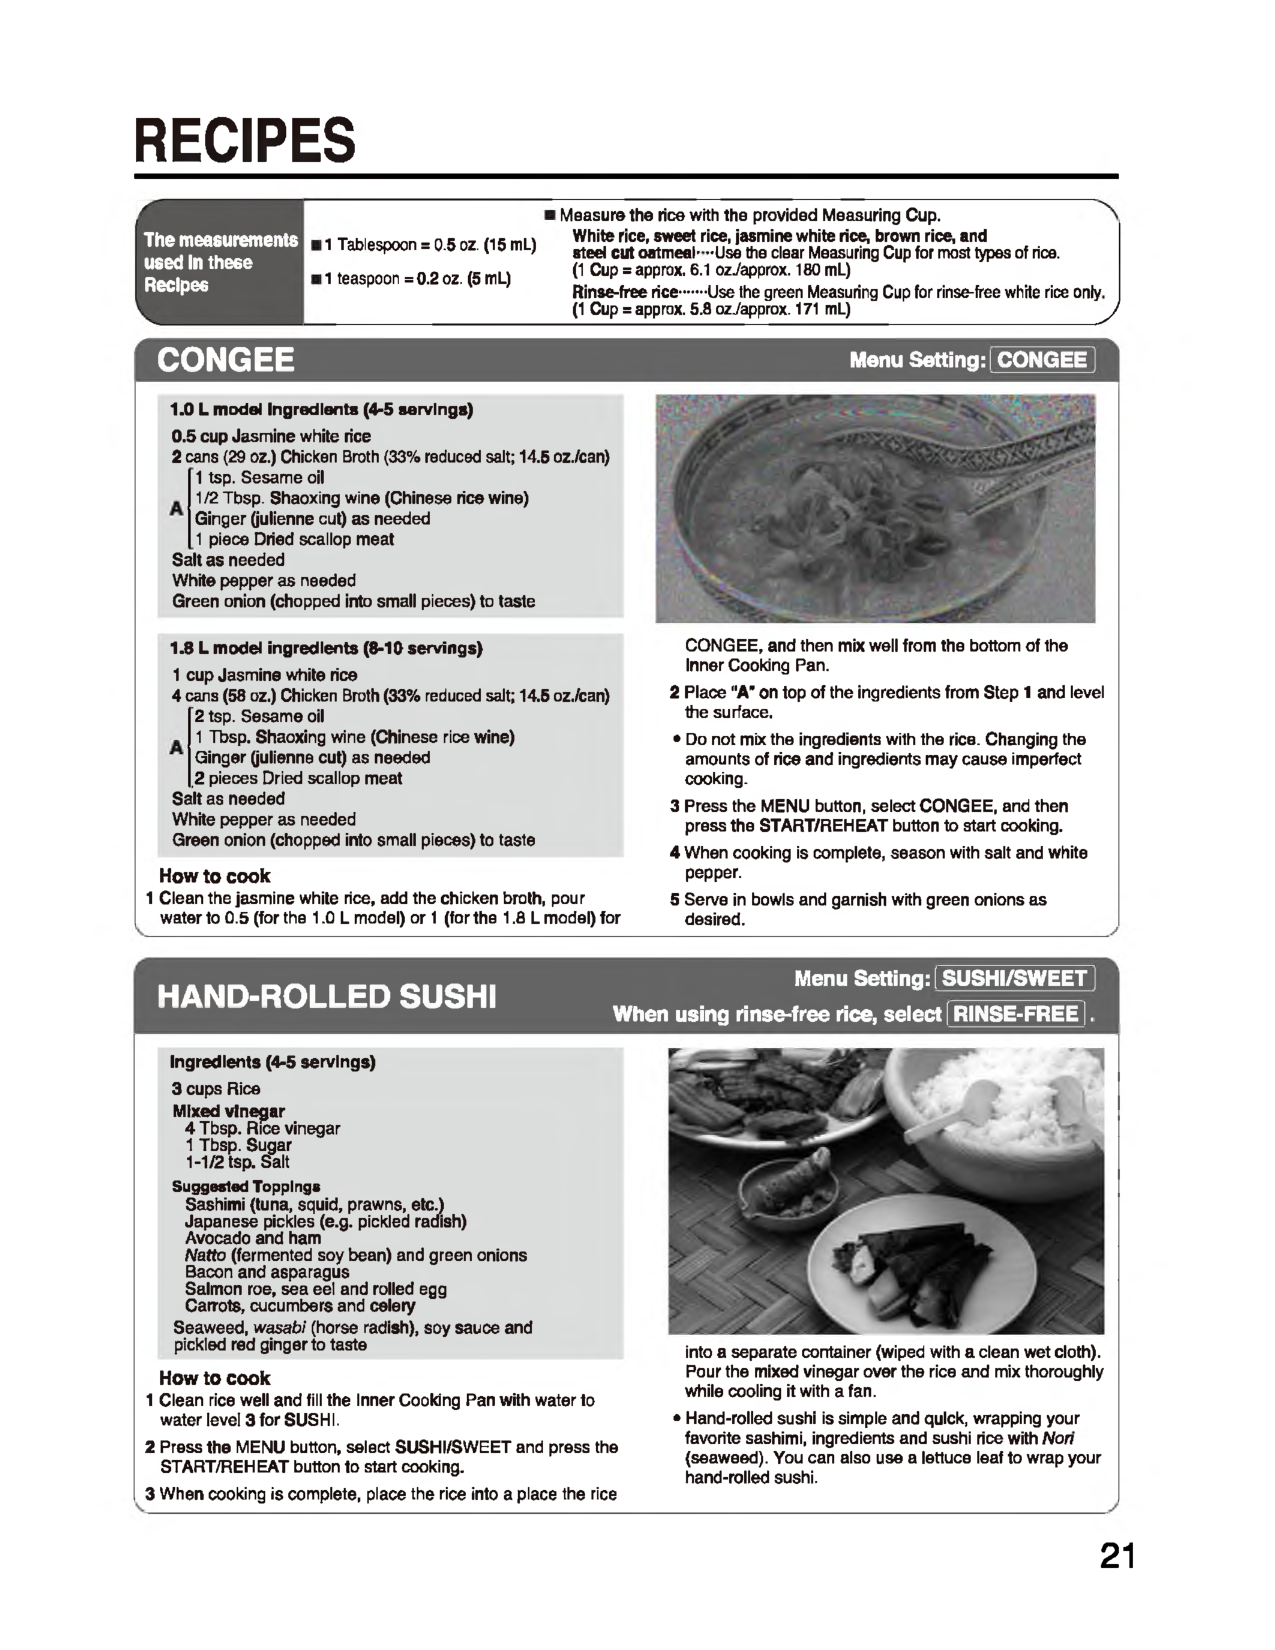
r The measurements used In these Recipes 11■ Tablespoon = 0.5 oz. (15 mL) 1■1 teaspoon = 0.2 oz. (5 mL)■ Measure the rice with the provided Measuring Cup. White rice, sweet rice, jasmine white rice, brown rice, and steel cut oatmeal-’Use the clear Measuring Cup for most types of rice. (1 Cup = approx. 6.1 ozJapprox. 180 mL) Rinse-free rice......Use the green Measuring Cup for rinse-free white rice only (1 Cup = approx. 5.8 ozJapprox. 171 mL)_____________________________ JCongee
Menu Setting:! CONGEE 1.0 L model Ingredients (4-5 servings) 0.5 cup Jasmine white rice 2 cans (29 oz.) Chicken Broth (33% reduced salt; 14.5 oz./can)A 1 tsp. Sesame oil 1/2 Tbsp. Shaoxing wine (Chinese rice wine) Ginger (julienne cut) as needed 1 piece Dried scallop meat Salt as needed White pepper as needed Green onion (chopped into small pieces) to taste 1.8 L model ingredients (8-10 servings) 1 cup Jasmine white rice 4 cans (58 oz.) Chicken Broth (33% reduced salt; 14.5 oz./can)A 2 tsp. Sesame oil 1 Tbsp. Shaoxing wine (Chinese rice wine) Ginger (julienne cut) as needed .2 pieces Dried scallop meat Salt as needed White pepper as needed Green onion (chopped into small pieces) to taste How to cook 1 Clean the jasmine white rice, add the chicken broth, pour water to 0.5 (for the 1.0 L model) or 1 (for the 1.8 L model) for CONGEE, and then mix well from the bottom of the Inner Cooking Pan. 2 Place "A” on top of the ingredients from Step 1 and level the surface.Hand-Rolled Sushi
Menu Setting: j SUSHI/SWEET When using rinse-free rice, select [ RINSE-FREE [. Ingredients (4-5 servings) 3 cups Rice Mixed vinegar 4 Tbsp. Rice vinegar 1 Tbsp. Sugar 1-1/2 tsp. Salt Suggested Toppings Sashimi (tuna, squid, prawns, etc.) Japanese pickles (e.g. pickled radish) Avocado and ham Natto (fermented soy bean) and green onions Bacon and asparagus Salmon roe, sea eel and rolled egg Carrots, cucumbers and celery Seaweed, wasabi (horse radish), soy sauce and pickled red ginger to taste How to cook 1 Clean rice well and fill the Inner Cooking Pan with water to water level 3 for SUSHI. 2 Press the MENU button, select SUSHI/SWEET and press the START/REHEAT button to start cooking. 3 When cooking is complete, place the rice into a place the rice into a separate container (wiped with a clean wet cloth). Pour the mixed vinegar over the rice and mix thoroughly while cooling it with a fan.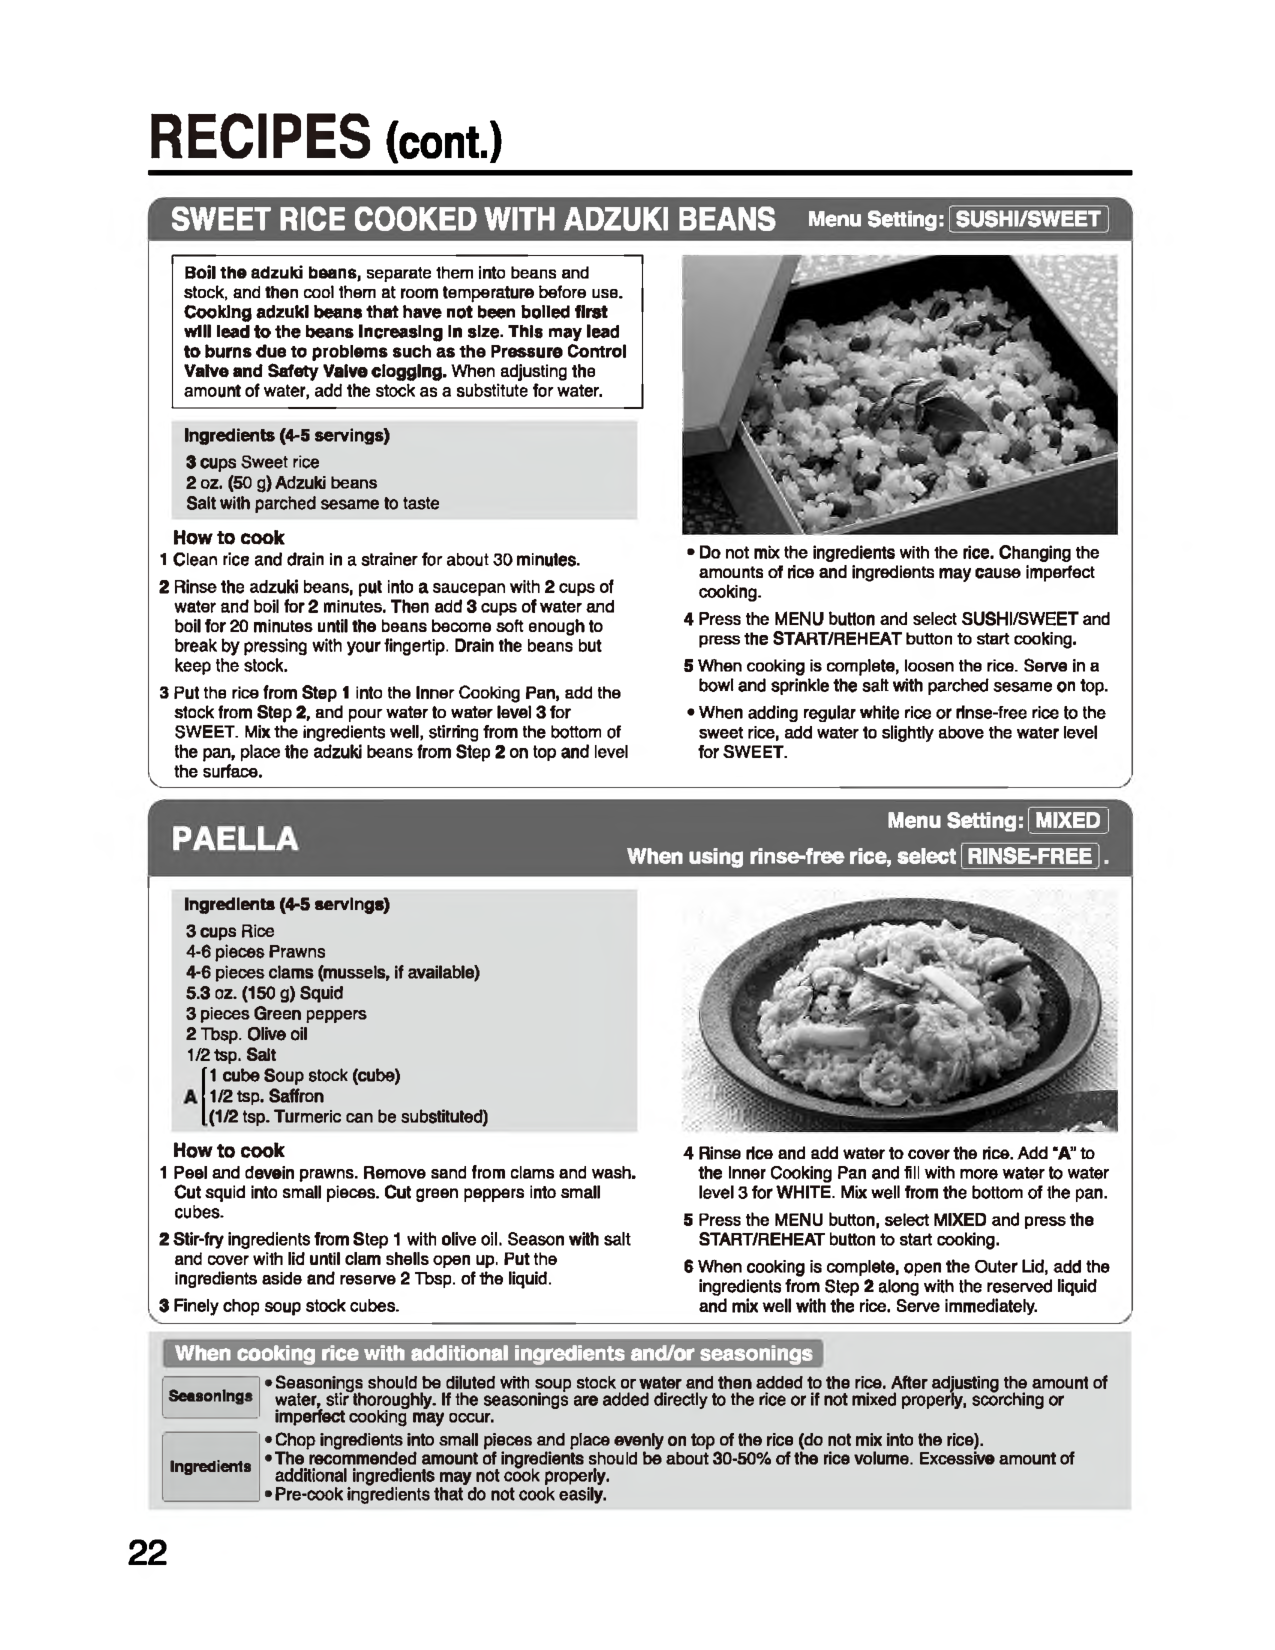
RECIPES (cont.)
Sweet Rice Cooked With Adzuki Beans
Menu Setting: SUSHI/SWEET Boil the adzuki beans, separate them into beans and stock, and then cool them at room temperature before use. Cooking adzuki beans that have not been boiled first will lead to the beans Increasing In size. This may lead to burns due to problems such as the Pressure Control Valve and Safety Valve clogging. When adjusting the amount of water, add the stock as a substitute for water. Ingredients (4-5 servings) 3 cups Sweet rice 2 oz. (50 g) Adzuki beans Salt with parched sesame to taste How to cook 1 Clean rice and drain in a strainer for about 30 minutes. 2 Rinse the adzuki beans, put into a saucepan with 2 cups of water and boil for 2 minutes. Then add 3 cups of water and boil for 20 minutes until the beans become soft enough to break by pressing with your fingertip. Drain the beans but keep the stock. 3 Put the rice from Step 1 into the Inner Cooking Pan, add the stock from Step 2, and pour water to water level 3 for SWEET. Mix the ingredients well, stirring from the bottom of the pan, place the adzuki beans from Step 2 on top and level the surface.____________________________________________ ^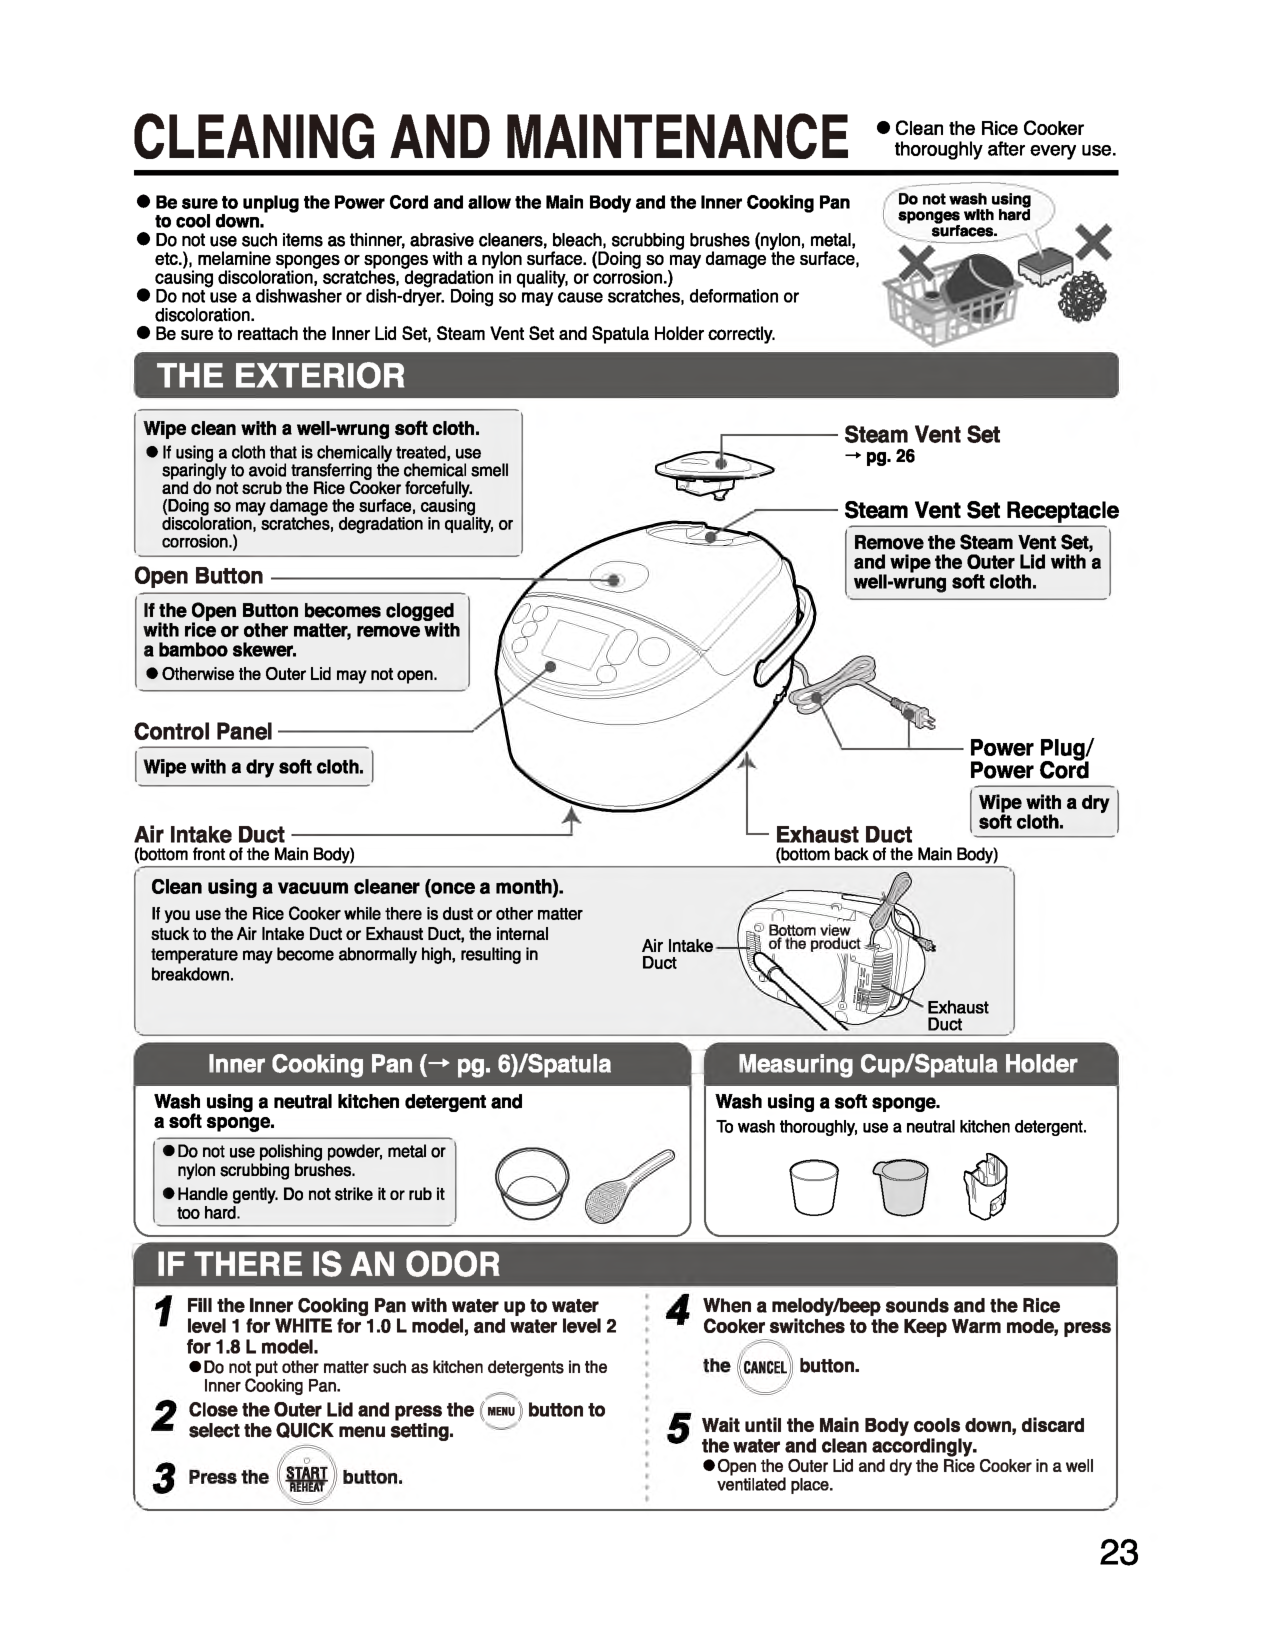
Cleaning And Maintenance
The Exterior
Open ButtonControl Panel Air Intake Duct Steam Vent Set
V .
Wash using a neutral kitchen deterç lent and a soft sponge.V
Measuring Cup/Spatula Holder j Wash using a soft sponge. To wash thoroughly, use a neutral kitchen detergent. 0 6Í
V.
J
r IF THERE IS AN ODOR1 Fill the Inner Cooking Pan with water up to water level 1 for WHITE for 1.0 L model, and water level 2 for 1.8 L model.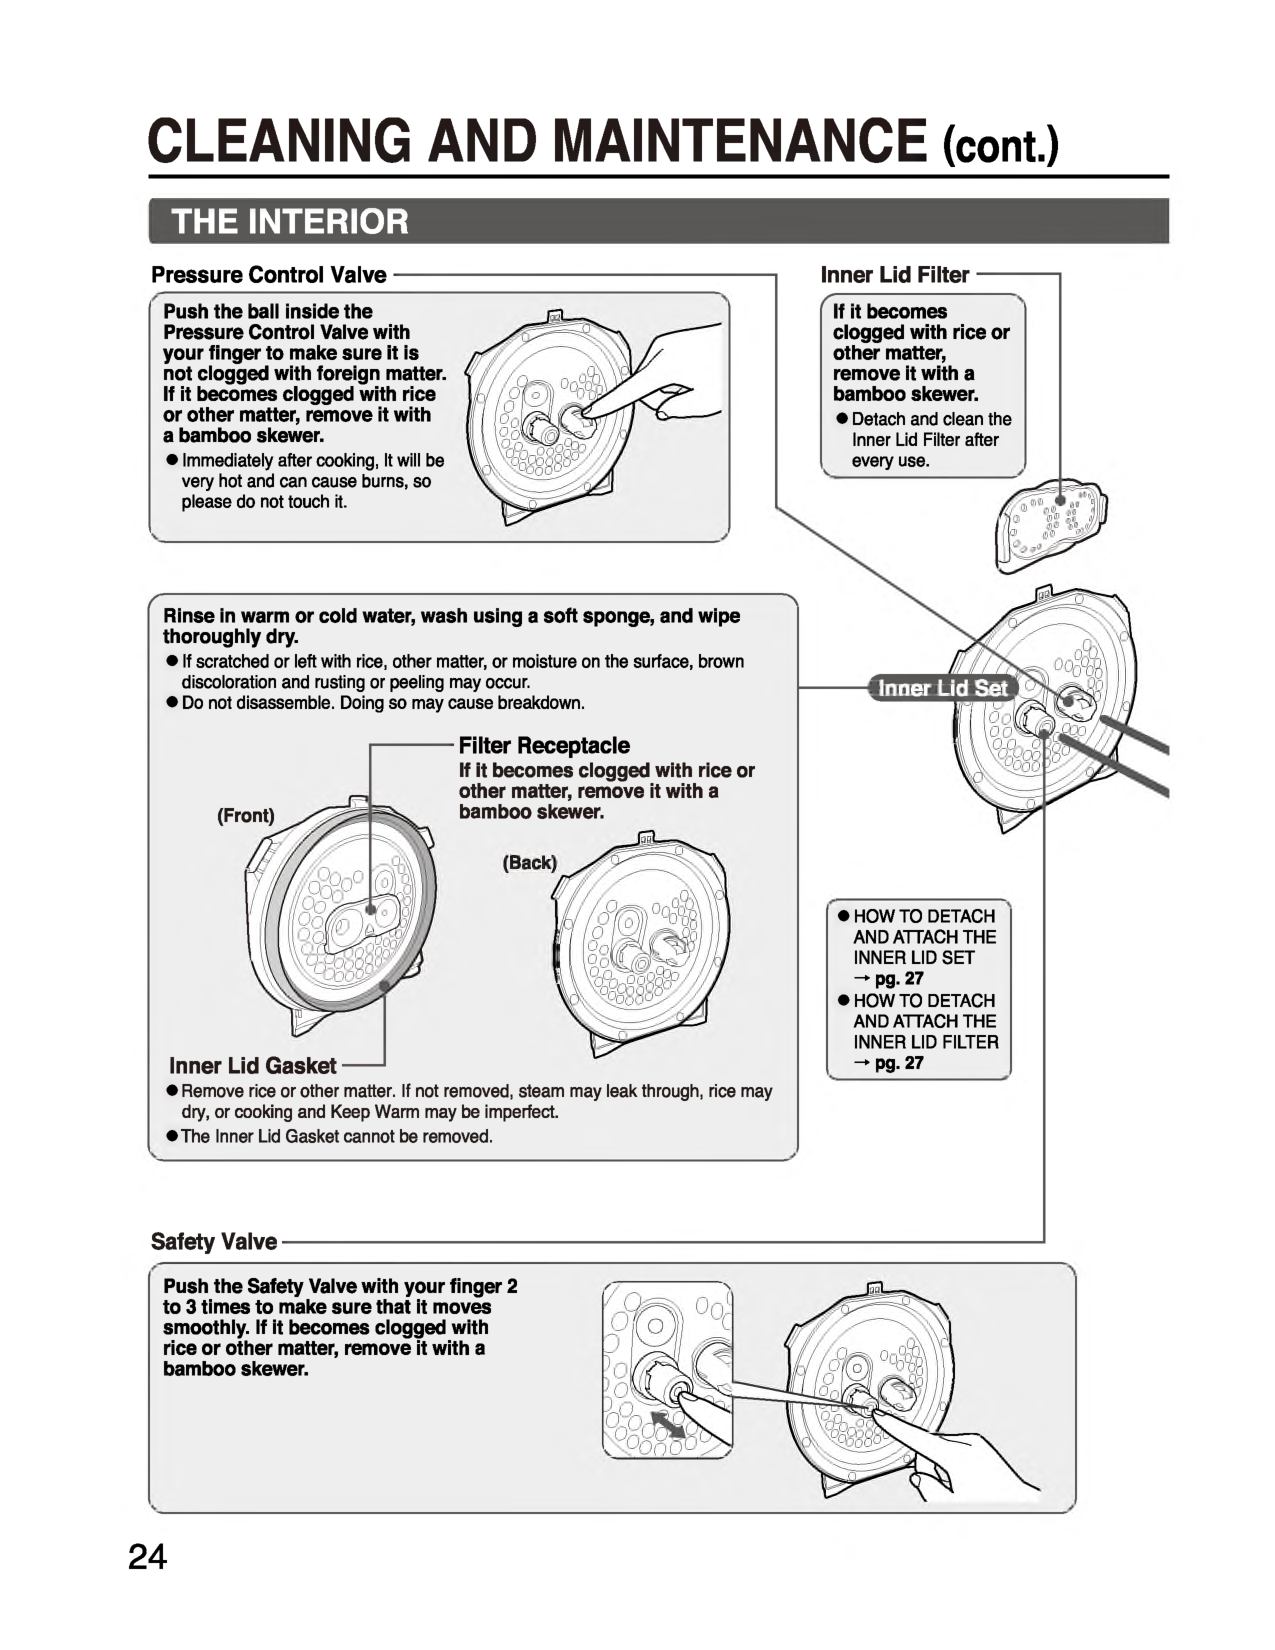
The Interior
Pressure Control Valve Push the ball inside the Pressure Control Valve with your finger to make sure it is not clogged with foreign matter. If it becomes clogged with rice or other matter, remove it with a bamboo skewer.C
\ Rinse in warm or cold water, wash using a soft sponge, and wipe thoroughly dry.• How To Detach
And Attach The
Inner Lid Set
• How To Detach
And Attach The
Inner Lid Filter

LEANING AND MAINTENANCE (cont.) Lid Hooks Side Sensor Condensation Collecting Area — Hook Holes of the Main Body — Gap Between the Main Body and Outer Lid (Shaded Area)
Outer Lid Gasket f -------------------------------------------------------------------\
C
Remove rice or other matter with a bamboo skewer.
CLEANING AND MAINTENANCE (cont.) HOW TO CLEAN THE STEAM VENT SET Please allow the Rice Cooker to cool down before cleaning. Wash the outside and inside of the Steam Vent Set under running water. ( h o w t o d et ac h t h e s t e a m v e n t s e t ) Hold the rear part and pull up.
How To Attach The Steam Vent Set )
C
Hold the rear part and push down.( How To Remove The Steam Vent Case )
Turn the Steam Vent Case counterclockwise, align the “A ” mark of the Steam Vent Case with the “v ” mark on the Steam Vent Cap and remove. (©) ( h o w TO ATTACH THE STEAM VENT CASE ) Align the “A ” mark of the Steam Vent Case with the “v ” mark on the Steam Vent Cap. Then turn the Steam Vent Case clockwise to reattach firmly. (©) ( h o w TO DETACH AND ATTACH THE STEAM VENT GASKEHOW TO DETACHT)I
Insert a toothpick in the small opening to remove the Steam Vent Gasket. ê H O W T O A TTACH I Attach the Steam Vent Gasket to the groove of the Steam Vent Cap firmly. Make sure that the Steam Vent Gasket is not twisted. •A n incorrectly attached Steam Vent Gasket may cause steam or condensation to leak. 26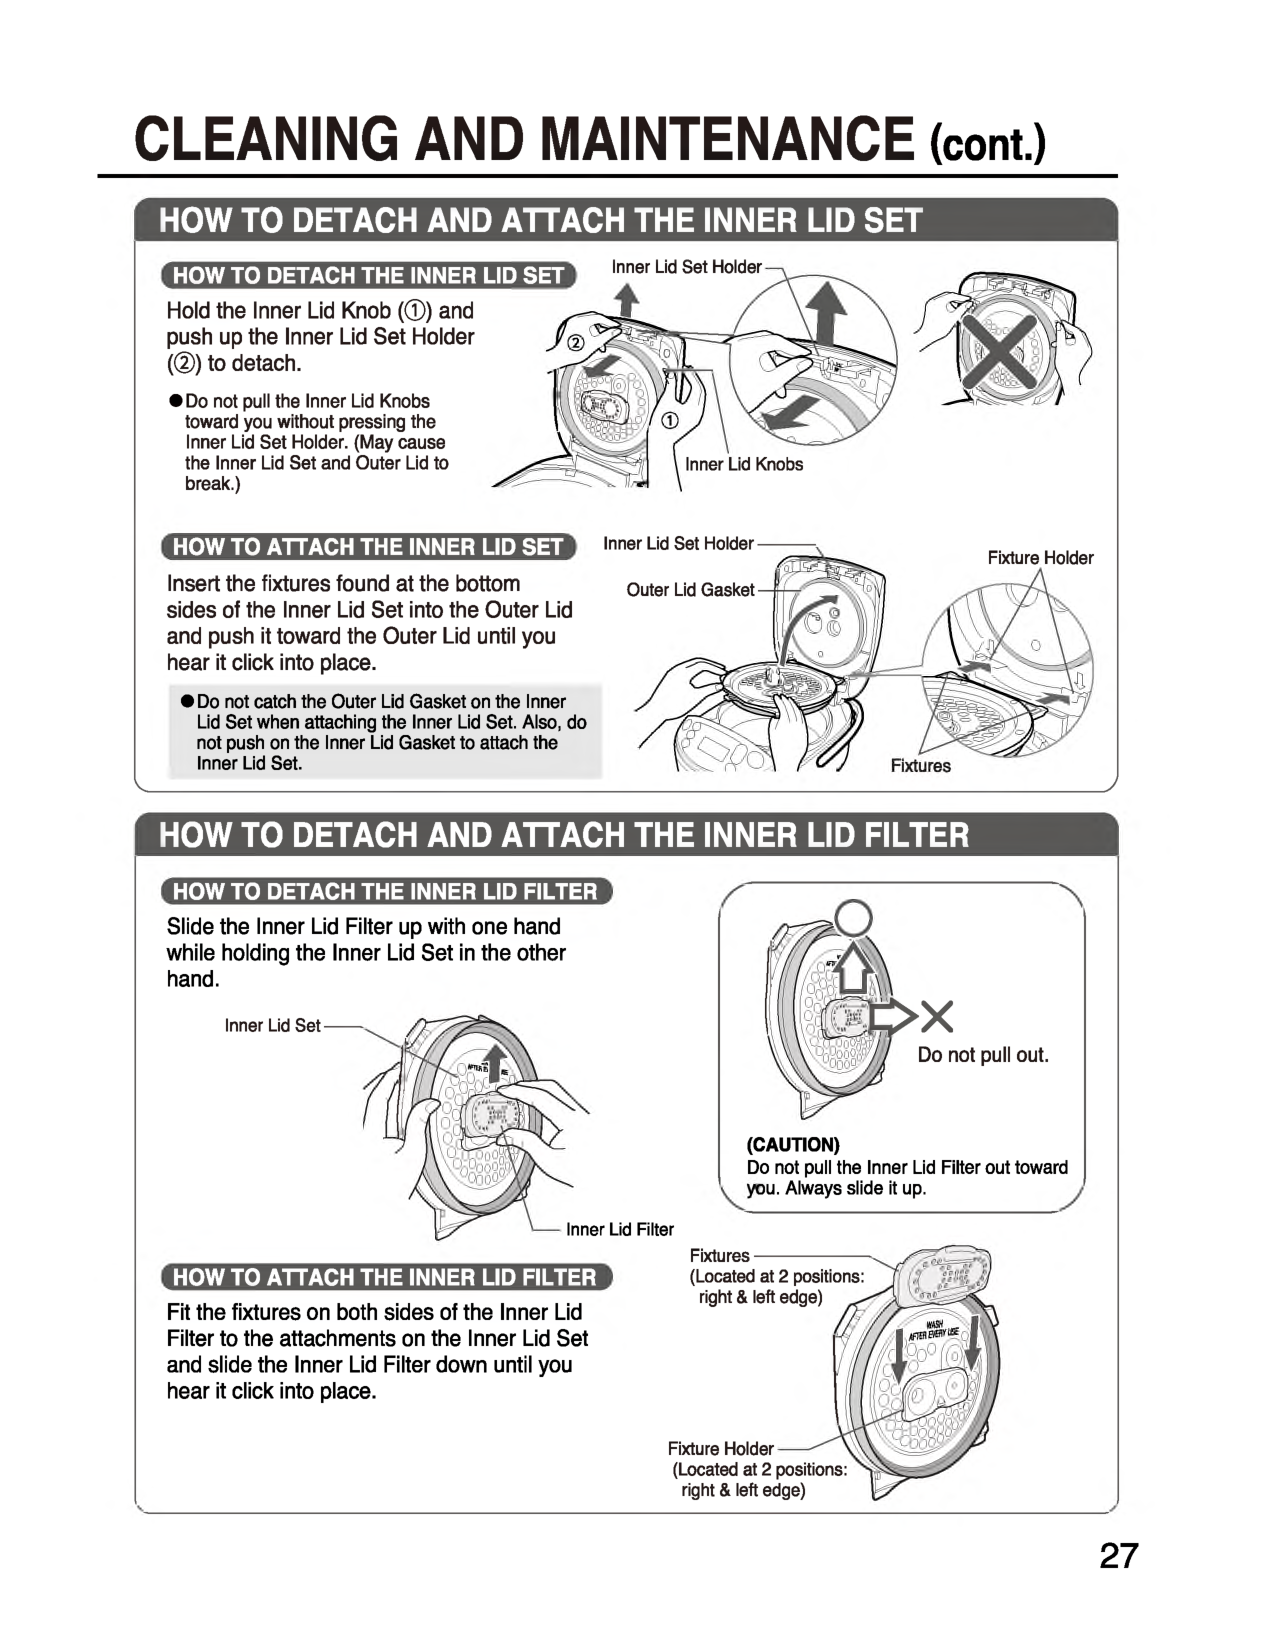
CLEANING AND MAINTENANCE (cont.)
How To Detach And Attach The Inner Lid Set
How To Detach The Inner Lid Set
Hold the Inner Lid Knob1 and push up the Inner Lid Set Holder 2 to detach.How To Attach The Inner Lid Set
Insert the fixtures found at the bottom sides of the Inner Lid Set into the Outer Lid and push it toward the Outer Lid until you hear it click into place.How To Detach And Attach The Inner Lid Filter
How To Detach The Inner Lid Filter
Slide the Inner Lid Filter up with one hand while holding the Inner Lid Set in the other hand. Inner Lid Set O x Do not pull out.(Caution)
Do not pull the Inner Lid Filter out toward ou. Always slide it up. Inner Lid FilterHow To Attach The Inner Lid Filter
Fit the fixtures on both sides of the Inner Lid Filter to the attachments on the Inner Lid Set and slide the Inner Lid Filter down until you hear it click into place. Fixtures - (Located at 2 positions: right & left edge) Fixture Holder (Located at 2 positions: right & left edge) 27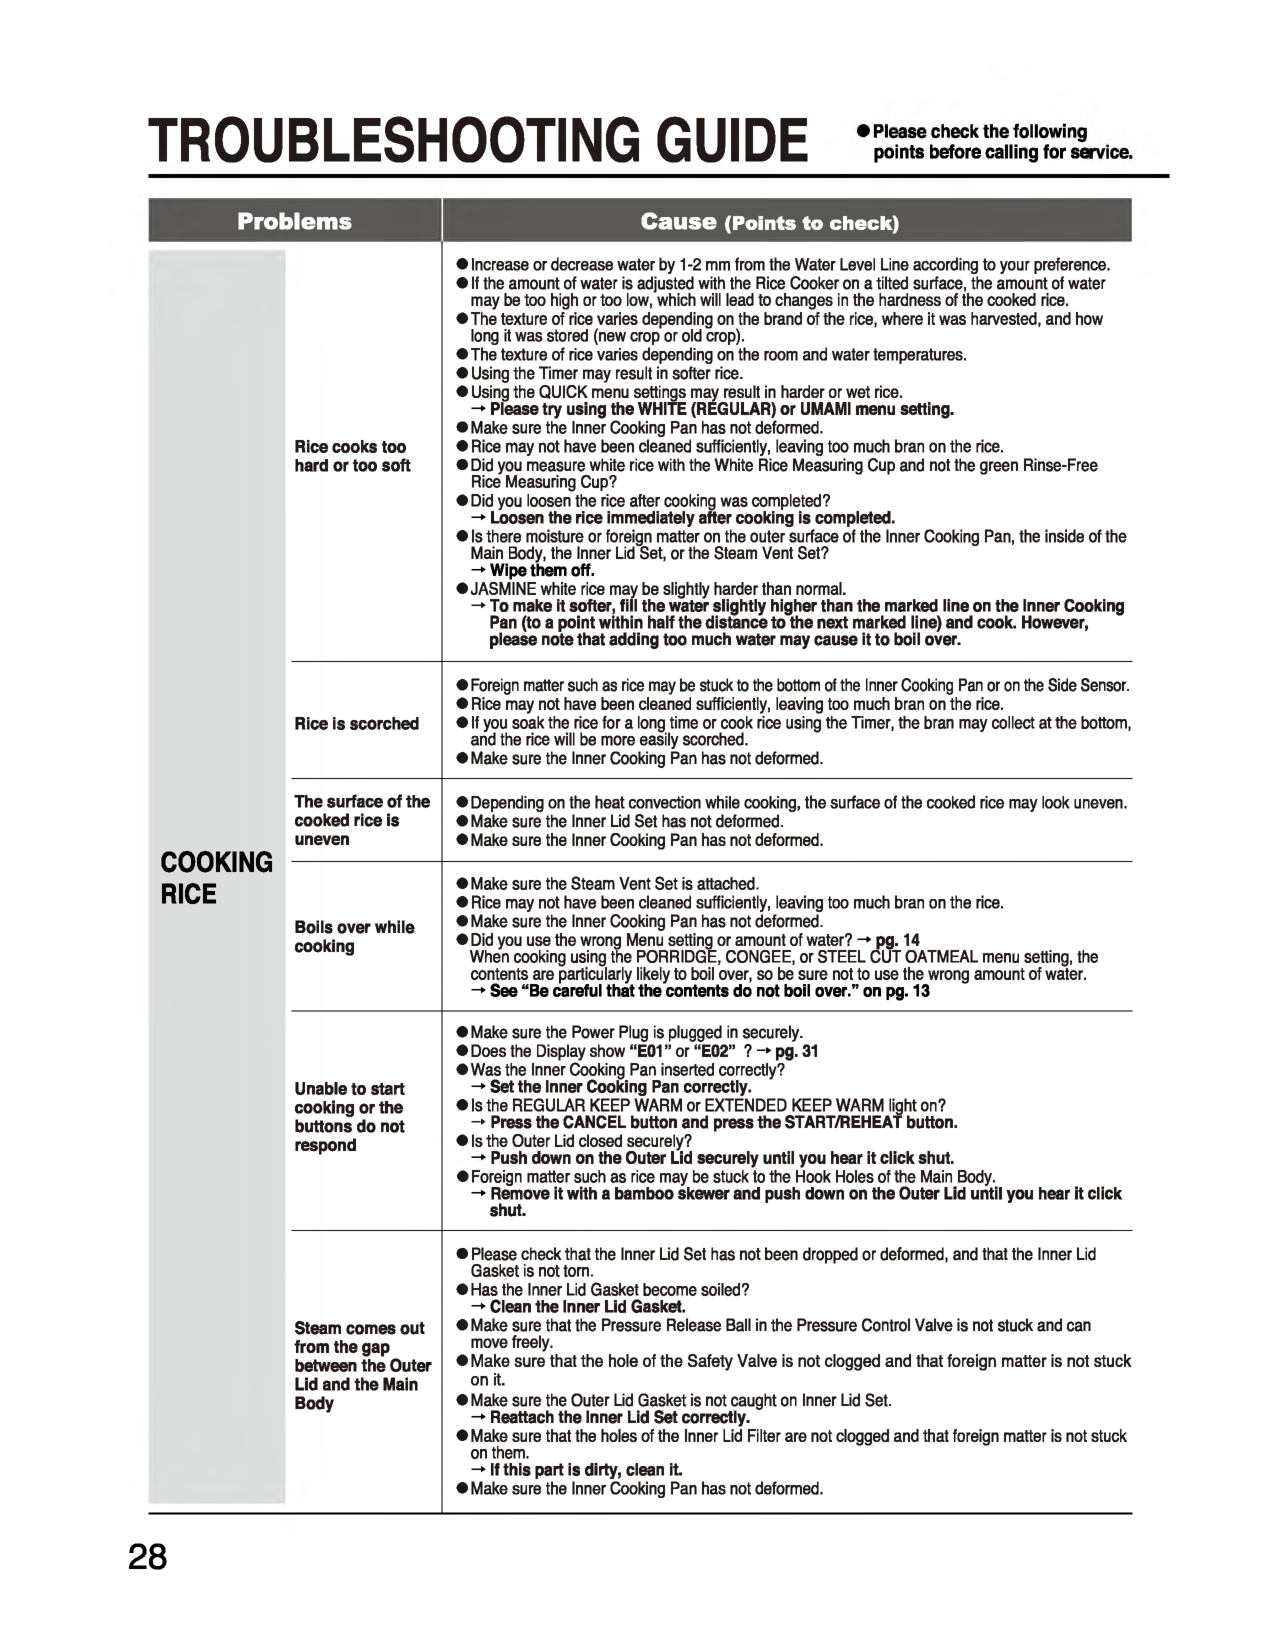
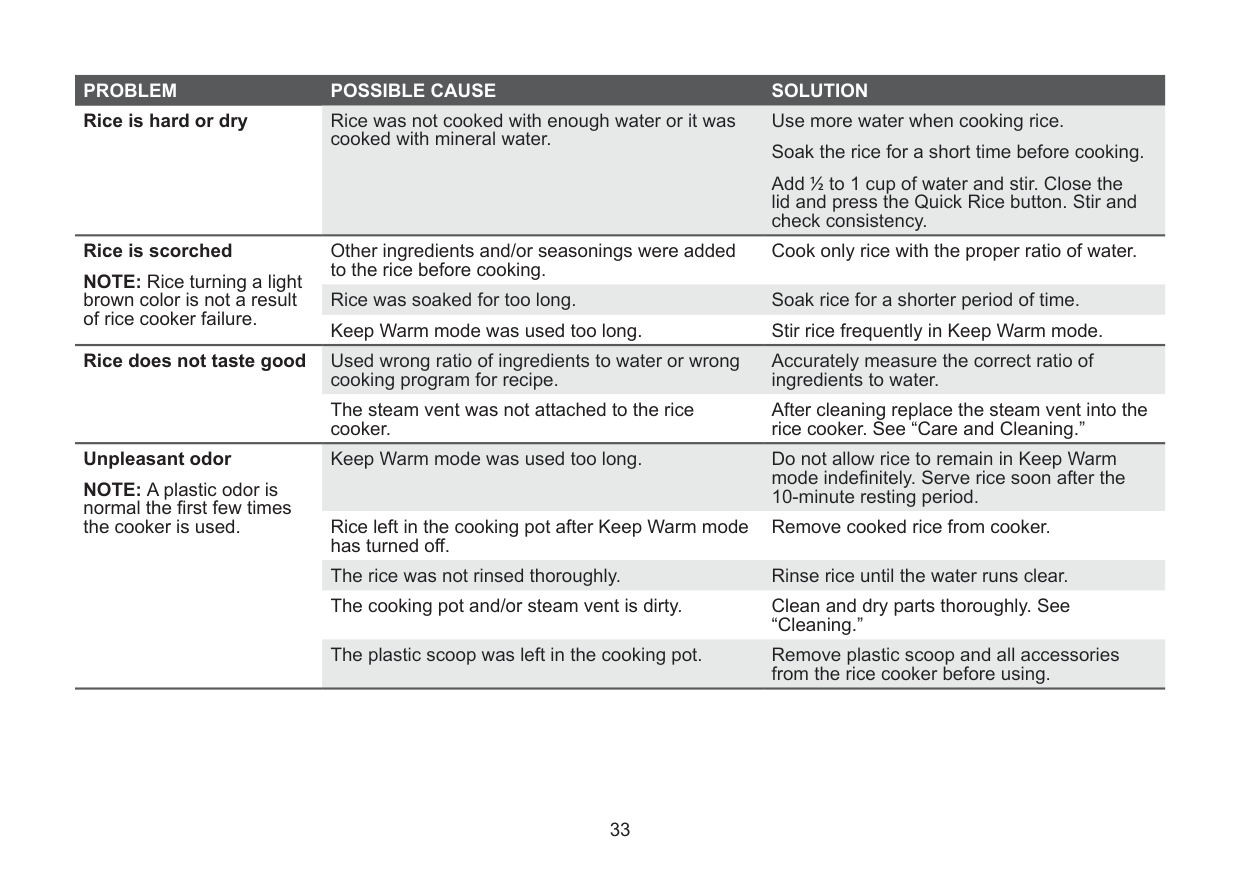
Troubleshooting Guide
points before calling for se.Please check the following points before calling for service. Problems Cause (Points to check)Cooking
Rice
Rice cooks too hard or too soft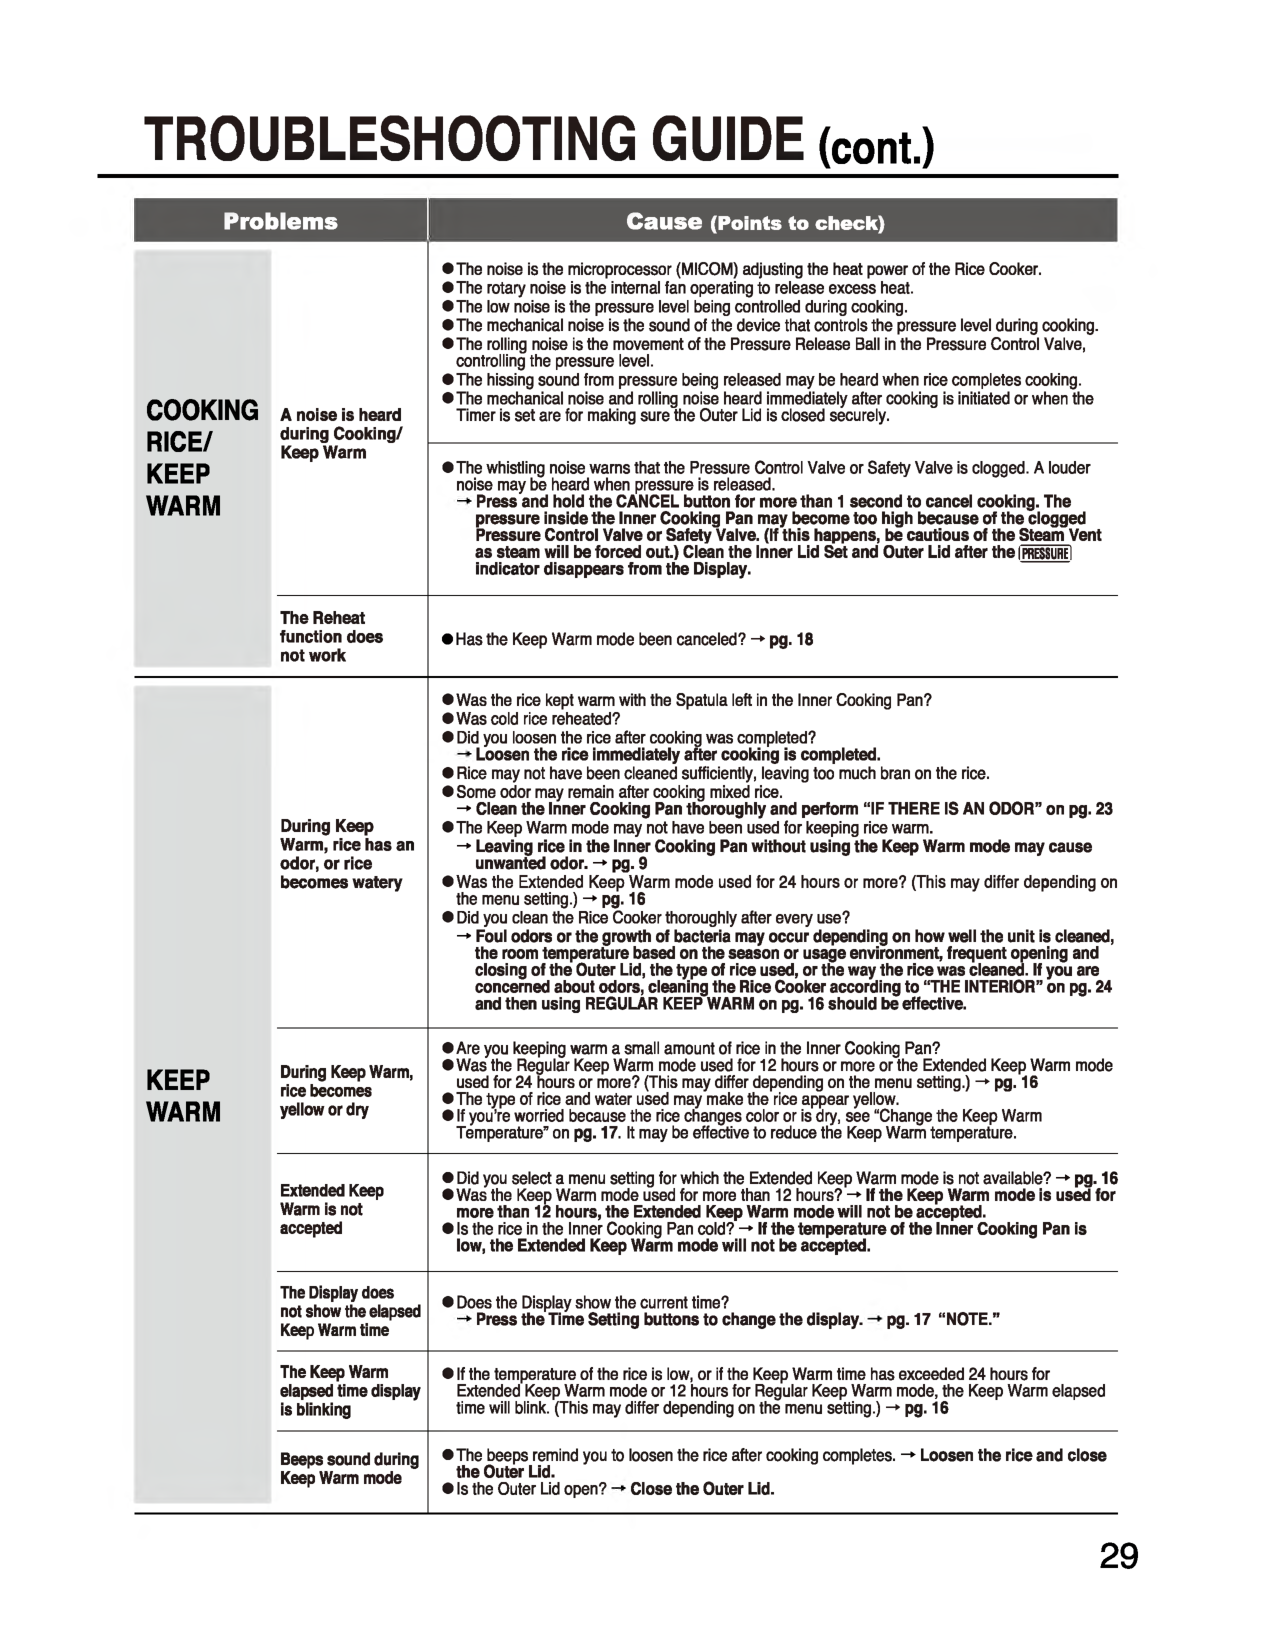
TROUBLESHOOTING GUIDE (cont.) Problems Cause (Points to check)
Cooking
Rice/
Keep
Warm
A noise is heard during Cooking/ Keep WarmKeep
Warm
During Keep Warm, rice has an odor, or rice becomes wateryKeep Warm mode used for 24 hours or more? (This may differ depending on the menu setting.) pg. 16
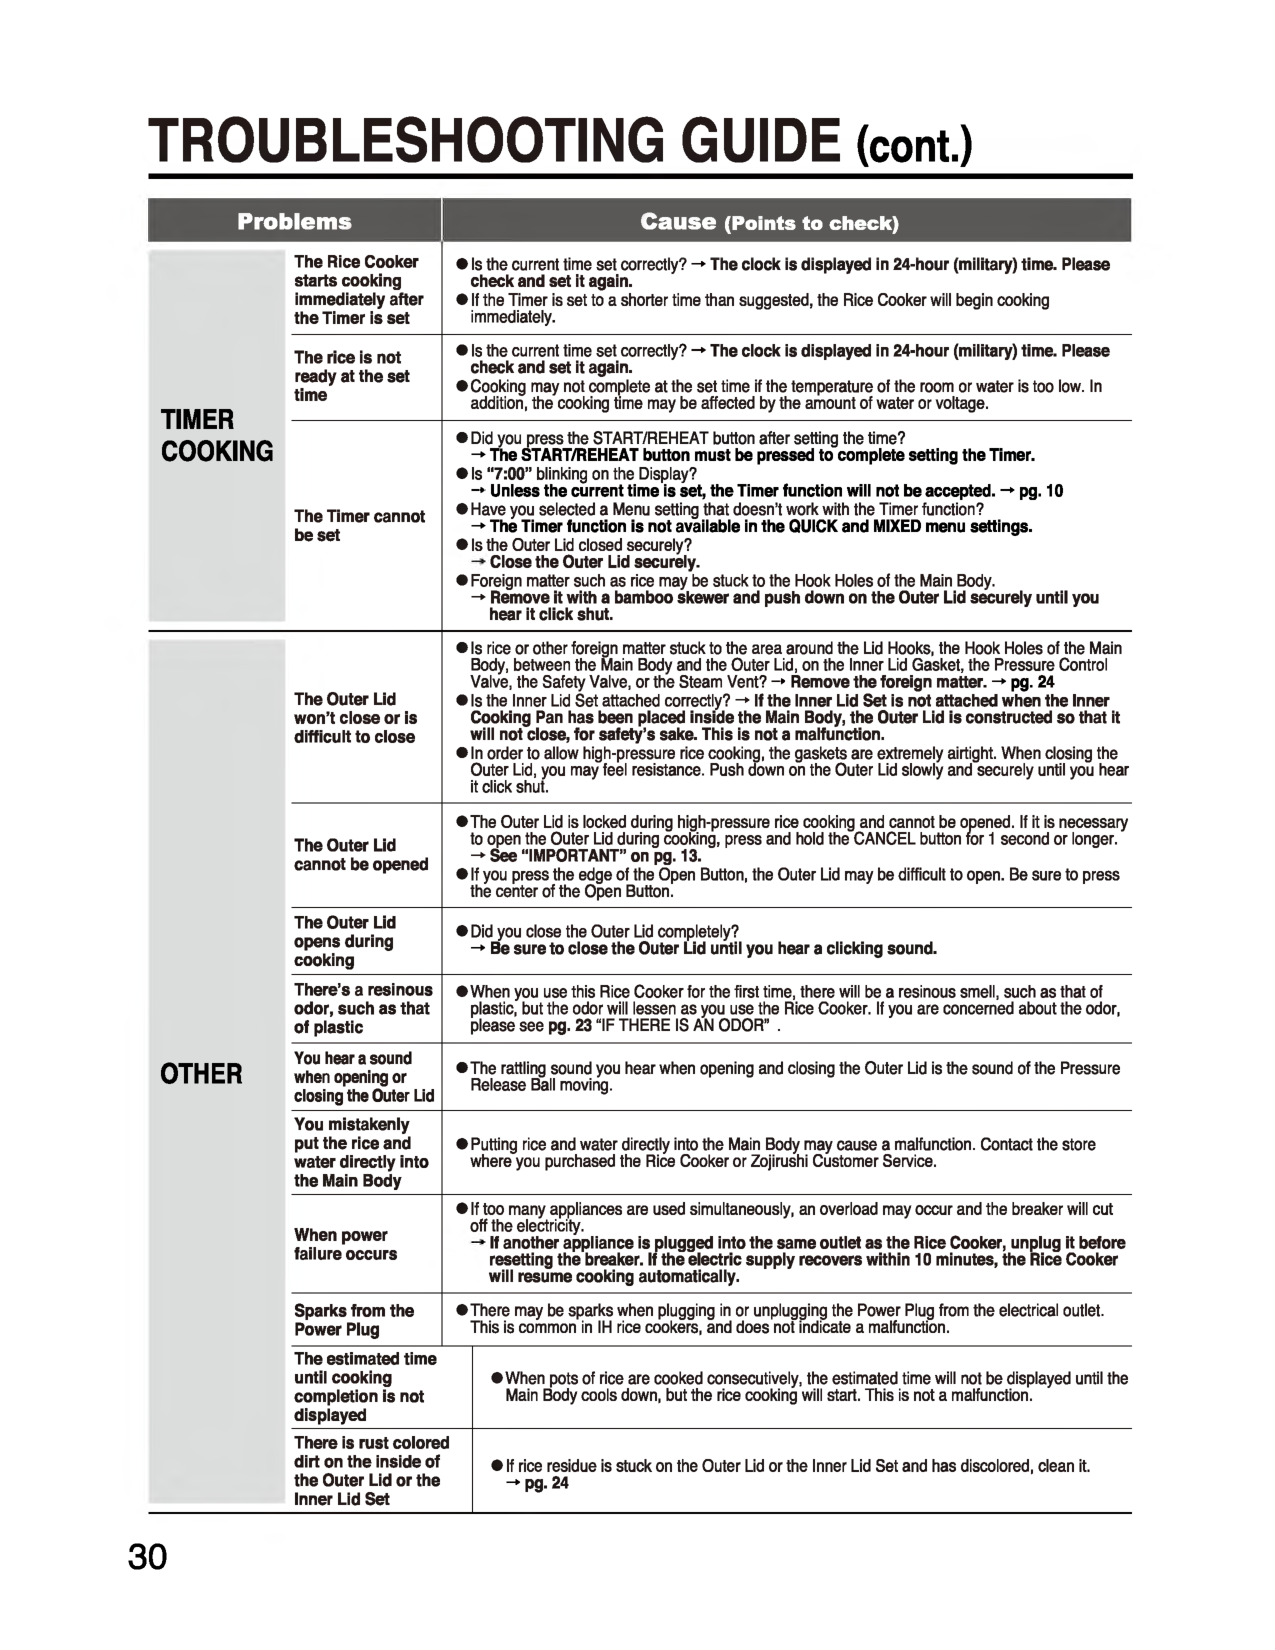
TROUBLESHOOTING GUIDE (com.) Problems Cause (Points to check)
Timer
Cooking
The Rice Cooker starts cooking immediately after the Timer is setOther
The Outer Lid won’t close or is difficult to close
Error Displays And Their Meanings
Panel Display Cause (Points to check) Error Display C n i C u • C n jC Uc
C n iC U •
C
*3L
*J
L Uc
H 0 S'
'-Go,
-» Contact Zojirushi Customer Service to have the lithium battery replaced (a fee will be charged for the replacement). I PRESSURE I is blinking
Replacement Parts
C162-Gr
Inner Lid Set (1.8 L model)C163-Gr
Inner Cooking Pan (1.0 L model)B572-6B
Inner Cooking Pan (1.8 L model)B573-6B
SpatulaShakn-6B
Spatula Holder 618112-00 Measuring Cup for most types of rice (Clear Cup) 615784-00 Measuring Cup for rinse-free white rice only (Green Cup) 617824-00 Inner Lid FilterBu201011L-00
Specifications
Model No.Np-Nw C10
Np-Nw C18
Cooking Capacity (approx. L) [cups] *1 WH ITE (Short/medium grain white rice)(Regular,
c n n c DHarder)
0.09-1.0 [0.5-5.5] 0.18-1.8 [1-10] Rinse-Free Rice 0.09-0.94 [0.5-5.5] 0.17-1.71 [1-10] UMAMI (Short/medium grain white rice) 0.09-1.0 [0.5-5.5] 0.18-1.8 [1-10] Rinse-Free Rice 0.09-0.94 [0.5-5.5] 0.17-1.71 [1-10] QUICK (Short/medium grain white rice) 0.09-1.0 [0.5-5.5] 0.18-1.8 [1-10] Rinse-Free Rice 0.09-0.94 [0.5-5.5] 0.17-1.71 [1-10] MIXED (Short/medium grain white rice) 0.09-0.72 [0.5-4] 0.36-1.08 [2-6] Rinse-Free Rice 0.09-0.68 [0.5-4] 0.34-1.03 [2-6]Sushi
(Short/medium grain white rice) 0.09-1.0 [0.5-5.5] 0.18-1.8 [1-10] Rinse-Free Rice 0.09-0.94 [0.5-5.5] 0.17-1.71 [1-10] SWEET (Sweet rice only or sweet rice + short/medium grain white rice) 0.18-0.72 [1-4] 0.36-1.08 [2-6] Rinse-Free Rice 0.17-0.68 [1-4] 0.34-1.03 [2-6]Jasmine
0.09-1.0 [0.5-5.5] 0.18-1.8 [1-10] PORRIDGE (Short/medium grain white rice) 0.09-0.27 [0.5-1.5] 0.09-0.45 [0.5-2.5] Rinse-Free Rice 0.09-0.26 [0.5-1.5] 0.09-0.43 [0.5-2.5]Congee
0.09-0.18 [0.5-1] 0.09-0.27 [0.5-1.5] BROWN (Short/medium grain brown rice) 0.18-0.72 [1-4] 0.36-1.44 [2-8] GABA BROWN (Short/medium grain brown rice) 0.18-0.72 [1-4] 0.36-1.44 [2-8]Steel Cut Oatmeal
0.09-0.45 [0.5-2.5] 0.18-0.54 [1-3] RatingAc 120 V
60 Hz Electric Consumption1240 W
1370 W
Average Power Consumption during Keep Warm29 W
36 W
Rice Cooking System PRESSURE IH System Power Cord Length 3' 3" (1.0 m)