
Everstart Maxx 1200A Jump Starter
Ask AI
— answers from the official manualAnswers from the official manual.
Common questions
Common Questions
25 totalHow do I charge the EverStart Maxx 1200A Jump Starter for the first time?
The unit is delivered in a partially charged state and must be fully charged before first use. Insert the barrel connector of the AC charging adapter into the AC charging port on the front of the unit, then plug the adapter into a standard 120V 60Hz outlet. Charge for approximately 20 hours or until the Battery Status Icon shows 4 solid bars. (Page 6)
What are the specifications of the EverStart Maxx 1200A Jump Starter?
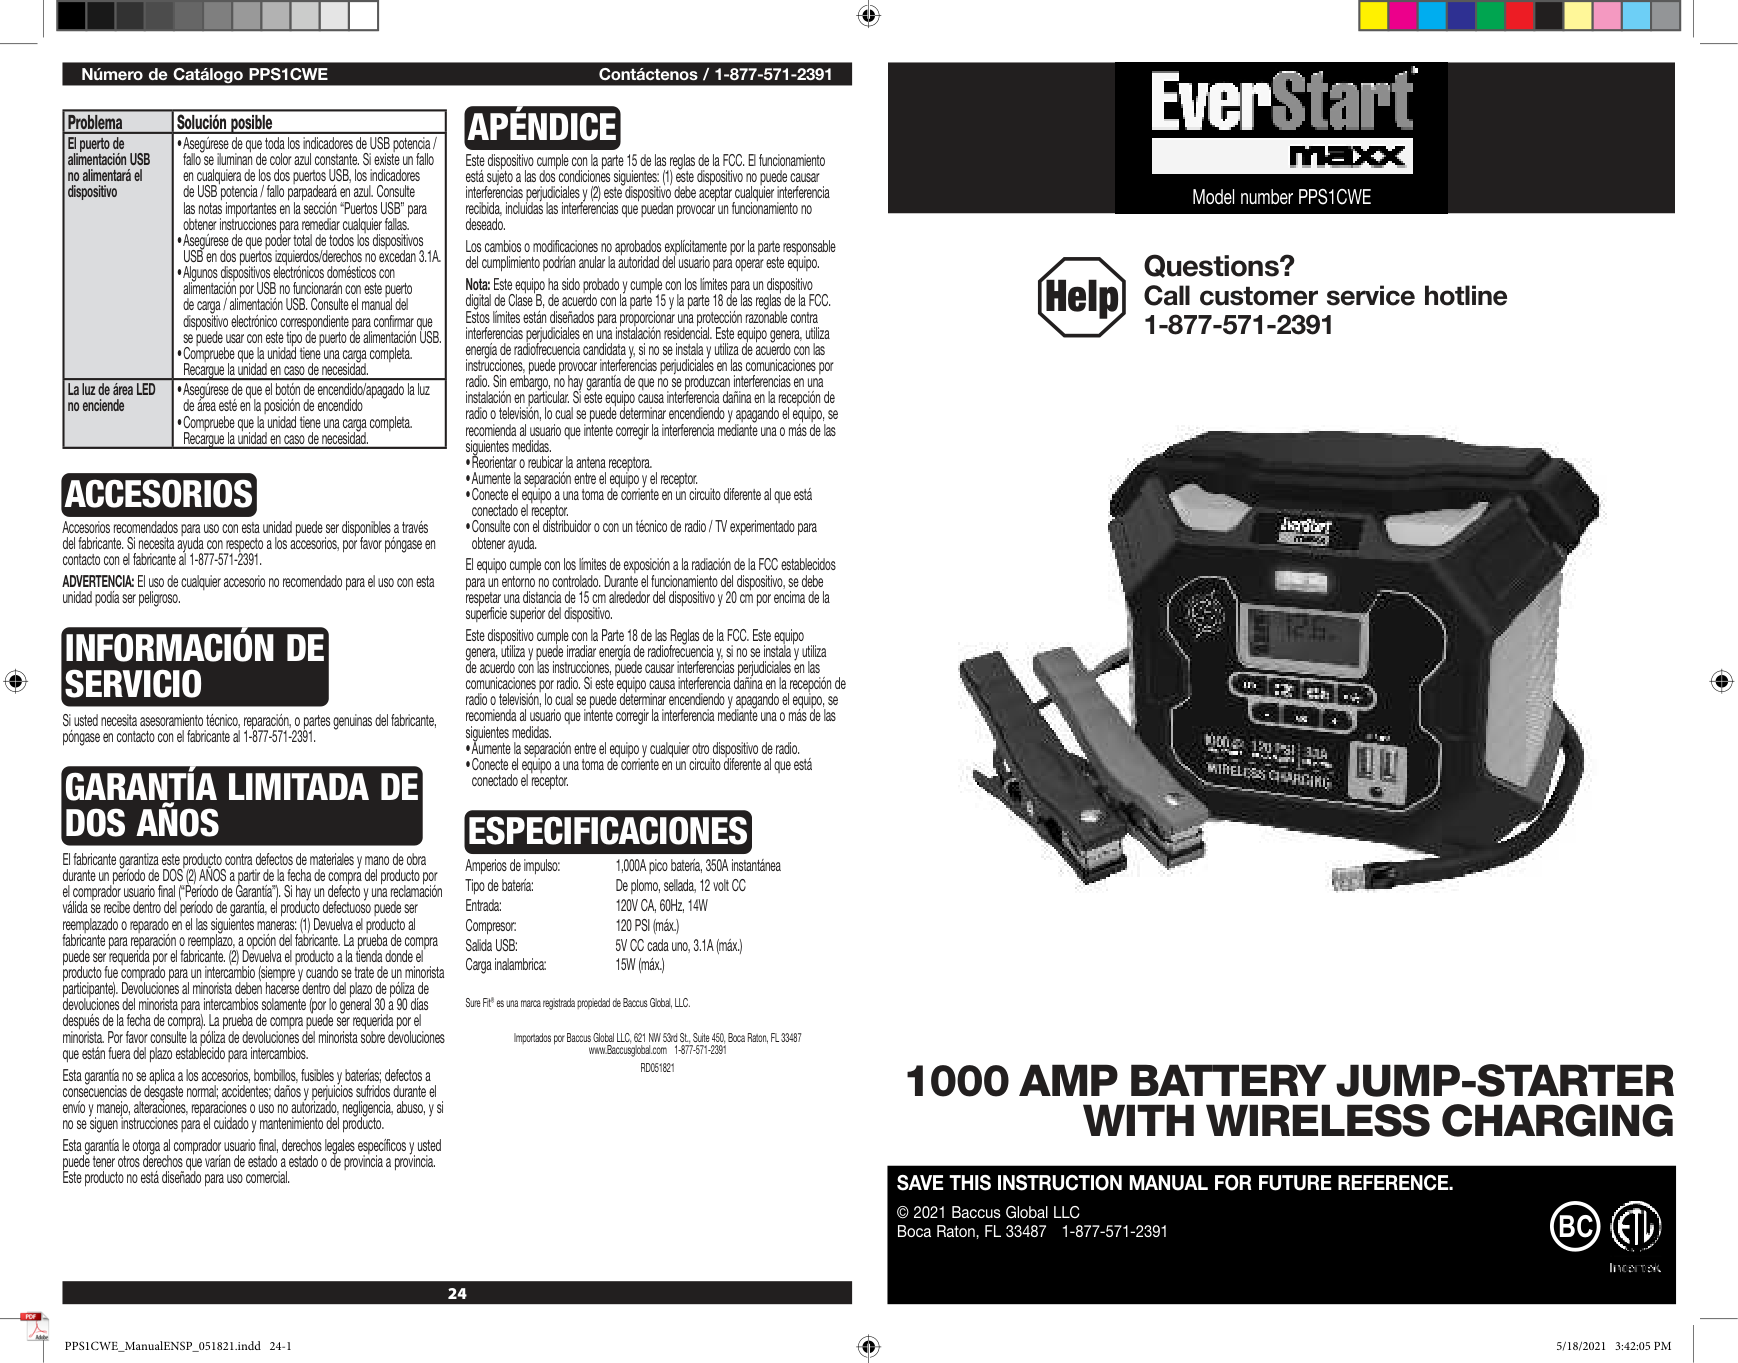
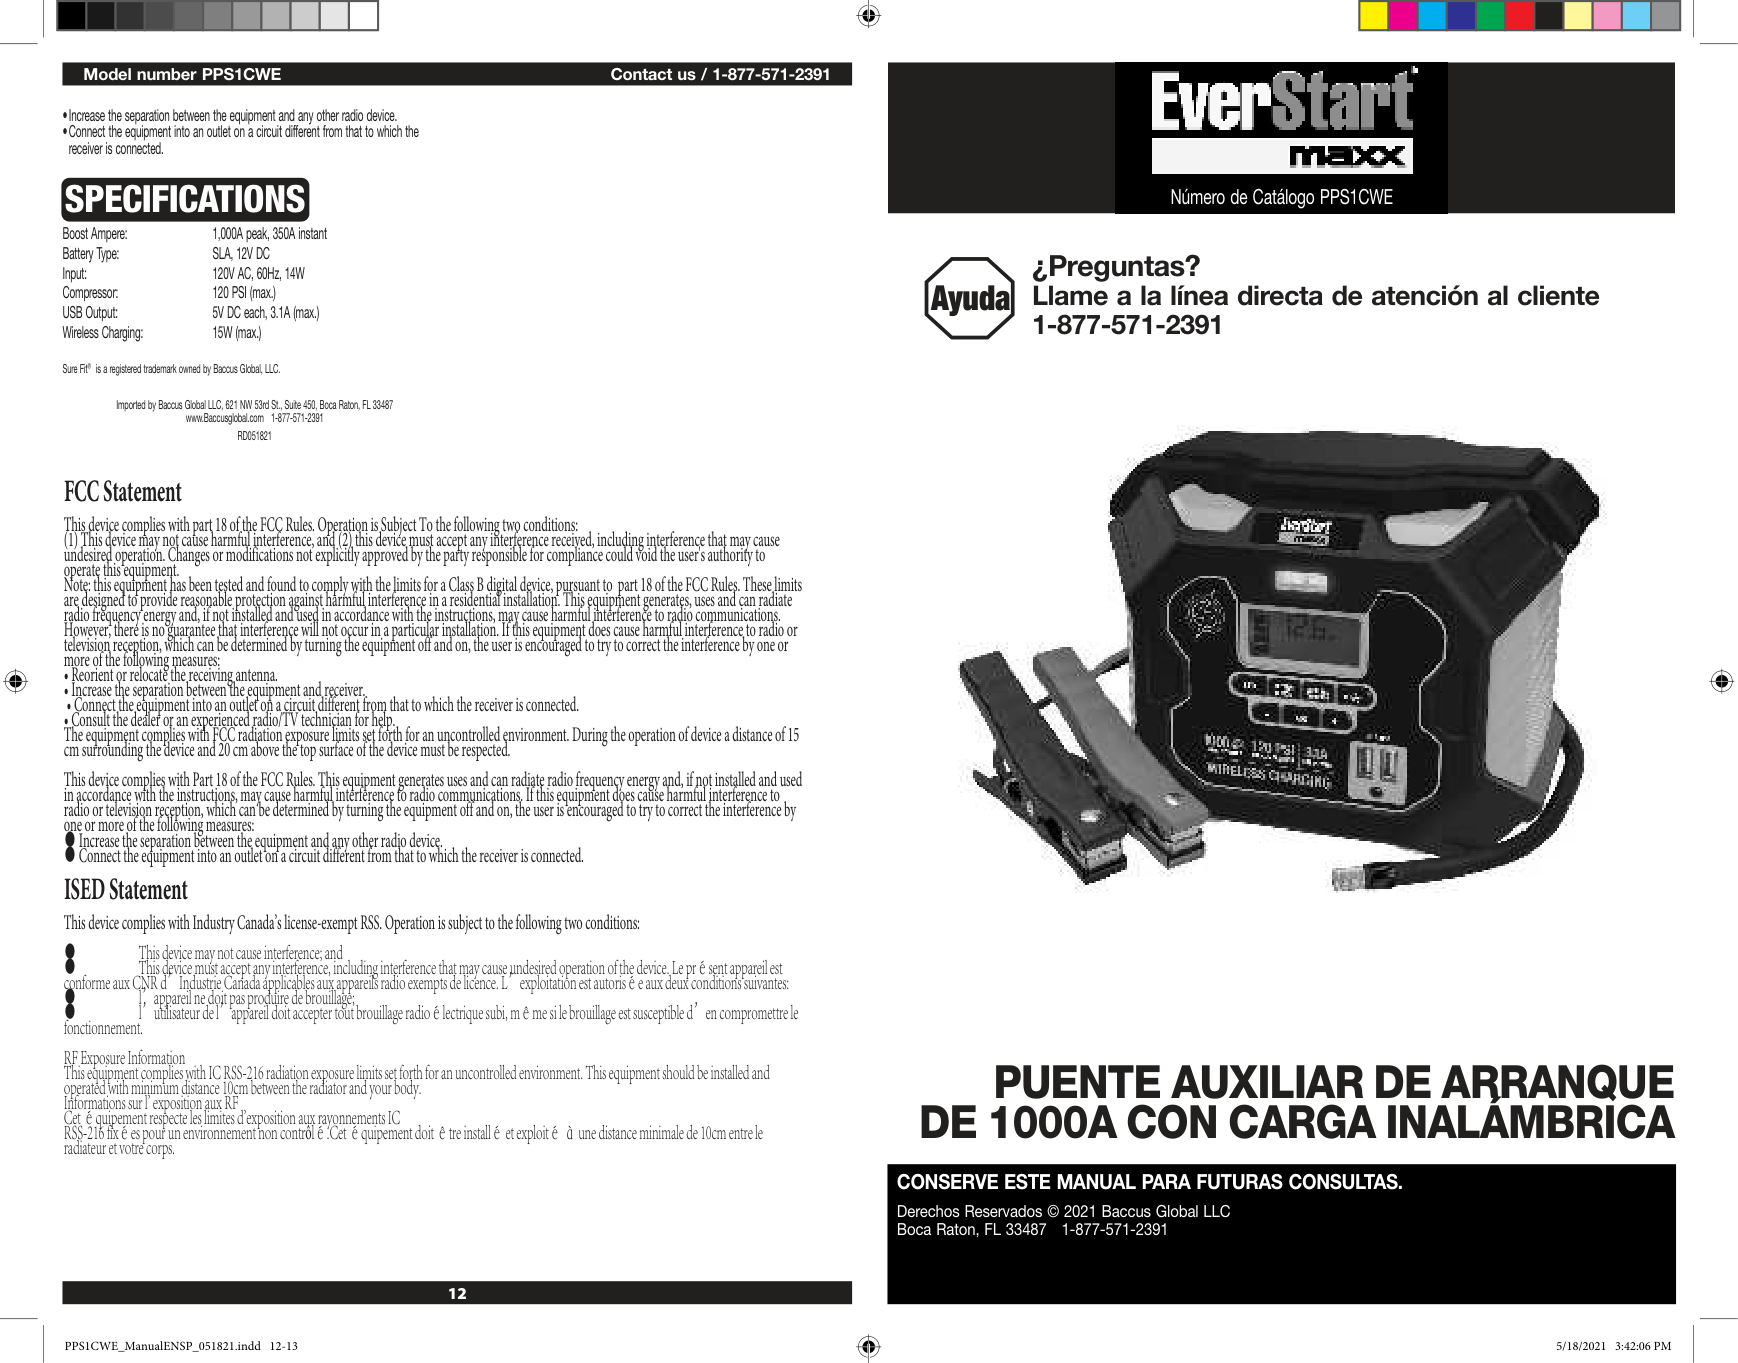
The unit features 1,000A peak boost amperage with 350A instant output, a sealed 12V DC lead-acid battery, 120V AC 60Hz input, a compressor rated to 120 PSI maximum, USB output of 5V DC at 3.1A maximum, and wireless charging capability of 15W maximum. (Page 12)
How do I use the jump starter to start a vehicle?
Turn off the vehicle ignition and accessories. Plug the Boost Cables Connector into the Clamp Connection Slot on the back of the unit. Connect the red clamp first to the battery's positive terminal, then connect the black clamp to the chassis or a solid metal vehicle component (not directly to the negative terminal). Turn on the ignition and crank the engine in 5-6 second bursts until it starts. Disconnect the negative clamp first, then the positive clamp. (Page 8)
What should I do if the jump starter shows a reverse polarity alarm?
If the clamps are connected with incorrect polarity, the unit will sound a continuous alarm and the LCD screen will display the Alarm Icon, the "+" and "–" signs, and the Reverse Polarity Icons flashing. Immediately disconnect the clamps and reconnect them to the battery with the correct polarity. (Page 8)
How do I use the portable compressor feature to inflate tires?
Screw the Sure Fit® nozzle onto the tire valve stem without overtightening. Press the Compressor Power Button, then use the "+" and "–" Pressure Control Buttons to set your desired pressure (3-120 PSI). Press the Compressor Power Button again to begin inflating. The compressor will automatically stop when the preset pressure is reached. Unscrew the nozzle and allow the unit to cool before storing. (Page 9)
What should I do if the USB ports won't power my device?
First, make sure the USB Power Button is in the on position and the USB Power/Fault Indicators light solid blue. Ensure the total current draw of all USB devices does not exceed 3.1A. Check that the unit has a full charge and recharge if necessary. Some USB-powered electronics may not be compatible with this unit, so check your device's manual. (Page 10)
Show 19 more questions
How do I troubleshoot the wireless charging function?
What maintenance is required for the EverStart Maxx 1200A?
How long can I continuously operate the compressor?
What is the warranty coverage for the EverStart Maxx 1200A Jump Starter?
What is the maximum output for the USB ports?
What should I do if I need technical support or repair?
Why isn't my USB port charging my device?
Who do I contact if I need technical support or repairs?
What is the maximum pressure rating for the air compressor feature?
What are the USB output specifications?
The LED area light won't turn on. What should I do?
What is the peak amperage output of this jump starter?
Can I use non-recommended accessories with this jump starter?
How long is the warranty on this product?
What is the warranty coverage for the Everstart Maxx 1200A?
How much power input does this unit require for charging?
Are non-recommended accessories safe to use with this jump starter?
What type of battery does this jump starter use?
What input power is required to recharge this unit?
Full Manual
7 pages
24 Número de Catálogo PPS1CWE Contáctenos / 1-877-571-2391 Problema Solución posible El puerto de alimentación USB no alimentará el dispositivo
Accesorios
Accesorios recomendados para uso con esta unidad puede ser disponibles a través del fabricante. Si necesita ayuda con respecto a los accesorios, por favor póngase en contacto con el fabricante al 1-877-571-2391. ADVERTENCIA: El uso de cualquier accesorio no recomendado para el uso con esta unidad podía ser peligroso.Información De
Servicio
Si usted necesita asesoramiento técnico, reparación, o partes genuinas del fabricante, póngase en contacto con el fabricante al 1-877-571-2391.Garantía Limitada De
Dos Años
El fabricante garantiza este producto contra defectos de materiales y mano de obra durante un período de DOS (2) AÑOS a partir de la fecha de compra del producto por el comprador usuario final (“Período de Garantía”). Si hay un defecto y una reclamación válida se recibe dentro del período de garantía, el producto defectuoso puede ser reemplazado o reparado en el las siguientes maneras: (1) Devuelva el producto al fabricante para reparación o reemplazo, a opción del fabricante. La prueba de compra puede ser requerida por el fabricante. (2) Devuelva el producto a la tienda donde el producto fue comprado para un intercambio (siempre y cuando se trate de un minorista participante). Devoluciones al minorista deben hacerse dentro del plazo de póliza de devoluciones del minorista para intercambios solamente (por lo general 30 a 90 días después de la fecha de compra). La prueba de compra puede ser requerida por el minorista. Por favor consulte la póliza de devoluciones del minorista sobre devoluciones que están fuera del plazo establecido para intercambios. Esta garantía no se aplica a los accesorios, bombillos, fusibles y baterías; defectos a consecuencias de desgaste normal; accidentes; daños y perjuicios sufridos durante el envío y manejo, alteraciones, reparaciones o uso no autorizado, negligencia, abuso, y si no se siguen instrucciones para el cuidado y mantenimiento del producto. Esta garantía le otorga al comprador usuario final, derechos legales específicos y usted puede tener otros derechos que varían de estado a estado o de provincia a provincia. Este producto no está diseñado para uso comercial.Apéndice
Este dispositivo cumple con la parte 15 de las reglas de la FCC. El funcionamiento está sujeto a las dos condiciones siguientes: (1) este dispositivo no puede causar interferencias perjudiciales y (2) este dispositivo debe aceptar cualquier interferencia recibida, incluidas las interferencias que puedan provocar un funcionamiento no deseado. Los cambios o modificaciones no aprobados explícitamente por la parte responsable del cumplimiento podrían anular la autoridad del usuario para operar este equipo. Nota: Este equipo ha sido probado y cumple con los límites para un dispositivo digital de Clase B, de acuerdo con la parte 15 y la parte 18 de las reglas de la FCC. Estos límites están diseñados para proporcionar una protección razonable contra interferencias perjudiciales en una instalación residencial. Este equipo genera, utiliza energía de radiofrecuencia candidata y, si no se instala y utiliza de acuerdo con las instrucciones, puede provocar interferencias perjudiciales en las comunicaciones por radio. Sin embargo, no hay garantía de que no se produzcan interferencias en una instalación en particular. Si este equipo causa interferencia dañina en la recepción de radio o televisión, lo cual se puede determinar encendiendo y apagando el equipo, se recomienda al usuario que intente corregir la interferencia mediante una o más de las siguientes medidas.Especificaciones
Amperios de impulso: 1,000A pico batería, 350A instantánea Tipo de batería: De plomo, sellada, 12 volt CC Entrada: 120V CA, 60Hz, 14W Compresor: 120 PSI (máx.) Salida USB: 5V CC cada uno, 3.1A (máx.) Carga inalambrica: 15W (máx.) Sure Fit® es una marca registrada propiedad de Baccus Global, LLC. Importados por Baccus Global LLC, 621 NW 53rd St., Suite 450, Boca Raton, FL 33487 www.Baccusglobal.com 1-877-571-2391Rd051821
Model number PPS1CWE Help Questions? Call customer service hotline 1-877-571-23911000 Amp Battery Jump-Starter
With Wireless Charging
Save This Instruction Manual For Future Reference.
© 2021 Baccus Global LLC Boca Raton, FL 33487 1-877-571-2391Bc
PPS1CWE_ManualENSP_051821.indd 24-1 PPS1CWE_ManualENSP_051821.indd 24-15/18/2021 3:42:05 Pm
5/18/2021 3:42:05 Pm
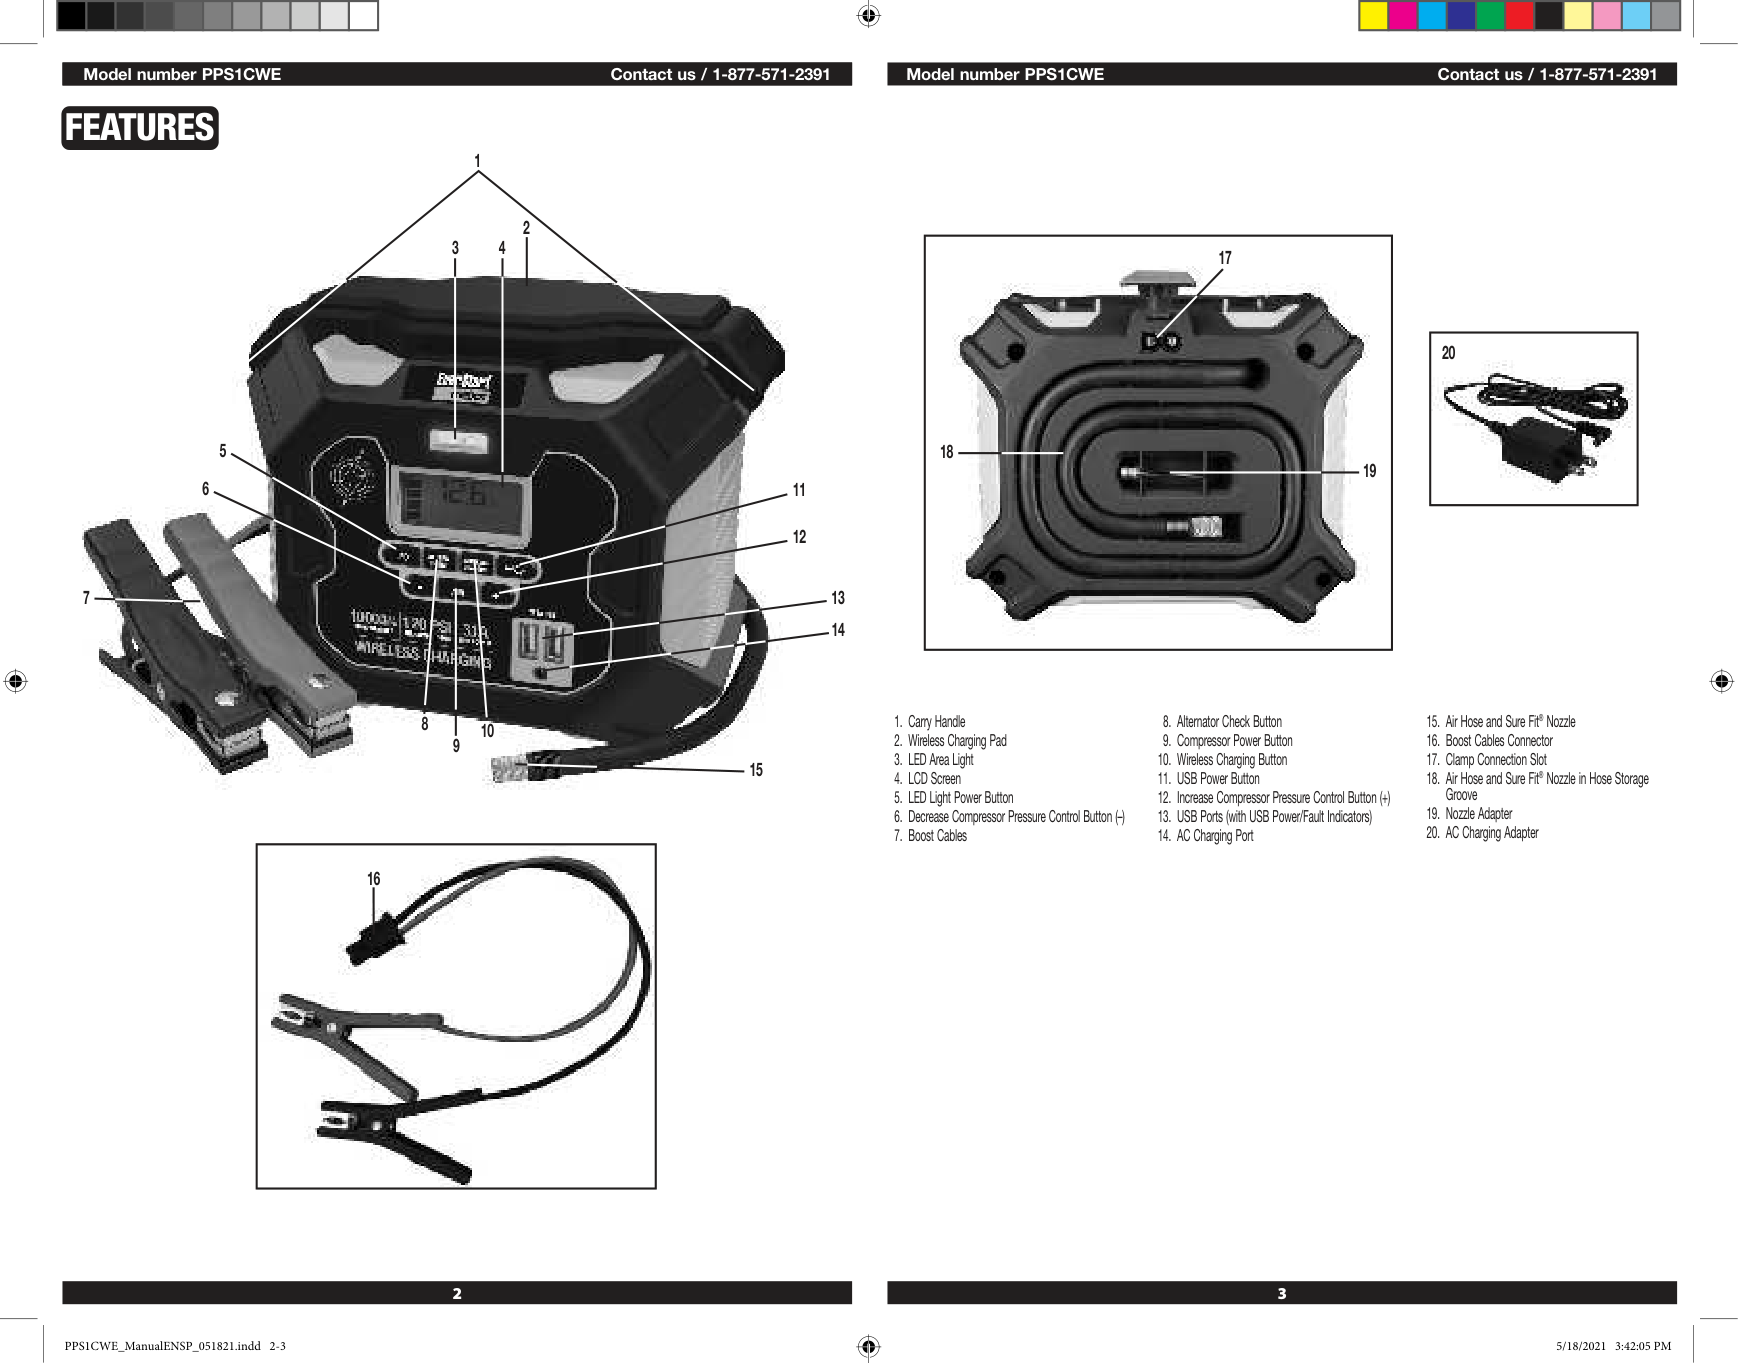
2 3 Model number PPS1CWE Contact us / 1-877-571-2391 Model number PPS1CWE Contact us / 1-877-571-2391 20 18 19 17
Features
1 3 4 5 8 9 10 11 12 15 13 14 6 7 2 16 Model number PPS1CWE Contact us / 1-877-571-2391 PPS1CWE_ManualENSP_051821.indd 2-3 PPS1CWE_ManualENSP_051821.indd 2-35/18/2021 3:42:05 Pm
5/18/2021 3:42:05 Pm
5 Model number PPS1CWE Contact us / 1-877-571-2391 4 Model number PPS1CWE Contact us / 1-877-571-2391
Safety Guidelines /
Definitions
DANGER: Indicates an imminently hazardous situation which, if not avoided, will result in death or serious injury. WARNING: Indicates a potentially hazardous situation which, if not avoided, could result in death or serious injury. CAUTION: Indicates a potentially hazardous situation which, if not avoided, may result in minor or moderate injury and/or property damage. RISK OF UNSAFE OPERATION. When using tools or equipment, basic safety precautions should always be followed to reduce the risk of personal injury. Improper operation, maintenance or modification of tools or equipment could result in serious injury and property damage. There are certain applications for which tools and equipment are designed. Manufacturer strongly recommends that this product NOT be modified and/or used for any application other than for which it was designed. Read and understand all warnings and operating instructions before using any tool or equipment.Read All Instructions
WARNING: Read and understand this instruction manual before using this unit. Failure to follow all instructions listed below may result in electric shock, fire and/ or serious injury.Important Safety
Instructions
General Safety Warnings And Instructions
Specific Safety Instructions For Charging
This Unit
Minimum Gauge For Cord Sets
Volts Total Length of Cord in Feet120V
0-25 26-50 51-100 101-150(0-7.6m) (7.6-15.2m) (15.2-30.4m) (30.4-45.7m)
240V
0-50 51-100 101-200 201-300(0-15.2m) (15.2-30.4m) (30.4-60.9m) (60.9-91.4m) Ampere Rating Extension Cord Length More Not more 0'-25' 26'-50' 51'-100' 101'-150' Than Than American Wire Gauge (AWG) 0 - 6 18 16 16 14 6 - 10 18 16 14 12 10 - 12 16 16 14 12 12 - 16 14 12 Not Recommended
Specific Safety Instructions For Wireless
Charging
CAUTION – To reduce the risk of property damage:Specific Safety Instructions For Jump Starters
WARNING – Burst hazard: Do not use the unit for charging dry-cell batteries that are commonly used with home appliances. These batteries may burst and cause injury to persons and damage property. Use the unit for charging/boosting a lead-acid battery only. It is not intended to supply power to a low-voltage electrical system other than in a starter-motor application.• Never Attempt To Jump-Start Or Charge A Frozen Battery.
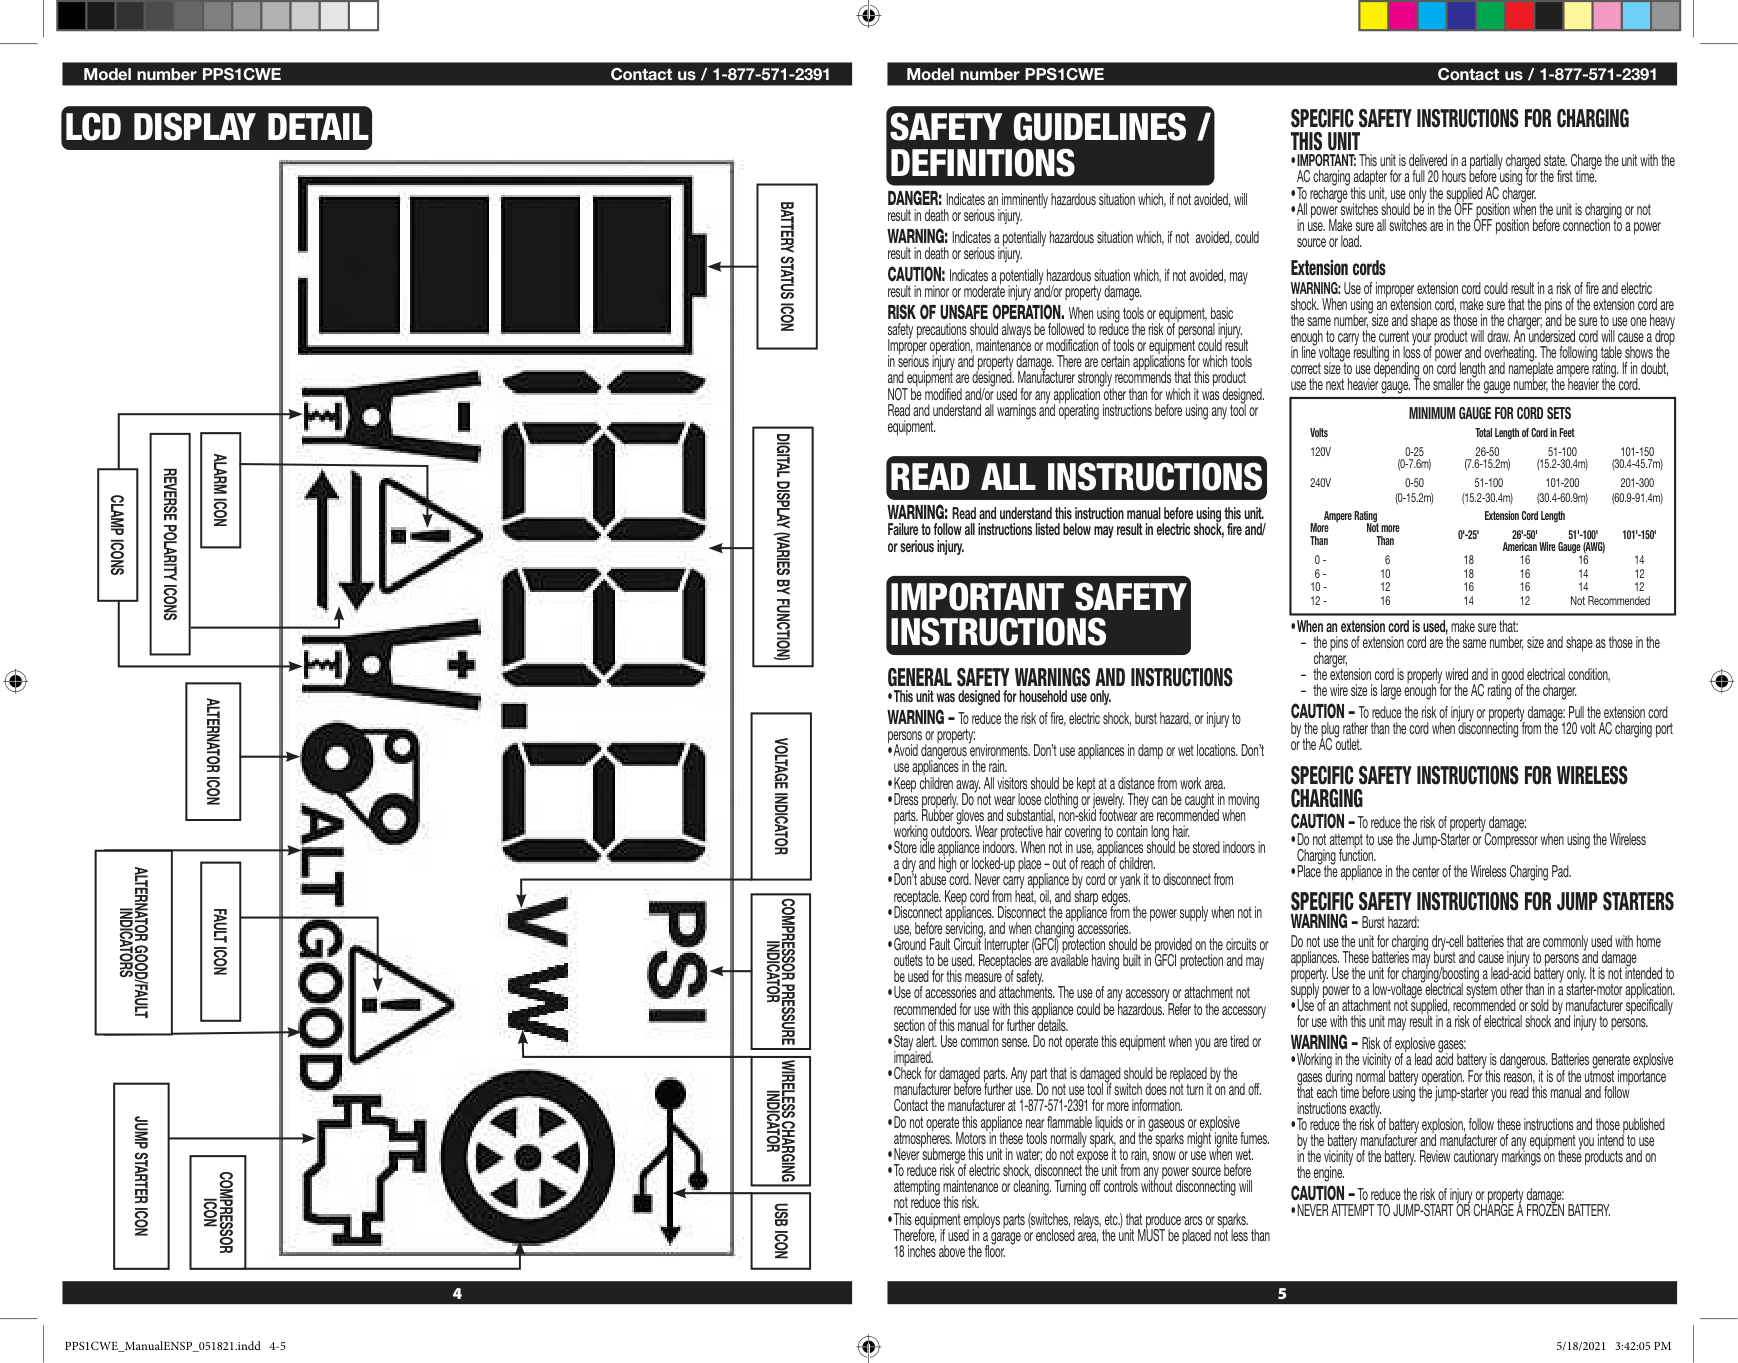
Lcd Display Detail
Battery Status Icon
Digital Display (Varies By Function)
Alarm Icon
Reverse Polarity Icons
Clamp Icons
Voltage Indicator
Compressor Pressure
Indicator
Usb Icon
Compressor
Icon
Jump Starter Icon
Alternator Icon
Alternator Good/Fault
Indicators
Fault Icon
Wireless Charging
Indicator
PPS1CWE_ManualENSP_051821.indd 4-5 PPS1CWE_ManualENSP_051821.indd 4-55/18/2021 3:42:05 Pm
5/18/2021 3:42:05 Pm
6 7 Model number PPS1CWE Contact us / 1-877-571-2391 Model number PPS1CWE Contact us / 1-877-571-2391 Whenever the clamps are properly connected to a battery (refer to the “Jump Starter” section) … … a beep will sound and the backlit LCD screen will display the Battery Status Icon, Battery Voltage Indicator, the Clamp Icons, and the “+” and ”–” signs, as well as the flashing Jump Starter Icon. The unit remains on until the clamps are disconnected from the battery. If the red and black clamps touch each other (refer to the “Jump Starter” section) … … the backlit LCD screen will display the Battery Status Icon and Battery Voltage Indicator. The Clamp Icons, “+” and ”–” signs and the Alarm Icon will flash. The unit will sound a two-second warning every ten seconds continuously until the clamps are separated. If the clamp connections to the battery’s positive and negative terminals are reversed (refer to the “Jump Starter” section) … … the backlit LCD screen will display the Battery Status Icon, Battery Voltage Indicator, and the Clamp Icons. The Alarm Icon, the “+” and ”–” signs and the Reverse Polarity Icons will flash and the unit will sound a warning continuously until the clamps are disconnected from the battery. When the unit is charging or recharging using the supplied Charging Adapter (refer to the “Charging/ Recharging” section) … … the backlight will turn on for 10 seconds (only). The LCD screen will continue to display the Battery Status Icon and Battery Voltage Indicator. The bars on the Battery Status Icon will change from empty to solid (bottom to top) repeatedly. Note: The unit will automatically power off once ALL the functions are turned off.
Viewing Battery
Status
The Battery Status Icon and Battery Voltage Indicator indicate the battery charge level as follows.Charging/Recharging
Lead-acid batteries require routine maintenance to ensure a full charge and long battery life. All batteries lose energy from self-discharge over time and more rapidly at higher temperatures. Therefore, batteries need periodic charging to replace energy lost through self-discharge. When the unit is not in frequent use, manufacturer recommends the battery should be recharged at least every 30 days and after each use.Important Charging Notes
Procedure
Wireless Charging
The built-in Wireless Charging feature is suitable for most appliances with a Wireless Charging function. Before proceeding, check the unit’s battery status on the LCD screen. Four solid bars in the battery icon indicates a full battery. When the battery level is nearly empty with only one solid bar, the unit MUST be recharged before use or the unit’s built-in low voltage protection will activate. The empty Battery Status Icon will flash for a short period of time before automatic shut down. CAUTION – To reduce the risk of property damage: Do not attempt to use the Jump- Starter or Compressor when using the Wireless Charging function.Important Note:
Procedure
Important:
Jump-Starter
IMPORTANT: All features must be turned off with the exception of the area light when jump-starting. The unit is intended to be used only in the upright position. The unit must be kept upright during use. See the illustration to the right for correct orientation.Specific Safety Instructions For The Usb
Power Ports
Specific Safety Instructions For Compressors
Warning – Burst Hazard:
First Aid
When working with lead acid batteries, always make sure immediate assistance is available in case of accident or emergency. Always have protective eyewear when using this product. Contact with battery acid may cause blindness and/or severe burns. Be aware of first aid procedures in case of accidental contact with battery acid. Have plenty of fresh water and soap nearby in case battery acid contacts skin. WARNING – Battery fluid is a diluted sulphuric acid and may cause personal injury or damage to property. In case of skin or eye contact, follow the instructions below.Save These
Instructions
WARNING – To reduce the risk of injury: Follow these instructions and those published by the battery manufacturer and manufacturer of any equipment you intend to use with this unit. Review cautionary markings on these products and on engine.Overview
Common Actions and Unit Responses The following actions turn the unit on and activate the LCD screen: Press the LED Area Light Power Button. (Refer to the “LED Area Light” section.) A beep will sound and the Area Light will turn on. The backlight will turn on for 10 seconds (only). The LCD screen will continue to display the Battery Status Icon and Battery Voltage Indicator. The unit remains on until the LED Area Light Power Button is pressed again to turn it off. Press the Alternator Check Button. (Refer to the “Alternator Check” section.) A beep will sound and the backlit LCD screen will display the Battery Status Icon, and the Alternator Icon will flash. The unit remains on until the Alternator Check Button is pressed again to turn it off. Press the Wireless Charging Button. (Refer to the “Wireless Charging” section.) A beep will sound. The backlit LCD screen will display the flashing Wireless Charging Indicator. The unit remains on until the button is pressed again to turn it off, or the unit does not detect an appliance (such as a mobile phone) for 3 minutes. Press the USB Power Button. (Refer to the “USB Ports” section.) A beep will sound and the backlight will turn on for 10 seconds (only). The LCD screen will display the Battery Status Icon, Battery Voltage Indicator, and the USB Icon; and the USB Power/Fault Indicators will light solid blue indicating the two USB Ports are active. The unit remains on until the USB Power Button is pressed again to turn it off. Press the Compressor Power Button. (Refer to the “Portable Compressor” section.) A beep will sound and the backlit LCD screen will display the Battery Status Icon, “XXX” PSI and the Compressor Icon. If no further actions are taken after 1 minute, the unit will display the Battery Status Icon and Battery Voltage Indicator for 10 seconds before automatically turning off. PPS1CWE_ManualENSP_051821.indd 6-7 PPS1CWE_ManualENSP_051821.indd 6-75/18/2021 3:42:06 Pm
5/18/2021 3:42:06 Pm
8 9 Model number PPS1CWE Contact us / 1-877-571-2391 Model number PPS1CWE Contact us / 1-877-571-2391 WARNING – To reduce the risk of serious injury or property damage:
Procedure
Take the following steps, observing all cautions and warnings in the “Important Safety Instructions” section at the front of this manual.Important:
Alternator Check
Set up the unit, connect the battery clamps and connect to the battery following steps 1 through 5 under “Procedure” in the “Jump-Starter” section.Important Notes
Is Rated To Support The Application.
Part 1
No Load (turn OFF all vehicle’s accessories): The vehicle battery must be fully charged before testing the alternator. Run the engine long enough to achieve normal idle speed and verify there is a no-load voltage.Part 2
Under Load (accessories ON): Next, load the alternator by turning on as many accessories as possible (except for A/C and Defrost).Portable Compressor
The built-in 12 volt DC compressor is the ultimate compressor for all vehicle tires, trailer tires and recreational inflatables. A nozzle adaptor is supplied that screws onto the end of the Sure Fit® nozzle at the free end of the compressor hose. The compressor hose with tire fitting is stored in the hose storage groove on the rear of the unit. Refer to the “Features” section to locate. The Compressor Power Button and Increase (+) and Decrease (–) Compressor Pressure Control Buttons are located on the control panel on the front of the unit. Before proceeding, check the unit’s battery status on the LCD screen. Four solid bars in the battery icon indicates a full battery. When the battery level is nearly empty with only one solid bar, the unit MUST be recharged before use or the unit’s built-in low voltage protection will activate. The empty Battery Status Icon will flash for a short period of time before automatic shut down. The compressor is capable of inflating up to 120 pounds per square inch (PSI) pressure. Return hose to the hose storage groove after use. WARNING – To reduce the risk of serious injury or property damage: Follow all safety instructions found in the “Specific Safety Instructions for Compressors” section of this instruction manual. CAUTION – To reduce the risk of serious injury or property damage: When the compressor is operated at a low PSI, the unit may start in low and gradually rev up. When the compressor is operated at higher PSIs, the unit may operate normally for several minutes, then rev down for a few minutes before returning to normal operation. This feature protects the unit from overheating during normal use. In any event, do not operate compressor continuously for longer than 10 minutes, as it may overheat. This could damage the compressor. If the compressor must be operated for longer periods: every 10 minutes press the Compressor Power Button to turn the compressor off, then restart after a cooling down period of approximately 30 minutes. In any event, the compressor will automatically shut down after operating continuously for 10 minutes.Inflating Tires Or Products With Valve Stems
5/18/2021 3:42:06 Pm
5/18/2021 3:42:06 Pm
10 11 Model number PPS1CWE Contact us / 1-877-571-2391 Model number PPS1CWE Contact us / 1-877-571-2391
Troubleshooting
Problem Possible Solution Unit not chargingAccessories
Recommended accessories for use with your tool may be available from the manufacturer. If you need assistance regarding accessories, please contact the manufacturer at 1-877-571-2391. WARNING: The use of any accessory not recommended for use with this appliance could be hazardous.Service Information
Whether you need technical advice, repair, or genuine factory replacement parts, contact the manufacturer at 1-877-571-2391.Two-Year Limited
Warranty
The manufacturer warrants this product against defects in materials and workmanship for a period of TWO (2) YEARS from the date of retail purchase by the original end-user purchaser (“Warranty Period”). If there is a defect and a valid claim is received within the Warranty Period, the defective product can be replaced or repaired in the following ways: (1) Return the product to the manufacturer for repair or replacement at manufacturer’s option. Proof of purchase may be required by manufacturer. (2) Return the product to the retailer where product was purchased for an exchange (provided that the store is a participating retailer). Returns to retailer should be made within the time period of the retailer’s return policy for exchanges only (usually 30 to 90 days after the sale). Proof of purchase may be required. Please check with the retailer for their specific return policy regarding returns that are beyond the time set for exchanges. This warranty does not apply to accessories, bulbs, fuses and batteries; defects resulting from normal wear and tear, accidents; damages sustained during shipping; alterations; unauthorized use or repair; neglect, misuse, abuse; and failure to follow instructions for care and maintenance for the product. This warranty gives you, the original retail purchaser, specific legal rights and you may have other rights which vary from state to state or province to province. This product is not intended for commercial use.Appendix
This device complies with part 15 of the FCC rules. Operation is subject to the following two conditions: (1) this device may not cause harmful interference, and (2) this device must accept any interference received, including interference that may cause undesired operation. Changes or modifications not explicitly approved by the party responsible for compliance could void the user’s authority to operate this equipment. Note: This equipment has been tested and found to comply with the limits for a Class B digital device, pursuant to part 15 and part 18 of the FCC Rules. These limits are designed to provide reasonable protection against harmful interference in a residential installation. This equipment generates, uses and candidate radio frequency energy and, if not installed and used in accordance with the instructions, may cause harmful interference to radio communications. However, there is no guarantee that interference will not occur in a particular installation. If this equipment does cause harmful interference to radio or television reception, which can be determined by turning the equipment off and on, the user is encouraged to try to correct the interference by one or more of the following measures:Inflating Other Inflatables Without Valve Stems
Inflation of other items requires use of the nozzle adapter.Usb Ports
The USB Power Button and the two USB Ports are located on the front of the unit; the USB Power/Fault Indicator is a translucent ring around each of the USB Ports. Refer to the “Features” section to locate.Important Notes
The Fault Icon will flash. The USB Ports will automatically shut down. Should this occur: a. Disconnect the USB-powered device and press the USB Power Button again to turn off the USB Ports immediately. b. Make sure the unit does not need to be recharged. c. Allow the unit to cool down for several minutes before attempting to use the USB Ports again. d. If an individual USB device is within specifications and the fault occurs, have the USB device checked for malfunction and do not continue to use it with these USB Ports.
Using The Usb Ports
Led Area Light
The built-in LED Area Light is controlled by the area light on/off button on the control panel. Refer to the “Features” section to locate.Care And Maintenance
All batteries lose energy from self-discharge over time and more rapidly at higher temperatures. When the unit is not in use, we recommend that the battery is charged at least every 30 days. From time to time wipe the outside of the appliance with a soft cloth. Do not immerse the appliance in water. There are no user-replaceable parts. Periodically inspect the condition of adapters, connectors and wires. Contact manufacturer to replace any components that have become worn or broken.Battery Replacement/Disposal
Battery Please be advised that the battery is designed to last the service life of the unit and is not replaceable, removable or serviceable. Service life is dependent on a number of factors including but not limited to the number of recharge cycles, and proper care and maintenance of the battery by the end user. Contact manufacturer for any information you may need.Safe Battery Disposal
Contains a maintenance-free, sealed, non-spillable, lead acid battery, which must be disposed of properly. Recycling is required. Failure to comply with local, state and federal regulations can result in fines, or imprisonment. Please recycle.Warning:
5/18/2021 3:42:06 Pm
5/18/2021 3:42:06 Pm
12 Model number PPS1CWE Contact us / 1-877-571-2391