
Ask AI
— answers from the official manualAnswers from the official manual.
Common questions
Common Questions
10 totalWhat is the Kwikset Powerbolt 250 manual and where can I find setup instructions?
The Kwikset Powerbolt 250 manual provides comprehensive instructions for setting up and using your smart lock, including Alexa voice control integration and device activation. Setup instructions are detailed in the manual's initial pages, which guide you through account creation, lock activation, and connection to the Kwikset app.
How do I enable Alexa voice control with my Kwikset Powerbolt 250?
There are two methods to enable Alexa control. Method 1 involves opening the Alexa app, navigating to Skills and Games, searching for 'Kwikset Smart Home,' enabling the skill, and linking your Kwikset account credentials. Method 2 involves opening the Alexa app, tapping Add Device, selecting Lock, choosing Kwikset Halo, and following the same account linking process.
What Alexa voice commands work with the Powerbolt 250?
You can use the following Alexa commands: 'Alexa, is [Lock Name] unlocked?', 'Alexa, is [Lock Name] locked?', 'Alexa, lock [Lock Name],' and 'Alexa, unlock [Lock Name].' Note that unlocking requires an additional PIN for security purposes.
What should I do if my Powerbolt 250 isn't discovered by Alexa during setup?
Ensure your Kwikset account is properly set up and your lock is activated before attempting Alexa integration. Wait while Alexa searches for your device after enabling the skill or selecting the device type, and verify that your device credentials have been properly entered on the account linking page.
Do I need to set up my Kwikset account before enabling Alexa on my lock?
Yes, you must set up your Kwikset account and activate your lock before enabling Alexa integration. If your account is already set up and your lock is activated, you can proceed directly to the Alexa linking process.
Can I add my Powerbolt 250 to a group in Alexa?
Yes, during the Alexa setup process you can choose to add your device to a group. After device discovery, tap 'Set Up Device,' and you'll have the option to skip or tap 'Choose Group' to assign your lock to an Alexa group.
Full Manual
4 pages

How to Enable Alexa Voice Control On your Android or iOS device, open the Alexa app. 1 Tap on the hamburger menu. 2 Tap on Skills and Games. 3 Search for “Kwikset Smart Home” and tap on it. Tap the search icon on the upper right of the screen. When the accounting linking is complete, tap the X in the top right corner to continue to device discovery. 4 7 Tap Enable to Use. 5 On the account linking page, enter your Kwikset app username and password, then tap Sign In. 6 Tap “Discover Devices” to show the newly discovered Halo devices that you can control using Alexa. 8 9 Continue to the next page for additional steps. 1 There are two ways to enable Alexa voice control of your Kwikset Halo Smart Lock: Method 1 - Linking the Kwikset Smart Home skill Method 2 - Adding a lock to your Alexa account (page 3) Method 1 - Linking the Kwikset Smart Home skill
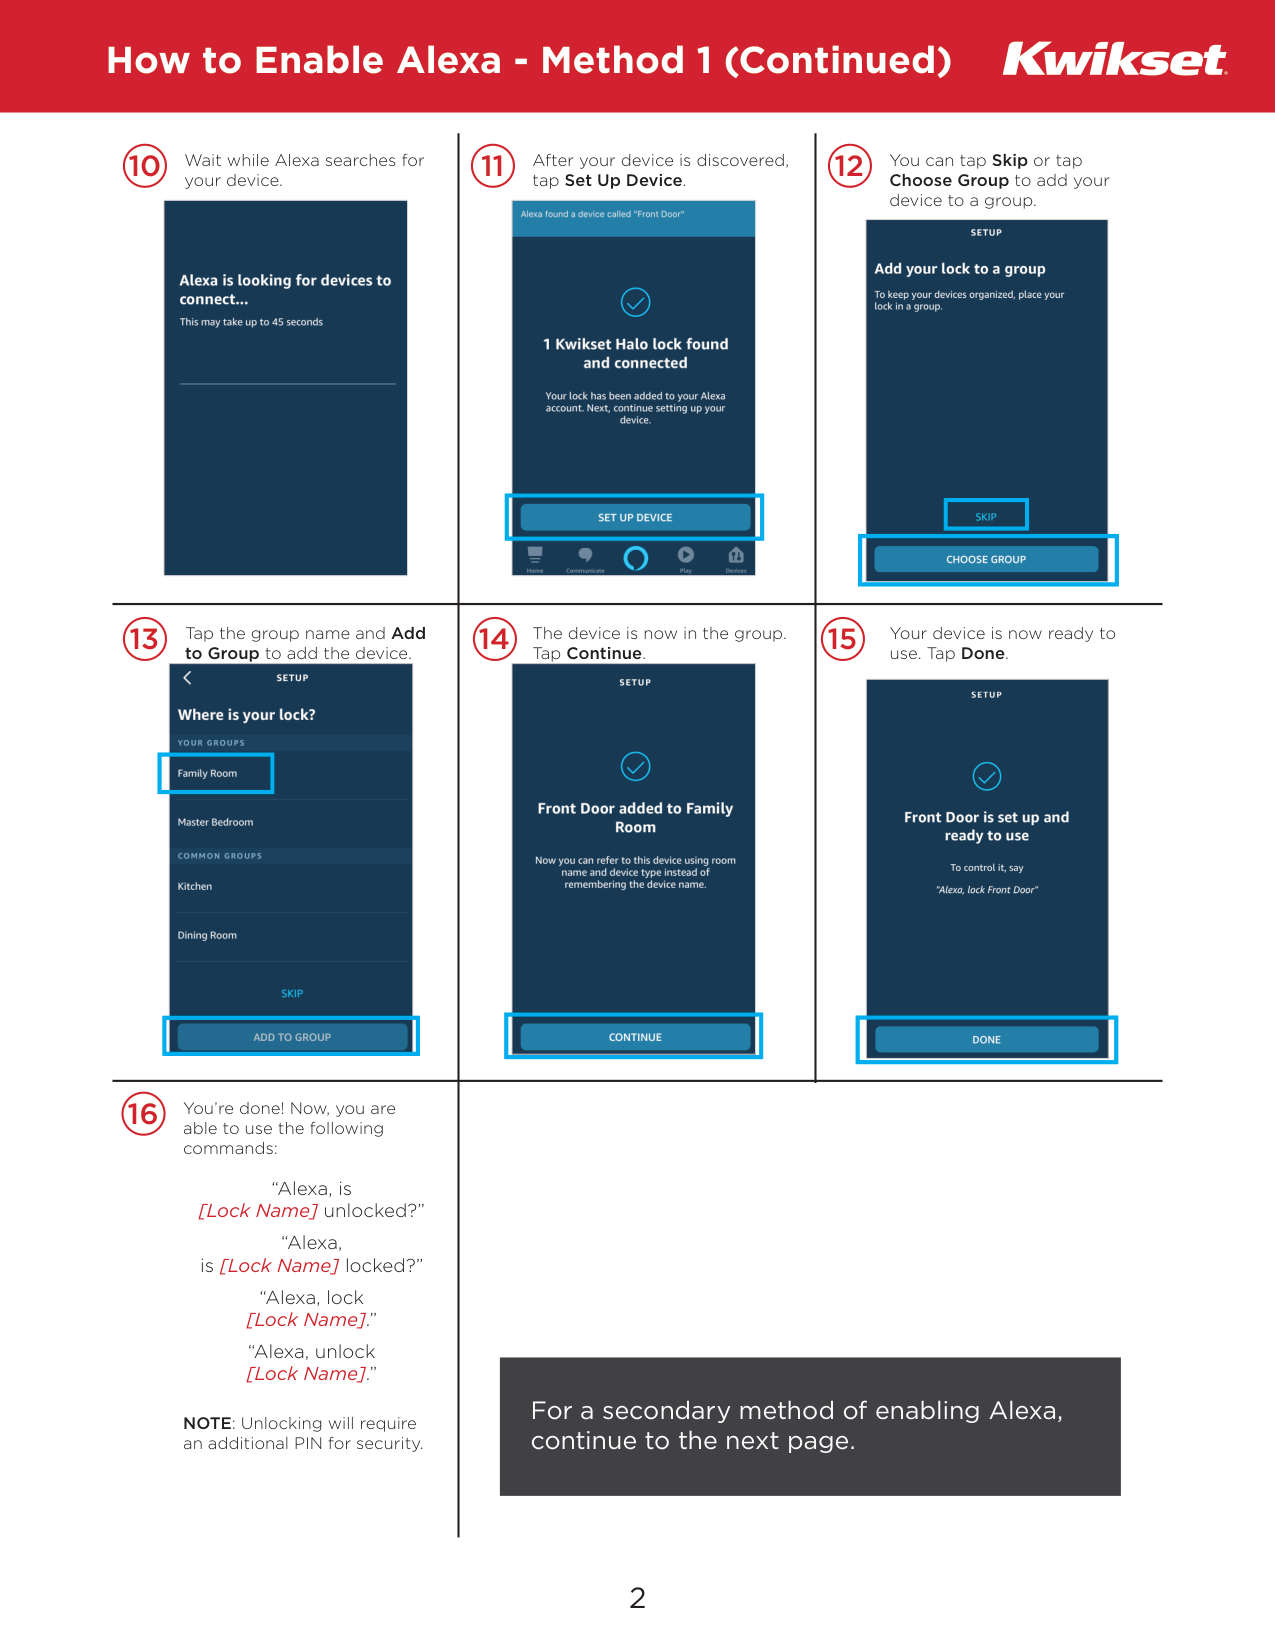
How to Enable Alexa - Method 1 (Continued) You can tap Skip or tap Choose Group to add your device to a group. 10 Tap the group name and Add to Group to add the device. 11 12 Your device is now ready to use. Tap Done. 13 14 15 The device is now in the group. Tap Continue. After your device is discovered, tap Set Up Device. For a secondary method of enabling Alexa, continue to the next page. 16 You’re done! Now, you are able to use the following commands: “Alexa, is [Lock Name] unlocked?” “Alexa, is [Lock Name] locked?” “Alexa, lock [Lock Name].” “Alexa, unlock [Lock Name].” NOTE: Unlocking will require an additional PIN for security. Wait while Alexa searches for your device. 2
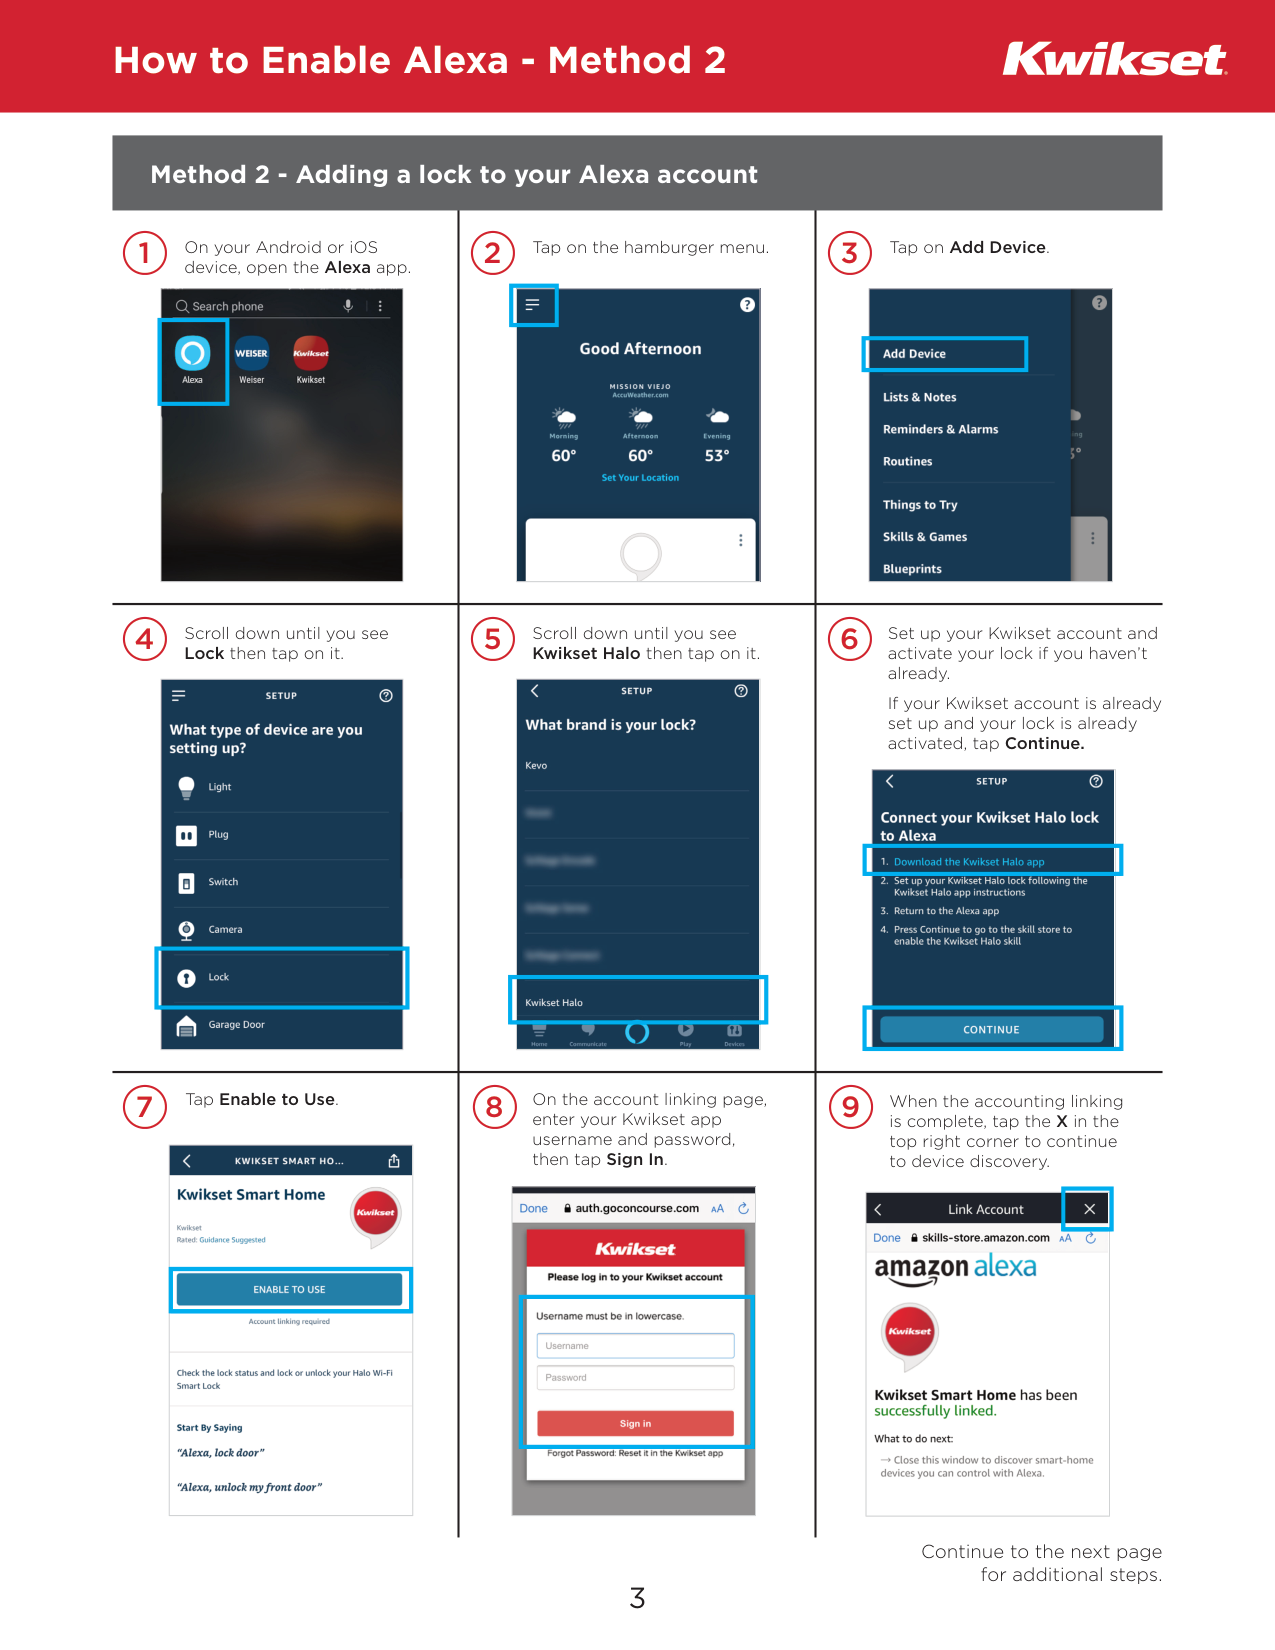
How to Enable Alexa - Method 2 On your Android or iOS device, open the Alexa app. 1 Tap on the hamburger menu. 2 Tap on Add Device. 3 Scroll down until you see Lock then tap on it. When the accounting linking is complete, tap the X in the top right corner to continue to device discovery. 4 7 Scroll down until you see Kwikset Halo then tap on it. Set up your Kwikset account and activate your lock if you haven’t already. If your Kwikset account is already set up and your lock is already activated, tap Continue. 5 On the account linking page, enter your Kwikset app username and password, then tap Sign In. 6 8 9 Tap Enable to Use. Continue to the next page for additional steps. 3 Method 2 - Adding a lock to your Alexa account
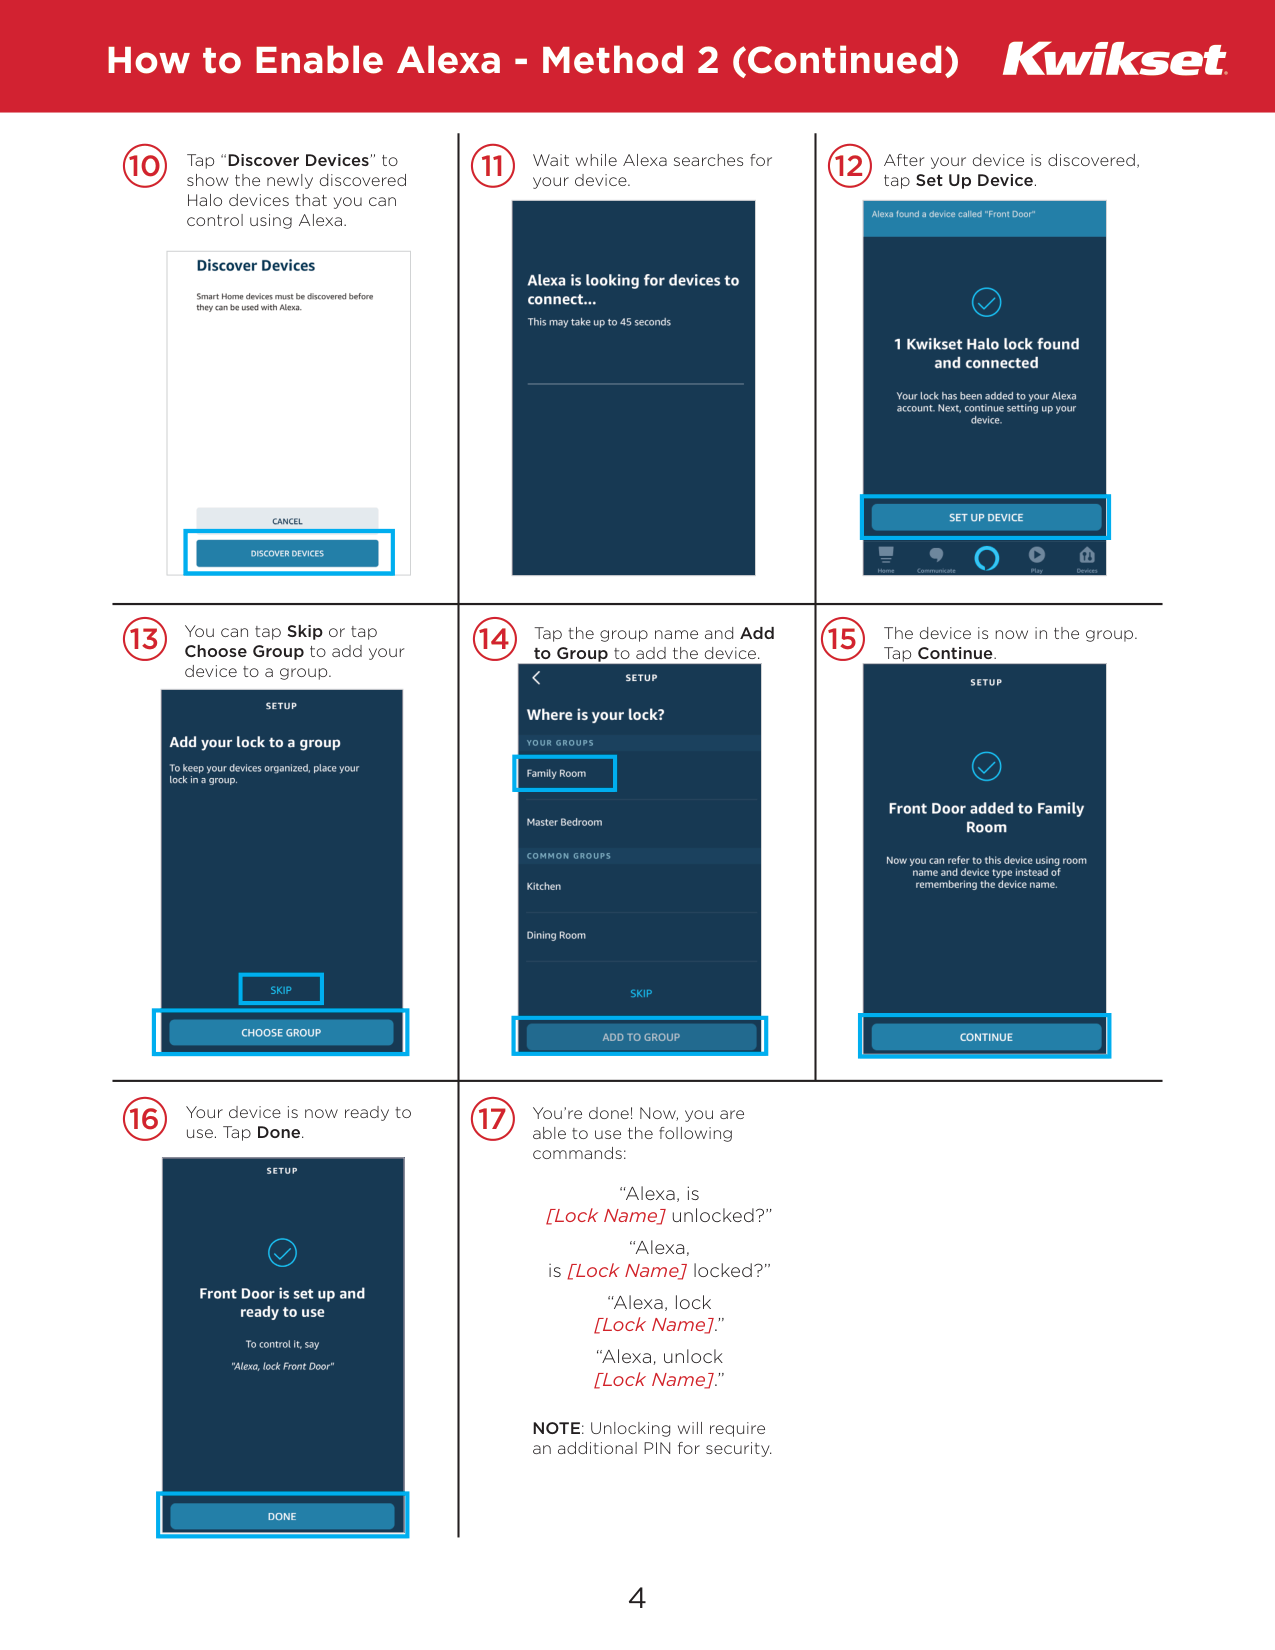
How to Enable Alexa - Method 2 (Continued) You can tap Skip or tap Choose Group to add your device to a group. 10 Tap the group name and Add to Group to add the device. 11 12 Your device is now ready to use. Tap Done. 13 16 17 14 15 The device is now in the group. Tap Continue. You’re done! Now, you are able to use the following commands: “Alexa, is [Lock Name] unlocked?” “Alexa, is [Lock Name] locked?” “Alexa, lock [Lock Name].” “Alexa, unlock [Lock Name].” NOTE: Unlocking will require an additional PIN for security. After your device is discovered, tap Set Up Device. Wait while Alexa searches for your device. 4 Tap “Discover Devices” to show the newly discovered Halo devices that you can control using Alexa.