
Ask AI
— answers from the official manualAnswers from the official manual.
Common questions
Common Questions
10 totalHow do I adjust the volume on my walkie talkie?
Press and hold the Volume button for three seconds to enter volume adjustment mode. Press the up arrow to increase volume or the down arrow to decrease volume. When the volume reaches level 0, the mute icon appears permanently on screen. Do not hold the radio close to your ear as uncomfortable volume levels could hurt your ear.
What does the battery meter on the display screen tell me?
The number of bars on the battery icon indicates the current battery level. When the battery meter shows only one segment, the radio chirps periodically as a Low Battery Alert every 10 minutes or after releasing the PTT button.
How do I install batteries in the Onn Walkie Talkie?
First, take the belt clip off and lift the battery cover latch on the back of the radio to remove the cover. Insert three AA alkaline batteries with the correct + and – polarity as shown inside, then close the battery cover firmly. Do not mix old and new batteries or different battery types (alkaline, standard, or rechargeable).
What do I need to do before communicating with other walkie talkies?
All radios in your group must be set to the same channel and the same Interference Eliminator Code to communicate properly. You have 121 different Sub-Codes available to minimize interference from unknown sources.
How do I talk and listen on the walkie talkie?
To talk, press and hold the PTT (Push-to-Talk) button and speak directly into the microphone while holding the radio 2 to 3 centimeters away from your mouth. When you finish talking, release the PTT button to listen for incoming transmissions. Do not cover the microphone while talking.
What is the Push-to-Talk timeout timer and why is it important?
The radio will automatically stop transmitting if you press the PTT button for 60 seconds continuously. This feature prevents accidental transmissions and helps save battery life.
Full Manual
2 pages
Walkie Talkie Model: 100068731
Product Guide
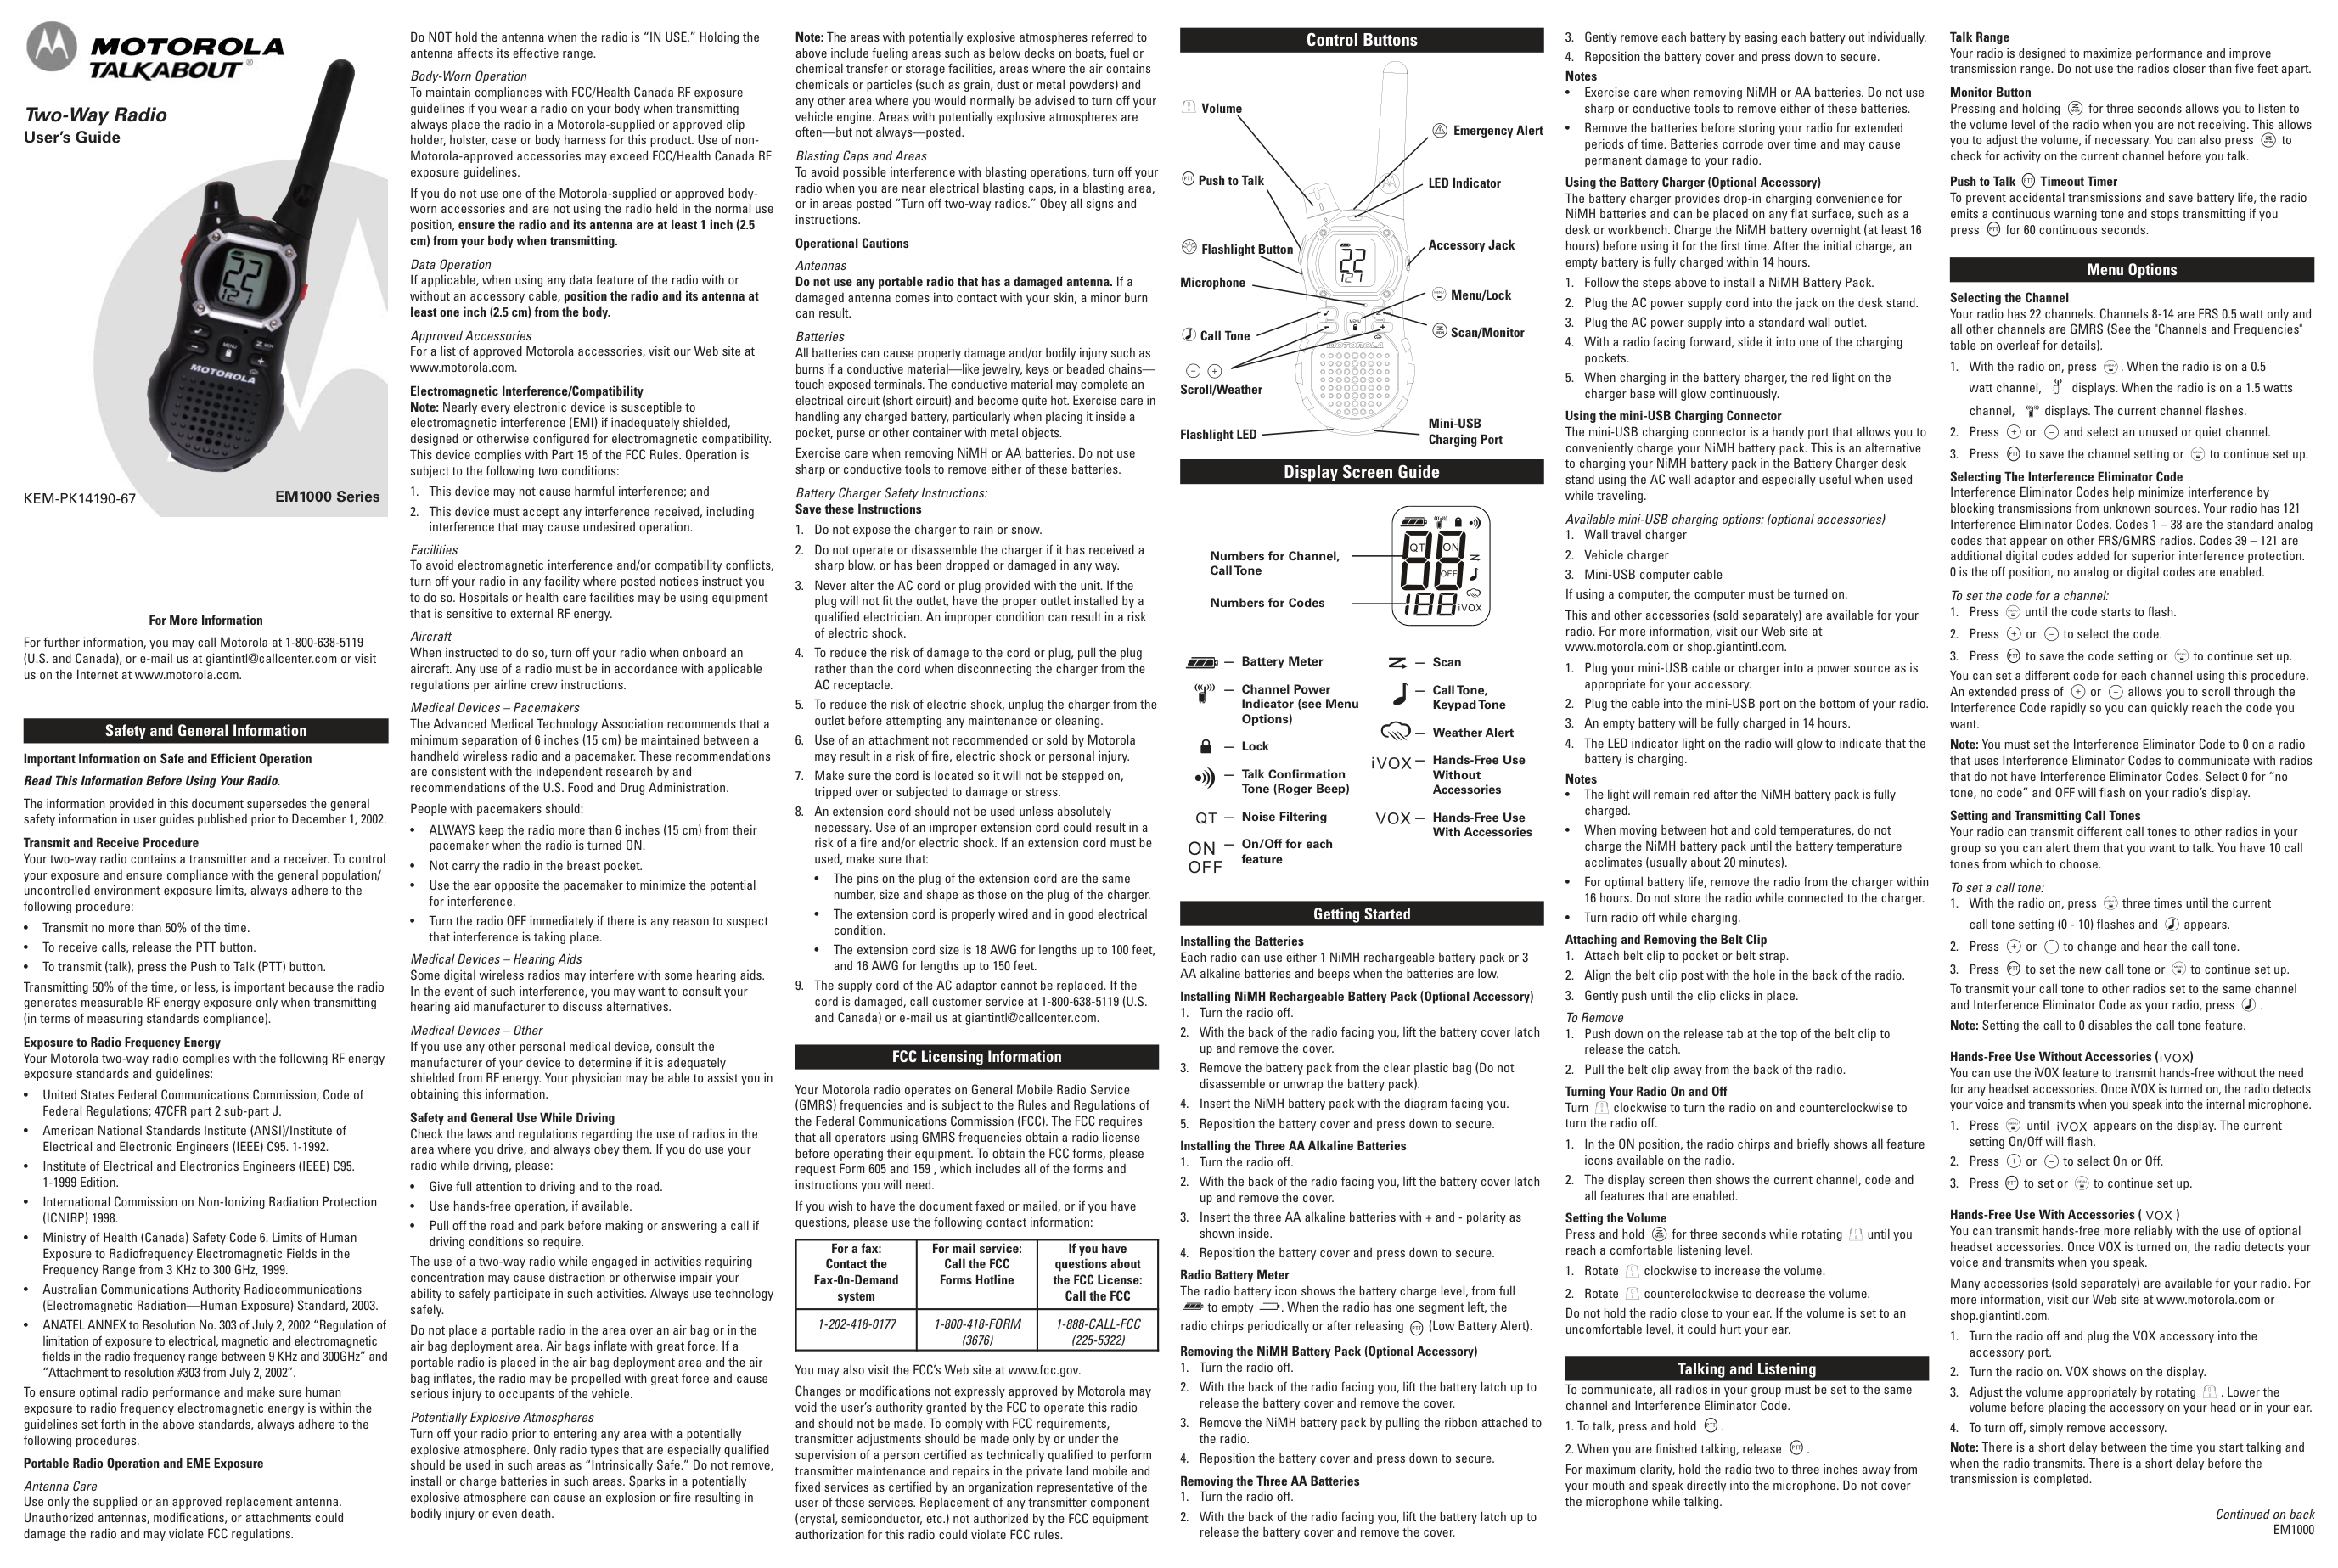
Control Buttons
Display Screen Guide
Talking And Listening
Menu Options
Getting Started
Installing the Three AA Batteries 1.Take the belt clip off. 2.With the back of the radio facing you, lift the battery cover latch up and remove the cover. Removing the Three AA alkaline battery 1.Turn the radio off. 2.With the back of the radio facing you, lift the battery cover latch up and remove the cover. 3.Close the battery cover firmly. To communicate , all radios in your group must be set to the same channel and Interference Eliminator Code. 1.To talk, press and hold the PTT button. When transmitting , the icon is shown . 2.When you are finished talking, release the PTT button. 3.When receiving, the icon is shown. For maximum clarity, hold the radio 2 to 3 centimeters away from your mouth and speak directly into the microphone . Do not cover the microphone while talking. Talk Range Your radio is designed to maximize performance and improve transmission range . Do not use radios closer than five feet apart. Monitor Button Press and hold button for 3 seconds to enter monitor mode and listen for weak signals on the current channel . You can also listen to the volume level of the radio when you are not receiving . This allows you to adjust the volume, if necessary .You can also press button to check for activity on the current channel before you talk. Push-to-Talk Timeout Timer To prevent accidental transmissions and save battery life, radio will stop transmitting if you press PTT button for 60 seconds continuously. Mode Button Press and hold button for 3 seconds, the user will be seamlessly switching between two-way and weather mode. Selecting the Channel The channel is the frequency of the radio uses to transmit. 1.Press the button until the channel number starts to flash. 2.Press or button to change the channel number. 3.Press the PTT button to exit menu or button to continue setup. Selecting the Interference Eliminator Code Sub-Codes help minimize interference by blocking transmission from unknown sources. Your radio has 121 Sub-Codes. To set the code for a channel:Lamp
Menu
Menu
Menu
Menu
Menu
Menu
Call
Call
(1) May 11.2021-V1 (2) (3) (5) (4) (6) (7) The micro – USB charger is a handy port that allows you to conveniently charge your NiMH battery . Use certified adaptor (5V,≥1A). Do not attempt to charge alkaline batteries . 1.Make sure your radio is turned OFF. 2.Plug the micro – USB cable into the micro –USB charging port on your radio . Connect the other end of the micro –USB charger to wall power outlet. 3.The battery meter on LCD will move to indicate the battery is Charging.Call
Mon ScanLamp
Menu
Microphone Accessary Port Lamp Screen Push-to-Talk Power On /Off Call Tone Lamp On/Off Weather Switch Speaker Micro-USB Charging Port Lock Menu Monitor Scan Numbers of Channel Call Tone Numbers for Codes WeatherVox
Dual Watch Volume Mute Battery Meter Scan Lock Status (transmit/ receive)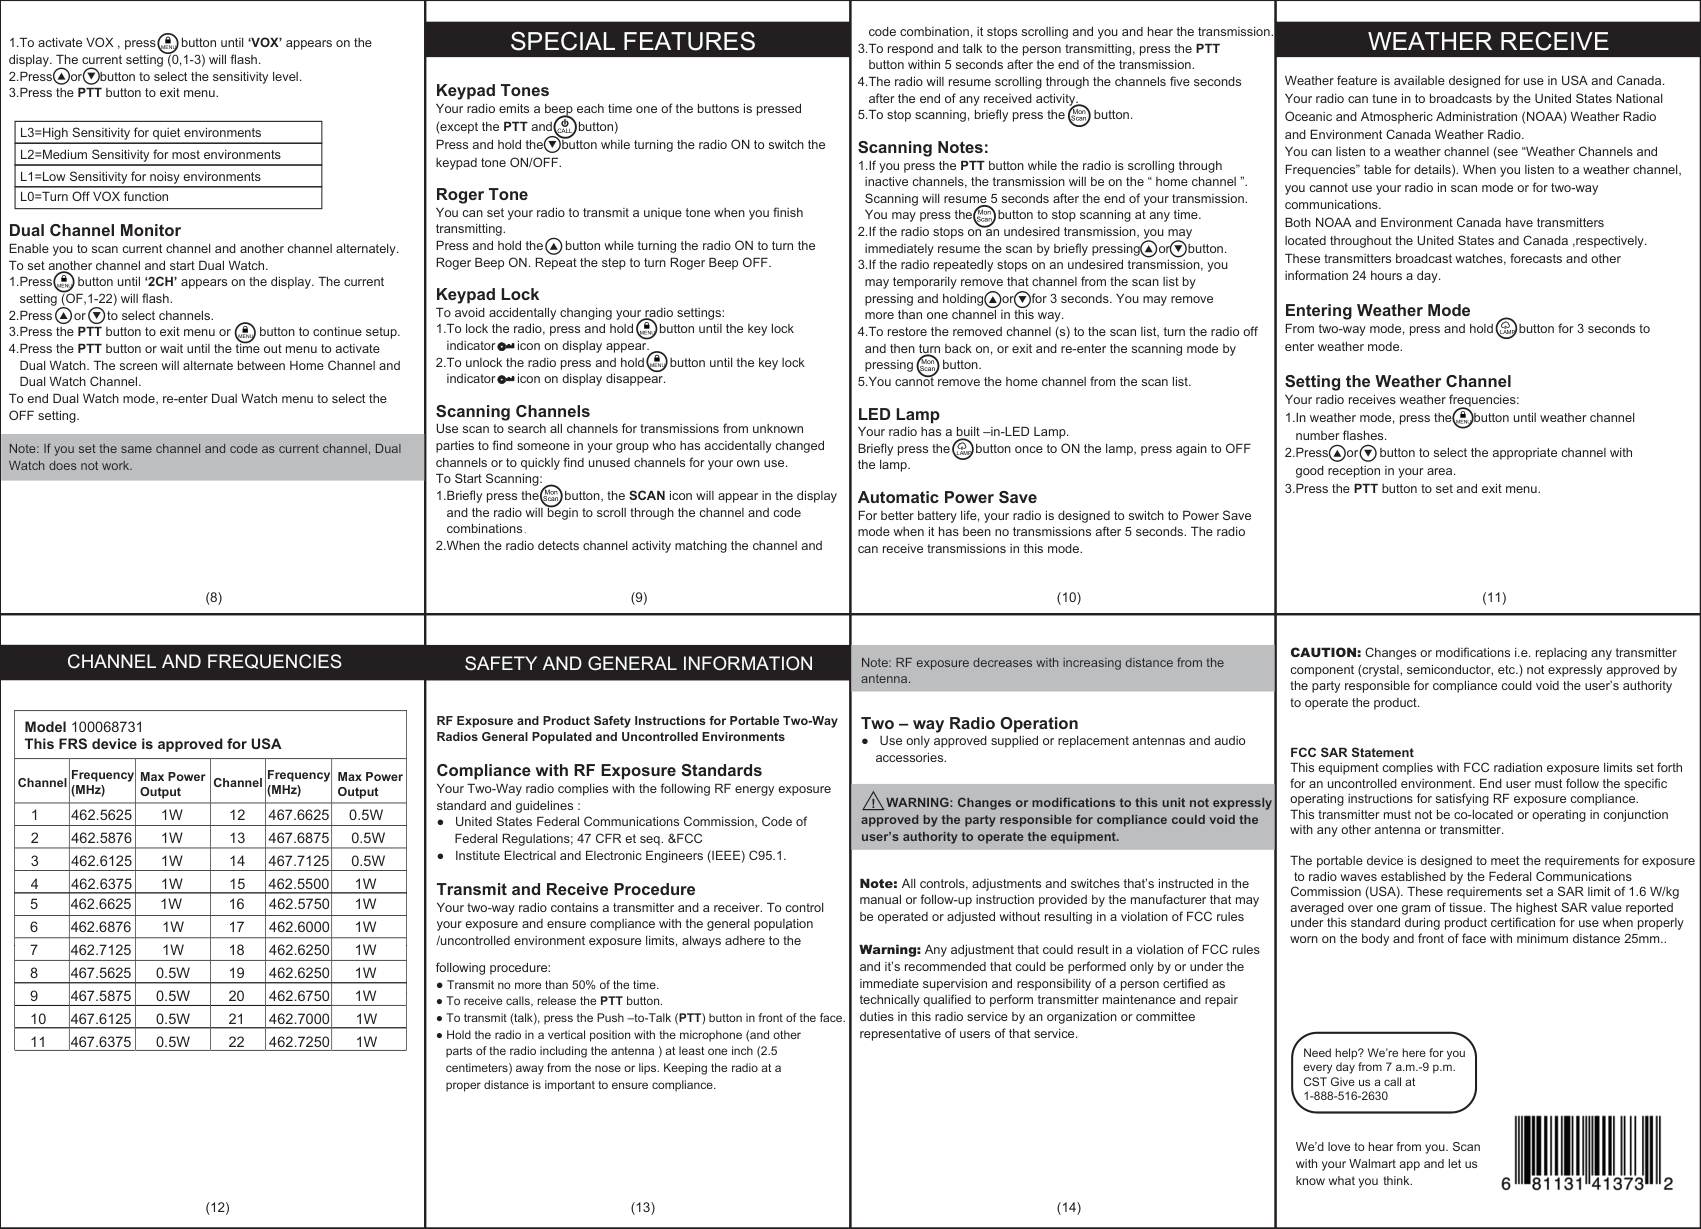
code combination, it stops scrolling and you and hear the transmission. 3.To respond and talk to the person transmitting, press the PTT button within 5 seconds after the end of the transmission. 4.The radio will resume scrolling through the channels five seconds after the end of any received activity. 5.To stop scanning, briefly press the button. Scanning Notes: 1.If you press the PTT button while the radio is scrolling through inactive channels, the transmission will be on the “ home channel ”. Scanning will resume 5 seconds after the end of your transmission. You may press the button to stop scanning at any time. 2.If the radio stops on an undesired transmission, you may immediately resume the scan by briefly pressing or button. 3.If the radio repeatedly stops on an undesired transmission, you may temporarily remove that channel from the scan list by pressing and holding or for 3 seconds. You may remove more than one channel in this way. 4.To restore the removed channel (s) to the scan list, turn the radio off and then turn back on, or exit and re-enter the scanning mode by pressing button. 5.You cannot remove the home channel from the scan list. LED Lamp Your radio has a built –in-LED Lamp. Briefly press the button once to ON the lamp, press again to OFF the lamp. Automatic Power Save For better battery life, your radio is designed to switch to Power Save mode when it has been no transmissions after 5 seconds. The radio can receive transmissions in this mode. Keypad Tones Your radio emits a beep each time one of the buttons is pressed (except the PTT and button) Press and hold the button while turning the radio ON to switch the keypad tone ON/OFF. Roger Tone You can set your radio to transmit a unique tone when you finish transmitting. Press and hold the button while turning the radio ON to turn the Roger Beep ON. Repeat the step to turn Roger Beep OFF. Keypad Lock To avoid accidentally changing your radio settings: 1.To lock the radio, press and hold button until the key lock indicator icon on display appear. 2.To unlock the radio press and hold button until the key lock indicator icon on display disappear. Scanning Channels Use scan to search all channels for transmissions from unknown parties to find someone in your group who has accidentally changed channels or to quickly find unused channels for your own use. To Start Scanning: 1.Briefly press the button, the SCAN icon will appear in the display and the radio will begin to scroll through the channel and code combinations 2.When the radio detects channel activity matching the channel and 1.To activate VOX , press button until ‘VOX’ appears on the display. The current setting (0,1-3) will flash. 2.Press or button to select the sensitivity level. 3.Press the PTT button to exit menu. Dual Channel Monitor Enable you to scan current channel and another channel alternately. To set another channel and start Dual Watch. 1.Press button until ‘2CH’ appears on the display. The current setting (OF,1-22) will flash. 2.Press or to select channels. 3.Press the PTT button to exit menu or button to continue setup. 4.Press the PTT button or wait until the time out menu to activate Dual Watch. The screen will alternate between Home Channel and Dual Watch Channel. To end Dual Watch mode, re-enter Dual Watch menu to select the OFF setting. Note: If you set the same channel and code as current channel, Dual Watch does not work. Weather feature is available designed for use in USA and Canada. Your radio can tune in to broadcasts by the United States National Oceanic and Atmospheric Administration (NOAA) Weather Radio and Environment Canada Weather Radio. You can listen to a weather channel (see “Weather Channels and Frequencies” table for details). When you listen to a weather channel, you cannot use your radio in scan mode or for two-way communications. Both NOAA and Environment Canada have transmitters located throughout the United States and Canada ,respectively. These transmitters broadcast watches, forecasts and other information 24 hours a day. Entering Weather Mode From two-way mode, press and hold button for 3 seconds to enter weather mode. Setting the Weather Channel Your radio receives weather frequencies: 1.In weather mode, press the button until weather channel number flashes. 2.Press or button to select the appropriate channel with good reception in your area. 3.Press the PTT button to set and exit menu. L3=High Sensitivity for quiet environments L2=Medium Sensitivity for most environments L1=Low Sensitivity for noisy environments L0=Turn Off VOX function
Special Features
Channel And Frequencies
Safety And General Information
Weather Receive
Model 100068731 This FRS device is approved for USA 1 462.5625 2 462.5876 3 462.6125 4 462.63751W
1W
1W
1W
0.5W
0.5W
0.5W
1W
12 13 14 15 467.6625 467.6875 467.7125 462.5500 Channel Channel Frequency (MHz) Frequency (MHz) Max Power Output Max Power Output 5 462.6625 6 462.6876 7 462.7125 8 467.56251W
1W
1W
0.5W
1W
1W
1W
1W
16 17 18 19 462.5750 462.6000 462.6250 462.6250 9 467.5875 10 467.6125 11 467.63750.5W
0.5W
0.5W
1W
1W
1W
20 21 22 462.6750 462.7000 462.7250 RF Exposure and Product Safety Instructions for Portable Two-Way Radios General Populated and Uncontrolled Environments . Compliance with RF Exposure Standards Your Two-Way radio complies with the following RF energy exposure standard and guidelines : ● United States Federal Communications Commission, Code of Federal Regulations; 47 CFR et seq. &FCC ● Institute Electrical and Electronic Engineers (IEEE) C95.1. Transmit and Receive Procedure Your two-way radio contains a transmitter and a receiver. To control your exposure and ensure compliance with the general population /uncontrolled environment exposure limits, always adhere to the following procedure: ● Transmit no more than 50% of the time. ● To receive calls, release the PTT button. ● To transmit (talk), press the Push –to-Talk (PTT) button in front of the face. ● Hold the radio in a vertical position with the microphone (and other parts of the radio including the antenna ) at least one inch (2.5 centimeters) away from the nose or lips. Keeping the radio at a proper distance is important to ensure compliance. Note: RF exposure decreases with increasing distance from the antenna.Two – way Radio Operation ● Use only approved supplied or replacement antennas and audio accessories. WARNING: Changes or modifications to this unit not expressly approved by the party responsible for compliance could void the user’s authority to operate the equipment. ! Need help? We’re here for you every day from 7 a.m.-9 p.m. CST Give us a call at 1-888-516-2630 We’d love to hear from you. Scan with your Walmart app and let us know what you think. Mon Scan Mon Scan Mon Scan Mon Scan