
Ask AI
— answers from the official manualAnswers from the official manual.
Common questions
Common Questions
20 totalWhat are the weight and height limits for rear-facing use?
The rear-facing weight limit is 2.3 to 18 kg (5 to 40 lbs) and the height limit is 48 to 102 cm (19 to 40 in.). Additionally, the top of the child's head must be at least 25 mm (1 in.) below the top of the child restraint seat back. Once your child exceeds any of these requirements, they must transition to forward-facing use if possible, or discontinue use if they are under 2 years old. (Page 2)
What are the weight and height limits for forward-facing use?
The forward-facing weight limit is 10 to 29.4 kg (22 to 65 lbs) and the height limit is 71 to 137 cm (28 to 54 in.). The child must also be at least 2 years old, and the tops of the child's ears must be at or below the top of the child restraint seat back. Once your child exceeds any of these requirements, you must discontinue use of this child restraint and consider a booster seat. (Page 2)
Can I use both LATCH lower anchors and the vehicle seat belt at the same time to install the seat?
No, you must never install this child restraint using both LATCH lower anchors and the vehicle seat belt simultaneously. Using both together can cause slack during a sudden stop or crash. Choose one method only — either the lower anchor connector assembly or the vehicle seat belt. (Page 11)
What is the maximum child weight allowed when using the LATCH lower anchor connectors?
Do not use the lower anchor connectors (LATCH system) to attach the child restraint when the child weighs more than 24.9 kg (55 lbs). This applies to both rear-facing and forward-facing installations. If your child exceeds this weight, you must use the vehicle seat belt instead. (Page 12)
Should I use the tether strap when the seat is installed rear-facing?
No, you must never use the tether strap when the child restraint is in the rear-facing position. The tether strap is for forward-facing use only. When installing forward-facing, however, the tether strap must always be used regardless of whether you are using LATCH or the vehicle seat belt. (Pages 7, 13)
How do I know if my child restraint installation is tight enough?
The child restraint must not move more than 25 mm (1 in.) side to side or front to back at the belt path being used. To test this, try moving the restraint in all directions at the belt path after installation. If it moves more than 25 mm (1 in.), the seat belt or lower anchor connector strap is not tight enough and you must re-install or move it to another location. (Pages 23, 27)
Show 14 more questions
Which harness slots should I use for rear-facing versus forward-facing?
How should I dress my child during cold weather when using the car seat?
How do I clean the seat pad and harness straps?
What should I do if my child restraint has been involved in a crash?
What are the weight and height requirements for rear-facing use?
Can I use this car seat in the front seat of a vehicle with an airbag?
What should I do if my child restraint is involved in a crash?
What is LATCH and what are the weight limits for using it?
How tight should the harness straps be on my child?
What position should the recline stand be in for rear-facing use?
How much side-to-side or front-to-back movement is acceptable for proper installation?
What should I do with excess tether strap when not in use?
How should I clean and maintain the car seat?
What are the child requirements for forward-facing use?
Full Manual
63 pages
SureRideTM/Titan®65 Child Restraint System Owner’s Manual Keep for future use. © 2022 Evenflo Company, Inc. 25701704 1/22 To reduce the risk of serious injury or death, read this owner’s manual prior to installing and using this child restraint.
Warning:
Rear-facing* 2.3 to 18 kg (5 to 40 lbs) 48 to 102 cm (19 to 40 in.) Forward-facing* 10 to 29.4 kg (22 to 65 lbs) 71 to 137 cm (28 to 54 in.) At least 2 years old Para instrucciones en Español, llamar al: 1-800-233-5921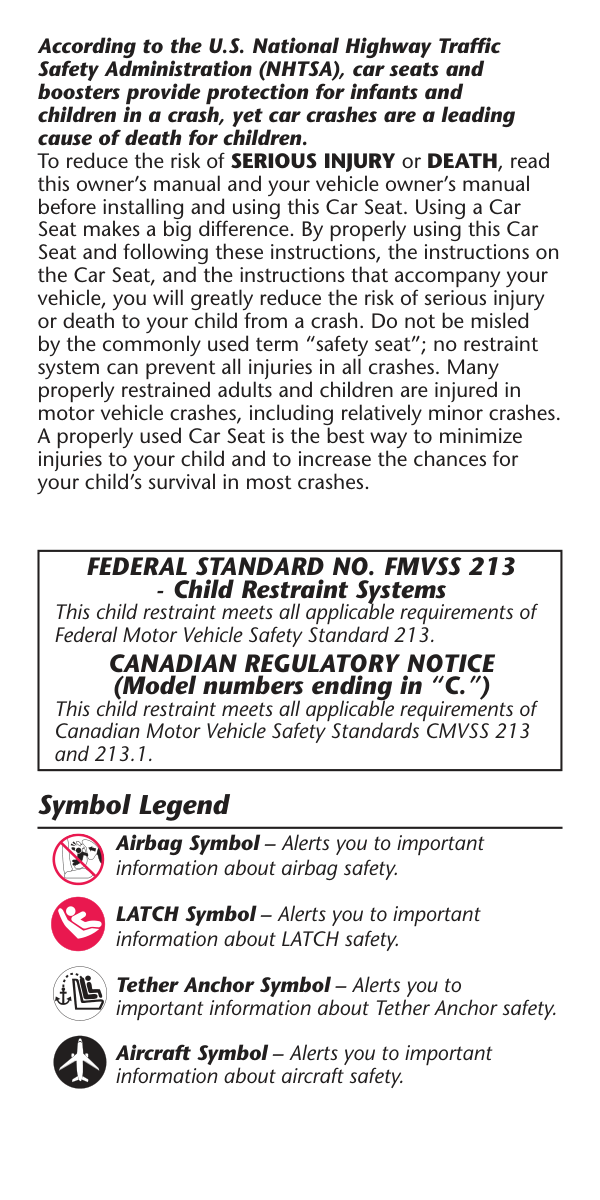
Federal Standard No. Fmvss 213
Canadian Regulatory Notice
(Model numbers ending in “C.”) This child restraint meets all applicable requirements of Canadian Motor Vehicle Safety Standards CMVSS 213 and 213.1. According to the U.S. National Highway Traffic Safety Administration (NHTSA), car seats and boosters provide protection for infants and children in a crash, yet car crashes are a leading cause of death for children. To reduce the risk of SERIOUS INJURY or DEATH, read this owner’s manual and your vehicle owner’s manual before installing and using this Car Seat. Using a Car Seat makes a big difference. By properly using this Car Seat and following these instructions, the instructions on the Car Seat, and the instructions that accompany your vehicle, you will greatly reduce the risk of serious injury or death to your child from a crash. Do not be misled by the commonly used term “safety seat”; no restraint system can prevent all injuries in all crashes. Many properly restrained adults and children are injured in motor vehicle crashes, including relatively minor crashes. A properly used Car Seat is the best way to minimize injuries to your child and to increase the chances for your child’s survival in most crashes. Symbol Legend Airbag Symbol – Alerts you to important information about airbag safety. LATCH Symbol – Alerts you to important information about LATCH safety. Tether Anchor Symbol – Alerts you to important information about Tether Anchor safety. Aircraft Symbol – Alerts you to important information about aircraft safety.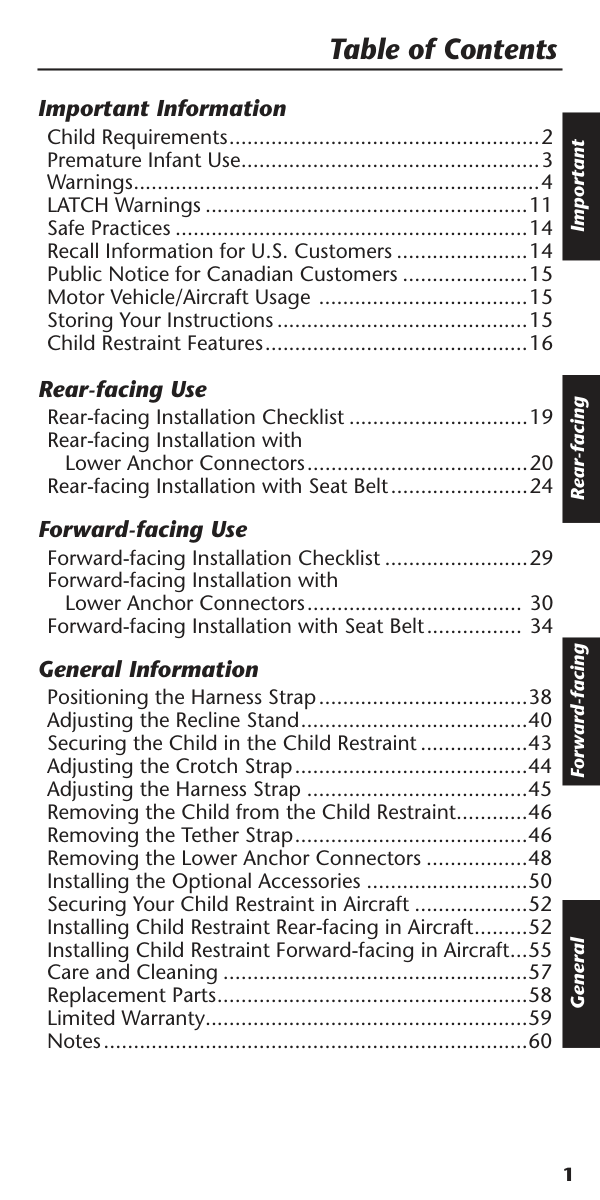
1 Table of Contents Rear-facing Forward-facing General Important Important Information Child Requirements.....................................................2 Premature Infant Use...................................................3 Warnings.....................................................................4 LATCH Warnings.......................................................11 Safe Practices............................................................14 Recall Information for U.S. Customers.......................14 Public Notice for Canadian Customers......................15 Motor Vehicle/Aircraft Usage ....................................15 Storing Your Instructions...........................................15 Child Restraint Features.............................................16 Rear-facing Use Rear-facing Installation Checklist...............................19 Rear-facing Installation with Lower Anchor Connectors......................................20 Rear-facing Installation with Seat Belt........................24 Forward-facing Use Forward-facing Installation Checklist.........................29 Forward-facing Installation with Lower Anchor Connectors..................................... 30 Forward-facing Installation with Seat Belt................. 34 General Information Positioning the Harness Strap....................................38 Adjusting the Recline Stand.......................................40 Securing the Child in the Child Restraint...................43 Adjusting the Crotch Strap........................................44 Adjusting the Harness Strap......................................45 Removing the Child from the Child Restraint.............46 Removing the Tether Strap........................................46 Removing the Lower Anchor Connectors..................48 Installing the Optional Accessories............................50 Securing Your Child Restraint in Aircraft....................52 Installing Child Restraint Rear-facing in Aircraft..........52 Installing Child Restraint Forward-facing in Aircraft....55 Care and Cleaning....................................................57 Replacement Parts.....................................................58 Limited Warranty......................................................59 Notes........................................................................60
2
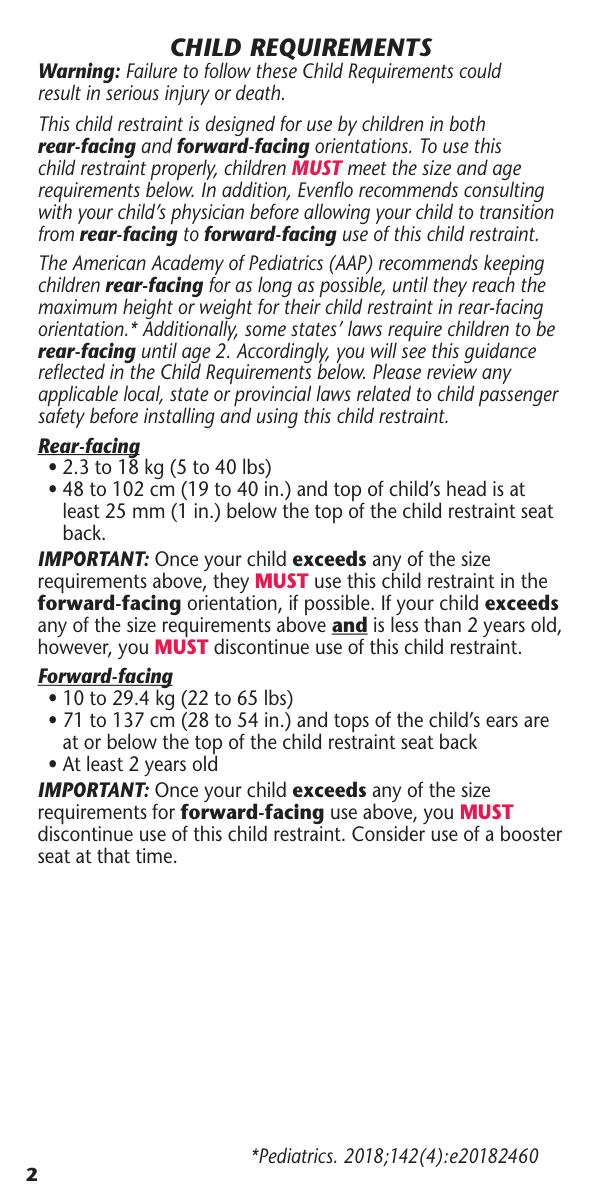
Child Requirements
Warning: Failure to follow these Child Requirements could result in serious injury or death. This child restraint is designed for use by children in both rear-facing and forward-facing orientations. To use this child restraint properly, children MUST meet the size and age requirements below. In addition, Evenflo recommends consulting with your child’s physician before allowing your child to transition from rear-facing to forward-facing use of this child restraint. The American Academy of Pediatrics (AAP) recommends keeping children rear-facing for as long as possible, until they reach the maximum height or weight for their child restraint in rear-facing orientation.* Additionally, some states’ laws require children to be rear-facing until age 2. Accordingly, you will see this guidance reflected in the Child Requirements below. Please review any applicable local, state or provincial laws related to child passenger safety before installing and using this child restraint. Rear-facing
3 Before using this child restraint for preterm or low birth weight infants, ensure the Child Requirements are met and follow the guidelines in this section. According to the U.S. National Highway Traffic Safety Administration, a properly installed child restraint reduces the risk of death by over 70 percent for infants involved in crashes. Federal Motor Vehicle Safety Standard (FMVSS) 213 establishes design and dynamic performance requirements for child restraint systems. However, the standard has no minimum weight limit and does not address the special medical needs of preterm or low-birth weight infants. To ensure that preterm and low-birth weight infants are transported safely, the guidelines published by the American Academy of Pediatrics (AAP) in Pediatrics 2009; 123:1424–1429 must be followed (reaffirmed June 2018). All children should ride rear-facing in the vehicle as long as possible. Preterm and low-birth weight infants are at additional risk of breathing difficulties and heart problems when placed in a child restraint. Evenflo requires that the evaluation recommended by the AAP be conducted for all infants born earlier than 37 weeks and all newborn infants who weigh less than 2.26 kg (5 pounds) at birth before their first car trip to check for breathing difficulties or heart rate problems when traveling in a rear-facing child restraint. The AAP recommends that appropriate hospital staff observe your infant in the child restraint for a period of 90 to 120 minutes or the duration of travel, whichever is longer. This period of observation must be performed with the infant properly positioned as described in these instructions and with the child restraint placed at an angle that is approved for use in the vehicle. The hospital staff will check for any breathing difficulties or heart rate problems. Your child’s pediatrician will let you know if there are any special considerations for travel. The number of trips and the duration of time the infant is seated in the child restraint should be minimized. A caregiver should ride in the back seat to monitor the infant during travel. You can learn more about the AAP’s recommendations for observation of newborns and the guidelines for safe transportation of preterm and low-birth weight infants, as well as other resources for parents and medical professionals, at https://www.healthychildren.org/english/safety- prevention/on-the-go/Pages/default.aspx
Premature Infant Use
Important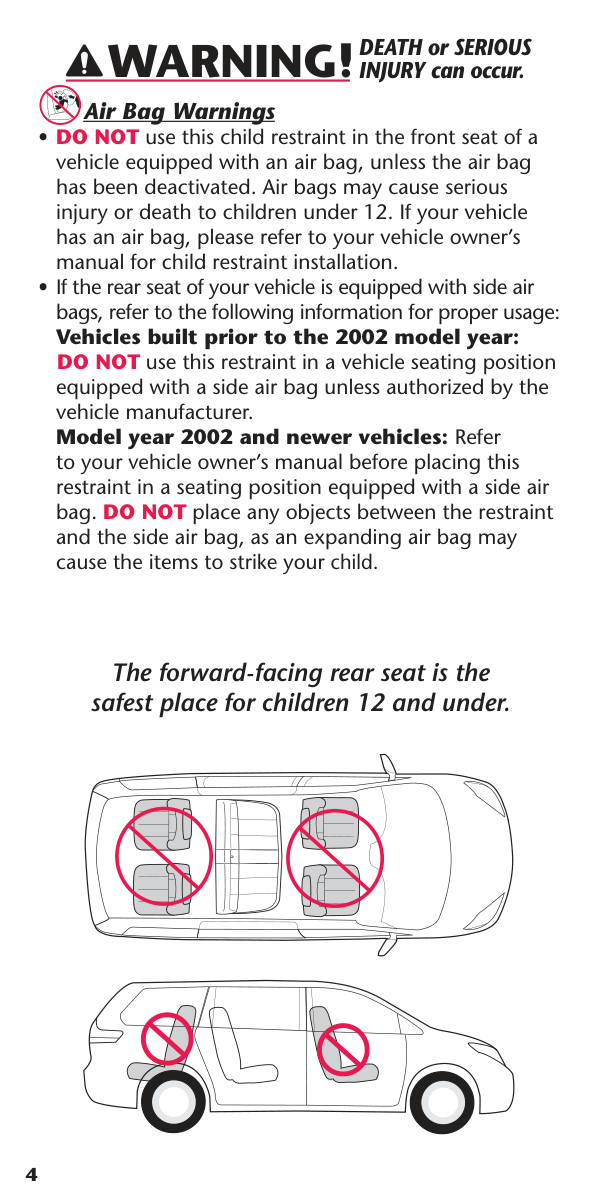
4 Air Bag Warnings
Warning!
DEATH or SERIOUS INJURY can occur.
5 Important General Warnings Rear-facing and Forward-facing Use
Warning/Mise En Garde
Des enfants se sont ÉTRANGLÉS dans des sangles de harnais desserrées ou mal serrées. Attacher complètement l’enfant même lorsque le porte-bébé est utilisé hors du véhicule.Warning!
DEATH or SERIOUS INJURY can occur.
6 Location Warnings Rear-facing and Forward-facing Use
• Vehicle Types Which The Restraint
System Can Not Be Used With:
Warning!
DEATH or SERIOUS INJURY can occur.
7 Important Rear-facing Only Warnings
Warning!
DEATH or SERIOUS INJURY can occur.
8 Seat Belt Warnings Rear-facing and Forward-facing Use
Warning!
DEATH or SERIOUS INJURY can occur. Retractor
9 Important Seat Belt Warnings (cont.)
Warning!
DEATH or SERIOUS INJURY can occur.
10 Seat Belt Warnings (cont.) If you have any of these types of vehicle belt systems listed, these are SAFE to use to install your child restraint in the vehicle. Review vehicle owner’s manual for specific instructions on child restraint installation. LATCH can be used IN PLACE OF these vehicle belt types. Refer to the Rear-facing and Forward-facing weight limits on LATCH use on pages 20 and 30. Refer to your vehicle owner’s manual for LATCH locations. Lap Belt with Automatic Locking Retractor (ALR) The automatic locking retractor does not allow the lap belt to get longer once it is buckled. The vehi cle belt is tightened by feeding seat belt webbing into retractor. Lap Belt with Locking Latch Plate Once buckled, the vehicle belt is tightened by pulling on the free end of the strap until the belt is tight. Free end Lap/Shoulder Belt with Locking Latch Plate Lap/Shoulder Belt with Sliding Latch Plate with Locking Retractor The latch plate slides freely along the lap/shoulder belt. Vehicle belts with sliding latch plates are typically locked at the shoulder belt retractor by buckling the belt and pulling all of the webbing out slowly to switch the retractor. Check vehicle owner’s manual for specific instructions. The vehicle belt is tightened after switching the retractor by pulling up on shoulder belt and feeding the webbing into the retractor. The lap portion of this belt does not loosen once the belt is buckled. The vehicle belt is tightened by pulling up hard on shoulder belt and feeding the extra webbing into the retractor.
Warning!
DEATH or SERIOUS INJURY can occur.
11 LATCH Warnings Rear-facing and Forward-facing Use What is LATCH? LATCH is an acronym for (Lower Anchors and Tethers for CHildren) and refers to a pair of fixed Lower Anchors (or bars) and a Top Tether anchor that are built into your vehicle, in vehicles built after September 1, 2002.
The lower LATCH anchors are located in the crease, or bight, between the vehicle seat back and seat cushion, and if not visible, will typically be indicated by symbol. Top tether anchors are located in various places behind the rear vehicle seat. Center installation in a non-standard LATCH position: Center installation of this child restraint is permitted using inner Lower Anchor Bars from the outside seating positions if (1) your vehicle manual allows such installation; and (2) the inner Lower Anchor Bars from the outside seating positions are 28-51 cm (11-20 in.) apart. LATCH typically offers an easier and more consistent installation. However, this child restraint can be safely installed using either LATCH or vehicle belts and meets the requirements of Federal Safety Standard FMVSS 213 with either installation method. Either method is safe for your child when installed correctly. When using either method, ALWAYS use tether when installing in the forward-facing position. DO NOT install this child restraint with LATCH and the vehicle’s seat belts at the same time. Your vehicle owner’s manual may refer to this system as ISOFIX, Universal Anchorage System (UAS), or Lower Universal Anchorage System. The LATCH system is intended to be used ONLY as described in these instructions. Serious injury or death may result from misuse. Refer to your vehicle Owner’s Manual for lower anchor bar positions in your vehicle.
Warning!
DEATH or SERIOUS INJURY can occur. Vehicle Lower Anchors Vehicle Top Tether Anchor Points Vehicle Seat Crease Important
12
Warning!
DEATH or SERIOUS INJURY can occur. LATCH Warnings (cont.) Rear-facing and Forward-facing Use
13 Tether Strap Warnings Forward-facing Use Only
Warning!
DEATH or SERIOUS INJURY can occur. Important
14 Safe Practices
Evenflo Company, Inc.,
1801 Commerce Dr.,
Piqua, OH 45356
or call 1-800-233-5921.
or register online at:
www.evenflo.com/registercarseat

15 Public Notice for Canadian Customers
Evenflo Company, Inc.,
1801 Commerce Dr.,
Piqua, OH 45356
or call 1-937-773-3971.
or register online at:
www.evenflo.com/registercarseatcanada

16 Child Restraint Features Front View Note: Recline Stand is nested below child restraint. Top 2 Harness Positions for Forward-facing
Only
Bottom 3 Harness Positions for Rear-facingOnly
Back View For U.S. Customers: This set of harness slots can be for either forward-facing or rear-facing use. For Canadian Customers: This set of harness slots can ONLY be used forward-facing. 2 1 3 4 5 13 14 12 11 9 7 8 6 15 10 16
17

18 Using the Child Restraint Rear-facing IMPORTANT: Once your child exceeds any of the size requirements above, they MUST use this child restraint in the forward-facing orientation, if possible. If your child exceeds any of the size requirements above and is less than 2 years old, however, you MUST discontinue use of this child restraint. Note: When in rear-facing position, bottom of child restraint MUST be entirely on vehicle seat. Child Requirements:

19
Chest clip MUST be at armpit level (page 43).
Warning!
DEATH or SERIOUS INJURY can occur.
20 LATCH is a system for attaching the child restraint to your vehicle seat. It is to be used in place of your vehicle’s seat belts and can be used in vehicles with LATCH anchors. DO NOT install this child restraint with LATCH and the vehicle’s seat belts. Your vehicle owner’s manual may refer to this system as ISOFIX, Universal Anchorage System (UAS), or Lower Universal Anchorage System. Rear-facing Installation with Lower Anchor Connectors To avoid a strangulation hazard, you MUST store the unused lower anchor connector assembly, with all slack removed, in storage area on the back of the seat (page 47). Roll or fold excess lower anchor connector strap and secure with a rubber band to prevent serious injury to vehicle occupants. 1 Infants MUST always ride facing the rear of the vehicle. NEVER turn a child restraint forward-facing with a child who weighs less than 10 kg (22 lbs). Crash forces may cause serious injury or death. For complete child requirements for forward-facing use, see page 2. Adjust the child restraint to the recline position (page 40). Place the child restraint in your vehicle rear-facing. Adjust the restraint so that the level arrow A is level with the ground.
Arrow Must Be Level With
Ground When Used Rear-Facing
Rear Of Vehicle
Arrow Must Be Level With
Ground When Used Rear-Facing
Rear Of Vehicle
A
Important:
Center installation of this child restraint is permitted using inner Lower Anchor Bars from the outside seating positions if:Warning!
DEATH or SERIOUS INJURY can occur.Warning!
DEATH or SERIOUS INJURY can occur.
21 Make sure both harness straps are installed completely on the splitter plate, as shown. Failure to properly attach the harness straps to the splitter plate may result in a loose harness and serious injury or death to your child. Attach the harness straps B to the splitter plate C using the infant position (page 39) on the harness straps. As your child grows, you can attach the harness straps B to the splitter plate using the pockets at the end of the straps. 2 Pull the seat pad off of the front of the child restraint. Route the Lower Anchor Connector strap D and hook through the rear-facing belt paths E. IMPORTANT: Make sure the Lower Anchor Connector strap D is in front of the crotch strap F, and it lies flat without twisting, as shown. Reconnect the seat pad to the front of the child restraint. Rear-facing Installation with Lower Anchor Connectors
C
B
B
E
F
D
3 Rear-facingWarning!
DEATH or SERIOUS INJURY can occur.
22 Rear-facing Installation with Lower Anchor Connectors Make sure the harness straps are in one of the three lower strap slots G. The harness straps MUST start at shoulder height or lower, using the strap slots closest to your child’s shoulders H, as shown. 4 DO NOT use the upper harness slots rear-facing. The harness may not properly restrain the child during a crash. U.S. Customers Only: For a taller child, the fourth set of harness slots I can be used. Note: These slots MUST start at shoulder height or lower and be the closest slots to your child's shoulders. SecureRight™ Quick Connector™ Clip Strap Adjuster Refer to your vehicle owner’s manual to locate the lower anchor bars J on your vehicle seat. Attach the right hook K, or clip L, to the right anchor bar J and the left hook, or clip, to the left anchor bar. DOUBLE CHECK that the lower anchor connector hook is fully engaged by pulling hard on the lower anchor connector strap. 5
J
J
K
J
L
Know Your Lower Anchor Connector Assembly The lower anchor connector assembly that comes with your child restraint will be one of the two types below. Hook Adjuster StrapG
H
I
Warning!
DEATH or SERIOUS INJURY can occur.
23 Rear-facing Installation with Lower Anchor Connectors
E
DO NOT use this child restraint if it moves more than 25 mm (1 in.) side-to-side or front to back at the rear-facing belt path. Serious injury or death may result from poor installation. If you can not tightly secure the child restraint, try again or move it to another location, or install with the vehicle seat belt. Using your full weight, push the child restraint firmly into the vehicle seat while pulling up on the lower anchor connector assembly strap to tighten. The lower anchor connector assembly strap must be as tight as possible. If you can move the child restraint more than 25 mm (1 in.) side to side or front to back at the rear-facing belt path E, the lower anchor connector assembly strap is not tight enough. You will need to try again, find another location for your child restraint, or install with the vehicle seat belt (page 24). To remove the lower anchor connector assembly strap, go to page 48. 6 Rear-facingWarning!
DEATH or SERIOUS INJURY can occur.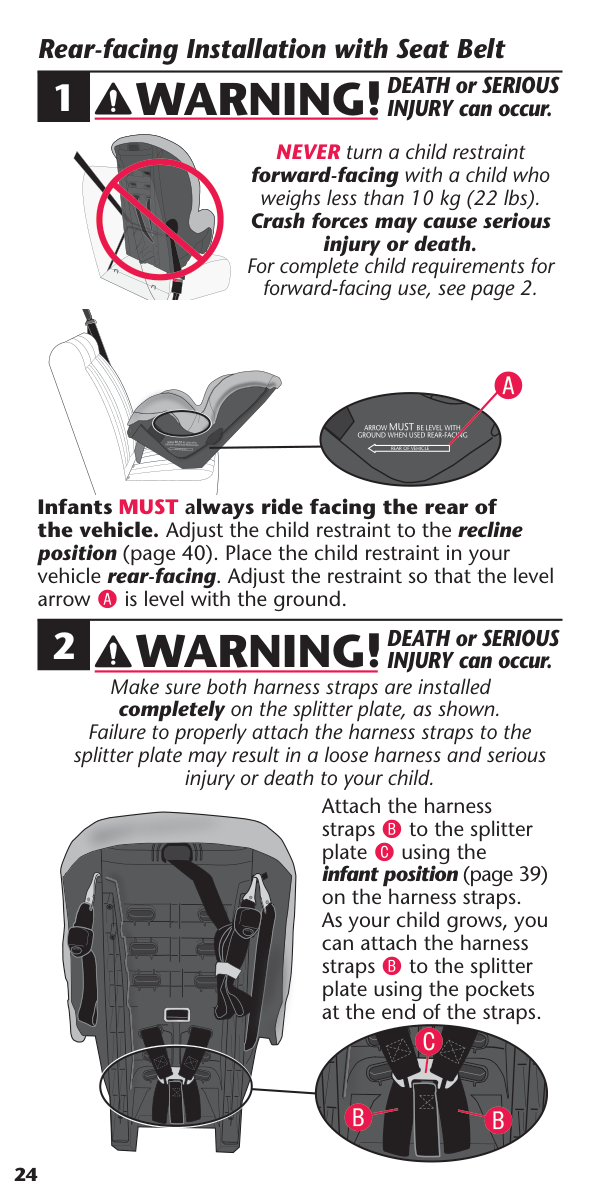
24 Rear-facing Installation with Seat Belt Attach the harness straps B to the splitter plate C using the infant position (page 39) on the harness straps. As your child grows, you can attach the harness straps B to the splitter plate using the pockets at the end of the straps. 1 Infants MUST always ride facing the rear of the vehicle. Adjust the child restraint to the recline position (page 40). Place the child restraint in your vehicle rear-facing. Adjust the restraint so that the level arrow A is level with the ground. NEVER turn a child restraint forward-facing with a child who weighs less than 10 kg (22 lbs). Crash forces may cause serious injury or death. For complete child requirements for forward-facing use, see page 2.
Arrow Must Be Level With
Ground When Used Rear-Facing
Rear Of Vehicle
Arrow Must Be Level With
Ground When Used Rear-Facing
Rear Of Vehicle
A
C
B
B
2 Make sure both harness straps are installed completely on the splitter plate, as shown. Failure to properly attach the harness straps to the splitter plate may result in a loose harness and serious injury or death to your child.Warning!
DEATH or SERIOUS INJURY can occur.Warning!
DEATH or SERIOUS INJURY can occur.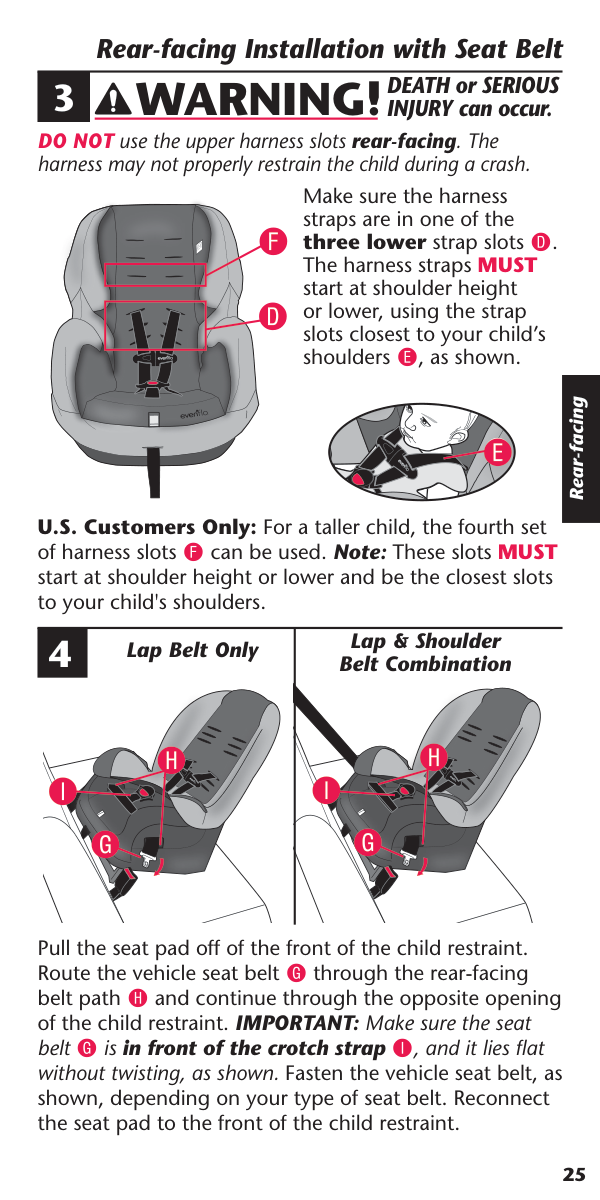
25 Make sure the harness straps are in one of the three lower strap slots D. The harness straps MUST start at shoulder height or lower, using the strap slots closest to your child’s shoulders E, as shown. 3 DO NOT use the upper harness slots rear-facing. The harness may not properly restrain the child during a crash. Lap Belt Only Lap & Shoulder Belt Combination Pull the seat pad off of the front of the child restraint. Route the vehicle seat belt G through the rear-facing belt path H and continue through the opposite opening of the child restraint. IMPORTANT: Make sure the seat belt G is in front of the crotch strap I, and it lies flat without twisting, as shown. Fasten the vehicle seat belt, as shown, depending on your type of seat belt. Reconnect the seat pad to the front of the child restraint. U.S. Customers Only: For a taller child, the fourth set of harness slots F can be used. Note: These slots MUST start at shoulder height or lower and be the closest slots to your child's shoulders. Rear-facing Installation with Seat Belt
E
D
F
G
I
H
G
H
I
4 Rear-facingWarning!
DEATH or SERIOUS INJURY can occur.
26 5 Remove Locking Clip from vehicle seat belt when not used with a child restraint, or the vehicle seat belt will not properly restrain an adult or child. Serious injury could occur. If your vehicle is model year 1996 or newer, it likely has a vehicle belt system that can be locked when tightened, and will not require use of a Locking Clip. Consult your vehicle owner’s manual before installing a locking clip. If your vehicle requires a Locking Clip, please call ParentLink at 1-800-233-5921 (U.S.) or 1-937-773- 3971 (Canada), or 800-706-1200 (Mexico). to obtain a Locking Clip and instructions on how to install and use it. Install Locking Clip (not included), if necessary. If your vehicle was built prior to model year 1996, and has a lap/shoulder belt that is equipped with an emergency locking retractor (ELR) AND sliding latch plate, you MUST use a Locking Clip. Check your vehicle owner’s manual to identify which vehicle belt system is in your vehicle. Locking Clip installed properly
13 mm (0.5 in.) Rear-facing Installation with Seat Belt
Warning!
DEATH or SERIOUS INJURY can occur.
27 Rear-facing 6 The seat belt must be as tight as possible. Put your full weight onto the child restraint as you tighten the seat belt G. Check your work. Make certain the belts are tight. If you can move the child restraint more than 25 mm (1 in.) side to side or front to back at the rear-facing belt path H, the vehicle belt is not tight enough. If you have not tightly secured the child restraint, try again, move it to another location, or install with the lower anchor connector assembly (p. 20).
H
G
Rear-facing Installation with Seat BeltWarning!
DEATH or SERIOUS INJURY can occur.
28 Using the Child Restraint Forward-facing Child Requirements:
Important:
When installing this child restraint with Lower Anchor Connectors or the vehicle seat belt, always use the top anchorage (tether) strap. Harness straps are Harness straps are at, or slightly above at, or slightly above the child’s shoulders. the child’s shoulders. Forward-facing Forward-facing Belt Path Belt Path Lower Anchor Lower Anchor Connector Connector Assembly Assembly Lower Anchor Lower Anchor Connector Connector Assembly Assembly Tether Tether Strap Strap
29
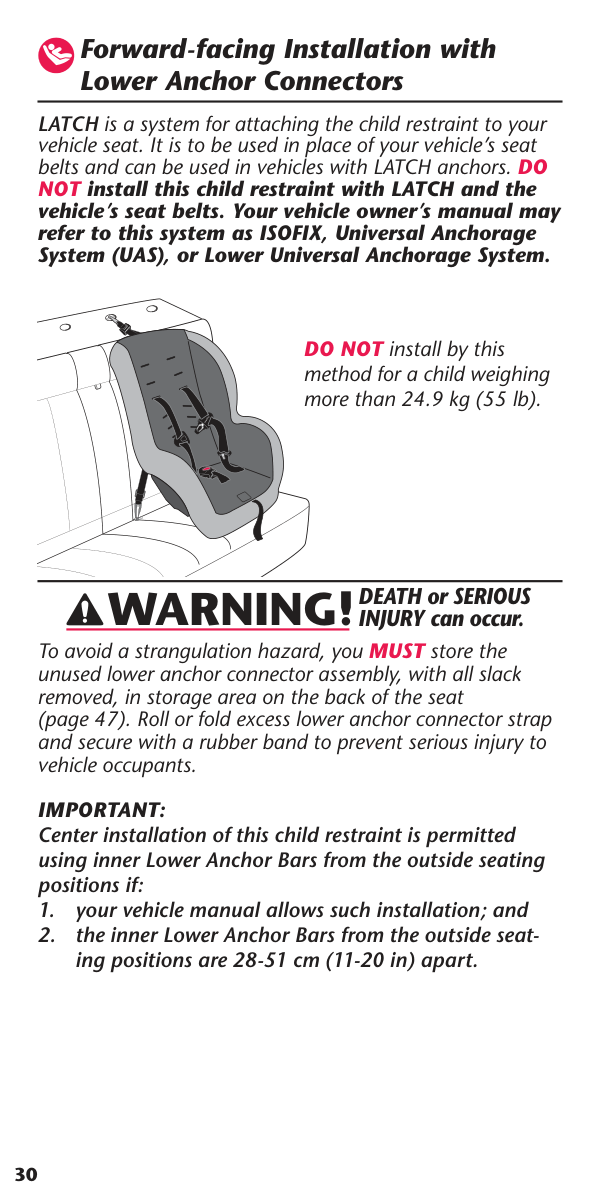
30 LATCH is a system for attaching the child restraint to your vehicle seat. It is to be used in place of your vehicle’s seat belts and can be used in vehicles with LATCH anchors. DO NOT install this child restraint with LATCH and the vehicle’s seat belts. Your vehicle owner’s manual may refer to this system as ISOFIX, Universal Anchorage System (UAS), or Lower Universal Anchorage System. To avoid a strangulation hazard, you MUST store the unused lower anchor connector assembly, with all slack removed, in storage area on the back of the seat (page 47). Roll or fold excess lower anchor connector strap and secure with a rubber band to prevent serious injury to vehicle occupants. Forward-facing Installation with Lower Anchor Connectors DO NOT install by this method for a child weighing more than 24.9 kg (55 lb).
Important:
Center installation of this child restraint is permitted using inner Lower Anchor Bars from the outside seating positions if:Warning!
DEATH or SERIOUS INJURY can occur.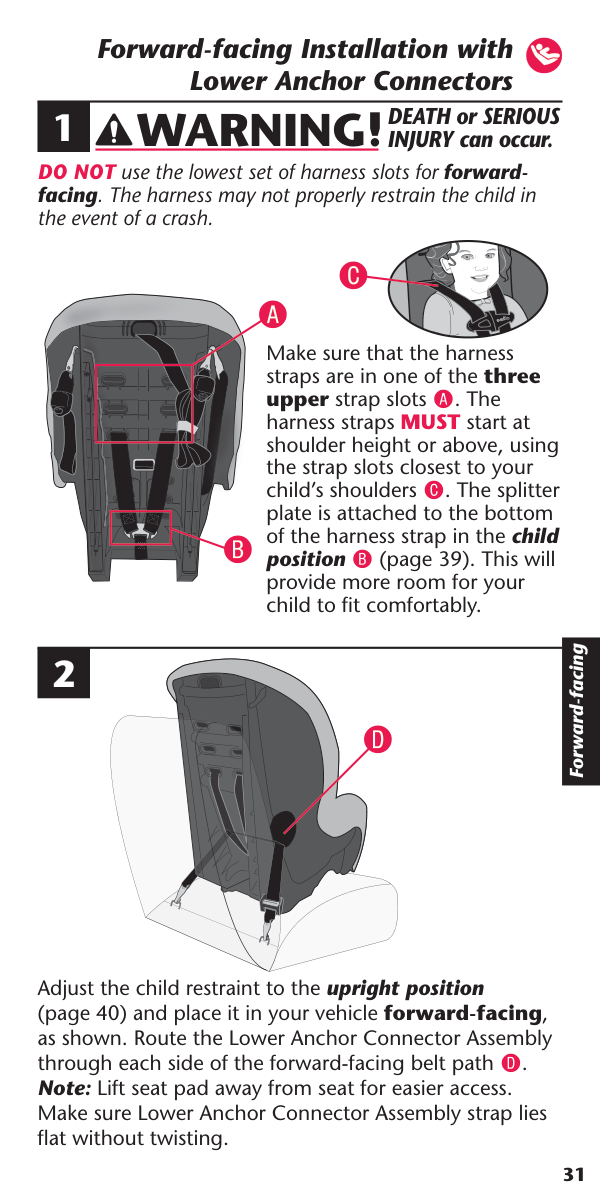
31 Adjust the child restraint to the upright position (page 40) and place it in your vehicle forward-facing, as shown. Route the Lower Anchor Connector Assembly through each side of the forward-facing belt path D. Note: Lift seat pad away from seat for easier access. Make sure Lower Anchor Connector Assembly strap lies flat without twisting. DO NOT use the lowest set of harness slots for forward- facing. The harness may not properly restrain the child in the event of a crash. 2
D
1 Forward-facing Installation with Lower Anchor Connectors Make sure that the harness straps are in one of the three upper strap slots A. The harness straps MUST start at shoulder height or above, using the strap slots closest to your child’s shoulders C. The splitter plate is attached to the bottom of the harness strap in the child position B (page 39). This will provide more room for your child to fit comfortably.B
A
C
Forward-facingWarning!
DEATH or SERIOUS INJURY can occur.
32 4 3
D
Hook Adjuster Strap SecureRight Quick Connector Clip Strap AdjusterE
E
F
E
G
Know Your Lower Anchor Connector Assembly The lower anchor connector assembly that comes with your child restraint will be one of the two types below. Refer to your vehicle owner’s manual to locate the lower anchor bars E on your vehicle seat. Attach the right hook F, or clip G, to the right anchor bar E and the left hook, or clip, to the left anchor bar. DOUBLE CHECK that the lower anchor connector hook is fully engaged by pulling hard on the lower anchor connector strap. DO NOT use this child restraint if it moves more than 25 mm (1 in.) side-to-side or front to back at the forward-facing belt path. Serious injury or death may result from poor installation. If you can not tightly secure the child restraint, try again, move it to another location, or install with the vehicle seat belt. Using your full weight, push the child restraint firmly into the vehicle seat, while pulling up on the lower anchor connector strap to tighten. The lower anchor connector strap must be as tight as possible. If you can move the child restraint more than 25 mm (1 in.) side to side or front to back at the belt path D, the lower anchor connector strap is not tight enough. You will need to try again, find another location for your child restraint, or install with the vehicle seat belt (page 34). To remove the lower anchor connector strap, go to page 48.Warning!
DEATH or SERIOUS INJURY can occur.
33
H
I
J
Forward-facingWarning!
DEATH or SERIOUS INJURY can occur.Warning!
DEATH or SERIOUS INJURY can occur.
34 Adjust the child restraint to the upright position (page 40). Place the child restraint in your vehicle forward-facing. If the vehicle belts are not routed and fastened correctly, the child restraint may not protect your child in a crash. Forward-facing Installation with Seat Belt DO NOT use the lowest set of harness slots for forward-facing. The harness may not properly restrain the child in the event of a crash. 1 3 Make sure that the harness straps are in one of the three upper strap slots A. The harness straps MUST start at shoulder height or above, using the strap slots closest to your child’s shoulders C. The splitter plate is attached to the bottom of the harness strap in the child position B (page 39). This will provide more room for your child to fit comfortably. Thread the vehicle seat belt D through the forward-facing belt path behind the seat pad. Note: Lift seat pad away from seat for easier access. Make sure vehicle seat belt lies flat without twisting.
B
A
C
2D
Warning!
DEATH or SERIOUS INJURY can occur.Warning!
DEATH or SERIOUS INJURY can occur.
35 Forward-facing Installation with Seat Belt Lap Belt Only Lap & Shoulder Belt 4 5 Remove Locking Clip from vehicle seat belt when not used with a child restraint, or the vehicle seat belt will not properly restrain an adult or child. Serious injury could occur. Fasten the vehicle seat belt as shown depending on your type of seat belt. Note: Install locking clip on lap and shoulder belt combinations, if necessary. If your vehicle is model year 1996 or newer, it likely has a vehicle belt system that can be locked when tightened, and will not require use of a Locking Clip. Consult your vehicle owner’s manual before installing a locking clip. If your vehicle requires a Locking Clip, please call ParentLink at 1-800-233-5921 (U.S.) or 1-937-773-3971 (Canada), or 800-706-1200 (Mexico) to obtain a Locking Clip and instructions on how to install and use it. Install Locking Clip (not included), if necessary. If your vehicle was built prior to model year 1996, and has a lap/shoulder belt that is equipped with an emergency locking retractor (ELR) AND sliding latch plate, you MUST use a Locking Clip. Check your vehicle owner’s manual to identify which vehicle belt system is in your vehicle. Locking Clip installed properly
13 mm (0.5 in.) Forward-facing
Warning!
DEATH or SERIOUS INJURY can occur.
36
E
6 The vehicle seat belt must be as tight as possible. Using your full weight, push the child restraint firmly into the vehicle seat as you tighten the vehicle belt. If you can move the child restraint more than 25 mm (1 in.) side to side or front to back at the forward-facing belt path E, the seat belt is not tight enough, you will need to try again, or install with the lower anchor connector assembly (page 30).Warning!
DEATH or SERIOUS INJURY can occur.
37 Forward-facing Installation with Seat Belt Forward-facing 7 After adjusting the top tether strap, you may have excess strap; DO NOT cut it off. If you do, it may not be long enough to use in another vehicle. Instead, tightly roll up the excess tether strap and place the rubber band around the bundle. Note: Refer to your vehicle owner’s manual for the location of the tether anchor bracket in your vehicle. Older vehicles may not come equipped with anchor bracket hardware. Check with your vehicle dealer. If you have questions regarding tether anchors that are not addressed by the vehicle owner’s manual or answered by an authorized dealer/vehicle manufacturer, call Evenflo’s ParentLink at 1-800-233-5921 (U.S.) or 1-937-773-3971 (Canada), or 800-706-1200 (Mexico).
F
G
H
Warning!
DEATH or SERIOUS INJURY can occur.Warning!
DEATH or SERIOUS INJURY can occur.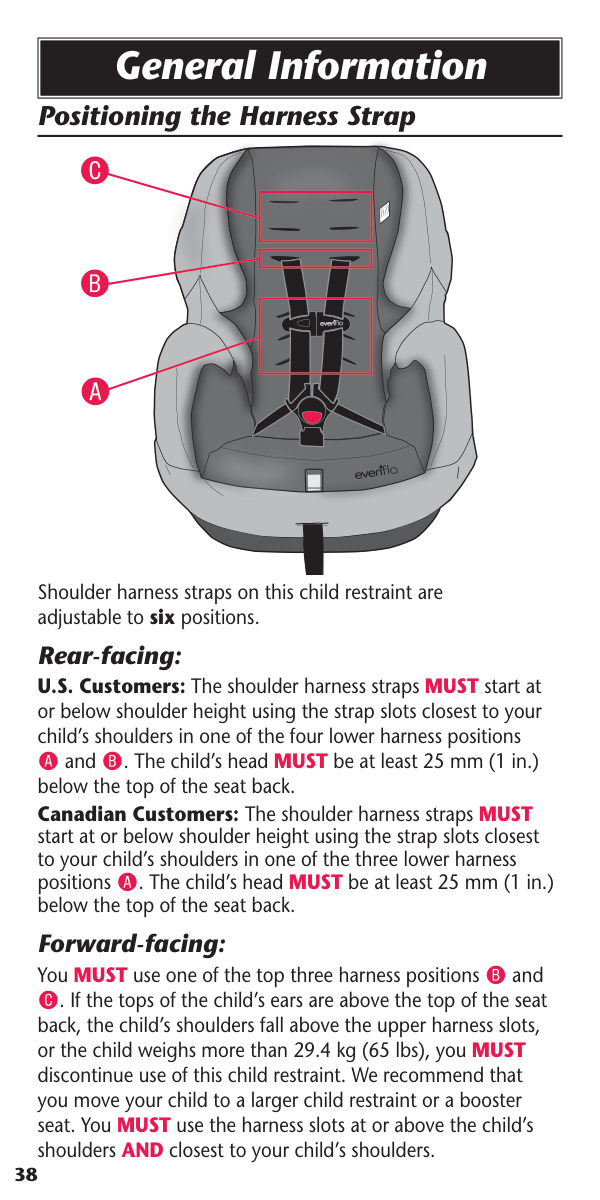
38 Positioning the Harness Strap General Information
A
C
B
Shoulder harness straps on this child restraint are adjustable to six positions. Rear-facing: U.S. Customers: The shoulder harness straps MUST start at or below shoulder height using the strap slots closest to your child’s shoulders in one of the four lower harness positions A and B. The child’s head MUST be at least 25 mm (1 in.) below the top of the seat back. Canadian Customers: The shoulder harness straps MUST start at or below shoulder height using the strap slots closest to your child’s shoulders in one of the three lower harness positions A. The child’s head MUST be at least 25 mm (1 in.) below the top of the seat back. Forward-facing: You MUST use one of the top three harness positions B and C. If the tops of the child’s ears are above the top of the seat back, the child’s shoulders fall above the upper harness slots, or the child weighs more than 29.4 kg (65 lbs), you MUST discontinue use of this child restraint. We recommend that you move your child to a larger child restraint or a booster seat. You MUST use the harness slots at or above the child’s shoulders AND closest to your child’s shoulders.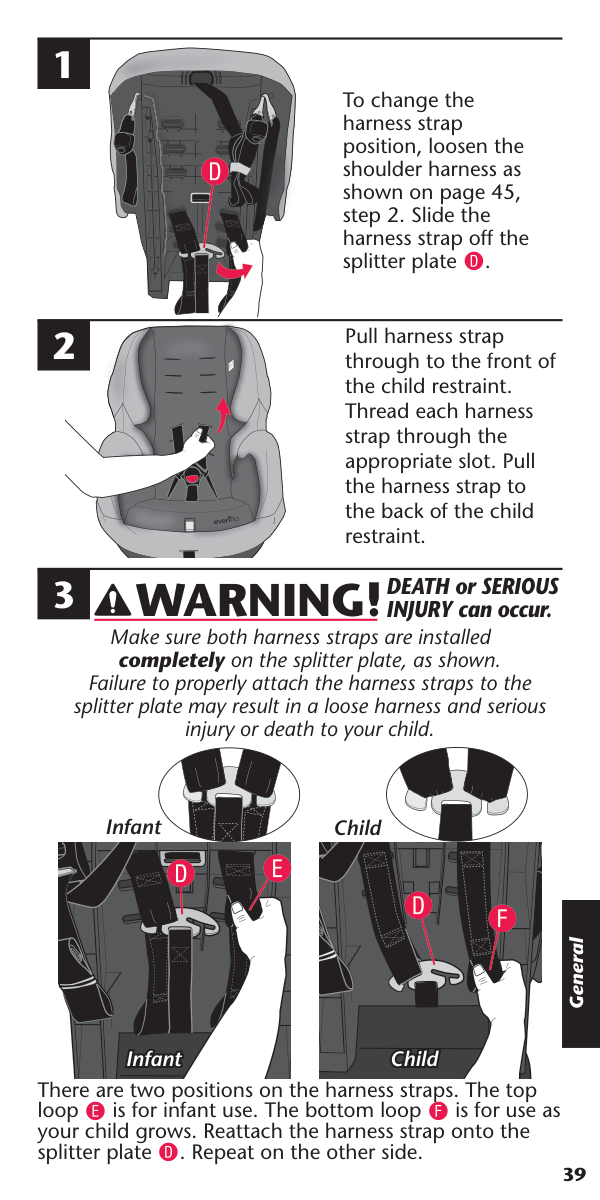
39 1 2 3
D
There are two positions on the harness straps. The top loop E is for infant use. The bottom loop F is for use as your child grows. Reattach the harness strap onto the splitter plate D. Repeat on the other side.D
F
Child ChildD
E
Infant Infant Child Infant To change the harness strap position, loosen the shoulder harness as shown on page 45, step 2. Slide the harness strap off the splitter plate D. Pull harness strap through to the front of the child restraint. Thread each harness strap through the appropriate slot. Pull the harness strap to the back of the child restraint. Make sure both harness straps are installed completely on the splitter plate, as shown. Failure to properly attach the harness straps to the splitter plate may result in a loose harness and serious injury or death to your child. GeneralWarning!
DEATH or SERIOUS INJURY can occur.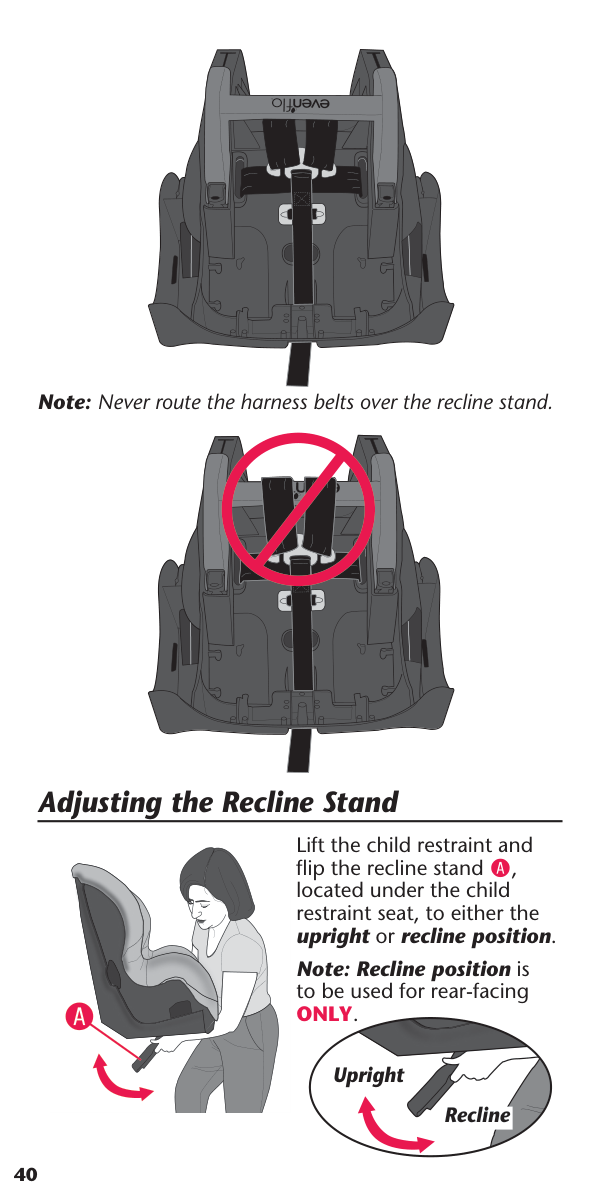
40 Adjusting the Recline Stand Lift the child restraint and flip the recline stand A, located under the child restraint seat, to either the upright or recline position. Note: Recline position is to be used for rear-facing
Only.
Upright ReclineA
Note: Never route the harness belts over the recline stand.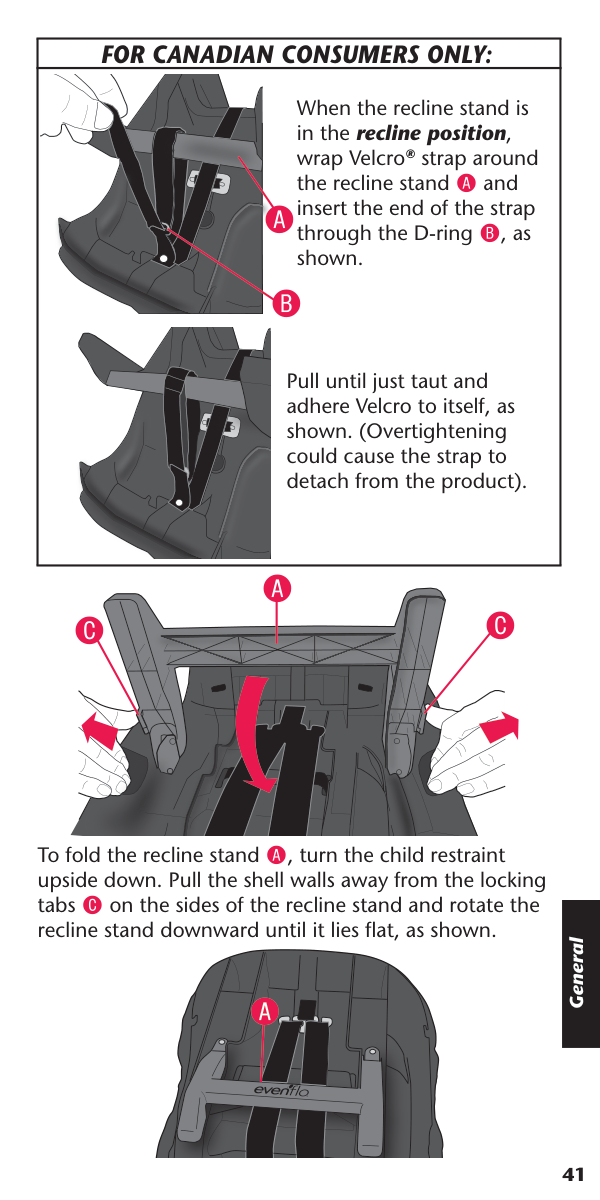
41 General To fold the recline stand A, turn the child restraint upside down. Pull the shell walls away from the locking tabs C on the sides of the recline stand and rotate the recline stand downward until it lies flat, as shown.
A
C
C
For Canadian Consumers Only:
When the recline stand is in the recline position, wrap Velcro® strap around the recline stand A and insert the end of the strap through the D-ring B, as shown.A
B
Pull until just taut and adhere Velcro to itself, as shown. (Overtightening could cause the strap to detach from the product).A
42
Arrow Must Be Level With
Ground When Used Rear-Facing
Rear Of Vehicle
E
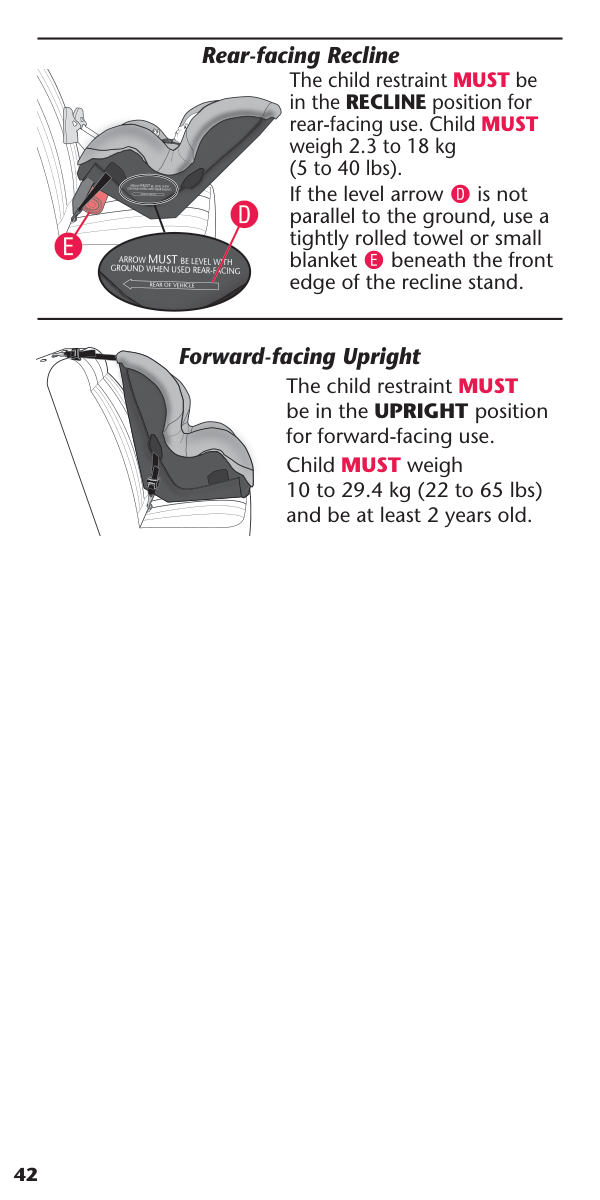
Rear-facing Recline The child restraint MUST be in the RECLINE position for rear-facing use. Child MUST weigh 2.3 to 18 kg (5 to 40 lbs). If the level arrow D is not parallel to the ground, use a tightly rolled towel or small blanket E beneath the front edge of the recline stand.Arrow Must Be Level With
Ground When Used Rear-Facing
Rear Of Vehicle
D
The child restraint MUST be in the UPRIGHT position for forward-facing use. Child MUST weigh 10 to 29.4 kg (22 to 65 lbs) and be at least 2 years old. Forward-facing Upright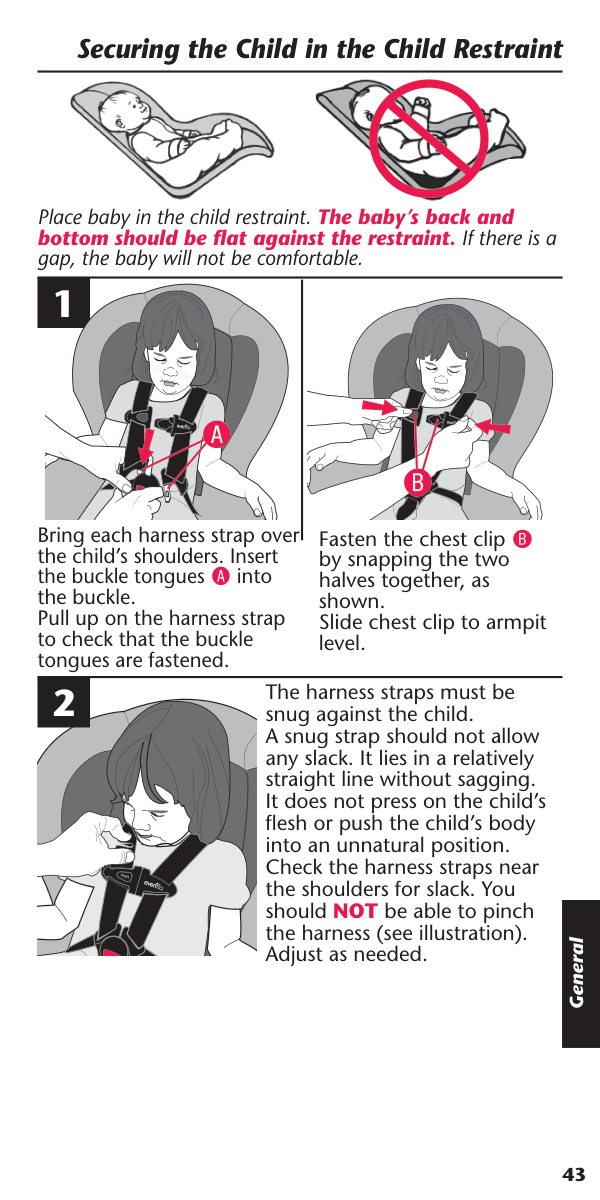
43 General Place baby in the child restraint. The baby’s back and bottom should be flat against the restraint. If there is a gap, the baby will not be comfortable. Securing the Child in the Child Restraint Bring each harness strap over the child’s shoulders. Insert the buckle tongues A into the buckle. Pull up on the harness strap to check that the buckle tongues are fastened. 2 The harness straps must be snug against the child. A snug strap should not allow any slack. It lies in a relatively straight line without sagging. It does not press on the child’s flesh or push the child’s body into an unnatural position. Check the harness straps near the shoulders for slack. You should NOT be able to pinch the harness (see illustration). Adjust as needed. Fasten the chest clip B by snapping the two halves together, as shown. Slide chest clip to armpit level. 1
A
B

44 For Newborn Position Place the anchor A through the rear slot, then feed it through the front slot. Make sure the anchor is completely through the front slot and is lying flat against the bottom of the seat. IMPORTANT: Do not use this configuration for infants weighing more than 4.5 kg (10 lbs). Adjusting the Crotch Strap To reposition the crotch strap, first turn the child restraint upside down. Turn the crotch strap harness anchor A sideways and push it through the slot in the bottom of the seat shell B. Reposition the harness anchor into the other slot. Make certain the harness anchor is properly seated against the seat shell B. Note: The crotch strap should be snug against the child. Choose the slot that is closest to the child AND the most comfortable for the child but NEVER under the child’s bottom. This Child Restraint Has Two Crotch Strap Positions
A
B
B
A
A
A
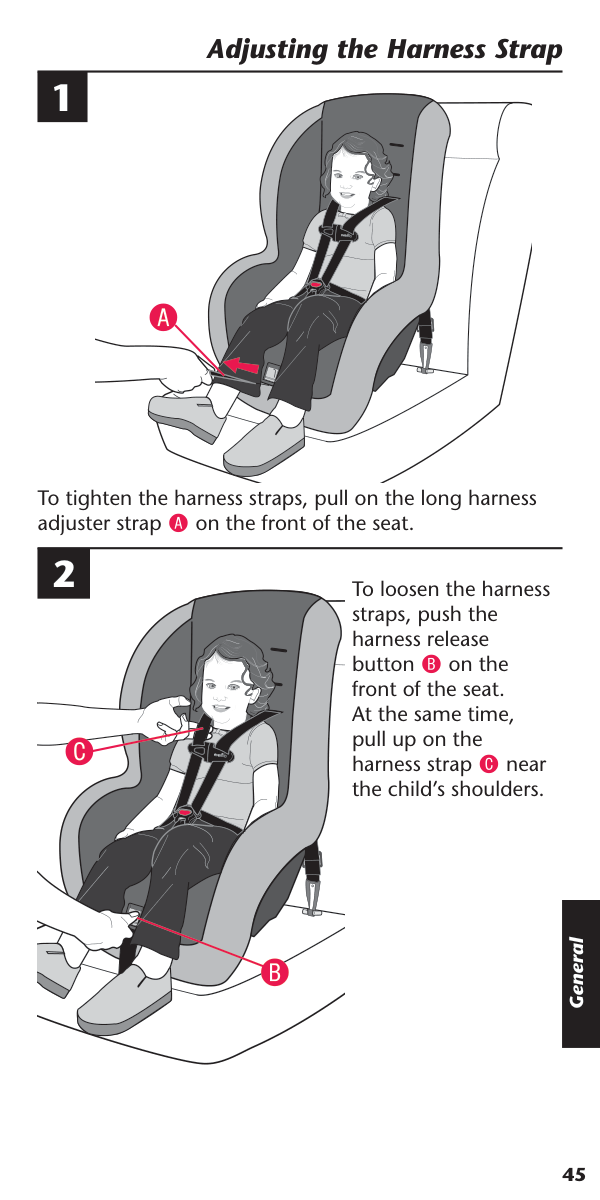
45 General To loosen the harness straps, push the harness release button B on the front of the seat. At the same time, pull up on the harness strap C near the child’s shoulders.
C
B
To tighten the harness straps, pull on the long harness adjuster strap A on the front of the seat. 1 Adjusting the Harness StrapA
2
46 Removing the Child from the Child Restraint Push the release button A and pull the chest clip apart. Press the red buckle release B and remove the buckle tongues C. Removing the Tether Strap 1 2 Press the tab C and twist, then remove the hook from the anchor D.
C
D
The tether strap that comes with your child restraint will be one of the two types below.A
B
Press the adjuster release button B to loosen. Tilt the adjuster A and slide the strap to loosen.A
B
C

47 3
E
GeneralWarning!
DEATH or SERIOUS INJURY can occur.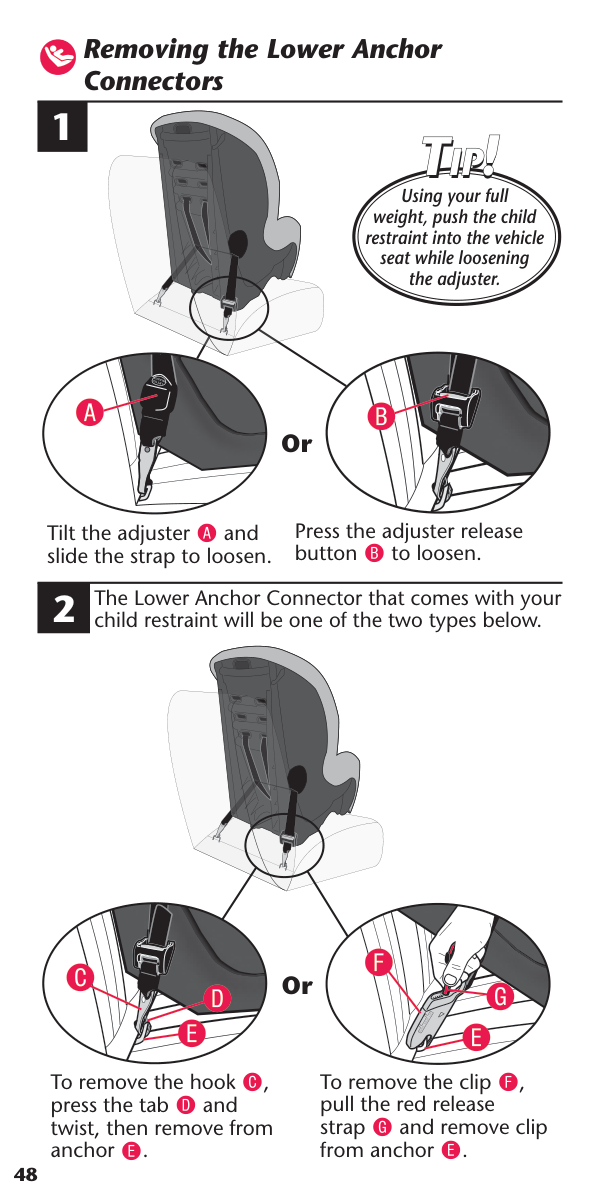
48 Removing the Lower Anchor Connectors 1
A
To remove the hook C, press the tab D and twist, then remove from anchor E.C
E
D
2B
Or To remove the clip F, pull the red release strap G and remove clip from anchor E.F
E
G
Or The Lower Anchor Connector that comes with your child restraint will be one of the two types below. Tilt the adjuster A and slide the strap to loosen. Press the adjuster release button B to loosen. Using your full weight, push the child restraint into the vehicle seat while loosening the adjuster. Tip! Tip! Tip!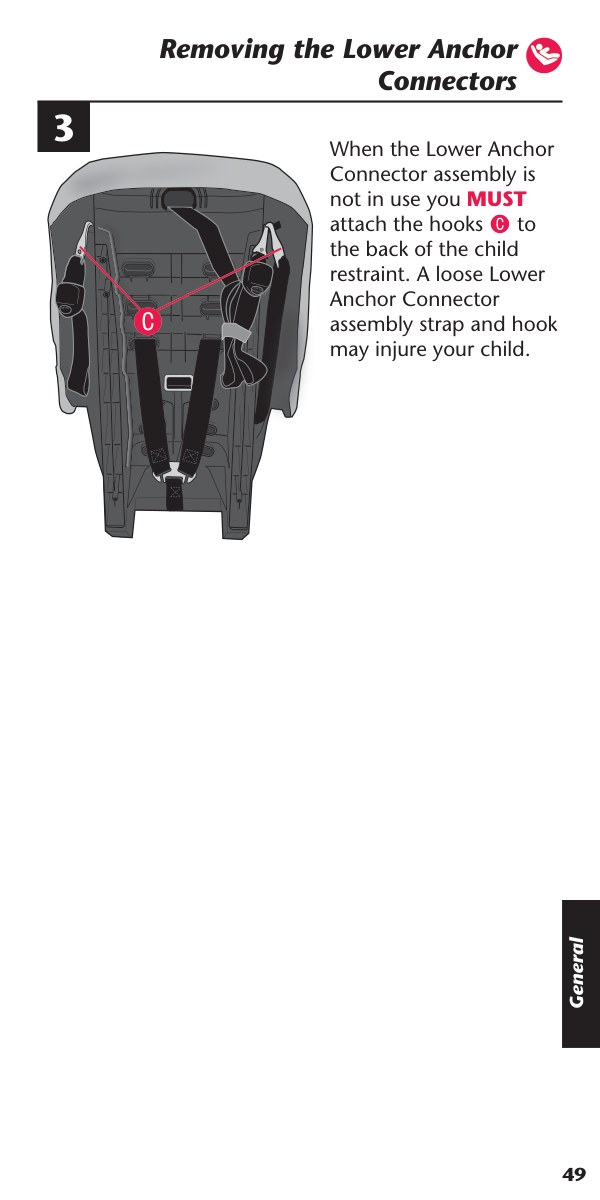
49 General When the Lower Anchor Connector assembly is not in use you MUST attach the hooks C to the back of the child restraint. A loose Lower Anchor Connector assembly strap and hook may injure your child. Removing the Lower Anchor Connectors
C
3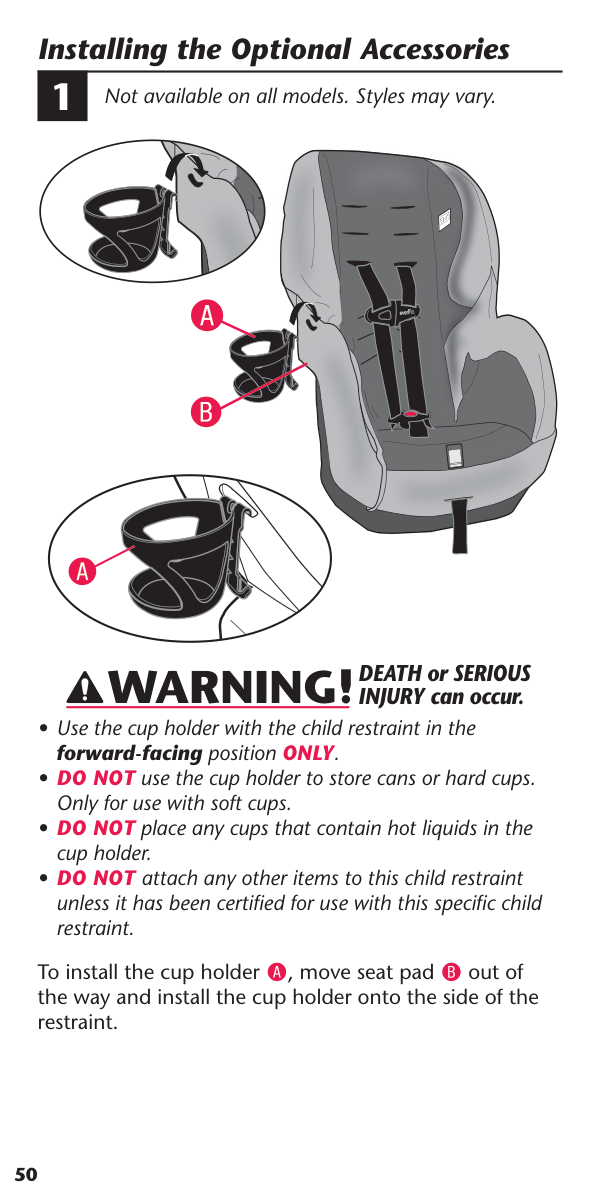
50 Not available on all models. Styles may vary. Installing the Optional Accessories
B
A
A
1Warning!
DEATH or SERIOUS INJURY can occur.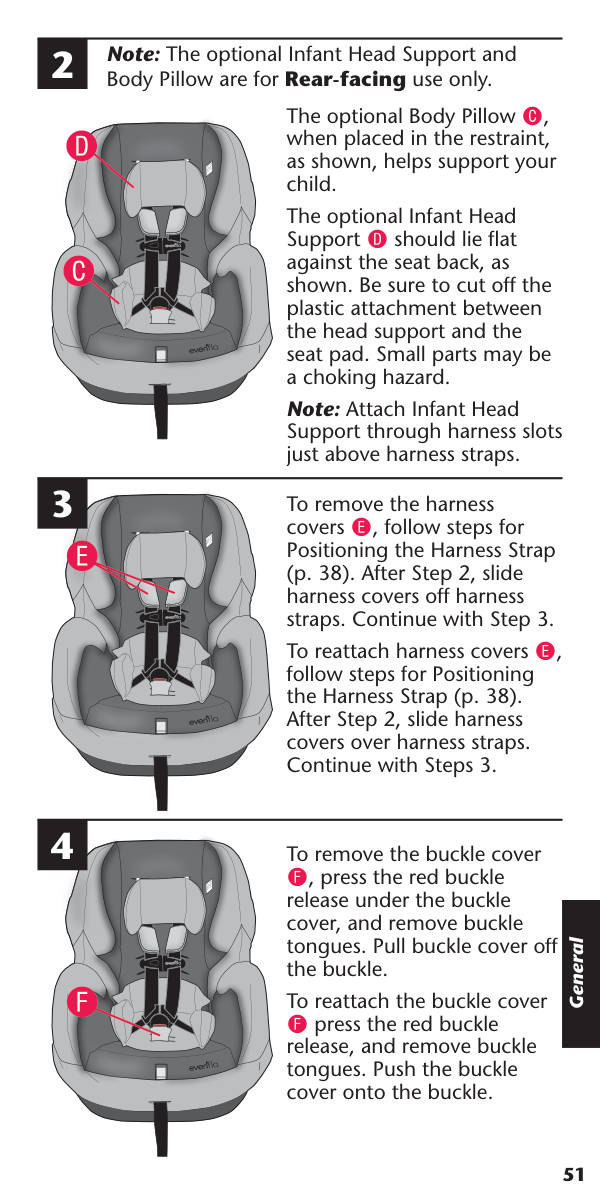
51 The optional Body Pillow C, when placed in the restraint, as shown, helps support your child. The optional Infant Head Support D should lie flat against the seat back, as shown. Be sure to cut off the plastic attachment between the head support and the seat pad. Small parts may be a choking hazard. Note: Attach Infant Head Support through harness slots just above harness straps. Note: The optional Infant Head Support and Body Pillow are for Rear-facing use only.
D
C
E
F
To remove the harness covers E, follow steps for Positioning the Harness Strap (p. 38). After Step 2, slide harness covers off harness straps. Continue with Step 3. To reattach harness covers E, follow steps for Positioning the Harness Strap (p. 38). After Step 2, slide harness covers over harness straps. Continue with Steps 3. To remove the buckle cover F, press the red buckle release under the buckle cover, and remove buckle tongues. Pull buckle cover off the buckle. To reattach the buckle cover F press the red buckle release, and remove buckle tongues. Push the buckle cover onto the buckle. 2 3 4 General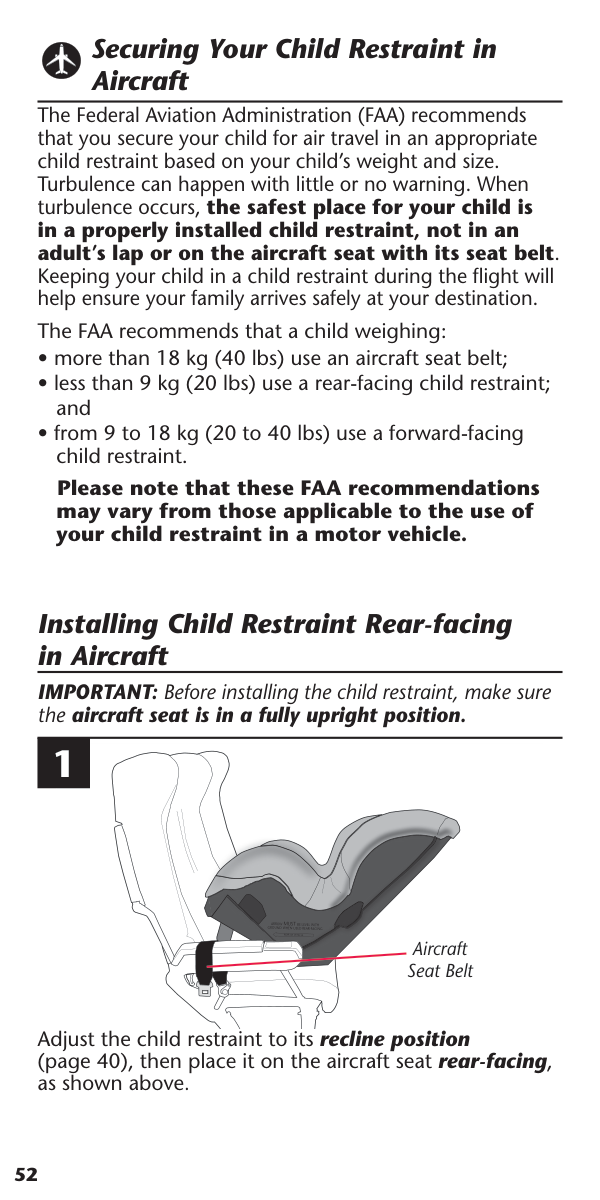
52 Securing Your Child Restraint in Aircraft The Federal Aviation Administration (FAA) recommends that you secure your child for air travel in an appropriate child restraint based on your child’s weight and size. Turbulence can happen with little or no warning. When turbulence occurs, the safest place for your child is in a properly installed child restraint, not in an adult’s lap or on the aircraft seat with its seat belt. Keeping your child in a child restraint during the flight will help ensure your family arrives safely at your destination. The FAA recommends that a child weighing:
Arrow Must Be Level With
Ground When Used Rear-Facing
Rear Of Vehicle
1 Aircraft Seat Belt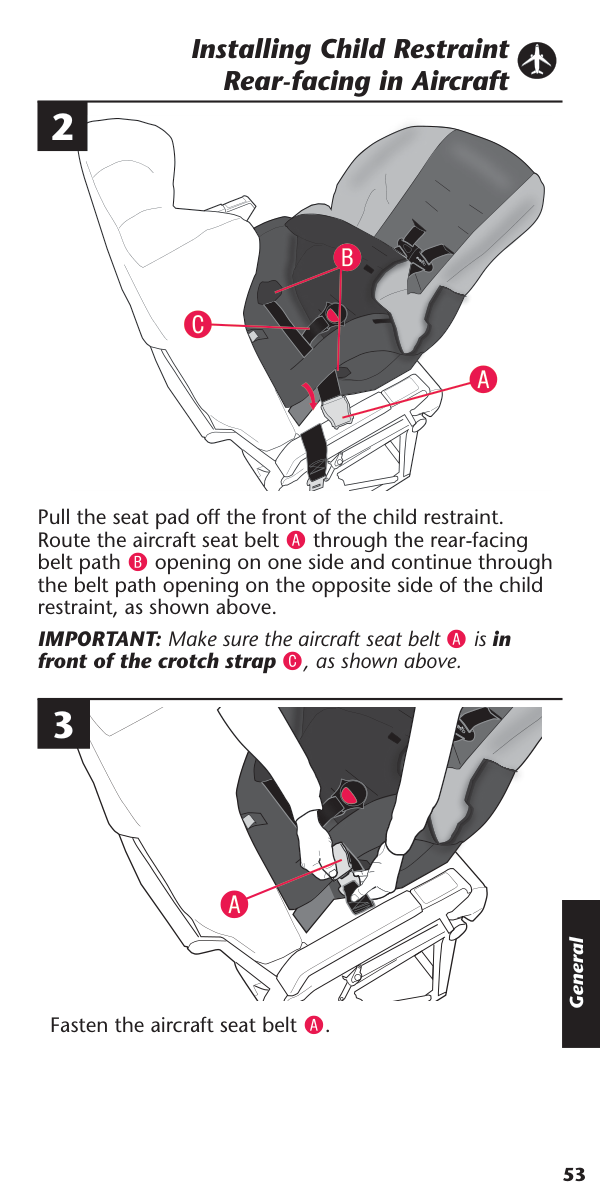
53 General Installing Child Restraint Rear-facing in Aircraft Pull the seat pad off the front of the child restraint. Route the aircraft seat belt A through the rear-facing belt path B opening on one side and continue through the belt path opening on the opposite side of the child restraint, as shown above. IMPORTANT: Make sure the aircraft seat belt A is in front of the crotch strap C, as shown above. Fasten the aircraft seat belt A.
A
B
C
2 3A
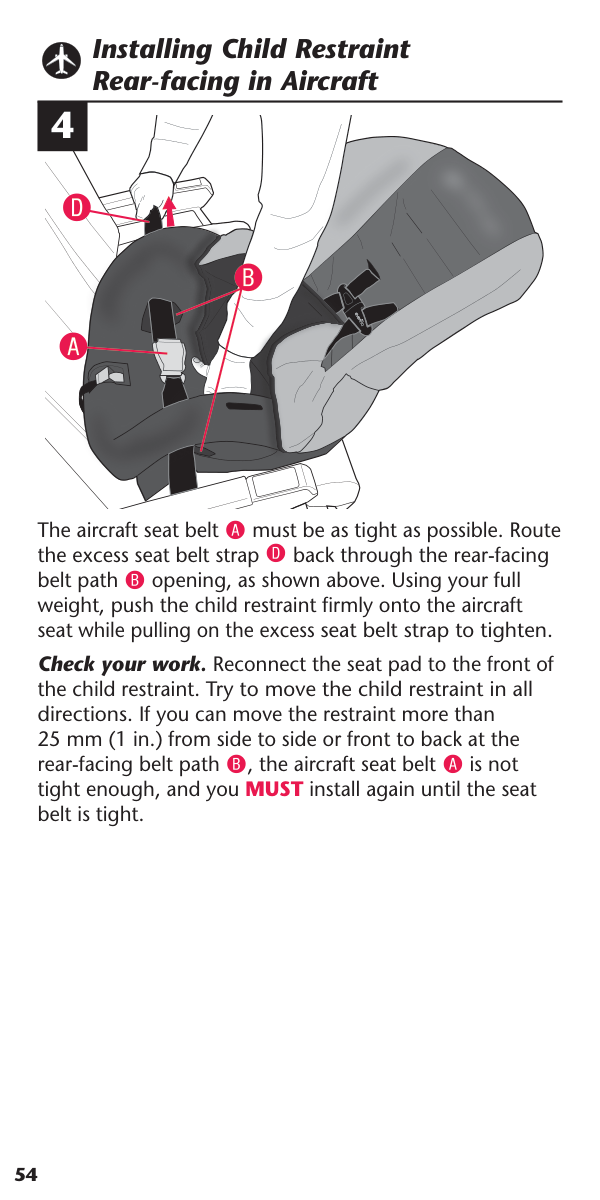
54 Installing Child Restraint Rear-facing in Aircraft The aircraft seat belt A must be as tight as possible. Route the excess seat belt strap D back through the rear-facing belt path B opening, as shown above. Using your full weight, push the child restraint firmly onto the aircraft seat while pulling on the excess seat belt strap to tighten. Check your work. Reconnect the seat pad to the front of the child restraint. Try to move the child restraint in all directions. If you can move the restraint more than 25 mm (1 in.) from side to side or front to back at the rear-facing belt path B, the aircraft seat belt A is not tight enough, and you MUST install again until the seat belt is tight.
A
B
D
4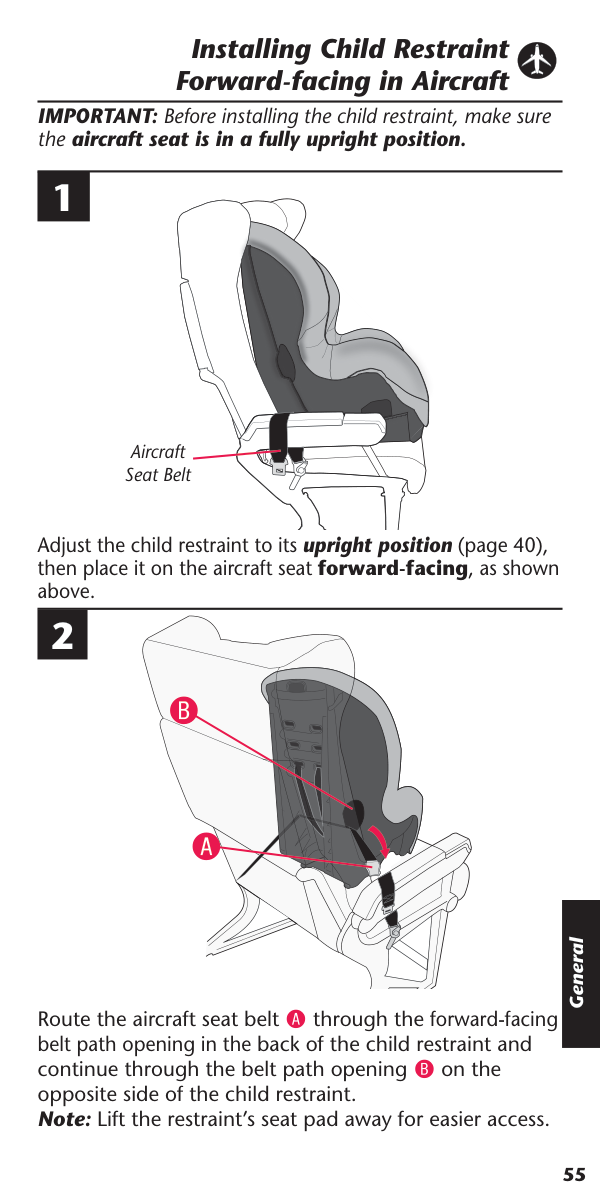
55 Route the aircraft seat belt A through the forward-facing belt path opening in the back of the child restraint and continue through the belt path opening B on the opposite side of the child restraint. Note: Lift the restraint’s seat pad away for easier access. Installing Child Restraint Forward-facing in Aircraft 1 Adjust the child restraint to its upright position (page 40), then place it on the aircraft seat forward-facing, as shown above. IMPORTANT: Before installing the child restraint, make sure the aircraft seat is in a fully upright position. 2
A
B
Aircraft Seat Belt General
56 Installing Child Restraint Forward- facing in Aircraft 3 Fasten the aircraft seat belt A. The aircraft seat belt must be as tight as possible. Route the excess aircraft seat belt strap C back through the forward-facing belt path D opening, as shown above. Using your full weight, push the child restraint firmly onto the aircraft seat while pulling on the excess seat belt strap to tighten. Note: Because of the fixed length of aircraft seat belts, the belt buckle could be behind the child’s back after tightening the belt. For your child’s comfort, Evenflo recommends cushioning the child’s back by placing a small pillow or folded-up blanket, or a folded-up jacket, over the belt buckle. Check your work. Reconnect the seat pad to the front of the child restraint. Try to move the child restraint in all directions. If you can move the restraint more than 25 mm (1 in.) from side to side or front to back at the forward- facing belt path, the aircraft seat belt is not tight enough, and you MUST install again until the seat belt is tight. 4
A
C
D

57 General Care and Cleaning
To help protect the vehicle upholstery, place a towel beneath and behind the child restraint. Tip! Tip! Tip!

58 To order replacement parts, you can order online at www.evenflo.com or contact Evenflo. When you contact us, please have the product model number and date of manufacture (found on the back of the child restraint). Replacement Parts Head Pillow Harness Covers Not available on all models. Styles may vary. Crotch Strap 3 Seat pad 14 Harness 4 Proper Disposal of This Child Restraint At the end of this child restraint’s useful life, Evenflo encourages you to dispose of it properly. Most of the components in this child restraint are recyclable.

59 General For a period of 90 days from the original purchase of this Product, Evenflo warrants to the original end user (“Purchaser”) this Product (including any accessories) against defects in material or workmanship. Evenflo’s sole obligation under this express limited warranty shall be, at Evenflo’s option, to repair or replace any Product that is determined to be defective by Evenflo and determined to be covered by this warranty. Repair or replacement as provided under this warranty is the exclusive remedy of the Purchaser. Proof of purchase in the form of a receipted invoice or bill of sale evidencing that the Product is within the warranty period must be presented to obtain warranty service. This express limited warranty is extended by Evenflo ONLY to the original Purchaser of the Product and is not assignable or transferable to subsequent purchasers or end users of the Product. For warranty service, contact Evenflo’s ParentLink Consumer Resource Center.
Except To The Extent Prohibited By Applicable
Law, Any Implied Warranty Of Merchantability
Or Fitness For A Particular Purpose On
This Product Is Hereby Disclaimed. Evenflo
Shall Not Be Liable For Any Incidental,
Consequential, Special Or Punitive Damages
Of Any Kind For Breach Of The Express Limited
Warranty On This Product, Or Any Warranty
Implied By Operation Of Law. Other Than The
Express Limited Warranty Set Forth Above, There
Are No Other Warranties That Accompany This
Product And Any Oral, Written Or Any Other
Express Representation Of Any Kind Is Hereby
Disclaimed.
Limited Warranty www.evenflo.com USA:1-800-233-5921 8 AM to 5 PM E.T. Canada: 1-937-773-3971 México: 800-706-1200
61 General Notes

www.evenflo.com USA:1-800-233-5921 8 AM to 5 PM E.T. Canada: 1-937-773-3971 México: 800-706-1200