Ask AI
— answers from the official manualAnswers from the official manual.
Common questions
Common Questions
26 totalWhat should I do if the software installer does not detect the printer on the network?
You may need to enter the IP address manually during installation. To find the IP address, print a Configuration Report by pressing OK, opening the Reports menu, selecting Configuration Report, and pressing OK again. (Page 9)
How do I install the printer software on Windows using a USB connection?
Insert the CD into the computer and follow the on-screen instructions, running Setup.exe if the installer does not start automatically. Connect the USB cable only when the software prompts you to do so, then follow the on-screen instructions to finish. (Page 11)
Do I need administrator privileges to install the HP LaserJet Pro M706 software?
Yes, you must have administrator privileges on the computer to install the software. This applies to all installation methods. (Page 8)
How do I install the HP LaserJet Pro M706 software on a Mac?
If using a USB or wired network connection, connect the cable first, then insert the CD into the computer and follow the on-screen instructions. If the installer does not detect the printer on the network, you may need to enter the IP address manually. (Page 12)
Where can I find troubleshooting guidance and regulatory information for the HP LaserJet Pro M706?
The HP Help and Learn Center, available on the CD included with the product or in the HP Program folder on your computer, provides troubleshooting guidance, regulatory, and safety information. Regulatory compliance information is also available at www.hp.com/support/ljM706. (Page 14)
What do I need to know about power requirements?
The device uses 220-240 Vac and operates at 50/60 Hz. Connect it only to a grounded AC outlet that matches the voltage rating on the product label.
Show 20 more questions
How do I verify that my HP LaserJet Pro M706 is printing correctly after setup?
How do I find the IP address of my HP LaserJet Pro M706?
Where should I place the HP LaserJet Pro M706 for best results?
What power supply does the HP LaserJet Pro M706 require?
Can I use any power cord with the HP LaserJet Pro M706?
安全提示是什么?
What should I do if the product doesn't automatically detect during network setup?
How do I pair this printer with my USB cable?
USB 连接安装软件怎么做?
Mac OS X 的软件安装过程是怎样的?
什么是HP Help and Learn Center?
注册产品的方式是什么?
设备符合哪些规定的要求?
How do I find the IP address for software installation?
How do I install the software using a wired network?
How do I register my product after software installation?
What kind of environment should I place this device in for optimal performance and longevity?
How can I check if the printer works properly after initial setup?
Where do I find safety and regulatory compliance information for this printer?
What do I need to know before installing the software for Mac OS X?
Full Manual
20 pages

LaserJet Pro M701/M706
EN Installation Guide
FR Guide d’installation DE Installationshandbuch IT Guida all’installazione ES Guía de instalación CA Guia d’instal·lació DA Installationsvejledning NL Installatiehandleiding FI Asennusopas NO Installasjonsveiledning
PT Guia de instalação SV Installationshandbok
www.hp.com/support/ljM701 www.hp.com/support/ljM706
ES Lea esto primero
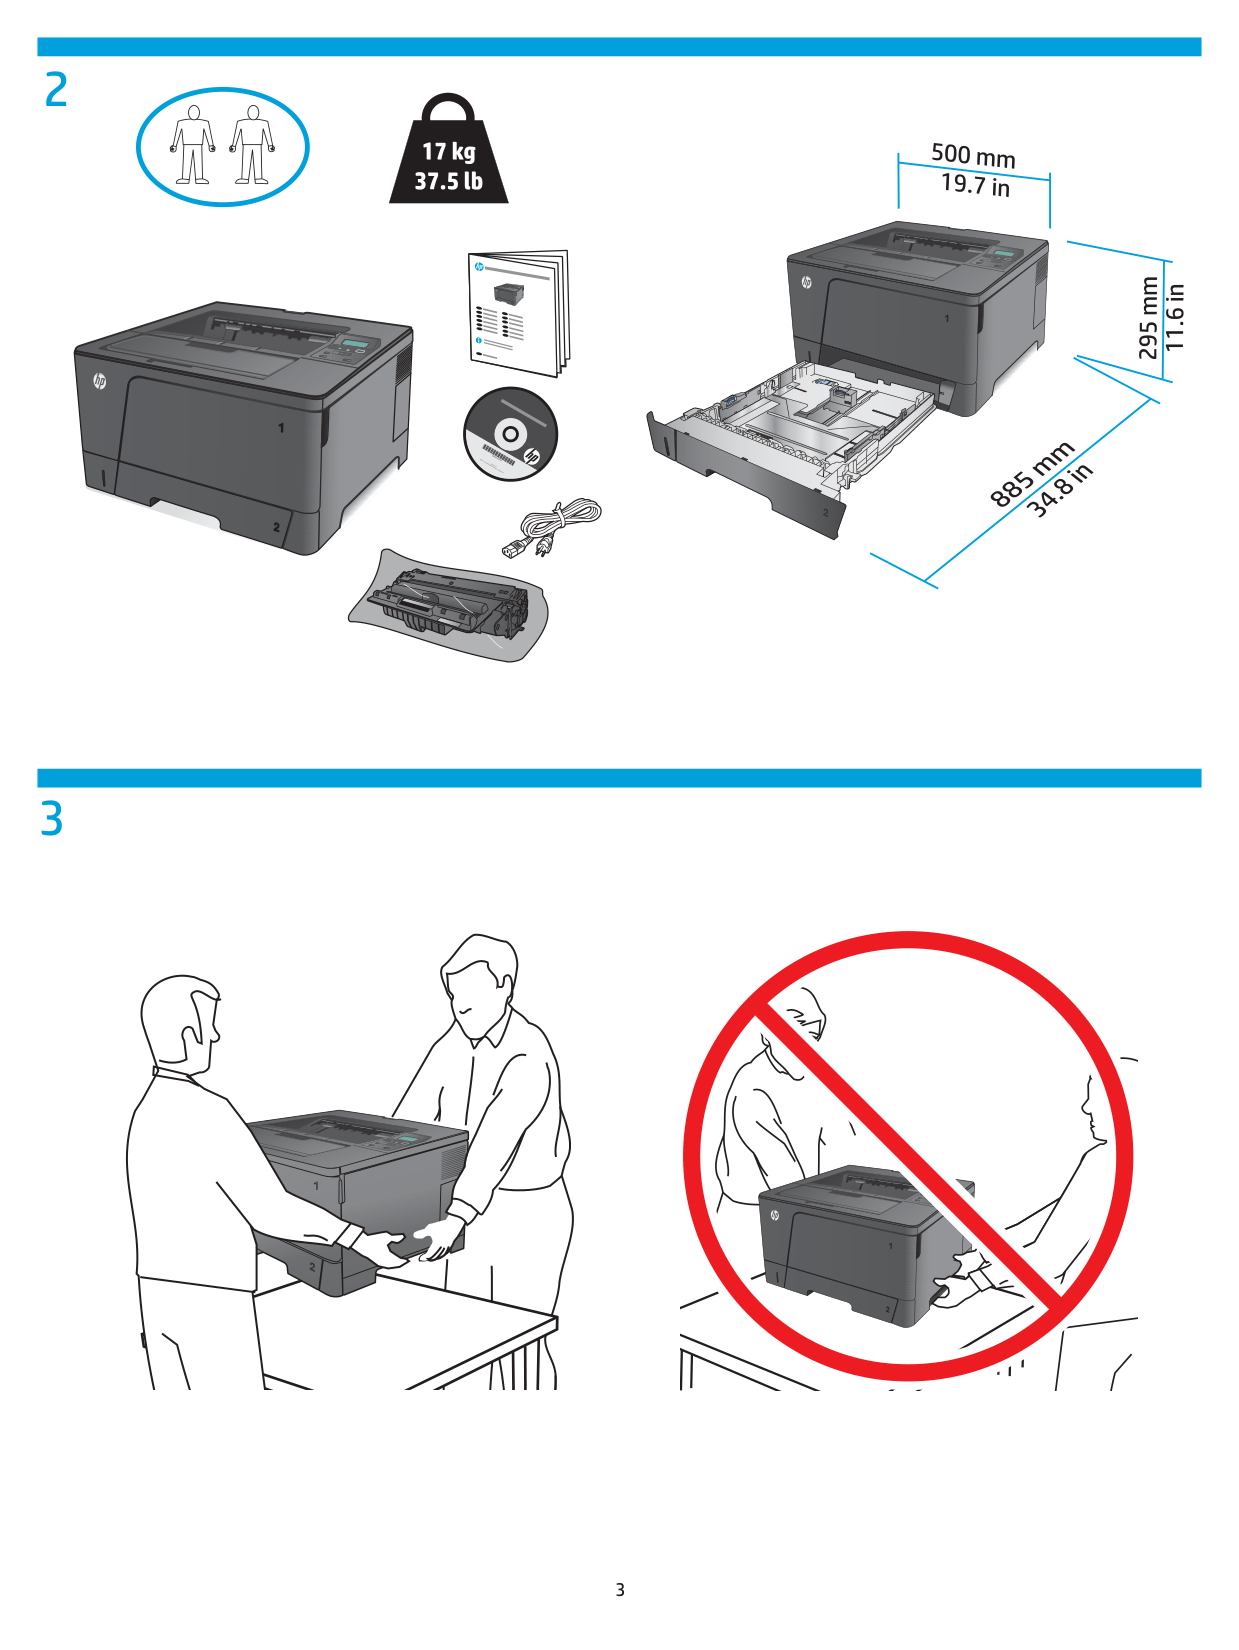
EN Select a sturdy, well-ventilated, dust-free area, away from direct sunlight to position the product. FR Choisissez un support solide et un endroit propre, bien aéré et à l'abri du rayonnement direct du soleil pour placer votre produit. DE Stellen Sie das Gerät an einem stabilen, gut durchlüfteten und staubfreien Ort auf, der nicht direktem Sonnenlicht ausgesetzt ist. IT Posizionare il prodotto in un'area piana, ben ventilata, priva di polvere e lontana dalla luce diretta del sole. ES Busque una superficie sólida en un lugar bien ventilado, sin polvo y alejado de la luz solar directa para colocar el producto. CA Seleccioneu una superfície sòlida, ben ventilada, sense pols i allunyada de la llum directa del sol per situar-hi el producte. DA Placer produktet i et stabilt, godt udluftet, støvfrit område uden direkte sollys. NL Plaats het apparaat op een stevige, goed geventileerde, stofvrije plek uit direct zonlicht. FI Sijoita laite tukevalle alustalle pölyttömään paikkaan, johon aurinko ei paista suoraan ja jossa on hyvä ilmanvaihto. NO Plasser produktet i et stabilt, støvfritt område med god ventilasjon og utenfor direkte sollys. PT Escolha um local firme, bem ventilado, sem poeira e longe da exposição direta à luz do sol para instalar o dispositivo. SV Placera produkten i ett stadigt, väl ventilerat, dammfritt utrymme och fritt från direkt solljus.
3
#### 21
#### 3 4
#### 5 6
#### 7

#### 43
| | | |---|---| | | |
EN 1. Connect the power cord between the product and a grounded AC outlet. Make sure your power source is adequate for the product
voltage rating. The voltage rating is on the product label. The product uses 220-240 Vac and 50/60 Hz. CAUTION: To prevent damage to the product, use only the power cord that is provided with the product.
FR 1. Connectez le cordon d'alimentation entre le produit et une prise secteur avec mise à la terre. Vérifiez que la source d’alimentation électrique est adéquate pour la tension nominale du produit. Cette tension nominale est indiquée sur l’étiquette du produit. Le produit fonctionne à 220-240 V CA et à 50/60 Hz.
ATTENTION : afin d'éviter d'endommager le produit, utilisez uniquement le cordon d'alimentation fourni avec le produit.
DE 1. Verbinden Sie das Netzkabel mit dem Gerät und einer geerdeten Steckdose mit Wechselspannung. Stellen Sie sicher, dass Ihre Stromquelle für die Betriebsspannung des Geräts geeignet ist. Die Betriebsspannung finden Sie auf dem Geräteetikett. Das Gerät wird mit 220 bis 240 V Wechselspannung und 50/60 Hz betrieben.
ACHTUNG: Um Schaden am Gerät zu vermeiden, sollten Sie ausschließlich das Netzkabel verwenden, das im Lieferumfang des Geräts enthalten ist.
IT 1. Collegare il cavo di alimentazione del prodotto a una presa CA con messa a terra. Accertarsi che la fonte di alimentazione sia adeguata alla tensione del prodotto specificata sulla relativa etichetta. Il prodotto utilizza 220-240 Vca e 50/60 Hz.
ATTENZIONE: per evitare di danneggiare il prodotto, utilizzare solo il cavo di alimentazione fornito in dotazione.
ES 1. Conecte el cable de alimentación entre el producto y una toma CA con conexión a tierra. Compruebe que la alimentación sea la correcta para la clasificación de tensión del producto. La clasificación de tensión se encuentra en la etiqueta del producto. El producto utiliza 220-240 VCA y 50/60 Hz.
PRECAUCIÓN: Para evitar daños al producto, utilice solo el cable de alimentación que se proporciona con él.

CA 1. Connecteu el cable d’alimentació a un endoll de CA connectat a terra i al producte. Assegureu-vos que la font d’energia és adequada per a la
tensió nominal del producte. El límit de tensió apareix a l’etiqueta del producte. El producte utilitza 220-240 VCA i 50/60 Hz. PRECAUCIÓ: per evitar fer malbé el producte, feu servir només el cable d’alimentació que s’inclou amb el producte.
DA 1. Tilslut netledningen mellem produktet og en stikkontakt med jordforbindelse. Sørg for, at strømforsyningen svarer til produktets
spændingsangivelse. Spændingsangivelsen findes på produktetiketten. Produktet bruger 220-240 V vekselstrøm og 50/60 Hz. ADVARSEL: Hvis du vil forhindre beskadigelse af produktet, skal du kun bruge den netledning, der fulgte med produktet.
NL 1. Sluit het netsnoer aan op het product en op een geaard stopcontact. Controleer of de voedingsbron geschikt is voor het maximale voltage van het apparaat. U vindt het voltage op het productetiket. Het apparaat gebruikt 220-240 Vac en 50/60 Hz. WAARSCHUWING: gebruik alleen het bij het apparaat geleverde netsnoer om schade aan het apparaat te voorkomen.

FI 1. Liitä virtajohto laitteeseen ja maadoitettuun pistorasiaan. Tarkista, että virtalähteen jännite vastaa laitteelle sopivaa jännitettä. Laitteelle sopiva jännite on merkitty laitteen tarraan. Laitteen jännite on 220–240 Vac ja 50/60 Hz.
VAROITUS: Älä käytä muuta kuin laitteen mukana toimitettua virtajohtoa. Muutoin laite voi vahingoittua.
NO 1. Koble strømledningen til produktet og et jordet strømuttak. Kontroller at strømkilden passer for spenningsspesifikasjonen til produktet. Spenningsnivået vises på produktetiketten. Produktet bruker 220–240 volt og 50/60 Hz.
FORSIKTIG: Bruk bare strømledningen som følger med produktet, slik at du ikke skader produktet.
PT 1. Conecte o cabo de alimentação entre o produto e a tomada CA aterrada. Verifique se sua fonte de alimentação é adequada para a classifica-
ção de tensão do dispositivo. A classificação de tensão está na etiqueta do dispositivo. O produto utiliza 220-240 Vac e 50/60 Hz. CUIDADO: Para evitar danos ao produto, use apenas o cabo de alimentação fornecido.

SV 1. Anslut nätsladden från produkten till ett jordat växelströmsuttag. Se till att strömkällan överensstämmer med skrivarens
strömspecifikationer. Nätspänningen står angiven på produktens etikett. Produkten använder 220–240 V växelström och 50/60 Hz. VARNING! Undvik att produkten skadas genom att endast använda den nätsladd som levereras med produkten.
EN
FR
DE
IT
ES
CA
DA

NL
FI
NO
PT
SV
Choose a software install method. NOTE: You must have administrator privileges on the computer to install the software.
Choisissez une méthode d'installation du logiciel. REMARQUE : pour installer ce logiciel sur l'ordinateur, vous devez disposer des privilèges d'administrateur.
Wählen Sie eine Methode zur Softwareinstallation. HINWEIS: Sie müssen über Administratorrechte auf dem Computer verfügen, um die Software installieren zu können.
Scegliere un metodo di installazione del software. NOTA: per installare il software, è necessario disporre dei privilegi di amministratore.
Elija un método de instalación de software. NOTA: Debe tener privilegios de administrador en el ordenador para instalar el software.
Trieu un mètode d’instal·lació del programari. NOTA: heu de tenir drets d’administrador a l’ordinador per instal·lar el programari.
Vælg en softwareinstallationsmetode. BEMÆRK: Du skal have administratorrettigheder på computeren for at kunne installere softwaren.

Kies een software-installatiemethode. LET OP: u dient over beheerdersrechten te beschikken om de software te installeren.
Valitse ohjelmiston asennustapa. HUOMAUTUS: Ohjelmiston asentaminen tietokoneeseen edellyttää järjestelmänvalvojan oikeuksia.
Velg en metode for å installere programvaren. MERK: Du må ha administratorrettigheter på datamaskinen for å kunne installere programvaren.
Escolha um método de instalação de software. NOTA: Você deve ter privilégios de administrador para instalar o software.
Välj en installationsmetod för programvara. OBS! Du måste ha administratörsbehörighet på datorn för att installera programvaran.

| | | | |---|---|---| | | | | | | | | | | | |


| | | | |---|---|---| | | | | | | | | | | | |
9
7
| | | | |---|---|---| | | | | | | | | | | | |


EN Software installation for Windows wired networks: Connect the network cable to the product and the network. Insert the CD into the computer, and follow the on-screen instructions. If the installation program does not start automatically, browse to the CD drive. Double-click the Setup.exe file to run the program and install the product. NOTE: If the installation program does not detect the product on the network, you might need to enter the IP address manually. To find the IP address, press the OK button, open the Reports menu, select the Configuration Report option, and then press the OK button. The IP address is listed on the first page of the report.
##### FR Installation du logiciel pour les réseaux câblés Windows :
Reliez le produit au réseau à l'aide du câble réseau. Insérez le CD dans l'ordinateur et suivez les instructions affichées à l'écran. Si le programme d'installation ne démarre pas automatiquement, parcourez le lecteur CD. Cliquez deux fois sur le fichier Setup.exe pour exécuter le programme et installer le produit.
REMARQUE : si le programme d'installation ne détecte pas le produit sur le réseau, il peut être nécessaire de saisir manuellement l'adresse IP. Pour connaître l'adresse IP, appuyez sur le bouton OK, ouvrez le menu Rapports, sélectionnez l'option Rapport de configuration, puis appuyez sur le bouton OK. L'adresse IP est indiquée sur la première page du rapport.
DE Softwareinstallation für drahtgebundene Windows-Netzwerke: Schließen Sie das Netzwerkkabel an das Gerät und an das Netzwerk an. Legen Sie die CD in den Computer ein, und befolgen Sie die Anweisungen auf dem Bildschirm. Wenn das Installationsprogramm nicht automatisch gestartet wird, wechseln Sie zum CD-Laufwerk. Doppelklicken Sie auf die Datei „Setup.exe“, um das Programm auszuführen und das Gerät zu installieren. HINWEIS: Wenn das Installationsprogramm das Gerät auf dem Netzwerk nicht erkennt, müssen Sie die IP-Adresse eventuell manuell eingeben. Um die IP-Adresse zu finden, drücken Sie auf OK, öffnen Sie das Menü Berichte, wählen Sie die Option Konfiguratsionbericht und drücken Sie dann auf OK. Sie finden die IP-Adresse auf der ersten Seite des Berichts.
IT Installazione del software per le reti cablate Windows: Collegare il cavo di rete al prodotto e alla rete. Inserire il CD nel computer e seguire le istruzioni visualizzate sullo schermo. Se il programma di installazione non viene avviato automaticamente, andare all'unità CD. Fare doppio clic sul file Setup.exe per eseguire il programma di installazione del prodotto. NOTA: se il programma di installazione non trova il prodotto sulla rete, potrebbe essere necessario immettere manualmente l'indirizzo IP. Per individuare l'indirizzo IP, premere il pulsante OK, aprire il menu Rapporti, quindi selezionare l'opzione Rapporto di configurazione e infine premere il pulsante OK. L'indirizzo IP è riportato nella prima pagina del rapporto.
ES Instalación de software para redes con cable de Windows: Conecte el cable de red al producto y a la red. Introduzca el CD en el equipo y siga las instrucciones que aparecen en pantalla. Si el programa de instalación no se inicia automáticamente, examine la unidad de CD. Haga doble clic en el archivo Setup.exe para ejecutar el programa e instalar el producto. NOTA: Si el programa de instalación no detecta el producto en la red, es posible que deba introducir la dirección IP de forma manual. Para encontrar la dirección IP, pulse el botón OK, abra el menú Informes, seleccione la opción Informe de configuración y, a continuación, pulse el botón OK. La dirección IP aparece en la primera página del informe.

CA Instal·lació de programari per a xarxes cablejades del Windows: Connecteu el cable de xarxa al producte i a la xarxa. Inseriu el CD a l’ordinador i seguiu les instruccions de la pantalla. Si el programa d’instal·lació no s’inicia automàticament, navegueu fins a la unitat del CD. Feu doble clic al fitxer Setup.exe per executar el programa i instal·lar el producte. NOTA: si el programa d’instal·lació no detecta el producte a la xarxa, potser haureu d’introduir l’adreça IP manualment. Per trobar l’adreça IP, premeu el botó OK, obriu el menú Informes, seleccioneu l’opció Informe de configuració i, a continuació, premeu el botó OK. L’adreça IP apareix a la primera pàgina de l’informe.
DA Softwareinstallation i kabelbaserede Windows-netværk: Slut netværkskablet til produktet og til netværket. Sæt cd’en i computeren, og følg vejledningen på skærmen. Hvis installationsprogrammet ikke starter automatisk, skal du navigere til cd-drevet. Dobbeltklik på filen Setup.exe for at køre programmet og installere produktet. BEMÆRK: Hvis installationsprogrammet ikke registrerer produktet på netværket, skal du muligvis indtaste IP-adressen manuelt. Du kan finde IP-adressen ved at trykke på knappen OK, åbne menuen Rapporter, vælge indstillingen Konfigurationsrapport og derefter trykke på knappen OK. IP-adressen står på første side i rapporten.
##### NL Software-installatie voor bekabelde netwerken in Windows:
Sluit de netwerkkabel aan op het apparaat en de netwerkaansluiting. Plaats de cd in de computer en volg de instructies op het scherm. Als het installatieprogramma niet automatisch wordt gestart, bladert u naar het cd-station. Dubbelklik op het bestand Setup.exe om het programma uit te voeren en het apparaat te installeren.

LET OP: als het installatieprogramma het apparaat niet detecteert binnen het netwerk, dient u mogelijk het IP-adres handmatig in te voeren. Voor het IP-adres drukt u op de knop OK, opent u het menu Rapporten, selecteert u de optie Configuratierapport en drukt u op de knop OK. Het IP-adres staat vermeld op de eerste pagina van het rapport.
FI Ohjelmiston asentaminen kiinteisiin verkkoihin Windowsissa: Liitä verkkokaapeli laitteeseen ja verkkoon. Aseta CD-levy tietokoneeseen ja noudata näyttöön tulevia ohjeita. Jos asennusohjelma ei käynnisty automaattisesti, hae ja valitse CD-asema. Suorita laitteen asennusohjelma kaksoisnapsauttamalla Setup.exe-tiedostoa. HUOMAUTUS: Jos asennusohjelma ei havaitse tuotetta verkossa, IP-osoite on ehkä määritettävä manuaalisesti. Selvitä IP-osoite seuraavasti: paina OK-painiketta, avaa Raportit-valikko, valitse Kokoonpanoraportti ja sitten OK. IP-osoite näkyy raportin ensimmäisellä sivulla.
NO Programvareinstallering for kablede nettverk for Windows: Koble nettverkskabelen til produktet og nettverket. Sett CDen inn i datamaskinen, og følg instruksjonene på skjermen. Hvis installasjonsprogrammet ikke starter automatisk, må du bla¨ til CD-stasjonen. Dobbeltklikk på filen Setup.exe for å kjøre programmet og installere produktet.
MERK: Hvis installeringsprogrammet ikke oppdager produktet i nettverket, må du kanskje angi IP-adressen manuelt. Du finner IP-adressen ved å klikke på OK-knappen, åpne menyen Rapporter, velge alternativet Konfigurasjonsrapport og deretter trykke på OK-knappen. IP-adressen er oppført på første side i rapporten.

PT Instalação do software para redes cabeadas Windows: Conecte o cabo de rede ao produto e à rede. Insira o CD no computador e siga as instruções na tela. Se o programa de instalação não iniciar automaticamente, procure a unidade do CD. Clique duas vezes no arquivo Setup.exe para executar o programa e instalar o produto. NOTA: Se o programa de instalação não detectar o produto na rede, você precisará especificar o endereço IP manualmente. Para localizar o endereço IP, pressione o botão OK, abra o menu Relatórios, selecione a opção Relatório de configuração e pressione o botão OK. O endereço IP estará listado na primeira página do relatório.
SV Installation av programvara för trådanslutna Windows-nätverk: Anslut nätverkskabeln till produkten och nätverket. Sätt i cd-skivan i datorn och följ instruktionerna på skärmen. Om installationsprogrammet inte startar automatiskt bläddrar du till CD-enheten. Dubbelklicka på filen Setup.exe när du vill installera produkten genom att köra programmet. OBS! Om installationsprogrammet inte upptäcker produkten på nätverket kan det hända att du måste ange IP-adressen manuellt. Leta reda på IP-adressen genom att trycka på OK, öppna menyn Rapporter, välja alternativet Konfigurationsrapport och sedan trycka på OK. IP-adressen anges på första sidan i rapporten.
8

##### EN Software installation for Windows USB connections:

##### FR Installation logicielle pour connexions USB Windows :
##### DE Softwareinstallation für Windows USB-Verbindungen:
automatisch gestartet wird, wechseln Sie zum CD-Laufwerk. Doppelklicken Sie auf die Datei „Setup.exe“, um das Programm auszuführen und das Gerät zu installieren.
##### IT Installazione del software per connessioni USB Windows:
##### ES Instalación de software para conexiones USB de Windows:

##### CA Instal·lació de programari per a connexions USB del Windows:
##### DA Softwareinstallation til Windows USB-forbindelser:
##### NL Software-installatie voor USB-verbindingen in Windows:
##### FI Ohjelmiston asentaminen Windowsin USB-yhteyksiä varten:

##### NO Programvareinstallering for USB-tilkoblinger for Windows:

##### PT Instalação do software para conexões USB Windows:
##### SV Installation av programvara för Windows USB-anslutningar:

9
| | | | |---|---|---| | | | | | | | | | | | |


##### EN Software installation for Mac OS X:
NOTE: For network connections, if the installation program does not detect the product on the network, you might need to enter the IP address manually. To find the IP address, press the OK button, open the Reports menu, select the Configuration Report option, and then press the OK button. The IP address is listed on the first page of the report.
##### FR Installation logicielle sous Mac OS X :

REMARQUE : pour les connexions réseau, si le programme d'installation ne détecte pas le produit sur le réseau, il peut être nécessaire de saisir manuellement l'adresse IP. Pour connaître l'adresse IP, appuyez sur le bouton OK, ouvrez le menu Rapports, sélectionnez l'option Rapport de configuration, puis appuyez sur le bouton OK. L'adresse IP est indiquée sur la première page du rapport.
##### DE Softwareinstallation für Mac OS X:
HINWEIS: Wenn das Installationsprogramm bei Netzwerkverbindungen das Gerät auf dem Netzwerk nicht erkennt, müssen Sie die IP-Adresse eventuell manuell eingeben. Um die IP-Adresse zu finden, drücken Sie auf OK, öffnen Sie das Menü Berichte, wählen Sie die Option Konfigurationsbericht und drücken Sie dann auf OK. Sie finden die IP-Adresse auf der ersten Seite des Berichts.
##### IT Installazione del software per Mac OS X:
NOTA: per le connessioni di rete, se il programma di installazione non rileva il prodotto sulla rete, potrebbe essere necessario immettere manualmente l'indirizzo IP. Per individuare l'indirizzo IP, premere il pulsante OK, aprire il menu Rapporti, quindi selezionare l'opzione Rapporto di configurazione e infine premere il pulsante OK. L'indirizzo IP è riportato nella prima pagina del rapporto.
##### ES Instalación de software para Mac OS X:
##### CA Instal·lació de programari per al Mac OS X:
NOTA: per a connexions de xarxa, si el programa d’instal·lació no detecta el producte a la xarxa, potser haureu d’introduir l’adreça IP manualment. Per trobar l’adreça IP, premeu el botó OK, obriu el menú Informes, seleccioneu l’opció Informe de configuració i, a continuació, premeu el botó OK. L’adreça IP apareix a la primera pàgina de l’informe.
##### DA Softwareinstallation på Mac OS X:
NOTE: Hvis installationsprogrammet ved netværksforbindelser ikke registrerer produktet på netværket, skal du muligvis indtaste IP-adressen manuelt. Du kan finde IP-adressen ved at trykke på knappen OK, åbne menuen Rapporter, vælge indstillingen Konfigurationsrapport og derefter trykke på knappen OK. IP-adressen står på første side i rapporten.
| | | | |---|---|---| | | | | | | | | | | | |


##### NL Software-installatie in Mac OS X:
LET OP: als u gebruikmaakt van een netwerkverbinding en het installatieprogramma het product niet detecteert binnen het netwerk, dient u mogelijk het IP-adres handmatig in te voeren. Voor het IP-adres drukt u op de knop OK, opent u het menu Rapporten, selecteert u de optie Configuratierapport en drukt u op de knop OK. Het IP-adres staat vermeld op de eerste pagina van het rapport.
##### FI Ohjelmiston asennus Mac OS X -käyttöjärjestelmissä:
HUOMAUTUS: Verkkoyhteyteen tarvittava IP-osoite on ehkä määritettävä manuaalisesti, jos asennusohjelma ei havaitse tuotetta verkossa. Selvitä IP-osoite seuraavasti: paina OK-painiketta, avaa Raportit-valikko, valitse Kokoonpanoraportti ja sitten OK. IP-osoite näkyy raportin ensimmäisellä sivulla.
##### NO Programvareinstallering for Mac OS X:

Du finner IP-adressen ved å klikke på OK-knappen, åpne menyen Rapporter, velge alternativet Konfigurasjonsrapport og deretter trykke på OK-knappen. IP-adressen er oppført på første side i rapporten.
##### PT Instalação do software para Mac OS X:
##### SV Installation av programvara för Mac OS X:
10
EN Setup is complete. If you did not register your product during software installation go to www.register.hp.com to register now. The HP Help and Learn Center and other documentation are on the CD that came with the product or in the HP Program folder on your computer. The HP Help and Learn Center is a product help tool that provides easy access to product information, HP product Web support, troubleshooting guidance, and regulatory and safety information. For regulatory compliance information, see the Warranty and Legal Guide on the product CD or at the following Web site: www.hp.com/support/ljM701 or www.hp.com/support/ljM706.
FR L’installation est terminée. Si vous n'avez pas enregistré votre produit lors de l'installation du logiciel, rendez-vous sur www.register.hp.com pour le faire dès maintenant. Le centre d'aide et d'apprentissage HP (HP Help and Learn Center) ainsi que d'autres documents se trouvent sur le CD livré avec le produit ou dans le dossier dédié aux programmes HP sur votre ordinateur. Le centre d'aide et d'apprentissage HP est un outil d'aide qui fournit un accès facile aux informations sur le produit, à une assistance en ligne pour les produits HP, à un guide de dépannage et à des informations relatives à la réglementation et à la sécurité. Pour les informations relatives à la conformité, consultez le Guide de garantie et d'informations légales sur le CD du produit ou sur le site Web suivant : www.hp.com/support/ljM701 ou www.hp.com/support/ljM706.
DE Die Einrichtung ist abgeschlossen. Falls Sie Ihr Gerät während der Softwareinstallation nicht registriert haben, besuchen Sie die Website www.register.hp.com, um es jetzt zu registrieren. Das HP Help and Learn Center sowie weitere Dokumentation befinden sich auf der CD, die dem Gerät beiliegt, oder im HP Programmordner auf Ihrem Computer. Das HP Help and Learn Center ist eine Produkthilfe für einfachen Zugriff auf Produktinformationen, Web-Support für HP Produkte, Hinweise zur Fehlerbehebung sowie Zulassungs- und Sicherheitsinformationen. Informationen zur Erfüllung behördlicher Bestimmungen finden Sie im Handbuch zu Garantie und rechtlichen Hinweisen auf der Geräte-CD oder auf der folgenden Website: www.hp.com/support/ljM701 oder www.hp.com/support/ljM706.
IT La configurazione è stata completata. Se durante l'installazione del software non è stata eseguita la registrazione del prodotto, visitare il sito Web www.register.hp.com per eseguire la registrazione. HP Help and Learn Center e documentazione aggiuntiva sono disponibili sul CD fornito con il prodotto o nella cartella dei programmi HP sul computer. HP Help and Learn Center è uno strumento di assistenza che fornisce accesso facilitato alle informazioni sul prodotto, supporto Web ai prodotti HP, guida alla risoluzione dei problemi e informazioni relative alla sicurezza e alle normative. Per informazioni sulla conformità normativa, vedere il documento Garanzia e informazioni di carattere legale disponibile sul CD del prodotto o nel seguente sito Web: www.hp.com/support/ljM701 o www.hp.com/support/ljM706.
ES La instalación ha terminado. Si no registró el producto durante la instalación del software, vaya a www.register.hp.com para registrarlo ahora. El centro de ayuda y formación de HP se incluye junto con otra documentación en el CD suministrado con el producto o en la carpeta Programa de HP de su equipo. El centro de ayuda y formación de HP es una herramienta de ayuda para el producto que permite acceder fácilmente a información del producto, asistencia Web del producto HP, guía para la solución de problemas e información legal y de seguridad. Para obtener información sobre el cumplimiento de normativas, consulte la garantía y guía legal del CD del producto o vaya al siguiente sitio Web: www.hp.com/support/ljM701 o www.hp.com/support/ljM706.
CA La instal·lació ha finalitzat. Si no heu registrat el producte durant la instal·lació del programari, visiteu www.register.hp.com per fer-ho ara. El centre d’ajuda i aprenentatge d’HP, a més d’altra informació, es troben al CD subministrat amb el producte o a la carpeta de programes HP del vostre ordinador. El centre d’ajuda i aprenentatge d’HP és una utilitat d’ajuda que permet accedir fàcilment a informació sobre productes, assistència tècnica web de productes HP, guia per a la solució de problemes i informació sobre normativa i seguretat. Per obtenir informació sobre el compliment de normatives, vegeu la garantia i guia legal al CD del producte o en el lloc web següent: www.hp.com/support/ljM701 o www.hp.com/support/ljM706.
DA Installationen er fuldført. Hvis du ikke registrerede produktet under softwareinstallationen, kan du gå til www.register.hp.com for at registrere det nu. HP hjælpe- og læringscenter og anden dokumentation findes på den cd, der fulgte med produktet, eller i HP-programmappen på computeren. HP hjælpe- og læringscenter er et hjælpeværktøj til produktet, der giver nem adgang til produktoplysninger, websupport til HP-produkter, hjælp til fejlfinding, lovpligtige oplysninger og sikkerhedsoplysninger. For oplysninger om overholdelse af lovgivning kan du se Garantivejledning og juridisk vejledning på produkt-cd’en eller på følgende websted: www.hp.com/support/ljM701 eller www.hp.com/support/ljM706.
NL De installatie is nu voltooid. Als u het apparaat niet hebt geregistreerd tijdens de software-installatie, gaat u naar www.register.hp.com om het alsnog te registreren. Het HP Help & Learn Center en andere documentatie kunt u vinden op de cd-rom die bij het apparaat is geleverd of in de programmamap van HP op uw computer. Het HP Help & Learn Center is een hulpprogramma voor eenvoudige toegang tot productinformatie, online productondersteuning van HP, hulp bij het oplossen van problemen en overheids- en veiligheidsinformatie. Informatie over conformiteit met wettelijke voorschriften vindt u in de gids met informatie over garantie en juridische informatie op de product-cd of op de volgende website: www.hp.com/support/ljM701 of www.hp.com/support/ljM706.
FI Asennus on valmis. Jos et rekisteröinyt laitetta ohjelmiston asennuksen yhteydessä, rekisteröi se nyt osoitteessa www.register.hp.com. HP:n ohje- ja oppimiskeskus ja muut oppaat ovat laitteen mukana toimitetulla CD-levyllä tai tietokoneen HP-ohjelmakansiossa. HP:n ohje- ja oppimiskeskus on laitteen ohjetyökalu, joka sisältää tietoja laitteesta, HP-tuotteiden verkkotuesta, vianmäärityksestä, säädöksistä ja turvallisuudesta helppokäyttöisessä muodossa. Tiedot säädöstenmukaisuudesta ovat laitteen CD-levyn takuu- ja lakioppaassa ja osoitteessa www.hp.com/support/ljM701 tai www.hp.com/support/ljM706.
NO Installeringen er fullført. Hvis du ikke registrerte produktet under programvareinstallasjonen, kan du gå til www.register.hp.com for å registrere det nå. HPs hjelpe- og læresenter og annen dokumentasjon finnes på CDen som fulgte med produktet, eller i HP-programmappen på datamaskinen. HPs hjelpe- og læresenter er et hjelpemiddel for produktet som gir enkel tilgang til produktinformasjon, webstøtte for HP-produkter, feilsøkingshjelp samt informasjon om forskrifter og sikkerhet. Hvis du vil se informasjon om samsvar med forskrifter, kan du se veiledningen for garanti og juridisk informasjon på produkt-CDen eller på følgende webområde: www.hp.com/support/ljM701 eller www.hp.com/support/ljM706.
PT A configuração está concluída. Se você não registrou o produto durante a instalação do software, acesse www.register.hp.com e o faça agora mesmo. O Centro de ajuda e aprendizagem da HP e outras documentações estão disponíveis no CD que acompanha o produto ou na pasta do programa HP no seu computador. O Centro de ajuda e aprendizagem da HP é uma ferramenta de ajuda que fornece acesso fácil às informações do produto, suporte na Web para o produto da HP, auxílio para a solução de problemas e informações sobre normas e segurança. Para obter informações sobre a conformidade com as regulamentações, consulte o Guia jurídico e de garantia no CD do produto ou no site: www.hp.com/support/ljM701 ou www.hp.com/support/ljM706.
SV Installationen är klar. Om du inte registrerade produkten vid programvaruinstallationen går du till www.register.hp.com och registrerar den nu. HP:s hjälp- och utbildningscenter och annan dokumentation finns på den cd-skiva som medföljde produkten eller i HP-programmappen i datorn. HP:s hjälp- och utbildningscenter är ett produkthjälpverktyg som ger enkel tillgång till produktinformation, webbsupport för HP-produkter, felsökningstips och information om myndighetskrav och säkerhet. Gällande föreskrifter finns i garantin och den juridiska guiden på cd-skivan till produkten eller på nedanstående webbplats: www.hp.com/support/ljM701 eller www.hp.com/support/ljM706.
© Copyright 2015 HP Development Company, L.P.
Copyright and License © Copyright 2015 HP Development Company, L.P. Reproduction, adaptation or translation without prior written permission is prohibited, except as allowed under the copyright laws. The information contained herein is subject to change without notice. The only warranties for HP products and services are set forth in the express warranty statements accompanying such products and services. Nothing herein should be construed as constituting an additional warranty. HP shall not be liable for technical or editorial errors or omissions contained herein. Edition 1, 11/2015 FCC Regulations This equipment has been tested and found to comply with the limits for a Class A digital device, pursuant to Part 15 of the FCC rules. These limits are designed to provide reasonable protection against harmful interference in a residential installation. This equipment generates, uses, and can radiate radio frequency energy, and if not installed and used in accordance with the instruction manual, may cause harmful interference to radio communications. Operation of this equipment in a residential area is likely to cause harmful interference in which case the user will be required to correct the interference at his own expense.
NOTE: Any changes or modifications to the printer that are not expressly approved by HP could void the user’s authority to operate this equipment. Use of a shielded interface cable is required to comply with the Class A limits of Part 15 of FCC rules.
Trademark Credits Windows® is a U.S. registered trademark of Microsoft Corporation.
Copyright et licence © Copyright 2015 HP Development Company, L.P. La reproduction, l'adaptation ou la traduction de ce document sans l'autorisation écrite préalable de HP est interdite, sauf dans des conditions conformes aux lois relatives au copyright. Les informations contenues dans ce document peuvent être modifiées sans préavis.
Les seules garanties pour les produits et services HP sont décrites dans les déclarations de garantie expresse qui accompagnent ces produits et services. Les informations contenues dans ce document ne constituent en aucun cas une garantie supplémentaire. HP n'est pas responsable des erreurs d'ordre technique ou éditorial ou des omissions contenues dans ce document.
Edition 1, 11/2015 Réglementations de la FCC Ce matériel a été testé et respecte les limitations concernant les équipements numériques de classe A, conformément à l'article 15 de la réglementation FCC. Ces limites sont destinées à assurer une protection suffisante contre les interférences produites dans une installation résidentielle. Cet équipement génère, utilise et peut émettre des fréquences radioélectriques. S'il n'est pas installé et utilisé conformément au manuel d'instructions, il peut provoquer des interférences préjudiciables aux communications radio. L'utilisation de cet équipement dans une zone résidentielle peut provoquer des interférences préjudiciables. Dans un tel cas, il incombe à l'utilisateur de corriger ces interférences à ses propres frais.
REMARQUE : toute modification apportée au produit sans le consentement de HP peut se traduire par la révocation du droit d'exploitation de l'équipement dont jouit l'utilisateur. Un câble d'interface blindé est requis afin de satisfaire aux stipulations de l'article 15 des réglementations de la FCC sur les appareils de classe A.
Crédits concernant les marques Windows® est une marque déposée aux Etats-Unis de Microsoft Corporation.