Ask AI
— answers from the official manualAnswers from the official manual.
Common questions
Common Questions
33 totalCan I perform modifications to my HP LaserJet Pro P1606?
Modifying the product without prior written consent from HP could void your right to use this equipment. All changes need adherence to FCC rules and guidelines.
What should I do if paper jams occur repeatedly?
You can change the jam recovery setting on the product to help prevent repeated jams. The manual also recommends checking for common causes of jams and reviewing jam locations. If you continue to experience issues after changing settings, refer to the specific jam-clearing procedures for different areas (input trays, duplexer, output areas, or inside the product) described in the troubleshooting section.
How do I print on both sides of the paper (duplex)?
For the P1600 series: Automatic duplexing is supported and can be enabled by checking the 'Print on both sides' option in the Finishing tab of the printer driver. For the P1560 series: Manual duplexing is used—print the first side, then retrieve the stack from the output bin, place it printed-side down in the main tray, and press the go button on the control panel to print the second side.
How do I set up the printer on a wired network?
Connect a CAT-5 Ethernet cable to an available port on your Ethernet hub or router and to the Ethernet port on the back of the printer. Verify that a network light is illuminated on the network port. Then use either HP Smart Install or the installation CD to configure the product for network printing. You can use the embedded Web server by typing the printer's IP address (found on the configuration page) into a web browser.
What should I avoid using to prevent damage to the printer?
Do not use paper or print media designed for inkjet printers, as HP LaserJet products use fusers to bond dry toner particles at extreme heat, and inkjet paper could damage the product. Also avoid using envelopes with clasps, snaps, windows, wrinkled labels, or raised/metallic letterhead. Using non-HP media that does not meet specifications may require repairs not covered by the Hewlett-Packard warranty.
How do I access the HP Embedded Web Server?
After printing a configuration page to find the printer's IP address, open a web browser and type the IP address into the address line. The HP Embedded Web Server will appear, providing access to information about product and network activities. This feature is only available on the P1600 printer series and does not require special software installation—you only need a supported web browser.
Show 27 more questions
How do I connect the printer to my computer using a USB cable?
What should I do if the auto-play option does not start the software installation on my computer?
How do I configure a network connection for my printer?
What should I do if my printer control panel shows flashing lights?
How do I install software for my printer on a Mac?
What are common hardware problems I might encounter with my HP LaserJet Pro P1606?
How do I find additional documentation for my HP LaserJet Pro P1606?
How do I ensure my printer complies with FCC regulations?
How do I prevent interference between my radio/TV equipment and printer?
Where do I find the printer's serial number and model number?
What are the main differences between the HP LaserJet Professional P1560 and P1600 printer series?
How do I install the printer driver using HP Smart Install?
What Windows operating systems are supported by this printer?
What paper sizes and types does this printer support?
What should I do before performing maintenance on the printer?
What utilities are available to manage my printer?
What should I know about the warranty for my HP LaserJet Pro printer?
Where can I find support and additional resources for my printer?
What operating systems are supported for Windows with this printer?
What should I do if I need to print multiple pages on one sheet?
How do I remove the printer software from my Windows computer?
What printer drivers are supported for Windows?
Can I print on both sides of the paper automatically?
How do I print multiple pages on a single sheet of paper?
What operating systems does the HP LaserJet Pro P1606 support?
Where can I find the serial number and model number on my printer?
What printer drivers are recommended for Windows?
Full Manual
12 pages


LASERJET PROFESSIONAL P1560 and P1600
PRINTER SERIES/SERIE D'IMPRIMANTES


EN Getting Started Guide FR Guide de mise en route ES Guía básica de instalación PT Guia de primeiros passos
HE
##### ES Lea esto primero
www.hp.com/support/ljp1560series www.hp.com/support/ljp1600series
##### P1560 P1600


Select a sturdy, well-ventilated, dust-free area, away from direct sunlight to position the product. FR Choisissez un endroit solide, bien ventilé, dépourvu de poussière et qui ne soit pas exposé à lumière directe du soleil
EN
comme emplacement pour votre produit. ES Seleccione un área sólida, bien ventilada, sin polvo y que no esté expuesta a la luz solar directa para ubicar el producto. PT Para posicionar o produto, selecione uma área firme, bem-ventilada, livre de poeira e sem exposição direta à luz solar.
HE
2


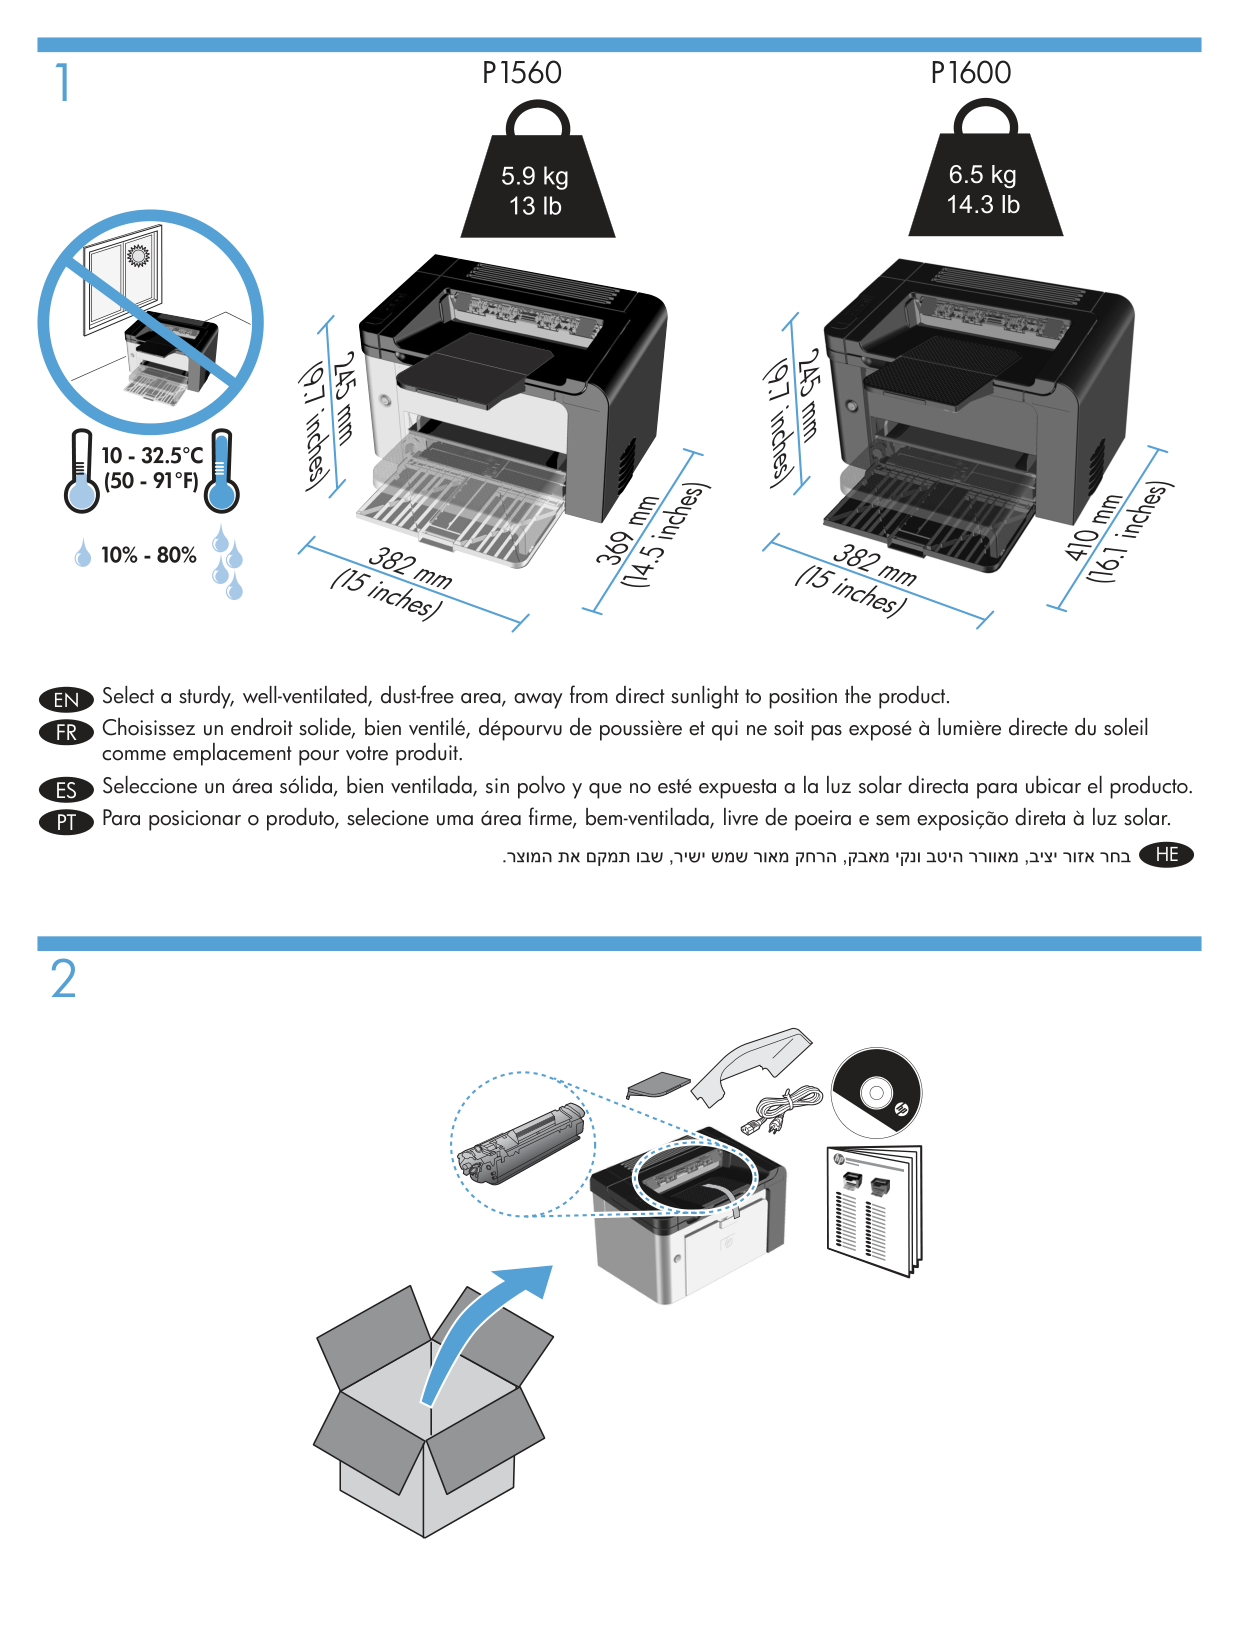


##### 1 2 3
EN Product Requirements Power outlet• USB cable (A-to-B type USB cable that is no longer than 2 m (6.56 ft))•
FR Configurations du produit Prise d’alimentation• Câble USB (câble USB de type A à B mesurant moins de 2 m).•
ES Requisitos del producto Toma de corriente• Cable USB (tipo de A a B que no mida más de 2 metros [6,5 pies])•
PT Requisitos do produto Tomada• Cabo USB (Cabo USB do tipo A para B, que não tenha mais de 2 m (6,56 pés))•
HE
#### 1 3
#### 2


#### 4

#### 5


#### 6 7 8
| | | | |---|---|---| | | | |
| | | |---|---| | | |
#### 9 10


#### 11

#### 14
#### 12 13


#### 15 16


#### 2
##### 1


Connect the power cord between the product and a grounded AC outlet, and then turn on the product. Make sure your power source is adequate for the product voltage rating. The voltage rating is on the product label. The product uses either 110-127 VAC or 220-240 VAC and 50/60 Hz. Caution: To prevent damage to the product, use only the power cord that is provided with the product.
EN
Raccordez le cordon d’alimentation entre l’imprimante et une prise de terre, puis allumez l’imprimante. Vérifiez que votre source d’alimentation est compatible avec la tension nominale de votre imprimante. La tension nominale est indiquée sur l’étiquette du produit. L’appareil utilise soit du 110-127 V CA, soit du 220-240 V CA et 50/60 Hz. Attention : Afin d’éviter d’endommager votre appareil, veillez à n’utiliser que le cordon d’alimentation fourni avec l’imprimante.
FR
Conecte el cable de alimentación eléctrica entre el producto y una toma de corriente alterna con conexión a tierra y luego encienda el producto. Asegúrese de que la fuente de alimentación sea la adecuada para la especificación de voltaje del producto. La especificación del voltaje está en la etiqueta del producto. El producto usa 110-127 VCA o 220-240 VCA y 50/60 Hz. Precaución: Para evitar dañar el producto, utilice sólo el cable de alimentación eléctrica que se proporciona con el producto.
ES
PT
Conecte o cabo de alimentação entre o produto e uma tomada de corrente alternada aterrada e, em seguida, ligue o produto. Verifique se a fonte de alimentação é adequada para a voltagem do produto. A voltagem está na etiqueta do produto. O produto utiliza tensões de 110-127 VCA ou 220-240 VCA e 50/60 Hz. Cuidado: Para evitar danos ao produto, use apenas o cabo de alimentação fornecido com o produto.
HE
5


Go to step 6.
Go to step 7.
Go to step 8.
EN
EN
EN
Passez à l’étape 8.
Passez à l’étape 6.
Passez à l’étape 7.
FR
FR
FR
Avance al paso 6.
Avance al paso 7.
Avance al paso 8.

ES
ES
ES
Vá para a etapa 6.
Vá para a etapa 7.
Vá para a etapa 8.
PT
PT
PT
HEHEHE
EN

Windows USB installation Connect the USB cable between the computer and the1.
product. The HP Smart Install program (see picture above) should start automatically within 30 seconds. Note: If HP Smart Install does not start automatically,
AutoPlay might be disabled on your computer. Browse My Computer and double-click the HP Smart Install CD drive. Double-click the SISetup.exe file to run the program to install the product. If you cannot find the HP Smart Install CD drive, use the software CD to install the product.
Follow the onscreen instructions.2. If prompted to select a connection type, select the3.
Configure to print using USB option.
FR
Installation USB Windows Raccordez le câble USB entre l’imprimante et l’ordinateur.1.
Le programme HP Smart Install (cf. image ci-dessus) s’exécute automatiquement dans les 30 secondes. Remarque : Si le programme HP Smart Install ne
démarre pas automatiquement, la mise en route « AutoPlay » est peut-être désactivée sur votre ordinateur. Parcourez votre Poste de travail et double-cliquez sur le lecteur CD HP Smart Install. Double-cliquez sur le fichier SISetup.exe pour exécuter le programme et installer le produit. Si vous ne trouvez pas le lecteur CD HP Smart Install, utilisez le CD du logiciel pour installer le produit.
Suivez les instructions à l’écran.2. Si le programme vous invite à sélectionner un type3.
de connexion, sélectionnez l’option Configurer pour imprimer à l’aide de USB.
ES
Instalación del USB en Windows Conecte el cable USB entre el equipo y el producto.1.
El programa HP Smart Install (consulte la imagen anterior) debería iniciarse automáticamente en un plazo de 30 segundos. Nota: Si el programa HP Smart Install no se inicia
automáticamente, es posible que AutoPlay esté desactivada en el equipo. Explore Mi PC y haga doble clic en la unidad de CD HP Smart Install. Haga doble clic en el archivo SISetup.exe para ejecutar el programa para instalar el producto. Si no puede encontrar la unidad de CD de HP Smart Install, utilice el CD del software para instalar el producto.
Siga las instrucciones que aparecen en la pantalla.2. Si se le solicita que seleccione un tipo de conexión,3.
seleccione la opción Configure to print using USB (Configurar para imprimir con USB).
HP Smart Install


PT
Instalações USB do Windows Conecte o cabo USB entre o computador e o produto.1.
O programa HP Smart Install (visualize a figura acima) deve iniciar automaticamente em 30 segundos. Nota: Se o programa HP Smart Install não for iniciado
automaticamente, a reprodução automática pode estar desativada no computador. Procure em Meu Computador e clique duas vezes na unidade de CD do HP Smart Install. Clique duas vezes no arquivo SISetup.exe para executar o programa de instalação do produto. Se não puder localizar a unidade HP Smart Install, use o CD de instalação do produto para instalar o software.
Siga as instruções na tela.2. Se for solicitado a selecionar um tipo de conexão,3.
selecione a opção Configurar impressão usando USB.
HE

| | | | |---|---|---| | | | | | | | | | | | | | | | | | | | | | | | |
| | | | |---|---|---| | | | |
HP Smart Install

1

EN Windows network installation
ES Instalación de red de Windows
Connect the network cable to the product, and then wait1. about 2 minutes for the network to assign an IP address for the product.
Conecte el cable de red al producto. Espere aproximadamente1. 2 minutos para que la red asigne una dirección IP para el producto.
From the product control panel, press and hold the Go2. button , and then release it when the ready light begins blinking to print a configuration page (callout 1). This page will have an IP address in the Network Information section.
En el panel de control del producto, mantenga2. presionado el botón Continuar , y luego suéltelo cuando la luz Preparada comience a parpadear para imprimir una página de configuración (referencia 1). Esta página tendrá una dirección IP en la sección Información de la red.
At the computer, open a Web browser, type the product3. IP address in the address field, and press the Enter key to open the product embedded web server page.
En el equipo, abra un explorador Web, escriba la3. dirección IP del producto en el campo de la dirección y presione la tecla Intro para abrir la página del servidor Web incorporado en el producto.
Click the4. HP Smart Install tab, and then click the Download button. The HP Smart Install program starts (see picture above).5. Follow the onscreen instructions.

Haga clic en la ficha4. HP Smart Install y luego haga clic en el botón Download (Descargar). Se iniciará el programa HP Smart Install (consulte la5.
imagen anterior). Siga las instrucciones que aparecen en la pantalla.FRInstallation sur réseau Windows
Connectez le câble réseau à l’imprimante, puis patientez1. environ 2 minutes pour permettre au réseau d’attribuer une adresse IP au produit.
PT Instalação em rede Windows
Conecte o cabo da rede ao produto e aguarde por volta1. de 2 minutos para que a rede atribua um endereço IP ao produto.
Sur le panneau de commande de l'imprimante, appuyez2. sur le bouton Go (Envoi) et maintenez-le enfoncé, puis relâchez-le lorsque le voyant Prête commence à clignoter pour imprimer une page de configuration (illustration 1). Cette page comportera une adresse IP dans la section Informations sur le réseau.
No painel de controle do produto, mantenha pressionado2. o botão Ir , e solte-o quando a luz de pronto começar a piscar para imprimir uma página de configuração (texto explicativo 1). Essa página terá um endereço IP na seção de Informações sobre a rede.
Sur l'ordinateur, ouvrez un navigateur Web, saisissez3. l'adresse IP de l'imprimante dans le champ de l’adresse et appuyez sur la touche Entrée pour ouvrir le serveur Web intégré de l’imprimante.
No computador, abra um navegador da Web, digite o3. endereço IP do produto no campo de endereço e, em seguida, pressione a tecla Enter para abrir a página do servidor da Web incorporado do produto.
Cliquez sur l’onglet4. HP Smart Install, puis sur le bouton Télécharger. Le programme HP Smart Install démarre (voir illustration5. ci-dessus). Suivez les instructions à l’écran.
Clique na guia4. HP Smart Install e, em seguida, no botão Download. O programa HP Smart Install é iniciado (consulte a figura5. acima). Siga as instruções na tela.
| | | | |---|---|---| | | | | | | | | | | | | | | | | | | | | | | | |
| | | | |---|---|---| | | | |

HP Smart Install


1


Mac installation Insert the software installation CD into the computer1.
PT Instalação do Mac
EN
Insira o CD de instalação do software na unidade de CD do1. computador. Nota: Conecte o cabo USB e ligue o produto antes
CD drive. Note: Connect the USB cable and turn the product on
before installation. In the pop-up dialog box, click the installer program.2. Follow the onscreen instructions to install the3.
da instalação. Na caixa de diálogo pop-up, clique no programa2. instalador. Siga as instruções de instalação exibidas na tela para3. instalar o driver da impressora.
printer driver.
FR Installation Mac
Introduisez le CD d’installation du logiciel dans le lecteur1. de CD de l’ordinateur. Remarque : Raccordez le câble USB et mettez l’imprimante sous tension avant de procéder à l’installation.
HE
Dans la boîte de dialogue contextuelle, cliquez sur le2. programme d’installation. Suivez les instructions affichées à l’écran pour installer3. le pilote de l’imprimante.
ES Instalación en Mac
Inserte el CD de instalación del software en la unidad de1. CD del equipo. Nota: Conecte el cable USB y encienda el producto antes
de la instalación. En el cuadro de diálogo emergente, haga clic en el2. programa instalador. Siga las instrucciones que aparecen en pantalla para3. instalar el controlador de la impresora.
The HP LaserJet Guide and other documentation are on the CD that came with the product or in the HP Program folder on your computer. The HP LaserJet Guide is a product help tool that provides easy access to product information, HP product Web support, troubleshooting guidance, and regulatory and safety information.
EN
Le guide de l’imprimante HP LaserJet et d’autres documentations sont sur le CD fourni avec le produit ou dans le dossier du programme HP sur votre ordinateur. Le Guide HP LaserJet est un outil d’aide de l’imprimante qui permet d’accéder facilement aux informations sur le produit, à l’assistance web du produit HP, aux indications de dépannage et aux informations sur les normes de sécurité et de réglementations.
FR
ES La Guía de HP LaserJet y otros documentos están en el CD que viene con el producto o en la carpeta Programa HP del equipo. La Guía de HP LaserJet es una herramienta de ayuda del producto que facilita el acceso a la información del producto, a la asistencia Web del producto HP, orientación para la solución de problemas e información reglamentaria y de seguridad.
O guia da HP LaserJet e outras documentações estão no CD fornecido com o produto ou na pasta Programas da HP no seu computador. O guia da HP LaserJet é uma ferramenta de ajuda do produto que fornece fácil acesso a informações sobre o produto, ao suporte do produto HP na web, à orientação sobre solução de problemas e a informações regulamentares sobre segurança.
PT
HE
10


EN Control panel The product control panel alerts you when problems occur. If a light is blinking, check the following: Print cartridge is installed correctly.• Paper is not jammed inside the product.• Paper is in at least one tray.• The print cartridge door is completely closed.•
See the electronic user guide or control panel simulator on the CD-ROM for complete information about solving problems.
FR Panneau de commande Le panneau de commande de l’imprimante vous avertit en cas de problèmes. Si un voyant clignote, procédez aux vérifications suivantes : La cartouche d’impression est correctement installée.• Il n’y a pas de papier coincé à l’intérieur de l’imprimante.• Il y a du papier dans au moins un bac.• Le panneau d’accès à la cartouche d’impression est•
totalement fermé. Pour des informations complètes concernant la résolution des problèmes, reportez-vous au manuel d’utilisation électronique ou au simulateur du panneau de commande situé sur le CD-ROM.
ES Panel de control El panel de control del producto le avisa cuando se produce un problema. Si hay una luz parpadeando, verifique lo siguiente: El cartucho de impresión está instalado correctamente.• No hay atasco de papel al interior del producto.• Hay papel al menos en una bandeja.• La puerta del cartucho de impresión está completamente•
cerrada. Consulte la guía electrónica del usuario o el simulador del panel de control en el CD-ROM para obtener información completa acerca de la solución de problemas.
PT Painel de controle O painel de controle do produto alerta você sobre a ocorrência de problemas. Se a luz estiver piscando, verifique o seguinte: O cartucho de impressão está instalado corretamente.• O papel não está congestionado no produto.• O papel está em pelo menos uma bandeja.• A porta do cartucho de impressão está completamente•
fechada. Consulte o guia eletrônico do usuário ou o simulador do painel de controle do CD-ROM para obter informações completas sobre como solucionar problemas.
HE
.
www.hp.com
Copyright and License © 2010 Copyright Hewlett-Packard Development Company, L.P. Reproduction, adaptation or translation without prior written permission is prohibited, except as allowed under the copyright laws. The information contained herein is subject to change without notice. The only warranties for HP products and services are set forth in the express warranty statements accompanying such products and services. Nothing herein should be construed as constituting an additional warranty. HP shall not be liable for technical or editorial errors or omissions contained herein. Part number: CE663-90940 Edition 2, 3/2010 FCC Regulations
This equipment has been tested and found to comply with the limits for a Class B digital device, pursuant to Part 15 of the FCC rules. These limits are designed to provide reasonable protection against harmful interference in a residential installation. This equipment generates, uses, and can radiate radio-frequency energy. If this equipment is not installed and used in accordance with the instructions, it may cause harmful interference to radio communications. However, there is no guarantee that interference will not occur in a particular installation. If this equipment does cause harmful interference to radio or television reception, which can be determined by turning the equipment off and on, correct the interference by one or more of the following measures:
Any changes or modifications to the product that are not expressly approved by HP could void the user’s authority to operate this equipment. Use of a shielded interface cable is required to comply with the Class B limits of Part 15 of FCC rules. For more regulatory information, see the electronic user guide. Hewlett-Packard shall not be liable for any direct, indirect, incidental, consequential, or other damage alleged in connection with the furnishing or use of this information.
Trademark Credits Windows® is a U.S. registered trademark of Microsoft Corporation.
Copyright et licence © 2010 Copyright Hewlett-Packard Development Company, L.P. La reproduction, l’adaptation ou la traduction, sans autorisation écrite préalable, sont interdites sauf dans le cadre des lois sur le copyright. Les informations contenues dans le présent document sont susceptibles d’être modifiées sans préavis. Les seules garanties pour les produits et services HP sont exposées dans la garantie expresse qui accompagne lesdits produits et services. Rien de ce qui pourrait être mentionné dans le présent document ne pourrait constituer une garantie supplémentaire. HP ne saurait être tenu responsable d’erreurs ou d’omissions rédactionnelles ou techniques contenues dans le présent document. Numéro de référence : CE663-90940 Edition 2, 3/2010 Réglementations de la FCC
Les tests effectués sur cet équipement ont déterminé qu’il est conforme aux prescriptions des unités numériques de classe B, telles que spécifiées à l’article 15 des normes de la FCC (Commission fédérale des communications). Ces limites sont destinées à assurer une protection suffisante contre les interférences produites dans une installation résidentielle. Cet équipement génère, utilise et peut émettre de l’énergie sous forme de fréquences radio. Si ce matériel n’est pas installé et utilisé conformément aux instructions, il peut causer des interférences nuisibles aux communications radio. Aucune garantie n’est néanmoins fournie quant à l’apparition d’interférences dans une installation particulière. Si cet appareil provoque des interférences nuisibles (qui peuvent être déterminées en éteignant et rallumant l’appareil) à des communications radio ou télévision, corrigez ce problème en appliquant une ou plusieurs des mesures suivantes :
Toute modification apportée au produit sans le consentement de HP peut se traduire par la révocation du droit d’exploitation de l’équipement dont jouit l’utilisateur. Un câble d’interface blindé est requis afin de satisfaire aux stipulations de l’article 15 des réglementations de la FCC sur les appareils de classe B. Pour de plus amples informations sur les réglementations, reportezvous au Guide de l’utilisateur au format électronique. Hewlett-Packard ne sera en aucun cas tenu responsable des dommages directs, indirects, accessoires, consécutifs ou autres pouvant résulter de la mise à disposition de ces informations ou de leur utilisation.
Marques commerciales Windows® est une marque déposée aux Etats-Unis de Microsoft Corporation.
CE663-90940
