Ask AI
— answers from the official manualAnswers from the official manual.
Common questions
Common Questions
20 totalHow can I access the printer's user guide if I have Windows 8?
On the Start screen, right-click an empty area, click All Apps on the app bar, click the icon with the printer's name, and then select Help. Alternatively, the user guide is available online at www.hp.com/support/ljm11-m13.
What are the requirements for using HP ePrint via email?
The printer must be connected to a wireless network and have Internet access. HP Web Services must be enabled on the printer, and the printer must be registered with HP Connected. The printer code is valid for only 24 hours from the time HP Web Services is enabled.
What should I verify before performing a wireless installation?
Before starting wireless installation, verify that the wireless access point is working correctly, the printer, router, and computer are all turned on, and the computer is connected to the same wireless network that the printer will be connected to. Also check that the print driver is installed on the computer.
How do I download printer firmware updates?
Go to www.hp.com/support/ljm11-m13, click on 'Drivers, Software & Firmware' under Download options, select your operating system and click Next, select Firmware, and then click the Download button.
What USB cable type is required for direct connection between printer and computer?
Use an A-to-B type USB cable for the direct USB connection between the printer and the computer.
How can I factory reset my HP LaserJet Pro M11-M13 printer?
Press and hold the Cancel button for 5 seconds until a configuration page prints out which will clear all settings, returning it to its default state. Re-pair all connected devices post-reset (Page 2).
Show 14 more questions
How often should I check if firmware updates are available for my HP LaserJet Pro M11-M13 printer?
Do I need to connect the USB cable before or after installing the software on Windows?
What should I do if the wireless installer cannot detect my printer?
How far should the printer be from the wireless access point?
What is the difference between Process A and Process B for wireless installation?
How do I enable HP Wireless Direct on my printer?
How do I set up my HP LaserJet Pro M11-M13 printer using the USB connection method?
What should I do if my HP LaserJet Pro M11-M13 shows error code Err0x4d?
How do I establish an initial wireless connection between my HP LaserJet Pro M11-M13 and computer?
What should I do if my HP LaserJet Pro M11-M13 is having issues printing wirelessly?
How can I download the necessary software for installing my HP LaserJet Pro M11-M13?
How do I enable HP Wireless Direct feature in my printer's settings?
Can I use HP ePrint via email on my printer? What are the conditions?
How do I configure mobile printing from my device with the printer?
Full Manual
20 pages
2
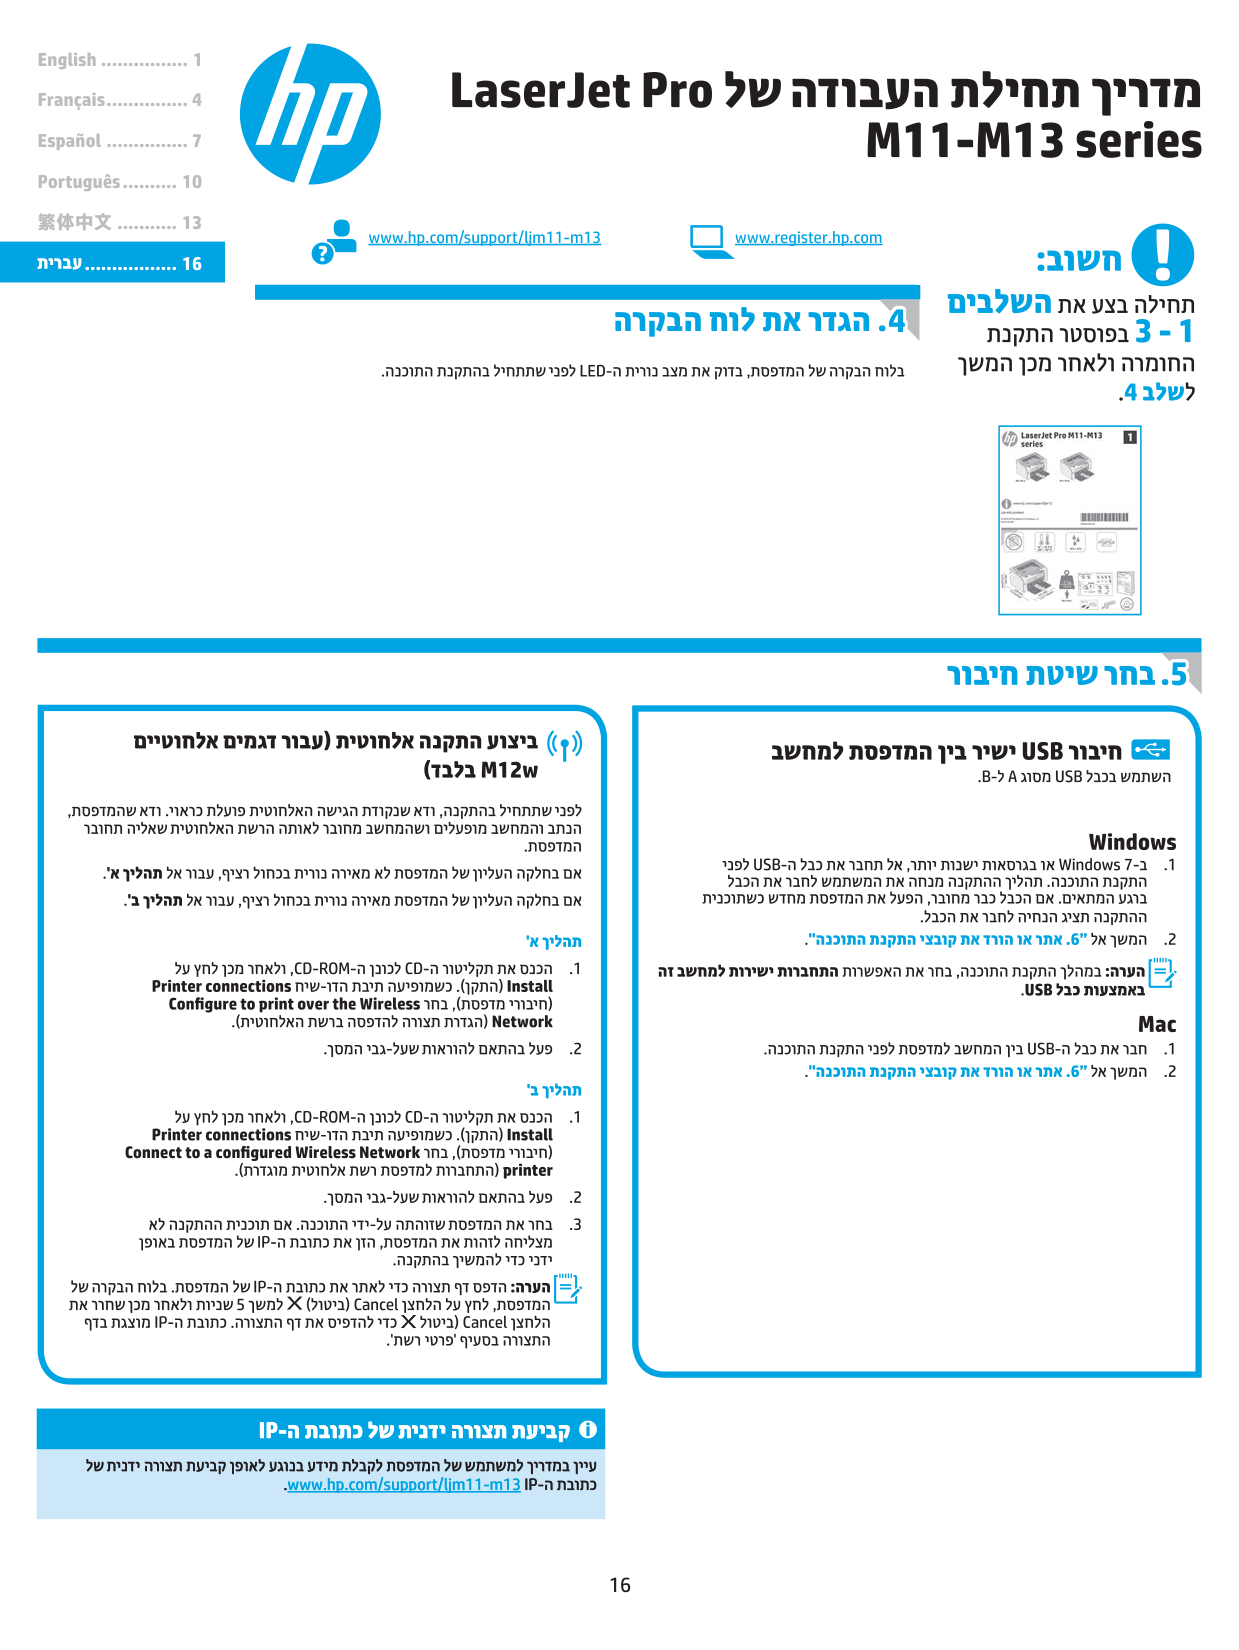
English .............. 1
LaserJet Pro M11-M13 series Getting Started Guide
Français ............ 4
Español ............. 7
Português ....... 10 繁体中文......... 13
www.hp.com/support/ljm11-m13 www.register.hp.com
#### IMPORTANT:
.............. 16
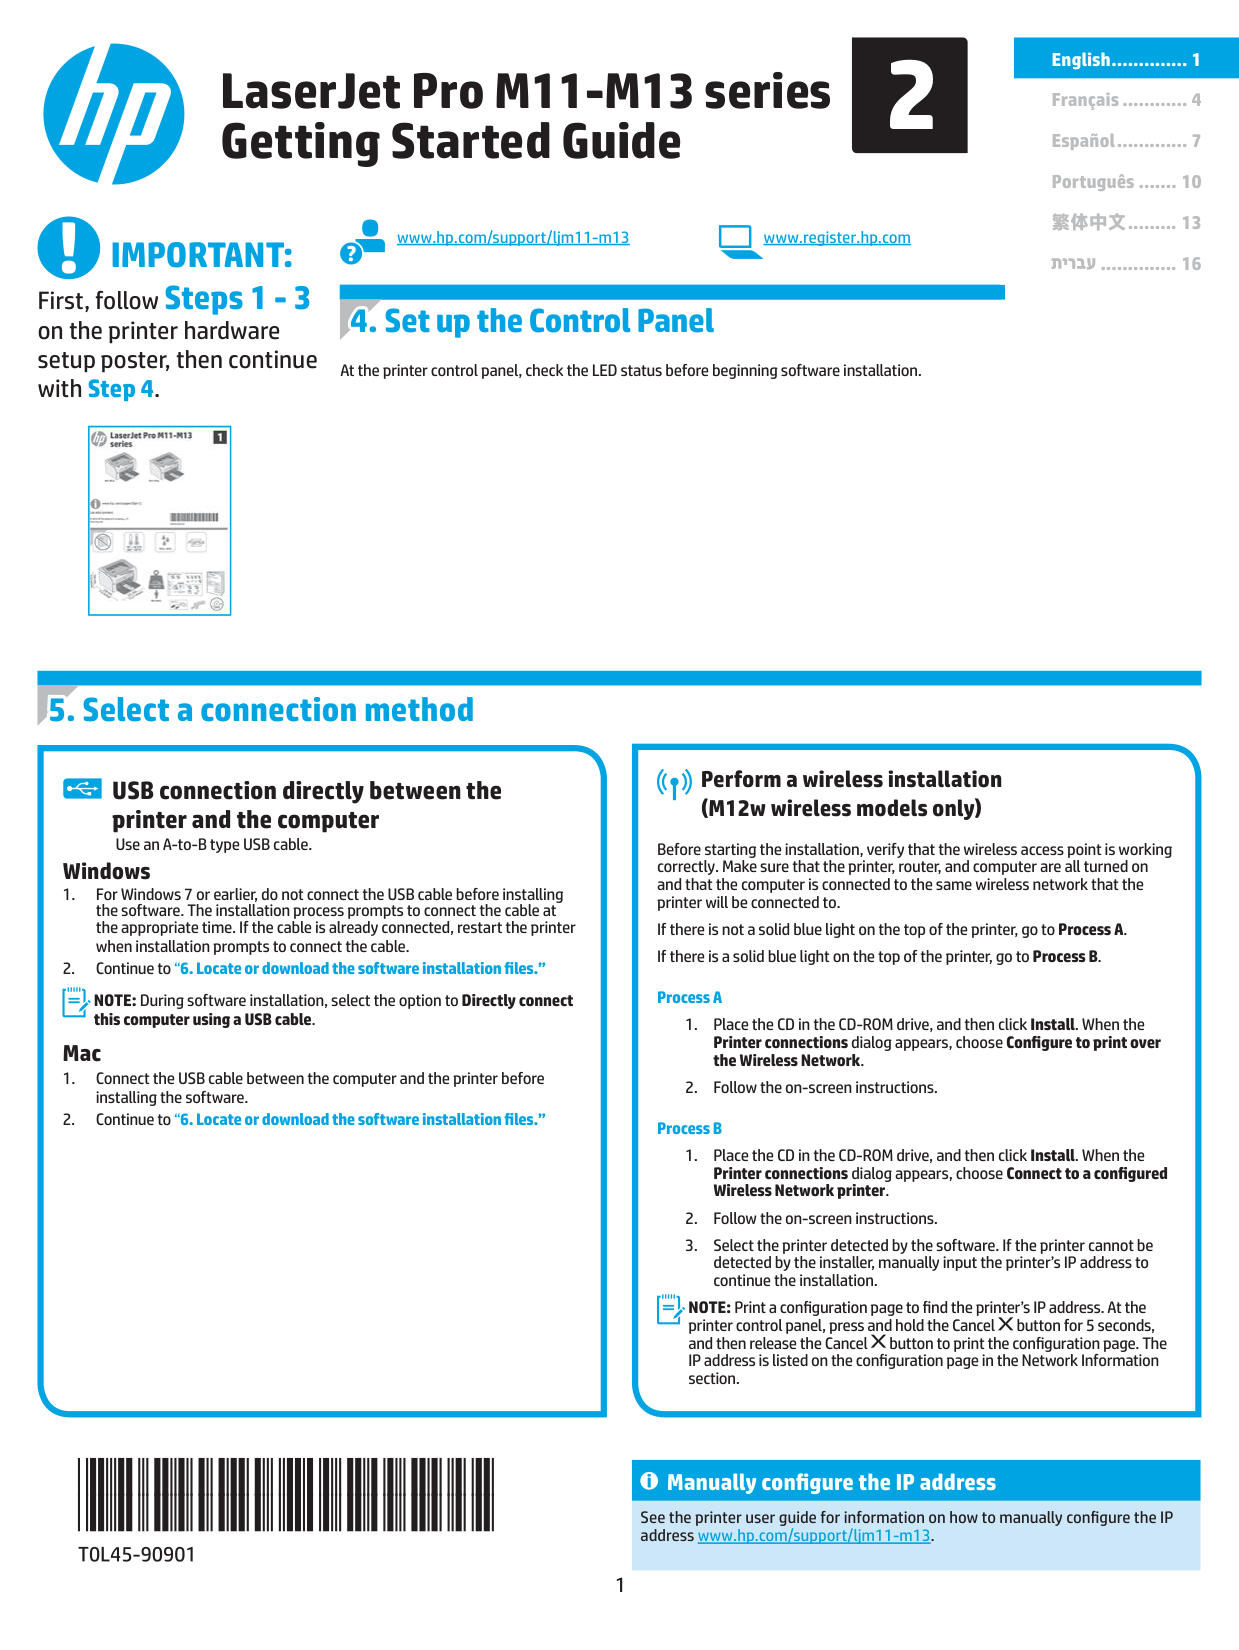
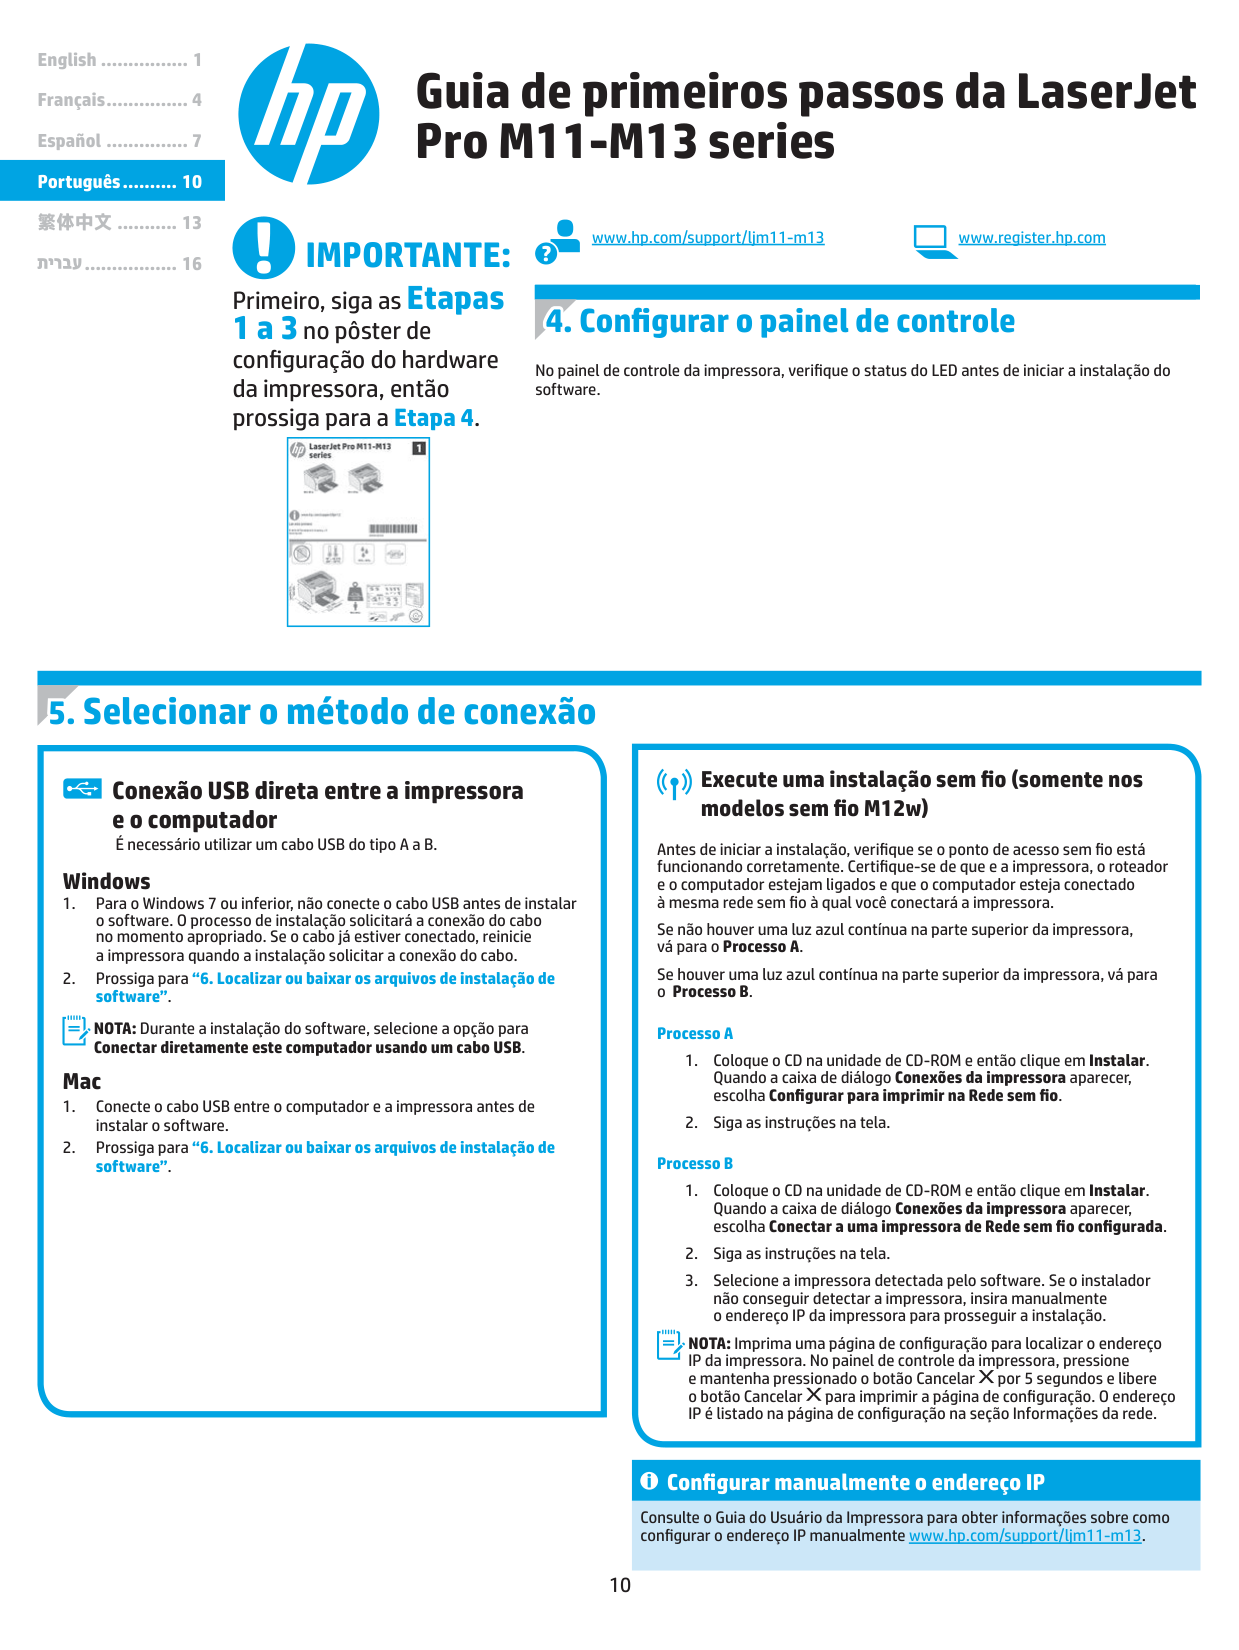
First, follow Steps 1 - 3 on the printer hardware setup poster, then continue with Step 4.
##### 4. Set up the Control Panel
At the printer control panel, check the LED status before beginning software installation.
|| |---|
##### 5. Select a connection method
USB connection directly between the printer and the computer Use an A-to-B type USB cable.
####### Windows
NOTE: During software installation, select the option to Directly connect this computer using a USB cable.
####### Mac
####### Perform a wireless installation (M12w wireless models only)
Before starting the installation, verify that the wireless access point is working correctly. Make sure that the printer, router, and computer are all turned on and that the computer is connected to the same wireless network that the printer will be connected to.
If there is not a solid blue light on the top of the printer, go to Process A. If there is a solid blue light on the top of the printer, go to Process B.
######### Process A
######### Process B
NOTE: Print a configuration page to find the printer’s IP address. At the printer control panel, press and hold the Cancel button for 5 seconds, and then release the Cancel button to print the configuration page. The IP address is listed on the configuration page in the Network Information section.
####### Manually configure the IP address
See the printer user guide for information on how to manually configure the IP address www.hp.com/support/ljm11-m13.
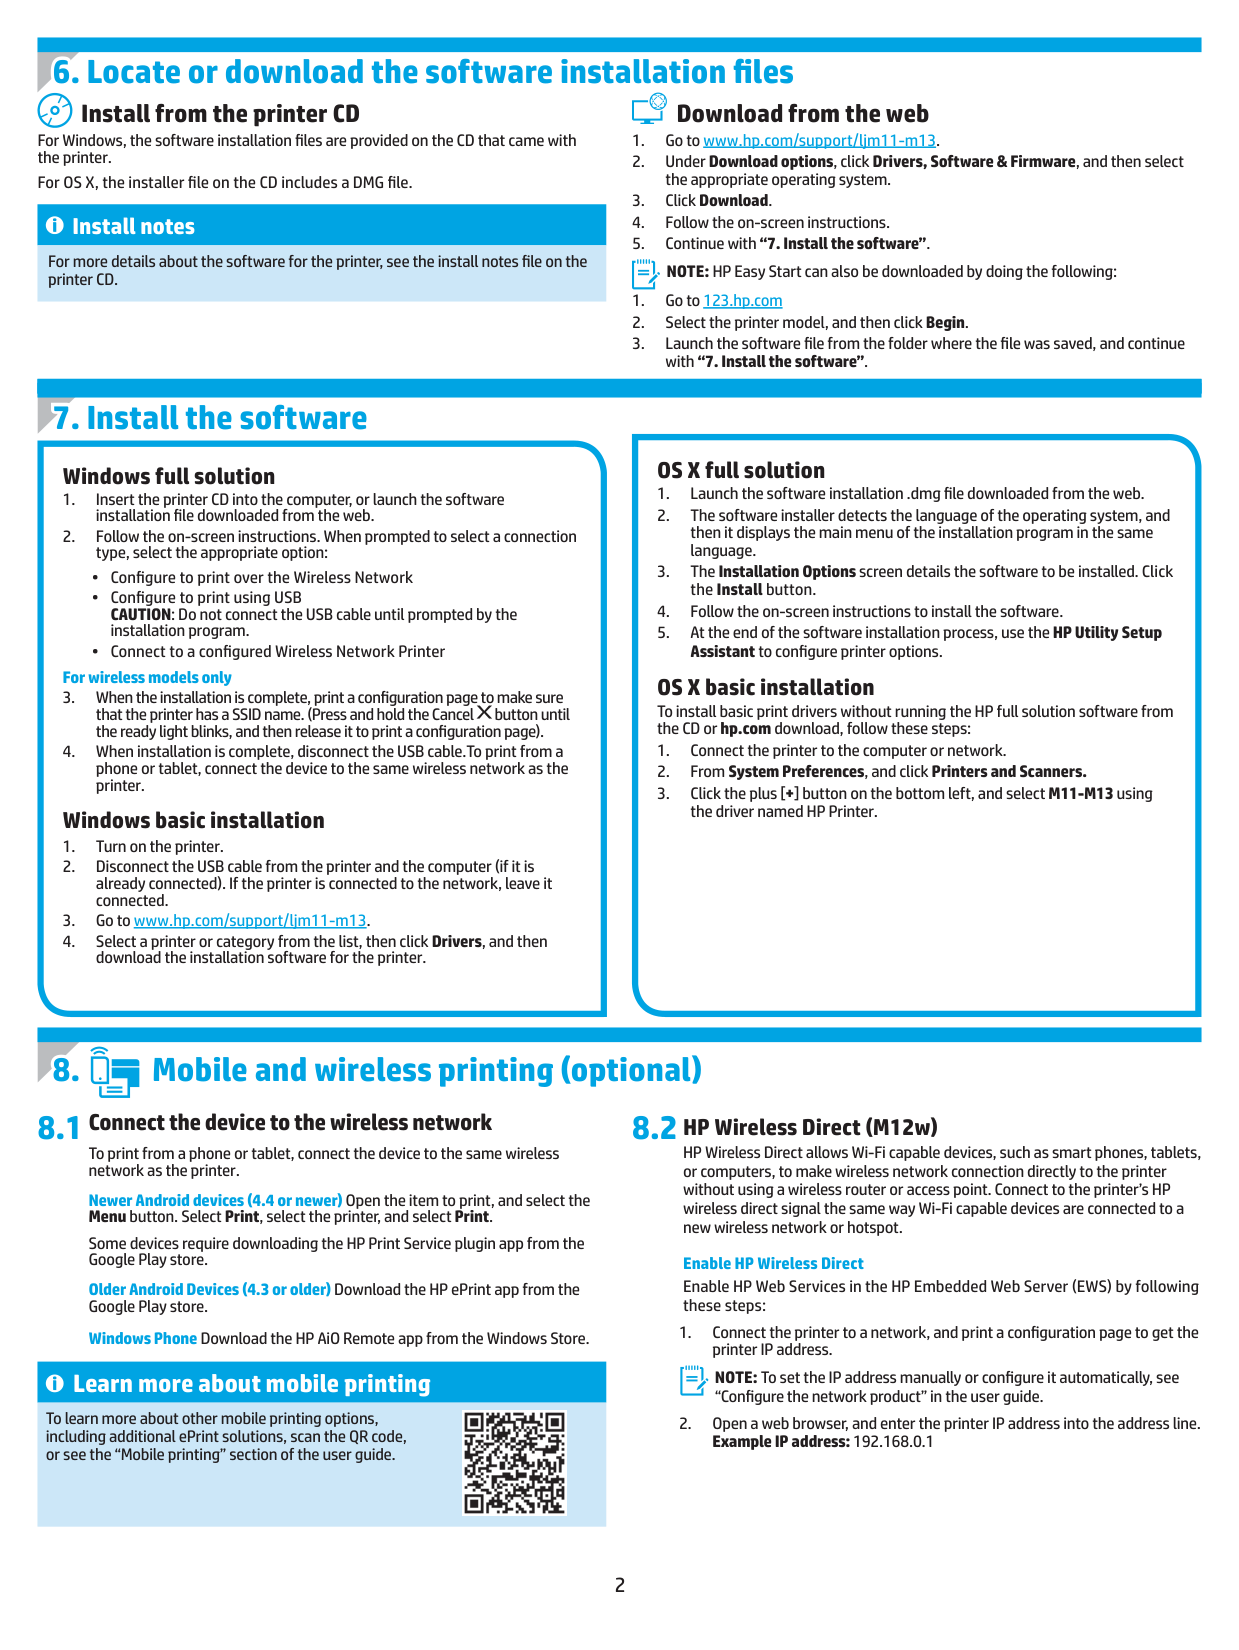
Install from the printer CD
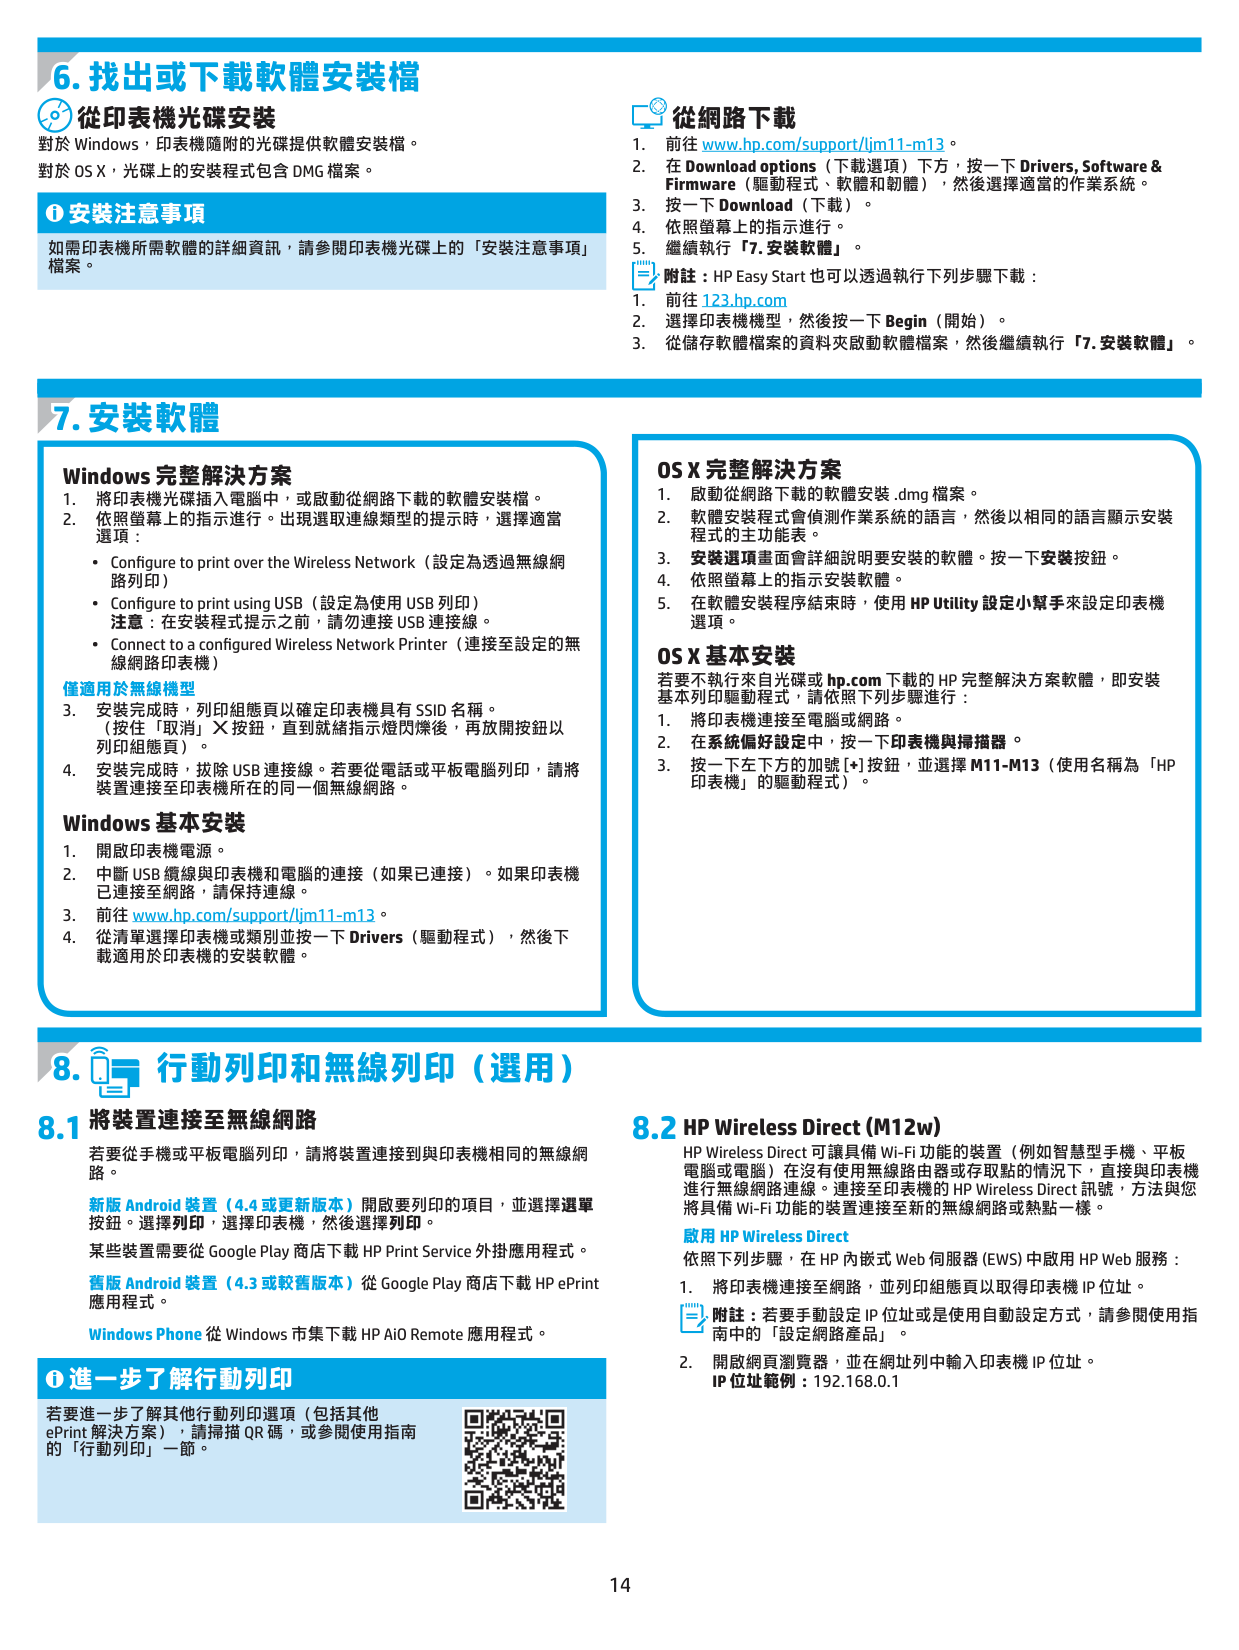
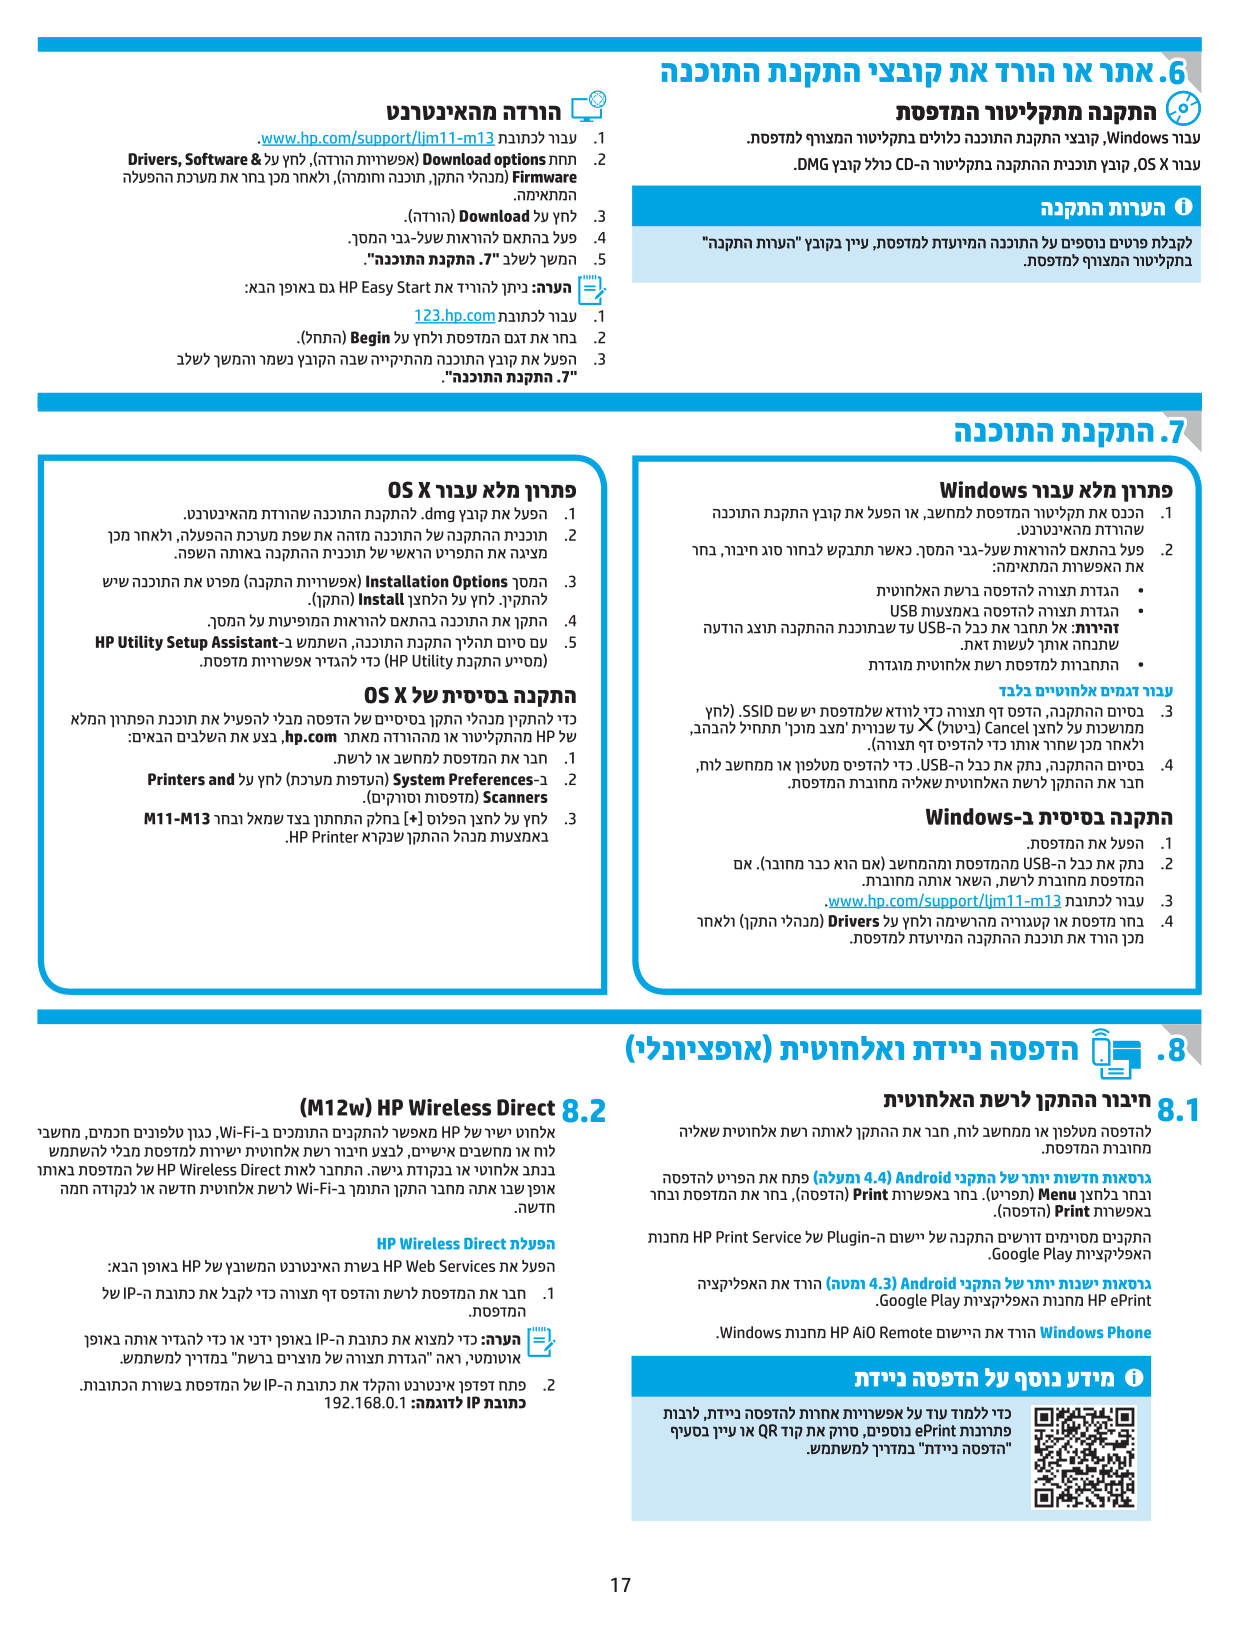
Download from the web
For Windows, the software installation files are provided on the CD that came with the printer.
For OS X, the installer file on the CD includes a DMG file.
Install notes
For more details about the software for the printer, see the install notes file on the printer CD.
NOTE: HP Easy Start can also be downloaded by doing the following:
##### 7. Install the software
####### Windows full solution
For wireless models only
####### Windows basic installation
####### OS X full solution
OS X basic installation To install basic print drivers without running the HP full solution software from the CD or hp.com download, follow these steps:
##### 8.1 8.2
Connect the device to the wireless network
HP Wireless Direct (M12w) HP Wireless Direct allows Wi-Fi capable devices, such as smart phones, tablets, or computers, to make wireless network connection directly to the printer without using a wireless router or access point. Connect to the printer’s HP wireless direct signal the same way Wi-Fi capable devices are connected to a new wireless network or hotspot.
To print from a phone or tablet, connect the device to the same wireless network as the printer.
Newer Android devices (4.4 or newer) Open the item to print, and select the Menu button. Select Print, select the printer, and select Print.
Some devices require downloading the HP Print Service plugin app from the Google Play store.
Enable HP Wireless Direct Enable HP Web Services in the HP Embedded Web Server (EWS) by following these steps:
Older Android Devices (4.3 or older) Download the HP ePrint app from the Google Play store.
NOTE: To set the IP address manually or configure it automatically, see “Configure the network product” in the user guide.
Windows Phone Download the HP AiO Remote app from the Windows Store.
Learn more about mobile printing
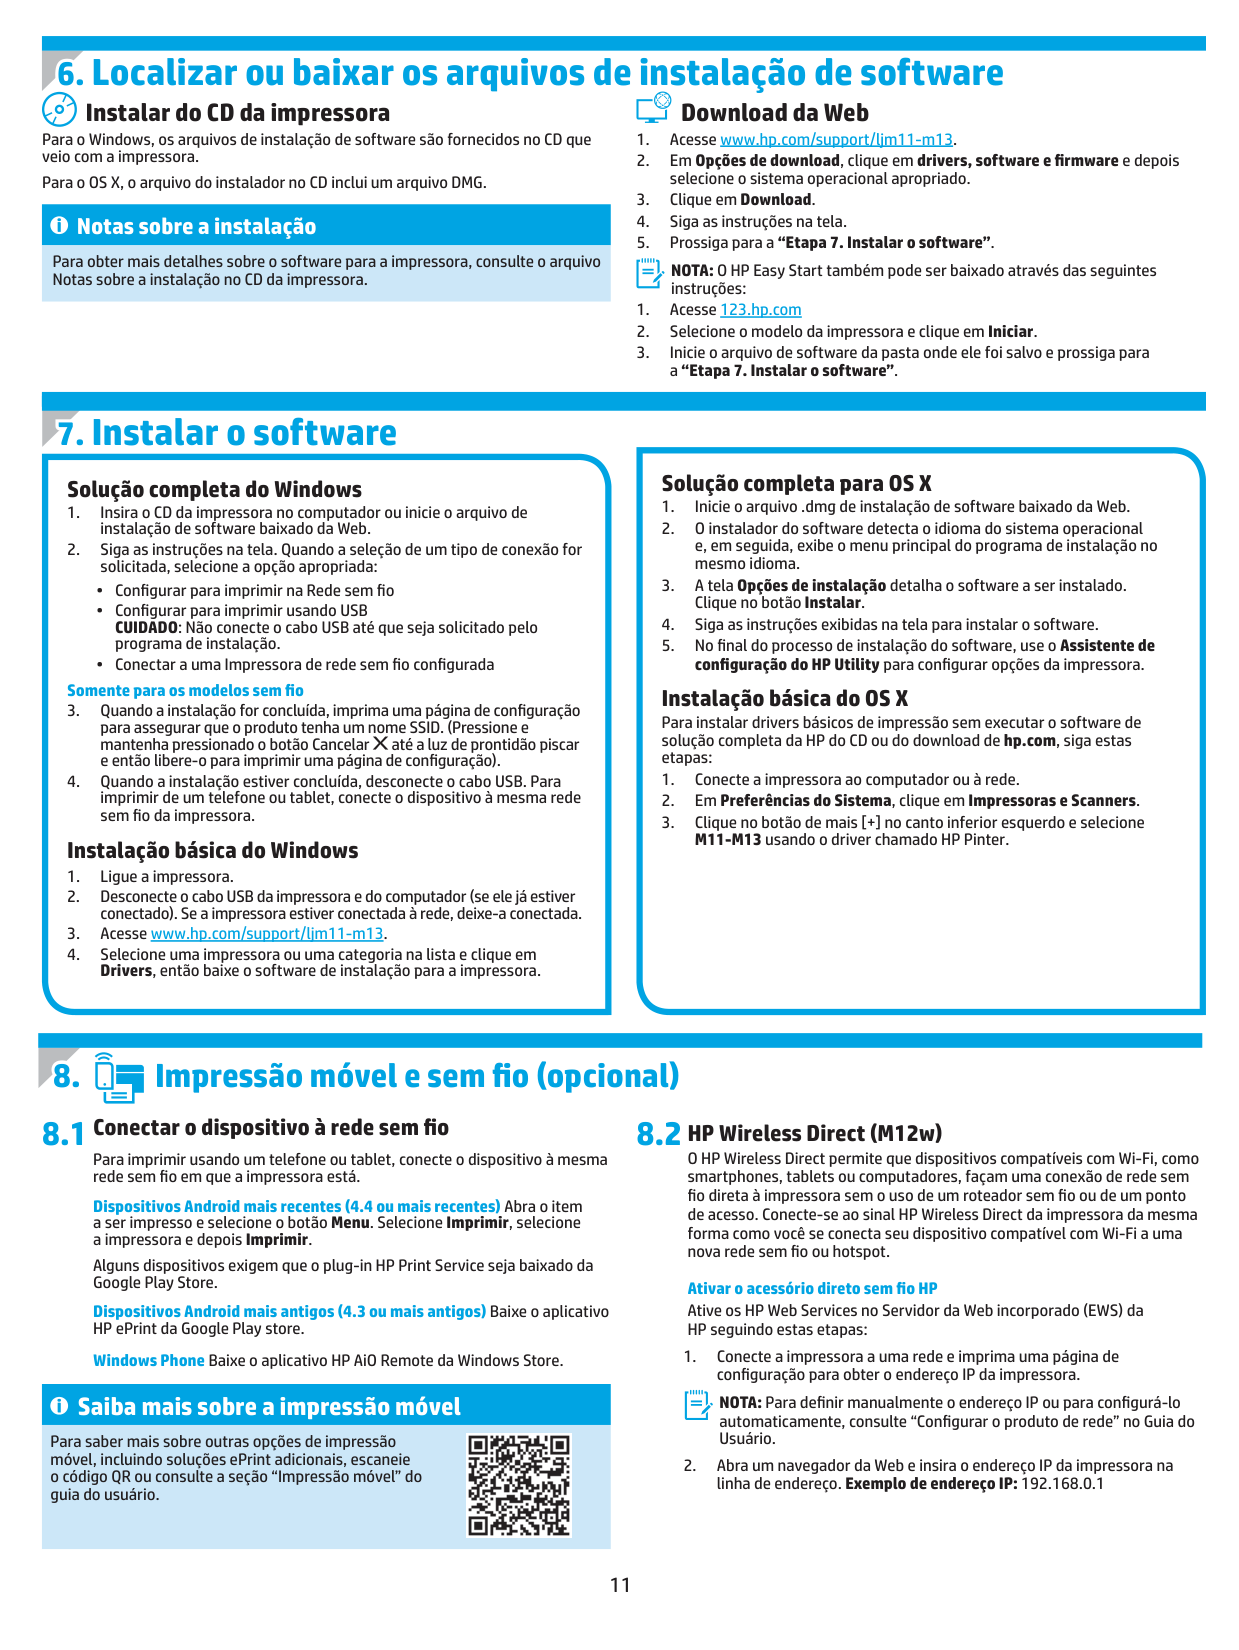
To learn more about other mobile printing options, including additional ePrint solutions, scan the QR code, or see the “Mobile printing” section of the user guide.

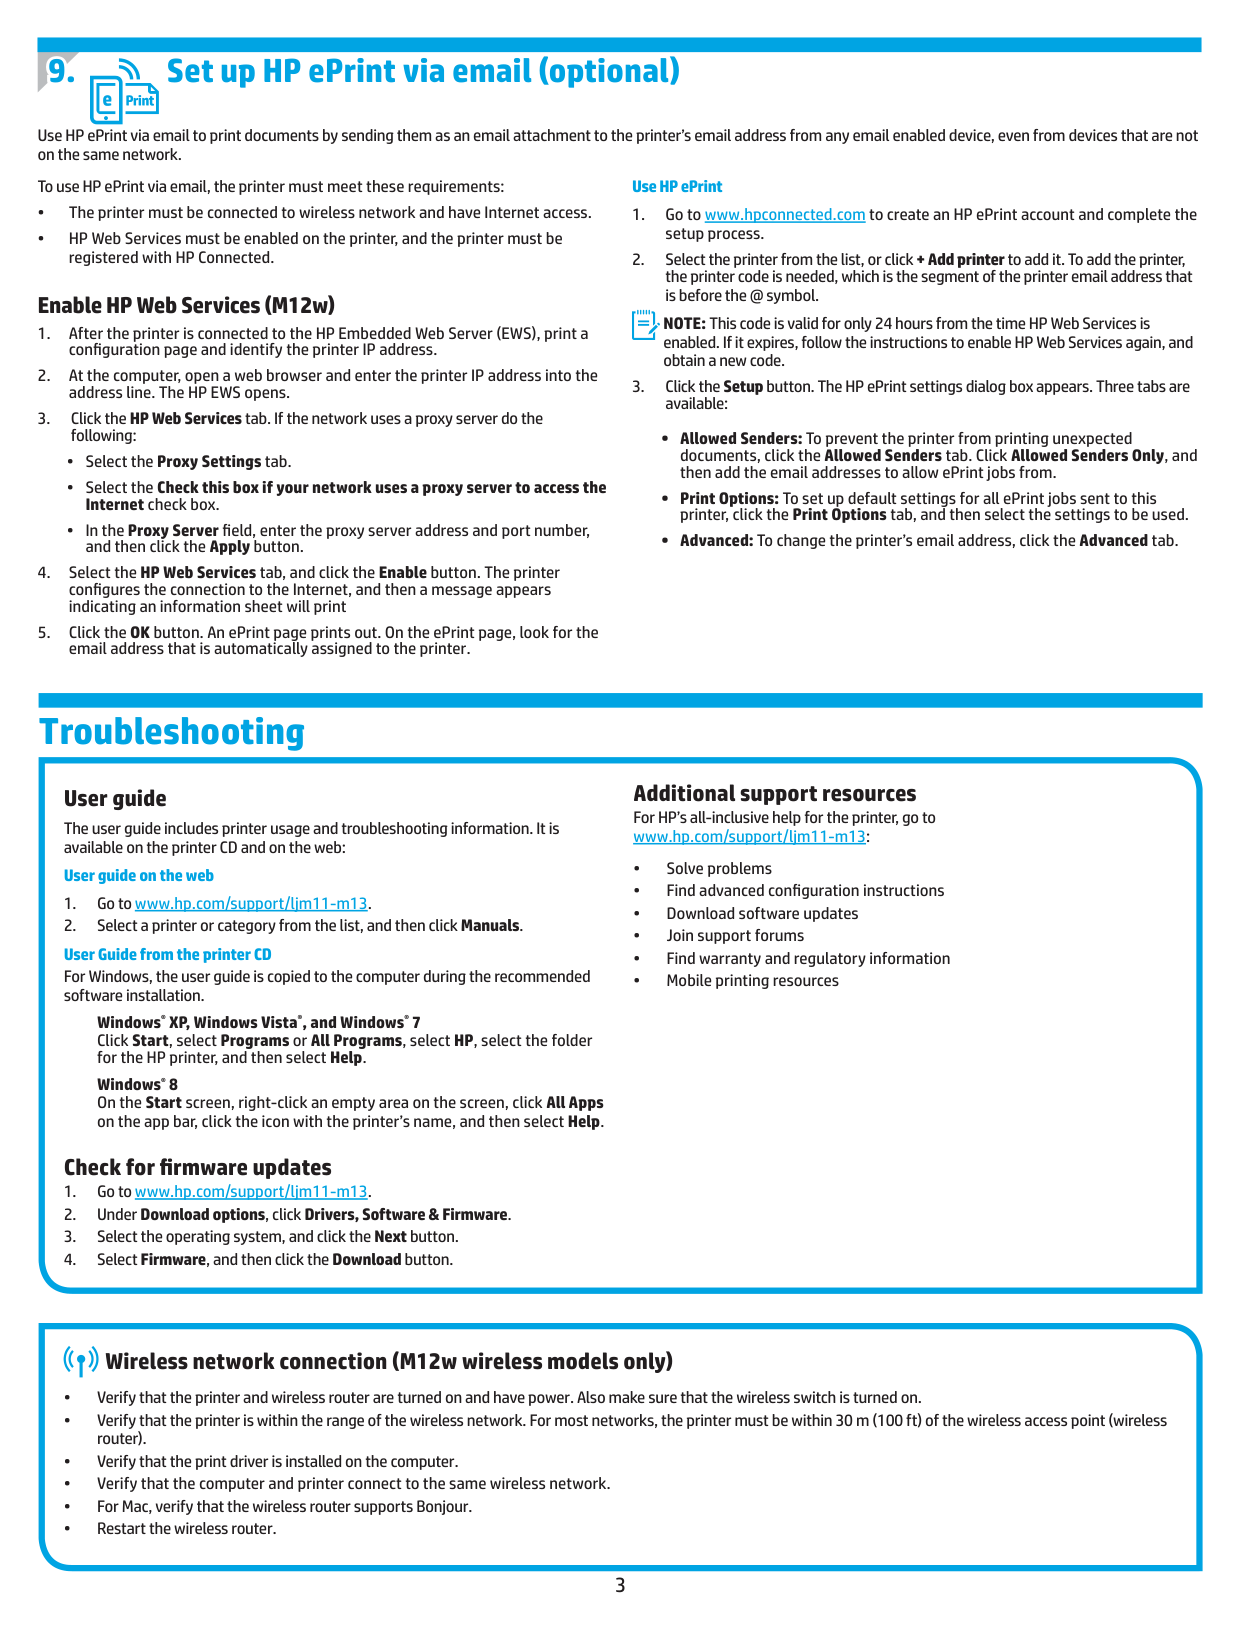
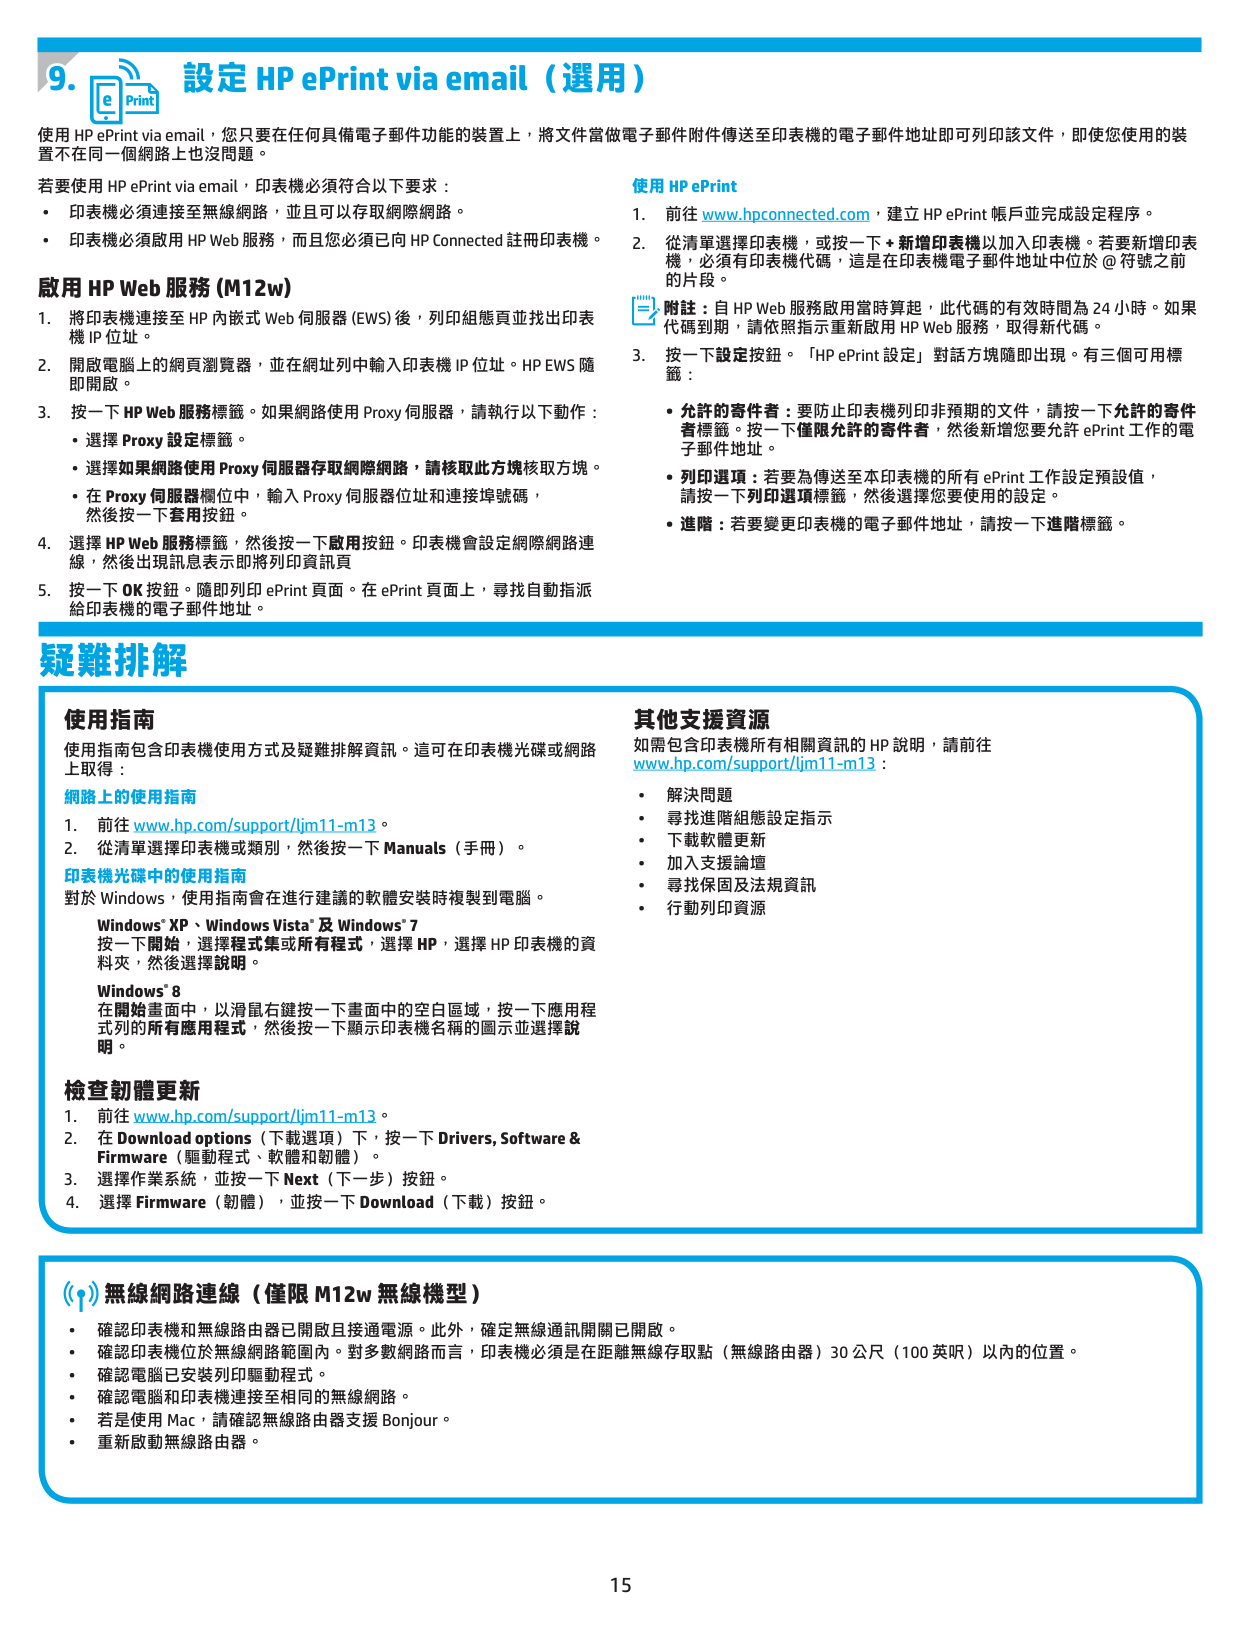
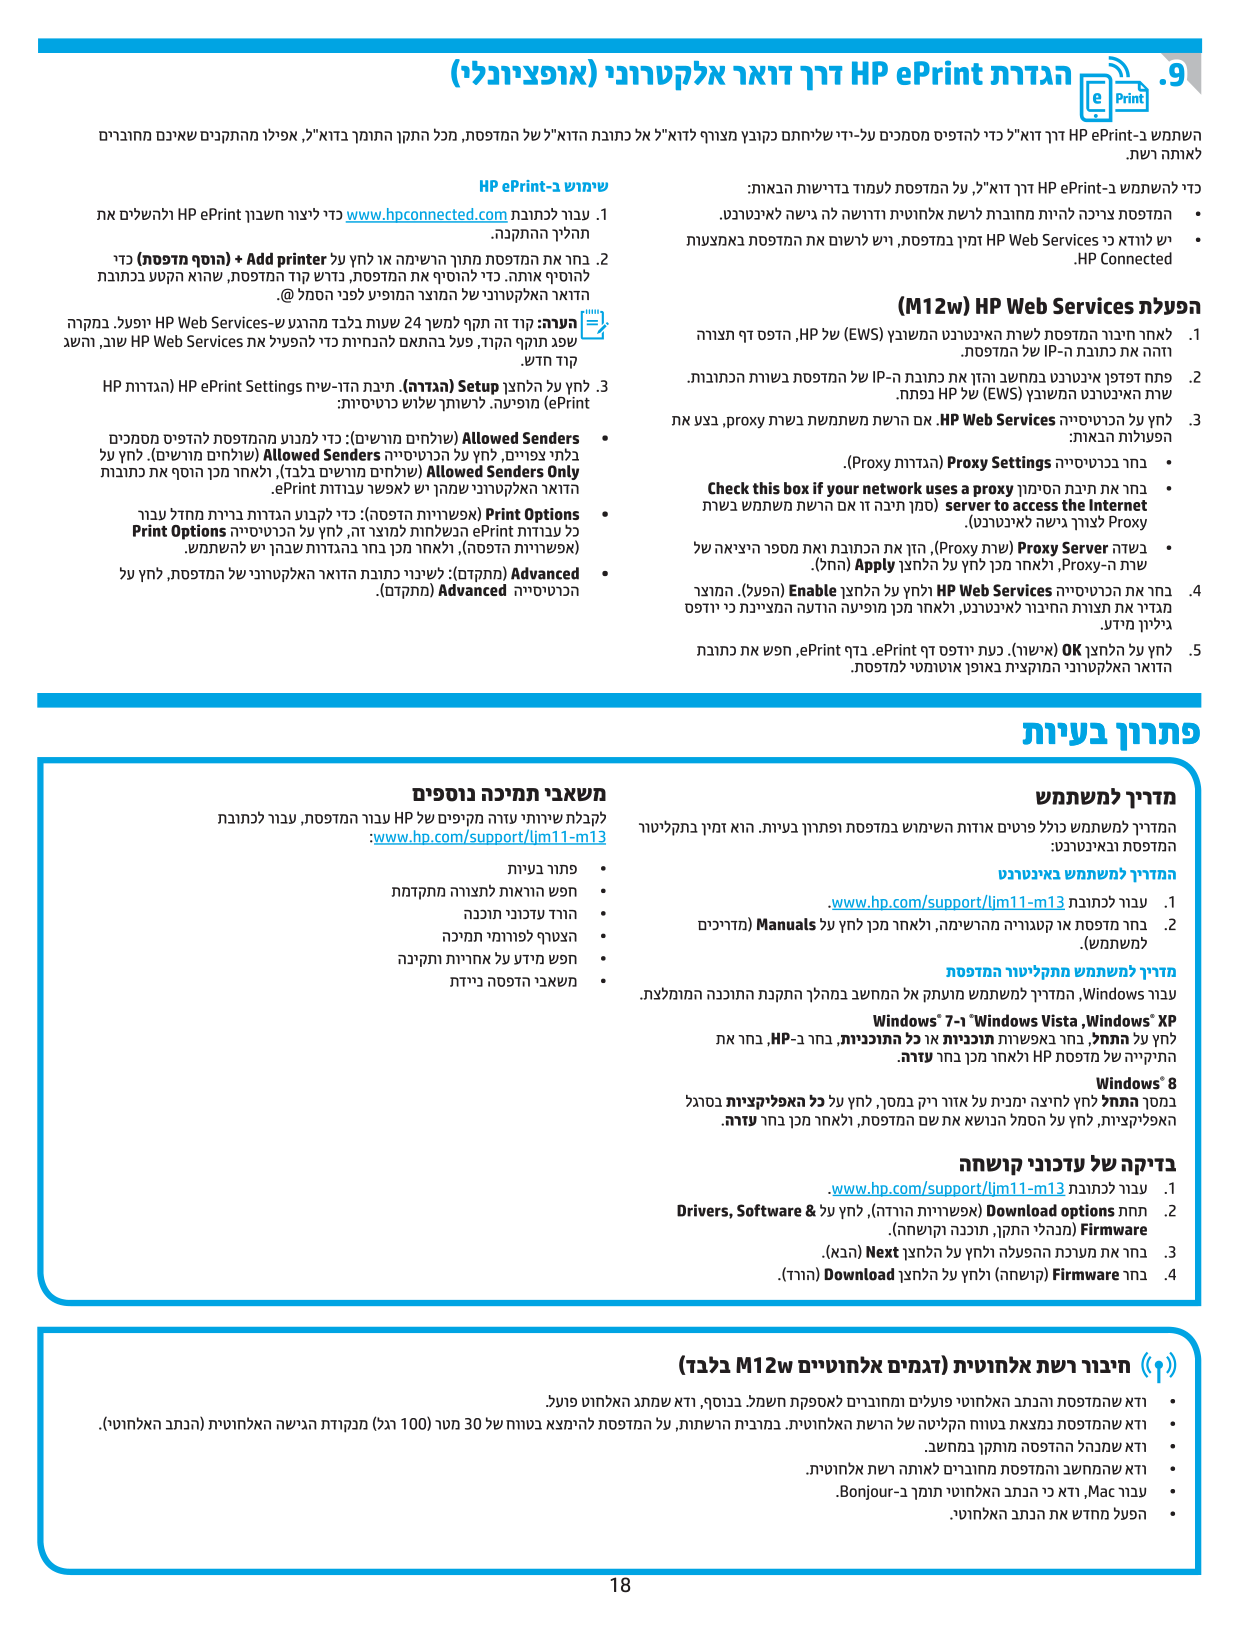
##### 9. Set up HP ePrint via email (optional)
Use HP ePrint via email to print documents by sending them as an email attachment to the printer’s email address from any email enabled device, even from devices that are not on the same network.
To use HP ePrint via email, the printer must meet these requirements:
######### Use HP ePrint
NOTE: This code is valid for only 24 hours from the time HP Web Services is enabled. If it expires, follow the instructions to enable HP Web Services again, and obtain a new code.
####### Enable HP Web Services (M12w)
Troubleshooting
####### User guide
The user guide includes printer usage and troubleshooting information. It is available on the printer CD and on the web:
######### User guide on the web
User Guide from the printer CD For Windows, the user guide is copied to the computer during the recommended software installation.
Windows® XP, Windows Vista®, and Windows® 7 Click Start, select Programs or All Programs, select HP, select the folder for the HP printer, and then select Help.
Windows® 8
On the Start screen, right-click an empty area on the screen, click All Apps on the app bar, click the icon with the printer’s name, and then select Help.
####### Check for firmware updates
Additional support resources For HP’s all-inclusive help for the printer, go to www.hp.com/support/ljm11-m13:
####### Wireless network connection (M12w wireless models only)
English ................ 1
Guide de démarrage LaserJet Pro des séries M11-M13
Français ............... 4
Español ............... 7
Português .......... 10 繁体中文 ........... 13
www.hp.com/support/ljm11-m13 www.register.hp.com
#### IMPORTANT :
................. 16
Suivez tout d’abord les
##### 4. Configurer le panneau de commande
étapes 1 à 3indiquées sur le poster d’installation matérielle de l’imprimante, puis passez à l’étape 4.
Sur le panneau de commande de l’imprimante, vérifiez l’état des voyants avant de commencer l’installation du logiciel.
|| |---|
##### 5. Sélectionner une méthode de connexion
Connexion USB directement entre l’imprimante et l’ordinateur Utilisez un câble USB de type A-à-B.
####### Windows
REMARQUE : Lors de l’installation du logiciel, sélectionnez l’option pour Connecter directement cet ordinateur à l’aide d’un câble USB.
####### Mac
####### Installation sans fil (modèles sans fil M12w uniquement)
Avant de commencer l’installation, vérifiez que le point d’accès sans fil fonctionne correctement. Assurez-vous que l’imprimante, le routeur et l’ordinateur sont tous sous tension et que l’ordinateur est connecté au réseau sans fil auquel vous souhaitez connecter l’imprimante.
Si le voyant bleu sur le dessus de l’imprimante n’est pas allumé, passez au
######### Processus A
######### Processus B
REMARQUE : Imprimez une page de configuration pour déterminer l’adresse IP de l’imprimante. Sur le panneau de commande de l’imprimante, appuyez sur la touche Annuler et maintenez-la enfoncée pendant 5 secondes, puis relâchez la touche Annuler pour imprimer la page de configuration. L’adresse IP est mentionnée sur la page de configuration dans la section Information réseau.
####### Configurer manuellement l’adresse IP
Consultez le manuel de l’utilisateur de l’imprimante pour obtenir des informations sur la configuration manuelle de l’adresse IP www.hp.com/support/ljm11-m13.
Installation à partir du CD de l’imprimante
Téléchargement à partir du Web
Pour Windows, les fichiers d’installation du logiciel sont fournis sur le CD de l’imprimante.

Pour OS X, le fichier d’installation sur le CD comprend un fichier DMG.
Notes d'installation
Pour plus de détails sur le logiciel de l'imprimante, consultez le fichier des notes d'installation sur le CD de l'imprimante.
REMARQUE : HP Easy Start peut également être téléchargé comme suit :
##### 7. Installer le logiciel
####### Solution complète Windows
####### Installation de base Windows
####### Solution complète OS X
Installation de base d’OS X Pour installer les pilotes d’impression de base sans exécuter le logiciel de la solution complète HP à partir du CD ou du téléchargement à partir de hp.com, procédez comme suit :
##### 8.1 8.2
Connexion du produit à un réseau sans fil
HP Wireless Direct (M12w) HP Wireless Direct permet aux périphériques Wi-Fi (smartphones, tablettes ou ordinateurs) d’effectuer une connexion réseau sans fil directement vers l’imprimante sans utiliser de routeur sans fil ou de point d’accès. Les utilisateurs se connectent au signal d’impression directe sans fil HP de l’imprimante de la même manière qu’ils connectent un périphérique Wi-Fi à un nouveau réseau sans fil ou à une borne d’accès.
Pour imprimer depuis un téléphone ou une tablette, connectez le périphérique au même réseau sans fil que l’imprimante.
Périphériques Android plus récents (4.4 ou ultérieurs) Ouvrez l’élément à imprimer puis sélectionnez le bouton Menu. Sélectionnez Imprimer, puis l’imprimante et appuyez sur Imprimer.
Pour certains périphériques, il est nécessaire de télécharger l’application du module d’extension du service d’impression HP sur Google Play.
Activer HP Wireless Direct Activez les services Web HP dans le serveur Web intégré (EWS) HP en procédant comme suit :
Périphériques Android plus anciens (4.3 ou antérieurs) Téléchargez l’appli HP ePrint, disponible sur Google Play.
Téléphones Windows Téléchargez l’appli HP AiO Remote disponible dans le Windows Store.
REMARQUE : Pour configurer manuellement ou automatiquement l’adresse IP, consultez « Configurer le produit en réseau » dans le manuel de l’utilisateur.
En savoir plus sur l'impression mobile
Pour en savoir plus sur les autres options d'impression mobile, notamment les solutions ePrint supplémentaires, numérisez le code QR ou consultez la section « Impression mobile » du manuel de l'utilisateur.

##### 9. Configurer HP ePrint via messagerie électronique (facultatif)
Utilisez HP ePrint via messagerie électronique pour imprimer des documents en les envoyant en pièce jointe à l’adresse électronique de l’imprimante depuis n’importe quel périphérique activé, même ceux qui ne sont pas sur le même réseau.
Pour utiliser HP ePrint via messagerie électronique, l’imprimante doit répondre aux exigences suivantes :
######### Utiliser HP ePrint
REMARQUE : Ce code est valable pendant 24 heures seulement à partir du moment où vous activez les services Web HP. S’il expire, suivez à nouveau les instructions d’activation des services Web HP pour obtenir un nouveau code.
####### Activer les services Web HP (M12w)
Dépannage
####### Manuel de l’utilisateur
Le manuel de l’utilisateur comprend des informations relatives à l’utilisation de l’imprimante et au dépannage. Il est disponible sur le CD de l’imprimante et sur le Web :
######### Manuel de l’utilisateur sur le Web
Manuel de l’utilisateur sur le CD de l’imprimante Pour Windows, le manuel de l’utilisateur est copié sur l’ordinateur lors de l’installation logicielle recommandée.
Windows® XP, Windows Vista® et Windows® 7 Cliquez sur Démarrer, puis sur Programmes ou Tous les programmes, sélectionnez HP, puis le dossier pour l’imprimante HP et sélectionnez Aide.
Windows® 8 À l’écran Démarrer, effectuez un clic droit sur une zone vide de l’écran, cliquez sur Toutes les applications sur la barre d’applications, cliquez sur l’icône avec le nom de l’imprimante, puis sélectionnez Aide.
####### Recherche des mises à jour de micrologiciels
Ressources d’assistance supplémentaires Pour l’aide globale de HP relative à l’imprimante, allez à www.hp.com/support/ljm11-m13:
####### Connexion au réseau sans fil (modèles sans fil M12w uniquement)
English .............. 1
Guía de inicio de la serie LaserJet Pro M11-M13
Français ............ 4
Español ............. 7
Português ....... 10 繁体中文......... 13
www.hp.com/support/ljm11-m13 www.register.hp.com
#### IMPORTANTE:
.............. 16
En primer lugar, siga los
##### 4. Configuración inicial en el panel de control
##### pasos 1 - 3del folleto de
configuración del hardware de la impresora y, después, continúe con el paso 4.
En el panel de control de la impresora, compruebe el estado del diodo emisor de luz antes de comenzar a instalar el software.
|| |---|
##### 5. Selección del método de conexión
####### Realice una instalación inalámbrica (solo para los modelos inalámbricos M12w)
###### Conexión USB directamente entre la impresora y el equipo
Antes de comenzar la instalación, verifique que el punto de acceso inalámbrico funcione correctamente. Asegúrese de que la impresora, el direccionador y el equipo estén encendidos y que el equipo esté conectado a la misma red inalámbrica a la que desea conectar la impresora.
Utilice un cable USB de tipo A a B.
####### Windows
Si en la parte superior de la impresora no se ilumina una luz azul constante, pase al Proceso A.
Si en la parte superior de la impresora se ilumina una luz azul constante, pase al Proceso B.
instalación del software”.
######### Proceso A
NOTA: Durante la instalación del software, seleccione la opción Conectar directamente este equipo mediante un cable USB.
####### Mac
######### Proceso B
instalación del software”.
NOTA: Para obtener la dirección IP de la impresora, imprima una página de configuración. En el panel de control de la impresora, mantenga pulsado el botón Cancelar durante 5 segundos y, después, suéltelo para imprimir la página de configuración. La dirección IP consta en la sección Información de la red de la página de configuración.
####### Configuración manual de la dirección IP
Consulte la Guía del usuario de la impresora para obtener información sobre cómo configurar manualmente la dirección IP www.hp.com/support/ljm11-m13.
Instalación desde el CD de la impresora
Descargar de la Web
En Windows, los archivos de instalación del software se proporcionan en el CD que se suministra con la impresora.
En OS X, el archivo del programa de instalación del CD incluye un archivo DMG.
Notas sobre la instalación
Para obtener más información acerca del software de la impresora, consulte el archivo de notas sobre la instalación del CD de la impresora.
NOTA: HP Easy Start también se puede descargar mediante el siguiente método:
##### 7. Instalación del software
####### Solución completa para Windows
PRECAUCIÓN: No conecte el cable USB hasta que se le solicite durante la instalación del software.
Solo para modelos inalámbricos
####### Instalación básica en Windows
####### Solución completa para OS X
Instalación básica en OS X Para instalar los controladores de impresión básicos sin ejecutar la solución de software completa de HP desde el CD o los archivos que haya descargado de hp.com, siga estos pasos:
##### 8.1 8.2
Conexión del dispositivo a la red inalámbrica
Impresión inalámbrica directa de HP (M12w) HP Wireless Direct permite que los dispositivos con capacidad Wi-Fi, como por ejemplo, los teléfonos inteligentes, las tabletas o los ordenadores, realicen conexiones de red inalámbricas directamente a la impresora sin utilizar un direccionador ni un punto de acceso inalámbricos. Conéctese a la señal directa inalámbrica de HP de la impresora del mismo modo que conecta un dispositivo con capacidad Wi-Fi a una red inalámbrica nueva o a una conexión inalámbrica en una zona Wi-Fi.
Para imprimir desde un teléfono o una tableta, conecte el dispositivo a la misma red inalámbrica que la impresora.
Dispositivos Android actuales (4.4 o versiones posteriores) Abra el elemento que desee imprimir y seleccione el botón Menú. Seleccione primero Imprimir, después la impresora y por último, de nuevo, Imprimir. Algunos dispositivos requieren que se descargue el complemento HP Print Service de Play Store de Google. Dispositivos Android antiguos (4.3 o versiones anteriores) Descargue la aplicación HP ePrint de Play Store de Google. Windows Phone Descargue la aplicación HP AiO Remote de Windows Store.
Activar HP Wireless Direct Active los Servicios Web de HP en el servidor Web incorporado de HP (EWS) siguiendo estos pasos:
NOTA: Para establecer manualmente la dirección IP o configurarla de manera automática, consulte la sección “Configuración del producto de red” de la Guía del usuario.
Obtener más información sobre la impresión móvil
Para obtener más información acerca de otras opciones de impresión móvil, incluidas las soluciones adicionales de ePrint, escanee el código QR o consulte la sección “Impresión móvil” de la guía del usuario.

##### 9. Configuración de HP ePrint a través del correo electrónico (opcional)
Utilice HP ePrint a través del correo electrónico para imprimir documentos enviándolos como adjunto de un mensaje de correo electrónico a la dirección de correo de la impresora desde cualquier dispositivo que tenga acceso al correo electrónico, incluso desde dispositivos que no están en la misma red.
Para utilizar HP ePrint a través del correo electrónico, la impresora debe cumplir los requisitos siguientes:
######### Uso de HP ePrint
NOTA: Este código solo es válido durante 24 horas desde la activación de los servicios Web de HP. Si caduca, siga las instrucciones para activar de nuevo los Servicios Web de HP y obtener un nuevo código.
####### Activar los Servicios Web de HP (M12w)
Solución de problemas
####### Guía del usuario
La guía del usuario incluye información acerca del uso de la impresora y solución de problemas. Está disponible en el CD de la impresora y en la Web:
######### Guía del usuario en la Web
haga clic en Manuales. Guía del usuario en el CD de la impresora En Windows, la guía del usuario se copia en el equipo durante la instalación del software recomendada.
Windows® XP, Windows Vista® y Windows® 7 Haga clic en Inicio, seleccione Programas o Todos los programas, a continuación, seleccione HP, así como la carpeta de la impresora HP y, por último, seleccione Ayuda.
Windows® 8 En la pantalla Inicio, haga clic con el botón derecho en un área vacía de la pantalla, en Todas las aplicaciones en la barra de aplicaciones, en el icono que tiene el nombre de la impresora y, a continuación, seleccione Ayuda.
####### Comprobar las actualizaciones del firmware
Recursos de asistencia adicional Para obtener ayuda total de HP para la impresora, vaya a www.hp.com/support/ljm11-m13:
####### Conexión a una red inalámbrica (solo para los modelos inalámbricos M12w)
English ................ 1
Guia de primeiros passos da LaserJet Pro M11-M13 series
Français ............... 4
Español ............... 7
Português .......... 10 繁体中文 ........... 13
www.hp.com/support/ljm11-m13 www.register.hp.com
#### IMPORTANTE:
................. 16
Primeiro, siga as Etapas 1 a 3no pôster de configuração do hardware da impressora, então prossiga para a Etapa 4.
##### 4. Configurar o painel de controle
No painel de controle da impressora, verifique o status do LED antes de iniciar a instalação do software.
|| |---|
5. Selecionar o método de conexão
####### Execute uma instalação sem fio (somente nos modelos sem fio M12w)
Conexão USB direta entre a impressora e o computador É necessário utilizar um cabo USB do tipo A a B.
Antes de iniciar a instalação, verifique se o ponto de acesso sem fio está funcionando corretamente. Certifique-se de que e a impressora, o roteador e o computador estejam ligados e que o computador esteja conectado à mesma rede sem fio à qual você conectará a impressora.

####### Windows
Se não houver uma luz azul contínua na parte superior da impressora, vá para o Processo A.
Se houver uma luz azul contínua na parte superior da impressora, vá para o Processo B.
software”.
NOTA: Durante a instalação do software, selecione a opção para Conectar diretamente este computador usando um cabo USB.
######### Processo A
####### Mac
######### Processo B
NOTA: Imprima uma página de configuração para localizar o endereço IP da impressora. No painel de controle da impressora, pressione e mantenha pressionado o botão Cancelar por 5 segundos e libere o botão Cancelar para imprimir a página de configuração. O endereço IP é listado na página de configuração na seção Informações da rede.
####### Configurar manualmente o endereço IP
Consulte o Guia do Usuário da Impressora para obter informações sobre como configurar o endereço IP manualmente www.hp.com/support/ljm11-m13.
Instalar do CD da impressora
Download da Web
Para o Windows, os arquivos de instalação de software são fornecidos no CD que veio com a impressora.
Para o OS X, o arquivo do instalador no CD inclui um arquivo DMG.
Notas sobre a instalação
Para obter mais detalhes sobre o software para a impressora, consulte o arquivo Notas sobre a instalação no CD da impressora.
NOTA: O HP Easy Start também pode ser baixado através das seguintes instruções:
7. Instalar o software
####### Solução completa do Windows
####### Instalação básica do Windows
####### Solução completa para OS X
configuração do HP Utility para configurar opções da impressora.
Instalação básica do OS X Para instalar drivers básicos de impressão sem executar o software de solução completa da HP do CD ou do download de hp.com, siga estas etapas:
##### 8.1 8.2
Conectar o dispositivo à rede sem fio
HP Wireless Direct (M12w) O HP Wireless Direct permite que dispositivos compatíveis com Wi-Fi, como smartphones, tablets ou computadores, façam uma conexão de rede sem fio direta à impressora sem o uso de um roteador sem fio ou de um ponto de acesso. Conecte-se ao sinal HP Wireless Direct da impressora da mesma forma como você se conecta seu dispositivo compatível com Wi-Fi a uma nova rede sem fio ou hotspot.
Para imprimir usando um telefone ou tablet, conecte o dispositivo à mesma rede sem fio em que a impressora está.
Dispositivos Android mais recentes (4.4 ou mais recentes) Abra o item a ser impresso e selecione o botão Menu. Selecione Imprimir, selecione a impressora e depois Imprimir.
Alguns dispositivos exigem que o plug-in HP Print Service seja baixado da Google Play Store.
Ativar o acessório direto sem fio HP Ative os HP Web Services no Servidor da Web incorporado (EWS) da HP seguindo estas etapas:
Dispositivos Android mais antigos (4.3 ou mais antigos) Baixe o aplicativo HP ePrint da Google Play store.
NOTA: Para definir manualmente o endereço IP ou para configurá-lo automaticamente, consulte “Configurar o produto de rede” no Guia do Usuário.
Windows Phone Baixe o aplicativo HP AiO Remote da Windows Store.
Saiba mais sobre a impressão móvel
Para saber mais sobre outras opções de impressão móvel, incluindo soluções ePrint adicionais, escaneie o código QR ou consulte a seção “Impressão móvel” do guia do usuário.

##### 9. Configurar o HP ePrint por e-mail (opcional)
Use o HP ePrint via e-mail para imprimir documentos enviando-os como um anexo de e-mail para o endereço de e-mail da impressora de qualquer dispositivo compatível com e-mail, mesmo de dispositivos que não estejam na mesma rede.
Para usar o HP ePrint via e-mail, a impressora deverá atender a estes requisitos:
####### Ativar Serviços da Web da HP (M12w)
######### Usar o HP ePrint
NOTA: Esse código é válido somente por 24 horas a partir da ativação dos Serviços da Web HP. Se ele expirar, siga as instruções para ativar os HP Web Services novamente e obter um novo código.
Solução de problemas
####### Guia do usuário
O guia do usuário inclui o uso da impressora e informações sobre solução de problemas. Ele está disponível no CD da impressora e na Web:
######### Guia do Usuário na Web
Manuais. Guia do Usuário do CD da impressora Para o Windows, o guia do usuário é copiado para o computador durante a instalação do software recomendado.
Windows® XP, Windows Vista® e Windows® 7 Clique em Iniciar, selecione Programas ou Todos os programas, selecione HP, selecione a pasta da impressora HP e selecione Ajuda. Windows® 8 Na tela Iniciar, clique com o botão direito do mouse em uma área vazia da tela, clique em Todos os Aplicativos na barra de aplicativos, clique no ícone com o nome da impressora e selecione Ajuda.
####### Verificar atualizações de firmware
Recursos de suporte adicionais Para obter ajuda completa da HP para a impressora, acesse www.hp.com/support/ljm11-m13:
####### Conexão de rede sem fio (somente nos modelos sem fio M12w)
English .............. 1
LaserJet Pro M11-M13 系列入門指南
Français ............ 4
Español ............. 7
Português ....... 10 繁体中文......... 13
www.hp.com/support/ljm11-m13 www.register.hp.com
#### 重要事項:
.............. 16
首先,依照印表機硬體設
##### 4. 設定控制面板
定海報的步驟 1 - 3進行
後,再繼續執行步驟 4。
在印表機控制面板上,先檢查 LED 狀態,再開始進行軟體安裝。
|| |---|
##### 5. 選擇連線方法
###### 直接在印表機與電腦之間連接的 USB 連線
使用 A 對 B 型 USB 連接線。
####### Windows
附註:進行軟體安裝時,選擇「使用 USB 纜線直接連接這部電腦」 的選項。
####### Mac
####### 執行無線安裝(僅限 M12w 無線機型)
開始安裝前,先確認無線存取點運作正常。確定印表機、路由器和電 腦皆已開啟電源,而且電腦也已連接至印表機將要連接的同一個無線 網路。
如果印表機上面沒有恆亮的藍色指示燈,請移至程序 A。 如果印表機上面有恆亮的藍色指示燈,請移至程序 B。
######### 程序 A
######### 程序 B
附註:列印組態頁以找出印表機 IP 位址。在印表機控制面板上, 按住「取消」 按鈕 5 秒鐘後,再放開「取消」 按鈕以列印組 態頁。IP 位址會在組態頁的「Network Information」(網路資訊) 區段中列出。
####### 手動設定 IP 位址
如需有關如何手動設定 IP 位址的詳細資訊,請參閱印表機使用指南 www.hp.com/support/ljm11-m13。
從印表機光碟安裝 對於 Windows,印表機隨附的光碟提供軟體安裝檔。 對於 OS X,光碟上的安裝程式包含 DMG 檔案。
從網路下載
安裝注意事項
如需印表機所需軟體的詳細資訊,請參閱印表機光碟上的「安裝注意事項」 檔案。
附註:HP Easy Start 也可以透過執行下列步驟下載:
##### 7. 安裝軟體
####### Windows 完整解決方案
僅適用於無線機型
####### Windows 基本安裝
####### OS X 完整解決方案
OS X 基本安裝 若要不執行來自光碟或 hp.com 下載的 HP 完整解決方案軟體,即安裝 基本列印驅動程式,請依照下列步驟進行:
##### 8.1 8.2
將裝置連接至無線網路
HP Wireless Direct (M12w) HP Wireless Direct 可讓具備 Wi-Fi 功能的裝置(例如智慧型手機、平板
若要從手機或平板電腦列印,請將裝置連接到與印表機相同的無線網 路。
電腦或電腦)在沒有使用無線路由器或存取點的情況下,直接與印表機 進行無線網路連線。連接至印表機的 HP Wireless Direct 訊號,方法與您 將具備 Wi-Fi 功能的裝置連接至新的無線網路或熱點一樣。
新版 Android 裝置(4.4 或更新版本)開啟要列印的項目,並選擇選單 按鈕。選擇列印,選擇印表機,然後選擇列印。 某些裝置需要從 Google Play 商店下載 HP Print Service 外掛應用程式。 舊版 Android 裝置(4.3 或較舊版本)從 Google Play 商店下載 HP ePrint 應用程式。 Windows Phone 從 Windows 市集下載 HP AiO Remote 應用程式。
啟用 HP Wireless Direct 依照下列步驟,在 HP 內嵌式 Web 伺服器 (EWS) 中啟用 HP Web 服務:
附註:若要手動設定 IP 位址或是使用自動設定方式,請參閱使用指 南中的「設定網路產品」。
進一步了解行動列印
若要進一步了解其他行動列印選項(包括其他 ePrint 解決方案),請掃描 QR 碼,或參閱使用指南 的「行動列印」一節。

##### 9. 設定 HP ePrint via email(選用)
使用 HP ePrint via email,您只要在任何具備電子郵件功能的裝置上,將文件當做電子郵件附件傳送至印表機的電子郵件地址即可列印該文件,即使您使用的裝 置不在同一個網路上也沒問題。

######### 使用 HP ePrint
附註:自 HP Web 服務啟用當時算起,此代碼的有效時間為 24 小時。如果 代碼到期,請依照指示重新啟用 HP Web 服務,取得新代碼。
疑難排解
####### 使用指南
使用指南包含印表機使用方式及疑難排解資訊。這可在印表機光碟或網路 上取得:
######### 網路上的使用指南
印表機光碟中的使用指南 對於 Windows,使用指南會在進行建議的軟體安裝時複製到電腦。
######### Windows® XP、Windows Vista® 及 Windows® 7 按一下開始,選擇程式集或所有程式,選擇 HP,選擇 HP 印表機的資 料夾,然後選擇說明。
Windows® 8 在開始畫面中,以滑鼠右鍵按一下畫面中的空白區域,按一下應用程 式列的所有應用程式,然後按一下顯示印表機名稱的圖示並選擇說 明。
####### 檢查韌體更新
其他支援資源 如需包含印表機所有相關資訊的 HP 說明,請前往 www.hp.com/support/ljm11-m13:
####### 無線網路連線(僅限 M12w 無線機型)
English ................ 1
Français ............... 4
Español ............... 7
Português .......... 10 繁体中文 ........... 13
................. 16
www.hp.com/support/ljm11-m13 www.register.hp.com
##### 4
|| |---|
##### 5
####### IP-ה תבותכ לש תינדי הרוצת תעיבק
לש תינדי הרוצת תעיבק ןפואל עגונב עדימ תלבקל תספדמה לש שמתשמל ךירדמב ןייע .www.hp.com/support/ljm11-m13 IP-ה תבותכ
###### תספדמה רוטילקתמ הנקתה
.תספדמל ףרוצמה רוטילקתב םילולכ הנכותה תנקתה יצבוק ,Windows רובע .DMG ץבוק ללוכ CD-ה רוטילקתב הנקתהה תינכות ץבוק ,OS X רובע
####### הנקתה תורעה
"הנקתה תורעה" ץבוקב ןייע ,תספדמל תדעוימה הנכותה לע םיפסונ םיטרפ תלבקל .תספדמל ףרוצמה רוטילקתב
##### 8.18.2
###### תדיינ הספדה לע ףסונ עדימ
תוברל ,תדיינ הספדהל תורחא תויורשפא לע דוע דומלל ידכ ףיעסב ןייע וא QR דוק תא קורס ,םיפסונ ePrint תונורתפ .שמתשמל ךירדמב "תדיינ הספדה"


תויעב ןורתפ
© Copyright 2016 HP Development Company, L.P.
Reproduction, adaptation or translation without prior written permission is prohibited, except as allowed under the copyright laws.
The information contained herein is subject to change without notice.
The only warranties for HP products and services are set forth in the express warranty statements accompanying such products and services. Nothing herein should be construed as constituting an additional warranty. HP shall not be liable for technical or editorial errors or omissions contained herein.
Trademark Credits Windows® is a U.S. registered trademark of Microsoft Corporation.
Apple and the Apple logo are trademarks of Apple Inc., registered in the U.S. and other countries.
OS X is a trademark of Apple Inc., registered in the U.S. and other countries.
FCC Regulations This equipment has been tested and found to comply with the limits for a Class B digital device, pursuant to Part 15 of the FCC rules. These limits are designed to provide reasonable protection against harmful interference in a residential installation. This equipment generates, uses, and can radiate radio-frequency energy. If this equipment is not installed and used in accordance with the instructions, it may cause harmful interference to radio communications. However, there is no guarantee that interference will not occur in a particular installation. If this equipment does cause harmful interference to radio or television reception, which can be determined by turning the equipment off and on, correct the interference by one or more of the following measures:
© Copyright 2016 HP Development Company, L.P. La reproduction, l'adaptation ou la traduction sans autorisation écrite préalable est interdite, sauf dans le cadre des lois sur le droit d'auteur. Les informations contenues dans ce document peuvent être modifiées sans préavis. Les seules garanties pour les produits et services HP sont décrites dans les déclarations de garantie expresses accompagnant ces mêmes produits et services. Les informations contenues dans ce document ne constituent en aucun cas une garantie supplémentaire. HP ne pourra être tenu responsable des erreurs ou omissions de nature technique ou rédactionnelle qui pourraient subsister dans le présent document. Crédits concernant les marques Windows® est une marque déposée de Microsoft Corporation aux Etats-Unis. Apple et le logo Apple sont des marques commerciales d'Apple, Inc. aux Etats-Unis et dans d'autres pays/régions. OS X est une marque commerciale d'Apple Inc. aux États-Unis et dans d'autres pays/régions.
Réglementations de la FCC Les tests effectués sur cet équipement ont déterminé qu’il est conforme aux prescriptions des unités numériques de classe B, telles que spécifiées à l’article 15 des normes de la FCC (Commission fédérale des communications). Ces limites sont destinées à assurer une protection suffisante contre les interférences produites dans une installation résidentielle. Cet équipement génère, utilise et peut émettre de l’énergie sous forme de fréquences radio. Si ce matériel n'est pas installé et utilisé conformément aux instructions, il peut causer des interférences nuisibles aux communications radio. Aucune garantie n'est néanmoins fournie quant à l'apparition d'interférences dans une installation particulière. Si cet appareil provoque des interférences nuisibles (qui peuvent être déterminées en éteignant et rallumant l'appareil) à des communications radio ou télévision, corrigez ce problème en appliquant une ou plusieurs des mesures suivantes :
Toute modification apportée au produit sans le consentement de HP peut se traduire par la révocation du droit d’exploitation de l’équipement dont jouit l’utilisateur. Un câble d’interface blindé est requis afin de satisfaire aux stipulations de l’article 15 des réglementations de la FCC sur les appareils de classe B. Pour de plus amples informations sur les réglementations, reportez-vous au Guide de l'utilisateur au format électronique. HP ne sera en aucun cas tenu responsable des dommages directs, indirects, accessoires, consécutifs ou autres pouvant résulter de la mise à disposition de ces informations ou de leur utilisation.
www.hp.com
