
Epson ET-2800 EcoTank All-in-One Printer
Ask AI
— answers from the official manualAnswers from the official manual.
Common questions
Common Questions
58 totalWhat should I do if the ET-2800 is not printing?
First, check that the product is turned on and connected to your computer or network. Verify that paper is loaded and no error messages are displayed on the LCD screen. If printing from a computer, check that the product is not paused in the print queue. You may also need to check the product icon in the Windows Taskbar to ensure the printer is selected. Run a product check if problems persist.
What should I do if I receive network connection error codes on the ET-2800?
Print a network connection report to view specific error codes and messages. Error codes like E-1 indicate connection problems with cables or network devices, while E-2 or E-3 suggest issues finding wireless networks. For E-5 errors, the security mode may not match your router settings. Consult the Network Connection Report Codes and Messages section in the manual for detailed solutions for each error code, which include checking router settings, confirming passwords, and verifying network configuration.
How do I load paper into the ET-2800?
First, flip the feeder guard forward and pull out the paper support. Slide the edge guides all the way out. For regular paper, insert it glossy or printable side up with the short edge first, centered on the paper support. You can load up to 30 sheets of letter-size paper, but if loading larger sizes like Oficio 9 or 8.5×13 inches, load only 1 sheet. Always slide the edge guides against the paper without tightening them too much, flip the feeder guard back, and pull out the output tray.
How do I set up my ET-2800 printer for wireless printing?
To set up wireless printing, press the home button, select Wi-Fi Setup, then Wi-Fi (Recommended), and follow the Wi-Fi Setup Wizard. Select your wireless network name, enter your password using the numeric keypad, and press OK. A blue Wi-Fi icon will appear on the LCD screen when successfully connected. If the icon doesn't appear, you may have entered the wrong network name or password, so repeat the steps to try again.
What paper types and capacities are compatible with the ET-2800?
The ET-2800 supports various paper types including plain paper, photo paper glossy, presentation matte, and envelopes. Loading capacity varies by paper type: plain paper holds up to 30 sheets for letter/A4 sizes, photo paper holds 20 sheets, presentation paper holds 80 sheets, and envelopes hold up to 10. Epson also offers compatible specialty papers like EcoTank Premium Paper, Bright White Pro Paper, and Ultra Premium Photo Paper Glossy in various sizes.
How do I check and refill the ink levels in my ET-2800?
You can check ink levels directly on the product by going to the control panel or through your computer software. To check on the product, press the home button and navigate to the appropriate menu. On Windows, use the Epson software utility to check ink levels; on Mac, use the printer utility. When ink is low, purchase genuine Epson ink bottles (part numbers available in the manual) and refill the ink tanks following the refilling instructions provided in the manual.
Show 52 more questions
What should I do if nothing prints from my ET-2800?
How do I perform maintenance on the ET-2800 print head?
How do I copy documents using the ET-2800?
What do the Wi-Fi status icons on the ET-2800 LCD screen mean?
How do I enable Wi-Fi Direct mode on the ET-2800?
What network error codes might appear on the ET-2800 connection report and how do I fix them?
What paper types and sizes are compatible with the ET-2800?
How do I load paper in the ET-2800 Printer?
How do I check and refill ink levels on the ET-2800?
How do I perform a nozzle check on the ET-2800?
How do I enable Wi-Fi Direct on the ET-2800?
What are the network security recommendations for the ET-2800?
How do I clean the print head on the ET-2800?
What are the main parts of the Epson ET-2800 printer?
What paper types are compatible with the ET-2800?
How do I set up Wi-Fi on my ET-2800 printer?
What should I do if my ET-2800 won't connect to Wi-Fi?
How do I check ink levels on the ET-2800?
How do I perform a print head nozzle check on the ET-2800?
How do I clean the print head on my ET-2800?
What is Wi-Fi Direct mode and how do I enable it on the ET-2800?
What should I do if paper jams inside my ET-2800?
How do I enable/disable the PC Connection via USB on my ET-2800?
What is the process to change the sleep timer setting on my ET-2800?
How can I activate the Email Print feature for my ET-2800?
What should I do if the Wi-Fi icon is not displayed after attempting a connection?
How often should I refill the ink tanks in my ET-2800?
What are the network connection report codes E-2, E-3, and E-7 solutions?
How can I check print head nozzles on my ET-2800?
How do I adjust paper settings when loading a new paper size?
What are the safety precautions when handling ink cartridges?
How do I reset my ET-2800 back to factory default settings?
How do I change the language displayed on the ET-2800 LCD screen?
How do I print a network status sheet or connection report?
How do I print from my smartphone or tablet?
Can I prevent my printer from connecting to a computer via USB?
What should I do to set up Wi-Fi on my ET-2800 printer?
How do I enable Wi-Fi Direct mode on my printer?
How do I access the Web Config Utility to manage my printer settings?
How do I change the language displayed on the LCD screen?
What is Wi-Fi Protected Setup (WPS) and how do I use it?
How do I adjust the sleep timer and power off timer settings?
What should I do if I need to troubleshoot my network connection?
Can I print from my smartphone or tablet to the ET-2800?
How do I prevent USB connections to my printer from the computer?
How can I adjust power saving settings on the ET-2800?
How do I convert my USB connection to a Wi-Fi connection?
How much paper can the rear paper feeder hold?
What are the paper loading capacity limits for the ET-2800?
How do I set up Wi-Fi Direct mode on my printer?
What compatible papers can I use with the ET-2800?
What should I know about network security for my printer?
Full Manual
252 pages
ET-2800/ET-2803 User's Guide
3 Contents ET-2800/ET-2803 User's Guide................................................................................................................. 11 Product Basics .......................................................................................................................................... 12 Product Parts Locations ..................................................................................................................... 12 Product Parts - Front ..................................................................................................................... 13 Product Parts - Inside .................................................................................................................... 14 Product Parts - Back...................................................................................................................... 15 Using the Control Panel ..................................................................................................................... 15 Control Panel Buttons and Lights .................................................................................................. 16 Status Icon Information............................................................................................................. 17 Entering Characters on the LCD Screen ....................................................................................... 17 Changing LCD Screen Language.................................................................................................. 18 Preventing PC Connection via USB .............................................................................................. 19 Using Power Saving Settings ............................................................................................................. 20 Changing the Sleep Timer Setting from the Control Panel ............................................................ 20 Changing the Power Off Timer Setting from the Control Panel...................................................... 22 Using the Epson Smart Panel Mobile App.......................................................................................... 23 Epson Connect Solutions for Smartphones, Tablets, and More......................................................... 24 Setting Up Epson Connect Services.............................................................................................. 24 Using Epson Email Print ............................................................................................................... 25 Using Epson Remote Print ........................................................................................................... 26 Using AirPrint .................................................................................................................................... 27 Using the Mopria Print Service .......................................................................................................... 28 Using Mopria Scan............................................................................................................................. 28 Setting Up Printing on a Chromebook ................................................................................................ 29 Android Printing Using the Epson Print Enabler ................................................................................ 29 Using Fire OS Printing ....................................................................................................................... 30 Using Epson Print and Scan App with Windows Tablets ................................................................... 30 Wi-Fi Networking ....................................................................................................................................... 32 Network Security Recommendations ................................................................................................. 32 Wi-Fi Infrastructure Mode Setup......................................................................................................... 33
4 Selecting Wireless Network Settings from the Control Panel ........................................................ 34 Wi-Fi Direct Mode Setup .................................................................................................................... 36 Enabling Wi-Fi Direct (Simple AP) Mode....................................................................................... 36 Wi-Fi Protected Setup (WPS)............................................................................................................. 38 Using WPS to Connect to a Network ............................................................................................. 38 Printing a Network Status Sheet......................................................................................................... 40 Printing a Network Connection Report ............................................................................................... 40 Network Connection Report Codes and Messages....................................................................... 41 Changing or Updating Network Connections ..................................................................................... 47 Accessing the Web Config Utility................................................................................................... 47 Changing a USB Connection to a Wi-Fi Connection...................................................................... 48 Connecting to a New Wi-Fi Router ................................................................................................ 48 Disabling Wi-Fi Features ............................................................................................................... 49 Loading Paper ........................................................................................................................................... 50 Loading Paper in the Rear Paper Feeder........................................................................................... 50 Paper Loading Capacity..................................................................................................................... 54 Compatible Epson Papers.................................................................................................................. 55 Borderless Paper Type Compatibility ................................................................................................. 57 Selecting the Paper Settings - Control Panel ..................................................................................... 57 Paper or Media Type Settings - Control Panel............................................................................... 58 Paper or Media Type Settings - Printing Software.............................................................................. 59 Selecting the Default Paper Source Settings...................................................................................... 60 Paper Source Settings Options ..................................................................................................... 60 Placing Originals on the Product ............................................................................................................. 62 Placing Originals on the Scanner Glass ............................................................................................. 62 Copying...................................................................................................................................................... 65 Copying Documents or Photos........................................................................................................... 65 Copying Options................................................................................................................................. 67 Printing from a Computer ......................................................................................................................... 69 Printing with Windows ........................................................................................................................ 69 Selecting Basic Print Settings - Windows ...................................................................................... 70 Print Quality Options - Windows ............................................................................................... 72

5 Multi-Page Printing Options - Windows..................................................................................... 72 Selecting Double-sided Printing Settings - Windows..................................................................... 73 Double-sided Printing Options - Windows................................................................................. 75 Selecting Additional Layout and Print Options - Windows ............................................................. 75 Custom Color Correction Options - Windows ........................................................................... 77 Image Options and Additional Settings - Windows.................................................................... 78 Header/Footer Settings - Windows ........................................................................................... 79 Selecting a Printing Preset - Windows........................................................................................... 80 Selecting Extended Settings - Windows ........................................................................................ 82 Extended Settings - Windows ................................................................................................... 83 Printing Your Document or Photo - Windows................................................................................. 84 Checking Print Status - Windows .................................................................................................. 86 Locking Printer Settings - Windows ............................................................................................... 86 Locked Setting Options............................................................................................................. 88 Selecting Default Print Settings - Windows.................................................................................... 90 Changing the Language of the Printer Software Screens ......................................................... 91 Changing Automatic Update Options ............................................................................................ 92 Printing with the Built-in Epson Driver - Windows 10 S....................................................................... 93 Selecting Print Settings - Windows 10 S........................................................................................ 93 Printing on a Mac ............................................................................................................................... 96 Selecting Basic Print Settings - Mac ............................................................................................. 97 Print Quality Options - Mac ..................................................................................................... 100 Print Options - Mac ................................................................................................................. 101 Selecting Page Setup Settings - Mac .......................................................................................... 101 Selecting Print Layout Options - Mac........................................................................................... 102 Managing Color - Mac ................................................................................................................ 103 Color Matching and Color Options - Mac ............................................................................... 104 Selecting Printing Preferences - Mac .......................................................................................... 105 Printing Preferences - Mac...................................................................................................... 106 Printing Your Document or Photo - Mac ...................................................................................... 107 Checking Print Status - Mac.................................................................................................... 108 Printing from a Smartphone or Tablet............................................................................................... 108 Printing with Epson Photo+ .............................................................................................................. 109

6 Cancelling Printing Using a Product Button...................................................................................... 109 Scanning .................................................................................................................................................. 110 Starting a Scan................................................................................................................................. 110 Starting a Scan Using the Product Control Panel ........................................................................ 110 Setting Up a WSD Port (Windows 7/Windows Vista) .............................................................. 111 Changing Default Scan Job Settings ...................................................................................... 112 Starting a Scan Using Epson ScanSmart .................................................................................... 113 Starting a Scan Using the Epson Scan 2 Icon ............................................................................. 114 Starting a Scan from a Scanning Program................................................................................... 117 Starting a Scan from a Smartphone or Tablet.............................................................................. 119 Scanning a Document or Photo in Epson ScanSmart ................................................................. 119 Saving a Scan......................................................................................................................... 122 Attaching a Scan to Email ....................................................................................................... 123 Sending a Scan to a Cloud Service......................................................................................... 124 Printing a Scan........................................................................................................................ 125 Selecting Epson ScanSmart Settings.......................................................................................... 126 Changing the Epson Product .................................................................................................. 127 Changing the Scan Settings.................................................................................................... 128 Changing the File Name Settings ........................................................................................... 129 Changing the Save Settings.................................................................................................... 131 Save Settings.......................................................................................................................... 133 Customizing Action Icons........................................................................................................ 134 Scanning in Epson Scan 2 ............................................................................................................... 136 Additional Scanning Settings - Main Settings Tab ....................................................................... 139 Additional Scanning Settings - Advanced Settings Tab............................................................... 139 Saving Scanned Documents as a Searchable PDF Using Epson Scan 2 ................................... 141 Image Format Options................................................................................................................. 142 Scan Resolution Guidelines ........................................................................................................ 143 Refilling Ink.............................................................................................................................................. 144 Ink Safety Precautions ..................................................................................................................... 144 Check Ink Levels.............................................................................................................................. 146 Checking Ink Levels on Your Product.......................................................................................... 147 Checking Ink Levels - Windows................................................................................................... 147
7 Checking Ink Levels - Mac........................................................................................................... 148 Disabling Special Offers with Windows ....................................................................................... 149 Purchase Epson Ink ......................................................................................................................... 151 Ink Bottle Part Numbers............................................................................................................... 151 Refilling the Ink Tanks ...................................................................................................................... 151 Adjusting Print Quality............................................................................................................................ 158 Print Head Maintenance................................................................................................................... 158 Print Head Nozzle Check............................................................................................................. 158 Checking the Nozzles Using the Product Control Panel ......................................................... 159 Checking the Nozzles Using a Computer Utility...................................................................... 161 Print Head Cleaning .................................................................................................................... 164 Cleaning the Print Head Using the Product Control Panel ...................................................... 164 Cleaning the Print Head Using a Computer Utility................................................................... 168 Power Cleaning ........................................................................................................................... 171 Power Cleaning Using the Product Control Panel................................................................... 172 Power Cleaning Using a Computer Utility ............................................................................... 173 Print Head Alignment ....................................................................................................................... 175 Aligning the Print Head Using the Product Control Panel ............................................................ 175 Cleaning the Paper Guide ................................................................................................................ 177 Checking the Number of Sheets Fed................................................................................................ 178 Checking the Number of Sheets on the LCD Screen................................................................... 178 Checking the Sheet Counter - Windows...................................................................................... 178 Checking the Sheet Counter - Mac.............................................................................................. 179 Cleaning and Transporting Your Product ............................................................................................. 181 Cleaning Your Product ..................................................................................................................... 181 Transporting Your Product ............................................................................................................... 182 Solving Problems.................................................................................................................................... 186 Checking for Software Updates........................................................................................................ 186 Product Status Messages ................................................................................................................ 187 Message Appears Prompting You to Reset Ink Levels..................................................................... 189 Running a Product Check ................................................................................................................ 189 Resetting Control Panel Defaults ..................................................................................................... 191 Solving Setup Problems................................................................................................................... 192
8 Product Does Not Turn On or Off................................................................................................. 192 Noise After Filling the Ink............................................................................................................. 192 Software Installation Problems.................................................................................................... 193 Control Panel Setup Problems .................................................................................................... 193 Solving Network Problems ............................................................................................................... 194 Product Cannot Connect to a Wireless Router or Access Point .................................................. 194 Network Software Cannot Find Product on a Network................................................................. 196 Product Does Not Appear in Mac Printer Window ....................................................................... 197 Wireless Network Connection is Unstable on a Mac ................................................................... 197 Cannot Print Over a Network....................................................................................................... 198 Cannot Scan Over a Network ...................................................................................................... 199 Solving Copying Problems ............................................................................................................... 200 Product Makes Noise, But Nothing Copies.................................................................................. 200 Product Makes Noise When It Sits for a While............................................................................. 201 Copies Have Incorrect or Faint Colors......................................................................................... 201 Position, Size, or Margins of Copies are Incorrect ....................................................................... 201 Solving Paper Problems................................................................................................................... 202 Paper Feeding Problems............................................................................................................. 202 Paper Jam Problems Inside the Product ..................................................................................... 203 Paper Ejection Problems............................................................................................................. 206 Solving Problems Printing from a Computer..................................................................................... 207 Nothing Prints.............................................................................................................................. 207 Product Icon Does Not Appear in Windows Taskbar................................................................... 208 Printing is Slow............................................................................................................................ 209 Solving Page Layout and Content Problems.................................................................................... 211 Inverted Image............................................................................................................................. 211 Too Many Copies Print ................................................................................................................ 212 Blank Pages Print........................................................................................................................ 212 Incorrect Margins on Printout....................................................................................................... 213 Border Appears on Borderless Prints .......................................................................................... 213 Incorrect Characters Print............................................................................................................ 214 Incorrect Image Size or Position.................................................................................................. 215 Slanted Printout........................................................................................................................... 215
9 Solving Print Quality Problems......................................................................................................... 216 White or Dark Lines in Printout .................................................................................................... 216 Blurry or Smeared Printout .......................................................................................................... 217 Faint Printout or Printout Has Gaps............................................................................................. 219 Grainy Printout............................................................................................................................. 220 Incorrect Colors .......................................................................................................................... 221 Solving Scanning Problems ............................................................................................................. 223 Scanning Software Does Not Operate Correctly ......................................................................... 223 Cannot Start Epson Scan 2 ......................................................................................................... 224 Scanning is Slow ......................................................................................................................... 225 Cannot Send Scans to a Cloud Service....................................................................................... 225 Solving Scanned Image Quality Problems ....................................................................................... 225 Image Consists of a Few Dots Only............................................................................................. 226 Line of Dots Appears in All Scanned Images............................................................................... 226 Straight Lines in an Image Appear Crooked ................................................................................ 226 Scanned Image Quality Problems ............................................................................................... 227 Characters are Not Recognized During Conversion to Editable Text (OCR)............................... 228 Image Colors are Patchy at the Edges ........................................................................................ 228 Ripple Patterns Appear in an Image............................................................................................ 229 Scanned Image Edges are Cropped ........................................................................................... 229 Resetting the Epson Scan 2 Settings .......................................................................................... 229 Uninstall Your Product Software....................................................................................................... 230 Uninstalling Product Software - Windows.................................................................................... 230 Uninstalling Product Software - Mac............................................................................................ 231 Where to Get Help ........................................................................................................................... 232 Technical Specifications ........................................................................................................................ 234 Windows System Requirements ...................................................................................................... 234 Mac System Requirements .............................................................................................................. 235 Paper Specifications ........................................................................................................................ 236 Printable Area Specifications ........................................................................................................... 237 Scanning Specifications ................................................................................................................... 239 Ink Specifications ............................................................................................................................. 239 Dimension Specifications ................................................................................................................. 240
10 Electrical Specifications ................................................................................................................... 240 Environmental Specifications ........................................................................................................... 241 Interface Specifications .................................................................................................................... 241 Network Interface Specifications...................................................................................................... 241 Safety and Approvals Specifications (U.S. and Canada) ................................................................. 242 Notices ..................................................................................................................................................... 244 Important Safety Instructions............................................................................................................ 244 General Product Safety Instructions............................................................................................ 244 LCD Screen Safety Instructions................................................................................................... 246 Wireless Connection Safety Instructions ..................................................................................... 246 FCC Compliance Statement............................................................................................................. 247 Binding Arbitration and Class Waiver............................................................................................... 248 Trademarks...................................................................................................................................... 251 Copyright Notice............................................................................................................................... 251 libTIFF Software Acknowledgment.............................................................................................. 252 A Note Concerning Responsible Use of Copyrighted Materials................................................... 253 Default Delay Times for Power Management for Epson Products............................................... 253 Copyright Attribution.................................................................................................................... 253

11 ET-2800/ET-2803 User's Guide Welcome to the ET-2800/ET-2803 User's Guide. For a printable PDF copy of this guide, click here.

12 Product Basics See these sections to learn about the basic features of your product. Product Parts Locations Using the Control Panel Using Power Saving Settings Using the Epson Smart Panel Mobile App Epson Connect Solutions for Smartphones, Tablets, and More Using AirPrint Using the Mopria Print Service Using Mopria Scan Setting Up Printing on a Chromebook Android Printing Using the Epson Print Enabler Using Fire OS Printing Using Epson Print and Scan App with Windows Tablets Product Parts Locations See these sections to identify the parts on your product. Product Parts - Front Product Parts - Inside Product Parts - Back Parent topic: Product Basics

13 Product Parts - Front 1 Rear paper feeder 2 Paper support 3 Edge guides 4 Feeder guard 5 Output tray 6 Paper stopper Parent topic: Product Parts Locations

14 Product Parts - Inside 1 Document cover 2 Scanner glass 3 Control panel 1 Scanner unit

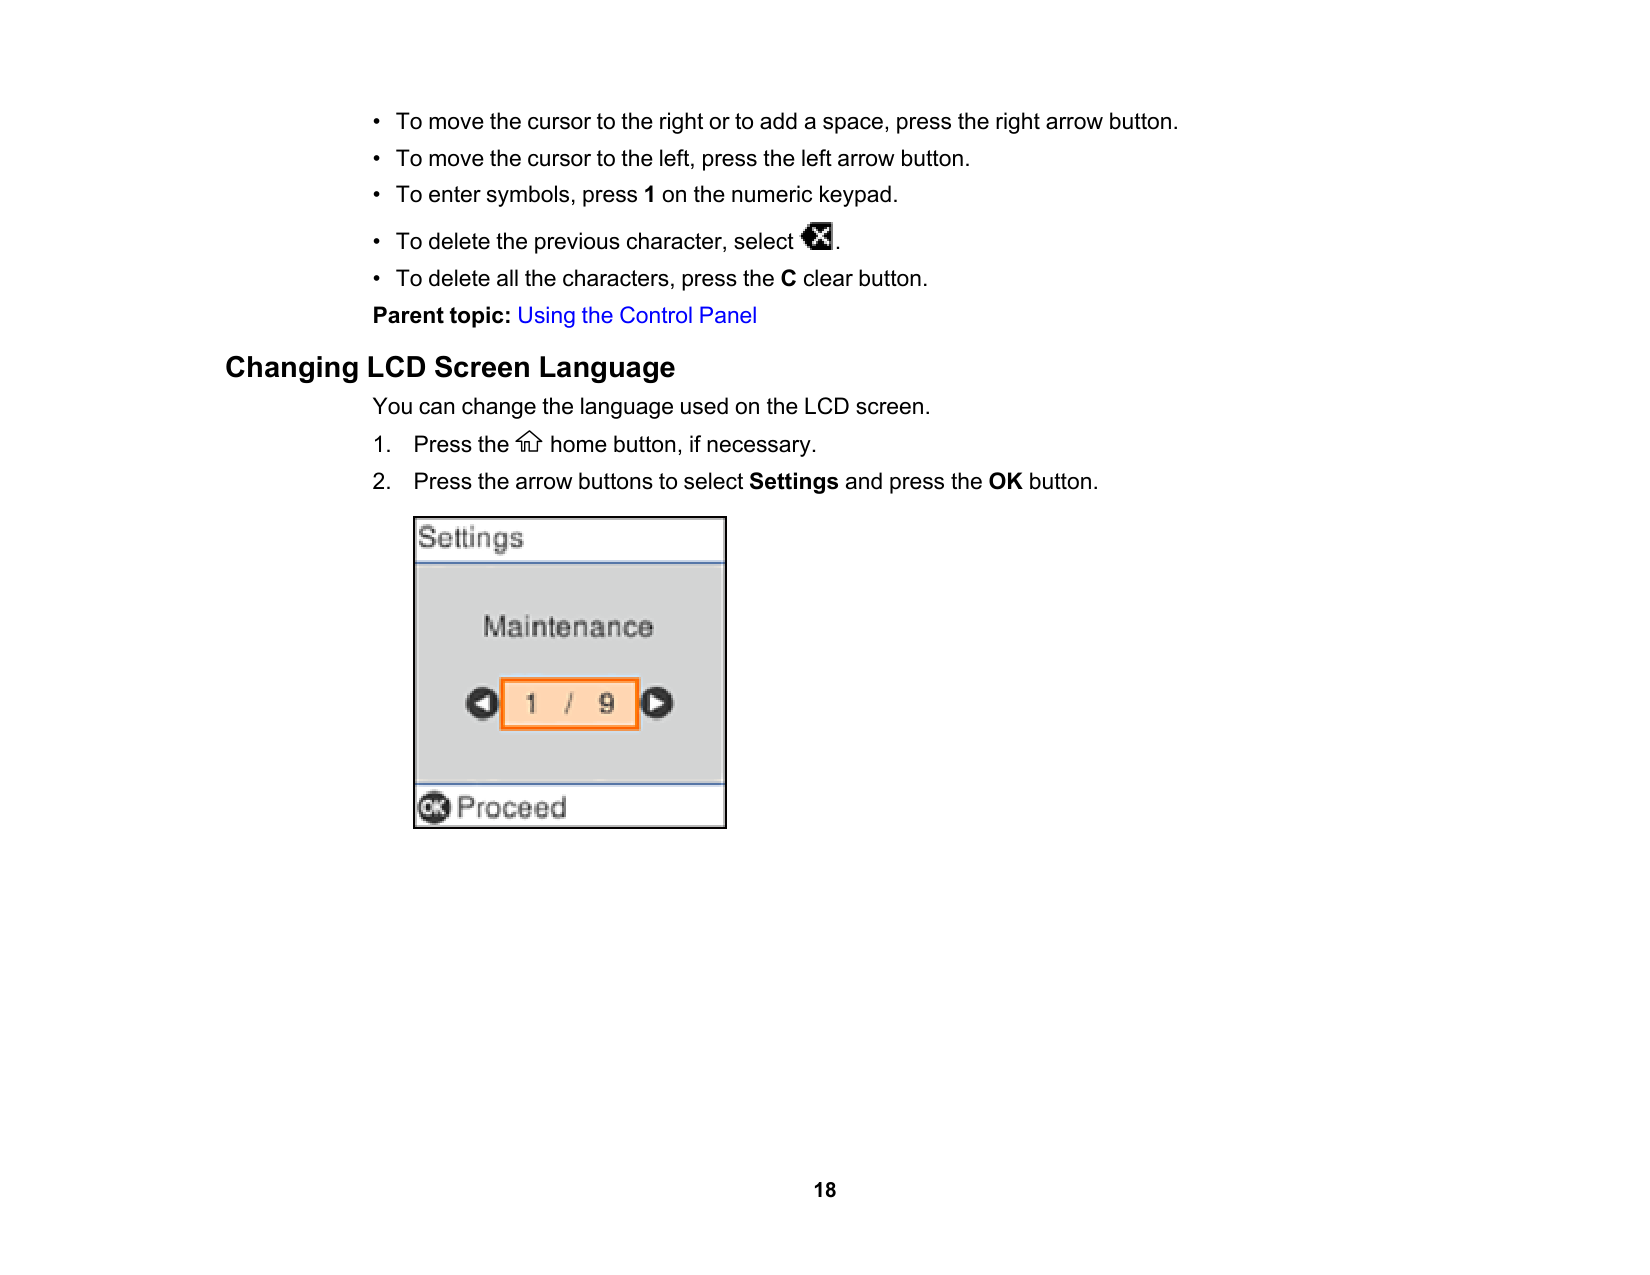
15 2 Ink tank cap 3 Ink tank cover 4 Ink tank unit 5 Ink tanks 6 Inner cover 7 Scanner unit support 8 Print head Parent topic: Product Parts Locations Product Parts - Back 1 AC inlet 2 USB port Parent topic: Product Parts Locations Using the Control Panel See these sections to learn about the control panel and select control panel settings. Control Panel Buttons and Lights

16 Entering Characters on the LCD Screen Changing LCD Screen Language Preventing PC Connection via USB Parent topic: Product Basics Control Panel Buttons and Lights 1 power button and light 2 home button 3 LCD screen 4 help button 5 Arrow buttons and OK button 6 stop button 7 start button 8 reset button 9 back button
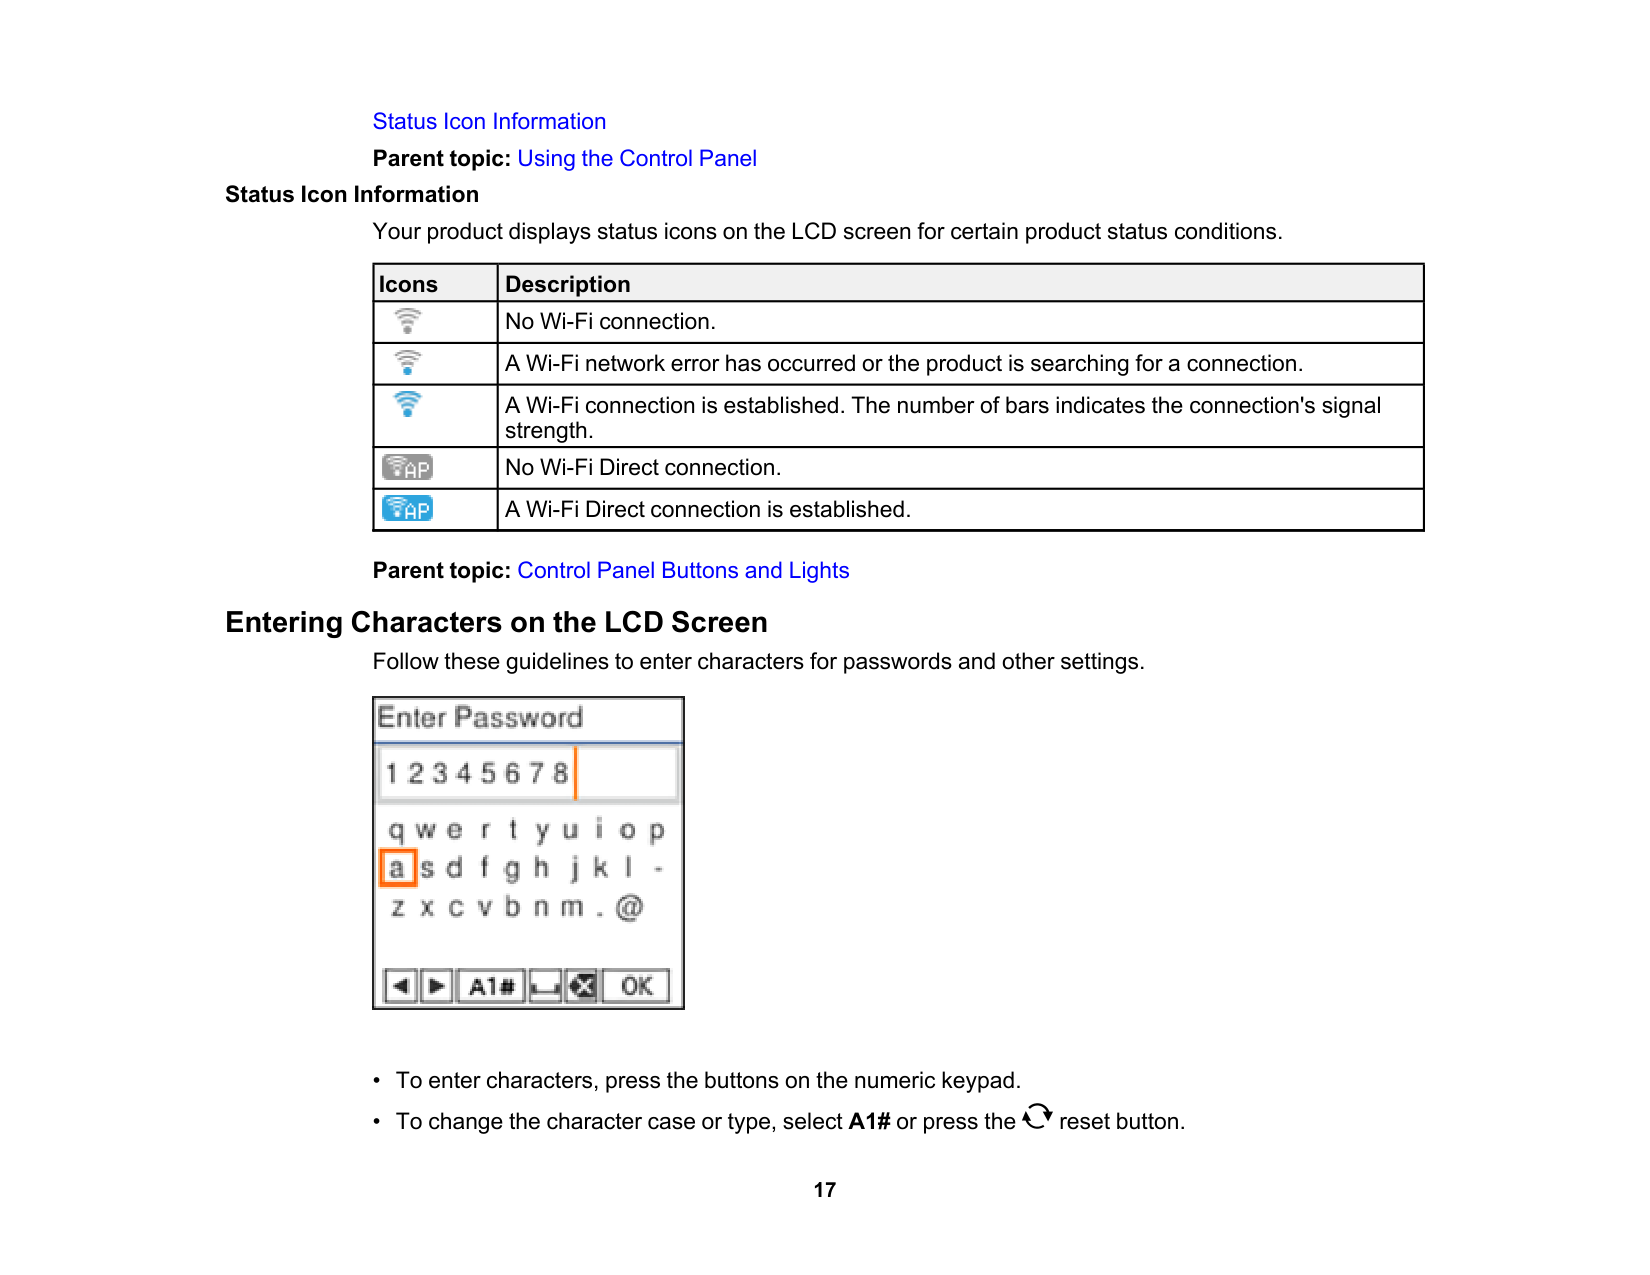
17 Status Icon Information Parent topic: Using the Control Panel Status Icon Information Your product displays status icons on the LCD screen for certain product status conditions. Icons Description No Wi-Fi connection. A Wi-Fi network error has occurred or the product is searching for a connection. A Wi-Fi connection is established. The number of bars indicates the connection's signal strength. No Wi-Fi Direct connection. A Wi-Fi Direct connection is established. Parent topic: Control Panel Buttons and Lights Entering Characters on the LCD Screen Follow these guidelines to enter characters for passwords and other settings.
18
19
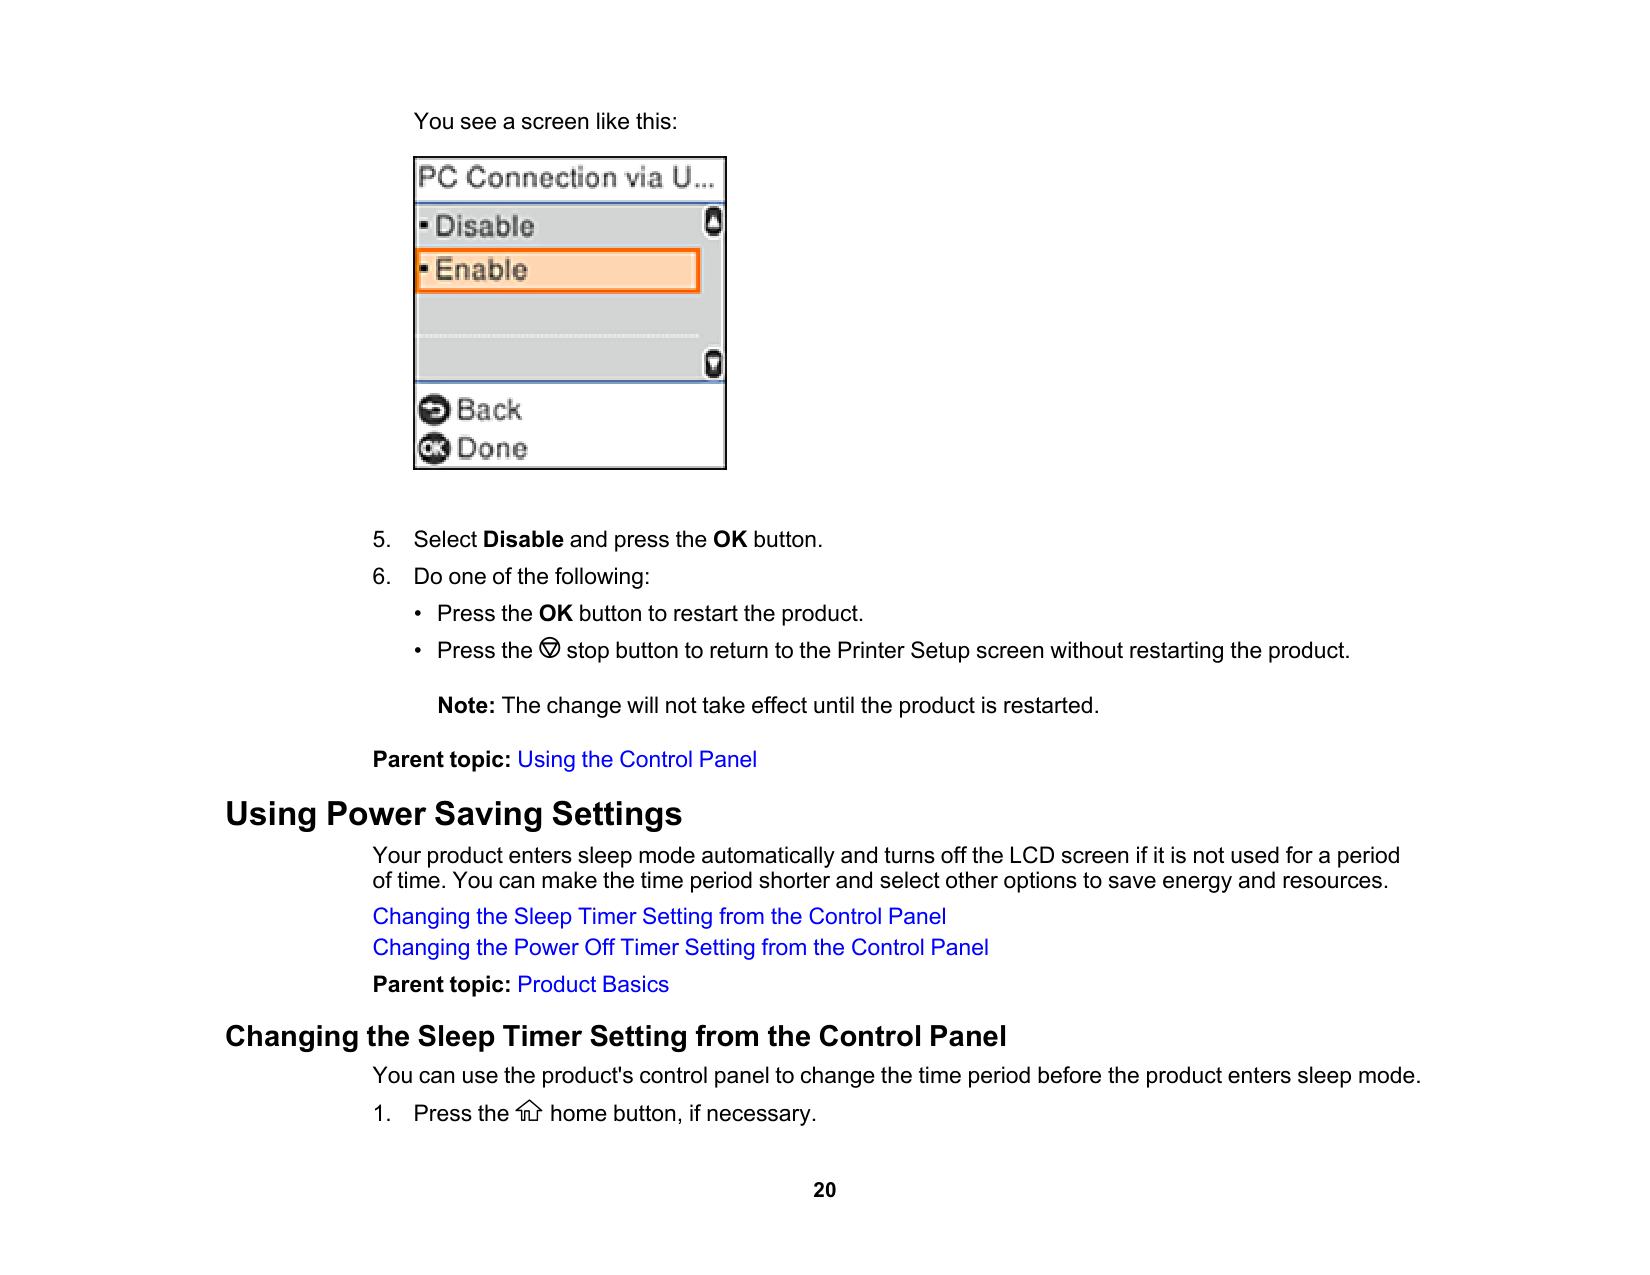
20 You see a screen like this:
21
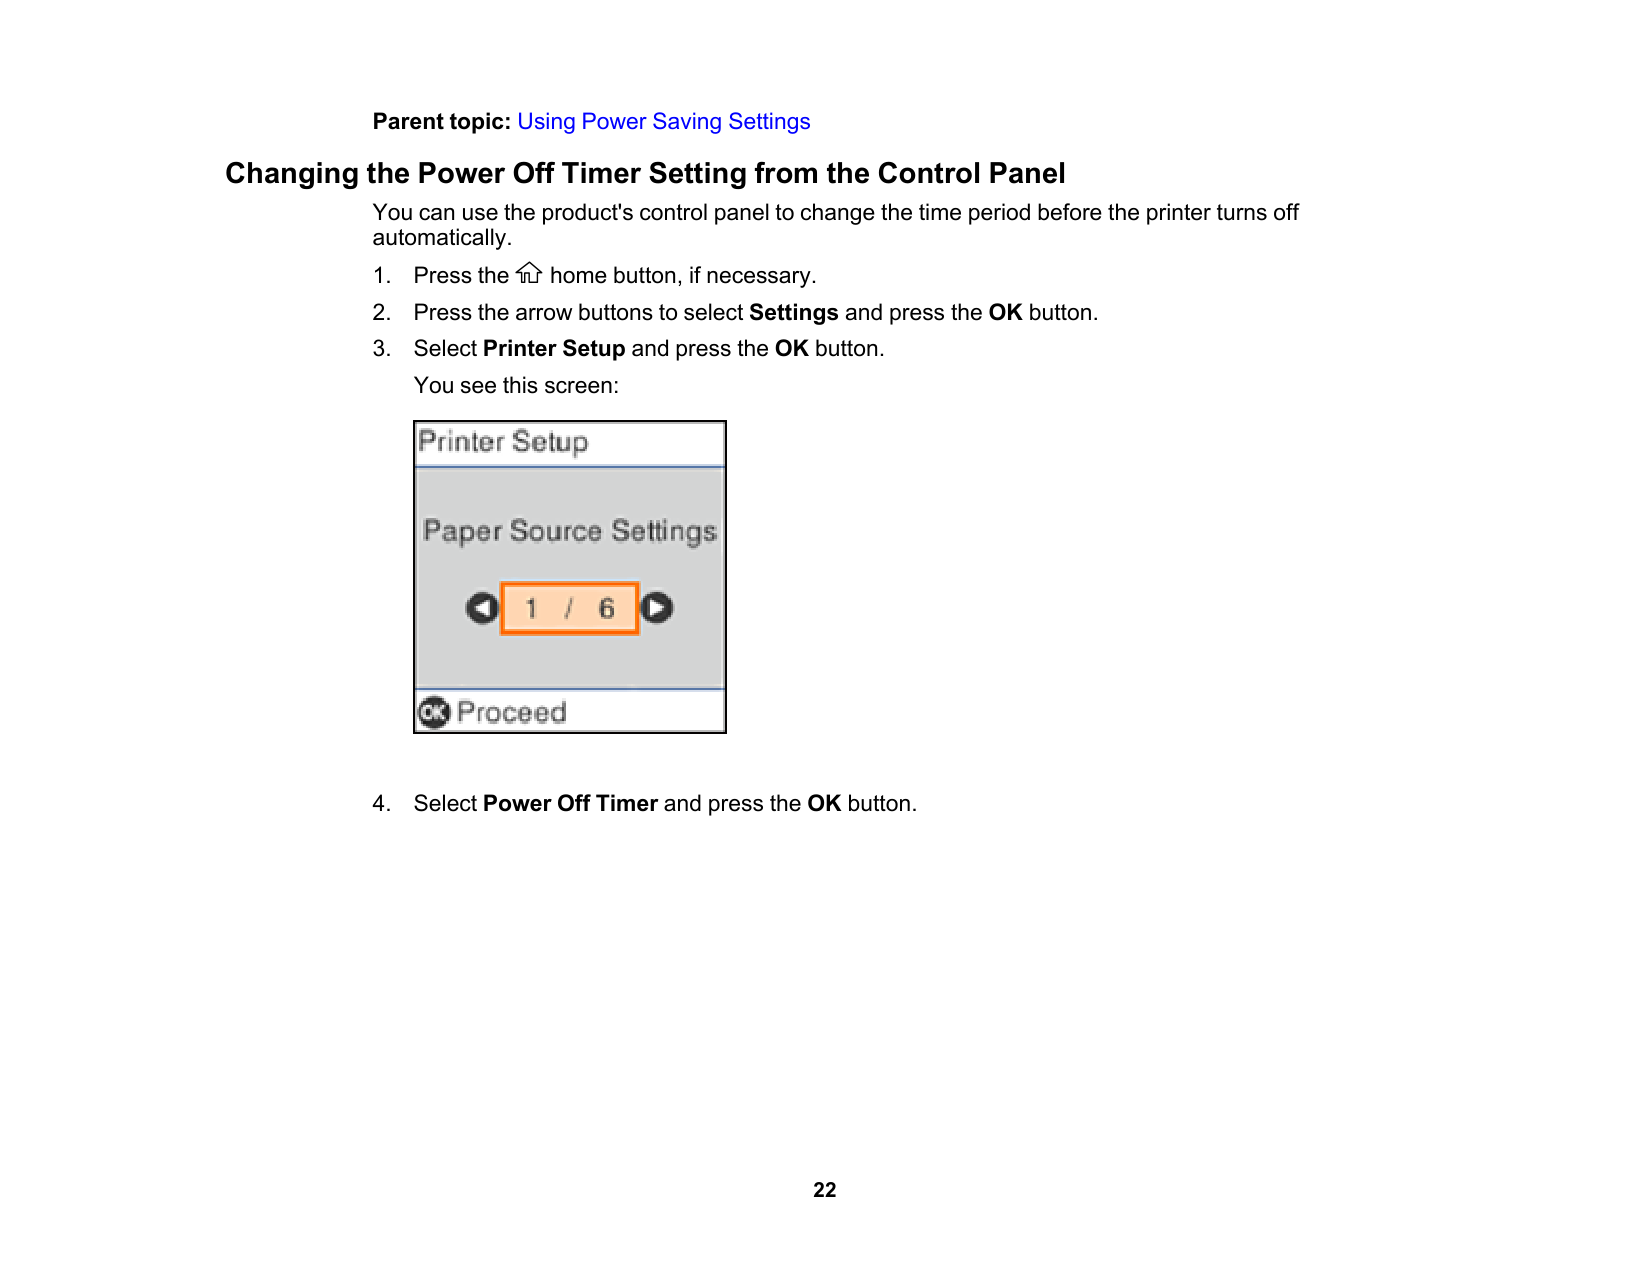
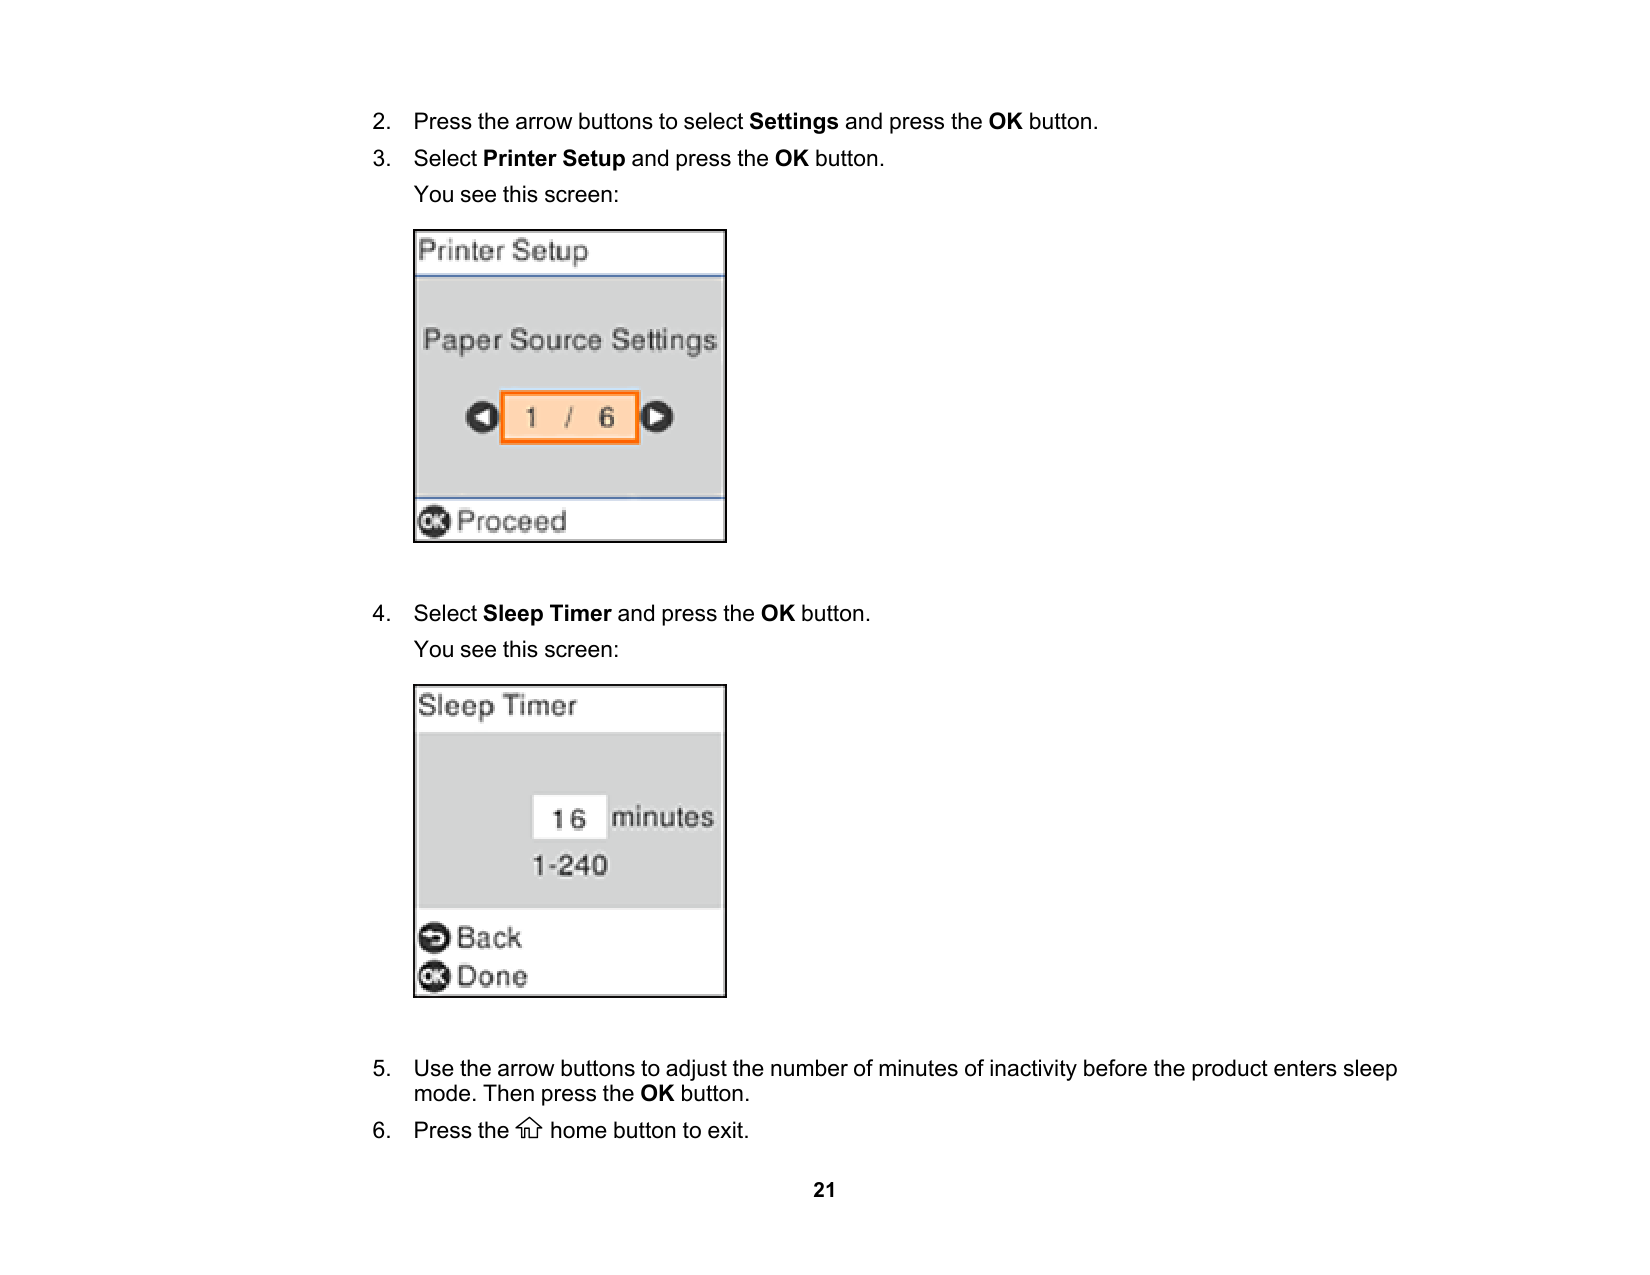
22 Parent topic: Using Power Saving Settings Changing the Power Off Timer Setting from the Control Panel You can use the product's control panel to change the time period before the printer turns off automatically.
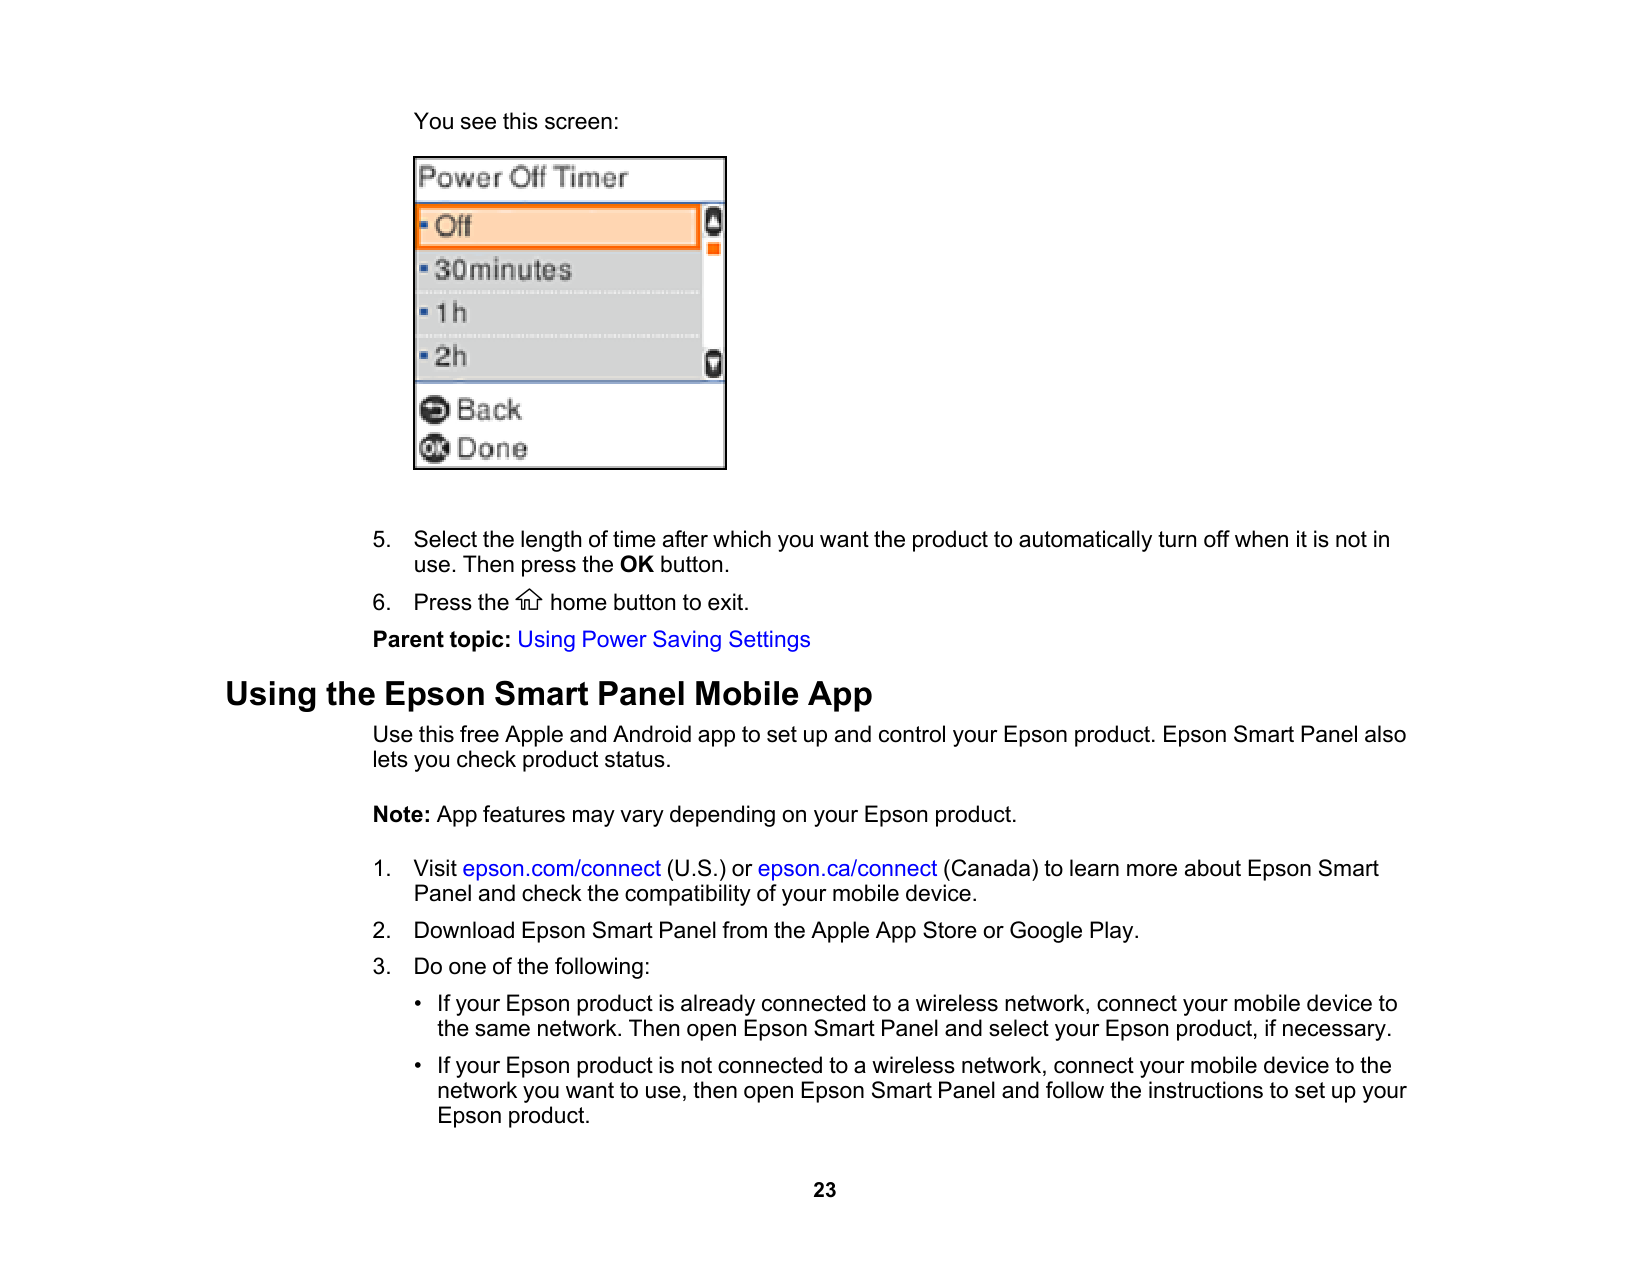
23 You see this screen:

24 Now you are ready to control your Epson product with your mobile device. Parent topic: Product Basics Related topics Wi-Fi Networking Epson Connect Solutions for Smartphones, Tablets, and More Use your smartphone, tablet, or computer to print documents, photos, emails, and web pages from your home, office, or even across the globe. Note: If you are using your Epson product with the Windows 10 S operating system, you cannot use the software described in this section. You also cannot download and install any Epson product software from the Epson website for use with Windows 10 S; you must obtain software only from the Windows Store. Print from anywhere with these Epson Connect solutions:
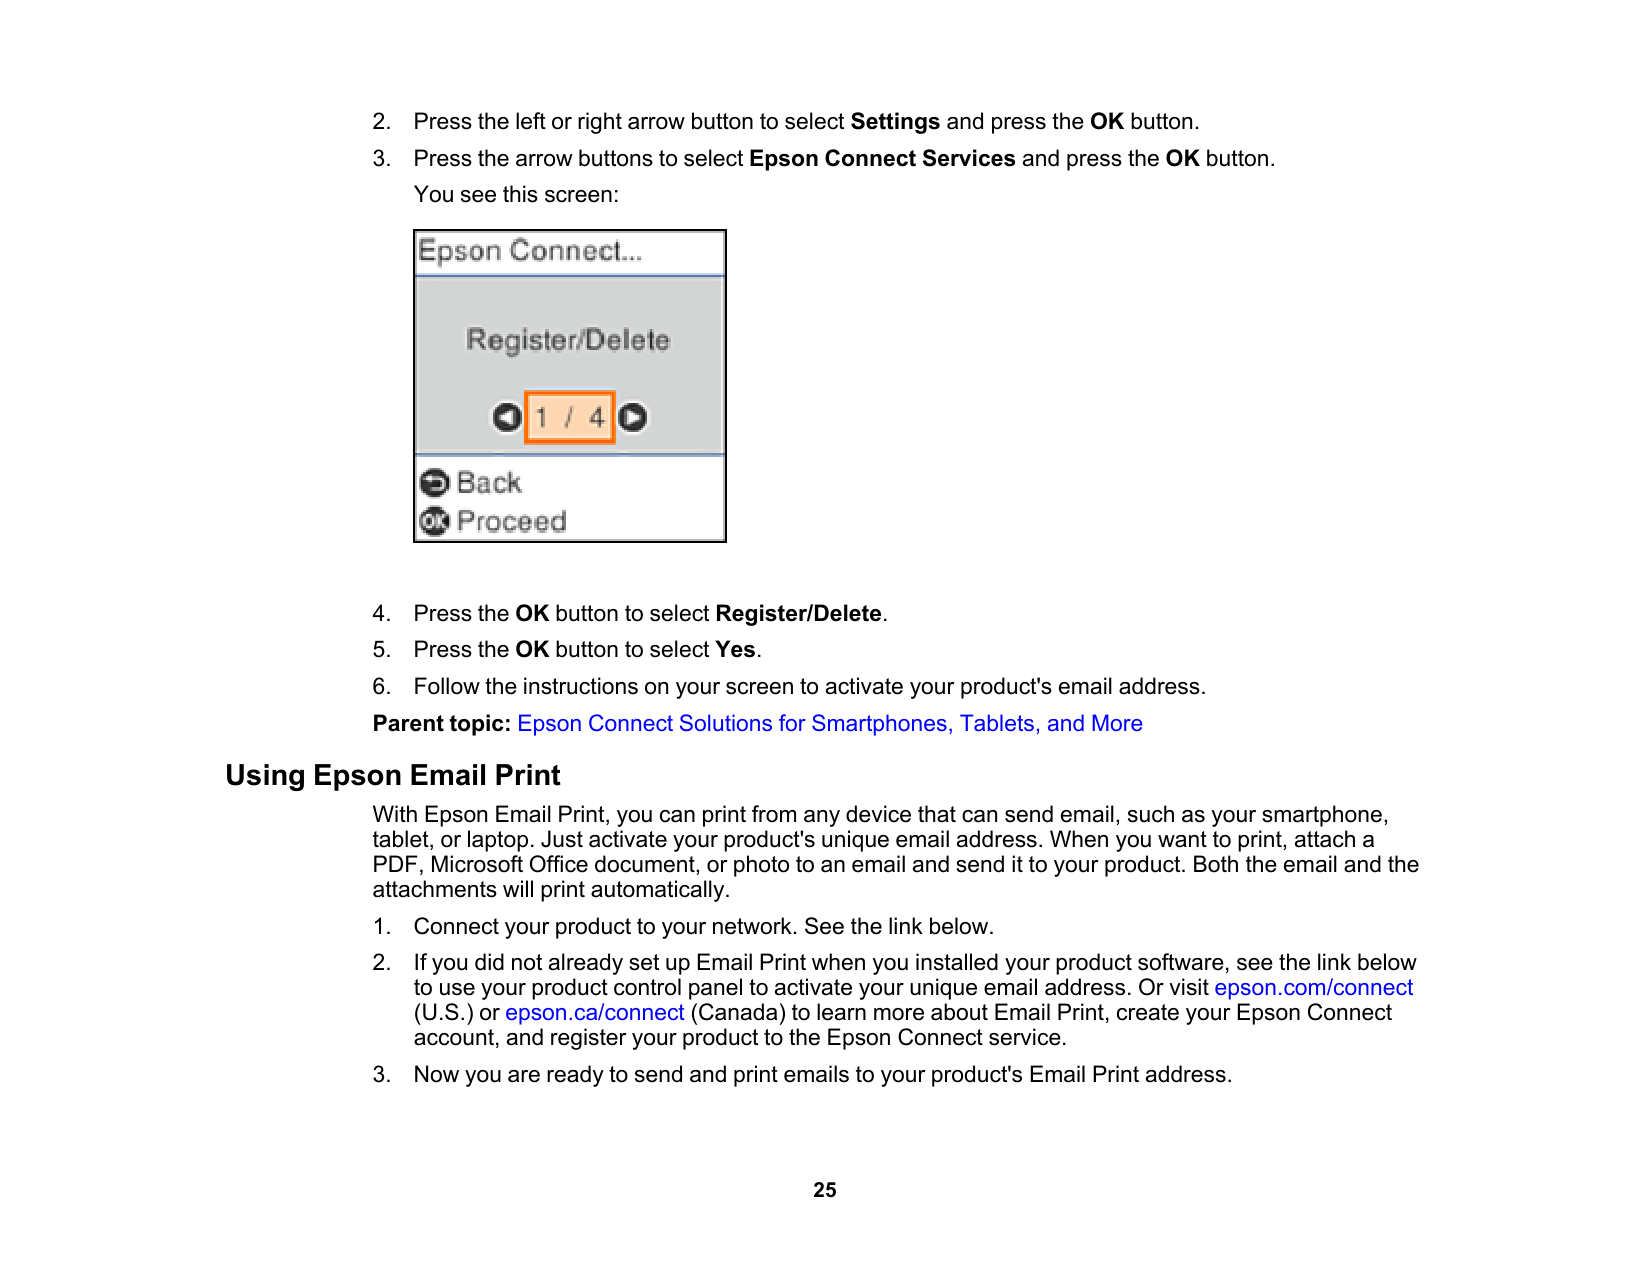
25

26 Note: Go to epsonconnect.com and log into your Epson Connect account to personalize your product's email, adjust print settings, and set up other Epson Connect services. Parent topic: Epson Connect Solutions for Smartphones, Tablets, and More Related tasks Setting Up Epson Connect Services Related topics Wi-Fi Networking Using Epson Remote Print With Epson Remote Print software, you can print from your laptop or desktop computer to an Epson Email-enabled product anywhere in the world.
27 Using AirPrint AirPrint enables instant wireless printing from iPhone, iPad, iPod touch, and Mac without the need to install drivers or download software. Note: If you disabled paper configuration messages on your product control panel, you cannot use AirPrint. See the link below to enable the messages, if necessary.
28 Using the Mopria Print Service Mopria Print Service enables printing to Mopria certified printers and multifunction printers from many manufacturers. Mobile printing from your Android phone or tablet may be accomplished using the Mopria Print Service app in the Google Play Store. Note: For details and support on the Mopria Print Service, visit https://mopria.org. Parent topic: Product Basics Related topics Wi-Fi Networking Using Mopria Scan Mopria Scan enables scanning from Mopria certified multifunction printers and scanners from many manufacturers. Mobile scanning from your Android phone or tablet may be accomplished using the Mopria Scan app in the Google Play Store.

29 Note: For details and support on Mopria Scan, visit https://mopria.org. Parent topic: Product Basics Related topics Wi-Fi Networking Setting Up Printing on a Chromebook Your Epson printer supports native printing on Chromebook, allowing you to print from a Chromebook without drivers or cables. For directions on setting up your printer, visit Setting Up Your Epson Printer on Your Chromebook (U.S.) or Setting Up Your Epson Printer on Your Chromebook (Canada). Parent topic: Product Basics Android Printing Using the Epson Print Enabler You can wirelessly print your documents, emails, photos, and web pages right from your Android phone or tablet. With a few taps, your Android device will discover your nearby Epson product and print. Note: Operations may differ depending on the device.
30 Using Fire OS Printing You can wirelessly print from Amazon Fire tablets and phones to your nearby networked Epson product. There is no software to download, no drivers to install, and no cables to connect. With just a few taps in Email, Calendar, Contacts, and WPS Office, you can send whatever is on the screen to an Epson product.

31 Related topics Wi-Fi Networking

32 Wi-Fi Networking See these sections to use your product on a Wi-Fi network. Network Security Recommendations Wi-Fi Infrastructure Mode Setup Wi-Fi Direct Mode Setup Wi-Fi Protected Setup (WPS) Printing a Network Status Sheet Printing a Network Connection Report Changing or Updating Network Connections Network Security Recommendations To help deter unauthorized access to your product over a network, you should protect your network environment using appropriate security measures. Security measures such as these can help deter threats such as loss of user data, use of telephone and fax lines, and other intrusions:

33 Wi-Fi Infrastructure Mode Setup You can set up your product to communicate with your computer using a wireless router or access point. The wireless router or access point can be connected to your computer over a wireless or wired network. 1 Epson product 2 Wireless router or access point 3 Computer with a wireless interface 4 Computer 5 Internet 6 Ethernet cable (used only for wired connection to the wireless router or access point) Selecting Wireless Network Settings from the Control Panel Parent topic: Wi-Fi Networking
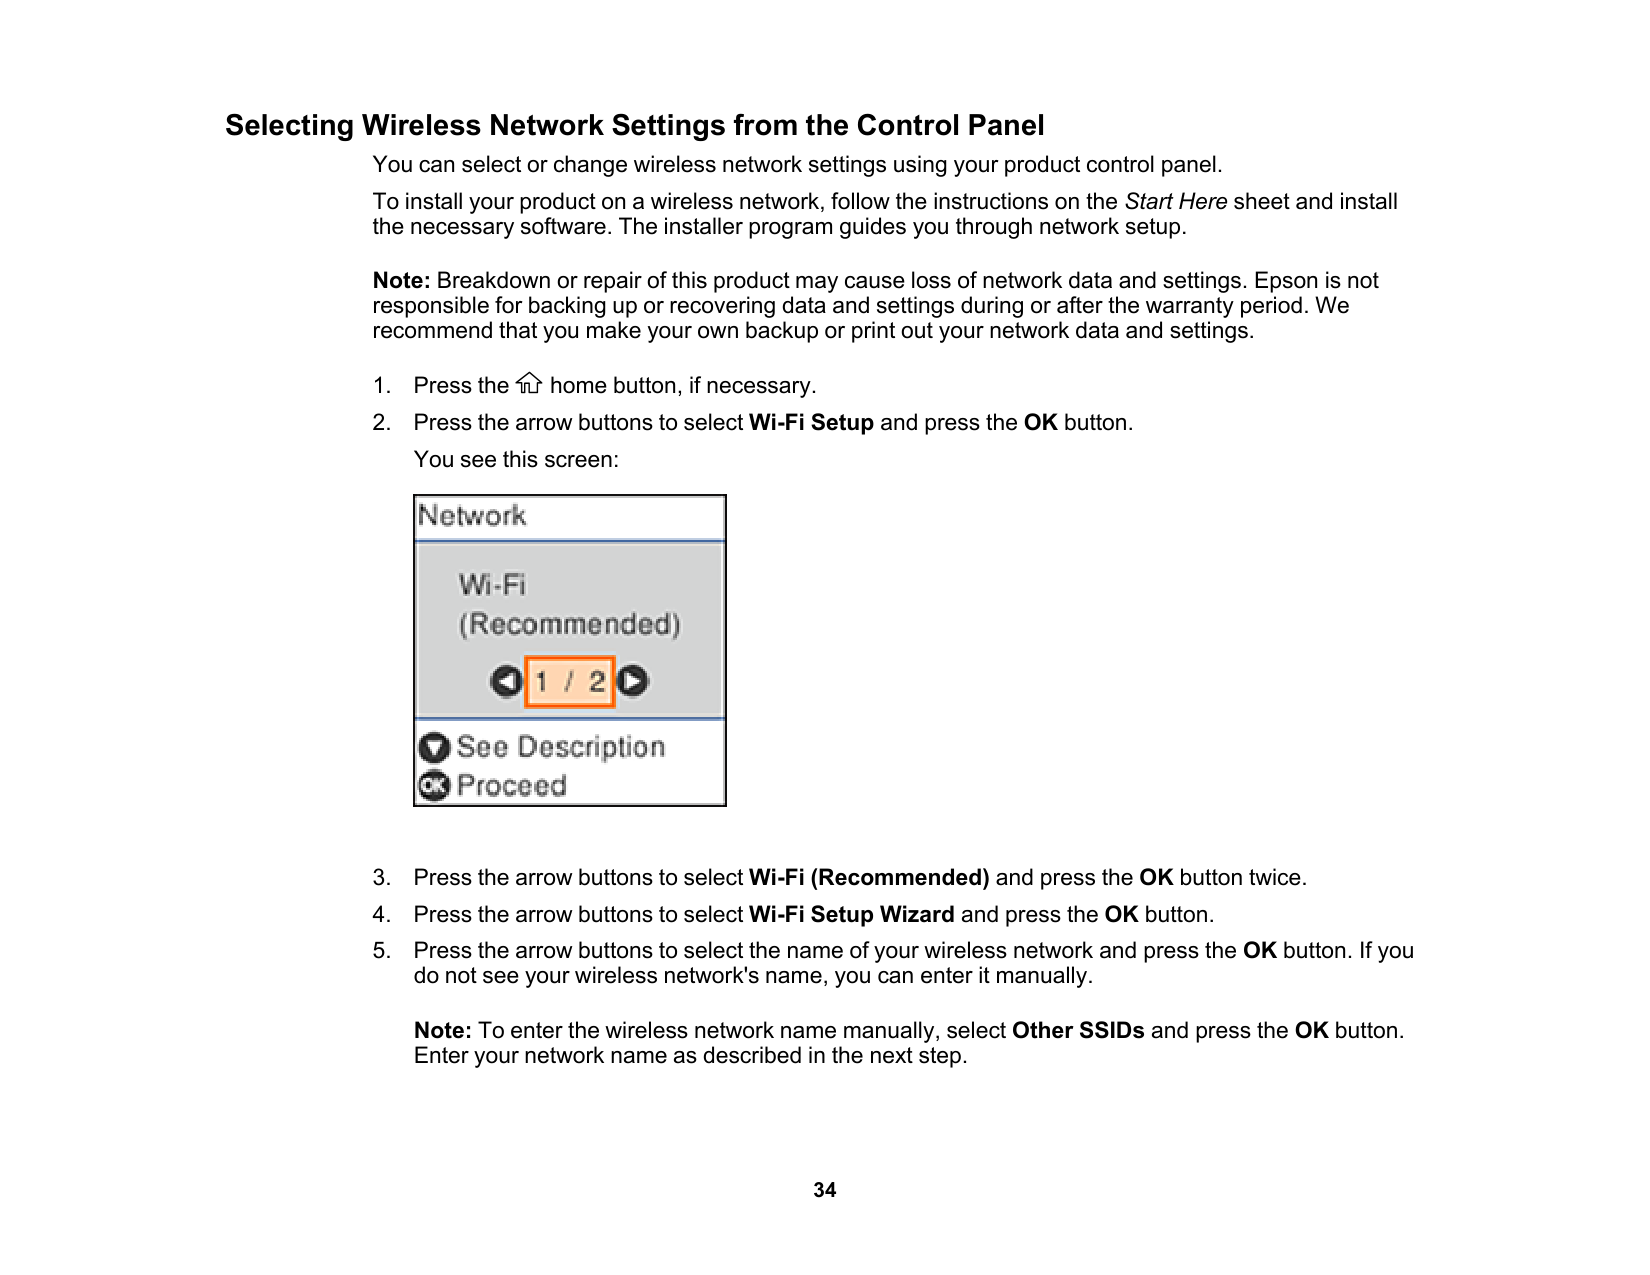
34 Selecting Wireless Network Settings from the Control Panel You can select or change wireless network settings using your product control panel. To install your product on a wireless network, follow the instructions on the Start Here sheet and install the necessary software. The installer program guides you through network setup. Note: Breakdown or repair of this product may cause loss of network data and settings. Epson is not responsible for backing up or recovering data and settings during or after the warranty period. We recommend that you make your own backup or print out your network data and settings.
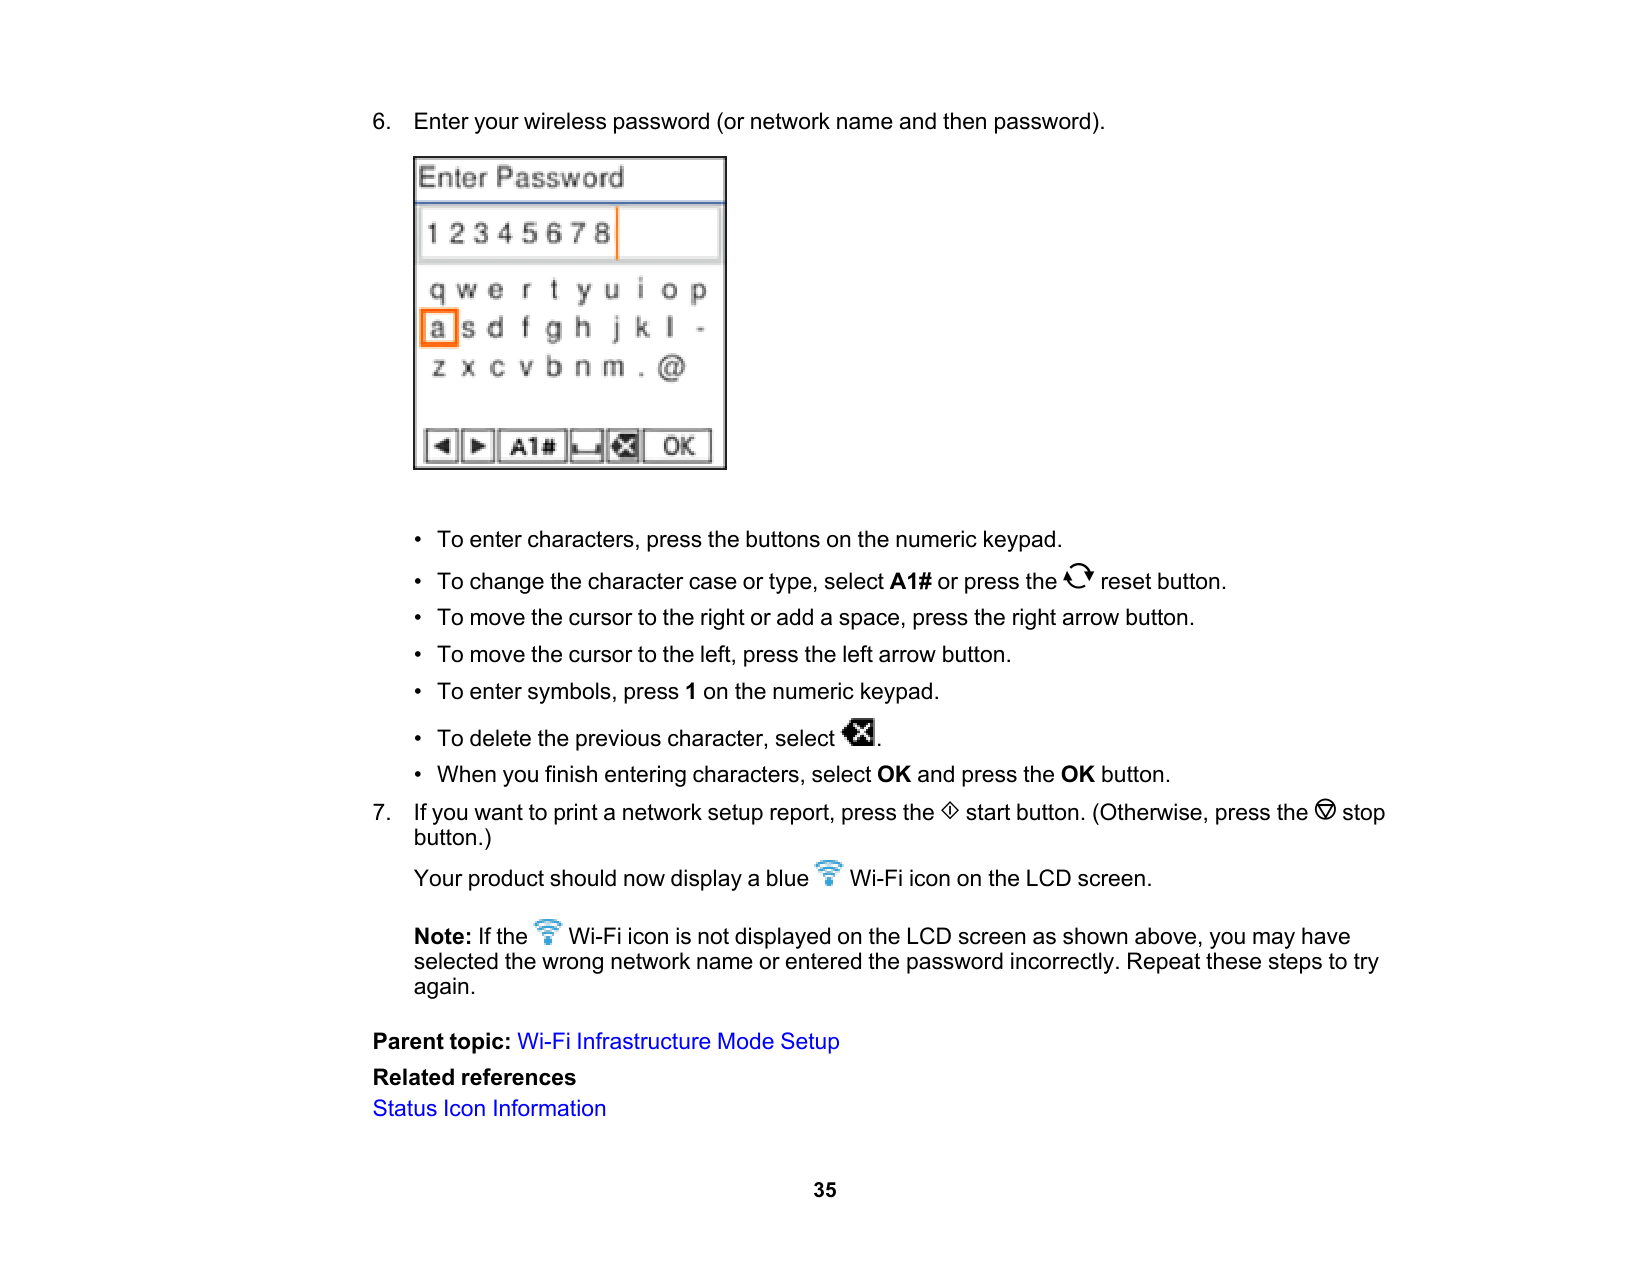
35
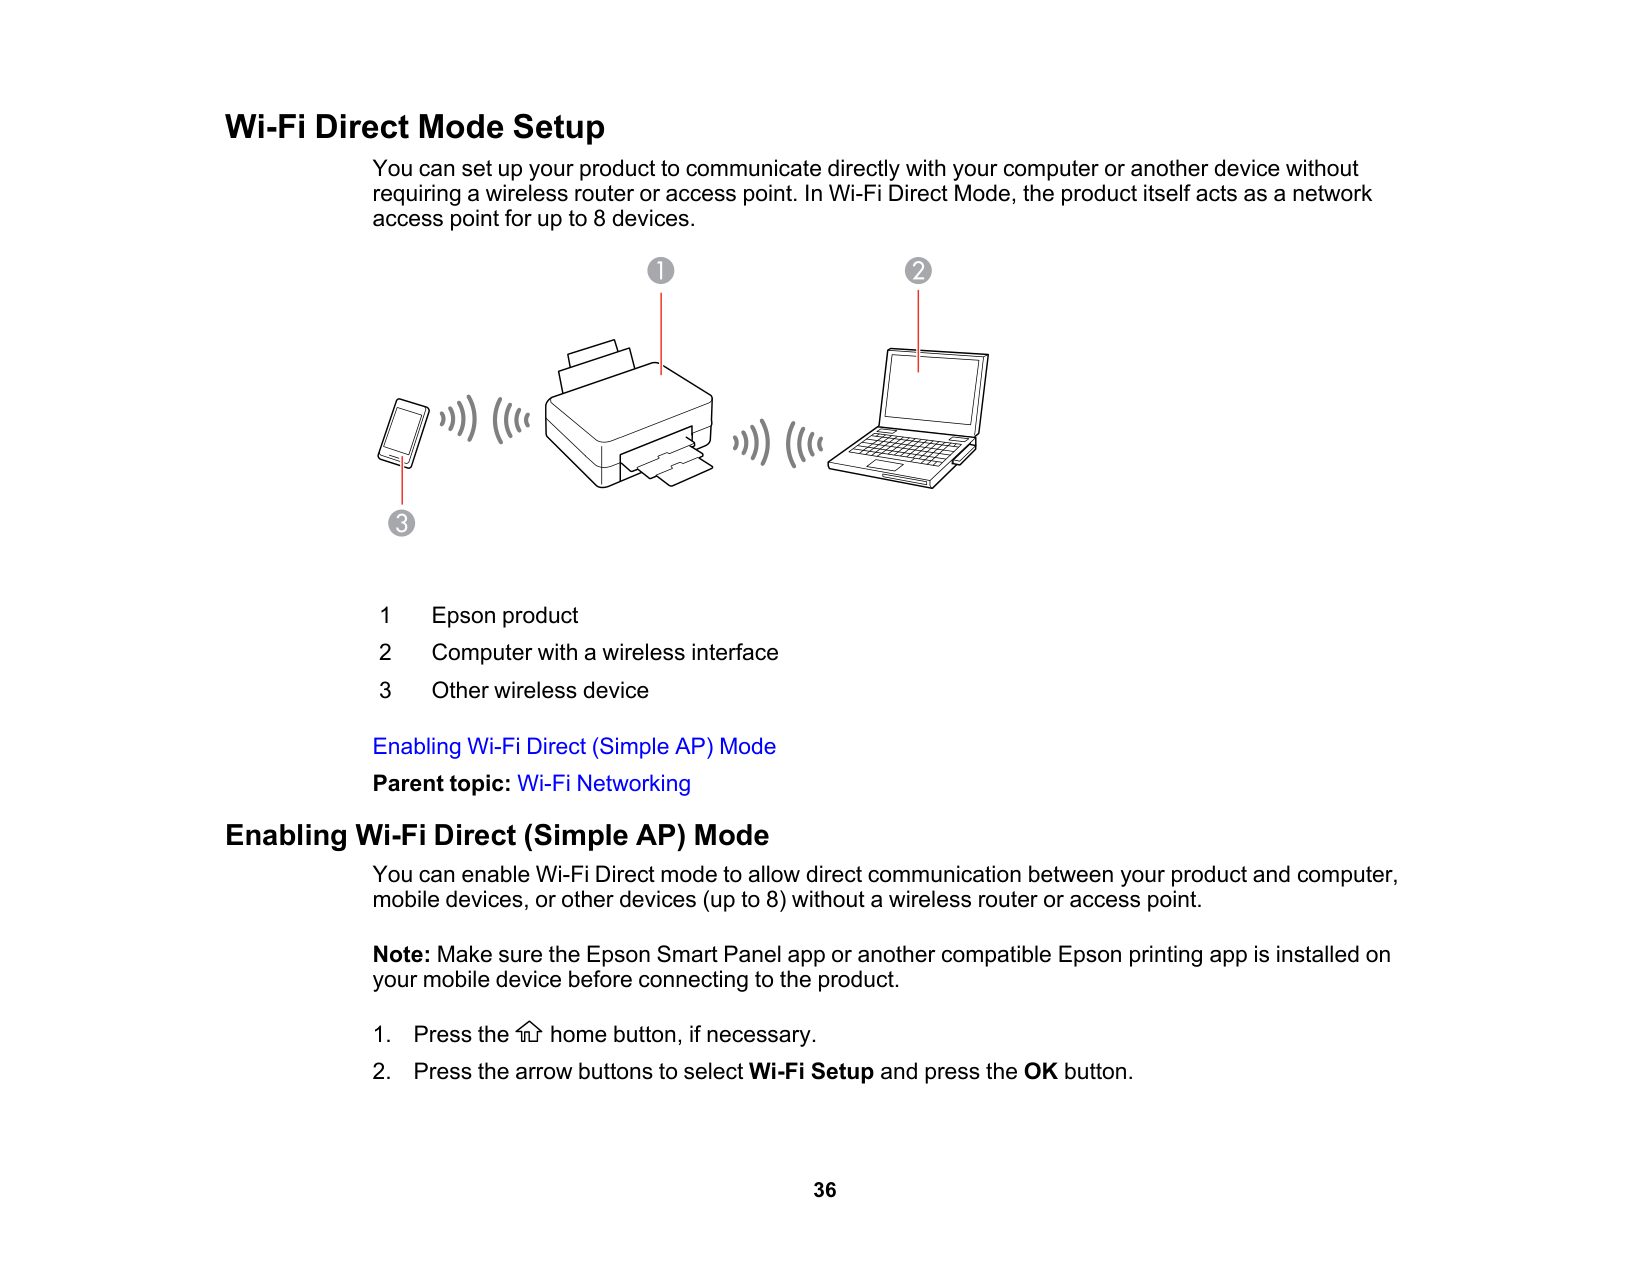
36 Wi-Fi Direct Mode Setup You can set up your product to communicate directly with your computer or another device without requiring a wireless router or access point. In Wi-Fi Direct Mode, the product itself acts as a network access point for up to 8 devices. 1 Epson product 2 Computer with a wireless interface 3 Other wireless device Enabling Wi-Fi Direct (Simple AP) Mode Parent topic: Wi-Fi Networking Enabling Wi-Fi Direct (Simple AP) Mode You can enable Wi-Fi Direct mode to allow direct communication between your product and computer, mobile devices, or other devices (up to 8) without a wireless router or access point. Note: Make sure the Epson Smart Panel app or another compatible Epson printing app is installed on your mobile device before connecting to the product.
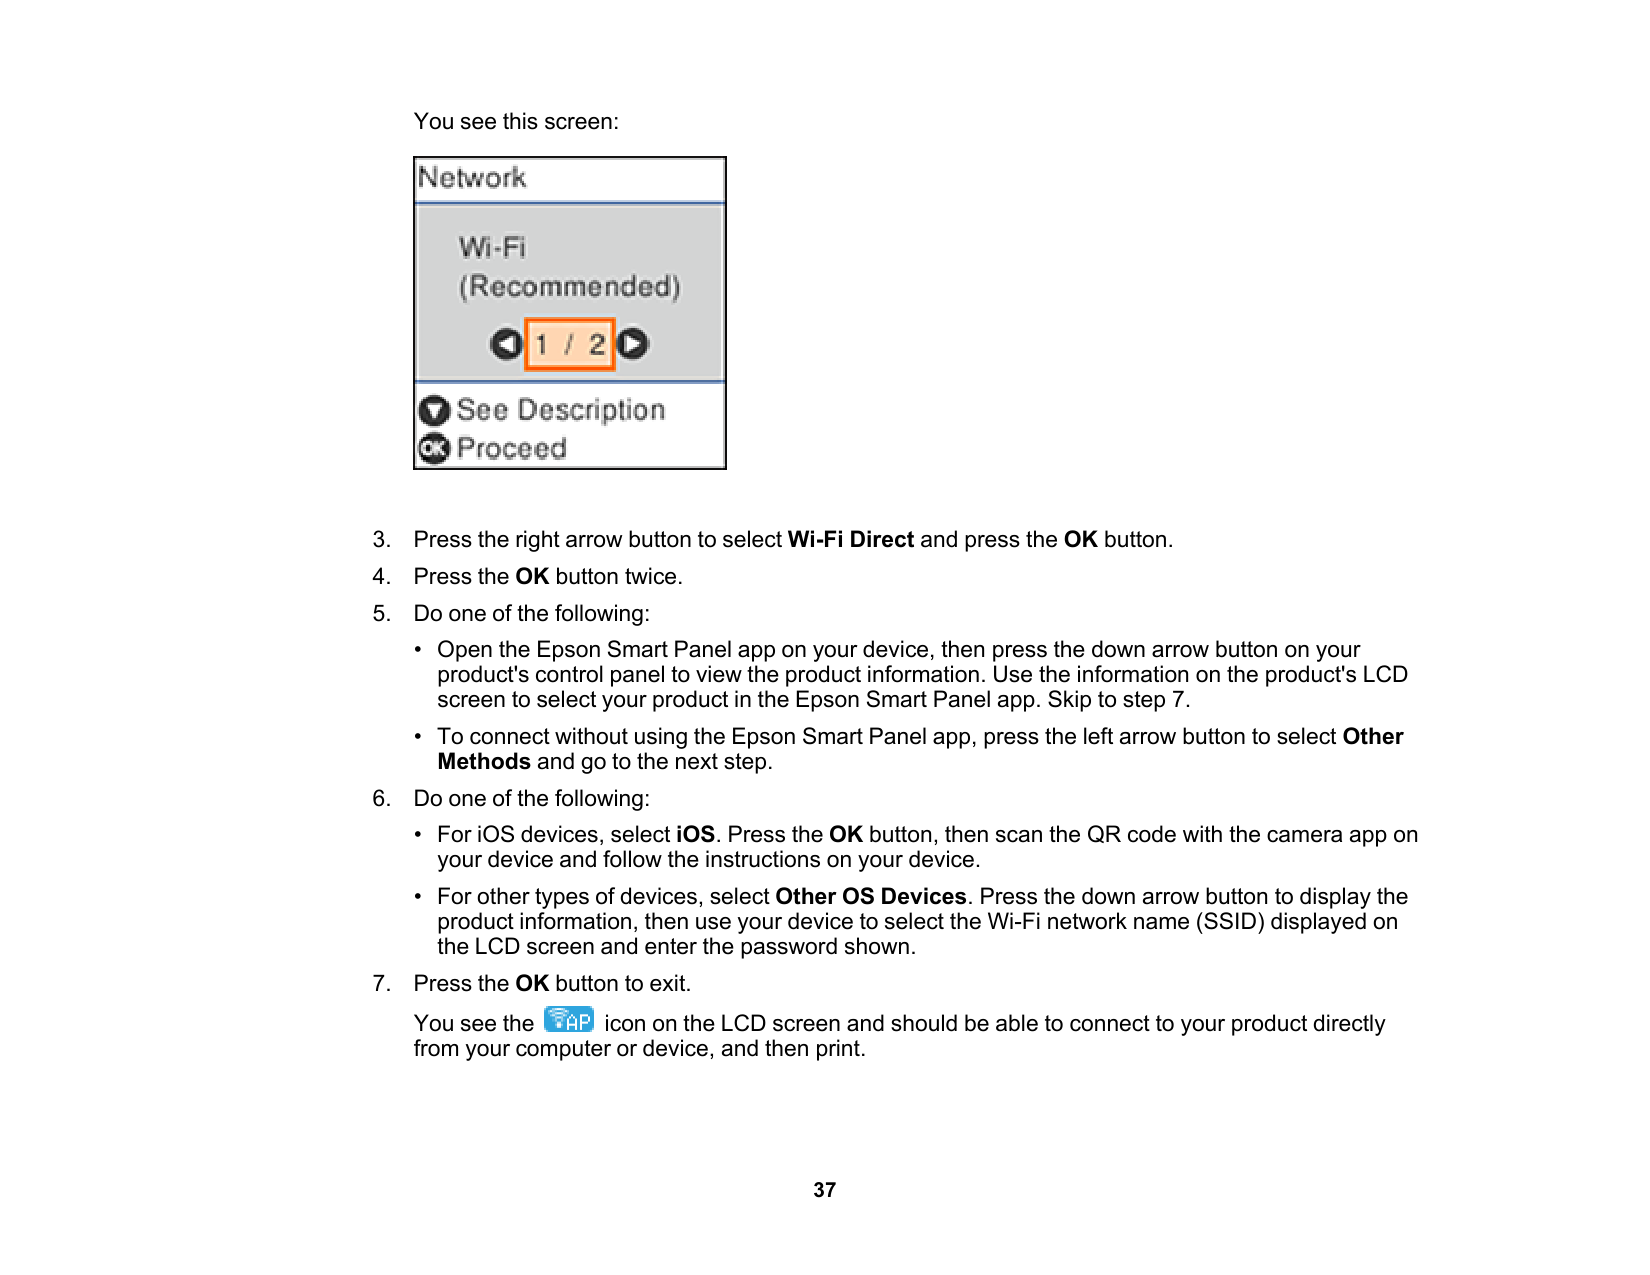
37 You see this screen:
38 Note: If the icon is displayed on the LCD screen, Wi-Fi Direct mode is not enabled. Repeat these steps to try again. Parent topic: Wi-Fi Direct Mode Setup Related references Status Icon Information Wi-Fi Protected Setup (WPS) If your network uses a WPS-enabled wireless router or access point, you can quickly connect your product to the network using Wi-Fi Protected Setup (WPS). Note: To check if your router is WPS-enabled, look for a button labeled WPS on your router or access point. If there is no hardware button, there may be a virtual WPS button in the device's software. Check your network product documentation for details. Using WPS to Connect to a Network Parent topic: Wi-Fi Networking Using WPS to Connect to a Network If you have a WPS-enabled router or access point, you can use Wi-Fi Protected Setup (WPS) to connect your product to the network.
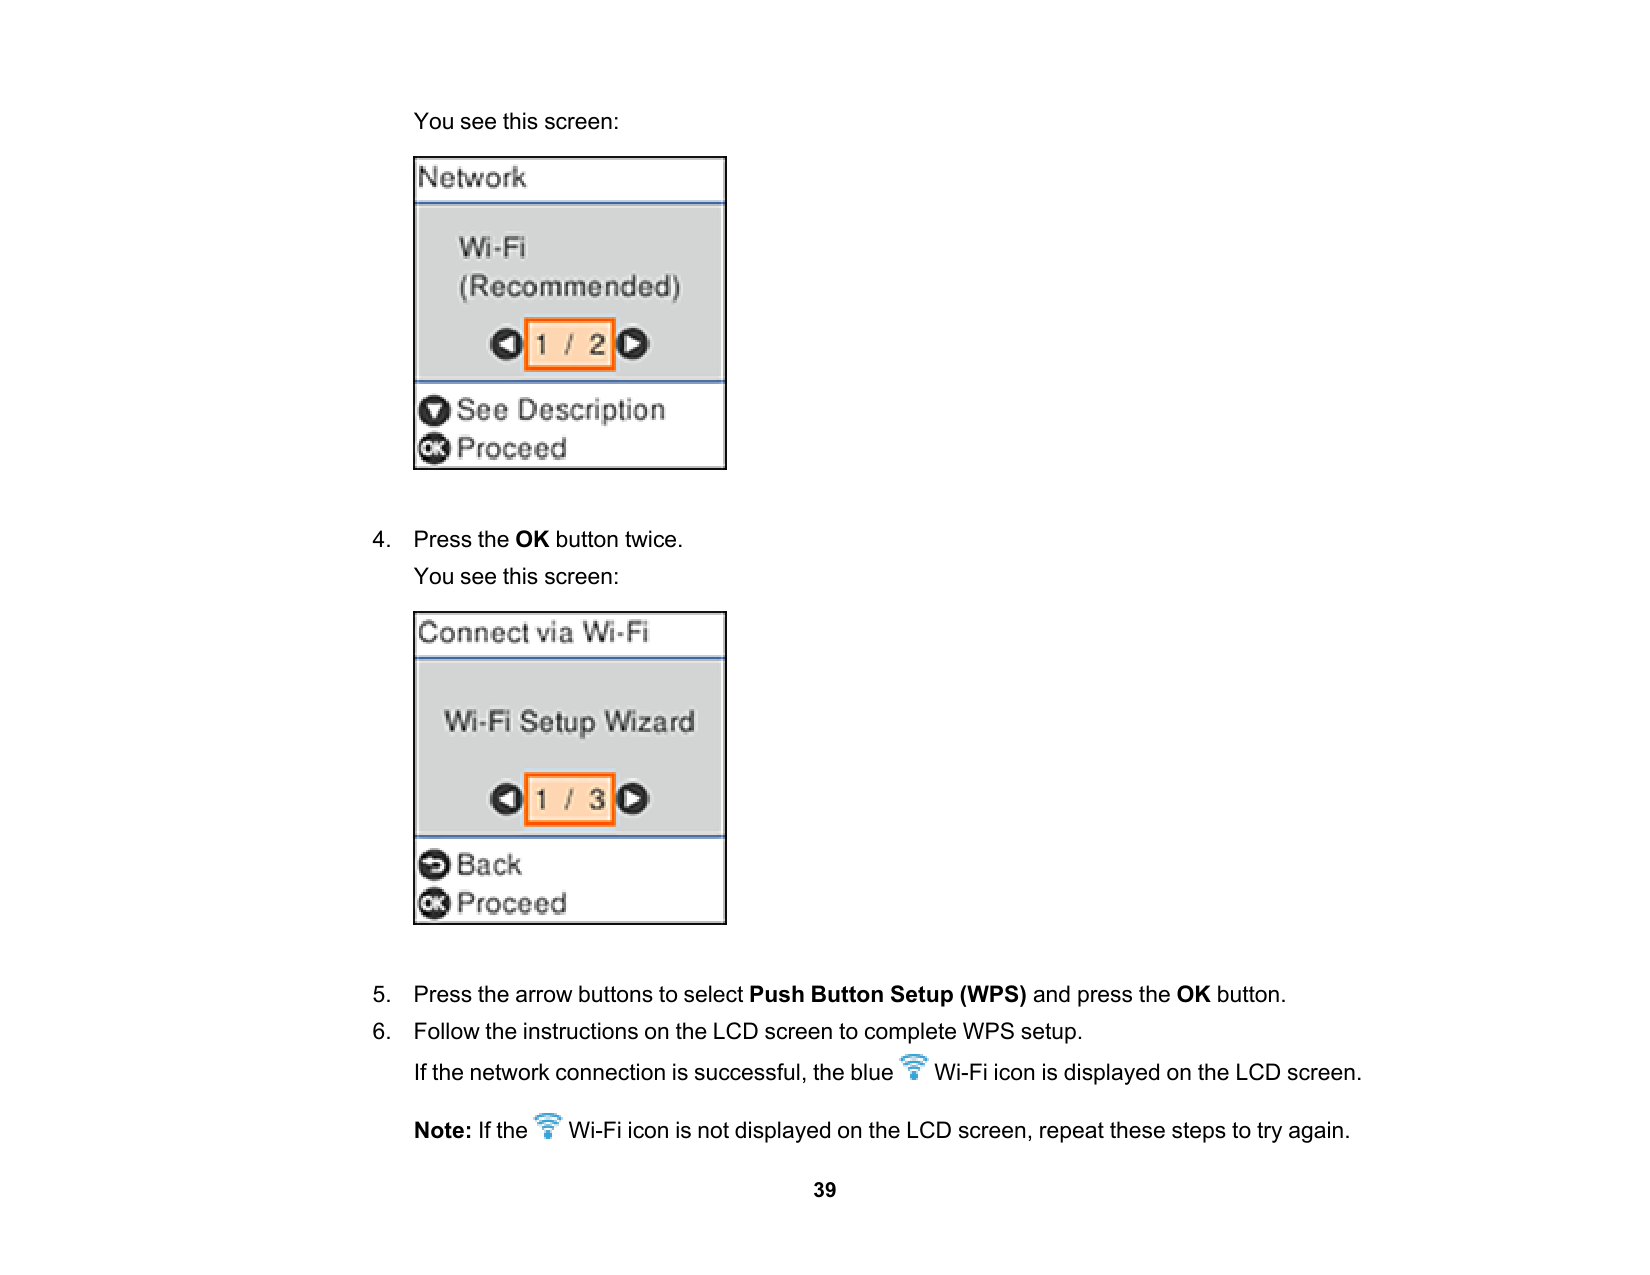
39 You see this screen:
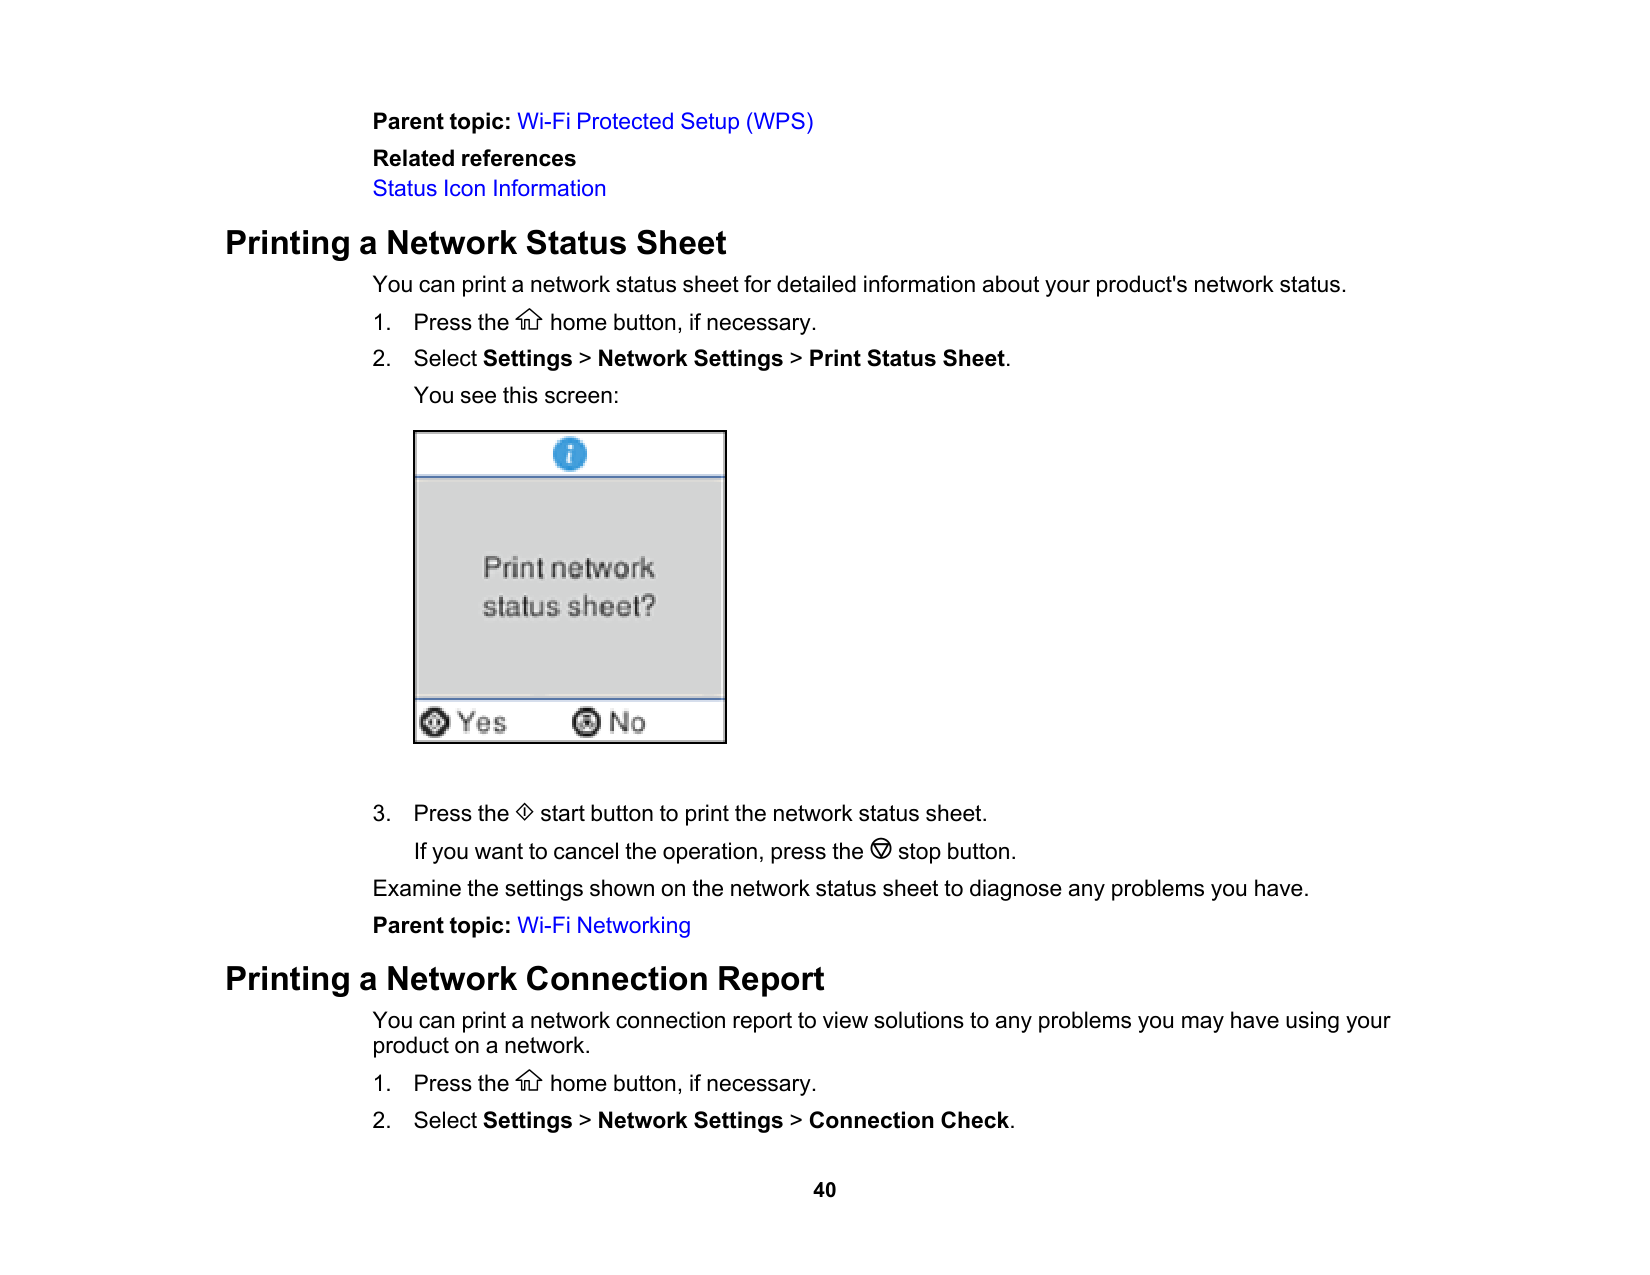
40 Parent topic: Wi-Fi Protected Setup (WPS) Related references Status Icon Information Printing a Network Status Sheet You can print a network status sheet for detailed information about your product's network status.
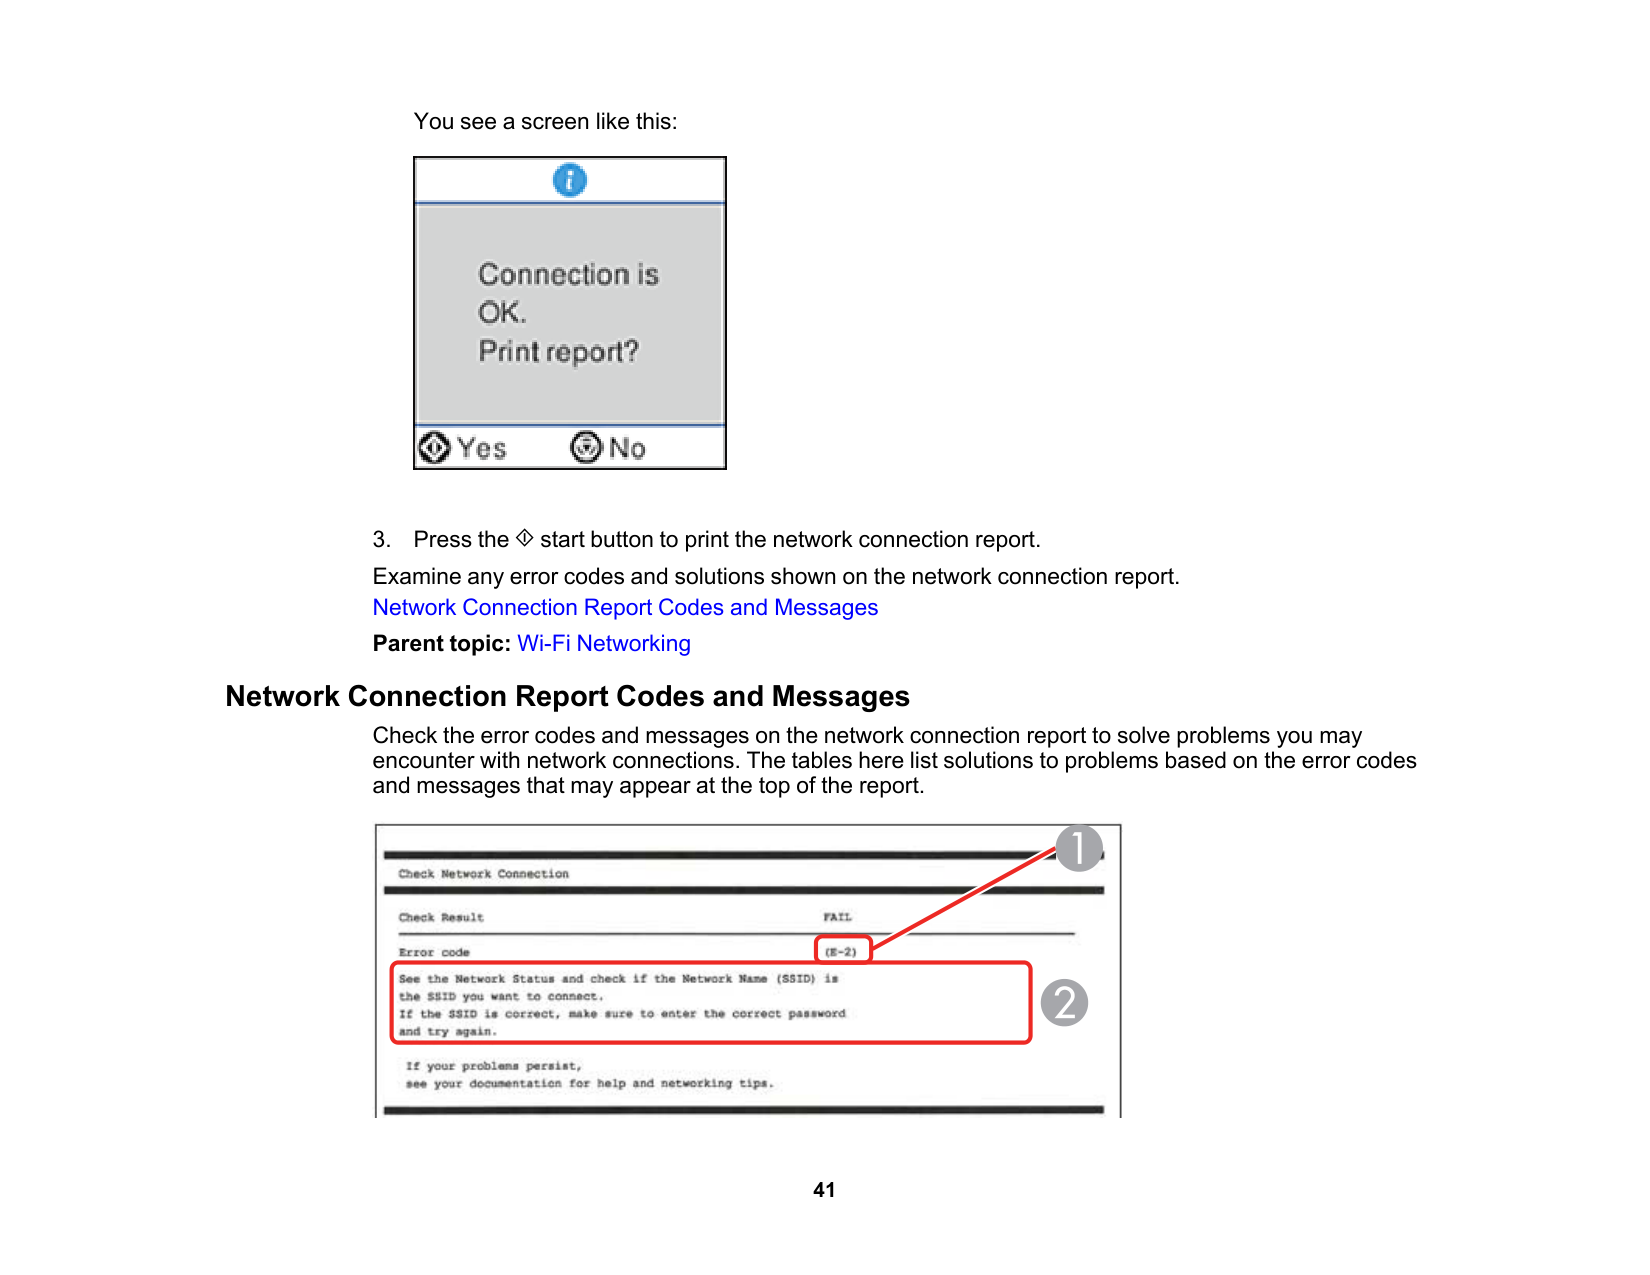
41 You see a screen like this:
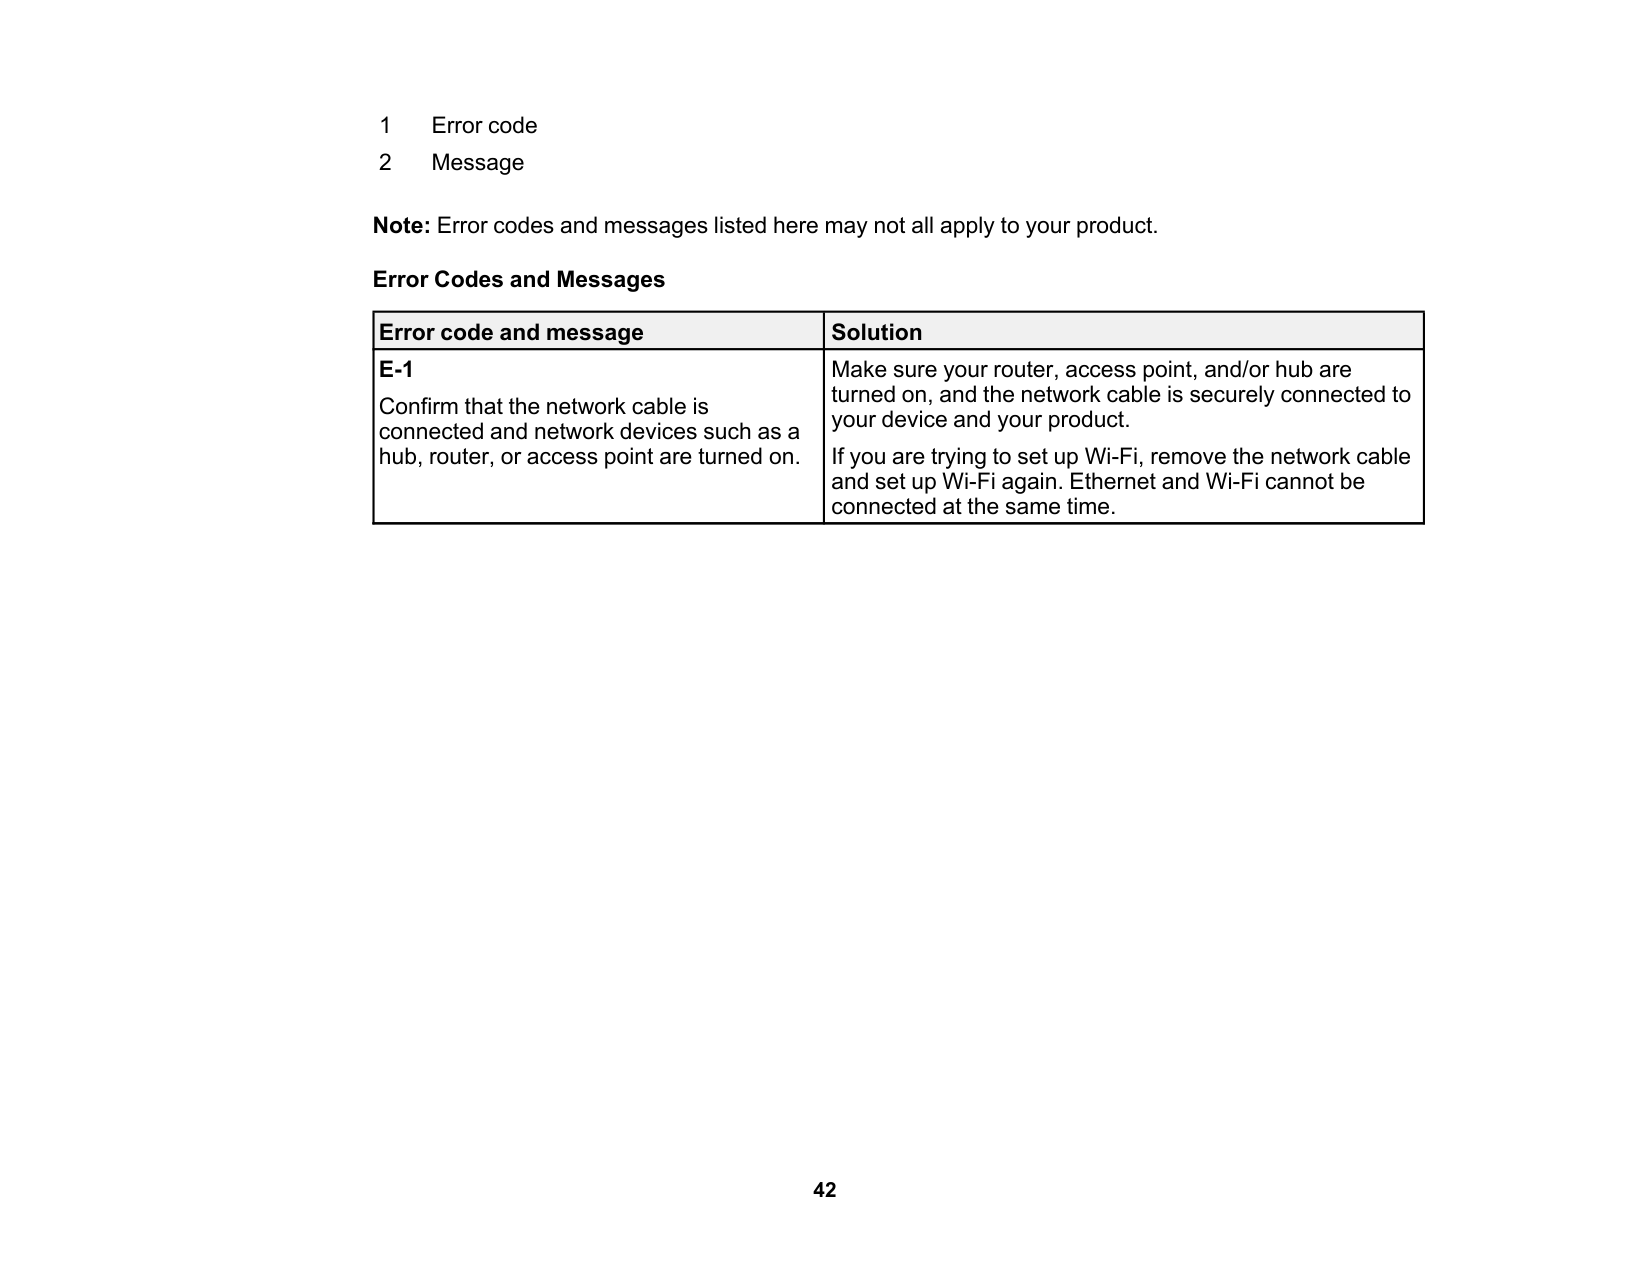
42 1 Error code 2 Message Note: Error codes and messages listed here may not all apply to your product. Error Codes and Messages Error code and message Solution
E-1
Confirm that the network cable is connected and network devices such as a hub, router, or access point are turned on. Make sure your router, access point, and/or hub are turned on, and the network cable is securely connected to your device and your product. If you are trying to set up Wi-Fi, remove the network cable and set up Wi-Fi again. Ethernet and Wi-Fi cannot be connected at the same time.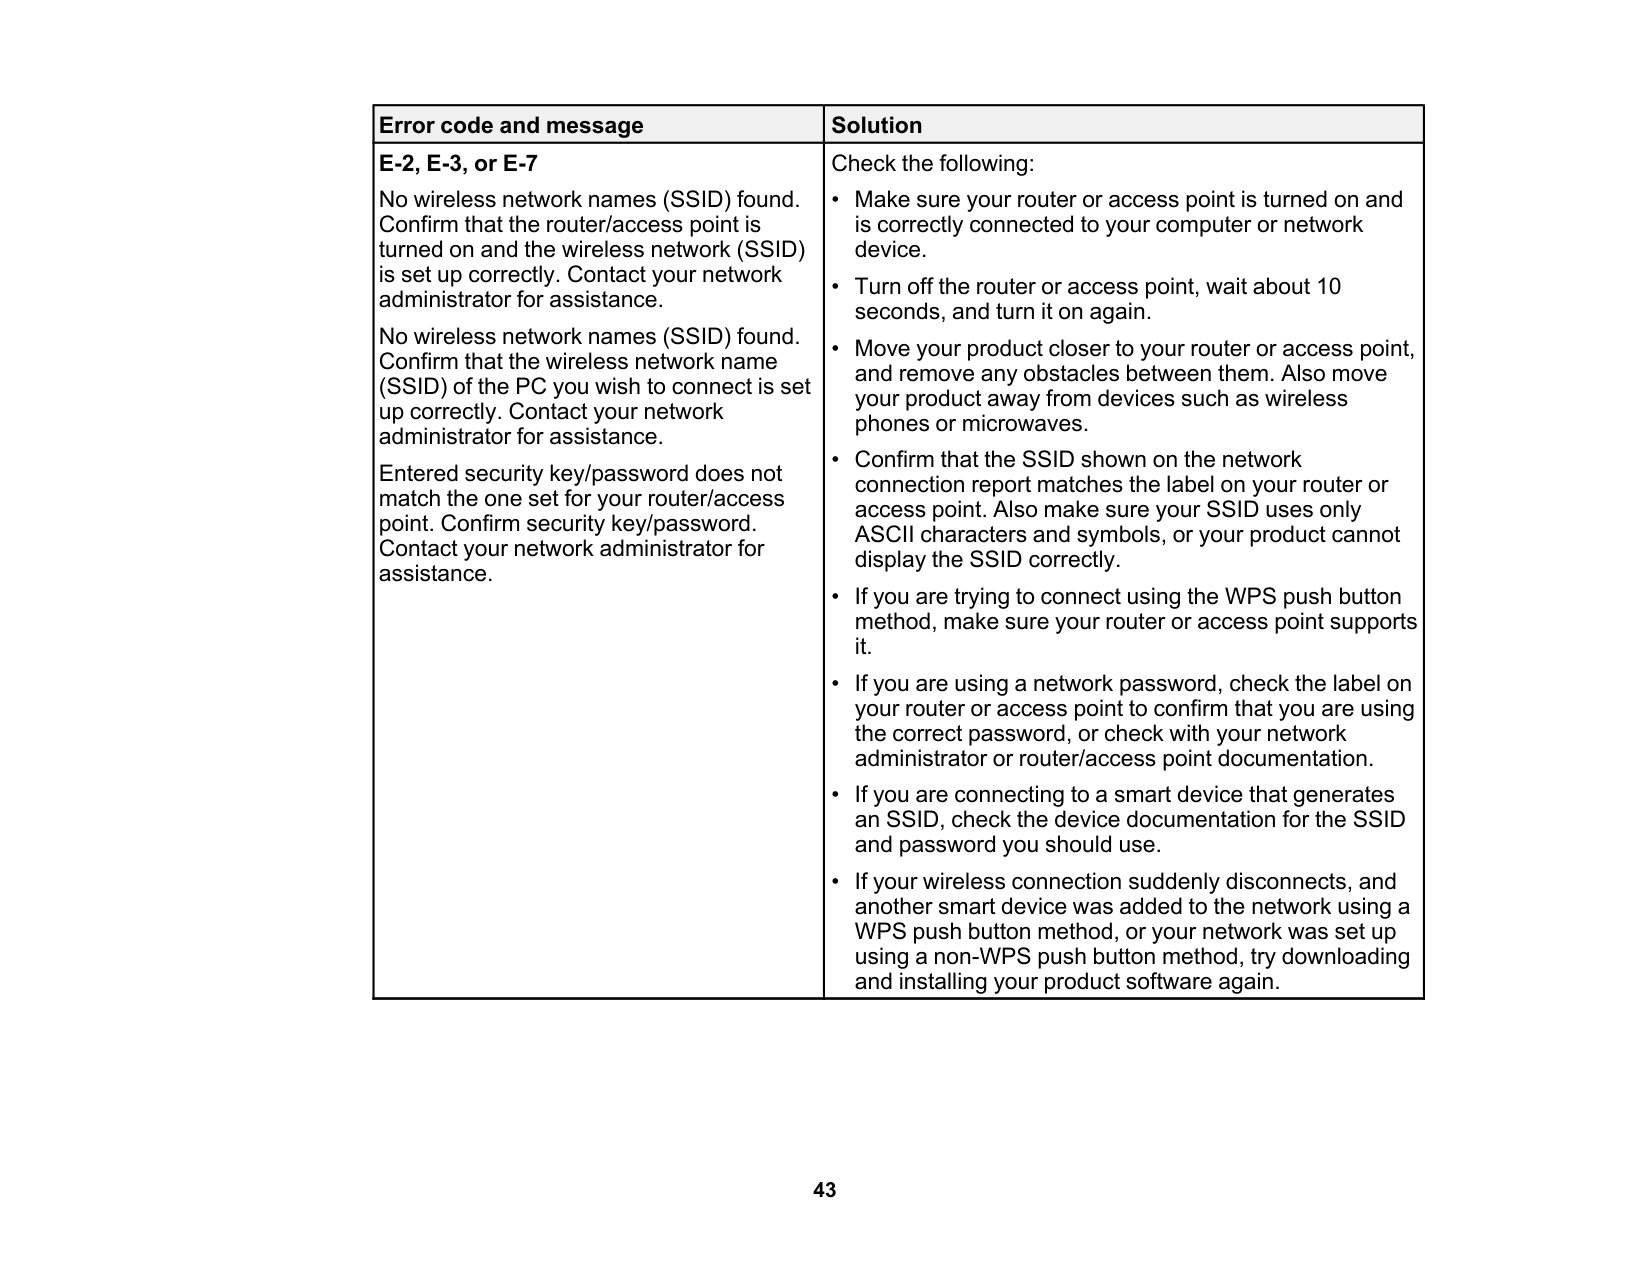
43 Error code and message Solution E-2, E-3, or E-7 No wireless network names (SSID) found. Confirm that the router/access point is turned on and the wireless network (SSID) is set up correctly. Contact your network administrator for assistance. No wireless network names (SSID) found. Confirm that the wireless network name (SSID) of the PC you wish to connect is set up correctly. Contact your network administrator for assistance. Entered security key/password does not match the one set for your router/access point. Confirm security key/password. Contact your network administrator for assistance. Check the following:
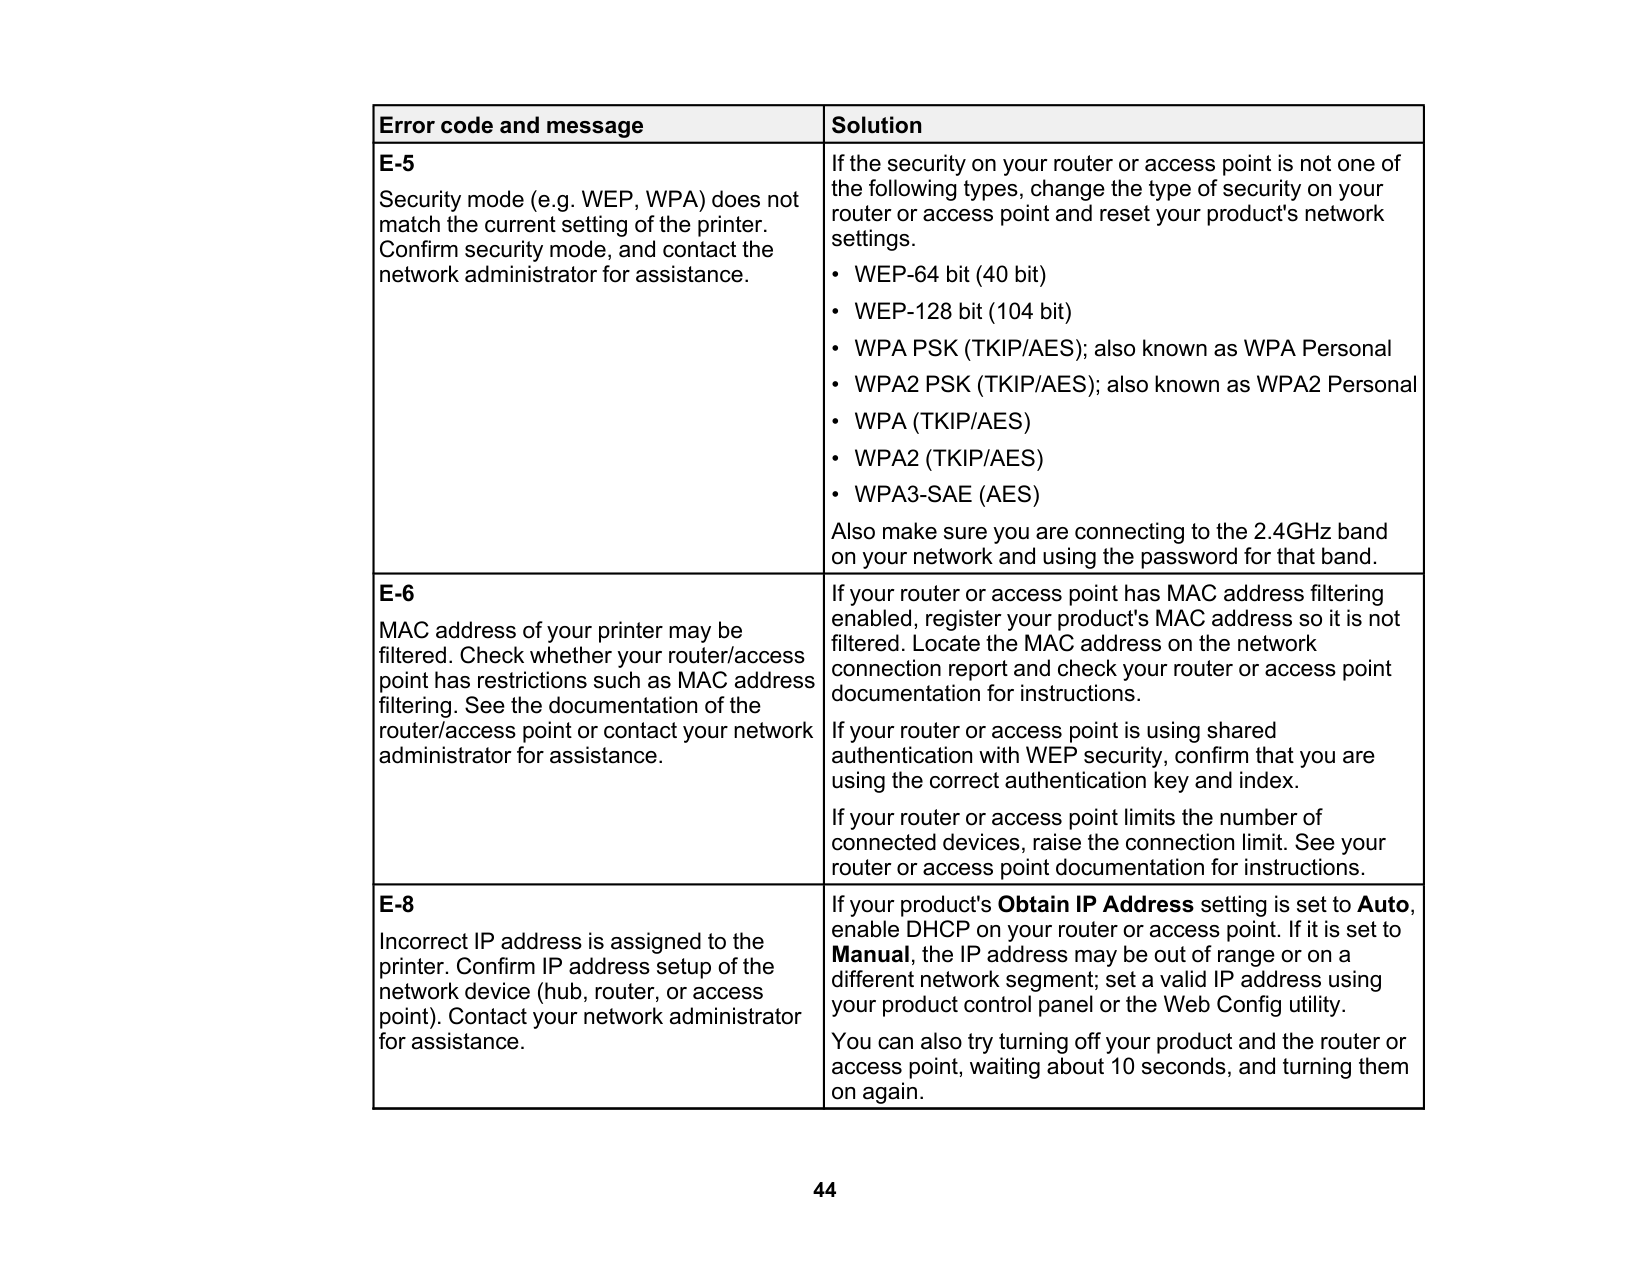
44 Error code and message Solution
E-5
Security mode (e.g. WEP, WPA) does not match the current setting of the printer. Confirm security mode, and contact the network administrator for assistance. If the security on your router or access point is not one of the following types, change the type of security on your router or access point and reset your product's network settings.• Wpa (Tkip/Aes)
• Wpa2 (Tkip/Aes)
• Wpa3-Sae (Aes)
Also make sure you are connecting to the 2.4GHz band on your network and using the password for that band.E-6
MAC address of your printer may be filtered. Check whether your router/access point has restrictions such as MAC address filtering. See the documentation of the router/access point or contact your network administrator for assistance. If your router or access point has MAC address filtering enabled, register your product's MAC address so it is not filtered. Locate the MAC address on the network connection report and check your router or access point documentation for instructions. If your router or access point is using shared authentication with WEP security, confirm that you are using the correct authentication key and index. If your router or access point limits the number of connected devices, raise the connection limit. See your router or access point documentation for instructions.E-8
Incorrect IP address is assigned to the printer. Confirm IP address setup of the network device (hub, router, or access point). Contact your network administrator for assistance. If your product's Obtain IP Address setting is set to Auto, enable DHCP on your router or access point. If it is set to Manual, the IP address may be out of range or on a different network segment; set a valid IP address using your product control panel or the Web Config utility. You can also try turning off your product and the router or access point, waiting about 10 seconds, and turning them on again.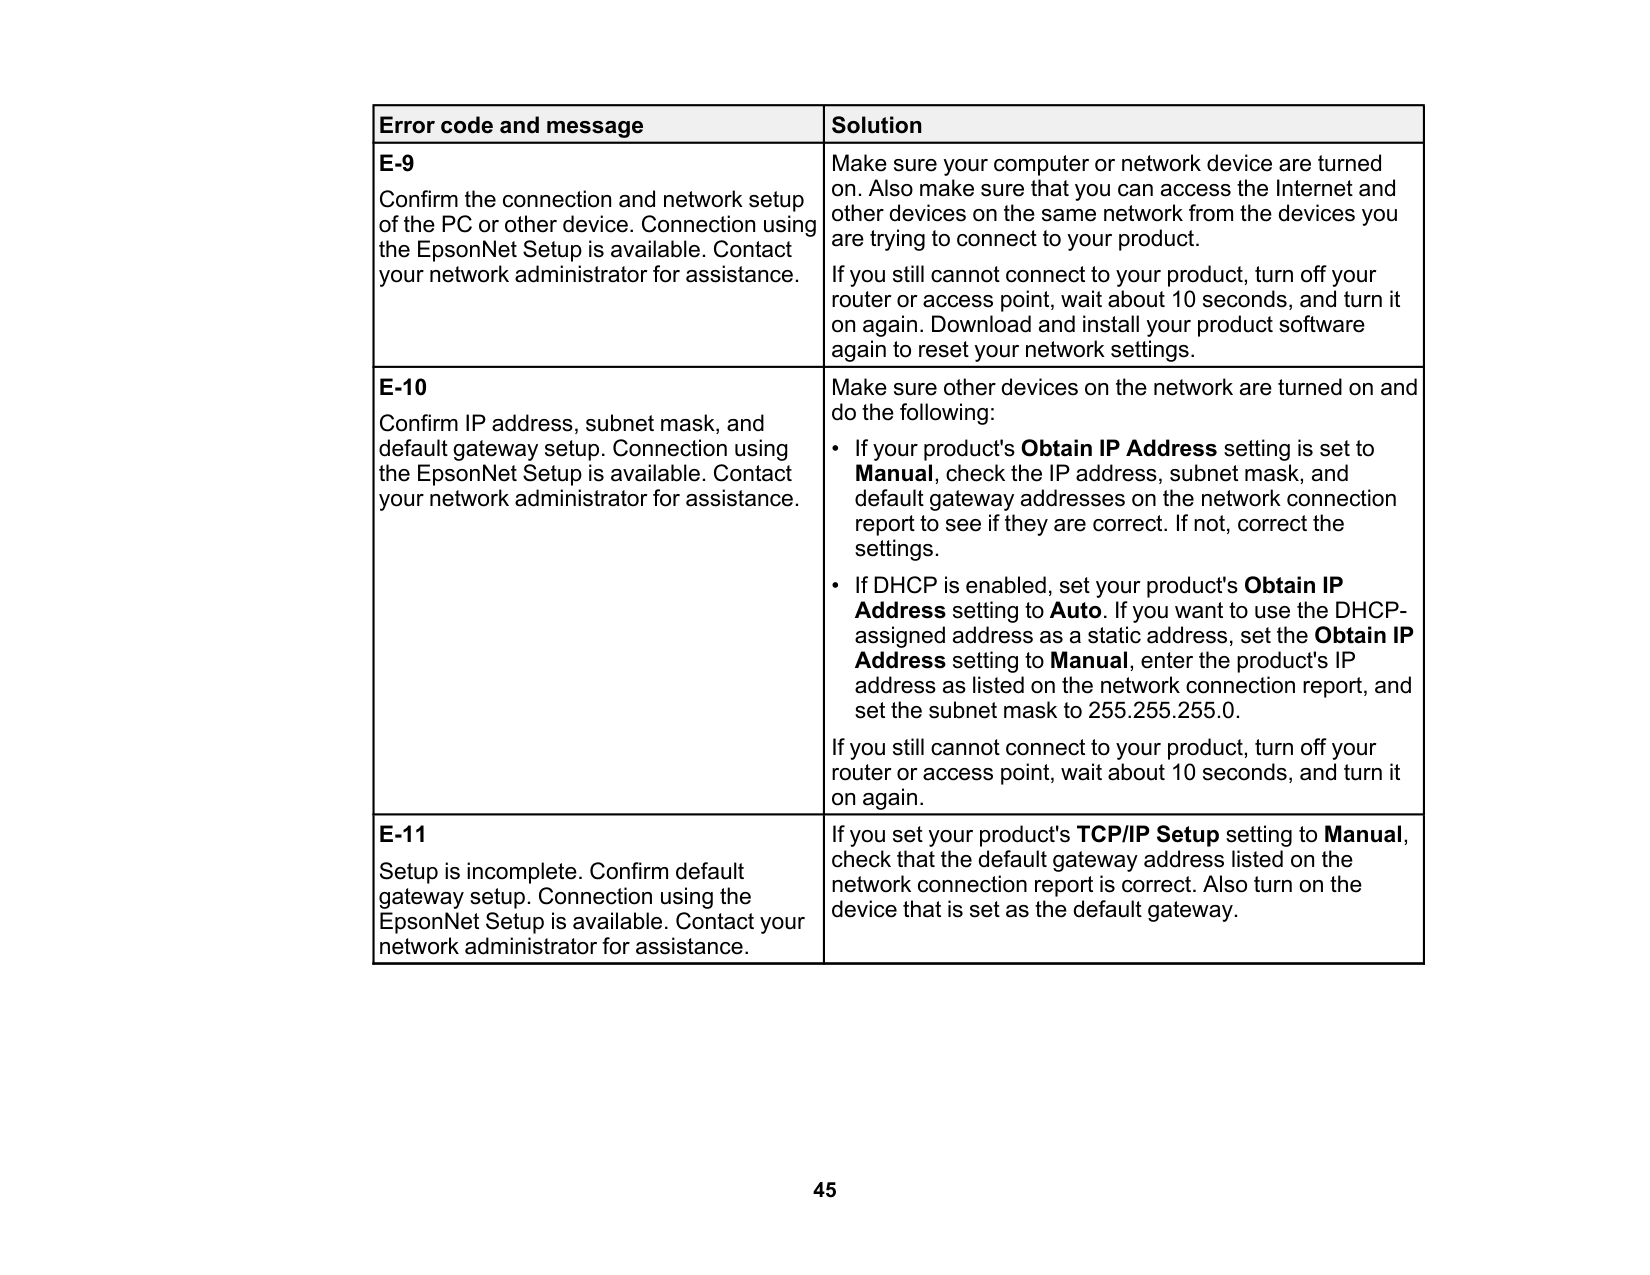
45 Error code and message Solution
E-9
Confirm the connection and network setup of the PC or other device. Connection using the EpsonNet Setup is available. Contact your network administrator for assistance. Make sure your computer or network device are turned on. Also make sure that you can access the Internet and other devices on the same network from the devices you are trying to connect to your product. If you still cannot connect to your product, turn off your router or access point, wait about 10 seconds, and turn it on again. Download and install your product software again to reset your network settings.E-10
Confirm IP address, subnet mask, and default gateway setup. Connection using the EpsonNet Setup is available. Contact your network administrator for assistance. Make sure other devices on the network are turned on and do the following:E-11
Setup is incomplete. Confirm default gateway setup. Connection using the EpsonNet Setup is available. Contact your network administrator for assistance. If you set your product's TCP/IP Setup setting to Manual, check that the default gateway address listed on the network connection report is correct. Also turn on the device that is set as the default gateway.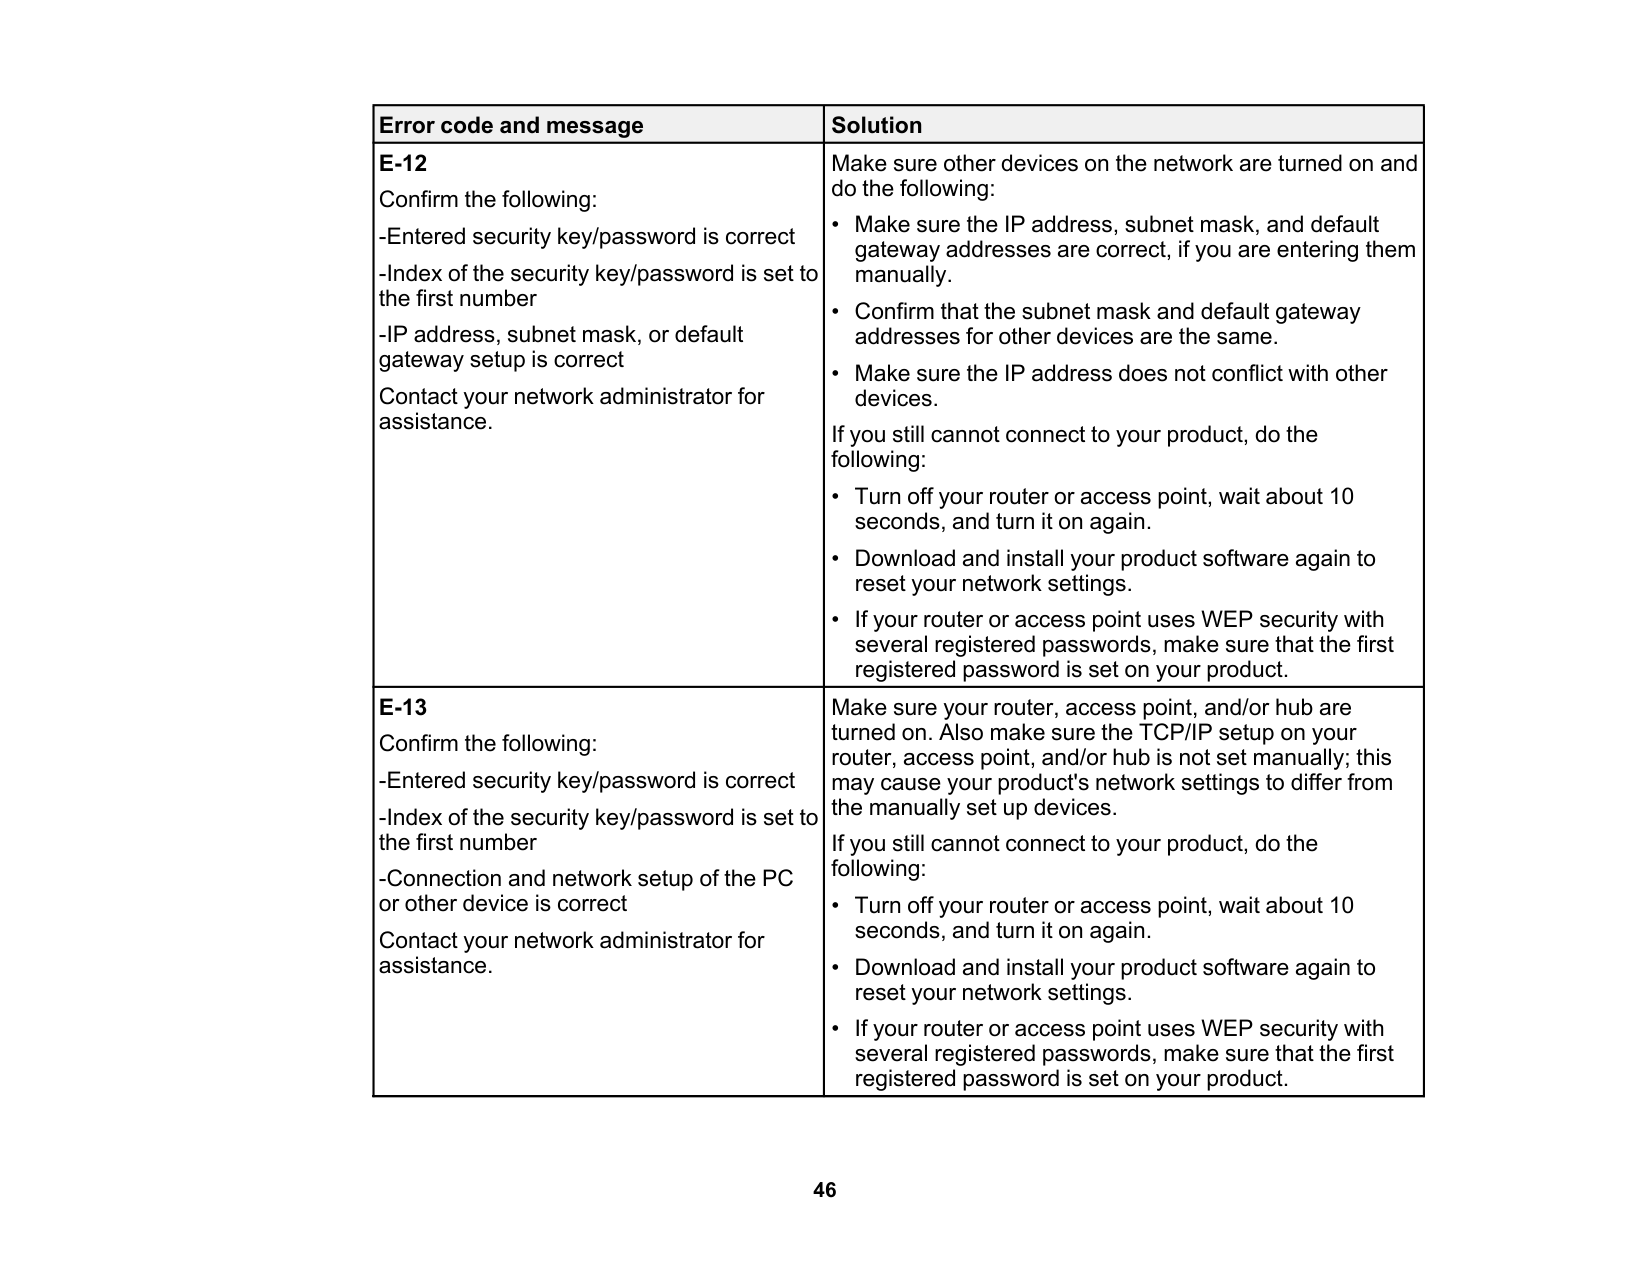
46 Error code and message Solution
E-12
Confirm the following: -Entered security key/password is correct -Index of the security key/password is set to the first number -IP address, subnet mask, or default gateway setup is correct Contact your network administrator for assistance. Make sure other devices on the network are turned on and do the following:E-13
Confirm the following: -Entered security key/password is correct -Index of the security key/password is set to the first number -Connection and network setup of the PC or other device is correct Contact your network administrator for assistance. Make sure your router, access point, and/or hub are turned on. Also make sure the TCP/IP setup on your router, access point, and/or hub is not set manually; this may cause your product's network settings to differ from the manually set up devices. If you still cannot connect to your product, do the following: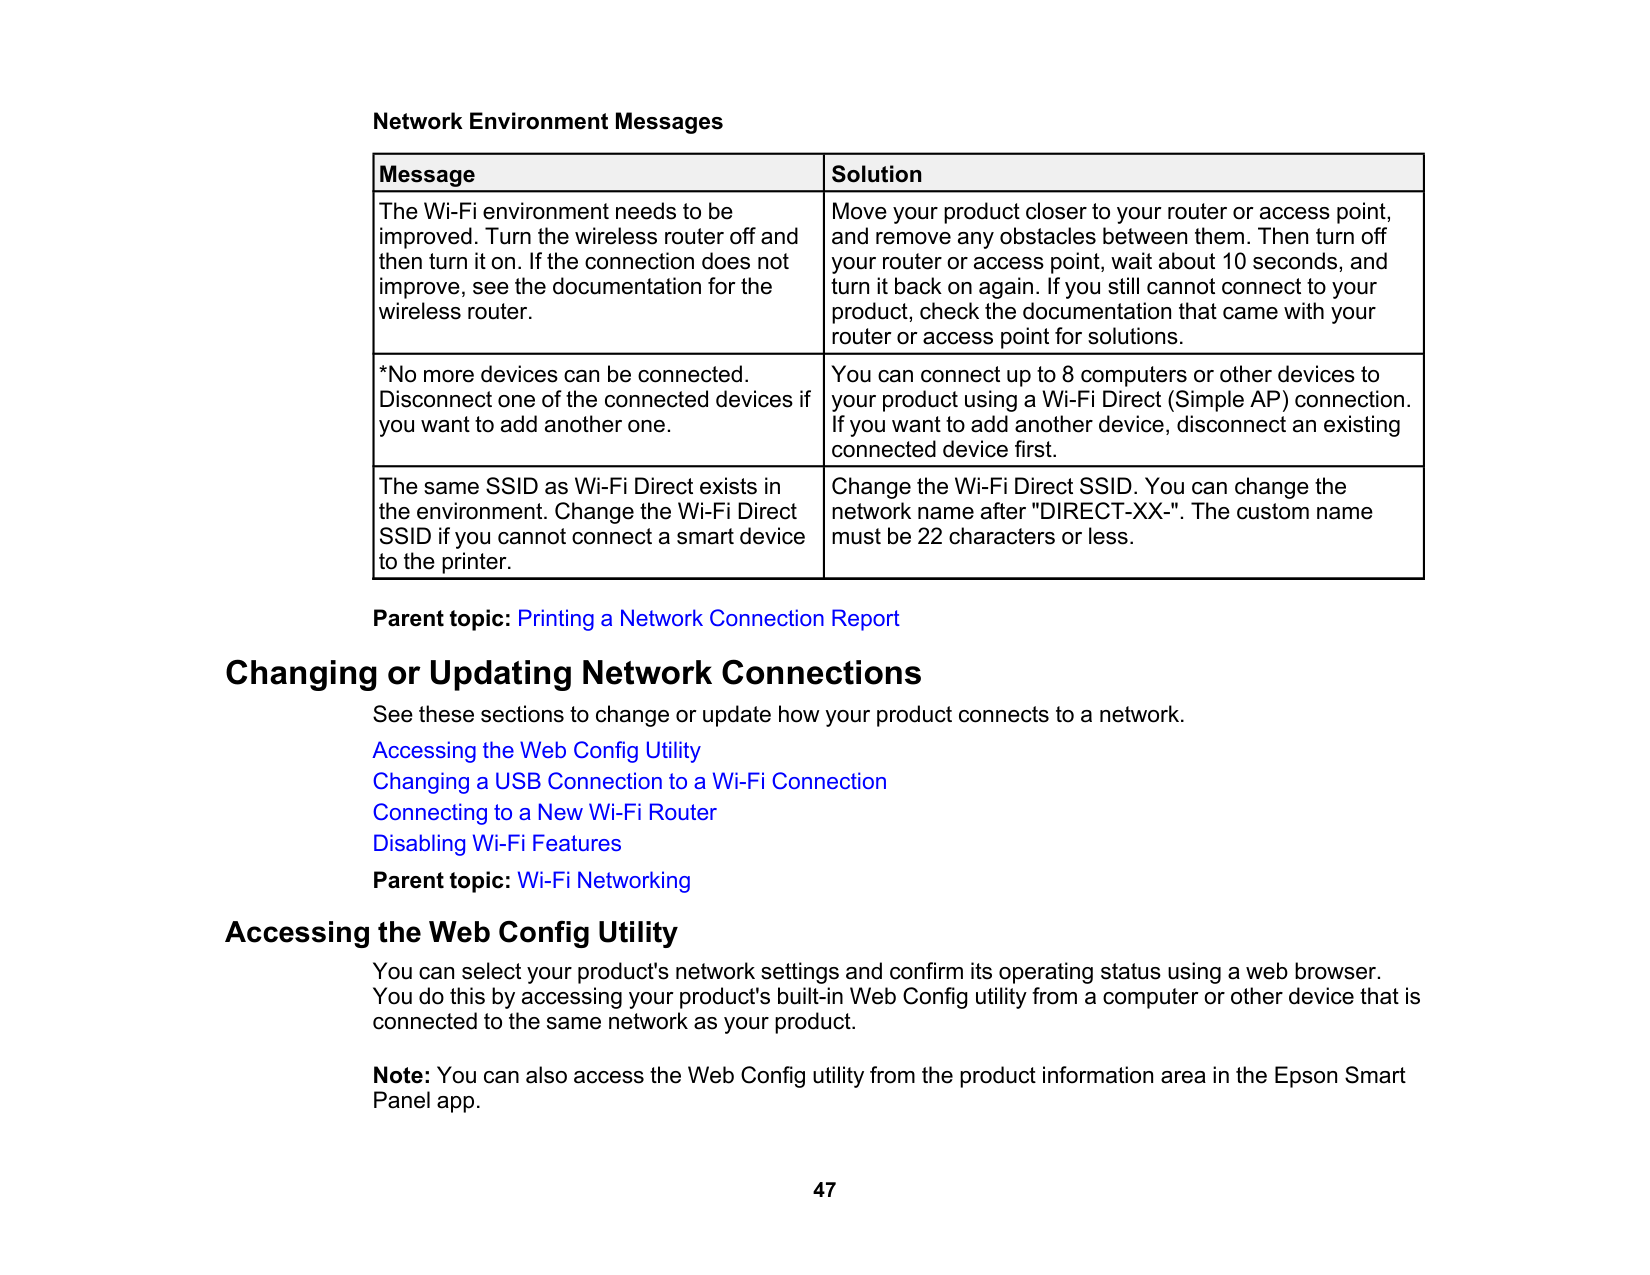
47 Network Environment Messages Message Solution The Wi-Fi environment needs to be improved. Turn the wireless router off and then turn it on. If the connection does not improve, see the documentation for the wireless router. Move your product closer to your router or access point, and remove any obstacles between them. Then turn off your router or access point, wait about 10 seconds, and turn it back on again. If you still cannot connect to your product, check the documentation that came with your router or access point for solutions. *No more devices can be connected. Disconnect one of the connected devices if you want to add another one. You can connect up to 8 computers or other devices to your product using a Wi-Fi Direct (Simple AP) connection. If you want to add another device, disconnect an existing connected device first. The same SSID as Wi-Fi Direct exists in the environment. Change the Wi-Fi Direct SSID if you cannot connect a smart device to the printer. Change the Wi-Fi Direct SSID. You can change the network name after "DIRECT-XX-". The custom name must be 22 characters or less. Parent topic: Printing a Network Connection Report Changing or Updating Network Connections See these sections to change or update how your product connects to a network. Accessing the Web Config Utility Changing a USB Connection to a Wi-Fi Connection Connecting to a New Wi-Fi Router Disabling Wi-Fi Features Parent topic: Wi-Fi Networking Accessing the Web Config Utility You can select your product's network settings and confirm its operating status using a web browser. You do this by accessing your product's built-in Web Config utility from a computer or other device that is connected to the same network as your product. Note: You can also access the Web Config utility from the product information area in the Epson Smart Panel app.

48

49
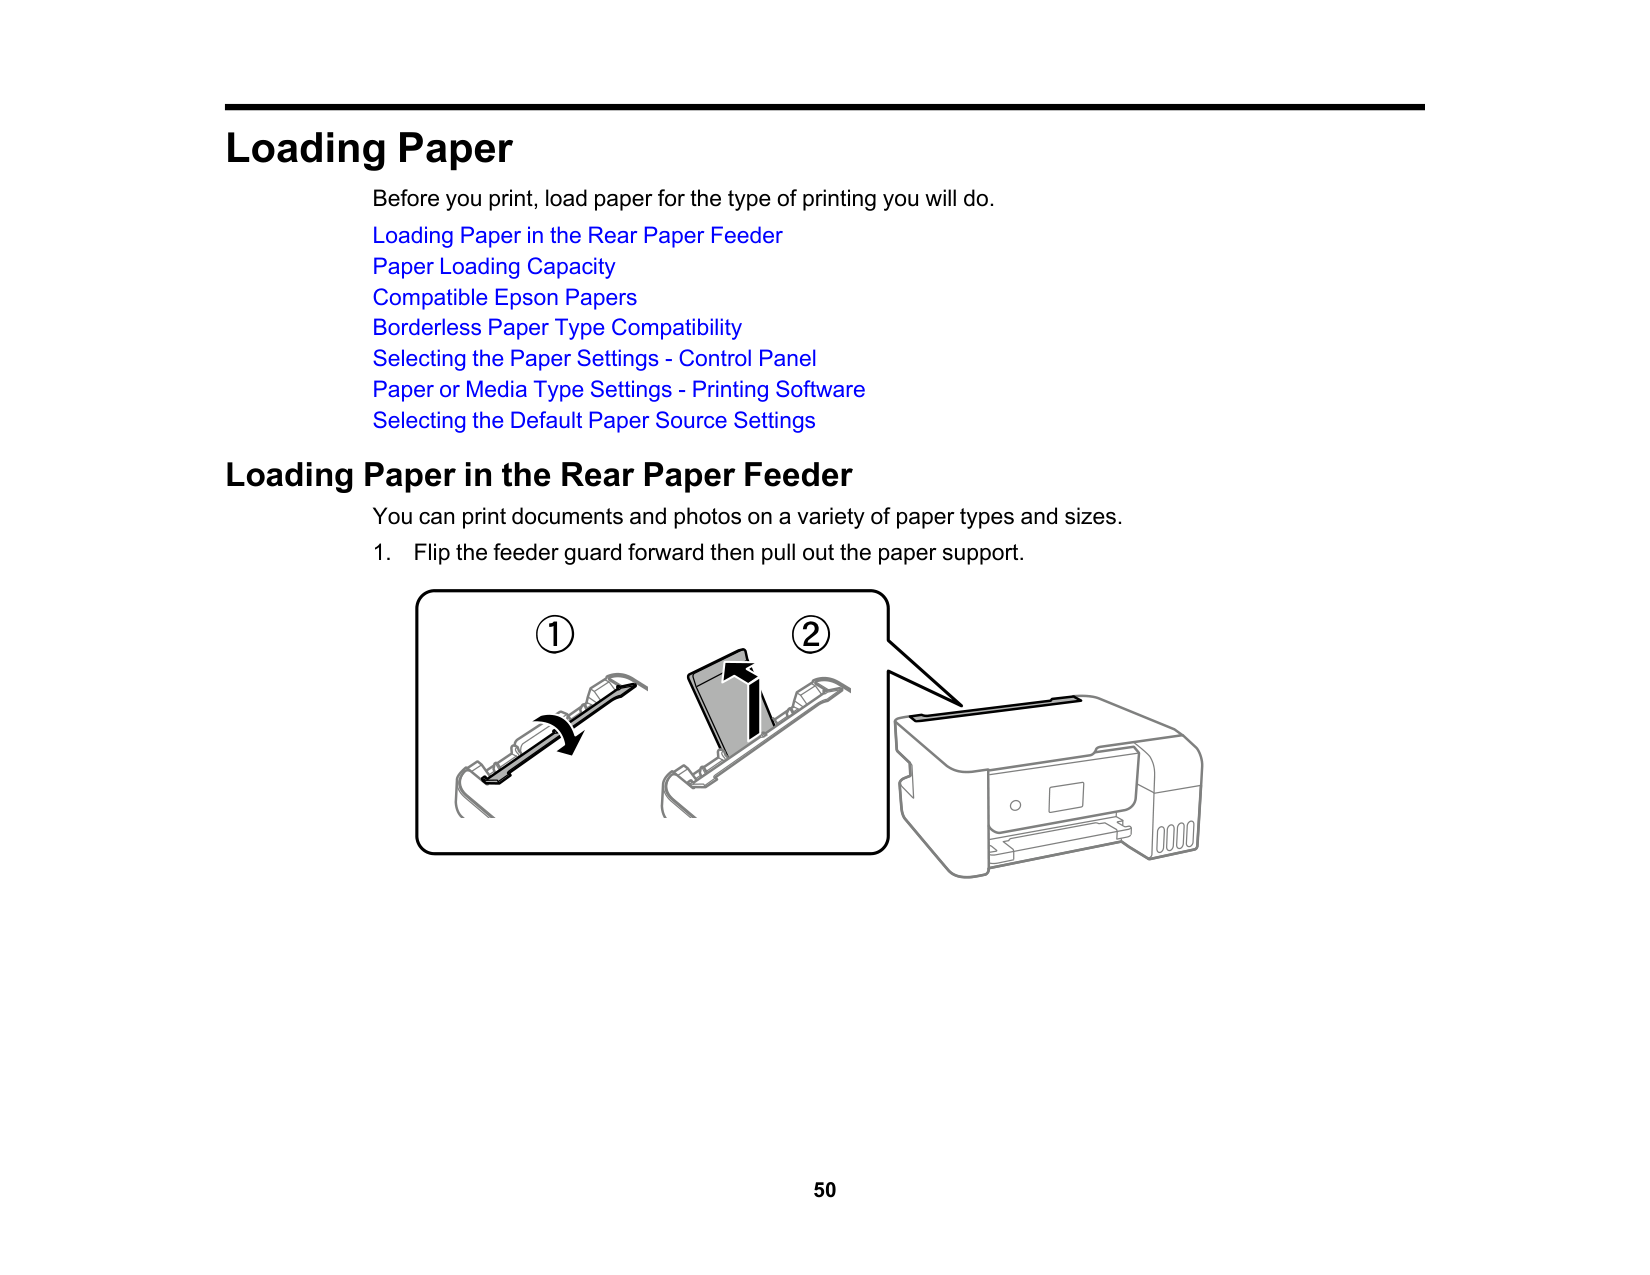
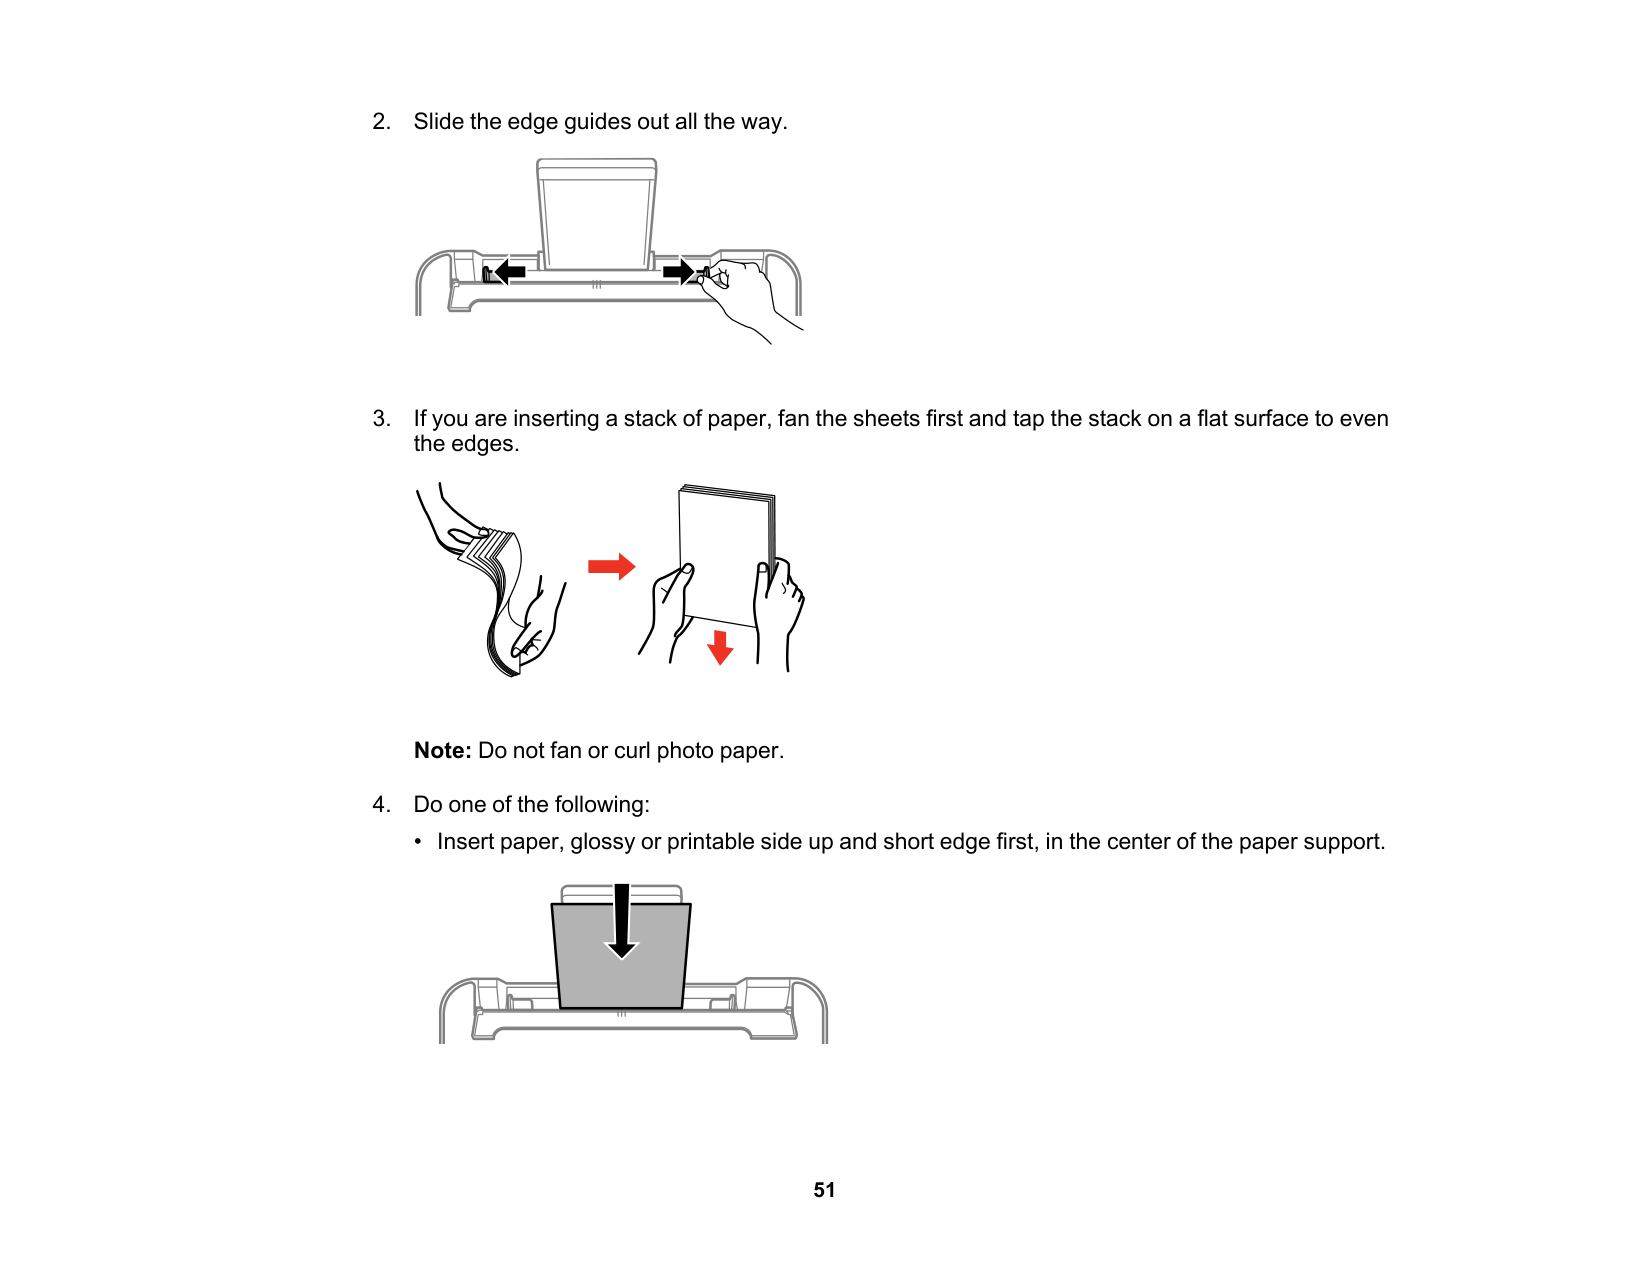
50 Loading Paper Before you print, load paper for the type of printing you will do. Loading Paper in the Rear Paper Feeder Paper Loading Capacity Compatible Epson Papers Borderless Paper Type Compatibility Selecting the Paper Settings - Control Panel Paper or Media Type Settings - Printing Software Selecting the Default Paper Source Settings Loading Paper in the Rear Paper Feeder You can print documents and photos on a variety of paper types and sizes.
51
52
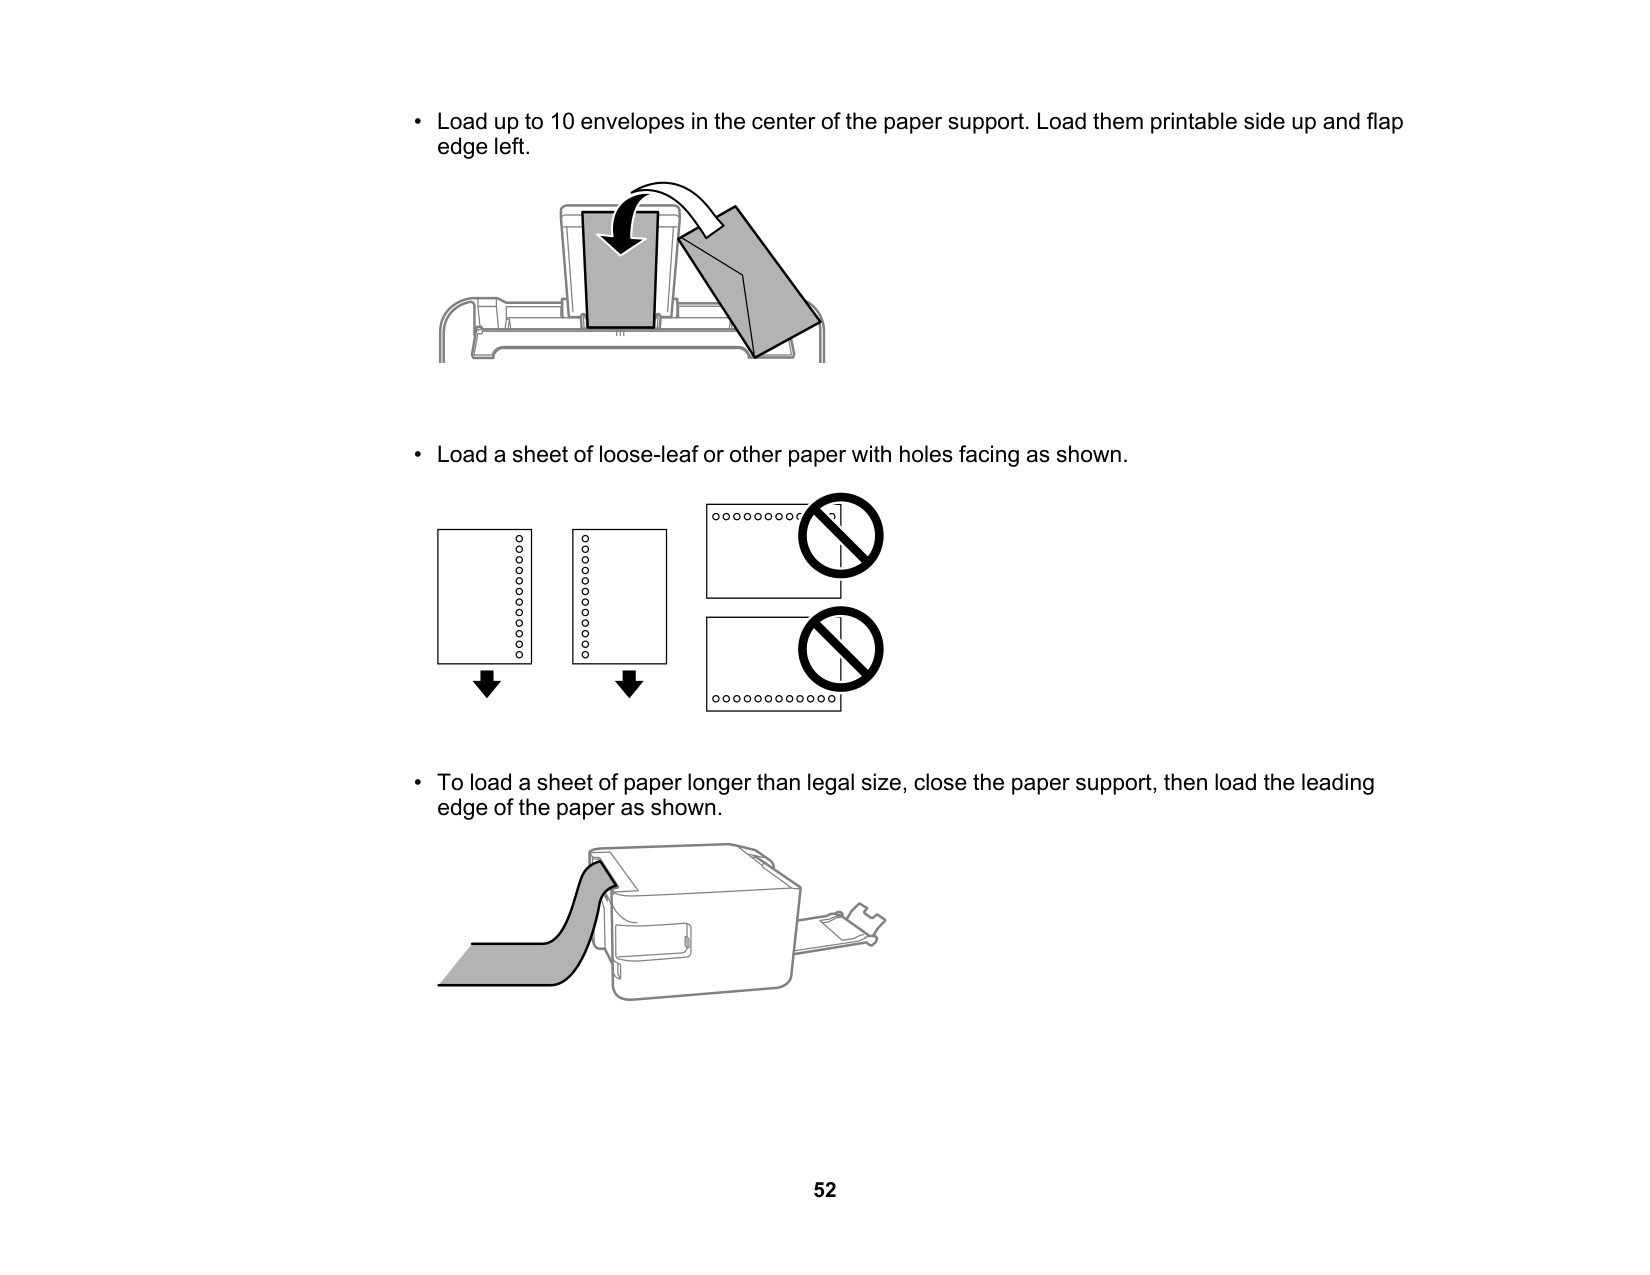
53
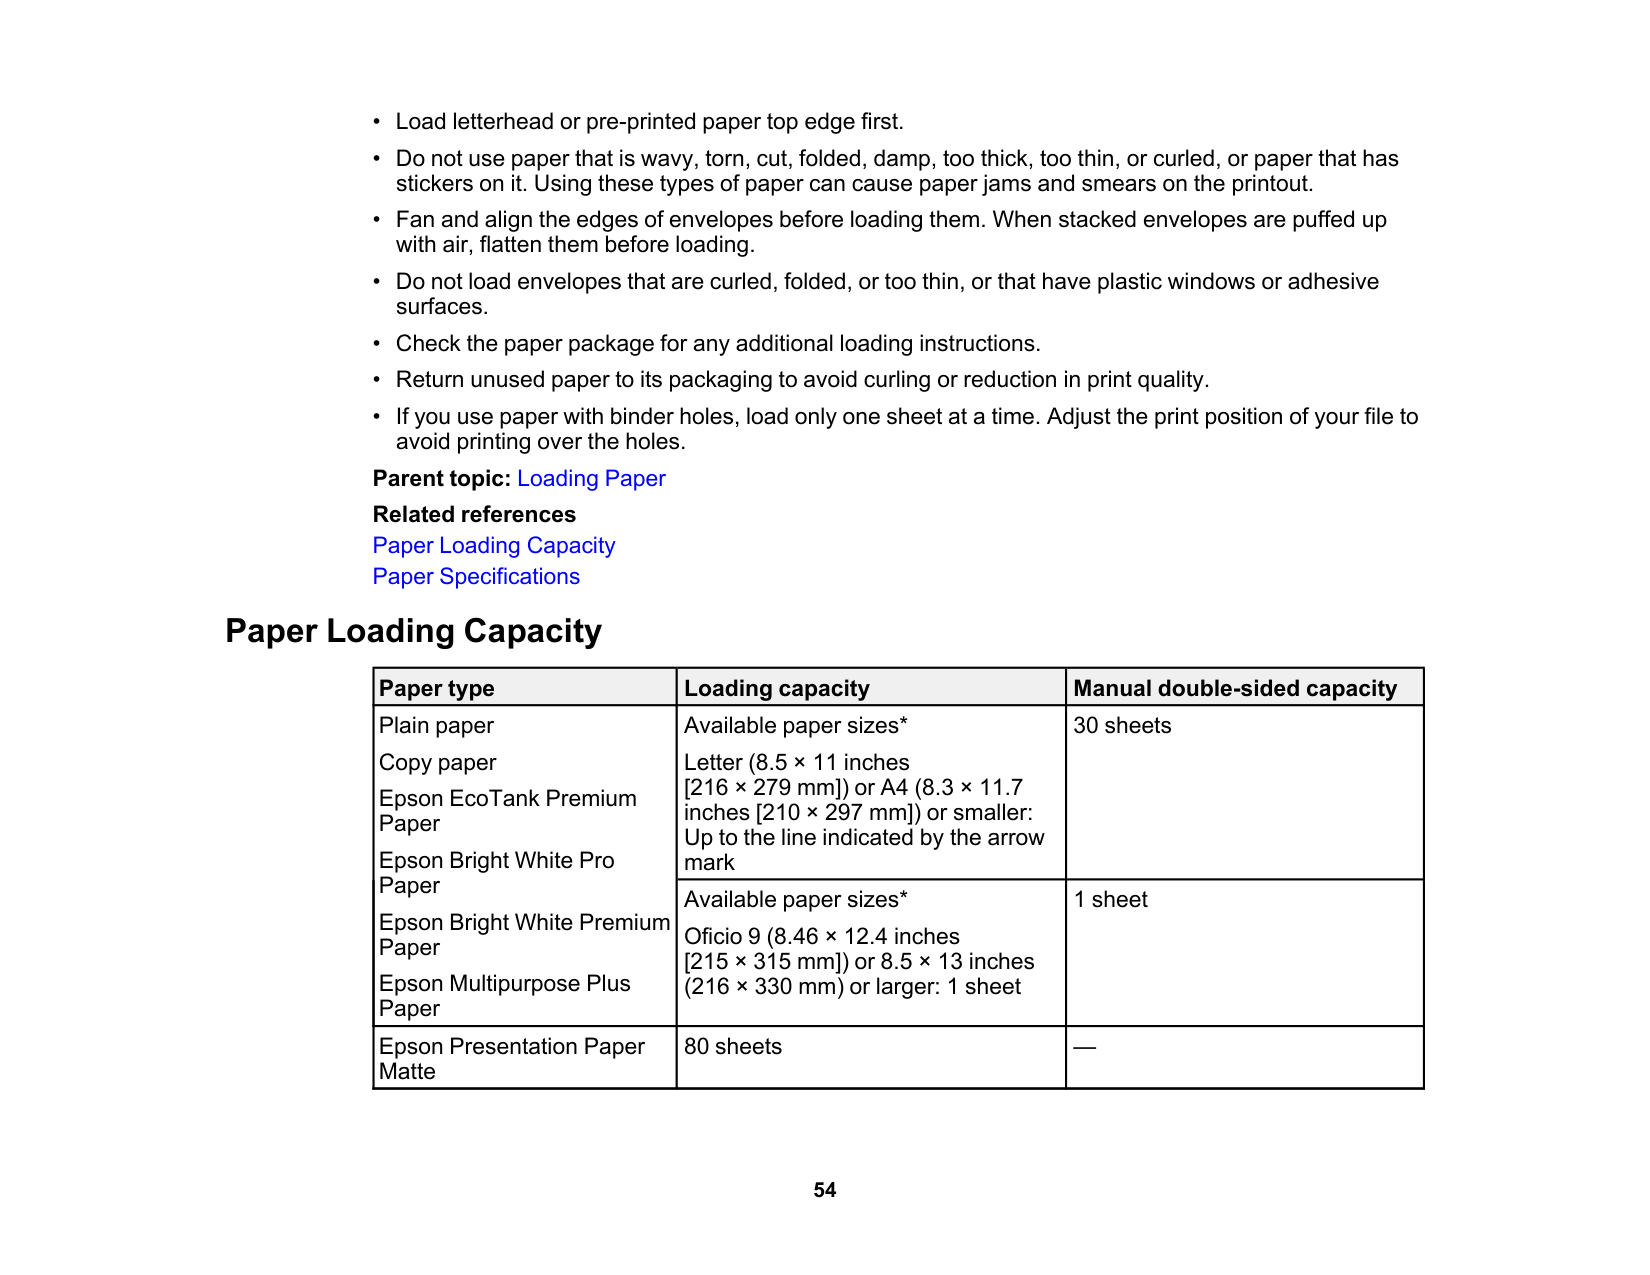
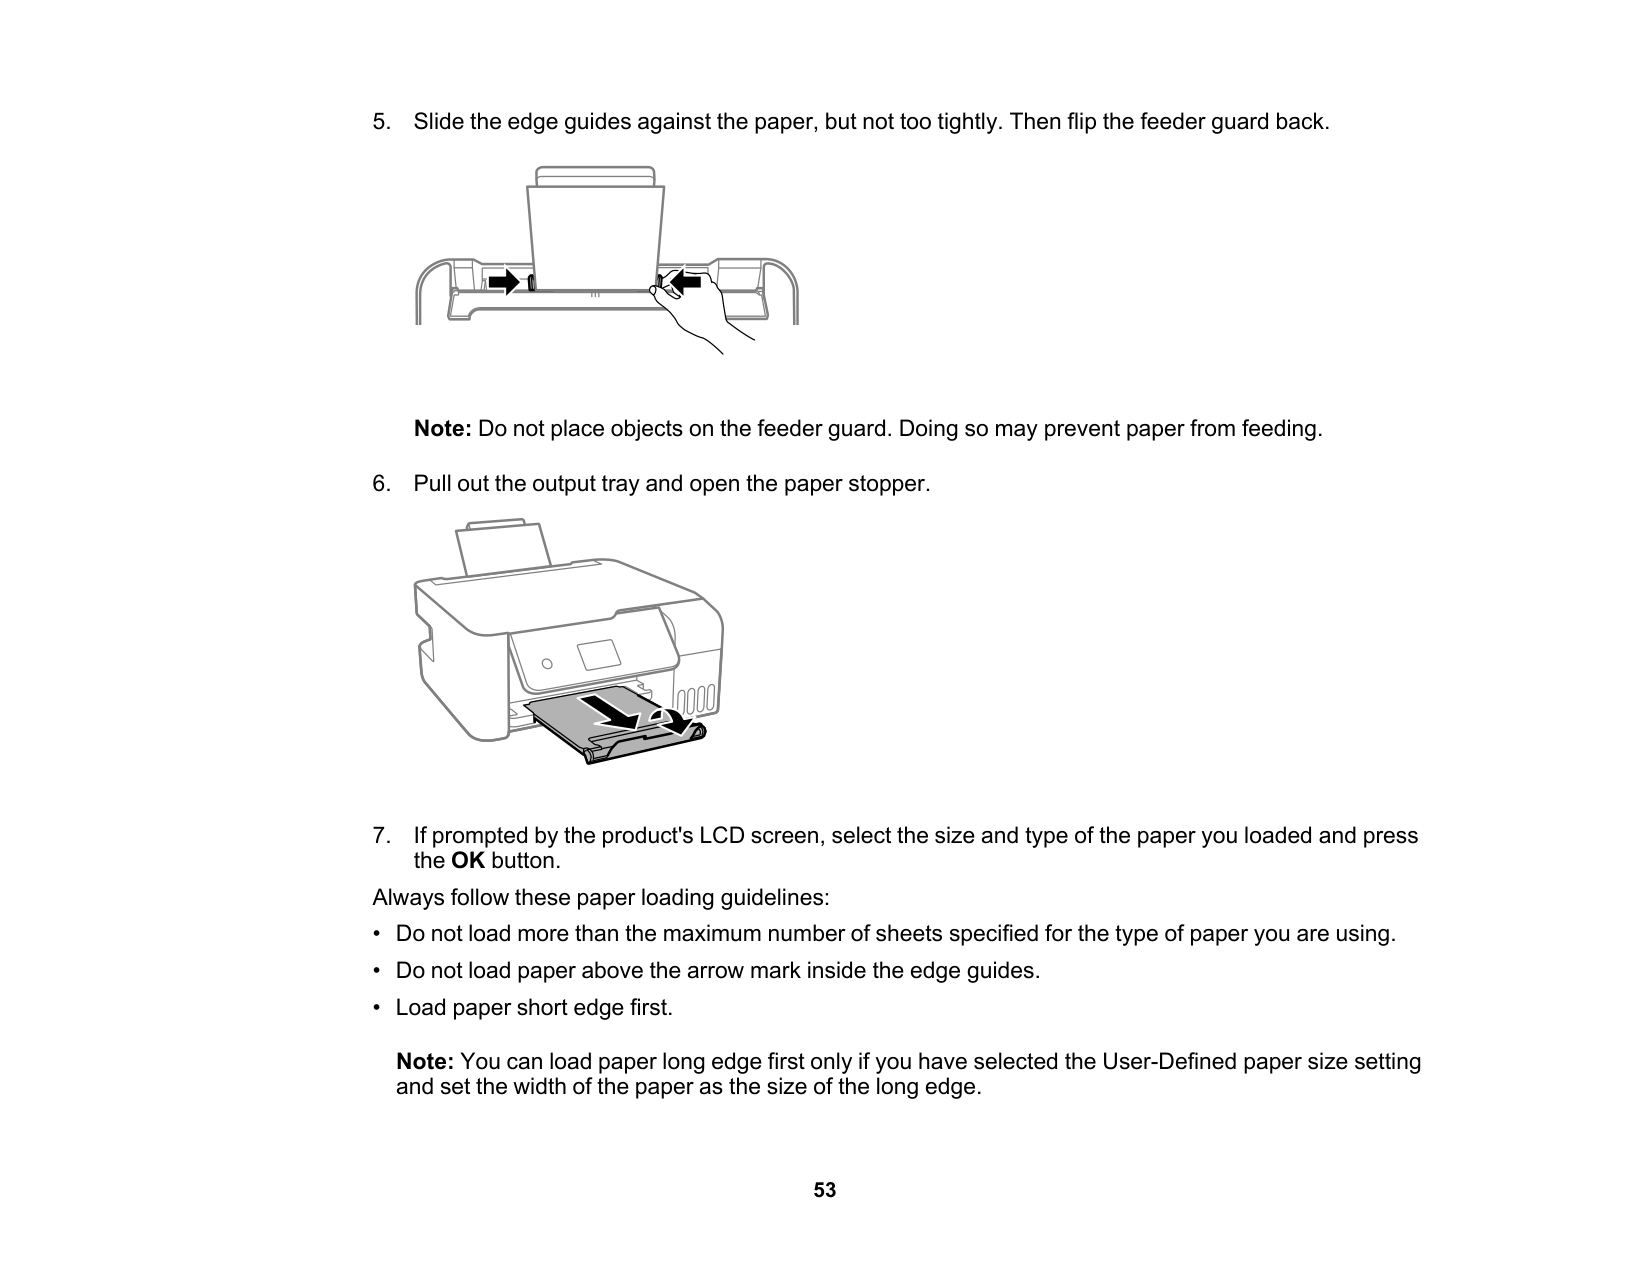
54

55 Paper type Loading capacity Manual double-sided capacity Epson Premium Presentation Paper Matte Epson Photo Paper Glossy Epson Premium Photo Paper Glossy Epson Ultra Premium Photo Paper Glossy Epson Premium Photo Paper Semi-gloss 20 sheets If paper feeds incorrectly, or printing is uneven or smeared, load 1 sheet at a time. — Epson Premium Presentation Paper Matte Double-sided 1 sheet 1 sheet Envelopes 10 envelopes —
S041586-Et
500 Epson Bright White Pro Paper Letter (8.5 × 11 inches [216 × 279 mm])S041586
500 Epson Bright White Premium Paper Letter (8.5 × 11 inches [216 × 279 mm])S450218-4
500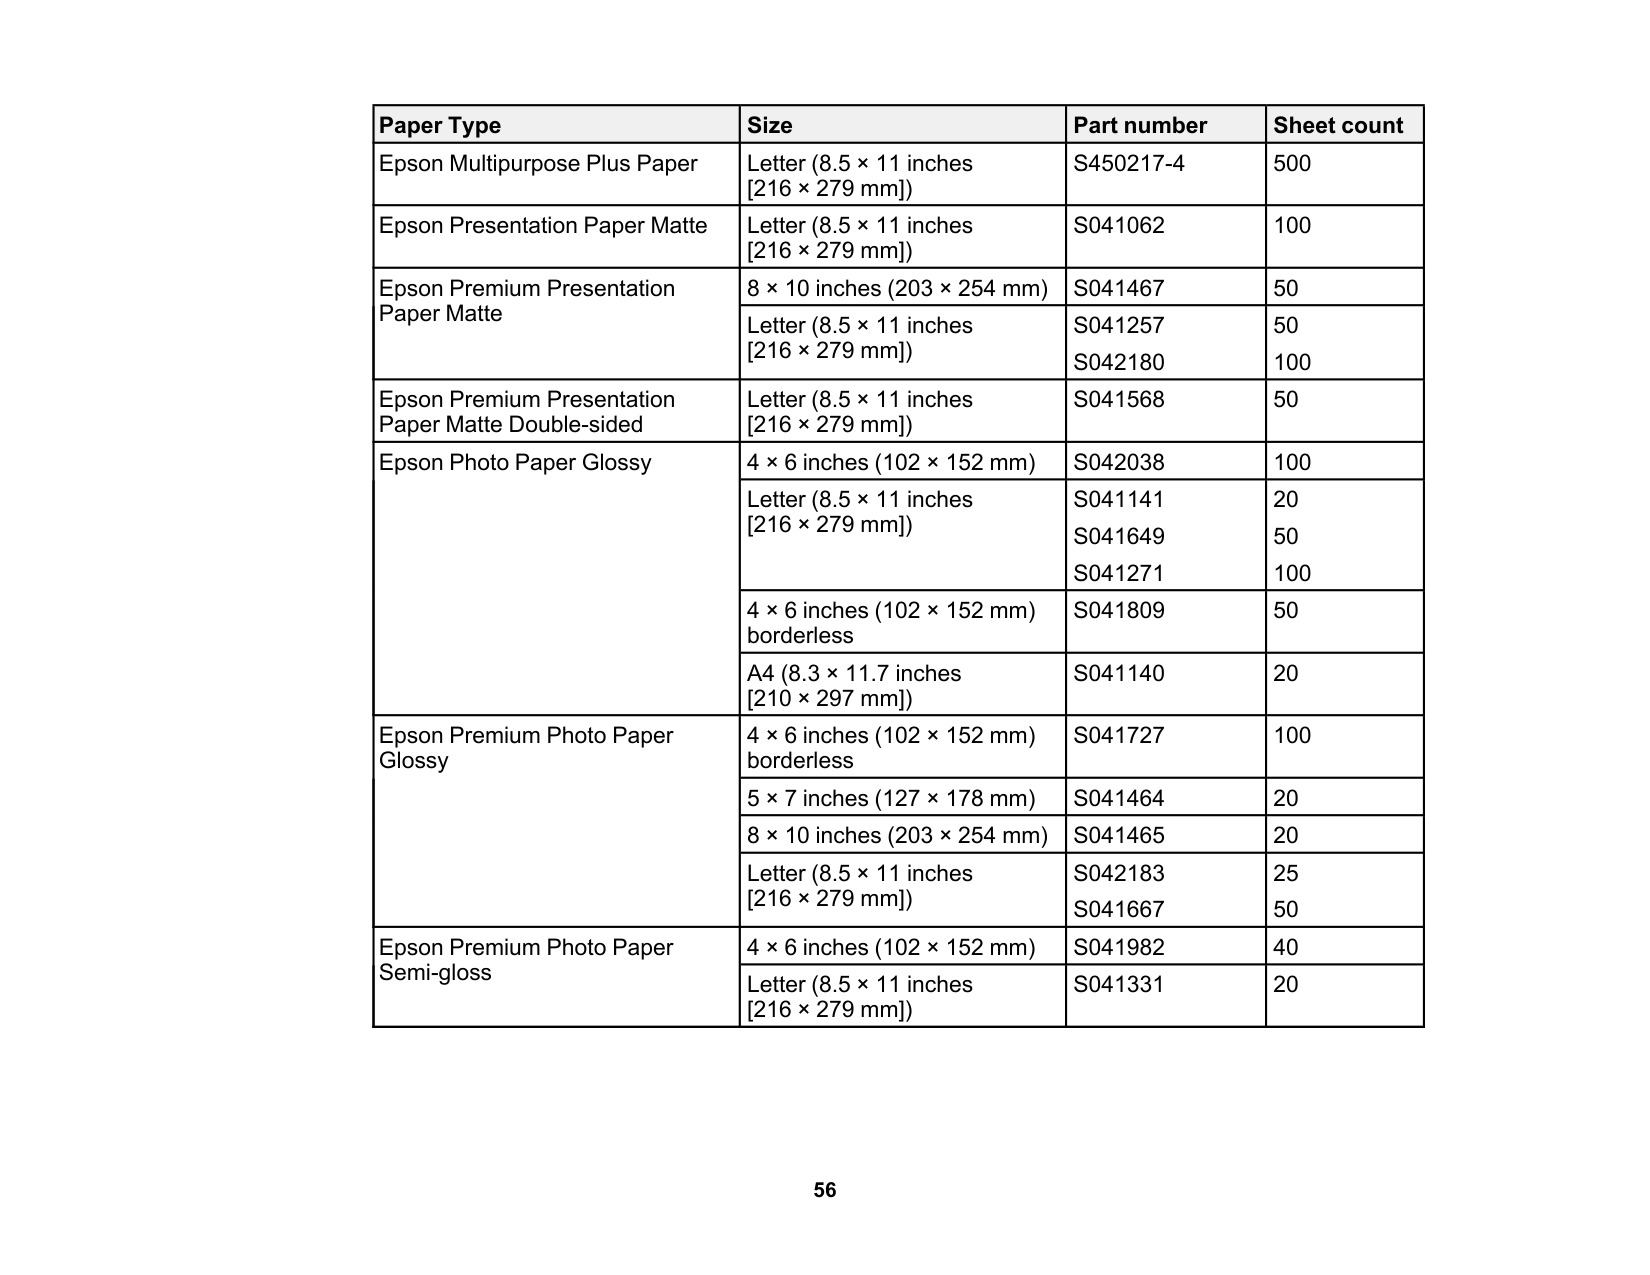
56 Paper Type Size Part number Sheet count Epson Multipurpose Plus Paper Letter (8.5 × 11 inches [216 × 279 mm])
S450217-4
500 Epson Presentation Paper Matte Letter (8.5 × 11 inches [216 × 279 mm])S041062
100 Epson Premium Presentation Paper Matte 8 × 10 inches (203 × 254 mm)S041467
50 Letter (8.5 × 11 inches [216 × 279 mm])S041257
S042180
50 100 Epson Premium Presentation Paper Matte Double-sided Letter (8.5 × 11 inches [216 × 279 mm])S041568
50 Epson Photo Paper Glossy 4 × 6 inches (102 × 152 mm)S042038
100 Letter (8.5 × 11 inches [216 × 279 mm])S041141
S041649
S041271
20 50 100 4 × 6 inches (102 × 152 mm) borderlessS041809
50 A4 (8.3 × 11.7 inches [210 × 297 mm])S041140
20 Epson Premium Photo Paper Glossy 4 × 6 inches (102 × 152 mm) borderlessS041727
100 5 × 7 inches (127 × 178 mm)S041464
20 8 × 10 inches (203 × 254 mm)S041465
20 Letter (8.5 × 11 inches [216 × 279 mm])S042183
S041667
25 50 Epson Premium Photo Paper Semi-gloss 4 × 6 inches (102 × 152 mm)S041982
40 Letter (8.5 × 11 inches [216 × 279 mm])S041331
20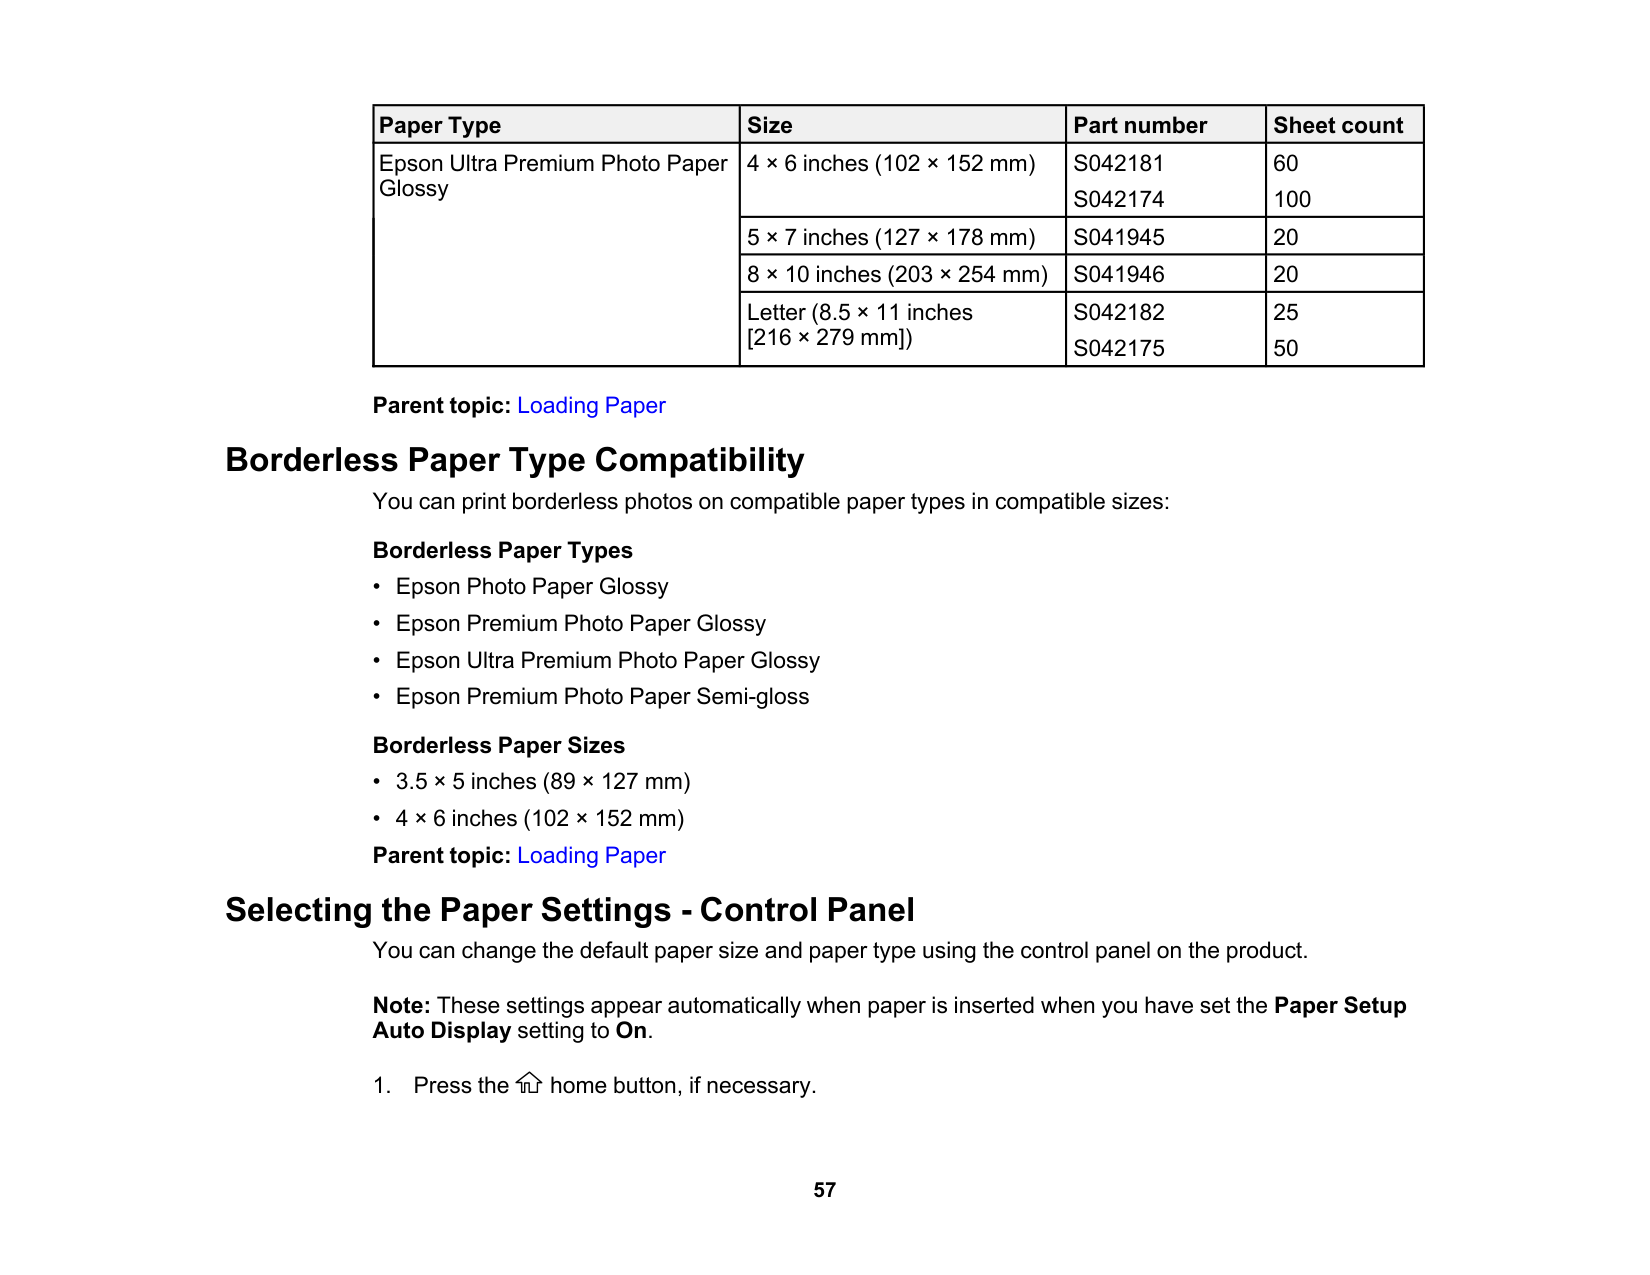
57 Paper Type Size Part number Sheet count Epson Ultra Premium Photo Paper Glossy 4 × 6 inches (102 × 152 mm)
S042181
S042174
60 100 5 × 7 inches (127 × 178 mm)S041945
20 8 × 10 inches (203 × 254 mm)S041946
20 Letter (8.5 × 11 inches [216 × 279 mm])S042182
S042175
25 50 Parent topic: Loading Paper Borderless Paper Type Compatibility You can print borderless photos on compatible paper types in compatible sizes: Borderless Paper Types
58

59 For this paper Select this Paper Type setting Epson Ultra Premium Photo Paper Glossy Ultra Glossy Epson Photo Paper Glossy Glossy Epson Premium Photo Paper Semi-gloss Prem. Semi-Gloss Epson Presentation Paper Matte Presentation Matte Epson Premium Presentation Paper Matte Epson Premium Presentation Paper Matte Double- sided Epson Ultra Premium Presentation Paper Matte Prem. Matte Envelope Envelope Parent topic: Selecting the Paper Settings - Control Panel Paper or Media Type Settings - Printing Software For this paper Select this paper Type or Media Type setting Plain paper Epson Multipurpose Plus Paper Plain paper Envelopes Envelope Epson Ultra Premium Photo Paper Glossy Ultra Premium Photo Paper Glossy Epson Premium Photo Paper Glossy Premium Photo Paper Glossy Epson Photo Paper Glossy Photo Paper Glossy Epson Premium Photo Paper Semi-gloss Premium Photo Paper Semi-Gloss Epson Presentation Paper Matte Presentation Paper Matte Epson Premium Presentation Paper Matte Epson Premium Presentation Paper Matte Double- sided Premium Presentation Paper Matte Note: The settings listed here are available only when printing from your computer; they do not apply to your product's control panel settings.

60 Parent topic: Loading Paper Selecting the Default Paper Source Settings You can change default paper source settings using the control panel on the product.

61 Paper Source Settings option Available settings Description A4/Letter Auto Switching On Select On to switch the selected paper size to match the loaded paper (Letter or A4) if the wrong size is selected Off Error Notice Paper Size Notice Select On for either of these settings to display an error message when the selected paper type or size does not match the loaded paper Paper Type Notice Paper Setup Auto Display On Select On to automatically display a menu that lets you select the paper size and type when you load paper in the product. Note: If this setting is disabled, you cannot print using AirPrint. Off Parent topic: Selecting the Default Paper Source Settings

62 Placing Originals on the Product Follow the instructions here to place your original documents or photos on the product. Caution: Do not place anything on top of your product or use its cover as a writing surface to avoid damaging it. Placing Originals on the Scanner Glass Placing Originals on the Scanner Glass You can place originals up to this size on the scanner glass: Letter (8.5 × 11 inches [216 × 279 mm]) or A4 (8.3 × 11.7 inches [210 × 297 mm]). Note: To view animated instructions on how to place originals on the scanner glass, press the help button and select How To > Place Originals.

63

64

65 Copying See the information here to copy documents or photos using your product. Note: Copies may not be exactly the same size as your originals. Copying Documents or Photos Copying Options Copying Documents or Photos You can copy color or black-and-white documents or photos onto various sizes and types of paper, including Epson special papers.

66

67
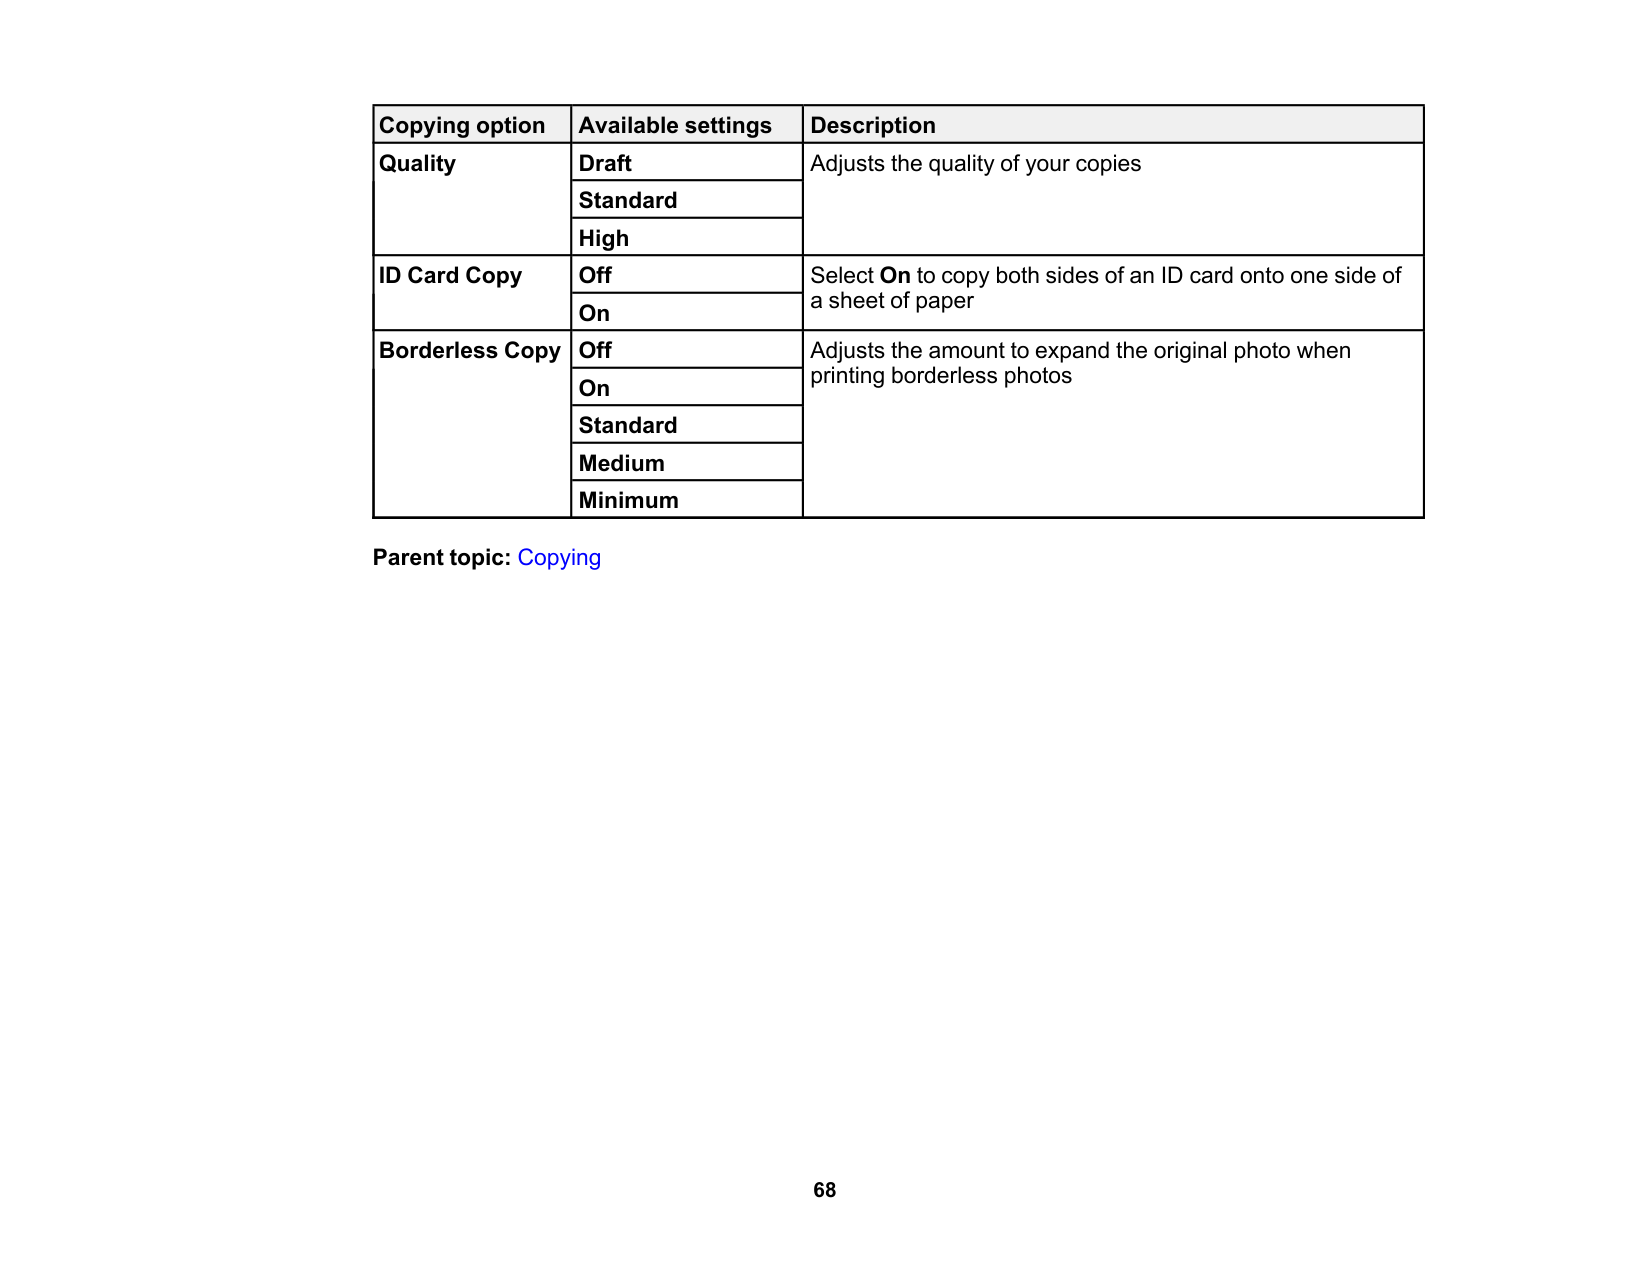
68 Copying option Available settings Description Quality Draft Adjusts the quality of your copies Standard High ID Card Copy Off Select On to copy both sides of an ID card onto one side of a sheet of paper On Borderless Copy Off Adjusts the amount to expand the original photo when printing borderless photos On Standard Medium Minimum Parent topic: Copying
69 Printing from a Computer Before printing from your computer, make sure you have set up your product and installed its software as described on the Start Here sheet. Note: If you have an Internet connection, it is a good idea to check for updates to your product software on Epson's support website. If you see a Software Update screen, select Enable automatic checking and click OK. The update scans your system to see if you have the latest product software. Follow the on-screen instructions. Printing with Windows Printing with the Built-in Epson Driver - Windows 10 S Printing on a Mac Printing from a Smartphone or Tablet Printing with Epson Photo+ Cancelling Printing Using a Product Button Printing with Windows You can print with your product using any Windows application, as described in these sections. Note: If you are using your Epson product with the Windows 10 S operating system, you cannot use the software described in this section. You also cannot download and install any Epson product software from the Epson website for use with Windows 10 S; you must obtain software only from the Windows Store. Selecting Basic Print Settings - Windows Selecting Double-sided Printing Settings - Windows Selecting Additional Layout and Print Options - Windows Selecting a Printing Preset - Windows Selecting Extended Settings - Windows Printing Your Document or Photo - Windows Checking Print Status - Windows Locking Printer Settings - Windows Selecting Default Print Settings - Windows Changing Automatic Update Options

70 Parent topic: Printing from a Computer Selecting Basic Print Settings - Windows Select the basic settings for the document or photo you want to print.

71

72

73 2-Up, 4-Up, 6-Up, 8-Up, 9-Up, and 16-Up Prints several pages on one sheet of paper. Click the Layout Order button to select page layout and border options. 2×1 Poster, 2×2 Poster, 3×3 Poster, 4×4 Poster Prints one image on multiple sheets of paper to create a larger poster. Click the Settings button to select image layout and guideline options. Parent topic: Selecting Basic Print Settings - Windows Selecting Double-sided Printing Settings - Windows You can print on both sides of the paper by selecting one of the 2-Sided Printing options on the Main tab. Note: You will need to print one side and flip the paper over manually to print the other side. Note: Some options may be pre-selected or unavailable, depending on other settings you have chosen or if you are accessing the product over a network.

74 You see a window like this:

75 Double-sided Printing Options - Windows You can select any of the double-sided options to set up your double-sided print job. Binding Edge Options Select a setting that orients double-sided print binding in the desired direction. Binding Margin Options Select options that define a wider margin to allow for binding. Booklet Option Select the Booklet checkbox and a binding option to print double-sided pages as a booklet. Parent topic: Selecting Double-sided Printing Settings - Windows Selecting Additional Layout and Print Options - Windows You can select a variety of additional layout and printing options for your document or photo on the More Options tab.

76

77 Parent topic: Printing with Windows Related tasks Selecting Basic Print Settings - Windows Custom Color Correction Options - Windows You can select any of the available options in the Color Correction window to customize the image colors for your print job. Color Controls Lets you select a Color Mode setting, individual settings for Brightness, Contrast, Saturation, and Density, and individual color tones. Depending on the selected color mode, you can also adjust the midtone density using the Gamma setting. Fix Photo Improves the color, contrast, and sharpness of flawed photos. Note: Fix Photo uses a sophisticated face recognition technology to optimize photos that include faces. For this to work, both eyes and the nose must be visible in the subject's face. If your photo
78 includes a face with an intentional color cast, such as a statue, you may want to turn off Fix Photo to retain the special color effects. No Color Adjustment Turns off color management in your printer software so you can manage color using only your application software. Parent topic: Selecting Additional Layout and Print Options - Windows Image Options and Additional Settings - Windows You can select any of the Image Options and Additional Settings to customize your print. Some options may be pre-selected or unavailable, depending on other settings you have chosen. Image Options Emphasize Text Adjusts the weight of printed text to increase readability. Emphasize Thin Lines Adjusts the weight of printed lines to increase visibility. Edge Smoothing Smooths jagged edges in low-resolution images such as screen captures or images from the Web. Fix Red-Eye Reduces or removes red-eye in photos. Print Text in Black Prints colored text in black. For Color Text Prints colored text on a background pattern or underlined. For Color Graphs and Images Prints colored graphics and images with overlay patterns. For Color Text, Graphs, and Images Prints colored text, graphics, and images with overlay patterns. Enhancement Options Specifies Color Universal Print enhancement settings for text, graphics, and images. Additional Settings Options Rotate 180º Prints the image rotated 180º from its original orientation.
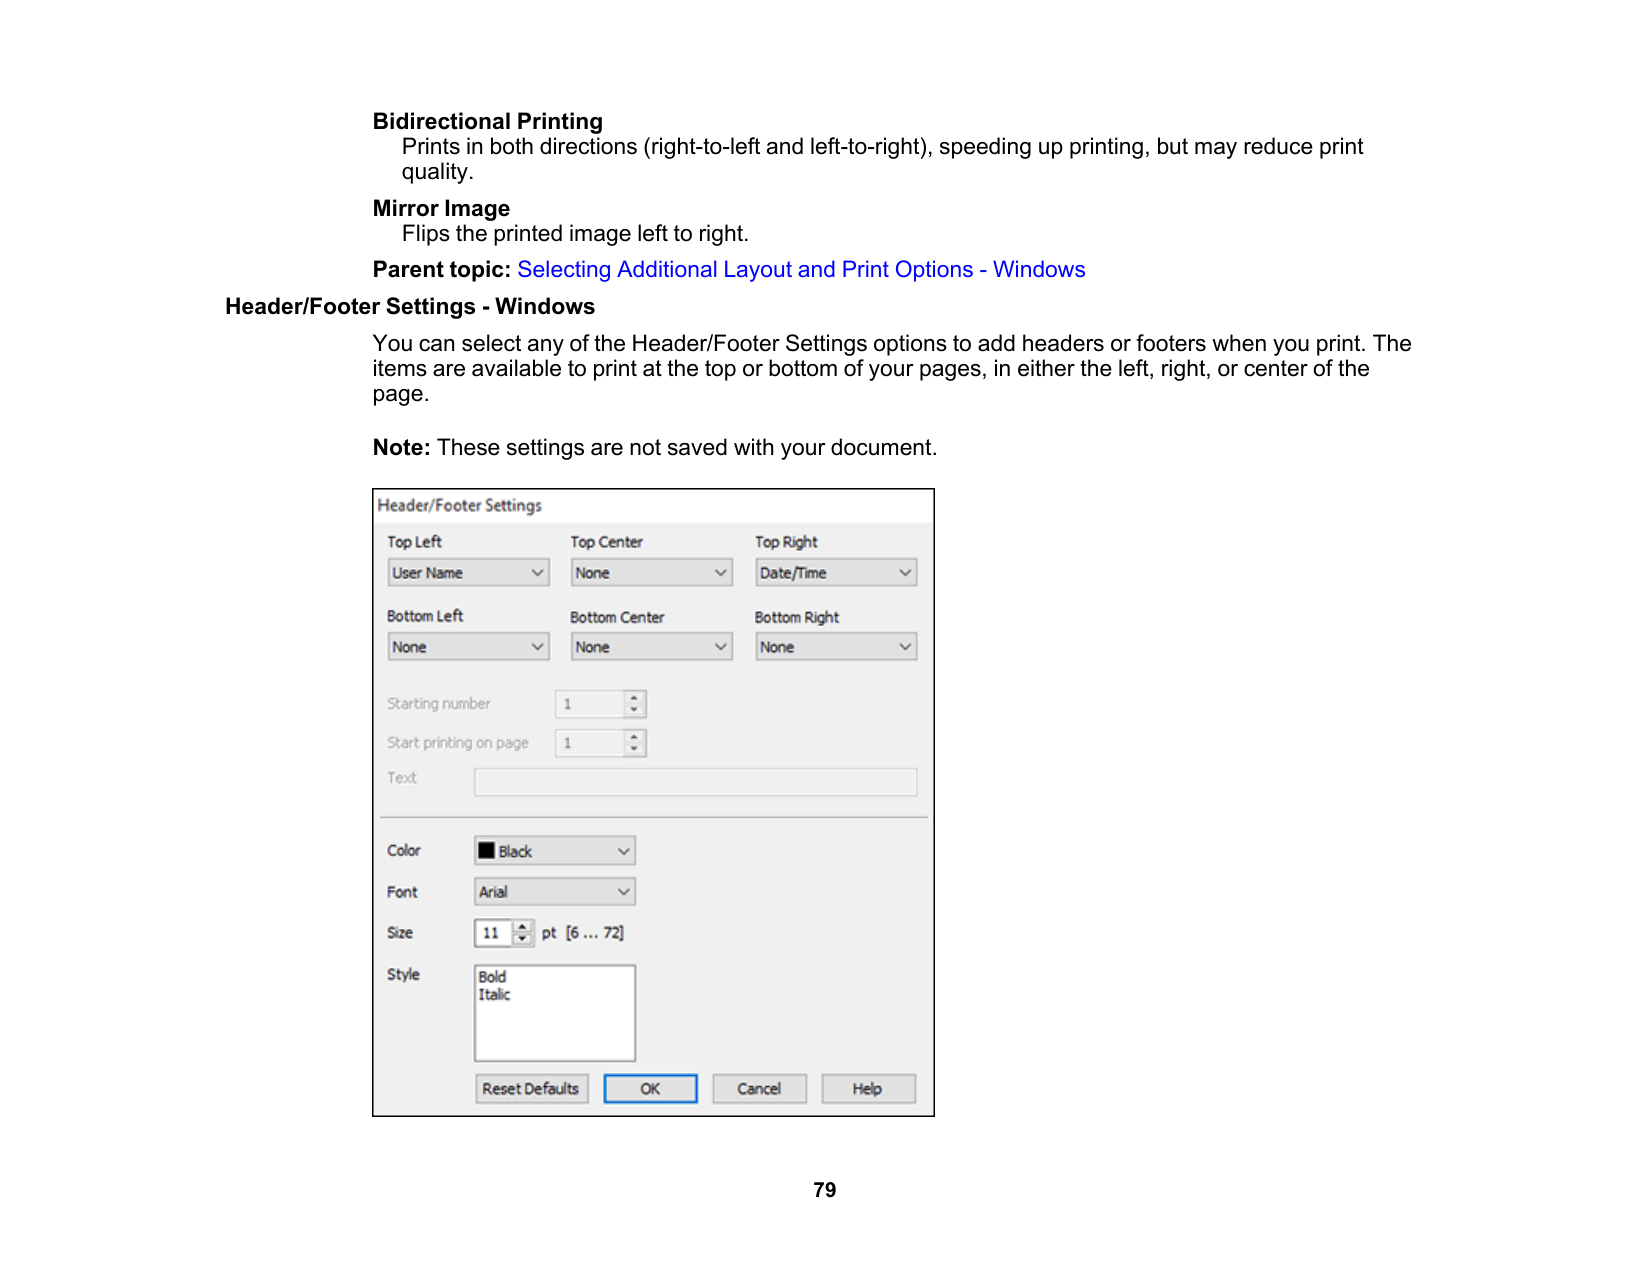
79 Bidirectional Printing Prints in both directions (right-to-left and left-to-right), speeding up printing, but may reduce print quality. Mirror Image Flips the printed image left to right. Parent topic: Selecting Additional Layout and Print Options - Windows Header/Footer Settings - Windows You can select any of the Header/Footer Settings options to add headers or footers when you print. The items are available to print at the top or bottom of your pages, in either the left, right, or center of the page. Note: These settings are not saved with your document.
80 You can select to print the following information:
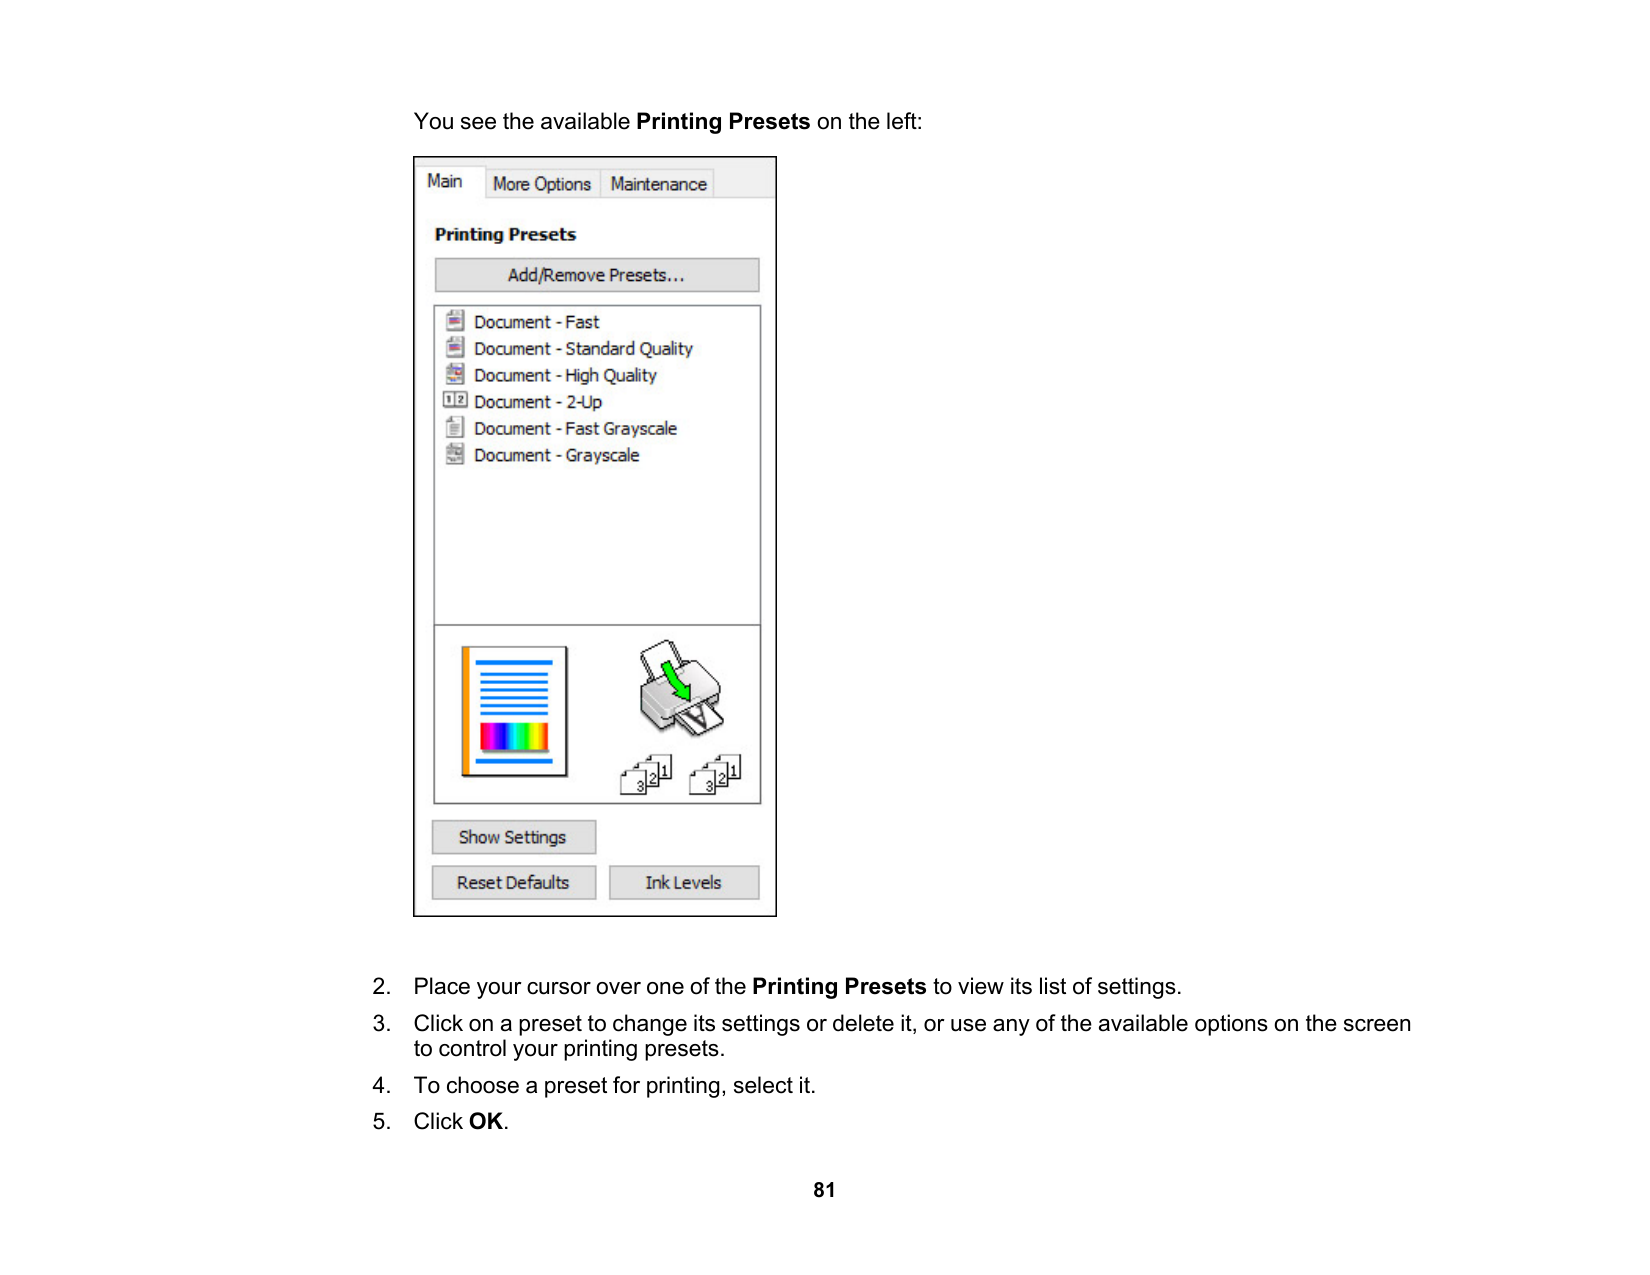
81 You see the available Printing Presets on the left:

82 Parent topic: Printing with Windows Selecting Extended Settings - Windows You can select additional settings that apply to all the print jobs you send to your product.
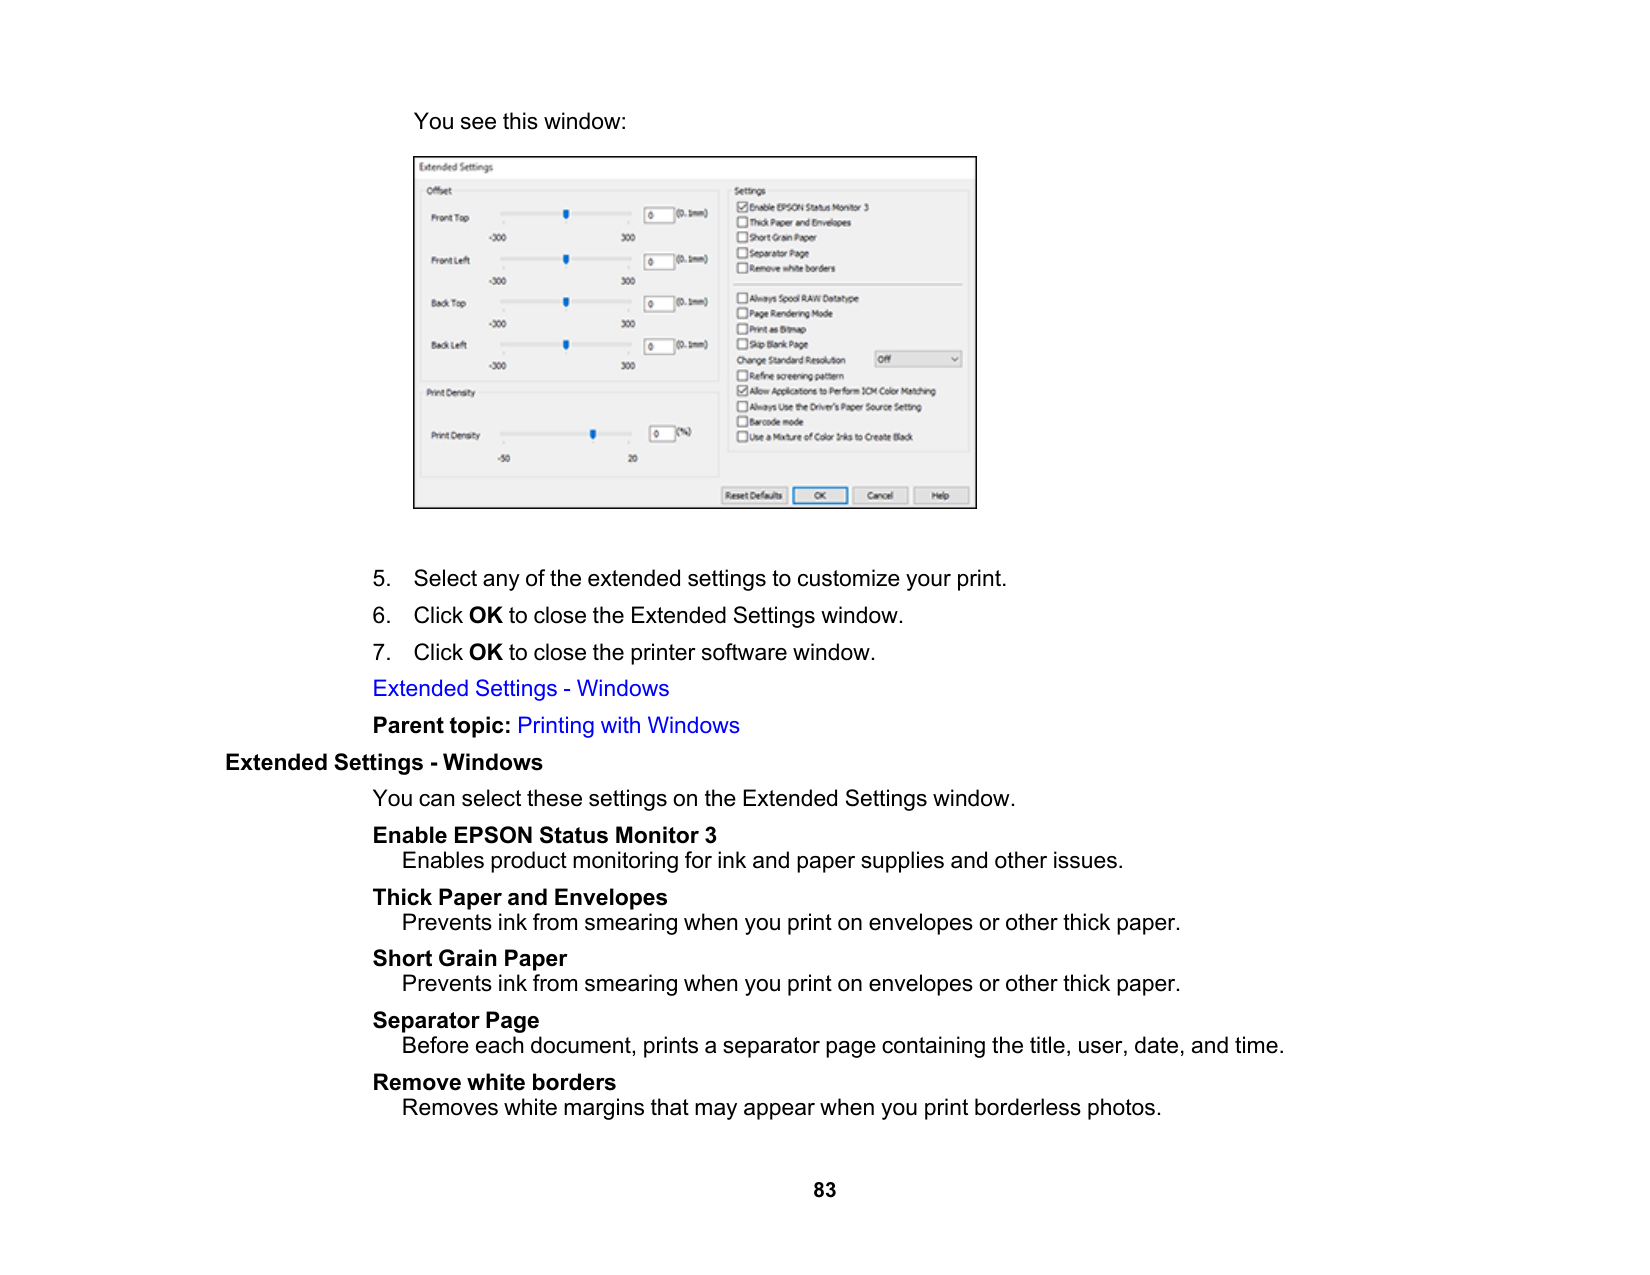
83 You see this window:
84 Always Spool RAW Datatype Increases print speed and may solve other printing problems. Page Rendering Mode Increases print speed when printing is extremely slow or the print head stops during printing. Print as Bitmap Increases print speed when printing is extremely slow or the print head stops during printing, and other settings do not help. Skip Blank Page Ensures that your product does not print pages that contain no text or images. Change Standard Resolution Reduces the resolution of print data to correct printing problems. Refine screening pattern Prints graphics with a finer screening pattern. Allow Applications to Perform ICM Color Matching Allows applications to perform ICM color matching. Always Use the Driver's Paper Source Setting Prints using the paper source setting in the printer driver, rather than the setting in your application. Barcode mode Reduces bleeding when printing barcodes on plain paper, letterhead paper, recycled paper, preprinted paper, envelopes, and thick paper. Use a Mixture of Color Inks to Create Black Mixes color inks to create composite black when printing at standard quality on plain paper or envelopes. Parent topic: Selecting Extended Settings - Windows Printing Your Document or Photo - Windows Once you have selected your print settings, you are ready to save your settings and print.
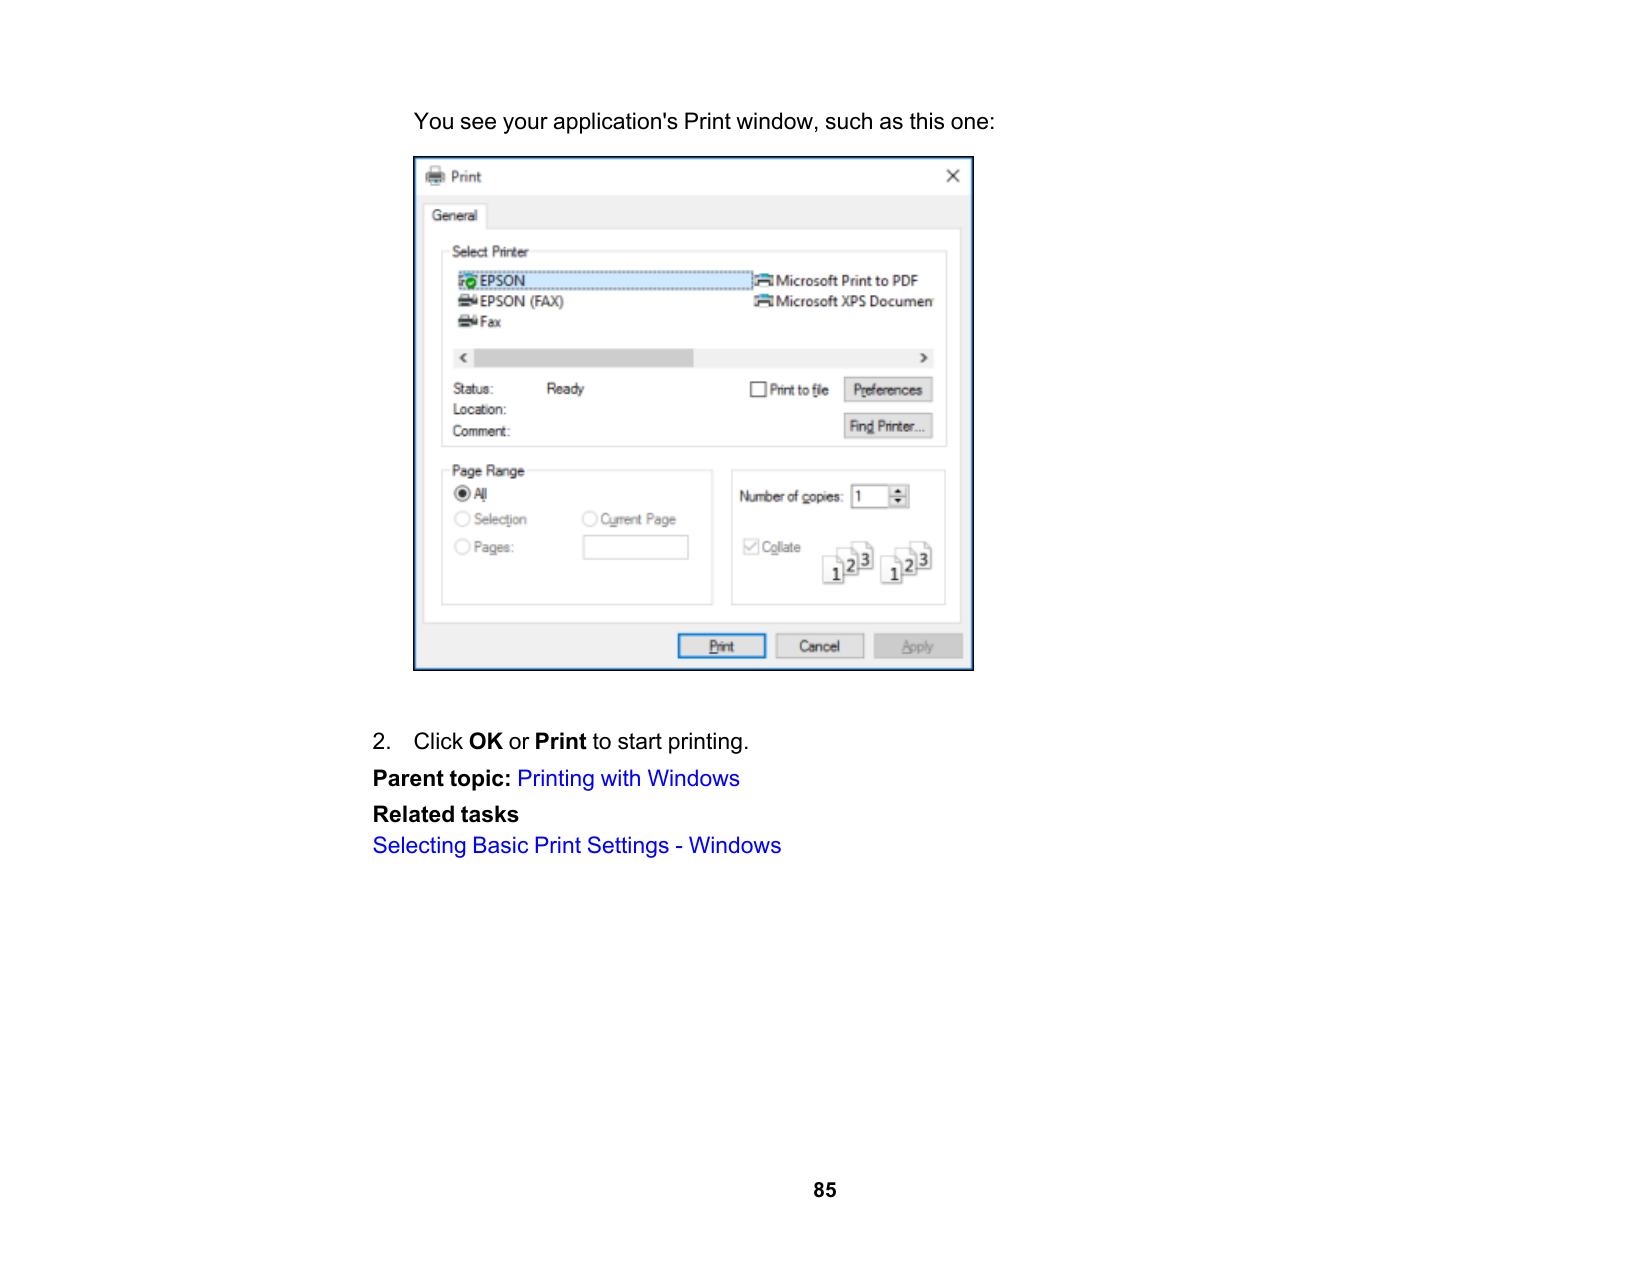
85 You see your application's Print window, such as this one:

86 Checking Print Status - Windows During printing, you see this window showing the progress of your print job. It allows you to control printing and check ink status.
87

88 You see a window like this:

89 Setting Options Description Anti-Copy Pattern Various data items Lets you select the data to use for the pattern or prohibit anti- copy patterns Add/Delete Lets you add or delete a customized anti-copy pattern Settings Lets you select the arrangement, size, and other settings for the custom anti-copy pattern Watermark Various text watermarks Lets you select the text for the watermark or prohibit watermarks Add/Delete Lets you add or delete a customized text or image-based watermark Settings Lets you select the size, position, and other watermark settings Header/Footer Off Prohibits headers or footers On Allows headers and footers Settings Lets you select the text and position for printing headers and footers Color Color Allows color printing Grayscale Allows printing in black or shades of gray only Multi-Page Off Prohibits multi-page settings 2-Up Allows printing of 2 pages on one sheet of paper 4-Up Allows printing of 4 pages on one sheet of paper 6-Up Allows printing of 6 pages on one sheet of paper 8-Up Allows printing of 8 pages on one sheet of paper 9-Up Allows printing of 9 pages on one sheet of paper 16-Up Allows printing of 16 pages on one sheet of paper Parent topic: Locking Printer Settings - Windows
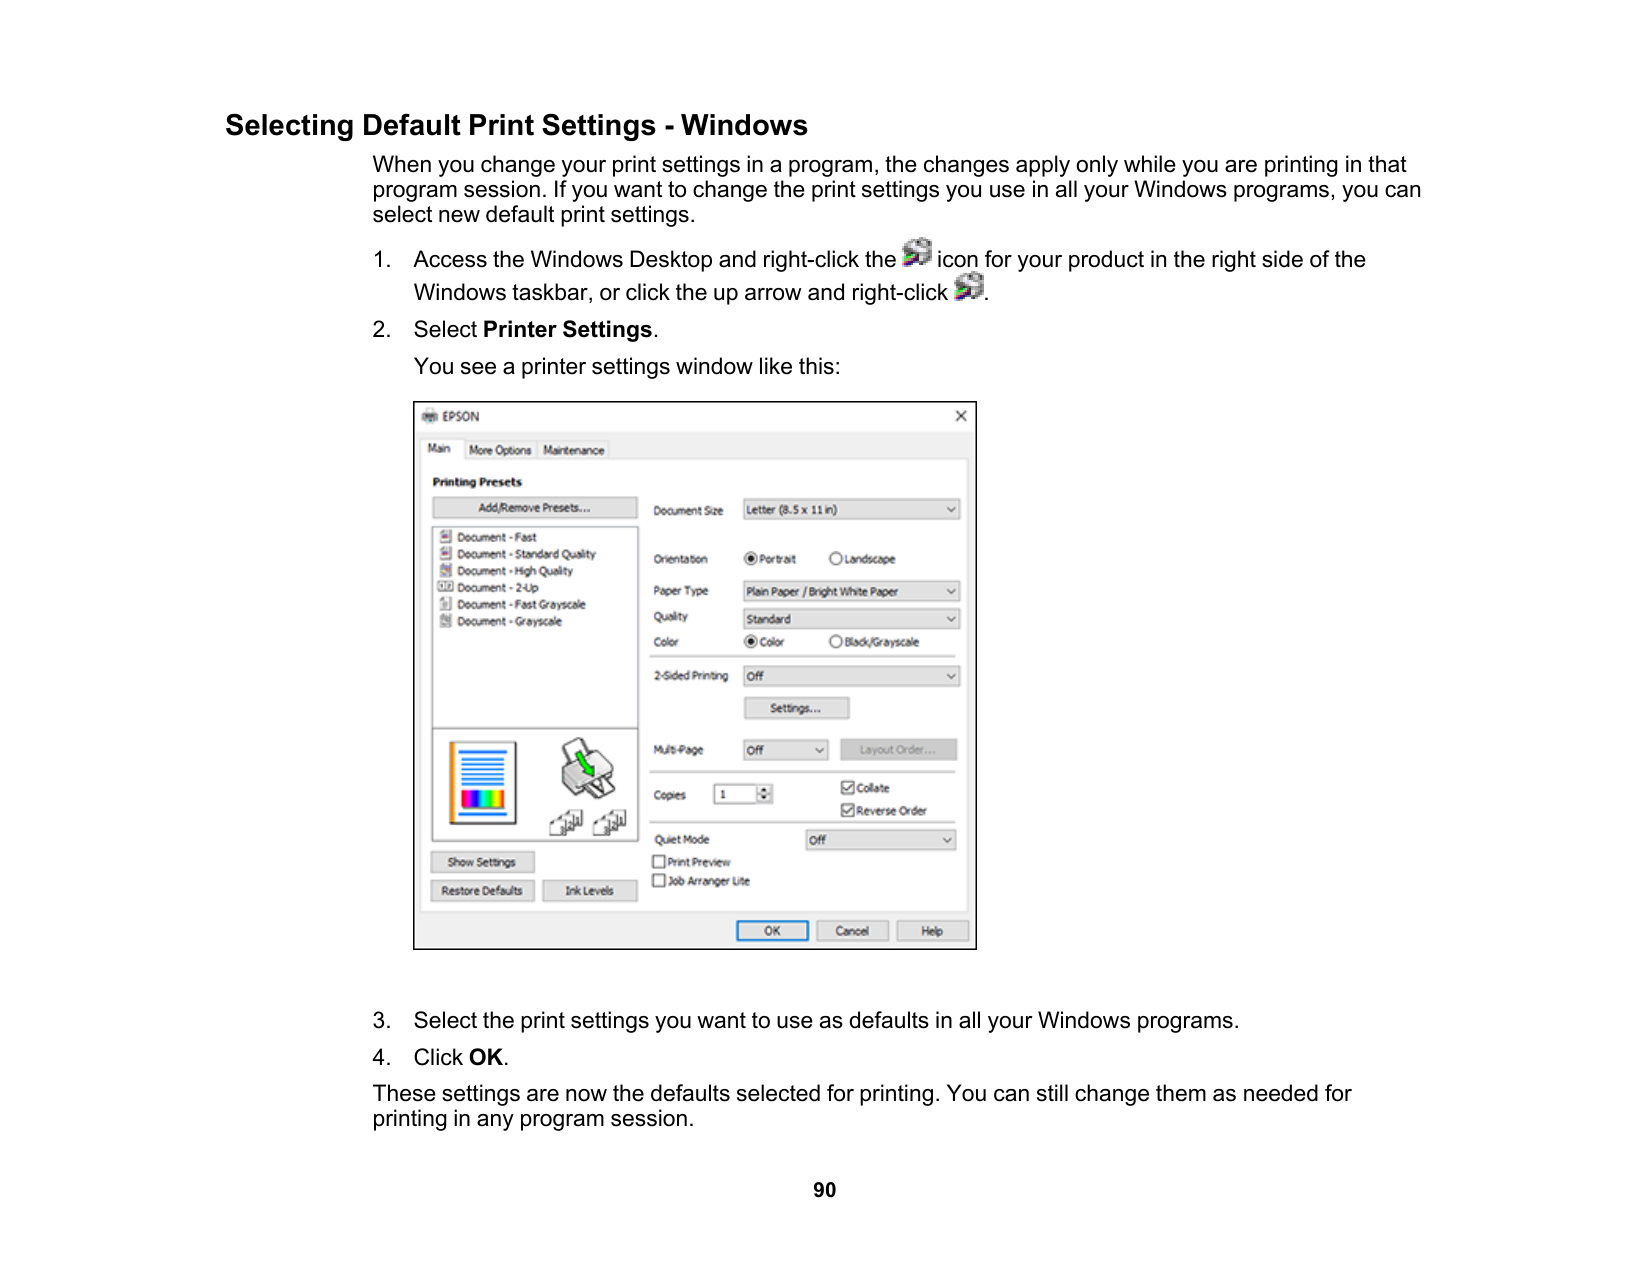
90 Selecting Default Print Settings - Windows When you change your print settings in a program, the changes apply only while you are printing in that program session. If you want to change the print settings you use in all your Windows programs, you can select new default print settings.
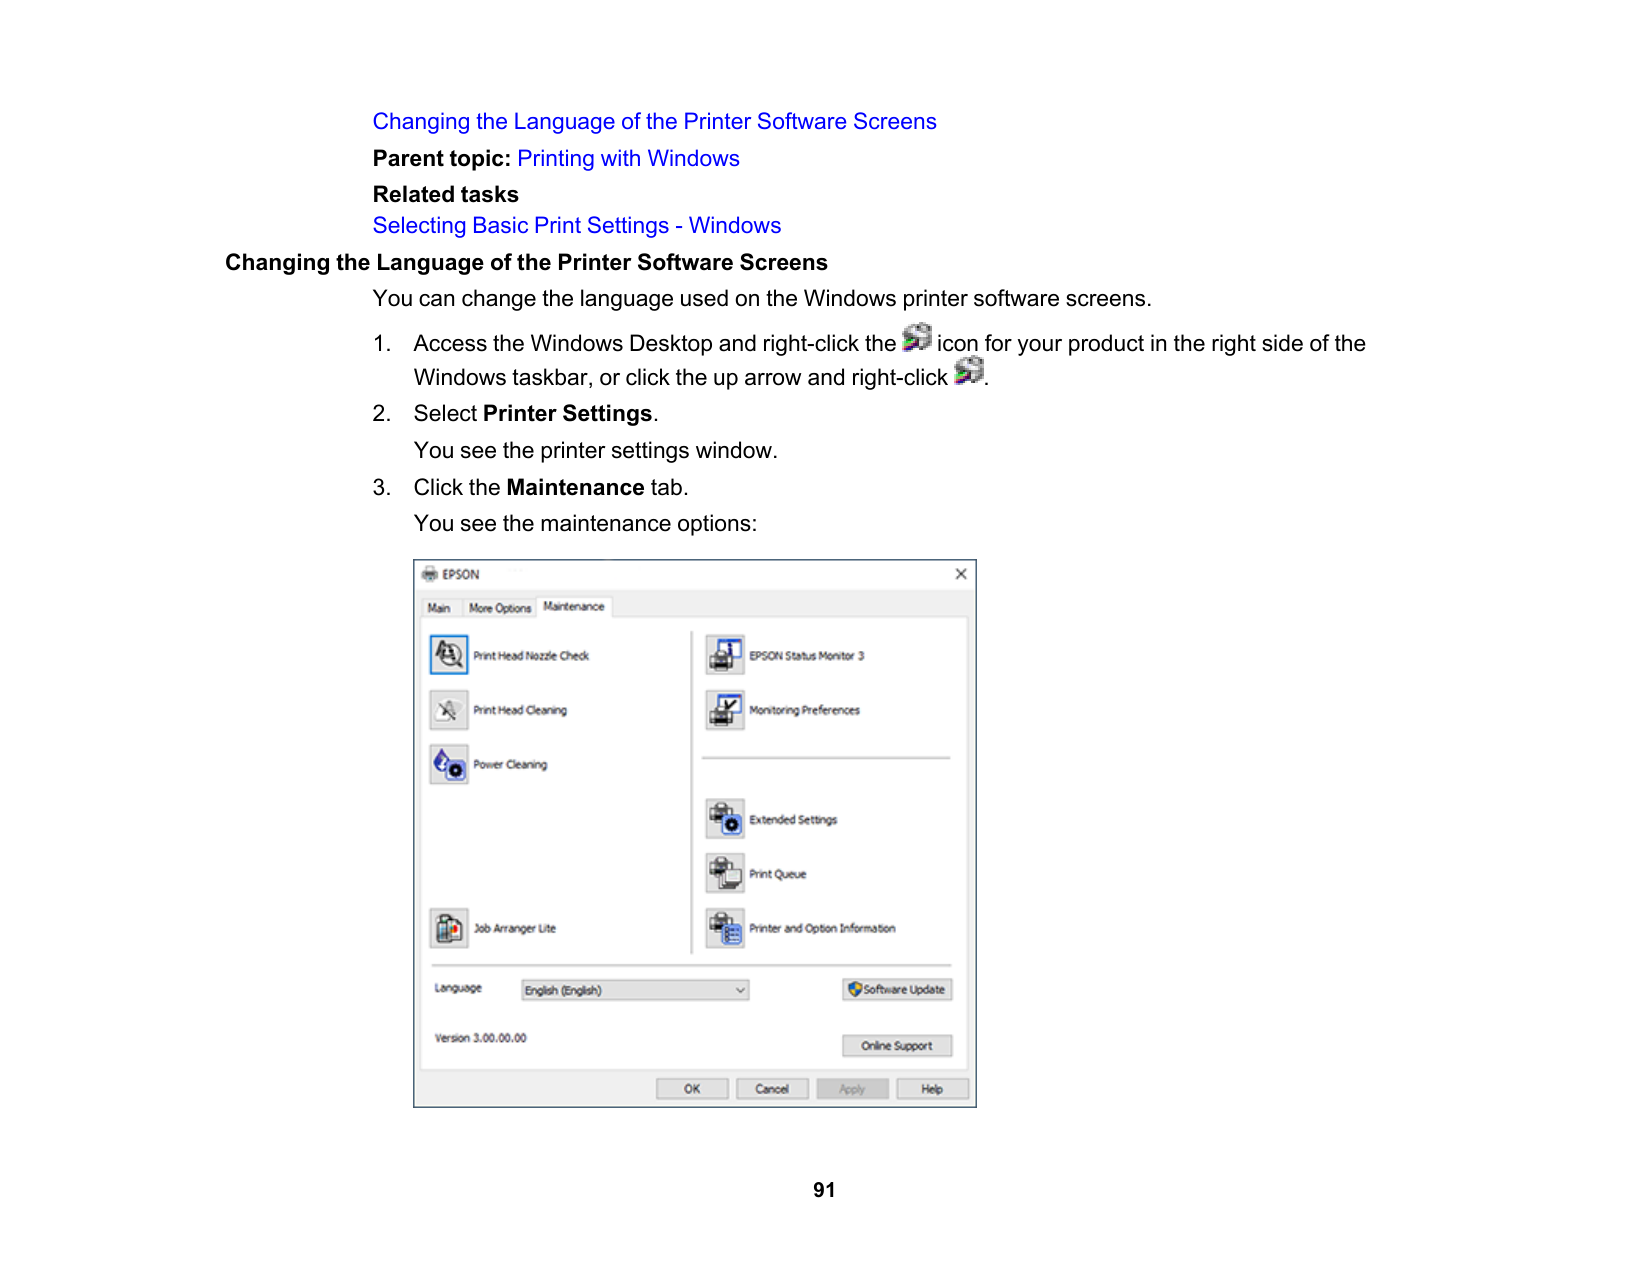
91 Changing the Language of the Printer Software Screens Parent topic: Printing with Windows Related tasks Selecting Basic Print Settings - Windows Changing the Language of the Printer Software Screens You can change the language used on the Windows printer software screens.
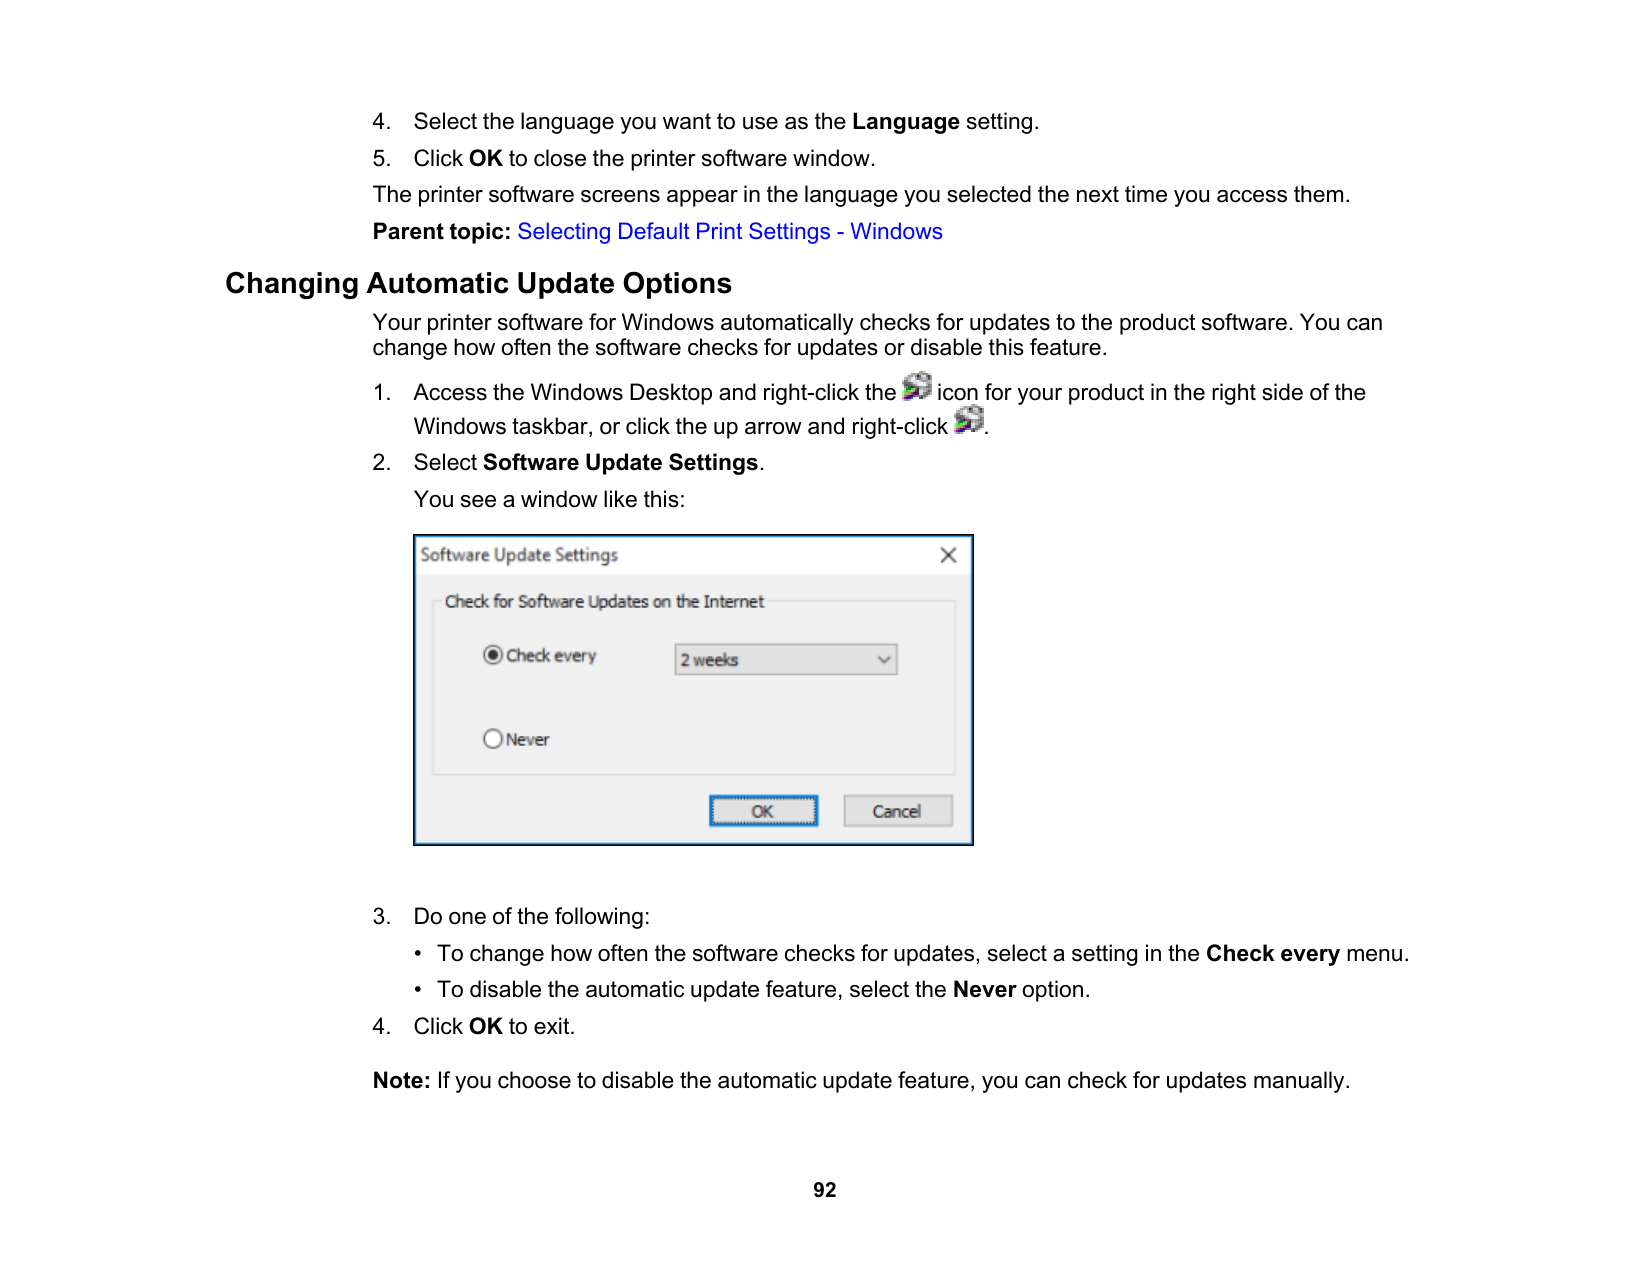
92
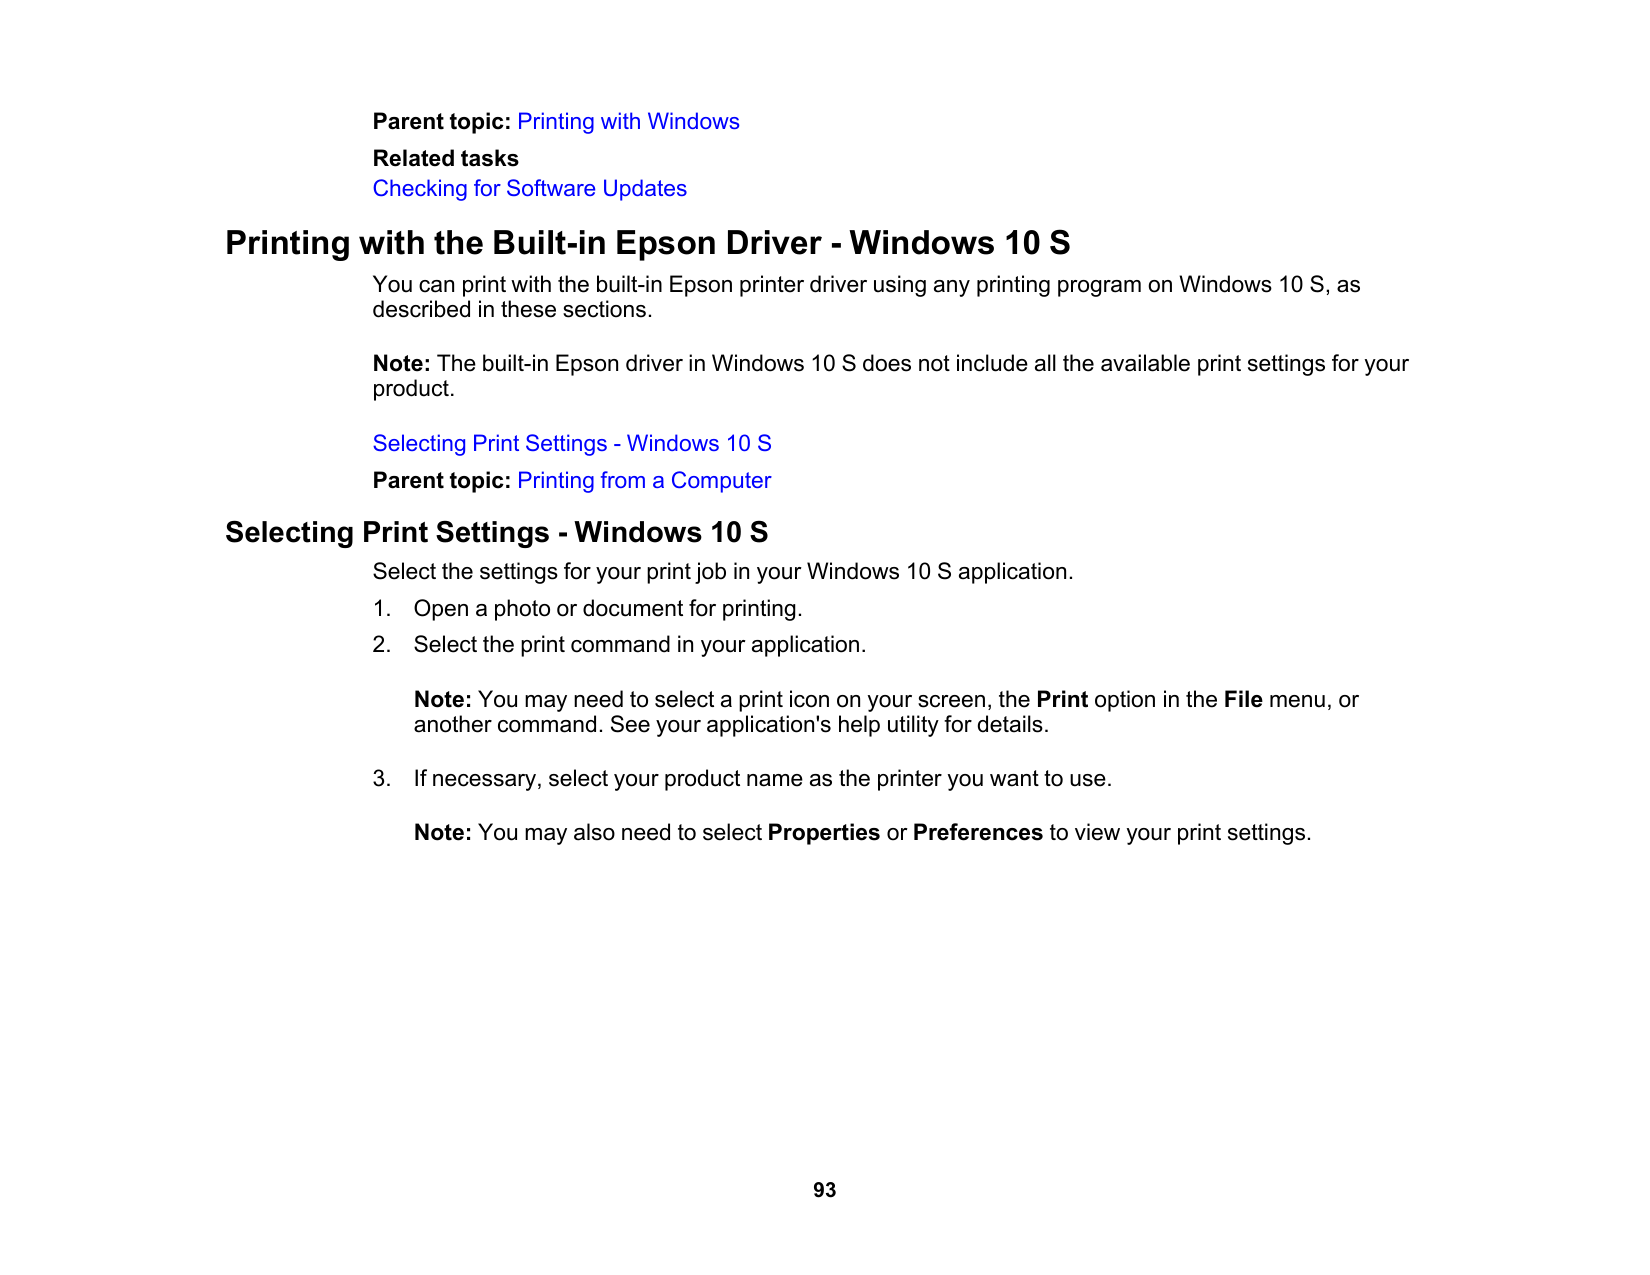
93 Parent topic: Printing with Windows Related tasks Checking for Software Updates Printing with the Built-in Epson Driver - Windows 10 S You can print with the built-in Epson printer driver using any printing program on Windows 10 S, as described in these sections. Note: The built-in Epson driver in Windows 10 S does not include all the available print settings for your product. Selecting Print Settings - Windows 10 S Parent topic: Printing from a Computer Selecting Print Settings - Windows 10 S Select the settings for your print job in your Windows 10 S application.
94 You see a window like this:
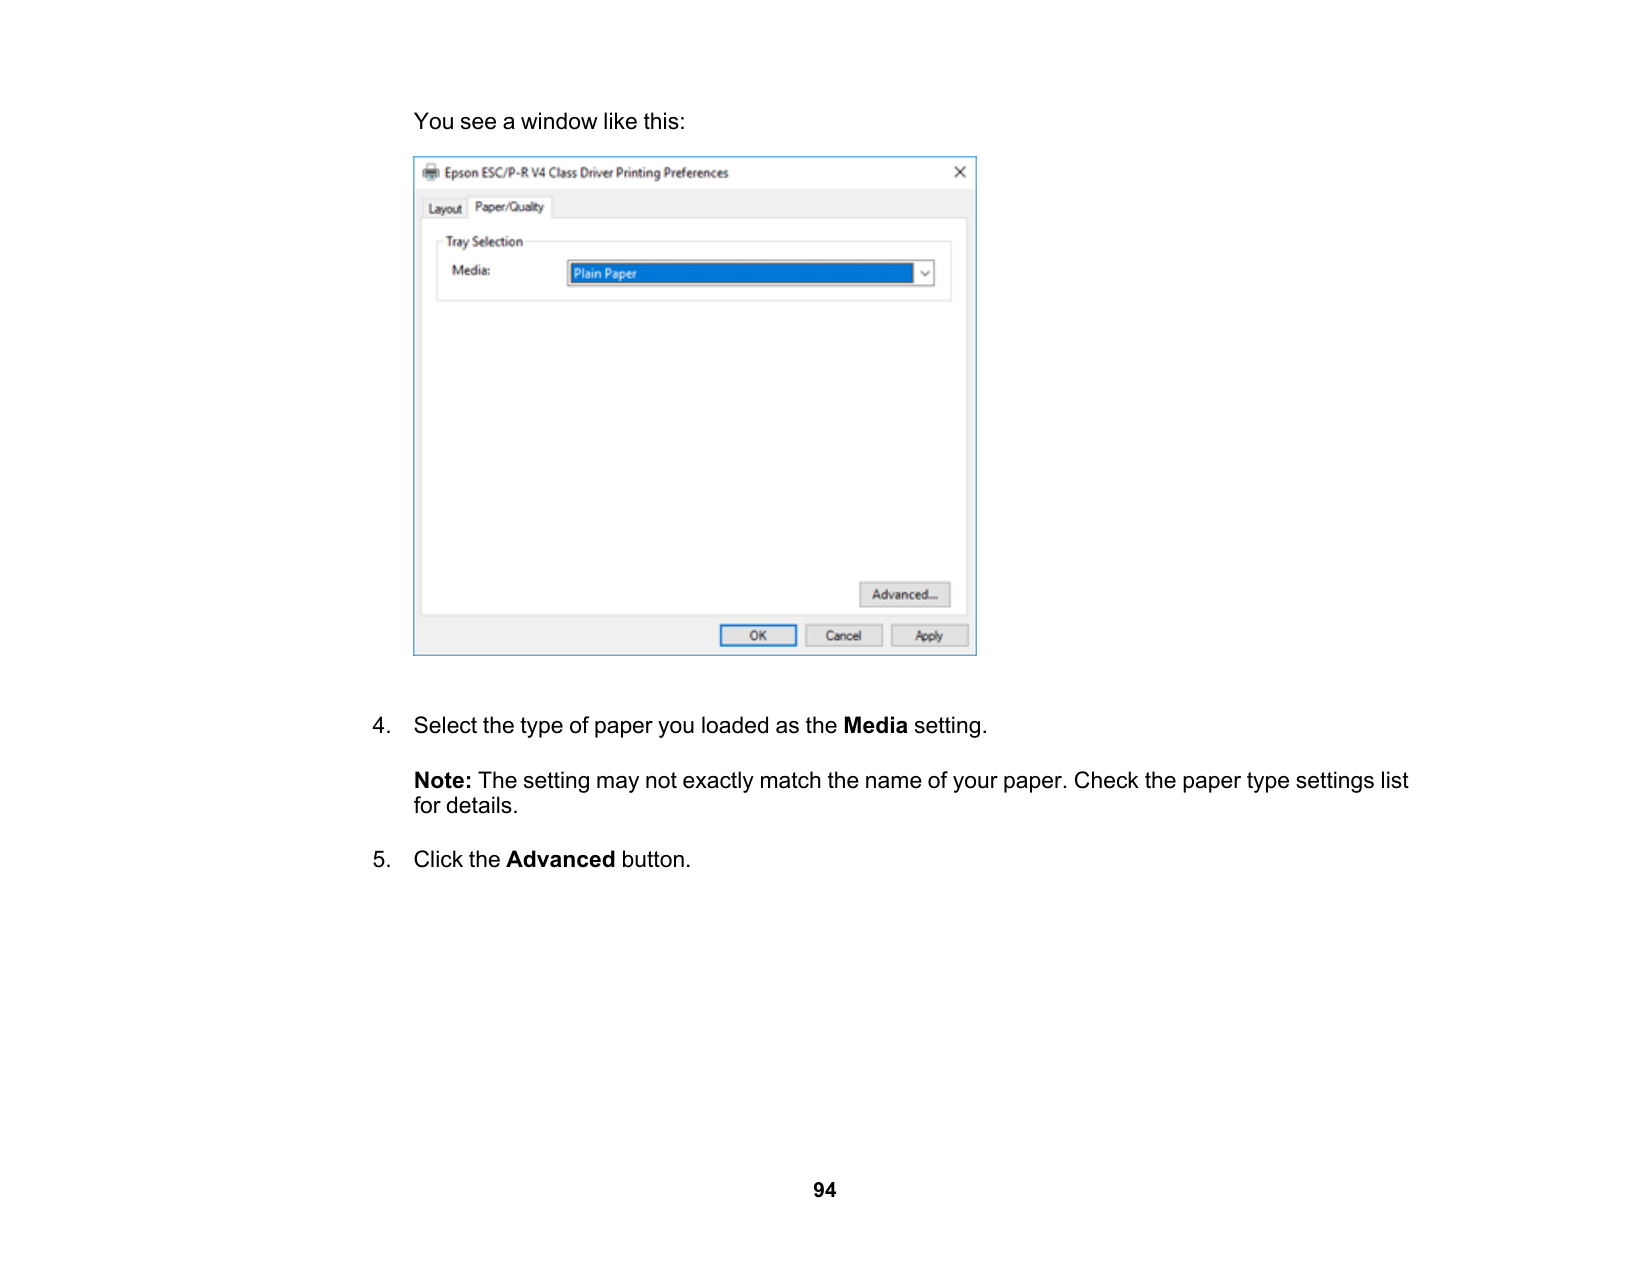
95 You see a window like this:
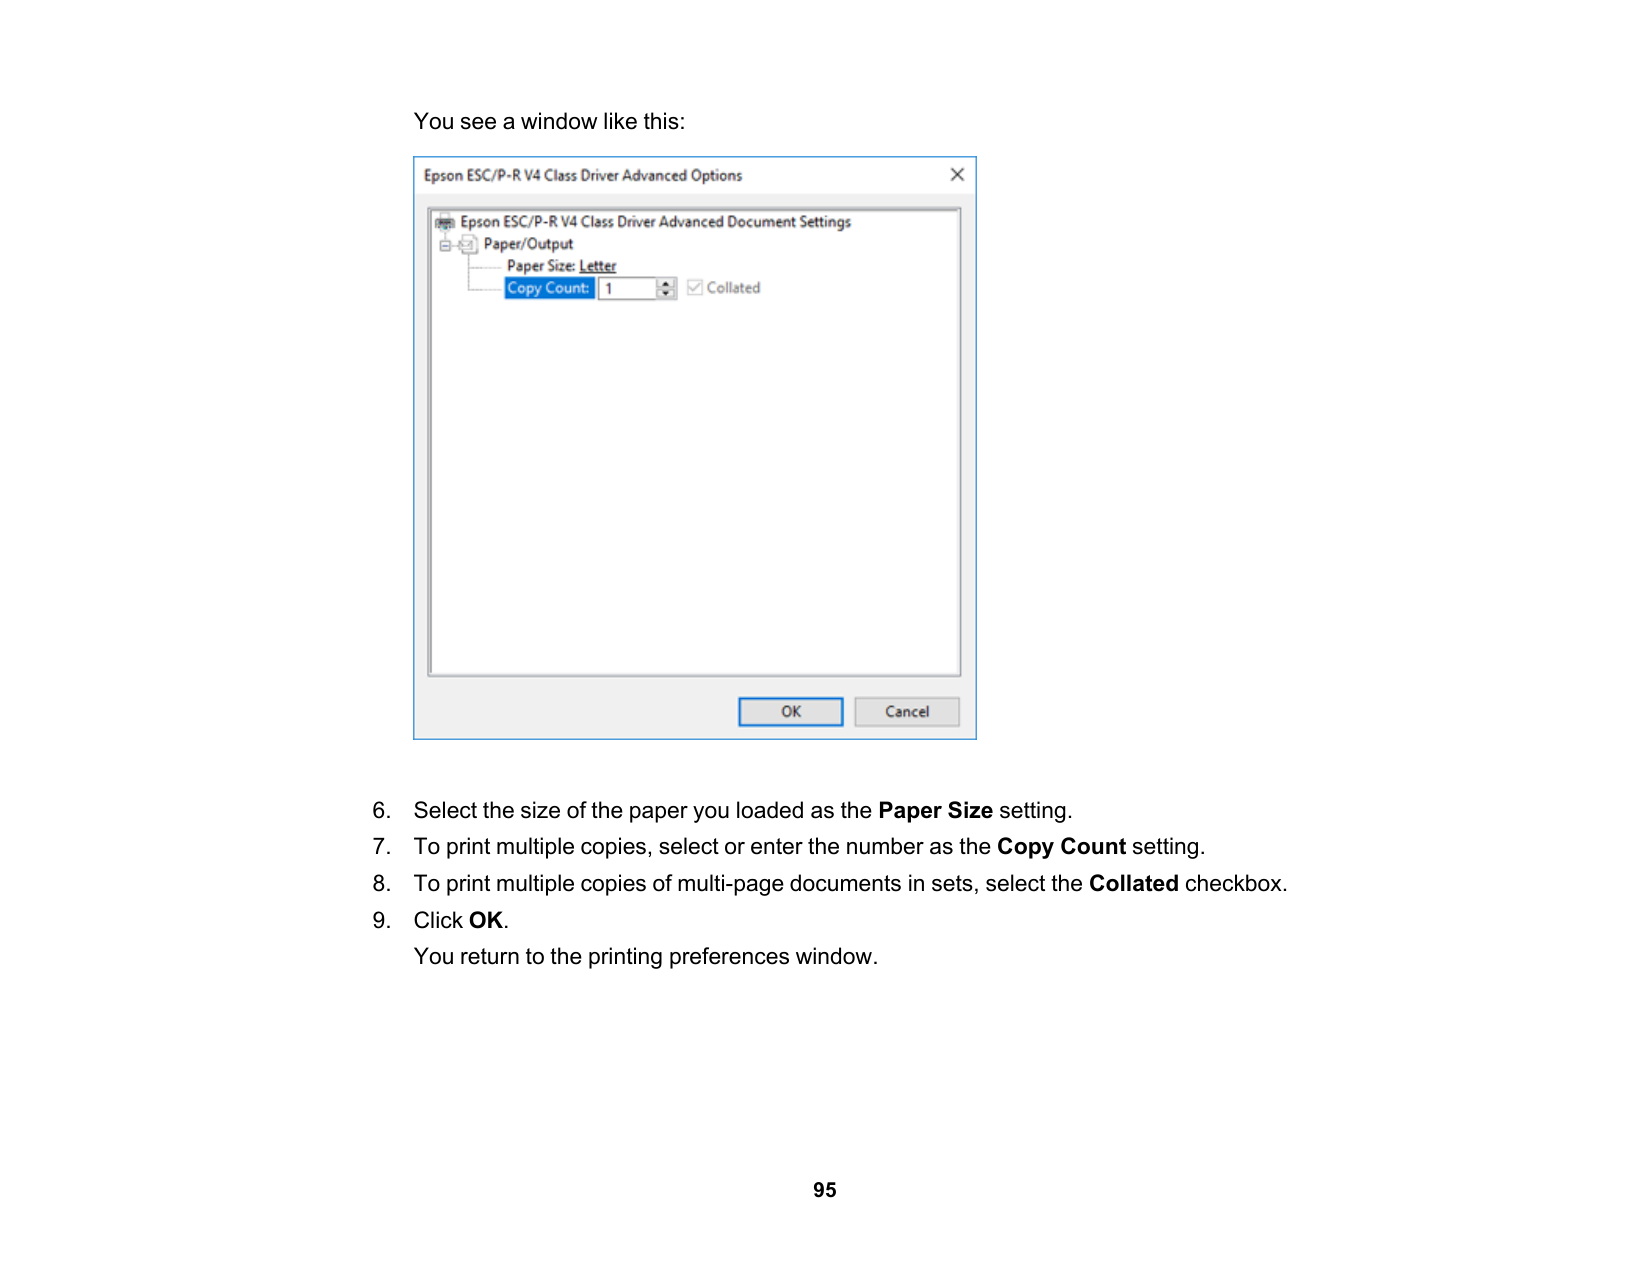
96
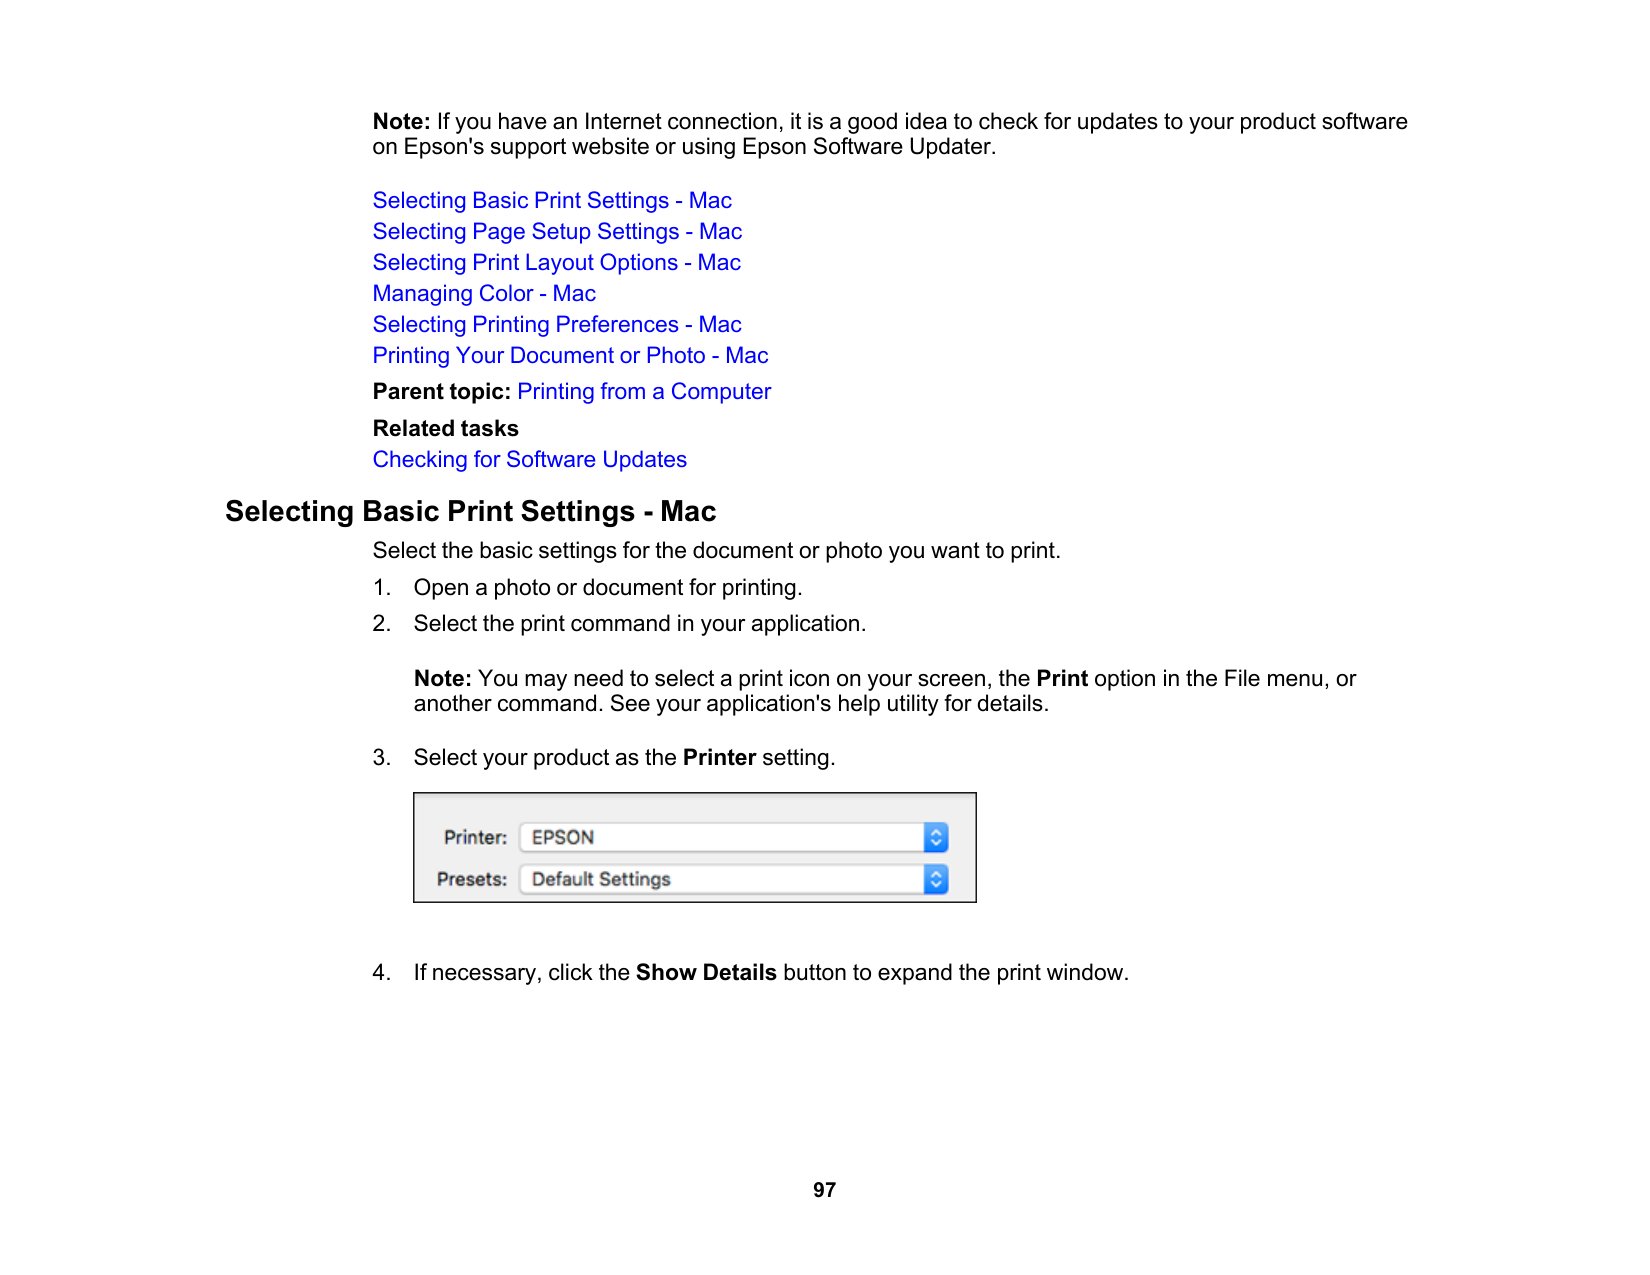
97 Note: If you have an Internet connection, it is a good idea to check for updates to your product software on Epson's support website or using Epson Software Updater. Selecting Basic Print Settings - Mac Selecting Page Setup Settings - Mac Selecting Print Layout Options - Mac Managing Color - Mac Selecting Printing Preferences - Mac Printing Your Document or Photo - Mac Parent topic: Printing from a Computer Related tasks Checking for Software Updates Selecting Basic Print Settings - Mac Select the basic settings for the document or photo you want to print.

98 You see the expanded printer settings window for your product: Note: The print window may look different, depending on the Mac OS version and the application you are using.

99

100 Note: The available print settings and appearance of the print window may be different than those covered here, depending on the Mac OS version and the application you are using.

101 Quality For text and graphics with increased quality and print speed. Parent topic: Selecting Basic Print Settings - Mac Print Options - Mac You can select any of the print options to customize your print. Some options may be unavailable, depending on other settings you have chosen. Expansion If you selected a borderless paper size setting, this option adjusts the image expansion settings to control printing at the edges of borderless prints. Grayscale Prints text and graphics in black or shades of gray. Mirror Image Lets you flip the printed image horizontally. Note: If you select the Min option for the Expansion setting, you may see white borders on your printed photo. Parent topic: Selecting Basic Print Settings - Mac Selecting Page Setup Settings - Mac Depending on your application, you may be able to select the paper size and orientation settings from the print window. Note: If you do not see these settings in the print window, check for them in your application before printing. They may be accessible by selecting Page Setup from the File menu.

102 select a custom setting to create a custom paper size, but the Quality setting will be limited to Normal. Note: You must select a compatible borderless paper type and size to print without borders. Check the borderless paper compatibility list for details.

103

104

105 Color Options Settings Manual Settings Lets you select manual color adjustments. Click the arrow next to Advanced Settings and select settings for Brightness, Contrast, Saturation, and individual color tones. You can also select a color Mode setting for printing photos and graphics and the Fix Red-Eye setting to reduce or remove red- eye in photos. Depending on the selected color mode, you can also adjust the midtone density using the Gamma setting. Fix Photo Improves the color, contrast, and sharpness of flawed photos. Click the arrow next to Advanced Settings and select the Fix Red-Eye setting to reduce or remove red-eye in photos. Note: Fix Photo uses a sophisticated face recognition technology to optimize photos that include faces. For this to work, both eyes and the nose must be visible in the subject's face. If your photo includes a face with an intentional color cast, such as a statue, you may want to turn off Fix Photo to retain the special color effects. Off (No Color Adjustment) Turns off color management in your printer software so you can manage color using only your application software. Note: An ICC profile is required if color management is turned off. Parent topic: Managing Color - Mac Selecting Printing Preferences - Mac You can select printing preferences that apply to all the print jobs you send to your product.

106 You see a screen like this:

107 Bidirectional printing Prints in both directions (right-to-left and left-to-right), speeding up printing, but may reduce print quality. Remove white borders Removes white margins that may appear when you print borderless photos. Warning Notifications Lets you choose whether or not to receive warning notifications from the printer software for various operating conditions. Establish bidirectional communication Allows the product to communicate with the computer. Do not change the default setting unless you experience issues when using a shared printing pool. Parent topic: Selecting Printing Preferences - Mac Printing Your Document or Photo - Mac Once you have selected your print settings, you are ready to print. Click Print at the bottom of the print window. Checking Print Status - Mac Parent topic: Printing on a Mac
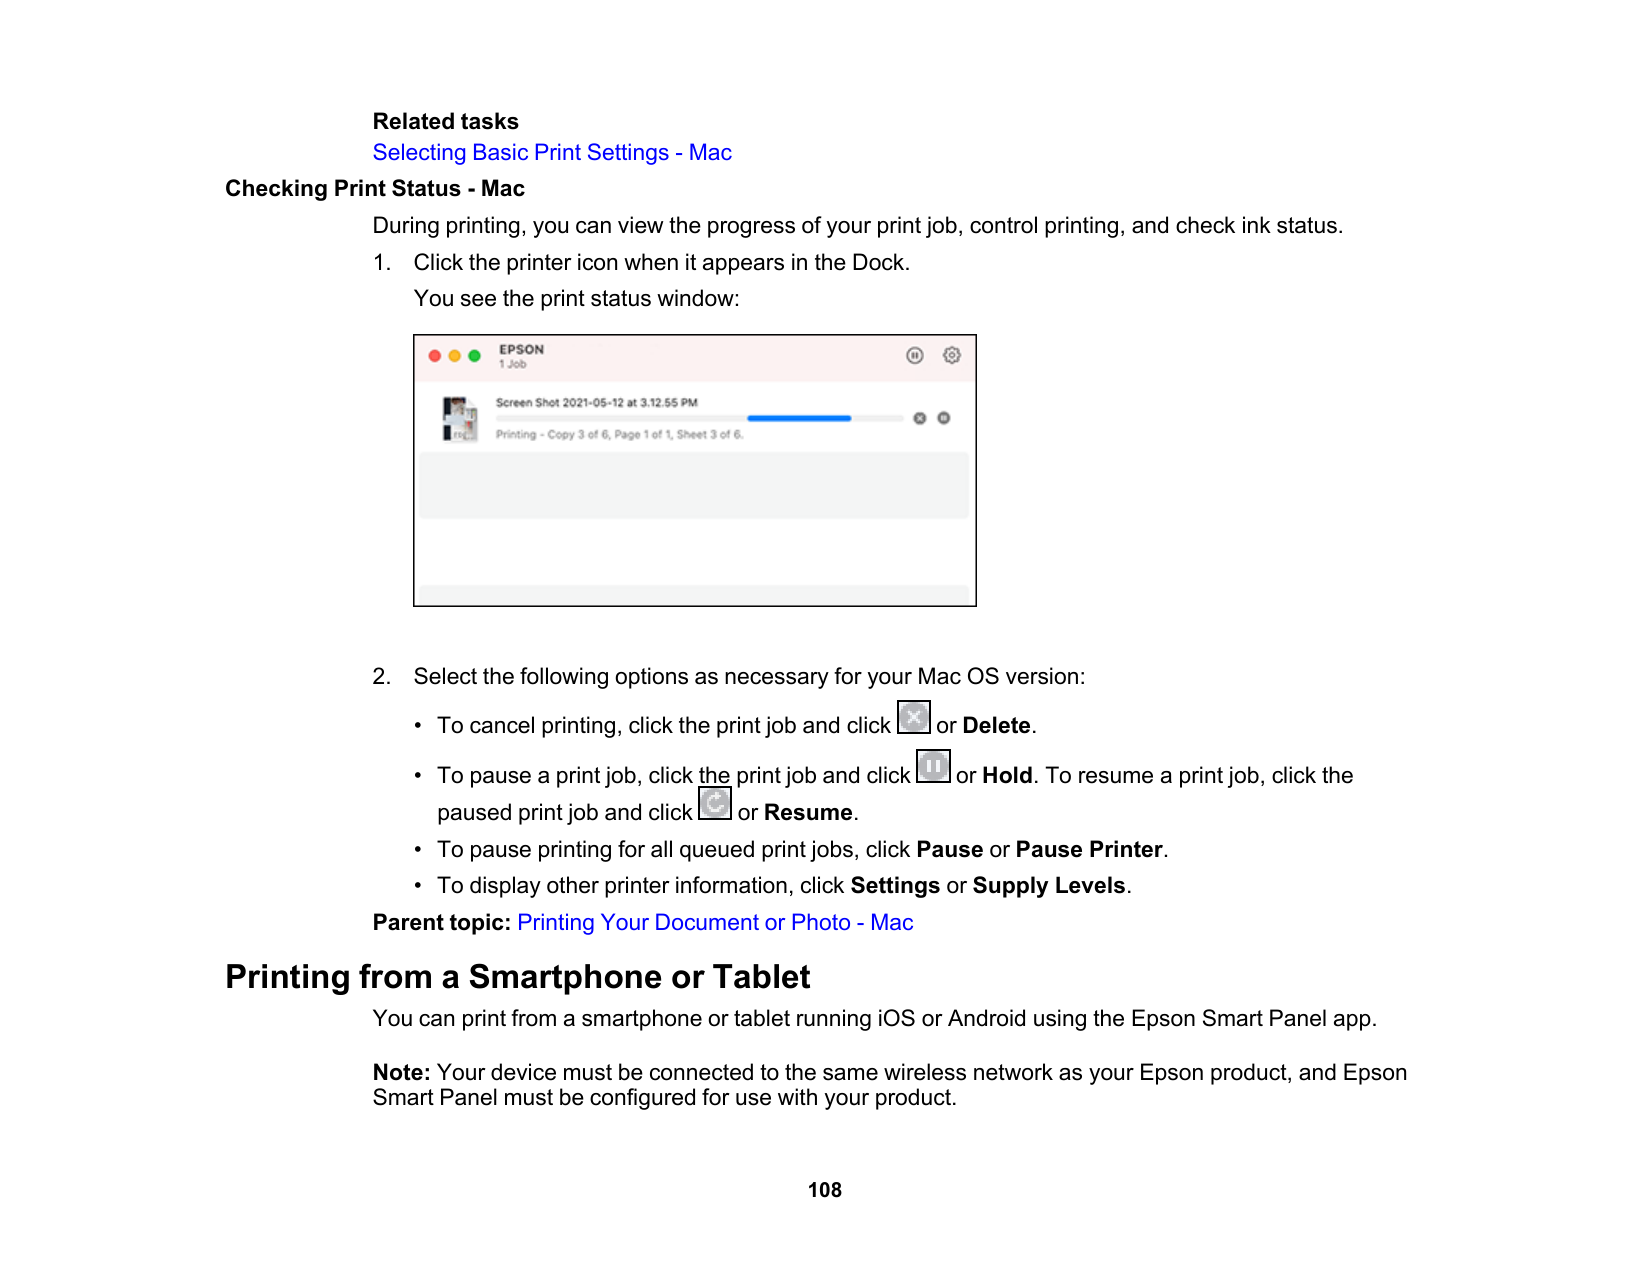
108 Related tasks Selecting Basic Print Settings - Mac Checking Print Status - Mac During printing, you can view the progress of your print job, control printing, and check ink status.
109

110 Scanning You can scan your originals and save them as digital files. Starting a Scan Scanning in Epson Scan 2 Starting a Scan After placing your originals on your product for scanning, start scanning using one of these methods. Starting a Scan Using the Product Control Panel Starting a Scan Using Epson ScanSmart Starting a Scan Using the Epson Scan 2 Icon Starting a Scan from a Scanning Program Starting a Scan from a Smartphone or Tablet Scanning a Document or Photo in Epson ScanSmart Selecting Epson ScanSmart Settings Parent topic: Scanning Starting a Scan Using the Product Control Panel You can scan an image to your computer using your product's control panel buttons. Your product automatically selects default scan settings, but you can view or change them as necessary. If you are scanning to a computer, you can change the default scan settings using the Event Manager utility on the computer. Note: Be sure you have installed Epson Scan 2, ScanSmart, and Event Manager on your computer before scanning to your computer.

111

112

113

114 You see a screen like this: Parent topic: Starting a Scan Starting a Scan Using the Epson Scan 2 Icon You can start the Epson Scan 2 program to select scan settings, scan, and save the scanned image to a file. Note: If you are using your Epson product with the Windows 10 S operating system, you cannot use the software described in this section. You also cannot download and install any Epson product software from the Epson website for use with Windows 10 S; you must obtain software only from the Windows Store.

115

116 You see an Epson Scan 2 window like this:

117 Parent topic: Starting a Scan Starting a Scan from a Scanning Program You can start Epson Scan 2 from a TWAIN-compliant scanning program to select scan settings, scan, and open the scanned image in the program. Note: If you are using your Epson product with the Windows 10 S operating system, you cannot use the software described in this section. You also cannot download and install any Epson product software from the Epson website for use with Windows 10 S; you must obtain software only from the Windows Store.
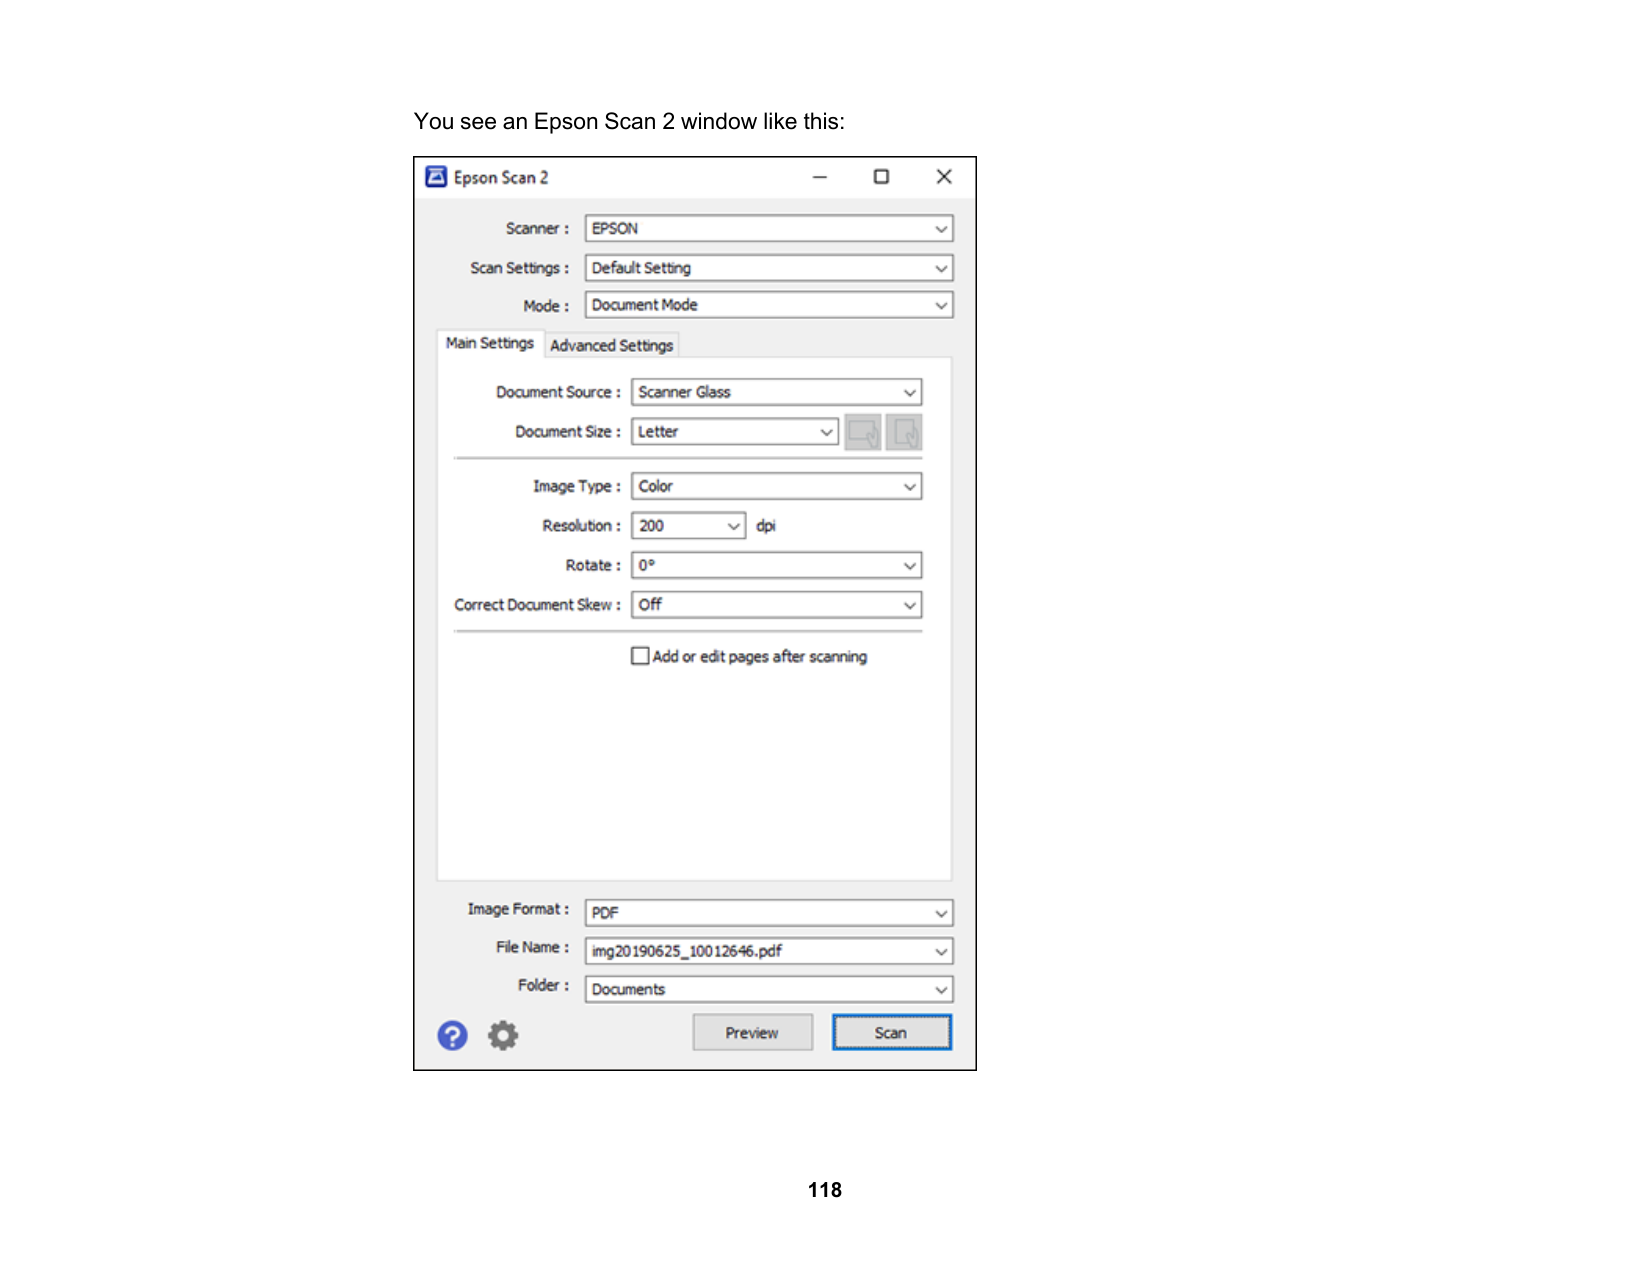
118 You see an Epson Scan 2 window like this:
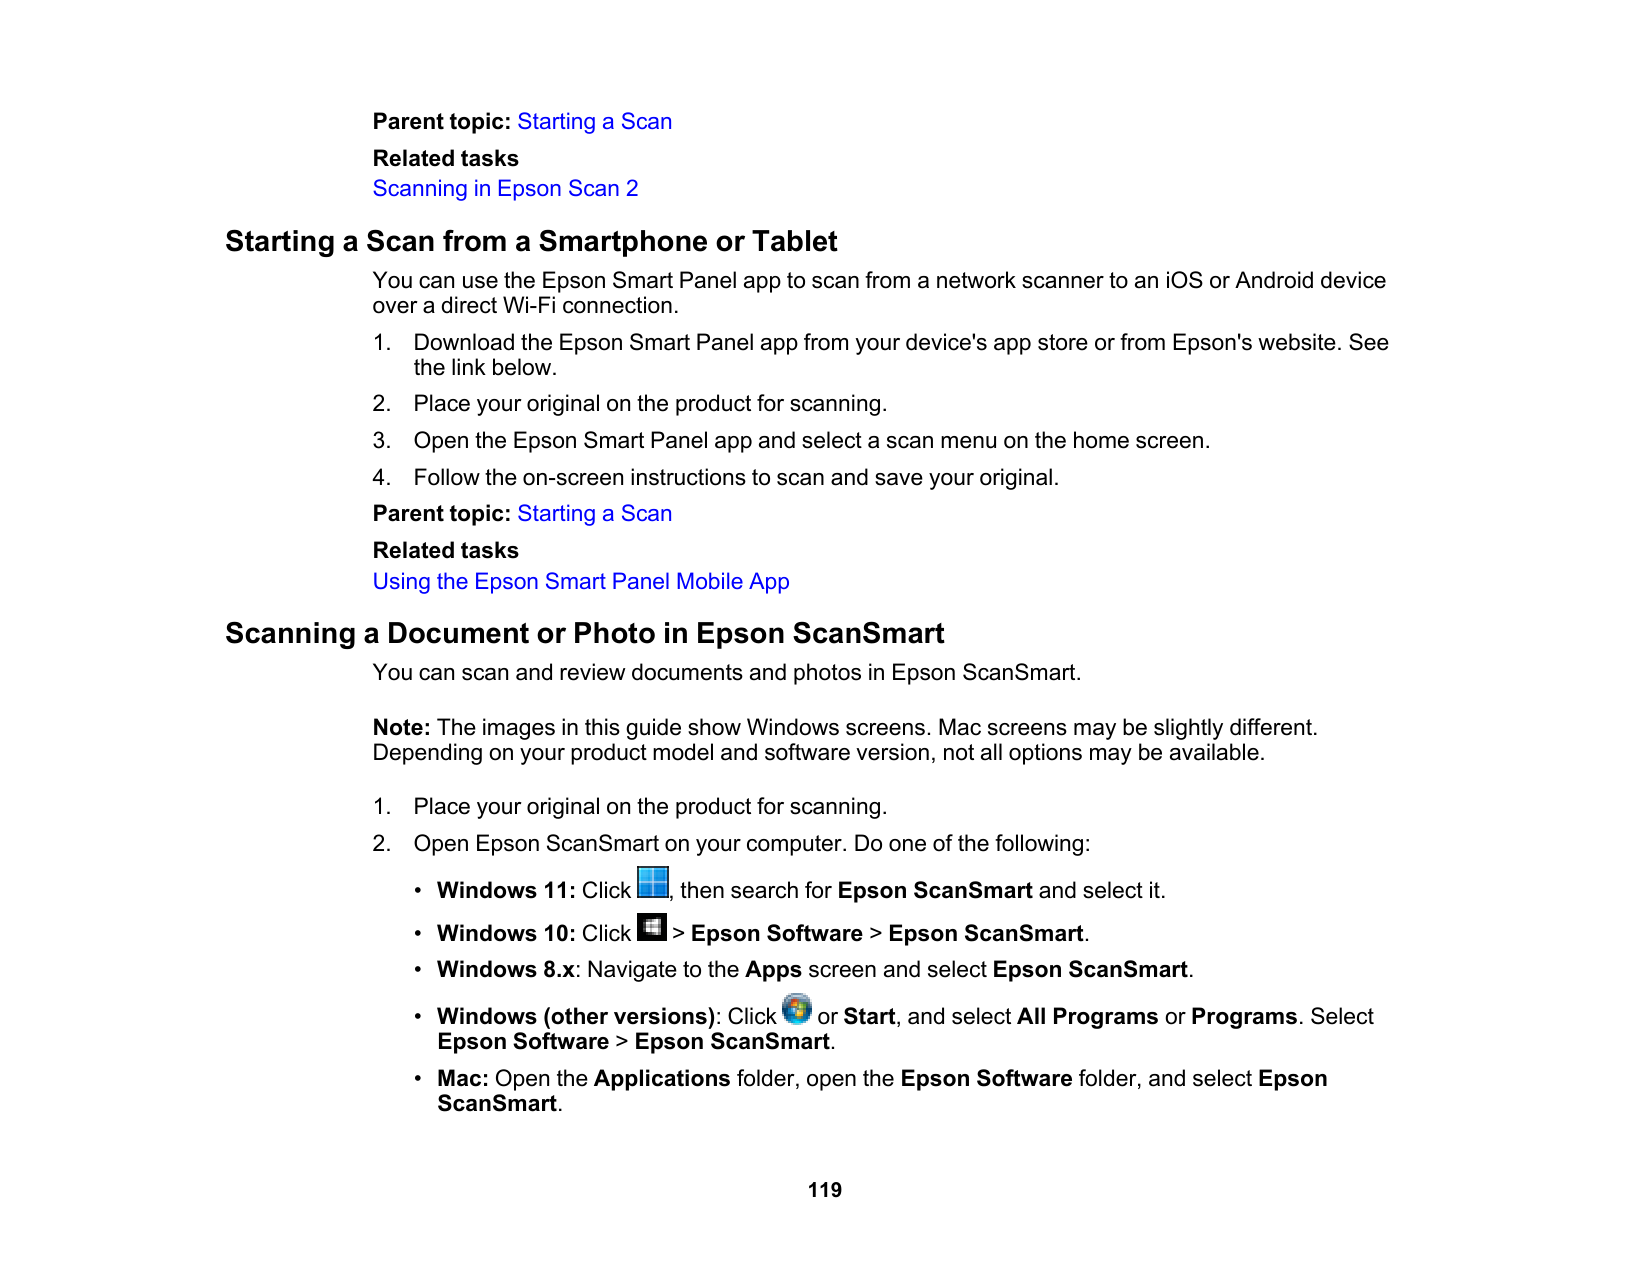
119 Parent topic: Starting a Scan Related tasks Scanning in Epson Scan 2 Starting a Scan from a Smartphone or Tablet You can use the Epson Smart Panel app to scan from a network scanner to an iOS or Android device over a direct Wi-Fi connection.
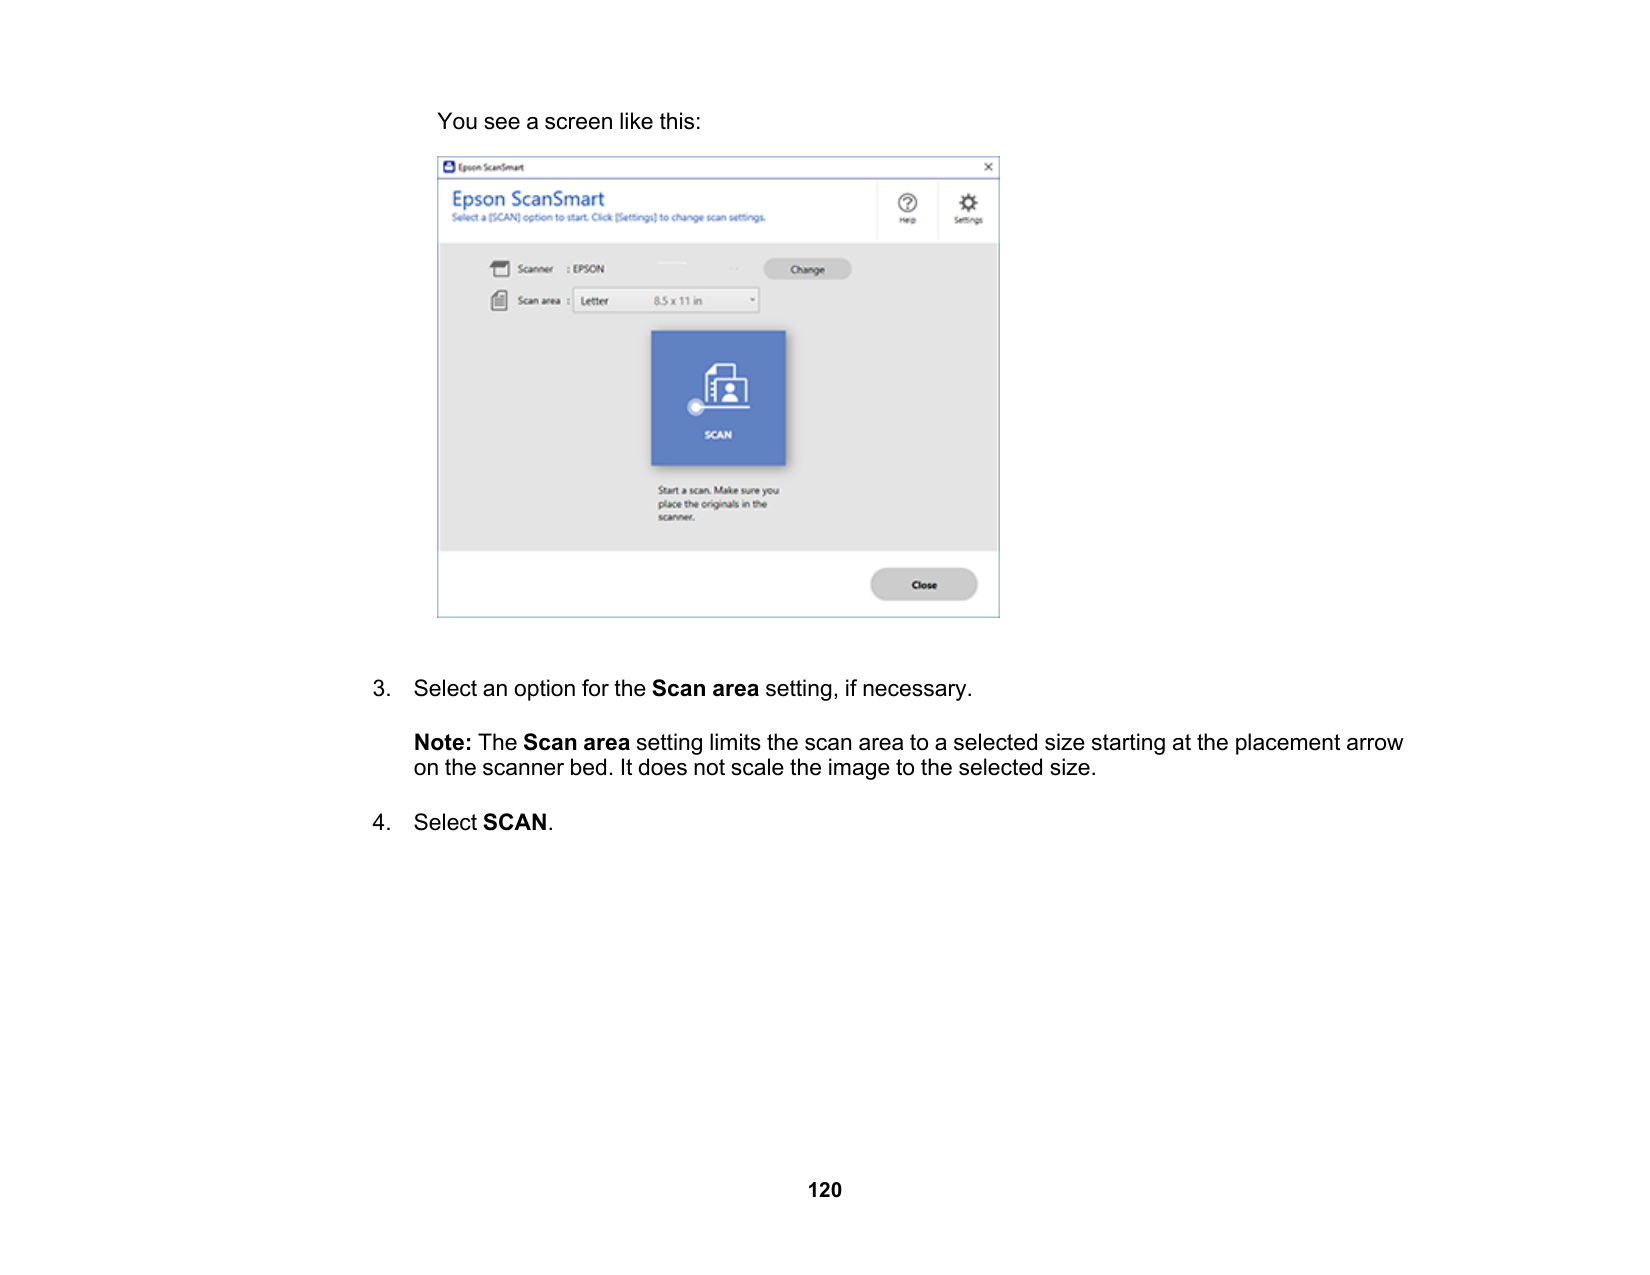
120 You see a screen like this:

121 The original is scanned. When scanning is complete, you see a screen like this: Note: To change between document or photo editing options, select Change Mode.
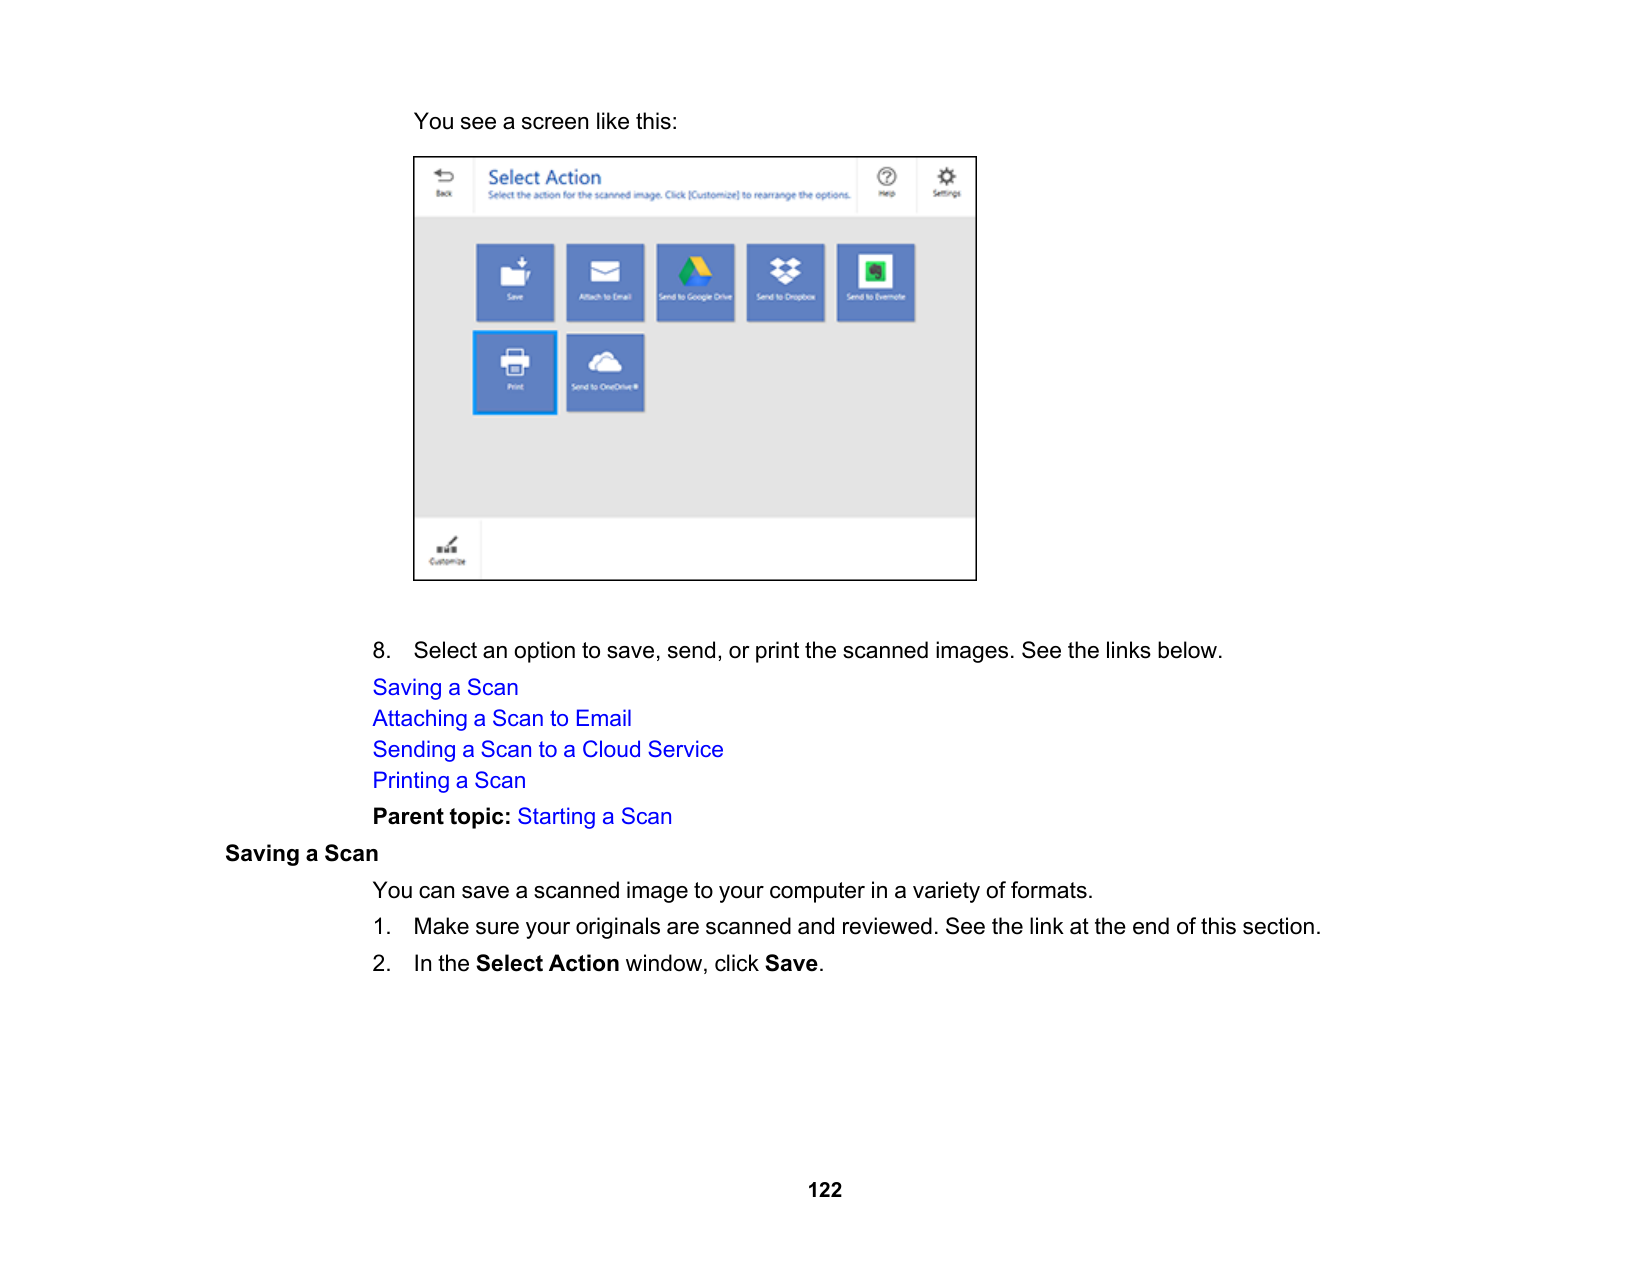
122 You see a screen like this:
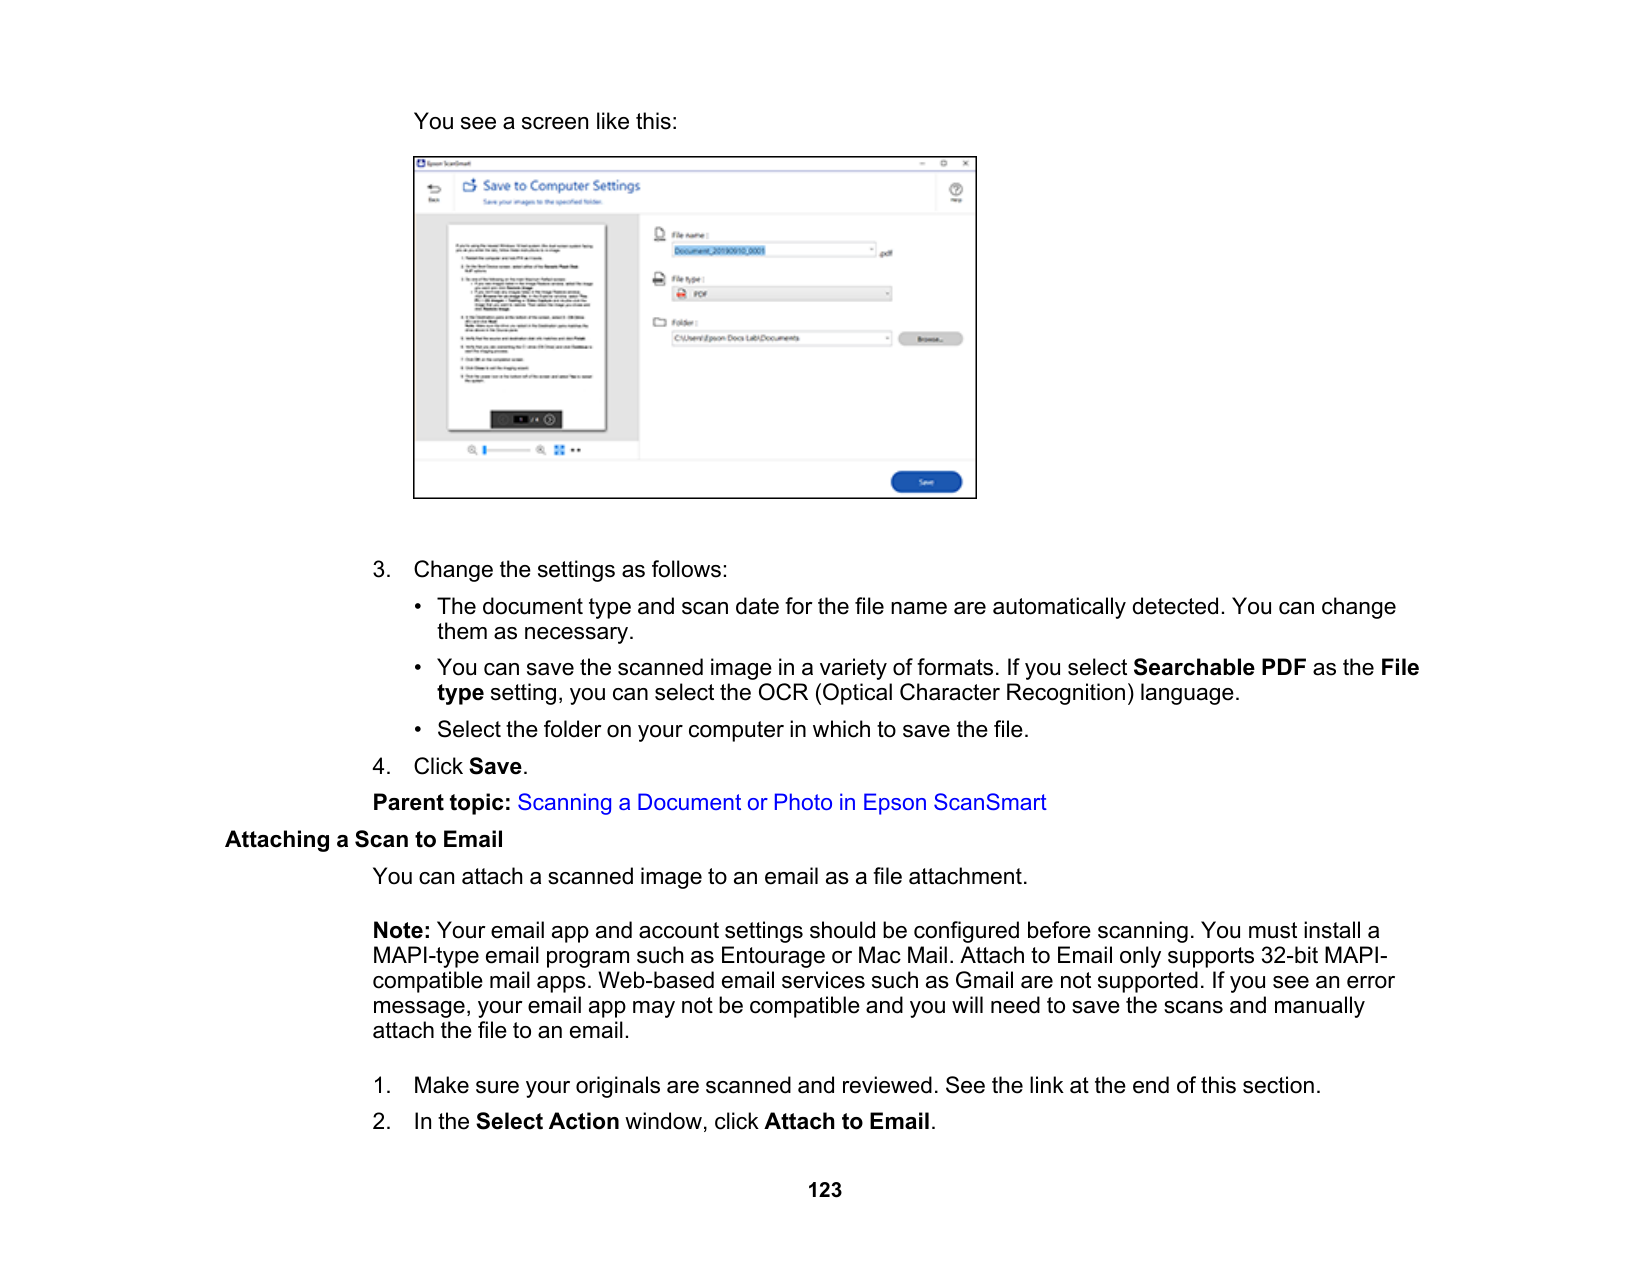
123 You see a screen like this:
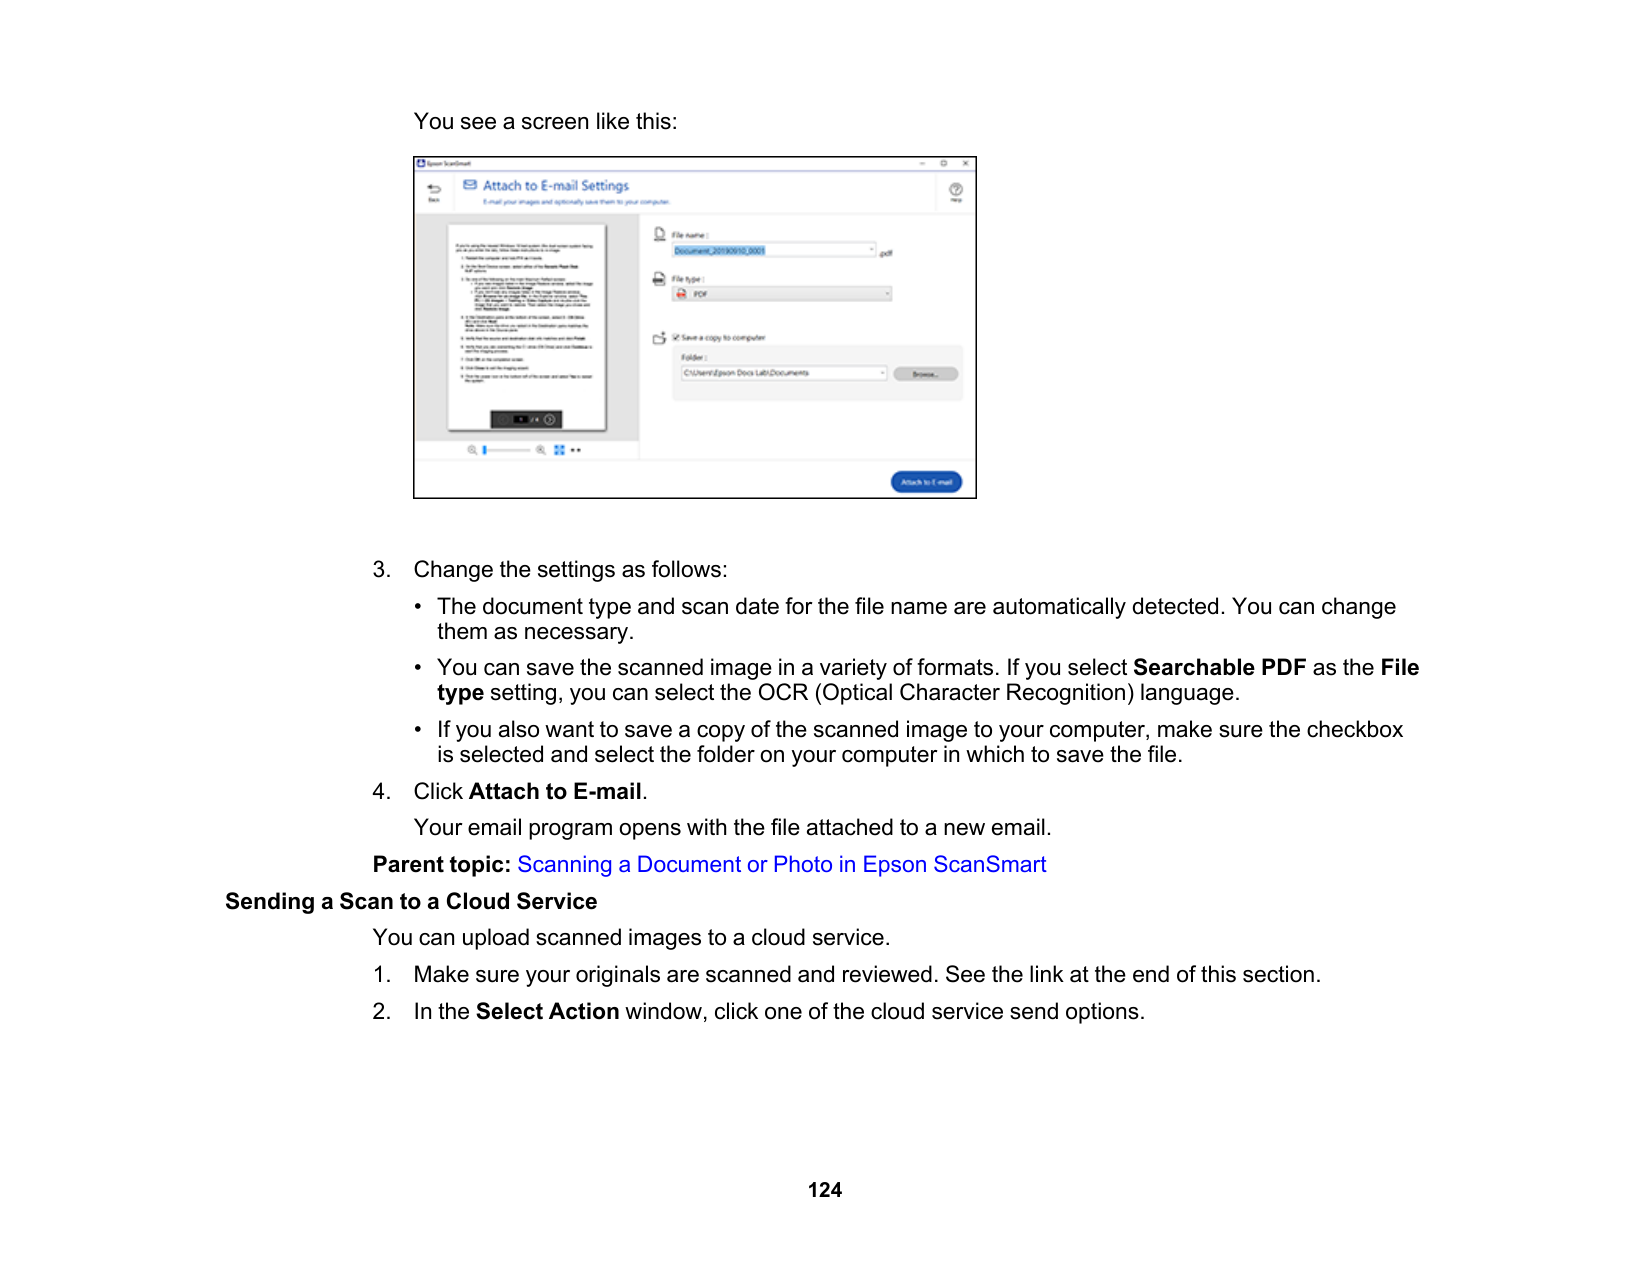
124 You see a screen like this:
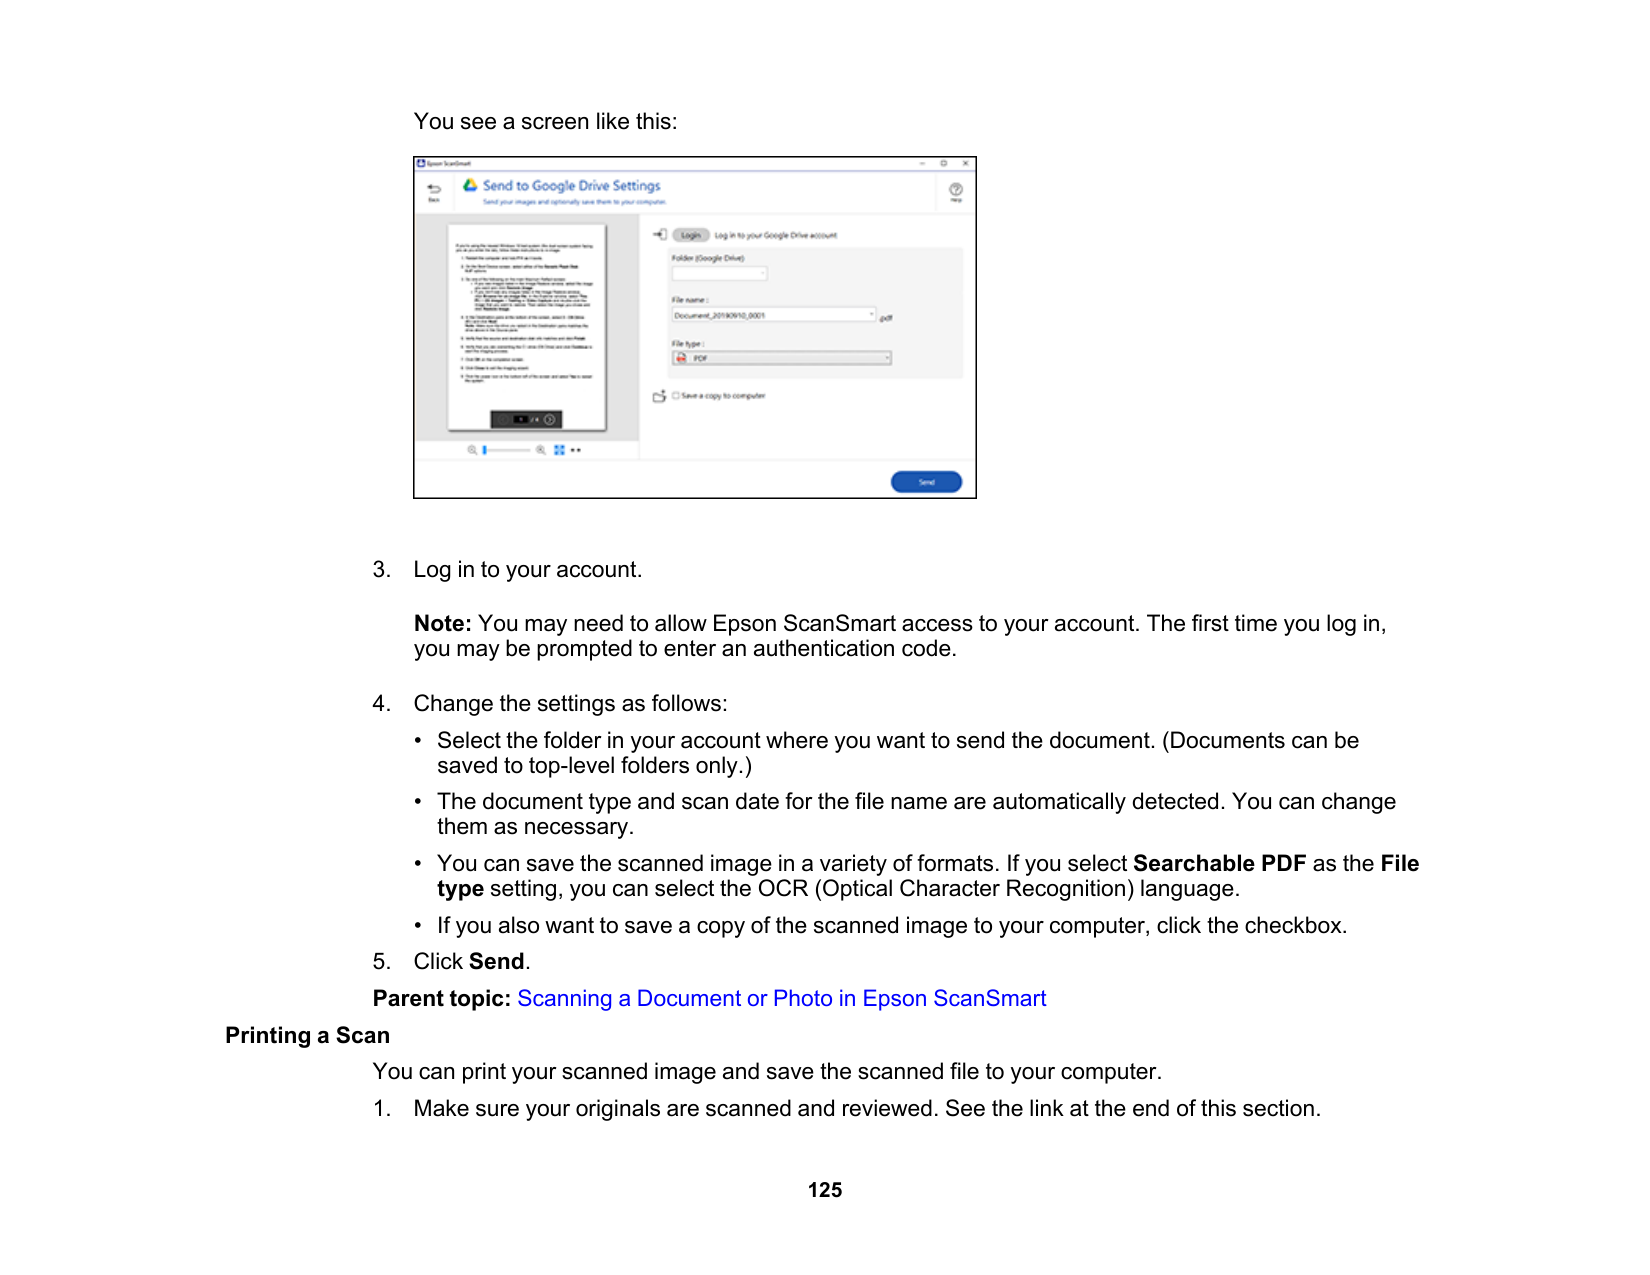
125 You see a screen like this:
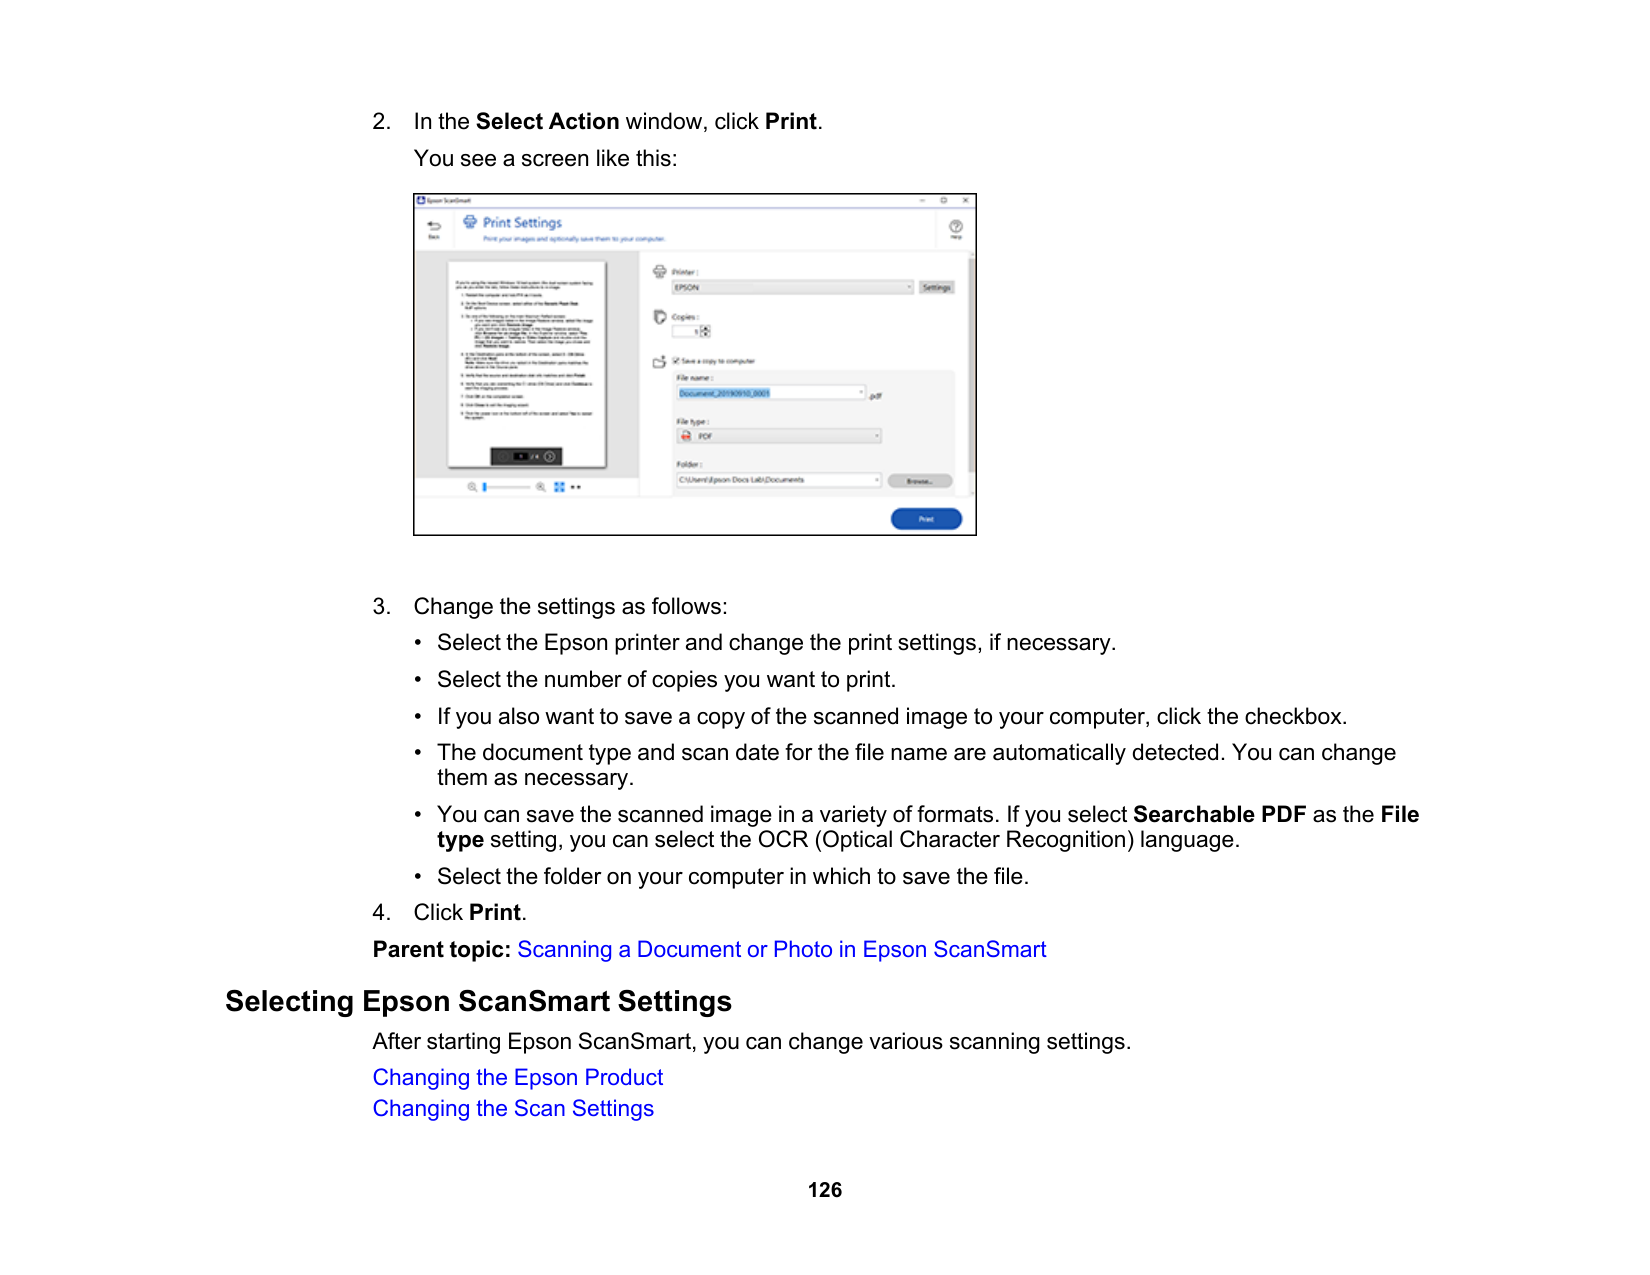
126
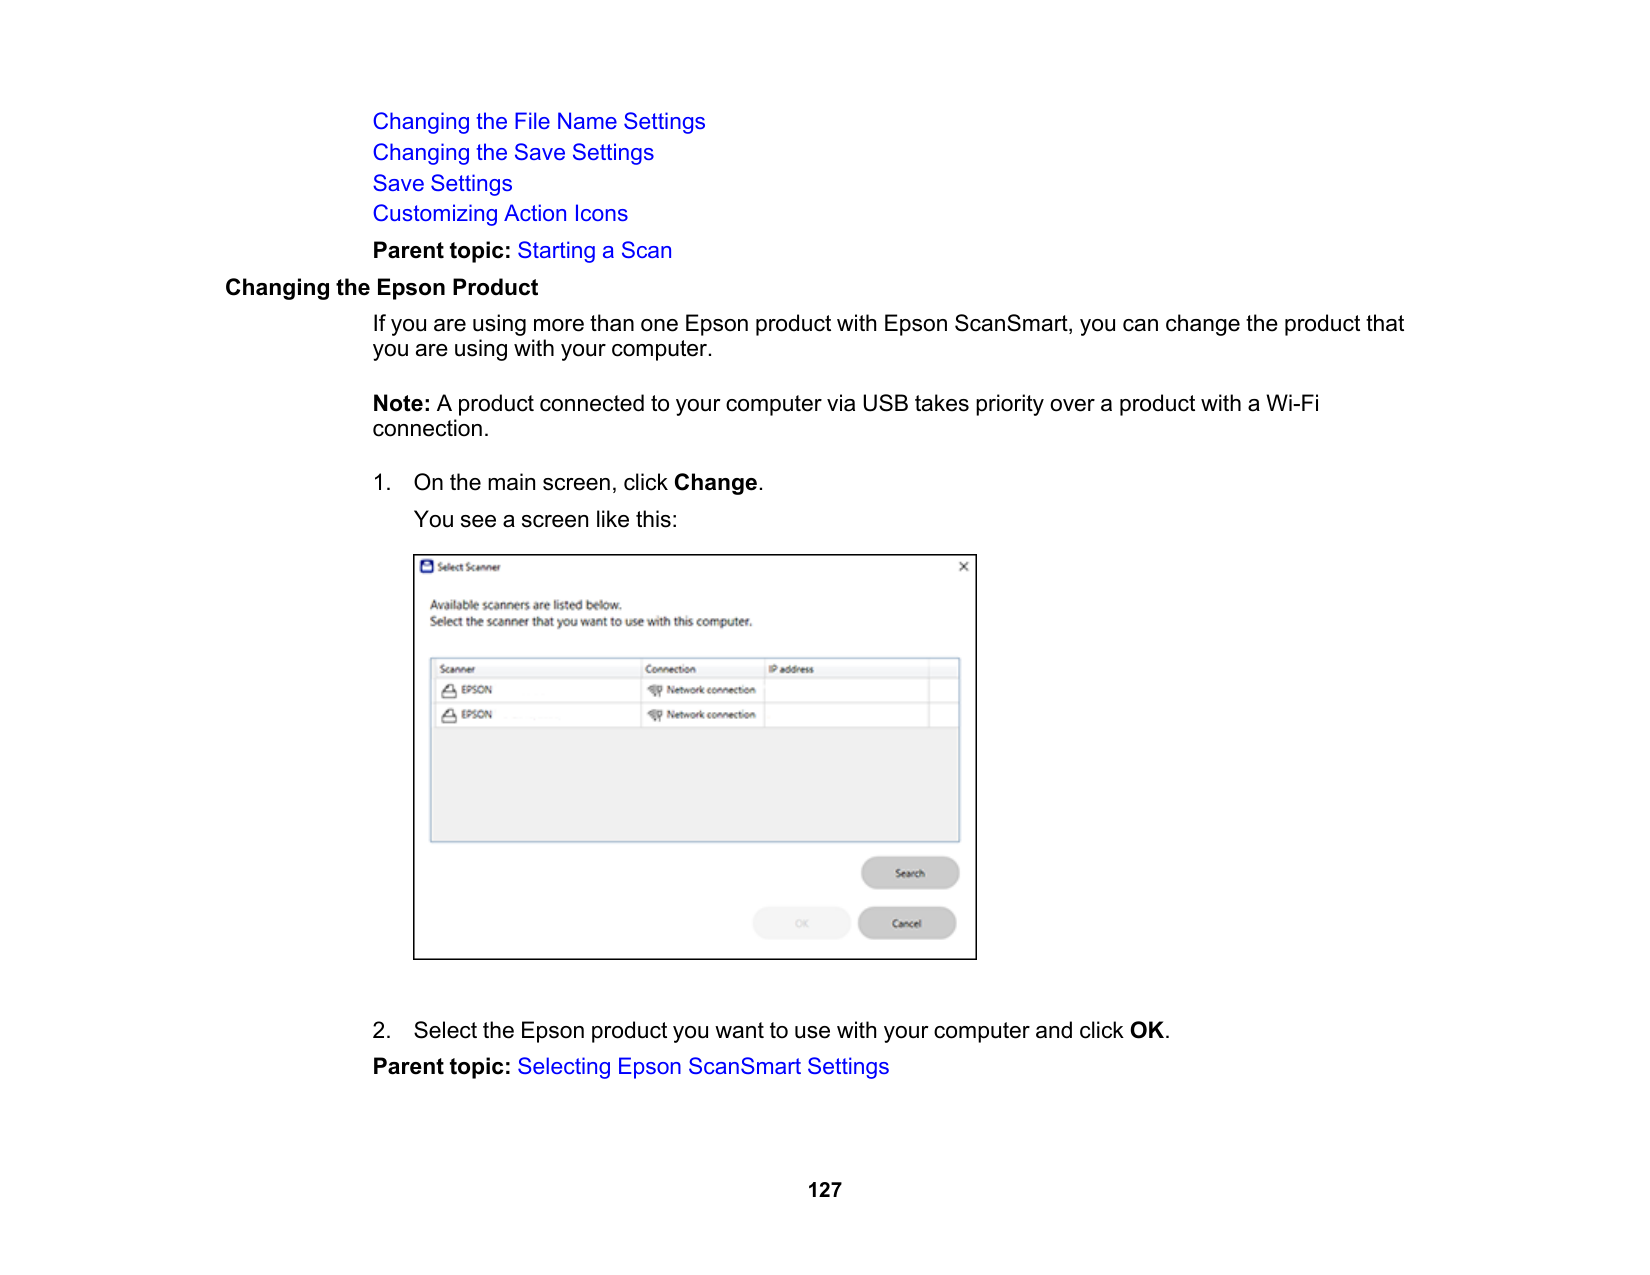
127 Changing the File Name Settings Changing the Save Settings Save Settings Customizing Action Icons Parent topic: Starting a Scan Changing the Epson Product If you are using more than one Epson product with Epson ScanSmart, you can change the product that you are using with your computer. Note: A product connected to your computer via USB takes priority over a product with a Wi-Fi connection.

128 Changing the Scan Settings You can change detailed scan settings such as the resolution, document size, and more. Note: If you select Auto Mode, you cannot change the scan settings.

129 You see a screen like this:
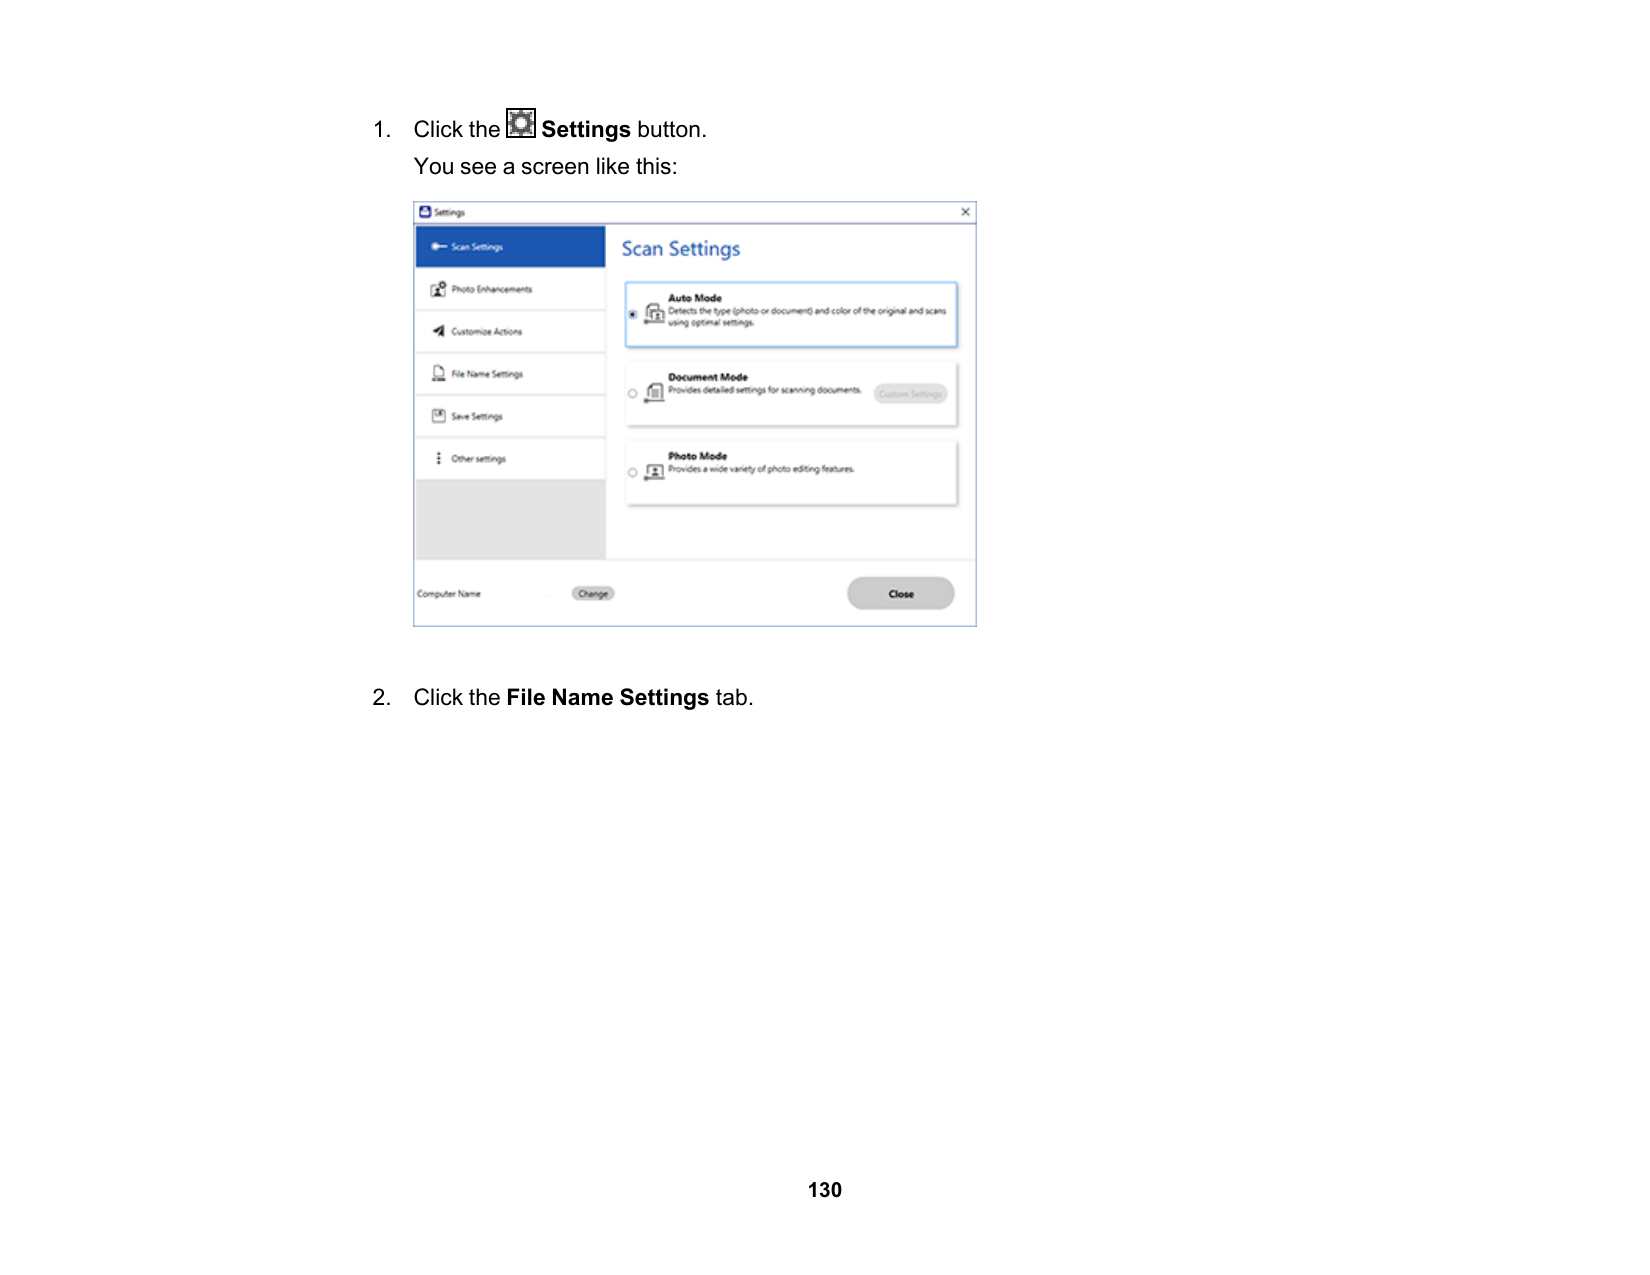
130
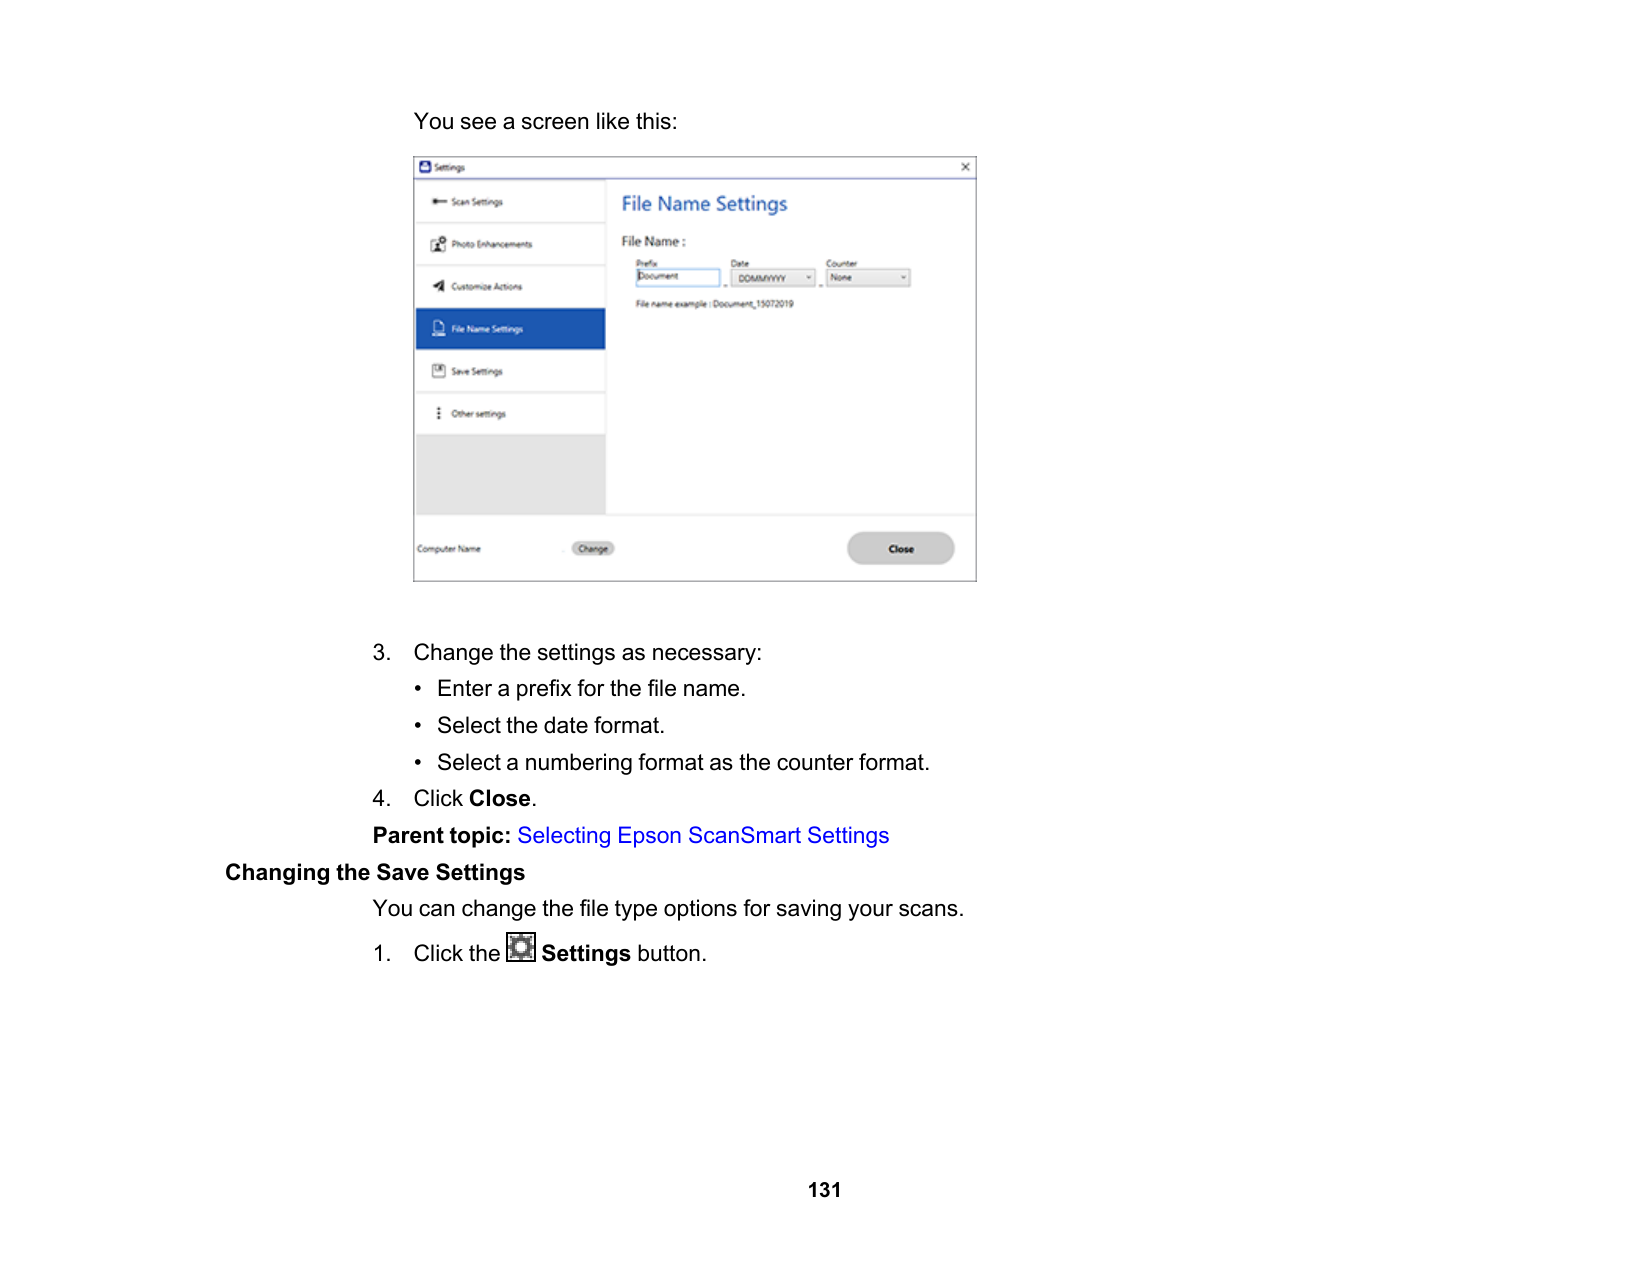
131 You see a screen like this:

132 You see a screen like this:
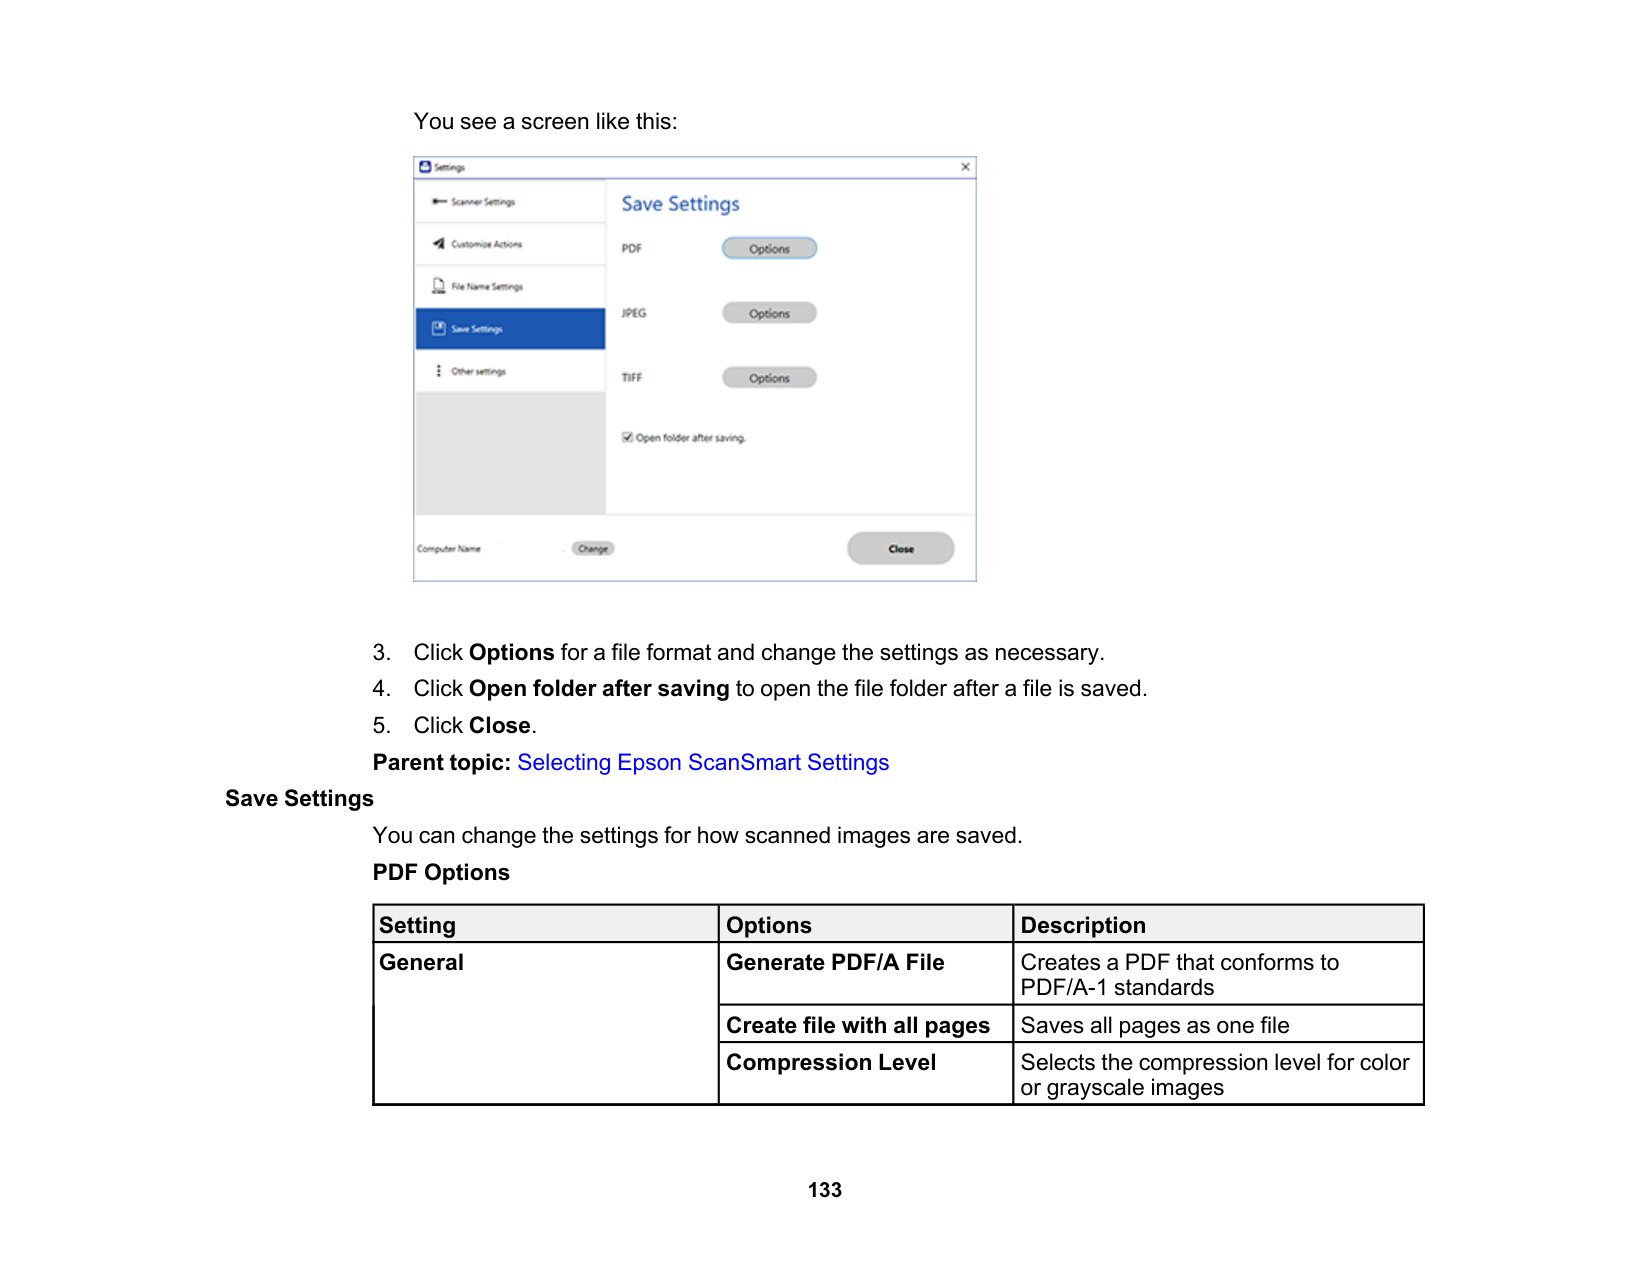
133 You see a screen like this:
134 JPEG Options Setting Options Description Image Quality Options — Sets a compression level by moving a slider or entering a value. File size increases the higher the resolution is. Encoding (Windows only) Standard Images load from top to bottom in a web browser. It takes longer to load the entire image. Progressive Images first load completely at low resolution and then adjust to high resolution in a web browser Embed ICC Profile (Windows only) — Allows you to add ICC profiles to the image TIFF Options Setting Options Description Byte Order Windows Macintosh Specifies the operating system where the scanned image will be used Compression (Windows only) — Specifies the compression format and level for Color/Grayscale and B&W images. File size increases with higher quality. Embed ICC Profile (Windows only) — Allows you to add ICC profiles to the image Parent topic: Selecting Epson ScanSmart Settings Customizing Action Icons You can customize which scan action icons appear on the Select Action screen. Note: You can also customize them by clicking the Customize icon on the Select Action screen.
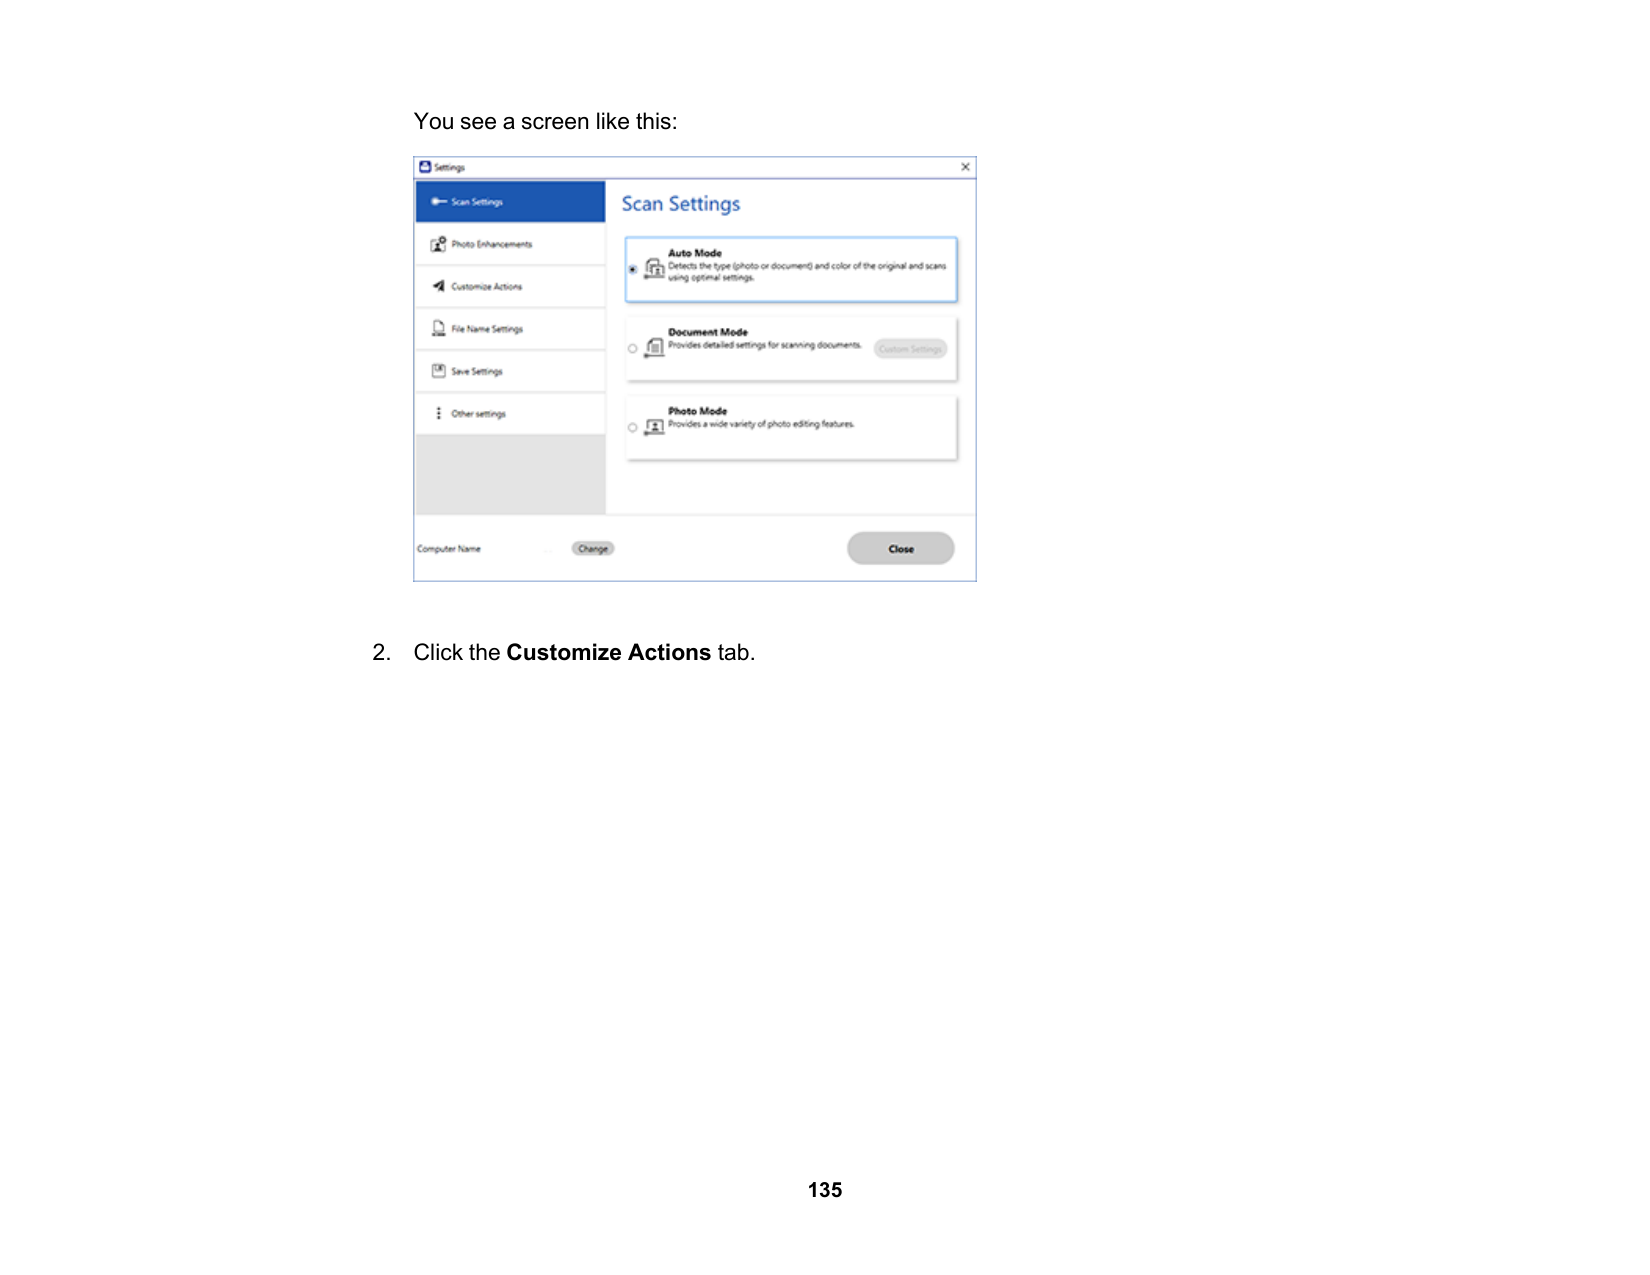
135 You see a screen like this:
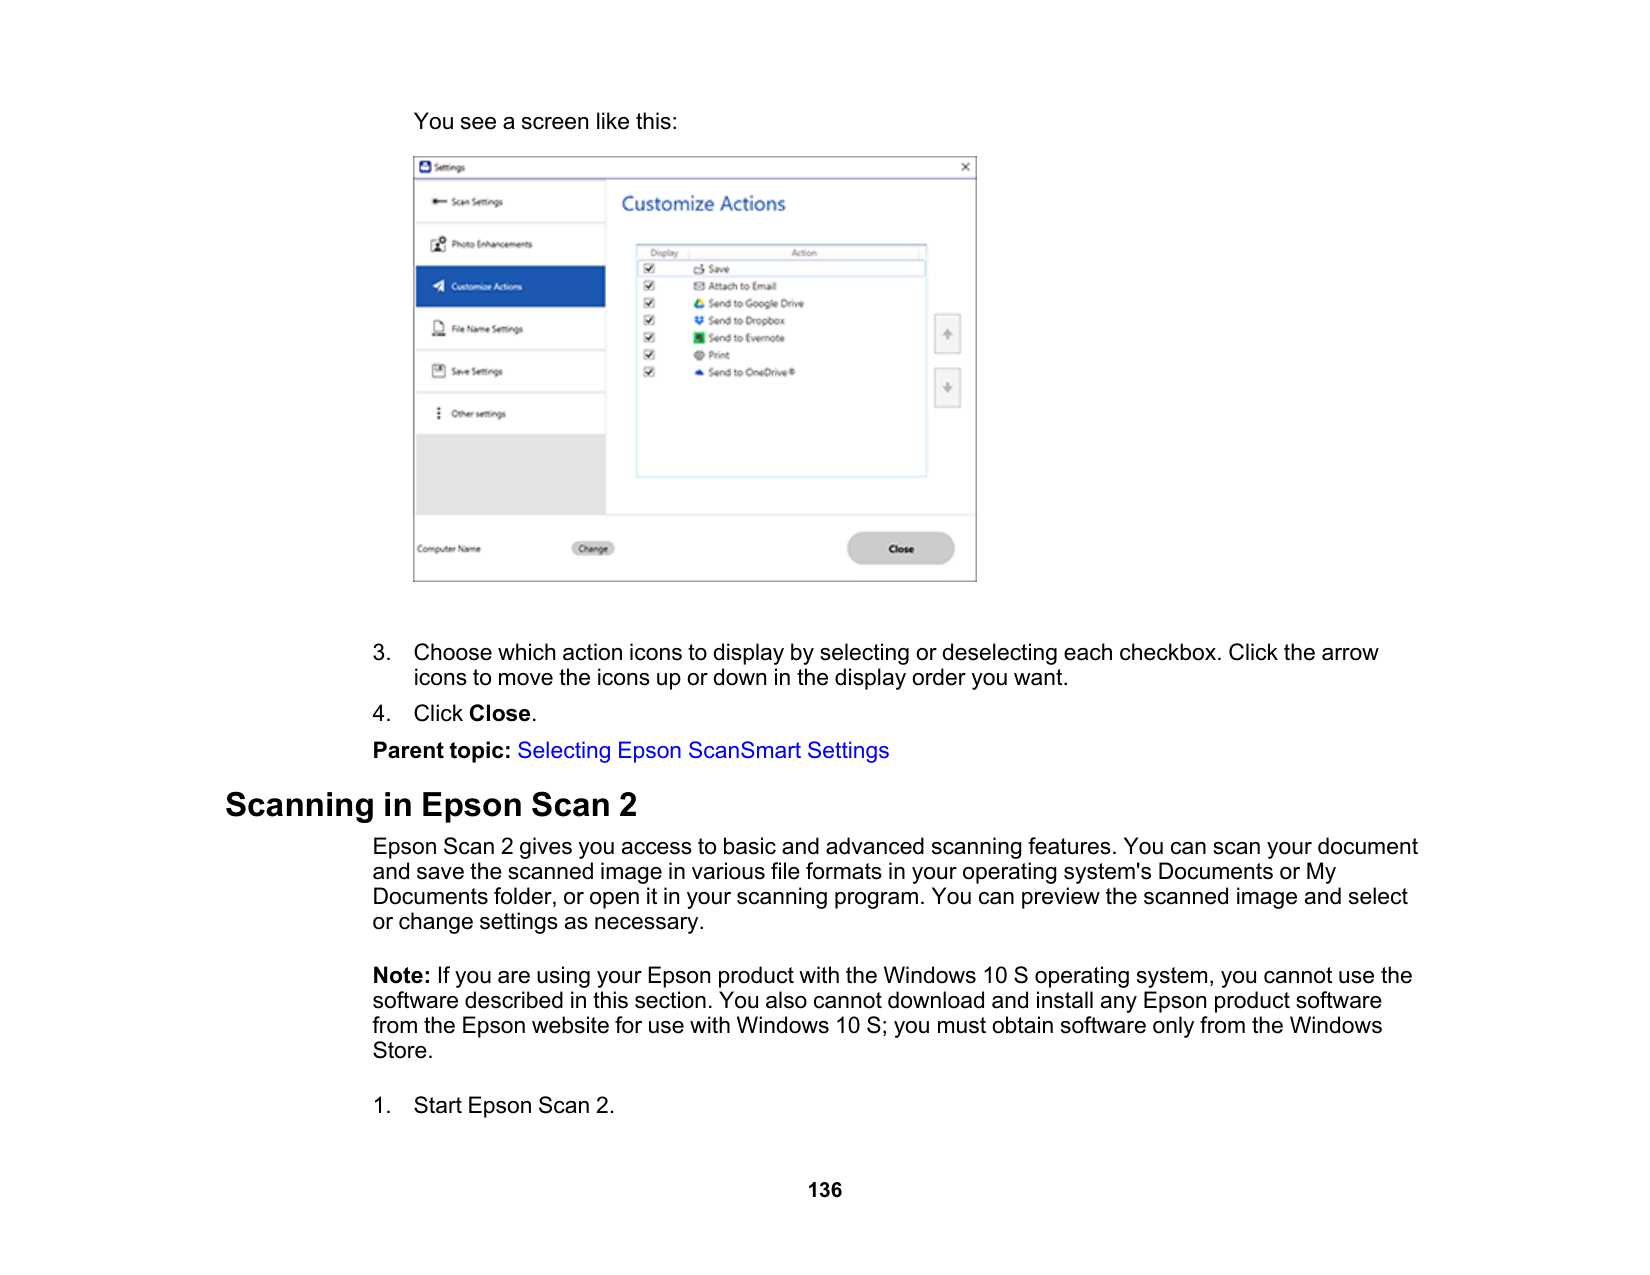
136 You see a screen like this:
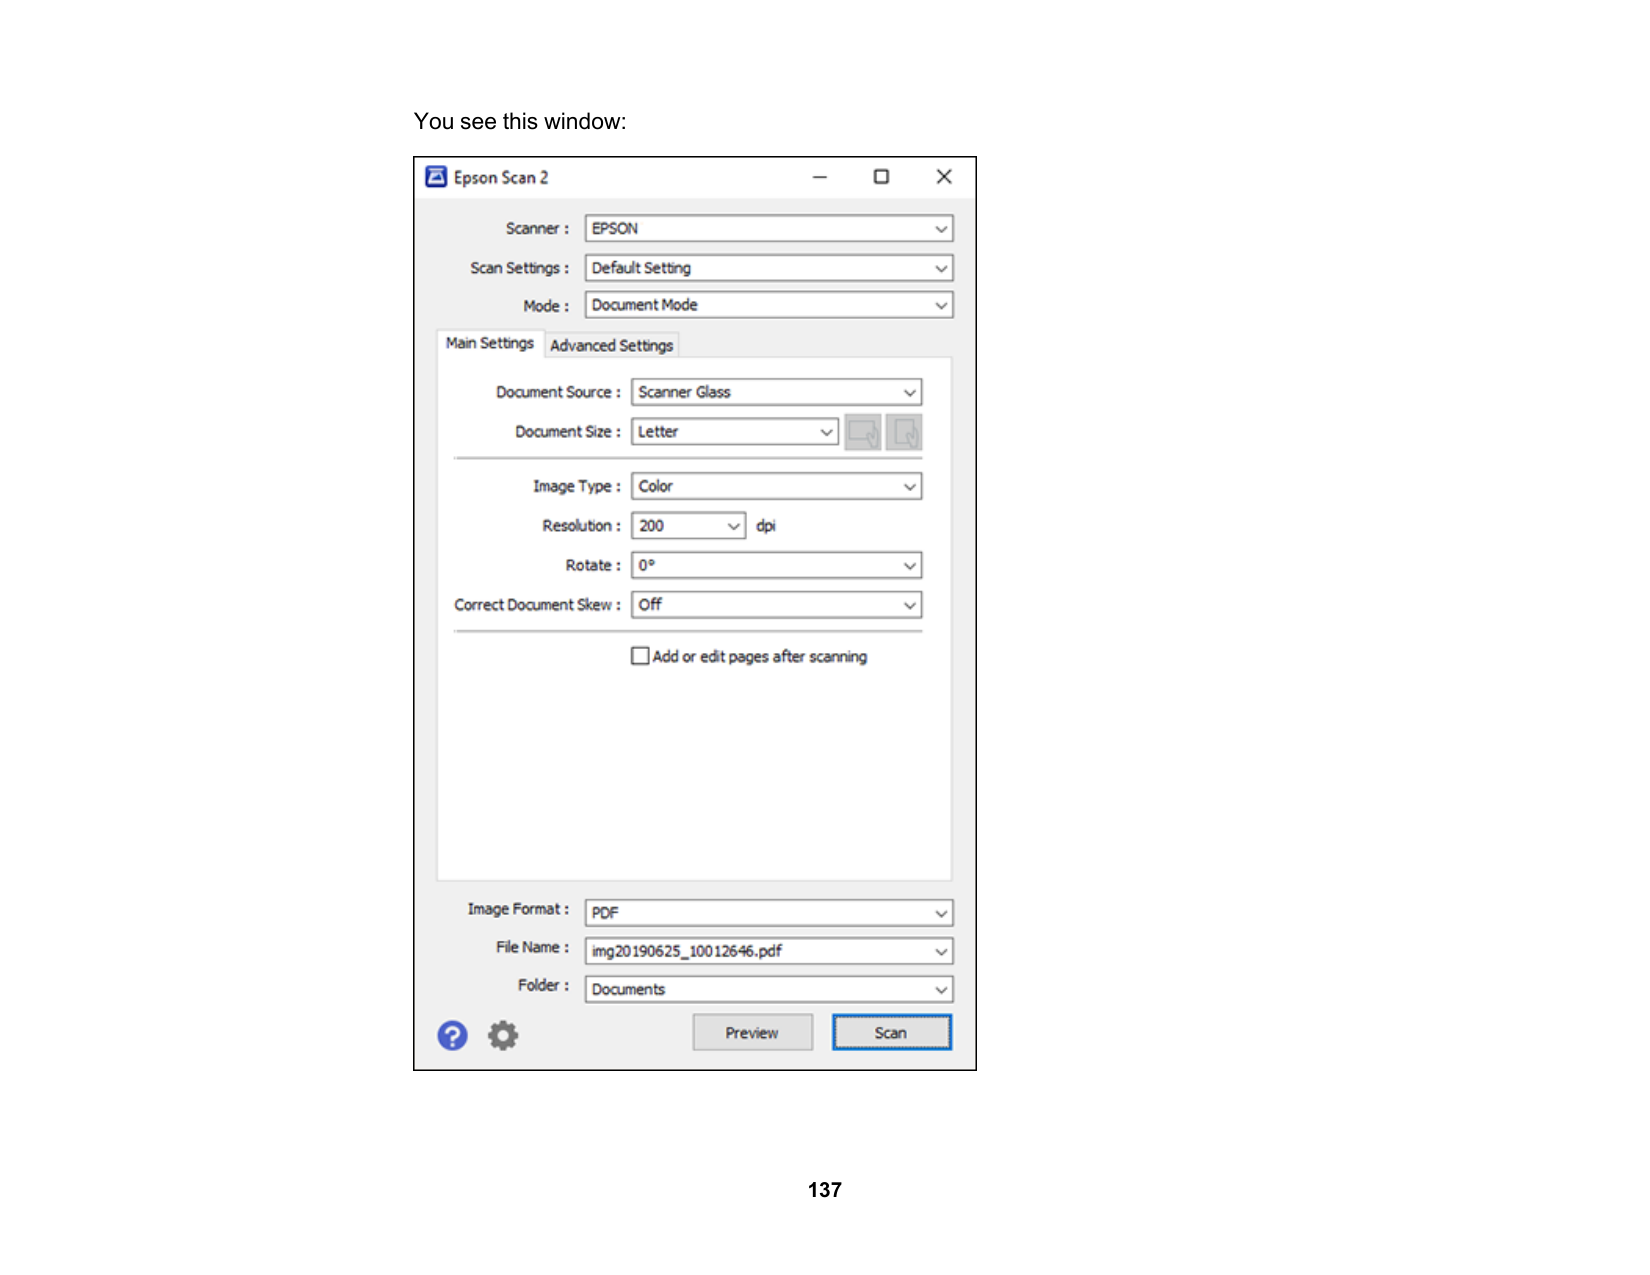
137 You see this window:

138

139

140 Text Enhancement Sharpens the appearance of letters in text documents. Auto Area Segmentation Makes black and white images clearer and text recognition more accurate by separating the text from the graphics. Threshold Adjusts the level at which black areas in text and line art are delineated, improving text recognition in OCR (Optical Character Recognition) programs. Color Enhance Enhances the shades of the color you select in the scanned image. This setting is available only if you select Grayscale or Black & White as the Image Type setting. Brightness Adjusts the overall lightness and darkness of the scanned image. Contrast Adjusts the difference between the light and dark areas of the overall scanned image. Gamma Adjusts the midtone density of the scanned image. Unsharp Mask Makes the edges of certain image areas clearer. Turn off this option to leave softer edges. Descreening Removes the ripple pattern that might appear in subtly shaded image areas, such as skin tones. This option improves results when scanning magazines or newspapers. (The results of descreening do not appear in the preview image, only in your scanned image.) Color Restoration Corrects color in faded images (when scanning in Photo Mode). Backlight Correction Lightens darkly backlit images (when scanning in Photo Mode). Dust Removal Removes dust on scanned images (when scanning in Photo Mode). Edge Fill Corrects shadowing around the edges of the image by filling the shadows with black or white. Dual Image Output Scans the original image twice using different output settings (Windows only). Parent topic: Scanning in Epson Scan 2

141 Saving Scanned Documents as a Searchable PDF Using Epson Scan 2 You can scan a document and save the text in a searchable PDF. In a searchable PDF, text is recognized using Optical Character Recognition (OCR) and then embedded in the scanned original. Note: The required Epson Scan 2 OCR Component is installed automatically when you install your product software from the CD included with your product. If you are downloading your product's software, you must download and install the required Epson Scan 2 OCR Component to scan using OCR with Epson Scan 2. Select Epson Software Updater in the Windows Start menu or Mac Epson Software folder, and select the component and PDF extension files to download and install them.

142

143 Parent topic: Scanning in Epson Scan 2 Scan Resolution Guidelines The Resolution setting, measured in dpi (dots per inch), controls the amount of detail captured in your scans. Increasing the resolution raises the amount of detail captured but comes with the following disadvantages:

144 Refilling Ink When the ink level is below the lower line on an ink tank, you need to refill it. Periodically check the ink tanks to see if they need to be refilled. Before checking the ink levels or refilling an ink tank as described here, be sure to read the ink safety precautions. Caution: If the ink level is below the lower line on the ink tank, fill it to the upper line on the ink tank. Continued use of the product when the ink level is below the lower line on a tank could damage the product. Ink Safety Precautions Check Ink Levels Purchase Epson Ink Refilling the Ink Tanks Ink Safety Precautions Note: Epson strongly recommends the use of genuine ink to ensure optimal print quality and performance. Note: The product has a low ink alert system. The accuracy of this system depends on the user refilling the ink tanks correctly. The product cannot directly measure the ink levels in the tanks; instead it estimates the amount of ink remaining by internally monitoring ink usage. The low ink alert system may generate inaccurate messages if the ink tanks are not refilled according to these instructions. As a precaution, perform regular visual inspections of the ink tanks to ensure ink levels do not fall below the lower line. Continued use of the product when the ink level is below the lower line on the tank could damage the product. Ink Handling Precautions
145

146

147 Checking Ink Levels on Your Product To confirm the actual ink levels, visually check the ink levels in the product’s ink tanks. Make sure the ink levels are above the lower lines on the ink tanks. Note: The product has a low ink alert system. The accuracy of this system depends on the user refilling the ink tanks correctly. The product cannot directly measure the ink levels in the tanks; instead it estimates the amount of ink remaining by internally monitoring ink usage. The low ink alert system may generate inaccurate messages if the ink tanks are not refilled according to these instructions. As a precaution, perform regular visual inspections of the ink tanks to ensure ink levels do not fall below the lower line. Continued use of the product when the ink level is below the lower line on the tank could damage the product. Parent topic: Check Ink Levels Related references Ink Safety Precautions Related tasks Refilling the Ink Tanks Checking Ink Levels - Windows A low ink reminder appears if you try to print when ink is low, and you can check your ink levels at any time using a utility on your Windows computer.

148 You see a window like this:

149

150
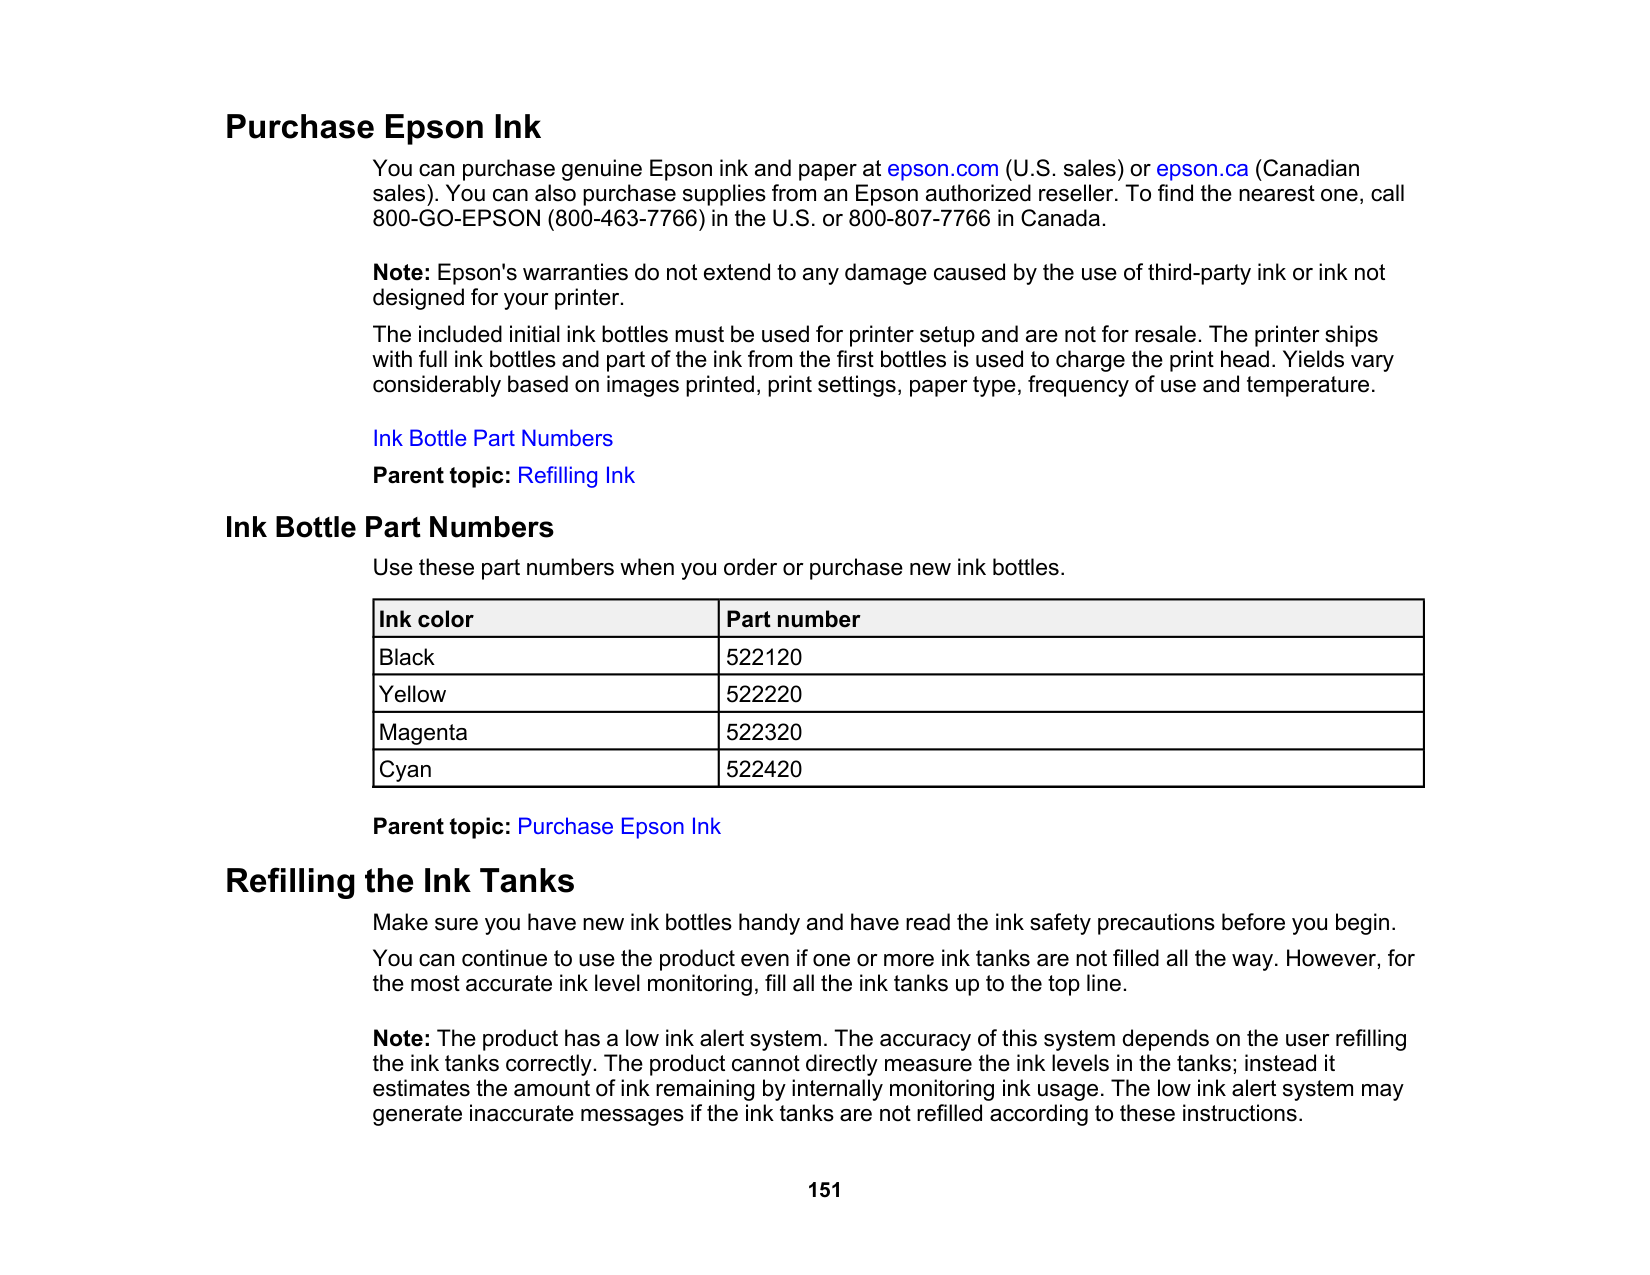
151 Purchase Epson Ink You can purchase genuine Epson ink and paper at epson.com (U.S. sales) or epson.ca (Canadian sales). You can also purchase supplies from an Epson authorized reseller. To find the nearest one, call 800-GO-EPSON (800-463-7766) in the U.S. or 800-807-7766 in Canada. Note: Epson's warranties do not extend to any damage caused by the use of third-party ink or ink not designed for your printer. The included initial ink bottles must be used for printer setup and are not for resale. The printer ships with full ink bottles and part of the ink from the first bottles is used to charge the print head. Yields vary considerably based on images printed, print settings, paper type, frequency of use and temperature. Ink Bottle Part Numbers Parent topic: Refilling Ink Ink Bottle Part Numbers Use these part numbers when you order or purchase new ink bottles. Ink color Part number Black 522120 Yellow 522220 Magenta 522320 Cyan 522420 Parent topic: Purchase Epson Ink Refilling the Ink Tanks Make sure you have new ink bottles handy and have read the ink safety precautions before you begin. You can continue to use the product even if one or more ink tanks are not filled all the way. However, for the most accurate ink level monitoring, fill all the ink tanks up to the top line. Note: The product has a low ink alert system. The accuracy of this system depends on the user refilling the ink tanks correctly. The product cannot directly measure the ink levels in the tanks; instead it estimates the amount of ink remaining by internally monitoring ink usage. The low ink alert system may generate inaccurate messages if the ink tanks are not refilled according to these instructions.

152 As a precaution, perform regular visual inspections of the ink tanks to ensure ink levels do not fall below the lower line. Continued use of the product when the ink level is below the lower line on the tank could damage the product. Caution: Wear disposable gloves while refilling the ink tanks to avoid staining your hands. If ink spills, wipe it off immediately with a damp towel to avoid permanent stains. If ink gets on your clothes or belongings, it may not come off.

153

154 Caution: Do not shake or squeeze the bottle. Do not touch the top of the bottle after its cap is removed. Do not allow the top of the ink bottle to hit any objects after removing its cap; otherwise, ink may spill. Warning: If ink gets on your skin, wash it thoroughly with soap and water. If ink gets into your eyes, flush them immediately with water. If discomfort or problems persist, see a doctor immediately. If ink gets into your mouth, spit it out and see a doctor right away. Keep the ink bottles out of the reach of children and do not drink the ink.

155

156

157 Parent topic: Refilling Ink Related concepts Purchase Epson Ink Related references Ink Safety Precautions Related tasks Checking Ink Levels on Your Product

158 Adjusting Print Quality If your print quality declines, you may need to run a utility to clean or align the print head. If running these utilities does not solve the problem, you may need to run a Power Cleaning or clean the paper path. Print Head Maintenance Print Head Alignment Cleaning the Paper Guide Checking the Number of Sheets Fed Print Head Maintenance If your printouts become too light, or you see dark or light bands across them, you may need to clean the print head nozzles. Cleaning uses ink, so clean the nozzles only if print quality declines. You can check for clogged nozzles before you clean them so you don’t clean them unnecessarily. Note: You cannot clean the print head if the ink level has reached the lower line on the ink tank, and may not be able to clean it when the ink level in any of the tanks is low. You must refill the ink tank first. If you still see white or dark lines or gaps in your printouts, even after cleaning the print head several times, you can run a Power Cleaning. Print Head Nozzle Check Print Head Cleaning Power Cleaning Parent topic: Adjusting Print Quality Related topics Refilling Ink Print Head Nozzle Check You can print a nozzle check pattern to check for clogged nozzles. Checking the Nozzles Using the Product Control Panel Checking the Nozzles Using a Computer Utility Parent topic: Print Head Maintenance

159 Checking the Nozzles Using the Product Control Panel You can check the print head nozzles using the control panel on your product.

160

161

162 You see a window like this:

163

164

165

166 You see a message on the LCD screen and the power light flashes throughout the cleaning cycle. When the cleaning cycle is finished, the power light stays on and you see a message on the LCD screen.

167

168

169 You see a window like this:

170

171

172 Power Cleaning Using the Product Control Panel You can run a Power Cleaning using the control panel on your product. Note: After a Power Cleaning, you must wait at least 12 hours before running another Power Cleaning.

173 If the print quality does not improve after running the Power Cleaning utility multiple times, contact Epson for support. Parent topic: Power Cleaning Related references Where to Get Help Related tasks Checking the Nozzles Using the Product Control Panel Loading Paper in the Rear Paper Feeder Related topics Refilling Ink Power Cleaning Using a Computer Utility You can run a Power Cleaning using a utility on your Windows or Mac computer.

174 You see a window like this:

175 Related topics Refilling Ink Print Head Alignment If your printouts become grainy or blurry, you notice misalignment of vertical lines, or you see dark or light horizontal bands, you may need to align the print head. Note: Banding may also occur if your print head nozzles need cleaning. Aligning the Print Head Using the Product Control Panel Parent topic: Adjusting Print Quality Related concepts Print Head Cleaning Related tasks Loading Paper in the Rear Paper Feeder Aligning the Print Head Using the Product Control Panel You can align the print head using the control panel on your product.

176 You see a screen like this:

177

178
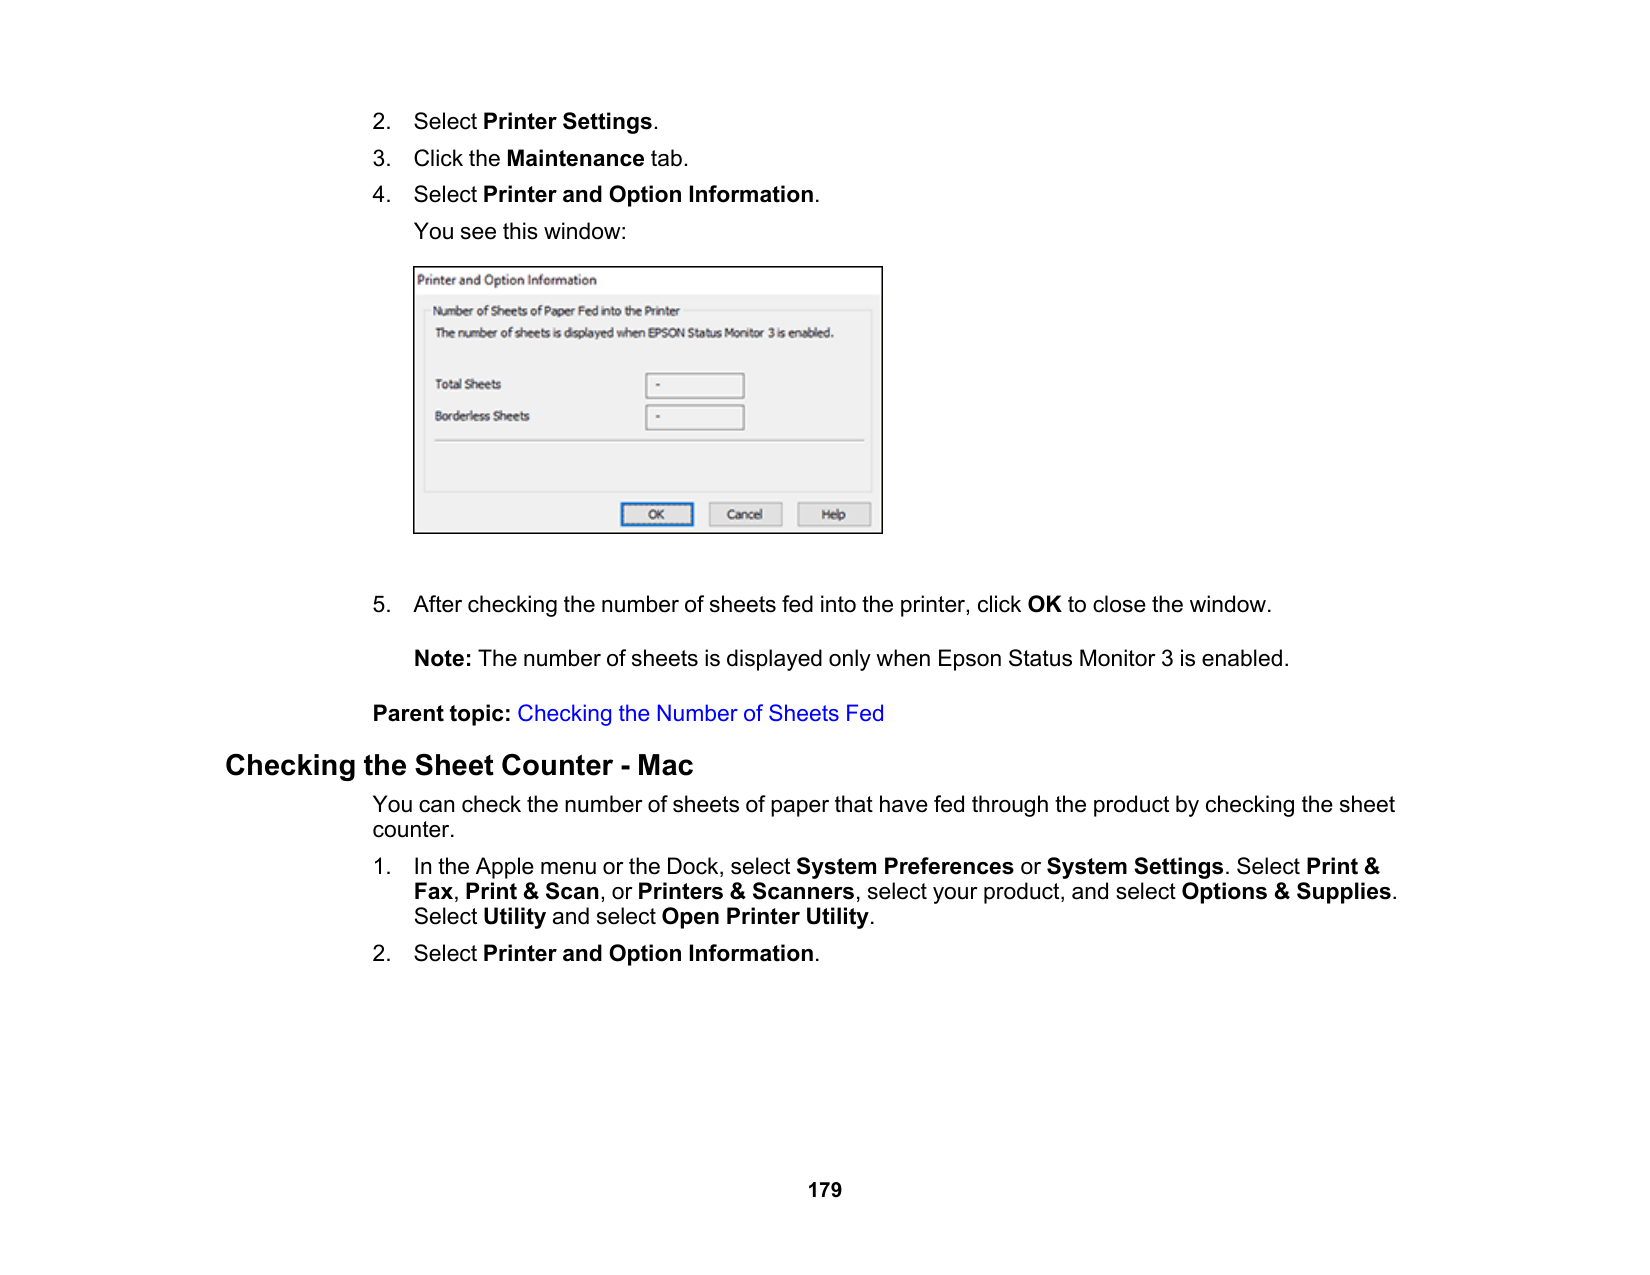
179

180 You see this window:

181 Cleaning and Transporting Your Product See these sections if you need to clean or transport your product. Cleaning Your Product Transporting Your Product Cleaning Your Product To keep your product working at its best, you should clean it several times a year. Caution: Do not use a hard brush, alcohol, or paint thinner to clean the product or you may damage it. Do not use oil or other lubricants inside the product or let water get inside it.

182

183

184

185
186 Solving Problems Check these sections for solutions to problems you may have using your product. Checking for Software Updates Product Status Messages Message Appears Prompting You to Reset Ink Levels Running a Product Check Resetting Control Panel Defaults Solving Setup Problems Solving Network Problems Solving Copying Problems Solving Paper Problems Solving Problems Printing from a Computer Solving Page Layout and Content Problems Solving Print Quality Problems Solving Scanning Problems Solving Scanned Image Quality Problems Uninstall Your Product Software Where to Get Help Checking for Software Updates It's a good idea to check Epson's support website occasionally for free updates to your product software. Visit epson.com/support (U.S.) or epson.ca/support (Canada) and select your product.

187
(E-01)
A printer error has occurred. Turn the product off and then back on again. If the error continues, check for a paper jam. If there is no paper jam, contact Epson for support.(E-02)
A scanner error has occurred. Turn the product off and then back on again.(E-11)
An ink pad needs to be replaced. Contact Epson for support. Non-printing features such as scanning are still available.(E-12)
A borderless printing ink pad needs to be replaced. Contact Epson for support. Borderless printing is not available, but printing with a border is available.(W-01)
Paper is jammed in the product. Remove the jammed paper, then press the button indicated on the LCD screen to clear the error. If the error continues, turn the product off and back on again.(W-11)
An ink pad is nearing the end of its service life. Contact Epson for support. (To continue printing, press the start button.)(W-14)
A borderless printing ink pad is nearing the end of its service life. Contact Epson for support. (To continue printing, press the start button.)(I-22)
To establish a wireless connection using a router or access point, press the button on the router or access point, or click the button on its wireless settings screen displayed on your computer.
188 LCD code Condition/solution
(I-23)
Enter the PIN code displayed on the LCD screen into the router, access point, or computer within two minutes. If you wait longer than two minutes, a time-out error occurs, the code changes, and you must enter a new code.(I-31)
To make wireless connection settings from your computer, run the installer and follow the on-screen instructions.(I-41)
The Paper Setup Auto Display option is disabled. You must enable Paper Setup Auto Display to use AirPrint.(I-60)
Your computer may not support WSD (Web Services for Devices). The Scan to PC (WSD) function is available only for computers running English versions of Windows 11, Windows 10, Windows 8.x, Windows 7, or Windows Vista. Make sure your product is connected correctly to the computer. Recovery Mode A firmware update has failed. Connect your product using a USB cable and try updating the firmware again. If you still receive this error message, contact Epson for support. Note: The ink pads in the printer collect, distribute, and contain the ink that is not used on printed pages. During the life of your product it may reach a condition where either satisfactory print quality cannot be maintained or the ink pads have reached the end of their usable life. The Epson Status Monitor, your LCD screen, or lights on the control panel will advise you when these parts need replacing. If this happens during the standard warranty of the product, the exchange of the product or replacement of the pads is covered under the standard warranty. If the product is out of warranty, the pads can be replaced by any Epson authorized service provider. The waste ink pads are not a user-replaceable part. Parent topic: Solving Problems Related references Where to Get Help Related tasks Checking for Software Updates Related topics Solving Paper Problems Loading Paper Wi-Fi Networking
189 Message Appears Prompting You to Reset Ink Levels If you see a message on the LCD screen prompting you to reset the ink levels, do the following:

190

191
192

193

194 Solving Network Problems Check these solutions if you have problems setting up or using your product on a network. Note: Breakdown or repair of this product may cause loss of network data and settings. Epson is not responsible for backing up or recovering data and settings during or after the warranty period. We recommend that you make your own backup or print out your network data and settings. Product Cannot Connect to a Wireless Router or Access Point Network Software Cannot Find Product on a Network Product Does Not Appear in Mac Printer Window Wireless Network Connection is Unstable on a Mac Cannot Print Over a Network Cannot Scan Over a Network Parent topic: Solving Problems Product Cannot Connect to a Wireless Router or Access Point If your product has trouble finding or connecting to a wireless router or access point, try these solutions:

195 Note: If you are reading these instructions online, you will lose your Internet connection when you restart your router.

196 Printing a Network Connection Report Disabling Wi-Fi Features Related topics Wi-Fi Networking Network Software Cannot Find Product on a Network If EpsonNet Setup cannot find your product on a network, try these solutions:

197

198 Cannot Print Over a Network If you cannot print over a network, try these solutions:

199

200 Windows 10: Click and select EPSON > Epson Scan 2 Utility. Make sure your product is selected. If necessary, select the Other tab and click Reset. Windows 8.x: Navigate to the Apps screen, select EPSON, and select Epson Scan 2 Utility. Make sure your product is selected. If necessary, select the Other tab and click Reset. Windows (other versions): Click or Start > All Programs or Programs > EPSON > Epson Scan 2 > Epson Scan 2 Utility. Make sure your product is selected. If necessary, select the Other tab and click Reset. Mac: Open the Applications folder, click Epson Software, and click Epson Scan 2 Utility. Make sure your product is selected. If necessary, select the Other tab and click Reset.

201 Related concepts Print Head Nozzle Check Print Head Cleaning Product Makes Noise When It Sits for a While Your product is performing routine maintenance. This is normal. Parent topic: Solving Copying Problems Copies Have Incorrect or Faint Colors If your copies have incorrect, uneven, smeared, or faint colors, try these solutions:

202 Solving Paper Problems Check these sections if you have problems using paper with your product. Paper Feeding Problems Paper Jam Problems Inside the Product Paper Ejection Problems Parent topic: Solving Problems Paper Feeding Problems If you have problems feeding paper, try these solutions:

203 Cleaning Your Product Paper Jam Problems Inside the Product If you see a message that paper has jammed inside the product, follow the steps here. Warning: Never touch the buttons on the control panel while your hand is inside the product. If the product starts operating, it may cause an injury. Do not touch any protruding parts inside the product. Be careful not to trap your hand or fingers when opening or closing the scanner unit. Caution: Remove the jammed paper carefully. Removing the paper forcefully may cause damage to the printer. When removing jammed paper, avoid tilting the printer, placing the printer vertically, or turning the printer upside down; otherwise ink may leak.

204

205 Caution: Do not touch the parts shown or you may damage your product. Be careful not to trap your hand or fingers when opening the scanner unit.

206

207

208

209

210 Note: If you are using a 5 GHz wireless router, set the router to operate in dual band (2.4 GHz and 5 GHz) mode. If your router uses a single network name (SSID) for both the 2.4 GHz and 5 GHz band, give each band its own network name (SSID) instead, such as Home Network 2.4 GHz and Home Network 5 GHz. See your router documentation or contact your internet service provider for instructions. For the fastest printing, select the following settings in your product software:

211 Mac System Requirements Paper or Media Type Settings - Control Panel Paper or Media Type Settings - Printing Software Related tasks Selecting Basic Print Settings - Windows Selecting Extended Settings - Windows Selecting Basic Print Settings - Mac Selecting Printing Preferences - Mac Solving Page Layout and Content Problems Check these sections if you have problems with the layout or content of your printed pages. Note: When printing using AirPrint, the available print settings are different from those covered in this manual. See the Apple website for details. Inverted Image Too Many Copies Print Blank Pages Print Incorrect Margins on Printout Border Appears on Borderless Prints Incorrect Characters Print Incorrect Image Size or Position Slanted Printout Parent topic: Solving Problems Inverted Image If your printed image is inverted unexpectedly, try these solutions:

212 Selecting Print Layout Options - Mac Too Many Copies Print Make sure that the Copies setting in your printing program or printer software is not set for multiple copies. Parent topic: Solving Page Layout and Content Problems Blank Pages Print If blank pages print unexpectedly, try these solutions:

213 Incorrect Margins on Printout If your printed page has incorrect margins, try these solutions:

214

215 Incorrect Image Size or Position If your printed image is the wrong size or in the wrong position, try these solutions:

216

217

218

219 Note: Power Cleaning consumes a lot of ink, so run this utility only if you cannot improve print quality by cleaning the print head. Note: Your product will not operate properly while tilted at an angle. Place it on a flat, stable surface that extends beyond the base of the product in all directions. Parent topic: Solving Print Quality Problems Related concepts Print Head Nozzle Check Print Head Cleaning Print Head Alignment Power Cleaning Related references Paper or Media Type Settings - Control Panel Paper or Media Type Settings - Printing Software Compatible Epson Papers Related tasks Checking Ink Levels on Your Product Selecting Basic Print Settings - Windows Selecting Basic Print Settings - Mac Related topics Loading Paper Refilling Ink Faint Printout or Printout Has Gaps If your printouts are faint or have gaps, try these solutions:

220

221

222

223 Related tasks Checking Ink Levels on Your Product Selecting Basic Print Settings - Windows Selecting Basic Print Settings - Mac Related topics Refilling Ink Solving Scanning Problems Check these solutions if you have problems scanning with your product. Scanning Software Does Not Operate Correctly Cannot Start Epson Scan 2 Scanning is Slow Cannot Send Scans to a Cloud Service Parent topic: Solving Problems Scanning Software Does Not Operate Correctly If your scanning software does not operate correctly, try these solutions:

224 Cannot Start Epson Scan 2 If you cannot start Epson Scan 2, try these solutions:

225 Scanning is Slow If scanning becomes slow, try these solutions:
226 Image Consists of a Few Dots Only If your scanned image consists only of a few dots, try these solutions:
227 Parent topic: Solving Scanned Image Quality Problems Related tasks Cleaning Your Product Scanned Image Quality Problems If you encounter quality problems with your scanned image, try these solutions: Image is Distorted or Blurry

228 Scanned Image Colors Do Not Match Original Colors Printed colors can never exactly match the colors on your computer monitor because printers and monitors use different color systems: monitors use RGB (red, green, and blue) and printers typically use CMYK (cyan, magenta, yellow, and black). Check the color matching and color management capabilities of your computer, display adapter, and the software you are using to see if they are affecting the palette of colors you see on your screen. To adjust the colors in your scanned image, adjust these Epson Scan 2 or Epson ScanSmart settings (if available) and try scanning again:

229 Ripple Patterns Appear in an Image You may see a ripple pattern (called a moiré) in scanned images of printed documents. This is caused by interference from differing pitches in the scanner's screen and your original's halftone screen. To reduce this effect, adjust these Epson Scan 2 settings (if available) and try scanning again:

230

231 Select your product again, if necessary, then select OK, and click Yes to confirm the uninstallation.
232 Note: If you find that re-installing your product software does not solve a problem, contact Epson.
233

234 Technical Specifications These sections list the technical specifications for your product. Note: Epson offers a recycling program for end of life Epson products. Please go to this site (U.S.) or this site (Canada) for information on how to return your Epson products for proper disposal. Windows System Requirements Mac System Requirements Paper Specifications Printable Area Specifications Scanning Specifications Ink Specifications Dimension Specifications Electrical Specifications Environmental Specifications Interface Specifications Network Interface Specifications Safety and Approvals Specifications (U.S. and Canada) Windows System Requirements To use your product and its software, your computer should use one of these Microsoft operating systems:

235

236 Parent topic: Technical Specifications Paper Specifications Note: Since the quality of any particular brand or type of paper may be changed by the manufacturer at any time, Epson cannot guarantee the quality of any non-Epson brand or type of paper. Always test a sample of paper stock before purchasing large quantities or printing large jobs. Single-sheets Size A4 (8.3 × 11.7 inches [210 × 297 mm]) A6 (4.1 × 5.8 inches [105 × 148 mm]) Letter (8.5 × 11 inches [216 × 279 mm]) 8.5 × 13 inches (216 × 330 mm) Legal (8.5 × 14 inches [216 × 356 mm]) 4 × 6 inches (102 × 152 mm) 5 × 7 inches (127 × 178 mm) Executive (7.25 × 10.5 inches [184 × 267 mm]) 8 × 10 inches (203 × 254 mm) Mexico-Oficio (8.5 × 13.4 inches [216 × 340 mm]) Oficio 9 (8.46 × 12.4 inches [215 × 315 mm]) Half Letter (5.5 × 8.5 inches [140 × 216 mm]) User-defined size paper from 2.12 × 3.39 inches (54 × 86 mm) to 8.5 × 47.24 inches (215.9 × 1200 mm) Note: Printing on user-defined paper sizes is available only when printing from a computer. Paper types Plain paper Note: Your product also supports compatible papers distributed by Epson. See the link at the end of this topic for a list of compatible Epson papers. Weight Plain paper: 17 lb (64 g/m2) to 24 lb (90 g/m2)

237 Envelopes Size No. 10 (4.1 × 9.5 inches [105 × 241 mm]) Paper types Plain bond paper Weight 20 lb (75 g/m2) to 27 lb (100 g/m2) Parent topic: Technical Specifications Related references Compatible Epson Papers Printable Area Specifications Note: When printing borderless, quality may decline in the expanded printable area. Single sheets - borders 1 Top/bottom/left/right margins: 0.12 inch (3 mm) minimum 2 Reduced print quality area/top: 1.61 inches (41 mm) minimum 3 Reduced print quality area/bottom: 1.46 inches (37 mm) minimum

238 Single sheets - borderless 1 Reduced print quality area/top: 1.73 inches (44 mm) minimum 2 Reduced print quality area/bottom: 1.57 inches (40 mm) minimum Envelopes 1 Right/left margins: 0.12 inch (3 mm) minimum 2 Top/bottom margins: 0.12 inch (3 mm) minimum 3 Reduced print quality area/right: 0.71 inch (18 mm) minimum 4 Reduced print quality area/left: 1.61 inches (41 mm) minimum Parent topic: Technical Specifications

239 Scanning Specifications Scanner type Flatbed, color Photoelectric device
Cis
Effective pixels 10200 × 14040 pixels (1200 dpi) Document size Maximum: 8.5 × 11.7 inches (216 × 297 mm) Scanner glass: US letter or A4 Scanning resolution 1200 dpi (main scan) 2400 dpi (sub scan) Output resolution 50 to 9600 dpi in 1 dpi increments Image data Color: 48 bits per pixel internal (16 bits per pixel per color internal) 24 bits per pixel external (8 bits per pixel per color external) Grayscale: 16 bits per pixel internal 8 bits per pixel external Black and white: 16 bits per pixel internal 1 bit per pixel external Light sourceLed
Parent topic: Technical Specifications Ink Specifications Note: Epson's warranties do not extend to any damage caused by the use of third-party ink or ink not designed for your printer. The included initial ink bottles must be used for printer setup and are not for resale. The printer ships with full ink bottles and part of the ink from the first bottles is used to charge the print head. Yields vary considerably based on images printed, print settings, paper type, frequency of use and temperature.
240 Color Cyan, Magenta, Yellow, Black Ink life Opened package: Use as soon as possible Unopened package: Use before the date on the package has expired Temperature Storage: –4 to 104 °F (–20 to 40 °C) 1 month at 104 °F (40 °C) Ink freezes at 5 °F (–15 °C) Ink thaws and is usable after 2 hours at 77 °F (25 °C) Parent topic: Technical Specifications Related references Ink Bottle Part Numbers Dimension Specifications Height Stored: 7.0 inches (179 mm) Printing: 10.0 inches (253 mm) Width Stored: 14.8 inches (375 mm) Printing: 14.8 inches (375 mm) Depth Stored: 13.7 inches (347 mm) Printing: 22.8 inches (578 mm) Weight (without ink or power cord) Approximately 9.0 lb (4.1 kg) Parent topic: Technical Specifications Electrical Specifications Note: Check the label on the product for its voltage. Power supply rating 100 to 240 V
241 Rated frequency range 50 to 60 Hz Rated current 0.4 to 0.2 A Power consumption with USB connection Standalone copying: Approximately 12 W (ISO/IEC24712) Ready mode: Approximately 4.5 W Sleep mode: Approximately 0.7 W Power off mode: Approximately 0.2 W Parent topic: Technical Specifications Environmental Specifications Temperature Operating: 50 to 95 °F (10 to 35 °C) Storage: –4 to 104 °F (–20 to 40 °C) 1 month at 104 °F (40 °C) Humidity (without condensation) Operating: 20 to 80% RH Storage: 5 to 85% RH Parent topic: Technical Specifications Interface Specifications Interface type Hi-Speed USB (Device Class for computers; USB 3.0 cables are not supported) Parent topic: Technical Specifications Network Interface Specifications Standard IEEE 802.11 b/g/n; IEEE 802.11n available only on the 20 MHz channel
242 Security WPA2-PSK (AES); complies with WPA2 with support for WPA/WPA2 Personal WEP (64/128 bit); not supported for Wi-Fi Direct mode WPA3-SAE (AES); not supported for Wi-Fi Direct mode Frequency range 2.4 GHz Maximum Radio-Frequency Power Transmitted 20 dBm (EIRP) Connection modes Infrastructure mode Wi-Fi Direct (Simple AP); not supported for IEEE 802.11b Note: Note: Infrastructure and Wi-Fi Direct modes can be used simultaneously. Security Protocol SSL/TLS: HTTPS Server/Client, IPPS Parent topic: Technical Specifications Safety and Approvals Specifications (U.S. and Canada) United States Safety: UL60950-1 EMC: FCC Part 15 Subpart B Class B Canada Safety: CAN/CSA C22.2 No. 60950-1 EMC: CAN/CSA-CEI/IEC CISPR 22 Class B This equipment contains the following wireless module:

243 To prevent radio interference to the licensed service, this device is intended to be operated indoors and away from windows to provide maximum shielding. Equipment (or its transmit antenna) that is installed outdoors is subject to licensing. This equipment complies with FCC/IC radiation exposure limits set forth for an uncontrolled environment and meets the FCC radio frequency (RF) Exposure Guidelines in Supplement C to OET65 and RSS-102 of the IC radio frequency (RF) Exposure rules. This equipment should be installed and operated so that the radiator is kept at least 7.9 inches (20 cm) or more away from a person's body (excluding extremities: hands, wrists, feet and ankles). Parent topic: Technical Specifications
244 Notices Check these sections for important notices about your product. Note: Epson offers a recycling program for end of life Epson products. Please go to this site (U.S.) or this site (Canada) for information on how to return your Epson products for proper disposal. Important Safety Instructions FCC Compliance Statement Binding Arbitration and Class Waiver Trademarks Copyright Notice Important Safety Instructions Before using your Epson product, read and follow these safety instructions. General Product Safety Instructions LCD Screen Safety Instructions Wireless Connection Safety Instructions Parent topic: Notices General Product Safety Instructions
245
246
247 such devices or inside a medical facility, follow the directions from authorized staff members at the facility, and follow all posted warnings and directions on the device to avoid causing an accident. Parent topic: Important Safety Instructions FCC Compliance Statement For United States Users This equipment has been tested and found to comply with the limits for a Class B digital device, pursuant to Part 15 of the FCC Rules. These limits are designed to provide reasonable protection against harmful interference in a residential installation. This equipment generates, uses, and can radiate radio frequency energy and, if not installed and used in accordance with the instructions, may cause harmful interference to radio communications. However, there is no guarantee that interference will not occur in a particular installation. If this equipment does cause harmful interference to radio or television reception, which can be determined by turning the equipment off and on, the user is encouraged to try to correct the interference by one or more of the following measures:
Warning
The connection of a non-shielded equipment interface cable to this equipment will invalidate the FCC Certification or Declaration of this device and may cause interference levels which exceed the limits established by the FCC for this equipment. It is the responsibility of the user to obtain and use a shielded equipment interface cable with this device. If this equipment has more than one interface connector, do not leave cables connected to unused interfaces. Changes or modifications not expressly approved by the party responsible for compliance could void the user’s authority to operate this equipment. For Canadian UsersCan Ices-3(B)/Nmb-3(B)
Parent topic: Notices
248 Binding Arbitration and Class Waiver
1. Disputes, Binding Individual Arbitration, And Waiver Of Class Actions And
Class Arbitrations
1.1 Disputes. The terms of this Section 1 shall apply to all Disputes between you and Epson. The term "Dispute" is meant to have the broadest meaning permissible under law and includes any dispute, claim, controversy or action between you and Epson arising out of or relating to this Agreement, Epson branded products (hardware and including any related software), or other transaction involving you and Epson, whether in contract, warranty, misrepresentation, fraud, tort, intentional tort, statute, regulation, ordinance, or any other legal or equitable basis. "DISPUTE" DOES NOT INCLUDE IP CLAIMS, or more specifically, a claim or cause of action for (a) trademark infringement or dilution, (b) patent infringement, (c) copyright infringement or misuse, or (d) trade secret misappropriation (an "IP Claim"). You and Epson also agree, notwithstanding Section 1.6,that a court, not an arbitrator, may decide if a claim or cause of action is for an IP Claim. 1.2 Binding Arbitration. You and Epson agree that all Disputes shall be resolved by binding arbitration according to this Agreement. ARBITRATION MEANS THAT YOU WAIVE YOUR RIGHT TO A JUDGEOr Jury In A Court Proceeding And Your Grounds For Appeal Are Limited.
Pursuant to this Agreement, binding arbitration shall be administered by JAMS, a nationally recognized arbitration authority, pursuant to its code of procedures then in effect for consumer related disputes, but excluding any rules that permit joinder or class actions in arbitration (for more detail on procedure, see Section 1.6 below). You and Epson understand and agree that (a) the Federal Arbitration Act (9 U.S.C. §1, et seq.) governs the interpretation and enforcement of this Section 1, (b) this Agreement memorializes a transaction in interstate commerce, and (c) this Section 1 shall survive termination of this Agreement. 1.3 Pre-Arbitration Steps and Notice. Before submitting a claim for arbitration, you and Epson agree to try, for sixty (60) days, to resolve any Dispute informally. If Epson and you do not reach an agreement to resolve the Dispute within the sixty (60) days), you or Epson may commence an arbitration. Notice to Epson must be addressed to: Epson America, Inc., ATTN: Legal Department, 3131 Katella Ave., Los Alamitos, CA 90720 (the "Epson Address"). The Dispute Notice to you will be sent to the most recent address Epson has in its records for you. For this reason, it is important to notify us if your address changes by emailing us at [email protected] or writing us at the Epson Address above. Notice of the Dispute shall include the sender's name, address and contact information, the facts giving rise to the Dispute, and the relief requested (the "Dispute Notice"). Following receipt of the Dispute Notice, Epson and you agree to act in good faith to resolve the Dispute before commencing arbitration. 1.4 Small Claims Court. Notwithstanding the foregoing, you may bring an individual action in the small claims court of your state or municipality if the action is within that court's jurisdiction and is pending only in that court.
249
1.5 Waiver Of Class Actions And Class Arbitrations. You And Epson Agree That
Each Party May Bring Disputes Against The Other Party Only In An Individual
Capacity, And Not As A Plaintiff Or Class Member In Any Class Or
Representative Proceeding, Including Without Limitation Federal Or State
Class Actions, Or Class Arbitrations. Class Action Lawsuits, Class-Wide
Arbitrations, Private Attorney-General Actions, And Any Other Proceeding
Where Someone Acts In A Representative Capacity Are Not Allowed.
Accordingly, Under The Arbitration Procedures Outlined In This Section, An
Arbitrator Shall Not Combine Or Consolidate More Than One Party'S Claims
Without The Written Consent Of All Affected Parties To An Arbitration
Proceeding.
1.6 Arbitration Procedure. If you or Epson commences arbitration, the arbitration shall be governed by the rules of JAMS that are in effect when the arbitration is filed, excluding any rules that permit arbitration on a class or representative basis (the "JAMS Rules"), available at http://www.jamsadr.com or by calling 1-800-352-5267, and under the rules set forth in this Agreement. All Disputes shall be resolved by a single neutral arbitrator, and both parties shall have a reasonable opportunity to participate in the selection of the arbitrator. The arbitrator is bound by the terms of this Agreement. The arbitrator, and not any federal, state or local court or agency, shall have exclusive authority to resolve all disputes arising out of or relating to the interpretation, applicability, enforceability or formation of this Agreement, including any claim that all or any part of this Agreement is void or voidable. Notwithstanding this broad delegation of authority to the arbitrator, a court may determine the limited question of whether a claim or cause of action is for an IP Claim, which is excluded from the definition of "Disputes" in Section 1.1 above. The arbitrator shall be empowered to grant whatever relief would be available in a court under law or in equity. The arbitrator may award you the same damages as a court could, and may award declaratory or injunctive relief only in favor of the individual party seeking relief and only to the extent necessary to provide relief warranted by that party's individual claim. In some instances, the costs of arbitration can exceed the costs of litigation and the right to discovery may be more limited in arbitration than in court. The arbitrator's award is binding and may be entered as a judgment in any court of competent jurisdiction. You may choose to engage in arbitration hearings by telephone. Arbitration hearings not conducted by telephone shall take place in a location reasonably accessible from your primary residence, or in Orange County, California, at your option. a) Initiation of Arbitration Proceeding. If either you or Epson decides to arbitrate a Dispute, both parties agree to the following procedure: (i) Write a Demand for Arbitration. The demand must include a description of the Dispute and the amount of damages sought to be recovered. You can find a copy of a Demand for Arbitration at http://www.jamsadr.com ("Demand for Arbitration"). (ii) Send three copies of the Demand for Arbitration, plus the appropriate filing fee, to: JAMS, 500 North State College Blvd., Suite 600 Orange, CA 92868, U.S.A.
250 (iii) Send one copy of the Demand for Arbitration to the other party (same address as the Dispute Notice), or as otherwise agreed by the parties. b) Hearing Format. During the arbitration, the amount of any settlement offer made shall not be disclosed to the arbitrator until after the arbitrator determines the amount, if any, to which you or Epson is entitled. The discovery or exchange of non-privileged information relevant to the Dispute may be allowed during the arbitration. c) Arbitration Fees. Epson shall pay, or (if applicable) reimburse you for, all JAMS filings and arbitrator fees for any arbitration commenced (by you or Epson) pursuant to provisions of this Agreement. d) Award in Your Favor. For Disputes in which you or Epson seeks $75,000 or less in damages exclusive of attorney's fees and costs, if the arbitrator's decision results in an award to you in an amount greater than Epson's last written offer, if any, to settle the Dispute, Epson will: (i) pay you $1,000 or the amount of the award, whichever is greater; (ii) pay you twice the amount of your reasonable attorney's fees, if any; and (iii) reimburse you for any expenses (including expert witness fees and costs) that your attorney reasonably accrues for investigating, preparing, and pursuing the Dispute in arbitration. Except as agreed upon by you and Epson in writing, the arbitrator shall determine the amount of fees, costs, and expenses to be paid by Epson pursuant to this Section 1.6d). e) Attorney's Fees. Epson will not seek its attorney's fees and expenses for any arbitration commenced involving a Dispute under this Agreement. Your right to attorney's fees and expenses under Section 1.6d) above does not limit your rights to attorney's fees and expenses under applicable law; notwithstanding the foregoing, the arbitrator may not award duplicative awards of attorney's fees and expenses. 1.7 Opt-out. You may elect to opt-out (exclude yourself) from the final, binding, individual arbitration procedure and waiver of class and representative proceedings specified in this Agreement by sending a written letter to the Epson Address within thirty (30) days of your assent to this Agreement (including without limitation the purchase, download, installation of the Software or other applicable use of Epson Hardware, products and services) that specifies (i) your name, (ii) your mailing address, and (iii) your request to be excluded from the final, binding individual arbitration procedure and waiver of class and representative proceedings specified in this Section 1. In the event that you opt-out consistent with the procedure set forth above, all other terms shall continue to apply, including the requirement to provide notice prior to litigation. 1.8 Amendments to Section 1. Notwithstanding any provision in this Agreement to the contrary, you and Epson agree that if Epson makes any future amendments to the dispute resolution procedure and class action waiver provisions (other than a change to Epson's address) in this Agreement, Epson will obtain your affirmative assent to the applicable amendment. If you do not affirmatively assent to the applicable amendment, you are agreeing that you will arbitrate any Dispute between the parties in accordance with the language of this Section 1 (or resolve disputes as provided for in Section 1.7, if you timely elected to opt-out when you first assented to this Agreement).
251 1.9 Severability. If any provision in this Section 1 is found to be unenforceable, that provision shall be severed with the remainder of this Agreement remaining in full force and effect. The foregoing shall not apply to the prohibition against class or representative actions as provided in Section 1.5. This means that if Section 1.5 is found to be unenforceable, the entire Section 1 (but only Section 1) shall be null and void. Parent topic: Notices Trademarks EPSON®, Epson ScanSmart®, and Epson Smart Panel® are registered trademarks and Epson ConnectTM and Remote PrintTM are trademarks of Seiko Epson Corporation. Apple, AirPrint, AirPrint logo, iPad, iPhone, iPod touch, Mac, macOS, and OS X are trademarks of Apple Inc., registered in the U.S. and other countries. App Store is a service mark of Apple Inc., registered in the U.S. and other countries. Use of the Works with Apple badge means that an accessory has been designed to work specifically with the technology identified in the badge and has been certified by the developer to meet Apple performance standards. The MopriaTM wordmark and the MopriaTM Logo are registered and/or unregistered trademarks of Mopria Alliance, Inc. in the United States and other countries. Unauthorized use is strictly prohibited. Google® is a registered trademark and AndroidTM, Google PlayTM, ChromebookTM, ChromeTM, and GmailTM are trademarks of Google LLC. Microsoft, OneDrive, Windows, Windows Server, and Windows Vista are registered trademarks of Microsoft Corporation in the United States and/or other countries. Wi-Fi Direct® is a registered trademark of Wi-Fi Alliance®. General Notice: Other product names used herein are for identification purposes only and may be trademarks of their respective owners. Epson disclaims any and all rights in those marks. Parent topic: Notices Copyright Notice All rights reserved. No part of this publication may be reproduced, stored in a retrieval system, or transmitted in any form or by any means, electronic, mechanical, photocopying, recording, or otherwise,
252 without the prior written permission of Seiko Epson Corporation. The information contained herein is designed only for use with this Epson product. Epson is not responsible for any use of this information as applied to other products. Neither Seiko Epson Corporation nor its affiliates shall be liable to the purchaser or lessee of this product or third parties for damages, losses, costs, or expenses incurred by purchaser or lessee or third parties as a result of: accident, misuse, or abuse of this product or unauthorized modifications, repairs, or alterations to this product, or (excluding the U.S.) failure to strictly comply with Seiko Epson Corporation's operating and maintenance instructions. Seiko Epson Corporation shall not be liable for any damages or problems arising from the use of any options or any consumable products other than those designated as Original Epson Products or Epson Approved Products by Seiko Epson Corporation. Seiko Epson Corporation shall not be held liable for any damage resulting from electromagnetic interference that occurs from the use of any interface cables other than those designated as Epson approved Products by Seiko Epson Corporation. This information is subject to change without notice. libTIFF Software Acknowledgment A Note Concerning Responsible Use of Copyrighted Materials Default Delay Times for Power Management for Epson Products Copyright Attribution Parent topic: Notices libTIFF Software Acknowledgment Copyright © 1988-1997 Sam Leffler Copyright © 1991-1997 Silicon Graphics, Inc. Permission to use, copy, modify, distribute, and sell this software and its documentation for any purpose is hereby granted without fee, provided that (I) the above copyright notices and this permission notice appear in all copies of the software and related documentation, and (ii) the names of Sam Leffler and Silicon Graphics may not be used in any advertising or publicity relating to the software without the specific, prior written permission of Sam Leffler and Silicon Graphics.
The Software Is Provided "As-Is" And Without Warranty Of Any Kind, Express,
Implied Or Otherwise, Including Without Limitation, Any Warranty Of
Merchantability Or Fitness For A Particular Purpose.
In No Event Shall Sam Leffler Or Silicon Graphics Be Liable For Any Special,
Incidental, Indirect Or Consequential Damages Of Any Kind, Or Any Damages
Whatsoever Resulting From Loss Of Use, Data Or Profits, Whether Or Not
253 ADVISED OF THE POSSIBILITY OF DAMAGE, AND ON ANY THEORY OF LIABILITY, ARISING OUT