
Ask AI
— answers from the official manualAnswers from the official manual.
Common questions
Common Questions
24 totalHow do I restore the factory default drink volumes on the Esperto Caffe?
Press and hold the power button and the coffee strength button simultaneously for approximately 5 seconds until 2 beeps are heard, then release the buttons. This restores the original factory water quantities: espresso approx. 40 ml, caffè crema approx. 125 ml, and americano approx. 125 ml.
What should I do when the descaling indicator lights up on the display?
You must descale the machine within the coming days — do not wait too long, as too much limescale can build up and the descaling agent may no longer be effective. Use a commercially available liquid descaling agent suitable for coffee and espresso machines, and follow the descaling procedure described in the manual. Note that warranty does not cover damage caused by neglecting descaling.
How do I adjust the grind setting on the Esperto Caffe?
The grind setting can only be changed while the grinder is actively running — start brewing a coffee first, then turn the grind adjustment dial toward '+' (clockwise) for a coarser grind or toward '-' (counter-clockwise) for a finer grind. The factory default setting is level 2, and you should only change the setting in small increments, observing the taste difference over 1–2 cups before adjusting again.
How do I change the auto-standby (auto-off) time on the machine?
Press and hold the power button for approximately 5 seconds until 1 beep is heard — one coffee button will light up continuously indicating the current setting, while the other two flash. Press the espresso button for 10 minutes, the caffè crema button for 20 minutes, or the americano button for 30 minutes to set your preferred auto-off interval.
My coffee is not hot enough — what can I do?
Pre-heat your cup before brewing by pressing the hot water button, which dispenses approximately 50 ml of hot water into the cup. Pour out this water before starting the coffee preparation — this is especially important for espresso, where the small volume of liquid cools quickly in a cold cup.
What types of coffee beans or substances must NOT be used in the Esperto Caffe?
Never put caramelized or sugar-coated coffee beans, raw (green, unroasted) coffee beans, or mixtures of raw and ground coffee into the bean container, as this can damage the machine. Only use roasted whole coffee beans; the machine is optimally calibrated for Tchibo coffee.
Show 18 more questions
How do I prepare the machine if I won't be using it for an extended period?
What should I do when the descaling indicator light comes on?
How do I descale the Esperto Caffe?
How do I adjust the grind size on the Esperto Caffe?
How do I change the auto-off timer on the machine?
What are the key safety warnings I should know before using the machine?
How do I perform the descaling process on the Esperto Caffe?
What does the 'brewing unit' indicator light mean and how do I fix it?
How do I clean the brewing unit?
How do I customize the amount of coffee the machine produces?
How do I descale (remove limescale from) the Esperto Caffè machine?
What is the factory preset amount of coffee for each type?
What should I do if the coffee is flowing too slowly from the spout?
How do I empty the machine if I won't be using it for an extended period?
What does it mean if the 'szemes kávé feltöltése' (coffee beans) indicator light is on?
How do I increase the capacity of the bean hopper?
What is the environmental operating temperature range for this machine?
What should I do if the coffee is not hot enough?
Full Manual
11 pages
Tchibo GmbH D-22290 Hamburg · 97826HBGS · 2018-05 Autolmata kávéfőző „Esperto Caffè“ Használati útmutató és jótállási jegy

5 DANGER - Risk of electric shock Never immerse the appliance, the power plug and the • power cable in water, as this could result in electric shock. Never touch the power plug with wet hands. Do not use the appliance outdoors. Never operate the appliance unattended. • Only connect the appliance to a properly installed socket • with protective contact, whose mains voltage corresponds to the appliance's technical data. The power cable must not be bent or crushed. Keep it • away from hot surfaces and sharp edges. Do not use the appliance if damage is visible on the appli- • ance itself, the power cable or the power plug, or if the appliance has been dropped. Do not make any changes to the appliance, the power • cable or other parts. Electrical appliances should only be repaired by a specialist, as improper repairs can have serious consequences. Have any necessary repairs carried out by a specialist or contact your dealer. Pull the power plug from the socket... • ... if a malfunction occurs, ... if you will not be using the appliance for an extended period, ... before cleaning the appliance. Always pull the power plug, not the power cable. To completely disconnect the appliance from the mains, • pull the power plug from the socket. CAUTION - Risk of health hazard Empty and clean the residual water tray, drip tray and • grounds container regularly. If you will not be using the appliance for an extended • period, empty the water tank, the coffee bean container, the drip tray and the grounds container. To prevent germ formation, change the water in the water • tank daily. Only use the cleaning and descaling agents specified in • this manual and appropriate cleaning supplies to clean the appliance. The use of other cleaning agents may be hazardous to health.

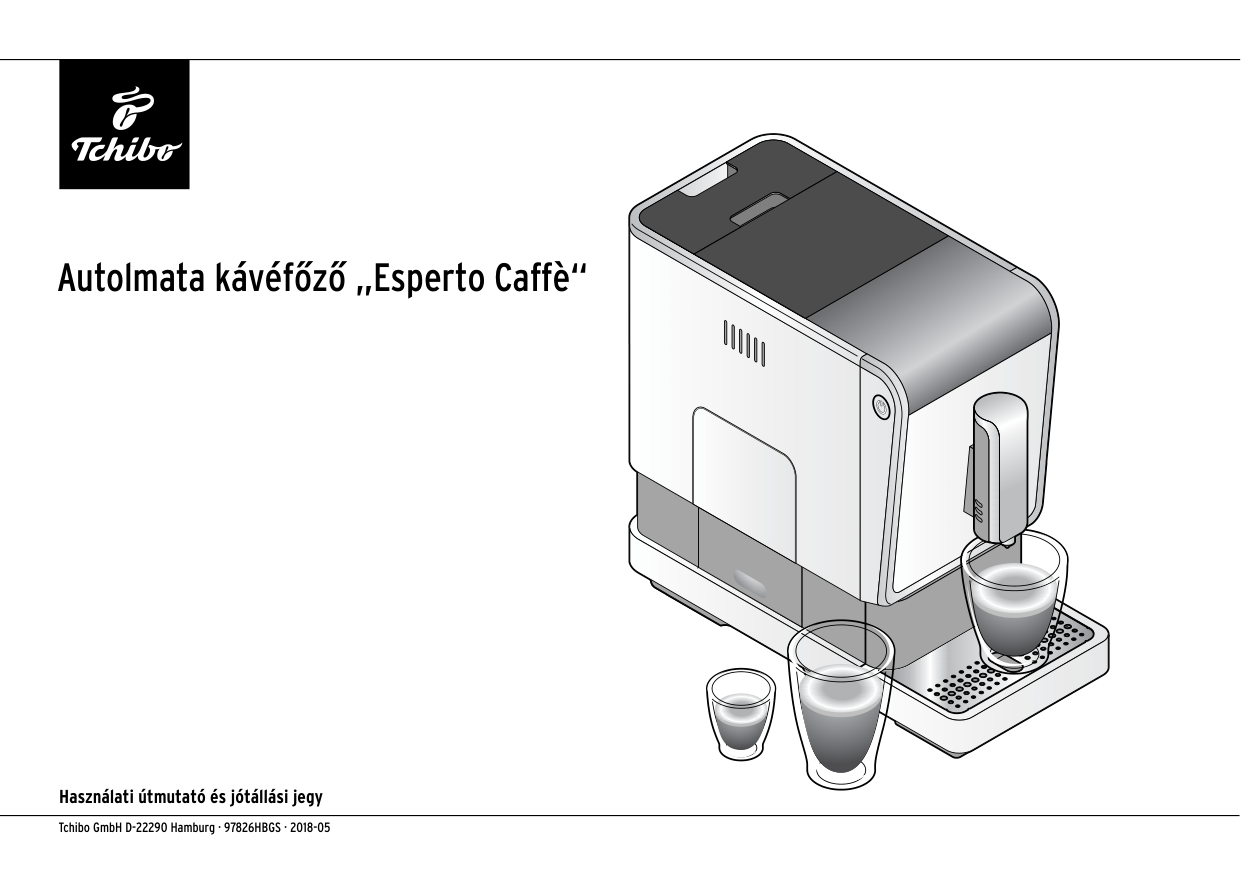
8 Termékrajz (tartozékok) víztartály állítható magasságú kávékifolyó kávé kifolyónyílás víztartály nyílása szűrő (a kis vízkő- vagy egyéb részecskék kiszűrésére) be/kikapcsoló gomb főzőegység őrlésszabályozó szemes kávé tartó (160g) kezelőpanel kávézacc tartó maradék víz tál szemes kávé tartó fedele csepegtetőrács csepegtetőtál

9 bővítés a szemes kávé tartóhoz csatlakozókábel tisztítókefe Kezelőgombok (fehér) A gombok csak a készülék bekapcsolását követően válnak láthatóvá. eszpresszó készítése kávé - erősség- funkció caffè crema készítése forró víz kiengedése americano készítése Jelzések a kijelzőn (narancssárga) A kijelzőn csak akkor világítanak a jelzések, ha tennivaló van a készülékkel. víz betöltése főzőegység szemes kávé betöltése vízkőmen- tesítés kávézacc kiürítése rendszer kiürítése

10 Setup - Before First Use

11 Cleaning up this manual page...
The text provided is entirely in Hungarian. Following instruction 7: "If a section is entirely non-English, replace it with just the page marker."

13
espresso
caffè crema or
americano (espresso with hot water added afterwards) The coffee brewing process starts and stops automatically. The machine pre-brews a small amount of coffee so that its aroma develops optimally. This process can be perceived as a brief pause at the beginning of coffee brewing. If you want to stop the coffee brewing early, press the same coffee selection button again during the process. Tip: You can change the drink quantity. You will find instructions for this in the "Changing the Drink Quantity" section.
When the grounds container is full (approximately after brewing 10 cups of coffee), the "empty grounds container" indicator flashes.
Factory settings at time of purchase: espresso approx. 40 ml – caffè crema approx. 125 ml – americano approx. 125 ml
Remove the drip tray. Pull out the residual water container with the grounds container.

Adjusting Grind Setting to Coarser Set the grind to a coarser setting if you want the coffee to flow faster, for example if you find it too strong.
Adjusting Grind Setting to Finer Set the grind to a finer setting if you want the coffee to flow more slowly and thus be more aromatic, for example if you find it too weak.
If you set the grind too fine, the coffee may flow very slowly or not at all.
Enabling and Disabling Rinsing When the Machine is Switched On The machine rinses the pipe system with a small amount of water every time it is switched on. During automatic rinsing, coffee residue and residual water are flushed out of the pipe system and the coffee outlet. This is important because it ensures the coffee always tastes consistently good. If you wish, you can manually disable this function. Proceed as follows:

17 Standby Mode After use, it is recommended to switch the machine to standby mode using the on/off button. The machine will then consume only minimal power. If no button is pressed for approximately 10 minutes, the machine will automatically switch to standby mode. This serves as both a safety function and helps save energy.
You can choose from three time intervals after which the machine will automatically shut off: 10 minutes, 20 minutes, or 30 minutes.
To set the different shutdown times:
If the espresso button lights continuously, the machine will shut off after approximately 10 minutes. If the caffè crema button lights continuously, the machine will shut off after approximately 20 minutes. If the americano button lights continuously, the machine will shut off after approximately 30 minutes.
Expanding the Bean Hopper Capacity
You can expand the bean hopper capacity from 160 g to 300 g.
To do this, proceed as follows:

20 Descaling
The descaling process cannot be interrupted. If the descaling process is interrupted (e.g., due to a power failure), the process must be completed at the next startup. Until then, the machine is locked and cannot be used.
As soon as the "descaling" symbol lights up on the display, the machine must be descaled.
Complete the descaling within the following days. Do not wait much longer, as so much limescale can build up that the descaling agent no longer works.
The descaling process takes approximately 15 minutes.
WARNING - Material damage due to limescale deposits
Descale the machine as soon as this appears on the display (approximately every 20 l). This extends the machine's lifespan and saves energy.
• Do not use vinegar-based descaling solutions.
• Use a commercial liquid descaling solution that is manufactured for coffee and espresso machines. Other products may damage the machine's materials and/or be ineffective.

23 Troubleshooting The "fill water" indicator is lit. Is the water tank empty? Fill the water tank with fresh water and reinsert it into the machine. The pump will automatically engage and continue the brewing process. Did you remove the water tank during coffee preparation? Coffee preparation will stop immediately. Reinsert the water tank into the machine. The "refill coffee beans" indicator is lit. Is the coffee bean hopper empty? Fill the coffee bean hopper with coffee beans. During the next grinding/brewing cycle, the coffee beans will automatically be fed into the grinder where the machine will grind them. The "empty coffee grounds" indicator is lit. Is the coffee grounds container full? Empty the coffee grounds container and reinsert it into the machine (see "Brewing Coffee" section, steps 5-7). Is the drip tray with coffee grounds container not properly inserted into the machine? Reinsert it into the machine (see "Brewing Coffee" section, step 7). The "brewing unit" indicator is lit. Is the brewing unit or brewing unit cover not properly reinstalled? Remove the brewing unit cover and check that the brewing unit is properly inserted (see "Cleaning" section, "Cleaning the Brewing Unit"). The "descaling" indicator is lit. The machine needs to be descaled. Perform descaling within the next few days. Do not wait much longer, as excessive limescale buildup may render the descaling agent ineffective. Such issues resulting from user neglect are not covered by warranty. Follow the instructions in the "Descaling" chapter. The coffee is not hot enough. Especially with espresso, the small coffee volume in relation to the cup size cools quickly. Preheat the cup (see "Preheating the Cup" chapter). The coffee is too "weak". Adjust the grind to a finer setting. If you prefer stronger coffee, press the coffee strength button before pressing the coffee selection button. The coffee flows slowly from the outlet. Adjust the grind to a coarser setting. The machine does not rinse when turned on. Have you disabled automatic rinsing? To re-enable automatic rinsing, follow the instructions in the "Rinsing on Machine Startup" chapter. The machine takes an unusually long time to heat up. Only very little hot water or coffee flows out. The machine needs to be descaled, even if the "descaling" indicator is not lit. Follow the instructions in the "Descaling" chapter.